Huawei Technologies U8860 HSPA/UMTS/GPRS/GSM/EDGE Mobile Phone with Bluetooth; Honor User Manual Part 2
Huawei Technologies Co.,Ltd HSPA/UMTS/GPRS/GSM/EDGE Mobile Phone with Bluetooth; Honor Part 2
Contents
- 1. User Manual Part 1
- 2. User Manual Part 2
- 3. User Manual Part 3
- 4. User Manual Part 4
- 5. User Manual Part 5
User Manual Part 2
15
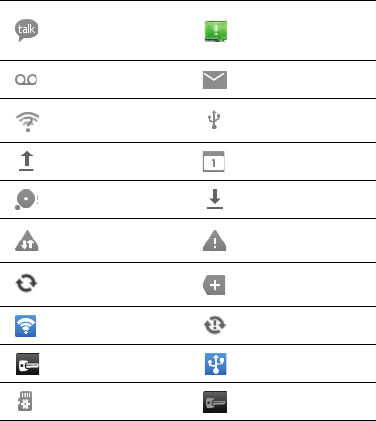
2.6.2 Notification Panel
Your mobile phone will notify you when you receive a new message or there is an
upcoming event. The notification panel also informs you of alarms and settings, for
example, you will be notified when
Call forwarding
is activated. Open the notification
panel to see your network operator or to view a message, reminder, or event
notification.
New chat message
Problem with text or
multimedia message
delivery
New voicemail New email
Open Wi-Fi network
available Connected to a PC
Uploading Upcoming event
Memory full Downloading
Carrier data use threshold
approaching or exceeded
Sign-in or synchronization
problem
Synchronizing data More undisplayed
notifications
Portable Wi-Fi hotspot on Synchronization failed
Connected to a VPN USB tethering on
Preparing the mircoSD card Disconnected from a VPN
16
Opening the Notification Panel
1. When a new notification icon appears on the notification bar, place your finger on
the notification bar and flick down to open the notification panel.
You can also open the notification panel from the Home screen: Touch >
Notifications
to open the panel.
2. On the panel, you can:
• Touch a notification to open the related application.
• Touch
Clear
to clear all notifications.
Closing the Notification Panel
Touch and hold the bottom of the panel. Then flick up to close it.
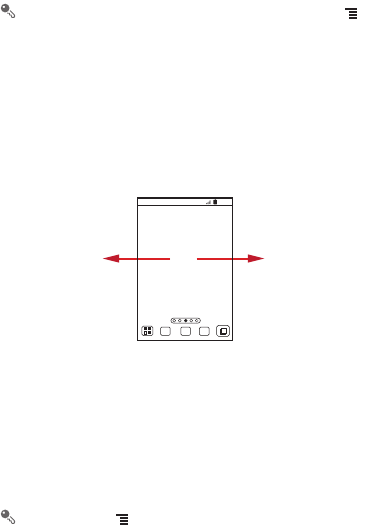
2.6.3 Viewing Other Parts of the Home Screen
2.6.4 Customizing the Home Screen
Adding a New Home Screen Item
1. Touch and hold a blank area on the Home screen until the
Select action
menu is
displayed.
You can also touch >
Add
on the Home screen to display the
Select
Flick your finger left or
right across the Home
screen.
10:23

17
action
menu.
2. Select an item to add it to the Home screen.
Moving a Home Screen Item
1. Touch and hold an item on the Home screen until the item expands in size and the
mobile phone vibrates.
2. Without lifting your finger, drag the item to the desired position on the screen, and
then release it.
Removing a Home Screen Item
1. Touch and hold an item on the Home screen until the item expands and the mobile
phone vibrates.
2. Without lifting your finger, drag the item to the trash can. When the item and the
trash can turn red, the item is ready to be removed.
3. Release the item to remove it from the Home screen.
2.6.5 Service Shortcuts
1. Open the notification bar.
2. Touch at the top of the screen to switch data services on or off.
You can also touch , , or turn the corresponding services on
or off.
2.6.6 Changing the Wallpaper
1. On the Home screen, touch >
Wallpaper
.
2. Touch the following menu items to select a picture and set it as the wallpaper:
•
Gallery
•
Live wallpapers
•
Wallpapers

18
2.7 Application Screen
The Application screen holds icons for all of the applications on your phone. You can
touch on the Home screen to open the application screen.
2.7.1 Moving Icons on the Application Screen
1. On the application screen, touch .
2. Touch and hold the icon you want to move on the application screen.
3. Without lifting your finger, drag the icon to the desired location, and then release it.
To move more icons, repeat steps 2 and 3.
4. Touch or to save.
2.8 Using a microSD Card
2.8.1 (Optional) Installing the microSD Card
Your mobile phone is already equipped with a large-volume built-in embedded
MultiMediaCard (eMMC). If you want to expand your phone memory, you can also
insert a microSD card
1. Remove the battery cover.
2. Insert the microSD card into the card slot as shown in the diagram.
2.8.2 Using the microSD Card as a USB Mass Storage
To transfer all your favorite music and pictures from your PC to your mobile phone’s
microSD card, set the microSD card as a USB mass storage.
1 2

19
1. Connect your mobile phone to your PC with the USB cable provided. Your PC will
detect the microSD card as a removable storage device.
2. Open the notification bar, and then touch
USB connected
.
3. Touch
Turn on USB storage
in the dialog box that opens to confirm that you want
to transfer files.
You can now transfer files from your PC to your mobile phone’s microSD card.
When your microSD card acts as a USB mass storage, your mobile phone will
not use this memory space. Ensure that you follow the correct procedures to
disconnect the USB mass storage device (your mobile phone) from the PC
when you have finished transferring files.
2.8.3 Removing the microSD Card
1. On the Home screen, touch >
Settings
.
2. Scroll down the screen, and then touch
Storage
>
Unmount SD card
.
3. Carefully remove the microSD card.
3 Calling
To make a phone call, you can dial a number using the keypad or touch a number
saved in your contact list, on a webpage, or in a document. When you are in a call,
you can answer other incoming calls or redirect them to your voicemail. You can also
set up conference calls with several participants.
3.1 Making a Call
To make a call, you can use the
Dialer
application, or select a number from
Contacts
or
Call log
.
When you are in a call, you can touch to use other functions. To return to the call
screen, flick the notification bar down and touch
Current call
.
Be careful not to block the microphone at the bottom of your phone if you want
your voice heard by the other parties in a call.
20
3.1.1 Making a Call with the Dialer Application
1. On the Home screen, touch >
Dialer
to display the dialer.
If you are already working with
Contacts
or
Call log
, touch the
Dialer
tab.
2. Touch the appropriate number keys to enter the phone number.
Your mobile phone supports the SmartDial function, that is, when you touch
numbers on the dialer, the phone automatically searches among your contacts
and lists the matching results ordered according to the accuracy of the match. If
no contacts match the information entered, the phone will not display any result.
3. Touch to initiate the call.
During a call, touch
Dialpad
to enter other numbers on the dialpad.
3.1.2 Making a Call from Contacts
1. On the Home screen, touch >
Contacts
to display the contact list.
If you are already working with
Dialer
or
Call log
, touch the
Contacts
tab.
2. In the list, touch the contact you want to call.
3. Touch to dial the phone number.
3.1.3 Making a Call from Call log
1. If you are already working with
Contacts
or
Dialer
, touch the
Call log
tab.
2. Touch to the right of the log entry to dial.
If you touch and hold a log entry, the options menu will open.
3.2 Answering or Rejecting a Call
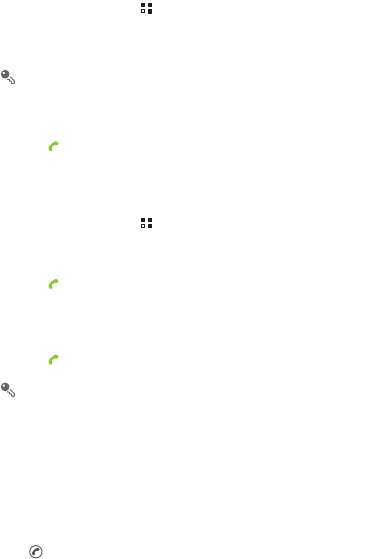
3.2.1 Answering an Incoming Call
When you receive a phone call, the incoming call screen opens. If you have
previously saved the caller’s number in
Contacts
, the caller's name and number are
displayed. If the caller’s number is not saved in
Contacts
the caller’s number is
displayed.
Drag to the right to answer the call.
21
3.2.2 Ending a Call
During a call, touch
End
to hang up.
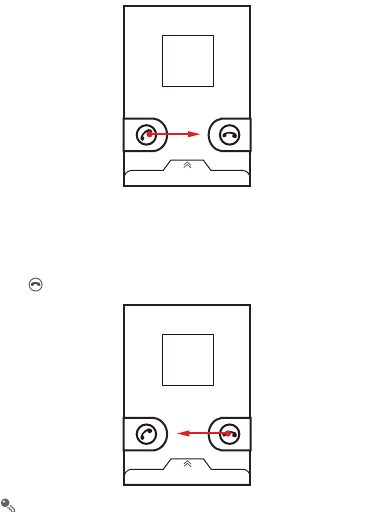
3.2.3 Rejecting an Incoming Call
Drag to the left to reject the call.
You can also drag up the bar at the bottom of the screen to reject a call and send
the caller a message.

22
3.3 Other Operations During a Call
3.3.1 Making a Conference Call
If you receive a new call while you are already in a call, you can add the second call to
the call you are in. This feature is known as conference calling. You can also set up a
conference call with multiple callers.
Contact your network operator to ask if conference calls are supported and, if
yes, how many parties can participate.
1. To initiate a conference call, dial the number of the first participant. After you have
connected to the first participant, keep the connection open, touch
Add call
.
2. Enter the phone number of the next person you want to invite for the conversation
and touch , or select someone from your
Call log
or
Contacts
. The first
participant is automatically placed on hold while you do this.
3. Once you have connected to the second person, touch
Merge calls
to begin the
conference call.
4. To end the conference call and disconnect from everyone, touch
End
.
3.3.2 Switching Between Calls
If you receive a new call while you are already in a call, you can switch between the
two calls.
1. While you are in the first call and the second call comes in, answer the incoming
call, and then touch
Swap calls
.
2. The current call is placed on hold and you are connected to the first call.
3.4 Using the Call log
The
Call log
contains a list of calls that you have dialed, received, and missed. You
can use the call log to find a recently called number quickly or add a number from the
call log to your contact list.
3.4.1 Adding an Entry to Contacts
1. If you are already working with
Dialer
or
Contacts
, touch the
Call log
tab.
2. Touch and hold the entry you want to add to your
Contacts
.

23
3. Touch
Add to contacts
in the options menu.
4. Touch
Create new contact
or scroll through the contact list and touch an existing
contact name.
3.5 Using Airplane Mode
Some locations may require you to turn off your phone’s wireless connections. Rather
than powering off your phone, you can place it in
Airplane mode
.
1. Press and hold .
2. Touch
Airplane mode
in the options menu.
4 Contacts
The
Contacts
application enables you to save and manage information such as
phone numbers and addresses of your contacts. After you save contact information
on your mobile phone, you have easy access to the people with whom you want to
communicate.
4.1 Opening the Contacts Application
If you have not yet added any contacts to your mobile phone,
Contacts
displays a
message with hints on how to start adding contacts information. On the Home screen,
touch
Contacts
to open the
Contacts
application.
On the Home screen, touch >
Contacts
to open the
Contacts
application.
All of your contacts are displayed alphabetically in a list that you can scroll through.
4.2 Importing Contacts from a SIM Card
1. In the contact list, touch >
Manage contacts
.
2. Touch
Copy from SIM card
.
3. Wait for the SIM card contents to be loaded. Select the contacts you want to import
or touch
Select all
to select all contacts.
4. Touch
Copy
.

24
5. If you have more than one account on your phone, touch the account into which
you want to import the contacts.
4.3 Adding a Contact
1. In the contact list, touch >
Create contact
.
2. If you have more than one account with contacts, touch the account to which you
want to add the contact.
3. Enter the contact's name, and then add detailed information such as phone
number and address.
4. When you are finished, touch
Done
to save the contact information.
4.4 Adding a Contact to Your Favorites
• Touch and hold the contact you want to add to
Favorites
. Then touch
Add to
Favorites
.
• Touch a contact, and then touch the star to the right of the contact’s name. The star
turns gold.
4.5 Searching for a Contact
1. In the contact list, touch >
Search
.
2. Enter the name of the contact you wish to search for. As you type, contacts with
matching names appear below the search box.
On the contact list screen, you can touch a letter on the right to display contacts
starting with the touched letter.
4.6 Editing a Contact
You can make changes to the information you have stored for a contact at any time.
1. In the contacts list, touch and hold the contact whose details you want to edit, and
then touch
Edit contact
in the options menu.
2. Touch the category of contact information you wish to change: name, phone
number, email address, or any other information you recorded earlier.

25
3. Make the desired changes to the contact information, and then touch
Done
. To
cancel all of your changes, touch
Cancel
.
4.7 Communicating with Your Contacts
From the
Contacts
or
Favorites
tab, you can quickly call or send a text (SMS) or
multimedia (MMS) message to a contact’s default phone number. You can also open
details to view a list of all the ways you can communicate with that contact. This
section describes how to communicate with a contact when you view your contacts
list.
4.7.1 Using Quick Contact for Android
1. Touch the contact's picture or picture frame (if you have not assigned a picture to
the contact) to open Quick Contact for Android.
2. Touch the icon for the way you want to communicate with the contact.
The icons available depend on the information you have entered for the contact,
the applications installed on your phone, and the accounts you have.
4.7.2 Communicating with a Contact
1. In the contacts list, touch the contact that you want to communicate with.
2. On the contact’s details screen, touch the icon to the right of the number to call or
send messages.
4.8 Deleting a Contact
1. In the contacts list, touch and hold the contact that you want to delete, and then
touch
Delete contact
in the options menu.
2. Touch
OK
to confirm that you want to delete the contact.
4.9 Streams
Streams is a client that integrates social networking service (SNS) functions of
Facebook, and Twitter. Using Streams, your SNS accounts can be closely linked with
Contacts.

26
To access the Streams screen, touch >
Streams
. You can also touch
Contacts
, and then flick left to switch to the Streams screen.
4.9.1 Logging in to an Account
1. The first time you access Streams, touch
Login to Social Network
.
2. Select the type of account that you want to log in to. Then follow the on-screen
setup instructions to complete login.
You can log in to different types of accounts at the same time. To add an account of
another type, touch >
Accounts
>
Add account
.
4.9.2 Importing Friends
After login, the phone asks you whether to import all friends. If you choose to import
friends, Streams will import the SNS accounts of all your friends to your phone. If not,
you can import your friends' accounts in Settings later.
After friends are imported, the group of imported accounts is automatically added to
the groups of
Contacts
.
4.9.3 Preference Settings
You can configure account settings, such as refresh mode, refresh frequency, and
notifications.
1. On the Streams screen, touch >
Accounts
. Then touch the account to be
configured.
2. On the account screen, touch
Social Preference Settings
to configure the
settings.
4.9.4 Adding the Streams Widget to the Home Screen
Touch and hold the blank area of the Home screen. In the displayed menu, touch
Add widget
>
Streams
to add Streams to the Home screen.
Using the widget, you can quickly access Streams, or directly browse the latest events
and update the status of your friends on the Home screen.

27
4.10 Managing Groups
4.10.1 Creating a Group
1. On the Home screen, touch >
Contacts
. Then flick the tab bar to the left and
touch
Groups
.
2. In the groups list, touch , and then touch
Create group
.
3. Enter the name and picture you want to assign to the group, and then set a
ringtone for it.
4. Touch >
Add Members
to add members to the group.
5. Select the contacts to be added to the group, and then touch
OK
.
6. When you are finished, touch
Done
to save the group information.
You can only add contacts saved in the phone memory to a group.
4.10.2 Editing a Group
You can always make changes to the information you have saved for a group.
1. In the groups list, touch and hold the group whose details you want to edit, and then
touch
Edit group
in the options menu.
2. Make the desired changes to the group information, and then touch
Done
. To
cancel all changes you made to the group information, touch
Cancel
.
4.10.3 Adding a Contact to Your Groups
To add a contact to your groups, you can do any of the following:
• Touch and hold the contact you want to add to
Groups
. Then touch
Add to
groups
.
• When editing a group, touch , and then touch
Add Members
to select the
contacts you want to add to group.
You can add contacts in phone memory rather than in SIM/UIM card to a group.

28
4.11 Joining and Separating Contacts
You may have duplicate contacts if you import contacts by:
• Adding an account, such as a Gmail account.
• Using the social networking services such as Facebook or Twitter. (If your phone
has the Streams function, you can use it to access Facebook or Twitter.)
• Using other methods, such as exchanging emails.
To avoid duplication, join two or more contacts together to form a single contact.
Availability of Facebook or Twitter may vary depending on your country or
carrier. Please use them according to local laws and regulations.
4.11.1 Joining Contacts
1. On the Home screen, touch >
Contacts
.
2. Touch a duplicated contact.
3. Touch
Joined Contacts
, and then touch
Add contact
.
4. Select the contact to be joined to combine two duplicate contacts.
Two contacts will be joined together and displayed as one contact. Touch the contact
to view the joined information. You can see that the contact is joined together by two
contacts. You can also combine more than two contacts.
4.11.2 Separating Contacts
If contact information from different sources was joined together in error, you can
separate the contacts.
1. On the Home screen, touch >
Contacts
.
2. Touch the joint contact to be separated.
3. Touch the option for separating a contact.
4. Select the contact to be separated from the joint contact.
The joint contact is then separated into two contacts displayed separately in
Contacts
.

29
4.12 Sending Contacts
You can send contacts as a .vcf file via Bluetooth or Email.
1. In the contacts list, touch .
2. Select contacts that you want to send.
3. Touch
Send
.
4. Select the way you prefer to send the contacts you have selected, for example
Bluetooth or Email.
You can send one contact by another way. Touch and hold a contact, touch
Send contact
, and then select the way you prefer to send.
5 Using the Onscreen Keyboard
5.1 Displaying the Keyboard
To enter text, use the onscreen keyboard. Some applications open the keyboard
automatically. In others, touch a text field to open the keyboard.
Touch to hide the keyboard.
Touch and hold a text field to open the
Edit text
menu.
5.1.1 Choosing an Input Method
1. Touch and hold a text field until the
Edit text
menu is displayed.
2. Touch
Select input method
.
3. Select the input method.
The keyboard panel will be displayed automatically.
30
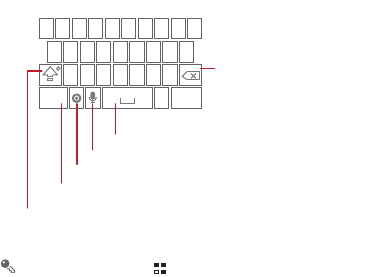
5.1.2 Using the Android Keyboard
On the Home screen, touch >
Settings
>
Language & keyboard
>
Android keyboard
>
Voice input
to turn on or turn off voice input.
q w e r t y u i o p
a s d f g h j k
z x c v b n m
.Next?123
l
Touch once to capitalize the next letter you type.
Touch twice for all caps.
Touch to change from text mode to symbol/number mode.
Touch to enter text by voice.
Touch to insert a space.
Touch to delete a character
to the left of the cursor.
Touch and hold to delete all
characters to the left of the
cursor.
......
Touch to select input method or set input method.

31
5.1.3 Using the Swype Keyboard(Optional)
q w e
#123 _%(
&
!7890/ ?
$ 456 +: ; ”
)
r t y u i o p
a s d f g h j k
z x c v b n m
.
’
’
_
:-)
SYM
l
Touch once to capitalize the next letter you type.
Touch twice for all caps.
Touch and hold to get helpful tips.
Touch to get swype functions.
Touch to change from text mode to symbol/number mode.
Touch to insert a space.
Touch to delete a character
to the left of the cursor.
Touch and hold to delete all
characters to the left of the
cursor.
EN
bay
To enter a word, just drag your
finger over the letters in the word.
I’ll
To capitalize, go above the
keypad.
To enter apostrophes in common
words drag through the ‘n’.
To enter double letters, circle the
letter.
q w e
#123 _%(
&
!7890/ ?
$456+: ;”
)
r t y u i o p
a s d f g h j k
z x c v b n m
l
q w e
#123 _%(
&
!7890/ ?
$456+: ;”
)
r t y u i o p
a s d f g h j k
z x c v b n m
l
.
’
’
_:-)
SYM
.
’
’
_:-)
SYM

32
5.1.4 Using the Landscape Keyboard
If you find the keyboard inconvenient or difficult to use, turn your mobile phone
sideways. The screen will display the keyboard in landscape orientation, providing
you with a wider keyboard layout.
5.2 Customizing Keyboard Settings
1. On the Home screen, touch >
Settings
>
Language & keyboard
.
2. In
Keyboard settings
, select an input method to customize the keyboard settings.
6 Messaging
The
Messaging
application allows you to exchange text messages (SMS) and
multimedia messages (MMS) with anyone using an SMS-or-MMS-capable phone.
With the
Email
application you can read and send emails.
6.1 SMS and MMS
6.1.1 Opening Messaging
Touch >
Messaging
.
6.1.2 Creating and Sending a Text Message
1. Touch >
Messaging
>
New message
.
2. Enter a phone number or a contact's name in the
To
field, or touch to select a
contact from
Contacts
or
Groups
.
As you enter the phone number or the contact's name, the phone displays
possible matches from your contacts. Select a contact from the list of possible
matches or continue entering.
After you select a contact or finish entering a number, add a comma and you can
enter another recipient. You can also touch a previously entered contact again
to edit or delete it.