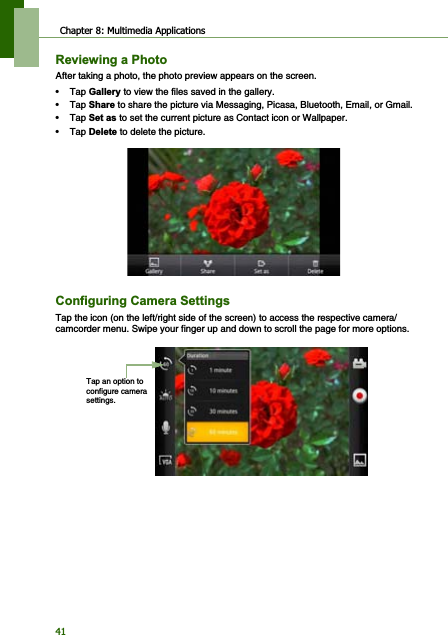
Huawei Technologies U9000 HSPA/UMTS/GPRS/GSM/EDGE Mobile Phone with BT User Manual FB0 UM EN
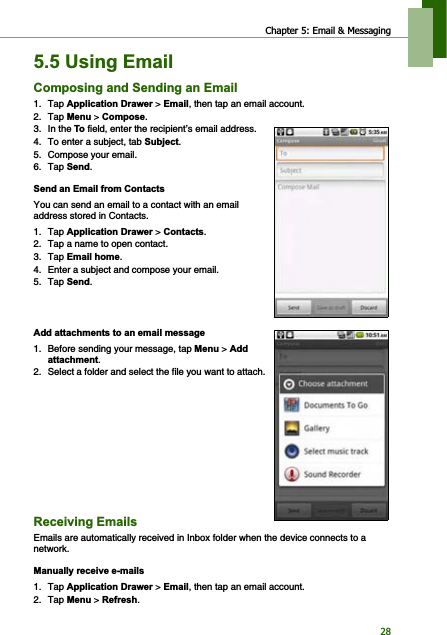
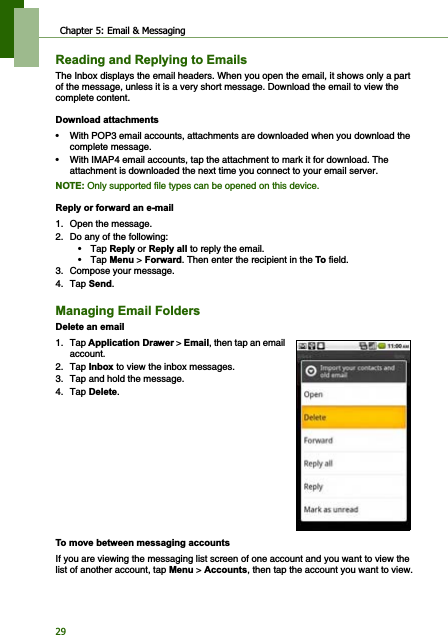
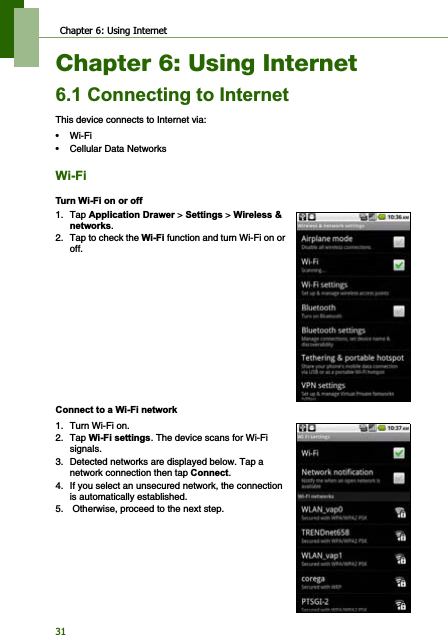
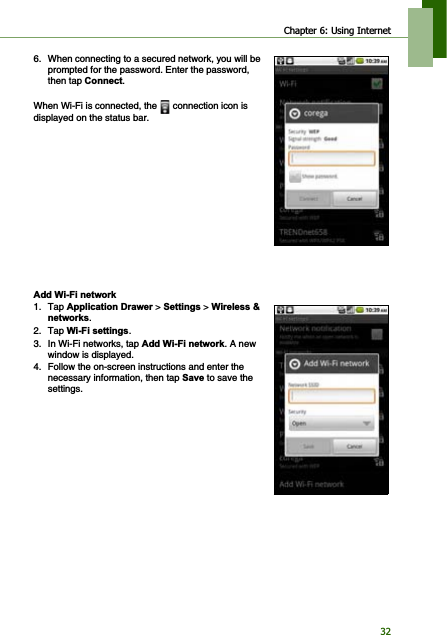
Huawei Technologies Co.,Ltd HSPA/UMTS/GPRS/GSM/EDGE Mobile Phone with BT FB0 UM EN
UserManual.wiki
>
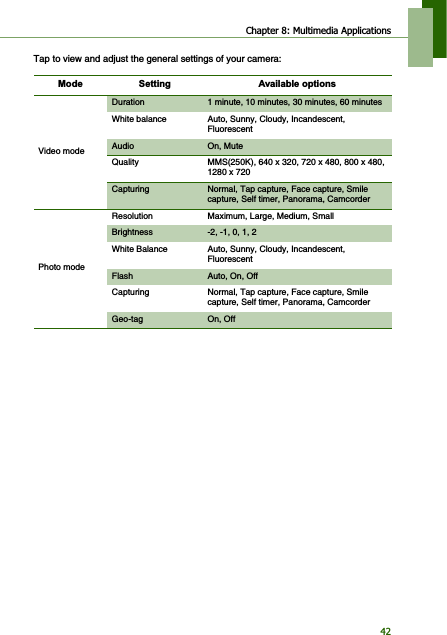
Huawei Technologies
>
U9000 User Manual
User Manual
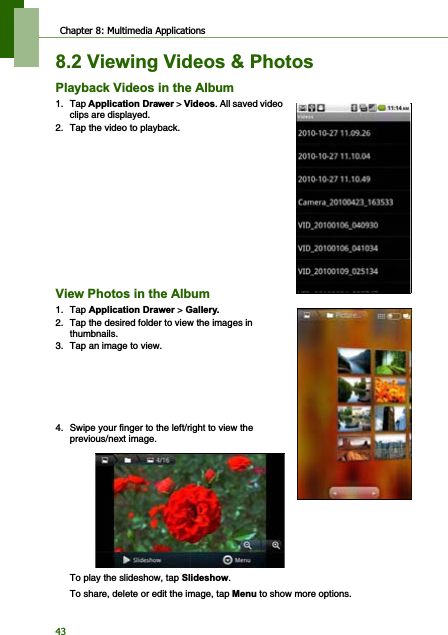
Navigation menu
Upload a User Manual
Namespaces
Wiki Guide
HTML
PDF
Info
Views
User Manual
Discussion / Help
Navigation

![Chapter 2: The Basics116KRUWFXW0HQXThe Shortcut menu displays notification or other information of each menu item. To easily access the menu, tap the item on the Home screen.&XVWRPL]LQJ6KRUWFXWPHQXTo add a shortcut:1. Tap 0HQX > $GG > 6KRUWFXWV.2. Tap $SSOLFDWLRQV to display the list of applications.3. Tap to add the items that you want to appear on the Home screen.To remove a shortcut:1. Tap and holdthe desired shortcut icon. The icon enlarges.2. appears on the bottom of the Home screen.3. Drag the icon to to delete. The shortcut icon is then removed.,FRQ 0HQX,WHP 'HVFULSWLRQPhone Display device keypad. Tap to enter the phone number and make calls.Browser Tap to browse the web pages.](https://usermanual.wiki/Huawei-Technologies/U9000/User-Guide-1404726-Page-16.png)


![Chapter 5: Email & Messaging30&XVWRPL]LQJ(PDLO6HWWLQJVYou can configure the general settings of your email account such as account name, email checking frequency, default account, notifications, and server settings.6HWXS\RXUDFFRXQWQDPH1. Tap an email account.2. Tap 0HQX > $FFRXQWVHWWLQJV to view the email account settings.3. Tap $FFRXQWQDPH to change the account name.4. Tap 2. to confirm.6HWXSWKHHPDLOFKHFNLQJIUHTXHQF\1. Tap an email account.2. Tap 0HQX > $FFRXQWVHWWLQJV to view the email account settings.3. Tap (PDLOFKHFNIUHTXHQF\.You can set the device to automatically check for new email every 5 mins, every 10 mins, every 15 mins, every 30 mins, every hour, or never.6HWXSGHIDXOWDFFRXQW1. Tap an email account.2. Tap 0HQX > $FFRXQWVHWWLQJV to view the email account settings.3. Tap 'HIDXOWDFFRXQWto send email from this account by default.'HOHWHDQHPDLODFFRXQW1. Tap $SSOLFDWLRQ'UDZHU > (PDLO.2. Tap and hold the account to delete.3. Tap 5HPRYHDFFRXQW.4. Tap 2. to confirm.](https://usermanual.wiki/Huawei-Technologies/U9000/User-Guide-1404726-Page-35.png)
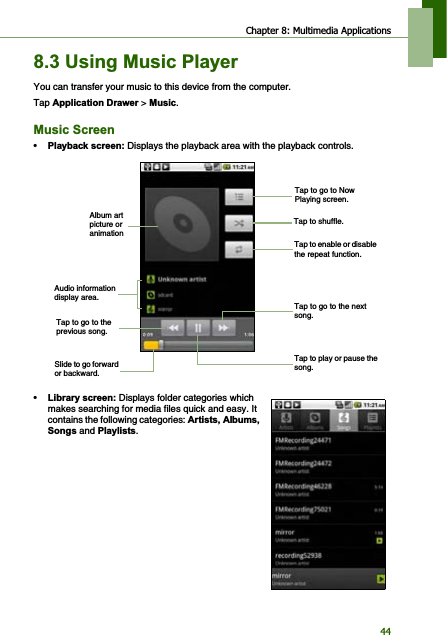
![Chapter 9: Programs560DSV0DSV is Google's mapping service to search for places of interest.1. Tap $SSOLFDWLRQ'UDZHU > 0DSV.2. Do any of the following:• To select a nearby attractions: Tap then tap the desired category.• To select a Map mode: Tap then tap 7UDIILF,6DWHOOLWH,7HUUDLQ,%X]],/DWLWXGH5HVWDXUDQWV0\0DSV:LNLSHGLD7UDQVLW/LQHVRU)DYRULWH3ODFHV.• To find your location: Tap .• To search for a place of interest: Tap 0HQX > 6HDUFK then type in a keyword to begin search.• To get direction: Tap 0HQX > 'LUHFWLRQV.• To view the starred places: Tap 0HQX > 6WDUUHG3ODFHV.• To clear the map: Tap 0HQX > &OHDU0DS.• Tap 0HQX > /DWLWXGH to share your location with friends.• To enable or disable a lab: Tap 0HQX > 0RUH > /DEV.• To get help on the map: Tap 0HQX > 0RUH > +HOS.• To view terms, privacy, and notices: Tap 0HQX>0RUH > 7HUPV3ULYDF\1RWLFHV.• To view information about Google Map: Tap 0HQX > 0RUH > $ERXW.](https://usermanual.wiki/Huawei-Technologies/U9000/User-Guide-1404726-Page-61.png)
![Chapter 10: Managing Your Phone69/DQJXDJHNH\ERDUG9RLFHLQSXWRXWSXW$FFHVVLELOLW\'DWHWLPH$ERXWSKRQHView legal information, device status and software version.$SSOLFDWLRQ 'HVFULSWLRQ6HOHFWODQJXDJH Select language and region for this device.7RXFK3DO Set on-screen keyboard settings.8VHUGLFWLRQDU\ Add user preset words to the dictionary.$SSOLFDWLRQ 'HVFULSWLRQ9RLFHLQSXW Set the voice recognizer settings.9RLFHRXWSXW Set the text-to-speech settings.$SSOLFDWLRQ 'HVFULSWLRQ$FFHVVLELOLW\ Configure the settings for the downloaded application with an accessibility feature.3RZHUEXWWRQ Set to end a call by pressing the power button.$SSOLFDWLRQ 'HVFULSWLRQ$XWRPDWLF Check to use network provided values.6HWGDWH Tap to set date for this device.6HWWLPH]RQH Set time zone of your current location.6HWWLPH Tap to set time for this device.8VHKRXUIRUPDWSet the clock to 24-hour format.6HOHFWGDWHIRUPDW Set the preferred date format.](https://usermanual.wiki/Huawei-Technologies/U9000/User-Guide-1404726-Page-74.png)
![Chapter 10: Managing Your Phone70&KDQJLQJ%DVLF6HWWLQJV'DWHDQG7LPH7RVHWWKHGDWHDQGWLPH1. Tap $SSOLFDWLRQ'UDZHU > 6HWWLQJV > 'DWHWLPH.2. Tap 6HWGDWH to set the date.• To adjust the date, tap the month, day, or year field, and tap or to increase or decrease the value. Tap 6HWto apply the values.• To change the date format, tap 6HOHFWGDWHIRUPDW, and select the date format from the list.3. Tap 6HWWLPH]RQH to select the time zone from the list.4. Tap 6HWWLPH to set the time.• To adjust the time, tap the hour, minute, second or AM/PM field, and tap + or - to increase or decrease the value. Tap 6HWto apply the values.• To use 24-hour format, tap 8VHKRXUIRUPDW.6HWWLQJ$ODUPVYou can set up alarms on this device.7RVHWWKHDODUP1. Tap $SSOLFDWLRQ'UDZHU > &ORFN.2. Tap .3. To add an alarm, tap $GGDODUP.4. Tap the and icons to set the alarm time, and tap 6HW.5. To set repeat mode, tap 5HSHDW. Tap one or more options, then tap 2..6. To set the ringtone, tap 5LQJWRQH. Tap an option, then tap 2..7. To vibrate when alarm sounds, check 9LEUDWH.8. To enter an alarm label, tap /DEHO.9. After all settings are completed, tap 'RQH.](https://usermanual.wiki/Huawei-Technologies/U9000/User-Guide-1404726-Page-75.png)
![Chapter 11: Using PC Tools Application73Chapter 11: Using PC Tools ApplicationPC Tools application is a software that enables you to change USB modes when your device is connected to a computer. Available modes are as follows:•86%0DVV6WRUDJH: Allows the computer to recognize your device as a USB mass storage device.•3KRQHDVPRGHP: Allows you to use your device as a modem.•6\QFKURQL]DWLRQ7RRO: Allows you to sync your device with a computer.127(The pre-loaded user manual in microSD card can only be viewed through storage function.8VLQJ3&7RROV$SSOLFDWLRQ,QVWDOOLQJWKH'ULYHU1. Turn on your device, and connect it to your computer using the USB cable.2. From the Windows desktop, double click on 0\&RPSXWHUand locate the &'GULYH.3. Browse and double click 6HWXSH[H.4. Follow the on-screen instructions to complete the driver installation.](https://usermanual.wiki/Huawei-Technologies/U9000/User-Guide-1404726-Page-78.png)
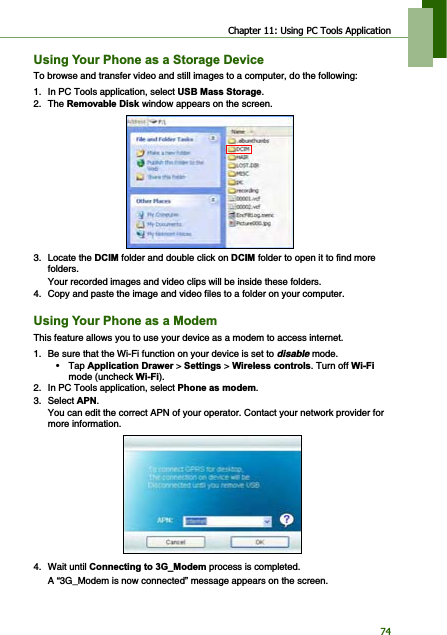
![Chapter 11: Using PC Tools Application755. From the Windows desktop, double click on ,QWHUQHW([SORUHUorlaunch a web browser.8VLQJ<RXU3KRQHWR6\QFZLWKD&RPSXWHUThis feature allows you to sync your device with a computer.In PC Tools application, select 6\QFKURQL]DWLRQ7RRO.•6WDUW6\QFKURQL]DWLRQallows you to initiate synchronization.•6\QFKURQL]DWLRQ6HWWLQJallows you to set the synchronization settings. Follow the on-screen instructions to complete the settings.•6\QFKURQL]DWLRQ6XPPDU\displays the summary of the synchronization process.](https://usermanual.wiki/Huawei-Technologies/U9000/User-Guide-1404726-Page-80.png)