Huawei Technologies U9000 HSPA/UMTS/GPRS/GSM/EDGE Mobile Phone with BT User Manual FB0 UM EN
Huawei Technologies Co.,Ltd HSPA/UMTS/GPRS/GSM/EDGE Mobile Phone with BT FB0 UM EN
User Manual
USER'S MANUAL
HUAWEI U9000/U9000

Table of Contents
i
&KDSWHU*HWWLQJ6WDUWHG
<RXU'HYLFH
Front ........................................................................................................................ 1
Back......................................................................................................................... 1
Top........................................................................................................................... 2
Down ....................................................................................................................... 2
Side .......................................................................................................................... 2
$FFHVVRULHV
,QVWDOOLQJ6,0&DUG%DWWHU\DQG0HPRU\&DUG
SIM card .................................................................................................................. 3
Battery ..................................................................................................................... 4
Memory card ........................................................................................................... 5
&KDUJLQJ%DWWHU\
8VLQJ+HDGVHW
7XUQLQJWKH'HYLFH2QRU2II
8QORFNLQJWKH6FUHHQ
&KDSWHU7KH%DVLFV
+RPH6FUHHQ
Status Bar Icons....................................................................................................... 8
Shortcut Menu ....................................................................................................... 11
Using Widgets ....................................................................................................... 12
Application Drawer ............................................................................................... 12
Extended Home Screen ......................................................................................... 13
Setting Wallpaper .................................................................................................. 13
$GMXVWLQJWKH9ROXPH
&RQWDFWV
Adding a Contact................................................................................................... 15
Searching for Contacts .......................................................................................... 15
Importing Contacts ................................................................................................ 16
Backing Up Contacts............................................................................................. 16
Favorite Contacts................................................................................................... 17
&KDSWHU8VLQJWKH3KRQH
0DNLQJD&DOO
$QVZHULQJDFDOO
&KDSWHU(QWHULQJ,QIRUPDWLRQ
2Q6FUHHQ.H\ERDUG
Using the On-Screen Keyboard............................................................................. 20
Setting the Input Method ....................................................................................... 21
Changing Input Method......................................................................................... 21
&RQILJXULQJ'HYLFH.H\ERDUG6HWWLQJV
&KDSWHU(PDLO0HVVDJLQJ
7H[W0HVVDJH
Creating and Sending a Text Message .................................................................. 22
Receiving and Managing Messages ...................................................................... 23

Table of Contents
ii
0XOWLPHGLD0HVVDJH
Creating and Sending an MMS Message .............................................................. 25
9RLFH0HVVDJH
(PDLO$FFRXQWV
Setting Up an Internet Email Account................................................................... 27
Opening Email....................................................................................................... 27
8VLQJ(PDLO
Composing and Sending an Email ........................................................................ 28
Receiving Emails................................................................................................... 28
Reading and Replying to Emails ........................................................................... 29
Managing Email Folders ....................................................................................... 29
Customizing Email Settings .................................................................................. 30
&KDSWHU8VLQJ,QWHUQHW
&RQQHFWLQJWR,QWHUQHW
Wi-Fi...................................................................................................................... 31
Cellular Data Network........................................................................................... 33
Starting a Data Connection.................................................................................... 34
%URZVLQJD:HE3DJH
Managing a Web Page........................................................................................... 35
Quick search on your phone and the web.............................................................. 36
&KDSWHU8VLQJ%OXHWRRWK
&RQQHFWLQJWR%OXHWRRWK'HYLFHV
&KDSWHU0XOWLPHGLD$SSOLFDWLRQV
9LGHRVDQG3KRWRV
Recording Video.................................................................................................... 39
Taking a Photo....................................................................................................... 40
Reviewing a Video ................................................................................................ 40
Reviewing a Photo................................................................................................. 41
Configuring Camera Settings ................................................................................ 41
9LHZLQJ9LGHRV3KRWRV
Playback Videos in the Album .............................................................................. 43
View Photos in the Album .................................................................................... 43
8VLQJ0XVLF3OD\HU
Music Screen ......................................................................................................... 44
Playing Music........................................................................................................ 45
Changing Playback Options .................................................................................. 45
Creating a Playlist.................................................................................................. 46
&KDSWHU3URJUDPV
%URZVHU
&DOFXODWRU
&DOHQGDU
&DPFRUGHU
&DPHUD
&ORFN

Table of Contents
iii
&RQWDFWV
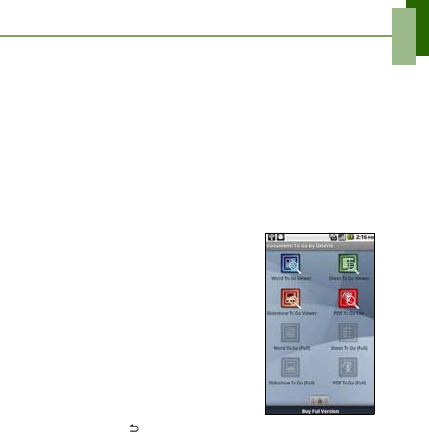
'RFXPHQWV7R*R
Word To Go® Viewer........................................................................................... 50
Sheet To Go® Viewer ........................................................................................... 50
Slideshow To Go® Viewer ................................................................................... 51
PDF To Go® Lite.................................................................................................. 51
(PDLO
)DFHERRN
)LOH%URZVHU
Managing Files and Folders .................................................................................. 52
)05DGLR
Recording the Radio .............................................................................................. 53
*DOOHU\
*PDLO
*RRJOH6HDUFK
/DWLWXGH
0DSV
0DUNHW
0HVVDJLQJ
0XVLF
1DYLJDWLRQ
1HZVDQG:HDWKHU
1RWH3DG
3KRQH
3ODFHV
5665HDGHU
6HWWLQJV
6,07RRONLW
7DON
9LGHR3RUWDO
9LGHRV
9RLFH'LDOHU
9RLFH1RWH
9RLFH6HDUFK
<RX7XEH
&KDSWHU0DQDJLQJ<RXU3KRQH
'HYLFH6HWWLQJV
Wireless & networks ............................................................................................. 66
Call settings ........................................................................................................... 66
Sound..................................................................................................................... 66
Display................................................................................................................... 67
Location & security ............................................................................................... 67
Applications........................................................................................................... 68
Accounts & sync.................................................................................................... 68
Privacy................................................................................................................... 68
SD card & phone storage....................................................................................... 68
Language & keyboard ........................................................................................... 69
Voice input & output ............................................................................................. 69

Table of Contents
iv
Accessibility .......................................................................................................... 69
Date & time ........................................................................................................... 69
About phone .......................................................................................................... 69
&KDQJLQJ%DVLF6HWWLQJV
Date and Time ....................................................................................................... 70
Setting Alarms ....................................................................................................... 70
Display Settings..................................................................................................... 71
Ring Settings ......................................................................................................... 71
8VLQJ:LUHOHVVQHWZRUNV
3URWHFWLQJ<RXU3KRQH
Enable or Disable SIM card PIN ........................................................................... 72
Enabling Screen Lock Protection .......................................................................... 72
5HVHWWLQJWKH'HYLFH
&KDSWHU8VLQJ3&7RROV$SSOLFDWLRQ
8VLQJ3&7RROV$SSOLFDWLRQ
Installing the Driver............................................................................................... 73
Using Your Phone as a Storage Device................................................................. 74
Using Your Phone as a Modem............................................................................. 74
Using Your Phone to Sync with a Computer ........................................................ 75
Chapter 1: Getting Started
1
Chapter 1: Getting Started
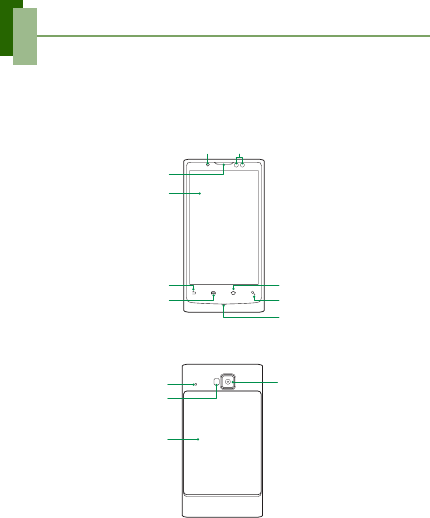
<RXU'HYLFH
)URQW
%DFN
5HWXUQ
0HQX
• Press to view
menu options.
7RXFKVFUHHQ
+RPH
• Press to return to Home
screen.
6HDUFK
)URQWFDPHUD 6HQVRUV
(DUSLHFH
0LFURSKRQH
5.0mega
pixel
0HJDSL[HOVFDPHUD
See “Videos and Photos”
on page 39.
0LFURSKRQH
)ODVK/('
%DFNFRYHU
Chapter 1: Getting Started
2
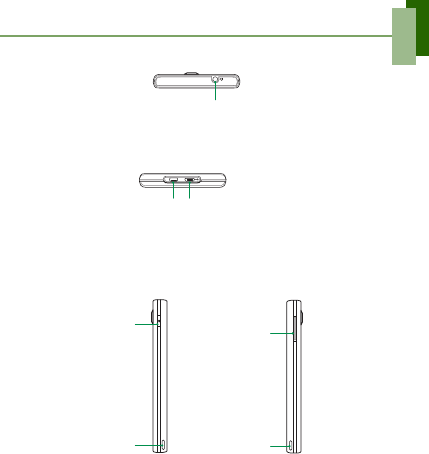
7RS
'RZQ
127( The battery can also be charged while connecting to a computer.
6LGH
$FFHVVRULHV
Your package comes with the following items. If any of them is missing, please
contact your retailer.
• Smartphone
• AC adapter
• Mini USB cable
• Headset
• Battery
• Quick Start Guide
+HDGVHWMDFN
Use a headset for hands-free
conversation or listening to music.
+'0,'W\SH
FRQQHFWRU
0LFUR86%FRQQHFWRU
• Connect USB cable to PC as a
modem / USB mass storage.
• Connect USB cable and the AC
adapter to charge the battery.
3RZHU
• Press and hold for 5
seconds to turn the
device on or off.
• To save battery, press
to temporarily turn the
screen on or off.
6SHDNHUV 6SHDNHUV
9RO XP H Press to
adjust the volume.
Chapter 1: Getting Started
3
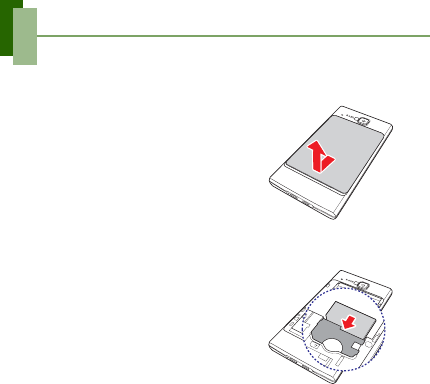
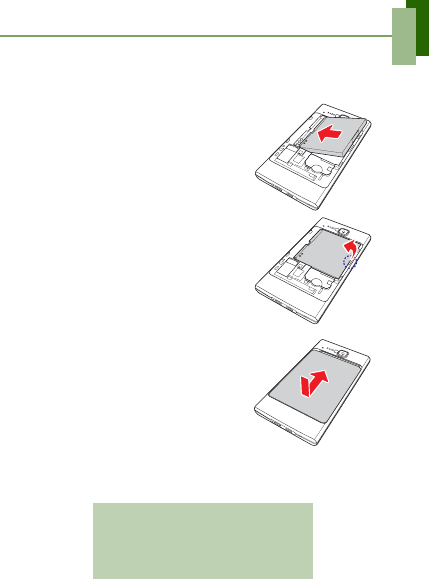
,QVWDOOLQJ6,0&DUG%DWWHU\DQG
0HPRU\&DUG
7RUHPRYHWKHEDFNFRYHU
1. Turn the device off.
2. Push and slide downwards to open the
back cover.
6,0FDUG
SIM card contains your phone number, memory storage, and network service details.
7RLQVWDOO6,0FDUG
Insert SIM card as shown. Make sure the gold
contacts are facing down and the cut-off corner
facing towards the battery slot.
7RUHPRYH6,0FDUG
1. Remove battery.
2. Use your finger to slide SIM card from the
card slot.
Chapter 1: Getting Started
4
%DWWHU\
This device comes with a rechargeable Li-Ion battery. Battery life varies depending on
the network and applications used and the type of connections attached to this device.
7RLQVWDOOEDWWHU\
Insert battery. Make sure the contacts of the
battery are aligned with the connectors on the
battery slot.
7RUHPRYHEDWWHU\
Use your fingertip to lift the battery tab and
remove battery.
7RUHSODFHWKHEDFNFRYHU
Secure the hooks on the back cover with
designated holes on the device and close the
back cover.
127( To ensure battery performance and avoid the risk of fire:
• Use only original batteries designated for the device.
• Do not store the battery in temperatures below -10ºC or higher than 45ºC.
&$87,21
5,6.2)(;3/26,21,)%$77(5<,65(3/$&('
%<$1,1&255(&77<3(
',6326('2)86('%$77(5,(6$&&25',1*
727+(,16758&7,216
Chapter 1: Getting Started
5
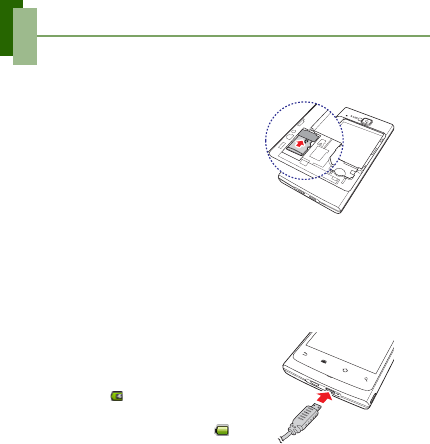
0HPRU\FDUG
You will need a microSD® card to store photos, music, videos and other data.
7RLQVWDOOPHPRU\FDUG
1. Insert memory card with the gold contacts
facing down.
2. Push memory card until it clicks into place.
7RUHPRYHPHPRU\FDUG
1. For safety removal, tap $SSOLFDWLRQ'UDZHU!
6HWWLQJV > 6'FDUGSKRQHVWRUDJH >
8QPRXQW6'FDUG.
2. Push memory card down to eject it from the
slot.
&KDUJLQJ%DWWHU\
The battery that came with your device is only partially charged. To fully charge the
battery, charge it for 2 hours.
&KDUJHWKHEDWWHU\
1. Connect one end of the AC adaptor to the mini
USB connector of the device as shown.
2. Plug the other end of the AC adaptor to the
wall outlet to start charging.
When the battery is charging, the red LED is
activated; the icon is also displayed on the
status bar. When the battery is fully charged, the
red LED disappears and the green LED is
activated; if the device is turned on, the icon
is also displayed on the status bar.
127(
• Battery can also be charged when the device connects to computer through
a USB cable.
• Battery life may vary depending on user usage.
Chapter 1: Getting Started
6
8VLQJ+HDGVHW
For hands-free conversation or listening to music, plug a headset to the headset jack.
127(
• When using a headset, your ability to hear outside sounds may be limited.
Do not use headset if it will endanger you.
• Do not set the volume to its maximum with a headset as it may damage your
hearing.
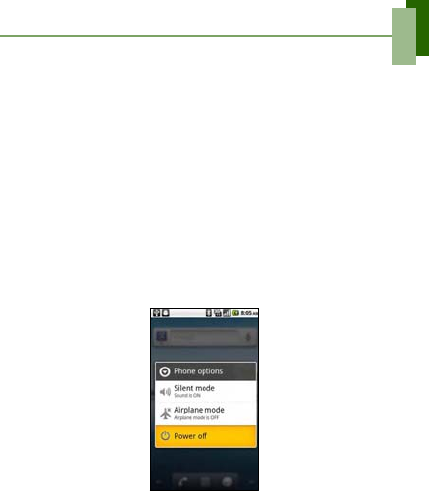
7XUQLQJWKH'HYLFH2QRU2II
After installing the SIM card and charging the battery, the device is ready to turn on.
7XUQRQ\RXUGHYLFH
Press and hold the 3RZHU button until the device vibrates.
7XUQRII\RXUGHYLFH
1. Press and hold the 3RZHU button for 5 seconds.
2. A pop-up window appears, tap 3RZHUR II.
3. Select 2. to confirm.
6HW\RXUGHYLFHWR6OHHSPRGH
To set the device to sleep mode, press the 3RZHU button. This turns the display off.
To turn the display on, press the 3RZHU button again.
Chapter 1: Getting Started
7
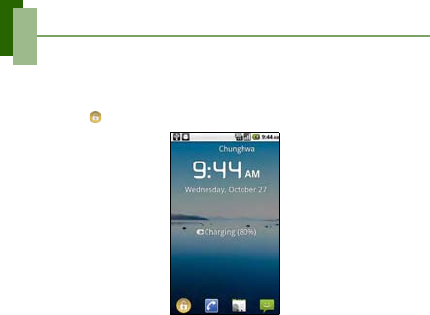
8QORFNLQJWKH6FUHHQ
8QORFNWKHVFUHHQ
1. Press the 3RZHU button to turn on the display from Sleep mode.
2. Drag to the center of the screen to unlock the screen.
Chapter 2: The Basics
8
Chapter 2: The Basics
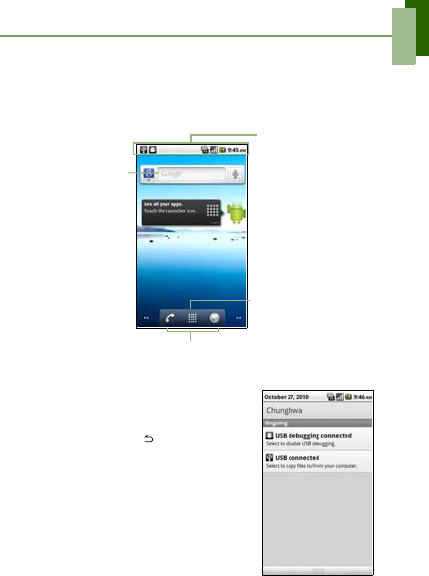
+RPH6FUHHQ
From Home screen, you can quickly access common features and view notifications
of missed calls, received messages, check battery and connection status.
6WDWXV%DU,FRQV
The Status bar icons indicate different types of
information. Tap the status bar and scroll down to
view ongoing phone activities or!notifications easily.
To close the window, press .
6KRUWFXW0HQX
Tap an icon to access the application.
$SSOLFDWLRQ'UDZHU
Tap to view the applications
and device settings.
6WDWXVEDU
• Displays status and
notification icons and
clock.
• Message, appointment,
task, and connection
notifications are also
displayed here.
*RRJOH6HDUFK
Enter the text you
want to search in
the box.
Chapter 2: The Basics
9
The icons on the status bar indicates the following information:
6LJQDOVWUHQJWKLFRQ
%OXHWRRWKLFRQ
86%FRQQHFWLRQ
LFRQ
%DWWHU\LFRQ
1HWZRUNLFRQ
9ROXPHLFRQ
The following icons may appear on the
volume icon area.
To adjust the volume, see “Adjusting the
Volume” on page 14.
%DWWHU\LFRQ
The following icons may appear on the
battery icon area:
To charge the battery, see “Charging
Battery” on page 5.
,FRQ 'HVFULSWLRQ
Sound is off.
Vibrate mode is activated.
Speakerphone is on.
Phone is muted.
,FRQ 'HVFULSWLRQ
Battery is full.
Battery is low.
Battery is charging.
3KRQH1HWZRUNLFRQ
The following icons may appear on the phone network icon area.
,FRQ 'HVFULSWLRQ
No network signal.
Maximum signal strength. Fewer
bars indicate lower signal
strength.
GPRS network is in use.
Call is in progress.
Call is on hold.
No SIM card inserted.
,FRQ 'HVFULSWLRQ
Chapter 2: The Basics
10
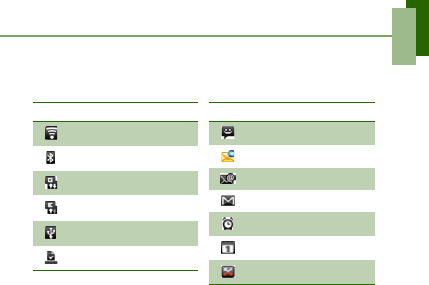
&RQQHFWLRQLFRQ
The following icons may appear on the
connection icon area.
1RWLILFDWLRQLFRQ
The following icons may appear on the
notification icon area.
,FRQ 'HVFULSWLRQ
WiFi is connected.
Bluetooth connection is active.
GPRS data connection is active.
HSDPA data connection is
active.
Device is connected to PC via
USB connector.
File has been downloaded.
,FRQ 'HVFULSWLRQ
New text message notification.
New WAP Push notification.
New email notification.
New Google mail notification.
Alarm.
Task notification.
Missed call notification.
Chapter 2: The Basics
11
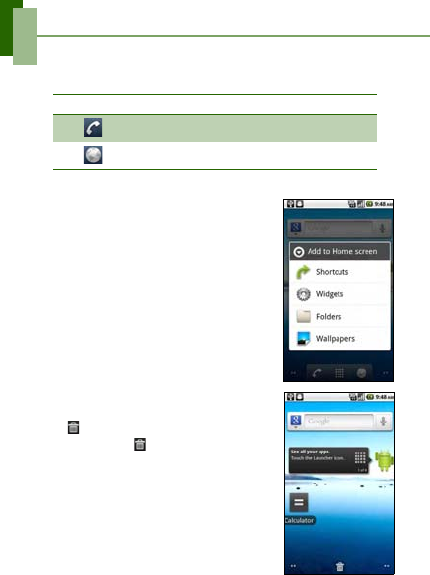
6KRUWFXW0HQX
The Shortcut menu displays notification or other information of each menu item. To
easily access the menu, tap the item on the Home screen.
&XVWRPL]LQJ6KRUWFXWPHQX
To add a shortcut:
1. Tap 0HQX > $GG > 6KRUWFXWV.
2. Tap $SSOLFDWLRQV to display the list of applications.
3. Tap to add the items that you want to appear on the
Home screen.
To remove a shortcut:
1. Tap and holdthe desired shortcut icon. The icon
enlarges.
2. appears on the bottom of the Home screen.
3. Drag the icon to to delete. The shortcut icon is
then removed.
,FRQ 0HQX,WHP 'HVFULSWLRQ
Phone Display device keypad. Tap to enter the
phone number and make calls.
Browser Tap to browse the web pages.
Chapter 2: The Basics
12
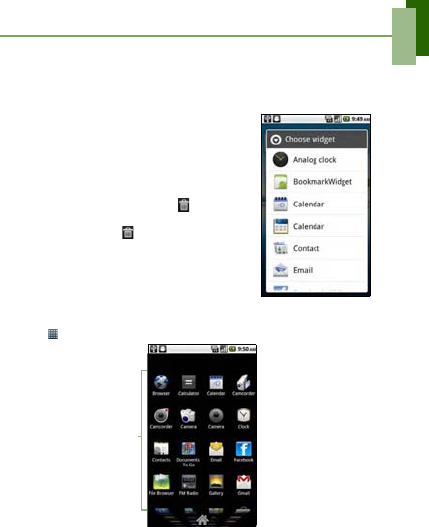
8VLQJ:LGJHWV
Save time with live updates right on the Home screen and get all your personalized
updates in one place.
You may add and customize the Widgets on the Home screen as you like.
1. From the Home Screen, tap 0HQX > $GG >
:LGJHWV.
A list of all available widgets is displayed.
2. Tap to select the widget you want to appear on the
Home screen.
To remove widgets:
1. From the Home screen, tap and hold the desired
widget. The widget enlarges and appears at the
bottom of the Home screen.
2. Drag the widget to to delete. The widget is then
removed.
$SSOLFDWLRQ'UDZHU
The Application Drawer contains all applications and settings. On the Home screen,
tap to display the menu.
• Swipe your finger up
or down to view
more applications.
• Tap an icon to open
the application.
Chapter 2: The Basics
13
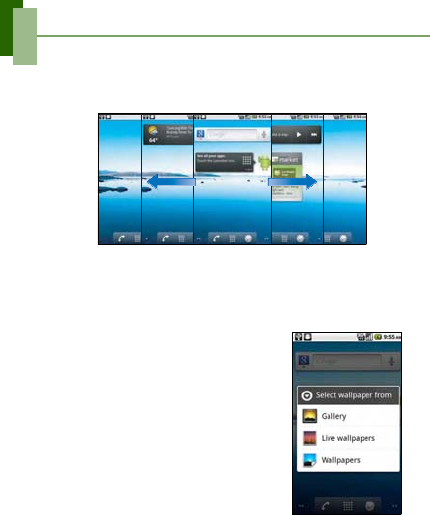
([WHQGHG+RPH6FUHHQ
Swipe your finger to the left or right across the Home screen.
The two extensions to the left and to the right of the Home screen provide more space
for icons, widgets, shortcuts, and other items.
6HWWLQJ:DOOSDSHU
You can customize the wallpaper of your Home screen with a default wallpaper or with
pictures taken with this device.
6HWZDOOSDSHUIURP3LFWXUHV
1. From the Home Screen, tap 0HQX > :DOOSDSHU.
6HOHFWZDOOSDSHUIURP is displayed on screen.
2. Tap *DOOHU\.
3. Tap to select pictures taken by the phone camera or
saved on your microSD card.
4. You will see thumbnail images of all pictures. Tap to
select the picture you want to use as wallpaper.
5. Drag your finger to select the crop area and tap
inside the box to crop the image.
6. Tap 6DYHand the cropped image appears as
wallpaper on the Home screen.
Chapter 2: The Basics
14
6HWZDOOSDSHUIURP:DOOSDSHUJDOOHU\
1. From the Home Screen, tap 0HQX > :DOOSDSHU.
6HOHFWZDOOSDSHUIURP is displayed on screen.
2. Tap :DOOSDSHUV.
3. All system wallpapers are displayed. Swipe your finger left or right to view all
available wallpapers.
4. Tap to preview the wallpaper.
5. Tap 6HWZDOOSDSHU to apply your selection.
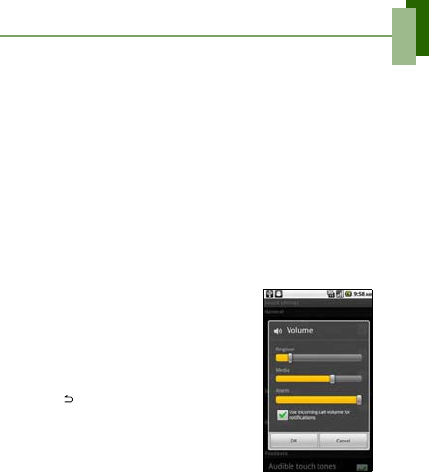
$GMXVWLQJWKH9ROXPH
This device features four types of volume which can be adjusted separately:
5LQJHUYROXPH: Set the volume for incoming calls and notifications.
,QFDOOYROXPH: Set the volume during a call.
•0HGLD YROXPHSet the volume for music and videos.
$ODUPYROXPH: Set the volume for alarms.
7RDGMXVWULQJHUYROXPH
1. Tap $SSOLFDWLRQ'UDZHU > 6HWWLQJV>6RXQG.
2. Tap 9RO XP H.
3. To adjust the ringtone volume, do either of the
following:
a. Drag the volume slider to adjust the volume.
b. Press the volume button to adjust the volume.
127( When the device is set to silent mode,
all sounds are turned off except media
and alarm.
4. Tap to exit the menu.
7RDGMXVWLQFDOOYROXPH
During a phone call, press the volume button to adjust
the volume.
7RDGMXVWPHGLDDODUPYROXPH
1. Tap $SSOLFDWLRQ'UDZHU > 6HWWLQJV>6RXQG.
2. Tap 9RO XP H.
3. Drag the media/alarm volume slider to adjust the volume.
Chapter 2: The Basics
15
&RQWDFWV
&RQWDFWV is your phonebook that lets you store names, phone numbers, email
addresses and other information. Contacts are stored in the phone memory. You can
save information such as names, pictures, phone numbers, e-mail addresses, etc.
You can also add the frequently used contacts to the favorites list. See “Favorite
Contacts” on page 17.
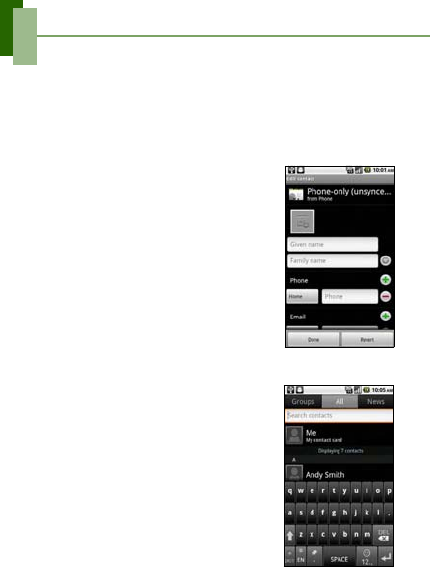
$GGLQJD&RQWDFW
1. Tap $SSOLFDWLRQ'UDZHU > &RQWDFWV.
2. Tap 0HQX > 1HZFRQWDFW.
3. Enter contact information such as name, phone
number, email address etc.
4. Tap 'RQH to save the contact or tap 5HYHUW to exit
without saving any changes.
6HDUFKLQJIRU&RQWDFWV
On the Contacts screen, do any of the following to easily search for contacts:
• In the search box, type the first few letters of the
contact to search, or tap 0HQX > 6HDUFK The list is
filtered as you type.
• Tap an alphabetical index to view contacts that start
with the letter. For example, to view names that
start with “k”, tap “k” and the list of contacts will be
displayed.
Chapter 2: The Basics
16
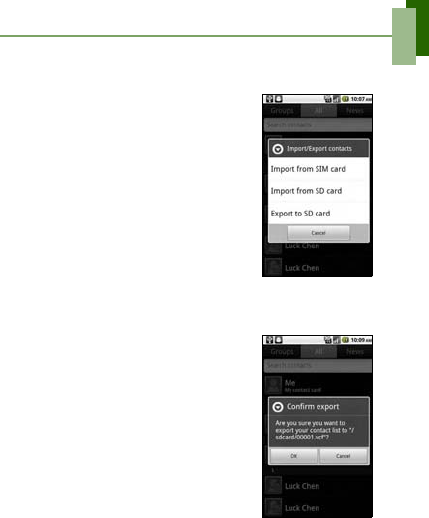
,PSRUWLQJ&RQWDFWV
You can import contacts from the SIM card or the memory card to this device.
1. Tap $SSOLFDWLRQ'UDZHU > &RQWDFWV.
2. Tap 0HQX > ,PSRUW([SRUW.
3. Select ,PSRUWIURP6,0FDUG or ,PSRUWIURP6'
FDUG.
4. Select contacts to import, tap 0HQX to select ,PSRUW
DOO or select vCard files to import.
%DFNLQJ8S&RQWDFWV
You can copy the contacts to the memory card to back up the contact information.
([SRUWFRQWDFWVWRWKHPHPRU\FDUG
1. Tap $SSOLFDWLRQ'UDZHU > &RQWDFWV.
2. Tap 0HQX > ,PSRUW([SRUW>([SRUWWR6'FDUG.
127(
• Copying contacts to the memory card will
overwrite the old backup file.
3. A warning message pops up, tap 2. to proceed. All
contacts are copied to the memory card.
Chapter 2: The Basics
17
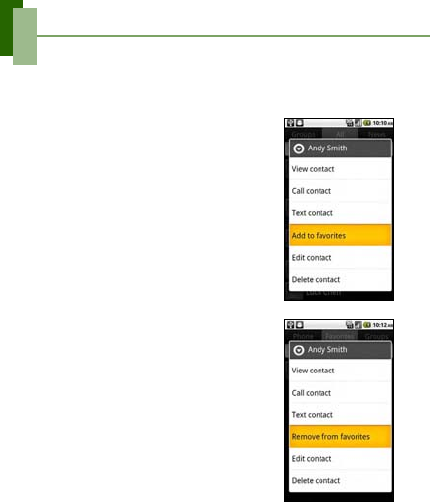
)DYRULWH&RQWDFWV
You can add the most frequently called contacts to the favorite contact list which helps
you to access the contacts quickly and easily.
$GGWR)DYRULWHV
1. Tap $SSOLFDWLRQ'UDZHU > &RQWDFWV.
2. From the contact list, tap and hold the desired
contact.
3. Tap $GGWRIDYRULWHV.
The contact is now in the favorites list.
5HPRYHIURP)DYRULWHV
1. Tap $SSOLFDWLRQ'UDZHU > &RQWDFWV.
2. Tap )DYRULWHV tab.
The favorites list is displayed.
3. Tap and hold the desired contact to display the
submenu.
4. Tap 5HPRYH IURPIDYRULWHV.
The contact will be removed from the favorites list.
Chapter 3: Using the Phone
18
Chapter 3: Using the Phone
To open Phone screen, do any of the following:
• On the home screen, tap 3KRQH.
• Tap $SSOLFDWLRQ'UDZHU > 3KRQH.
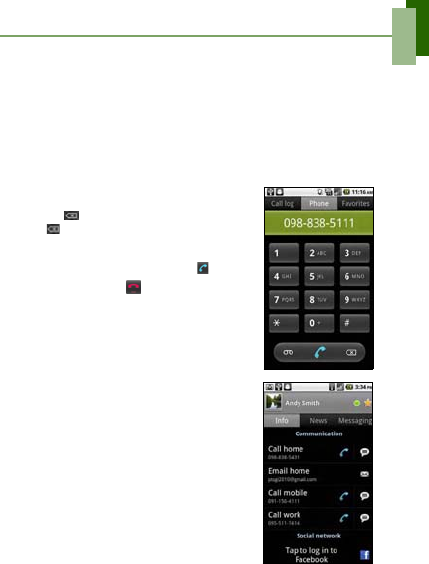
0DNLQJD&DOO
7RPDNHDFDOOIURPWKH3KRQHVFUHHQ
1. Tap $SSOLFDWLRQ'UDZHU > 3KRQH.
2. Tap the phone number on the keypad.
3. Tap to erase a wrong number. Tap and hold
to erase the entire number.
127(To call a contact, tap the contact from the
list.
4. After entering the phone number, tap .
5. To end the call, tap .
7RPDNHDFDOOIURP&RQWDFWV
1. Tap $SSOLFDWLRQ'UDZHU > &RQWDFWV.
2. Tap the desired contact.
3. Tap &DOO PRELOH,&DOOZRUN, or &DOOKRPH.
Chapter 3: Using the Phone
19
7RPDQDJHRWKHUYRLFHFDOOIHDWXUHV
• Tap $GGFDOO to place a second call while putting the
current caller on hold.
• Tap 'LDOSDG to display the on-screen keypad.
• Tap %OXHWRRWK to route the device's audio through a
connected Bluetooth device.
• Tap 0XWH to mute or unmute the microphone.
• Tap 6SHDNHU to activate or deactivate the
Speakerphone.
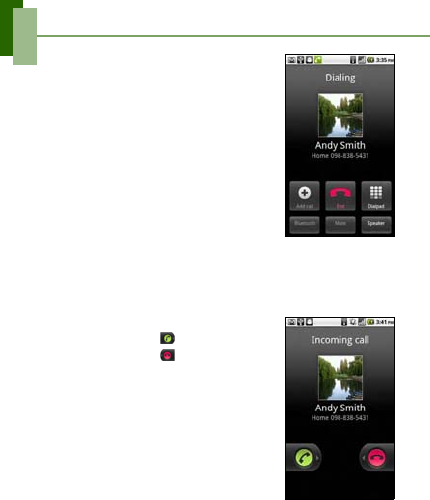
$QVZHULQJDFDOO
7RDFFHSWRUUHMHFWDQLQFRPLQJFDOO
• To answer a call, drag to the right side.
• To reject the call, drag to the left side.
Your device notifies you of incoming calls in the
following ways:
• The device rings or vibrates.
• The screen displays an incoming call message. If
the caller is listed in your Contacts, the contact’s
name appears. You may also see the caller’s phone
number, if available.
Chapter 4: Entering Information
20
Chapter 4: Entering Information
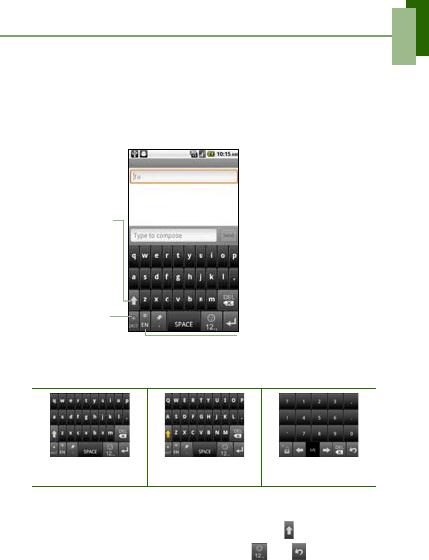
2Q6FUHHQ.H\ERDUG
On-screen keyboard appears in portrait mode when an application requires text input,
such as messaging, and writing emails. The keyboard input method is activated by
default.
8VLQJWKH2Q6FUHHQ.H\ERDUG
Tap the screen to display the on-screen keyboard.
• Use the on-screen keyboard as you would a computer keyboard.
• Tap the keys to enter characters.
• To toggle between upper and lower case letter display, tap .
• To display the numeric and symbols keyboard, tap . Tap to toggle back.
Lower case keyboard
(default)
Upper case keyboard Numbers and symbols
&$3V/RFN
VHOHFWRUDUURZ
Tap to toggle
between upper
case or lower
case text input
method.
'LFWLRQDU\:
Tap to enable
dictionary.
,QSXWPHWKRGVHOHFWRU: Tap
to choose your preferred
input method.
Chapter 4: Entering Information
21
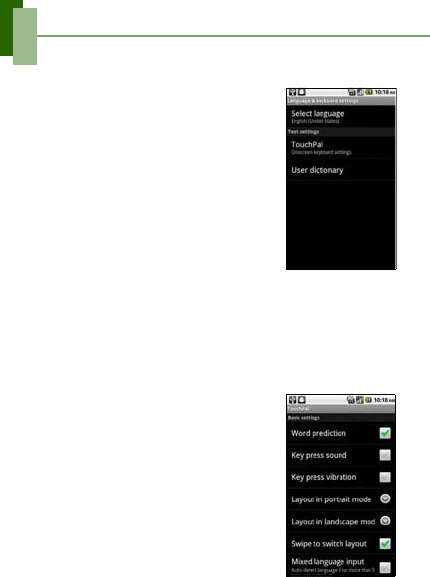
6HWWLQJWKH,QSXW0HWKRG
This device supports several text input methods, select your preferred method.
1. Tap $SSOLFDWLRQ'UDZHU > 6HWWLQJV > /DQJXDJH &
NH\ERDUG.
2. In Language & keyboard settings, a list of the input
methods is displayed. Select and check the options
you prefer.
&KDQJLQJ,QSXW0HWKRG
1. Press and hold any text-field in an application. For
example, in 0HVVDJLQJ, tap and hold the field “7R´ .
The Input Method Screen pops up.
2. Select an available input methods to use.
&RQILJXULQJ'HYLFH.H\ERDUG
6HWWLQJV
You can use keyboard aids to help you when you input text using the on-screen
keyboard.
1. Tap $SSOLFDWLRQ'UDZHU > 6HWWLQJV > /DQJXDJH & NH\ERDUG.
2. Tap 7RXFK3DO.
3. Select the applicable options from the following Basic settings, Prediction &
Gestures, Chinese, and Handwriting submenus.
%DVLFVHWWLQJVavailable options are Word
prediction, Key press sound, Key press
vibration, Layout in portrait mode, Layout in
landscape mode, Swipe to switch layout, Mixed
language input, and Select languages.
3UHGLFWLRQ*HVWXUHV: available options are
Predict next word, Correct mistyping, Slide-
down symbols, and Relevant words.
&KLQHVHtap $PELJXRXV3LQ<LQ to see more
options.
+DQGZULWLQJavailable options are Stroke
width, Recognize interval, Stroke Color, and
Help.
Chapter 5: Email & Messaging
22
Chapter 5: Email & Messaging
Use0HVVDJLQJ to access text and MMS messages. Use (PDLO to send and
receive email messages via your internet e-mail accounts.
7H[W0HVVDJH
A text message can only contain letters, numbers and symbols.
&UHDWLQJDQG6HQGLQJD7H[W0HVVDJH
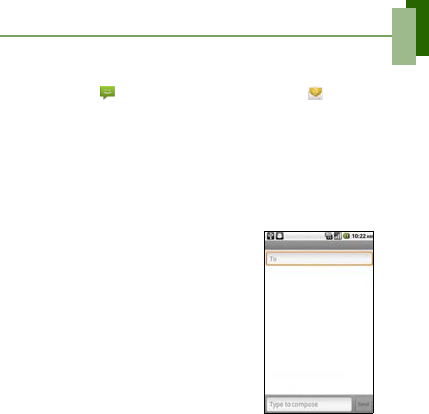
This device offers several ways to create and send a new text message.
)URP0HVVDJLQJVFUHHQ
1. Tap $SSOLFDWLRQ'UDZHU > 0HVVDJLQJ
2. Tap 1HZ PHVVDJH.
3. In the 7R field, enter the recipient’s phone number,
then tap 1H[W.
4. Type message in the 7\SHWRFRPSRVH field, then
tap 'RQH.
5. Tap 6HQG to send your message.
)URP&DOOORJ
1. Tap $SSOLFDWLRQ'UDZHU > &RQWDFWV.
2. Tap the Call log tab to view all call history.
3. Tap and hold a call from the Call log.
4. Tap 6HQGWH[WPHVVDJH.
5. Compose your message.
6. Tap 6HQG.
1RWH If you exit Messaging before sending, the
unsent message will be automatically saved as a draft.
Chapter 5: Email & Messaging
23
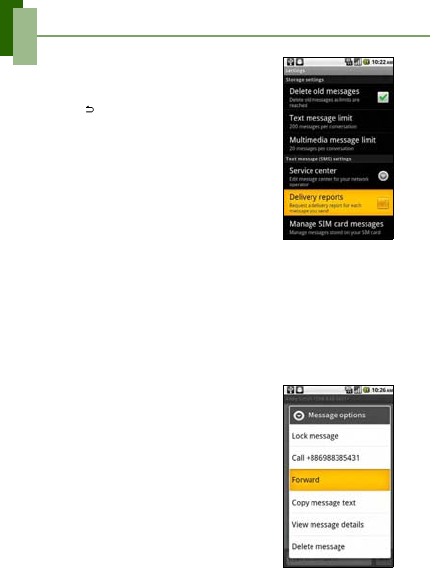
5HTXHVWPHVVDJHGHOLYHU\QRWLILFDWLRQ
1. In 0HVVDJLQJ, tap 0HQX > 6HWWLQJVto access SMS
and MMS settings.
2. Tap to check 'HOLYHU\UHSRUWVcheck box.
3. Tap to exit the menu.
5HFHLYLQJDQG0DQDJLQJ0HVVDJHV
When you send and receive messages from a contact, these messages are grouped
as a message thread. A message thread looks like an exchanged conversation.
5HSO\WRDWH[WPHVVDJH
1. Tap $SSOLFDWLRQ'UDZHU > 0HVVDJLQJ.
2. Tap a message thread to open it.
3. Tap 7\SHWRFRPSRVH to enter your message.
4. Tap 6HQG.
)RUZDUGDWH[WPHVVDJH
1. Tap $SSOLFDWLRQ'UDZHU > 0HVVDJLQJ.
2. Tap to view a message thread.
3. Tap and hold a message to display the message
options.
4. Tap )RUZDUG.
5. In the 7R field, enter the recipient’s phone number.
6. Tap 6HQG.

Chapter 5: Email & Messaging
24
'HOHWHDOOWH[WPHVVDJHV
You can delete all text threads in Messaging.
1. Tap $SSOLFDWLRQ'UDZHU > 0HVVDJLQJ.
2. Tap 0HQX > 'HOHWHWKUHDGV.
3. Tap 'HOHWH to confirm.
'HOHWHRQHPHVVDJHWKUHDG
1. Tap $SSOLFDWLRQ'UDZHU > 0HVVDJLQJ.
2. Tap and hold the message thread you want to
delete.
3. Tap 'HOHWH WKUHDG.
4. Tap 'HOHWH to confirm.
&RS\PHVVDJHWH[W
You can use this function to copy the text from a message to a new message you are
composing.
1. Tap $SSOLFDWLRQ'UDZHU > 0HVVDJLQJ.
2. Tap a message thread to open it.
3. Tap and hold the message to display the options.
4. Tap &RS\PHVVDJHWH[W.
5. Tap and hold 7\SHWRFRPSRVH.
6. Tap 3DVWH to paste the copied texts to your new
message.
Chapter 5: Email & Messaging
25
0XOWLPHGLD0HVVDJH
A Multimedia message or MMS can contain letters, an image, an audio or video file.
&UHDWLQJDQG6HQGLQJDQ0060HVVDJH
This device offers several ways to create and send an MMS message.
1. Tap $SSOLFDWLRQ'UDZHU > 0HVVDJLQJ.
2. Tap 1HZ 0HVVDJH.
3. Tap 0HQX > $GGVXEMHFW.
The message automatically converts to an MMS
message.
4. In the 7R field, enter the recipient’s phone number or
email address.
7,3To add recipients from Contacts, tap 7R and
enter at least two numbers of a contact number
or two characters of a contact name. Then the
corresponding contact will be listed for you to
select.
5. Enter a subject.
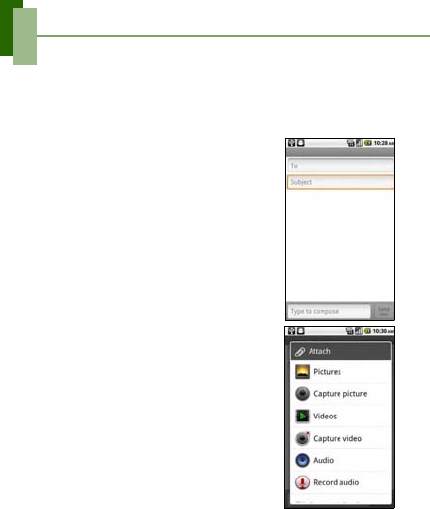
6. To insert a picture or video file, tap 0HQX > $WWDFK.
7. To insert text, tap 7\SH WR FRPSRVH, then enter
your message.
8. To insert an audio file, tap 0HQX > $WWDFK > $XGLR.
9. Tap 6HQG006.
)URPWKH&DOOORJ
1. Tap $SSOLFDWLRQ'UDZHU > &RQWDFWV>&DOOORJ.
2. Tap and hold a call from the Call log.
3. Tap 6HQGWH[WPHVVDJH.
4. Tap 0HQX > $GGVXEMHFWto convert to an MMS
message. To enter subject, tap 6XEMHFW.
5. To insert a picture or video file, tap 0HQX > $WWDFK.
6. To insert an audio file, tap 0HQX > $WWDFK > $XGLR.
7. To insert text, tap 7\SH WR &RPSRVH, then enter
your message using the on-screen keyboard.
8. Tap 6HQG006.
Chapter 5: Email & Messaging
26
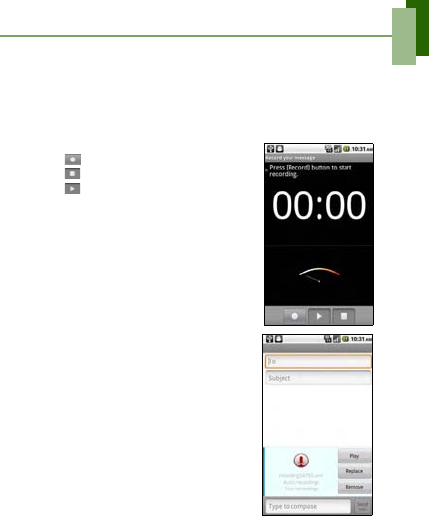
9RLFH0HVVDJH
This device supports sending of Voice message.
&UHDWHDYRLFHPHVVDJH
1. Tap $SSOLFDWLRQ'UDZHU > 0HVVDJLQJ.
2. Tap 1HZ 0HVVDJH.
3. Tap 0HQX > $WWDFK > 5HFRUGDXGLR.
4. Tap to record your message.
5. Tap to stop recording.
6. Tap to listen to your recording.
7. Tap 8VHWKLVUHFRUGLQJ to proceed or 'LVFDUG to
return to the compose message screen.
8. Tap 3OD\ to listen to your recording again, or tap
5HPRYH to delete your recording from the MMS
message.
9. Enter the recipient’s phone number in the 7R field.
10.Tap 7\SHWRFRPSRVH to enter your message, and
tap 6HQG006.
Chapter 5: Email & Messaging
27
(PDLO$FFRXQWV
This device can send and receive emails just as you do with a computer. This device
supports Internet email: email account provided by an Internet Service Provider (ISP)
or web-based email, such as Gmail, Hotmail, Yahoo! Mail, etc.
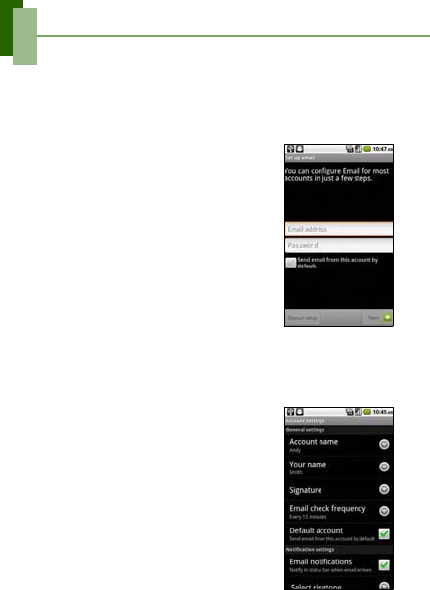
6HWWLQJ8SDQ,QWHUQHW(PDLO$FFRXQW
1. Tap $SSOLFDWLRQ'UDZHU > (PDLO.
2. Enter your (PDLODGGUHVV and 3DVVZRUG.
3. Tap 1H[W. The device will automatically retrieve the
email settings.
• To add another email account, tap 0HQX>
$FFRXQWV!0HQX!$GGDFFRXQW
4. Enter 1DPH and $FFRXQW GLVSOD\QDPH.
127( The $FFRXQWGLVSOD\QDPH is the name
shown on the Home screen and the Email
screen.
5. Tap 'RQH.
2SHQLQJ(PDLO
From the Application Drawer, tap (PDLO to view your
emails.
6HOHFWDQDFFRXQW
1. Tap $SSOLFDWLRQ'UDZHU > (PDLO.
The account picker screen lists the available email accounts.
2. Tap the account you want to access.
&RQILJXUHHPDLOVHWWLQJV
Configure message settings using the $FFRXQW
VHWWLQJV submenus.
1. On Your accounts screen, tap to select an email
account.
2. Tap 0HQX > $FFRXQWVHWWLQJV to open the email
setting submenus.

Chapter 5: Email & Messaging
28
8VLQJ(PDLO
&RPSRVLQJDQG6HQGLQJDQ(PDLO
1. Tap $SSOLFDWLRQ'UDZHU > (PDLO, then tap an email account.
2. Tap0HQX > &RPSRVH.
3. In the 7R field, enter the recipient’s email address.
4. To enter a subject, tab 6XEMHFW.
5. Compose your email.
6. Tap 6HQG.
6HQGDQ(PDLOIURP&RQWDFWV
You can send an email to a contact with an email
address stored in Contacts.
1. Tap $SSOLFDWLRQ'UDZHU > &RQWDFWV.
2. Tap a name to open contact.
3. Tap (PDLOKRPH.
4. Enter a subject and compose your email.
5. Tap 6HQG.
$GGDWWDFKPHQWVWRDQHPDLOPHVVDJH
1. Before sending your message, tap 0HQX > $GG
DWWDFKPHQW.
2. Select a folder and select the file you want to attach.
5HFHLYLQJ(PDLOV
Emails are automatically received in Inbox folder when the device connects to a
network.
0DQXDOO\UHFHLYHHPDLOV
1. Tap $SSOLFDWLRQ'UDZHU > (PDLO, then tap an email account.
2. Tap 0HQX > 5HIUHVK.
Chapter 5: Email & Messaging
29
5HDGLQJDQG5HSO\LQJWR(PDLOV
The Inbox displays the email headers. When you open the email, it shows only a part
of the message, unless it is a very short message. Download the email to view the
complete content.
'RZQORDGDWWDFKPHQWV
• With POP3 email accounts, attachments are downloaded when you download the
complete message.
• With IMAP4 email accounts, tap the attachment to mark it for download. The
attachment is downloaded the next time you connect to your email server.
127(Only supported file types can be opened on this device.
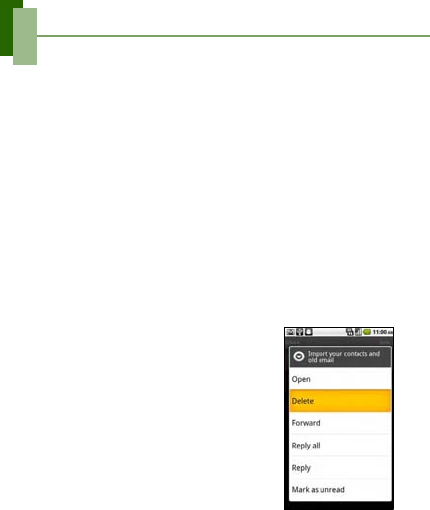
5HSO\RUIRUZDUGDQHPDLO
1. Open the message.
2. Do any of the following:
• Tap 5HSO\ or 5HSO\DOO to reply the email.
• Tap 0HQX > )RUZDUG. Then enter the recipient in the 7R field.
3. Compose your message.
4. Tap 6HQG.
0DQDJLQJ(PDLO)ROGHUV
'HOHWHDQHPDLO
1. Tap $SSOLFDWLRQ'UDZHU > (PDLO, then tap an email
account.
2. Tap ,QER[ to view the inbox messages.
3. Tap and hold the message.
4. Tap 'HOHWH.
7RPRYHEHWZHHQPHVVDJLQJDFFRXQWV
If you are viewing the messaging list screen of one account and you want to view the
list of another account, tap 0HQX > $FFRXQWV, then tap the account you want to view.
Chapter 5: Email & Messaging
30
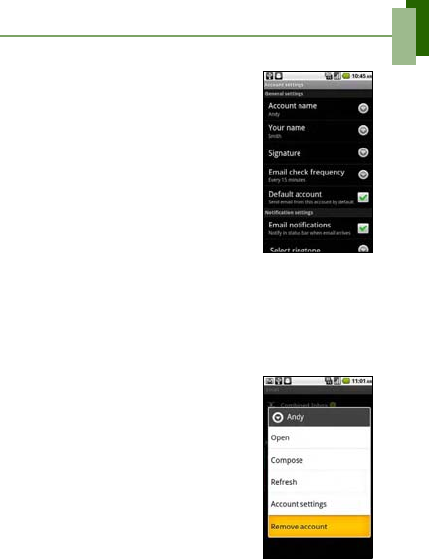
&XVWRPL]LQJ(PDLO6HWWLQJV
You can configure the general settings of your email
account such as account name, email checking
frequency, default account, notifications, and server
settings.
6HWXS\RXUDFFRXQWQDPH
1. Tap an email account.
2. Tap 0HQX > $FFRXQWVHWWLQJV to view the email
account settings.
3. Tap $FFRXQWQDPH to change the account name.
4. Tap 2. to confirm.
6HWXSWKHHPDLOFKHFNLQJIUHTXHQF\
1. Tap an email account.
2. Tap 0HQX > $FFRXQWVHWWLQJV to view the email
account settings.
3. Tap (PDLOFKHFNIUHTXHQF\.
You can set the device to automatically check for new email every 5 mins, every
10 mins, every 15 mins, every 30 mins, every hour, or never.
6HWXSGHIDXOWDFFRXQW
1. Tap an email account.
2. Tap 0HQX > $FFRXQWVHWWLQJV to view the email account settings.
3. Tap 'HIDXOWDFFRXQWto send email from this account by default.
'HOHWHDQHPDLODFFRXQW
1. Tap $SSOLFDWLRQ'UDZHU > (PDLO.
2. Tap and hold the account to delete.
3. Tap 5HPRYHDFFRXQW.
4. Tap 2. to confirm.
Chapter 6: Using Internet
31
Chapter 6: Using Internet
&RQQHFWLQJWR,QWHUQHW
This device connects to Internet via:
•Wi-Fi
• Cellular Data Networks
:L)L
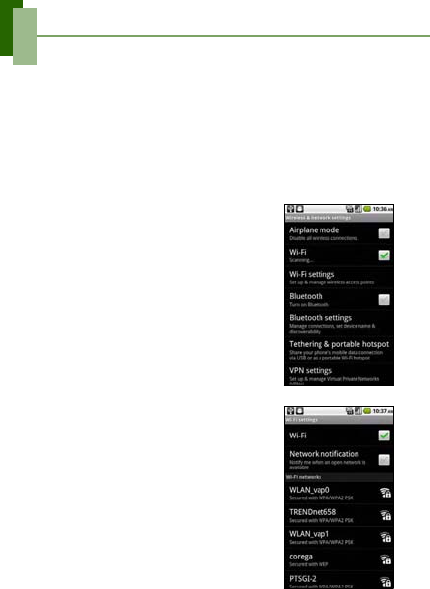
7XUQ:L)LRQRURII
1. Tap $SSOLFDWLRQ'UDZHU > 6HWWLQJV > :LUHOHVV
QHWZRUNV.
2. Tap to check the :L)L function and turn Wi-Fion or
off.
&RQQHFWWRD:L)LQHWZRUN
1. Turn Wi-Fi on.
2. Tap :L)LVHWWLQJV. The device scans for Wi-Fi
signals.
3. Detected networks are displayed below. Tap a
network connection then tap &RQQHFW.
4. If you select an unsecured network, the connection
is automatically established.
5. Otherwise, proceed to the next step.

Chapter 6: Using Internet
32
6. When connecting to a secured network, you will be
prompted for the password. Enter the password,
then tap &RQQHFW.
When Wi-Fi is connected, the connection icon is
displayed on the status bar.
$GG:L)LQHWZRUN
1. Tap $SSOLFDWLRQ'UDZHU > 6HWWLQJV >:LUHOHVV
QHWZRUNV.
2. Tap :L)LVHWWLQJV.
3. In Wi-Fi networks, tap $GG:L)LQHWZRUN. A new
window is displayed.
4. Follow the on-screen instructions and enter the
necessary information, then tap 6DYH to save the
settings.
Chapter 6: Using Internet
33
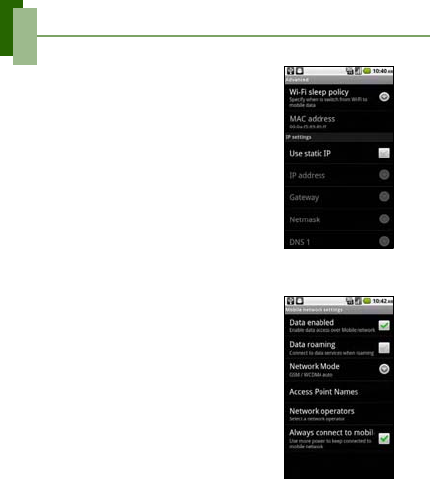
&RQILJXUH:L)LVHWWLQJV
1. Tap $SSOLFDWLRQ'UDZHU > 6HWWLQJV >:LUHOHVV
QHWZRUNV.
2. Tap :L)LVHWWLQJV > 0HQX > $GYDQFHG.
127(If you use static IP, enter the IP settings as
required.
3. Tap 8VHVWDWLF,3.
4. In IP settings, enter the IP address, gateway,
netmask, and DNS. Tap 2. to save your settings.
&HOOXODU'DWD1HWZRUN
Check the availability of these connections with your
network service provider and obtain the following
information:
• Access Point Names
•Proxy
•Port
•User name
• Password
Chapter 6: Using Internet
34
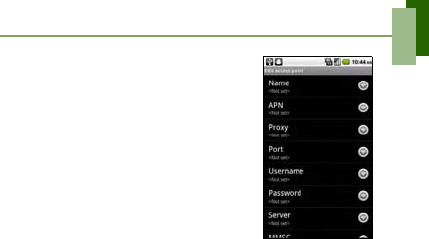
6HWXSZLUHOHVVGDWDFRQQHFWLRQ
1. Tap $SSOLFDWLRQ'UDZHU > 6HWWLQJV >:LUHOHVV
QHWZRUNV.
2. Tap 0RELOHQHWZRUNV >$FFHVV3RLQW1DPHV.
3. Tap 0HQX > 1HZ$31.
4. Tap 1DPH to enter a name for the connection, then
tap 2..
5. Enter the $31, then tap 2..
6. Enter the 3UR[\,3RUW,8VHUQDPH, and 3DVVZRUG (if
available) etc., then tap 2..
7. Tap 6DYH to store your settings or tap 'LVFDUG to
exit without saving the changes.
6WDUWLQJD'DWD&RQQHFWLRQ
Data connection is automatically activated when the device is turned on. If you set up
multiple data connections, select the connection you want to use manually.
0DQXDOO\VWDUWDGDWDFRQQHFWLRQ
1. Tap $SSOLFDWLRQ'UDZHU > 6HWWLQJV.
2. Tap :LUHOHVVQHWZRUNV>0RELOHQHWZRUNV >$FFHVV3RLQW1DPHV.
3. A list of connections will be displayed. Tap the connection you want to use.
Chapter 6: Using Internet
35
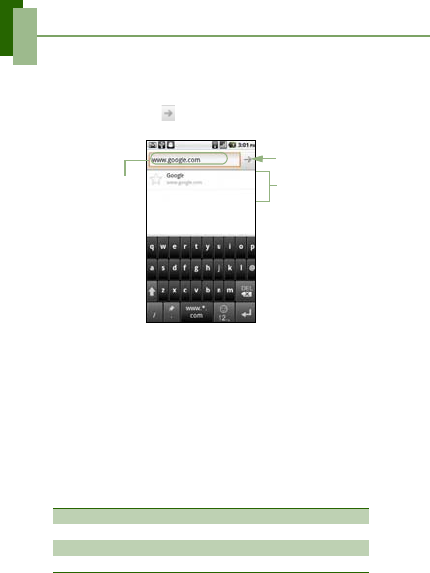
%URZVLQJD:HE3DJH
1. On the home screen, tap %URZVHU or tap $SSOLFDWLRQ'UDZHU > %URZVHU.
2. Tap the address bar.
3. Type the URL then tap .
7RVFUROOWKHSDJH
To scroll up or down, swipe your finger down or up. To scroll left or right, tap and
swipe your finger to the right or left.
7RVHWWKH+RPHSDJH
1. While viewing a web page, tap 0HQX > 0RUH > 6HWWLQJV > 6HWKRPHSDJH.
2. Enter the URL of the page that you want to set as home page.
3. Tap 2. to save your settings.
0DQDJLQJD:HE3DJH
While viewing a web page, tap 0HQXto change view settings or apply other functions.
The following table lists the Menu options. Depending on the function, some options
may be unavailable.
New window Open a web page in a new window.
Exit Close the Browser and return to Home screen.
Bookmarks Select from the list of saved favorite web pages to visit.
Windows Display a list of the current active Web pages.
Recently viewed
websites are
listed.
Address bar
Tap to enter the
website.
Chapter 6: Using Internet
36
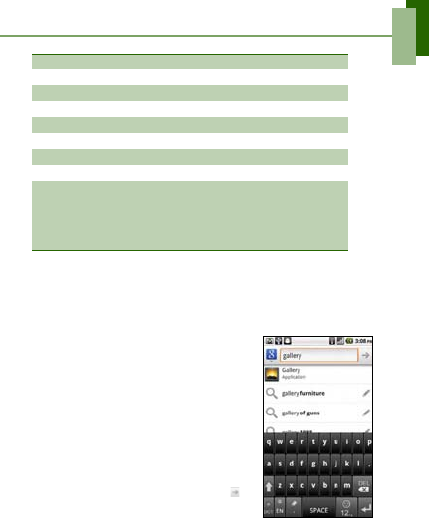
4XLFNVHDUFKRQ\RXUSKRQHDQGWKHZHE
From the Home Screen, you can search information on your phone and on the web
with *RRJOH6HDUFK.
7RVHDUFKLQIRUPDWLRQE\HQWHULQJWH[W
1. Tap $SSOLFDWLRQ'UDZHU > *RRJOH6HDUFK or tap
*RRJOH6HDUFK widget.
2. Enter the text you are searching in Quick Search
Box.
3. As you type, matching items on your phone and
suggestions from Google web search are added to
the list of previously chosen search results.
If what you are searching for is in the list of
suggestions, phone search results, or previously
chosen search results, tap it in the list.The item
opens in the appropriate application, such as
Contacts or the Browser.
4. If what you are searching is not in the list, tap in
the Quick Search Box. The Browser opens,
displaying results of a Google search on the web.
Refresh Reload the current Web page.
Forward Go to the next page.
Add a bookmark Allows you to save favorite Web pages.
Find on page Find the text on the web page.
Select text Select text on the web page.
Page info View web page information.
Share page Send this web page via email or messaging.
Downloads View the download history.
Settings Configure browser settings:
• Page content settings: configure page content settings.
• Privacy settings: configure privacy settings.
• Security settings: configure security settings.
• Advanced settings: set advanced settings for individual
websites or reset all settings to factory default.
Chapter 6: Using Internet
37
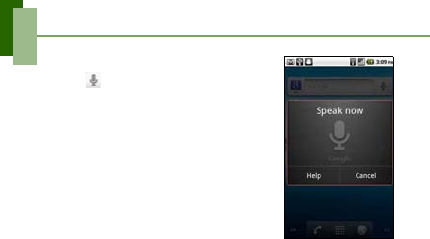
7RVHDUFKLQIRUPDWLRQE\VSHDNLQJ
1. Tap in the Quick Search Box.
2. A dialog opens, prompting you to speak the words
that you want to search for.
3. When you are finished speaking, 9RLFH6HDUFK
analyzes your speech and displays the results of
your search.
If 9RLFH6HDUFK misunderstood you, Quick Search
Box presents a list of similar-sounding search terms.
Chapter 7: Using Bluetooth
38
Chapter 7: Using Bluetooth
%OXHWRRWKPRGHV
•2Q Bluetooth is turned on. This device detects other Bluetooth devices, but this
device is not visible to others.
•'LVFRYHUDEOH Bluetooth is turned on and this device is visible to other Bluetooth
devices.
•2II Bluetooth is turned off.
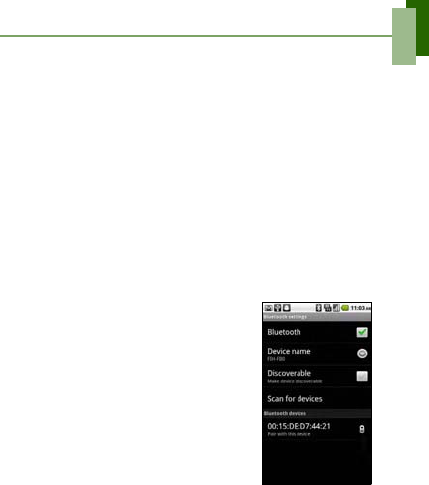
7RWXUQ%OXHWRRWKRQRURII
1. Tap $SSOLFDWLRQ'UDZHU >6HWWLQJV>:LUHOHVVQHWZRUNV.
2. Tap to check %OXHWRRWK and activate.
3. To make your phone visible to others, tap %OXHWRRWKVHWWLQJV and check
'LVFRYHUDEOH to make this phone visible to other devices.
&RQQHFWLQJWR%OXHWRRWK'HYLFHV
A connection to a Bluetooth device is called a partnership. You need to pair and
create a partnership with a Bluetooth device to exchange information.
1. Tap $SSOLFDWLRQ'UDZHU > 6HWWLQJV > :LUHOHVV
QHWZRUNV.
2. Tap %OXHWRRWKVHWWLQJV to view the menu options.
3. To search for a new device, tap 6FDQIRUGHYLFHV.
4. Tap the device to connect.
5. Enter the 3,1 to start pairing, then tap 2..
127( PIN of the device must be the same PIN on
the other Bluetooth pairing device.
6. If you connect with an audio device which only
supports HSP/HFP, "&RQQHFWHGWRSKRQHDXGLR"
will be displayed on the screen.
7. If you connect with audio device which supports
HSP/HFP/A2DP, "&RQQHFWHGWRSKRQHDQGPHGLD
DXGLR" will be displayed on the screen.
127( Tap and hold the selected device to enter
device options menu.
127( Once a partnership has been created, connecting to that device again will
no longer require entering the passcode.
Chapter 8: Multimedia Applications
39
Chapter 8: Multimedia
Applications
9LGHRVDQG3KRWRV
This device is equipped with a 5.0 megapixels camera to take videos and photos.
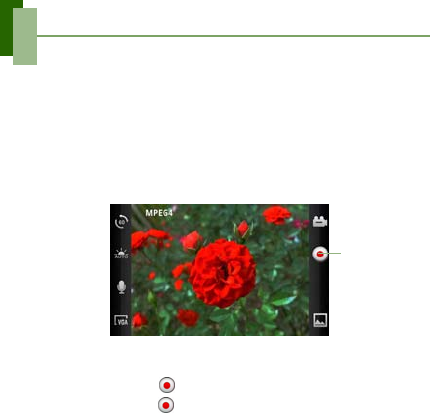
5HFRUGLQJ9LGHR
1. Tap $SSOLFDWLRQ'UDZHU > &DPFRUGHU.
2. Aim the device at the subject.
3. To start recording, tap .
To stop recording, tap again.
Tap to record
video.
Chapter 8: Multimedia Applications
40
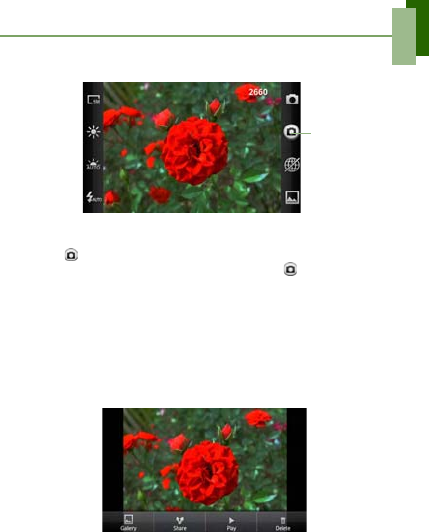
7DNLQJD3KRWR
1. Tap $SSOLFDWLRQ'UDZHU > &DPHUD.
2. Aim the device at the subject.
3. Tap to take the shot.
To focus on the image before taking the shot, tap and hold . The focus frame
turns red to indicate that the focus is set.
5HYLHZLQJD9LGHR
After recording a video, the video preview appears on of the screen.
• Tap *DOOHU\ to view all files saved in the gallery.
• Tap 6KDUH to share the video via Messaging, YouTube, Bluetooth, Email, or
Gmail.
• Tap 3OD\ to playback the video clip.
• Tap 'HOHWH to delete the video.
Tap to take a
photo.
Chapter 8: Multimedia Applications
41
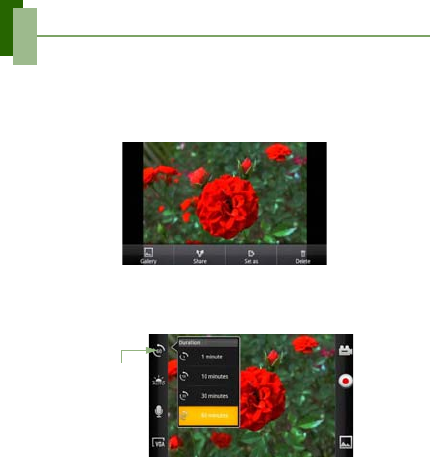
5HYLHZLQJD3KRWR
After taking a photo, the photo preview appears on the screen.
• Tap *DOOHU\ to view the files saved in the gallery.
• Tap 6KDUH to share the picture via Messaging, Picasa, Bluetooth, Email, or Gmail.
• Tap 6HWDV to set the current picture as Contact icon or Wallpaper.
• Tap 'HOHWH to delete the picture.
&RQILJXULQJ&DPHUD6HWWLQJV
Tap the icon (on the left/right side of the screen) to access the respective camera/
camcorder menu. Swipe your finger up and down to scroll the page for more options.
Tap an option to
configure camera
settings.

Chapter 8: Multimedia Applications
42
Tap to view and adjust the general settings of your camera:
0RGH 6HWWLQJ $YDLODEOHRSWLRQV
Video mode
Duration 1 minute, 10 minutes, 30 minutes, 60 minutes
White balance Auto, Sunny, Cloudy, Incandescent,
Fluorescent
Audio On, Mute
Quality MMS(250K), 640 x 320, 720 x 480, 800 x 480,
1280 x 720
Capturing Normal, Tap capture, Face capture, Smile
capture, Self timer, Panorama, Camcorder
Photo mode
Resolution Maximum, Large, Medium, Small
Brightness -2, -1, 0, 1, 2
White Balance Auto, Sunny, Cloudy, Incandescent,
Fluorescent
Flash Auto, On, Off
Capturing Normal, Tap capture, Face capture, Smile
capture, Self timer, Panorama, Camcorder
Geo-tag On, Off
Chapter 8: Multimedia Applications
43
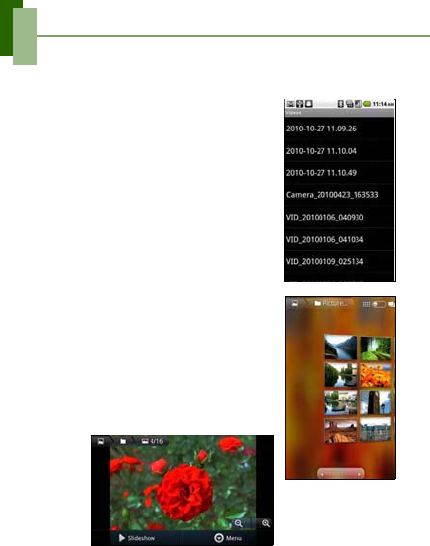
9LHZLQJ9LGHRV3KRWRV
3OD\EDFN9LGHRVLQWKH$OEXP
1. Tap $SSOLFDWLRQ'UDZHU > 9LGHRV. All saved video
clips are displayed.
2. Tap the video to playback.
9LHZ3KRWRVLQWKH$OEXP
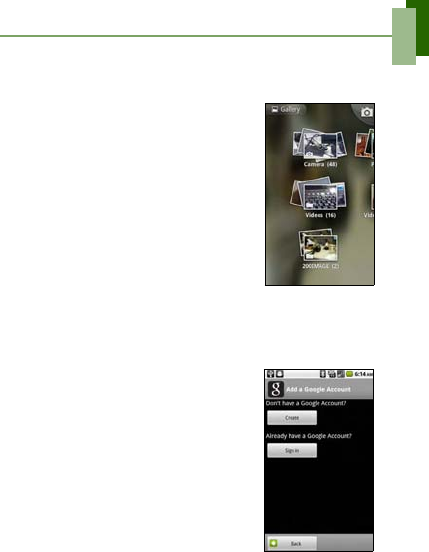
1. Tap $SSOLFDWLRQ'UDZHU > *DOOHU\
2. Tap the desired folder to view the images in
thumbnails.
3. Tap an image to view.
4. Swipe your finger to the left/right to view the
previous/next image.
To play the slideshow, tap 6OLGHVKRZ.
To share, delete or edit the image, tap 0HQX to show more options.
Chapter 8: Multimedia Applications
44
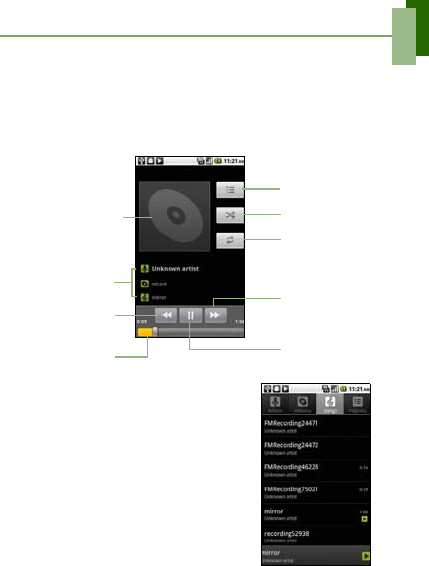
8VLQJ0XVLF3OD\HU
You can transfer your music to this device from the computer.
Tap $SSOLFDWLRQ'UDZHU > 0XVLF.
0XVLF6FUHHQ
•3OD\EDFNVFUHHQ Displays the playback area with the playback controls.
•/LEUDU\VFUHHQ Displays folder categories which
makes searching for media files quick and easy. It
contains the following categories: $UWLVWV$OEXPV
6RQJVand3OD\OLVWV.
Album art
picture or
animation
Audio information
display area.
Tap to go to Now
Playing screen.
Tap to enable or disable
the repeat function.
Tap to go to the next
song.
Slide to go forward
or backward.
Tap to go to the
previous song.
Tap to shuffle.
Tap to play or pause the
song.
Chapter 8: Multimedia Applications
45
•1RZ3OD\LQJVFUHHQ: Displays the list of songs
currently playing and those on queue for playback.
Drag the icon on the left of each media file to
arrange playback sequence.
3OD\LQJ0XVLF
7RSOD\PXVLF
1. Tap $SSOLFDWLRQ'UDZHU > 0XVLF.
Library screen is displayed.
2. Tap 6RQJV, and all songs on the device are
displayed.
3. Tap to select the song, then the music playback
automatically starts.
&KDQJLQJ3OD\EDFN2SWLRQV
While in the Playback screen, tap 0HQX.
• Tap /LEUDU\ to go to the Music Library screen.
• Tap 3DUW\ VKXIIOH to play all songs in shuffle order.
• Tap $GGWRSOD\OLVW to add the song to a preferred playlist.
• Tap 8VHDVULQJWRQH to set this song as your ringtone.
• Tap 'HOHWH to delete this song.
Chapter 8: Multimedia Applications
46
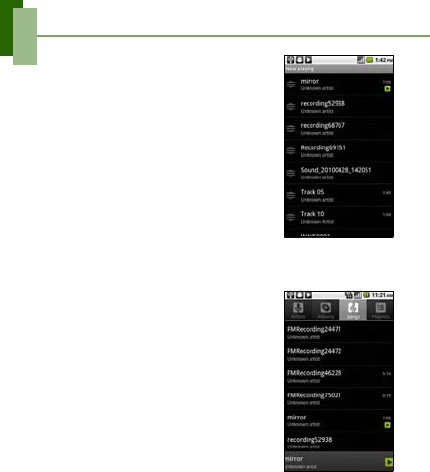
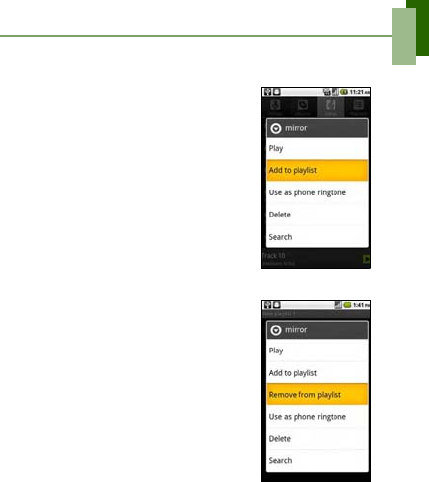
&UHDWLQJD3OD\OLVW
Add songs to a specific playlist or create a playlist.
1. Tap $SSOLFDWLRQ'UDZHU > 0XVLF.
The Library screen is displayed.
2. Tap and hold the song you want to add.
3. Tap $GGWRSOD\OLVW.
4. Select from the current playlist or tap 1HZ to create
a new playlist. The song is added to the playlist.
7RUHPRYHDPXVLFILOHIURPSOD\OLVW
1. Tap $SSOLFDWLRQ'UDZHU > 0XVLF.
The Library screen is displayed.
2. Tap 3OD\OLVWV and select the desired playlist.
3. Tap and hold the song you want to delete.
4. Tap 5HPRYHIURPSOD\OLVW.
5. The song is removed from the playlist.
Chapter 9: Programs
47
Chapter 9: Programs
This device comes with the following pre-installed programs.
3URJUDPV 'HVFULSWLRQ
%URZVHU Browse the web and download files from Internet.
&DOFXODWRU Perform basic arithmetic functions, such as addition,
subtraction, multiplication, and division.
&DOHQGDU Create and track schedule or appointments.
&DPFRUGHU Record video clips.
&DPHUD Capture still images and record videos.
&ORFN Set up alarm clock.
&RQWDFWV Stores names, numbers, e-mail and other information.
'RFXPHQWV7R*R Uses Document To Go applications such as Word To Go,
Sheet To Go, Slideshow To Go, and PDF To Go Lite.
(PDLO Send and receive e-mail messages.
)DFHERRN Logs in and uses facebook applications on your device.
)LOH%URZVHU Manage audio, video, and picture files.
)05DGLR Connect the earphones and tune in to the FM radio.
*DOOHU\ View and edit photos and videos.
*PDLO Google’s web-based email service.
*RRJOH6HDUFK Search applications and contacts on your device, and the
Internet using Google Search.
Chapter 9: Programs
48
/DWLWXGH See your friends’ locations and share yours with them. You
need to sign in with your Google account to use this feature.
0DSV Google’s mapping service to search for places of interest.
0DUNHW Find applications and fun games which you can download
and install on your device.
0HVVDJLQJ Sends and receives all types of messages, such as text
message, MMS, and voice messages.
0XVLF Play and manage the music and audio files on your phone.
1DYLJDWLRQ Use to track your location, find places, and get driving
directions.
1HZVDQG:HDWKHU View the current weather as well as the weather forecast on
the selected city, and read the latest news.
1RWH3DG Creates notes..
3KRQH Make and receive phone calls.
3ODFHV Help you to find the places around you. Local information
available includes restaurants, coffee shops, bars, hotels,
attractions, ATMs, gas stations, and more.
5665HDGHU Gets live update of your favorite news or web sites.
6HWWLQJV Configure the device settings, wireless settings and call
settings of this device.
6,07RRONLW Directly connect to and use services provided by your mobile
service provider.
7DON Google’s instant messaging program.
9LGHR3RUWDO Play back the video clips from your device or YouTube.
9LGHRV Play back the video clips.
9RLFH'LDOHU Read and record predefined texts to be recognized and used
by this device for voice dialing, finding a contact and others.
9RLFH1RWH Record voice notes.
3URJUDPV 'HVFULSWLRQ

Chapter 9: Programs
49
%URZVHU
Open the %URZVHU to view web pages. See “Connecting to Internet” on page 31.
&DOFXODWRU
With &DOFXODWRU, you can perform basic arithmetic functions on this device.
Tap $SSOLFDWLRQ'UDZHU > &DOFXODWRU.
&DOHQGDU
The &DOHQGDU lets you schedule and sound alarms for appointments, meetings and
other events. Scheduled appointments for the day can be displayed on the Home
screen.
7RVFKHGXOHDQHYHQW
1. Tap $SSOLFDWLRQ'UDZHU > &DOHQGDU.
2. Tap 0HQX > 0RUH > 1HZHYHQW.
3. Enter the event details.
4. Select the dates for )URP and 7R fields.
127(For an all-day event, check All Day.
5. To set repetition, select the repetition from the list.
6. To set a reminder, select the reminder time from the
list.
7. When finished, tap 'RQH to return to the calendar.
TIP: From the Calendar screen, tap a day or a time
slot then tap 1HZHYHQW to set a new
appointment on the tapped date or time.
&DPFRUGHU
Record video clips with this device. See “Videos and Photos” on page 39.
9RLFH6HDUFK Speak out the item to search for applications and contacts
on your device, or search the Internet using Google Search.
<RX7XEH Online video streaming service that allows you to view,
search, and upload videos.
3URJUDPV 'HVFULSWLRQ
Chapter 9: Programs
50
&DPHUD
Capture images with this device. See “Videos and Photos” on page 39.
&ORFN
Set alarm clock with this device. See “Setting Alarms” on page 70.
&RQWDFWV
View or manage your contact list. See “Contacts” on page 15.
'RFXPHQWV7R*R
'RFXPHQWV7R*R allows you to open Microsoft®
Office and Adobe file formats.
:RUG7R*R9LHZHU
:RUG7R* R9LHZHU allows you to view Microsoft®
Word documents (.doc and .docx). It supports
embedded pictures, font color, bold, italics, underline,
bulleted, numbered list and more.
To open :RUG7R*R9LHZHU
1. Tap $SSOLFDWLRQGUDZHU > 'RFXPHQWV7R*R>
:RUG7R* R 9LHZHU.
2. Tap 2SHQ)LOH.
3. Tap the file you want to open.
• Swipe your finger on the screen to pan or go
through other pages.
4. To close the file, tap .
127(To create a new document or edit an existing document, purchase the full
version of 'RFXPHQWV7R*R.
6KHHW7R*R9LHZHU
6KHHW7R*R9LHZHU allows you to view Microsoft® Excel spreadsheets (.xls and
.xlsx). It supports cell and number formatting, row and column alignment, formulas,
and fast finger-friendly panning.
To open 6KHHW7R*R9LHZHU
1. Tap $SSOLFDWLRQGUDZHU > 'RFXPHQWV7R*R>6KHHW7R*R 9LHZHU.
2. Tap 2SHQ)LOH.
3. Tap the file you want to open.

Chapter 9: Programs
51
• Swipe your finger on screen to pan through the sheet.
• To view other worksheets on file, tap 0HQX > 9LHZ > :RUNVKHHWV, then tap
the worksheet name you want to view.
4. To close the file, tap .
127(To create a new spreadsheet or edit an existing spreadsheet, purchase the full
version of 'RFXPHQWV7R*R.
6OLGHVKRZ7R*R9LHZHU
6OLGHVKRZ7R*R9LHZHU allows you to view Microsoft® PowerPoint presentations
(.ppt and .pptx). It supports slide view, outline view, speaker notes, images, charts,
font formatting, and effortless slide “flick” navigation.
To open 6OLGHVKRZ7R*R9LHZHU
1. Tap $SSOLFDWLRQGUDZHU > 'RFXPHQWV7R*R>6OLGHVKRZ7R*R 9LHZHU.
2. Tap 2SHQ)LOH.
3. Tap the file you want to open.
4. To close the file, tap .
127(To create a new presentation or edit an existing presentation, purchase the full
version of'RFXPHQWV7R*R
3')7R*R/LWH
3')7R*R/LWH allows you to view Adobe® PDF files (.pdf). It supports page view,
word wrap, multiple zoom levels, auto-rotate, embedded images, and more.
To open 3')7R*R/LWH
1. Tap $SSOLFDWLRQGUDZHU > 'RFXPHQWV7R*R>3')7R*R /LWH.
2. Tap 2SHQ)LOH.
3. Tap the file you want to open.
• Tap the screen to bring up the zoom controls.
• Swipe your finger up or down to view the next or previous page.
4. To close the file, tap .
3XUFKDVH'RFXPHQWV7R*R
To get the full version of Documents To Go:
1. Tap the lock tab .
2. Tap %X\. Browser is launched and you will be redirected to www.dataviz.com.
3. Follow the on-screen instructions to complete purchase.
(PDLO
Use (PDLO to connect to your remote mailbox to retrieve your new e-mail messages,
or view your previously retrieved e-mail messages offline. See “Using Email” on
page 28.
Chapter 9: Programs
52
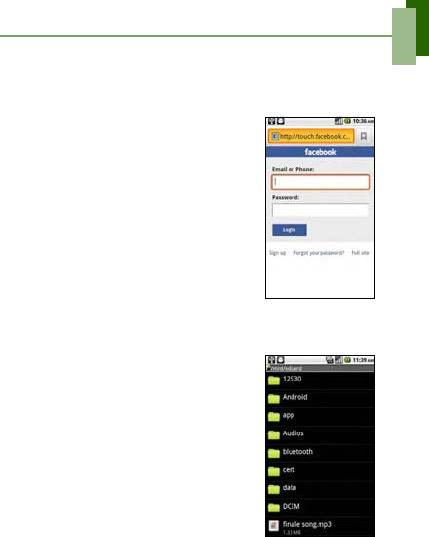
)DFHERRN
Facebook lets you connect to your Facebook account with a single tap. You can log in
to your Facebook account and get connected with your friends anytime.
/RJLQWR)DFHERRN
1. Tap $SSOLFDWLRQ'UDZHU > )DFHERRN.
2. Enter your username and password.
3. Tap /RJLQ.
127(If you do not have a Facebook account, tap
6LJQXS
8VLQJ)DFHERRN
•1HZVIHHG: Tap to view news feeds page.
•(YHQWV: Tap to view upcoming events.
•5HTXHVWV: Tap to view and accept invitations.
•3URILOH: Tap to view your profile.
•)ULHQGV: Tap to view and search for friends.
•,QER[: Tap to read and send messages.
)LOH%URZVHU
)LOH([SORUHU lets you browse the contents of your phone.
1. Tap $SSOLFDWLRQ'UDZHU > )LOH%URZVHU.
2. Tap the folder list and tap the folder you want to
explore.
0DQDJLQJ)LOHVDQG)ROGHUV
• To open an item, tap it.
• To move, copy, delete, rename, or set the picture as
Contact icon or Wallpaper, tap and hold the item
then tap the option.
• To paste an item, tap 0HQX > 3DVWH.
• To sort items, tap 0HQX > 6RUW, then select an option.
• To search for a file, tap 0HQX > 0RUH > 6HDUFK.
Chapter 9: Programs
53
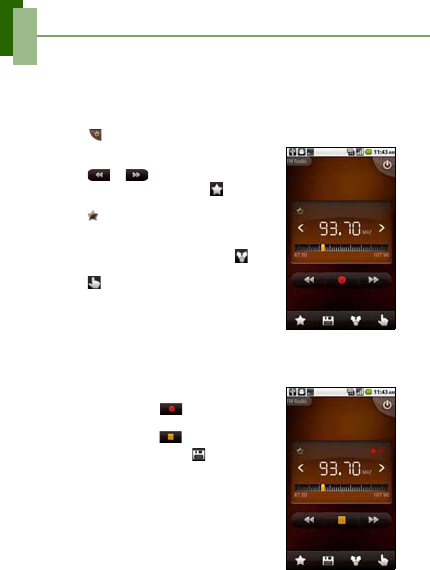
)05DGLR
)05DGLR lets you listen to the FM radio with your phone when the headset is
plugged.
127(You must connect the supplied headset to use the FM Radio.
1. Tap $SSOLFDWLRQ'UDZHU > )05DGLR.
2. Tap to turn on the radio.
3. Do any of the following:
• To select the radio station to listen to: Tap
or .
• To view the Favorite List: Tap . To add the
current radio station into the Favorite list, tap
, and then enter the station name and tap
2..
• To share the radio station information via
Bluetooth, Gmail or Messaging: Tap .
• To set the desired radio station frequency: Tap
. Enter the radio frequency and tap 2..
• To turn on the speaker: Tap 0HQX > 6SHDNHU.
• To mute the sound: Tap 0HQX > 0XWH.
• To change the other radio settings: Tap 0HQX
>6HWWLQJV.
5HFRUGLQJWKH5DGLR
• To start recording, tap while listening to the
radio.
• To stop recording, tap .
• To view the recorded files, tap . Tap the file to
playback.
Chapter 9: Programs
54
*DOOHU\
You can view your captured images, recorded video clips, and downloaded images in
the *DOOHU\.
1. Tap $SSOLFDWLRQ'UDZHU > *DOOHU\.
2. Tap the desired folder to view the camera pictures
or camera videos.
The images or videos are displayed in thumbnails.
3. To view photos or videos, see “Viewing Videos &
Photos” on page 43.
*PDLO
*PDLO is Google's web-based email service. Google Mail is configured when you first
set up this device. Depending on your synchronization settings, Google Mail on this
device is automatically synchronized with your Google Mail account on the web.
1. Tap $SSOLFDWLRQ'UDZHU > *PDLO.
2. Tap &UHDWH or 6LJQLQ your Google account.
3. Follow the on screen instructions to login or create
your Gmail username and password.
4. Once logged in, you can begin reading and sending
emails from your Gmail account.
Chapter 9: Programs
55
*RRJOH6HDUFK
Search information on your phone and on the web with *RRJOH6HDUFK. See “Quick
search on your phone and the web” on page 36.
/DWLWXGH
/DWLWXGH allows you to keep track of your friends’ location and share your location to
them.
-RLQLQJ/DWLWXGHIRUWKH)LUVW7LPH
1. Tap $SSOLFDWLRQ'UDZHU > /DWLWXGH.
2. Tap 0HQX > -RLQ/DWLWXGH.
3. Tap $OORZ6KDUH to share your location with
friends and accept Google Latitude’s Terms and
Service.
6HW+LGH<RXU/RFDWLRQ
1. Tap $SSOLFDWLRQ'UDZHU > /DWLWXGH.
2. Tap a friend.
3. Tap (GLWSULYDF\VHWWLQJV and tap one of the
following:
•'HWHFW\RXUORFDWLRQ: Select to automatically
update your location.
•6HW\RXUORFDWLRQ: Select to manually set your
location on the map.
•+LGH\RXUORFDWLRQ: Select to hide your
location from your friends.
•7XUQRII/DWLWXGH: Tap to sign out from
Latitude.
Chapter 9: Programs
56
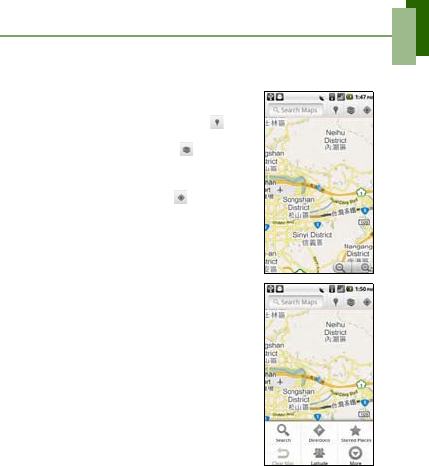
0DSV
0DSV is Google's mapping service to search for places of interest.
1. Tap $SSOLFDWLRQ'UDZHU > 0DSV.
2. Do any of the following:
• To select a nearby attractions: Tap then
tap the desired category.
• To select a Map mode: Tap then tap
7UDIILF,6DWHOOLWH,7HUUDLQ,%X]],/DWLWXGH
5HVWDXUDQWV0\0DSV:LNLSHGLD7UDQVLW
/LQHVRU)DYRULWH3ODFHV.
• To find your location: Tap .
• To search for a place of interest: Tap 0HQX >
6HDUFK then type in a keyword to begin search.
• To get direction: Tap 0HQX > 'LUHFWLRQV.
• To view the starred places: Tap 0HQX >
6WDUUHG3ODFHV.
• To clear the map: Tap 0HQX > &OHDU0DS.
• Tap 0HQX > /DWLWXGH to share your location
with friends.
• To enable or disable a lab: Tap 0HQX > 0RUH >
/DEV.
• To get help on the map: Tap 0HQX > 0RUH >
+HOS.
• To view terms, privacy, and notices: Tap 0HQX
>0RUH > 7HUPV3ULYDF\1RWLFHV.
• To view information about Google Map: Tap
0HQX > 0RUH > $ERXW.

Chapter 9: Programs
57
0DUNHW
Android 0DUNHW allows you to find and download applications and fun games to this
device.
1. Tap $SSOLFDWLRQ'UDZHU > 0DUNHW.
2. Tap $FFHSW after reading the terms of services.
3. Tap 1H[W to setup your Google account.
4. Tap &UHDWH to create a new account or 6LJQLQ to
sign in your existing account.
5. Once you are signed in, you can begin searching
and downloading programs from the market.
• Tap $SSV to view the list of applications avail-
able.
• Tap *DPHV to view the list of games available.
• Tap 'RZQORDGV to view the programs you have
previously downloaded.
127($QGURLG0DUNHWmay not be supported in some
countries.
0HVVDJLQJ
Use the Messaging to send or receive text and MMS messages. See “Text Message”
on page 22.
0XVLF
Use the Music player to play music files or recorded voice files. See “Using Music
Player” on page 44.
Chapter 9: Programs
58
1DYLJDWLRQ
1DYLJDWLRQ is a pre-loaded GPS and map system that helps you to locate your
location and provide a real time turn by turn direction to your chosen destination.
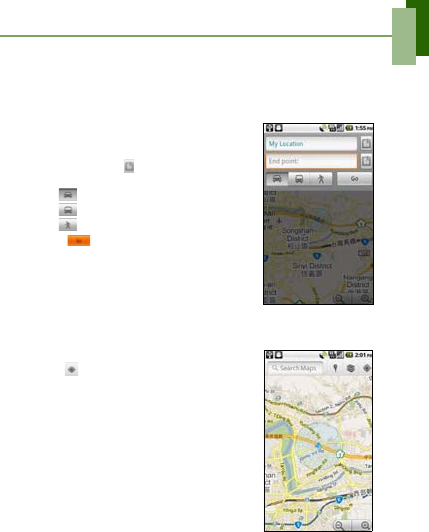
*HWWLQJ'LUHFWLRQV
1. Tap $SSOLFDWLRQ'UDZHU > 1DYLJDWLRQ.
2. Tap 0HQX > 'LUHFWLRQV.
3. Enter the starting point and the ending point, or tap
the corresponding and select an option.
4. Select a direction icon.
• : Driving directions
• : Transit directions
• : Walking directions
5. Tap to view the directions.
6. Tap 0HQX to do any of the following:
•6HHPDS: Tap to view the directions on the map.
•5HYHUVH: Tap to reverse the directions.
•8SGDWHURXWH: Tap to update the route.
)LQGLQJ<RXU/RFDWLRQ
1. Tap $SSOLFDWLRQ'UDZHU > 1DYLJDWLRQ.
2. Tap to view your location on the map.
3. A blue blinking arrow indicates your current location
on the map.
Chapter 9: Programs
59
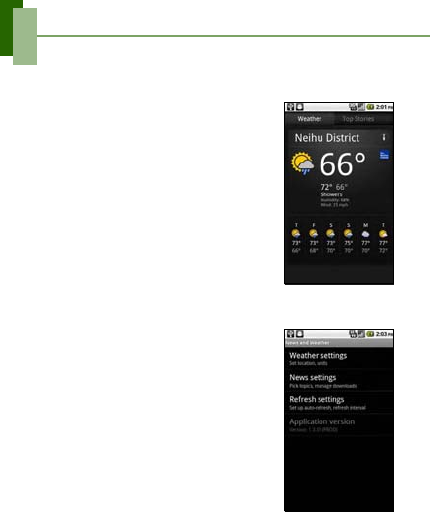
1HZVDQG:HDWKHU
1HZVDQG:HDWKHU allows you to view the weather in your location and read the
latest stories, sports, and entertainment news headlines on your device.
1. Tap $SSOLFDWLRQ'UDZHU > 1HZVDQG:HDWKHU.
2. Swipe your finger to the right or left to browse the
categories.
3. Touch a headline to open Browser and view the
complete story.
&KDQJLQJ1HZVDQG:HDWKHUVHWWLQJV
1. Tap $SSOLFDWLRQ'UDZHU > 1HZVDQG:HDWKHU.
2. Tap 0HQX > 6HWWLQJV.
3. Select one of the following options:
•:HDWKHUVHWWLQJV: Tap to set the location and
the temperature scale to use.
•1HZVVHWWLQJV: Tap to pick topics and manage
the download.
•5HIUHVKVHWWLQJV: Tap to set up automatic
update and refresh interval.
Chapter 9: Programs
60
1RWH3DG
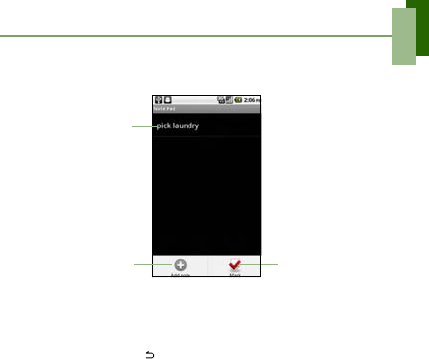
Use the Note Pad to write down notes as you would on a note pad.
7RFUHDWHDQRWH
1. Tap $SSOLFDWLRQGUDZHU > 1RWH3DG.
2. Tap 0HQX > $GGQRWH.
3. Enter your notes using the on-screen keyboard.
4. Tap 0HQX > (GLW WLWOH to add a title to the note.
5. When you are done, tap to return to the Note pad screen. The note is
automatically saved.
3KRQH
Use 3KRQH to make phone calls or manage contact list. See “Making a Call” on
page 18.
Saved notes are
displayed here.
Tap to add a new note. Tap to mark the note.
Chapter 9: Programs
61
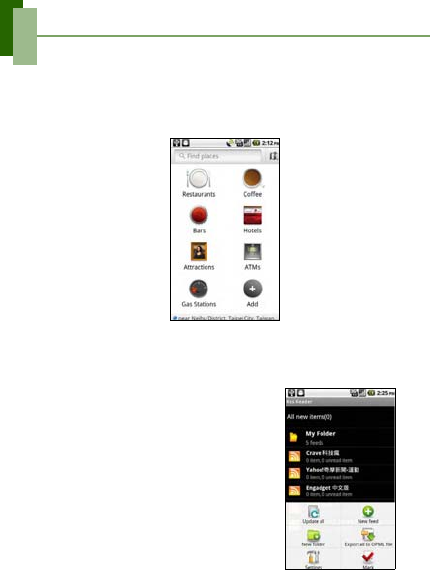
3ODFHV
3ODFHVis a location based application that helps you find the places and things
around you. Local information available includes restaurants, coffee shops, bars,
hotels, attractions, ATMs, gas stations, and more. This application also helps you get
where you are going with maps and directions.
Tap $SSOLFDWLRQ'UDZHU > 3ODFHV.
5665HDGHU
Use the Rss Reader to get live update of your favorite web sites.
$GGDQHZ5VV)HHG
1. Tap$SSOLFDWLRQ'UDZHU>5VV5HDGHU.
2. Tap 0HQX > 1HZIHHG.
3. Tap an import option:
•,PSRUWIURP230/ILOH: Select a file from the
SD card.
•,PSRUW230/IURP,QWHUQHW: Enter the URL to
import OPML from.
•0DQXDO$GG: Manually enter a URL.
4. Tap 2. to confirm.
8SGDWH5VV)HHG
1. Tap $SSOLFDWLRQ'UDZHU > 5VV5HDGHU.
2. Tap 0HQX > 8SGDWHDOO to update the RSS feeds.
New feeds are displayed in RSS feed inbox.
Chapter 9: Programs
62
6HWWLQJV
In the 6HWWLQJV menu, you can view and make adjustments for wireless & network
settings, call settings, phone general settings and security settings. See “Device
Settings” on page 66.
6,07RRONLW
Directly connect to and use services provided by your mobile service provider.
Tap $SSOLFDWLRQ'UDZHU > 6,07RRONLW.
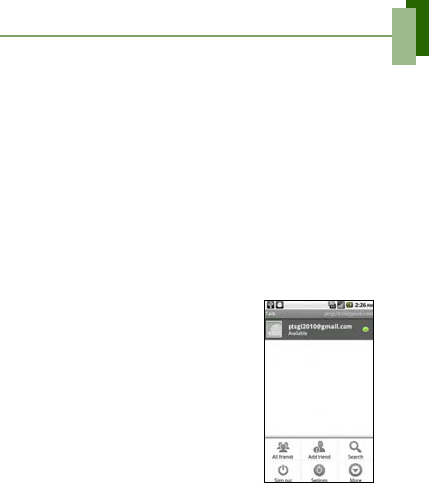
7DON
7DON is Google's instant messaging program.
7RVLJQLQWR*RRJOH7DON
1. Tap $SSOLFDWLRQ'UDZHU > 7DON.
2. Tap &UHDWH or 6LJQLQ your Google account.
3. Follow the on screen instructions to login or create your Gmail username and
password.
4. Once logged in, you can begin using Google Talk
and do any of the following:
• View friend’s list: Tap 0HQX > $OOIULHQGV.
• Add friends to friend’s list: Tap 0HQX > $GG
IULHQGV.
• To search a person: Tap 0HQX > 6HDUFK.
• To sign out: Tap 0HQX > 6LJQRXW.
• To configure Google Talk settings: Tap 0HQX
>6HWWLQJV.
• To block a person: Tap 0HQX > 0RUH >
%ORFNHG.
• To invite a person to your chat: Tap 0HQX >
0RUH > ,QYLWHV.
• To close all chats: Tap 0HQX > 0RUH>&ORVH
DOOFKDWV.
Chapter 9: Programs
63
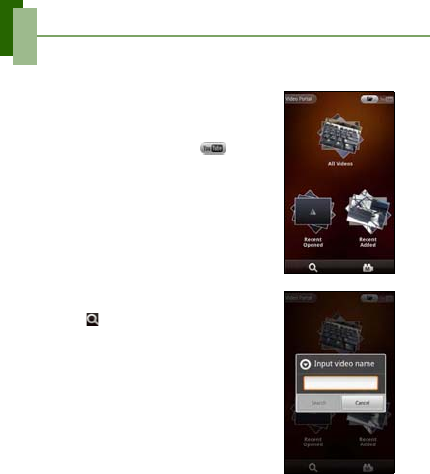
9LGHR3RUWDO
You can view and play back the video clips from your device or YouTube.
1. Tap $SSOLFDWLRQ'UDZHU > 9LGHR3RUWDO.
2. Videos are grouped into categories, such as All
Videos, Recent Opened, and Recent Added. Tap a
category to see the available videos for that
category.
To view videos on YouTube, tap on the top
right of the screen. YouTube videos are grouped
into categories, such as Most Viewed, Most
Discussed, Most Recent, and Top Rated. Tap a
category to see the available videos for that
category.
3. Tap a video to play it.
6HDUFKDYLGHRILOH
1. Tap $SSOLFDWLRQ'UDZHU > 9LGHR3RUWDO.
2. Tap .
3. Enter the video name and tap 6HDUFK.
9LGHRV
You can playback the video clips captured with this device. See “Videos and Photos”
on page 39.
Chapter 9: Programs
64
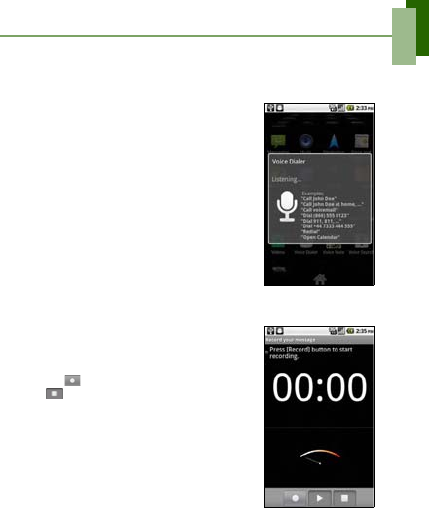
9RLFH'LDOHU
Read and record predefined texts to be recognized and used by this device for voice
dialing, finding a contact and others.
1. Tap $SSOLFDWLRQ'UDZHU > 9RLFH'LDOHU.
2. When the application prompts you to speak an
available command from the menu, say the
command in normal conversation tone and speed.
3. If the application recognizes the command you said,
it may prompt you for a confirmation, select 2. or
&DQFHO.
9RLFH1RWH
7RUHFRUGDYRLFHQRWH
1. Tap 0HQX > 9RLFH1RWH.
2. Tap 0HQX > 5HFRUG.
The recording screen is displayed.
3. Tap to record your voice. To stop recording, tap
.
4. Tap 8VHWKLVUHFRUGLQJ to save the file.
7RSOD\DYRLFHQRWH
1. Tap 0HQX > 9RLFH1RWH.
A list of voice notes is displayed.
2. Tap the voice note you want to listen.
The voice note is played with the Music player.
Chapter 9: Programs
65
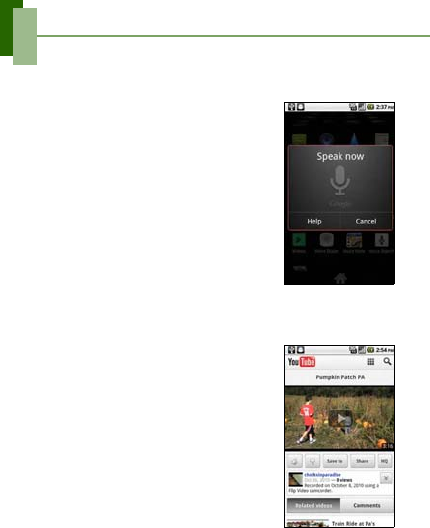
9RLFH6HDUFK
Speak your query to search item on Google, or for applications or contacts on your
device.
1. Tap $SSOLFDWLRQ'UDZHU > 9RLFH6HDUFK.
2. A dialog opens, prompting you to speak the words
that you want to search for.
3. When you are finished speaking, 9RLFH6HDUFK
analyzes your speech and displays the results of
your search.
If 9RLFH6HDUFK misunderstands you, Quick Search
Box presents a list of similar-sounding search
terms.
<RX7XEH
<RX7XEH is an online video streaming service that allows you to view, search, and
upload videos.
1. Tap $SSOLFDWLRQ'UDZHU > <RX7XEH.
2. Videos are grouped into categories, such as
Featured, Most popular, Most viewed, Top rated,
and more. Tap a category to see the available
videos for that category.
3. Tap a video to play it.

Chapter 10: Managing Your Phone
66
Chapter 10: Managing Your
Phone
'HYLFH6HWWLQJV
Tap $SSOLFDWLRQ'UDZHU > 6HWWLQJV to view and adjust the settings of this device.
The Settings menu is categorized into: :LUHOHVVQHWZRUNV,&DOOVHWWLQJV,6RXQG
'LVSOD\,/RFDWLRQVHFXULW\,$SSOLFDWLRQV,$FFRXQWVV\QF,3ULYDF\6'FDUG
SKRQHVWRUDJH,/DQJXDJHNH\ERDUG,9RLFHLQSXWRXWSXW,$FFHVVLELOLW\,'DWH
WLPH, and $ERXWSKRQH.
:LUHOHVVQHWZRUNV
&DOOVHWWLQJV
6RXQG
$SSOLFDWLRQ 'HVFULSWLRQ
$LUSODQHPRGH Disable all wireless connections.
:L)LVHWWLQJV Set up and manage wireless access points.
%OXHWRRWKVHWWLQJV Manage connections, set device name, and discoverability of the
device.
7HWKHULQJ
SRUWDEOHKRWVSRW
Share your phone’s mobile data connection via USB or as a
portable Wi-Fi hotspot.
931VHWWLQJV Set up & manage Virtual Private Networks (VPNs).
0RELOHQHWZRUNV Set options for roaming, networks, and Access Point Names.
$SSOLFDWLRQ 'HVFULSWLRQ
)L[HG'LDOLQJ
1XPEHUV
Managed fixed dialing numbers.
9RLFHPDLO Set voice mail number.
2WKHUFDOOVHWWLQJV Call forwarding, call barring, caller ID and call waiting.
$SSOLFDWLRQ 'HVFULSWLRQ
6LOHQWPRGH Turn silent mode on/off. All sounds except media and alarms are
silenced.
9LEUDWH Device vibrates for incoming calls (only during Silent mode).
9ROXPH Adjust ringtone, media, and alarm volume.
3KRQHULQJWRQH Set your default incoming call ringtone.

Chapter 10: Managing Your Phone
67
'LVSOD\
/RFDWLRQVHFXULW\
1RWLILFDWLRQ
ULQJWRQH
Set your default notification ringtone.
$XGLEOHWRXFK
WRQHV
Enable/disable sound when using dial pad.
$XGLEOHVHOHFWLRQ Enable/disable sound when making screen selection.
6FUHHQORFN
VRXQGV
Play sounds when locking or unlocking the screen.
+DSWLFIHHGEDFN Play sound when pressing soft keys and on certain UI interactions.
$SSOLFDWLRQ 'HVFULSWLRQ
%ULJKWQHVV Adjust the brightness of the screen.
$XWRURWDWHVFUHHQ Switch orientation automatically when rotating the device.
$QLPDWLRQ Show animation when opening & closing windows.
6FUHHQWLPHRXW Adjust the delay before the screen automatically goes off.
*6HQVRU
&DOLEUDWLRQ
Set the g-sensor calibration for the device.
(&RPSDVV
&DOLEUDWLRQ
Set the e-compass calibration for the device.
2XWSXW6FUHHQ Adjust the resolution of the output screen.
$SSOLFDWLRQ 'HVFULSWLRQ
8VHZLUHOHVV
QHWZRUNV
Set location in applications (such as maps) using wireless networks.
8VH*36VDWHOOLWHV Check to enable GPS satellites.
8VHDVVLVWHG*36 Use server to assist GPS.
$*366HWWLQJV Adjust AGPS settings. This option is only available if Enable GPS
satellites is activated.
*36(SKHPHULV
$XWR'RZQORDG
Enable/Disable to download Ephemeris updates from the server.
6FUHHQXQORFN Tap to set the lock screen with a pattern, PIN, or password.
6,0FDUGORFN Tap to set up SIM card lock or change SIM pin.
3DVVZRUGV Check the box to show password as you type.
'HYLFH
DGPLQLVWUDWLRQ
Add or remove device administrators.
$SSOLFDWLRQ 'HVFULSWLRQ

Chapter 10: Managing Your Phone
68
$SSOLFDWLRQV
$FFRXQWVV\QF
3ULYDF\
6'FDUGSKRQHVWRUDJH
&UHGHQWLDOVWRUDJH Use secure credentials from SD card, set or change password for
credential storage, or clear credential storage.
$SSOLFDWLRQ 'HVFULSWLRQ
8QNQRZQVRXUFHV Allow install of non-market applications.
0DQDJH
DSSOLFDWLRQV
Manage and remove installed applications.
5XQQLQJVHUYLFHV View and control currently running services.
'HYHORSPHQW Set options for application development.
$SSOLFDWLRQ 'HVFULSWLRQ
%DFNJURXQGGDWD Check to enable sync, send, and receive data for all applications.
$XWR6\QF Check to automatically sync data with applications.
0DQDJHDFFRXQWV Tap an account to configure synchronization settings for Calendar,
Contacts, and Gmail or tap to add a Gmail account.
$SSOLFDWLRQV 'HVFULSWLRQ
%DFNXSDQG
UHVWRUH
Check to back up and restore the settings and other application
data.
3HUVRQDOGDWD Delete all data on the device.
$SSOLFDWLRQ 'HVFULSWLRQ
6'FDUG Show available memory card storage.
8QPRXQW6'FDUG Unmount the memory card for safe removal.
,QWHUQDOSKRQH
VWRUDJH
Show available phone storage.
$SSOLFDWLRQ 'HVFULSWLRQ

Chapter 10: Managing Your Phone
69
/DQJXDJHNH\ERDUG
9RLFHLQSXWRXWSXW
$FFHVVLELOLW\
'DWHWLPH
$ERXWSKRQH
View legal information, device status and software version.
$SSOLFDWLRQ 'HVFULSWLRQ
6HOHFWODQJXDJH Select language and region for this device.
7RXFK3DO Set on-screen keyboard settings.
8VHUGLFWLRQDU\ Add user preset words to the dictionary.
$SSOLFDWLRQ 'HVFULSWLRQ
9RLFHLQSXW Set the voice recognizer settings.
9RLFHRXWSXW Set the text-to-speech settings.
$SSOLFDWLRQ 'HVFULSWLRQ
$FFHVVLELOLW\ Configure the settings for the downloaded application with an
accessibility feature.
3RZHUEXWWRQ Set to end a call by pressing the power button.
$SSOLFDWLRQ 'HVFULSWLRQ
$XWRPDWLF Check to use network provided values.
6HWGDWH Tap to set date for this device.
6HWWLPH]RQH Set time zone of your current location.
6HWWLPH Tap to set time for this device.
8VHKRXU
IRUPDW
Set the clock to 24-hour format.
6HOHFWGDWHIRUPDW Set the preferred date format.
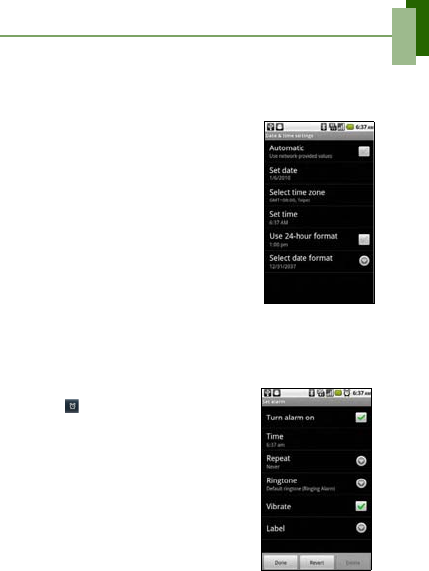
Chapter 10: Managing Your Phone
70
&KDQJLQJ%DVLF6HWWLQJV
'DWHDQG7LPH
7RVHWWKHGDWHDQGWLPH
1. Tap $SSOLFDWLRQ'UDZHU > 6HWWLQJV > 'DWHWLPH.
2. Tap 6HWGDWH to set the date.
• To adjust the date, tap the month, day, or year
field, and tap or to increase or decrease the
value. Tap 6HWto apply the values.
• To change the date format, tap 6HOHFWGDWH
IRUPDW, and select the date format from the list.
3. Tap 6HWWLPH]RQH to select the time zone from the
list.
4. Tap 6HWWLPH to set the time.
• To adjust the time, tap the hour, minute, second
or AM/PM field, and tap + or - to increase or
decrease the value. Tap 6HWto apply the values.
• To use 24-hour format, tap 8VHKRXUIRUPDW.
6HWWLQJ$ODUPV
You can set up alarms on this device.
7RVHWWKHDODUP
1. Tap $SSOLFDWLRQ'UDZHU > &ORFN.
2. Tap .
3. To add an alarm, tap $GGDODUP.
4. Tap the and icons to set the alarm time, and tap
6HW.
5. To set repeat mode, tap 5HSHDW. Tap one or more
options, then tap 2..
6. To set the ringtone, tap 5LQJWRQH. Tap an option,
then tap 2..
7. To vibrate when alarm sounds, check 9LEUDWH.
8. To enter an alarm label, tap /DEHO.
9. After all settings are completed, tap 'RQH.

Chapter 10: Managing Your Phone
71
'LVSOD\6HWWLQJV
The display settings of this device affect the battery and external power level.
7RWXUQRIIEDFNOLJKWZKHQWKHSKRQHLVLGOH
1. Tap $SSOLFDWLRQ'UDZHU > 6HWWLQJV > 'LVSOD\ to enter the submenu.
2. Tap 6FUHHQWLPHRXW.
3. Select from the screen timeout list. Your setting is automatically saved.
7RDGMXVWEULJKWQHVV
1. Tap $SSOLFDWLRQ'UDZHU > 6HWWLQJV > 'LVSOD\ to enter the submenu.
2. Tap %ULJKWQHVV.
3. Drag the %ULJKWQHVV slider to adjust brightness settings, and tap 2..
7RFKDQJHWKHVFUHHQRULHQWDWLRQ
1. Tap $SSOLFDWLRQ'UDZHU > 6HWWLQJV > 'LVSOD\ to enter the submenu.
2. Tap $XWRURWDWHVFUHHQto check the box to automatically switch the screen
orientation when rotating the device.
5LQJ6HWWLQJV
You can assign a ringtone and a ringtone type for various events such as an incoming
call, new message received, among others.
7RFKDQJHWKHULQJWRQHDQGULQJW\SHRIDQLQFRPLQJFDOO
1. Tap $SSOLFDWLRQ'UDZHU > 6HWWLQJV>6RXQG.
2. Tap 3KRQH ULQJWRQH.
3. Select the desired ringtone from the lists.
4. Tap 2.when finished.
7RFKDQJHWKHULQJWRQHRIRWKHUHYHQWV
1. Tap $SSOLFDWLRQ'UDZHU > 6HWWLQJV>6RXQG.
2. Tap 1RWLILFDWLRQ ULQJWRQH.
3. Select the desired ringtone from the lists.
4. Tap 2.when finished.
8VLQJ:LUHOHVVQHWZRUNV
Wireless & networks allows you to manage Wi-Fi, Bluetooth, airplane mode, and
mobile networks.
1. Tap $SSOLFDWLRQ'UDZHU > 6HWWLQJV > :LUHOHVVQHWZRUNV.
2. To turn on or off :L)L,%OXHWRRWK or $LUSODQHPRGH, simply tap their
corresponding bars.
3. To change connection settings, tap the corresponding function settings, then
select the setting to change.

Chapter 10: Managing Your Phone
72
3URWHFWLQJ<RXU3KRQH
You can protect this device from unauthorized users by requiring the PIN code or
entering a password.
(QDEOHRU'LVDEOH6,0FDUG3,1
When PIN code is enabled, you are required to enter the PIN code before making a
call.
1. Tap $SSOLFDWLRQ'UDZHU > 6HWWLQJV > /RFDWLRQVHFXULW\.
2. Tap 6HWXS6,0FDUGORFN.
3. Tap /RFN6,0FDUG to use PIN to use the device. Check to enable, uncheck to
disable.
4. Enter the current PIN code.
5. To change the PIN code, tap &KDQJH6,03,1.
6. Enter the old PIN code.
7. Enter the new PIN code and confirm.
(QDEOLQJ6FUHHQ/RFN3URWHFWLRQ
You can increase your device’s security by creating a screen unlock pattern (disabled
by default). When enabled, you must draw the correct unlock pattern on the screen to
unlock and regain access to the device.
1. Tap$SSOLFDWLRQ'UDZHU > 6HWWLQJV>/RFDWLRQVHFXULW\.
2. Tap 6HWXSVFUHHQORFN.
3. Tap 3DWWHUQ to draw pattern to unlock screen.
4. Follow on-screen instructions to draw your own personal unlock pattern and tap
&RQWLQXH.
5. Redraw your unlock pattern again and tap &RQILUP.
5HVHWWLQJWKH'HYLFH
You can reset your phone to its factory defaults.
1. Tap $SSOLFDWLRQ'UDZHU > 6HWWLQJV>3ULYDF\.
2. Tap )DFWRU\GDWDUHVHW.
3. Tap 5HVHWSKRQH to erase all data on your device.
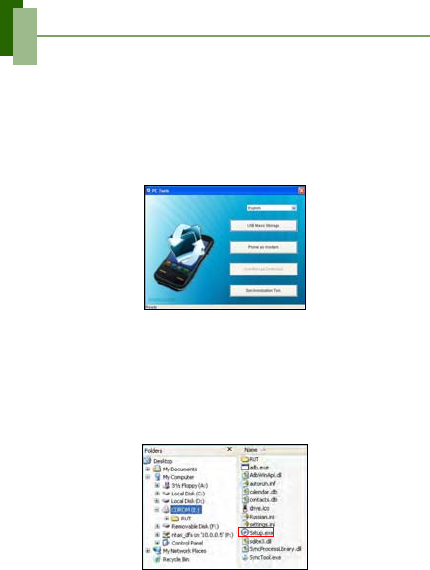
Chapter 11: Using PC Tools Application
73
Chapter 11: Using PC Tools
Application
PC Tools application is a software that enables you to change USB modes when your
device is connected to a computer. Available modes are as follows:
•86%0DVV6WRUDJH: Allows the computer to recognize your device as a USB
mass storage device.
•3KRQHDVPRGHP: Allows you to use your device as a modem.
•6\QFKURQL]DWLRQ7RRO: Allows you to sync your device with a computer.
127(The pre-loaded user manual in microSD card can only be viewed through
storage function.
8VLQJ3&7RROV$SSOLFDWLRQ
,QVWDOOLQJWKH'ULYHU
1. Turn on your device, and connect it to your computer using the USB cable.
2. From the Windows desktop, double click on 0\&RPSXWHUand locate the &'
GULYH.
3. Browse and double click 6HWXSH[H.
4. Follow the on-screen instructions to complete the driver installation.
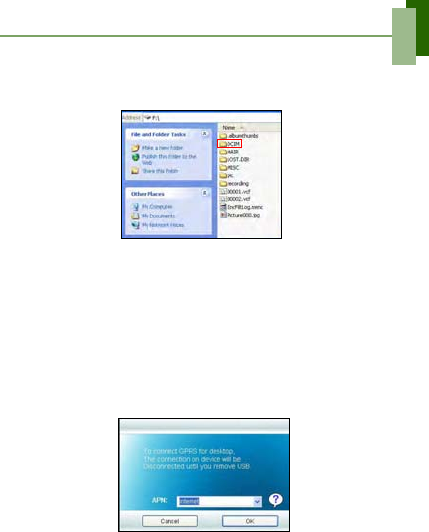
Chapter 11: Using PC Tools Application
74
8VLQJ<RXU3KRQHDVD6WRUDJH'HYLFH
To browse and transfer video and still images to a computer, do the following:
1. In PC Tools application, select 86%0DVV6WRUDJH.
2. The 5HPRYDEOH'LVN window appears on the screen.
3. Locate the '&,0 folder and double click on '&,0 folder to open it to find more
folders.
Your recorded images and video clips will be inside these folders.
4. Copy and paste the image and video files to a folder on your computer.
8VLQJ<RXU3KRQHDVD0RGHP
This feature allows you to use your device as a modem to access internet.
1. Be sure that the Wi-Fi function on your device is set to disable mode.
• Tap $SSOLFDWLRQ'UDZHU > 6HWWLQJV > :LUHOHVVFRQWUROV. Turn off :L)L
mode (uncheck :L)L).
2. In PC Tools application, select 3KRQHDVPRGHP.
3. Select $31.
You can edit the correct APN of your operator. Contact your network provider for
more information.
4. Wait until &RQQHFWLQJWR*B0RGHP process is completed.
A “3G_Modem is now connected” message appears on the screen.
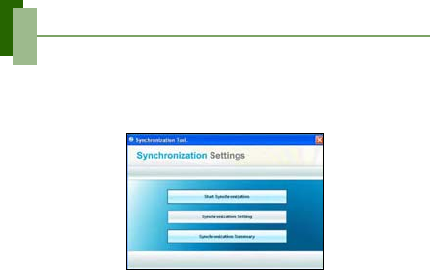
Chapter 11: Using PC Tools Application
75
5. From the Windows desktop, double click on ,QWHUQHW([SORUHUorlaunch a web
browser.
8VLQJ<RXU3KRQHWR6\QFZLWKD&RPSXWHU
This feature allows you to sync your device with a computer.
In PC Tools application, select 6\QFKURQL]DWLRQ7RRO.
•6WDUW6\QFKURQL]DWLRQallows you to initiate synchronization.
•6\QFKURQL]DWLRQ6HWWLQJallows you to set the synchronization settings. Follow
the on-screen instructions to complete the settings.
•6\QFKURQL]DWLRQ6XPPDU\displays the summary of the synchronization
process.
Warnings and Precautions
This section contains important information pertaining to the operating instructions of your device. It also contains information about how to use the
device safely. Read this information carefully before using your device.
Electronic Device
Power off your device if using the device is prohibited. Do not use the device when using the device causes danger or interference with electronic
devices.
Medical Device
yFollow rules and regulations set forth by hospitals and health care facilities. Do not use your device when using the device is prohibited.
yPacemaker manufacturers recommend that a minimum distance of 15 cm be maintained between a device and a pacemaker to prevent potential
interference with the pacemaker. If you are using a pacemaker, use the device on the opposite side of the pacemaker and do not carry the device in
your front pocket.
Potentially Explosive Atmosphere
Power off your device in any area with a potentially explosive atmosphere, and comply with all signs and instructions. Areas that may have
potentially explosive atmospheres include the areas where you would normally be advised to turn off your vehicle engine. Triggering of sparks in
such areas could cause an explosion or a fire, resulting in bodily injuries or even deaths. Do not power on your device at refueling points such as
service stations. Comply with restrictions on the use of radio equipment in fuel depots, storage, and distribution areas, and chemical plants. In
addition, adhere to restrictions in areas where blasting operations are in progress. Before using the device, watch out for areas that have potentially
explosive atmospheres that are often, but not always, clearly marked. Such locations include areas below the deck on boats, chemical transfer or
storage facilities, and areas where the air contains chemicals or particles such as grain, dust, or metal powders. Ask the manufacturers of vehicles
using liquefied petroleum gas (such as propane or butane) whether this device can be safely used in their vicinity.
Traffic Security
Observe local laws and regulations while using the device. In addition, if using the device while driving a vehicle, comply with the following
guidelines:
yConcentrate on driving. Your first responsibility is to drive safely.
yDo not talk on the device while driving. Use hands-free accessories.
yWhen you have to make or answer a call, park the vehicle at the road side before using your device.
yRF signals may affect electronic systems of motor vehicles. For more information, consult the vehicle manufacturer.
yIn a motor vehicle, do not place the device over the air bag or in the air bag deployment area. Otherwise, the device may hurt you owing to the
strong force when the air bag inflates.
yDo not use your device while flying in an aircraft. Power off your device before boarding an aircraft. Using wireless devices in an aircraft may
cause danger to the operation of the aircraft and disrupt the wireless telephone network. It may also be considered illegal.
Operating Environment
yDo not use or charge the device in dusty, damp, and dirty places or places with magnetic fields. Otherwise, it may result in a malfunction of the
circuit.
yThe device complies with the RF specifications when the device is used near your ear or at a distance of 1.5 cm from your body. Ensure that the
device accessories such as a device case and a device holster are not composed of metal components. Keep your device 1.5 cm away from your
body to meet the requirement earlier mentioned.
yOn a stormy day with thunder, do not use your device when it is being charged, to prevent any danger caused by lightning.
yWhen you are on a call, do not touch the antenna. Touching the antenna affects the call quality and results in increase in power consumption. As a
result, the talk time and the standby time are reduced.
yWhile using the device, observe the local laws and regulations, and respect others' privacy and legal rights.
yKeep the ambient temperature between 0°C and 40°C while the device is being charged. Keep the ambient temperature between 0°C to 40°C for
using the device powered by a battery.
Prevention of Hearing Damage
Using a headset at high volume can damage your hearing. To reduce the risk of damage to hearing, lower the headset volume to a safe and comfortable
level.
Safety of Children
Comply with all precautions with regard to children's safety. Letting the child play with your device or its accessories, which may include parts that
can be detached from the device, may be dangerous, as it may present a choking hazard. Ensure that small children are kept away from the device and
accessories.
Accessories
Use the accessories delivered only by the manufacturer. Using accessories of other manufacturers or vendors with this device model may invalidate
any approval or warranty applicable to the device, result in the non-operation of the device, and cause danger.
Battery and Charger
yUnplug the charger from the electrical plug and the device when not in use.
yThe battery can be charged and discharged hundreds of times before it eventually wears out. When the standby time and the talk time are shorter
than the normal time, replace the battery.
yUse the AC power supply defined in the specifications of the charger. An improper power voltage may cause a fire or a malfunction of the charger.
yDo not connect two poles of the battery with conductors, such as metal materials, keys, or jewelries. Otherwise, the battery may be short-circuited
and may cause injuries and burns on your body.

yDo not disassemble the battery or solder the battery poles. Otherwise, it may lead to electrolyte leakage, overheating, fire, or explosion.
yIf battery electrolyte leaks out, ensure that the electrolyte does not touch your skin and eyes. When the electrolyte touches your skin or splashes
into your eyes, wash your eyes with clean water immediately and consult a doctor.
yIf there is a case of battery deformation, color change, or abnormal heating while you charge or store the battery, remove the battery immediately
and stop using it. Otherwise, it may lead to battery leakage, overheating, explosion, or fire.
yIf the power cable is damaged (for example, the cord is exposed or broken), or the plug loosens, stop using the cable at once. Otherwise, it may
lead to an electric shock, a short circuit of the charger, or a fire.
yDo not dispose of batteries in fire as they may explode. Batteries may also explode if damaged.
yDanger of explosion if battery is incorrectly replaced. Recycle or dispose of used batteries according to the local regulations or reference
instruction supplied with your device.
Cleaning and Maintenance
yThe device, battery, and charger are not water-resistant. Keep them dry. Protect the device, battery, and charger from water or vapor. Do not touch
the device or the charger with a wet hand. Otherwise, it may lead to a short circuit, a malfunction of the device, and an electric shock to the user.
yDo not place your device, battery, and charger in places where they can get damaged because of collision. Otherwise, it may lead to battery
leakage, device malfunction, overheating, fire, or explosion.
yDo not place magnetic storage media such as magnetic cards and floppy disks near the device. Radiation from the device may erase the
information stored on them.
yDo not leave your device, battery, and charger in a place with an extreme high or low temperature. Otherwise, they may not function properly and
may lead to a fire or an explosion. When the temperature is lower than 0°C, performance of the battery is affected.
yDo not place sharp metal objects such as pins near the earpiece. The earpiece may attract these objects and hurt you when you are using the device.
yBefore you clean or maintain the device, power off the device and disconnect it from the charger.
yDo not use any chemical detergent, powder, or other chemical agents (such as alcohol and benzene) to clean the device and the charger. Otherwise,
parts of the device may be damaged or a fire can be caused. You can clean the device and the charger with a piece of damp and soft antistatic cloth.
yDo not dismantle the device or accessories. Otherwise, the warranty on the device and accessories is invalid and the manufacturer is not liable to
pay for the damage.
Emergency Call
You can use your device for emergency calls in the service area. The connection, however, cannot be guaranteed in all conditions. You should not rely
solely on the device for essential communications.
Certification Information (SAR)
This device meets guidelines for exposure to radio waves.
Your device is a low-power radio transmitter and receiver. As recommended by international guidelines, the device is designed not to exceed the
limits for exposure to radio waves. These guidelines were developed by the independent scientific organization International Commission on
Non-Ionizing Radiation Protection (ICNIRP) and include safety measures designed to ensure safety for all users, regardless of age and health.
The Specific Absorption Rate (SAR) is the unit of measurement for the amount of radio frequency energy absorbed by the body when using a device.
The SAR value is determined at the highest certified power level in laboratory conditions, but the actual SAR level of the device when being
operated can be well below the value. This is because the device is designed to use the minimum power required to reach the network.
The SAR limit adopted by USA and Canada is 1.6 watts/kilogram (W/kg) averaged over one gram of tissue. The highest SAR value reported to the
FCC and IC for this device type when tested for use at the ear is 0.759 W/kg, and when properly worn on the body is 1.19 W/kg.
FCC Statement
This equipment has been tested and found to comply with the limits for a Class B digital device, pursuant to Part 15 of the FCC Rules. These limits
are designed to provide reasonable protection against harmful interference in a residential installation. This equipment generates, uses and can radiate
radio frequency energy and, if not installed and used in accordance with the instructions, may cause harmful interference to radio communications.
However,there is no guarantee that interference will not occur in a particular installation.If this equipment does cause harmful interference to radio or
television reception,which can be determined by turning the equipment off and on, the user is encouraged to try to correct the interference by one or
more of the following measures:
--Reorient or relocate the receiving antenna.
--Increase the separation between the equipment and receiver.
-- Connect the equipment into an outlet on a circuit different from that to which the receiver is connected.
-- Consult the dealer or an experienced radio/TV technician for help.
This device complies with Part 15 of the FCC Rules. Operation is subject to the following two conditions: (1) this device may not cause harmful
interference, and (2) this device must accept any interference received, including interference that may cause undesired operation.
Warning: Changes or modifications made to this device not expressly approved by Huawei Technologies Co., Ltd. may void the FCC authorization
to operate this device.

INDEX
1
%
Battery 4
Charge 5
Bluetooth 38
connecting 38
Browser 49
&
Call
answer a call 19
Camcorder 49, 50, 51, 52, 53, 55
Camera
settings 41
Contacts
searching 15
'
device
settings menu 62
Device settings 66
Display
backlight 71
brightness 71
orientation 71
(
E-mail 28
)
Facebook 52, 53
File
managing 52, 53
File Browser 52, 53
FM Radio 53
Folders
managing 52, 53
*
Gallery 54, 55
Google Talk 62
GPS
using 73
+
Headset 6
Home screen 8
,
Icons
Battery 9
Connection 10
Notification 10
Phone Network 9
Status Bar 8
volume 9
Input method 21
Internet 31
connecting 31
data connection 34
.
Keyboard
on-screen 20
/
Latitude 55
0
Maps 56
Market 57
Memory card 5
Menu
Application drawer 12
Messaging
e-mail 27
Voice 26
Messaging
MMS 25
SMS, text 22
Micro USB port 2
Music 57
Music Player 44, 57, 58, 59, 65
1
Navigation 58
News and Weather 59
Note Pad 60
3
Phone 60
answering a call 19
protect 72
reset 72
Photo
taking photos 40
PIN code 72
Places 61
Power
button 2
turn on and off 6

INDEX
2
Programs 47
5
RSS Reader 61
6
Screen
orientation 71
Screen lock 72
Settings 62
alarms 70
basic 70
date and time 70
display 71
keyboard 21
ringtone 71
SIM
install 3
remove 3
SIM Toolkit 62
7
Text
entering 20
8
Unlock screen 7
9
Video
recording 39
viewing 40, 41
Video Portal 63
Videos 63
Voice Dialer 64
Voice Note 64
Voice Search 65
Volume
adjusting 14
slider 2
:
Wi-Fi 31
Wireless & networks 71
<
YouTube 65