Huion Animation Technology DWH69 Graphic Tablet (Pen Tablet) User Manual Manual
Shenzhen Huion Animation Technology Co.,ltd. Graphic Tablet (Pen Tablet) Manual
Manual
Graphic
Model:DWH69
Address:
Huion Building,Hi-Tech Park Shifeng, ShenZhen, P.R.China
Tel: +86-755-61537861
Support: service@huion.cn
service@huiontablet.com
www.huion-tablet.com
www.huiontablet.com
IM-DWH690-0-WIN000-0
CONTENTS
1
1
1
2
2
2
3
5
6
6
7
7
8
9
12
13
15
I. General Information
1. Overview
2. Pen Tablet Functions
3. System Requirements
4. Installing the Driver Software on Windows
5. Hardware Installation
IV. Question & Answer
II. Driver Interface Introduction
1. Control Interface
2.1 Key Functions
4. Digital Pen Pressure Sensitivity Test
6. Wireless Graphic Tablet
2. Pen Buttons Settings
lll. Pen Storage and Maintenance
3. Workspace and Hotkey Settings
3.1 Workspace Settings
10
3.2 No Shortcut keys-Workspace Settings
7. Usage Tips

1
I. General Information
1. Overview
Welcome to the world of Graphic Tablet with rechargeable pen. Now you will discover how easy it is to use
your personal computer by using a Graphic Tablet with rechargeable pen instead of a mouse.Unique feature
of this rechargeable pen is that it makes it easy for you to draw thin, thick, light or dark (called pressure
sensitivity) lines. You can also write, sign, annotate documents or draw, sketch and paint as easily as you
would do on normal paper. You can further simulate functions like pencil, mark pen, brush, or water color
pen by using the commercial software packages such as Adobe Photoshop, Corel Painter.
2. Graphic Tablet Functions
After installing the device driver, your Graphic Tablet will have following functions:
(1) Direct pointing — You can move the cursor to any area of the screen by hovering the rechargeable pen tip
over the tablet’s surface.
(2) Three-buttons mouse commands — Your Graphic Tablet will provide all functions of a three-buttons’ mouse
by using its pen tip and two buttons.
(3) Pressure sensitivity — This feature allows you to emulate various brushes and pencils. Harder you press down
the pen, the thicker lines you get; lighter you press the thinner ones you get.
2
3. System Requirements
Windows Vista / Windows 7 / Windows 8 / Windows 8.1 / Windows 10
4. Installing the Driver Software on Windows
Please close all painting software and antivirus software before driver installation.
For Windows Vista / Windows 7 / Windows 8 / Windows 8.1 / Windows 10 operating systems:
(1) Insert the Driver CD intoa CD-ROM drive and wait for the main installation screen to appear.
(2) The main installation screen will appear automatically; if not, you can manually start the installation-
Open [My Computer] [CD/DVD Rom] -click on the [Setup] program.
(3) When installing the driver, follow the installation instructions on screen.
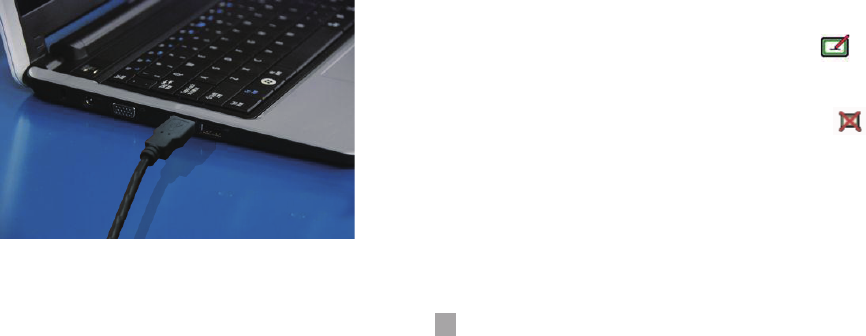
5. Hardware Installation
Once the driver installation is finished, connect the tablet with USB
interface into a PC.You will then see a small tablet icon
appearing in the system tray (normally at thelower right corner of
the screen.)
If the USB cable is disconnected, there will apprear a icon
to represent the tablet is disable
3
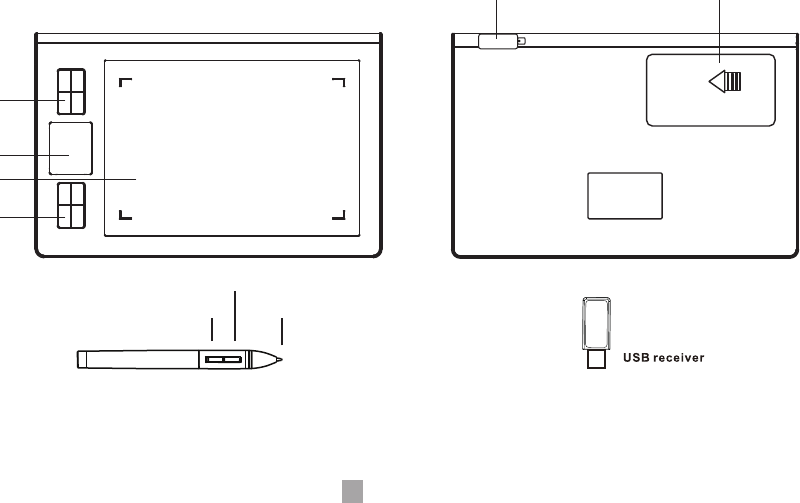
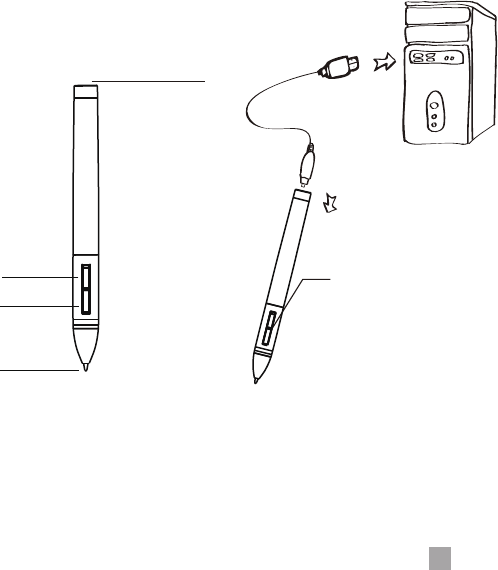
6. Wireless Graphic Tablet
(1) Dual working modes - wired & wireless (wireless distance can reach 20 meters in open space)
Wireless Graphic Tablet:
Button2
Button1
Pen tip
*This illustration is of a model picture of Huion DWH69
Touch Express Keys
Touch Express Keys
USB Receiver Battery
LCD
Active Area
4
(3) Working Mode for Wireless Graphic Tablet
1) Pull out the USB cable - switch “On/Off” button to “On” plug in the wireless receiver.
2) If you want to charge in wireless mode, please plug the USB cable directly.
3) Constant working time: > 30 hours.
4) For battery power saving, please switch “On/Off” button to “OFF” when you are not using it.
5) Automatic shutdown: 200 uA (the tablet will automatically turn off when not used for over 20 minutes.
(Push ON OFF ON to restart).
(4) Working Mode for Wired Graphic Tablet
1) Swith "ON/OFF" button to "OFF".
2) Then plug in the USB cable and the Graphic Tablet is in a wired mode.
3) Swith "ON/OFF" button to "ON", then the tablet is still in wired mode plus charge at the same time.
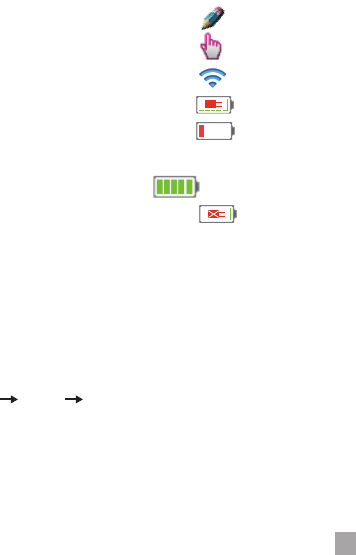
(2) Functions of the LCD display
1).The LCD display will lit up when the Graphic Tablet is in normal working conditions;
2).The LCD display will show an icon to represent that the Graphic Tablet detected the pen;
3).The LCD display will show an icon to represent that you are touching the Express Key;
4).The LCD display will show an icon to represent the Graphic Tablet is in a wireless mode;
5).The LCD display will show an icon to represent the Graphic Tablet is charging;
6).The LCD sreen will show the icon when running out of battery and please charging in time , or it will lead
to bad Linear, no drawing line and the screen dim out etc
7).The display will show an icon to show the power
8).The LCD display will show an icon to represent the Graphic Tablet is in wired mode and without charging.

7. Usage Tips
(1) Double tapping
When you double tap with a rechargeable pen (equivalent to a double click with a mouse), try to keep pen’ tip away
from the tablet’s surface, or at least try to lift the pen tip as fast as possible before the second tap.
(2) Storing the rechargeable pen
While storing the rechargeable pen, make sure the pen tip does not touch anything, especially the pen stand in a
cup or pen holder with the tip down. Though the possibility is low, constant stress on a pen tip might damage
precise configuration of the pen. Place the pen in a pen holder, or turn the pen tip pointing upward or horizontally
with the pen tip free from any pressure by other objects.
(3) Using a pen without an ordinary mouse
You may install the rechargeable pen, digital mouse, and normal mouse in your computer at the same time.
However, only one device will be able to work at a time.
* Do not use more than two devices at the same time in case the screen cursor is jittering or not moving.
5
6
ǁ. Driver Interface Introduction
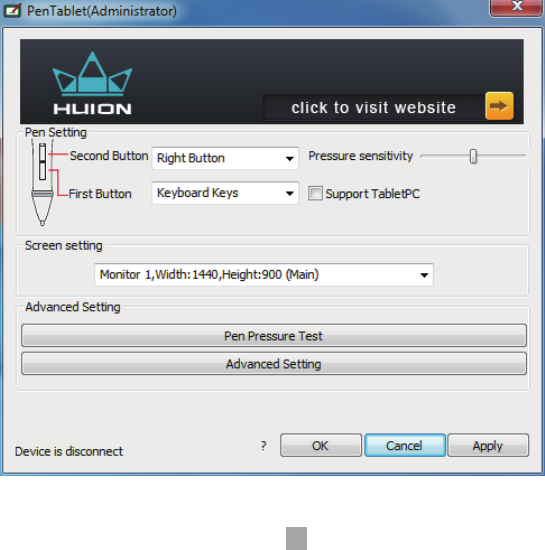
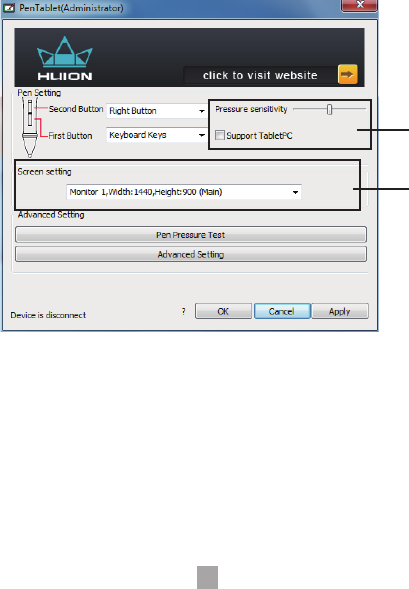
1. Control Interface
7
When you double click the driver tablet icon ( ) that normally appears in the system tray at the corner of a
screen, you will see control panel (pictured above). It will display driven-related information.Controlling the panel
by digital graphic tablet can set up functions of a rechargeable pen, regulating pen’s pressure sensitivity.
2. Pen Buttons Settings
2.1 Key Functions
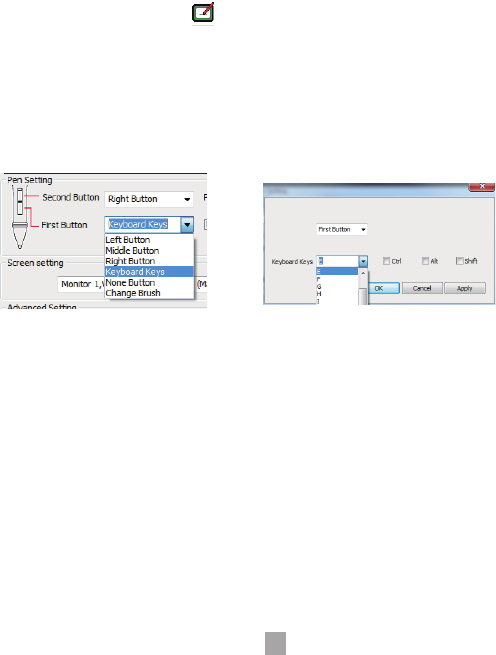
You can set up any Mouse functions for the rechargeable pen (as the above Picture I). Selecting its "Left Button,
Middle Button, Right Button, Keyboard Keys, None Button" on the corresponding right drop-down menu of the
"Second Button, First Button", you can achieve the rechargeable pen button function settings.
Note:
(1)"Left Button, Middle Button, Right Button" functions represent a normal mouse left, middle, right button functions.
(2) When choosing "Middle Button", the corresponding pen button will have the same "Press" function as a normal
mouse, but doesn't have the "Scroll" function.
(3) When choosing the "Keyboard Keys", there will appear an "Express Key Settings (as Picture II). You can set
pen button functions as the same as any "Express Key" or "Keyboard Keys" functions.
III
8
Default functions of the Rechargeable Pen
(1) Pen nib is equivalent to the mouse left button function.
(2) When first key is E, you can switch it to eraser in the graphic software (such as photoshop etc.)
(3) Second key is equivalent to the mouse right function.
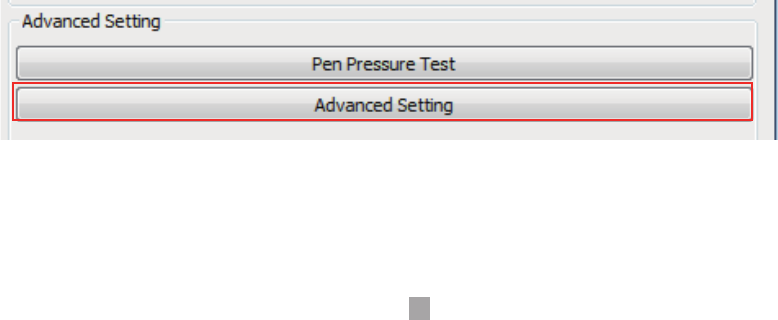
3. Workspace and Hotkey Settings
Click ” Advanced Setting” button in tablet settings (see the selected area above), you will be able to access the
working area and Express Key settings.
9
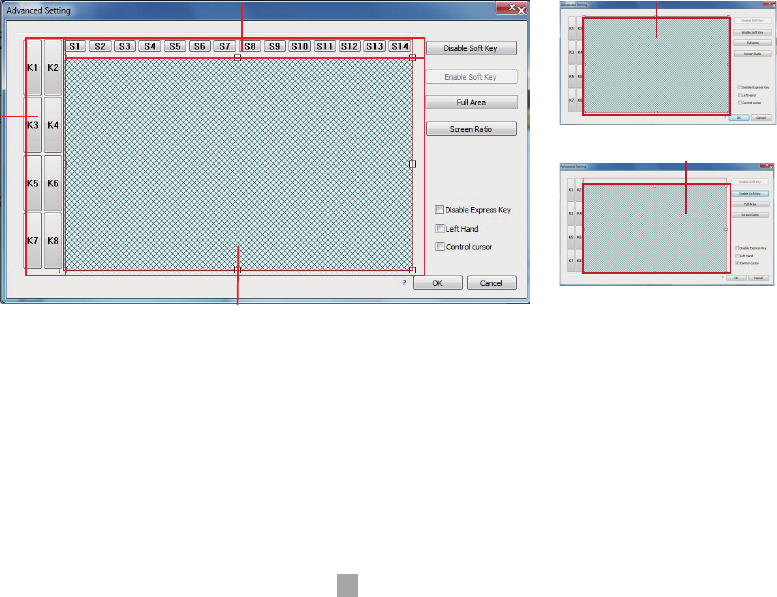
3.1 Workspace Settings
Area A: Soft Key area
Area B: Express Key area
Area C: The work area
Disable Soft Key: Selecting this key, the Soft Key’s (only for some models with soft keys) functions will be disabled.
Enable Soft Key: Selecting this key, the Soft Key’s (only for some models with Soft Keys) functions will be enables.
Full Area: Selecting this key, the work area of the Graphic Tablet will be expended to Area A and Area C, at the mean
time, the Soft Key’s functions are disabled.
Attention: Select this key of " Disable Express Key" , the key founction will be disabled.
Area A:Softkey
Disable softkey
Area B:
Express key
Area C:the work area
The work area:Area A+Area C
The work area:Area C
Full Area
10
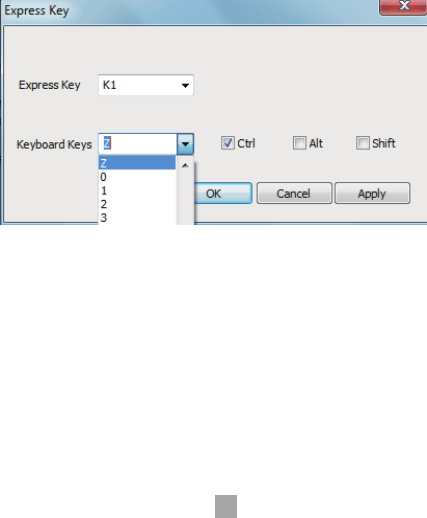
3.1.1.Express key Settings
Click any Express keys to enter into the Express keys’ functions setting screen(pictured above), the
corresponding Express Key are from K1-K8 of 8 express shortcuts.
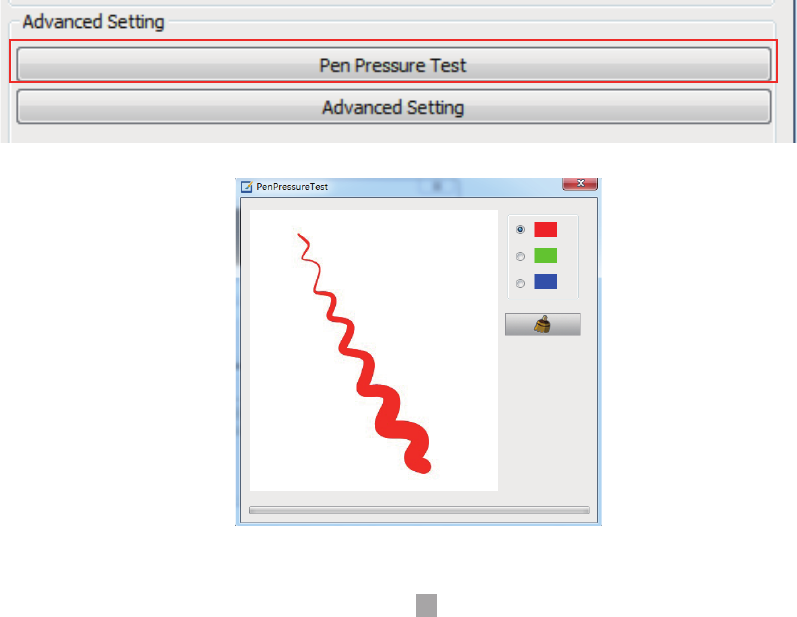
3.2 Rechargeable Pen Pressure Sensitivity Test
Click the control interface into Pressure Sensitivity Testing
11
12
Pressure sensitivity: move the slider from left to right, to adjust sensitivity of the tip and severity of the stroke
while drawing as it will affect change of the handwriting(box 1)
Support TabletPC: If there in no pressure sensitivity in your drawing software, please check whether the
Support TabletPC is checked or not. If checked, please uncheck; if unchecked, please check. Then try again
in the drawing software.
When your computer is connected with two screens; use the extended mode through which you can choose
corresponding work area of the graphic tablet in a setup screen area(box 2).
4. Rechargeable Pen Pressure Sensitivity Test
box 1
box 2
13
III. Pen Storage and Maintenance
1. Tap on any surface with the
tip of a pen, to “wake it up”.
2. It will “ auto sleep” if not
used for a period of time.
Notice: if the reading height
is lower and the line is
unstable, it means tablet needs
to be charged
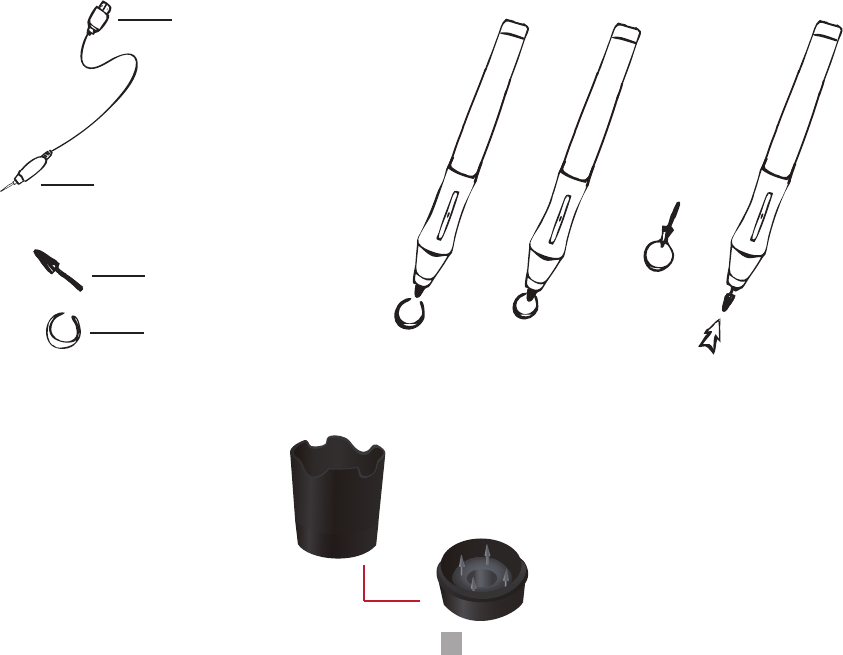
A: Pull out the pen tip from rechargeable pen by using a pen Clip that is inside the pen holder.
Charging the rechargeable pen tip
Rechargeable LI-ION Battery
Plug in USB cable and charging
The LED indicator flashes during charging
when it is out of flashing, it finished charging.
charging time: about 1 hour
1. Rechargeable LI-ION Battery & Tip
Charging port
Pen tip
Button 2
Button 1
14
Pen Tip
USB
Pen Clip
B: Push the pen’s tip into a rechargeable pen and make sure it fits up to the end properly.
The pen tip replacement tool and 4 pen tips.
The pen tip replacement tool and 4 pen tips
Gently unscrew the pen holder in
counter clockwise direction. You will
see one pen tip replacement tool &
4 spare pen tips inside.
Charging port

15
Question 3: Why does the cursor moves and flashes constantly even when I haven’t moved the pen?
Answer: It could be because some electronic devices emit electromagnetic interference. Please maintain the
distance of atleast five inches between the Graphic Tablet and other electronic equipment.
Question 4: There is no pressure sensitivity in the drawing software but still the cursor moves while moving the
pen, why?
Answer: You may have installed other drivers or opened the drawing software while installing the driver. Please
uninstall all drivers and close the drawing software, then reinstall the Huion drive. Once installation is finished,
open the drawing software to check if it works.
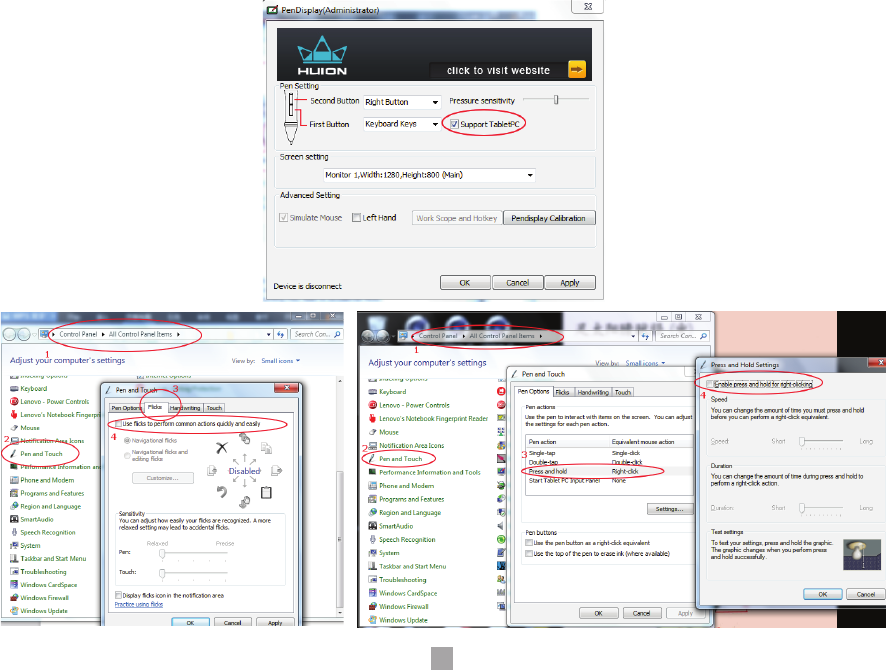
Question 5: How to deal with abnormal drawing problems in the painting software?
Answer: Please follow these steps in control panel and graphic driver panel
(1) Uncheck the “Support Tablet PC” in graphic driver panel
(2) Turn off the “Flicks” in “Pen and Touch” in control panel
(3) Cancel the “Press and Hold” in “Pen and Touch” control panel
Question 1: How can I get an updated software?
Answer: You can download the new driver from our official website www.huion-tablet.com or
www.huiontablet.com,and also can send us an email at: service@huiontablet.com
Question 2: The tablet doesn’t work. What can I do?
Answer: Please follow one of the steps as mentioned below:
a. Close and restart your software (such as PS, Painter) to check if it works.
b. Restart your computer.
c. Uninstall your driver and reinstall the newest driver.
d. Change to other computer and then try your Graphic Tablet.
If the Graphic Tablet still didn’t work, please contact our service center for assistance.
IV. Question & Answer
16

FCC Information and Copyright
This equipment has been tested and found to comply with the limits for a Class B digital device,
pursuant to part 15 of the FCC Rules.
These limits are designed to provide reasonable protection against harmful interference in a residential
installation. This equipment generates,
uses and can radiate radio frequency energy and, if not installed and used in accordance with the
instructions, may cause harmful interference
to radio communications. However, there is no guarantee that interference will not occur in a particular
installation. If this equipment does
cause harmful interference to radio or television reception, which can be determined by turning the
equipment off and on, the user is
encouraged to try to correct the interference by one or more of the following measures:
—Reorient or relocate the receiving antenna.
—Increase the separation between the equipment and receiver.
—Connect the equipment into an outlet on a circuit different from that to which the receiver is
connected.
—Consult the dealer or an experienced radio/TV technician for help.
15.19 Labelling requirements.
This device complies with part 15 of the FCC Rules. Operation is subject to the
following two conditions:
(1)This device may not cause harmful interference, and
(2) this device must accept any interference received, including interference that may
cause undesired operation.
changes or modifications not expressly approved by the party responsible for compliance could
void the user's authority to operate the equipment.