User Manual
User Manual
SDA-L3000S
USB/iPod/Bluetooth Player with
AM/FM Radio

English
USB/Bluetooth/iPod Player with AM/FM Radio
SDA-L3000S / User Manual
Please read this manual carefully before operating your set and retain it for future
reference. Designs and specifications are subject to change without prior notice.
This device complies with Part 15 of the FCC Rules. Operation is subject to the following
two conditions:
(1) This device may not cause harmful interference, and
(2) This device must accept any interference received, including interference that may
cause undesired operation.
Note: This equipment has been tested and found to comply with the limits for a Class B
digital device, pursuant to part 15 of the FCC Rules.
These limits are designed to provide reasonable protection against harmful interference in
a residential installation. This equipment generates, uses and can radiate radio frequency
energy and, if not installed and used in accordance with the instructions, may cause
harmful interference to radio communications. However, there is no guarantee that
interference will not occur in a particular installation.
If this equipment does cause harmful interference to radio or television reception, which
can be determined by turning the equipment off and on, the user is encouraged to try to
correct the interference by one or more of the following measures:
- Reorient or relocate the receiving antenna.
- Increase the separation between the equipment and receiver.
- Connect the equipment into an outlet on a circuit different from that to which the receiver
is connected.
- Consult the dealer or an experienced radio/TV technician for help.
Modifications not expressly approved by the party responsible for compliance could void
the user's authority to operate the equipment.
This device complies with RF exposure requirement.

3
English
Contents
Safety Information ....................5
Getting started ..........................7
Control buttons, functions and device
connections ....................................... 7
Control unit buttons and functions
(A/V system) ......................................... 7
Basic operation.................................. 8
Turning on the unit ................................ 8
Switching the unit to standby mode ...... 8
Adjusting the volume ............................. 8
Muting the sound quickly ...................... 8
Using the touch screen ......................... 9
Using the rearview camera screen ..... 10
Using the ChevyStar ...................... 10
Audio and Video System .......11
Home menu screen ......................... 11
Smart LINK menu screen ................ 11
Radio ................................................. 12
FM/AM radio screen ............................ 12
Listening to radio stations ................... 12
Storing radio stations manually ........... 12
Storing radio stations automatically .... 13
USB or iPod music player............... 13
Connecting a USB device or iPod to
the iPod/USB port ............................... 13
USB or iPod music player screen ....... 13
Selecting a le from a list .................... 14
USB image player ........................... 16
USB image player screen ................... 16
Selecting a le from a list .................... 17
AUX player ...................................... 17
Connecting an external audio
device to the AUX port ........................ 17
Using the AUX player .......................... 17
Bluetooth audio player .................... 18
Pairing and connecting with a
Bluetooth device ................................. 18
Bluetooth audio player screen ............ 18
Bluetooth Connectivity ..........19
About the Bluetooth feature ........... 19
Pairing devices .................................... 19
Connecting devices ............................. 19
Using the hands-free feature and
listening to music ................................ 19
Bluetooth connection ...................... 19
Connecting a Bluetooth device ........... 20
Disconnecting a Bluetooth device ....... 21
Deleting Bluetooth devices ................. 21
Phone functions .............................. 22
Phone screen ...................................... 22
Accepting a call ................................... 22
Making a call ....................................... 22
Using options during a call .................. 23
Managing the call history and the
phone book ......................................... 24
Bluetooth settings ........................... 24
Setting the phone volume ................... 24
Changing the Bluetooth passkey ........ 25
Setting auto connection mode ............ 25
Downloading phonebook contacts
automatically ...................................... 25
Deleting all Call History or
Phonebook all contacts ...................... 25
Apple CarPlay (optional) .......26
About Apple CarPlay ....................... 26
Accessing Apple CarPlay ............... 26
Returning to the Apple CarPlay home
screen ............................................... 26
Apple CarPlay home screen ........... 27
Activating Siri .................................. 27
Phone ................................................ 27
Making a call using Siri ....................... 27
Making a call using Contacts .............. 28
Accepting or declining a call ............... 28
Music ................................................ 28
Playing music ...................................... 28
Now Playing ..................................... 29

4
Contents
English
Maps ................................................. 29
Viewing your current location .............. 29
Searching for a location ...................... 29
Messages ......................................... 30
Sending a text message ..................... 30
Hearing a text message ...................... 30
Podcasts........................................... 30
Playing a podcast ................................ 30
Android Auto (optional) ........31
About Android Auto ........................ 31
Accessing Android Auto ................. 31
Android Auto screen ....................... 32
Phone ................................................ 32
Making a call using Google voice
recognition .......................................... 32
Making a call using phone options ...... 32
Music ................................................ 33
Playing music ...................................... 33
Navigation ....................................... 33
Viewing your current location .............. 33
Searching for a location ...................... 33
Car Link (for Android OS) .....34
Downloading the Car Link application to
your Android smartphone .................... 34
Accessing Car Link ............................. 34
Returning to the Car Link
home screen ....................................... 36
Car Link home screen ......................... 36
Setting Car Link .................................. 37
Settings ...................................38
Setting the sound ............................ 38
Adjusting the sound balance .............. 38
Adjusting the sound fader .................. 38
Selecting the EQ style ......................... 38
Tuning on and o the loudness
feature ................................................. 39
Setting the initial volume ..................... 39
Setting the display ........................... 39
Adjusting the brightness of the screen 39
Setting the power-o display type ....... 40
Setting the Connectivity ................. 40
Setting the Bletooth Connection ......... 40
Setting the Bletooth ............................. 40
Setting the system........................... 40
Checking/Updating/Initializing the
unit ...................................................... 41
Setting the time ................................... 41
Setting the date ................................... 42
Selecting the language ....................... 42
Troubleshooting .....................43
Specications .........................44
Limited Warranty ....................45
5
English
Safety Information
Read and follow all safety instructions in
this manual to operate the device safely
and appropriately. Malfunctions or defects
caused by the user are not covered by the
warranty.
Safety symbols
Warning
Indicates a potentially hazardous
situation that, if not avoided, could result
in injury or death.
Caution
Indicates a potentially hazardous
situation that, if not avoided, could result
in minor injury or property damage.
Note
Indicates items that help you understand
and maximize the performance of the
system.
Safety warnings
Warning
●Do not use the unit if there are audio
or screen problems. Operating the
unit in an abnormal state may cause
electric shock, injury, or fire.
●Do not disassemble or modify the
unit. Incorrect procedures can
cause electric shock, injury, fire, and
equipment malfunction.
●Do not use the unit at high volume
while driving. Listening at high volume
can reduce your ability to hear
external sounds and may cause an
accident.
●Do not block the vent. Restricting
airflow traps heat inside the unit and
may cause malfunction or fire.
●Do not adjust the unit while driving.
Entering information or adjusting the
controls on the unit can distract your
attention while driving and may cause
an accident. Stop your vehicle in a
safe location before adjusting the unit.
●Do not use your phone in private
mode while you are driving. You must
stop at a safe location before using the
phone in private mode.
The distance between this device and
nearby persons should be maintained at
20 cm.

6
Safety Information
English
Safety cautions
Caution
●Some countries have laws restricting
the use of video screens while driving.
Use the unit only where it is legal to
do so.
●Do not operate the unit for a long
period while the engine is not
operating. This may cause the battery
to discharge.
●The recommended operating
temperature range for the unit is from
-20°C to 65°C. Operating the unit
outside the recommended range can
cause malfunction.
●Do not use unauthorized accessories.
Unauthorized accessories may cause
the unit to malfunction. Use authorized
accessories only.
●Do not allow the unit to come in
contact with moisture. Moisture
can damage the unit and cause
malfunction.
●When cleaning the screen, turn off
the unit and use a soft dry cloth. Do
not use abrasive cleaning products.
Abrasive products can damage the
screen or affect color and image
quality.
●Do not apply excessive force to the
unit's screen. Doing so may damage
the screen.
●Do not use sharp objects to operate
the screen. Using a sharp object may
cause damage or malfunction.
7
English
Getting started
Control buttons, functions and device connections
This unit can be controlled by using the buttons on the unit or the controls on the steering
wheel. It also provides connections for media devices. This section explains the buttons
and functions that are available on the unit and the steering wheel and provides information
about connecting media devices.
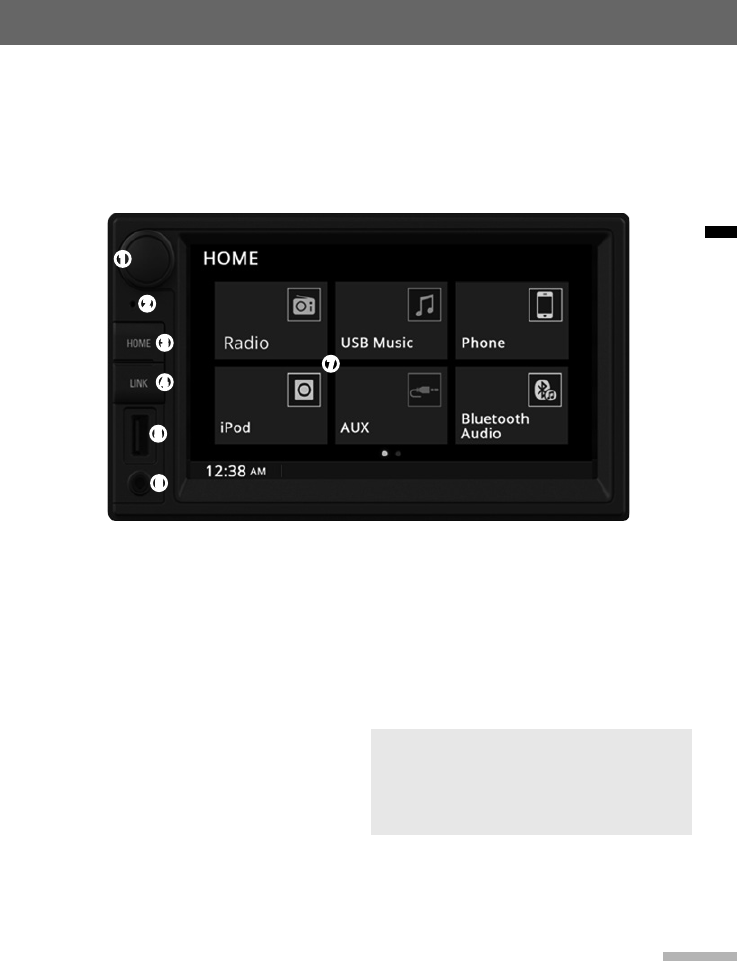
► Control unit buttons and functions (A/V system)
➊
➌
➋
➍
➎
➏
➐
➊ POWER button / VOLUME dial
● Press snd hold to switch to standby
mode. In standby mode, press and
hold to switch to the mode you used
previously.
● Press to turn the mute function on
or off.
● Rotate the dial to adjust the volume.
➋ Microphone
● Detects voice during phone
conversations.
➌ HOME button
● Press to display the Home menu
screen.
➍ LINK button
● Press to switch to Smart LINK mode
(Apple CarPlay, Android Auto or Car
Link).
➎ USB port
● Connect USB device, iPod or iPhone.
➏ AUX port
● Connect other external devices.
➐ Touch screen display
Note
●Apple CarPlay, Android Auto or Car Link
may not be supported depending on
your vehicle’s options and which region
the unit is being used in.
8
Getting started
English
Basic operation
This section explains basic operations such
as switching to standby mode, adjusting
the volume, quickly muting the sound, and
using the touch screen.
► Turning on the unit
1 Place the ignition switch in the ACC
or IGN (ON) position.
The unit will turn on and the following
screen will appear.
2 Tap Agree to start the system.
Note --------------------------------------------------
●You can also change the language by
referring to "Selecting the language" on
page 42.
●The unit also turns on automatically
when a device is connected to the USB.
----------------------------------------------------------
► Switching the unit to standby
mode
To switch the unit to standby mode while
using the unit's functions, press and hold
the POWER button.
Once the unit's system starts, the clock
screen appears, which means that the unit
is in standby mode.
To start using the unit's functions, press
and hold POWER button.
► Adjusting the volume
Rotate the VOLUME dial to increase or
decrease the volume. When the volume is
adjusted, the volume level bar will appear
as shown below.
► Muting the sound quickly
Press the POWER button to activate the
mute function. When the mute function is
activated, the mute icon ( ) will appear
next to the volume control bar.
To deactivate the mute function, rotate
the VOLUME dial on the unit, or press the
9
Getting startded
English
MUTE or VOL +/- buttons on the steering
wheel.
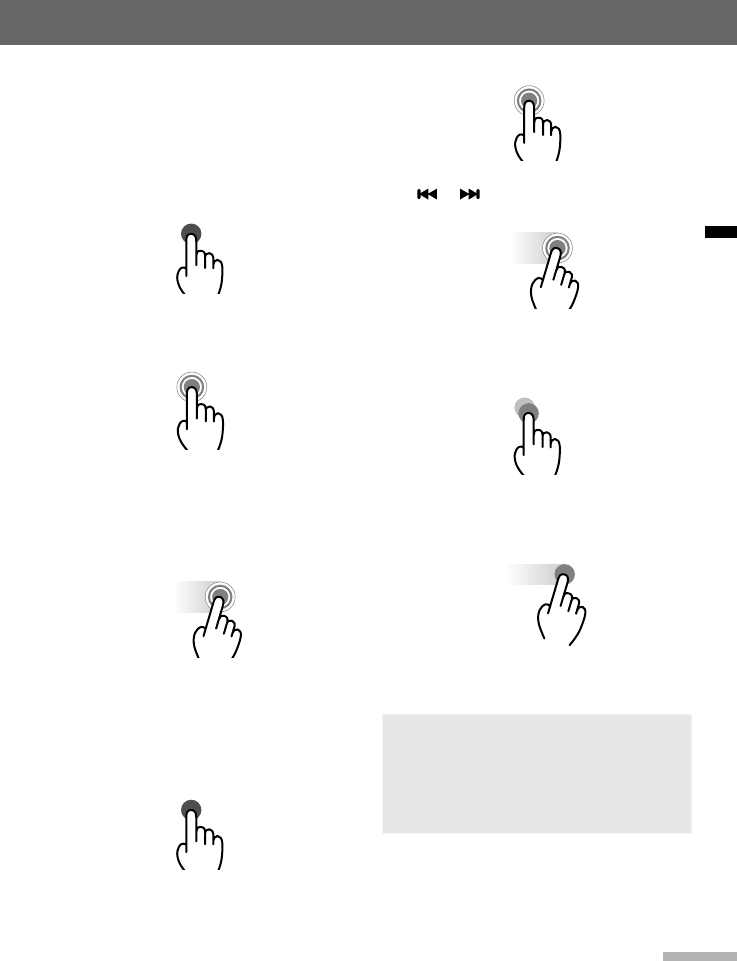
► Using the touch screen
Touch gestures for built-in
applications
Tapping
Open an application, select a menu item, or
activate an on-screen button.
Tapping and holding
Tap and hold the preset station shortcut
to store the current station. You can also
quickly change a value by tapping and
holding + or - when setting the time and
date.
Dragging
Rewind or fast-forward a track. Drag the
progress bar to the target position to rewind
or fast-forward a track.
Touch gestures for Apple CarPlay and
Android Auto (optional)
Tapping
Open an application, select a menu item, or
activate an on-screen button.
Tapping and holding
To rewind or fast-forward in a track, tap and
hold or .
Dragging
Rewind or fast-forward a track. Drag the
progress bar to the target position to rewind
or fast-forward a track.
Double-tapping
X2
Double-tap on a page or an image to
zoom in. Double-tap again to return to the
previous view.
Swiping
Swipe left, right, upwards or downwards on
the screen to scroll through pages or a list
of items.
Note
Touch gesture for Apple CarPlay and
Android Auto such as double-tapping,
spreading, pinching, and swiping are not
available with the built-in applications.
10
Getting startded
English
► Using the rearview camera
screen
If equipped, a rearview camera will display
the area behind the vehicle on the screen
when power is turned on and the reverse
gear is selected.
The rearview camera display is not a
substitute for proper and safe driving
procedures. Always drive safely and use
caution when backing up. The rearview
camera display may not detect all objects
behind the vehicle.
Caution
●The rearview camera's purpose is to
prevent accidents or injuries. Do not
use this function for entertainment
purpose.
●Objects in the rearview camera's
images may be closer or more distant
than they actually appear.
Note
The edges of images may differ slightly
depending on whether full-screen
images are displayed when reversing.
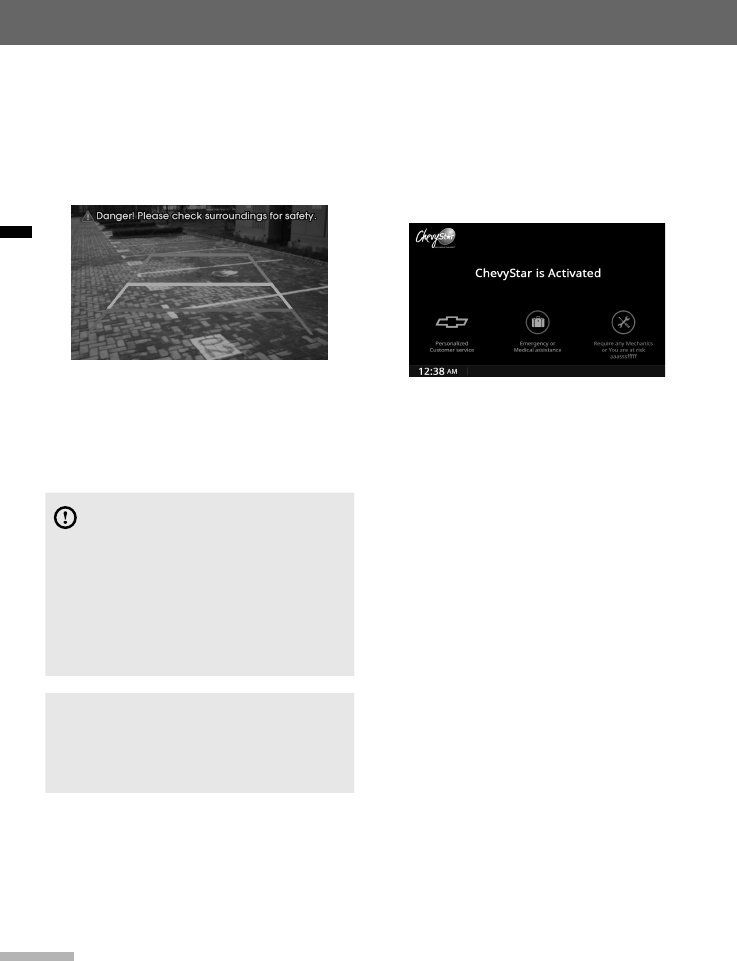
Using the ChevyStar
This section explains each menu on the
ChevyStar screen.
To open the ChevyStar screen, press the
ChevyStar button on the unit.
The following screen will be displayed.
Select the desired menu from this screen.
Select the desired menu from this screen.
11
English
Audio and Video System
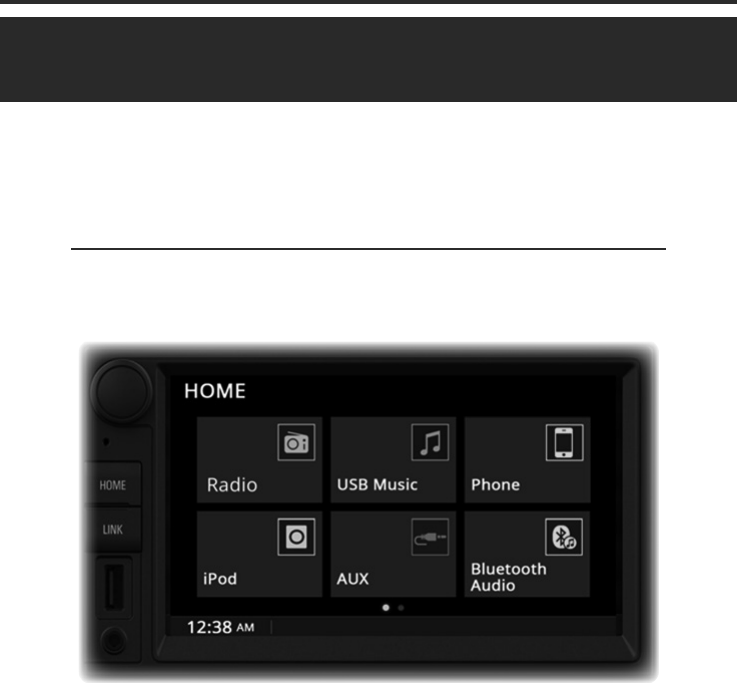
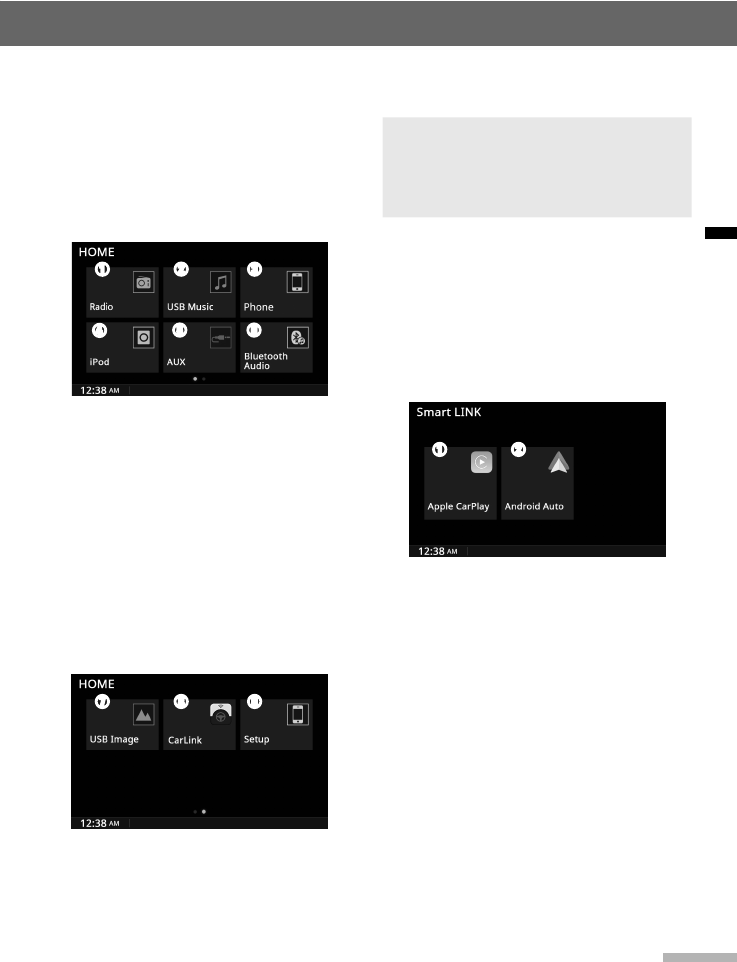
HOME menu screen
This section explains each menu on the
Home screen.
To open the Home menu screen, press the
HOME button on the unit. The following
screen will be displayed. Select the desired
menu from this screen.
<1 page>
➊
➍
➋
➎
➌
➏
➊ Radio: Enter the Radio screen.
➋ USB Music: Plays music from an
external USB device.
➌ Phone: Shows images stored on an
external USB device.
➍ iPod: Plays music from an iPod
connected to the unit.
➎ AUX: Plays an external device's output
audio signal on the unit.
➏ Bluetooth Audio: Plays audio from a
Bluetooth-enabled device paired with
the unit.
<2 page:Flick right to left>
➐➑ ➒
➐ USB Image: Shows images stored on
an external USB device.
➑ CarLink: Provides directions, makes
calls and plays music from an Android
phone connected to the unit (optional).
➒ Setup: Enter the Setup menu screen.
Note
CarLink may not be supported
depending on your vehicle’s options and
which region the unit is being used in.
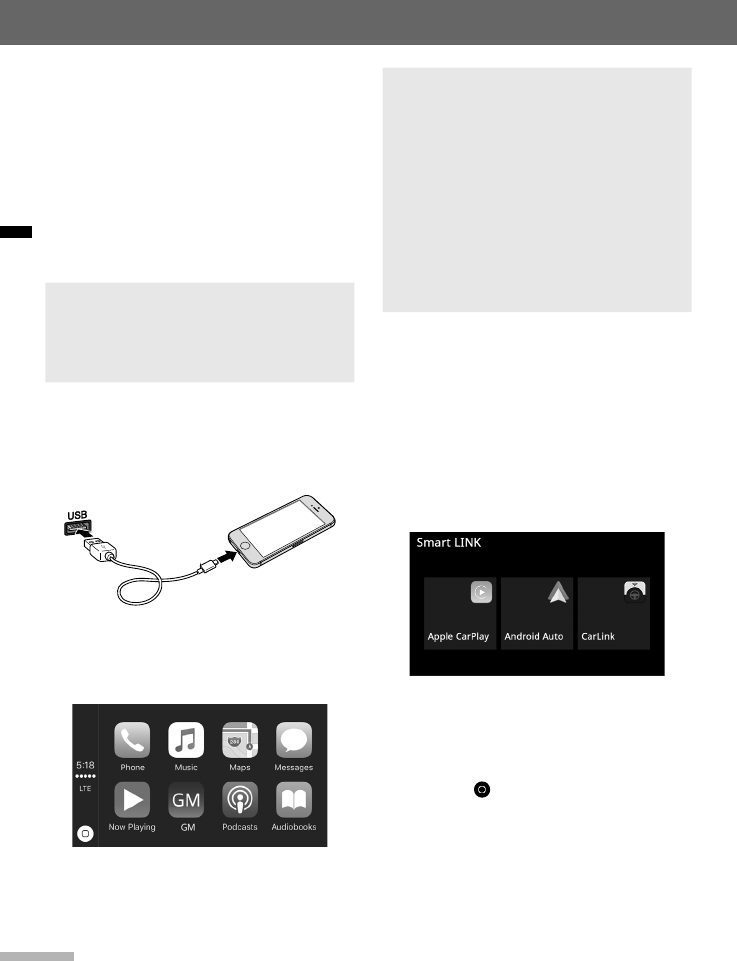
Smart LINK menu screen
This section explains each menu on the
Smart LINK screen.
To open the Smart LINK menu screen,
press the LINK button on the unit.
The following screen will be displayed.
Select the desired menu from this screen.
➊➋
➊ Apple CarPlay: Provides directions,
makes calls, send and receive
messages, and, plays music from an
iPhone connected to the unit (optional).
➋ Android Auto: Provides directions,
makes calls and plays music from an
Android phone connected to the unit
(optional).
12
Audio and Video System
English
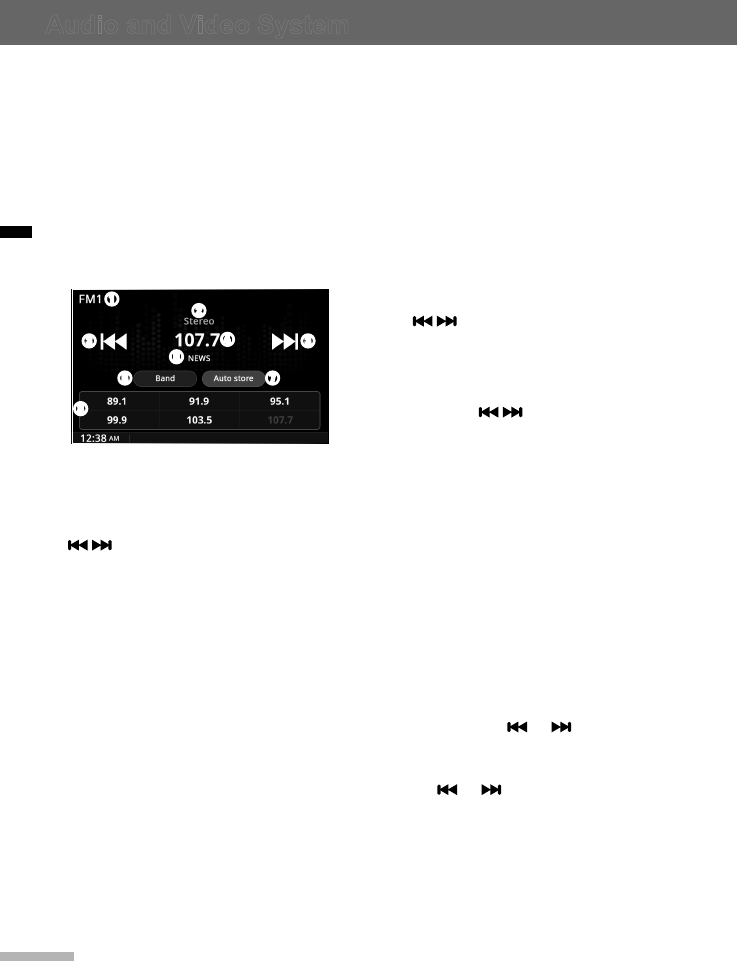
Radio
This section explains how to use radio and
access various radio frequencies (FM1,
FM2, and AM). Also, it covers automatically
or manually locating and storing your
favorite radio stations.
► FM/AM radio screen
To turn on the radio, press the HOME
button, and tap Radio on the HOME
screen. The FM/AM radio screen appears.
➊
➌ ➌
➍
➎
➏ ➐
➑
➋
➊ Frequency band: Displays the current
radio frequency band.
➋ Stereo: Indicates when FM stereo
reception is available.
➌ / : Tap to fine-tune above and
below the current frequency.
Tap and hold either button to quickly
adjust the frequency in that direction,
then release to automatically search for
radio stations.
➍ Radio frequency: Displays the current
station's radio frequency.
➎ Category name (optional): Displays
the category of the current station (The
category name may not be displayed
depending on radio stations.
➏ Band: Changes the radio band..
➐ Auto Store: Stores the strongest radio
stations to preset list automatically.
➐ Radio station name (optional): Displays
the name of the current radio station.
(The station name may not be displayed
depending on radio stations.)
➑ Preset station shortcuts: Tap to recall
the indicated frequency. Tap and hold
one of the shortcuts to store the current
station.
► Listening to radio stations
Changing the frequency band
Tap Band to change the frequency band to
FM1, FM2, or AM. The current frequency
band is displayed at the top left corner of
the screen.
Searching for a radio station manually
Tap / to manually fine-tune in a
desired frequency.
Searching for a radio station
automatically
Tap and hold / to quickly adjust the
frequency, then release to automatically
search for radio stations.
Selecting a preset radio station
To recall a preset station on the radio
screen, tap the desired preset station
shortcut.
► Storing radio stations manually
Up to six preset radio stations can be
stored for each frequency band (FM1, FM2,
and AM). Follow the instructions below to
manually store radio stations.
1 Tap Band to change to the desired
frequency band.
2 Tap and hold or to
automatically search for the station
you want to store.
Tap or to manually search for
the station you want to store.
3 Tap and hold a Preset station shortcut
to save the current radio station.
13
Audio and Video System
English
Note
The selected radio station is stored to the
preset number. If a new station is stored
using an existing preset number, the
previously stored station will be deleted
and the new station will be stored.
► Storing radio stations
automatically
1 Tap Band to change to the desired
frequency band.
2 Tap Auto Store.
The stations with the strongest
signals are automatically stored in
the list.
USB or iPod music player
This section explains how to use the USB
or iPod music player.
You can play MP3, WMA, WAV, and OGG
files that are stored on a USB device, and
any music files that are stored on an iPod.
► Connecting a USB device or iPod
to the iPod/USB port
Connect a USB device or iPod to the iPod/
USB port as shown below.
Music, video, or image playback will start
automatically after the data on the USB
device or iPod is recognized.
Note
If a USB device with no music, video,
or image files is connected, the USB
music, video and image players cannot
be opened.
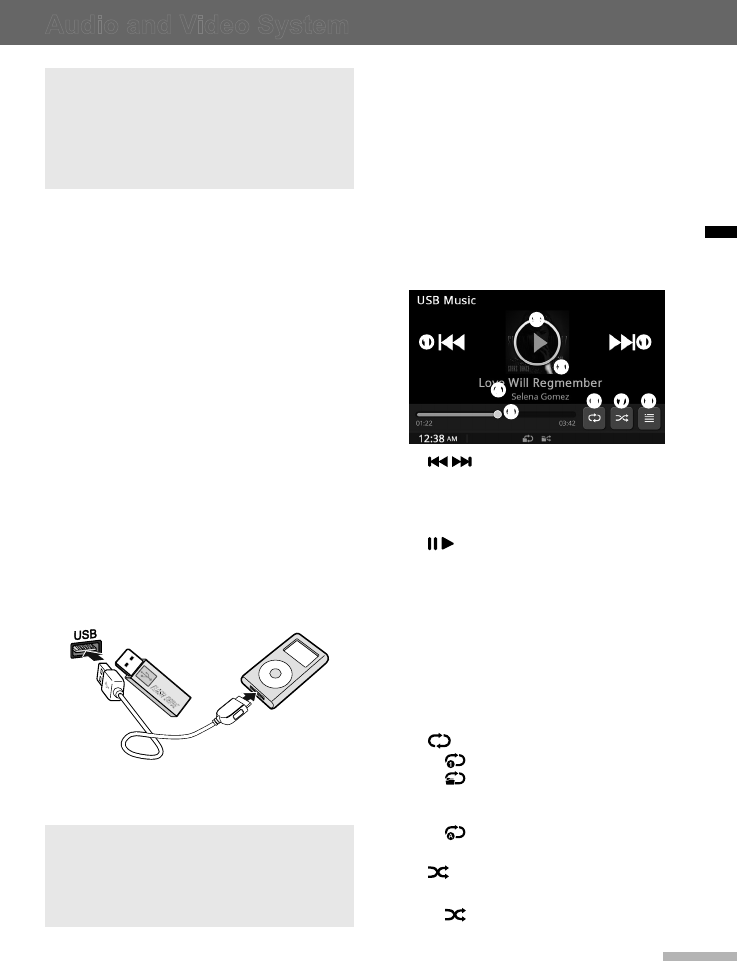
► USB or iPod music player screen
To open the USB or iPod music player
screen:
1 Press the HOME button on the unit to
display the Home menu screen.
2 Tap USB Music to open the USB
music player or iPod to open the iPod
music player.
The music player screen will be
displayed.
➋
➌
➍
➊
➑➐
➊
➏
➎
➊ / : Tap to skip to the previous or
next file.
➋ Thumbnail: Displays the current
album art.
➌ / : Tap to pause or resume
playback.
➍ Song information: Displays the
album, artist, song title, and file
name.
➎ Progress bar with time information:
Displays the progress bar for the
current song. Drag the progress bar
to the target position to rewind or
fast-forward a track.
➏ : Tap to change the repeat mode.
● : Repeats the current file.
● : Plays and then repeats all
files in the current folder (USB
only).
● : Plays and then repeats all
files on a device.
➐ : Tap to activate and select the
random playback modes.
● : Plays all files in the playlist in
14
Audio and Video System
English
a random order.
● : Plays all files in the current
folder in the playlist in a random
order.
➑ : Tap to open the file list.
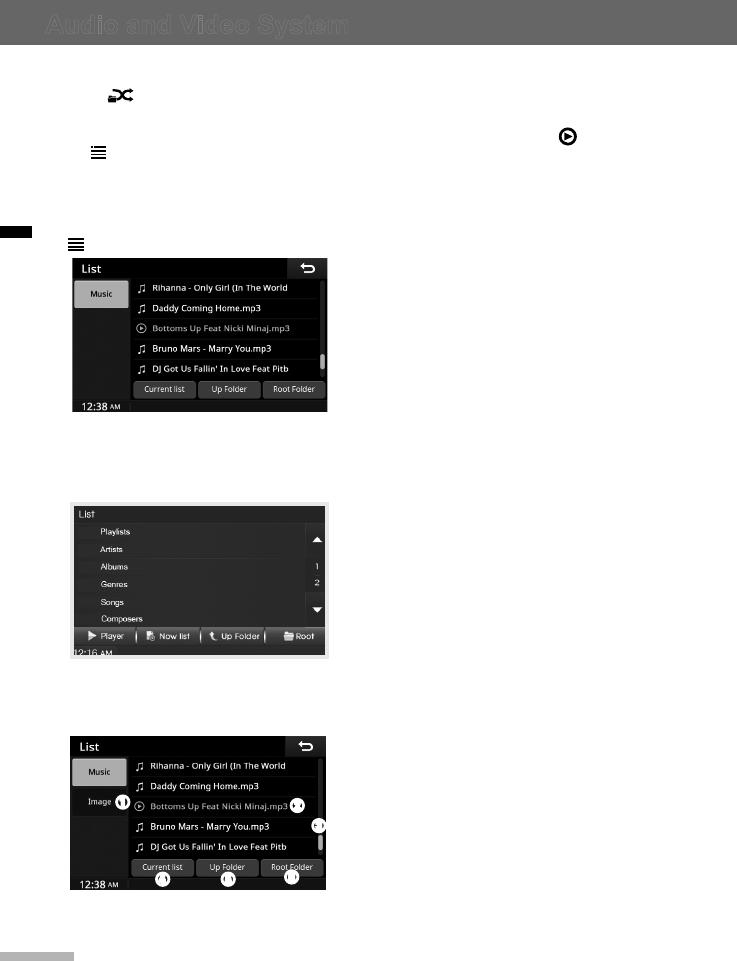
► Selecting a file from a list
1 From the music player screen, tap
.
For iPods:
When an iPod is connected, the
following category list will be
displayed.
For USB devices:
When a USB device is connected, the
following file list will be displayed.
➊➋
➌
➍ ➎ ➏
➊ Music/Image: Indicates the media
type that is available.
➋ File list: Displays the files in the
current folder. The currently playing
file is indicated by .
➌ Tap to navigate the files in the
playlist.
➍ Cureent list: Tap to return to the
current playlist.
➎ Up Folder: Tap to move to the
parent folder.
➏ Root Folder: Tap to move to the root
folder.
2 For the USB music player, select the
desired file to start playback.
For the iPod music player, select the
desired category and the file.

15
Audio and Video System
English
Caution
●When using a USB device or iPod,
make sure to disconnect the device
when it is not in use. Do not connect
the device until after you have
started the vehicle. The device may
be damaged if the device is already
connected when the ignition is turned
on.
●Do not allow the USB connector to
come into contact with body parts or
foreign substances.
●Repeatedly connecting or
disconnecting a USB device over a
short period may cause damage to the
device.
●Abruptly disconnecting a USB device
while it is in use may cause the
device to be damaged or to function
abnormally. Make sure to disconnect
the USB device only when the unit is
operating in a different mode.
●Do not use the USB I/F to charge
batteries or USB accessories that
generate heat. Doing so may reduce
performance or damage the device.
●In some cases, iPods may be
damaged if the ignition is turned off
while it is connected to the unit. When
the iPod is not being used, disconnect
it before turning the ignition off.
Note
●Some USB devices may not operate
properly due to compatibility issues.
Check that the device is supported
before using it.
●The unit will only recognize USB
devices formatted in FAT16 or FAT32
(NTFS format is not supported). When
you format a USB device, the unit may
not recognize a byte/sector selection
other than 512 bytes or 2,048 bytes.
●The amount of time required to
recognize a USB device may differ
depending on the type, size, or file
formats stored on the USB device.
Such time differences are not the
result of any malfunction. Please wait
while the unit attempts to recognize
the device.
●The unit supports only USB devices
designed to play music and video files
and images.
●When disconnecting a USB device, an
abnormal sound may occur.
●The unit may not recognize the USB
device if separately purchased USB
hubs and extension cables are used.
●If high capacity USB devices are used,
there may be situations that require
the logical drive to be partitioned for
user convenience. In these situations,
it will only be possible to play music on
a USB device from the top level of the
drive. When using partitioned drives,
save songs to play on the device
only in the top level of the logical
drive. Also, certain USB devices are
configured with a separate drive for
installing application programs, playing
music files from a separate drive
may not be possible for the reasons
described above.
16
Audio and Video System
English
●The unit may not operate properly
when accessing files from HDD, CF, or
SD memory.
●The unit will not support locked DRM
(Digital Rights Management) files.
●iPod is a registered trademark of the
Apple Corporation in the United States
and other countries.
●The unit supports iPod Nano, iPod
Touch, and iPhone models. Other
devices are not supported.
●Some iPod and iPhone models
may not be supported or provide
compatible connection.
●Only connect the iPod and the unit
using approved iPod cables. Other
connection cables cannot be used.
●The playback functions and the
displayed items on iPods may differ
when they are connected to the unit.
This can affect play order, method,
and information displays on the iPod.
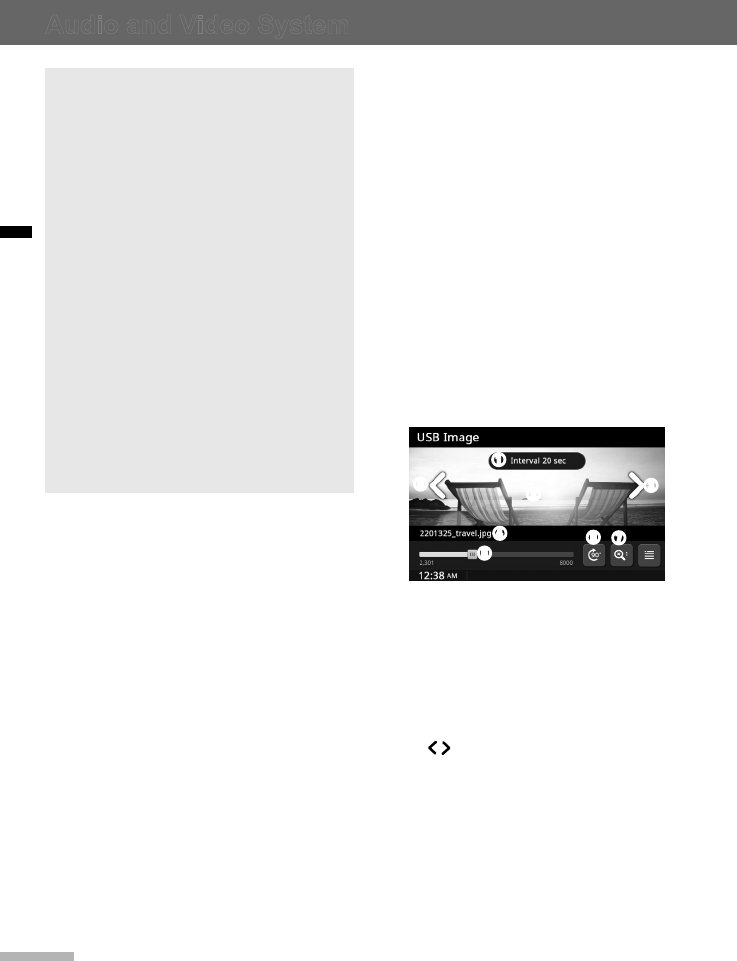
USB image player
This section explains how to use the USB
image player.
You can view JPG, BMP, and PNG files
that are stored on a USB device.
► USB image player screen
To open the USB image player screen:
1 Connect a USB device to the iPod/
USB port.
2 Press the HOME button on the unit to
display the Home menu screen.
3 Tap USB Image to open the USB
image player.
The USB image player screen will be
displayed.
➊
➌
➌➋
➍➐
➏
➎
➊ Slideshow interval: Tap to select the
time interval between slides.
➋ Full screen playback: Tap the
playback area on the screen to
display playback on a full screen and
hide the control panel. To unhide the
control panel, tap the playback area
again.
➌ / : Tap to skip to the previous or
next file.
➍ File name: Displays the name of the
current file.
➎ Progress bar with file indication:
Displays the progress bar for the
current file indication. Drag the
progress bar to the target position to
search a file with previouse mode.
17
Audio and Video System
English
➏ : Tap to rotate the image in a
clockwise direction.
➐ : Tap to zoom in (1x, 3x, 5x) on
the picture.
➑ : Tap to open the file list.
► Selecting a file from a list
1 From the image player screen, tap .
The following file list will be displayed.
12:38 AM l
List
Music
Image
Current list Up Folder Root Folder
Icon
Icon
Icon
Icon
01_My Photo_Flower.jpg
02_My Photo_Flower_New.jpg
1324.jpg
1325.jpg
1327.jpg
➊
➋
➌
➍➎ ➏
➊ Music/Image: Indicates the USB
media type that is available.
➋ File list: Displays the files in the
current folder. The currently playing
file is indicated by .
➌ Tap to navigate the files in the
playlist.
➍ Current List: Tap to return to the
current playlist.
➎ Up Folder: Tap to move to the
parent folder.
➏ Root Folder: Tap to move to the root
folder.
2 Select the desired file to start
playback.
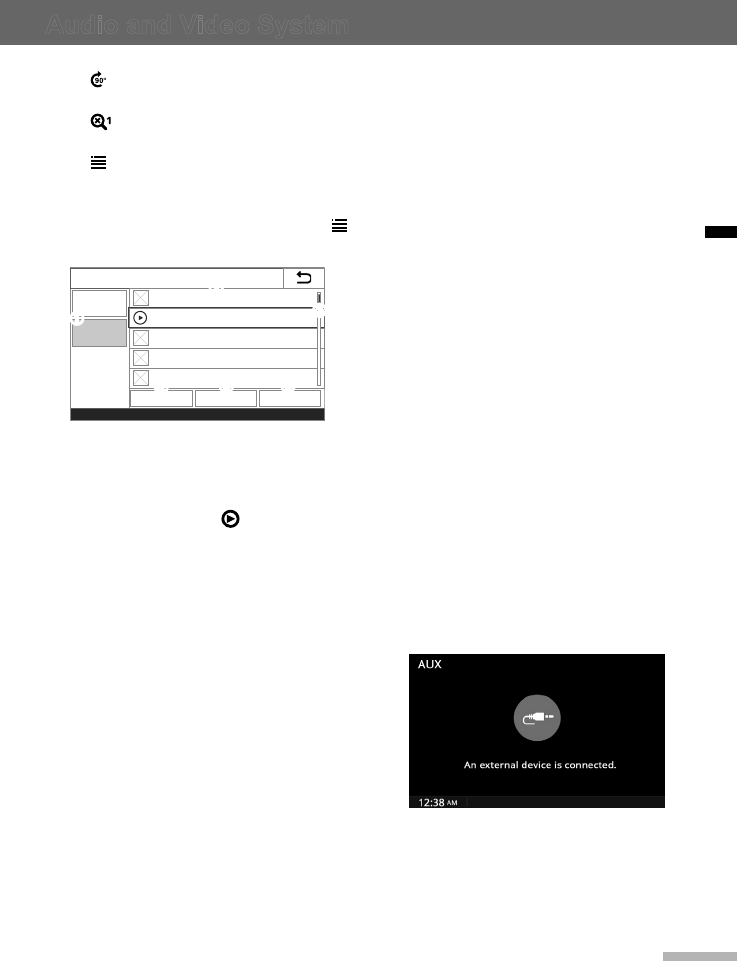
AUX player
This section explains how to use the AUX
player.
External audio devices can be connected
to the AUX port (stereo mini jack).
When a device is connected to the AUX
port and the source is selected, you can
listen to the device’s audio through your
car speakers. The volume level can be
adjusted to allow for differences between
the unit and the device.
► Connecting an external audio
device to the AUX port
1 Turn off the external audio device.
2 Connect the audio output of the
external device to the AUX port.
► Using the AUX player
1 Make sure the volume is adjusted
properly both for the unit and for the
connected device before starting
playback.
2 Press the HOME button on the unit to
display Home.
3 Tap AUX to open the AUX audio
screen.
4 Start playback at the external device.
5 Set the desired volume at the unit and
the external device.
18
Audio and Video System
English
Bluetooth audio player
This section explains how to use the
Bluetooth audio player.
This unit supports the A2DP (Advanced
Audio Distribution Profile). If your Bluetooth
mobile phone or music player supports this
profile, then music can be played through
this unit and the car's speakers.
Also, this unit supports the AVRCP (Audio
Video Remote Control Profile). If your
Bluetooth mobile phone or music player
supports this profile, then it is possible
to advance to the next track or replay
previous tracks by using the buttons on the
unit or the steering wheel (if fitted).
► Pairing and connecting with a
Bluetooth device
For information on how to pair and connect
the unit with a Bluetooth device, refer to
"Connecting a Bluetooth device" on page
20.
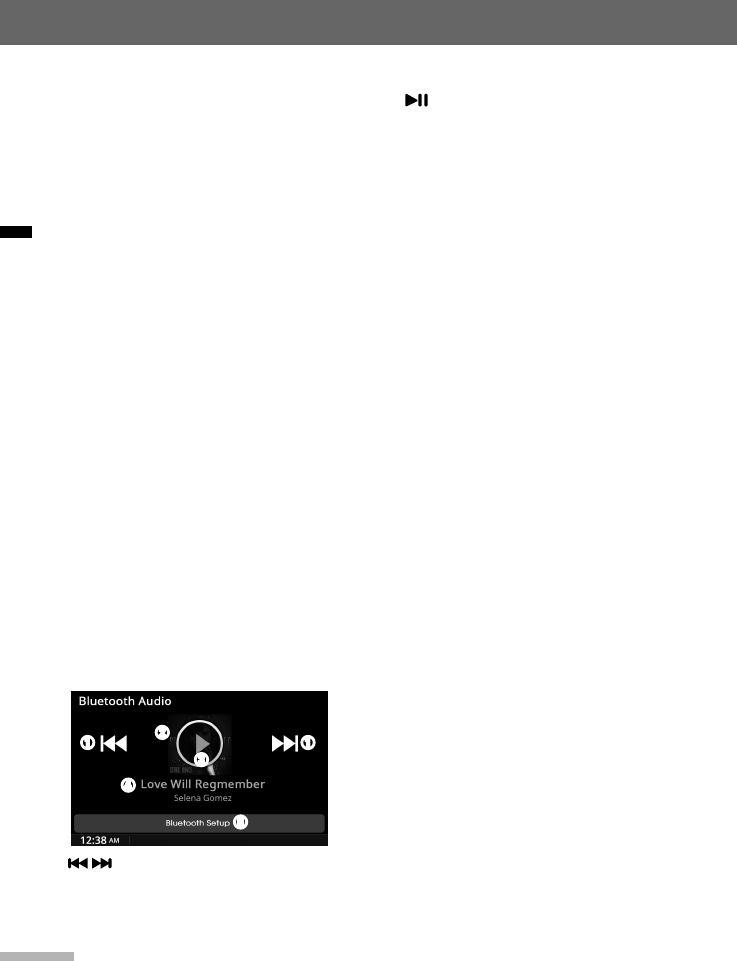
► Bluetooth audio player screen
To open the Bluetooth audio player screen:
Press the HOME button to display the
Home menu screen, and tap Bluetooth
Audio.
The Bluetooth audio player screen will be
displayed.
➋
➊ ➊
➌
➍
➎
➊ / : Tap to skip to the previous or
next file.
➋ Thumbnail: Displays the current album
art. In A2DP, the unit does not support
album art display.
➌ : Tap to pause or resume playback.
➍ Song information: Displays the album,
artist, and song details.
➍ Bluetooth Setup: Tap to open the
Bluetooth settings screen.

19
English
Bluetooth Connectivity
About the Bluetooth feature
The Bluetooth feature enables you to
wirelessly connect two devices that are
near to each other. You can connect
your unit and a wide variety of Bluetooth-
enabled devices.
Note
●In some locations, there may be
restrictions when using Bluetooth
connections.
●Depending on the type and
specifications of the Bluetooth device,
your unit may respond differently when
connected.
●Some devices, especially those that
are not tested or approved by the
Bluetooth SIG, may be incompatible
with your unit.
► Pairing devices
Pairing is a process that enables mutual
registration between two devices. The
paired devices share and record the other's
Bluetooth information.
When two devices are paired for the first
time, you must enter a Bluetooth passkey.
Once the devices are paired and an initial
connection is established, the devices will
recognize and automatically connect to
each other each time they are in range.
Note
●Depending on the devices, you may
need to enter a passkey each time
they connect.
●Depending on the devices, the
passkey may be referred to
as "passcode", "PIN code", or
"password".
► Connecting devices
After the devices are paired, subsequent
Bluetooth connections for previously
paired devices start automatically. You
can connect to any of the devices on the
paired device list. Once you are connected,
you can access various Bluetooth
functions, such as hands-free calling or
playing music, depending on the device's
specifications.
► Using the hands-free feature and
listening to music
Once a Bluetooth connection is made, you
can make or answer calls using hands-
free features and listen to music from a
Bluetooth-connected device.
For more information on how to use
call functions using Bluetooth, refer to
"Phone functions" on page 22. For more
information on how to play music using
Bluetooth, refer to "Bluetooth audio player"
on page 18.
Note
Some Bluetooth devices may not support
all available functions.
Bluetooth connection
Connect your unit with other Bluetooth-
enabled devices, such as smartphones and
music players.
Before establishing a connection, ensure
that the other device is ready to connect
using the Bluetooth feature. The Bluetooth
feature and the visibility option should be
activated on the device so that it can be
detected by other devices.
20
Bluetooth Connectivity
English
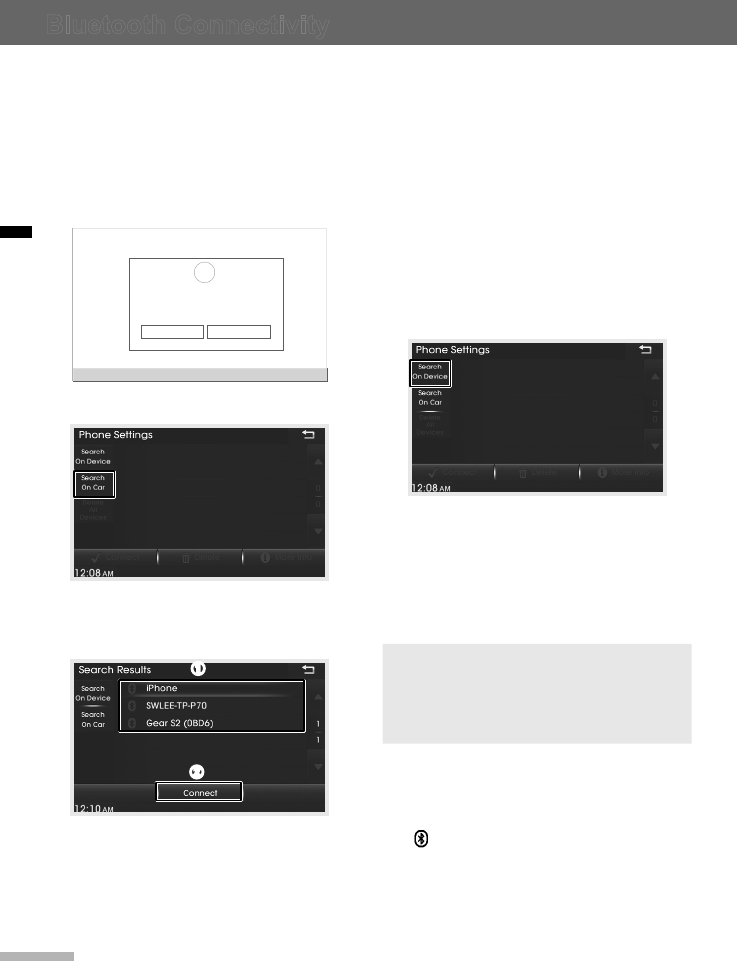
► Connecting a Bluetooth device
To search for and connect a Bluetooth-
enabled device from the unit:
1 Tap PHONE on the Home menu
screen to open the phone screen.
2 Tap Yes. If the pop-up message does
not appear, tap BT setup > Pairing.
12:38 AM l
No Bluetooth device connected.
Do you wish to connect a Bluetooth device?
?
Yes No
3 Tap Search On Car.
4 From the list of detected devices,
tap the name of the device, and tap
Connect.
➊
➋
5 On the device that you are connecting
to, confirm the pairing and data
access request from the unit.
6 If a passkey is required at the
Bluetooth device, enter the passkey
displayed on the Bluetooth device
and tap OK.
To search for and connect to the unit
from a Bluetooth device:
1 Tap PHONE on the Home menu
screen to open the phone screen.
2 Tap Yes. If the pop-up message does
not appear, tap BT setup > Pairing.
3 Tap Search On Device. The unit can
be detected as "Chevrolet" by other
devices for two minutes.
4 Within two minutes, pair and connect
the Bluetooth device by following the
device's specific procedures.
5 If the Bluetooth device requests a
passkey, enter the default passkey for
the unit, "0000".
Note
To change the unit's passkey, go to the
phone screen, tap BT setup > Change
Passkey.
When the devices are paired and
connected, the name of the Bluetooth
device appears on the screen showing
"Bluetooth device connected" as its status
and . The Bluetooth device is added to
the unit's paired device list and is ready to
be used with the unit.

21
Bluetooth Connectivity
English
Note
●The unit can pair with up to five
Bluetooth devices. Device information
is stored in the unit's memory and
device pairing will not be required for
subsequent connections unless the
devices are deleted from the paired
device list.
●For hands-free operation, only one
mobile device can be connected to the
unit at a time.
●Bluetooth connections between your
unit and mobile devices are normally
established using the Hands Free
Profile (HFP). However, some mobile
devices may only allow a connection
using the Head Set Profile (HSP).
In HSP, some functions may not be
available.
► Disconnecting a Bluetooth
device
1 Tap PHONE on the Home menu
screen to open the phone screen.
2 Tap BT setup > Pairing.
A list of paired devices will be
displayed and the currently connected
device will be highlighted.
3 Tap Disconnect > Yes.
The connection between the unit
and device ends and the search and
connect buttons on the screen are
activated.
Note
To search for and pair with other
devices or connect the unit with another
paired device, you must disconnect the
currently connected device.
► Deleting Bluetooth devices
1 Tap PHONE on the Home menu
screen to open the phone screen.
2 Tap BT setup > Pairing.
3 Select a device, and then tap Delete
> Yes.
The device will be deleted from the
list and the data and information
related to the device will be also
deleted.
22
Bluetooth Connectivity
English
Phone functions
After connecting the unit to a smartphone,
you can use various call functions that are
available on the connected smartphone
from the unit.
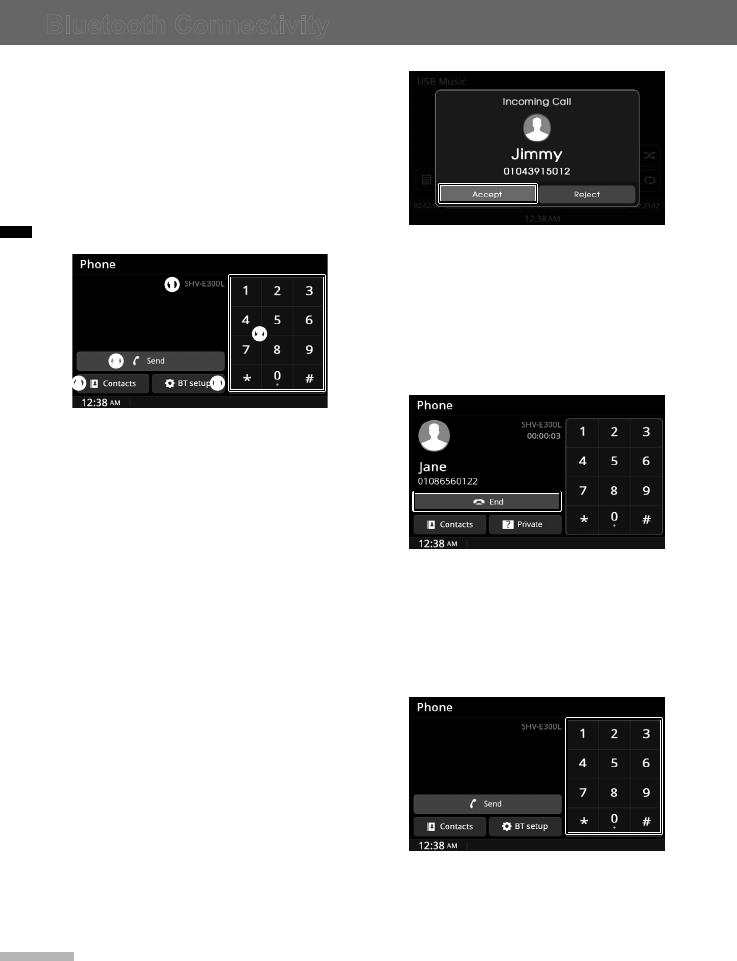
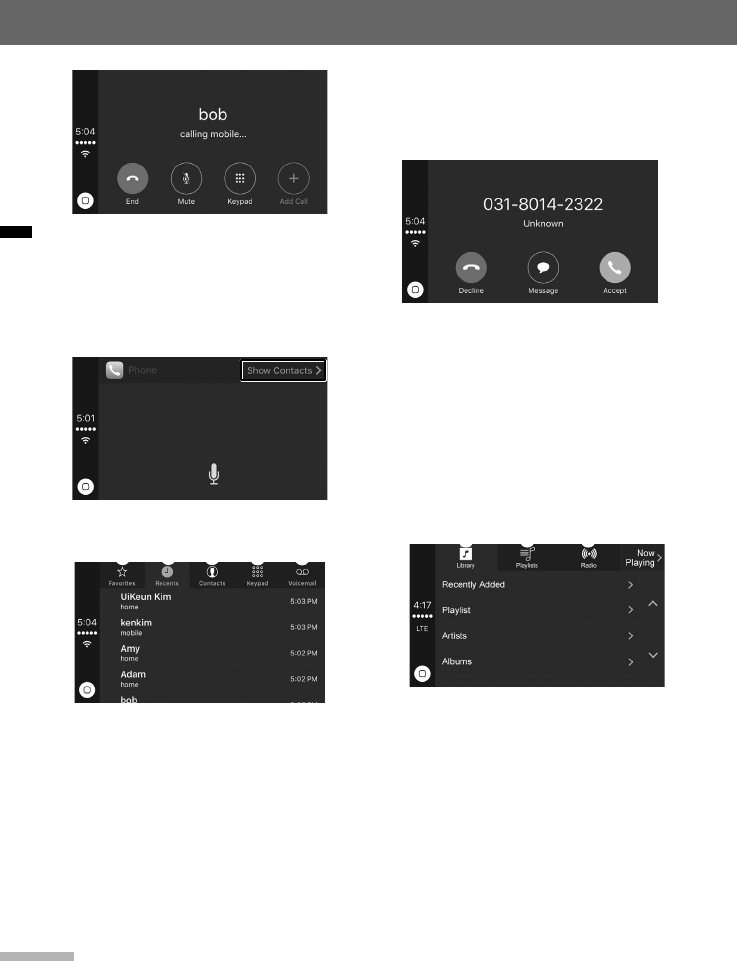
► Phone screen
Tap PHONE on the Home menu screen to
open the Phone screen.
➊
➋
➌
➍ ➎
➊ Phone name: View the name of the
currently connected smartphone.
➋ Keypad: Tap to enter a phone
number. Tap and hold "0" to enter the
international prefix.
➌ Send: Tap to make a call. When there is
no entered number, the call history list
opens.
➍ Contacts: Tap to open the phone's
contact list.
➎ BT setup: Tap to open the Bluetooth
settings screen.
► Accepting a call
When a call is received at the unit, the
Incoming Call screen will appear.
1 Tap Accept on the screento accept
the call.
To reject the call, tap Reject on the
screen.
2 Talk with the other party through
the speaker and the unit's built-in
microphone.
3 Tap End on the screen to end the
call.
► Making a call
Using the keypad
1 From the phone screen, tap the
buttons on the keypad to enter a
phone number.
2 Tap Send on the screen to make a
call.
0123456789
23
Bluetooth Connectivity
English
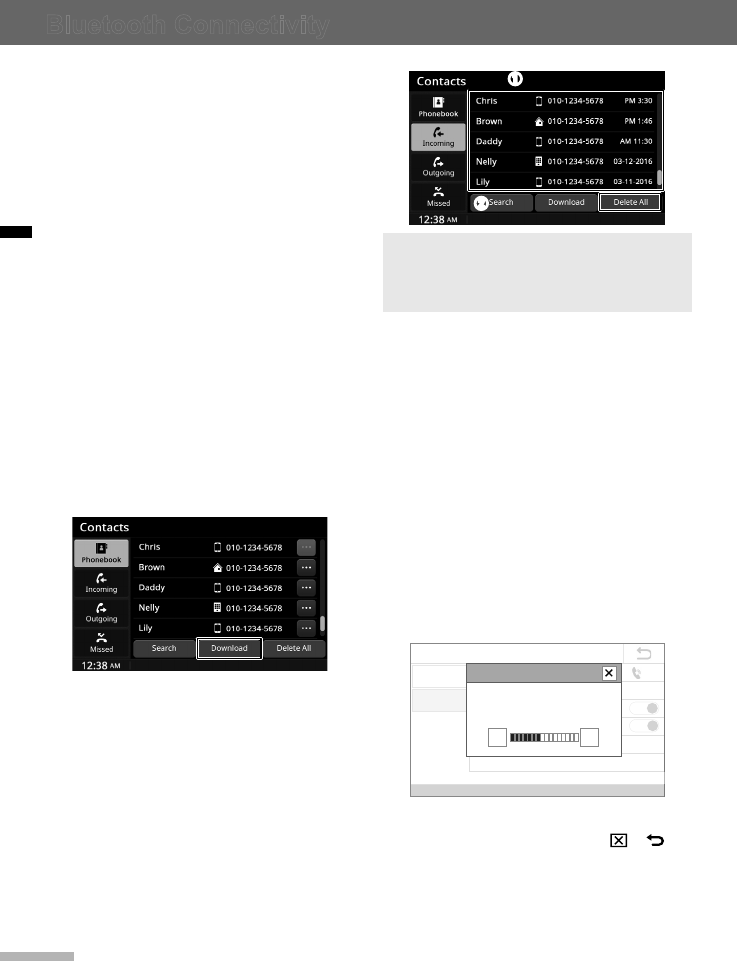
Using the phone book
1 From the Phone screen, tap
Contacts to open the Contacts menu
screen.
2 Tap Phonebook > Download to
import the phone book from the
smartphone.
3 Select a record from the phone book
list.
To search for a phone book record by
name, tap Search.
To enter the character for searching,
and tap Search.
4 Tap Call to call the phone number
from the selected record.
To make a call to another phone
number for the selected phone book
record, tap , select the desired
number, and then tap Call.
Using the call history
1 From the phone screen, tap
Contacts.
The Contacts menu screen will be
displayed.
2 Tap Download to import the call
history from the smartphone.
3 Select a record from the call history
list.
To select the call history type, tap
Outgoing, Incoming or
Missed.
4 Tap Call to call the phone number
from the selected record.
► Using options during a call
To adjust the volume during a call, rotate
the VOL dial.
To switch the call to the smartphone for a
private conversation, tap Private. To switch
the call back to the unit, tap Handsfree.
Warning
Do not use the phone in private mode
when you are driving. Stop driving and
park in a safe location before using
private mode.
24
Bluetooth Connectivity
English
► Managing the call history and the
phone book
You can import call history and phone book
data from the smartphone to use various
call functions and delete obsolete items
from the unit.
Importing call history and phone book
records
The latest call history and phone book
records on the smartphone can be
synchronized with the unit. Import the
records to the unit when you connect the
unit to a smartphone for the first time or
whenever there are any changes to the
smartphone's call history or phone book
records.
1 From the phone screen, tap
Contacts to open the phone book.
2 Tap Download.
The records will be updated with the
latest data from the smartphone.
Deleting call history and phone book
records
To delete a call history record:
1 From the Contacts screen, tap
Incoming, Outgoing or Missed to
open the call history.
2 Select an record and tap Delete >
Yes.
➊
➋
Note
Deleting records from the unit's call
history or phone book does not affect the
data stored in the phone.
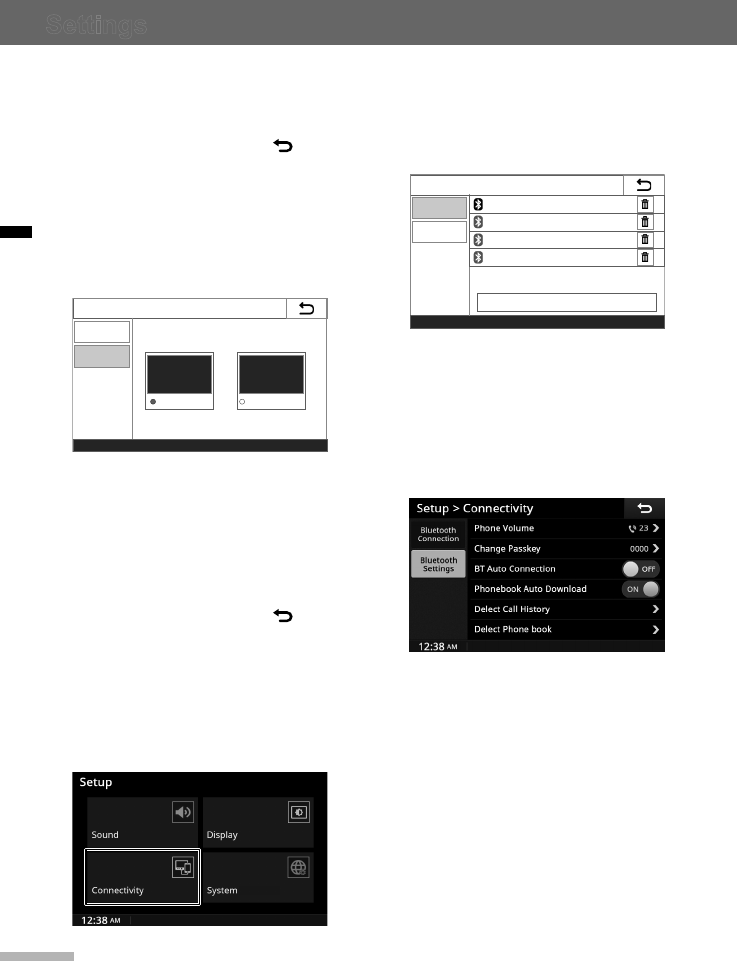
Bluetooth settings
Customize the default settings for the
phone and the Bluetooth feature.
1 Tap BT setup on the Phone screen to
open the Connectivity Setting screen.
2 Tap Bluetooth Settings to open the
Bluetooth Setting screen.
► Setting the phone volume
1 From the Bluetooth Setting screen,
tap BT setup > Phone Volume.
2 Tap
-
or + to adjust the phone
volume.
Setup > Connectivity
12:38 AM l
Bluetooth
Connection
Bluetooth
Settings
Phonebook Auto Download
BT Auto Connection
Change Passkey
Phone Volume
Delete Call History
Delete Phonebook
6 >
0000 >
>
>
ON
ON
Phone Volume
- +
You can preset the phone volume
which is applied to active screen.
3 To confirm your selection, and return
to the previous screen, tap > .
25
Bluetooth Connectivity
English
► Changing the Bluetooth passkey
1 From the Bluetooth Setting screen,
tap Change Passkey.
The current passkey will be displayed
on the top of the keypad.
2 Tap to delete each digit in the
current passkey.
Setup > Connectivity
12:38 AM l
Bluetooth
Connection
Bluetooth
Settings
Phonebook Auto Download
BT Auto Connection
Change Passkey
Phone Volume
Delete Call History
Delete Phonebook
6 >
0000 >
>
>
ON
ON
Change Passkey
0000 ←
1 2 3 4 5
6 7 8 9 0
3 When all of the old passkey digits are
deleted, enter the new passkey using
the keypad.
4 To confirm your selection, and return
to the previous screen, tap > .
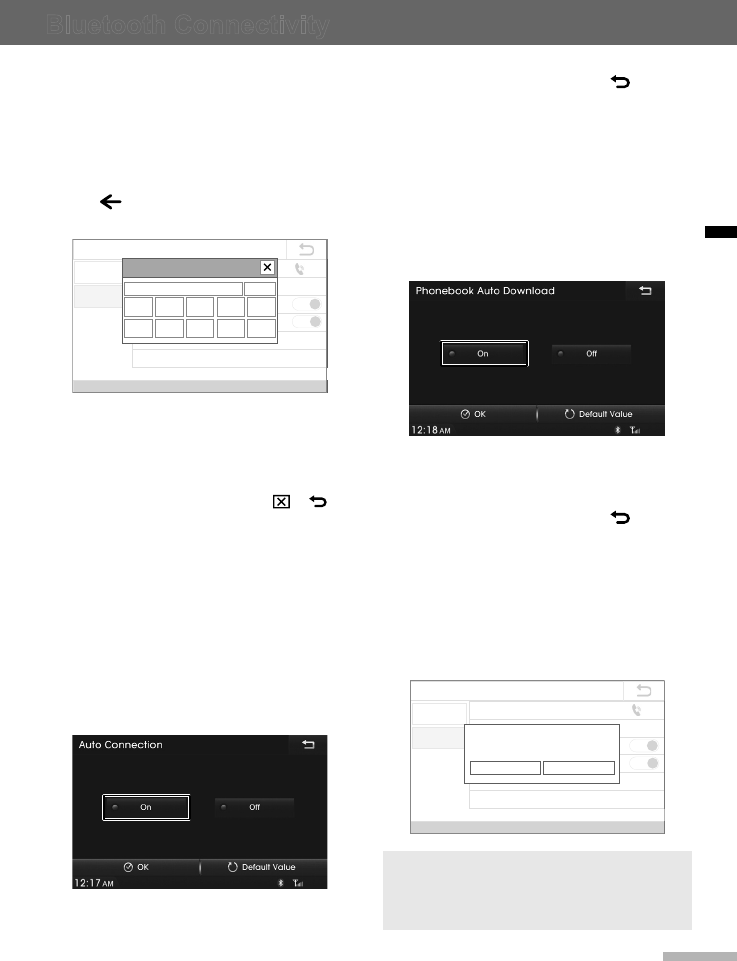
► Setting auto connection mode
1 From the Bluetooth Setting screen,
tap BT Auto Connection.
2 Tap On to activate auto connection or
Off to deactivate it.
When auto connection is activated,
the unit will automatically search for
and connect to the device that was
most recently connected.
3 To confirm your selection, and return
to the previous screen, tap .
► Downloading phonebook
contacts automatically
1 From the Bluetooth Setting screen,
tap Phonebook Auto Download.
2 Tap On to set the device to
automatically download phonebook
contacts each time you connect your
phone to it.
To disable the phonebook auto
download mode, tap Off > OK
3 To confirm your selection, and return
to the previous screen, tap .
► Deleting all Call History or
Phonebook all contacts
1 From the Bluetooth Setting screen,
tap Delete Call History or Delete
Phonebook.
2 Tap Yes to delete all records.
Setup > Connectivity
12:38 AM l
Bluetooth
Connection
Bluetooth
Settings
Phonebook Auto Download
BT Auto Connection
Change Passkey
Phone Volume
Delete Call History
Delete Phonebook
6 >
0000 >
>
>
ON
ON
Do you want to delete call history?
YES NO
Note
Deleting records from the unit's call
history or phone book does not affect the
data stored in the phone.
26
English
Apple CarPlay (optional)
About Apple CarPlay
Apple CarPlay integrates your iPhone’s
apps with your car’s media system,
allowing you to access the applications
and your device more easily. You can get
directions, make calls, send and receive
messages, and listen to music.
Apple CarPlay is available for all Lightning-
enabled iPhones (currently supported
iPhones are 5, 5C, 5S, 6/6 plus).
Note
Apple CarPlay may not be supported
depending on your vehicle’s options and
which region the unit is being used in.
Accessing Apple CarPlay
1 Plug your iPhone into the iPod/USB
port via a Lightning cable.
When your iPhone is successfully
connected to the iPod/USB port,
the Apple CarPlay home screen will
appear.
Note
●If your iPhone is locked, you need
to enter the passcode to unlock the
iPhone. To access Apple CarPlay
while the iPhone is locked, on your
iPhone, tap Settings > General >
CarPlay and set your iPhone to Allow
CarPlay While Locked.
●If your iPhone is not successfully
connected, a pop-up message will
appear. Then, reconnect the iPhone to
the iPod/USB port.
2 Tap a desired app to open it.
To end Apple CarPlay, unplug the Lightning
cable from the iPod/USB port.
Returning to the Apple
CarPlay home screen
To return to the Apple CarPlay home
screen, press the LINK button on the unit
and tap Apple CarPlay.
Or, press the MODE button on the steering
wheel several times until the Apple CarPlay
home screen appears.
To return to the Apple CarPlay home
screen while using any application in Apple
CarPlay, tap at the bottom left of the
screen.
27
English
Apple CarPlay (optional)
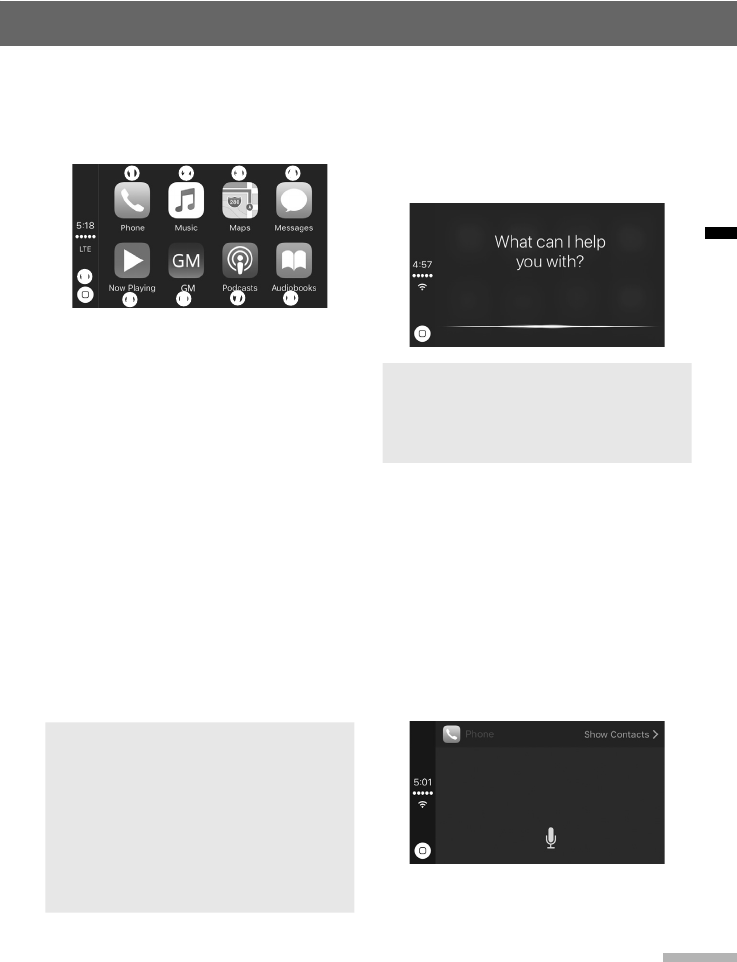
Apple CarPlay home screen
The following are the main applications
available on the Apple CarPlay home
screen.
➊
➎
➋
➏
➌
➐
➍
➑
➒
➊ Phone: Tap to make a call.
➋ Music: Tap to play music stored on your
iPhone.
➌ Maps: Tap to view the map or search for
a location.
➍ Messages: Tap to hear or send a text
message using Siri.
➎ Now Playing: Tap to play streaming
music or a music file that are previously
played or currently playing.
➏ GMI: Tap to display the Home menu
screen.
➐ Podcasts: Tap to play podcasts stored
on your iPhone.
➑ Audiobooks: Tap to play audio books
stored on your iPhone.
➒ Home: Tap to return to the Apple
CarPlay home screen.
Note
●Applications not shown in the Apple
CarPlay home screen are not
supported by Apple CarPlay. The
applications supported by Apple
CarPlay may change in the future.
●Apple CarPlay is optimized for iOS
8.4. Application features may vary
depending on your iOS version.
Activating Siri
1 Tap and hold the Home button on the
Apple CarPlay home screen or on
your iPhone.
2 Say the desired command loudly.
Note
When using Siri, say commands loudly
so that Apple CarPlay can properly
recognize your voice.
Phone
► Making a call using Siri
1 From the Apple CarPlay home
screen, tap Phone.
You can also press the PHONE
button on the unit to open the Phone
application.
2 Say the name of your desired contact.
Your iPhone will then call the desired
contact.
28
Apple CarPlay (optional)
English
► Making a call using Contacts
1 From the Apple CarPlay home
screen, tap Phone.
2 Tap Show Contacts.
3 Select the desired calling option.
➊➋➌➍ ➎
➊ Favorites: Tap to see a list of your
favorite contacts.
➋ Recents: Tap to see a list of recently
called contacts.
➌ Contacts: Tap to call a number
stored in your contacts.
➍ Keypad: Tap to enter a phone
number.
➎ Voicemail: Tap to start a voicemail.
► Accepting or declining a call
When you receive an incoming call on
your iPhone while using Apple CarPlay, the
following screen will appear.
Tap Accept to accept the call or tap
Decline to decline the call.
Music
► Playing music
1 From the Apple CarPlay home
screen, tap Music.
2 Tap a desired category and select a
song stored on you iPhone.
➊ ➋ ➌
➊ Library: Tap to select a library.
➋ Playlists: Tap to listen to the music
in default playlists or your own
playlists.
➌ Radio: Tap to listen to the iPhone’s
radio.
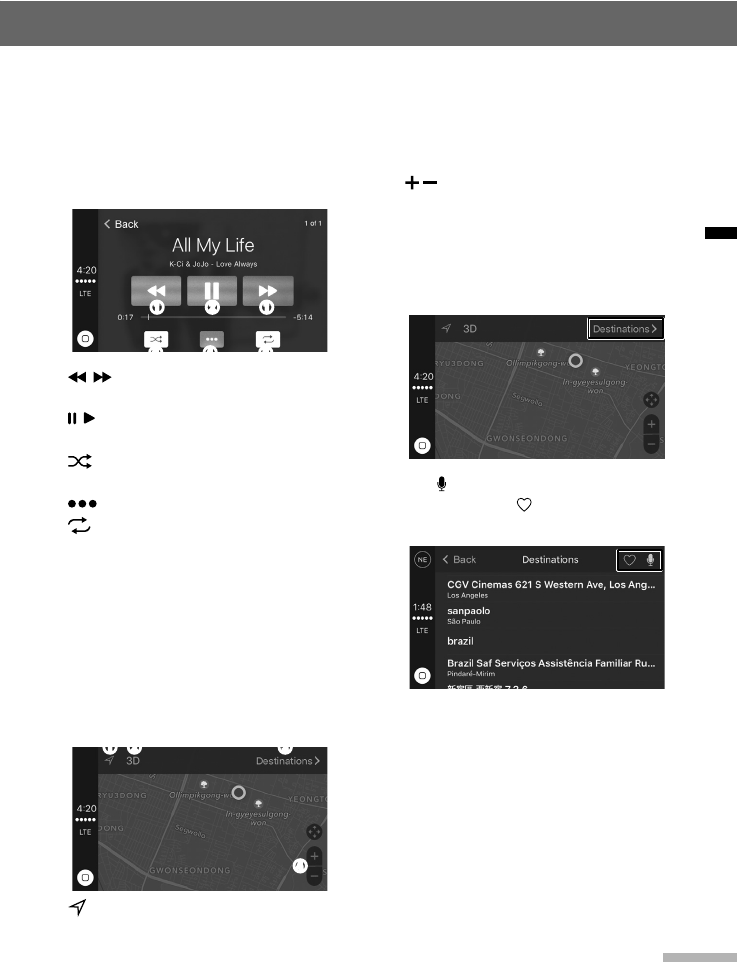
29
English
Apple CarPlay (optional)
Now Playing
From the Apple CarPlay home screen, tap
Now Playing.
This feature plays music from third-party
applications or music files stored in your
iPhone.
➊ ➊
➌ ➍ ➎
➋
➊ / : Tap to skip to the previous or
next song in the list.
➋ / : Tap to pause or resume the
playback.
➌ : Tap to select or deselect the shue
playback mode.
➍ : Tap to open the more menu.
➎ : Tap to select or deselect the repeat
playback mode.
Maps
► Viewing your current location
From the Apple CarPlay home screen, tap
Maps.
Your current location will be indicated on
the map.
➊ ➋ ➌
➍
➊ : Tap to locate your current position
on the map.
➋ 3D: Tap to change the map to a 3D
view.
➌ Destinations: Tap to search for desired
locations or favorite locations.
➍ / : Tap to zoom in or zoom out the
current location on the map.
► Searching for a location
1 From the Apple CarPlay home
screen, tap Maps > Destinations.
2 Tap to search for the desired
location or tap to search for a
favorite location.
30
Apple CarPlay (optional)
English
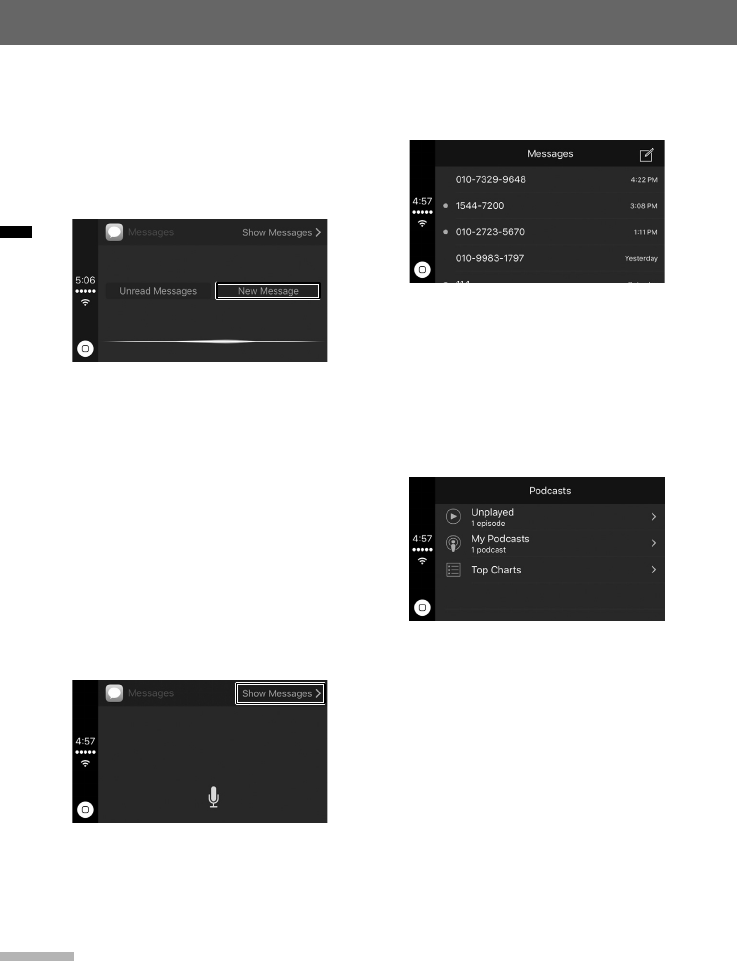
Messages
► Sending a text message
1 From the Apple CarPlay home
screen, tap Messages.
2 Tap New Message.
3 Say the desired name from your
contacts to send a text message
using Siri.
Siri will ask you what you want to tell
the contact.
4 Say the message out loud.
A text message will be sent to the
contact.
► Hearing a text message
1 From the Apple CarPlay home
screen, tap Messages > Show
Messages.
2 Select a message.
Siri will read the selected message
out loud.
Podcasts
► Playing a podcast
1 From the Apple CarPlay home
screen, tap Podcasts.
2 Tap My Podcasts and select a
desired podcast to play.
● Unplayed: Tap to open the list of
unplayed podcasts stored in your
iPhone.
● My Podcasts: Tap to open the list of
podcasts stored in your iPhone.
● Top Charts: Tap to open the list of
top chart rankings in Potcasts.
3 Select a podcast.
31
English
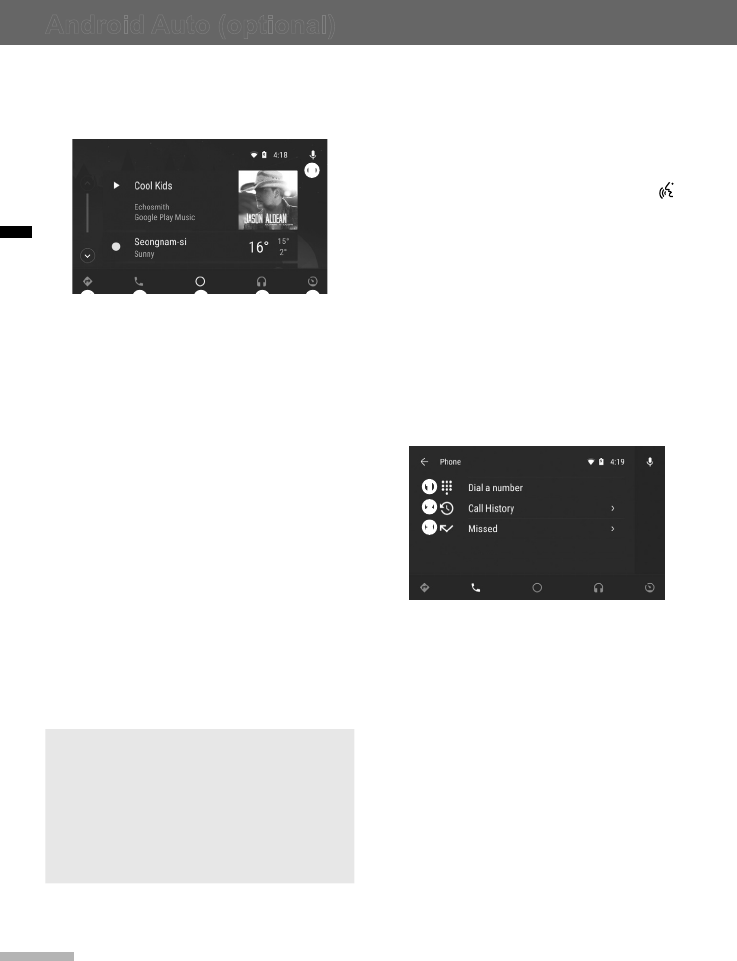
Android Auto (optional)
About Android Auto
Android Auto allows you to gain access to
maps, make phone calls, listen to music,
and more by connecting a compatible
Android phone to the unit.
Note
Android Auto may not be supported
depending on your vehicle’s options and
which region the unit is being used in.
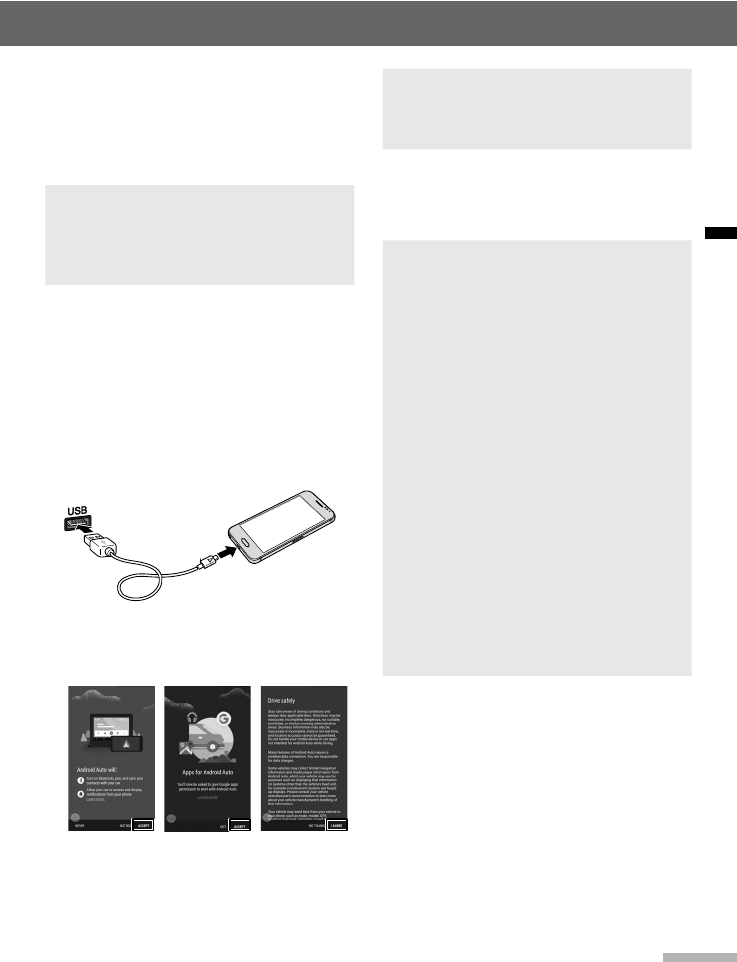
Accessing Android Auto
1 Download the Android Auto app on
your Android phone from the Google
Play Store.
2 Plug your Android phone into the
iPod/USB port via the USB cable
provided with your Android phone.
3 When initially accessing Android Auto,
tap ACCEPT or I AGREE on your
Android pone.
Note
The user agreement screens may differ
depending on Android phones.
The Android Auto screen will appear.
To end Android Auto, unplug the USB
cable from the iPod/USB port.
Note
●To use Android Auto, you need an
Android phone running 5.0 (Lollipop)
or higher.
●While connected to Android Auto, calls
can only be made via Android Auto,
not through the Bluetooth connection.
●Android Auto requires a compatible
Android phone with an active cellular
connection and data plan. Your
carrier’s rate plans will apply.
●Android Auto features may operate
differently than similar features on
your phone.
●Android Auto relies on the
performance of your phone. If you
experience performance issues,
restart your apps. Then, disconnect
and reconnect your phone.
●To set Android Auto on or off, refer to
“Enabling or disabling Android Auto
(optional)” on page 42
32
Android Auto (optional)
English
Android Auto (optional)
Android Auto screen
The following are the main menu options
available on the Android Auto screen.
➊ ➋ ➌ ➍ ➎
➏
➊ Navigation: Tap to view a map and
operate the navigation feature. You can
only use this system or the pre-installed
navigation system to set a destination
with routing guidance.
➋ Phone: Tap to make phone calls or hear
your voicemail.
➌ Google Now (Home): Tap to display
useful information when required.
➍ Music: Tap to play music from
compatible apps. Also, tap this icon to
switch between music apps.
➎ Vehicle info: Tap to check your vehicle
info or call roadside assistance.
➏ Voice: Tap to use voice commands to
operate Android Auto. You can also
press and hold the PHONE button on
the unit to use Google voice commands.
With Google voice recognition, you can
make phone calls, view maps, and play
music.
Note
●To return to the Home menu screen,
tap the Vehicle info icon > Return to
HYUNDAI MOTORS.
●You can use compatible third-party
apps. Refer to the Android Auto
website for a list of compatible apps.
Phone
► Making a call using Google voice
recognition
1 From the Android Auto screen, tap the
Voice icon or press and hold the
button on the unit.
2 Say the name of your desired contact.
Android Auto will then call the desired
contact.
► Making a call using phone
options
1 From the Android Auto screen, tap the
Voice icon > Phone.
2 Select the desired calling option.
➊
➋
➌
➊ Dial a number: Tap to dial a number
and make a call.
➋ Call History: Tap to see your call
history and make a call.
➌ Missed: Tap to see your missed calls
and make a call.
33
English
Android Auto (optional)
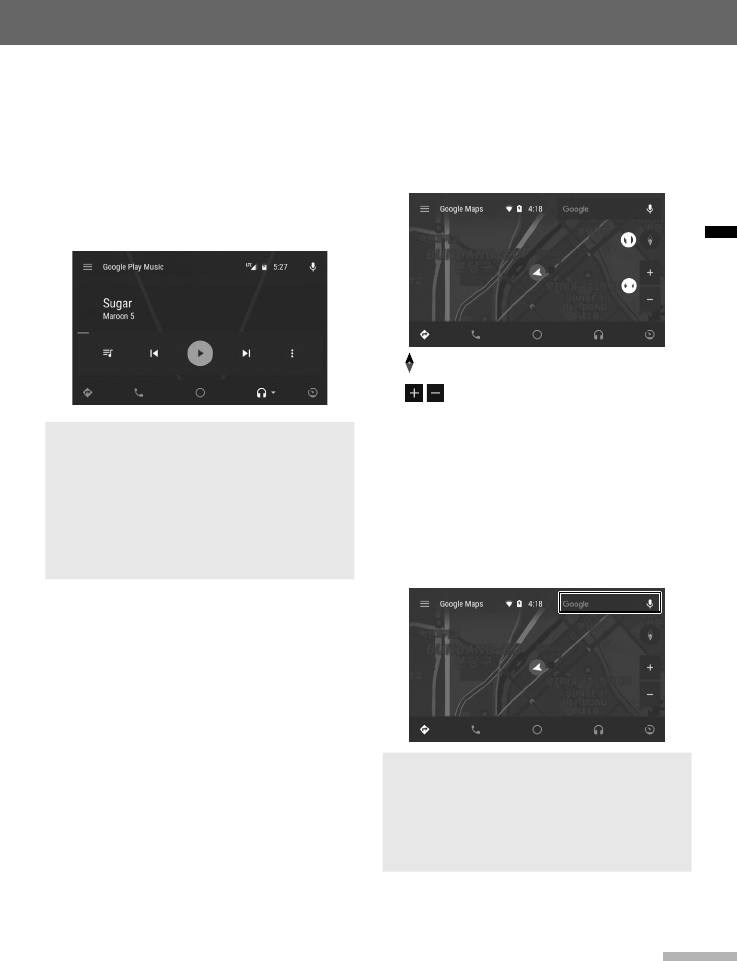
Music
► Playing music
1 From the Android Auto screen, tap the
Music icon.
2 Select the desired music app.
When a music app is selected, song
information will be displayed.
Note
Google Play Music is the only music
app that can be controlled by voice
recognition. Third-party music
applications, such as Spotify and
iHeartRadio, do not support voice
recognition.
Navigation
► Viewing your current location
From the Android Auto screen, tap the
Navigation icon. Your current location will
be indicated on the map.
➊
➋
➊ : Tap to change the map to a 3D view.
➋ / : Tap to zoom in or zoom out the
current location on the map.
► Searching for a location
1 From the Android Auto screen, tap
the Navigation icon. Your current
location will be indicated on the map.
2 Tap the Google search field and
search for a desired location.
Note
You cannot enter destinations using the
keyboard while driving. To search for a
location, tap the Voice icon and say a
desired destination to begin navigation.

34
English
Car Link (for Android OS)
This section explains how to aCar Link
provides two-way control mirroring for
Android devices that supports touch
actions, and audio support via your mobile
hotspot. This allows you to use supported
applications on the Car Link’s large screen
with wireless, smooth mirroring.
For more information on supported Android
smartphones, visit the website at http://car-
link.co.kr.
For more information on the Android OS
version, refer to "Specications" on page
44.
► Downloading the Car Link
application to your Android
smartphone
Before using Car Link, the Car Link
application must be installed on your
Android smartphone. To download the
application:
1 Access Google Play Store on your
smartphone.
2 Search for "Car Link" in the Play
Store.
3 Tap INSTALL.
► Accessing Car Link
1 Tap Car Link on your smartphone.
2 Install two plug-ins that are required
to run the Car Link application on the
smartphone.
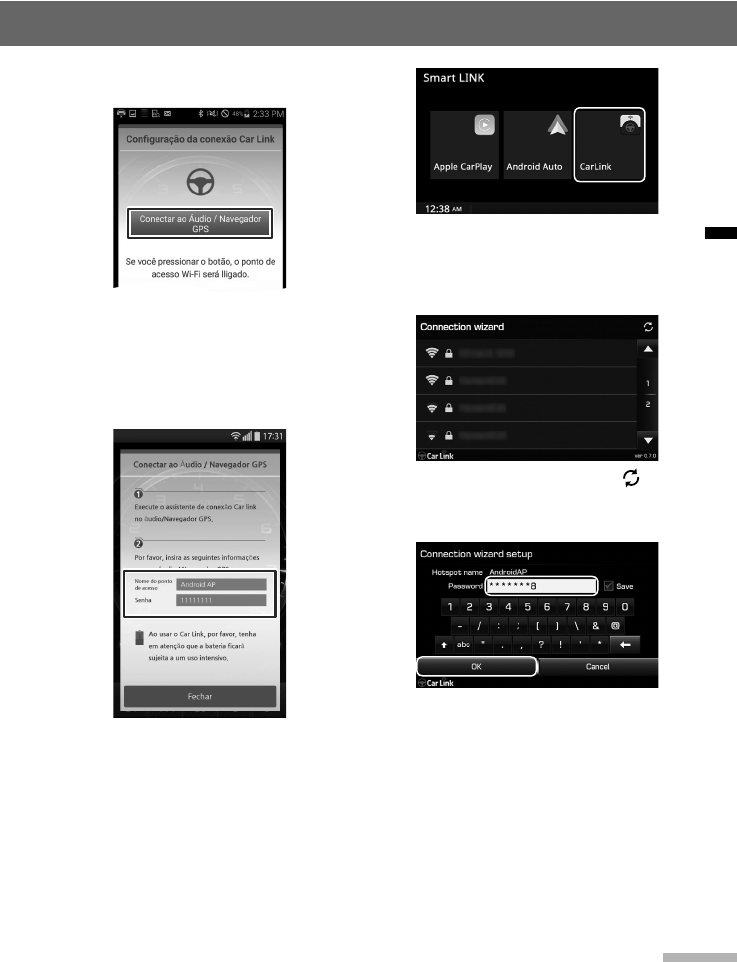
35
English
Car Link (for Android OS)
3 Tap Connect to car audio/GPS
navigator to turn your mobile hotspot.
To set your smartphone to automatically
connect to the unit for future access, tap
the checkbox next to Automatically
connect from now on.
4 Check the hotspot ID and password
given on the smartphone's screen.
5 Press the LINK button on the unit
and tap CarLink to search for your
smartphone’s hotspot.
Read the caution carefully and then
tap [Agree].
6 Tap your smartphone's hotspot from
the list of detected hotspots.
To refresh the network list, tap .
7 Enter the password for the hotspot
and tap OK.
To save the password, tap the checkbox
next to Save.
8 When the unit successfully connected
to your smartphone, select one of
supported applications.
36
Car Link (for Android OS)
English
Or, press the MODE button on the
steering wheel several times until the
Car Link home screen appears.
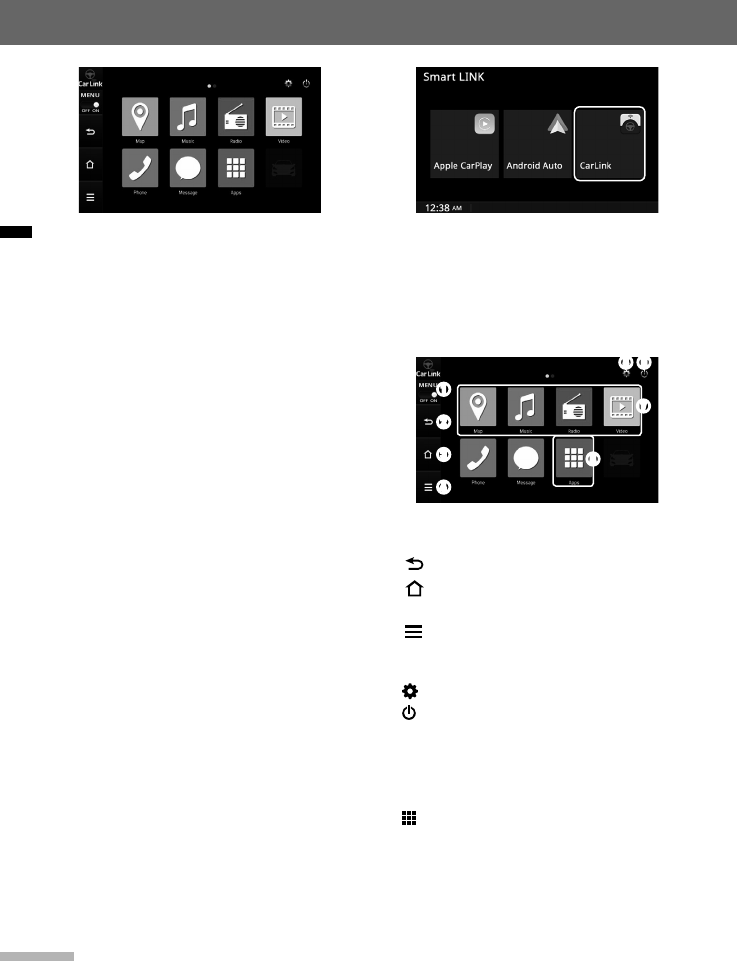
► Car Link home screen
The following are options available on
the Car Link home screen.
➋
➏
➌
➐
➊
➎
➍
➑
➊ MENU: Slide the switch to turn the
menu on or off.
➋ : Tap to return to the previous page.
➌ : Tap to display Car Link’s home
screen.
➍ Multi-function key: Tap to show the
recent app(Map, Music, Radio and
Video). & Switch to the navigation app.
➎ : Tap to adjust more Car Link settings.
➏ : Tap to exit Car Link from your
connected smartphone.
➐ Tap to customizing apps.
Map, Music, Radio and Video: Register and
use the apps you want for each item.
➑ : Tap to use non-customized apps.
For more information on the supported
applications, refer to the following
section.
Note --------------------------------------------------
• The manufacturer is not responsible for
any loss of data from your Android
smartphone while using this unit. Ensure
to back up your Android smartphone data
regularly.
• Your Android smartphone's battery must
be more than 20% to use Car Link
properly. If not, the connection will be
terminated.
• During the Bluetooth-related operation,
the Car Link function is interrupted for
some time with the message display. (For
example: downloading the phone book,
searching for Bluetooth devices, etc.)
Follow the message on the screen.
• Applications that may distract drivers
cannot be used in Car Link. A message
will appear letting drivers know that an
app cannot be used.
• Depending on the conditions of the
wireless network in the car, mirroring may
be interrupted temporarily or the
connection may be lost at times.
• Audio or videos with Digital Rights
Management (DRM) may not play
correctly when using the mirroring
function.
----------------------------------------------------------
► Returning to the Car Link home
screen
To return to the Car Link home screen,
press the HOME button on the unit and
tap CarLink.
37
English
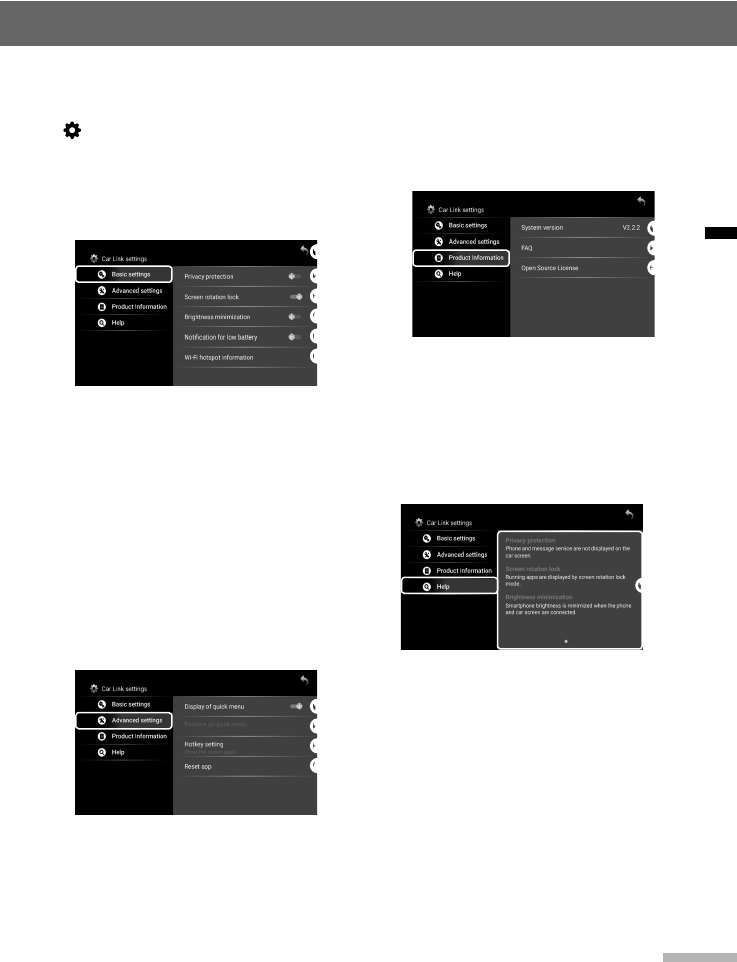
➌ Hotkey setting: Selecting the "Previous
app shortcuts" or " View Shortcut
apps" setting.
➍ Reset app: Car Link Reset all settings
on Car Link.
<Product Information>
➋
➌
➊
➊ System version: Car LinkVersion
information.
➋ FAQ : Go to Car Link's Frequently
Asked Questions (Homepage).
➌ Open Source License: Go to the Open
Source page related to Car Link
(Homepage).
<Help>
➊
➊ Help: Car Link feature help guide.
► Setting Car Link
1 From the Car Link home screen, tap
to display the Car Link settings
screen.
2 Tap each option to change the Car
Link settings.
<Basic settings>
➋
➌
➍
➎
➏
➊
➊ Back key: Go to Home screen.
➋ Privacy protection: When a call /
message is received, set the screen
blanking.
➌ Screen rotation lock: Car Link set
screen-horizontal xed.
➍ Brightness minimization: when a start
the Car Link, brightness minimization.
➎ Notication for low battery: when your
smartphone battery is less than 15%,
Set an alert.
➏ Wi-Fi hotspot information: Hotspot
connection information display.
<Advanced settings>
➋
➌
➍
➊
➊ Display of quick menu: Quick menu
output setting on the left side of the
home screen.
➋ Position of quick menu: Quick menu
position setting.
Car Link (for Android OS)
38
English
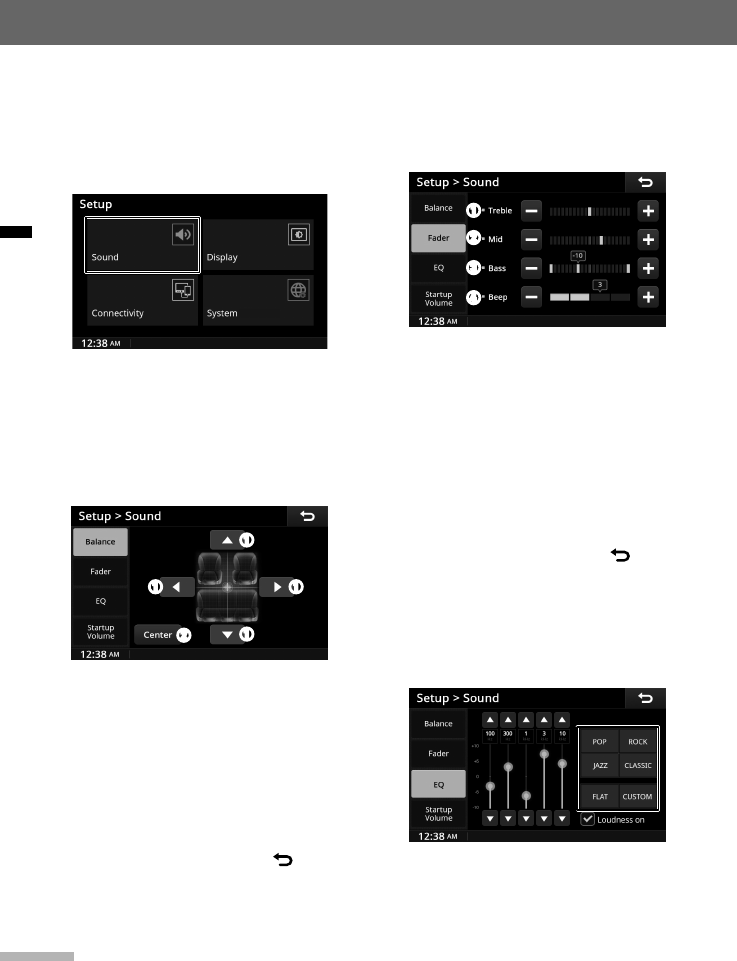
Setting the sound
This section explains how to customize the
settings for media and system sounds.
1 Tap Setup on the Home screen to
display the Setup menu screen.
2 Tap Sound.
► Adjusting the sound balance
1 Tap Balance on the Sound settings
screen.
2 Adjust the sound balance.
➊ ➊
➊
➊
➋
➊ Balance control ▲/▼/◄/►buttons:
Tap to adjust the sound balance
of the speakers by moving the
highlighted pointer on the grid. The
highlighted pointer will indicate the
focused listening position.
➋ Center: Tap to set the highlighted
pointer to the center of the car.
3 To confirm your selection, and return
to the previous screen, tap .
Settings
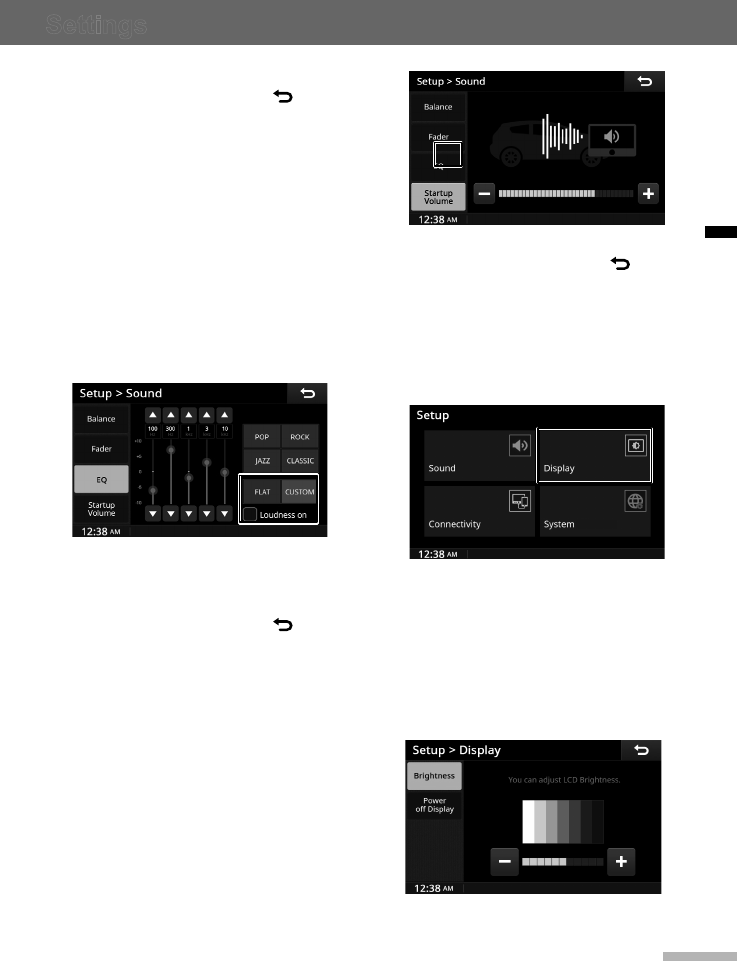
► Adjusting the sound fader
1 Tap Fader on the Sound settings
screen.
2 Adjust the sound output level.
➊
➋
➌
➍
➊ Treble: Tap to adjust the output level
of the highest range of sounds.
➋ Mid: Tap to adjust the output level of
the middle range of sounds.
➌ Bass: to adjust the output level of
the lowest range of sounds.
➍ Beep: Tap to adjust the volume of
the beep that sounds when you tap
the screen.
3 To confirm your selection, and return
to the previous screen, tap .
► Selecting the EQ style
1 Tap EQ on the Sound settings screen.
2 Select one of the preset equalizer
styles.
To adjust the equalizer settings
manually, tap Custom, and then tap
▲ or ▼ on the control bars of each
band.
39
Settings
English
3 To confirm your selection, and return
to the previous screen, tap .
► Tuning on and off the loudness
feature
When the equalizer style is set to FLAT or
User Customization, you can activate the
loudness feature which compensates by
increasing the output level of the treble and
bass. This feature will help improve sound
quality when the source sound is quiet.
1 Tap FLAT or Custom on EQ settings
scree.
2 Tap the checkbox next to Loudness
on to activate the loudness feature.
To deactivate the loudness feature,
tap the checkbox again.
3 To confirm your selection, and return
to the previous screen, tap .
► Setting the initial volume
You can set the initial volume level for
media players. When you turn off the
unit and turn it back on, this setting will
be applied, regardless of your previous
volume setting.
1 Tap Startup Volume on the Sound
settings screen.
2 Tap
-
or + to adjust the startup
volume level.
3 To confirm your selection, and return
to the previous screen, tap .
Setting the display
This section explains how to customize the
display settings.
1 Tap Setup on the Home screen to
display the Setup menu screen.
2 Tap Display.
► Adjusting the brightness of the
screen
1 Tap Brightness on the Display
settings screen.
2 Tap
-
or + to adjust the screen
brightness.
The image upper to each control bar
40
Settings
English
will provide you with a preview of the
settings.
3 To confirm your selection, and return
to the previous screen, tap .
► Setting the power-off display
type
1 Tap Power Off Display on the
Display settings screen.
2 Select a display type.
Setup > Display
12:38 AM l
Brightness
Power off
Display
You can set the power off display
when you turn off the system by pressing PWR knob.
Clock Blank
No Image
09:32 AM
16-JAN-2017
If you select Clock, the time and date
(dd-mm-yyyy) will be displayed when
the unit is switched to standby mode.
If you select Blank, the screen will
turn off when the unit is switched to
standby mode.
3 To confirm your selection, and return
to the previous screen, tap .
Setting the Connectivity
This chapter explains how to customize the
Bluetooth Connection and Settings.
1 Tap Setup on the Home screen to
display the Setup menu screen.
2 Tap Connectivity.
► Setting the Bletooth Connection
Tap Bluetooth Connection on the
Connectivity settings screen.
Setup > Connectivity
12:38 AM l
Bluetooth
Connection
Bluetooth
Settings
iPhone 7
Galaxy S4
Galaxy S3
Son’s iPhone
Pair New Device
For information on how to pair and
connect the unit with a Bluetooth device,
refer to "Bluetooth Connection" on page
19.
► Setting the Bletooth
Tap Bluetooth Settings on the
Connectivity settings screen.
For information on how to setup the
Bluetooth device, refer to "Bluetooth
settings" on page 24.
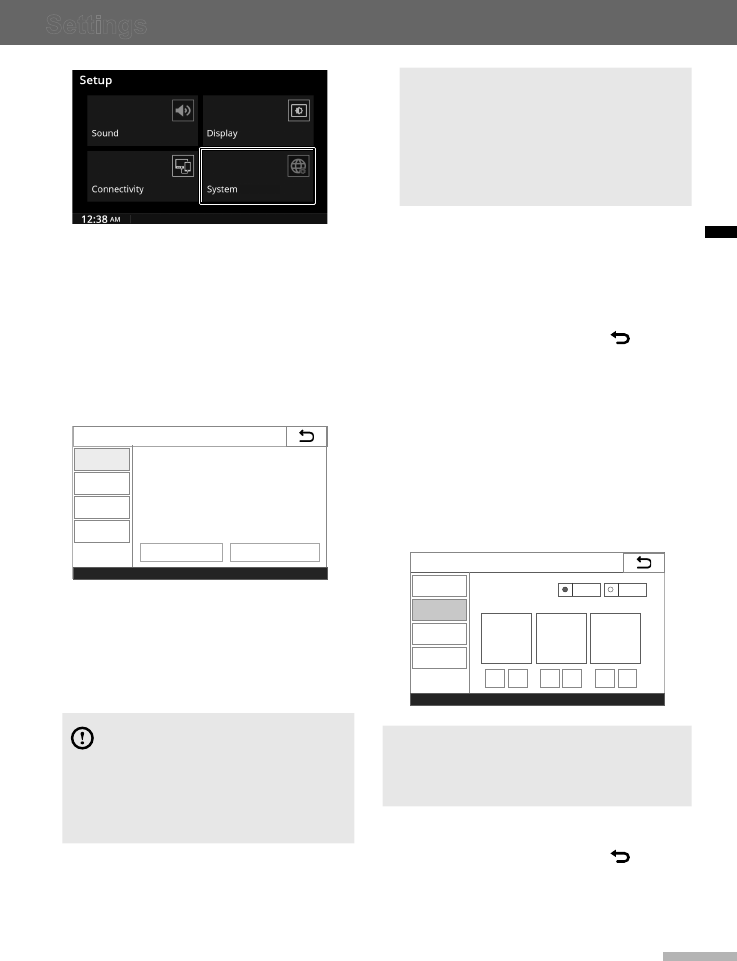
Setting the system
This chapter explains how to customize the
unit settings and keep the unit up to date.
1 Tap Setup on the Home screen to
display the Setup menu screen.
41
Settings
English
2 Tap System.
► Checking/Updating/Initializing
the unit
1 Tap Device Info on the System
settings screen.
2 Check the unit's system software
version and other information.
Setup > System
12:38 AM l
Device Info
Time
Date
Language
Model : SDA-L3000S
SW Ver : 0.01.00
Platform : 1.87.00
Micom : 0.01.07
CarLink : 0.43.0
Software Update System Default
To update the unit to the latest
software version, tap Software
Update > Yes. The unit will restart to
update the firmware. The customized
settings and user data will still be
maintained after the update.
Caution
Do not remove the USB storage device
or turn off the ignition until the update
is complete and the unit restarts. Doing
so may damage the unit.
Note
Before updating the unit, you first need
to prepare the firmware files. Move
the firmware files to a USB storage
device and insert it into the unit's iPod/
USB port.
To return the unit to the factory default
settings and delete user data, tap
System Default > Yes. The unit will
restart and initialize the system.
3 To confirm your selection, and return
to the previous screen, tap .
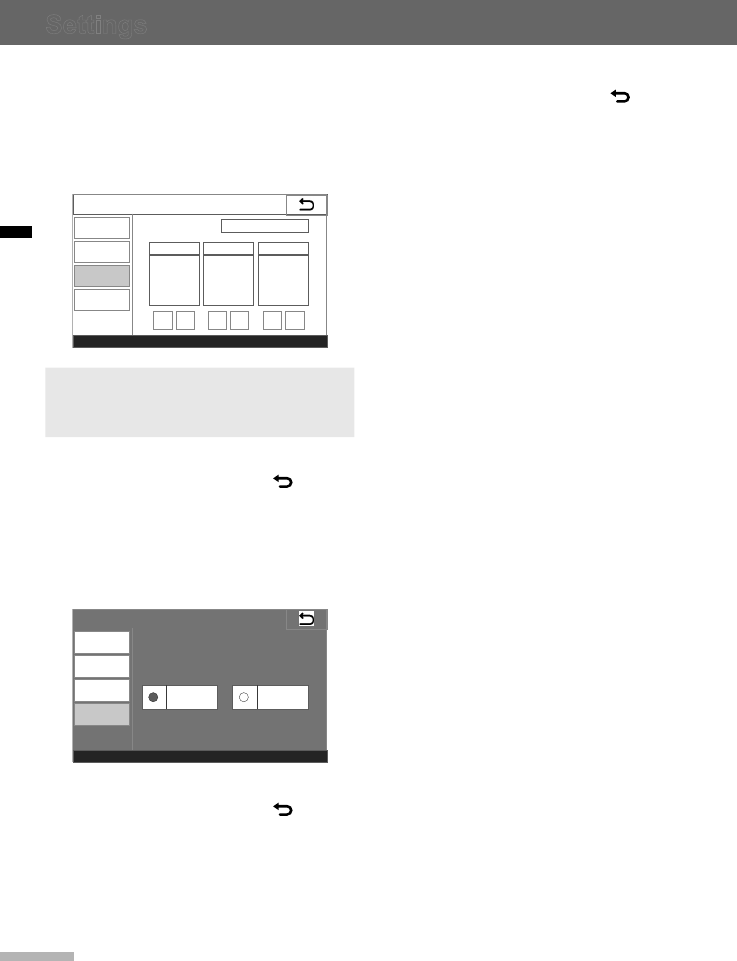
► Setting the time
1 Tap Time on the System settings
screen.
2 Select a time format and tap
-
or +
under the hour and minute boxes
to set the current time. AM and PM
buttons are available when you select
the 12-hour format.
Setup > System
12:38 AM l
Device Info
Time
Date
Language
Time format
12 12 AM
12 Hr 24 Hr
- + - + AM PM
Note
You can quickly change a value by
tapping and holding - or +.
3 To confirm your selection, and return
to the previous screen, tap .
42
Settings
English
► Setting the date
1 Tap Date on the System settings
screen.
2 Tap
-
or + upper the Day, Month, and
Year boxes to set the current date.
Setup > System
12:38 AM l
Device Info
Time
Date
Language
Date format
12 01 2017
Day Month Year
DD –MM –YYYY >
- + - + - +
Note
You can quickly change a value by
tapping and holding - or +.
3 To confirm your selection, and return
to the previous screen, tap .
► Selecting the language
1 Tap Language on the System
settings screen.
2 Select a display language.
Setup > System
12:38 AM l
Device Info
Time
Date
Language
You can set the language to this system only.
For set the language of connectivity mode, you set it
in your smartphone.
EnglishEspañol
3 To confirm your selection, and return
to the previous screen, tap .
4 To confirm your selection, and return
to the previous screen, tap .

43
English
Troubleshooting
Problem Cause Solution
The unit does not
start.
The ignition switch is not
turned on.
Place the ignition switch in the
IGN (ON) position.
The ignition switch is not in
the accessory (ACC) position.
Place the ignition switch in the
ACC position.
The unit does not
operate.
The ignition switch is not
turned on.
Place the ignition switch in the
IGN (ON) position.
The unit does not
play files.
The inserted USB device is
not formatted for FAT 16 or
FAT 32 file systems. The unit
recognizes USB devices only
when they are formatted for
FAT 16 or FAT 32 file systems.
Use a USB device formatted
for a FAT 16 or FAT 32 file
system.
The file format is not
supported by the unit.
Check the file format.
(See page 44)
The unit does not
play any sound.
The volume level is too low. Increase the volume. (See
page 8)
The mute function is on. Turn off the mute function.
(See page 8)
Apple CarPlay
does not start.
(optional)
Your iPhone does not support
Apple CarPlay.
Check the supported iOS
version. (See page 44)
Android Auto
does not start.
(optional)
Your Android phone does not
support Android Auto.
Check the supported Anroid
OS version. (See page 44)

44
English
Specifications
Range of tuning AM: 530 ~ 1,710 kHz / 10 kHz Steps
FM: 87.7 ~ 107.9 MHz / 200 kHz Steps
Sensitivity AM: 35 dB under
FM: 12 dB under
Division Stereo FM 20 dB
Format logical file ISO 9660 (level 1, 2 & 3), Joliet
Usable sampling
rates and bit
MP3: Sampling Rate 44 kHz bit rate 32-320 KB/s with VBR
ID3 Tags ID3v1, ID3v2
Bluetooth
●Output Power
●Profile
Version 4.1
+ 4 dBm Max
Advanced Audio Distribution Profile, Audio Remote Control
Profile, Hands-Free Profile, Headset Profile
Usable media file
formats on USB
Devices
●Supported File System: FAT16 or FAT32 Only (This unit
does not recognize NTFS or exFAT file formats)
●Music: MP3, WMA, WAV, OGG
●Image: JPG, BMP, PNG
Supported Apple
CarPlay iPhones
(optional)
iPhone 5, iPhone 5c, iPhone 5s, iPhone 6, iPhone 6 Plus, or
higher
Supported Android
Auto Android
phones (optional)
Android OS 5.0 (Lollipop) or higher
Note
This equipment operates on a secondary basis; it is not entitled to protection from
harmful interference, even from stations of the same type, and cannot cause interference
to systems operated on a primary basis.

45
English
Limited Warranty
ORIGINAL NAVIGATION HEAD UNIT SUPPLIED BY VEHICLE DEALER
Product :
Product No. :
► WHAT THIS WARRANTY COVERS
1. Vehicle Dealer Shop ("Dealer")
warrants to you that the Hardware will
be free from defects in workmanship
and materials under Normal use
("Defects") for a period of three (3)
years / 60,000 km from the original
date of the registration of the motor
vehicle ("Warranty Period").
During the Warranty Period the
Hardware will be repaired or replaced
at DEALER's choice ("Limited
Warranty") without charge to you for
either parts or labor. This Limited
Warranty covers the replacement of the
head unit including of the Hardware
only.
► WHAT THIS WARRANTY DOES NOT
COVER
2. The Limited Warranty does not apply to
normal wear and tear, does not apply
when the Hardware is opened or
repaired by someone not authorized by
DEALER and does not cover repair or
replacement of any Hardware or part
thereof damaged by: misuse, moisture,
liquids, proximity or exposure to heat
and accident, abuse, non-compliance
with the instructions supplied with the
Hardware, neglect or misapplication.
The Limited Warranty does not cover
physical damage to the surface of the
Hardware. This Limited Warranty does
not cover any software that may
accompany or be installed on the
Hardware.
The Limited Warranty does not cover
the installation, removal or maintenance
of the Hardware or any costs related
herewith.
► HOW TO MAKE A WARRANTY CLAIM
3. In order to make a claim of a Defect,
you must contact DEALER. If a defect
arises and a valid claim under this
Limited Warranty is received by
DEALER. After the warranty Period,
DEALER is entitled to charge you for
any reasonable shipping and handling
costs made in connection with the
repair or replacement of the Hardware.
You must comply with any other return
procedures stipulated by DEALER, if
any.
►DEALER LIMITED WARRANTY YOUR
LEGAL RIGHTS
4. Some countries may not allow the
exclusion or limitation of damages. If
any part of this Limited Warranty is held
to be invalid or unenforceable, the
remainder of the Limited Warranty shall
nonetheless remain in full force and
effect.
5. This Limited Warranty is the only
express warranty made to you and is
provided in place of any other express
warranties or similar obligations (if any)
created by any advertising,
documentation, packaging, or other
communications.

46
Limited Warranty
English
6. Except for the Limited Warranty and to
the maximum extent permitted by
applicable law, DEALER and its
suppliers provide the Hardware "AS IS
AND WITH ALL FAULTS", and hereby
disclaim all other warranties and
conditions, whether express, implied or
statutory, including, but not limited to,
any (if any) implied warranties, duties
or conditions of satisfactory quality, of
fitness for a particular purpose, of
reliability or availability, of accuracy or
completeness of responses, of results,
of workmanlike effort, of lack of viruses,
and of reasonable care and skill, all
with regard to the Hardware, and the
provision of or failure to provide
support or other services, information,
software, and related content through
the Hardware or otherwise arising out
of the use of the Hardware. Also, there
is no warranty or condition of quiet
enjoyment, quiet possession, or non-
infringement with regard to the
Hardware.
7. This Limited Warranty does not affect
any legal rights under applicable
national legislation governing the sale
of consumer goods.
8. This Limited Warranty cannot be
transferred to any other person.
►LIMITATION OF LIABILITY
9. Neither DEALER nor its suppliers shall
be liable to you or to any third party for
any damages either direct, indirect,
incidental, consequential or otherwise
(including in each case, but not limited
to, damages for the inability to use the
equipment or access data, loss of data,
loss of business, loss of profits,
business interruption or the like) arising
out of the use of or inability to use the
Hardware even if DEALER has been
advised of the possibility of such
damages.
10.
Notwithstanding any damages that you
might incur for any reason whatsoever,
the entire liability of DEALER and any
of its suppliers shall be limited to the
amount actually paid by you for the
Hardware.
11.
DEALER shall not be liable for
- any fraud on the part of its
employees and/or agents; or
- any fraudulent misrepresentation
on the part of its employees and/or
agents.
12.
Notwithstanding the above, neither
party's liability for death or personal
injury resulting from its own negligence
shall be limited.

SDA-L3000S Rev. 1.0
PN : 3264-00???