Humax T2 11n Wireless Roaming Router User Manual 3
Humax Co., Ltd. 11n Wireless Roaming Router 3
Humax >
Users Manual
T1 Extender
T1 Router
Internet
Electrical Outlet
PC
Gaming Console &
Media Sharing
Printer SharingStorage Sharing
Mobile Phone
Modem
Electrical Outlet
WPS
Quick Start Guide
Wireless or Wired, it's 11n Wireless Roaming Router
QUANTUM T2
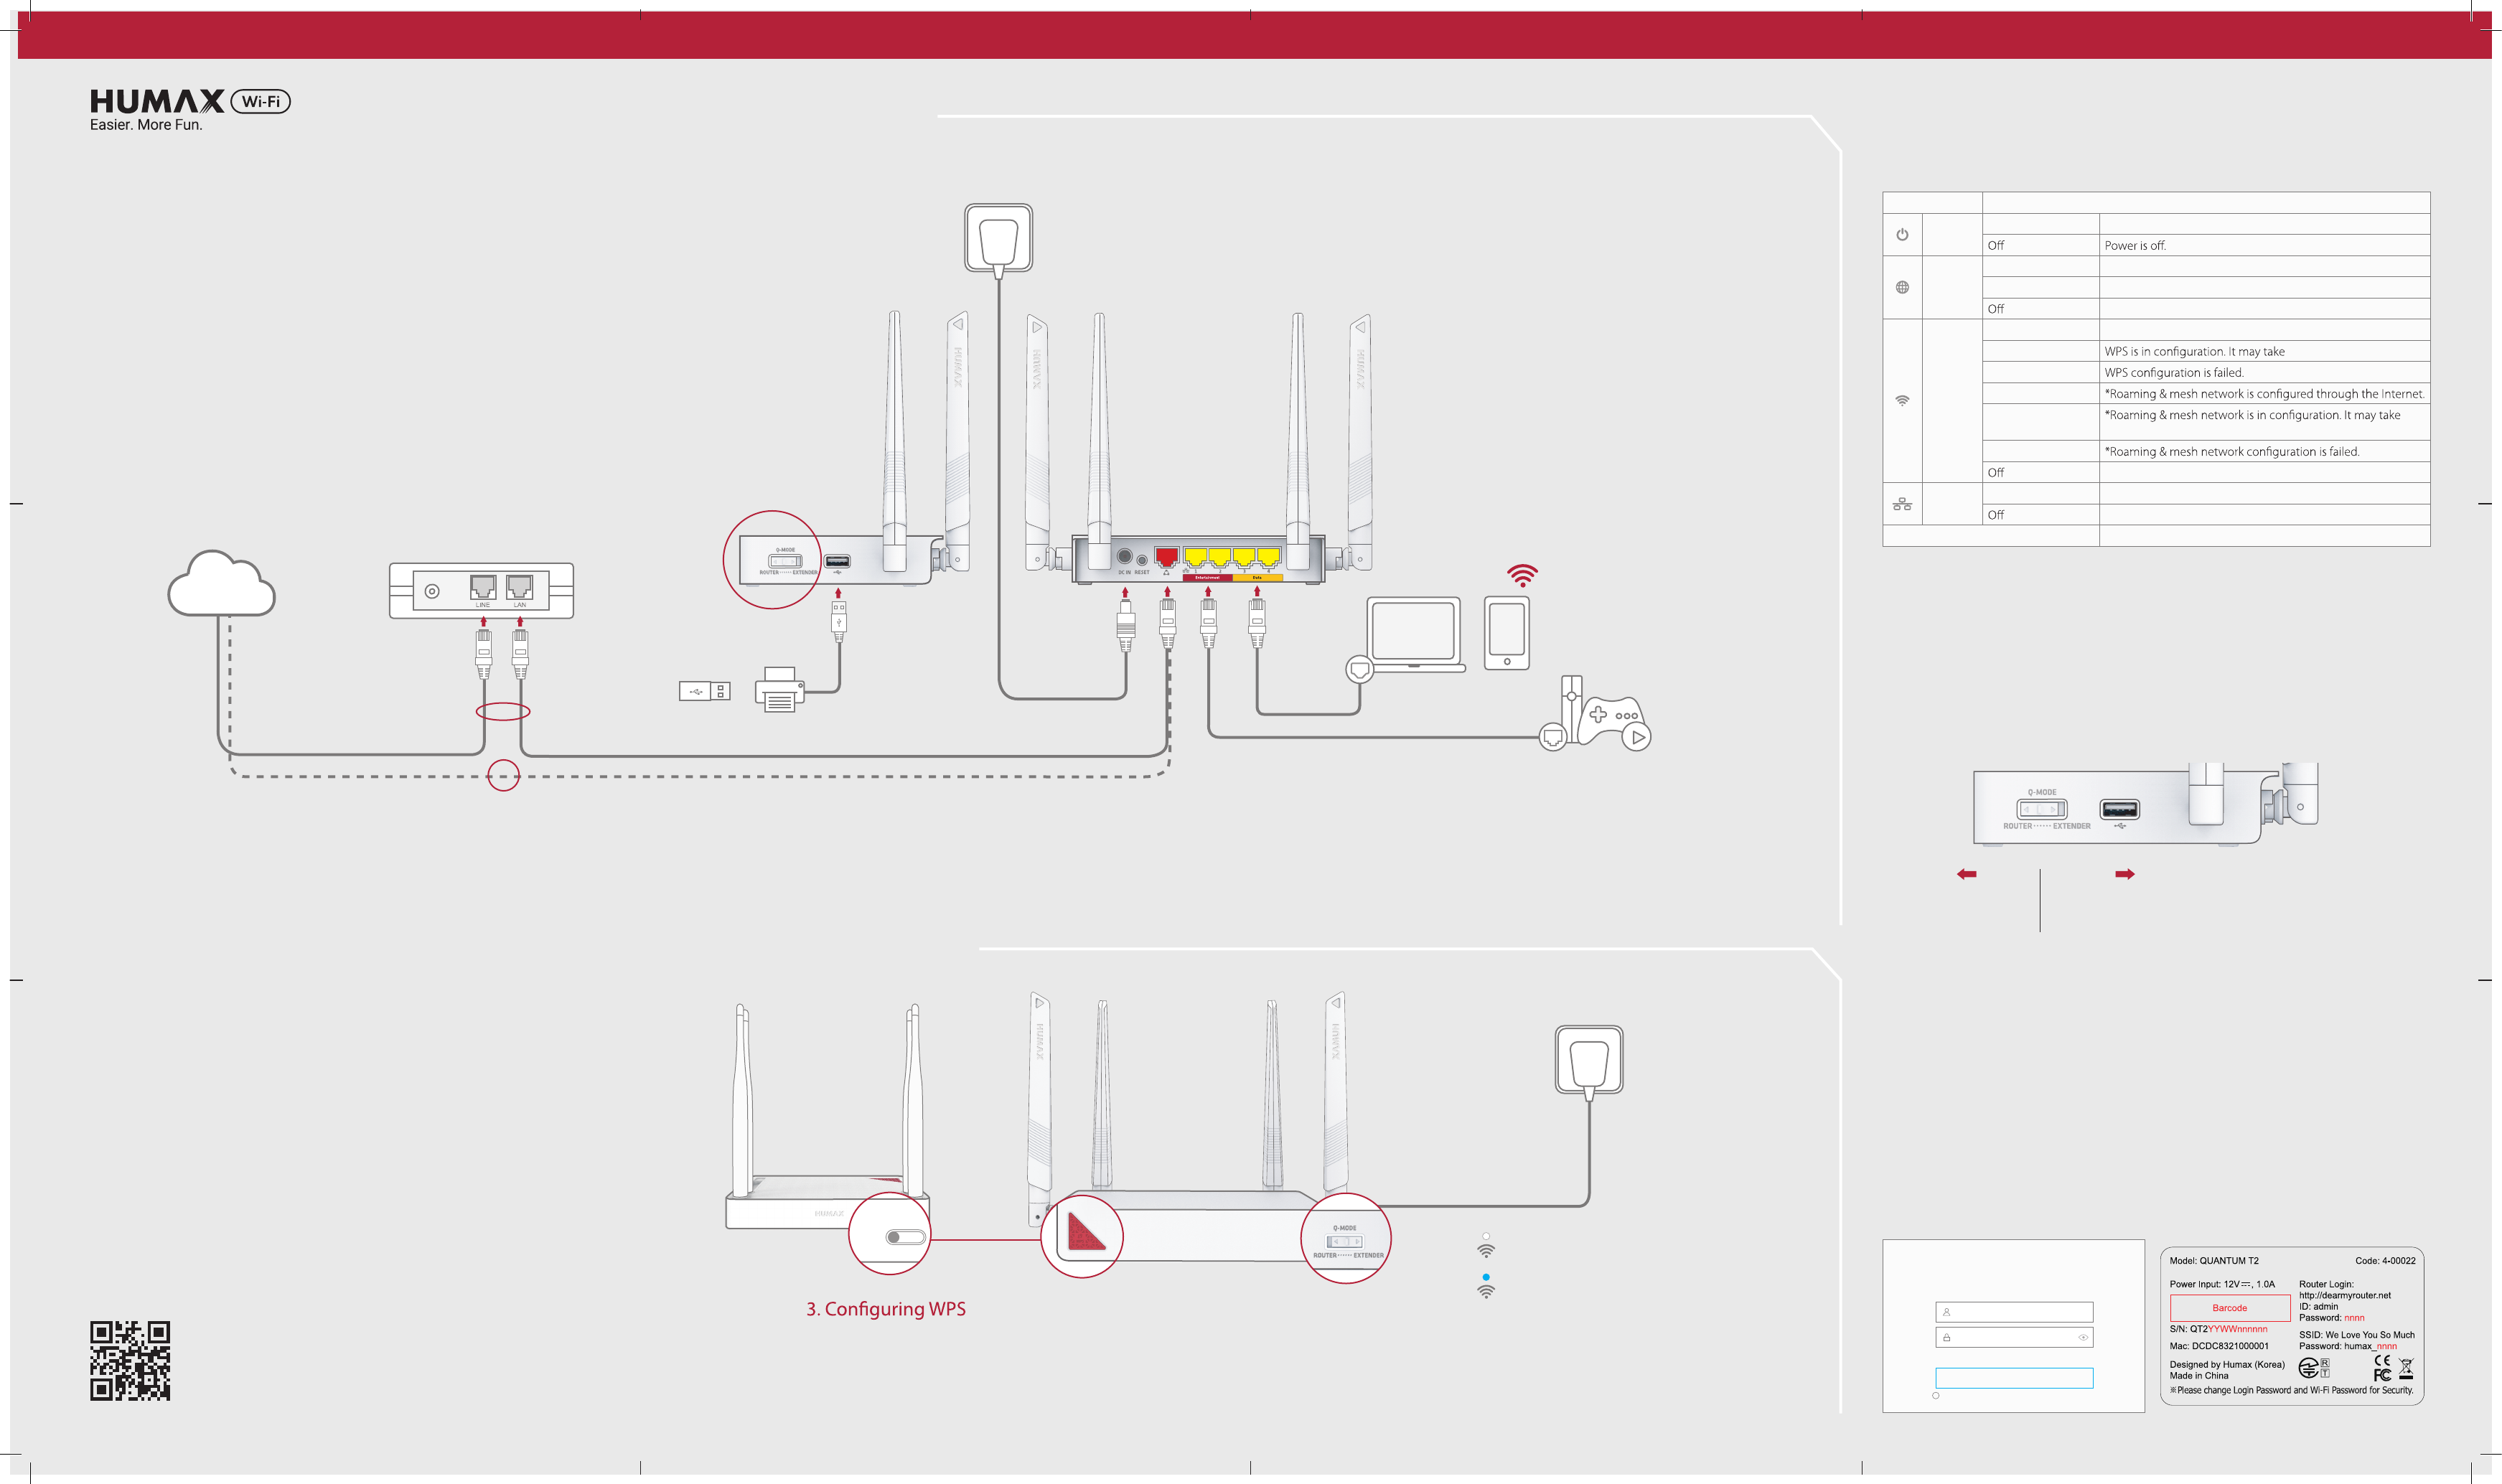
1. Connecting the Internet
You can connect your product to the Internet over a direct WAN or through a modem.
1-1 If you access Internet by the modem such as ADSL, VDSL, cable and FTTH, plug one end of the Ethernet
cable to the Internet port of your product and the other end to the LAN port of your modem.
1-2 If you access the Internet by WAN broadband, plug the Ethernet cable to the Internet port of your product.
4. Connecting the Network Devices
You can connect your network devices to the router over wired or wirelessly.
Use Ethernet cables to connect your devices to the router over a wired Ethernet connection.
Note: We recommend you to connect entertainment devices such as OTT, gaming console and
IPTV to the Entertainment ports. The ports have the priority in transmitting multimedia
data without transmission delay or interruption.
Internet Connection
You can congure the network over a wired Ethernet connection or wirelessly.
Wired
Connect the Ethernet cable between the PC and the LAN port of your product.
Wireless
1. Open the web browser.
2. Enter http://dearmyrouter.net to the address bar, and then press the Enter key.
3. The default ID and password are admin and nnnn. nnnn is the last 4 digits of serial number.
Refer to the serial number at the bottom of your product.
Note: We recommend you to change the ID and password to secure your network.
Go to Management > Change Password to change your password.
Q-MODE
Your product supports Q-MODE that enables operating as a router or an extender.
It’s very simple to change the operation mode. Just slide the Q-MODE switch to ROUTER or EXTENDER.
Then, the mode change is automatically completed.
3. Powering On
1. Plug in the AC power adaptor from the power connector to an electrical outlet.
2. If the power successfully turns on, a white light on the power LED is turned on.
Note: Use only the AC power adaptor provided in this product. Using other
adaptors may damage the product.
You can congure WPS between the extender and the router.
3-1 Press the WPS buttons on both devices within 2 minutes. When WPS is
successfully congured, the blue light blinks on the Wireless LED.
Note: If you use another router other than HUMAX product, the white light blinks
on the Wireless LED, which means your extender is in repeater mode.
2. Powering On
2. Checking the Mode
Your product has the Q-MODE switch.
Check that the switch is set to ROUTER.
1. Changing the Mode
Your product has the Q-MODE switch.
Slide the switch to EXTENDER.
Warning
1. Connect all devices before you plug any power cords into the electrical outlet.
2. Always turn o the product and network devices before you connect or
disconnect any cables.
3. Hazardous electrical voltages can exist on the product and peripheral devices
and can be present on any connected cables.
- With HUMAX QUANTUM Series,
you will experience seamless Wi-Fi network at any moment.
- T1, T2, T3, T3A, X1 and X3 support both roaming & mesh network, and T5, T7 and
T9 support roaming network only.
- Roaming & mesh feature is congured over HUMAX products. (*)
BOTH
*Roaming Mode
*Mesh Mode
123456789
123456789
T1
T2
Designed by Humax (Korea)
Made in China
Router Login:
http://dearmyrouter.net
ID: admin
Password: nnnn
S/N: QT2YYWWnnnnnn
Mac: DCDC8321000001
Model: QUANTUM T2 Code: 4-00022
Power Input: 12V , 1.0A
SSID:
We Love You So Much
Password: humax_nnnn
※Please change Login Password and Wi-Fi Password for Security.
Designed by Humax (Korea)
Made in China
Router Login:
http://dearmyrouter.net
ID: admin
Password: nnnn
S/N: QT1YYWWnnnnnn
Mac: DCDC8321000001
Model: QUANTUM T1 Code: 4-00021
Power Input: 12V , 0.5A
SSID:
We Love You So Much
Password: humax_nnnn
※Please change Login Password and Wi-Fi Password for Security.
123456789
Designed by Humax (Korea)
Made in China
Router Login:
http://dearmyrouter.net
ID: admin
Password: nnnn
S/N: QT1YYWWnnnnnn
Mac: DCDC8321000001
Model: QUANTUM T1 Code: 4-00021
Power Input: 12V , 0.5A
SSID:
We Love You So Much
Password: humax_nnnn
※Please change Login Password and Wi-Fi Password for Security.
Scan the QR code
to access @@ on your mobile device.
Use it as Router
Use it as Extender
1-1
1-2
WPS
WPS
Extender has wireless connectivity
with a third party router
* Roaming & mesh network is congured
over HUMAX products
edoM retuoR
WISP Mode
AP Mode
Repeater Mode
Media Bridge Mode
LEDs on the Front Panel
After the product is successfully registered on the network, the LEDs illuminate continuously to indicate
that the product is active and fully operational.
LED Operation
Power White On Power is on.
Internet
White On Internet is connected.
White Blinking Firmware update is in progress.
Internet is not connected.
Wireless
White On Network is connected wirelessly.
White Slow Blinking 2 minutes.
White Fast Blinking
Blue On
Blue Slow Blinking
2 minutes.
Blue Fast Blinking
Wi-Fi is not available.
Ethernet White On Networking device is connected to the LAN port.
No device is connected to the LAN port.
Internet, Wireless, Ethernet Blinking Resetting the system is in progress.
Note: Blue light is turned on when the roaming & mesh network is successfully congured over HUMAX
products.
3-2 Check the network when the connection is complete.
If you connect the extender to a HUMAX router, both network names
are the same as if they congure a single network. But, if you use a router
other than HUMAX products, the network name of your extender will
copy the router›s name following Ext2G or Ext5G. (ex. Router_Ext5G)
Welcome to QUANTUM T2!
http://dearmyrouter.net
192.168.1.1
admin
****
Password
! For the default ID and password, see the bottom of the product.
Login
ID
ROUTER EXTENDER
211-170302
D170007211
FCC ID:O6ZT2
etwork.
Router Mode
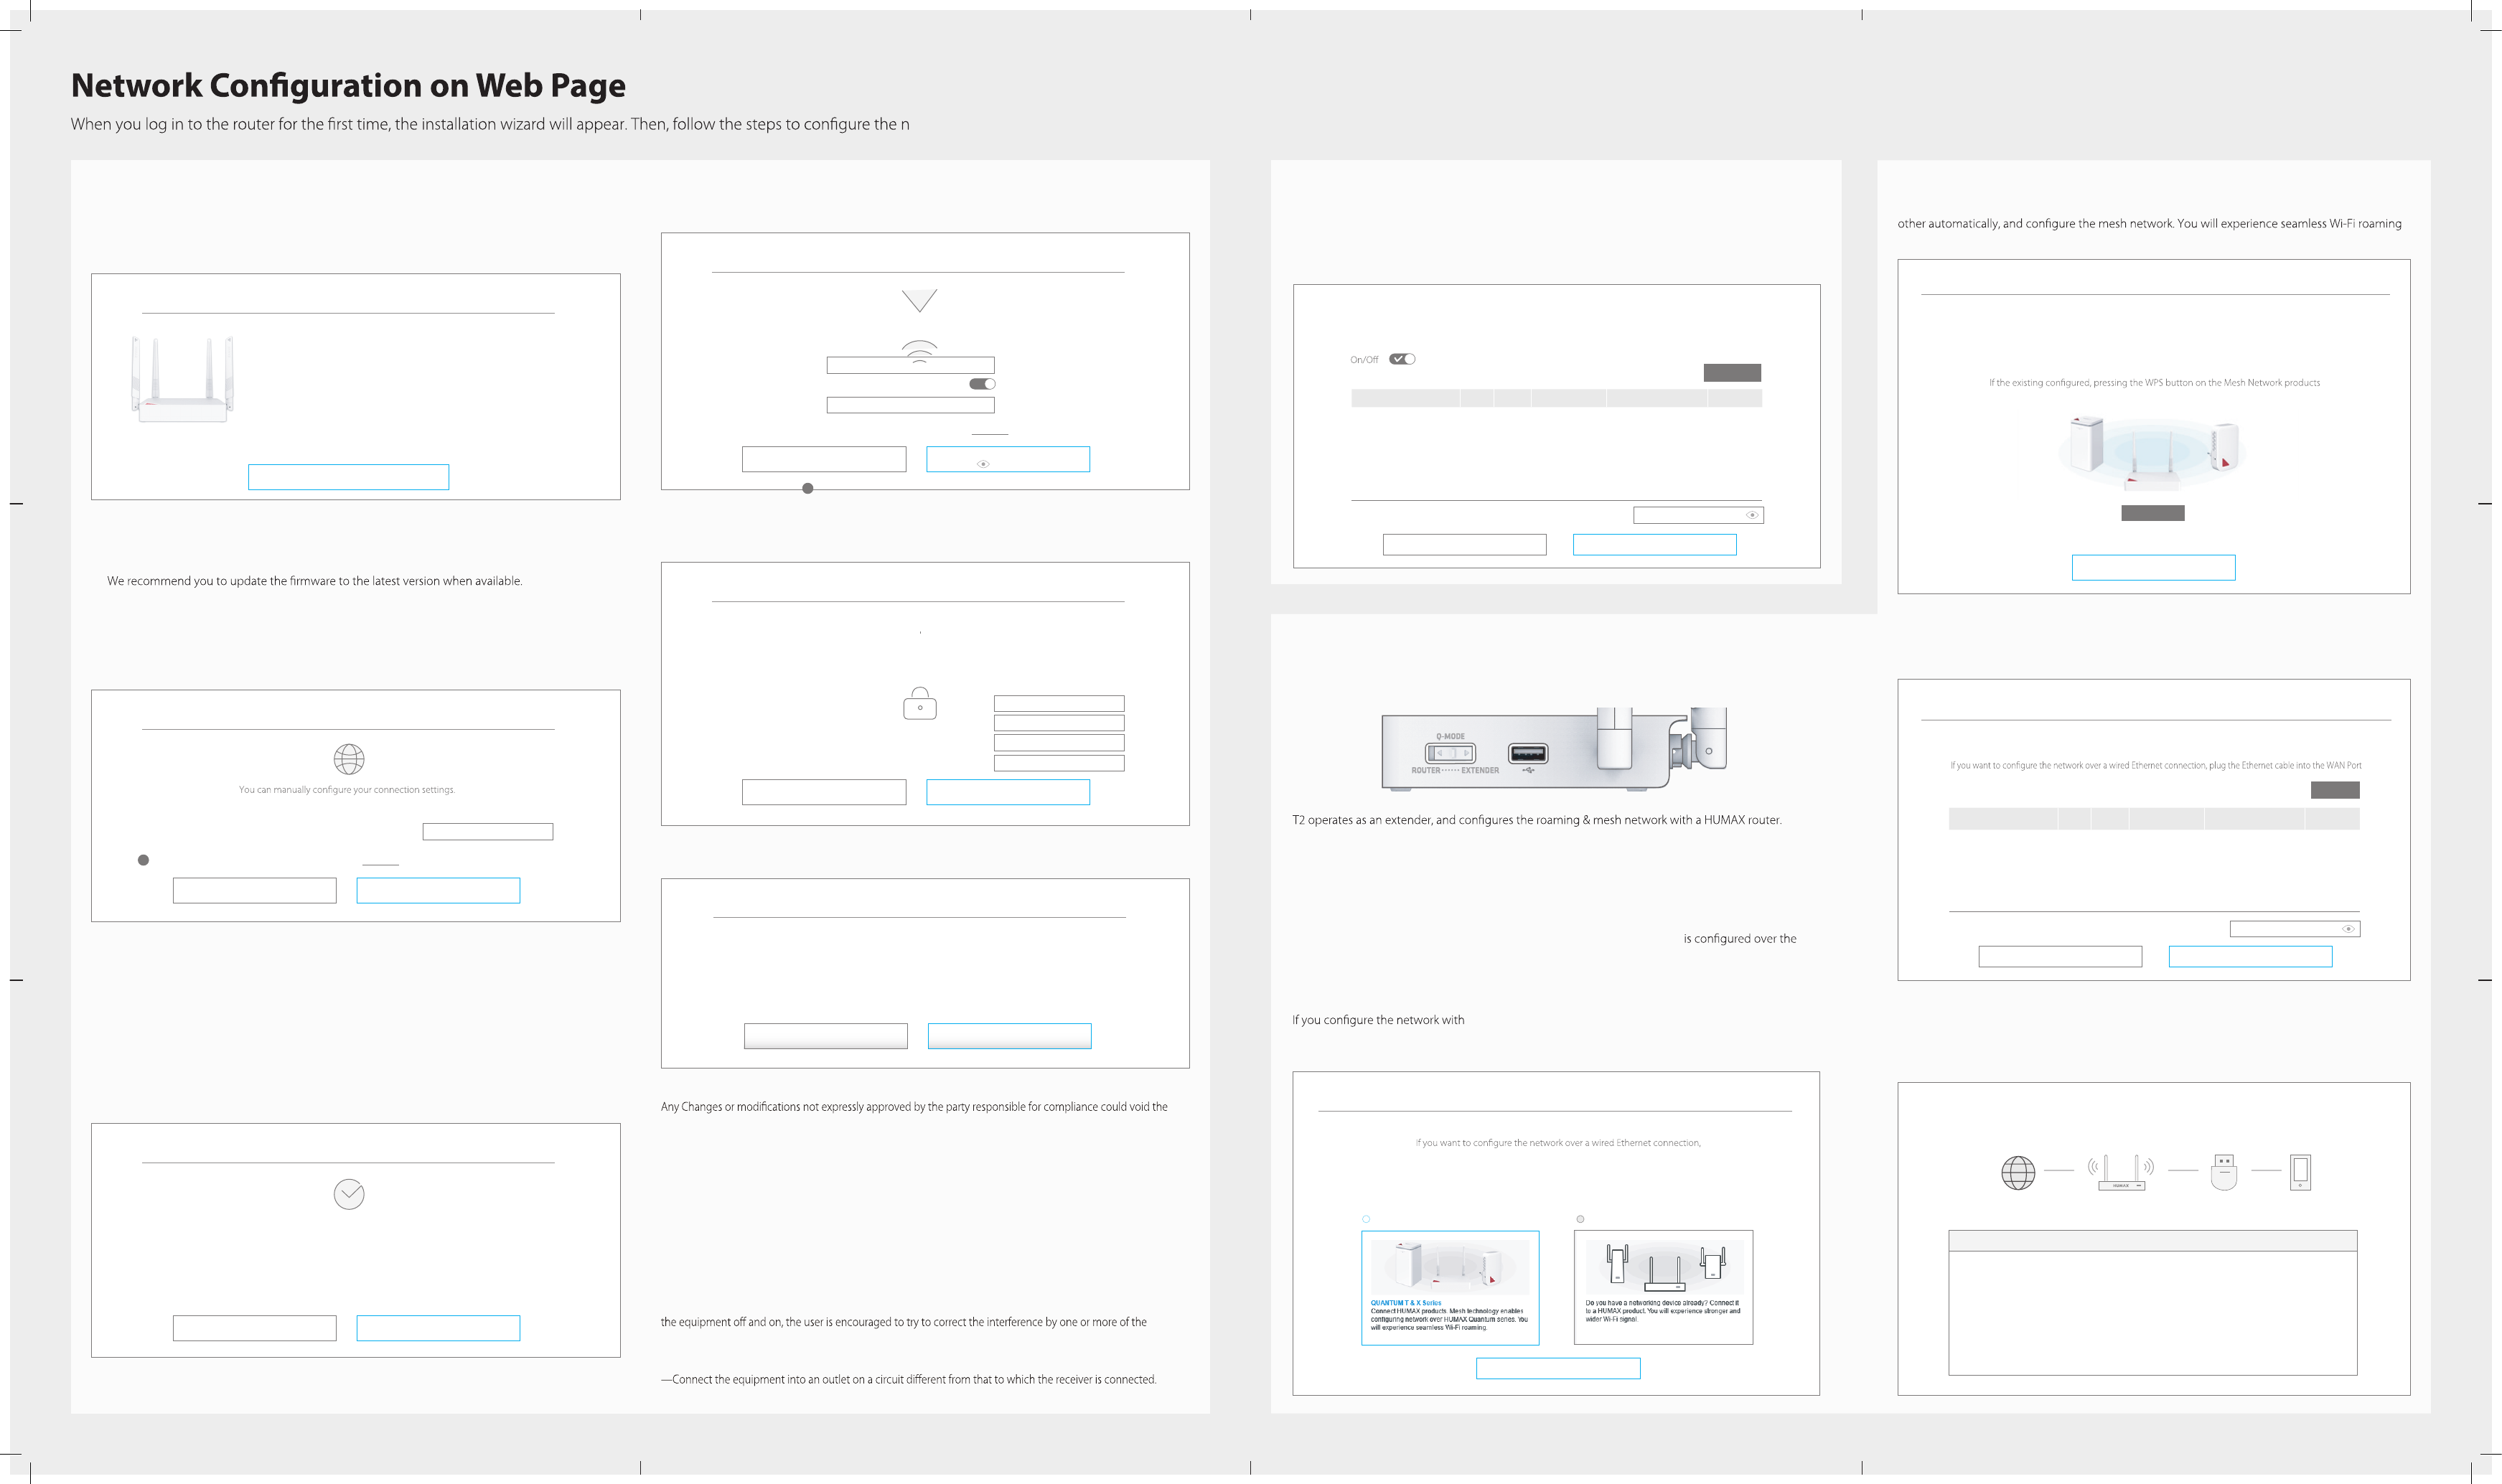
1. Welcome
Click Start. The system will check automatically if your router is connected to the Internet.
Extender Mode
Slide the Q-MODE switch to EXTENDER.
x T2 works automatically in AP mode if you connect it to a router over a wired Ethernet cable and use a
client device wirelessly.
x T2 works automatically in media bridge mode if you connect it to a router wirelessly and use a client
device over a wired Ethernet cable.
x T2 works automatically in repeater mode if you connect it wirelessly to a router other than a HUMAX
router and use a client device wirelessly.
x If T2 works together with a HUMAX router, the roaming & mesh network
products.
2. Internet Setting
You can connect the Internet automatically or manually depending on your Internet connection type.
Note: This page appears only when your product is not connected to the Internet.
3. Wireless Network Setting
Enter your own network name and password to change the default settings. You can secure your
wireless network from unauthorized users.
2-1. Roaming & Mesh
Just press the WPS buttons on HUMAX products within 1 second. Then, they are connected each
over the mesh network.
2-2. Repeater
If you have a networking device other than HUMAX products, select it from the list and then enter
the password. You will experience stronger and wider Wi-Fi signal.
1. Welcome
HUMAX
products only, click HUMAX Products and go to
2-1. Roaming & Mesh.
If you use a third party product other than
HUMAX, click Other Products and go to
2-2 Repeater.
Home
After completing the network settings, go to Operation Mode. In this page, you can see the current
status of your product.
4. Password Setting
Enter your ID and password to change the default password. You can enhance the security on your
network environment.
5. Summary
When you complete your network settings, the information on your network will display.
Select the connection type your ISP is using. In most cases, it will be Dynamic IP.
t Dynamic IP: The Internet will be connected automatically.
t Static IP: Enter the IP address, Subnet mask, Gateway and DNS server supplied by the ISP.
t PPPoE: Enter the user name and password supplied by the ISP.
t PPTP or L2TP: Enter the user name, password and VPN server supplied by the ISP.
Note: For more information on the Internet connection, refer to the web manual at
www.humaxdigital.com/QUANTUM.
If your router is successfully connected to the Internet, the information on the internet connection will
display.
Note:
t If you want to skip the installation wizard, click Skip. This button is available always during
installation wizard.
t
WISP Mode
You can use wireless Internet service in Router mode.
1. Log in to dearmyrouter.net, and then go to Management > WISP Mode.
2. Set the WISP mode to On, and select your Internet service provider.
WPS
WPS
Internet Setting
If you do not know the Internet connection type, please contact your ISP.
Connection Type
? What is the Dynamic IP/Static IP/PPPoE/PPTP/L2TP? view more
Dynamic IP ۂ
Previous Next
Internet Setting
Connection Type
WAN IP Address
Subnet Mask
Gateway
Primary DNS
Secondary DNS
Dynamic IP
100.1.1.1
255.255.255.0
192.168.1.1
0.0.0.0
0.0.0.0
Previous Next
Change Password (Optional)
If you change the password, you can make your network more secure.
For the default ID and password, see the bottom of the product.
The changed password will be applied from the next login.
Login ID
Current Password
New Password
Retype New Password
**********
**********
**********
Previous Next
admin
Home
This page shows the current status and some basic settings of the device.
Operation Mode
Connection Status
IP Address
Subnet Mask
Gateway
DNS Server
MAC Address
Router Mode
Dynamic IP
183.99.19.131
255.255.255.128
183.99.19.129
168.126.63.1/168126.63.2
F4:28:53:35:C3:F9
Internet
Dynamic IP
10.10.10.1
QUANTUM T2
2.4G
SanULTRA DUAL_1 4 Devices
Welcone to Quantum T2 !
This is Quantum T2,
x Complies with 11n Wi-Fi standard.
x Wi-Fi 600 Mbps speed.
x Provides WEP 64/128-bit, WPA, WPA2 and WPA-Mixed security.
x Supports Guest Network ,Media Share, QoS, Parental Control, VPN, WPS etc.
x Supports Smart Roaming for Mobile Client.
x Supports Power Saving, LED Control, System Restart for energy saving.
You can more easily set various functions through web UI and experience fabulous router.
Do you want to start the wizard for easy setup?
Start
Repeater Setting
Select a device from the list below and enter the password to connect to the host device.
Using the WPS button on both devices, you can easily connect them.
of the host device. In this case, the host operates automatically in Bridge mode.
Network Name (SSID) CH RSSI Security MAC Address Band
IPTime Zone
TIANA_89
ASUS
Wafya
1
1
1
3
-45
-47
-51
-26
WPA2-PSK
WPA2-PSK
WPA2-PSK
None
BC:76:70:7C:5C:74
F8:D1:11:5C:84:BA
70:7C:F8:D1:11:55
11:5C:54:D8:33:98
2.4GHz
2.4GHz
2.4GHz
2.4GHz
Password **********
WPS
NextBack
Select the device and enter the password to connect the host device.
Network Name (SSID) CH RSSI Security MAC Address Band
We Love You So Much
TIANA_89
ASUS
Wafya
NETGEAR
iptime
1
1
1
3
1
9
-45
-47
-51
-26
-51
-77
WPA2-PSK
WPA2-PSK
WPA2-PSK
None
WPA2-PSK
WEP
BC:76:70:7C:5C:74
F8:D1:11:5C:84:BA
70:7C:F8:D1:11:55
11:5C:54:D8:33:98
70:7C:F8:D1:11:55
5C:74:31:AB:C1:D2
2.4GHz
2.4GHz
2.4GHz
2.4GHz
2.4GHz
2.4GHz
Password **********
ConnectBack
Refresh
WISP Mode
In this mode, all Ethernet ports are bridged together and the wireless client will connect to ISP access
point. The NAT is enabled and PCs in Ethernet ports share the same IP to ISP through wireless LAN.
Roaming & Mesh Setting
HUMAX each other two products that you want to connect to, you can simply Extended Network via the WPS button.
Place the product on where to actual use, press the WPS button on your product.
Tip!
Minimizing the walls, furniture, appliances, etc. to connect between the two products,
and the products work best when operating at up to 12m (40 feet) inside and outside.
and add new products are the closest connection automatically.
Start WPS Process...
Previous
WPS
Welcome to Extended Network
Your product has changed to Extender mode. In this mode, you can expand Wi-Fi coverage.
plug the Ethernet cable into the WAN port of your product.
In this case, the product operates automatically in Bridge mode.
Select a product you want to connect wirelessly.
Next
HUMAX Products Other Products
Wireless Setting
2.4GHz
Network Name (SSID)
Password
? About wireless security and password. view more
We Love You So Much
**********
Previous Next
Summary
Internet
Wireless 2.4GHz
Connection Type
IP Address
Network Name (SSID)
Password
Dynamic IP
100.1.1.1
We Love You So Much
humax_0000
Previous Done
FCC warning:
user’s authority to operate the equipment.
This device complies with part 15 of the FCC Rules. Operation is subject to the following two conditions: (1) This
device may not cause harmful interference, and (2) this device must accept any interference received, including
interference that may cause undesired operation.
FCC Radiation Exposure Statement:
This equipment complies with FCC radiation exposure limits set forth for an uncontrolled environment. This
equipment should be installed and operated with minimum distance 20cm between the radiator& your body.
This transmitter must not be co-located or operating in conjunction with any other antenna or transmitter.
Note: This equipment has been tested and found to comply with the limits for a Class B digital device, pursuant
to part 15 of the FCC Rules. These limits are designed to provide reasonable protection against harmful
interference in a residential installation. This equipment generates uses and can radiate radio frequency energy
and, if not installed and used in accordance with the instructions, may cause harmful interference to radio
communications. However, there is no guarantee that interference will not occur in a particular installation. If this
equipment does cause harmful interference to radio or television reception, which can be determined by turning
following measures:
—Reorient or relocate the receiving antenna.
—Increase the separation between the equipment and receiver.
—Consult the dealer or an experienced radio/TV technician for help.