Hunter Douglas Window Fashions SIL1 Motor Control User Manual Users Manaul
Hunter Douglas Window Fashions Motor Control Users Manaul
Users Manaul
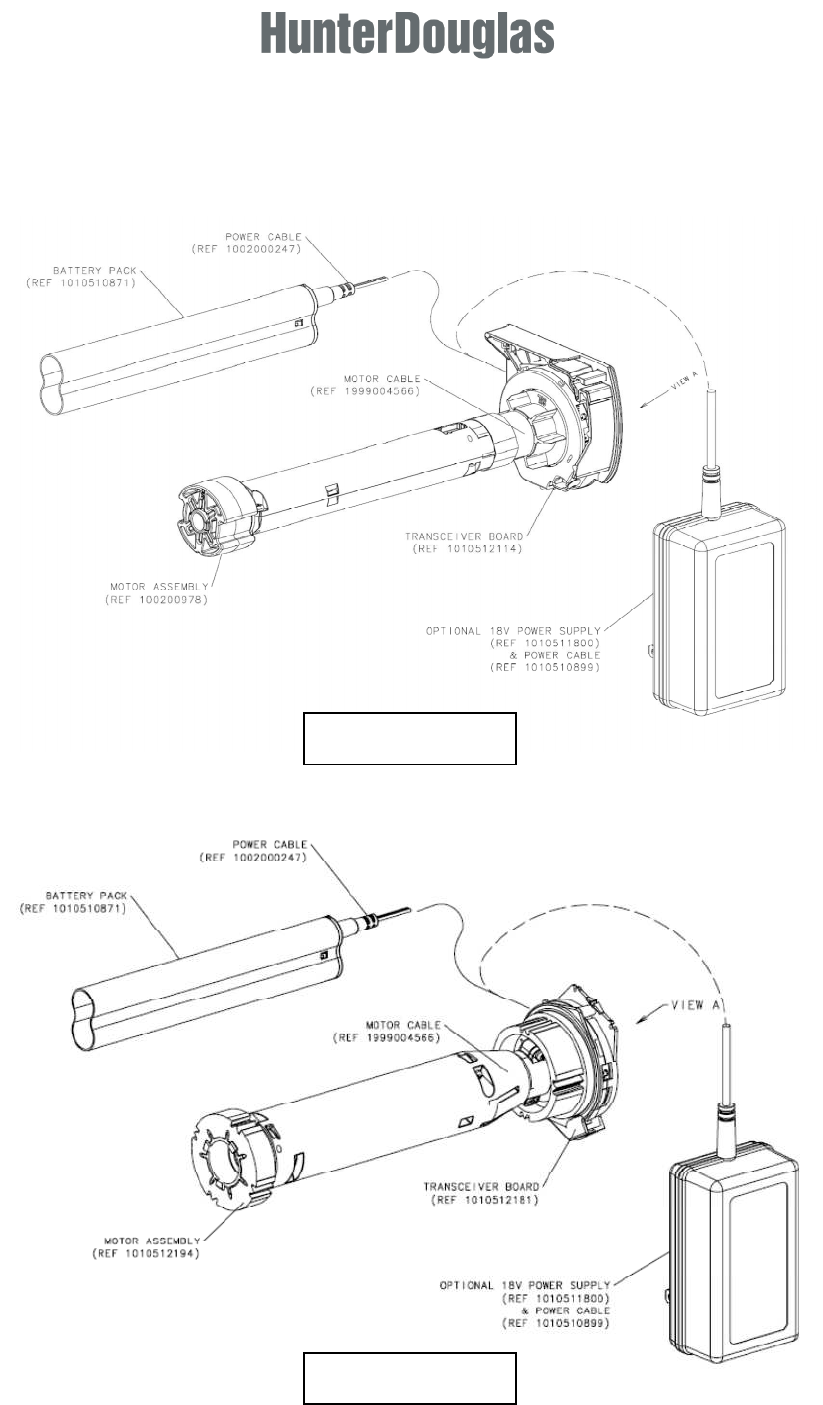
Instructions for PV4 Assembly
23mm Motor
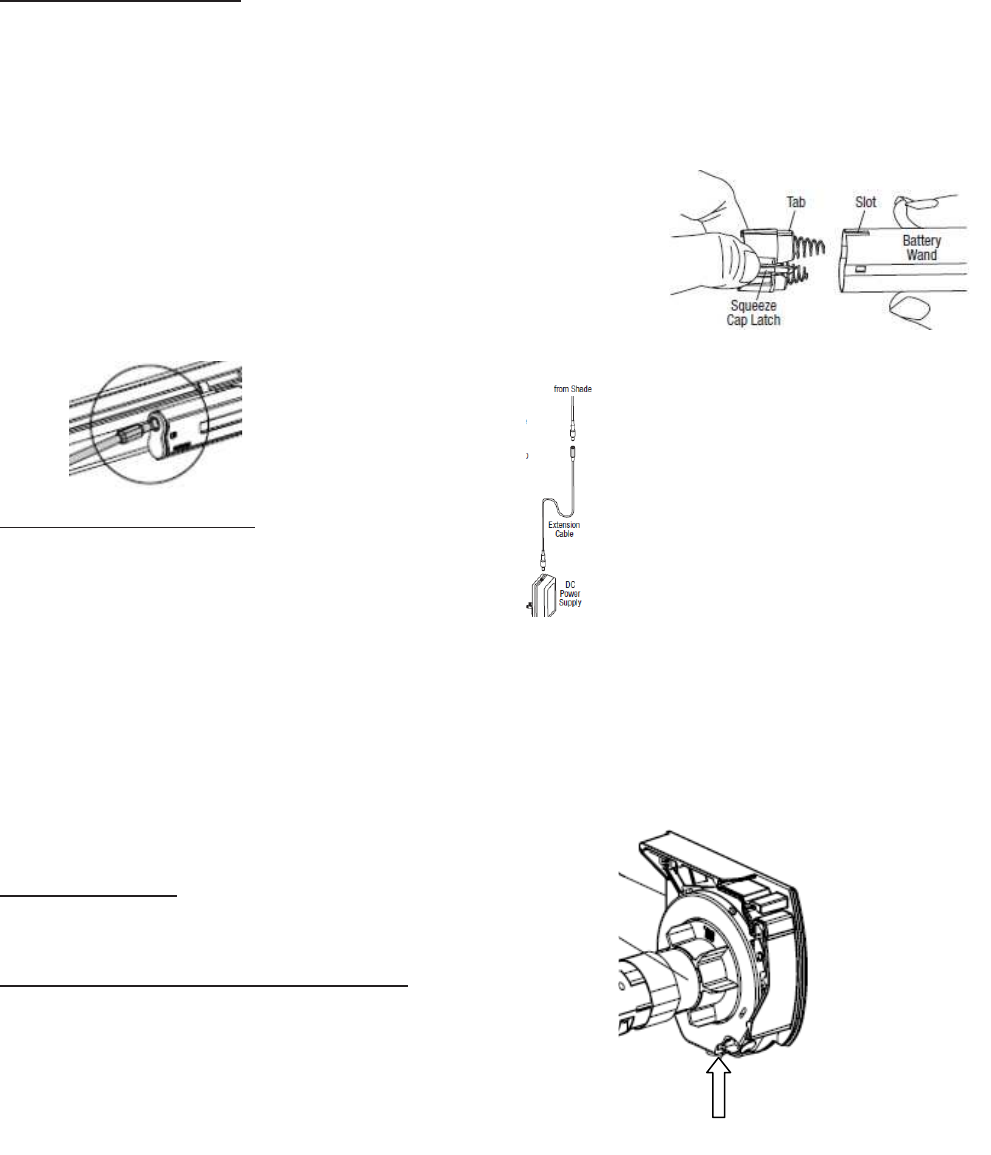
31
mm Motor
Connect
the
Power
Source
■ Refer to the appropriate section below based on your
order
.
➤
For a battery wand, see “If You Have a Battery Wand
...” below
.
➤
For an optional DC power supply, see “If You Have a DC Power Supply...”
.
If You Have a Battery Wand
...
Install Batteries Into the Battery
W
and
NOTE:
Hunter Douglas recommends AA alkaline batteries for use with our
battery-powered
assemblies. These will provide more than one year of
operation, depending on usage. Lithium and
rechargeable batteries are not recommended.
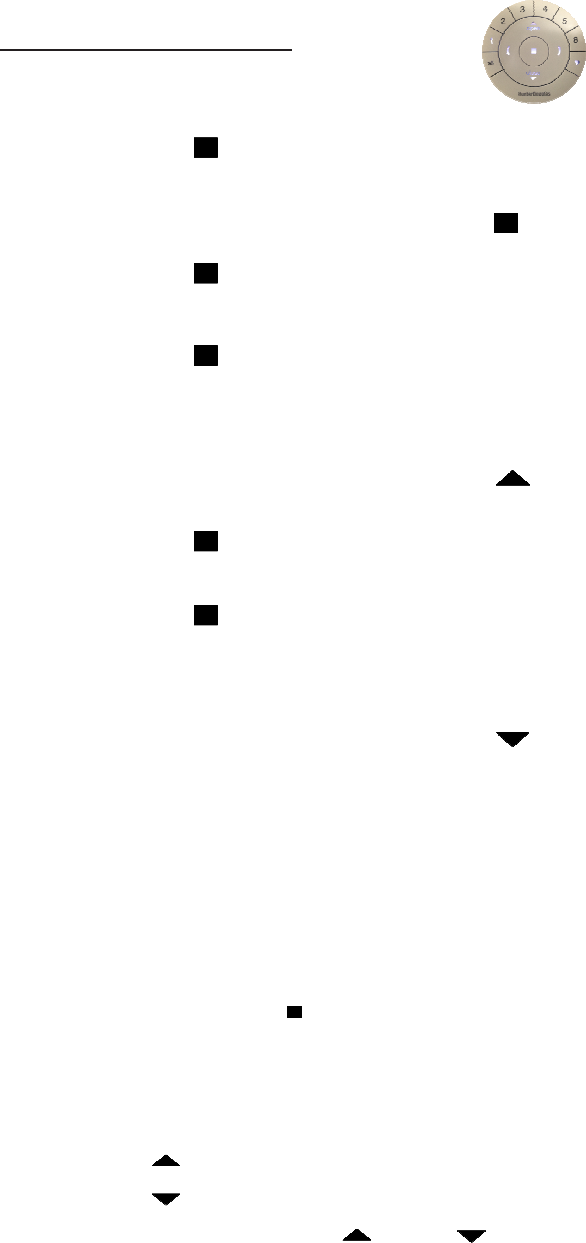
■ Squeeze
the cap latch to release and
remove the cap.
■ Install the batteries according to the instructions on the battery wand label.
■ Replace
the cap.
➤
Align the tab with the end of the wand.
➤
Press the cap on until it
latches.
Plug the Power Cable into the Battery
W
and
■ Connect
the
power cable (coming from the end of
the
motor) into the socket on the battery
wand.
If You Have a DC Power Supply
...
Connect the Power
Supply
■
Plug the power cable from the motor into the extension cable.
■
Plug the other end of the extension cable
into
the DC power
supply
.
■
Plug the DC
power supply into a standard
outlet.
WARNING:
Keep cords and small parts out of the reach of children. They
can wrap
cords around their necks and
STRANGLE
. They can also
put
small parts in their
mouths and
CHOKE
.
WARNING:
Electric shock and/or a fire hazard may occur if the DC power supply
and cables are not properly installed.
Operate
the Assembly
Check the Power
Cor
d
■
Check to ensure the power cord is not pinched.
Test the Assembly Using
the Manual Control Button
Testing the shade with the manual control button
will
allow you to ensure that
the motor and power source are
working
correctly
.
Press
the
manual
control
button
to test operation
➤
Press the button to alternately rotate motor, stop, and rotate the other way.
Manual control button
Test the Assembly Using
the Remote
Refer to the PowerView™ Remote Guide for more information
To link a shade to a remote:
1. Press and hold
Stop for six seconds to put remote in program mode. The lights on remote will pulsate to indicate it is in
program mode.
2.
Press and hold the manual control button on the
3.
While continuing to press the manual button, press
been linked to the network.
4. Press and hold Stop
for six seconds to exit program mode.
To join a shade to a GROUP:
1. Press and hold
Stop for six seconds to put remote in program mode. The lights on remote will pulsate to indicate it is in
program mode.
2. Press desired group number (1 –
6) on the remote.
selected.
3.
Press and hold the manual control button on the
4.
While continuing to press the manual button, Press
has joined the group.
5. Press and hold
Stop for six seconds to exit program mode.
To remove a shade from a group:
1. Press and hold
Stop for six seconds to put remote in program mode. The lights on remote will pulsate to indicate it is in
program mode.
2. Press desired group number (1 –
6) on the remote. The light for the group number selected will pulsate to show it is
selected.
3.
Press and hold the manual control button on the
4.
While continuing to press the manual button, Press
removed from the group.
Radio Control Operation
Once the assembly has
been joined to a group, radio control is used to operate the
toward the assembly being operated. Multiple
assemblies
Remote Functions:
1. To wake up remote, press
Stop. The last group(s) selected will be highlighted and active.
2. Press “All” or Groups 1‐
6 to select specific shade(s) to move. Selected
a. Multiple Group number may be selected at a time.
b.
To deselect a Group, press the Group number again. The light for that group will go out.
3. Select the OPEN button to
move the motor in one direction
4. Select the CLOSE button to
move the motor in the other direction
5. While a motor is in motion, press
OPEN or
Stop for six seconds to put remote in program mode. The lights on remote will pulsate to indicate it is in
Press and hold the manual control button on the
assembly.
While continuing to press the manual button, press
Stop on the remote. The motor will
rotate slightly
for six seconds to exit program mode.
Stop for six seconds to put remote in program mode. The lights on remote will pulsate to indicate it is in
6) on the remote.
The light for the group number selected will pulsate to show it is
Press and hold the manual control button on the
assembly.
While continuing to press the manual button, Press
Open on the remote. The motor will
rotate slightly
Stop for six seconds to exit program mode.
Stop for six seconds to put remote in program mode. The lights on remote will pulsate to indicate it is in
6) on the remote. The light for the group number selected will pulsate to show it is
Press and hold the manual control button on the
assembly.
While continuing to press the manual button, Press
Close on the remot
e. The shade will jog to indicate it has been
been joined to a group, radio control is used to operate the
motor
. There is no need to aim the remote
assemblies
can be operated at the same time.
Stop. The last group(s) selected will be highlighted and active.
6 to select specific shade(s) to move. Selected
groups will light to show they are selected.
a. Multiple Group number may be selected at a time.
To deselect a Group, press the Group number again. The light for that group will go out.
move the motor in one direction
.
move the motor in the other direction
.
OPEN or
CLOSE, the opposite of motor
motion to reverse direction.
Stop for six seconds to put remote in program mode. The lights on remote will pulsate to indicate it is in
rotate slightly
to indicate it has
Stop for six seconds to put remote in program mode. The lights on remote will pulsate to indicate it is in
The light for the group number selected will pulsate to show it is
rotate slightly
to indicate it
Stop for six seconds to put remote in program mode. The lights on remote will pulsate to indicate it is in
6) on the remote. The light for the group number selected will pulsate to show it is
e. The shade will jog to indicate it has been
. There is no need to aim the remote
groups will light to show they are selected.
motion to reverse direction.
U.S. Radio Frequency FCC Compliance
This device complies with Part 15 of the FCC Rules. Operation is subject to the following two conditions:
(1) This device may not cause harmful interference, and
(2) This device must accept any interference received, including interference that may cause
This equipment has been tested and found to comply with the limits for a Class B digital device, pursuant to Part 15 of the F
reasonable protection against harmful interference in a reside
installed and used in accordance with the instructions, may cause harmful interference to radio communications. However, ther
not occur in a particular installation. If this equipment does cause harmful interference to radio or television reception, w
equipment off and on, the user is encouraged to try to correct the interference b
• Reorient or relocate the receiving antenna.
• Increase the separation between the equipment and receiver.
• Connect the equipment into an outlet on a circuit different from that to which the receiver is connected.
• Consult the dealer or an experienced radio/TV technician for help.
Any changes or modifications not expressly approved by the party responsible for compliance could void the user’s authority t
Industry Canada
Under Industry Canad
a regulations, this radio transmitter may only operate using an antenna of a type and maximum (or lesser) gain approved for t
Industry Canada. To reduce potential radio interference to other users, the antenna type and its gain should be s
power (e.i.r.p.) is not more than that necessary for successful communication.
This device complies with Industry Canada licence‐
exempt RSS standard(s). Operation is subject to the following two condition
interference, and (2) this device must accept any interference, including interference that may cause undesired operation of
Industrie Canada
Conformément à la réglementation d’Industrie Canada, le présent émett
approuvé pour l’émetteur par Industrie Canada. Dans le but de réduire les risques de brouillage radioélectrique à l’intention
d’antenne et son gain de sorte que la puissance isotrope rayonnée équivalente (p.i.r.e.) ne dépasse pas l’intensité nécessair
satisfaisante.
Le présent appareil est conforme aux CNR d’Industrie Canada applica
suivantes : (1) l’appareil ne doit pas produire de brouillage, et (2) l’utilisateur de l’appareil doit accepter tout brouilla
susceptible d’en compromettre le fonctionnement.
European Conformity
We, the undersigned,
Hunter Douglas Window Fashions
Address: One Duette Way, Broomfield, CO 80020, USA
Authorized representative in Europe: Nico Dekker
Hunter Douglas Europe B.V.
Piekstraat 2, 3071 EL Rotterdam, The Netherlands
certify and declare under our sole responsibility that the PV4
1999/5/EC.
A copy of the original d
eclaration of conformity may be found at
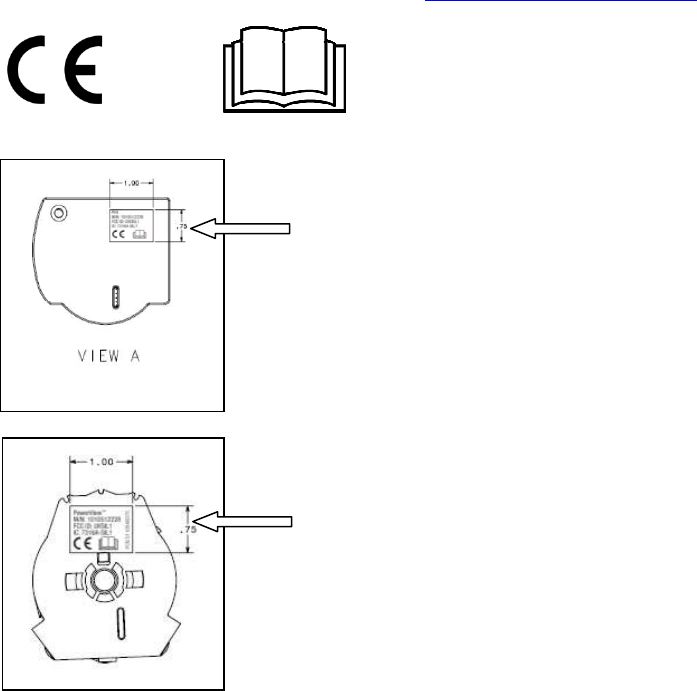
Location of FCC label on
Location of FCC label on assembly
This device complies with Part 15 of the FCC Rules. Operation is subject to the following two conditions:
(2) This device must accept any interference received, including interference that may cause
undesired operation.
This equipment has been tested and found to comply with the limits for a Class B digital device, pursuant to Part 15 of the F
CC Rules. These limits are designed to provide
reasonable protection against harmful interference in a reside
ntial installation. This equipment generates, uses and can radiate radio frequency energy and, if not
installed and used in accordance with the instructions, may cause harmful interference to radio communications. However, ther
e is no guarantee that interf
not occur in a particular installation. If this equipment does cause harmful interference to radio or television reception, w
hich can be determined by turning the
equipment off and on, the user is encouraged to try to correct the interference b
y one or more of the following measures:
• Increase the separation between the equipment and receiver.
• Connect the equipment into an outlet on a circuit different from that to which the receiver is connected.
• Consult the dealer or an experienced radio/TV technician for help.
Any changes or modifications not expressly approved by the party responsible for compliance could void the user’s authority t
o operate the equipment.
a regulations, this radio transmitter may only operate using an antenna of a type and maximum (or lesser) gain approved for t
Industry Canada. To reduce potential radio interference to other users, the antenna type and its gain should be s
o chosen that the equivalent isotropically radiated
power (e.i.r.p.) is not more than that necessary for successful communication.
exempt RSS standard(s). Operation is subject to the following two condition
s: (1) this device may not cause
interference, and (2) this device must accept any interference, including interference that may cause undesired operation of
the device.
Conformément à la réglementation d’Industrie Canada, le présent émett
eur radio peut fonctionner avec une antenne d’un type et d’un gain maximal (ou inférieur)
approuvé pour l’émetteur par Industrie Canada. Dans le but de réduire les risques de brouillage radioélectrique à l’intention
des autres utilisateurs, il faut choisir
d’antenne et son gain de sorte que la puissance isotrope rayonnée équivalente (p.i.r.e.) ne dépasse pas l’intensité nécessair
e à l’établissement d’une communication
Le présent appareil est conforme aux CNR d’Industrie Canada applica
bles aux appareils radio exempts de licence. L’exploitation est autorisée aux deux conditions
suivantes : (1) l’appareil ne doit pas produire de brouillage, et (2) l’utilisateur de l’appareil doit accepter tout brouilla
ge radioélectrique subi, même si le b
assembly conforms with the essential requirements of the
EMC directive 2004/108/EC and
eclaration of conformity may be found at
www.hunterdouglas.com/RFcertifications.
Location of FCC label on
assembly
Location of FCC label on assembly
CC Rules. These limits are designed to provide
ntial installation. This equipment generates, uses and can radiate radio frequency energy and, if not
e is no guarantee that interf
erence will
hich can be determined by turning the
o operate the equipment.
a regulations, this radio transmitter may only operate using an antenna of a type and maximum (or lesser) gain approved for t
he transmitter by
o chosen that the equivalent isotropically radiated
s: (1) this device may not cause
the device.
eur radio peut fonctionner avec une antenne d’un type et d’un gain maximal (ou inférieur)
des autres utilisateurs, il faut choisir
le type
e à l’établissement d’une communication
bles aux appareils radio exempts de licence. L’exploitation est autorisée aux deux conditions
ge radioélectrique subi, même si le b
rouillage est
EMC directive 2004/108/EC and
R&TTE directive