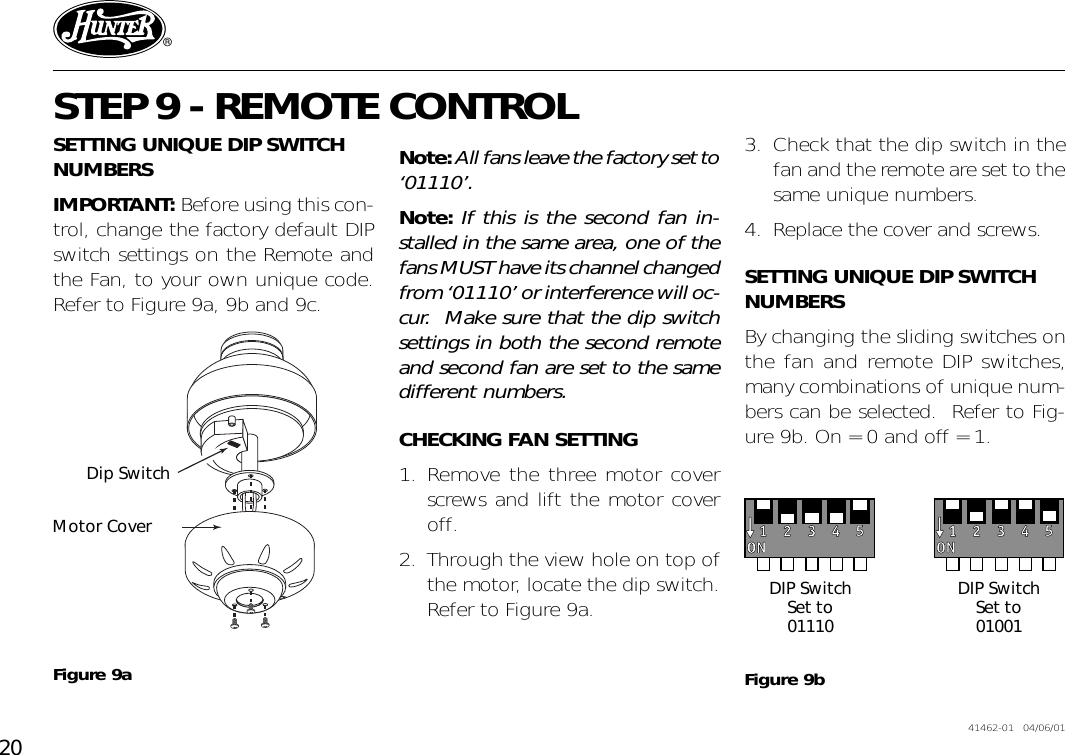
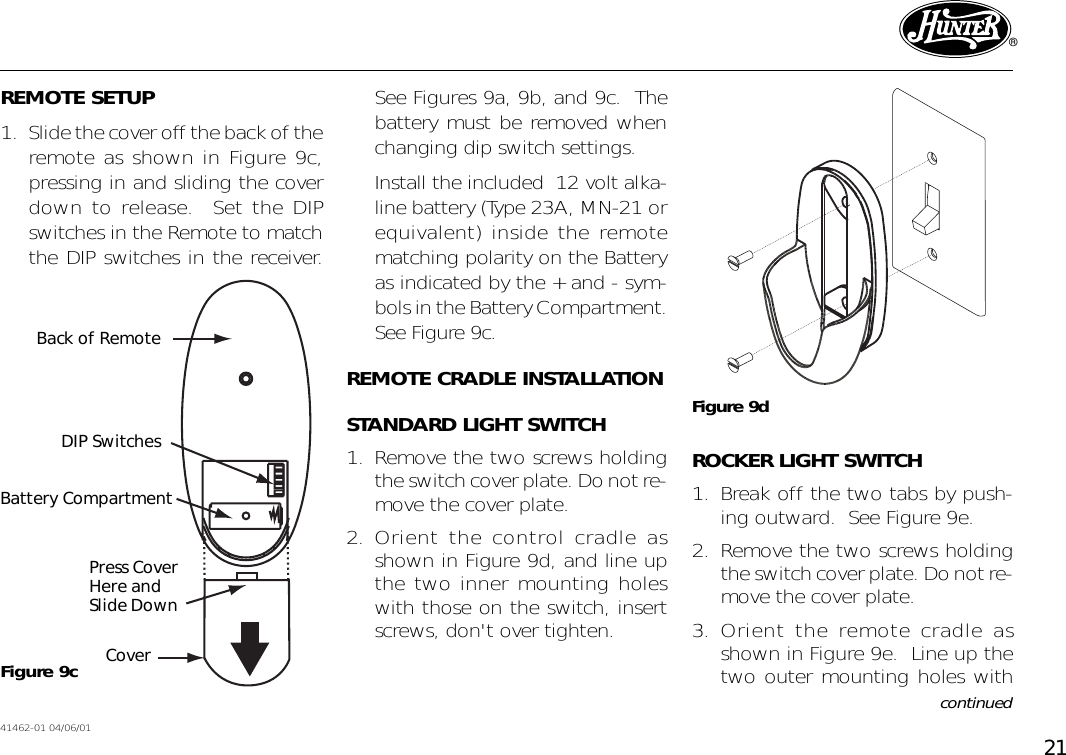
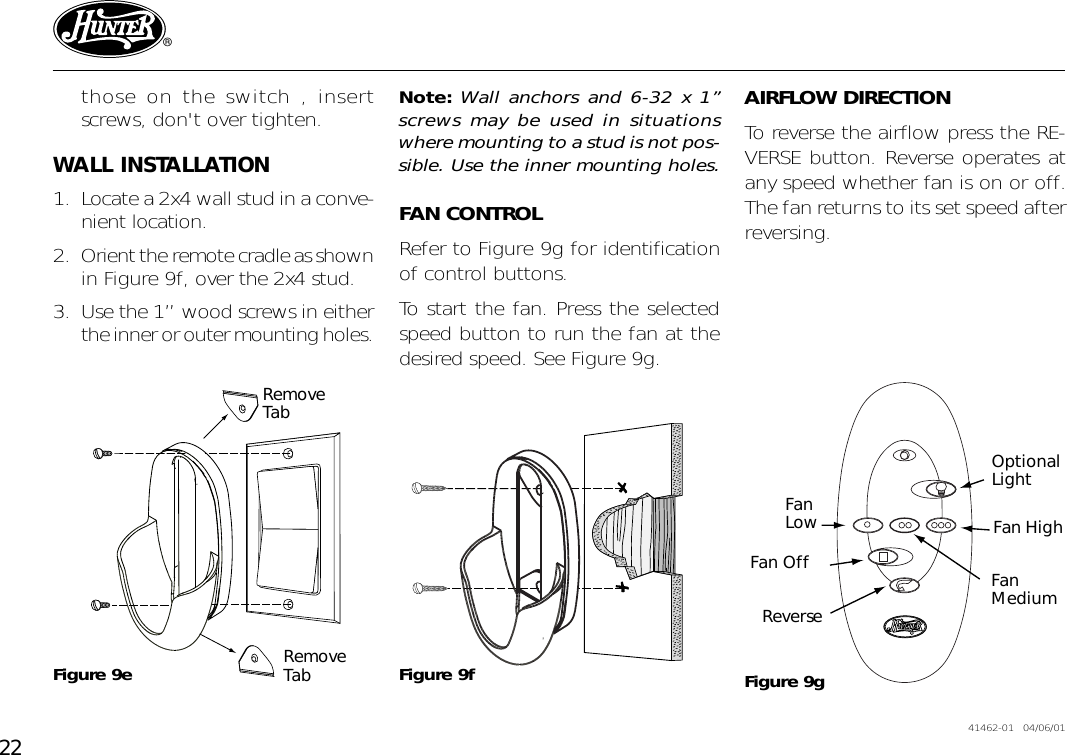
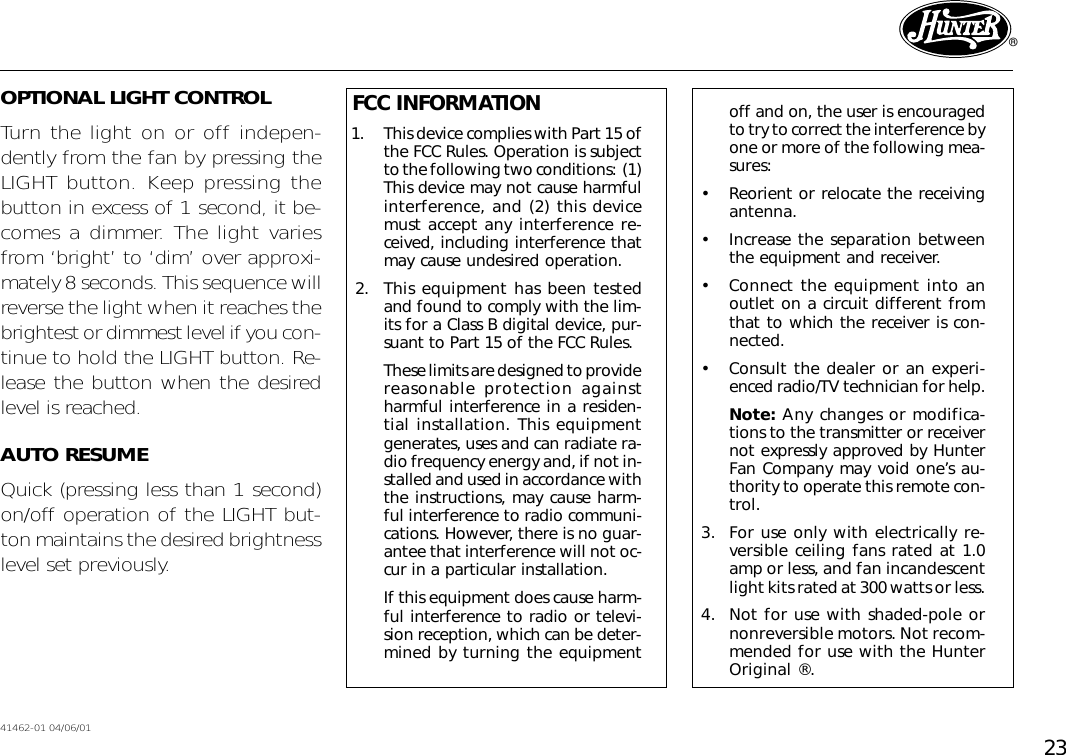
Hunter Fan TX14 Ceiling fan and lamp remote control. User Manual 41462 01 remote no light USA p65

Hunter Fan Company Ceiling fan and lamp remote control. 41462 01 remote no light USA p65

Users Manual

20 41462-01   04/06/01®STEP 9 - REMOTE CONTROLSETTING UNIQUE DIP SWITCHNUMBERSIMPORTANT: Before using this con-trol, change the factory default DIPswitch settings on the Remote andthe Fan, to your own unique code.Refer to Figure 9a, 9b and 9c.Figure 9aDip SwitchMotor CoverNote: All fans leave the factory set to‘01110’.Note: If this is the second fan in-stalled in the same area, one of thefans MUST have its channel changedfrom ‘01110’ or interference will oc-cur.  Make sure that the dip switchsettings in both the second remoteand second fan are set to the samedifferent numbers.CHECKING FAN SETTING1. Remove the three motor coverscrews and lift the motor coveroff.2. Through the view hole on top ofthe motor, locate the dip switch.Refer to Figure 9a.3. Check that the dip switch in thefan and the remote are set to thesame unique numbers.4. Replace the cover and screws.SETTING UNIQUE DIP SWITCHNUMBERSBy changing the sliding switches onthe fan and remote DIP switches,many combinations of unique num-bers can be selected.  Refer to Fig-ure 9b. On = 0 and off = 1.DIP SwitchSet to01110DIP SwitchSet to01001Figure 9b
2141462-01 04/06/01®See Figures 9a, 9b, and 9c.  Thebattery must be removed whenchanging dip switch settings.Install the included  12 volt alka-line battery (Type 23A, MN-21 orequivalent) inside the remotematching polarity on the Batteryas indicated by the + and - sym-bols in the Battery Compartment.See Figure 9c.REMOTE CRADLE INSTALLATIONSTANDARD LIGHT SWITCH1. Remove the two screws holdingthe switch cover plate. Do not re-move the cover plate.2. Orient the control cradle asshown in Figure 9d, and line upthe two inner mounting holeswith those on the switch, insertscrews, don't over tighten.REMOTE SETUP1. Slide the cover off the back of theremote as shown in Figure 9c,pressing in and sliding the coverdown to release.  Set the DIPswitches in the Remote to matchthe DIP switches in the receiver.continuedFigure 9dROCKER LIGHT SWITCH1. Break off the two tabs by push-ing outward.  See Figure 9e.2. Remove the two screws holdingthe switch cover plate. Do not re-move the cover plate.3. Orient the remote cradle asshown in Figure 9e.  Line up thetwo outer mounting holes withFigure 9cDIP SwitchesBattery CompartmentCoverBack of RemotePress CoverHere andSlide Down
22 41462-01   04/06/01®FanLowReverseFan Off FanMediumFan HighFigure 9ethose on the switch , insertscrews, don't over tighten.WALL INSTALLATION1. Locate a 2x4 wall stud in a conve-nient location.2. Orient the remote cradle as shownin Figure 9f, over the 2x4 stud.3. Use the 1” wood screws in eitherthe inner or outer mounting holes.Note: Wall anchors and 6-32 x 1”screws may be used in situationswhere mounting to a stud is not pos-sible. Use the inner mounting holes.RemoveTabRemoveTab Figure 9gFigure 9fFAN CONTROLRefer to Figure 9g for identificationof control buttons.To start the fan. Press the selectedspeed button to run the fan at thedesired speed. See Figure 9g.OptionalLightAIRFLOW DIRECTIONTo reverse the airflow press the RE-VERSE button. Reverse operates atany speed whether fan is on or off.The fan returns to its set speed afterreversing.
2341462-01 04/06/01®off and on, the user is encouragedto try to correct the interference byone or more of the following mea-sures:• Reorient or relocate the receivingantenna.• Increase the separation betweenthe equipment and receiver.• Connect the equipment into anoutlet on a circuit different fromthat to which the receiver is con-nected.• Consult the dealer or an experi-enced radio/TV technician for help.Note: Any changes or modifica-tions to the transmitter or receivernot expressly approved by HunterFan Company may void one’s au-thority to operate this remote con-trol.3. For use only with electrically re-versible ceiling fans rated at 1.0amp or less, and fan incandescentlight kits rated at 300 watts or less.4. Not for use with shaded-pole ornonreversible motors. Not recom-mended for use with the HunterOriginal ®. FCC INFORMATION 1. This device complies with Part 15 ofthe FCC Rules. Operation is subjectto the following two conditions:  (1)This device may not cause harmfulinterference, and (2) this devicemust accept any interference re-ceived, including interference thatmay cause undesired operation.2. This equipment has been testedand found to comply with the lim-its for a Class B digital device, pur-suant to Part 15 of the FCC Rules.These limits are designed to providereasonable protection againstharmful interference in a residen-tial installation. This equipmentgenerates, uses and can radiate ra-dio frequency energy and, if not in-stalled and used in accordance withthe instructions, may cause harm-ful interference to radio communi-cations. However, there is no guar-antee that interference will not oc-cur in a particular installation.If this equipment does cause harm-ful interference to radio or televi-sion reception, which can be deter-mined by turning the equipmentOPTIONAL LIGHT CONTROLTurn the light on or off indepen-dently from the fan by pressing theLIGHT button. Keep pressing thebutton in excess of 1 second, it be-comes a dimmer. The light variesfrom ‘bright’ to ‘dim’ over approxi-mately 8 seconds. This sequence willreverse the light when it reaches thebrightest or dimmest level if you con-tinue to hold the LIGHT button. Re-lease the button when the desiredlevel is reached.AUTO RESUMEQuick (pressing less than 1 second)on/off operation of the LIGHT but-ton maintains the desired brightnesslevel set previously.

Navigation menu