Hytera Communications PD75XIU1 Digital Portable Radio User Manual
Hytera Communications Corporation Limited Digital Portable Radio
UserManual.wiki
>
Hytera Communications
>
PD75XIU1 User Manual
User manual
Navigation menu
Upload a User Manual
Namespaces
Wiki Guide
HTML
PDF
Info
Views
User Manual
Discussion / Help
Navigation


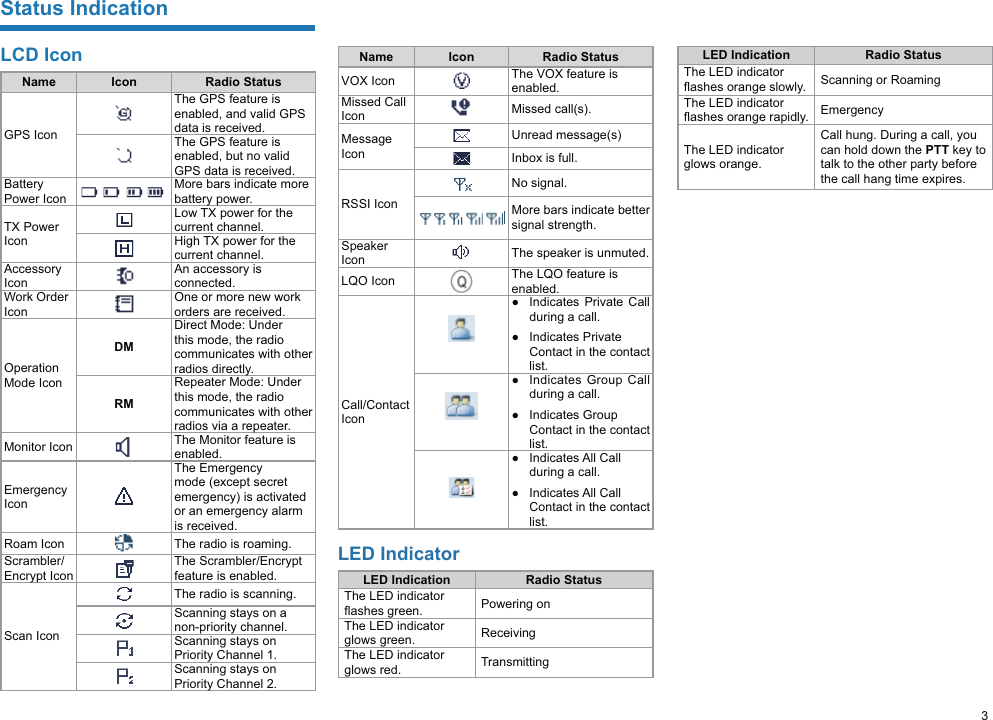
![1Items in the PackagePlease unpack carefully and check that all items listed below are received. If any item is missing or damaged, please contact your dealer. 4UZK :NK LXKW[KTI_HGTJOY SGXQKJUTZNKRGHKRULGTZKTTG!OLTUZVRKGYKXKLKXZUZNKRGHKRUTZNKXGJOULUXLXKW[KTI_HGTJOTLUXSGZOUT Antenna Charger Power AdapterRadio Unit Battery Belt Clip Strap Documentation KitProduct OverviewProduct ControlNo. Part Name No. Part Name1 SK1 (Side Key 1) 12 Antenna2PTT (Push-to-Talk) Key 13 Power On-Off/Volume Control Knob3 SK2 (Side Key 2) 14 Accessory connector4 TK (Top Key) 15 Back/Group Call Management Key5Group Call Selector knob 16 BackDial/End/Home Screen Key6 Microphone 17 Up Key7 LCD Display 18 Down Key8 OK/Menu Key 19 Battery Latch9Answer/Redial/Call Key 20 Belt Clip10 Speaker 21 Battery11 LED Indicator - -Programmable KeysFor enhanced convenience, you may request your dealer to program the TK ( ), SK1, SK2 and P1( ) and P2( ) as shortcuts to certain functions. Please refer to the corresponding Feature Book for more details. )G[ZOUT :NK:1OYVXUMXGSSKJ]OZNKSKXMKTI_LKGZ[XKH_JKLG[RZYNUXZVXKYY +SKXMKTI_5T!RUTMVXKYY +SKXMKTI_5LL/ZOYVXUMXGSSGHRKH__U[XJKGRKXBefore UseCharging the Battery)G[ZOUT 3GQKY[XKZNKXGJOUOY VU]KXKJULLHKLUXKINGXMOTM8KGJZNK9GLKZ_ /TLUXSGZOUT(UUQRKZOTGJ\GTIKZUMKZTKIKYYGX_YGLKZ_OTLUXSGZOUT:UGINOK\KUVZOSGRHGZZKX_VKXLUXSGTIKVRKGYKINGXMKZNKHGZZKX_LUXGZRKGYZNU[XYHKLUXKOTOZOGR[YKPlease use the charger specified by the Company to charge the battery. Charging Diagram is listed below. Charging Status Indication (on charger): OWNER'S MANUAL21)NGXMKZNK8GJOU]OZNHGZZKX_GZZGINKJ)NGXMKZNK(GZZKX_](https://usermanual.wiki/Hytera-Communications/PD75XIU1/User-Guide-3915655-Page-5.png)
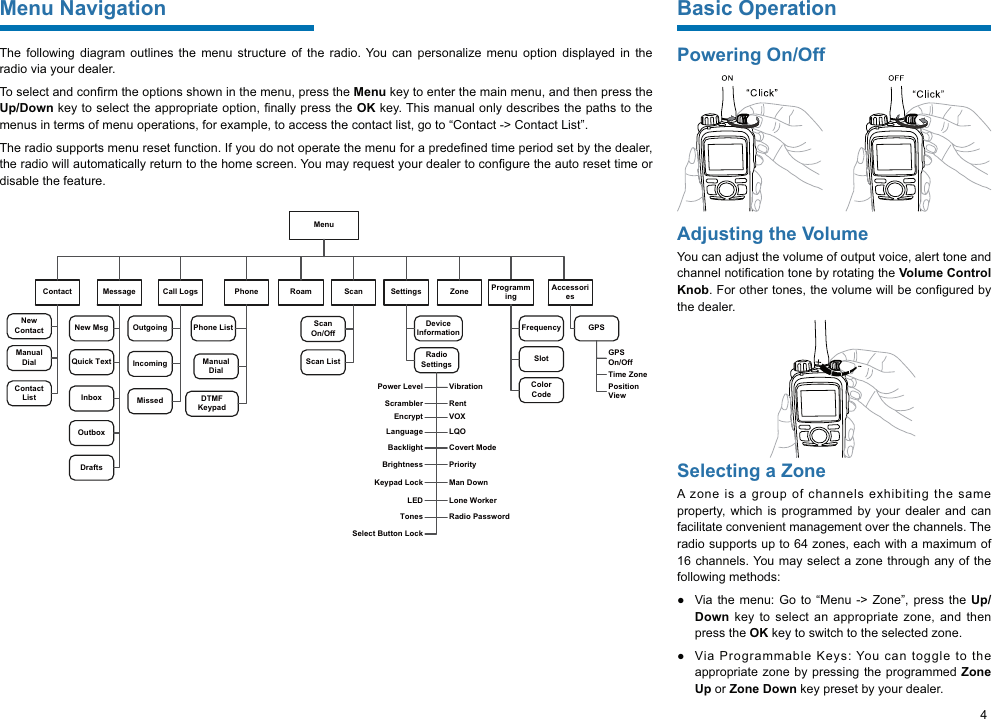
![2ĜhhLED Indication Charging StatusThe LED Indicator flashes red slowly. Standby (no load)The LED Indicator glows red. ChargingThe LED Indicator glows orange. 90% chargedThe LED Indicator glows green. Fully chargedThe LED Indicator flashes red rapidly. Charging failedAttaching the Battery4UZK :UXKSU\KZNKHGZZKX_Z[XTULLZNKXGJOULOXYZ:NKTYROJK ZNKHGZZKX_ RGZIN[V]GXJYZU[TRUIQZNKHGZZKX_GTJXKSU\KOZChecking the Battery PowerYou may check the current battery power by holding down the programmed Battery Power Indicator key preset by your dealer. And release the key to exit. Battery power indications are listed below: LED Indication Icon Battery PowerThe LED Indicator glows green. High The LED Indicator glows orange. Medium The LED Indicator glows red. Low The LED Indicator glows red and low battery alert beeps. Under the low battery threshold. Please recharge or replace the battery for proper radio operationAttaching the Antenna)G[ZOUT *UTUZNURJZNKXGJOUH_OZYGTZKTTGUZNKX]OYKZNKVKXLUXSGTIKGTJROLKYVGTULZNKGTZKTTG]ORRHKXKJ[IKJAttaching the Belt Clip1. Loosen the screws from the back of the radio. 2. Align the screw holes of the belt clip with those on the radio’s back, and then tighten the screws. Attaching the Accessories1. Open the accessory connector cover as shown below. 2. Align the accessory (such as an audio accessory, or a programming cable) plug with the accessory connector. )G[ZOUT *UTUZYIXGVKZNKYOROIUTKX[HHKXY[XXU[TJOTMZNKGIIKYYUX_IUTTKIZUXYIXK]NURKOTUXJKXZUKTY[XKZNK]GZKXVXUULVKXLUXSGTIKULZNKXGJOU 3. Tighten the screw on the accessory plug. "Click"](https://usermanual.wiki/Hytera-Communications/PD75XIU1/User-Guide-3915655-Page-6.png)