Hytera Communications PD7XXU1 Digital Portable Radio User Manual
Hytera Communications Corporation Limited Digital Portable Radio
UserManual.wiki
>
Hytera Communications
>
PD7XXU1 User Manual
User Manual
Navigation menu
Upload a User Manual
Namespaces
Wiki Guide
HTML
PDF
Info
Views
User Manual
Discussion / Help
Navigation

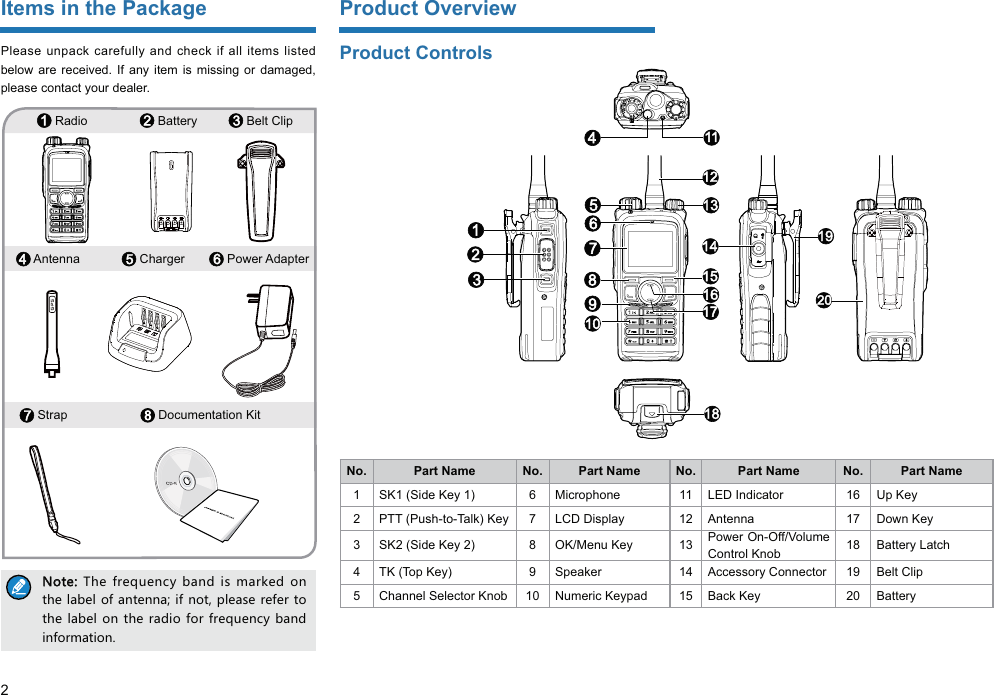
![3Programmable KeysFor enhanced convenience, you may request your dealer to program the TK ( ), SK1, SK2, P1 ( ) and P2 () as shortcuts to certain functions. Please refer to the Feature Description and Operation Manual along with the product for more details. )G[ZOUT :NK :1QK_OYVXUMXGSSKJ]OZNKSKXMKTI_LKGZ[XKH_JKLG[RZYNUXZVXKYY +SKXMKTI_5T!RUTMVXKYY +SKXMKTI_5LL/ZOYVXUMXGSSGHRKH__U[XJKGRKXLCD IconIcon Name Radio StatusDTMF Keypad Icon The DTMF keypad is active.GPS IconThe GPS feature is active, and valid GPS data is received. The GPS feature is active, but no valid GPS data is received.Battery Power IconMore bars indicate more battery power. TX Power IconLow TX power for the current channel. High TX power for the current channel. Accessory Icon An accessory is connected. Work Order IconOne or more new work orders are received. DMOperation Mode IconDirect Mode: Under this mode, radios communicate with each other directly. RMRepeater Mode: Under this mode, radios communicate with each other via a repeater. Monitor Icon The Monitor feature is active. Icon Name Radio StatusEmergency IconThe radio is in emergency state (except for silent emergency type) or an emergency call is received. Roam Icon The radio is roaming. Scrambler/Encrypt IconThe Scrambler/Encrypt feature is active. Scan IconThe radio is scanning. The radio stays on a non-priority channel. The radio stays on priority channel 1. The radio stays on priority channel 2. VOX Icon The VOX feature is active.Missed Call Icon Missed call(s). Message IconNew message/unread message. Inbox is full.RSSI IconNo signal. More bars indicate stronger signal strength. Speaker Icon The speaker is unmuted. LQO Icon The LQO feature is active. Call/Contact Iconƽ Indicates a private call in progress. ƽ Indicates a private contact in the contact list. ƽ Indicates a group call in progress. ƽ Indicates a group contact in the contact list. ƽ Indicates an all call in progress.ƽ Indicates an all call contact in the contact list.LED IndicatorLED Indication Radio StatusThe LED indicator Powering on The LED indicator glows green. Receiving The LED indicator glows red. Transmitting The LED indicator Scanning or Roaming The LED indicator Emergency The LED indicator glows orange. Call hung period. No voice is being transmitted or received a call. Within such period, you can hold down the PTT key to talk to the other party.](https://usermanual.wiki/Hytera-Communications/PD7XXU1/User-Guide-4015666-Page-7.png)
![4Before UseAttaching the Battery4UZK :UXKSU\KZNKHGZZKX_ Z[XTULLZNKXGJOULOXYZGTJZNKTYROJK ZNKHGZZKX_RGZIN[V]GXJYZU[TRUIQZNKHGZZKX_Attaching the Antenna)G[ZOUT *U TUZNURJZNKXGJOUH_ OZYGTZKTTGUZNKX]OYKZNKVKXLUXSGTIKGTJROLKYVGTULZNKGTZKTTG]ORRHKXKJ[IKJAttaching the Belt Clip1. Remove the screws. 2. Align the screw holes on the belt clip with those on the radio’s back, and then tighten the screws. Attaching the Accessories1. Open the accessory connector cover as shown below. 2. Align the accessory (such as an audio accessory, or a programming cable) plug with the accessory connector. )G[ZOUT *U TUZYIXGVKZNKYOROIUTKX[HHKXY[XXU[TJOTMZNKGIIKYYUX_IUTTKIZUXYIXK]NURKOT UXJKXZUKTY[XKZNK]GZKXVXUULVKXLUXSGTIKULZNKXGJOUĜhh3. Tighten the screw on the plug. Charging the Battery)G[ZOUT ;YKZNK INGXMKXYVKIOLOKJ H_ZNK)USVGT_ZUINGXMKZNKHGZZKX_3GQKY[XKZNK XGJOUOYVU]KXKJULLHKLUXKINGXMOTM8KGJZNK 9GLKZ_/TLUXSGZOUT(UUQRKZ OTGJ\GTIKZUMKZTKIKYYGX_YGLKZ_OTLUXSGZOUT)NGXMKGTK]HGZZKX_LUX GZRKGYZNU[XYHKLUXKOTOZOGR[YKLUXHKYZVKXLUXSGTIK)NGXMKZNK8GJOU]OZNHGZZKX_GZZGINKJ)NGXMKZNK(GZZKX_](https://usermanual.wiki/Hytera-Communications/PD7XXU1/User-Guide-4015666-Page-8.png)
![5- +Charging Status Indication (on charger): LED Indication Charging Statusslowly. Standby (no load)The LED Indicator glows red. ChargingThe LED indicator glows orange. 90% charged The LED indicator glows green. Fully chargedrapidly. Charging failedChecking the Battery PowerYou can check the current battery power by holding down the programmed Battery Power Indicator key preset by your dealer. And release the key to exit. Battery power indications and alert tone are listed below: LED Indication/Tone IconThe LED Indicator glows green. The LED Indicator glows orange. The LED Indicator glows red. The LED Indicator glows red and an alert tone sounds. The battery runs low. Please recharge or replace the battery for proper radio operation Basic OperationsTurning the Radio On/OffAdjusting the VolumeSelecting a ZoneA zone is a group of channels with the same property, which can facilitate convenient management over the channels. The radio supports 64 zones, each of which consists of up to 16 channels. Your dealer can program You can select a zone through any of the following ways: ƽ Menu: Go to “Menu -> Zone”, press the Up/Down key to select an appropriate zone, and then press the OK key to switch to the selected zone. ƽ Shortcut key: You can toggle to the appropriate zone by pressing the programmed Zone Up or Zone Down key preset by your dealer. Selecting a Channel 4UZK /LZNK)NGTTKR 4UZOL_LKGZ[XKOYKTGHRKJH_ _U[XJKGRKX ZNKXGJOU]ORRGTTU[TIKZNK INGTTKRT[SHKX[VUTINGTTKRY]OZINOTMInputting via KeypadYou can input alias, call numbers and messages via the keypad of the radio. In the editing mode, you may do as follows. ƽ Press to switch the text input methods between alphabetic mode and numeric modeƽ In the alphabetic mode, press to input the special characters. But in the numeric mode, pressing will input the numeric digit 1 ƽ In the alphabetic mode, press to input the space. But in the numeric mode, pressing will input the special characters Locking and Unlocking the Keypad When the keypad is not in use, you can lock the keypad to prevent accidental keypad operation. The following methods are available for you to lock or unlock the keypad: ƽ Key Combination: Press “OK+ ” to lock or unlock the keypad.](https://usermanual.wiki/Hytera-Communications/PD7XXU1/User-Guide-4015666-Page-9.png)
![6d)3ƽ Shortcut key: Press the programmed Keypad Lock key to lock or unlock the keypad. ƽ Menu: Go to “Menu -> Settings -> Radio Set -> Keypad Lock” and then select “Enable” or “Disable”. »Enable: The keypad will be locked automatically if no operation is made within the preset time period. After the “Enable” option is selected, you can press the Up/Down key to set the Keypad Auto Lock Delay Time. »Disable: The keypad will not be locked automatically. 4UZK 'RRQK_YUTZNKLXUTZVGTKRK^IKVZLUX6 GTJ6 ]ORR HKRUIQKJH_JKLG[RZ3UXKU\KX_U[IGTMUZUȔ9KZZOTMY$8GJOU 9KZ$9KRKIZ2UIQKJ1K_ȕZUIUTLOM[XKZNKLURRU]OTMRUIQGHRK QK_YUXQTUHY :16 澝6 91 916::)NGTTKR9KRKIZUX1TUHGTJ<UR[SK)UTZXUR1TUHManaging the ContactContact management allows you to view, edit, delete or add contacts. Contact ListThe contact list is used to save private call contact, group call contact, and all call contact information such as call alias, call type and call ID. ƽ Go to the “Menu -> Contact -> Contact List” menu to access the contact list. ƽ Press the programmed Contact List key to access the contact list. In the “Contact List” menu, you can view, edit or delete the private contact. You can send to a private call contact the following commands: Alert Call, Radio Check, Remote Monitor, Radio Enable or Radio Disable. Please refer to the Feature Description and Operation Manual along with the product for details. Favorite Contact Favorite Contact is used to save the frequently used contacts. ƽ Go to the “Menu -> Contact -> Favorite Contact” menu to access the favorite contact list. ƽ Press the programmed Favorite Contact List key to access the favorite contact list. In the favorite contact list, you can view, edit or delete the favorite contacts. You can send to a favorite contact the following commands: Alert Call, Radio Check, Remote Monitor, Radio Enable or Radio Disable. Please refer to the Feature Description and Operation Manual along with the product for details. New Contact New Contact is used to add a new contact to the contact list. Go to the “Menu -> Contact -> New Contact” menu to access the relevant screen. Input the number and alias of a new contact and save it to the private contact list. 4UZK:NKT[SHKXGTJGROGYULGTK]IUTZGIZS[YZHK[TOW[K?U[IGTGRYUYG\KZNKT[SHKXYLXUSZNK)GRR2UMYOTZUZNKIUTZGIZROYZCall ServicesAfter the radio is powered on, you can make and receive calls. To ensure optimal volume of the receiving radio, keep the microphone about 2.5 to 5 centimeters away from your mouth when transmitting. Private Call Initiating a Private CallWhen you initiate a private call, the radio will display the icon . You can make a private call through any of the following ways: Preset Contact You may request your dealer to preset a regular private call contact for each digital channel. In the home screen, hold down the PTT key to initiate a private call to the private contact preset for the current channel. Contact List1. Go to “Menu -> Contact -> Contact List”. 2. Use the Up/Down key to select an appropriate contact. 3. Hold down the PTT key to initiate a private call.](https://usermanual.wiki/Hytera-Communications/PD7XXU1/User-Guide-4015666-Page-10.png)
![7Call Logs1. Go to “Menu -> Call Logs -> Outgoing/Incoming/Missed”. 2. Use the Up/Down key to select an appropriate contact. 3. Hold down the PTT key to initiate a private call. Manual Dial1. Go to “Menu -> Contact -> Manual Dial”. 2. Input the private call number using the numeric keypad. 3. Hold down the PTT key to initiate a private call. 4UZK/LHUZNZNK6XO\GZK)GRR3GT[GR*OGRGTJ-XU[V)GRR3GT[GR*OGR GXKG\GORGHRK_U[IGT VXKYY ZUY]OZINHKZ]KKTZNKZ]UJOGROTMSKZNUJYGTJZNKXGJOU]ORRJOYVRG_ ZNKIGRRZ_VK6XO\GZK/*-XU[V/*/LZNK *KLG[RZ4[SKXOI1K_9KRKIZOUTLKGZ[XKOYKTGHRKJH_ _U[XJKGRKX_U[IGT KTZKXGVXO\GZKIGRRT[SHKXOTZNK NUSKYIXKKTGTJZNKTNURJJU]TZNK 6::QK_ZUOTOZOGZKGVXO\GZKIGRR.U]K\KXOLZNK*:3,QK_VGJOYKTGHRKJZNK T[SHKXKTZKXKJOTZNKNUSKYIXKKTOYGVNUTKT[SHKX?U[IGTJOGRZNKVXO\GZKIGRRT[SHKXZNXU[MNZNKȔ3GT[GR*OGRȕSKT[UTR_Receiving and Responding to a Private CallWhen you receive a private call, the radio will display the icon , then you can listen without any operation. You can hold down the PTT key to call back within the preset time. If you do not respond to it, the radio will display appropriate indications.Group Call Initiating a Group CallWhen you initiate a group call, the radio will display the icon . You can make a group call through any of the following ways. The operation is similar to initiating a private call. Preset Contact In the home screen, hold down the PTT key to initiate a group call to the group call contact preset for the current channel. Contact List1. Go to “Menu -> Contact -> Contact List”. 2. Use the Up/Down key to select an appropriate contact. 3. Hold down the PTT key to initiate a group call. Manual DialThe operation is the same as initiating a private call. Receiving and Responding to a Group CallWhen you receive a group call, the radio will display the icon on the LCD. You can hold down the PTT key to call back within the preset time. Call on Analog Channel (No Signaling) To transmit on an analog channel, hold down the PTT and speak into the microphone. To receive, release the PTT key. Please refer to the Feature Description and Operation Manual along with the product for operation description on how to make and receive calls on the analog channel with signaling. Emergency CallIn case of emergency, you can use Emergency Call to ask for help from your companion or the control center. your dealer. Please refer to the Feature Description and Operation Manual along with the product for details. Message Services Message Services allow you to edit and send a new message, to directly send a quick text message and to forward the messages saved in the InBox, OutBox and Drafts. Text Message 1. Go to “Menu -> Message -> New Msg” to enter the relevant screen. 2. Type the text and press the OK key. You can save the text message to Drafts, or send it to a private call contact or a group call contact directly. 3. Select the contact or input the contact number manually. 4. Press the OK key to send the message. When the message is sent successfully, the radio will display the prompt “Send Success!”. Quick TextQuick Text is the frequently used message preset by your dealer. You can send the quick text directly or edit this text before sending it. InBoxThe Inbox saves the received messages and marks each message with a corresponding icon to indicate its status. ƽ : Read text message.](https://usermanual.wiki/Hytera-Communications/PD7XXU1/User-Guide-4015666-Page-11.png)