Hytera Communications PD98XU5 Digital Portable Radio User Manual
Hytera Communications Corporation Limited Digital Portable Radio Users Manual
Users Manual
Preface
Thanks for your favor in our product. This manual provides guidance for you to quickly know how to use
the product.
This manual is applicable to the following product:
PD982 U(5) Digital Portable Radio
Copyright Information
Hytera is the trademark or registered trademark of Hytera Communications Corporation Limited (the Company)
in the People's Republic of China (PRC) and/or other countries or areas. The Company retains the ownership of its
trademarks and product names. All other trademarks and/or product names that may be used in this manual are
properties of their respective owners.
The product described in this manual may include the Company's computer programs stored in memory or other
media. Laws in PRC and/or other countries or areas protect the exclusive rights of the Company with respect to its
computer programs. The purchase of this product shall not be deemed to grant, either directly or by implication,
any rights to the purchaser regarding the Company's computer programs. The Company's computer programs may
not be copied, modified, distributed, decompiled, or reverse-engineered in any manner without the prior written
consent of the Company.
Disclaimer
The Company endeavors to achieve the accuracy and completeness of this manual, but no warranty of accuracy or
reliability is given. All the specifications and designs are subject to change without notice due to continuous
technological development. No part of this manual may be copied, modified, translated, or distributed in any
manner without the prior written consent of the Company.
We do not guarantee, for any particular purpose, the accuracy, validity, timeliness, legitimacy or completeness of
the third-party products and contents involved in this manual.
If you have any suggestions or would like to receive more information, please visit our website at:
http://www.hytera.com.
FCC Statement
This equipment has been tested and found to comply with the limits for a Class B digital device, pursuant to part
15 of the FCC Rules. These limits are designed to provide reasonable protection against harmful interference in a
residential installation. This equipment generates, uses and can radiate radio frequency energy and, if not installed
and used in accordance with the instructions, may cause harmful interference to radio communications. However,
there is no guarantee that interference will not occur in a particular installation. If this equipment does cause
harmful interference to radio or television reception, which can be determined by turning the equipment off and
on, the user is encouraged to try to correct the interference by one or more of the following measures:
Reorient or relocate the receiving antenna.
Increase the separation between the equipment and receiver.
Connect the equipment into an outlet on a circuit different from that to which the receiver is connected.
Consult the dealer or an experienced radio/TV technician for help.
This device complies with part 15 of the FCC Rules. Operation is subject to the following two conditions: (1) This
device may not cause harmful interference, and (2) this device must accept any interference received, including
interference that may cause undesired operation.
Note: Changes or modifications to this unit not expressly approved by the party responsible for compliance could
void the user's authority to operate the equipment.
Compliance with RF Exposure Standards
Hytera's radio complies with the following RF energy exposure standards and guidelines:
United States Federal Communications Commission, Code of Federal Regulations; 47 CFR §
1.1307, 1.1310 and 2.1093
American National Standards Institute (ANSI) / Institute of Electrical and Electronic Engineers (IEEE)
C95. 1:2005; Canada RSS102 Issue 5 March 2015
Institute of Electrical and Electronic Engineers (IEEE) C95.1:2005 Edition
RF Exposure Compliance and Control Guidelines and
Operating Instructions
To control your exposure and ensure compliance with the occupational/controlled environmental exposure limits,
always adhere to the following procedures.
Guidelines:
Do not remove the RF Exposure Label from the device.
User awareness instructions should accompany device when transferred to other users.
Do not use this device if the operational requirements described herein are not met.
Operating Instructions:
Transmit no more than the rated duty factor of 50% of the time. To transmit (talk), push the
Push-To-Talk (PTT) key. To receive calls, release the PTT key. Transmitting 50% of the time, or
less, is important because the radio generates measurable RF energy only when transmitting (in
terms of measuring for standards compliance).
Keep the radio unit at least 2.5 cm away from the face. Keeping the radio at the proper distance is
important as RF exposure decreases with distance from the antenna. The antenna should be kept
away from the face and eyes.
When worn on the body, always place the radio in a Hytera-approved holder, holster, case, or body
harness or by use of the correct clip for this product. Use of non-approved accessories may result in
exposure levels which exceed the FCC's occupational/controlled environmental RF exposure limits.
Use of non-approved antennas, batteries, and accessories causes the radio to exceed the FCC RF
exposure guidelines.
Contact your local dealer for the optional accessories of the product.
ISEDC Statement
The device has been tested and complies with SAR limits, users can obtain Canadian information on RF exposure
and compliance.
Après examen de ce matériel aux conformité aux limites DAS et/ou aux limites d’intensité de champ RF, les
utilisateurs peuvent sur l’exposition aux radiofréquences et la conformité and compliance d’acquérir les
informations correspondantes
This device complies with Innovation, Science and Economic Development Canada license-exempt RSS
standard(s). Operation is subject to the following two conditions:
This device may not cause harmful interference.
This device must accept any interference received, including interference that may cause undesired
operation.
Le présent appareil est conforme aux CNR d'Innovation, Sciences et Développement économique Canada
applicables aux appareils radio exempts de licence. L'exploitation est autorisée aux deux conditions suivantes:
(1) l'appareil ne doit pas produire de brouillage, et (2) l'utilisateur de l'appareil doit accepter tout brouillage
radioélectrique subi, même si le brouillage est susceptible d'en compromettre le fonctionnement
Contents
Documentation Information ................................................................................................................... 1
1. Packing List ........................................................................................................................................ 2
2. Product Overview ............................................................................................................................... 3
2.1 Product Layout ................................................................................................................................ 3
3. Before Use .......................................................................................................................................... 5
3.1 Attaching the Antenna ..................................................................................................................... 5
3.2 Installing the Micro-SD Card ........................................................................................................... 5
3.3 Attaching the Battery ....................................................................................................................... 5
3.4 Attaching the Belt Clip ..................................................................................................................... 6
3.5 Attaching the Accessories ............................................................................................................... 6
3.6 Charging the Battery ....................................................................................................................... 7
4. Basic Operations ................................................................................................................................ 9
4.1 Turning the Radio On/Off ................................................................................................................ 9
4.2 Adjusting the Volume ...................................................................................................................... 9
4.3 Checking the Battery Power ........................................................................................................... 9
4.4 Locking or Unlocking the Keypad ................................................................................................... 9
4.5 Using the Keypad .......................................................................................................................... 10
4.6 Switching the Operation Mode ...................................................................................................... 10
4.7 Selecting a Zone and Channel (Conventioal) ............................................................................... 11
4.8 Registering with BS (Trunking) ..................................................................................................... 11
5. Status Indication .............................................................................................................................. 12
5.1 LCD Icon ....................................................................................................................................... 12
5.2 LED Indicator ................................................................................................................................ 14
6. Call Services ..................................................................................................................................... 15
6.1 Group Call ..................................................................................................................................... 15
6.2 Private Call ................................................................................................................................... 17
6.3 Phone Call .................................................................................................................................... 18
6.4 All Call ........................................................................................................................................... 20
6.5 Broadcast Call (Trunking Only) ..................................................................................................... 22
6.6 Include Call (Trunking Only) ......................................................................................................... 23
6.7 Call on Analog Channel (Conventional Only) ................................................................................ 23
7. Message Services ............................................................................................................................ 24
7.1 Viewing Messages ........................................................................................................................ 24
7.2 Sending Messages ....................................................................................................................... 24
7.3 Deleting Messages ....................................................................................................................... 25
8. Supplementary Features .................................................................................................................. 26
8.1 Basic Settings ............................................................................................................................... 27
8.2 Contact Management .................................................................................................................... 29
8.3 Audio Optimization ........................................................................................................................ 30
8.4 MIC & SPK .................................................................................................................................... 31
8.5 One Touch Call/Menu ................................................................................................................... 32
8.6 Scan .............................................................................................................................................. 33
8.7 Hunt .............................................................................................................................................. 34
8.8 Roam ............................................................................................................................................ 35
8.9 Talk Around .................................................................................................................................. 35
8.10 Time-out Timer ........................................................................................................................... 35
8.11 VOX ............................................................................................................................................ 35
8.12 Call Divert ................................................................................................................................... 36
8.13 DGNA ......................................................................................................................................... 36
8.14 GPS ............................................................................................................................................ 36
8.15 Work Order ................................................................................................................................. 37
8.16 Data Query ................................................................................................................................. 38
8.17 Control Services.......................................................................................................................... 38
8.18 Analog Services .......................................................................................................................... 39
8.19 Personal Safety Services ............................................................................................................ 40
8.20 Communication Security Services .............................................................................................. 41
9. Troubleshooting ............................................................................................................................... 44
10. Care and Cleaning .......................................................................................................................... 46
10.1 Product Care ............................................................................................................................... 46
10.2 Product Cleaning ........................................................................................................................ 46
11. Optional Accessories ..................................................................................................................... 47
Abbreviations ....................................................................................................................................... 48

1
Documentation Information
Icon Conventions
Icon Description
Note Indicates references that can further describe the related topics.
Caution Indicates situations that could cause data loss or equipment damage.
Notational Conventions
Item Description Example
Boldface
Denotes menus, tabs, parameter
names, window names, dialogue
names, and hardware buttons.
To save the configuration, click
Apply.
The Log Level Settings dialogue
appears.
Press the PTT key.
" "
Denotes messages, directories, file
names, folder names, and parameter
values.
The screen displays "Invalid
Battery!".
Open "PDT_PSS.exe".
Go to "D:/opt/local".
In the Port text box, enter "22".
> Directs you to access a multi-level
menu.
Go to File > New.
Italic Denotes document titles.
For details about using the DWS,
refer to Dispatch Workstation User
Guide.
Courier New Denotes commands and their
execution results.
To set the IP address, run the
following command:
vos-cmd - m name IP

2
1. Packing List
Please unpack carefully and check that you have received the following items. If any item is missing or
damaged, please contact your dealer.
Item Quantity
(PCS) Item Quantity
(PCS)
Radio 1 Antenna 1
Battery 1 Belt Clip 1
Charger 1 Strap 1
Power Adapter 1 User Manual 1
Note
Check whether the frequency band marked on the antenna label matches that on the radio label. If not,
please contact your dealer.
3
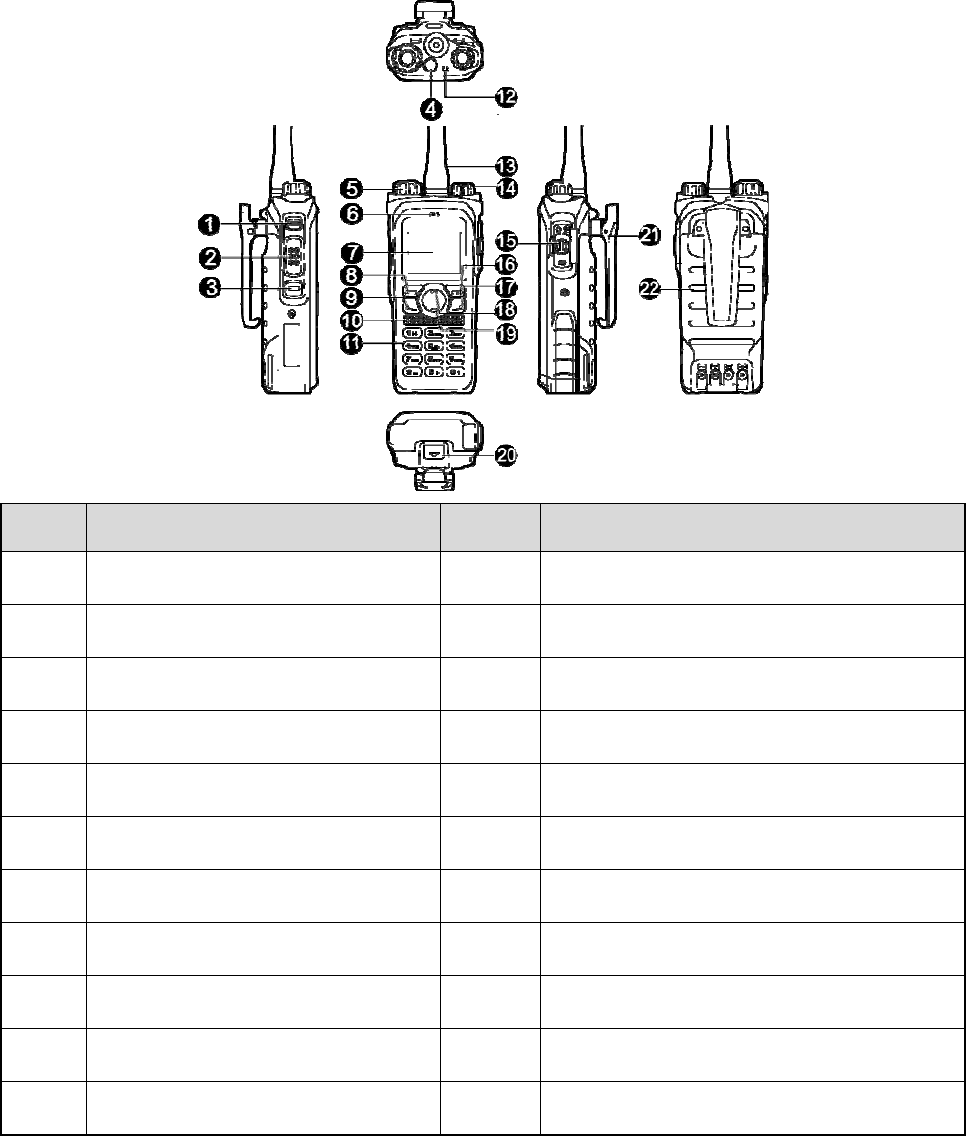
2. Product Overview
2.1 Product Layout
No. Part Name No. Part Name
1 Side Key 1 (SK1) 12 LED Indicator
2 Push-to-Talk (PTT) Key 13 Antenna
3 Side Key 2 (SK2) 14 On-Off/Volume Control Knob
4 Top Key (TK) 15 Accessory Connector
5 Channel/Group Selector Knob 16 Back/Subgroup Key
6 Microphone 17 P2/BackDial/End/Home Screen Key
7 LCD Display 18 Up Key
8 OK/Menu Key 19 Down Key
9 P1/Answer/Redial/Call Key 20 Battery Latch
10 Speaker 21 Belt Clip
11 Numeric Keypad 22 Battery

4
Note
For enhanced convenience, you may request your dealer to program the TK, P1, P2, SK1, and SK2
as shortcuts to radio features.
5
3. Before Use
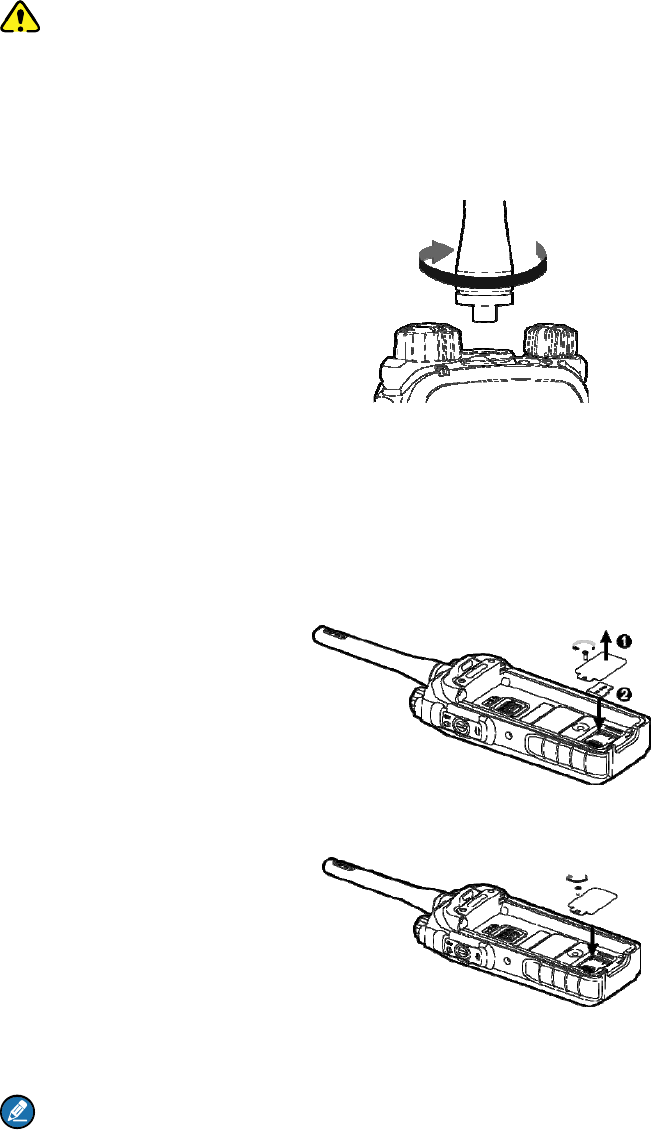
3.1 Attaching the Antenna
Caution
Rotate the antenna clockwise until hand tight; if over tightened, the antenna or its connector
may be damaged.
Do not hold the radio by its antenna as it may reduce the radio performance and life span of the
antenna.
3.2 Installing the Micro-SD Card
Install the Micro-SD card as follows if required:
Step 1 Loosen the screw fixing the Micro-SD card cover, remove the cover, and then place the card in
the holder correctly.
Step 2 Put the cover back and tighten the screw.
3.3 Attaching the Battery
Note
Upon power-on, the radio automatically checks whether the battery is approved by the
Company and gives a corresponding indication.

6
Using an unapproved battery makes the battery power indication inaccurate and reduces the
radio performance.
3.4 Attaching the Belt Clip
Step 1 Unfasten the two screws on the back of the radio.
Step 2 Align the screw holes on the belt clip with those on the back of the radio.
Step 3 Tighten the screws.
3.5 Attaching the Accessories
Caution: For optimal waterproof and dustproof performance:
Do not scrape the silicone waterproof pad surrounding the screw hold of the accessory
connector.
Do close the accessory connector cover and fasten the screw after removing the accessory.
Step 1 Loosen the screw fixing the accessory connector cover, and open the cover.
Step 2 Align the accessory (such as an audio accessory or a programming cable) plug with the
accessory connector.
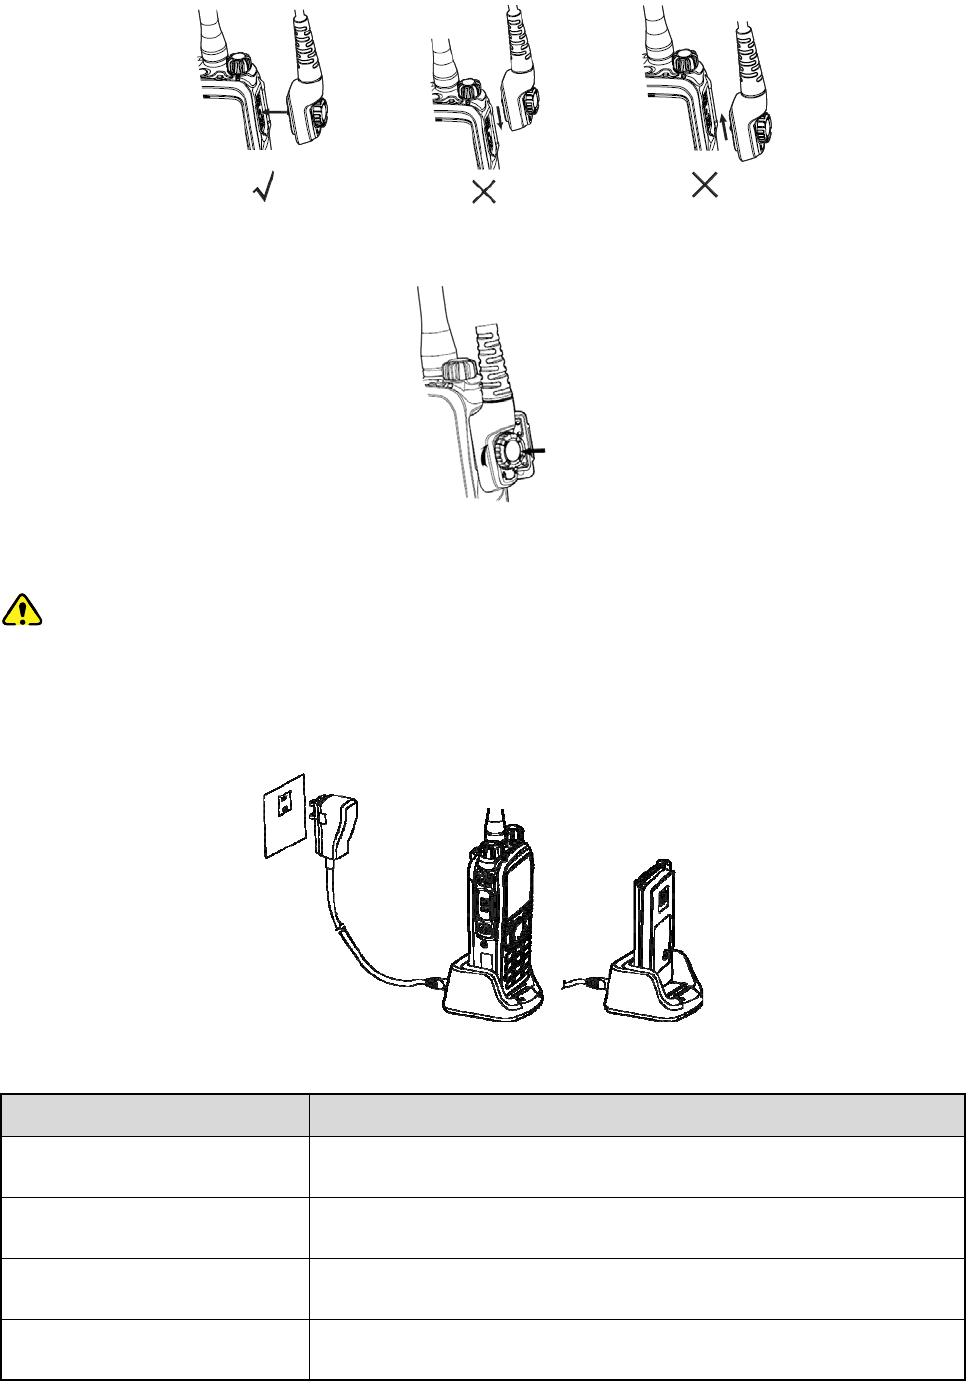
7
Step 3 Tighten the screw on the accessory plug.
3.6 Charging the Battery
Caution: Use the charger specified by the Company to charge the battery.
Charge the battery fully before initial use because reduction of state of charge may lead to low battery
alarm. You can charge the standalone battery or the radio with battery attached. It is recommended that
your radio remain powered off during charging.
The LED indicator on the charger shows the charging status. For details, see the following table.
LED Indication Charging Status
Flashes red slowly The battery is inserted incorrectly.
Glows red The battery is being charged.
Glows orange The battery is charged to 90% or more.
Glows green The battery is fully charged.

8
LED Indication Charging Status
Flashes red rapidly The battery fails to be charged.
9
4. Basic Operations
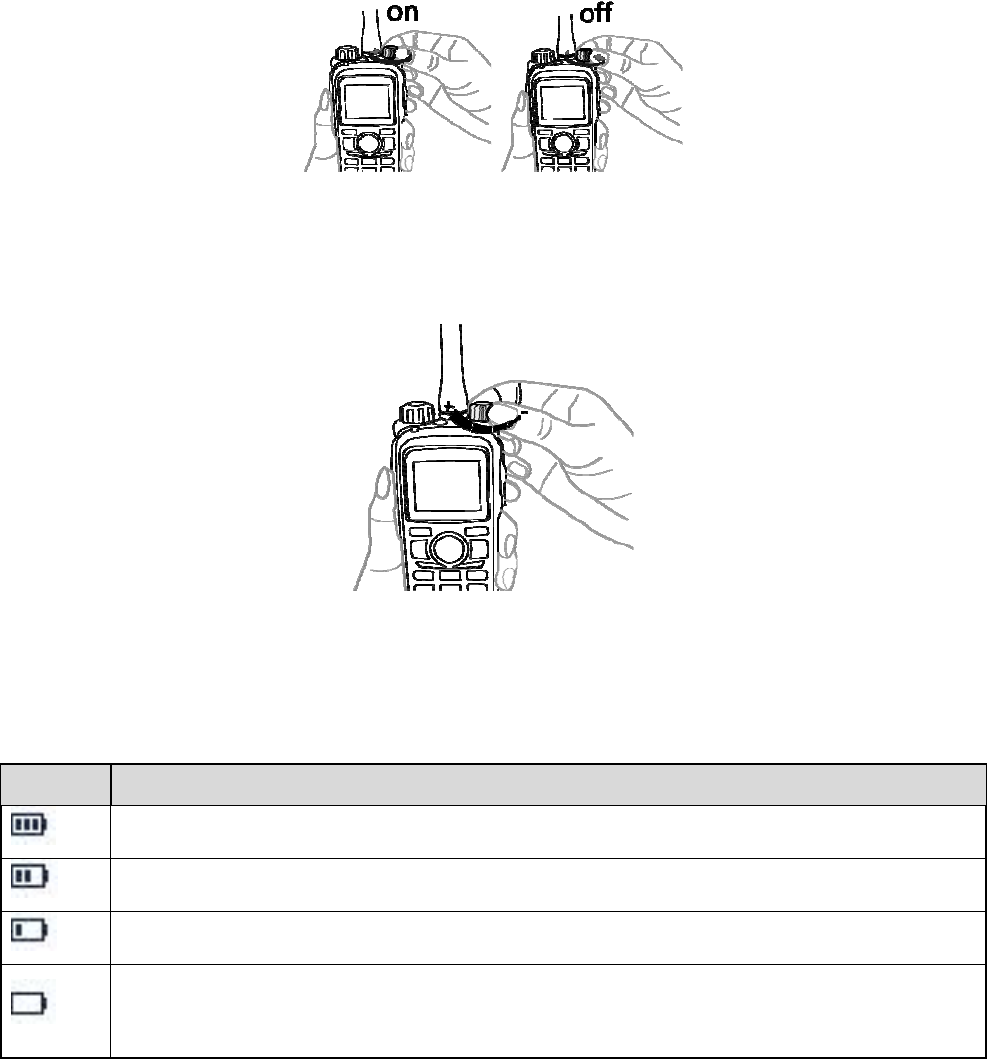
4.1 Turning the Radio On/Off
4.2 Adjusting the Volume
4.3 Checking the Battery Power
You can check the current battery power by holding down the preprogrammed Battery Power Indicator
key, and release the key to exit. Battery power indications and alert tone are listed below:
Icon LED Indication/Tone
The LED Indicator glows green.
The LED Indicator glows orange.
The LED Indicator glows red.
The LED Indicator glows red and an alert tone sounds. The battery runs low. Please
recharge or replace the battery.
4.4 Locking or Unlocking the Keypad
When the keypad is not in use, it is recommended that you lock it to avoid unintended operations. To

10
lock or unlock the keypad, do one of the following:
Automatically lock or unlock the keypad
The Keypad Lock feature allows the keypad to be locked automatically if no operation is performed
within the preset time period.
To enable this feature, go to Menu > Settings > Radio Set > Keypad Lock, select Enable, and set
Delay Time(s) by pressing the Up or Down key.
To disable this feature, select "Disable" under the "Keypad Lock" menu.
Manually lock or unlock the keypad
To manually lock or unlock the keypad, do one of the following on the home screen:
Press the Keypad Lock key programmed by your dealer.
Press the OK/Menu key and then press .
Note
You can go to Menu > Settings > Radio Set > Optional Key to set whether the keys and knobs still
function when the keypad is locked.
4.5 Using the Keypad
You can use the keypad to enter user aliases or IDs and text messages.
To switch the input method between alphabetic mode and numeric mode, press .
To enter special characters, press in the alphabetic mode or in the numeric mode.
To enter the space, press in the alphabetic mode.
4.6 Switching the Operation Mode
The radio can operate in conventional or trunking mode. In conventional mode, you can receive and
transmit voice and data after selecting the required channel. In trunking mode, you can receive and
transmit voice and data after the radio registers successfully.
To manually switch the operation mode, do one of the following:
Go to Menu -> Mode -> Manual Switch, select the required mode, and then press the OK/Menu
key.
Press the preprogrammed Operation Mode Switch key.
To allow the radio to automatically switch to conventional mode when the signal drops below the preset
level in trunking mode, go to Menu -> Mode -> Auto Switch, and then select Enable.

11
4.7 Selecting a Zone and Channel (Conventioal)
In conventional mode, the radio receives and transmits data and voice on the selected channel. A zone
is a group of channels within the same operational area. To select a zone and then a channel contained
in it, do as follows:
Step 1 Select a zone in one of the following ways:
Go to Menu > Zone, and then select the required zone.
Press the preprogrammed Zone Up or Zone Down key.
Step 2 Select a channel in one of the following ways:
Rotate the Channel Selector knob.
Press the preprogrammed Channel Up or Channel Down key.
4.8 Registering with BS (Trunking)
Upon power-on, the radio automatically hunts the control channels to find an available BS for registration.
During hunting, the radio displays "Out of Range" with the icon , the LED indicator flashes orange
slowly, and the radio emits the hunt tone.
The radio automatically registers with the found BS for communication. If you want the radio to register
with another BS, press the programmed Manual Current Hunt key to hunt again.
12
5. Status Indication
5.1 LCD Icon
The following tables list icons that may appear on the radio's liquid-crystal display (LCD).
Operation Mode Icons
Icon Radio Status
DM Direct Mode: The radio transmits and receives directly.
RM Repeater Mode: The radio transmits and receives through a repeater.
TDMA TDMA Direct Mode: If one time slot is occupied, the radio can transmit and receive
through the other time slot.
TM-DW Trunking Mode-Digital Wide: The radio operates under multiple interconnected BSs.
TM-DL Trunking Mode-Digital Local: The radio operates under a single BS.
The Mode Automatic Switch feature is enabled.
Basic Status Icons
Icon Radio Status
The dual-tone multi-frequency signaling (DTMF) keypad is enabled.
The number of bars indicates the charge left in the battery.
There is no signal in conventional or TM-DW mode.
The number of bars indicates the signal strength in conventional or TM-DW mode.
There is no signal in TM-DL mode.
The number of bars indicates the signal strength in TM-DL mode.
The radio operates in high power mode.
The radio operates in low power mode.
An accessory is connected.
The Global Positioning System (GPS) feature is enabled, and the radio receives
GPS data.
The GPS feature is enabled, but the radio receives no GPS data.

13
The radio is in emergency mode.
The radio is roaming.
The Scrambler or Encrypt feature is enabled.
The radio is scanning or hunting.
The radio stays on a non-priority channel.
The radio stays on priority channel 1.
The radio stays on priority channel 2.
The Voice Operated Transmit (VOX) feature is enabled.
The Monitor feature is enabled.
The speaker is turned on.
The radio operates in silent mode.
The Loudness and Quality Optimizer (LQO) feature is enabled.
Short Data Icons
Icon Radio Status
There is/are unread short message(s).
The Inbox is full.
There is/are unread work order(s).
The work order list is full.
Call Icons
Icon Radio Status
There is/are alert call(s).
There is/are missed call(s).
The Call Divert feature is enabled.
A private call is in progress or a private contact is on the contact list.
A group call is in progress or a group contact is on the contact list.
An all call is in progress or an all call contact is on the contact list.

14
An include call is in progress.
5.2 LED Indicator
To determine the radio status, check the LED indicator on the radio according to the following table:
LED Indicator Radio Status
Flashes green Being turned on.
Flashes green slowly Standby in trunking mode.
Glows green Receiving.
Glows red Transmitting.
Flashes red
Establishing a call in trunking mode. This indication is applicable only to the
calling radio.
Flashes orange slowly Scanning, hunting, or roaming.
Flashes orange rapidly
Conventional mode: Working in emergency mode.
Trunking mode: Establishing a Full Off Air Call Set-Up (FOACSU) call. This
indication is applicable only to the called radio.
Glows orange
Call hang time: No voice is being transmitted or received on the channel during a
call. Within such a period, you can press and hold the PTT key and speak.
15
6. Call Services
You can initiate various types of calls in different manners.
When initiating a call in Manual Dial manner in trunking mode, you need to enter a number complying
with the dial rule. For the detailed dial rule, please consult your dealer.
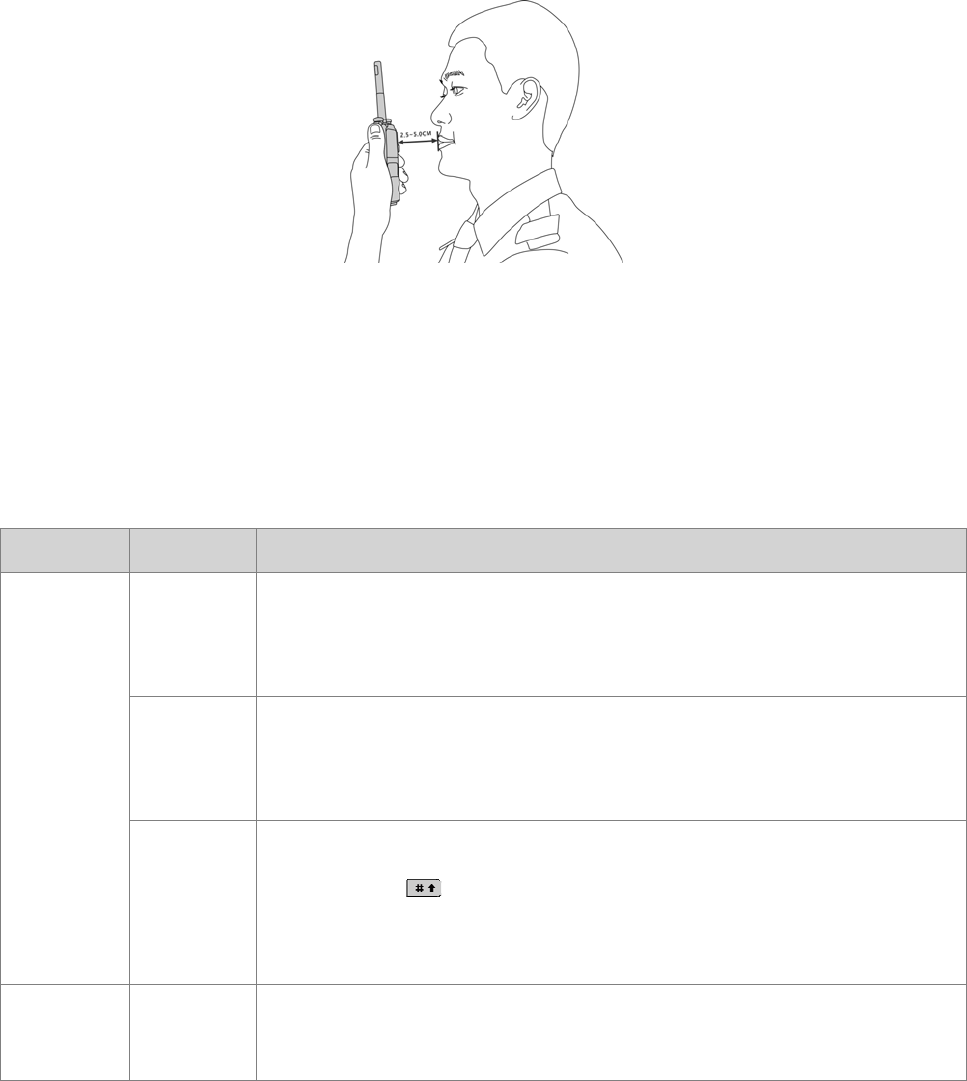
When you are speaking during a call, keep the microphone about 2.5 to 5 cm away from your mouth.
This ensures optimal voice quality on the receiving radio.
6.1 Group Call
A group call is a call from an individual user in a group to all the other members in the group.
6.1.1 Initiating Group Calls
The following table describes how to initiate a group call in conventional mode and trunking mode.
Mode Manner Operation
Conventional
Preset
Contact
1. Rotate the Channel Selector knob to select the channel associated
with the required group contact.
2. Press and hold the PTT key.
Contact
List/Favorites
1. Go to Menu > Contact > Contact List/Favorites.
2. Select the required group contact.
3. Press and hold the PTT key.
Manual Dial
1. Go to Menu > Contact > Manual Dial.
2. Press to switch the input mode to Group ID.
3. Enter the required group ID.
4. Press and hold the PTT key.
Trunking
Preset
Contact
1. Rotate the Group Selector knob to select the required group
contact.
16
Mode Manner Operation
2. Press and hold the PTT key.
Favorites
1. Go to Menu > Contact > Favorites.
2. Select the required group contact.
3. Press or press and hold the PTT key.
Subgroup
1. Press the preprogrammed Subgroup key or go to Menu >
Subgroup.
2. Select the required subgroup, and then select Member.
3. Select the required group contact.
4. Press or press and hold the PTT key.
Manual Dial
1. Go to Menu > Settings > Radio Set > Keypad Mode, and then
select Enable.
2. From the home screen, enter the group call number.
3. Press or or press and hold the PTT key.
ReDial/Back
Dial Call Log
1. From the home screen, press or (if preprogrammed as the
ReDial or BackDial key).
2. Select the required group contact from the list.
3. Press or press and hold the PTT key.
Call Log
1. Go to Menu > Call Logs > Outgoing/Incoming > Outgoing
List/Incoming List.
2. Select the required group contact.
3. Press or press and hold the PTT key.
6.1.2 Receiving Group Calls
When you receive a group call in conventional mode, the radio displays . The call is established
automatically. In trunking mode, the radio displays after the call is established successfully.
6.1.3 Ending Group Calls
In conventional mode and trunking mode, a group call automatically ends when the call hang time
expires.
In trunking mode, a group call also ends in any of the following cases:
The calling party ends the call by pressing the End key or preprogrammed Clear Down key.
The call duration preset by your dealer expires.
17
A preemptive or emergency call interrupts the call.
The base station signal is lost.
6.2 Private Call
A private call is a call from an individual user to another individual user.
6.2.1 Initiating Private Calls
The following table describes how to initiate a private call in conventional mode and trunking mode.
Mode Manner Operation
Conventio
nal
Preset
Contact
1. Rotate the Channel Selector knob to select the channel associated
with the required private contact.
2. Press and hold the PTT key.
Contact
List/Favorite
s
1. Go to Menu > Contact > Contact List/Favorites.
2. Select the required private contact.
3. Press and hold the PTT key.
Manual Dial
1. Go to Menu > Contact > Manual Dial.
2. Press to switch the input mode to Private ID.
3. Enter the required private ID.
4. Press and hold the PTT key.
Trunking
Preset
Contact
1. Rotate the Group Selector knob to select the required private contact.
2. Press and hold the PTT key to initiate the call.
Favorites/Pr
ivate
Contact
1. Go to Menu > Contact > Favorites/ Private Contact.
2. Select the required private contact.
3. Press or press and hold the PTT key.
Manual Dial
1. Go to Menu > Settings > Radio Set > Keypad Mode, and then select
Enable.
2. From the home screen, enter the private call number.
3. Press or or press and hold the PTT key.
ReDial/Back
Dial Call
Log
1. From the home screen, press or (if preprogrammed as the
ReDial or BackDial key).
2. Select the required private contact from the list.
3. Press or press and hold the PTT key.
18
Mode Manner Operation
Conventio
nal/
Trunking
Call Log
1. Go to Menu > Call Logs > Outgoing/Incoming/Missed > Outgoing
List/Incoming List/Missed List.
2. Select the required private contact.
3. Press or press and hold the PTT key.
6.2.2 Receiving Private Calls
Conventional Mode
When you receive a private call, the radio displays . The call is established automatically.
Trunking Mode
Depending on the system settings, you can answer a private call in one of the following ways:
FOACSU
When you receive a private call, the radio rings and vibrates, and displays . Press or press
and hold the PTT key within the preset period to answer the call. After the call is established
successfully, the radio displays .
Off Air Call Set-Up (OACSU)
When you receive a private call, the radio displays . The call is established automatically.
6.2.3 Ending Private Calls
In conventional mode and trunking mode, a private call automatically ends when the call hang time
expires.
In trunking mode, a private call also ends in any of the following cases:
The calling or called party ends the call by pressing the End key or preprogrammed Clear Down key.
The call duration preset by your dealer expires.
A preemptive or emergency call interrupts the call.
The base station signal is lost.
6.3 Phone Call
In conventional mode, you can initiate a call to or receive a call from a Public Switched Telephone
Network (PSTN) terminal.
In trunking mode, you can initiate a call to or receive a call from a PSTN or Private Automatic Branch
eXchange (PABX) terminal.

19
6.3.1 Initiating Phone Calls
The following table describes how to initiate a phone call in conventional mode and trunking mode.
Mode Manner Operation
Conventional
Manual Dial
1. Go to Menu > Phone > DTMF Keypad, and then select Enable.
2. Access the phone system in one of the following manner:
If the One-Key Connect feature is enabled, press to transmit the
connect code.
If the One-Key Connect feature is not enabled, enter the
preprogrammed connect code from the home screen, and then press
and hold the PTT key.
3. After accessing the phone system successfully, the radio enters the
DTMF Dial mode.
4. From the home screen, enter the phone number.
5. Press and hold the PTT key.
Contact List
1. Enable the DTMF keypad and access the phone system as
described in the first two steps above.
2. Go to Menu > Phone > Phone Contact, and then select the
required phone contact.
3. Press and hold the PTT key.
Trunking
Preset
Contact
1. Rotate the Group Selector knob to select the required phone
contact.
2. Press and hold the PTT key.
Favorites/Pri
vate Contact
1. Go to Menu > Contact > Favorites/Private Contact.
2. Select the required phone contact.
3. Press or press and hold the PTT key.
Manual Dial
1. Go to Menu > Settings > Radio Set > Keypad Mode, and then
select Enable.
2. From the home screen, enter the phone number.
3. Press or or press and hold the PTT key.
Call Log
1. Go to Menu > Call Logs > Outgoing/Incoming/Missed >
Outgoing List/Incoming List/Missed List.
2. Select the required phone contact.
3. Press or press and hold the PTT key.
20
Mode Manner Operation
ReDial/Back
Dial Call Log
1. From the home screen, press or (if preprogrammed as the
ReDial or BackDial key).
2. Select the required phone contact from the list.
3. Press or press and hold the PTT key.
6.3.2 Receiving Phone Calls
Conventional Mode
When receiving a phone call, you need to transmit the preprogrammed connect code to access the
telephone system as described in 6.3.1 Initiating Phone Calls
After the radio accesses the telephone system successfully, the call is established automatically.
Trunking Mode
When you receive a phone call, the radio displays . To answer the call, press or press and hold
the PTT key within the preset period. After the call is established successfully, the radio displays .
6.3.3 Ending Phone Calls
In conventional mode, a phone call ends in any of the following cases:
You transmit the preprogrammed disconnect code in the same way as the connect code.
The phone user hangs up.
In trunking mode, a phone call ends in any of the following cases:
The calling or called party ends the call.
The call duration exceeds the period preset by your dealer.
A preemptive or emergency call interrupts the call.
The base station signal is lost.
6.4 All Call
Conventional Mode
An all call is a call from an individual user to all other users on the current channel.
Trunking Mode
An all call is a call from an individual user to all other users in a specific BS, area, or system.
According to whether the called party can respond, an all call is classified into the following two types:
Broadcast All Call: The called party cannot respond to the call.
21
General All Call: The called party can respond to the call.
To set the type, go to Menu > Settings > Radio Set > All Call, and then select Broadcast Call or
General Call.
6.4.1 Initiating All Calls
Your radio can initiate an all call only after being authorized by your dealer.
The following table describes how to initiate an all call in conventional mode and trunking mode.
Mode Manner Operation
Convention
al
Preset Contact
1. Rotate the Channel Selector knob to select the channel
associated with the all call contact.
2. Press and hold the PTT key.
Contact List
1. Go to Menu > Contact > Contact List.
2. Select the all call contact.
3. Press and hold the PPT key.
Trunking
Manual Dial
1. Go to Menu > Settings > Radio Set > Keypad Mode, and then
select Enable.
2. From the home screen, enter the all call number.
3. Press or or press and hold the PTT key.
ReDial Call Log
1. From the home screen, press (if preprogrammed as the
ReDial key).
2. Select the all call log from the list.
3. Press or press and hold the PTT key.
6.4.2 Receiving All Calls
When you receive an all call, the radio displays , and the call is established automatically.
6.4.3 Ending All Calls
In conventional mode and trunking mode, an all call ends when the Time-out Timer (TOT) expires.
In trunking mode, an all call also ends in any of the following cases:
The calling party ends the call.
The call duration exceeds the period preset by your dealer.
The base station signal is lost.
22
6.5 Broadcast Call (Trunking Only)
A broadcast call is a special group call to which the called party cannot respond. Your radio can initiate a
broadcast call only after being authorized by your dealer.
6.5.1 Initiating Broadcast Calls
The following table describes how to initiate a broadcast call.
Manner Operation
Favorites
1. Go to Menu > Contact > Favorites.
2. Select the required group contact, and then press the OK/Menu key.
3. Select Call Type, and then select Broadcast Call.
4. Press or press and hold the PTT key.
Subgroup
1. Press the preprogrammed Subgroup key or go to Menu > Subgroup.
2. Select the required subgroup, and then select Member.
3. Select the required group contact, and then press the OK/Menu key.
4. Select Call Type, and then select Broadcast Call.
5. Press or press and hold the PTT key.
Manual Dial
1. Go to Menu > Settings > Radio Set > Keypad Mode, and then select
Enable.
2. From the home screen, enter the broadcast call number.
3. Press or or press and hold the PTT key.
Call Log
1. Go to Menu > Call Logs > Outgoing/Incoming > Outgoing List/Incoming
List.
2. Select the required group contact, and then press the OK/Menu key.
3. Select Call Type, and then select Broadcast Call.
4. Press or press and hold the PTT key.
ReDial/BackDial
Call Log
1. From the home screen, press or (if preprogrammed as the ReDial or
BackDial key).
2. Select the target group contact from the list, and then press the OK/Menu
key.
3. Select Call Type, and then select Broadcast Call.
4. Press or press and hold the PTT key.
6.5.2 Receiving Broadcast Calls
In conventional mode, when you receive a broadcast call, the radio displays . The call is established

23
automatically. In trunking mode, the radio displays after the call is established successfully.
6.5.3 Ending Broadcast Calls
A broadcast call ends in any of the following cases:
The calling party ends the call.
The call duration exceeds the period preset by your dealer.
A preemptive or emergency call interrupts the call.
The base station signal is lost.
6.6 Include Call (Trunking Only)
An include call is a special group call initiated to another group in call hang time of an ongoing group call,
so that the group joins the ongoing call. Your radio can initiate an include call only after being authorized
by your dealer.
For operations of the include call, see "Group Call".
6.7 Call on Analog Channel (Conventional Only)
You can initiate or receive a call on an analog channel with or without signaling.
6.7.1 Call Without Signaling
A call without signaling is a call initiated to all the other users on an analog channel without signaling.
To initiate a call without signaling, do as follows:
Step 1 Rotate the Channel Selector knob to select the required channel.
Step 2 Press and hold the PTT key, and speak into the microphone.
6.7.2 Call With Signaling
On an analog channel with signaling, you can initiate a call to a specific contact on the channel. Do as
follows:
Step 1 Rotate the Channel Selector knob to select the required channel.
Step 2 Press the OK/Menu key, and go to Contact > Contact List.
Step 3 Select the required contact.
Step 4 Press and hold the PTT key, and speak into the microphone.

24
7. Message Services
The Message feature allows you to send and receive the following types of messages in trunking mode
or on a digital channel in conventional mode:
New messages: messages created using the keypad.
Quick text messages: frequently used messages predefined by your dealer but editable.
Status messages (trunking only): frequently used messages predefined by your dealer and not
editable.
7.1 Viewing Messages
To view a newly received message, directly press the OK/Menu key.
To view a message from the Inbox, a sent message, or a saved message, go to Menu > Message >
Inbox/Outbox/Drafts > Inbox List/Outbox List/Drafts List, and then select the required message.
7.2 Sending Messages
7.2.1 Sending New Messages
Step 1 Go to Menu > Message > New Msg, and then type the text.
Step 2 Press the OK/Menu key, and then select Send.
Step 3 Select the required contact, and then press the OK/Menu key.
Note
Instead of directly sending the new message, you can also select Save in conventional mode or
select Save to Drafts or Save to QuickText in trunking mode to save the new message, and send it
later.
7.2.2 Sending Quick Text Messages
Step 1 Go to Menu > Message > Quick Text, and then select the required quick text message.
Step 2 (Optional) Edit the message, and then press the OK/Menu key.
Step 3 Select Send, and then select the required contact.
Step 4 Press the OK/Menu key.
7.2.3 Sending Status Messages
Step 1 Go to Menu > Message > Status Msg, and then select the required status message.
25
Step 2 Press the OK/Menu key, and then select the required contact.
Step 3 Press the OK/Menu key.
7.3 Deleting Messages
To delete a message from the InBox, OutBox, or Drafts, do as follows:
Step 1 Go to Menu > Message > InBox/OutBox/Drafts > Inbox List/Outbox List/Drafts List.
Step 2 Select the required message, and then press the OK/Menu key.
Step 3 Select Delete, and then press the OK/Menu key.
To delete all messages from the InBox, OutBox, or Drafts, do as follows:
Step 1 Go to Menu > Message > InBox/OutBox/Drafts.
Step 2 Select Delete All, and then press the OK/Menu key.

26
8. Supplementary Features
The supplementary features of the radio vary with the operation mode. For details, see the following
table.
Feature Conventional Trunking
Digital Analog
Basic Settings √ √ √
Contact Management √ √ √
Mic Automatic Gain Control (AGC) √ √ √
Treble Boost √ √ √
3-Band Equalizer √ √ √
LQO √ √ √
Audio Feedback Suppression √ × √
MIC & SPK √ √ √
One Touch Call/Menu √ √ √
Scan √ √ ×
Hunt × × √
Roam √ × √
Talk Around √ √ ×
Time-out Timer √ √ √
VOX √ √ √
Call Divert × × √
Call Priority × × √
Dynamic Group Number Assignment (DGNA) × × √
GPS √ √ √
Work Order √ × √

27
Feature Conventional Trunking
Digital Analog
Data Query × × √
Control Services √ × ×
Analog Services × √ ×
Personal Security Services √ √ √
Encrypt √ × √
Scrambler × √ ×
Erasing Data in Emergency √ √ √
Stun × √ √
Kill √ × √
8.1 Basic Settings
You can go to Menu > Settings > Radio Set and then do the following operations:
If you want to... Then...
Set the language Select Language, and then select the required language.
Turn the power-on password on or off
1. Go to Password > On/Off, and then select On or Off.
2. Enter the password (88888888 by default), and then
press the OK/Menu key.
Change the password
1. Go to Password > Password Set.
2. Enter the old password (88888888 by default), and then
press the OK/Menu key.
3. Enter the new password under Input Password and
Checkout, and then press the OK/Menu key.
Verify the battery
Select Battery.
The radio displays "Certificated Battery" if the battery is an
authorized one.
Set the backlight
Select Backlight, and select one of the following as required:
Off: The backlight remains off.

28
If you want to... Then...
On: The backlight remains on.
Timed: The backlight will automatically be off if no
operation or activity is performed within the preset period.
Adjust the brightness of the backlight Select Brightness, and then press the Up or Down key.
Set the LCD mode Select Day/Night, and then select Day Mode or Night Mode.
Turn the LED indication on or off Select LED, and then select Enable or Disable.
Turn the silent mode on or off
Go to Tone > Radio Silent, and then select Silent On or Silent
Off.
Turn a specific tone on or off
Select Tone, and then select the required tone.
Select On/Off, and then select Enable or Disable.
Adjust the volume of a specific tone
Select Tone, and then select the required tone.
Select Tone Volume, and then select the required level.
Turn the Vibration feature on or off Go to Vibration > On/Off, and then select Enable or Disable.
Set a specific vibration type
Select Vibration, and then select the required vibration type.
Select Settings, and then set Duration, Cycles, or Interval Time
as required.
Adjust the power level
Select Power Level, and then select one of the following as
required:
High Power: Enables long-distance communication but
consumes more battery power.
Low Power: Enables short-distance communication and
saves battery power.
Set the time zone
1. Go to Date & Time > Time Zone, and then press the
OK/Menu key.
2. Press the Up or Down key to change the time zone, and
then press the OK/Menu key.
Set the time format (trunking only)
Go to Date & Time > Time Format, and then select 24 Hour or
12 Hour.
Check the remaining rental period Go to Rent > Rent Query.

29
If you want to... Then...
Turn all visible and audible indications
off
Select Covert Mode, and then select On.
Allow or disallow the radio to send its
alias during voice transmission
Select Send Alias, and then select On or Off.
8.2 Contact Management
8.2.1 Adding Contacts
You can add a contact to the following lists:
Conventional: Contact, Phone Contact, and Favorites
Trunking: Private Contact and Favorites
Adding Contacts to the Contact List or Phone Contact List
Step 1 Go to Menu > Contact/Phone > New Contact > Input ID/Edit ID.
Step 2 Enter the ID, and then press the OK/Menu key.
Step 3 Select Input Alias/Edit Alias, and enter the alias.
Step 4 Press the OK/Menu key, and then select Save.
Adding Contacts to the Private Contact List
Step 1 Go to Menu > Contact > New Contact > Input ID.
Step 2 Enter the ID, and then press the OK/Menu key.
Step 3 Select the contact type (Private ID, PABX, or PSTN).
Step 4 Select Input Alias, and enter the alias.
Step 5 Press the OK/Menu key, and then select Save.
Adding Contacts to the Favorites List
To add a frequently used contact to the Favorites list, do as follows:
In conventional mode, go to Menu > Contact > Favorites > Add Contact, and then select the
required contact.
In trunking mode, go to Menu > Contact > Favorites > Folder Management > Add Contact, and
then select the required contact.
8.2.2 Deleting Contacts
To delete a contact from Favorites list, Phone Contact list (conventional only), and Private Contact list

30
(trunking only), do as follows:
Step 1 Select the required contact from the corresponding list.
Step 2 Select Delete or Del Contact, and then press the OK/Menu key.
8.2.3 Creating Folders Under Favorites (Trunking Only)
Step 1 Go to Menu > Contact > Favorites > Folder Management > Add Folder.
Step 2 Use the keypad to enter the folder name, and then press the OK/Menu key.
After creating the folder, you can go to Folder Management > Add Contact under the folder to add
contacts to the folder.
8.3 Audio Optimization
The features described in this section help optimize voice quality.
8.3.1 Turning the Mic AGC feature On or Off
The Mic AGC feature allows the radio to automatically keep the microphone gain within a proper range
during transmission. This provides optimized voice with proper volume for the receiving party.
To turn this feature on or off, go to Menu > Settings > Audio Set > Digital Mic AGC/Analog Mic AGC,
and then select On or Off.
8.3.2 Turning the Treble Boost feature On or Off
The Treble Boost feature allows the radio to output louder voice for better audio clarity.
To turn this feature on or off, go to Menu > Settings > Audio Set > Audio Optimization > Treble
Boost, and then select On or Off.
Note
If this feature is enabled, the LQO feature and 3-Band Equalizer feature are unavailable.
8.3.3 Setting the 3-Band Equalizer Feature
The 3-Band Equalizer feature allows the radio to automatically adjust the sound effect of received voice
according to preset frequency gains.
To turn this feature on or off, go to Menu > Settings > Audio Set > Audio Optimization > 3-Band
Equalizer > Equalizer Switch, and then select On or Off.
To set the low, mid, or high frequency gain, do as follows:
Step 1 Go to Menu > Settings > Audio Set > Audio Optimization > 3-Band Equalizer > Low Freq.
Gain/Mid Freq. Gain/High Freq. Gain, and then press the OK/Menu key.

31
Step 2 Press the Up or Down key to change the value, and then press the OK/Menu key.
It is recommended that you set the frequency gains according to the following table:
Scenario Low Frequency Gain (dB) Mid Frequency Gain (dB) High Frequency Gain (dB)
Square 0 3 5
Indoor 3.5 1.5 –1.5
Downtown 2 2 8
8.3.4 Turning the LQO Feature On or Off
The LQO feature allows the radio to automatically adjust the volume and improve the quality of received
voice in different environments.
To turn this feature on or off, go to Menu > Settings > Audio Set > LQO, and then select On or Off.
8.3.5 Turning the Audio Feedback Suppression Feature On or Off
The Audio Feedback Suppression feature helps reduce the noises arising from short-distance
communication.
To turn this feature on or off, go to Menu > Settings > Audio Set > Audio Feedback Suppressors, and
then select On or Off.
8.4 MIC & SPK
The MIC & SPK feature allows you to select the microphone and speaker used by the radio for
transmitting and receiving voice.
8.4.1 Selecting the Microphone
To set the way in which the radio uses the external or internal microphone, go to Menu > Settings >
Radio Set > MIC & SPK > MIC Selection, and then select one of the following as required:
Follow PTT: When you transmit by pressing and holding the radio's PTT key, the radio uses the
internal microphone; When you transmit by pressing and holding the PTT key on external device, it
uses the external microphone.
Only Internal: The radio uses only the internal microphone.
Only External: The radio uses only the external microphone.
External First: When an audio accessory is connected, the radio uses the external microphone;
otherwise, it uses the internal microphone.

32
8.4.2 Selecting the Speaker
To set the way in which the radio uses the external or internal speaker, go to Menu > Settings > Radio
Set > MIC & SPK > SPK Selection, and then select one of the following as required:
External First: When an audio accessory is connected, the radio uses the external speaker;
otherwise, it uses the internal speaker.
Only Internal: The radio uses only the internal speaker.
Only External: The radio uses only the external speaker.
8.5 One Touch Call/Menu
The One Touch Call/Menu feature allows you to press the preprogrammed One Touch Call/Menu key
to quickly access a service assigned by your dealer. The services available for assignment are as
follows:
Service Type Description
Voice and data services
in conventional mode
Analog Channel:
Call to a 5-tone or 2-tone contact.
Digital Channel:
Group call, quick text or GPS message to a group contact.
Private call, radio check, remote monitor, radio enable, radio
disable, quick text message, alert call, or GPS message to a private
contact.
All call to an all call contact.
Note: To initiate a one touch call on the digital channel in conventional mode,
you need to press the PTT key after pressing the preprogrammed One Touch
Call/Menu key.
Voice and data services
in trunking mode
Private call, emergency call, preemptive call, text or status message
to a private contact.
Group call, broadcast call, emergency call, preemptive call,
preemptive broadcast call, emergency broadcast call, text or status
message to a group contact.
All call to an all call contact.
Menu
Direct access to the designated menu. Check with your dealer for specific
menus.

33
Note
If the preprogrammed One Touch Call/Menu key is a numeric key, you need to go to Menu >
Settings > Radio Set > Keypad Mode, and then select One Touch Call/Menu.
8.6 Scan
In conventional mode, the Scan feature allows you to listen to activities on other channels, keeping track
of your team members. With this feature enabled, the radio searches the scan list preset for the current
channel and stays on a channel with activities.
8.6.1 Turning the Scan Feature On or Off
To turn the Scan feature on or off, go to Menu > Scan > Scan On/Off, and then select On or Off.
With the Scan feature enabled, the radio displays , and the LED indicator slowly flashes orange.
When detecting activities on a channel, the radio stays on it, and the LED indicator glows green.
Note
If you do not want to listen to the activities on a channel, press the preprogrammed Nuisance Temporary Delete
key to temporarily remove the channel from the scan list.
8.6.2 Adding a Channel to a Scan List
Step 1 Go to Menu > Scan > Scan List, and then select the required scan list.
Step 2 Select Edit/View, and then select Add CH.
Step 3 Select the required channel.
8.6.3 Setting a Priority Channel
You can set a channel on the scan list as priority channel 1 or 2, which will be scanned with priority than
a non-priority channel.
To set a priority channel, do as follows:
Step 1 Go to Menu > Scan > Scan List, and then select the required scan list.
Step 2 Select Edit/View, and then select the required channel.
Step 3 Select Edit Prio CH > Set PrioCH-1/Set PrioCH-2.
To change a priority channel to a non-priority channel, select the priority channel marked with or
, and then select Edit Prio CH > Disable PrioCH.
8.6.4 Deleting a Channel from a Scan List
Step 1 Go to Menu > Scan > Scan List, and then select the required scan list.
34
Step 2 Select Edit/View, and then select the required channel.
Step 3 Select Delete CH.
8.7 Hunt
In trunking mode, the radio must register with a BS for normal operation. The Hunt feature allows the
radio to:
Hunt through the Trunked Station Control Channels (TSCCs) for an available BS for registration.
Always work under a BS with higher signal strength after registration, ensuring smooth
communication.
8.7.1 Selecting the Mode for Fixed TSCC Hunt
If the radio is preprogrammed by your dealer to use the Fixed TSCC hunt for registration, you can go to
Menu > Hunt > TSCC Hunt, and then select one of the following modes as required:
Comprehensive Hunt: allows the radio to hunt all TSCCs within the preset frequency range.
Short Hunt: allows the radio to hunt the TSCCs in the fixed TSCC list predefined by your dealer.
Team Hunt: allows the radio to hunt the TSCCs in the team hunt list predefined by your dealer.
8.7.2 Turning the Background Hunt Feature On or Off
The Background Hunt feature allows the radio in standby mode to keep detecting the signal strength of
the current BS. If the signal strength drops below the preset threshold, the radio switches to another BS
with higher signal strength.
To turn this feature on or off, go to Menu > Hunt > Background Hunt, and then select Enable or
Disable.
8.7.3 Turning the Homestation Hunt Feature On or Off
The Homestation Hunt feature allows the radio operating on another channel to switch back to the
homestation channel if the signal strength of the homestation channel reaches the preset threshold. This
ensures smooth communication in an overlapping area. It is recommended that you request the dealer
to set the frequently used channel as the homestation channel and enable this feature.
To turn this feature on or off, go to Menu > Hunt > Homestation Hunt, and then select Enable or
Disable.
8.7.4 Turning the Handover Feature On or Off
The Handover feature allows the radio to automatically switch to another BS with higher signal strength if
the signal strength of the current BS drops below the preset threshold during a call. This prevents call

35
drops or discontinuous voice caused by low signal strength.
To turn this feature on or off, go to Menu > Hunt > Handover > Handover On/Off, and then select
Enable or Disable.
8.8 Roam
The Roam feature allows you to enjoy seamless communication across sites or networks.
In conventional mode, you can turn this feature on or off as follows:
Step 1 Go to Menu > Roam > Roam On/Off.
Step 2 Select On or Off.
In trunking mode, only your dealer can turn on or off this feature.
8.9 Talk Around
The Talk Around feature allows your radio to continue transmitting and receiving when the repeater is
not operating, or when your radio is out of the repeater's coverage but within other radio's coverage.
To turn this feature on or off, go to Menu > Settings > Radio Set > Talk Around, and then select
Enable or Disable.
8.10 Time-out Timer
The Time-out Timer (TOT) feature allows the radio to automatically stop transmission and keep beeping
when the period preset by your dealer expires. To stop beeping, release the PTT key. You need to wait for
a certain period (also preset by your dealer) to initiate transmission again.
This feature aims to prevent a radio user from occupying a channel for an extended period. It also avoids
potential radio damage caused by overheating.
8.11 VOX
The VOX feature allows you to transmit voice without pressing and holding the PTT key. The radio
automatically transmits voice when the volume reaches the preset level.
To turn this feature on or off, go to Menu > Settings > Radio Set > VOX > On/Off, and then select On or
Off. When this feature is enabled, the radio displays
After enabling this feature, you can set the sensitivity of the external or internal microphone. Do as
follows:
Step 1 Go to Menu > Settings > Radio Set > VOX > Gain Level > External/Internal.
36
Step 2 Select the appropriate level.
A higher gain level indicates lower sensitivity, which requires higher volume for triggering transmission.
8.12 Call Divert
The Call Divert feature allows you to divert an incoming half-duplex private call to a designated radio.
To turn this feature on, do as follows:
Step 1 Go to Menu > Settings > Radio Set > Call Divert > On/Off, and then select On.
Step 2 Select Divert ID, and enter the ID.
Step 3 Press the OK/Menu key.
To turn this feature off, select Off under Call Divert.
8.13 DGNA
The DGNA feature allows you to join a dynamic group added by the authorized dispatcher over the air
interface according to temporary task requirements. The dispatcher can also delete the dynamic group
from your radio.
The radio displays "DGNA Success!" when the dynamic group is added successfully and "DGNA
Deleted" when the dynamic group is deleted. The added dynamic group is saved on a dynamic subgroup
list under Subgroup on your radio.
8.14 GPS
The GPS feature allows you to view your location information, query location information of another radio
user, and send your location information to the dispatch station or another radio.
8.14.1 Turning the GPS Feature On or Off
In conventional mode, go to Menu > Accessories > GPS > GPS On/Off, and then select On or Off.
In trunking mode, only your dealer can turn on or off this feature.
8.14.2 Viewing Location Information
You can view location information of your radio and another radio.
Viewing Location Information of Your Radio
Go to Menu > Accessories > GPS > Position.
Viewing Location Information of Another Radio
Trunking Mode
37
To view location information of the nearest radio in a designated group, go to Menu > Accessories >
GPS > Query Neighbors > Group Contact, and then select the required group contact.
Digital Channel in Conventional Mode
To view the location information of another radio, go to Menu > Accessories > GPS > Query
Location > Contact List, and select the required private contact.
8.14.3 Sending Location Information
In conventional mode, you can send your location information to the required contact as follows:
Step 1 Go to Menu > Accessories > GPS > Position, and then press the OK/Menu key.
Step 2 Select Contact List, and then select the target contact.
In trunking mode, you can send your location information to the dispatch station as follows:
Step 1 Go to Menu > Accessories > GPS > Msg with Position.
Step 2 Edit the message, and then press the OK/Menu key.
8.14.4 Turning the Voice with GPS Feature On or Off
The Voice with GPS feature allows the radio to automatically send GPS data during voice transmission.
To turn this feature on or off, go to Menu > Accessories > GPS > Voice with GPS, and then select
Enable or Disable.
8.15 Work Order
The Work Order feature allows you to receive a task from the dispatcher and report the latest task state
to the dispatcher at each stage of the task.
8.15.1 Viewing a Task
To view a task in any state, go to Menu > Work Orders > All Task, select the required task, and then
select Details.
To view a task that has not been processed, go to Menu > Work Orders > New Task, select the
required task, and then select Details.
After a task is processed and the task state is updated, the task is moved from the New Task list to the
list of the corresponding state. To view a task in a specific state, do as follows:
Step 1 Go to Menu > Work Orders, and then select the corresponding list.
Step 2 Select the required task, and then select Details.

38
8.15.2 Reporting the Task State
To report the latest state of a task, do as follows:
Step 1 Select the required task as described above.
Step 2 Select the state to be reported, and then press the OK/Menu key.
If the corresponding task state is associated with a numeric key by your dealer, you can also press the
numeric key to report the state after selecting the required task.
8.16 Data Query
The Data Query feature allows you to query related information from a third party by sending the
keyword, for example, a vehicle number.
To query information, do as follows:
Step 1 Go to Menu > Query, and then select the required item.
Step 2 Enter the keyword, and then press the OK/Menu key.
Step 3 (Optional) Enter the password for data query, and then press the OK/Menu key.
8.17 Control Services
On a digital channel in conventional mode, you can initiate the following control services to a private
contact.
Feature Description Operation
Alert Call
Allows you to alert a
private contact to call you
back.
To trigger the corresponding feature, do one of the following:
Through Favorites/Contact List
1. Go to Menu > Contact > Favorites/Contact List.
2. Select the target private contact.
3. Go to Ctrl Services > Alert Call/Radio Check/Remote
Monitor/Radio Enable/Radio Disable.
Through Keypad Mode
1. Go to Menu > Settings > Radio Set > Keypad Mode,
and then select Enable.
2. Press to switch the input mode to Private ID.
3. From the home screen, enter the target private ID, and
then press the OK/Menu key.
Radio
Check
Allows you to check
whether another radio is
operating on the current
channel without
disturbing that radio user.
Remote
Monitor
Allows you to remotely
monitor activities
surrounding another
radio.

39
Feature Description Operation
Radio
Enable
Allows you to remotely
enable a disabled radio
for normal operation.
4. Go to Ctrl Services > Alert Call/Radio Check/Remote
Monitor/Radio Enable/Radio Disable.
Radio
Disable
Allows you to remotely
disable another radio.
8.18 Analog Services
The following features are available only on an analog channel in conventional mode.
8.18.1 Turning the Compandor Feature On or Off
The Compandor feature allows the radio to compress transmitted voice signals, which suppresses
ambient noise and improves audio quality.
To turn this feature on or off, go to Menu > Settings > Radio Set > Compandor, and then select
Enable or Disable.
8.18.2 Turning the Monitor Feature On or Off
The Monitor feature allows the radio to receive weak signals.
To turn this feature on, press the preprogrammed Monitor key or press and hold the preprogrammed
Monitor Momentary key. In this case, the radio displays .
To turn this feature off, press the preprogrammed Monitor key again or release the preprogrammed
Monitor Momentary key.
8.18.3 Turning the Squelch Off Feature On or Off
The Squelch Off feature allows the radio's speaker to keep turned on no matter whether the squelch
condition is satisfied.
To turn this feature on, press the preprogrammed Squelch Off key or press and hold the
preprogrammed Squelch Off Momentary key. In this case, the radio displays .
To turn this feature off, press the preprogrammed Squelch Off key again or release the preprogrammed
Squelch Off Momentary key.
8.18.4 Setting the Squelch Level
The squelch level refers to the squelch threshold required for the radio's speaker to be turned on.
To set the squelch level, go to Menu > Settings > Radio Set > Squelch, and then select Open, Normal,

40
or Tight (from low to high) as required. Generally, a higher squelch level requires higher signal strength.
If the squelch level is set to Open, the speaker will always keep turned on.
8.18.5 Setting the CTCSS/CDCSS Feature
The Continuous Tone-Coded Squelch System (CTCSS)/Continuous Digital-Coded Squelch System
(CDCSS) feature allows the radio to filter out unwanted voice on the current channel. With this feature
enabled by your dealer, the radio's speaker is turned on only when the CTCSS/CDCSS code received
matches the CTCSS/CDCSS code set for the radio.
To set the CTCSS/CDCSS type and code, go to Menu > Programming > Channel > TX
CTCSS/CDCSS/RX CTCSS/CDCSS.
8.19 Personal Safety Services
The features described in this section ensure personal safety.
8.19.1 Using the Emergency Feature
The Emergency feature allows you to ask for help from your companion or the control centre in case of
emergency.
In emergency mode, the radio gives different indications according to the preset emergency type. The
available emergency types are as follows:
Emergency Type Description
Siren Only The radio sounds shrill alarm tones with visible indications.
Regular The radio gives audible and visible indications.
Silent
The radio gives no audible or visible indication, and you cannot listen to a received
call.
Silent w/ Voice The radio gives no audible or visible indication, but you can listen to a received call.
Alarm w/ Siren The radio sends an alarm and sounds shrill alarm tones with visible indications.
In addition, you can request your dealer to set one of the following emergency modes:
Emergency Mode Description
Alarm Allows you to send an emergency alarm.
Call Only Allows you to initiate an emergency call.
Alarm W/Call Allows you to send an emergency alarm and initiate an emergency call.
41
The three emergency modes can be combined with any of the following emergency types: Regular,
Silent, and Siren w/ Voice.
8.19.2 Triggering the Emergency Mode
To trigger the emergency mode, press the preprogrammed Emergency On key. The radio then enters
the preset emergency mode with or without indications depending on the preset emergency type.
In trunking mode, you can also initiate an emergency call as follows:
Step 1 Go to Menu > Contact > Favorites, and then select the required group contact.
Step 2 Select Call Type, and then select Emergency Call.
Step 3 Press and hold the PTT key to initiate the call.
If the Call to Follow feature is enabled by your dealer, the radio will transmit automatically. You can
directly speak into the microphone in the preset period.
8.19.3 Exiting the Emergency Mode
To exit the emergency mode (as the initiating party) or emergency alert mode (as the receiving party),
press the preprogrammed Emergency Off key or turn the radio off.
8.19.4 Turning the Man Down Feature On or Off
The Man Down feature allows the radio to enter the emergency mode when it tilts at an angle greater
than the specified angle or stays motionless for a preset period.
To turn this feature on or off, go to Menu > Settings > Radio Set > Man Down, and then select Enable
or Disable.
8.19.5 Turning the Lone Worker Feature On or Off
The Lone Worker feature allows the radio to enter the emergency mode when no operation is detected
for a preset period.
To turn this feature on or off, go to Menu > Settings > Radio Set > Lone Worker, and then select
Enable or Disable.
8.20 Communication Security Services
The features described in this section ensure communication security.
8.20.1 Using the Encrypt Feature
The Encrypt feature prevents eavesdropping and ensures communication privacy. It allows the radio to
automatically encrypt transmitted voice or data. Only the receiving radio with the same key value or ID
can decrypt the voice or data.
42
8.20.2 Turning the Encrypt Feature On or Off
Go to Menu > Settings > Radio Set > Encrypt > On/Off, and then select On or Off.
Setting the Encrypt Key (Conventional Only)
You can add, edit, or select an encrypt key.
Adding an Encrypt Key
Go to Menu > Settings > Radio Set > Encrypt > New Key, set the related parameters, and then select
Save.
The related parameters are as follows:
Key ID: a unique key index ranging from 1 to 255.
Key Alias: a string containing up to 16 characters.
Key Length: the number (10, 32, or 64) of characters in the key.
Key Value: a string containing digits and letters A to F.
Selecting an Encrypt Key
Step 1 Go to Menu > Settings > Radio Set > Encrypt > Key List.
Step 2 Select the required key, and then select Select.
Editing an Encrypt Key
Step 1 Go to Menu > Settings > Radio Set > Encrypt > Key List.
Step 2 Select the required key, and then select Edit.
Step 3 Edit the ID, alias, or value, and then select Save.
Selecting Encrypted Service (Trunking Only)
In trunking mode, you can set which kind of service will be encrypted. Do as follows:
Step 1 Go to Menu > Settings > Radio Set > Encrypt > Encrypt Service.
Step 2 Select Only Voice, Only Data, or Voice and Data as required.
8.20.3 Turning the Scrambler Feature On or Off
The Scrambler feature allows the radio to invert the frequency spectrum of transmitted audio signals.
Only the receiving radio with the same scrambler setting can restore the audio signals. This prevents
eavesdropping and ensures communication privacy.
To turn this feature on or off, go to Menu > Settings > Radio Set > Scrambler, and then select Enable
or Disable.
43
8.20.4 Erasing Data in Emergency
In case of emergency, you can erase encryption data from the radio to prevent the data from
unauthorized access.
To erase the data, press the SK1 and PTT key by turns twice, and make sure the press interval is less
than 1.5 seconds. Then, press SK1 to confirm.
8.20.5 Restoring the Stunned Radio
When being stunned, the radio displays "Radio Stunned!" In this case, you cannot initiate services such
as call or message services.
To restore normal operation, request your dealer to program the radio or send a Revive command.
When being enabled by a Revive command, the radio displays "Revive Success!"
8.20.6 Restoring the Killed Radio
When being killed, the radio displays "Radio Killed!" In this case, you can only turn the radio on or off.
To restore normal operation, request your dealer to burn the radio firmware.

44
9. Troubleshooting
Phenomena Analysis Solution
You cannot turn
the radio on.
The battery may be installed improperly.Remove and reattach the battery.
The battery power may run out. Recharge or replace the battery.
The battery may suffer from poor
contact caused by dirty or damaged
battery contacts.
Clean the battery contacts or replace the
battery.
The radio cannot
register.
The radio may not be detecting signals
from the BS.
Make sure the radio is within the coverage o
f
the BS.
The radio may not be authorized.
Contact the BS manager to check if the radio
is authorized in the network management
system.
During receiving,
the voice is weak
or intermittent.
The battery voltage may be low. Recharge or replace the battery.
The volume level may be low. Increase the volume.
The antenna may be loose or may be
installed incorrectly.
Turn the radio off, and then remove and
reattach the antenna.
The speaker may be blocked. Clean the surface of the speaker.
You cannot
communicate with
other group
members.
The frequency or signaling type may be
inconsistent with that of other members.
Verify that your TX/RX frequency and
signaling type are correct.
The channel type (digital or analog) may
be set incorrectly.
Verify that you are on the correct digital or
analog channel.
You may be too far away from other
members.
Move towards other members.
You hear unknown
voices or noise.
You may be interrupted by radios using
the same frequency.
Change the frequency, or adjust the squelch
level.
The radio in analog mode may be set
with no signaling.
Request your dealer to set signaling for the
current channel to avoid interference.
You are unable to You may be too far away from other
Move towards other members.

45
Phenomena Analysis Solution
hear anyone
because of too
much noise and
hiss.
members.
You may be in an unfavourable position.
For example, your communication may
be blocked by high buildings or blocked
in an underground area.
Move to an open and flat area, restart the
radio, and try again.
It may be the result of external
disturbance (such as electromagnetic
interference).
Stay away from equipment that may cause
interference.
The GPS cannot
locate your
position.
The radio may not receive GPS signals
due to unfavourable position.
Move to an open and flat area, and try again.
The called party
disconnects
repeatedly during
communication.
The signal may be intermittent or weak.
Make sure the radio is within the coverage o
f
the BS.
You cannot use the
keys.
The keypad may not work temporarily. Restart the radio.
The LCD does not
display any
information.
The LCD may not work temporarily. Restart the radio.
The radio registers
repeatedly.
The signal may be intermittent.
Make sure the radio is within the coverage o
f
the BS.
The radio cannot
establish a call.
The signal may be weak.
Make sure the radio is within the coverage o
f
the BS.
The voice is
unclear.
The signal may be weak.
Make sure call participants are within the
communication range.
If the above solutions cannot fix your problems, or you may have some other queries, please contact
your dealer for more technical support.

46
10. Care and Cleaning
To guarantee optimal performance as well as a long service life of the product, please follow these tips.
10.1 Product Care
Do not pierce or scrape the product.
Keep the product far away from substances that can corrode the circuitry.
Do not hold the product by the antenna or earpiece cable.
Close the accessory connector cover when no accessory is in use.
10.2 Product Cleaning
Caution
Turn the product off and remove the battery before cleaning.
Clean up the dust and fine particles on the product surface and charging piece with a clean and dry
lint-free cloth or a brush regularly.
Use neutral cleanser and a non-woven fabric to clean the keys, knobs, and front case after long-time
use. Do not use chemical preparations such as stain removers, alcohol, sprays or oil preparations, so
as to avoid surface case damage.
If the radio is used in a harsh environment (such as sea and salt frog), periodically clean and dry the
radio.
Make sure the product is completely dry before use.

47
11. Optional Accessories
Contact your local dealer for the optional accessories used with the product.
Caution
Use the accessories specified by the Company only; otherwise, the Company will not be liable for
any loss or damage arising out of the use of any unauthorized accessories.

48
Abbreviations
Abbreviation Full Name
AGC Automatic Gain Control
BS Base Station
CDCSS Continuous Digital-coded Squelch System
CTCSS Continuous Tone-coded Squelch System
DGNA Dynamic Group Number Assignment
DTMF Dual-tone Multi-frequency
FOACSU Full Off Air Call Set-up
GPS Global Positioning System
LCD Liquid-crystal Display
LED Light-emitting Diode
LQO Loudness and Quality Optimizer
OACSU Off Air Call Set-up
PABX Private Automatic Branch eXchange
PSTN Public Switched Telephone Network
PTT Push-to-Talk
SK Side Key
TM-DL Trunking Mode-Digital Local
TM-DW Trunking Mode-Digital Wide
TK Top Key
TOT Time-out Timer
TSCC Trunked Station Control Channel
VOX Voice Operated Transmit