Hytera Communications RCS-01 Motorcycle Wireless Console User Manual
Hytera Communications Corporation Limited Motorcycle Wireless Console
User manual

1
Preface
Welcome to the world of Hytera and thank you for purchasing this
product. To derive optimum performance from the product, please
carefully read this manual before use.
This manual is applicable to the following product:
RCS-01 Motorcycle Wireless Console
Icon Conventions
The following icons are available through this manual:
Caution: indicates situations that could cause damage to your
product or bodily injury.
Note: indicates tips that can help you make better use of your
product.
Copyright Information
Hytera is the trademark or registered trademark of Hytera
Communications Corporation Limited (the Company) in the People's
Republic of China (PRC) and/or other countries or areas. The Company
retains the ownership of its trademarks and product names. All other
trademarks and/or product names that may be used in this manual are
properties of their respective owners.
The product described in this manual may include the Company's
computer programs stored in memory or other media. Laws in PRC and/
or other countries or areas protect the exclusive rights of the Company
with respect to its computer programs. The purchase of this product shall
not be deemed to grant, either directly or by implication, any rights to the
purchaser regarding the Company's computer programs. The Company's
computer programs may not be copied, modied, distributed, decompiled,
or reverse-engineered in any manner without the prior written consent of
the Company.
Disclaimer
The Company endeavors to achieve the accuracy and completeness
of this manual, but no warranty of accuracy or reliability is given. All the
specifications and designs are subject to change without notice due to
continuous technological development. No part of this manual shall be
copied, modified, translated, or distributed in any manner without the
2
express written permission of us.
We do not guarantee, for any particular purpose, the accuracy, validity,
timeliness, legitimacy or completeness of the third-party products and
contents involved in this manual.
If you have any suggestions or would like to receive more information,
please visit our website at: http://www.hytera.com.
Instructions
●The use of the product is subject to the laws and regulations of the
countries or regions in which it is used.
●To avoid suboptimal performance, do not use the product in a
thunderstorm.
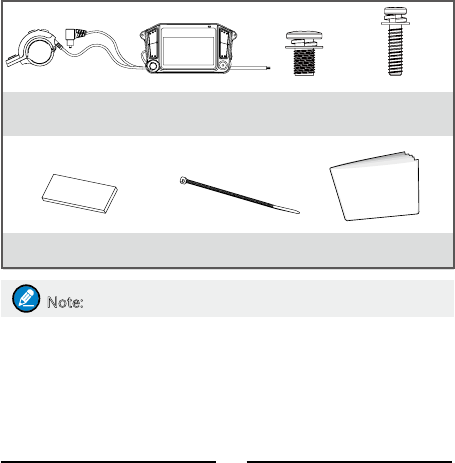
Packing List
Please unpack carefully and check that all items listed below are
received. If any item is missing or damaged, please contact your dealer.
Note
Note: Pictures in this manual are for reference only.
Product Overview
RCS-01 motorcycle wireless console is an audio accessory that allows
the user to achieve convenient communication while riding a motorcycle.
It features user-friendly and easy-to-use design, improving the user's
personal safety and work efciency. The product works with MD65X or
Owner's Manual
Motorcycle Wireless
Console
Cable Tie x 8 Owner's Manual
M5 Screw for
PTT Unit x 2
Rubber Pad for PTT Unit
x 6 (2 mm x 4, 1 mm x 2)
M3 Screw for
Motorcycle Wireless
Console x 4
3
MD78X with rmware version of V8.00.06.007 or later, ADA-01 wireless
audio adapter with rmware version of V2.XX.XX.XXX or later, ECN27
wired helmet headset, and the like.
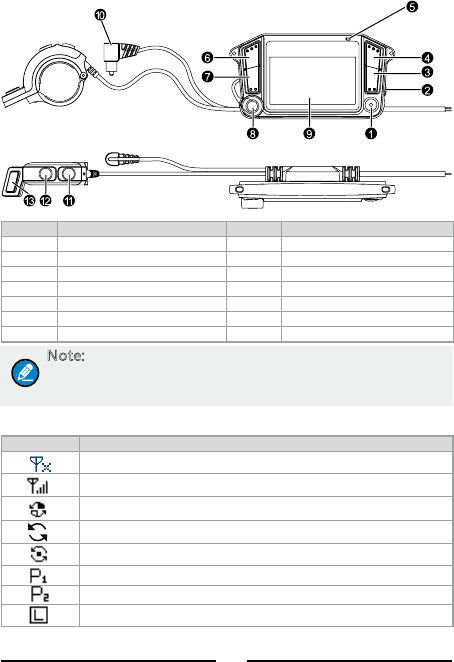
Product Introduction
Product Controls
No. Part Name No. Part Name
1 On-Off/Switch Key 8 Headset Jack
2 Side Key (SK) 9 LCD Display
3 P2 Key 10 Loudspeaker Connector
4 P1 Key 11 Up Key
5 LED Indicator 12 Down Key
6 Answer Key 13 Push-to-Talk (PTT) Key
7 End Key / /
Note: For enhanced convenience, you may request your
dealer to program SK, P1 and P2 as the shortcuts to specific
functions.
LCD Icon
Icon Description
The mobile radio receives no signal.
More bars indicate better signal strength.
The mobile radio is roaming.
The mobile radio is scanning.
The mobile radio stays on a non-priority channel.
The mobile radio stays on priority channel 1.
The mobile radio stays on priority channel 2.
The current channel is set at low power.

4
Icon Description
The current channel is set at high power.
The GPS feature is enabled, and positioning data is
received.
The GPS feature is enabled, but no positioning data is
received.
The Scrambler or Encrypt feature is enabled.
The radio is in emergency mode.
●The mobile radio is stunned or killed.
●You have made too many incorrect login attempts for
the programming software.
●The rental period expires.
●A power-on error occurs.
Longer black block indicates higher volume.
A private call is in progress.
You are receiving a private call.
You are initiating a private call.
A group call is in progress.
You are receiving a group call.
You are initiating a group call.
An all call is in progress.
You are receiving an all call.
You are initiating an all call.
An emergency group call is in progress.
You are receiving an emergency group call.
You are initiating an emergency group call.
An emergency call is in progress.
You are receiving an emergency call.
You are initiating an emergency call.
A PABX/PSTN call is in progress.
CThe mobile radio is in DMR conventional mode.
XThe mobile radio is in XPT trunking mode.
DThe mobile radio is in DMR trunking mode.
AThe mobile radio is in MPT trunking mode.
Note: For detailed feature description, refer to
Owner's
Manual
of the mobile radio used with the product.
5
LED Indicator
LED Indication Description
Glows red The mobile radio is transmitting.
Glows green The mobile radio is receiving.
Glows orange The call has been set up, and you can press
and hold the PTT key to speak.
Flashes red and
blue in turn The product is in pairing mode.
Flashes blue
twice rapidly and
periodically
The wireless connection is established, but
no voice is transmitted.
Flashes blue
once rapidly and
periodically
The wireless connection is established, and
voice is being transmitted.
Flashes blue slowly The wireless connection is not established.
Note: LED indications of the product are the same as those
of the mobile radio used with the product. For details
on other LED indications, refer to
Owner's Manual
of the
mobile radio.
Specications
Item Specications
Input voltage 12 – 24 V DC
Wireless
communication
coverage
10 m
Dust & Water
protection IP55
Operating
temperature –30°C to +60°C
Storage
temperature –40°C to +85°C
Basic Operations
Powering On/Off
The product gives an alert tone upon power-on or power-off.
Powering On

6
Auto Power-on
The product automatically powers on when the motorcycle engine starts.
Manual Power-on
To manually power on the product, press the On-Off/Switch key for two
seconds while the motorcycle engine is running.
Powering Off
Auto Power-off
The product automatically powers off when the motorcycle engine stops.
Manual Power-off
To Manually power off the product, do as follows:
Step 1 Press and hold the On-Off/Switch key for two seconds. The
LCD displays "Select Power Off".
Step 2 Press the On-Off/Switch key.
Note: If you prefer not to power the product off when the
LCD displays "Select Power Off", press the Up key or Down
key to select "No", and then press the On-Off/Switch key (or
wait for 10 seconds without any operation).
Pairing and Connection
The product can work properly only when it is paired with and wirelessly
connected to the wireless audio adapter. After initial pairing and
connection, the wireless connection will be automatically established
afterwards.
The pairing and connection can be nished automatically or manually.
Auto Pairing
The product and the wireless audio adapter automatically perform pairing
and connection upon power-on in the case of initial use.
When the LED indicator ashes blue rapidly, it indicates that the product
has established wireless connection to the wireless audio adapter.
Manual Pairing
If the wireless audio adapter initially connected to the product has been
replaced, you need to manually perform the pairing and connection.
Step 1 Power off the product.

7
Step 2 Hold down the On-Off/Switch key, until the LED indicator ashes
red and blue in turn. The product enters pairing mode.
Step 3 Make the new wireless audio adapter enter pairing mode.
For details on how to make the new wireless audio adapter, refer to ADA-
01 Wireless Audio Adapter Owner's Manual.
The product and the wireless audio adapter automatically establish
wireless connection after both of them enter pairing mode. When the LED
indicator ashes blue rapidly, it indicates that the wireless connection has
been established.
Adjusting the Volume
●On the home screen, press the Up key or Down key to increase or
decrease the volume.
●On the non-home screen, do as follows:
Step 1 Press the On-Off/Switch key to switch to the volume adjustment
option.
Step 2 Press the Up key or Down key to increase or decrease the
volume.
Selecting a Channel/Group Contact
To select a channel in DMR conventional mode or XPT trunking mode,
do as follows:
Step 1 On the home screen, press the On-Off/Switch key to switch to
the channel selecting option.
Step 2 Press the Up key or Down key to select the required channel.
To select a group contact in DMR trunking mode or MPT trunking mode,
do as follows:
Step 1 On the home screen, press the On-Off/Switch key to switch to
the group contact selecting option
Step 2 Press the Up key or Down key to select the required group
contact.
Transmitting
Press and hold the PTT key on the PTT unit, and speak into the
microphone on the wired or wireless helmet headset.

8
Note: If the product is connected to both the wired helmet
headset and the wireless helmet headset, the wireless one
will be put into use by default. To use the wired helmet
headset, power off the wireless one.
Using the Loudspeaker
Power on the loudspeaker, and then speak into the microphone on
the wired helmet headset when the mobile radio is not transmitting or
receiving.
Viewing the Product Information
On the home screen, hold down both the End key and the P2 key. The
product information includes the software version of the control module
(MCU), wireless module (BT), and wireless audio adapter (AD), as well
as the language version (FONT).
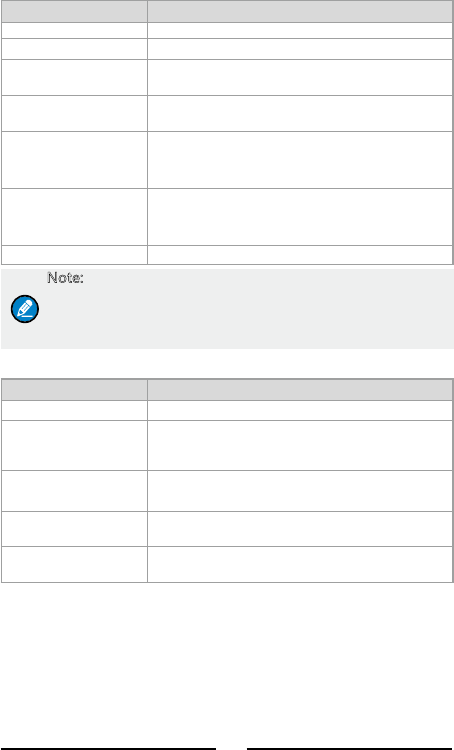
Troubleshooting
Phenomena Analysis Solution
The product fails
to automatically
reconnect to the
wireless audio
adapter in the case of
disconnection.
The product
is out of the
wireless
communication
coverage of the
wireless audio
adapter.
Make sure that the
product is within the
wireless communication
coverage of the wireless
audio adapter.
You hear noise during
calls.
The LED indicator
does not glow red
when you press and
hold the PTT key.
9
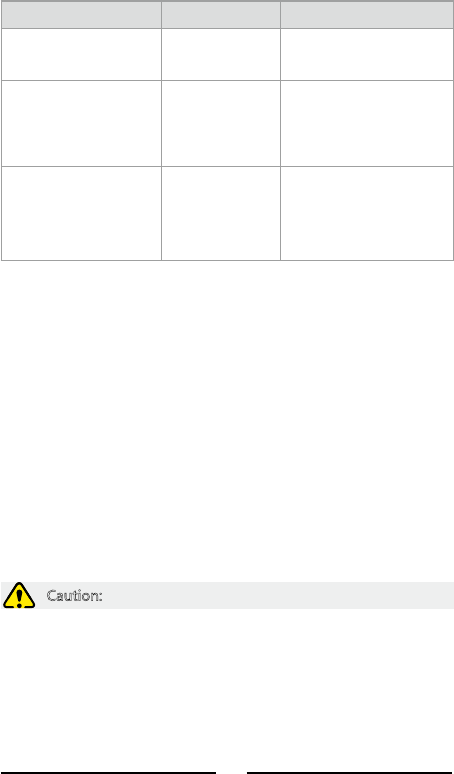
Phenomena Analysis Solution
The product does not
respond to any key
press.
The system
crashes.
Cut off the power supply
and then restart the
product.
The product fails to
enter the home screen
when you press the
On-Off/Switch key.
The rmware
version of the
mobile radio
is earlier than
V8.00.06.007.
Upgrade the rmware
version to V8.00.06.007
or later.
The product fails
to automatically
power on after the
motorcycle engine
starts.
The power cord
has not been
connected
correctly.
Connect the red wire
to the positive pole and
the black wire to the
negative pole of the
motorcycle battery.
If the above solutions cannot x your problems, or you may have some
other queries, please contact us or your local dealer for more technical
support.
Care and Cleaning
To guarantee optimum performance as well as a long service life of the
product, please follow these tips.
Product Care
●Do not pierce or scrape the product.
●Keep the product away from substances that can corrode the
circuitry.
●When the wired helmet earpiece is not in use, keep the magnetic
connector far away from the magnet-sensitive substances and cover
the earpiece jack on the wireless console with the stopple.
Product Cleaning
Caution: Do power off the product before cleaning.
● Clean up the dust and ne particles on the product's surface with a
clean and dry lint-free cloth or a brush regularly.
●Use a non-woven cloth with neutral cleanser to clean the device
after long-time use. Do not use chemical preparations such as stain
removers, alcohol, sprays or oil preparations, so as to avoid potential
damage on the surface.
●Make sure the product is completely dry before use.
FCC Notice:
This device complies with Part 15 of the FCC rules. Operation is subject to the following two
conditions: (1) This device may not cause harmful interference. (2) This device must accept
any interference received, including interference that may cause undesired operation.
NOTE: This equipment has been tested and found to comply with the limits for a Class B
digital device, pursuant to Part 15 of the FCC rules. These limits are designed to provide
reasonable protection against harmful interference in a residential installation. This equipment
generates uses and can radiate radio frequency energy and, if not installed and used in
accordance with the instructions, may cause harmful interference to radio communications.
However, there is no guarantee that interference will not occur in a particular installation. If this
equipment does cause harmful interference to radio or television reception, which can be
determined by turning the equipment off and on, the user is encouraged to try to correct the
interference by one or more of the following measures:
---Reorient or relocate the receiving antenna.
---Increase the separation between the equipment and receiver.
---Connect the equipment into an outlet on a circuit different from that to which the receiver is
connected.
---Consult the dealer or an experienced radio/TV technician for help.
WARNING: Changes or modifications not expressly approved by the party responsible for
compliance could void the user's authority to operate the equipment.
RF Exposure
The equipment complies with FCC radiation exposure limits set forth for an uncontrolled
environment. This device should be installed and operated with minimum distance 20cm
between the radiator & your body.
IC Notice:
This device complies with Canada Industry licence-exempt RSS standard(s). Operation is
subject to the following two conditions:
(1) this device may not cause interference; and
(2) this device must accept any interference. Including interference that may cause
undesired operation of the device.
Cet appareil est conforme aux CNR exemptes de licence d'Industrie Canada . Son
fonctionnement est soumis aux deux conditions suivantes :
( 1 ) Ce dispositif ne peut causer d'interférences ; et
( 2 ) Ce dispositif doit accepter toute interférence , y compris les interférences qui peuvent
causer un mauvais fonctionnement de l'appareil.
CAN ICES-3 (B)
Avis d’Industrie Canada
Le présent appareil est conforme aux CNR d'industrie Canada applicables aux appareils
radio exem pts de licence L'exploitation est autorisée aux deux conditions suivantes:
1) I'appareil ne doit pas produire de brouillage; et
2) I'utillsateur de I'appareil doit accepterbrouillage radioélectrique subi meme si le
brouillage est susceptible d'encompromettre le fonctionnement. mauvais fonctionnement
de I'appareil.
Cet appareil numériquie de la classe B est conforme à la norme NMB-003 du Canada.
CAN NMB-3 (B)
Radiation Exposure Statement:
This equipment complies with IC radiation exposure limits set forth for an uncontrolled
environment. This equipment should be installed and operated with minimum distance
20cm between the radiator & your body.
Déclaration d'exposition aux radiations:
Cet équipement est conforme aux limites d'exposition aux rayonnements IC établies pour
un environnement non contrôlé. Cet équipement doit être installé et utilisé avec un
minimum de 20cm de distance entre la source de rayonnement et votre corps.