Hytera Communications VM550 Body Worn Camera User Manual
Hytera Communications Corporation Limited Body Worn Camera Users Manual
User manual

Body Worn Camera
USER MANUAL
Preface
Welcome to the world of Hytera and thank you for purchasing this product. To derive optimum
performance from the product, please carefully read this manual before use.
This manual is applicable to the following product:
VM550 Body Worn Camera

Icon Conventions
The following icons are available through this manual:
: Indicates references that can further describe the related topics.
: Indicates situations that could cause data loss or equipment damage.
: Indicates situations that could cause minor personal injury.
Copyright Information
Hytera is the trademark or registered trademark of Hytera Communications Corporation Limited (the
Company) in PRC and/or other countries or areas. The Company retains the ownership of its trademarks
and product names. All other trademarks and/or product names that may be used in this manual are
properties of their respective owners.
The product described in this manual may include the Company's computer programs stored in
memory or other media. Laws in PRC and/or other countries or areas protect the exclusive rights of the
Company with respect to its computer programs. The purchase of this product shall not be deemed to
grant, either directly or by implication, any rights to the purchaser regarding the Company's computer
programs. The Company's computer programs may not be copied, modified, distributed, decompiled, or
reverse-engineered in any manner without the prior written consent of the Company.
Disclaimer
The Company endeavors to achieve the accuracy and completeness of this manual, but no warranty of
accuracy or reliability is given. All the specifications and designs are subject to change without notice
due to continuous technological development. No part of this manual may be copied, modified,
translated, or distributed in any manner without the prior written consent of the Company.
We do not guarantee, for any particular purpose, the accuracy, validity, timeliness, legitimacy or
completeness of the third-party products and contents involved in this manual.
If you have any suggestions or would like to receive more information, please visit our website
at: http://www.hytera.com.
EU Regulatory Conformance
As certified by the qualified laboratory, the product is in compliance with the essential requirements and
other relevant provisions of the following directives:
2006/66/EC
2011/65/EU
2012/19/EU
2014/53/EU
Please note that the above information is applicable to EU countries only.
FCC Statement
This equipment has been tested and found to comply with the limits for a Class B digital device,
pursuant to Part 15 of the FCC Rules. These limits are designed to provide reasonable protection against
harmful interference in a residential installation. This equipment generates uses and can radiate radio
frequency energy and, if not installed and used in accordance with the instructions, may cause harmful
interference to radio communications. However, there is no guarantee that interference will not occur in
a particular installation. If this equipment does cause harmful interference to radio or television
reception, which can be determined by turning the equipment off and on, the user is encouraged to try
to correct the interference by one or more of the following measures:
Reorient or relocate the receiving antenna.
Increase the separation between the equipment and receiver.
Connect the equipment into an outlet on a circuit different from that to which the receiver is
connected.
Consult the dealer or an experienced radio/TV technician for help.
Labelling requirements
This device complies with part 15 of the FCC Rules. Operation is subject to the following two conditions:
(1) This device may not cause harmful interference, and (2) this device must accept any interference
received, including interference that may cause undesired operation.
Information to User
Any Changes or modifications not expressly approved by the party responsible for compliance could
void the user's authority to operate the equipment.
Specific Absorption Rate (SAR) information
This product meets the government's requirements for exposure to radio waves. The guidelines are
based on standards that were developed by independent scientific organizations through periodic and
thorough evaluation of scientific studies. The standards include a substantial safety margin designed to
assure the safety of all persons regardless of age or health.
Body-worn Operation
This device was tested for typical body-worn operations. To comply with RF exposure requirements, a
minimum separation distance of 5mm for body worn must be maintained between the user’s body,
including the antenna. Third-party belt-clips, holsters, and similar accessories used by this device should
not contain any metallic components. Body-worn accessories that do not meet these requirements may
not comply with RF exposure requirements and should be avoided. Use only the supplied or an
approved antenna.
IC Statement
This device complies with Industry Canada’s licence-exempt RSSs. Operation is subject to the following
two conditions:
(1) This device may not cause interference; and
(2) This device must accept any interference, including interference that may cause undesired
operation of the device.
Le présent appareil est conforme aux CNR d'Industrie Canada applicables aux appareils radio exempts
de licence. L'exploitation est autorisée aux deux conditions suivantes: (1) l'appareil ne doit pas produire
de brouillage, et (2) l'utilisateur de l'appareil doit accepter tout brouillage radioélectrique subi, même si
le brouillage est susceptible d'en compromettre le fonctionnement.
IC SAR Warning
The information listed above provides the user with information needed to make him or her aware of a
RF exposure, and what to do to assure that this radio operates within the FCC exposure limits of this
radio.
The device complies with RF specifications when the device used at 5mm from your body. Third-party
belt-clips, holsters, and similar accessories used by this device should not contain any metallic
components. Body-worn accessories that do not meet these requirements may not comply with RF
exposure requirements and should be avoided.
RED Statement
1. Risk of explosion if battery is replaced by an incorrect type. Dispose of used batteries according to
the instructions.
2. The product shall only be connected to a USB interface of version USB2.0.
3. Adapter shall be installed near the equipment and shall be easily accessible.
4. The operating temperature of the EUT can't exceed 55°C and shouldn't be lower than 0°C.
5. The plug considered as disconnect device of adapter.
6. The device complies with RF specifications when the device used at 5 mm form your body.
Hereby, Hytera Communications Corporation Limited declares that this product is in compliance with
essential requirements and other relevant provisions of Directive 2014/53/EU. This product is allowed to
be used in all EU member states.

1. Packing List
Please unpack carefully and check if all items listed below are received. If any item is missing or
damaged, please contact your dealer.
No.
Name
Qty.
1
Body Worn Camera (RVM)
1
2
Battery
1
3
Belt Clip
1
4
USB Cable
1
5
Power Adapter
1
6
User Manual
1
Pictures listed in this manual are for reference only.
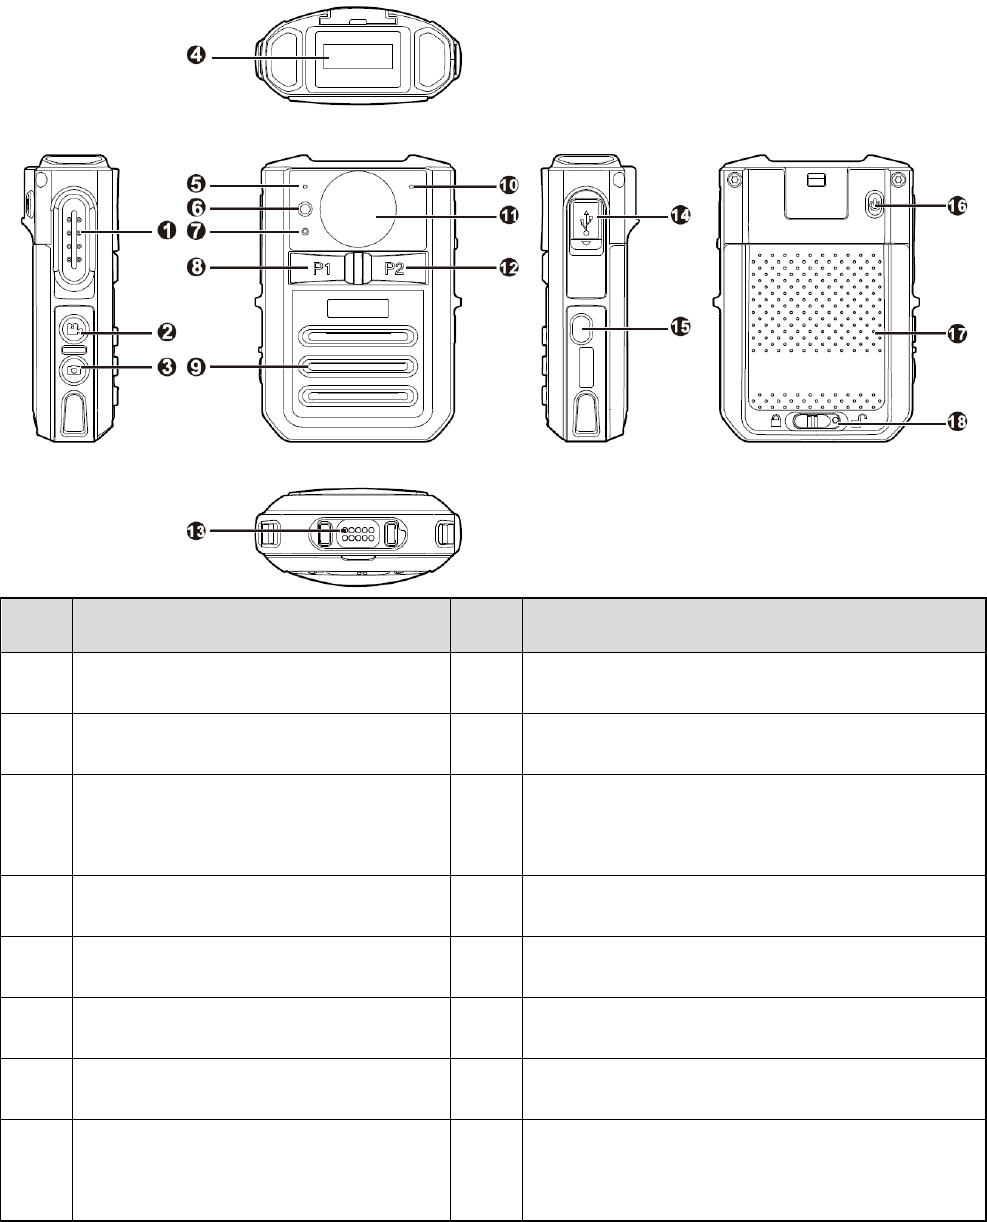
2. Product Overview
2.1 Product Controls
No.
Name
No.
Name
1
Push-to-Talk (PTT) Key
10
Audio/Video Recording Microphone
2
Video Recording Key
11
Camera
3 Photo Taking Key 12
P2 Key (Programmable key, default as the Audio
Recording key)
4
OLED Display
13
Accessory Connector (10-pin)
5
Speaking Microphone
14
USB Connector
6
Camera Flash
15
Emergency Key
7
LED Indicator
16
Power On/Off Key
8
P1 Key (Programmable key, default as
the Tagging key)
17 Battery
No.
Name
No.
Name
9
Speaker
18
Battery Latch
The P1 key and P2 key can be programmed through the RVM Manager tool. Contact us or
your local dealer to get the tool.
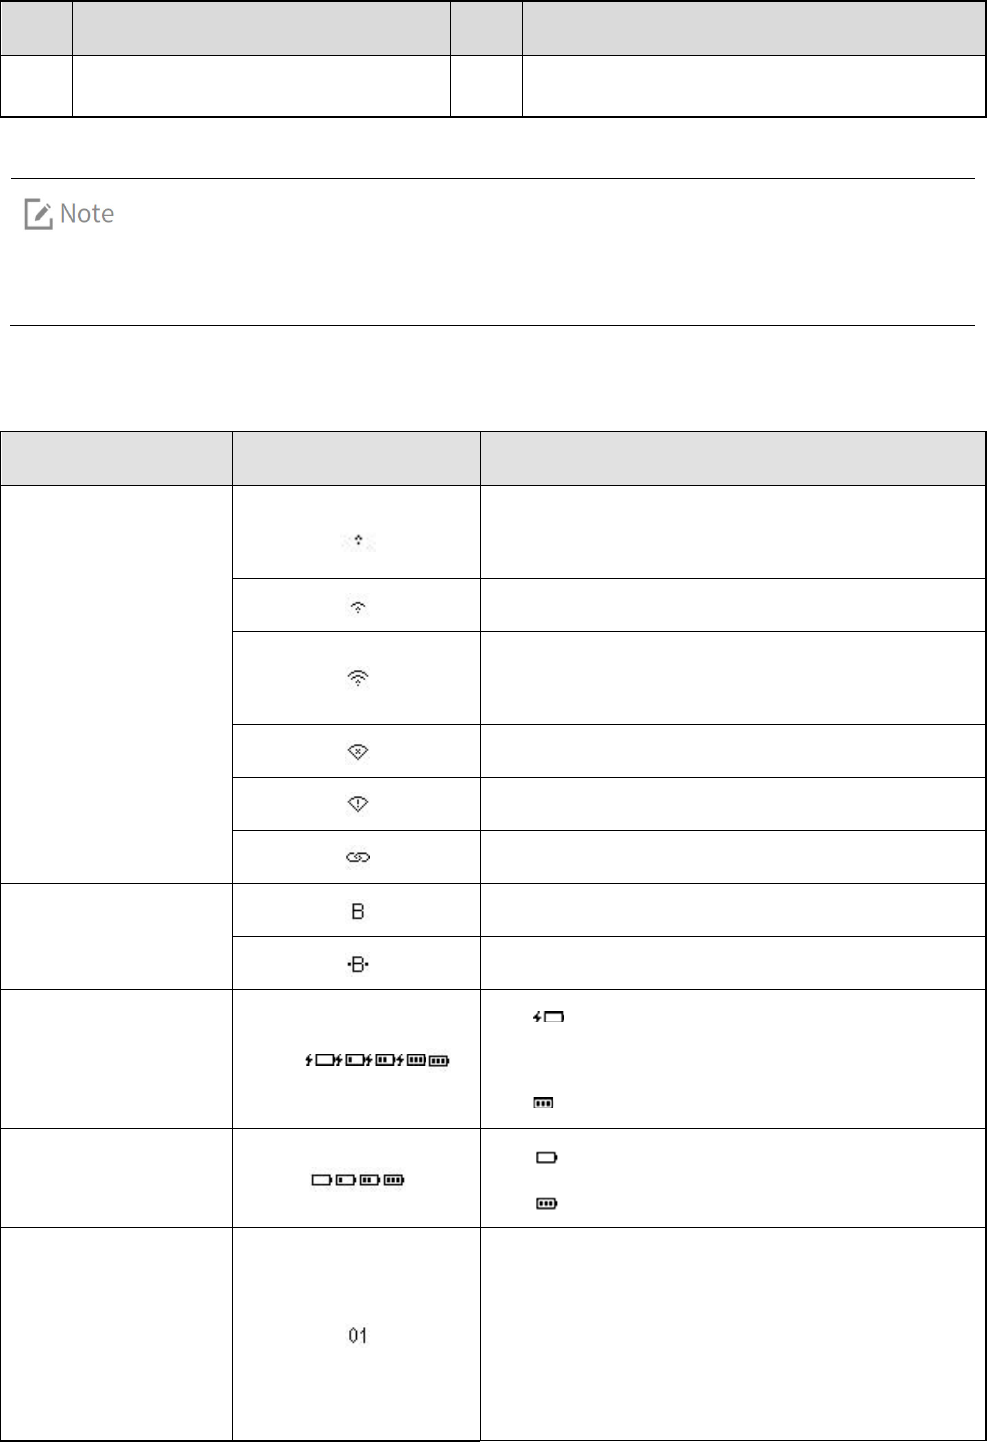
2.2 OLED Icons
Type
Icon
Description
WLAN
The product is connected to WLAN with very weak
signal.
The product is connected to WLAN with weak signal.
The product is connected to WLAN with strong
signal.
The product is disconnected from WLAN.
A problem occurred in WLAN connection.
WLAN hotspot is enabled.
BT
BT feature is enabled.
BT connection is established.
Charging
: The product is being charged under low
battery.
: The product is fully charged.
Battery Level
: Low battery.
: Full battery.
Area/Group (Folder)
Displays the area of the current channel, or the
group (folder) of the current contact in standby
mode while connected to a portable radio. Only
letters, digits and some special characters are
supported.
Type
Icon
Description
Channel/Contact
Displays the current channel, or the current contact
in standby mode while connected to a portable
radio. Only letters, digits and some special
characters are supported.
Time
Displays the current time in standby mode while not
connected to the portable radio.
Video Recording
Pre-recording mode
Video recording mode
Important video recording mode
Post-recording mode
Important post-recording mode
Audio Recording
Audio recording mode
Important audio recording mode
TF Card
The remaining capacity of the TF card is less than 2
GB.
Photo Taking
Photo taking mode
Call
Individual call
Group call
All call
Analog call
Telephone call
Emergency call
Call out
Call in
2.3 LED Indicators
Status
Description

Status
Description
Glows red
The product is transmitting voice or emergency alarm.
The product is being charged.
The TF card is full.
The product is being turned off.
Glows green
The product is receiving voice or emergency alarm.
The product is fully charged.
The product is being turned on
.
Glows orange
Call hang time. You can press and hold the PTT key to speak.
Flashes orange rapidly
No voice transmission in emergency mode.
The remaining capacity of the TF card is less than 2 GB.
Flashes red slowly
Flashes once every second: The product is recording a video.
Flashes red once every five seconds: The battery runs low. Please
recharge or replace the battery in time.
Flashes orange slowly
The product is recording an audio.
Flashes red and blue in turn
The product is pairing with other BT devices.
Flashes blue rapidly
BT connection is established.
2.4 Specifications
Body Worn Camera
Dimensions (H×W×D)
25.7 mm×58 mm×86.5 mm
Weight (with battery)
≤145 g
Image Sensor
4-megapixel
Camera
Fixed angle, glass, diagonal 139
°
, horizontal 116
°
, vertical 60
°
.
Focus Range
0.1 m to infinity
Battery Life (continuous video
recording)
≥8h (480P 30 FPS)
≥7h (720P 30 FPS)

Body Worn Camera
≥6h (1080P 30 FPS)
≥9h (audio recording)
Main Battery Capacity
2,500 mAh
Main Battery Charging Time
≤4 h
Standby Battery Capacity
0.8 mAh
RTC Hold Time
72 h (without main battery)
Display Size
0.9 inch
Display Resolution
128 × 32
Screen Type
Dot-matrix Monochrome OLED Display
TF Card Storage
Standard: 16 GB
Optional: 32 GB/64 GB/128 GB
Video Format
MP4
Video Encoding Format
H.264
Video Resolution
480P (30 FPS), 720P (30/60 FPS), 1080P (30/60 FPS)
TF Card Recording Time
Take the standard 16 GB storage as example.
>20 h (480P 30 FPS)
>13 h (720P 30 FPS)
>6.5 h (1080P 30 FPS)
Audio Format
AAC (Advanced Audio Coding)
Photo Format
JPG
Photo Resolution
4608×3456 (16-megapixel)
3072×1728 (5-megapixel)
2304×1296 (3-megapixel)
Pre-recording Time
10s/20s
Post-recording Time
10s/20s/30s

Body Worn Camera
Speaker Power
2 W
Microphone
Electret microphone ×2, Omni-directional: –44 dB
Connector
Micro USB port, 10-pin connector
Sensor
Accelerometer
Camera Flash
1 W
IP Class
MIL-STD-810G, IP67
Drop Resistance
1.5 m
ESD
±6 kV (contact discharge)
±12 kV (air discharge)
Operating Temperature
0
˚
C to +55
˚
C
Storage Temperature
–40
˚
C to +85
˚
C
Compatible System
Windows XP/Windows 7/Windows 8/Windows 10
Wi-Fi (supporting AP mode and STA mode)
Operation frequency 802.11b/802.11g/802.11n(HT20): 2,412 – 2,462 MHz
Maximum EIRP Refer to the RF report
BT
BT4.0 (supporting voice, EDR and BLE)
BT-EDR
Operation frequency
2,402 – 2,480 MHz
Maximum EIRP
Refer to the RF report
BT-BLE
Operation frequency
2,402 – 2,480 MHz
Maximum EIRP
Refer to the RF report

Body Worn Camera
Power Adapter
Input
AC 110 – 240 V, 50 – 60 Hz
Output
DC 5 V, 1 A

3. Before Use
3.1 Attaching the Battery
Use only the Hytera standard or optional battery. Polarity reverse or use of other batteries
may result in explosion and fire hazards.
The battery is applicable to a temperature range of 0˚C to +55˚C.
Attach the battery according to the steps shown in the following figure. To remove the battery, turn off
the product and reverse the attaching steps.
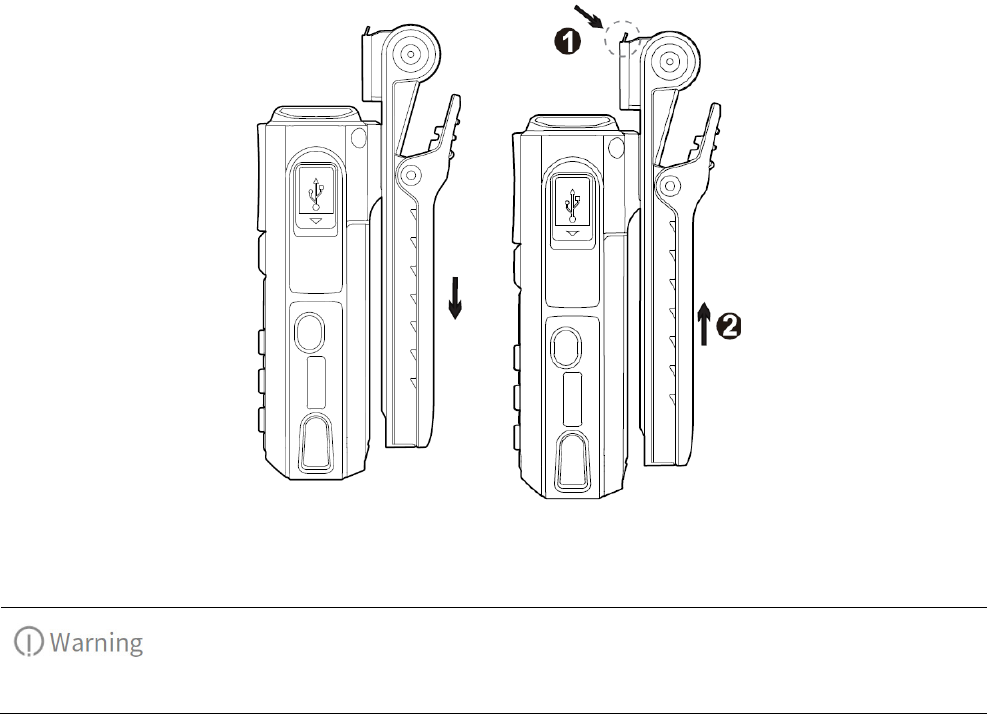
3.2 Attaching the Belt Clip
Attach the belt clip according to the steps shown in the left figure. To remove the belt clip, do as the
steps shown in the right figure.
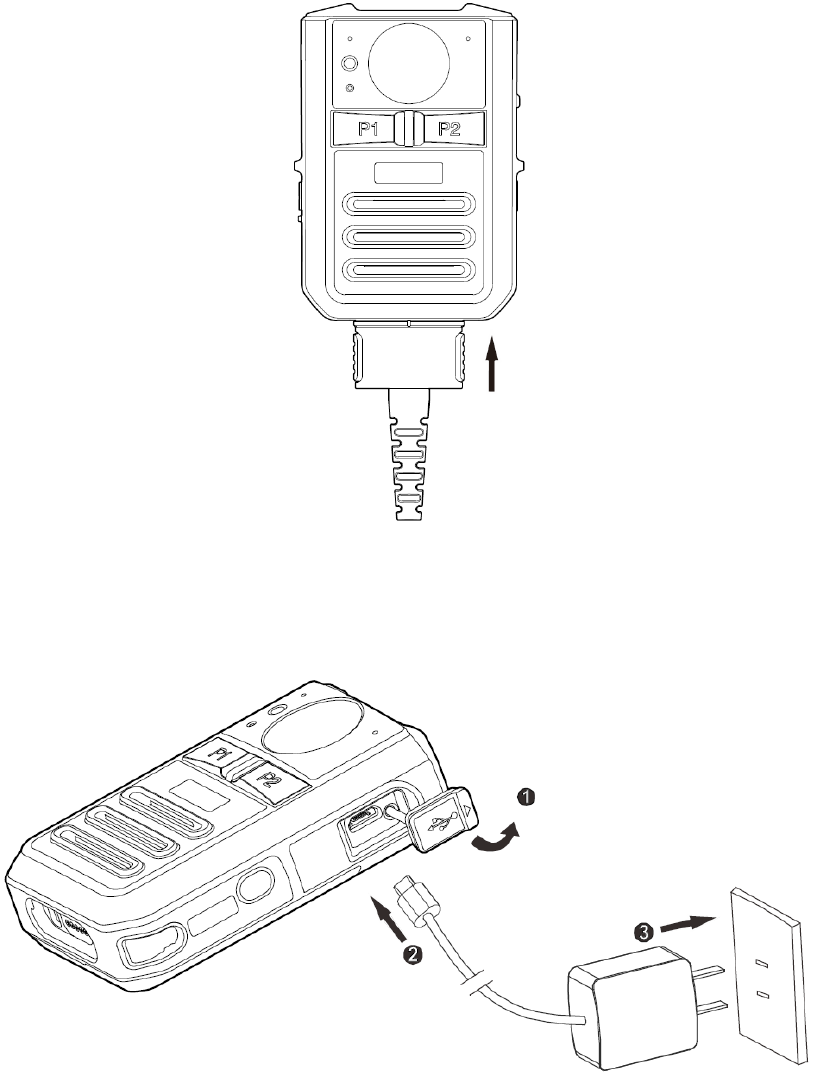
3.3 (Optional) Connecting the Accessory Cable
Skip this section if you do not purchase the accessory cable.
Connect the cable to RVM as shown in the figure below. To disconnect the cable, press both sides of the
cable connector with proper force and remove the connector.

4. Basic Operations
4.1 Turning On and Turning Off the Product
Turning On the Product
In power-off mode, press and hold the On/Off key for three seconds to turn on the product.
Turning Off the Product
In power-on mode, press and hold the On/Off key for three seconds to turn off the product.
4.2 Entering BT Pairing
In power-off mode, press and hold the On/Off key for five seconds to start BT pairing.
4.3 One-touch Activation and Recording/Photo Taking
In power-off mode, press and hold the Video Recording key/Photo Taking key to turn on the product
and record video or take photo; press the Video Recording key again to exit video recording.
4.4 Recording Videos
In power-on mode, press the Video Recording key to record video; press the key again to exit video
recording.
The product supports loop recording. In loop mode, when the TF card is full and a new
video is being recorded, the product automatically deletes the oldest video by date. You
can program this feature through the RVM Manager.
If the post-event recording feature is enabled, the product automatically enters
post-event recording mode after the recording is deactivated.
4.5 Pre- and Post-event Recording
The RVM is capable of pre- and post-event recording to ensure all interactions during an incident are
captured. Pre-event recording allows officers to capture a period time of footage prior to an event that
led them to press the record button, while post-event recording can add a period time of footage after

the recording is deactivated.
You can program the pre- and post-event recording features through the RVM Manager.
Pre-event Recording
In power-on mode, press and hold the Video Recording key to enter pre-event recording; press and hold
the key again to exit.
In pre-event recording mode, the product loops to record video every 10 or 20 seconds according to the
pre-recording time.
Post-event Recording
During video recording, press the Video Recording key to enter post-event recording.
In post-event recording mode, the product records video for another 10, 20 or 30 seconds according to
the post-recording time.
To exit post-recording mode, do one of the followings:
Press the Video Recording key to start normal video recording again; press the Video Recording key
again to exit recording.
Press the Emergency key or the P1 key to start recording videos and tag the videos as critical
evidence; press the Video Recording key to exit recording.
The product automatically exits recording after the post-recording time ends.
4.6 Recording Audios
In power-on mode, press the P2 key (default) to record audio; press the key again to exit audio recording.
You can modify the method to start and exit audio recording through the RVM Manager
.
4.7 Taking Photos
In power-on mode, press the Photo Taking key to take photo.
4.8 Recording Tagging
During video or audio recording, press the P1 key (default) to tag critical events; press the P1 key
(default) again to untag.

In power-on mode, press the Emergency key to start recording videos and tag the videos as critical
evidence; press and hold the Emergency key or press the Video Recording key to exit recording.
You can modify the method to tag and untag recordings through the RVM Manager.
4.9 Taking Photos during Video Recording
During video recording, press the Photo Taking key to take photos.
4.10 Making Calls
When the product is connected to a portable radio through BT, you can use the product to make calls,
answer calls, speak or terminate calls. You can program keys to make or answer a call through the RVM
Manager.
Making a call: Press the PTT key to start a call in the current channel or with the current contact.
Answering a call: Press and hold the P2 key (default) to answer a call.
Speaking: Press and hold the PTT key to speak through the Speaking Microphone.
Terminating a call: During an ongoing call, press and hold the P2 key (default) to terminal the call.
4.11 Video Transmission
When the product is connected to a portable radio through BT, you can accept, refuse or terminate video
transmission from other devices. The video transmitting features can be programmed through the RVM
Manager.
Accepting video transmission: Press and hold the P1 key (default).
Refusing video transmission: Press or press and hold the P1/P2 key.
Terminating video transmission: During the transmission, press and hold the P1 key (default) to
terminate.
4.12 Sending an Emergency Alarm
When the product is connected to a portable radio through BT, you can press the Emergency key to
make an emergency alarm in case of emergencies. At this time, the product enters important video
recording automatically. The emergency alarm has the highest priority. You can send an emergency
alarm no matter whether the portable radio is transmitting or receiving. To cancel the emergency alarm,

press the Emergency key again.
The method to send and cancel an emergency alarm can be set by your dealer.
4.13 Silent Mode
With this feature enabled, the product gives no alert tones, the indicator will not light up. You can
program this feature through the RVM Manager.
In power-on mode, press and hold or press the P1/P2 key to enable the Silent Mode; press and hold or
press the P1/P2 key again to disable the Silent Mode.
4.14 Flashlight
In power-on mode, press and hold the Photo Taking key for three seconds to turn on the flashlight;
press and hold the Photo Taking key for three seconds again to turn off the flashlight.
4.15 Viewing Device Information
When the OLED screen is on, press and hold the P1 key and P2 key simultaneously for three seconds; the
screen displays the device information, including device ID, storage, software version and etc.

5. Troubleshooting
Phenomena
Analysis
Solution
The product cannot be
turned on.
The battery may be improperly
attached.
Remove the battery and attach it
again.
The battery may run out.
Recharge or replace the battery.
The battery and the charging
probes are in poor contact due to
dirtied or damaged battery
contacts.
Clean the battery contacts.
BT connection cannot
be established.
The product is out of the portable
radio's communication coverage.
Make sure to use the product within
the radio's communication coverage.
You hear noise during
calls.
The LED indicator does
not glow red when you
press and hold the PTT
key.
The volume is low
when the product is
used with a portable
radio.
The speaking microphone and the
speaker are blocked or damaged.
Clean the speaking microphone and
the speaker.
The product cannot
record video or audio.
The TF card is full.
Delete all data from the TF card after
exporting the data.
The product cannot
take photo.
The TF card is full.
Delete all data from the TF card after
exporting the data.
The total number of photos reaches
the maximum (300).
Delete all photos from the TF card
after exporting them.
The product cannot
pre-record or
post-record the video
.
The pre-recording or post-recording
feature is not enabled.
Enable the feature through the RVM
Manager.

Phenomena
Analysis
Solution
The product gives no
alert tone; the indicator
does not light up.
The Silent Mode is enabled.
Disable the Silent Mode.
The product gives no
response to operations.
The system has crashed.
Press the P1 key, the P2 key, and the
Photo Taking key simultaneously to
turn off the product, and then turn it
on again.
If the above solutions cannot solve your problems, or you may have some other queries, please contact
us or your local dealer for more technical support.

6. Care and Cleaning
To guarantee optimum performance as well as a long service life of the product, please follow the tips
below.
Product Care
Do not pierce or scrape the product.
Keep the product away from substances that can corrode the circuitry.
Do not hold the product by the connection cable.
Attach the USB port cover when the USB port is not in use.
Product Cleaning
Power off the product before cleaning.
Make sure the product is completely dry before use.
Clean up the dust and fine particles on the product's surface with a clean and dry lint-free cloth or a
brush regularly.
Use neutral cleanser and a non-woven fabric to clean the keys and surface after long-time use. Do
not use chemical preparations such as stain removers, alcohol, sprays or oil preparations, so as to
avoid surface damage.

7. Optional Accessories
Use the accessories specified by the Company only; otherwise, we shall not be liable for any
losses or damages arising out of the use of any unauthorized accessories.
Contact your local dealer for the optional accessories of the product.