Hyun Won DAH1000 MP3 PLAYER (WITH FM RADIO) User Manual EMISSION TEST REPORT
Hyun Won Inc. MP3 PLAYER (WITH FM RADIO) EMISSION TEST REPORT
Hyun Won >
USERS MANUAL

Test Report No.: GETEC-E3-03-027
FCC Class B Certification
APPENDIX H
: USER’S MANUAL
EUT Type: MP3 Player
FCC ID : PCMDAH1000
MP3 & WMA Playback
MP3 & WMA Playback
SRS WOW
SRS WOW
FM Radio
FM Radio
Voice Recorder
Voice Recorder
DAH-1000
User s Manual
Digital Audio Player
Digital Audio Player
Cautions
Warning
To reduce danger of fire or electric shock, do not expose the product to rain
or moisture.
Do not release or distribute the music files formatted in WMA or MP3 from
the product to the public. (As this would violate Copyright laws.)
The software contained on the installation CD-ROM is for personal use only
and it not to be distributed.
To maintain best quality from the player
Do not use the product in hazardous conditions, such as extremely
high/ low temperatures, dusty area, or excessively wet areas.
Do not leave the product in the bathroom, near/ on a heater, or in a car
parked in the direct sunlight.
Do not leave batteries in pockets with any metallic substance such as coins
or keys.(Doing so may cause fire from the batteries contacts)
Throwing or dropping the product can cause shock damage.
Avoid sudden shock
Any data lost due to careless use is not our responsibility.
(Any valuable data should be stored on your PC)
Caution when using headset
Auditory sense may be damaged when listening to the music at a high
volume for extended time periods.
Using a headset while driving a car or riding bicycle/motorcycle is not
recommended.
Use caution when walking or jogging with device.
Ear-in type headset should have a long wire to be located at the back of the
neck.
Do not ever disassemble to repair or rebuild the product as it may cause
permanent damage.
Welcome to the World of Player
1
Note: The copyright of this product belongs to Hyun Won Inc.
anyone who wishes to utilize illustrations, pictures, software, and
other documents related to this product shall have a prior approval by
Hyun-Won Inc. Anyone violating this regulation will be subject to legal charges.
The content of this manual may change without prior notification.
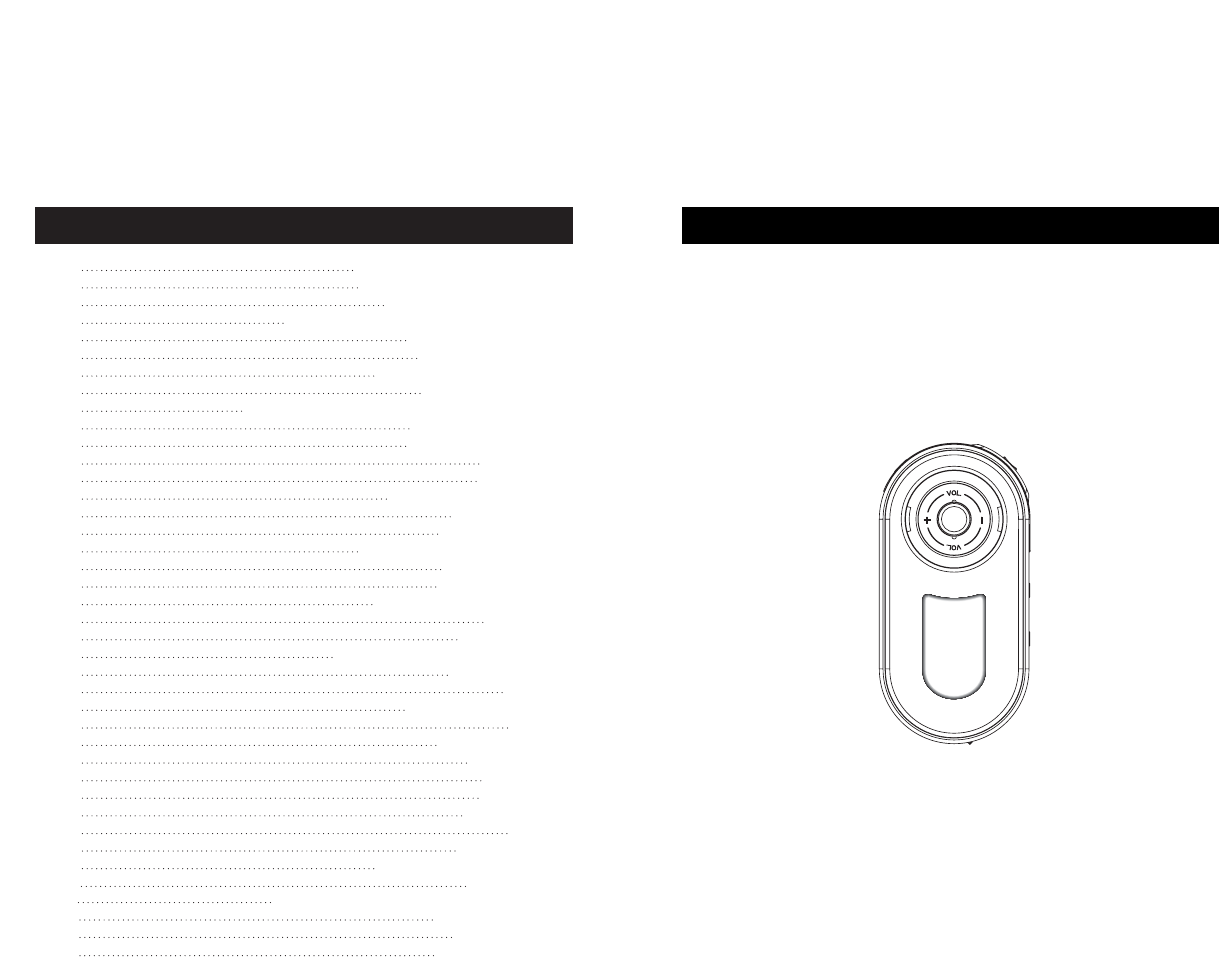
Thank you for purchasing our portable digital audio player, DAH-1000.
This player is multi-functional-portable digital audio player, playing MP3 & WMA
files, FM Radio and Digital Voice Record. The player is equipped with internal
flash memories, 128/256/512MB. You can now enjoy various contents ranging
from digital music to conversations using the most advanced digital audio player
on market.
Table of Contents
1
2
3
4
5
6
7
8
10
12
13
14
15
17
18
19
20
21
22
24
25
26
27
28
29
30
31
32
34
35
36
37
38
39
40
42
43
44
45
46
Welcome to the World of Player
What is a Digital Audio Player?
The Product Specifications
PC System Requirements and Accessories
Hardware Descriptions
About Power Supply
Remaining Battery Indicator
Software Installation
Connecting the Player to a PC using a USB Cable
File Download/Upload
USB cable Separating
Formatting
OS Update
LCD DISPLAY Illustration
Power On/Play
Power Off/Stop
Setting Volume/Lock Functions
Mode Changing
Voice Recording
Searching a Music/Voice File
FM Mode
FM Recording
EQ Setting / Setting Range Repeat
Selecting Menu
Setting
Display(Screen Setting)
Timer
Setting PLAY MODE
Setting USER EQ
Setting SRS
SRS setup
Deleting Files
About
Menu Catalog
Remote Control Instructions
User’s Guide
It May Not be a Trouble In the following cases
Warranty Services
Warranty policy
Product Certificate
Product Specifications
3
What is a Digital Audio Player?
2
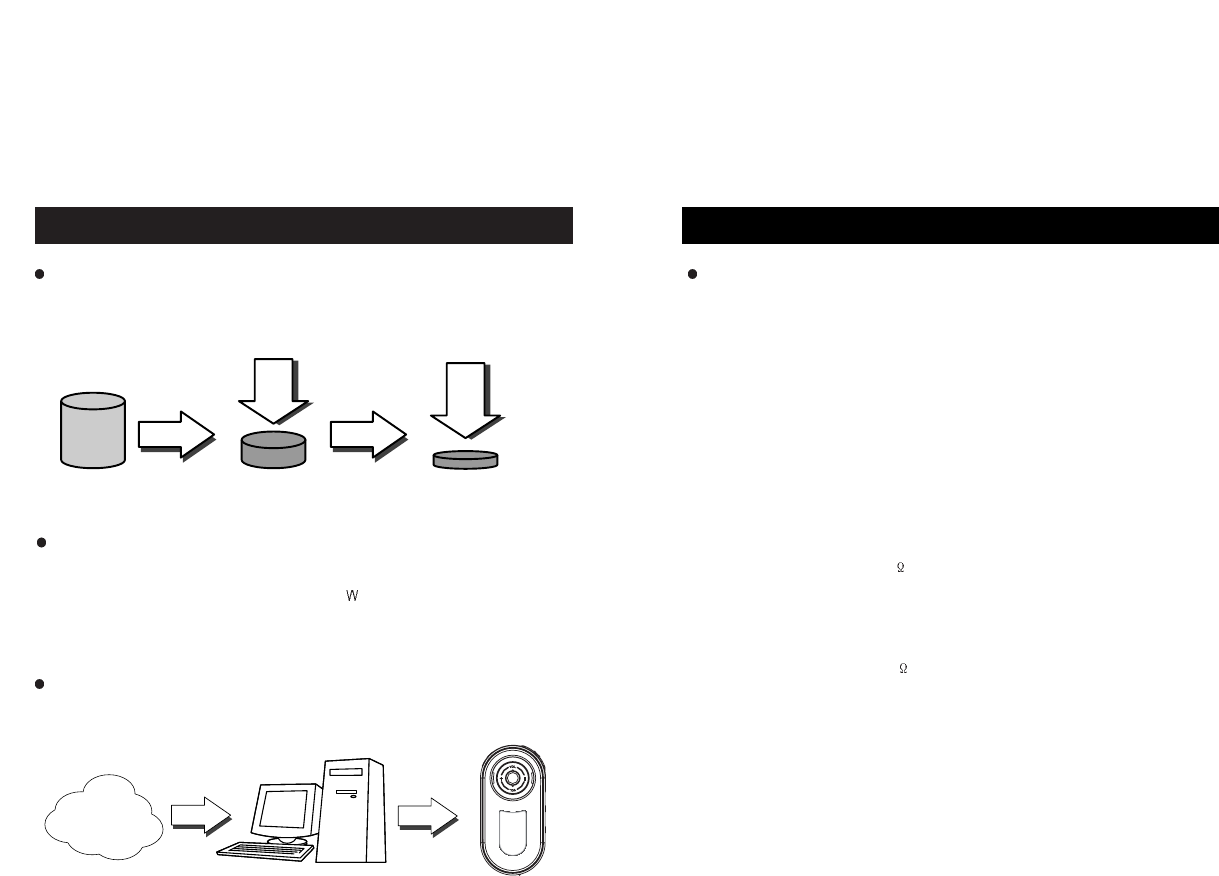
What is the MP3 file?
MP3 stands for MPEG1-Layer3 and it uses a compression technology that
converts conventional CD music data into an MP3 file format that is used on a
PC, at 1/12 compression ratio. It provides CD-quality music.
What is the WMA file?
It is a multimedia compression method from Microsoft. The technology
specifically compresses music data from the “ indow Media Technologies”. As it
provides sound quality equivalent to 128Kbps using only 64Kbps format, it takes
only half as much space as MP3 file format for compressing music data.
What is a Portable Digital Audio Player?
It is a portable device that stores and plays digital audio files, which once were
only playable on a PC.
CD Data MP3 Data
1/12
Internat PC
Communication
Digital
Audio File
Digital
Audio File
Digital Audio Player
1/2
WMA Data
- Audio Format
- Built-in Flash Memory
- Music Play time
- Voice Recording Time
- FM Radio Recording Time
- FM Output Frequency
- FM Signal to Noise Ratio
- FM Output Power
- Audio Output Frequency
- Audio Signal to Noise Ratio
- Audio Output Power
- PC Interface
- Download Speed
- Power Supply
- Battery Life
- Dimensions (W x H x D)
- Weight
Product Specifications
MP3(MPEG 1/2-Layer 2/3, 8~320Kbps & VBR files),
WMA(Microsoft Windows Media Audio, 32 ~ 160Kbps & VBR files),
ADPCM for Voice Recording and new formats by Firmware upgrade
128MB / 256MB / 512MB
8 hours with WMA(64Kbps) & 4 hours with MP3(128Kbps) per 256MB
Upto 18 hours per 256MB
Upto 18 hours per 256MB
87.50MHz ~ 108.00MHz
50dB
16 / 7mW(Right & Left)
20Hz ~ 20KHz
90dB
16 / 7mW(Right & Left)
USB 1.1
Max. 4Mbps
1 x 1.5V AAA Alkaline Battery
Lasts about 12 hours
40mm x 80mm x 15mm
37g (1.30 Ounces) without battery
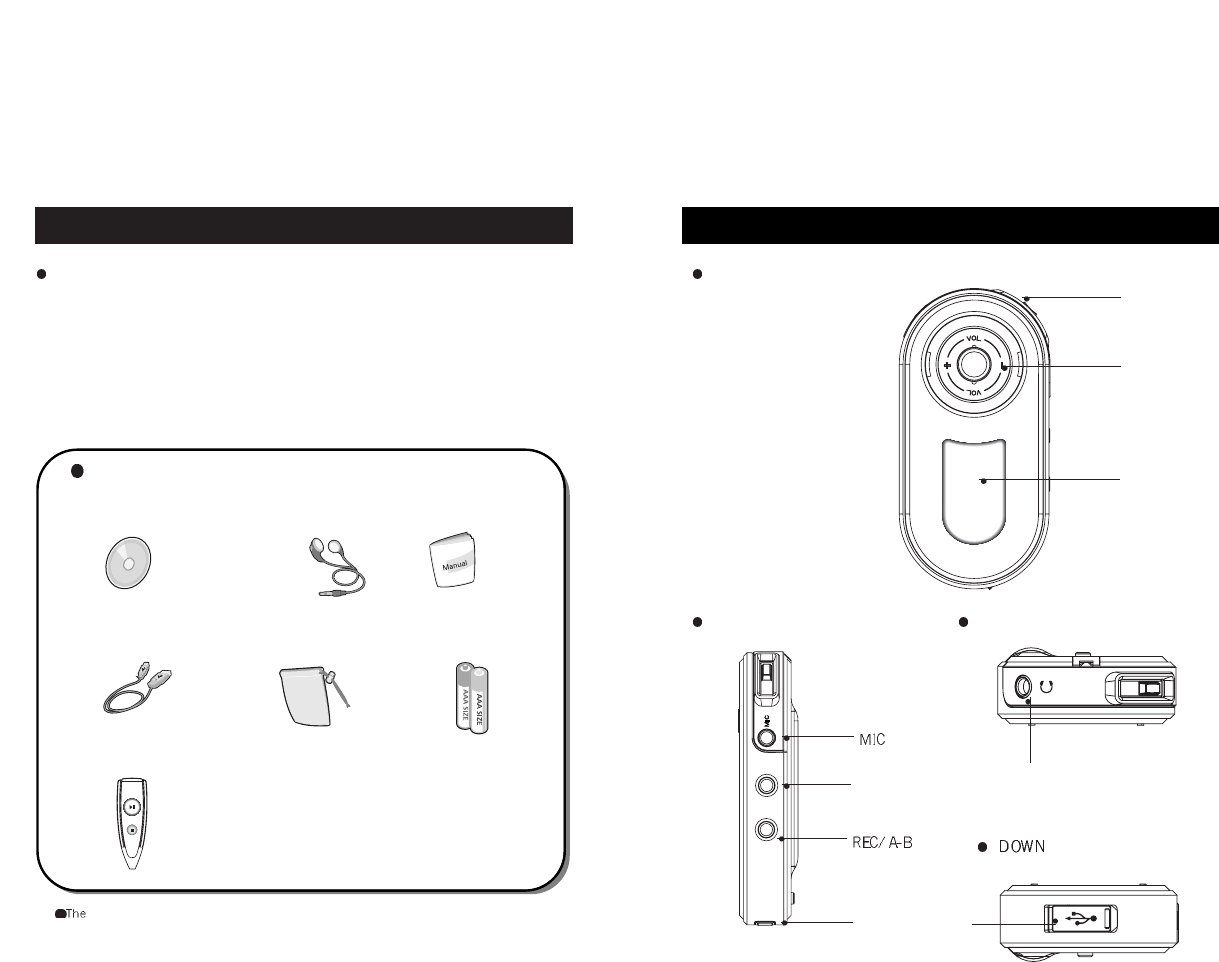
Hardware OverView
5
PC System Requirements and Accessories
4
++
A. Program CD
Accessories
C. User ManualB. Stereo Earphones
D. USB Cable E. 2 x AAA Alkaline
Battery
F. Carrying Case
I. Remote Control
(Optional Item)
included accessories may vary depending on the market.
PC system requirements
- Microsoft Windows 98, ME, 2000, or XP
- Pentium(or Compatible) 200MHz or Higher
- 32MB (64MB for Windows ME or 2000) Main Memory or Higher
- 30MB free hard drive space or Higher
- CD-Rom Drive and USB Port
- Internet Connection for content downloading
Front
LCD window
Right
Volume
Up/Down
Power On/Play/
pause/EQ
MODE
button
Connection port
for USB cable
UP
Connection port for
earphones/remote control
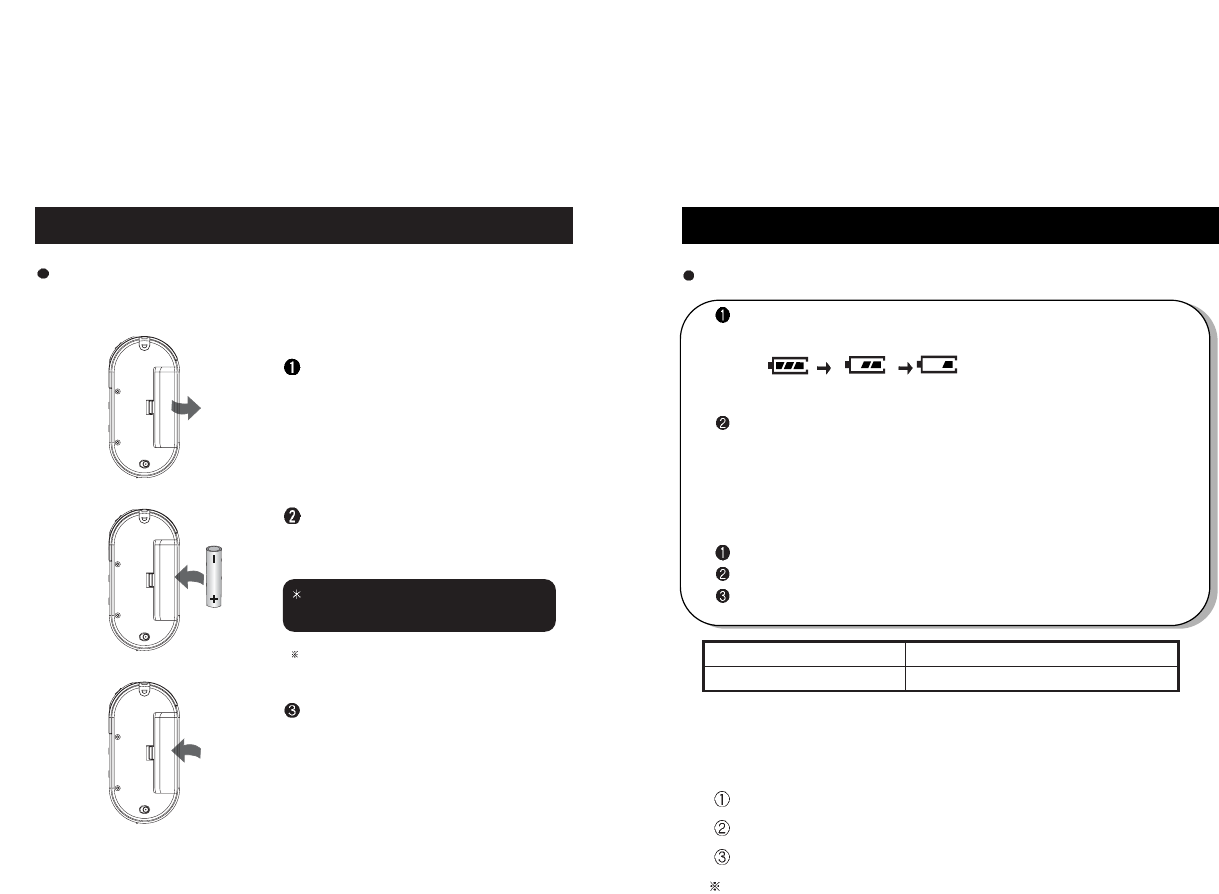
Remaining Battery Indicator
7
About Power Supply
6
Using cylindrical AAA type batteries Remaining Battery Indicator
At its initial start-up, remaining battery indicator may fluctuate.
After 5 or 6 seconds, the display will show the actual reading.
Due to the characteristics of regular batteries, there can be situations
when the product dose not operate even when the battery level indicator
shows above medium level. When this happens, please exchange the
batteries with new ones.
(alkaline batteries last longer than manganese batteries)
* Exchange to new batteries when the following happens:
The indicator displays “how battery” sign.
The player stops or does not respond to pushing buttons.
LCD light does not turn on when buttons on the main body are pushed.
1. Continuous play time
Using 1EA : 12hours
2. Conditions for usage time
output: 7mV(L)+7mV(R)
MP3 128kbps
At Vol 20
Above values were measured using commercially available alkaline
batteries, and actual usage time depends on the type of batteries,
manufacturer, and usage conditions.
Type MP3 play
Alkaline battery 12 hours
Inserting batteries in wrong polarity
positions may cause damage to the product
Open the battery cover on the
back by pushing it in the direction
of arrow.
Insert AAA batteries with correct
polarity positions as shown in the picture.
After fitting the cover to the groove, push it
in the direction of arrow to close it.
One 1.5V AAA-type batteries are needed
(based on battery usage)
(full) (medium) (Low)
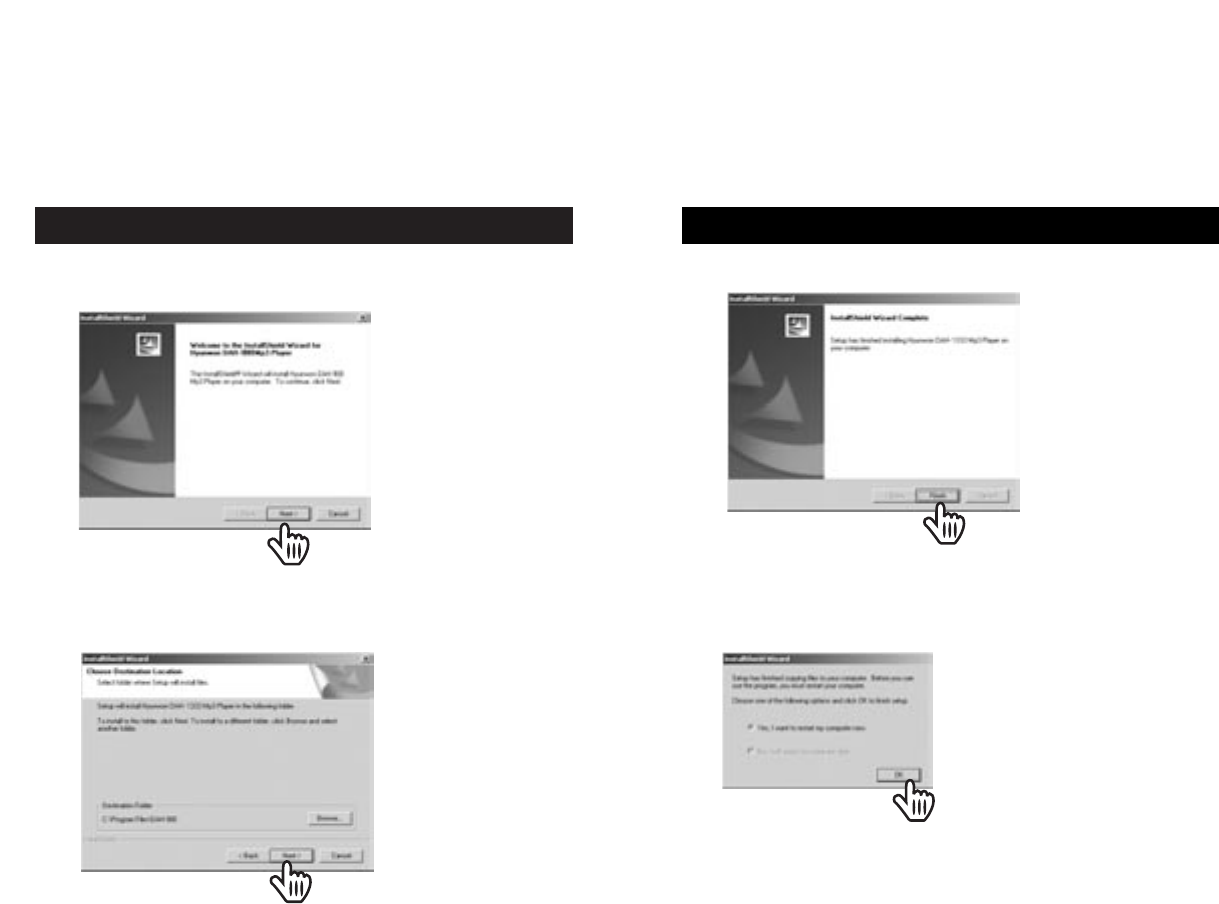
Software Installation
9
3. Click [Finish] button to complete installation.
Software Installation
8
1. When you insert the installation CD in the CD-ROM drive, the following screen
appears.
2. When the following screen appears, select the folder you wish the
program to be installed in and click [next] button.
Click!
Click!
Click!
Click!
Finish!
Finish!
4. When the following screen appears, click [OK] in order to reboot the
system.
OK!
OK!
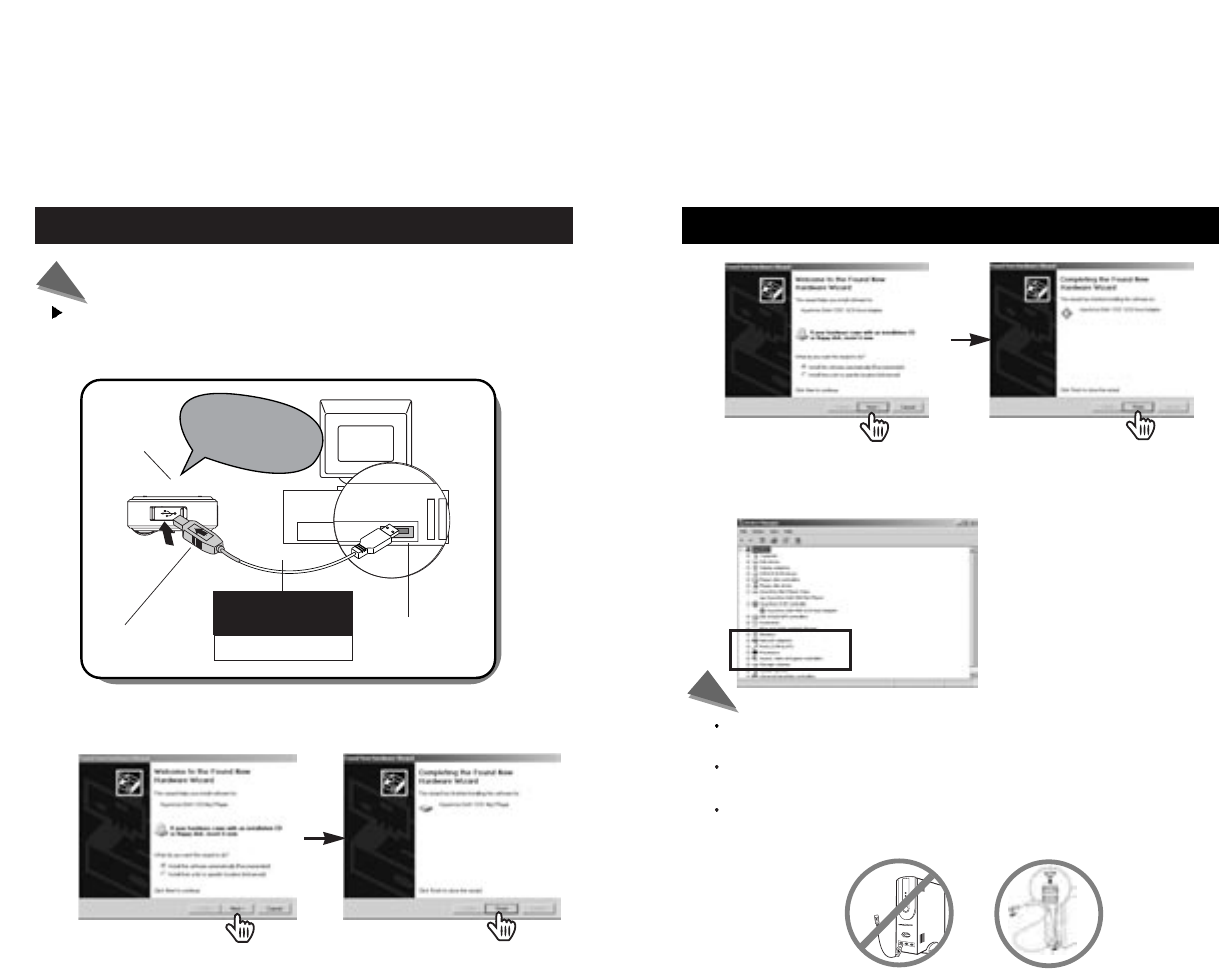
Connecting the Player to a PC using a USB Cable
11
Connecting the Player to a PC using a USB Cable
10
1. Connect one end of a USB cable to one of the USB ports on the back
of the PC, and connect the other end to the player.
The digital audio turns on when connect USB USB port.
Note
In order to assure smooth operation of the product, connect the USB cable directly to the
USB port behind the PC.
Connecting the USB cable to the frond-side USB port or through USB hub may cause
connection problems.
Using Player simultaneously with other USB peripheral devices such as a digital
camera or a scanner may cause communication errors with its software, so please try not
to use them together.
Note
Player -Down-
DATA In/Out
port (USB
PORT)
USB cable
Be careful with the
direction of insertion USB PORT
note:
The LCD displays
USB Connected Ready”
2. The system will automatically install the required driver with a message
saying it is searching for new device. In Windows XP, click as shown in
the following picture.
Click!
Click! Click!
Click!
Click!
Click! Click!
Click!
3. After installation is completed, the device information shows as follows.
Please refer to “start -> setting -> control panel -> system -> device
manager”
USB cable separation
13
File Download/Upload
12
1. Connect Player to the PC.
2. Execute Windows Explorer.
3. Select the file you wish to download/upload, then store the file
in the folder selected using “Copy -> Paste” or Drag & Drop.
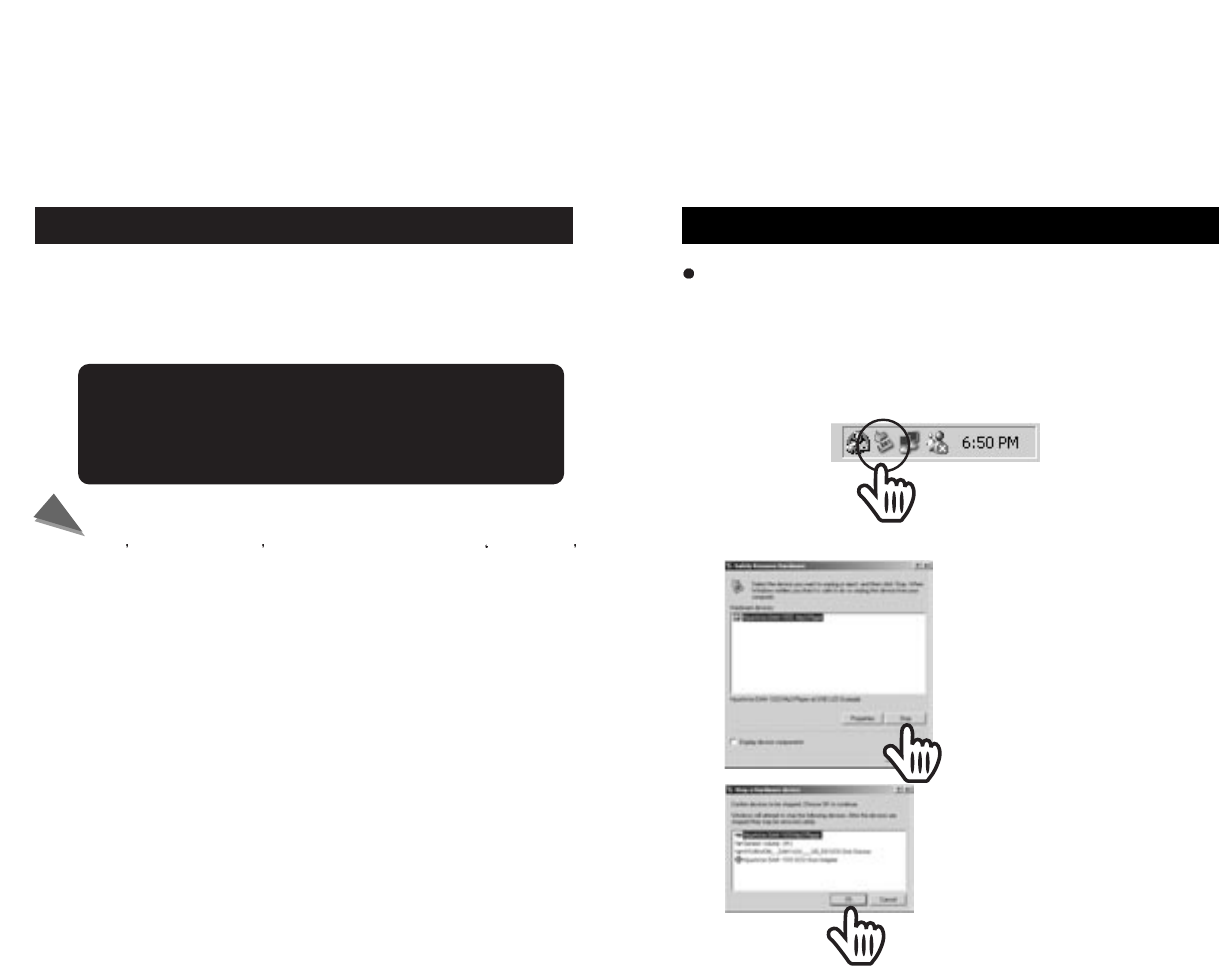
2. Select the USB device to be separated, then select the [Stop] button.
Click!
Click!
Click!
Click!
Note
LCD display shows “WRITING” during file downloading.
Unplugging the cable while still downloading/uploading may cause
malfunction of the product.
At one s discretion, don t amend or delete the file settings.dat
from the memory as it is a system file.
Maximum display file size is 256 characters.
Caution
1. Before separating the USB cable from the PC, double click on the
“Unplug or Eject Hardware” icon on the toolbar located at the bottom
right of the Windows screen.
Separating the USB cable from the Player
After completing file transfer, please remove the USB cable
using the following method:
Dubble Click!
Dubble Click!
OS Update
15
Formatting
14
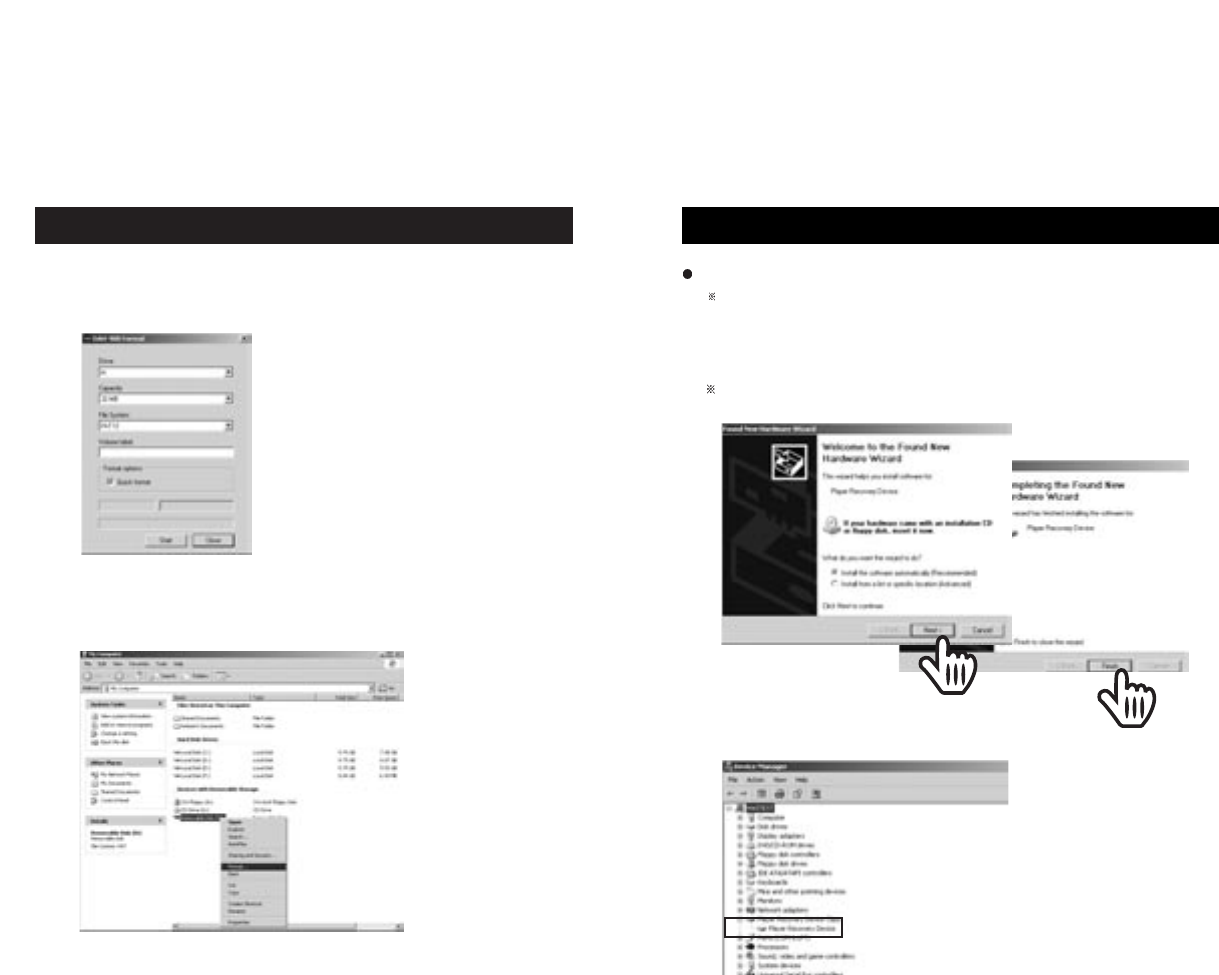
1. To format using Player program: After connecting the player to the PC using
a USB cable, select and exeute “Hyunwon inc DAH900 Mp3 Player -> DAH900
Format” from “Start -> Programs”.
Push the Start button to proceed. Be
cautious as all files will be deleted and
cannot be restored after the formatting.
2. To format using the Windows Explorer: After connecting the player to the PC
using a USB cable, select the removable disk from the Explorer, then select
the “Format” option by right-clicking.
1. Recovery Mode: The system will enter into the Recovery Mode 5 seconds after
connecting the USB cable to the player while pressing and
holding the Play button on the player.
When running the Recovery Mode for the first in XP, the screen for layer
Recovery Device Installation appears. Select the [Next] then [Finish] button.
Download the OS for the player that is stored in the PC by default.
2. “Player Recovery Device” will appear in Device Manager from
“Settings -> Control Panel -> System”
Click!
Click!
Click!
Click!
OS (Operating System) is the integral operating system that controls the operations of the product.
LCD DISPLAY
17
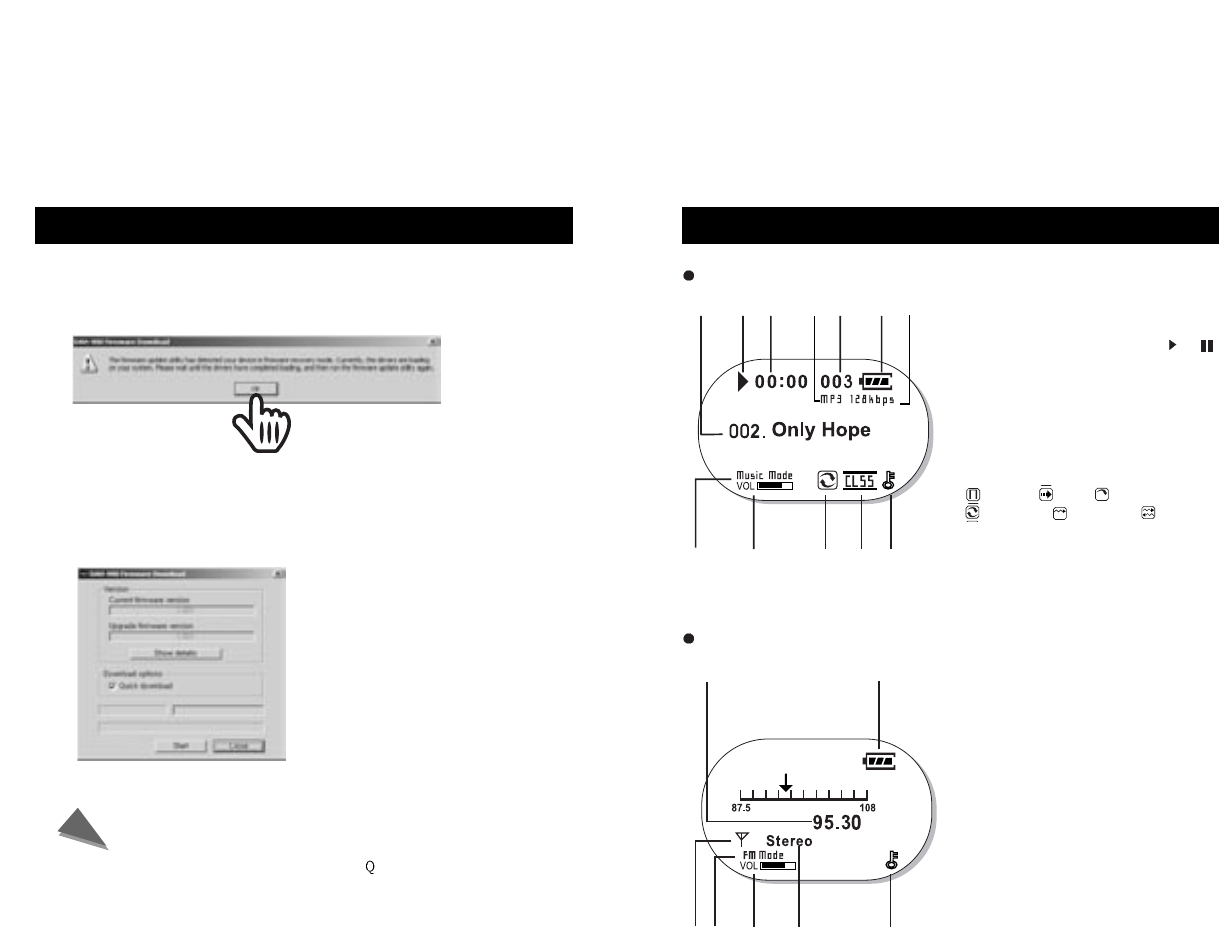
MUSIC MODE
a. Displays music order and music title.
b. Displays the current music status( ),( )
c. Displays the current play time of the music
d. Displays the file format
e. Displays the total number of music
f. Displays the remaining battery life
g. Displays the file compression rate (Bit rate)
h. Displays the play mode Radio mode
i. Displays the current volume level
j. ( )Normal, ( )Intro, ( )Repeat 1,
( )Repeat All, ( )Random 1, ( )Random All
k. Displays the current equalizer/WOW
l. Displays the HOLD status
abcef
hi
a. Displays the current frequency tuned
b. Displays the remaining battery life
c. Displays MUTE
(FM On: antenna shown, FM Mute: no antenna
shown)
d. Displays FM mode
e. Displays the current volume level
f. Displays the Stereo / mono status
g. Displays the HOLD status
jk l
FM MODE
ab
cefg
d
g
d
OS Update
16
a. Proceed by selecting the [Start]
button.
b. When update is completed, finish
by selecting [Close] button.
If you proceed to update without selecting “ uick download”, every file on
the player will be deleted.
Note
3. Execute “Hyunwon DAH900 MP3 Player -> DAH900 Update” from windows
desktop “Start -> Programs”. When the following message appears after 10
seconds, select [OK].
Click!
Click!
4. Execute once again “HyunWonInc., DAH-900 Mp3 Player -> DAH-900 Update”
from windows desktop “Start -> Programs”.
Power Off / Stop
19
Power On / Play
18
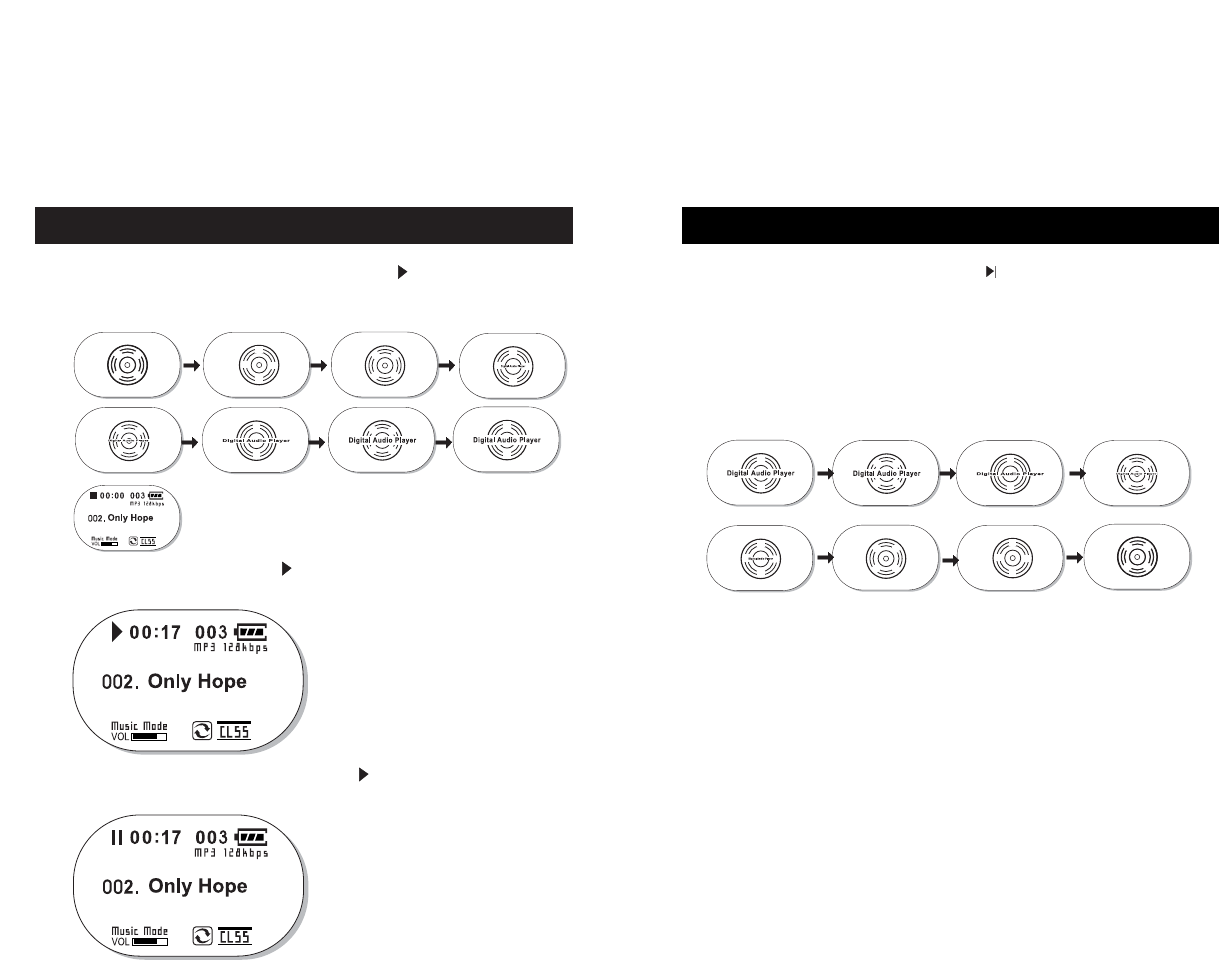
1. Power ON : When you push the PLAY button ( ) on the product,
its power turns on and it goes to the stop mode, after displaying
the product logo.
3. Pause: When you push the PLAY button( ) shortly while playing
music, it will pause the music.
2. Play: Press the PLAY button ( ) to play music from the stop mode.
1. Stop: When you push the PLAY button ( ) on the product shortly
while playing music, it will stop the music. If you push the PLAY button
long enough from either play or stop mode, the power will turn off after
displaying the product logo.
2. If there is no key entry while in pause/stop mode, power turns off
automatically according to the configuration of Auto Power Off or Sleep Mode
feature.
2120
Setting Volume/Lock Functions
1. Volume Control
You can control the volume level by using VOL - / VOL +
buttons on the product while playing music.
Volume level can be set within the range from MIN (00) to
MAX (30).
You can adjust the volume level step by step by pushing
shortly, or adjust successively by pushing long.
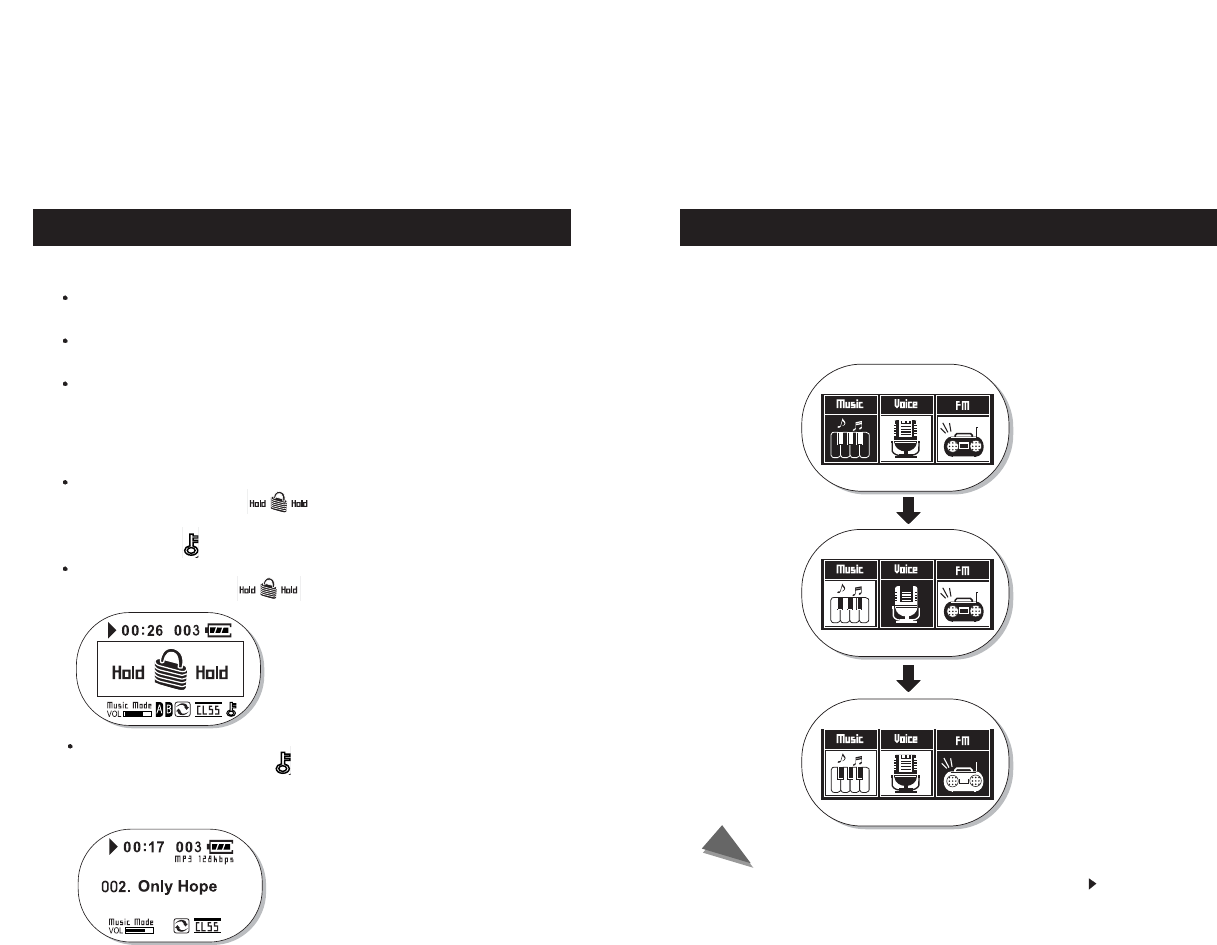
2. Lock Function
When you move the hold switch on the back part of the player to
left direction, it displays
When you move the hold switch on the back part of the player to
right direction,
No other key inputs from the product body will work,
displaying the HOLD( ) screen to indicate the lock status.
Mode Changing
1. Push the MENU button for 2 seconds or longer.
2. Push the MENU button again after moving to the desired mode
using the FF/REW Button.
Music Mode
Voice Mode
FM Mode
When the power is turned off using the PLAY button( ),
the most recent mode set is stored
Note
If the MENU/HOLD button is pushed and held long enough from
lock mode, the lock icon ( ) will disappear and lock mode
will be released.
2322
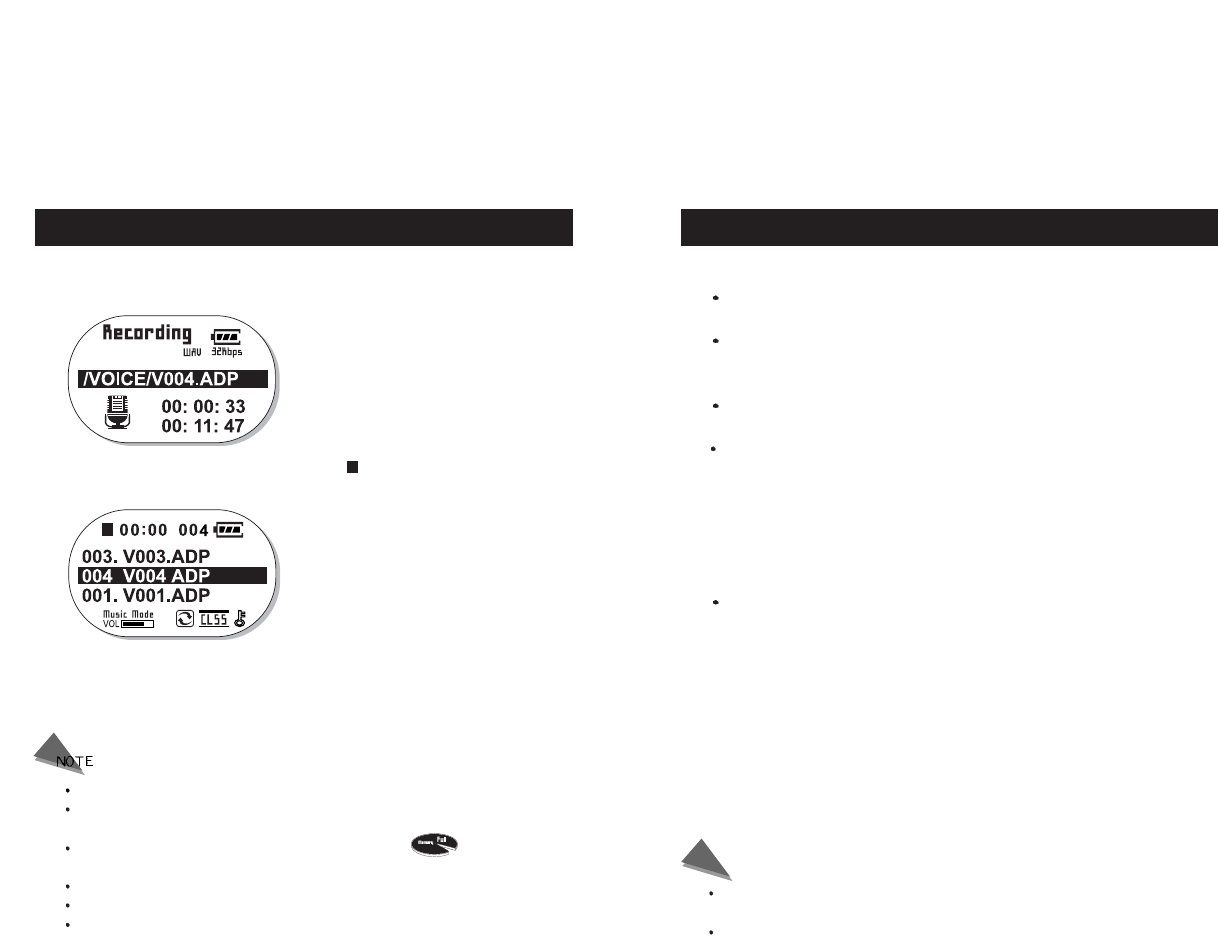
Voice Recoding
1. Voice recording starts when the REC/A-B button is
pushed for 2 seconds or longer.
2. When you push the STOP button( ), the recording
process stops and a new voice file is created.
The recorded file is stored in ADPCM file format and will have an extension of ADP.
Adjusting the volume level while recording would not affect the recording volume. The
recording volume is maintained at a constant level.
Voice recording stops automatically when memory is full ( ), and the file
recorded up to the stop point will be stored.
The sensitivity may vary depending on the distance from the sound source.
Be cautious that separating batteries while recording may cause malfunction.
The file created after batteries have been separated while recoding cannot be played.
Searching a Music/Voice File
1. Searching a certain part in the file while playing.
A certain part can be searched by pushing and holding
the FF/REW buttons while playing.
Releasing the buttons will start playing from the searched
position.
2. Searching a certain file during while playing.
The next/previous track is played if the FF/REW buttons
is pushed shortly while playing.
If the REW button is pushed within 5 seconds after
a track started to play, it will move to the previous
track and start to play. If the REW button is pushed
5 seconds or longer after a track started to play,
it will move to the beginning of the current track and
start to play.
3. Searching a certain file in STOP mode
In STOP mode, you can move to previous/next tracks
and search a certain file, by pushing the FF/REW
buttons shortly.
Note
VBR (Variable Bit Rate) file: MP3 file, which has different compression rates
depending on the progress of music.
In case of VBR files, pushing the REW button within 5 seconds the track
started to play, may not move it to the previous track and play.
FM Mode
25
FM Mode
24
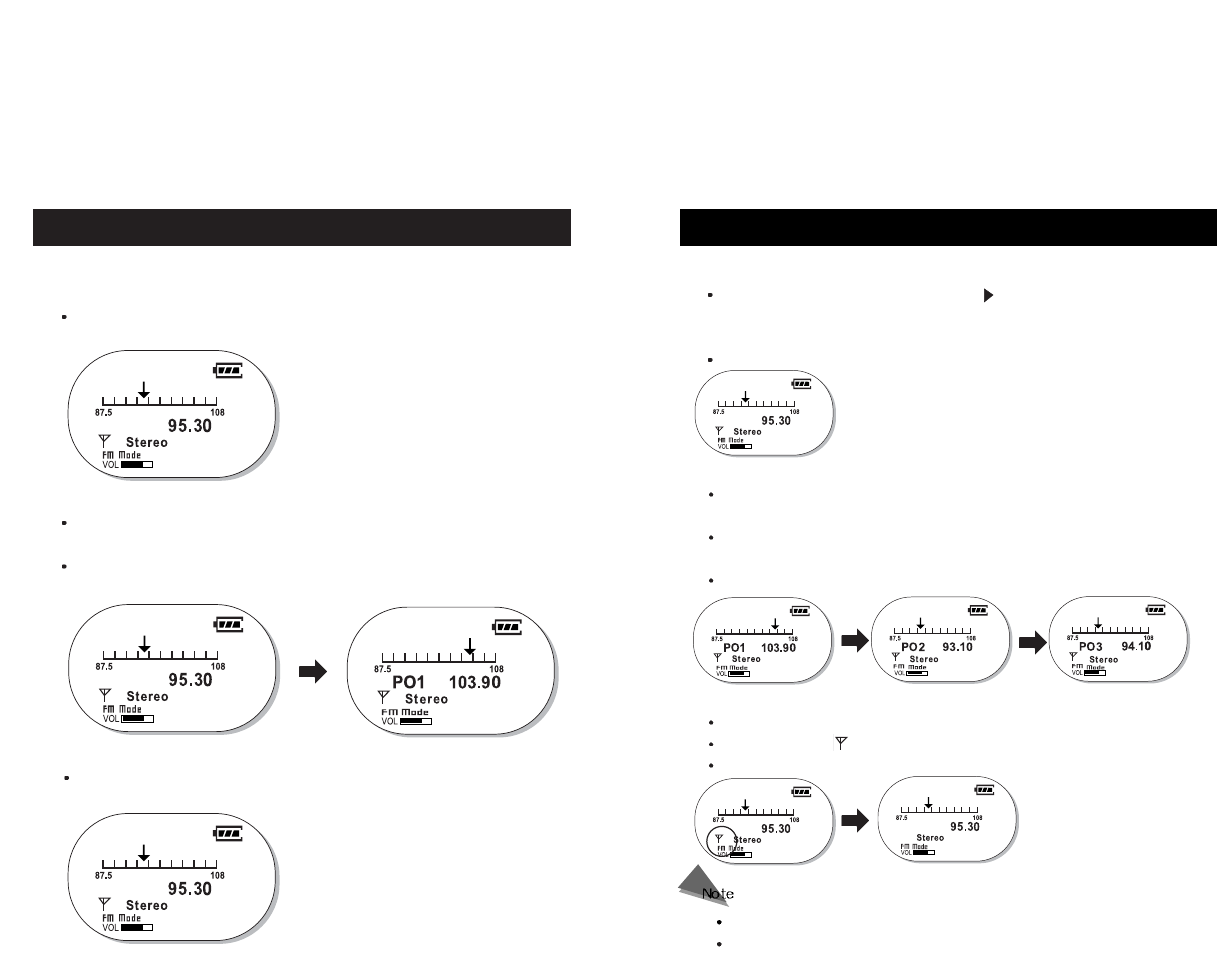
4. Storing frequencies automatically
Pushing and holding the PLAY button( ) in FM mode scans frequencies
from 87.5 MHz to 108. MHz automatically and stores the frequencies picked
up automatically.
When storing frequencies automatically, it stores from number 1 again (PO1).
6. MUTE Function
Push the PLAYbutton shortly in FM mode.
The antenna icon( ) will disappear in the screen and there will be no sound.
Push the PLAY button shortly in order to release the MUTE function.
5. Searching/Releasing frequencies stored
Pushing the REC/A-B button shortly in FM mode searches frequencies
stored in an ascending order.
Pushing the REC/A-B button shortly in FM mode searches frequencies stored
in an descending order.
While at the stored frequency, pushing the MENU/HOLD button shortly releases it.
Choose FM mode using the MODE button.
1. Searching a frequency manually
You can manually search for a desired frequency by pushing the
FF/REW buttons shortly.
2. Store/Release of a frequency manually
The frequency searched manually can be stored by pushing the
MENU button shortly.
Pushing the MENU button shortly once a frequency is stored,
will release the frequency.
3. Searching a frequency automatically
If you push and hold the FF/REW buttons, it searches for a frequency
automatically and stops at the searched frequency.
Mono/Stereo is selected automatically.
Up to 20 frequencies can be stored.
Setting Range Repeat
27
FM Recoding EQ Setting
26
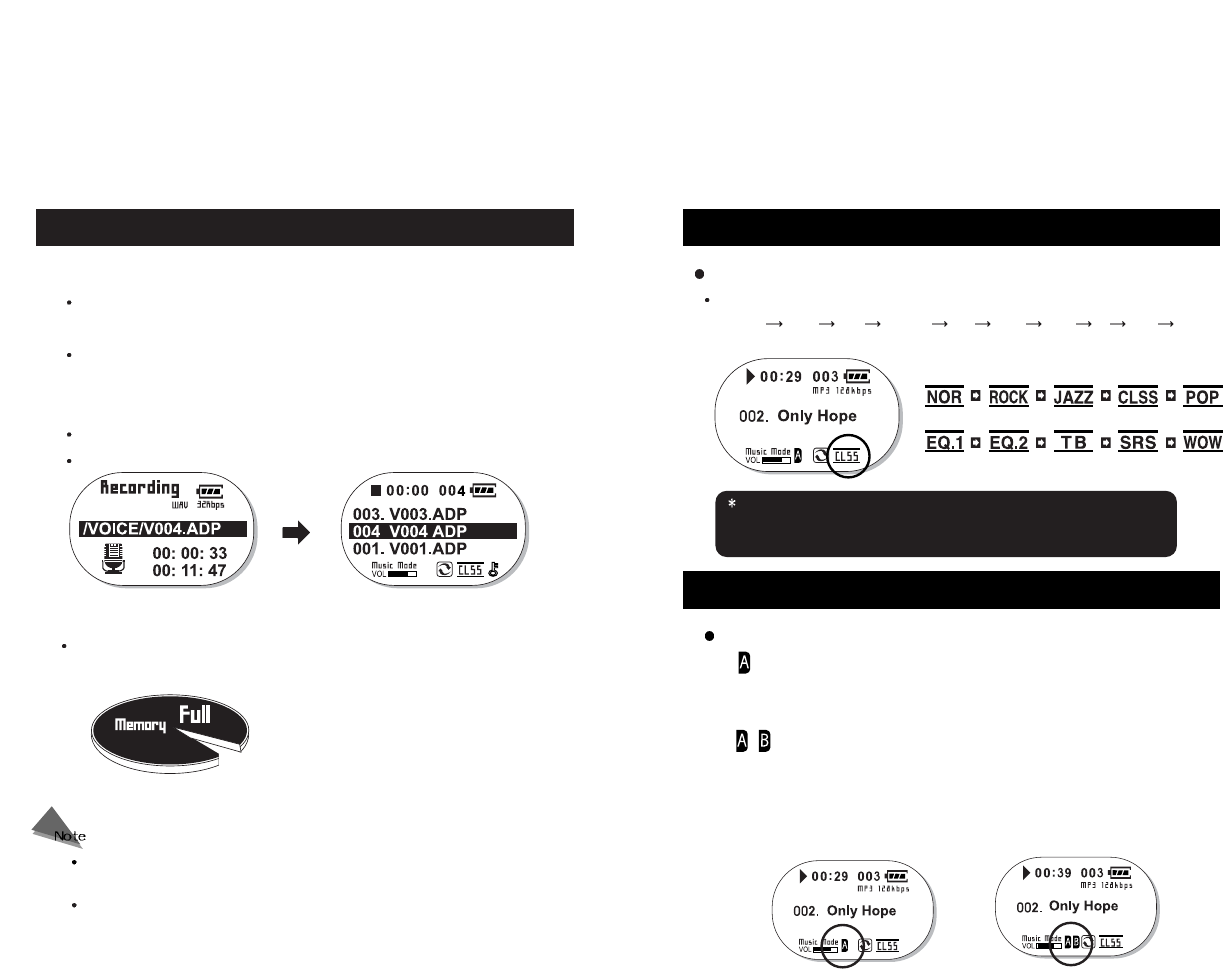
1. Push and hold the REC/A-B button while listening to FM.
It will start recording the FM broadcasting being received
currently in an ADP file format.
The recording volume is automatically adjusted to proper level while
recording.
2. Push the PLAY button
A file is created in the voice folder and the recoding stops
After recording, the volume level returns to the pre-recoding level.
The files are stored in the order of V001, V002, ...…, and
recoding stops automatically at Memory full status.
Memory Full
EQ Setting
EQ mode will be changed while playing a music by pushing Menu button.
Normal Rock Jazz Classic Pop EQ 1 EQ 2 TB SRS WOW
It may cause deterioration in sound quality depending on the source of music.
You can enjoy with better sound quality by setting the EQ as desired.
Also, you may not sense the effect of EQ when the volume level is 25 or over.
REPEAT MODE (Range repeat within the currently playing music. )
1) ‘ ’ is displayed when you push the REC/A-B button shortly while music
is being played.
2) After 3 seconds or longer, push the REC/A-B button again. The Display shows
‘ ’ and the player repeats the ‘A B’ section. When you push the
REC/A-B button shortly once more after 3 seconds, range repeat between
A and B positions is set with a display as in the figure. If the B position is not
set, the range repeat functionality will not be configured.
3) Pushing the REC/A-B button shortly will release the REPEAT MODE.
Be cautious that separating batteries while recording may cause
malfunction.
The file created after batteries have been separated while recoding cannot
be played.
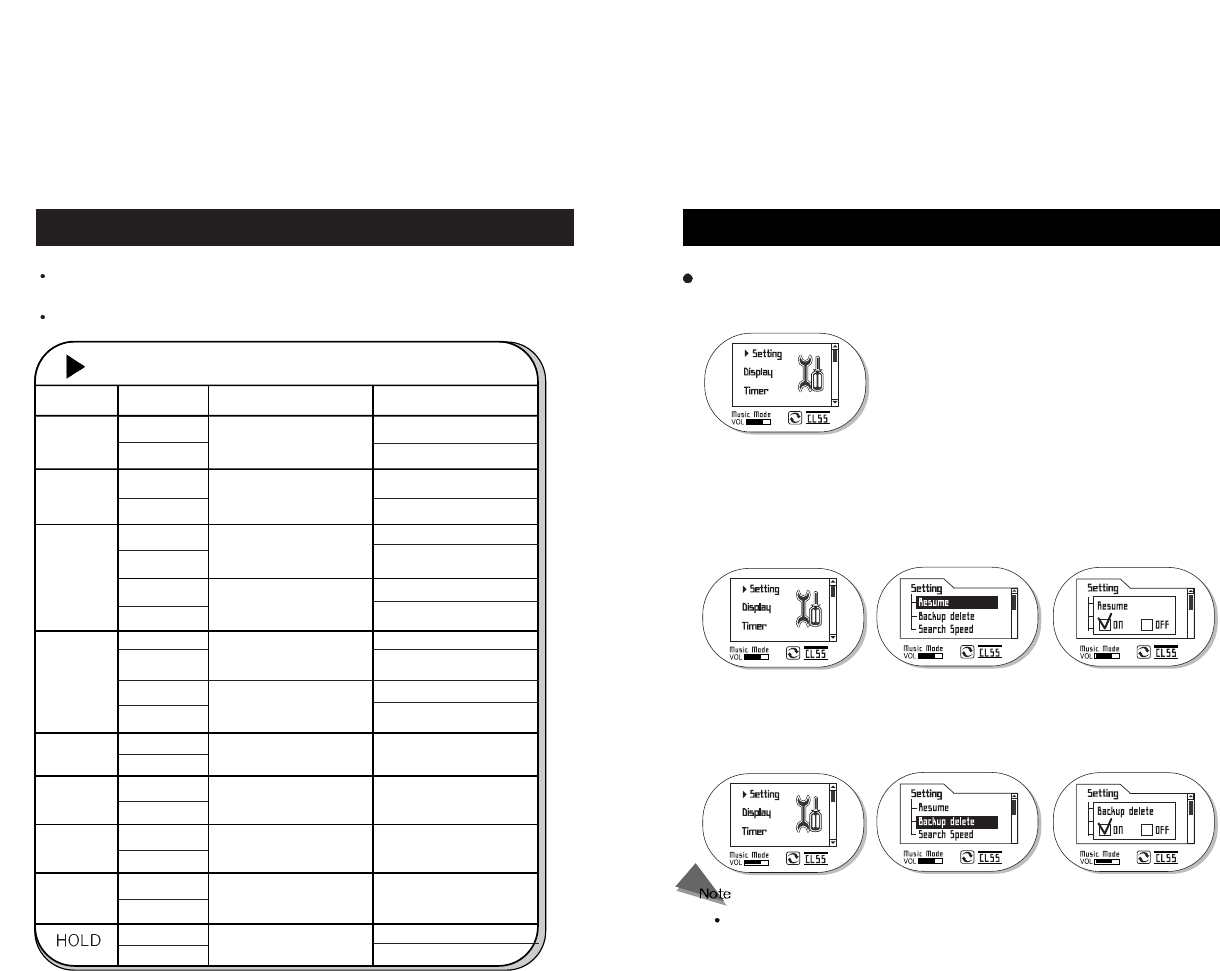
Setting
29
Selecting MENU
MENU mode status
Button
PLAY
STOP
FF
REW
VOL+
VOL-
MENU
REC/A-B
Current status Next status
Menu Mode No changes
Power Off
MENU mode released
Power Off
Next item selected
Next items selected
successively
Set value changed (increased)
Set value changed
successively (increased)
Previous item selected
Previous items selected
successively
Set value changed (decreased)
Set value changed successively
(decreased)
No changes
No changes
Saving & Exit
No changes
Lock
Unlock
Menu Mode
Menu Mode
Sub Menu Mode
Menu Mode
Sub Menu Mode
Menu Mode
Menu Mode
Sub Menu Mode
Menu Mode
Duration
Short
Long
Short
Long
Short
Long
Short
Long
Short
Long
Short
Long
Short
Long
Short
Long
Short
Long
Short
Long
Left
Right
Pushing the MENU/HOLD button shortly in music/voice mode changes it
to MENU mode.
Button specifications in MENU mode
28
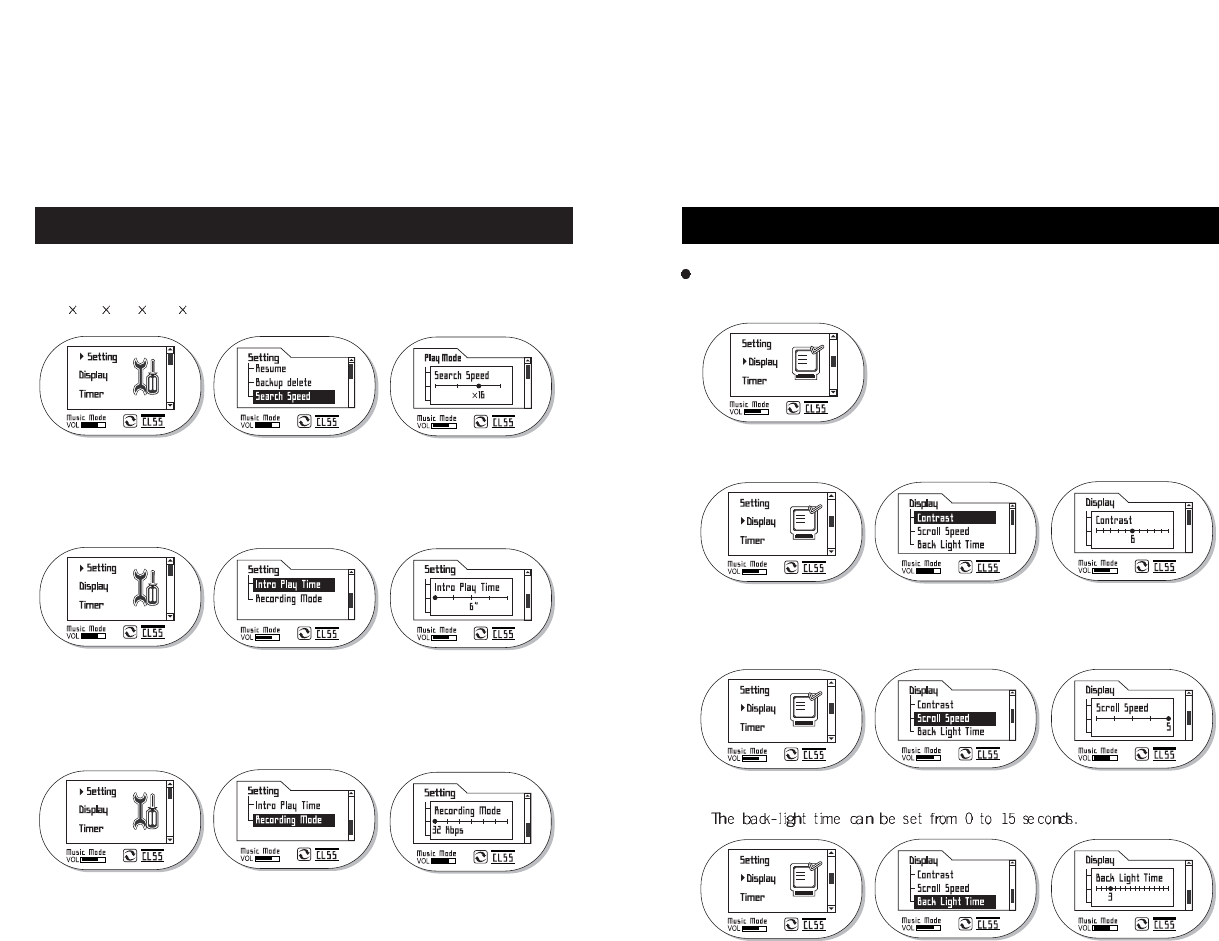
Select Setting on MENU
After moving to the desired function using the FF/REW buttons in Setting, select it
using the MENU/HOLD button.
1. Resume
With the restore functionality, it provides the convenience of reuse.
It completely restores all the setting states such as Volume, EQ, Play
list, etc. of the last music played, when you play music again after a
normal stop. You can select one of ON/OFF.
2. Backup Delete
This function initializes all the stored set functions and one of ON/OFF can
be selected. When this function is ON, all set values are initialized to the
default values when played again after a normal stop.
What is the normal stop? It refers to the stop by pushing the STOP button for
longer than 2 seconds or the automatic stop by the TIMER functionalities, not
due to removal of batteries by force.
Display (Screen Setting)
31
Setting
30
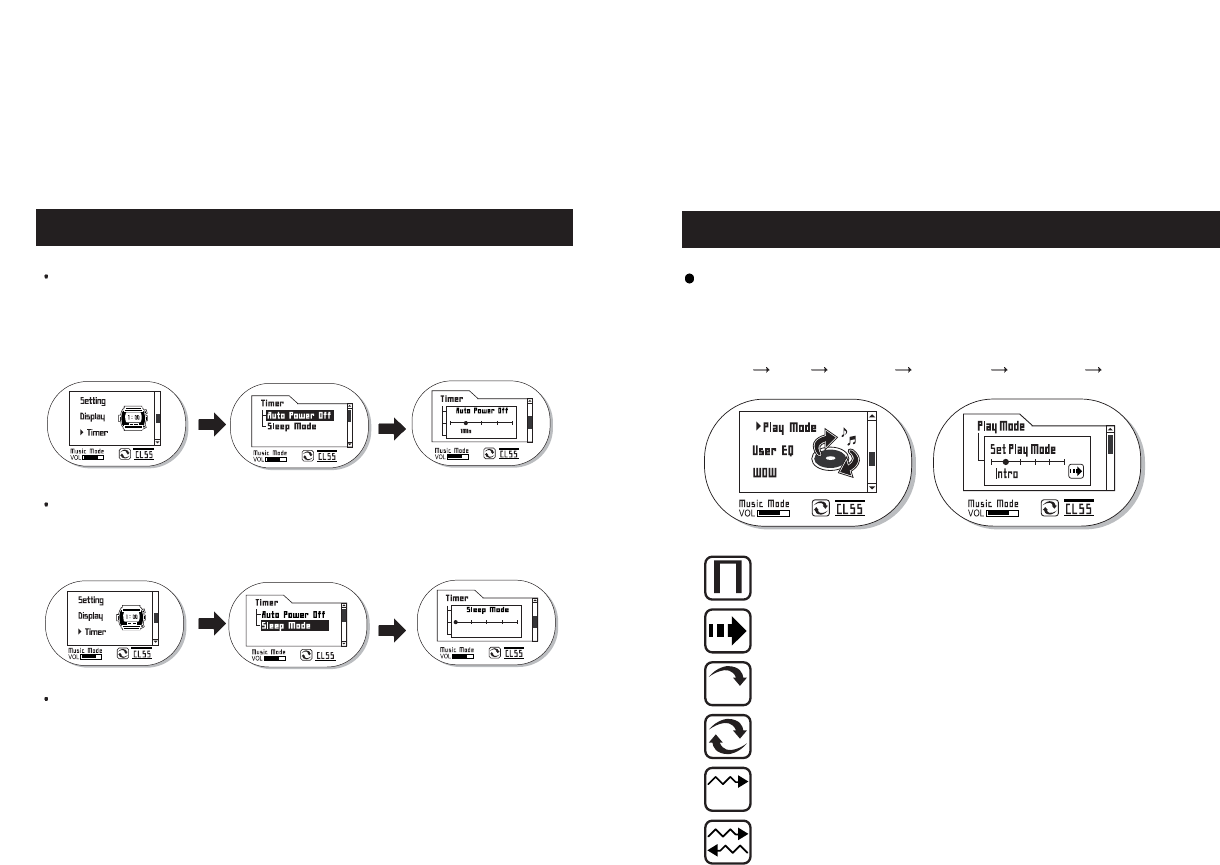
3. Search Speed
Search speed controls the speed of Fast Search and it may be selected to one
of 4 / 8 / 16 / 32.
4. Intro Play Time
Intro Play Time: For listening to only the intro parts of all the stored music, one of
2” / 4” / 6” / 8” / 10” can be selected.
5. Recording Mode
When Voice/Radio Recording, you can select one of 32 / 44 /64 / 88 / 128 / 176 / 192
kbps Bit Rates.
Select Display on MENU
After moving to the desired function using the FF/REW buttons in Display, select
the function using the MENU/A-B button.
1. Contrast
Contract that sets the brightness of the screen can be set from 1 to 11.
2. Scroll Speed
Scroll Speed: the scroll speed for the music title can be set to between 1 and 5.
3. Back Light Time
33
Timer
32
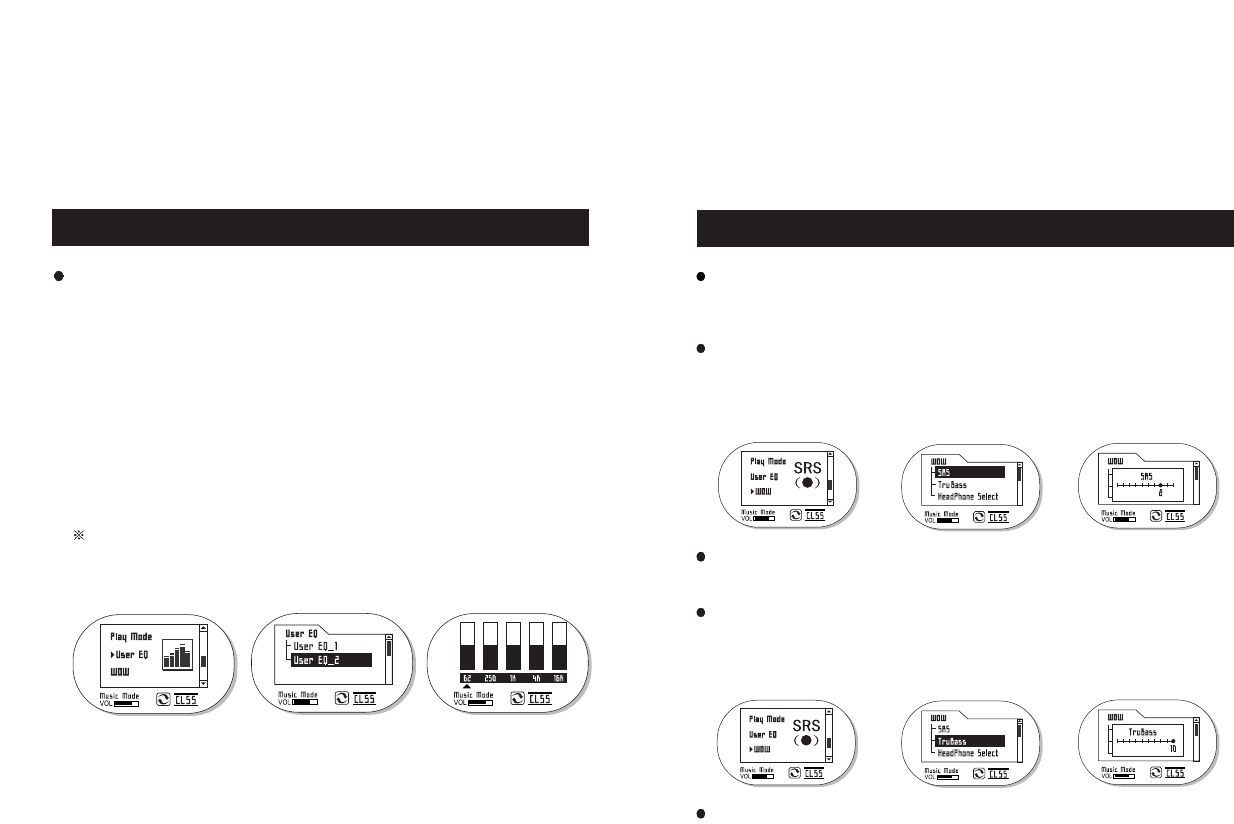
Auto Power Off (automatic power saving mode): At “MENU/A-B button -> Timer
Select -> Auto Power Off”, push the
MENU/HOLD button to select the auto
power save time.
(Disable/1min/2min/5min/10min)
Sleep Mode: At “MENU/HOLD button -> Timer Select -> Sleep Mode”, push the
MENU/HOLD button to select the auto power save OFF time.
(Disable/10min/20min/30min/60min)
Play Back Position: When the power is turned off automatically as above,
becomes PLAY LIST or frequency channel (in FM mode)
status.
Setting Play Mode
Play Mode (repeat MODE setting per music)
Select the Play Mode by pushing the MENU/HOLD button shortly from play or
stop status. After changing the Set Play Mode using the FF/REW
buttons, push the MENU/HOLD button to set the play mode.
Normal Intro Repeat 1 Repeat All Random 1 Rancom All
Normal : plays music files in order, for only once.
Intro : plays only the intros of all the music files in order.
Repeat 1 : repeats the music selected indefinitely.
Repeat All : plays and repeats all the stored music continuously in order.
Random 1 :
plays all the stored music once in random fashion regardless of
the music order, and stops automatically.
Random All : Is the same as Random 1 except it repeats indefinitely.
Disable
3534
Setting USER EQ
1) Select USER EQ on MENU
2) Select User EQ from User_EQ1 and User_EQ2
3) You can control when the display shows 5 BARs (supports 5 Bands)
4) You can select Band using the FF/REW buttons.
5) You can adjust the value of selected Band using the VOL+/VOL-
buttons.
6) The set values can be stored by pushing the MENU/HOLD button
shortly and long.
But if you push the REC/A-B or STOP button, the set values will not be
stored and it will be released from the previous selected item or MENU.
Setting USER EQ
Player supports two USER EQs (USER EQ_1 USER EQ_2)
Setting SRS
What is SRS?
SRS is one of the most representative 3D sound technologies, that was developed by
SRS labs.
Setting SRS
1. Select WOW using FF/REW buttons after pushing the MENU/HOLD button shortly in play
or stop mode. Push the MENU/HOLD button shortly again.
2. Select SRS by pushing the MENU/HOLD button.
Then set the Level using the FF/REW buttons. (total of 10 levels)
What is TruBass?
It delivers the same effect as having larger speakers, by improving the response of bass
sound and low frequencies.
Setting TruBass
1.
Select WOW using FF/REW buttons after pushing the MENU/HOLD button shortly in play mode.
Push the MENU/HOLD button shortly again.
2. Select TruBass by pushing the
MENU/HOLD
button. Then set the Level using FF/REW button.
(total of 10 levels)
What is WOW?
It consists of FOCUS function that enables the detection of even the very small sound in addition
to SRS and Trubass functionalities. You can enjoy the 3D sound and rich bass altogether.
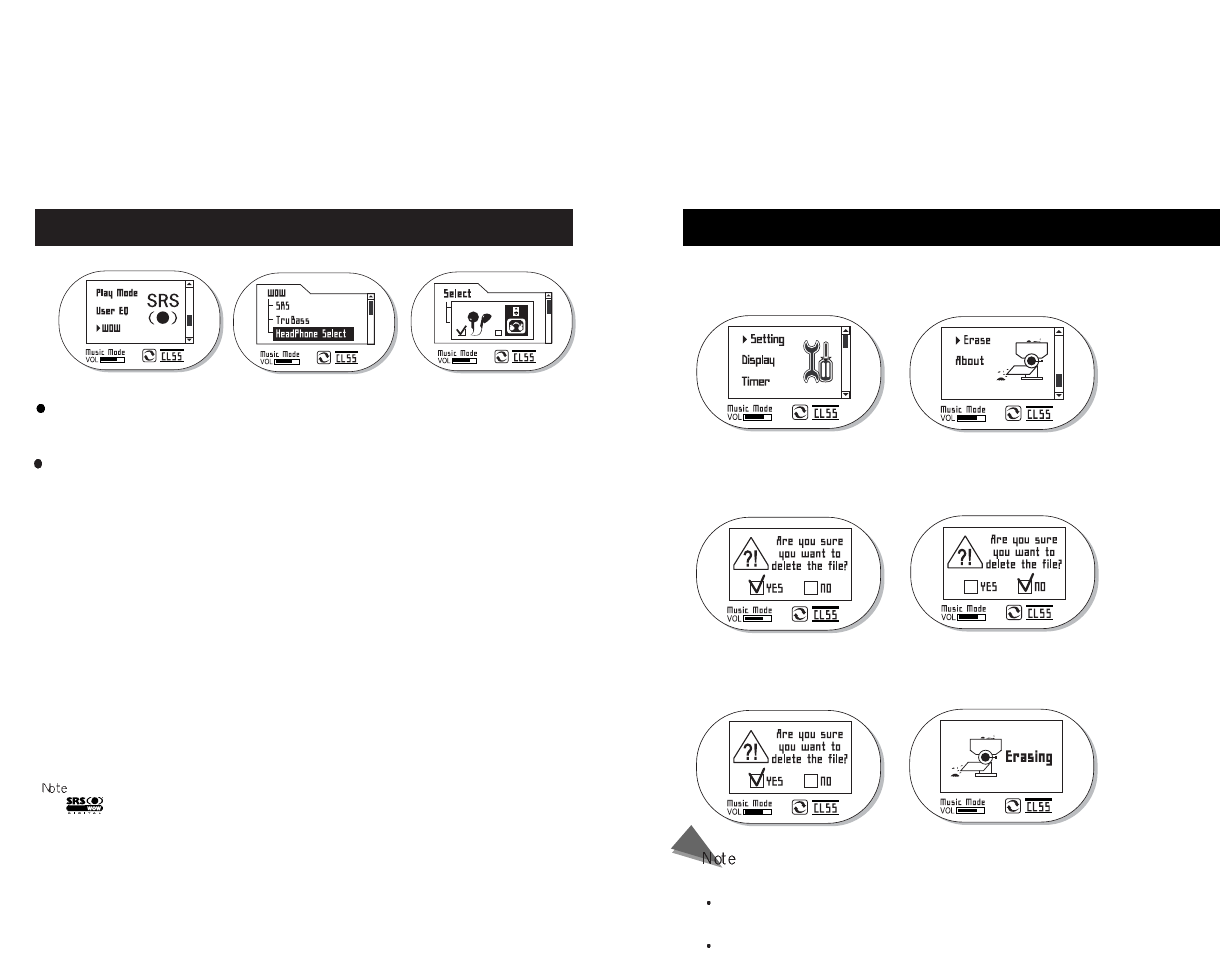
Deleting Files
1. When you push the MENU/HOLD button in PLAY/STOP mode, the Setting Mode is
displayed. Select “ERASE” using the FF/REW buttons.
Deleting files is done from the current music in a sequential order only.
What is the Erase function?
It is a function to delete files without connecting the device.
File deletion functionality is not supported while playing.
3. The file gets deleted when you select “YES” using the FF/REW buttons and push
the MENU/HOLD button (canceling is not allowed while deleting).
2.
When you push the MENU/HOLD button shortly, a warning message “Are you
sure you want to delete this file?” shows on the LCD screen. Choose “Yes” or
“NO” using the FF/REW buttons.
SRS Setup
Headphone select feature
you can experience better SRS effects by setting the headphones and speakers in use.
Headphone Select setup
1. Push the MENU button shortly while in play or stop mode. After selecting the WOW
using the FF/REW buttons, push the MENU/HOLD button shortly once again.
2. Push the MENU/HOLD button after selecting Headphone Select. Set the Headphone or
Speaker using the FF/REW buttons. (experience more enhanced SRS feature when
using Headphones or Speakers)
*
-
is a registered trademark of SRS Labs Inc. WOW Technology is licensed under SRS Labs inc.
- When SRS mode is selected, the previously selected EQ mode switches to NORMAL mode
automatically.
- Select a proper volume level, as setting the SRS will increase the overall sound
- Files with sampling frequencies of 32KHz, 44.1KHz and 48KHz are supported.
- SRS functionality is available only in music mode.
3736
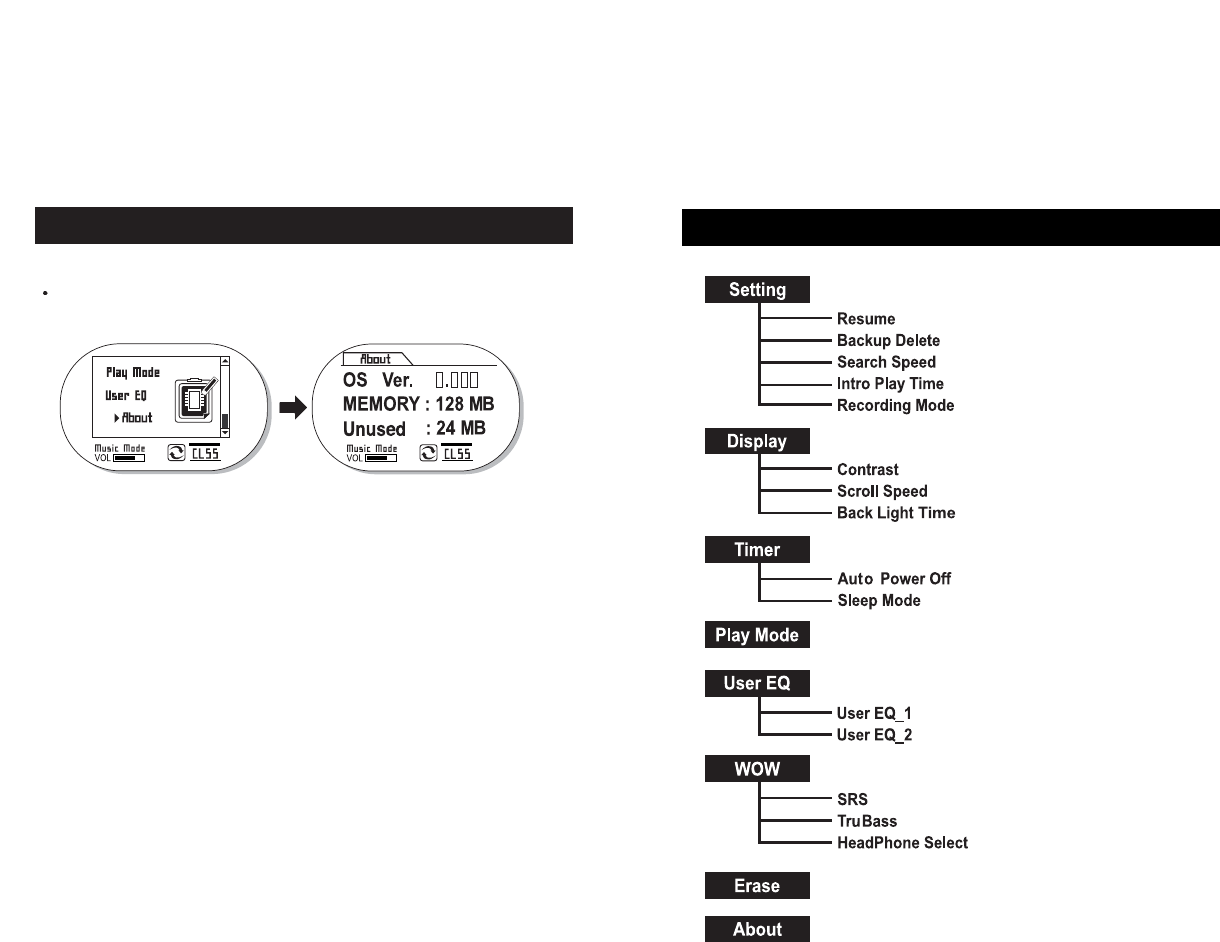
MENU Catalog
39
About
38
Select About on MENU
Product information such as OS version, total memory capacity and
available memory amount, etc. is displayed.
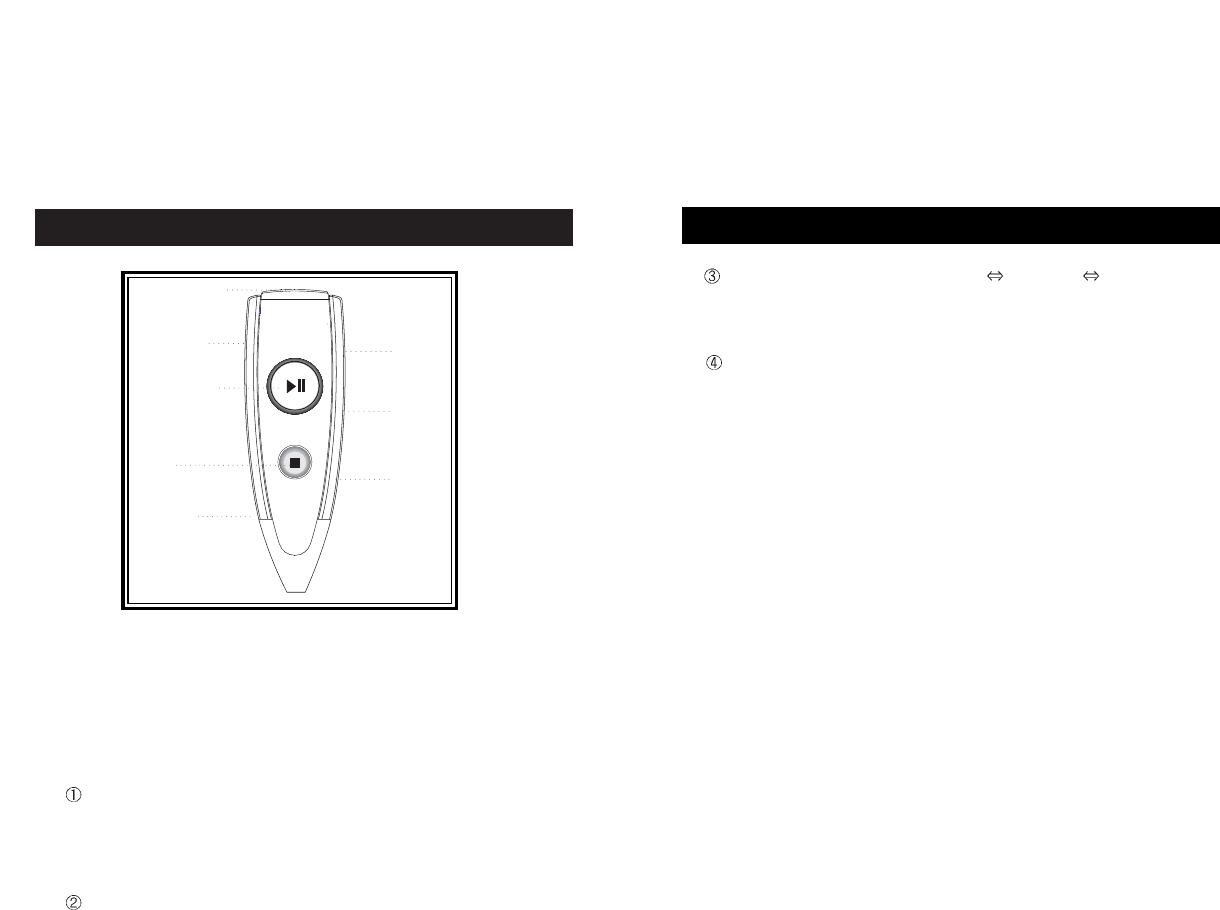
Remote Control Instructions
41
Mode Change functionality (Music Modes Voice Mode FM Mode)
– Pushing and holding the EQ/MODE button from stop mode or
FM ON mode, switches the mode in sequence as “music mode-
voice mode-FM mode” in order.
Play Mode switch function
Pushing the EQ/MODE button shortly in stop mode changes the
‘Normal- Intro-….’
4. Operating the player when the player or remote control is in
HOLD mode (an icon displayed on the LCD)
- The buttons on the remote control are still recognized even if the
player is in HOLD status.
- The buttons on the player are not recognized if the
remote control is in HOLD status.
40
Remote Control Instructions
Earphone Jack
VOL+/ VOL-
FF
STOP
EQ / MODE
PLAY/PAUSE
REW
HOLD
1. The remote control is consisted of 7 buttons and a HOLD button
(PLAY/STOP/VOL+/VOL-/FF/REW/EQ/HOLD)
2. All buttons except the EQ/MODE button have the same functions as in
the player.
3. EQ/MODE has the following functionalities
Range Repeat Mode (REPEAT MODE)
- The Repeat Mode changes to ‘REPEAT A’ when you push the
EQ/MODE button and to ‘REPEAT B’ when you push the button
again in play mode. The REPEAT MODE is released using the
STOP button.
Equalizer (EQ) Change Functionality
- Equalizer setting changes when you push the EQ/MODE button in
play status.
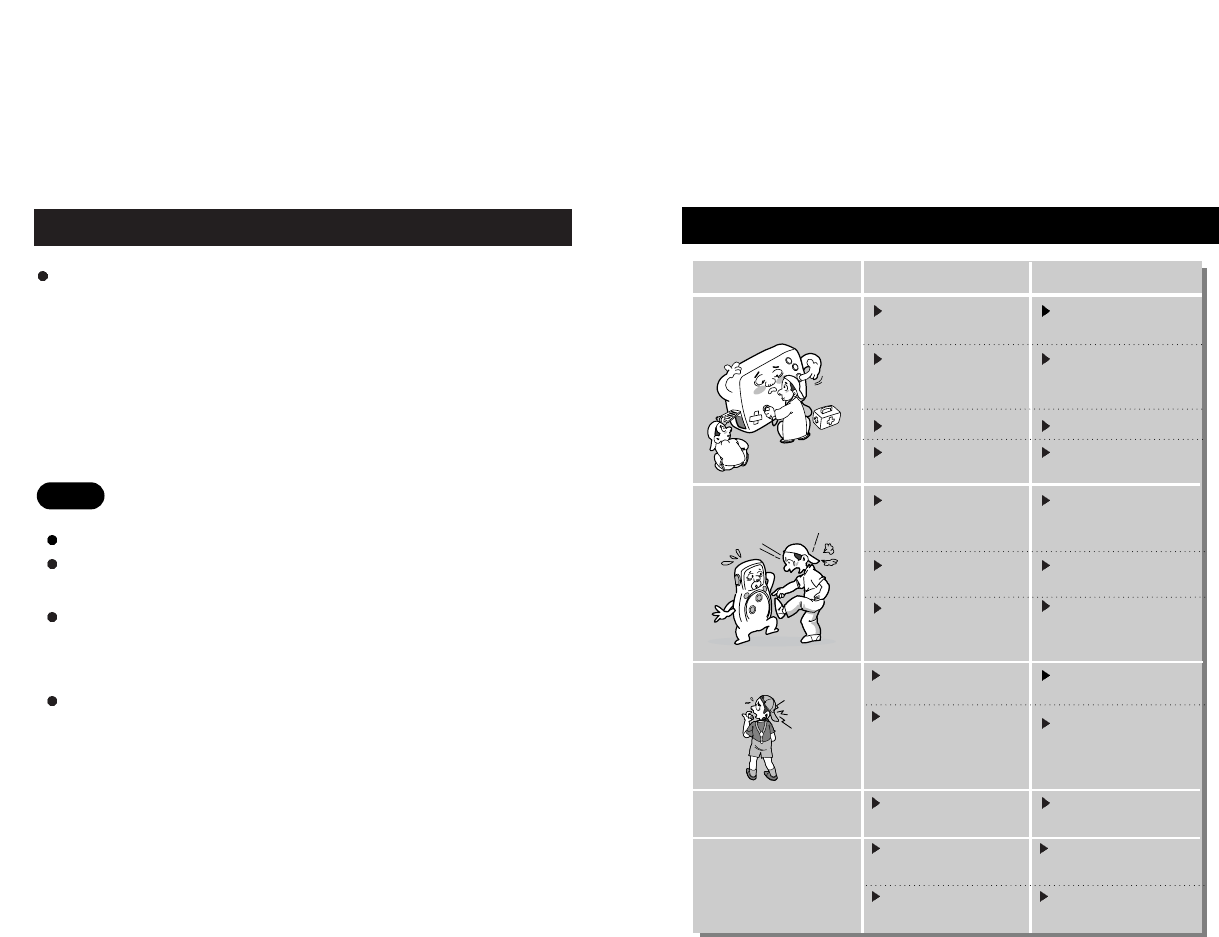
It may not be a trouble in the following cases.
Put batteries properly with
correct polarity
Replace the batteries or
recharge the rechargeable
batteries
Release the lock
Make sure the contact is
tight
Insert the battery properly,
then close the cover
completely
Press only the necessary
buttons accurately
Replace the batteries
or recharge the
rechargeable batteries
Batteries or rechargeable
batteries are put properly?
Battery or rechargeable
batteries are exhausted?
Lock is in the HOLD position?
Loose contact of the
earphones to Player
Battery contact is loose?
Abuse the buttons when
pushing?
The batteries are exhausted?
Does not respond to
pushing buttons
The digital audio player
malfunctions
Case Check Action
Download music files to
the memory
Replace the batteries or
recharge the rechargeable
batteries
Make sure the connection
is properly made
There is a music file on the
memory?
Enough battery life
remaining?
USB cable is connected
properly?
Is the USB cable
connected properly?
Is the driver installed on
the PC?
Inspect the cable
connection status again and
connect it properly
Install the CD program to
the PC
It does not play MP3
It does not download
MP3
4342
User Guide
Caution:
Be sure to make tight connection when connecting the earphones to player.
If malfunction occurs when playing the product after separating the USB
cable, remove the batteries and reinsert them after a moment.
Using Player simultaneously with other USB peripheral devices such as
a digital camera or a scanner may cause communication errors with its
software, so please try not to use them together
Please refer to our website for more detail (http://www.mobiBLU.com)
The instructions for using the Player are as follows:
1. Insert batteries after verifying the polarity.
2. Connect PC to Player using a USB cable via USB port.
3. Purchase or download music files via internet or PC communications, then
store them on player.
4. Detach the USB cable from Player, then turn on the power.
5. Now please enjoy the digital music with Player using earphones.
the player does not
connect to the PC
44
WARRANTY SERVICE
Customers are entitled to warranty service for a period of one
year from the date of purchase. Warranty service does not
apply to defects resulting from customer fault or acts of God.
Non-warranty service shall apply to defects resulting from:
1. Infiltration of foreign matter, such as water, liquid, or sand.
2. Breakage due to dropping or severe impact.
3. Damage to or deformation of the outer case caused by
organic solvents, such as benzene.
4. Use of parts other than those certified by the manufacturer.
5. Loss or breakage of any parts or components caused by
unauthorized disassembly.
6. Repair or modification done by any persons other than
manufacturer authorized personnel.
7. Acts of God, such as lightning, storm or flood.
8. Purchase from unauthorized retailers.
For more warranty information and service options in your
place, please visit the Hyun Won Inc. web site at
http//:www.mobiBLU.com
FCC RF INTERFERENCE STATEMENT
51
THIS DEVICE COMPLIES WITH PART 15 OF THE FCC RULES. OPERATION IS
SUBJECT TO THE FOLLOWING TWO CONDITIONS: (1) THIS DEVICE MAY NOT
CAUSE HARMFUL INTERFERENCE, AND (2) THIS DEVICE MUST ACCEPT ANY
INTERFERENCE RECEIVED INCLUDING INTERFERENCE THAT MAY CAUSE
UNDESIRED OPERATION.
CAUTION
Changes or modifications not expressly approved by the party responsible
for compliance could void the user's authority to operate the equipment.
Note
This equipment has been tested and found to comply with the limits
for a Class B digital device, pursuant to Part 15 of the FCC Rules.
These limits are designed to provide reasonable protection against
harmful interference in a residential installation.
This equipment generates, uses and can radiate radio frequency
energy and, if not installed and used in accordance with the
instructions, may cause harmful interference to radio ommunications.
However, there is no guarantee that interference will not occur in a
particular installation.
If this equipment does cause harmful interference to radio or television
reception which can be determined by turning the equipment off and
on, the user is encouraged to try to correct the interference by one or
more of the following measures.
- Reorient or relocate the receiving antenna.
- Increase the separation between the equipment and receiver.
- Connect the equipment into an outlet on a circuit different from that
to which the receiver is connected.
- Consult the dealer or an experienced radio, TV technical for help.
- Only shielded interface cable should be used.
Finally, any changes or modifications to the equipment by the user not
expressly approved by the grantee or manufacturer could void the
users authority to operate such equipment.
MEMOMEMO
SRS is a registered trademark of SRS Labs.
WOW Technology is an intellectual property of SRSLabs.