Hyundai Digital Technology HSC-880HNA Cable Set-top Box User Manual
Hyundai Digital Technology Co., Ltd. Cable Set-top Box
UserManual.wiki
>
Hyundai Digital Technology
>
HSC 880HNA User Manual
User Manual
Navigation menu
Upload a User Manual
Namespaces
Wiki Guide
HTML
PDF
Info
Views
User Manual
Discussion / Help
Navigation
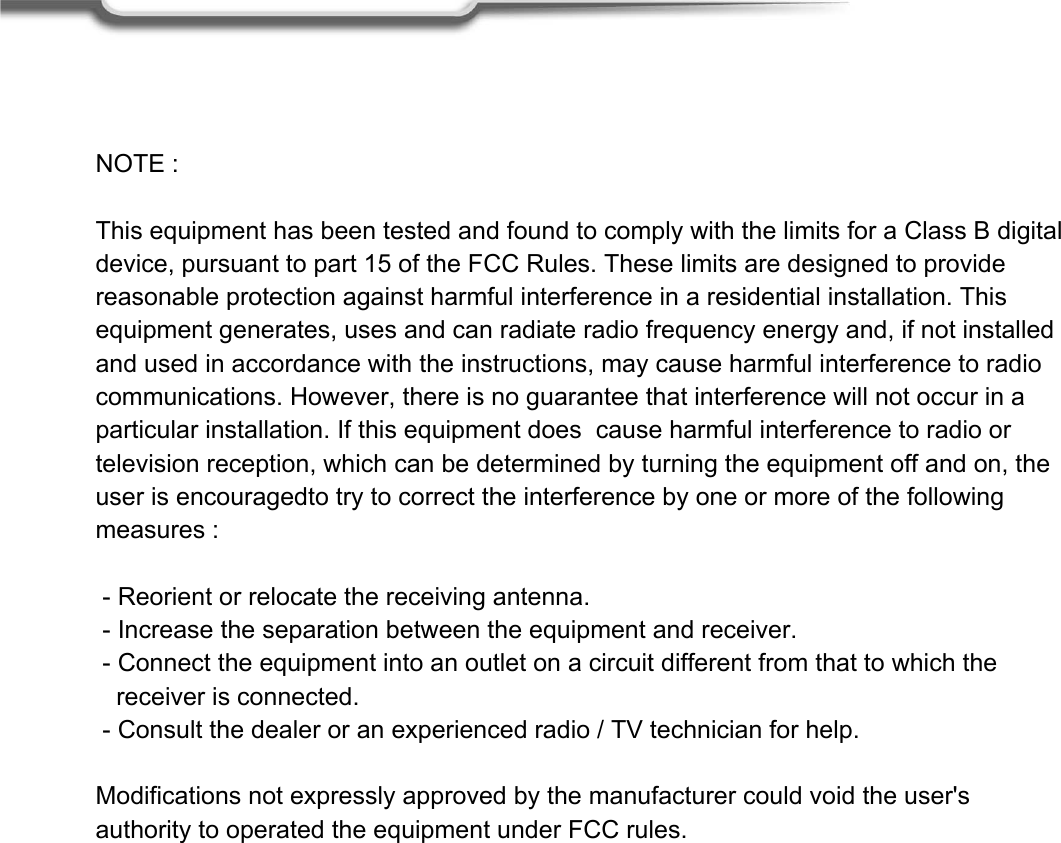

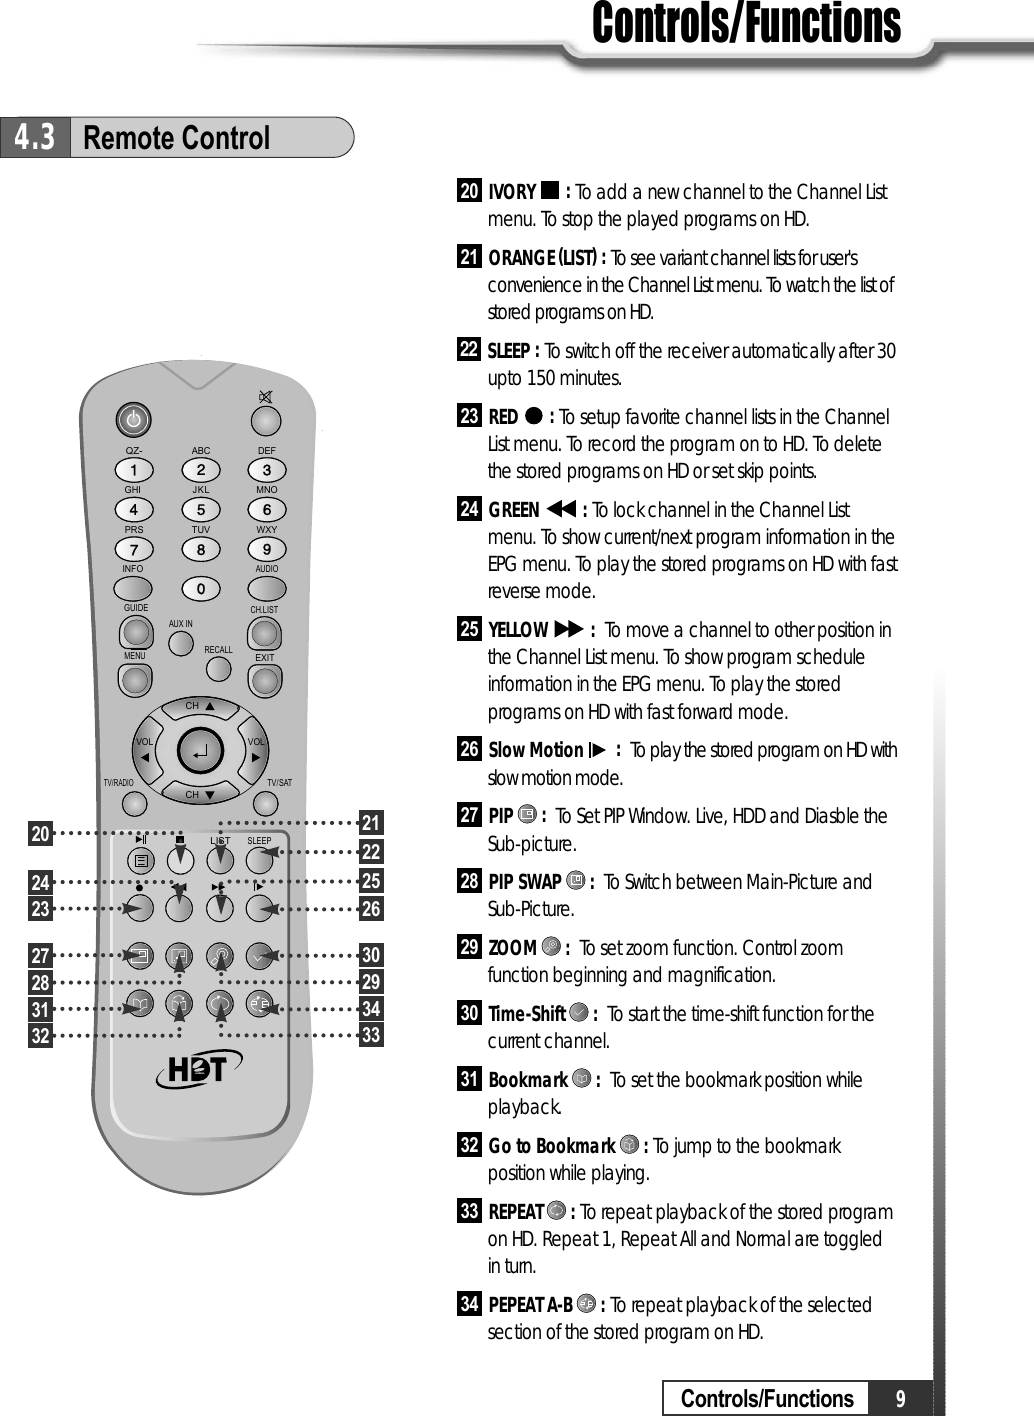

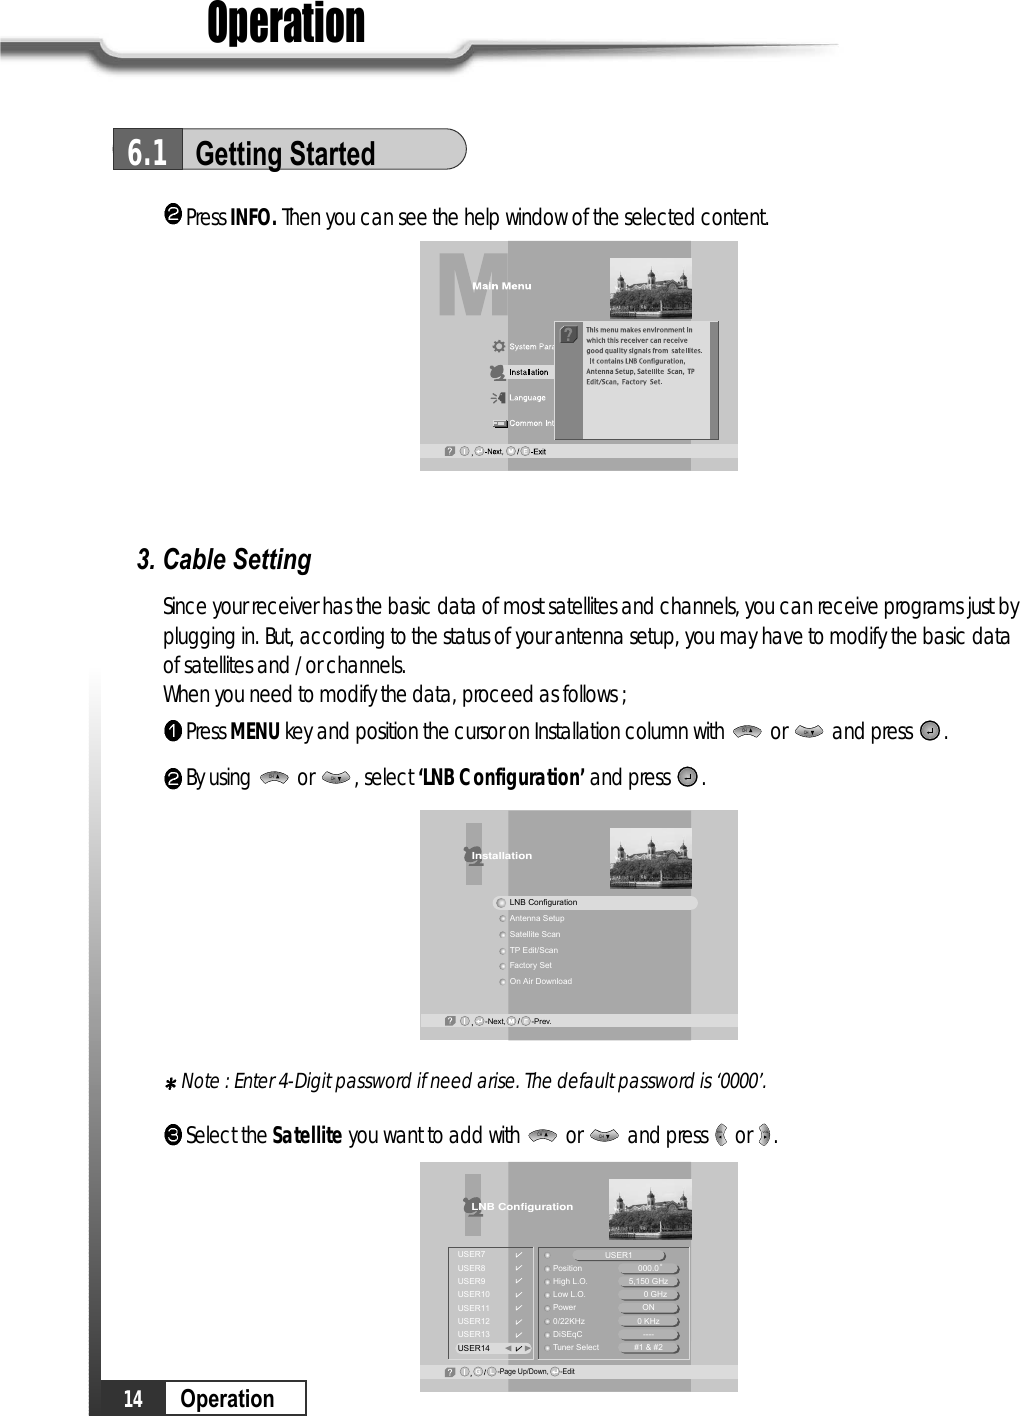
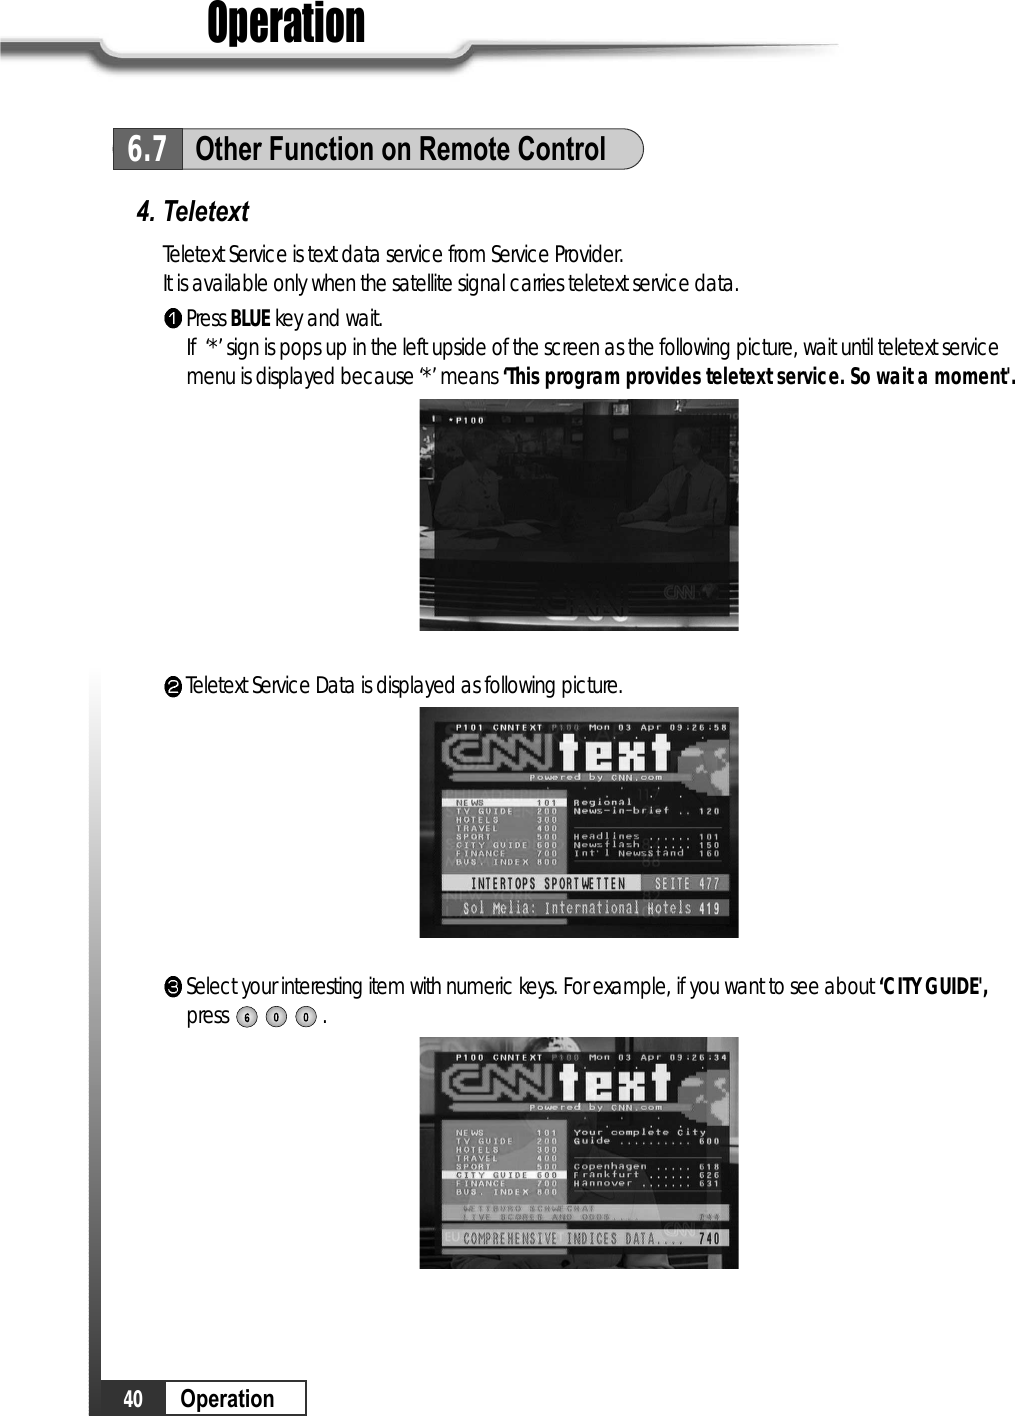
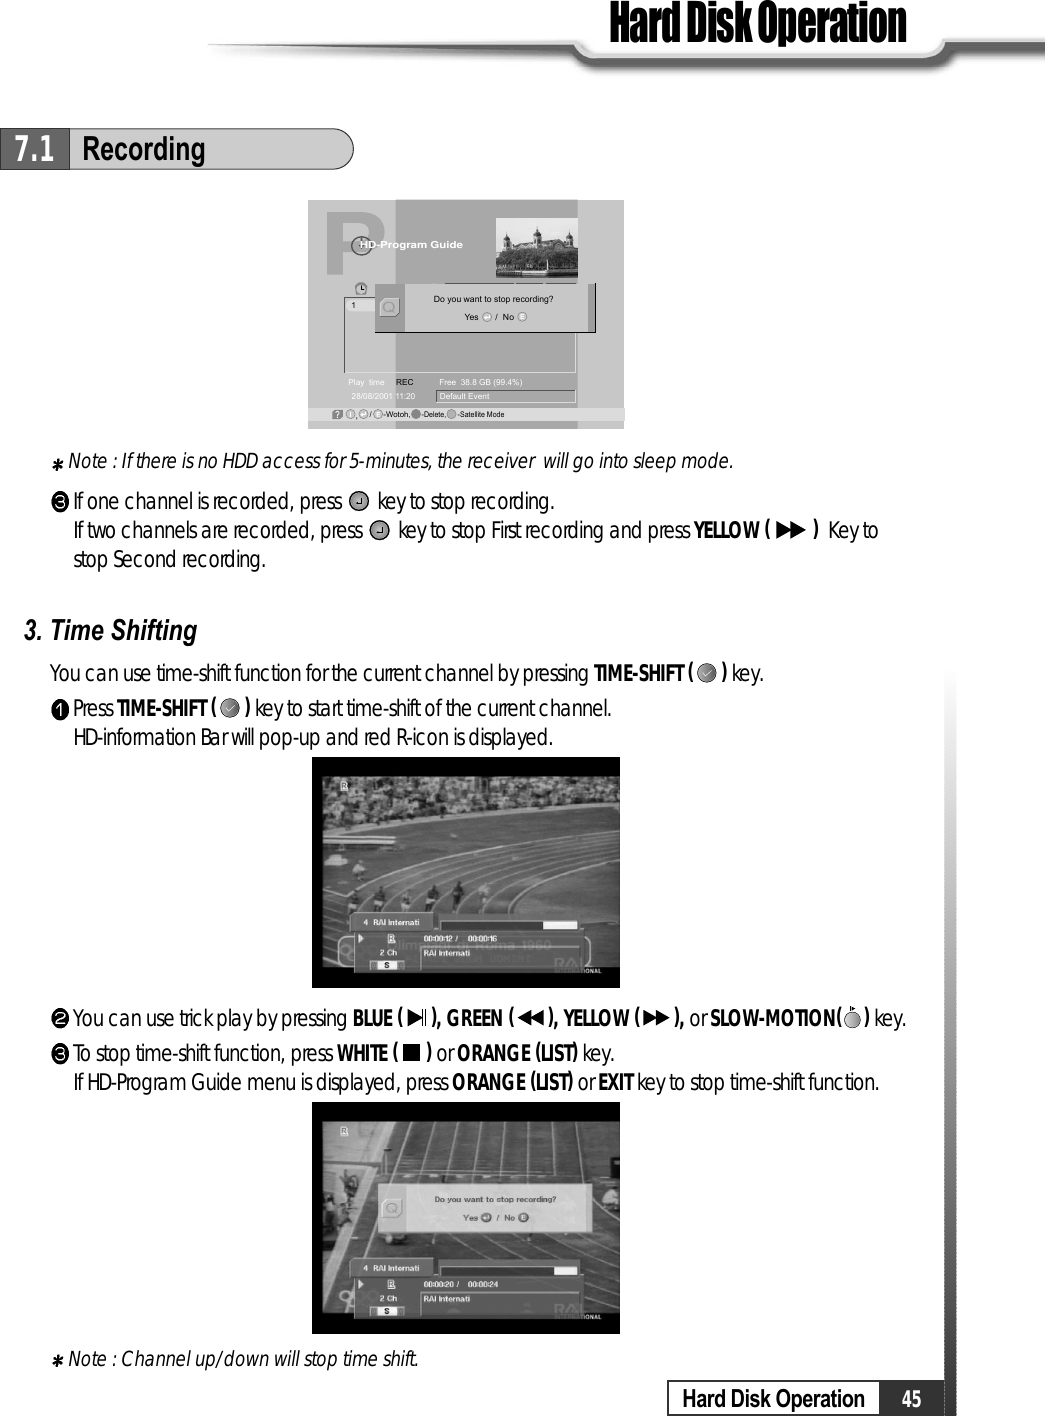
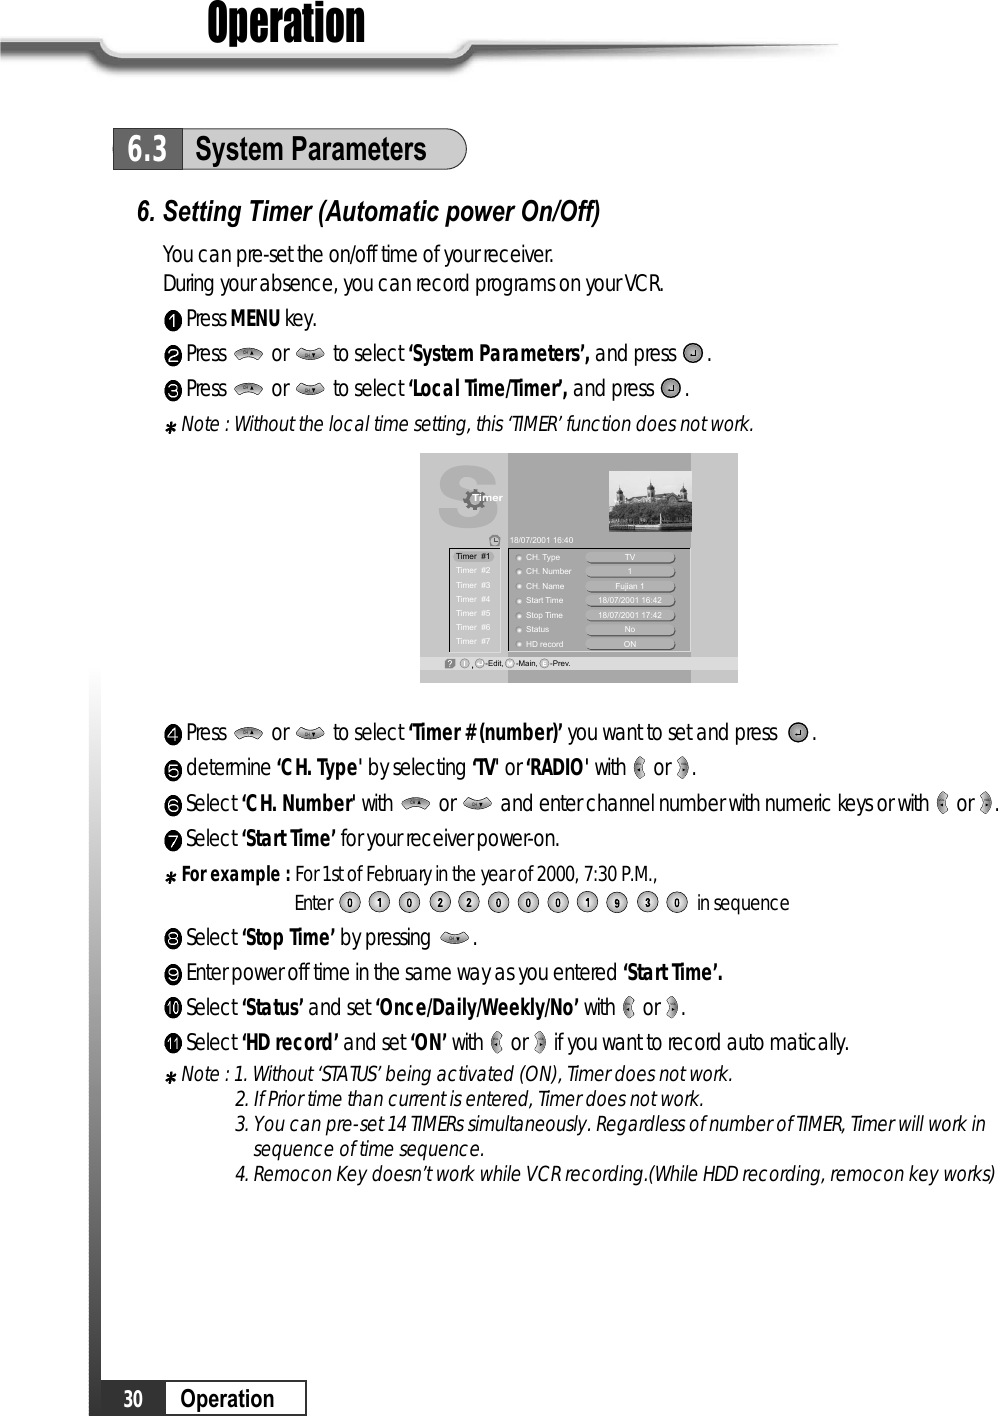
![15OperationOperation6.1Getting StartedSelect item you want to edit with or and change each parameter.- Position : You can input the longitude of the satellite with numeric keys.- High L.O. / Low L.O. : Enter LNB oscillator frequency with numeric keys.- Power : Set LNB power ON or OFF with or .- 0/22KHz : Set the path of 0/22KHz switch box with or .- DiseqC : Set the path of DiSEqC box with or .- Tuner Select : Set the tuner #1, #2, #1 & #2 and Loop with or . If you do not use the switch box, set as “---”.Note : When you change each parameter, you need to know exact parameter of LNB to modifyL.O.(local oscillator) frequency.Note : When you change each parameter, you need to understand environment of connecting thereceiver and antenna in order for you to set 22KHz and DiSEqC properly.Note : For more information, refer to Chapter.6 How to ConnectWhen necessary, you can change a satellite name as you wish. You can enter alphabetic characters with the numeric keys.For example, if you want to enter ‘SAT-1', Press .Note : Press for space.After the installation procedure, press EXIT key or MENU key to store your entered data.VOLVOLVOLVOLVOLVOLVOLVOLVOLVOLVOLVOLCHCHIf you press , the selected Satellite will be added and the cursor will move to right window fordetailed installation.Note : If you just want to edit the data of the satellite which is already contained in the receiver, pressafter you select the satellite.4. Antenna SetupYou need to position your antenna correctly for reception of the best signal.Press MENU key.Select ‘Installation’ with or , and press .Select ‘Antenna Setup’ with or and press .CHCHCHCHAntenna Setup-Prev.-Main,Motor / Goto 0Move / SaveSet LimitMy longitudoMy latitudoOffStopDisable000.000.0OOOASIA3[7] 3,710 GHzVertical - 14V3,300 MSPSTuner LockFECLevel47% 51%Qual.3/4](https://usermanual.wiki/Hyundai-Digital-Technology/HSC-880HNA/User-Guide-511131-Page-17.png)
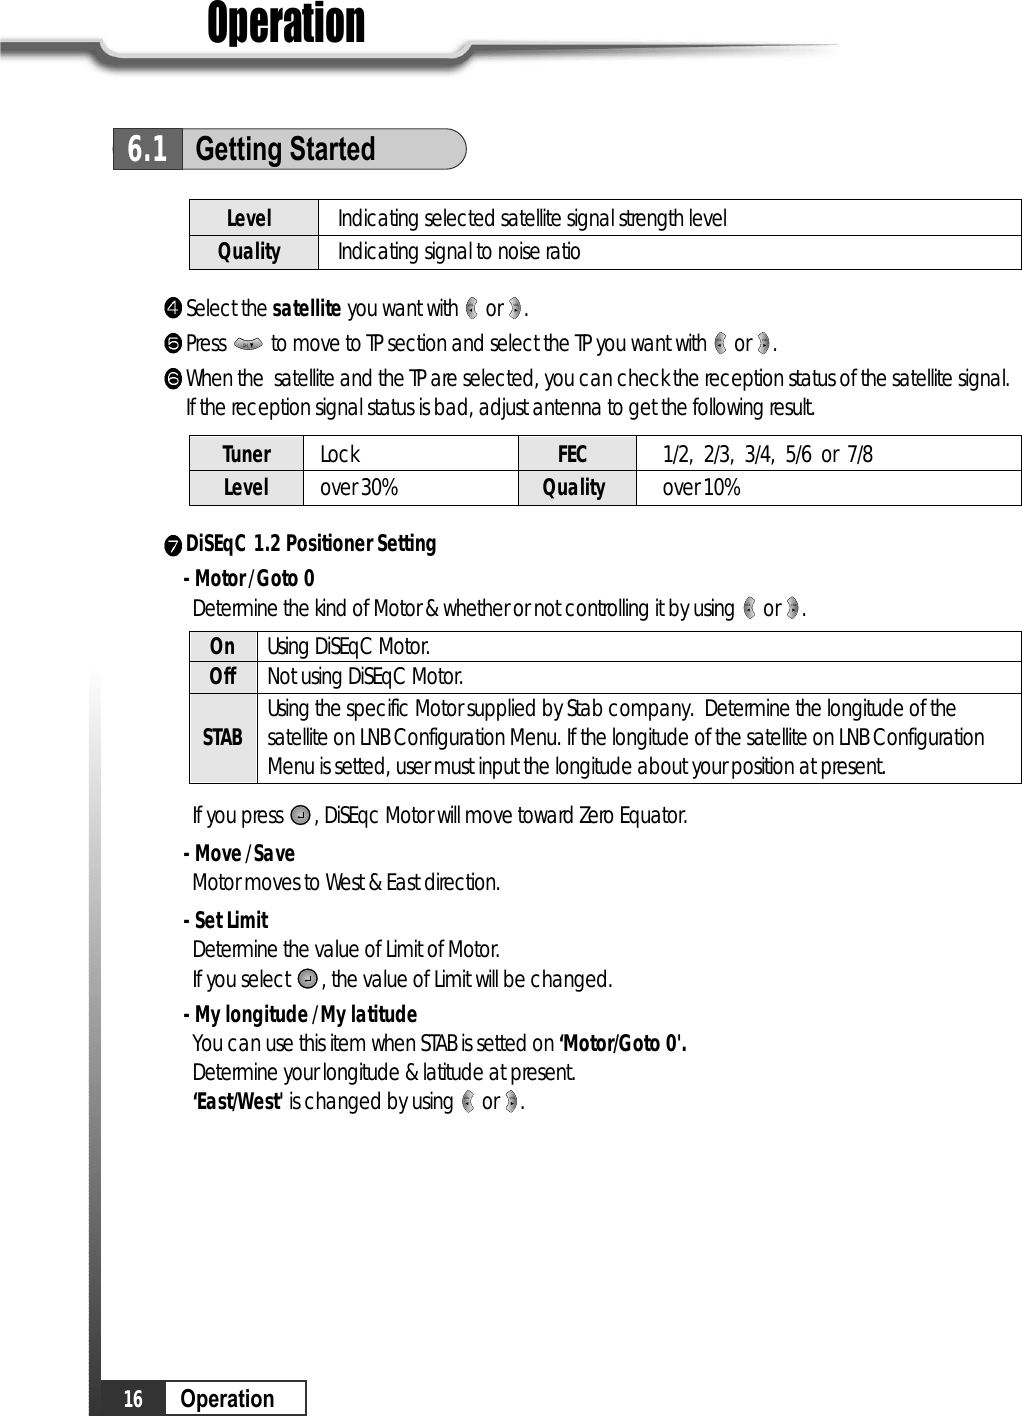
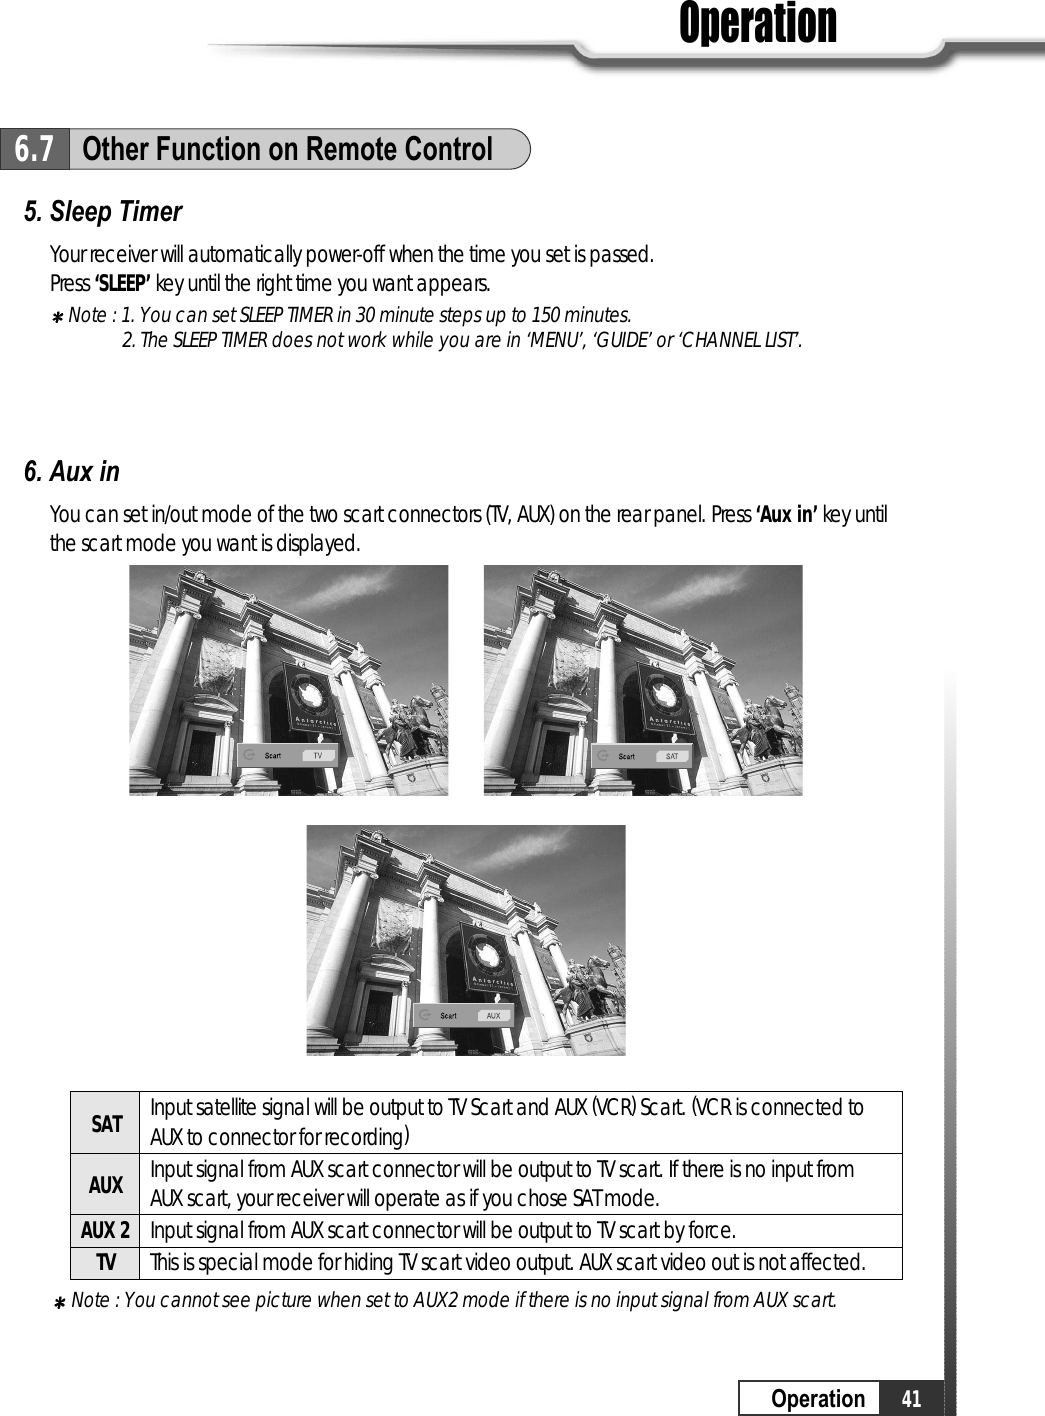
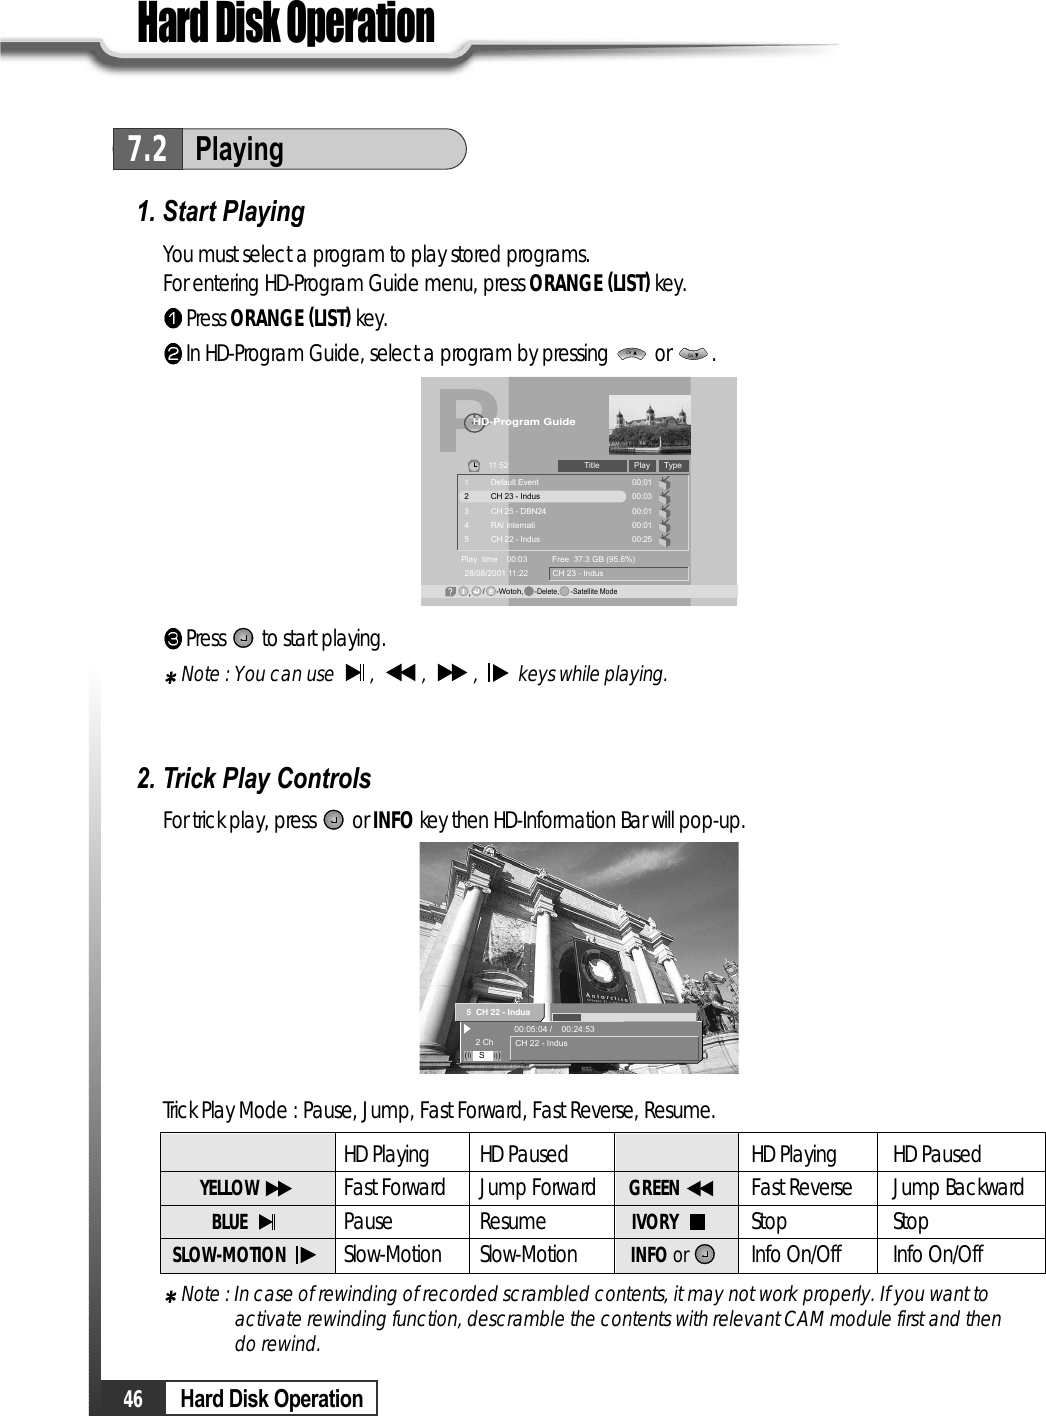
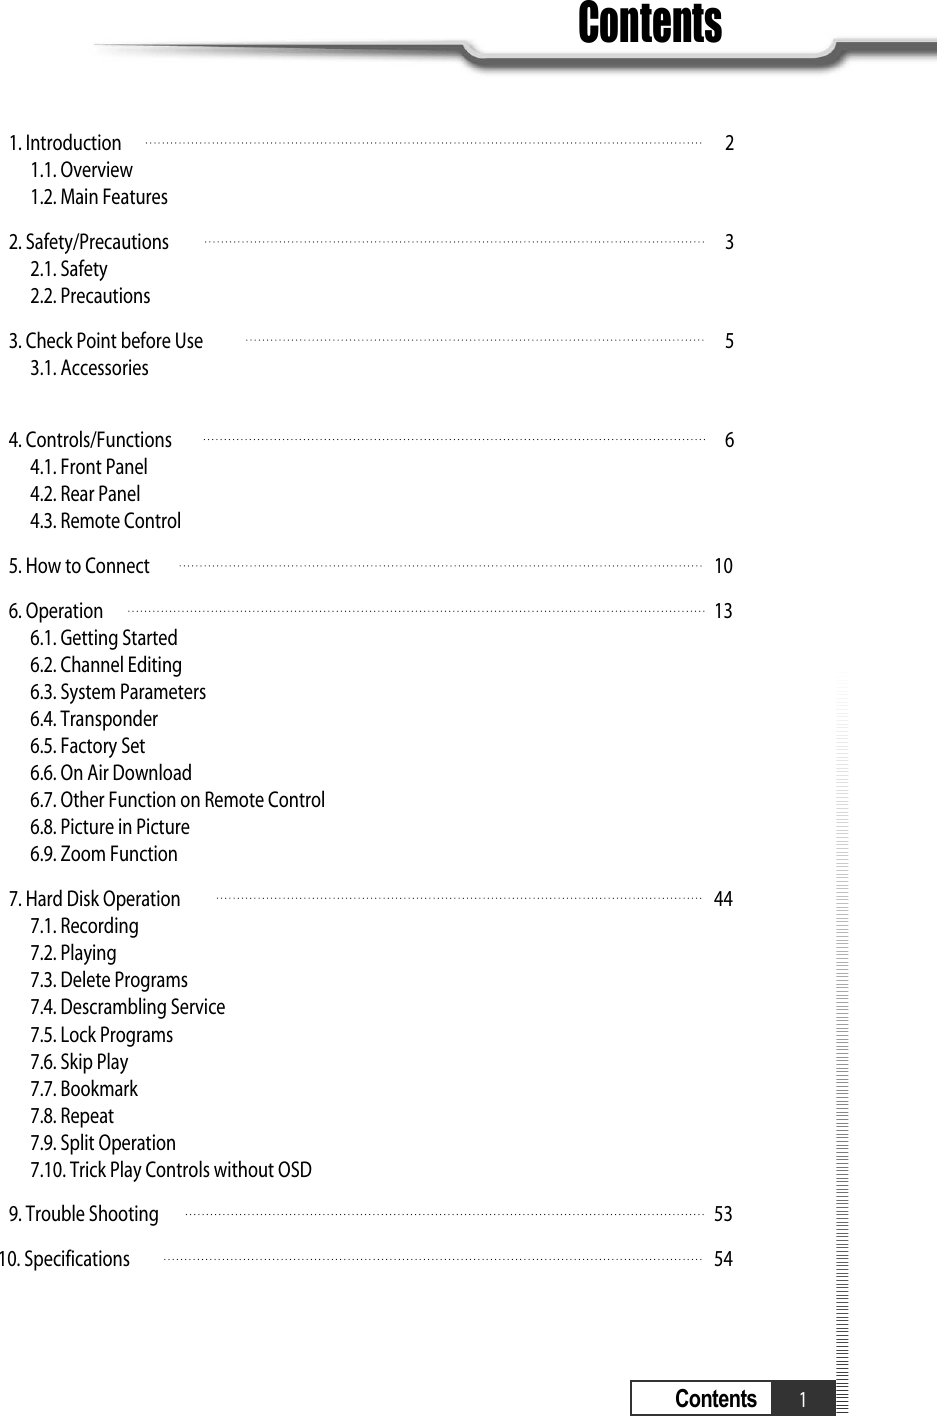
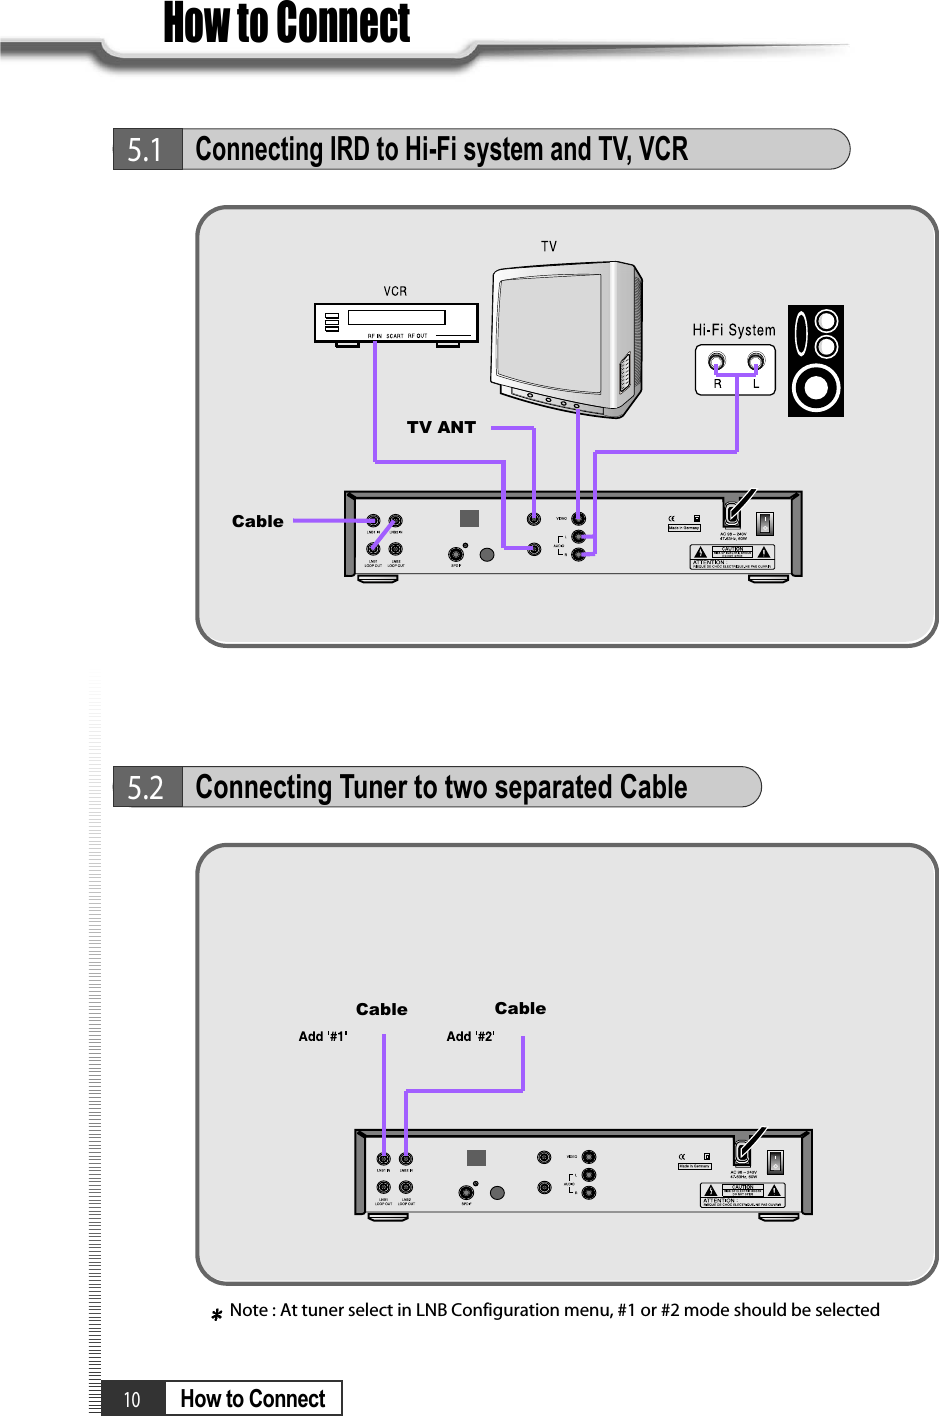
![17OperationOperation6.1Getting Started5. Satellite ScanAfter finishing ‘Antenna Setup’, execute a ‘Satellite Scan’.Then you can get all channels in the pre-programmed TPs. This function can also be used to get thelatest channel data while receiver is in use. Through this function, the receiver searches for all theavailable channels and saves them in the memory.Press MENU key.Select ‘Installation’ with or , and press .Select ‘Satellite Scan’ with or , and press .Select ‘Scan Mode’ with or . Select the scan mode you want with or .Select the satellite name you want with or .VOLVOLVOLVOLCHCHCHCHCHCHSatellite Scan-Select, -Prev.-Main,Free+ScrambledAsiaSat 2Scan ModeSatellite NameIf you press , the selected satellites will be scanned.While scanning, you can see the following menu on the screen.Satellite Scan-Select, -Main,M-Prev.EGood84%TV: 2 Scanning:10% Radio: 033343536373839171819202122SATLINK 972 2APTN1 + 442074NMTVGuangdong 2Hunan 2Hubei 1Hubei 2DW 9RDP ANTENA 1RDP ESPECIALNN¥xÆWaN¥<< TWN¥@uØ1/2Auø USAAsiaSat 2 [4] 3,720 GHz Hor. 4,420~~Satellite Scan-Watch, /M-Prev.EBad1%-Page Up/Down,TV: 39 Scanning:10% Radio: 22171819202122DW 9RDP ANTENA 1RDP ESPECIALNN¥xÆWaN¥<< TWN¥@uØ1/2Auø USAAsiaSat 2 [28] 3,960 GHz Hor. 30,000~~33343536373839SATLINK 972 2APTN1 + 442074NMTVGuangdong 2Hunan 2Hubei 1Hubei 2Satellite scan is done. Press Key.Q](https://usermanual.wiki/Hyundai-Digital-Technology/HSC-880HNA/User-Guide-511131-Page-19.png)
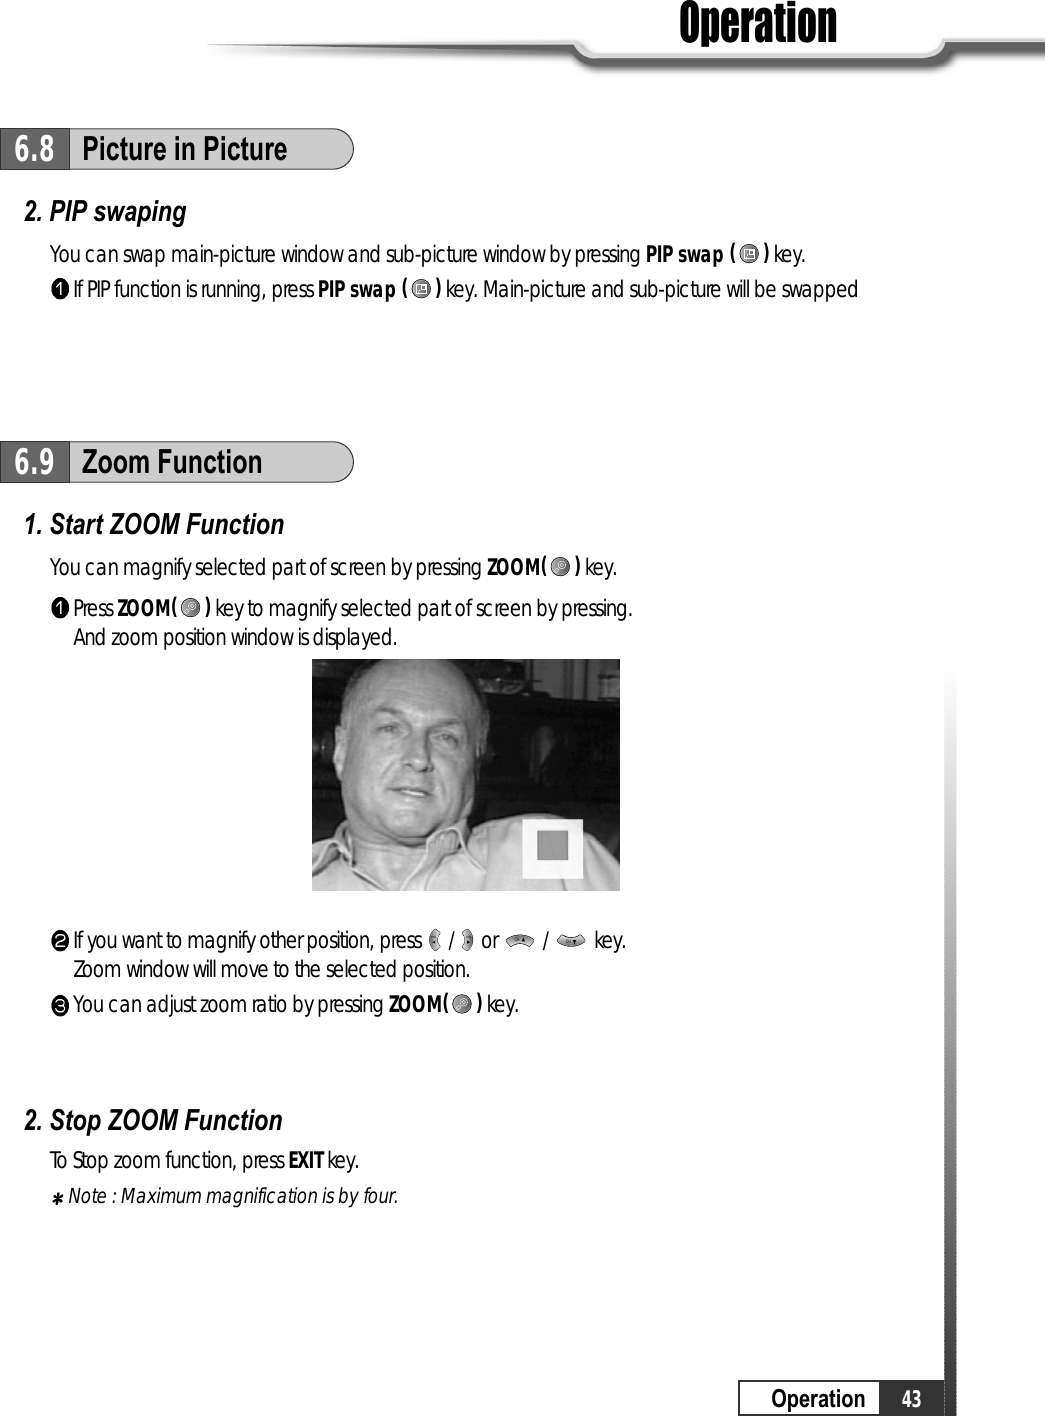
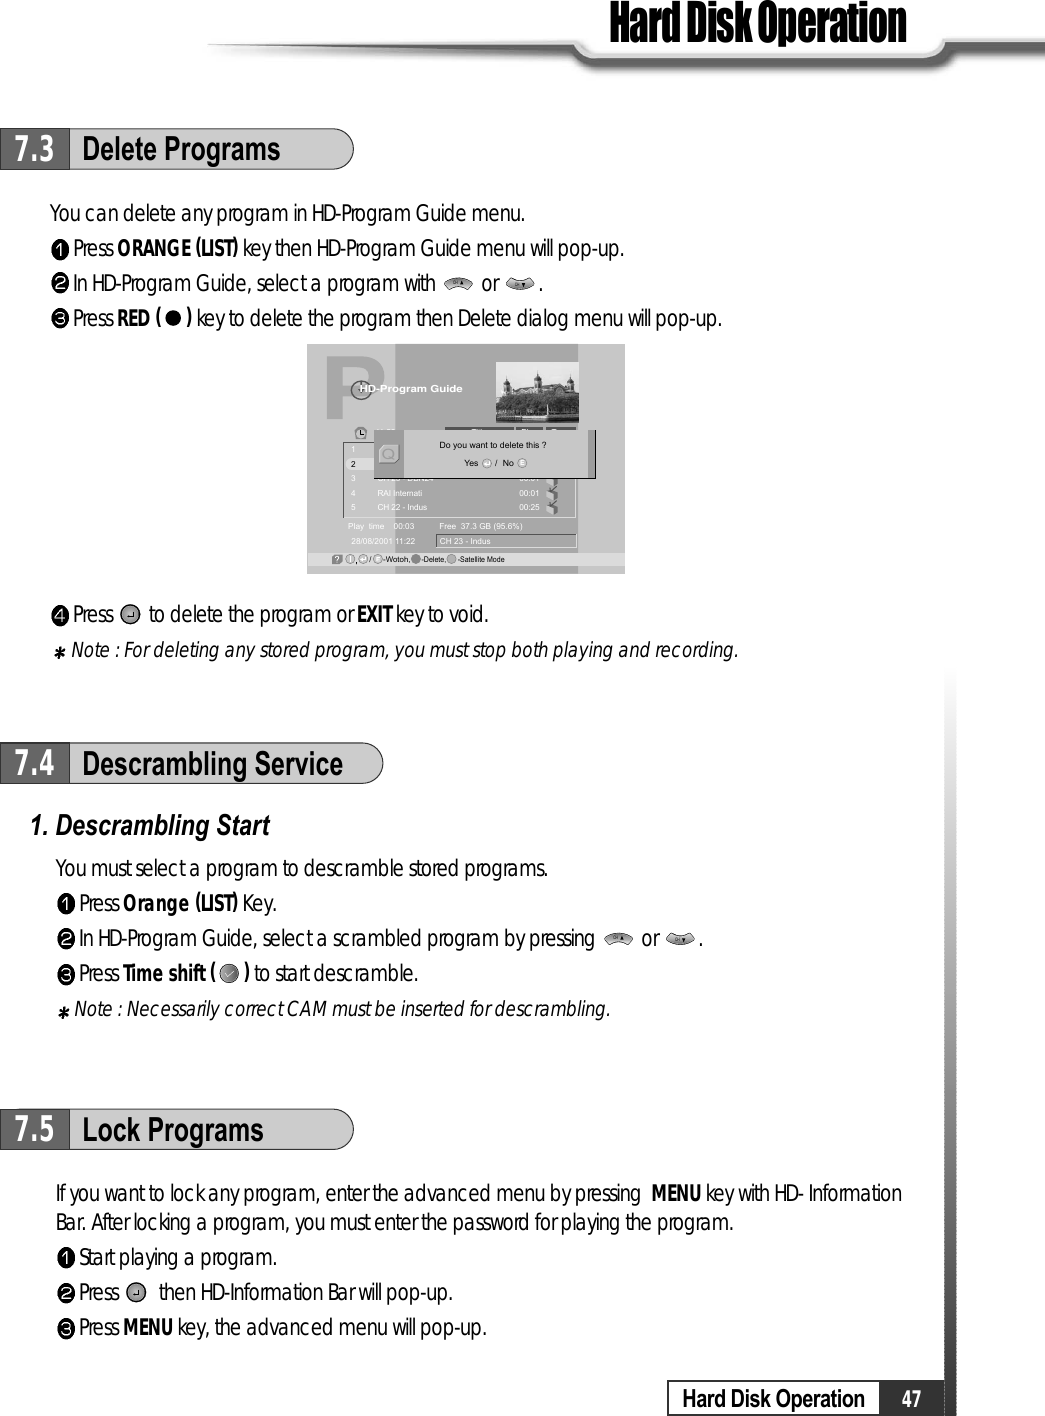
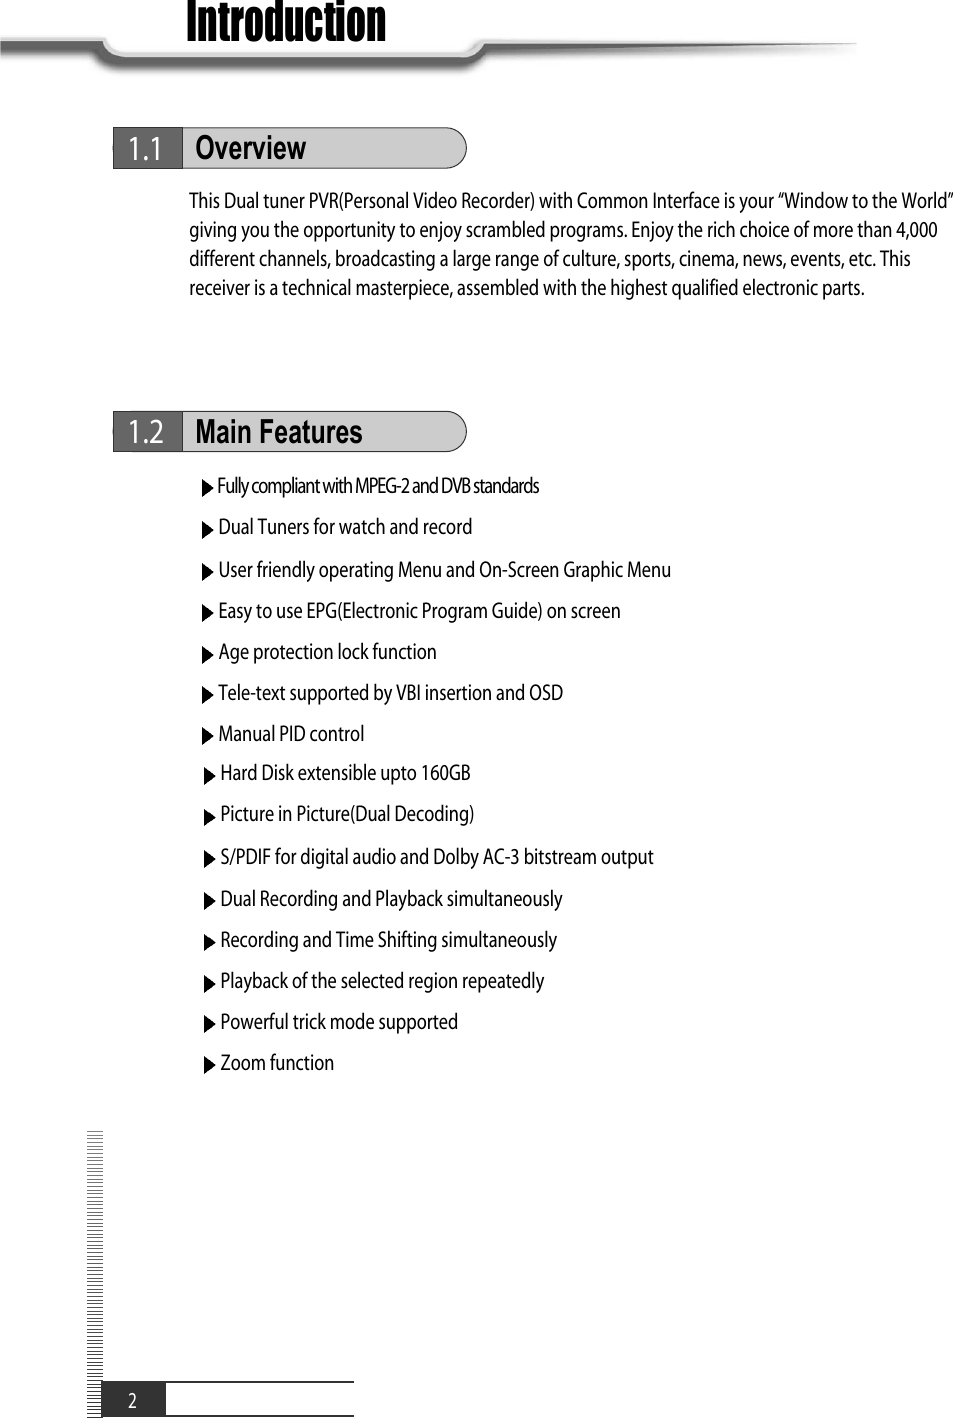
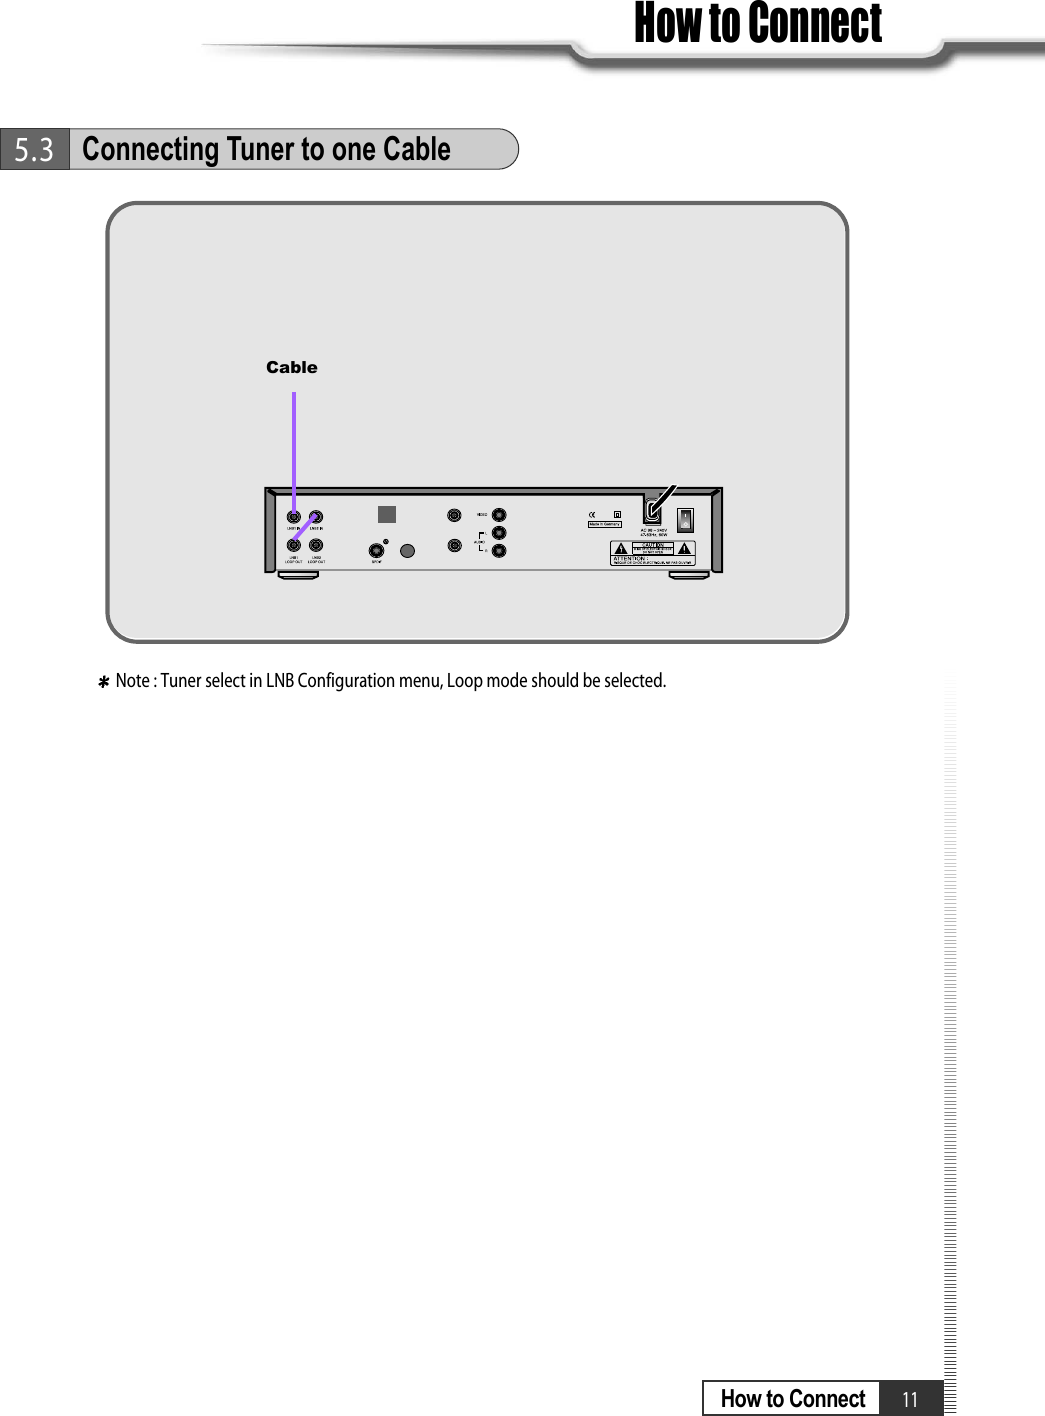
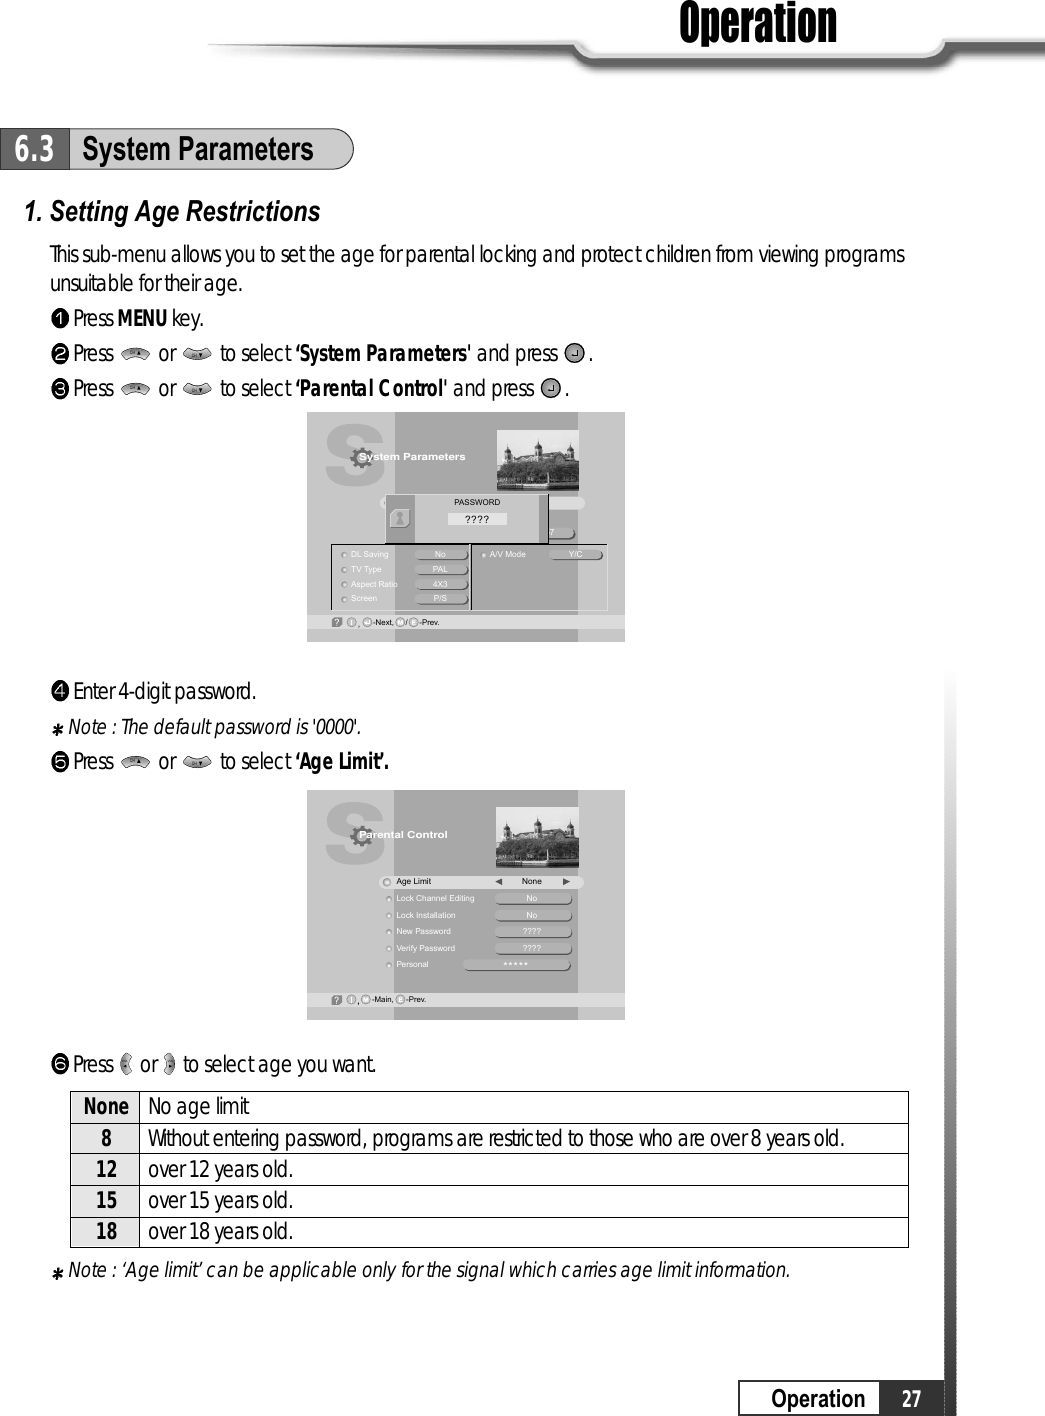
![18OperationOperation6. Select ChannelYou can change the current channel to any other channel you want.If you do not know the channel name, or you want to select a channel at random, you cannavigate between channels with or (CH. Up/Down)till you find the channel you want.If you know the channel number, enter the number and wait 5 seconds for the channel to change.If you know the channel name, press CH LIST key then channel list will pop-up.CHCHIn the right section, detailed information of the selected channel will be displayed.(Name of satellite,frequency, symbol rate, etc.)Select the channel you want with / (scroll up/down) or / (page up/down). When the scroll bar is positioned on the channel you want to see, press . VOLVOLCHCHTV Channel List-Watch, -EXIT, ~ -Move09-Main,-Page Up/Down,12345678Fujian 1DIGITL VIDANHUI TVNMCHTVGuangdong 1Hunan 1DWtvMCMAsiaSat 2[24] 4,000 GHzHorizontal-18V28,123 MSPSDeutsche WellFAV.LOCKMOVEDELADDMODEAll List6.1Getting StartedAfter the scanning process, the first channel of the last scanned TP will be displayed on the backscreen.Press to finish the process. Then select a channel and press to watch a program or pressMENU key or EXIT key. Note : Now you have completed all steps needed for watching programs. If you could not see theprogram after finishing these procedures, please contact your engineer or representative.](https://usermanual.wiki/Hyundai-Digital-Technology/HSC-880HNA/User-Guide-511131-Page-20.png)
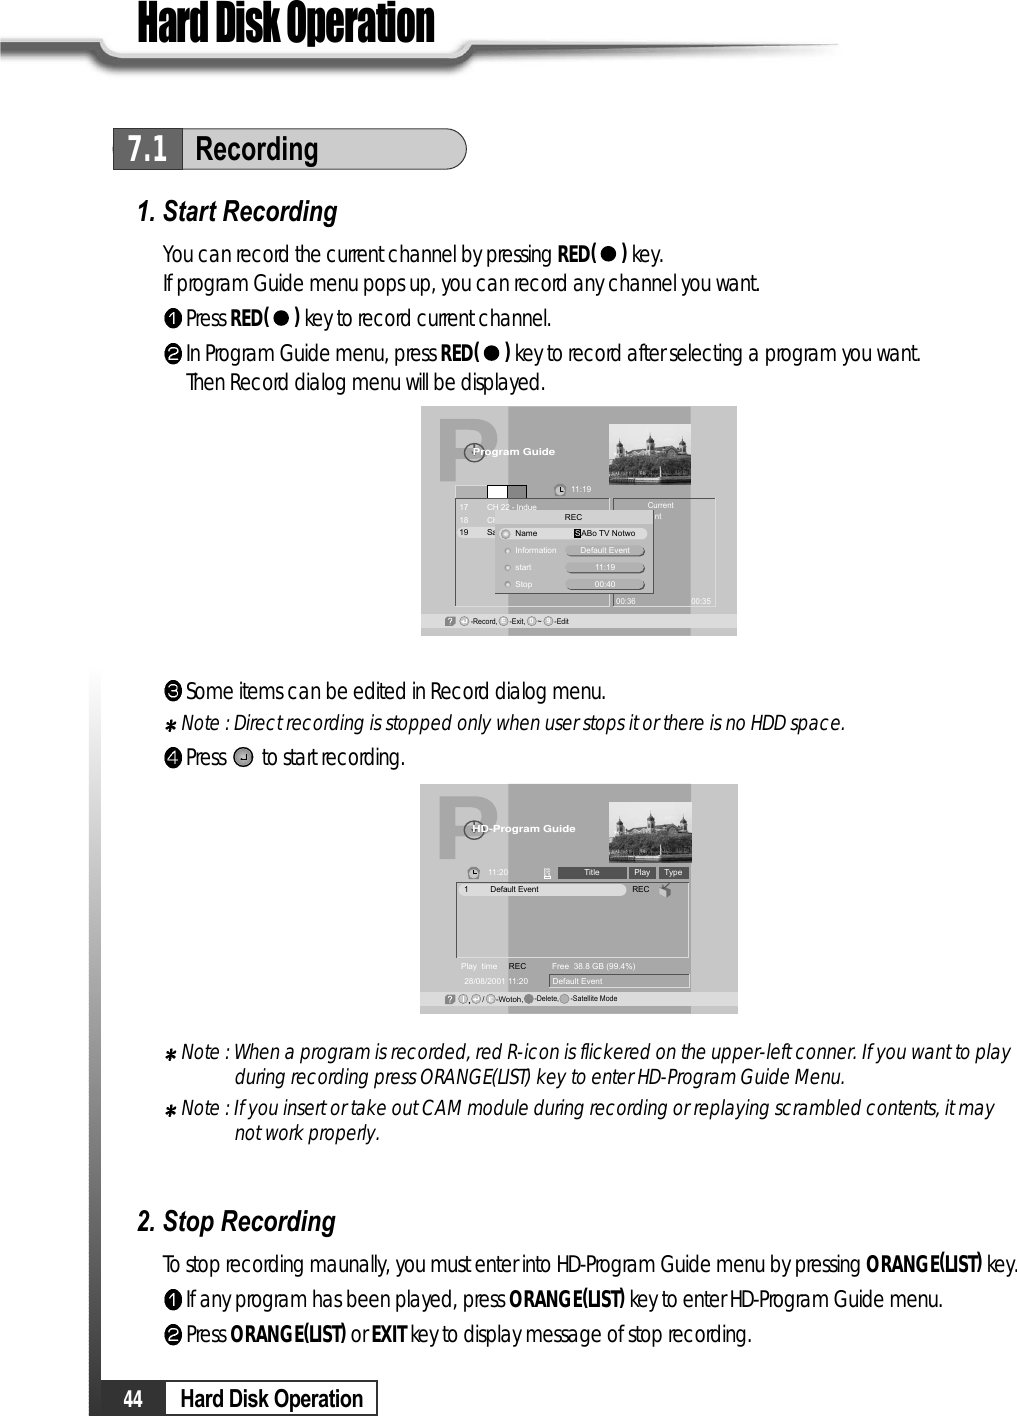
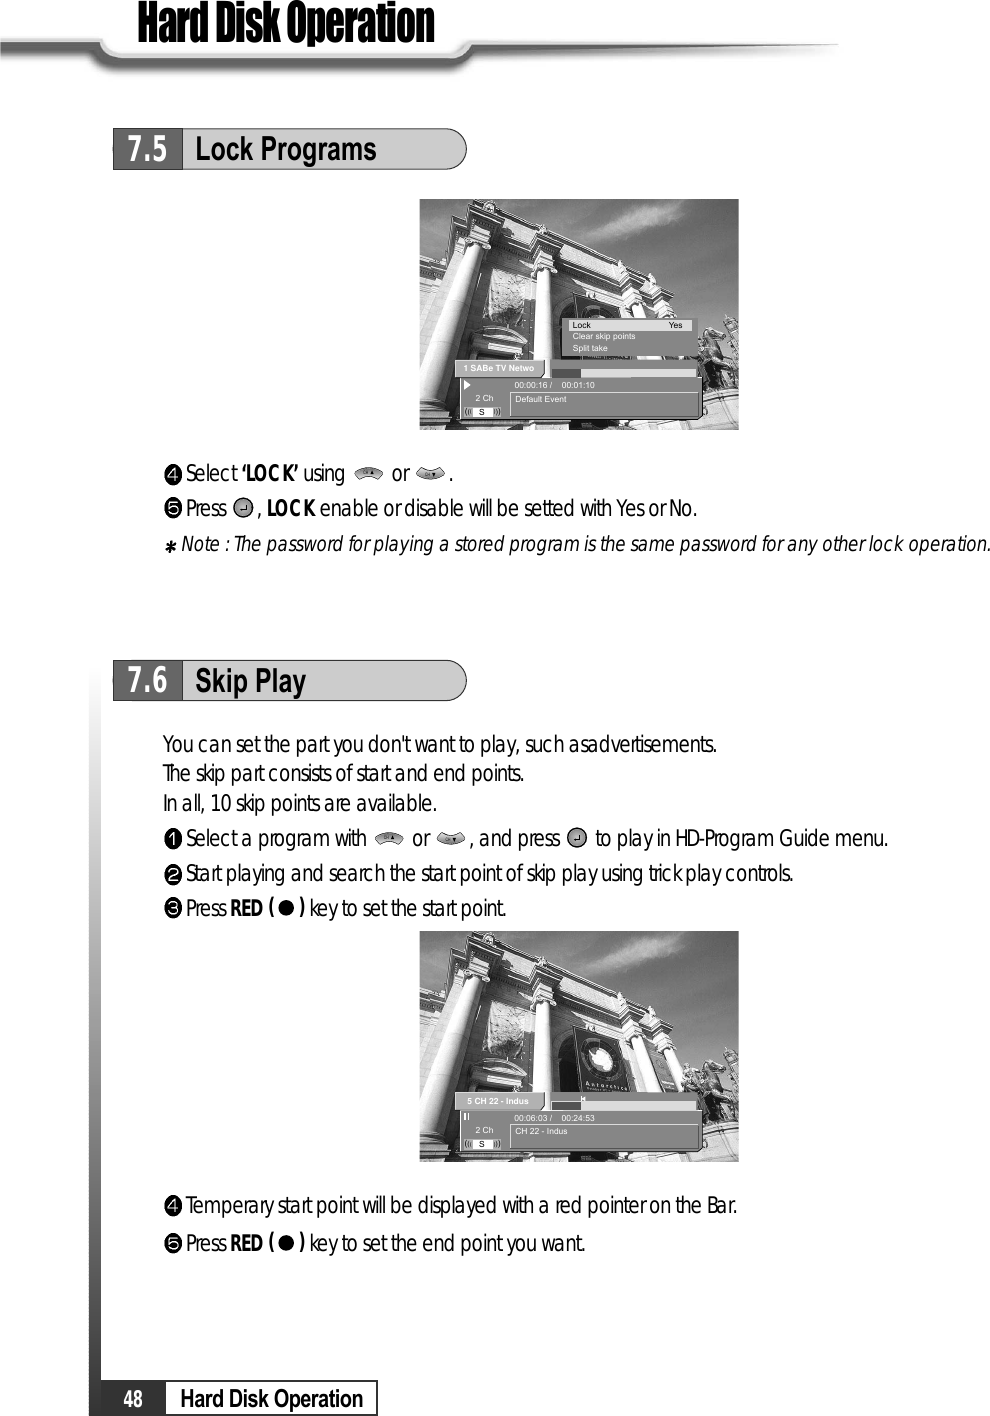
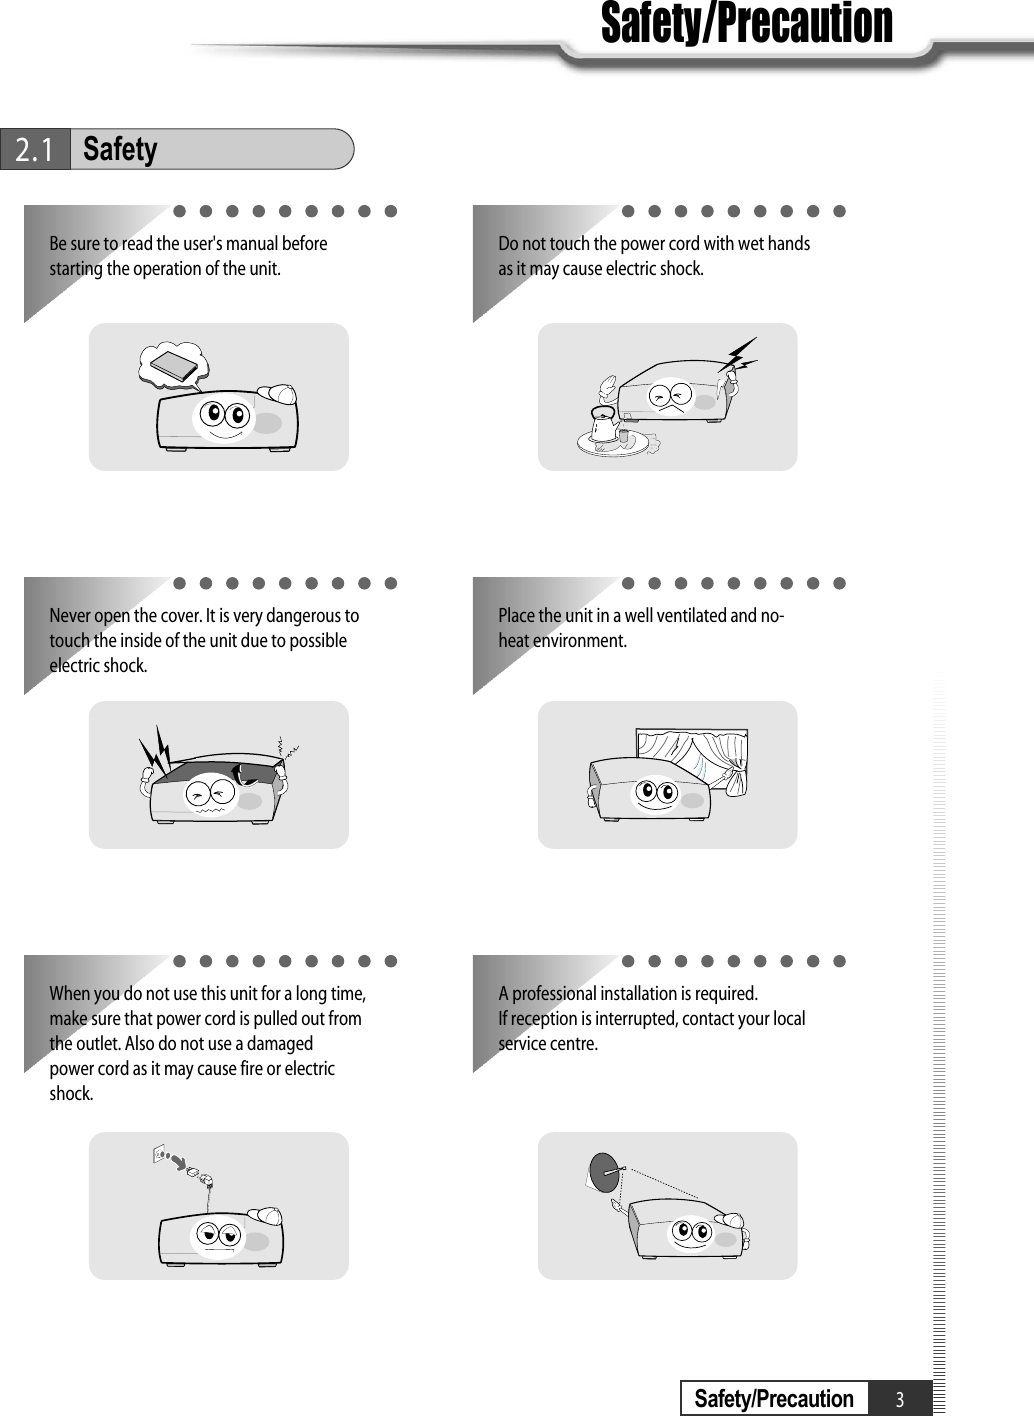
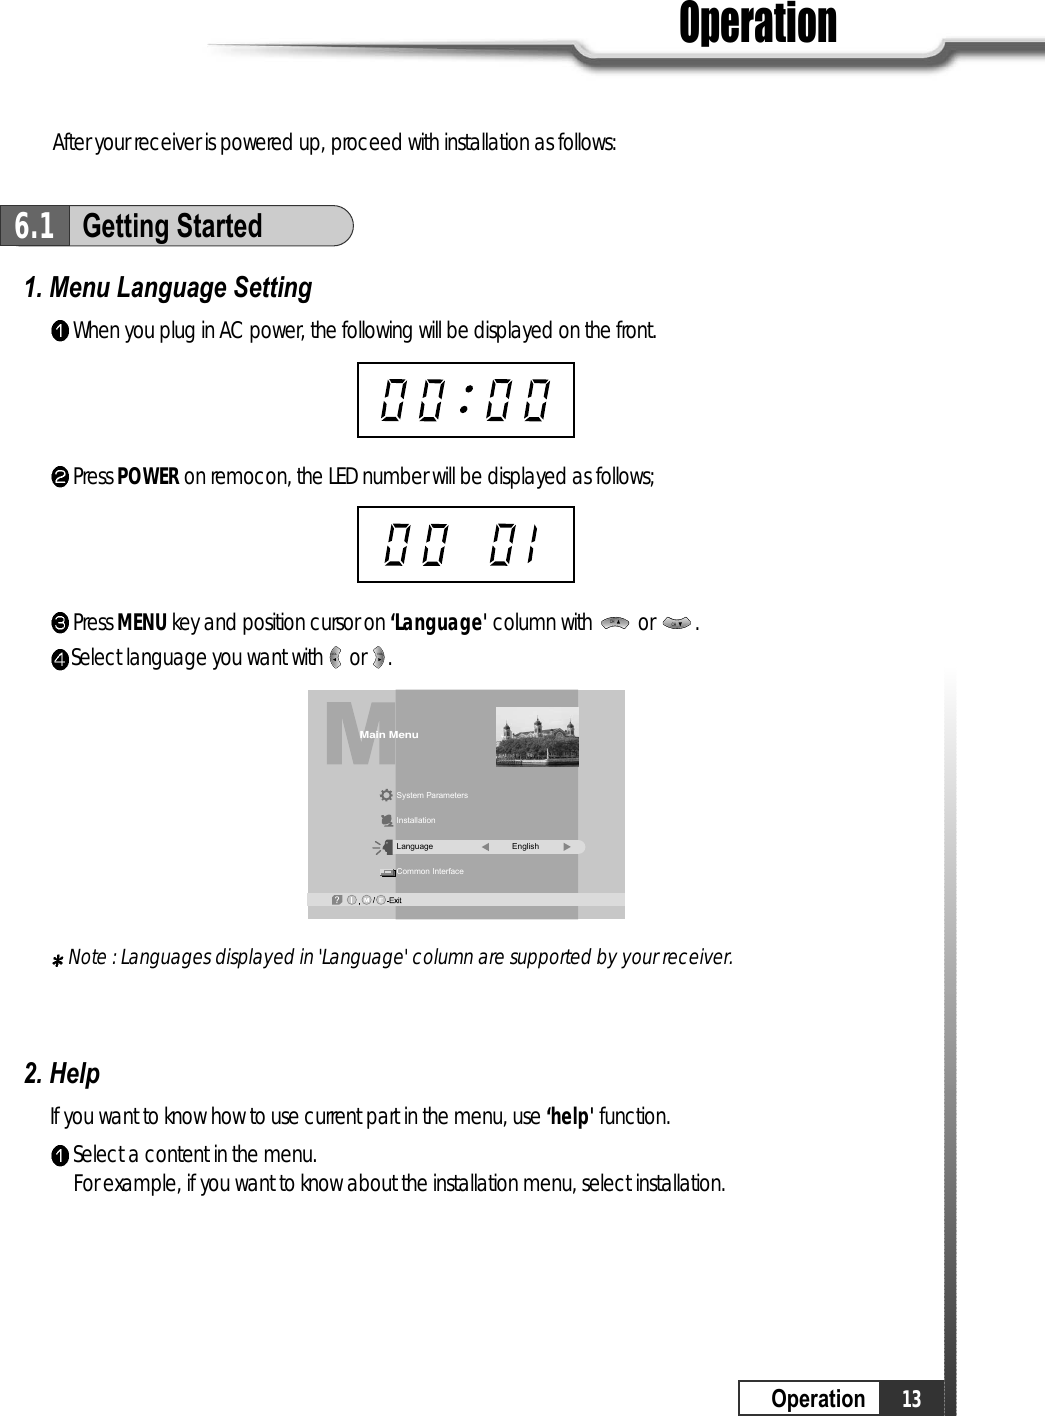
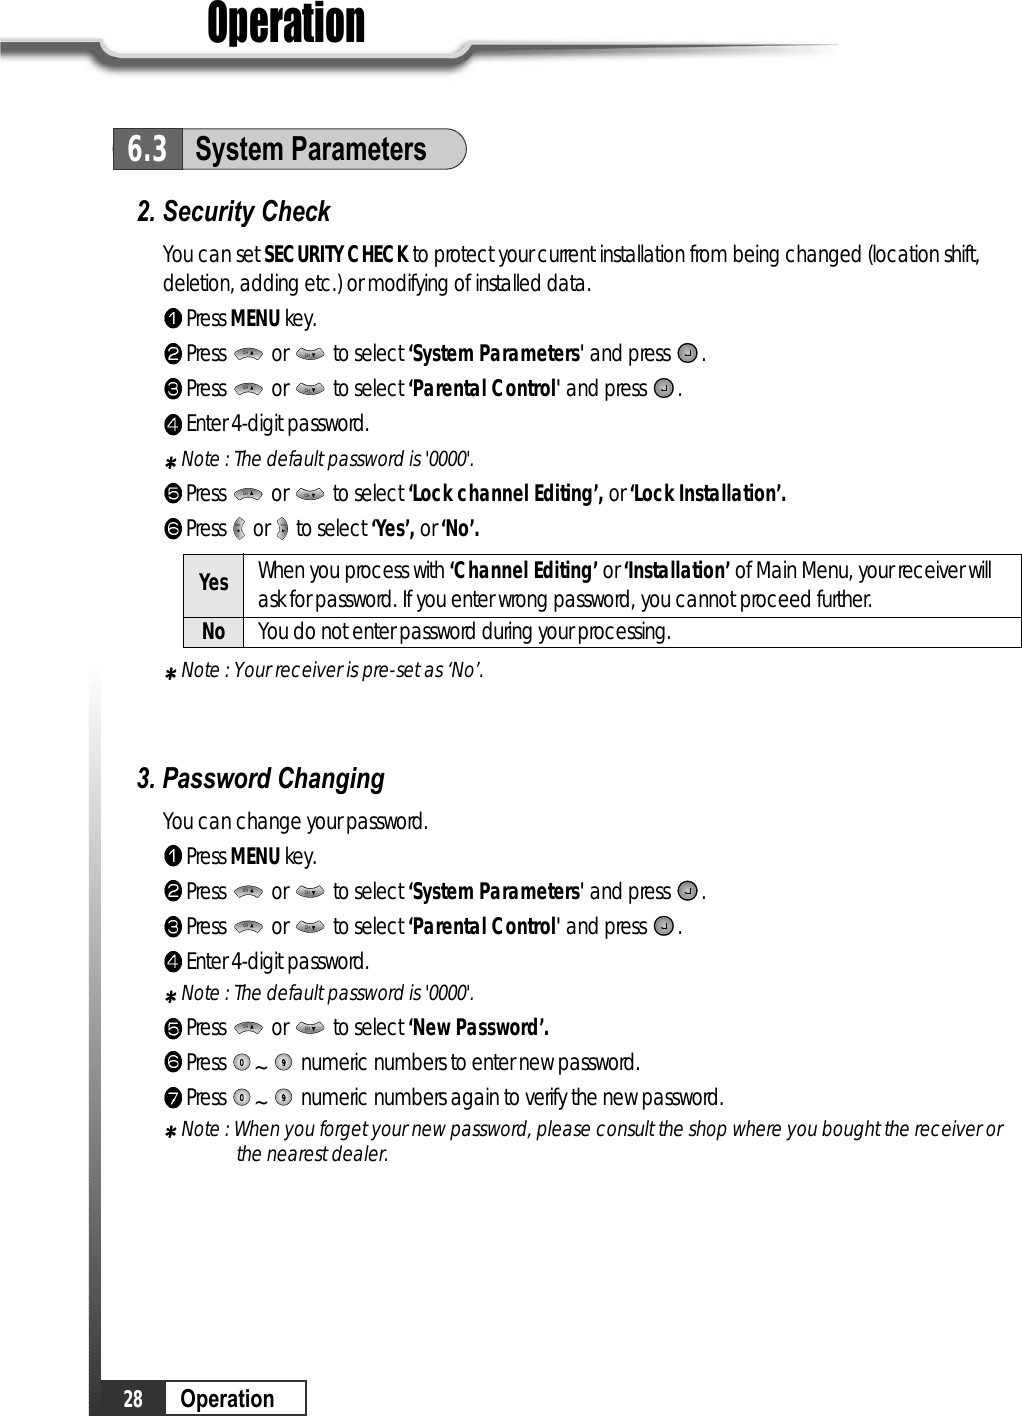
![19OperationOperation1. Favorite ChannelYou can set up favorite channel lists as you want.For example, if you want to set favorite channel lists as following.Favorite1 : 7 DWtv, 6 Hunan1Favorite2 : 1 Fujian1Favorite3 : 3 ANHUI TV, 5 Guangdong1Firstly, set favorite1 channels.Press CH.LIST.Select ‘DWtv' channel with / or / .VOLVOLCHCHTV Channel List-Watch, -EXIT, ~ -Move09-Main,-Page Up/Down,12345678Fujian 1DIGITL VIDANHUI TVNMCHTVGuangdong 1Hunan 1DWtvMCMAsiaSat 2[24] 4,000 GHzHorizontal-18V28,123 MSPSDeutsche WellFAV.LOCKMOVEDELADDMODEAll ListTV Channel List-Select, -Exit/12345678Fujian 1DIGITL VIDANHUI TVNMCHTVGuangdong 1Hunan 1DWtvMCMAsiaSat 2[24] 4,847 GHzHorizontal-18V28,123 MSPSDbanFAV.LOCKMOVEDELADDMODEAll List Favorite StateFavorite 1Favorite 2Favorite 3Favorite 4Favorite 5Rename.TV Channel List12345678Fujian 1DIGITL VIDANHUI TVNMCHTVGuangdong 1Hunan 1DWtvMCMAsiaSat 2[24] 4,000 GHzHorizontal-18V28,123 MSPSDeutsche WellFAV.LOCKMOVEDELADDMODEAll List-Watch, -Exit, ~ -Move09-Main,-Page Up/Down,6.2Channel EditingPress RED.Select favorite1 with or and Press .CHCHFavorite1 ~Favorite5 are default name. Users can rename them for their convenience. If you want to rename ‘Favorite1' (for example ‘Drama').Press RED.TV Channel List-Select, -Exit/12345678Fujian 1DIGITL VIDANHUI TVNMCHTVGuangdong 1Hunan 1DWtvMCMAsiaSat 2[24] 4,000 GHzHorizontal-18V28,123 MSPSDeutsche WellFAV.LOCKMOVEDELADDMODEAll List Favorite StateFavorite 1Favorite 2Favorite 3Favorite 4Favorite 5Rename.](https://usermanual.wiki/Hyundai-Digital-Technology/HSC-880HNA/User-Guide-511131-Page-21.png)
![20OperationOperationSelect ‘Favorite 1’ with or .CHCHPress IVORY.TV Channel List-Select, -Exit/12345678Fujian 1DIGITL VIDANHUI TVNMCHTVGuangdong 1Hunan 1DWtvMCMAsiaSat 2[24] 4,847 GHzHorizontal-18V28,123 MSPSDbanFAV.LOCKMOVEDELADDMODEAll List Favorite StateFavorite 1Favorite 2Favorite 3Favorite 4Favorite 5Rename.TV Channel List-Select, -Exit/12345678Fujian 1DIGITL VIDANHUI TVNMCHTVGuangdong 1Hunan 1DWtvMCMAsiaSat 2[24] 4,830 GHzHorizontal-18V28,123 MSPS HTV1FAV.LOCKMOVEDELADDMODEAll List Favorite StateRename.Favorite 1Favorite 2Favorite 3Favorite 4Favorite 5VOLVOLVOLVOLVOLVOLVOLVOLVOLTV Channel List-Select, -Exit//12345678Fujian 1DIGITL VIDANHUI TVNMCHTVGuangdong 1Hunan 1DWtvMCMAsiaSat 2[24] 4,000 GHzHorizontal-18V28,123 MSPS he WellFAV.LOCKMOVEDELADDMODEAll List Favorite StateRename.DRAMAFavorite 2Favorite 3Favorite 4Favorite 56.2Channel Editing2. Channel List ModeUsing this function, you can see variant channel lists which may enable you to edit and select channelsmore conveniently.Favorite ModeIf you have set up favorite channel lists as the previous section, you can use them as following.Press CH.LIST.Press ORANGE.](https://usermanual.wiki/Hyundai-Digital-Technology/HSC-880HNA/User-Guide-511131-Page-22.png)
![21OperationOperation6.2Channel EditingYou can see ‘Channel List Mode' window. Select ‘Favorite' with or and select ‘Favorite1'with or .VOLVOLCHCHTV Channel List-Exit/12345678Fujian 1DIGITL VIDANHUI TVNMCHTVGuangdong 1Hunan 1DWtvMCMAsiaSat 2[20] 3,847 GHzHorizontal-18V4,420 MSPSHunanFAV.LOCKMOVEDELADDMODEAll ListABChannel List ModeFavoriteSatelliteAlphabetFavorite 1AsiaSat 2AFree+ScrambledPress . You can see only favorite1 channels are listed. With similar way, you can see favorite2 ~favorite5channel list.If you want to return to all channel list (all channels of the selected satellite), press ORANGE and select‘Satellite' with or and press .CHCHTV Channel List-Watch, -Exit, ~ -Move09-Main,-Page Up/Down,AsiaSat 2[20] 3,847 GHzHorizontal-18V4,420 MSPSHunanFAV.LOCKMOVEDELADDMODE67Hunan 1DWtvFavorite 11TV Channel List-Exit/AsiaSat 2[24] 4,000 GHzHorizontal-18V28,123 MSPSDeutsche WellFAV.LOCKMOVEDELADDMODE27DIGITL VIDDWtvDABABChannel List ModeFavoriteSatelliteAlphabetFavorite 1AsiaSat 2DFree+ScrambledAlphabet ModeUsing this function, you can see the channel list which have same initial. This function is useful when yousearch specific channel among the list of thousands channels. For example, if you want to see the channel lists which start with ‘D'.Press ORANGE in the channel list and select ‘Alphabet' with or .CHCH](https://usermanual.wiki/Hyundai-Digital-Technology/HSC-880HNA/User-Guide-511131-Page-23.png)
![22OperationOperationTV Channel List-Exit/12345678Fujian 1DIGITL VIDANHUI TVNMCHTVGuangdong 1Hunan 1DWtvMCMAsiaSat 2[20] 3,000 GHzHorizontal-18V4,420 MSPSDeutsche WellFAV.LOCKMOVEDELADDMODEAll ListABChannel List ModeFavoriteSatelliteAlphabetFavorite 1AsiaSat 2DFree+ScrambledSelect ‘D' with or .VOLVOLPress .You can see the channel list where all channels have initial ‘D'.TV Channel List-Watch, -Exit, ~ -Move09-Main,-Page Up/Down,AsiaSat 2[24] 4,000 GHzHorizontal-18V28,123 MSPSDeutsche WellFAV.LOCKMOVEDELADDMODE27DIGITL VIDDWtvDABFree only ModePress ORANGE in the channel list and select first line with or .Select ‘Free only' with or . Select ‘Favorite' or ‘Satellite' or ‘Alphabet' and press . You can see only the selected ‘free'channel list. VOLVOLCHCHTV Channel List-Exit/12345678Fujian 1DIGITL VIDANHUI TVNMCHTVGuangdong 1Hunan 1DWtvMCMAsiaSat 2[20] 3,000 GHzHorizontal-18V4,420 MSPSHunanFAV.LOCKMOVEDELADDMODEAll ListABChannel List ModeFavoriteSatelliteAlphabetFavorite 1AsiaSat 2AFree+Scrambled6.2Channel Editing](https://usermanual.wiki/Hyundai-Digital-Technology/HSC-880HNA/User-Guide-511131-Page-24.png)
![23OperationOperation6.2Channel EditingFree + Scrambled ModePress ORANGE in the channel list and select first line with or . Select ‘Free+ Scrambled' with or . VOLVOLCHCHTV Channel List-Exit/12345678Fujian 1DIGITL VIDANHUI TVNMCHTVGuangdong 1Hunan 1DWtvMCMAsiaSat 2[20] 3,20 GHzHorizontal-18V4,420 MSPSDianFAV.LOCKMOVEDELADDMODEAll ListABChannel List ModeFavoriteSatelliteAlphabetDRAMAAsiaSat 2AFree+ScrambledSatellite ModeBy using this function, you can see all channel list of the selected satellite.Press ORANGE and select ‘Satellite’ item with or . CHCHTV Channel List-Exit/AsiaSat 2[24] 4,000 GHzHorizontal-18V28,123 MSPSDeutsche WellFAV.LOCKMOVEDELADDMODE27DIGITL VIDDWtvDABABChannel List ModeFavoriteSatelliteAlphabetFavorite 1AsiaSat 2DFree+ScrambledSelect ‘Favorite' or ‘Satellite' or ‘Alphabet' and press . You can see the selected free andscrambled channel list.Note : ‘Scrambled’ channel can be shown only with CI (Common Interface) model and CAS(Conditional Access System) model. ‘Free’ channel can be shown with all (FTA(Free To Air) and CIand CAS) models.Press or to select a satellite and press .VOLVOL](https://usermanual.wiki/Hyundai-Digital-Technology/HSC-880HNA/User-Guide-511131-Page-25.png)
![24OperationOperation3. Lock ChannelThis menu enables you to prevent children from viewing programs unsuitable for their age.Press CH.LIST and select the channel you want to lock with / or / and press GREEN.Then the selected channel is locked.Note : If ‘password’ window is risen as following picture, enter password with numeric keys (defaultpassword is ‘0000’). Then you can lock the channel. If you don't want this window, change‘Parental Control' set up in the ‘System Parameters’ menu. Refer to the ‘Parental control' in‘System parameters’ in this manual for detail.VOLVOLCHCHTV Channel List-Watch, / -EXIT, ~-Move09-Main,-Page Up/Down,12345678Fujian 1NMCHTVRAIGuangdong 1Hunan 1MCMDWtvTVEAsiaSat 2[24] 4,000 GHzHorizontal-18V28,123 MSPSDeutsche WellFAV.LOCKMOVEDELADDMODEAll ListTV Channel List-Watch, / -EXIT, ~-Move09-Main,-Page Up/Down,12345678Fujian 1NMCHTVRAIGuangdong 1Hunan 1MCMDWtvTVEAsiaSat 2[24] 4,000 GHzHorizontal-18V28,123 MSPSDeutsche WellFAV.LOCKMOVEDELADDMODEAll List<< Authorized! >>6.2Channel EditingPress MENU, EXIT or to finish the process.Without entering your password, you cannot watch a locked channel's program.If you want to cancel the channel lock, go to the channel list and select the channel and pressGREEN.4. Channel Order SettingYou can organize the number or sequence of the channels.Press CH.LIST.Select the channel you want to move with / or / and press YELLOW.VOLVOLCHCHTV Channel List-Watch, -EXIT, ~ -Move09-Main,-Page Up/Down,910111213141516RAI InternatiTVETV5-AsiaRTPiuØoH-u1/4Ö¥x CSªFËê>>Ú¥x ET«DoZ¥x USTV-Ioé¥>>¥x JET AsiaSat 2[24] 4,000 GHzHorizontal-18V28,123 MSPSDeutsche WellFAV.LOCKMOVEDELADDMODEAll ListSSSSMove the selected channel with / or / to the position you want.VOLVOLCHCH](https://usermanual.wiki/Hyundai-Digital-Technology/HSC-880HNA/User-Guide-511131-Page-26.png)
![25OperationOperation6.2Channel EditingPress YELLOW.Press MENU,EXIT or to finish the process. TV Channel List-Watch, -EXIT, ~ -Move09-Main,-Page Up/Down,910111213141516RAI InternatiRTPiTVETV5-AsiauØoH-u1/4Ö¥x CSªFËê>>Ú¥x ET«DoZ¥x USTV-Ioé¥>>¥x JET AsiaSat 2[24] 4,000 GHzHorizontal-18V28,123 MSPSDeutsche WellFAV.LOCKMOVEDELADDMODEAll ListSSSS5. Delete ChannelYou can delete channels from the channel list. Press CH.LIST and select the channel you want to remove with / or / . Press BLUE.Note : If ‘password' window is risen as following picture, enter password with numeric keys (defaultpassword is' 0000'). Then you can delete the channel. If you don't want this window, change‘Parental Control' set up in the ‘System Parameters' menu. Refer to the 'Parental control' in Systemparameters' in this manual for detail.VOLVOLCHCHThen, you need to confirm the deletion. If you definitely want to delete, press . If not, press EXIT.Note : Please be careful when you delete channel(s).Press MENU, EXIT or to finish the process.TV Channel List-Watch, -Exit,/ ~ -Move0L9-Main,-Page Up/Down,910111213141516TVETV5 - AsiaHubei 1Hubei 2RAI InternatiFujian 2Jiangxi 1Jiangxi 2AsiaSat 2[3] 3,713 GHzHorizontal-18V4,420 MSPSHubeiFAV.LOCKMOVEDELADDMODEPASSWORD????TV Channel List-Watch, -Exit,/ ~ -Move0L9-Main,-Page Up/Down,910111213141516TVETV5 - AsiaHubei 1Hubei 2RAI InternatiFujian 2Jiangxi 1Jiangxi 2AsiaSat 2[3] 3,713 GHzHorizontal-18V4,420 MSPSHubeiFAV.LOCKMOVEDELADDMODEAll List Do you want to delete this channel?Yes / NoQ](https://usermanual.wiki/Hyundai-Digital-Technology/HSC-880HNA/User-Guide-511131-Page-27.png)
![26OperationOperation6. Add ChannelPress CH.LIST.Press Ivory.Select a satellite into which you want to add your new channel. Note : You can only select satellites which you set in ‘Installation’ menu.Move to ‘TP Frequency' section (column)by pressing and change frequency with / or enterfrequency with numeric keys. Note : TP frequency consists of 5 digits ending with GHz.For example : TP Frequency 4.000GHz isMove to ‘Polarization' by pressing and select Horizontal or Vertical with or . Note : Please check whether LNB Power is ON in ‘Installation’ menu.Move to ‘Symbol Rate' by pressing and enter the Symbol Rate value with numeric keys. Move to ‘CH. Name' by pressing and enter the alphabetic characters with numeric keys. For example : if you want to enter SAT-1, Note : Press for space.Move to ‘VIDEO PID' by pressing key and enter the proper value with numeric keys. Move to ‘AUDIO PID' by pressing key and enter the proper value with numeric keys. Move to ‘PCR PID' by pressing key and enter the value between 0000~8192 with numeric keys. Note : The above mentioned TP Frequency, Symbol Rate, VIDEO PID, AUDIO PID, PCR PID are veryimportant for optimal satellite signal reception. We recommend you get professional advicewhere available. You cannot setup ‘VIDEO PID’ for RADIO channels.CHCHCHVOLVOLVOLVOLCHCHVOLVOLCHVOLVOLCHAdd Digital ChannelAsiaSat 2[24] 4,000 GHzHorizontal-18V28,123 MSPSDWtv230523062304Satellite NameTP FrequencyPolarizationSymbol RateCH. NameVideo PIDAudio PIDPCR PID6.2Channel Editing](https://usermanual.wiki/Hyundai-Digital-Technology/HSC-880HNA/User-Guide-511131-Page-28.png)

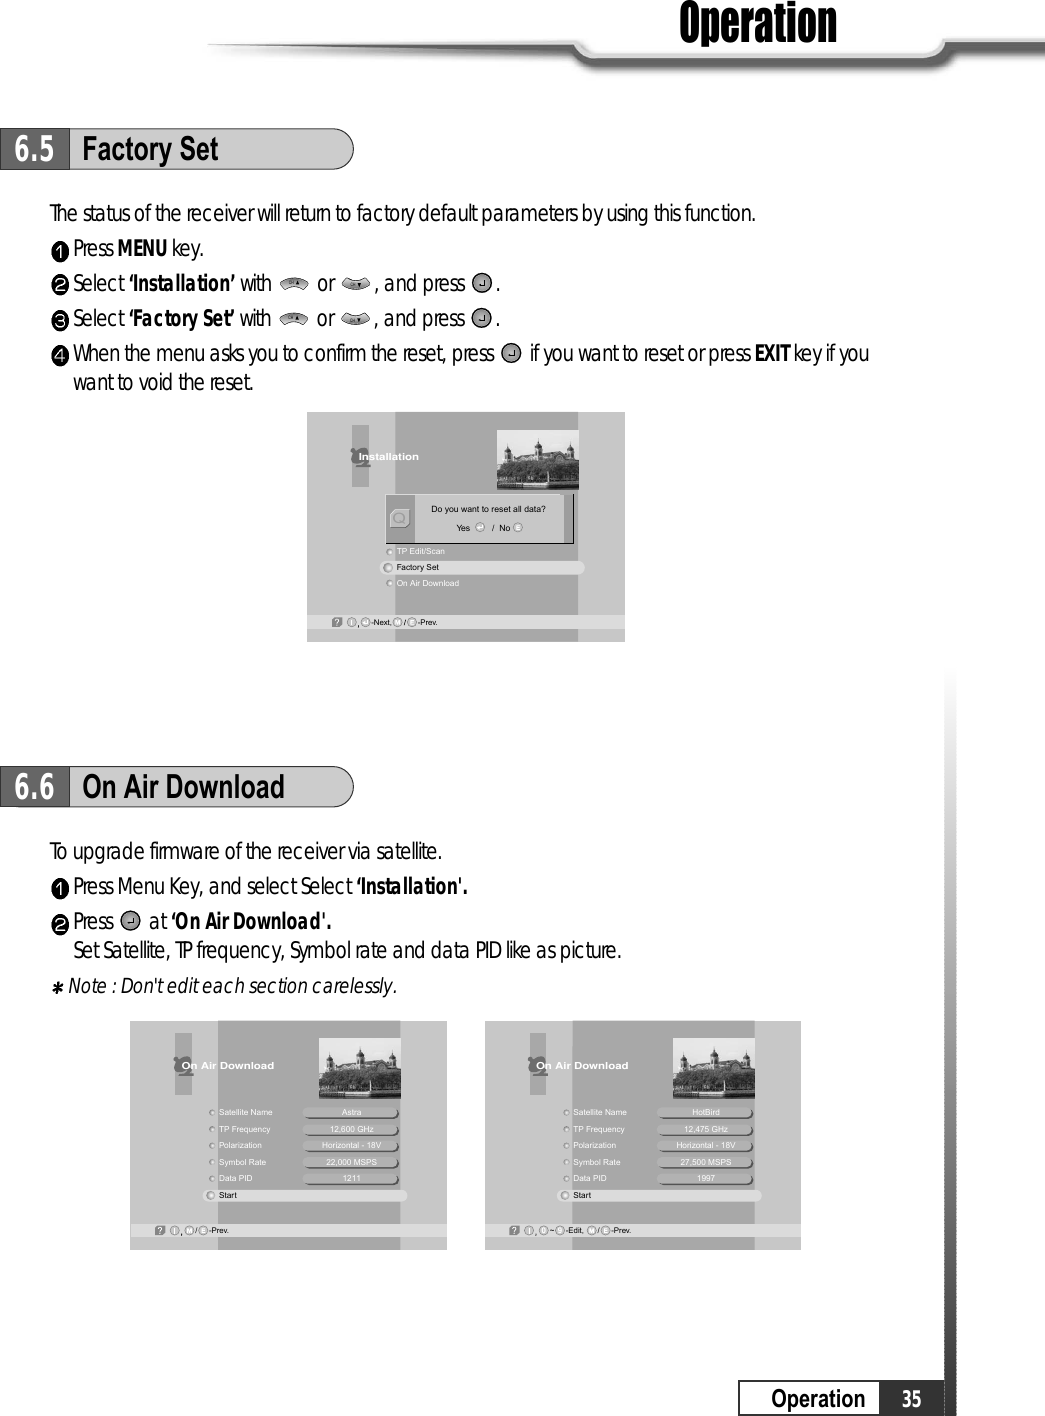
![33OperationOperation1. TP Edit / ScanAfter ‘LNB Configuration’ and ‘Antenna Setup’ procedure, when necessary, you can edit and/or addcertain TPs (transponders)Press MENU key.Select ‘Installation’ with or , and press .Select ‘TP Edit/Scan’ with or , and press .CHCHCHCHSelect the ‘Satellite Name’ which includes the TP you want to add/edit with or .Move to ‘TP Frequency’ with and select the TP you want to edit with or . If you want to add the new TP, enter the TP frequency with numeric keys.Select ‘Polarization’ by pressing and the set the proper value for selected TP with or .Select ‘Symbol rate’ by pressing and enter the symbol rate value for the selected TP withnumeric keys . After entering all values of the TP parameters, move to ‘SCAN’ section (column) with and pressfor storing all the entered TP data.As a result, you can get the following menu showing the scanning process.CHCHVOLVOLCHVOLVOLCHVOLVOLTP Edit/Scan-Select, -Prev.-Main,AsiaSat 2[24] 4,000 GHzHorizontal-18V28,123 MSPSFree+Scrambled Good81%Satellite NameTP FrequencyPolarizationSymbol RateScanTP Delete6.4TransponderTP Edit/Scan-Select, -Prev.-Main,USER[15] 3,820 GHzVertical-14V28,123 MSPSFree+ScrambledGood81%Satellite NameTP FrequencyPolarizationSymbol RateScanTP DeleteScanningPress to stop scanningQ](https://usermanual.wiki/Hyundai-Digital-Technology/HSC-880HNA/User-Guide-511131-Page-35.png)
![34Operation6.4TransponderAfter scanning process, the first channel of scanned TP will be displayed.Note : If the scan fails, please check whether your entered values are correct or not and the signalreception sensitivity is good or bad.TP Edit/ScanGood82%-Watch, -Prev./-Page Up/Down,TV: 6 Success Radio: 20171819202122DW 9RDP ANTENA 1RDP ESPECIALNN¥xÆWaN¥<< TWN¥@uØ1/2Auø USA-AsiaSat 2 [24] 4,000 GHz Hor. 28,123~~910111213141516RAI InternatiTVETV5-AsiaRTPiuØoH-u1/4Ö¥x CSªFËê>>Ú¥x ET«DoZ¥x USTV-Ioé¥>>¥x JET 2. TP DeletePress MENU key.Select ‘Installation’ with or , and press .Select ‘TP Edit/Scan’ with or , and press .CHCHCHCHTP Edit/Scan-Select, -Prev.-Main,AsiaSat 2[24] 4,000 GHzHorizontal - 18V28,123 MSPSFree+ScrambledGood80%Satellite NameTP FrequencyPolarizationSymbol RateScanTP DeleteMove to TP section (column) with and select the TP you want to delete with or .Move to ‘TP Delete’ section (column) by pressing and press .When the menu asks you to confirm the deletion, press if you want to delete it or press EXIT key ifyou want to void the deletion.CHVOLVOLCHOperation](https://usermanual.wiki/Hyundai-Digital-Technology/HSC-880HNA/User-Guide-511131-Page-36.png)
![36OperationOperationPress at ‘Start'. It takes a few minutes to search the group of program & download channel. If there is problem insearching the necessary information, then other window is open.If you select ‘Start' again, upgrade will start. On finishing upgrade, if necessary, Receiver is restarted.Note : Do not turn off the power, while upgrading Receiver.-Select, -Prev.-Main,AstraHorizontal-18V[1] 12,603 GHz22,000 MSPSOn Air DownloadGood98%SelectYe sNoYe sStartDisplay InfoMain SWCh ListInfo Text-Select, -Prev.-Main,HotBirdHorizontal-18V[1] 11,750 GHz27,500 MSPSOn Air DownloadGood98%SelectYe sNoYe sStartDisplay InfoMain SWCh ListInfo Text1. TV / RADIO switchingYou can use this menu when you change a TV channel to a Radio channel or vice versa.Press ‘TV/RADIO’.When listening a radio channel, ‘r001’ will be displayed on the front panel.6.7Other Function on Remote Control2. GUIDE(EPG:Electronic Program Guide)You can check the channel information on the channels of the transponder you are watching.Press GUIDE key, then the following menu will be displayed.Note : 1. You can check local time, channel name, and other brief information on the current program.2. If you didn't set local time under ‘System Parameters’ section, the GUIDE function may not workproperly.3. EPG information is delivered by satellite from service providers. If the channel does not carryany signal on the guide data, this function may not work properly.6.6On Air Download](https://usermanual.wiki/Hyundai-Digital-Technology/HSC-880HNA/User-Guide-511131-Page-38.png)
![37OperationOperation6.7Other Function on Remote ControlSelect Channel with or . Then you can see current or next program information of the selected channel.If you press GREEN, current or next program information would be converted to next or currentprogram information respectively.CHCHProgram Guide-Schedule, -Extended-Current/Next,19:3319:23 19:53CurrentJOURNAL News - Sports -Weather - Interview12345678Fujian 1DIGITL VIDANHUI TVNMCHTVGuangdong 1Hunan 1DWtvMCMJOURNAL Ne..Program Guide-Schedule, -Extended-Current/Next,19:3419:53 20:23NextIn Focus12345678Fujian 1DIGITL VIDANHUI TVNMCHTVGuangdong 1Hunan 1DWtvMCMIn FocusIf you press YELLOW, you can see program schedule list of the selected channel.If you want to see program information of a program in the program schedule list, select the programwith or . Then you can see the program information in the right window.CHCHIf you press BLUE, you can see extended program information of the selected program.Program Guide-Schedule, -Extended-Current/Next,19:39Guest: Marianne Birthler Commissionerfor Stasi Files [7] DWtv11/03/1998 19:27~19:57JOURNAL News-Sports-Weather - InterviewProgram Guide-Schedule, -Extended-Current/Next,19:4219:27~19:5719:57~20:2720:27~20:5720:57~21:2721:27~21:5721:57~22:2722:27~22:5722:57~23:27JOURNAL News - Sports..In FocusJOURNAL Nachrichten - ..ThemaJOURNAL News - Busines..Germany LiveJOURNAL Nachrichten - ..Im Focus [7] DWtv11/03/1998 20:27~20:57JOURNAL Nachrichten -Wirtsohaft - Wetter -Tagesthema](https://usermanual.wiki/Hyundai-Digital-Technology/HSC-880HNA/User-Guide-511131-Page-39.png)
![38OperationOperation6.7Other Function on Remote ControlYou can set up automatic power on-off (Timer)or automatic recording on the program schedule list.After pressing YELLOW in the Guide(EPG)menu, select a program with / or / and press.Select ‘Once/Daily/Weekly/No' of ‘Status' with or .Select ‘HD record’ and set ‘ON’ with if you want to record automatically.VOLVOLVOLVOLCHCHPress to save the new ‘Timer' setting.Press MENU,EXIT or to finish GUIDE menu.Note : 1. Without 'STATUS' being actuated (Yes), 'Timer' does not work.2. If a program of prior time than current time ('Local Time' in 'System Parameters' menu) isselected, Timer does not work.3. Refer to 'Setting Timer' in 'System Parameters' in this manual.Program Guide-Schedule, -Extended-Current/Next,19:4219:27~19:5719:57~20:2720:27~20:5720:57~21:2721:27~21:5721:57~22:2722:27~22:5722:57~23:27JOURNAL News - Sports..In FocusJOURNAL Nachrichten - ..ThemaJOURNAL News - Busines..Germany LiveJOURNAL Nachrichten - ..Im Focus [7] DWtv11/03/1998 20:27~20:57JOURNA chrichten -Weather -- Wetter -11/03/1998 20:26TimerStatusHD record11/03/1998 21:02-Reserve, -CancelEOnceONProgram Guide-Schedule, -Extended-Current/Next,19:4219:27~19:5719:57~20:2720:27~20:5720:57~21:2721:27~21:5721:57~22:2722:27~22:5722:57~23:27JOURNAL News - Sports..In FocusJOURNAL Nachrichten - ..ThemaJOURNAL News - Busines..Germany LiveJOURNAL Nachrichten - ..Im Focus [7] DWtv11/03/1998 20:27~20:57JOURNA chrichten -Weather -- Wetter -11/03/1998 20:26TimerStatusHD record11/03/1998 21:02-Reserve, -CancelENoONProgram Guide-Schedule, -Extended-Current/Next,19:4219:27~19:5719:57~20:2720:27~20:5720:57~21:2721:27~21:5721:57~22:2722:27~22:5722:57~23:27JOURNAL News - Sports..In FocusJOURNAL Nachrichten - ..ThemaJOURNAL News - Busines..Germany LiveJOURNAL Nachrichten - ..Im Focus [7] DWtv11/03/1998 20:27~20:57Wirtsohaft - Wetter -TagesthemaReserved at Timer #1!](https://usermanual.wiki/Hyundai-Digital-Technology/HSC-880HNA/User-Guide-511131-Page-40.png)
![39OperationOperation3. Subtitle/AudioYou can adjust the subtitle and audio condition/status of the current channel.Press ‘AUDIO’ and subtitle and audio related window will be displayed on the screen.In this example, program spoken language is ‘English' and user's selected subtitle language is‘Swedish'.The contents of each parameter are as follows ;Note : These subtitle and audio parameters are workable only when the receiving channel supportsthese functions.-Subtitle On/OffSubtitle TrackAudio TrackAudio ModeDig.Output2 of 10 [Swedish]1 of 8 [English]StereoNon-compressedSubtitle/AudioSubtitle Track (Subtitle language #)of (all subtitle language available in this program)[Current selected subtitle language]Audio Track (Audio track #)of (all tracks available in this program)[spoken language in this program]Audio Mode Stereo -> Mono-Left -> Mono-RightDig.Output Non-compressed / Compressed6.7Other Function on Remote Control](https://usermanual.wiki/Hyundai-Digital-Technology/HSC-880HNA/User-Guide-511131-Page-41.png)