Hyundai IBT LT20A0000 20” LCD Monitor User Manual 1
Hyundai IBT Corp. 20” LCD Monitor 1
UserManual.wiki
>
Hyundai IBT
>
LT20A0000 User Manual
>
Users Manual 1 of 2
Contents
1.
Users Manual 1 of 2
2.
Users Manual 2 of 2
Users Manual 1 of 2
Navigation menu
Upload a User Manual
Namespaces
Wiki Guide
HTML
PDF
Info
Views
User Manual
Discussion / Help
Navigation
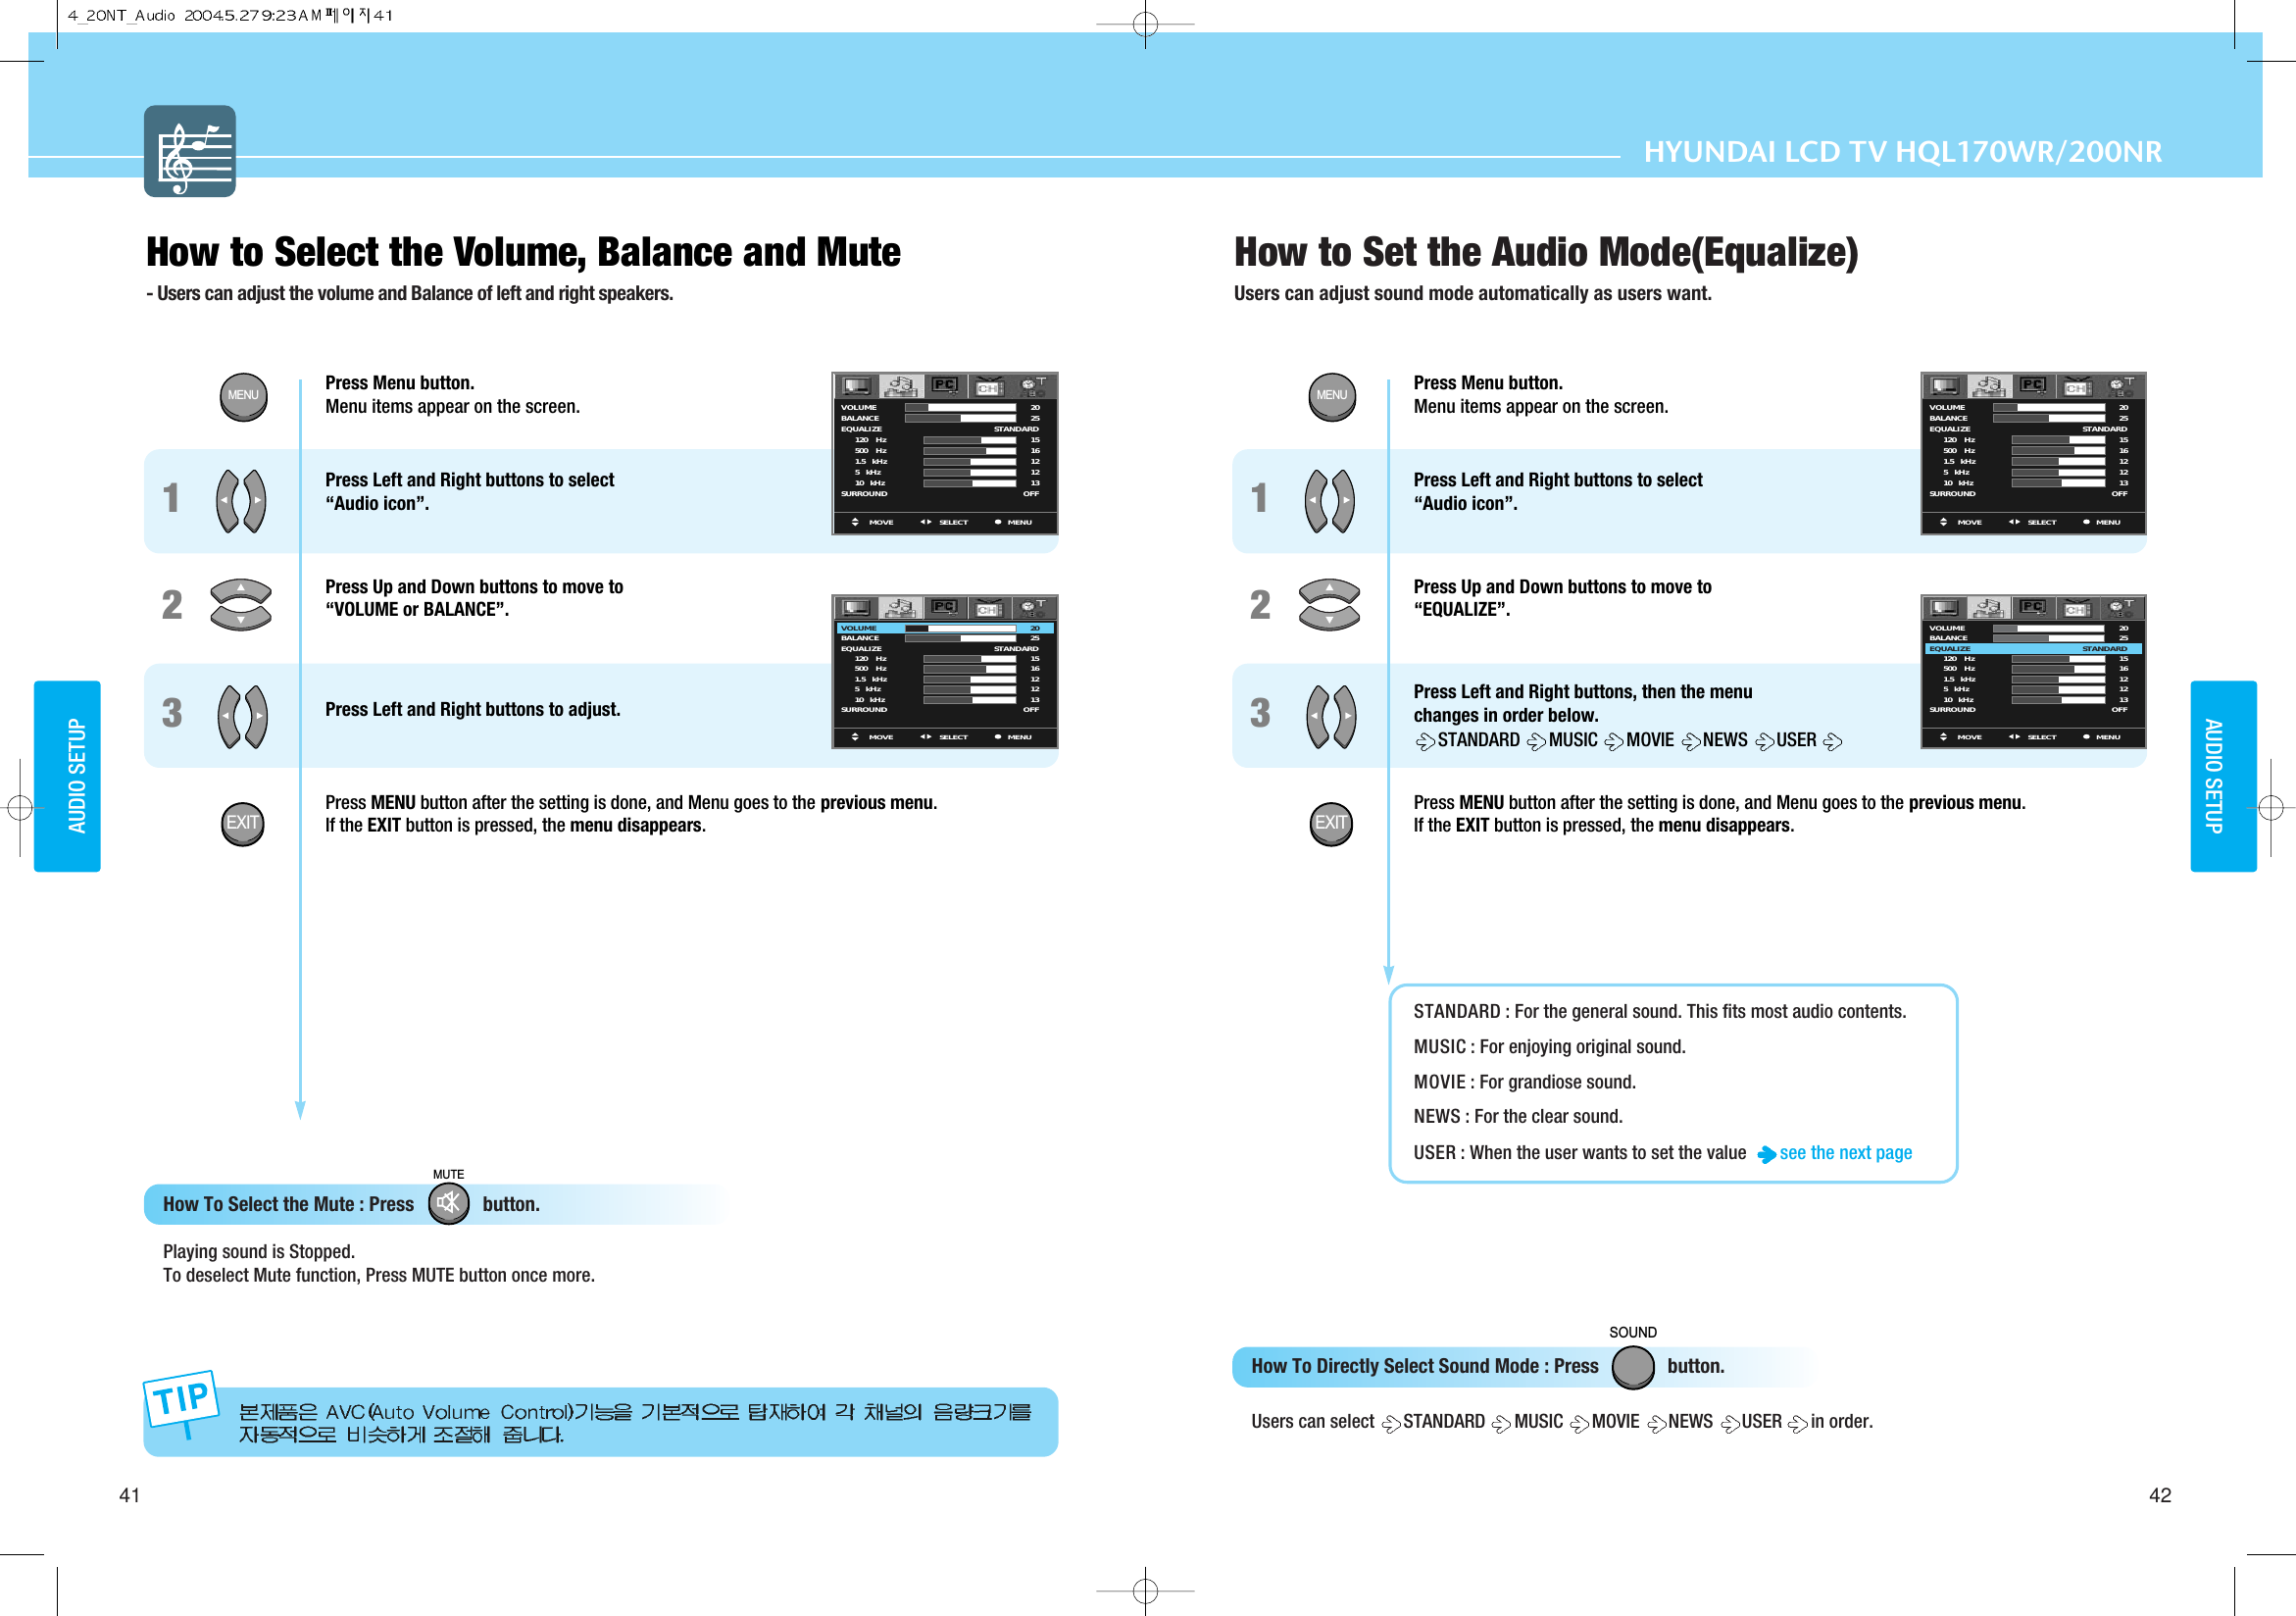
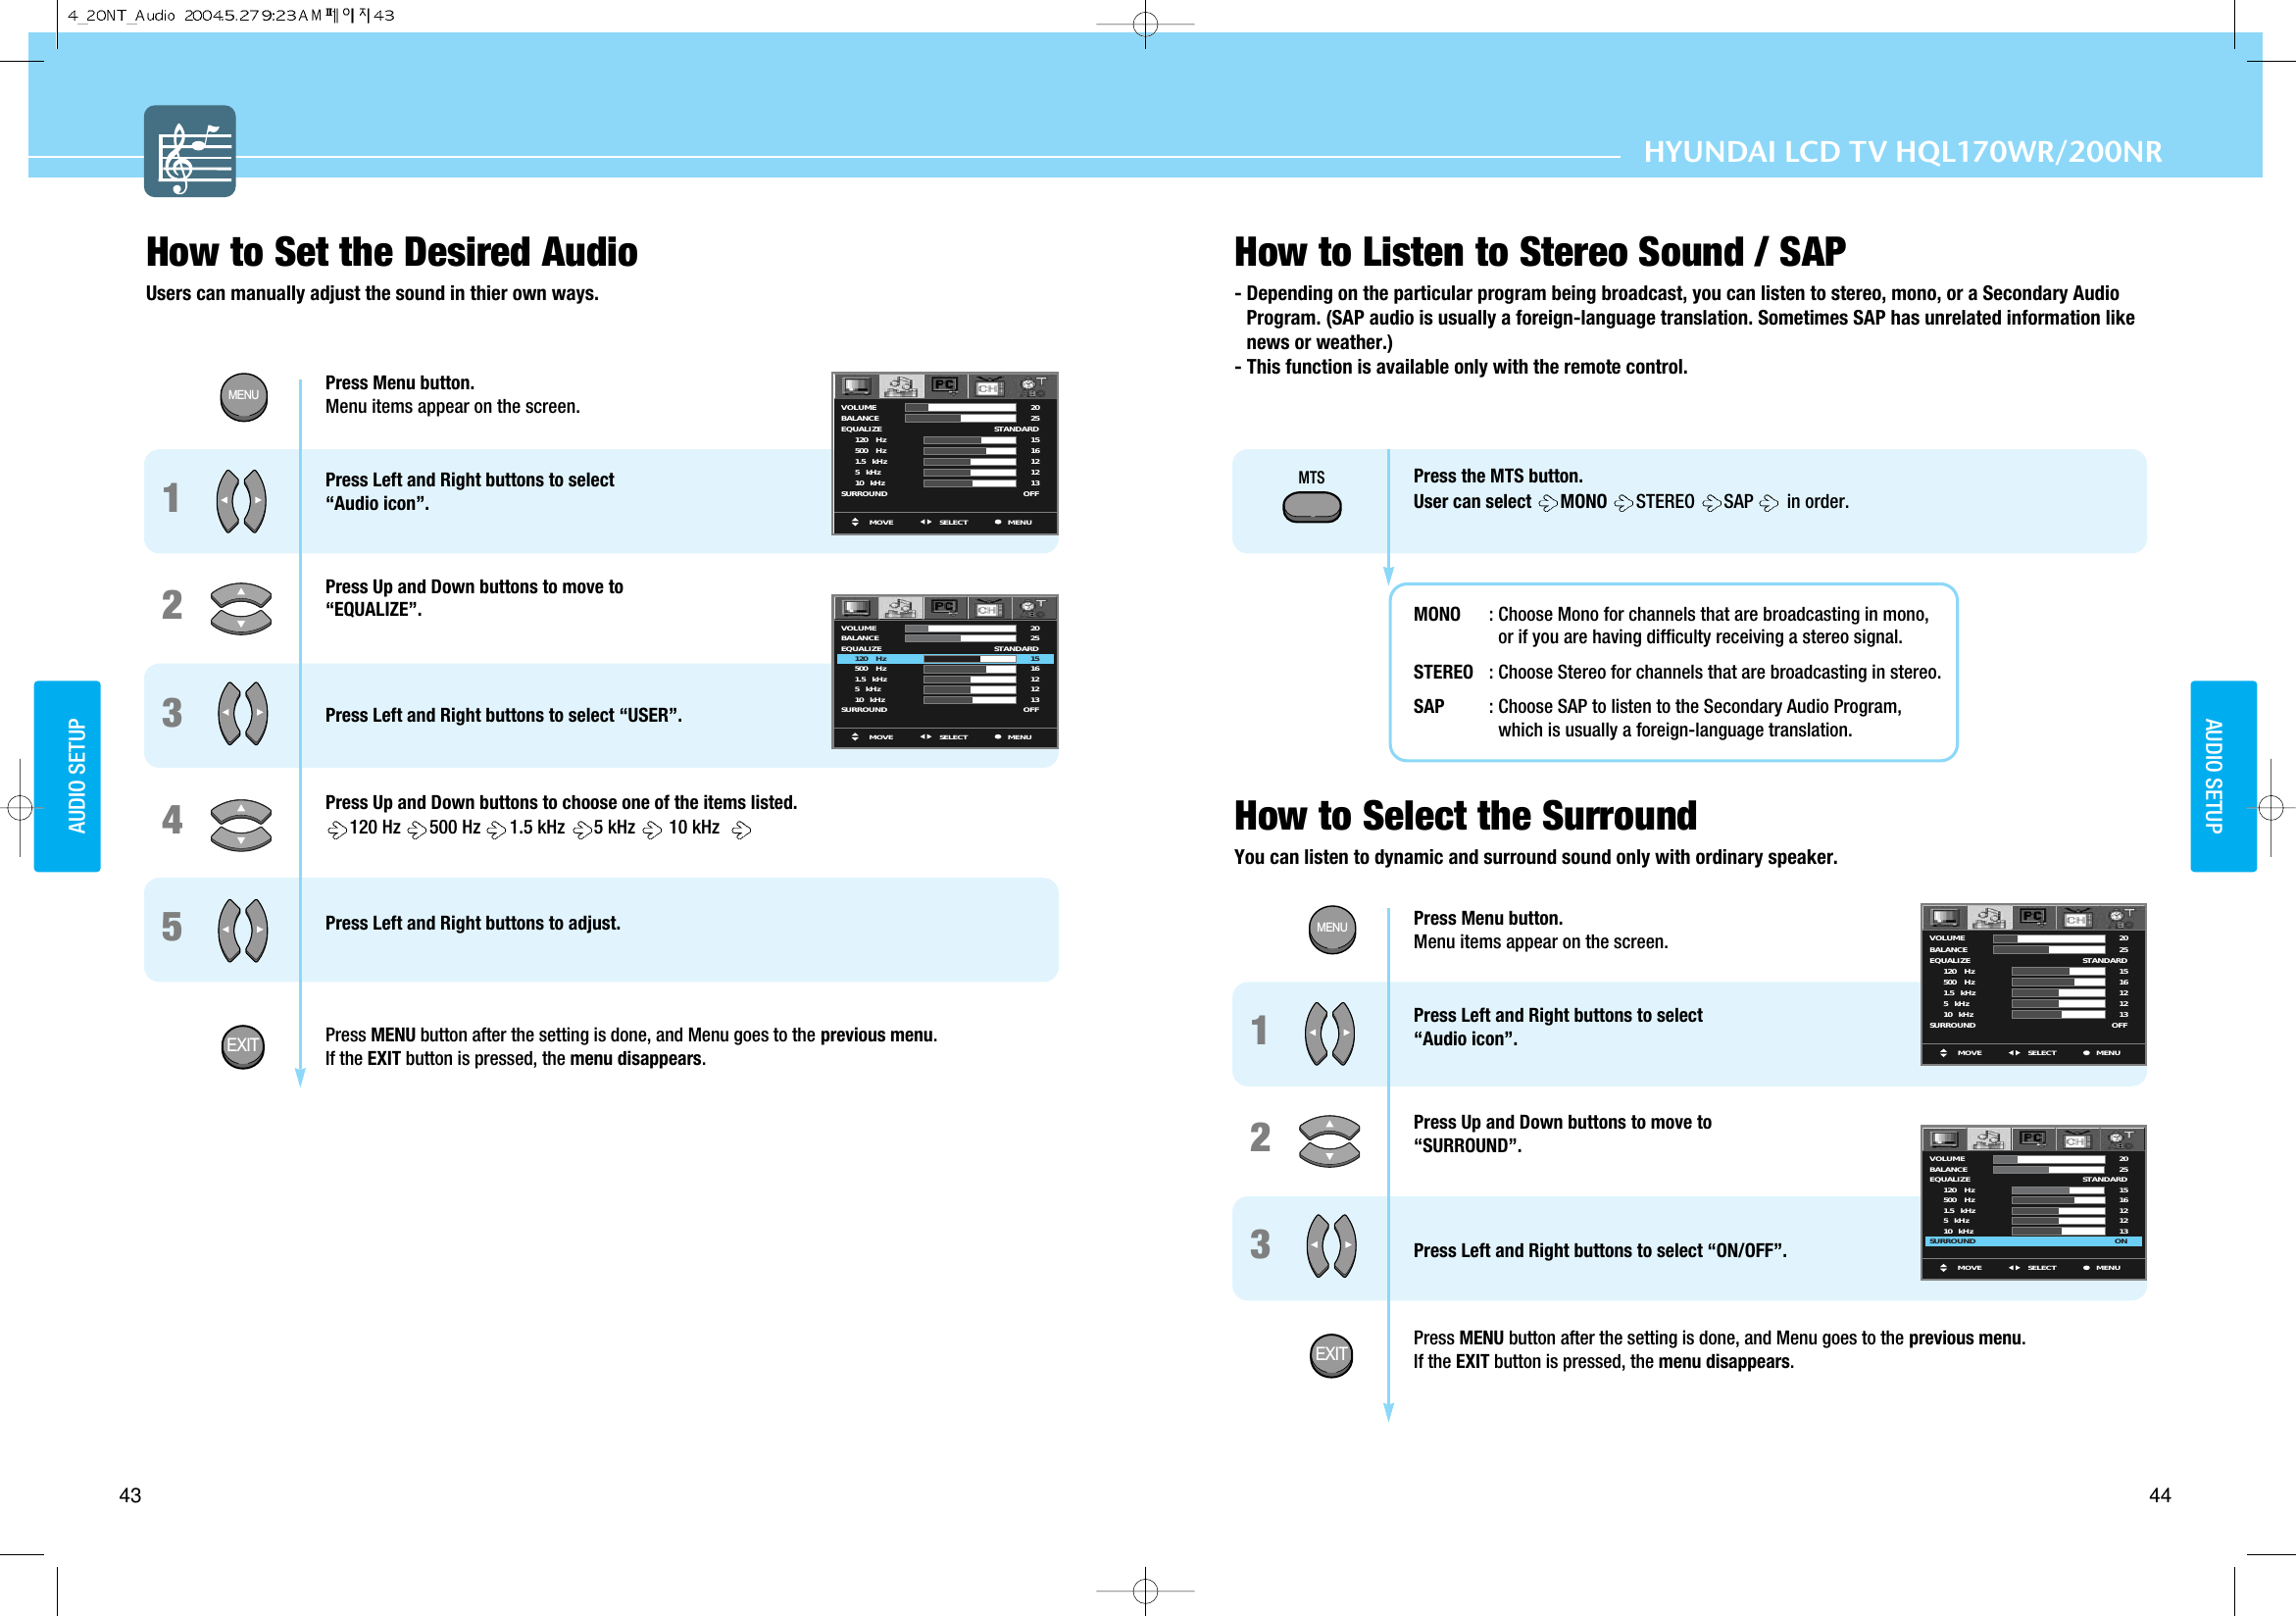
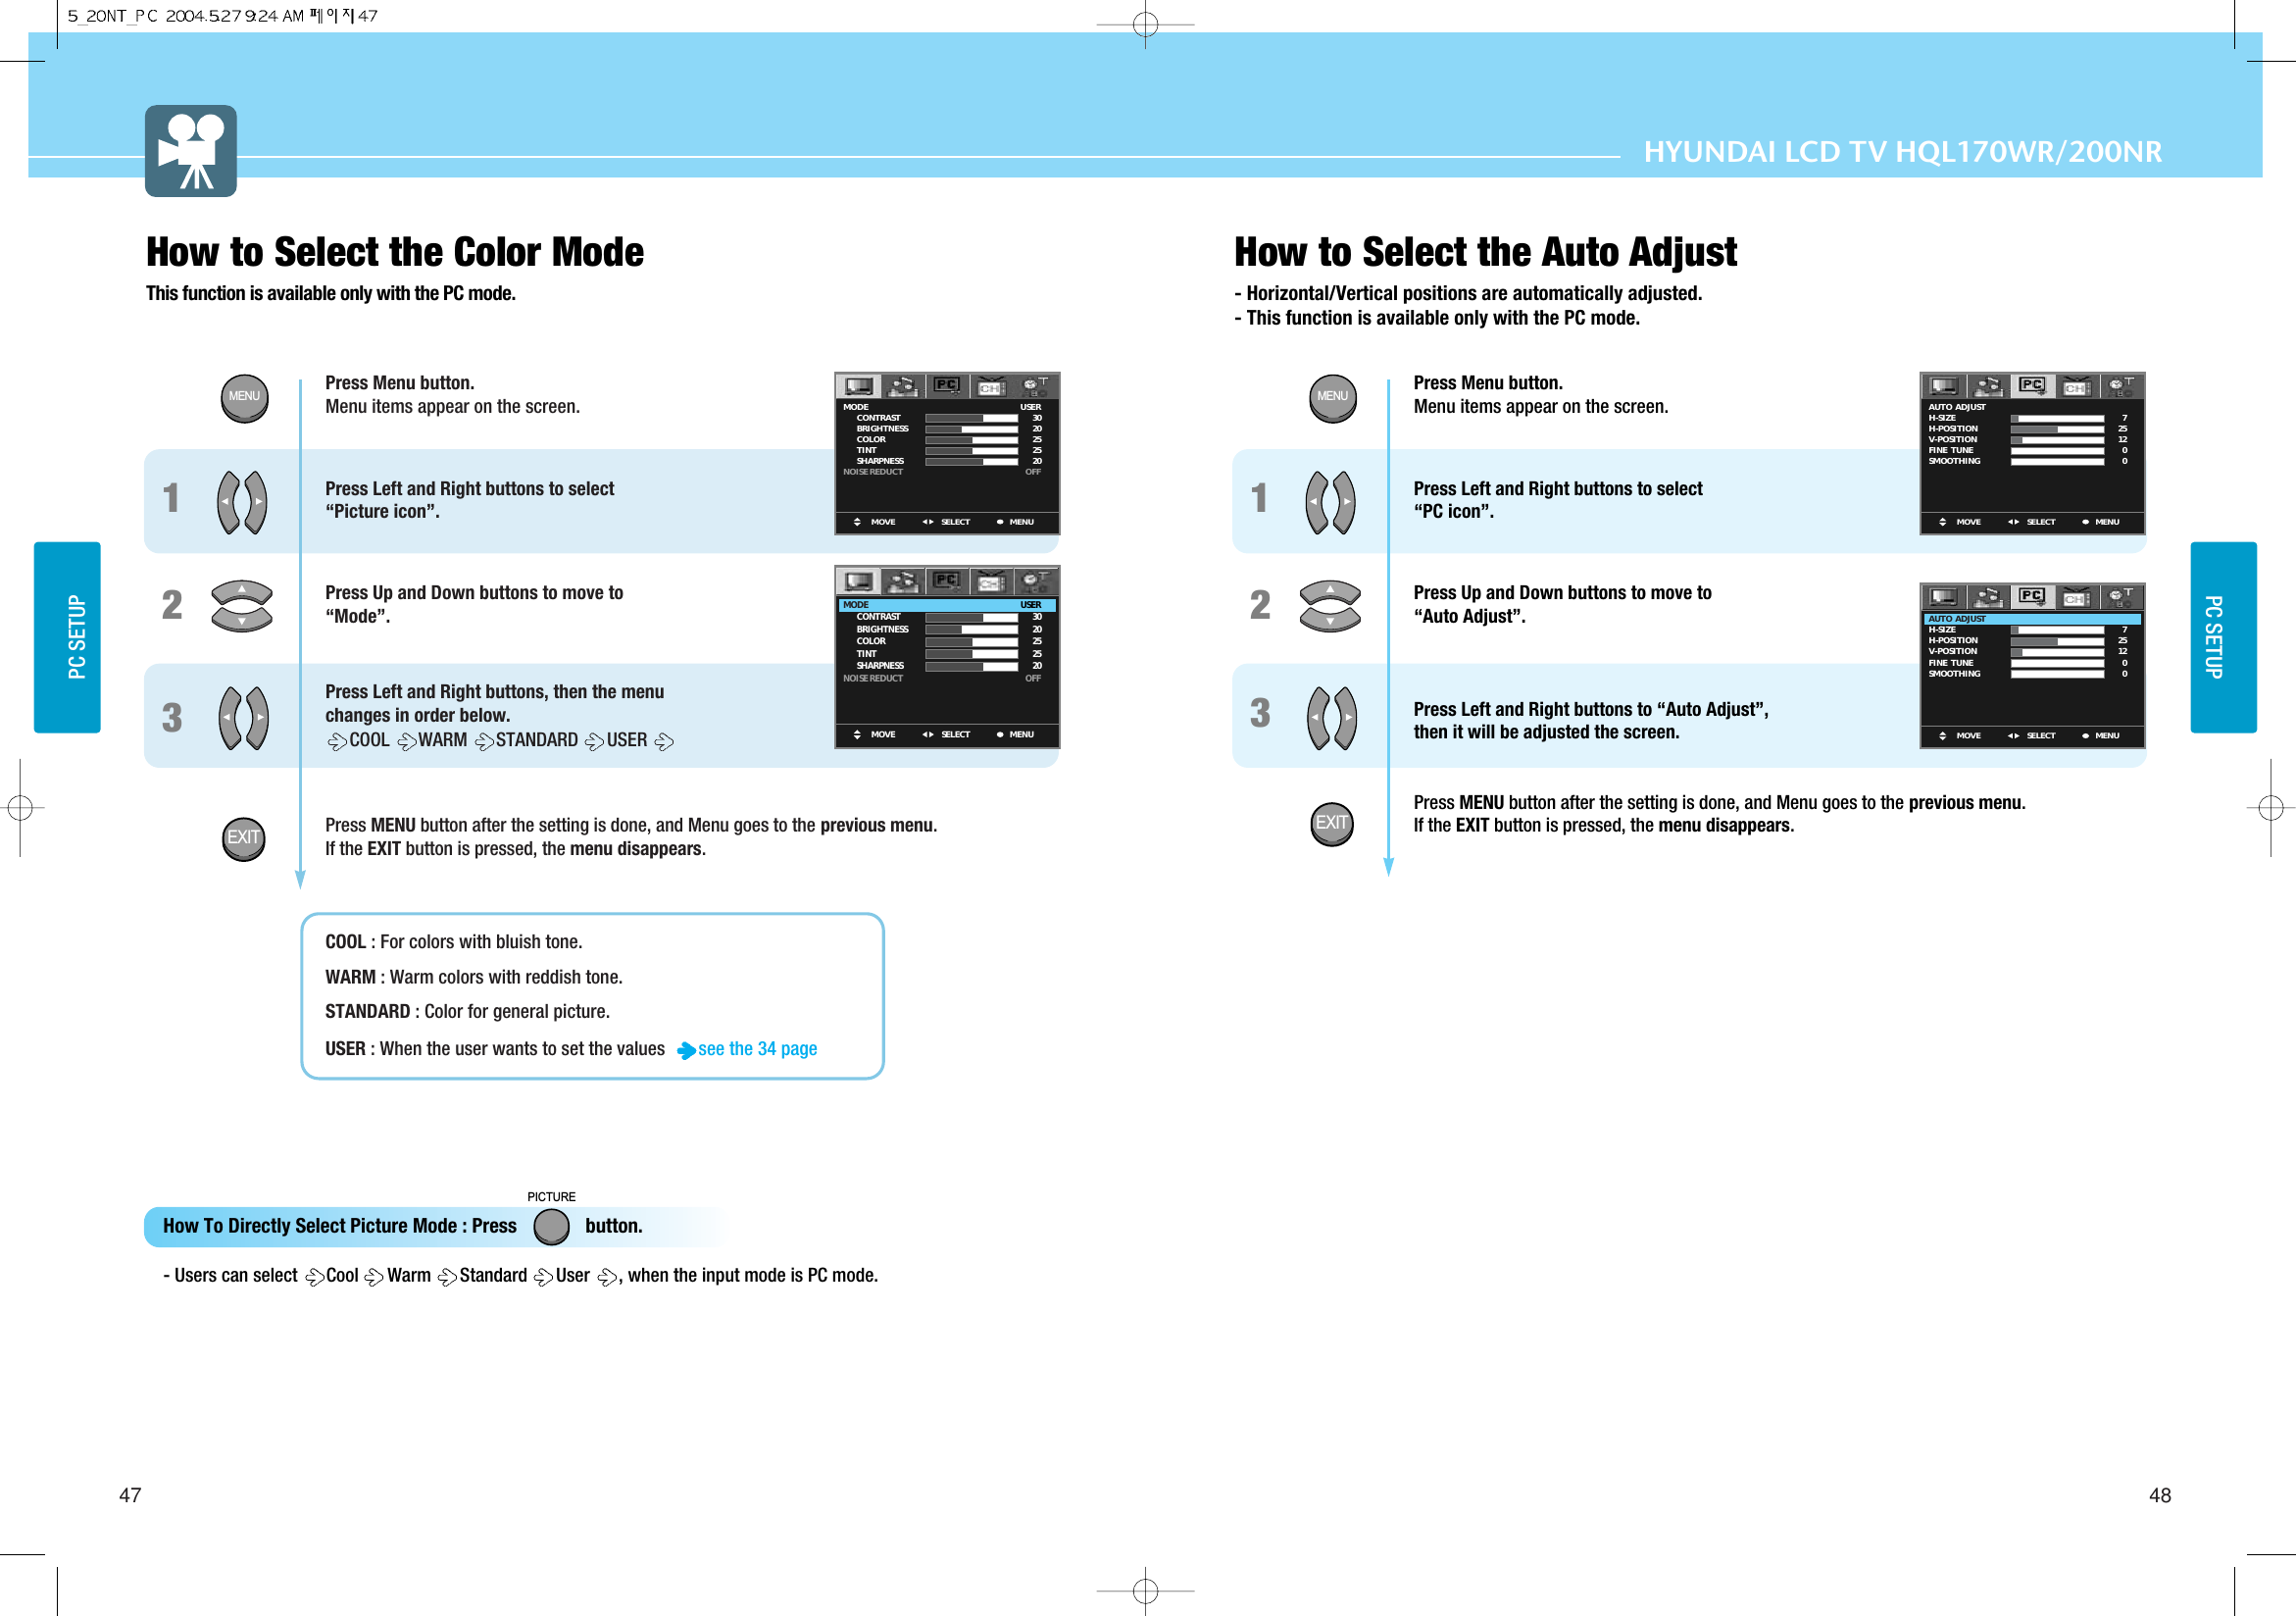
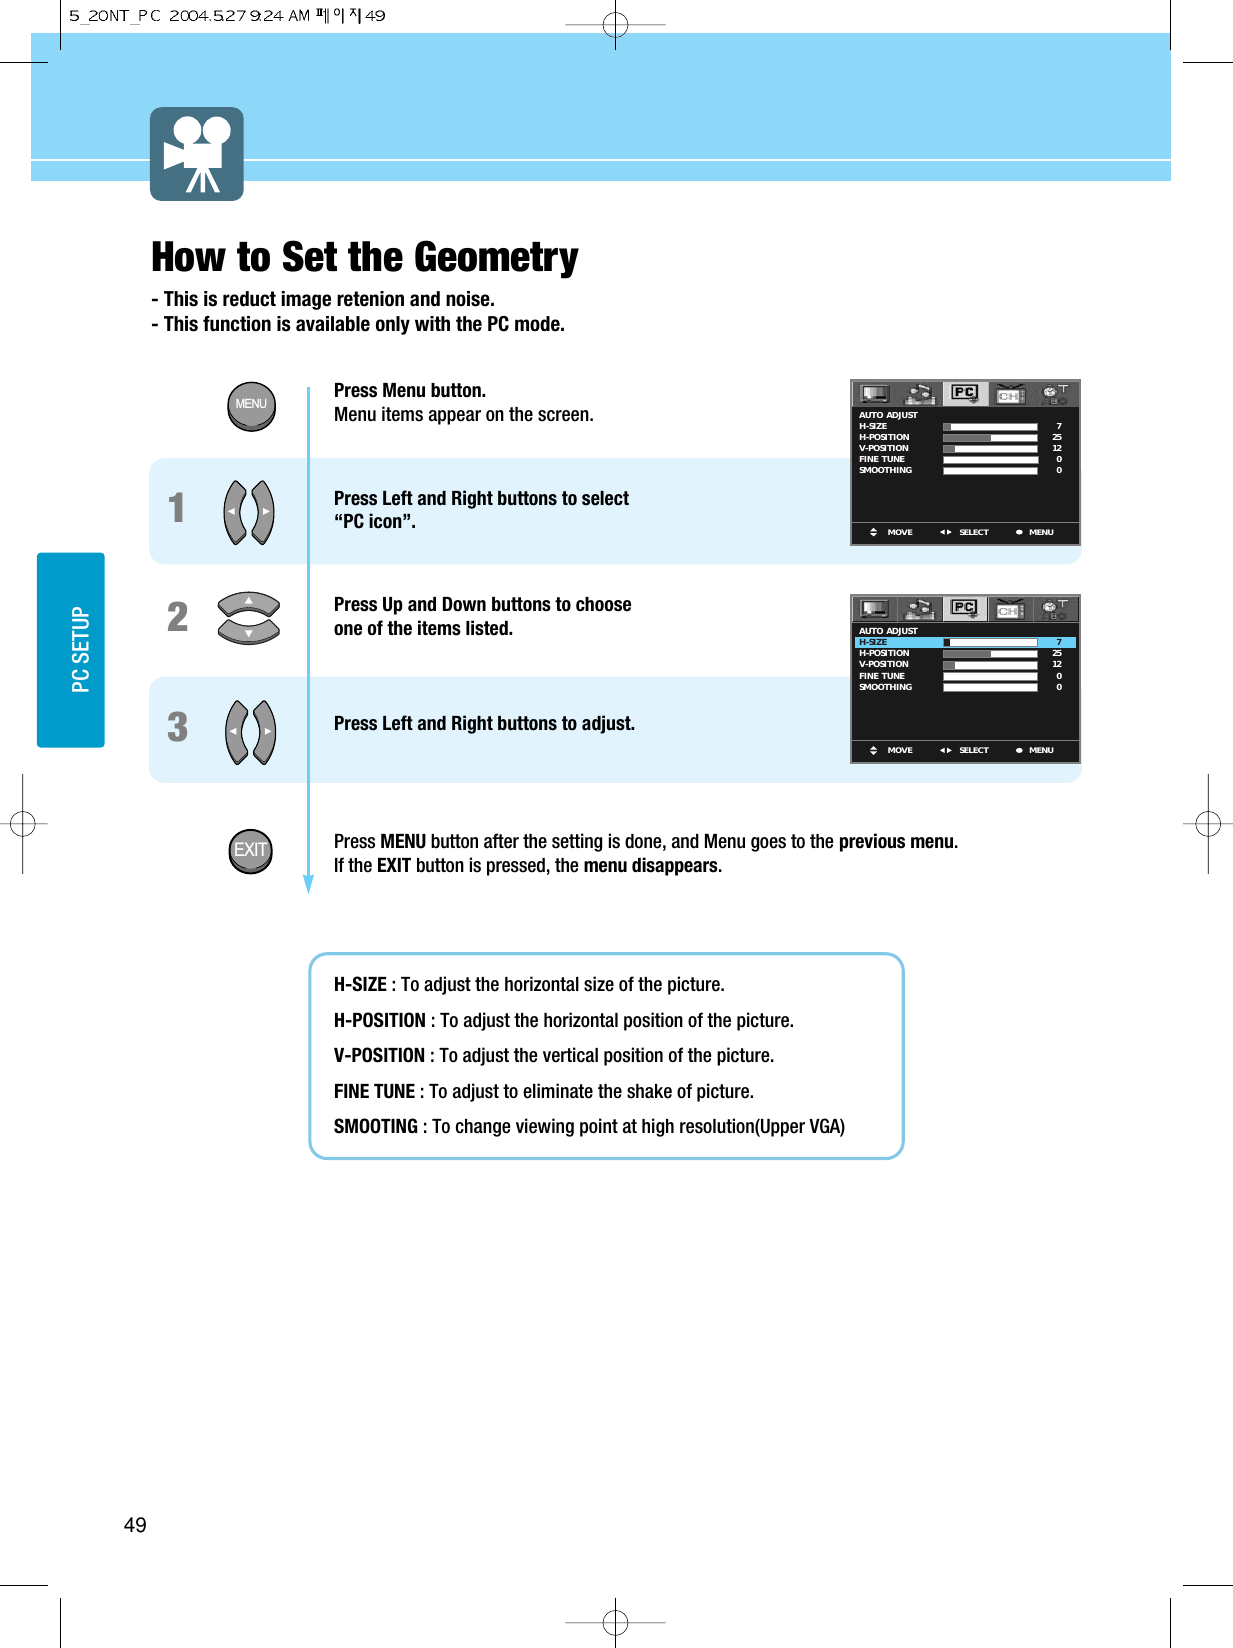
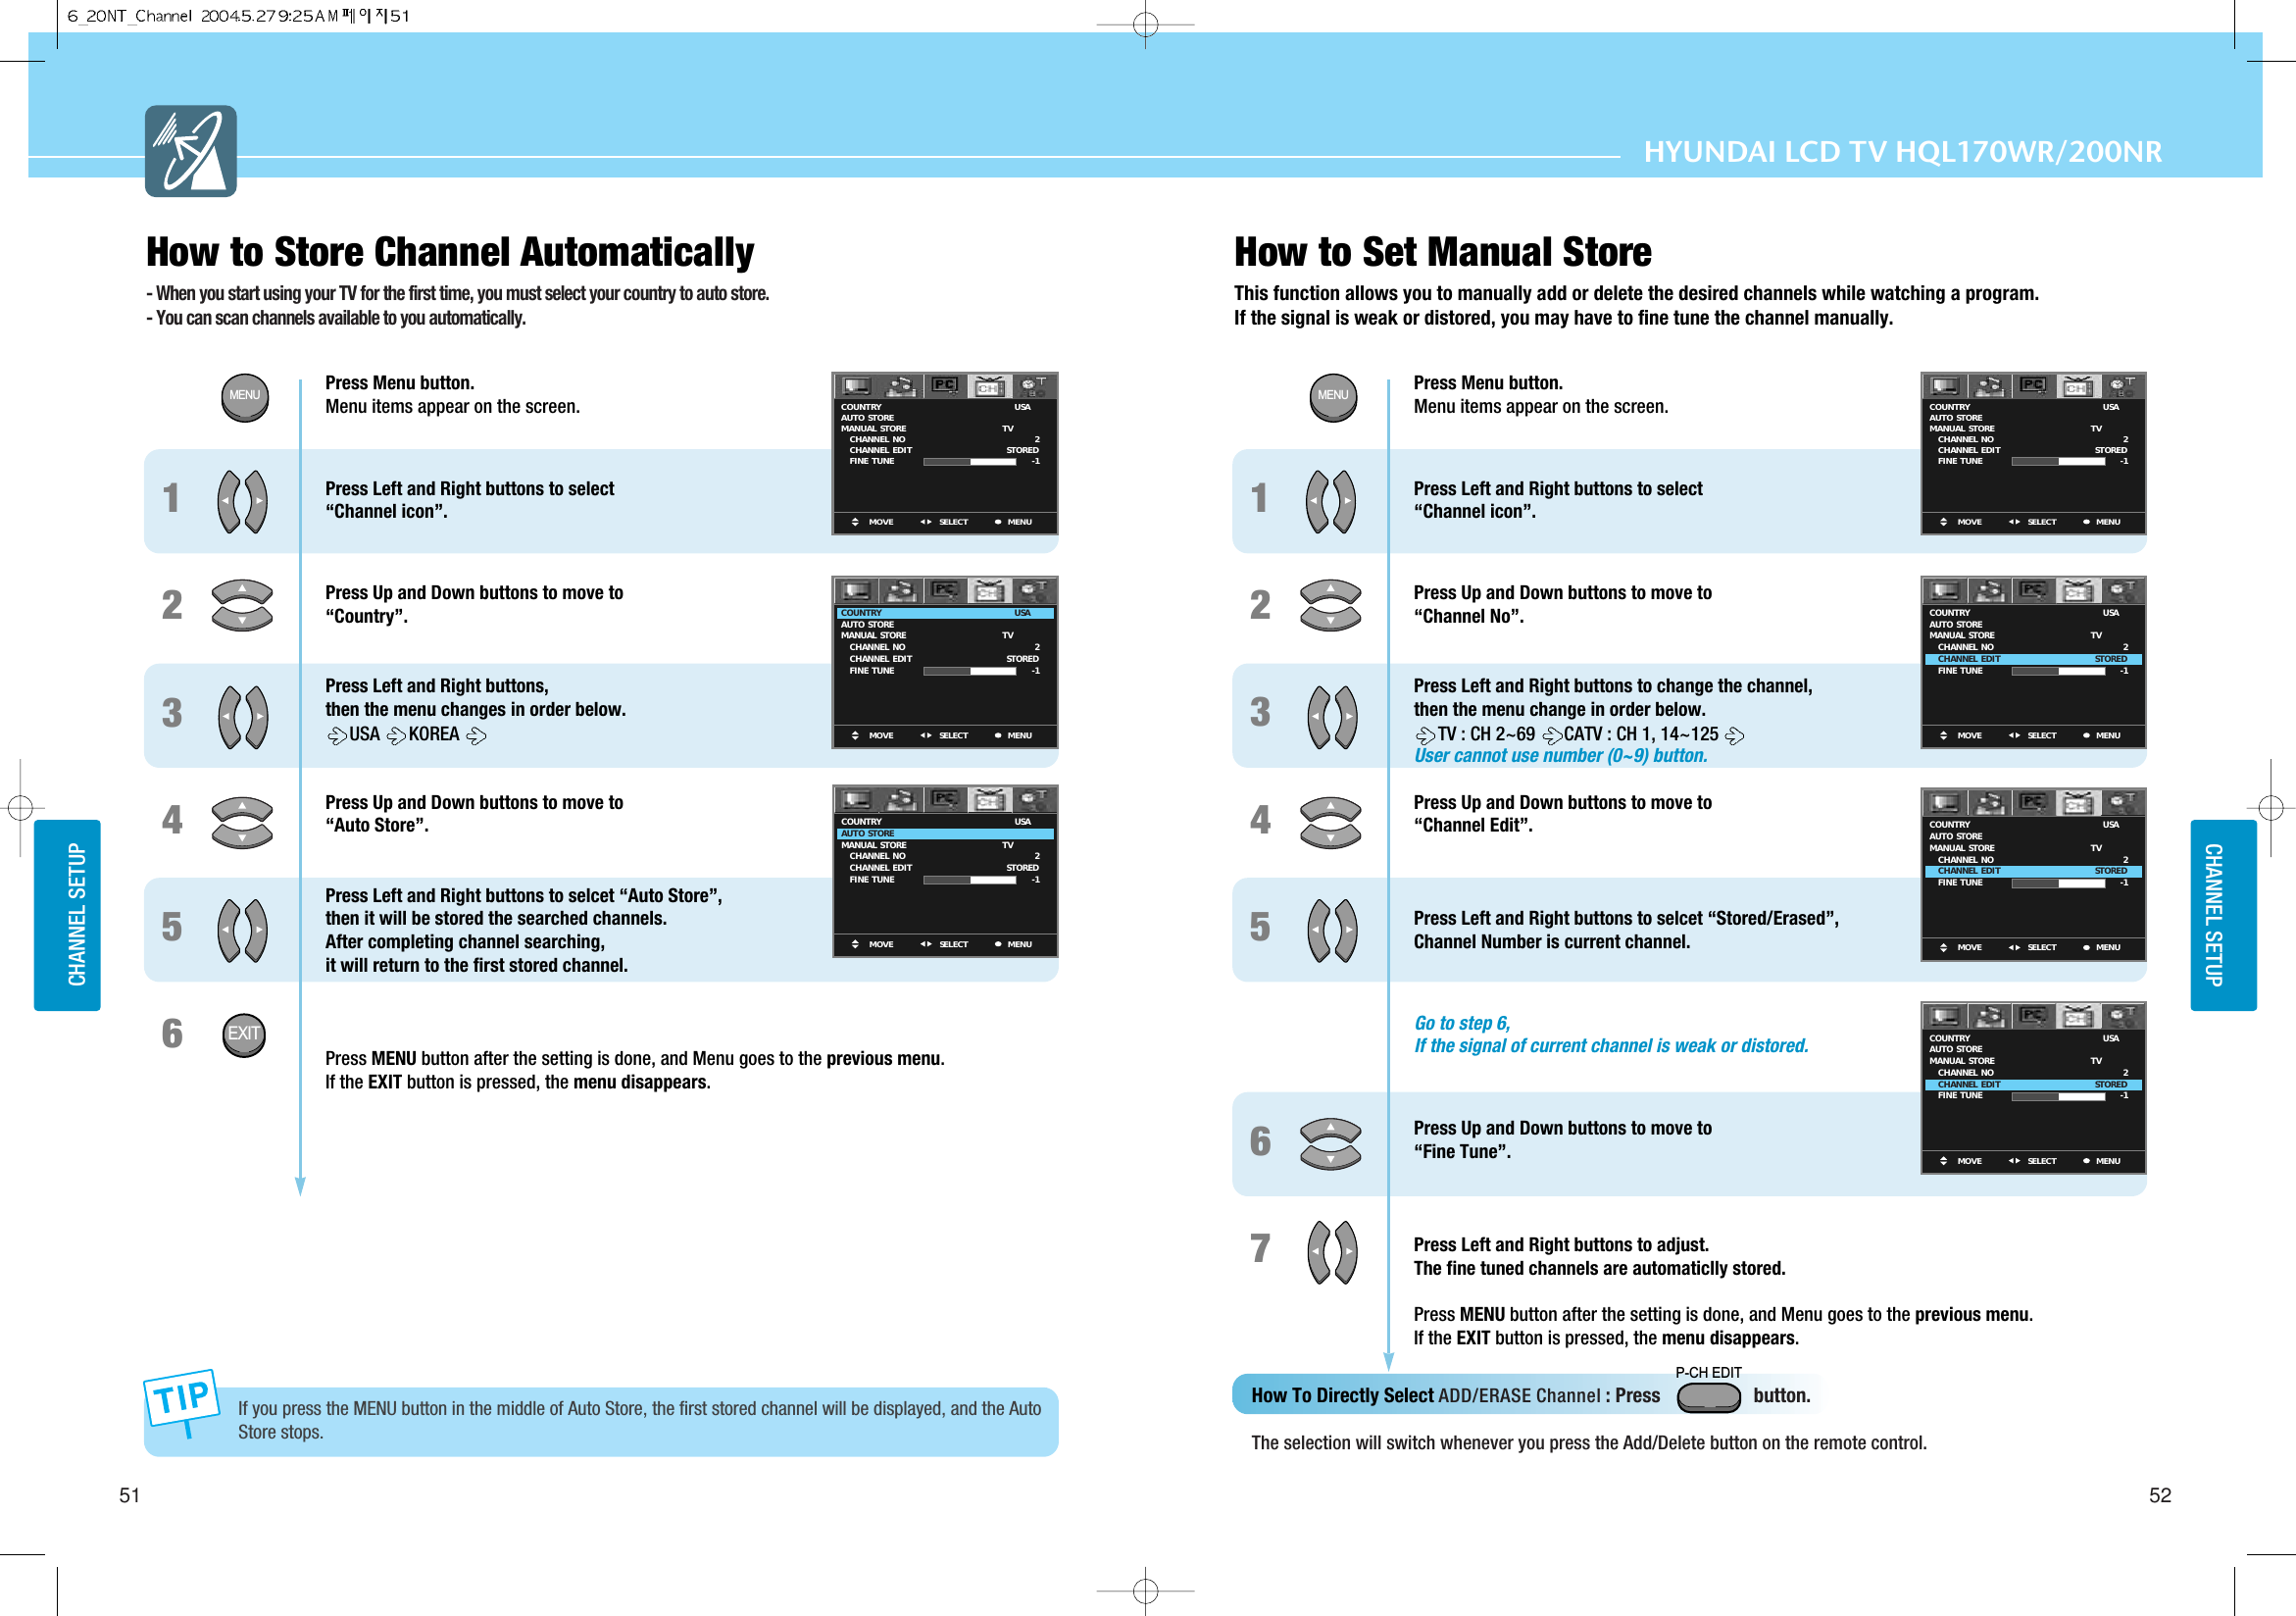
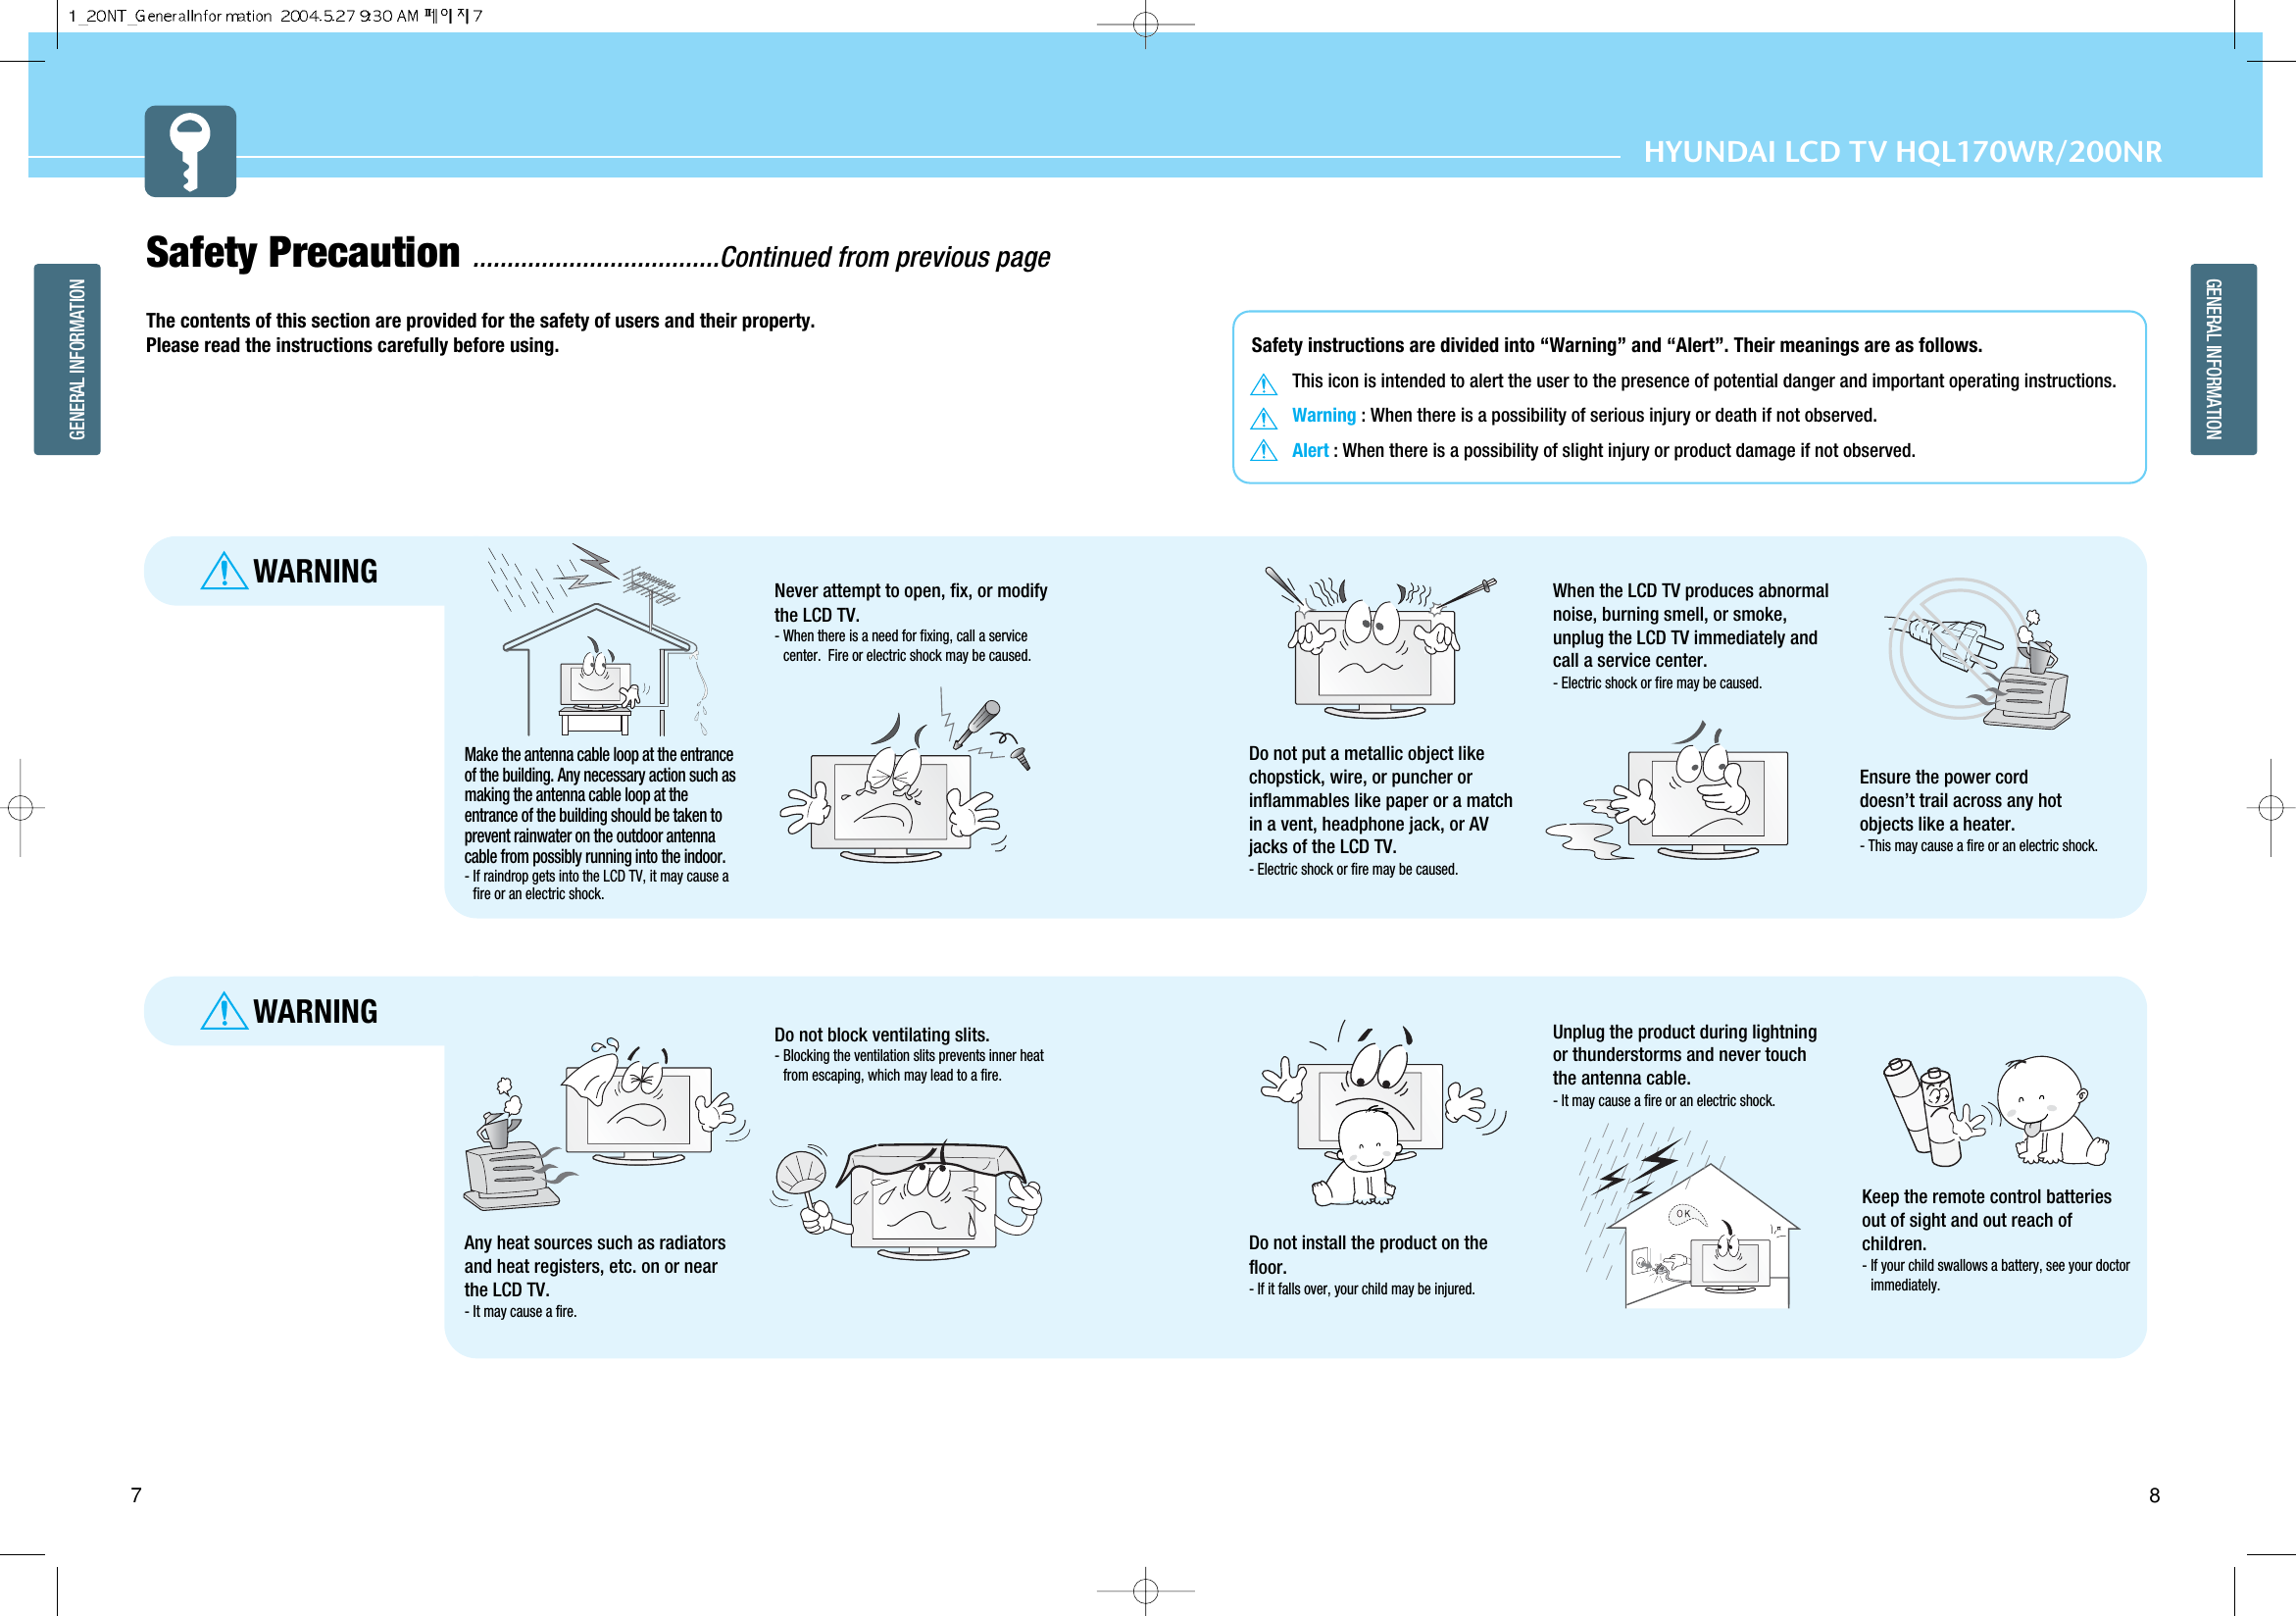
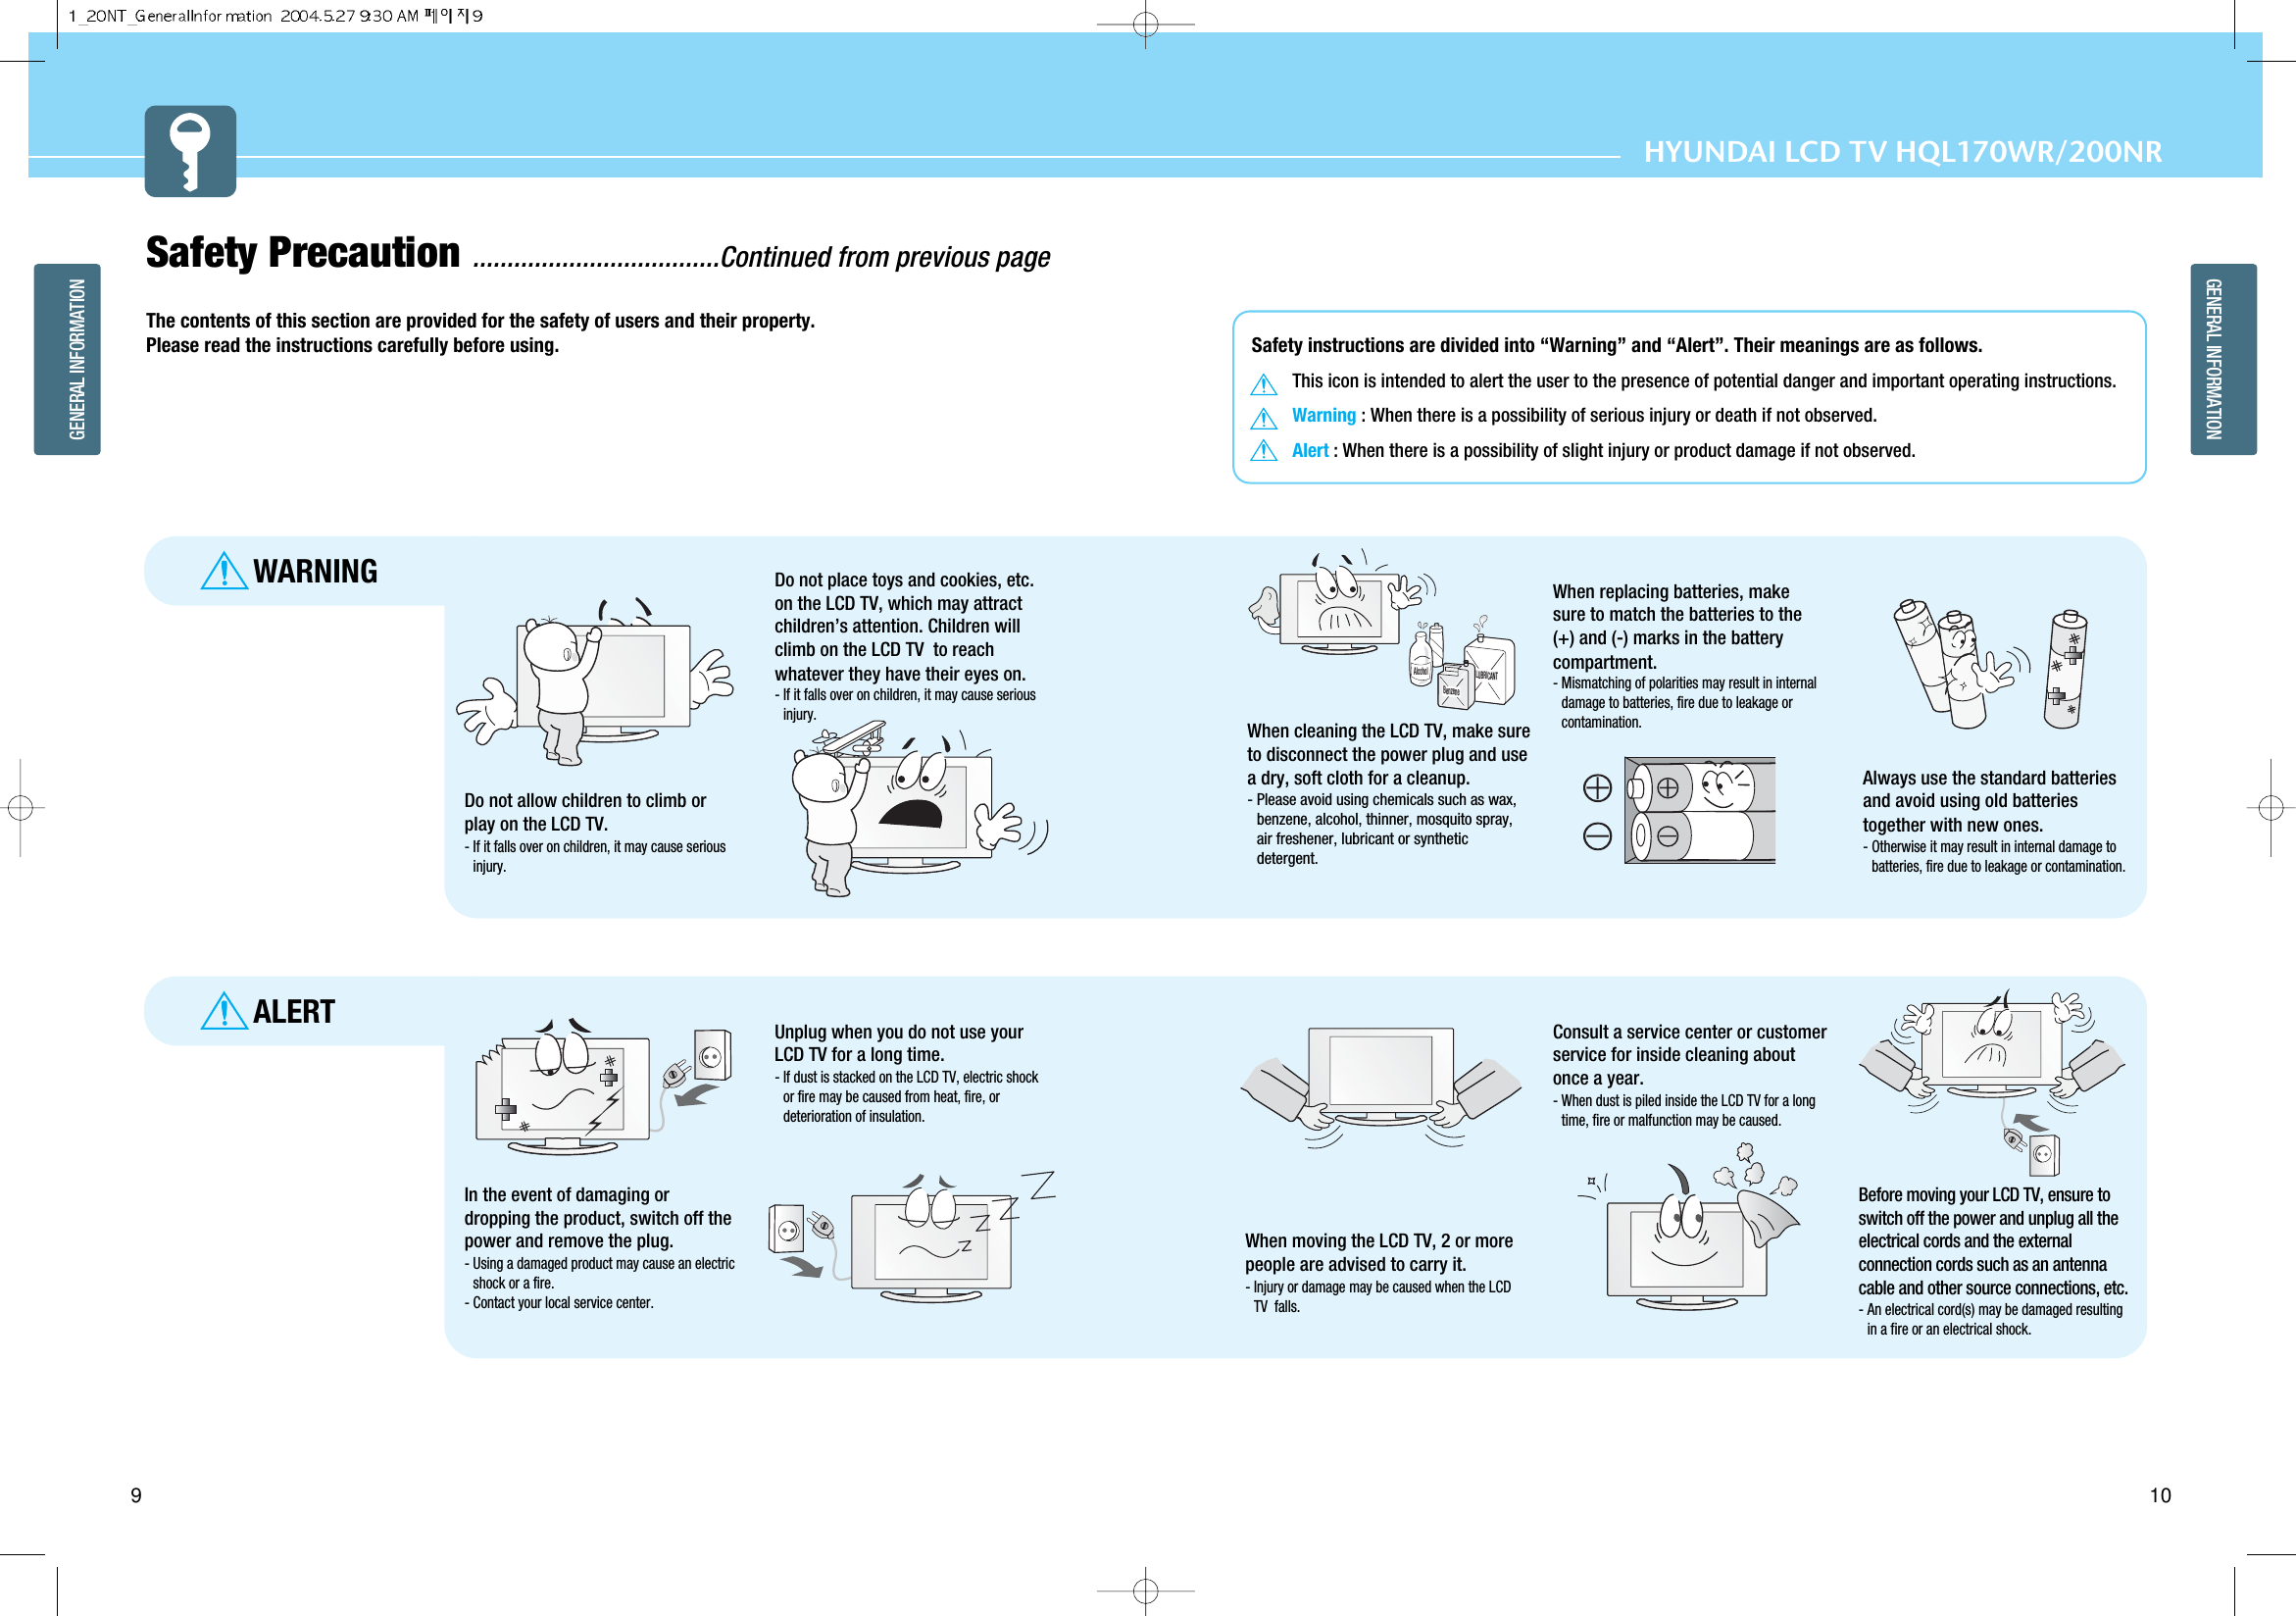
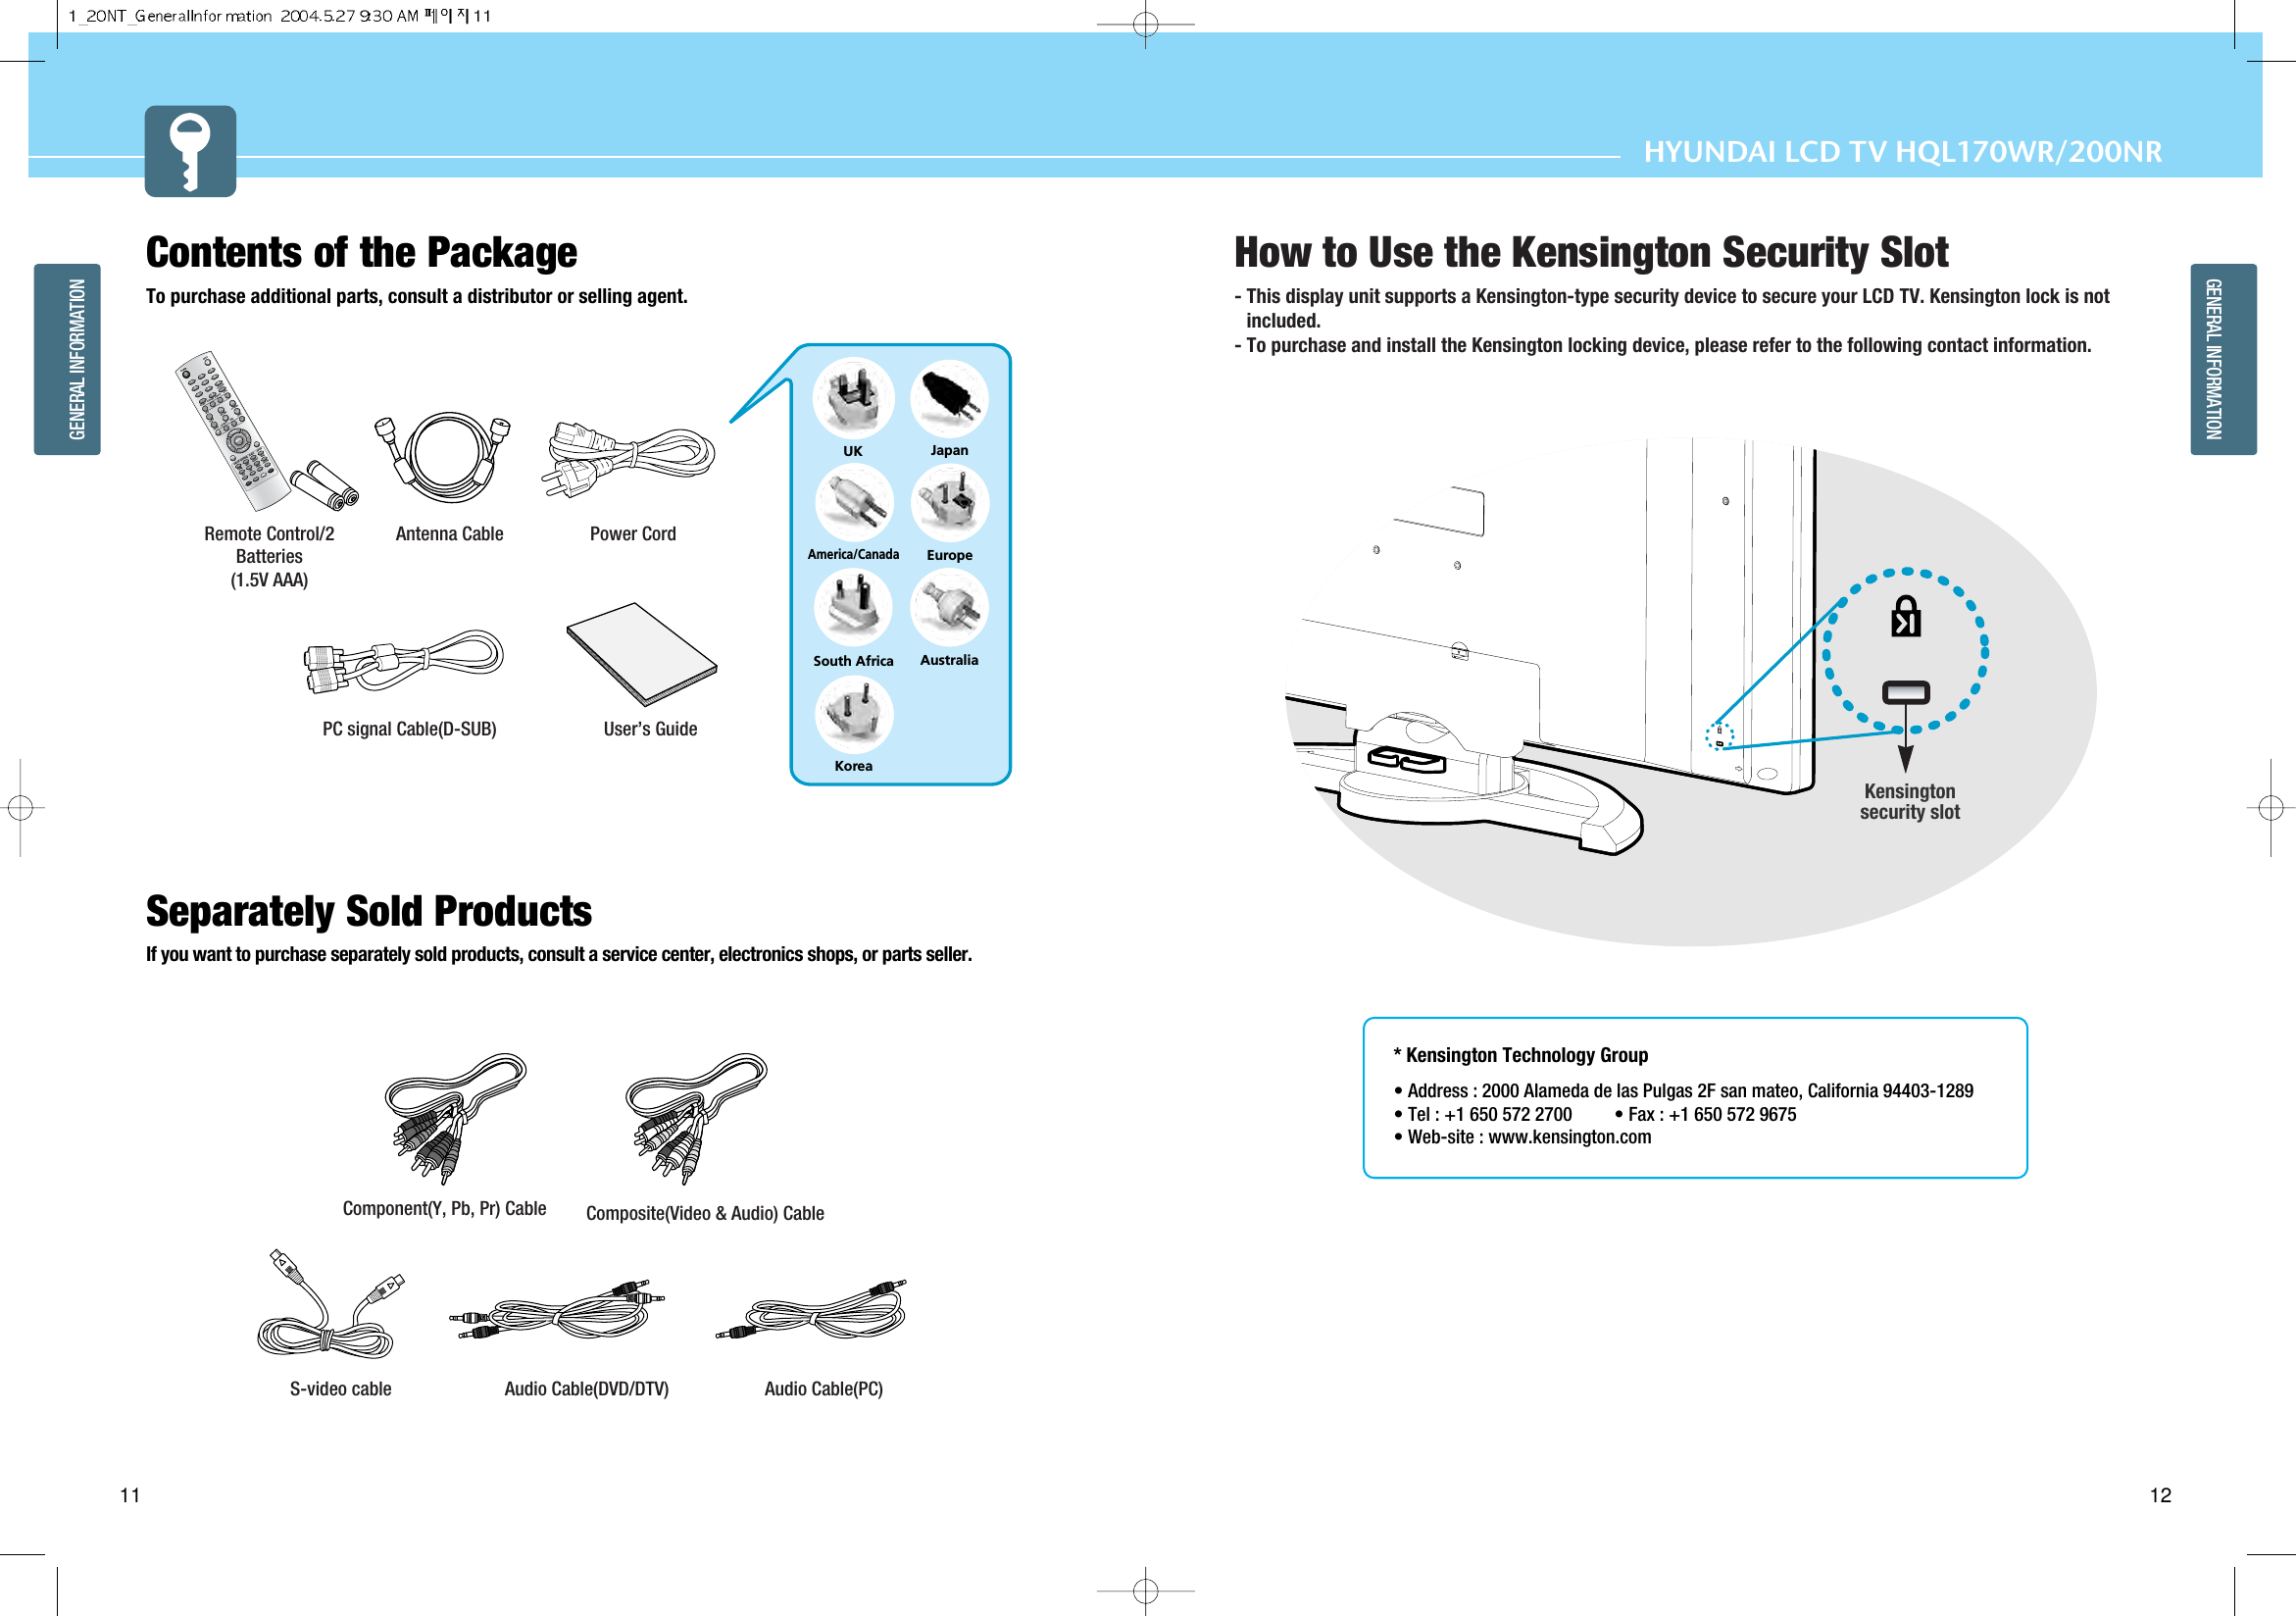
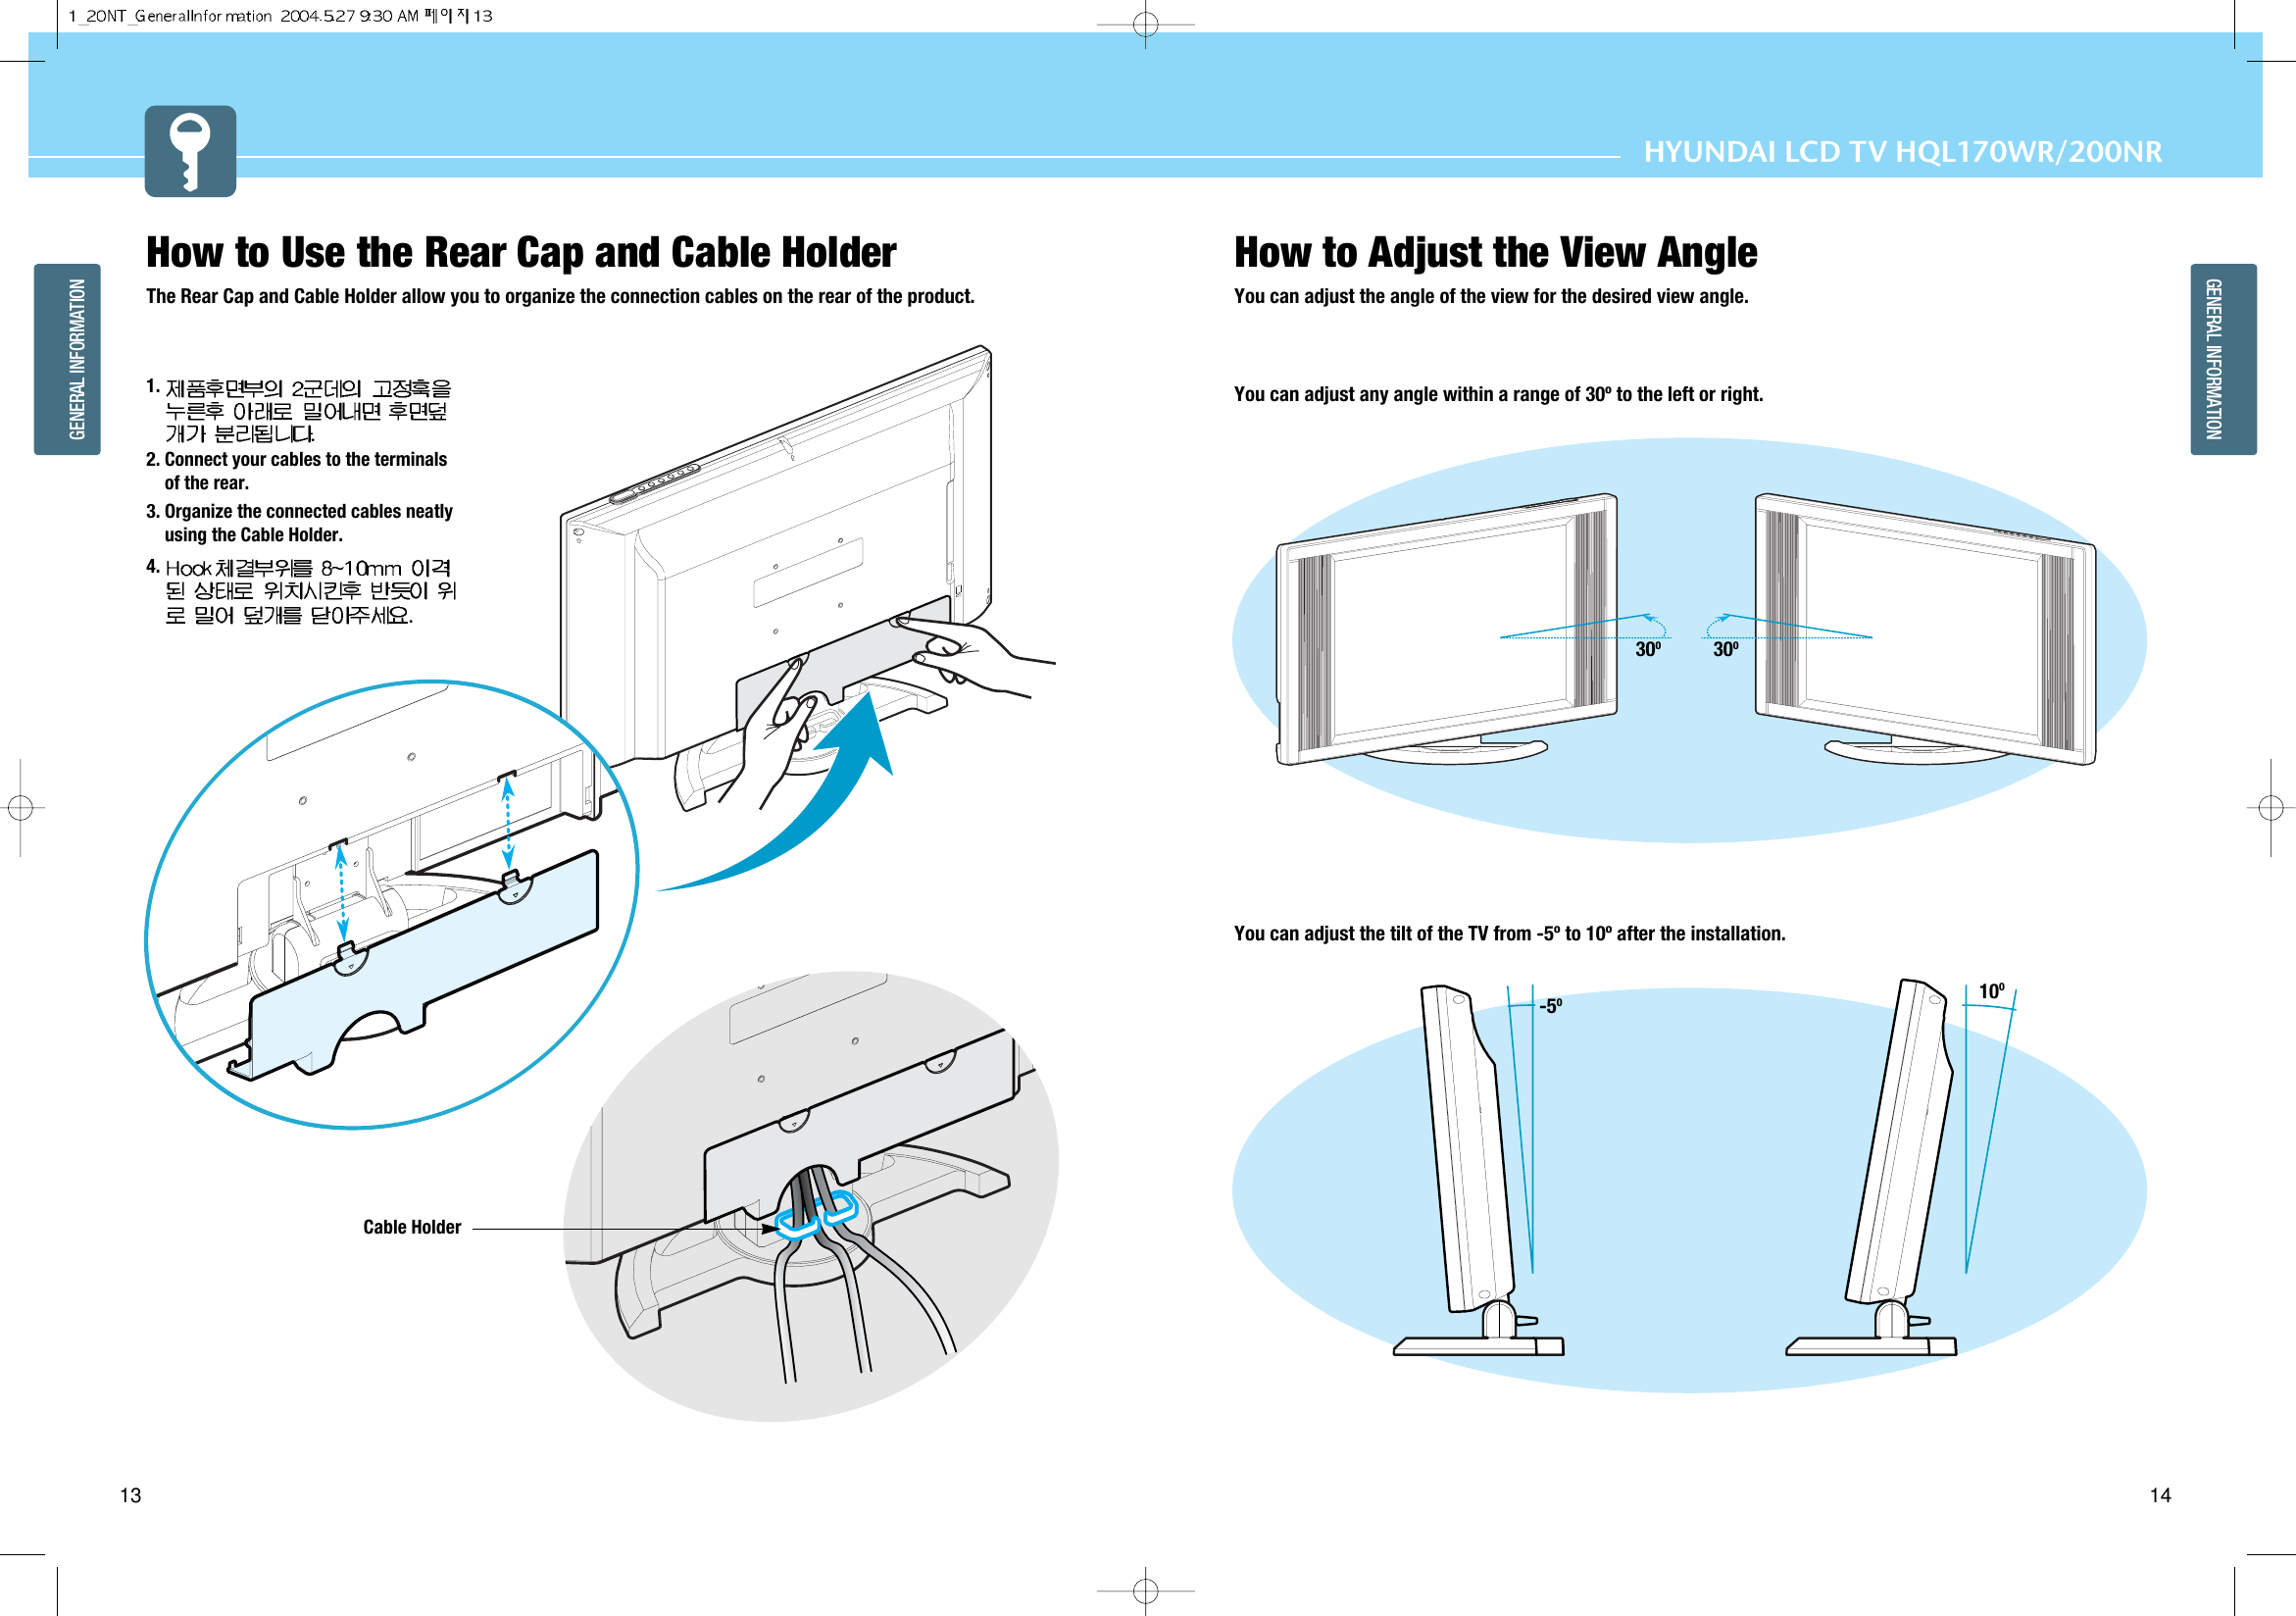
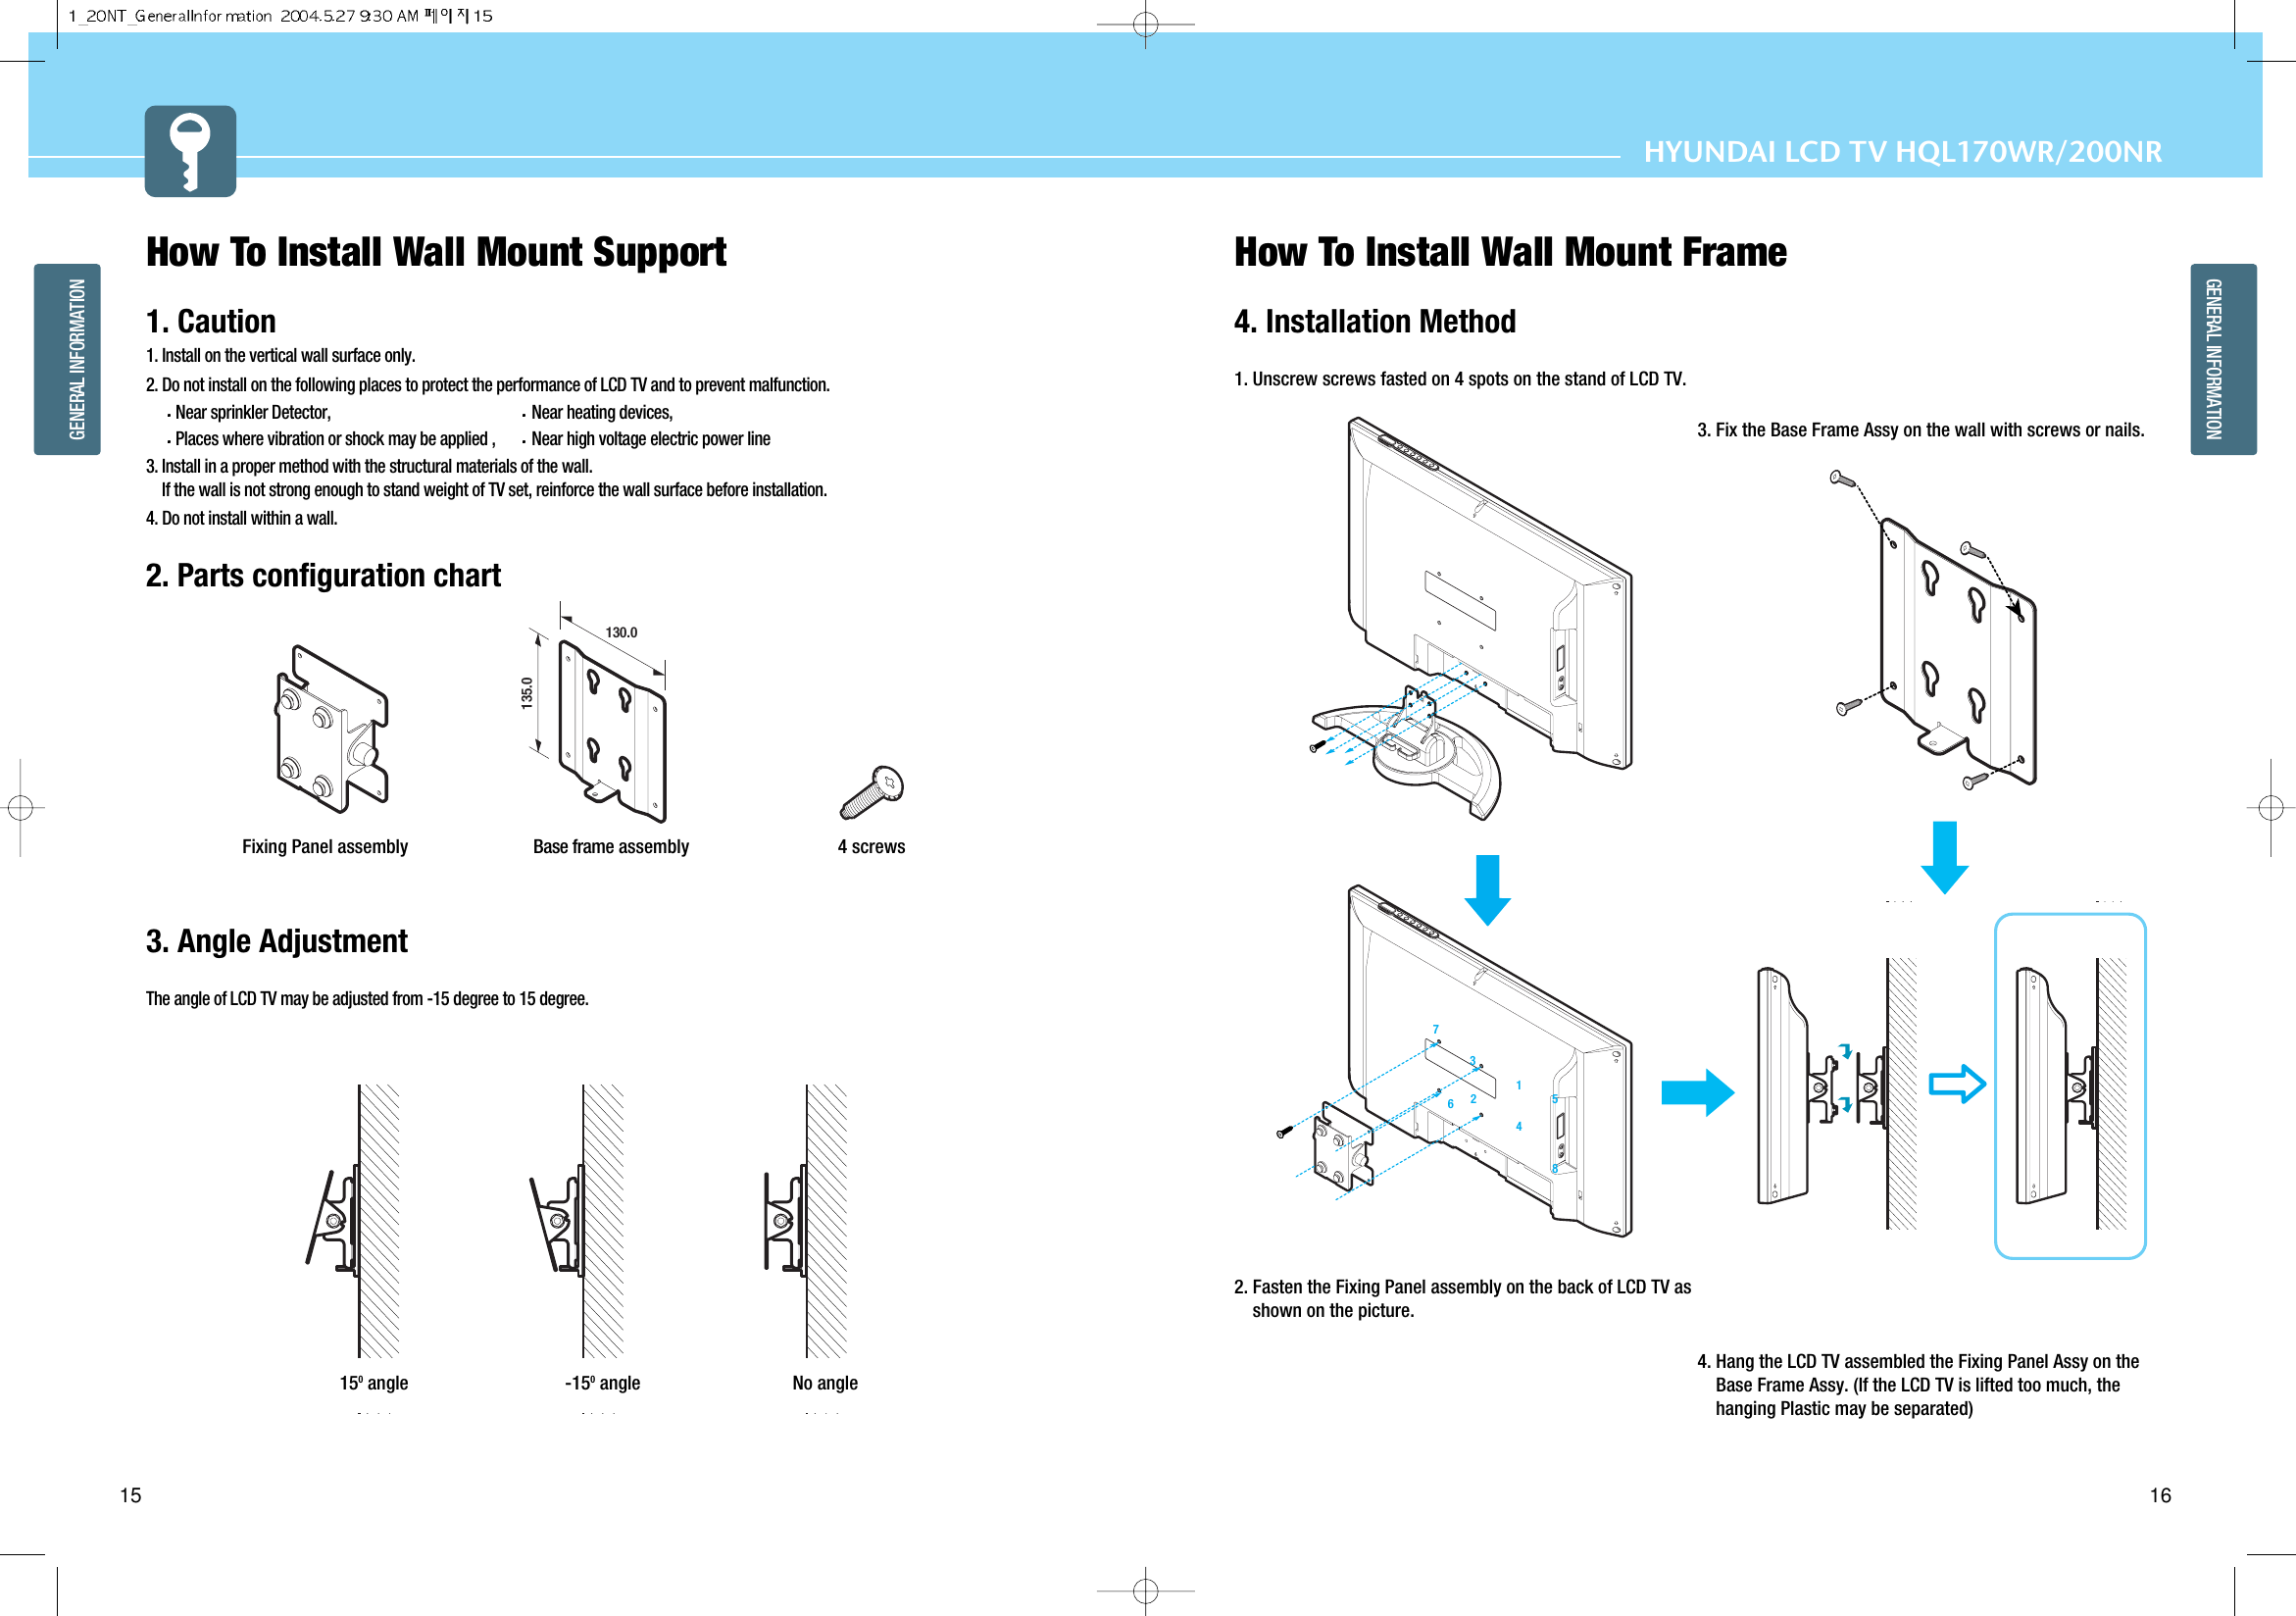
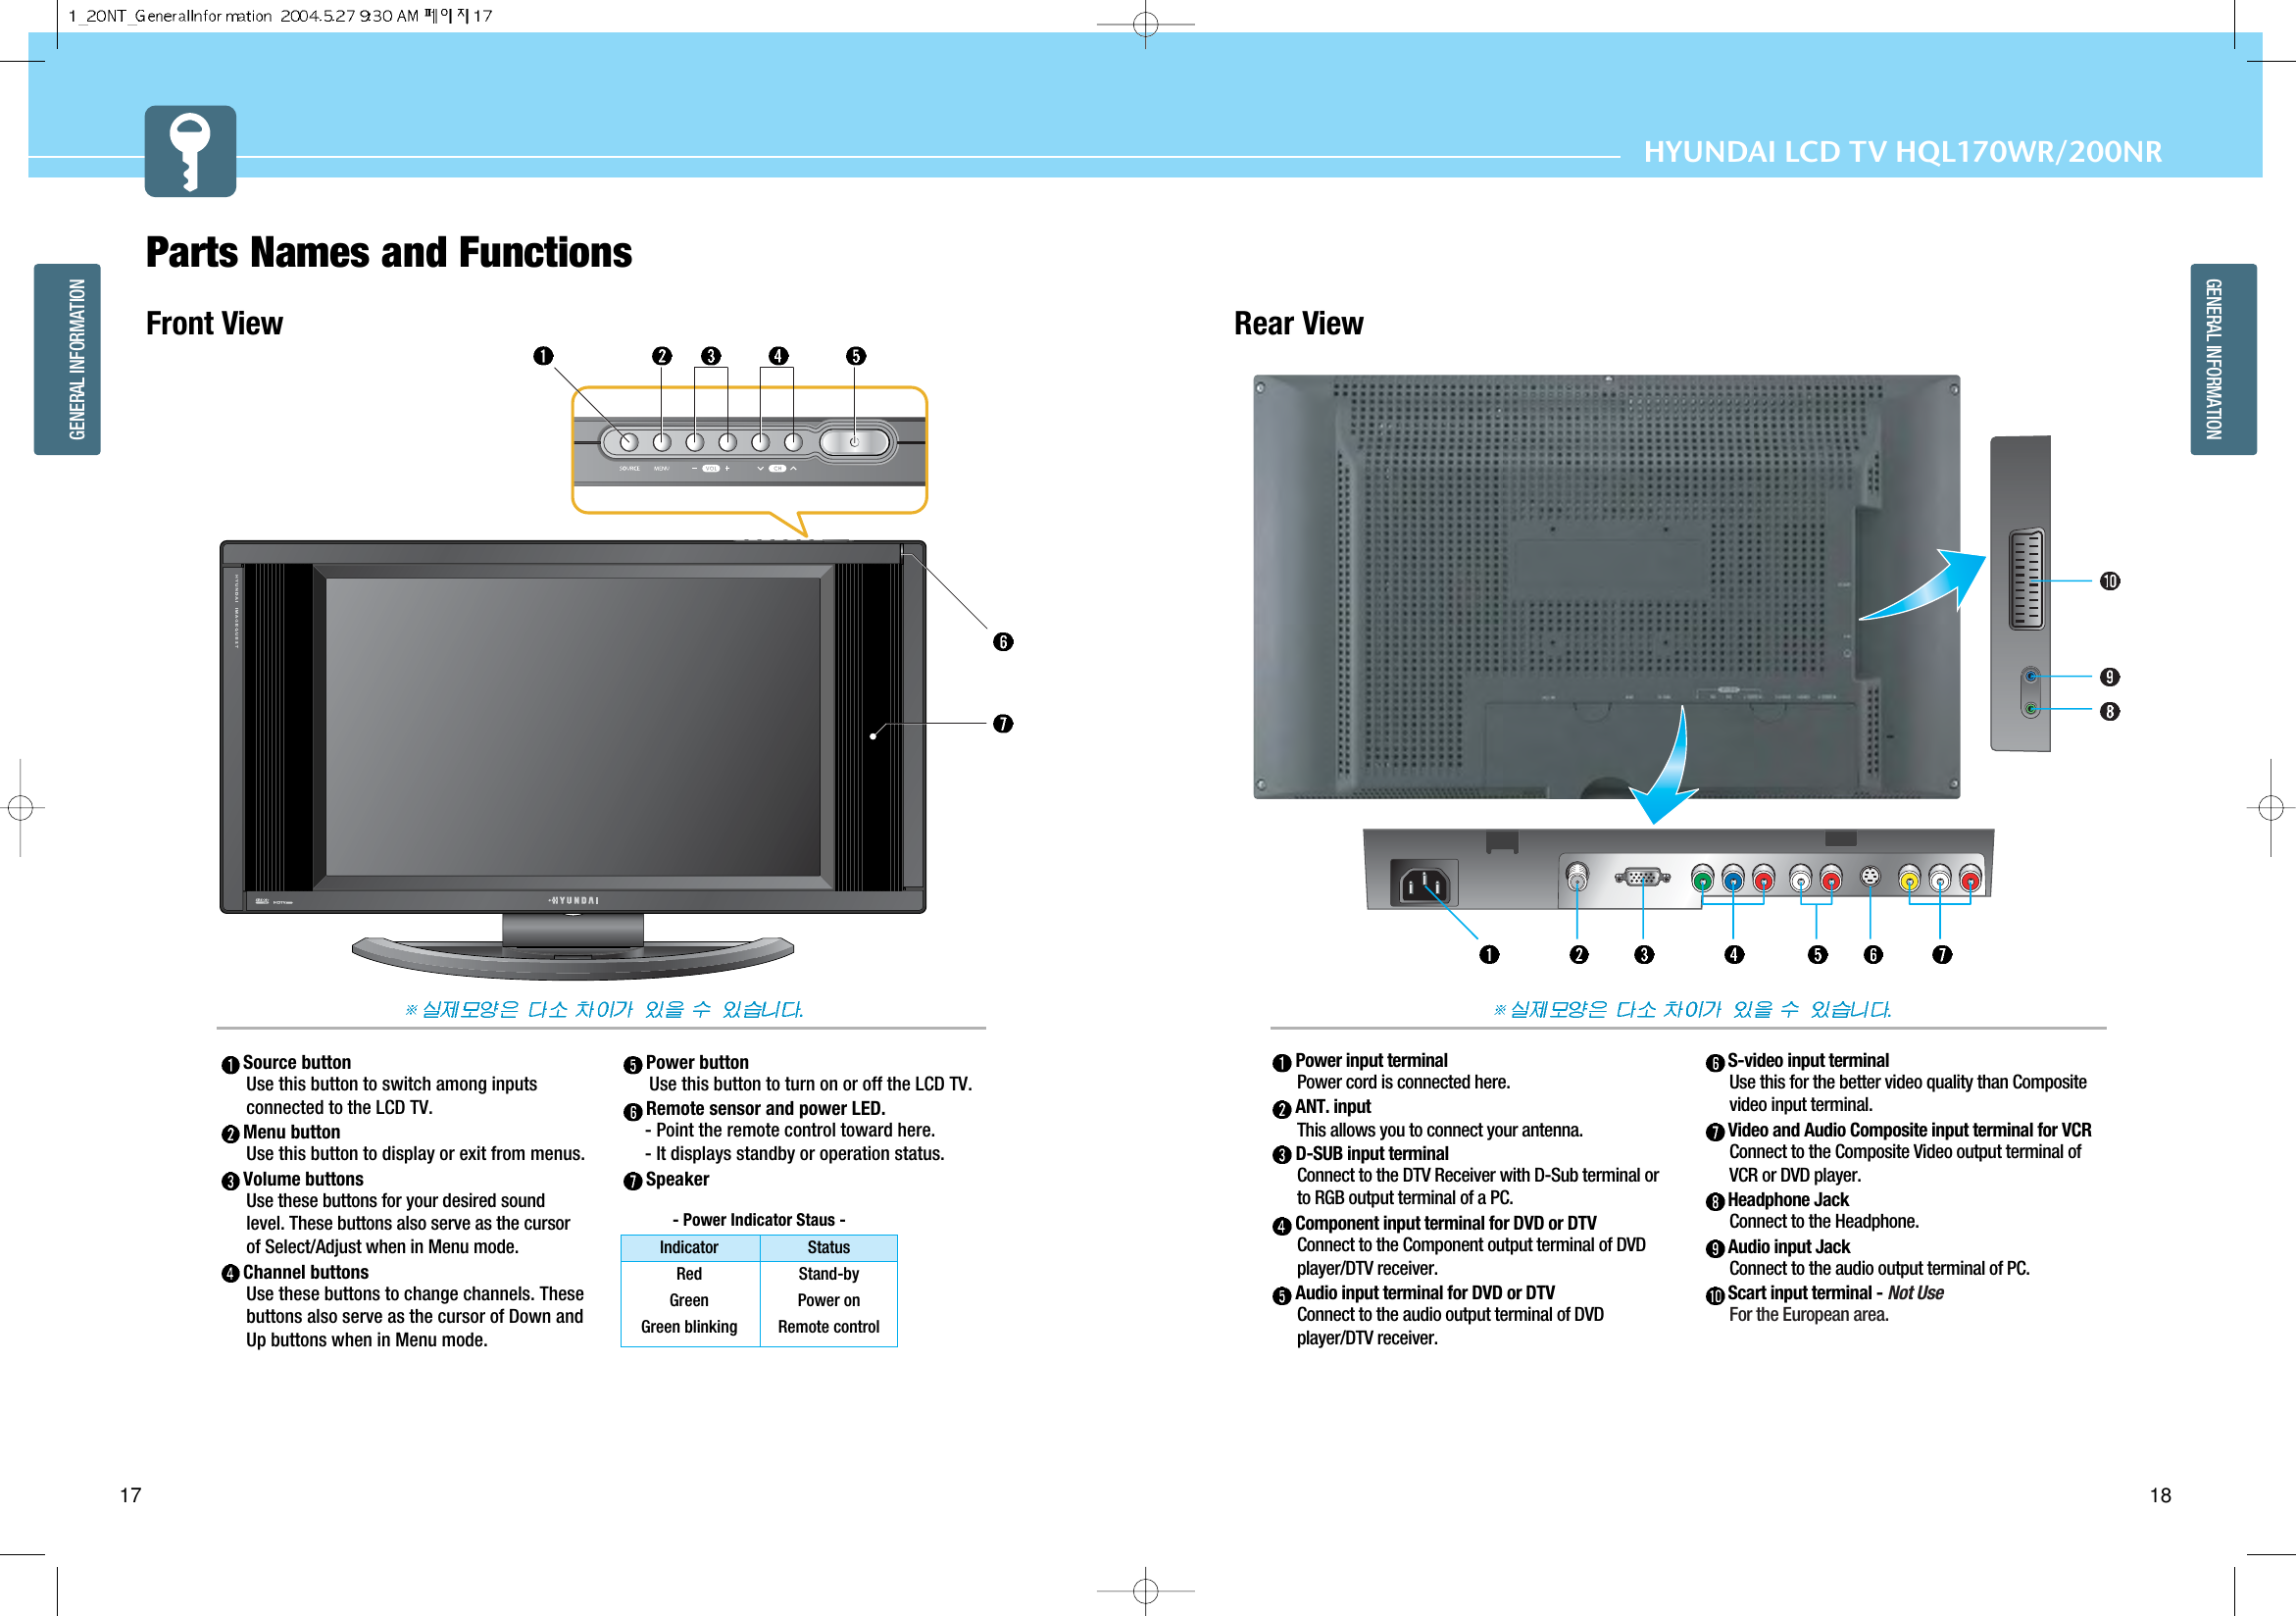
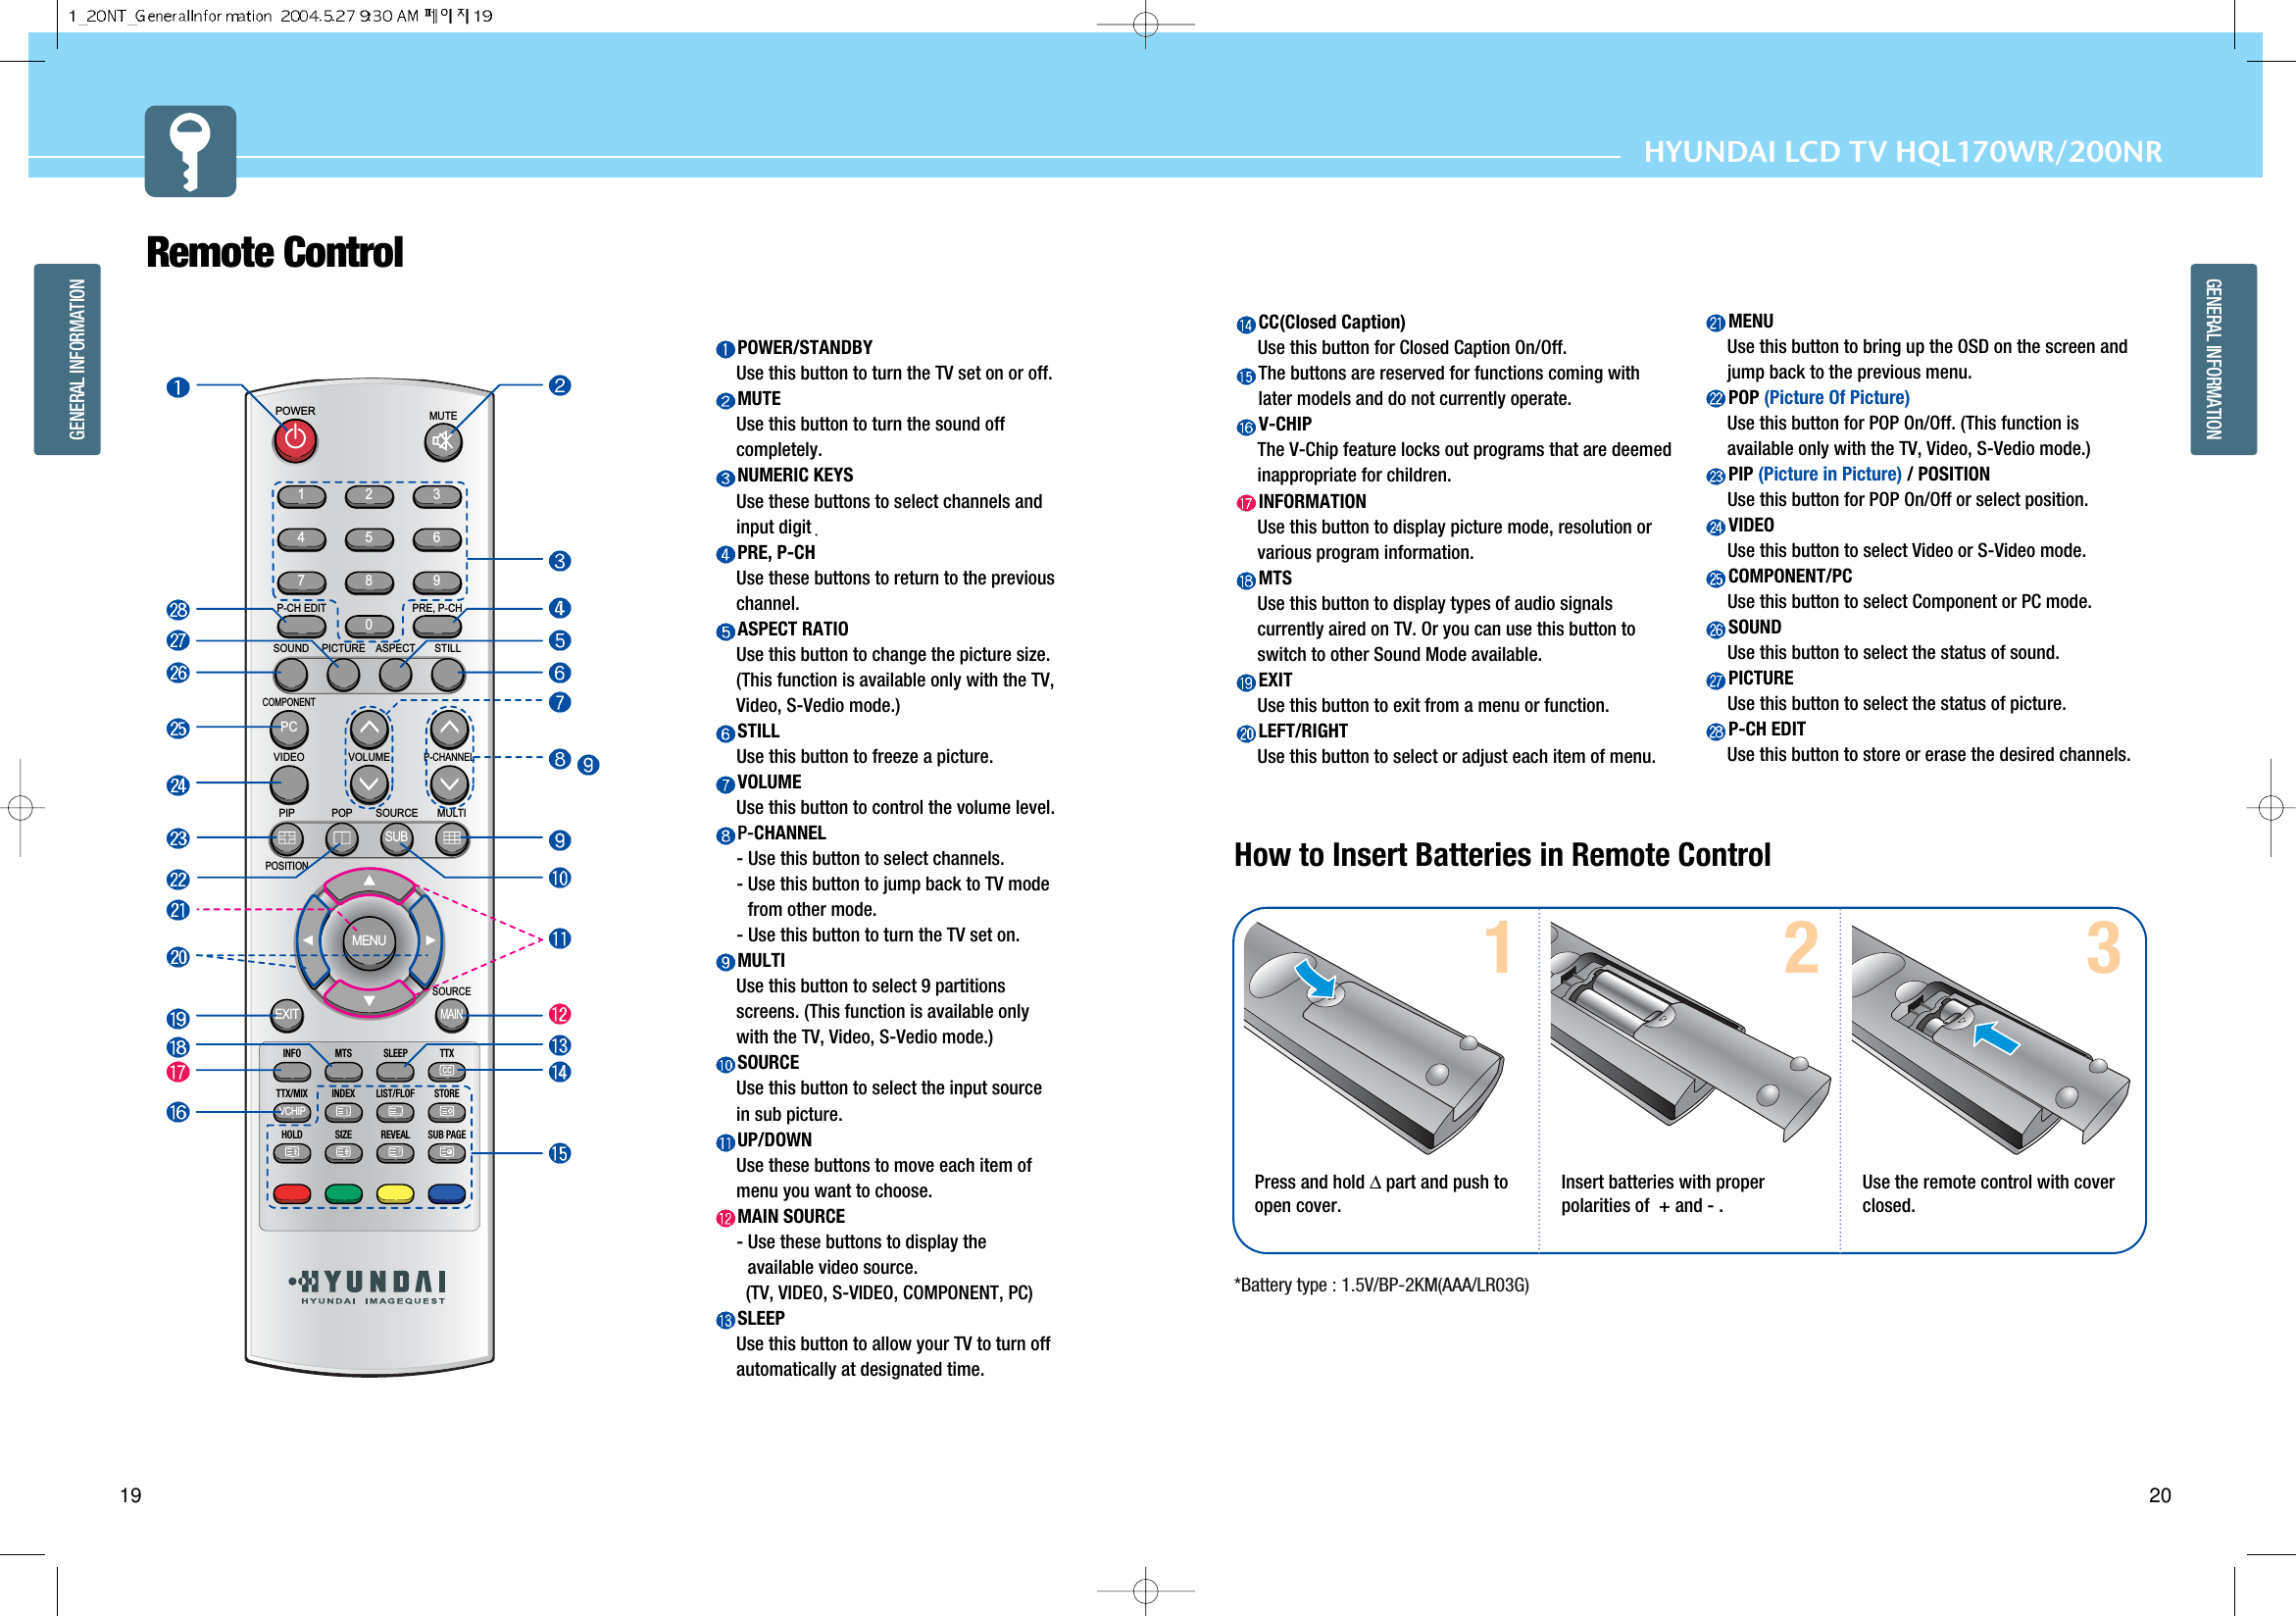
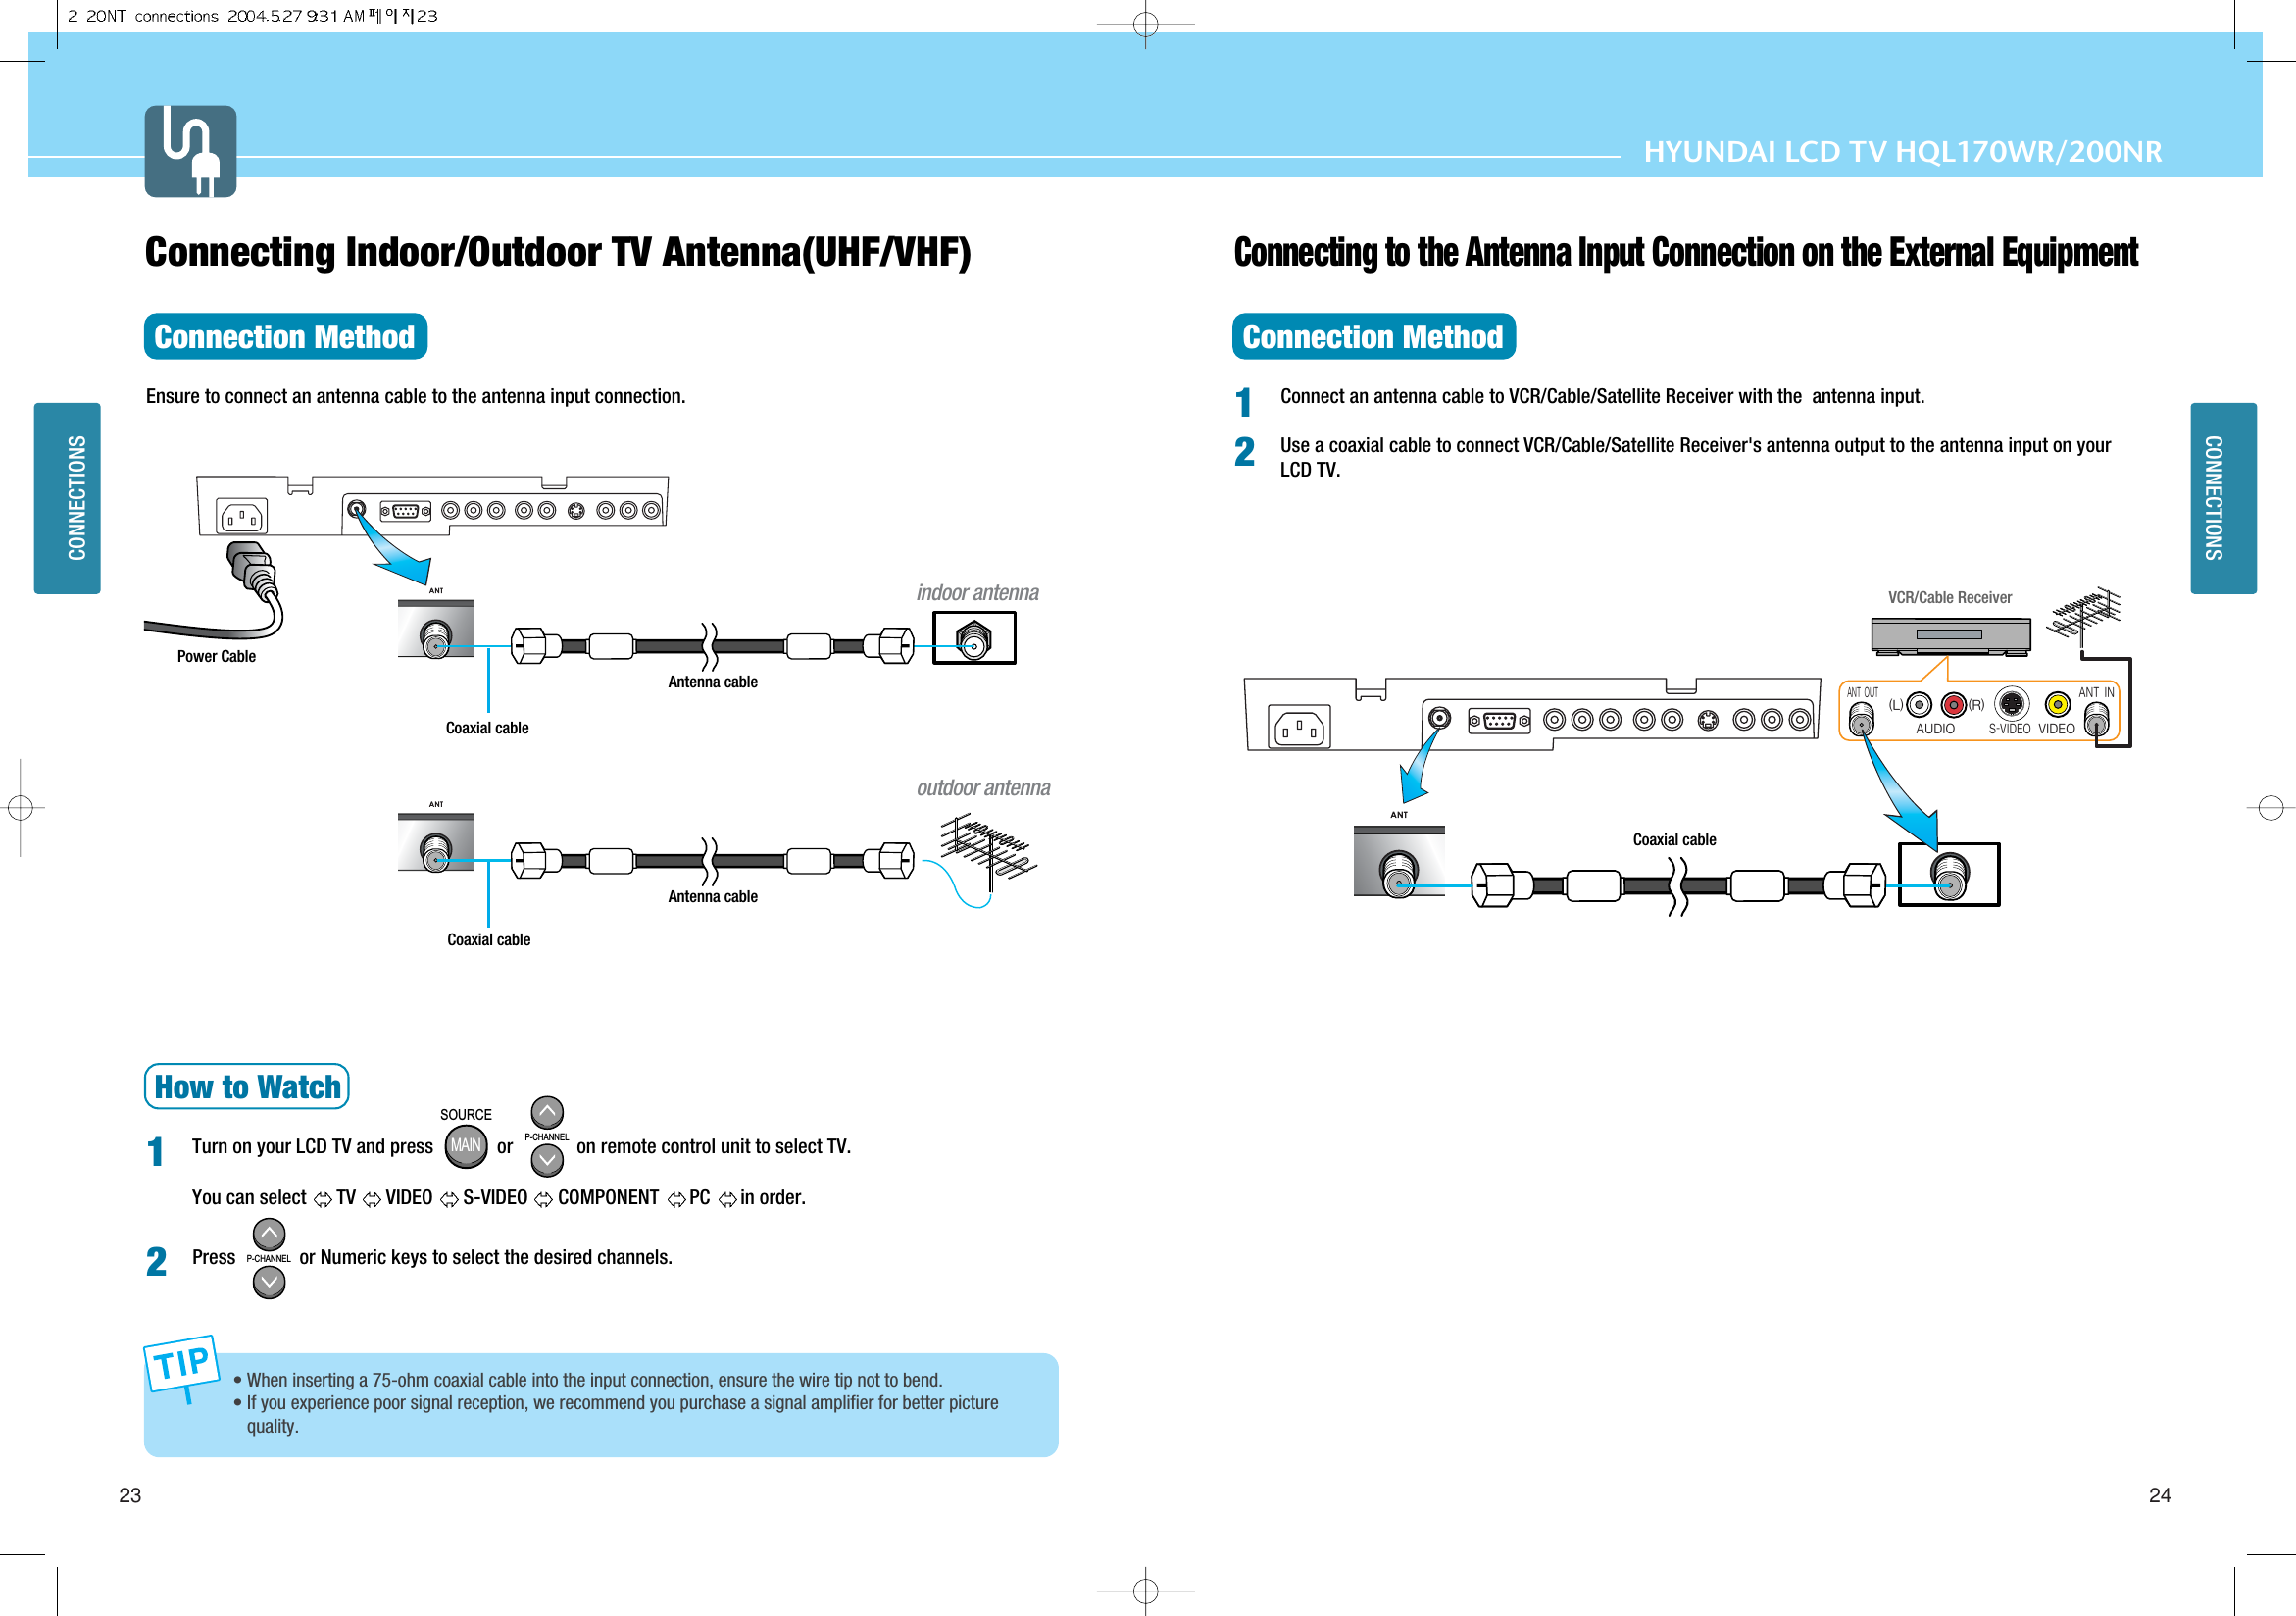
![HYUNDAI LCD TV HQL170WR/200NRFeatures Table of ContentsGeneral InformationSafety Precaution .................................................................5Contents of the Package ....................................................11How to Use the Kensington Security Slot ............................12How to Use the Rear Cap and Cable Holder .........................13How to Adjust the View Angle .............................................14How To Install Wall Mount Support .....................................15How To Install Wall Mount Frame .......................................16Parts Names and Functions ..............................................17Remote Control ................................................................. 19Connections Connecting Indoor/Outdoor TV Antenna(UHF/VHF) ...............23Connecting to the Antenna Input Connectionon the External Equipment ..................................................24Before connecting the video connections to external devices....25Connecting a VCR, Cable/Satellite Receiver ........................26Connecting a DTV Receiver or DVD Player ...........................27Playing Back a Tape Recorded On a Camcorder .................28Connecting to a PC .............................................................29Resolutions Supported in PC ...............................................30Picture SetupHow to Select the Picture Mode ..........................................33How to Set the Desired Picture ...........................................34How to Set Noise Reduction ................................................35How to Set PIP [Mode] ........................................................36How to Set POP [Mode] ......................................................36How to Set Multi [Mode] .....................................................37How to Select the Aspect Ratio ...........................................39Sound SetupHow to Select the Volume, Balance and Mute .....................41How to Set the Audio Mode(Equalize) ..................................42How to Set the Desired Audio .............................................43How to Listen to Stereo Sound / SAP ..................................44How to Select the Surround ................................................44How to Select the AVC(Auto Volume Control) .......................45PC SetupHow to Select the Color Mode .............................................47How to Select the Auto Adjust .............................................48How to Set the Geometry ....................................................49Channel SetupHow to Store Channel Automatically ...................................51How to Set Manual Store ....................................................52Option SetupChoosing Your Language ....................................................55How to Set OSD(On-Screen-Display) Display Time ..............56How to Select OSD the Background ....................................57How to Set Sleep Time .......................................................58How to Set Clock ................................................................59How to Set On /Off Time .....................................................60Displaying Information ........................................................62How to View Closed Captions .............................................63How to Select the V-Chip Control ........................................64How to Set the Desired V-Chip Control ................................65AppendixGlossary .............................................................................69Troubleshooting ..................................................................71Care and Cleaning ..............................................................73Product Specifications ........................................................74A Wide Array of Screen SettingsYou can choose different screen settings depending on the type of program you are watchingor the surrounding conditions (the lighting or the outside weather conditions).You can switch among Dynamic, Mild and Standard, or you can configure the screen settingsfor yourself.A Wide Array of Sound SettingsYou can choose an optimal sound setting for the type of program you are watching.You can switch among Standard, Music, Movie and News, or you can configure the settings foryourself.V-ChipThe V-Chip feature locks out programs that are deemed inappropriate for children.Closed Captions FunctionThis is to displays the closed captions that are broadcast with certain TV shows.Surround Audio FunctionYou can listen to dynamic and surround sound only with ordinary speakerAuto ON/OFF Function This function allows you to turn on/off your LCD TV at the preset time.](https://usermanual.wiki/Hyundai-IBT/LT20A0000.Users-Manual-1-of-2/User-Guide-458128-Page-4.png)
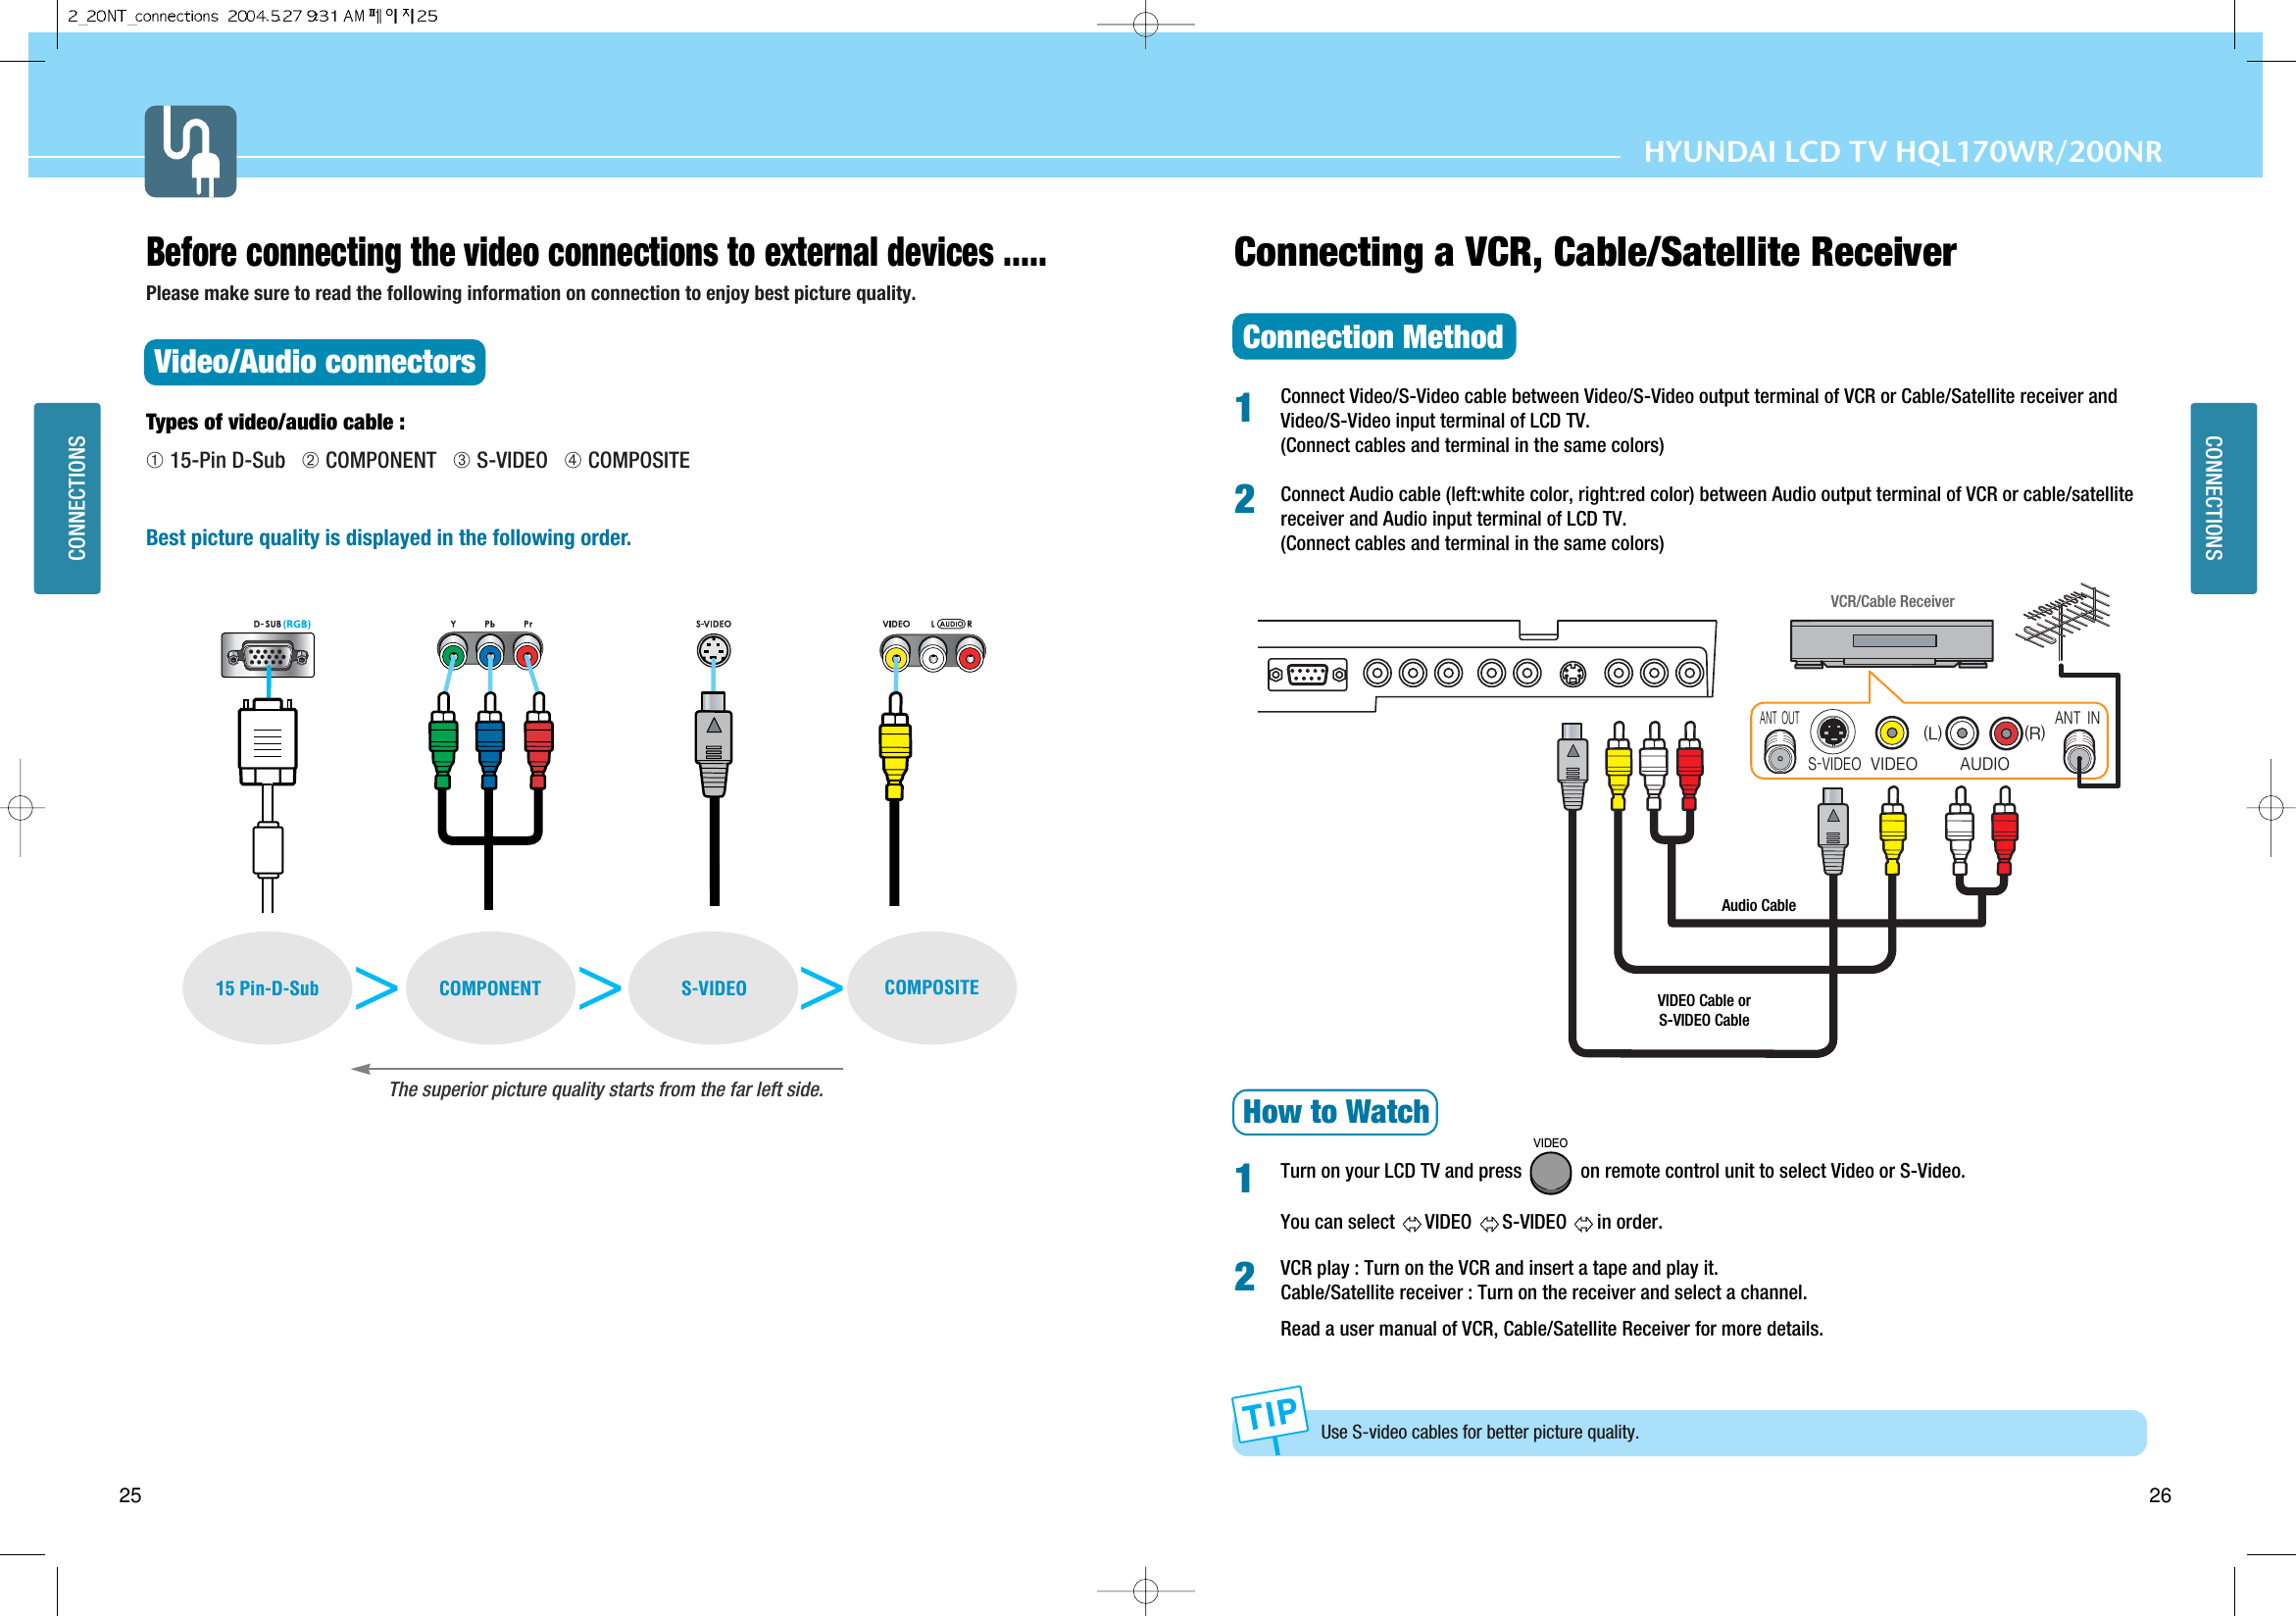
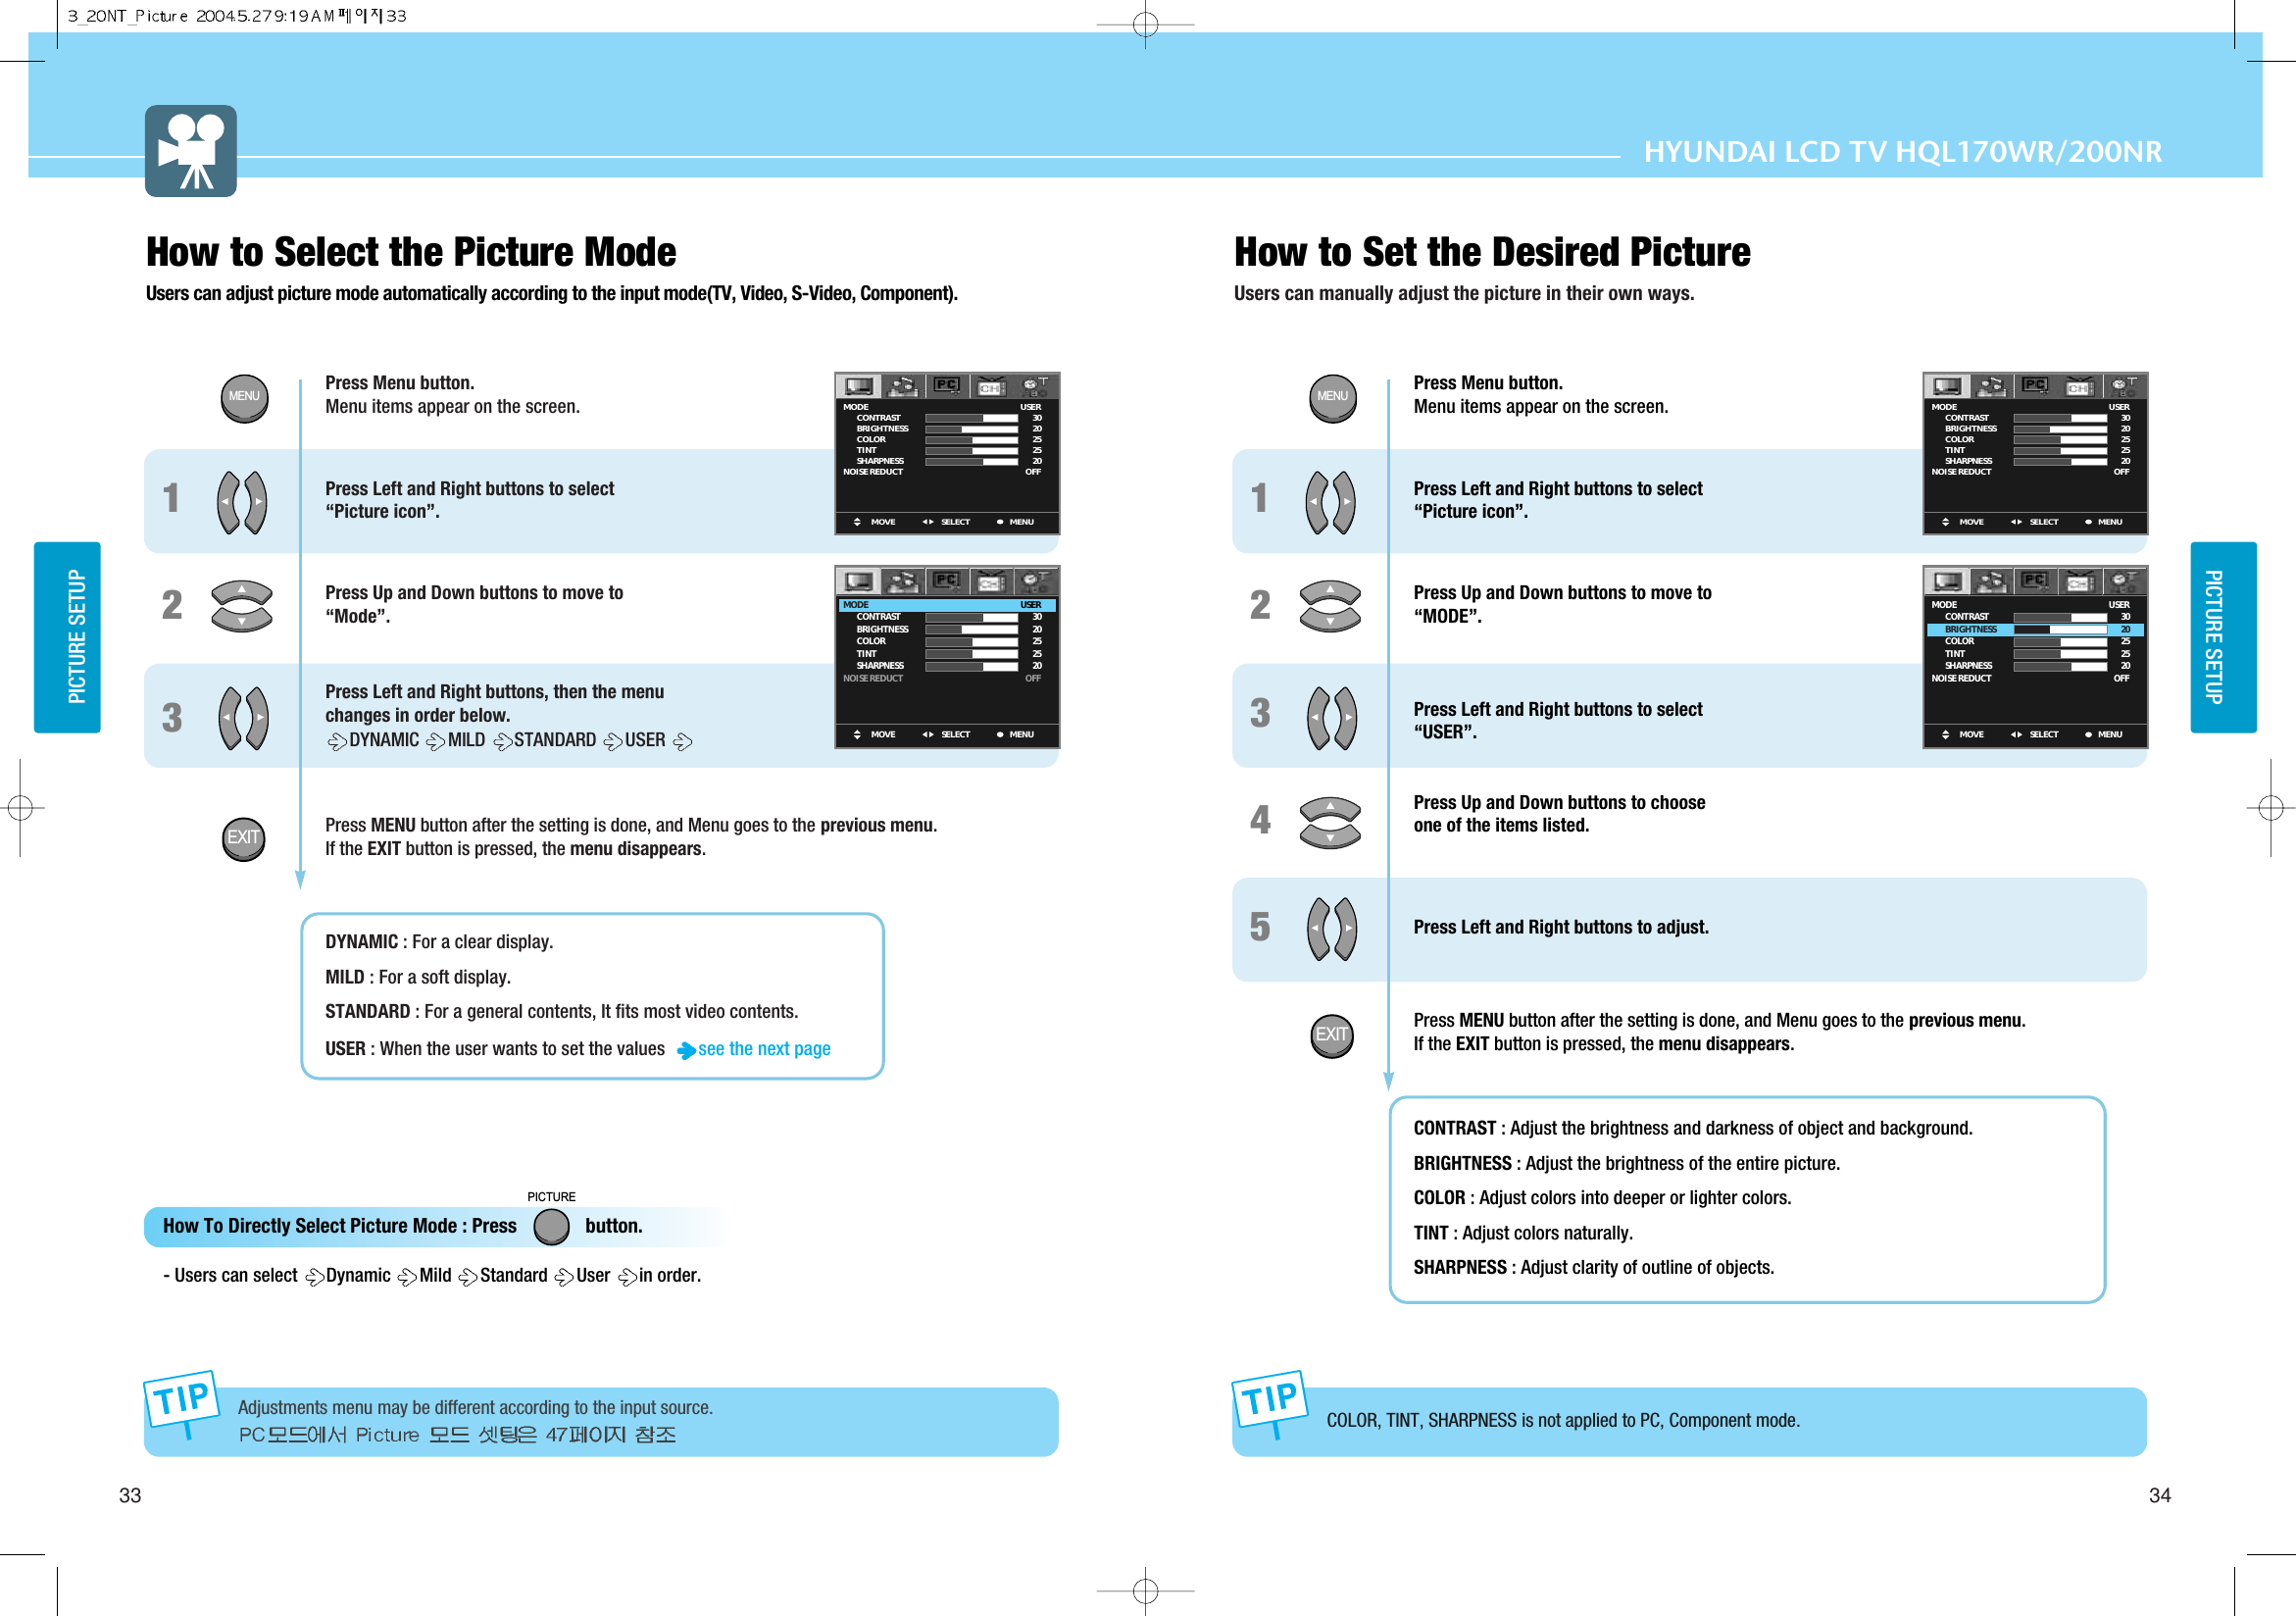
![How to Select the Picture Mode .................................................33How to Set the Desired Picture ...................................................34How to Set Noise Reduction .......................................................35How to Set PIP [Mode] ................................................................36How to Set POP [Mode] ..............................................................36How to Set Multi [Mode] .............................................................37How to Select the Aspect Ratio ..................................................39Picture SetupHYUNDAI LCD COLOR TV](https://usermanual.wiki/Hyundai-IBT/LT20A0000.Users-Manual-1-of-2/User-Guide-458128-Page-18.png)
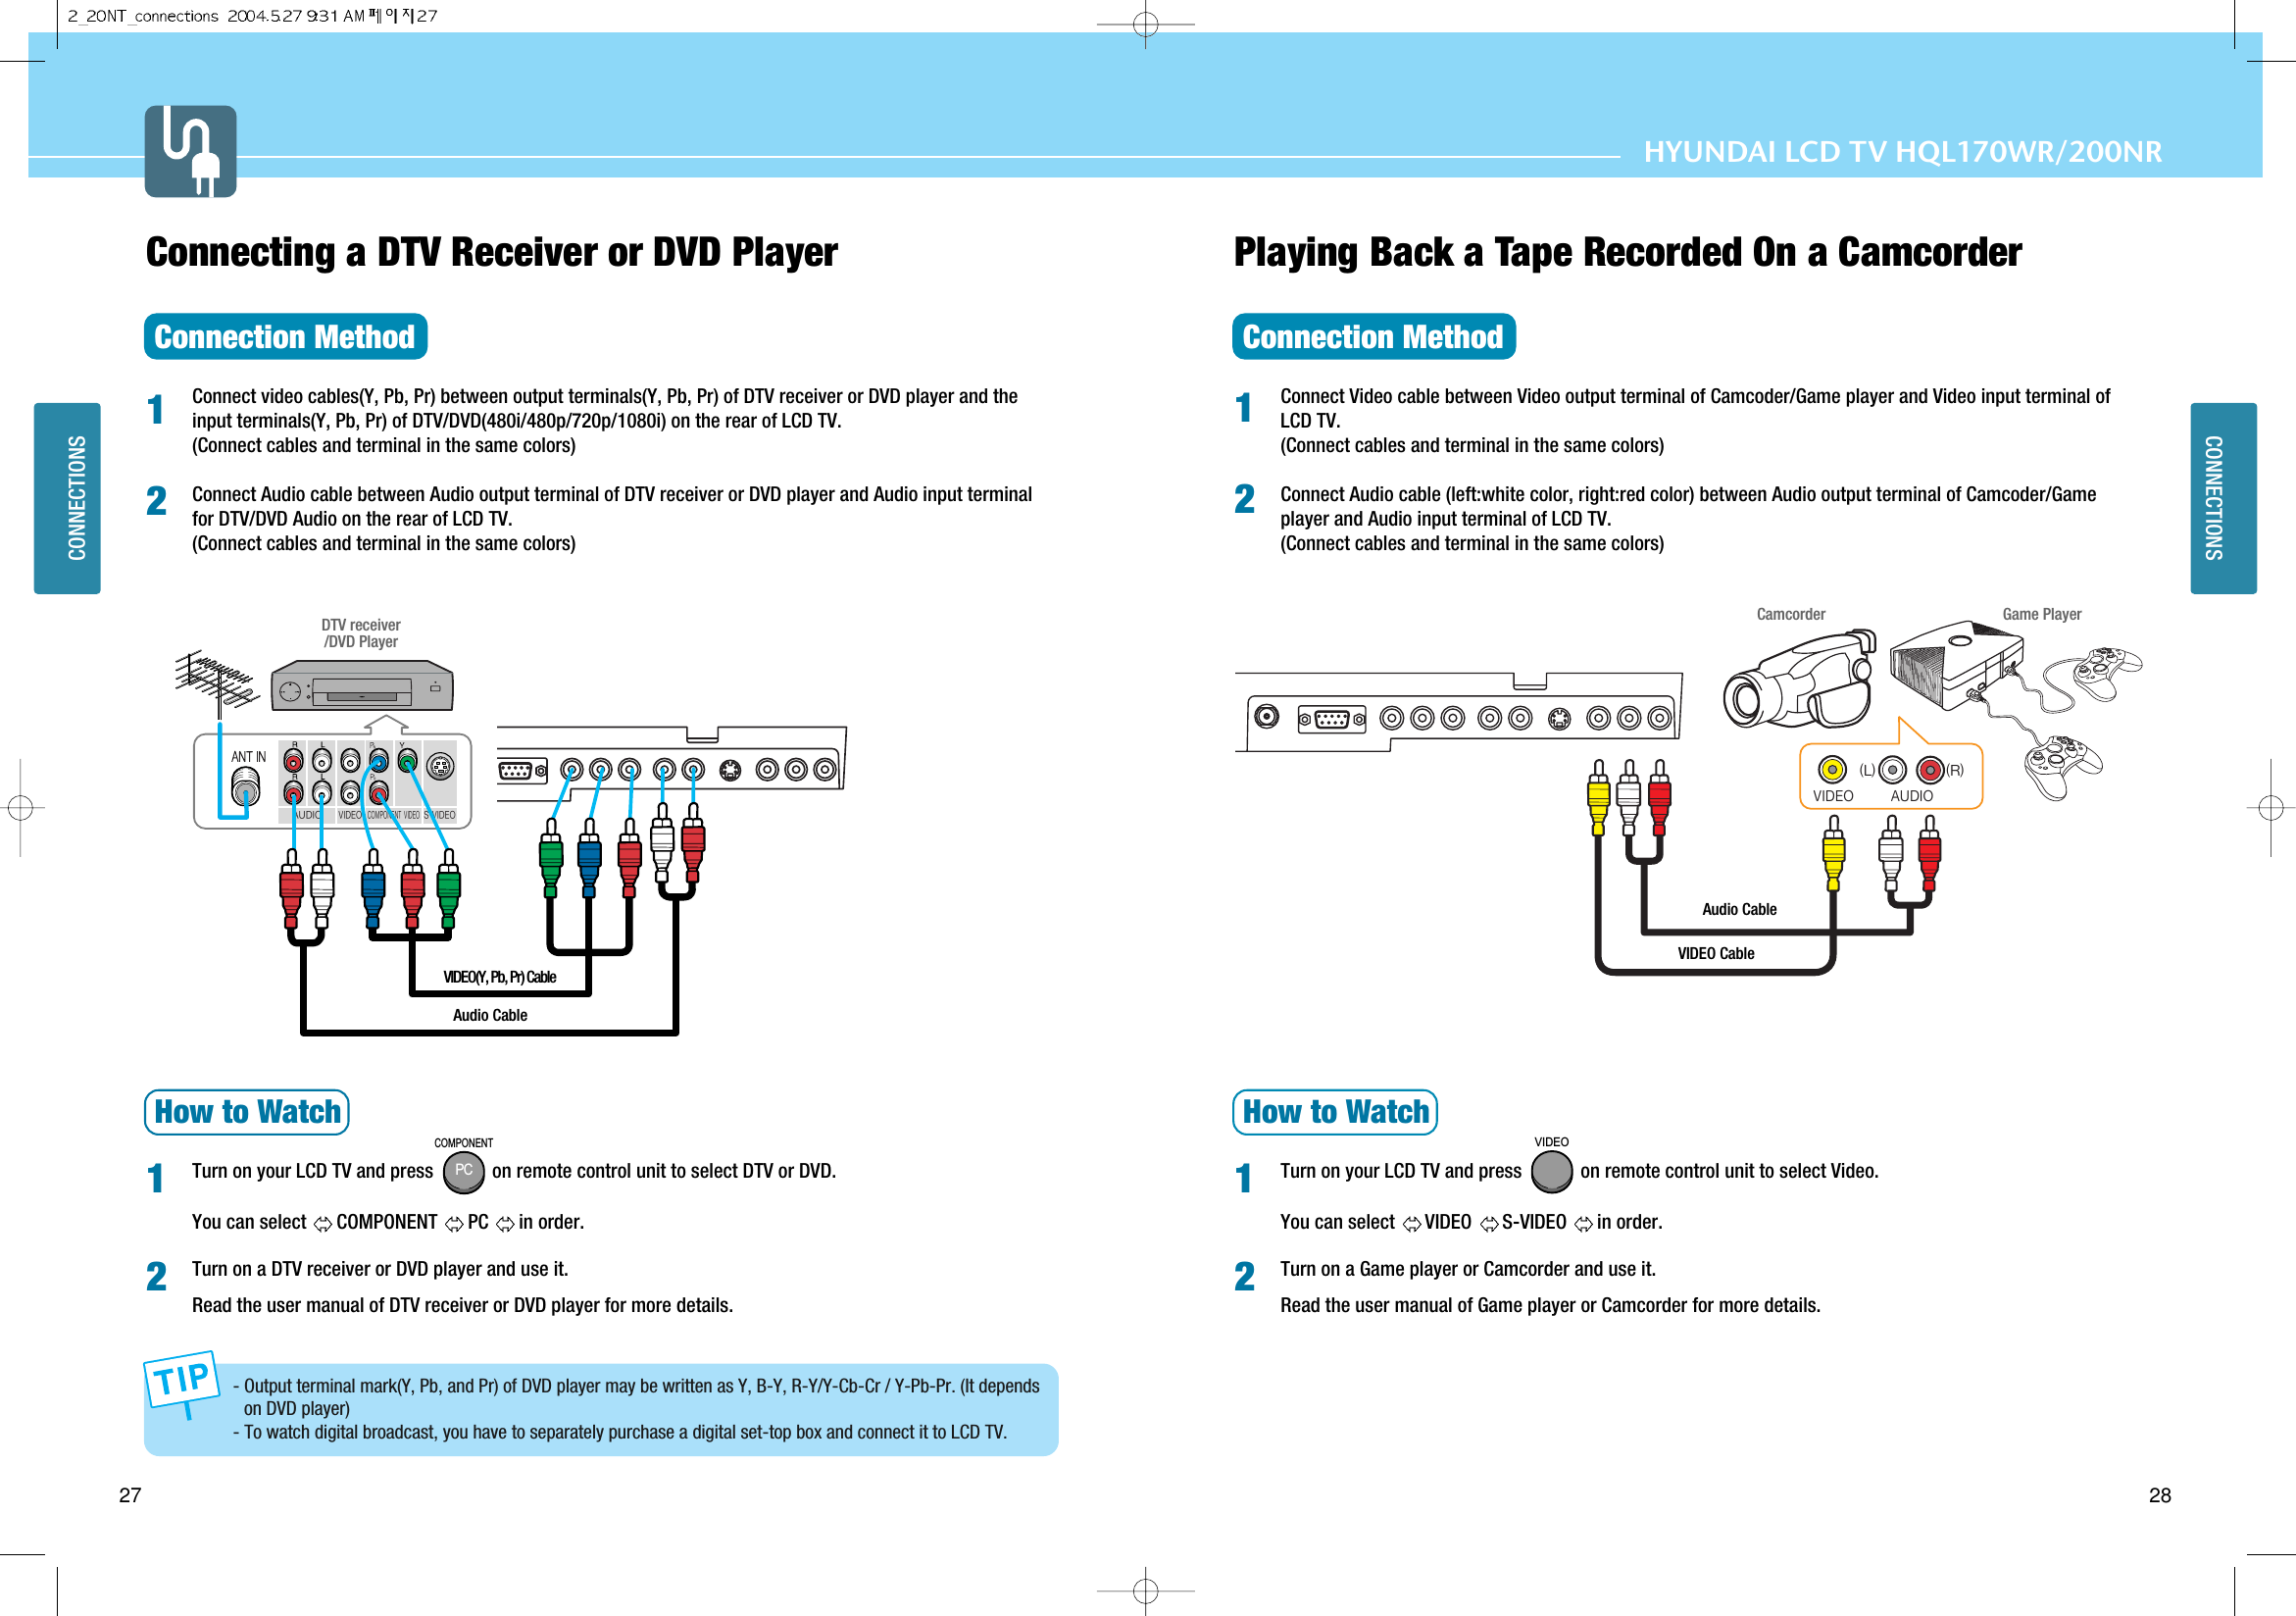
![36PICTURE SETUPHYUNDAI LCD TV HQL170WR/200NR35PICTURE SETUPPress Menu button. Menu items appear on the screen. Press Left and Right buttons to select “Picture icon”.Press Up and Down buttons to move to “NOISE REDUCT”.Press Left and Right buttons, then the menu changes in order below. OFF MIDDLE STRONGPress MENU button after the setting is done, and Menu goes to the previous menu.If the EXIT button is pressed, the menu disappears.OFF : For a normal screen.MIDDLE : For a reduced noise on the screen.STRONG : For a reduced a lot of noise on the screen.123How to Set Noise ReductionNoise Reduction is to eliminate some noise on the screen and It is not applied to Component and PC mode.MOVE MENUSELECTMODE CONTRAST BRIGHTNESS COLOR TINT SHARPNESSNOISE REDUCTUSER3020252520OFFMOVE MENUSELECTMODE CONTRAST BRIGHTNESS COLOR TINT SHARPNESSNOISE REDUCTUSER3020252520OFFMENUEXITIn the noise reduction, the more you reduce the screen noise, the more sharpness level of the picture maybecome degrade.How to Set PIP [Mode]- You can watch another device's image in the PIP while watching the main image.- This function is available only with the remote control.How to Set POP [Mode]- You can watch another device's image in the POP while watching TV, VIDEO, S-VIDEO mode in the main image.- This function is available only with the remote control.Press the PIP button.You will see the PIP at the upper left corner.Press the PIP button, then position changes in order below. Left Up Right Up Right DownLeft Down OFF Press the SOURCE button, then PIP input source changes in order below. TV VIDEO S-VEDIOTo deselect PIP function, Press EXIT button.Press the POP button.You will see the POP at the Right.Press the SOURCE button, then POP input source changes in order below. TV VIDEO S-VEDIOTo deselect POP function, Press POP button once more or Press EXIT button.1423MainMain POP- Main and sub pictures cannot have the same input source. - In case of TV mode, you can change the PIP TV channel by “P-CHANNEL” Button. - In case of TV mode, you can change the POP TV channel by “P-CHANNEL” Button.PIPPIPSOURCESUBSOURCESOURCESUBSOURCEPOPPOPPIPEXITEXIT](https://usermanual.wiki/Hyundai-IBT/LT20A0000.Users-Manual-1-of-2/User-Guide-458128-Page-20.png)
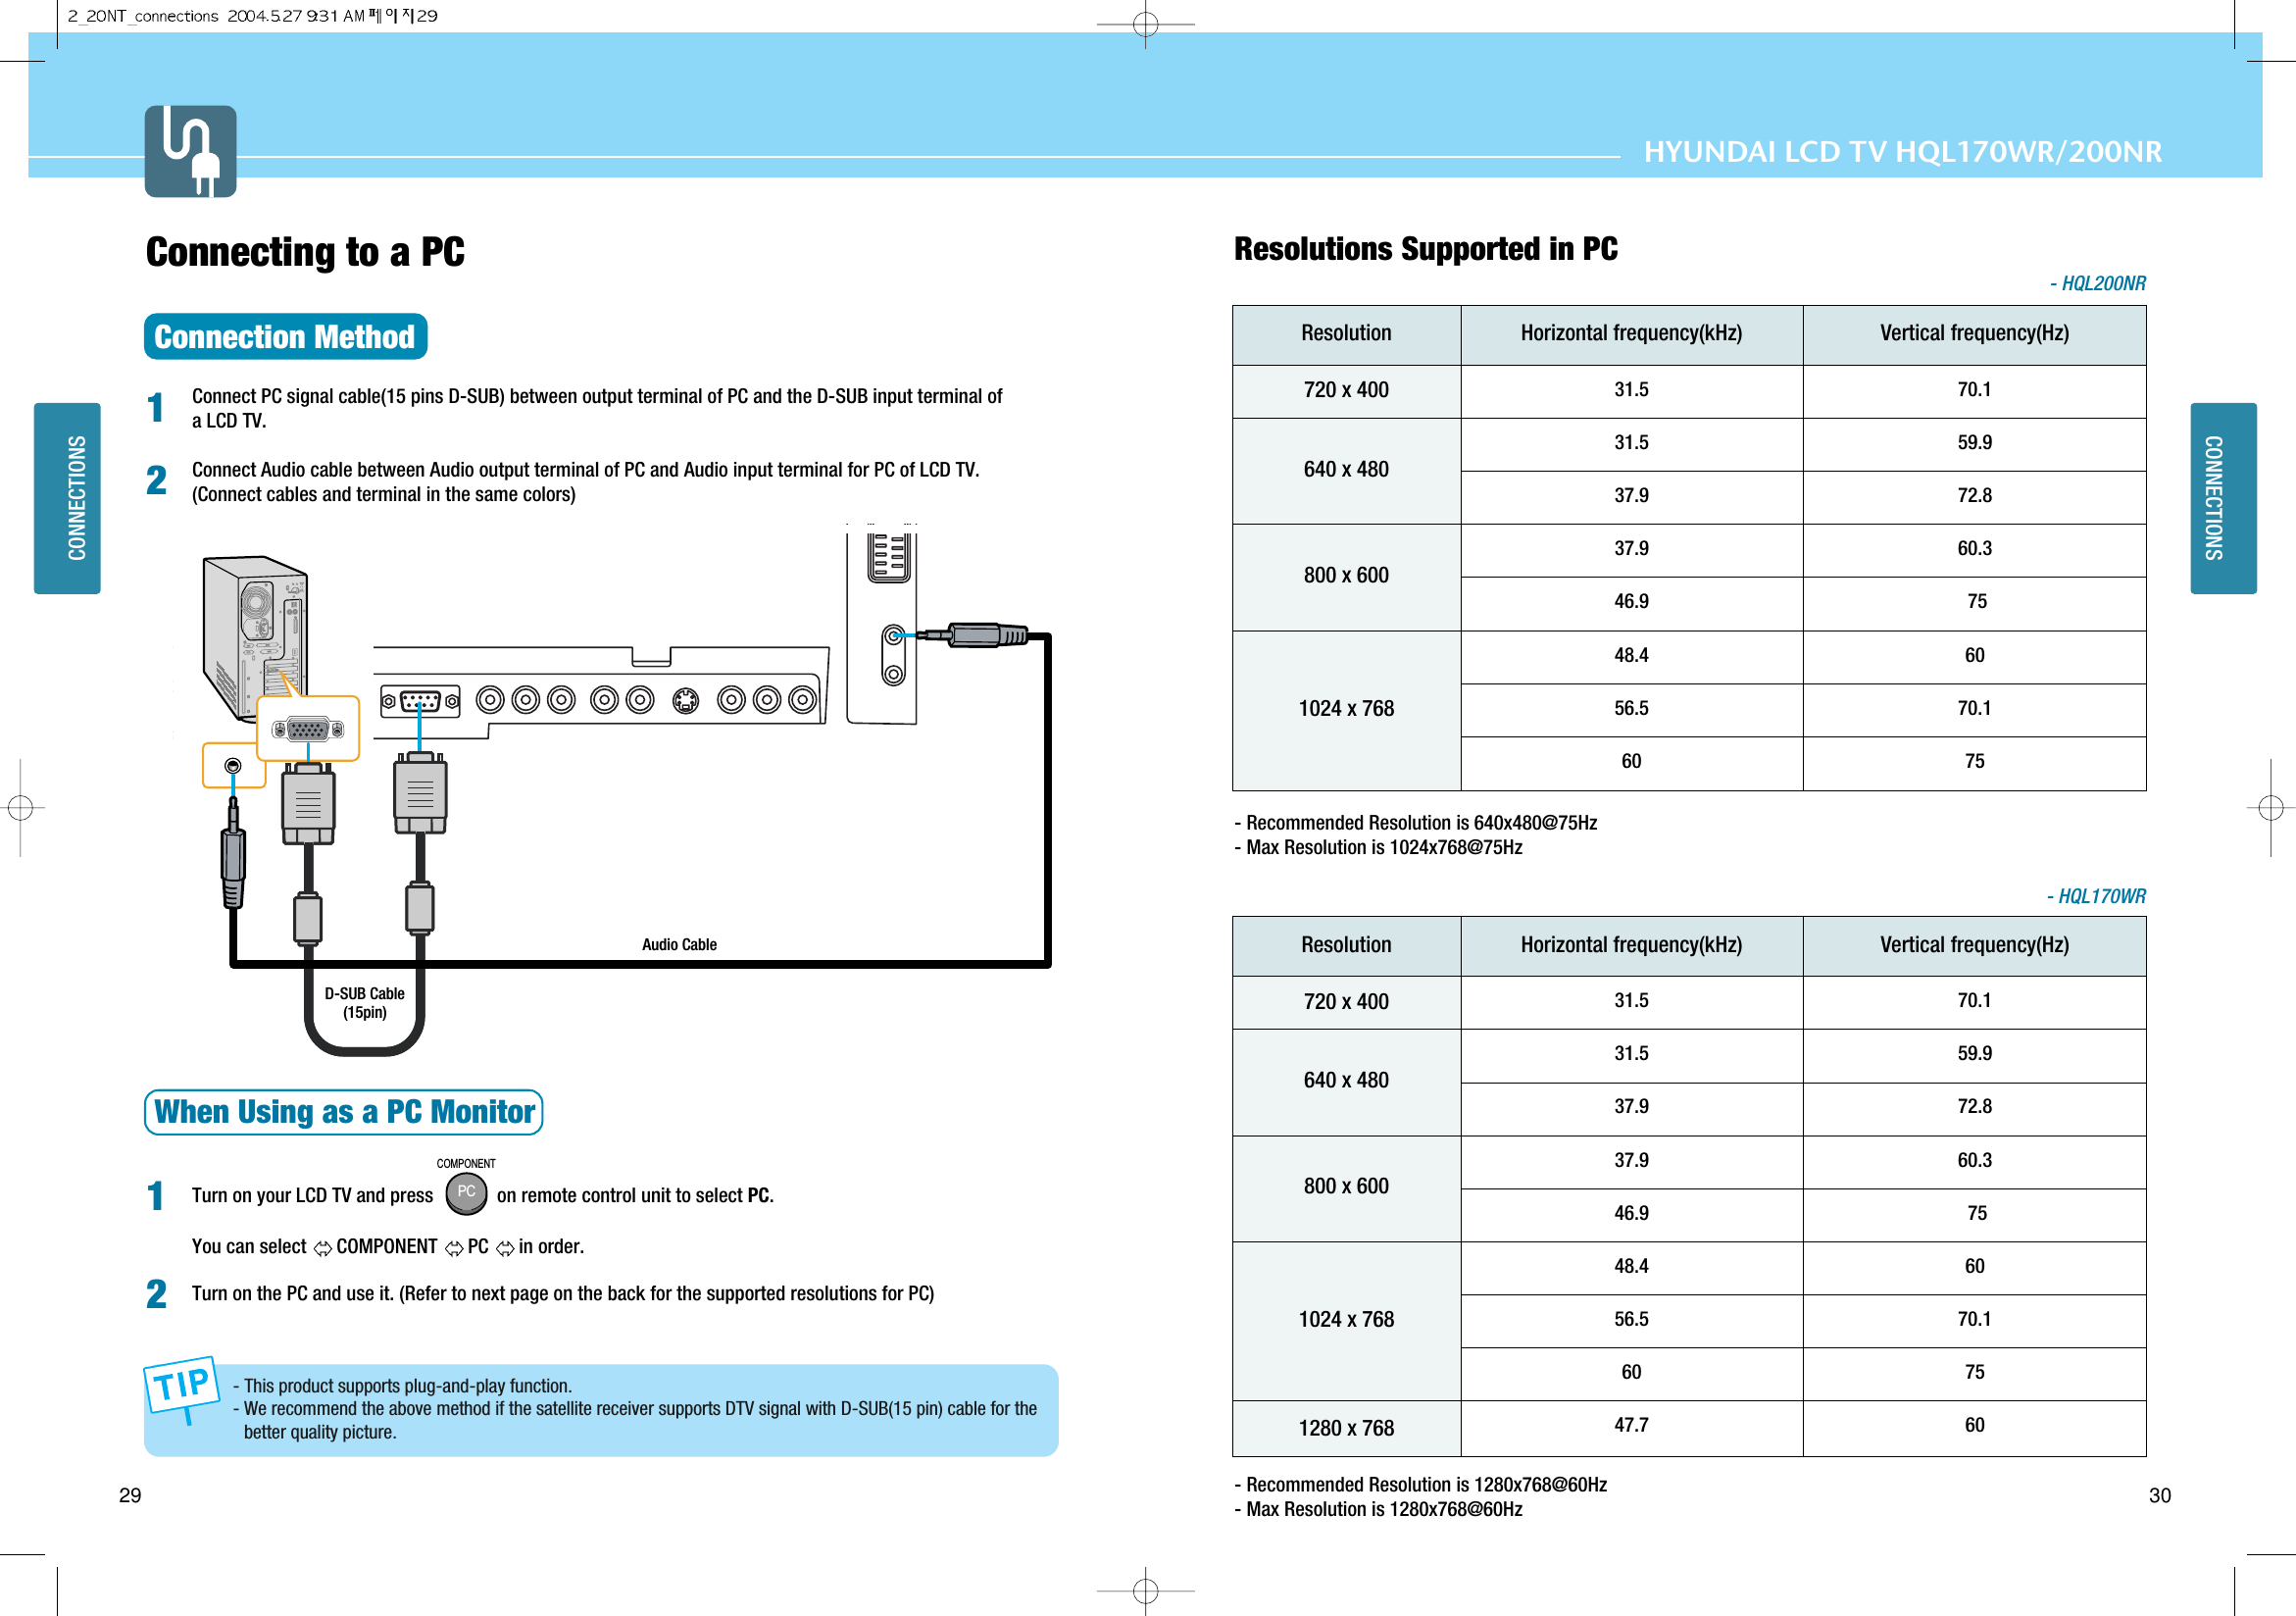
![How to Set Multi [Mode]- You can watch another device's image in the MULTI while watching TV, VIDEO, S-VIDEO mode in the main image.- This function is available only with the remote control.Supported PIP TablePIP : O →Supported, X →Not Supporte37 38PICTURE SETUPPICTURE SETUPHYUNDAI LCD TV HQL170WR/200NRPress the MULTI button.You will see the Multi screen of nine screens.To deselect Multi function, Press MULTI button once more or Press EXIT button.1234 56789EXITMULTIMULTISupported POP TablePIP : O →Supported, X →Not SupporteHow to Freeze PictureThe user can temporarily stop the playing picture. - In case of TV mode, you can change the multi TV channel.- You cannot change the multi input source.TVVideoS-VideoComponentPCTVXOOXXVideoOXOXXS-VideoOOXXXComponentXXXXXPCXXXXXSub MainTVVideoS-VideoComponentPCTVXOOXXVideoOXOXXS-VideoOOXXXComponentOOOXXPCOOOXXSub MainTSTILLPress Still button. Playing picture is stopped. * In PIP/POP mode, the main picture stops. To deselect Still function. Press Still button once more.](https://usermanual.wiki/Hyundai-IBT/LT20A0000.Users-Manual-1-of-2/User-Guide-458128-Page-21.png)