Hyundai IBT LT26AW000 26 Inches LCD/TV Monitor User Manual 1
Hyundai IBT Corp. 26 Inches LCD/TV Monitor 1
Contents
- 1. User Manual 1
- 2. User Manual 2
User Manual 1

FCC ID : PJILT26AW000
REPORT NO. : HCT-F04-0303 HYUNDAI C–TECH
ATTACHMENT E -1.
- USER’S MANUAL -
HQL260WR
LCD TV
Operating instructions
U.S.A.
U.S.FEDERAL COMMUNICATIONS COMMISSION
RADIO FREQUENCY INTERFERENCE STATEMENT
INFORMATION TO THE USER
NOTE : This equipment has been tested and found to comply with the limits for a
Class B digital device pursuant to Part 15 of the FCC Rules.
These limits are designed to provide reasonable protection against harmful
Interference in a residential installation.
This equipment generates, uses, and can radiate radio frequency energy and, if
Not installed and used in accordance with the instructions, may cause harmful
Interference to radio communications.
However, there is no guarantee that interference will not occur in a particular
Installation.
If this equipment does cause harmful interference to radio or television reception,
Which can be determined by turning the equipment off and on, the user is
encouraged to try to correct the interference by one or more of the following
measures:
Reorient or relocate the receiving antenna.
Increase the separation between the equipment and receiver.
Connect the equipment into an outlet of a circuit different from that
to which the receiver is connected.
Consult the dealer or an experienced radio/TV technician for assistance.
Changes or modification not expressly approved by the party responsible for
Compliance could void the user’s authority to operate the equipment.
Connecting of peripherals requires the use of grounded shielded signal cables.
LCD TV
A Wide Array of Screen Settings
You can choose different screen settings depending on the type of program you are
watching or the surrounding conditions (the lighting or the outside weather conditions).
You can switch among the Sports, Movies, Music and Normal options , or you can
configure the screen settings yourself.
A Wide Array of Sound Settings
You can choose an optimal sound setting for the type of program you are watching.
You can switch among the Music, Movie, News and Normal options , or you can configure
the settings yourself.
Favorite Channel Memory
You can store your favorite channels in the order of preference for easy channel selection.
Captions
When you watch a captioned program, you can turn the caption option on to see English
text on te screen. This feature also works with video CDs or videotapes with captions.
CAUTION
RISK OF ELECTRIC SHOCK
DO NOT OPEN
CAUTION: TO REDUCE THE RISK OF ELECTRIC SHOCK,
DO NOT REMOVE COVER (OR BACK).
NO USER-SERVICEABLE PARTS INSIDE.
REFER SERVICING TO QUALIFIED SERVICE PERSONNEL.
WARNING
To reduce the risk of fire or shock hazard, do not expose the TV to rain or moisture.
This symbol is intended to alert the user to the presence of uninsulated
“dangerous voltage” within the product’s enclosure that may be of sufficient
magnitude to constitute a risk of electric shock to persons.
This symbol is intended to alert the user to the presence of important operating
and maintenance (servicing) instructions in the literature accompanying the
appliance.
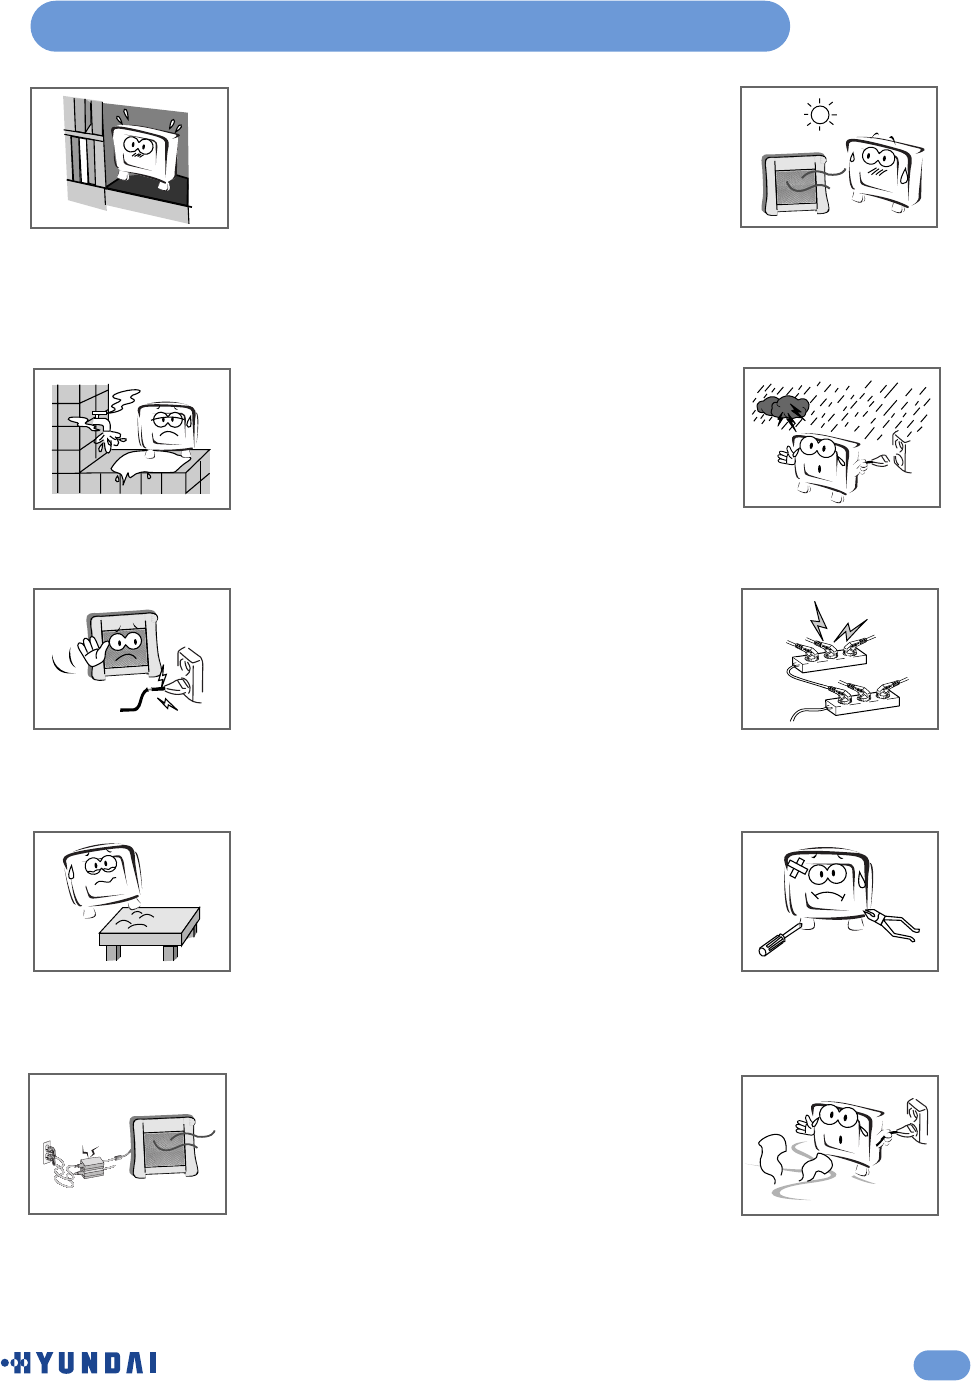
The unit should not be placed in a built-in installation such as
a book-case, limited space rack unless proper ventilation is
provided.
- This may cause fire by overheating or damage the unit by
falling.
3
Safety Instructions
Do not use the unit in direct sunlight and keep it away from
heaters, stoves, and other sources of heat.
- This may cause a fire.
Do not use the unit near water, oil or inflammables.
- This may cause a fire.
During storm conditions (especially when there is lighting)
unplug your TV set from the main electrical outlet
and antenna.
Do not use a damaged plug and do not let the power cord
touch a heat source.
- This may cause an electric shock or fire.
Do not connect too many extension cords or plugs to an outlet.
- This may cause a fire.
Place the unit on a flat and stable surface.
- The unit can cause injury or damage the unit by falling.
Do not attempt to service the unit.
Contact an authorized dealer or repair service.
- Servicing the unit yourself may cause an electric shock or fire.
Keep the power adapter away from any heat source.
- This may cause a fire.
If there are any unusual sounds or smells coming from the
unit, unplug it immediately and contact an authorized
dealer or repair service.
- This may be caused by an electric shock or fire.
4
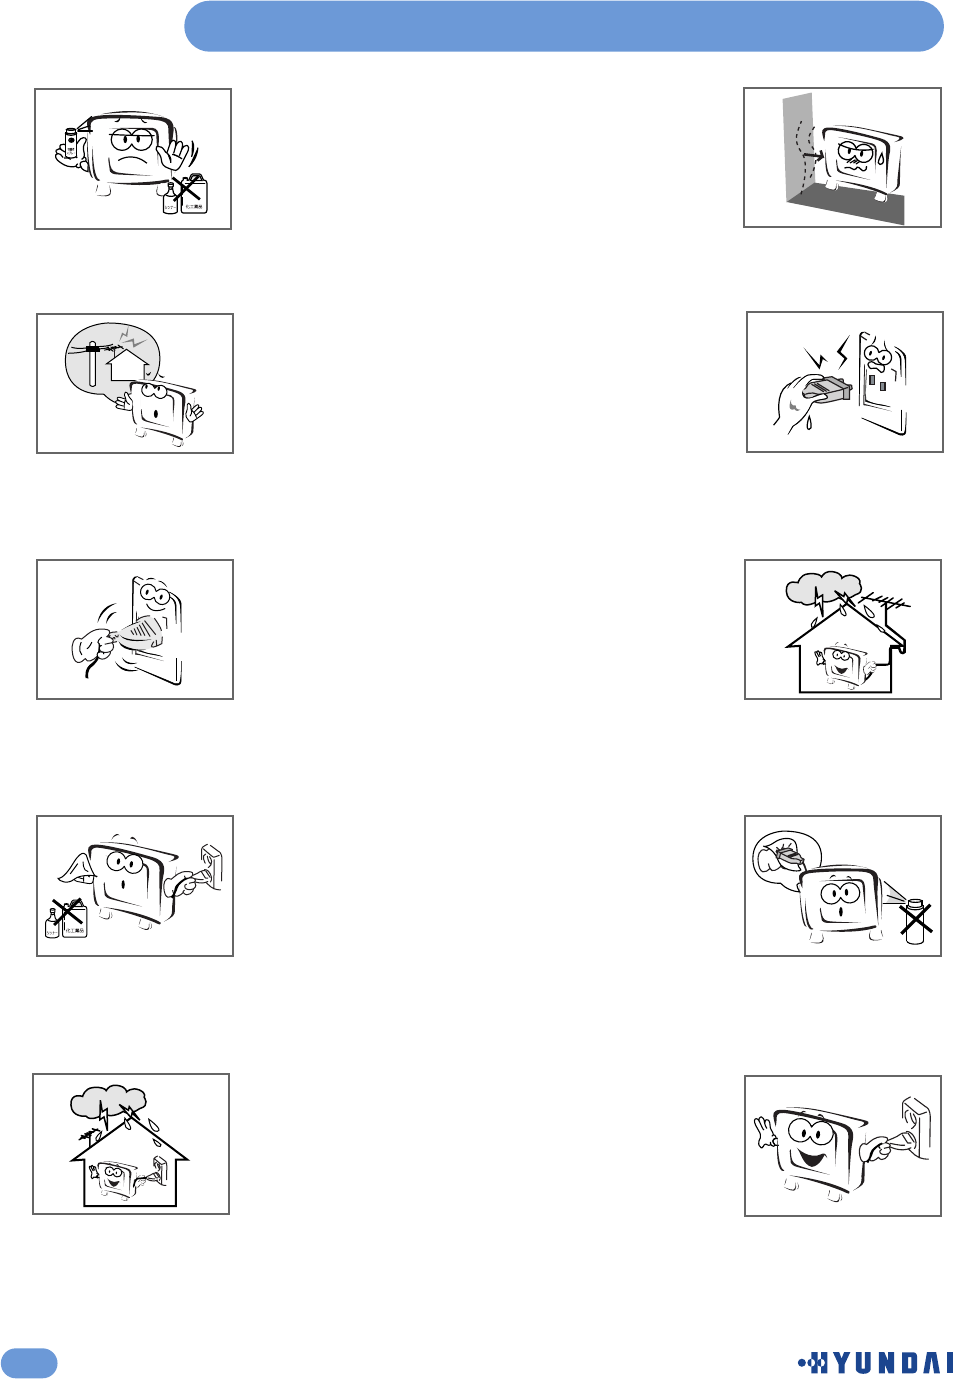
Safety Instructions
Do not use or store inflammable substances near the unit
- This may cause an explosion or fire.
Place the unit away from the wall for well ventilation.
- This may cause a fire.
Place the antenna away from the electric wire, not to touch
even though it falls down by wind.
- This may cause an electric shock.
Do not touch the plug with wet hands.
- This may cause an electric shock.
Be sure to plug in tightly and hold the plug, not the cord when
disconnecting the plug from the wall outlet.
- This may cause a fire.
If an outside antenna is connected to the unit, do not let the
rain water get into the unit by bending or antenna wire sealing
- This may cause an electric shock or fire.
Unplug the unit from the wall outlet before cleaning. Use a
smooth cloth. Do not use industrial chemicals.
- This may cause an electric shock or fire.
If the connector between the plug and the pin is dusty or
dirty, clean it. Do not spray detergent directly on the unit.
- This may cause an electric shock or fire.
Do not touch the antenna wire and disconnect the plug from
the electrical outlet during storms or lightening.
- This may cause an electric shock or fire.
Disconnect the plug from the outlet if it is not used for a long
period of time.
- This may cause an electric shock or fire.

5
Table of Contents
Safety Instructions ....................................................................................................................3
Unpacking your TV ....................................................................................................................6
Viewing the Control Panels (Front View) ...................................................................................7
Viewing the Control Panels (Rear View) ....................................................................................8
Remote Control .........................................................................................................................9
Inserting Batteries in the Remote Control .................................................................................10
Connecting an Antenna or Cable ..............................................................................................10
Connecting to the RCA or S-Video Input (AV1 or AV2) ............................................................11
Connecting to a DVD or DTV Set-Top Box Input ......................................................................11
Connecting to the RCA Input (AV3) ..........................................................................................12
Connecting a Second VCR to Record from the TV (LINE-OUT) ...............................................12
Connecting the Power Cord and Switching the TV On/Off ........................................................13
Selecting a Picture from External Sources.................................................................................13
Selecting your Language ...........................................................................................................13
Storing Channels in Memory .....................................................................................................14
Setting the Parental Lock ..........................................................................................................15
Customizing the Picture ............................................................................................................19
Customizing the Sound .............................................................................................................20
Adjusting the Speaker Volume & Selecting the Speaker Sound Source ...................................21
Listening to Stereo Sound/SAP .................................................................................................22
Setting the Sound Effect ............................................................................................................22
Setting the Date & Time ............................................................................................................23
Displaying the Current Time ......................................................................................................23
Setting the Preset Time (On/Off) ...............................................................................................24
Setting the Sleep Timer .............................................................................................................24
Viewing the Closed Captions ....................................................................................................25
Setting Restrictions On Button Input .........................................................................................25
Setting the OSD Display Time ...................................................................................................26
No Key Operation Auto Power Off ............................................................................................26
No Signal Auto Power Off .........................................................................................................27
Watching your Favorite Channels .............................................................................................27
Reducing Picture Noise .............................................................................................................28
Displaying the TV Information ...................................................................................................28
Display the Picture in Picture (PIP) ...........................................................................................29
Changing the Picture Size .........................................................................................................31
Display a Still Image ..................................................................................................................31
Connecting to the PC ................................................................................................................32
Setting the PC Software ............................................................................................................33
Adjusting the Screen Position ...................................................................................................34
Reload Geometry Values ..........................................................................................................34
Adjusting the Screen Color ........................................................................................................35
Standard Display Mode .............................................................................................................36
Troubleshooting .........................................................................................................................37
Specifications .............................................................................................................................39
6
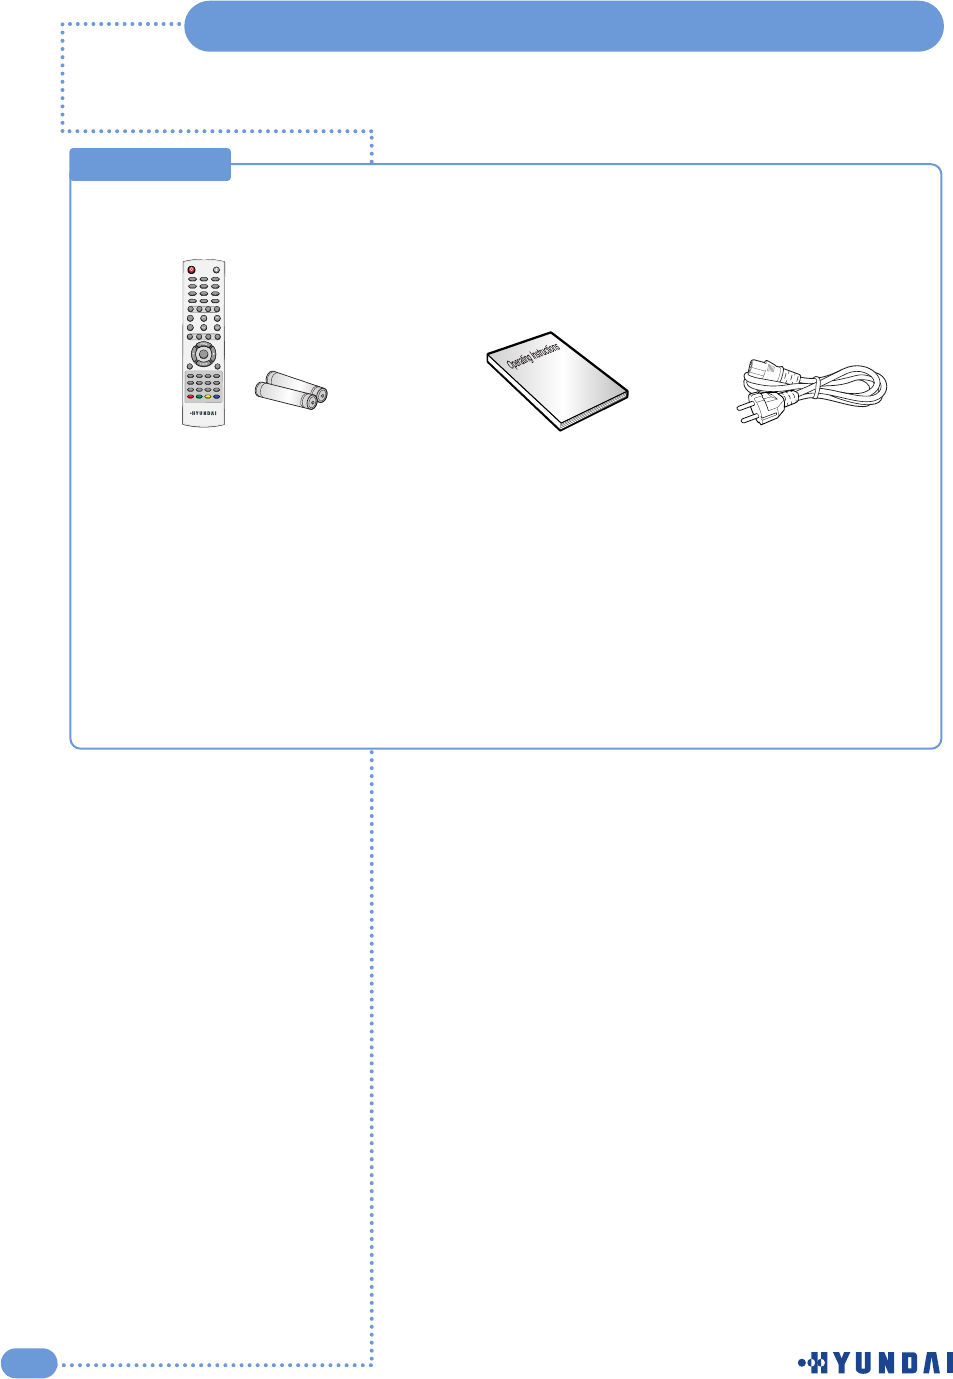
Unpacking your TV
Remote Control & Batteries (AAA x 2) Operating Instructions Power Cord
Accessories
Battery
Battery
Please make sure the following items are included with your TV set.
if any items are missing, contact your dealer.
12
0
3
4
7
5
8
6
9
PIP
MENU
TV/AV
INFO
MUTE
PREVIEW
SOUND
MTS
VOLUME
SLEEP
ON/OFF
HIGH/LOWPROTECTIONPC.AUTOCAPTION
TTX/MIXINDEXLIST/FLOFSTORE
HOLDSIZEREVEALSUB PAGE
SOURCESIZESWAP
CHANNEL
PICTUREASPECTSTILL
POWER
7
INPUT MENU - VOL + < CH >
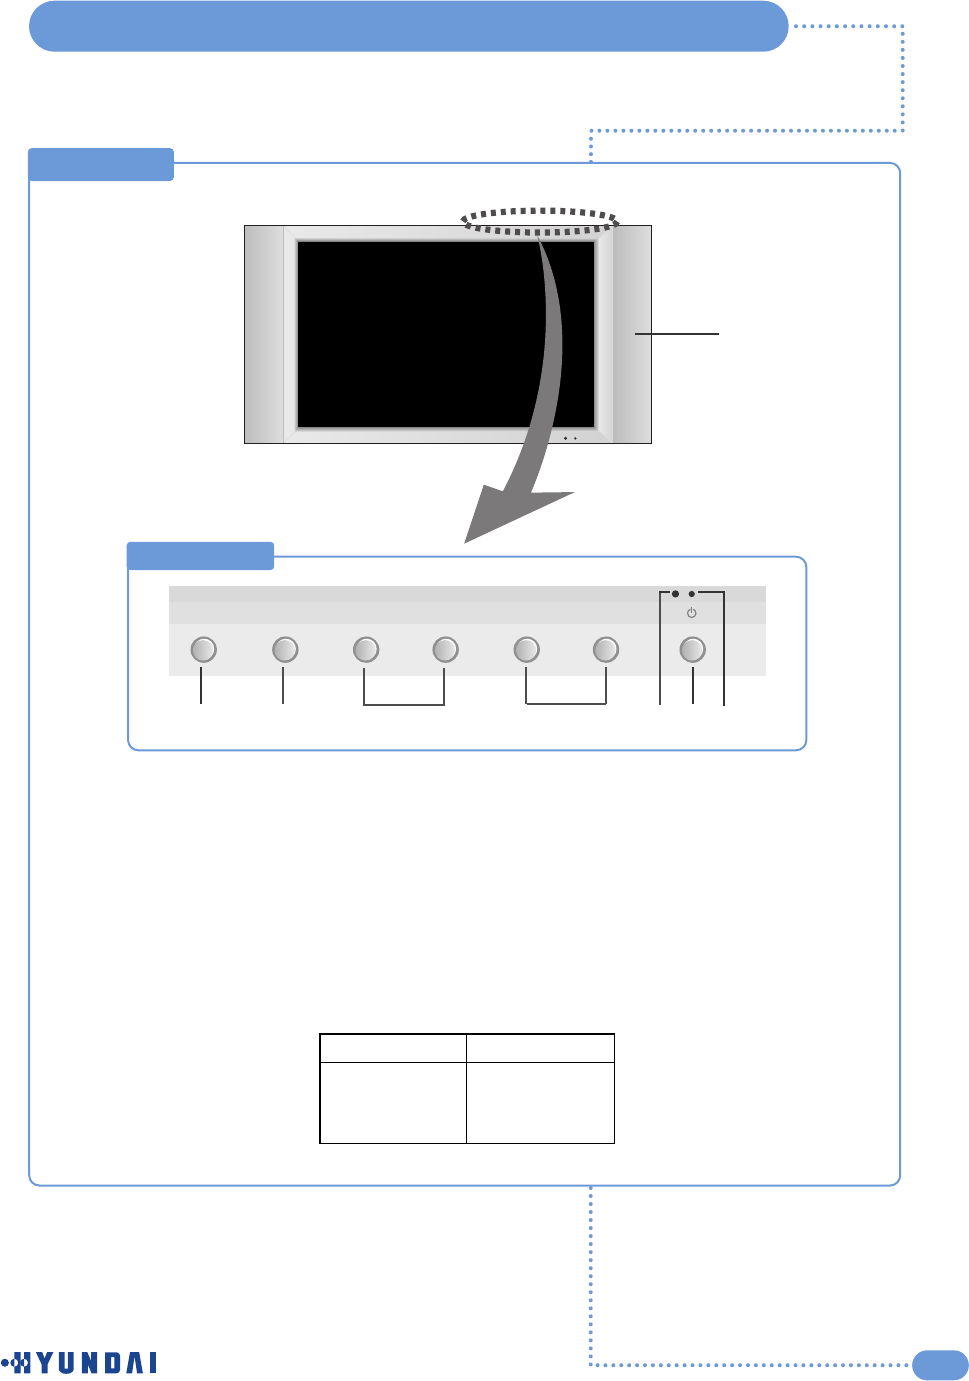
Viewing the Control Panels
ԽԾԿՀՁ
TOP Side
Ճ
Մ
Front View
Խ
Ծ
Կ
Հ
Ձ
Ղ
Ճ
Մ
Input source selection button
MENU selection button
Volume adjustment button
Channel selection button
Remote control sensor
Power Indicator
Power button
Speaker
Power Indicator Status
Indicator
Red
Green
Green blinking
Status
Stand-by
Power on
Remote control
Ղ
Bottom Side
8
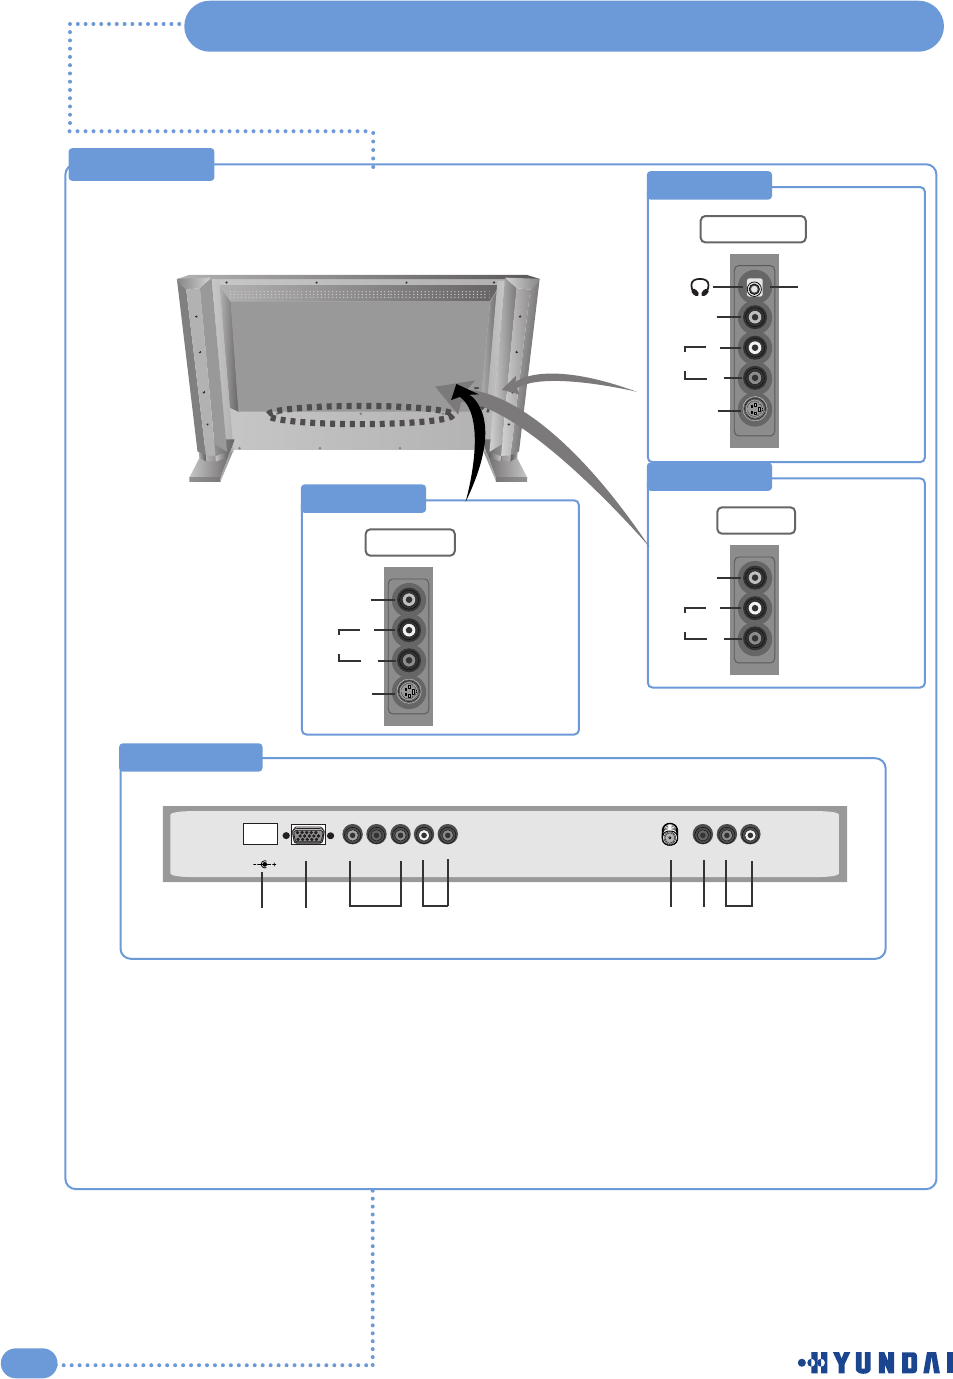
Viewing the Control Panels
Rear View
Right Side 1
L
R
AV2 INPUT
AC INPUT RGB
Y Pb Pr L R
VIDEO
L RANT
DTV/DVD
Audio
1. AC INPUT
2. RGB Video Input Connector (PC)
3. DTV/DVD Video (Y/Pb/Pr) Input
4. DTV/DVD Audio Input(L/R
5. Antenna Input Jack
6. AV1 VIDEO Input
7. AV1 AUDIO Input(L/R)
S-VIDEO
VIDEO
Headphone Jack
Audio
Right Side 2
L
R
AVOUT
VIDEO
Audio
Right Side 3
L
R
AV3 OUT
S-VIDEO
VIDEO
Audio
1 2 3 4 5 6 7
9
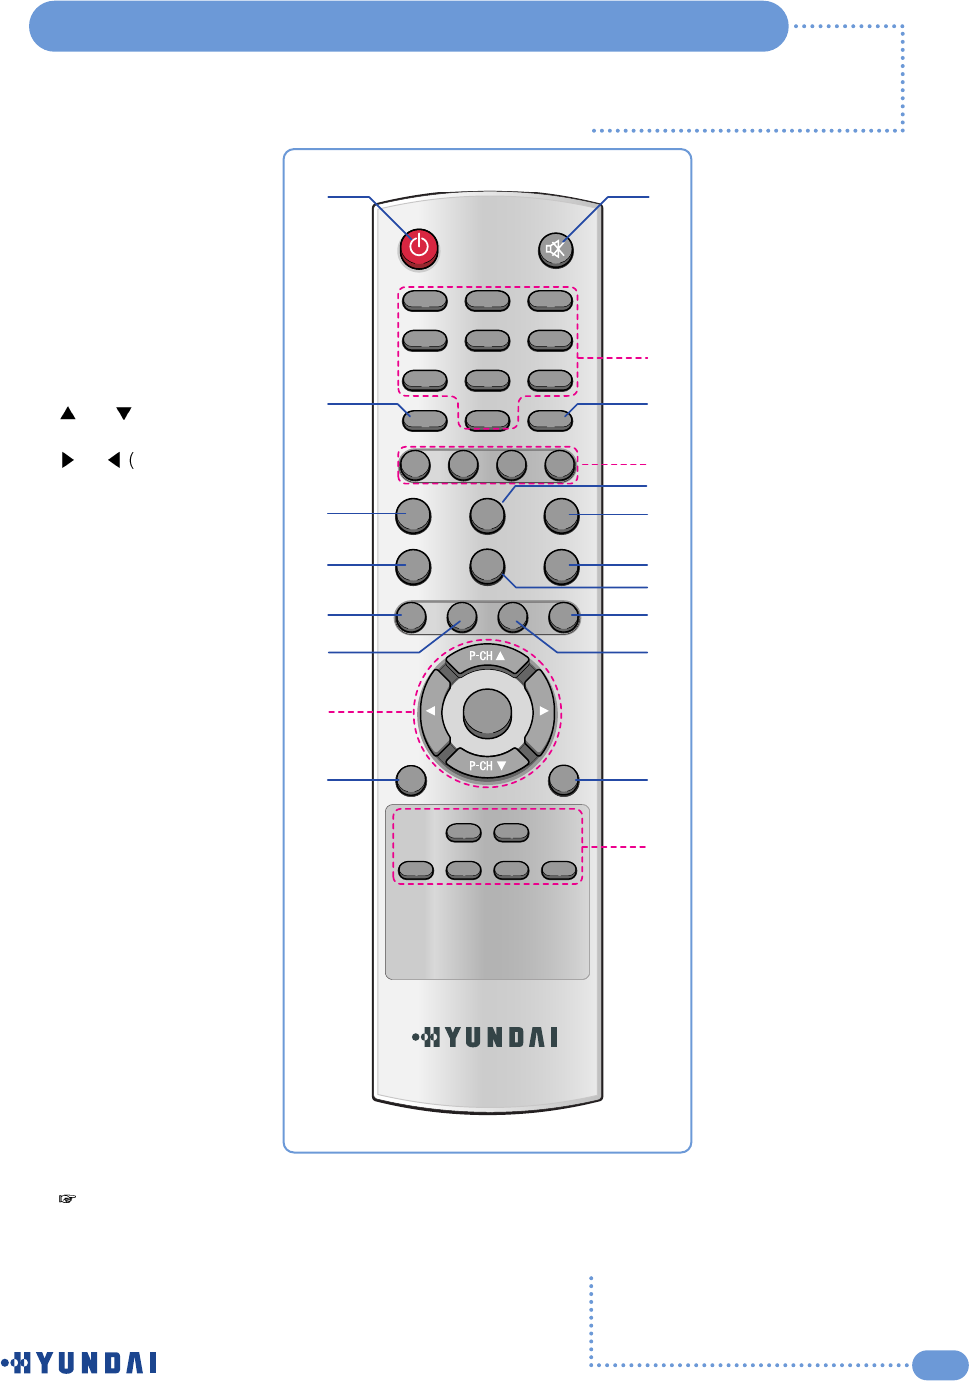
Remote Control
Power On/Off button
Numeric buttons
Previous Channel
ON Screen Display and
MENU
and (Channel Up /
Down
and Volume Up /
Down)
Favorite Channel Selection
(See page 27)
Picture Still (See page 31)
Picture Size Selection
(See page 31)
Picture Mode Selection
(See page 19)
Sleep Timer (See page 24)
Sound Mode Selection
(See page 20)
Խ
Ծ
Կ
Հ
Ձ
Ղ
Ճ
Մ
Յ
Ն
Temporary Sound Mute
External Source Input Selection
(See page 13 )
Closed Captions
(See page 25)
MENU Confirmation
PIP Functions:
(See page 29~30)
-PIP On/Off
-Position Selection (Position)
-Size Selection (Size)
-Picture Mode Selection (P.Mode)
-Swapping main and sub
picture (Swap)
-Selecting the Input Source(INPUT)
Sound Selection :
Mono/Stereo
/
SAP
(See page 22)
Sound Effect Selection
(See page 22)
Clock Display
(See page 23)
TV Information Display
(See page 28)
Add or Erase Channels in the
TV’s Memory
(See page 14)
Շ
Ո
Չ
Պ
Ջ
Ռ
Ս
Վ
Տ
Ր
-
Makes
sure
there
are
no
objects
between
the
remote
control
and
its
sensor.
-
Don't
place
the
remote
control
near
a
heater
or
in
damp
place.
-
A
strong
blow
to
the
remote
control
may
cause
it
not
to
operate.
1 2
0
3
4
7
5
8
6
9
MENU
LT-260W
OK
MUTE
CC
PC
STILL ASPECT SLEEP
S.MODEP.MODE
MTS
FAVORITE
PIP INPUT
SIZE POSITION P.MODE SWAP
DISPLAY CLOCK ADD/ERASE
S.EFFECT
DTV VIDEO STILL
POWER
Q.View
➋
➐
➒
➓
➏
➑
➎
➍
➌
➊
ANT
or
Cable Television
Network
Rear of the TV
10
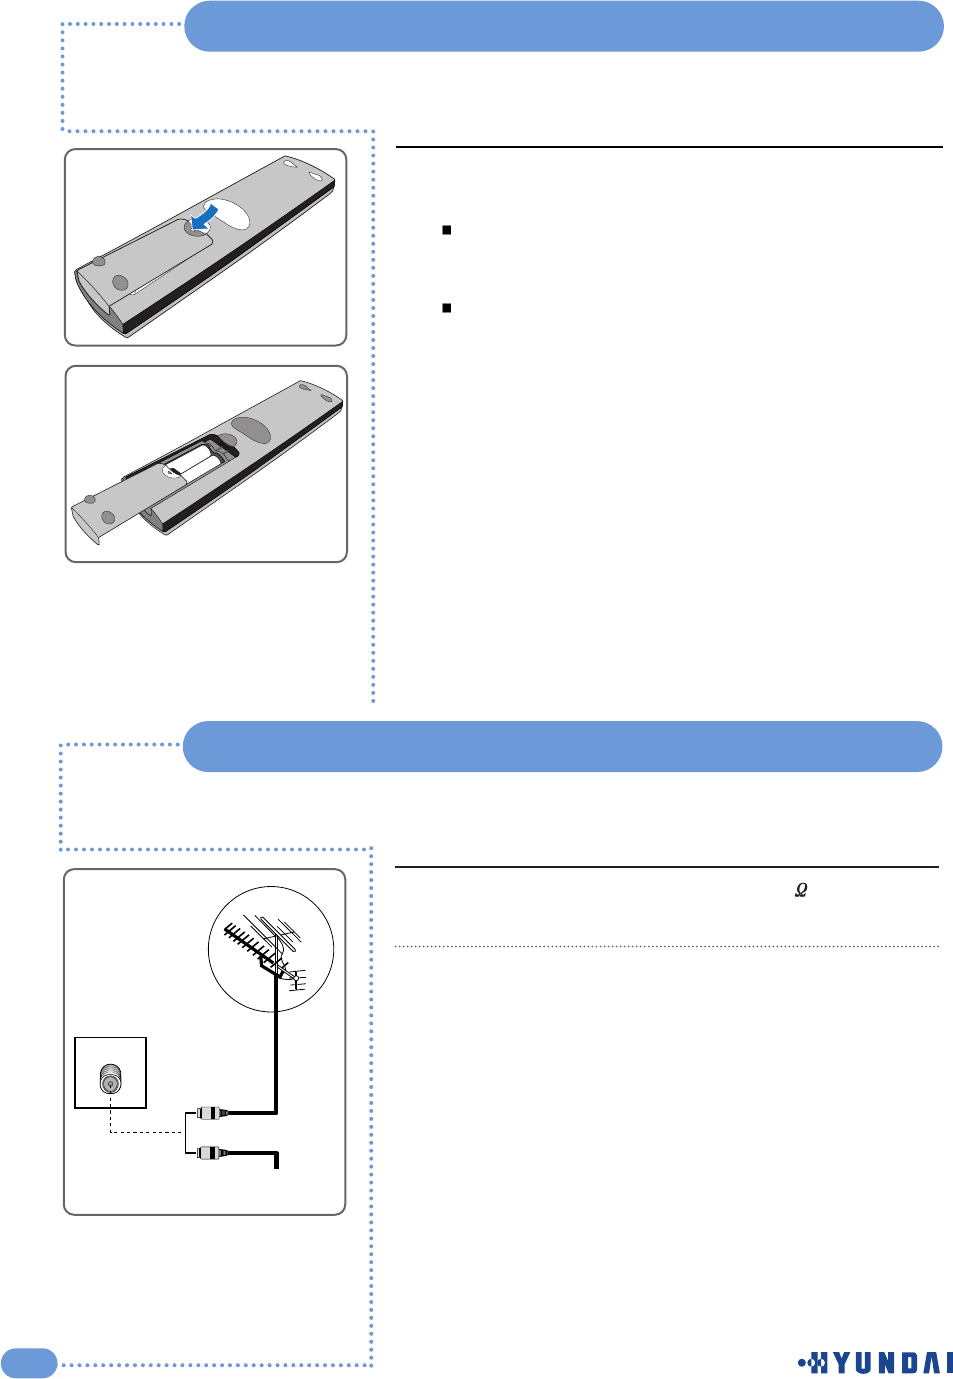
Inserting Batteries in the Remote Control
Insert two AAA-size batteries (supplied) by matching the +and
-on the batteries to the diagram inside the battery compartment.
Handle the remote control with care; avoid dropping it,
getting it wet, placing it direct sunlight, near a heater, or
where the humidity is high .
Remove the batteries to avoid damage from possible battery
leakage whenever you anticipate that the remote control
will not be used for an extended period.
1
Connect the antenna or input cable to the 75 coaxial input
on the rear of the TV.
If you are using an indoor antenna, you may need to turn it
when tuning your television until you receive a clear picture.
1
2
You must insert or replace the batteries in the remote control when you purchase the TV
or when you find that the remote control is no longer operating correctly.
To view television channels correctly, a signal must be received by the set from one of
the following sources: an outdoor antenna, a cable television system or a satellite dish.
Connecting an Antenna or Cable
11
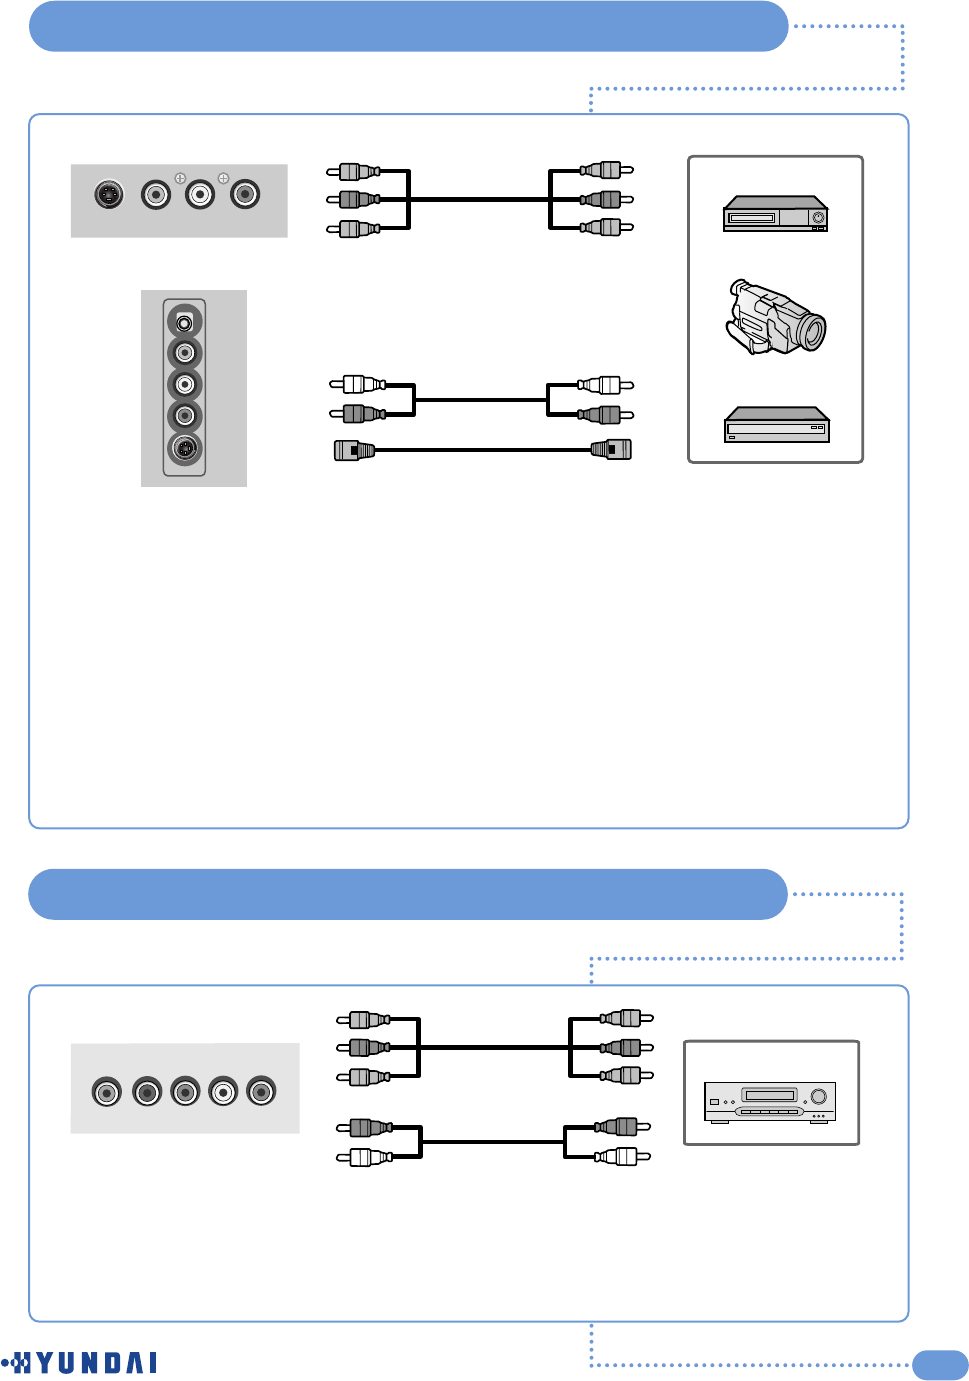
Connecting to the RCA or S-Video Input ( AV1 or AV2 )
Connecting to a DVD or DTV Set-Top Box INPUT
Rear of the TV (A) For RCA Input
(A) For RCA Input
1. Connect the RCA cable to the input jacks (Video+ Audio L/R of AV1 or AV2) on the TV and
output jacks on the external equipment such as a VCR, camcorder and some Video game
devices.
(B) For S-Video Input
1. Connect the S-Video/RCA (audio L/R of AV1 or AV2) cable to the input jacks on the TV and
output jacks on the external equipment such as a VCR, camcorder and some video game
devices.
2. If the external equipment has mono audio output, connect it only to left jack of the Audio
Input/Output.
S-Video VIDEO LR
AV1
VIDEO
L
R
S-Video
VCR
Camcorder
Video game device
(B) For S-Video Input
Rear of the TV
1. Connect the video cables to the Y, Pb, Pr input jacks (DTV/DVD) on the TV and the Y, Pb, Pr
output jacks on the DVD or DTV Set-Top Box.
2. Connect the audio cables to the Audio L/R input jacks (DTV/DVD) on the TV and the Audio
output jacks on the DVD or DTV Set-Top Box.
YPb Pr L R
DTV/DVD
Video Cable
Audio Cable
DVD/DTV STB
12
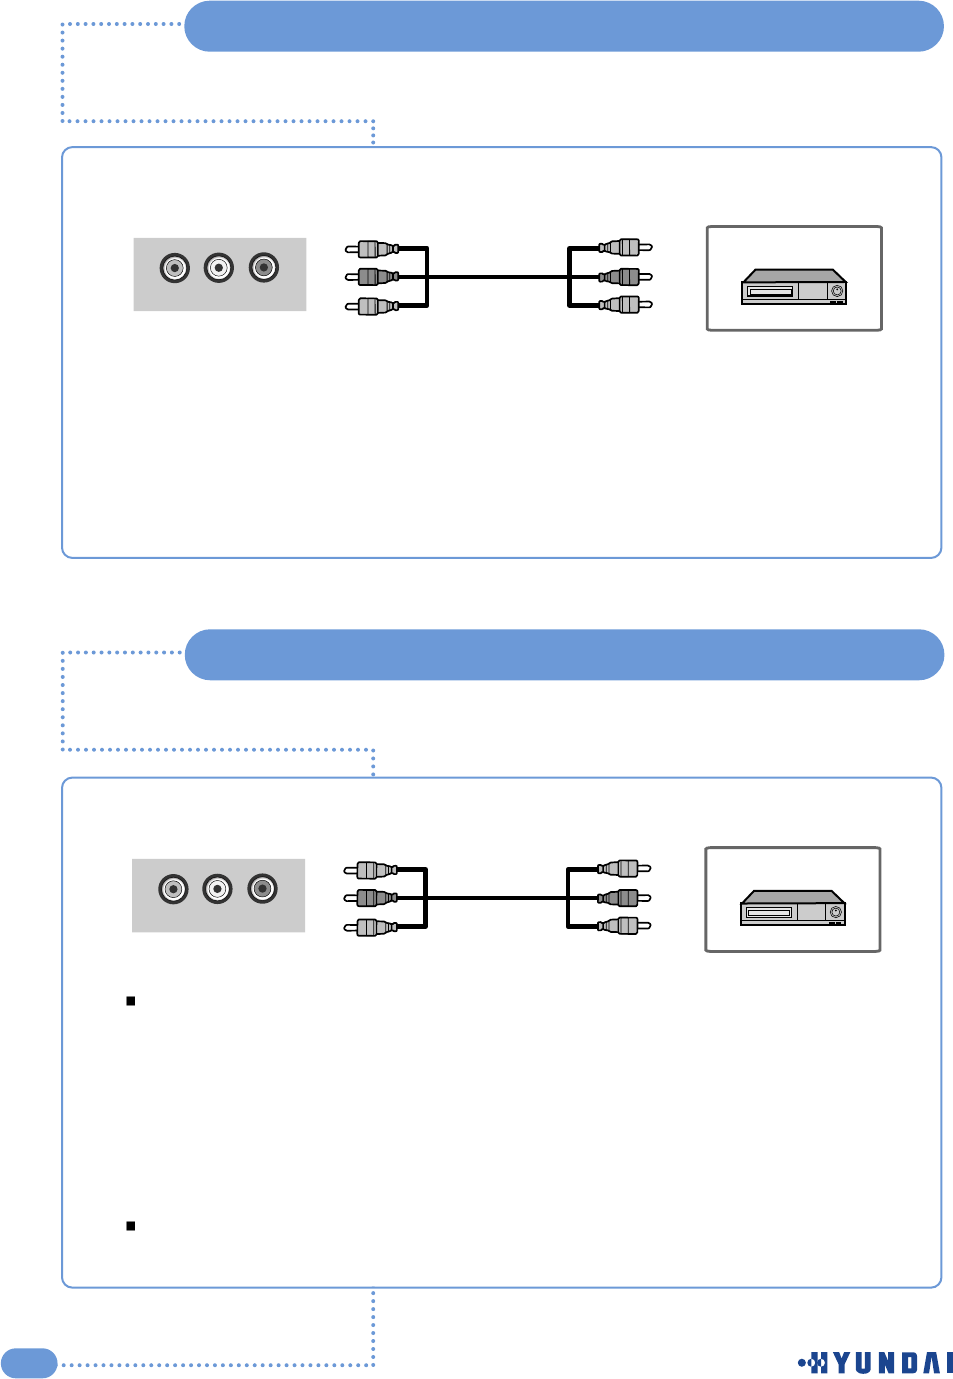
Connecting to the RCA Input ( AV3 )
Rear of the TV
Your TV can send out signals of its picture and sound to be recorded by a second VCR.
To do this, connect your second VCR as follows:
(The VCR input jacks might be either on the front or on back of the VCR.)
1. Connect a set of audio cables between the AUDIO OUT jacks on the TV and the AUDIO IN
jacks on the VCR.
2. Connect a video cable between the VIDEO OUT jack on the TV and the VIDEO IN jack on
the VCR.
Refer to your VCR’s instructions for more inforation about how to record using this kind of
connection.
VIDEO LR
LINE-OUT
VCR
Audio
Rear of the TV
1. Connect the RCA cable to the input jacks (Video+ Audio L/R of AV3) on the TV and output
jacks on the VCR.
2. If the external equipment has mono audio output, connect it only to left jack of the Audio
Input/Output.
VIDEO LR
AV3
VCR
Audio
Connecting a Second VCR to Record from the TV(LINE-OUT)
13
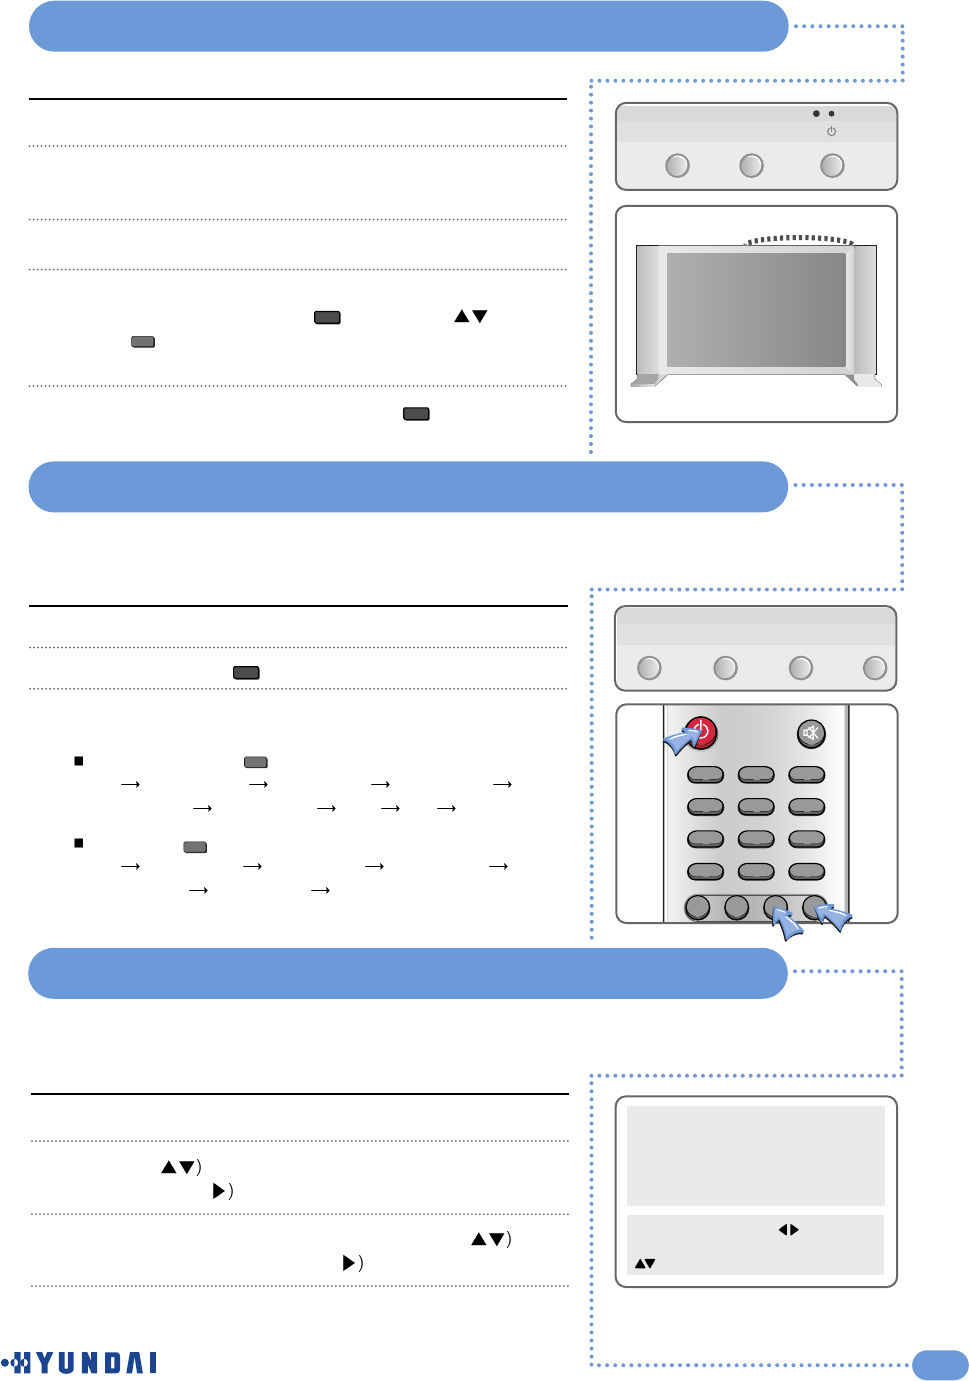
Connecting the Power Cord and Switching the TV On / Off
Selecting a Picture from External Sources
Connect the AC Power cord to AC input.
Connect the power cord for your TV to the power input on the
back of your TV.
Plug the power cord for the TV into a nearby outlet.
Press the POWER, CH or INPUT button on the front panel of
your set or press the POWER( ), CHANNEL( ),
INPUT( ), or Number (0~9) button on the remote control.
The LED lamp will blink and your TV will be turned on.
To switch your TV off, press the POWER( ) button again
1
2
3
4
< CH >
5
Power
Make sure all the necessary connections have been made.
Press the POWER () button to switch the device on.
Select the favorite source by pressing the INPUT button one
or more times.
The Input Source ( ) is displayed in following order :
TV AV1 VIDEO AV1 S-VHS AV2 VIDEO
AV2 S-VHS AV3 VIDEO DTV PC TV
The Video( ) is displayed in the following order :
TV AV3 VIDEO AV2 S-VHS AV2 VIDEO
AV1 S-VHS AV1 VIDEO TV
1
2
3
INPUT MENU - VOL +
After your various systems (audio and video) have finished, you can view any of the
sources by selecting the appropriate external input.
Selecting your Language
Picture
Sound
Clock
Install
Language
Advanced
MENU : Previous : Select
INPUT : Exit OK : Select
: Position
Press the MENU button.
Press the ( button to select the Language and then
press the OK or ( button.
Select the appropriate language by pressing the (
button and then press the OK or ( button.
Press the MENU button to return to the previous menu.
1
2
3
4
When you start using your TV for the first time, you must select the language in which to
display all on-screen menus.
INPUT
Power
Power
INPUT
VIDEO
1 2
0
3
4
7
5
8
6
9
MUTE
CC
PC DTV VIDEO INPUT
POWER
Q.View
14
Storing Channels in Memory
Press the MENU button.
Press the ( button to select Install group and press the
(or OK button.
To Select the type of signal source that is connected to the TV.
Move to Select by pressing ( button and select TV or
CATV by pressing ( button.
Press the ( button to select Auto tuning, and press the
(or OK button.
You can stop the Auto tuning by pressing the MENU button
during auto tuing.
When the Auto tuning is finished, screen will be changed
to normal viewing screen automatically.
Press the ( button to select Channel and press the
(button. The channels will be stored one by one.
If you have picture noise on step 3, Press the ( button to
select Fine Tuning and press the ( button to adjust the
frequency manually.
Add or erase the channels from the channel you scanned.
Move to Channel by pressing ( button and select
channel by pressing ( button.
Move to Add/Erase by pressing ( button and select
Add or Erase by pressing ( button.
1
2
3
Use
the
Auto
tuning
during
a
broadcast
after
connecting
the
antenna.
5
Picture
Sound
Clock
Install
Language
Advanced
MENU : Previous : Select
INPUT : Exit OK : Select
: Position
Auto tuning
Select TV
Channel 7
Fine Tuning 175.25
Add/Erase Add
Parental Lock _ _ _ _
Install
MENU : Previous : Access
INPUT : Exit OK : Access
: Position
6
Auto tuning
Select TV
Channel 7
Fine Tuning 175.25
Add/Erase Add
Parental Lock _ _ _ _
Install
MENU : Previous : Access
INPUT : Exit OK : Access
: Position
Auto tuning
Select CATV
Channel 7
Fine Tuning 175.25
Add/Erase Add
Parental Lock _ _ _ _
Install
MENU : Previous : Access
INPUT : Exit OK : Access
: Position
Auto tuning
Select CATV
Channel 7
Fine Tuning 175.25
Add/Erase Add
Parental Lock _ _ _ _
Install
MENU : Previous : Access
INPUT : Exit OK : Access
: Position
7
Auto tuning
Select CATV
Channel 7
Fine Tuning 175.25
Add/Erase Add
Parental Lock _ _ _ _
Install
MENU : Previous : Access
INPUT : Exit OK : Access
: Position
4
You
can
get
the
same
result
by
pressing
the
(
)
button
on
the
remote
control.
Add/Erase
MENU
OK
FAVORITE
15
Setting the Parental Lock
Press the MENU button.
Press the ( ) button to select the Install group and press
the ( ) or OK button.
Press the ( ) button to select the Parental Lock and Enter
your 4-digit password.
Press the ( ) button to set Parental Lock.
You can select these options in the following order.
Off Child Youth Young Adult Custom
Off : Parental lock is disabled. All programs are unblocked
from viewing.
Child : The permitted Maximum ratings are TV-Y, TV-G, G.
Youth : The permitted Maximum ratings are TV-PG, PG.
Young Adult : The permitted Maximum ratings are TV-14, PG-13.
Custom : Select to set ratings manually.
1
2
3
4
Picture
Sound
Clock
Install
Language
Advanced
MENU : Previous : Select
INPUT : Exit OK : Select
: Position
Parental Lock Off
Movie Rating PG-13
General TV-14
Children Unblock
Content Block
Not Rated Unblock
AV Sources Unblock
Change Password - - - -
Install
MENU : Previous : Select
INPUT : Exit
: Position
Press the MENU button.
Press the ( button to select Install group and press the
(or OK button.
Press ( button to select the Parental Lock and Enter
your 4-digit password.
Press the ( ) button to select the Movie Rating and press
the ( ) button to set the restriction ratings.
You can select these options in the following order.
GPG PG-13 RNC-17 XUnblock
G: All children and General audience.
PG : Parental guidance suggested.
PG-13 : Parental guidance for children under 13.
R: Restricted viewing, parental guidance is suggested for
children under 17.
NC-17 : No children under age 17.
X: Adults only.
Unblock : Not rated.
1
2
3
Setting up restrictions using the MPAA ratings system.
4
Parental Lock Off
Movie Rating PG-13
General TV-14
Children Unblock
Content Block
Not Rated Unblock
AV Sources Unblock
Change Password - - - -
Install
MENU : Previous : Select
INPUT : Exit
: Position
The
default
password
for
a
new
TV
set
is
“0119”.
MENU
OK
FAVORITE
16
Setting the Parental Lock
Press the MENU button.
Press the ( button to select Install group and press the
(or OK button.
Press ( button to select the Parental Lock and Enter
your 4-digit password.
Press the ( ) button to select the General and press the
() button to set the restriction ratings.
You can select these options in the following order.
TV-G TV-PG TV-14 TV-MA Unblock
TV-G : General audience.
TV-PG : Parental guidance suggested.
TV-14 : Parents strongly cautioned.
TV-MA : Mature audience.
Unblock : Not rated.
1
2
3
Setting up restrictions using the TV guidelines (Age-Based)
Press the MENU button.
Press the ( button to select Install group and press the
(or OK button.
Press ( button to select the Parental Lock and Enter
your 4-digit password.
Press the ( ) button to select the Children and press the
() button to set the restriction ratings.
You can select these options in the following order.
TV-Y TV-Y7 Unblock
TV-Y : Young children.
TV-Y7 : Child 7 and over.
Unblock : Not rated.
1
2
3
TV Program for Children
4
4
Picture
Sound
Clock
Install
Language
Advanced
MENU : Previous : Select
INPUT : Exit OK : Select
: Position
Parental Lock Off
Movie Rating PG-13
General TV-14
Children Unblock
Content Block
Not Rated Unblock
AV Sources Unblock
Change Password - - - -
Install
MENU : Previous : Select
INPUT : Exit
: Position
Parental Lock Off
Movie Rating PG-13
General TV-14
Children Unblock
Content Block
Not Rated Unblock
AV Sources Unblock
Change Password - - - -
Install
MENU : Previous : Select
INPUT : Exit
: Position
MENU
OK
FAVORITE
17
Setting the Parental Lock
Press the MENU button.
Press the ( button to select Install group and press the
(or OK button.
Press ( button to select the Parental Lock and Enter
your 4-digit password.
Press the ( ) button to select the Content Block and press
the ( ) button.
Press the ( ) button to select sub-rating mode of content
Block.
Press the ( ) button.
You can select one of the restriction ratings in the each sub-rating mode.
1
2
4
Setting up restrictions using the TV guidelines (Content -Based)
5
Sub-ratings
F Violence
Dialogue
Language
Sex. Scenes
Violence
Restrictive ratings
TV- Y7 Unblock
TV- PG TV-14 Unblock
TV- PG TV-14 TV-MA Unblock
TV- PG TV-14 TV-MA Unblock
TV- PG TV-14 TV-MA Unblock
Picture
Sound
Clock
Install
Language
Advanced
MENU : Previous : Select
INPUT : Exit OK : Select
: Position
Parental Lock Off
Movie Rating PG-13
General TV-14
Children Unblock
Content Block
Not Rated Unblock
AV Sources Unblock
Change Password - - - -
Install
MENU : Previous : Select
INPUT : Exit
: Position
3
Parental Lock Off
Movie Rating PG-13
General TV-14
Children Unblock
Content Block
Not Rated Unblock
AV Sources Unblock
Change Password - - - -
Install
MENU : Previous : Select
INPUT : Exit
: Position
Press the MENU button.
Press the ( button to select Install group and press the
(or OK button.
Press ( button to select the Parental Lock and Enter
your 4-digit password.
Press the ( ) button to select the Not rated and press the
() button to set Block/ Unblock.
Block : When TV signal or movies display without restriction
ratings, TV or Movies signal will be blocked, and a
blank screen will be displayed.
Unblock : When TV signal or movies display without
restriction ratings, All signals will be unblocked,
and you can view any other program
1
2
3
Block/ Unblock of Not rated program
4
MENU
OK
FAVORITE
18
Press the MENU button.
Press the ( button to select Install group and press the
(or OK button.
Press ( button to select the Parental Lock and Enter
your 4-digit password.
Press the ( ) button to select the AV Sources and press
the ( ) button to set Block/ Unblock.
Block : Blocks all AV sources.
Unblock : Unblock all AV sources.
1
Block/ Unblock the AV Sources
Press the MENU button.
Press the ( button to select Install group and press the
(or OK button.
Press ( button to select the Parental Lock and Enter
your 4-digit password.
press the ( ) button to select the change password and
Enter you new password. (4-digit)
1
2
3
Changing the Password
Setting the Parental Lock
2
3
4
Parental Lock Off
Movie Rating PG-13
General TV-14
Children Unblock
Content Block
Not Rated Unblock
AV Sources Unblock
Change Password - - - -
Install
MENU : Previous : Select
INPUT : Exit
: Position
Parental Lock Off
Movie Rating PG-13
General TV-14
Children Unblock
Content Block
Not Rated Unblock
AV Sources Unblock
Change Password - - - -
Install
MENU : Previous : Select
INPUT : Exit
: Position
4
19
Press the MENU button.
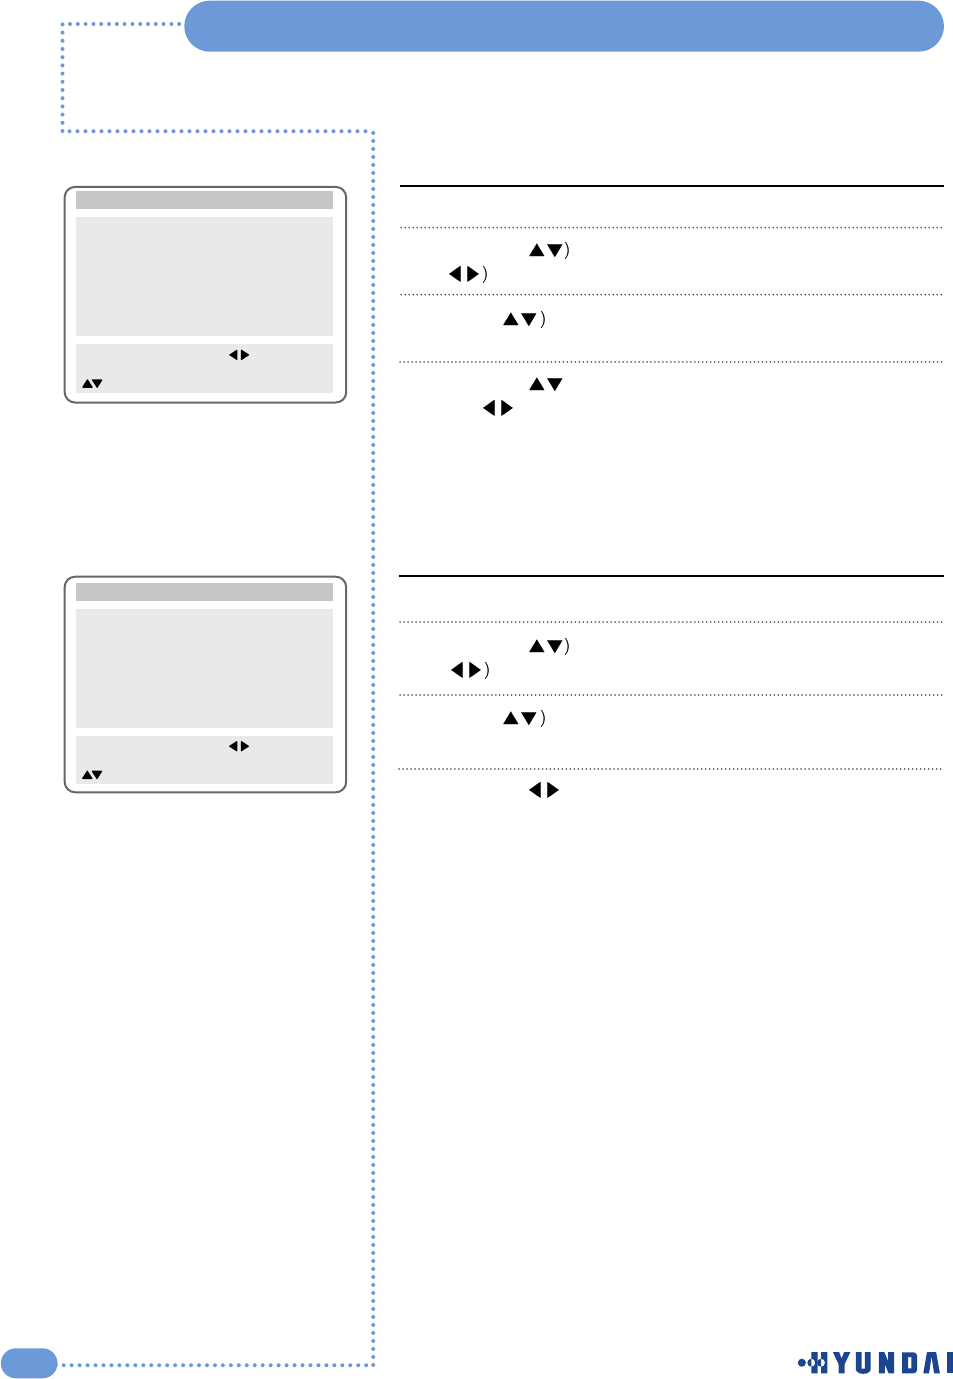
Press the ( button to select the Picture group and press
the ( or OK button.
Pre-set mode will be displayed.
The picture mode will change whenever you press the (
button.
Standard : Select when it is bright around the TV.
Sports : Select when you want to get a clearer picture or
watch sports.
Natural : Select when viewing movies or live music.
Mild : Select when it is dark around the TV or at night.
Custom : Select if you want to adjust the settings manually.
Otherwise, if you are viewing contents of the PIP function,
whenever you press the ( ) button, the picture mode will
change as above.
Press the ( button to move to the MENU that you wish to
adjust.
Press the ( button to adjust
Contrast : Adjusts the clarity of the whole screen
Brightness : Adjusts the brightness of the whole screen
Sharpness : Corrects the contours of the image
Color : Adjusts the color saturation of the image
Tint : Adjusts the colors of the image
1
2
3
4
5
If
you
adjust
the
TV
in
step
5
while
it
is
in
Standard,
Sports,
Natural
or
Mild
mode,
the
mode
will
change
to
Custom
mode.
Picture
Sound
Clock
Install
Language
Advanced
MENU : Previous : Select
INPUT : Exit OK : Select
: Position
Mode Standard
Contrast
Brightness
Sharpness
Colour
Tint
Picture
79
50
28
50
0
MENU : Previous : Select
INPUT : Exit
: Position
Mode Custom
Contrast
Brightness
Sharpness
Colour
Tint
Picture
88
50
42
60
0
MENU : Previous : Select
INPUT : Exit
: Position
You can select an appropriate picture mode by pressing the ( button in Picture
mode.
Customizing the Picture
You
can
get
the
same
result
by
pressing
the
(
)
button
on
the
remote
control.
P.Mode
P.Mode
MENU
OK
FAVORITE
PC
STILL ASPECT SLEEP
S.MODEP.MODE
MTS DISPLAY CLOCK ADD/ERASE
S.EFFECT
DTV VIDEO INPUT