Hyundai IBT LT46DW000 LCD TV User Manual
Hyundai IBT Corp. LCD TV
Contents
- 1. User Manual 1
- 2. User Manual 2
User Manual 2

FCC ID : PJILT46DW000
HYUNDAI CALIBRATION & CERTIFICATION TECHNOLOGIES CO., LTD.
SAN 136-1, AMI-RI, BUBAL-EUP, ICHEON-SI, KYOUNGKI-DO, 467-701, KOREA
TEL:+82 31 639 8517 FAX:+82 31 639 8525 www.hct.co.kr
Report No. : HCT-F07-0404 1/1
ATTACHMENT E.
- USER’S MANUAL-2 -

37
PICTURE
Supported PIP Table
PIP : O→Supported, X →Not Supported
HMDI 1
O
O
O
O
O
O
O
X
X
HDMI 2
O
O
O
O
O
O
O
X
X
PC
O
O
O
O
O
O
X
O
O
Component 2
O
O
O
O
O
X
O
O
O
Component 1
O
O
O
O
X
O
O
O
O
S-VIDEO
O
O
X
X
O
O
O
O
O
TV
X
O
O
O
O
O
O
O
O
TV
VIDEO 1
VIDEO 2
S-Video
Component 1
Component 2
PC
HDMI 1
HDMI 2
VIDEO 1
O
X
O
O
O
O
O
O
O
VIDEO 2
O
O
X
X
O
O
O
O
O
Main
Sub
38
HYUNDAI FULL HD LCD TV
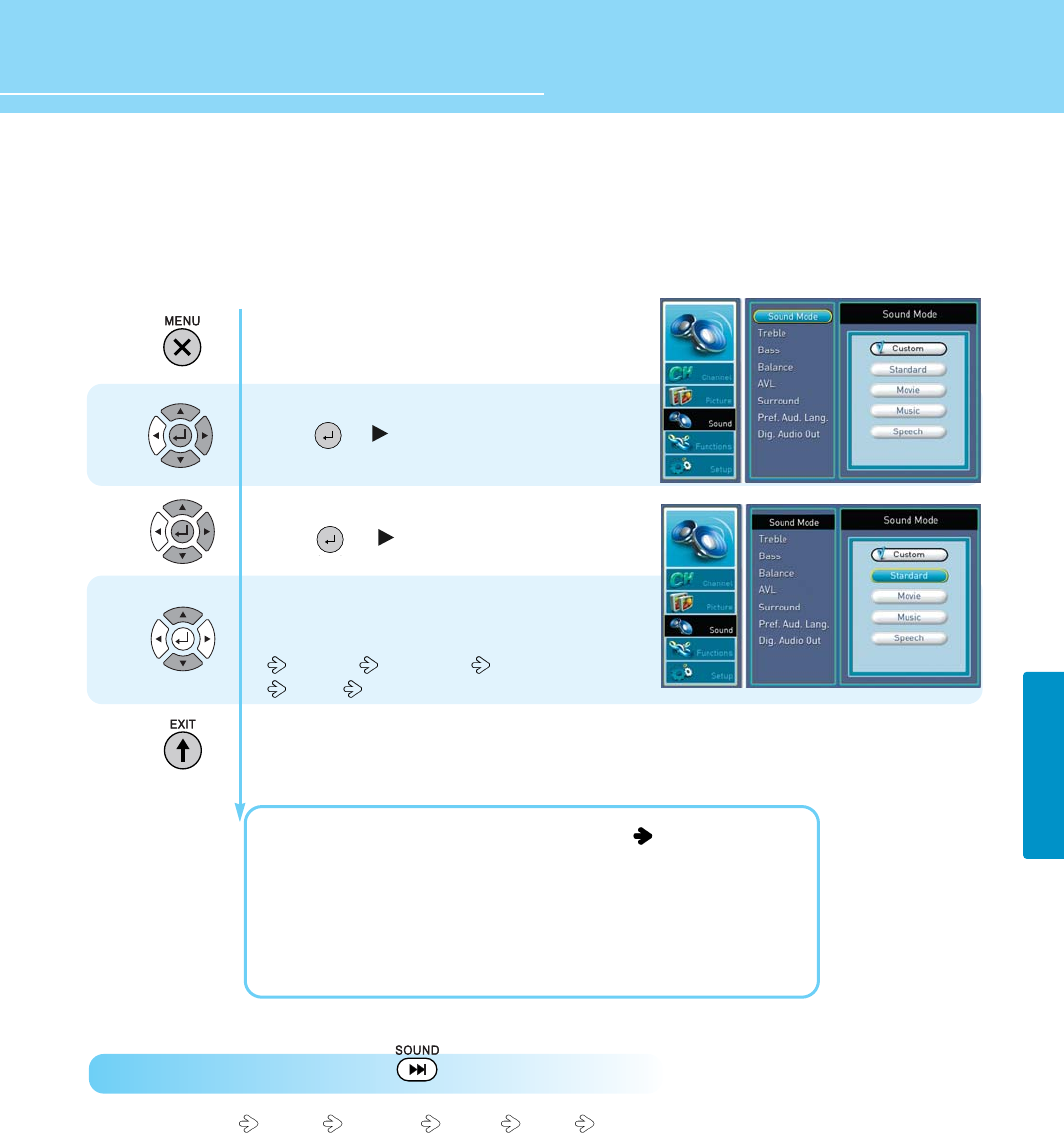
How to Directly Select Sound Mode : Press SOUND button.
Users can select Custom Standard Movies Music Speech
Press Menu button.
Menu items appear on the screen.
Press Up or Down button to move to sound .
Press or button to select sound .
Press Up or Down button to move to sound mode
Press or button to select sound mode.
Mode is selected.
Whenever you press Up or Down button,
the mode changes in following order.
CUSTOM STANDARD MOVIES
MUSIC SPEECH
Press MENU button after the setting is done and menu goes to the previous menu.
If the EXIT button is pressed, the menu will disappear.
CUSTOM : When the user wants to set the value. See the next page
STANDARD : General sound mode. This fits most audio contents.
MOVIES : For enjoying vivid sound.
SPEECH : For enjoying clear sound.
MUSIC : For enjoying original sound.
1
2
3
How to Select the Audio Mode
Users can adjust sound mode automatically as they want.
SOUND
39
SOUND
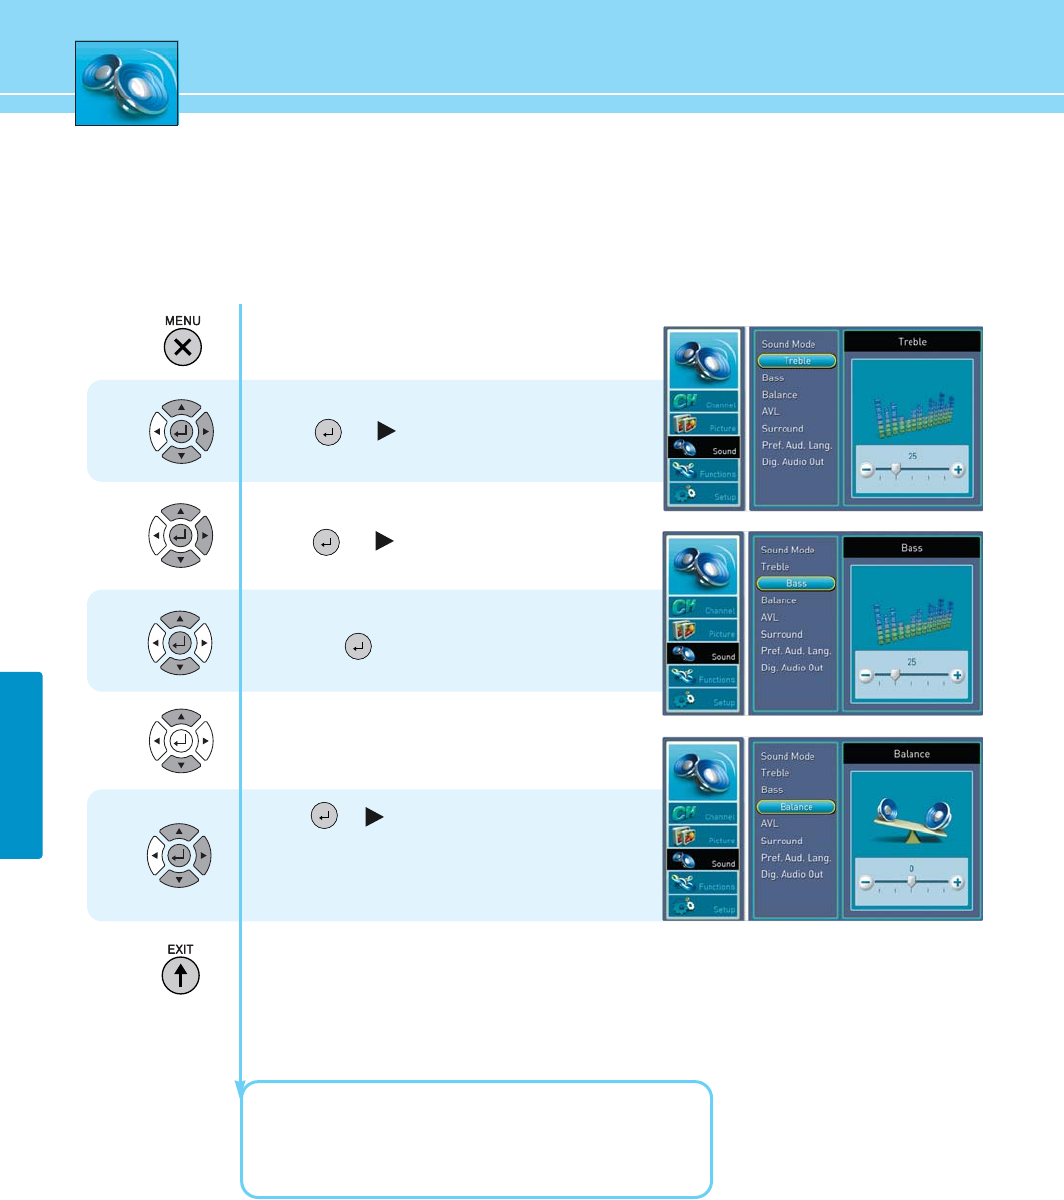
How to Adjust the Desired Audio Mode
Users can adjust sound mode manually as they want.
Press Menu button.
Menu items appear on the screen.
Press Up or Down button to move to sound.
Press or button to move to sound.
Press Up or Down button to move to sound mode
Press or to select.
Press Up or Down button to move to custom.
and press button to make a selection.
Press Up or Down to select items.
(Table, Bass and blance)
Press or button to select items.
Move between the items listed using UP or Down button
.
Adjust the level of the item selected using
Left or Right button.
Press MENU button after the setting is done and menu goes to the previous menu.
If the EXIT button is pressed, the menu will disappear.
TREBLE: Adjusts the range size of high sound.
BASS: Adjusts the range size of low sound.
BALANCE : Adjusts the balance of left and right speakers.
1
2
3
4
5
40
HYUNDAI FULL HD LCD TV
SOUND
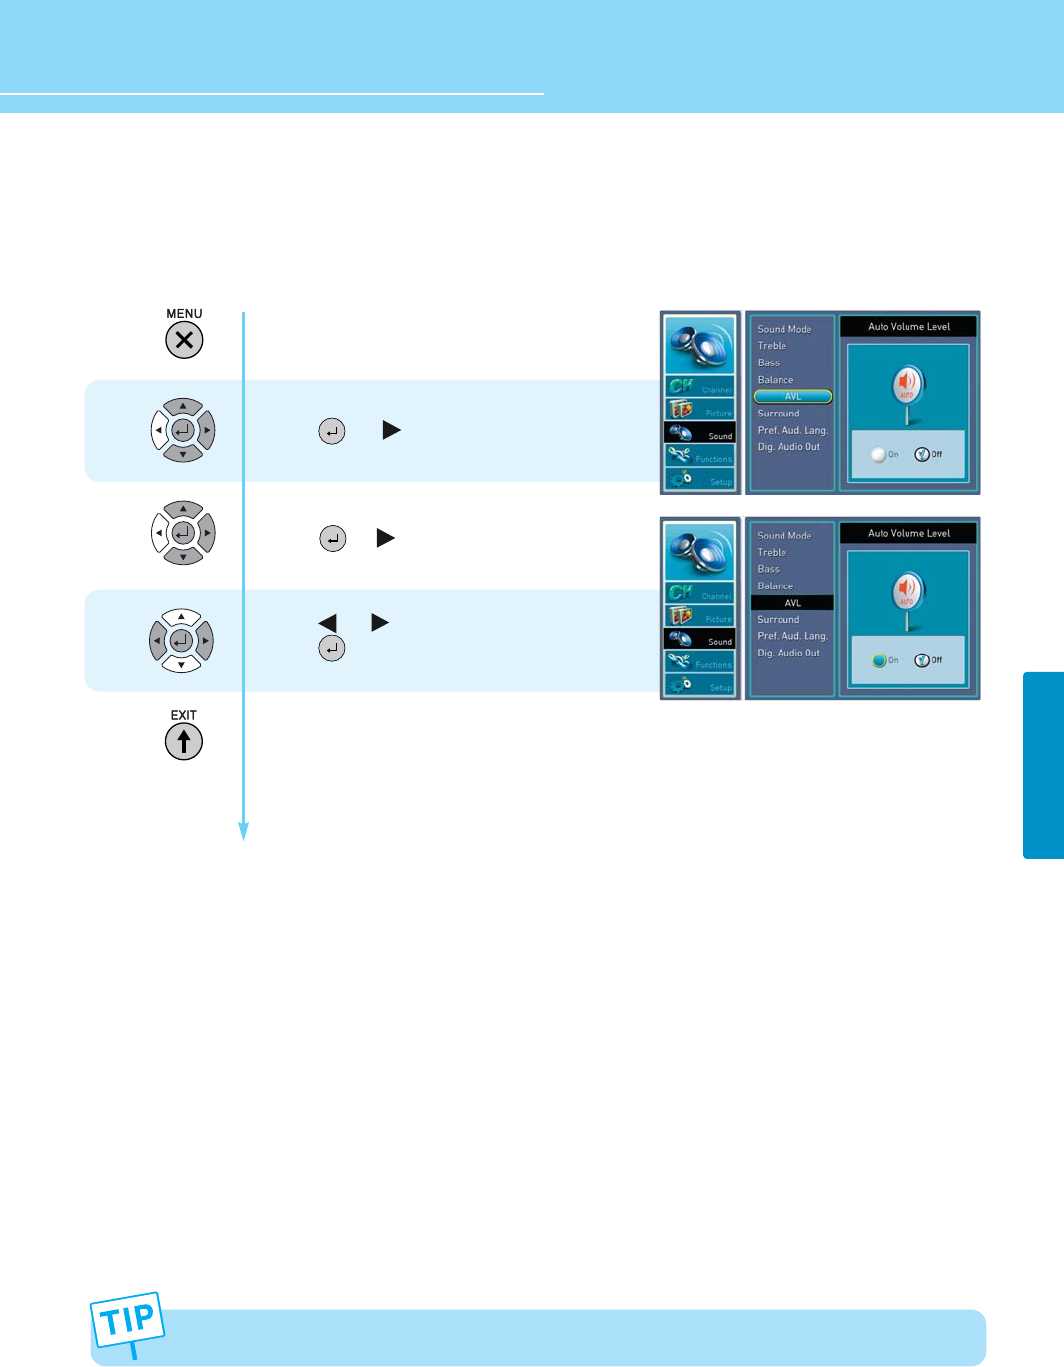
If the SRS TruSurround XT function is activated, the AVL is disabled.
How to Use the Automatic Volume Control
With this Automatic Volume Level Control, everything you watch will always maintain the volume level that you
decide. Basically it is set to “ON”
Press Menu button.
Menu items appear on the screen.
Press Up or Down button to move to sound .
Press or button to select sound .
Press Up or Down button to move to AVL.
Press or button to select AVL.
Press or button to set to on/off.
Press button to set to on/off.
Press MENU button after the setting is done and menu goes to the previous menu.
If the EXIT button is pressed, the menu will disappear.
1
2
3
41
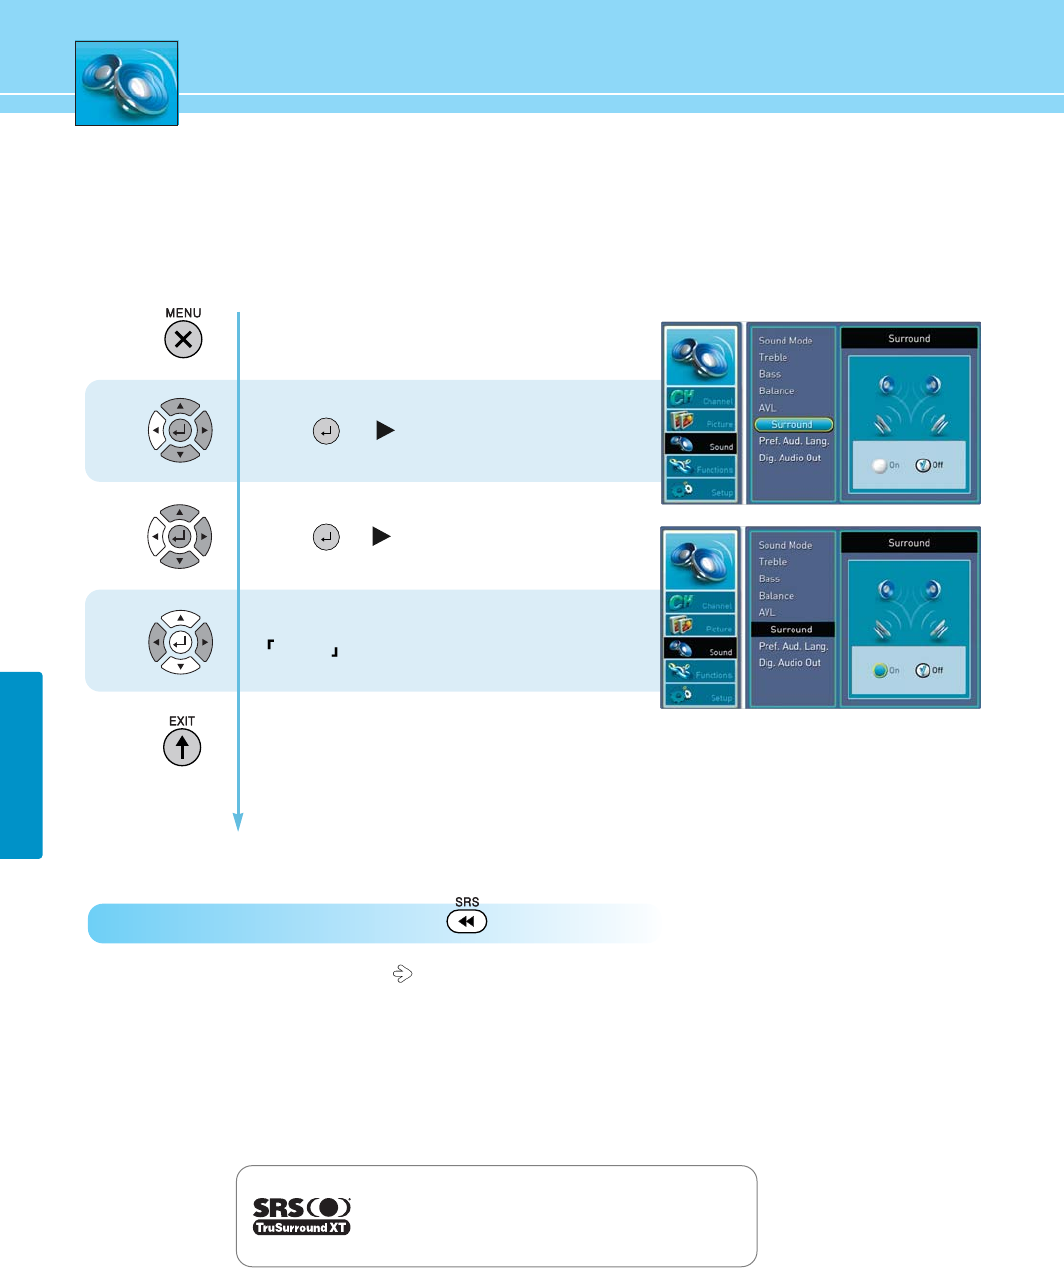
SOUND
How to Directly Select Surround : Press the button.
- User can select TruSurround XT ON TruSurround XT OFF
Press Menu button.
Menu items appear on the screen.
Press Up or Down button to move to sound.
Press or button to select sound.
Press Up or Down button to move to Surround.
Press or button to select Surround.
Press Left and Right buttons to set to
ON/OFF .
Press MENU button after the setting is done and menu goes to the previous menu.
If the EXIT button is pressed, the menu will disappear.
1
2
3
is a trademark of SRS Labs, Inc.
TruSurround XT technology is incorporated under
license from SRS Labs, Inc.
How to Listen to SRS TruSurround XT (Surround)
Users can enjoy spectacular 3D sound.
42
HYUNDAI FULL HD LCD TV
SOUND
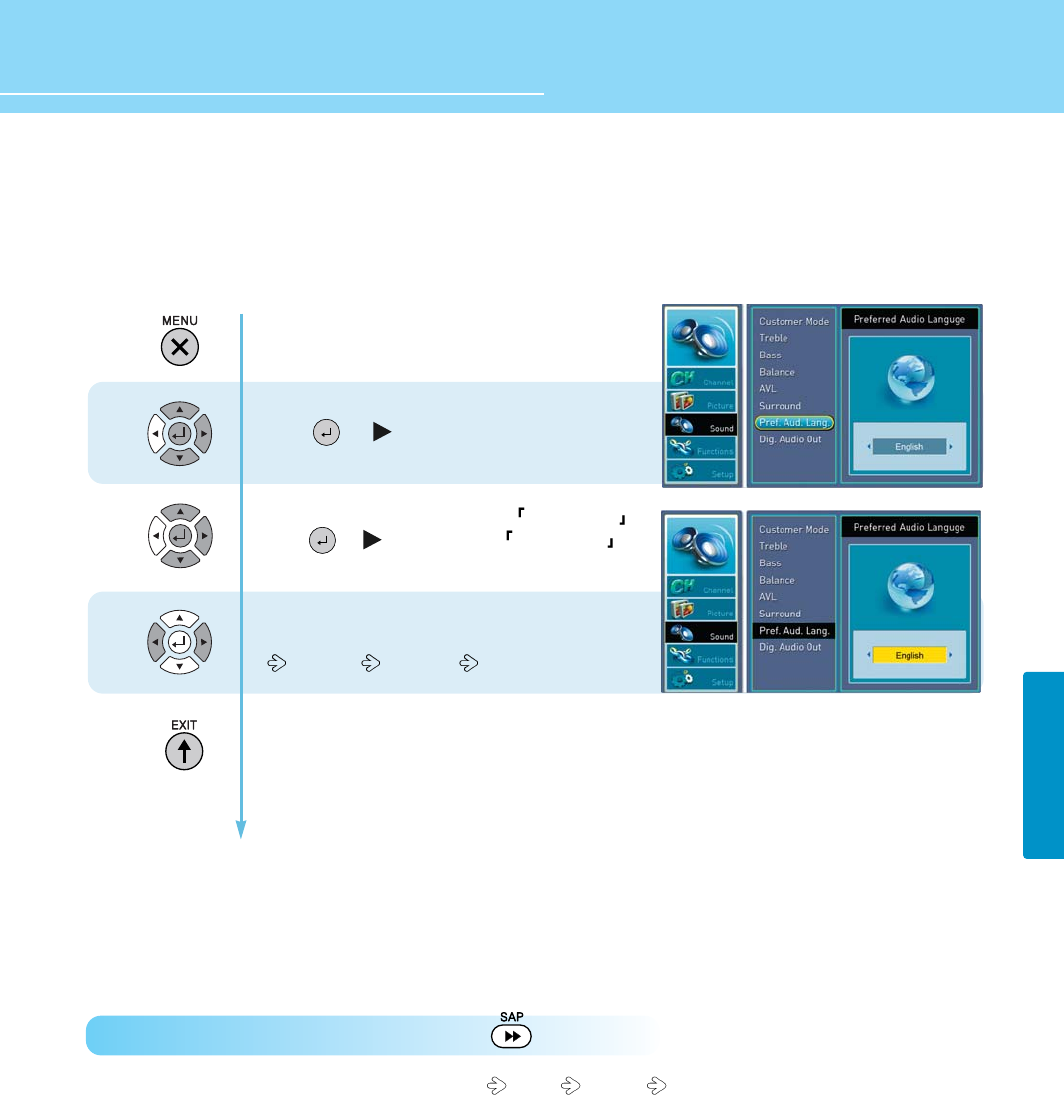
How to Set Audio Language
While watching a digital program, you can listen to foreign language if the program is supported with foreign
language.
Press Menu button.
Menu items appear on the screen.
Press Up or Down button to move to sound .
Press or button to select sound .
Press Up or Down button to move to Pref.Aud.Lang .
Press or button to select Pref.Aud.Lang .
Whenever you press Left or Right button,
the mode shifts in following order.
ENGLISH SPANISH FRANCE
Press MENU button after the setting is done and menu goes to the previous menu.
If the EXIT button is pressed, the menu will disappear.
1
2
3
How to Directly Select Audio Language : Press the button.
- Whenever you press this button, the mode shifts MONO STEREO SAP in order when receiving analog
signals.
You can select one of the languages listed you prefer when receiving digital signals.
43
SOUND
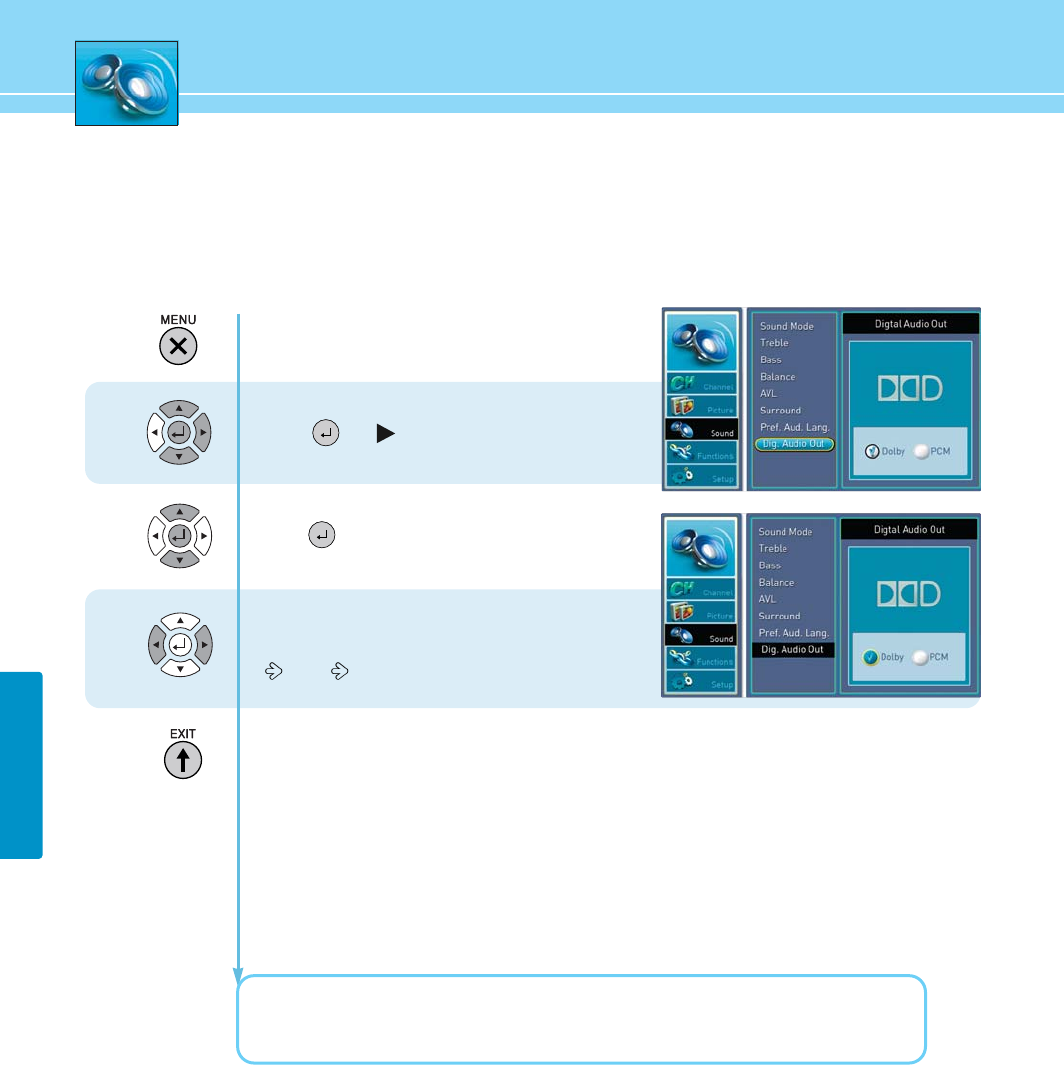
How to Set the Digital Audio Output
The digital audio output terminal allows you to enjoy digital sound.
Press Menu button.
Menu items appear on the screen.
Press Up or Down button to move to sound .
Press or button to select sound.
Press Up or Down button to move to “Dig.Audio Out”
Press or buttons to select “
Dig.Audio Out”
Whenever you press Left or Right button, the mode
shifts in following order.
Dolby PCM
Press MENU button after the setting is done and menu goes to the previous menu.
If the EXIT button is pressed, the menu will disappear.
Manufactured under license from Dolby Laboratories.
“Dolby Digital” and the double-D symbol are trademarks of Dolby Laboratories.
1
2
3
44
HYUNDAI FULL HD LCD TV
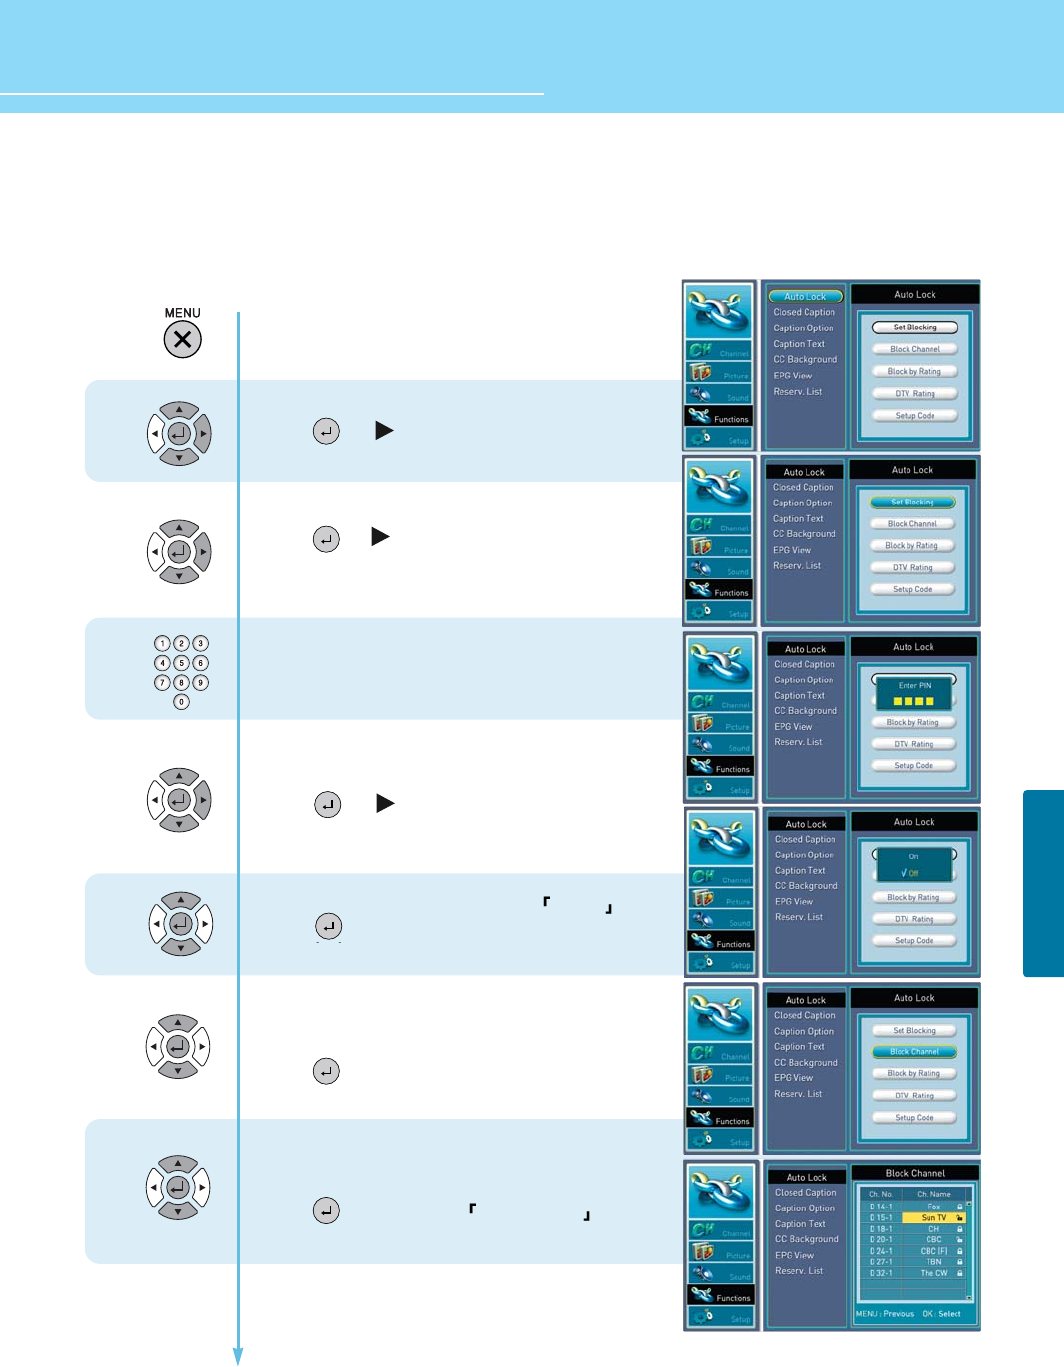
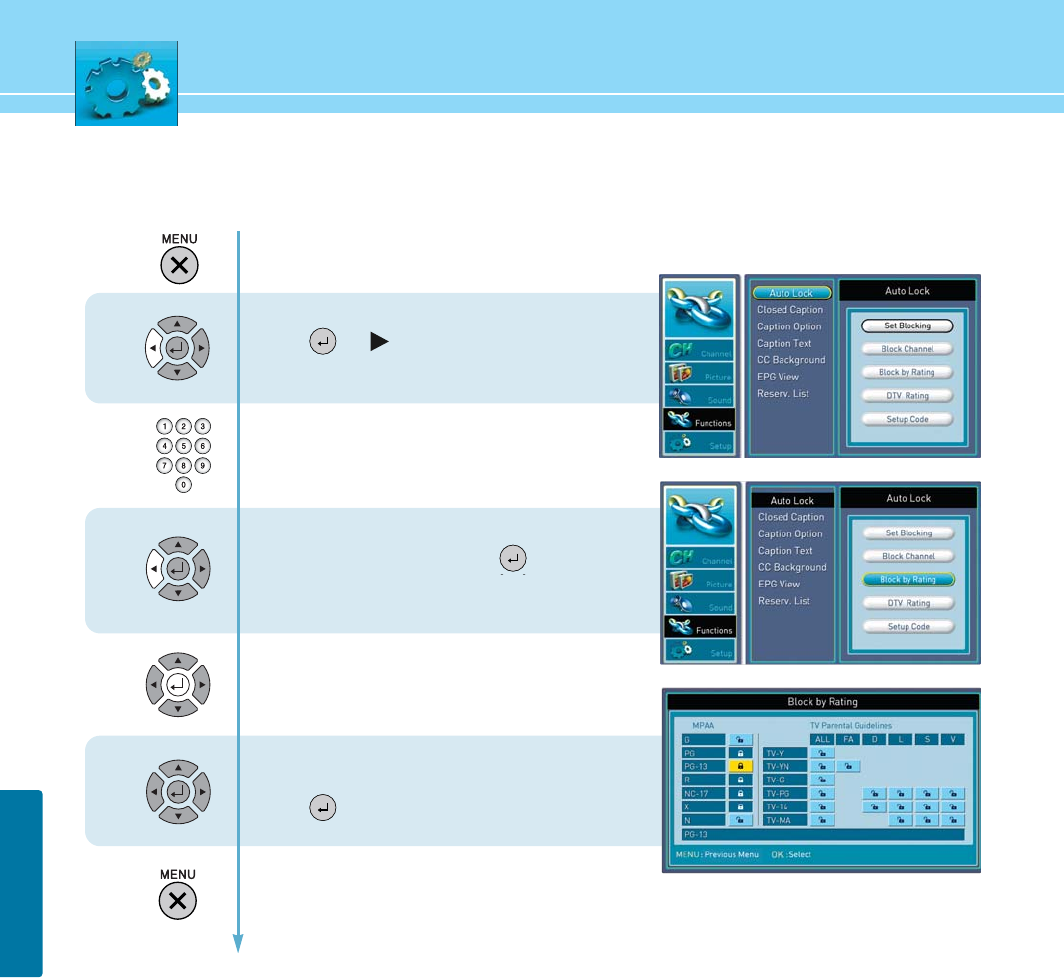
How to Set Auto Lock
This function is used to prevent from using the control buttons on the front top of the TV or from connecting
external devices to the TV. You make sure to set a PIN number to use this function.
1
2
3
4
5
6
7
Press Menu button.
Menu items appear on the screen.
Press Up or Down button to move to function .
Press or button to select function .
Press Up or Down buttons to move to “AUTO LOCK”.
Press or button to select “AUTO LOCK”.
Then the Enter PIN number window appears.
The default is 4 digits (0-0-0-0).
- To set Blocking :
Press Up or Down button to move to “SET BLOCKING”.
Press or button to select “SET BLOCKING”
Press Up or Down button to move to ON/OFF .
Press button to make a selection.
- To set Channel blocking :
Press Up or Down button to move to
“CHANNEL BLOCKING”.
Press button to select “ BLOCK CHANNEL”.
Then the AUX BLOCK items appear.
Press Up or Down button to move to the
item you want.
Press button to set to LOCK/UNLOCK .
If the item is set to ON, such item is disabled.
Continued on next page ......
FUNCTION
45
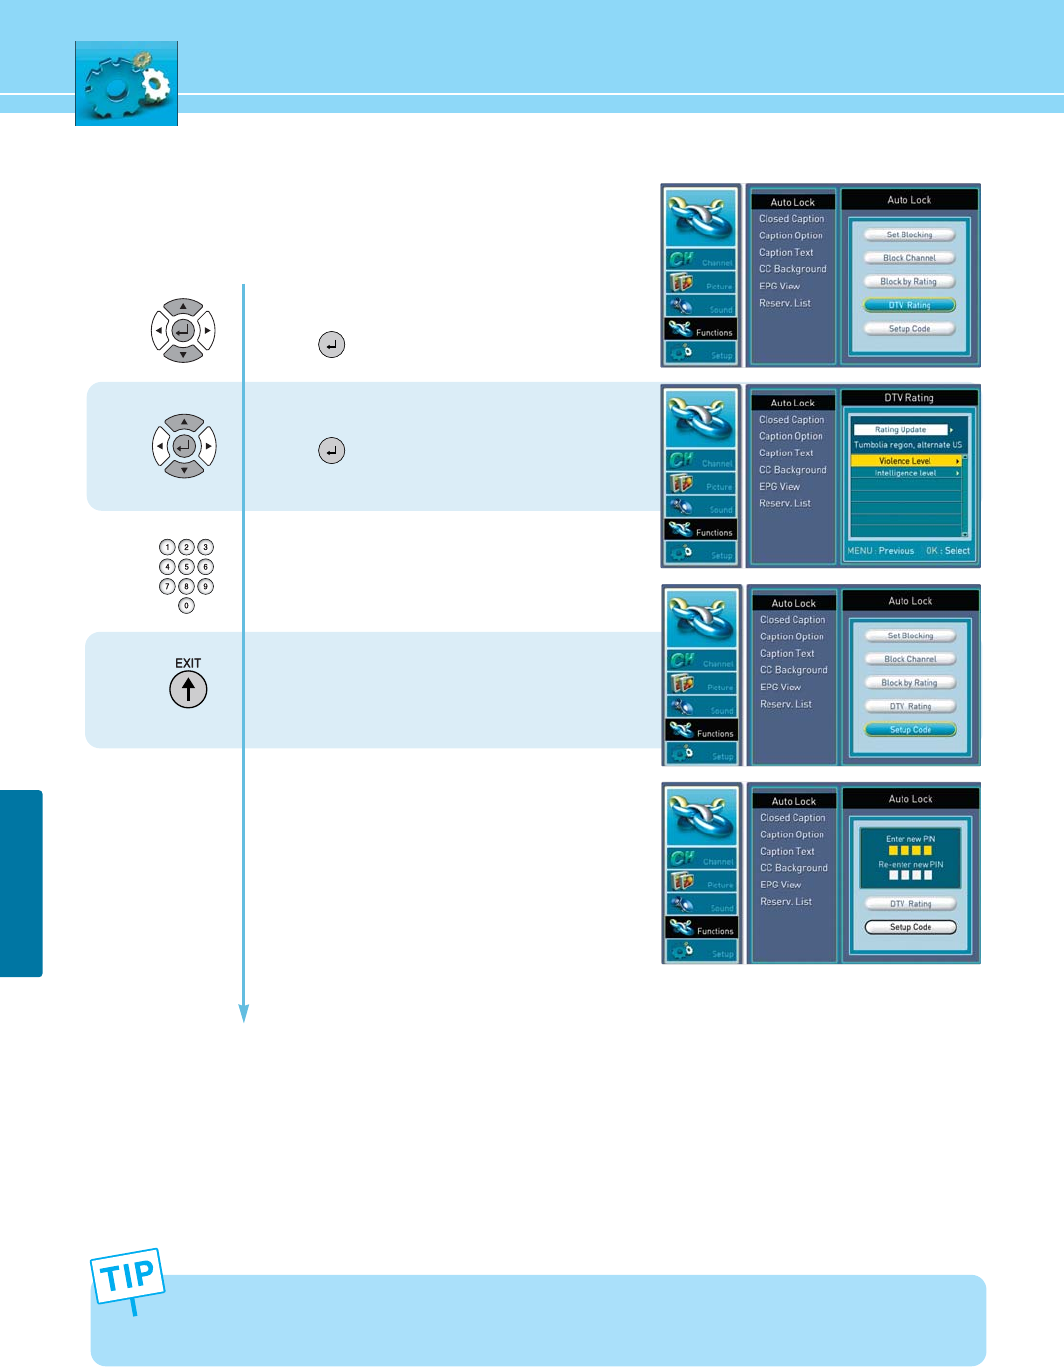
FUNCTION
Continued from previous page.....
(Set the Lock External Signal function.)
9
8
- To update DTV rating :
Press Up or Down button to move to “DTV Rating”.
Press button to select “DTV Rating”.
- To set setup code :
Press Up or Down button to select “SETUP CODE”.
Press button to select “SETUP CODE”
Then the Enter PIN number window appears.
Enter a 4- digit PIN number.
When the Confirm PIN number window appears,
enter the PIN number again.
Press MENU button after the setting is done
and menu goes to the previous menu.
If the EXIT button is pressed, the menu will disappear.
If you forgot your PIN number, Enter a 4-digit number (0-7-1-1)twice in the pin number window.
10

46
FUNCTION
HYUNDAI FULL HD LCD TV
How To Set Block By Rating
This(V-Chip) is used to block program viewing based on the ratings sent by the broadcasting station.
The default setting is to allow all programs to be viewed. Viewing can be blocked by the type of program and by
the categories chosen to be blocked.
V-Chip rating and categories
Rating guidelines are provided by broadcasting stations. Most television programs and television movies can be
blocked by TV Rating and/or Individual Categories. Movies that have been shown at the theaters or direct-to-
video movies use the Movie Rating System (MPAA) only.
Ratings for Movies previously shown in theaters :
Ratings for Television programs including made-for-TV movies :
Continued on next page ......
Movie Ratings : - Blocking Off (Permits all programs)
- G (General audience)
- PG (Parental guidance suggested)
- PG-13 (Parents strongly cautioned)
- R (Restricted)
- NC-17 (No one 17 and under admitted)
- X (Adult only)
- NR (Not Rated)
If you set PG-13 : G and PG movies will be available , PG-13, R, NC-17 and X will be blocked.
- TV-G (General audience)
- TV-PG (Parental guidance suggested)
- TV-14 (Parents strongly cautioned)
- TV-MA (Mature audience only)
- TV-Y (All children)
- TV-Y7 (Children 7 years older)
TV Rating Children : - Age (applies to TV-Y, TV-Y7)
- Fantasy Violence (applies to TV-Y7)
TV Rating General : - Age (applies to TV-G, TV-PG, TV-14, TV-MA)
- Dialogue-sexual dialogue (applies to TV-PG, TV-14)
- U Language-adult language (applies to TV-PG, TV-14, TV-MA)
- Sex-sexual situations (applies to TV-PG, TV-14, TV-MA)
- Violence (applies to TV-PG, TV-14, TV-MA)
47
FUNCTION
1
2
3
4
5
Press Menu button.
Menu items appear on the screen.
Press Up or Down button to move to Auto Lock.
Press or button to select Auto Lock.
The message “Enter PIN” will appear.
Enter your 4-digit PIN number.
Press Up or Down button to move to
“BLOCK BY RATING” and press buttons
to make a selection.
The new screen will appear.
Press Up/Down and left/right buttons to
select the items (MPAA and TV Parental midelines)
Press up/down and left/right buttons
to select the item.
Press button to make a selection.
Press MENU button after the setting is done and
menu goes to the previous menu.
If the EXIT button is pressed, the menu will disappear.

48
FUNCTION
HYUNDAI FULL HD LCD TV
How to View Closed Captions
Choices in the closed caption menu are : CC Mode, Priority (Analog caption or Digital caption), and Option.
1. CC MODE :
Always On : Captioning information is always shown, when available.
Off : No captioning information is displayed.
On When Muted : Captioning information is shown, when mute.
2. PRIORITY :
You can choose whether the TV uses digital or analog captions for digital TV programs that have both or either.
- ANALOG (CAPTION) : You can select a closed caption mode, which is the mode, or source, used for displaying
captioning information for analog channels or digital channels, if available.
- DIGITAL (CAPTION) : You can select a closed caption, service mode(1-6) for digital channels.
The service modes support MPEG-2 based transport sources Service 1 and Service2 are the
primary and secondary languages, respectively.
Service3 and service4.5.6 are additional caption sources that may be available.
Continued on next page ......
• CAPTION :
The form for the words that scroll across the bottom of the TV screen : usually the audio portion of the
program provided for the hearing impaired.
CC 1 : For video related information that can be displayed. Script can be in any language.
CC 2/3/4 : Other modes used for video related information.
• TEXT :
The term for the words that appear in a large black frame and almost cover the entire screen :
Usually message provided by the broad caster.
T 1 : Blanks out a large portion of the picture on the television screen, and display program guide or any
other information currently being transmitted.
T 2/3/4 : other modes that display information and blank out a large portion of the picture of the TV screen.
49
FUNCTION
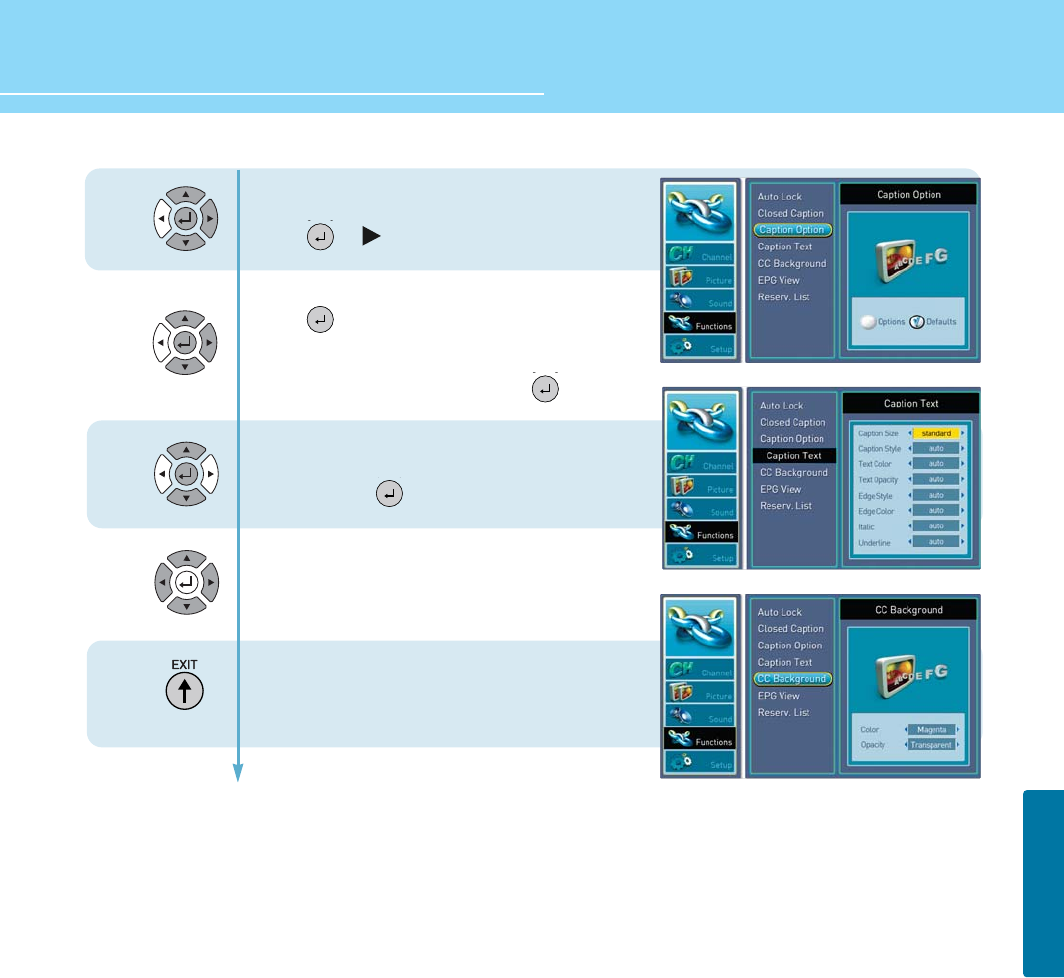
COLOR : Set the color of the cc Background AUTO -> BLACK -> WHITE -> RED -> GREEN -> BLUE -> YELLOW
-> MARGENTA -> CYAN
OPACIFY : Specify the opacity for the - AUTO -> SOLID -> TRANSPARENT -> TRANSLUCENT -> FLASHING
CAPTION SIZE : Set the size of the words - AUTO -> SMALL -> STANDARD -> LARGE
CAPTION STYLE : Set the style of the words - AUTO -> STYLE1 -> STYLE2 -> STYLE3 -> STYLE4 -> STYLE5
-> STYLE6 ->STYLE7.
TEXT COLOR : Choose a color for the text - AUTO -> BLACK -> WHITE -> RED -> GREEN -> BLUE -> YELLOW
-> MARGENTA -> CYAN
TEXT OPACIFY : Specify the opacity for the text - AUTO -> SOLID -> TRANSPARENT -> TRANSLUCENT
-> FLASHING
EDGE STYLE : Select Edge style for the text - AUTO -> NONE -> RASIED -> DEPRESSED -> UNIFORM
-> L-DROPSHADOW -> R-DROPSHADOW
EDGE COLOR : Select Edge color for the text - AUTO -> BLACK -> WHITE -> RED -> GREEN -> BLUE -> YELLOW
-> MARGENTA -> CYAN
ITALIC : Convert the text in to italic - AUTO -> ON -> OFF
UNDERLINE : Add the underline to the text - AUTO -> ON -> OFF
...... Continued from previous page.
3. OPTION :
Customized closed captioning for the digital caption by choosing the settings for the following options :
1) Caption Text
2) cc Background
Press Menu button.
Menu items appear on the screen.
Press Up or Down button to move to function
and press or to select function.
Press Up and Down buttons to move to
“CLOSED CAPTION” and press or button
to make a selection.
Display MODE is highlighted.
Press Left and Right buttons to select
Off" or "Always On" or "On When Muted".
Sub menu items are activated.
Press Up or Down button to move the item.
Press Left or Right button to select the item.
1
2
3
4
50
FUNCTION
HYUNDAI FULL HD LCD TV
- To select caption option
Press Up or Down button to move to caption option.
Press or button to select caption option.
Press left/right buttons to select Auto/Option and
press to select make a selection.
If caption option selected options, CC Background and
caption Text are highlighted When selectiong the
CC Background and caption text, press button.
Press Up or Down button to move between the items
(cc Background and Caption text)
Press left/right buttons to select the item
Then you can choose the CC Background
and caption text by pressing up/down
and left/Right buttons.
Press MENU button after the setting is done and
menu goes to the previous menu.
If the EXIT button is pressed, the menu will disappear.
6
5
7
8
51
FUNCTION
3
4
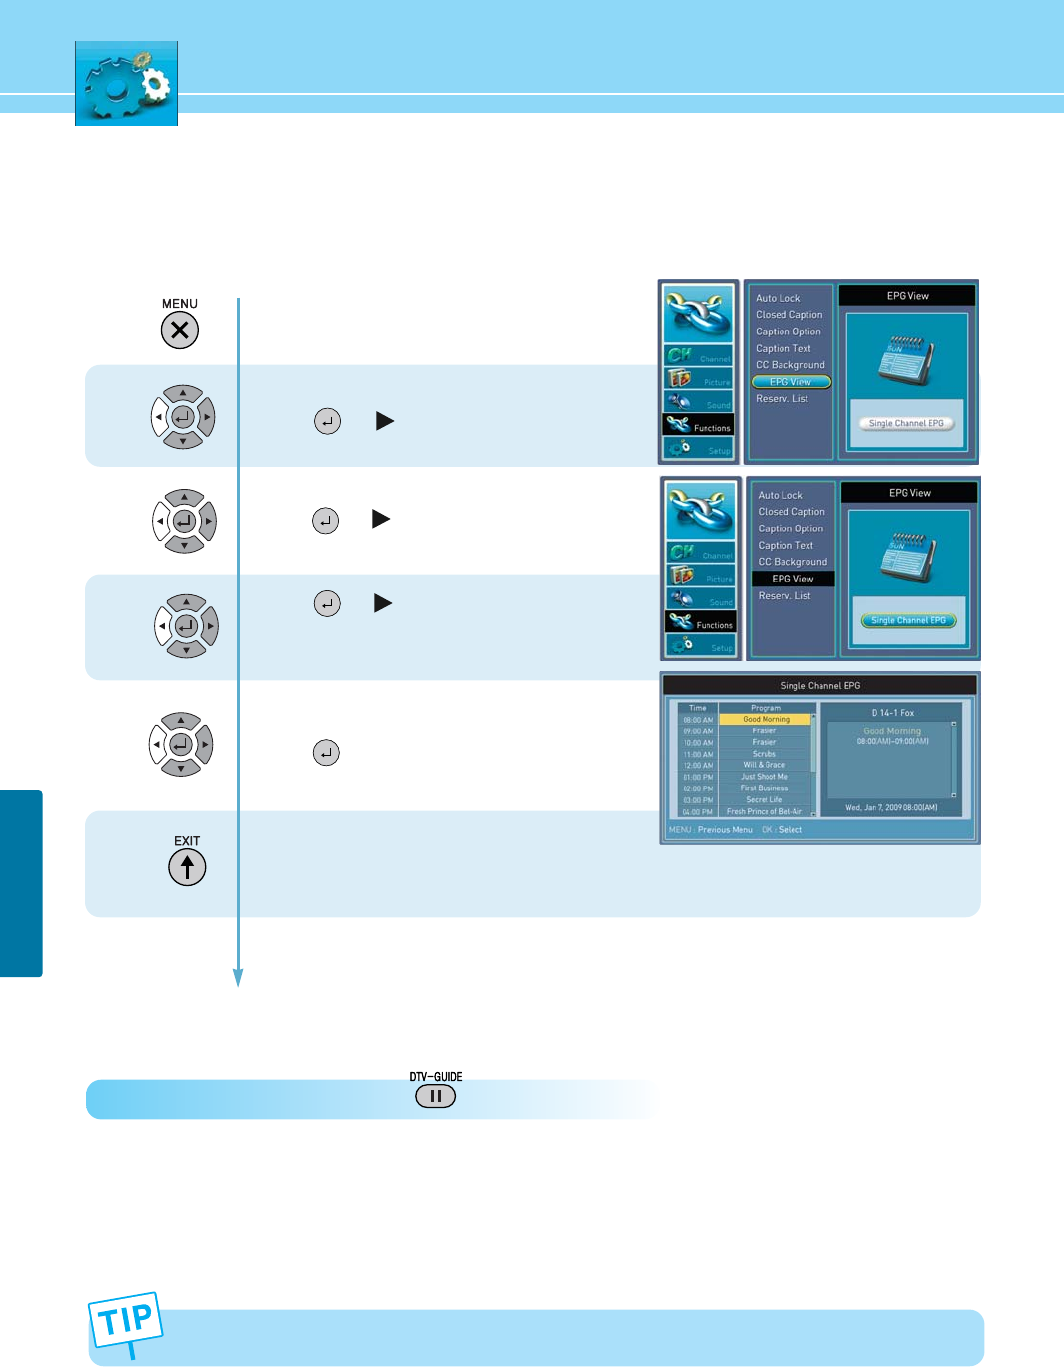
How to Set the EPG View
- This service is only for DTV model.
2
1
Press Menu button.
Menu items appear on the screen.
Press Up or Down button to move to function.
Press
or
button to select function.
Press Up or Down button to move to EPG View.
Press
or
button to select EPG View.
Press
or
button to see the EPG.
Then you can get information on the broadcasting
time and program.
Press Up or Down button to select the
program for reservation.
Press to reserve the selected program.
If reserved, clock mark will appear on the program.
Press MENU button after the setting is done and
menu goes to the previous menu.
If the EXIT button is pressed, the menu will disappear.
How to Directly Move to EPG : Press the button.
Five programs can be reserved.
52
FUNCTION
HYUNDAI FULL HD LCD TV
3
4
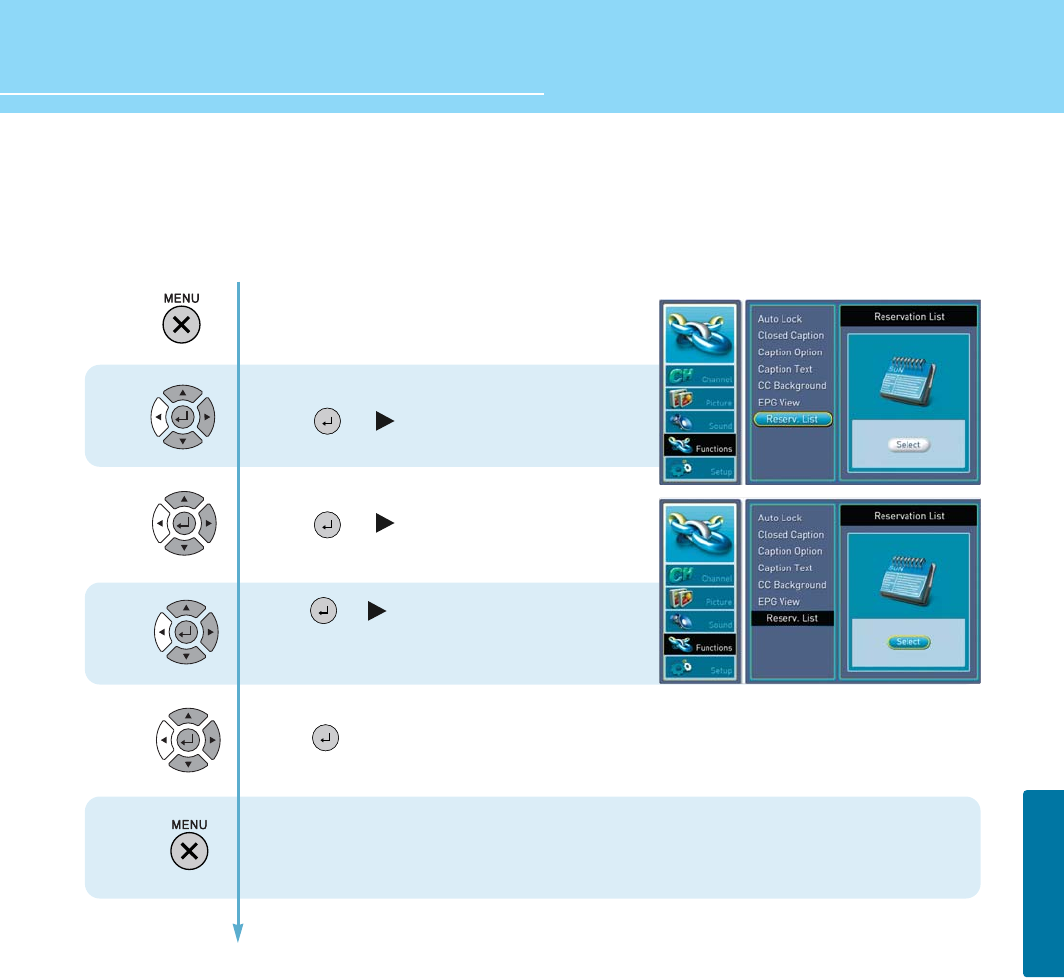
How to View Reservation List
2
1
Press Menu button.
Menu items appear on the screen.
Press Up or Down button to move to function.
Press
or
button to select function.
Press Up or Down button to move to Reserv. List
.
Press
or
button to select Reserv. List
.
Press or to activate Reservation List.
If you reserved programs, Reservation List will appear.
If not, No program schedule will appear.
To cancel reserved programs, move to Reservation List and
press to cancel.
The clock symbol will disappear.
Press MENU button. If the message "Do you want to save ?"
appears, select Yes.
After saving, Reservation List will disappear.
53
SETUP
4
5
6
7
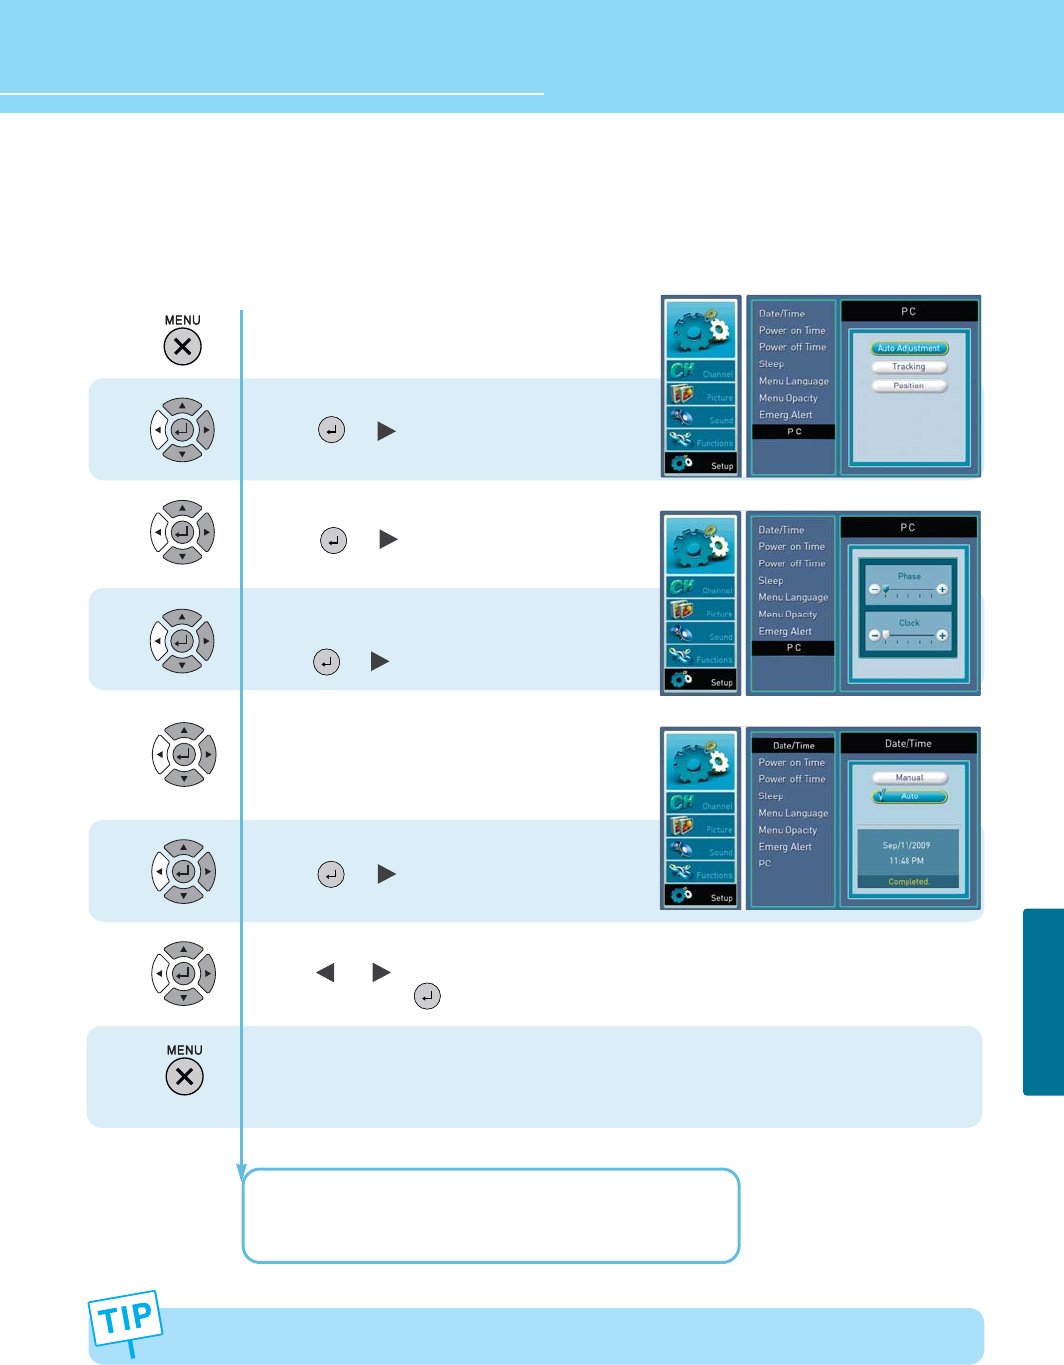
How to Set Date / Time
2
1
3
Press Menu button.
Menu item appear on the screen.
Press Up or Down button to move to setup
.
Press
or
button to select setup.
Press Up or Down button to move to “DATE/TIME” .
Press or button to select “DATE/TIME”.
Press or button to select “Observe or Do not observe”,
DayLight Saving Time.
Press button to select function
Press left/right buttons to timezone.
Whenever you press the buttons, timezone
is changed in following order.
Pacific Mountain Central Eastern
Alaska Hawaii Atlantic
Press button to select “SETTING”.
Press Up or Down button to move to manual manually.
Press button to set the current “DATE/TIME”
Press Up/Down and Left/Right buttons to set
year, month, day, Hour, Minute and AM/PM
After setting,
Press
or
button to exit
“AUTO” is only for DTV mode.
If you select “AUTO”,
Press
or
button to select function
Press MENU button after the setting is done and
menu goes to the previous menu.
If the EXIT button is pressed, the menu will disappear.
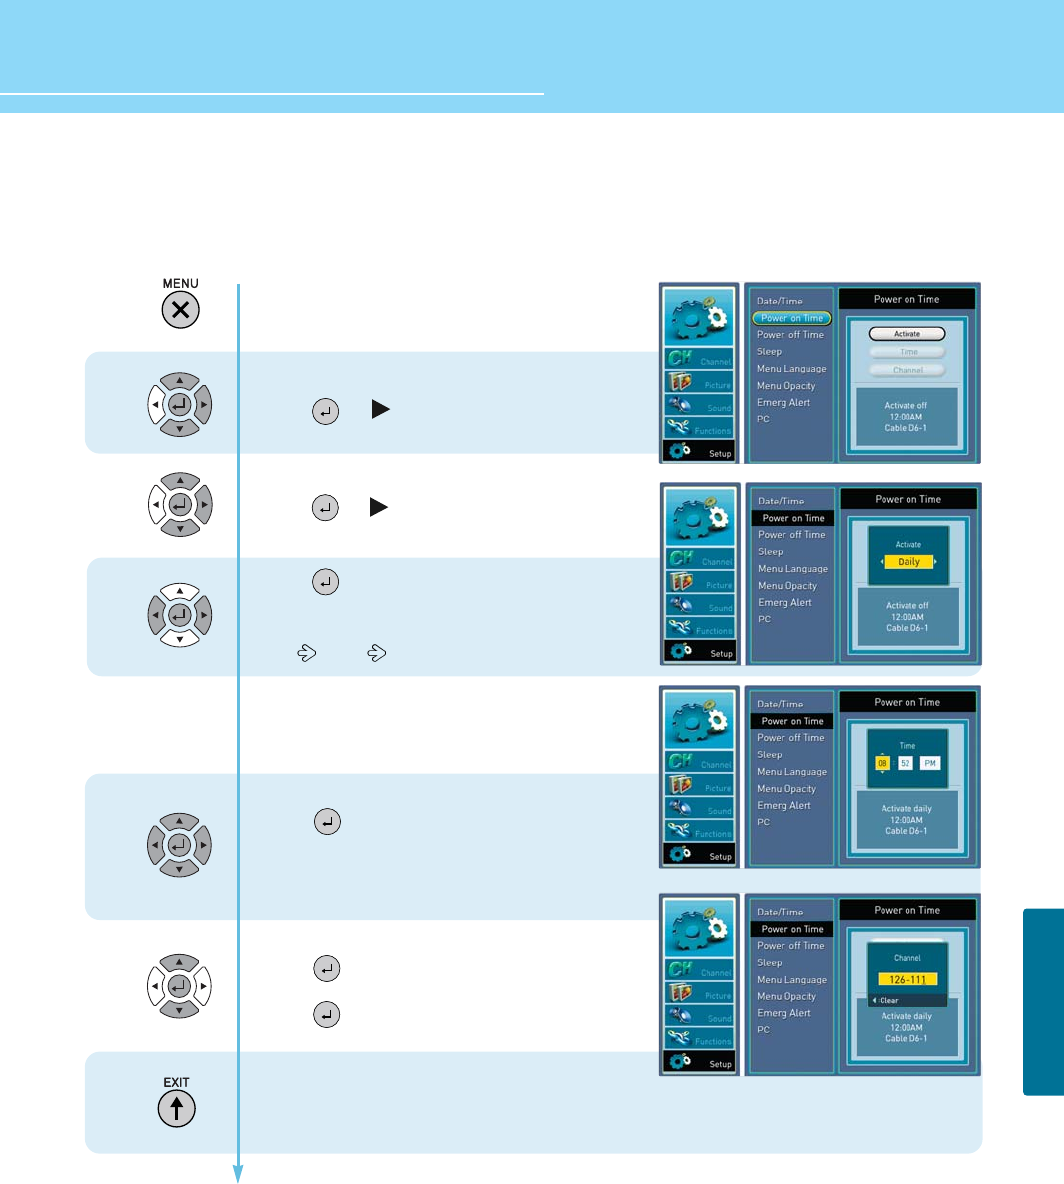
How to Set Power on Time
- Yes can automatocally turn on or off the TV at a present time, To do this, you must set the time it you wish to
use the automatic on or off timers
54
HYUNDAI FULL HD LCD TV
SETUP
1
2
3
4
5
Press Menu button.
Menu items appear on the screen.
Press Up or Down button to move to setup.
Press or button to select setup.
Press Up/Down button to select power on time
Press or button to select power on time.
Press button to activate power on time
whenever you press left and right button,
the mode shifts in following order
OFF ONCE DAILY
If you select once or daliy in the “ACTIVATE”
You can set time and channel
Press up/down button to select Time.
Press button to set Time.
Press Left or Right button to move between Hour,
minute and AM/PM and press up or down buttons
to set Hour, minute and AM/PM
Press Up/Down buttons to select channel.
Press button to set channel.
Press numeric key to set channel number.
Press button to set.
Press MENU button after the setting is done and
menu goes to the previous menu.
If the EXIT button is pressed, the menu will disappear.

55
SETUP
How to Set Power Off Time
1
2
3
4
Press Menu button.
Menu items appear on the screen.
Press Up or Down button to move to setup
Press or button to select setup.
Press Up/Down button to move to power off time
Press or button to select power off time.
Press button to activate power off time.
Whenever you press left and right button, the mode
shift in following order.
OFF ONCE DAILY
If you select once or daily in the “ACTIVATE”
You can set time.
Press Up/Down buttons to select time.
Press button to set time.
Press Left or Right button to move between
hour, minute and AM/PM
Press Up or Down buttons to set
hour, minute and AM/PM.
Press button to set.
Press MENU button after the setting is done and menu goes to the previous menu.
If the EXIT button is pressed, the menu will disappear.
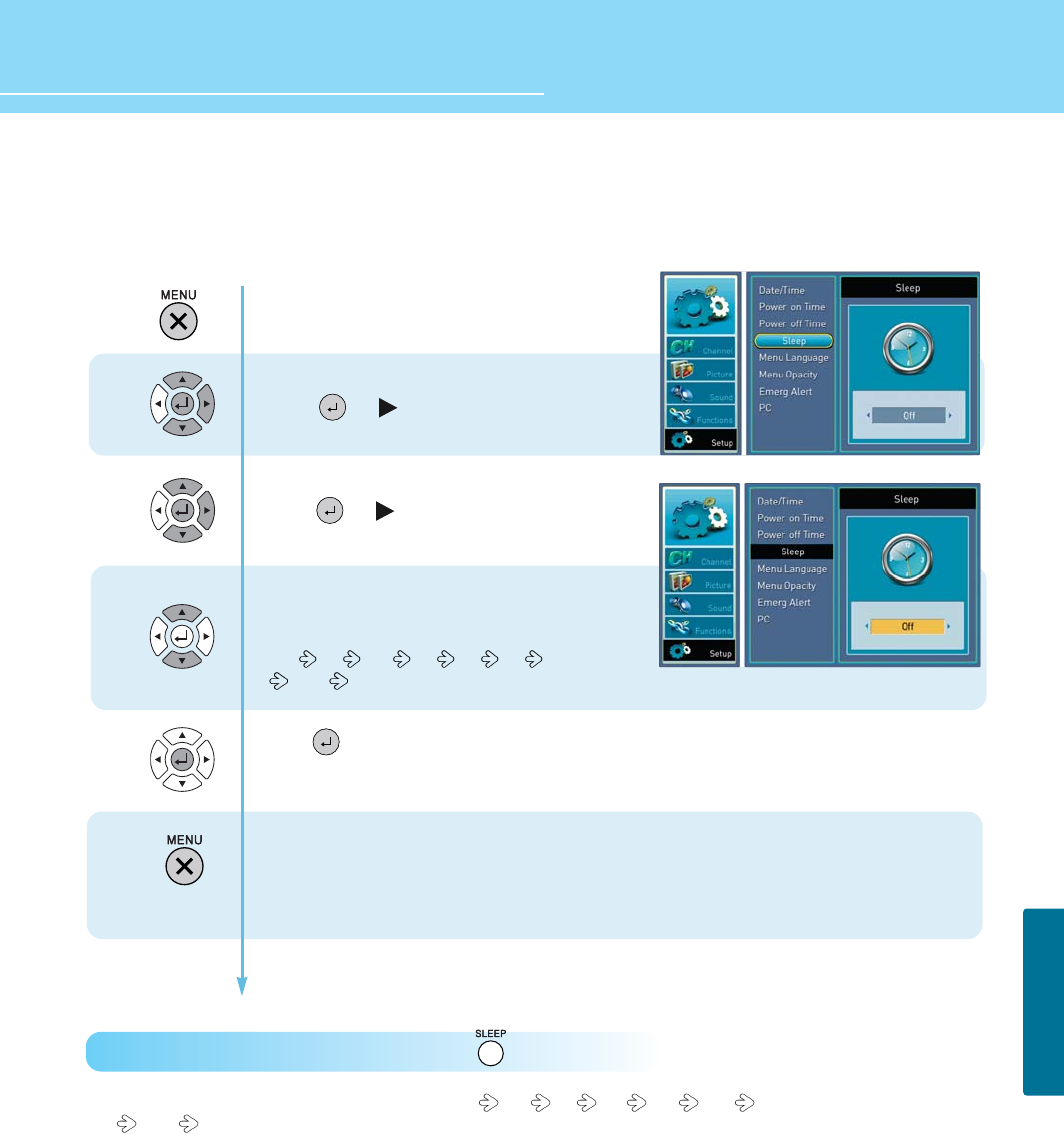
How to Set Sleep Time
56
HYUNDAI FULL HD LCD TV
SETUP
1
2
3
4
Press Menu button.
Menu items appear on the screen.
Press Up or Down button to move to setup
Press or button to select setup.
Press Up or Down button to move to sleep time.
Press or button to set sleep time.
Press up or down button to set sleep time
Whenever you press up or down button the mode
shifts in following order.
OFF 15 30 45 60 90 120
180 240 MINUTES
Press button to set.
Press MENU button after the setting is done and menu goes to the previous menu.
If the EXIT button is pressed, the menu will disappear.
How to Directly Set the sleep timer : Press the button.
- Whenever press this button, the mode shifts off 15 30 45 60 90 120
180 240 minutes
57
SETUP
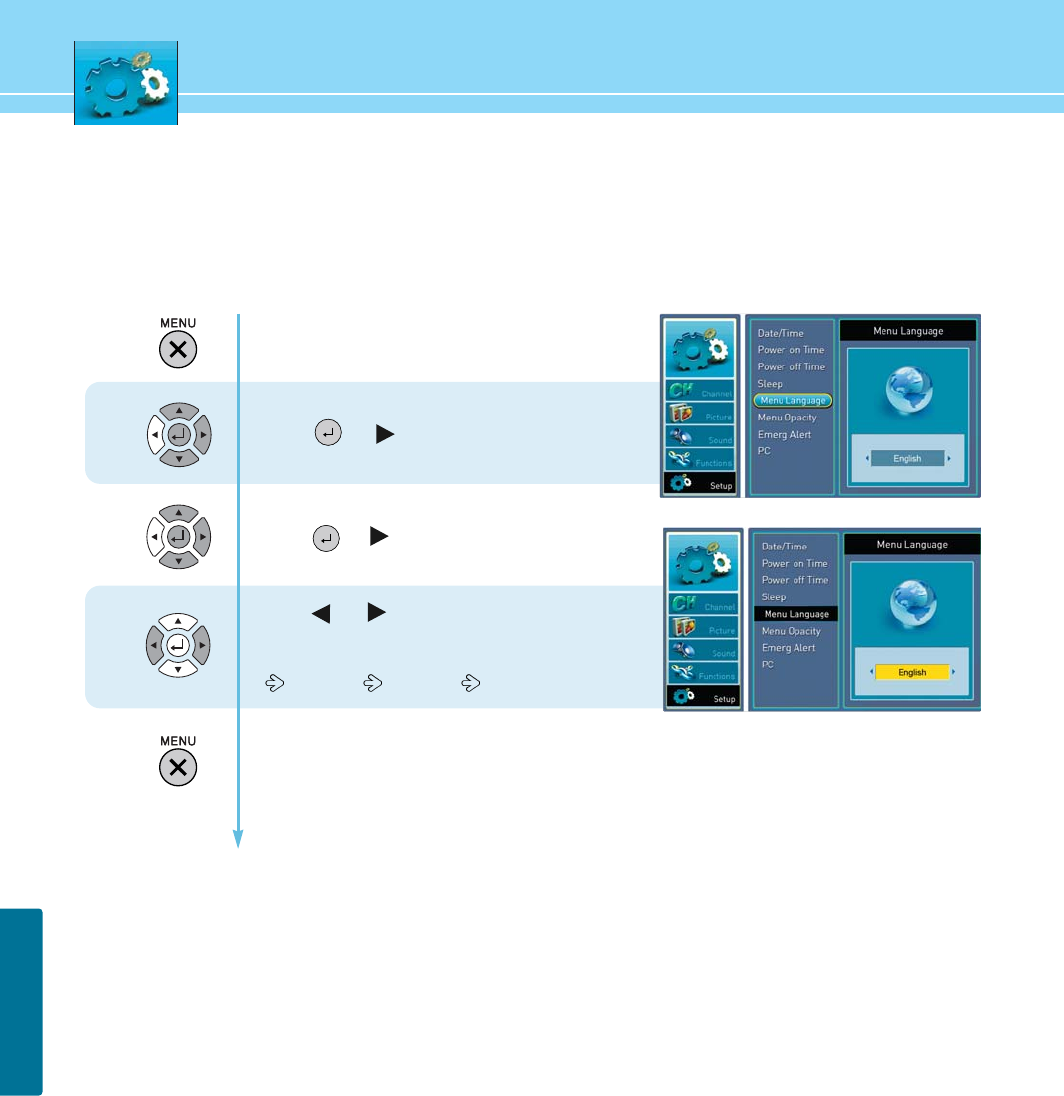
How to Choose Menu Language
Users can select their language preference in order to display main menus and sub menus, etc.
1
2
3
Press Menu button.
Menu items appear on the screen.
Press Up or Down button to move to setup.
Press or button to select setup.
Press up/down button to move to menu language.
Press or button to select menu language.
Press or button to set language
Whenever you press Left or Right button,
the mode shifts in following order.
ENGLISH SPANISH FRENCH
Press MENU button after the setting is done and menu goes to the previous menu.
If the EXIT button is pressed, the menu will disappear.
58
HYUNDAI FULL HD LCD TV
SETUP
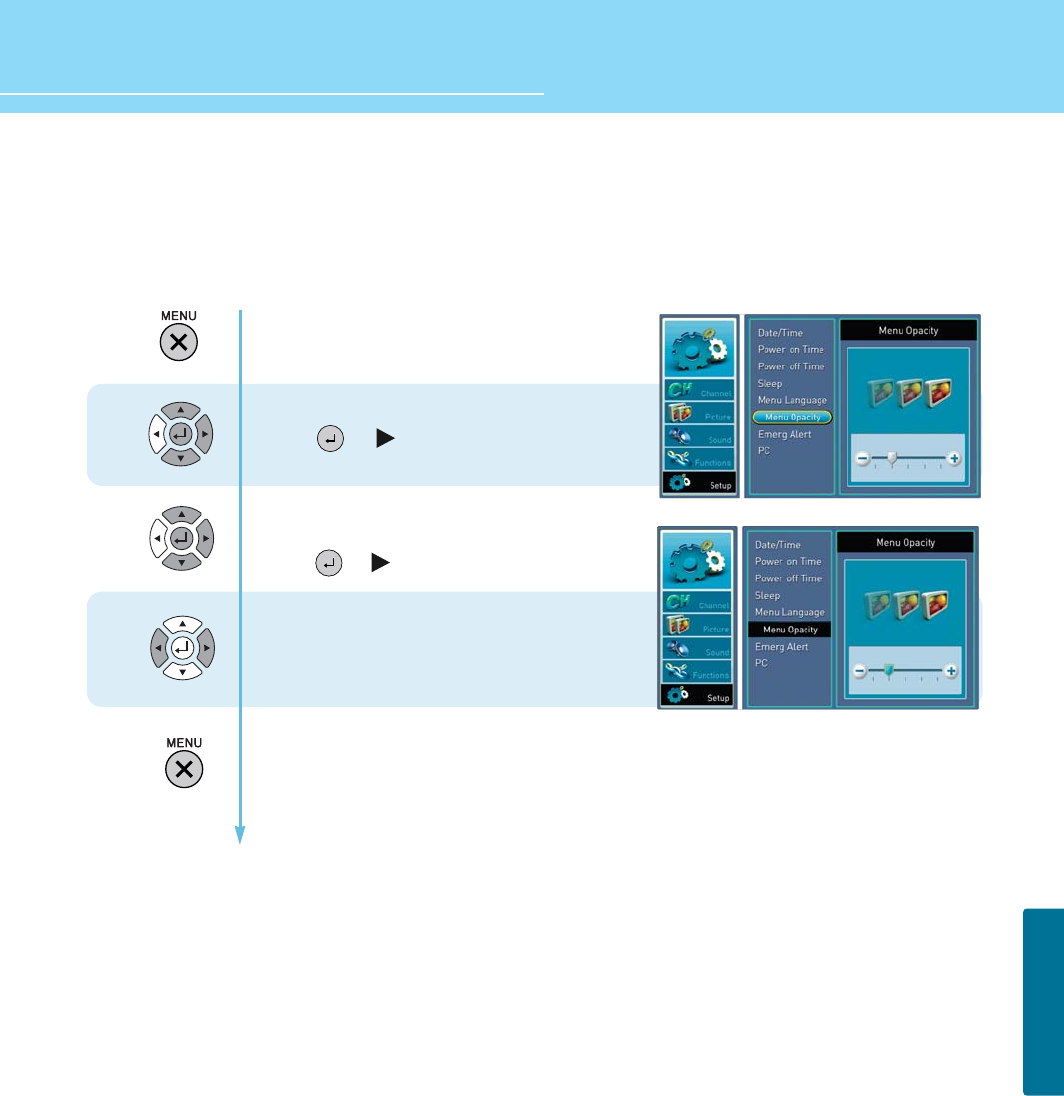
How to Set Menu Opacity
Users can select their language preference in order to display main menus and sub menus, etc.
1
2
3
Press Menu button.
Menu items appear on the screen.
Press Up or Down button to move to setup.
Press or button to select setup.
Press Up or Down button to move to move to
menu opacify.
Press or button to select menu opacity.
Press left or right to set menu opacity you want.
Press MENU button after the setting is done and menu goes to the previous menu.
If the EXIT button is pressed, the menu will disappear.
59
SETUP
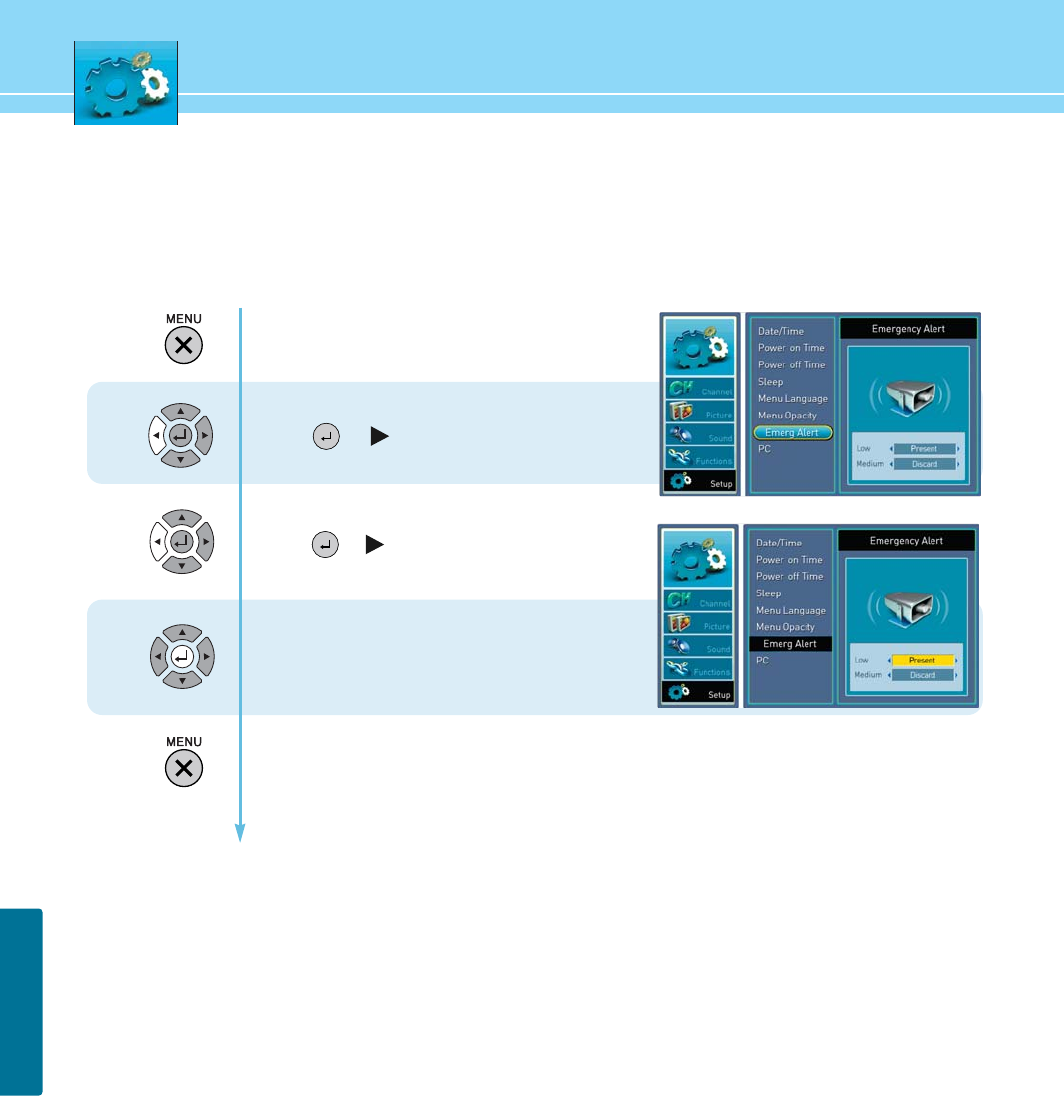
How to Set Emergency Alert
1
2
3
Press Menu button.
Menu items appear on the screen.
Press Up or Down button to move to setup .
Press or button to select setup
Press Up or Down button to move to Energ Alert.
Press or button to select Energ Alert.
Press Up or Down button to move to Low/medium.
Press left or right button to select present/discard.
Press MENU button after the setting is done and menu goes to the previous menu.
If the EXIT button is pressed, the menu will disappear.
60
HYUNDAI FULL HD LCD TV
SETUP
How to Set the Geometry in PC Mode
This function is only available in PC mode.
1
2
3
4
5
Press Menu button.
Menu item appear on the screen.
Press Up or Down button to move to setup.
Press or button to select setup.
Press Up or Down buttons to move to “PC”.
Press or button to select “PC”.
Press Up and Down buttons to move to
“Auto Adjustment”.
Press or button to adjust H/V-position auto.
Press Up and Down buttons to move to “TRACKING”.
After pressing OK button, you can select Phase,
Clock with Up or Down button and change the value
with Left or Right button.
Press Up or Down button to move to position.
Press or button to select position.
Press Up and Down buttons to adjust V-position .
Press or button to adjust H-position.
After setting press button to exit
Press MENU button after the setting is done and menu goes to the previous menu.
If the EXIT button is pressed, the menu will disappear.
H. POSITION : To adjust the horizontal position of the picture.
V. POSITION : To adjust the vertical position of the picture.
6
If the display input signal (resolution) has been changed, the picture will be automatically optimized.

Picture On Function Guide
Picture on function allowing users to set the customized display image on initial TV power on screen.
1) Open your image editor software to open your desire image file.
2) Using your software tool, resize the image pixel to 960 x 550.
3) Set your image color to hi-color (16bit).
4) Select ‘Save As’ on menu and change the image file to “logo.bmp” then save it.
5) Create new file folder name “DDM40” on your USB drive. Copy your “logo.bmp” file to DDM40
directory. Then connect your USB driver to TV by using mini USB cable on LED in Red (Standby
mode).
6) Turn on your TV using the Power ON from the remote controller. Then the file is loaded
automatically.
7) When you see “SPLH: OK” screen, Turn OFF TV using OFF button on the remote controller.
8) Disconnect the Mini USB cable from the TV and Power ON the TV.
9) Initial power on screen is set and now you can view your selected image.
61
SETUP
- Requirements : File Format - Bit Map(*.BMP) / Image pixel size - 960X540 / BIT- 16bit Free image editor
software’s can be downloading at the www.download.com
Recommended USB Drive - SanDisk Cruzer, Micro USB Flash Drive 256Mb, Hana Micro
62
HYUNDAI FULL HD LCD TV
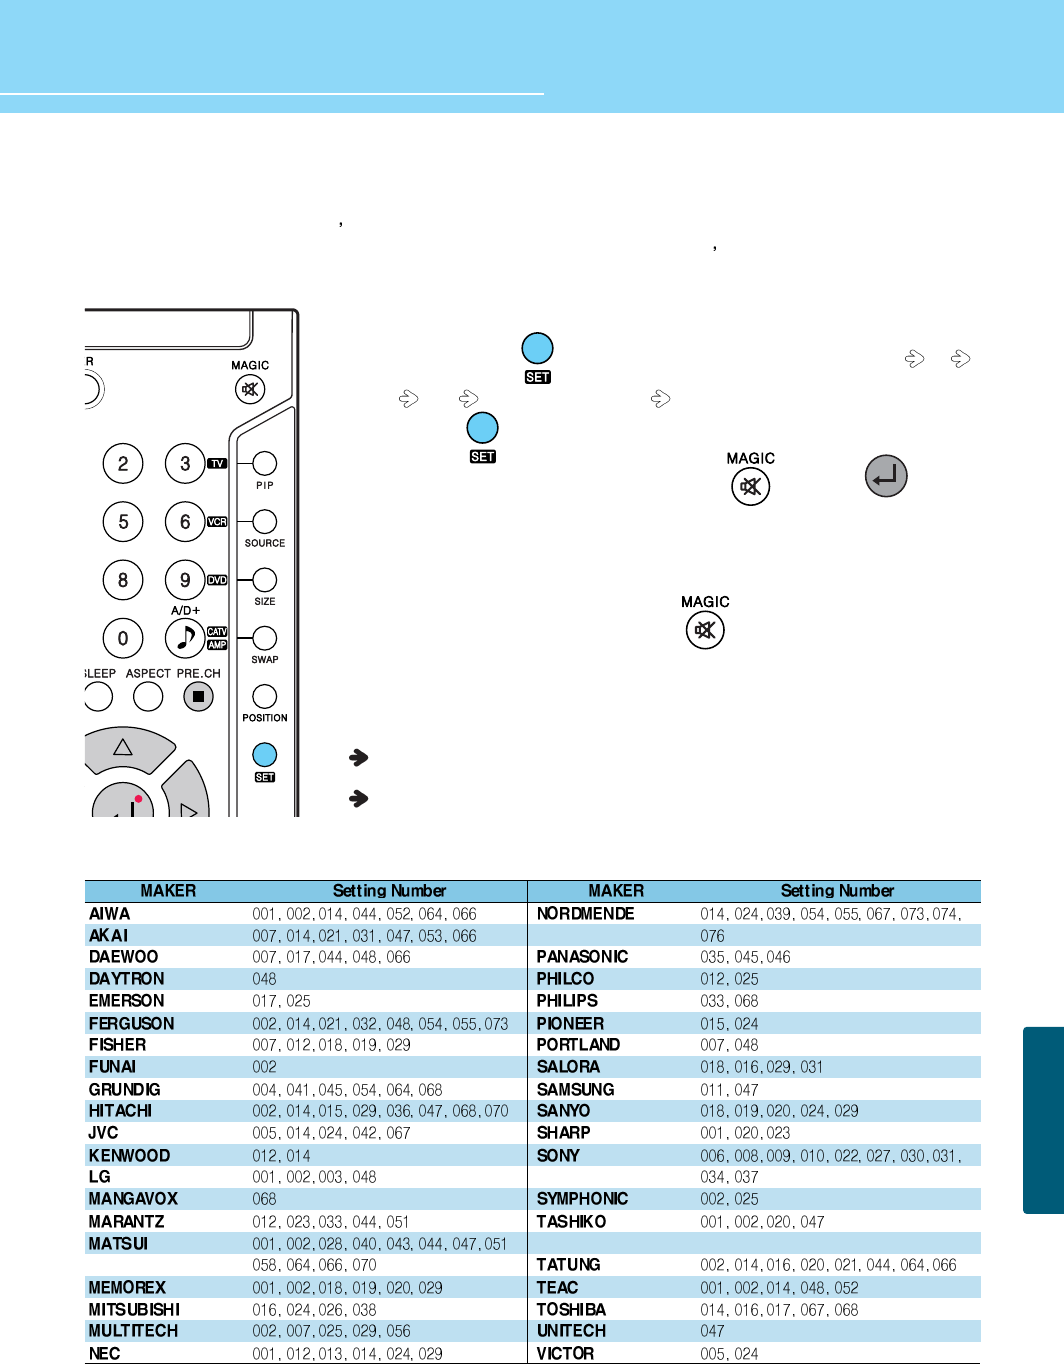
How to Use an External Device Using the Remote Control
When setting other manufacturer s product using the remote control, some of the buttons on the remote control may
not operate or different functions may be activated, or some of other manufacturer s products may not work. Some
of DVD/VCR combos are allowed only either in DVD mode or VCR mode.
1. Turn on the external device you want to set.
2. Whenever you press button on the remote control, the mode shifts TV
VCR DVD SAT(Satellite Receiver) in order.
Or Press the button and the prefered device(TV/VCR/DVD/SAT) at once.
3. If the external device has been chosen, press the button and button
at the same time for two seconds.
4. Enter an appropriate 3-digit number of the manufacturer from the DVD Setting
Number Table. (If the product brand you want to set has multiple setting numbers,
attempt to enter the setting numbers repeatedly until the product is turned off.)
5. When the product has turned off, press the button again.
(The appropriate button associated with the product will flash 3 times to show the
product operates properly.)
6. Check that the Power button works normally and then check that other function
buttons work normally.
If the Power button works normally but other function buttons do not, repeat the
above steps from the beginning.
Depending on product brands or setting numbers, the power button may work
normally but other function buttons do not work.
VCR Setting Number Table
APPENDIX
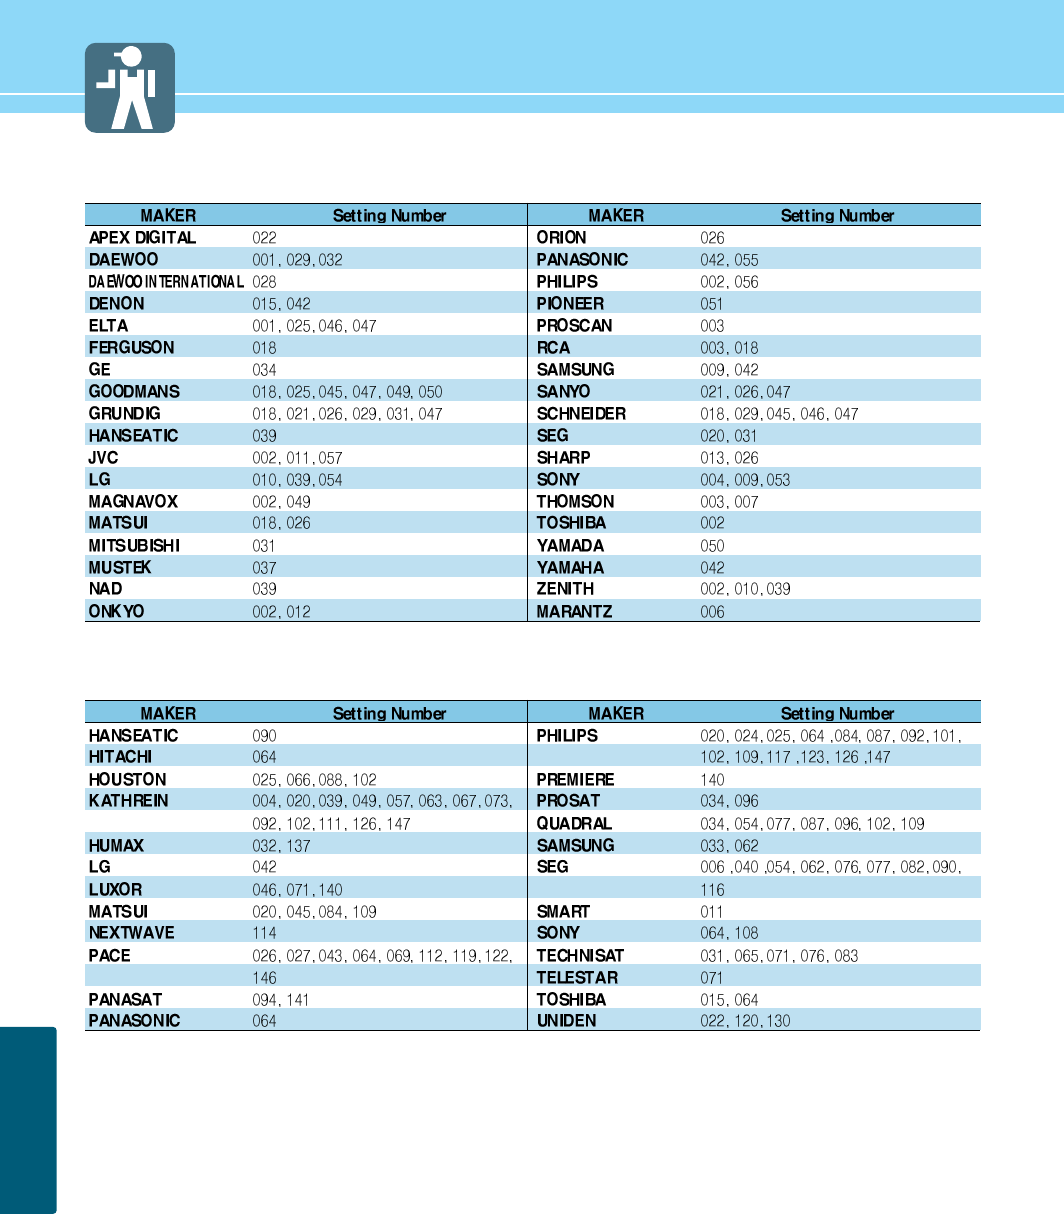
63
APPENDIX
DVD Setting Number Table
Satellite Receiver Setting Number Table

64
HYUNDAI FULL HD LCD TV
APPENDIX
Glossary 1
Component video Component video is sent through three cables: two color shade (chrominance) signals
and one brightness (luminance) signal. Component video achieves greater color
accuracy than composite video or S-VIDEO by splitting chrominance into two separate
portions.
Composite video Composite video is sent through a single cable. Composite video combines the color
shade (chrominance) and brightness (luminance) information into one video signal.
S-VIDEO S-VIDEO requires a single cable, which carries the brightness (luminance) and color
(chrominance) signals of the picture separately. S-VIDEO provides better resolution
than composite video, which carries the signals together.
480i Provides 480 lines of resolution. Displays images using interlaced scanning, which first
transmits all the odd lines on the TV screen and then the even lines.
480p Provides 480 lines of resolution. Displays images using progressive scanning, which
transmits each line from top to bottom.
720p Provides 720 lines of resolution. Displays images using progressive scanning, which
transmits each line from top to bottom.
1080p Provides 1080 lines of resolution. Displays images using progressive scanning, which
transmits each line from top to bottom.
1080i Provides 1080 lines of resolution. Displays images using interlaced scanning, which
first transmits all the odd lines on the TV screen and then the even lines. 1080i is one
of the formats used by HDTV (High Definition TV).
Digital television (DTV) A new technology for transmitting and receiving broadcast television signals. DTV
provides higher resolution and improved sound quality over analog television.
HDTV(High Definition TV) HDTV is a new kind of digital TV, creating a high quality picture, high definition. The
HDTV provides a theater-like screen with an aspect ratio of 16:9. Supports 720p or
higher.
SDTV(Standard Definition TV) SDTV is a new kind of standard definition digital TV, having a range of lower resolution
than the HDTV. Supports 480i.
Cable Broadcast Receiver A device that receives cable broadcasting. Connecting it to your TV set allows you to
watch a various channels.
(Converter)
Satellite Broadcasting Provides crisp picture and clear audio quality throughout the country via a satellite.
VHF/UHF VHF (Very High Frequency) is the part of the frequency spectrum from 30 to 300
megahertz. UHF (Ultra High Frequency) is the part of the frequency spectrum from 300
to 3,000 megahertz.

65
APPENDIX
Glossary 2
DVD DVD (Digital Versatile Disc) is an optical disc that can store a huge volume of
multimedia such as video, game, and audio application, etc.
Coaxial Cable Coaxial cable is the kind of rounded copper cable, which is generally used for TV
antenna.
Aspect ratio Refers to the ratio between the width and height of the screen. This TV has a 16:9
(widescreen) aspect ratio, as opposed to a 4:3 aspect ratio.
Picture Mode Picture Mode features the optimal picture quality. There are Standard-Mild-Vivid -
Multimedia-Custom features in order. “CUSTOM” allows you to adjust Contrast,
Brightness, Sharpness, Color and Tint.
Sound Mode Sound Mode features the optimal sound quality. There are Standard-Movies-Speech-
Music features in order. “CUSTOM” allows you to adjust high frequency sound, middle
frequency sound and low frequency sound.
Digital Broadcasting Video and Audio signals digitized and transmitted by broadcasting companies
complying with the new digital television standard developed by the ATSC (Advanced
Television System Committee). Digital Broadcasting technology provides multimedia
services including a variety of additional services as well as high-definition quality
picture.
Analog Broadcasting ATSC-based Video and Audio signals transmitted by broadcasting companies.
SRS TruSurround TX A well-recognized 3D sound technology developed by US SRS Labs, Inc.
This technology delivers the ultimate audio experience only with two speakers as if
through multi-channel speakers.
Dolby Digital Formerly known as AC-3, Dolby Digital is a digital audio coding technique that reduces
the amount of data needed to produce high quality sound.
Mono Audio signals are produced through a single channel. It is difficult to experience a
spectacular sound since audio signals are reproduced with a single speaker.
Stereo Audio signals are produced through two channels. A spectacular sound is reproduced
with two separated speakers.
Widescreen Term given to picture displays with a wider aspect ratio than NTSC 4:3. Digital HDTV is
16:9 widescreen. Most motion pictures also have a widescreen aspect ratio, some
even wider than 16:9.
External source Refers source signals that come from other external devices such as a VCR, camcorder
and DVD player, etc. than a TV set.

66
HYUNDAI FULL HD LCD TV
APPENDIX
Glossary 3
MTS A bilingual service provided when an overseas film, foreign drama or overseas news,
etc. is aired. You can select one of two choices: mother tongue and foreign language.
Or you can listen to both languages at the same time.
DVI Digital Visual Interface is a specification for digital signals. This interface using TMDS
transmission reduces the loss of signal, allowing to enjoy a clear and crisp image.
HDMI HDMI (High-Definition Multimedia Interface) is the first and only industry-supported,
uncompressed, all-digital audio/video interface.
HDMI provides an interface between any audio/video source, such as a set-top box,
DVD player, or A/V receiver and an audio and/or video monitor, such as a digital
television (DTV), over a single cable.
Virtual channels There is a new numbering system for DTV channels. The system, called the “DTV
virtual channels,” gives a number for each DTV program service, and almost always
uses the analog NTSC channel number as the first number for that station. The use of
virtual channels allows stations to use the same channel number “brand” for both
NTSC and DTV. The printed listing services have not yet changed their format to show
only the DTV virtual channel numbering system. So in the example, the station is using
RF Channel 38 for DTV and is transmitting DTV programs with virtual channel
numbers 15.n. The 15.n is short hand for 15.1, and 15.2 and 15.3, etc., as there can
be more than one DTV program lineup from the station. So, 15.1 is the first DTV
program lineup, 15.2 is the second, 15.3 is the third. Some DTV stations may have
only one virtual channel, others perhaps as many as six.

67
APPENDIX
Troubleshooting
Installation Problems
Picture Problems
Symptom
How can I install an
antenna?
TV screen is not clear after
installing an indoors
antenna.
How can I view cable
broadcasting?
Symptom
Neither picture nor
sound comes up.
Picture turns on slowly
after power is on.
Picture is distorted or frozen
while watching digital
broadcasting.
Input Source information
only appears on black
screen.
Poor reception on some
channels.
Black and white on some
channels.
TV won’t turn on.
Screen is too bright or too
dark.
Possible solution
Refer to page 16.
Indoors antenna may experience poor reception due to surrounding buildings. Please
install an outdoors antenna or wireless antenna.
Please install a cable broadcasting receiver (Converter).
Possible solution
Check whether power is on.
Check whether the power is cut or whether power cord is properly connected.
Try to plug another product’s power cord to the outlet the TV is plugged into.
This symptom is not a malfunction. This delay is designed to prevent the distorted and
noisy picture when power is on. However, if the picture does not appear more than 5
minutes after power is on, call a service center.
This symptom may be caused by weak reception. Contact your local station or cable
company.
Check whether your TV is properly connected to external devices.
Check whether you selected proper channels. Try re-orienting your antenna.
Check other channels for black and white screen. Adjust colour.
Ensure the power cord is plugged.
Adjust brightness.

68
HYUNDAI FULL HD LCD TV
APPENDIX
Sound Problems
General
Auto On does not work.
After setting the time,
I turned TV off and turn it on.
The programmed information
has been erased.
Symptom
Too much noise occurs.
No sound while viewing a
cable channel
Picture is OK but sound does
not come out.
One of the speakers does not
produce sound.
Symptom
Remote control won't work.
Where does the S-Video
cable plug in for audio
output?
Strange noises are heard.
I tried to use the TV screen
as a PC monitor
but it doesn’t work.
Ensure to use the remote control or power button on the product to turn off your TV. If
you unplug the power cord, the stand-by consumption power becomes 0 (zero), which
causes the programmed time to be erased.
Ensure to use the remote control or power button on the product to turn off your TV. If
you unplug the power cord, the stand-by consumption power becomes 0 (zero), which
causes the programmed time to be erased.
Possible solution
Check whether the audio setting is in the Stereo mode. In the Stereo mode, the sound
may be distorted in the area where experiences poor reception or is located far away
from a TV broadcasting station.
Make sure an audio or audio/video component is securely inserted into the appropriate
jacks. Check other channels for sound. Check the volume settings on the cable
broadcasting receiver.
Try to press volume up/volume down buttons of your remote control.
Try to press MUTE buttons of your remote control.
Select sound balance and make proper adjustment. (Page 39)
Check the speaker connection cables.
Possible solution
Check whether there is a blocking object between the remote control and TV.
Make sure your TV is Power On. (In case of normal, LED on the front panel is in Red.)
Check whether batteries are inserted with proper polarities(+, -).
When the batteries are worn out, replace with new ones.
Connect the two Audio jacks from the S-Video cable to the left and right ports on the
Composite.
Ticking noise during or after watching is caused by the change of ambient
environment such as humidity and temperature, which is characterized by plastic
products. Strange ticking noise occurs because a signal is suddenly transmitted to the
TV panel. So, this is not a malfunction.
Adjust the resolution referring to the standard signal mode table. Check the
specification of your video card installed in your PC. If your video card does not work in
supported hardware. Try upgrading the video card’s driver.
69
APPENDIX
Care and Cleaning
Cabinet Cleaning
Wipe a soft dry cloth.
Do not use inflammables like Benzene or Thinner, or wet clothes.
Do not scratch the panel of LCD with a fingernail or pointed object.
Screen Cleaning
Clean the screen with a soft cloth moistened in mild glass
detergent and dry with a soft cloth.
Never use any solvent on the screen such as Acetone, Benzene, or
Thinner, etc.
Cleaning Inside
When the inside needs to be cleaned, contact a service center or
distribution agent where the item is purchased.
It is recommended cleaning is complete before the rainy season.

70
HYUNDAI FULL HD LCD TV
APPENDIX
E465D
1(A/V audio common)
2(Audio included)
2(Audio included)
1
D-SUB
1920 X 1080 @ 60 Hz
L/R
2
No
1
2(L/R, SPDIF)
NTSC M / FM
ATSC
Component, S-Video,
Composite, PC, HDMI
AC 100 - 240 V, 50/60 Hz
260W (Typical )
< 1W
1143 x350 x 845
31.5 Kg
Remote control, Key control
Product Specifications - E425D/E465D
- The above specifications may be subject to change without prior notice.
S-Video
Video (RCA)
Component(Y/Cb/Cr)
Antenna
PC Connection jack
Max. resolution
Audio
HDMI
Memory Slot
Video
Audio
Analog
Digital
Video system
Supply
Consumption power
Stand-by power
Model
Input
Output
TV/Video
Power
Dimension
(W x D x H mm - Stand included)
Weigh (Stand included)
Control type
E425D
1(A/V audio common)
2(Audio included)
2(Audio included)
1
D-SUB
1920 X1080 @ 60 Hz
L/R
2
No
1
2(L/R, SPDIF)
NTSC M / FM
ATSC
Component, S-Video,
Composite, PC, HDMI
AC 100 - 240 V, 50/60 Hz
200W (Typical )
< 1W
1057 x350 x 796
32.6 Kg
Remote control, Key control

71
APPENDIX
E466D
1(A/V audio common)
2(Audio included)
2(Audio included)
1
D-SUB
1920 X 1080 @ 60 Hz
L/R
2
No
1
2(L/R, SPDIF)
NTSC M / FM
ATSC
Component, S-Video,
Composite, PC, HDMI
AC 100 - 240 V, 50/60 Hz
260W (Typical )
< 1W
1323 x310 x 757
31.5 Kg
Remote control, Key control
Product Specifications - E426D/E466D
- The above specifications may be subject to change without prior notice.
S-Video
Video (RCA)
Component(Y/Cb/Cr)
Antenna
PC Connection jack
Max. resolution
Audio
HDMI
Memory Slot
Video
Audio
Analog
Digital
Video system
Supply
Consumption power
Stand-by power
Model
Input
Output
TV/Video
Power
Dimension
(W x D x H mm - Stand included)
Weigh (Stand included)
Control type
E426D
1(A/V audio common)
2(Audio included)
2(Audio included)
1
D-SUB
1920 X1080 @ 60 Hz
L/R
2
No
1
2(L/R, SPDIF)
NTSC M / FM
ATSC
Component, S-Video,
Composite, PC, HDMI
AC 100 - 240 V, 50/60 Hz
200W (Typical )
< 1W
1237 x310 x 708
32.6 Kg
Remote control, Key control

HYUNDAI IT SERVICE CENTER
Germany/Austria/Benelux
Hyundai IT Germany SVC
Hessenring 13B D-65546
Mörfelden-Walldorf Germany
Tel -
Total : 0049 (0) 6105 4088 211
IT : 0049 (0) 180 50 70113
TV : 0049 (0) 180 59 13 134
e-mail : oezer.oeguen@
hyundai-service.eu
Attn : Oezer Oeguen
France
SERRIB
25 rue Albert Camus BP355,
90006 BELFORT Cedex
Tel - IT : +33 (0) 4-70-58-44-11
TV : +33 (0) 4-70-58-44-02
e-mail : g.demeusy@serrib.com
Attn : Gilles Demeusy
UK
RepairTech Ltd
Unit 5, Westfield Road,
Southam, Warwickshire,
CV47 0JH
Tel : 0871 855 3171
e-mail : john.satchwell@
repairtech.co.uk
Attn : John Satchwell
Czech Republic, Slovakia
SIL Eastern Europe a.s.
Tesinska 1970/56, 710 00,
Ostrava,Czech Republic
Tel : 00420 (0) 596 253 677
e-mail : schneider@sil.cz
Attn : Tomas Schneider
Norway
A Novo
Fetveien 1
Tel : 0047 63804538
e-mai : joa@anovo.no
Attn : Joakim Skriung
Sw/Fi/De
A Novo
Nätverksgränd 11, 721 36
Västerås Sweden
Tel : 0046 21812310
e-mail :
andreas.gerhardsen@anovo.se
Attn : Andreas Gerhardson
Spain
Seltron, S.L.
C/INDUSTRIA,44-46
Tel : 0034 (0) 902014909
e-mail : ruiz@seltron.org
Attn : JL RUIZ
DATA LOGIC SL
Pol Ind Mas Batlle,
C/I. Iglesias 161, 43206 Reus
Tel : 0034 (0) 902141209
e-mail : jmfortuny@datalogic.es
Attn : JM Fortuny
Switzerland
Pictronic AG
Aavorstadt 40,5600 Lenzburg
Tel : 0041 (0) 62 892 96 00
e-mail : correia@pictronic.ch
Attn : Thomas Correia
ITALY
Euvision SRL
Via di Grotte Portella, 6/8
00044 Frascati - Roma - Italy EU
Tel : 0039 06 94293 321
e-mail : Infoservizi@hyundai.it
Attn : LUCARELLI STEFANO
Lithuania
"ServiceNet" UAB
Gaiziunu g.3, Kaunas LT-50128,
Lithuania
Tel : 00370 (37) 400160
e-mail :
Robertas_Zubrus@servicenet.lt
Attn : Robertas Zubrus
POLAND
Zolter Sp. z o. o.
Piaseczno 05-500 ul.˙zoytnia 1
Tel : 0048 (0) 22735 54 30
e-mail :
A.Gorayski@zolter.com.pl
Attn Antoni Gorayski
SLOVENIA
E-MISIJA d.o.o.
LJUBLJANSKA CESTA 21 D
Tel : 00386 (0) 18303560
e-mail : hyundai@e-misija.si
Attn : ZAPLOTNIK BOSTJAN
GREECE
ALMAN HELLAS LTD
ORTANSIAS 23, GR-13677
ACHARNAI, ATHENS, GREECE
Tel : 00302 (0) 102409150
e-mail : support@alman.gr
Attn : JOHN SPANOS
Turkey
Multimedya
Küçükköy karayolları mah 569.
Sk no:6 k:2 GaziosmanPa¸sa
Istanbul
Tel : 0090 (0) 212 479 46 46
e-mail :
gurhan.bayir@multimedya.com
Attn : Gürhan Bayır
Croatia
HG Spot
Avenija Dubrovnik 46
10010 Zagreb
Tel : +385 (1) 66 11 548