Hyundai IBT PT42DA000 PDP TV User Manual 1 7 Appen eng
Hyundai IBT Corp. PDP TV 1 7 Appen eng
Contents
- 1. Users Manual 1a
- 2. Users Manual 1b
- 3. Users Manual 2
- 4. Users Manual 3
Users Manual 1b
ENGLISH
16
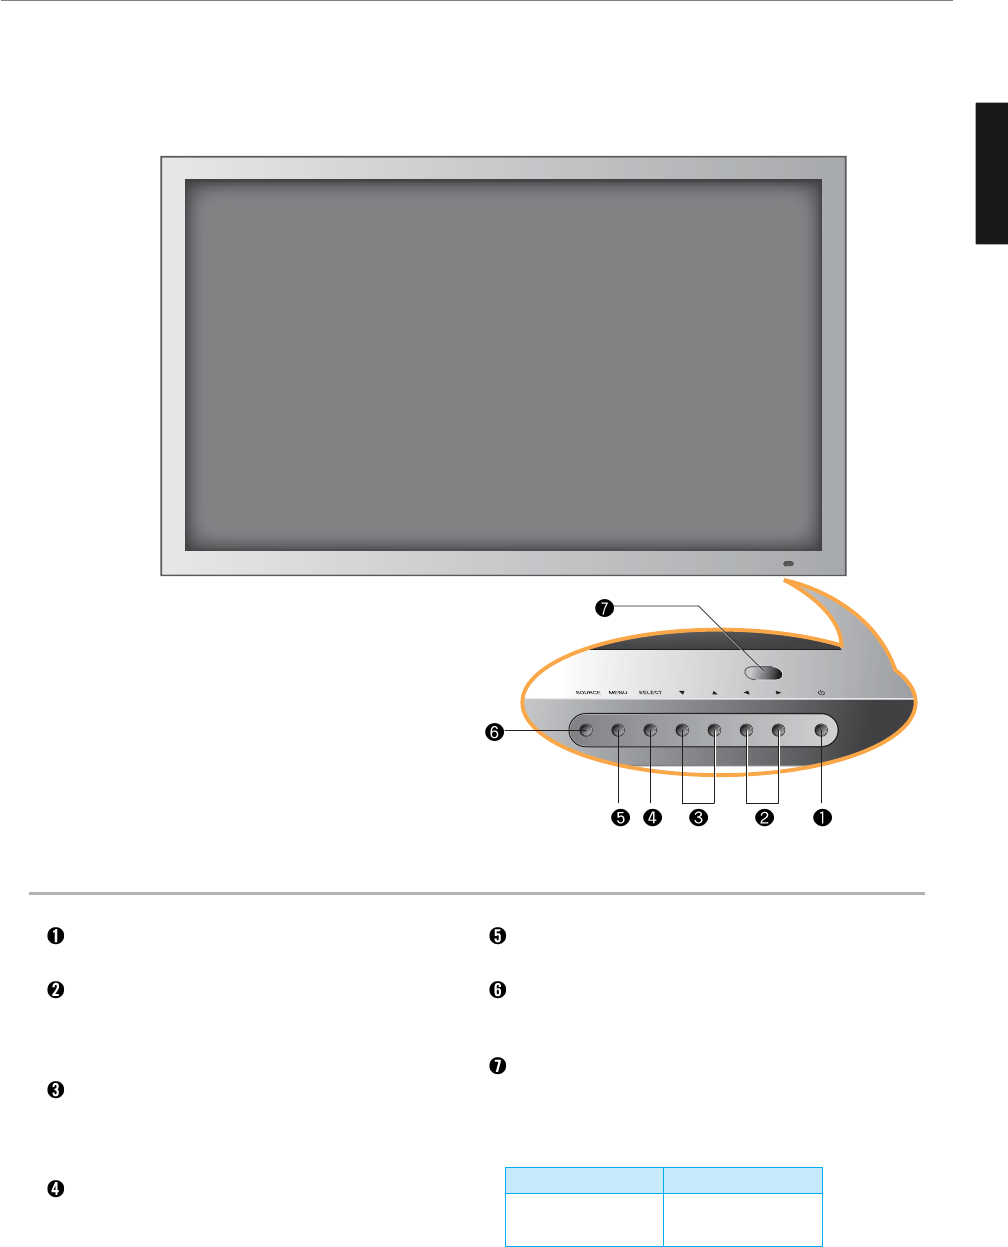
General Information
Parts Names and Functions - 42”/50” PDP TV
Front View
Power button
Use this button to turn on or off the TV.
Volume buttons
Use these buttons to adjust sound levels. These
buttons also serve as the cursors of Select/Adjust in
Menu mode.
Channel buttons
Use these buttons to change channels. These buttons
also serve as the cursors of Down and Up buttons in
Menu mode.
Select button
Use this button to select each item from the menu
mode.
Menu button
Use this button to display or exit from the menu mode.
Source button
Use this button to switch among inputs connected to
the TV.
Remote sensor and power LED.
- Point the remote control toward LED.
- It displays standby or operation status.
* This product image may be a bit different from the actual product.
- Power Indicator Status -
Indicator
Red
Green
Status
Standby
Power on
17
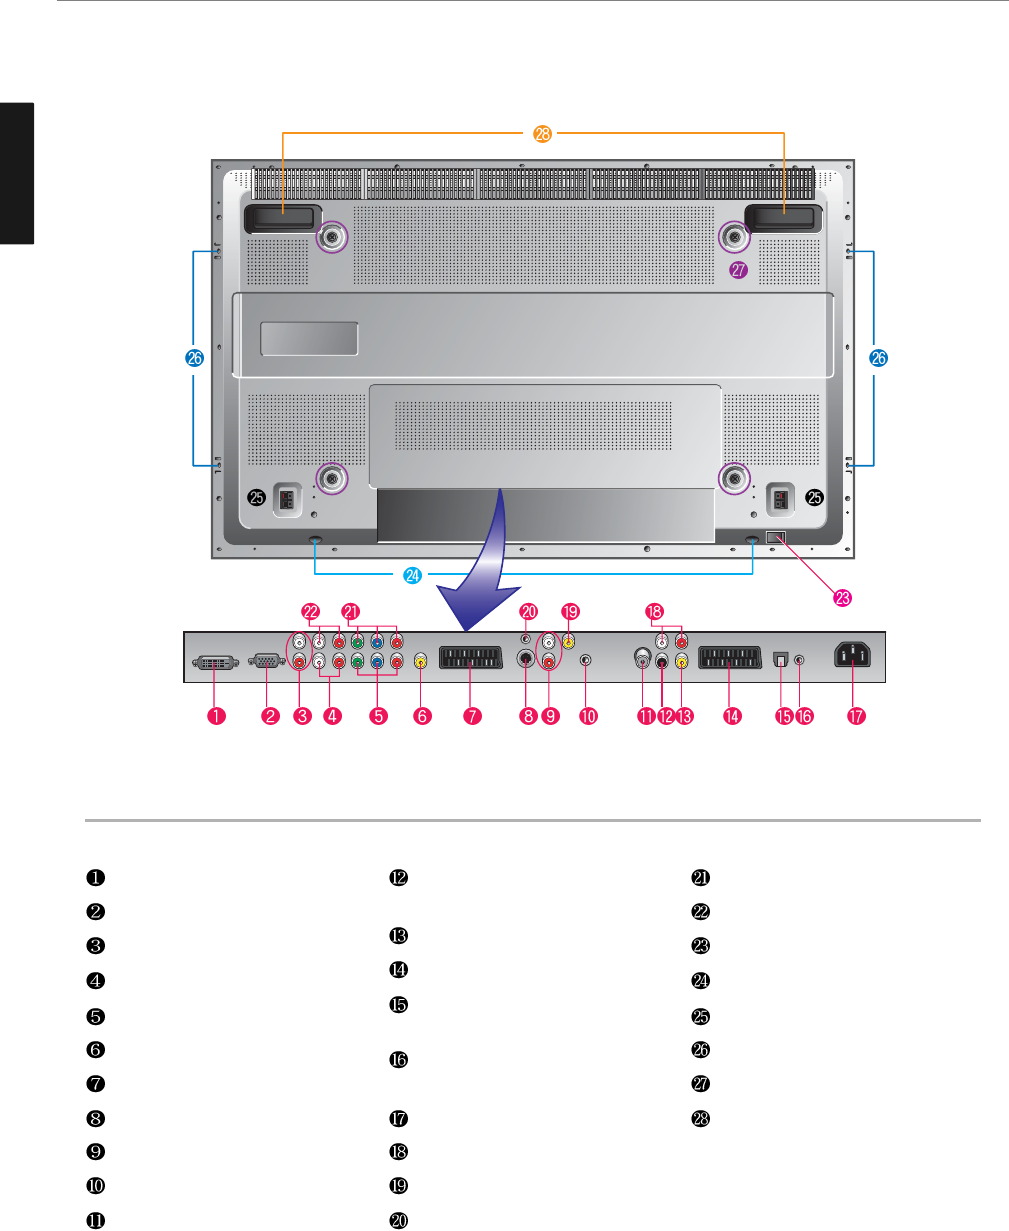
General Information
ENGLISH
Rear View
DVI Video input terminal
D-SUB input terminal
DVI/D-SUB Audio input terminal
Component 2 Audio input terminal
Component 2 Video input terminal
CVBS output terminal
Full Scart input terminal
S-Video input terminal
Audio(CVBS) input terminal
Headphone output terminal
Antenna input terminal
Digital Audio output terminal for
coaxial cable
Subwoofer output terminal
Half Scart input terminal
SPDIF Optical audio output
terminal
Extend an RS-232 input for DTV
communication
Power (AC) input terminal
Extend Audio ontput terminal
Video(CVBS) input terminal
Extend an RS-232 input for ATV
communication
Component 1 Video input terminal
Component 1 Audio input terminal
Power switch
Stand assembly
Speaker terminal
Speaker assembly
Screw hole for fixing on a wall
Carrying handles
* This product image may be a bit different from the actual product.
18
General Information
ENGLISH
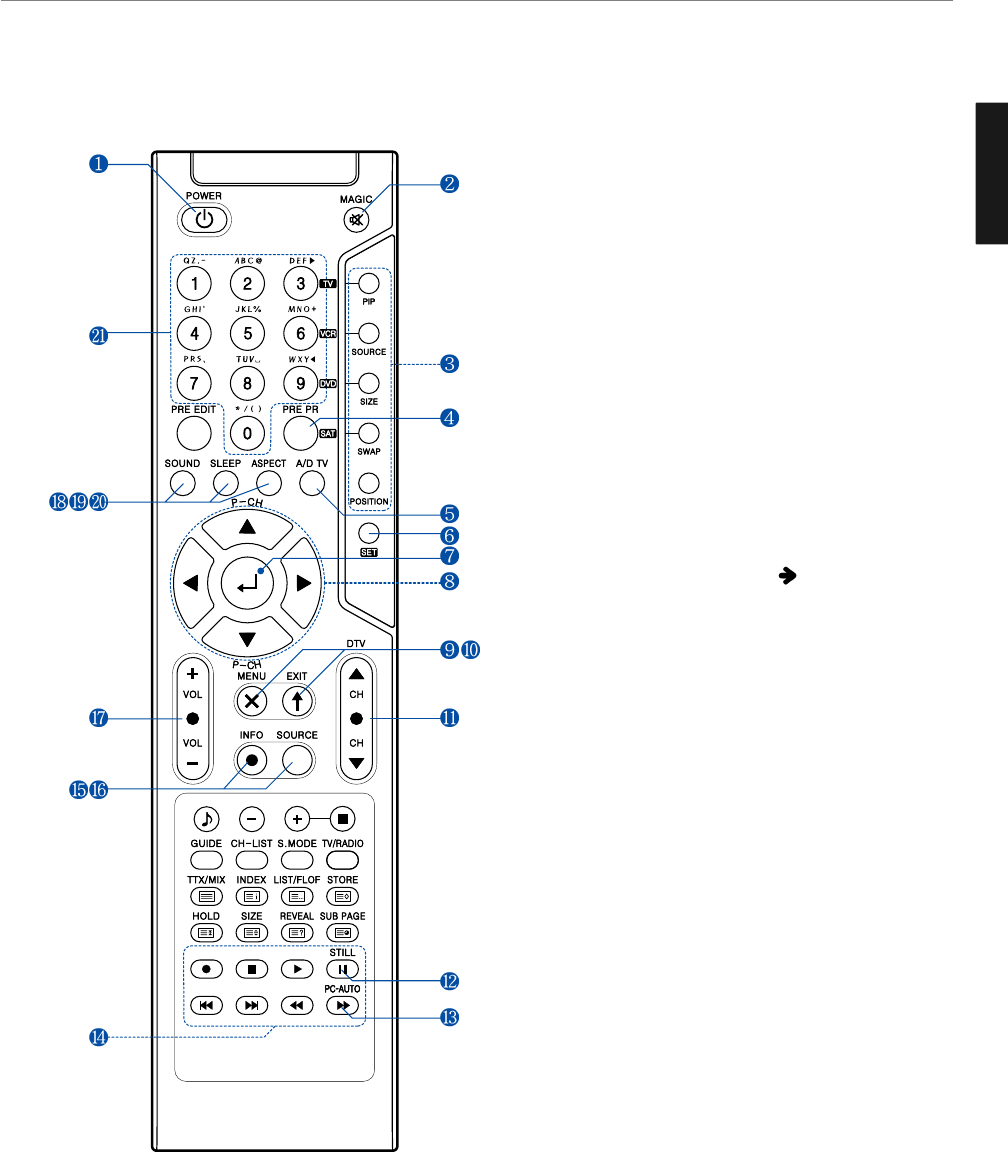
1. POWER/STANDBY
2. MUTE
This button is also used when setting up to use other external
devices.
3. PIP FUNCTIONS
- PIP
: Use this button for PIP On/Off.
- SOURCE
: Use this button to select the input source of sub-picture.
- SIZE
: Use this button to select the size of sub-picture.
- SWAP
: Use this button to swap main and sub-picture.
- POSITION
: Use this button to select the position of sub-picture.
4. PREVIOUS PROGRAM
5. A/D TV
Use this button to switch the input source from analog to
digital
6. Other external device selection ( 59P)
7. MENU SELECTION
Use this button to select menu items.
8. LEFT/RIGHT MOVE/ADJUST
- Use these buttons to move between menu items or adjust
each item.
- Use UP/DOWN buttons to select Analog TV channels.
9. MENU
Use this button to call the OSD on the screen.
10. EXIT
Use this button to end the OSD.
11. DTV CHANNEL SELECTION
You can also use these buttons when changing pages in TTX
mode.
12. STILL
13. PC-AUTO (For PDP TV only)
14. Use this buttons to use other manufacturer’s DVD or
VCR.
15. INFOMATION
Use this button to display resolution or various program.
16. SOURCE
Use this button to select External Input.
17. VOLUME
18. SOUND MODE
19. SLEEP
20. ASPECT RATIO
Use this button to change the picture size.
21. NUMERIC KEYS
Remote Control
19
General Information
ENGLISH
Power Saving Function when listening to music
Music Playback Setting (Repeat 1, Repeat All, Sequence)
Select, Start, Pause/Playback
Move between file listings, Previous Track/Next Track,
Reverse/Fast Forward, Photo Rotation
Exit, Cancel
Eject Card
Slide Show
Zoom In
Check Version (Initial Screen), Check Running Time (Movie Mode)
Hide Menu
When Shifting into Memory Mode
Other buttons available in Memory Mode
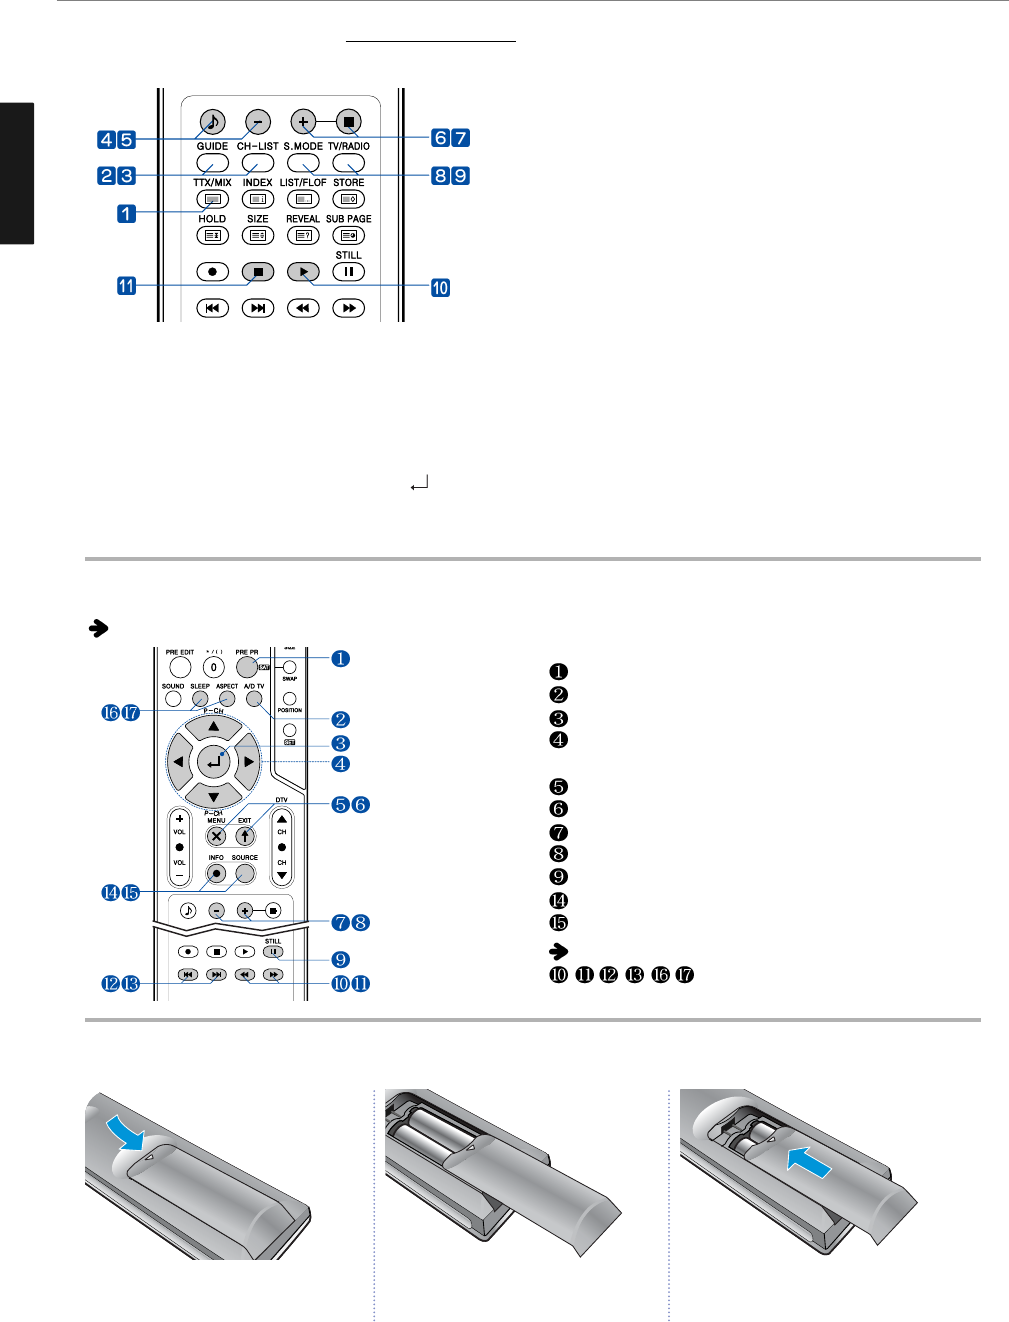
How to Insert Batteries in the Remote Controller * Battery type :1.5V/AAA
Using buttons when in Memory Mode -* For Q320, Q400 Model only
The following buttons are used differently in each menu. (See pages 51~58 for more details.)
Teletext & Fastext Function
(See pages 34 for more details.)
1. TTX/MIX
To see Teletext Service Data for Analog TV and Digital TV.
2. GUIDE (EPG-Electronic Program Guide)
To watch the program information. Press once more to return
to normal mode.
3. CH. LIST
To watch the channel list for Digital TV. Press key to
confirm or press EXIT to return to previous channels.
4. RED rubber
- DTV : To setup favorite channel lists in the Channel List menu.
- ATV : To delete a channel in the Program Edit menu.
5. GREEN rubber
- DTV : To lock favorite channel lists in the channel list menu.
- ATV : To sort channels in the Program Edit menu.
6. YELLOW rubber
- DTV : To move favorite channel lists in the channel list menu.
- ATV : To edit channel names in the Program Edit menu.
7. BLUE rubber
DTV : To delete a channel from the channel List menu. To show
extended program information in the EPG menu.
8. S.MODE
To adjust the subtitle and audio condition/status of the current
channel for Digital TV
9. TV-RADIO
To switch between the TV channel and radio channel for
Digital TV.
10. WHITE rubber
DTV : To add a new channel to the Channel List menu.
11. ORANGE rubber
DTV : To see variant channel lists for user’s convenience in the
Channel List menu.
Press and hold Δpart and push to open
cover.
Insert batteries with proper polarities of
+ and -.
Use the remote control with cover closed.
123
20
Connections
ENGLISH
✓
When inserting a 75 ohm coaxial cable into the input connection, ensure the wire tip not to bend.
✓
If you experience poor signal reception, we recommend you purchase a signal amplifier for better picture quality.
VHF Antenna
UHF Antenna
Antenna cable
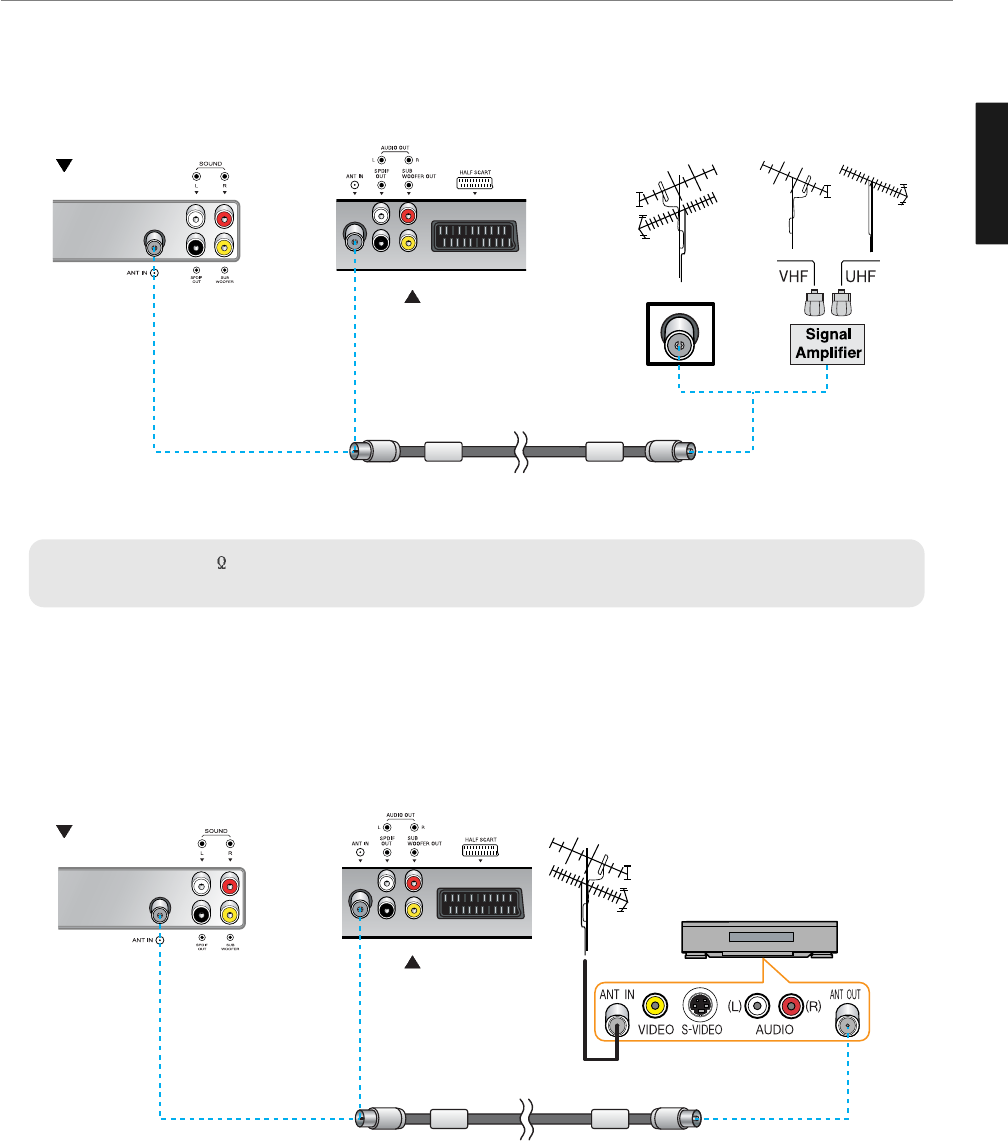
Connecting Indoor/Outdoor TV Antenna(UHF/VHF)
- Antenna or Cable service without cable box connections
- For on optimum picture quality, adjust the direction of antenna if needed.
VCR/Cable Receiver
Connecting Antenna Input Connection to External Equipments
1. Connect an antenna cable to VCR/Cable/Satellite Receiver with the antenna input.
2. Use a coaxial cable to connect VCR/Cable/Satellite Receiver's antenna output to the antenna input on your TV.
Antenna cable
26”/32”/40”
TV
42”/50” TV
26”/32”/40”
TV
42”/50” TV
21
Connections
ENGLISH
Before Connecting the Video/Audio Connections to External Devices...
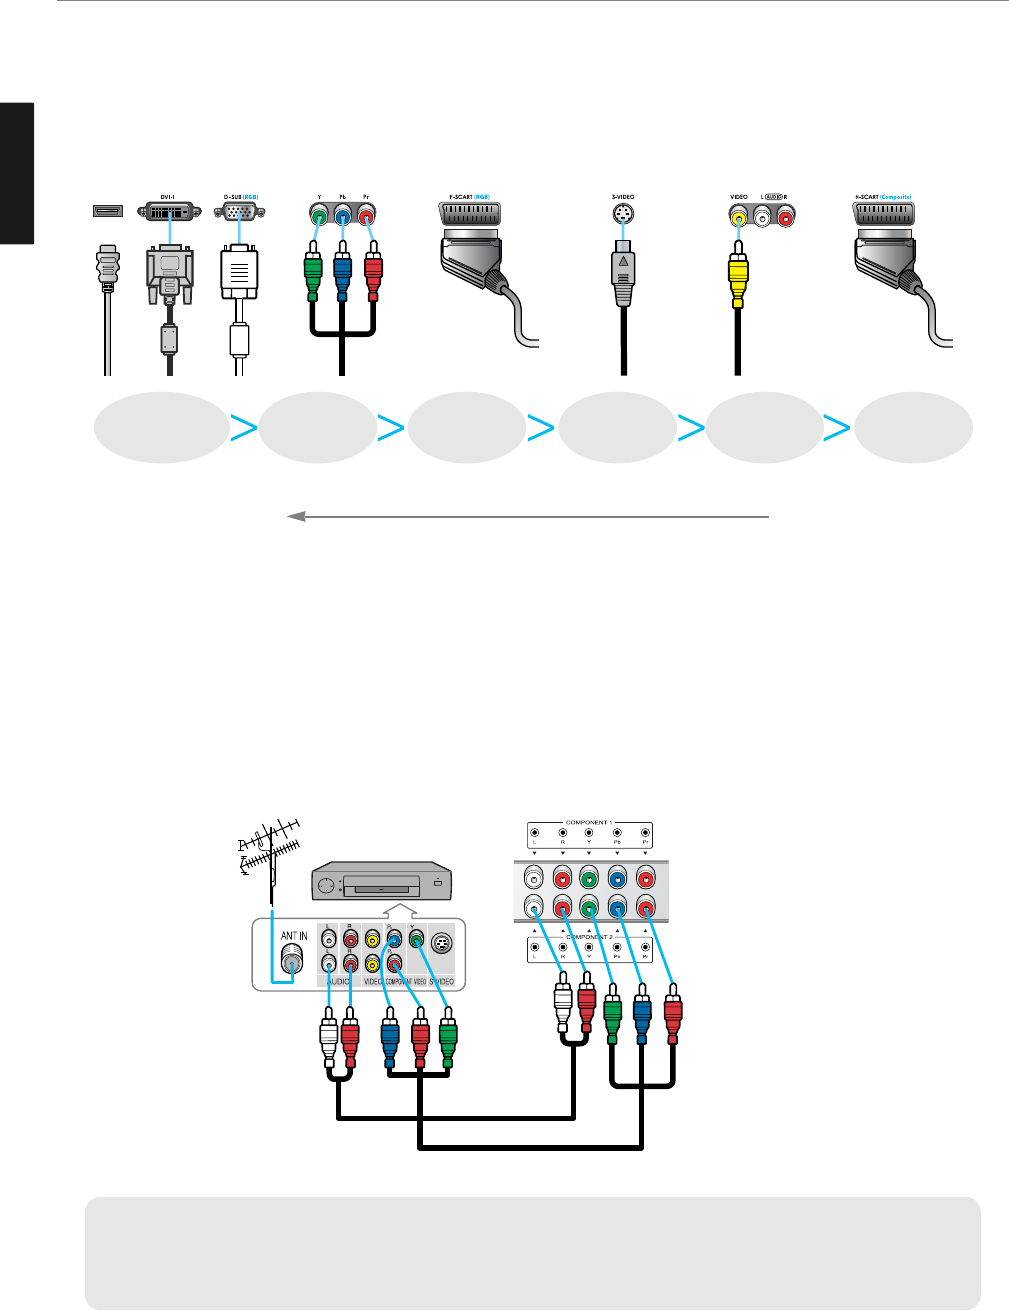
Please make sure to read the following instruction to enjoy the best picture quality.
Best picture quality is displayed in the following order.
The superior picture quality starts from the far left side.
✓
Output terminal mark (Y, Pb, and Pr) of DVD player may be indicated as Y, B-Y, R-Y/Y-Cb-Cr /Y-Pb-Pr according to the
type of DVD player models.
✓
If your DVD player or Set Top Box supports HDMI/DVI or D-SUB, see Connecting to a PC (page 22) for connection. You
can enjoy more clear picture quality.
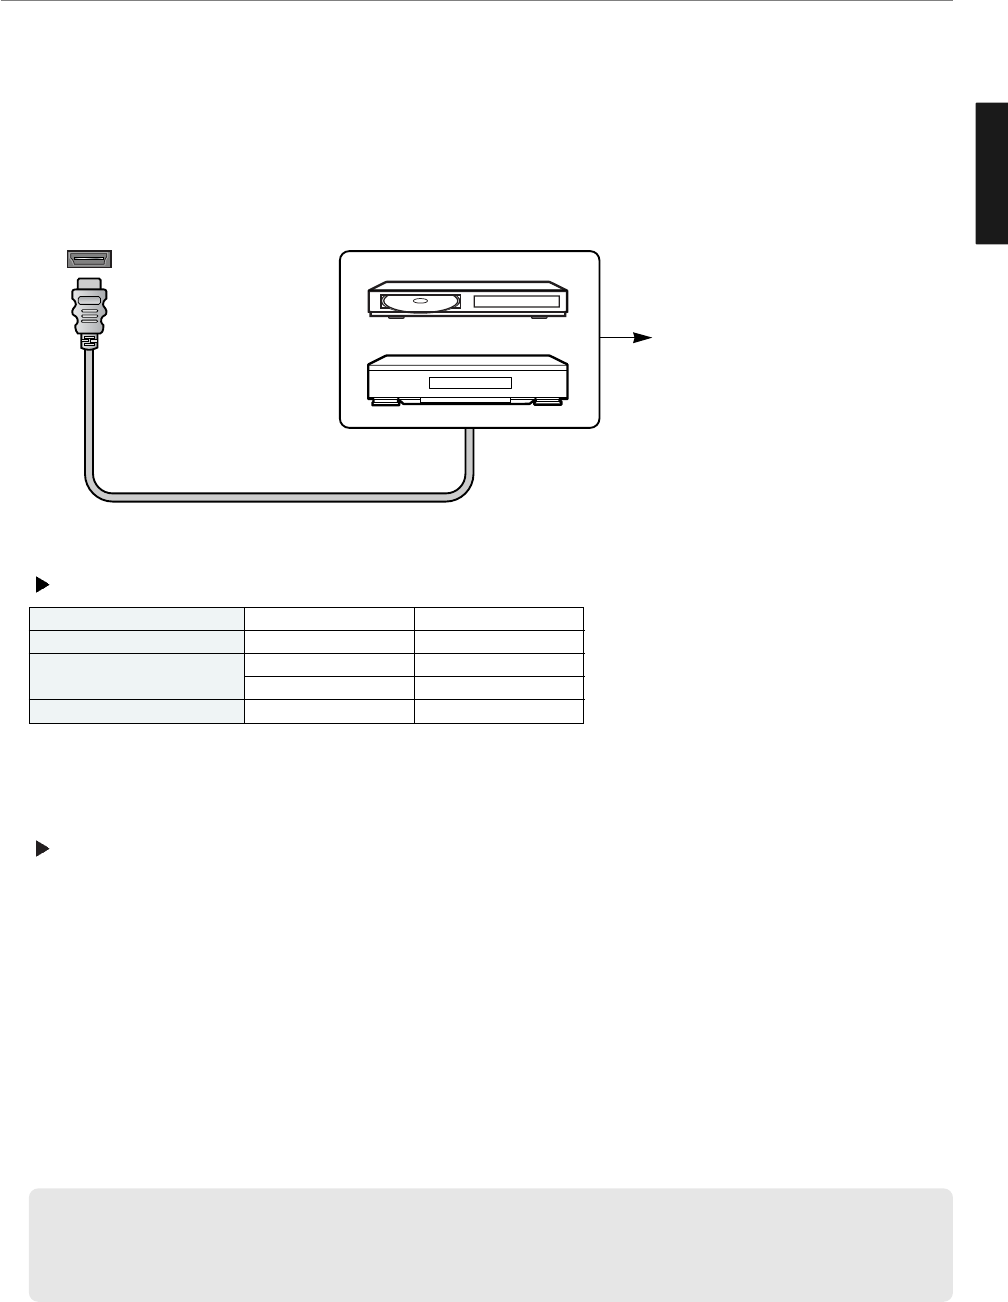
DTV receiver
/ DVD Player
Audio cable
Video (Y, Pb, Pr) cable
How to Connect a DTV Receiver or DVD Player
1. Connect the Video cable (Y, Pb, Pr) between output terminals (Y, Pb, Pr) of DTV receiver or DVD player and the
input terminals (Y, Pb, Pr) of DTV/DVD (576i/576p/720p/1080i) on the rear of TV.
(Connect the jacks to terminals in the same color.)
2. Connect the Audio cable between Audio output terminals of DTV receiver or DVD player and Audio input terminal
for DTV/DVD Audio on the rear of TV. (Connect the jacks to terminals in the same color.)
HDMI
FULL SCART
HDMI,
DVI-1, D-Sub COMPONENT S-VIDEO COMPOSITE HALF SCAT
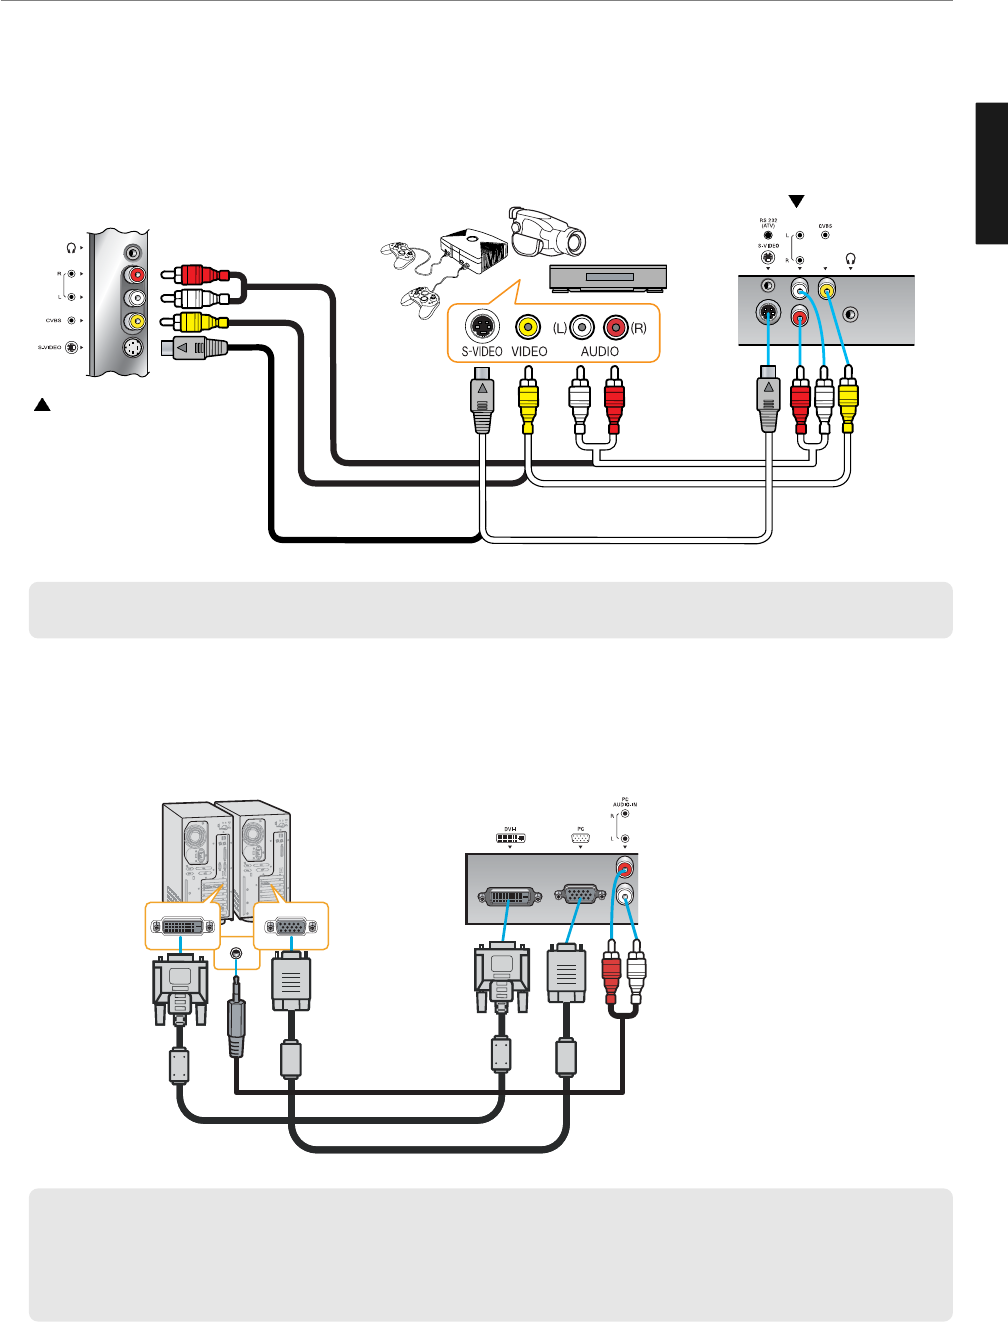
How to Connect to a PC
1. Connect the PC signal cable (15-pin D-sub) between the output terminal of PC and the D-sub input terminal of TV.
2. Connect the Audio cable between Audio output terminal of PC and Audio input terminal for PC on the rear of TV.
(Connect the jacks to terminals in the same color.)
✓If you use DVI/HDMI connection, you can enjoy better picture quality.
✓This product supports Plug-and-Play function.
✓We recommend the above method if the DVD player or set top box supports DTV signal with DVI/D-sub (15 pin) cable
for better picture quality.
✓If you input an unsupported resolution in PC or DVI/HDMI mode, the screen won’t be displayed properly.
How to Connect a VCR, Cable Receiver, Camcoder, Game Player
1. Connect the Video cable or S-Video cable between Video/S-Video output terminals of VCR or Cable receiver and
Video/S-Video input terminal of TV. (Connect the jacks to terminals in the same color.)
2. Connect the Audio cable (Left: white, Right: red) between Audio output terminals of VCR or cable receiver and
Audio input terminal of TV. (Connect the jacks to terminals in the same color.)
✓ To enjoy a better picture quality, use the S-Video cable rather than the composite cable.
DVI cable (DIGITAL)
D-SUB cable
Audio Cable
or
Video cable or
S-Video Cable
Video cable or
S-Video Cable
Game Player
Camcorder
Video
/Cable receiver
Audio cable Audio cable
26”/32”/40” TV
42”/50” TV
22
Connections
ENGLISH
23
Connections
ENGLISH
Resolutions Supported in PC
Vertical frequency
70.00
-
72.80
75.00
-
-
70.08
60.32
75.00
72.19
74.55
60.00
70.07
75.03
60.02
74.99
Horizontal frequency
31.47
-
37.86
31.50
-
-
31.47
37.88
46.88
48.08
49.73
48.36
56.48
60.02
63.98
61.27
Vertical frequency
70.09
85.08
59.94
72.80
75.00
85.01
70.08
60.32
72.18
75.00
85.06
74.55
60.00
75.03
85.00
-
-
Horizontal frequency
31.47
37.86
31.47
37.86
37.50
43.27
31.47
37.88
48.08
46.88
53.67
49.72
48.36
60.02
68.68
-
-
Model
Resolution
640 x 350
640 x 480
720 x 400
800 x 600
832 x 624
1024 x 768
1280 x 1024
1366 x 768
26” / 32” / 40” LCD TV 42” / 50 PDP TV
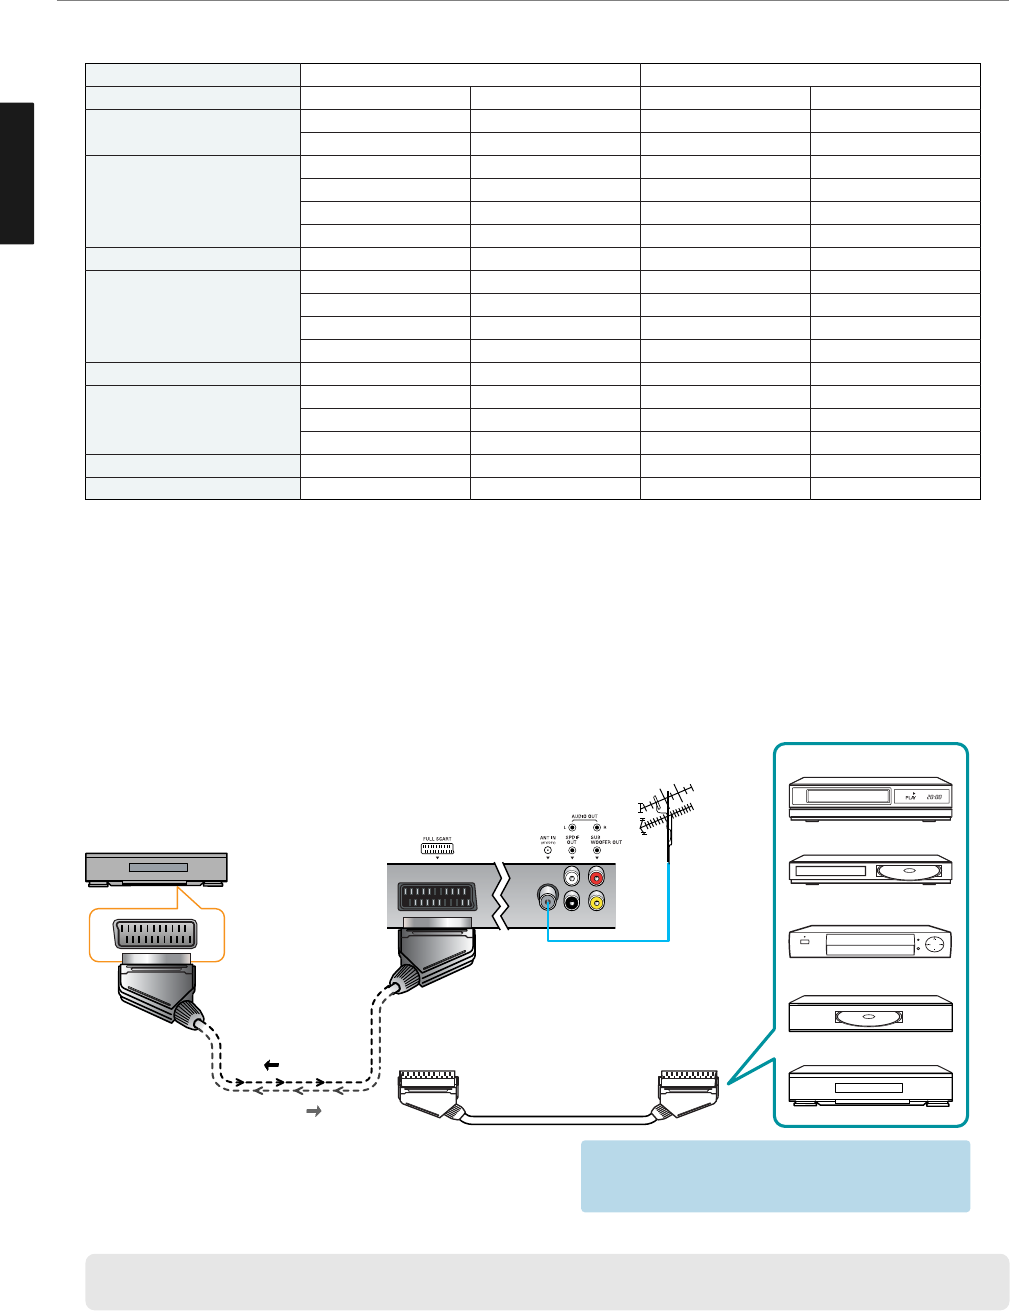
Scart Connection to the External Input/Output
If you have a second VCR and wish to copy casettes tape. Connect the source VCR to “F Scart” and the target VCR
to “H Scart” so that you can redirect the signal from “F Scart” to “H Scart”.
* “F Scart” sends the TV broadcast signal received through an antenna to a set-top box and receives the
descrambled signal back, which allows you to view TV broadcasts in AV Mode.
* “H Scart” you are capable to record live TV broadcasts on the TV screen. (Please make sure that your TV is “ON”.)
✓When switching voltage comes into the Scart-Pin 8 during viewing a TV program, the current mode will be switched
to Scart mode.
F SCART
SET TOP BOX
VIDEO(CVBS)
+ Audio(L/R)
TV OUT
TV IN
- F Scart Input : RGB, CVBS - F Scart Output : CVBS
- H Scart Input : CVBS - H Scart Output : CVBS
Video Game Device
Video Disc Player
Satellite Receiver
DVD
VCR
*1. HDMI, the HDMI logo and High-Definition Multimedia Interface are trademarks or registered trademarks of HDMI
Licensing LLC.
*2. EIA/CEA-861/861B profiles compliance covers profiles for transmission of uncompressed digital video including high
bandwidth digital content protection.
HDMI Connection (For HDMI model only)
HDMI*1(High Definition Multi media Interface) is the first all digital consumer electronics A/V interface that supports
uncompressed standard. The HDMI terminal supports both video and audio information.
To the HDMI™ input terminal, you can connect an EIA/CEA-861/861*2compliant consumer electronic device, such
as a Set Top Box or DVD player with HDMI or DVI output terminal.
Compatible VIDEO Signal
- This input terminal is not intended for use with computers.
Compatible sampling freguency of AUDIO signal through HDMI (L.PCM) : 48kHz / 44.1kHz / 32 kHz
➥ Notes :
• This HDMI connector is Type A.
• If you connect an equipment without a digital output terminal, connect to the COMPONENT VIDEO, S VIDEO or
VIDEO input terminal on the TV so you can enjoy an analog signal.
• The DIGITAL IN terminal can only be used with 1080i, 720p or 576p picture signals. Set the Digital Set -Top -Box
DIGITAL OUT terminal Output setting to 1080i, 720p or 576p. For detailed information, refer to the Digital Set -Top
- Box instruction manual. If you cannot display the picture because your Digital Set -Top -Box does not have a
DIGITAL OUT terminal Output setting, use the component Video Input (or the S Video Input or Video Input). In this
case the picture will be displayed as an analog signal.
HDMI
HDMI Cable
Set Top Box
DVD Player
If the external device has DVI
output only, use a DVI to HDMI
adapter cable to connect to the
HDMI terminal.
50
50
50
50
1,920 x 1,080i
720 x 576p
640 x 576p
1280 x 720p
Model
1080i
576p
720p
Resolution Vertical frequency
24
Connections
ENGLISH
25
Connections
ENGLISH
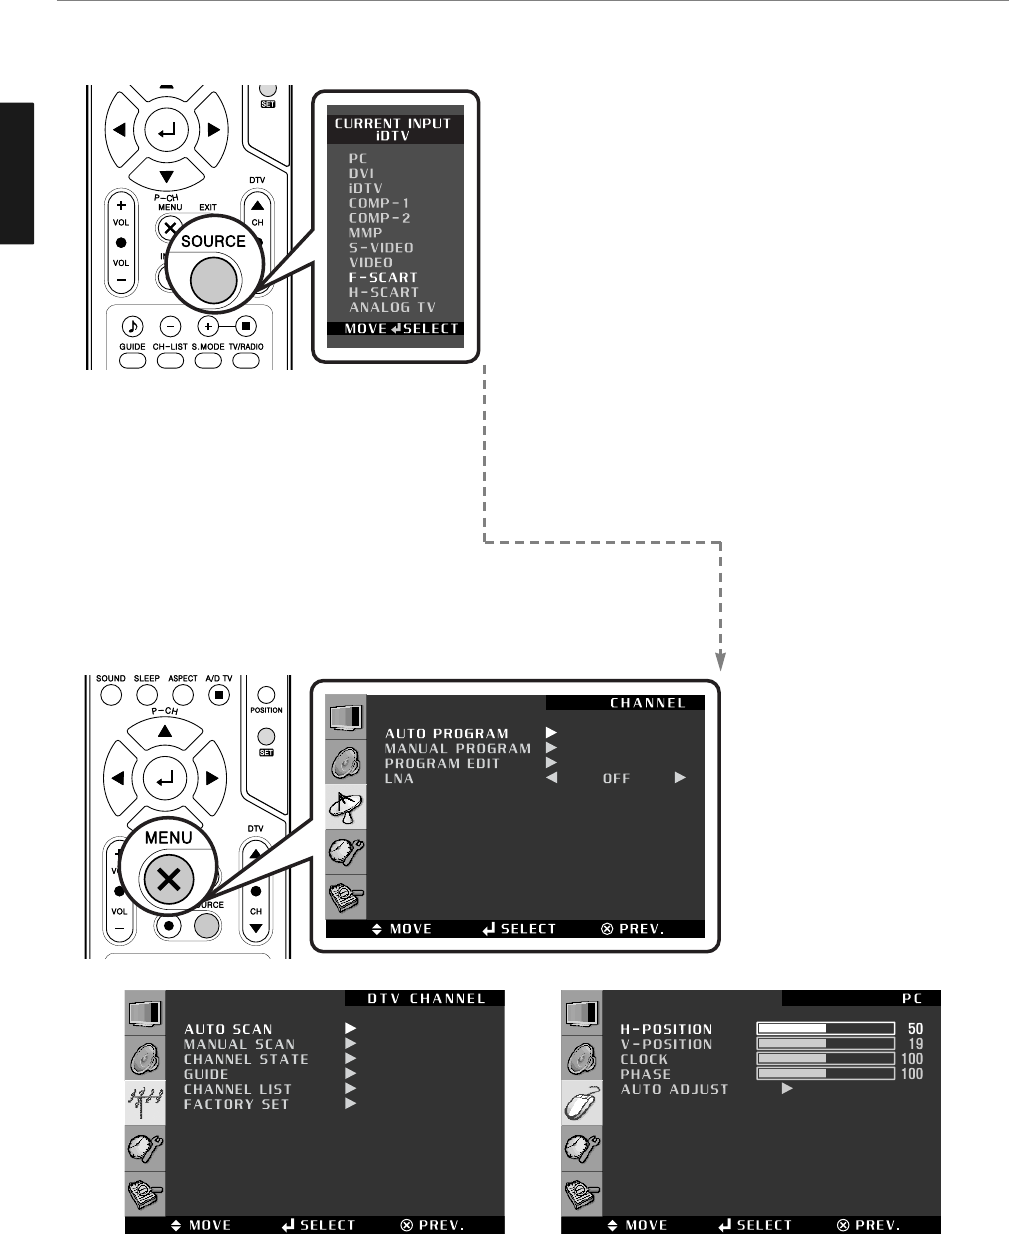
Different OSD Menu
You can confirm OSD menu of three different type.
How to Set the OSD Screen
PC : For supporting Personal Computer connection.
DVI* : Digital Visual Interface for using TMDS transmission
reduces the loss of signal.
➥ *Notes : “DVI” is changed to “HDMI” in HDMI
model.
HDMI* : High Definition Multi media Interface that supports
both video and audio information.
COMP-1 / COMP-2 : For supporting greater color accuracy than
composite video or S-VIDEO by splitting
chrominance into one video signal.
S-VIDEO : For supporting better resolution than composite video,
which carries the signals together.
VIDEO : For supporting the color shade(chrominance) and
brightness(luminance) information into one video signal.
F-SCART - For supporting composite video and RGB video
signals. SCART connectors is used with many
European video equipments.
H-SCART - Basically the same as Full SCART in function but not
supporting RGB Video signals.
ANALOG TV - Terrestrial broadcasting for supporting analog
PAL/SECAM system.
✓ The menu button “EXIT” or
“PREV.” may occur
depending on the model.
✓ In case of the source in
Analog TV, S-VIDEO, VIDEO,
F-SCART, H-SCART
✓ In case of the source in iDTV ✓ In case of the source in PC, DVI,
COMP-1, COMP-2

ENGLISH
26
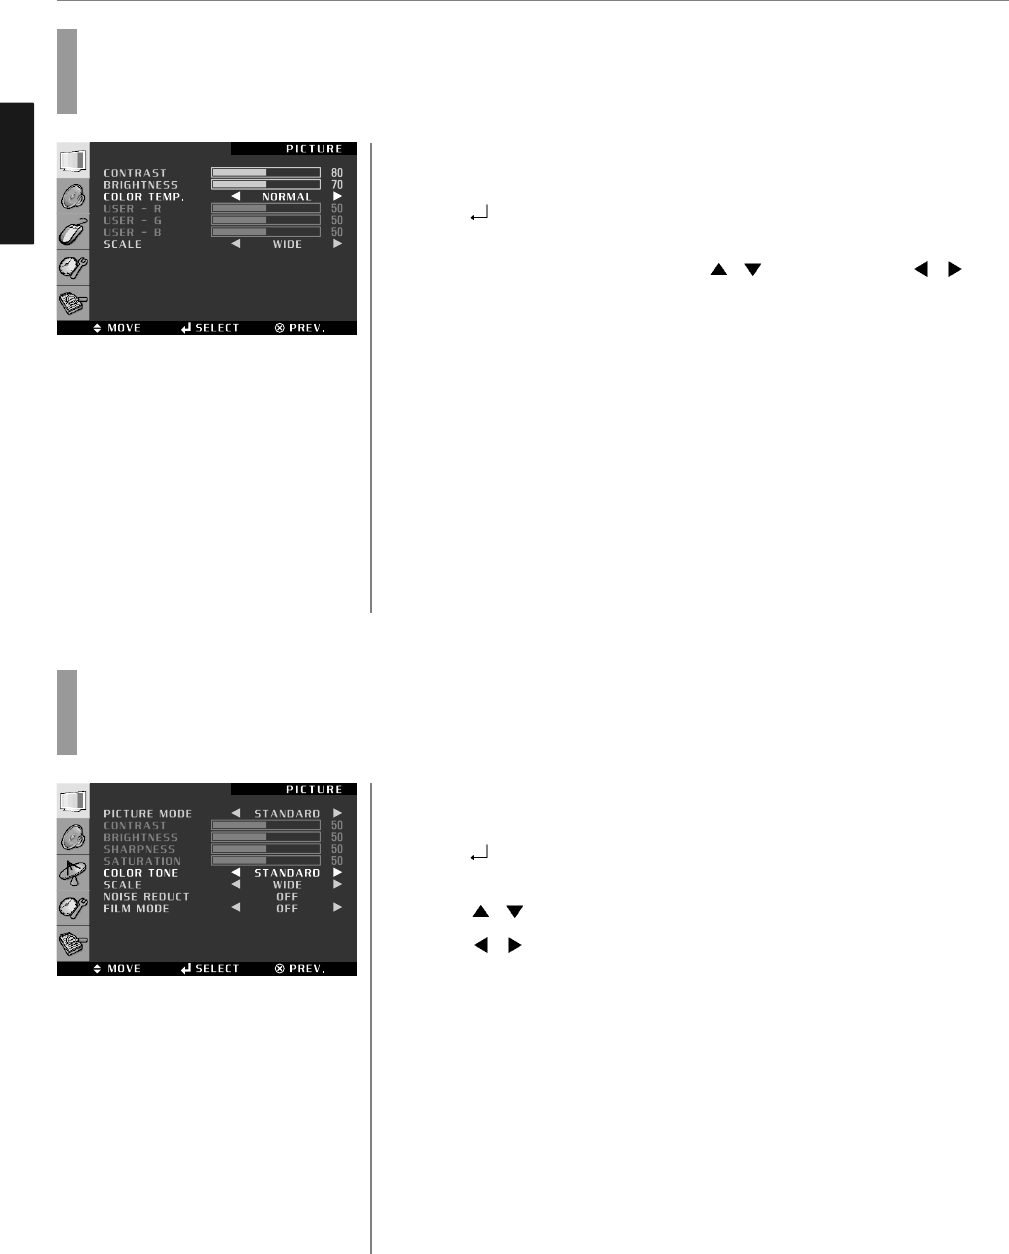
Picture Setup
Press MENU button.
Menu items appear on the screen.
Press button to select “Picture” Icon.
“PICTURE MODE” is highlighted.
Press / buttons, then the menu changes in the following order.
➛STANDARD ➛DYNAMIC ➛MOVIE ➛MILD ➛USER ➛
Press EXIT button to TV viewing or press MENU button to return to the previous
menu.
♦ STANDARD : Most video contents are appropriate to this mode.
♦ DYNAMIC : Clear display
♦ MOVIE : When watching a movie
♦ MILD : Soft display.
♦ USER : When the user wants to set the values directly.
✓ In the user’s mode, the users can adjust their desired contrast, brightness,
sharpness, hue, saturation.
How to Select the Picture Mode
Users can automatically adjust the picture mode according to the input mode.
How to Set the Desired Picture
Users can manually adjust their desired picture
Press MENU button.
Menu items appear on the screen.
Press button to select “Picture” Icon.
“PICTURE MODE” is highlighted.
Press / buttons to select USER .
Select required option by pressing the / button, then Press / button
to adjust.
Press EXIT button to TV viewing or press MENU button to return to the previous
menu.
♦ CONTRAST : Adjust the brightness and darkness of the object and backgrounds.
♦ BRIGHTNESS : Adjust the brightness of the entire picture.
♦ SHARPNESS : Adjust the clarity of object outlines.
♦ SATURATION : Adjust colors into deeper or lighter colors.
1
3
4
2
1
2
3
4
5
ENGLISH
Press MENU button.
Menu items appear on the screen.
Press button to select “Picture” Icon.
“CONTRAST” is highlighted.
Select required option by pressing the / buttons, then Press /
buttons to adjust.
After selecting COLOR TEMP, then the menu changes in the following order.
➛NORMAL ➛WARM ➛COOL ➛sRGB ➛USER ➛
Press EXIT button to TV viewing or press MENU button to return to the previous
menu.
♦ NORMAL : For a general Color Tone.
♦ WARM : For warm colors with reddish tone.
♦ COOL : For cool colors with bluish tone.
♦ USER : When the user wants to set the degree of RGB directly.
Press MENU button.
Menu items appear on the screen.
Press button to select “Picture” Icon.
“PICTURE MODE” is highlighted.
Press / buttons to move to “COLOR TONE”.
Press / buttons, then the menu changes in the following order.
➛STANDARD ➛WARM ➛COOL ➛
Press EXIT button to TV viewing or press MENU button to return to the previous
menu.
♦ STANDARD : For a general Color Tone.
♦ WARM : For warm colors with reddish tone.
♦ COOL : For cool colors with bluish tone.
How to Set the Desired Picture in PC, DVI/HDMI Input Modes
Users can adjust Color as users want.
How to Select a Color Temperature
Users can adjust Color as users want.
1
1
3
4
5
2
27
Picture Setup
3
4
2

ENGLISH
28
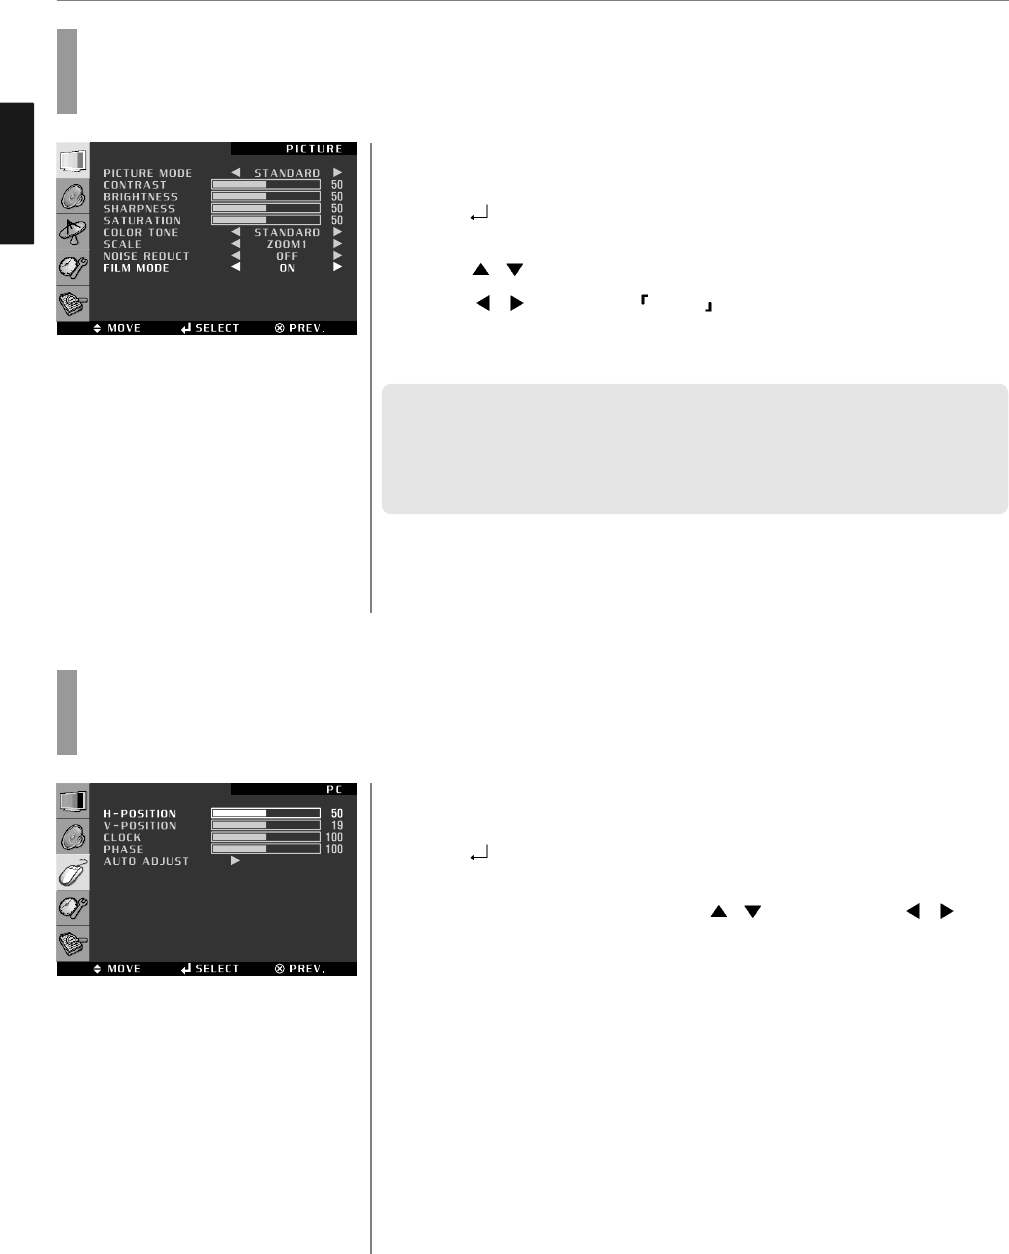
Picture Setup
How to Set the Display Scale
Users can adjust the display scale as they want
Press MENU button.
Menu items appear on the screen.
Press button to select “Picture” Icon.
“PICTURE MODE” is highlighted.
Press / buttons to move to “SCALE”.
Press / buttons, then the mode change in the following order.
➛WIDE ➛ZOOM1 ➛ZOOM2 ➛4:3 ➛14:9 ➛
Press EXIT button to TV viewing or press MENU button to return to the previous
menu.
♦ WIDE - General broadcast picture is adjusted to 16:9.
♦ ZOOM 1 - Picture enlarged to 16:9 format, letter box format.
♦ ZOOM 2 - Zoom in 16:9 in vertical direction
♦ 4:3 - 4:3 general picture size
♦ 14:9 - 14:9 picture size
1
3
4
5
2
Press MENU button.
Menu items appear on the screen.
Press button to select “Picture” Icon.
“PICTURE MODE” is highlighted.
Press / buttons to move to “NOISE REDUCT”.
Press / buttons to set ON/OFF .
Press EXIT button to TV viewing or press MENU button to return to the previous
menu.
1
2
How to Set Noise Reduction
User can eliminate noises on the screen in Video mode
3
4
5
ENGLISH
29
Picture Setup
How to Set Image Adjust in PC Mode
Press MENU button.
Menu items appear on the screen.
Press button to select “PC” Icon.
“H-POSITION” is highlighted.
Select required option by pressing the / button, then Press / button
to adjust.
Press EXIT button to TV viewing or press MENU button to return to the previous
menu.
♦ H-POSITION : To adjust the horizontal position of the picture.
♦ V-POSITION : To adjust the vertical position of the picture.
♦ CLOCK : To adjust the horizontal size of the entire screen image.
♦ PHASE : To eliminate the shake of the picture.
♦ Auto ADJUST : Horizontal/vertical positions are automatically adjusted.
➥ How To Directly Select Auto Track : Press PC-AUTO button.
1
3
4
2
How to Set Film Mode
Set Film Mode to receive a crisp, clear picture without flickering.
Press MENU button.
Menu items appear on the screen.
Press button to select “Picture” Icon.
“PICTURE MODE” is highlighted.
Press / buttons to move to “FILM MODE”.
Press / buttons to set ON/OFF .
Press EXIT button to TV viewing or press MENU button to return to the previous
menu.
✓ During the reproduction of a DVD or VCR it can come to a distortion of the picture
edges. Usually it happens due to a low quality film edition. In case you experience
this, please switch in the menu the function "film mode" to "ON".
✓ You may experience tearing effects on the flowing texts during general
broadcasting. If you come across this symptom, select ‘OFF’ in the Film Mode.
1
3
4
5
2
ENGLISH
30
Sound Setup
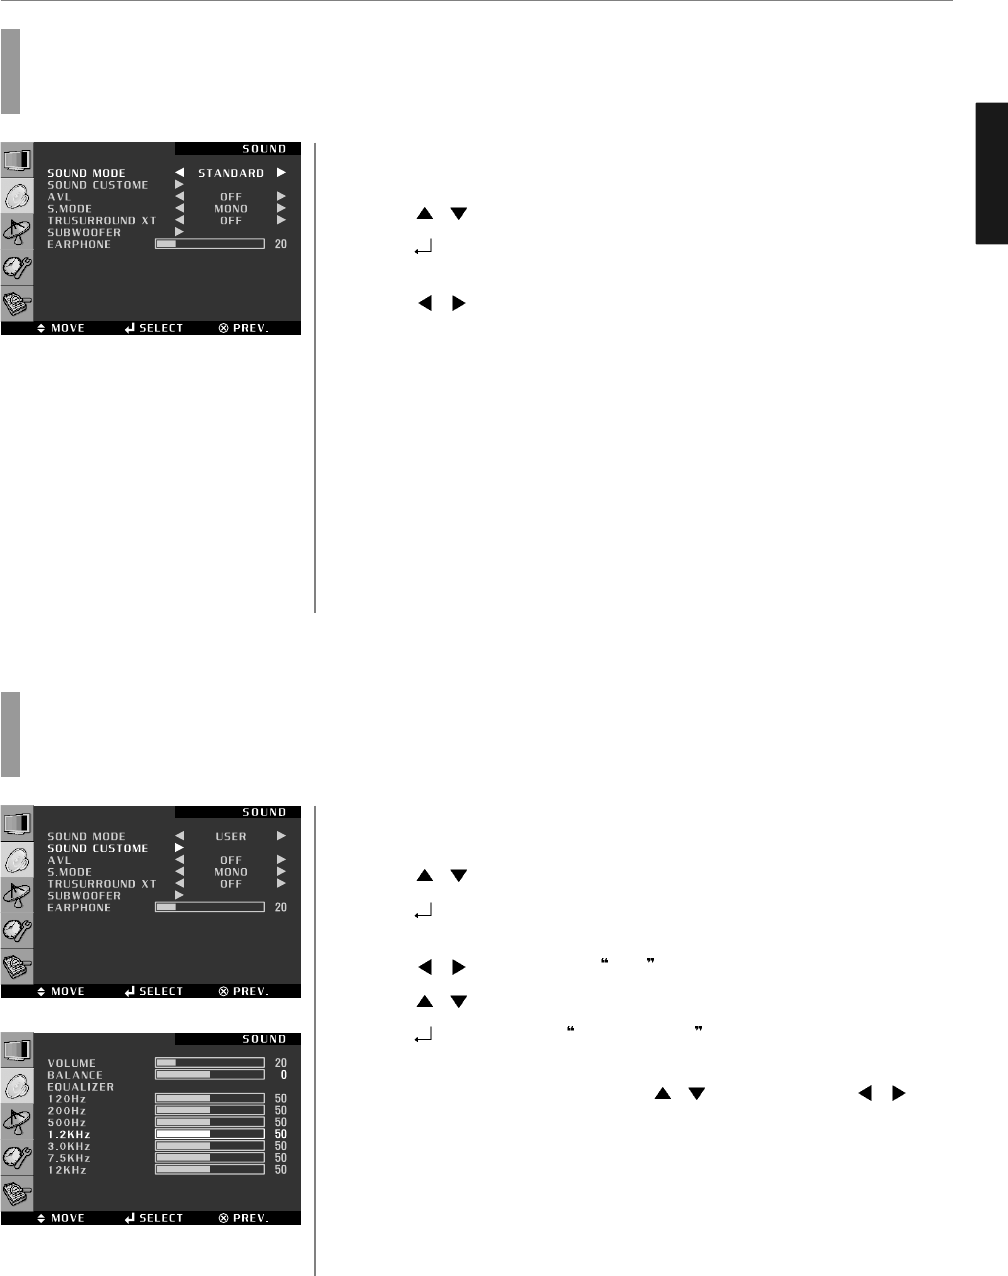
How to Adjust the Desired Audio Mode
Users can adjust sound mode automatically as they want.
Press MENU button.
Menu items appear on the screen.
Press / buttons to move to “SOUND” icon.
Press button to select “SOUND” icon.
“SOUND MODE” is highlighted.
Press / buttons to select USER .
Press / buttons to move to “SOUND CUSTOM”.
Press buttons to select SOUND CUSTOM .
SOUND CUSTOME menu appears.
Select required option by pressing the / buttons, then Press /
buttons to adjust.
Press EXIT button to TV viewing or press MENU button to return to the previous
menu
♦ VOLUME : Adjusts the volume.
♦ BALANCE : Adjusts the balance of left and right speakers.
♦ EQUALIZER : Adjusts the audio ouput signal in the desired band.
3
4
2
1
5
6
7
8
Press MENU button.
Menu items appear on the screen.
Press / buttons to move to “SOUND” icon.
Press button to select “SOUND” Icon.
“SOUND MODE” is highlighted.
Press / buttons, then the menu changes in the following order.
➛STANDARD ➛MUSIC ➛MOVIE ➛NEWS ➛USER ➛
Press EXIT button to TV viewing or press MENU button to return to the previous
menu.
♦ STANDARD : For the general sound. Most audio contents are approviate to this
mode.
♦ MUSIC : For enjoying original sound.
♦ MOVIE : Grandiose sound.
♦ NEWS : Clear sound.
♦ USER : When the user wants to set the values directly.
➥ How To Directly Select Picture Mode : Press SOUND button.
Users can select STANDARD ➛MUSIC ➛MOVIE ➛NEWS ➛USER in order.
How to Select the Audio Mode
Users can adjust sound mode automatically as they want.
1
3
4
5
2
ENGLISH
Press MENU button.
Menu items appear on the screen.
Press button to select “SOUND” Icon.
“SOUND MODE” is highlighted.
Press / buttons to move to “S.MODE”.
Press / buttons to set to MONO/STEREO .
Press EXIT button to TV viewing or press MENU button to return to the previous
menu.
➥ How To Directly Select S. MODE : Press S. MODE button.
To select “MONO” or “STEREO”.
♦Choose “STEREO” for channels that are broadcasting in STEREO.
♦Choose “MONO” for channels that are broadcasting in MONO, or if you are
having difficultly receiving a STEREO signal.
✓ If the signal reception conditions deteriorate, setting to Mono will make sound
conditions better.
1
2
31
Sound Setup
How to Select S. Mode
Depending on the particular program being broadcast, you can select stereo or mono.
3
4
5
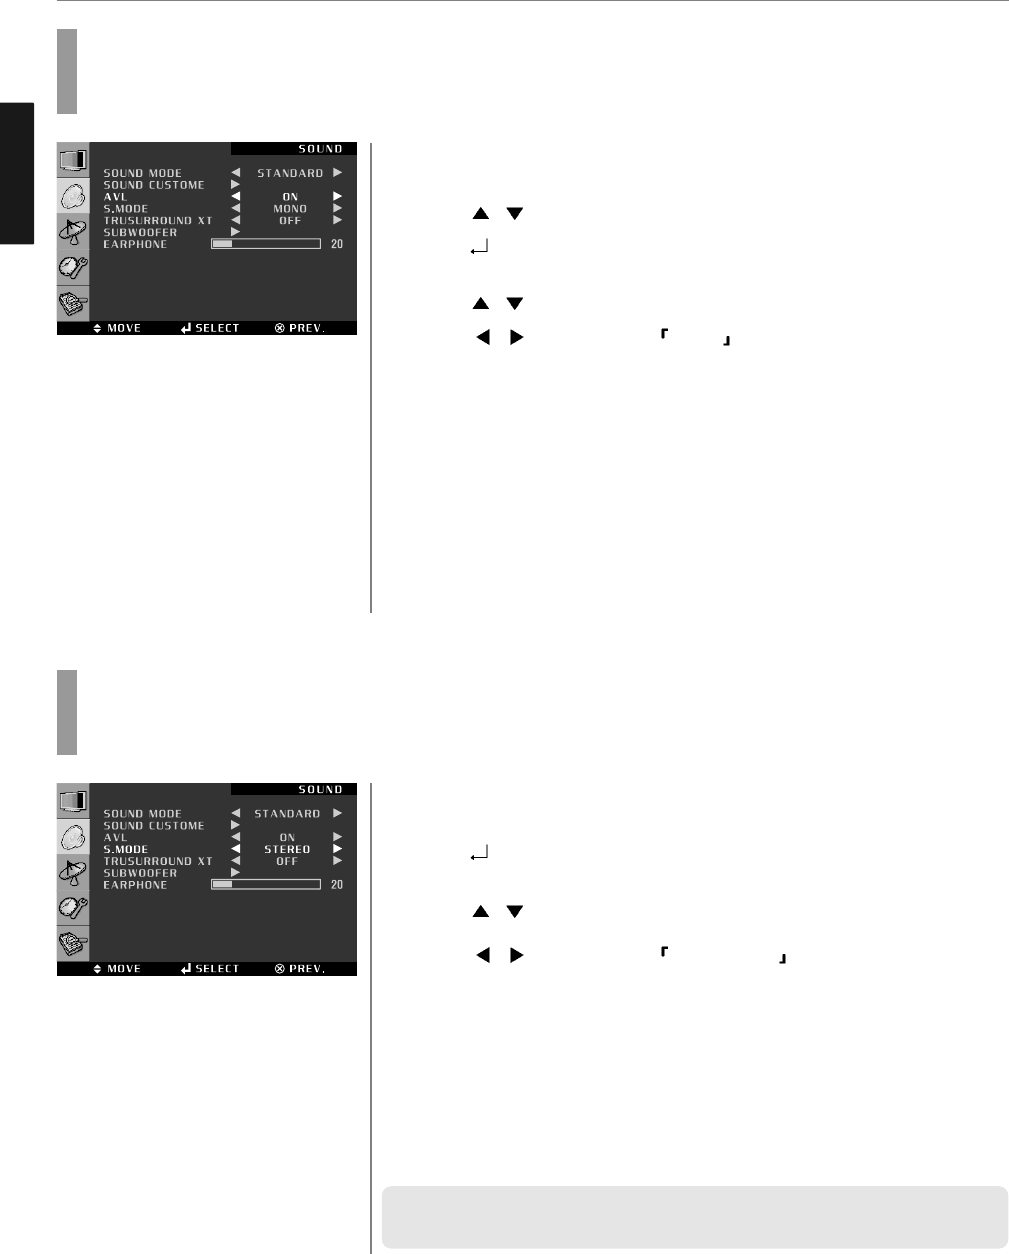
How to Select AVL
This function will automatically give a similar volume size to each channel.
Press MENU button.
Menu items appear on the screen.
Press / buttons to move to “SOUND” icon.
Press button to select “SOUND” icon.
“SOUND MODE” is highlighted.
Press / buttons to move to “AVL”.
Press / buttons to set to ON/OFF .
Press EXIT button to TV viewing or press MENU button to return to the previous
menu
1
3
4
5
6
2
ENGLISH
32
Sound Setup
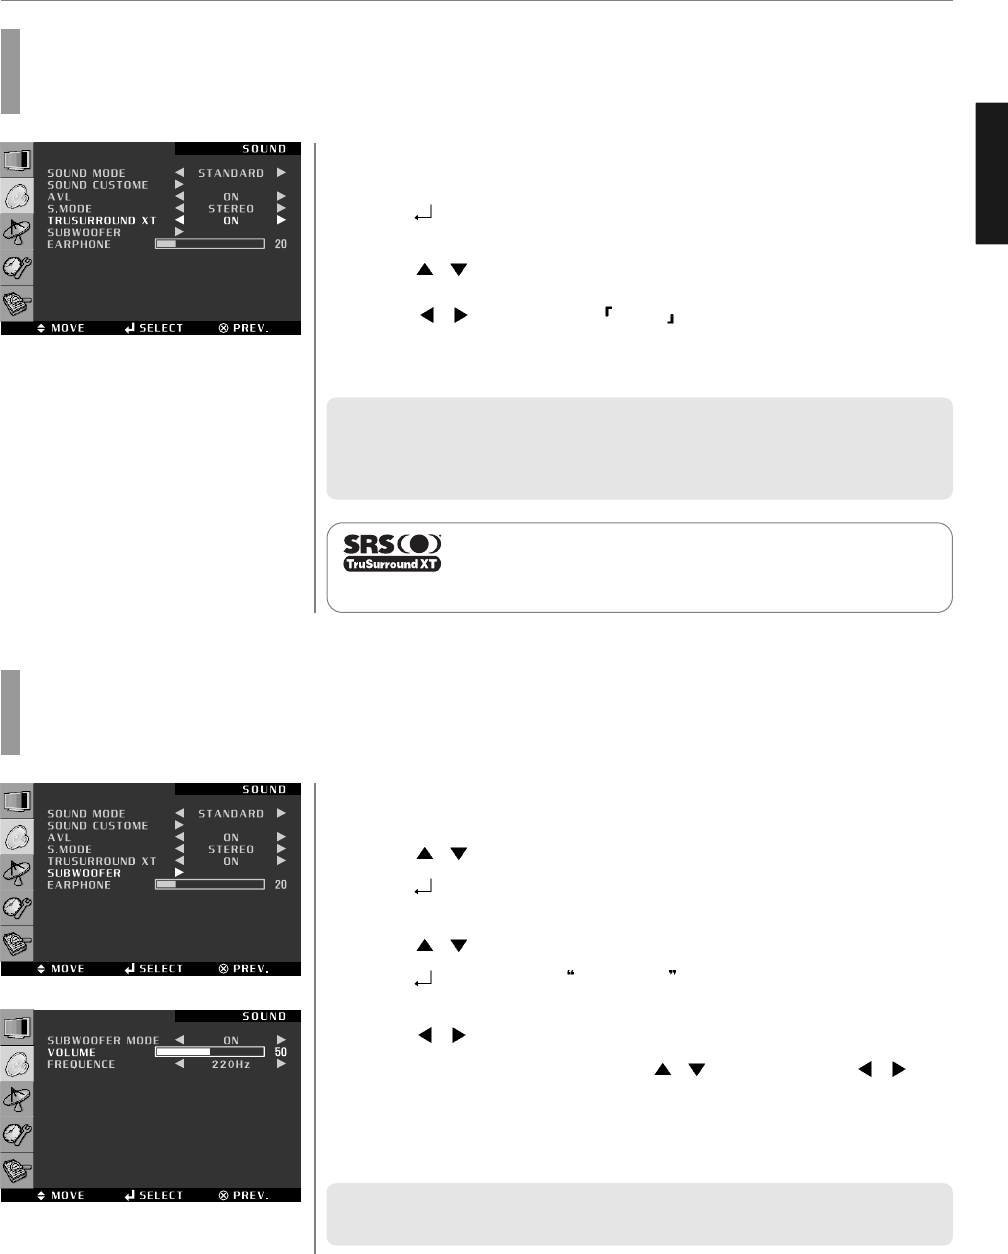
How to Set the Output of Subwoofer
You can set this function when you wish to install your subwoofer speaker system.
Press MENU button.
Menu items appear on the screen.
Press / buttons to move to “SOUND” icon.
Press button to select “SOUND” icon.
“SOUND MODE” is highlighted.
Press / buttons to move to “SUBWOOFER”.
Press buttons to select SUBWOOFER .
SUBWOOFER menu appears.
Press / button to set to “ON”.
Select required option by pressing the / buttons, then Press /
buttons to adjust.
Press EXIT button to TV viewing or press MENU button to return to the previous
menu
✓ The frequencies in the entry are the subwoofer’s frequency range.
✓ Make sure to use a subwoofer speaker system with built-in amplifier.
1
3
4
5
6
7
8
2
How to Select TruSurround XT
This function processes multi-channel surround sound through two speakers.
Press MENU button.
Menu items appear on the screen.
Press button to select “SOUND” Icon.
“SOUND MODE” is highlighted.
Press / buttons to move to “TRUSURROUND XT”.
Press / buttons to set to ON/OFF .
Press EXIT button to TV viewing or press MENU button to return to the previous
menu.
✓ If you want to connect a device with only one RCA audio output terminal (white-
colored), connect it to the white audio input terminal (also white-colored!) and turn
TruSurround XT “ON”. If not, you will hear just one speaker.
✓ You can’t adjust sound mode, AVL and S.mode after selecting TruSurround XT.
1
3
4
5
2
is a trademark of SRS Labs, Inc.
TruSurround XT technology is incorporated under license from SRS Labs, Inc.
ENGLISH
33
Sound Setup
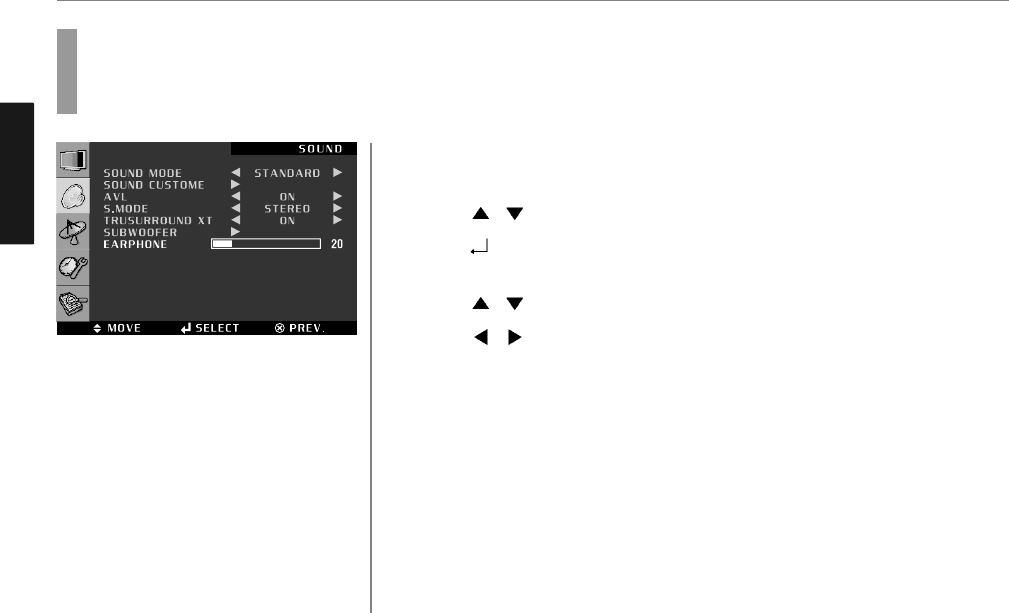
How to Select Earphone
User can adjust earphone volume.
Press MENU button.
Menu items appear on the screen.
Press / buttons to move to “SOUND” icon.
Press button to select “SOUND” icon.
“SOUND MODE” is highlighted.
Press / buttons to move to “EARPHONE”.
Press / buttons to adjust volume.
Press EXIT button to TV viewing or press MENU button to return to the previous
menu
✓ Check the audio cable when the sound outputs in just one speaker only.
1
3
4
5
6
2
ENGLISH
34
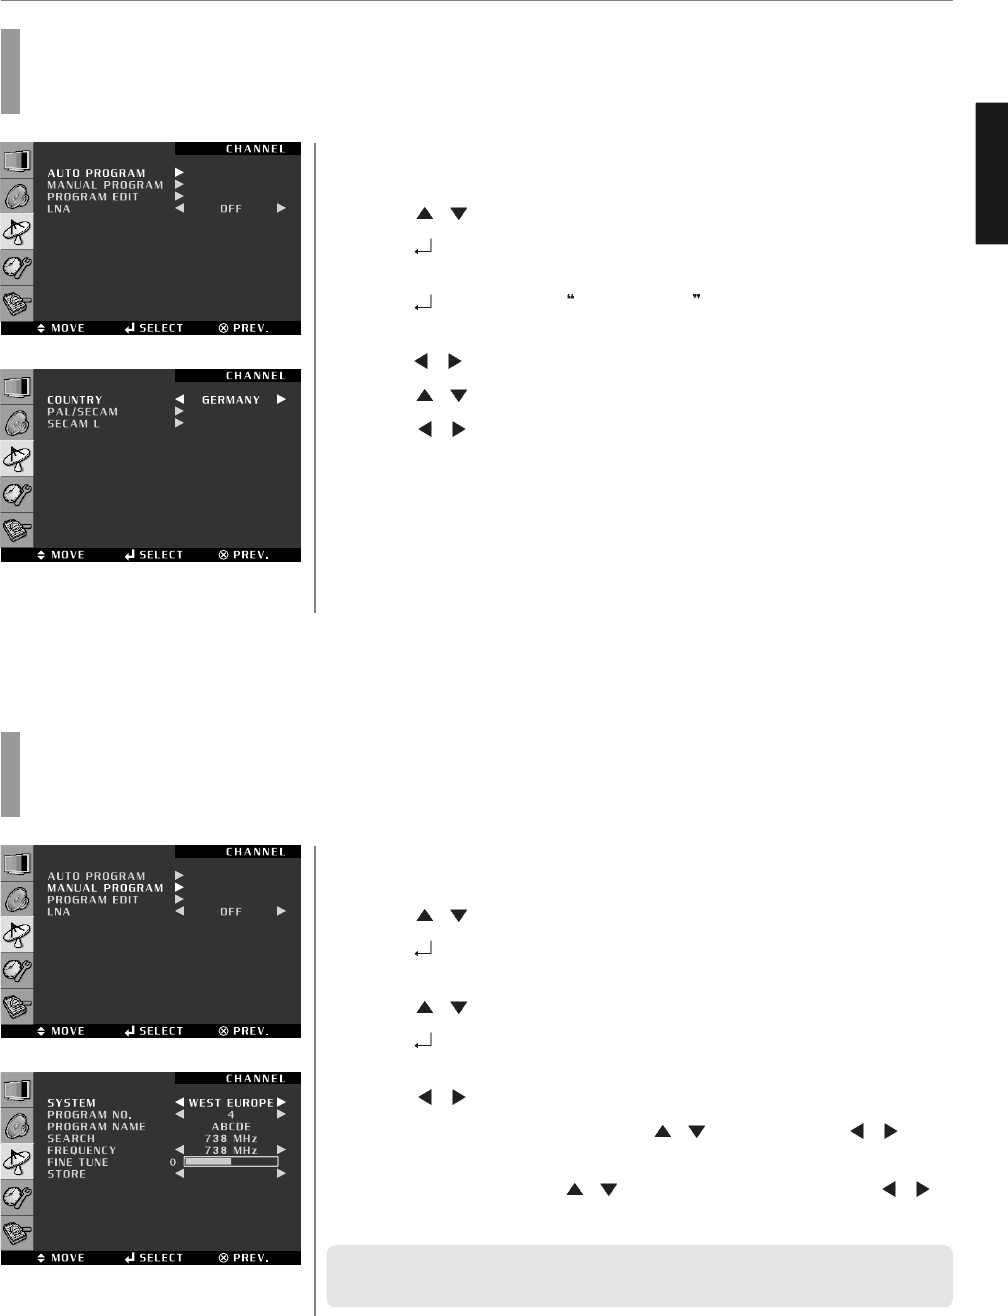
Channel Setup
Press MENU button.
Menu items appear on the screen.
Press / Buttons to move to “CHANNEL” icon.
Press button to select “CHANNEL” Icon.
“AUTO PROGRAM” is highlighted.
Press / Buttons to move to “MANUAL PROGRAM”.
Press button to select “MANUAL PROGRAM”.
Manual program menu appears, then “SYSTEM” is highlighted.
Press / buttons to select your country.
Select required option by pressing the / button, then Press / button
to set or adjust.
To store the setting, press / buttons, move to STORE and press /
buttons to store and finish.
✓ In order to display the channel name in the MANUAL PROGRAM, you have to set
“COUNTRY” sub menu in AUTO PROGRAM previously.
Press MENU button.
Menu items appear on the screen.
Press / Buttons to move to “CHANNEL” icon.
Press button to select “CHANNEL” Icon.
“AUTO PROGRAM” is highlighted.
Press buttons to select AUTO PROGRAM .
Auto program menu appears, then “COUNTRY” is highlighted.
Press / buttons to select your country.
Press / Buttons to move to “PAL/SECAM” or “SECAM L”.
Press / Buttons to select “PAL/SECAM” or “SECAM L”, then store the
selected channels.
Press EXIT button to TV viewing or press MENU button to return to the previous
menu.
♦ PAL/SECAM : Phase Alternation by Line system.
♦ SECAM L : System Electronique Avec Memoire.
Automatic Program Searching
Automatic program searching enables to search/store channels of countries where the user is located automatically.
Manual Program Searching
Manual Program searching enables to searching channels which the user want manually.
1
3
4
5
6
7
8
2
1
2
3
4
5
6
7
8
ENGLISH
Press MENU button.
Menu items appear on the screen.
Press / Buttons to move to “CHANNEL” icon.
Press button to select “CHANNEL” Icon.
“AUTO PROGRAM” is highlighted.
Press / Buttons to move to PROGRAM EDIT”.
Press button to select “PROGRAM EDIT”.
The program table appears on the screen. One program table contains
five programes.
Press / Buttons to move the program list, and press / buttons to
move the menu list.
Assigning Names to Channel
a. Place the cursor on NAME blank and press the Yellow button.
Select a letter (A~Z), a number (0~9) or blank space. If you need to erase,
press button, which is the same feature as back space.
b. To store the setting, press the Yellow button once again.
Sorting the Stored Channels
a. Place the cursor on TO, press / the buttons to choose the swapping PR
number.
b. Place the cursor on SORT, press the Green button. An “OK” message will
appear and sort the stored channels.
Skipping Unwanted Channels
Place the cursor on DEL, press the RED button and delete the selected channel.
An “OK” message will appear and delete the selected channels.
How to Set the Program Edit
Program edit enables users to edit the searched programs.
1
35
Channel Setup
3
4
5
6
☞
☞
☞
2
ENGLISH
36
Channel Setup
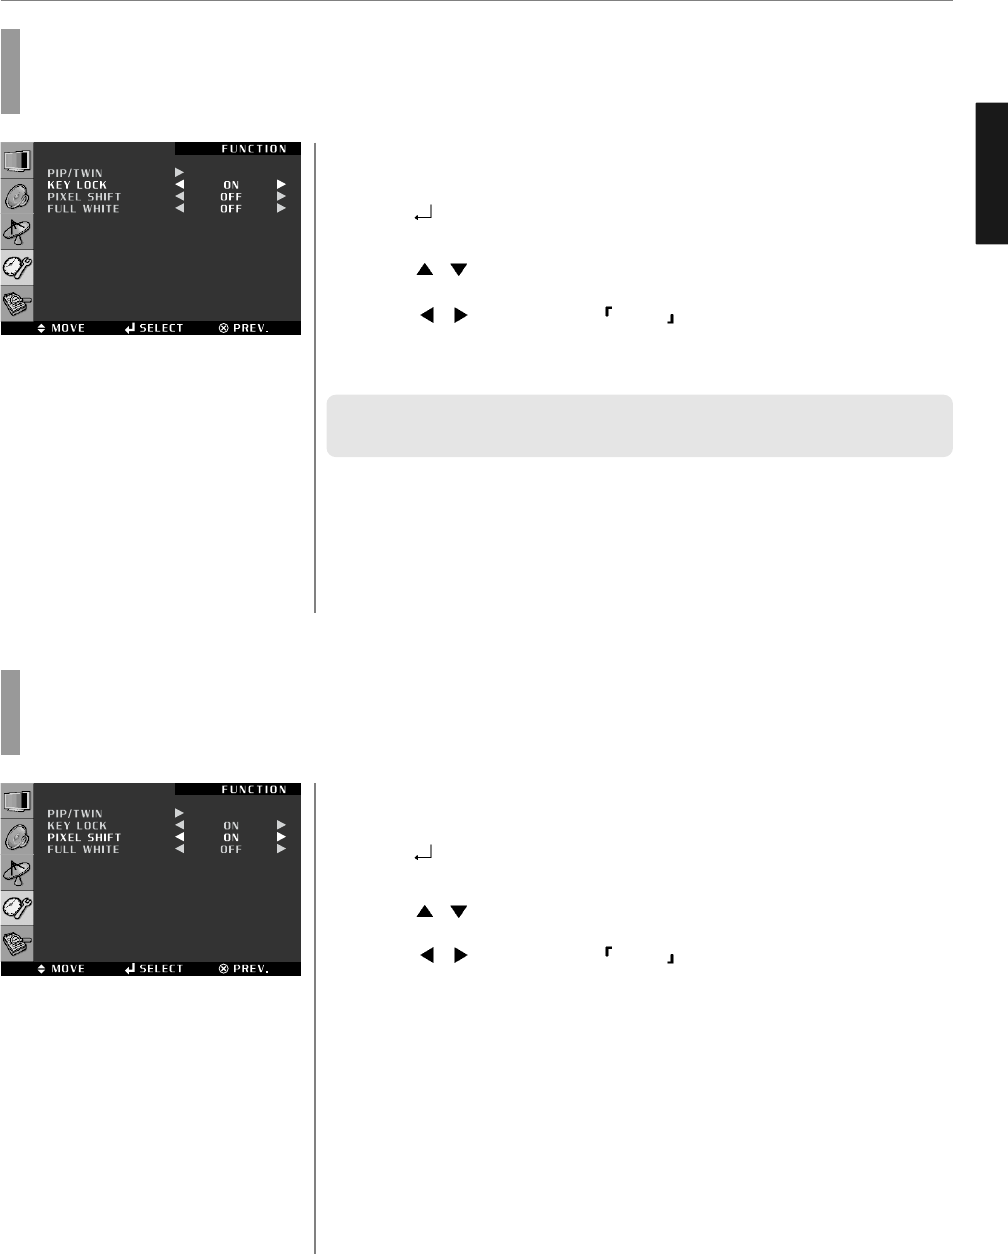
How to Set PIP/TWIN
This is to set PIP(Picture In Picture) or Twin Picture mode.
You can watch two programs or source at the same time.
Press Menu button.
Menu items appear on the screen.
Press Up and Down buttons to move to “Function” icon.
Press button to select “Function”.
“PIP/TWIN” is highlighted.
Press button to select “PIP/TWIN”.
New Menu items appears, then “MODE” is highlighted.
Press button, then the menu changes in the following order.
➛PIP ➛TWIN ➛OFF ➛
➥ How to Directly Turn PIP FUNCTION ON/OFF : Press PIP button.
♦ TWIN : To watch two screens in half and half.
♦ PIP : To watch the Sub screen in the main screen at once.
After setting this, go to step 6 to set the SOURCE.
1
3
4
5
2
Press MENU button.
Menu items appear on the screen.
Press button to select “CHANNEL” Icon.
“AUTO PROGRAM” is highlighted.
Press / buttons to move to “LNA”.
Press / buttons to set to ON/OFF .
Press EXIT button to TV viewing or press MENU button to return to the previous
menu.
✓ This function is not supported in HDMI model.
✓ “Swap” function is not supported in
PDP TV OSD menu.
✓ “Twin” function is not supported in
HDMI model.
1
2
Using the LNA(Low-Noise-Amplifier) Feature
If the reception is clear, users don’t have to use this feature.
If the signal is weak or distorted, try the followings.
3
4
5
<PIP> <TWIN >
ENGLISH
37
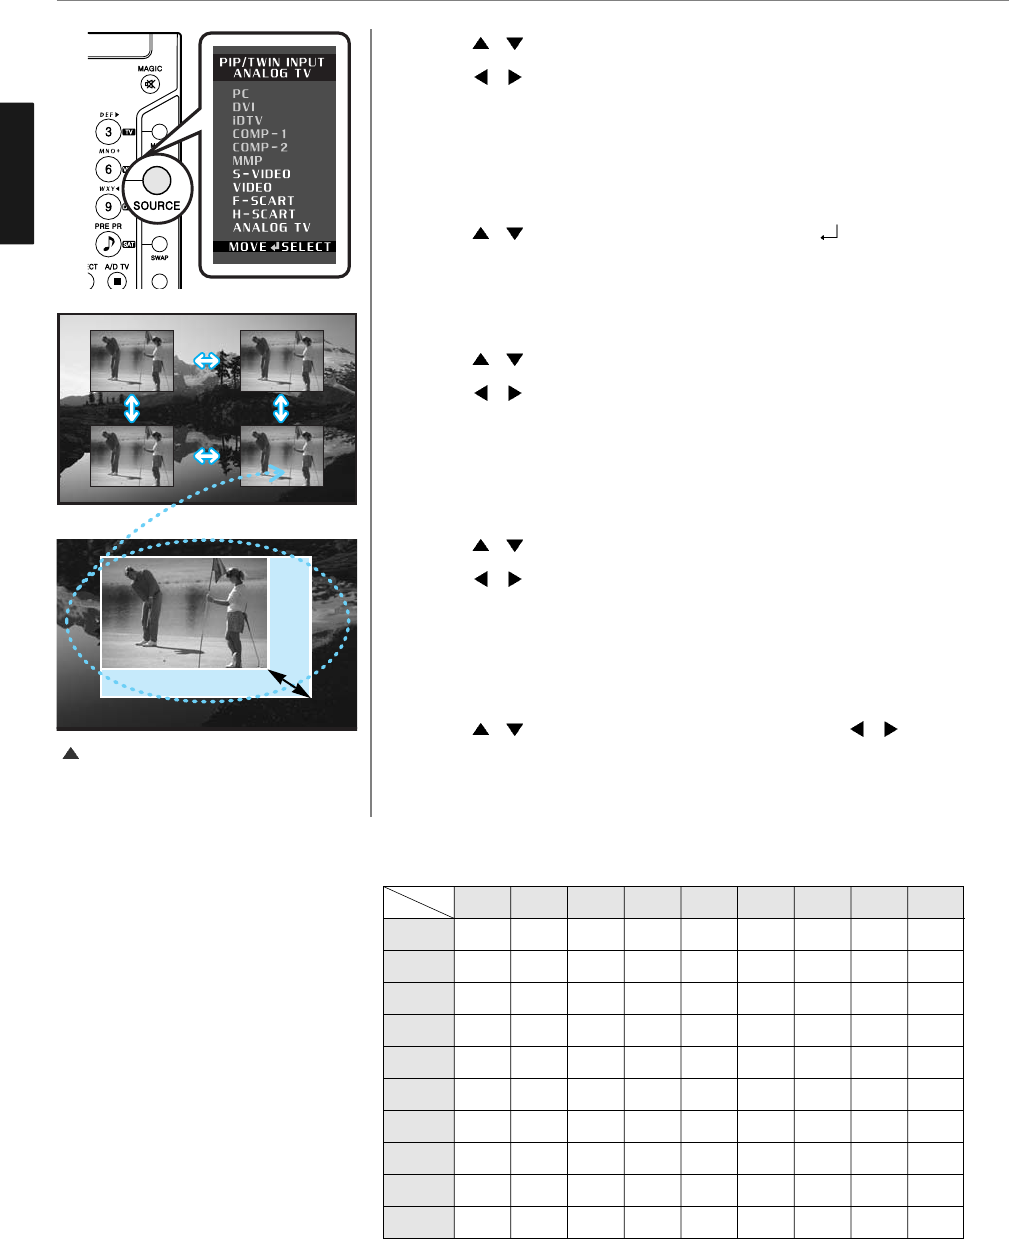
Function Setup
Press / buttons to move to “SOURCE”.
Press / button, then source changes.
➟see the refer supported PIP table.
➥ How To Directly Change Sub Source : Press SOURCE button.
In case of PIP mode, go to step 8
if you need to set the “SWAP” of Main and sub pictures.
Press / buttons to move to “SWAP”, then Press buttons.
➥ How To Directly Set the SWAP : Press SWAP button.
In case of PIP mode, go to step 9
if you need to set the “SIZE” of Sub picture.
Press / buttons to move to “Size”
Press / button, then mode will changes in order below.
➛SMALL ➛MEDIUM ➛LARGE ➛
➥ How To Directly Adjust PIP SIZE : Press SIZE button.
In case of PIP mode, go to step 11
if you need to set the “POSITION” of Sub picture.
Press / buttons to move to “Positon”.
Press / button, then the mode will changes the following order.
➛LEFT TOP ➛RIGHT TOP ➛RIGHT BOTTOM ➛LEFT BOTTOM ➛
➥ How To Directly Set the POSITION : Press POSITION button.
In case the Input source in Sub picture is TV,
go to step 13 when you wish to change the channels of Sub picture.
Press / buttons to move to “CHANNEL”, then press / buttons to
select channel number.
Press EXIT button to TV viewing or press MENU button to return to the previous
menu.
6
8
9
7
10
11
12
13
14
Adjust the size in PIP
PC
DVI/HDMI
COMP-1
COMP-2
S-Video
Video
FSCRT
HSCRT
Analog TV
Memory
PC
X
X
X
X
O
O
O
O
O
X
DVI/HDMI
X
X
X
X
O
O
O
O
O
X
COMP-1
X
X
X
X
O
O
O
O
O
X
COMP-2
X
X
X
X
O
O
O
O
O
X
S-Video
O
O
O
O
X
O
O
O
O
X
Video
O
O
O
O
O
X
O
O
O
X
FSCRT
O
O
O
O
O
O
X
O
O
X
HSCRT
O
O
O
O
O
O
O
X
O
X
Analog TV
O
O
O
O
O
O
O
O
X
X
Main Sub
Supported PIP Table
PIP : O→Supported, X →Not Supported
ENGLISH
38
Function Setup
Press MENU button.
Menu items appear on the screen.
Press button to select “Function” Icon.
“PIP/TWIN” is highlighted.
Press / buttons to move to “KEY LOCK”.
Press / buttons to set to ON/OFF .
Press EXIT button to TV viewing or press MENU button to return to the previous
menu.
✓ If you want to deselct “Key-Lock” without the remote controller, press the front
keys in the following order. ♦ SOURCE ➛MENU ➛LEFT ➛RIGHT
1
2
How to Set Key-Lock
User can lock the control buttons on the front bottom of the TV.
3
4
5
Using the Pixel Shift / Full White (Only for the PDP model)
This feature is designed to reduce image sticking effects during displaying a static picture.
(Brightness degradation is caused by the scale effects of a panel, which is characteristic of a TV.)
Press MENU button.
Menu items appear on the screen.
Press button to select “Function” Icon.
“PIP/TWIN” is highlighted.
Press / buttons to move to “PIXEL SHIFT or FULL WHITE”.
Press / buttons to set to ON/OFF .
Press EXIT button to TV viewing or press MENU button to return to the previous
menu.
3
4
5
1
2
ENGLISH
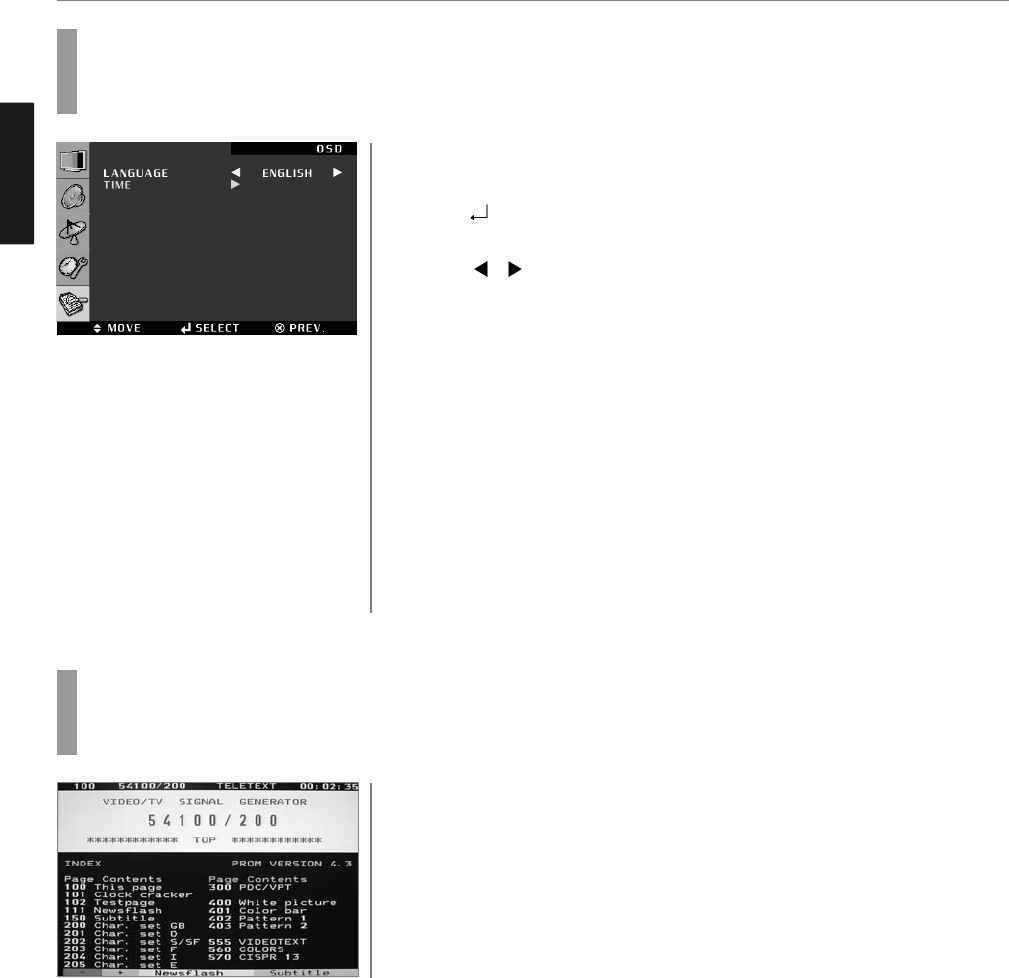
Choosing the Your Languages
Using the TV for the first time, users must select thier prefered language preference in order to
display main menus and sub menus, etc.
Press MENU button.
Menu items appear on the screen.
Press button to select “OSD” Icon.
“LANGUAGE” is highlighted.
Press / buttons, then the menu changes in the following order.
➛ENGLISH ➛DEUTSCH ➛FRANÇAIS ➛NEDERLAND ➛ITALIANO ➛
ESPAÑOL ➛SUOMI ➛
Press EXIT button to TV viewing or press MENU button to return to the previous
menu.
39
Function Setup
1
3
4
2
How to Set Teletext in ATV
You can use Teletext service in analog TV mode.
If it is included in you receiving channels.
Press “TTX/MIX” button and wait.
If the “*” sign pops up left upside of the screen as the following picture, wait
until the teletext service menu is displayed “*” means it provides teletext
service. So wait a moment.
Select your interesting item with numeric keys.
1
2
ENGLISH
40
Function Setup
• FLOF INDEX (Full Level One Facilities)
• TOP INFO. (Table of Page)
• To Store Page
• Return to List or FLOF mode
Selecting Teletext Display Options in ATV Mode
When users have displayed a teletext page, they can have various options to suit their requirements.
DISPLAY(ACTION)
• Hidden Text (Answers to Quiz Games, for Example)
• The Normal Screen
• A Second Page
• Normal screen
• Double-Size Letters in the :
- Upper half of the screen
- Lower half of the screen
• Normal Screen :
Stops the automatic page change which will occur if teletext page
consists of 2 or more sub pages.
The stop symbol is displayed at the top left-hand corner of the screen.
BUTTON
REVEAL
REVEAL AGAIN
SUB PAGE
SUB PAGE AGAIN
SIZE
- ONCE
- TWICE
- THREE TIMES
HOLD
HOLD AGAIN
INDEX
STORE
LIST/FLOF
41
Function Setup
ENGLISH
How to Set Clock, Sleep Time, ON/OFF Time
Press Menu button.
Menu items appear on the screen.
Press button to select “OSD” Icon.
“LANGUAGE” is highlighted.
Press / buttons to move to “TIME”.
Press buttons to select “TIME”.
Time menu appears, then “MANUAL CLOCK” is highlighted.
Press / buttons to move between Hour, Minute and AM/PM and Press
/ buttons to set Hour, Minute and AM/PM.
✓ When the power supply(AC main power) is cut off, the clock is reset to the value
before the Time set.
Go to step 6 if you need to set the “SLEEP TIME”.
Press / buttons to move to “SLEEP TIME”.
Press / buttons, then the menu changes in the following order.
➛30 ➛60 ➛90 ➛120 ➛240 ➛
➥ How To Directly Start Sleep : Press SLEEP button.
✓ One minute before the preset Sleep Time, “TURN OFF AFTER 1 MIN” message
will appear.
Go to step 8 if you need to set the “ON/OFF TIME”.
Press / buttons to move to “ON/OFF TIME”.
Press buttons to select “ON/OFF TIME”.
On/Off time menu appears, then “PROGRAM” is highlighted.
Press / buttons to select program number.
Press / buttons to move to “ON TIME or OFF TIME”.
Press / buttons to move between Hour, Minute and AM/PM and Press
/ buttons to set Hour, Minute and AM/PM.
Press / buttons to move to “VOLUME”.
Press / buttons to adjust volume.
1
3
4
5
6
7
2
8
9
10
11
12
13
14

ENGLISH
42
DTV Channel Setup
Press MENU button.
Menu items appear on the screen.
Press / Buttons to move to “DTV CHANNEL” icon.
Press button to select “DTV CHANNEL” Icon.
“AUTO SCAN” is highlighted.
Press / Buttons to move to “MANUAL SCAN”.
Press buttons to select MANUAL SCAN”
MANUAL Scan menu appears.
Press / buttons to move to “Channel”.
Press / buttons to select a channel or press button and choose them
directly with using the numeric keys.
Press / buttons to move to “Tx Mode”.
Press / buttons, then mode changes in order below.
➛Auto ➛8K➛2K ➛
Press / buttons to move to “Bandwidth”.
Press MENU button.
Menu items appear on the screen.
Press / Buttons to move to “DTV CHANNEL” icon.
Press button to select “DTV CHANNEL” Icon.
“AUTO SCAN” is highlighted.
Press buttons to select AUTO SCAN”
Automatic Scan menu appears, then auto scan activates.
While searching, you can see the following menu on the screen.
When scanning is finished, you can see the following information on the
screen. After the scanning process, the first program of the last scanned
channel will be displayed on the back screen
Press EXIT button to TV viewing or press MENU button to return to the previous
menu.
✓ Now you have completed all steps needed for watching programs. If you could
not see the program after finishing these procedures, please contact your engineer
or representative.
✓ If you press the MENU or EXIT button in the middle of AUTO SCAN, the first stored
channel will be displayed, and the AUTO SCAN stops.
How to Search Automatically
This function can be used to get the latest program data while the receiver is still in use.
Through this function, the receiver searches for all the available program and saves them in the memory.
How to Search Manually
You can edit parameters of certain channels and scan them.
1
3
4
5
2
1
2
3
4
5
6
7
8
9
10

ENGLISH
43
DTV Channel Setup
Press / buttons to select “Bandwidth”, and set the proper value for the
selected Channel.
Press Up and Down buttons to move to “Scan”.
Press buttons to store all the entered channel data. Then you can get the
following menu showing the scanning process.
After scanning process, the first channel of scanned channel will be displayed.
Press EXIT button to TV viewing or press MENU button to return to the previous
menu.
✓ If the scan fails, please check whether your entered values are correct or not
and the signal reception sensitivity is good or bad.
11
12
13
14
Press MENU button.
Menu items appear on the screen.
Press / Buttons to move to “DTV CHANNEL” icon.
Press button to select “DTV CHANNEL” Icon.
“AUTO SCAN” is highlighted.
Press / Buttons to move to “CHANNEL STATE” icon.
Press buttons to select CHANNEL STATE”
Tuner State menu appears.
Press / buttons to select the channel you want.
Press EXIT button to TV viewing or press MENU button to return to the previous
menu.
♦ Level : Indicating selected network signal strength level.
♦ Quality : Indicating signal to noise ratio.
✓ When the channel is selected, you can check the reception status of the signal.
If the reception signal status is bad, adjust anttena to get the following result.
♦ Tuner : Lock ♦ FEC : 1/2, 2/3, 3/4, 5/6 or 7/8
♦ Level : over 30% ♦ Quality : over 40%
How to Check Tuner State
Users can check parameters of certain channels and scan them.
1
2
3
4
5
6
7
ENGLISH
44
DTV Channel Setup
Press MENU button.
Menu items appear on the screen.
Press / Buttons to move to “DTV CHANNEL” icon.
Press button to select “DTV CHANNEL” Icon.
“AUTO SCAN” is highlighted.
Press / Buttons to move to “GUIDE”.
Press buttons to select GUIDE”
Program Guide menu appears.
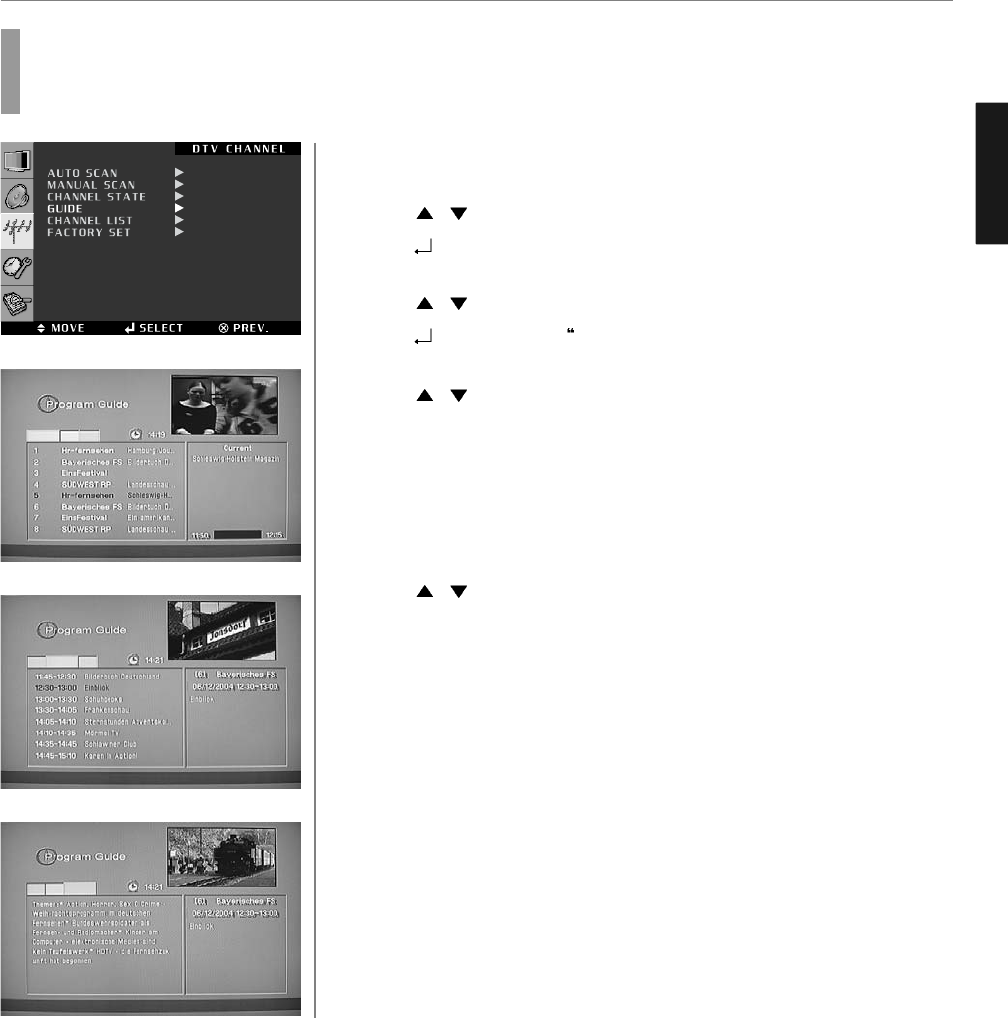
Press / buttons to select Channel, you can see the current or next
program information of the selected channel.
➥ Press “GREEN” button. The current or next program information would be
converted to the next or current program information respectively.
➥ Press “YELLOW” button. You can see the program schedule list of the
selected channel.
If you want to see the program information of a program in the schedule list,
Press / buttons to select the program. You will see the information in the
right window.
➥ Press “BLUE” button. You will see extended information of the selected
program.
Press EXIT button to TV viewing or press MENU button to return to the previous
menu.
1
2
How to Use the Guide (EPG : Electronic Program Guide)
Users can check the channel information on the channels of the transponder they are watching.
3
4
5
6
7
8
ENGLISH
45
DTV Channel Setup
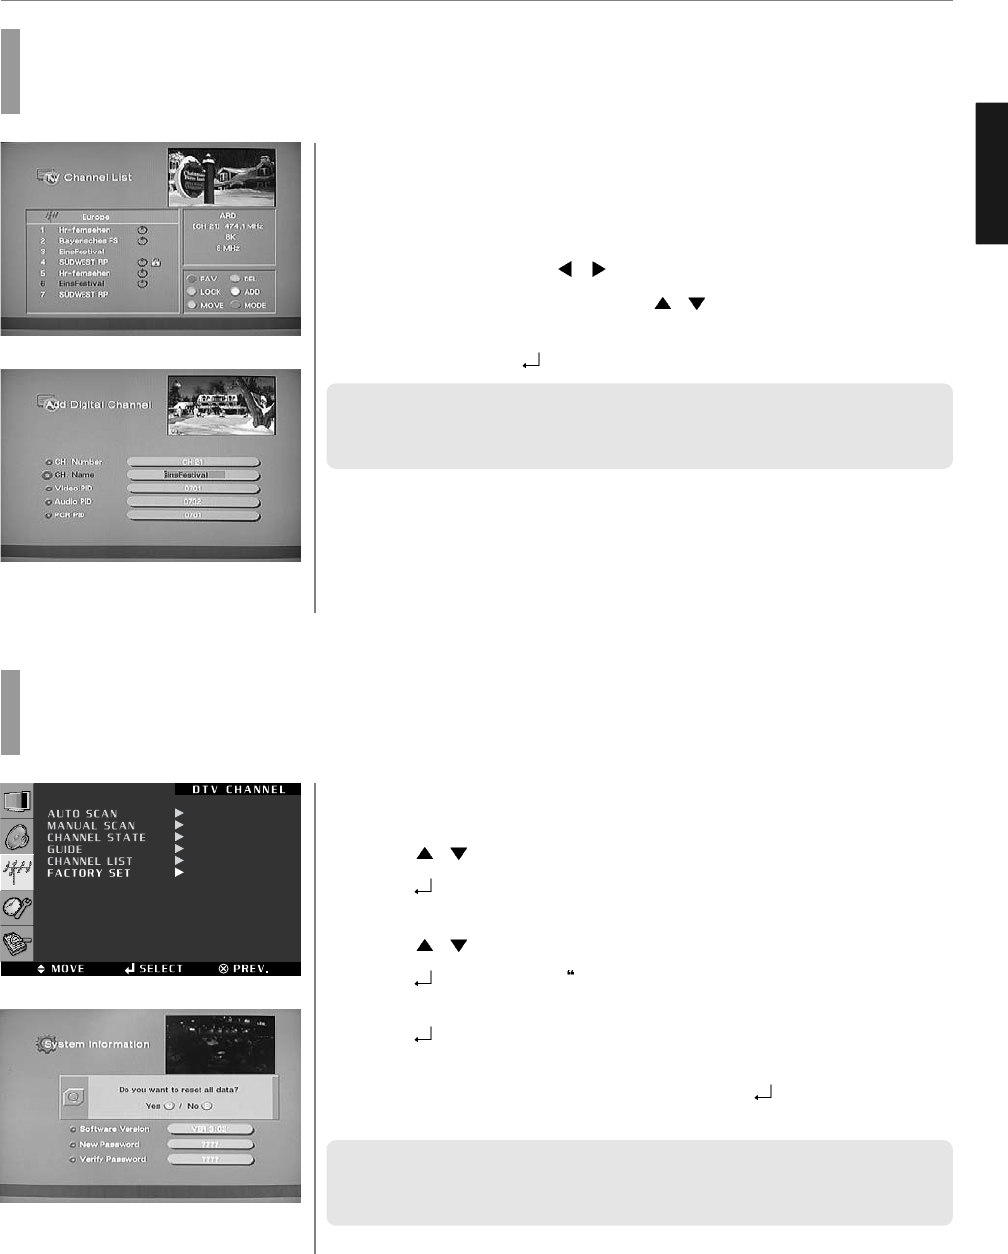
How to Select Channel List
Users can change the current channel to any other channel they want.
Press MENU button.
Menu items appear on the screen.
Press / buttons to move to “DTV CHANNEL” icon.
Press button to select “DTV CHANNEL” Icon.
“AUTO SCAN” is highlighted.
Press / buttons to move to “CHANNEL LIST”.
Press buttons to select CHANNEL LIST”
Channel List menu will appear, detailed information of the selected channel will
be displayed in the right section (Name of network, frequency, bandwidth, etc).
Press / (page up/down) or / buttons (scroll up/down) buttons to
select the channel you want
Press buttons, The selected channel appears on the screen.
Press EXIT button to TV viewing or press MENU button to return to the previous
menu.
1
3
4
5
6
7
8
2
How to Set Favorite Channel
Users can store frequently watched channels to quickly access a preferred channel.
Press MENU button.
Menu items appear on the screen.
Press / buttons to move to “DTV CHANNEL” icon.
Press button to select “DTV CHANNEL” Icon.
“AUTO SCAN” is highlighted.
Press / buttons to move to “CHANNEL LIST”.
Press button to select CHANNEL LIST”
Press / (page up/down) or / buttons (scroll up/down) buttons to
select the channel you want
➥ Press RED button, then Favorite State menu appears.
Press / buttons to move to favorite state list of 1~5.
➥ Press WHITE button. You can rename them for their convenience.
Press button. You favorite state list will be stored. An apple symbol will
occur on the ALL LIST MENU.
Press EXIT button to TV viewing or press MENU button to return to the previous
menu.
1
3
4
5
6
7
8
9
10
11
2
ENGLISH
46
DTV Channel Setup
Press CH. LIST button.
Channel list appears on the screen.
Press “ORANGE” button, then you can see “Channel List Mode” window.
Select required option by pressing the / buttons, then Press /
buttons to select you want.
Press buttons.
You will see the following mode.
♦ Favorite Mode : You can see favorite 1 ~ 5 channel list.
♦ Alphabet Mode : You can see the channel alphabetical listed.
- ABC : If you want to see all channels listed in alphabetic order, select ‘ABC’.
- ETC : If you want to see channels without numeric or alphabetic initials.
♦ Network Mode : You can see the channel list in network style.
Press EXIT button to TV viewing or press MENU button to return to the previous
menu.
1
2
How to Use Channel List Mode
Users can see variant channel lists which may enable them to edit and select channels more conveniently.
3
4
5
How to Lock Channel
This menu enables users to prevent children from viewing programs unsuitable for their age.
Press CH. LIST button.
Channel list menu appears on the screen.
Press / or / buttons to select the channel you want to lock.
Press “GREEN” button.
Then the selected channel is locked.
Press MENU, EXIT or button to finish the process.
Without entering you password, you cannot watch a locked channel’s program.
The original password is programmed to 0-0-0-0. Please refer to 48 page “How
to Factory Set” for changing the password.
✓ If you want to cancel the channel lock, go to the channel list and select the
channel and press GREEN.
1
3
4
5
2
ENGLISH
47
DTV Channel Setup
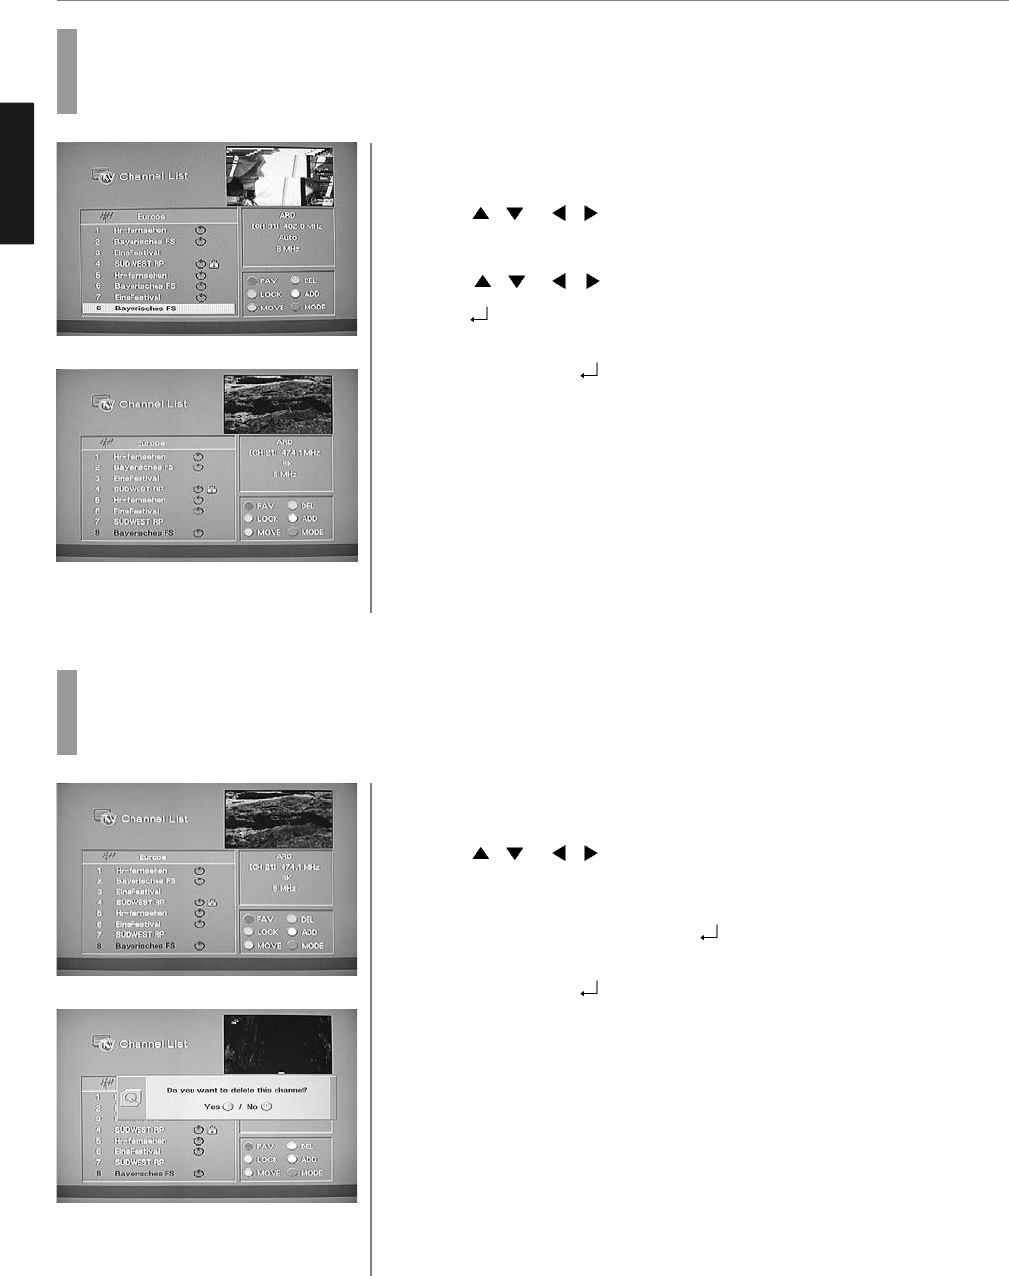
How to Set the Channel Order
Users can organize the number or sequence of the channels.
Press CH. LIST button.
Channel list menu appears on the screen.
Press / or / buttons to select the channel you want to move.
Press “YELLOW” buttons.
Press / or / buttons to move to the position you want to move.
Press buttons, the channels will move automatically to the programmed
position.
Press MENU, EXIT or button to finish the process.
1
2
How to Delete Channel
Users can delete channels from the channel list.
Press CH. LIST button.
Channel list menu appears on the screen.
Press / or / buttons to select the channel you want to remove.
Press BLUE buttons.
Then, you need to confirm the deletion.
If you definitely want to delete, press buttons. If not, press EXIT.
You can find the deleted list in left window.
Press MENU, EXIT or button to finish the process.
1
3
4
2
3
4
5
6
ENGLISH
48
DTV Channel Setup
How to Add Channel
Users add channels they want.
Press CH. LIST button.
Channel list menu appears on the screen.
Press WHITE buttons.
The Add Digital Channel window will appear.
Select the channels with / buttons or numeric keys.
Select required option by pressing the / buttons, then Press numeric
keys to enter the proper value.
Press MENU, EXIT or button to finish the process.
✓ The above mentioned VIDEO PID, AUDIO PID, PCR PID are very important for
optimal terrestrial signal reception. We recommend you to get professional advices
where available. You can’t setup “VIDEO PID” for RADIO channels.
How to Factory Set
The status of the Digital-TV will return to factory default parameters by using this function.
Press MENU button.
Menu items appear on the screen.
Press / Buttons to move to “DTV CHANNEL” icon.
Press button to select “DTV CHANNEL” Icon.
“AUTO SCAN” is highlighted.
Press / Buttons to move to “FACTORY SET”.
Press buttons to select FACTORY SET”
“Factory Set” is highlighted.
Press button to select “Factory Set”.
A window will appear, asking you to confirm.
When the menu asks you to confirm the reset, press if you want to reset or
press EXIT key if you want to void the reset.
✓ When you forgot your new password, please consult the shop where you bought
the TV or the nearest dealer.
✓ After choosing Factory Set, reset the power.
1
3
4
5
2
1
3
4
5
6
7
2
ENGLISH
49
DTV Channel Setup
How to TV/RADIO switching
Users can use this menu when they want to change a TV channel to a Radio channel or vice versa.
➥ Press “TV/RADIO” button.
Avoid listening to the radio for a long time, without changing the screen
image. It can cause “Image Sticking”.
Check “Image Retention Effect (Image Sticking)” at the begining of the manual.
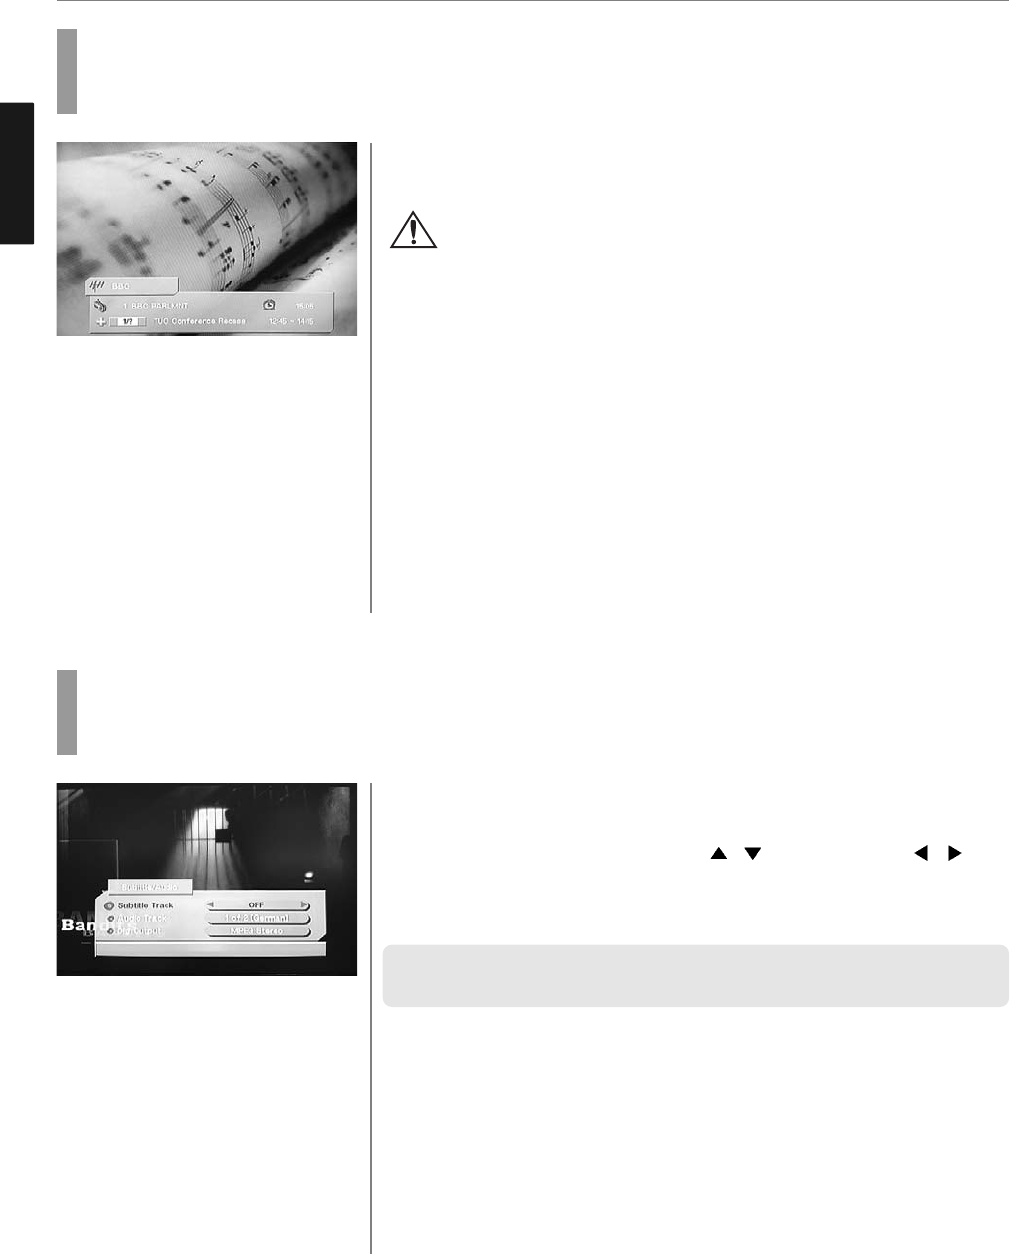
How to Subtitle / Audio
Users can adjust the subtitle and audio condition/status of the current channel.
Press “S.MODE” button.
Subtle and audio related window will be displayed on the screen.
Select required option by pressing the / buttons, then Press /
buttons to select you want.
If Dig. Output is supported, you can select MPEG Stereo or Dolby Digital/AC3.
✓ These subtitle and audio parameters are workable only when the receiving
channel supports these functions
1
2

ENGLISH
50
DTV Channel Setup
How to Select Channel / Information
Brief information is displayed, such as current channel type, name, local start/end time, guide information, current time,
fav/normal mode, Audio mode and Audio ID.
➥ Press “INFO” button.
The information bar will pop-up.
✓ If you have no information : Check if your local time settings are correct or infor-
mation is not sent by the channel provider.
How to Set Teletext in DTV
You can use Teletext service in iDTV mode.
The icon on the screen means your TV is receiving Teletext service.
Press “TTX/MIX” button and wait.
If the “*” sign pops up left upside of the screen as the following picture, wait
until the teletext service menu is displayed “*” means it provides teletext
service. So wait a moment.
Select your interesting item with numeric keys.
1
2
51
Memory Setup
ENGLISH
Memory Card Slot 1 (MT) Memory Card Slot 2 (CF)
How to Use Memory Mode -* For Q320, Q400 Model only
Please read the following instructions carefully before using it.
Remaining for a long time in Memory mode (Still Image) can cause “Image Sticking”.
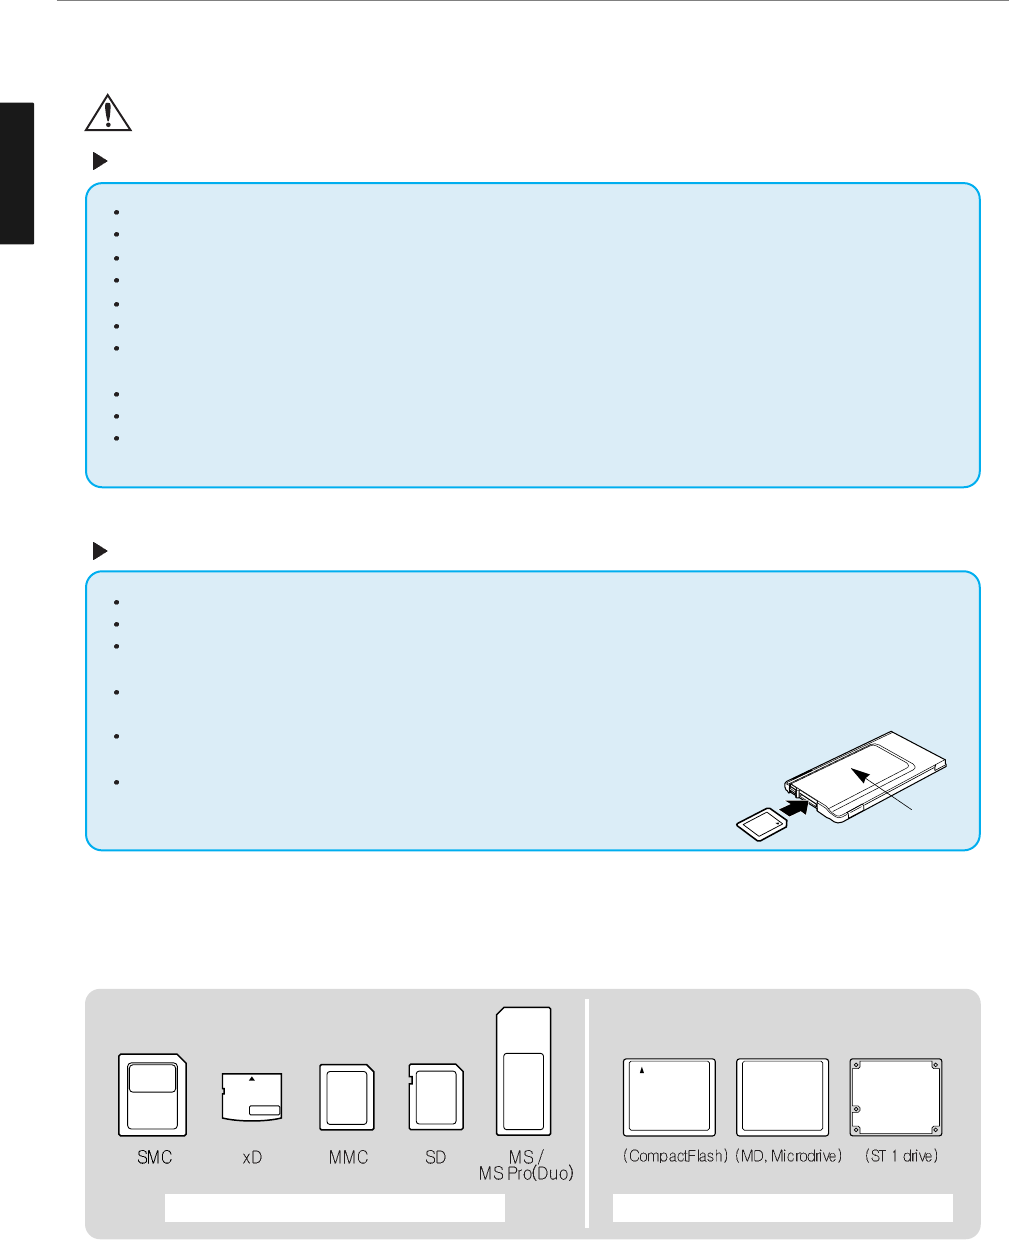
Precautions when using a Memory Card
Ensure to use a memory card labeled with the manufacturer’s name and manufacture number.
Do not insert other objects such as a coin into the memory card slot, which may cause a malfunction.
Do not drop or apply a shock to memory cards.
Keep a memory card in the provided case after using it.
Do not dismantle or modify memory cards.
Avoid static electricity or electronic noise, this may damage data stored in it.
We shall not be liable for misuse of the TV set, any troubles during use, or other problems, or incorrect settings,
except for those cases for which we are liable by law.
Any damages arising out of the misuse of the TV set may result in damage to or loss of data.
We are not responsible for any damaged data. To avoid them, ensure to back up.
This unit is designed for personally converted MP3 files, for personal use only. In case of listening to any
copyright-protected files, ensure to use a separate MP3 player.
Precautions when inserting a Memory Card
Turn the TV set off before connecting all necessary cables.
Insert a memory card with the label facing up avoiding twisting or skewing.
Insert a memory card with the label facing up and the arrow on the label pointing toward the unit. Inserting the
memory in upside down may result in damage to the memory card or unit.
Do not attempt to remove a memory card while it is in operation. This may cause serious damage to the memory
card or unit. Ensure to stop all memory cards before removing a memory card from the unit.
Make sure the cards are completely and firmly inserted into the appropriate slots.
Improperly seated cards will cause serious damage to memory cards or unit.
Make sure the RSMMC, miniSD, T-FLASH, MS Duo and MS Pro Duo memory cards
are inserted into an adapter. Contact the dealer where you purchased it.
Commercially available memory cards (Sold separately)
- The available types of memory cards by slot are shown on the side of the TV.
- The playback speed varies depending on their types.
Adapter
Supported Files
Supported Media File Types
Supported Compressed Jpeg/Image File Format
Available
memory card
capacity
USB HOST
USB 1.1
HOST
Power
Supply
CompactFlash : 8MB ~ 4GB
Microdrive : 1GB, 2GB, 4GB / 2.5GB, 5GB
SmartMedia : 8MB ~ 128MB
xD-Picture : 16MB ~ 512MB / 1GB(M-CARD)
MultiMediaCard/RS MMC : 8MB ~ 1GB
Secure Digital/miniSD : 8MB ~ 1GB
Memory Stick/Duo : 4MB ~ 128MB
Memory Stick Pro/Duo : 256MB, 512MB, 1GB
USB HDD, Flash Memory Bar
MP3 Player (Available only in portable disk mode)
Cellular Phone (Available only in portable disk mode)
Make sure to use TV USB power for USB HDD with 2.5” or less. Never use
separate power.
Make sure to use separate power for 3.5” USB HDD.
Using a memory card with capacity
larger than supported may cause an
error.
A very high capacity of a memory card
may result in slow speed.
Some non-supported Jpeg or MP3 files
may not be played back.
Photo
Support
Support
Compatibility
ID3 tag not supported MP3i, MP3 PRO not supported
Compatibility
Compatibility
Support
Movie
Music
JPEG : JIFF, EXIF (.jpg)
MP3
DivX3, DivX4 XviD (.avi) MPEG-1 (.mpeg/.mpg)
MPEG-2 (.mpeg/.mpg/.vob) MPEG-4 (.mpeg/.mpg, asf)
Baseline JPEG : 5120x3840 (Max. Resolution)
Progressive JPEG : 2048x1536 (Max. Resolution)
DivX - 720 x 480 30fbs or less, - 720 x 576 25fbs or less
- AC3 support, MPEG-1 audio layer-2 and 3 encoded files
- GMC(Gobal Motion Compression), Q-Pel(Quarter Pixel) not supported.
MPEG-2 - Main prolile@Main level, - 2Mbps below supported
MPEG-4 - 640 x 480 (4Mbps or less), - MPEG-4V1 : not supported
- MPEG-4V2 : Simple Profile supported.
Motion JPEG(.avi) - 640 x 480 15 frames/sec
4:2:2, 21:11:11(Y,Cb,Cr)
12:11:11(Y,Cb,Cr)
4:2:0
22:11:11(Y,Cb,Cr)
4:4:4
11:11:11(Y,Cb,Cr)
Standard
(Baseline)
Compression method Color format
O
Image
Optimization
(Progressive)
OX O
Image
Not supported
Image
O
Image
JPG compression
Image display
52
Memory Setup
ENGLISH
53
Memory Setup
ENGLISH
Using a Memory Card
1. Insert a memory card or USB memory into Slot 1/2 or USB port.
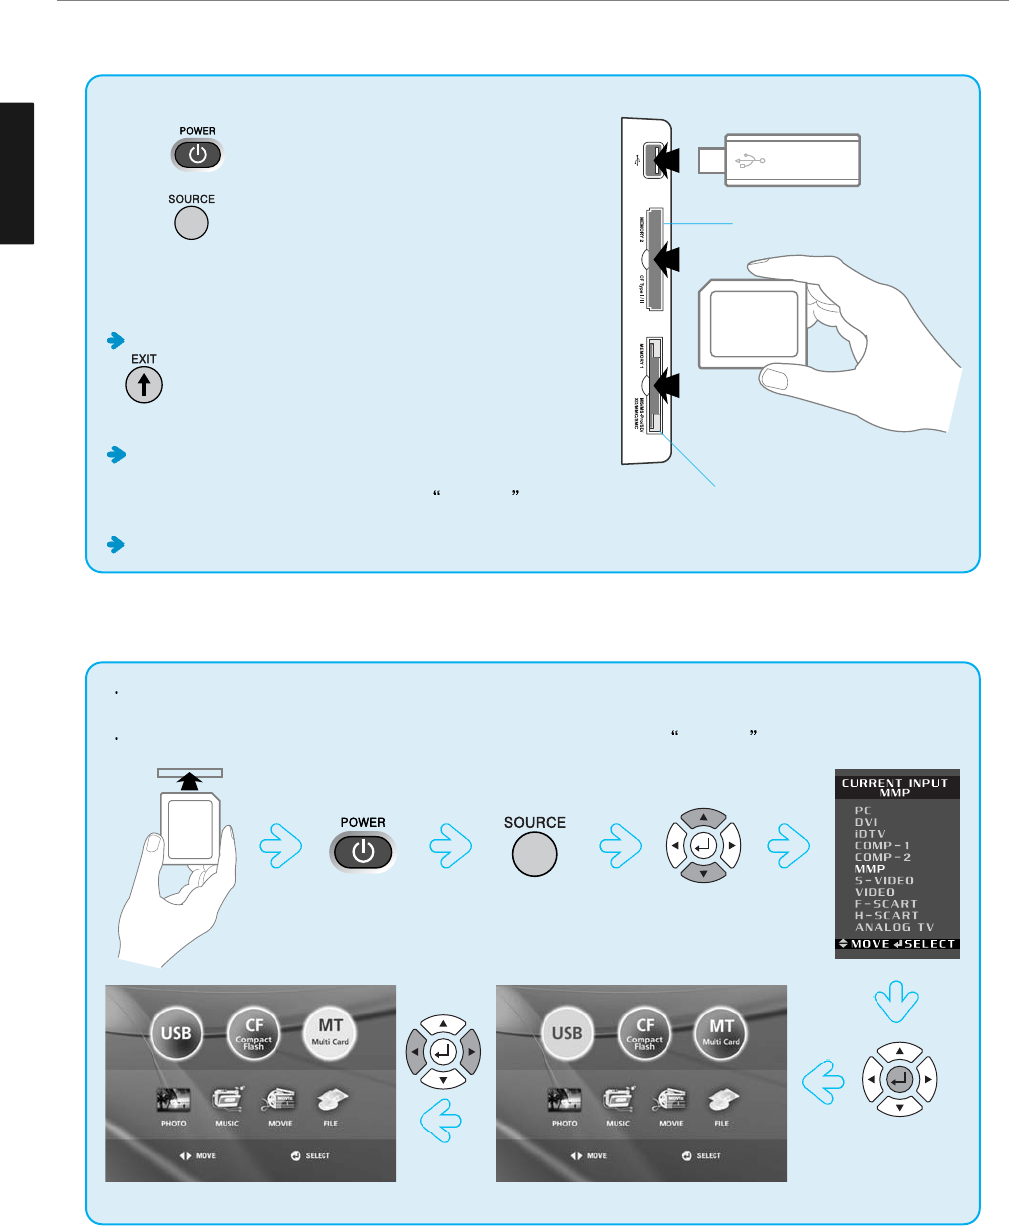
2. Press to power on.
3. Press to select Memory Mode.
4. Refer to icons listed below menu screen to manipulate.
CAUTION !
When you are going to remove the memory card, press the
button on the remote control. You can go back to the
initial screen anytime to remove the memory card safely
while keeping the damage to stored data to a minimum level.
If you have pressed the EXIT button, you have to remove and
then insert the memory card or turn the power off and on to use
the memory card. Otherwise, a message No device will
appear when selecting.
Only one memory card is allowed for each slot.
Shifting into Memory Mode
Memory Mode allows you to play back photos, music, movies and motion pictures files that are stored in memory
cards.
When selecting a slot into which no memory card is inserted, a message, No device will appear.
The initial screen of the memory mode will appear.Move one of the slots you want.
Memory Card Slot 1 (MT)
Memory Card Slot 2 (CF)
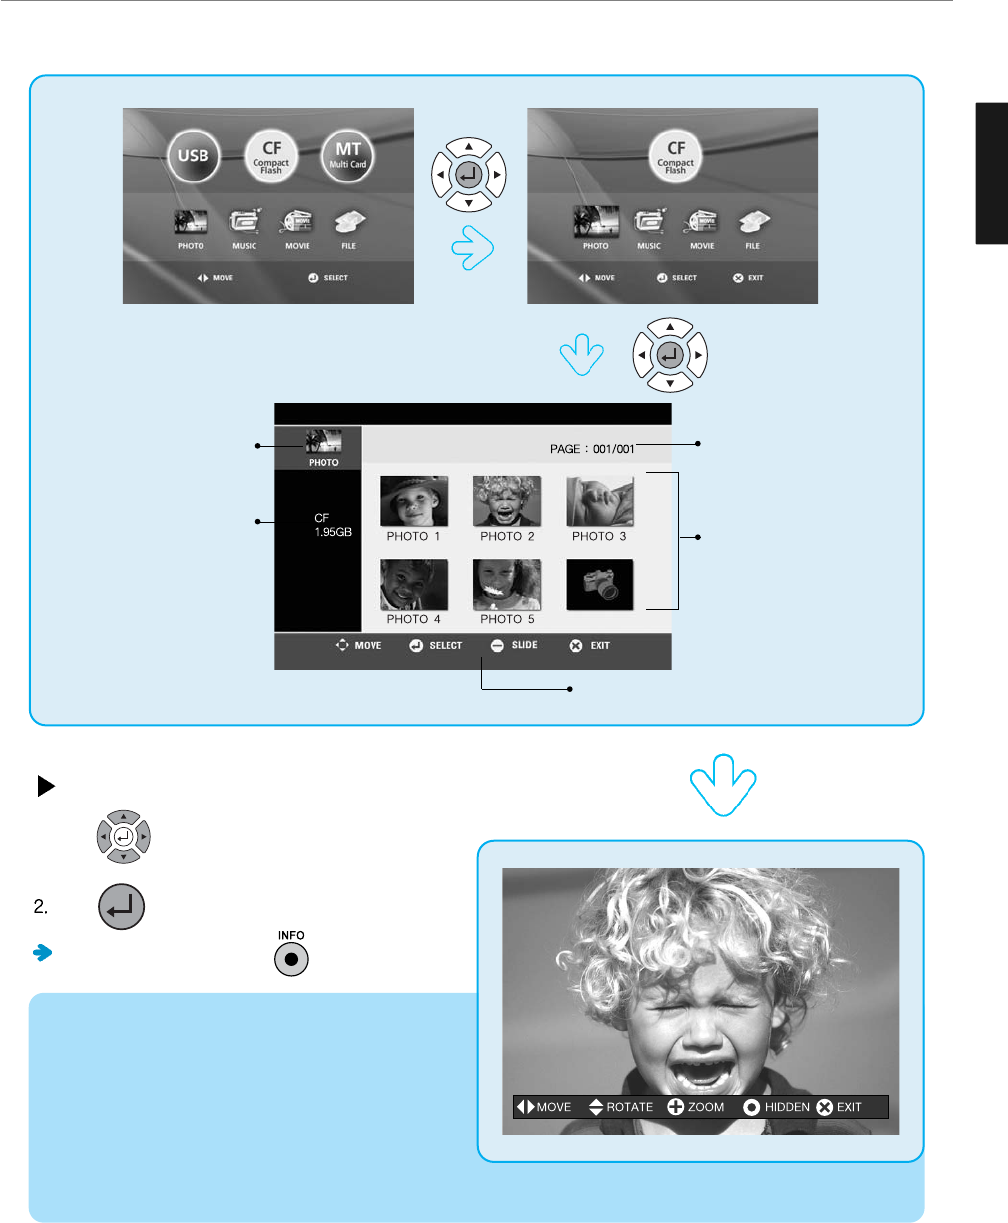
Viewing the stored photo files
Viewing full-size photos
1. Press to move a photo file you want.
Press to select.
To the icon menus, press the button.
Manipulation buttons
Current page/All pages
Preview
Mode
Card type/capacity
1) JFIF
- As decording is required when making a listing,
decording time is different according to file sizes.
- While the slide show is in operation, music may be
paused temporarily or corrupted according to the
performance of the memory card or USB device.
2) EXIF
Listed files are quickly displayed when making a listing.
For example EXIF files created by a digital camera, etc, which are already listed.
54
Memory Setup
ENGLISH
55
Memory Setup
ENGLISH
Viewing full-size photos
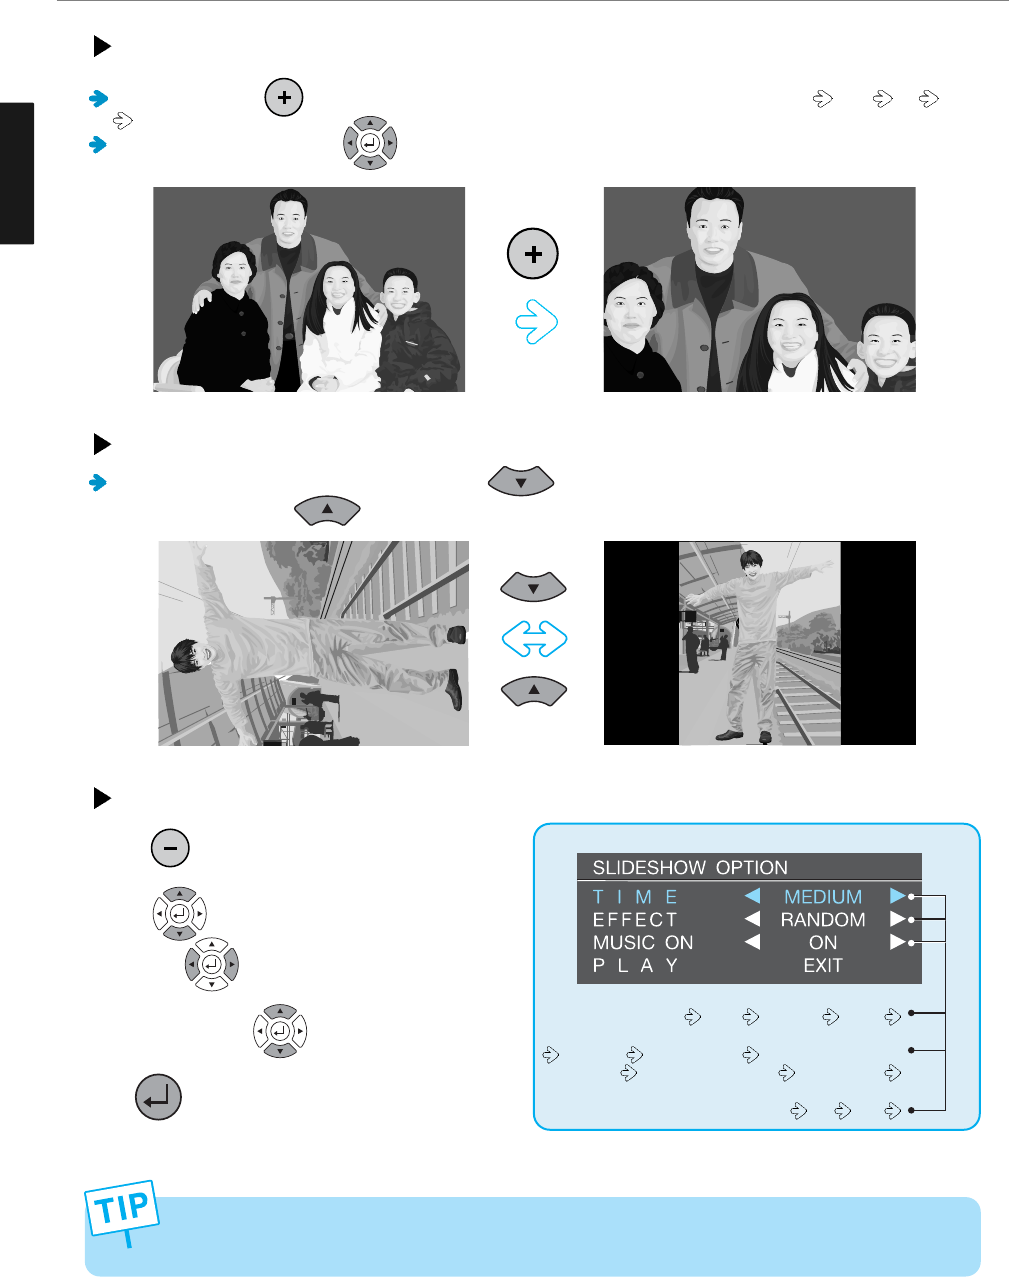
Whenever you press from the current screen, magnifying powers are shifted in sequence 1.5X 2X 2.5X
1X(original size).
After zooming in a photo, press to move.
Rotating a photo
To rotate the photo by 90 degrees clockwise, press button. To rotate the photo by 90 degrees
counterclockwise, press button.
Viewing images using Slide Show
1. Press to display Option Menu.
2. Press to move between items
and press to change.
3. After setting, press buttons to move to PLAY.
Press to start a slide show.
Slow access may take place according to file sizes, selected effect mode and card types (MMC/MS) or due to
unsupported image files. This may result in time difference taken to display images or corrupted music sound.
FAST MEDIUM SLOW
RANDOM TOP->BUTTOM CENTER->LEFT/RIGHT
LEFT->RIGHT (BLIND) CLOSS FADE
ON OFF
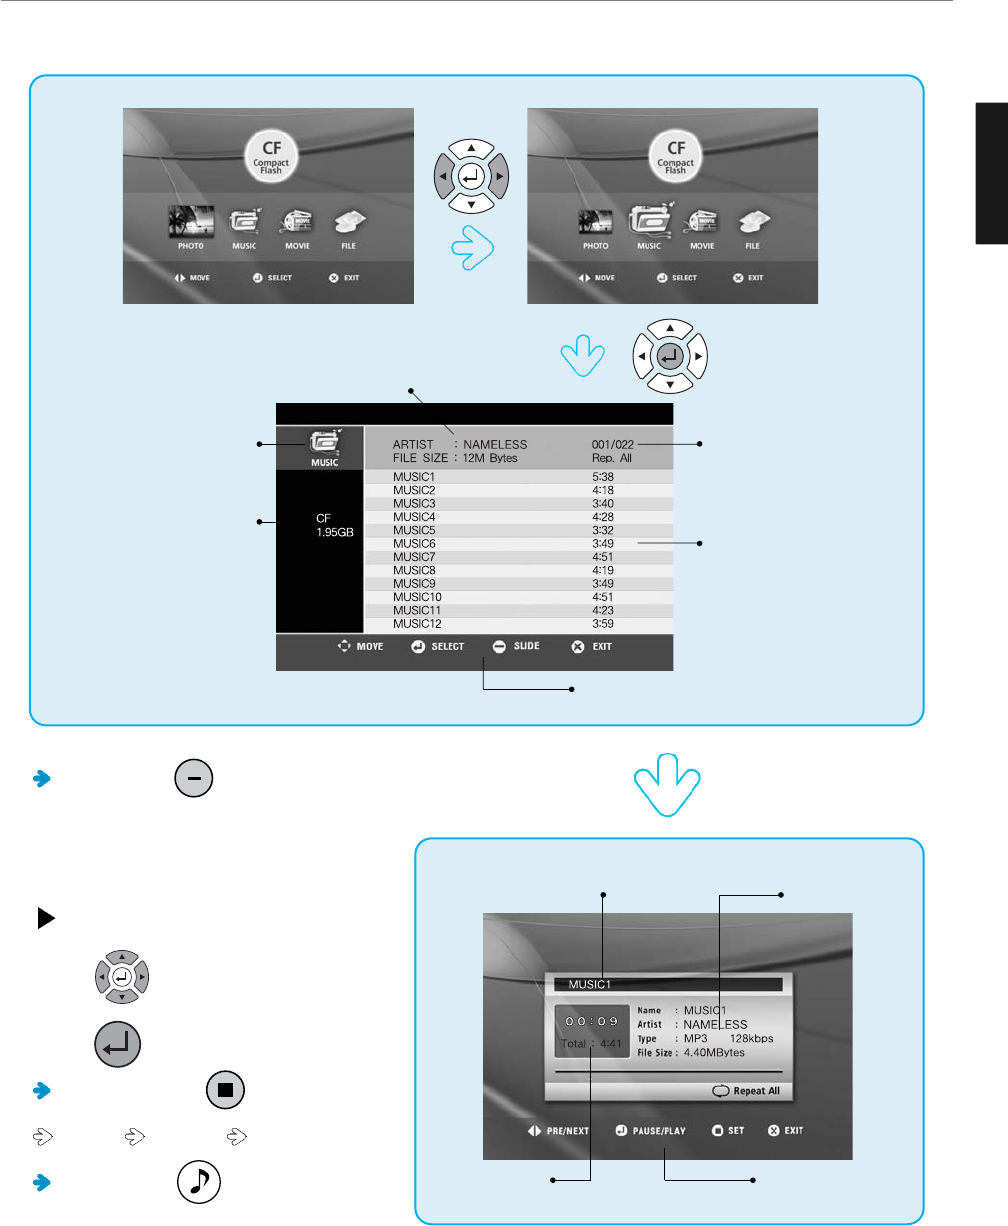
Viewing the stored music files
When you press , the slide show function
starts playing back music files according to the
selected options in photo mode.
Playing back music files
1. Press to display Option Menu.
1. Press to play back.
Whenever you press , you can set
Repeat 1 Repeat All Play Sequence.
When you press ,
you can listen to music in power saving mode.
Media music file name File information
Manipulation buttons
Selected file/All files
Artist/File size
File name/Playing time
Mode
Card type/Capacity
Playing time Manipulation buttons
56
Memory Setup
ENGLISH
57
Memory Setup
ENGLISH
Checking the stored movie files
You can set to play back all files (Play Sequence) or selected file (Play One)
in sequence by pressing .
Playing back movie files
1. Press to move to movie file you want.
2. Press to select a movie file to play back.
To hide the icon menus on the bottom of the screen,
press .
To perform Rewind or Fast Forward, press .
To pause, press .
To see running time, press .
File order/All files
Playback mode
Playing time/File creation date
File name/Playing time
Mode
Card type/Capacity
Manipulation buttons
Checking the stored movie files
Running a file
1. Press to move to a file you want.
2. Press to run.
If you select, in Photo Mode, Music Mode or Movie Mode, one of the
non-executable files or unrecognized files stored in the memory
card, an error message, “No file in this mode” will appear.
Manipulation buttons
File order/All files
Card type/Used space/Total capacity
File name/File creation date
Mode
Card type/Capacity
- Slow access may take place according to card types (MMC/MS). This may result in interruption of a motion
picture being played back.
- When playing back a motion picture stored in a USB memory, an interruption may take place. This
phenomenon is not because the product yields its low performance but because the transmission speed differs
depending on the USB memory types.
58
Memory Setup
ENGLISH
59
Appendix
ENGLISH
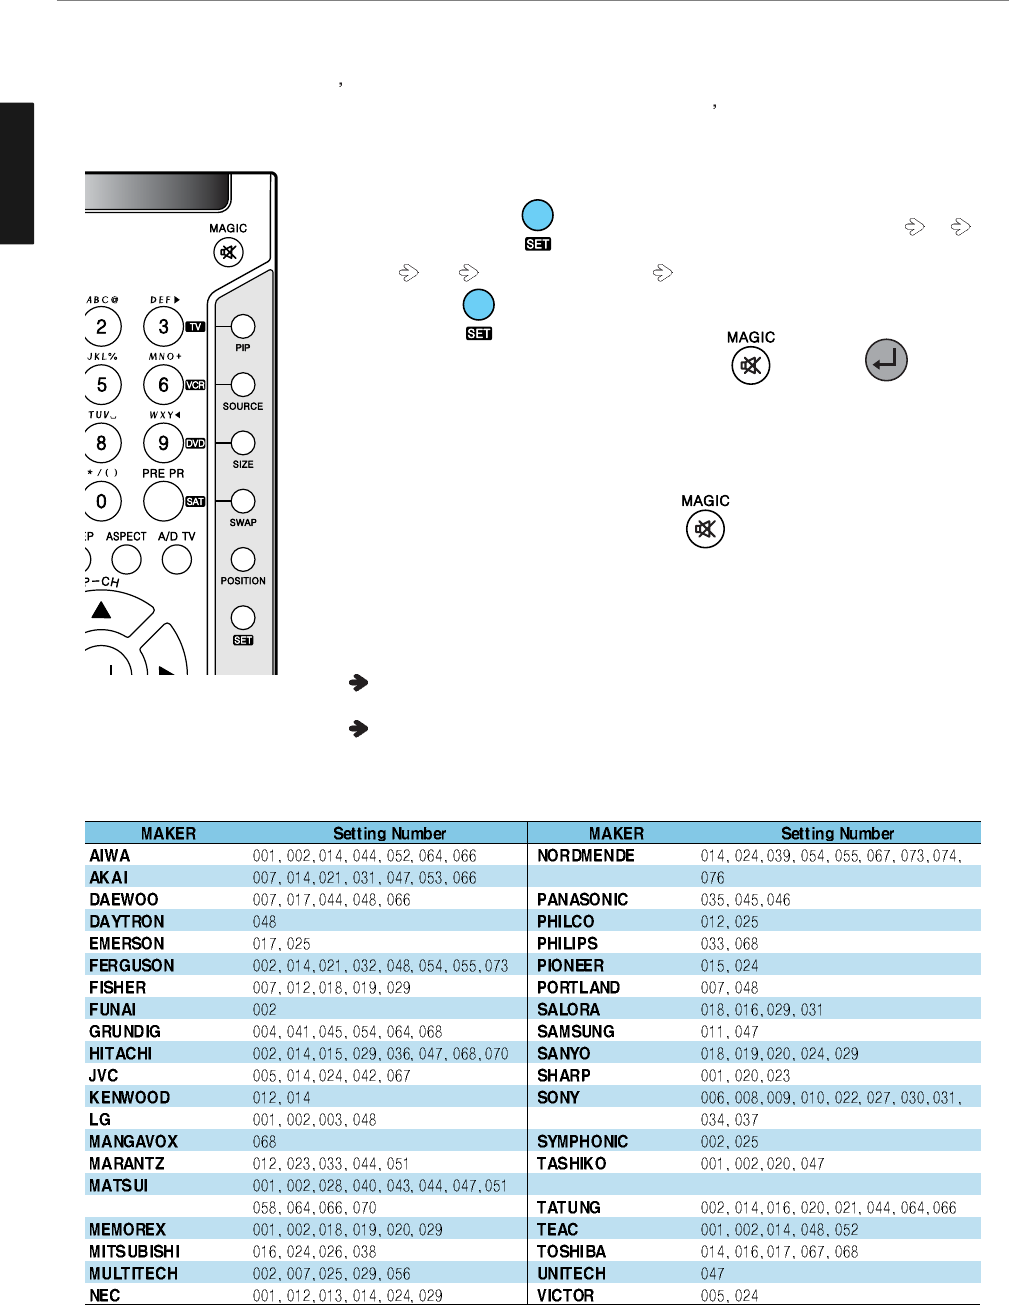
How to Use an External Device Using the Remote Control
When setting other manufacturer s product using the remote control, some of the buttons on the remote control may
not operate or different functions may be activated, or some of other manufacturer s products may not work. Some
of DVD/VCR combos are allowed only either in DVD mode or VCR mode.
1. Turn on the external device you want to set.
2. Whenever you press button on the remote control, the mode shifts TV
VCR DVD SAT(Satellite Receiver) in order.
Or Press the button and the prefered device(TV/VCR/DVD/SAT) at once.
3. If the external device has been chosen, press the button and button
at the same time for two seconds.
4. Enter an appropriate 3-digit number of the manufacturer from the DVD Setting
Number Table. (If the product brand you want to set has multiple setting numbers,
attempt to enter the setting numbers repeatedly until the product is turned off.)
5. When the product has turned off, press the button again.
(The appropriate button associated with the product will flash 3 times to show the
product operates properly.)
6. Check that the Power button works normally and then check that other function
buttons work normally.
If the Power button works normally but other function buttons do not, repeat the
above steps from the beginning.
Depending on product brands or setting numbers, the power button may work
normally but other function buttons do not work.
VCR Setting Number Table
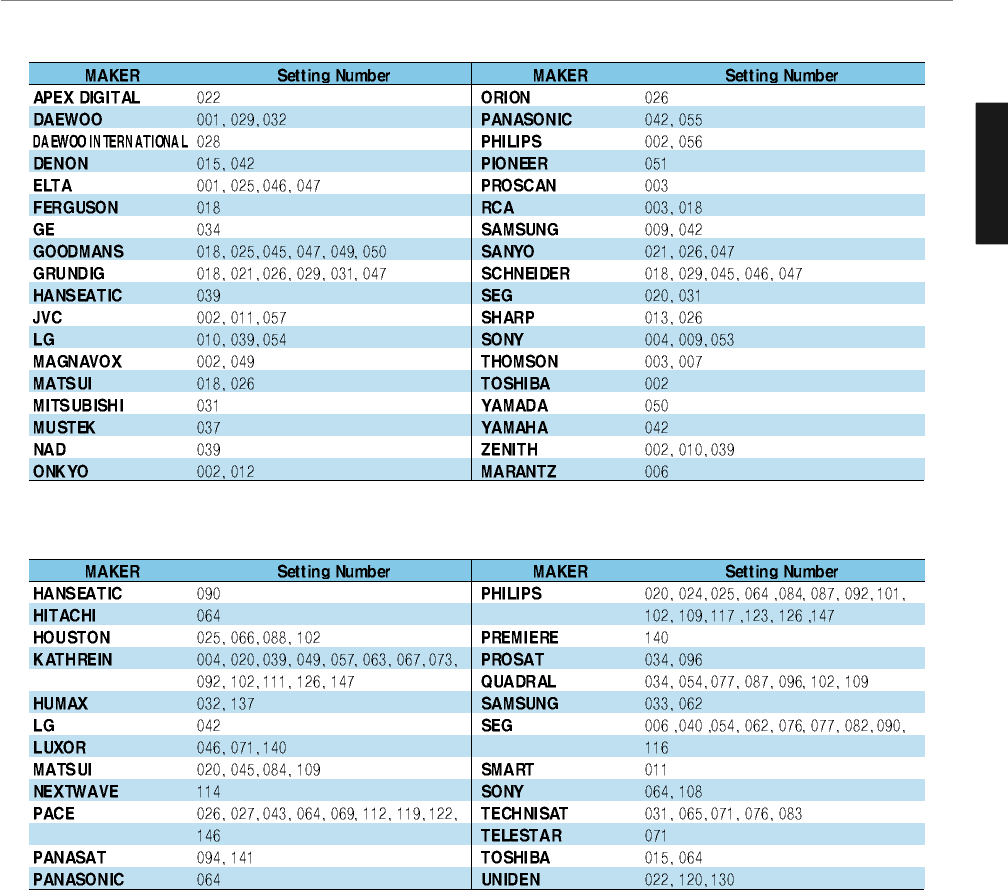
DVD Setting Number Table
Satellite Receiver Setting Number Table
60
Appendix
ENGLISH

61
Appendix
ENGLISH
Troubleshooting
Installation Problems
Picture Problems
Symptom
How can I install an
antenna?
TV screen is not clear after
installing an indoors
antenna.
How can I view cable
broadcasting?
Symptom
Neither picture nor
sound comes up.
Picture turns on slowly
after power is on.
Picture is distorted or frozen
while watching digital
broadcasting.
Input Source information
only appears on black
screen.
Poor reception on some
channels.
Black and white on some
channels.
TV won’t turn on.
Screen is too bright or too
dark.
Auto On does not work.
Possible solution
Refer to page 20.
Indoors antenna may experience poor reception due to surrounding buildings. Please
install an outdoors antenna or wireless antenna.
Please install a cable broadcasting receiver (Converter).
Possible solution
Check whether power is on.
Check whether the power is cut or whether the power cord is properly connected.
Try to plug another product’s power cord to the same outlet to check the outlet itself.
This symptom is not a malfunction. This delay is designed to prevent the distorted and
noisy picture when the power is on. However, if the picture does not appear more than
5 minutes after the power is on, call a service center.
This symptom may be caused by weak reception. Contact your local station or cable
company.
Check whether your TV is properly connected to external devices.
Check whether you selected proper channels. Try re-orienting your antenna. Ensure
LNA is activated.
Check other channels for black and white screen. Adjust colour.
Ensure the power cord is plugged.
Adjust brightness.
Ensure to use the remote control or power button on the product to turn off your TV. If
you unplug the power cord, the stand-by consumption power becomes 0 (zero), which
causes the programmed time to be erased.

Sound Problems
General
After setting the time,
I turned TV off and turn it on.
The programmed information
has been erased.
Symptom
Too much noise occurs.
No sound while viewing a
cable channel
Picture is OK but sound does
not come out.
One of the speakers does not
produce sound.
Symptom
Remote control won't work.
Where does the S-Video
cable plug in for audio
output?
Strange noises are heard.
I tried to use the TV screen
as a PC monitor
but it doesn’t work.
Ensure to use the remote control or power button on the product to turn off your TV. If
you unplug the power cord, the stand-by consumption power becomes 0 (zero), which
causes the programmed time to be erased.
Possible solution
Check whether the audio setting is in the Stereo mode. In the Stereo mode, the sound
may be distorted in areas with poor reception or located far away from a TV
broadcasting station.
Make sure audio or audio/video components are securely inserted into the appropriate
jacks. Check other channels for sound. Check the volume settings on the cable
broadcasting receiver.
Try to press volume up/volume down buttons of your remote control.
Select sound balance and make proper adjustment. (Page 30)
Check the speaker connection cables.
Possible solution
Check whether there is a blocking object between the remote control and PDP.
Make sure your PDP is Power On. (Normally, the LED on the front panel is red.)
Check whether batteries are inserted with proper polarities(+, -).
When the batteries are worn out, replace them.
Connect the two Audio jacks from the S-Video cable to the left and right ports on the
Composite.
Ticking noises during or after watching are caused by the change of ambient
environment such as humidity and temperature, which is characterized by plastic
products. Strange ticking noises occur because a signal is suddenly transmitted to the
PDP panel. So, It is not a malfunction.
Adjust the resolution referring to the standard signal mode table. Check the
specification of your video card installed in your PC. If your video card does not work in
the supported hardware, try upgrading the video card’s driver.
62
Appendix
ENGLISH

63
Appendix
ENGLISH
Product Specifications
- The above specifications may be subject to change without prior notice.
Q321 / Q320
1 (A/V)
1 (A/V)
1 (A/V audio common)
1 (Audio included)
2 (Audio included)
1
D-SUB
1366 X 768 @ 75 Hz
L/R
1
Slot 1, Slot 2, USB
(For Q320 model only)
1 (Audio included)
1
1
1
PAL/SECAM L
FM, NTCAM
Component, S-Video,
Composite, PC, DVI/HDMI
AC 100 - 240 V, 50/60 Hz
Typical 150W
Typical 3W
772 x 230 x 563
19.3 Kg
Remote control, Key control
Q401 / Q400
1 (A/V)
1 (A/V)
1 (A/V audio common)
1 (Audio included)
2 (Audio included)
1
D-SUB
1366 X 768 @ 75 Hz
L/R
1
Slot 1, Slot 2, USB
(For Q400 model only)
1 (Audio included)
1
1
1
PAL/SECAM L
FM, NTCAM
Component, S-Video,
Composite, PC, DVI/HDMI
AC 100 - 240 V, 50/60 Hz
Typical 225W
Typical 3W
988 x 297 x 715.5
23.0 Kg
Remote control, Key control
Full-Scart
Half-Scart
S-Video
Video (RCA)
Component(Y/Cb/Cr)
Antenna
PC Connection jack
Max. resolution
Audio
DVI-HDCP / HDMI
Memory Slot
Digital SPDIF Optical
Digital SPDIF Coaxial
Subwoofer
Color system
Sound system
Video system
Supply
Consumption power
Stand-by power
Model
Input
Video Output
Audio Output
TV/Video
Power
Dimension
(W x D x H mm - Stand included)
Weigh (Stand included)
Control type
Q261
1 (A/V)
1 (A/V)
1 (A/V audio common)
1 (Audio included)
2 (Audio included)
1
D-SUB
1366 X 768 @ 75 Hz
L/R
1
No
1 (Audio included)
1
1
1
PAL/SECAM L
FM, NTCAM
Component, S-Video,
Composite, PC, DVI/HDMI
AC 100 - 240 V, 50/60 Hz
Typical 120W
Typical 3W
640 x 230 x 485
17.5 Kg
Remote control, Key control

Product Specifications
- The above specifications may be subject to change without prior notice.
Q421H
1 (A/V)
1 (A/V)
1 (A/V audio common)
1 (Audio included)
2 (Audio included)
1
D-SUB
1024 X 768 @ 85 Hz
L/R
1
1 (Audio included)
1
1
1
PAL/SECAM L
FM, NTCAM
Component, S-Video,
Composite, PC, DVI/HDMI
AC 100 - 240 V, 50/60 Hz
Typical 380W
Typical 3.5W
1030 x 79 x 716
32 Kg
Remote control, Key control
Q501
1 (A/V)
1 (A/V)
1 (A/V audio common)
1 (Audio included)
2 (Audio included)
1
D-SUB
1024 X 768 @ 85 Hz
L/R
1
1 (Audio included)
1
1
1
PAL/SECAM L
FM, NTCAM
Component, S-Video,
Composite, PC, DVI/HDMI
AC 100 - 240 V, 50/60 Hz
-
Typical 3.5W
1208 x 79 x 810
46 Kg
Remote control, Key control
Full-Scart
Half-Scart
S-Video
Video (RCA)
Component(Y/Cb/Cr)
Antenna
PC Connection jack
Max. resolution
Audio
DVI-HDCP
Digital SPDIF Optical
Digital SPDIF Coaxial
Subwoofer
Color system
Sound system
Video system
Supply
Consumption power
Stand-by power
Model
Input
Video Output
Audio Output
TV/Video
Power
Dimension
(W x D x H mm - Stand included)
Weight (Stand included)
Control type
Q421S
1 (A/V)
1 (A/V)
1 (A/V audio common)
1 (Audio included)
2 (Audio included)
1
D-SUB
1024 X 768 @ 85 Hz
L/R
1
1 (Audio included)
1
1
1
PAL/SECAM L
FM, NTCAM
Component, S-Video,
Composite, PC, DVI/HDMI
AC 100 - 240 V, 50/60 Hz
Typical 280W
Typical 3.5W
1030 x 79 x 716
32 Kg
Remote control, Key control
64
Appendix
ENGLISH

65
Appendix
ENGLISH