IAdea IAD16000 Digital Signage Media Appliance User Manual
IAdea Corporation Digital Signage Media Appliance
IAdea >
Contents
- 1. Usuer Manual
- 2. User Manual
Usuer Manual

XMP‐6400
(IAD‐16000)
HardwareUserManual
i
Contents
1.Introduction1
1.1.Packagecontents1
1.2.Installation1
1.3.Physicalview2
2.TechnicalData3
2.1.Specifications3

i
1. Introduction
ThisdocumentdescribesthehardwareoftheXMP‐6400(IAD‐16000).
1.1. Packagecontents
NOTINCLUDED:AUSBmouseisrequiredforsystemsetup
1.2. Installation
Attachwirelessantenna
Attachthewirelessantennaasshownbelow,andthenscrewantennaclockwiseontothepost.
MountingOption:[Attachtheplayeronthebackofthemonitor
usingVelcro]
1. SeparatetheVelcropads,andstickonthebottomofplayer.
2. SticktheotherVelcropadontothebackofmonitor,andthenattach
theplayertoit.
3. UseHDMIcabletoconnectplayerandthemonitor.
MediaPlayerUnitHDMICable
Wi‐FiAntenna
ACAdapter
(withselectpowerplug)
Velcro(2sets)PowerandMicroSD
cardbrackets
i
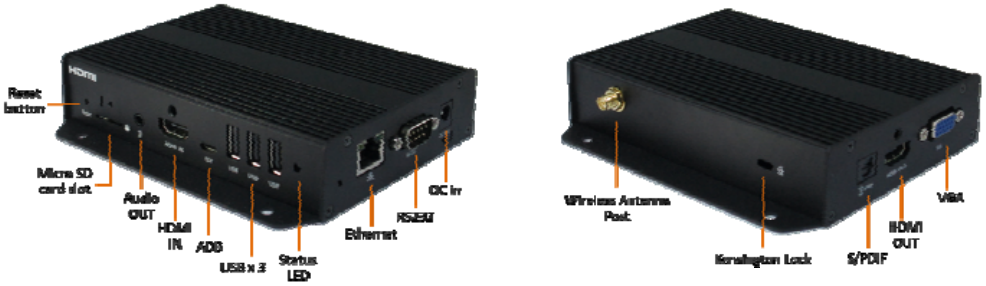
1.3. Physicalview
Physicalfeatures(lefttorightinaboveillustration)
Resetbuttontoperformfactoryreset
MicroSDcardslot
3.5mmAudioout
HDMI1.4connectorfordigitalvideoandaudiocombinedINPUT
MicroUSBforADB,Androiddebugconsoleport
3xUSBportsforUSBcontentupdateandconfiguration
Power(green)andStatus(orange)LEDindicator
Ethernetportfornetworkcontentupdate
RS232portfordisplaycontrol
DCinputport
Wirelessantennapost
Kensingtonlock
S/PDIFAudioout
HDMI1.4connectorfordigitalvideoandaudiocombinedOUTPUT
VGAout

i
2. TechnicalData
2.1. Specifications
XMP‐6400(IAD‐16000)
VideoformatsupportPOPAIScreenMediaStandards
S6(MPEG‐1SIF,3MbpsCBR)
S7(MPEG‐1480p,10MbpsCBR)
S8(MPEG‐1720p,15MbpsCBR)
S9(MPEG‐2480p,6MbpsCBR)
S10(MPEG‐2720p,12MbpsCBR)
S11(MPEG‐4AVC,480p,6MbpsCBR)
S12(MPEG‐4AVC,720p,10MbpsCBR)
E4(VC‐1/WMV9,MP@ML,720p)
E7(MPEG‐4ASP,480p,10MbpsCBR)
E8(MPEG‐4AVC,1080p,10MbpsCBR)
ImageformatsupportPOPAIScreenMediaStandards
S1(JPEG480pbaseline)
S2(JPEG720pbaseline)
S3(JPEG1080pbaseline)
E1(PNG24bpp+alpha,480p)
E2(PNG24bpp+alpha,720p)
E3(PNG24bpp+alpha,1080p)
AudiocodecsupportPOPAIScreenMediaStandards
S4(MPEGL2audio)
S5(MP3audio,320Kbps)
DynamiccontentW3CHTML5(HTML,CSS,JavaScript)
W3CSMIL3.0instructions(sub‐set)
PhysicalI/Oconnectors HDMI1.4forAVINPUT
HDMI1.4forAVOUTPUT
VGA
RS232
USB2.0x3
RJ45Ethernetport
Wi‐Fiantennaport
MicroUSBforADB
MicroSDcardslot
LED:Power(green)/Status(orange)
Localstorage8GBeMMC(upto6hrsoftypical720pvideo@3Mbps)
MicroSDcardexpansionslot
AccessoriesACadapter
HDMIcable
Wi‐Fiantenna
Velcro(2sets)
MicroSDcardslotbracket/screwx1
Powerjackbracket/screwx1
Powerrequirement12V1.5ADC
Powerconsumption6W
EnvironmentalOperatingtemperature:0
–
50°C/32
–
122
°
F
Humidity:10–85%@45°C/32
–
113
°
Fnon‐condensing
DimensionsTophousing:138.60x98x30.20 mm(5.45x3.85x1.18 inches)
Base:138.60x128.10x30.20mm(5.45x5.04x1.18inches)
Weight478g
1.05lbs
i
SafetyUL/FCC/CE
CertificationsCE/FCC/RoHS
WarrantyOne‐yearlimitedparts&labor
FirmwareUserManual
Firmwareversion–1.2
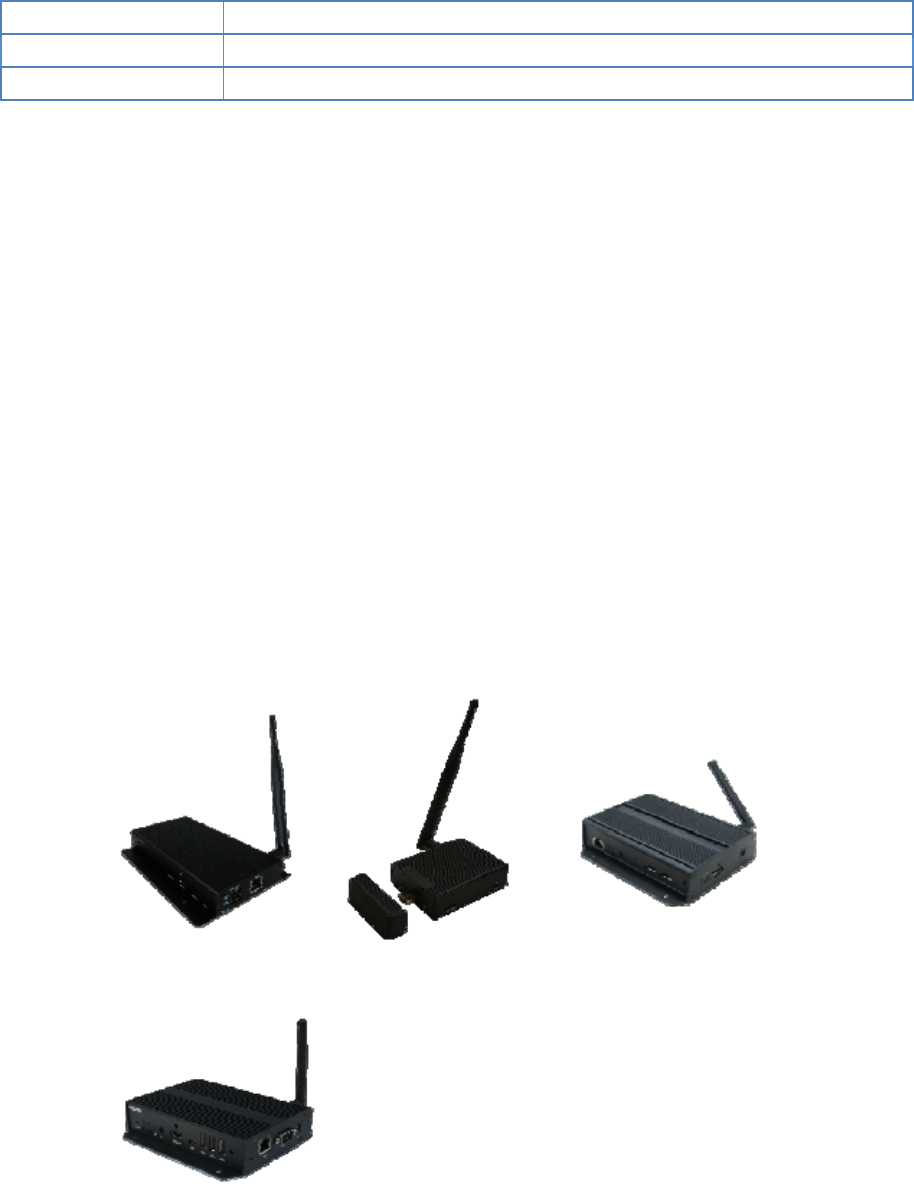
MediaPlayers:
XMP‐6200 MBR‐1100XMP‐7300
(IAD‐16001)
XMP‐6400
(IAD‐16000)
i
Contents
FirmwareUserManual4
1.Introduction1
1.1.Features1
2.ConfiguringthePlayer1
2.1.Systemconnections1
2.2.Basicsettings2
2.3.Connecttheplayertoyournetwork3
2.4.Timezonesettings7
2.5.Contentsettings8
2.6.PlayerInformation9
2.7.Contentconfiguration–AppStart10
2.8.Contentconfiguration–FailSafe10
2.9.Contentconfiguration–EasyPlay11
2.10.Displaysettings14
2.11.Soundsettings17
2.12.Systemconfiguration–Playername18
2.13.Systemconfiguration–Security18
2.14.Systemconfiguration–TimeServer19
2.15.Systemconfiguration–Scheduledreboot19
2.16.Systemconfiguration‐Firmwareupdate20
2.17.Systemconfiguration–Expansionstorage21
2.18.Systemconfiguration‐Factoryreset22
2.19.Systemconfiguration–Powersave23
3.ContentManagement24
4.AuthoringinHTML524
5.WorkingwithSMIL24
5.1.Introduction24
5.2.www.a‐smil.orgfordevelopers24
6.Appendix:FAQ24
1
3. Introduction
Thisdocumentdescribesthebasicoperationoftheplayerandfrequentlyaskedquestions.
3.1. Features
ThisisaFullHD1080phighdefinitiondigitalsignageplayerfeaturingindustrialgrademechanicaldesignand
versatileopen‐standardHTML5andSMILprogrammability.
SupportforHTML5widgetsfordynamiccontent(W3CWidgetsstandard)
IndustryleadingW3CSMILsupportfordevelopers
FullHD1080phardwaredecodingofMPEG1/2/4,H.264,andVC‐1mediaformats
SupportsfullPOPAIScreenMediaFormatsStandardsprofilesS1toS12,andE1toE8
Multiple3
rd
partysoftwaresolutioncompatibility
4. ConfiguringthePlayer
4.1. Systemconnections
Ifitisamediaplayer,connectittoamonitorviaanHDMIcable.
Ifitisasignboard(withbuilt‐inscreen),nomonitorisrequired.However,asignboardplayercanstillbe
connectedtoamonitorviaHDMIforlargerdisplayarea.
WhenusinganHDMIconnection,audioissentalongwithvideoovertheHDMIcable,sonoadditionalcablesare
required.
1
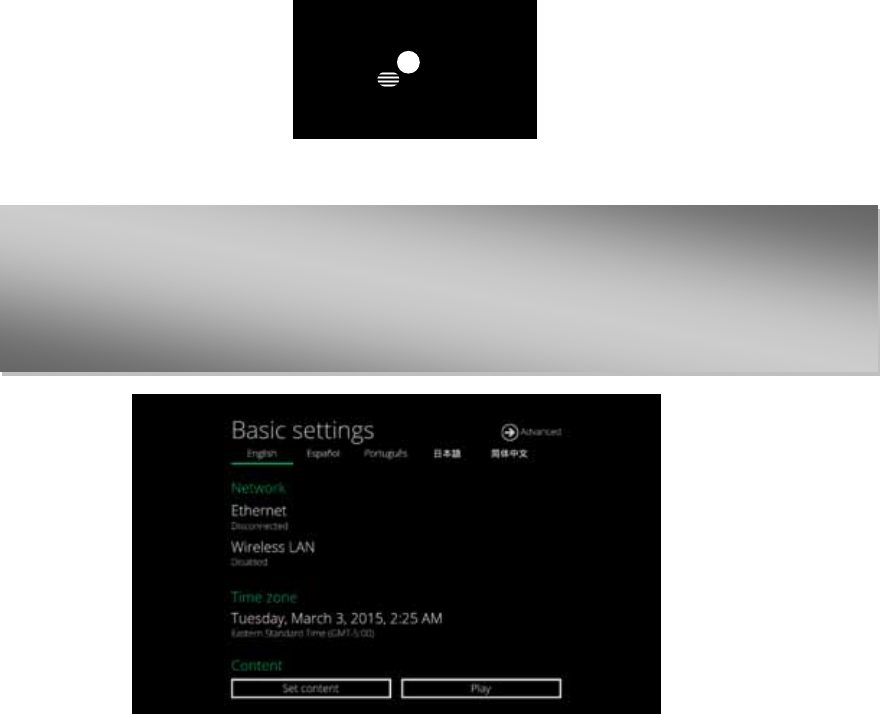
AttachtheACpoweradaptertopowerontheunit.Afterapproximately15seconds,thebootinganimation
willbedisplayedonscreenasshownbelow:
2
Theboot‐upprocesstakesapproximately40secondstocomplete.
TroubleshootingTipsformediaplayers
Theoperationindicatorslightup,butnovideoisdisplayedonscreen
Ensurethatyourvideocable(HDMI)issecurelyconnected.WhenusinganHDMIconnection,
choosehighquality,certifiedHDMIcablesortryusingshorterlengthcables
Checkif
y
ourmonitoristurnedonandthecorrectvideoin
p
utsourceisselected
2
Afterboot‐upcompletes,playerwillstayinBasicsettingsmenuifnocontentservicehasbeenconfigured(i.e.
firstboot‐upforbrandnewunitorafterafactoryreset).Ifyouhavealreadysetcontentintotheplayer,contents
willplaybackautomaticallyafter15secondsafterboot‐up.
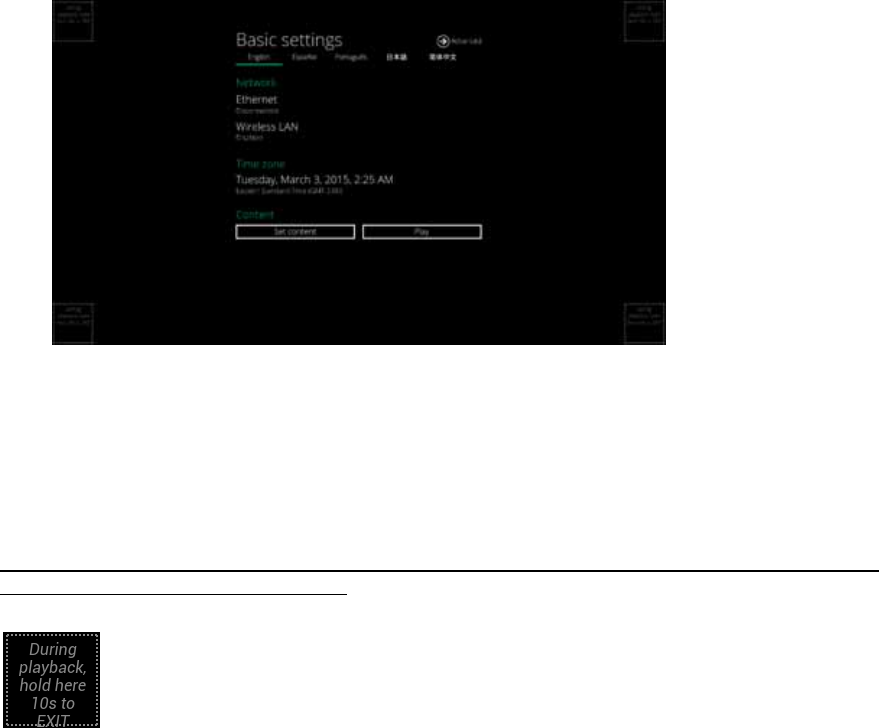
4.2. Basicsettings
YoumustattachaUSBmousetotheplayertoconfiguresettings.Iftheplayerhastouchscreen,thentheUSB
mouseisnotrequired,andalltheclickactioncanbereplacedbytapaction.
(Fig.2.2.1)
Basicsettings:
–Network,TimezoneandContent.
EachtimetheBasicsettingsmenuisentered,playbackwillautomaticallybeginafter15secondsifcontent
serviceshavebeenpreviouslyset.Autoplaybackcanbecanceledbyclickingonthebuttonbeforethecountdown
ends.
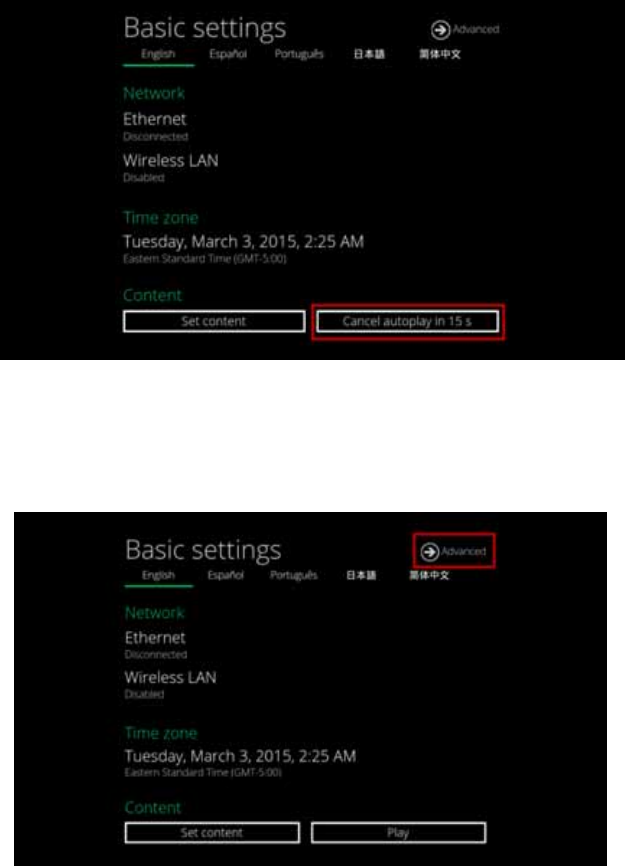
UserisabletoenterAdvancedSettingsbyclickingtheAdvancedbutton.
Toenterthemenusystematanytimeduringplayback,pluginaUSBmouseandholdtheleftmousekeyinthe
cornerareaasshownbelowfor10seconds.Iftheplayerhastouchscreen,thentappingandholdinginthe
cornerareasfor10secondswouldalsobringyoutothemenu.
*Playerwillaskforpasswordifpasswordhasbeenconfigured.
3
4.3. Connecttheplayertoyournetwork
Wirelessconnection
1 ClicktheWirelessLANsettingtolaunchthewirelessconfigurationUI.
(Fig.2.3.1)
2 ClicktheON/OFFbuttonasindicatedbelowtoturnONWirelessinterface(network).
(Fig.2.3.2)
3 Theplayerwillscanforwirelesssignalsnearbyandavailableaccesspointswillbelisted.
(Fig.2.3.3)
4 ClickonthenetworkIDtoconnect.Ifthenetworkrequiresauthentication,youwillbeaskedtoprovidea
password.

4
(Fig.2.3.4)
StaticIP–manuallyassignnetworkIPaddress
1 Checktheboxthatsays"Showadvancedoptions"
(Fig.2.3.5)
Clickdownarrowtohidekeyboardifneeded.
Youcanalsoscrolldown/swipetoseetherestofthemenu.
2 UnderIPsettings,changeDHCPtoStatic.
(Fig.2.3.6)
3 FilltheformandclickConnecttocompletethesetting.
(Scrolldown/swipetoseetherestofthemenuifneeded)
(Fig.2.3.7)

5
Wiredconnection
TousethewiredEthernetconnection,connectanEthernetcable.Ethernetconnectiontakeshigherpriority.
DHCP–automaticallyassignnetworkIPaddress
1 TurnonEthernet.IfusingDHCP,nofurtheractionisrequired.
(Fig.2.3.8)
StaticIP–manuallyassignnetworkIPaddress
1 ClickStaticIPSettingstoconfigurestaticIPaddress.
(Fig.2.3.9)
Proxysettings
1 InBasicsettings,clicktheAdvancedbutton,advancedconfigurationmenuwillbelaunched.
(Fig.2.3.10)
2 ClickNetwork,andthenclickAdvanced.

6
(Fig.2.3.11)
3 Proxysettingmenuwillbelaunched,inputproxyhostnameandport,thenclickDonetofinish
configuration.
(Fig.2.3.12)
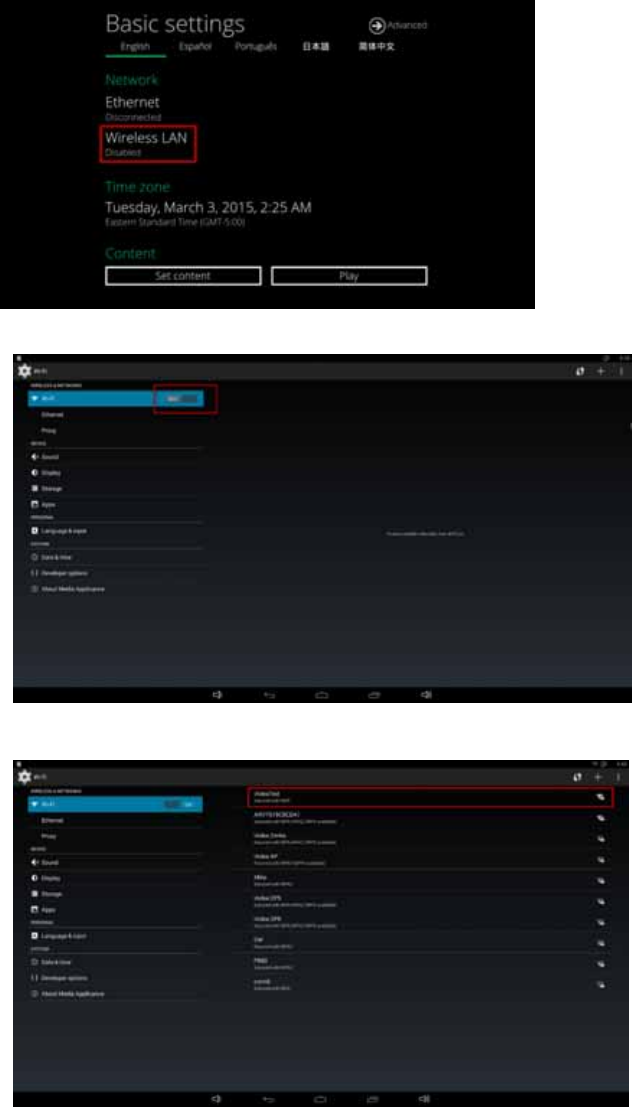
ShowIPsettings
1 InBasicsettings,clicktheAdvancedbutton,advancedconfigurationmenuwillbelaunched.(Fig.2.3.10)
2 ClickNetwork,andthenclickShowIP.
(Fig.2.3.13)
3 ThisfeatureistocontrolwhethertheIPaddressbeingdisplayedinBasicsettingsmenu.Thisisdefault
enabled.Whendisabled,Basicsettingswilldisplay“connected”insteadofIPaddress.
7
(Fig.2.3.14)
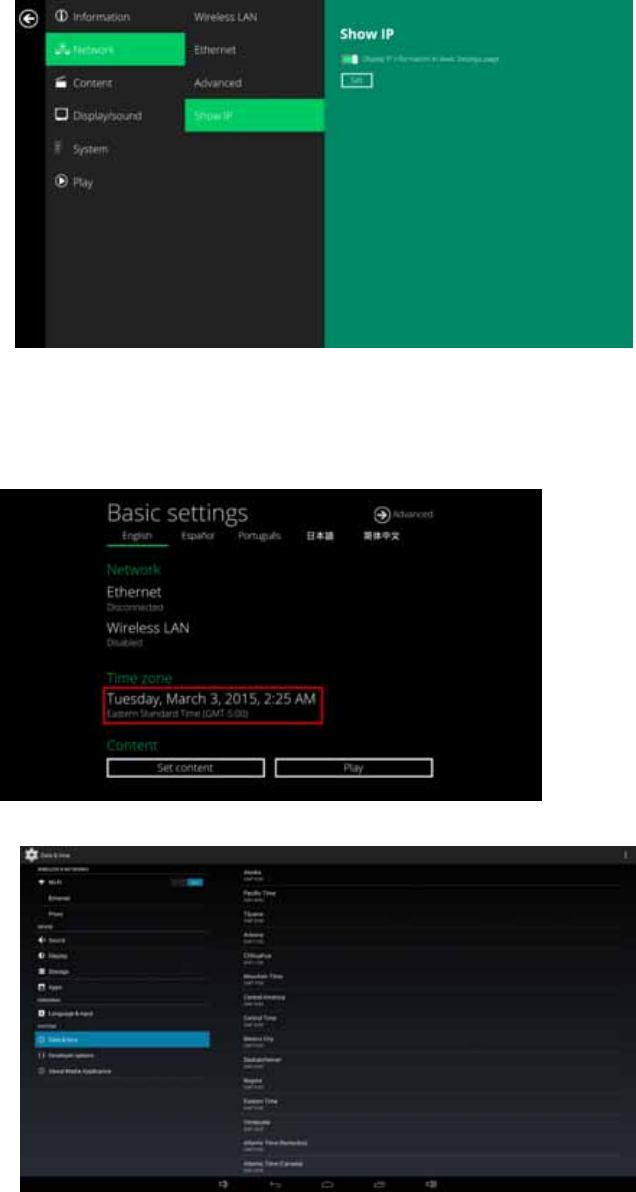
4.4. Timezonesettings
1 ClickTimezone.
(Fig.2.4.1)
2 Choosethecorrecttimezonefromtheavailableoptions.
(Fig.2.4.2)
8
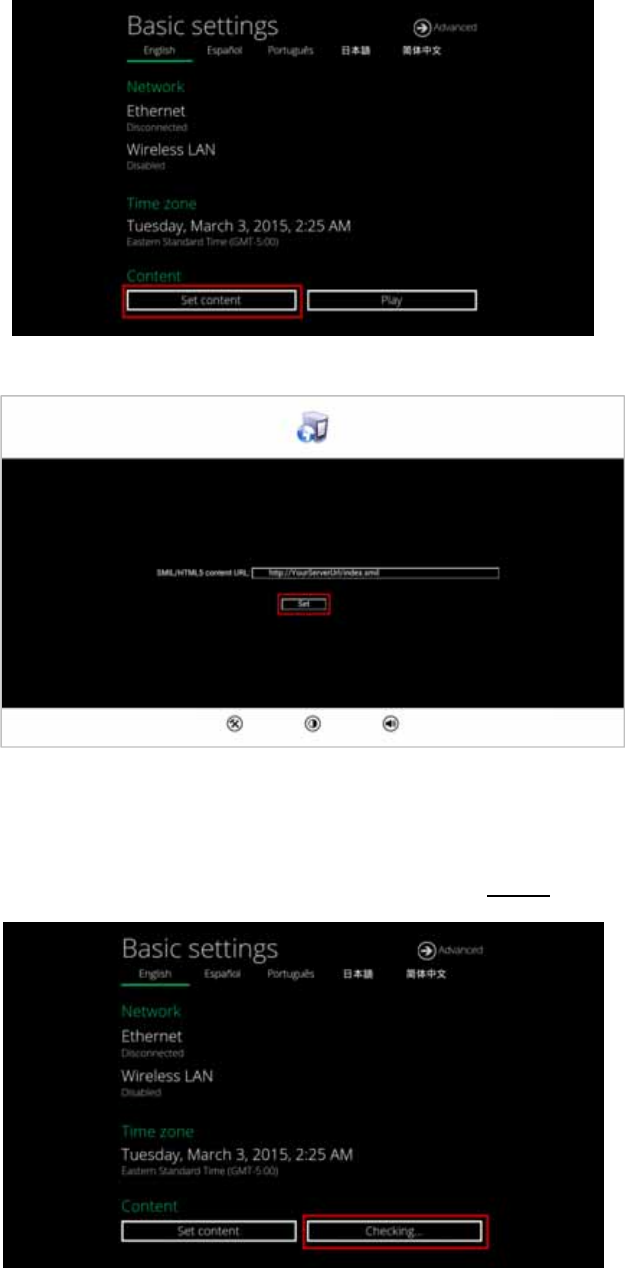
4.5. Contentsettings
1 ClicktheSetcontentbutton.
(Fig.2.5.1)
2 InputtheSMIL/HTML5contentURLandclickSet.ItwillreturntoBasicSettingsautomatically.
(Fig.2.5.2)
3 TheplayerwillchecktheavailabilityofSMIL/HTML5contentURL,withthePlaybuttonshowingChecking…
ThecheckingactioncanbecanceledbyclickingChecking…button,itwillchangebacktoPlay.
NOTE:
ItishighlyrecommendedtolettheplayerchecktheavailabilityofthecontentURL.ClickingPlaybuttonwith
abad/invalidURLsetwouldcausetheplayertoreboot,iftheFailSafefunctionisnotconfigured.
(Fig.2.5.3)
9
4 IftheSMIL/HTML5contentURLisavailable,thePlaybuttonwillchangetoa15‐secondcountdownandthe
playbackwillstartafterthecountdown.Thecountdowncanbecanceledbyclickingthebutton.
IfitkeepsshowingChecking…foralongtime,pleasegobacktoSetcontenttocheckthecorrectnessofthe
URL.
(Fig.2.5.4)
4.6. PlayerInformation
Usercanchecktheplayer’sbasicinformationincludingtheHealthstatus,Firmwareversion,andPlayerID.
1 ClicktheAdvancedbutton,advancedconfigurationmenuwillbelaunched.
(Fig.2.6.1)
2 ClickonInformation.ThedefinitionsoftheHealthStatus:
Green–Normal.ThedeviceisconnectedtotheURLserver.
Blue–Local.ThedeviceisplayingcontentfromtheUSBdriveorSDcard.
Gray–Disconnected.Thedeviceisdisconnected.

10
(Fig.2.6.2)
4.7. Contentconfiguration–AppStart
UsercanassigntheURLandAPPforexecutionrightafterthesystemstartsup.
1 ClicktheAdvancedbutton.(Fig.2.6.1)
2 ClickonContent,andthenclickonAppStart.
3 EnterthevalidURLofHTML/SMILinAppStart(Fig.2.7.1).IfyoualreadyconfiguredSMIL/HTML5content
URLvia”Setcontent”(Fig.2.5.2),theURLwouldbeshowedhere.
4 TheAdvancedoptionisusedfor3rd‐partyAppconfigurationonly.
(Fig.2.7.1)
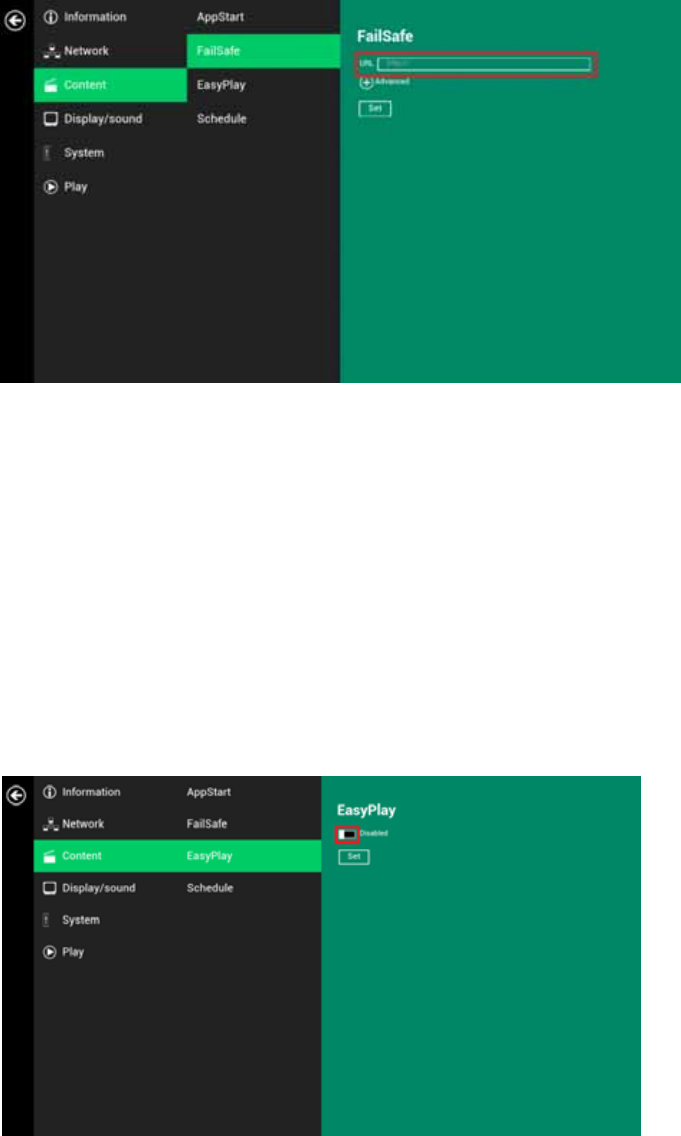
4.8. Contentconfiguration–FailSafe
UsercanassigntheURLandAPPforexecutionwhilethesystemhasfailedtoplaytheassignedcontent.
1 ClicktheAdvancedbutton,advancedconfigurationmenuwillbelaunched.(Fig.2.6.1)
2 ClickonContent,andthenclickonFailSafe.
3 EntertheURLofHTML/SMILinFailSafe.
4 TheAdvancedoptionisusedfor3rd‐partyAppconfigurationonly.
11
(Fig.2.8.1)
4.9. Contentconfiguration–EasyPlay
ThefeatureEasyPlayallowstheplayertoplaymediacontentfromtheUSBflashdrive(orMicroSDcard)directly.
Pleasenotemediafilesdoesnotcopiedtoplayer’sinternalstorage,soUSBflashdrive(orMicroSDcard)must
notberemoved.
WhenEasyPlayisenabled,theplayerwillplaycontentonlyfromtheUSBdrive(orMicroSDcard).Ifuserwants
toplaycontentfromtheURLserverconfiguredvia”Setcontent”,EasyPlaymustbedisabled.
1
InsertUSBdriveorMicroSDcardcontainingmediacontentthatyouwanttoplay.
2
ClicktheAdvancedbutton.(Fig.2.6.1)
3
ClickonContent,andthenclickonEasyPlay.
4
ClickDisabled/EnabledbuttontoenableEasyPlay,andchoosefrom2availableoperationmodes,Photo
ModeandMovieMode.
(Fig.2.9.1)
ConfigurePhotoMode
1
ClickonPhotoforchoosingphotosandmusic.Clickonthebuttonsasmarkedinredbelow,andselectthe
directoriesforphotosandmusicfromtheUSBdrive.
2
ClickSetbuttonafterselectingthedirectories.

12
(Fig.2.9.2)
ConfigureMovieMode
1
ClickonMovie.Clickonthebuttonasmarkedinredbelow,andselectthedirectoryformoviesfromtheUSB
drive.
2
ClickSetbuttonafterthefolderisselected.
3
ThefilesintheselectedfolderswillbeplayedafterclickingthePlaybuttonintheBasicorAdvancedsettings
menu.
(Fig.2.9.3)
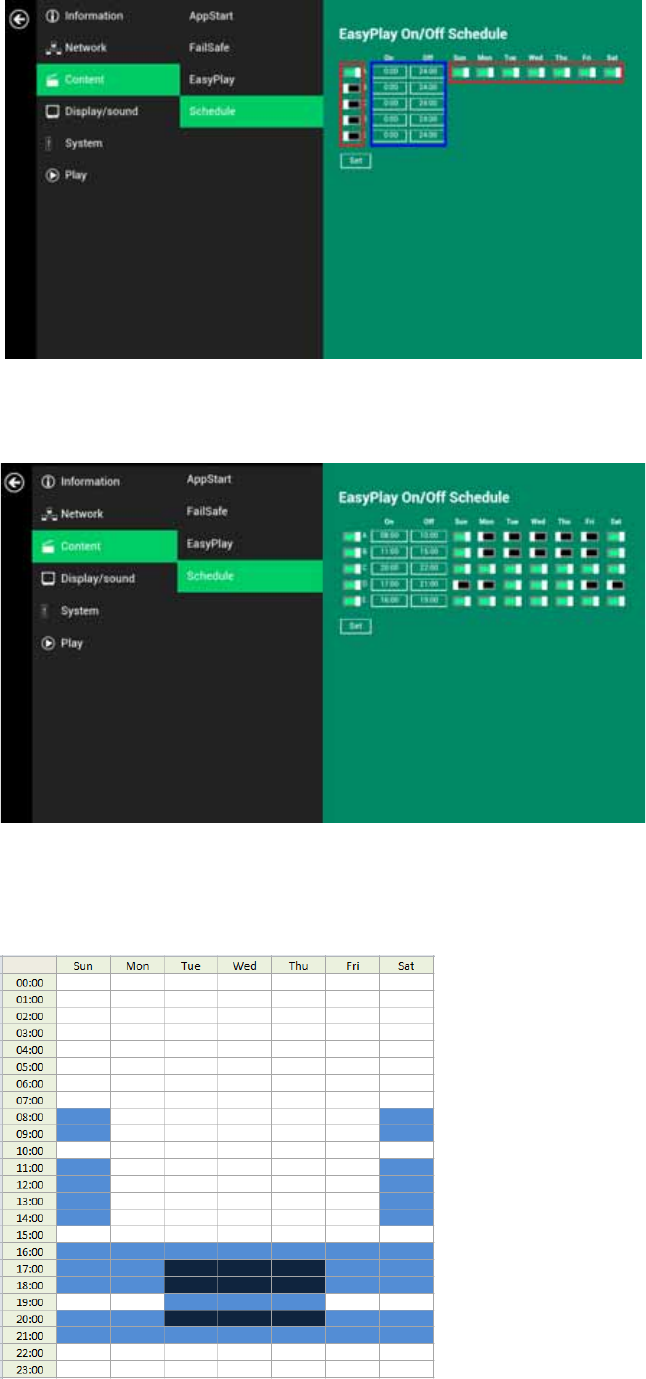
EasyPlayScheduleconfiguration
1
ClicktheAdvancedbutton.(Fig.2.6.1)
2
ClickonContent,andthenclickonSchedule.
3
Clickonthebuttonsmarkedinredbelowtoenable/disabletheEasyPlayscheduleforeachtimeslots.
Typethescheduledtimeinthedialogueboxesmarkedinbluebelowbyusingthepop‐upkeyboardorthe
USBkeyboard.
13
(Fig.2.9.4)
4
The"On"timesassignedinthetimeslotsA‐Eareinclusive.Forexample,ascheduleassignedastheexample
below:
(Fig.2.9.5)
Theexactplaybacktimewillbethetimeslotsmarkedinblueasshowninfigure2.9.6.Thedarkblueparts
aretheoverlaptimeofC/DandD/E.
(Fig.2.9.6)
14
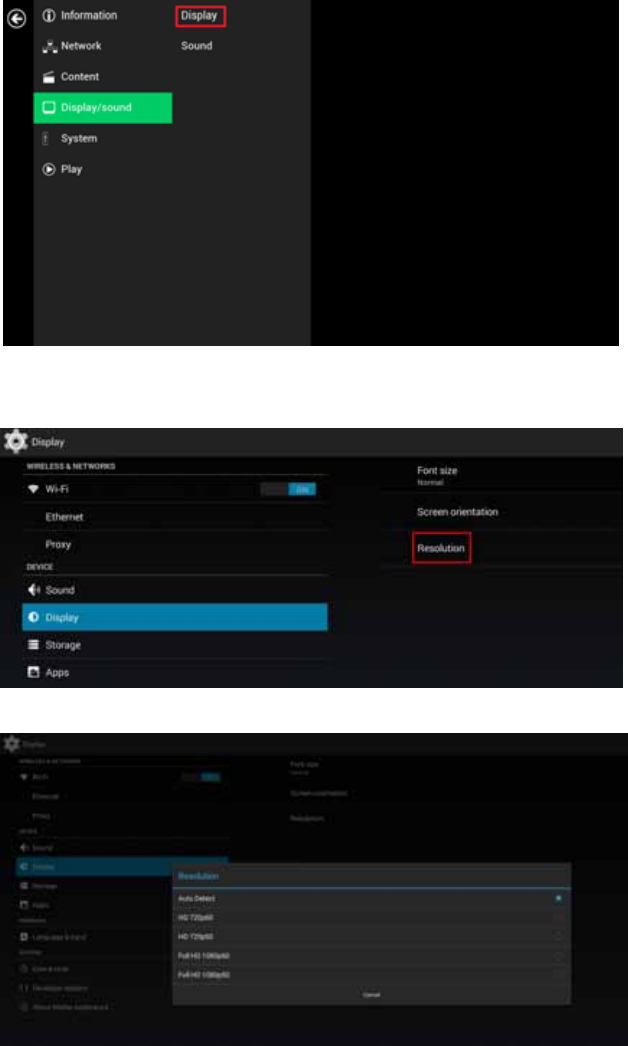
4.10. Displaysettings
Resolutionsettings(formediaplayers)
Forbestquality,settheoutputresolutiontomatchyourdisplay’snativeresolutiontoavoidimagescalingand
blur.
IfyouareconnectinganLCDcomputermonitor,projector,orplasmadisplay,refertothedevicespecifications
foroptimalsettings.
1
ClicktheAdvancedbutton,advancedconfigurationmenuwillbelaunched.(Fig.2.6.1)
2
ClicktheDisplay/soundbutton,andthenclickonDisplay.TheDisplaySettingspagewillbelaunched.
(Fig.2.10.1)
3
ClickonResolution,andselectsuitableresolutionfromthepopupmenu.DefaultconfigurationisAuto
Detect,playerwillautodetectandusethebestoptimizedresolutionthatyourdisplaysupports.
(Fig.2.10.2)
(Fig.2.10.3)

15
ResolutionandDualDisplay(forsignboards)
ThedefaultOutputmodeissetto"Panel".(Fig.2.10.4)WithOutputmodesetto“Panel”,thesignboardisONLY
displayingimageonthepanel.
(Fig.2.10.4)
Signboardssupportoutputtopanelandexternalmonitoratthesametime,tousethisfunction,please:
1 Check“Enabledualdisplay”intheDisplaymenu.(Fig.2.10.5)
2 ConnectsignboardtoamonitorviaHDMIport
3 SettheOutputmodetoasettingwhichbestmatchesthemonitor’sspecification.(Fig.2.10.6)
(Fig.2.10.5)
(Fig.2.10.6)

16
PanelBrightness(forsignboards)
Thedefaultpanelbrightnessissettomaximum,anditcanbeadjustedintheDisplaysettings.
1 ClicktheAdvancedbutton,advancedconfigurationmenuwillbelaunched.(Fig.2.6.1)
2 ClicktheDisplay/soundbutton,andthenclickonDisplay.TheDisplaySettingspagewillbelaunched.
(Fig.2.10.1)
3 ClickonBrightness.
(Fig.2.10.7)
4 Dragthebluedotmarkedinredbelowtoadjustthebrightness.ClickonOKtosavetheconfiguration.
(Fig.2.10.8)
Screenorientation
Screenorientationistosetthedisplaytorotate90/180/270degrees.
1 ClicktheAdvancedbutton,advancedconfigurationmenuwillbelaunched.(Fig.2.6.1)
2 ClicktheDisplay/soundbutton,andthenclickonDisplay.TheDisplaySettingspagewillbelaunched.
(Fig.2.10.1)
3 ClickontheScreenorientationmarkedinredbelow.

17
(Fig.2.10.9)
4
Clickonthepreferredanglefromthemenu.
(Fig.2.10.10)
4.11. Soundsettings
Tocontroltheoutputsoundvolumesandtouchsounds:
1
ClicktheAdvancedbutton,advancedconfigurationmenuwillbelaunched.(Fig.2.6.1)
2
ClicktheDisplay/soundbutton,andthenclickonSound.TheSoundSettingspagewillbelaunched.
(Fig.2.11.1)
3
ClickonVolumes,theVolumessettingspagewillbelaunched.Dragthebluesliderstoadjustthevolumesfor
theselectedoptions,andthenclickonOKtosavethenewsettings.

18
(Fig.2.11.2)
(Fig.2.11.3)
4.12. Systemconfiguration–Playername
Theplayer’snamecanbespecifiedsotheplayercanbeeasilyrecognizedinthemanagementsoftware.
(Managementsoftwaresupportisrequired)
1 ClicktheAdvancedbutton,advancedconfigurationmenuwillbelaunched.(Fig.2.6.1)
2 ClickonSystem,andclickonPlayername.
3 InputanameforthefieldandclickSet.
(Fig.2.12.1)
4.13. Systemconfiguration–Security
Apasswordcanbesettoprovideauthenticationforplayeraccess.Ifthepasswordisset,apasswordpromptwill
appearifauseristryingtoentertheBasicsettingsmenufromplayback.

19
1 ClicktheAdvancedbutton,advancedconfigurationmenuwillbelaunched.(Fig.2.6.1)
2 ClickonSystem,andclickonSecurity.
3 InputapasswordinthefieldandclickSet.
(Fig.2.13.1)
4.14. Systemconfiguration–TimeServer
Thefeatureallowsusertosynchronizeplayer’stimewiththewebserverwheretheappStartURLhosted,
disabledbydefault.
Whendisabled,playersynchronizeit’stimewithAndroiddefaulttimeserver(ntp.pool.org),thisrequires
internetconnection.
Whenenabled,playersynchronizeit’stimewiththewebserverwheretheappStartURLhosted(basedonhttp
responseheader’stime)
1 ClicktheAdvancedbutton,advancedconfigurationmenuwillbelaunched.(Fig.2.6.1)
2 ClickonSystem,andclickonTimeserver.
3 ClicktheUseAppStartURLastimeserverbuttonasmarkedinredbelowtoenable/disablethetimeserver
function.
4 ClickonSettosavethesetting.
(Fig.2.14.1)
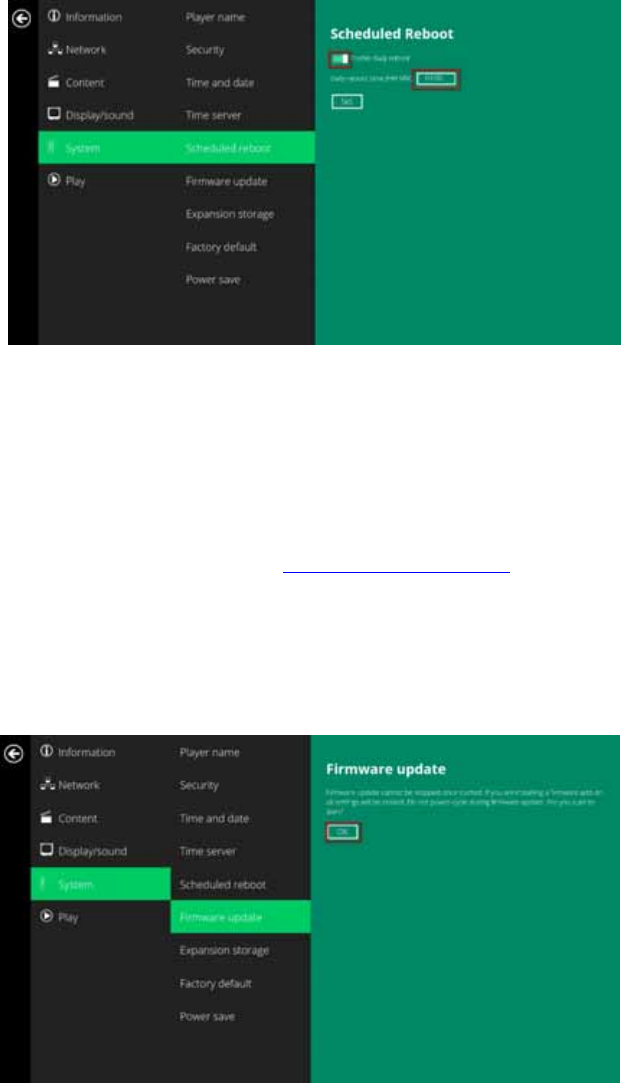
4.15. Systemconfiguration–Scheduledreboot
ThefeatureScheduledRebootallowstheplayertorebootontheassignedtimeautomaticallyeveryday.
20
1 ClicktheAdvancedbutton,advancedconfigurationmenuwillbelaunched.(Fig.2.6.1)
2 ClickonSystem,andclickonScheduledReboot.
3 ClicktheEnabledailyrebootbuttonasmarkedinredbelowtoenable/disablethedailyrebootfunction.
Clickonthedialogueboxtosetthetime.Thevaluecanbeinputtedwiththepop‐upkeyboardortheUSB
keyboard.
4 ClickonSettosavethesetting.
(Fig.2.15.1)
4.16. Systemconfiguration‐Firmwareupdate
FirmwareupdatescanbeperformedbyusingaUSBflashdrive.Pleasereadthereleasenotesregardingthe
changesthatwillbemadetoyourplayerbeforeapplyingtheupgrade.
IMPORTANT:DONOTunplugtheUSBdriveorpowerdowntheplayerwhilethesystemisperformingthe
firmwareupdate.
5 Downloadthelatestfirmwarefromhttp://www.digisignage.comandcopyittotherootdirectoryofaUSB
drive
6 Pluginthepowercordintothedevice.
7 Aftertheboot‐upcompletes,clicktheAdvancedbuttonontheBasicsettingsmenu.(Fig.2.6.1)
8 ClickonSystem,thenclickFirmwareupdate.
9 ClickonOKtobeginthefirmwareupdate.
(Fig.2.16.1)
10 PlugintheUSBdrivewhilethescreenshows“ScanningUSBdrivesforfirmwarepackage”.
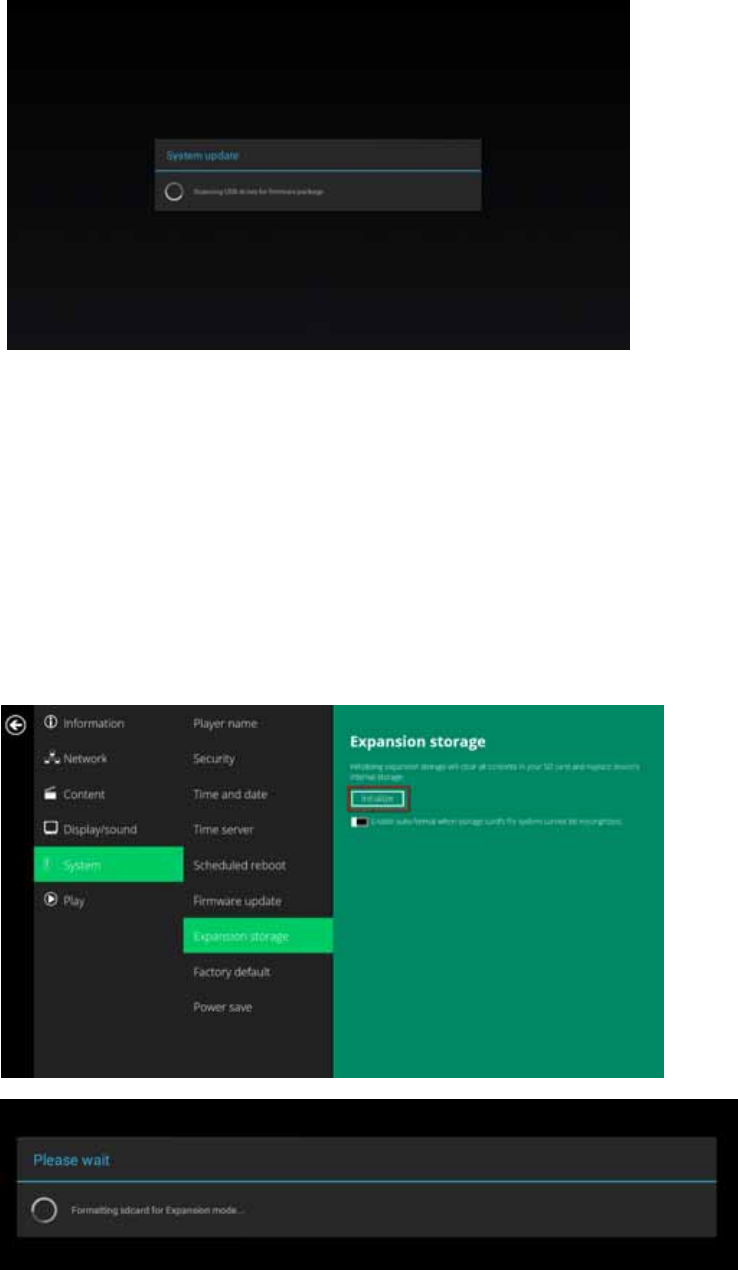
21
(Fig.2.16.2)
4.17. Systemconfiguration–Expansionstorage
UsercanaddextraMicroSDcardtoreplaceitsinternalstorage,pleasenotewheninternalstoragebeing
replaced,playeruseonlytheextraMicroSDcardasmainstorage,internalstoragewillnotbeused.
ManualExpansion
11 Poweroffdevice.
12 InsertMicroSDcardandthenpluginpowercordtopoweron.
13 IntheBasicsettingsmenu,clicktheAdvancedbutton,advancedconfigurationmenuwillbelaunched.
(Fig.2.6.1)
14 ClickonSystem,clickonExpansionstorageandclickInitialize,playerwillformatMicroSDcardthenreboot
byitself.
(Fig.2.17.1)
(Fig.2.17.2)
15 Afterbootup,checkplayerinformationandnewcapacitywillbedisplayed.
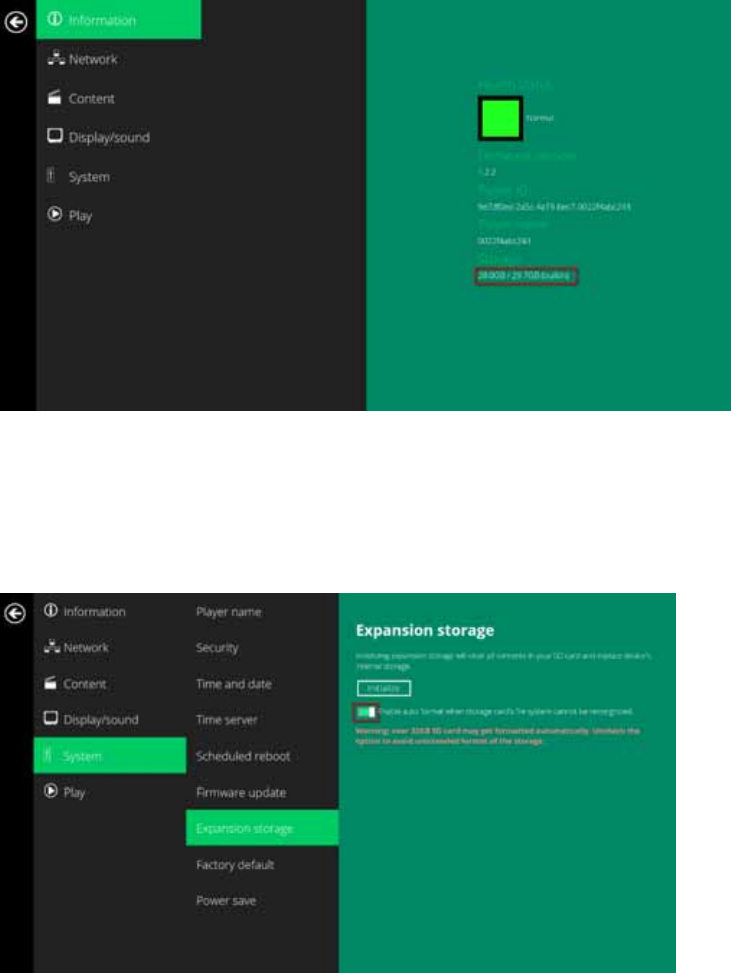
22
(Fig.2.17.3)
AutoExpansion
16 IntheBasicsettingsmenu,clicktheAdvancedbutton,advancedconfigurationmenuwillbelaunched.
(Fig.2.6.1)
17 ClickonSystem,clickonExpansionstorageandenableauto‐format.
(Fig.2.17.4)
18 Poweroffdevice.
19 InsertMicroSDcardandthenpluginpowercordtopoweron.
20 Afterbootup,checkplayerinformationandnewcapacitywillbedisplayed.(Fig2.17.3)
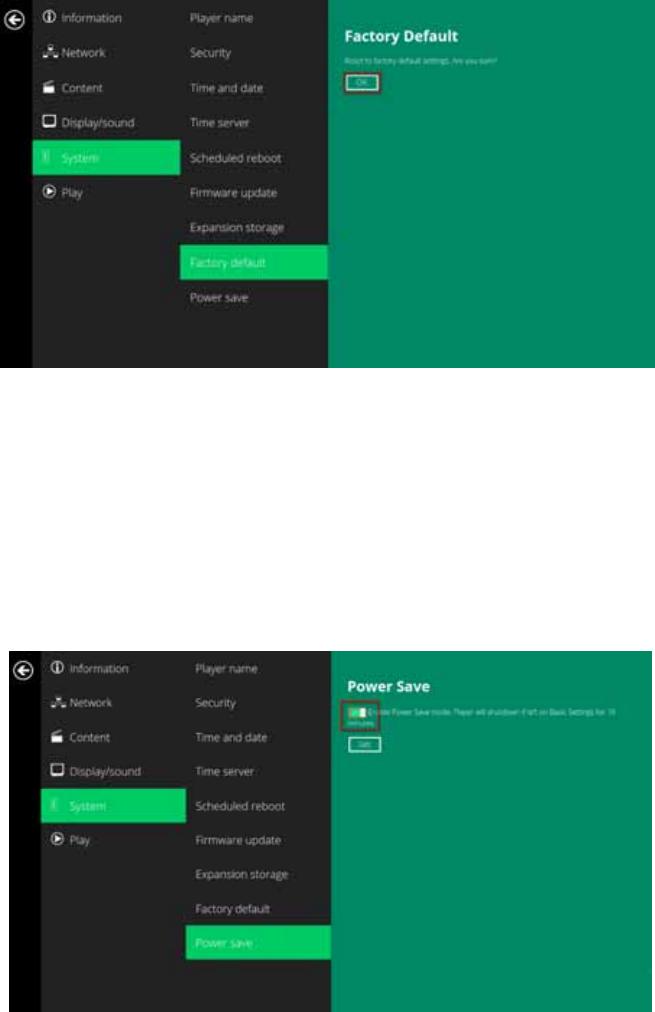
4.18. Systemconfiguration‐Factoryreset
Ifyouforgetthesystempasswordyouhaveset,youmustresetthesystemtoregainaccesstotheplayer.
Usingtheresetbutton
21 PRESSandHOLDtheresetbuttonwithapin.
22 RE‐CONNECTthepowercord.
23 WAITuntilthestatusLEDflashes.
24 RELEASEresetbuttonandwaitforsystemtoinitialize.
23
UsingaUSBmouse
Systemresetwillre‐initializethesystem,clearpasswords,andreturnsettingstotheirdefaultvalues.Performthe
following:
25 CONNECTaUSBmouseorusingtouchscreenforinput.
2 ClicktheAdvancedbutton,advancedconfigurationmenuwillbelaunched.(Fig.2.6.1)
3 ClickonSystemconfiguration,andchooseFactorydefault.
4 ClickonOKbuttontoperformthesystemreset.
(Fig.2.18.1)
4.19. Systemconfiguration–Powersave
ThePowersavefeatureallowstheplayertopoweroffautomaticallywhilestayingattheBasicsettingsmenu
withoutanyactiontakenfor10minutes.
1 ClicktheAdvancedbutton,advancedconfigurationmenuwillbelaunched.(Fig.2.6.1)
2 ClickonSystem,andclickonPowersave.
3 ClicktheEnablePowerSavemodebuttonasmarkedinredbelowtoenable/disablethepowersavefunction.
4 ClickonSettosavethesetting.
(Fig.2.19.1)

24
5. ContentManagement
Theplayerisdesignedtoworkwith3
rd
partymanagementsolutions.Pleaserefertotheprintedguideforrelated
setupinstructions.
6. AuthoringinHTML5
AmajoradvancementintheplayeristheabilitytoplaybackHTML5contentwhichcancontaindynamic
information.
TofindoutmoreaboutusingHTML5fordigitalsignage,visithttp://www.digisignage.com/
7. WorkingwithSMIL
Theplayerusesopencommunicationsprotocolsforcontentpresentationandplaybackcontrol.SMIL‐compliance
meanspredictableresultsacrossmultipledevices,andSMIL’snon‐proprietarynaturemeansthatyour
investmentsareneverobsolete.
7.1. Introduction
UsingSMIL(pronounced“smile”),thelanguagecreatedbyW3Cformultimediacommunications,themedia
playerunderstandsthelanguage“spoken”byprofessionaltoolsfromcompaniessuchasAdobe,Apple,Microsoft,
andRealNetworks.Whatthismeansisquicker,easier,andbetterintegrationofyourplayersintoyourdigital
signagenetworks,openingupavenuesofsoftwarecontrolsandrealizingthefullpotentialofyourplayer
hardwaredowntheroad.
7.2. www.a‐smil.orgfordevelopers
ThemediaplayeroperatingsystemutilizesW3CSMILastheunderlyingscriptinglanguage,whichlendswellto
customizationtoyourprojectmanagementneeds.Forresources,downloads,andcommunitysupport,please
visitwww.a‐smil.org.
8. Appendix:FAQ
WhatvideoformatcanIplay?
VideofilesencodedinMPEG‐4AVCupto1920x1080resolutionsandbitratesshouldplayperfectly.Ifacertain
videoisnotplayedasscheduled,orifitplayspoorly,pleasesearchthesupportsitefor“transcode”instructions.
TheplayerisplacednearmyWi‐Fiaccesspoint,yettheconnectionisunreliable.
Wi‐Fiappliancesingeneralshouldbeplaced10feet(3meters)fromtheWi‐Fiaccesspointforreliableoperation.
Tryrelocatingtheaccesspointfurtherawayfromtheplayertoimproveconnection.
IfbothEthernet&Wi‐Fiareconnected,whichonewilltakeprecedence?
Ifbothconnectionsareavailable,Ethernetwillbeused.
WhatshouldIdoifIforgotmypassword?
Pleaseperformafactoryreset.
UsetheS/WRESETbuttonlocatedatthebackofthemediaplayertorestorefactorysettings.Thiswillalsoclear
theplayer’spassword.

25
HowdoImanagetheplaybackofcontents?
Themediaapplianceisdesignedtobeinteroperablewithleading3rdpartymanagementsoftwaresolutionsorvia
SMILopenstandardcommands.
CouldtheplayerdisplayFlashorMicrosoftPowerPointpresentations?
TheplayerfeatureslimitedPowerPointsupport,butnotFlashsupport.
WhilePCscanplaymanyformatswithvaryingdegreesofsuccess,RISC‐basedmediaplayersaredesignedto
reliablyplayspecificvideoformats(seespecfordetails).WhileMicrosoftPowerPointnativefilescannotplay
directlyonaRISC‐basedplayer,thefilecanbeconverted(i.e.ManagerExpress)intoanimageformattobe
playedasanimageslideshow.
Whywon’tsomemediafilesplayproperly?
Thevideodatabit‐rateusedmayhaveexceededtherecommendedbitrate.
Thevideodatabit‐rateistheamountofvideooraudiodatausedpersecondtostoreorplaythecontents,
usuallyexpressedinMbps(mega‐bitspersecond).Videoencodedwithexcessivebit‐rateswillnotplayback
smoothlyinthemediaplayer,likelyduetostorageI/Obottleneck.
Visithttp://www.digisignage.comforcompatiblemediaformatpresets.
ThemediaplaybacklooksdifferentonaPCcomparedtothemediaplayer’sscreen.(Wrongaspect
ratio)
Thereare2majoraspectratios(width‐to‐heightratios)forvideocontent,butmanykindsofdisplays.Ifyouplay
4:3videoona16:9display(orviceversa),acirclebecomesoval,andthepicturetakesonasqueezedor
stretchedlook.Toavoidthisdistortedlook,addingblackbarsareacommontechnique.
TheNetworkMediaPlayercanbeconfiguredtoautomaticallyaddblackbarsforcertaintypesofdisplays.You
cansettheoutputresolutionintheplayer’sconfigurationmenutomatchthenativeresolutionofyourdisplay.
SomeJPEGimagescannotbeplayedinthemediaplayer.
ProgressiveJPEGfilesarenotsupported.PleaseconverttobaselineJPEGformaximumcompatibility.
JPEGimagescanbeeitherof2types:baselineorprogressivecompression.BaselineJPEGoffersgreatest
compatibility,whileprogressiveJPEGsaresuitableforwebsiteimages.Progressiveimagesaredownloadedand
displayed“progressively,”beingrenderedmoreclearlyasmoredataisreceivedovertheinternet.Progressive
imagesareprimarilysupportedonPCs.Formediaappliances,makesuretosaveimagesasbaselineJPEGinyour
photoeditor,orresavethemasbaselineJPEGsusingfreetoolssuchasIrfanView(http://www.irfanview.com/).
Doesthemediaplayersupportvideostreaming?
No.Mediaplayersplayfilesfromlocalstorageanddonotsupportreal‐timevideostreamingoverthenetwork.
Thisdeliversanoptimumviewingexperiencefreeofplaybackqualityissuessuchasstuttering,blocking,orblue‐
screens.
Theplayerisnotplaying.WhatshouldIdo?
Playlisterrorsandschedulingissuesaretwomajorcausesofplaybackproblems.Todetermineiftheproblemis
causedbyabadplaylist,justdeletetheplaylistandrestarttheplayer.Theplayershouldloopthroughallmedia
files,indicatingafaultwiththeplaylist.
Iftheplaybackisscheduledtoplayatspecifictime,checktoseeifthedeviceissettotherighttimezoneonthe
worldclock.Ifnothingseemswrong,thetimezonesettingisoftenthereasontheprogramisnotplayed.
ThevideoisplayingbutIcan’thearanysound,whatshouldIdo?
Checkvolume(mute)settingsonmonitor.
26
FederalCommunicationsCommission(FCC)Statement
15.21
Youarecautionedthatchangesormodificationsnotexpresslyapprovedbythepartresponsibleforcompliance
couldvoidtheuser’sauthoritytooperatetheequipment.
15.105(b)
ThisequipmenthasbeentestedandfoundtocomplywiththelimitsforaClassBdigitaldevice,pursuanttopart
15oftheFCCrules.Theselimitsaredesignedtoprovidereasonableprotectionagainstharmfulinterferenceina
residentialinstallation.
Thisequipmentgeneratesusesandcanradiateradiofrequencyenergyand,ifnotinstalledandusedin
accordancewiththeinstructions,maycauseharmfulinterferencetoradiocommunications.However,thereisno
guaranteethatinterferencewillnotoccurinaparticularinstallation.Ifthisequipmentdoescauseharmful
interferencetoradioortelevisionreception,whichcanbedeterminedbyturningtheequipmentoffandon,the
userisencouragedtotrytocorrecttheinterferencebyoneormoreofthefollowingmeasures:
‐Reorientorrelocatethereceivingantenna.
‐Increasetheseparationbetweentheequipmentandreceiver.
‐Connecttheequipmentintoanoutletonacircuitdifferentfromthattowhichthereceiverisconnected.
‐Consultthedealeroranexperiencedradio/TVtechnicianforhelp.
Thisdevicecomplieswithpart15oftheFCCRules.Operationissubjecttothefollowingtwoconditions:
1)thisdevicemaynotcauseinterferenceand
2)thisdevicemustacceptanyinterference,includinginterferencethatmaycauseundesiredoperationofthe
device.
FCCRFRadiationExposureStatement:
1. ThisTransmittermustnotbeco‐locatedoroperatinginconjunctionwithanyotherantennaortransmitter.
ThisequipmentcomplieswithFCCRFradiationexposurelimitssetforthforanuncontrolledenvironment.Thisequipment
shouldbeinstalledandoperatedwithaminimumdistanceof20centimetersbetweentheradiatorandyourbody
27
Canadian Notice
This device complies with Industry Canada license-exempt RSS standard(s). Operation is subject to
The following two conditions: (1) this device may not cause interference, and (2) this device must
accept any interference, including interference that may cause undesired operation of the device.
This device complies with the Canadian ICES-003 Class B specifications and RSS-247 of Industry
Canada.
This Class B digital apparatus meets all requirements of the Canadian Interference-Causing Equipment
Regulations. Wireless operation is subject to 2 conditions. The first is that the wireless device may not
cause interference. The second is that the wireless device must accept any interference, including
interference that may cause undesired operation of the device.
To comply with the Canadian RF exposure compliance requirements, this device and its antenna
must not be co-located or operating in conjunction with any other antenna or transmitter.
Avis Canadien
Le présent appareil est conforme aux CNR d'Industrie Canada applicables aux appareils radio
exempts
de licence. L'exploitation est autorisée aux deux conditions suivantes : (1) l'appareil ne doit pas
produire
de brouillage, et (2) l'utilisateur de l'appareil doit accepter tout brouillage radioélectrique subi, même si
le brouillage est susceptible d'en compromettre le fonctionnement.
Cet appareil est conforme à la norme canadienne NMB-003 classe B et CNR-247 d'Industrie Canada.
Ce dispositif numérique de classe B respecte toutes les exigences du Règlement canadien matériel brouilleur.
Fonctionnement sans fil est soumis à deux conditions. La première est que l'appareil sans fil peut ne pas
provoquer des interférences. La seconde est que le dispositif sans fil doit accepter toute interférence,
y compris les interférences qui peuvent causer un mauvais fonctionnement de l'appareil.
Pour se conformer aux exigences de conformité RF canadienne l'exposition, cet appareil et son antenne
ne doivent pas être co-localisés ou fonctionnant en conjonction avec une autre antenne ou transmetteur.
ThisradiotransmitterhasbeenapprovedbyIndustryCanadatooperatewiththeantennatypeslisted
belowwiththemaximumpermissiblegainindicated.Antennatypesnotincludedinthislist,havinga
gaingreaterthanthemaximumgainindicatedforthattype,arestrictlyprohibitedforusewiththis
device.
AntennaType:DipoleAntenna
Maximumpermissiblegain:3.92dBi