ICOM orporated 307600 Wideband Receiver User Manual 1
ICOM Incorporated Wideband Receiver 1
UserManual.wiki
>
ICOM orporated
>
307600 User Manual
>
User Manual 1
Contents
1.
User Manual 1
2.
User Manual 2
User Manual 1
Navigation menu
Upload a User Manual
Namespaces
Wiki Guide
HTML
PDF
Info
Views
User Manual
Discussion / Help
Navigation

![viiNew200112345678910111213141516171819 ■ Memory channel programming ����������������������������������������������48 ■ Selecting a memory channel �������������������������������������������������53 ■ Copying memory contents �����������������������������������������������������54 ■ Memory clearing ��������������������������������������������������������������������568 MENU SCREEN OPERATION ··············································57–70 ■ General ������������������������������������������������������������������������������57 ■ Menu list ������������������������������������������������������������������������������58 ■ MODE/TS/TONE set items ����������������������������������������������������60D Duplex direction (DUPLEX) �����������������������������������������������60D Offset frequency (OFFSET FREQ) ������������������������������������60D Tuning step (TS) ����������������������������������������������������������������61D Receiving mode (MODE) ���������������������������������������������������61D Tone squelch/DTCS squelch setting (TONE)���������������������62D Tone squelch frequency (TSQL FREQ) �����������������������������62D DTCS code (DTCS CODE)������������������������������������������������63D DTCS polarity (DTCS POLARITY) ������������������������������������63D Voice squelch control (VSC) ����������������������������������������������63 ■ SETTING menu items ������������������������������������������������������������64D AM antenna selection (AM ANTENNA) �����������������������������64D FM antenna selection (FM ANTENNA)������������������������������64D RF gain (RF GAIN) ������������������������������������������������������������65D Auto power OFF (AUTO POWER OFF) �����������������������������65D Auto power ON (AUTO POWER ON) ��������������������������������65D Power save (POWER SAVE) ���������������������������������������������65D Dial acceleration (DIAL SPEED-UP) ���������������������������������66D Key lock type (LOCK) ��������������������������������������������������������66D CI-V setting (CI-V SET) �����������������������������������������������������67• CI-V address (ADDRESS) �����������������������������������������������67• CI-V baud rate (BAUD RATE) ������������������������������������������67• CI-V transeive (TRANSCEIVE) ���������������������������������������67 ■ SOUNDS menu items ������������������������������������������������������������68D Key-touch beep (KEY-TOUCH BEEP) �������������������������������68D Beep output level (BEEP LEVEL) ��������������������������������������68D AF filter (AF FILTER) ���������������������������������������������������������68D Tone control (TONE CONTROL) ���������������������������������������69• Bass level (BASS) �����������������������������������������������������������69• Treble level (TREBLE) �����������������������������������������������������69 ■ DISPLAY menu items ������������������������������������������������������������70D Display backlighting (BACKLIGHT) �����������������������������������70D LCD contrast (LCD CONTRAST) ��������������������������������������70D Opening logo (OPENING LOGO) ��������������������������������������70D Font size (FONT SIZE) ������������������������������������������������������709 OTHER FUNCTIONS ····························································71–85 ■ Antenna selection ������������������������������������������������������������������71 ■ RF gain ����������������������������������������������������������������������������������72 ■ Attenuator function �����������������������������������������������������������������73 ■ Lock function ��������������������������������������������������������������������������73 ■ Duplex operation ��������������������������������������������������������������������74 ■ [DIAL] function assignment ����������������������������������������������������75 ■ Tone/DTCS squelch operation �����������������������������������������������76 ■ Tone squelch frequency/DTCS code setting �������������������������78 ■ DTCS polarity ������������������������������������������������������������������������79 ■ Tone search ���������������������������������������������������������������������������80 ■ Beep tones�����������������������������������������������������������������������������81 ■ Dial speed acceleration ���������������������������������������������������������81 ■ Power save ����������������������������������������������������������������������������81 ■ Auto power OFF���������������������������������������������������������������������82 ■ Auto power ON ����������������������������������������������������������������������82 ■ Display backlighting ���������������������������������������������������������������82 ■ Font size ��������������������������������������������������������������������������������82TABLE OF CONTENTS](https://usermanual.wiki/ICOM-orporated/307600.User-Manual-1/User-Guide-973370-Page-7.png)
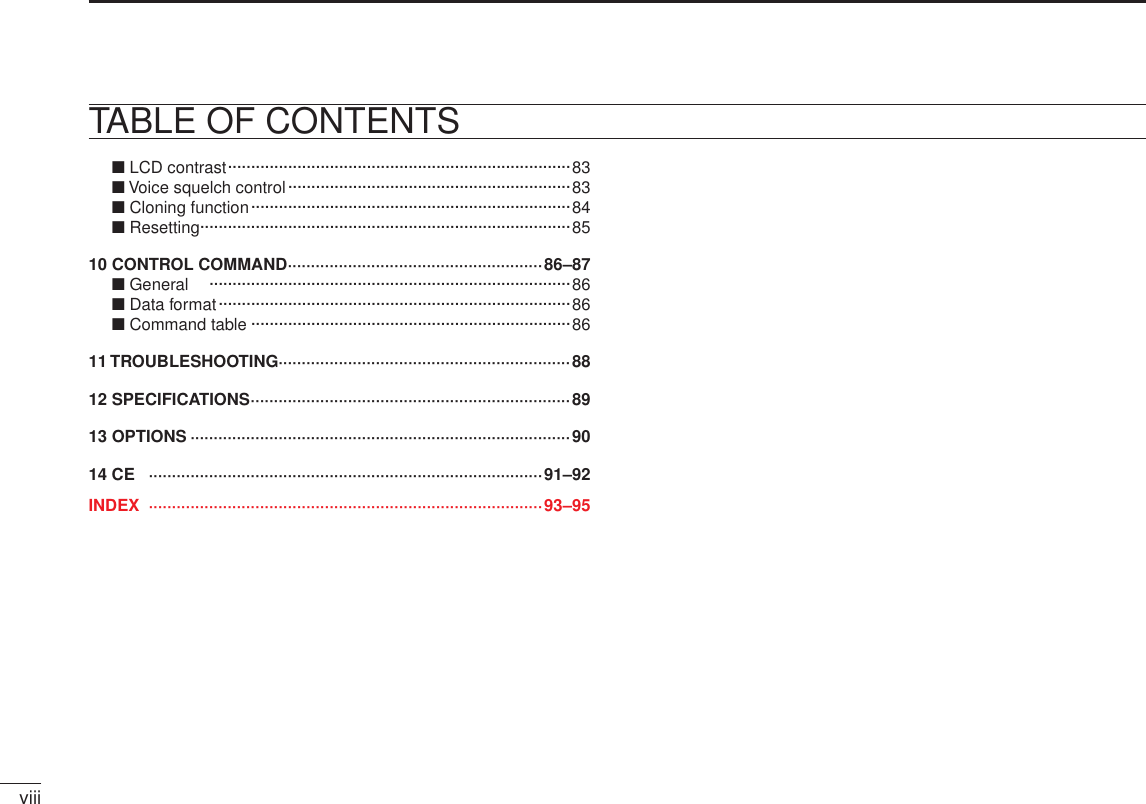
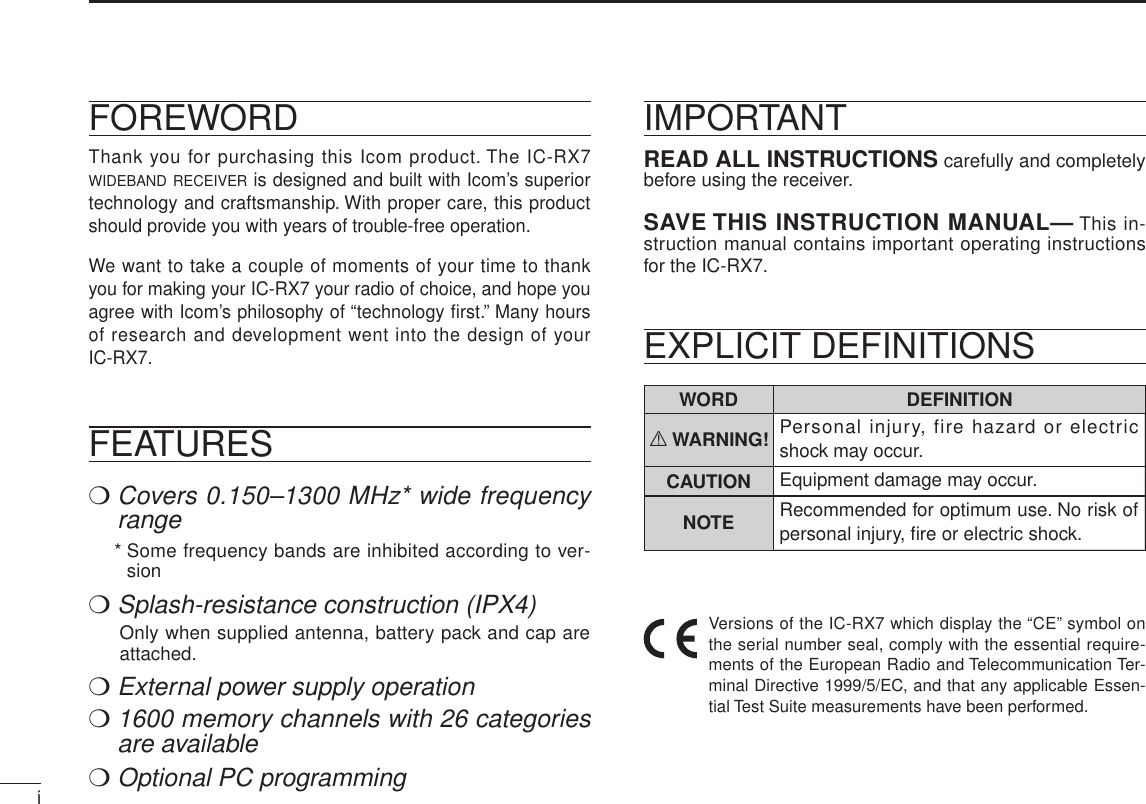
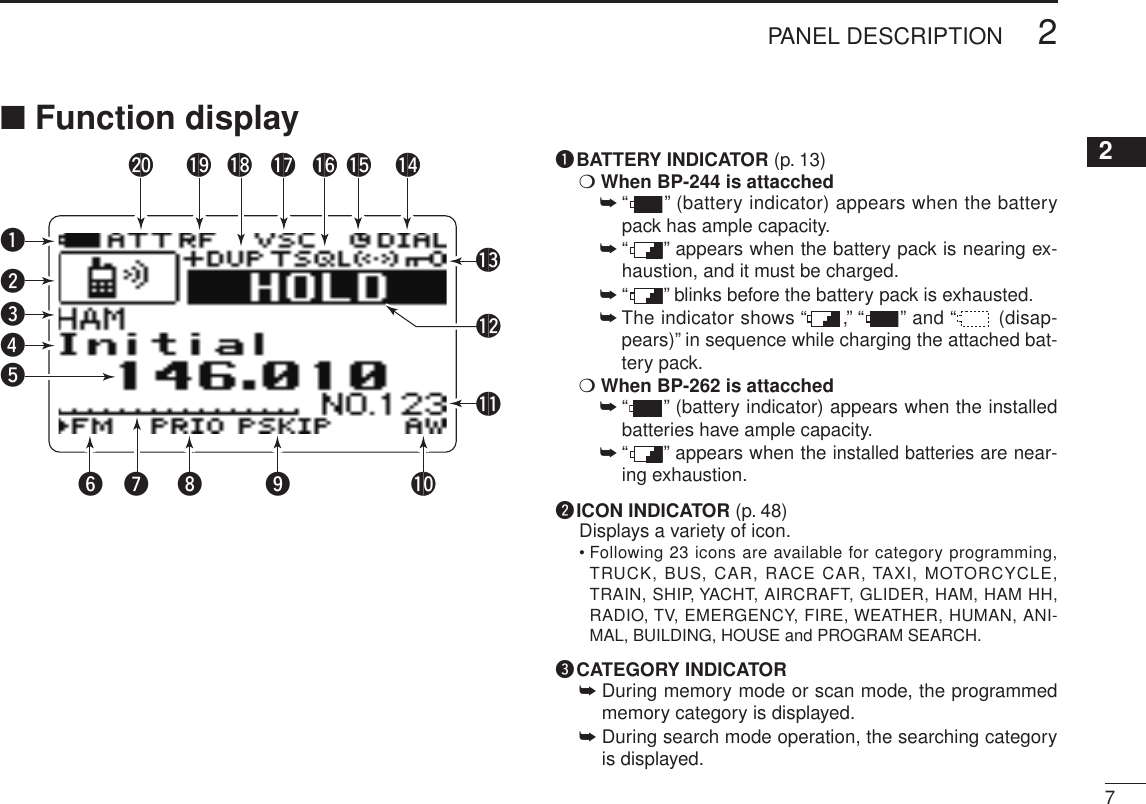
![■ Front, top and side panelsq ANTENNA CONNECTOR (p. 1)Connects the supplied antenna.• An optional AD-92SMA adapter (p. 90) is available for connect-ing an antenna with a BNC connector.w KEYPAD (pgs. 5, 6)e EXTERNAL DC IN JACK [DC 6V]Connects a battery charger or an optional CP-18A/E cigarette lighter cable for both charging the installed re-chargeable battery pack and operating.* r EXTERNAL SPEAKER/CLONE JACK [SP]Connect a clone cable, optional speaker or earphone, if desired.See page 90 for a list of available options.➥ Connect an optional earphone or headphone. The internal speaker will not function when any exter-nal equipment is connected.➥ Connects to a PC using an optional OPC-478/UC clon-ing cable for cloning. Cloning allows you to quickly and easily transfer the programmed contents between the IC-RX7 and the connected PC. (p. 84)➥ Connect an optional CT-17 for remote control operation. (p. 87)t CONTROL DIAL [DIAL]➥ During VFO mode or search holding state, rotate to tune the operating frequency. (p. 22)➥ During memory mode or scan holding state, rotate to select the memory channel. (p. 53)➥ While searching or scanning, changes the direction. (p. 18)➥ While monitor function is active, rotate to set the squelch level. (p. 15)➥ While in menu mode, rotate to select the set items or values. (p. 57)The assigned function for [DIAL] and [r]/[s] can be ex-changed by pushing and holding [NO. DIAL].New20014New2001PANEL DESCRIPTION26VSPDCMWMENUENTHOLD VSCAN.1472580369SKIPNO.CLRSQLDIALSEARCHATTqSpeakerFront view Side viewFunction displaywter](https://usermanual.wiki/ICOM-orporated/307600.User-Manual-1/User-Guide-973370-Page-12.png)
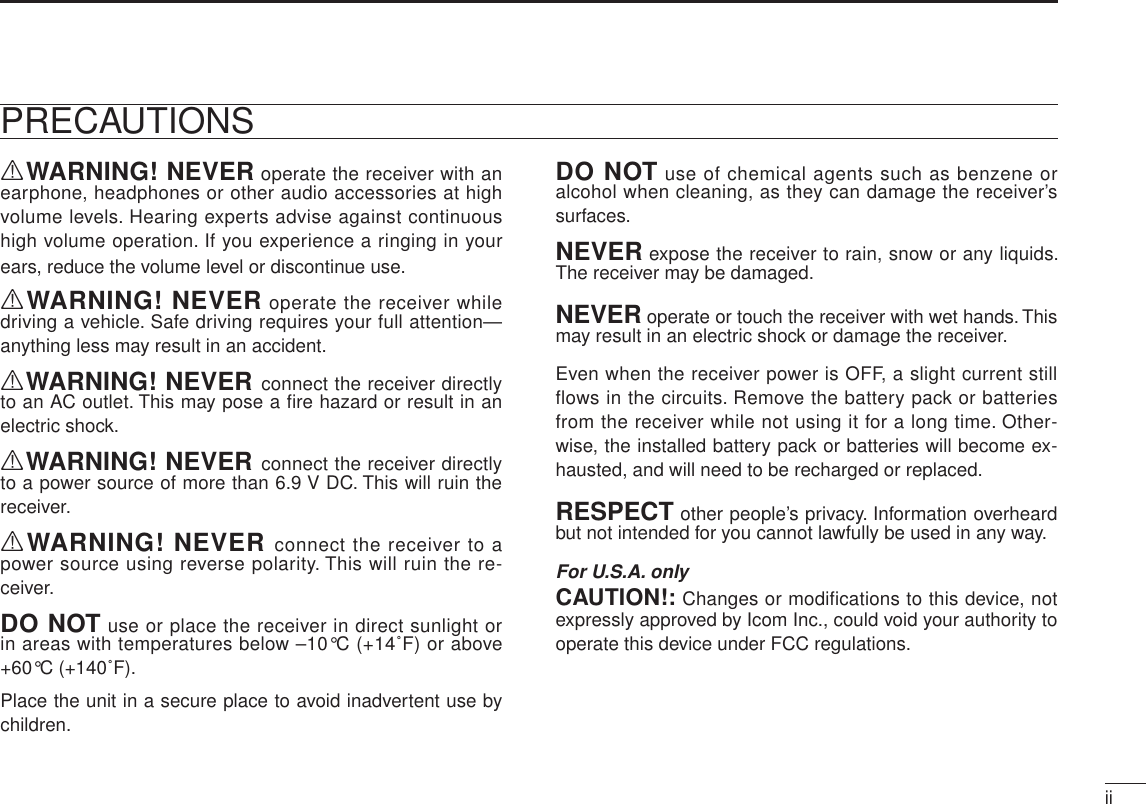
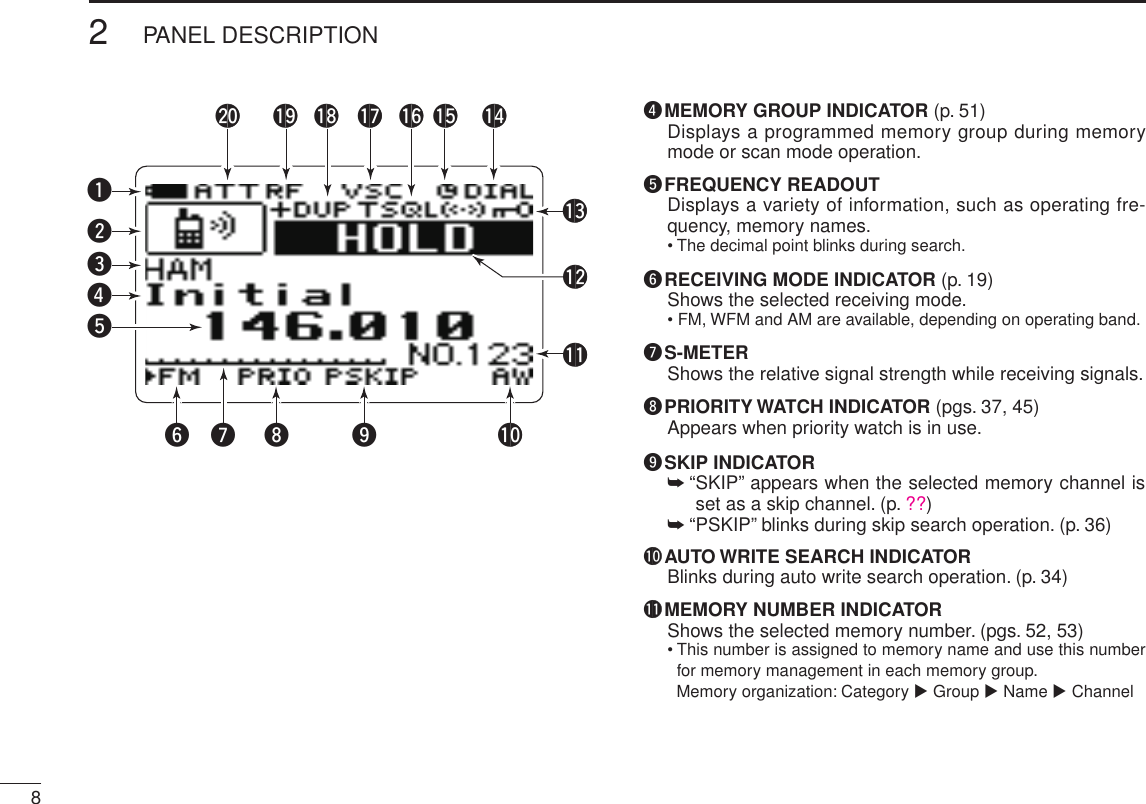
![New200152PANEL DESCRIPTION2KEYPADNUMERAL KEYS [0] to [9]09➥ Enter the frequency in VFO mode or memory programming state. (pgs. 20, 21, 53)➥ After pushing [NO. DIAL], select the memory name number directly in scan mode. (p. 53)➥ After pushing [• ATT], turn the scan link set-ting ON and OFF in scan mode. (p. 49)NUMBER/SQUELCH KEY [NO. DIAL]DIALNO.➥ After pushing this key, push numeral keys to select the memory channel name in the mem-ory group directly in scan mode. (p. 53)➥ Push and hold for 1 sec. to exchange the assigned functions for [DIAL] and [r]/[s]. (p. 75)CLEAR/SQUELCH KEY [CLR SQL]SQLCLR➥ Aborts numeral key input. (p. 20)➥ Push to return to previous operating condition while memory channel programming or while in menu screen operation. (p. 57)➥ Push and hold for 1 sec. to open the squelch temporarily and monitor the operating fre-quency. (p. 15)➥ After pushing and holding this key for 1 sec., rotate [DIAL] to adjust the squelch level. (p. 15)HOLD/VFO KEY [HOLD V]HOLD V➥ Push to stop searching or scanning temporar-ily, and push again to return previous condi-tion. (p. 18)➥ Push and hold for 1 sec. to select VFO mode. (p. 16)SCAN KEY [SCAN]SCAN➥ Push to start a scan. (p. 18)➥ Push and hold for 1 sec. to enter SCAN menu. SEARCH KEY [SEARCH]SEARCH➥ Push to start a search. (p. 26)➥ Push and hold for 1 sec. to enter SEARCH menu.ATTDIALSQLMWSCANSEARCH1472580369SKIPMENUCLRENTNO..HOLD VATTDIALSQLMWSCANSEARCH1472580369SKIPMENUCLRENTNO..HOLD V](https://usermanual.wiki/ICOM-orporated/307600.User-Manual-1/User-Guide-973370-Page-13.png)
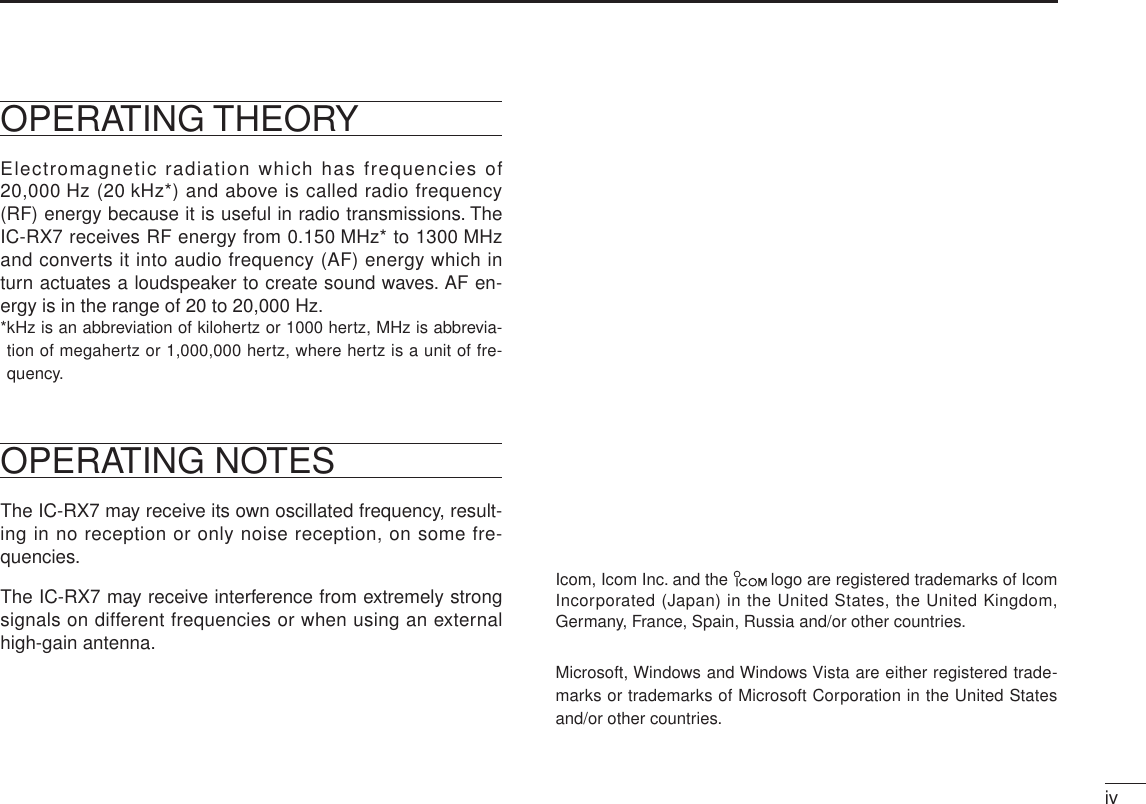
![New200162PANEL DESCRIPTIONNew2001POWER KEY [ ] Push for 1 sec. to turn the receiver power ON and OFF. (p. 14)ATTENUATOR KEY [• ATT]ATT➥ Push to input MHz digit for frequency entry. (pgs. 20, 21)➥ After pushing this key, push numeral keys to turn the link setting ON and OFF during link scan. (p. 49)• Direct key number 0 to 9 can be selected by nu-meral key only. ➥ Push and hold for 1 sec. to turn the attenuator function ON and OFF. (p. 73)SKIP KEY [SKIP]SKIP➥ Push to set the memory channel as the follow-ing skip channel during scan holding state in order. (p. 44)• Skip channel — “SKIP” appears. • Frequency skip channel — “PSKIP” appears. • Non-skip channel — no skip indicator appears.➥ Push and hold for 1 sec. to program a paused frequency as a skip frequency during search. (p. 36)➥ Push and hold for 1 sec. to select the group skip setting ON and OFF during link scan. (p. 44)ENTER/MEMORY WRITE KEY [ENT MW]MWENT➥ During VFO mode, search holding state or scan holding state, push to enter memory pro-gramming state. (p. 48)➥ Push and hold for 1 sec. to turn the auto write search function ON and OFF. (p. 34)➥ Push and hold for 2 sec. to write the operating frequency into the selected memory channel in memory programming state.MENU/LOCK KEY [MENU ]MENU➥ Push to select menu screen indication ON. (p. 57)➥ Push and hold for 1 sec. to toggle the lock function ON and OFF. (p. 73)LEFT/RIGHT KEY [v]/[w]➥ During VFO mode or search mode, push to select the operating frequency band. (p. 16)➥ During VFO mode, push and hold for 1 sec. to select and toggle 1 MHz and 10 MHz tuning steps. (p. 22)➥ During memory mode or scan mode, push to select the group. (p. 18)➥ During memory mode or scan mode, push and hold for 1 sec. to select the category. (p. 18)UP/DOWN/VOLUME CONTROL KEY [r]/[s]➥ Adjust audio volume level. (p. 14)➥ While in menu screen operation, push to se-lect the set items or values. (p. 57)The function of tuning control and volume control can be traded. See page 75 for details.](https://usermanual.wiki/ICOM-orporated/307600.User-Manual-1/User-Guide-973370-Page-14.png)
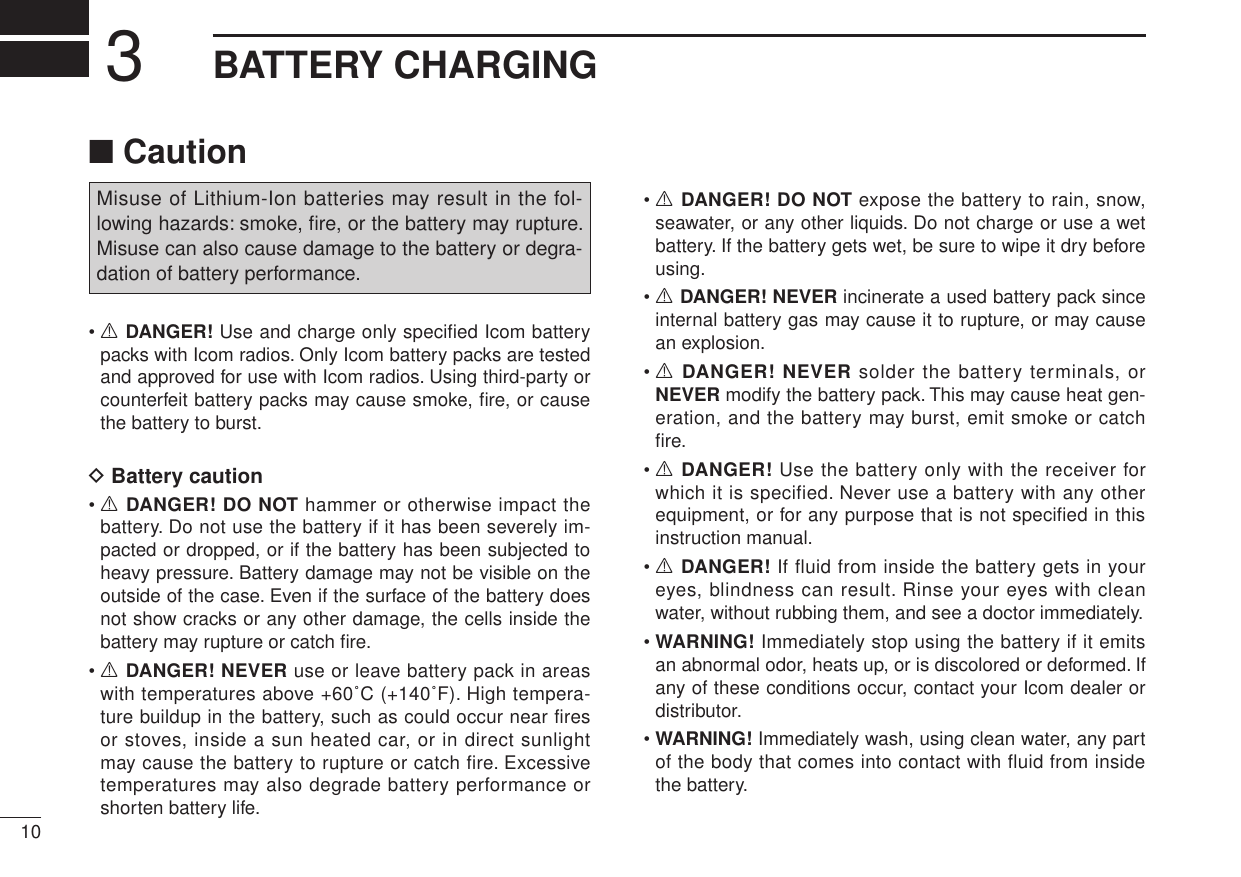
![New200192PANEL DESCRIPTION12345678910111213141516171819!2 STATUS INDICATORShows the receiver’s status such as “HOLD,” “SCAN,” “SEARCH” or “MEMORY.”!3 KEY LOCK INDICATOR (p. 73)Appears when the key lock function is activated.!4 DIAL STATUS INDICATOR (p. 75)➥ “ DIAL” appears when [DIAL] is assigned as frequency control. • In this case, [r]/[s] keys are activate for volume control.➥ “ VOL” appears when the [DIAL] is assigned as volume control. • In this case, [r]/[s] keys are activate for frequency control.!5 AUTO POWER OFF INDICATOR (p. 82)Appears when the auto power OFF function is in use.!6 TONE SQUELCH INDICATOR (pgs. 76, 77)Available only when FM mode is selected.➥ “ TSQL” appears while the tone squelch function is in use. (p. 124)➥ “ TSQL-R” appears while the reverse* tone squelch function is in use. (p. 124)➥ “ DTCS” appears while the DTCS squelch function is in use. (p. 124)➥ “ DTCS-R” appears while the reverse* DTCS squelch function is in use. (p. 124)➥ “ S” appears with the “TSQL” or “DTCS” indicator while the pocket beep function (with CTCSS or DTCS) is in use. (p. 125)*: Reverse tone squelch or reverse DTCS squelch closes when the signal is received with matched tone or DTCS.!7 VOICE SQUELCH CONTROL INDICATOR (p. 83)Appears when VSC (Voice squelch control) function is in use.!8 DUPLEX INDICATOR (pgs. 74, 75)“ +DUP” appears when plus duplex, “–DUP” appears when minus duplex is selected.!9 RF GAIN INDICATOR (p. 72)“RF” appears when the RF gain is adjusted other than “MAX.” @0 ATTENUATOR INDICATOR (p. 73)Appears when the RF attenuator is in use.](https://usermanual.wiki/ICOM-orporated/307600.User-Manual-1/User-Guide-973370-Page-17.png)
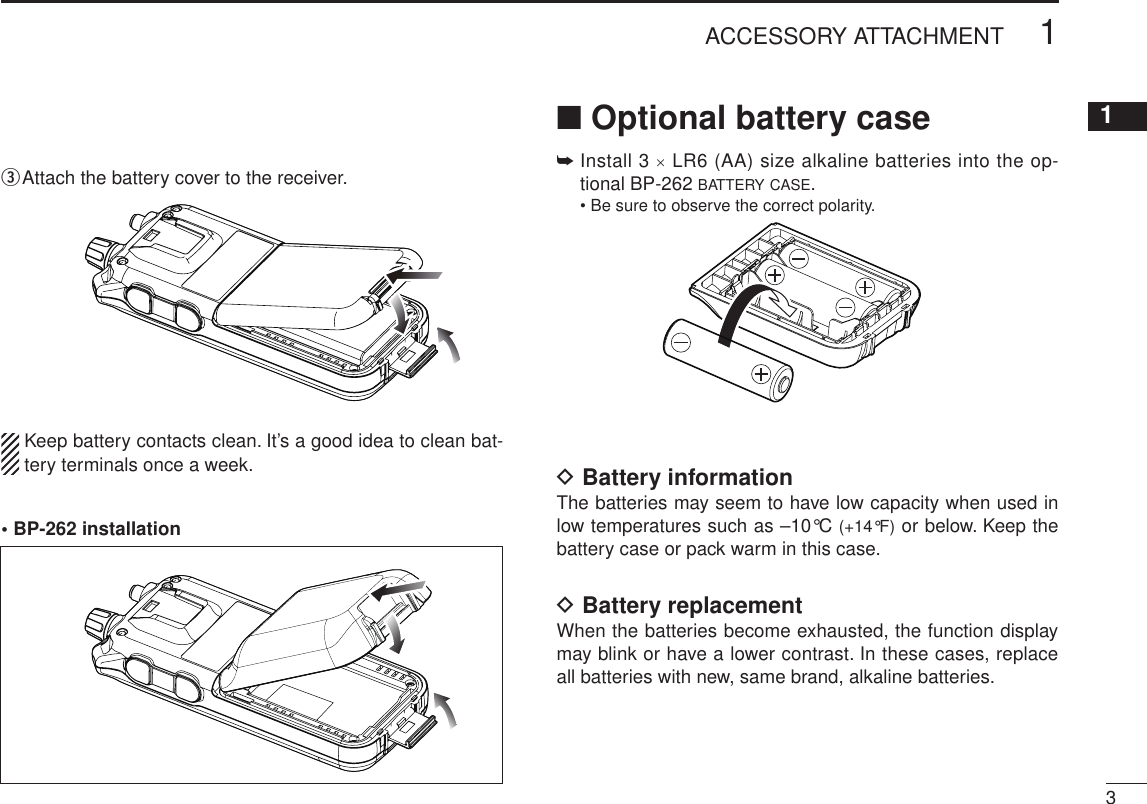
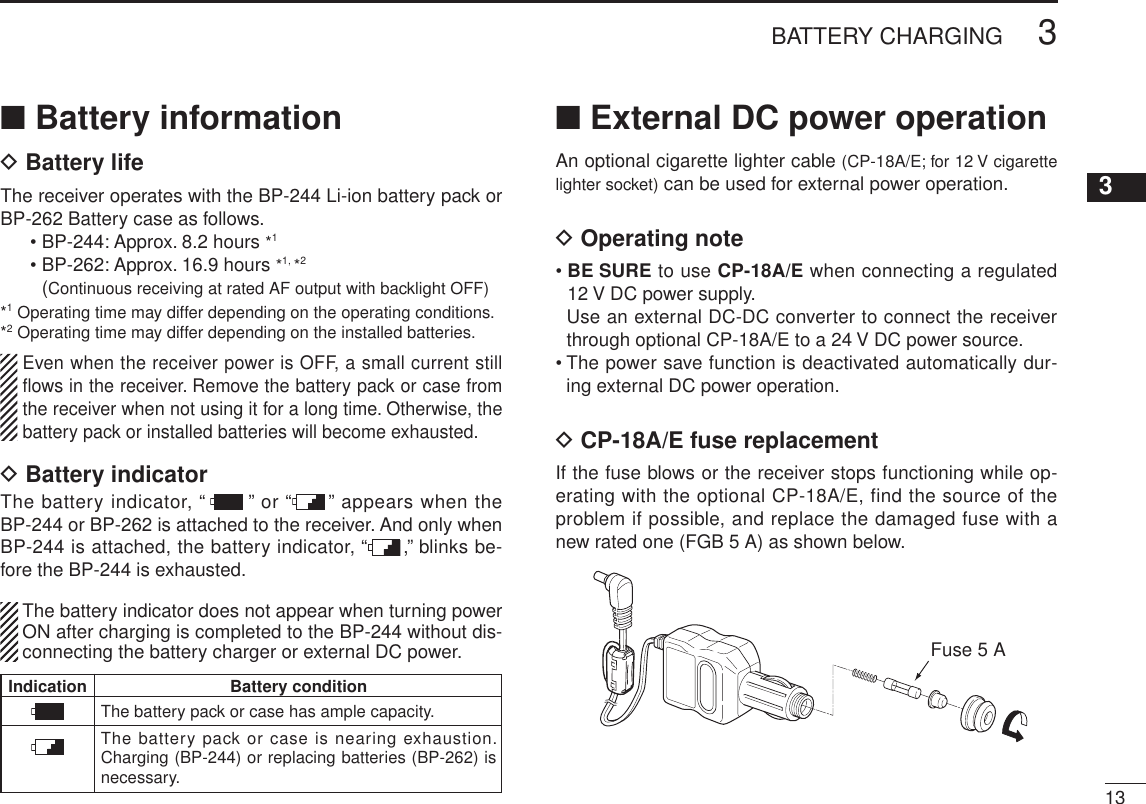
![New2001123BATTERY CHARGINGNew2001■ ChargingPrior to using the receiver for the first time, the battery pack must be fully charged for optimum life and operation.D Battery indicator and charging indicatorWhen the receiver’s power is ON, the battery indicator shows “ ,” “ ” and “ (disappears)” in sequence while charging, and indicator disappears when completely charged.When the receiver’s power is OFF, the charging indicator shows “ ,” “ ” and “ ” in sequence with “Charg-ing...” while charging, and indicator disappears when com-pletely charged.D Charging note• Be sure to turn the receiver power OFF.Otherwise the battery pack will not be charged completely or takes longer to charge time periods.• External DC power operation becomes possible when using an optional CP-18A/E. The attached battery pack is also charged simultaneously. • If your battery pack seems to have no capacity even after being charged, fully charge the battery pack again. If the battery pack still does not retain a charge (or very little), a new battery pack must be purchased.q Insert the battery pack (BP-244) into the receiver. (p. 2)w Plug the battery charger (BC-149A/D*) into an AC outlet; or the optional CP-18A/E into a cigarette lighter socket. * Not supplied with some versions.e Turn OFF the receiver, then insert the adapter plug into [DC 6V] of the receiver. CAUTION: BE SURE to disconnect the CP-18A/E from the cigarette lighter socket when charging is finished, be-cause, a slight current still follows in the CP-18A/E and the vehicle’s battery will become exhausted.Optional CP-18A/ECigarette lighter cablewith DC-DC converterto AC outletto cigarettelighter socketBattery charger BC-149A/Dto[DC 6V]jackIC-RX7Charging periods: approx. 5 hoursTurn power OFF.](https://usermanual.wiki/ICOM-orporated/307600.User-Manual-1/User-Guide-973370-Page-20.png)
![14New2001BASIC OPERATION4■ Power ON➥ Push and hold [ ] for 1 sec. to turn power ON.MWMENUENTHOLD VSCAN.1472580369SKIPNO.CLRSQLDIALSEARCHATT■ Setting audio volume➥ Push [r] or [s] several time to adjust the audio level. • If squelch is closed, push and hold [CLR SQL] for 1 sec. to activate the monitor function ON while setting the audio level Push [CLR SQL] again to return to normal operating mode.• The display shows the volume level while setting.MWMENUENTHOLD VSCAN.1472580369SKIPNO.CLRSQLDIALSEARCHATTCLRSQLMinimum setting(no audio)Volume level indicatorMaximum settingWhile in menu mode or memory programming state, audio volume cannot be adjusted.Beep level is adjustable in SOUNDS menu.New2001 MENU ➪ SOUNDS ➪ BEEP LEVEL (p. 68)](https://usermanual.wiki/ICOM-orporated/307600.User-Manual-1/User-Guide-973370-Page-22.png)
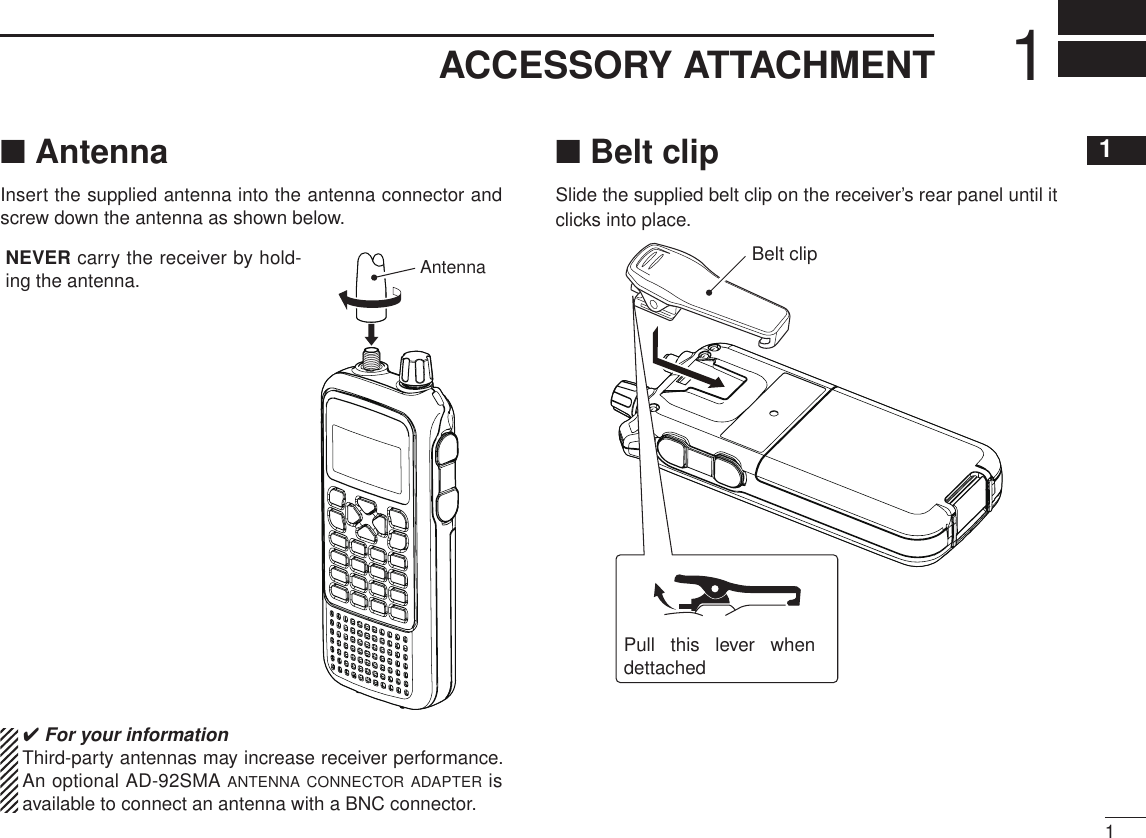
![New2001154BASIC OPERATION12345678910111213141516171819■ Setting squelch levelThe squelch circuit mutes the received audio signal depend-ing on the signal strength. The receiver has 9 squelch levels, a continuously open setting and an automatic squelch set-ting.➥ After pushing and holding [CLR SQL] for 1 sec., rotate [DIAL] to select the squelch level.• “ LEVEL 1” is loose squelch (for weak signals) and “LEVEL 9” is tight squelch (for strong signals).• “ AUTO” indicates automatic level adjustment by a noise pulse counting system.• “OPEN” indicates continuously open setting.• Push [CLR SQL] to return to normal operating mode.MWMENUENTHOLD VSCAN.1472580369SKIPNO.CLRSQLDIALSEARCHATTCLRSQL[DIAL]Automatic squelchMaximum level■ Monitor functionThis function is used to listen to weak signals without dis-turbing the squelch setting or to open the squelch manually even when mute functions such as the tone squelch are in use.➥ Push and hold [CLR SQL] for 1 sec. to monitor the oper-ating frequency. • Push [CLR SQL] to clear the monitor function.MWMENUENTHOLD VSCAN.1472580369SKIPNO.CLRSQLDIALSEARCHATTCLRSQLThe 1st segment blinks The squelch adjustment is available when the monitor function is activate. See left content for details.](https://usermanual.wiki/ICOM-orporated/307600.User-Manual-1/User-Guide-973370-Page-23.png)
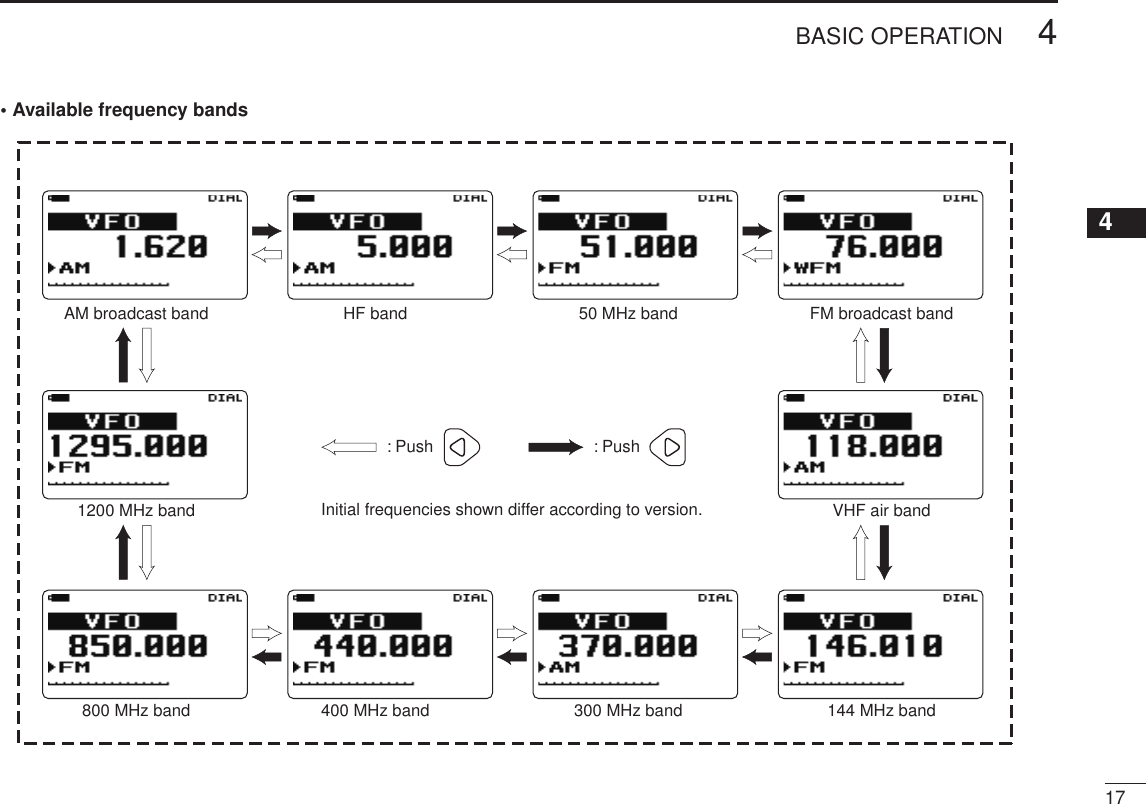
![New2001164BASIC OPERATIONNew2001■ Operating mode selectionD VFO modeVFO mode is used for the desired frequency setting within the frequency coverage.➥ Push and hold [HOLD V] for 1 sec. to select VFO mode.MWMENUENTHOLD VSCAN.1472580369SKIPNO.CLRSQLDIALSEARCHATTHOLD V• VFO mode indicationWhat is VFO?VFO is an abbreviation of Variable Frequency Oscillator. Fre-quencies for receiving are generated and controlled by the VFO.D Operating band selectionThe receiver can receive the AM broadcast, HF bands, 50 MHz, FM broadcast, VHF air, 144 MHz, 300 MHz, 400 MHz, 800 MHz* or 1200 MHz bands. ➥ In VFO mode, push [v] or [w] several times to select the desired frequency band. • If VFO mode is not selected, such as a scan mode or memory mode, or weather channel,† push and hold [HOLD V] to select VFO mode first, then push [v] or [w] to select the desired band. († Available for USA and CANADA versions only.) • Search mode is also selectable operating band. Available frequency bands are different depending on ver-sion. See the specification for details. (p. 89) * Some frequency ranges are blocked for the U.S.A. ver-sion by regulation.Set the attenuator function ON (+p. 73) if the received signal is blocked by other radio station when using a third party high-gain antenna.](https://usermanual.wiki/ICOM-orporated/307600.User-Manual-1/User-Guide-973370-Page-24.png)
![184BASIC OPERATIONNew2001 New2001D Search modeSearch mode searches for signals for specified tuning steps automatically and makes it easier to locate new stations for listening purpose. Search mode is described more details at Section 6—SEARCH AND SCAN OPERATIONS.q Push [SEARCH] to start a search. • Search pauses when a signal is received. • Rotate [DIAL] to change the searching direction.w Push [v] or [w] several times to select the desired fre-quency band.e Push [HOLD V] to stop the search temporarily, if desired. • Rotate [DIAL] to change the frequency. • Push [HOLD V] again to restart the search.MWMENUENTHOLD VSCAN.1472580369SKIPNO.CLRSQLDIALSEARCHATTHOLD VSEARCH[DIAL]• Search mode indicationArrow indicates searching direction About the searching steps: The selected tuning step in each frequency band (in VFO mode) is used during search.D Scan modeScan mode searches for signals from the pre-programmed memory channels automatically. Scan mode is described more details at Section 6—SEARCH AND SCAN OPERA-TIONS.q Push [SCAN] to start a scan. • Scan pauses when a signal is received. • Rotate [DIAL] to change the scanning direction.w Push and hold [v] or [w] several times to select the de-sired category; or push [v] or [w] several times to select the desired group.e Push [HOLD V] to stop the scan temporarily, if desired. • Rotate [DIAL] to select the desired channel. • Push [HOLD V] again to restart the scan.MWMENUENTHOLD VSCAN.1472580369SKIPNO.CLRSQLDIALSEARCHATTHOLD V[DIAL]SCAN• Scan mode indicationArrow indicates scanning direction While scan holding condition, memory channels can be selected by the rotating [DIAL].](https://usermanual.wiki/ICOM-orporated/307600.User-Manual-1/User-Guide-973370-Page-26.png)
![New2001194BASIC OPERATION12345678910111213141516171819■ Receiving mode selectionReceiving modes are determined by the modulation of the radio signals. The receiver has 3 operating modes: FM, WFM and AM modes. (And also auto mode is available for USA version.) The mode selection is stored independently for each operating band and memory channels. (Auto mode is available for USA version only.)Typically, AM mode is used for the AM broadcast stations (0.495–1.620 MHz) and air band (118–136.995 MHz), and WFM is used for FM broadcast stations (76–107.9 MHz).q Enter “MODE” in MODE/TS/TONE… menu. MENU ➪ MODE/TS/TONE ➪ MODE (p. 61) (Push [MENU ]), (Push [r]/[s], then push [ENT MW].)w Push [r]/[s] (or rotate [DIAL]) to set the mode.e Push [ENT MW] (or [v]) to return to MODE/TS/TONE… menu, and push [CLR SQL] to return to frequency indica-tion.MWMENUENTHOLD VSCAN.1472580369SKIPNO.CLRSQLDIALSEARCHATTMWMENUENTPushPushPushMWMENUENTMWENT[DIAL]](https://usermanual.wiki/ICOM-orporated/307600.User-Manual-1/User-Guide-973370-Page-27.png)
![New200120New2001FREQUENCY SETTING5■ Setting a frequencyD Via the keypadThe frequency can be directly set via numeric keys.• If a frequency outside the frequency range is entered, the previ-ously displayed frequency is automatically recalled after editing last digit.q Push and hold [HOLD V] to select VFO mode, if neces-sary.w Enter the desired frequency via the keypad. • Pushing [ENT MW] omits the entry of 100 kHz and below, when you want to edit to those digits “0.” • When a digit is mistakenly input, push [CLR SQL] to abort input.Depending on the tuning step setting, it may not be pos-sible to input a 1 kHz digit. In this case, enter “0” as 1 kHz digit, then rotate [DIAL] to set the desired frequency.MWMENUENTHOLD VSCAN.1472580369SKIPNO.CLRSQLDIALSEARCHATTMWENTCLRSQL.1472580369ATT](https://usermanual.wiki/ICOM-orporated/307600.User-Manual-1/User-Guide-973370-Page-28.png)

![New2001225FREQUENCY SETTING New2001D Via the dialq Push and hold [HOLD V] for 1 sec. to select VFO mode, if necessary.w Push [v] or [w] to select the desired frequency band.e Rotate [DIAL] to select the desired frequency. • The frequency changes according to the preset tuning steps. See the next page for setting the tuning step.MWMENUENTHOLD VSCAN.1472580369SKIPNO.CLRSQLDIALSEARCHATT[DIAL][DIAL] changes the frequency according to the selected tuning step.✔ CONVENIENT!Push and hold [v] or [w] for 1 sec. then rotate [DIAL] to change the frequency in 1 MHz steps, or push [v] again then rotate [DIAL] to change the frequency in 10 MHz steps. (After entering MHz selection mode, pushing [v] or [w] selects 10 MHz tuning steps or 1 MHz tuning steps, respectively.) Push and holdfor 1 sec.orPushPushPushCLRSQL](https://usermanual.wiki/ICOM-orporated/307600.User-Manual-1/User-Guide-973370-Page-30.png)
![235FREQUENCY SETTING New200112345678910111213141516171819■ Setting a tuning stepThe tuning step can be selected for each frequency band. The following tuning steps are available for the IC-RX7.(Auto tuning step is available for USA version only.)• 5.0 kHz • 6.25 kHz • 7.5 kHz • 8.33 kHz† • 9.0 kHz‡• 10.0 kHz • 12.5 kHz • 15.0 kHz • 20.0 kHz • 25.0 kHz • 30.0 kHz • 50.0 kHz • 100.0 kHz • 125.0 kHz • 200.0 kHz† Appears for the VHF air band only.‡ Appears for the AM broadcast band only.D Tuning step selectionq Push and hold [HOLD V] for 1 sec. to select VFO mode, if necessary.w Push [v] or [w] to select the desired frequency band.e Enter “TS” in MODE/TS/TONE… menu. MENU ➪ MODE/TS/TONE ➪ TS (p. 61) (Push [MENU ]), (Push [r]/[s], then push [ENT MW].)r Push [r]/[s] (or rotate [DIAL]) to select the tuning step.t Push [ENT MW] (or [v]) to return to MODE/TS/TONE… menu, and push [CLR SQL] to return to frequency indica-tion.MWMENUENTHOLD VSCAN.1472580369SKIPNO.CLRSQLDIALSEARCHATTMWMENUENTPushPush MWMENUENT[DIAL]Push MWENT](https://usermanual.wiki/ICOM-orporated/307600.User-Manual-1/User-Guide-973370-Page-31.png)
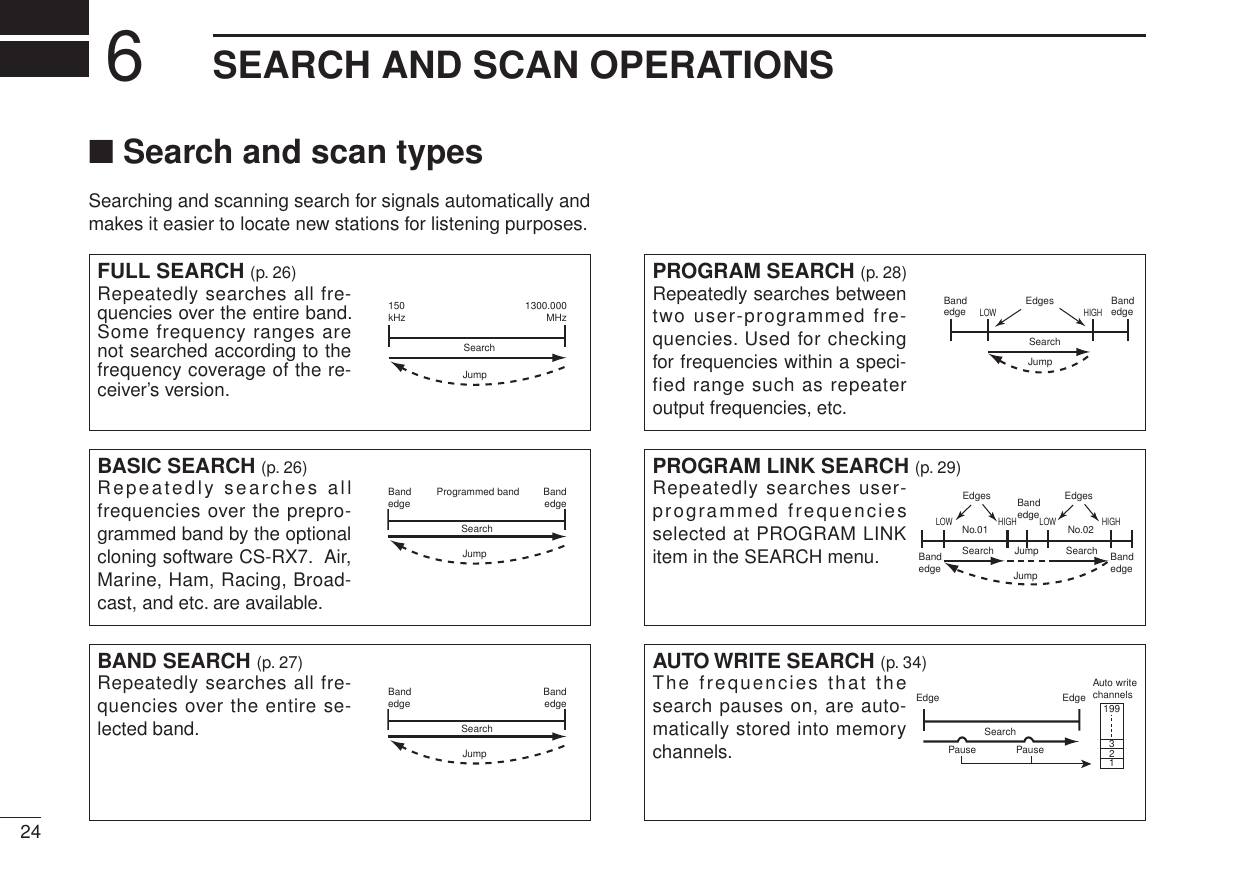
![266SEARCH AND SCAN OPERATIONSNew2001 New2001■ Full searchq Push [SEARCH] to start a search. • Search pauses when a signal is received. • Rotate [DIAL] to change the searching direction.w Push [v] or [w] several times to select the desired fre-quency band.e Push [HOLD V] to stop the search temporarily, if desired. • Push [HOLD V] again to restart the search.MWMENUENTHOLD VSCAN.1472580369SKIPNO.CLRSQLDIALSEARCHATTHOLD VSEARCH[DIAL]• Search mode indicationArrow indicates searching direction About the searching steps: The selected tuning step in each frequency band (in VFO mode) is used during search.■ Basic searchq Enter “BASIC SEARCH” in SEARCH menu. MENU ➪ SEARCH ➪ BASIC SEARCH (Push [MENU ]), (Push [r]/[s], then push [ENT MW].) • Search menu can also be entered by pushing and holding [SEARCH] for 1 sec. • 1st category appears.w Push [r]/[s] (or rotate [DIAL]) to select the desired cat-egory, then push [ENT MW] to start the search. • Search pauses when a signal is received. • Rotate [DIAL] to change the searching direction.e Push [HOLD V] to stop the search temporarily, if desired. • Push [HOLD V] again to restart the search.MWMENUENTHOLDSCAN.1472580369SKIPNO.CLRSQLDIALSEARCHATTMWENTHOLD VMENUPush MWENTPush MWENT](https://usermanual.wiki/ICOM-orporated/307600.User-Manual-1/User-Guide-973370-Page-34.png)
![New2001276SEARCH AND SCAN OPERATIONS12345678910111213141516171819■ Band searchq Enter “BAND SEARCH” in SEARCH menu. MENU ➪ SEARCH ➪ BAND SEARCH (Push [MENU ]), (Push [r]/[s], then push [ENT MW].) • Search menu can also be entered by pushing and holding [SEARCH] for 1 sec. • Band selection screen appears.w Push [r] or [s] several times to select the desired fre-quency band, then push [ENT MW] to start the search. • Search pauses when a signal is received. • Rotate [DIAL] to change the searching direction. • After started the search, searching frequency band can be changed by pushing [v] or [w].e Push [HOLD V] to stop the search temporarily, if desired. • Push [HOLD V] again to restart the search.MWMENUENTHOLD VSCAN.1472580369SKIPNO.CLRSQLDIALSEARCHATTMWENTHOLD VMENUPush MWENTPush MWENT](https://usermanual.wiki/ICOM-orporated/307600.User-Manual-1/User-Guide-973370-Page-35.png)
![286SEARCH AND SCAN OPERATIONSNew2001 New2001■ Program searchq Enter “PROGRAM SEARCH” in SEARCH menu. MENU ➪ SEARCH ➪ PROGRAM SEARCH (Push [MENU ]), (Push [r]/[s], then push [ENT MW].)• Search menu can also be entered by pushing and holding [SEARCH] for 1 sec.• Program number selection screen appears.w Push [r] or [s] several times to select the desired pro-gram number, then push [ENT MW] to enter the program.• A total 25 program link numbers (No. 00 to No. 24) are avail-able.e Push [ENT MW] again to start the search.• Search pauses when a signal is received.• Rotate [DIAL] to change the searching direction.• After started the search, program number can be changed by pushing [v] or [w].r Push [HOLD V] to stop the search temporarily, if desired.• Push [HOLD V] again to restart the search.MWMENUENTHOLD VSCAN.1472580369SKIPNO.CLRSQLDIALSEARCHATTMWENTHOLD VMENUPush MWENTPush MWENTPush MWENT](https://usermanual.wiki/ICOM-orporated/307600.User-Manual-1/User-Guide-973370-Page-36.png)
![New2001296SEARCH AND SCAN OPERATIONS12345678910111213141516171819■ Program link searchq Enter “PROGRAM LINK SEARCH” in SEARCH menu. MENU ➪ SEARCH ➪ PROGRAM LINK SEARCH (Push [MENU ]), (Push [r]/[s], then push [ENT MW].) • Search menu can also be entered by pushing and holding [SEARCH] for 1 sec. • Program link number selection screen appears.w Push [r] or [s] several times to select the desired pro-gram link number, then push [ENT MW] to enter the link edit state. • A total 10 program link numbers (No. 0 to No. 9) are available.e Push [ENT MW] again to start the search. • Search pauses when a signal is received. • Rotate [DIAL] to change the searching direction. • After started the search, program link number can be changed by pushing [v] or [w].r Push [HOLD V] to stop the search temporarily, if desired. • Push [HOLD V] again to restart the search.NOTE: All program searches are linked in default settings. Program links can be customized, see page 32 for pro-gramming details. MWMENUENTHOLD VSCAN.1472580369SKIPNO.CLRSQLDIALSEARCHATTMWENTHOLD VSEARCHPush MWENTPush MWENTPush MWENT](https://usermanual.wiki/ICOM-orporated/307600.User-Manual-1/User-Guide-973370-Page-37.png)
![306SEARCH AND SCAN OPERATIONSNew2001 New2001■ Search edges programmingSearch edges programming can be stored frequency edges, receiving mode, tuning steps, attenuator ON/OFF and search name. But other items of the frequencies are not nec-essary to program. In this case, settings of each frequency band are used to the search. q Enter “PROGRAM SEARCH” in SEARCH menu. MENU ➪ SEARCH ➪ PROGRAM SEARCH (Push [MENU ]), (Push [r]/[s], then push [ENT MW].) • Search menu can also be entered by pushing and holding [SEARCH] for 1 sec. • Program number selection screen appears.w Push [r] or [s] several times to select the desired pro-gram number, then push [ENT MW] to enter the program.MWMENUENTHOLD VSCAN.1472580369SKIPNO.CLRSQLDIALSEARCHATTMWENTMENUPush MWENTe Push [s] once to select “EDIT,” then push [ENT MW] (or [w]).r Set the desired edge frequencies either “LOW” or “HIGH.” • Other items cannot be programmed until these frequencies are input. LOW:/HIGH:q Push [ENT MW] (or [w]) to enter the frequency input.w Edit the desired frequency with keypad (pgs. 20, 21).e Push [r] or [s] to select another edge, then edit dif-ferent frequency.](https://usermanual.wiki/ICOM-orporated/307600.User-Manual-1/User-Guide-973370-Page-38.png)
![New2001316SEARCH AND SCAN OPERATIONS12345678910111213141516171819t Set the other items, if desired. NAME: q Push [ENT MW] (or [w]) to edit the name program-ming. w Rotate [DIAL] to select the desired character. • The selected character blinks. • Push [r] or [s] to select the character group from “ABC” (al-phabetical characters; capital letters), “abc” (alphabetical char-acters; lower case letters), “123” (numbers) or “!”#” (symbols). See next page for available characters details. • Push [v] or [w] to move the cursor left or right, respectively. • Push [CLR SQL] to clear the selected character. e Push [ENT MW] to set the name and return to program search edit state. TS:/MODE:/ATT: q Push [ENT MW] (or [w]) to edit the tuning step setting. w Push and hold [r]/[s] (or rotate [DIAL]) to select the desired setting. • Push [v] or [w] to move the cursor left or right, respectively. • Push [CLR SQL] to clear the selected character. e Push [ENT MW] (or [w]) to set the setting. r Set the mode or attenuator settings as same as steps q to e.MODEATT](https://usermanual.wiki/ICOM-orporated/307600.User-Manual-1/User-Guide-973370-Page-39.png)
![326SEARCH AND SCAN OPERATIONSNew2001 New2001■ Program link programmingEach program link can be programmed by linking program searches (No. 00 to No. 24), and can be programmed with an alphanumeric link name for easy recognition. Program links are available a total 10 kind of links.q Enter “PROGRAM LINK” in SEARCH menu. MENU ➪ SEARCH ➪ PROGRAM LINK (Push [MENU ]), (Push [r]/[s], then push [ENT MW].) • Search menu can also be entered by pushing and holding [SEARCH] for 1 sec. • Program link number selection screen appears.w Push [r] or [s] several times to select the desired pro-gram link number, then push [ENT MW] to enter the link edit state.MWMENUENTHOLD VSCAN.1472580369SKIPNO.CLRSQLDIALSEARCHATTMWENTMENUPush MWENTe Push [s] several time to select the following operations. NAME q Push [ENT MW] (or [w]) to edit the link name program-ming. • Push [r] or [s] to select the character group from “ABC” (alphabetical characters; capital letters), “abc” (alphabetical characters; lower case letters), “123” (numbers) or “!”#” (sym-bols). • Push [v] or [w] to move the cursor left or right, respectively. • Push [CLR SQL] to clear the selected character. w Push [ENT MW] to set the name and return to link edit state.• Available charactersABCDEFGHIJKLMNOPQRSTUVWXYZabcdefghijklmnopqrstuvwxyz0123456789!''#$%&'()*+,-./:;<=>?@[\]^_`{|}~ (Space)](https://usermanual.wiki/ICOM-orporated/307600.User-Manual-1/User-Guide-973370-Page-40.png)
![New2001336SEARCH AND SCAN OPERATIONS12345678910111213141516171819 CLEAR q Push [ENT MW] (or [w]) to edit the link clearing. • If all program searches are already cleared in the selected program link number, this item cannot be edited. w Push [r] or [s] to select the program search to be unlinked. e Push [ENT MW] (or [w]) to unlink the program search. • “CLEAR?” window appears. r Push [r] to select “YES,” then push [ENT MW] (or [w]). • Select “NO,” then push [ENT MW] to cancel clearing.Cancel clearing Link clear t Push [v] to finish the link clearing and return to link edit state. ADDITION q Push [ENT MW] (or [w]) to edit the adding link. • If all program searches are already linked in the selected program link number, this item cannot be edited. w Push [r] or [s] to select the desired program search. e Push [ENT MW] to set the link. r Push [v] to finish the adding link and return to link edit state. DETAIL q Push [ENT MW] (or [w]) to enter the program link de-tails. • If no program searches are linked in the selected program link number, this item cannot be entered. w Push [r] or [s] to select the program search. e Push [ENT MW] (or [w]) to enter the program search. r Push [v] to return to link edit state.](https://usermanual.wiki/ICOM-orporated/307600.User-Manual-1/User-Guide-973370-Page-41.png)
![346SEARCH AND SCAN OPERATIONSNew2001 New2001■ Auto write searchThis search is useful for searching a specified frequency range and automatically storing busy frequencies into mem-ory channels. The auto write search is performed with any search types.q Push [SEARCH] to start the full search.• Any other searches are also available (see pages 26 to 29).• Search pauses when a signal is received.• Rotate [DIAL] to change the searching direction.w Push and hold [ENT MW] for 1 sec. to turn the auto write function ON and OFF.• “AW” indicator blinks.MWMENUENTHOLD VSCAN.1472580369SKIPNO.CLRSQLDIALSEARCHATTMWENT“AW” indicator blinks during auto write search.• During auto write searche Push [HOLD V] to stop the auto write search.D During auto write searching:• When a signal is received, search pauses and the fre-quency is stored into auto write channel group (CH000 –CH199).- 2 short beeps sound when stored.• Search resumes after frequency storing.• When all channels are stored, the search is cancelled au-tomatically and 1 long beep sounds.](https://usermanual.wiki/ICOM-orporated/307600.User-Manual-1/User-Guide-973370-Page-42.png)
![New2001356SEARCH AND SCAN OPERATIONS12345678910111213141516171819D Recalling the stored frequencies:q Enter “AUTO WRITE CH” in SEARCH menu. MENU ➪ SEARCH ➪ AUTO WRITE CH (Push [MENU ]), (Push [r]/[s], then push [ENT MW].)• Search menu can also be entered by pushing and holding [SEARCH] for 1 sec.• Auto write channel group appears.MWMENUENTHOLD VSCAN.1472580369SKIPNO.CLRSQLDIALSEARCHATTMWENTMENUPush MWENTw Rotate [DIAL] to select the desired channel.D Clearing the stored frequencies:q Select the auto write channel group.w Push and hold [SKIP] for 1 sec. to clear the all channels contents.• 1 short and 1 long beeps sound.MWMENUENTHOLD VSCAN.1472580369SKIPNO.CLRSQLDIALSEARCHATT SKIP NOTE: The auto write channel contents CANNOT be cleared by an independent channel. Thus it is a good idea to copy the contents into regular memory channel.](https://usermanual.wiki/ICOM-orporated/307600.User-Manual-1/User-Guide-973370-Page-43.png)
![366SEARCH AND SCAN OPERATIONSNew2001 New2001■ Skip searchDuring search operation, you can store the paused fre-quency into memory channel as a skip channel which is skipped during search. This setting is useful to speed up the search speed.D Settingq Enter “PROGRAM SKIP” in SEARCH menu. MENU ➪ SEARCH ➪ PROGRAM SKIP (Push [MENU ]), (Push [r]/[s], then push [ENT MW].)• Search menu can also be entered by pushing and holding [SEARCH] for 1 sec.w Push [r]/[s] (or rotate [DIAL]) to select the program skip setting ON or OFF.e Push [ENT MW] (or [v]) to return to SEARCH menu, and push [CLR SQL] to return to frequency indication.MWMENUENTHOLD VSCAN.1472580369SKIPNO.CLRSQLDIALSEARCHATTMWENTMENUPush MWENTD Operationq Push [SEARCH] to start the full search.• Any other searches are also available (see pages 26 to 29).• “PSKIP” indicator blinks.• Search pauses when a signal is received.• Rotate [DIAL] to change the searching direction.w When search pauses and you want to set the paused fre-quency as a skip frequency. Push and hold [SKIP] for 1 sec. to store the frequency into skip channel group in program search category.• Program search (category)/PSKIP1 (group) are made automati-cally when first skip channel is stored.• 1 long beep and 2 short beeps sound when stored.MWMENUENTHOLD VSCAN.1472580369SKIPNO.CLRSQLDIALSEARCHATT SKIP“PSKIP” indicator blinks during program skip search.• During Program skip searche After that, stored frequencies are skipped during search.• This setting can be turned OFF by entering “PROGRAM SKIP” in SEARCH menu (see left content for details).](https://usermanual.wiki/ICOM-orporated/307600.User-Manual-1/User-Guide-973370-Page-44.png)
![New2001376SEARCH AND SCAN OPERATIONS12345678910111213141516171819■ Priority watch during searchPriority watch checks for signals on the priority channels every 5 sec. while operating on a search. All programmed memory channels can be set as priority channels at same time.The watch resumes according to the selected search resume condition. See page 89 for details.q Push [SEARCH] to start the full search.• Any other searches are also available (see pages 26 to 29).• Search pauses when a signal is received.• Rotate [DIAL] to change the searching direction.w Enter “PRIORITY” in SEARCH menu. MENU ➪ SEARCH ➪ PRIORITY (Push [MENU ]), (Push [r]/[s], then push [ENT MW].)e Push [r]/[s] (or rotate [DIAL]) to select “ON.”• Select “BELL” if the priority beep function is desired.MWMENUENTHOLD VSCAN.1472580369SKIPNO.CLRSQLDIALSEARCHATTMWENTMENUPush MWENTr Push [ENT MW] (or [v]) to return to SEARCH menu, and push [CLR SQL] to return to frequency indication and start the watch.• “PRIO” indicator appears.• The receiver checks the priority channel(s) every 5 sec (see p. 53 for priority channel programming details).• The watch resumes according to the selected scan resume condition (p. 46), or push [CLR SQL] to resume manually.• During priority watchSearches VFO frequencies for 5 sec. Pauses on a priority channel when a signal is received.• During priority watch with priority beepEmits beep and blinks “S” indicator when a signal is received on a priority channel.t Push [CLR SQL] to cancel the priority watch.](https://usermanual.wiki/ICOM-orporated/307600.User-Manual-1/User-Guide-973370-Page-45.png)
![386SEARCH AND SCAN OPERATIONSNew2001 New2001■ Other SEARCH menu itemsD Stop beep (STOP BEEP)Selects the stop beep setting for search.• OFF : The stop beep is turned OFF. (default)• ON : The receiver emits a long beep when a search pauses with signal is received.D Search pause timer (PAUSE)Selects the search pause time. When receiving signals, the search pauses according to the search pause time.• 2–20 SEC : Search pauses for 2–20 sec. on a received signal in 2 sec. steps. (default: 10 sec.)• HOLD : Search pauses on a received signal until it disappears. Rotate [DIAL] to resume man-ually.D Search resume timer (RESUME)Selects the search resume time from a pause after the re-ceived signal disappears.• 0 SEC : Search resumes when a received signal dis-appears.• 1–5 SEC : Search pauses 1–5 sec. after a received sig-nal disappears. (default: 2 sec.)• HOLD : Search remains paused on the received signal even if it disappears. Rotate [DIAL] to resume manually. Search resume timer must be set shorter than search pause timer (previous item), otherwise this timer does not activate.D Tone search (TONE SEARCH)This item appears only when FM mode is selected. See page ?? for tone search details.](https://usermanual.wiki/ICOM-orporated/307600.User-Manual-1/User-Guide-973370-Page-46.png)
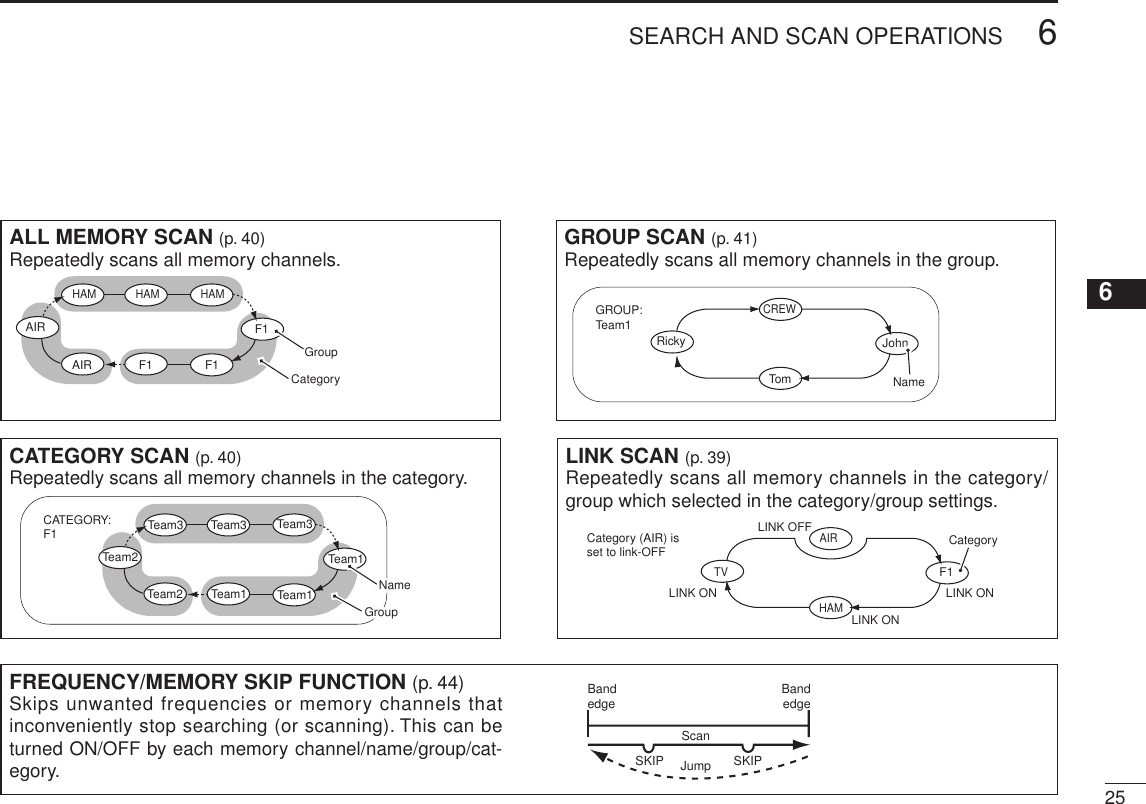
![New2001396SEARCH AND SCAN OPERATIONS12345678910111213141516171819■ Link scan IMPORTANT!: To perform scan functions, 2 or more memory channels MUST be programmed, otherwise the scans will not start.q Push [SCAN] to start a link scan.• Scan pauses when a signal is received.• Rotate [DIAL] to change the scanning direction.w Push [HOLD V] to stop the scan temporarily, if desired.• Push and hold [v] or [w] for 1 sec. several times to select the desired category; or push [v] or [w] several times to select the desired group.• Push [HOLD V] again to restart the scan.MWMENUENTHOLD VSCAN.1472580369SKIPNO.CLRSQLDIALSEARCHATTHOLD VSEARCH[DIAL]• Search mode indicationArrow indicates searching direction The category/group link setting can be changed in mem-ory programming. See page 109 for details. Scan skips any memory channels in the selected cat-egory/group that are set to “SKIP” or “PSKIP.” Link scan stops at the first channel when all channels in a category/group are set to “SKIP” or “PSKIP.”](https://usermanual.wiki/ICOM-orporated/307600.User-Manual-1/User-Guide-973370-Page-47.png)
![406SEARCH AND SCAN OPERATIONSNew2001 New2001■ All scanAll scan repeatedly scans all memory channels programmed with any frequencies in the memory channel selected for scanning.q Enter “ALL” in SCAN menu. MENU ➪ SCAN ➪ ALL (Push [MENU ]), (Push [r]/[s], then push [ENT MW].)• SCAN menu can also be entered by pushing and holding [SCAN] for 1 sec.• Scan pauses when a signal is received.• Rotate [DIAL] to change the scanning direction.w Push [HOLD V] to stop the scan temporarily, if desired.• Push and hold [v] or [w] for 1 sec. several times to select the desired category; or push [v] or [w] several times to select the desired group.• Push [HOLD V] again to restart the scan.MWMENUENTHOLDSCAN.1472580369SKIPNO.CLRSQLDIALSEARCHATTMWENTHOLD VMENUPush MWENT■ Category scanCategory scan repeatedly scans all memory channels in the same category as the selected memory channel has been programmed.q Enter “CATEGORY” in SCAN menu. MENU ➪ SCAN ➪ CATEGORY (Push [MENU ]), (Push [r]/[s], then push [ENT MW].)• SCAN menu can also be entered by pushing and holding [SCAN] for 1 sec.w Push [r]/[s] (or rotate [DIAL]) to select the desired cat-egory, then push [ENT MW].• Scan pauses when a signal is received.• Rotate [DIAL] to change the scanning direction.e Push [HOLD V] to stop the scan temporarily, if desired.• Push and hold [v] or [w] for 1 sec. several times to select the desired memory category; or push [v] or [w] several times to select the desired group.• Push [HOLD V] again to restart the scan.](https://usermanual.wiki/ICOM-orporated/307600.User-Manual-1/User-Guide-973370-Page-48.png)
![New2001416SEARCH AND SCAN OPERATIONS12345678910111213141516171819■ Group scanGroup scan repeatedly scans all memory channels in the same group as the selected memory channel has been pro-grammed.q Select the category that includes the desired group to be scanned.➥ Push [SCAN] to start a scan, then push [HOLD V] to hold the scan.➥ Push and hold [v] or [w] for 1 sec. to select the cat-egory.w Enter “GROUP” in SCAN menu. MENU ➪ SCAN ➪ GROUP (Push [MENU ]), (Push [r]/[s], then push [ENT MW].)• SCAN menu can also be entered by pushing and holding [SCAN] for 1 sec.e Push [r]/[s] (or rotate [DIAL]) to select the desired group, then push [ENT MW].• Scan pauses when a signal is received.• Rotate [DIAL] to change the scanning direction.r Push [HOLD V] to stop the scan temporarily, if desired.• Push and hold [v] or [w] for 1 sec. several times to select the desired memory category; or push [v] or [w] several times to select the desired group.• Push [HOLD V] again to restart the scan.MWMENUENTHOLDSCAN.1472580369SKIPNO.CLRSQLDIALSEARCHATTMWENTHOLD VMENUPush MWENTPush MWENT](https://usermanual.wiki/ICOM-orporated/307600.User-Manual-1/User-Guide-973370-Page-49.png)
![New2001426SEARCH AND SCAN OPERATIONSNew2001■ Weather channel operationThere are 10 weather channels for monitoring weather chan-nels from the NOAA (National Oceanographic and Atmos-pheric Administration) broadcasts.D Weather channel selectionq Enter “WEATHER SCAN” in SCAN menu. MENU ➪ SCAN ➪ WEATHER SCAN (Push [MENU ]), (Push [r]/[s], then push [ENT MW].)• SCAN menu can also be entered by pushing and holding [SCAN] for 1 sec.• “WX” and the weather channel number appear.w Push [HOLD V] to stop scanning.e Rotate [DIAL] to select the desired weather channel.r Push and hold [HOLD V] for 1 sec. to return to VFO mode.MWMENUENTHOLD VSCAN.1472580369SKIPNO.CLRSQLDIALSEARCHATTMWENTHOLD VMENU[DIAL]Push MWENTD Weather alert functionNOAA broadcast stations transmit weather alert tones be-fore important weather announcements. When the weather alert function is turned ON, the selected weather channel is monitored every 5 sec. for the announcement. When the alert signal is detected, the “ALT” and the WX channel are displayed alternately and sounds a beep tone until the re-ceiver is operated. The previously selected (used) weather channel is checked periodically during standby or while scanning.q Select the desired weather channel.w Enter “WEATHER ALERT” in SCAN menu. MENU ➪ SCAN ➪ WEATHER ALERT (Push [MENU ]), (Push [r]/[s], then push [ENT MW].)• Scan menu can also be entered by pushing and holding [SCAN] for 1 sec.e Push [r]/[s] (or rotate [DIAL]) to select “ON” or “OFF.”r Push [ENT MW] (or [v]) to return to SCAN menu, and push [CLR SQL] to return to the weather channel indica-tion.t Set the desired stand-by condition.• Select VFO or memory channel.• Search, scan or priority watch operation can also be selected.y When the alert is detected, a beep sounds and the follow-ing indication will be displayed.u Turn the weather alert function OFF in SCAN menu.U.S.A. and CANADA versions only](https://usermanual.wiki/ICOM-orporated/307600.User-Manual-1/User-Guide-973370-Page-50.png)
![436SEARCH AND SCAN OPERATIONSNew200112345678910111213141516171819 NOTE: While receiving a signal (on a frequency other than the weather alert ON frequency), the receiving signal or audio will be interrupted momentarily every 5 sec. (approx.) in the case that the alert function is turned ON. This symp-tom is caused by the WX alert function. To cancel these symptoms, set the weather alert item OFF in SCAN menu.MWMENUENTHOLD VSCAN.1472580369SKIPNO.CLRSQLDIALSEARCHATTMWENTHOLD VMENU[DIAL]Push MWENT](https://usermanual.wiki/ICOM-orporated/307600.User-Manual-1/User-Guide-973370-Page-51.png)
![446SEARCH AND SCAN OPERATIONSNew2001 New2001■ Skip setting for scanningMemory category/group/name can be set to be skipped during scan. In addition, memory channels can be set to be skipped during search. This is useful to speed up the scan/search rate.q Enter “SKIP” in SCAN menu. MENU ➪ SCAN ➪ SKIP (Push [MENU ]), (Push [r]/[s], then push [ENT MW].)• Scan menu can also be entered by pushing and holding [SCAN] for 1 sec.MWMENUENTHOLD VSCAN.1472580369SKIPNO.CLRSQLDIALSEARCHATTMWENTMENUPush MWENTw Push [v]/[w] once or twice to to select “CATEGORY,” “GROUP” or “NAME.”e Push [r]/[s] (or rotate [DIAL]) to select the category (group/name) to be skipped.r Push [SKIP] to set the skip state.• Push [SKIP] again to cancel the skip state.t Push [ENT MW] (or [v]) several times to return to SCAN menu, and push [CLR SQL] to return to frequency indica-tion.✔ CONVENIENT!The group skip setting can be set with the following opera-tion during a scan or scan holding state.q Select the desired memory group to be skipped.w Push and hold [SKIP] for 1 sec., and rotate [DIAL] to se-lect the skip setting from “ON (skip)” and “OFF,” then push [ENT MW].](https://usermanual.wiki/ICOM-orporated/307600.User-Manual-1/User-Guide-973370-Page-52.png)
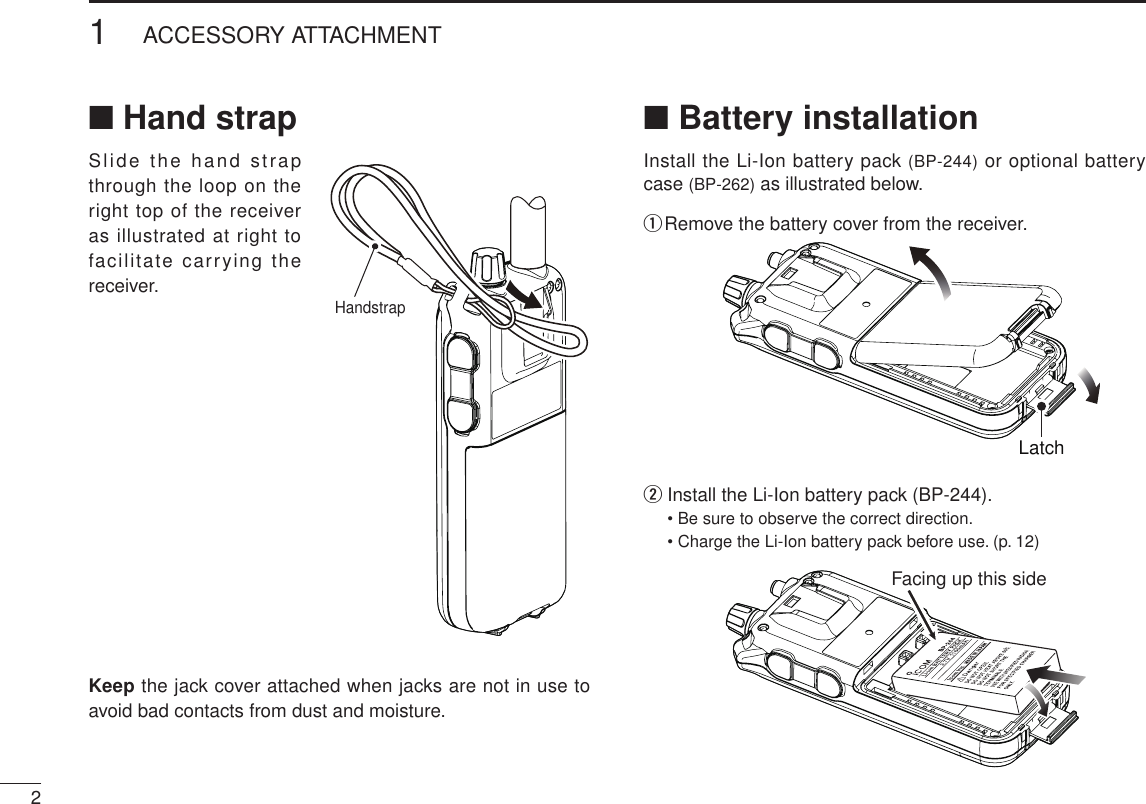
![New2001456SEARCH AND SCAN OPERATIONS12345678910111213141516171819■ Priority watch during scanPriority watch checks for signals on the priority channels every 5 sec. during a scan. q Push [SCAN] to start the link scan.• Any other scans are also available (see pages 39 to 41).• Scan pauses when a signal is received.• Rotate [DIAL] to change the scanning direction.w Enter “PRIORITY” in SCAN menu. MENU ➪ SCAN ➪ PRIORITY (Push [MENU ]), (Push [r]/[s], then push [ENT MW].)e Push [r]/[s] (or rotate [DIAL]) to select “ON.”MWMENUENTHOLD VSCAN.1472580369SKIPNO.CLRSQLDIALSEARCHATTMWENTMENUPush MWENTr Push [ENT MW] (or [v]) to return to SCAN menu, and push [CLR SQL] to exit the menu screen and start the watch.• “PRIO” indicator appears.• The receiver checks the priority channel(s) every 5 sec (see p. 53 for priority channel programming details).• The watch resumes according to the selected scan resume condition (p. 89), or push [CLR SQL] to resume manually.CH-000CH-999CH-400CH-300CH-200CH-99CH-006CH-010CH-024CH-100CH-005CH-004CH-003CH-002CH-001Scan operationPriority channels every 5 sec.Pauses on a priority channel when a signal is received.t Turn the priority watch function OFF in SCAN menu.](https://usermanual.wiki/ICOM-orporated/307600.User-Manual-1/User-Guide-973370-Page-53.png)
![466SEARCH AND SCAN OPERATIONSNew200146■ Other SCAN menu itemsD Stop beep (STOP BEEP)Selects the stop beep setting for scan.• OFF : The stop beep is turned OFF. (default)• ON : The receiver emits a long beep when a scan pauses with signal is received.D Scan pause timer (PAUSE)Selects the scan pause time. When receiving signals, the scan pauses according to the scan pause time.• 2–20 SEC : Scan pauses for 2–20 sec. on a received signal in 2 sec. steps. (default: 10 sec.)• HOLD : Scan pauses on a received signal until it disappears. Rotate [DIAL] to resume man-ually.D Scan resume timer (RESUME)Selects the scan resume time from a pause after the re-ceived signal disappears.• 0 SEC : Scan resumes when a received signal disap-pears.• 1–5 SEC : Scan pauses 1–5 sec. after a received signal disappears. (default: 2 sec.)• HOLD : Scan remains paused on the received sig-nal even if it disappears. Rotate [DIAL] to resume manually. Scan resume timer must be set shorter than scan pause timer (previous item), otherwise this timer does not activate.](https://usermanual.wiki/ICOM-orporated/307600.User-Manual-1/User-Guide-973370-Page-54.png)
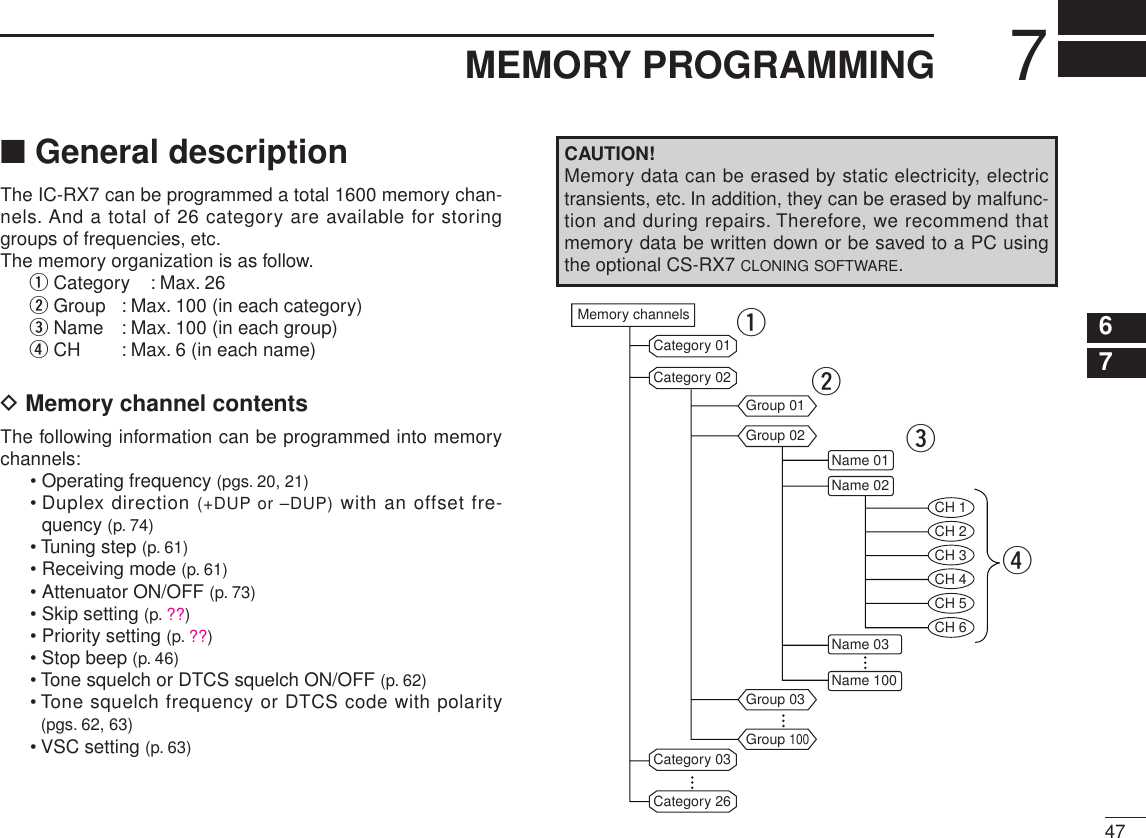
![487MEMORY PROGRAMMINGNew2001 New2001■ Memory channel programmingq Push and hold [HOLD V] for 1 sec. to select VFO mode.w Set the desired frequency, if desired:• Frequency or any other data can be set while in CH program-ming state.➥ Select the desired band with [v] or [w].➥ Set the desired frequency with [DIAL].➥ Or set the desired frequency with keypad directly. In this case, the band and frequency settings with [v]/[w] and [DIAL] as above are not required.➥ Set other data (e.g. offset frequency, duplex direction, tone squelch, etc.) in the Menu screen.e Push and hold [ENT MW] for 1 sec. to enter memory pro-gramming mode.• 1 short and 1 long beep sound.• Category selection screen appears.✔ STORING SEARCHED FREQUENCY:While in a serach holding state, the displayed frequency, receiving mode and other data can also be stored into memory channel as follwing operation instead above q to e.q Start a search.• Search pauses when a signal is received.• Rotate [DIAL] to restart the search.w Push [HOLD V] to hold the search, if you want to store the paused frequency into memory channel.e Push and hold [ENT MW] for 1 sec. to enter the memory programming mode.r Push [r] or [s] (or rotate [DIAL]) to select the desired category or “ADDITION,” then push [ENT MW].• When “ADDITION” is selected, new category can be pro-grammed (see p. 50 for new category programming details).t Push [r] or [s] (or rotate [DIAL]) to select the desired group or “ADDITION,” then push [ENT MW].• When “ADDITION” is selected, new group can be programmed in the category (see p. 51 for new group programming details).](https://usermanual.wiki/ICOM-orporated/307600.User-Manual-1/User-Guide-973370-Page-56.png)
![New2001497MEMORY PROGRAMMING12345678910111213141516171819y Push [r] or [s] (or rotate [DIAL]) to select the desired name or “ADDITION,” then push [ENT MW].• When “ADDITION” is selected, new name can be programmed in the group (see p. 52 for new name programming details).u Push [r] (or rotate [DIAL]) to select “ADDITION,” then push [ENT MW].• After “ADDITION” is selected, new channel can be programmed in the name (see p. 53 for new channel programming details).i After all data are programmed, push and hold [ENT MW] for 1 sec. to store the channel and return to frequency dis-play.What is DIRECT KEYThe IC-RX7 has a total of 100 direct keys in the same category (00 to 99). Direct key is used to turn the link setting ON/OFF for the assigned category or group during link scan. q Push [SCAN] to start the link scan.• Scan pauses when a signal is received.• Rotate [DIAL] to restart the scan.w Push [HOLD V] to hold the scan.➥ Push a numeral key (0 to 9) to the link setting ON or OFF for the category or group which assigned a direct key (00 to 09).➥ Or push [• ATT] and 2 digit number (00 to 99) to the link setting ON or OFF for the category or group which assigned a direct key (00 to 99).➥ Or push [• ATT] and a numeral key (0 to 9), then push [ENT MW] to the link setting ON or OFF for the category or group which assigned a direct key (00 to 09).](https://usermanual.wiki/ICOM-orporated/307600.User-Manual-1/User-Guide-973370-Page-57.png)
![New2001507MEMORY PROGRAMMINGNew2001D New CATEGORY programmingq Push [r] or [s] (or rotate [DIAL]) to select the desired information, then push [ENT MW].Selectable information: • NAME • ICON • SKIP • LINK • DIRECT KEY • NEXT (Edit GROUP programming) NAME (Category name) q Push [ENT MW] (or [w]) to edit the name programming. • Push [r] or [s] to select the character group from “ABC” (alphabetical characters; capital letters), “abc” (alphabetical characters; lower case letters), “123” (numbers) or “!”#” (sym-bols). See next page for available characters details. • Push [v] or [w] to move the cursor left or right, respectively. • Push [CLR SQL] to clear the selected character. ICON q Push [ENT MW] (or [w]) to edit the setting state. w Push [r] or [s] (or [v]/[w]) to select the desired icon, then push [ENT MW]. SKIP, LINK q Push [ENT MW] (or [w]) to edit the setting state. w Push [r] or [s] to select the desired setting, then push [ENT MW]. DIRECT KEY q Push [ENT MW] (or [w]) to enter the number input. w Edit the desired 2 digit number with keypad. • Duplicated number can not be assigned in the same cat-egory (including direct key for group).w Push [s] (or rotate [DIAL]) to select “NEXT,” then push [ENT MW] to enter the GROUP programming state.](https://usermanual.wiki/ICOM-orporated/307600.User-Manual-1/User-Guide-973370-Page-58.png)