ICOM orporated 307600 Wideband Receiver User Manual 2
ICOM Incorporated Wideband Receiver 2
UserManual.wiki
>
ICOM orporated
>
307600 User Manual
>
User Manual 2
Contents
1.
User Manual 1
2.
User Manual 2
User Manual 2
Navigation menu
Upload a User Manual
Namespaces
Wiki Guide
HTML
PDF
Info
Views
User Manual
Discussion / Help
Navigation
![517MEMORY PROGRAMMINGNew200112345678910111213141516171819D New GROUP programmingq Push [r] or [s] (or rotate [DIAL]) to select the desired information, then push [ENT MW].Selectable information: • NAME • SKIP • LINK • DIRECT KEY • NEXT (Edit NAME programming) NAME (Group name) q Push [ENT MW] (or [w]) to edit the name program-ming. • Push [r] or [s] to select the character group from “ABC” (alphabetical characters; capital letters), “abc” (alphabetical characters; lower case letters), “123” (numbers) or “!”#” (sym-bols). • Push [v] or [w] to move the cursor left or right, respectively. • Push [CLR SQL] to clear the selected character.• Available charactersABCDEFGHIJKLMNOPQRSTUVWXYZabcdefghijklmnopqrstuvwxyz0123456789!''#$%&'()*+,-./:;<=>?@[\]^_`{|}~ (Space) SKIP, LINK q Push [ENT MW] (or [w]) to edit the setting state. w Push [r] or [s] to select the desired setting, then push [ENT MW]. DIRECT KEY q Push [ENT MW] (or [w]) to enter the number input. w Edit the desired 2 digit number with keypad. • Duplicated number can not be assigned in the same cat-egory (including direct key for category).w Push [s] (or rotate [DIAL]) to select “NEXT,” then push [ENT MW] to enter the NAME programming state. Or push and hold [ENT MW] for 1 sec. to program the memory channel and return to the frequency indication.• 1 short and 1 long beep sound.](https://usermanual.wiki/ICOM-orporated/307600.User-Manual-2/User-Guide-973371-Page-1.png)
![New2001527MEMORY PROGRAMMINGNew2001D New NAME programmingq Push [r] or [s] (or rotate [DIAL]) to select the desired information, then push [ENT MW].Selectable information: • NAME • SKIP • NUMBER • NEXT (Edit CH programming) NAME q Push [ENT MW] (or [w]) to edit the name program-ming. • Push [r] or [s] to select the character group from “ABC” (alphabetical characters; capital letters), “abc” (alphabetical characters; lower case letters), “123” (numbers) or “!”#” (sym-bols). See previous page for available characters details. • Push [v] or [w] to move the cursor left or right, respectively. • Push [CLR SQL] to clear the selected character. SKIP q Push [ENT MW] (or [w]) to edit the setting state. w Push [r] or [s] to select the desired setting, then push [ENT MW]. NUMBER q Push [ENT MW] (or [w]) to enter the number input. w Edit the desired 3 digit number with keypad. • Duplicated number can not be assigned in the same group.w Push [s] (or rotate [DIAL]) to select “NEXT,” then push [ENT MW] to enter the CH programming state. Or push and hold [ENT MW] for 1 sec. to program the memory channel and return to the frequency indication.• 1 short and 1 long beep sound.](https://usermanual.wiki/ICOM-orporated/307600.User-Manual-2/User-Guide-973371-Page-2.png)
![537MEMORY PROGRAMMINGNew200112345678910111213141516171819D New CH programmingq Push [r] or [s] (or rotate [DIAL]) to select the desired information, then push [ENT MW].Selectable information: • FREQ • DUP • OFFSET • TS • MODE • ATT • SKIP • PRIO • STOP BEEP • TONE • TSQL FREQ • DTCS CODE • DTCS P • VSC FREQ, OFFSET q Push [ENT MW] (or [w]) to enter the frequency input. w Edit the desired frequency with keypad (pgs. 20, 21). Other information q Push [ENT MW] (or [w]) to edit the setting state. w Push [r] or [s] to select the desired setting, then push [ENT MW].w Push and hold [ENT MW] for 1 sec. to program the chan-nel and return to the frequency indication.• 1 short and 1 long beep sound.■ Memory channel selectionMemory channel can be selected during scan holding state.q Push [SCAN] to start a scan, then push [HOLD V] to hold the scan.w Push and hold [v] or [w] for 1 sec. to select the desired category.e Push [v] or [w] to select the desired group in the cat-egory.r Push [No. DIAL] and 3 digit number (000 to 999) to call the desired memory name in the group directly.• If the memory number is not assigned to the memory name, skip this step. (See p. 50 for number programming details.)t Rotate [DIAL] to select the channel.](https://usermanual.wiki/ICOM-orporated/307600.User-Manual-2/User-Guide-973371-Page-3.png)
![New2001547MEMORY PROGRAMMINGNew2001■ Copying memory contentsThis function copies a memory channel’s contents to VFO (or another memory). This is useful when searching for sig-nals around a memory channel frequency and for recalling the offset frequency, subaudible tone frequency etc.D Memory channel ➪VFOq Select the memory channel to be copied.➥ Push [SCAN] to start a scan, then push [HOLD V] to hold the scan.➥ Rotate [DIAL] to select the desired channel.• Push and hold [v] or [w] for 1 sec. to change the category, or push [v] or [w] to change the group.w Push and hold [HOLD V] for 1 sec. to write the selected channel contents to VFO mode.• 1 short and 1 long beep sound.• Returns to VFO mode automatically.D Memory channel ➪ memory channelq Select the desired memory channel to be copied.➥ Push [SCAN] to start a scan, then push [HOLD V] to hold the scan.➥ Rotate [DIAL] to select the channel.• Push and hold [v] or [w] for 1 sec. to change the category, or push [v] or [w] to change the group.w Push and hold [ENT MW] for 1 sec. to enter memory pro-gramming state.• 1 short and 1 long beep sound.e Push [s] once (or rotate [DIAL]) to select “COPY,” then push [ENT MW].](https://usermanual.wiki/ICOM-orporated/307600.User-Manual-2/User-Guide-973371-Page-4.png)
![557MEMORY PROGRAMMINGNew200112345678910111213141516171819r Push [r] or [s] (or rotate [DIAL]) to select the desired category or “ADDITION,” then push [ENT MW].• When “ADDITION” is selected, new category can be pro-grammed (see p. 50 for new category programming details).t Push [r] or [s] (or rotate [DIAL]) to select the desired group or “ADDITION,” then push [ENT MW].• When “ADDITION” is selected, new group can be programmed in the category (see p. 51 for new group programming details).y Push [r] or [s] (or rotate [DIAL]) to select the desired name or “ADDITION,” then push [ENT MW].• When “ADDITION” is selected, new name can be programmed in the group (see p. 52 for new name programming details).u Push [r] or [s] (or rotate [DIAL]) to select the target channel or “ADDITION,” then push [ENT MW].• When “ADDITION” is selected, new channel can be pro-grammed in the name (see p. 53 for new channel programming details).i Push and hold [ENT MW] for 1 sec. to copy the channel and return to frequency display.](https://usermanual.wiki/ICOM-orporated/307600.User-Manual-2/User-Guide-973371-Page-5.png)
![New2001567MEMORY PROGRAMMINGNew2001■ Memory clearingContents of programmed memories can be cleared (erased), if desired.q Select the desired memory channel to be erased.➥ Push [SCAN] to start a scan, then push [HOLD V] to hold the scan.➥ Rotate [DIAL] to select the channel.• Push and hold [v] or [w] for 1 sec. to change the category, or push [v] or [w] to change the group.w Push and hold [ENT MW] for 1 sec. to enter memory pro-gramming state.• 1 short and 1 long beep sound.e Push [s] twice (or rotate [DIAL]) to select “CLEAR,” then push [ENT MW].• “CLEAR?” window appears.r Push [r] to select “YES,” then push [ENT MW] (or [w]).• Select “NO,” then push [ENT MW] to cancel clearing.• Returns to scan holding state. NOTE: Be careful!— the contents of cleared memories CANNOT be recalled.](https://usermanual.wiki/ICOM-orporated/307600.User-Manual-2/User-Guide-973371-Page-6.png)
![578MENU SCREEN OPERATION12345678910111213141516171819■ GeneralMENU screen is used for programming values or conditions of functions.D Entering MENU screen and operatione.g.) Set “AUTO power OFF” to 30 minutes.q Push [MENU ] to enter MENU screen.w Push [ ]/[ ] (or rotate [DIAL]) to select the desired menu group, then push [ENT MW].e Push [ ]/[ ] (or rotate [DIAL]) to select the desired item, then push [ENT MW].r Push [ ]/[ ] (or rotate [DIAL]) to select the desired value or condition, then push [ENT MW] to return to the setting item selection mode.t Push [CLR SQL] to return to frequency indication, or re-peat steps w to r to set another items.MWMENUENTHOLD VSCAN.1472580369SKIPNO.CLRSQLDIALSEARCHATTMWMENUENTCLRSQL[DIAL]](https://usermanual.wiki/ICOM-orporated/307600.User-Manual-2/User-Guide-973371-Page-7.png)
![New2001588MENU SCREEN OPERATIONNew2001■ Menu listSEARCHMODE/TS/TONE...SETTINGALL SCAN Push [ENT MW] to startSkip setting ON/OFF for Category, Group or NamePush [ENT MW] to startON OFFON OFFTSQL DTCSHOLD 20SEC 18SEC 16SEC 14SEC 12SEC 10SEC 8SEC 6SEC 4SEC 2SECHOLD 5SEC 4SEC 3SEC 2SECBELL ON OFFOFF+DUP −DUP OFF0.000001SEC 0SECHOLD 20SEC 18SEC 16SEC 14SEC 12SEC 10SEC 8SEC 6SEC 4SEC 2SECAUTO88.5023NORMAL200.0kHz 125.0 kHz 100.0kHzAUTOFM WFM AMDTCS-R TSQL-R TSQL TSQLSDTCS DTCSSREVERSE50.0 kHzHOLD 5SEC 4SEC 3SEC 2SEC 1SEC 0SECON OFFON OFFON OFFON OFFSelect a category, then push [ENT MW] to startSelect a category, then push [ENT MW] to startSelect a band, then push [ENT MW] to startPush [ENT MW] to indicate the auto write channelSelect a program, then push [ENT/MW] twice to startSelect a program-link, then push [ENT/MW] twice to startSelect a group, then push [ENT MW] to startSOUNDSCANDISPLAYSEARCHMODE/TS/TONE...SETTINGSOUNDSCANDISPLAYCATEGORY SCANGROUP SCANWEATHER SCANWEATHER ALERTSKIPPRIORITYSTOP BEEPPAUSERESUMEALL SCAN Push [ENT MW] to startSkip setting ON/OFF for Category, Group or NamePush [ENT MW] to startON OFFHOLD 20SEC 18SEC 16SEC 14SEC 12SEC 10SEC 8SEC 6SEC 4SEC 2SECHOLD 5SEC 4SEC 3SEC 2SEC 1SEC 0SECON OFFON OFFSelect a category, then push [ENT MW] to startSelect a group, then push [ENT MW] to startSCANCATEGORY SCANGROUP SCANWEATHER SCANWEATHER ALERTSKIPPRIORITYSTOP BEEPPAUSERESUMEBASIC SEARCHBAND SEARCHPROGRAM SEARCHPROGRAM LINKAUTO WRITE CHPROGRAM SKIPTONE SEARCHPRIORITYSTOP BEEPPAUSERESUMEAM ANTENNAFM ANTENNARF GAINAUTO POWER OFFAUTO POWER ONPOWER SAVEDIAL SPEED-UPLOCKCI-V ADDRESSBAUD RATEBASSTREBLETRANSCEIVEDUPLEXOFFSET FREQTSMODETONEKEY-TOUCH BEEPBEEP LEVELAF FILTERTONE CONTROLBACKLIGHTLCD CONTRASTOPENING LOGOFONT SIZESETTINGSOUNDSDISPLAYAM ANTENNAFM ANTENNARF GAINAUTO POWER OFFAUTO POWER ONPOWER SAVEDIAL SPEED-UPLOCKCI-V ADDRESSBAUD RATEBASSTREBLETRANSCEIVEKEY-TOUCH BEEPBEEP LEVELAF FILTERTONE CONTROLBACKLIGHTLCD CONTRASTOPENING LOGOFONT SIZETSQL FREQDTCS CODEDTCS POLARITYVSC*“AUTO” is available for USA version only*Appears only when FM mode is selectedON OFFON781908OFFON OFFON OFFON OFFTSQL DTCSBELL ON OFFHOLD 20SEC 18SEC 16SEC 14SEC 12SEC 10SEC 8SEC 6SEC 4SEC 2SECMAX 987654321MINHOLD 5SEC 4SEC 3SEC 2SEC 1SEC 0SEC120MIN 90MIN 60MIN 30MINON OFFSelect a category, then push [ENT MW] to startSelect a band, then push [ENT MW] to startPush [ENT MW] to indicate the auto write channelSelect a program, then push [ENT/MW] twice to startSelect a program-link, then push [ENT/MW] twice to startSEARCHBASIC SEARCHBAND SEARCHPROGRAM SEARCHPROGRAM LINKAUTO WRITE CHPROGRAM SKIPTONE SEARCHPRIORITYSTOP BEEPPAUSERESUME*Appears only when FM mode is selected*Appears only when AM/WFM mode is selected*Depending on the operating frequency *Depending on the operating frequency *Available for some frequency band30.0 kHz 25.0kHz 15.0 kHz12.5 kHz 10.0kHz 7.5 kHz9.0 kHz* 8.33 kHz* 6.25 kHz 5.0 kHzOFF+DUP −DUP OFFEXT-DX EXT-LOCAL BARBOOST CUTEXT EARPHONE0.00000AUTO88.5023NORMAL200.0kHz 125.0 kHz 100.0kHzAUTOFM WFM AMDTCS-R TSQL-R TSQL TSQLSDTCS DTCSSREVERSELARGESMALLNORMALNORMALBOOST CUTNORMALNO SQL NO VOL ALLAUTO 19200bps 9600bps 4800bps 1200bps 300bpsAUTO OFFAUTO ON OFF50.0 kHzON OFFON OFFSOUNDSDISPLAYBASSTREBLEKEY-TOUCH BEEPBEEP LEVELAF FILTERTONE CONTROLBACKLIGHTLCD CONTRASTOPENING LOGOFONT SIZE1908ON OFFON OFF*Appears only when AM/WFM mode is selectedBOOSTLARGESMALLNORMALBOOST NORMALAUTO ON OFFON OFFOFFOFFMODE/TS/TONE...DUPLEXOFFSET FREQTSMODETONETSQL FREQDTCS CODEDTCS POLARITYVSC*“AUTO” is available for USA version onlyPush []/[] to set the timer in 30 min. steps*Depending on the operating frequency *Depending on the operating frequency *Available for some frequency band30.0 kHz 25.0kHz 15.0 kHz12.5 kHz 10.0kHz 7.5 kHz9.0 kHz* 8.33 kHz* 6.25 kHz 5.0 kHz](https://usermanual.wiki/ICOM-orporated/307600.User-Manual-2/User-Guide-973371-Page-8.png)
![598MENU SCREEN OPERATIONNew200112345678910111213141516171819SEARCHMODE/TS/TONE...SETTINGALL SCAN Push [ENT MW] to startSkip setting ON/OFF for Category, Group or NamePush [ENT MW] to startON OFFON OFFTSQL DTCSHOLD 20SEC 18SEC 16SEC 14SEC 12SEC 10SEC 8SEC 6SEC 4SEC 2SECHOLD 5SEC 4SEC 3SEC 2SECBELL ON OFFOFF+DUP −DUP OFF0.000001SEC 0SECHOLD 20SEC 18SEC 16SEC 14SEC 12SEC 10SEC 8SEC 6SEC 4SEC 2SECAUTO88.5023NORMAL200.0kHz 125.0 kHz 100.0kHzAUTOFM WFM AMDTCS-R TSQL-R TSQL TSQLSDTCS DTCSSREVERSE50.0 kHzHOLD 5SEC 4SEC 3SEC 2SEC 1SEC 0SECON OFFON OFFON OFFON OFFSelect a category, then push [ENT MW] to startSelect a category, then push [ENT MW] to startSelect a band, then push [ENT MW] to startPush [ENT MW] to indicate the auto write channelSelect a program, then push [ENT/MW] twice to startSelect a program-link, then push [ENT/MW] twice to startSelect a group, then push [ENT MW] to startSOUNDSCANDISPLAYSEARCHMODE/TS/TONE...SETTINGSOUNDSCANDISPLAYCATEGORY SCANGROUP SCANWEATHER SCANWEATHER ALERTSKIPPRIORITYSTOP BEEPPAUSERESUMEALL SCAN Push [ENT MW] to startSkip setting ON/OFF for Category, Group or NamePush [ENT MW] to startON OFFHOLD 20SEC 18SEC 16SEC 14SEC 12SEC 10SEC 8SEC 6SEC 4SEC 2SECHOLD 5SEC 4SEC 3SEC 2SEC 1SEC 0SECON OFFON OFFSelect a category, then push [ENT MW] to startSelect a group, then push [ENT MW] to startSCANCATEGORY SCANGROUP SCANWEATHER SCANWEATHER ALERTSKIPPRIORITYSTOP BEEPPAUSERESUMEBASIC SEARCHBAND SEARCHPROGRAM SEARCHPROGRAM LINKAUTO WRITE CHPROGRAM SKIPTONE SEARCHPRIORITYSTOP BEEPPAUSERESUMEAM ANTENNAFM ANTENNARF GAINAUTO POWER OFFAUTO POWER ONPOWER SAVEDIAL SPEED-UPLOCKCI-V ADDRESSBAUD RATEBASSTREBLETRANSCEIVEDUPLEXOFFSET FREQTSMODETONEKEY-TOUCH BEEPBEEP LEVELAF FILTERTONE CONTROLBACKLIGHTLCD CONTRASTOPENING LOGOFONT SIZESETTINGSOUNDSDISPLAYAM ANTENNAFM ANTENNARF GAINAUTO POWER OFFAUTO POWER ONPOWER SAVEDIAL SPEED-UPLOCKCI-V ADDRESSBAUD RATEBASSTREBLETRANSCEIVEKEY-TOUCH BEEPBEEP LEVELAF FILTERTONE CONTROLBACKLIGHTLCD CONTRASTOPENING LOGOFONT SIZETSQL FREQDTCS CODEDTCS POLARITYVSC*“AUTO” is available for USA version only*Appears only when FM mode is selectedON OFFON781908OFFON OFFON OFFON OFFTSQL DTCSBELL ON OFFHOLD 20SEC 18SEC 16SEC 14SEC 12SEC 10SEC 8SEC 6SEC 4SEC 2SECMAX 987654321MINHOLD 5SEC 4SEC 3SEC 2SEC 1SEC 0SEC120MIN 90MIN 60MIN 30MINON OFFSelect a category, then push [ENT MW] to startSelect a band, then push [ENT MW] to startPush [ENT MW] to indicate the auto write channelSelect a program, then push [ENT/MW] twice to startSelect a program-link, then push [ENT/MW] twice to startSEARCHBASIC SEARCHBAND SEARCHPROGRAM SEARCHPROGRAM LINKAUTO WRITE CHPROGRAM SKIPTONE SEARCHPRIORITYSTOP BEEPPAUSERESUME*Appears only when FM mode is selected*Appears only when AM/WFM mode is selected*Depending on the operating frequency *Depending on the operating frequency *Available for some frequency band30.0 kHz 25.0kHz 15.0 kHz12.5 kHz 10.0kHz 7.5 kHz9.0 kHz* 8.33 kHz* 6.25 kHz 5.0 kHzOFF+DUP −DUP OFFEXT-DX EXT-LOCAL BARBOOST CUTEXT EARPHONE0.00000AUTO88.5023NORMAL200.0kHz 125.0 kHz 100.0kHzAUTOFM WFM AMDTCS-R TSQL-R TSQL TSQLSDTCS DTCSSREVERSELARGESMALLNORMALNORMALBOOST CUTNORMALNO SQL NO VOL ALLAUTO 19200bps 9600bps 4800bps 1200bps 300bpsAUTO OFFAUTO ON OFF50.0 kHzON OFFON OFFSOUNDSDISPLAYBASSTREBLEKEY-TOUCH BEEPBEEP LEVELAF FILTERTONE CONTROLBACKLIGHTLCD CONTRASTOPENING LOGOFONT SIZE1908ON OFFON OFF*Appears only when AM/WFM mode is selectedBOOSTLARGESMALLNORMALBOOST NORMALAUTO ON OFFON OFFOFFOFFMODE/TS/TONE...DUPLEXOFFSET FREQTSMODETONETSQL FREQDTCS CODEDTCS POLARITYVSC*“AUTO” is available for USA version onlyPush []/[] to set the timer in 30 min. steps*Depending on the operating frequency *Depending on the operating frequency *Available for some frequency band30.0 kHz 25.0kHz 15.0 kHz12.5 kHz 10.0kHz 7.5 kHz9.0 kHz* 8.33 kHz* 6.25 kHz 5.0 kHz](https://usermanual.wiki/ICOM-orporated/307600.User-Manual-2/User-Guide-973371-Page-9.png)
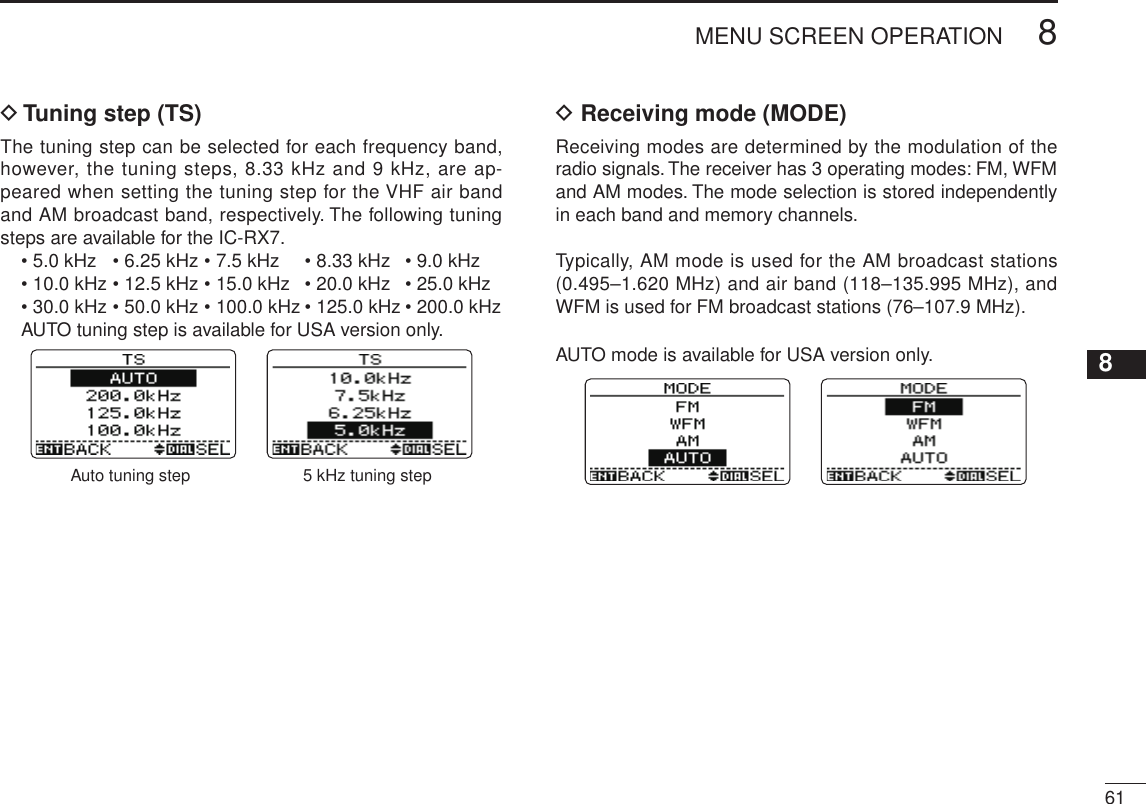
![New2001608MENU SCREEN OPERATIONNew2001■ MODE/TS/TONE menu itemsD Duplex direction (DUPLEX)Sets the duplex direction. The displayed frequency shifts the programmed frequency in offset frequency at right when monitor function is in use (while pushing [CLR SQL]).• +DUP : The displaying frequency shifts up during moni-tor.• –DUP : The displaying frequency shifts down during monitor.• OFF : Simplex operation. (default)Simplex operation Positive duplex operationD Offset frequency (OFFSET FREQ)Sets the duplex offset frequency for each frequency band independently within 0 to 159.995 MHz range. During duplex operation (–DUP or +DUP), the monitoring frequency (while [CLR SQL] is pushed) shifts the set frequency.The default value may differ according to the selected fre-quency band (before accessing menu screen) and receiver version. The selected tuning step at next column (right page) is used for the offset frequency setting.](https://usermanual.wiki/ICOM-orporated/307600.User-Manual-2/User-Guide-973371-Page-10.png)
![New2001668MENU SCREEN OPERATIONNew2001D Dial acceleration (DIAL SPEED-UP)The dial speed acceleration automatically speeds up the tuning dial speed when rotating [DIAL] rapidly.• OFF : The dial speed acceleration is turned OFF.• ON : The dial speed acceleration is tuned ON. (default)D Key lock type (LOCK)While the key lock function is ON, [ ], [CLR SQL] (SQL function only), [VOL] and [MENU ] (Lock function only) can still be accessed. Accessible keys can be set to 1 of 4 groups.• NORMAL : [ ], [CLR SQL] (SQL function only), [VOL] and [MENU ] (Lock function only) acces-sible. (default)• NO SQL : [ ], [VOL] and [MENU ] (Lock func-tion only) are accessible.• NO VOL : [ ], [CLR SQL] (SQL function only) and [MENU ] (Lock function only) are acces-sible.• ALL : [ ] and [MENU ] (Lock function only) are accessible.](https://usermanual.wiki/ICOM-orporated/307600.User-Manual-2/User-Guide-973371-Page-16.png)

![719OTHER FUNCTIONS12345678910111213141516171819■ Antenna selectionThe IC-RX7 has an internal bar antenna installed for receiv-ing AM broadcast band (0.495–1.620 MHz; differ according to version) signals. In addition, the connected earphone’s cable can be used as an antenna for receiving FM broadcast band (76.000–107.995 MHz; differ according to version) signals.D Selecting antennaq Enter “AM ANTENNA” or “FM ANTENNA” in SETTING menu for AM broadcast band or FM broadcast band, re-spectively. MENU ➪ SETTING ➪ AM ANTENNA (p. 64) (Push [MENU ]), (Push [r]/[s], then push [ENT MW].) MENU ➪ SETTING ➪ FM ANTENNA (p. 64)MWMENUENTHOLD VSCAN.1472580369SKIPNO.CLRSQLDIALSEARCHATTMWENTMENUPush MWENTw Push [r]/[s] (or rotate [DIAL]) to select “BAR” when “AM ANTENNA” is selected for the AM broadcast band; select “EARPHONE” when “FM ANTENNA” is selected for the FM broadcast band.Bar antenna selection for 0.495–1.620 MHz band Earphone cable selection for 76.000–107.995 MHz bande Push [ENT MW] (or [v]) to return to SETTING menu, and push [CLR SQL] to return to frequency indication. NOTES: • Some noise or spurious may be received when the in-ternal bar or earphone cable is used for antenna. • The supplied or third party’s antenna MUST BE con-nected to the antenna connector to receive signals other than AM or FM broadcast bands. • When receiving an AM broadcast signal with internal bar antenna, aim the receiver to better audio direction. • When the internal bar or earphone cable is used for an antenna, the attenuator function cannot be used.](https://usermanual.wiki/ICOM-orporated/307600.User-Manual-2/User-Guide-973371-Page-21.png)
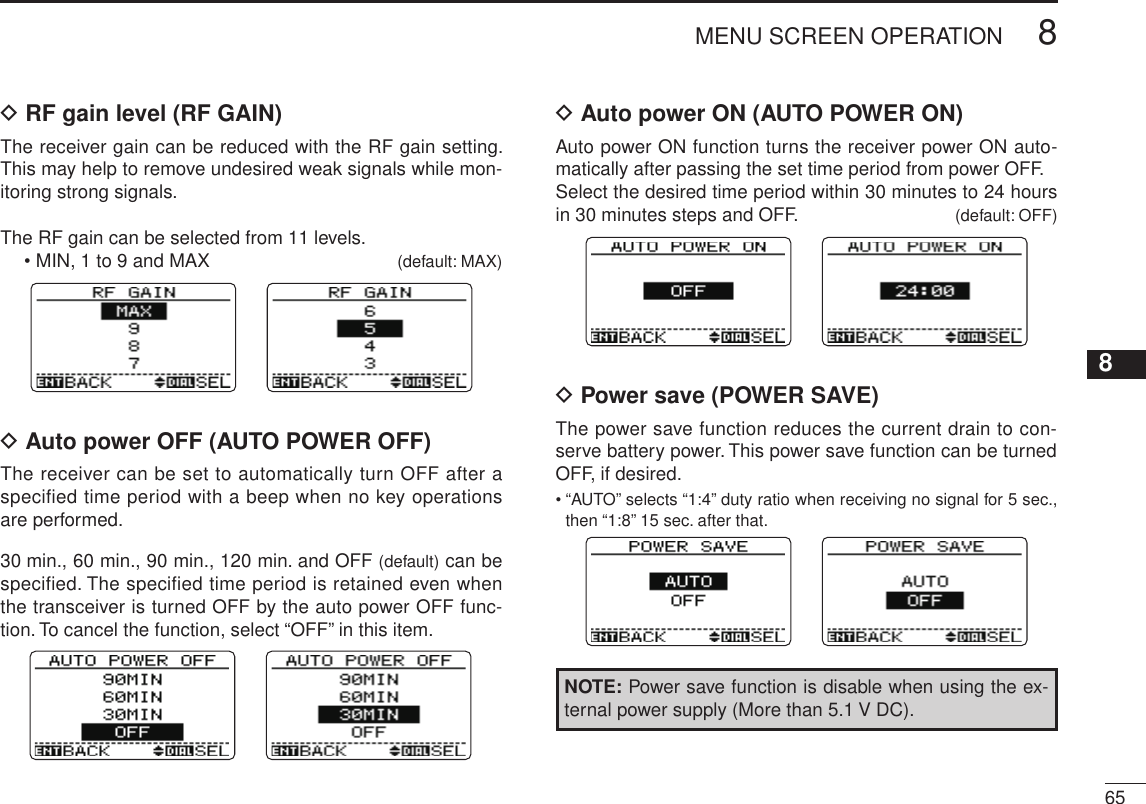
![729OTHER FUNCTIONSNew2001■ RF gainThe receiver gain can be reduced with the RF gain setting. This may help to remove undesired weak signals while mon-itoring strong signals. q Enter “RF GAIN” in SETTING menu. MENU ➪ SETTING ➪ RF GAIN (p. 65) (Push [MENU ]), (Push [r]/[s], then push [ENT MW].)w Push [r]/[s] (or rotate [DIAL]) to adjust the RF gain. • Normally this setting is used with maximum level.e Push [ENT MW] (or [v]) to return to SETTING menu, and push [CLR SQL] to return to frequency indication. • “RF” indicator appears when the RF gain is adjusted other than “MAX.”AppearsMWMENUENTHOLD VSCAN.1472580369SKIPNO.CLRSQLDIALSEARCHATTMWMENUENTPushPushPushMWMENUENTMWENT[DIAL]](https://usermanual.wiki/ICOM-orporated/307600.User-Manual-2/User-Guide-973371-Page-22.png)
![739OTHER FUNCTIONS12345678910111213141516171819■ Attenuator functionThe attenuator prevents distortion of a desired signal by very strong signals near the desired frequency or when very strong electric fields, such as from a broadcasting station, are present at your location. The attenuation is about 15 dB.➥ Push and hold [• ATT] for 1 sec. to turn the attenuator function ON and OFF. • “ATT” appears on the function display.MWMENUENTHOLD VSCAN.1472580369SKIPNO.CLRSQLDIALSEARCHATT.ATTAppears■ Lock functionTo prevent accidental frequency changes and unnecessary function access, use the lock function. ➥ Push and hold [MENU ] for 1 sec. to turn the lock function ON and OFF. • “ ” appears while the lock function is activated. • [ ] and [MENU ] is operatable while the lock function is activated. • The squelch control and volume control can be used while the lock function is in use with default setting. Either or both the squelch control and volume control can also be locked in setting menu. MENU ➪ SETTING ➪ LOCK (p. 66)MWMENUENTHOLD VSCAN.1472580369SKIPNO.CLRSQLDIALSEARCHATTMENUAppears](https://usermanual.wiki/ICOM-orporated/307600.User-Manual-2/User-Guide-973371-Page-23.png)
![749OTHER FUNCTIONSNew2001 New2001■ Duplex operationDuplex communication uses 2 different frequencies for transmitting and receiving. Generally, duplex is used in com-munication through a repeater, some utility communications, etc.During duplex operation, the transmit station frequency is shifted from the receive station frequency by the offset fre-quency. Repeater information (offset frequency and shift di-rection) can be programmed into memory channels. (p. 53)D Settingq Set the receive station frequency (repeater output fre-quency) in VFO mode.w Enter “DUPLEX” in MODE/TS/TONE... menu. MENU ➪ MODE/TS/TONE... ➪ DUPLEX (p. 60) (Push [MENU ]), (Push [r]/[s], then push [ENT MW].)e Push [r]/[s] (or rotate [DIAL]) to select “–DUP” or “+DUP.”MWMENUENTHOLD VSCAN.1472580369SKIPNO.CLRSQLDIALSEARCHATTMWMENUENTPushPushMWMENUENTPush orPushMWENTPushMWENTPushMWENT[DIAL]](https://usermanual.wiki/ICOM-orporated/307600.User-Manual-2/User-Guide-973371-Page-24.png)
![r Push [ENT MW] (or [v]) to return to MODE/TS/TONE... menu, and push [s] (or rotate [DIAL]) to select “OFFSET FREQ.” MENU ➪ MODE/TS/TONE... ➪ OFFSET FREQ (p. 60)t Enter the desired offset frequency within 0.00000–159.99500 MHz range via the keypad, or by pushing [r]/[s] (or rotate [DIAL]) also can be set. • The tuning step, selected in VFO mode, is used for setting. • Push and hold [v] or [w] for 1 sec. then rotate [R-DIAL] to change the frequency in 1 MHz steps. y Push [ENT MW] (or [v]) to return to MODE/TS/TONE... menu, and push [CLR SQL] to return to frequency indica-tion.Appearsu Push and hold [CLR SQL] to monitor the transmit station frequency (repeater input frequency) directly.■ [DIAL] function assignmentThe [DIAL] control can be used as an audio volume control instead of [r]/[s] keys to suit your preference. However, while [DIAL] functions as an audio volume, [r]/[s] keys function as tuning controls. ➥ Push and hold [NO. DIAL] for 1 sec. to toggle the dial function from turning dial and audio volume.MWMENUENTHOLD VSCAN.1472580369SKIPNO.CLRSQLDIALSEARCHATTNO.DIAL Toggles• [DIAL] and [r]/[s] functions[DIAL] [r]/[s]Frequency, Memory channel, Squelch level, Searching/scanning directionAudio volume setNew2001759OTHER FUNCTIONS12345678910111213141516171819](https://usermanual.wiki/ICOM-orporated/307600.User-Manual-2/User-Guide-973371-Page-25.png)
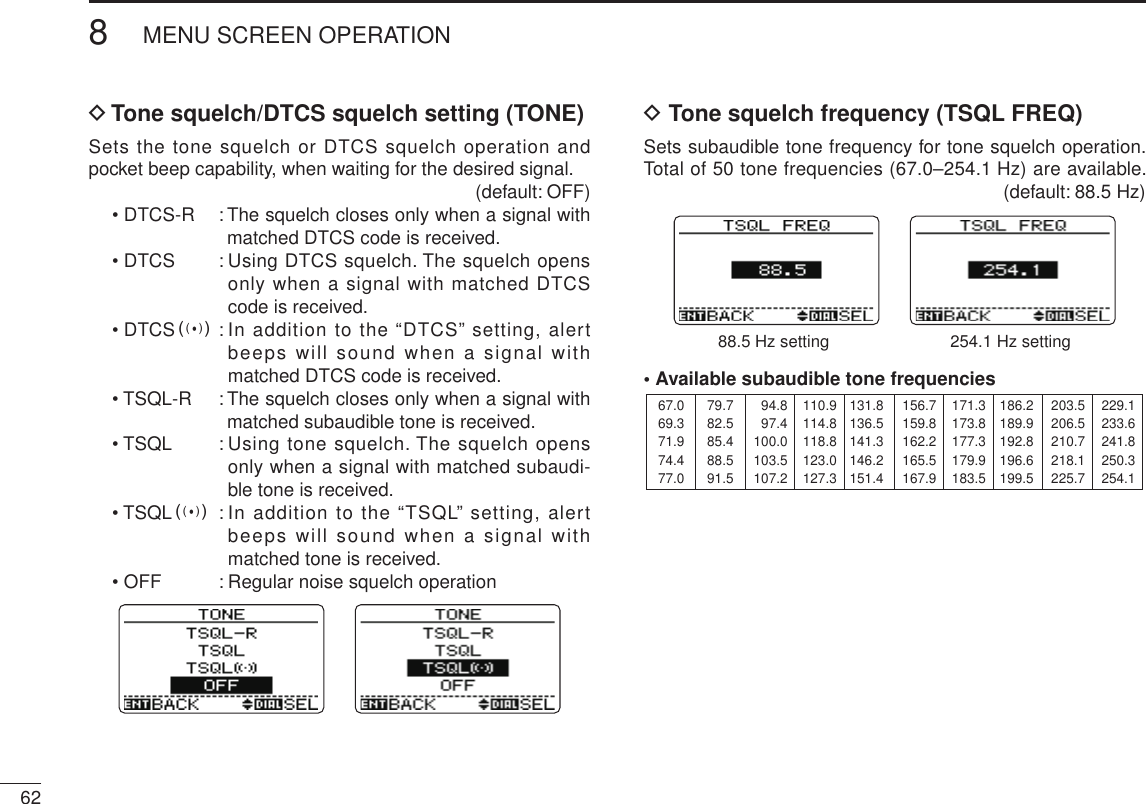
![New2001■ Tone/DTCS squelch operationD Tone and DTCS squelchesThe tone squelch (CTCSS) or DTCS squelch opens only when receiving a signal containing a matching subaudible tone or DTCS code, respectively. You can silently wait for calls from group members using the same tone or code. D Reverse tone/DTCS squelchThe reverse tone/DTCS squelch is convenient if you want to ignore a specific signal. The receiver mutes the squelch when a signal with the matched tone or code is received. “TSQL-R” / “DTCS-R” is displayed when the reverse tone/DTCS is set.D Pocket beepThese functions use subaudible tones or DTCS codes for calling and can be used as a “common pager” to inform you that someone has called while you were away from the re-ceiver.D Settingq Set the desired operating frequency in FM mode.w Enter “TONE” in MODE/TS/TONE... menu. MENU ➪ MODE/TS/TONE... ➪ TONE (p. 62) (Push [MENU ]), (Push [r]/[s], then push [ENT MW].)e Push [r]/[s] (or rotate [DIAL]) to select the tone or DTCS squelch. • Tone squelch “TSQL,” tone squelch reverse “TSQL-R,” pocket beep “TSQLS,” DTCS squelch “DTCS,” DTCS squelch re-verse “DTCS-R,” DTCS beep “DTCSS” and no tone opera-tion are available.MWMENUENTHOLD VSCAN.1472580369SKIPNO.CLRSQLDIALSEARCHATTMWENTMENUPush MWENT769OTHER FUNCTIONSNew2001](https://usermanual.wiki/ICOM-orporated/307600.User-Manual-2/User-Guide-973371-Page-26.png)
![779OTHER FUNCTIONSNew200112345678910111213141516171819r Push [ENT MW] (or [v]) to return to MODE/TS/TONE... menu, and push [CLR SQL] to return to frequency indica-tion.OFF (no indication)Tone squelch with pocket beep DTCS squelch with pocket beepTone squelch DTCS squelchTone squelch reverse DTCS squelch reverset Operate the receiver in the normal way.y When the received signal includes a matching tone/code, the squelch opens and the signal can be heard. • When the received signal’s tone/code does not match, tone/DTCS squelch does not open, however, the S-indicator shows signal strength. • To open the squelch manually, push and hold [CLR SQL] for 1sec.D Pocket beep functionq When pocket beep function is activated and the signal with a matching tone/code is received, the receiver emits beep tones for 30 sec. and blinks “S.”w Push [CLR SQL] to stop the beeps and blinking.](https://usermanual.wiki/ICOM-orporated/307600.User-Manual-2/User-Guide-973371-Page-27.png)
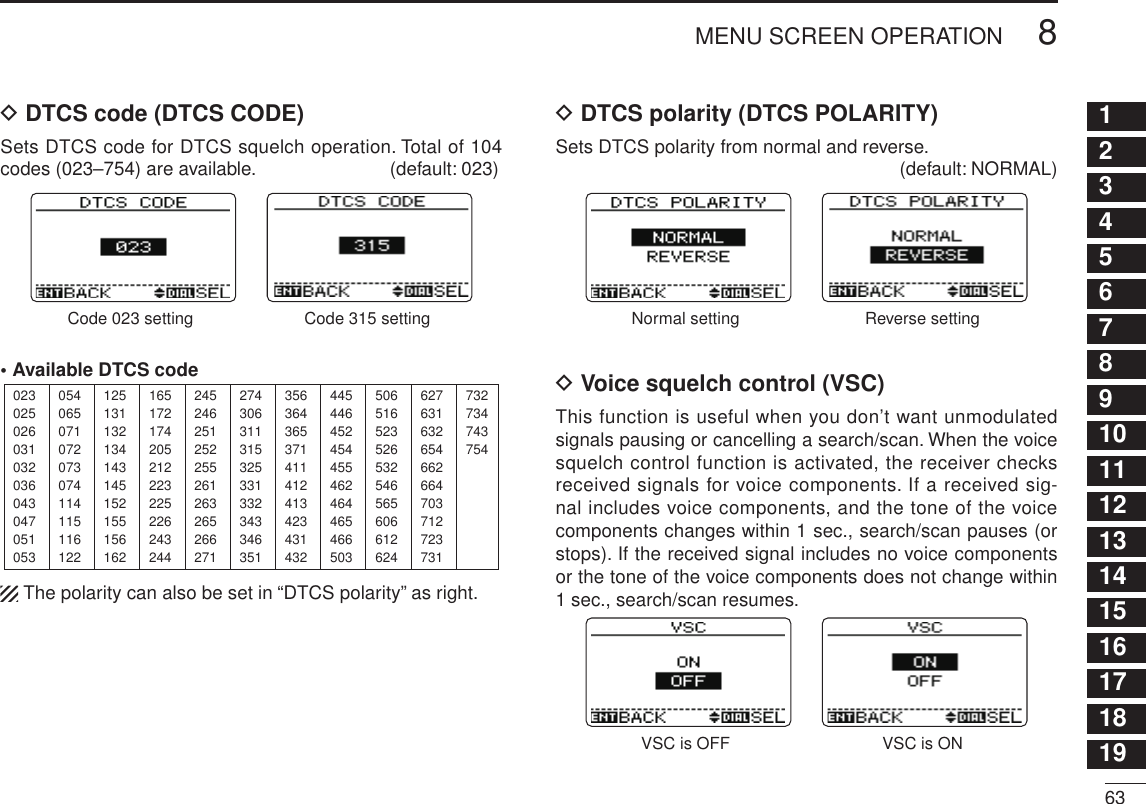
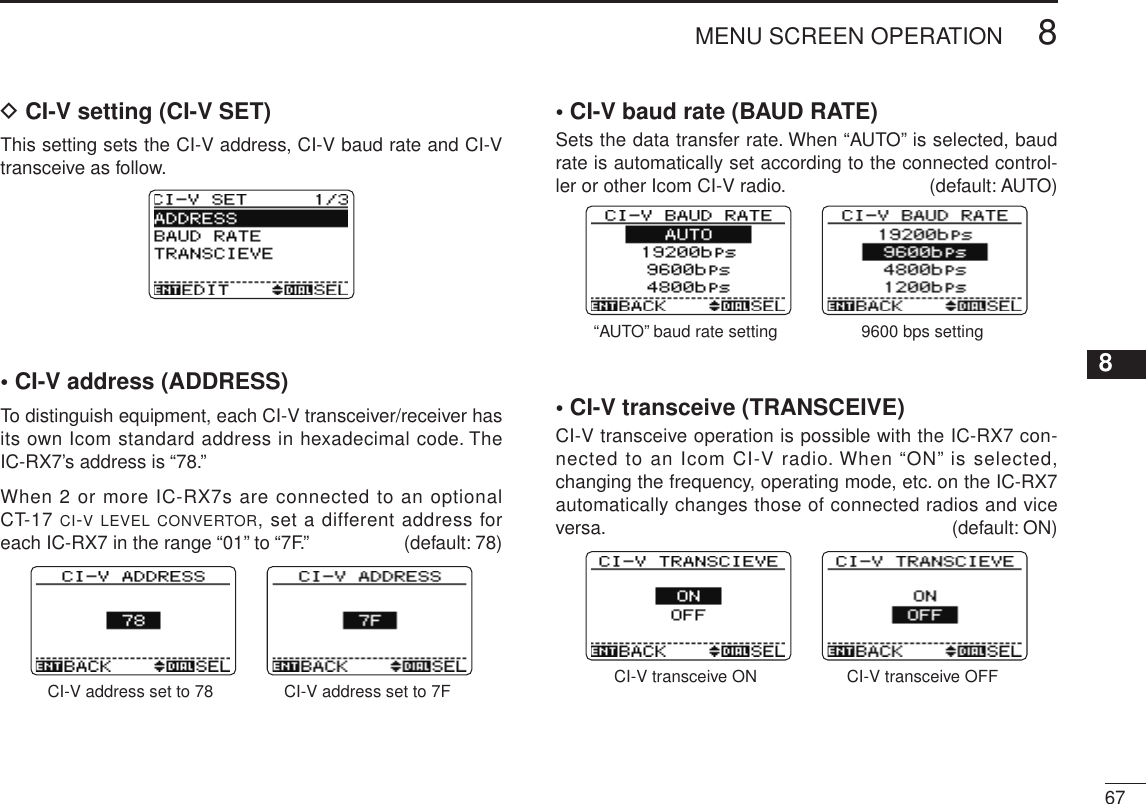
![New2001789OTHER FUNCTIONSNew2001q Enter “TSQL FREQ” or “DTCS CODE” in MODE/TS/TONE... menu for selecting tone squelch frequency or DTCS code, respectively. MENU ➪ MODE/TS/TONE... ➪ TSQL FREQ (p. 62) (Push [MENU ]), (Push [r]/[s], then push [ENT MW].) MENU ➪ MODE/TS/TONE... ➪ DTCS CODE (p. 63)w Push [r]/[s] (or rotate [DIAL]) to select the desired tone squelch frequency or DTCS code. • Each operating band and each memory channel have inde-pendent settings. • See next page for available tone frequencies or DTCS codes for details.MWMENUENTHOLD VSCAN.1472580369SKIPNO.CLRSQLDIALSEARCHATTMWENTMENUPush MWENTTone squelch frequency DTCS codee Push [ENT MW] (or [v]) to return to MODE/TS/TONE… menu, and push [CLR SQL] to return to frequency indica-tion. DTCS phase mode can be selected in “DTCS POLAR-ITY” setting. (p. 79)■ Tone squelch frequency/DTCS code setting](https://usermanual.wiki/ICOM-orporated/307600.User-Manual-2/User-Guide-973371-Page-28.png)
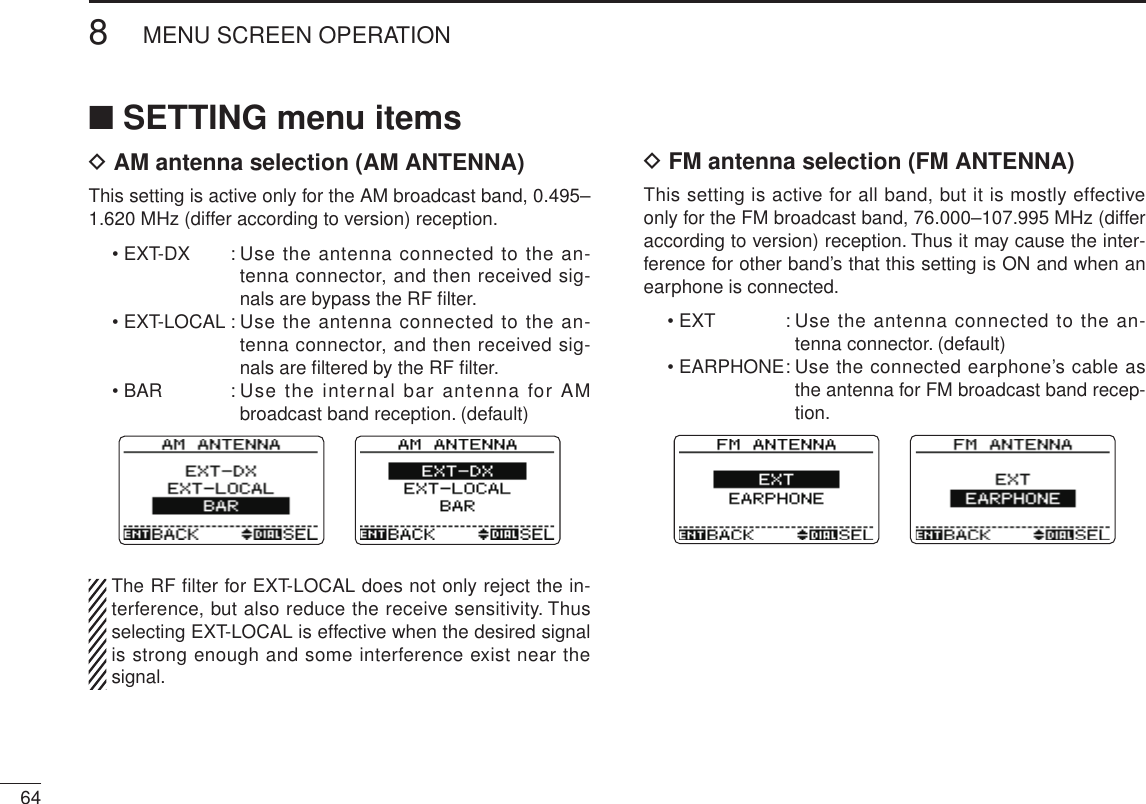
![799OTHER FUNCTIONSNew200112345678910111213141516171819•Available tone frequencies 67.069.371.974.477.079.782.585.488.591.594.897.4100.0103.5107.2110.9114.8118.8123.0127.3131.8136.5141.3146.2151.4156.7159.8162.2165.5167.9171.3173.8177.3179.9183.5186.2189.9192.8196.6199.5203.5206.5210.7218.1225.7229.1233.6241.8250.3254.1•Available DTCS code023025026031032036043047051053125131132134143145152155156162245246251252255261263265266271356364365371411412413423431432506516523526532546565606612624054065071072073074114115116122165172174205212223225226243244274306311315325331332343346351445446452454455462464465466503627631632654662664703712723731732734743754■ DTCS polarity settingq Enter “DTCS POLARITY” in DUP/TONE... menu. MENU ➪ MODE/TS/TONE... ➪ DTCS POLARITY (p. 63) (Push [MENU ]), (Push [r]/[s], then push [ENT MW].)w Push [r]/[s] (or rotate [DIAL]) to select the desired DTCS polarity.MWMENUENTHOLD VSCAN.1472580369SKIPNO.CLRSQLDIALSEARCHATTMWENTMENUPush MWENTe Push [ENT MW] (or [v]) to return to DUP/TONE… menu, and push [CLR SQL] to return to frequency indication.](https://usermanual.wiki/ICOM-orporated/307600.User-Manual-2/User-Guide-973371-Page-29.png)
![New2001809OTHER FUNCTIONSNew2001■ Tone searchBy monitoring a signal that is being operated with pocket beep, tone or DTCS squelch function, you can determine the tone frequency or DTCS code necessary to open a squelch.q Set the frequency to be checked for a tone frequency or DTCS code.w Enter “TONE SEARCH” in SEARCH menu. MENU ➪ SEARCH ➪ TONE SEARCH (Push [MENU ]), (Push [r]/[s], then push [ENT MW].) • Search menu can also be entered by pushing and holding [SEARCH] for 1 sec. • Tone search screen appears.e Push [r] or [s] to select “TSQL” or “DTCS,” then push [ENT MW] to start the tone search. • To change the searching direction, rotate [DIAL]. • Tone squelch or DTCS squelch function is activate automatically.MWMENUENTHOLD VSCAN.1472580369SKIPNO.CLRSQLDIALSEARCHATTMWENTMENUPush MWENTr When the tone frequency or DTCS code is decoded, the setting menu contents are programmed with the fre-quency or code. • The tone search pauses for the set period in search pause timer (p. 38) when a tone frequency or DTCS code is detected. • The decoded tone frequency is used for the tone squelch fre-quency (TSQL FREQ) when the tone squelch is ON. • The decoded DTCS code is used for the DTCS code when the DTCS squelch is ON.Tone search for tone squelch Tone search for DTCS squelcht Push [CLR SQL] to stop the search. • If the search is cancelled before the receiver detects the tone or code, the setting menu contents are not changed. • The detected tone is used for temporary operation only. The stored tone setting in memory channel won’t be changed.NOTE: Tone frequency is over-written automatically when it corre-sponds with the searching tone frequency in tone squelch mode.However, it is not over-written in memory channel.](https://usermanual.wiki/ICOM-orporated/307600.User-Manual-2/User-Guide-973371-Page-30.png)
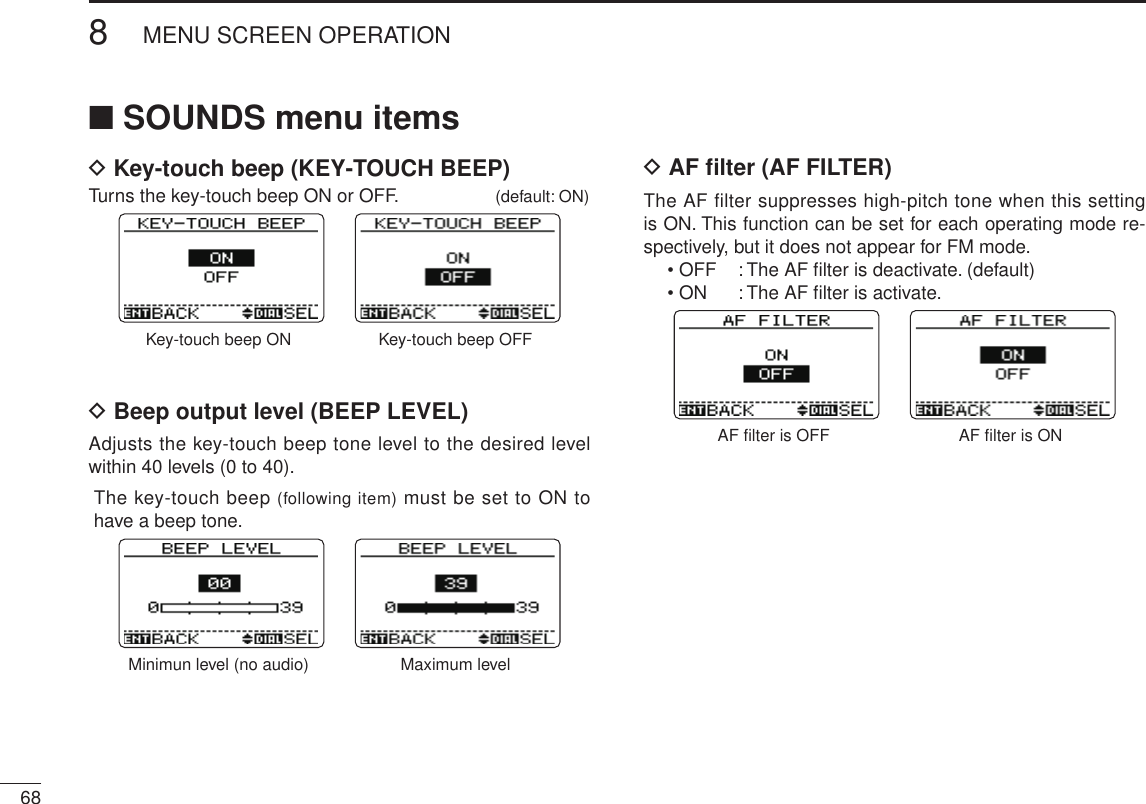
![819OTHER FUNCTIONSNew200112345678910111213141516171819■ Beep tonesYou can select to have confirmation beeps sound at the push of a switch. The output level can be adjusted within 39 levels with “BEEP LEVEL” in SOUNDS menu. MENU ➪ SOUNDS ➪ BEEP LEVEL (p. 68) (Push [MENU ]), (Push [r]/[s], then push [ENT MW].)You can select silent operation by turning beep tones OFF with “KEY-TOUCH BEEP” in SOUNDS menu. MENU ➪ SOUNDS ➪ KEY-TOUCH BEEP (p. 68) (Push [MENU ]), (Push [r]/[s], then push [ENT MW].)■ Dial speed accelerationThe dial speed acceleration automatically speeds up the tuning dial speed when rotating [DIAL] rapidly.This function can be turned ON and OFF with “DIAL SPEED-UP” in SETTING menu. MENU ➪ SETTING ➪ DIAL SPEED-UP (p. 66) (Push [MENU ]), (Push [r]/[s], then push [ENT MW].)■ Power saveThe power save function reduces the current drain to con-serve battery power. The power save duty cycle, the ratio of receive circuit on to receive circuit off during standby, can be set to auto-matic (default), 1 : 4 (150 msec. : 600msec.), 1 : 8 (150 msec. : 1200msec.), or OFF with “POWER SAVE” in SETTING menu. MENU ➪ SETTING ➪ POWER SAVE (p. 65) (Push [MENU ]), (Push [r]/[s], then push [ENT MW].)• “AUTO” selects “1:4” duty ratio when receiving no signal for 5 sec., then “1:8” 15 sec. after that.150 msec.15 sec.600 msec. 1200 msec.No signal5 sec.Circuit ONCircuit OFF](https://usermanual.wiki/ICOM-orporated/307600.User-Manual-2/User-Guide-973371-Page-31.png)
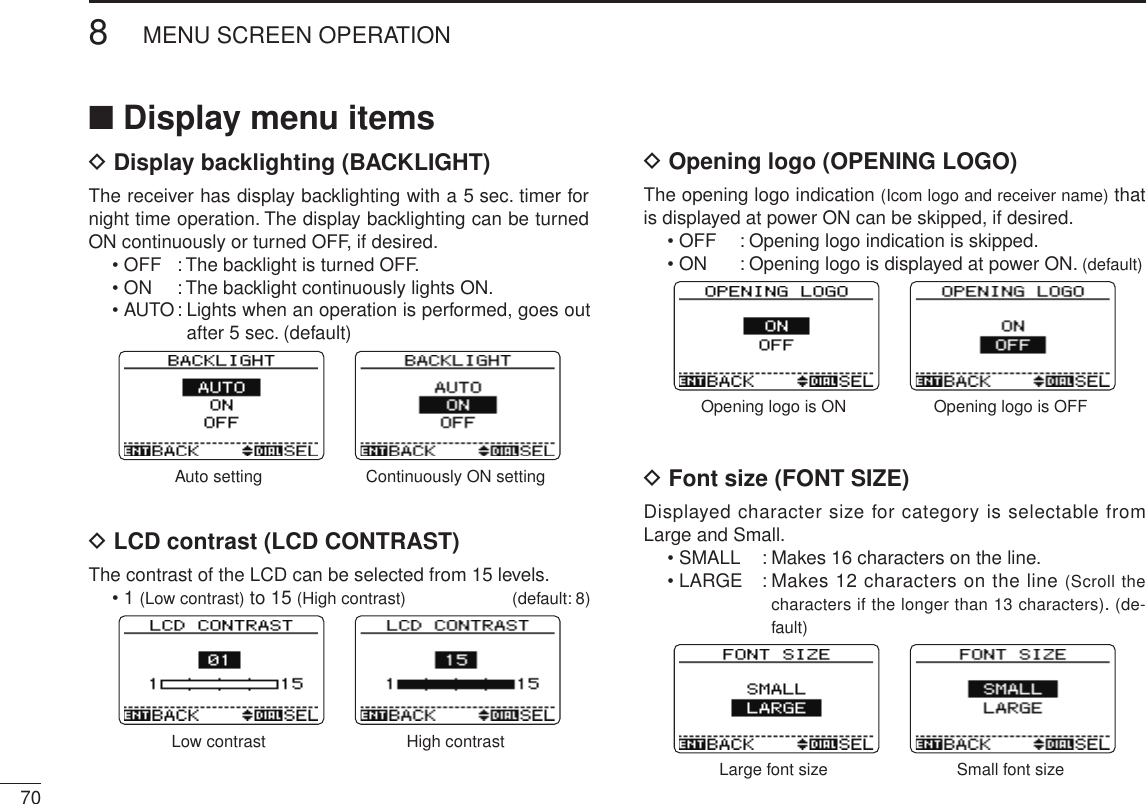
![New2001829OTHER FUNCTIONSNew2001■ Auto power OFFThe receiver can be set to automatically turn OFF after a specified period with a beep when no switch is pushed.120 min., 90 min., 60 min., 30 min. and OFF can be speci-fied. The specified period is retained even when the receiver is turned OFF by the auto power-off function. To cancel the function, select “OFF” in the auto power-off item in setting menu.This can be selected with “AUTO POWER OFF” in SETTING menu. MENU ➪ SETTING ➪ AUTO POWER OFF (p. 65) (Push [MENU ]), (Push [r]/[s], then push [ENT MW].)■ Auto power ONThe receiver can be set to automatically turn ON after a specified period. The timer can be selected within 30 min. to 24 hrs. in 30 min. steps.This can be selected with “AUTO POWER ON” in setting menu. MENU ➪ SETTING ➪ AUTO POWER ON (p. 65) (Push [MENU ]), (Push [r]/[s], then push [ENT MW].) When operating with battery pack or case and the battery is exhausted, auto power-on does not function. During standby, a small current still flows in the radio.■ Display backlightingThe receiver has display backlighting with a 5 sec. timer for night time operation. The display backlighting can be turned ON continuously, turned AUTO or turned OFF, if desired.This can be selected with “BACKLIGHT” in DISPLAY menu. MENU ➪ DISPLAY ➪ BACKLIGHT (p. 70) (Push [MENU ]), (Push [r]/[s], then push [ENT MW].)■ Font sizeDisplayed character size for category is selectable from Large and Small.This can be selected with “FONT SIZE” in DISPLAY menu. MENU ➪ DISPLAY ➪ FONT SIZE (p. 70) (Push [MENU ]), (Push [r]/[s], then push [ENT MW].)](https://usermanual.wiki/ICOM-orporated/307600.User-Manual-2/User-Guide-973371-Page-32.png)
![839OTHER FUNCTIONSNew200112345678910111213141516171819■ LCD contrastThe contrast of the LCD can be selected from 15 levels.This can be selected with “LCD CONTRAST” in DIAPLAY menu. (p. 96) MENU ➪ DISPLAY ➪ LCD CONTRAST (p. 70) (Push [MENU ]), (Push [r]/[s], then push [ENT MW].) ■ Voice squelch controlThis function is useful when you don’t want unmodulated signals pausing or cancelling a search/scan. When the voice squelch control function is activated, the receiver checks received signals for voice components. If a received sig-nal includes voice components, and the tone of the voice components changes within 1 sec., search/scan pauses (or stops). If the received signal includes no voice components or the tone of the voice components does not change within 1 sec., scan resumes.This can be selected with “VSC” in MODE/TS/TONE... menu. (p. 96) MENU ➪ MODE/TS/TONE... ➪ VSC (p. 63) (Push [MENU ]), (Push [r]/[s], then push [ENT MW].) • “VSC”appears when the function is activated.](https://usermanual.wiki/ICOM-orporated/307600.User-Manual-2/User-Guide-973371-Page-33.png)
![849OTHER FUNCTIONSNew200184■ Cloning functionThe IC-RX7 has receiver-to-receiver data cloning capability. This function is useful when you want to copy all of the pro-grammed contents from one IC-RX7 to another. • An optional OPC-474 cloning cable is required.q Turn the receiver’s power OFF, then connect an optional OPC-474 between both [SP] jacks as shows right.w While pushing [r] and [MENU ], push and hold [] for 1 sec. to enter cloning mode. • “MASTER” appears.e Push [ENT MW] on the “master” receiver. • “CLONE OUT” appears on the master receiver and “CLONE IN” appears on the sub receiver and the bar meters show that clon-ing is taking place. • After the cloning is completed, the display returns to “CLONE END.”r Push and hold [ ] for 1 sec. to turn power OFF.MWMENUENTHOLD VSCAN.1472580369SKIPNO.CLRSQLDIALSEARCHATTMENUMaster receiverSub receiverMWENTThe optional CS-RX7 CLONING SOFTWARE is also available to clone/edit contents with a PC (for Microsoft® Windows® 98SE/ME/2000/XP/Windows VistaTM) and using ICF format files.to [SP] OPC-474to [SP]Master receiver Sub receiverto [SP]PCIC-RX7 OPC-478(RS-232C type)OPC-478UC(USB type) to USB portto RS-232Cport](https://usermanual.wiki/ICOM-orporated/307600.User-Manual-2/User-Guide-973371-Page-34.png)
![New2001■ ResettingThe display may occasionally display erroneous information (e.g. when first applying power). This may be caused externally by static electricity or by other factors.If this problem occurs, turn power OFF. After waiting a few seconds, turn power ON again. If the problem persists, per-form either or both procedures below.• All resetReset the CPU before operating the receiver for the first time, or if the in-ternal CPU malfunctions, to clear and return all programmed contents to their default settings. • Partial resetIf you want to initialize the operat-ing conditions (VFO frequency, VFO settings, set mode contents) without clearing the memory contents, a partial reset function is available for the re-ceiver.D All resetq Push and hold [ ] for 1 sec. to turn power OFF.w While pushing and holding [r], [s], [ENT MW] and [CLR SQL], then turn power ON to reset the CPU. • “ALL RESET” appears when resetting the CPU (See the illustration below). CAUTION: Resetting the CPU re-turns all programmed contents to their default settings.D Partial resetq Push and hold [ ] for 1 sec. to turn power OFF.w While pushing and holding [v] and [w], then turn power ON to partially reset the receiver.[NOTE]: No message appears on the display after the partial reset is done.MWMENUENTHOLD VSCAN.1472580369SKIPNO.CLRSQLDIALSEARCHATTMWENTCLRSQLMWMENUENTHOLD VSCAN.1472580369SKIPNO.CLRSQLDIALSEARCHATT859OTHER FUNCTIONS12345678910111213141516171819](https://usermanual.wiki/ICOM-orporated/307600.User-Manual-2/User-Guide-973371-Page-35.png)
![8710CONTROL COMMAND12345678910111213141516171819New2001CT-17Power supply9–15VDCRS-232CcableIC-RX7to [SP]CI-V connections exampleCI-V compatible transceiverCI-V compatible transceiverpersonalcomputer3.5(d) mmGNDI/OGNDI/O3-conductor 3.5(d) mm plug must be used.2-conductor 3.5(d) mm plug](https://usermanual.wiki/ICOM-orporated/307600.User-Manual-2/User-Guide-973371-Page-37.png)
![88New2001TROUBLESHOOTING11PROBLEMNo power comes ON.No sound comes from the speaker.Sensitivity is low and only strong signals are audible.Receive audio is distorted.Frequency can not be set.Scan function can not start.Link scan function can not start.The displayed frequency is erroneous.If your receiver seems to be malfunctioning, please check the following points before sending it to a service center.POSSIBLE CAUSE• The batteries are exhausted.• Loose connection of a battery pack (case).• The battery polarity is reversed.• Volume level is too low.• External speaker or Cloning cable is con-nected to [SP] jack.• Squelch level is set too tight.• Different tone is selected with tone/DTCS squelch.• Attenuator function is activated.• RF gain is setting too low.• Receiving mode is not selected correctly.• The lock function is activated.• The programmed memory channel is only one.• All category or group are set to “SKIP.”• The CPU malfunctioned.• External factors caused a fault.SOLUTION• Replace the batteries or charge the battery pack.• Clean battery terminals.• Check the battery polarity.• Push [r] to suitable level.• Check the connection of the external speaker cor-rectly or disconnect the cloning cable. • After pushing and holding [CLR SQL] for 1 sec., ro-tate [DIAL] to set the squelch level.• Turn the appropriate function OFF.• Push and hold [• ATT] for 1 sec. to cancel the func-tion.• Set the RF gain to “MAX” in SETTING menu.• Set the receiving mode correctly in MODE/TS/TONE... menu.• Push [MENU ] for 1 sec. to cancel the function.• Program more than 2 memory channels.• Cancel “SKIP” setting in SCAN menu.• Reset the receiver.• Remove and re-attach the battery pack or battery case.REF.pgs. 2, 3, 12––p. 14–p. 15p. 76p. 73p. 72p. 19p. 73p. 133p. 1p. 44p. 85pgs. 2, 3New2001](https://usermanual.wiki/ICOM-orporated/307600.User-Manual-2/User-Guide-973371-Page-38.png)