ICOM orporated 339000 VHF/UHF Transceiver User Manual
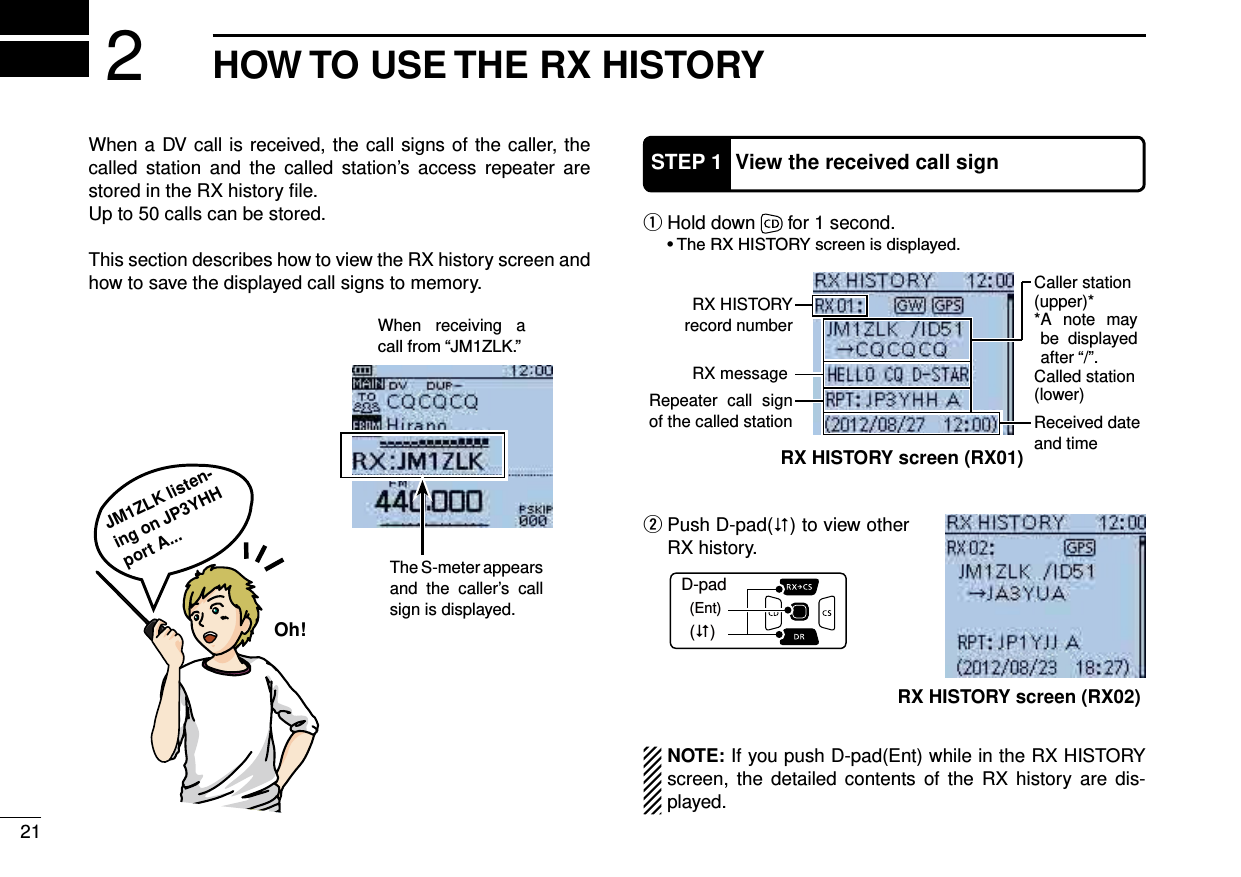
ICOM Incorporated VHF/UHF Transceiver
UserManual.wiki
>
ICOM orporated
>
339000 User Manual
User Manual
Navigation menu
Upload a User Manual
Namespaces
Wiki Guide
HTML
PDF
Info
Views
User Manual
Discussion / Help
Navigation
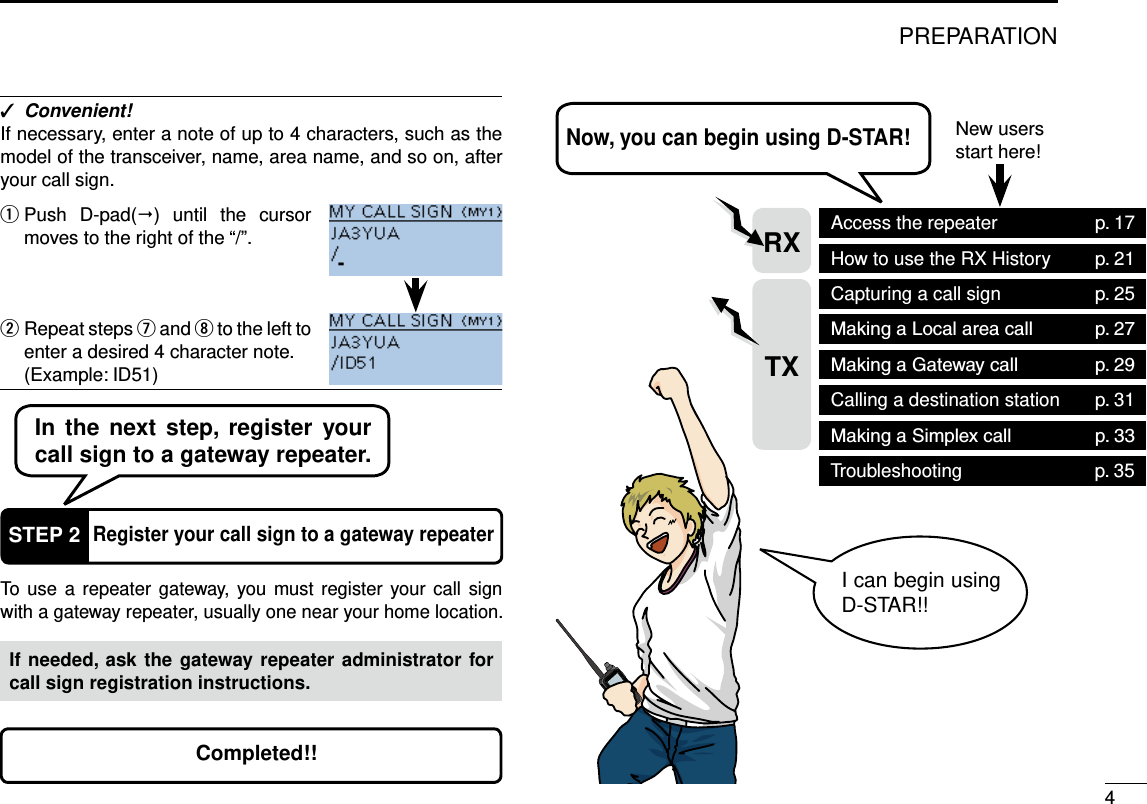
![PREPARATIONPREPARATIONIMPORTANT!Before starting D-STAR, entering and registering your call sign (MY) are needed, as described below.STEP 1 Entering your call sign (MY) into the transceiver. STEP 2 Registering your call sign (MY) to a gateway repeater. You have completed the steps!!STEP 1Enter your call sign into the transceiverExample: Enter “JA3YUA” as your own call sign into the MY call sign memory [MY1]. Hold down q[ ] for 1 second to turn ON the power. ] for 1 second to turn OFF power.power source voltage are dis-played, the operating frequency appears.Push [MENU] w.MENU screen is displayed. Push D-pad( e) to select the root item (“My Station”), and then push D-pad(Ent).D-pad(�)(Ent) Push D-pad( r) to select “My Call Sign,” and then push D-pad(Ent). displayed.MENU screenGo to step tContinued on the next pageThis is page 2.[ ]](https://usermanual.wiki/ICOM-orporated/339000/User-Guide-1879288-Page-3.png)
![3PREPARATION Push D-pad( t) to select MY call sign memory channel “1” ([MY1]).D-pad(�)(Ent) Push [QUICK] y, and then push D-pad() to select “Edit.” Then, push D-pad(Ent) to enter the call sign edit mode. Rotate [DIAL] to select the ufirst digit. (Example: J)selectable.)..Move cursor, then rotate [DIAL].to enter a space. Push iD-pad() to move the cursor to the second digit.NOTE: Your call sign must match the call sign registered to your gateway repeater. Repeat steps o u and i to enter your own call sign of up to 8 characters, including spaces. ( For example: First J, then A, then 3, then Y, then U, then A)!0 Push D-pad(Ent) to set the call sign.note.!1 Push D-pad(Ent) again to save and return to the MY CALL SIGN screen. !2 Push [MENU] to exit the MENU screen.Edit modeBeepsCompletedGo to step o[DIAL]Selects/exits the MENU screenMoves the cursorSelectsDeletesShows theQUICK MENUKeys used for input](https://usermanual.wiki/ICOM-orporated/339000/User-Guide-1879288-Page-4.png)

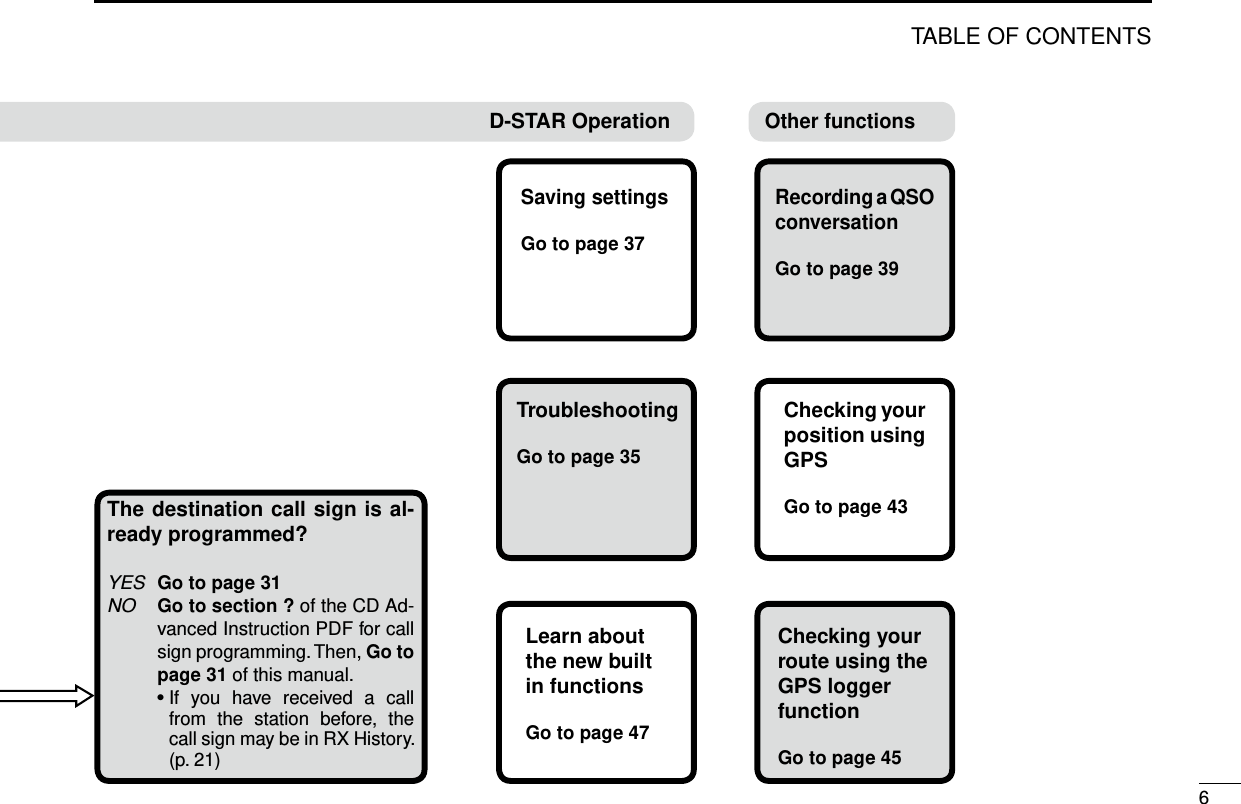
![7TABLE OF CONTENTSUNIQUE FEATURES OF D-STAR ..................... 1PREPARATION ............................................ 2–16Enter your call sign into the transceiver ................................2Register your call sign to a gateway repeater .......................4TABLE OF CONTENTS ........................................................5FOREWORD ........................................................................FEATURES ...........................................................................EXPLICIT DEFINITIONS ....................................................10IMPORTANT .......................................................................10SUPPLIED ACCESSORIES ...............................................10ABOUT THE SUPPLIED CD ..............................................11 Starting the CD D ......................................................11PRECAUTIONS ..................................................................12BATTERY CAUTIONS ........................................................14Battery caution D .......................................................14Charging caution D ....................................................15Charging time D .........................................................15IMPORTANT NOTES ..........................................................16When using the GPS receiver D ................................16Spurious signals D .....................................................16About charging at power ON D ..................................161 ACCESS THE REPEATER .................... 17–20STEP1 Select the DR mode .........................................17STEP2 Select your Access repeater (“FROM”) ............17STEP3 Select the Destination repeater (“TO”) .............1STEP4 ...202 HOW TO USE THE RX HISTORY .......... 21–24STEP1 View the received call sign ...............................21STEP2 Save the destination call sign into your call sign memory from the RX History ......223 CAPTURING A CALL SIGN .................. 25–26STEP1 Set the received call sign to the destination .....26STEP2 Hold down [PTT] to transmit .............................264 MAKING A LOCAL AREA CALL .......... 27–28STEP1 Set “FROM” (Access repeater) .........................27STEP2 Set “TO” (Destination) .......................................28STEP3 Hold down [PTT] to transmit .............................285 MAKING A GATEWAY CALL ................ 29–30STEP1 Set “FROM” (Access repeater) .........................2STEP2 Set “TO” (Destination) .......................................30STEP3 Hold down [PTT] to transmit .............................30](https://usermanual.wiki/ICOM-orporated/339000/User-Guide-1879288-Page-8.png)
![8TABLE OF CONTENTS6 CALLING A DESTINATION STATION .. 31–32STEP1 Set “FROM” (Access repeater) .........................31STEP2 Set “TO” (Destination) .......................................32STEP3 Hold down [PTT] to transmit .............................327 MAKING A SIMPLEX CALL ................. 33–34STEP1 Set “FROM” (Simplex channel) .........................33STEP2 Hold down [PTT] to transmit .............................348 TROUBLESHOOTING ........................... 35–369 SAVING SETTINGS .............................. 37–38STEP1 Saving settings into memory ............................37STEP2 View the saved contents ...................................3810 RECORDING A QSO ONTO A MICROSD CARD ................................... 39–42About using a microSD card ■ .....................................3STEP1 Inserting the microSD card ...............................3STEP2 Format the microSD card .................................40STEP3 Recording a QSO audio ...................................41STEP4 ......................4211 GPS OPERATION ................................. 43–44STEP1 Receiving GPS data from the internal GPS receiver ....................................................43STEP2 Displaying your position ....................................4412 GPS LOGGER FUNCTION ................... 45–46STEP1 Receiving GPS data from the internal GPS receiver ....................................................45STEP2 Turning ON the GPS Logger function ...............4613 INTRODUCING NEW FUNCTIONS ...... 47–48Voice Recorder function ................................................47Two bands monitoring plus BC Radio ...........................47Auto Position Reply function .........................................48Voice TX function ..........................................................48Speech function ............................................................48 ...............................................4814 RESETTING .......................................... 49–50Resetting ■ ...................................................................415 INFORMATION ............................................ 51COUNTRY CODE LIST ................................................51FCC INFORMATION .....................................................51INDEX ......................................................... 52–54](https://usermanual.wiki/ICOM-orporated/339000/User-Guide-1879288-Page-9.png)
![13CAUTION: DO NOT use harsh solvents such as ben-zine or alcohol to clean the transceiver, because they can damage the transceiver’s surfaces.DO NOT push the PTT unless you actually intend to trans-mit.DO NOT operate the transceiver near unshielded electri-cal blasting caps or in an explosive atmosphere.DO NOT use or place the transceiver in direct sunlight or in areas with temperatures below –20°C (–4˚F) or above +60°C (+140˚F).BE CAREFUL! The transceiver will become hot when operating it continuously for long periods of time.BE CAREFUL! The transceiver meets IPX7* require-ments for waterproof protection. However, once the trans-ceiver has been dropped, waterproof protection cannot be guaranteed because of possible damage to the transceiver's case or waterproof seal.* Only when the BP-271 or BP-272 (option), flexible antenna, [MIC/SP] cap, [DATA/DC IN] cap and [micro SD] slot cap are attached.Place the unit in a secure place to avoid inadvertent use by children.The BP-273 meets IPX4 requirements for splash resistance. When it is connected, the transceiver corresponds to IPX4.Even when the transceiver power is OFF, a slight current still the transceiver when not using it for a long time. Otherwise, and will need to be recharged or replaced.PRECAUTIONS](https://usermanual.wiki/ICOM-orporated/339000/User-Guide-1879288-Page-14.png)
![16 DWhen using the GPS receiver-ing the ID-51A or ID-51E inside a vehicle, you may not re-ceive GPS signals. We recommend you use it near a win-dow. Please avoid the areas shown in the following: 2. DO NOT use where the air bags could deploy. 3. DO NOT use where it becomes a driving obstacle.by the U.S. Department of Defence. The Department is re-sponsible for accuracy and maintenance of the system. Any changes by the Department may affect the accuracy and function of the GPS system. -lite signals.-tions: 1. Tunnels or high-rise buildings 3. Under a bridge or viaduct 4. In remote forested areas 5. Under bad weather conditions (rainy or cloudy day)near the 440.205 MHz. This is due to signals made in the internal circuit and does not indicate a transceiver malfunc-tion. DSpurious signalsDepending on the combination of the operating band and mode, the Dualwatch or Triple-watch operation may generate certain spurious signals, or noise may be heard. These do not indicate a transceiver malfunction. DAbout charging at power ONin approximately 3 hours. But with this rapid circuit, the bat-sure to turn OFF the power before charging.When “Charging (Power ON)”* is set to ON in the MENU screen, to [DC IN].) But this operation may generate certain spurious signals; the S-meter appears, or noise may be heard.*MENU > Function > Charging (Power ON) (Default: OFF) operating condition. and the current capacity must be more than 2.5 A to charge the receive signals correctly, set “Charging (Power ON)”* to OFF, and disconnect the external DC power cable from [DC IN].IMPORTANT NOTES](https://usermanual.wiki/ICOM-orporated/339000/User-Guide-1879288-Page-17.png)
![17ACCESS THE REPEATER1STEP 1 Select the DR mode Hold down for 1 second.VFO modeDR modeSTEP 2 Select your Access repeater (“FROM”) Push D-pad( q) to select “FROM” (Access repeater), and then push D-pad(Ent).D-pad(�)(Ent) Push D-pad( w) to select “Re-peater List,” and then push D-pad(Ent).If you want to return to the VFO mode hold down again for 1 second.Go to step e“FROM” is selected.access your local area repeater (Access repeater), and if your signal is successfully sent to a destination repeater.If your call sign (MY) has not been set, or your call sign has not been registered on a D-STAR repeater, see page 2.Example: Your Access repeater is Hirano/Japan in the Re-peater list.You have four other ways to select your access repeater, other than selecting it from re-peater list. See the Advanced Instructions for more details. Rotating [DIAL] Searching for the nearest re-peaters Selecting from the TX History Searching for a repeater us-ing the DR mode scan](https://usermanual.wiki/ICOM-orporated/339000/User-Guide-1879288-Page-18.png)
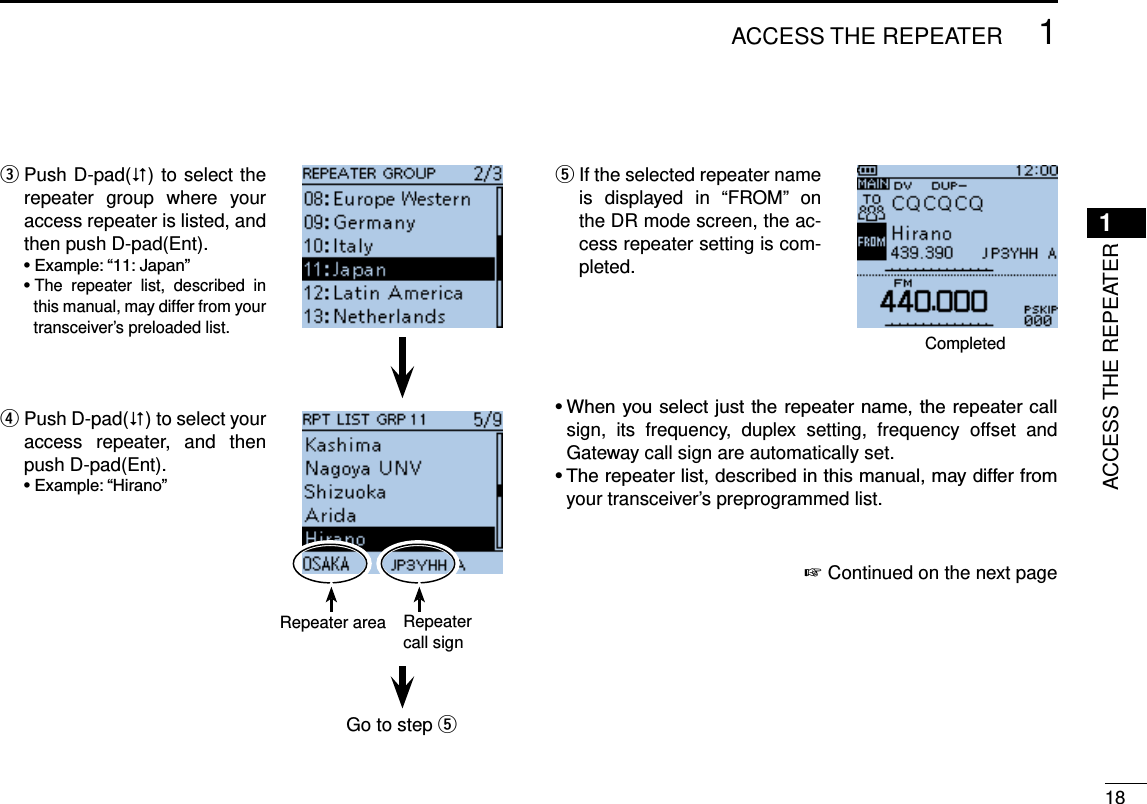
![201ACCESS THE REPEATER1ACCESS THE REPEATER If the selected repeater name tin step r is displayed in “TO” on the DR mode screen, the destination repeater setting is completed.Completed Hold down [PTT] for approxi- qmately 1 second to access the repeater. If you get a reply call, or “UR?” wappears on the LCD within 3 seconds, your signal reached your access repeater and your call was successfully sent from your destination repeater. Transmitting to various repeaters by changing the “TO” setting!STEP 4 Check whether you can access the re-peaterNOTE: See page 35 for status indications after a reply is received.Go to step wSuccessfully sent!](https://usermanual.wiki/ICOM-orporated/339000/User-Guide-1879288-Page-21.png)
![222HOW TO USE THE RX HISTORY2HOW TO USE THE RX HISTORYSTEP 2 Save the destination call sign into your call sign memory from the RX History While in the RX HISTORY qscreen, push D-pad() to se-lect the RX HISTORY record with the call sign that you want to save to memory. Push D-pad(Ent), and then wpush [QUICK] . Push D-pad( e) to select “To Your Memory,” and then push D-pad(Ent). Push D-pad( r) to select the call sign that you want to save, and then push D-pad(Ent).The display changes to the YOUR CALL SIGN EDIT screen, and then the call sign is automatically saved.Continued on the next page ☞Go to step eGo to step tCall sign to be saved](https://usermanual.wiki/ICOM-orporated/339000/User-Guide-1879288-Page-23.png)
![232HOW TO USE THE RX HISTORYSTEP 2 Save the destination call sign into your call sign memory from the RX History (Continued) Push D-pad( t) to select “NAME,” and then push D-pad(Ent). Rotate [DIAL] to select a ydesired character to enter a name of up to 16 characters, including spaces.About text entry D-pad() to move the push [QUICK] to change the character to an upper case or lower case letter. [QUICK] to open the input mode selection window. - Push D-pad() to select the desired Upper case let-ters, Lower case letters, Numbers or Symbols. - To enter symbols, select “!”#,” and then push D-pad(Ent) to open the symbol character selection window. And ro-tate [DIAL] to select the desired symbol character, and then push D-pad(Ent). to delete the se-lected character, symbol or number, or hold down [CLR] to continuously erase the characters, first to the right, and then to the left of the cursor.D-pad(�)(Ent)Go to step uInput mode selection window](https://usermanual.wiki/ICOM-orporated/339000/User-Guide-1879288-Page-24.png)

![263CAPTURING A CALL SIGN3CAPTURING A CALL SIGNSTEP 2 Hold down [PTT] to transmit Hold down for 1 second.the station call sign is announced if the RX>CS Speech function is set to ON in the MENU screen. (MENU > SPEECH > RX>CS SPEECH)-ing a call sign.NOTE:rotate [DIAL] while holding down .the power save is ON, the call sign may not be received correctly. In that case, “--------” appears, an error beep While holding down [PTT], q level.Transmitting Push w or [CLR] to return to the previous call sign setting.BeepsSTEP 1Set the received call sign to the destinationWhile holding down .BeepsAfter releasing .JG3LUKReturn to the previous screen](https://usermanual.wiki/ICOM-orporated/339000/User-Guide-1879288-Page-27.png)
![284MAKING A LOCAL AREA CALL4MAKING A LOCAL AREA CALLSTEP 2 Set “TO” (Destination) Push D-pad( q) to select “TO,” and then push D-pad(Ent). Push D-pad( w) to select “Lo-cal CQ,” and then push D-pad(Ent).D-pad(�)(Ent)STEP 3 Hold down [PTT] to transmitat your normal voice level.TransmittingJA3YUA, this is JG3LUK.Hello, how are you?JG3LUK< Communication example for a Local area call>JA3YUAJA3YUA listening on JP3YHH port A.JA3YUAJG3LUK, this is JA3YUA. Thanks for the nice QSO and I hope to talk to you again soon. This is JA3YUA now clear of the JP3YHH repeater.Convenient! ✓The Local CQ call is used to call anyone, but you can call a specific station by simply saying their call sign.](https://usermanual.wiki/ICOM-orporated/339000/User-Guide-1879288-Page-29.png)
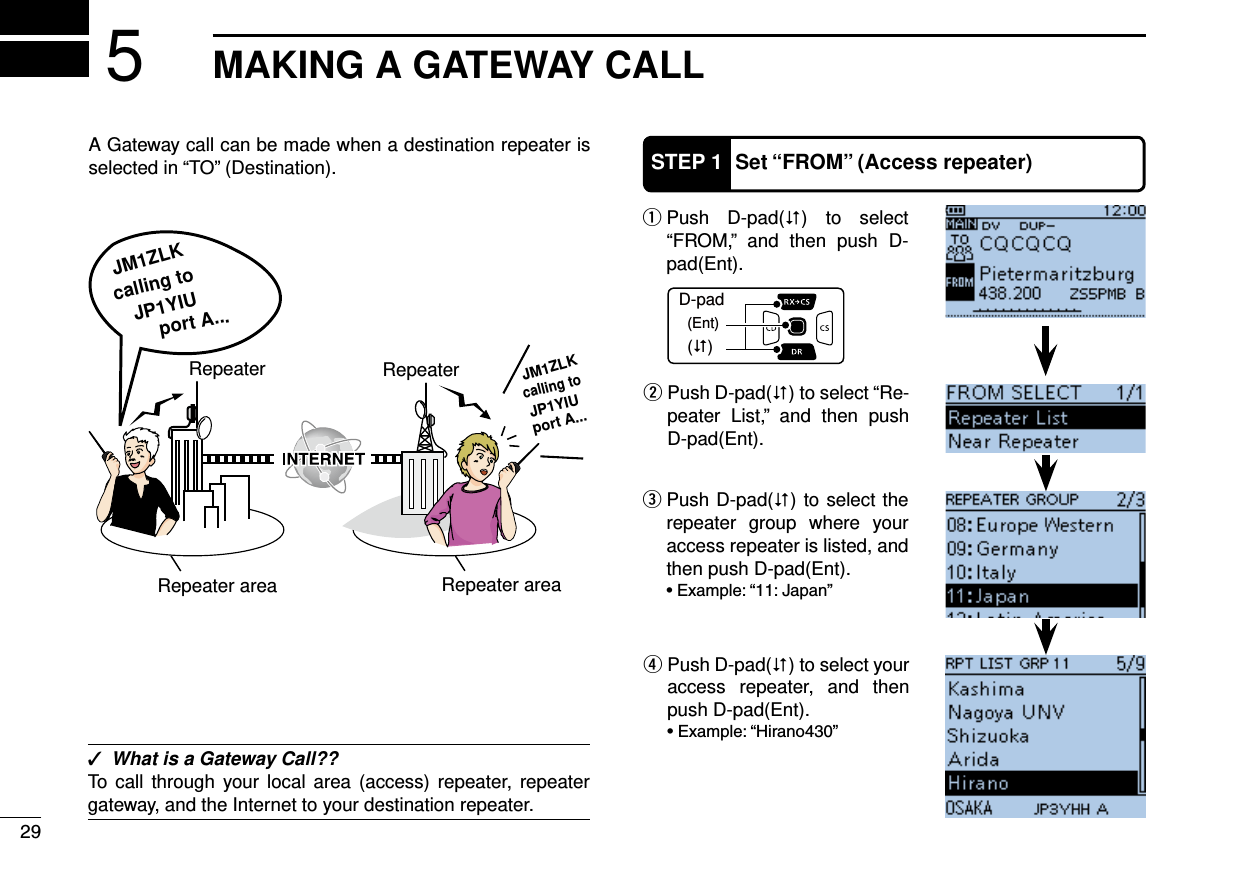
![305MAKING A GATEWAY CALL5MAKING A GATEWAY CALLSTEP 2 Set “TO” (Destination) Push D-pad( q) to select “TO,” and then push D-pad(Ent). Push D-pad( w) to select “Gateway CQ,” and then push D-pad(Ent).D-pad(�)(Ent)STEP 3 Hold down [PTT] to transmitat your normal voice level.it is a repeater call sign.Transmitting Push D-pad( e) to select the repeater group where your destination repeater is listed, and then push D-pad(Ent). Push D-pad( r) to select the destination repeater, and then push D-pad(Ent).JA3YUA, this is JM1ZLK.Hello, how are you?JM1ZLKJA3YUAJA3YUA calling to JP1YIU port A.JA3YUAJM1ZLK, this is JA3YUA. Thanks for the nice QSO and I hope to talk to you again soon. This is JA3YUA now clear of the JP3YHH repeater.Convenient! ✓The Gateway CQ call is used to call any repeater, but you can call a specific station by simply saying their call sign.< Communication example for a Gateway call>](https://usermanual.wiki/ICOM-orporated/339000/User-Guide-1879288-Page-31.png)
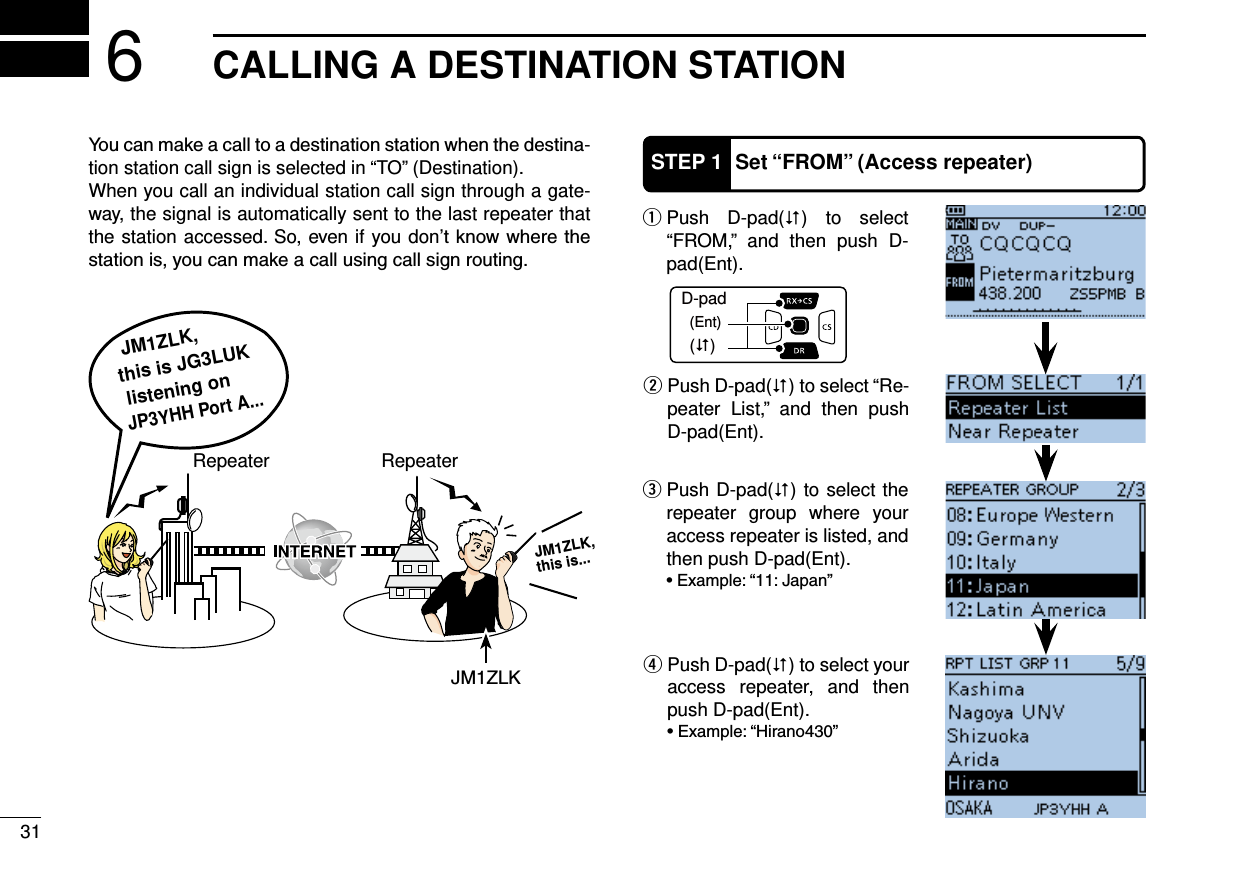
![326CALLING A DESTINATION STATION6CALLING A DESTINATION STATIONSTEP 2 Set “TO” (Destination) Push D-pad( q) to select “TO,” and then push D-pad(Ent). Push D-pad( w) to select “Your Call Sign,” and then push D-pad(Ent).D-pad(�)(Ent)STEP 3 Hold down [PTT] to transmit While holding down [PTT], qyour normal voice level.Transmitting Push D-pad( e) to select the destination station, and then push D-pad(Ent).JG3LUK, this is JM1ZLK.Hello, how are you?JM1ZLK(TOM)JM1ZLK, this is JG3LUK lis-tening on JP3YHH port A.JM1ZLK, this is JG3LUK. Thanks for the nice QSO and I hope to talk to you again soon. This is JG3LUK now clear of the JP3YHH repeater.JG3LUKJG3LUK< Communication example with a destination station>](https://usermanual.wiki/ICOM-orporated/339000/User-Guide-1879288-Page-33.png)
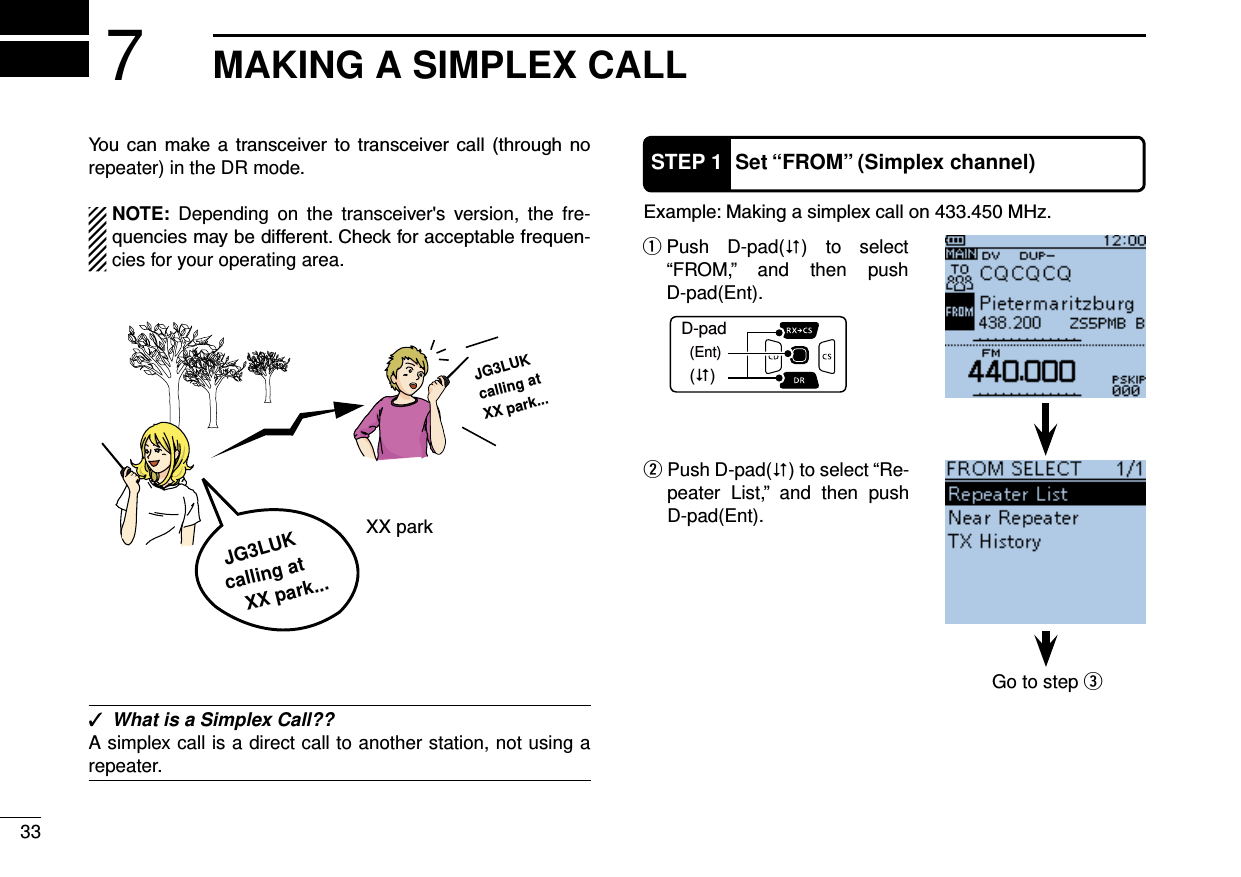
![347MAKING A SIMPLEX CALL7MAKING A SIMPLEX CALL Push D-pad( e) to select “25: Simplex,” and then push D-pad(Ent). Push D-pad( r) to select “433.450,” and then push D-pad(Ent). “FROM.” - If a station call sign is set in “TO”, select “Local CQ” in the TO SELECT screen to set “TO” to “CQCQCQ.”STEP 2 Hold down [PTT] to transmit While holding down [PTT], q level. transmit output power level.Release [PTT] to receive. wTransmittingthe VFO mode, the LCD chang-es as shown to the right.NOTE: The simplex frequencies can be changed in the MENU screen. See the PDF type Advanced Instruction (MENU > DV memory > Repeater List)](https://usermanual.wiki/ICOM-orporated/339000/User-Guide-1879288-Page-35.png)
![37SAVING SETTINGSIn the DR mode, select the set-tings to be saved into memory. wRotate [DIAL] to select a programed is selected, the memory name will not be pro-grammed. eHold down [S.MW] for 1 second to save the settings into the channel. mode, the saved memory con-tents are briefly displayed. automatically programmed as the Memory name. Up to 16 alphanumeric charac-ters can be programmed for the memory name. Hold down [S.MW] q for 1 second to enter the Select Memory write mode.NOTE: DO NOT hold down [S.MW] for more than 2 seconds. Otherwise the setting contents will be copied to the VFO.Go to step wDR mode screenSelect Memory write modeShows the settings to be saved.STEP 1 Saving settings into memoryBeepsWhen “FROM” (Access repeater) and “TO” (Destination) settings are saved, the settings can be selected by rotating [DIAL].](https://usermanual.wiki/ICOM-orporated/339000/User-Guide-1879288-Page-38.png)
![38SAVING SETTINGS9SAVING SETTINGSSTEP 2 View the saved contents Push [M/CALL] q to select the Memory mode. ” appears. wRotate [DIAL] to select the stored channel.[DIAL]Station AMemory mode screenStored channelis selected“FROM” and “TO” names are automati-cally programmed as the Memory name.Station B Hamacho areaM-CH 11 M-CH 006 M-CH 010Hirano areaHow useful! I only have to rotate [DIAL]!](https://usermanual.wiki/ICOM-orporated/339000/User-Guide-1879288-Page-39.png)
![RECORDING A QSO ONTO A microSD CARD10About ■using a microSD card Usable microSD cards DA microSD or microSDHC card is not supplied with the transceiver. Please purchase a card to use.Read the instructions of the microSD card thoroughly be-fore use.and microSDHC cards:(As of December 2012)Maker Kind of the card Capacity®microSD 2 GBmicroSDHC4 GB8 GB16 GB32 GBBE CAREFUL! While reading or writing data from or to the card; NEVER turn OFF the transceiver. It will corrupt the data or damage the card.Also be careful in the following cases:and the batteries are near exhaustion. -ternal power is turned OFF. Turn OFF the transceiver. q Lift OFF the [micro SD] slot cover on the side panel. w With the terminals facing the front, insert the card into the e BE CAREFUL!DO NOT touch the terminals. pull out the card. NEVER remove the card. It will corrupt the data or damage the card. Firmly close the [micro SD] slot cover. rSTEP 1 Inserting the microSD cardNEVER forcibly or in-versely insert the card.It will damage the card and/or the slot.[micro SD] slotmicroSD cardTerminals facing the front Slot cover](https://usermanual.wiki/ICOM-orporated/339000/User-Guide-1879288-Page-40.png)
![4010RECORDING A QSO ONTO A microSD CARD10RECORDING A QSO ONTO A microSD CARDWhen using a preformatted brand new microSD card, format-ting is not necessary. However, we still recommend you format it in the following way to get the card’s best performance.IMPORTANT!Formatting a card erases all its data. Before formatting any D-pad(�)(Ent)STEP 2 Format the microSD card After formatting, the display uautomatically returns to the SD CARD menu. Push [MENU] to return to the frequency display. qTurn ON the transceiver.” appears when the micro SD card is inserted.” and “ while accessing the microSD card. wPush [MENU] to enter the Menu screen. Push D-pad( e) to select “SD Card,” then push D-pad(Ent). The confirmation screen “For- tmat OK?” appears. Push D-pad( y) to select “YES,” then push D-pad(Ent) to format. display shows the formatting progress.Shows the formatting progress Push D-pad( r) to select “For-mat,” then push D-pad(Ent).Go to step t](https://usermanual.wiki/ICOM-orporated/339000/User-Guide-1879288-Page-41.png)
![4110 RECORDING A QSO ONTO A microSD CARDSTEP 3 Recording a QSO audio Push D-pad(Ent) to stop evoice recording. -cording stopped,” and auto- screen. Push [QUICK] q to enter Push D-pad( w) to select “<<REC Start>>.” Push D-pad(Ent) to start evoice recording. -cording started” and auto- screen.” appears while the trans-ceiver is recording.” appears while the record-ing is paused. you manually stop recording, or the card becomes full. reaches 2GB, the transceiver automatically creates a new file, and continues recording.NOTE: BC Radio audio can-not be recorded.To Dstop recording Push [QUICK] q to enter Push D-pad( w) to select “<<REC Stop>>.”D-pad(�)(Ent)While recordingWhile pausing Convenient! ✓When the PTT Automatic Recording function is set to ON in the MENU screen, the recording automatically starts when [PTT] is pushed.( MENU > Voice Memo > QSO Recorder > Recorder Set > PTT Auto REC)NOTE: BC Radio audio cannot be recorded.](https://usermanual.wiki/ICOM-orporated/339000/User-Guide-1879288-Page-42.png)
![4210RECORDING A QSO ONTO A microSD CARD10RECORDING A QSO ONTO A microSD CARDSTEP 4 Playing back the recorded audio Push [MENU] y or [CLR] -played. qPush [MENU] to enter the Menu screen. Push D-pad( w) to select the root item (Voice Memo), and then push D-pad(Ent) to go to the next level.D-pad(�)(Ent) ( MENU > Voice Memo > QSO Recorder > Play Files) Refer to the menu sequence eshown directly above and push D-pad() to select, and then push D-pad(Ent) to en-ter, one or more times until the last screen is displayed. Push D-pad( r) to select the folder that contains the file you want to play, and then push D-pad(Ent). of the year (4 digits), the month and the day (2 digits each). Push D-pad( t) to select the file that you want to play, then push D-pad(Ent) to play it displayed, and the file starts to Go to step r](https://usermanual.wiki/ICOM-orporated/339000/User-Guide-1879288-Page-43.png)
![43GPS OPERATION11The ID-51A/E has a built-in internal GPS receiver. You can mode. qPush [MENU] to enter the Menu screen. Push D-pad( w) to select the root item (GPS), and then push D-pad(Ent) to go to the next level.D-pad(�)(Ent) ( MENU > GPS > GPS Set> GPS Select) Refer to the menu sequence eshown directly above and push D-pad() to select, and then push D-pad(Ent) to en-ter, one or more times until the last screen is displayed. Push D-pad( r) to select “In-ternal GPS.” tPush [MENU] to exit the Menu screen. -ceiving data, as illustrated be- valid data is received. ➝➝➝ - If “Manual” was selected, the icon does not appear. to receive, but depending on the minutes. If you have difficulties receiving, we recommend that you try a different location.See the PDF type Advanced Instruction for more details of the GPS operation.STEP 1 Receiving GPS data from the internal GPS receiverGo to step rGPS Select screen](https://usermanual.wiki/ICOM-orporated/339000/User-Guide-1879288-Page-44.png)
![4411GPS OPERATION11GPS OPERATIONSTEP 2 Displaying your positionConfirm the GPS icon is dis-played on the LCD. Push [QUICK] q to enter wPush D-pad() to select the “GPS position” item, and then push D-pad(Ent).D-pad(�)(Ent) eThe first MY GPS position screen appears. (1/5)GPS Position screen (MY)<Contents of the GPS Position screen>The top of the compass is North.Your course head-ing is Northwest.Your course head-ing is 306 degrees.LatitudeLongitudeGrid LocatorAltitudeSpeedTime that the displayed data was acquired.Shows the dis-played position is yours.How convenient!position and altitude!!](https://usermanual.wiki/ICOM-orporated/339000/User-Guide-1879288-Page-45.png)
![45GPS LOGGER FUNCTION12The GPS Logger function allows you to store the GPS position data (Latitude, Longitude, Altitude, Positioning state, Course, Speed and Date) onto a microSD card, as your route.-ing course on a mapping software.NOTE:The GPS logger function requires a microSD card. qPush [MENU] to enter the Menu screen. Push D-pad( w) to select the root item (GPS), and then push D-pad(Ent) to go to the next level.D-pad(�)(Ent) ( MENU > GPS > GPS Set> GPS Select) Refer to the menu sequence eshown directly above and push D-pad() to select, and then push D-pad(Ent) to en-ter, one or more times until the last screen is displayed. Push D-pad( r) to select “In-ternal GPS.” tPush [MENU] to exit the Menu screen. -ceiving data, as illustrated be- valid data is received. ➝➝➝ - If “Manual” is selected, the icon does not appear. to receive, but depending on the minutes. If you have difficulties receiving, we recommend that you try a different location.STEP 1 Receiving GPS data from the internal GPS receiverGo to step r](https://usermanual.wiki/ICOM-orporated/339000/User-Guide-1879288-Page-46.png)
![4612GPS LOGGER FUNCTION12GPS LOGGER FUNCTIONSTEP 2 Turning ON the GPS Logger function qPush [MENU] to enter the Menu screen. Push D-pad( w) to select the root item (GPS), and then push D-pad(Ent) to go to the next level.D-pad(�)(Ent) ( MENU > GPS > GPS Logger > GPS Logger) Refer to the menu sequence eshown directly above and push D-pad() to select, and then push D-pad(Ent) to en-ter, one or more times until the last screen is displayed. rPush D-pad() to select “ON.” Push [MENU] t to exit the Menu screen. NOTE: -ceiver continuously stores the position data from the GPS receiver, even if the transceiver is rebooted. To can-cel this function, turn the function OFF. While this function is ON, and when the transceiver is turned OFF, the log file will be closed. Then the trans-ceiver is turned ON and positioning is carried out by the GPS receiver, a new log file will be created.-matically paused.<About log file>You can display your route as you move, if you import the log file into a mapping software. compatible with all mapping software.your PC.Go to step r](https://usermanual.wiki/ICOM-orporated/339000/User-Guide-1879288-Page-47.png)
![4813INTRODUCING NEW FUNCTIONS13INTRODUCING NEW FUNCTIONSUnwanted frequencyRepeat Voice TX waiting screenThis is JA3YUAJA3YUA<While scanning>NEW! Auto Position Reply functionNEW! Voice TX functionNEW! Speech functionNEW! Temporary Skip functionWhen you receive a call addressed to your own call sign, but -ceiver, this function automatically replies with your own call sign and transmits your position.You can transmit recorded audio once or repeatedly, which is useful for D-STAR events.Hold down [SPCH] for 1 second to audibly announce the displayed frequency and operating mode, or call sign. Also, other functions helpat the display.See the PDF type Advanced In-struction for details.❍ Home CH beep function❍ [DIAL] speech function❍ Mode speech functiona scan, for a set period.NOTE: This function requires a microSD card. Destination(ID-51)Your stationq A call addressed to your own call sign.w Your position is auto-matically transmitted. e After receiving, the screen shows the position.](https://usermanual.wiki/ICOM-orporated/339000/User-Guide-1879288-Page-49.png)
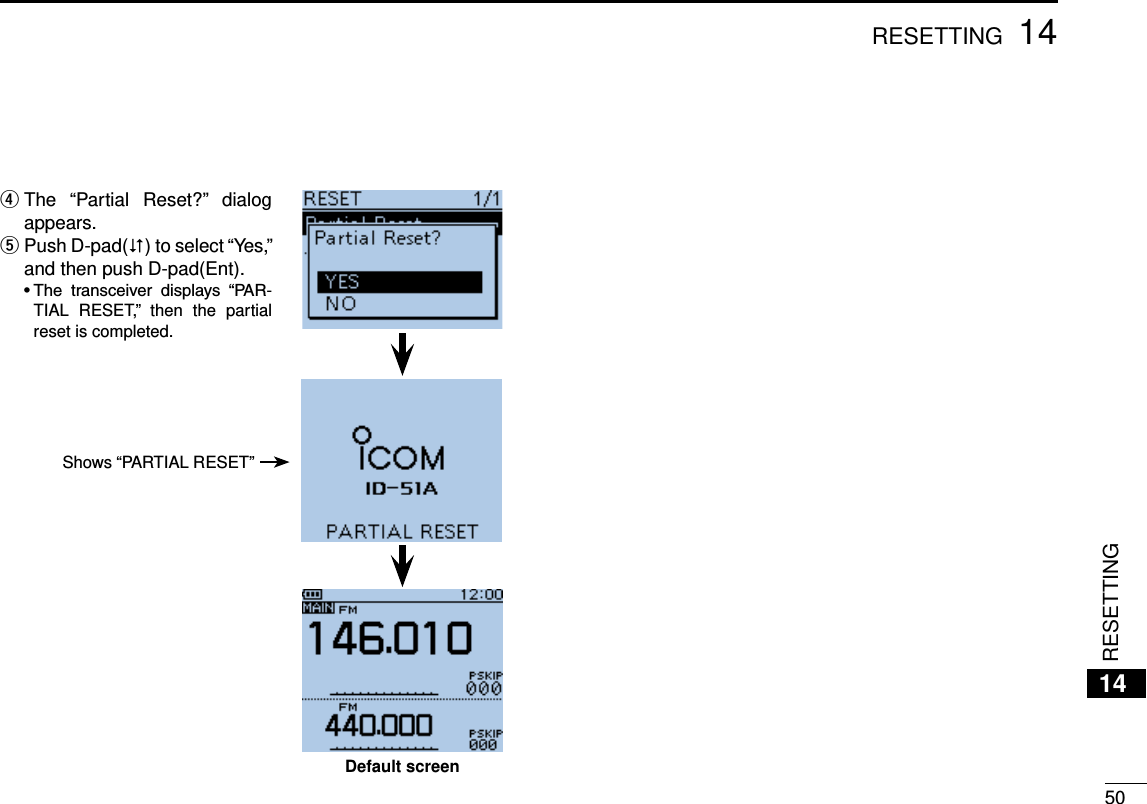
![RESETTING14 ■ResettingThe display may occasionally display erroneous information (for example when first applying power). This may be caused externally by static electricity or by other factors.If this problem occurs, turn OFF power.After waiting a few seconds, turn ON power again. If the prob-lem persists, perform a Partial reset or an All reset.A Partial reset resets operating settings to their default values (VFO frequency, VFO settings, menu contents) without clear-ing the items below: BE CAREFUL! An All reset clears all programming and returns all settings to their factory defaults. See the PDF type Advanced Instruction for more details. qPush [MENU] to enter the Menu screen. Push D-pad( w) to select the root item (Others), and then push D-pad(Ent) to go to the next level.D-pad(�)(Ent) ( MENU > Others > Reset > Partial Reset) Refer to the menu sequence eshown directly above and push D-pad() to select, and then push D-pad(Ent) to en-ter, one or more times until the last screen is displayed. DPartial resetGo to step r](https://usermanual.wiki/ICOM-orporated/339000/User-Guide-1879288-Page-50.png)