ICOM orporated 339000 VHF/UHF Transceiver User Manual
ICOM Incorporated VHF/UHF Transceiver
User Manual
This device complies with Part 15 of the FCC Rules. Operation is
subject to the following two conditions: (1) this device may not cause
harmful interference, and (2) this device must accept any interference
received, including interference that may cause undesired operation.
WARNING: MODIFICATION OF THIS DEVICE TO RECEIVE CEL-
LULAR RADIOTELEPHONE SERVICE SIGNALS IS PROHIBITED
UNDER FCC RULES AND FEDERAL LAW.
BASIC INSTRUCTIONS
ID-51A
VHF/UHF TRANSCEIVER
ID-51E
VHF/UHF TRANSCEIVER
L
e
t
’
s
b
e
g
i
n
u
s
i
n
g
D
-
S
T
A
R
!
You can easily begin using
D-STAR repeaters!

1
UNIQUE FEATURES OF D-STAR
Easy to QSO to the world ●
Easy call sign entry with ●
the Repeater list or TX/RX
History
Call Sign Capture key ●
makes call sign capture
easy.
Easy Desti-
nation (To)
setting!
Worldwide
communication!!
This key makes call sign
capture easy!
PREPARATION
PREPARATION
IMPORTANT!
Before starting D-STAR, entering and registering your call sign (MY) are needed, as described below.
STEP 1 Entering your call sign (MY) into the transceiver. STEP 2 Registering your call sign (MY) to a
gateway repeater. You have completed the steps!!
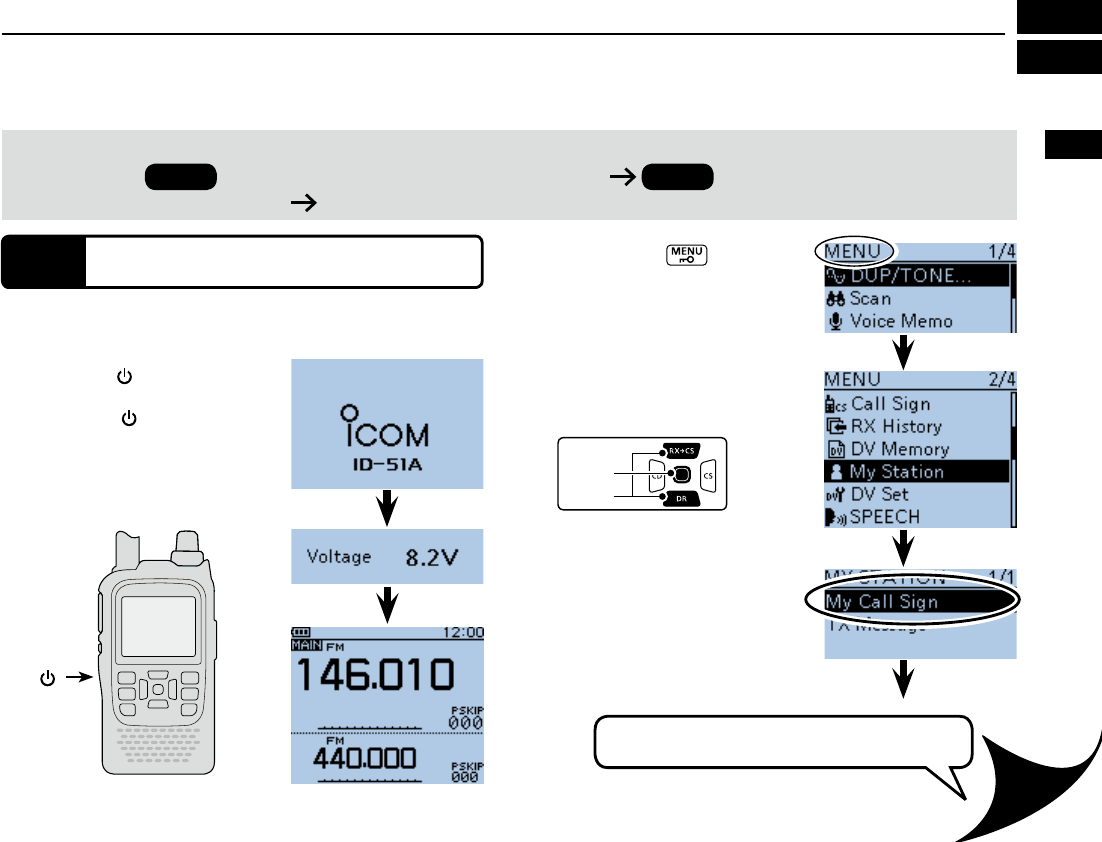
STEP 1
Enter your call sign into the transceiver
Example: Enter “JA3YUA” as your own call sign into the MY
call sign memory [MY1].
Hold down q
[ ]
for 1 second to
turn ON the power.
] for 1 second to
turn OFF power.
power source voltage are dis-
played, the operating frequency
appears.
Push [MENU] w.
MENU screen is displayed.
Push D-pad( e) to select the
root item (“My Station”), and
then push D-pad(Ent).
D-pad
(�)
(Ent)
Push D-pad( r) to select “My
Call Sign,” and then push D-
pad(Ent).
displayed.
MENU screen
Go to step t
Continued on the next page
This is page 2.
[ ]
3
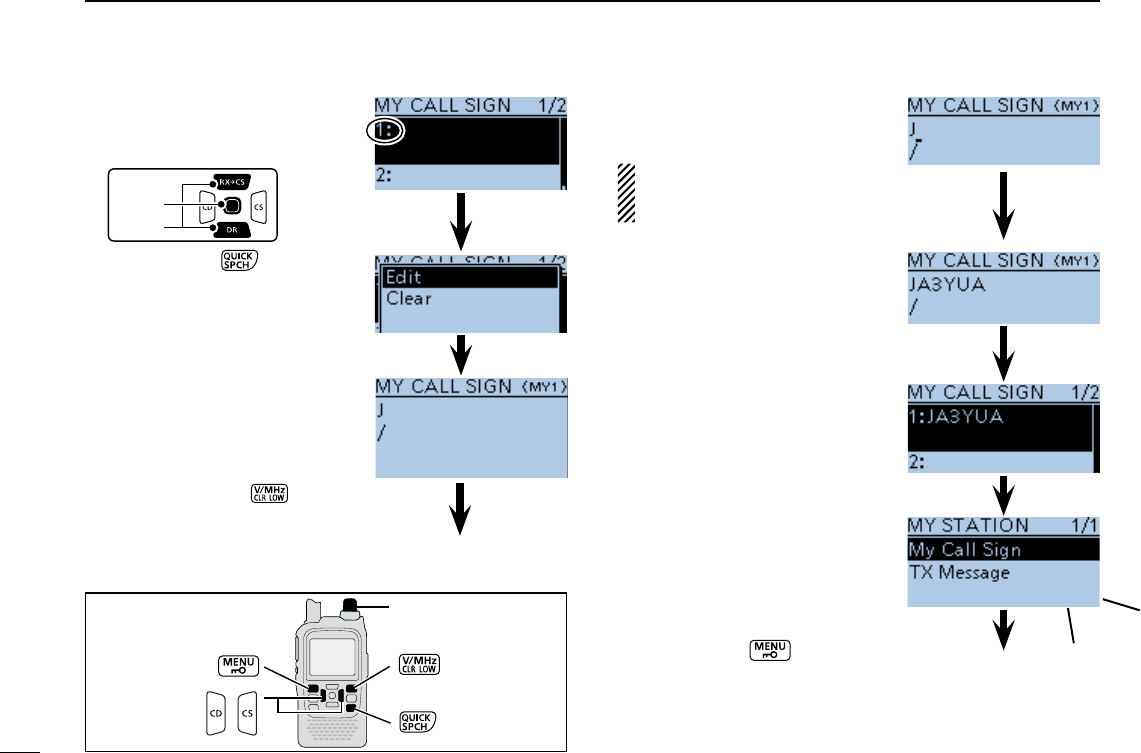
PREPARATION
Push D-pad( t) to select MY
call sign memory channel “1”
([MY1]).
D-pad
(�)
(Ent)
Push [QUICK] y, and then
push D-pad() to select
“Edit.” Then, push D-pad(Ent)
to enter the call sign edit
mode.
Rotate [DIAL] to select the u
first digit. (Example: J)
selectable.
).
.
Move cursor, then rotate
[DIAL].
to enter a space.
Push iD-pad() to move the
cursor to the second digit.
NOTE: Your call sign must
match the call sign registered
to your gateway repeater.
Repeat steps o u and i to
enter your own call sign of
up to 8 characters, including
spaces.
( For example: First J, then A,
then 3, then Y, then U, then A)
!0 Push D-pad(Ent) to set the
call sign.
note.
!1 Push D-pad(Ent) again to
save and return to the MY
CALL SIGN screen.
!2 Push [MENU] to exit the
MENU screen.
Edit mode
Beeps
Completed
Go to step o
[DIAL]
Selects/exits the
MENU screen
Moves the
cursor
Selects
Deletes
Shows the
QUICK MENU
Keys used for input
4
PREPARATION
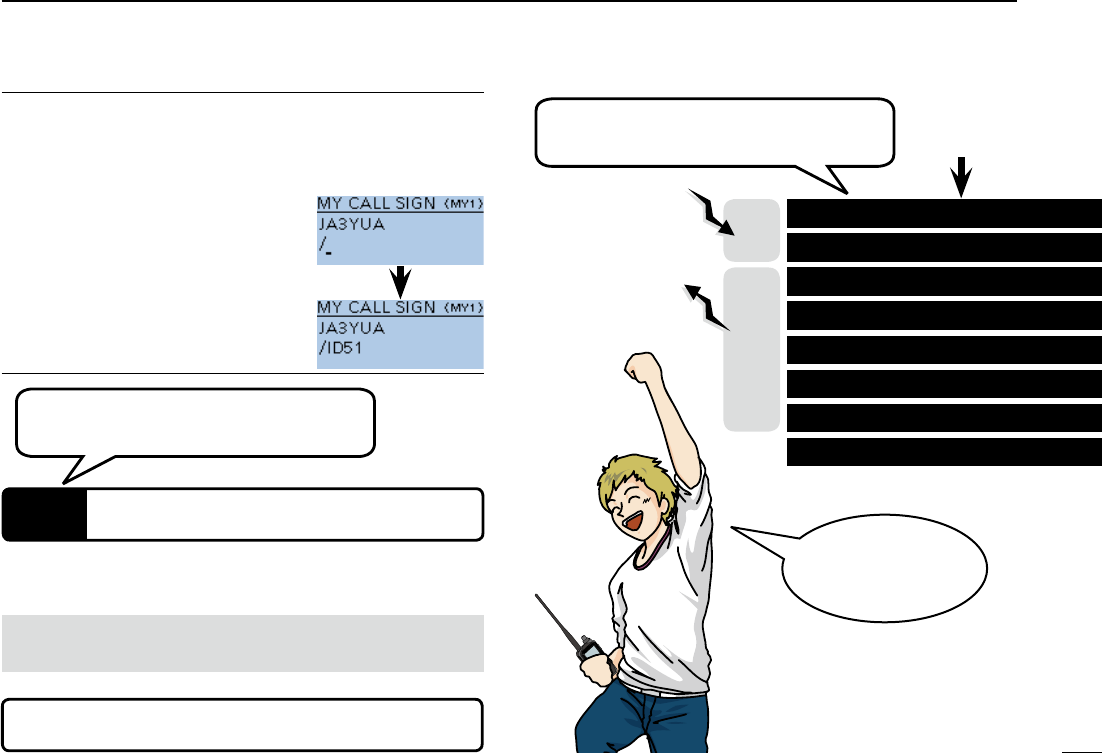
Access the repeater p. 17
How to use the RX History p. 21
Capturing a call sign p. 25
Calling a destination station p. 31
If needed, ask the gateway repeater administrator for
call sign registration instructions.
To use a repeater gateway, you must register your call sign
with a gateway repeater, usually one near your home location.
RX
TX
Now, you can begin using D-STAR!
New users
start here!
In the next step, register your
call sign to a gateway repeater.
I can begin using
D-STAR!!
Completed!!
Convenient! ✓
If necessary, enter a note of up to 4 characters, such as the
model of the transceiver, name, area name, and so on, after
your call sign.
Push qD-pad() until the cursor
moves to the right of the “/”.
Repeat steps w u and i to the left to
enter a desired 4 character note.
(Example: ID51)
STEP 2
Register your call sign to a gateway repeater
Troubleshooting p. 35
5
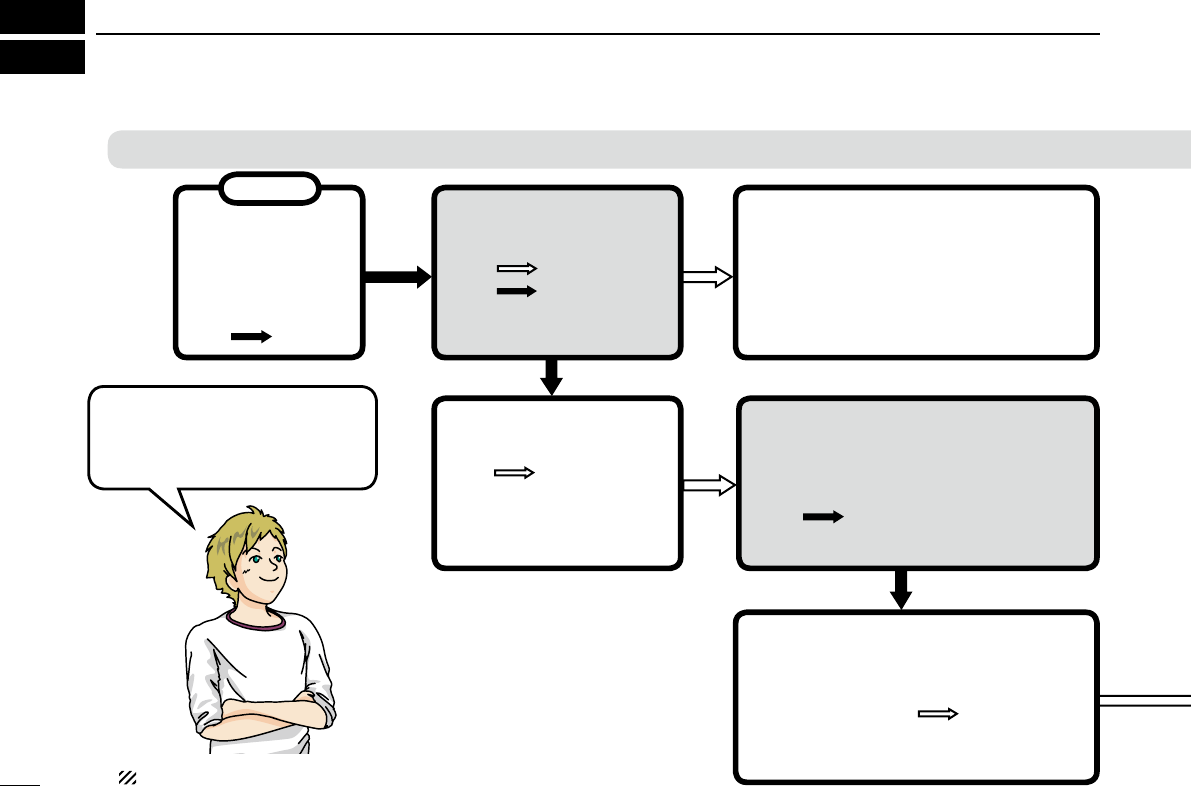
TABLE OF CONTENTS
D-STAR Operation
Answer the questions,
and figure out your
operating steps!
Start
Confirm you can
access your local
repeater?
YES Go to page 17
NO
Reply to a call?
YES
NO
How to easily reply using the call-
ing station’s call sign?
Call Sign Capture key Go to page 25
RX History Go to page 21
Making a call in your local area?
(Local area call)
YES Go to page 27
NO
Use a repeater?
YES
NO Go to page 33
Making a call to another area?
(Gateway call)
To a specific station
To anyone Go to page 29
NOTE: This chart may not apply to your specific environment.
6
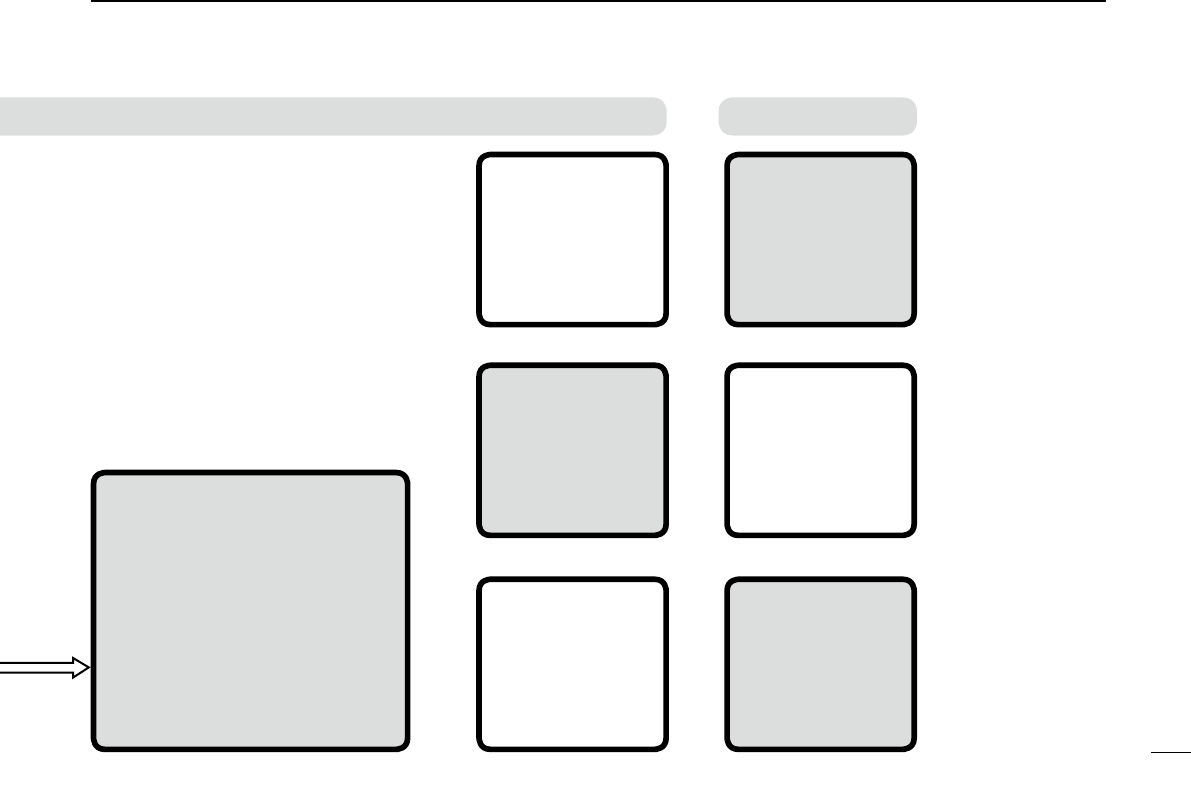
TABLE OF CONTENTS
Other functions
D-STAR Operation
Saving settings
Go to page 37
Learn about
the new built
in functions
Go to page 47
Troubleshooting
Go to page 35
Checking your
position using
GPS
Go to page 43
Recording a QSO
conversation
Go to page 39
Checking your
route using the
GPS logger
function
Go to page 45
The destination call sign is al-
ready programmed?
YES Go to page 31
NO Go to section ? of the CD Ad-
vanced Instruction PDF for call
sign programming. Then, Go to
page 31 of this manual.
If you have received a call
from the station before, the
call sign may be in RX History.
(p. 21)

7
TABLE OF CONTENTS
UNIQUE FEATURES OF D-STAR ..................... 1
PREPARATION ............................................ 2–16
Enter your call sign into the transceiver ................................2
Register your call sign to a gateway repeater .......................4
TABLE OF CONTENTS ........................................................5
FOREWORD ........................................................................
FEATURES ...........................................................................
EXPLICIT DEFINITIONS ....................................................10
IMPORTANT .......................................................................10
SUPPLIED ACCESSORIES ...............................................10
ABOUT THE SUPPLIED CD ..............................................11
Starting the CD D ......................................................11
PRECAUTIONS ..................................................................12
BATTERY CAUTIONS ........................................................14
Battery caution D .......................................................14
Charging caution D ....................................................15
Charging time D .........................................................15
IMPORTANT NOTES ..........................................................16
When using the GPS receiver D ................................16
Spurious signals D .....................................................16
About charging at power ON D ..................................16
1 ACCESS THE REPEATER .................... 17–20
STEP1 Select the DR mode .........................................17
STEP2 Select your Access repeater (“FROM”) ............17
STEP3 Select the Destination repeater (“TO”) .............1
STEP4 ...20
2 HOW TO USE THE RX HISTORY .......... 21–24
STEP1 View the received call sign ...............................21
STEP2 Save the destination call sign into
your call sign memory from the RX History ......22
3 CAPTURING A CALL SIGN .................. 25–26
STEP1 Set the received call sign to the destination .....26
STEP2 Hold down [PTT] to transmit .............................26
4 MAKING A LOCAL AREA CALL .......... 27–28
STEP1 Set “FROM” (Access repeater) .........................27
STEP2 Set “TO” (Destination) .......................................28
STEP3 Hold down [PTT] to transmit .............................28
5 MAKING A GATEWAY CALL ................ 29–30
STEP1 Set “FROM” (Access repeater) .........................2
STEP2 Set “TO” (Destination) .......................................30
STEP3 Hold down [PTT] to transmit .............................30

8
TABLE OF CONTENTS
6 CALLING A DESTINATION STATION .. 31–32
STEP1 Set “FROM” (Access repeater) .........................31
STEP2 Set “TO” (Destination) .......................................32
STEP3 Hold down [PTT] to transmit .............................32
7 MAKING A SIMPLEX CALL ................. 33–34
STEP1 Set “FROM” (Simplex channel) .........................33
STEP2 Hold down [PTT] to transmit .............................34
8 TROUBLESHOOTING ........................... 35–36
9 SAVING SETTINGS .............................. 37–38
STEP1 Saving settings into memory ............................37
STEP2 View the saved contents ...................................38
10 RECORDING A QSO ONTO A
MICROSD CARD ................................... 39–42
About using a microSD card ■ .....................................3
STEP1 Inserting the microSD card ...............................3
STEP2 Format the microSD card .................................40
STEP3 Recording a QSO audio ...................................41
STEP4 ......................42
11 GPS OPERATION ................................. 43–44
STEP1 Receiving GPS data from the internal
GPS receiver ....................................................43
STEP2 Displaying your position ....................................44
12 GPS LOGGER FUNCTION ................... 45–46
STEP1 Receiving GPS data from the internal
GPS receiver ....................................................45
STEP2 Turning ON the GPS Logger function ...............46
13 INTRODUCING NEW FUNCTIONS ...... 47–48
Voice Recorder function ................................................47
Two bands monitoring plus BC Radio ...........................47
Auto Position Reply function .........................................48
Voice TX function ..........................................................48
Speech function ............................................................48
...............................................48
14 RESETTING .......................................... 49–50
Resetting ■ ...................................................................4
15 INFORMATION ............................................ 51
COUNTRY CODE LIST ................................................51
FCC INFORMATION .....................................................51
INDEX ......................................................... 52–54

FOREWORD
or ID-51E VHF/UHF TRANSCEIVER is designed and build with
Icom’s superior technology and craftsmanship combining tra-
ditional analog technologies with the new digital technology,
Digital Smart Technologies for Amateur Radio (D-STAR), for
With proper care, this product should provide you with years
of trouble-free operation.
choice, and hope you agree with Icom’s philosophy of “tech-
nology first.” Many hours or research and development went
into the design of your ID-51A or ID-51E.
FEATURES
Dual independent receivers in one radio; ❍
receives two bands simultaneously
Two band monitoring plus the Broadcast
(BC) Radio
watch or Triple-watch cannot be made.
Rapid charging is possible, and the charg- ❍
ing time period is approximately 3 hours
with the supplied battery pack. (Half peri-
ods of the ID-31A/E)
Built-in GPS receiver allows you to check ❍
your current position, or automatically send
a reply with your position to the called
ID-51A/E
Voice recorder records your QSO conver- ❍
sation, voice audio for TX and microphone
voice audio
microSD card slot that can accept different ❍
cards to backup settings, various memo-
ries, the GPS log and so on
Incorporated (Japan) in Japan, the United States, the United King-
dom, Germany, France, Spain, Russia and/or other countries.
-
other countries.
Microsoft Corporation in the United States and/or other countries.
10
EXPLICIT DEFINITIONS
WORD DEFINITION
R DANGER! Personal death, serious injury or an ex-
plosion may occur.
R WARNING! Personal injury, fire hazard or electric
CAUTION Equipment damage may occur.
NOTE
IMPORTANT
READ ALL INSTRUCTIONS carefully and completely
before using the transceiver.
SAVE THIS INSTRUCTION MANUAL— This in-
struction manual contains basic operating instructions for the
ID-51A/ID-51E.
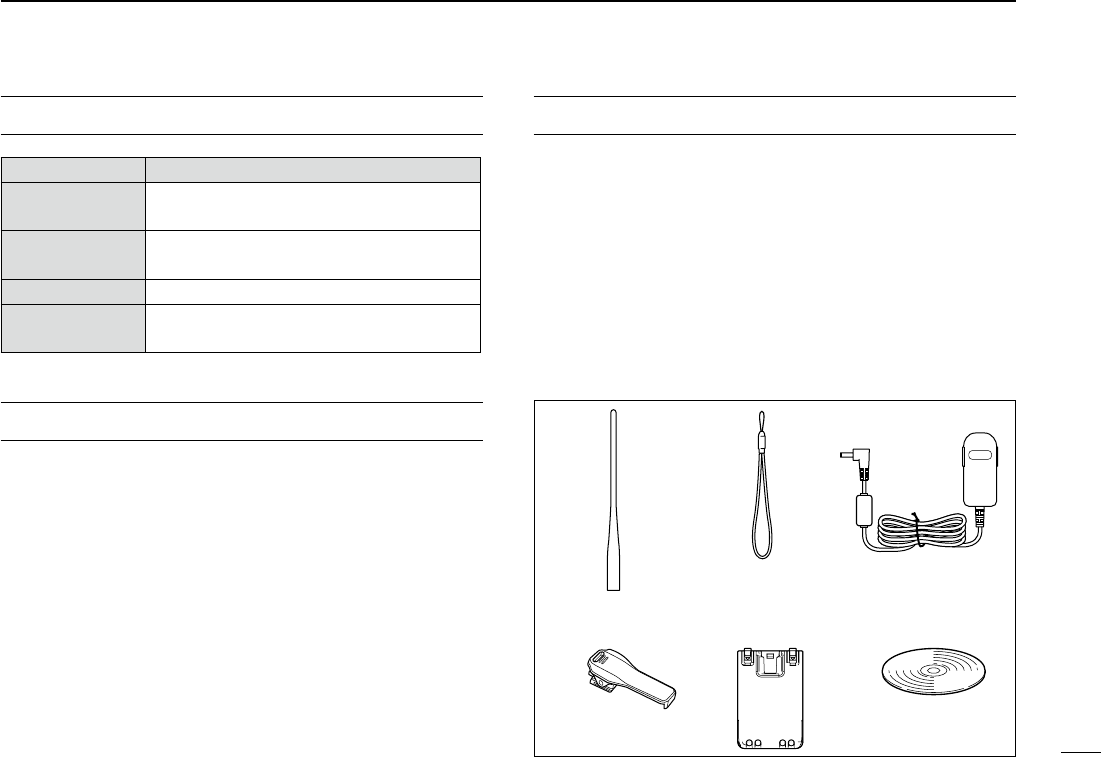
SUPPLIED ACCESSORIES
The following accessories are supplied with the transceiver.
q Antenna .......................................................................... 1
w Hand strap ..................................................................... 1
e Battery charger (BC-167SA/SD/SV)* ............................. 1
r Belt clip .......................................................................... 1
t .................................................... 1
y CD (Including the CS-51 CLONING SOFTWARE) ................. 1
* Not supplied, or the shape is different, depending on the
transceiver version.
qe
w
ry
t
11
The following instructions and installers are included on the
CD.
•Basicinstructions
Instructions for the basic operations, the same as this man-
ual
•AdvancedInstructions
Instructions for the advanced operations and more details
are described than in this manual
•HAMradioTerms
A glossary of HAM radio terms
•CS-51Instructionmanual
Instructions for the CS-51 cloning software installation and
use
•CS-51Installer
Installer for the CS-51 cloning software
•Adobe® Reader® Installer
Installer for Adobe® Reader®
DStarting the CD
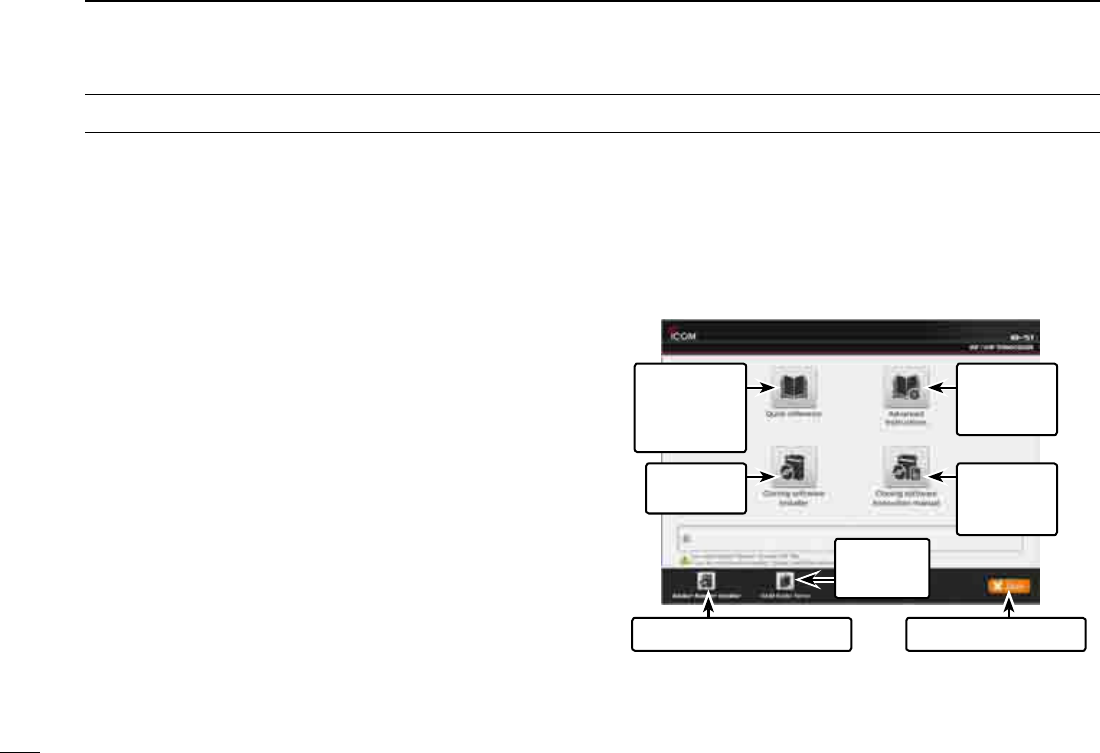
ABOUT THE SUPPLIED CD
Insert the CD into the CD drive. q
below is automatically displayed.
w
A PC with the following Operating System is required.
® Windows® 8, Microsoft® Windows® 7 , Microsoft®
Windows Vista® or Microsoft® Windows® XP
To read the guide or instructions, Adobe® Reader® is required.
If you have not installed it, please install the Adobe® Reader®
on the CD or downloaded it from Adobe Systems Incorporat-
ed’s web
site.
Quits the menu screenInstalls the Adobe® Reader®
Opens the
Glossary
Opens the
Basic
Instructions
(this manual)
Installs the
CS-51
Opens the
Advanced
Instructions
Opens the
CS-51
Instructions

12
1
2
3
4
5
6
7
8
9
10
11
12
13
14
15
16
17
18
19
R DANGER! NEVER short the terminals of the bat-
R DANGER! Use and charge only specified Icom battery
charged with Icom chargers. Using third-party or counterfeit
the battery to burst.
R WARNING RF EXPOSURE! This device emits
Radio Frequency (RF) energy. Caution should be observed
when operating this device. If you have any questions regard-
ing RF exposure and safety standards, please refer to the
Federal Communications Commission Office of Engineering
and Technology’s report on Evaluating Compliance with FCC
Guidelines for Human Radio Frequency Electromagnetic
Fields (OET Bulletin 65).
R WARNING! NEVER hold the transceiver so that
the antenna is very close to, or touching exposed parts of
the body, especially the face or eyes, while transmitting. The
transceiver will perform best if the microphone is 5 to 10 cm
(2 to 4 inches) away from the lips and the transceiver is verti-
cal.
R WARNING! NEVER operate or touch the trans-
may damage the transceiver.
R WARNING! NEVER operate the transceiver with
an earphone, headphones or other audio accessories at high
volume levels. Hearing experts advise against continuous
high volume operation. If you experience a ringing in your
ears, reduce the volume level or discontinue use.
R WARNING! NEVER operate the transceiver while
driving a vehicle. Safe driving requires your full attention—
anything less may result in an accident.
R WARNING! NEVER connect the transceiver to a
power source of more than 16 V DC or use reverse polarity.
This could cause a fire or damage the transceiver.
CAUTION: MAKE SURE the flexible antenna and
Exposing the inside of the transceiver to water will result in
serious damage to the transceiver.
After exposure to water, clean the battery contacts thoroughly
with fresh water and dry them completely to remove any wa-
ter or salt residue.
PRECAUTIONS

13
CAUTION: DO NOT use harsh solvents such as ben-
zine or alcohol to clean the transceiver, because they can
damage the transceiver’s surfaces.
DO NOT push the PTT unless you actually intend to trans-
mit.
DO NOT operate the transceiver near unshielded electri-
cal blasting caps or in an explosive atmosphere.
DO NOT use or place the transceiver in direct sunlight
or in areas with temperatures below –20°C (–4˚F) or above
+60°C (+140˚F).
BE CAREFUL! The transceiver will become hot when
operating it continuously for long periods of time.
BE CAREFUL! The transceiver meets IPX7* require-
ments for waterproof protection. However, once the trans-
ceiver has been dropped, waterproof protection cannot be
guaranteed because of possible damage to the transceiver's
case or waterproof seal.
* Only when the BP-271 or BP-272 (option), flexible antenna,
[MIC/SP] cap, [DATA/DC IN] cap and [micro SD] slot cap
are attached.
Place the unit in a secure place to avoid inadvertent use by
children.
The BP-273 meets IPX4 requirements for splash resistance.
When it is connected, the transceiver corresponds to IPX4.
Even when the transceiver power is OFF, a slight current still
the transceiver when not using it for a long time. Otherwise,
and will need to be recharged or replaced.
PRECAUTIONS

14
R DANGER! NEVER short the terminals (or charging termi-
-
Simply carrying with or placing near metal objects such as a
R DANGER! Use and charge only specified Icom battery
charged with Icom chargers. Using third-party or counterfeit
burst.
Battery caution D
R DANGER! DO NOT hammer or otherwise impact the bat-
tery. Do not use the battery if it has been severely impacted or
dropped, or if the battery has been subjected to heavy pres-
sure. Battery damage may not be visible on the outside of the
or any other damage, the cells inside the battery may rupture
or catch fire.
R DANGER! NEVER
temperatures above +60˚C (+140˚F). High temperature build-
up in the battery, such as could occur near fires or stoves,
inside a sun heated car, or in direct sunlight may cause the
battery to rupture or catch fire. Excessive temperatures may
also degrade battery performance or shorten battery life.
R DANGER! DO NOT expose the battery to rain, snow, sea-
water, or any other liquids. Do not charge or use a wet battery.
If the battery gets wet, be sure to wipe it dry before using.
R DANGER! NEVER
internal battery gas may cause it to rupture, or may cause an
explosion.
R
DANGER! NEVER solder the battery terminals, or NEVER
R DANGER! Use the battery only with the transceiver for
which it is specified. Never use a battery with any other equip-
ment, or for any purpose that is not specified in this instruc-
tion manual.
R DANGER! If fluid from inside the battery gets in your eyes,
blindness can result. Rinse your eyes with clean water, with-
out rubbing them, and see a doctor immediately.
R WARNING! Immediately stop using the battery if it emits
an abnormal odor, heats up, or is discolored or deformed. If
any of these conditions occur, contact your Icom dealer or
distributor.
R WARNING! Immediately wash, using clean water, any part
of the body that comes into contact with fluid from inside the
battery.
BATTERY CAUTIONS
15
R WARNING! NEVER put the battery in a microwave oven,
This could cause a fire, overheating, or cause the battery to
rupture.
CAUTION: Always use the battery within the specified tem-
perature range, –20˚C to +60˚C (–4˚F to +140˚F). Using the
battery out of its specified temperature range will reduce the
battery’s performance and battery life.
CAUTION: Shorter battery life could occur if the battery is left
fully charged, completely discharged, or in an excessive tem-
perature environment (above +50˚C; +122˚F) for an extended
period of time. If the battery must be left unused for a long
time, it must be detached from the radio after discharging.
You may use the battery until the battery indicator shows half-
temperature range:
–20˚C (–4˚F) to +50˚C (+122˚F) (within a month).
–20˚C (–4˚F) to +20˚C (+68˚F) (within a year).
DCharging caution
R DANGER! NEVER
extremely high temperatures, such as near fires or stoves,
inside a sun-heated vehicle, or in direct sunlight. In such en-
vironments, the safety/protection circuit in the battery will ac-
tivate, causing the battery to stop charging.
R
WARNING! DO NOT charge or leave the battery in the bat-
tery charger beyond the specified time for charging. If the bat-
tery is not completely charged by the specified time, stop charg-
ing and remove the battery from the battery charger. Continuing
to charge the battery beyond the specified time limit may cause
a fire, overheating, or the battery may rupture.
R WARNING! NEVER insert the transceiver (battery at-
tached to the transceiver) into the charger if it is wet or soiled.
This could corrode the battery charger terminals or damage
the charger. The charger is not waterproof.
CAUTION: DO NOT charge the battery outside of the speci-
fied temperature range: 0˚C to +40˚C (+32˚F to +104˚F).
Icom recommends charging the battery at +25˚C (+77˚F). The
battery may heat up or rupture if charged out of the specified
temperature range. Additionally, battery performance or bat-
tery life may be reduced.
BE SURE to turn the transceiver power OFF while charg-
ing with the supplied BC-167S BATTERY CHARGER. The battery
transceiver’s power is ON.
DCharging time
BC-167S
(Supplied)
BC-202
(Optional)
BP-271 (Supplied) Approx. 3 hours Approx. 2 hours
BP-272 (Optional) Approx. 4.5 hours Approx. 3.5 hours
BATTERY CAUTIONS
Charger

16
DWhen using the GPS receiver
-
ing the ID-51A or ID-51E inside a vehicle, you may not re-
ceive GPS signals. We recommend you use it near a win-
dow. Please avoid the areas shown in the following:
2. DO NOT use where the air bags could deploy.
3. DO NOT use where it becomes a driving obstacle.
by the U.S. Department of Defence. The Department is re-
sponsible for accuracy and maintenance of the system. Any
changes by the Department may affect the accuracy and
function of the GPS system.
-
lite signals.
-
tions:
1. Tunnels or high-rise buildings
3. Under a bridge or viaduct
4. In remote forested areas
5. Under bad weather conditions (rainy or cloudy day)
near the 440.205 MHz. This is due to signals made in the
internal circuit and does not indicate a transceiver malfunc-
tion.
DSpurious signals
Depending on the combination of the operating band and
mode, the Dualwatch or Triple-watch operation may generate
certain spurious signals, or noise may be heard. These do not
indicate a transceiver malfunction.
D
About charging at power ON
in approximately 3 hours. But with this rapid circuit, the bat-
sure to turn OFF the power before charging.
When “Charging (Power ON)”* is set to ON in the MENU screen,
to [DC IN].) But this operation may generate certain spurious
signals; the S-meter appears, or noise may be heard.
*MENU > Function > Charging (Power ON) (Default: OFF)
operating condition.
and the current capacity must be more than 2.5 A to charge the
receive signals correctly, set “Charging (Power ON)”* to OFF, and
disconnect the external DC power cable from [DC IN].
IMPORTANT NOTES
17
ACCESS THE REPEATER
1
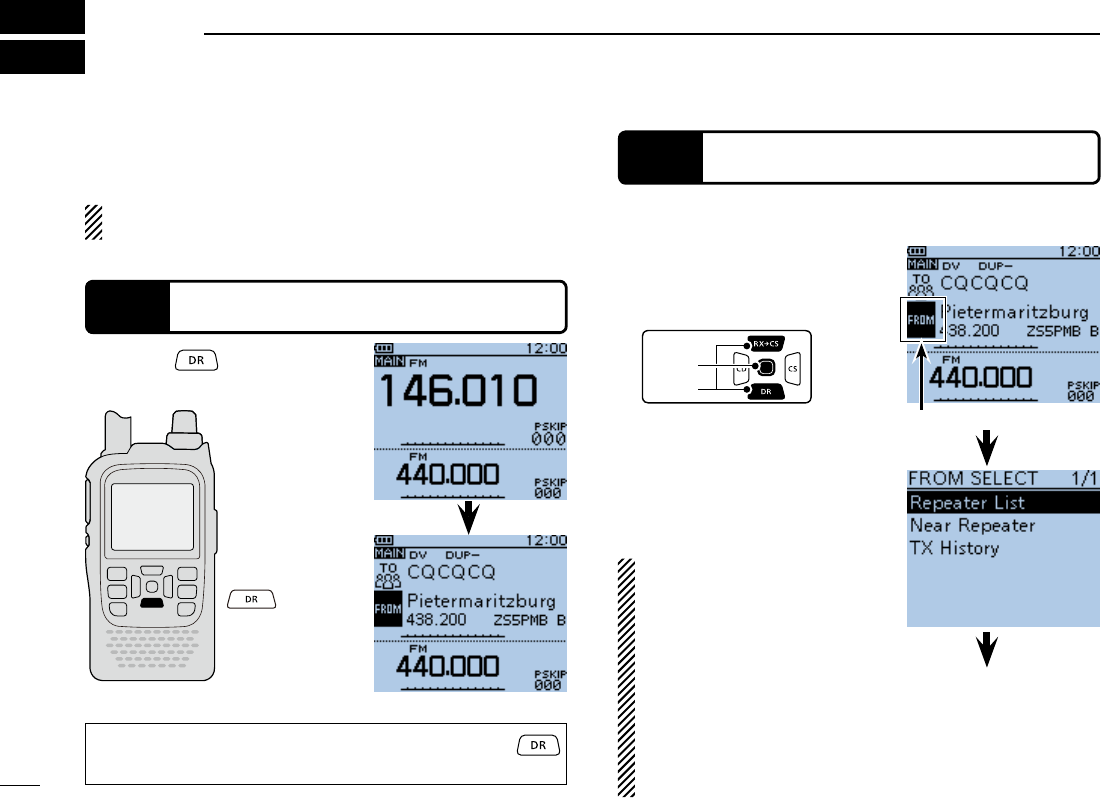
STEP 1 Select the DR mode
Hold down for 1 second.
VFO mode
DR mode
STEP 2 Select your Access repeater (“FROM”)
Push D-pad( q) to select
“FROM” (Access repeater),
and then push D-pad(Ent).
D-pad
(�)
(Ent)
Push D-pad( w) to select “Re-
peater List,” and then push
D-pad(Ent).
If you want to return to the VFO mode hold down
again for 1 second.
Go to step e
“FROM” is selected.
access your local area repeater (Access repeater), and if your
signal is successfully sent to a destination repeater.
If your call sign (MY) has not been set, or your call sign has
not been registered on a D-STAR repeater, see page 2.
Example: Your Access repeater is Hirano/Japan in the Re-
peater list.
You have four other ways to
select your access repeater,
other than selecting it from re-
peater list. See the Advanced
Instructions for more details.
Rotating [DIAL]
Searching for the nearest re-
peaters
Selecting from the TX History
Searching for a repeater us-
ing the DR mode scan
18
1
ACCESS THE REPEATER
1
ACCESS THE REPEATER
Continued on the next page ☞
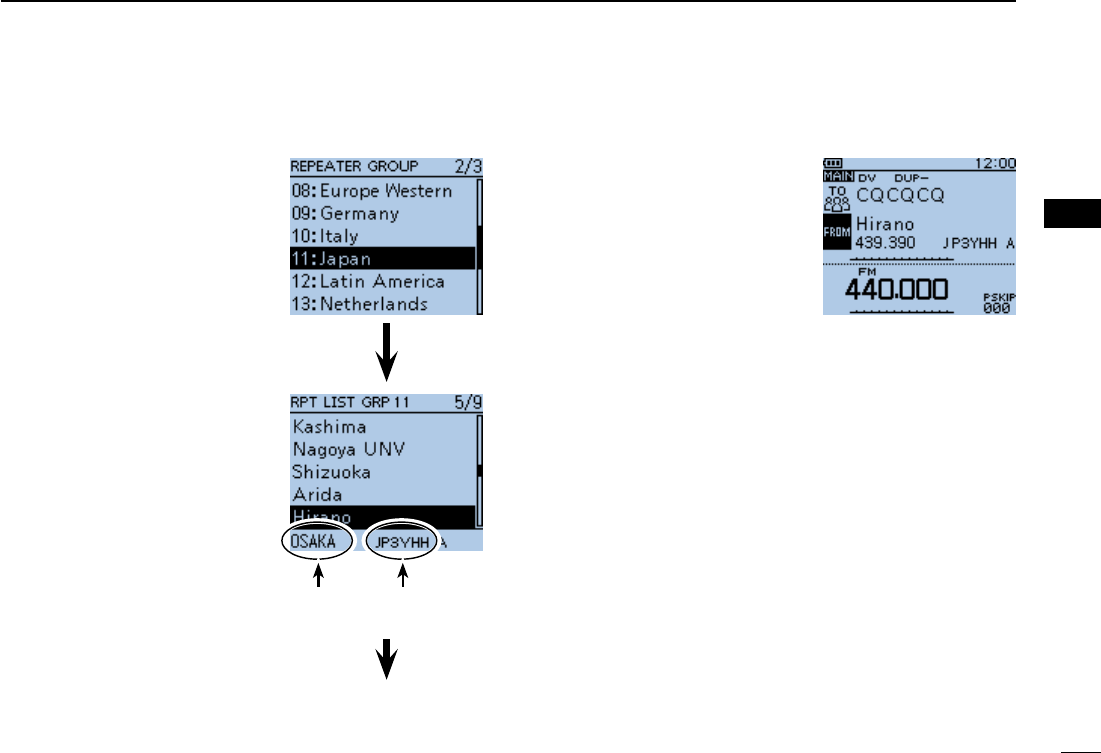
Push D-pad( e) to select the
repeater group where your
access repeater is listed, and
then push D-pad(Ent).
The repeater list, described in
this manual, may differ from your
transceiver’s preloaded list.
Push D-pad( r) to select your
access repeater, and then
push D-pad(Ent).
If the selected repeater name t
is displayed in “FROM” on
the DR mode screen, the ac-
cess repeater setting is com-
pleted.
Completed
sign, its frequency, duplex setting, frequency offset and
Gateway call sign are automatically set.
your transceiver’s preprogrammed list.
Repeater area Repeater
call sign
Go to step t
Completed
1ACCESS THE REPEATER
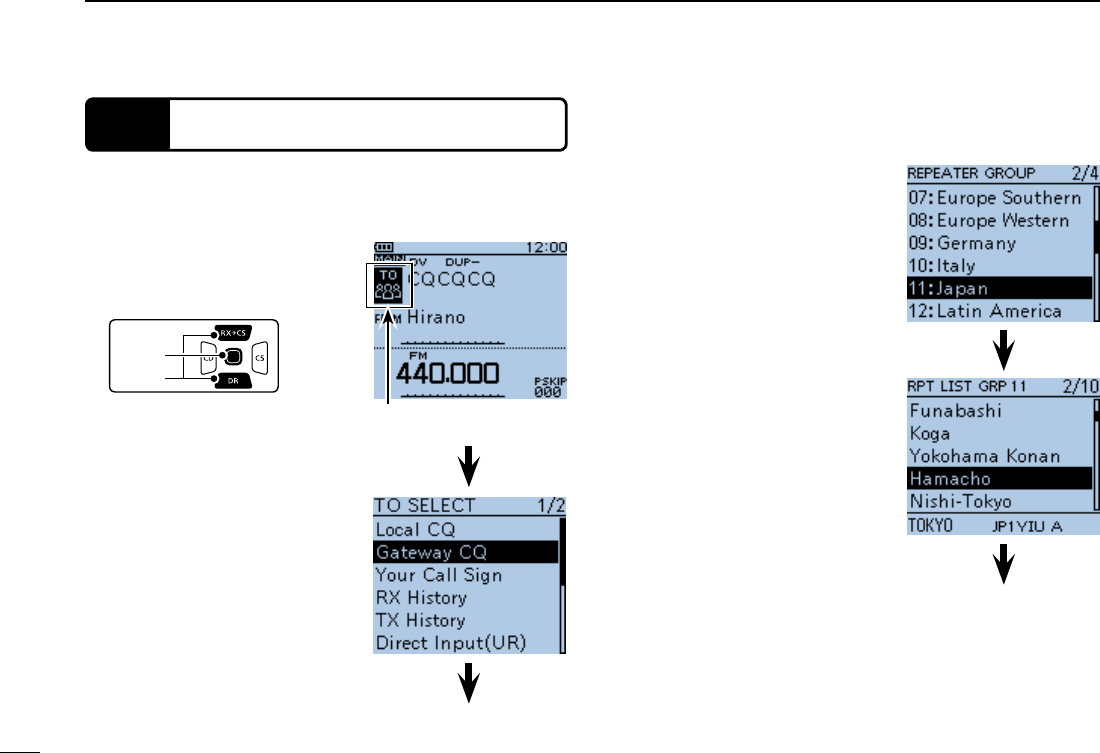
STEP 3 Select the Destination repeater (“TO”)
Push D-pad( q) to select “TO”
(Destination repeater), and
then push D-pad(Ent).
D-pad
(�)
(Ent)
Push D-pad( w) to select se-
lect “Gateway CQ,” and then
push D-pad(Ent).
Push D-pad( e) to select the
repeater group where your
destination repeater is listed,
and then push D-pad(Ent).
Push D-pad( r) to select your
destination repeater, and
then push D-pad(Ent).
Go to step eGo to step t
“TO” is selected.
Go to step e
Example: Your destination repeater is Hamacho/Japan in the
repeater list.
20
1
ACCESS THE REPEATER
1
ACCESS THE REPEATER
If the selected repeater name t
in step r is displayed in “TO”
on the DR mode screen, the
destination repeater setting is
completed.
Completed
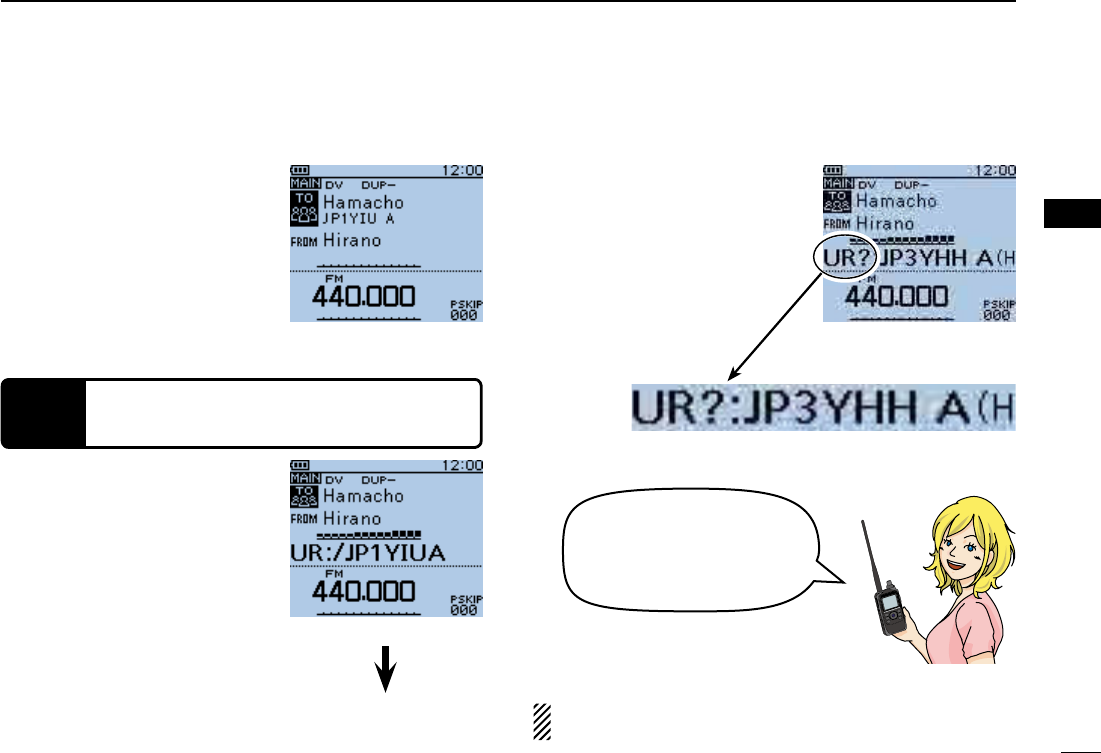
Hold down [PTT] for approxi- q
mately 1 second to access
the repeater.
If you get a reply call, or “UR?” w
appears on the LCD within 3
seconds, your signal reached
your access repeater and your
call was successfully sent from
your destination repeater.
Transmitting
to various repeaters by
changing the “TO” setting!
STEP 4 Check whether you can access the re-
peater
NOTE: See page 35 for status indications after a reply is
received.
Go to step w
Successfully sent!
21
HOW TO USE THE RX HISTORY
2
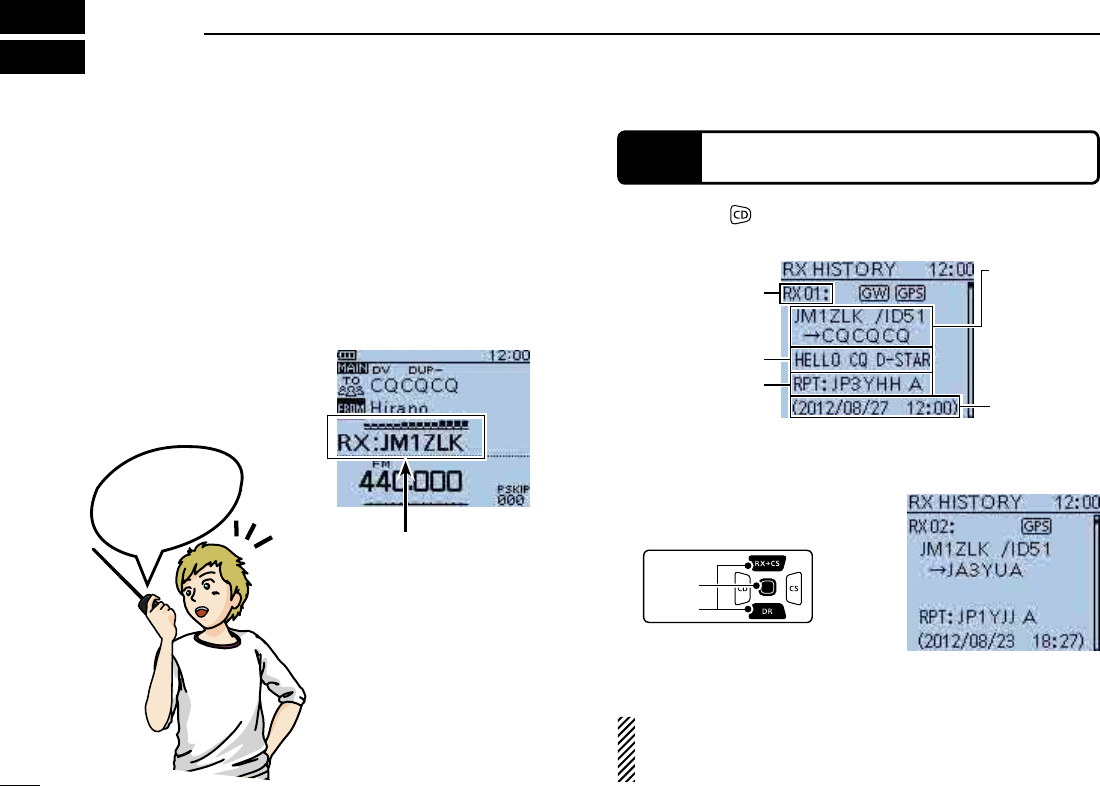
When a DV call is received, the call signs of the caller, the
called station and the called station’s access repeater are
stored in the RX history file.
Up to 50 calls can be stored.
This section describes how to view the RX history screen and
how to save the displayed call signs to memory.
STEP 1 View the received call sign
Hold down q for 1 second.
D-pad
(�)
(Ent)
Push D-pad( w) to view other
RX history.
NOTE: If you push D-pad(Ent) while in the RX HISTORY
screen, the detailed contents of the RX history are dis-
played.
JM1ZLK listen-
ing on JP3YHH
port A...
Oh!
The S-meter appears
and the caller’s call
sign is displayed.
RX HISTORY
record number
RX message
RX HISTORY screen (RX01)
Received date
and time
Caller station
(upper)*
* A note may
be displayed
after “/”.
Called station
(lower)
Repeater call sign
of the called station
RX HISTORY screen (RX02)
When receiving a
22
2
HOW TO USE THE RX HISTORY
2
HOW TO USE THE RX HISTORY
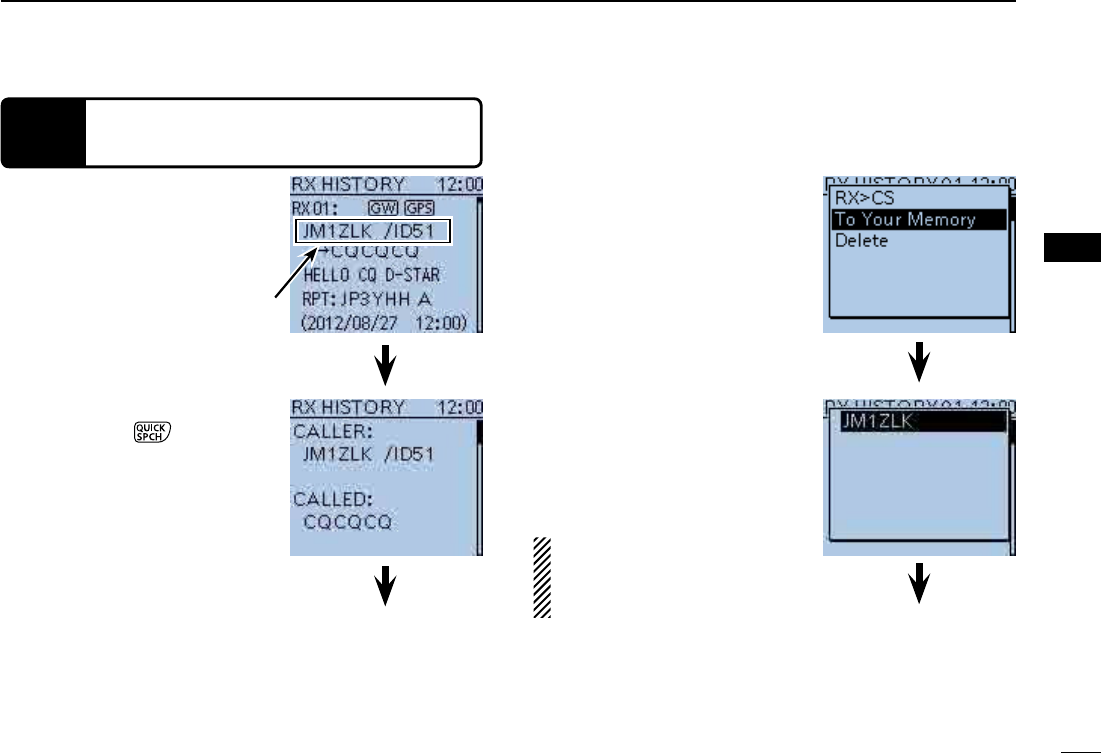
STEP 2 Save the destination call sign into your
call sign memory from the RX History
While in the RX HISTORY q
screen, push D-pad() to se-
lect the RX HISTORY record
with the call sign that you
want to save to memory.
Push D-pad(Ent), and then w
push [QUICK] .
Push D-pad( e) to select “To
Your Memory,” and then push
D-pad(Ent).
Push D-pad( r) to select the
call sign that you want to save,
and then push D-pad(Ent).
The display changes to the
YOUR CALL SIGN EDIT
screen, and then the call sign
is automatically saved.
Continued on the next page ☞
Go to step eGo to step t
Call sign to be saved
23
2HOW TO USE THE RX HISTORY
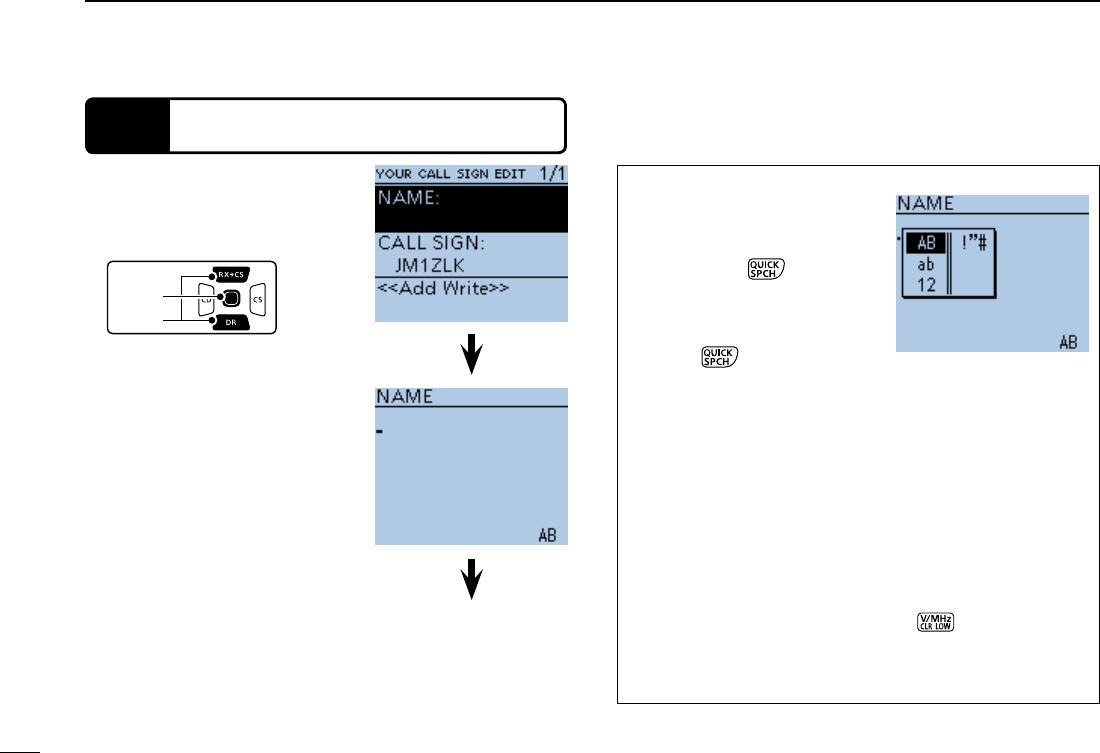
STEP 2 Save the destination call sign into your call sign
memory from the RX History (Continued)
Push D-pad( t) to select
“NAME,” and then push D-
pad(Ent).
Rotate [DIAL] to select a y
desired character to enter a
name of up to 16 characters,
including spaces.
About text entry
D-pad() to move the
push [QUICK] to change
the character to an upper case
or lower case letter.
[QUICK] to open the input
mode selection window.
- Push D-pad() to select
the desired Upper case let-
ters, Lower case letters, Numbers or Symbols.
- To enter symbols, select “!”#,” and then push D-pad(Ent)
to open the symbol character selection window. And ro-
tate [DIAL] to select the desired symbol character, and
then push D-pad(Ent).
to delete the se-
lected character, symbol or number, or hold down [CLR]
to continuously erase the characters, first to the right, and
then to the left of the cursor.
D-pad
(�)
(Ent)
Go to step u
Input mode selection
window
24
2
HOW TO USE THE RX HISTORY
2
HOW TO USE THE RX HISTORY
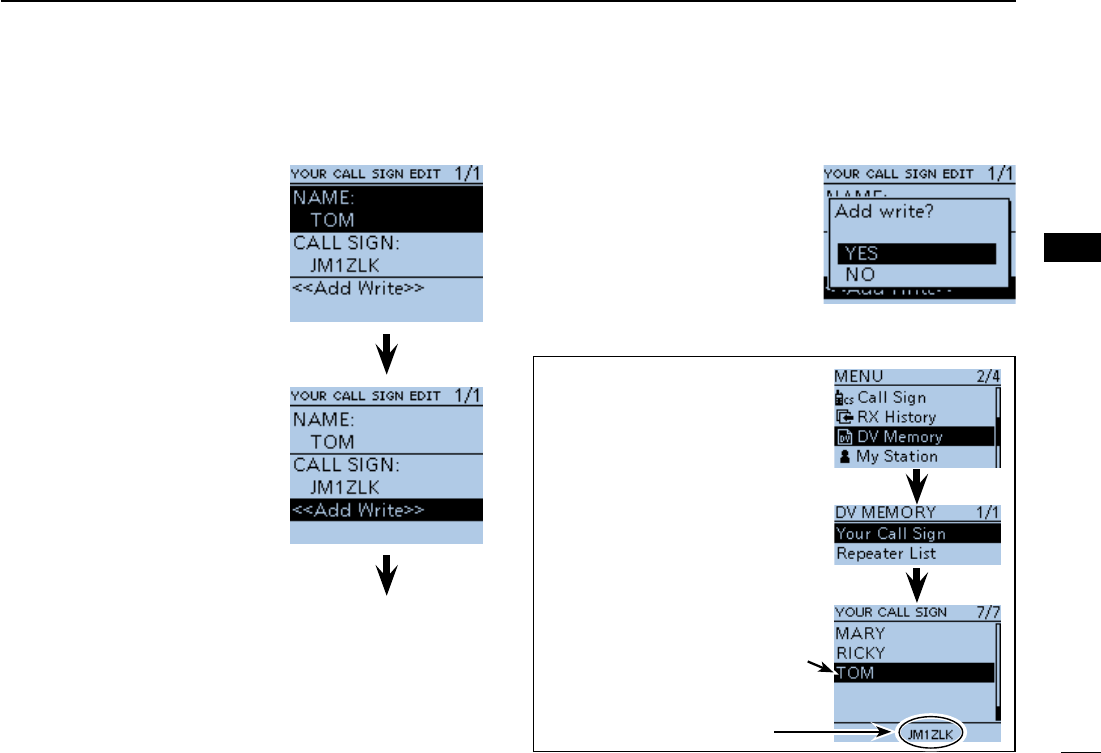
After entering the name, push u
D-pad(Ent).
Push D-pad( i) to select
“<<Add Write>>,” and then
push D-pad(Ent).
Push D-pad( o) to select “YES,”
and then push D-pad(Ent).
The saved call sign is displayed on
the YOUR CALL SIGN screen as a
selectable destination.
Go to step o
Completed
“TOM” is added
Shows TOM’s
call sign
25
CAPTURING A CALL SIGN
3
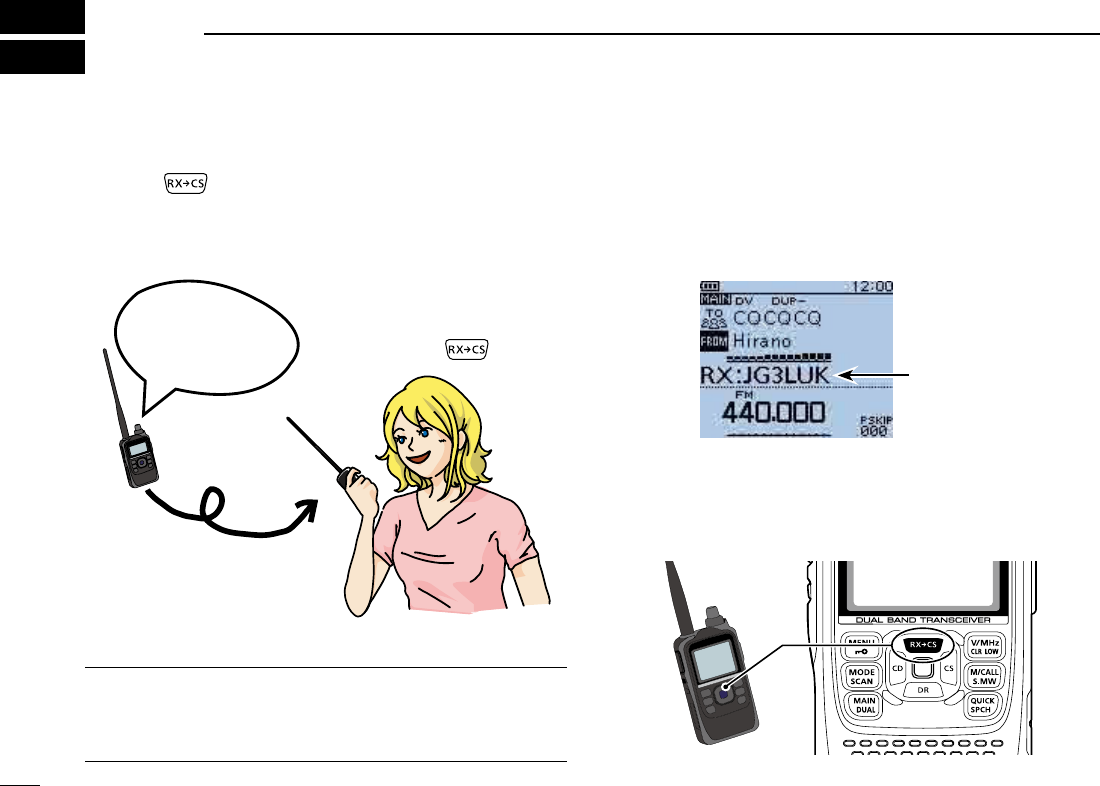
After you receive the repeater’s signal, the calling station’s
call sign can be captured by holding down the Call Sign Cap-
received call.
What is the Call Sign Capture key?? ✓
last received station call sign as a temporary destination, and
The Call Sign Capture key is here!
JG3LUK listen-
ing on JP3YHH
port A...
Beeps
Wow! I only have to
hold down !
While receiving
When receiving a
call from “JG3LUK.”
26
3
CAPTURING A CALL SIGN
3
CAPTURING A CALL SIGN
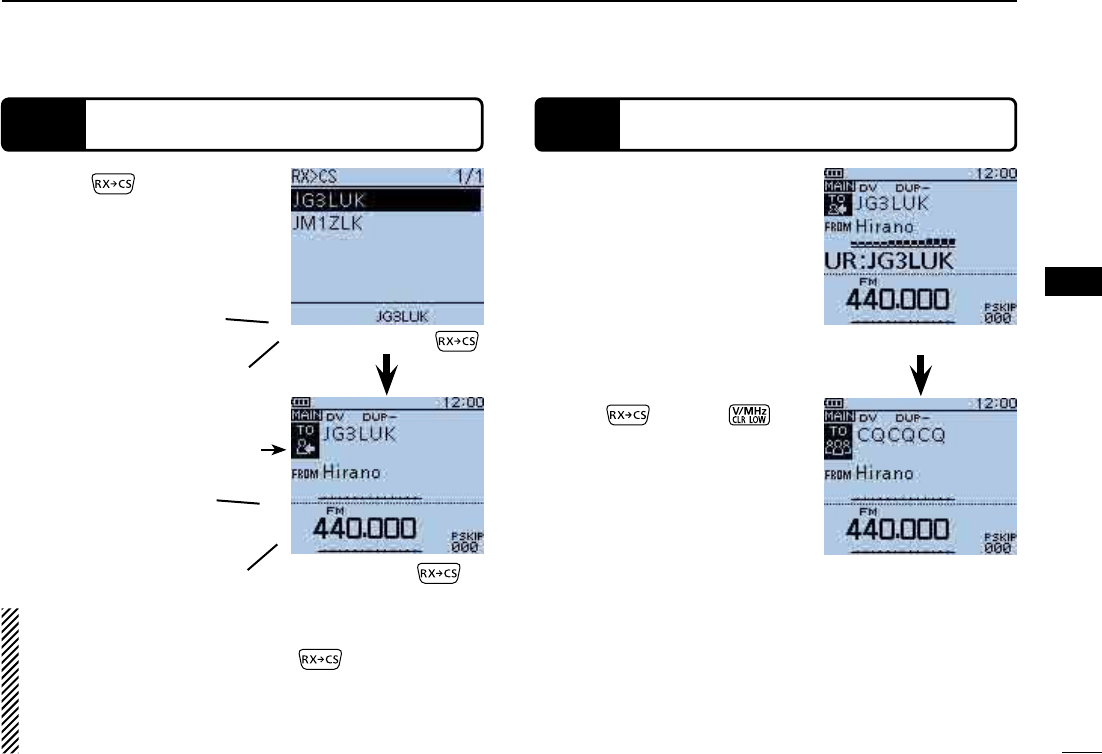
STEP 2 Hold down [PTT] to transmit
Hold down for 1 second.
the station call sign is announced if
the RX>CS Speech function is set
to ON in the MENU screen.
(MENU > SPEECH > RX>CS SPEECH)
-
ing a call sign.
NOTE:
rotate [DIAL] while holding down .
the power save is ON, the call sign may not be received
correctly. In that case, “--------” appears, an error beep
While holding down [PTT], q
level.
Transmitting
Push w or [CLR]
to
return to the previous call sign
setting.
Beeps
STEP 1
Set the received call sign to the destination
While holding down .
Beeps
After releasing .
JG3LUK
Return to the previous
screen
27
MAKING A LOCAL AREA CALL
4
A Local area call can be made when “Local CQ” is used to set
“CQCQCQ” in “TO” (Destination).
✓What is a Local Area Call??
To call through your local area (access) repeater.
Push D-pad( q) to select
“FROM,” and then push
D-pad(Ent).
Push D-pad( w) to select “Re-
peater List,” and then push
D-pad(Ent).
D-pad
(�)
(Ent)
STEP 1 Set “FROM” (Access repeater)
Push D-pad( e) to select the
repeater group where your
access repeater is listed, and
then push D-pad(Ent).
Push D-pad( r) to select your
access repeater, and then
push D-pad(Ent).
JG3LUK
listening on
JP3YHH port A...
JG3LUK
listening on
JP3YHH
port A...
Repeater
Repeater area
28
4
MAKING A LOCAL AREA CALL
4
MAKING A LOCAL AREA CALL
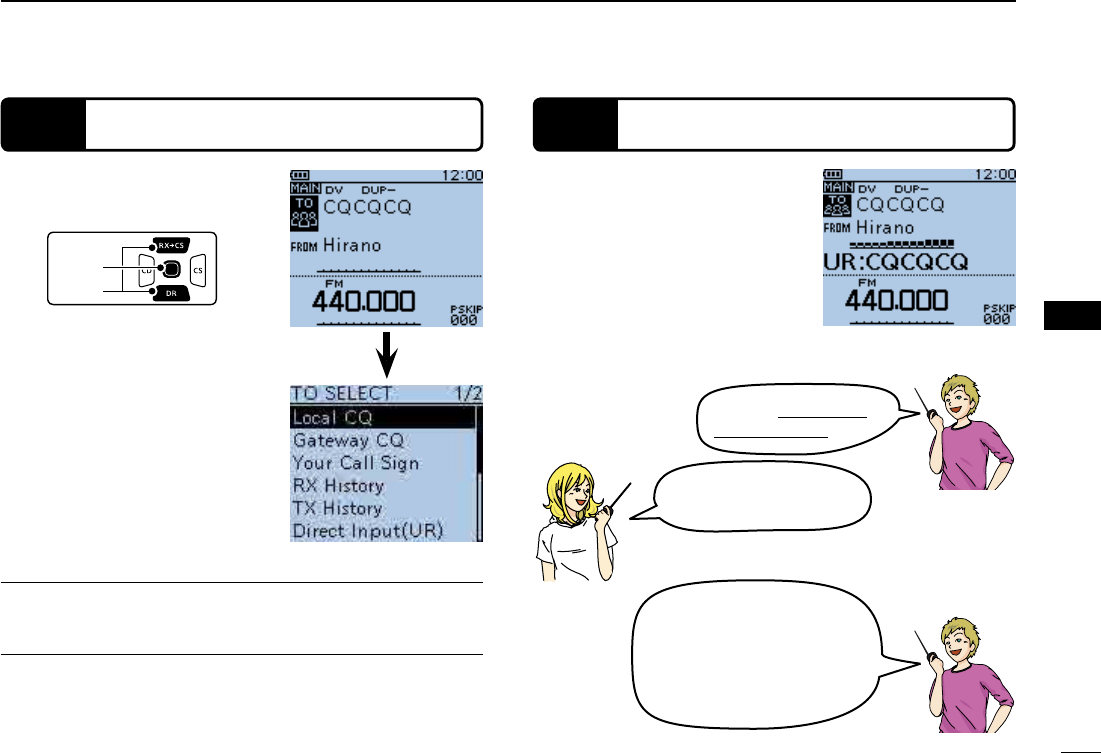
STEP 2 Set “TO” (Destination)
Push D-pad( q) to select “TO,”
and then push D-pad(Ent).
Push D-pad( w) to select “Lo-
cal CQ,” and then push D-
pad(Ent).
D-pad
(�)
(Ent)
STEP 3 Hold down [PTT] to transmit
at your normal voice level.
Transmitting
JA3YUA, this is JG3LUK.
Hello, how are you?
JG3LUK
< Communication example
for a Local area call>
JA3YUA
JA3YUA listening on
JP3YHH port A.
JA3YUA
JG3LUK, this is JA3YUA.
Thanks for the nice QSO and I
hope to talk to you again soon.
This is JA3YUA now clear of
the JP3YHH repeater.
Convenient! ✓
The Local CQ call is used to call anyone, but you can call a
specific station by simply saying their call sign.
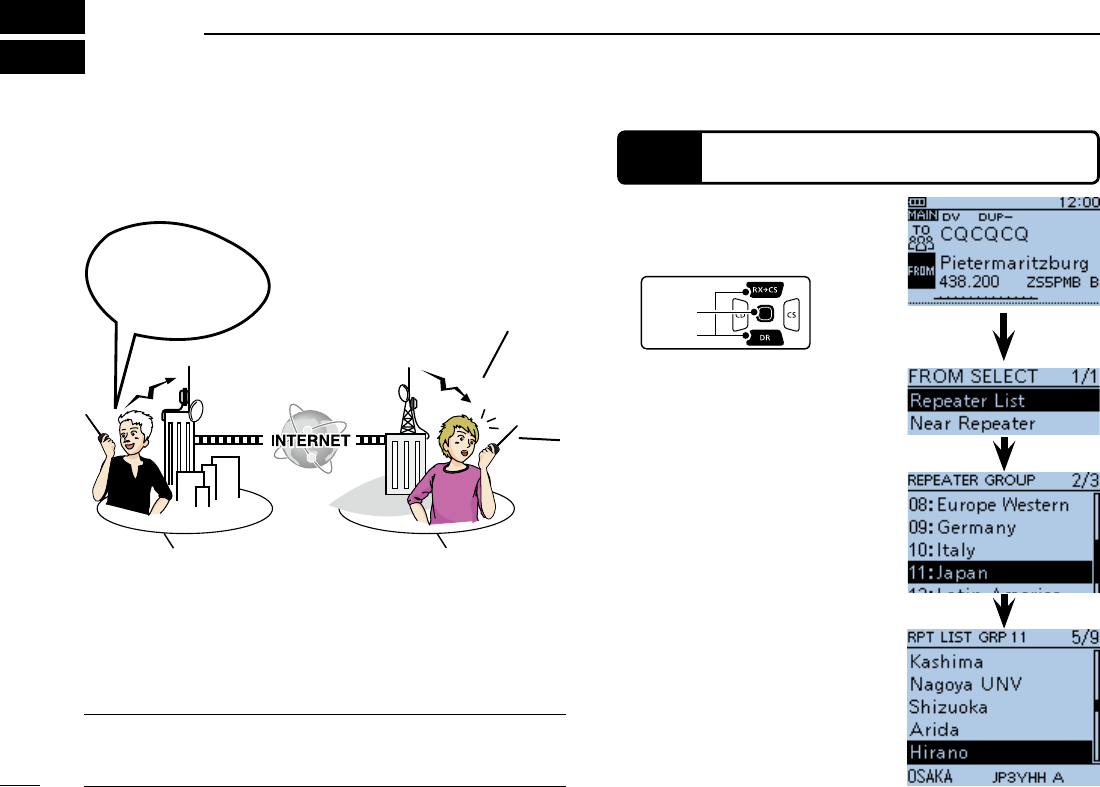
MAKING A GATEWAY CALL
5
A Gateway call can be made when a destination repeater is
selected in “TO” (Destination).
✓What is a Gateway Call??
To call through your local area (access) repeater, repeater
gateway, and the Internet to your destination repeater.
Push D-pad( q) to select
“FROM,” and then push D-
pad(Ent).
Push D-pad( w) to select “Re-
peater List,” and then push
D-pad(Ent).
D-pad
(�)
(Ent)
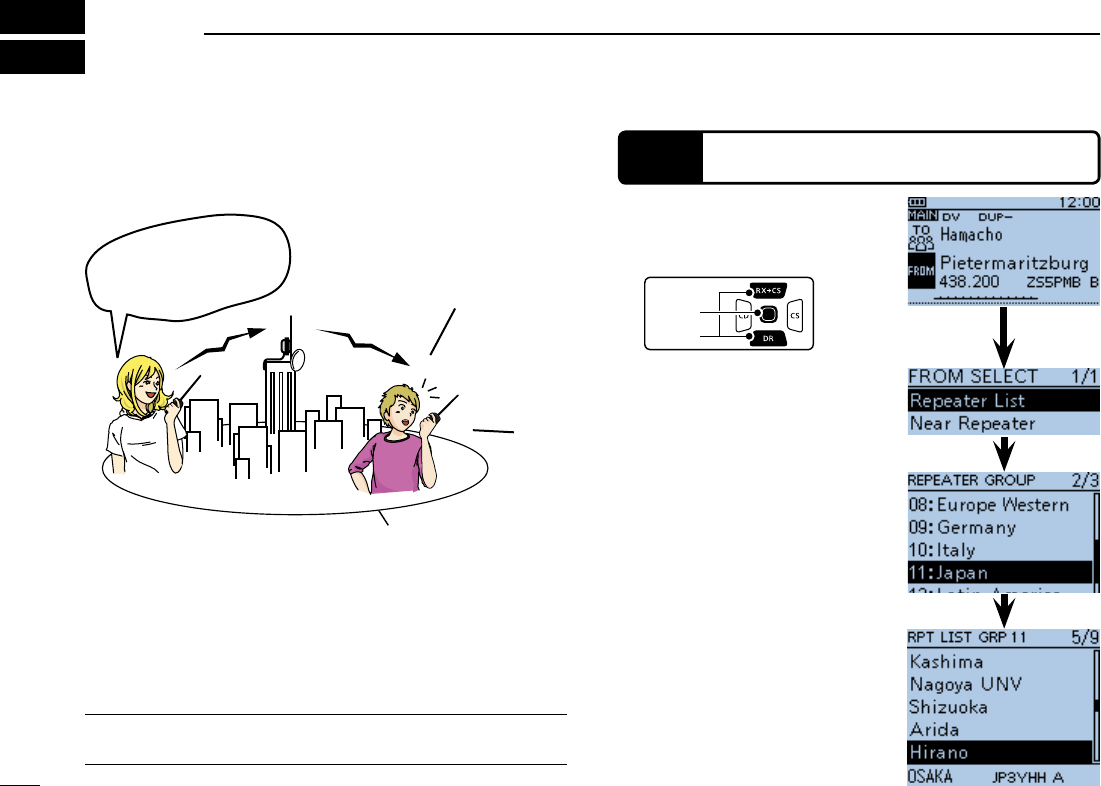
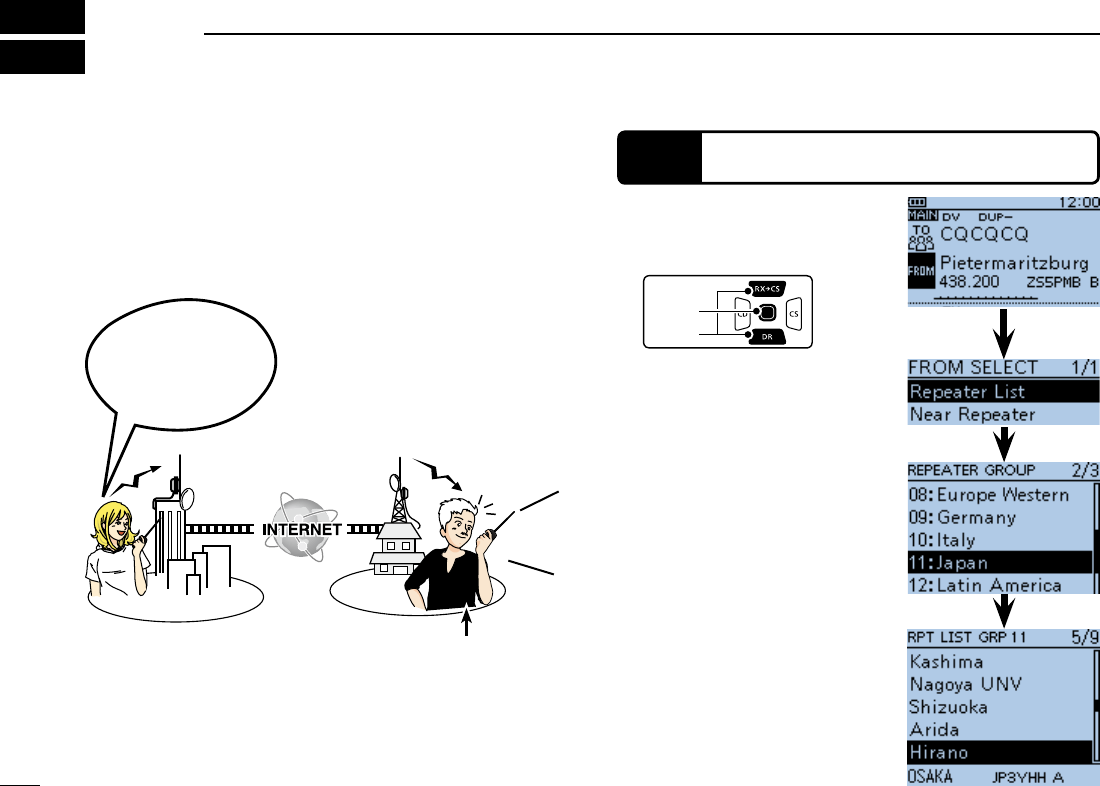
STEP 1 Set “FROM” (Access repeater)
Push D-pad( e) to select the
repeater group where your
access repeater is listed, and
then push D-pad(Ent).
Push D-pad( r) to select your
access repeater, and then
push D-pad(Ent).
port A...
Repeater
JM1ZLK
JM1ZLK
calling to
calling to
JP1YIU
JP1YIU
port A...
Repeater
Repeater area Repeater area
30
5
MAKING A GATEWAY CALL
5
MAKING A GATEWAY CALL
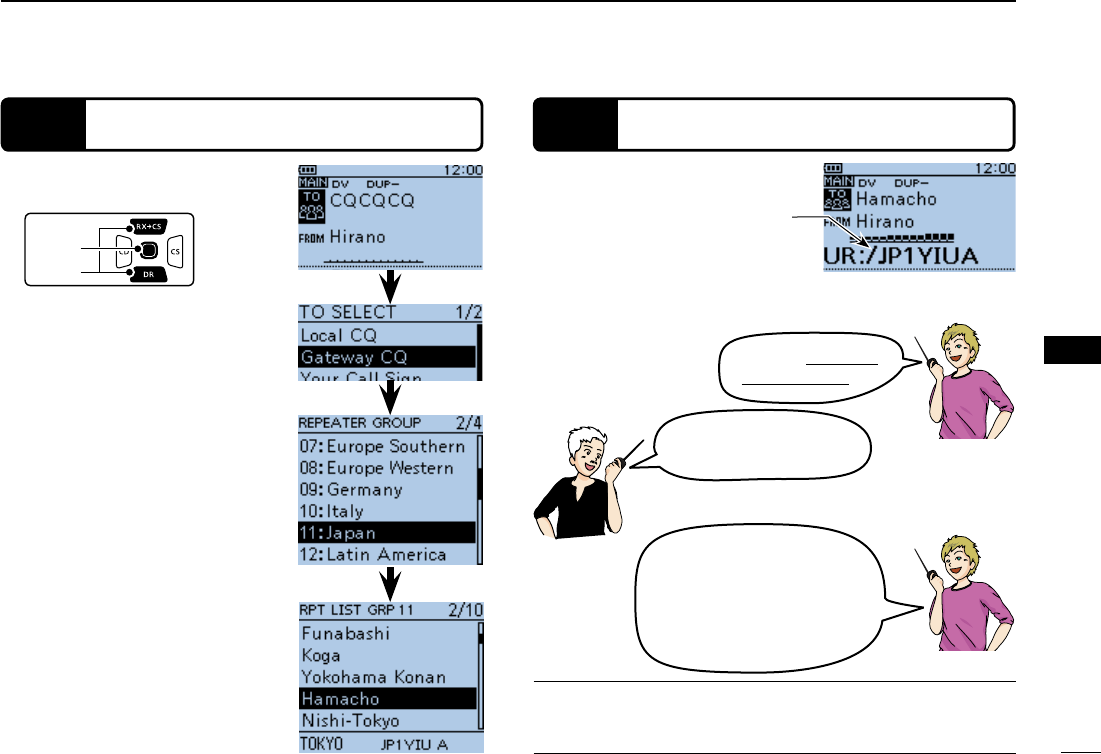
STEP 2 Set “TO” (Destination)
Push D-pad( q) to select “TO,”
and then push D-pad(Ent).
Push D-pad( w) to select
“Gateway CQ,” and then push
D-pad(Ent).
D-pad
(�)
(Ent)
STEP 3 Hold down [PTT] to transmit
at your normal voice level.
it is a repeater call sign.
Transmitting
Push D-pad( e) to select the
repeater group where your
destination repeater is listed,
and then push D-pad(Ent).
Push D-pad( r) to select the
destination repeater, and
then push D-pad(Ent).
JA3YUA, this is JM1ZLK.
Hello, how are you?
JM1ZLK
JA3YUA
JA3YUA calling to
JP1YIU port A.
JA3YUA
JM1ZLK, this is JA3YUA.
Thanks for the nice QSO and I
hope to talk to you again soon.
This is JA3YUA now clear of
the JP3YHH repeater.
Convenient! ✓
The Gateway CQ call is used to call any repeater, but you can
call a specific station by simply saying their call sign.
< Communication example
for a Gateway call>
31
CALLING A DESTINATION STATION
6
-
tion station call sign is selected in “TO” (Destination).
When you call an individual station call sign through a gate-
way, the signal is automatically sent to the last repeater that
the station accessed. So, even if you don’
Push D-pad( q) to select
“FROM,” and then push D-
pad(Ent).
Push D-pad( w) to select “Re-
peater List,” and then push
D-pad(Ent).
D-pad
(�)
(Ent)
STEP 1 Set “FROM” (Access repeater)
Push D-pad( e) to select the
repeater group where your
access repeater is listed, and
then push D-pad(Ent).
Push D-pad( r) to select your
access repeater, and then
push D-pad(Ent).
JM1ZLK,
JM1ZLK,
this is...
Repeater Repeater
this is JG3LUK
listening on
JP3YHH Port A...

32
6
CALLING A DESTINATION STATION
6
CALLING A DESTINATION STATION
STEP 2 Set “TO” (Destination)
Push D-pad( q) to select “TO,”
and then push D-pad(Ent).
Push D-pad( w) to select
“Your Call Sign,” and then
push D-pad(Ent).
D-pad
(�)
(Ent)
STEP 3 Hold down [PTT] to transmit
While holding down [PTT], q
your normal voice level.
Transmitting
Push D-pad( e) to select the
destination station, and then
push D-pad(Ent).
JG3LUK, this is JM1ZLK.
Hello, how are you?
JM1ZLK
(TOM)
JM1ZLK, this is JG3LUK lis-
tening on JP3YHH port A.
JM1ZLK, this is JG3LUK.
Thanks for the nice QSO and I
hope to talk to you again soon.
This is JG3LUK now clear of
the JP3YHH repeater.
JG3LUK
JG3LUK
< Communication example
with a destination station>

33
MAKING A SIMPLEX CALL
7
repeater) in the DR mode.
NOTE: Depending on the transceiver's version, the fre-
-
cies for your operating area.
✓What is a Simplex Call??
A simplex call is a direct call to another station, not using a
repeater.
JG3LUK
calling at
XX park...
JG3LUK
calling at
XX park...
Push D-pad( q) to select
“FROM,” and then push
D-pad(Ent).
D-pad
(�)
(Ent)
STEP 1 Set “FROM” (Simplex channel)
Push D-pad( w) to select “Re-
peater List,” and then push
D-pad(Ent).
Go to step e
34
7
MAKING A SIMPLEX CALL
7
MAKING A SIMPLEX CALL
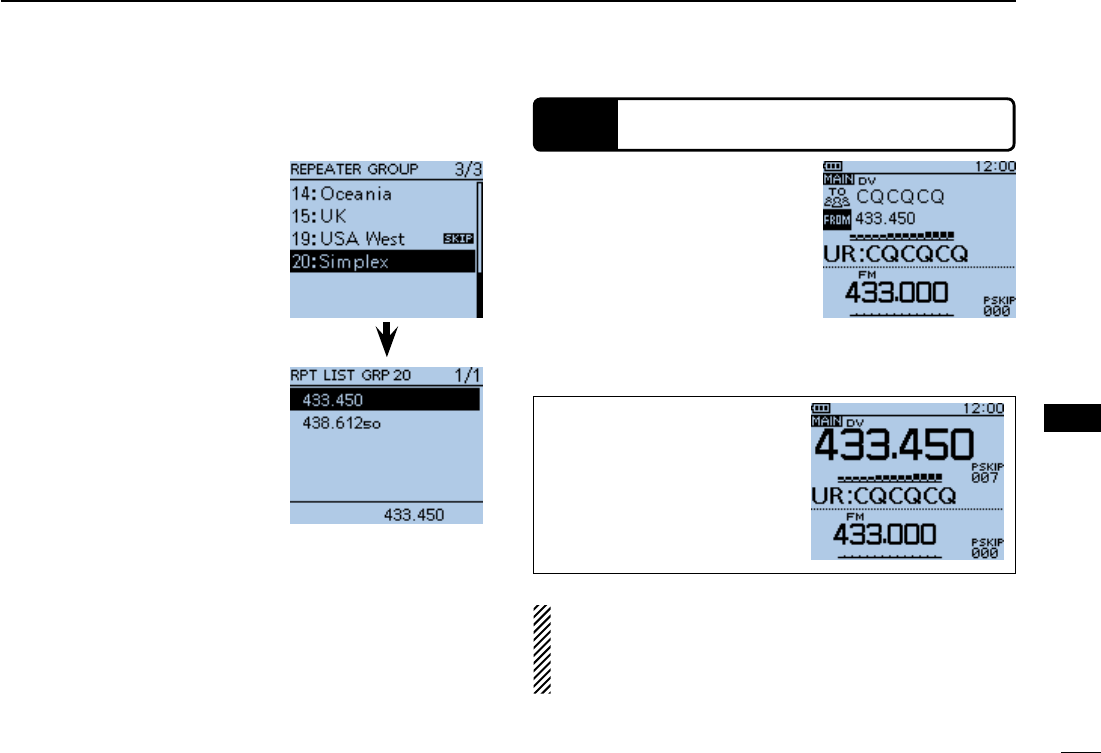
Push D-pad( e) to select “25:
Simplex,” and then push D-
pad(Ent).
Push D-pad( r) to select
“433.450,” and then push
D-pad(Ent).
“FROM.”
- If a station call sign is set in
“TO”, select “Local CQ” in the
TO SELECT screen to set
“TO” to “CQCQCQ.”
STEP 2 Hold down [PTT] to transmit
While holding down [PTT], q
level.
transmit output power level.
Release [PTT] to receive. w
Transmitting
the VFO mode, the LCD chang-
es as shown to the right.
NOTE: The simplex frequencies can be changed in the
MENU screen. See the PDF type Advanced Instruction
(MENU > DV memory > Repeater List)
35
TROUBLESHOOTING
8
To communicate through the repeater, your signal must access to the repeater. When your signal accesses your local repeater,
but it is not sent to the destination repeater, the repeater replies with an status message.
PROBLEM POSSIBLE CAUSE SOLUTION REF.
After your call, the repeater does
not return a status reply.
-
er.
offset, or duplex setting.
try again.
p. 17
—
—
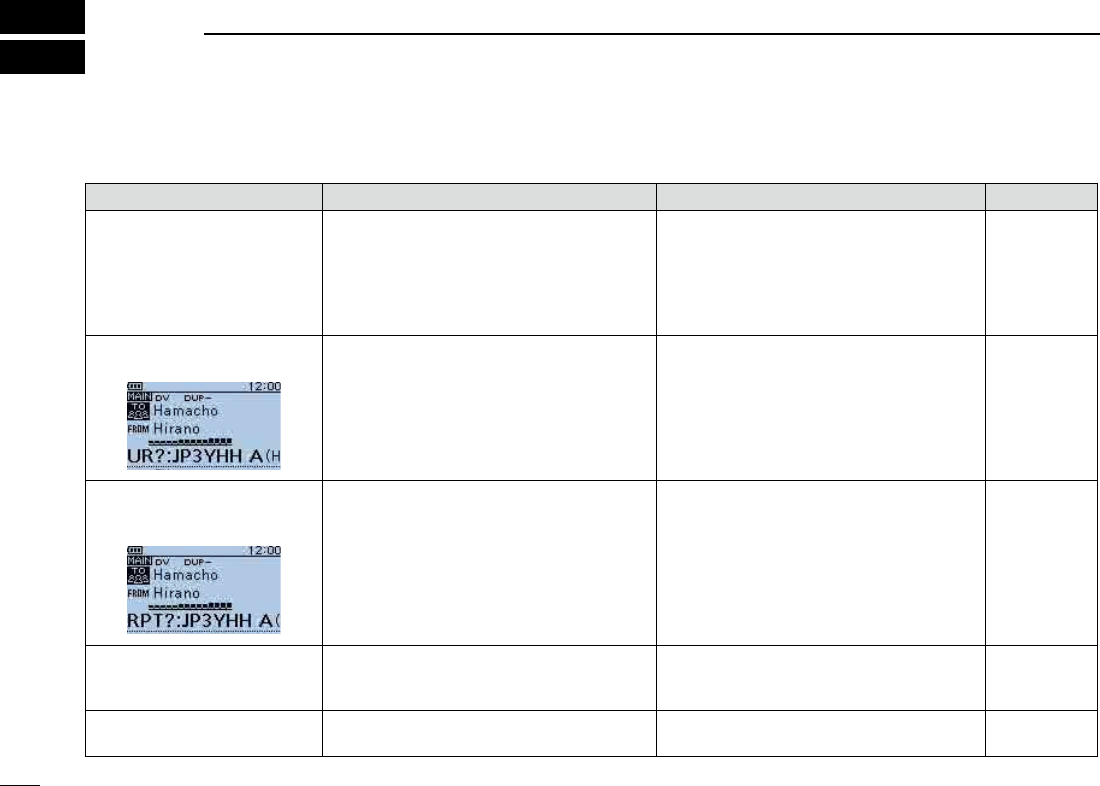
After your call, the repeater re-
plies ‘UR?’ and its call sign.
immediately replied.
—
After your call, the repeater re-
plies ‘RX’ or ‘RPT?’ and the ac-
cess repeater’s call sign.
-
istered on a gateway repeater, or the regis-
tered contents do not match your transceiv-
er’s setting.
-
way repeater, or confirm the registration of
the call sign.
p. 2
p. 4
After your call, the repeater re-
plies ‘RPT?’ and call sign of the
destination repeater.
-
tion repeater.
busy.
Wait for a while, and try it again.
p. 17
—
After your call, the access repeat-
er replies ‘RPT?’ and its call sign.
wrong.
sign.
—
36
8
TROUBLESHOOTING
8
TROUBLESHOOTING
PROBLEM POSSIBLE CAUSE SOLUTION REF.
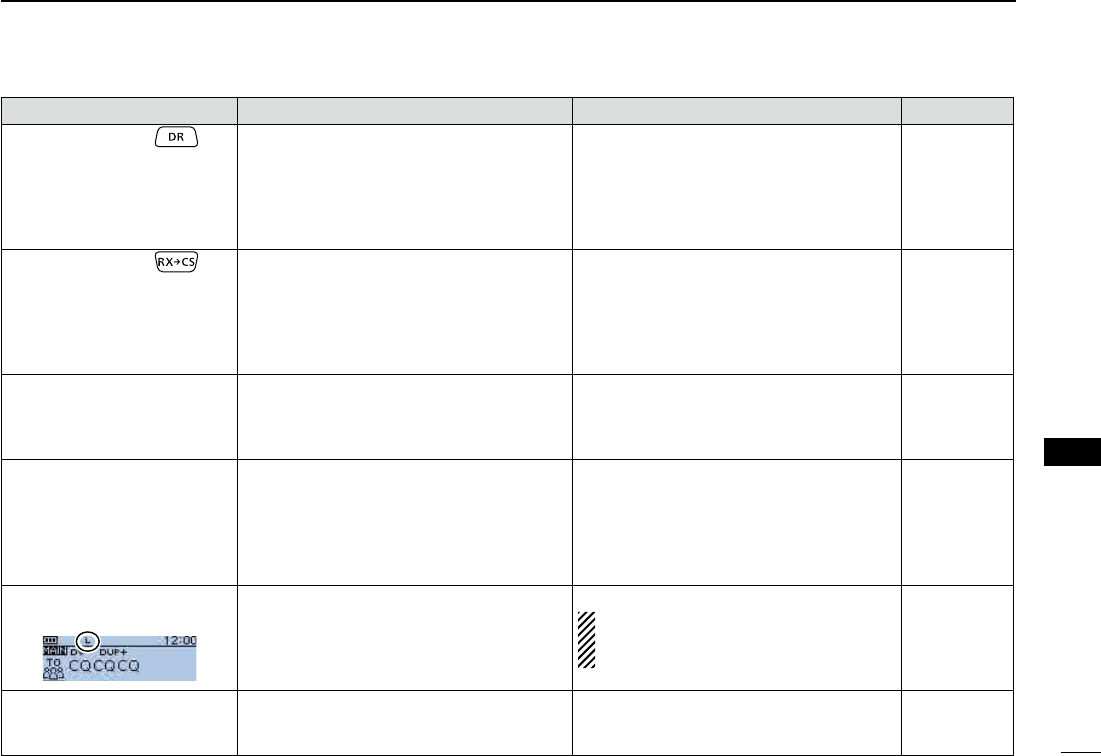
Even holding down , the
DR mode will not appear.
CLONING SOFTWARE on the CD.
transceiver.
Sec. 17 of the
Advanced In-
struction PDF
Advanced In-
struction PDF
Even holding down , the
received call sign will not set to
the destination call sign.
received during scanning, the call sign may
not be received correctly. In that case, “--------
” appears and error beeps sound, and a reply
call cannot be made.
-
rectly received the call sign.
—
A Local area call can be made,
but the Gateway call or desti-
nation station call cannot be
made.
a
D-STAR repeater.
Register your own call sign (MY) on a gate-
way repeater, or confirm the registration of
the call sign.
—
Position data cannot be re-
ceived.
on the Menu screen, but an external GPS re-
ceiver is not connected.
item on the Menu screen.
in the GPS Set item on the Menu screen.
After transmitting, “L” appears
on the LCD.
While receiving through the internet, some
(poor data throughput performance).
When the transceiver receives corrupted
“L” is displayed, even if it is a Local area call.
—
“DV” and “FM” icons alternately
While in the DV mode, an FM signal is re-
ceived.
function.
Advanced In-
struction PDF
37
SAVING SETTINGS
In the DR mode, select the set-
tings to be saved into memory.
wRotate [DIAL] to select a
programed is selected, the
memory name will not be pro-
grammed.
eHold down [S.MW] for 1
second to save the settings
into the channel.
mode, the saved memory con-
tents are briefly displayed.
automatically programmed as
the Memory name.
Up to 16 alphanumeric charac-
ters can be programmed for the
memory name.
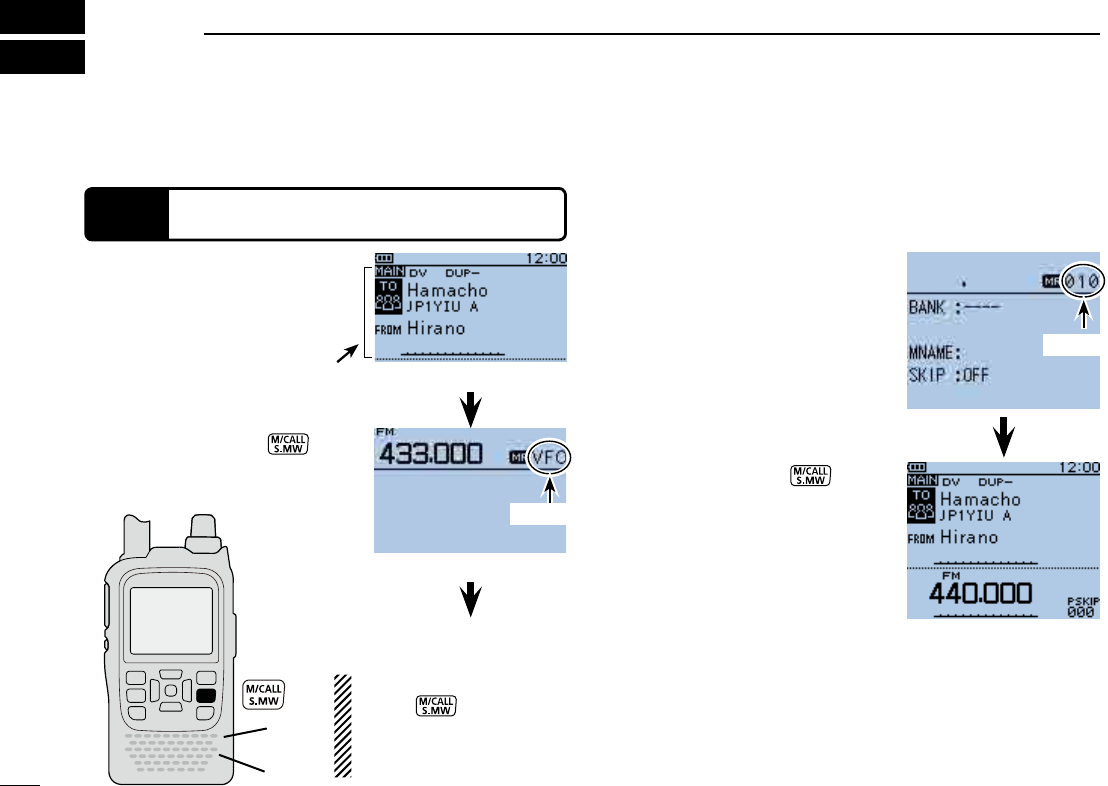
Hold down [S.MW] q for
1 second to enter the Select
Memory write mode.
NOTE: DO NOT hold down
[S.MW] for more than
2 seconds. Otherwise the
setting contents will be
copied to the VFO.
Go to step w
DR mode screen
Select Memory write mode
Shows the settings
to be saved.
STEP 1 Saving settings into memory
Beeps
When “FROM” (Access repeater) and “TO” (Destination) settings
are saved, the settings can be selected by rotating [DIAL].
38
SAVING SETTINGS
9
SAVING SETTINGS
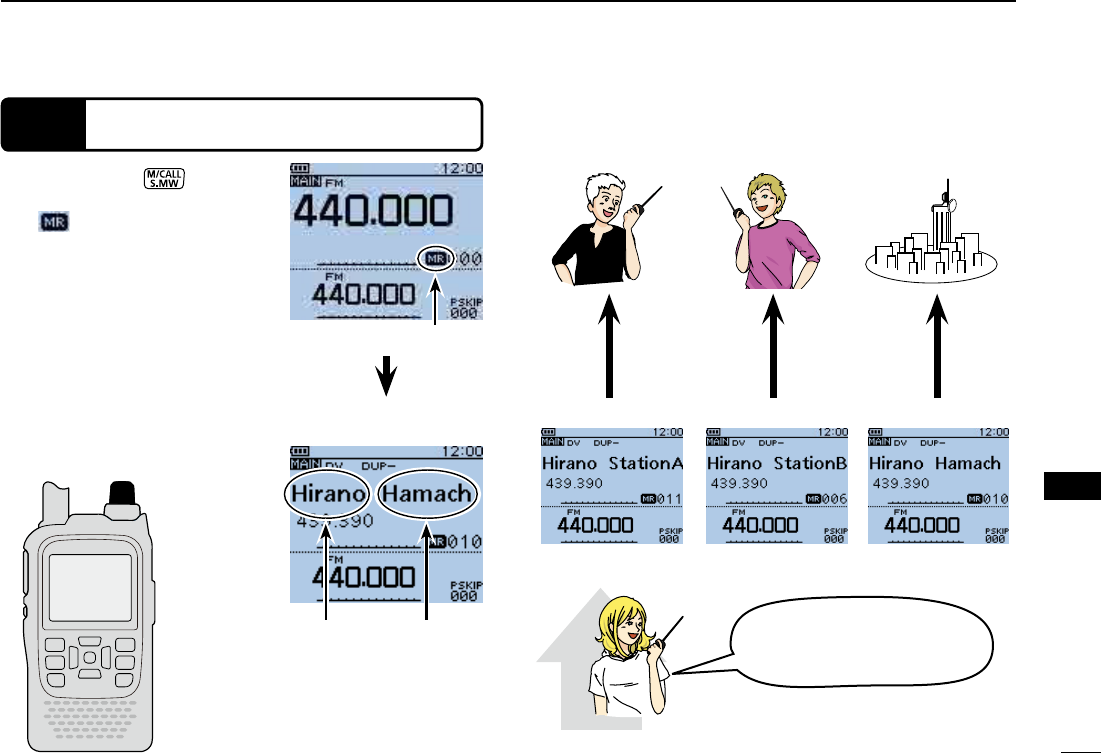
STEP 2 View the saved contents
Push [M/CALL] q to select
the Memory mode.
” appears.
wRotate [DIAL] to select the
stored channel.
[DIAL]
Station A
Memory mode screen
Stored channel
is selected
“FROM” and “TO”
names are automati-
cally programmed as
the Memory name.
Station B Hamacho area
M-CH 11 M-CH 006 M-CH 010
Hirano area
How useful! I only have
to rotate [DIAL]!
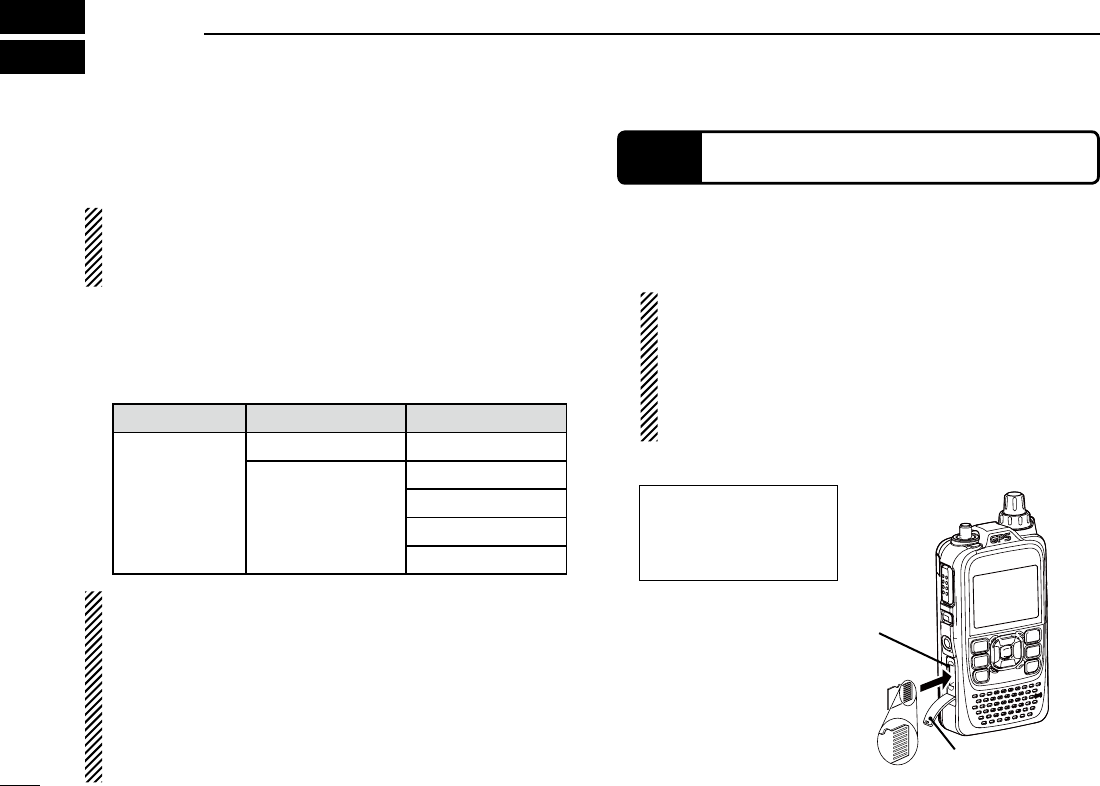
RECORDING A QSO ONTO A microSD CARD
10
About ■using a microSD card
Usable microSD cards D
A microSD or microSDHC card is not supplied with the
transceiver. Please purchase a card to use.
Read the instructions of the microSD card thoroughly be-
fore use.
and microSDHC cards:
(As of December 2012)
Maker Kind of the card Capacity
®
microSD 2 GB
microSDHC
4 GB
8 GB
16 GB
32 GB
BE CAREFUL! While reading or writing data from or to the
card; NEVER turn OFF the transceiver. It will corrupt the
data or damage the card.
Also be careful in the following cases:
and the batteries are near exhaustion.
-
ternal power is turned OFF.
Turn OFF the transceiver. q
Lift OFF the [micro SD] slot cover on the side panel. w
With the terminals facing the front, insert the card into the e
BE CAREFUL!
DO NOT touch the terminals.
pull out the card.
NEVER remove the card. It will corrupt the data or
damage the card.
Firmly close the [micro SD] slot cover. r
STEP 1 Inserting the microSD card
NEVER forcibly or in-
versely insert the card.
It will damage the card
and/or the slot.
[micro SD] slot
microSD card
Terminals facing
the front Slot cover
40
10
RECORDING A QSO ONTO A microSD CARD
10
RECORDING A QSO ONTO A
microSD CARD
When using a preformatted brand new microSD card, format-
ting is not necessary. However, we still recommend you format
it in the following way to get the card’s best performance.
IMPORTANT!
Formatting a card erases all its data. Before formatting any
D-pad
(�)
(Ent)
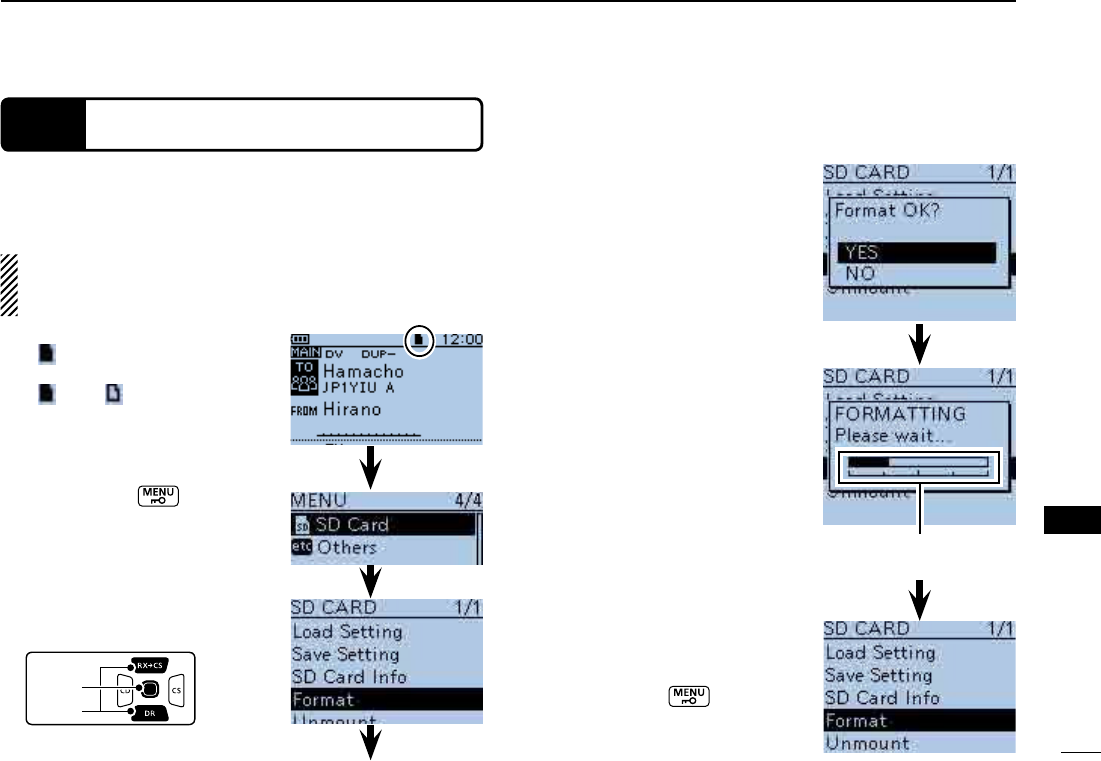
STEP 2 Format the microSD card
After formatting, the display u
automatically returns to the
SD CARD menu.
Push [MENU] to return
to the frequency display.
qTurn ON the transceiver.
” appears when the micro
SD card is inserted.
” and “
while accessing the microSD
card.
wPush [MENU] to enter
the Menu screen.
Push D-pad( e) to select “SD
Card,” then push D-pad(Ent).
The confirmation screen “For- t
mat OK?” appears.
Push D-pad( y) to select
“YES,” then push D-pad(Ent)
to format.
display shows the formatting
progress.
Shows the formatting
progress
Push D-pad( r) to select “For-
mat,” then push D-pad(Ent).
Go to step t
41
10 RECORDING A QSO ONTO A microSD CARD
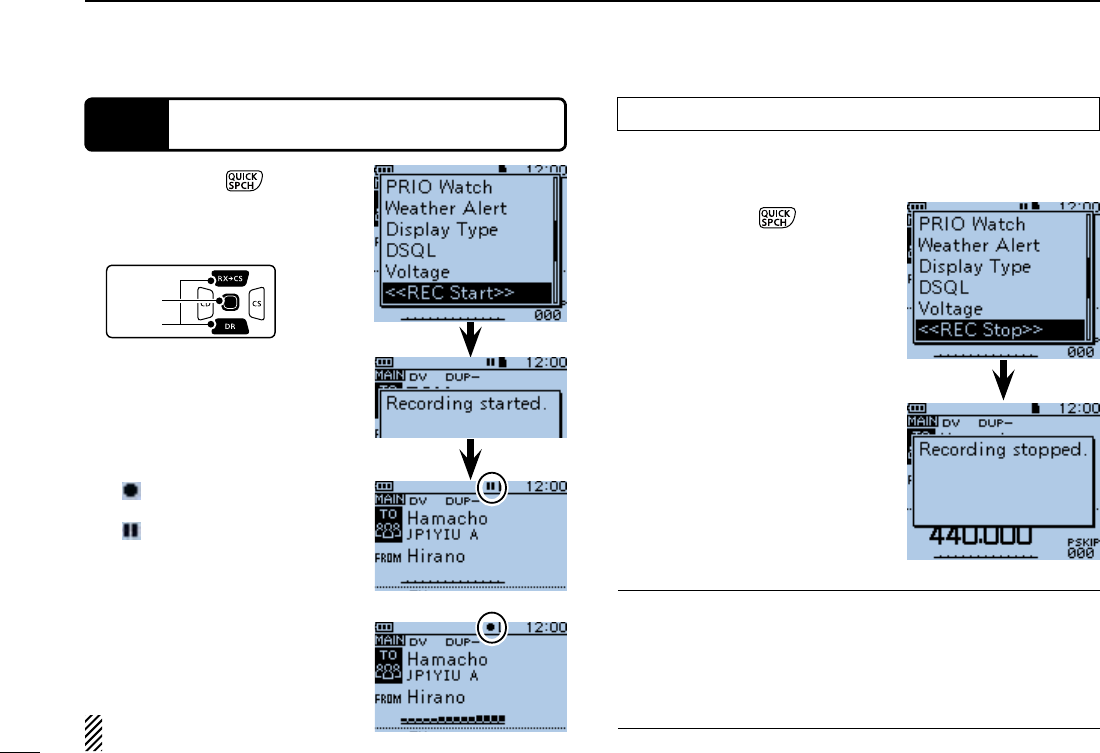
STEP 3 Recording a QSO audio
Push D-pad(Ent) to stop e
voice recording.
-
cording stopped,” and auto-
screen.
Push [QUICK] q to enter
Push D-pad( w) to select
“<<REC Start>>.”
Push D-pad(Ent) to start e
voice recording.
-
cording started” and auto-
screen.
” appears while the trans-
ceiver is recording.
” appears while the record-
ing is paused.
you manually stop recording, or
the card becomes full.
reaches 2GB, the transceiver
automatically creates a new
file, and continues recording.
NOTE: BC Radio audio can-
not be recorded.
To Dstop recording
Push [QUICK] q to enter
Push D-pad( w) to select
“<<REC Stop>>.”
D-pad
(�)
(Ent)
While recording
While pausing Convenient! ✓
When the PTT Automatic Recording function is set to ON in
the MENU screen, the recording automatically starts when
[PTT] is pushed.
( MENU > Voice Memo > QSO Recorder > Recorder Set >
PTT Auto REC)
NOTE: BC Radio audio cannot be recorded.
42
10
RECORDING A QSO ONTO A microSD CARD
10
RECORDING A QSO ONTO A
microSD CARD
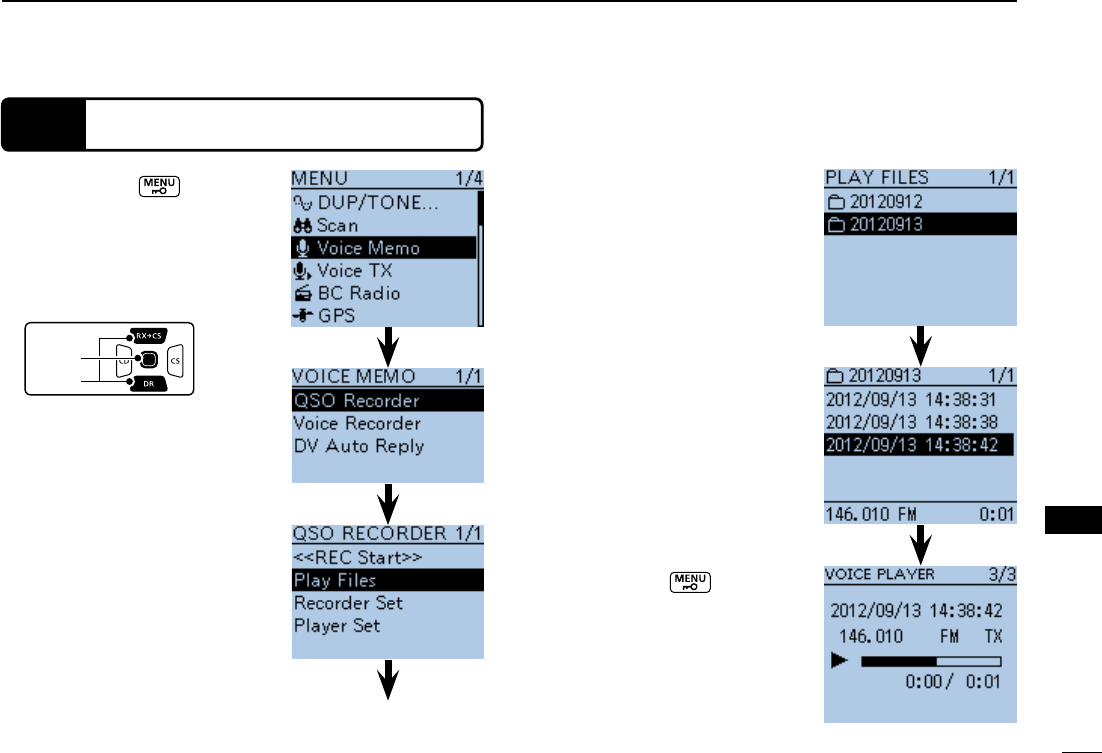
STEP 4 Playing back the recorded audio
Push [MENU] y or [CLR]
-
played.
qPush [MENU] to enter
the Menu screen.
Push D-pad( w) to select the
root item (Voice Memo), and
then push D-pad(Ent) to go to
the next level.
D-pad
(�)
(Ent)
( MENU > Voice Memo >
QSO Recorder > Play Files)
Refer to the menu sequence e
shown directly above and
push D-pad() to select, and
then push D-pad(Ent) to en-
ter, one or more times until
the last screen is displayed.
Push D-pad( r) to select the
folder that contains the file
you want to play, and then
push D-pad(Ent).
of the year (4 digits), the month
and the day (2 digits each).
Push D-pad( t) to select the
file that you want to play, then
push D-pad(Ent) to play it
displayed, and the file starts to
Go to step r

43
GPS OPERATION
11
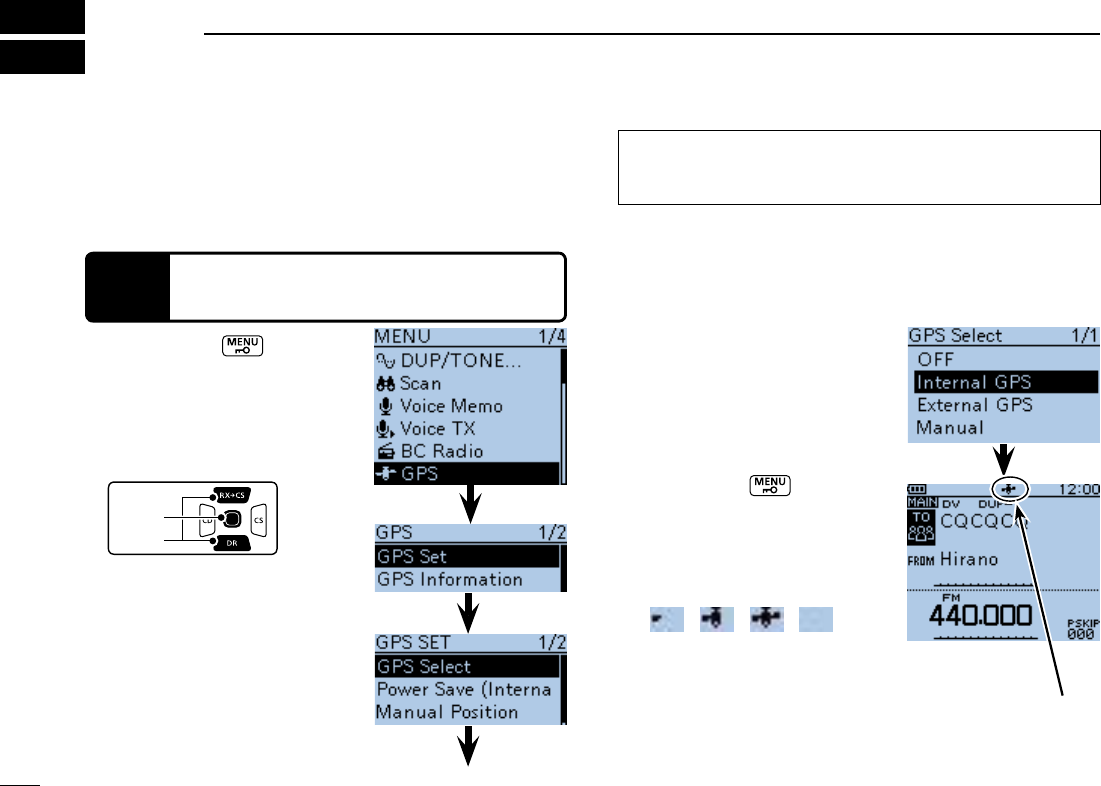
The ID-51A/E has a built-in internal GPS receiver. You can
mode.
qPush [MENU] to enter
the Menu screen.
Push D-pad( w) to select the
root item (GPS), and then
push D-pad(Ent) to go to the
next level.
D-pad
(�)
(Ent)
( MENU > GPS > GPS Set>
GPS Select)
Refer to the menu sequence e
shown directly above and
push D-pad() to select, and
then push D-pad(Ent) to en-
ter, one or more times until
the last screen is displayed.
Push D-pad( r) to select “In-
ternal GPS.”
tPush [MENU] to exit the
Menu screen.
-
ceiving data, as illustrated be-
valid data is received.
➝➝➝
- If “Manual” was selected, the
icon does not appear.
to receive, but depending on the
minutes. If you have difficulties
receiving, we recommend that
you try a different location.
See the PDF type Advanced Instruction for more details of
the GPS operation.
STEP 1 Receiving GPS data from the internal
GPS receiver
Go to step r
GPS Select screen
44
11
GPS OPERATION
11
GPS OPERATION
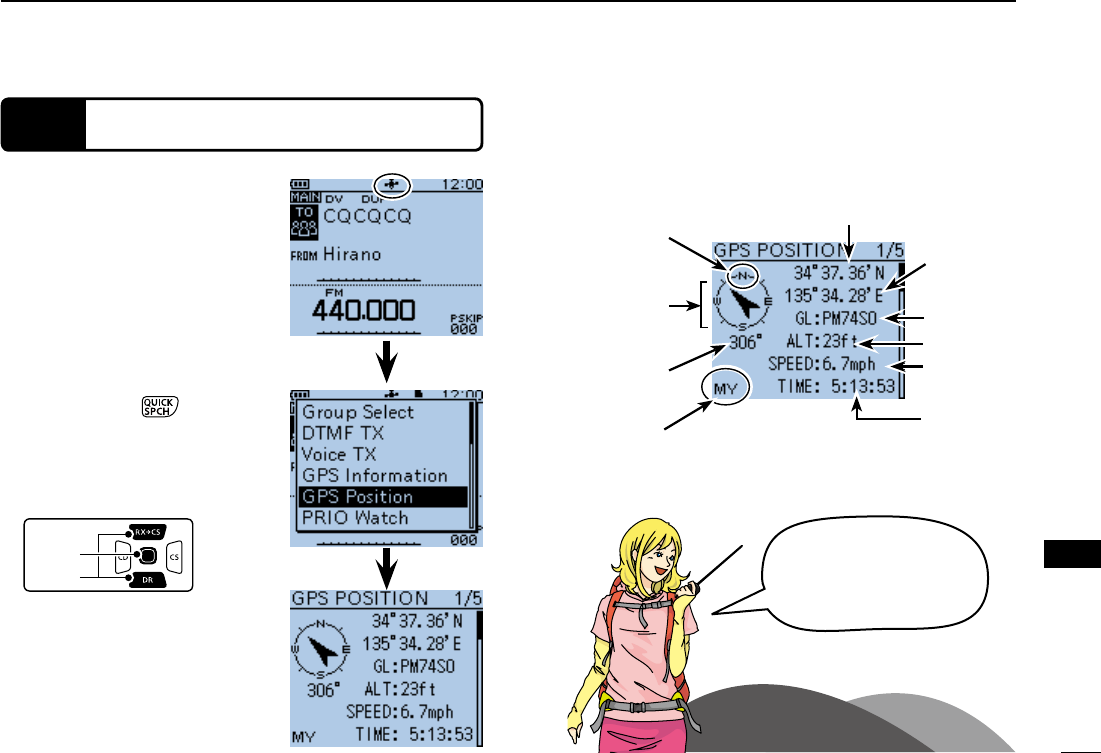
STEP 2 Displaying your position
Confirm the GPS icon is dis-
played on the LCD.
Push [QUICK] q to enter
wPush D-pad() to select the
“GPS position” item, and then
push D-pad(Ent).
D-pad
(�)
(Ent)
eThe first MY GPS position
screen appears. (1/5)
GPS Position screen (MY)
<Contents of the GPS Position screen>
The top of the
compass is North.
Your course head-
ing is Northwest.
Your course head-
ing is 306 degrees.
Latitude
Longitude
Grid Locator
Altitude
Speed
Time
that the
displayed
data was
acquired.
Shows the dis-
played position
is yours.
How convenient!
position and altitude!!
45
GPS LOGGER FUNCTION
12
The GPS Logger function allows you to store the GPS position
data (Latitude, Longitude, Altitude, Positioning state, Course,
Speed and Date) onto a microSD card, as your route.
-
ing course on a mapping software.
NOTE:
The GPS logger function requires a microSD card.
qPush [MENU] to enter
the Menu screen.
Push D-pad( w) to select the
root item (GPS), and then
push D-pad(Ent) to go to the
next level.
D-pad
(�)
(Ent)
( MENU > GPS > GPS Set>
GPS Select)
Refer to the menu sequence e
shown directly above and
push D-pad() to select, and
then push D-pad(Ent) to en-
ter, one or more times until
the last screen is displayed.
Push D-pad( r) to select “In-
ternal GPS.”
tPush [MENU] to exit the
Menu screen.
-
ceiving data, as illustrated be-
valid data is received.
➝➝➝
- If “Manual” is selected, the icon
does not appear.
to receive, but depending on the
minutes. If you have difficulties
receiving, we recommend that
you try a different location.
STEP 1 Receiving GPS data from the internal
GPS receiver
Go to step r
46
12
GPS LOGGER FUNCTION
12
GPS LOGGER FUNCTION
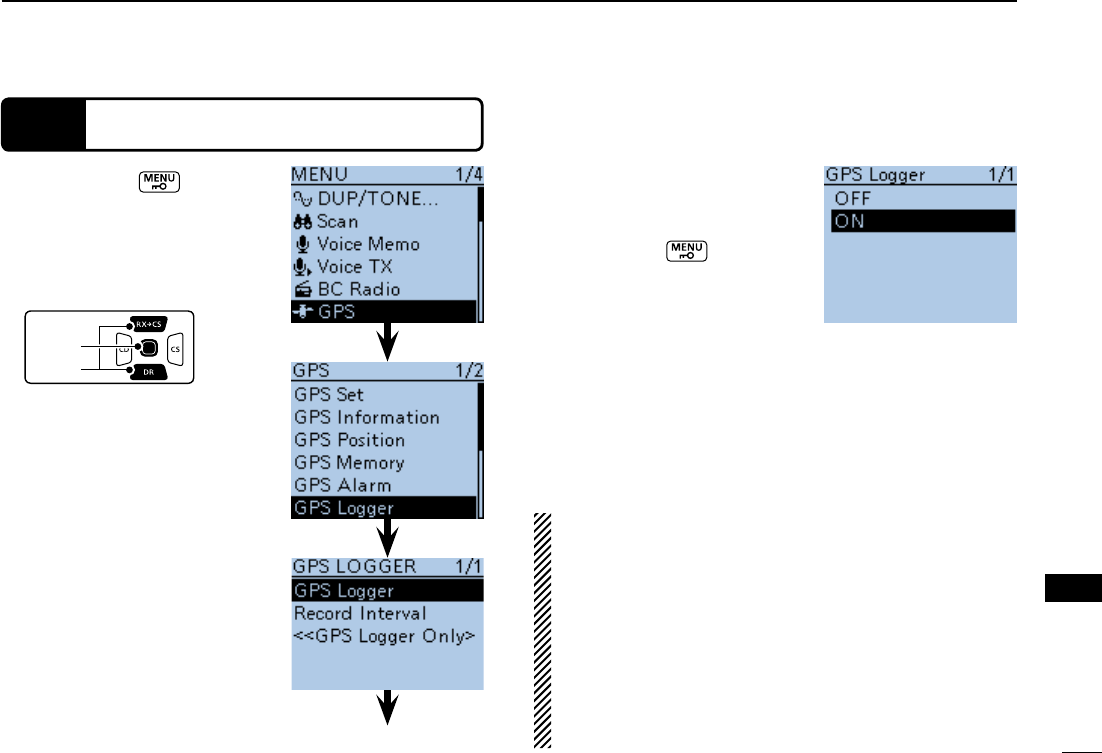
STEP 2 Turning ON the GPS Logger function
qPush [MENU] to enter
the Menu screen.
Push D-pad( w) to select the
root item (GPS), and then
push D-pad(Ent) to go to the
next level.
D-pad
(�)
(Ent)
( MENU > GPS > GPS Logger
> GPS Logger)
Refer to the menu sequence e
shown directly above and
push D-pad() to select, and
then push D-pad(Ent) to en-
ter, one or more times until
the last screen is displayed.
rPush D-pad() to select
“ON.”
Push [MENU] t to exit the
Menu screen.
NOTE:
-
ceiver continuously stores the position data from the
GPS receiver, even if the transceiver is rebooted. To can-
cel this function, turn the function OFF.
While this function is ON, and when the transceiver is
turned OFF, the log file will be closed. Then the trans-
ceiver is turned ON and positioning is carried out by the
GPS receiver, a new log file will be created.
-
matically paused.
<About log file>
You can display your route as you move, if you import the log
file into a mapping software.
compatible with all mapping software.
your PC.
Go to step r
47
INTRODUCING NEW FUNCTIONS
13
Receiving on the MAIN band
Listening to the BC Radio
Receiving on the SUB band
I should bring a camera,
extra clothes, lights, towel,
sunglasses and transceiv-
er for my climbing trip.
Recording
NEW! Voice Recorder function
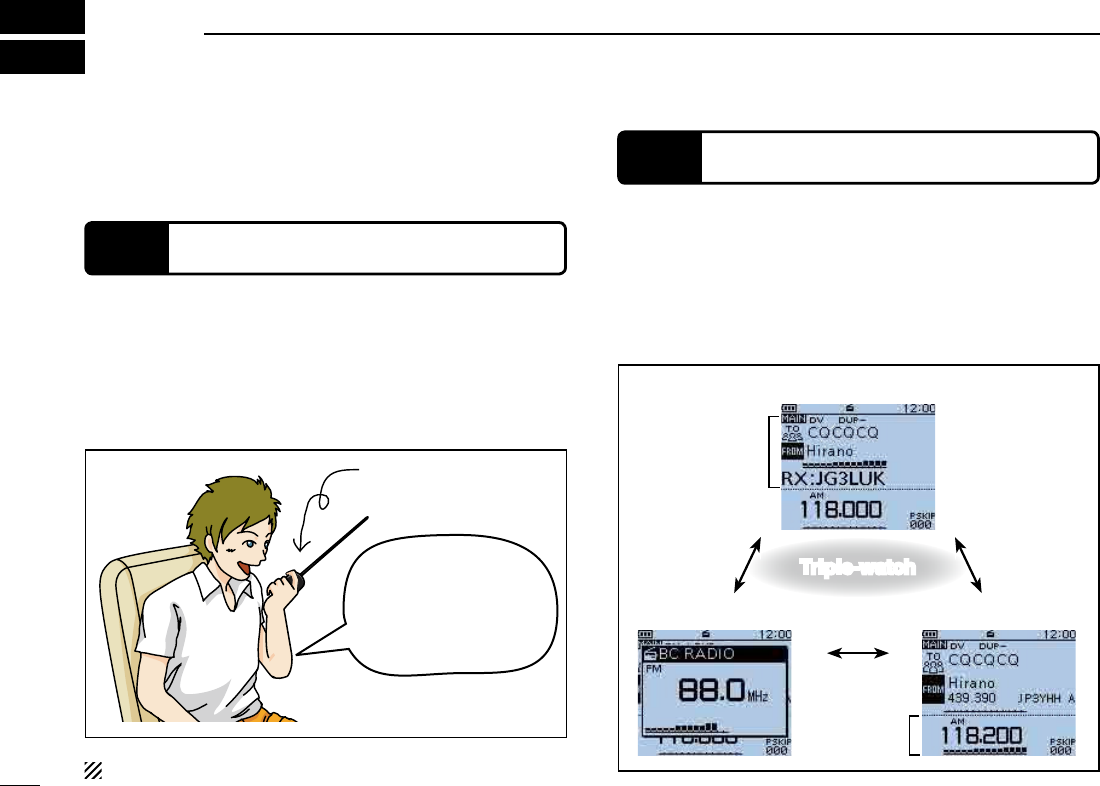
NEW! Two band monitoring plus BC Radio
This section introduces new functions built into the ID-51A/E.
NOTE: This function requires a microSD card.
The microphone audio can be recorded.
Audio from an external microphone can also be recorded.
record up to a maximum of about 37 hours. If the fi le size exceeds
2 GB, a new fi le is automatically created in the same folder, and the
recorded voice audio is saved there.
When the transceiver receives 2 amateur bands on the MAIN
band and SUB band, you can still listen to the Broadcast (BC)
Radio.
You can comfortably standby listening to the BC Radio.
Also, the transceiver can be used as just a BC Radio. In this
case, the other modes are in a sleep state.
MAIN band
SUB band
Triple-watch
Triple-watch
48
13
INTRODUCING NEW FUNCTIONS
13
INTRODUCING NEW FUNCTIONS
Unwanted frequency
Repeat Voice TX
waiting screen
This is JA3YUA
JA3YUA
<While scanning>
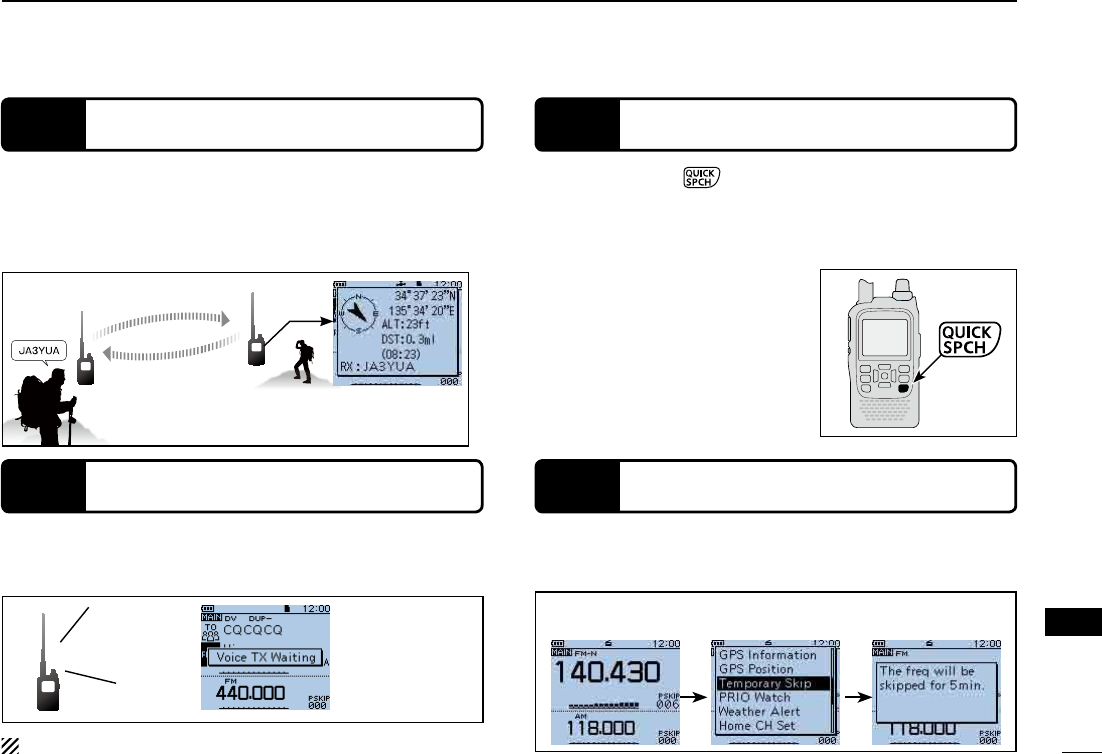
NEW! Auto Position Reply function
NEW! Voice TX function
NEW! Speech function
NEW! Temporary Skip function
When you receive a call addressed to your own call sign, but
-
ceiver, this function automatically replies with your own call
sign and transmits your position.
You can transmit recorded audio once or repeatedly, which is
useful for D-STAR events.
Hold down [SPCH] for 1 second to audibly announce the
displayed frequency and operating mode, or call sign.
Also, other functions help
at the display.
See the PDF type Advanced In-
struction for details.
❍ Home CH beep function
❍ [DIAL] speech function
❍ Mode speech function
a scan, for a set period.
NOTE: This function requires a microSD card.
Destination
(ID-51)
Your station
q A call addressed to
your own call sign.
w Your position is auto-
matically transmitted.
e After receiving, the
screen shows the
position.
RESETTING
14
■Resetting
The display may occasionally display erroneous information
(for example when first applying power). This may be caused
externally by static electricity or by other factors.
If this problem occurs, turn OFF power.
After waiting a few seconds, turn ON power again. If the prob-
lem persists, perform a Partial reset or an All reset.
A Partial reset resets operating settings to their default values
(VFO frequency, VFO settings, menu contents) without clear-
ing the items below:
BE CAREFUL! An All reset clears all programming and
returns all settings to their factory defaults. See the PDF
type Advanced Instruction for more details.
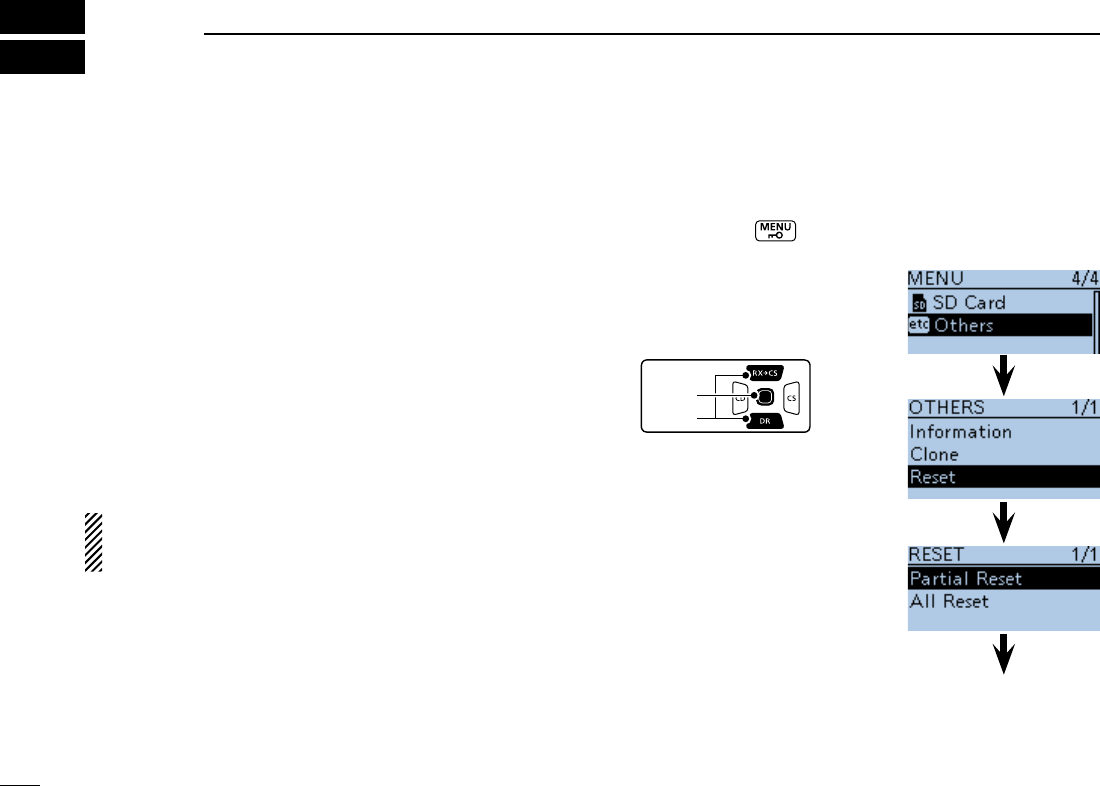
qPush [MENU] to enter
the Menu screen.
Push D-pad( w) to select the
root item (Others), and then
push D-pad(Ent) to go to the
next level.
D-pad
(�)
(Ent)
( MENU > Others > Reset >
Partial Reset)
Refer to the menu sequence e
shown directly above and
push D-pad() to select, and
then push D-pad(Ent) to en-
ter, one or more times until
the last screen is displayed.
DPartial reset
Go to step r
50
14
RESETTING
14
RESETTING
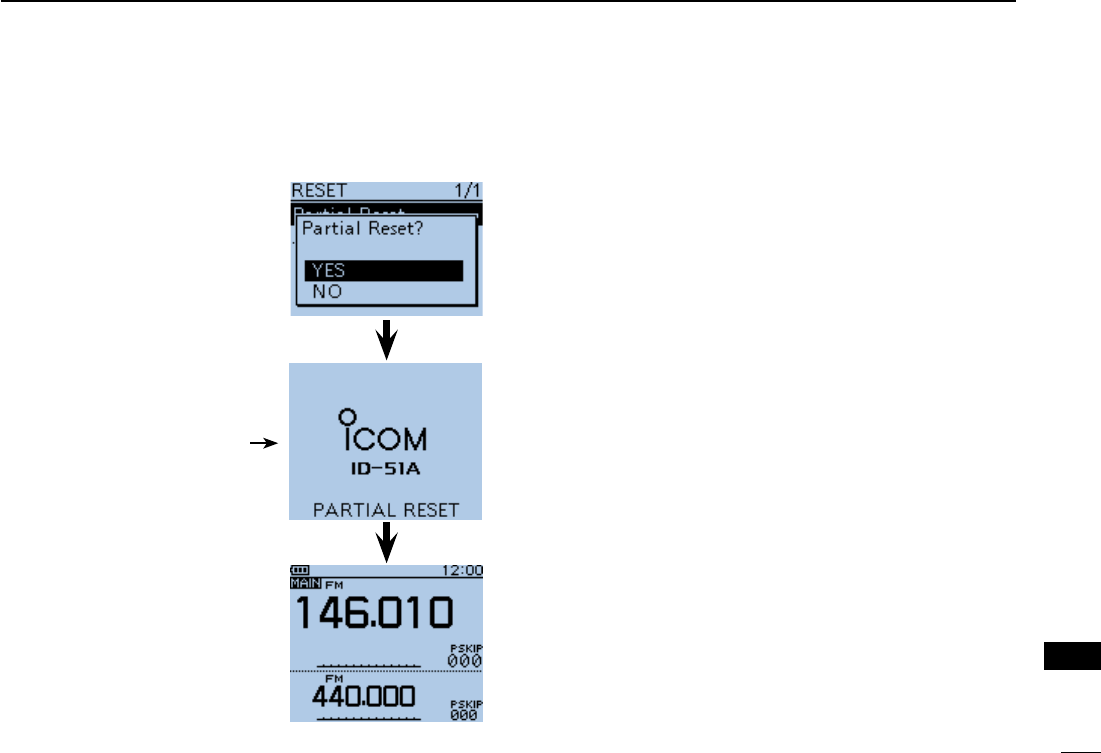
The “Partial Reset?” dialog r
appears.
Push D-pad( t) to select “Yes,”
and then push D-pad(Ent).
-
TIAL RESET,” then the partial
reset is completed.
Default screen
Shows “PARTIAL RESET”
51
INFORMATION
15
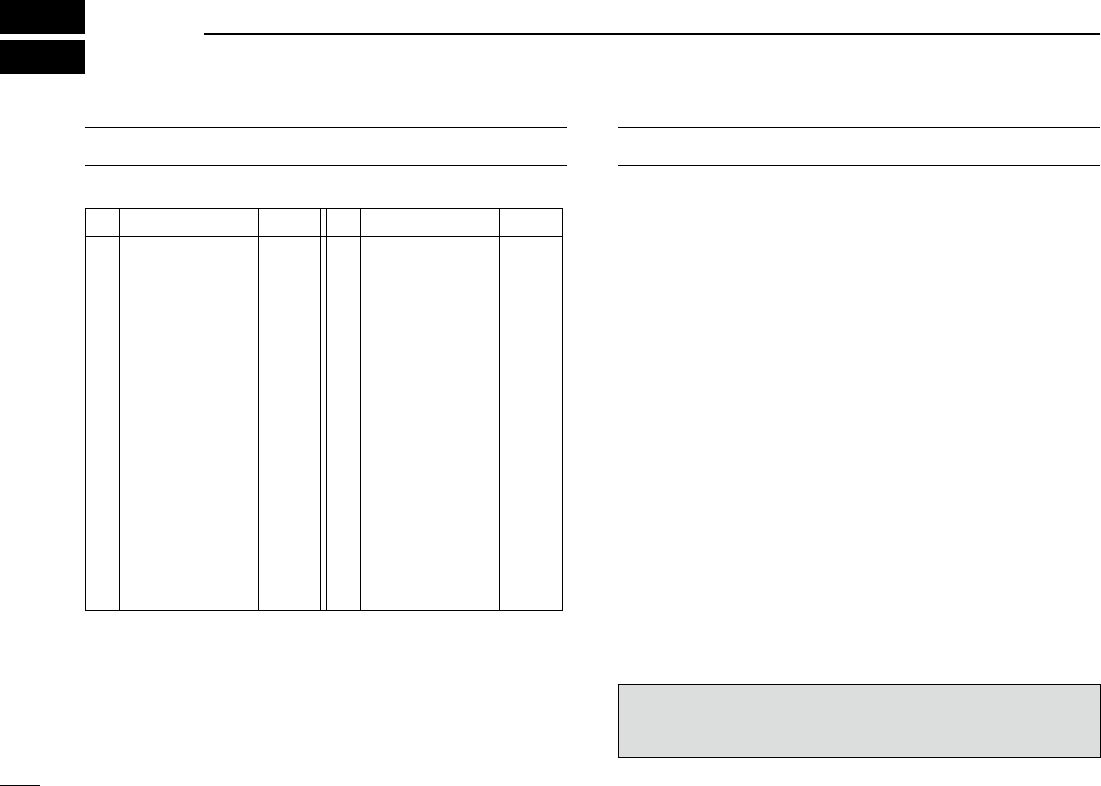
COUNTRY CODE LIST
•ISO3166-1
Country Codes Country Codes
1
2
3
4
5
6
7
8
10
11
12
13
14
15
16
17
Austria
Belgium
Bulgaria
Croatia
Czech Republic
Cyprus
Estonia
Finland
France
Germany
Greece
Hungary
Iceland
Ireland
Italy
Latvia
AT
BE
BG
HR
CY
DK
EE
FI
FR
DE
GR
HU
IS
IE
IT
LV
18
20
21
22
23
24
25
26
27
28
30
31
32
33
Liechtenstein
Lithuania
Luxembourg
Malta
Netherlands
Norway
Poland
Portugal
Romania
Slovenia
Spain
Sweden
Switzerland
United Kingdom
LI
LT
LU
MT
NL
NO
PL
PT
RO
SK
SI
ES
SE
CH
TR
GB
FCC INFORMATION
•FORCLASSBUNINTENTIONALRADIATORS:
This equipment has been tested and found to comply with the
limits for a Class B digital device, pursuant to part 15 of the
FCC Rules. These limits are designed to provide reasonable
protection against harmful interference in a residential instal-
lation. This equipment generates, uses and can radiate radio
frequency energy and, if not installed and used in accordance
with the instructions, may cause harmful interference to radio
communications. However, there is no guarantee that inter-
ference will not occur in a particular installation. If this equip-
ment does cause harmful interference to radio or television
reception, which can be determined by turning the equipment
off and on, the user is encouraged to try to correct the inter-
ference by one or more of the following measures:
-
ceiver.
from that to which the receiver is connected.
for help.
CAUTION: Changes or modifications to this device, not ex-
pressly approved by Icom Inc., could void your authority to
operate this device under FCC regulations.

52
INDEX
15
INFORMATION
A
Access repeater
Access repeater (“FROM”) setting .................................17
Access the repeater .......................................................17
.................20
Auto Position Reply function ...............................................48
B
Battery
Cautions .........................................................................14
C
Call
Gateway call ...................................................................2
Gateway call to a destination station ..............................31
Local area call ................................................................27
Simplex call ....................................................................33
Call sign
Call sign Capture ...........................................................25
....................................................25
Your own call sign entering into the transceiver ...............2
Charging
Caution ...........................................................................15
Charging at power ON ...................................................16
Charging time .................................................................15
Communication example
For Gateway call ............................................................30
For Local area call..........................................................28
With a destination station ...............................................32
Country code list .................................................................51
D
Destination repeater (“TO”) setting .....................................1
DR mode
Selection ........................................................................17
E
Explicit definitions ...............................................................10
F
FCC information .................................................................51
Features ...............................................................................
Unique features of D-STAR ..............................................1
Foreword ...............................................................................
Format the microSD card ...................................................40
G
Gateway call .......................................................................2
Communication example ................................................30
What is a Gateway Call?? ..............................................2
Gateway call to a destination station ..................................31
Communication example ................................................32
GPS
Displaying your position .................................................44
GPS Logger function ......................................................45
GPS operation ...............................................................43
GPS Position screen ......................................................44
When using the GPS receiver ........................................16
Receiving GPS data from the internal GPS receiver .....43

53
INDEX
I
IMPORTANT NOTES ..........................................................16
About charging at power ON ..........................................16
When using the GPS receiver ........................................16
Spurious signals .............................................................16
Inserting the microSD card .................................................3
L
Local area call ....................................................................27
Log file ................................................................................46
Local area call
Communication example ................................................28
What is a Local Area Call?? ...........................................27
M
MENU screen .......................................................................2
microSD card
Format ............................................................................40
Inserting .........................................................................3
Recording a QSO audio .................................................41
Recording a QSO onto a microSD card .........................3
....................................42
Stop recording ................................................................41
Using ..............................................................................3
Voice Recorder function .................................................47
Voice TX function ...........................................................48
N
New functions .....................................................................47
Speech function .............................................................48
Voice Recorder function .................................................47
Voice TX function ...........................................................48
................................................48
Two band monitoring plus BC Radio ..............................47
P
Partial reset ........................................................................4
........................................42
Power ....................................................................................2
Precautions .........................................................................12
Preparation ...........................................................................2
Enter your call sign into the transceiver ...........................2
Register your call sign to a gateway repeater ..................4
R
Receiving GPS data from the internal GPS receiver ..........43
Record
Recording a QSO audio .................................................41
Recording a QSO onto a microSD card .........................3
Stop recording ................................................................41
Resetting ............................................................................4
Partial reset ....................................................................4
RX history
How to use the RX history .............................................21
Save the destination call sign from the RX History ........22
View the received call sign .............................................21

54
INDEX
S
Save
Save the destination call sign from the RX History ........22
Saving settings ...............................................................37
View the saved contents ................................................38
Simplex call ........................................................................33
Simplex channel setting .................................................33
What is a Simplex Call?? 33
Speech function ..................................................................48
Spurious signals .................................................................16
Stop recording ....................................................................41
Supplied accessories..........................................................10
Supplied CD ...................................................................11
Starting the CD ..............................................................11
T
Table of contents ..................................................................7
.....................................................48
Text entry ............................................................................23
Keys used for input ...........................................................3
Two band monitoring plus BC Radio ..................................47
Troubleshooting ..................................................................35
U
Unique features of D-STAR ..................................................1
Using a microSD card .........................................................3
V
View the received call sign .................................................21
View the saved contents .....................................................38
Voice Recorder function .....................................................47
Voice TX function ................................................................48
Y
Your position .......................................................................44
Your own call sign entering into the transceiver ....................2
A-7056H-1EX
Printed in Japan
© 2012 Icom Inc.
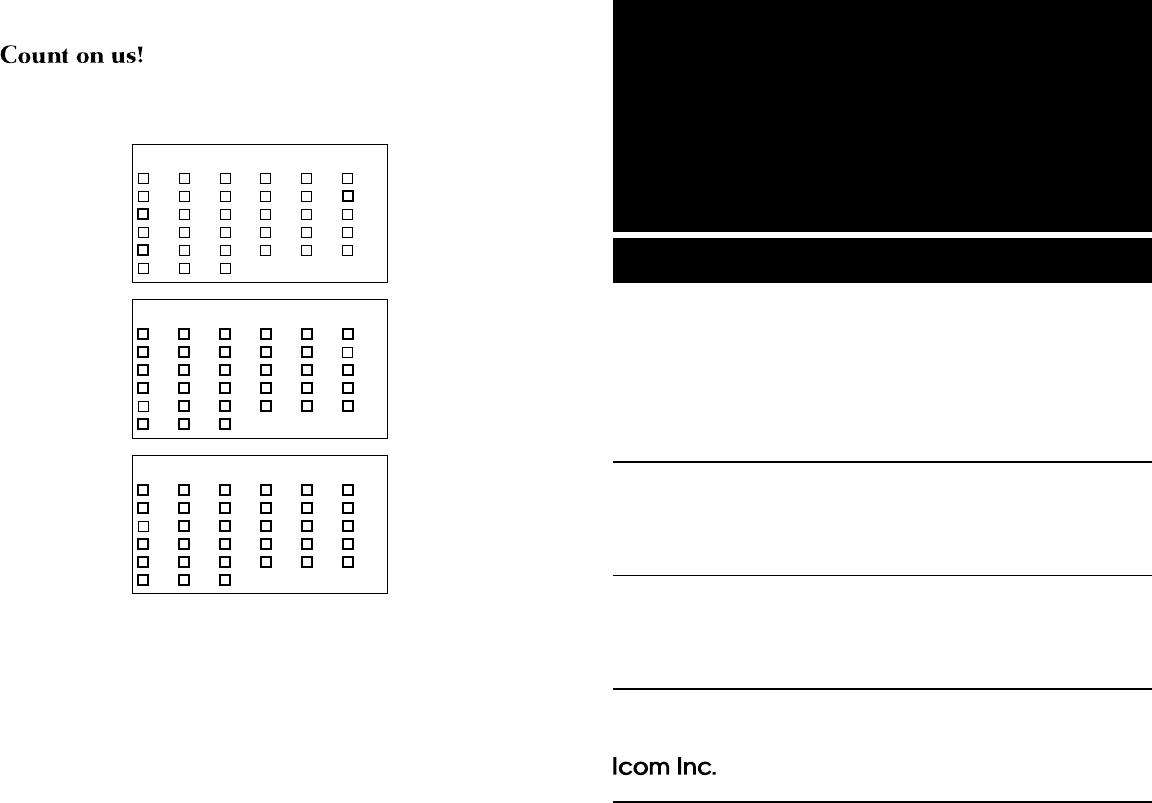
<Intended Country of Use>
■ AT ■ BE ■ CY ■ ■ DK ■ EE
■ FI ■ FR ■ DE ■ GR ■ HU ■ IE
■ IT ■ LV ■ LT ■ LU ■ MT ■ NL
■ PL ■ PT ■ SK ■ SI ■ ES ■ SE
■ GB ■ IS ■ LI ■ NO ■ CH ■ BG
■ RO ■ TR ■ HR
#02 Europe
<Intended Country of Use>
■ AT ■ BE ■ CY ■ ■ DK ■ EE
■ FI ■ FR ■ DE ■ GR ■ HU ■ IE
■ IT ■ LV ■ LT ■ LU ■ MT ■ NL
■ PL ■ PT ■ SK ■ SI ■ ES ■ SE
■ GB ■ IS ■ LI ■ NO ■ CH ■ BG
■
RO
■
TR
■
HR
#03 U.K.
<Intended Country of Use>
■ AT ■ BE ■ CY ■ ■ DK ■ EE
■ FI ■ FR ■ DE ■ GR ■ HU ■ IE
■ IT ■ LV ■ LT ■ LU ■ MT ■ NL
■ PL ■ PT ■ SK ■ SI ■ ES ■ SE
■ GB ■ IS ■ LI ■ NO ■ CH ■ BG
■
RO
■
TR
■
HR
#04 Italy