ICOM orporated 369402 UHF Transceiver User Manual IC F1000D F2000D Operating guide
ICOM Incorporated UHF Transceiver IC F1000D F2000D Operating guide
UserManual.wiki
>
ICOM orporated
>
369402 User Manual
>
User Manual 1
Contents
1.
User Manual 1
2.
User Manual 2
3.
User Manual 3
4.
Antenna Specs
User Manual 1
Navigation menu
Upload a User Manual
Namespaces
Wiki Guide
HTML
PDF
Info
Views
User Manual
Discussion / Help
Navigation

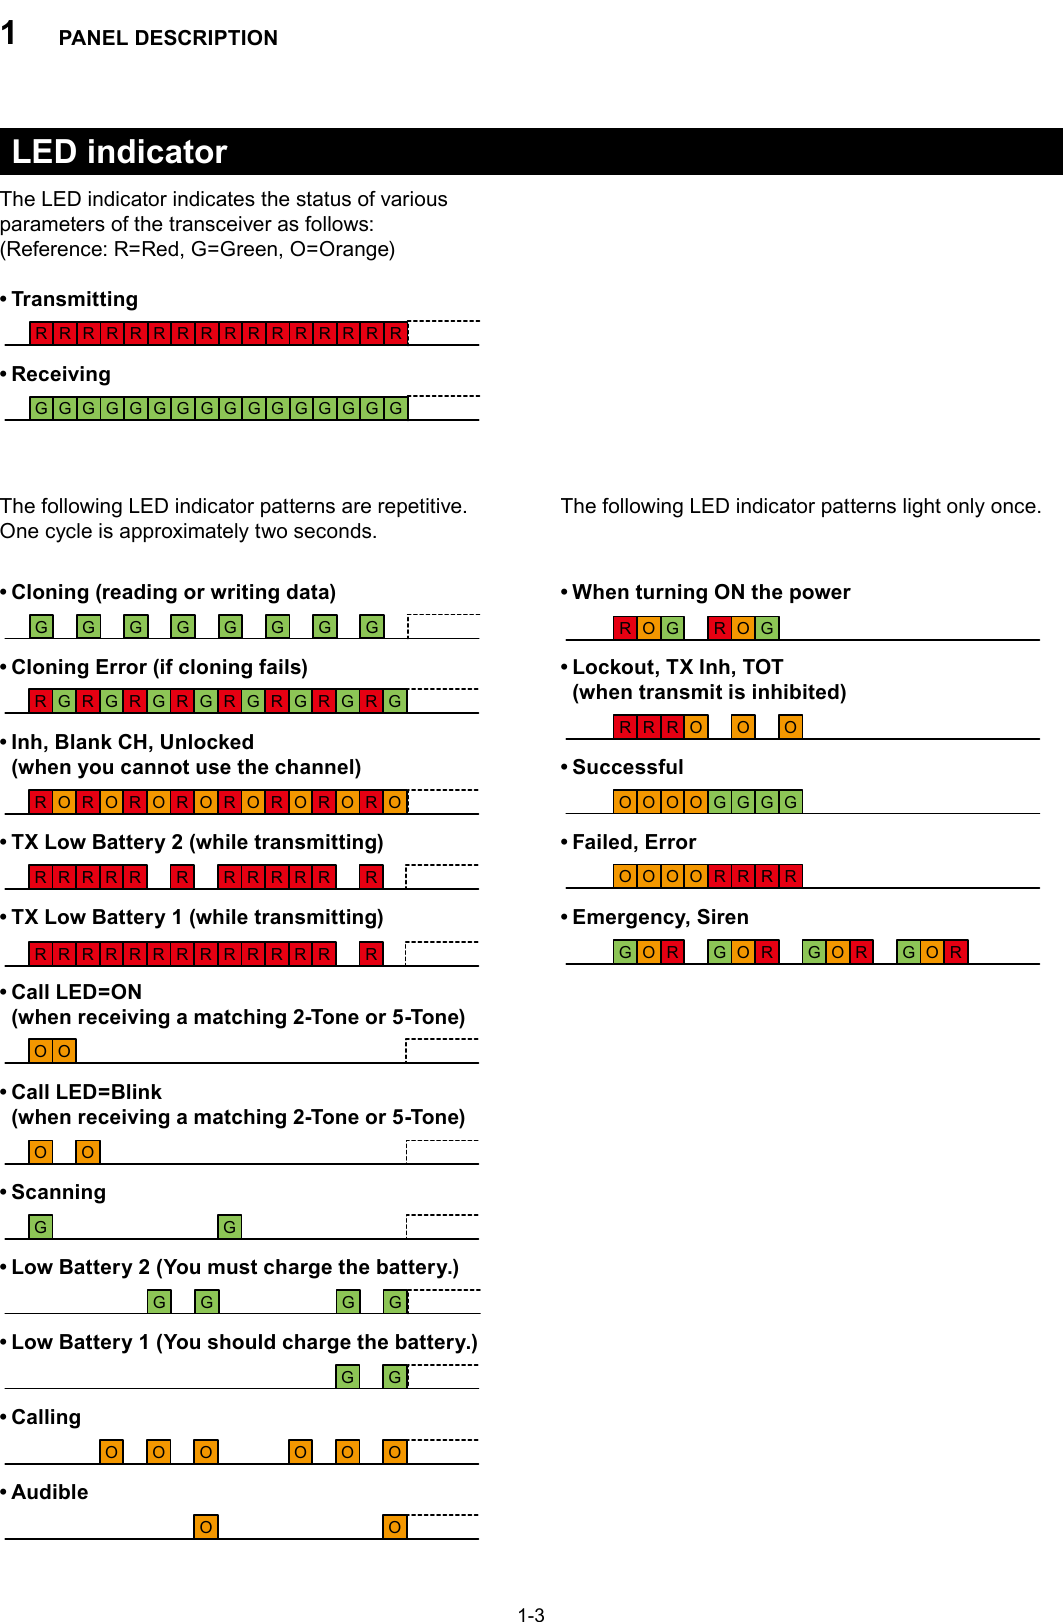
![1PANEL DESCRIPTION1-2ROTARY SELECTORRotate to select the preset memory channels.VOLUME CONTROL [VOL]Rotate to turn the power ON or OFF and to adjust the audio level.DEALER-ASSIGNABLE KEY [Emer]A desired function can be preset by your dealer.SPEAKER-MICROPHONE JACKConnect an optional equipment.NOTE: After turning OFF the transceiver, connect or disconnect the optional equipment.Jack coverNOTE: Attach the jack cover when optional equipment is not used.ROTARY SELECTORVOLUME CONTROL [VOL][Emer]Speaker[Lower][Upper]PTT SWITCH [PTT]LED INDICATORMicrophoneANTENNA CONNECTORSPEAKER-MICROPHONE JACKFront, top and side panelsDEALER-ASSIGNABLE KEYS [Upper] or [Lower]Desired functions can be independently preset by your dealer.PTT SWITCH [PTT]Hold down to transmit, release to receive.LED INDICATOR (p. 1-3)Lights red while transmitting. Â Lights green while receiving a signal, or when the Âsquelch is open. Lights or blinks orange when the matching 2-Tone Âor 5-Tone is received, depending on the presetting. You should charge the battery when the indicator Âslowly blinks. You must charge the battery when the indicator Âblinks fast.ANTENNA CONNECTORConnects the supplied antenna.Detaching and attaching the jack cover Attaching:Attach the jack cover (q),then tighten the screws (w). Detaching:Remove the screws (z),then detach the jack cover (x). xqwwzzAttaching:Attach the jack cover (q),then tighten the screws (w). Detaching:Remove the screws (z),then detach the jack cover (x). xqwwzz](https://usermanual.wiki/ICOM-orporated/369402.User-Manual-1/User-Guide-2816031-Page-4.png)
![1PANEL DESCRIPTION1-4Programmable function keysThe following functions can be assigned to [Emer], [Upper], and [Lower].Consult your Icom dealer or system operator for details concerning your transceiver’s presetting.SCAN START/STOPPush to start and cancel scanning operation.When a scan started with the Power ON Scan or Auto Scan function, push to cancel the scanning operation. These scans resume after the specified time period, depending on the Auto Reset setting.PRIORITY A CHANNEL, PRIORITY B CHANNELPush to select the Priority A or Priority B channel.PRIORITY A CHANNEL (REWRITE), PRIORITY B CHANNEL (REWRITE)Push to select the Priority A or Priority B channel. Â Hold down [Prio A (Rewrite)] or [Prio B (Rewrite)] Âfor 1 second to assign the operating channel to Priority A or Priority B channel, respectively.MEMORY CHANNELS 1, 2, 3, 4Push to directly select memory channel 1, 2, 3 or 4, if preset.MONI // only for the LMR model // Hold down to cancel the CTCSS (DTCS) or 2-Tone Âmute. The transceiver enters “Audible” mode.Push to turn OFF the function. ÂMONI (Audi) // only for the PMR model // Hold down to cancel the CTCSS (DTCS) or 5-Tone Âmute. The transceiver enters “Audible” mode. Push or hold down to activate one or two functions Âif preset.LOCKHold down this key for 1 second to turn the Key Lock function ON or OFF.The Key Lock function locks all programmable keys except the followings:[Moni], [Moni (Audi)], [Lock], [Emergency], [Surveillance], [Siren], [Call], [Call A], [Call B], and [Lone Worker].LONE WORKERHold down to turn ON the Lone Worker Function. ÂPush to turn OFF the Function. ÂHIGH/LOWPush to select the transmit output power temporarily or permanently, depending on the presetting.Beeps sound as described below and the beeps indicate which output power you are selecting.High (5 W for VHF, or 4 W for UHF): Three beepsLow2 (2 W): Two beepsLow1 (1 W): One beepTALK AROUND Hold down for 1 second to turn ON the Talk Around Âfunction.Push to turn OFF the Talk Around function. ÂThe Talk Around function equalizes the transmit frequency to the receive frequency, for transceiver-to-transceiver communication.WIDE/NARROW (only for the analog mode operation)Push to select toggle the channel bandwidth between Wide, Middle*, and Narrow.Beeps sound as described below and the beeps indicate which channel bandwidth you are selecting.Narrow: One beepMiddle*: Two beepsWide: Three beeps* Only for the PMR model. It is selectable depending on the presetting. Ask your dealer for details.](https://usermanual.wiki/ICOM-orporated/369402.User-Manual-1/User-Guide-2816031-Page-6.png)
![1PANEL DESCRIPTION1-5DTMF AUTODIALPush to transmit the preset DTMF code.CALLPush to transmit a 2-Tone or 5-Tone in the operating channel.CALL A (CODE 1)/CALL B (CODE 2) (only for the analog mode operation) // only for the LMR model //While in analog mode operation, push to transmit a 2-Tone code as station code, that is set in the channel 1 (Code A) or channel 2 (Code B).CALL A (CODE 30)/CALL B (CODE 29) (only for the analog mode operation) // only for the PMR model //While in analog mode operation, push to transmit a 5-Tone code as the station code, that is set in the channel 30 (Code A) or channel 29 (Code B).EMERGENCY Hold down for the set time period* to turn ON the ÂEmergency function. •ThecountdownfortheEmergencycalltransmissionstarts. After the countdown, an Emergency call is automatically transmitted once, or repeatedly*. During the first countdown, hold down for the set Âtime period* to cancel the Emergency function.*Depending on the presetting. Ask your dealer for details.SURVEILLANCE Hold down for 1 second to turn ON the Surveillance Âfunction.Push to turn OFF the Surveillance function. ÂWhen this function is turned ON, the beep is not heard and the LED indicator does not light, even when a signal is received, or a key is pushed.SIRENHold down for 1 second to emit a siren sound. Â •ThisfunctioncanbeusedforsituationsotherthananEmergency alert, such as a security alarm. Turn OFF the transceiver power to stop the siren Âsound.ENCRYPTION (only for the digital mode operation) Hold down for 1 second to turn ON the Encryption Âfunction.Push to turn OFF the Encryption function. ÂANNOUNCEPush to turn the Channel Announce function ON or OFF.When this function is turned ON, the transceiver announces the position of [ROTARY SELECTOR].CALL ALERT (only for the digital mode operation)Hold down for 1 second to transmit a Call Alert.STATUS (only for the digital mode operation)Hold down for 1 second to transmit a Status call.](https://usermanual.wiki/ICOM-orporated/369402.User-Manual-1/User-Guide-2816031-Page-7.png)
![2BASIC OPERATION2-2Selecting a channelThere are several types of channel selections. Methods may differ, depending on the presetting. Ask your dealer for details.NON-ZONE TYPE:To select the desired operating channel:Rotate [ROTARY SELECTOR]. ÂPush one of [MR-CH 1] to [MR-CH 4]. Â Push [Prio A], [Prio B], [Prio A (Rewrite)] or [Prio B Â(Rewrite)].AUTOMATIC SCAN TYPE:Channel setting is not necessary for this scan type. When turning ON the power, the transceiver automatically starts scanning. Scanning stops when a signal is received.](https://usermanual.wiki/ICOM-orporated/369402.User-Manual-1/User-Guide-2816031-Page-9.png)
![2BASIC OPERATION2-3Receiving and transmitting CAUTION: Attach an antenna before transmitting. Transmitting without an antenna may damage the transceiver.Receiving:Rotate [VOL] to turn ON the power.1) Select a channel. (p. 2-2)2) When receiving a call, adjust the audio output level 3) to a comfortable listening level.Transmitting: Wait until the channel is clear to avoid interference. 1) While holding down [PTT], speak at a normal voice level.Release [PTT] to receive.2) IMPORTANT: To maximize the readability of your signal: 1. After pushing [PTT], pause briefly before you start speaking. 2. Hold the microphone 5 to 10 cm (2 to 4 inches) from your mouth, then speak at a normal voice level.Transmitting notes •TransmitinhibitfunctionThe transceiver has several inhibit functions which restrict transmission under the following conditions:- The channel is busy. However, depending on the presetting, you can transmit when the call includes an unmatching (or matching) CTCSS (DTCS) tone.- The selected channel is a ‘receive only’ channel.•Time-outtimer(TOT)If continuous transmission exceeds the preset time-out timer limit, transmission is cut off.•PenaltytimerThe time-out timer cuts off transmission, further transmission is inhibited for the preset penalty timer period.Receiving a Stun, Kill, and Revive call The dispatcher can send a 2-Tone or 5-Tone that will stun, kill or revive your transceiver.When the Stun call is received, beeps sound, and you cannot receive or transmit. Receiving a Revive call or cloning the transceiver is necessary to operate the transceiver again.When the Kill call is received, beeps sound, and the transceiver becomes unusable. Cloning the transceiver is necessary to operate the transceiver again, in this case.NOTE:These functions and operations may or may not be available or different, depending on the presetting. Ask your dealer for preset information.](https://usermanual.wiki/ICOM-orporated/369402.User-Manual-1/User-Guide-2816031-Page-10.png)
![2BASIC OPERATION2-4When holding down [Emergency] for the set time period, the transceiver enters the Emergency mode then the countdown starts.After the countdown, the transceiver transmits an Emergency call once, or repeatedly, on the specified Emergency channel. Countdown beeps sound for the set timer period.When no Emergency channel is specified, it transmits the call on the previously selected channel.If you want to cancel the Emergency call, turn OFF the transceiver, or hold down [Emergency] for the set time period again during the first countdown.If your transceiver is set for the Silent operation, you can transmit an Emergency call without beeps and the LED indicator lighting. NOTE: Depending on the presetting, the following functions are automatically activated. Ask your dealer for details.•AutoTXfunctionAfter an Emergency call transmission, the transceiver transmits the audio from the microphone for the set time period.•AutoRXfunctionAfter the Emergency call transmission, the transceiver stands by in the audible mode for the set time period.Emergency callNOTE:This function and operations may or may not be available or different, depending on the presetting. Ask your dealer for preset information.](https://usermanual.wiki/ICOM-orporated/369402.User-Manual-1/User-Guide-2816031-Page-11.png)
![2BASIC OPERATION2-5About other Emergency callsLone Worker Emergency call When the Lone Worker function is ON, the transceiver enters the Emergency mode then the countdown for the Emergency call transmission starts when either/or:1. No operation occurs for the set time period.2. The acceleration sensor detects a lower acceleration than the set value for the set time period.After a set time period has passed, an Emergency call is automatically transmitted once, or repeatedly.If the user pushes any key during the first countdown, the transceiver exits the Emergency mode, and the Emergency call is cancelled.You can also cancel the Emergency call by turning OFF the transceiver.To turn ON the Lone Worker function, see page 1-4.Man Down Emergency call When the transceiver leans past the preset angle for a set time period, the transceiver enters the Emergency mode, and then a countdown starts.After a set time period has passed, an Emergency call is automatically transmitted once, or repeatedly.If the transceiver is placed again within the preset angle, during the first countdown, the transceiver exits the Emergency mode, and the Emergency call is cancelled.You can also cancel the Emergency call by turning OFF the transceiver.Motion Detection Emergency call When the acceleration sensor keeps detecting a higher acceleration than the preset value for the set time period, the transceiver enters the Emergency mode then the countdown starts.After the set time period has passed, an Emergency call is automatically transmitted once, or repeatedly.Countdown beeps sound for the set time period.If the user holds down [Emergency] for the set time period during the first countdown, the Emergency call is canceled.You can also cancel the Emergency call by turning OFF the transceiver.NOTE:These functions and operations may or may not be available or different, depending on the presetting. Ask your dealer for preset information.](https://usermanual.wiki/ICOM-orporated/369402.User-Manual-1/User-Guide-2816031-Page-12.png)
![3NXDN™ OPERATION3-3Receiving a callReceiving a Call Alert When a Call Alert is received: Â •Thetransceiverwillautomaticallytransmittheacknowledgement. •TheLEDindicatorblinksorange. •Release[PTT]toreceivearesponse.Hold down [PTT], then speak into the microphone.1) Release [PTT] to receive a response.2) Receiving a Stun, Kill, and Revive call If an individual call with Stun or Kill command is received, the transceiver will automatically transmit the acknowledgement, and then you cannot receive or transmit.When a Stun command is received: Â •Youcannotreceive,transmit,orchangethechannel. •ReceivingaRevivecallorcloningthetransceiverisnecessary to operate the transceiver again.When a Kill command is received: Â •Thetransceiverbecomesunusable. •TheLEDindicatoralternatelyblinksredandorange. •Cloningthetransceiverisnecessarytousethetransceiver again. Receiving a Remote Monitor or Radio Check callWhen a Remote Monitor call is received: Â •Thetransceiverwillautomaticallytransmittheacknowledgement •Thenittransmitsthemicrophoneaudioforthetimesetat the caller station.When a Radio Check call is received: Â •Thetransceiverwillautomaticallytransmittheacknowledgement. Receiving a Status call When a Status call is received: Â •Thetransceiverwillautomaticallytransmittheacknowledgement.NOTE:These functions and operations may or may not be available or different, depending on the presetting. Ask your dealer for preset information.](https://usermanual.wiki/ICOM-orporated/369402.User-Manual-1/User-Guide-2816031-Page-15.png)
![3NXDN™ OPERATION3-4Transmitting a callTransmitting a Call Alert Hold down [Call Alert]. ÂTransmitting an Emergency call When holding down [Emergency] for the set time period, the transceiver enters the Emergency mode then the countdown starts.After the countdown, the transceiver transmits an Emergency call (digital command) once, or repeatedly, on the specified Emergency channel. Countdown beeps sound for the set time period.When no Emergency channel is specified, it transmits the call on the previously selected channel.Individual or Talkgroup call types of Emergency calls can be preset. If the call type is not preset, a default or selected call type is used.If you want to cancel the Emergency call, turn OFF the transceiver, or hold down [Emergency] for the set time period again during the first countdown.If your transceiver is set for Silent operation, you can transmit an Emergency call without beeps and the LED indicator lighting.The transceiver can also be set to keep the microphone open during an Emergency call, allowing other persons to monitor the situation. Ask your dealer for details.Transmitting a Status call A Status call can be transmitted by pushing [Status]. Â Rotate [ROTARY SELECTOR] to select a desired 1) Status.Hold down [Status] to transmit a Status call.2) A Status call can be automatically transmitted when Âthe transceiver is turned ON or OFF. A Status call can be automatically transmitted after Âreleasing [PTT].NOTE:These functions and operations may or may not be available or different, depending on the presetting. Ask your dealer for preset information.](https://usermanual.wiki/ICOM-orporated/369402.User-Manual-1/User-Guide-2816031-Page-16.png)
![3NXDN™ OPERATION3-5About other Emergency callsLone Worker Emergency call When the Lone Worker function is ON, the transceiver enters the Emergency mode then the countdown for the Emergency call transmission starts when either/or:1. No operation occurs for the set time period.2. The acceleration sensor detects a lower acceleration than the set value for the set time period.After a set time period has passed, an Emergency call is automatically transmitted once, or repeatedly.If the user pushes any key during the first countdown, the transceiver exits the Emergency mode, and the Emergency call is cancelled.You can also cancel the Emergency call by turning OFF the transceiver.To turn ON the Lone Worker function, see page 1-4.Man Down Emergency call When the transceiver leans past the preset angle for a set time period, the transceiver enters the Emergency mode, and then a countdown starts.After a set time period has passed, an Emergency call is automatically transmitted once, or repeatedly.If the transceiver is placed again within the preset angle, during the first countdown, the transceiver exits the Emergency mode, and the Emergency call is cancelled.You can also cancel the Emergency call by turning OFF the transceiver.Motion Detection Emergency call When the acceleration sensor keeps detecting a higher acceleration than the preset value for the set time period, the transceiver enters the Emergency mode then the countdown starts.After the set time period has passed, an Emergency call is automatically transmitted once, or repeatedly.Countdown beeps sound for the set time period.If the user holds down [Emergency] for the set time period during the first countdown, the Emergency call is canceled.You can also cancel the Emergency call by turning OFF the transceiver.NOTE:These functions and operations may or may not be available or different, depending on the presetting. Ask your dealer for preset information.](https://usermanual.wiki/ICOM-orporated/369402.User-Manual-1/User-Guide-2816031-Page-17.png)
![3NXDN™ OPERATION3-6Encryption functionThe Encryption function enables voice scrambling, which provides a private digital communication between stations. Hold down [Encryption] for 1 second to turn ON the 1) Encryption function. Push [Encryption] to turn OFF the Encryption 2) function.NOTE:This function and operations may or may not be available or different, depending on the presetting. Ask your dealer for preset information.](https://usermanual.wiki/ICOM-orporated/369402.User-Manual-1/User-Guide-2816031-Page-18.png)
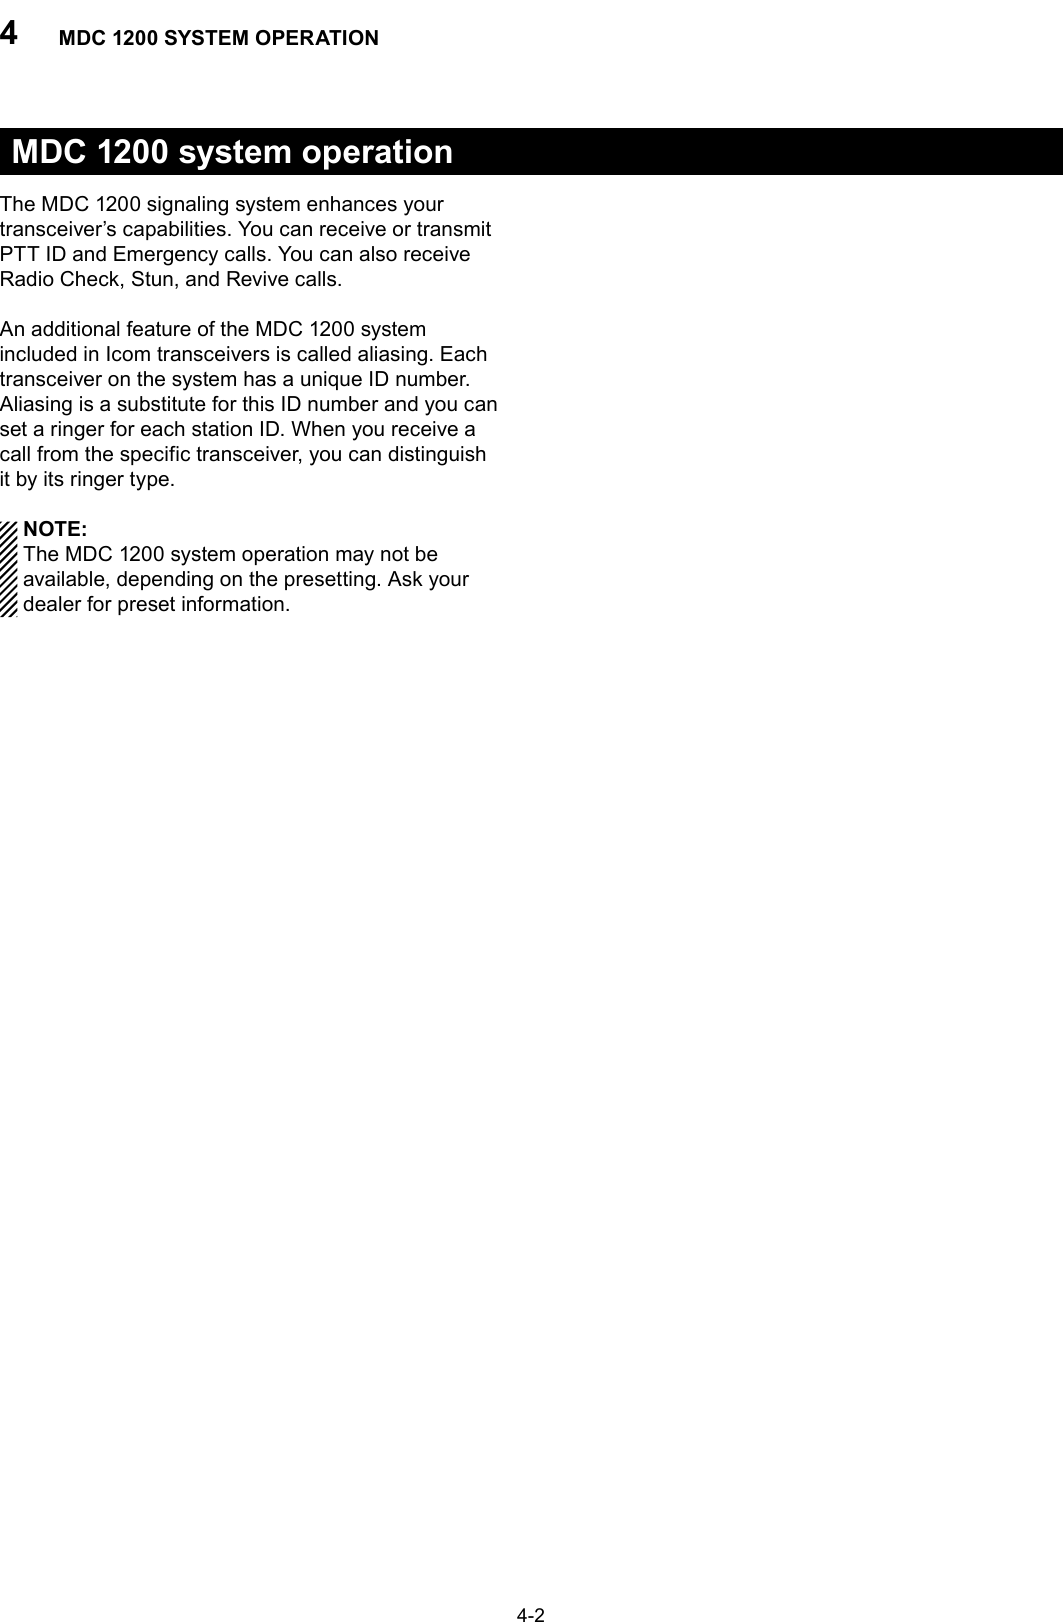
![4MDC 1200 SYSTEM OPERATION4-3Receiving a callReceiving a PTT ID When a PTT ID is received:1) •Beepssound.Hold down [PTT] and speak into the microphone.2) Release [PTT] to receive a response.3) Receiving an Emergency call When an Emergency call is received:1) •Beepssound. Turn power OFF or change the channel to stop the 2) beep.Receiving a Stun or Revive call If a Stun call is received that matches your station ID, you can not receive or transmit. If a Revive call that matches your station ID is received, the transceiver will be revived.NOTE:These functions and operations may or may not be available or different, depending on the presetting. Ask your dealer for preset information.](https://usermanual.wiki/ICOM-orporated/369402.User-Manual-1/User-Guide-2816031-Page-21.png)
![4MDC 1200 SYSTEM OPERATION4-4Transmitting a callTransmitting a PTT ID Push [PTT] to make a call.1) Beeps sound, depending on the presetting.2) Your station ID will be transmitted when you push 3) [PTT] (at the beginning of transmission) or release it (at the end of transmission), depending on the presetting.Transmitting an Emergency call When holding down [Emergency] for the set time period, the transceiver enters the Emergency mode then the countdown starts.After the countdown, the transceiver transmits an Emergency call once, or repeatedly, on the specified Emergency channel. Countdown beeps sound for the set time period.When no Emergency channel is specified, it transmits the call on the previously selected channel.If you want to cancel the Emergency call, turn OFF the transceiver, or hold down [Emergency] for the set time period again during the first countdown.If your transceiver is set for Silent operation, you can transmit an Emergency call without beeps and the LED indicator lighting.The transceiver can also be set to keep the microphone open during an Emergency call, allowing other persons to monitor the situation. Ask your dealer for details.NOTE:These functions and operations may or may not be available or different, depending on the presetting. Ask your dealer for preset information.](https://usermanual.wiki/ICOM-orporated/369402.User-Manual-1/User-Guide-2816031-Page-22.png)
![5USER SETTINGS5-2Setting the Beep functionThe Beep function can be turned ON or OFF. NOTE: You should turn ON the Beep function when you set the Beep level, the Ringer level, the microphone gain, the VOX function, the VOX gain and the squelch level.Rotate [VOL] to turn the transceiver power OFF.1) Set [ROTARY SELECTOR] to any channel other 2) than Channel 16. While holding down [Lower], rotate [VOL] to turn 3) ON the power to enter the Beep level adjustment mode.Push [Lower] to turn the Beep function ON or OFF.4) •Whenabeepsoundsafterpushing[Lower],theBeep function is ON. When no beep sounds after pushing [Lower], the Beep function is OFF. •Thetransceiverstoresthesettingeverytimeyouchange it. •Ifdesired,push[Upper]toadjusttheBeeplevel.Seepage 5-4 for details. Rotate [VOL] to turn OFF the power to exit the 5) Beep level adjustment mode.[ROTARY SELECTOR] [VOL][Upper][Lower]](https://usermanual.wiki/ICOM-orporated/369402.User-Manual-1/User-Guide-2816031-Page-24.png)
![5USER SETTINGS5-3Setting the Beep levelThe Beep level is adjustable between 1 and 5, or 1 (linked) and 5 (linked). When a Linked option is selected, the beep audio level is adjustable by rotating [VOL].Rotate [VOL] to turn OFF the transceiver.1) Set [ROTARY SELECTOR] to any channel other 2) than Channel 16. While holding down [Lower], rotate [VOL] to turn 3) ON the power and enter the Beep level adjustment mode.Push [Upper] to change the Beep level.4) •Repeatedlypushing[Upper]firstselects1(lowest)to5 (highest), and then selects the lowest linked level, 1 (Linked) to the highest, 5 (Linked). Repeatedly pushing [Upper] repeats the cycle. See the illustration on the right. •Theadjustablerangeis1to5or1(Linked)to5(Linked). •Abeepsoundseverytimeyoupush[Upper].Therefore,you can determine the current level setting by the increasing loudness of the beep that sounds. •Todetermineifyouhaveselectedalinkedlevel,set[VOL] to minimum, then push [Upper] repeatedly, listening for the loudest beep (level 5). Pushing [Upper] once after the loudest beep will select 1 (Linked). Repeatedly push [Upper] to select the desired linked level. Rotate [VOL] to turn OFF the power to exit the 5) Beep level adjustment mode.[ROTARY SELECTOR] [VOL][Upper][Lower]254315 (Linked)4 (Linked)3 (Linked)2 (Linked)1 (Linked)Pushing[Upper]NOTE:You should turn ON the Beep function (p. 5-2) before you start setting the Beep level.](https://usermanual.wiki/ICOM-orporated/369402.User-Manual-1/User-Guide-2816031-Page-25.png)
![5USER SETTINGS5-4Setting the Ringer levelThe Ringer level can be adjusted between 1 and 5, or 1 (Linked) and 5 (Linked). When a Linked option is selected, the ringer audio level is adjustable by rotating [VOL].Rotate [VOL] to turn OFF the transceiver power.1) Set [ROTARY SELECTOR] to Channel 16.2) While holding down [Lower], rotate [VOL] to 3) turn ON the power and enter the Ringer level adjustment mode. Push [Upper] to increase, or push [Lower] to 4) decrease the Ringer level. •Repeatedlypushing[Upper]firstselects1(lowest)to5 (highest), and then selects the lowest linked level, 1 (Linked) to the highest, 5 (Linked). Repeatedly pushing [Upper] or [Lower] repeats the cycle. See the illustration on the right. •Theadjustablerangeis1to5or1(Linked)to5(Linked). •Abeepsoundsafterpushing[Upper].Therefore,you can determine the current level setting by the increasing loudness of the beep that sounds. •Todetermineifyouhaveselectedalinkedlevel,set[VOL] to minimum, then push [Upper] up to 10 times, listening for the loudest beep (level 5). Pushing [Upper] once after the loudest beep will select 1 (Linked). Repeatedly push [Upper] or [Lower] to select the desired linked level. Rotate [VOL] to turn OFF the power to exit the 5) Ringer level adjustment mode.[ROTARY SELECTOR] [VOL][Upper][Lower]254315 (Linked)4 (Linked)3 (Linked)2 (Linked)1 (Linked)Pushing[Upper]Pushing[Lower]NOTE:You should turn ON the Beep function (p. 5-2) before you start setting the Ringer level.](https://usermanual.wiki/ICOM-orporated/369402.User-Manual-1/User-Guide-2816031-Page-26.png)
![5USER SETTINGS5-5Setting the microphone gainAdjust the microphone gain.Higher values make the microphone more sensitive to the user voice.Rotate [VOL] to turn OFF the transceiver power.1) Set [ROTARY SELECTOR] to Channel 16.2) While holding down [Upper], rotate [VOL] to turn 3) ON the power and enter the microphone gain adjustment mode. Push [Upper] to increase, or push [Lower] to 4) decrease the microphone gain. •Theadjustablerangeis1(minimum)to4(maximum). •Abeepsoundsafterpushing[Upper]or[Lower].Anerror beep sounds if you try to exceed the adjustable range. Rotate [VOL] to turn OFF the power to exit the 5) microphone gain adjustment mode.[ROTARY SELECTOR] [VOL][Upper][Lower]NOTE:You should turn ON the Beep function (p. 5-2) before you start setting the microphone gain.](https://usermanual.wiki/ICOM-orporated/369402.User-Manual-1/User-Guide-2816031-Page-27.png)
![5USER SETTINGS5-6Setting the squelch levelThe squelch circuit mutes the received audio signal, depending on the signal strength.Rotate [VOL] to turn OFF the transceiver power.1) Set [ROTARY SELECTOR] to any channel other 2) than Channel 16. While holding down [Upper], rotate [VOL] to 3) turn ON the power and enter the squelch level adjustment mode. Push [Upper] to increase the squelch level (tight 4) squelch), or push [Lower] to decrease the squelch level (loose squelch). •Theadjustablerangeis0(loosesquelch)to9(tightsquelch). •Abeepsoundsafterpushing[Upper]or[Lower].Anerror beep sounds if you try to exceed the adjustable range. Rotate [VOL] to turn OFF the power to exit the 5) squelch level adjustment mode.[ROTARY SELECTOR] [VOL][Upper][Lower]NOTE:You should turn ON the Beep function (p. 5-2) before you start setting the squelch level.](https://usermanual.wiki/ICOM-orporated/369402.User-Manual-1/User-Guide-2816031-Page-28.png)
![5USER SETTINGS5-7Setting the VOX functionThe VOX function can be turned ON or OFF. The VOX function automatically switches between receive and transmit during voice operation.Rotate [VOL] to turn OFF the transceiver power.1) Set [ROTARY SELECTOR] to any channel other 2) than Channel 16. While holding down [PTT] and [Upper], rotate 3) [VOL] to turn ON the power, to turn the VOX function ON or OFF. •WhentheVOXfunctionisON,abeepsounds. •WhentheVOXfunctionisOFF,twobeepssound. Rotate [VOL] to turn OFF the power, then turn ON 4) again to restart the normal operation.NOTE:You should turn ON the Beep function (p. 5-2) before you start setting the VOX function.[ROTARY SELECTOR] [VOL][Upper][PTT][Lower]](https://usermanual.wiki/ICOM-orporated/369402.User-Manual-1/User-Guide-2816031-Page-29.png)
![5USER SETTINGS5-8Setting the VOX gainAdjust the VOX gain.Higher values make the VOX function more sensitive to the user voice.Rotate [VOL] to turn OFF the transceiver power.1) Set [ROTARY SELECTOR] to Channel 16.2) While holding down [PTT] and [Upper], rotate 3) [VOL] to turn ON the power and enter the VOX gain adjustment mode. Push [Upper] to increase, or push [Lower] to 4) decrease the microphone gain. •Theadjustablerangeis1(minimum)to10(maximum). •Abeepsoundsafterpushing[Upper]or[Lower].Anerror beep sounds if you try to exceed the adjustable range. Rotate [VOL] to turn OFF the power to exit the VOX 5) gain adjustment mode.[ROTARY SELECTOR] [VOL][Upper][PTT][Lower]NOTE:You should turn ON the Beep function (p. 5-2) before you start setting the VOX gain.](https://usermanual.wiki/ICOM-orporated/369402.User-Manual-1/User-Guide-2816031-Page-30.png)