ICOM orporated 369700 VHF Air Band Transceiver User Manual
ICOM Incorporated VHF Air Band Transceiver
UserManual.wiki
>
ICOM orporated
>
369700 User Manual
User Manual
Navigation menu
Upload a User Manual
Namespaces
Wiki Guide
HTML
PDF
Info
Views
User Manual
Discussion / Help
Navigation
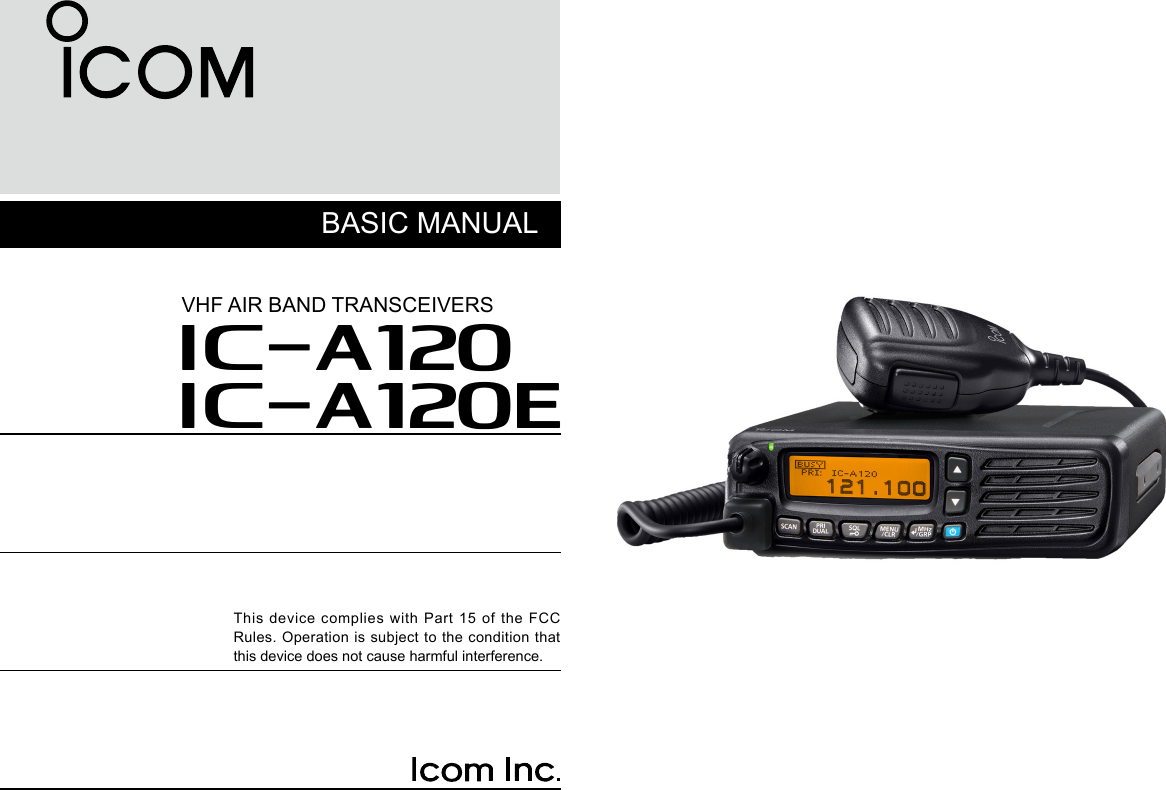
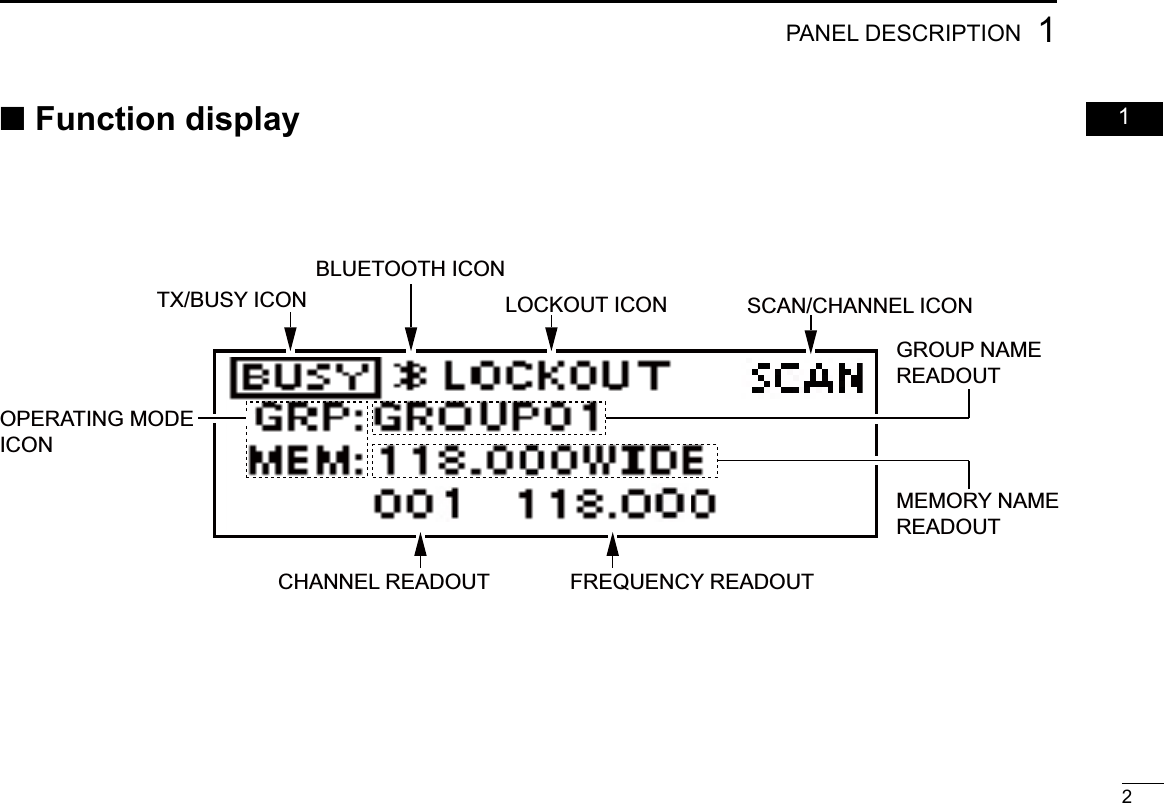
![11PANEL DESCRIPTION1 ■Front panelVOLUME CONTROL KNOBSTATUS INDICATORFUNCTION DISPLAYUP/DOWN KEYS [∫]/[√]POWER KEY []SPEAKERENTER/MHz/GRP KEY []/[MHz]/[GRP]MENU/CLEAR KEY [MENU]/[CLR]SQUELCH ADJUSTMENT/LOCK KEY [SQL]/[ ]PRIORITY CHANNEL/DUALWATCH KEY [PRI]/[DUAL]SCAN KEY [SCAN]MICROPHONE CONNECTOR](https://usermanual.wiki/ICOM-orporated/369700/User-Guide-2852553-Page-8.png)
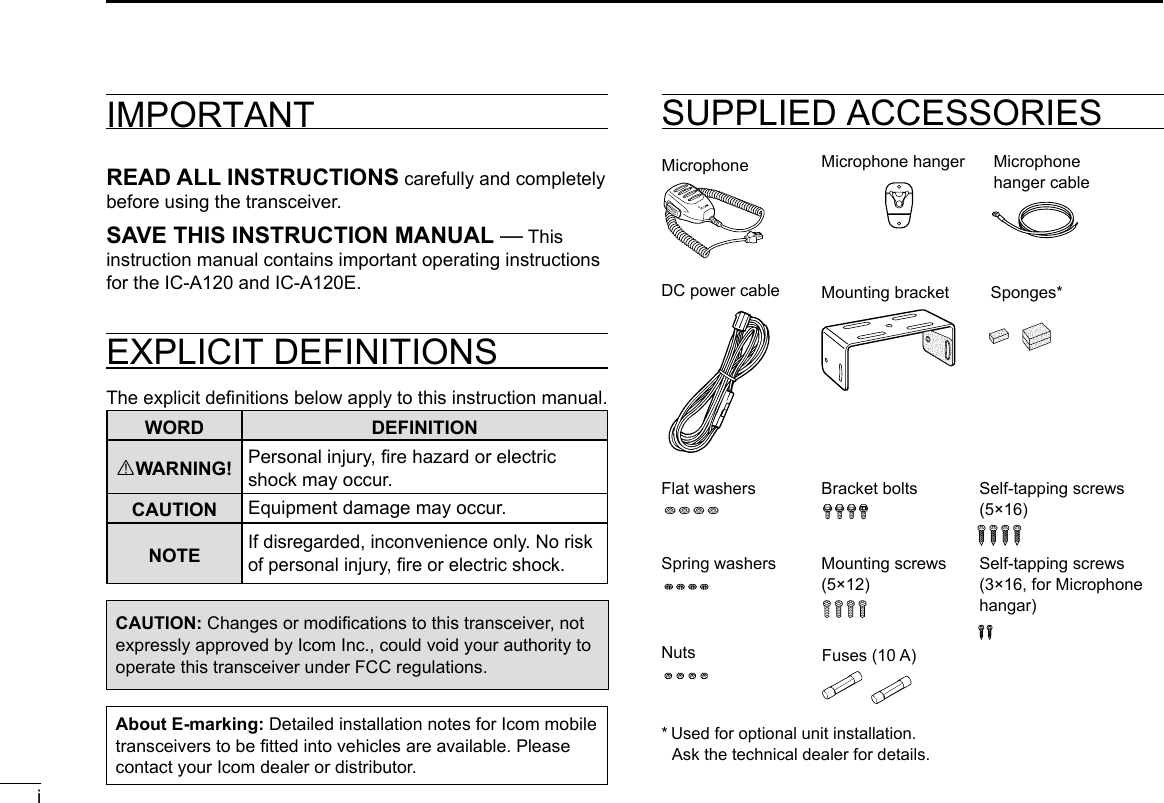
![32BASIC OPERATION ■Turning ON the transceiverHold down [ ] for 1 second to turn ON the power. If the transceiver is preset for a start-up password, enter the 6 digits password. While in the Password Entry mode, “PASSWORD” is displayed. DEntering the passwordEnter the password in the following manner.KEYNUMBER0516273849Example:If the password is 513824, push [SCAN], [PRI/DUAL], [MENU/CLR], [MENU/CLR], [SQL/ ], and then push [/MHz/GRP].• Note that each key represents 2 digits. That means, “123456” and “678901” are entered in exactly the same way (requires no multiple or extended pushing.)• The entered password will not be displayed.• If “PASSWORD” does not disappear after entering, the entered password is incorrect. Turn OFF the transceiver, and then try again.](https://usermanual.wiki/ICOM-orporated/369700/User-Guide-2852553-Page-10.png)
![42BASIC OPERATION1 02345678910111213141516 Setting the frequency in the VFO mode(For only EXP, USA, and EUR versions.)1) Switch the transceiver to the VFO mode. ➥ Select “VFO MODE” group in the Menu mode and then push [ /MHz/GRP].2) Set the MHz digit. ➥ Push [ /MHz/GRP], and then push [∫] or [√]. • The MHz digit blinks.3) Exit the MHz Digit Selection mode. ➥ Push [ /MHz/GRP] again.4) Set the kHz digit. ➥ Push [∫] or [√]. ■Receiving and transmitting1. Setting the frequency Setting the frequency in the Memory mode1) Open the “MEMORY” menu. ➥ Push [ /MHz/GRP]. 2) Select “GROUPS” item. ➥ Push [∫] or [√], and then push [ /MHz/GRP]. 3) Select a desired group. ➥ Push [∫] or [√], and then push [ /MHz/GRP]. 4) Select a desired channel. ➥ Push [∫] or [√].TIP: You can select the channel spacing in the “CH SPACING” item*.* The menu may not be displayed, depending on the transceiver’s setting. Ask your authorized Icom dealer or transceiver administrator for details.MENU > SETTINGS > FUNCTIONS > CH SPACINGCAUTION: In Canada, use of 8.33 kHz Channel Spacing of this radio is strictly prohibited and shall not be used.](https://usermanual.wiki/ICOM-orporated/369700/User-Guide-2852553-Page-11.png)
![52BASIC OPERATION2. ReceivingWhen receiving a signal, “BUSY” is displayed and audio is heard.• Rotate volume control knob to adjust the audio level.• Adjust the squelch if necessary. See ‘Adjusting the squelch’ to the right for details.3. Transmitting 1) Hold down [PTT], and then speak at your normal voice level. • “TX” is displayed. 2) Release [PTT] to receive.InformationTo maximise the clarity of the signal, Hold the microphone about 5 to 10 cm (2 to 4 inches) from your mouth. ■Receiving and transmitting (Continued) ■Adjusting the squelchAdjust the squelch to mute undesired noise when no signal received. 1) Open the “SQL” window. ➥ Push [SQL/ ]. 2) Adjust the squelch. ➥ Push [∫] or [√] to select the desired squelch level.](https://usermanual.wiki/ICOM-orporated/369700/User-Guide-2852553-Page-12.png)
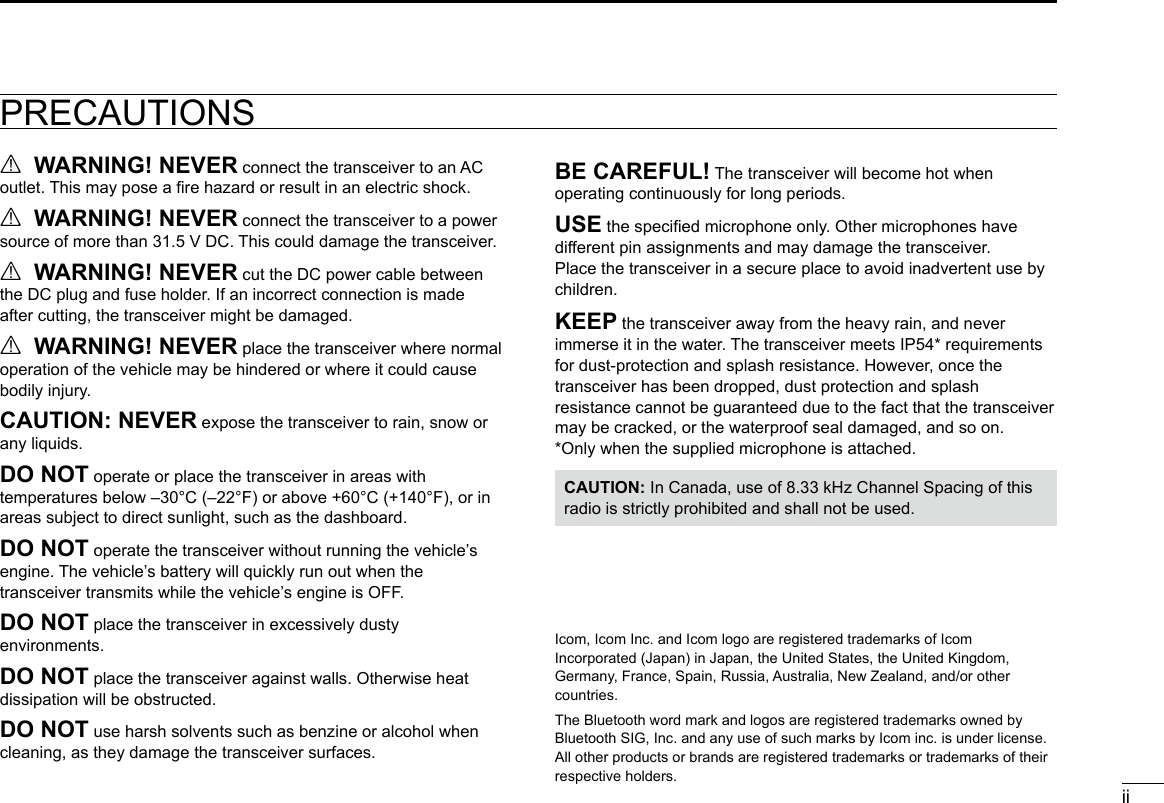
![63Bluetooth® OPERATION 02 03 ■ Operating Bluetooth®If the UT-133A Bluetooth® unit is installed in the transceiver, you can connect a Bluetooth® headset.When you connect the VS-3 Bluetooth® headset to the transceiver, you can wirelessly transmit and receive the headset audio.The VS-3 has a [PTT] switch, so you can transmit in the same way as using the transceiver’s [PTT] switch.Communication range of Bluetooth® is approximately 10 meters (32.8 ft). ■Electromagnetic InterferenceWhen you use a Bluetooth® headset, pay attention to the following:Bluetooth® devices operate in the 2.4 GHz band.The 2.4 GHz band is also used by other devices, such as Wireless LAN products, microwave ovens, RFID systems, amateur radio stations, and so on. When using the Bluetooth® headset near such devices, interference may occur, causing a decrease in communication speed, and an unstable connection.In such cases, use the headset away from the other devices, or stop using those headsets.The Bluetooth® communication range may vary, depending on your operating environment.Microwave ovens or Wireless LANs may cause interference. In that case, stop using those devices or move away from them.This Bluetooth® headset has a usable range. If communication is unstable, move within the range.Bluetooth®Transceiver with theUT-133A Bluetooth® unitOptional Vs-3Bluetooth® headset](https://usermanual.wiki/ICOM-orporated/369700/User-Guide-2852553-Page-13.png)
![73Bluetooth® OPERATION ■Pairing with a headsetThese instructions describe pairing with the VS-3 Bluetooth® headset as example. You can pair a maximum of 7 Bluetooth® headsets with the transceiver.• If you try to pair a Bluetooth® headset to a transceiver that already has 7 headsets paired with it, the oldest headset will automatically be unpaired.1. Turning ON transceiver’s Bluetooth® function 1) Open the “BLUETOOTH FUNC” menu. 2) Activate the Bluetooth® unit. ➥ Select “ON” and push [ /MHz/GRP].2. Entering the Pairing mode of the VS-3 • See the VS-3’s instruction manual for details.3. Pairing the Bluetooth® headset 1) Open the “DEVICE SEARCH” menu. 3) Select the desired headset to pair. ➥ Push [∫] or [√] and then push [ /MHz/GRP]. • A passkey or PIN code may be required to pair, depending on the headset. Refer to your headset’s instructions for details. 4) Exit the Menu mode. ➥ Push [ ]. • “ ” is displayed if the headset is correctly paired. ■Connecting a paired headsetIf you have a previously paired headset, follow the steps below to connect it. 1) Open the “PAIR/CONNECT” menu. MENU > BLUETOOTH > PAIR/CONNECT • The paired headsets are displayed.2) Select the desired headset to connect. ➥ Push [∫] or [√] and then push [ /MHz/GRP]. • “CONNECT” and “UNPAIR” is displayed.3) Connect the headset. ➥ Select “CONNECT” and then push [/MHz/GRP]. • The check mark “4” in the box is displayed.4) Exit the Menu mode. ➥ Push [ ]. 2) Search for a headset to pair. ➥ Select “HEADSET” and push [/MHz/GRP]. • The found headsets are displayed. • “NOT FOUND” is displayed if no headset is found. • Push [MENU/CLR] to cancel searching. • The headset name changes to its Bluetooth® device address in 5 seconds.MENU > SETTINGS > BLUETOOTH > BLUETOOTH FUNCMENU > BLUETOOTH > PAIR/CONNECT >DEVICE SEARCH](https://usermanual.wiki/ICOM-orporated/369700/User-Guide-2852553-Page-14.png)
![83Bluetooth® OPERATION 03 ■Setting AF OutputYou can select the AF output option in the “AF OUTPUT” menu.MENU > SETTINGS > BLUETOOTH > HEADSET SET > AF OUTPUTHEADSET: Outputs audio to the connected Bluetooth® headset.HEADSET & SPEAKER: Outputs audio to both the connected Bluetooth® headset and the transceiver’s speaker.You can disconnect from a headset without cancelling the pairing. 1) Open the “PAIR/CONNECT” menu. MENU > BLUETOOTH > PAIR/CONNECT• The connected headsets are displayed.2) Select the desired headset to disconnect. ➥ Push [∫] or [√] and then push [ /MHz/GRP]. • “DISCONNECT” is displayed. ■ Disconnecting a headset3) Disconnect the headset. ➥ Push [ /MHz/GRP], and then select [YES]. • The check mark “4” in the box disappears.4) Exit the Menu mode. ➥ Push [ ]. ■ Unpairing a headsetYou can unpair a Bluetooth® headset.Before unpairing a connected headset, disconnect it. 1) Open the “PAIR/CONNECT” menu. MENU > BLUETOOTH > PAIR/CONNECT • The paired headsets are displayed.2) Select the desired headset to unpair. ➥ Push [∫] or [√] and then push [ /MHz/GRP].3) Unpair the headset. ➥ Select “UNPAIR” and push [ /MHz/GRP]. • The headset name disappears from the “PAIR/CONNECT” menu.4) Exit the Menu mode. ➥ Push [ ].](https://usermanual.wiki/ICOM-orporated/369700/User-Guide-2852553-Page-15.png)
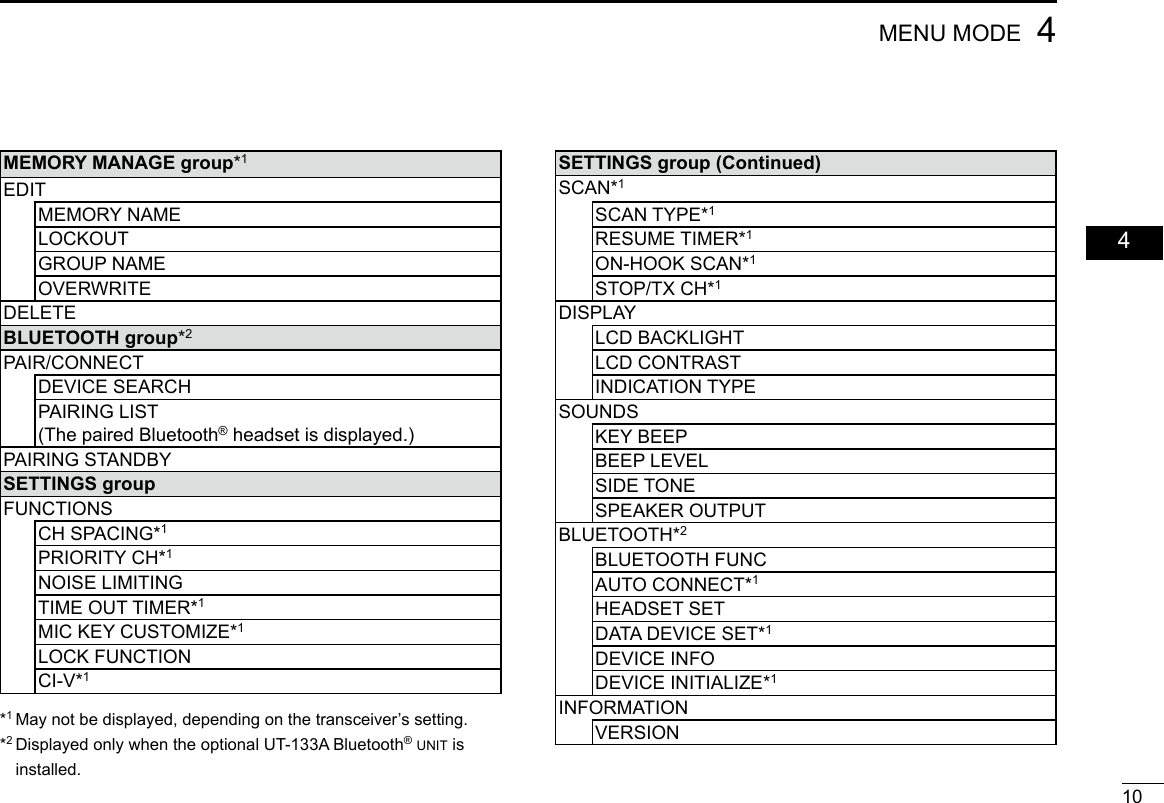
![■Using the Menu modeYou can set seldom changed settings in the Menu mode. You can customize the transceiver settings to suit your preference and operating style.Example: Turning OFF the key beep.94MENU MODE1) Enter the Menu mode. ➥ Push [MENU/CLR].2) Open the “SETTINGS” menu. ➥ Push [∫] or [√], and then push [ /MHz/GRP].3) Open the “SOUNDS” menu. ➥ Push [∫] or [√], and then push [ /MHz/GRP].4) Open the “KEY BEEP” menu. ➥ Push [∫] or [√], and then push [ /MHz/GRP].5) Select OFF. ➥ Push [∫] or [√], and then push [ /MHz/GRP].6) Exit the Menu mode. ➥ Push [ ].■ Menu item listThe list on this basic manual shows the transceiver’s menu items.See the FULL MANUAL for each menu item’s details. You can download the FULL MANUAL from the Icom website, shown below.http://www.icom.co.jp/world/support/download/manual/index.phpThe menu items contained in the transceiver may be different, depending on the transceiver’s setting. Ask your dealer or transceiver administrator for details.VFO MODE/MEMORY MODE group(For only EXP, USA, and EUR versions.)VFO MODE/MEMORY MODEMEMORY WRITE group(May not be displayed, depending on the transceiver’s settings.)MEMORY NAMELOCKOUTGROUPGROUP NAMEWRITE](https://usermanual.wiki/ICOM-orporated/369700/User-Guide-2852553-Page-16.png)
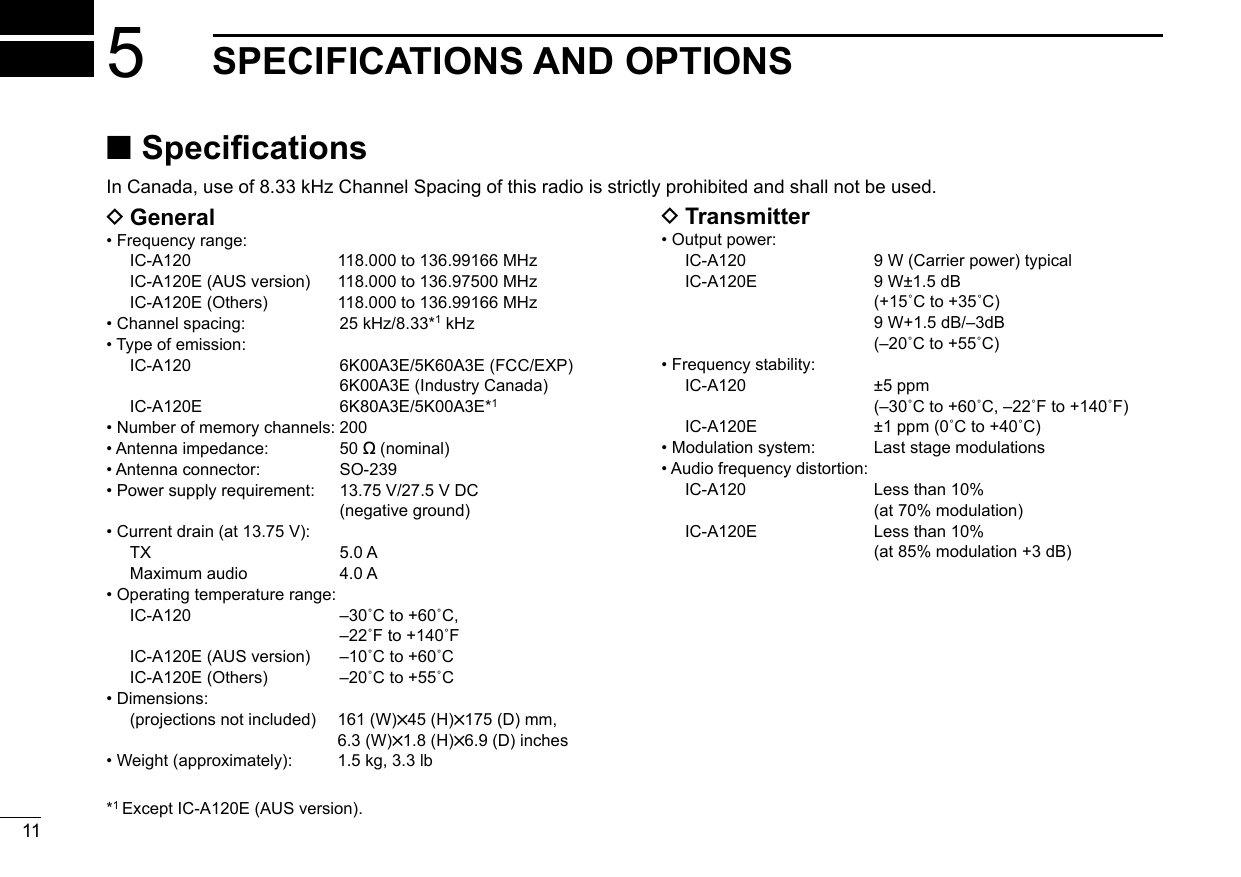
![• Spurious emissions: IC-A120 Less than –60 dBc IC-A120E*2 9 kHz to 30 MHz Less than –46 dBm 30 MHz to 1 GHz Less than –36 dBm (For Harmonics) Less than –46 dBm (For Non-Harmonics) 1 GHz to 4 GHz Less than –30 dBm (For Harmonics) Less than –40 dBm (For Non-Harmonics) DReceiver• Receive system: Double conversion superheterodyne• Intermediate frequencies: 1st 38.85 MHz 2nd 450 kHz• Sensitivity: IC-A120 Less than 1 μV (pd) (at 6 dB S/N) IC-A120E Less than –101 dBm (12 dB SINAD with CCITT)• Squelch sensitivity: IC-A120 Less than 0.35 μV (pd) IC-A120E Less than –116 dBm• Spurious response rejection ratio: IC-A120 More than 5 mV (pd) IC-A120E More than 70 dB125SPECIFICATIONS AND OPTIONS 05Approved Icom optional equipment is designed for optimal performance when used with an Icom transceiver.Icom is not responsible for the destruction or damage to an Icom transceiver in the event the Icom transceiver is used with equipment that is not manufactured or approved by Icom.• Audio output power: External speaker More than 10 W (at 13.75 V DC with 8 Ω load 60% mod, 10% distortion) Side tone More than 100 mW (at 13.75 V DC with 500 Ω load 60% mod, 10% distortion) ■OptionsHM-217 speaker micrOphOneThe speaker microphone with [∫]/[√] keys and [P1]/[P2] keys.VS-3 Bluetooth® headsetThe Bluetooth® headset with a [PTT] switch.UT-133A Bluetooth® unitOPC-871A headset adapterThe adapter to connect a standard headset.All stated specications are subject to change without notice or obligation.*2 Except for operating frequency ±1 MHz.](https://usermanual.wiki/ICOM-orporated/369700/User-Guide-2852553-Page-19.png)