ICOM orporated IC-706MK2G Receiver portion of amateur transceiver User Manual manual
ICOM Incorporated Receiver portion of amateur transceiver manual
UserManual.wiki
>
ICOM orporated
>
IC 706MK2G User Manual
manual
Navigation menu
Upload a User Manual
Namespaces
Wiki Guide
HTML
PDF
Info
Views
User Manual
Discussion / Help
Navigation
![EXPLICIT DEFINITIONSPRECAUTIONSIMPORTANTRead this instruction manual carefullybefore attempting to operate the transceiver. Save this instruction manual. This instructionmanual contains important safety and operatinginstructions for the IC-706MKIIG.RWARNING HIGH VOLTAGE! NEVERattach an antenna or internal antenna connector dur-ing transmission. This may result in an electrical shockor burn.RNEVER apply AC to the [DC13.8V] socket on thetransceiver rear panel. This could cause a fire or ruinthe transceiver.RNEVER apply more than 16 V DC, such as a 24 Vbattery, to the [DC13.8V] socket on the transceiverrear panel. This could cause a fire or ruin the trans-ceiver.RNEVER let metal, wire or other objects touch anyinternal part or connectors on the rear panel of thetransceiver. This will cause electric shock.RNEVER expose the transceiver to rain, snow orany liquids.NEVER allow children to play with the transceiver.AVOID using or placing the transceiver in areas withtemperatures below –10°C (+14°F) or above +60°C(+140°F). Be aware that temperatures on a vehicle’sdashboard can exceed 80°C, resulting in permanentdamage to the transceiver’s front panel if left there forextended periods.AVOID placing the transceiver in excessively dustyenvironments or in direct sunlight.AVOID placing the transceiver against walls or puttinganything on top of the transceiver. This will obstructheat dissipation.During mobile operation, DO NOT operate the trans-ceiver without running the vehicle’s engine. Whentransceiver power is ON and your vehicle’s engine isOFF, the vehicle’s battery will soon become exhausted.Make sure the transceiver power is OFF before start-ing the vehicle. This will avoid possible damage to thetransceiver by ignition voltage spikes.During maritime mobile operation, keep the transceiv-er and microphone as far away as possible from themagnetic navigation compass to prevent erroneousindications.BE CAREFUL!The heatsink will become hot whenoperating the transceiver continuously for long periods.BE CAREFUL! If a linear amplifier is connected, setthe transceiver’s RF output power to less than the lin-ear amplifier’s maximum input level, otherwise, the lin-ear amplifier will be damaged.Use Icom microphones only (supplied or optional).Other manufacturer’s microphones have different pinassignments and connection to the IC-706MKIIG maydamage the transceiver.Beat signals may be heard on some frequencies.These will occur as a result of circuit construction.For U.S.A. onlyCaution: Changes or modifications to this transceiver, notexpressly approved by Icom Inc., could void your author-ity to operate this transceiver under FCC regulations.The explicit definitions described below apply to thisinstruction manual.The IC-706MKIIG Europe version complies withessential requirements of the 89/336/EEC direc-tive for Electromagnetic Compatibility under theconditions listed below. This compliance is based on confor-mity with the European harmonized standard ETS300 684Jan. 1997 (EMC product standard for Commercially AvailableAmateur Radio Equipment).Condition:• In combination with PS-85•When connected to a power supply via OPC-639WORD DEFINITIONRWARNING Personal injury, fire hazard or electricshock may occur.CAUTION Equipment damage may occur.NOTE If disregarded, inconvenience only. No riskof personal injury, fire or electric shock.](https://usermanual.wiki/ICOM-orporated/IC-706MK2G/User-Guide-19246-Page-2.png)
![■Front panelqPOWER SWITCH [POWER] (p. 15)Turns power ON and OFF.•Push momentarily to turn power ON.• Push for 2 sec. to turn power OFF.wAF GAIN CONTROL [AF] (inner control; p. 15)Rotate clockwise to increase the audio output fromthe speaker; rotate counterclockwise to decreasethe audio output from the speaker.eRF GAIN CONTROL/SQUELCH CONTROL[RF/SQL] (outer control; p. 22)➥Adjusts the squelch threshold level (to mute noisewhen receiving no signal) in all modes.➥This control can be used for RF gain control toadjust receiver gain manually.•RF gain selection can be set in initial set mode (p. 50).•RF gain is usable in SSB/CW/RTTY modes only.rFUNCTION DISPLAYShows the operating frequency, dot matrix indica-tions, selected memory channel, etc. See p. 7 fordetails.tTUNING STEP SWITCH [TS] (pgs. 17, 18)➥Push momentarily to cycle between 1 Hz/10 Hz,programmable and 1 MHz tuning steps.•1 and 10 Hz steps are only available in SSB, CW andRTTY modes; 1 MHz steps are only available in FM,WFM and AM modes.➥Push for 2 sec. to toggle between 1 and 10 Hzsteps, or; when the programmable tuning steps isindicated, push for 2 sec. to enter programmabletuning step mode.yMODE SWITCH [MODE] (p. 19)➥Push momentarily to cycle through the operatingmodes:USB/LSB ➧CW/CWå➧RTTY/åRTTY ➧➧FM/WFM/AM➥Push and hold for 2 sec. to toggle between thefollowing operating modes:USB ↔LSBCW ↔CWåRTTY↔åRTTYFM →WFM →AM →FM, etc.uRECEIVE/TRANSMIT INDICATORS [RX]/[TX][RX] lights green while receiving (and squelchopens); [TX] lights red while transmitting.iMAIN DIALChanges the displayed frequency, selects initial setmode items, etc.oUP/DOWN (BAND) SWITCHES [Y/Z(BAND)]➥Push to select a band.•Can also be used to advance quick set mode items,initial set mode items, etc.➥Push and hold to scroll through the bands contin-uously.!0 MAIN DIAL TENSION LATCHSelects the main dial tension.•2 positions are available.!1 MICROPHONE CONNECTOR (p. 8)Modular-type microphone connector—connects thesupplied microphone (HM-103).•The optional OPC-589 can be used to connect an 8-pinmicrophone such as the SM-8 or SM-20, if desired.•A microphone connector is also available on the rear1PANEL DESCRIPTION](https://usermanual.wiki/ICOM-orporated/IC-706MK2G/User-Guide-19246-Page-4.png)
![21PANEL DESCRIPTIONpanel. DO NOT connect 2 microphones simultaneously.!2 LOCK SWITCH [LOCK]➥Push momentarily to turn the dial lock functionON and OFF.•The dial lock function electronically locks the maindial.➥When the optional UT-102 VOICE SYNTHESIZERUNITis installed (p. 52), push for 2 sec. to havethe frequency, etc. announced.•UT-102 operation can be adjusted in initial set mode(pgs. 53, 54).!3 DISPLAY SWITCH [DISP] (p. 67)➥Push momentarily to select one of the three menusets: M1 to M4,S1 to S3 and G1 to G4.➥Push for 2 sec. to select quick set mode.!4 FUNCTION SWITCHES [F1]/[F2]/[F3] (pgs. 3, 4, 67)Push to select the function indicated in the dotmatrix display above these switches.•Functions vary depending on the menu set selected.!5 MENU SWITCH [MENU] (p. 67)➥Push this switch one or more times to selectmenus within a menu set (M,Sor G), or push toadvance through the quick set mode and initialset mode displays.➥Push and hold to jump between two differentfunction menu sets.!6RIT/SUB DIAL SWITCH [RIT/SUB] (p. 20)➥Push to toggle the RIT or SUB DIAL function ONand OFF—initial set mode is used to select thedesired action*.•Lights green when the SUB DIAL function is ON;lights red when the RIT function is ON.•Use the [M-CH] control to vary the RIT frequency orSUB DIAL frequency (see above).➥When the RIT function is ON, push for 2 sec. toadd or subtract the shifted frequency to the oper-ating frequency.*Even if RIT is selected in initial set mode, RIT cannot beselected when operating AM, FM or WFM modes.!7 SHIFT CONTROL [SHIFT] (outer control; p. 20)Shifts the center frequency of the receiver’s IF pass-band.•Rotate the control clockwise to shift the center frequen-cy higher, or rotate the control counterclockwise to shiftthe center frequency lower.•When the graphic menu display (G2) is selected, the IFpassband is graphically displayed and changes in accor-dance with the [SHIFT] control (see p. 20).!8 M-CH CONTROL [M-CH] (inner control)➥When the RIT or SUBDIAL functions are OFF,rotate to select a memory channel number (p. 35).➥Shifts the receive frequency while the RIT func-tion is ON in SSB, CW and RTTY modes (seebelow and p. 20).•RIT variable range is ± 9.99 kHz➥Changes the operating frequency in the selectedtuning steps while the SUB DIAL function is ON(p. 18).!9 HEADPHONE JACK [PHONES] (p. 12)Accepts headphones with 4–16 Ω impedance.•When headphones are connected, no receive audiocomes from the speaker.•When the PHONES/SPEAKER switch on the back of thefront panel is set to the [SPEAKER] position, an externalspeaker can be connected. This is convenient for mobileor outdoor operation.@0 TUNER/CALL SWITCH [TUNER/CALL](pgs. 26, 27)➥During HF/50 MHz operation, push this switchmomentarily to toggle the automatic antennatuner function ON/OFF.•An optional antenna tuner must be connected.➥During HF/50 MHz operation, push this switch for2 sec. to manually tune the antenna.•An optional antenna tuner must be connected.➥During 144/430 MHz operation, push this switchmomentarily to select the call channel (or the pre-vious channel/frequency when the call channel isalready selected). (p. 38)•“C1” is the 144 MHz call channel and “C2” is the 430MHz call channel.@1FRONT PANEL LATCH (p. 10)Pull away from the transceiver (towards yourselfwhen looking at the front of the transceiver) todetach the front panel from the main body of thetransceiver.@2 PREAMP/ATTENUATOR SWITCH [P.AMP/ATT](p. 21)➥Push momentarily to turn the preamp ON or OFF.➥Push and hold to turn the 20 dB attenuator ON;push momentarily to turn the attenuator OFF.•Lights green when the preamp is ON; lights red whenthe 20 dB attenuator is ON.](https://usermanual.wiki/ICOM-orporated/IC-706MK2G/User-Guide-19246-Page-5.png)
![■Function switchesDM1 FUNCTIONSSPLIT OPERATION (p. 28)Toggles the split function ON and OFF.•“ä”appears when the split function is ON.•The function of [F-3] changes to XFC when thesplit function is ON.VFO A/B SELECTION (p. 16)➥Toggles between VFO A and VFO B inVFO mode.➥Toggles between transmission VFO andreception VFO during split operation.➥Toggles between the transmit andreceive frequencies (and modes) ofmemory channels when the split func-tion is turned ON.VFO EQUALIZATION (p. 16)Equalizes the frequency and operatingmode of the two VFO’s.•The rear (undisplayed) frequency and operat-ing mode are equalized to the front (displayed)VFO frequency and operating mode.TRANSMIT FREQUENCY CHECK (p. 28)Appears when the split function is turnedON—monitors the transmit frequencywhen pushed and held.•While pushed, the transmit frequency can bechanged with the main dial.DM2 FUNCTIONSMEMORY WRITE (p. 39)Stores the displayed frequency and oper-ating mode into the displayed memorychannel.MEMORY TRANSFER (p. 40)Transfers the frequency and operatingmode in the selected memory channel to aVFO.VFO/MEMORY (p. 38)Toggles between VFO and memorymodes.MEMORY CLEAR (p. 38)Clears the selected memory channel’scontents.•“}” appears.DM3 FUNCTIONSNARROW FILTER (p. 23)Toggles the narrow filter (or wide filter—push for 2 sec.) ON and OFF.•“ã”appears when the narrow filter is ON; “ç”appears when the wide filter is ON.•An optional narrow filter and presetting in initialset mode (p. 50) is necessary to use the fol-lowing:CW/RTTY narrow: FL-100, FL-101 or FL-232SSB narrow: FL-223SSB wide: FL-103NOISE BLANKER (p. 21)Turns the noise blanker ON and OFF.•The noise blanker does not function in FM andWFM modes; the “AM Noise blanker” item ininitial set mode must be set to ON for the noiseblanker to work in AM mode (p. 52).METER SELECTION (p. 24)Selects the type of meter displayed (duringtransmit) in the function display.•Power, ALC or SWR metering can be select-ed.•Only an S-meter is available for receive.DM4 FUNCTIONSDURING SSB/AM OPERATION:DURING CW OPERATION:DURING RTTY OPERATION:1PANEL DESCRIPTION](https://usermanual.wiki/ICOM-orporated/IC-706MK2G/User-Guide-19246-Page-6.png)
![41PANEL DESCRIPTIONDURING FM OPERATION:VOX FUNCTION (p. 25)Toggles the VOX function ON and OFF.•The [VOX GAIN] and [ANTI VOX] are avail-able on the side panel.•VOX delay can be set in quick set mode(p. 47).SPEECH COMPRESSOR (p. 25)Toggles the speech compressor ON andOFF.•The [COMP GAIN] control is available on theside panel.AGC (p. 21)Changes the time constant of the AGC cir-cuit.BREAK-IN (p. 32)Selects semi break-in, full break-in (QSK)and break-in OFF•“BK” or “F-BK” appears when selecting semibreak-in or full break-in, respectively.•An external switch, such as a foot switch, isnecessary to connect to the ACC socket (pin 3,pin 7 or RTTY SEND—see p. 34) to use nobreak-in operation.1/4 FUNCTION (p. 35)Toggles the 1/4 function ON and OFF.•When the 1⁄4function is ON, a bar appearsunder the 1⁄4indication and fine tuning can beused.TONE SQUELCH (p. 30)Toggles the tone squelch function ON andOFF (a tone squelch frequency must beselected in Quick Set mode).•“FM-TSQL” appears when the function is ON.REPEATER TONE OPERATION (p. 29)➥Toggles the subaudible tone encoder forrepeater use ON and OFF.•“FM-T” appears when the function is ON.➥Transmits a 1750 Hz tone burst whenpushed and held during transmission.•Tone frequencies or tone burst can be set ininitial set mode (p. 48).DS1 FUNCTIONSMEMORY WRITE (p. 39)Stores the displayed frequency and oper-ating mode into the displayed memorychannel.MEMO PAD WRITE (p. 41)Stores the displayed frequency and oper-ating mode into a memo pad.MEMO PAD READ (p. 41)Calls up a memo pad.DS2 FUNCTIONSSCAN (p. 43)Starts and stops the scan function.PRIORITY WATCH (p. 43)Starts and stops priority watch.SELECT SCAN (p. 43)Toggles the select setting ON and OFF forthe selected memory channel.VFO/MEMORY (p. 43)Toggles between VFO and memorymodes.DS3 FUNCTIONSQUICK BAND CHANGE FUNCTION (p. 19)This item provides access to the band stacking regis-ter. By default the 7, 50 and 144 MHz bands are dis-played. Push [F-1] to [F-3] for 2 sec. to select a newband if desired.•A mode is memorized along with the frequency for eachband.](https://usermanual.wiki/ICOM-orporated/IC-706MK2G/User-Guide-19246-Page-7.png)
![1PANEL DESCRIPTION■Rear and side panelsqGROUND TERMINAL [GND] (p. 9)Connect this terminal to a ground to prevent electri-cal shocks, TVI, BCI and other problems.wANTENNA CONNECTORS [ANT 1], [ANT 2] (p. 11)Accept a 50 Ω antenna with an PL-259 type plug.•[ANT 1] is for connection to an HF/50 MHz antenna.•[ANT 2] is for connection to 144 MHz antenna.•These connectors are switched above or below 60 MHz.eDATA JACK [DATA] (p. 12)6-pin min DIN jack to connect a TNC, etc. for pack-et operation.rACCESSORY SOCKET [ACC] (p. 6)Enables connection to external equipment such asa TNC for data communications, a linear amplifier oran automatic antenna selector/tuner, etc.•See page at right for socket information.tRTTY JACK [RTTY] (p. 34)Connects an external terminal unit for RTTY (FSK)operation.•The keying polarity and mark/shift frequencies can beselected in quick set mode (p. 47).yCI-V REMOTE CONTROL JACK [REMOTE](p. 44)Designed for use with a personal computer forremote operation of transceiver functions.uMICROPHONE CONNECTOR [MIC] (p. 11)Accepts the supplied microphone (connected in par-allel with the front panel’s [MIC] connector).•See pgs. 1 and 2 for microphone notes.•See p. 8 for microphone connector information.iELECTRONIC KEYER JACK [KEY] (p. 32)Accepts a paddle to activate the internal electronickeyer.•Selection between the internal electronic keyer andstraight key operation can be made in quick set mode.(p. 48)oDC POWER SOCKET [DC13.8V] (p. 13)Accepts 13.8 V DC through the supplied DC powercable.!0 EXTERNAL SPEAKER JACK [EXT SP] (p. 12)Accepts a 4–16 Ω speaker.!1 TUNER CONTROL SOCKET [TUNER] (p. 12)Accepts the control cable from an optional AH-3 HFAUTOMATIC ANTENNA TUNER.!2 SPEECH COMPRESSION LEVEL CONTROL[COMP GAIN] (p. 25)Adjusts the compression level.•This control is available only when the speech compres-sor is ON.](https://usermanual.wiki/ICOM-orporated/IC-706MK2G/User-Guide-19246-Page-8.png)
![•ACC SOCKET•When connecting the ACC conversion cable (OPC-599)61PANEL DESCRIPTION!3 BEEP/SIDETONE CONTROL [BEEP/SIDETONE] Adjusts the beep tone and CW side tone audio lev-els.TECHNICAL INFORMATIONACC PIN # NAME DESCRIPTION SPECIFICATIONS COLOR1 8 V Regulated 8 V output. Output voltage : 8 V ±0.3 VOutput current : Less than 10 mA brown2 GND Connects to ground. red3 HSENDInput/output pin (HF/50 MHz).Goes to ground when transmitting.When grounded, transmits (connected to 8Vline thru 2.2 kΩ resistance/144 MHz operation).Ground level : –0.5 V to 0.8 VInput current : Less than 20 mA(HF/50 MHz bands) orange4 BDT Data line for the optional AT-180. yellow5 BAND Band voltage output.(Varies with amateur band) Output voltage : 0 to 8.0 V green6 ALC ALC voltage input. Control voltage : –4 to 0 VInput impedance : More than 10 kΩblue7 VSENDInput/output pin (144 MHz).Goes to ground when transmitting.When grounded, transmits (connected to 8Vline thru 2.2 kΩ resistance/HF•50 MHz operation).Ground level : –0.5 V to 0.8 VInput current : Less than 20 mA(144 MHz band) purple8 13.8 V 13.8 V output when power is ON. Output current : Max. 1 A gray9 TKEY Key line for the AT-180. white10 FSKK RTTY keying input.Connected in parallel to the [RTTY] jack. Ground level :–0.5 to 0.8 VInput current : Less than 10 mA black11 MOD Modulator input. Input impedance :10 kΩInput level :Approx. 100 mVrms pink12 AF AF detector output.Fixed, regardless of [AF] position. Output impedance :4.7 kΩOutput level : 100 to 350 mV rms lightblue13 SQLS Squelch output.Goes to ground when squelch opens. SQL open :Less than 0.3 V/5 mASQL closed :More than 6.0 V/100 µA lightgreenColor refers to thecable strands of thesupplied cable.](https://usermanual.wiki/ICOM-orporated/IC-706MK2G/User-Guide-19246-Page-9.png)
![1PANEL DESCRIPTION■Function displayqNARROW/WIDE FILTER INDICATORS➥“ã” appears when selecting AM narrow or FMnarrow modes.➥When installing an optional narrow filter, narrowmode can be selected in CW, RTTY and SSBmodes.•When the SSB wide filter is installed, “ç” appearsduring wide mode selection.wMODE INDICATORSShow the operating mode.ePROGRAMMABLE/1 MHz TUNING STEPINDICATORS➥ ➌a appears when the programmable tuning stepis selected.➥ ➌b appears when the 1 MHz tuning step isselected.rSPLIT INDICATORShows that the split frequency function is activated.tFREQUENCY READOUTShows the operating frequency.•“C” appears in place of the 1 Hz digit when the call chan-nel is selected.yDUPLEX INDICATORS➥“DUP+” appears during plus duplex operation.➥“DUP–” appears during minus duplex operation.uBLANK INDICATORShows that the displayed memory channel is notprogrammed.•This indicator appears both in VFO and memory modes.iVFO/MEMORY INDICATORSVFO A or B appears when VFO mode is selected;MEMO appears when memory mode is selected.oSELECT INDICATORShows that the displayed memory channel is desig-nated as a select memory channel.!0 MEMORY CHANNEL NUMBER READOUTShows the selected memory channel number.!1 DOT MATRIX INDICATORSThese alphanumeric readouts show a variety ofinformation such as current functions of the “F” keys[F1] to [F3], memory channel names, set modeitems, etc. See p. 67 for an overview of these indi-cators.!2 METER READOUTS➥Functions as an S-meter while receiving.➥Functions as a power, ALC or SWR meter whiletransmitting.Note:The SWR meter does not function in the 144MHz band.!3 FUNCTION INDICATORS➥“NB” appears when the noise blanker is activat-ed.➥“VOX” appears when the VOX function is select-ed.➥“F-BK” appears when full break-in operation isselected and only “BK” appears when semibreak-in operation is selected.➥“COM” appears when the speech compressor isactivated.➥“FAGC” appears when the fast AGC function isselected.!4DSP INDICATORSAppear when the optional DSP unit is installed andactivated.](https://usermanual.wiki/ICOM-orporated/IC-706MK2G/User-Guide-19246-Page-10.png)
![•MICROPHONE CONNECTOR81PANEL DESCRIPTION■Microphone (HM-103)➊UP/DOWN SWITCHES [UP]/[DN]Change the operating frequency.•Push and hold to change the frequency continuously.•Tuning step is 50 Hz when no TS indicator appears.➋LOCK SWITCH [LOCK]Locks the [UP]/[DN] switches.➌PTT SWITCH [PTT]Push and hold to transmit; release to receive.TECHNICAL INFORMATIONPIN NO. FUNCTION DESCRIPTION1 +8 V DC output Max. 10 mA2Frequency up GroundFrequency down Ground through 470 Ω8Squelch open “LOW” levelSquelch closed “HIGH” level•HM-103 SCHEMATIC DIAGRAMCaution:DO NOT short pin 1 to ground asthis can damage the internal 8 V regulator.](https://usermanual.wiki/ICOM-orporated/IC-706MK2G/User-Guide-19246-Page-11.png)
![2INSTALLATION AND CONNECTIONS■UnpackingAfter unpacking, immediately report any damage tothe delivering carrier or dealer. Keep the shipping car-tons.For a description and a diagram of accessory equip-ment included with the IC-706MKIIG, see UNPACK-ING on p. ii of this manual.■GroundingTo prevent electrical shock, television interference(TVI), broadcast interference (BCI) and other prob-lems, ground the transceiver through the GROUNDterminal on the rear panel.For best results, connect a heavy gauge wire or strapto a long earth-sunk copper rod. Make the distancebetween the GROUND terminal and ground as shortas possible.■AntennaSelect antenna(s), such as a well-matched 50 Ωantenna, and feedline. The transmission line shouldbe a coaxial cable. 1.5 : 1 or better of Vo l t a g eStanding Wave Ratio (VSWR) is recommended foryour required band. Of course, the transmission lineshould be a coaxial cable.CAUTION: Protect your transceiver from lightningusing a lightning arrestor.RWARNING:NEVER connect the [GND] ter-minal to a gas or electric pipe, since the connectioncould cause an explosion or electric shock.ANTENNA SWREach antenna is tuned for a specified frequencyrange and SWR may be increased out-of-range.When the SWR is higher than approx. 2.0:1, thetransceiver’s power drops to protect the final transis-tors. In this case, an optional antenna tuner is usefulto match the transceiver and antenna. Low SWRallows full power for transmitting even when usingthe antenna tuner. The IC-706MKIIG has an SWRmeter to monitor the antenna SWR continuously.](https://usermanual.wiki/ICOM-orporated/IC-706MK2G/User-Guide-19246-Page-12.png)
![2INSTALLATION AND CONNECTIONS■Power supply connectionsUse the optional PS-85 DC POWER SUPPLYwhen oper-ating the IC-706MKIIG with AC power. Refer to thediagram below for connection.C A U T I O N : Before connecting the DC powercable, check the following important items. Makesure:•The [POWER] switch is OFF.•Output voltage of the power source is 12–15 Vwhen you use a non-Icom power supply.•DC power cable polarity is correct.Red : positive (+) terminalBlack : negative (–) terminalNote:When using the PS-85, the IC-706MKIIG Europe version complies withEMC directives even if the OPC-639 isnot used.](https://usermanual.wiki/ICOM-orporated/IC-706MK2G/User-Guide-19246-Page-16.png)
![142INSTALLATION AND CONNECTIONS■External antenna tuners and linear amplifierNote:•Turn the IC-706MKIIG’s powerOFF when connecting the AT-180, otherwise, the CPU maymalfunction and the AT-180may not function properly.•The OPC-742 is required whenusing both the AT-180 and a 2m linear amplifier.Do not connect [ANT 2] to theAT-180. When using an HF to 2 mwide antenna, use a duplexerbetween the AT-180 and antennasince 2 m signals do not passthrough the AT-180.](https://usermanual.wiki/ICOM-orporated/IC-706MK2G/User-Guide-19246-Page-17.png)
![3FREQUENCY SETTING■When first applying power (CPU resetting)Before first applying power, make sure all connectionsrequired for your system are complete by referring tosection 2. Then, reset the transceiver using the fol-lowing procedure.➀Make sure the transceiver power is OFF.➁While pushing [Y] and [Z], push [POWER] to turnpower ON.•The internal CPU is reset.•The transceiver displays as shown at right when reset-ting is complete.DM1 display selectionIf you can’t figure out how to return to the M1 display:While pushing [MENU], turn power ON.■Initial settingsAfter resetting the transceiver, set controls and switch-es as shown in the diagram below.Note:Resetting clears all programmed contents inmemory channels and returns all initial set mode andquick set mode contents to their default values.CCW: counterclockwiseTurn power ON, then check the display. If any of thefollowing indicators appear, turn them OFF as follows:•Tuning step indicators, Z, (SSB, CW or RTTY):Push [TS].•MHz tuning step indicator,Z, (FM, WFM or AM):Push [TS].•1 Hz frequency readout (SSB, CW or RTTY):Push and hold [TS].•Memory mode indicator, MEMO:Use [(F-3)V/M] in the M2 display (p. 67).•Split indicator, ä:Use [(F-1)SPL] in the M1 display (p. 67).](https://usermanual.wiki/ICOM-orporated/IC-706MK2G/User-Guide-19246-Page-18.png)
![163FREQUENCY SETTING■VFO description VFO is an abbreviation of Variable FrequencyOscillator, and traditionally refers to an oscillator. TheIC-706MKIIG’s VFO can store a frequency and anoperating mode.You can call up a desired frequency to a VFO with thememo pad-read switch (p. 41) or with the memorytransfer switch (p. 41). You can also change the fre-quency with the main dial and select an operatingmode with the [MODE] switch or call up previouslyaccessed frequency and modes with the band stack-ing register (p. 19).The IC-706MKIIG has two VFOs, specially suited forsplit frequency operation. The VFOs are called VFO Aand VFO B. You can use the desired VFO to call up afrequency and operating mode for operation.•The differences between VFO and memory modeVFO MODEEach VFO shows a frequency and operating mode. Ifthe frequency or operating mode is changed, theVFO automatically memorizes the new frequency oroperating mode.When the VFO is selected from another VFO ormemory mode, the last-used frequency and operat-ing mode for that VFO appear.[EXAMPLE]MEMORY MODE (pgs. 38–41)Each memory channel shows a frequency and oper-ating mode like a VFO. Even if the frequency ormode is changed, the memory channel does notmemorize the new frequency or memory mode.When a memory channel is selected from anothermemory channel or VFO mode, the memorized fre-quency and operating mode appear.[EXAMPLE]](https://usermanual.wiki/ICOM-orporated/IC-706MK2G/User-Guide-19246-Page-19.png)
![3FREQUENCY SETTING•Programmable tuning stepsProgrammable tuning steps are available to suit youroperating requirements.These tuning steps are:•Independently selectable for each mode•Selectable from 0.01 (FM/WFM/AM only), 0.1, 1, 5,9, 10, 12.5, 15, 20 and 100 kHz➀Push [TS] one or more times until the programma-ble tuning step indicator, “Z,” appears above the1 kHz digit.•Rotating the main dial changes the frequency accordingto the set tuning step.➁Push [TS] for 2 sec. while the programmable tun-ing step indicator appears to enter the tuning stepselection mode.•Rotate DIAL appears.➂Rotate the main dial to set the desired tuning step.•Change the mode and select tuning steps for othermodes, if desired.➃Push [TS] to exit the tuning step selection mode.➄Rotate the main dial to change the frequencyaccording to the set tuning step.•Band selectionAll HF ham bands, the 50 MHz band, the 144 MHzband and a general coverage receiver band areincluded in the IC-706MKIIG.Push [(Y)BAND]/[(Z)BAND] to select the desiredband.•Pushing [(Y)B A N D ] / [(Z)BAND] continuously scrollsthrough the available bands.Note:The band stacking register can also be used toselect bands. Refer to p. 19.■Frequency setting•1 Hz and 10 Hz tuning stepsWhen neither the quick tuning step or programmabletuning step, “Z,” appear, rotating the main dialchanges the frequency in increments of 1 or 10 Hz.These tuning steps are only available in SSB, CWand RTTY modes.➀Select SSB, CW or RTTY mode if necessary.➁Push [TS] for 2 sec. to toggle between the 1 and10 Hz step settings.•When the 1 Hz step is selected, the 1 Hz digit appearsin the frequency indication; when the 10 Hz step isselected, the 1 Hz digit disappears from the frequencyindication.](https://usermanual.wiki/ICOM-orporated/IC-706MK2G/User-Guide-19246-Page-20.png)
![183FREQUENCY SETTING•1 MHz quick tuning stepThe quick tuning step function allows you to changethe frequency in 1 MHz steps when rotating the maindial. This function is only available in FM, WFM andAM modes.➀Select FM, WFM or AM mode if necessary.➁Push [TS] momentarily to toggle between the 1MHz tuning step and the programmable tuningstep.•“Z” appears above the 1 MHz indicator when the 1MHz tuning step is selected.•When the 1 MHz tuning step is selected, slow rotationof the main dial changes the frequency in 1 MHz stepsand fast rotation of the main dial changes the frequen-cy in 5 MHz steps.•Sub dial functionThe sub dial function allows you to change the oper-ating frequency using the [M-CH] control. This givesyou more control in tuning since the [M-CH] knob isdetented—each click changes the frequency accord-ing to the set tuning step. This function is alwaysavailable in FM, WFM and AM modes. However, inSSB, CW and RTTY modes, the set mode item “Subdial function,” must be set to “FrEq.”➀Push [RIT/SUB] to turn the sub dial function ON.•The [SUB] indicator lights green; if it lights red, the RITfunction is activated—sub dial function must be set ininitial set mode in this case.➁Rotate [M-CH] to change the operating frequencyaccording to the set tuning steps.➂Push [RIT/SUB] again to turn the function OFF.•The [SUB] indicator turns off.](https://usermanual.wiki/ICOM-orporated/IC-706MK2G/User-Guide-19246-Page-21.png)
![3FREQUENCY SETTING•Quick band change functionThe quick band change function automatically storesthe last frequency and mode used for each band in aband stacking register. This is convenient for contestoperation, etc. The tables below show the quick bandchange default settings for each band.➀Select S3.•Push [DISPLAY] when M or G is displayed.•Push [MENU] twice to select S3.➁Push [F-1]–[F-3] to select a band stacking register.•The default settings for [F-1]–[F-3] are 7, 144 and 430MHz bands, respectively.➂To change the settings for [F-1]–[F-3] from theirdefaults, push [F-1]–[F-3] for 1 sec. one or moretimes to until the desired band appears in the dis-play above the corresponding switch.•The last-used frequency and mode for the selectedband are displayed.*General refers to the general coverage receiver (GEN inthe display) and the range varies according to version.■Mode selectionThe following modes are available in the IC-706MKIIG:SSB (LSB/USB), CW, CW-å(CW reverse), FM,WFM (receive only), AM, RTTY and åRTTY (RTTYreverse).To select the desired mode of operation push[MODE] one or more times, then push [MODE] for 2sec., if necessary. See the diagram at right for theorder of selection.•The selected mode is indicated in the function display.Note:If a desired mode cannot be selected, it may behidden using Initial Set mode (p. 49).BAND FREQUENCY MODE18 MHz 18.15000 MHz USB21 MHz 21.30000 MHz USB24 MHz 24.95000 MHz USB28 MHz 28.60000 MHz USB50 MHz 50.10000 MHz USB144 MHz 145.00000 MHz FMBAND FREQUENCY MODE1.9 MHz 1.91000 MHz CW3.5 MHz 3.56000 MHz LSB7 MHz 7.06000 MHz LSB10 MHz 10.13000 MHz CW14 MHz 14.10000 MHz USBGeneral* 15.10000 MHz USB430 MHz 433.00000 MHz FM](https://usermanual.wiki/ICOM-orporated/IC-706MK2G/User-Guide-19246-Page-22.png)
![204RECEIVE AND TRANSMITThe IF shift function electronically changes the pass-band frequency of the IF (intermediate frequency)and cuts out higher or lower frequency componentsof the IF to reject interference. The function shifts theIF frequency up to ±1.2 kHz in 15 Hz steps inSSB/CW/RTTY modes and up to ±250 Hz in 3 Hzsteps in CW-ã/RTTY-ãmodes. The IF shift is notavailable in FM and AM modes.➀Adjust the [SHIFT] control for a minimum interfer-ence signal level.•The audio tone may be changed while the IF shift is inuse.➁Set the shift control to its center position whenthere is no interference.•Graphic displayThe IF shift is displayed graphically (for about 1 sec.)each time the shift control is rotated.DRIT functionThe RIT (Receive Incremental Tuning) function com-pensates for off-frequencies of communicating sta-tions. The function shifts the receive frequency up to±9.99 kHz in 10 Hz steps without moving the transmitfrequency. The [SUB/RIT] switch in Initial Set Modemust be set to RIT mode in advance (p. 50).➀Push [RIT].•The [RIT] indicator lights red.➁Rotate the [M-CH] control to cancel the off-fre-quencies.•The transmit frequency is not shifted.➂To cancel the RIT function, push [RIT] again.•The [RIT] switch indicator goes out.•Calculate functionThe shift frequency of the RIT function can beadded/subtracted to the displayed frequency.While the RIT indicator is lit, push and hold [RIT] for2 sec.Note:The RIT function is not available in FM, WFMor AM modes regardless of the Initial Set mode set-ting (p. 50).DIF shift function■Functions for receive](https://usermanual.wiki/ICOM-orporated/IC-706MK2G/User-Guide-19246-Page-23.png)
![4RECEIVE AND TRANSMITDNoise blankerThe noise blanker reduces pulse-type noise such asthat generated by automobile ignition systems. Thisfunction is not effective for FM modes or for non pulse-type noise. If you don’t want to use the noise blankerfor AM communications, the “AM noise blanker” itemin Initial Set mode must be turned OFF (ON is thedefault setting—p. 52).➀Select M3.•Push [DISPLAY] 1 or 2 times when Sor Gis displayed.•Push [MENU] one or more times to select M3.➁Push [(F-2)NB] to toggle the noise blanker ON andOFF.•“NB” appears when the noise blanker is turned ON.DAGC time constantThe AGC (Automatic Gain Control) controls receivergain to produce a constant audio output level evenwhen the received signal strength is varied by fading,etc. Use AGC slow for normal phone operation; AGCfast for receiving data and searching for signals.AGC time constant cannot be changed in FM mode.➀Select M4.•Push [DISPLAY] 1 or 2 times when Sor Gis displayed.•Push [MENU] one or more times to select M4.➁Push [(F-3)AGC] to toggle the AGC time constantbetween fast and slow.•“FAGC” appears when the fast time constant is selected.DPreamp and attenuatorThe preamp amplifies received signals in the frontend circuit to improve the S/N ratio and sensitivity.Turn this function ON when receiving weak signals.The attenuator prevents desired signals from distort-ing when very strong signals are near the desired fre-quency or when very strong electric fields, such asfrom broadcasting stations, are near your location.Push [P.AMP/ATT] momentarily to turn the preampON and OFF; push and hold to turn the attenuator ON.•Lights green when the preamp is ON; lights red whenthe 20 dB attenuator is ON.• Only one of these functions can be activated at a time.DPeak meter holdThe peak meter hold function freezes the highest dis-played bar segment in any meter function for about0.5 sec. so that you can more easily read the meter.This function can be turned ON and OFF in initial setmode (see p. 50).INITIAL SET MODE](https://usermanual.wiki/ICOM-orporated/IC-706MK2G/User-Guide-19246-Page-24.png)
![224RECEIVE AND TRANSMITDRF gain and squelchDSimple band scopeThe IC-706MKIIG uses the same control, [RF/SQL],to adjust one of either the RF gain or the squelch.[RF/SQL] adjusts either the RF gain or the squelchdepending on the operating mode selected and thecondition of the RF gain item in initial set mode (p.50; also see the table at right).The RF (Radio Frequency) gain is used to adjust thereceiver gain.•This control should be set to the 11 o’clock position fornormal use.•Shallow rotation moves the S-meter to the right indicatingthe signal strength which can be received.The S Q U E L C H removes noise output from thespeaker (closed condition) when no signal isreceived. The squelch is particularly effective for FM.It is also available for the other modes.•When operating in FM, first rotate the control fully coun-terclockwise. Then, rotate the control clockwise to thepoint where the noise just disappears. This is the bestposition. The squelch does not open for weak signalswhen it is set too deep.•A segment appears in the S-meter to indicate the S-metersquelch level.•[RF/SQL] control priorityThis function allows you to visually “sweep” an areasurrounding the set frequency for other signals.Detected signals are indicated graphically in the dotmatrix section of the display.➀Set a mode and frequency.➁Select G1.•Push [DISPLAY] 1 or 2 times if Mor Sappears.•Push [MENU] one or more times to select G1.➂Push [F-1] one or more times to select the desiredsteps.•Each dot corresponds to a step for the indicated fre-quency.•0.5, 1, 2, 5, 10, 20 and 100 kHz can be set for the scopestep.➃Push [F-3] to start the sweep.•“___” (below SWP) flashes while sweeping.•The receive audio is muted while sweeping.➄Rotate the main dial if you want to monitor the dis-played signals.•The sweep marker indicates the location of the dis-played frequency in the sweep readout.•If the displayed frequency is outside of the sweep read-out (determined by the sweep width), the sweep mark-er flashes.➅Push [F-2] to return the frequency to the start of asweep.•The sweep marker moves back to the center position.N o t e : The recommendedposition for RF gain is the11 o’clock position sincethis sets RF gain to themax.When set to AUTO, SQL isactive in FM/WFM/AM; RFis active inNote: Use the attenuator or turn OFF the preamp whenusing the band scope on a band containing a lot of noise.Initial set modesetting USB, LSB,CW, RTTY AM, FM, WFMSQL*1SQL SQLAUTO RF GAIN SQLRF •SQL*2RF/SQL RF/SQL*1Default; *2Default for USA version.](https://usermanual.wiki/ICOM-orporated/IC-706MK2G/User-Guide-19246-Page-25.png)
![Filter variations*Optional filter.Optional filter installation and selection tablesSSB4RECEIVE AND TRANSMITDOptional filter selectionTwo optional filters can be installed in the IC-706MKIIG.Narrow filters help reject interference from adjacentsignals and obtain good selectivity.Wide filters provide improved audio for SSB opera-tion when no interfering signals are present.Consult the table below to select a filter most suitablefor your operating needs.Narrow filters for AM/FM modes are standard.FILTER PRESETTING:After you install a filter (see p. 59 for installation), youmust specify the installed filter in initial set mode(item 19 “OPT. FIL 1” or item 20 “OPT. FIL 2”; seep. 50).FILTER ON/OFF:➀Select M3.• Push [DISPLAY] 1 or 2 times if Gor Sappears.•Push [MENU] one or more times to select M3.➁Push [(F-1)FIL] momentarily to select the narrowfilter; for 2 sec. to select the wide filter.•ãappears when the narrow filter is selected; çappears when the wide filter is selected.Note:When selecting the narrow filter, the graphicpassband is narrowed (see diagram below).FL-101* CW, RTTY 250 Hz/–6 dBCW, RTTY 350 Hz/–6 dBCW, RTTY 500 Hz/–6 dBSSB, CW, RTTY 2.8 kHz/–6 dBFL-223* SSB, CW, RTTY 1.9 kHz/–6 dBSSB, CW, RTTY 2.4 kHz/–6 dBAM, FM 8 kHz/–6 dBMode Band widthNameFIL 1FIL 2Nooptionalfilter FL-100 FL-101 FL-103 FL-223 FL-232NooptionalfilterW:–––M:FL-272N:–––W:–––M:FL-272N:–––W:–––M:FL-272N:–––W:FL-103M:FL-272N:–––W:– ––M:FL-272N:FL-223W:–––M:FL-272N:–––FL-100 W:–––M:FL-272N:–––W:–––M:FL-272N:–––W:–––M:FL-272N:–––W:FL-103M:FL-272N:–––W:– ––M:FL-272N:FL-223W:–––M:FL-272N:–––FL-101 W:–––M:FL-272N:–––W:–––M:FL-272N:–––W:–––M:FL-272N:–––W:FL-103M:FL-272N:–––W:– ––M:FL-272N:FL-223W:–––M:FL-272N:–––FL-103 W:FL-103M:FL-272N:–––W:FL-103M:FL-272N:–––W:FL-103M:FL-272N:–––W:FL-103M:FL-272N:–––W:FL-103M:FL-272N:FL-223W:FL-103M:FL-272N:–––FL-223 W:–––M:FL-272N:FL-223W:–––M:FL-272N:FL-223W:–––M:FL-272N:FL-223W:FL-103M:FL-272N:FL-223W:– ––M:FL-272N:FL-223W:–––M:FL-272N:FL-223FL-232 W:–––M:FL-272N:–––W:–––M:FL-272N:–––W:–––M:FL-272N:–––W:FL-103M:FL-272N:–––W:–––M:FL-272N:FL-223W:–––M:FL-272N:–––FIL 1FIL 2Nooptionalfilter FL-100 FL-101 FL-103 FL-223 FL-232NooptionalfilterW:–––M:FL-272N:–––W:–––M:FL-272N:FL-100W:–––M:FL-272N:FL-101W:FL-103M:FL-272N:–––W:– ––M:FL-272N:FL-223W:–––M:FL-272N:FL-232FL-100 W:–––M:FL-272N:FL-100W:–––M:FL-272N:FL-100W:FL-272M:FL-100N:FL-101W:FL-103M:FL-272N:FL-100W:FL-272M:FL-223N:FL-100W:FL-272M:FL-100N:FL-232FL-101 W:–––M:FL-272N:FL-101W:FL-272M:FL-100N:FL-101W:–––M:FL-272N:FL-101W:FL-103M:FL-272N:FL-101W:FL-272M:FL-223N:FL-101W:FL-272M:FL-232N:FL-101FL-103 W:FL-103M:FL-272N:–––W:FL-103M:FL-272N:FL-100W:FL-103M:FL-272N:FL-101W:FL-103M:FL-272N:–––W:FL-103M:FL-272N:FL-223W:FL-103M:FL-272N:FL-223FL-223 W:–––M:FL-272N:FL-223W:FL-272M:FL-223N:FL-100W:FL-272M:FL-223N:FL-101W:FL-103M:FL-272N:FL-223W:–––M:FL-272N:FL-223W:FL-272M:FL-223N:FL-232FL-232 W:–––M:FL-272N:FL-232W:FL-272M:FL-100N:FL-232W:FL-272M:FL-232N:FL-101W:FL-103M:FL-272N:FL-232W:FL-272M:FL-223N:FL-232W:–––M:FL-272N:FL-232FL-100*FL-232*FL-94FL-103*FL-272FM Normal FL-23+SFPC455ENarrow FL-94AM Normal FL-94Narrow FL-272CW, RTTYTable key:W—wide positionM—medium (normal) positionN—Narrow position](https://usermanual.wiki/ICOM-orporated/IC-706MK2G/User-Guide-19246-Page-26.png)
![244RECEIVE AND TRANSMIT•Setting output power➀Push [DISPLAY] for 2 sec. to select quick set mode.➁Push [MENU] one or more times to select Q1 RFPOWER.➂Rotate the main dial to select the desired output.•Output power is displayed in 11 steps (L, 1–9 and H)but is continuously selectable.➃Push [DISPLAY] to exit quick set mode.•Available power*Carrier power•Setting microphone gainMicrophone gain must be adjusted properly so thatyour signal does not distort when transmitted.➀Select SSB or another phone mode.➁Push [DISPLAY] for 2 sec. to select quick set mode.➂Push [MENU] one or more times to select Q2 MICGAIN.•The ALC meter is selected automatically when operat-ing in SSB mode.➃While speaking into the microphone adjust the micgain so that the ALC meter does not peak past theALC zone.➄Push [DISPLAY] to exit quick set mode.DMeter functionThe bar meter in the function display acts as anS-meter (for relative signal strength, except in WFMmode) during receive and can be selected for one ofthree types during transmit.➀Select M3.•Push [DISPLAY] 1 or 2 times when Sor Gappears.•Push [MENU] one or more times to select M3.➁Push [(F-3)MET] one or more times to select thedesired meter function.•The display indication changes as in the table at right.DOutput power and mic gain■Functions for transmitNote:The SWR meter cannot be used for the 144/430MHz bands since the meter activates for the [ANT 1] con-nector only.BAND SSB/CW/RTTY/FM AM*HF 5–100 W 4–40 W50 MHz 5–100 W 4–40 W144 MHz 2–20 W 2–8 WDISPLAYINDICATION MEASUREMENTPo Indicates the relative RF output power.ALCIndicates the ALC level. When themeter movement shows the input signallevel exceeds the allowable level, theALC limits the RF power. In such cases,reduce the microphone gain (seeabove).SWR Indicates the SWR over the transmis-sion line.](https://usermanual.wiki/ICOM-orporated/IC-706MK2G/User-Guide-19246-Page-27.png)
![4RECEIVE AND TRANSMITDSpeech compressorThe IC-706MKIIG has a built-in, low distortionspeech compressor circuit. This circuit increasesyour average talk power in SSB mode and is espe-cially useful for DX’ing when the receiving station ishaving difficulty copying your signal.➀Select USB or LSB mode.➁Select the ALC meter.•Push [DISPLAY] 1 or 2 times to select M, if necessary.•Push [MENU] one or more times to select M3, thenpush [(F-3)MET] one or more times to select “ALC.”➂Select the mic gain display in quick set mode.•Push [DISPLAY] for 2 sec.•Push [MENU] one or more times to select Q2 MICGAIN.➃Adjust the mic gain.•While transmitting at your normal voice level, the ALCmeter should read at about the middle of the ALC zone.•Be sure the mic gain is in the range of 2 to 5.➄Select M4.•Push [DISPLAY] 1 or 2 times to select M, if necessary.•Push [MENU] one or more times to select M4.➅Push [(F-2)COM], then adjust [COMP GAIN] so thatthe ALC meter reads within the ALC zone whetheryou speak softly or loudly.Note:When the ALC meter peaks above the ALCzone, your transmitted voice may be distorted.DVOX operationThe VOX (Voice-operated Transmission) functiontoggles between transmit and receive with yourvoice. This function provides an opportunity to inputlog entries into your computer, etc., while operating.➀Select M4, then turn the VOX function ON.•Push [DISPLAY] 1 or 2 times when Sor Gappears.•Push [MENU] one or more times to select M4.•Push [(F-1)VOX] to turn the function ON.➁Select VOX GAIN in quick set mode.•Push [DISPLAY] for 2 sec. then push [MENU] one ormore times to select Q4.➂While speaking into the microphone, adjust [VOXGAIN] until the transceiver is transmitting.➃Select VOX DELAY in quick set mode.•Push [MENU] one or more times to select Q3.➄While speaking into the microphone, adjust [VOXDELAY] as desired.➅Select ANTI VOX in quick set mode.•Push [MENU] one or more times to select Q5.➆If the receive audio from the speaker toggles thetransceiver to transmit during receive, adjust the[ANTI-VOX] to the point where it has no effect.➇Push [DISPLAY] to exit quick set mode.](https://usermanual.wiki/ICOM-orporated/IC-706MK2G/User-Guide-19246-Page-28.png)
![264RECEIVE AND TRANSMITThe AT-180 automatic antenna tuner matches the IC-706MKIIG to the connected antenna automatically.Once the tuner matches an antenna, the variablecapacitor angles are memorized as a preset point foreach frequency range (100 kHz steps). Therefore,when you change the frequency range, the variablecapacitors are automatically preset to the memorizedpoint.Note:•The AT-180 cannot be used for the 144/430 MHzband.•When operating on the 144/430 MHz band, pushingthe tuner switch selects the call channel (p. 38).•The AT-180 can match both HF and 50 MHz bands.However, operation is different for the HF and 50MHz bands.TUNER OPERATION•For the HF band:Push [TUNER] to turn the tuner ON. The antenna istuned automatically during transmission when theantenna SWR is higher than 1.5:1.•When the tuner is OFF, the [TUNER] light goes out.•For the 50 MHz band:Push and hold [TUNER] to tune the antenna. If the[TUNER] light flashes slowly while transmitting, pushand hold [TUNER] again to re-tune the antenna.MANUAL TUNINGDuring SSB operation on HF bands at low voice lev-els, the AT-180 may not be tuned correctly. In suchcases, manual tuning is helpful.Push and hold [TUNER] for 1 sec. to start manualtuning.•CW mode is selected, a side tone is emitted, and the[TUNER] light flashes; then, the previous mode is select-ed.If the tuner cannot reduce the SWR to less than 1.5:1after 20 sec. of tuning, the [TUNER] light goes out. Inthis case, check the following:•the antenna connection and feedline•the antenna SWR (p. 25; meter function)Through inhibit (HF bands only)The AT-180 has a through inhibit condition. Whenselecting this condition, the tuner can be used at poorSWR’s. In this case, automatic tuning in the HFbands activates only when exceeding SWR 3:1.Therefore, manual tuning is necessary each time youchange the frequency. Although termed “throughinhibit,” the tuner will be “through” if the SWR is high-er than 3:1 after tuning.•Tuner sensitive condition (HF bands only)If you require critical tuning at any time during trans-mission, select the tuner sensitive condition. Seep. 55 for selection.•Automatic tuner start (HF bands only)If you want to turn OFF the tuner under conditions ofVSWR 1.5:1 or less, use “automatic tuner on” andturn the tuner OFF. See p. 53 for turning the functionON and OFF.DOptional AT-180 AUTOMATIC ANTENNA TUNERoperationCAUTION: NEVER transmit with the tuner ONwhen no antenna is connected. This will damageboth the transceiver and the antenna tuner.CONVENIENT](https://usermanual.wiki/ICOM-orporated/IC-706MK2G/User-Guide-19246-Page-29.png)
![4RECEIVE AND TRANSMITThe AH-4 matches the IC-706MKIIG to a long wireantenna more than 7 m / 2 3 ft long (3.5 MHz andabove).•See p. 14 for connection.•See the AH-4 instruction manual for AH-4 installation andantenna connection details.NEVER operate the AH-4 without an antenna wire.The tuner and transceiver will be damaged.NEVER operate the AH-4 when it is ungrounded.Transmitting before tuning may damage the trans-ceiver. Note that the AH-4 cannot tune when using a1⁄2λlong wire or multiple of the operating frequency.Note: The AH-4 can be used for HF bands and the50 MHz band only.AH-4 operation➀Set the desired frequency in an HF band.•The AH-4 will not operate on frequencies outside ofham bands.➁Push and hold [TUNER] for 2 sec.•The [TUNER] light flashes and “CW” appears while tun-ing.➂The [TUNER] light lights constantly when tuning iscomplete.•When the connected wire cannot be tuned, the[TUNER] light goes out, the AH-4 is bypassed and theantenna wire is connected to the antenna connector onthe transceiver directly.➃To bypass the AH-4 manually, push [TUNER].•PTT tune functionThe AH-4 is always tuned when the PTT is pushedafter the frequency is changed (more than 1%). Thisfunction removes the “push and hold [TUNER]” oper-ation and activates first transmission on the new fre-quency. This function is turned ON in initial set mode,item 13 (p. 53).DOptional AH-4 AUTOMATIC ANTENNA TUNERoperationRWARNING: HIGH VOLTAGE!NEVER touch the antenna element while tuning ortransmitting.Tuning is required for each frequency. Be sure tore-tune the antenna before transmitting when youchange the frequency—even slightly.CONVENIENT](https://usermanual.wiki/ICOM-orporated/IC-706MK2G/User-Guide-19246-Page-30.png)
![284RECEIVE AND TRANSMITSplit frequency operation allows you to transmit andreceive on two different frequencies. Split frequencyoperation uses 2 frequencies, one in VFO A and theother in VFO B.Following is an example of setting 7.057 MHz, CWmode in VFO A (for receive) and 7.025 MHz, CWmode in VFO B (for transmit).➀Select VFO A and set the frequency to 7.057MHz/CW.•[(F-2)A/B] is available when M1 appears.•[(F-3)V/M] is available when M2 appears.➁Push or push and hold [(F-1)SPL] in the M1 dis-play.➥Push [SPL]: activates split only.➥Push and hold [SPL]: activates the quick splitbelow.➂To change the receive frequency, rotate the maindial; to change the transmit frequency, rotate themain dial while pushing [(F-3)XFC].•The transmit frequency can be monitored while pushing[(F-3)XFC].•Split operation is now set for receive on 7.057 MHz/CWand transmit on 7.025 MHz/CW.To exchange the transmit and receive frequencies,push [(F-2)A/B] in M1.CONVENIENTThe G3 display conveniently shows the transmit fre-quency during split frequency operation and [(F-3)Ñ]allows you to change the transmit frequency.•Split lock functionThe split lock function is convenient for changing onlythe transmit frequency. Otherwise, accidentallyreleasing the [(F-3)XFC] switch while rotating themain dial changes the receive frequency. The splitlock’s effectiveness can be selected in initial setmode (item 12) for both receive and transmit fre-quencies; or only the receive frequency. (p. 51)DQuick split functionIn M1, when you push [(F-1)SPL] for 2 sec., split fre-quency operation is turned ON and VFO B is auto-matically changed according to the plus/minus pre-programmed shift frequency set in initial set mode (orequalized when 0 kHz is programmed as the splitshift frequency). This shortens the time needed tostart split frequency operation—great for DX’ing.The quick split function is ON by default. If desired, itcan be turned OFF in initial set mode (p. 51). In thiscase, pushing [(F-1)SPL] for 2 sec. has the sameeffect as pushing [(F-1)SPL] momentarily as in nor-mal split operation.PROGRAMMING SPLIT SHIFT FREQUENCY➀Push [POWER] to turn power OFF.➁While pushing [LOCK], push [POWER] to turnpower ON and enter initial set mode.➂Select “SPL OFFSET” using [MENU], [M-CH] orthe [Y]/[Z] keys, then rotate the main dial to selectthe desired split offset.•The split offset can be selected from –4000 kHz to+4000 kHz.Note: This setting is not valid for FM operation. Thisis because FM operation uses the duplex setting forrepeater operation (next page).■Split frequency operation](https://usermanual.wiki/ICOM-orporated/IC-706MK2G/User-Guide-19246-Page-31.png)
![4RECEIVE AND TRANSMITDRepeater operationA repeater amplifies received signals and retransmitsthem at a different frequency. When using a repeater,the transmit frequency is shifted from the receive fre-quency by an offset frequency. A repeater can beaccessed using split frequency operation with theshift frequency set to the repeater’s offset frequency.➀Set the offset frequency and turn ON the quick splitfunction in initial set mode in advance (p. 51).•If the quick split function is turned OFF, both transmitand receive must be set separately.➁Push [MODE] one or more times to select FMmode, then set the receive frequency.➂Select a suitable tone frequency or the 1750 Hztone burst in quick set mode.➥Push [DISPLAY] for 2 sec., then push [MENU]one or more times to select “Q4 RPTR TONE.”•If FM mode has not been selected, this item doesnot appear.➥Rotate the main dial to set a subaudible tone fre-quency or the 1750 Hz tone burst function.➥Push [DISPLAY] to exit quick set mode.➃Push [(F-1)SPL] for 2 sec. (in the M1 display) toactivate the split frequency function (duplex func-tion) with the pre-selected offset.•When a subaudible tone frequency (excepting 1750 Hz)is selected in ➂, “FM-T” is selected simultaneously.➄Push and hold [PTT] to transmit; release [PTT] toreceive.•When a 1750 Hz tone burst is selected, push and hold[(F-3)TON] in the M4 display while pushing [PTT] tosend the 1750 Hz tone burst.➅To check the repeater input frequency (direct sig-nal from the other station), push and hold[(F-3)XFC]in the M1 display.➆To return to simplex operation, push [(F-1)SPL].Each memory channel can store a tone frequency(subaudible tones or a tone burst) and an offset fre-quency, as well as the operating frequency. Storerepeater information into memory channels for quickand easy access to repeaters.PROGRAMMING DUPLEX SHIFT FREQUENCY➀Push [POWER] to turn power OFF.➁While pushing [LOCK], push [POWER] to turnpower ON and enter initial set mode.➂Select “DUP 144M” using [MENU] or the[UP]/[DN] keys, then rotate the main dial to selectthe desired duplex offset.•The duplex offset can be selected from –4000 kHz to+4000 kHz.CONVENIENT](https://usermanual.wiki/ICOM-orporated/IC-706MK2G/User-Guide-19246-Page-32.png)
![304RECEIVE AND TRANSMITTone squelch operation is a method of communica-tions using selective calling. Only received signalshaving a matching tone will open the squelch. Beforecommunicating using tone squelch, all members ofyour party must agree on the tone squelch frequencyto use.➀Push [MODE] one or more times to select FMmode.➁Push and hold [DISPLAY] to enter Quick Set mode.➂Push [MENU] one or more times to select item Q7TONE SQL.•[Y]/[Z] or [M-CH] can also be used.➃Rotate the main dial to select the desired subaudi-ble tone frequency.•Available tone frequencies are the same as for repeatertone operation (see previous page).➄Select M4 and turn the tone squelch function ON.➥Push [(F-3)TON] to toggle tone squelch opera-tion ON and OFF.•When tone squelch is turned ON, “TSQL” appears inthe display.➅Communicate in the usual manner.•Push [PTT] to transmit; release to receive.By monitoring a signal that is being transmitted on arepeater input frequency, you can determine the tonefrequency necessary to open a repeater.➀During tone squelch or repeater operation, pushand hold [DISPLAY] to enter Quick Set mode.➁Push [MENU] one or more times to select item Q8T-SQL SCN during tone squelch operation, orQ8 RPTR-T SCN during repeater operation.•[Y]/[Z] or [M-CH] can also be used.➂Push [(F-3)SCN] to toggle tone scan operation ONand OFF.•While scanning tone frequencies are displayed insteadof the operating frequency.•When a matched tone is detected, tone scan automati-cally stops, the matched tone is displayed and therepeater tone (or tone squelch tone) setting is automat-ically adjusted accordingly.➃Push [DISPLAY] to return to the main menu.■Tone squelch operation■Tone scan operation](https://usermanual.wiki/ICOM-orporated/IC-706MK2G/User-Guide-19246-Page-33.png)
![4RECEIVE AND TRANSMITThis function allows you to set repeater operationwith the push of one switch.➀Push [(Y)BAND]/[(Z)BAND] to select the 28 MHzband.➁Rotate [DIAL] to select the operating frequency.➂Push [MODE] one or more times to select FM.➃Select M4 and turn the one-touch repeater functionON.➥Push and hold [(F-2)DUP] to toggle the one-touch repeater function ON and OFF.•When the one-touch repeater function is turned ON,“DUP” (duplex indicator) and “T” (tone frequencyindicator) appear in the display.•Be sure to set the duplex direction and offset in ini-tial set mode in advance (p. 51).•Push [(F-2)DUP] to toggle the duplex direction.☞NOTE:When you want to transmit a 1750 Hz tone,while pushing [PTT], push [(F-3)TON] in the M4display during repeater operation.■One-touch repeater functionThis function automatically activates the repeater set-tings (DUP+ or DUP– and tone encoder ON/OFF)when the operating frequency falls within the generaloutput frequency range and deactivates them whenoutside of the range.Set the auto repeater function ON or OFF in initial setmode in advance (p. 52). When set ON, repeater set-tings are automatically activated according to thetable at right.☞NOTE:This function is available for the USA ver-sion only.■Auto repeater functionFREQUENCY DUPLEX DIRECTION145.200–145.495 MHz “DUP–” appears146.610–146.995 MHz147.000–147.395 MHz “DUP+” appears442.000–444.995 MHz “DUP+” appears447.000–449.995 MHz “DUP–” appears](https://usermanual.wiki/ICOM-orporated/IC-706MK2G/User-Guide-19246-Page-34.png)
![324RECEIVE AND TRANSMITDConnections for CWDCW operation➀Connect a paddle or straight key as above.➁Select CW (or CWå) mode with [MODE].➂Set CW break-in operation as semi break-in, fullbreak-in or OFF.•Push [DISPLAY] one or two times to select M, if necessary.•Push [MENU] one or more times to select M4.•Push [(F-2)BRK] one or more times to select the desiredcondition:➧“F-BK”: full break-in➧“BK”: semi break-in➧No indicator: no break-in (ACC socket connection isnecessary as above.)➃Set the CW delay time when semi break-in opera-tion is selected.➥Push [DISPLAY] for 2 sec. to select quick setmode; push [MENU] one or more times to selectQ3 BK-IN DELAY; then rotate the main dialto set the desired delay time (see p. 43 fordetails).■Functions for CW](https://usermanual.wiki/ICOM-orporated/IC-706MK2G/User-Guide-19246-Page-35.png)
![4RECEIVE AND TRANSMITDCW pitch controlThe received CW audio pitch and monitored CWaudio pitch can be adjusted to suit your preferences(300 to 900 Hz) without changing the operating fre-quency.➀Push [MODE] one or more times to select CWmode.➁Select CW PITCH in quick set mode.•Push [DISP] for 2 sec. then push [MENU] one or moretimes.➂Rotate the main dial to set the desired pitch.➃Push [DISPLAY] to exit quick set mode.QUICK SET MODEDCW reverse modeThe CWå(CW Reverse) mode receives CW signalswith a reverse side CW carrier point like that of LSBand USB modes. Use this mode when interferencesignals are near the desired signal and you want tochange the interference tone.➀Push [MODE] one or more times to select CWmode.➁Push and hold to toggle between CW and CWåmodes.•Check the interference tone.DElectronic CW keyerThe IC-706MKIIG has an electronic keyer. Both key-ing speed and weight (the ratio of dot:space: dash)can be set in quick set mode.•Setting the electronic keyer➀Select CW mode with [MODE].➁Push [DISPLAY] for 2 sec. to enter quick set mode.➂Push [MENU] one or more times to select item Q4CW PADDLE, then rotate the main dial to selectthe paddle type.•When “ud” is selected, the up/down switches on themicrophone can be used as a paddle.➃Push [MENU] two more times to select item Q6RATIO, then rotate the main dial to select thedesired weight.•Key weight can be selected from 2.8 to 4.5.•Check the selected ratio with the side tone function inCW mode.➄Push [DISPLAY] momentarily to exit quick set mode.Paddle operation from front panel MIC connectorConnect a CW paddle as at right to operate an elec-tronic keyer from the front panel MIC connector.•This function is available from the front panel micconnector only.•Be sure to select item “n,” “r,” “buG” or “oFF” in Q4CW PADDLE in quick set mode. (p. 48)•Connect straight key to “DOT” side.QUICK SET MODE](https://usermanual.wiki/ICOM-orporated/IC-706MK2G/User-Guide-19246-Page-36.png)
![4RECEIVE AND TRANSMITDRTTY (FSK) operation➀Connect a terminal unit as at left.➁Select RTTY (or åRTTY—see bottom of page)mode with [MODE].➂Select the desired FSK tone/shift frequencies andkeying polarity as below.➃Set the desired frequency with the main dial.•Use [(F-1)1/4] in the M4 display when critical setting isrequired.➄Operate the connected PC or TNC (TU).PRESETTING FOR RTTYTone frequency➀Push [DISPLAY] for 2 sec. to select quick set mode.➁Push [MENU] one or more times to select Q2RTTY TONE; then rotate the main dial to selectthe desired tone frequency (p. 47).Shift frequency➀Push [DISPLAY] for 2 sec. to select quick set mode.➁Push [MENU] one or more times to select Q3RTTY SHIFT; then rotate the main dial to selectthe desired shift frequency (p. 47).RTTY keying➀Push [DISPLAY] for 2 sec. to select quick set mode.➁Push [MENU] one or more times to select Q4RTTY KEYING; then rotate the main dial toselect the desired keying polarity (p. 47).➀Connect a terminal unit as at left.➁Select SSB (LSB) mode with [MODE].•Generally, LSB is used on the HF bands and FM isused for the VHF band.➂Select the desired FSK tone/shift frequencies andkeying polarity as below.➃Set the desired frequency with the main dial.•Use [(F-1)1/4] in the M4 display when critical setting isrequired.➄Operate the connected PC or TNC (TU).PRESETTING FOR RTTYTone frequencySame as above.Shift frequencySame as above.RTTY keyingSame as above.RTTY reverse modeReceived characters are occasionally garbled whenthe receive signal is reversed between MARK andSPACE. This reversal can be caused by incorrectTNC connections, settings, commands, etc.To receive a reversed RTTY signal correctly, selectåRTTY (RTTY reverse) mode.➥Push [MODE] for 1 sec. (while RTTY is selected)to select åRTTY mode.•Check the receive signal.DRTTY (AFSK) operation](https://usermanual.wiki/ICOM-orporated/IC-706MK2G/User-Guide-19246-Page-38.png)

![4RECEIVE AND TRANSMITThe IC-706MKIIG can measure SWR in 2 ways:(A) Spot measurement; or (B) Plot measurement.(A) Spot measurement➀Confirm that the output power is over 30 W.➁Push [MENU] one or more times to select M3.➂Push [(F3)MET] to select the SWR meter.➃Push [MODE] one or more times to select CW orRTTY operation.•Key down or push [PTT] to transmit; then read the actu-al SWR from the meter:➠≤1.5 well matched antenna➠>1.5 check antenna or cable connection, etc.(B) Plot measurementPlot measurement allows you to measure the SWRover an entire band.qConfirm that the output power is over 30 W.wPush [DISPLAY] twice to select G1.ePush [MENU] to select G2.rSet the center frequency for the SWR to be mea-sured.tPush and hold [(F1)10k] one or more times toselect the desired frequency pitch.yPush and hold [(F2)] one or more times to selectthe desired step.uAfter selecting the desired pitch and step, push[(F3)STR] to measure the SWR.iPush and hold [PTT] to display the SWR in a bargraph readout.oWhen [PTT] is released, the frequency marker andfrequency indication move to the next frequency tobe measured.!0 Repeat steps i.and oto measure SWR over theentire frequency range.!1 When the measured SWR is less than 1.5, theantenna is well matched.■SWRThe IC-706MKIIG has a built-in circuit for measuringantenna SWR while in SSB mode—no external equip-ment or special adjustments are necessary.☞NOTE: The SWR of ANT1 only can be read sinceANT2 has no measuring circuit.DMeasuring SWRSpan Push [F-1] for 1 sec. to change theselected span.Step bar Push [F-2] for 1 sec. to change the stepbar (3, 5, 7 or 9 steps are available.Marker Indicates the currently active step bar.Start Flashes while the SWR is being mea-sured.](https://usermanual.wiki/ICOM-orporated/IC-706MK2G/User-Guide-19246-Page-40.png)
![385MEMORY AND SCAN OPERATION■Memory channelsThe transceiver has 105 memory channels (plus 2 callchannels). Memory mode is useful for quickly chang-ing to often-used frequencies.All 105 memory channels are tuneable which meansthe programmed frequency can be tuned temporarilywith the main dial, etc., in memory mode.➀Select M2 functions.•Push [DISPLAY] 1 or 2 times to select M.•Push [MENU] one or more times to select M2.➁Push [(F-3)V/M] to select memory mode.➂Rotate [M-CH] to select the desired memory chan-nel.•All memory channels including blank channels can beselected.•[UP]/[DN] on the microphone changes the frequency.➃To return to VFO mode, push [(F-3)V/M] again.Any unnecessary memory channels can be cleared.The cleared memory channels become blank chan-nels.➀Push [(F-3)V/M] in the M2 display to select mem-ory mode.➁Rotate [M-CH] to select a memory channel to becleared.➂Push [MCL(F-2)] for 2 sec. to clear the contents.•The programmed frequency and operating mode disap-pear and “}” appears.➃To return to VFO mode, push [(F-3)V/M] again.■Memory channel selection■Memory clearingNote: During split frequency operation, programmedmemory contents can be called up to the SUB readout(dot matrix portion of the display).MEMORYCHANNELMEMORYCHANNELNUMBER CAPABILITY TRANSFERTO VFO OVER-WRITING CLEARRegular(split memory) 1–99Independent transmit and receivefrequencies and one mode in eachmemory channel.In addition, tone frequencies (or1750 Hz tone burst) can also bestored for repeater use.Yes Yes YesScan edges 1A–3B(3 pair)One frequency and one mode ineach memory channel as scanedges for programmed scan. Yes Yes NoCall channel(split memory) C1 (144 MHz)C2 (430 MHz) Same as regular, but only 144/430MHz band can be programmed. Yes Yes No](https://usermanual.wiki/ICOM-orporated/IC-706MK2G/User-Guide-19246-Page-41.png)
![5MEMORY AND SCAN OPERATION•Programming in VFO mode➀Select M2 functions.•Push [DISPLAY] 1 or 2 times to select M.•Push [MENU] one or more times to select the M2 func-tions.➁Set the desired frequency and operating mode inVFO mode.•If you want to program the split frequency function, pro-gram both receive and transmit frequencies into VFO Aand B, then turn ON the split function.•If you want to program a repeater function, set a tonefrequency (p. 48) in addition to the receive/transmit fre-quencies.➂Rotate [M-CH] to select the desired memory chan-nel, or the call channel (144/430 MHz bands only).•Select memory mode to confirm the contents, if desired.• “}” appears if the selected memory channel is ablank channel (and does not have contents).➃Push [(F-1)MW] for 2 sec. to program the displayedfrequency and operating mode into the memorychannel.To check the programmed contents, push [(F-3)V/M]to select memory mode; or, push [CALL] to select thecall channel.■Memory/call programming•Programming in memory mode➀Set the desired frequency and operating mode.➁Select memory mode, then select the desiredmemory channel with [M-CH].•Push [Y]/[Z] when you want to program blank chan-nels.➂Push [(F-1)MW] for 2 sec. to program the displayedfrequency and operating mode into the memorychannel.](https://usermanual.wiki/ICOM-orporated/IC-706MK2G/User-Guide-19246-Page-42.png)
![405MEMORY AND SCAN OPERATION■Frequency transferringThe frequency and operating mode can be transferredfrom memory mode to VFO mode.➀Select VFO mode with [(F-3)V/M] in the M2 dis-play.➁Select a memory channel with [M-CH].•Select memory mode to confirm the memory channel’scontents, if desired; then return to VFO mode.•“}” appears if the selected memory channel is ablank channel (and does not have contents). In thiscase transferring is not possible.➂Push [(F-2)MÜV] for 2 sec. to transfer the frequen-cy and operating mode.•Transferred frequency and operating mode appear inthe display.•“MÜV” does not appear in memory mode.■Memory namesAll memory channels (including scan edges and thecall channel) can be tagged with alphanumeric namesof up to 9 characters each.All common keyboard characters (ASCII characters33 to 126) can be used, including numerals and punc-tuation marks.•Calling up memory names➀Select the G4 display.➥Push [DISPLAY] 1 or 2 times to select G.➥Push [MENU] one or more times to select theG4 display.➁Select a memory channel with [M-CH].•Editing (programming) memory names➀Call up the desired memory (channel) name asabove.➁Push [(F-3)É] to enter memory name edit mode.•“name edit” appears briefly, then a flashing cursorappears under the first character position.➂Rotate the main dial to select the desired charac-ter, then advance the cursor position.•[(F-3)Ç] increments the cursor position; [(F-1)Å] decre-ments the cursor position.•[(F-2)] overwrites the character with a space.➃Repeat this procedure until all desired charactershave been selected.➄Push [(MENU)Ä] to exit memory name edit mode.•The G4 display reappears and the programmed mem-ory name is displayed.](https://usermanual.wiki/ICOM-orporated/IC-706MK2G/User-Guide-19246-Page-43.png)
![5MEMORY AND SCAN OPERATION•Calling up a frequency from a memo padYou can simply call up the desired frequency andoperating mode of a memo pad by pushing[(F-3)MPR] in the S1 display.•Make sure S1 is selected in advance.•Both VFO and memory modes can be use.•The frequency and operating mode are called up, startingfrom the most recently written.When you call up a frequency and an operatingmode from memo pads with [(F-3)MPR], the previ-ously displayed frequency and operating mode areautomatically stored in a temporary pad. The fre-quency and operating mode in the temporary padcan be recalled by pushing [(F-3)MPR] one or moretimes.Note:If you change the frequency or operating modecalled up from a memo pad, the frequency and oper-ating mode in the temporary pad are erased.■Memo padsThe transceiver has a memo pad function to store fre-quency and operating mode for easy write and recall.The memo pads are separate from memory channels.The default number of memo pads is 5, however, thiscan be increased to 10 in initial set mode if desired(p. 52).Memo pads are convenient when you want to memo-rize a frequency and operating mode temporarily, suchas when you find a DX station in a pile-up or when astation is busy for a long time and you want to tem-porarily search for other stations.Use the transceiver’s memo pads instead of relying onhastily scribbled notes that are easily misplaced.•Writing frequencies and operating modesinto memo pads➀Select the S1 display.•Push [DISPLAY] 1 or 2 times to select S.•Push [MENU] one or more times to select S1.➁Push [(F-2)MPW] to program the frequency into amemo pad.When you write a 6th frequency and operating mode,the oldest written frequency and operating mode areautomatically erased to make room for the new set-tings.Note: Each memo pad must have its own uniquecombination of frequency and operating mode;memo pads having identical settings cannot be writ-ten.](https://usermanual.wiki/ICOM-orporated/IC-706MK2G/User-Guide-19246-Page-44.png)
![425MEMORY AND SCAN OPERATION■Scan types■Preparation•ChannelsFor programmed scan:Program scan edge frequen-cies into scan edge memory channels 1A and 1B(p. 33).For memory scan:Program 2 or more memory chan-nels except scan edge memory channels.For memory select scan: Designate 2 or more memo-ry channels as select memory channels—select amemory channel, then push [(F-2)SEL] in the S2 dis-play (memory mode) to designate the channel as aselect memory channel.For priority watch: Program 1 memory channel to bewatched.•Scan resume ON/OFFYou can select the scan to resume or cancel whendetecting a signal, in initial set mode, item 21. Scanresume ON/OFF must be set before operating a scan.See p. 52 for ON/OFF setting and scan resume con-dition details.•Scan speedScan speed can be selected from 2 levels, high or low,in initial set mode. See p. 46 for details.•Squelch conditionSCANSTARTSWITHPROGRAMMEDSCAN MEMORY SCANSPRIORITY WATCHSQUELCHOPENThe scan continuesuntil it is stoppedmanually, and doesnot pause even if itdetects signals.This is not applicablewhen the scanresume is OFF and aprogrammable step(more than 1 kHz) isselected.Scan pauses on eachchannel when thescan resume is ON;not applicable whenOFF.SQUELCHCLOSEDScan stops when detecting a signal.If you set scan resume ON in initial set mode,the scan pauses for 10 sec. when detecting asignal, then resumes. When a signal disap-pears while scan is paused, scan resumes 2sec. later.](https://usermanual.wiki/ICOM-orporated/IC-706MK2G/User-Guide-19246-Page-45.png)
![5MEMORY AND SCAN OPERATION➀Select VFO mode, then set a frequency.➁Close the squelch with [SQL].➂Set the desired memory channel as the watchingchannel.➃Select S2, then push [(F-2)PRI] to start the watch.•Decimal point blinks while scanning.➄When the scan detects a signal, the scan pausesfor 10 sec. or until the signal disappears, depend-ing on the resume setting.➅To cancel the scan push [(F-2)PRI]. Note: The paused condition when detecting a signaldiffers depending on the scan resume condition.resume on: pauses for 10 sec.resume off: pauses until the signal disappears.➀Select memory mode.➁Close the squelch with [SQL].➂Select S2, then push [(F-1)SCN] to start the mem-ory scan.•Decimal point blinks while scanning.➃Push [(F-2)SEL] to change the memory scan toselect memory scan.•Push [(F-2)SEL] for 2 sec. to clear all select memorychannels.➄When the scan detects a signal, the scan stops orpauses depending on the resume setting.➅To cancel the scan push [(F-1)SCN].Note: Two or more memory channels must be desig-nated as select memory channels for select memoryscan to start.➀Select memory mode.➁Close the squelch with [SQL].➂Select S2, then push [(F-1)SCN] to start the scan.•Decimal point blinks while scanning.➃When the scan detects a signal, the scan stops orpauses depending on the resume setting.➄To cancel the scan push [(F-1)SCN].Note: Two or more memory channels must be pro-grammed for memory scan to start.➀Select VFO mode.➁Select the desired operating mode.•The operating mode can also be changed while scan-ning.➂Set [SQL] open or closed.•See page a left for squelch condition.➃Select S2, then push [(F-1)SCN] to start the scan.•Decimal point blinks while scanning.➄When the scan detects a signal, the scan turnsO F F, pauses or ignores it depending on theresume setting and the squelch condition.•During scan [TS] can be used only when resume is ON.➅To cancel the scan push [(F-1)SCN].Note: If the same frequencies are programmed intothe scan edge memory channels 1A and 1B, pro-grammed scan does not start.■Programmed scan operation■Memory scan operation■Select memory scan operation■Priority watch](https://usermanual.wiki/ICOM-orporated/IC-706MK2G/User-Guide-19246-Page-46.png)

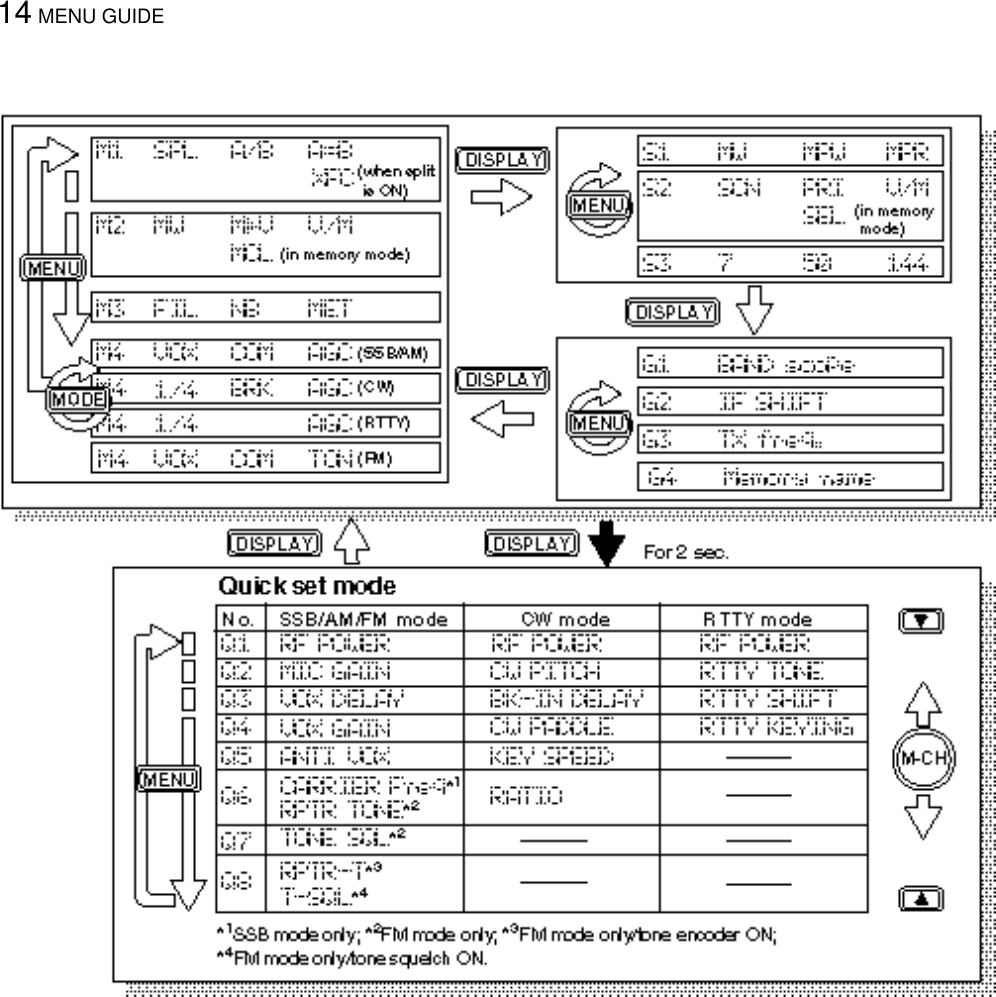
![46SET MODE7■GeneralSet mode is used for programming infrequentlychanged values or conditions of functions. The IC-706MKIIG has 2 separate set modes: quick set modeand initial set mode.DQuick set mode operation➀While power is ON, push [DISPLAY] for 2 sec.•Quick set mode is selected and one of its items appears.•Quick set mode items vary depending on the operatingmode (SSB, FM, etc.) selected.➁Push [MENU] one or more times to select thedesired item.•[M-CH] or [Y]/[Z] can also be used.➂Rotate the main dial to set the values or conditionsfor the selected item.➃Repeat steps ➁and ➂to set other items.➄To exit quick set mode, push [DISPLAY] momentar-ily.DInitial set mode operation➀Push [POWER] for 2 sec. to turn power OFF.➁While pushing [LOCK] push [POWER] to turn powerON.•Initial set mode is selected and one of its items appears.➂Push [MENU] one or more times to select thedesired item.• [M-CH] or [Y]/[Z] can also be used.➃Rotate the main dial to set the values or conditionsfor the selected item.➄Repeat steps ➂and ➃to set other items.➅To exit initial set mode, push [POWER] for 2 sec. toturn power OFF.➆Push [POWER] to turn power ON again.•The conditions selected in initial set mode are now effec-tive.](https://usermanual.wiki/ICOM-orporated/IC-706MK2G/User-Guide-19246-Page-49.png)

![487SET MODEQ6 CARRIER Frq (SSB only)This item adjusts the carrier frequency (BFO frequen-cy), allowing you to change the audio characteristics.Selectable values are –200 to +200 Hz in 10 Hz steps.Q6 RPTR TONE (FM only)This item selects a subaudible tone for FM-T modeoperation to access a repeater. There are 50 tonesavailable from 67.0 Hz to 254.1 Hz (see table atright).•Available subaudible tones Unit: HzQ4 CW PADDLE (CW only)This item adjusts the CW paddle type. Four selec-tions are available.•n : normal (for electronic keyer use)•r : reverse (for electronic keyer use)•buG : When using the electronic key, key downproduces a “dash,” releasing the key auto-matically produces a “dot(s).”•oFF : Turns OFF the electronic keyer (forstraight key use)•ud : For using the microphone’s [UP]/[DN]keys instead of the CW paddle.Q5 KEY SPEED (CW only)This item adjusts the CW key speed. The key speedcan be selected from 6 to 60 wpm.Q6 RATIO (CW only)This item adjusts the CW key ratio (or weight). Theratio can be selected from 2.8 to 4.5.Q7 TONE SQL (FM only)This item adjusts sets a subaudible tone for tonesquelch use. (the same subaudible tone frequenciesas for repeater operation are available—see above).67.0 79.9 94.8 110.9 131.8 156.7 171.3 186.2 203.5 229.169.3 82.5 97.4 114.8 136.5 159.8 173.8 189.9 206.5 233.671.9 85.4 100.0 118.8 141.3 162.2 177.3 192.8 210.7 241.874.4 88.5 103.5 123.0 146.2 165.5 179.9 196.6 218.1 250.377.0 91.5 107.2 127.3 151.4 167.9 183.5 199.5 225.7 254.1Q5 ANTI VOX (SSB/AM/FM only)This item adjusts the ANTI-VOX gain for the VOX(voice activated transmit) function.](https://usermanual.wiki/ICOM-orporated/IC-706MK2G/User-Guide-19246-Page-51.png)

![507SET MODE11 PEAK HOLD (peak hold)When the peak hold function is ON, the highest acti-vated segment of the meter remains visible for 0.5sec.; when OFF, the meter functions normally.6 AUTO OFF (auto power OFF)The auto power OFF function can be used to auto-matically turn the transceiver OFF after a specifiedtime of operation. This item can be set to 30 min., 60min., 90 min., 120 min., or OFF.7 RF/SQL (SQL/AUTO/RF•SQL)The [RF/SQL] control can be set as the squelch con-trol (default), the RF/squelch control (USA versiondefault) or automatic (acts as squelch inFM/WFM/AM modes; as RF in SSB/CW/RT T Ymodes). (See p. 22)8 SUBDIAL (Subdial function)When this item is set to “rit,” pushing [RIT/SUB]turns the RIT function ON (lights red)—rotating [M-CH] changes the RIT frequency; when this item is setto “Freq,” pushing [RIT/SUB] turns the sub dial func-tion ON (lights green)—rotating [M-CH] changes theoperating frequency. Note that in FM, WFM and AMmodes, pushing [RIT/SUB] always selects the subdial function (lights green), regardless of this setting.9 OPT. FIL 1 (optional filter)When an optional filter is installed, this selection isnecessary, otherwise the filters cannot be selected.Selections available are FL-100, FL-101, FL-103,FL-223, FL-232 and none (default). See p. 22 forusable filters for each mode and see p. 50 for filterinstallation.10 OPT. FIL 2 (optional filter)When an optional filter is installed, this selection isnecessary, otherwise the filters cannot be selected.Selections available are FL-100, FL-101, FL-103,FL-223, FL-232 and none (default). See p. 22 forusable filters for each mode and see p. 50 for filterinstallation.](https://usermanual.wiki/ICOM-orporated/IC-706MK2G/User-Guide-19246-Page-53.png)
![SET MODE715 DUP HF (duplex offset)This item sets the offset for the duplex function whenoperating on the HF bands.16 DUP 50M (duplex offset)This item sets the offset for the duplex function whenoperating on the 50 MHz band.17 DUP 144M (duplex offset)This item sets the offset for the duplex function whenoperating on the 144 MHz band.18 DUP 430M (duplex offset)This item sets the offset for the duplex function whenoperating on the 430 MHz band.19 1TOUCH RPTR (one touch repeater)This item sets the offset direction when using theone-touch repeater function. +duplex or –duplex canbe selected.14 SPL OFFSET (split offset)This item sets the offset (difference between transmitand receive frequencies) for the quick split function.Note that this setting is not valid in FM/WFM modes.13 SPLIT LOCK (split lock)When this item is ON the main dial can be used toadjust the transmit frequency (XFC) even while thelock function is activated.12 QUICK SPLIT (quick split function)When this item is set to ON, pushing [SPL] for 2 sec.sets the undisplayed VFO frequency to the displayedVFO frequency plus the split offset or duplex offset,and activates split operation.](https://usermanual.wiki/ICOM-orporated/IC-706MK2G/User-Guide-19246-Page-54.png)
![527SET MODE26 PWR ON CHK (Power on check)When this item is set to “on,” the set output power isbriefly displayed when turning power ON (RIT andauto power off settings are also displayed if activat-ed); when turned “oFF,” the display goes directly tofrequency indication at power ON.24 AM NB (Noise blanker in AM mode)When this item is set to ON, the noise blanker func-tion is available in AM mode. This is useful whencommunicating in AM mode (the noise blanker func-tion should not be used when listening to regular AMbroadcasts as it may degrade the received audio).20 AUTO RPTR (auto repeater)When this item is set to “on 1”, the tone encoder isnot set when the auto repeater is activated; when setto “on 2” the auto repeater function also sets the toneencoder on.22 SCAN SPEED (scan speed)This item sets the rate at which channels or frequen-cies are scanned during scan operations. High or lowcan be selected.23 U/D SPEED (up/down speed)This item sets the rate at which frequencies arescanned through when the [UP]/[DN] switches arepushed and held. High or low can be selected.21 SCAN RESUME (scan resume)This item sets the scan resume function ON or OFF.ON: scan resumes 10 sec. after stopping on a signal(or 2 sec. after a signal disappears); OFF: scan doesnot resume after stopping on a signal. For the priori-ty watch, setting to OFF pauses the watch until sig-nal disappears and scan resumes.25 PAD CH (available memo pads)This item sets the number of memo pad channelsavailable. 5 or 10 memo pads can be set.](https://usermanual.wiki/ICOM-orporated/IC-706MK2G/User-Guide-19246-Page-55.png)

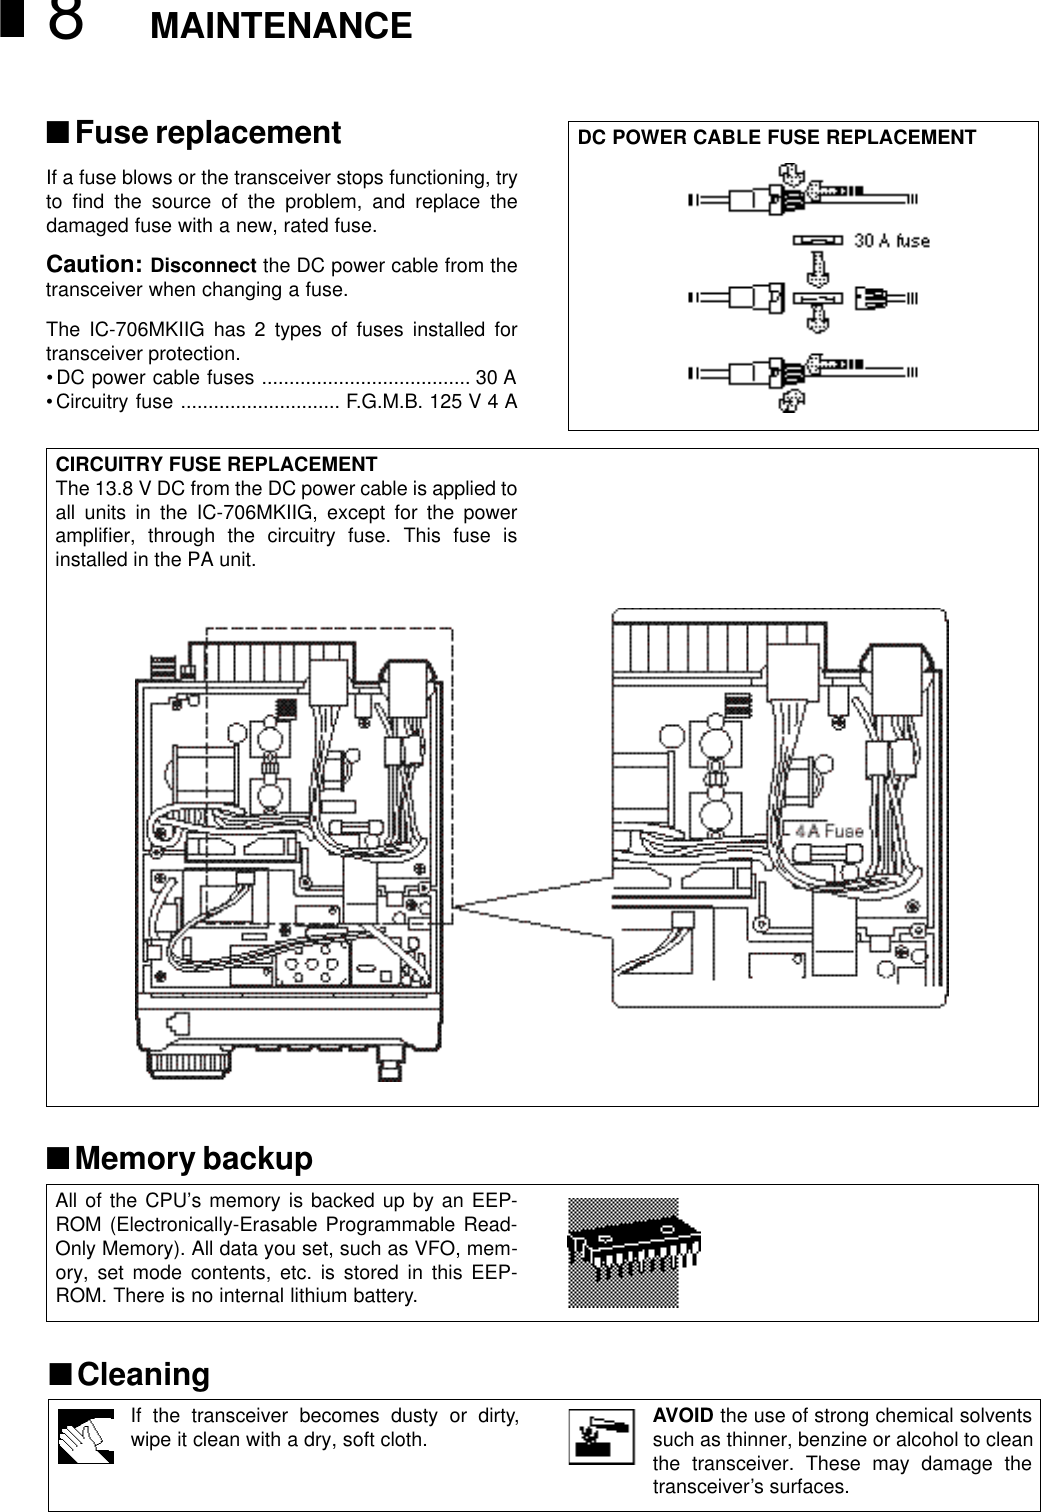

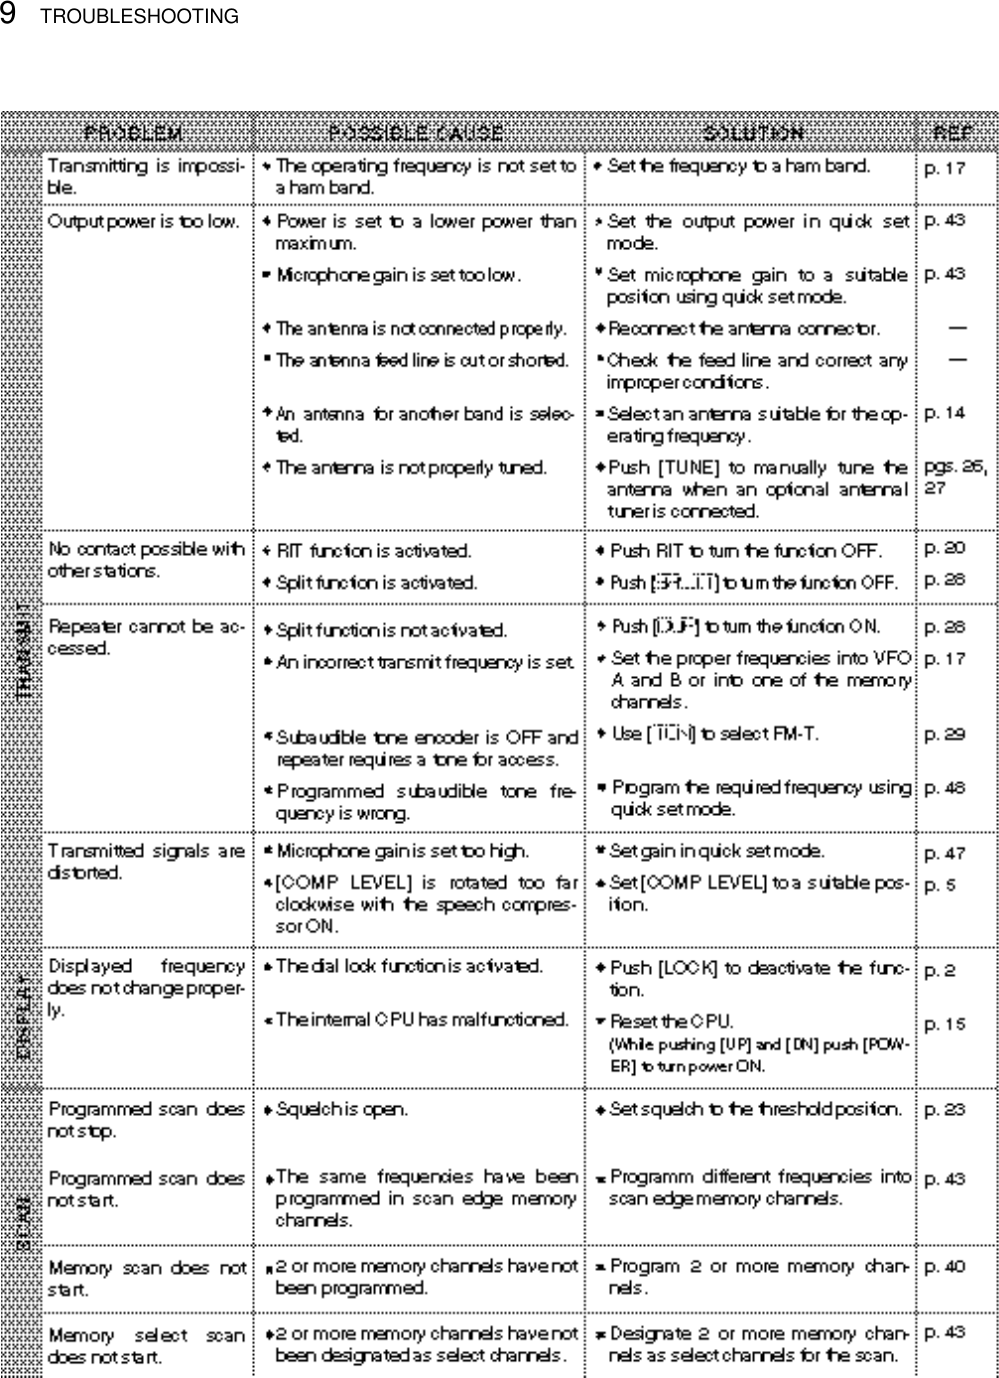


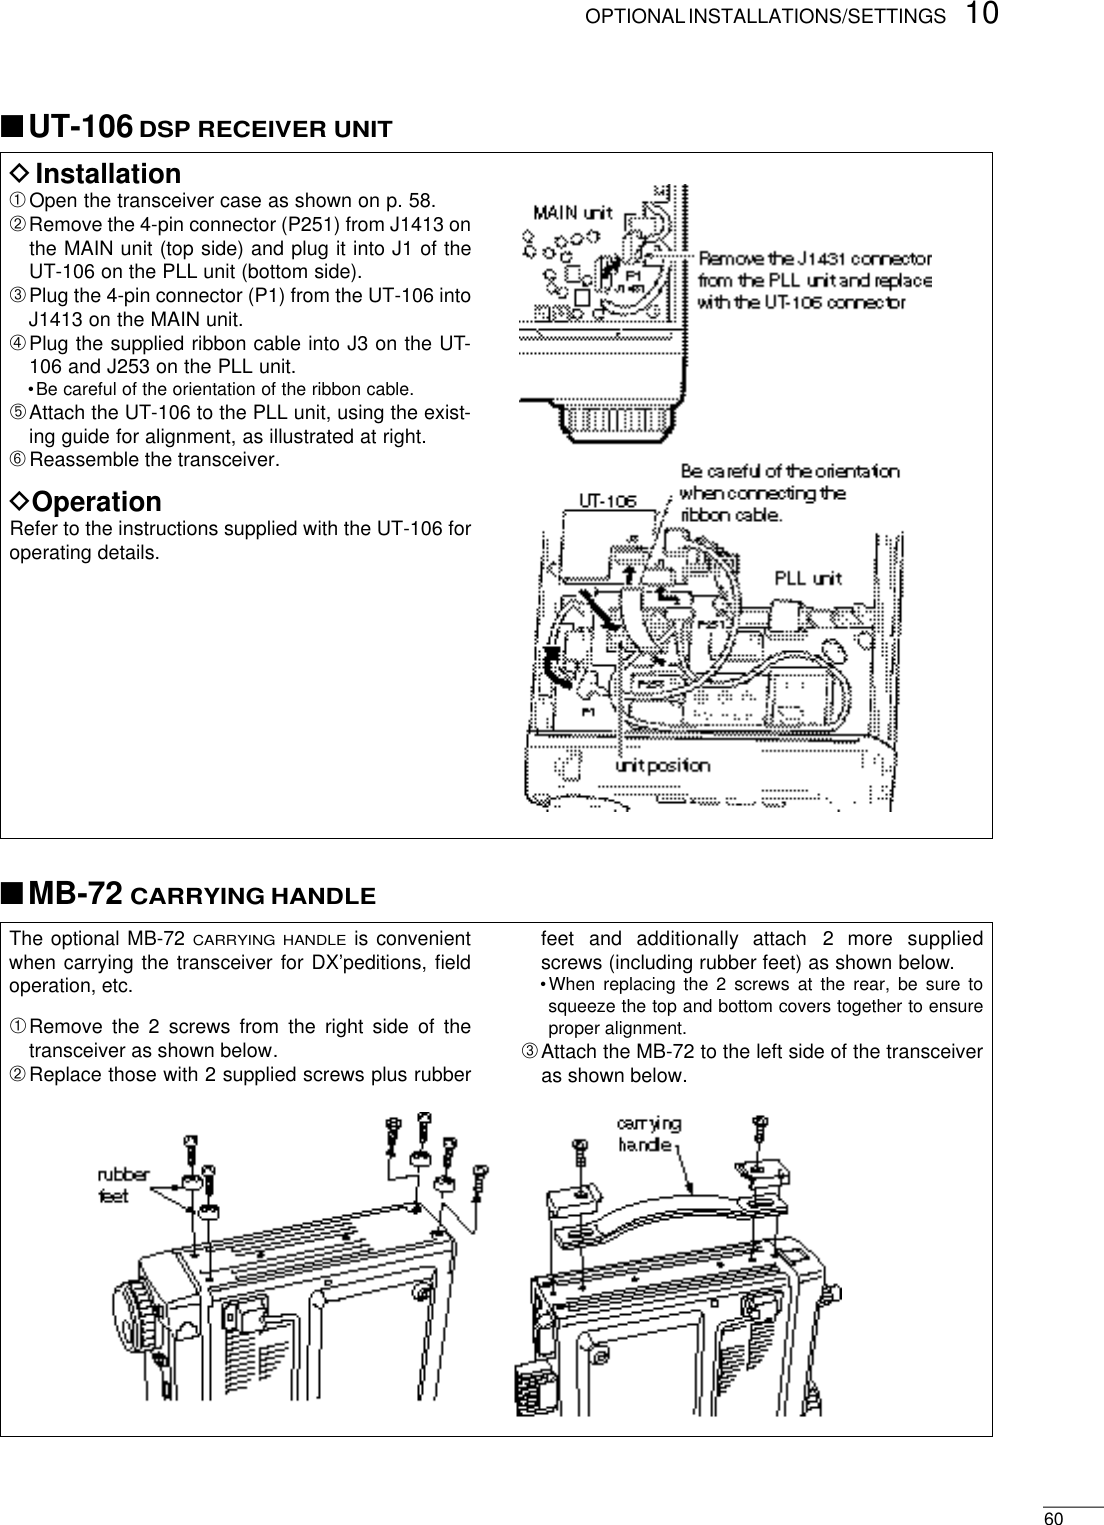

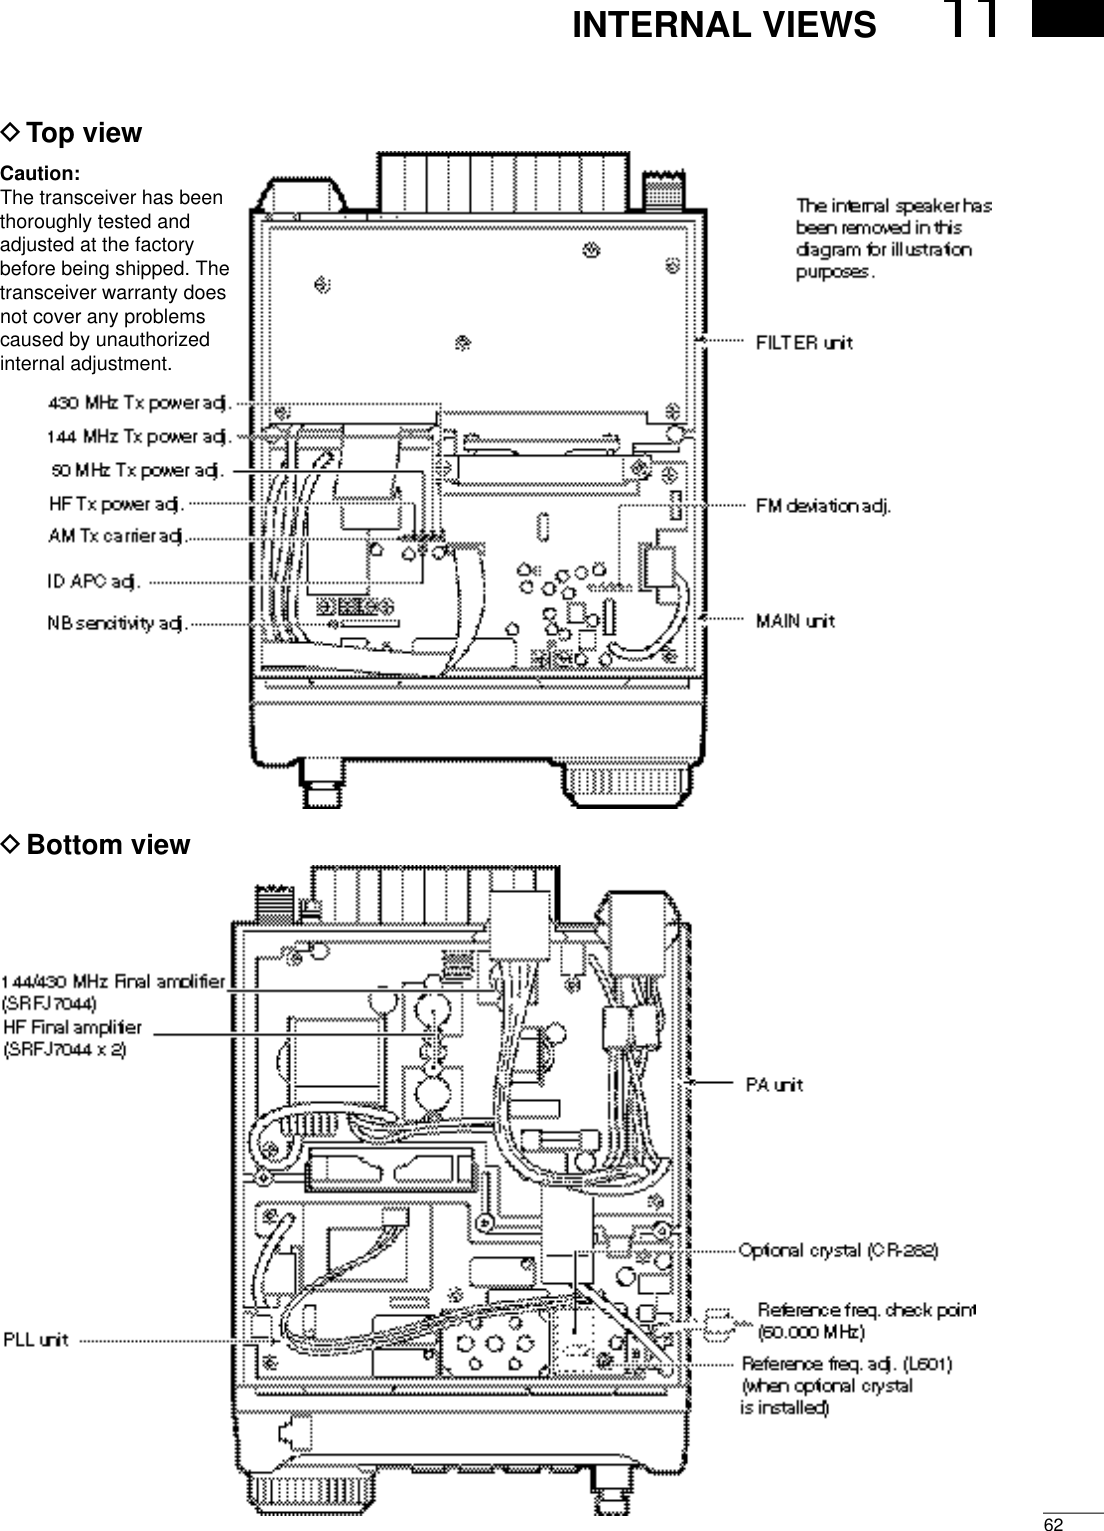
![OPTIONS12IC-PW1 HF + 50 MHz 1 kW LINEAR AMPLIFIERFull-duty 1 kW linear amplifier including an automatic antenna tuner. Has automatic tuningand band selection capability. Full break-in (QSK) operation is possible. The amplifier/powersupply unit and the remote control unit are separated. The OPC-599 is necessary to con-nect the IC-706MKIIG to the IC-PW1.AT-180 HF/50 MHz AUTOMATICANTENNA TUNERFully automatic antenna tuner with presetmemories for each 100 kHz. Unique “auto-matic tuner on” function is available. Seep. 55 for AT-180 specifications.EX-627 AUTOMATIC ANTENNASELECTORAutomatically selects the antenna for theselected HF ham band. Manual selectionis possible for the 50 MHz band.•Max. input power:100 W PEPSM-20 DESKTOP MICROPHONEIncludes [UP]/[DOWN] switches and a lowcut function. The OPC-589 is necessary touse this microphone.MB-65 MOUNTING BASEAllows you to conveniently vehicle-mountthe front panel of the IC-706MKIIG. AnMB-63 must be used in combination withthe MB-65.AH-2b ANTENNA ELEMENTA 2.5 m long antennaelement for mobileoperation with theAH-3.• Frequencycoverage3.5–28 MHz bandwith the AH-3SM-8 DESKTOP MICROPHONEIncluding 2 connection cables for simulta-neous connection of 2 transceivers. Has[UP]/[DOWN] switches. The OPC-589 isnecessary to use this microphone.MB-63 MOUNTING BRACKETMetal plate for attaching the front panel toa wall or other such flat surface.AH-4 HF AUTOMATIC ANTENNATUNERSpecially designed to tune a long wireantenna for portable or mobile HF/50 MHzoperation. The “PTT tune” function pro-vides simple operation.• Input power rating: 150 WPS-85 DC POWER SUPPLYLight weight switching regulator systempower supply.• Output voltage: 13.8 V DC•Max. current drain: 20 AMB-62 MOBILE MOUNTINGBRACKETMounts the transceiver main body, with orwithout the front panel, inside a vehicle.](https://usermanual.wiki/ICOM-orporated/IC-706MK2G/User-Guide-19246-Page-66.png)