ID Teck Co LX007 RFID With Finger Printer User Manual LX007 English 071001
ID-Teck Co Ltd RFID With Finger Printer LX007 English 071001
UserManual.wiki
>
ID Teck Co
>
LX007 User Manual
>
User Manual 2
Contents
1.
User Manual 2
2.
User Manual 1
3.
User Manual 1 2
User Manual 2
Navigation menu
Upload a User Manual
Namespaces
Wiki Guide
HTML
PDF
Info
Views
User Manual
Discussion / Help
Navigation
![29 assigns both readers (Built-in Reader and Exit Reader) to grant access to the user that is being registered, code ‘1’ only assigns Reader#1 (Built-in Reader) and code ‘2’ assigns Reader#2 (Exit Reader). If you enter ‘1’ in the RD field(Only Reader#1 assigned) and try to exit through Reader#2 (Exit Reader) then the LX007 generates an error message (“Access Door Error”) on the LCD display. 7. C – refers to the ID code. Code ‘0’ is default and codes ‘1’ and ‘2’ are codes used for the TWO MEN MODE. Code ‘3’ is used for the ARM/DISARM function and code ‘4’ is assigned for lost cards. 8. MA – refers to the Operating Mode of the Reader#1 (i.e. the built-in reader) for the cardholder. If you enter ‘1’ for MA, for example, Reader#1 will be operating on RF Only Mode always. • ‘0’ – System Operating Mode (Path: [F1 SETUP MENU] > [READER#1 MODE]) • ‘1’ – ID Only Mode • ‘2’ – ID + Fingerprint (Password) • ‘3’ – ID + Password + Fingerprint 9. MB – refers to Operating Mode of the Reader#2 (Exit Reader) for the cardholder. If you enter ‘1’ for MB, for example, Reader#2 will be operating on RF Only Mode always. • ‘0’ – System Operating Mode (Path: [F1 SETUP MENU] > [READER#1 MODE]) • ‘1’ – ID Only Mode • ‘2’ – ID + Password Mode 10. LV – refers to the Output Operating Level for the cardholder. Output operating time can be set for each user. To configure an Output operating time for each level, refer to the instructions on Output Setting in the [F6 SETUP MENU]. • ‘0’ or ‘1’ – Level #1 • ‘2’ – Level #2 • ‘3’ – Level #3 • ‘4’ – Level #4 11. FP – is the Fingerprint Usage Flag (1 digit). You can decide whether or not the user will register and use a fingerprint. • ‘0’ – User without a Fingerprint • ‘1’ – User with a Fingerprint](https://usermanual.wiki/ID-Teck-Co/LX007.User-Manual-2/User-Guide-948882-Page-1.png)
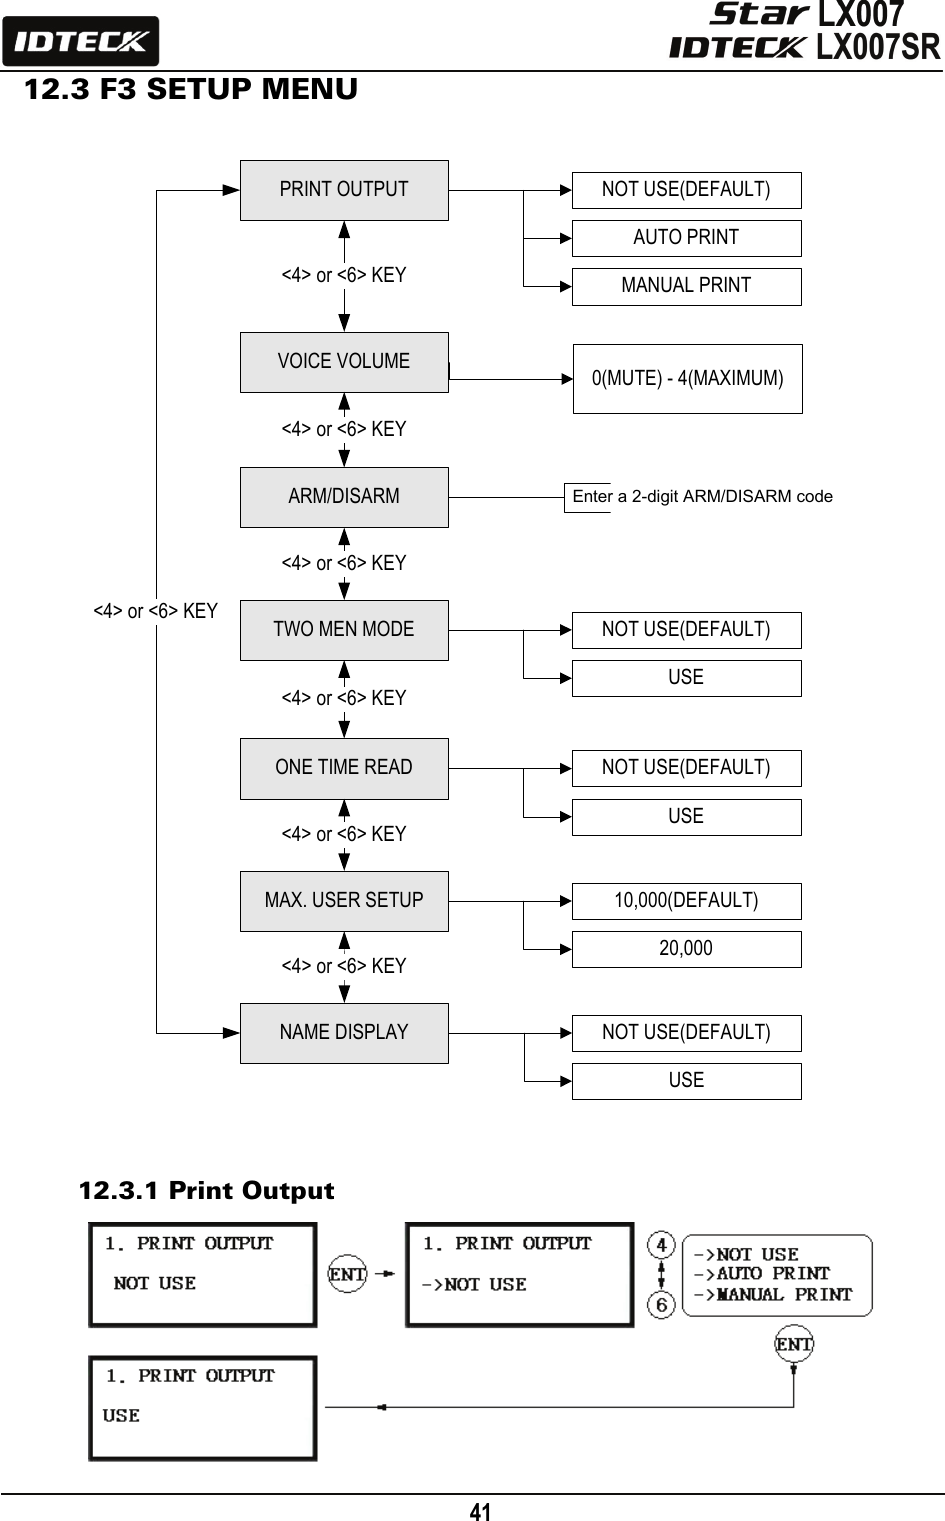
![31 12. Setting Changes To set up the LX007 or to change the settings, you have to enter the SETUP MENU first. To do so, press <0> key eight (or ten) times and <ENT> key on the keypad. (The Default Master ID is ‘00000000’. For the LX007SR, it’s ‘0000000000’.) There are 10 SETUP MENUS and you automatically enter [F1 SETUP MENU] first. You can move to other SETUP MENUS by pressing <F1> to <F10> keys. For example, if you want to go to [F2 SETUP MENU], then press <F2> key. To enter [F5 SETUP MENU], press <F5> key, and so on and on. There are several SUBMENUS inside each SETUP MENU and you can scroll up and down the SUBMENU by pressing <4> and <6> key. If you don’t press any key within 60 seconds or if you press <ESC> key, the LX007 will exit the SETUP MENU and return to the normal operating mode. You can change the Master ID in the [F7 SETUP MENU]. INITIAL DISPLAY(MODEL NAME, CURRENT TIME)ID INPUT?MASTER ID /PW/FINGERPRINT ?YESYESNONORMAL OPERATIONS MODESETUP MODENOF1 SETUP MENUF2 SETUP MENUF3 SETUP MENUF4 SETUP MENUF5 SETUP MENUF6 SETUP MENUF7 SETUP MENUF8 SETUP MENUF9 SETUP MENUF10 SETUP MENU](https://usermanual.wiki/ID-Teck-Co/LX007.User-Manual-2/User-Guide-948882-Page-3.png)
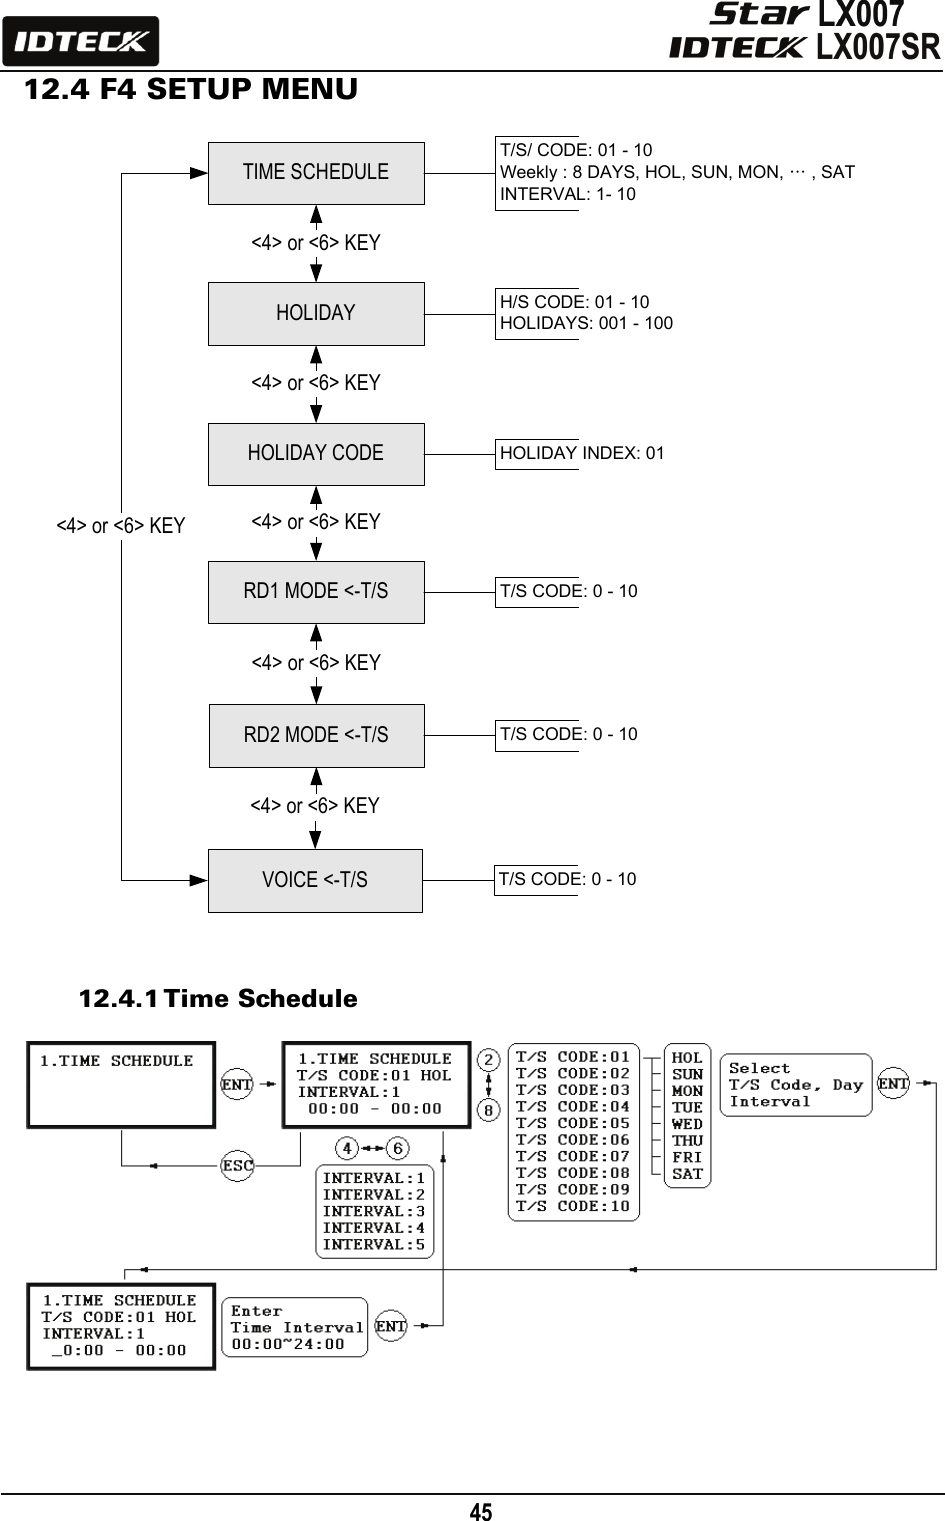
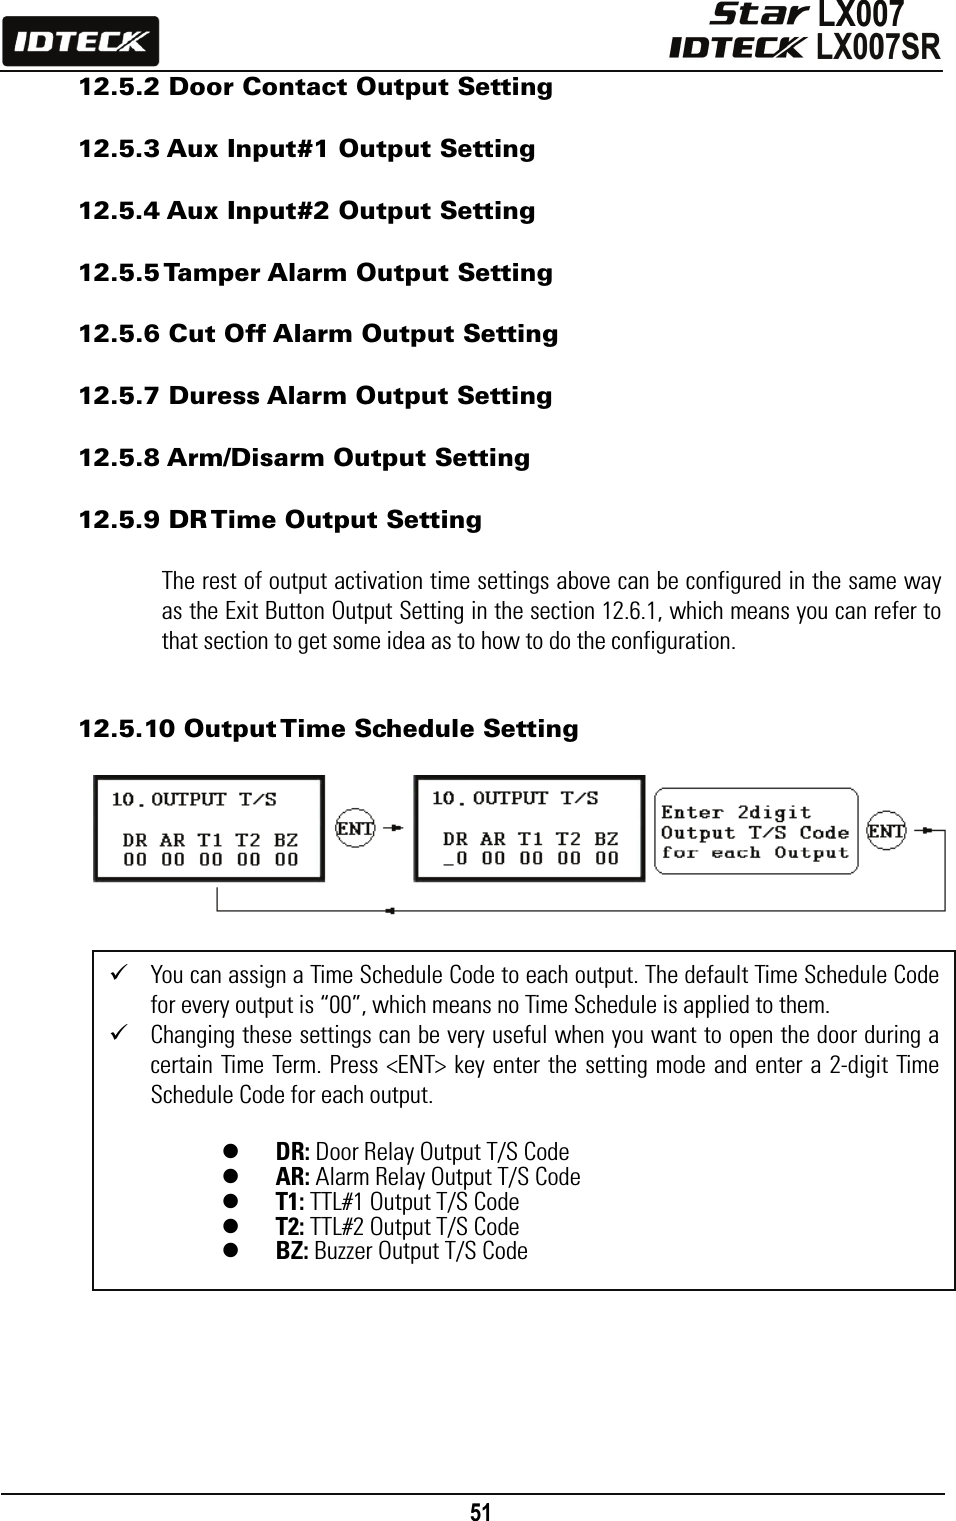
![47 12.4.3 Holiday Code 12.4.4 Reader#1 Mode Time Schedule 12.4.5 Reader#2 Mode Time Schedule The READER#2 MODE TIME SCHEDULE setting can be configured in the same way as READER#1 MODE T/S setting, which is explained in the previous section. The Holiday Code setting allows you to link a Holiday Schedule to a Time Schedule. A Time Schedule has 5 Time Intervals for holidays and the Time Intervals are applied only to the dates of this Holiday Schedule. The default Holiday Schedule Code is ‘00’ which means no holidays are applied to the Time Schedule. Use <4> or <6> key to scroll up and down from the T/S Code 01 to 10 and press <ENT> key. Then, enter a 2-digit Holiday Schedule Code and press <ENT> key to store the changed Holiday Index settings to the memory. To return to the previous menu, press <ESC> key. There are 3 system operating modes including RF Only Mode, RF+F/P Mode and RF+PW+F/P Mode. You can select one of these system operating modes at [R1 MODE SETTING] from [F1 SETUP MENU]. However, you may apply a different operating mode to all users during a certain Time Interval. For example, suppose you want to access the door by only presenting a card from 09:00 to 17:00 and use the Fingerprint Verification method for the rest of the time. Then, you can do so by setting [R1 MODE SETTING] to RF+F/P Mode, which is for the system operating mode, and then program T/S Code 01 so that it can include a Time Interval between 09:00 and 17:00. Then, here, link the programmed Time Schedule Code 01 to the R1 MODE Time Schedule setting. To link a Time Schedule Code (01~10) to Reader#1 Mode, first, press <ENT> key and get into the setting mode. Then, enter the 2-digit Time Schedule Code and press <ENT> key to store and apply the Time Schedule Code to R1 MODE. To return to the previous menu, press <ESC> key.](https://usermanual.wiki/ID-Teck-Co/LX007.User-Manual-2/User-Guide-948882-Page-19.png)
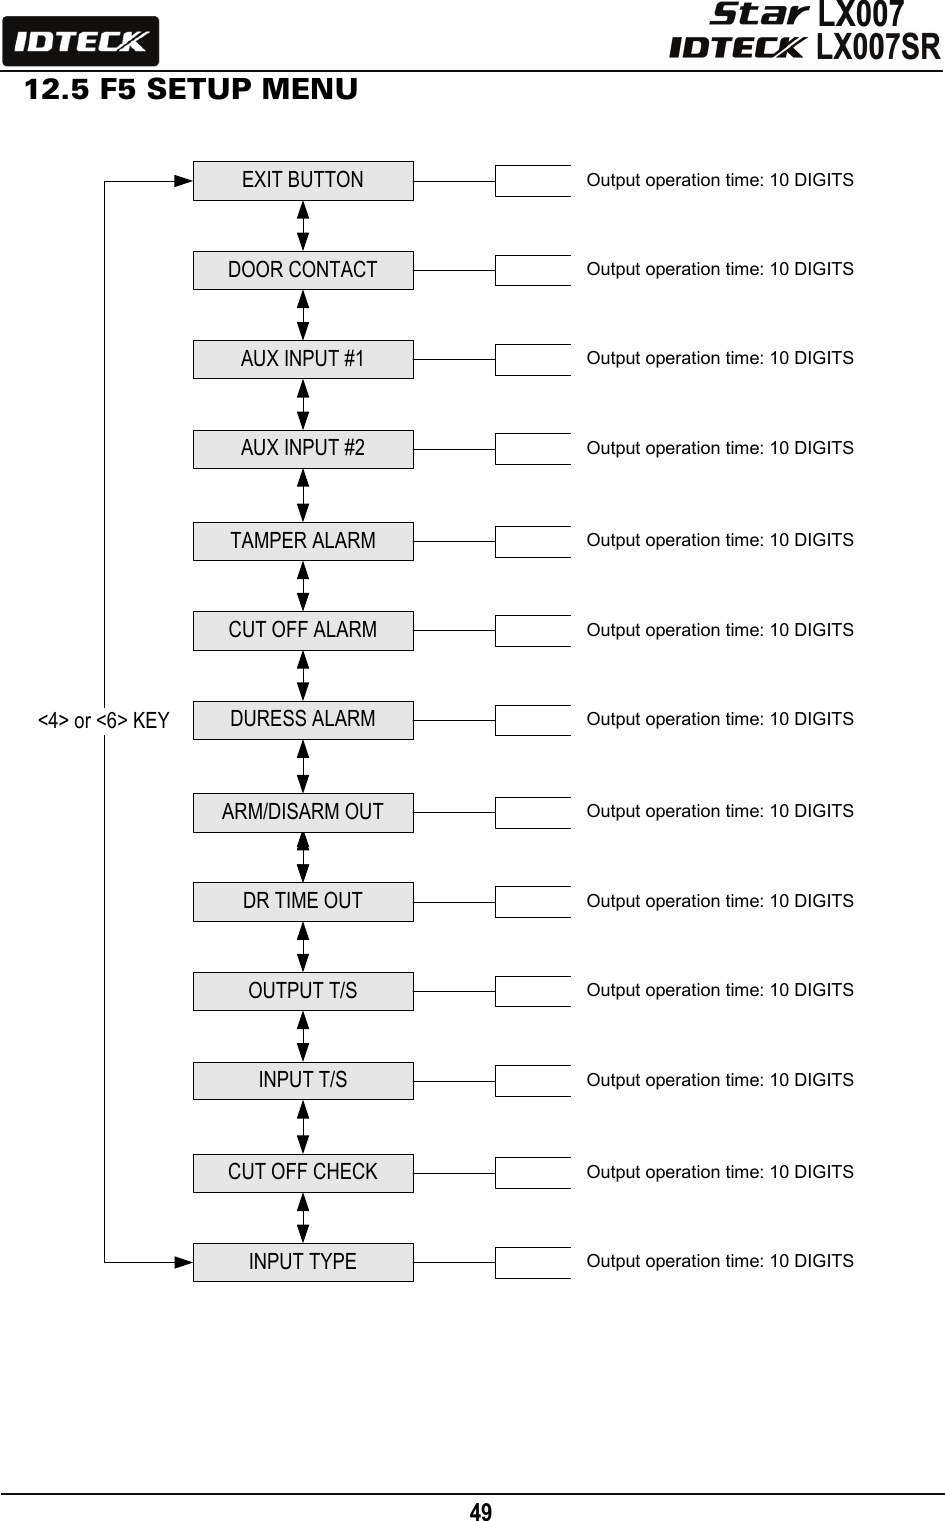
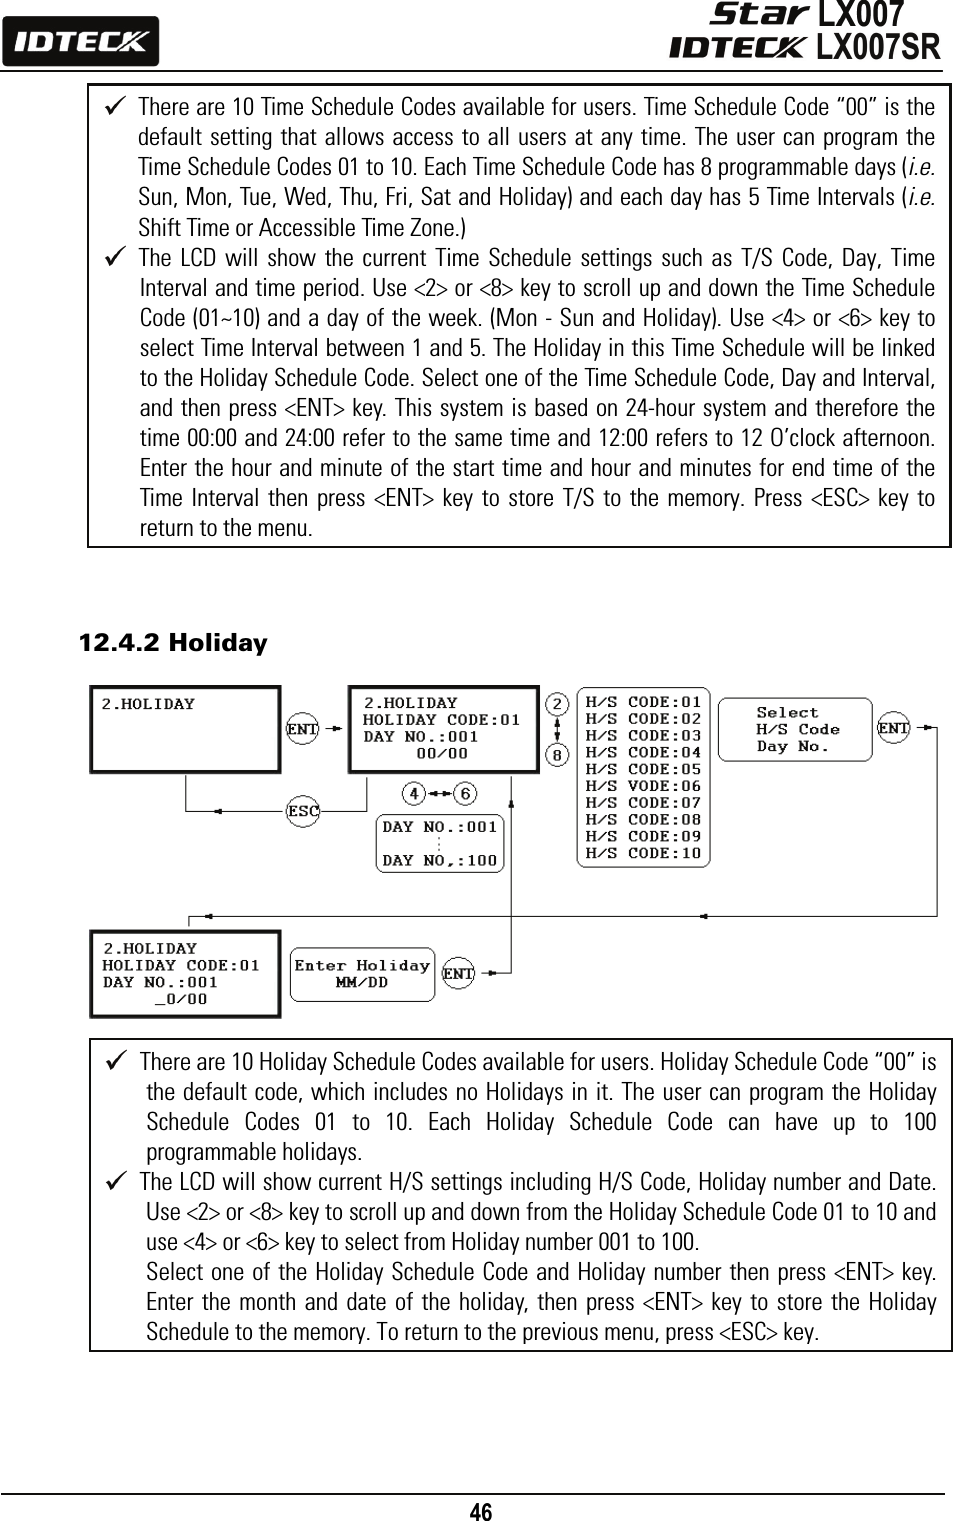
![50 Default Output Settings for Input Sources 12.5.1 Exit Button Output Setting OUTPUT Door Relay (DR) Alarm Relay (AR) TTL#1 (T1) TTL#2 (T2) Buzzer (BZ) [1] EXIT BUTTON 03 00 00 00 00 [2] DOOR CONTACT 00 99 00 00 00 [3] AUX Input #1 00 00 00 00 00 [4] AUX Input #2 00 00 00 00 00 [5] TAMPER ALARM 00 99 99 99 99 [6] CUT OFF ALARM 00 00 00 00 00 [7] DURESS ALARM 00 00 00 00 00 [8] ARM/DISARM OUT 00 00 00 00 00 [9] DR TIME OUT 00 00 00 00 00 [10] OUTPUT TIME SCHEDULE 00 00 00 00 00 [11] INPUT TIME SCHEDULE 00 00 00 00 00 [12] CUT OFF CHECK 00 00 00 00 00 [13] INPUT TYPE 00 00 00 00 00 9 You can program the Output Activation Time, the length of time for which the output is activated after the EXIT button is pressed. 9 Let’s say, we put ‘03’ for one of the fields, If the unit of time is set to ‘1 sec’, then the activation time will be 3 seconds. If the unit of time is set to ‘0.1 sec’, then the activation time will be 0.3 seconds (or 300 ms.) 9 You can set the time somewhere between 00 and 98 seconds (or between 0.0 and 9.8 seconds if the Time Unit is set to 0.1 sec.) If you put “99”, the corresponding output will be activated forever until you reset the output. z DR: Door Relay Output z AR: Alarm Relay Output z T1: TTL#1 Output z T2: TTL#2 Output z BZ: Buzzer Output](https://usermanual.wiki/ID-Teck-Co/LX007.User-Manual-2/User-Guide-948882-Page-22.png)
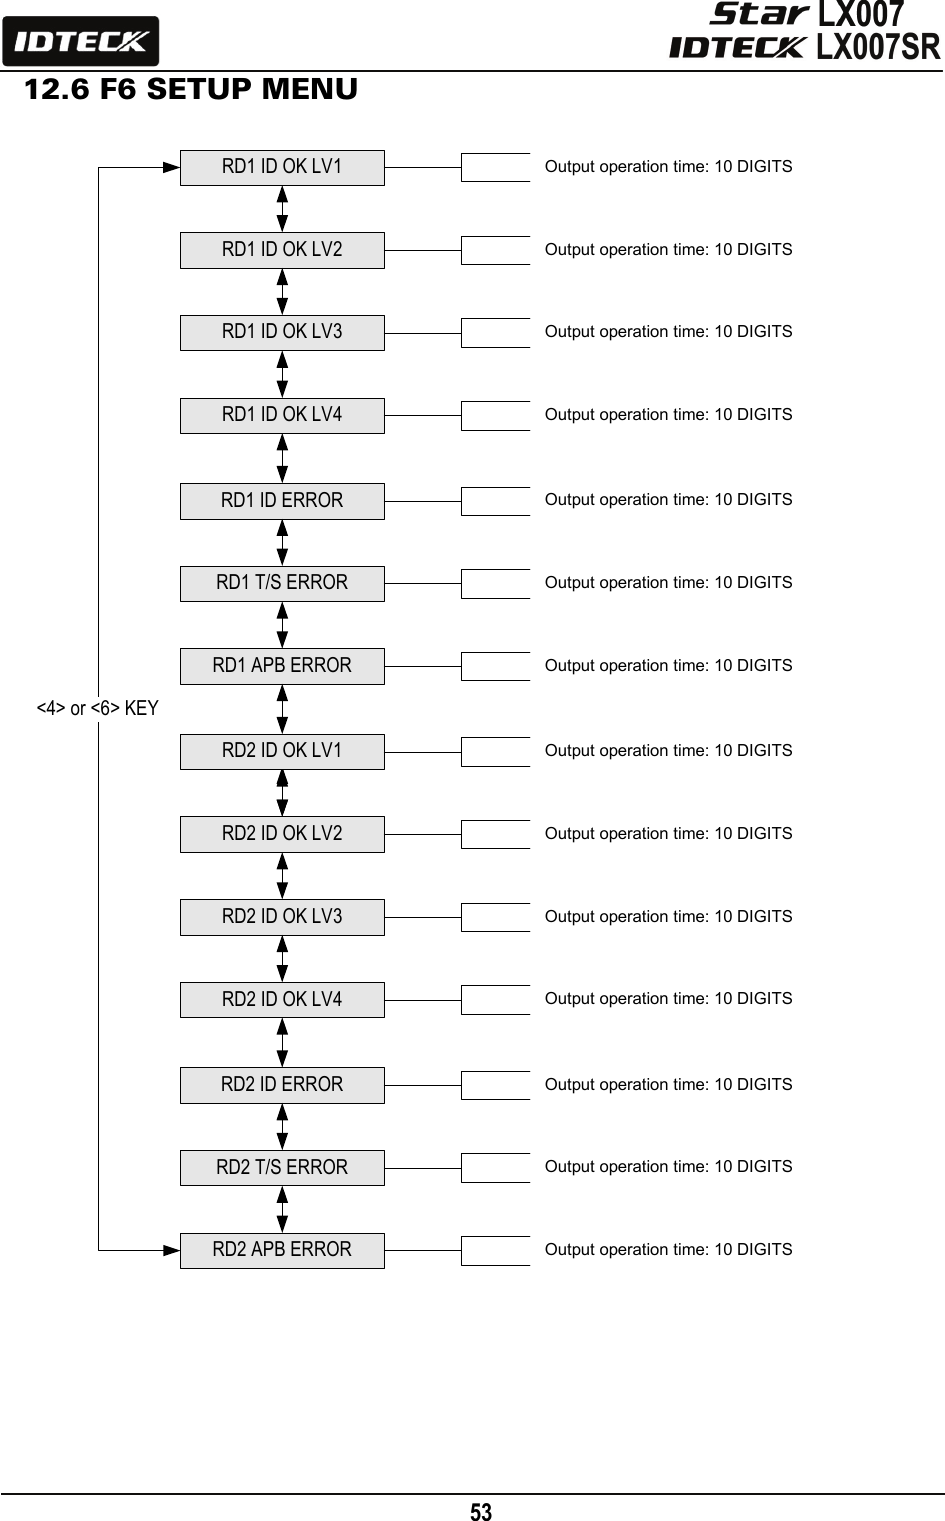
![54 Default Output Setting for Different Inputs 12.6.1 Output Setting for Reader#1 ID OK Level 1 OUTPUT Door Relay (DR) Alarm Relay (AR) TTL#1 (T1) TTL#2 (T2) Buzzer (BZ) [1] Reader#1 ID OK LV1 03 00 00 00 00 [2] Reader#1 ID OK LV2 05 00 00 00 00 [3] Reader#1 ID OK LV3 05 00 00 00 00 [4] Reader#1 ID OK LV4 05 00 00 00 00 [5] Reader#1 ID Error 00 03 00 00 00 [6] Reader#1 T/S Error 00 03 00 00 00 [7] Reader#1 APB Error 00 03 00 00 00 [8] Reader#2 ID OK LV1 03 00 00 00 00 [9] Reader#2 ID OK LV2 05 00 00 00 00 [10] Reader#2 ID OK LV3 05 00 00 00 00 [11] Reader#2 ID OK LV4 05 00 00 00 00 [12] Reader#2 ID Error 00 03 00 00 00 [13] Reader#2 T/S Error 00 03 00 00 00 [14] Reader#2 APB Error 00 03 00 00 00 9 You can program the Output Activation Time, the length of time during which the output is activated after the EXIT button is pressed. The actual Output Activation Time equals either V seconds, provided that the Time Unit is set to 1 second, or V/10 seconds, provided that the Time Unit is set to 0.1 second. (V=Activation Time Value assigned for each output.) 9 You can set the time somewhere between 00 and 98 seconds (between 0.0 and 9.8 seconds if the Time Unit is set to 0.1 sec.) If you put “99”, the corresponding output will be activated forever until you reset the Output. z DR: Door Relay Output z AR: Alarm Relay Output z T1: TTL#1 Output z T2: TTL#2 Output z BZ: Buzzer Output](https://usermanual.wiki/ID-Teck-Co/LX007.User-Manual-2/User-Guide-948882-Page-26.png)
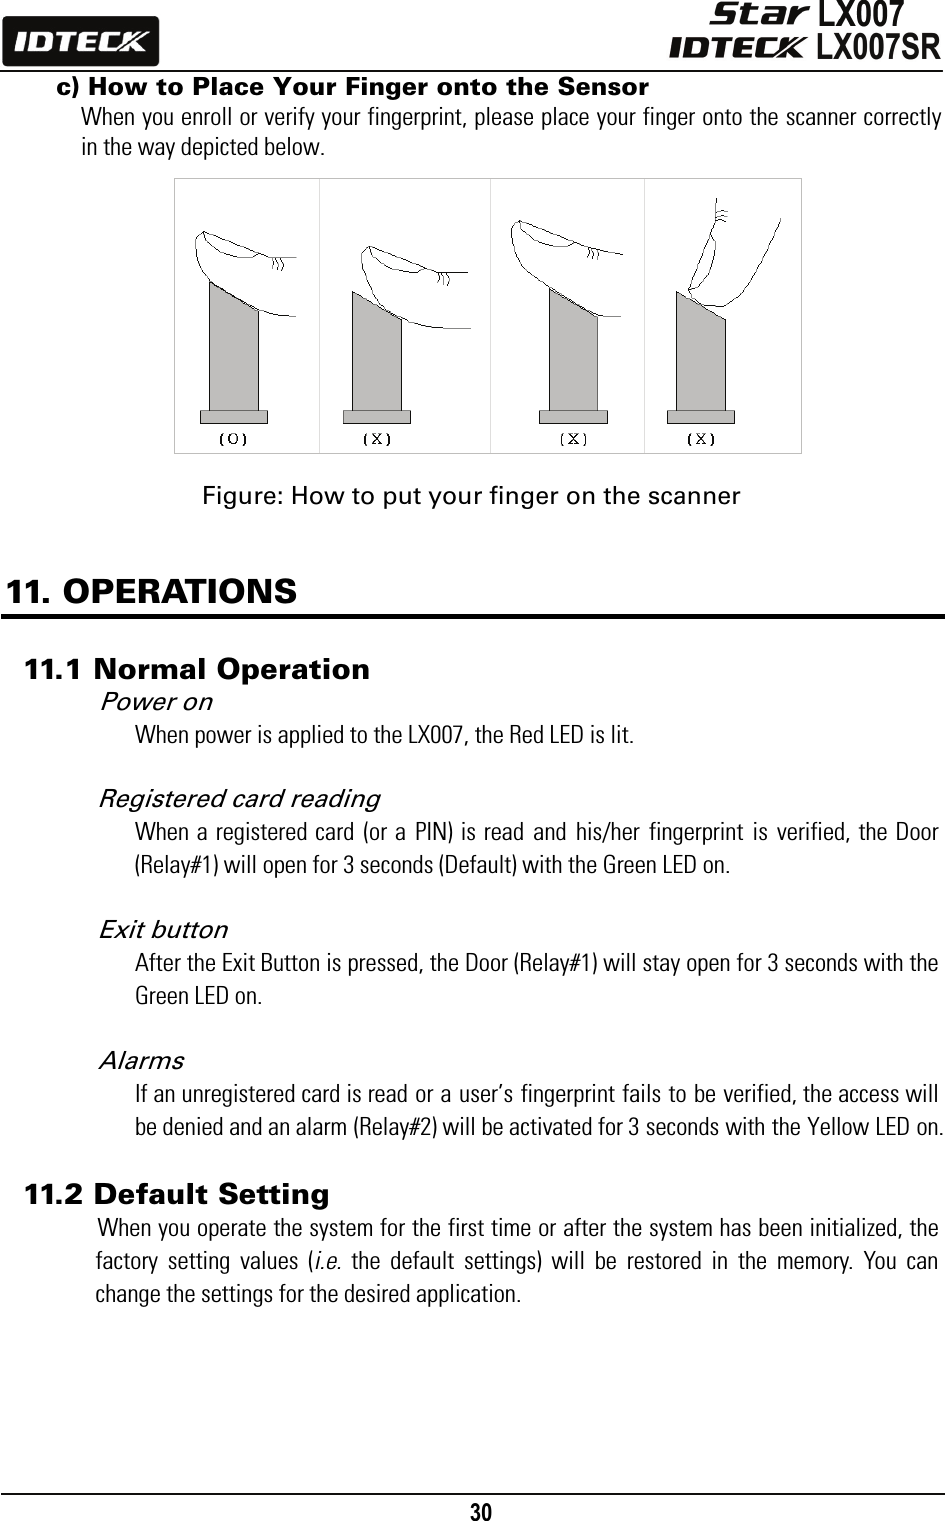
![58 b) Registration Using Keypad NOTE| In case you make a typing mistake during the registration process, you can press F1 button to erase the errors. 1. Scanning – means the reader is waiting for an ID number to be entered. The number of the card will appear with a beep sound when you present a card. 2. ID – refers to a Personal Identification Number (PIN) that consists of 4-8 digits. Enter a 4-8 digit ID number (PIN) and press <ENT> key. (An ID number of the LX007SR consists of 4-10 digits.) 3. PW – stands for a password that is required for verification in the RF + Password operating mode. 4. TA – refers to the Time Schedule code (‘00’ ~ ‘10’) for the Reader#1 (i.e. the built-in reader). Cardholders are granted access only during the Time Intervals of the Time Schedule code entered to this TA field. To set the Time Intervals for each Time Schedule code, refer to the instructions on the Time Schedule Setup in the [F4 SETUP MENU]. If you want to allow the cardholder access to the door anytime, enter the default Time Schedule code '00' for the value. 5. TB – refers to the Time Schedule code (‘00’ ~ ‘10’) for the Reader#2 (i.e. Exit Reader). Cardholders are granted access only during the Time Intervals of the Time Schedule code entered to this TB field. To set the Time Intervals for each Time Schedule code, refer to the instructions on the Time Schedule Setup in the [F4 SETUP MENU]. If you want allow the cardholder access to the door anytime, enter the default Time Schedule code '00' for the value. 6. RD – refers to the Reader Assignment code for the cardholder. Entering the code ‘0’ assigns both readers (Built-in Reader and Exit Reader) to grant access to the user that is](https://usermanual.wiki/ID-Teck-Co/LX007.User-Manual-2/User-Guide-948882-Page-30.png)
![59 being registered, code ‘1’ only assigns Reader#1 (Built-in Reader) and code ‘2’ assigns Reader#2 (Exit Reader). If you enter ‘1’ in the RD field(Only Reader#1 assigned) and try to exit through Reader#2 (Exit Reader) then the LX007 generates an error message (“Access Door Error”) on the LCD display. 7. C – refers to the ID code. Code ‘0’ is default and codes ‘1’ and ‘2’ are codes used for the TWO MEN MODE. Code ‘3’ is used for the ARM/DISARM function and code ‘4’ is assigned for lost cards. 8. MA – refers to the Operating Mode of the Reader#1 (i.e. the built-in reader) for the cardholder. If you enter ‘1’ for MA, for example, Reader#1 will be operating on RF Only Mode always. • ‘0’ – System Operating Mode (Path: [F1 SETUP MENU] > [READER#1 MODE]) • ‘1’ – ID Only Mode • ‘2’ – ID + Fingerprint (Password) • ‘3’ – ID + Password + Fingerprint 9. MB – refers to Operating Mode of the Reader#2 (Exit Reader) for the cardholder. If you enter ‘1’ for MB, for example, Reader#2 will be operating on RF Only Mode always. • ‘0’ – System Operating Mode (Path: [F1 SETUP MENU] > [READER#1 MODE]) • ‘1’ – ID Only Mode • ‘2’ – ID + Password Mode 10. LV – refers to the Output Operating Level for the cardholder. Output operating time can be set for each user. To configure an Output operating time for each level, refer to the instructions on Output Setting in the [F6 SETUP MENU]. • ‘0’ or ‘1’ – Level #1 • ‘2’ – Level #2 • ‘3’ – Level #3 • ‘4’ – Level #4 11. FP – is the Fingerprint Usage Flag (1 digit). You can decide whether or not the user will register and use a fingerprint. • ‘0’ – User without a Fingerprint • ‘1’ – User with a Fingerprint](https://usermanual.wiki/ID-Teck-Co/LX007.User-Manual-2/User-Guide-948882-Page-31.png)

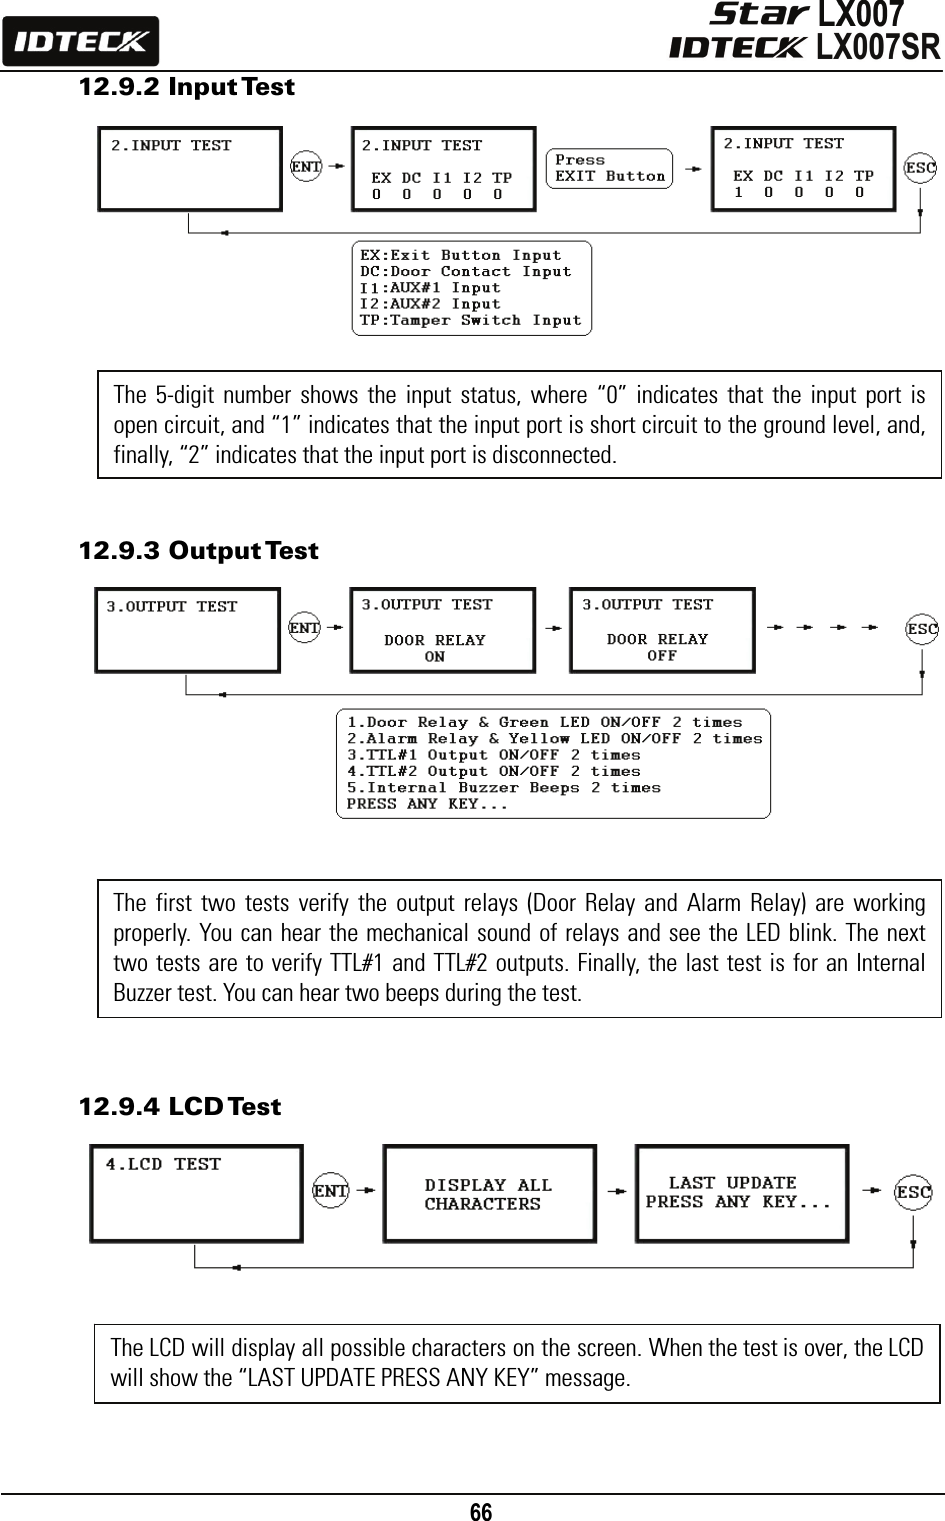
![65 The Firmware Version of the unit is displayed on the LCD. Press <4> or <6> key to see other items of the menu on [F9 SETUP MENU].12.9 F9 SETUP MENU 12.9.1 Version Check KEYPAD TESTREADER TEST<4> or <6> KEY<4> or <6> KEYFIRMWARE VER.INPUT TESTOUTPUT TEST<4> or <6> KEY<4> or <6> KEY<4> or <6> KEYLCD TEST<4> or <6> KEYTHE CURRENT VERSION OF FIRMWARE IS DISPLAYEDVERIFY THAT THE INPUT PORTS PROPERLY WORK.MEMORY TEST<4> or <6> KEYVERIFY THAT THE OUTPUT PORTS PROPERLY WORK.VERIFY THAT THE LCD SCREEN PROPERLY WORKS.VERIFY THAT ALL THE KEYS ON THE KEYPAD WORK.VERIFY THAT THE READER PROPERLY WORKS.VERIFY THAT COMMUNICATION PROPERLY WORKS.COMM TEST<4> or <6> KEYVERIFY THAT THE MEMORY PROPERLY WORKS.](https://usermanual.wiki/ID-Teck-Co/LX007.User-Manual-2/User-Guide-948882-Page-37.png)


![72 APPENDIX A. THE RELATION BETWEEN INPUT AND OUTPUT (DEFAULT) Default Output Settings for Input Sources * Index No. [1] ~ [9] The values indicate the operating time (second) of each output for the input signal. * Index No. [10] The values indicate the time schedule code (index) applied to each output operation. * Index No. [11] The values indicate the time schedule code (index) applied to each input from #1 (Exit button) to #5. * Index No. [12] The values indicate whether or not to use the cut off check feature. (0 – NOT USE, 1 – USE) * Index No. [13] The values indicate whether the input type is NO(Normally Open) or NC(Normally Closed). (0 – NO, 1 – NC) OUTPUT Door Relay (DR) Alarm Relay (AR) TTL#1 (T1) TTL#2 (T2) Buzzer (BZ) [1] EXIT BUTTON 03 00 00 00 00 [2] DOOR CONTACT 00 99 00 00 00 [3] AUX Input #1 00 00 00 00 00 [4] AUX Input #2 00 00 00 00 00 [5] TAMPER ALARM 00 99 99 99 99 [6] CUT OFF ALARM 00 00 00 00 00 [7] DURESS ALARM 00 00 00 00 00 [8] ARM/DISARM OUT 00 00 00 00 00 [9] DR TIME OUT 00 99 00 00 00 [10] OUTPUT TIME SCHEDULE 00 00 00 00 00 [11] INPUT TIME SCHEDULE 00 00 00 00 00 [12] CUT OFF CHECK 00 00 00 00 00 [13] INPUT TYPE 00 00 00 00 00](https://usermanual.wiki/ID-Teck-Co/LX007.User-Manual-2/User-Guide-948882-Page-44.png)
![73 Default Output Settings for Input Circumstance * Index No. [1] ~ [14]: The values indicate the operating time (second) of each output for the input signal. OUTPUT INPUT Door Relay (DR) Alarm Relay (AR) TTL#1 (T1) TTL#2 (T2) Buzzer (BZ) [1] Reader#1 ID OK LV1 03 00 00 00 00 [2] Reader#1 ID OK LV2 05 00 00 00 00 [3] Reader#1 ID OK LV3 05 00 00 00 00 [4] Reader#1 ID OK LV4 05 00 00 00 00 [5] Reader#1 ID Error 00 03 00 00 00 [6] Reader#1 T/S Error 00 03 00 00 00 [7] Reader#1 APB Error 00 03 00 00 00 [8] Reader#2 ID OK LV1 03 00 00 00 00 [9] Reader#2 ID OK LV2 05 00 00 00 00 [10] Reader#2 ID OK LV3 05 00 00 00 00 [11] Reader#2 ID OK LV4 05 00 00 00 00 [12] Reader#2 ID Error 00 03 00 00 00 [13] Reader#2 T/S Error 00 03 00 00 00 [14] Reader#2 APB Error 00 03 00 00 00](https://usermanual.wiki/ID-Teck-Co/LX007.User-Manual-2/User-Guide-948882-Page-45.png)
![74 B. TROUBLE SHOOTING ☞ A valid card became unregistered after batch-downloading IDs from PC. Cause Wrong download procedure or a component defect. Solution 1. The card ID might be registered only on the controller and not on the PC. During the process of batch-downloading IDs from the PC, the LX007 first erases the ID memory in it. That’s why this deletion of certain IDs can happen if those IDs were not registered on the PC at the point of batch-downloading. 2. Check whether the card ID is registered in the PC or not. 3. If not, please register the number and try downloading again. 4. If the trouble remains after following the procedures above, contact a designated service center. ☞ I entered the Master ID “00000000” but I still cannot enter the Setup Mode. Cause The Master ID might have been changed or some components are defective. Solution 1. Try changing the Master ID through the application software. (The Master ID will be changed to the default value “00000000”.) 2. When it is not feasible, initialize the unit as following: After the installation and connections are completed, supply power (+12V DC) to the LX007 with the initialization button being held down. Then, the LCD will first display “Initialize OK? 0:No 1:Yes”. Press <1> key if you want to initialize the system. After all the initialization process is completed, the system will be operating on the normal mode and the LCD will display “IDTECK, LX007 [F1], Date Time”. 3. If the trouble persists after following the procedures above, contact a designated service center. ☞ No problem with accessing by card, but cannot access via a manual PIN input. Cause An error in the settings or possible component defect. Solution 1. Check whether a beep sounds when you press a key. If a beep sounds, the problem may be wrong settings. Proceed as followings: - Enter the Master ID (Default=“00000000”) to get into the Setup mode. - Press <F2> key. - [LANGUAGE] will appear on the LCD, then use the <6> key to choose [RD1_PIN_INPUT] and press [ENT] key to modify the value to ‘USE’ by using <4> or <6> key. 2. When there is no beep sound or the problem persists after the keypad has been enabled, contact a designated service center. ☞ The unit suddenly returns from Setup Mode to normal operating mode. Cause Time-out error Solution The LX007 is originally programmed to go back to the normal operating mode when no keys are pressed or no cards are read within 60 seconds.](https://usermanual.wiki/ID-Teck-Co/LX007.User-Manual-2/User-Guide-948882-Page-46.png)
![75 ☞ The buzzer keeps beeping; “beep~ beep ~ beep” or “beeeeeeeep~~~~”. Cause An error in the Installation, Door status or Internal circuits. Solution 1. Check the door status. It occurs when the door is opened over 3 sec (Default). 2. Check the door contact sensor type: it must be NO/NC-type. 3. Check the 10 Time schedule code (01~10) values of output T/S, in [7. OUTPUT T/S] of F6 Setup Menu. This problem can occur if the time schedule code is set between 01 and 10 and the present time is within the time zone of the selected schedule. If the wrong time schedule is selected, cancel it by assigning the blank time schedule code “00” 4. Check the Tamper switch of the LX007. 5. If the trouble persists after checking the above, contact a designated service center. ☞ The “SCHEDULE ERROR” message appears when an RFID card is read. Cause An error in RFID card registration, time schedule setting or the system itself. Solution 1. If the LX007 used to be properly operating before, it is likely that there has been an electric shock that damaged the internal memory and data. Please initialize the unit as instructed in the manual. 2. Check if the ID information has been configured incorrectly. * Register ID again and check the following points. - In order to restrict access of a user within a specific time zone as instructed in the manual, register time schedule in advance and apply the time schedule code(1~10) to the user during the registration process. - In order to allow the user to access at all times, enter “00”. 3. Use the software for time schedule settings if the LX007 is connected to a PC. Refer to the software manual for more details. 4. If the trouble persists after checking the above, contact a designated service center. ☞ The “ACCESS DOOR ERR” message appears when an RF ID card is read. Cause Incorrect user setting or something wrong with internal circuits. Solution 1. If the LX007 used to operate properly before, it is likely that there has been an electric shock that damaged the internal memory and data. Please initialize the unit as instructed in the manual. 2. Check if the ID information has been entered incorrectly during its registration. * Register the ID again and check the following points: - Since the controller has two reader ports, set the “RD” setting – the door to which the user will be allowed access – to an appropriate value. - If the RD value is set to “1”, the door opens only when Reader 1 reads a card. If the card is presented to Reader 2, the “ACCESS DOOR ERROR” message will appear. - If the RD value is set to “2”, the door opens only when Reader 2 reads a card. If the card is presented to Reader 1, the “ACCESS DOOR ERROR” message will appear. - If the RD value is set to “0” or “3”, both the reader 1 and 2 will open their doors when a registered card is presented to them. 3. If the trouble persists after checking the above, contact a designated service center.](https://usermanual.wiki/ID-Teck-Co/LX007.User-Manual-2/User-Guide-948882-Page-47.png)