IDT Technology RMR939PA-01 RF Projection Clock with Remote Motion Sensor User Manual RMR939PA English R7
IDT Technology Limited RF Projection Clock with Remote Motion Sensor RMR939PA English R7
User Manual

POLERMO Projection Clock
with Motion Alert
Model: RMR939PA / MSR939A
USER MANUAL
RMR939PA English Cover R7 10/20/04, 10:34 AM1

EN
1
CONTENTS
Introduction .............................................................. 2
Product Overview .................................................... 3
Front View .............................................................. 3
Back View .............................................................. 5
LCD Display ........................................................... 6
Remote Motion Sensor (MSR939A) - Front View .. 8
Remote Motion Sensor (MSR939A) - Back View .. 9
Safety and Care ...................................................... 10
Safety Precautions ............................................... 10
Caring for this Product ......................................... 10
Getting Started ....................................................... 10
Package Contents ............................................... 10
Batteries ............................................................... 11
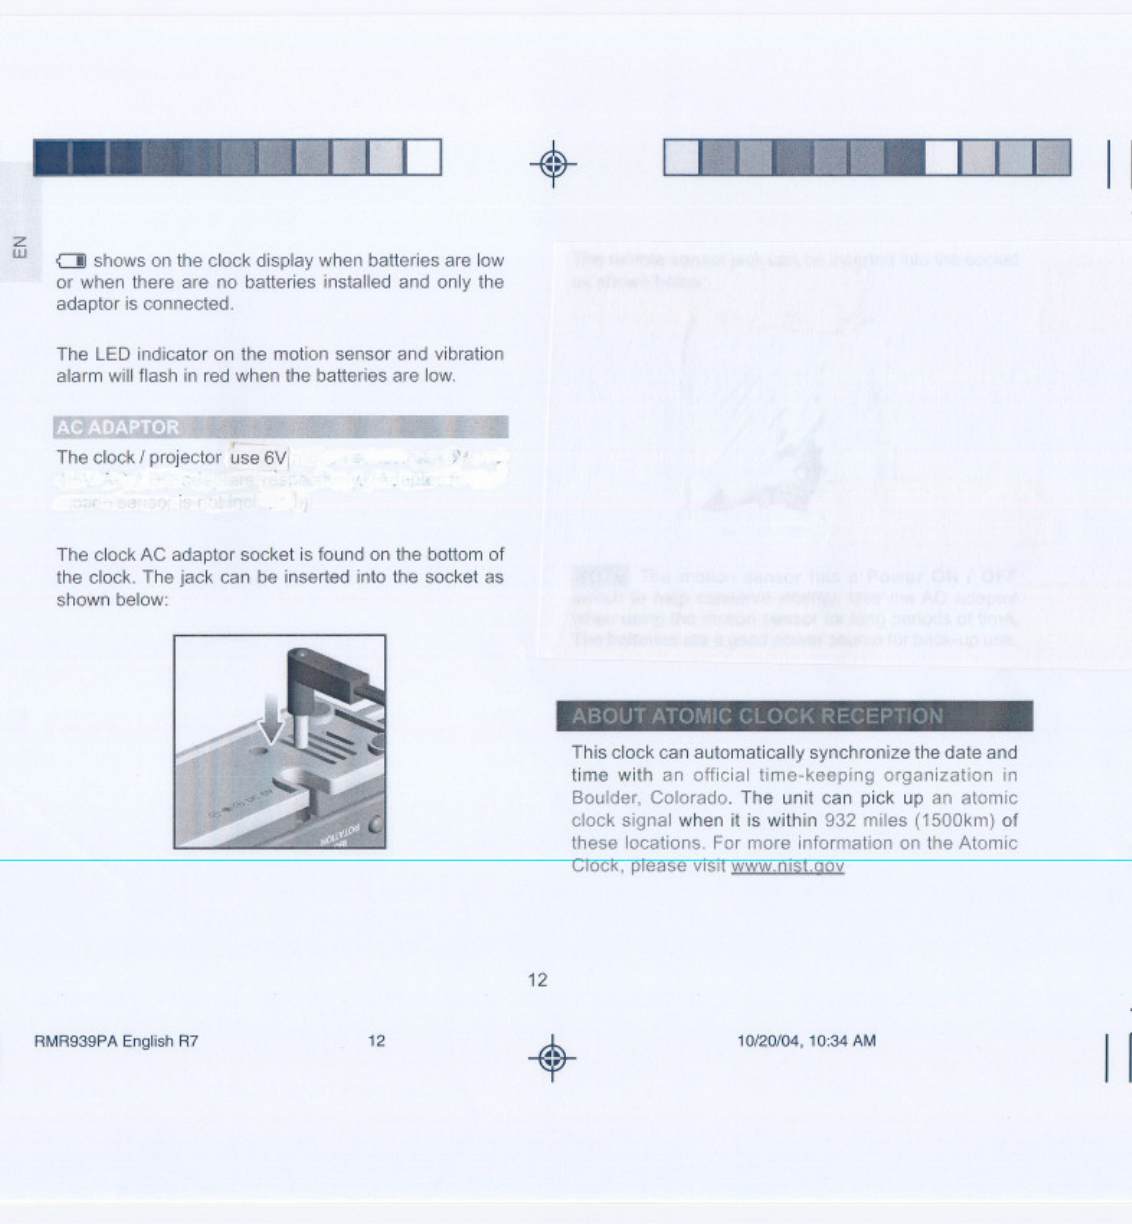
AC Adaptor .......................................................... 12
About Atomic Clock Reception ............................ 12
Turning the Atomic Clock Signal ON / OFF ......... 13
Clock / Calendar ..................................................... 13
Clock / Calendar Display ..................................... 13
Setting the Clock / Calendar ................................ 14
Backlight ................................................................. 14
Temperature ............................................................ 14
Alarm ....................................................................... 15
Alarm Display ...................................................... 15
Setting the Alarm(s) ............................................. 15
Activating / Deactivating the Alarm(s) .................. 15
Alarm Sound ........................................................ 15
Snooze / Turning the Alarm OFF ......................... 15
Motion Alarm .......................................................... 16
Motion Alarm Setting Display ............................... 16
Setting the Motion Alarm ...................................... 16
Turning the Motion Alarm OFF ............................ 17
Sleep Timer ............................................................. 17
Projection Unit ....................................................... 18
Motion Sensor (MSR939A).................................... 18
Setup Sensor ....................................................... 18
Wake-Up Vibration Alarm - VR101A (Optional) .... 19
Resetting the Clock ............................................... 19
Warnings ................................................................. 20
Troubleshooting ..................................................... 20
Technical Specifications ....................................... 21
POLERMO Projection Clock
with Motion Alert
Model: RMR939PA / MSR939A
USER MANUAL
RMR939PA English R7 10/20/04, 10:34 AM1

EN
2
INTRODUCTION
Thank you for selecting the Oregon ScientificTM
POLERMO Projection Clock with Motion Alert. This
device is designed to give you many years of reliable
service, including the following conveniences:
•US Atomic Calendar Clock
•Optional Wireless Vibration Alarm with 8-Minute
Snooze Function (Wake-Up Vibrating Alarm
VR101A can be purchased separately)
•Sleep Function with 6 Soothing Sounds
•5 Alarm Melodies with 2 Volume Levels
•2-Minute Dual Alarm with 8-Minute Snooze Function
•Time / Alarm Status Projection Unit
•Security Alarm / Motion Sensor Unit
•Indoor Temperature Display
•Day of the Week in 1 of 5 Languages
•Time Zone Hour Offset Function
•Backlight for Clock
Keep this manual handy as you use your new product.
It contains practical step-by-step instructions, as well
as technical specifications and warnings you should
know.
Notices .................................................................... 23
Statement of Responsibility ................................. 23
About Oregon Scientific ........................................ 23
FCC Statement ....................................................... 24
Declaration of Conformity .................................... 23
RMR939PA English R7 10/20/04, 10:34 AM2

EN
3
1
2
3
5
4
8
7
6
1. SOUND / SLEEP button
•Press to turn the soothing sound ON.
•Press to wrap around the sleep timer setting as
follows: 0 120 90 60 30 15
0 minutes.
•Press and hold for 2 seconds to choose 1 of
6 soothing sounds.
2. SNOOZE / LIGHT button
•Press to activate the 8-minute snooze function.
•Press and hold for 2 seconds to turn snooze OFF
and reset the alarm for the next day.
•Press to activate the backlight and projection for
5 seconds.
3. LCD display
4. CLOCK ALARM button
•Press to toggle between alarm 1 and alarm 2 -
ON / OFF.
•Press and hold for 2 seconds to enter the Alarm
Time Setting Mode.
5. MOTION ALARM button
•Press to enter the Motion Alarm Mode; press
again to toggle between motion alarm ON / OFF.
PRODUCT OVERVIEW
FRONT VIEW
RMR939PA English R7 10/20/04, 10:34 AM3
EN
4
•Press and hold for 2 seconds to enter:
-Motion Sensor Code.
-Motion Alarm Setting Mode for motion alarm
period and alarm type.
6. Projector
Projects time and alarm status.
7. CLOCK button
•Press to toggle between the following display
modes:
-Clock with seconds and calendar.
-Clock with weekday and calendar.
-Clock with time zone hour offset and calendar.
•Press and hold for 2 seconds to enter the
Clock Setting Mode - US time zone hour offset,
12- / 24-hour format, hour, minute, year, MM / DD
or DD / MM format, month, day and day of the
week language.
8. UP / DOWN button
•Press to increase or decrease a setting.
•Press and hold for 2 seconds to activate or
deactivate atomic clock.
•Press to increase or decrease the soothing sound
volume.
RMR939PA English R7 10/20/04, 10:34 AM4
EN
5
1
2
3
4
5
6
7
8
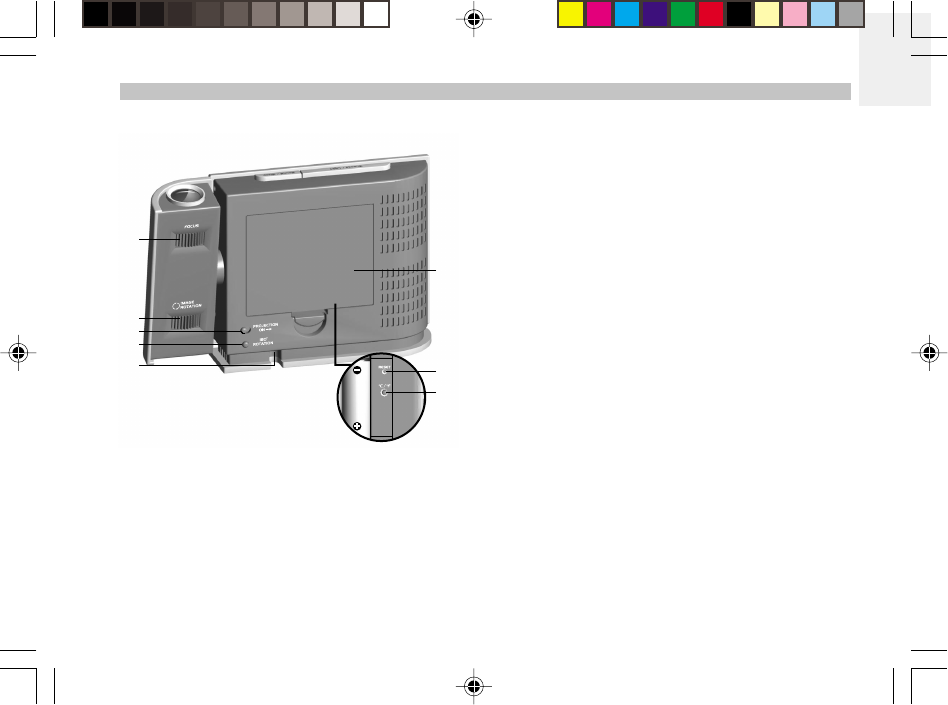
1. Projector FOCUS knob
• Twist to focus the projected image.
2. Projector IMAGE ROTATION knob
• Twist to get the best viewing angle of the projected
image.
3. PROJECTION ON switch
• Slide to ON for continuous image projection when
the AC power is connected.
4. Projector 180° ROTATION button
• Press to rotate the image upside down.
5. 6V AC / DC Power Socket
6. Battery Compartment (cover on)
• Uses 4 x UM-3 / AA 1.5V batteries.
7. RESET hole
• Insert a thin blunt instrument to return all values
to the default settings.
8. °C / °F switch
• Press to select between °C / °F display format.
BACK VIEW
RMR939PA English R7 10/20/04, 11:38 AM5
EN
6
LCD DISPLAY
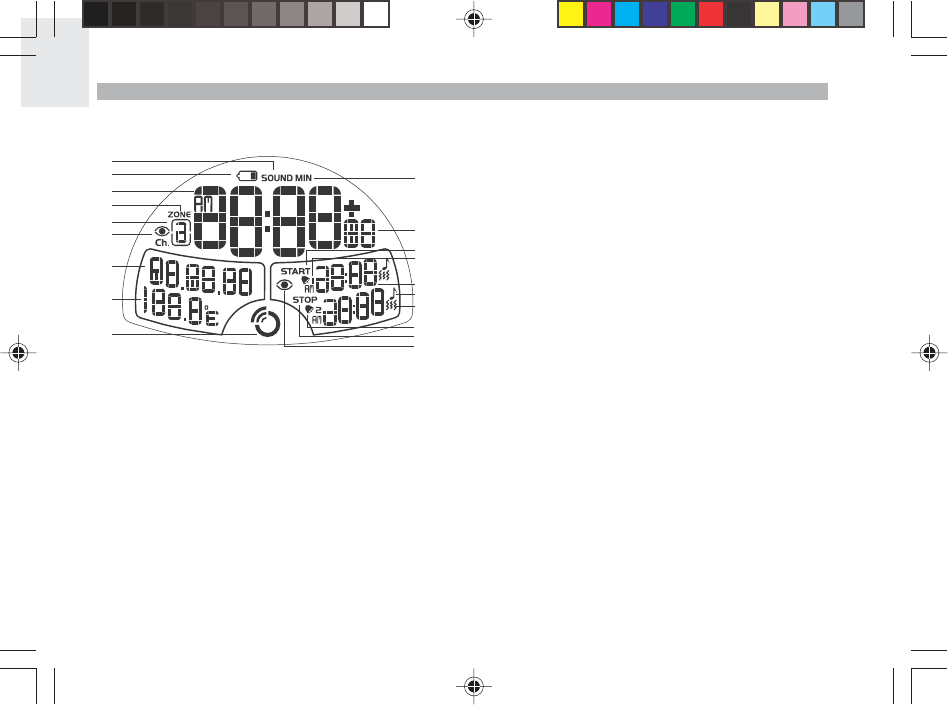
1. SOUND
•Appears when the sleep function is activated.
2. Battery Low icon
•Appears when the clock batteries are low or, no
batteries are installed and only the AC adaptor is
connected.
3. Time
•HH / MM, 12- / 24-Hour, AM / PM.
4. ZONE
•Appears when you are in the Time and Zone Hour
Offset display.
5. Channel 1 / 2
•Ch.1 or Ch.2 will appear when the related motion
sensor is activated.
6. Motion Alarm ON icon
7. Calendar
•DD / MM / YY or MM / DD / YY.
8. Temperature
•°C / °F.
9. Atomic Clock Signal Reception icon
• Shows the strength of the reception signal.
2
3
5
6
7
8
9
11
10
12
13
14
15
16
17
18
19
4
1
RMR939PA English R7 10/20/04, 10:34 AM6

EN
7
10. MIN
•Appears when the sleep function is activated.
11. Time Zone Hour Offset / Day of the Week
•Offsets the atomic clock time setting when you
are in a different time zone (+ / -23 hours).
•Name of day available in 1 of 5 languages.
12. START
•Start time for the motion sensor to be activated.
13. Alarm 1
•Indicator to show this is alarm 1.
14. Alarm 1 / 2 Time
•Shows alarm times / AM or PM.
15. Melody Alarm icon
•Shows when the clock alarm is set.
16. Vibration Alarm icon (Wake-Up Vibration Alarm -
optional item)
•Appears on the display when the vibrating alarm
has been set.
17. Alarm 2
•Indicator to show this is alarm 2.
18. STOP
•Stop time for the motion sensor.
19. Motion Alarm Settings icon
RMR939PA English R7 10/20/04, 10:34 AM7
EN
9
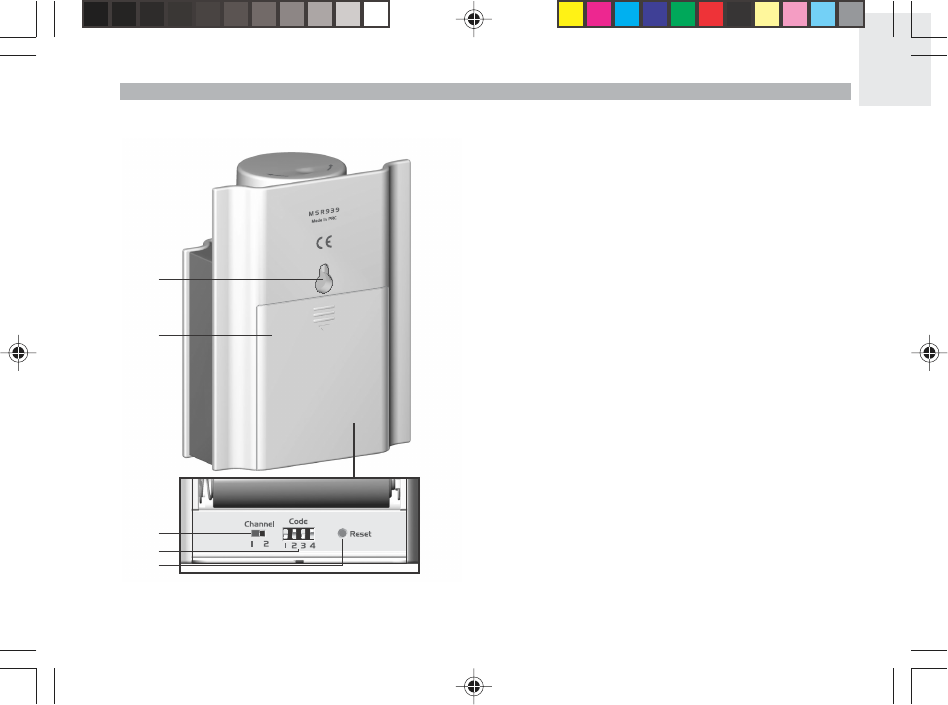
REMOTE MOTION SENSOR (MSR939A) - BACK VIEW
1. Wall Mount
2. Battery Compartment (cover on)
•Uses 3 x UM-3 / AA 1.5V batteries.
3. CHANNEL 1 / 2
•Slide to select either Channel 1 or Channel 2.
4. CODE switch
•Slide to change the Code.
5. RESET hole
•Insert a thin blunt instrument to return all values
to the default settings.
1
2
3
4
5
RMR939PA English R7 10/20/04, 10:34 AM9

EN
10
•Keep your product away from hot, humid conditions
or strong sunlight.
•Every effort has been made to ensure the highest
standards of reliability for your clock with remote
motion sensor. However, if something does go
wrong, please do not try to repair it yourself - consult
your supplier.
•Do not use your product outdoors in the rain, or
handle it with wet hands - water can damage
electrical equipment.
GETTING STARTED
PACKAGE CONTENTS
When you unpack your clock with remote motion sensor,
make sure you keep all the packing materials in a safe
place, in case you need to later transport the device or
return it for servicing.
In the box, you will find:
•Clock Unit
•Remote Motion Sensor
•4 x UM-3 / AA 1.5V Batteries for the Clock
• 6V AC / DC Adaptor for the Clock
•3 x UM-3 / AA 1.5V Batteries for the Remote Motion
Sensor
SAFETY AND CARE
SAFETY PRECAUTIONS
Please observe the following safety precautions when
setting up and using this product.
•LCD panel - The LCD panel is made of glass, and
may break if the unit is dropped.
•Heat sources - Keep the product away from heat
sources, such as radiators, stoves, heaters, and
other heat-generating products.
•Water and moisture - Do not use the product in or
near water or in high moisture areas, such as a
bathroom.
•Power source - The product may be susceptible to
power surges. It should be unplugged during severe
storms or whenever you will be away for a long time.
Only use the type of power source specified in this
manual. Do not overload power strips and extension
cords, as this can cause a fire hazard.
CARING FOR THIS PRODUCT
To ensure you receive the maximum benefit from using
this product, please observe the following guidelines.
•Do not clean any part of the product with benzene,
thinner or other solvent chemicals - this may cause
permanent damage that is not covered by the
guarantee. When necessary, clean it with a damp
cloth.
RMR939PA English R7 10/20/04, 10:34 AM10
EN
11
BATTERIES
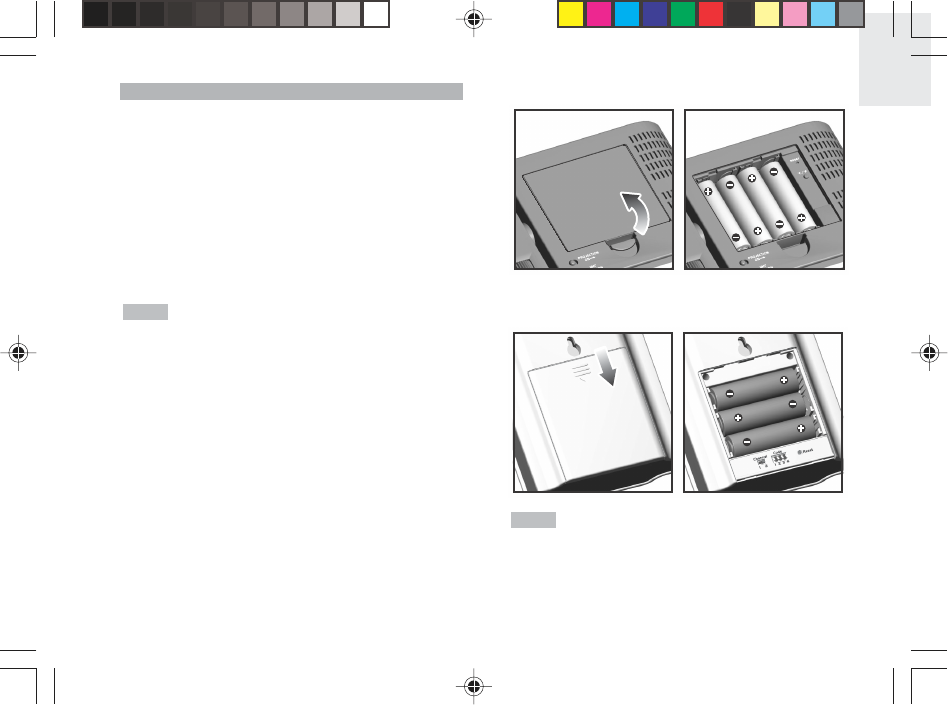
The clock uses:
•4 x UM-3 / AA 1.5V batteries.
The motion sensor uses:
•3 x UM-3 / AA 1.5V batteries.
The optional wake-up vibration alarm VR101A
(not included in the package) uses:
•2 x UM-3 / AA 1.5V batteries.
It is recommended that you use alkaline
batteries with this product for longer performance.
To install the batteries, simply insert them making sure
they match the correct polarities (+ and -). For best
results, install batteries in the motion sensor before the
clock. Press RESET after each battery change.
To install the clock batteries:
NOTE To install the motion sensor batteries:
Do not use rechargeable batteries for the clock
or remote motion sensor.
NOTE
RMR939PA English R7 10/20/04, 10:34 AM11
EN
13
For best results, place the clock away from metal
or electrical objects, and near a window with a clear view
to the sky.
TURNING THE ATOMIC CLOCK SIGNAL ON / OFF
To turn the atomic clock signal reception ON:
•Press and hold the button for 2 seconds.
•The atomic clock reception icon will appear and flash
on the display to indicate it is searching for the atomic
clock signal.
Once batteries have been installed in the clock, the
reception icon will flash to indicate it is searching for a
signal.
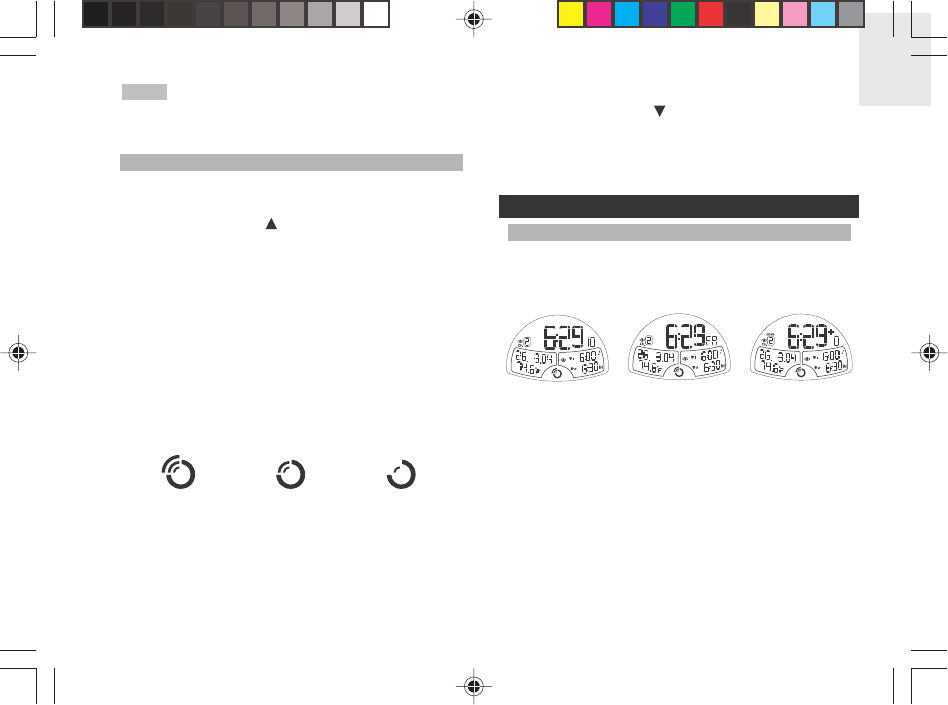
When the reception signal has been received the
reception icon will show the signal strength by displaying
between 0 and 3 waves:
To turn the atomic clock signal reception OFF:
•Press and hold the button for 2 seconds.
•The atomic clock reception icon will disappear from
the display.
CLOCK / CALENDAR
CLOCK / CALENDAR DISPLAY
There are 3 types of clock display:
NOTE
Strong Signal Weak Signal No Signal
Calendar /
Clock / Sec
Calendar /
Clock / Day
Calendar /
Clock / Offset
Press the CLOCK button to toggle between the 3 types
of display.
RMR939PA English R7 10/20/04, 10:34 AM13
EN
14
SETTING THE CLOCK / CALENDAR
Before you can manually set the clock and calendar,
you must specify the current time zone you live in and
the time format (12- or 24-hour) as follows:
1. Press and hold the CLOCK button for 2 seconds.
The time zone offset hour digits will flash. The default
setting will be -8 which stands for Pacific time. Select
the following for different US time zones:
-7 : Mountain time
-6 : Central time
-5 : Eastern time
6. Press CLOCK ALARM or MOTION ALARM to exit
the Clock Setting Mode.
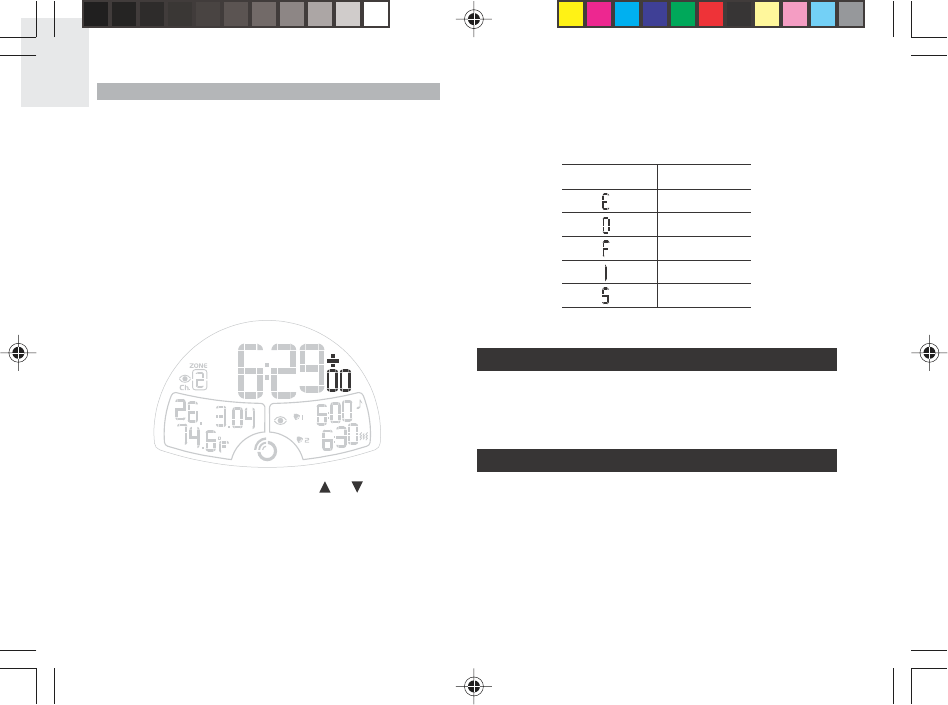
You can select 1 of the 5 following languages:
SYMBOL LANGUAGE
English
German
French
Italian
Spanish
BACKLIGHT
Press SNOOZE / LIGHT to activate the backlight for
5 seconds.
TEMPERATURE
To choose between °C / °F, press the °C / °F button to
select the setting you want.
2. Enter the value by pressing the or buttons.
3. Confirm the entry by pressing the CLOCK button.
The 12- or 24-hour display format will flash.
4. Repeat (2) and confirm the entry by pressing the
CLOCK button.
5. Repeat the above procedures to set the hour, minute,
year, MM / DD or DD / MM format, month, day and
day of the week language.
RMR939PA English R7 10/20/04, 10:34 AM14

EN
15
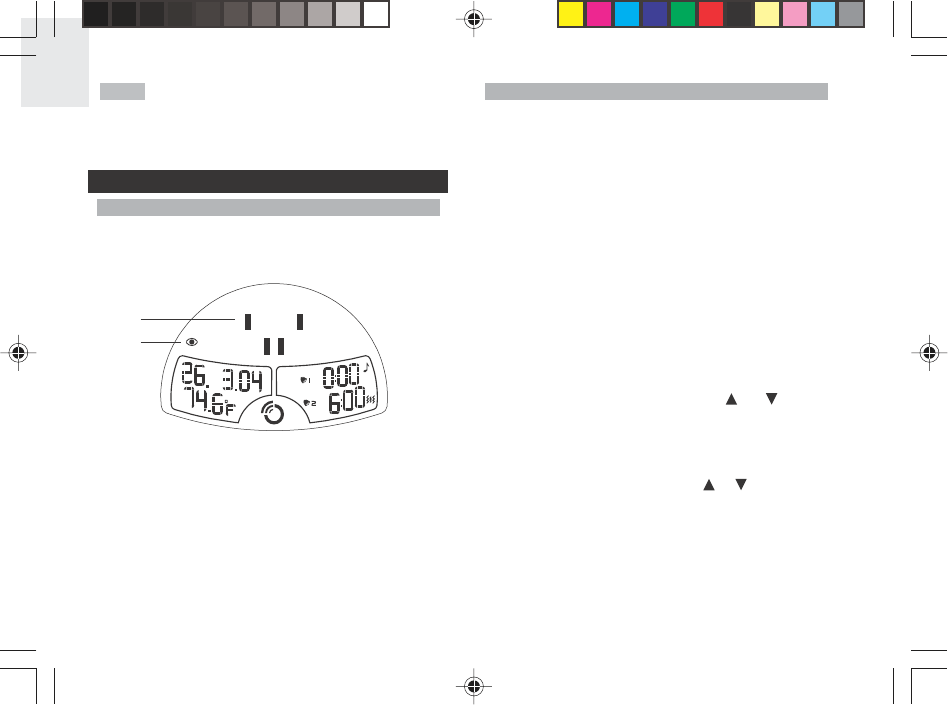
Alarm 1 (Melody)
Alarm 2 Disabled
Alarm 2 (Wake-Up) Alarm 2 Melody
+ Wake-Up
SETTING THE ALARM(S)
1. Press and hold CLOCK ALARM for 2 seconds to
enter the Alarm Setting Mode.
2. Alarm 1 will start flashing. Use the and
buttons to toggle between alarm 1 and 2. Then press
CLOCK ALARM to select alarm 1 or 2. The hour
will start flashing.
3. Enter the value by pressing the or buttons.
4. Confirm the entry by pressing the CLOCK ALARM
button and move on to the next setting.
5. Repeat (3 and 4) to set alarm 1 / alarm 2 - minute,
melody alarm and / or vibration alarm (optional). If
the melody alarm is selected, repeat (3 and 4) to
select the melody / beep alarm sound and volume.
6. The daily alarm will be on automatically after setting.
Press CLOCK at any time to exit the Alarm Setting Mode.
ACTIVATING / DEACTIVATING THE ALARM(S)
•Press the CLOCK ALARM button to toggle between
alarm 1 and alarm 2 ON / OFF.
•When the melody or vibration alarm icons appear
on the display the alarm is activated. When the icons
do not appear the alarm is deactivated.
ALARM SOUND
When activated, the alarm icon flashes, the backlight
will come on for 8 seconds and the alarm melody or
beep sound will play. If no key is pressed the alarm will
play for 2 minutes.
See "Setting the Alarm(s)" section to choose the
alarm melody / beep alarm and / or the vibration alarm.
SNOOZE / TURNING THE ALARM OFF
To silence the alarm:
• Press SNOOZE / LIGHT to silence it for 8 minutes.
The alarm 1 or alarm 2 icon will flash to show snooze
is enabled. Press and hold for 2 seconds to turn off
snooze.
OR
•Press any key except SNOOZE / LIGHT to mute the
alarm and activate it again in 24 hours.
NOTE
ALARM
ALARM DISPLAY
The melody and vibration alarm icons indicate the daily
alarm settings. Any disabled alarm will show no melody
or vibration alarm icons.
RMR939PA English R7 10/20/04, 10:34 AM15
EN
16
If no button is pressed, the alarm will
automatically silence after 2 minutes. It will then sound
again in 24 hours.
MOTION ALARM
MOTION ALARM SETTING DISPLAY
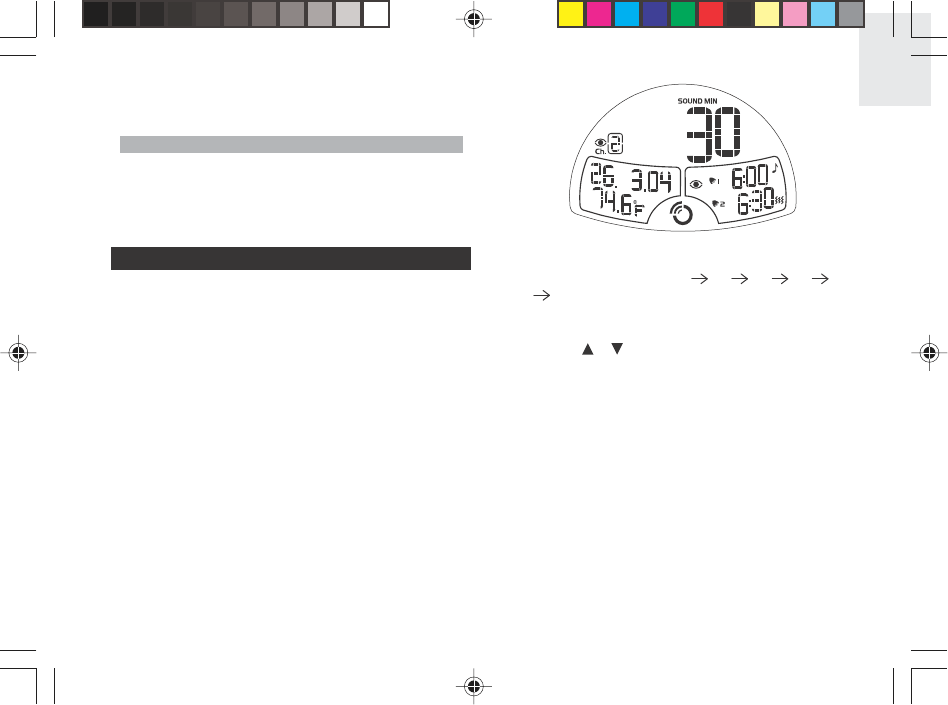
The motion sensor icon indicates the motion alarm
setting.
NOTE
1. Code icon
2. Motion Sensor icon
SETTING THE MOTION ALARM
The motion alarm has a security / monitoring function,
whereby when the motion sensor detects movement, it
sets off the clock alarm for 5 minutes and the backlight
will turn on for 10 seconds. The clock will also show
which sensor has been activated - Ch.1 or Ch.2 will
appear in the top left hand corner of the display.
You can set the motion alarm to be activated over a set
period of time i.e. during night time, by entering values
next to the Start / Stop Hour in the process detailed
below. However, it is important that you set the Code on
the clock display to match the Code on the back of the
motion sensor(s) so that the items can interact with each
other. This process is also detailed below.
1. Press and hold MOTION ALARM for 2 seconds to
enter the Motion Alarm Setting Mode.
2. The Code will start flashing. Use the and buttons
to choose the same Code setting as that displayed
on the back of the motion sensor. Then press
MOTION ALARM to select your chosen option. The
start hour digits will start flashing.
3. Enter the value by pressing the or buttons.
4. Confirm the entry by pressing the MOTION ALARM
button and move on to the next setting.
5. Repeat (3 and 4) to set the stop hour, beep / melody
and volume.
6. The motion alarm will be on automatically after setting.
1
2
RMR939PA English R7 10/20/04, 10:34 AM16
EN
17
Press CLOCK or CLOCK ALARM at any time to exit
the Motion Alarm Setting Mode.
TURNING THE MOTION ALARM OFF
Press any button on the clock to turn the motion alarm
off. It will sound again when the remote motion sensor
unit detects a motion again.
SLEEP TIMER
You can choose 1 of 6 soothing sounds to play for a set
time while you fall asleep:
•Bird
•Wind
•River
•Raindrop
•Waterfall
•Ocean Wave
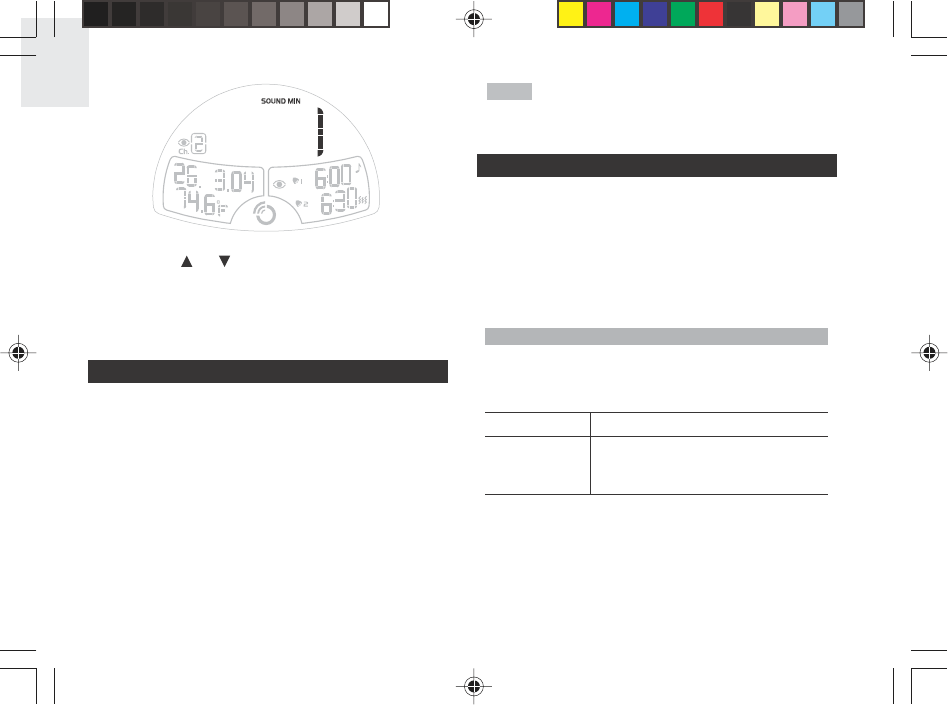
To set the sleep timer and soothing sound volume:
1. Press the SOUND / SLEEP button once. The
soothing sound will turn on and the sleep timer will
display the last setting.
2. Press the SOUND / SLEEP button to set the sleep
timer to turn off after 120 90 60 30 15
or 0 minutes. When 0 minutes is selected the
soothing sound will automatically turn off after a few
seconds.
3. Use the or buttons to change the soothing sound
volume.
4. SOUND will flash on the LCD display to indicate that
the sleep timer is activated.
To select the soothing sound:
1. Press and hold the SOUND / SLEEP button for
2 seconds when the soothing sound is on. The
soothing sound number will flash.
RMR939PA English R7 10/20/04, 10:34 AM17
EN
18
2. Use the or buttons to change the type of
soothing sound.
3. Press the SOUND / SLEEP button to confirm the
setting.
PROJECTION UNIT
The projection unit can display both time and alarm
status. To use this feature:
•Slide the PROJECTION switch to ON to activate
continuous projection. However, this function will not
work unless the AC / DC adaptor is used.
•Adjust the FOCUS knob to make the image clearer.
•Adjust the IMAGE ROTATION knob to rotate the
image clockwise or anti-clockwise.
•Manually tilt the projection unit to position the image
or press the 180° ROTATION button to reverse the
image and turn it upside down.
NOTE You can also press the SNOOZE / LIGHT button
to project the time and alarm status for 5 seconds.
MOTION SENSOR (MSR939A)
The motion sensor has a security / monitoring function.
It can set off your motion alarm on the clock for 5 minutes
and turn the backlight on for 10 seconds when it detects
movement.
Data can be collected from up to 2 sensors. Additional
sensor sold separately.
SETUP SENSOR
1. Slide the motion sensor battery door open.
2. Insert the batteries, matching the polarity (+ and -)
as shown in the battery compartment.
SWITCH OPTION
Channel Channel 1-2. If you are using more
than one sensor, select a different
channel for each sensor.
3. Set the channel by sliding the CHANNEL switch to
1 or 2. The switch is located in the battery
compartment.
4. Set the code by sliding the CODE switches to the
same setting as the Code on the clock display. This
enables the clock and motion sensor to interact with
each other.
RMR939PA English R7 10/20/04, 10:34 AM18

EN
19
5. Press the RESET button. Close the motion sensor
battery compartment.
6. Secure the sensor in the desired location using the
wall mount or table stand.
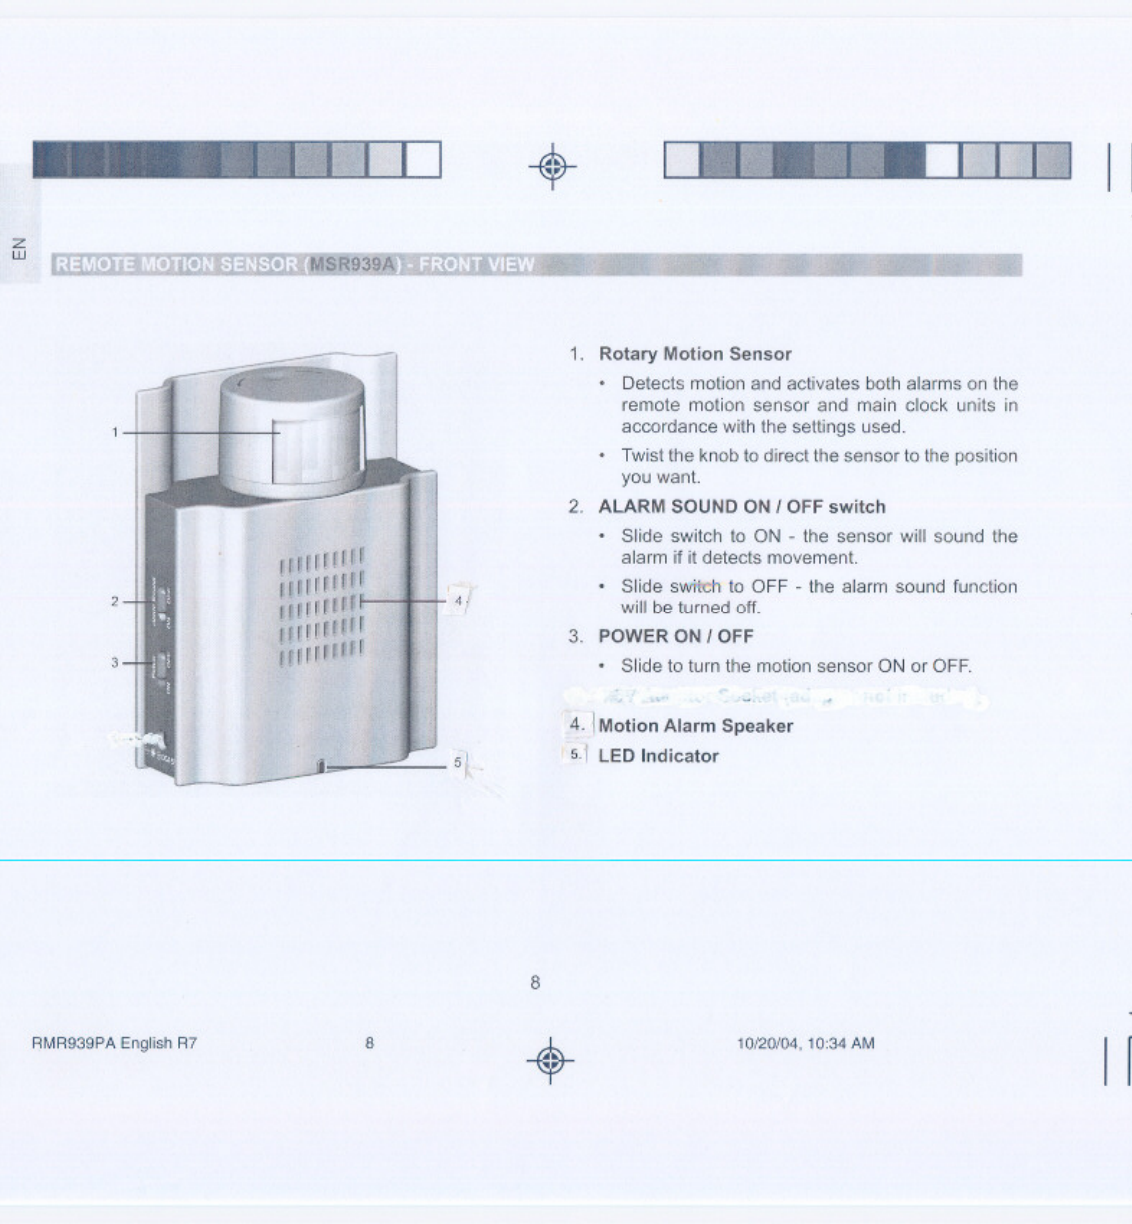
7. Twist the motion sensor knob to direct the sensor to
the position you want.
8. Slide the POWER ON / OFF switch to turn the motion
sensor ON or OFF.
9. Slide the ALARM SOUND ON / OFF switch to ON
to activate the alarm sound function. The motion
sensor alarm will now sound for 20 seconds if it
detects movement. Slide to OFF to deactivate this
function.
Once it has power, the motion sensor takes
2 minutes to warm up.
For best results:
•Insert the batteries and select the channel before
you mount the sensor.
•Place the sensor out of direct sunlight and moisture.
•Do not place the sensor more than 98 feet
(30 meters) from the main (indoor) unit.
•Position the sensor so that it faces the main (indoor)
unit, minimizing obstructions such as doors, walls,
and furniture.
•Place the sensor in a location with a clear view to
the sky, away from metallic or electronic objects.
NOTE
NOTE
You may need to experiment with various locations to
get the best results.
WAKE-UP VIBRATION ALARM - VR101A
(OPTIONAL)
The vibrating alarm receives a signal from the clock and
performs a wake-up function by vibrating. It is designed
to go under your pillow.
The device has a range of roughly 50 feet and has an
LED indicator to show data transmission and battery
level.
The switch within the vibrating alarm can adjust to
alarm 1 or alarm 2, or both. Simply select the alarm time
on the clock unit when you want the vibrating alarm to
wake you up.
The vibrating alarm is powered by 2 x UM-3 /
AA 1.5V batteries (included). It is also compatible with
rechargeable batteries (not included).
RESETTING THE CLOCK
Insert a thin blunt instrument into the hole below RESET
to return to the default settings.
RMR939PA English R7 10/20/04, 10:34 AM19

EN
20
The default settings are:
Clock Time: 12.00 PM
Date: 1st January 2004
Time Offset: -8 (Pacific Time)
Alarm 1 and 2 Time: 6.00 AM
Alarm Melody: #1 with low volume
Daily Alarms: Disabled
Motion Alarm Start Time: 12.00 AM
Motion Alarm Stop Time: 6.00 AM
Motion Alarm: Disabled
Display Setting: 12hr, MM / DD, °F
WARNINGS
This product is designed to give you years of service if
handled properly. Oregon Scientific will not be
responsible for any deviations in the usage of the device
from those specified in the user instructions or any
unapproved alterations or repairs of the product.
Observe the following guidelines:
•Never immerse the product in water. This can cause
electrical shock and damage the product.
•Do not subject the product to extreme force, shock,
or fluctuations in temperature or humidity.
• Do not tamper with the internal components.
•Do not mix new and old batteries or batteries of
different types.
•Do not use rechargeable batteries with this product.
•Remove the batteries if storing this product for a long
period of time.
•Do not scratch the LCD display.
The technical specification of this product and
contents of this user manual are subject to change
without notice. Images not drawn to scale.
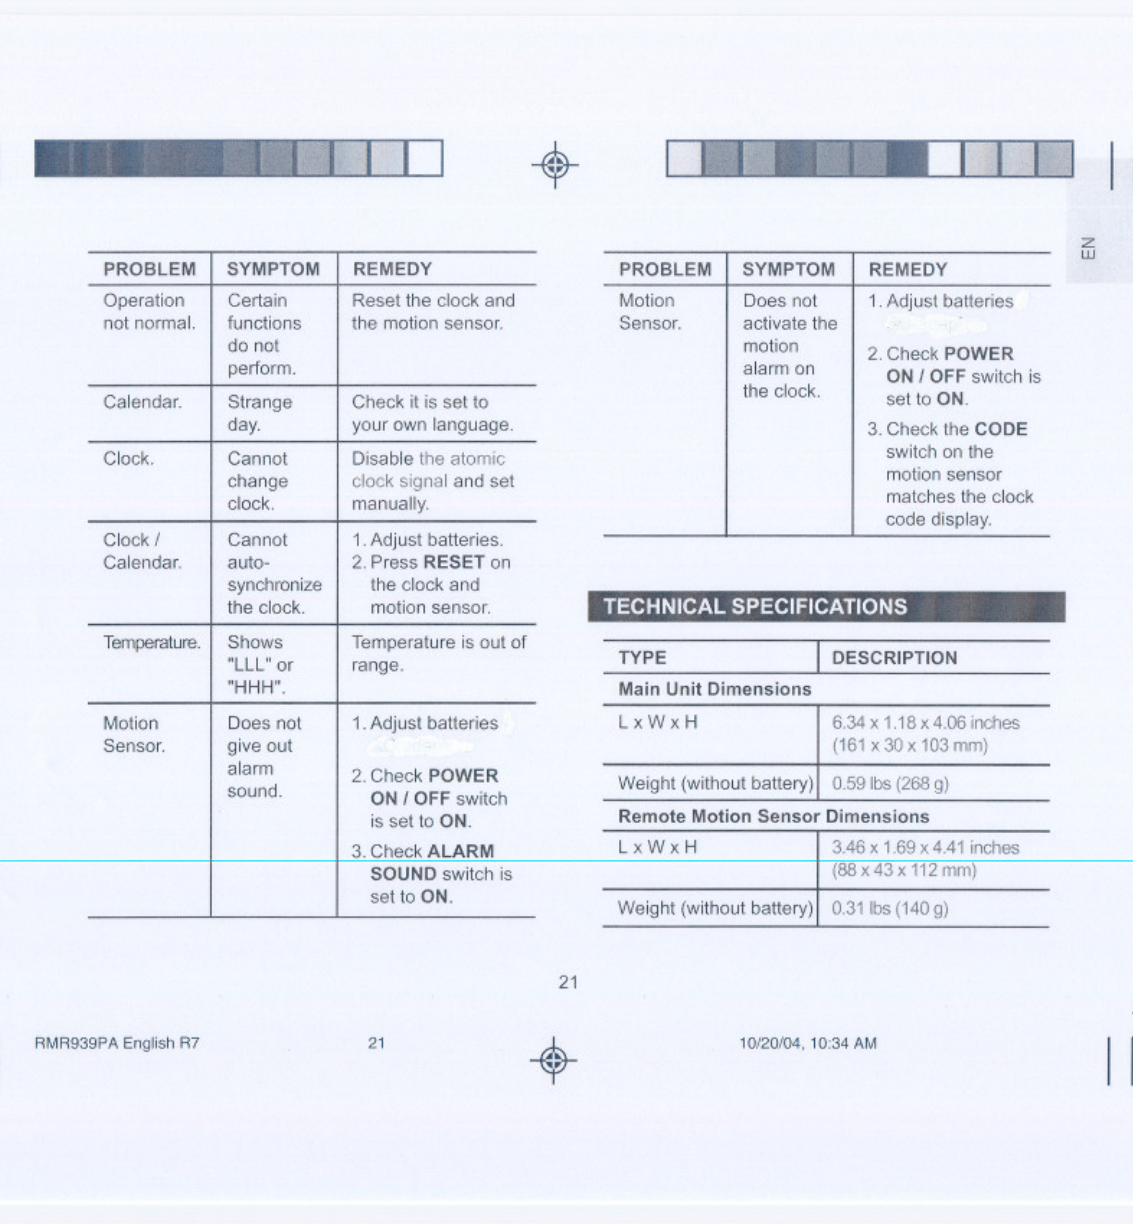
TROUBLESHOOTING
NOTE
PROBLEM SYMPTOM
Clock time
is not
correctly
set.
No atomic
clock
signal
reception.
REMEDY
Place the clock far
away from PCs,
phones, and other
electronic equipment
and near a
windowsill. Wait for
at least 24 hours.
No alarm. Alarm does
not sound.
Turn on the alarm
setting.
RMR939PA English R7 10/20/04, 10:34 AM20

EN
23
NOTICES
STATEMENT OF RESPONSIBILITY
Oregon Scientific will not be held liable for any bodily
injury, death, property damages, or any other claims of
whatever nature resulting from the misuse or negligence
of the product, whether intentional or unintentional.
Oregon Scientific will not be responsible for any
deviations in the usage of the device from those specified
in the user instructions or any approved alternations or
repairs of the product.
ABOUT OREGON SCIENTIFIC
Visit our website (www.oregonscientific.com) to learn
more about Oregon Scientific products such as digital
cameras; MP3 players; children's electronic learning
products and games; projection clocks; health and
fitness gear; weather stations; and digital and conference
phones. The website also includes contact information
for our customer care department in case you need to
reach us, as well as frequently asked questions and
customer downloads.
We hope you will find all the information you need on
our website, however if you'd like to contact the Oregon
Scientific Customer Care department directly, please
visit:
www2.oregonscientific.com/service/support
OR
Call 949-608-2848 in the US.
For international enquiries, please visit:
www2.oregonscientific.com/about/international/
default.asp
RMR939PA English R7 10/20/04, 10:34 AM23

EN
24
FCC STATEMENT
This device complies with Part 15 of the FCC Rules.
Operation is subject to the following two conditions:
(1) This device may not cause harmful interference, and
(2) This device must accept any interference received,
including interference that may cause undesired
operation.
WARNING Changes or modifications to this unit not
expressly approved by the party responsible for
compliance could void the user's authority to operate the
equipment.
NOTE This equipment has been tested and found to
comply with the limits for a Class B digital device,
pursuant to Part 15 of the FCC Rules. These limits are
designed to provide reasonable protection against
harmful interference in a residential installation.
This equipment generates, uses and can radiate radio
frequency energy and, if not installed and used in
accordance with the instructions, may cause harmful
interference to radio communications. However, there
is no guarantee that interference will not occur in a
particular installation. If this equipment does cause
harmful interference to radio or television reception,
which can be determined by turning the equipment off
and on, the user is encouraged to try to correct the
interference by one or more of the following measures:
•Reorient or relocate the receiving antenna.
•Increase the separation between the equipment and
receiver.
•Connect the equipment into an outlet on a circuit
different from that to which the receiver is connected.
•Consult the dealer or an experienced radio / TV
technician for help.
RMR939PA English R7 10/20/04, 10:34 AM24

EN
25
DECLARATION OF CONFORMITY
The following information is not to be used as contact for
support or sales. Please call our customer service number
(listed on our website at www.oregonscientific.com), or on
the warranty card for this product) for all inquiries instead.
We
Name: Oregon Scientific, Inc.
Address: 19861 SW 95th Place, Tualatin,
Oregon 97062 USA
Telephone No.: 1-800-853-8883
Fax No.: 1-503-684-3332
declare that the product
Product No.: RMR939PA
Product Name: POLERMO Projection Clock with
Motion Alert
Manufacturer: IDT Technology Limited
Address: Block C, 9/F, Kaiser Estate,
Phase 1, 41 Man Yue St.,
Hung Hom, Kowloon,
Hong Kong
is in conformity with Part 15 of the FCC Rules. Operation
is subject to the following two conditions:
1. This device may not cause harmful interference.
2. This device must accept any interference received,
including interference that may cause undesired
operation.
RMR939PA English R7 10/20/04, 10:34 AM25

© 2004 Oregon Scientific. All rights reserved.
P/N: 000-000000-000
RMR939PA English Back R7 10/20/04, 10:34 AM1