IDnet VIP15XB ALL- IN- ONE PC User Manual 917 1
IDnet Co.,Ltd ALL- IN- ONE PC 917 1
UserManual.wiki
>
IDnet
>
VIP15XB User Manual
>
USERS MANUAL 1
Contents
1.
USERS MANUAL 1
2.
USERS MANUAL 2
USERS MANUAL 1
Navigation menu
Upload a User Manual
Namespaces
Wiki Guide
HTML
PDF
Info
Views
User Manual
Discussion / Help
Navigation


![Chapter 3 Computer setting changeThis chapter shows how to change to be suited for use r environment in brief by using BIOS set up utility th an can change environment of system and OS D/(On Screen Display) that can change screen set ting of LCD monitor.In addition. it explains about system upgrade.BIOS set up utilityFor this product, BIOS based on the newe st Phoenix BIOS 4.0 version of Phoen ixTechnology, Inc. is applied, and for each envir onment variable, system environmentvalue which is the best suite d to this product is applied as def ault.Furthermore, because it provides BIOS set up utility that use rs can change systemenvironment at their will, users can change sy stem environment variable for theirenvironment. In particular, it is used when ch anging booting order, setting password,etc. or adding new device, But, beware that if you set BIO S set up wrongly, systemerror could happen.[Reference]BIOS set up is an operatio n that sets up appropria tely and stores hardware constituent content of system. Set up conte nts is saved CMOS RAM within system, so it is stored by the inside batter y even when power get turn ed off.How to change BIOS settingIt explains shortly regarding how to change set up by using BIOS set up utility.1. Turn on your computer.2. If booting screen appears, press <F2> button to operate BIOS set up utili ty. IF you press <F2> button too late at this time , window is booted, so press < F2> button again restarting com puter.](https://usermanual.wiki/IDnet/VIP15XB.USERS-MANUAL-1/User-Guide-371812-Page-10.png)
![PhoenixBIOS set up utility provides 5 menus.PhoenixBIOS set up utility provides 5 menus.Main menuAdvanced menuPower menuBoot menuExit menuSystem TimeSystem DateLegacy Diskette A :Primary MasterPrimary SlaveSecondary MasterSecondary SlaveSystem MemoryExtended Menory[09:43:29][03/16/2002][Disabled][FUJITSU MHK2060AT][None][None][None]640 KB129024 KBPhoenixBIOS Setup UtilityYou can see the basic spec of computer or change set up.You can set up regarding main chipset, peripheral, etc.You can set up regarding power mode.You can set up changing booting order.You can set up regarding set up exit.Main Advanced Power Boot ExitHelpExitF1Esc EnterEnterF9F10Select Item Select MenuChange ValuesSelect Sub-MenuSetup DefaultsSave and ExitExplanation of MenuMenu<Tad>, <Shift-Tab>, or<Enter> selects fieldsItem Specific Help](https://usermanual.wiki/IDnet/VIP15XB.USERS-MANUAL-1/User-Guide-371812-Page-11.png)
![3. Move to Advanced Chipset Control item from Advanced menu, and press <Enter> key, that enter into Advanced chipset Control sub menu screen.4. Move to from Advanced chipset Control sub menu screen to Legacy USB support item, and change the value as [Enabled].5. To move from Advanced chipset Control sub menu to the upper level, Advanced menu, press <Esc> key.6. After moving from Advanced menu to Boot menu, in case of booting as USB FDD in booting order, change for Removable Devices to be placed at top level, and in case of booting as USB CD -ROM, change for CD-ROM Drive to be placed at top level.7. To end set up after saving changed contents in CMOS RAM, press <F10> key. Then, system is booted with USB device which system is connected.Video boot typeVideo BIOS UpdateVideo BIOSEnable memory gep :Enable CD holeFrequency RatioLegacy USE Support[Onboard Video 1 MB][Enabled][Default VB][Disabled][]Disabled[2X][Enabled]PhoenixBIOS Setup UtilityAdvancedAdvance Chipset ControlHelpExitF1Esc EnterEnterF9F10Select Item Select MenuChange ValuesSelect Sub-MenuSetup DefaultsSave and ExitEnable support forLegacy Universal SerialBusItem Specific Help](https://usermanual.wiki/IDnet/VIP15XB.USERS-MANUAL-1/User-Guide-371812-Page-13.png)
![OSD(On Screen Display) programFor LCD monitor of this product, 15 inch TFT-LCD smart panel is applied, and it also provides standard OSD program for user to be able to change screen setting[Reference]OSD program means screen control program of monitor, and user can control with their desired value about the following items. Brightness control Contrast Position control ; H-Position / V-Position / Phase / Clock Auto-Adjustment Language select ; English / French / Deutsch / Italian / Spanish Color control OSD Adjust ; Display Position / Display Time Information ; Resolution, Horizontal & Vertical frequencies How to operate OSD program It explains briefly about how to operate OSD program. 1. With computer turned on, press <MENU> key on control part of computer in front side. 2. When OSD main menu screen appears, move to the icon indicating items that you want to control by using <up( )> / <down( )> key, and then press <SEL> key.3. In case there is sub menu in the selected item, move to the relevant item by using <up( )> / <down( )> key, and then press <SEL> key. 4. If the control screen regarding the relevant item appears, change it into desired value by using <up( )> / <down( )> key, and then press <MENU> key. Then the relevant item is saved as the changed value, and returned to OSD menu(main or sub menu) screen. 5. When control is completed, press <MENU> key on OSD main menu screen to end OSD program.](https://usermanual.wiki/IDnet/VIP15XB.USERS-MANUAL-1/User-Guide-371812-Page-14.png)
![System upgradeHardware upgradeThis product does not guarantee in case that user personally upgrade a system for user safety and normal operation of system.If you take a computer to pieces at random, computer could be damaged a lot, and there is danger of electric shock.Therefore, if you would like to install new TV tuner, or upgrade CPU, hard disk or memory, please make inquires of ESTATION center.The newest version of each manufacturing company is installed regarding basic driver and application program when shipping from factory. However, because each manufacturing company continues to present improved version for customers, please visit the following site regularly about main software installed previously to this product so you can upgrade with the newest version. Microsoft Corporation Windows XP Home Edition. 810E chipset software installation utility, video driver, and capacity improving utility of Intel Corporation.Software upgrade[Notice]In case of installing driver or utility using eSTATION rebooting of system is necessary in most cases. In case of rebooting of system, please boot with Master CD taken out to prevent booting with Master CD.After installing the above every driver and program, confirm whether each device is working normally by selecting 'device manager' on [hardware] tap screen of 'system registration information' which appears by clicking [start] - [control panel] - [capacity and maintenance management] - [system] to confirm the existence of abnormal condition. If yellow exclamation mark is seen in front of device name, or device name is not appeared, it means device is not working normally, or device is not installed properly. In these cases, you should update driver or install again regarding the device.](https://usermanual.wiki/IDnet/VIP15XB.USERS-MANUAL-1/User-Guide-371812-Page-15.png)
![Installing touch screen program and setupFollow these steps to install TouchKit.1. Put the TouchKit CD to CD-ROM.2. Open the "Win2000_XP" directory.3. Double click the Setup.exe, then windows starts to run the installation program.4. Just click [Next>] button to continue installation. 5. Check the check box if PS/2 touch controller is to be installed. The default setting is unchecked. Then Press [Next>] to continue installation.6. Choose the setup type that best suits your needs. There are two touchKit accessory utilities for choosing, "Rotation Monitor Utility" and "Shutdown Utility". Users can instal the utility they want by checking the box. Then Press [Next>] to continue installation.](https://usermanual.wiki/IDnet/VIP15XB.USERS-MANUAL-1/User-Guide-371812-Page-21.png)
![7. Select the appropriate folder where set-up files will be installed. Then press [Next>] to continue installation.8. Then type in the name of program folder for TouchKit or press [Next>] to continue. There will be a default name for it.](https://usermanual.wiki/IDnet/VIP15XB.USERS-MANUAL-1/User-Guide-371812-Page-22.png)
![During Installation, the Touchkit controller driver will be installed automatically.windows XP will prompt a warning message before driver certificated. Now,Press [continue>] to continue installation.](https://usermanual.wiki/IDnet/VIP15XB.USERS-MANUAL-1/User-Guide-371812-Page-23.png)
![Note to select thecompatible language first.Select the compatible language first or user may not see the normal display ofeach button.<Add> & <Remove>Please check the touch panel devices (including its controller) are equipped well,then click [Add] button to add all of those RS-232 and PS/2 components to the<Panel List> dialogue box.There is one devices found. Press [Yes] to continue.Device is found in COM1](https://usermanual.wiki/IDnet/VIP15XB.USERS-MANUAL-1/User-Guide-371812-Page-25.png)
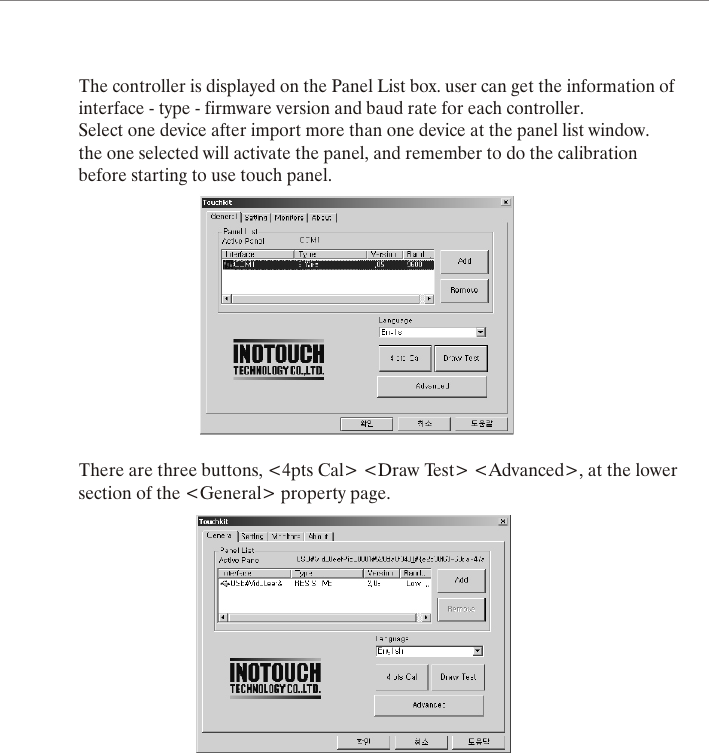
![<4pts Cal>Correct 4 point locations on screen with the panel. Press [4pts Cal], screendisplays as follows.Touch the blinking symbol on panel until beep or stop blinking.<Draw Test>Test the drawing position related to the display screen on panel.Click on the [Draw Test] button. There will be a squared blue display showing.In drawing test window, user can click <Clear> button to clear the window. Also,User can Click <Quit> or press mouse right button to quit from the drawing test.](https://usermanual.wiki/IDnet/VIP15XB.USERS-MANUAL-1/User-Guide-371812-Page-27.png)
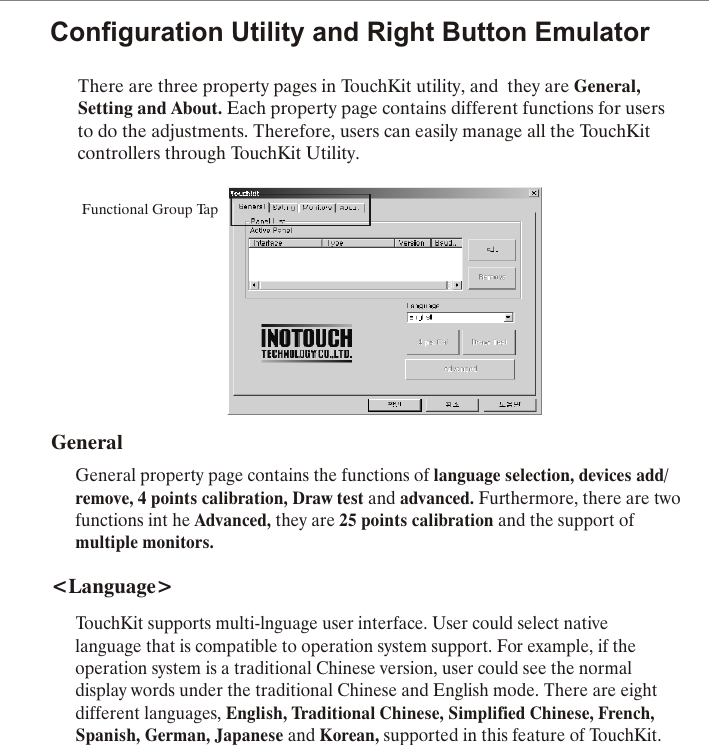
![Press [Clear] to clear the previous calibration records.Press [Yes] to clear previous records.The record will become default record.Press [25ptCal] to do 25 points calibration. Correct 25 point locations on screenwith the panel.If no "touch action" happen within minutes, it will quit from the draw test windowautomatically. In drawing test window, user can verify the panel linearity,calibration capability, and drawing line quality.<Advanced>Touchkit provide more accuracy 25 points calibration for touch sensor. Inaddition, Touchkit supports multiple monitors configuration in Windows98/ME/2000/XP. Also, touchkit provide controller setting for capacitive touchsensor. If the capacitive controller is selected, a capacitive setting property pageappears on the advanced sheet. In general case, it does not need to do 25points calibration other then bad linearity sensor.](https://usermanual.wiki/IDnet/VIP15XB.USERS-MANUAL-1/User-Guide-371812-Page-28.png)
![For Windows XP / XP Tablet PC EditionFollow these steps to uninstall TouchKit.1. Go to Start / All programs / TouchKit / Uninstall, and execute it.2. TouchKit setup dialog appears, ad prepares to uninstall. 3. Confirm dialog, press [YES] to start un-installation; [NO] to cancel un-installation.4. Start to uninstal TouchKit.If user does not want to uninstall TouchKit at this moment, press [Cancel] to terminate the uninstall process.](https://usermanual.wiki/IDnet/VIP15XB.USERS-MANUAL-1/User-Guide-371812-Page-29.png)
![5. touchKit driver will not be unloaded until system re-boot. Press [Yes>] to re-boot immediately or [No>] to re-boot later.Use Windows XP Home Editionto use application program, like Windows XP Home Edition that Microsoftprovides basically and for basic use of windows XP Home Edition, pleasereferto the manual(brochure) of Microsoft Windows XP Home Edition andMicrosoft Windows XP Home Edition help and support center.For referring to the help and support center, click your necessaryitems on a guide screen appearing by clicking [start]-[help and support]on Window Wallpaper.](https://usermanual.wiki/IDnet/VIP15XB.USERS-MANUAL-1/User-Guide-371812-Page-30.png)