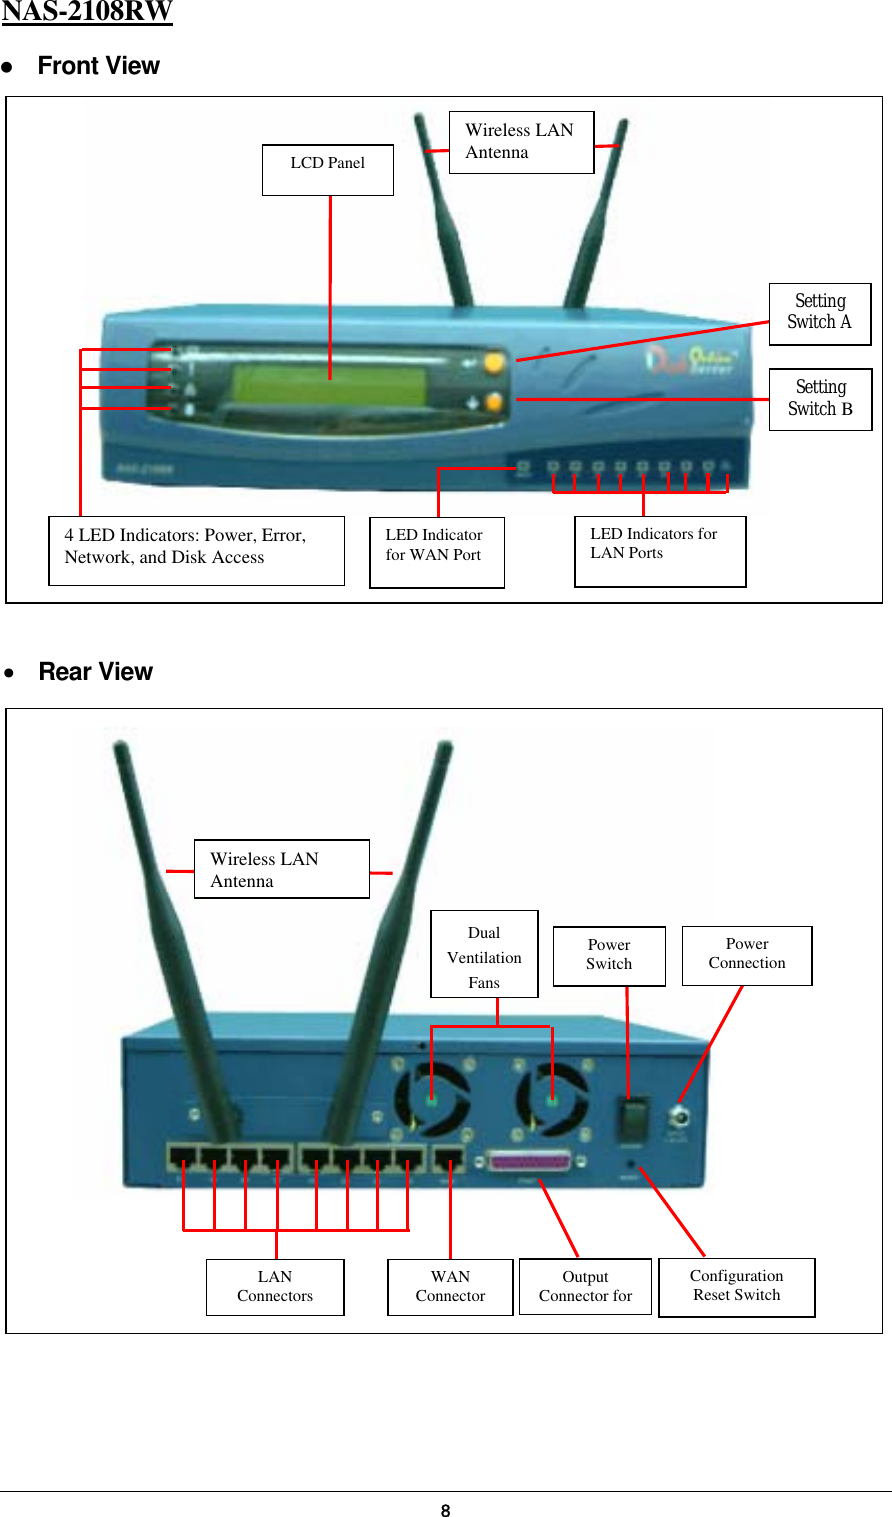
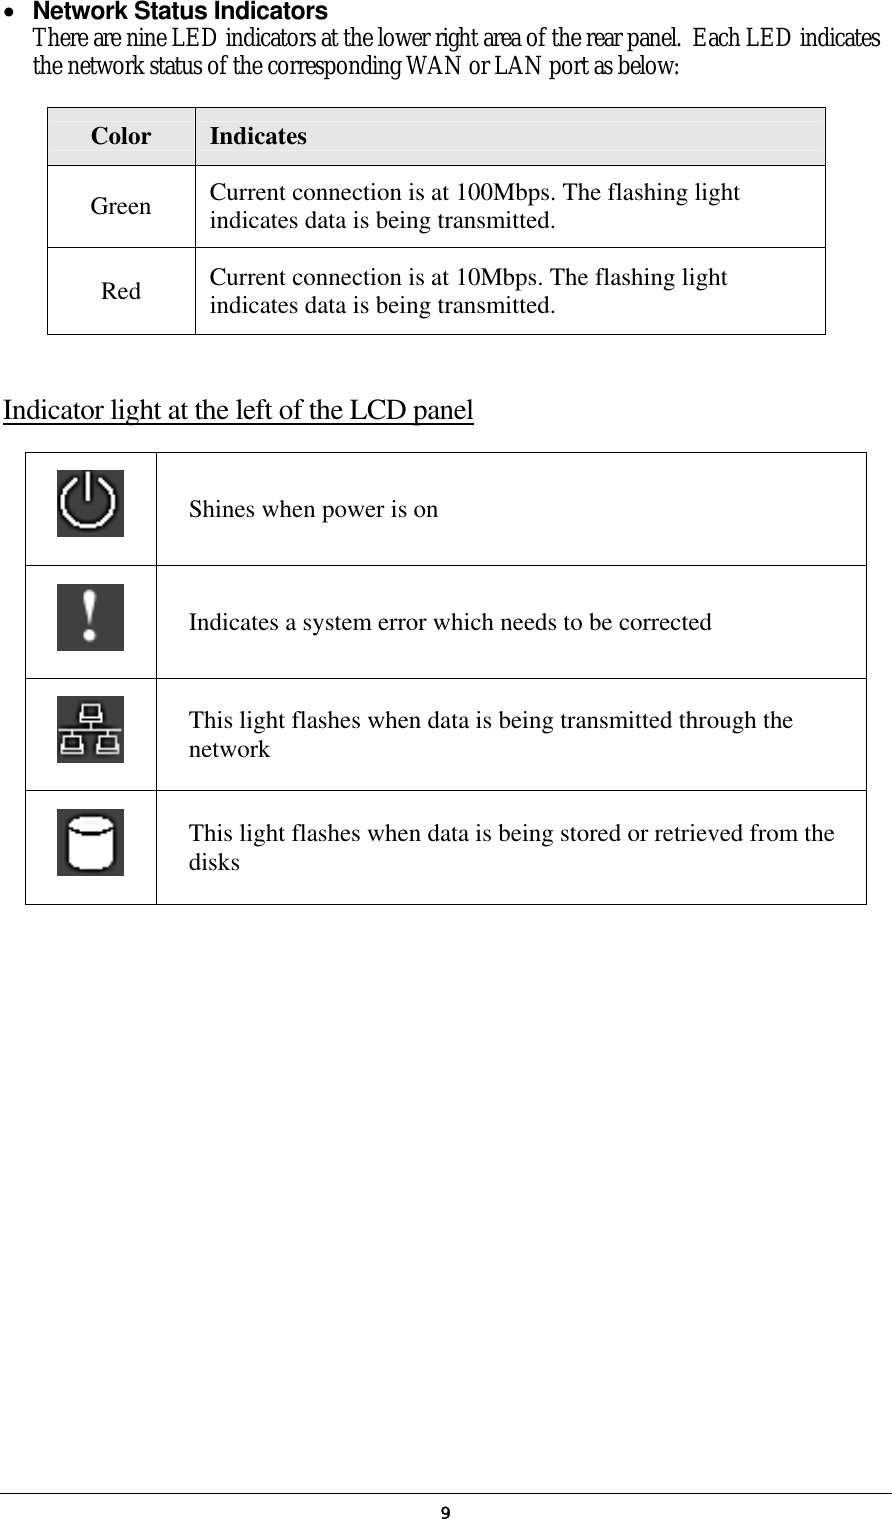
IEI Integration NAS-101RW Network Attatched Storage User Manual
IEI Integration Corp. Network Attatched Storage Users Manual
UserManual.wiki
>
IEI Integration
>
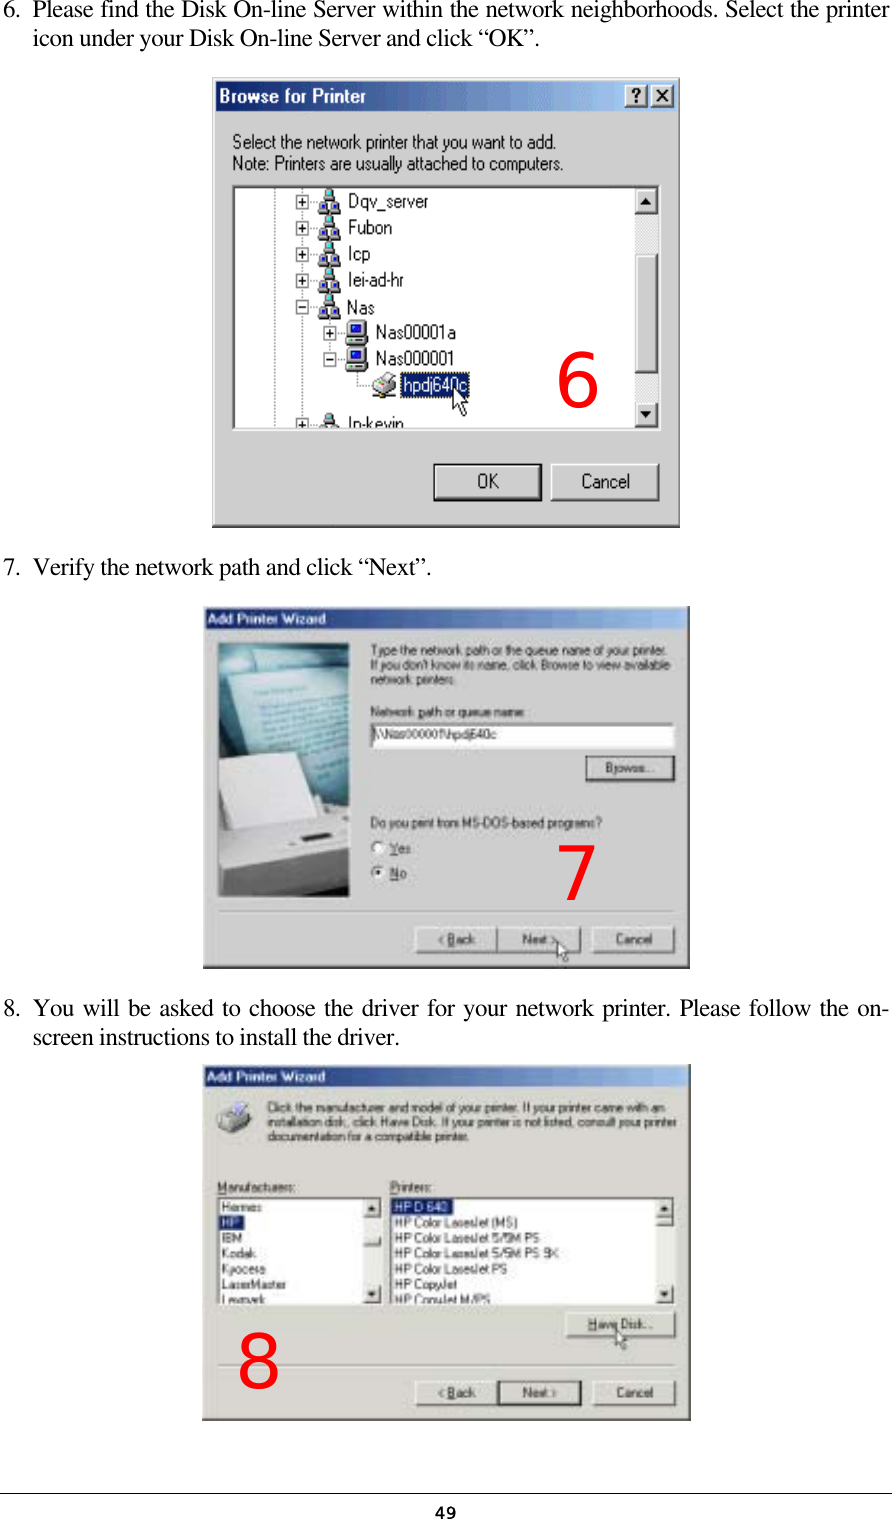
NAS 101RW User Manual
Users Manual
Navigation menu
Upload a User Manual
Namespaces
Wiki Guide
HTML
PDF
Info
Views
User Manual
Discussion / Help
Navigation


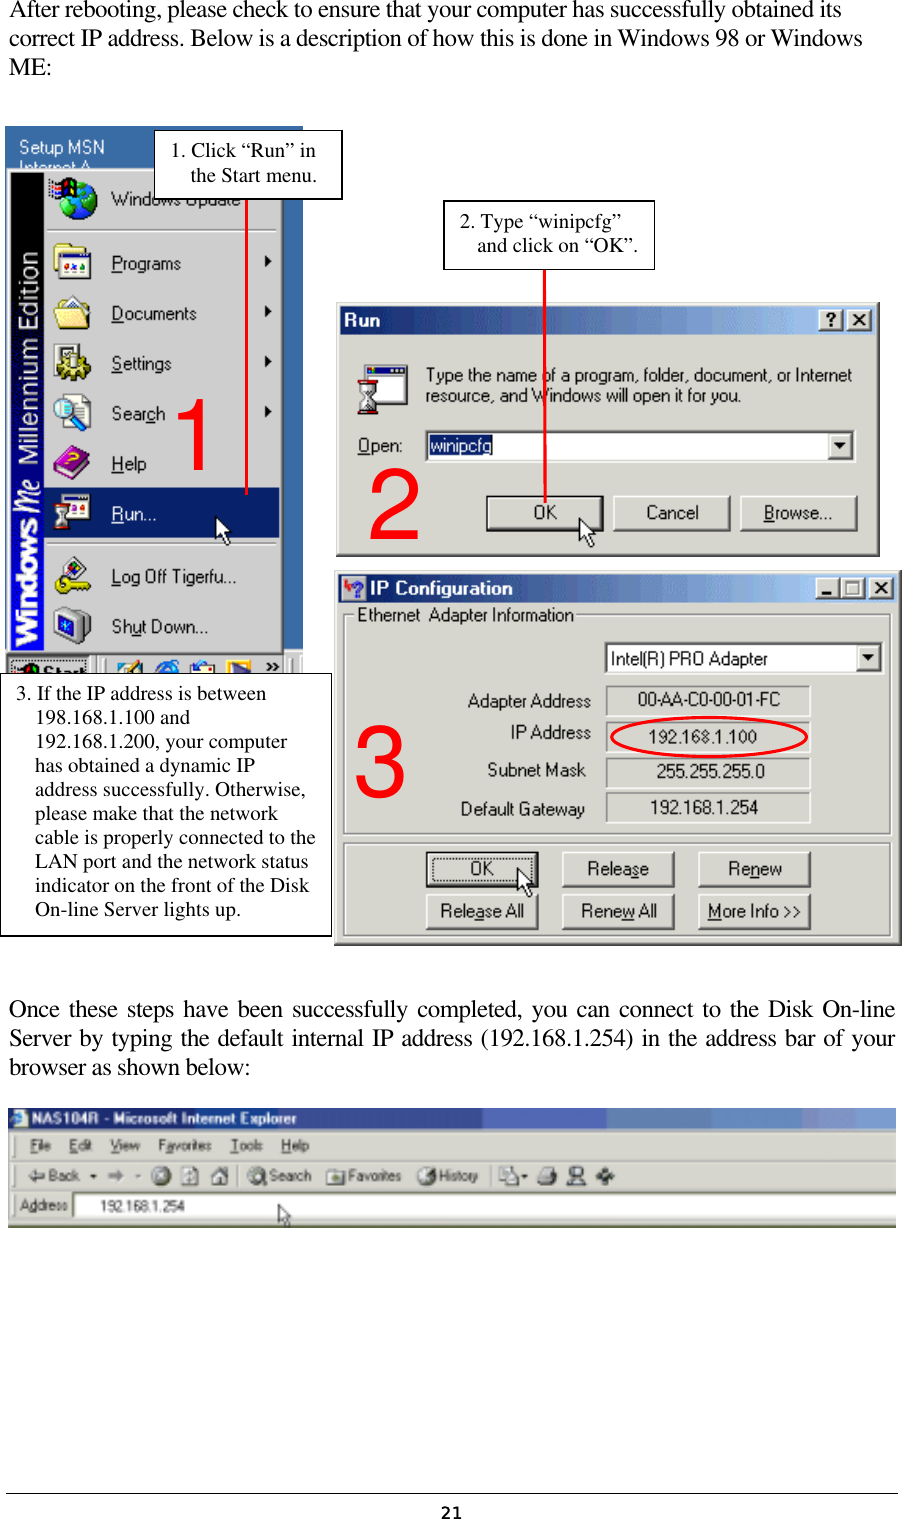
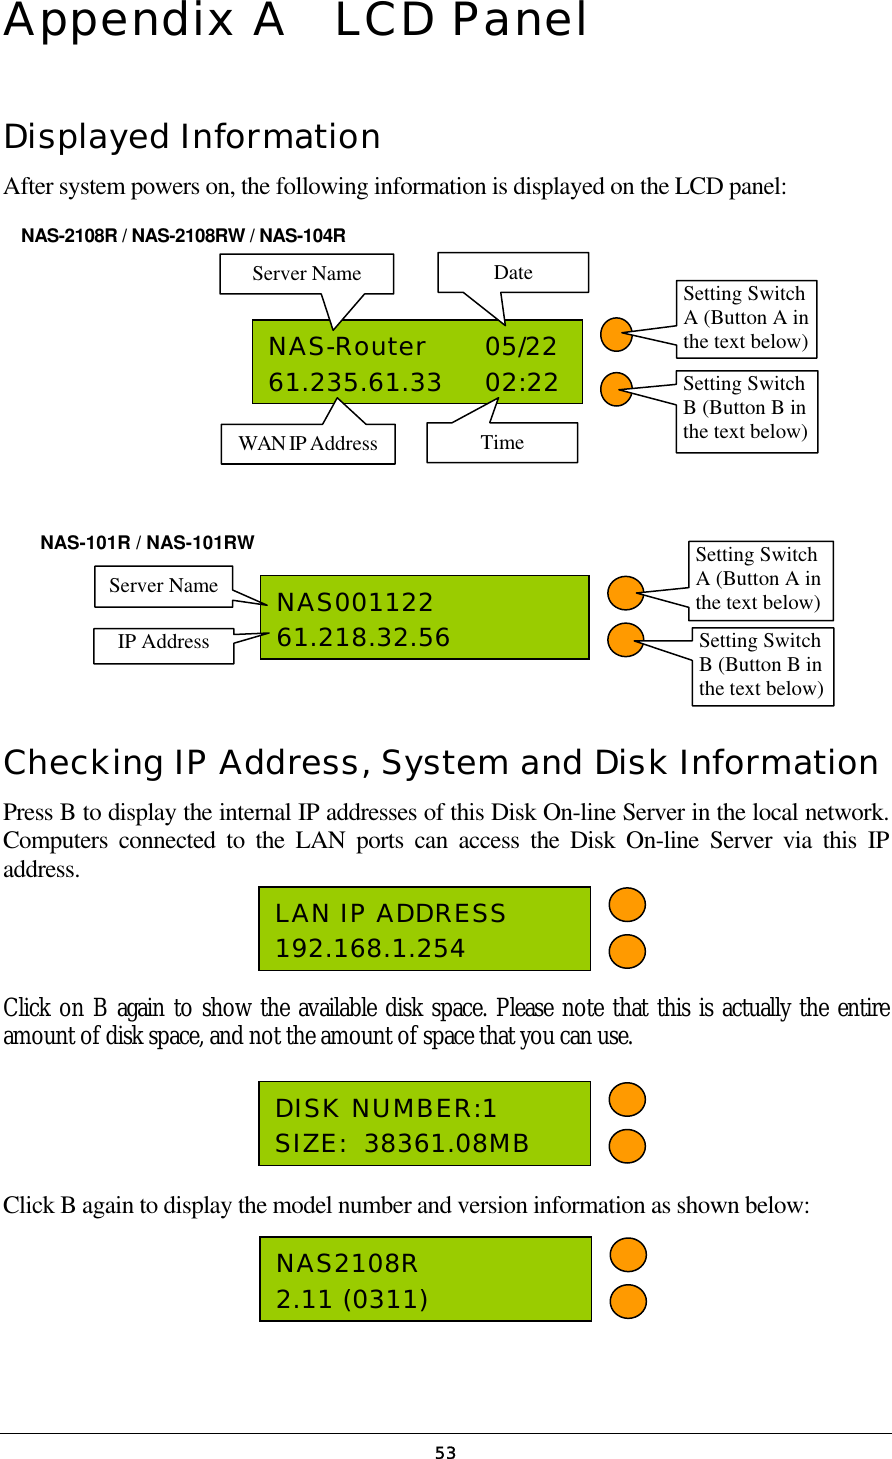
![26server will not accept name containing blank spaces, period (.), or names with only numbers. The LCD display will show the current server name. Next, you must configure your Disk On-line Server to the workgroup. The workgroup represents a basic computer group within the Microsoft Network. Files are normally shared within the group. Workgroups can accommodate as much as 15 characters but must exclude the following characters: ; : " < > * + = \ | ? , [ ] / The first character cannot be a period (.). For ease of management and usage, please set your Disk On-line Server and attached computer(s) in the same workgroup. Moreover, the Disk On-line Server allows you to specify comments (such as administrator name, department, or location) that describe the Disk On-line Server for ease of identification to an on-line user. • Date & Time Set the date, time, and time zone according to your location. If the settings are incorrectly entered, the following problems may occur: 1. When using a web browser to access or save a file, the time of the file accessed or saved may be out of sync. 2. The system event log time will be incorrect compared to the actual time an action occurred. • Language Setting The server is based on the language settings and uses it accordingly while creating or displaying files and directories. Select the correct language settings to avoid the following problems: 1. Inability to create files or directories with special characters. 2. Inability to display files or directories name with special characters. Network Settings The network settings include the TCP/IP configuration for WAN and LAN, network service settings, router and firewall configuration, etc. • WAN Configuration According to your WAN connection, you can choose the following four methods to configure the TCP/IP settings to the external network: 1. Use PPPoE Protocol PPPoE is commonly used in DSL-based broadband services to establish the Internet connection. Please check with you ISP to check if PPPoE is used. You will also need the user name and password information that supplied by your ISP to properly configure the PPPoE settings.](https://usermanual.wiki/IEI-Integration/NAS-101RW/User-Guide-354215-Page-27.png)

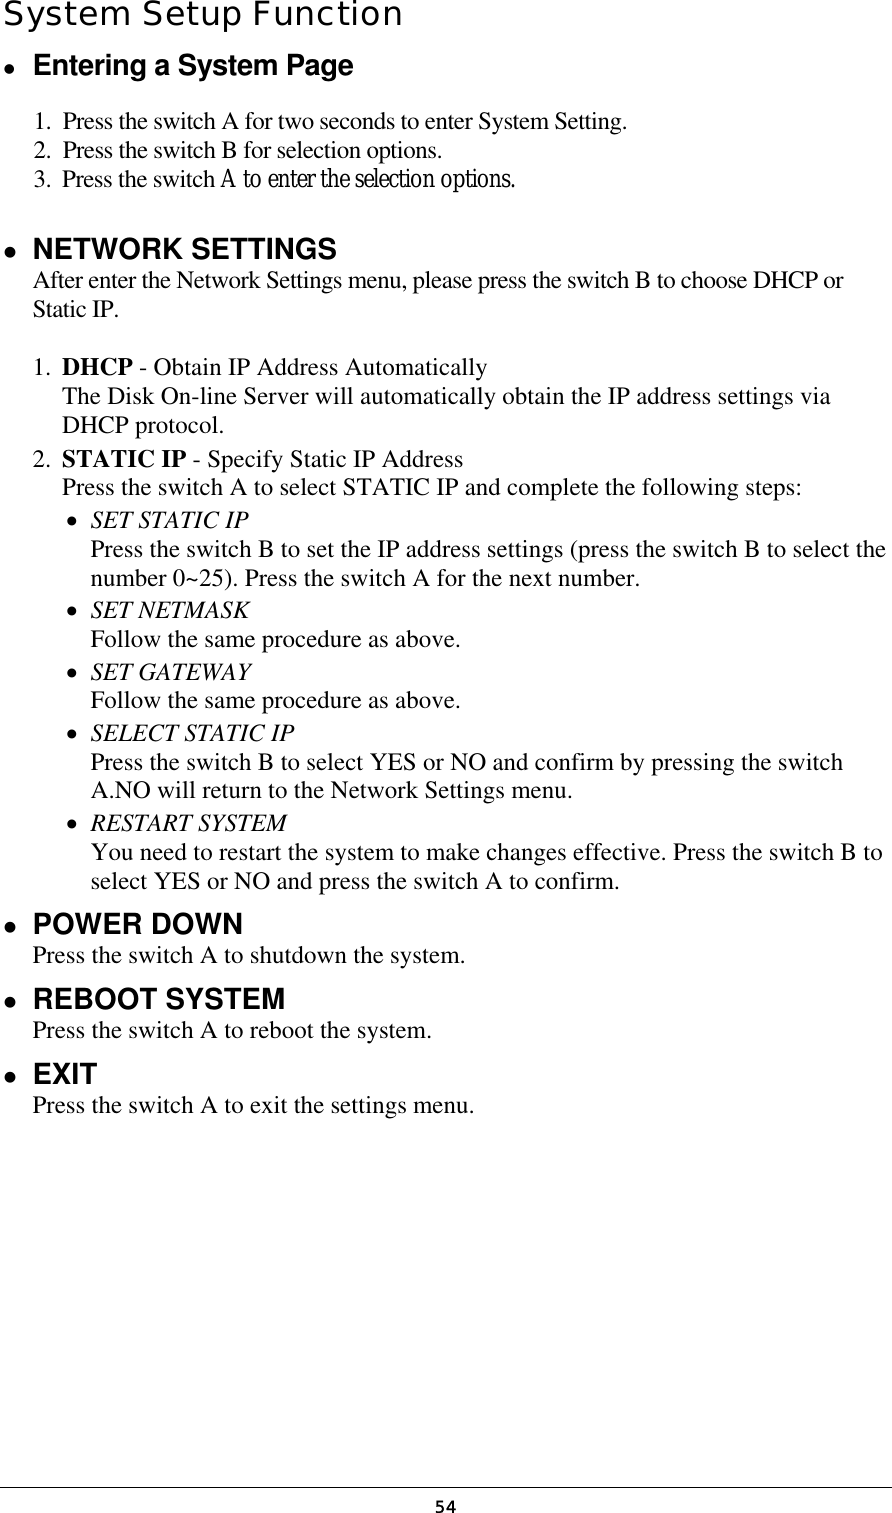
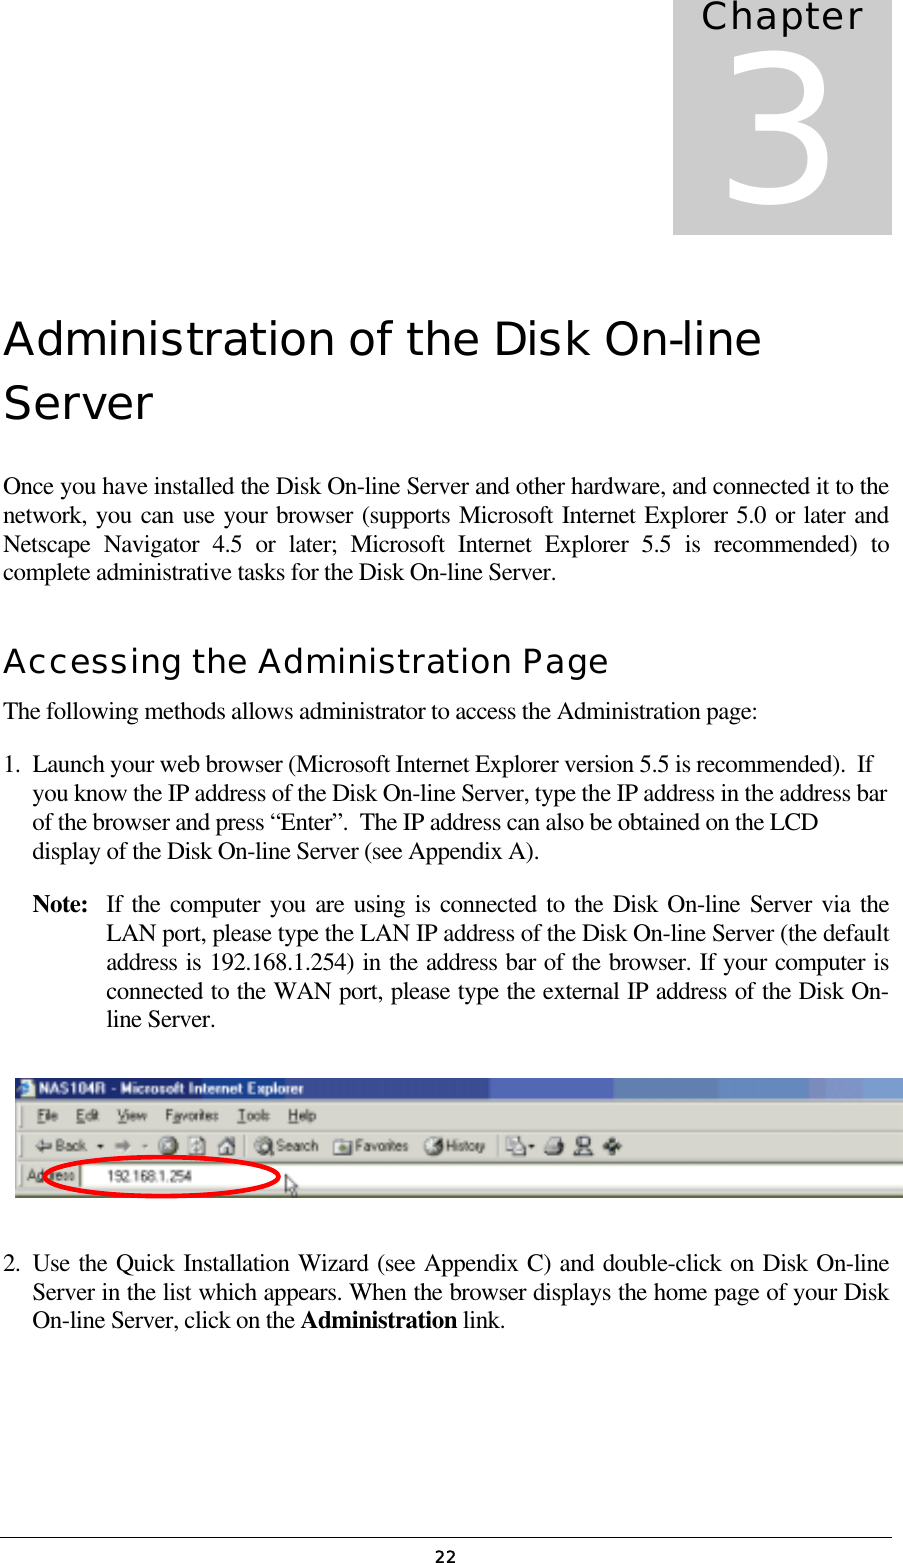
![33Anonymous When you connect to the server by FTP service, you can use the name to login as a guest. You cannot delete this user or change its password. You can create a new user according to your needs. The following information is required to create a new user: • User Name The user name must not exceed 32 characters. It is case insensitive and it can contain double-byte characters (Such as Chinese, Japanese, and Korean) But it cannot contain any of the characters below: " / \ [ ] : ; | = , + * ? < > ` ' • Password The password must not exceed 16 characters. Due to security concerns, the password must be at least 6 characters. Try to avoid using codes that are easily decipherable. You can perform the following settings for users: • Create User • Change Password • Create Private Network Share • Assign User Groups • NFS Settings • Quota Settings • Delete User User Groups To administer access rights, you can create user groups. User groups are a collection of users with the same access rights to files or folders. By factory default, the server contains the following pre-defined user groups: Administrators All members of the administrators group have the rights to perform system management. You cannot delete the administrators user groups. Everyone All registered users belongs to everyone group. You cannot delete the everyone user group or any of its users. You can administer user groups with the following: • Create User Groups • Create Private Network Share](https://usermanual.wiki/IEI-Integration/NAS-101RW/User-Guide-354215-Page-34.png)
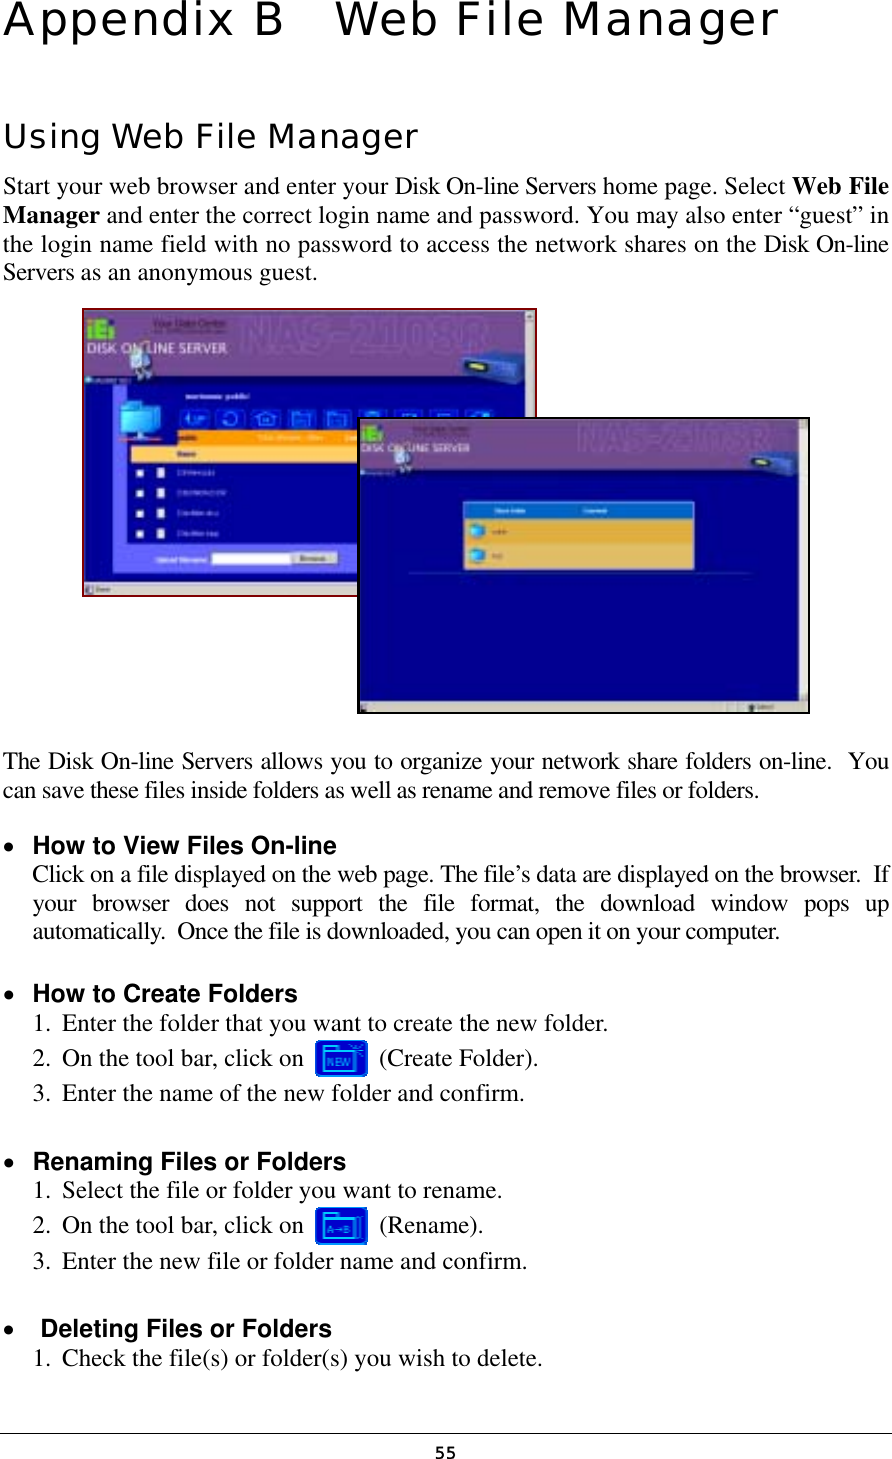
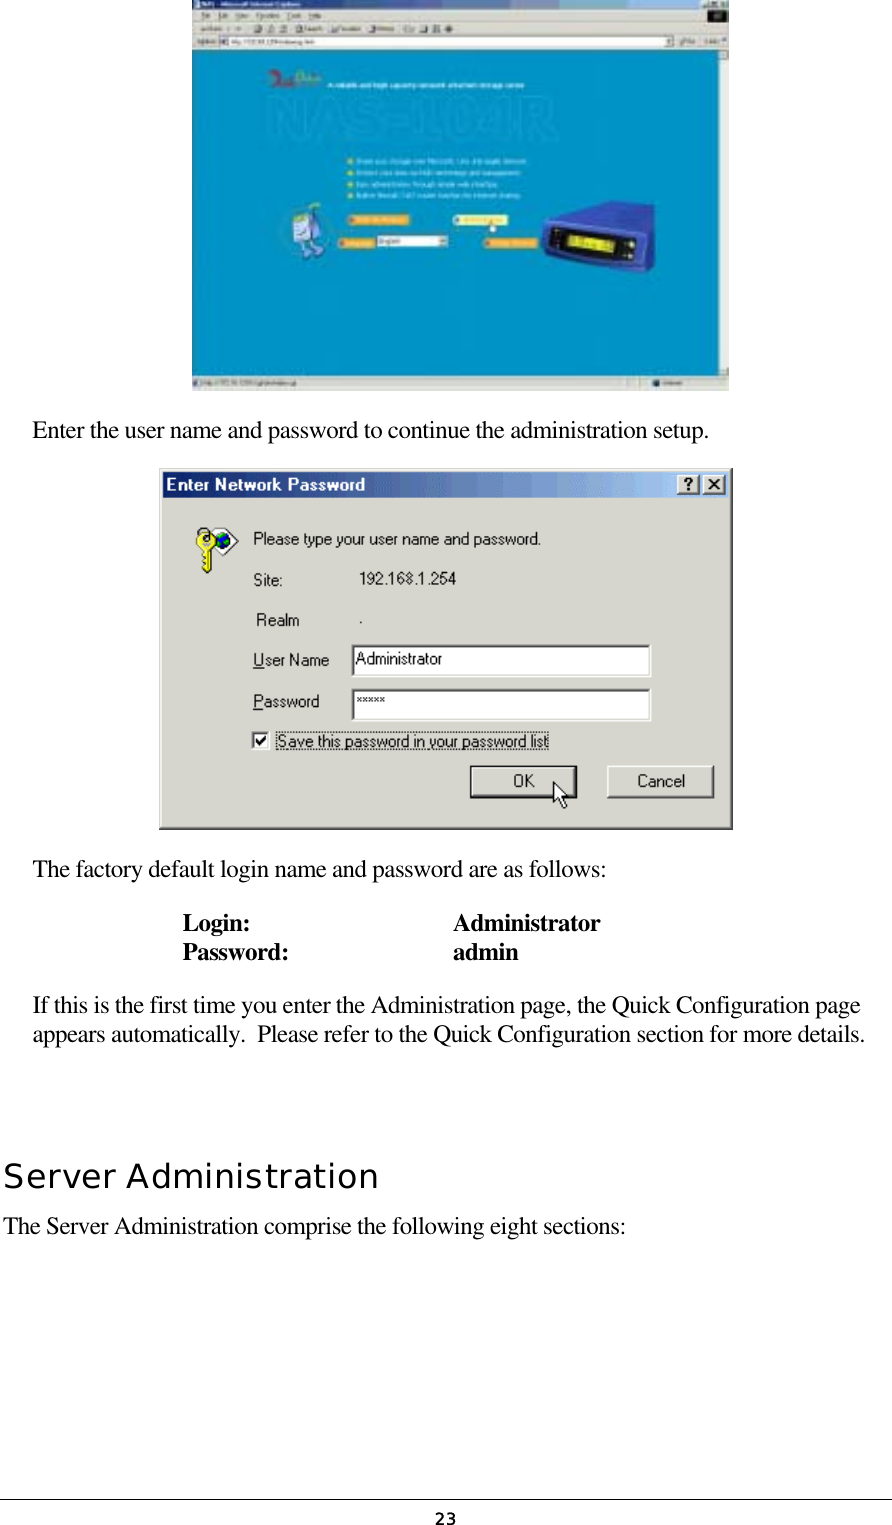
![34• Assign Users • Delete User Groups User groups name must not exceed 256 characters. It is case insensitive and it can contain double-byte characters (Such as Chinese, Japanese, and Korean) But it cannot contain any of the characters below: " / \ [ ] : ; | = , + * ? < > ` ' To properly manage security, it is very important to manage users and user groups. You may set the share access parameters of each user or user group accordingly. • PDC Authentication Settings If you have a Windows PDC (Primary Domain Controller) server to handle the domain security in your network, you don’t need to re-enter all the users and groups with the Disk On-line Server. You can simply enable the PDC authentication feature; the Disk On-line Server will connect with the NT domain and get all the information of the domain users and groups automatically. To enable PDC authentication, you must enter the domain name as well as the user name and password already established in this domain. The Disk On-line Server will use the user name and password to log in to the NT domain and retrieve user and group information. Once you have configured the Disk On-line Server to use PDC authentication, all NT domain users and groups will appear in lists of users and groups for which you can define access rights. Note: NetWare users cannot be authenticated via the PDC server. To properly authenticate NetWare users, please go to User Management · Users · Change Password page and type the password for that user manually. • Quota The amount of space given out to all users in the system can be limited in order to manage and allocate it efficiently. Once these restrictions are in place, users will be prevented from obtaining more space once they have reached their limit. This prevents monopolizing of a large amount of disk space by a small group of users. No limitations are set on the system when it leaves the factory. • Backup/Restore User Settings You may back up all user settings on to your computer as well as restore previously backed up user settings file to your Disk On-line Server. This function allows you to easily maintain the user settings. Network Share Management The primary purpose of network storage is file sharing. In a standard operation environment, you can create different network share folders for various types of files, or provide different file access rights to users or user groups. By factory default, a “public” share folder is created. The share folder gives full access to all users or guests. Administer network shares with the following:](https://usermanual.wiki/IEI-Integration/NAS-101RW/User-Guide-354215-Page-35.png)
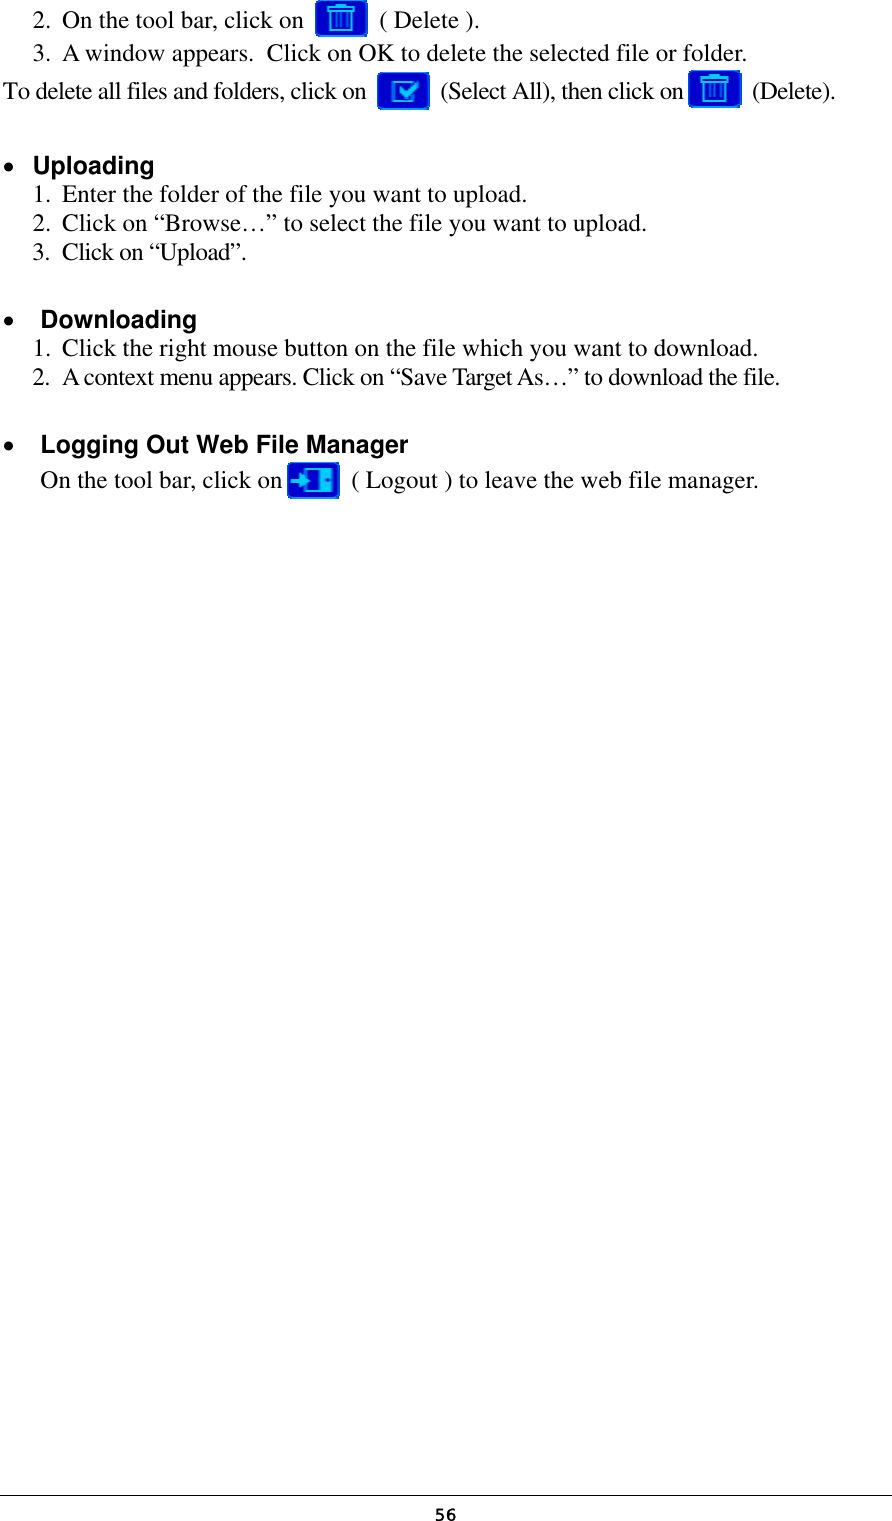
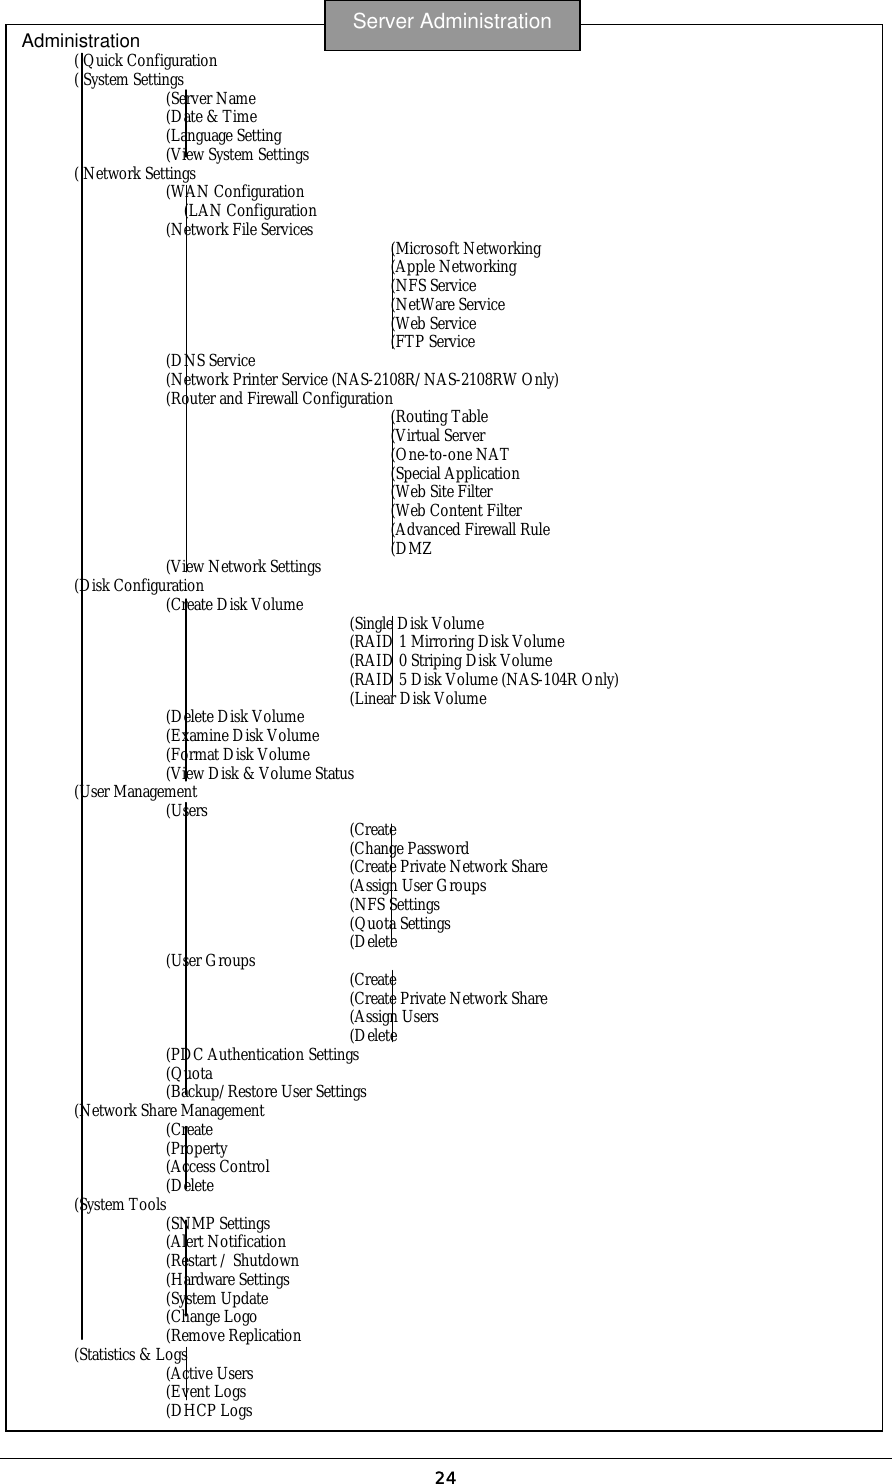
![35• Create a Network Share • Change the name, path and comment of a network share • Set access right for a network share • Remove a network share You can create new network shares according to your needs. While creating a network share the following parameters must be set: • Network Share Name The network share name must not exceed 12 characters. It cannot contain double-byte characters (such as Chinese, Japanese, and Korean) as well as the characters listed below: " . + = / \ : | * ? < > ; [ ] % • Disk Volume The network share will be created under the specified disk volume. • Path All data are stored under the assigned path onto the disk volume. You can select Specify Path Automatically to allow the server to automatically create a new path on the disk volume to store the network share files. Or you can assign a specific path for the share folder. The manually assigned path cannot exceed 256 characters and cannot contain the characters listed below: " \ : | * ? < > ; ` ' • Comment The Comment field allows a brief description of the share folder to help users identify its purpose in a network neighborhood window. The comment cannot exceed 128 characters. Once the network share is created, you can start assigning access rights to users or user groups: • Full Access Full access allows the user or user group to read, write, create, or remove all files and directories in the network share. • Read Only Reads files only in the network share but denies functions to write, create or delete files or directories. • Deny Access Denies all files on the network share.](https://usermanual.wiki/IEI-Integration/NAS-101RW/User-Guide-354215-Page-36.png)