INTO TECH LIVE480 DVR BOARD User Manual USERS MANUAL 1
INTO-TECH Inc. DVR BOARD USERS MANUAL 1
UserManual.wiki
>
INTO TECH
>
LIVE480 User Manual
>
USERS MANUAL 1
Contents
1.
USERS MANUAL 1
2.
USERS MANUAL 2
USERS MANUAL 1
Navigation menu
Upload a User Manual
Namespaces
Wiki Guide
HTML
PDF
Info
Views
User Manual
Discussion / Help
Navigation
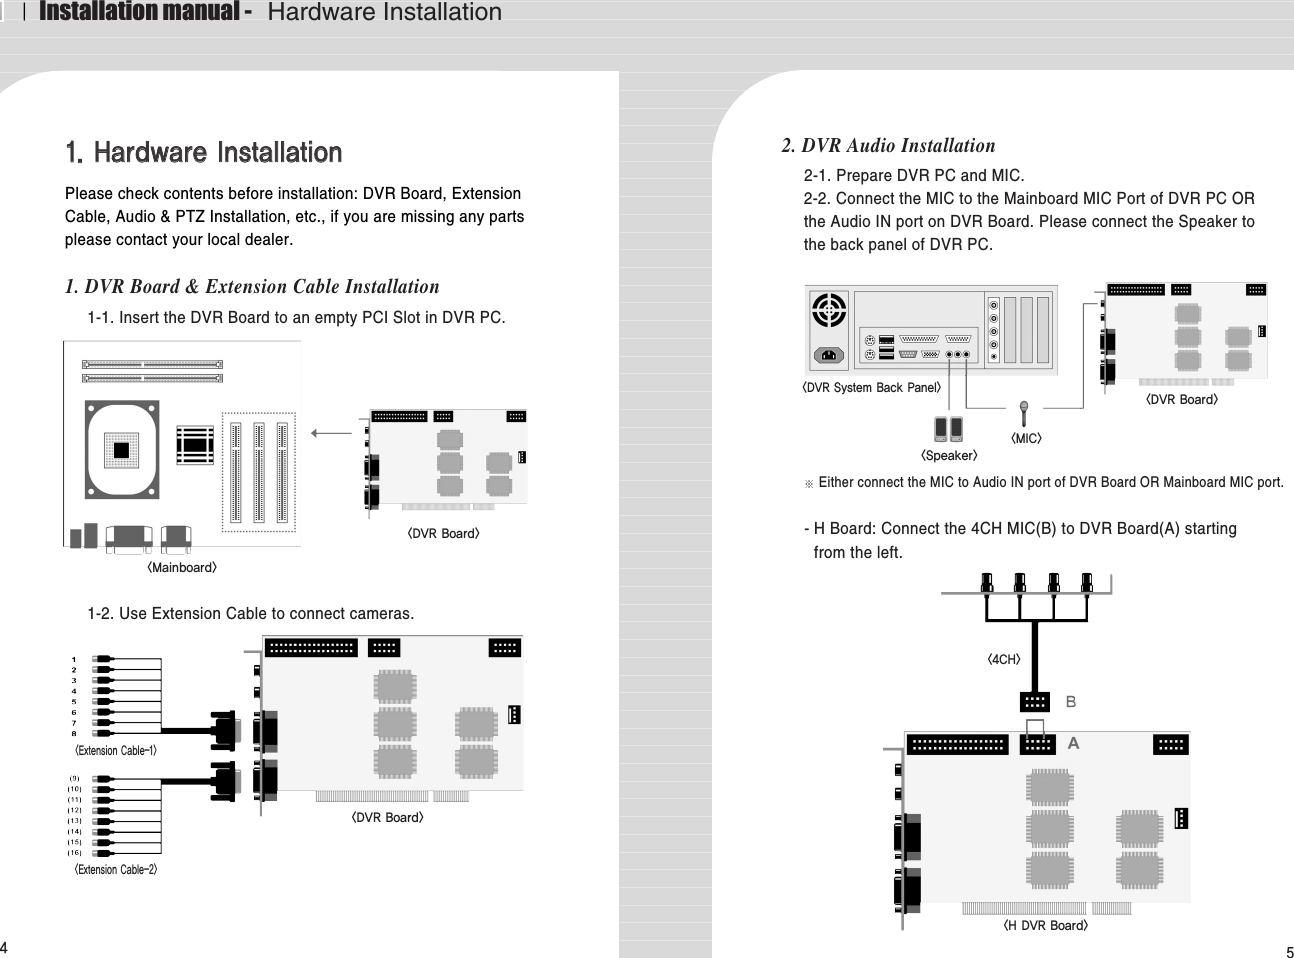
![ⅠInstallation manual - Hardware Installation4. Real Display(RD) Board Installation4-1. Insert the Real Display Board into an empty PCI Slot in DVR PC. 4-2. Use Cable to connect Real Display Board with DVR Board. Real Display Board cannot be used alone, it must be used with S, H, HPLUSDVR Boards.67AB3. P/T/Z Installation3-1. P/T/Z Cable [A] Cable : Connect to COM port of DVR PC[B] Cable : Connect to DVR Board[C] Cable : Connect to Receiver Cable- HP Board: Connect the 8CH MIC(B) to DVR Board(A) startingfrom the top.- RC Board: Connect the 4CH MIC(B) to DVR Board(A) startingfrom the left.C<8CH><HP DVR Board><4CH><RC DVR Board><Mainboard><RD Board><DVR Board><DVR System><DVR Board>BA<P/T/Z Cable>](https://usermanual.wiki/INTO-TECH/LIVE480.USERS-MANUAL-1/User-Guide-548786-Page-3.png)
![89To use 16 port In/Out, A : Slave Board must remove jumper. B : Master Board must install jumper.< 16 port In/Out Connection>5. I/O Board Installation5-1. Prepare Sensor, Alarm, I/O Board and I/O Extension Board for I/OBoard Installation. A : Industrial Case System can use In/Out port separately when additionalBack Panel is available.< 8 port In/Out Connection>I/O Extension Board <DVR Board><I/O Board><I/O Slave Board><I/O Master Board>4CH Input3CH OutputAAB4CH Input5CH OutputⅠInstallation manual - Software Installation1. Software InstallationYou can install SmartDVR Software by using SmartDVR Formula CDor downloading from INTOTECH website, www.intotech.co.kr.Software CD consists of Server Package (Main program, WebClientprogram, Apache HTTP Server program), Client Package (NetClientprogram) & AVI Codec. User Manual is also available from SW CD.[Main Program Installation]Insert SmartDVR Formula CD into CD-ROM drive or runDvrSetup.exe file; the following installation screen will appear .Click the icon below and Main Program installation willautomatically proceed.Installation Step : Apache HTTP Server (Web Server) ->WebClient -> SmartDVR Formula](https://usermanual.wiki/INTO-TECH/LIVE480.USERS-MANUAL-1/User-Guide-548786-Page-4.png)
![ⅠInstallation manual - Software Installation10 111. SmartDVR Apache HTTP Server (Web Server) Installation1-1 Installation wizard tool will appear. Click [Next].1-2 Read the License Agreement and if you agree to thecontents, select [I accept…] and click [Next].1-3 Click [Next] after checking server information of ApacheHTTP Server.1-4 Insert Network Domain, Server Name, Administrator’sE-mail Address.(This procedure is only a formality. In general cases, follow example)Select [Run as a service for All Users – Recommended]and click [Next].](https://usermanual.wiki/INTO-TECH/LIVE480.USERS-MANUAL-1/User-Guide-548786-Page-5.png)
![ⅠInstallation manual - Software Installation12 131-5 Select Setup Type as [Complete] and click [Next].1-6 Click [Next] without change of setting. Note: Do not changethe directory!1-7 After the setting is finished, click [Install] and start installation.1-8 After the installation is done, click [Finish].](https://usermanual.wiki/INTO-TECH/LIVE480.USERS-MANUAL-1/User-Guide-548786-Page-6.png)
![ⅠInstallation manual - Software Installation14 151-9 After the installation is finished, a message confirming thechange of the Server port of Apache will appear.2 SmartDVR WebClient Installation2-1 After the Installation Wizard Tool is appeared, click [Next].2-2 Check the contents of License Agreement; if you agree to thecontents, click [Yes]. 2-3 After the installation is done, click [Finish].](https://usermanual.wiki/INTO-TECH/LIVE480.USERS-MANUAL-1/User-Guide-548786-Page-7.png)
![ⅠInstallation manual - Software Installation16 173 SmartDVR Formula Installation3-1 After Installation Wizard Tool is appeared, Click [Next].3-2 Check the details of License Agreement; if you agree to thecontents, click [Yes].3-3 After choosing [Destination Folder] for installation, click[Next]. 3-4 After the installation is done, click [Finish].](https://usermanual.wiki/INTO-TECH/LIVE480.USERS-MANUAL-1/User-Guide-548786-Page-8.png)
![ⅠInstallation manual - Software Installation193-5 Driver Installation: Wizard automatically installs driversaccording to each board type.3-6 Reboot PC after all the installation.4. SmartDVR Formula Uninstallation4-1 Goto [Start] – [Control panel] and click [Add/RemoveProgram].4-2 Select [SmartDVR Formula] and click [Change/Remove].Click the icon below and NetClient Program installation will proceed.5 NetClient Installation5-1 After the Installation Wizard Tool is appeared, click [Next].5-2 After choosing [Destination Folder] for installation, click [Next].18](https://usermanual.wiki/INTO-TECH/LIVE480.USERS-MANUAL-1/User-Guide-548786-Page-9.png)