ION Audio IAS01 Speaker User Manual
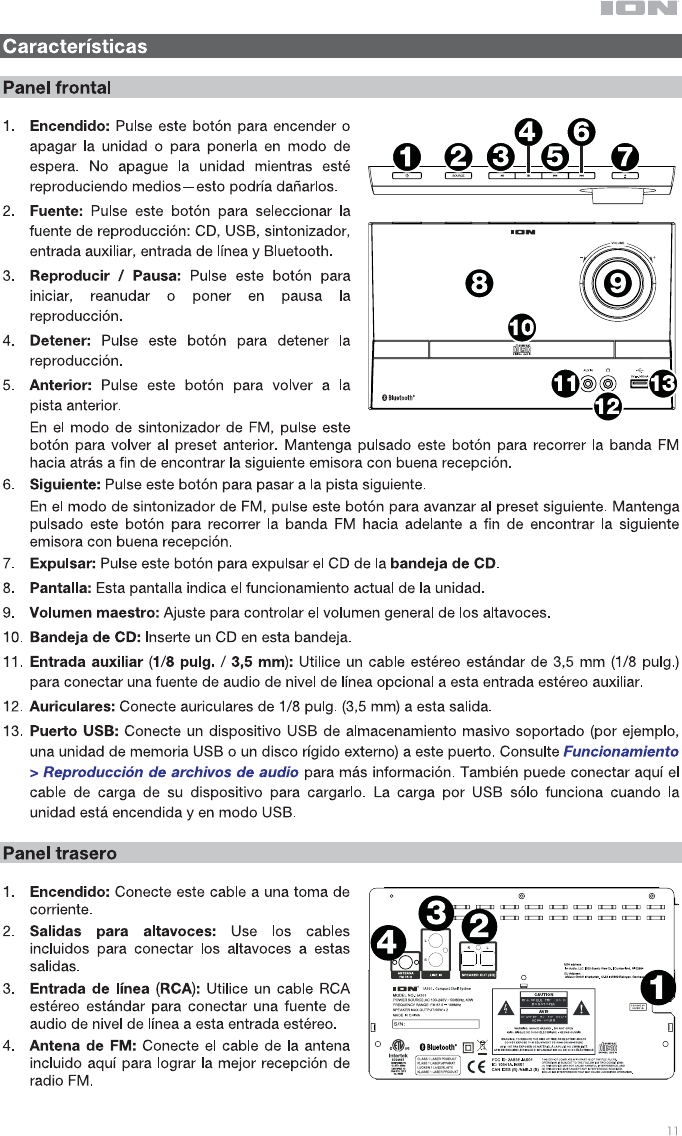
ION Audio, LLC Speaker
User Manual

Important Safety Instructions &
Warranty Information
2

3
Product Warranty
(purchases made in U.S.A.)
1. What is covered and for how long? All Products: ION Audio, LLC (“ION Audio”) warrants to the original purchaser
that this ION Audio product is free from defects in material and workmanship under normal use and service for the
period commencing upon the date of purchase from an authorized ION Audio dealer and continuing for ninety (90) days
following the date of purchase. ION Audio warrants factory-refurbished merchandise to be free of material and
operational defects for a period of ninety (90) days from the original date of retail sale. This refurbished merchandise
warranty is not transferable.
2. What is not covered? This Limited Warranty is conditioned upon proper use of the product by the purchaser. This
Limited Warranty does not cover:
Damage caused by improper installation or improper connection to any peripheral
Damage caused by an external electrical fault
Damage from use of parts not manufactured or sold by ION Audio
Product purchased from anyone other than an ION Audio authorized dealer
Modifications to product not approved in writing by ION Audio
Equipment that has the serial number removed or made illegible
Normal cosmetic and mechanical wear
Damage or loss during transit to an Authorized ION Audio Repair Center
Units that are purchased and/or located outside of the continental USA
3. What are ION Audio’s obligations? During the applicable warranty period, ION Audio will repair or replace, at ION
Audio’s sole option, without charge to the purchaser, any defective component part of the product. To obtain service
under this Limited Warranty, purchaser must first contact ION Audio and obtain a return authorization number (“RA#”).
Purchaser must then return the product to ION Audio in an adequate container for shipping, accompanied by
purchaser’s sales receipt or comparable proof of sale showing the date of purchase, the serial number of the product,
and the seller’s name and address. To obtain an RA# and assistance on where to return the product, contact ION
Audio customer service at 401-658-3743 (U.S.A.). Upon receipt, ION Audio will repair or replace the defective products.
ION Audio may, at ION Audio’s sole option, use rebuilt, reconditioned, or new parts or components when repairing any
product or replace a product with a rebuilt, reconditioned, new or comparable product. Repaired products will be
warranted for a period equal to the remainder of the original Limited Warranty on the original product or for 90 days,
whichever is longer. All replaced parts, components, boards, and equipment become the property of ION Audio. If ION
Audio determines that any product is not covered by this Limited Warranty, purchaser must pay all parts, shipping, and
labor charges for the repair or return of such product.
4. What are the limits on ION Audio’s liabilities? THE WARRANTIES GIVEN IN THIS LIMITED WARRANTY, TOGETHER
WITH ANY IMPLIED WARRANTIES COVERING ION AUDIO PRODUCTS, INCLUDING WITHOUT LIMITATION ANY
WARRANTIES OF MERCHANTABILITY OR FITNESS FOR A PARTICULAR PURPOSE, ARE LIMITED TO THE
DURATION OF THIS LIMITED WARRANTY. EXCEPT TO THE EXTENT PROHIBITED BY APPLICABLE LAW, ION AUDIO
SHALL NOT BE LIABLE FOR ANY SPECIAL, INCIDENTAL, CONSEQUENTIAL, INDIRECT OR SIMILAR DAMAGES,
LOSS OF PROFITS, DAMAGES TO PURCHASER’S PROPERTY, OR INJURY TO PURCHASER OR OTHERS ARISING
OUT OF THE USE, MISUSE OR INABILITY TO USE ANY ION AUDIO PRODUCT, BREACH OF WARRANTY, OR
NEGLIGENCE, INCLUDING BUT NOT LIMITED TO ION AUDIO’S OWN NEGLIGENCE, EVEN IF ION AUDIO OR THEIR
AGENTS HAVE BEEN ADVISED OF SUCH DAMAGES, OR FOR ANY CLAIM BROUGHT AGAINST PURCHASER BY
ANY OTHER PARTY. THIS LIMITED WARRANTY IS THE COMPLETE WARRANTY FOR ION AUDIO PRODUCTS, AND
IS GIVEN IN LIEU OF ALL OTHER EXPRESS WARRANTIES. THIS LIMITED WARRANTY SHALL NOT EXTEND TO
ANYONE OTHER THAN THE ORIGINAL PURCHASER OF THIS PRODUCT AND STATES PURCHASER’S EXCLUSIVE
REMEDY. IF ANY PORTION OF THIS LIMITED WARRANTY IS ILLEGAL OR UNENFORCEABLE BY REASON OF ANY
LAW, SUCH PARTIAL ILLEGALITY OR UNENFORCEABILTY SHALL NOT AFFECT THE ENFORCEABILITY OF THE
REMAINDER OF THIS LIMITED WARRANTY WHICH PURCHASER ACKNOWLEDGES IS AND WILL ALWAYS BE
CONSTRUED TO BE LIMITED BY ITS TERMS OR AS LIMITED AS THE LAW PERMITS.
This Limited Warranty allocates risk of product failure between purchaser and ION Audio, and ION Audio’s product
pricing reflects this allocation of risk and the limitations of liability contained in this Limited Warranty. The agents,
employees, distributors, and dealers of ION Audio are not authorized to make modifications to this Limited Warranty, or
make additional warranties binding on ION Audio. Accordingly, additional statements such as dealer advertising or
presentation, whether oral or written, do not constitute warranties by ION Audio and should not be relied upon.
5. How does state law apply to this warranty? SOME STATES DO NOT ALLOW THE EXCLUSION OR LIMITATIONS OF
INCIDENTAL OR CONSEQUENTIAL DAMAGES OR HOW LONG AN IMPLIED WARRANTY LASTS, SO THE ABOVE
LIMITATIONS OR EXCLUSIONS MAY NOT APPLY TO PURCHASER.
This Limited Warranty gives you specific legal rights. You may also have other rights, which vary from one jurisdiction to
another.
Please record the serial number of your unit as shown on the back of the chassis as well as the name of the dealer from whom
you purchased the unit. Retain this information and your original purchase receipt for your records. Go to our web site
ionaudio.com to register your product with us.
Model:__________________________________________________ Purchased From: ______________________________________
Serial Number: __________________________________________ Date of Purchase: _____________________________________

4
Product Warranty
(purchases not made in U.S.A.)
1. ION Audio, LLC (“ION Audio”) warrants to the original purchaser that ION Audio products are free from
defects in material and workmanship under normal use and service for the period commencing upon
the date of purchase from an authorized ION Audio dealer and continuing for the following period of
time after that date for (1) Year.
2. This Limited Warranty is conditioned upon proper use of the product by the purchaser.
This Limited Warranty does not cover: (a) defects or damage resulting from accident, misuse, abuse,
neglect, unusual physical or electrical stress, modification of any part of the product, or cosmetic
damage; (b) equipment that has the serial number removed or made illegible; (c) all plastic surfaces
and other externally exposed parts that are scratched or damaged due to normal use; (d) defects or
damage from improper testing, operation, maintenance, installation, adjustment, or service of the
products.
3. During the applicable warranty period, ION Audio will repair or replace, at ION Audio’s sole discretion,
without charge to the purchaser, any defective component part of the product. ION Audio may, at ION
Audio’s sole discretion, use rebuilt, reconditioned, or new parts or components when repairing any
product or replace a product with a rebuilt, reconditioned, new or comparable product.
4. THE WARRANTIES GIVEN IN THIS LIMITED WARRANTY, TOGETHER WITH ANY IMPLIED
WARRANTIES COVERING ION AUDIO PRODUCTS, INCLUDING WITHOUT LIMITATION ANY
WARRANTIES OF MERCHANTABILITY OR FITNESS FOR A PARTICULAR PURPOSE, ARE LIMITED
TO THE DURATION OF THIS LIMITED WARRANTY. EXCEPT TO THE EXTENT PROHIBITED BY
APPLICABLE LAW, ION AUDIO SHALL NOT BE LIABLE FOR ANY SPECIAL, INCIDENTAL,
CONSEQUENTIAL, INDIRECT OR SIMILAR DAMAGES, LOSS OF PROFITS, DAMAGES TO
PURCHASER’S PROPERTY, OR INJURY TO PURCHASER OR OTHERS ARISING OUT OF THE USE,
MISUSE OR INABILITY TO USE ANY ION AUDIO PRODUCT, BREACH OF WARRANTY, OR
NEGLIGENCE, INCLUDING BUT NOT LIMITED TO ION AUDIO’S OWN NEGLIGENCE, EVEN IF ION
AUDIO OR ITS AGENTS HAVE BEEN ADVISED OF SUCH DAMAGES, OR FOR ANY CLAIM
BROUGHT AGAINST PURCHASER BY ANY OTHER PARTY. THIS LIMITED WARRANTY IS THE
COMPLETE WARRANTY FOR ION AUDIO’S PRODUCTS, AND IS GIVEN IN LIEU OF ALL OTHER
EXPRESS WARRANTIES. THIS LIMITED WARRANTY SHALL NOT EXTEND TO ANYONE OTHER
THAN THE ORIGINAL PURCHASER OF THIS PRODUCT AND STATES PURCHASER’S EXCLUSIVE
REMEDY. IF ANY PORTION OF THIS LIMITED WARRANTY IS ILLEGAL OR UNENFORCEABLE BY
REASON OF ANY LAW, SUCH PARTIAL ILLEGALITY OR UNENFORCEABILTY SHALL NOT AFFECT
THE ENFORCEABILITY OF THE REMAINDER OF THIS LIMITED WARRANTY WHICH PURCHASER
ACKNOWLEDGES IS AND WILL ALWAYS BE CONSTRUED TO BE LIMITED BY ITS TERMS OR AS
LIMITED AS THE LAW PERMITS.
This Limited Warranty allocates risk of product failure between purchaser and ION Audio, and ION
Audio’s product pricing reflects this allocation of risk and the limitations of liability contained in this
Limited Warranty. The agents, employees, distributors, and dealers of ION Audio are not authorized to
make modifications to this Limited Warranty, or make additional warranties binding on ION Audio.
Accordingly, additional statements such as dealer advertising or presentation, whether oral or written,
do not constitute warranties by ION Audio and should not be relied upon. Some jurisdictions do not
allow limitations on how long an implied warranty lasts, so the above limitation may not apply to you.
This warranty gives you specific legal rights, and you may also have other rights which vary under
local laws.
Please record the serial number of your unit as shown on the back of the chassis as well as the name of the
dealer from whom you purchased the unit. Retain this information and your original purchase receipt for
your records. Go to our web site ionaudio.com to register your product with us.
Model:____________________________________ Purchased From: ____________________________________
Serial Number: ____________________________ Date of Purchase: __________________________________

5
Return Information
• A Return Authorization number must be obtained from your local ION Audio Representative. For your
representative go to ionaudio.com.
• A copy of the original sales receipt must also be included for the equipment to be repaired under
warranty.
• The faulty equipment must be packed in its original packaging.
• One additional outer layer of packaging must be included to ensure product safety. Failures to do so
may inadequately protect the equipment in transit and, therefore, jeopardize the customer’s warranty.
• ION Audio will not accept C.O.D. shipments and no call tags will be issued for merchandise return.
• ION Audio will not return repaired merchandise to customers by priority service, unless by written
request at the customer’s cost. Requests must be submitted in writing with merchandise returned.
• The defective ION Audio equipment should be sent, freight prepaid with Return Authorization number
clearly printed on the outer packaging and original sales receipt enclosed to your local service center
Important Safety Instructions
1. Read these instructions.
2. Keep these instructions.
3. Heed all warnings.
4. Follow all Instructions.
5. Do not use this apparatus near water.
6. Clean only with dry cloth.
7. Do not block any ventilation openings. Install in accordance with the manufacturer’s instructions.
8. Do not install near any heat sources such as radiators, heat registers, stoves, or other apparatus
(including amplifiers) that produce heat.
9. Do not defeat the safety purpose of the polarized plug or grounding-type plug. A polarized plug has two
blades with one wider than the other. A grounding-type plug has two blades and a third grounding
prong. The wide blade or the third prong is provided for your safety. If the provided plug does not fit
into your outlet, consult an electrician for replacement of the obsolete outlet.
10. Protect the power cord from being walked on or pinched particularly at plugs, convenience receptacles,
and the point where they exit from the apparatus.
11. Only use attachment/accessories specified by the manufacturer.
12. Use only the cart, stand, tripod, bracket or table specified by the manufacturer, or
sold with the apparatus (if applicable). When a cart is used, use caution when moving
the cart/apparatus combination to avoid injury from tip-over.
13. Unplug this apparatus during lightning storms or when unused for long periods of
time.
14. Refer all servicing to qualified service personnel. Servicing is required when the apparatus has been
damaged in any way, such as power-supply cord or plug is damaged, liquid has been spilled or objects
have fallen into the apparatus, the apparatus has been exposed to rain or moisture, does not operate
normally, or has been dropped.
15. Power Sources: This product should be connected to a power supply only of the type described in
these operating instructions, or as marked on the unit.
16.
17.
Water and Moisture: This product should be kept away from direct contact with liquids. The apparatus
shall not be exposed to dripping or splashing and that no objects filled with liquids, such as vases, shall
be placed on the apparatus.
18.
Caution (if applicable): Danger of explosion if battery is incorrectly replaced. Replace only with the
same or equivalent type. Batteries (a battery pack or an installed battery) shall not be exposed to
excessive heat such as sunshine, fire, etc. (This applies only if your product uses a battery.)
Where the mains plug or an appliance coupler is used as the disconnect device, the disconnect device
shall remain readily operable.
6
19.
20.
21.
If applicable: This symbol means the equipment is a Class II or double-insulated electrical appliance.
It has been designed in such a way that it does not require a safety connection to electrical earth.
22.
Do not install this equipment in a confined or “boxed-in” space such as a bookcase or similar unit, and
maintain good ventilation conditions. If your product has ventilation openings, the ventilation should not
be impeded by covering them with items such as newspaper, tablecloths, curtains, etc.
23.
24.
When moving or not using the appliance, secure the power cord (e.g., wrap it with a cable tie). Be
careful not to damage the power cord. Before using it again, make sure the power cord has not been
damaged. If the power cord has been damaged at all, bring the unit and cord to a qualified service
technician for repair or replacement as specified by the manufacturer.
25.
Warning: Excessive sound pressure (high volumes) from headphones can cause hearing loss.
26.
Warning: Please refer to any important information (e.g., electrical, safety, etc.) printed on the exterior
bottom enclosure or rear panel before installing or operating the product.
Service Instructions
• Disconnect power cord before servicing.
• Replace critical components only with factory parts or recommended equivalents.
• For AC line powered units: Before returning repaired unit to user, use an ohmmeter to measure from both
AC plug blades to all exposed metal parts. The resistance should be more than 2,000,000 ohms.
Safety Notices
CAUTION: TO REDUCE THE RISK OF ELECTRIC SHOCK,
DO NOT REMOVE ANY COVER. NO USER- SERVICEABLE
PARTS INSIDE. REFER SERVICING TO QUALIFIED SERVICE
PERSONNEL ONLY.
DANGEROUS VOLTAGE: The lightning flash with arrowhead symbol within the equilateral
triangle is intended to alert the user to the presence of un-insulated “dangerous voltage” within
the product’s enclosure that may be of sufficient magnitude to constitute a risk of electric shock.
INSTRUCTIONS: The exclamation point within the equilateral triangle is intended to alert the
user to the presence of important operating and maintenance (servicing) instructions in the
literature accompanying this appliance.
WARNING: To reduce the risk of fire or electrical shock, do not expose this appliance to rain or moisture.
Electrical equipment should NEVER be kept or stored in damp environments.
CAUTION (for U.S.A. & CANADIAN models only): TO PREVENT ELECTRIC SHOCK DO NOT USE THIS
(POLARIZED) PLUG WITH AN EXTENSION CORD, RECEPTACLE OR OTHER OUTLET UNLESS THE
BLADES CAN BE FULLY INSERTED TO PREVENT BLADE EXPOSURE.
NOTICE CONCERNING LASER PRODUCTS: DANGER: INVISIBLE LASER RADIATION WHEN OPEN AND
INTERLOCK FAILED OR DEFEATED. AVOID DIRECT EXPOSURE TO BEAM. USE OF CONTROLS OR
ADJUSTMENTS OTHER THAN THOSE SPECIFIED HEREIN MAY RESULT IN HAZARDOUS RADIATION
EXPOSURE.
No naked flame sources, such as lighted candles, should be placed on the apparatus
Attention should be drawn to environmental aspects of battery disposal.
Use of the apparatus in moderate climates.
The ventilation should not be impeded by covering the ventilation openings with items,
such as newspapers, table-cloths, curtains, etc.
Minimum distances around the apparatus for sufficient ventilation
27.
28.

7
NOTICE CONCERNING FCC REGULATIONS: You are cautioned that changes or modifications not expressly
approved by the part responsible for compliance could void the user’s authority to operate the equipment. This
equipment has been tested and found to comply with the limits for a Class B digital device, pursuant to part 15 of
the FCC rules. These limits are designed to provide reasonable protection against harmful interference in a
residential installation. This equipment generates uses and can radiate radio frequency energy and, if not installed
and used in accordance with the instructions, may cause harmful interference to radio communications. However,
there is no guarantee that interference will not occur in a particular installation. If this equipment does cause harmful
interference to radio or television reception, which can be determined by turning the equipment off and on, the user
is encouraged to try to correct the interference by one or more of the following measures: (a) reorient or relocate the
receiving antenna; (b) move this unit; (c) increase the separation between the equipment and receiver; (d) donnect
the equipment into an outlet on a circuit different from that to which the receiver is connected; (e) be sure that all
cables are properly shielded, using a choke or ferrite where appropriate; (f) consult the dealer or an experienced
radio/television technician for help.
For Canadian models:
• This device complies with Industry Canada licence-exempt RSSs. Operation is subject to the following two
conditions: (1) this device may not cause interference, and (2) this device must accept any interference, including
interference that may cause undesired operation of the device.
• Under Industry Canada regulations, this radio transmitter may only operate using an antenna of a type and
maximum (or lesser) gain approved for the transmitter by Industry Canada. To reduce potential radio interference
to other users, the antenna type and its gain should be so chosen that the equivalent isotropically radiated power
(e.i.r.p.) is not more than that necessary for successful communication.
• This unit does not exceed the Class B limits for radio noise emission from digital apparatus set out in the radio
interference regulations of the Canadian Department of Communications.
1. This device complies with Part 15 of the FCC Rules. Operation is subject to the following two conditions:
(1) This device may not cause harmful interference,and
(2) This device must accept any interference received, including interference that may causeundesired operation.
2. Any Changes or modifications not expressly approved by the party responsible for compliance
NOTE: This equipment has been tested and found to comply with the limits for a Class B digital
This equipment generates uses and can radiate radio frequency energy and, if not installed and
However, there is no guarantee that interference will not occur in a particular installation. If this
interference by one or more of the following measures:
Reorient or relocate the receiving antenna.
Increase the separation between the equipment and receiver.
Connect the equipment into an outlet on a circuit different from that to which the receiver is connected.
Consult the dealer or an experienced radio/TV technician for help.
This equipment complies with FCC radiation exposure limits set forth for an uncontrolled
environment. This equipment should be installed and operated with minimum distance 20cm between the radiator & your body
could void the
user's authority to operate the equipment.
These limits are designed to provide reasonable
device,
pursuant to Part 15 of the FCC Rules. protection against harmful interference
in a residential installation.
to radio communications.may cause harmful interference
used in accordance
with the instructions,
or television reception, which can be
equipment does cause harmful
interference to radio determined by turning the equipment off and on,
the user is encouraged to try to correct the
FCC Radiation Exposure Statement
FCC STATEMENT
ESD/EFT Warning: This unit may contain a microcomputer for signal processing and control functions. In
very rare situations, severe interference, noise from an external source, or static electricity may cause it to
lock up. In the unlikely event that this should happen, turn off the unit, wait at least five seconds, and then
turn it back on again.
In an environment with radio frequency interference, the unit may malfunction and resume normal operation after
removal of the interference.
For best audio quality, avoid using this device in a high RF-radiated environment.
For 240-volt use in U.K., use NEMA-style 240-volt plug. For other countries use proper plug for local outlet.
Double-Insulated: When servicing use only identical replacement parts.
2.
any Changes or modifications not expressly approved by the party responsible for compliance
could void the user's authority to operate the equipment.
•
(1) l'appareil ne doit pas produire de brouillage, et
(2) l'utilisateur de l'appareil doit accepter tout brouillage radioélectrique subi,
même si le brouillage est susceptible d'en compromettre le fonctionnement."
Le présent appareil est conforme aux CNR d'Industrie Canada applicables aux appareils radio exempts de licence.
L'exploitation est autorisée aux deux conditions suivantes :

8
Correct Disposal of This Product: This marking indicates that this product should not be disposed with
other household wastes throughout the EU. To prevent possible harm to the environment or human health
from uncontrolled waste disposal, recycle it responsibly to promote the sustainable reuse of material
resources. To return your used device, please use the return and collection systems or contact the retailer
where the product was purchased. They can take this product for environmentally safe recycling.
Disposing of General Purpose & Alkaline Batteries:
• Alkaline batteries can be safely disposed of with normal household waste. Never dispose of batteries in fire
because they could explode.
• Alkaline batteries are composed primarily of common metals—steel, zinc, and manganese—and do not pose a
health or environmental risk during normal use or disposal.
• It is important not to dispose of large amounts of alkaline batteries in a group. Used batteries are often not
completely “dead.” Grouping used batteries together can bring these “live” batteries into contact with one
another, creating safety risks.
• Proven cost-effective and environmentally safe recycling processes are not yet universally available for alkaline
batteries. Some communities offer recycling or collection of alkaline batteries. Contact your local government
for disposal practices in your area.
Warning: This product may contain chemicals known to the State of California to cause cancer and birth defects or
other reproductive harm. (California law requires this warning to be given to customers in the State of California.)

24
ionaudio.com
Manual Version 15.2
World Headquarters:
Phone:
Fax:
ION Audio
200 Scenic View Drive
Cumberland, RI 02864
USA
401.658.3743 (USA)
401.658.3640 (USA)

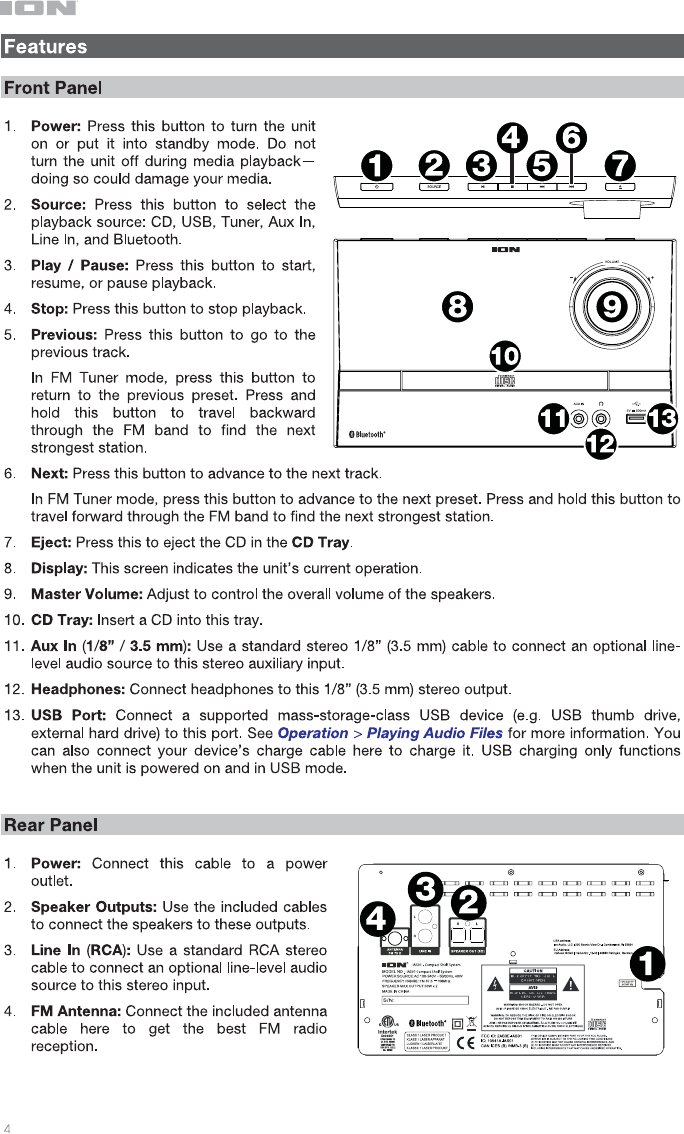
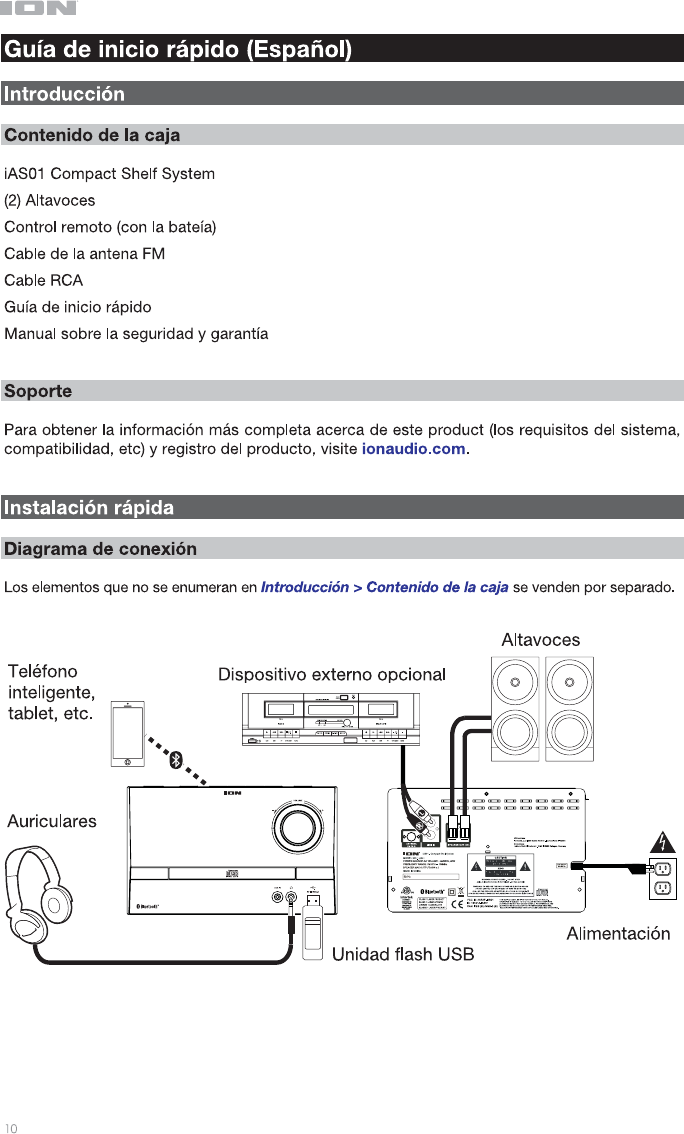
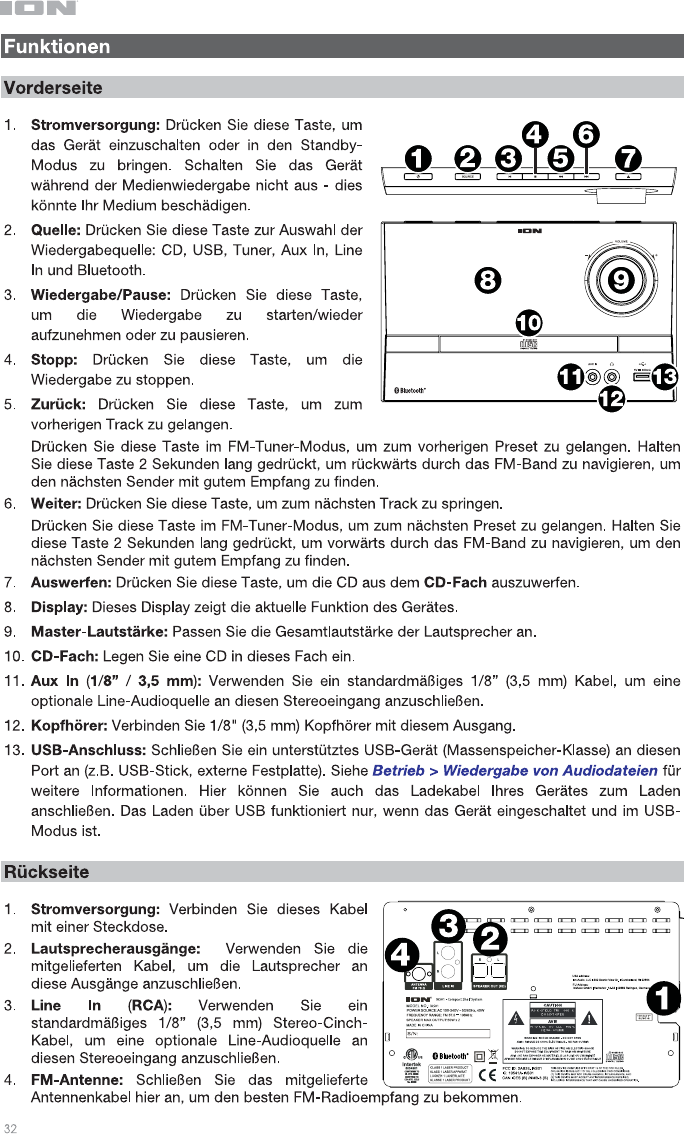
iAS01
Quickstart Guide English ( 3 – 9 )
Guía de inicio rápido Español ( 10 – 16 )
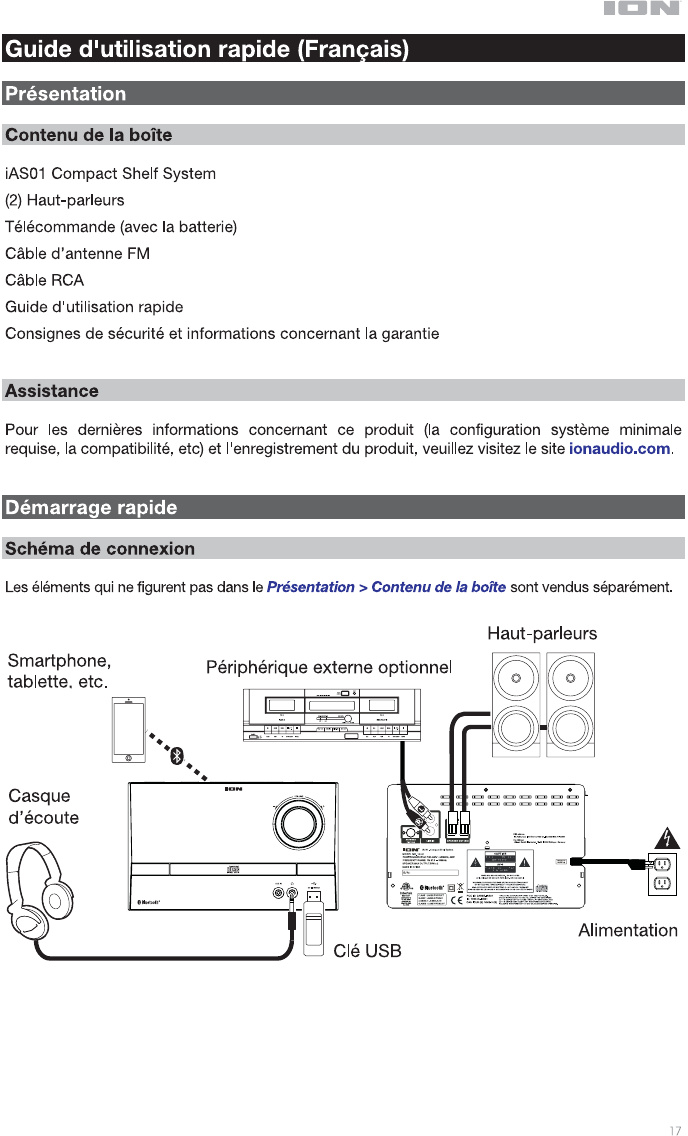
Guide d'utilisation rapide Français ( 17 – 23 )
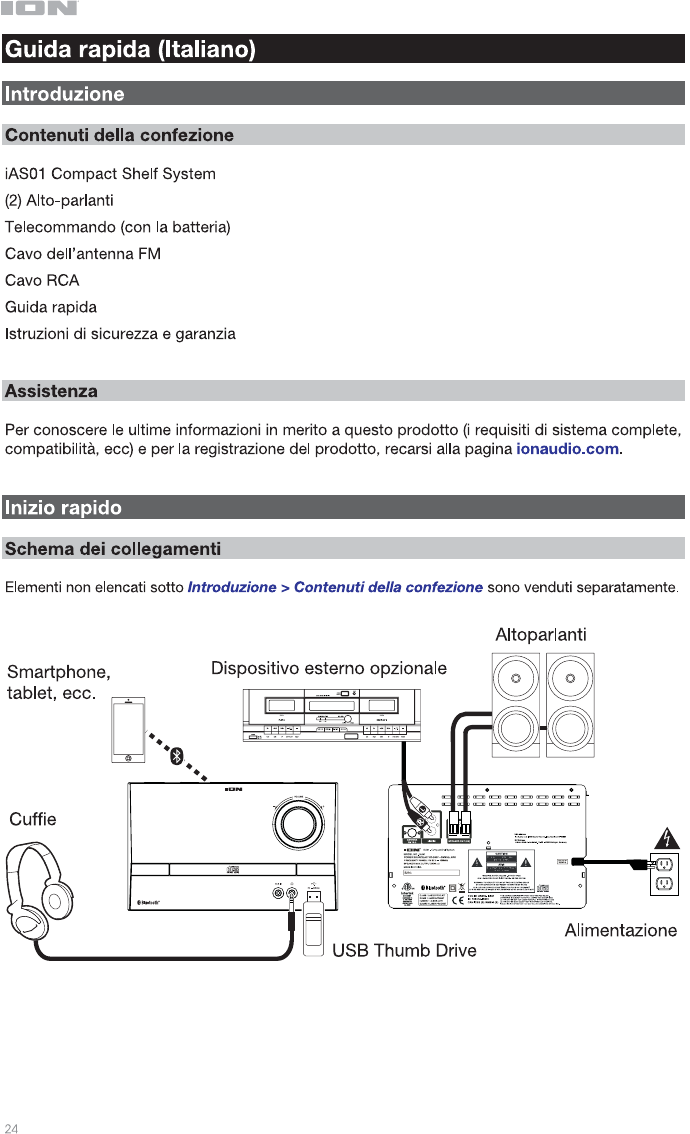
Guida rapida Italiano ( 24 – 30 )
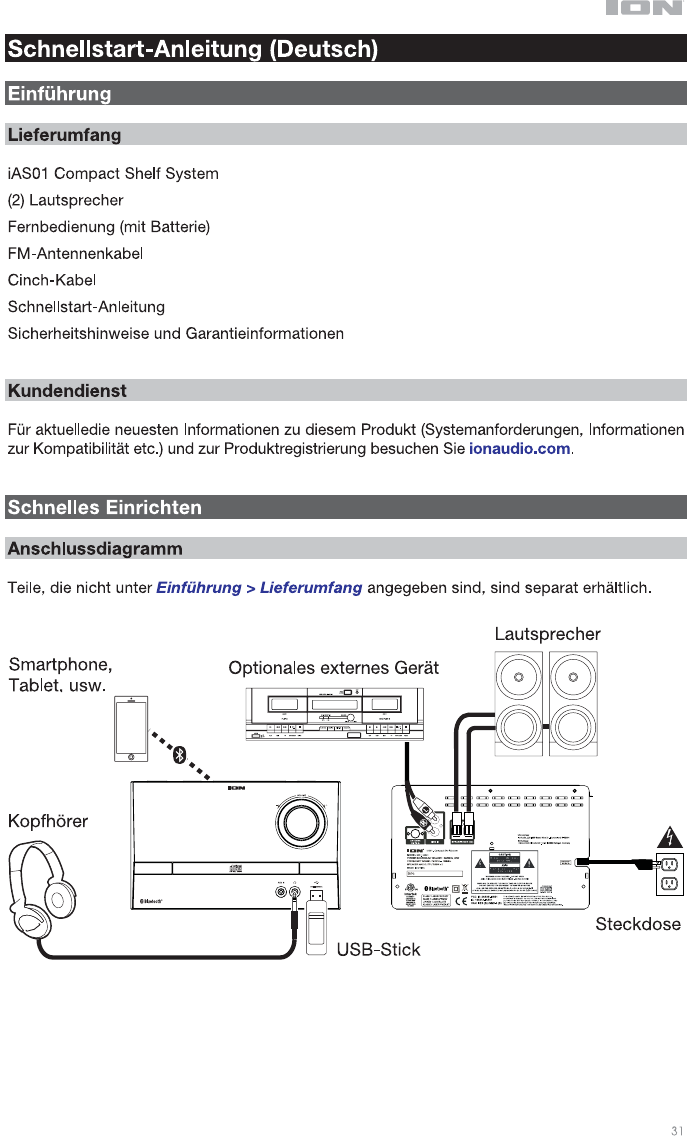
Schnellstart-Anleitung Deutsch ( 31 – 37 )
Snelstartgids Nederlands ( 38 – 44 )
Appendix English ( 46 )
2

3
4
5
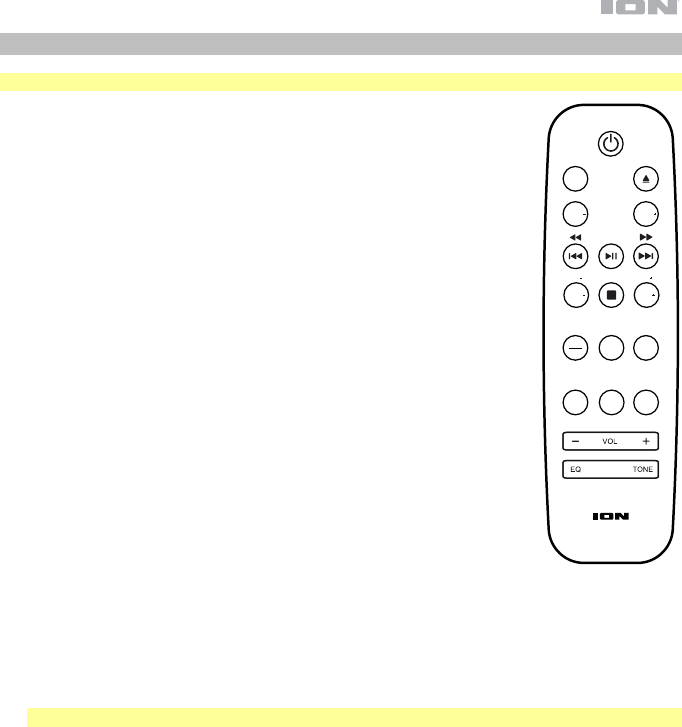
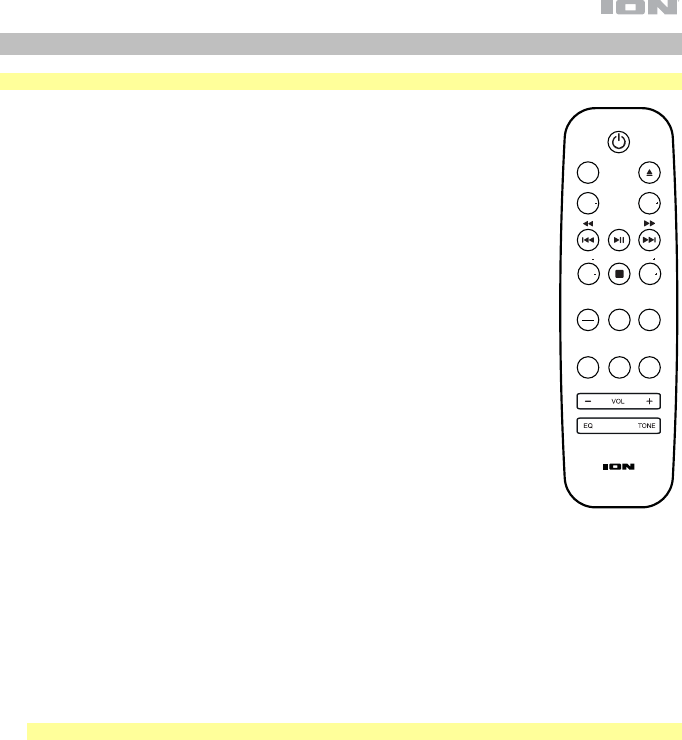
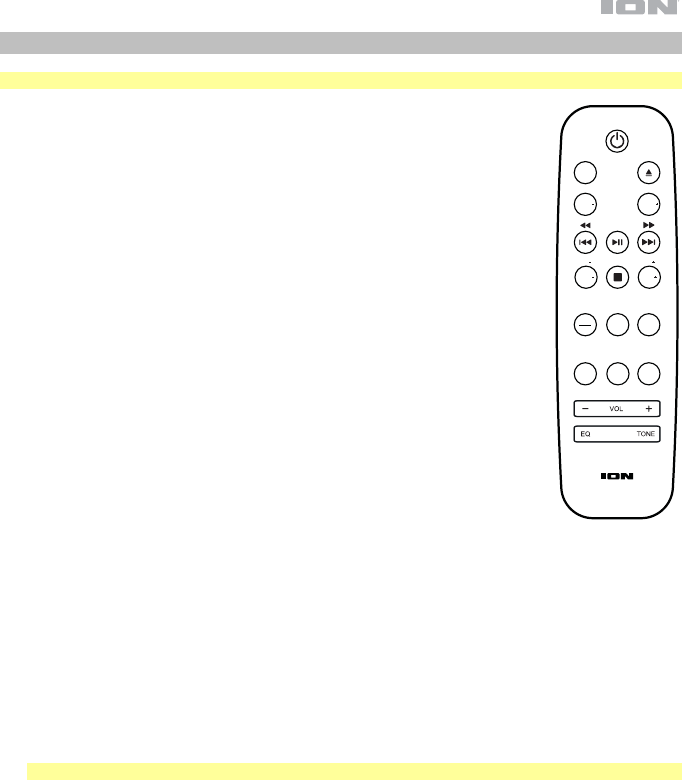
Remote
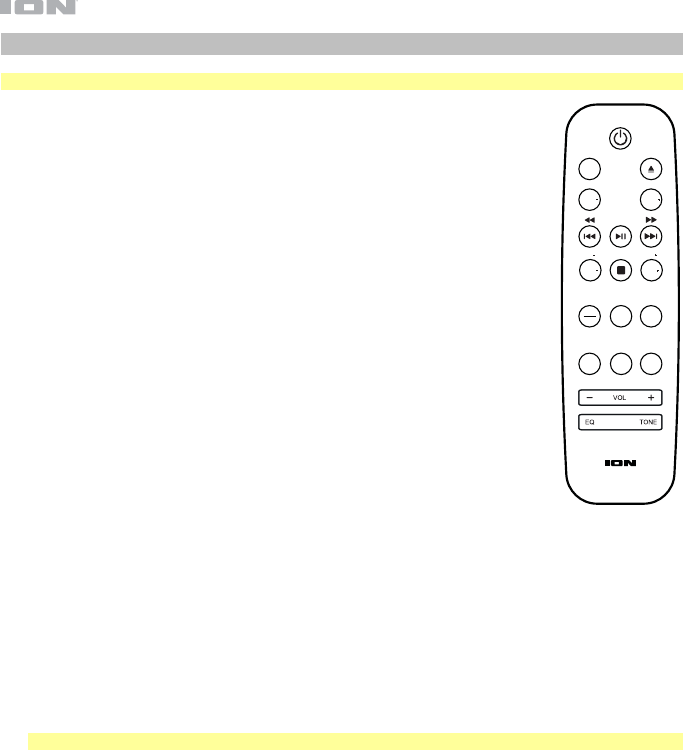
Note: The remote requires 1 AAA battery (included) to function.
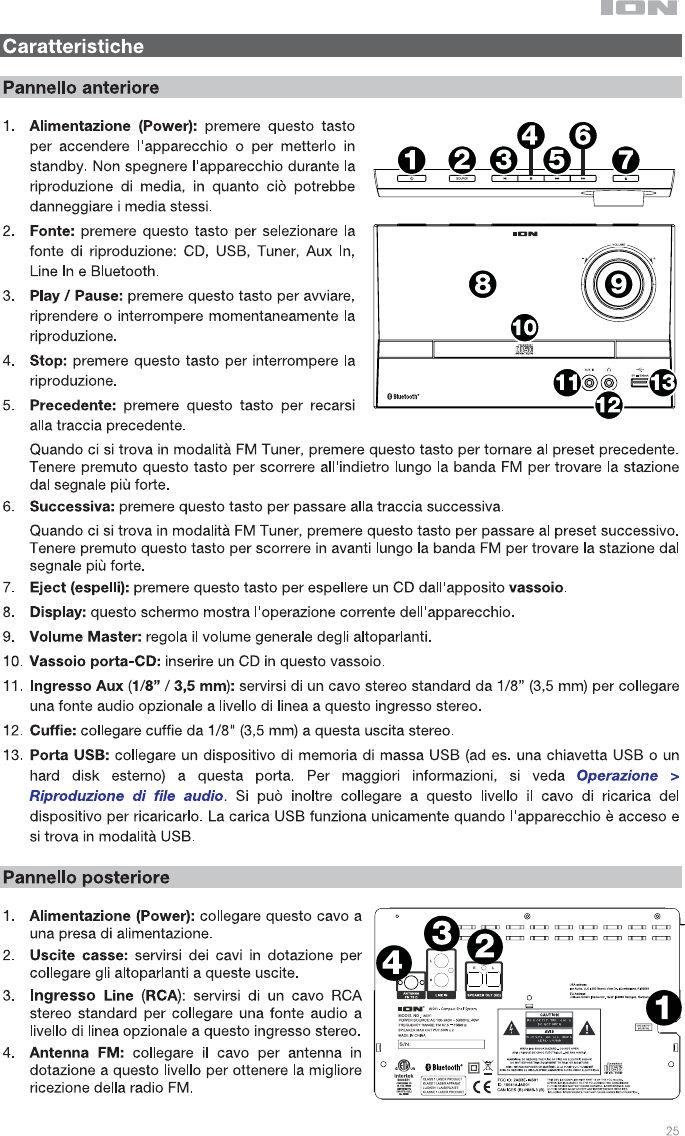
• Power Button: Press this button to power on the unit or to put it into
standby mode.
• Src: Press this button to select the playback source: CD, USB, Tuner,
Aux In, Line In, and Bluetooth.
• Eject: Press this button to eject the CD in the CD Tray.
• Fold-: Press this button to return to the previous folder.
• Fold+: Press this button to move to the next folder.
• Previous / Rewind: Press this button to go to the previous track. Press
and hold this button to rewind.
In FM Tuner mode, press and release this button to move to the previous
preset station. Press and hold this button to travel backward through the
FM band to find the next strongest station.
• Play / Pause: Press this button to play or pause the playback.
In Bluetooth mode, press and hold this button for 5 seconds to
disconnect a Bluetooth connection.
• Next / Fast-Forward: Press this button to go to the next track. Press and
hold this button to fast-forward.
In FM Tuner mode, press this button to move to the previous preset
station. Press and hold this button to travel forward through the FM band
to find the next strongest station.
• Tun- / 10-: In FM Tuner mode, press this button to skip backward
through the radio channels.
In CD or USB modes, press this button to move backward 10 tracks.
• Stop / Auto: Press this button to stop playback.
In FM Tuner mode, press and hold this button to automatically scan through the FM band.
• Tun+ / 10+: In FM Tuner mode, press this button to skip forward through the radio channels.
In CD or USB modes, press this button to move forward 10 tracks.
• Time / Info: Press this button to toggle the Display to show time elapsed, time remaing, or ID3
tag data.
Note: ID3 tag data may not be available with all file formats.
• Mem: In FM Tuner mode, you can use button to save a station as a favorite preset. See
Operation > Using the Radio for more information.
• Prg: In CD or USB mode, press this button once to access Program mode and create a custom
playback order. Use the Previous and Next buttons to navigate tracks, and press Program
again to confirm your selection. Once finished, press Play/Pause to resume playback.
• Mute: Silences music playback.
• Rep: Press this button to switch between Repeat Playback modes: Off, Repeat One, or Repeat
All.
• Rnd: Press this button to turn on Random Playback mode.
• Vol -: Decreases the source volume.
• Vol +: Increases the source volume.
• EQ: Press this button to switch equalizer settings.
• Tone: Press this button to create a custom EQ setting. Use the Vol - and Vol + buttons to adjust
the Bass and Treble settings. This setting will be saved as the “Custom” EQ setting.
SRC
FOLD FOLD
TUN
TIME
INFO
AUTO
TUN
PRG
10 10
MUTE REP
MEM
RAND
5

6
Operation
Selecting the Media Playback Mode
To select what kind of media you want to play:
• Press the Source button on the unit.
• Press the Src button on the remote control.
Bluetooth Pairing
To pair your Bluetooth device:
1. If the unit is off, press the Power button to power it on.
2. Make sure your desired Bluetooth device has its Bluetooth connectivity on and is within
range.
3. Press the Source button on the unit or the remote to enter Bluetooth mode.
4. Navigate to the Bluetooth setup screen on your device, find ION iAS01 and connect.
Note: Some older Bluetooth devices may require you to enter a PIN. If this is the case,
enter 0000 as the PIN.
5. On your Bluetooth device, start playing audio.
To unpair your Bluetooth device:
• Enter your Bluetooth device’s Bluetooth settings menu, and disconnect from ION iAS01.
• Press and hold the Play/Pause button on the remote control to unpair your device.
Playing Audio CDs
To play audio CDs:
1. If the unit is off, press the Power button to power it on.
Important: Do not insert a CD when the power is off. Doing so may damage the unit.
2. Insert a CD into the CD Tray.
3. Select CD as the media type (described in Selecting the Media Playback Mode).
4. To start playback, press the Play/Pause button on the unit or remote control.
Playing Audio Files
To play audio files on a USB device:
1. If the unit is off, press the Power button to power it on.
2. Connect your USB device (mass storage class) to the USB Port.
3. Select USB as the media type (described in Selecting the Media Playback Mode).
4. Select an audio file using the Previous and Next buttons. If your USB device contains
folders, you can navigate between folders using the Fold -/+ buttons. The file will play
automatically.
6

7
Playing Audio from an External Device
To play audio from an external device (e.g., smartphone, computer, turntable, etc.):
1. If the unit is off, press the Power button to power it on.
2. Connect the 1/8” (3.5 mm) headphone output or RCA stereo output of your external
device to the Aux In or Line In input on the unit, respectively.
Important: The Aux In and Line In inputs are line-level. Your audio sources must be line-
level (no phono-level turntables).
3. Select Aux In or Line In as the media type by pressing the Source button on the unit or
the remote control.
4. To start playback, press Play on your external device.
Using the Radio
1. Attach the FM Antenna Cable to the Antenna input on the back of the unit.
2. If the unit is off, press the Power button to power it on.
3. Select Tuner as the source (described in Selecting the Media Playback Mode).
4. Press the Tun -/+ buttons on the remote control to travel through the FM band. You can
also press and hold the Previous and Next buttons to jump backward or forward through
the FM band to the next strongest station.
5. Press and release the Previous and Next buttons to change FM presets.
To add a station as a preset:
1. Use the Tun -/+ buttons to select the desired radio station.
2. Press the Mem button.
3. Use the Previous and Next buttons to select a preset number.
4. Press the Mem button again to save the station to that preset.
7

8
Troubleshooting
If you encounter a problem, do the following:
• Make sure all cables, devices, antennae, and/or media are properly and securely
connected.
• Make sure you are using the unit as described in this Quickstart Guide.
• Make sure your other devices or media are working properly.
• If you believe the unit is not working properly, check the following table for your problem
and solution.
Problem Solution Please see:
Power does not turn
on.
Make sure the unit is connected to a
power outlet.
Quick Setup >
Connection
Diagram
The unit does not
produce any sound, or
the sound is distorted.
Make sure all cable, device, or media
connections are secure and correct.
Make sure none of the cables are
damaged.
Make sure the Mute function is not
engaged.
Adjust the Volume control.
Quick Setup >
Connection
Diagram
The remote control
does not function.
Make sure there are batteries in the remote
control.
Replace the batteries with new ones.
Make sure the remote control is pointed at
the unit.
Make sure you are within range of the unit.
Quick Setup >
Connection
Diagram
Audio from my
Bluetooth device does
not play.
Make sure you have properly paired your
Bluetooth device.
Improve the Bluetooth signal reception by
moving your Bluetooth device closer to the
unit. Also, remove obstacles (walls,
furniture, etc.) so there is a clear line of
sight between your Bluetooth device and
the unit.
Operation >
Bluetooth Pairing
No Disc appears even
when a CD is inserted.
Press the Eject Button to eject the CD and
insert it again.
Operation > Playing
Audio CDs
Playback does not
start even after
pressing the Play
button.
Make sure the unit is connected to a
power outlet and that it is powered on.
Clean the CD with a dry cloth or
commercial CD cleaner.
Insert a different CD.
Operation > Playing
Audio CDs
8

9
Problem Solution Please see:
No Songs appears
even when a USB
device is inserted.
Disconnect and reconnect the USB device
to make sure it is securely inserted.
Make sure the USB device is of a mass
storage class or compatible with MTP.
Make sure the USB device is formatted
using a FAT16 or FAT32 file system.
Do not use a USB hub or USB extension
cable.
Not all USB devices are guaranteed to
work; some may not be recognized.
Operation > Playing
Audio Files
Files on a USB device
do not appear.
Make sure the files are of a supported file
format. Only mp3 and wma files are
supported on USB. Files that are not
supported by this unit will not appear.
Make sure the USB device uses a folder
structure that the unit supports: up to 999
folders (up to 8 folder levels, including the
root) and up to 999 files.
If your USB device is partitioned, make
sure the files are in the first partition. The
unit will not show other partitions.
Operation > Playing
Audio Files
Files on a USB device
cannot play.
Make sure the files are of a supported file
format. Only mp3 and wma files are
supported on USB. Files that are not
supported by this unit will not appear.
Make sure the files are not copyright-
protected. The unit cannot play copyright-
protected files.
Operation > Playing
Audio Files
The source sound is
too low, or the sound
has noise.
Make sure the volume is properly set.
The Aux In and Line In inputs are line-
level. Your audio sources must be line-
level (no phono-level turntables).
Operation > Playing
Audio From an
External Device
Using the radio
produces noise.
Make sure the antenna is properly
connected.
Change the position or orientation of the
antenna.
Use an outdoor FM antenna (not included).
Move the antenna away from other cables.
Operation > Using
the Radio
9
10
11
12
Control remoto
Nota: El control remoto requiere una pila AAA (incluida) para funcionar.
• Botón de encendido: Pulse este botón para encender la unidad o colocarla en
modo de espera.
• Fuente: Pulse este botón para seleccionar la fuente de reproducción: CD, USB,
sintonizador, entrada auxiliar, entrada de línea y Bluetooth.
• Expulsar: Pulse este botón para expulsar el CD de la bandeja de CD.
• Carpeta-: Pulse este botón para volver la carpeta anterior.
• Carpeta+: Pulse este botón para pasar a la carpeta siguiente.
• Anterior / rebobinar: Pulse este botón para volver a la pista anterior. Mantenga
pulsado este botón para rebobinar.
En el modo de sintonizador de FM, pulse y suelte este botón para pasar a la
emisora de radio predefinida anterior. Mantenga pulsado este botón para recorrer
la banda FM hacia atrás a fin de encontrar la siguiente emisora con buena
recepción.
• Reproducir / Pausa: Pulse este botón para reproducir o poner en pausa la
reproducción.
En modo Bluetooth mantenga pulsado este botón durante 5 segundos para
desconectar una conexión Bluetooth.
• Siguiente / Avance rápido: Pulse este botón para pasar a la pista siguiente.
Mantenga pulsado este botón para hacer un avance rápido.
En el modo de sintonizador de FM, pulse este botón para pasar a la emisora de
radio predefinida anterior. Mantenga pulsado este botón para recorrer la banda
FM hacia adelante a fin de encontrar la siguiente emisora con buena recepción.
• Sintonizador- / 10-: En el modo de sintonizador de FM, pulse este botón para recorrer hacia atrás los
canales de radio.
En los modos CD o USB, pulse este botón para regresar 10 pistas hacia atrás.
• Parar / Automático: Pulse este botón para detener la reproducción.
En el modo de sintonizador de FM, mantenga pulsado este botón para explorar automáticamente la
banda FM.
• Sintonizador+ / 10+: En modo de sintonizador de FM, pulse este botón para saltar hacia adelante por
los canales de radio.
En los modos CD o USB, pulse este botón para desplazarse 10 pistas hacia adelante.
• Tiempo / Información: Pulse este botón para alternar la visualización de la pantalla entre el tiempo
transcurrido, el tiempo restante o los datos de la etiqueta ID3.
Nota: Los datos de la etiqueta ID3 podrían no estar disponibles en todos los formatos de archivo.
• Memorizar: En modo de sintonizador de FM, puede utilizar este botón para guardar una emisora de
radio como un preset favorito. Consulte Funcionamiento > Cómo usar la radio para más información.
• Programar: En un modo CD o USB, pulse el botón una vez para acceder al modo de programación y
crear un orden de reproducción personalizado. Utilice los botones Previous y Next para navegar por
las pistas y pulse Program nuevamente para confirmar su selección. Una vez que haya terminado,
pulse Play/Pause para reanudar la reproducción.
• Silenciar: Silencia la reproducción de la música.
• Repetir: Pulse este botón para alternar entre los modos de repetición de reproducción: Off (apagado),
Repeat One (repetir uno) o Repeat All (o repetir todos).
• Aleatorio: Pulse este botón para encender el modo de reproducción aleatorio.
• Volumen -: Disminuye el volumen de la fuente.
• Volumen +: Aumenta el volumen de la fuente.
• Ecualizador: Pulse este botón para modificar los ajustes del ecualizador.
• Tono: Pulse este botón para crear un ajuste de ecualización personalizado. Utilice los botones Vol - y
Vol + para modificar los ajustes de graves y agudos. Este ajuste será guardado como el ajuste de
ecualización "personalizado".
SRC
FOLD FOLD
TUN
TIME
INFO
AUTO
TUN
PRG
10 10
MUTE REP
MEM
RAND
12

13
Funcionamiento
Selección del modo de reproducción de medios
Cómo seleccionar el tipo de medio que desea reproducir:
• Pulse el botón Source de la unidad.
• Pulse el botón SRC del control remoto.
Apareamiento Bluetooth
Cómo aparear su dispositivo Bluetooth:
1. Si la unidad está apagada, pulse el botón Power (Encendido) para encenderla.
2. Asegúrese de que su dispositivo Bluetooth deseado tenga su conectividad Bluetooth
activada y se encuentre dentro del alcance.
3. Pulse el botón Source de la unidad o el control remoto para entrar al modo Bluetooth.
4. Navegue a la pantalla de configuración de Bluetooth en su dispositivo, busque ION
iAS01 y conéctelo con el.
Nota: Algunos dispositivos Bluetooth antiguos pueden requerir que introduzca un PIN. Si
este es el caso, introduzca 0000 como PIN.
5. Reproduzca audio en su dispositivo Bluetooth.
Cómo desaparear su dispositivo Bluetooth:
• Entre al menú de ajustes Bluetooth de su dispositivo Bluetooth y desconéctelo del ION
iAS01.
• Mantenga pulsado el botón Play/Pause del control remoto para desaparear su
dispositivo.
Reproducción de CD de audio
Como reproducer un CD de audio:
1. Si la unidad está apagada, pulse el botón Power (Encendido) para encenderla.
Importante: No inserte un CD cuando la unidad esté apagada. Esto podría dañar la
unidad.
2. Inserte un CD en la bandejo de CD.
3. Seleccione CD como el tipo de medio (descrito en Selección del modo de
reproducción de medios).
4. Para comenzar la reproducción, pulse el botón Play en la unidad o control remoto.
Reproducción de archivos de audio
Cómo reproducir archivos de audio en un dispositivo USB:
1. Si la unidad está apagada, pulse el botón Power para encenderla.
2. Conecte su dispositivo USB (de almacenamiento masivo) en el puerto USB.
3. Seleccione USB como el tipo de medio (descrito en Selección del modo de
reproducción de medios).
4. Seleccione un archivo de audio utilizando los botones Previous y Next. Si su dispositivo
USB contiene carpetas, puede navegar entre ellas utilizando los botones Fold -/+. El
archivo se reproducirá automáticamente.
13

14
Reproducción de audio desde un dispositivo externo
Cómo reproducir audio desde un dispositivo externo (por ej., teléfonos inteligentes
[smartphones], ordenadores, giradiscos, etc.):
1. Si la unidad está apagada, pulse el botón Power para encenderla.
2. Conecte la salida para auriculares de 3,5 mm (1/8 pulg.) o la salida estéreo RCA de su
dispositivo externo a las entradas Aux In o Line In de la unidad respectivamente.
Importante: Las entradas Aux In y Line In son para nivel de línea. Sus fuentes de audio
deben ser de nivel de línea (no giradiscos de nivel fonográfico).
3. Seleccione Aux In o Line In como tipo de medio pulsando el botón Source de la unidad
o el control remoto.
4. Para comenzar la reproducción, pulse el botón Play en su dispositivo externo.
Cómo usar la radio
1. Sujete el cable de la antena FM a la entrada Antenna en la parte trasera de la unidad.
2. Si la unidad está apagada, pulse el botón Power para encenderla.
3. Seleccione Tuner como la fuente (descrito en Selección del modo de reproducción de
medios).
4. Pulse los botones Tun -/+ en el control remoto para recorrer la banda FM. También
puede mantener pulsado los botones Previous y Next para saltar hacia delante y hacia
atrás a través de la banda FM a la siguiente emisora de radio con buena señal.
5. Mantenga pulsado los botones Previous y Next para modificar los presets de FM.
Cómo guardar una emisora de radio como preset:
1. Utilice los botones Tun -/+ para buscar la emisora de radio deseada.
2. Pulse el botón Mem.
3. Use los botones Previous y Next para seleccionar un número de preset.
4. Pulse el botón Mem nuevamente para guardar la emisora en ese preset.
14

15
Solución de problemas
Si experimenta problemas, realice lo siguiente:
• Asegúrese de que todos los cables, dispositivos, antenas, y/o medios estén conectados
firme y correctamente.
• Asegúrese de estar utilizando la unidad como describe esta Guía de inicio rápido.
• Asegúrese de que todos sus otros dispositivos o medios funcionen correctamente.
• Si cree que la unidad no está funcionando correctamente, busque su problema y
solución en la siguiente tabla.
Problema Solución Consulte:
La unidad no se
enciende.
Asegúrese de que la unidad esté
conectada a una toma de corriente.
Instalación
La unidad no emite
ningún sonido o el
sonido está
distorsionado.
Asegúrese de que todas las conexiones de
cables, dispositivos o medios estén firmes
y correctas.
Asegúrese de que ninguno de los cables
esté dañado.
Asegúrese de que la función de
silenciamiento no esté activada.
Ajuste el control de volumen.
Instalación
El control remoto no
funciona.
Asegúrese de que el control remoto tenga
pilas.
Sustituya las pilas viejas por pilas nuevas.
Asegúrese de apuntar el control remoto
hacia la unidad.
Asegúrese de estar dentro del alcance de
la unidad.
Instalación
No se reproduce el
audio proveniente de
mi dispositivo
Bluetooth.
Asegúrese de haber apareado
correctamente su dispositivo Bluetooth.
Mejore la recepción de la señal Bluetooth
acercando su dispositivo Bluetooth a la
unidad. También evite que se interpongan
obstáculos (paredes, muebles, etc.) en la
línea de visión entre su dispositivo
Bluetooth y la unidad.
Funcionamiento >
Apareamiento de
Bluetooth
Aparece No Disc (No
hay disco) aun cuando
hay un CD insertado.
Pulse el botón Eject para expulsar el CD e
insértelo nuevamente.
Funcionamiento >
Reproducción de
CD de audio
La reproducción no
comienza después de
pulsar el botón Play.
Asegúrese de que la unidad esté
conectada a una toma de corriente y que
esté encendida.
Limpie el CD con un paño seco o un
limpiador de CD comercial.
Inserte un CD diferente.
Funcionamiento >
Reproducción de
CD de audio
15

16
Problema Solución Consulte:
Aparece No Songs (No
hay canciones) incluso
después de haber
insertado un dispositivo
USB.
Desconecte y vuelva a conectar el dispositivo
USB para asegurarse de que esté
correctamente insertada.
Asegúrese de que el dispositivo USB sea de
clase almacenamiento masivo o compatible
con MTP.
Asegúrese de que el dispositivo USB esté
formateado con un sistema de archivos
FAT16 o FAT32.
No utilice un concentrador USB o un cable
alargador de USB.
No se garantiza que funcionen todos los
dispositivos USB; algunos pueden no ser
reconocidos.
Funcionamiento >
Reproducción de
archivos de audio
No aparecen los
archivos en un
dispositivo USB.
Asegúrese de que los archivos sean de un
formato soportado. Sólo se admiten archivos
mp3 y wma en el USB. Los archivos que no
sean soportados por esta unidad no
aparecerán.
Asegúrese de que el dispositivo USB posea
una estructura de carpetas soportada por la
unidad: hasta 999 carpetas (hasta 8 niveles
de carpetas, incluyendo la raíz) y hasta 999
archivos.
Si su dispositivo USB está particionado,
asegúrese de que los archivos se encuentren
en la primera partición. La unidad no mostrará
las otras particiones.
Funcionamiento >
Reproducción de
archivos de audio
No se reproducen los
archivos de un
dispositivo USB.
Asegúrese de que los archivos sean de un
formato soportado. Sólo se admiten archivos
mp3 y wma en el USB. Los archivos que no
sean soportados por esta unidad no
aparecerán.
Asegúrese de que las archivos no estén
protegidos por copyright. La unidad no puede
reproducir archivos protegidos por copyright.
Funcionamiento >
Reproducción de
archivos de audio
El sonido de la fuente
es demasiado bajo o
contiene ruido.
Asegúrese de que el volumen esté ajustado
correctamente.
Las entradas Aux In y Line In son para nivel
de línea. Sus fuentes de audio deben ser de
nivel de línea (no giradiscos de nivel
fonográfico).
Funcionamiento >
Reproducción de
audio desde un
dispositivo externo
El uso de la radio puede
generar ruido.
Asegúrese de que la antena esté conectada
correctamente.
Cambie la posición u orientación de la
antena.
Utilice una antena FM para exteriores (no
incluido).
Aleje la antena de los otros cables.
Funcionamiento >
Cómo usar la radio
16
17
18
19
Télécommande
Remarque : La télécommande requiert 1 pile AAA (fournie) pour fonctionner.
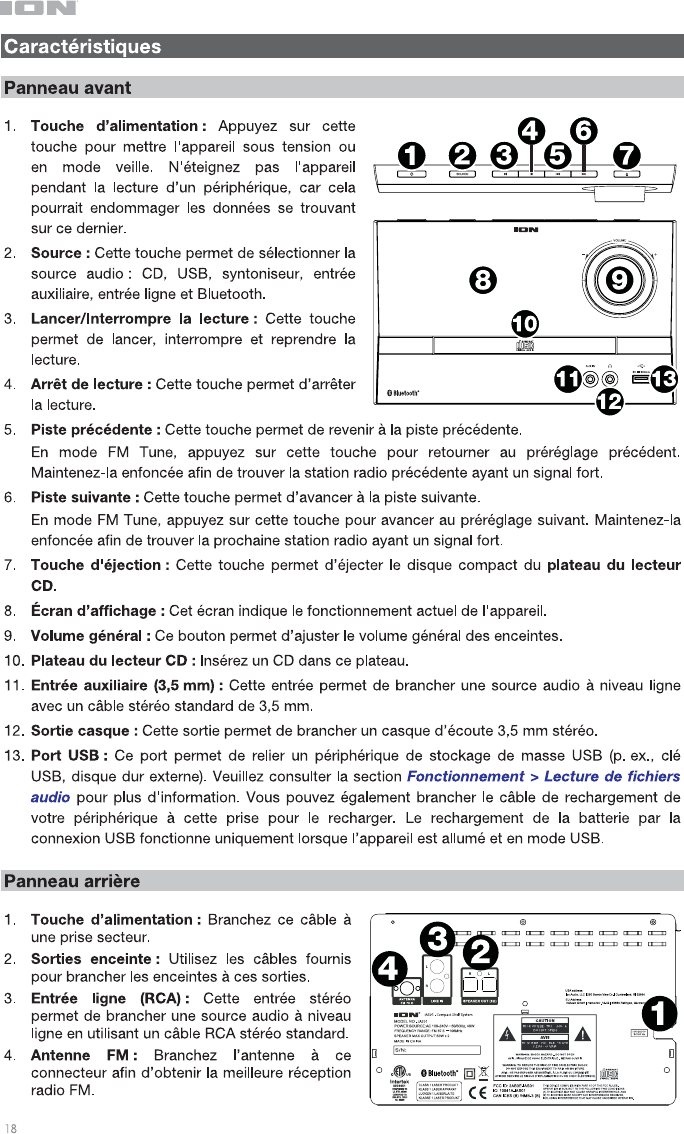
• Touche d'alimentation : Cette touche permet de mettre l'appareil sous tension
ou en mode veille.
• Src (source) : Cette touche permet de sélectionner la source audio : CD, USB,
Tuner (syntoniseur), Aux In (entrée auxiliaire), Line In (entrée ligne) et Bluetooth.
• Touche d'éjection : Cette touche permet d’éjecter le disque compact du
plateau du lecteur CD.
• Fold- (dossier) : Cette touche permet de revenir dossier précédent.
• Fold+ (dossier) : Cette touche permet d'avancer au dossier suivant.
• Piste précédente/Retour arrière : Cette touche permet de revenir à la piste
précédente. Appuyez sur cette touche pour effectuer un retour arrière.
En mode FM Tuner, appuyez sur cette touche pour retourner au préréglage
précédent. Maintenez cette touche enfoncée afin de trouver la station radio
précédente ayant un signal fort.
• Lancer/Interrompre la lecture : Cette touche permet de lancer ou d’interrompre
la lecture.
En mode Bluetooth, maintenez cette touche enfoncée pendant 5 secondes afin
de supprimer la connexion Bluetooth.
• Piste suivante/Avance rapide : Cette touche permet d'avancer à la piste
suivante. Maintenez cette touche enfoncée afin d’avancer rapidement.
En mode FM Tuner, appuyez sur cette touche pour retourner au préréglage
précédent. Maintenez cette touche enfoncée afin de trouver la prochaine station
radio ayant un signal fort.
• Tun-/10- (syntoniseur) : En mode FM Tuner, appuyez sur cette touche pour parcourir les stations radio
précédentes.
En mode CD ou USB, cette touche permet d’effectuer un retour arrière de 10 pistes.
• Arrêt de lecture/Balayage automatique : Cette touche permet d’arrêter la lecture.
En mode FM Tuner, maintenez cette touche enfoncée afin de balayer automatiquement toutes les
stations radio FM.
• Tun+/10+ (syntoniseur) : En mode FM Tuner, appuyez sur cette touche pour parcourir les stations
radio suivantes.
En mode CD ou USB, cette touche permet d’effectuer une avance rapide de 10 pistes.
• Time/Info (durée/info) : Cette touche permet de basculer entre l'affichage du temps restant, le temps
écoulé et les métadonnées ID3.
Remarque : Les métadonnées ID3 peuvent ne pas être disponibles avec tous les formats de fichier.
• Mem (mémoire) : En mode FM Tuner, cette touche permet de mémoriser une station radio comme
préréglage. Veuillez consulter la section Fonctionnement > Utilisation de la radio pour plus
d'information.
• Prg (programme) : En mode CD ou USB, cette touche permet d’accéder au mode de programmation
et de sélectionner l’ordre de lecture des pistes. Utilisez les touches Piste précédent et Piste suivante
pour parcourir les pistes, puis appuyez de nouveau sur la touche Prg afin de confirmer votre sélection.
Lorsque vous avez terminé, appuyez sur la touche Lancer/Interrompre la lecture pour reprendre la
lecture.
• Mute (mise en sourdine) : Cette touche permet de mettre en sourdine la lecture audio.
• Rep (lecture répétée) : Cette touche permet de basculer entre les modes de lecture répétée : Off
(lecture répétée désactivée), Repeat One (lecture répétée d’une piste) et Repeat All (lecture répétée de
toutes les pistes).
• Rnd (lecture aléatoire) : Cette touche permet d’activer/désactiver le mode de lecture aléatoire.
• Vol - : Cette touche permet de réduire le volume de la source.
• Vol + : Cette touche permet d’augmenter le volume de la source.
• EQ (égalisation) : Cette touche permet de modifier les réglages d’égalisation.
• Tone (tonalité) : Cette touche permet de créer un réglage d’égalisation personnalisé. Utilisez les
touches Vol - et Vol + pour régler les graves et les aigus. Ce réglage sera sauvegardé comme réglage
d’égalisation personnalisé.
SRC
FOLD FOLD
TUN
TIME
INFO
AUTO
TUN
PRG
10 10
MUTE REP
MEM
RAND
19

20
Fonctionnement
Sélection du type de média
Pour sélectionner le type de média que vous souhaitez lire :
• Appuyez sur la touche Source de l'appareil.
• Appuyez sur la touche Src de la télécommande.
Jumelage Bluetooth
Pour jumeler un périphérique Bluetooth :
1. Si l’appareil est hors tension, appuyez sur la touche d'alimentation afin de le mettre
sous tension.
2. Assurez-vous que la fonction Bluetooth du périphérique Bluetooth que vous souhaitez
jumeler est activée et qu’il se trouve dans les limites de portée de l’appareil.
3. Appuyez sur la touche Source de l'appareil ou de la télécommande pour passer en mode
Bluetooth.
4. Accédez à l'écran de configuration du périphérique Bluetooth, recherchez ION iAS01 et
appuyez sur Connecter.
Remarque : Certains périphériques Bluetooth plus anciens peuvent vous demander
d’entrer un NIP. Si tel est le cas, entrez 0000.
5. Lancer la lecture de fichier audio sur le périphérique Bluetooth.
Pour déjumeler un périphérique Bluetooth :
• Accédez au menu Bluetooth du périphérique, puis supprimez la connexion au ION iAS01.
• Maintenez la touche Lancer/interrompre la lecture de la télécommande enfoncée pour
déjumeler le périphérique.
Lecture de CD audio
Pour faire la lecture de CD audio :
1. Si l’appareil est hors tension, appuyez sur la touche d'alimentation afin de le mettre
sous tension.
Important : N'insérez pas un CD lorsque l’appareil est hors tension. Cela pourrait
endommager l'appareil.
2. Insérez un CD dans le plateau pour CD.
3. Sélectionnez CD comme type de média (comme indiqué dans la section Sélection du
type de média).
4. Pour lancer la lecture, appuyez sur la touche Lancer/Interrompre la lecture de l'appareil
ou de la télécommande.
Lecture de fichiers audio
Pour lire des fichiers audio sur un périphérique USB :
1. Si l’appareil est hors tension, appuyez sur la touche d'alimentation afin de le mettre
sous tension.
2. Insérez le périphérique USB (stockage de masse) dans le port USB.
3. Sélectionnez USB comme type de média (comme indiqué dans la section Sélection du
type de média).
4. Sélectionnez un fichier audio en utilisant les touches Piste précédente et Piste
suivante. Si le périphérique USB contient des dossiers, vous pouvez parcourir les
dossiers en utilisant les touches Fold -/+. Le fichier sera lancé automatiquement.
20

21
Lecture audio à partir d'un périphérique externe
Pour lire des fichiers audio sur un périphérique externe (p. ex., smartphone, ordinateur,
platine vinyle, etc.) :
1. Si l’appareil est hors tension, appuyez sur la touche d'alimentation afin de le mettre
sous tension.
2. Branchez la sortie casque 3,5 mm ou la sortie stéréo RCA d’un périphérique externe à
l’entrée auxiliaire ou à l’entrée ligne de l’appareil, respectivement.
Important : L'entrée auxiliaire et entrée ligne sont à niveau ligne. Vos sources audio
doivent être de niveau ligne (pas platine phono).
3. Sélectionnez Aux In ou Line In comme type de média en appuyant sur la touche Source
de l’appareil ou Src de la télécommande.
4. Pour lancer la lecture, appuyez sur la touche de lecture du périphérique externe.
Utilisation de la radio
1. Branchez le câble d'antenne FM à l'entrée d'antenne à l'arrière de l'appareil.
2. Si l’appareil est hors tension, appuyez sur la touche d'alimentation afin de le mettre
sous tension.
3. Sélectionnez Tuner comme type de média (comme indiqué dans la section Sélection du
type de média).
4. Utilisez les touches Tun -/+ de la télécommande afin de parcourir les stations radio. Vous
pouvez également maintenez la touche Piste précédente ou Piste suivante enfoncée
afin de trouver la station radio précédente ou suivante ayant un signal fort.
5. Appuyez et relâchez les touches Piste précédente et Piste suivante pour changer de
préréglage FM.
Pour programmer une station radio à un numéro de préréglage :
1. Utilisez les touches Tun -/+ afin de syntoniser la fréquence de la station désirée.
2. Appuyez sur la touche Mem.
3. Utilisez les touches Piste précédente et Piste suivante pour sélection un numéro de
préréglage.
4. Appuyez de nouveau sur la touche Mem afin de mémoriser la station radio sur ce numéro
de préréglage.
21

22
Dépannage
En cas de problème, procédez comme suit :
• Veuillez vous assurer que tous les câbles, appareils, antennes et/ou médias sont correctement
raccordés.
• Veuillez vous assurer d’utiliser l’appareil comme indiqué dans ce guide d’utilisation.
• Veuillez vous assurer que vos autres appareils et médias fonctionnent correctement.
• Si vous croyez que l'appareil ne fonctionne pas correctement, vérifiez le tableau suivant afin de
trouver le problème et la solution.
Problème Solution Veuillez consulter :
L’appareil ne s’allume
pas.
Veuillez vous assurer que le câble
d’alimentation est branché correctement à la
prise secteur.
Démarrage rapide >
Schéma de connexion
L'appareil ne produit
aucun son, ou le son est
déformé.
Veuillez vous assurer que tous les câbles,
appareils ou médias sont correctement
raccordés.
Veuillez vous assurer que les câbles ne
soient pas endommagés.
Veuillez vous assurer que la mise en
sourdine n’est pas activée.
Réglez le volume.
Démarrage rapide >
Schéma de connexion
La télécommande ne
fonctionne pas.
Veuillez vous assurer qu’il y a une pile dans
la télécommande.
Remplacez la pile usagée par une pile
neuve.
Veuillez vous assurer que vous pointez la
télécommande vers le capteur de
télécommande de l’appareil.
Veuillez vous assurer que vous êtes au sein
de la portée de transmission de l’appareil.
Démarrage rapide >
Schéma de connexion
L’appareil ne transmet
pas le signal audio du
périphérique Bluetooth.
Veuillez vous assurer que vous avez
correctement jumelé le périphérique
Bluetooth.
Améliorez la réception du signal Bluetooth
en rapprochant votre périphérique Bluetooth
de l’appareil. Veuillez également vous
assurer qu’il n’y a aucun obstacle (murs,
meubles, etc.) entre le périphérique
Bluetooth et l'appareil.
Fonctionnement >
Jumelage Bluetooth
No Disc s’affiche même
lorsqu'un CD est inséré.
Appuyez sur la touche d’éjection afin
d’éjecter le CD, puis réinsérez-le.
Fonctionnement >
Lecture de CD audio
La lecture ne démarre
pas même après avoir
appuyé sur la touche
de lecture.
Veuillez vous assurer que le câble
d’alimentation est branché correctement à la
prise secteur et que l’appareil est sous
tension.
Nettoyez le CD avec un chiffon doux ou un
produit de nettoyage spécialisé disponible
dans le commerce.
Insérez un CD différent.
Fonctionnement >
Lecture de CD audio
22

23
Problème Solution Veuillez consulter :
No Songs s’affiche
même lorsqu'un
périphérique USB est
inséré.
Retirez, puis réinsérez le périphérique USB afin
de vérifier qu'il est bien inséré.
Veuillez vous assurer que le périphérique USB
est bien de classe de stockage de masse ou
compatibles avec MTP.
Veuillez vous assurer que le périphérique USB
est formaté à l'aide d'un système de fichiers
FAT16 ou FAT32.
N’utilisez pas de concentrateur USB ou de câble
d'extension USB.
Certains périphériques USB peuvent ne pas
fonctionnés ; certains peuvent ne pas être
reconnus.
Fonctionnement >
Lecture de fichiers
audio
Les fichiers sur le
périphérique USB
n'apparaissent pas.
Assurez-vous que les fichiers sont d'un format
de fichier pris en charge. Uniquement les fichiers
MP3 et WMA sont pris en charge via USB. Les
fichiers qui ne sont pas pris en charge par cet
appareil ne seront pas affichés.
Veuillez vous assurer que le CD utilise une
structure de dossiers qui prend en charge :
jusqu'à 999 dossiers et jusqu'à 8 niveaux de
dossiers, y compris le répertoire racine et
jusqu’à 999 fichiers.
Si votre périphérique USB est partitionné,
assurez-vous que les fichiers se trouvent sur la
première partition. L'appareil n'affiche pas les
autres partitions.
Fonctionnement >
Lecture de fichiers
audio
Les fichiers sur le
périphérique USB ne
sont pas lus.
Veuillez vous assurer que les
f
ichiers sont d'un
format de fichier pris en charge. Uniquement les
fichiers MP3 et WMA sont pris en charge via
USB. Les fichiers qui ne sont pas pris en charge
par cet appareil ne seront pas affichés.
Veuillez vous assurer que les fichiers ne sont
pas protégés par droit d'auteur. L'appareil ne
peut pas lire les fichiers protégés par droit
d'auteur.
Fonctionnement >
Lecture de fichiers
audio
Le volume de la
source est trop faible,
ou il y a des bruits
parasitaires.
Veuillez vous assurer que les réglages du
volume sont corrects.
L'entrée auxiliaire et entrée ligne sont à niveau
ligne. Vos sources audio doivent être de niveau
ligne (pas platine phono).
Fonctionnement >
Lecture audio à partir
d'un périphérique
externe
L’utilisation de la
radio produit du bruit.
Assurez-vous que les antennes sont bien
branchées.
Changer la position ou l’orientation des
antennes.
Utilisez une antenne FM extérieure (non inclus).
Éloignez les antennes des câbles.
Fonctionnement >
Utilisation de la radio
23
24
25

26
Telecommando
Nota bene: il telecomando richiede 1 batteria AAA (in dotazione).
• Tasto di alimentazione: premere questo tasto per accendere l'apparecchio o
per metterlo in standby.
• Src: premere questo tasto per selezionare la fonte di riproduzione: CD, USB,
Tuner, Aux In, Line In e Bluetooth.
• Eject (espelli): premere questo tasto per espellere un CD dall'apposito vassoio.
• Fold- (cartella -): premere questo tasto per tornare alla cartella precedente.
• Fold+ (cartella +): premere questo tasto per passare alla cartella successiva.
• Previous / Rewind (precedente/riavvolgi): premere questo tasto per recarsi alla
traccia precedente. Tenere premuto questo tasto per riavvolgere.
Quando ci si trova in modalità FM Tuner, premere questo tasto e rilasciarlo per
tornare alla stazione predefinita precedente. Tenere premuto questo tasto per
scorrere all'indietro lungo la banda FM per trovare la stazione dal segnale più
forte.
• Play / Pause: premere questo tasto per riprodurre o interrompere
momentaneamente la riproduzione.
In modalità Bluetooth, tenere premuto questo tasto per 5 secondi per scollegare
un collegamento Bluetooth.
• Next / Fast-Forward (successivo/avanti veloce): premere questo tasto per
passare alla traccia successiva. Tenere premuto questo tasto per avanzare
rapidamente.
Quando ci si trova in modalità FM Tuner, premere questo tasto per passare alla
stazione predefinita precedente. Tenere premuto questo tasto per scorrere in
avanti lungo la banda FM per trovare la stazione dal segnale più forte.
• Tun- / 10-: in modalità FM Tuner, premere questo tasto per tornare indietro da un canale radio all'altro.
In modalità CD o USB, premere questo tasto per tornare indietro di 10 tracce.
• Stop / Auto: premere questo tasto per interrompere la riproduzione.
Quando ci si trova in modalità FM Tuner, tenere premuto questo tasto per effettuare la scansione
automatica lungo la banda FM.
• Tun+ / 10+: in modalità FM Tuner, premere questo tasto per saltare in avanti lungo i canali radio.
In modalità CD o USB, premere questo tasto per avanzare di 10 tracce.
• Time / Info: premere questo tasto per far commutare il Display tra tempo trascorso, tempo rimanente o
dati relativi al tag ID3.
Nota bene: i dati relativi al tag ID3 possono non essere disponibili con tutti i formati dei file.
• Mem: in modalità FM Tuner, servirsi di questo tasto per salvare una stazione tra i preset preferiti. Per
maggiori informazioni, si veda Operazione > Utilizzo della radio.
• Prg: in modalità CD o USB, premere una volta questo tasto per accedere alla modalità Programma e
creare un ordine di riproduzione personalizzato. Servirsi dei tasti Previous e Next per navigare tra le
tracce e premere nuovamente Program per confermare la scelta. Una volta finito, premere Play/Pause
per riprendere la riproduzione.
• Muto: silenzia la riproduzione della musica.
• Rep: premere questo tasto per commutare tra le diverse modalità di ripetizione della riproduzione. Off,
Repeat One, o Repeat All (spento, ripeti una o ripeti tutte).
• Rnd: premere questo tasto per attivare la modalità di riproduzione casuale.
• Vol -: abbassa il volume della fonte.
• Vol +: alza il volume della fonte.
• EQ: premere questo tasto per attivare le impostazioni dell'equalizzatore.
• Tone: premere questo tasto per creare un'impostazione EQ personalizzata. Servirsi dei tasti Vol- e Vol
+ per regolare le impostazioni di bassi e acuti. Questa impostazione verrà salvata come impostazione
EQ “personalizzata” (Custom).
SRC
FOLD FOLD
TUN
TIME
INFO
AUTO
TUN
PRG
10 10
MUTE REP
MEM
RAND
26

27
Operazione
Scelta della modalità di riproduzione dei Media
Per selezionare quale tipo di media si desidera riprodurre:
• Premere il tasto Source sull'apparecchio.
• Premere il tasto Src sul telecomando.
Collegamento Bluetooth
Per collegare il dispositivo Bluetooth:
1. Se l'apparecchio è spento, premere il tasto Power per accenderlo.
2. Assicurarsi che la connettività Bluetooth del dispositivo Bluetooth desiderato sia accesa
e che questo si trovi entro la portata.
3. Premere il tasto Source sull'apparecchio o sul telecomando per entrare in modalità
Bluetooth.
4. Navigare fino alla schermata di configurazione Bluetooth sul dispositivo, trovare ION
iAS01 e collegare.
Nota bene: alcuni dispositivi Bluetooth più vecchi possono richiedere l'inserimento di un
PIN. In questo caso, inserire 0000 come PIN.
5. Sul dispositivo Bluetooth, iniziare a riprodurre l'audio.
Per scollegare il dispositivo Bluetooth:
• Entrare nel menu delle impostazioni Bluetooth del dispositivo Bluetooth e scollegarlo
dall'ION iAS01.
• Tenere premuto il tasto Play/Pause sul telecomando per scollegare il dispositivo.
Riproduzione di CD audio
Per riprodurre CD audio:
1. Se l'apparecchio è spento, premere il tasto Power per accenderlo.
Importante: non inserire un CD quando l'alimentazione è spenta. Ciò potrebbe
danneggiare l'apparecchio.
2. Inserire un CD nell'apposito vassoio.
3. Selezionare CD come tipo di media desiderato (come descritto nel paragrafo Scelta
della modalità di riproduzione dei Media).
4. Per avviare la riproduzione, premere il tasto Play/Pause sull'apparecchio o sul
telecomando.
Riproduzione di file audio
Per riprodurre file audio su un dispositivo USB:
1. Se l'apparecchio è spento, premere il tasto Power per accenderlo.
2. Collegare il dispositivo USB (di memoria di massa) alla porta USB.
3. Selezionare USB come tipo di media desiderato (come descritto nel paragrafo Scelta
della modalità di riproduzione dei Media).
4. Scegliere un file audio servendosi dei tasti Previous e Next. Se il dispositivo USB
contiene cartelle, navigare tra le cartelle servendosi dei tasti Fold -/+. Il file verrà
riprodotto automaticamente.
27

28
Riproduzione di audio da un dispositivo esterno
Per riprodurre audio da un dispositivo esterno (ad es. smartphone, computer, giradischi,
ecc.):
1. Se l'apparecchio è spento, premere il tasto Power per accenderlo.
2. Collegare l'uscita cuffie da 1/8” (3,5 mm) o l'uscita RCA stereo del dispositivo esterno
all'ingresso Aux In o Line In dell'apparecchio, rispettivamente.
Importante: l'ingresso Aux In e Line In sono a livello di linea. Le fonti audio devono
essere a livello di linea (niente giradischi a livello fono).
3. Selezionare Aux In o Line In come tipo di media premendo il tasto Source
sull'apparecchio o sul telecomando.
4. Per avviare la riproduzione, premere Play sul dispositivo esterno.
Utilizzo della radio
1. Fissare il cavo dell'antenna FM all'ingresso Antenna sul retro dell'apparecchio.
2. Se l'apparecchio è spento, premere il tasto Power per accenderlo.
3. Selezionare Tuner come fonte (come descritto nel paragrafo Scelta della modalità di
riproduzione dei Media).
4. Premere i tasti Tun -/+ sul telecomando per muoversi lungo la banda FM. Si può inoltre
premere e tenere premuto i tasti Previous e Next per arretrare o avanzare lungo la banda
FM fino alla stazione più forte successiva.
5. Premere e rilasciare i tasti Previous e Next per modificare i preset FM.
Per aggiungere una stazione come preset:
1. Servirsi dei tasti Tun -/+ per selezionare la stazione radio desiderata.
2. Premere il tasto Mem.
3. Servirsi dei tasti Previous e Next per selezionare un numero di preset.
4. Premere nuovamente il tasto Mem per salvare la stazione su quel preset.
28

29
Risoluzione di problemi
In caso di problemi, procedere come segue:
• Assicurarsi che tutti i cavi, i dispositivi, le antenne e/o i media siano ben collegati.
• Assicurarsi di utilizzare l'apparecchio come descritto in questa Guida rapida.
• Assicurarsi che gli altri dispositivi o media funzionino correttamente.
• Se si ritiene che l'apparecchio non funzioni correttamente, verificare se nella seguente
tabella sono presenti il problema specifico e la relativa soluzione.
Problema Soluzione Si veda:
Non si accende. Assicurarsi che l'apparecchio sia collegato a
una presa elettrica.
Inizio rapido > Schema
dei collegamenti
L'apparecchio non
produce alcun suono o
il suono è distorto.
Assicurarsi che tutti i cavi, i dispositivi o i
collegamenti ai media siano sicuri e corretti.
Assicurarsi che non vi siano cavi
danneggiati.
Assicurarsi che la funzione di silenziamento
Mute non sia attiva.
Regolare il Volume.
Inizio rapido > Schema
dei collegamenti
Il telecomando non
funziona.
Assicurarsi che nel telecomando siano
presenti le batterie.
Sostituire le batterie con batterie nuove.
Assicurarsi di puntare il telecomando verso
l'apparecchio.
Assicurarsi di essere entro la debita portata.
Inizio rapido > Schema
dei collegamenti
L'audio proveniente dal
mio dispositivo
Bluetooth non viene
riprodotto.
Assicurarsi di aver collegato adeguatamente
il dispositivo Bluetooth.
Migliorare la ricezione del segnale Bluetooth
avvicinando il dispositivo Bluetooth stesso
all'apparecchio. Inoltre, rimuovere eventuali
ostacoli (pareti, mobili, ecc.) in modo che ci
sia una linea d'aria libera tra il dispositivo
Bluetooth e l'apparecchio.
Operazione >
Accoppiamento
Bluetooth
No Disc compare
anche quando un CD è
inserito.
Premere il tasto Eject per espellere il CD e
inserirlo nuovamente.
Operazione >
Riproduzione di CD
audio
La riproduzione non
parte anche dopo aver
premuto il tasto Play.
Assicurarsi che l'apparecchio sia collegato
ad una presa di alimentazione e che sia
acceso.
Pulire il CD con un panno asciutto o con un
detergente per CD in commercio.
Inserire un CD diverso.
Operazione >
Riproduzione di CD
audio
29

30
Problema Soluzione Si veda:
No Songs compare
anche quando un
dispositivo USB è
inserito.
Scollegare e ricollegare il dispositivo USB
per assicurarsi che sia ben inserito.
Assicurarsi che il dispositivo USB sia di una
classe di memoria di massa compatibile con
MTP.
Assicurarsi che il dispositivo USB sia
formattato con un file system FAT16 o
FAT32.
Non utilizzare hub USB o cavi di prolunga
USB.
Non è garantito che tutti i dispositivi USB
funzionino: alcuni potrebbero non essere
riconosciuti.
Operazione >
Riproduzione di file
audio
File presenti su un
dispositivo USB non
compaiono.
Assicurarsi che i file siano di un formato
supportato. Su USB solo i file mp3 e wma
sono supportati. I file che non sono
supportati da questo apparecchio non
compariranno.
Assicurarsi che il dispositivo USB impieghi
una struttura a cartelle supportata
dall'apparecchio: fino a un massimo di 999
cartelle (fino a 8 livelli di cartelle, incluso
quello base) e fino a un massimo di 999 file.
Se il dispositivo USB è partizionato,
assicurarsi che i file si trovino nella prima
partizione. L'apparecchio non mostrerà altre
partizioni.
Operazione >
Riproduzione di file
audio
I file presenti su un
dispositivo USB non
possono essere
riprodotti.
Assicurarsi che i file siano di un formato
supportato. Su USB solo i file mp3 e wma
sono supportati. I file che non sono
supportati da questo apparecchio non
compariranno.
Assicurarsi che i file non siano protetti da
copyright. L'apparecchio non può riprodurre
file protetti da copyright.
Operazione >
Riproduzione di file
audio
Il suono della fonte è
troppo basso o
presenta rumore.
Assicurarsi che il volume sia configurato
correttamente.
l'ingresso Aux In e Line In sono a livello di
linea. Le fonti audio devono essere a livello
di linea (niente giradischi a livello fono).
Operazione >
Riproduzione di audio
da un dispositivo
esterno
L’uso della radio
produce rumore.
Assicurarsi che le antenne siano ben
collegate.
Cambiare la posizione o l’orientamento delle
antenne.
Servirsi di un’antenna FM da esterni (non
incluso).
Allontanare le antenne dagli altri cavi.
Operazione > Utilizzo
della radio
30
31
32
33
Fernbedienung
Hinweis: Die Fernbedienung erfordert 1 AAA-Batterie (im Lieferumfang enthalten).
• Netzschalter: Drücken Sie diese Taste, um das Gerät einzuschalten oder in den
Standby-Modus zu bringen.
• Src: Drücken Sie diese Taste zur Auswahl der Wiedergabequelle: CD, USB,
Tuner, Aux In, Line In und Bluetooth.
• Auswerfen: Drücken Sie diese Taste, um die CD aus dem CD-Fach
auszuwerfen.
• Fold-: Drücken Sie diese Taste, um zum vorherigen Ordner zurückzukehren.
• Fold+: Drücken Sie diese Taste, um zum nächsten Ordner zu gelangen.
• Zurück / Zurückspulen: Drücken Sie diese Taste, um zum vorherigen Track zu
gelangen. Halten Sie diese Taste gedrückt, um zurückzuspulen.
Halten Sie diese Taste im FM-Tuner-Modus gedrückt und lassen Sie sie los, um
zum vorherigen voreingestellten Sender zu gelangen. Halten Sie diese Taste 2
Sekunden lang gedrückt, um rückwärts durch das FM-Band zu navigieren, um
den nächsten Sender mit gutem Empfang zu finden.
• Wiedergabe/Pause: Drücken Sie diese Taste, um die Wiedergabe anzuhalten
oder fortzusetzen.
Im Bluetooth-Modus können Sie diese Taste 5 Sekunden lang gedrückt halten,
um eine Bluetooth-Verbindung zu trennen.
• Weiter / Schnellvorlauf: Drücken Sie diese Taste, um zum nächsten Track zu
springen. Halten Sie diese Taste gedrückt, um vorzuspulen.
Drücken Sie diese Taste im FM-Tuner-Modus, um zum vorherigen
voreingestellten Sender zu gelangen. Halten Sie diese Taste 2 Sekunden lang
gedrückt, um vorwärts durch das FM-Band zu navigieren, um den nächsten
Sender mit gutem Empfang zu finden.
• Tun- / 10-: Drücken Sie diese Taste im FM-Tuner-Modus, um rückwärts durch die Radiosender zu
suchen.
Im CD- oder USB-Modus können Sie diese Taste drücken, um 10 Tracks zurückzuspringen.
• Stopp / Auto: Drücken Sie diese Taste, um die Wiedergabe zu stoppen.
Im FM-Tuner-Modus können Sie diese Taste gedrückt halten, um automatisch durch das FM-Band zu
scannen.
• Tun+ / 10+: Drücken Sie diese Taste im FM-Tuner-Modus, um vorwärts durch die Radiosender zu
suchen.
Im CD- oder USB-Modus können Sie diese Taste drücken, um 10 Tracks vorwärts zu springen.
• Zeit / Info: Drücken Sie diese Taste, um im Display die verstrichene Zeit, verbleibende Zeit oder die
ID3-Tag-Daten anzuzeigen.
Hinweis: Es kann sein, dass die ID3-Tag-Daten nur bei manchen Dateiformaten verfügbar sind.
• Mem: Im FM-Tuner-Modus können Sie diese Taste verwenden, um einen Sender als Lieblings-Preset
zu speichern. Siehe Betrieb > Verwendung des Radios für weitere Informationen.
• Prg: Im CD- oder USB-Modus können Sie diese Taste drücken, um auf den Programm-Modus
zuzugreifen und eine individuelle Wiedergabereihenfolge zu kreieren. Verwenden Sie die Tasten Zurück
und Weiter, um zwischen den Tracks zu navigieren und drücken Sie erneut Programm, um Ihre
Auswahl zu bestätigen. Drücken Sie Wiedergabe/Pause, um die Wiedergabe wieder aufzunehmen.
• Stummschalten: Schaltet die Musikwiedergabe stumm.
• Rep: Drücken Sie diese Taste, um zwischen den Wiederholungs-Modi zu wechseln: Aus, Repeat One
oder Repeat All.
• Rnd: Drücken Sie diese Taste, um die Zufallswiedergabe einzuschalten.
• Vol -: Senkt das Quellenvolumen.
• Vol +: Erhöht das Quellenvolumen.
• EQ: Drücken Sie diese Taste, um die EQ-Einstellungen zu ändern.
• Tone: Drücken Sie diese Taste, um eine individuelle EQ-Einstellung vorzunehmen. Verwenden Sie die
Tasten Vol - und Vol +, um die Bass- und Höheneinstellungen anzupassen. Diese Einstellung wird als
"benutzerdefinierte" EQ-Einstellung gespeichert.
SRC
FOLD FOLD
TUN
TIME
INFO
AUTO
TUN
PRG
10 10
MUTE REP
MEM
RAND
33

34
Betrieb
Auswahl des Medien-Wiedergabemodus
So wählen Sie, welchen Medientyp Sie abspielen möchten:
• Drücken Sie am Gerät die Taste Quelle.
• Drücken Sie auf der Fernbedienung die Taste Src.
Koppeln via Bluetooth
So koppeln Sie Ihr Bluetooth-Gerät:
1. Wenn das Gerät ausgeschaltet ist, drücken Sie den Ein-/Ausschalter, um das Gerät
einzuschalten.
2. Achten Sie darauf, dass die Bluetooth-Konnektivität am gewünschten Bluetooth-Gerät
aktiviert ist und dass sich das Gerät in Reichweite befindet.
3. Drücken Sie am Gerät oder auf der Fernbedienung die Taste Quelle, um in den
Bluetooth-Modus zu gelangen.
4. Navigieren Sie zum Bluetooth-Einstellungenbildschirm auf Ihrem Gerät, suchen ION
iAS01 und stellen eine Verbindung her.
Hinweis: Einige ältere Bluetooth-Geräte können Sie auffordern, einen PIN einzugeben. In
diesem Fall geben Sie 0000 als PIN ein.
5. Beginnen Sie mit der Audio-Wiedergabe auf Ihrem Bluetooth-Gerät.
So trennen Sie Ihr Bluetooth-Gerät:
• Navigieren Sie in das Menü Bluetooth-Einstellungen auf Ihrem Bluetooth-Gerät und
trennen es vom ION iAS01.
• Halten Sie die Taste Wiedergabe/Pause auf der Fernbedienung gedrückt, um Ihr Gerät
zu trennen.
Wiedergabe von Audio-CDs
So geben Sie Audio-CDs wieder:
1. Wenn das Gerät ausgeschaltet ist, drücken Sie den Ein-/Ausschalter, um das Gerät
einzuschalten.
Wichtig: Legen Sie keine CD ein, wenn das Gerät ausgeschaltet ist. Dies könnte das
Gerät beschädigen.
2. Legen Sie eine CD in das CD-Fach.
3. Wählen Sie CD als Medientyp (beschrieben im Abschnitt Auswahl des Medien-
Wiedergabemodus).
4. Um die Wiedergabe zu starten, drücken Sie die Wiedergabe/Pause-Taste am Gerät oder
auf der Fernbedienung.
34

35
Wiedergabe von Audiodateien
So geben Sie Audiodateien auf einem USB-Gerät wieder:
1. Wenn das Gerät ausgeschaltet ist, drücken Sie den Ein-/Ausschalter, um das Gerät
einzuschalten.
2. Schließen Sie Ihr USB-Gerät (Massenspeicher-Klasse) an den USB-Anschluss an.
3. Wählen Sie USB als Medientyp (beschrieben im Abschnitt Auswahl des Medien-
Wiedergabemodus).
4. Wählen Sie ein Audiodatei mit den Tasten Zurück und Weiter. Falls Ihr USB-Gerät
Ordner enthält, können Sie zwischen den Ordnern mit den Tasten Fold -/+ navigieren.
Die Datei wird automatisch wiedergegeben.
Audiowiedergabe über ein externes Gerät
Um Audio von einem externen Gerät wiederzugeben (z.B. Smartphone, Computer,
Plattenspieler etc.):
1. Wenn das Gerät ausgeschaltet ist, drücken Sie den Ein-/Ausschalter, um das Gerät
einzuschalten.
2. Verbinden Sie den 1/8” (3,5 mm) Kopfhörerausgang oder RCA-Stereoausgang Ihres
externen Geräts mit dem Aux In oder Line In Eingang des Geräts.
Wichtig: Die Aux In und Line In Eingänge sind line-pegel. Bei Ihren Audioquellen muss
es sich um Line-pegel-Geräte handeln (keine Phono-pegel-Turntable).
3. Wählen Sie Aux In oder Line In als Medientyp, indem Sie die Taste Quelle am Gerät oder
der Fernbedienung drücken.
4. Um die Wiedergabe zu starten, drücken Sie die Wiedergabe-Taste auf Ihrem externen
Gerät.
Verwendung des Radios
1. Schließen Sie das FM-Antennenkabel an den Antenneneingang an der Geräterückseite
an.
2. Wenn das Gerät ausgeschaltet ist, drücken Sie den Ein-/Ausschalter, um das Gerät
einzuschalten.
3. Wählen Sie Tuner als Quelle (beschrieben im Abschnitt Auswahl des Medien-
Wiedergabemodus).
4. Drücken Sie die Tasten Tun -/+ auf der Fernbedienung, um durch das FM-Band zu
navigieren. Sie können auch die Tasten Zurück und Weiter betätigen, um im FM-Band
zurück oder vorwärts zu springen, um den nächsten Sender mit gutem Empfang zu
finden.
5. Drücken Sie kurz auf die Tasten Zurück und Weiter, um die FM-Presets zu ändern.
So fügen Sie einem Sender ein voreingestelltes Presets hinzu:
1. Verwenden Sie die Tasten Tun -/+, um den gewünschten Radiosender auszuwählen.
2. Drücken Sie die Taste Mem.
3. Verwenden Sie die Tasten Zurück und Weiter, um eine Preset-Nummer auszuwählen.
4. Drücken Sie erneut die Taste Mem, um den Sender auf dieses Preset zu speichern.
35

36
Fehlerbehebung
Wenn ein Problem auftritt, gehen Sie wie folgt vor:
• Sorgen Sie dafür, dass alle Kabel, Geräte, Antennen und/oder Medien richtig und fest
angeschlossen sind.
• Achten Sie darauf, dass das Gerät laut vorliegender Schnellstartanleitung verwendet wird.
• Achten Sie darauf, dass Ihre anderen Geräte oder Medien ordnungsgemäß funktionieren.
• Wenn Sie glauben, dass das Gerät nicht ordnungsgemäß funktioniert, überprüfen Sie die
folgende Tabelle auf Lösungen für das Problem.
Problem Lösung Siehe:
Das Gerät lässt sich
nicht einschalten.
Achten Sie darauf, dass das Gerät an eine
Steckdose angeschlossen ist.
Schnelles Einrichten >
Anschlussdiagramm
Das Gerät gibt keinen
Ton aus bzw. der Ton
ist verzerrt.
Stellen Sie sicher, dass Kabel, Gerät oder
Medienanschlüsse sicher und korrekt sind.
Achten Sie darauf, dass keine Kabel
beschädigt sind.
Achten Sie darauf, dass die Funktion
Stummschalten nicht aktiviert ist.
Passen Sie den Lautstärkeregler an.
Schnelles Einrichten >
Anschlussdiagramm
Die Fernbedienung
funktioniert nicht.
Stellen Sie sicher, dass Batterien in der
Fernbedienung eingelegt sind.
Ersetzen Sie alte Batterien durch neue.
Achten Sie darauf, dass die Fernbedienung
auf das Gerät zeigt.
Achten Sie darauf, dass Sie sich in
Reichweite des Geräts befinden.
Schnelles Einrichten >
Anschlussdiagramm
Die Audiosignale von
meinem Bluetooth-
Gerät werden nicht
abgespielt.
Stellen Sie sicher, dass eine
ordnungsgemäße Verbindung zu Ihrem
Bluetooth-Gerät hergestellt wurde.
Verbessern Sie den Bluetooth-
Signalempfang, indem Sie Ihr Bluetooth-
Gerät näher an das Gerät bringen. Achten
Sie darauf, dass keine Hindernisse (Wände,
Möbel etc.) die direkte Sichtlinie zwischen
dem Bluetooth-Gerät und dem Gerät
beeinträchtigen.
Betrieb > Bluetooth-
Koppeln
Trotz eingelegter CD
erscheint No Disc.
Drücken Sie die Auswurftaste, um die CD
auszuwerfen und erneut einzulegen.
Betrieb > Wiedergabe
von Audio-CDs
Es erfolgt keine
Wiedergabe nachdem
die Wiedergabe-Taste
gedrückt wurde.
Stellen Sie sicher, dass die Einheit mit einer
Steckdose verbunden ist und dass sie
eingeschaltet ist.
Reinigen Sie die CD mit einem trockenen
Tuch oder einem handelsüblichen CD-
Reiniger.
Legen Sie eine andere CD ein.
Betrieb > Wiedergabe
von Audio-CDs
36

37
Problem Lösung Siehe:
Obwohl ein USB-Gerät
angeschlossen
eingelegt ist, erscheint
No Songs.
Trennen und verbinden Sie das USB-Gerät
erneut und stecken Sie sie erneut ein, um
sicherzustellen, dass sie richtig eingesteckt ist.
Achten Sie darauf, dass das USB-Gerät der
Massenspeicher-Klasse angehört oder mit dem
MTP kompatibel ist.
Sorgen Sie dafür, dass das USB-Gerät mit
einem FAT16 oder FAT32-Dateisystem
formatiert wurde.
Verwenden Sie keinen USB-Hub oder USB-
Verlängerungskabel.
Nicht alle USB-Geräte werden funktionieren;
manche werden nicht erkannt.
Betrieb > Wiedergabe
von Audiodateien
Dateien auf einem
USB-Gerät werden
nicht angezeigt.
Stellen Sie sicher, dass es sich bei den Dateien
um ein unterstütztes Dateiformat handelt. Nur
mp3- und wma-Dateien werden auf USB
unterstützt. Dateien, die von diesem Gerät
nicht unterstützt werden, werden nicht
angezeigt.
Stellen Sie sicher, dass das USB-Gerät eine
Ordnerstruktur verwendet, die vom Gerät
unterstützt wird: bis zu 999 Ordner (bis zu 8
Ordnerebenen einschließlich Root-Verzeichnis)
und bis zu 999 Dateien.
Wenn Ihr USB-Gerät partitioniert ist, stellen Sie
sicher, dass sich die Dateien in der ersten
Partition befinden. Das Gerät wird keine
anderen Partitionen anzeigen.
Betrieb > Wiedergabe
von Audiodateien
Dateien auf einem
USB-Gerät können
nicht wiedergegeben
werden.
Stellen Sie sicher, dass es sich bei den Dateien
um ein unterstütztes Dateiformat handelt. Nur
mp3- und wma-Dateien werden auf USB
unterstützt. Dateien, die von diesem Gerät
nicht unterstützt werden, werden nicht
angezeigt.
Stellen Sie sicher, dass die Dateien nicht
urheberrechtlich geschützt sind. Das Gerät
kann urheberrechtlich geschützte Dateien nicht
abspielen.
Betrieb > Wiedergabe
von Audiodateien
Die Quelle ist zu leise
oder der Ton rauscht.
Stellen Sie sicher, dass die Volumen richtig
eingestellt ist.
Die Aux In und Line In Eingänge sind line-
pegel. Bei Ihren Audioquellen muss es sich um
Line-pegel-Geräte handeln (keine Phono-
pegel-Turntable).
Betrieb >
Audiowiedergabe
über ein externes
Gerät
Bei der Verwendung
des Radios kommt es
zu Störgeräuschen.
Stellen Sie sicher, dass die Antenne richtig
angeschlossen ist.
Ändern Sie die Position oder Ausrichtung der
Antenne.
Verwenden Sie eine FM-Außenantenne (nicht
enthalten).
Bewegen Sie den Antenne weg von anderen
Kabeln.
Betrieb >
Verwendung des
Radios
37
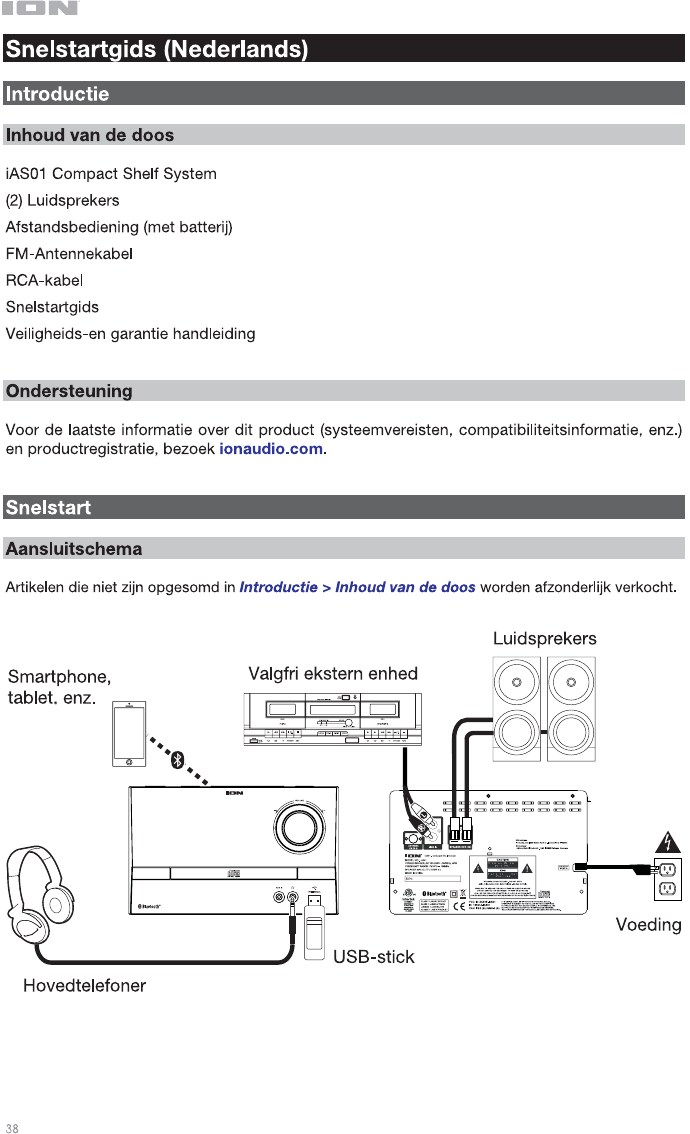
38
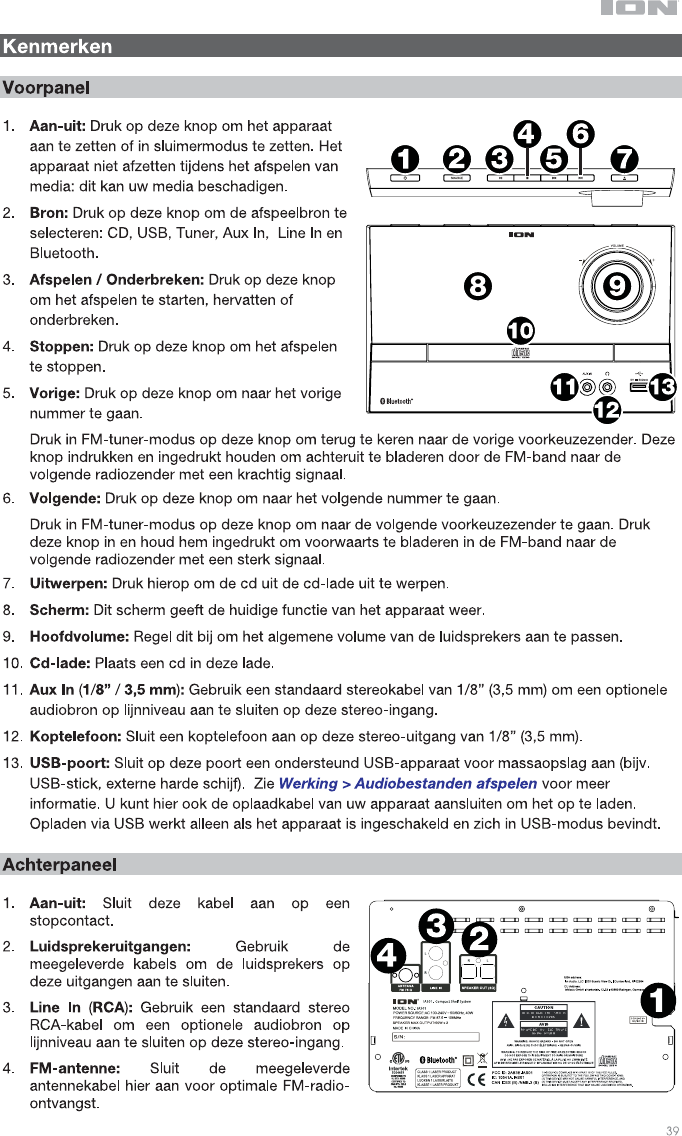
39
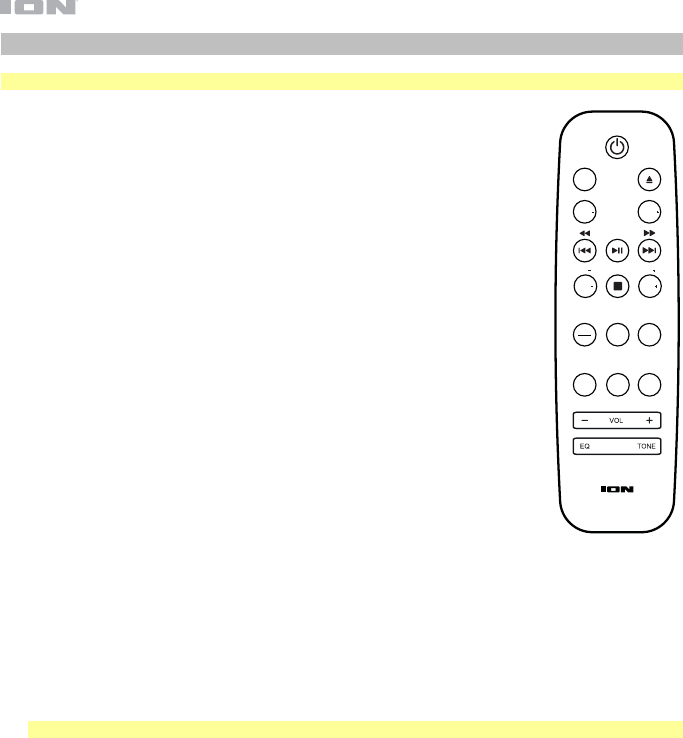
40
Afstandsbediening
Opmerking: De afstandsbediening vereist 1 AAA-batterij (meegeleverd) om te functioneren.
• Aan-uitknop: Druk op deze knop om het apparaat aan te zetten of het in
sluimermodus te zetten.
• Src (Bron): Druk op deze knop om de afspeelbron te selecteren: CD, USB,
Tuner, Aux In, Line In en Bluetooth.
• Uitwerpen: Druk hierop om de cd in de cd-lade uit te werpen.
• Fold- (invouwen): Druk op deze knop om terug te keren naar de vorige map.
• Fold+ (uitvouwen): Druk op deze knop om naar de volgende map te gaan.
• Vorige / terugspoelen: Druk op deze knop om naar het vorige nummer te gaan.
Druk deze knop in en houd hem ingedrukt om terug te spoelen.
Deze knop in FM-tuner-modus indrukken en loslaten om naar de vorige
voorkeuzezender te gaan. Deze knop indrukken en ingedrukt houden om
achteruit te bladeren door de FM-band naar de volgende radiozender met een
krachtig signaal.
• Afspelen / Onderbreken: Druk op deze knop om het afspelen te starten of te
onderbreken.
Druk in Bluetooth-modus deze knop 5 seconden lang in om een Bluetooth-
verbinding te verbreken.
• Volgende / vooruitspoelen: Druk op deze knop om naar het volgende nummer
te gaan. Druk deze knop in en houd hem ingedrukt om vooruit te spoelen.
Druk in FM-tuner-modus op deze knop om naar de volgende voorkeuzezender
te gaan. Druk deze knop in en houd hem ingedrukt om voorwaarts te bladeren in
de FM-band naar de volgende radiozender met een sterk signaal.
• Tun- / 10-: Druk in FM-tuner-modus op deze knop om achteruit te bladeren
door de radiostations.
Druk in cd- of USB-modus op deze knop om 10 nummers achteruit te bladeren.
• Stop / Auto: Druk op deze knop om het afspelen te stoppen.
Druk in FM-tuner-modus op deze knop en houd hem ingedrukt om automatisch de FM-band te
doorzoeken.
• Tun+ / 10+: Druk in FM-tuner-modus op deze knop om voorwaarts te bladeren door de radiostations.
Druk in cd- of USB-modus op deze knop om 10 nummers voorwaarts te bladeren.
• Time / Info: Druk op deze knop om op het Scherm afwisselend verstreken tijd, overblijvende tijd of ID3
tag-gegevens weer te geven.
Opmerking: ID3 tag-gegevens zijn mogelijk niet voor alle bestandsformaten beschikbaar.
• Mem (Geheugen): In FM-tuner-modus kunt u deze knop gebruiken om een zender op te slaan als
voorkeuzezender. Zie Werking > De radio gebruiken voor meer informatie.
• Prg: Druk in cd- of USB-modus een keer op deze knop om toegang te krijgen tot de Programmamodus
en een aangepaste afspeelvolgorde aan te maken. Gebruik de knoppen Vorige en Volgende om door
nummers te bladeren en druk nogmaals op Programma om uw selectie te bevestigen. Druk wanneer
dit voltooid is op Afspelen/Onderbreken om het afspelen te hervatten.
• Mute (Dempen): Dempt de afgespeelde muziek.
• Rep (Herhalen): Druk op deze knop om een van de verschillende afspeelmodi Herhalen te kiezen: Uit,
Een keer herhalen of Alles herhalen.
• Rnd (Willekeurig): Druk op deze knop om de afspeelmodus Willekeurig in te schakelen.
• Vol -: Verlaagt het bronvolume.
• Vol +: Verhoogt het bronvolume.
• EQ: Druk op deze knop om de instellingen van de equalizer te wijzigen.
• Tone (Toon): Druk op deze knop om een aangepaste EQ-instelling aan te maken. Gebruik de knoppen
Vol - en Vol + om de instellingen voor lage en hoge tonen aan te passen. Deze instelling wordt
opgeslagen als “Aangepaste EQ”-instelling.
SRC
FOLD FOLD
TUN
TIME
INFO
AUTO
TUN
PRG
10 10
MUTE REP
MEM
RAND
40

41
Werking
Afspeelmodus Media selecteren
Selecteren welke media u wilt afspelen:
• Druk op de knop Bron op het apparaat.
• Druk op de knop Src op de afstandsbediening.
Bluetooth koppelen
Uw Bluetooth-apparaat koppelen:
1. Als het apparaat is uitgeschakeld, druk dan op de Aan-uitknop om het in te schakelen.
2. Controleer of uw gewenst Bluetooth-apparaat beschikt over Bluetooth-connectiviteit en
zich binnen het bereik bevindt.
3. Druk op de knop Bron op het apparaat of de afstandsbediening om naar Bluetooth-
modus te gaan.
4. Navigeer naar het scherm Bluetooth-instellingen op uw apparaat, zoek naar ION iAS01
en maak een verbinding.
Opmerking: Mogelijk eisen sommige oudere Bluetooth-apparaten dat u een pincode
invoert. Als dit het geval is, voer dan 0000 in als pincode.
5. Start het afspelen van audio op uw Bluetooth-apparaat.
Uw Bluetooth-apparaat ontkoppelen:
• Ga naar het menu Bluetooth-instellingen van uw Bluetooth-apparaat en verbreek de
verbinding met de ION iAS01.
• Druk op de knop Afspelen/Onderbreken op de afstandsbediening en houd deze
ingedrukt om uw apparaat te ontkoppelen.
Cd's afspelen
Cd's afspelen:
1. Als het apparaat is uitgeschakeld, druk dan op de Aan-uitknop om het in te schakelen.
Belangrijk: Geen cd plaatsen als het apparaat niet aan staat. Dit kan het apparaat
beschadigen.
2. Een cd in de cd-lade plaatsen.
3. Selecteer cd als mediatype (beschreven in Afspeelmodus Media selecteren).
4. Druk op de knop Afspelen/Onderbreken op het apparaat of de afstandsbediening om
het afspelen te starten.
Audiobestanden afspelen
Audio afspelen op een USB-apparaat:
1. Als het apparaat is uitgeschakeld, druk dan op de Aan-uitknop om het in te schakelen.
2. Sluit uw USB-apparaat aan (apparaat voor massaopslag) op de USB-poort.
3. Selecteer USB als het mediatype (beschreven in Afspeelmodus Media selecteren).
4. Selecteer een audiobestand met behulp van de knoppen Vorige en Volgende. Als uw
USB-apparaat mappen bevat, kunt u navigeren tussen mappen met behulp van de
knoppen Fold -/+ (in- en uitvouwen). Het bestand begint automatisch af te spelen.
41

42
Audio afspelen vanaf een extern apparaat
Om audio af te spelen vanaf een extern apparaat (bijv. smartphone, computer, draaitafel,
enz.):
1. Als het apparaat is uitgeschakeld, druk dan op de Aan-uitknop om het in te schakelen.
2. Sluit de koptelefoonuitgang van 1/8” (3,5 mm) of de stereo RCA-uitgang van uw extern
apparaat respectievelijk aan op de ingang Aux In of Line In op het apparaat.
Belangrijk: De Aux In en Line In-ingangen zijn op lijnniveau. Uw audiobronnen moet
line-niveau zijn (geen phono-niveau draaitafels).
3. Selecteer Aux In of Line In als mediatype door de knop Bron in te drukken op het
apparaat of de afstandsbediening.
4. Druk op Afspelen op het externe apparaat om het afspelen te starten.
De radio gebruiken
1. Sluit de FM-antennekabel aan op de Antenne-ingang op de achterkant van het
apparaat.
2. Als het apparaat is uitgeschakeld, druk dan op de Aan-uitknop om het in te schakelen.
3. Selecteer Tuner als bron (beschreven in Afspeelmodus Media selecteren).
4. Druk op de knoppen Tun -/+ op de afstandsbediening om te bladeren door de FM-band.
U kunt ook de knoppen Vorige en Volgende indrukken en ingedrukt houden om achter-
of voorwaarts te bladeren door de FM-band, naar het volgende station met een krachtig
signaal.
5. Door de knoppen Vorige en Volgende in te drukken bladert u naar een andere
voorkeuzezender.
Een zender als voorkeuzezender toevoegen:
1. Gebruik de knoppen Tun -/+ om de gewenste radiozender te selecteren.
2. Druk op de knop Mem.
3. Gebruik de knoppen Vorige en Volgende om een voorkeuzenummer te selecteren.
4. Druk nogmaals op de knop Mem om de zender in dat station op te slaan.
42

43
Probleemoplossing
Doe het volgende in het geval van een probleem:
• Controleer of alle kabels, apparaten, antennes en/of media naar behoren en stevig zijn
aangesloten.
• Zorg ervoor dat u het apparaat gebruikt zoals beschreven in deze Snelstartgids.
• Zorg ervoor dat uw andere apparaten of media naar behoren werken.
• Als u denkt dat het apparaat niet naar behoren werkt, controleer dan de volgende tabel
voor problemen en oplossingen.
Probleem Oplossing Zie:
Het apparaat gaat niet
aan.
Controleer of het apparaat is aangesloten op
een stopcontact.
Snelstart >
Aansluitschema
Het apparaat
produceert geen
geluiden, of het geluid is
vervormd.
Controleer of alle kabels, apparaten of media
stevig en correct zijn aangesloten.
Controleer of geen van de kabels beschadigd
zijn.
Zorg ervoor dat de functie Dempen niet actief
is.
Pas de Volumeregeling aan.
Snelstart >
Aansluitschema
De afstandsbediening
werkt niet.
Controleer of de afstandsbediening batterijen
bevat.
Vervang de batterijen door nieuwe.
Controleer of de afstandsbediening naar het
apparaat is gericht.
Zorg ervoor dat u in de buurt van het
apparaat bent.
Snelstart >
Aansluitschema
De audio van mijn
Bluetooth-apparaat
wordt niet afgespeeld.
Zorg ervoor dat u uw Bluetooth-apparaat naar
behoren hebt gekoppeld.
Verbeter de ontvangst van het Bluetooth-
apparaat door uw Bluetooth-apparaat dichter
bij het apparaat te plaatsen. Verwijder de
apparaten van obstakels (muren, meubilair,
enz.), zodat er een gezichtsveld ontstaat
tussen uw Bluetooth-apparaat en het
apparaat.
Werking > Bluetooth
koppelen
Er verschijnt geen
schijf, ook als er een cd
in de lade is geplaatst.
Druk op de knop Uitwerpen om de cd uit te
werpen en opnieuw te plaatsen.
Werking > cd's
afspelen
Afspelen start niet, ook
na het indrukken van de
knop Afspelen.
Controleer of het apparaat is aangesloten op
een stopcontact en of het aan staat.
Reinig de cd met een droog doek of een
commerciële cd-reiniger.
Plaats een andere cd.
Werking > cd's
afspelen
43

44
Probleem Oplossing Zie:
Er verschijnt Geen
nummers, ook wanneer
een USB-apparaat is
geplaatst.
Het USB-apparaat loskoppelen en opnieuw
verbinden om te controleren of het naar
behoren is geplaatst.
Controleer of het USB-apparaat een apparaat
voor massaopslag is of compatibel is met
MTP.
Controleer of het USB-apparaat is
geformatteerd met een FAT16- of FAT32-
indeling.
Gebruik geen USB-hub of een USB-
verlengkabel.
Niet van alle USB-apparaten wordt de
werking gegarandeerd; sommige apparaten
worden niet herkend.
Werking >
audiobestanden
afspelen
Bestanden op een USB-
apparaat worden niet
weergegeven.
Controleer of de bestanden een ondersteunde
bestandsindeling gebruiken. Op USB worden
alleen mp3- en wma-bestanden ondersteund.
Bestanden die door dit apparaat niet worden
ondersteund, worden niet weergegeven.
Zorg ervoor dat het USB-apparaat een
mappenstructuur gebruikt die het apparaat
ondersteunt: max. 999 mappen (max. 8
mappenniveaus, inclusief de hoofdmap) en
max. 999 bestanden.
Als uw USB-apparaat partities bevat,
controleer dan of uw bestanden zich in de
eerste partitie bevinden. Het apparaat geeft
de andere partities niet weer.
Werking >
audiobestanden
afspelen
Bestanden op een USB-
apparaat worden niet
afgespeeld.
Controleer of de bestanden een ondersteunde
bestandsindeling gebruiken. Op USB worden
alleen mp3- en wma-bestanden ondersteund.
Bestanden die door dit apparaat niet worden
ondersteund, worden niet weergegeven.
Zorg ervoor dat de bestanden niet
auteursrechtelijk zijn beschermd. Het
apparaat kan auteursrechtelijk beschermde
bestanden niet afspelen.
Werking >
audiobestanden
afspelen
De bron geluid is te
laag, of het geluid heeft
ruis.
Zorg ervoor dat het volume goed is ingesteld.
De Aux In en Line In-ingangen zijn op
lijnniveau. Uw audiobronnen moet line-niveau
zijn (geen phono-niveau draaitafels).
Werking >Audio
afspelen vanaf een
extern apparaat
Gebruiken van de radio
produceert ruis.
Zorg ervoor dat de antenne goed is
aangesloten.
Verander de positie of oriëntatie van de
antenne.
Gebruik een FM-buitenantenne (niet
inbegrepen).
Verplaats de antenne uit de buurt van andere
kabels.
Werking > De radio
gebruiken
44

45
45
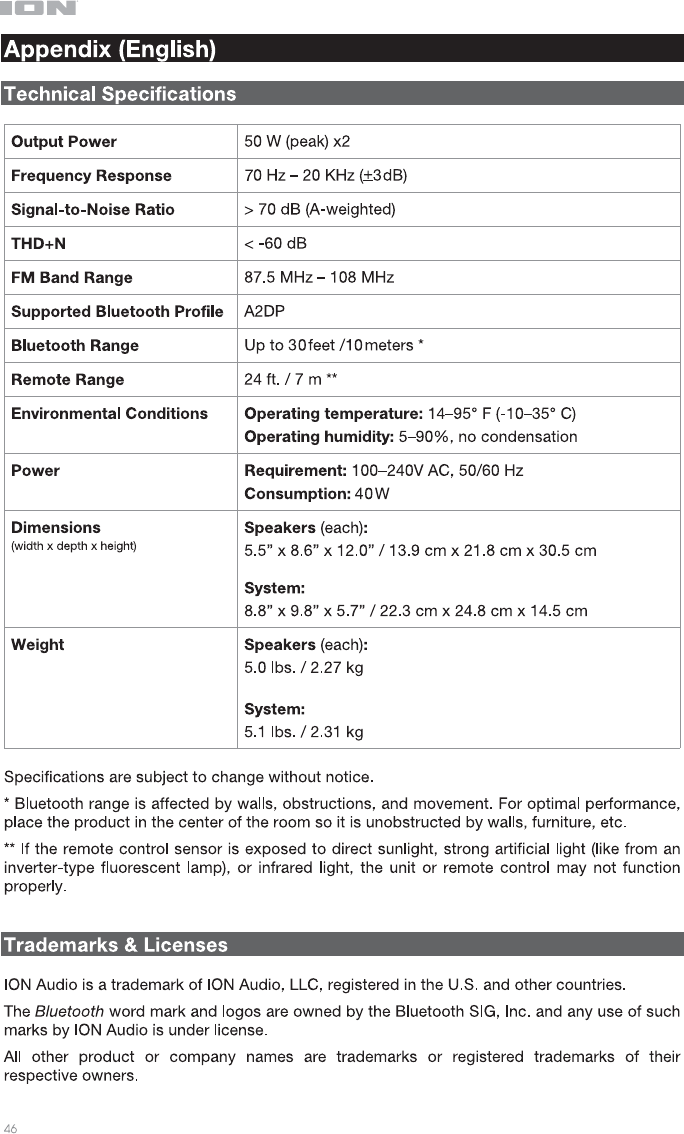
46
47
ionaudio.com
Manual Version 1.2