ION Audio IRB02 Party Bot Micro User Manual
ION Audio, LLC Party Bot Micro
UserManual.wiki
>
ION Audio
>
IRB02 User Manual
User manual
Navigation menu
Upload a User Manual
Namespaces
Wiki Guide
HTML
PDF
Info
Views
User Manual
Discussion / Help
Navigation
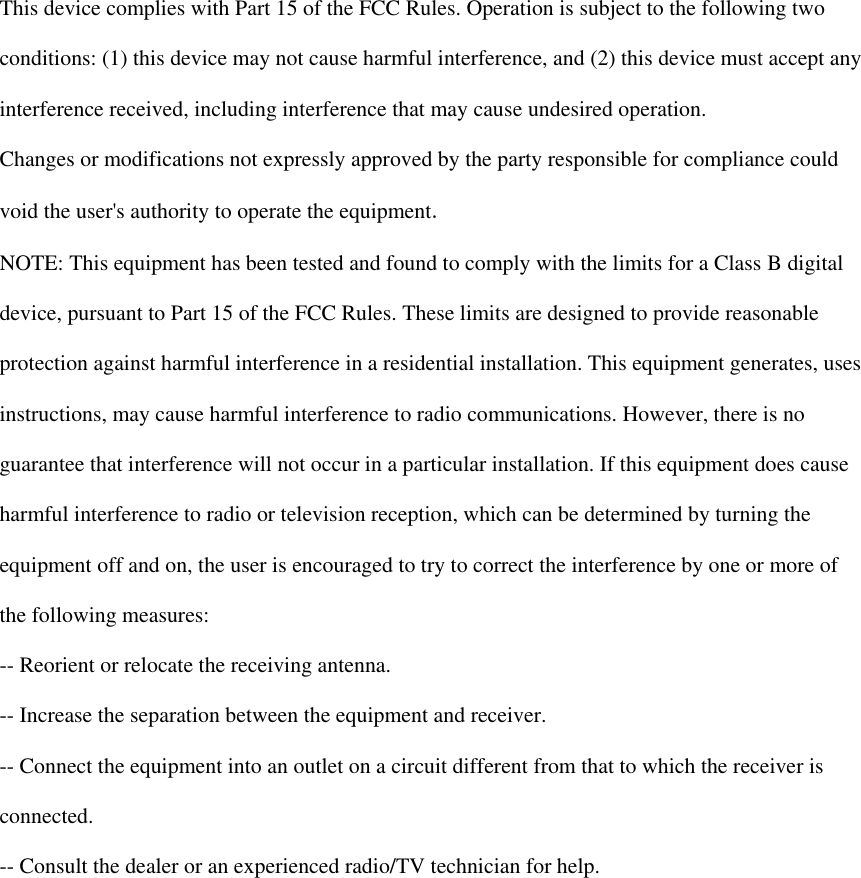
![Box Contents: Party Bot Micro, USB Charging Cable, Quickstart Guide. Charging Party Bot Micro: Use the included micro-USB cable to connect Party Bot Micro to (A) a USB power adapter connected to a power outlet or (B) your computer (powered on) for 3 hours. Front Panel Controls: (1) Bluetooth Pairing Light (solid red when powered on, solid blue when paired, blinks red when the battery is low, blinks purple when Bluetooth connected with low battery) (2) Volume - (3) Power (4) Volume + (5) Charging Light (red when charging, turns off once charging is complete). Real Panel Controls: (6) Micro-USB Charging Port (7) Motor On/Off (8) Light Off / Demo / On (9) Bluetooth Disconnect (hold for 2 seconds to disconnect from a Bluetooth device) (10) 1/8” (3.5 mm) Input Getting Started: (1) Press and hold the Power button for 2 seconds to power on Party Bot Micro. (2) Open Bluetooth settings on your music device (smartphone, tablet, etc.). (3) Connect to Party Bot Micro. (4) Play music and adjust Party Bot Micro's volume using the Volume - and Volume + buttons. (5) Adjust the Party Light switch and the Motor switch to turn the lights and motor on or off. For best party light results, use in a dark room. When using the motor feature, use on the floor or on a surface under supervision. Party Bot Micro cannot sense the edge of a table. Party Light Settings: Adjust this switch to turn the lights on and off, or put Party Bot Micro into Demo mode. When in Demo Mode, pressing the Power button will: • Powers on the unit (both lights and speaker) • Powers off the unit after 2 minutes if there is no Bluetooth connection For the complete safety and warranty manual, please visit ionaudio.com/warranty. Contenido de la caja: Party Bot Micro, cable de carga USB, guía de inicio rápido. Cómo cargar el Party Bot Micro: Utilice el cable micro USB incluido para conectar el Party Bot Micro a (A) un adaptador de alimentación USB conectado a una toma de corriente o (B) su ordenador (encendido) durante 3 horas. o Controles del panel frontal: (1) Luz de apareamiento Bluetooth (se ilumina de color rojo permanentemente cuando se enciende, de color azul permanentemente cuando se aparea, parpadea en rojo cuando la batería está por agotarse y parpadea en violeta cuando el Bluetooth se conecta con batería baja) (2) Volumen - (3) Encendido (4) Volumen + (5) Luz de carga (roja durante la carga, se apaga una vez completada la carga). Controles del panel trasero: (6) Puerto de carga Micro-USB (7) Motor encendido/apagado (8) Luces apagadas / demo / encendidas (9) Desconexión de Bluetooth (mantenga pulsado durante 2 segundos para desconectar de un dispositivo Bluetooth) (10) Entrada de 3,5 mm (1/8 pulg.) Para comenzar: (1) Mantenga pulsado el botón Power (Encendido) durante 2 segundos para encender el Party Bot Micro. (2) Abra la configuración Bluetooth en su dispositivo musical (smartphone [teléfono inteligente], tableta, etc.). (3) Conéctelo al Party Bot Micro. (4) Reproduzca un tema y ajuste el volumen del Party Box Micro utilizando los botones Volume - y Volume + (Volumen - y volumen +). (5) Ajuste el interruptor Party Light (Luces de fiesta) y el interruptor Motor para encender o apagar las luces y el motor. Para obtener los mejores resultados del Party Light, úselo en un ambiente oscuro. Cuando utilice la característica del motor, úselo en el piso o sobre una superficie bajo supervisión. El Party Bot Micro no puede detectar el borde de una mesa. Ajustes de las luces de fiesta: Ajuste este interruptor para encender o apagar las luces, o para poner al Party Bot Micro en modo demo. En modo demo, apretar el botón de encendido: • enciende la unidad (tanto las luces como el altavoz) • apaga la unidad después de 2 minutos sin conexiones Bluetooth Para obtener el manual sobre la seguridad y garantía visite ionaudio.com/warranty. Contenu de la boîte : Party Bot Micro, câble de rechargement USB, guide de démarrage rapide. Rechargement de la batterie du Party Bot Micro : Utilisez le câble mini-USB inclus afin de brancher le Party Bot Micror à (A) un adaptateur d’alimentation USB branché à une prise secteur, ou (B) à un ordinateur (sous tension) pendant 3 heures. ou Commandes du panneau avant : (1) Indicateur de jumelage Bluetooth (rouge lorsque l’appareil est sous tension, bleu lorsqu'il est jumelé, clignote rouge lorsque la batterie est faible, clignote violet lorsque la batterie de l’appareil Bluetooth connecté est faible). (2) Volume - (3) Interrupteur d’alimentation (4) Volume + (5) DEL de rechargement (rouge lors du rechargement, s'éteint lorsque le rechargement est terminé. Commandes du panneau arrière : (6) Port de rechargement micro-USB (7) Interrupteur du moteur (8) Sélecteur du mode d’éclairage (9) Déconnexion Bluetooth (maintenez enfoncée pendant 2 secondes pour déconnecter un appareil Bluetooth) (10) Entrée 3,5 mm Mise en route : (1) Maintenez l’interrupteur d’alimentation enfoncé pendant 2 secondes afin de mettre le Party Bot Micro sous tension. (2) Accédez aux paramètres Bluetooth de votre lecteur de musique (smartphone, tablette, etc.). (3) Connectez-le au Party Bot Micro. (4) Faites jouer de la musique et réglez le volume du Party Bot Micro avec les touches Volume - et Volume +. (5) Réglez le sélecteur d’éclairage et l’interrupteur du moteur pour activer ou désactiver les lumières et le moteur. Pour de meilleurs résultats, utilisez-le dans une pièce sombre. Lorsque vous mettez en marche le moteur, assurez-vous d’utiliser l’appareil au sol ou sur une surface sous surveillance. Le Party Bot Micro ne peut détecter le rebord d'une table. Réglages du sélecteur du mode d’éclairage : Ajustez ce sélecteur pour activer et désactiver les lumières, ou pour mettre le Party Bot Micro en mode démo. En mode démonstration, appuyer sur l’interrupteur d’alimentation permet : • de mettre l’appareil sous tension (lumières et enceinte) • d’éteindre automatiquement l’appareil après 2 minutes lorsqu'aucun appareil Bluetooth n’est jumelé Pour consulter les Consignes de sécurité et informations concernant la garantie, veuillez visiter ionaudio.com/warranty. Contenuti della confezione: Party Bot Micro, cavo di ricarica USB, Guida rapida. Carica del Party Bot Micro: servirsi del cavo mini-USB in dotazione per collegare il Party Bot Micro a (A) un adattatore di alimentazione USB collegato a una presa elettrica o (B) al computer (acceso) per 3 ore. oppure Comandi pannello anteriore: (1) Spia di collegamento Bluetooth (rosso fisso quando acceso, blu fisso quando collegato, lampeggia di rosso quando la batteria è scarica, lampeggia di viola quando il Bluetooth è collegato a batteria scarica) (2) Volume - (3) Alimentazione (4) Volume + (5) Spia di carica (rossa a carica in corso, si spegne una volta che la carica è completa). Comandi pannello posteriore: (6) Porta di ricarica Micro-USB (7) Motore acceso/spento (On/Off) (8) Spia Off / Demo / On (9) Scollegamento Bluetooth (tenere premuto il comando per 2 secondi per scollegare l'apparecchio da un dispositivo Bluetooth) (10) Ingresso da 1/8” (3,5 mm) Primi passi: (1) Premere e tenere premuto il tasto Power per 2 secondi per accendere il Party Bot Micro. (2) Aprire le impostazioni Bluetooth del proprio dispositivo musicale (smartphone, tablet, ecc.). (3) Collegare il Party Bot Micro. (4) Riprodurre la musica e regolare il volume del Party Bot Micro servendosi dei tasti Volume - e Volume +. (5) Regolare l'interruttore Party Light e l'interruttore Motor per accendere e spegnere le luci e il motore. Per ottenere i migliori risultati per le feste, utilizzare il prodotto in una stanza buia! Quando si utilizza la funzione motore, utilizzare l'apparecchio sul pavimento o su una superficie sotto controllo. Il Party Bot Micro non è in grado di rilevare il bordo di un tavolo. Impostazioni Party Light: regolare questo interruttore per accendere e spegnere le luci o per mettere il Party Bot Micro in modalità Demo. In modalità Demo, premendo il tasto di alimentazione (Power): • si accende l'apparecchio (luci e altoparlante) • si spegne l'apparecchio dopo 2 minuti se non vi è alcun collegamento Bluetooth Per ottenere il manuale di sicurezza e garanzia completo, recarsi alla pagina ionaudio.com/warranty. Lieferumfang: Party Bot Micro, USB-Ladekabel, Schnellstartanleitung. Aufladen des Party Bot Micro: Verwenden Sie das mitgelieferte Mikro-USB-Kabel, um den Party Bot Micro (A) mit einem USB-Netzteil, das in einer Steckdose eingesteckt ist oder (B) mit Ihrem (eingeschalteten) Computer für einen Zeitraum von 3 Stunden zu verbinden. oder Bedienelemente an der Vorderseite: (1) Bluetooth Koppel-LED (leuchtet durchgehend rot, wenn das Gerät eingeschaltet ist, leuchtet durchgehend blau, wenn es gekoppelt ist, blinkt rot, wenn die Batterie schwach ist, blinkt lila, wenn eine Bluetooth-Verbindung bei schwacher Batterie hergestellt wurde) (2) Lautstärke - (3) Strom (4) Lautstärke + (5) Ladeanzeige (rot beim Aufladen, erlischt, sobald der Ladevorgang abgeschlossen ist). Bedienelemente an der Rückseite: (6) Mikro-USB-Ladeanschluss (7) Motor Ein/Aus (8) Licht Aus / Demo / Ein (9) Bluetooth Trennen (Halten Sie diese Taste 2 Sekunden lang gedrückt, um es vom Bluetooth-Gerät zu trennen) (10) 1/8" (3,5 mm) Eingang Erste Schritte: (1) Halten Sie die Power-Taste 2 Sekunden lang gedrückt, um den Party Bot Micro einzuschalten. (2) Öffnen Sie die Bluetooth-Einstellungen auf Ihrem Musikgerät (Smartphone, Tablet etc.). (3) Verbinden Sie den Party Bot Micro. (4) Spielen Sie Musik ab und passen Sie die Lautstärke des Party Bot Micro mit den Tasten Lautstärke - und Lautstärke + an. (5) Passen Sie den Party-Lichtschalter und den Motor-Schalter an, um die Beleuchtung und den Motor ein- oder auszuschalten. Verwenden Sie die Party-Lichter am besten in einem dunklen Raum! Wenn Sie die Motorfunktion nutzen, verwenden Sie das Gerät am Boden oder auf einer Oberfläche und nur unter Aufsicht. Party Bot Micro kann keine Tischkanten orten. Partylicht-Einstellungen: Verwenden Sie diesen Schalter, um die Lichter ein- und auszuschalten oder um den Party Bot Micro in den Demo-Modus zu bringen. Im Demo-Modus wird durch Drücken der Power-Taste: • das Gerät eingeschaltet (beide Lichter und Lautsprecher) • das Gerät nach 2 Minuten ausgeschaltet, wenn keine Bluetooth-Verbindung besteht Für die kompletten Sicherheits- und Garantieinformationen besuchen Sie bitte ionaudio.com/warranty. Manual Version 1.0 Party Bot Microor ionaudio.com/support For technical support. Para soporte técnico. Pour obtenir de l’assistance technique. Per assistenza tecnica. Für technischen Support. Voor technische ondersteuning. För teknisk support. Teknisen tuen. ionaudio.com/warranty For complete warranty information. Para información completa sobre la garantía. Pour obtenir toutes les informations relatives à la garantie. Per informazioni complete in merito alla garanzia. Für komplette Garantieinformationen. Voor volledige informatie over de garantie. För fullständig garantiinformation. Täydelliset takuutiedot. Quickstart Guide Guia de inicio rapido Guide d'utilisation rapide Guida rapida Schnellstart-Anleitung Snelstartgids Snabbstartsguide Pikakäyttöopas CHARGE67891015234Allgemeinhinweis zur Konformitätserklärung: Hiermit erklären wir, daß sich das Gerät Party Bot Micro in Übereinstimmung mit den grundlegenden Anforderungen der europäischen Richtlinie 1999/5/EG befindet. Die vollständige EG Konformitätserklärung kann unter folgender Adresse angefordert werden: inMusic GmbH Harkortstrasse 12–32 40880 Ratingen GERMANY 15234CHARGE67891015234CHARGE67891015234CHARGE67891015234CHARGE678910](https://usermanual.wiki/ION-Audio/IRB02/User-Guide-2737440-Page-1.png)