ION Audio IRB02 Party Bot Micro User Manual
ION Audio, LLC Party Bot Micro
User manual
Box Contents: Party Bot Micro, USB Charging Cable, Quickstart Guide.
Charging Party Bot Micro: Use the included micro-USB cable to connect Party Bot
Micro to (A) a USB power adapter connected to a power outlet or (B) your computer
(powered on) for 3 hours.
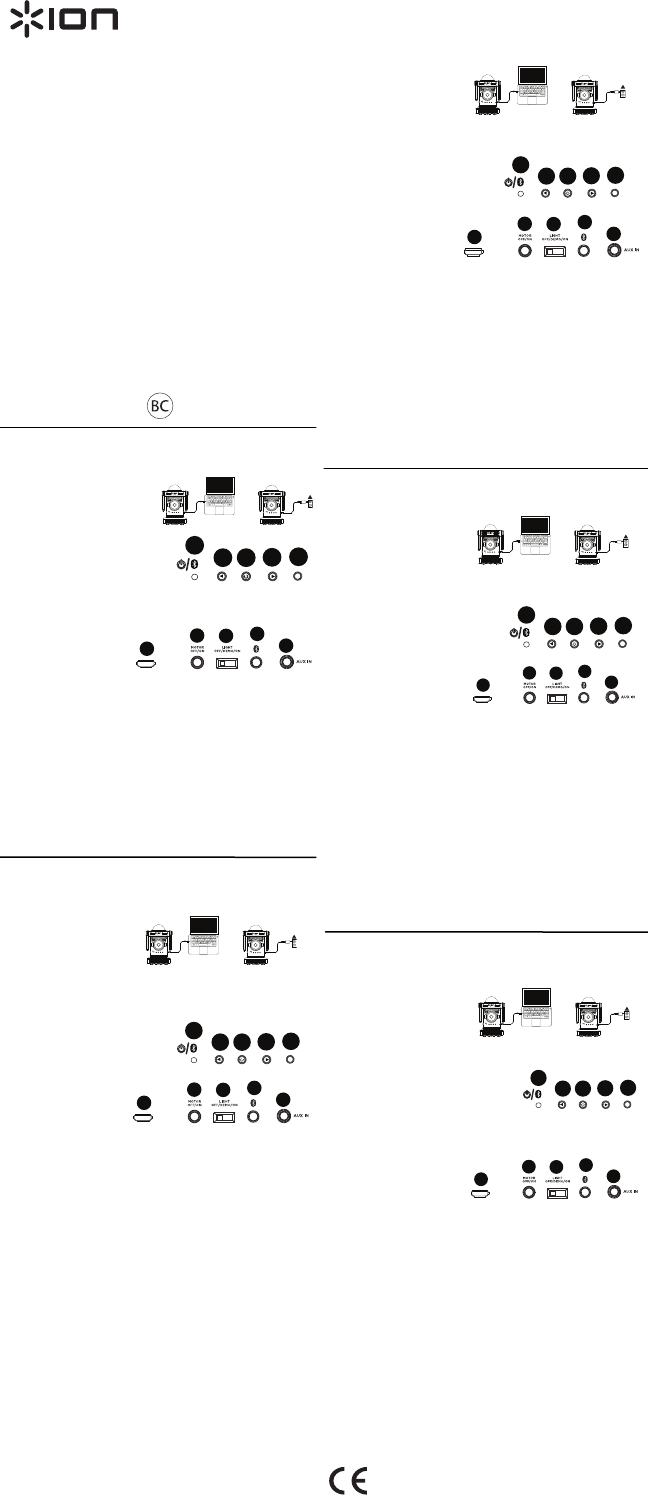
Front Panel Controls:
(1) Bluetooth Pairing Light (solid red when
powered on, solid blue when paired,
blinks red when the battery is low, blinks
purple when Bluetooth connected
with low battery)
(2) Volume -
(3) Power
(4) Volume +
(5) Charging Light (red when charging, turns off once charging is complete).
Real Panel Controls:
(6) Micro-USB Charging Port
(7) Motor On/Off
(8) Light Off / Demo / On
(9) Bluetooth Disconnect (hold for 2 seconds to disconnect from a Bluetooth device)
(10) 1/8” (3.5 mm) Input
Getting Started: (1) Press and hold the Power button for 2 seconds to power on
Party Bot Micro. (2) Open Bluetooth settings on your music device (smartphone,
tablet, etc.). (3) Connect to Party Bot Micro. (4) Play music and adjust Party Bot
Micro's volume using the Volume - and Volume + buttons. (5) Adjust the Party Light
switch and the Motor switch to turn the lights and motor on or off. For best party light
results, use in a dark room. When using the motor feature, use on the floor or on a
surface under supervision. Party Bot Micro cannot sense the edge of a table.
Party Light Settings: Adjust this switch to turn the lights on and off, or put Party Bot
Micro into Demo mode. When in Demo Mode, pressing the Power button will:
• Powers on the unit (both lights and speaker)
• Powers off the unit after 2 minutes if there is no Bluetooth connection
For the complete safety and warranty manual, please visit ionaudio.com/warranty.
Contenido de la caja: Party Bot Micro, cable de carga USB, guía de inicio rápido.
Cómo cargar el Party Bot Micro: Utilice el cable micro USB incluido para conectar el
Party Bot Micro a (A) un adaptador de alimentación USB conectado a una toma de
corriente o (B) su ordenador (encendido) durante 3 horas.
o
Controles del panel frontal:
(1) Luz de apareamiento Bluetooth (se ilumina de color
rojo permanentemente cuando se enciende, de color azul permanentemente
cuando se aparea, parpadea en rojo cuando la batería está por agotarse
y parpadea en violeta cuando el Bluetooth se conecta
con batería baja)
(2) Volumen -
(3) Encendido
(4) Volumen +
(5) Luz de carga (roja durante la carga,
se apaga una vez completada la carga).
Controles del panel trasero:
(6) Puerto de carga Micro-USB
(7) Motor encendido/apagado
(8) Luces apagadas / demo / encendidas
(9) Desconexión de Bluetooth (mantenga pulsado durante 2 segundos para
desconectar de un dispositivo Bluetooth)
(10) Entrada de 3,5 mm (1/8 pulg.)
Para comenzar: (1) Mantenga pulsado el botón Power (Encendido) durante 2
segundos para encender el Party Bot Micro. (2) Abra la configuración Bluetooth en su
dispositivo musical (smartphone [teléfono inteligente], tableta, etc.). (3) Conéctelo al
Party Bot Micro. (4) Reproduzca un tema y ajuste el volumen del Party Box Micro
utilizando los botones Volume - y Volume + (Volumen - y volumen +). (5) Ajuste el
interruptor Party Light (Luces de fiesta) y el interruptor Motor para encender o apagar
las luces y el motor. Para obtener los mejores resultados del Party Light, úselo en un
ambiente oscuro. Cuando utilice la característica del motor, úselo en el piso o sobre
una superficie bajo supervisión. El Party Bot Micro no puede detectar el borde de una
mesa.
Ajustes de las luces de fiesta: Ajuste este interruptor para encender o apagar las
luces, o para poner al Party Bot Micro en modo demo. En modo demo, apretar el
botón de encendido:
• enciende la unidad (tanto las luces como el altavoz)
• apaga la unidad después de 2 minutos sin conexiones Bluetooth
Para obtener el manual sobre la seguridad y garantía visite ionaudio.com/warranty.
Contenu de la boîte : Party Bot Micro, câble de rechargement USB, guide de
démarrage rapide.
Rechargement de la batterie du Party Bot Micro : Utilisez le câble mini-USB inclus
afin de brancher le Party Bot Micror à (A) un adaptateur d’alimentation USB branché à
une prise secteur, ou (B) à un ordinateur (sous tension) pendant 3 heures.
ou
Commandes du panneau avant :
(1) Indicateur de jumelage Bluetooth (rouge lorsque l’appareil est sous tension, bleu
lorsqu'il est jumelé, clignote rouge lorsque la batterie est faible, clignote violet
lorsque la batterie de l’appareil Bluetooth connecté est faible).
(2) Volume -
(3) Interrupteur d’alimentation
(4) Volume +
(5) DEL de rechargement (rouge
lors du rechargement, s'éteint lorsque
le rechargement est terminé.
Commandes du panneau arrière :
(6) Port de rechargement micro-USB
(7) Interrupteur du moteur
(8) Sélecteur du mode d’éclairage
(9) Déconnexion Bluetooth (maintenez
enfoncée pendant 2 secondes pour déconnecter un appareil Bluetooth)
(10) Entrée 3,5 mm
Mise en route : (1) Maintenez l’interrupteur d’alimentation enfoncé pendant 2
secondes afin de mettre le Party Bot Micro sous tension. (2) Accédez aux paramètres
Bluetooth de votre lecteur de musique (smartphone, tablette, etc.). (3) Connectez-le
au Party Bot Micro. (4) Faites jouer de la musique et réglez le volume du Party Bot
Micro avec les touches Volume - et Volume +. (5) Réglez le sélecteur d’éclairage et
l’interrupteur du moteur pour activer ou désactiver les lumières et le moteur. Pour de
meilleurs résultats, utilisez-le dans une pièce sombre. Lorsque vous mettez en marche
le moteur, assurez-vous d’utiliser l’appareil au sol ou sur une surface sous
surveillance. Le Party Bot Micro ne peut détecter le rebord d'une table.
Réglages du sélecteur du mode d’éclairage : Ajustez ce sélecteur pour activer et
désactiver les lumières, ou pour mettre le Party Bot Micro en mode démo. En mode
démonstration, appuyer sur l’interrupteur d’alimentation permet :
• de mettre l’appareil sous tension (lumières et enceinte)
• d’éteindre automatiquement l’appareil après 2 minutes lorsqu'aucun appareil
Bluetooth n’est jumelé
Pour consulter les Consignes de sécurité et informations concernant la garantie,
veuillez visiter ionaudio.com/warranty.
Contenuti della confezione: Party Bot Micro, cavo di ricarica USB, Guida rapida.
Carica del Party Bot Micro: servirsi del cavo mini-USB in dotazione per collegare il
Party Bot Micro a (A) un adattatore di alimentazione USB collegato a una presa
elettrica o (B) al computer (acceso) per 3 ore.
oppure
Comandi pannello anteriore:
(1) Spia di collegamento Bluetooth (rosso fisso quando acceso, blu fisso quando
collegato, lampeggia di rosso quando la batteria è scarica, lampeggia di viola
quando il Bluetooth è collegato a batteria scarica)
(2) Volume -
(3) Alimentazione
(4) Volume +
(5) Spia di carica (rossa a carica in
corso, si spegne una volta che la
carica è completa).
Comandi pannello posteriore:
(6) Porta di ricarica Micro-USB
(7) Motore acceso/spento (On/Off)
(8) Spia Off / Demo / On
(9) Scollegamento Bluetooth (tenere premuto il comando per 2 secondi per
scollegare l'apparecchio da un dispositivo Bluetooth)
(10) Ingresso da 1/8” (3,5 mm)
Primi passi: (1) Premere e tenere premuto il tasto Power per 2 secondi per accendere
il Party Bot Micro. (2) Aprire le impostazioni Bluetooth del proprio dispositivo musicale
(smartphone, tablet, ecc.). (3) Collegare il Party Bot Micro. (4) Riprodurre la musica e
regolare il volume del Party Bot Micro servendosi dei tasti Volume - e Volume +. (5)
Regolare l'interruttore Party Light e l'interruttore Motor per accendere e spegnere le
luci e il motore. Per ottenere i migliori risultati per le feste, utilizzare il prodotto in una
stanza buia! Quando si utilizza la funzione motore, utilizzare l'apparecchio sul
pavimento o su una superficie sotto controllo. Il Party Bot Micro non è in grado di
rilevare il bordo di un tavolo.
Impostazioni Party Light: regolare questo interruttore per accendere e spegnere le
luci o per mettere il Party Bot Micro in modalità Demo. In modalità Demo, premendo il
tasto di alimentazione (Power):
• si accende l'apparecchio (luci e altoparlante)
• si spegne l'apparecchio dopo 2 minuti se non vi è alcun collegamento
Bluetooth
Per ottenere il manuale di sicurezza e garanzia completo, recarsi alla pagina
ionaudio.com/warranty.
Lieferumfang: Party Bot Micro, USB-Ladekabel, Schnellstartanleitung.
Aufladen des Party Bot Micro: Verwenden Sie das mitgelieferte Mikro-USB-Kabel,
um den Party Bot Micro (A) mit einem USB-Netzteil, das in einer Steckdose
eingesteckt ist oder (B) mit Ihrem (eingeschalteten) Computer für einen Zeitraum von 3
Stunden zu verbinden.
oder
Bedienelemente an der Vorderseite:
(1) Bluetooth Koppel-LED (leuchtet durchgehend rot, wenn
das Gerät eingeschaltet ist, leuchtet durchgehend blau, wenn es gekoppelt ist,
blinkt rot, wenn die Batterie schwach ist, blinkt
lila, wenn eine Bluetooth-Verbindung
bei schwacher Batterie hergestellt wurde)
(2) Lautstärke -
(3) Strom
(4) Lautstärke +
(5) Ladeanzeige (rot beim Aufladen, erlischt, sobald der Ladevorgang abgeschlossen
ist).
Bedienelemente an der Rückseite:
(6) Mikro-USB-Ladeanschluss
(7) Motor Ein/Aus
(8) Licht Aus / Demo / Ein
(9) Bluetooth Trennen (Halten Sie
diese Taste 2 Sekunden lang gedrückt,
um es vom Bluetooth-Gerät zu trennen)
(10) 1/8" (3,5 mm) Eingang
Erste Schritte: (1) Halten Sie die Power-Taste 2 Sekunden lang gedrückt, um den
Party Bot Micro einzuschalten. (2) Öffnen Sie die Bluetooth-Einstellungen auf Ihrem
Musikgerät (Smartphone, Tablet etc.). (3) Verbinden Sie den Party Bot Micro. (4)
Spielen Sie Musik ab und passen Sie die Lautstärke des Party Bot Micro mit den
Tasten Lautstärke - und Lautstärke + an. (5) Passen Sie den Party-Lichtschalter
und den Motor-Schalter an, um die Beleuchtung und den Motor ein- oder
auszuschalten. Verwenden Sie die Party-Lichter am besten in einem dunklen Raum!
Wenn Sie die Motorfunktion nutzen, verwenden Sie das Gerät am Boden oder auf
einer Oberfläche und nur unter Aufsicht. Party Bot Micro kann keine Tischkanten
orten.
Partylicht-Einstellungen: Verwenden Sie diesen Schalter, um die Lichter ein- und
auszuschalten oder um den Party Bot Micro in den Demo-Modus zu bringen. Im
Demo-Modus wird durch Drücken der Power-Taste:
• das Gerät eingeschaltet (beide Lichter und Lautsprecher)
• das Gerät nach 2 Minuten ausgeschaltet, wenn keine Bluetooth-Verbindung
besteht
Für die kompletten Sicherheits- und Garantieinformationen besuchen Sie bitte
ionaudio.com/warranty.
Manual Version 1.0
Party Bot Micro
or
ionaudio.com/support
For technical support.
Para soporte técnico.
Pour obtenir de l’assistance technique.
Per assistenza tecnica.
Für technischen Support.
Voor technische ondersteuning.
För teknisk support.
Teknisen tuen.
ionaudio.com/warranty
For complete warranty information.
Para información completa sobre la garantía.
Pour obtenir toutes les informations relatives à la garantie.
Per informazioni complete in merito alla garanzia.
Für komplette Garantieinformationen.
Voor volledige informatie over de garantie.
För fullständig garantiinformation.
Täydelliset takuutiedot.
Quickstart Guide
Guia de inicio rapido
Guide d'utilisation rapide
Guida rapida
Schnellstart-Anleitung
Snelstartgids
Snabbstartsguide
Pikakäyttöopas
CHARGE
6
789
10
1
5
234
Allgemeinhinweis zur Konformitätserklärung: Hiermit erklären wir,
daß sich das Gerät Party Bot Micro in Übereinstimmung mit den
grundlegenden Anforderungen der europäischen Richtlinie 1999/5/EG
befindet. Die vollständige EG Konformitätserklärung kann unter
folgender Adresse angefordert werden:
inMusic GmbH
Harkortstrasse 12–32
40880 Ratingen
GERMANY
1
5
234
CHARGE
6
789
10
1
5
234
CHARGE
6
789
10
1
5
234
CHARGE
6
789
10
1
5
234
CHARGE
6
789
10
Inhoud van de doos: Party Bot Micro, USB Laadkabel, Snelstart Gids.
De Party Bot Micro opladen: Gebruik de bijgevoegde micro-USB kabel om de Party
Bot Micro te verbinden met (A) een USB stroomadapter die verbonden is met een
stopcontact of (B) uw computer (die aan staat) voor 3 uren.
of
Voorpaneel Besturing:
(1) Bluetooth Koppel Licht (Rood wanneer deze aan staat, blauw wanneer deze is
gekoppeld,
Knippert rood wanneer de batterij bijna leeg is, knippert paars wanneer Bluetooth
gekoppeld is met een lage batterij)
(2) Volume -
(3) Stroom
(4) Volume +
(5) Oplaad Licht(rood wanneer
deze aan het opladen is, gaat uit
eens opgeladen).
Achter paneel Besturing:
(6) Micro-USB Laadpoort
(7) Motor Aan/Uit
(8) Licht Uit / Demo / Aan
(9) Bluetooth Ontkoppel (houd deze 2 seconden in om te ontkoppelen)
(10) 1/8” (3.5 mm) Ingang
Om te beginnen: (1) Houd de Stroom knop 2 seconden in om de Party Bot Micro aan
te zetten. (2) Open Bluetooth instellingen op uw muziektoestel (smartphone, tablet,
etc.). (3) Verbind de Party Bot Micro. (4) Speel muziek en pas het volume van de
Party Bot Micro aan door middel van de Volume - en Volume + knoppen. (5) Pas de
Party Light en Motor schakelaar aan om de lichten en motor aan/uit te zetten. Voor
de beste Party Light resultaten, gelieve in een donkere ruimte te gebruiken. Wanneer u
de motor eigenschap gebruikt, doe dit op de vloer of op een oppervlakte onder
supervisie. Party Bot Micro kan de rand van een tafel niet detecteren.
Party Light Instellingen: Pas deze schakelaar aan om de lichten aan en uit te zetten,
of zet Party Bot Micro in Demo stand. Wanneer deze in Demo Stand staat zal het
indrukken van de Stroom knop:
• Het apparaat aan zetten (zowel lichten als luidspreker).
• Het apparaat uit zetten na 2 minuten als er geen Bluetooth verbinding is.
Voor de complete handleiding met betrekking tot de veiligheid en garantie, gelieve
ionaudio.com/warranty te bezoekn.
Innehåll i förpackningen: Party Bot Micro, USB-laddningskabel, Snabbstartsguide.
Hur man laddar Party Bot Micro: Använd den medföljande mikro-USB-kabeln för att
ansluta Party Bot Micro till (A) en USB-strömadapter som är ansluten till ett eluttag
eller (B) din dator (påslagen) i 3 timmar.
eller
Frontpanelens kontroller:
(1) Parkopplingslampa för Bluetooth (lyser stadigt röd när
den är på, stadigt blå när den är parad,
blinkar röd när batteriet är svagt, blinkar
lila när Bluetooth är anslutet
men batteriet är svagt)
(2) Volym -
(3) Strömbrytare
(4) Volym +
(5) Laddningslampa (röd under laddning, stängs av när laddningen är avslutad).
Bakpanelens kontroller:
(6) Mikro-USB-laddningsport
(7) Motor På/Av
(8) Lampa Av / Demo / På
(9) Hur man kopplar ifrån Bluetooth (tryck in i 2 sekunder för att koppla ifrån en
Bluetooth-enhet)
(10) Ingång 1/8” (3,5 mm)
Kom igång: (1) Tryck och håll ner knappen Strömbrytare i 2 sekunder för att sätta på
Party Bot Micro. (2) Öppna Bluetooth-inställningarna på din musikenhet (smartphone,
surfplatta, etc.). (3) Anslut till Party Bot Micro. (4) Spela musik och justera volymen på
Party Bot Micro med hjälp av knapparna Volume - och Volume +. (5) Justera
reglagen för Partybelysning och Motor för att stänga av och på lamporna och
motorn. Använd den i ett mörkt rum för bästa partybelysningsresultat. Ställ den på ett
golv eller en yta under övervakning, då motorfunktionen används. Party Bot Micro
känner inte av bordskanten.
Inställningar för partybelysningen: Justera detta reglage för att sätta på och stänga
av lamporna, eller ställ in Party Bot Micro i Demo-läget. Om du trycker på knappen
Strömbrytare då den är i Demo-läget:
• Sätts enheten på (både lamporna och högtalaren)
• Stängs enheten av efter 2 minuter om det inte finns någon Bluetooth-
anslutning
För att läsa hela säkerhetsmanualen och garantin, gå till ionaudio.com/warranty.
Laatikon sisältö: Party Bot Micro, USB-latauskaapeli, pikaopas.
Party Bot Micron lataaminen: Kytke Party Bot Micro mukana toimitetulla mikro -USB-
kaapelilla (A) USB-virtasovittimeen, joka on kytketty USB-pistorasiaan tai (B)
tietokoneeseesi (virta päällä) 3 tunniksi.
tai
Etupaneelin säätimet:
(1) Bluetooth parituksen valo (punainen valo, kun
virta on päällä, sininen valo kun paritettu,
vilkkuva punainen valo kun akku on vähissä, vilkkuva
violetti valo kun Bluetooth on yhdistetty
mutta paristo on vähissä)
(2) Äänenvoimakkuus -
(3) Virta
(4) Äänenvoimakkuus +
(5) Latausvalo (punainen kun lataa,
valo sammuu kun lataus on valmis).
Taustapaneelin säätimet:
(6) Mikro -USB latausportti
(7) Moottori päälle/pois päältä
(8) Valot pois / esittelytila / päällä
(9) Bluetoothin irtikytkentä (paina 2 sekuntia irroittaaksesi Bluetooth -laitteesta)
(10) 1/8" (3.5 mm) äänen sisäänmeno
Käytön aloittaminen: (1) Paina virtapainiketta 2 sekuntia käynnistääksesi Party Bot
Micron. (2) Avaa Bluetooth-asetukset musiikkilaitteessasi (älypuhelin, tabletti, jne.). (3)
Yhdistä Party Bot Microon. (4) Soita musiikkia ja säädä Party Bot Micron
äänenvoimakkuutta käyttämällä Äänenvoimakkuus+ ja Äänenvoimakkuus- -
painikkeita.. (5) Valitse Party Light ja Moottori -kytkimistä valitaksesi valot ja
moottorin päälle/pois päältä. Käytä sitä parhaiden tulosten saavuttamiseksi pimeässä
huoneessa! Kun käytät moottoria, käytä laitetta lattialla tai tasaisella pinnalla,
valvotuissa olosuhteissa. Party Bot Micro ei tunnista pöydän reunaa.
Party Light -asetukset: Valitse tästä kytkimestä laittaaksesi valot päälle/pois päältä,
tai valitaksesi Party Bot Micron esittelytilan. Kun laite on Esittelytilassa, virtapainikkeen
painamisesta aiheutuu seuraavaa:
• Laite käynnistyy (sekä valot että kaiutin)
• Sammuttaa laitteen 2 minuutin kuluttua, jos Bluetooth-yhteyttä ei ole
Turvallisuus- ja takuuopas löytyy osoitteesta ionaudio.com/warranty.
WARNING: To reduce the risk of fire or electrical shock, do not expose this
appliance to rain or moisture. Electrical equipment should NEVER be kept or stored
in damp environments.
NOTICE CONCERNING FCC REGULATIONS: You are cautioned that changes or
modifications not expressly approved by the part responsible for compliance could
void the user's authority to operate the equipment.
This equipment has been tested and found to comply with the limits for a Class B
digital device, pursuant to part 15 of the FCC rules. These limits are designed to
provide reasonable protection against harmful interference in a residential
installation. This equipment generates uses and can radiate radio frequency energy
and, if not installed and used in accordance with the instructions, may cause harmful
interference to radio communications. However, there is no guarantee that
interference will not occur in a particular installation. If this equipment does cause
harmful interference to radio or television reception, which can be determined by
turning the equipment off and on, the user is encouraged to try to correct the
interference by one or more of the following measures:
a. Reorient or relocate the receiving antenna.
b. Move this unit.
c. Increase the separation between the equipment and receiver.
d. Connect the equipment into an outlet on a circuit different from that to
which the receiver is connected.
e. Be sure that all cables are properly shielded, using a choke or ferrite where
appropriate.
f. Consult the dealer or an experienced radio/television technician for help.
ESD / EFT Warning: This unit may contain a microcomputer for signal
processing and control functions. In very rare situations, severe
interference, noise from an external source, or static electricity may
cause it to lock up. In the unlikely event that this should happen, turn
off the unit, wait at least five seconds, and then turn it back on again.
THIS DEVICE COMPLIES WITH PART 15 OF THE FCC RULES.
OPERATION IS SUBJECT TO THE FOLLOWING TWO CONDITIONS:
(1) THIS DEVICE MAY NOT CAUSE HARMFUL INTERFERENCE, AND
(2) THIS DEVICE MUST ACCEPT ANY INTERFERENCE RECEIVED,
INCLUDING INTERFERENCE THAT MAY CAUSE UNDESIRED
OPERATION.
FCC RF Radiation Exposure Statement: This equipment complies with FCC
radiation exposure limits set forth for an uncontrolled environment. End users must
follow the specific operating instructions for satisfying RF exposure
compliance. This transmitter must not be co-located or operating in conjunction with
any other antenna or transmitter.
RSS Statement for Canadian models: This device complies with Industry Canada
licence-exempt RSS standard(s). Operation is subject to the following two
conditions: (1) this device may not cause interference, and (2) this device must
accept any interference, including interference that may cause undesired operation
of the device
In an environment with radio frequency interference, the unit may malfunction and
resume normal operation after removal of the interference.
For best audio quality, avoid using this device in a high RF-radiated environment.
Technical Specifications
Dimensions (width x depth x height): 3.7" x 3.5" x 6.1"; 9.4 cm x 8.8 cm x 15.5 cm
Weight: 0.32 kg; 0.71 lbs.
Battery: Rechargeable Lithium-ion battery
Battery Life (when fully charged): Up to 2 hours with motor, lights, and music.
Up to 11 hours with music only.
Charging Time: Approximately 3 hours
Bluetooth Specification: Bluetooth 4.1
Woofer size: 2’’; 50 mm
Output power: 3W Peak
IMPORTANT!
Thanks for buying this ION product! If you have any issues or questions about
your product, we're here to help. Contact us at 401.658.3743 (U.S.) or visit
ionaudio.com/support.
Correct Disposal of This Product: This marking indicates that this
product should not be disposed with other household wastes
throughout the EU. To prevent possible harm to the environment or
human health from uncontrolled waste disposal, recycle it responsibly
to promote the sustainable reuse of material resources. To return your
used device, please use the return and collection systems or contact
the retailer where the product was purchased. They can take this
product for environmentally safe recycling.
1
5
234
CHARGE
6
789
10
1
5
234
CHARGE
6
789
10
1
5
234
CHARGE
6
789
10
This device complies with Part 15 of the FCC Rules. Operation is subject to the following two
conditions: (1) this device may not cause harmful interference, and (2) this device must accept any
interference received, including interference that may cause undesired operation.
Changes or modifications not expressly approved by the party responsible for compliance could
void the user's authority to operate the equipment.
NOTE: This equipment has been tested and found to comply with the limits for a Class B digital
device, pursuant to Part 15 of the FCC Rules. These limits are designed to provide reasonable
protection against harmful interference in a residential installation. This equipment generates, uses
instructions, may cause harmful interference to radio communications. However, there is no
guarantee that interference will not occur in a particular installation. If this equipment does cause
harmful interference to radio or television reception, which can be determined by turning the
equipment off and on, the user is encouraged to try to correct the interference by one or more of
the following measures:
-- Reorient or relocate the receiving antenna.
-- Increase the separation between the equipment and receiver.
-- Connect the equipment into an outlet on a circuit different from that to which the receiver is
connected.
-- Consult the dealer or an experienced radio/TV technician for help.
Warnings:
This device complies with Industry Canada’s licence-exempt RSSs
Operation is subject to the following two conditions:
(1) This device may not cause interference and (2) this device must accept any interference,
including interference that may cause undesired operation of the device.
Le présent appareil est conforme aux CNR d'Industrie Canada applicables aux appareils
radio exempts de licence.L'exploitation est autorisée aux deux conditions suivantes :
(1) l'appareil ne doit pas produire de brouillage, et
(2) l'utilisateur de l'appareil doit accepter tout brouillage radioélectrique subi, même si le
brouillage est susceptible d'en compromettre le fonctionnement.
Under Industry Canada regulations, this radio transmitter may only operate using an antenna
of a type and maximum (or lesser) gain approved for the transmitter by Industry Canada. To
reduce potential radio interference to other users, the antenna type and its gain should be so
chosen that the equivalent isotropically radiated power (e.i.r.p.) is not more than that
necessary for successful communication.
Conformément à la réglementation d'Industrie Canada, le présent émetteur radio peut
fonctionner avec une antenne d'un type et d'un gain maximal (ou inférieur) approuvé pour
l'émetteur par Industrie Canada. Dans le but de réduire les risques de brouillage
radioélectrique
à l'intention des autres utilisateurs, il faut choisir le type d'antenne et son gain de sorte que la
puissance isotrope rayonnée équivalente (p.i.r.e.) ne dépasse pas l'intensité nécessaire à
l'établissement d'une communication satisfaisante.
This radio transmitter (identify the device by certification number, or model number if
Category II) has been approved by Industry Canada to operate with the antenna types listed
below with the maximum permissible gain and required antenna impedance for each antenna
type indicated. Antenna types not included in this list, having a gain greater than the
maximum gain indicated for that type, are strictly prohibited for use with this device.
Le présent émetteur radio (identifier le dispositif par son numéro de certification ou son
numéro de modèle s'il fait partie du matériel de catégorie I) a été approuvé par Industrie
Canada pour
fonctionner avec les types d'antenne énumérés ci-dessous et ayant un gain admissible
maximal et l'impédance requise pour chaque type d'antenne. Les types d'antenne non inclus
dans cette liste,
ou dont le gain est supérieur au gain maximal indiqué, sont strictement interdits pour
l'exploitation de l'émetteur