Contents
- 1. Users Manual 1
- 2. Users Manual 2
Users Manual 2
ConvenientFunctions
ConvenientFunctions
Contents
5
NAVIGATION (SEARCHING)
PLAYBACK MODE
PROGRAM MODE
EQ MODE
MENU
Basic Operation
General
Display
Timer
Control
Mode
Name
Sound
5-1
5-3
5-5
5-8
5-9
5-10
5-12
5-14
5-17
5-20
5-24
5-26
5-27
ASF WMA
OGG MP3
ConvenientFunctions
Navigation(Searching)
Navigation
5-2
Navigation(Searching)
ConvenientFunctions
Navigation
5-1
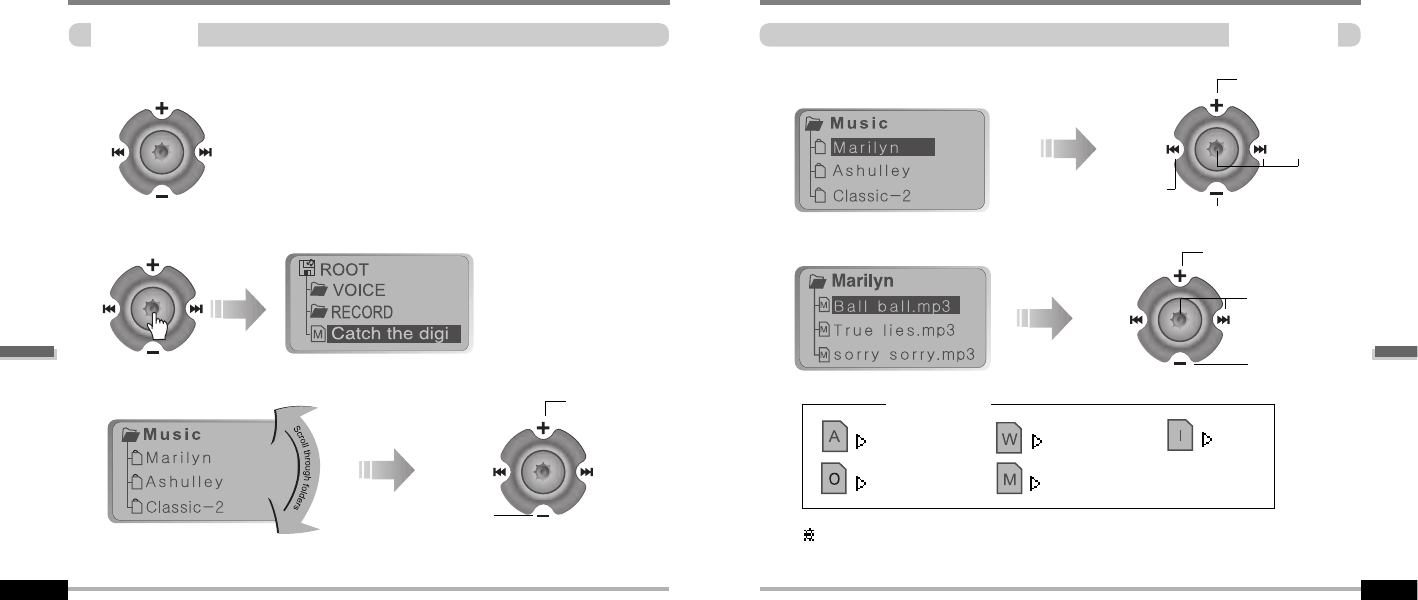
Navigate to locate tracks to play.
YoucanselectasongbypressingtheNAVI/MENU
buttonandusingtheVOL+,VOL-switch.
NAVI/MENU button
1
1
2
2
Select the track
4
4
Select folder or scroll to upper folder
3
3
FILE FORMAT
IRM (iRiver Rights Management)
iRiver Rights Management is a digital music format.
Please visit our web site for details about this music format.
IRM
Scroll up
Scroll down
Select the upper folder
Scroll up
Select the
folder or file
Scroll down
Scroll up
Scroll down
Select the track
MODE(PlaybackMode)
INTRO
5-4
MODE(PlaybackMode)
MODE(PlaybackMode)
5-3
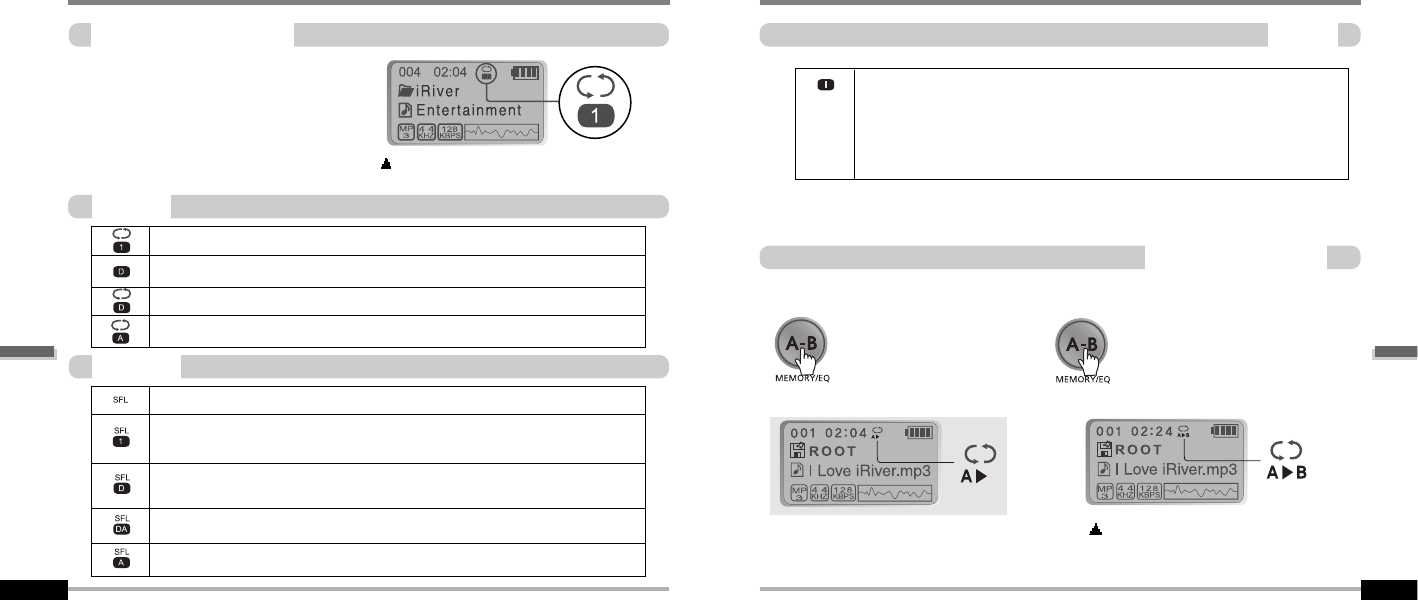
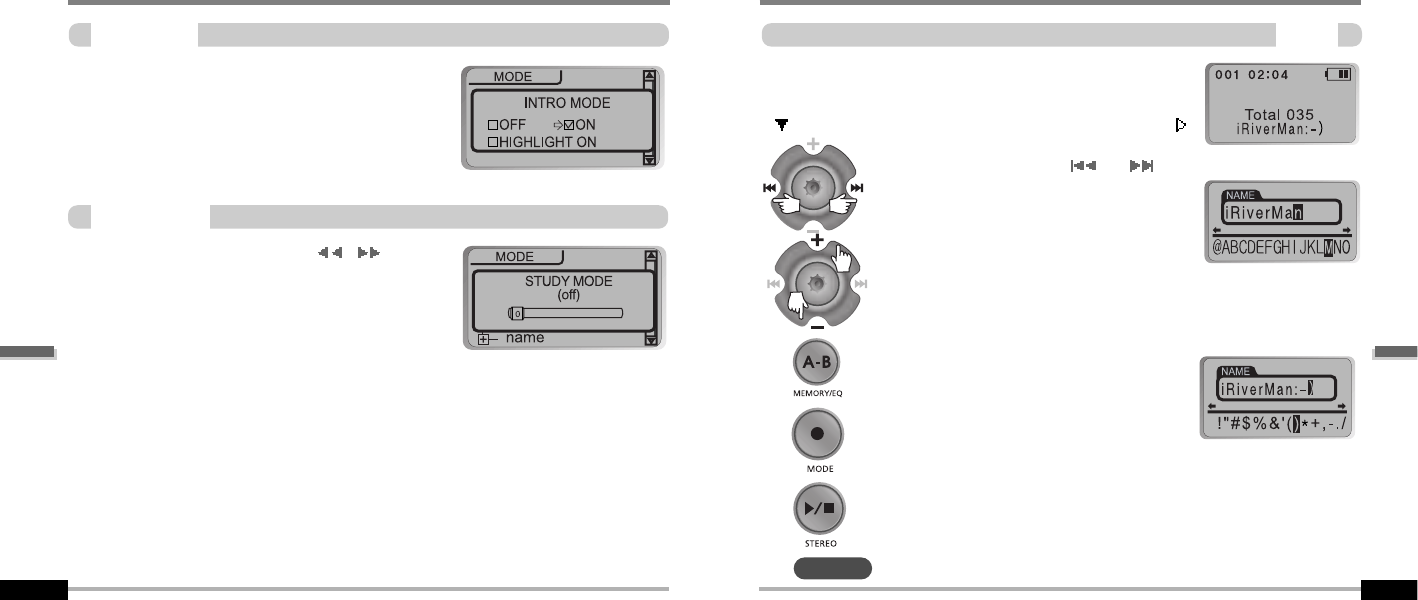
You can set various Repeat and Shuffle
options by choosing these selections under
Mode. Change the Repeat or Shuffle mode
by pressing the MODE button. Please refer
to the MODE function controls (page 5-24)
for user-defined configuration.
When the MODE/REC button is pushed, the
icon in the playback mode indicator is changed.
Play a single track repeatedly.
Play all tracks in the folder and stop.
Play all tracks in the folder repeatedly.
Play all tracks in the player repeatedly.
REPEAT
Randomly play all tracks in the player and stop.
Play a single track repeatedly.
Skip forward will select a new random track to play repeatedly.
Randomly play all tracks in the folder and stop.
Randomly play all tracks in the folder repeatedly.
Randomly play all tracks in the player repeatedly.
SHUFFLE
IntervalRepeat(A-B)
Repeat a selected interval.
A-B interval will be repeated.
Press the button once to
select the beginning <A>
point.
Press the button again to select
the ending <B> point.
INTRO: Plays the beginning 10 seconds of each track in sequential
order.
INTRO HIGHLIGHT: Plays 10 seconds from 1 minute into each track in
sequential order. You can set this function in the MENU function.(Refer to
page 5-25)
ConvenientFunctions
ConvenientFunctions
ProgramPlayback
ActivatingProgrammode
5-6
ProgramPlayback
ActivatingProgrammode
5-5
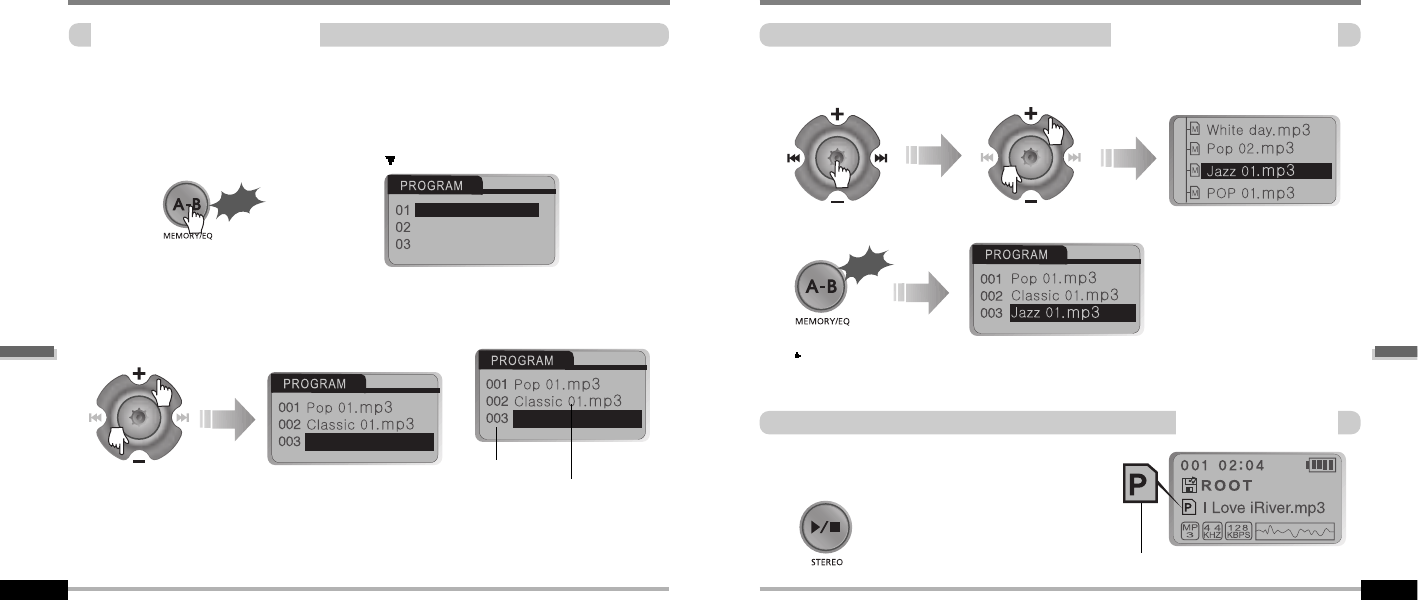
You can listen to your favorite songs by using Program Mode.
Click the MEMORY/EQ button at Stop playback.
The program list is displayed. If the player has been programmed already, the current
program list will display.
1
1
2
2
To save all files in the folder as the program list
After selecting a folder to save, then press the MEMORY/EQ button to save all files in
the folder. Sub folders are not added.
3
3
4
4
After programming, press PLAY/STOP button
to play the tracks in sequential order.
ProgramPlayback
Scroll to PROGRAM mode
Music name
Click
Numbers of
program list
Click
The PROGRAM mode icon appears
Push the VOL +, VOL - switch to select the number to be programmed.
Press the NAVI/MENU button once and navigate to the desired track. Press
the NAVI/MENU button again to save that track to the program list.
Press the MEMORY/EQ button to save the program list.
ConvenientFunctions
ConvenientFunctions
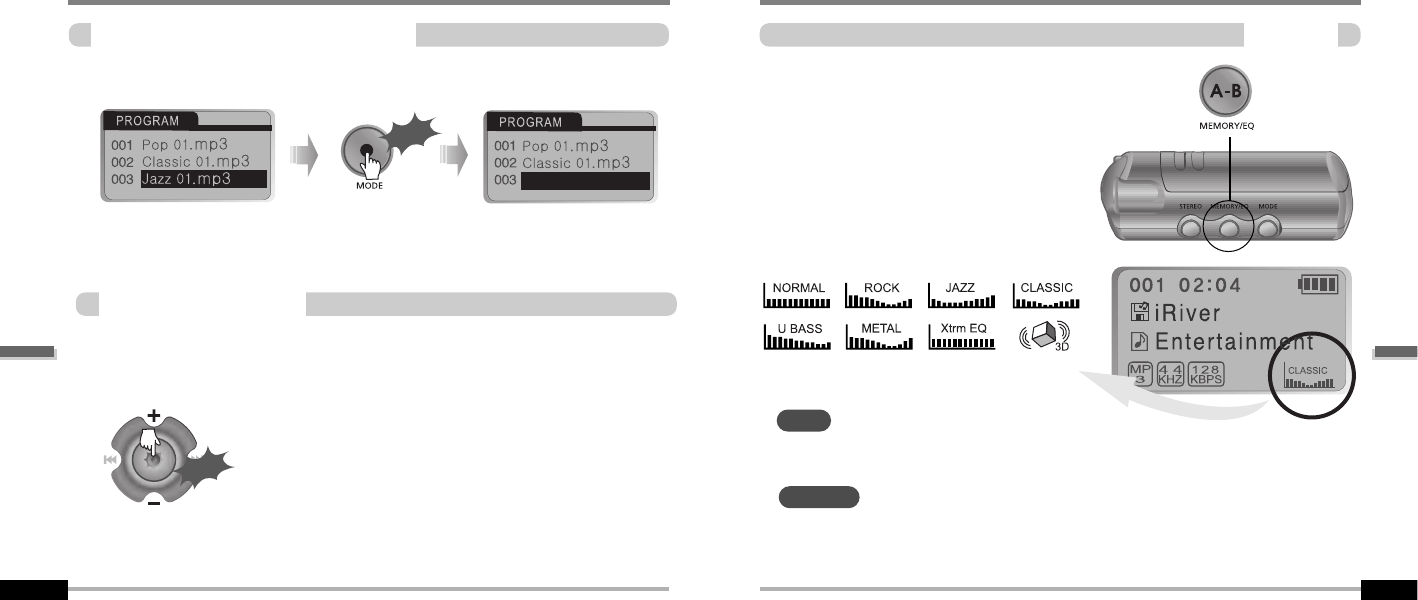
EQMode
EQMODE
5-8
ProgramPlayback
Toremovefilesfromtheprogramlist
5-7
Push the NAVI/MENU button toward VOL - at Stop mode.
Program playback is cancelled and normal playback is started.
CancelProgramMode
Press the MODE/REC button after selecting the file to be deleted using the MEMORY/EQ
button. The program list is automatically changed.
Click
You can select EQ mode in accordance to
the playing music genre.
Press and hold the MEMORY/EQ button to
display the current EQ setting. Then
press the button repeatedly to chose a
different EQ.
Xtrm EQ and 3D are set in the MENU, refer to page 5-27 through 5-29 for details.
To delete all programmed songs, press MEMORY/EQ button for several seconds.
Push
In Stop Mode
You can select your favorite EQ as the set value on the EQ SELECT menu.
The set value on the menu is saved but EQ mode is not changed in case of not selecting
Xtreme EQ and Xtreme 3D
NOTE
CAUTION
ConvenientFunctions
ConvenientFunctions
MENU
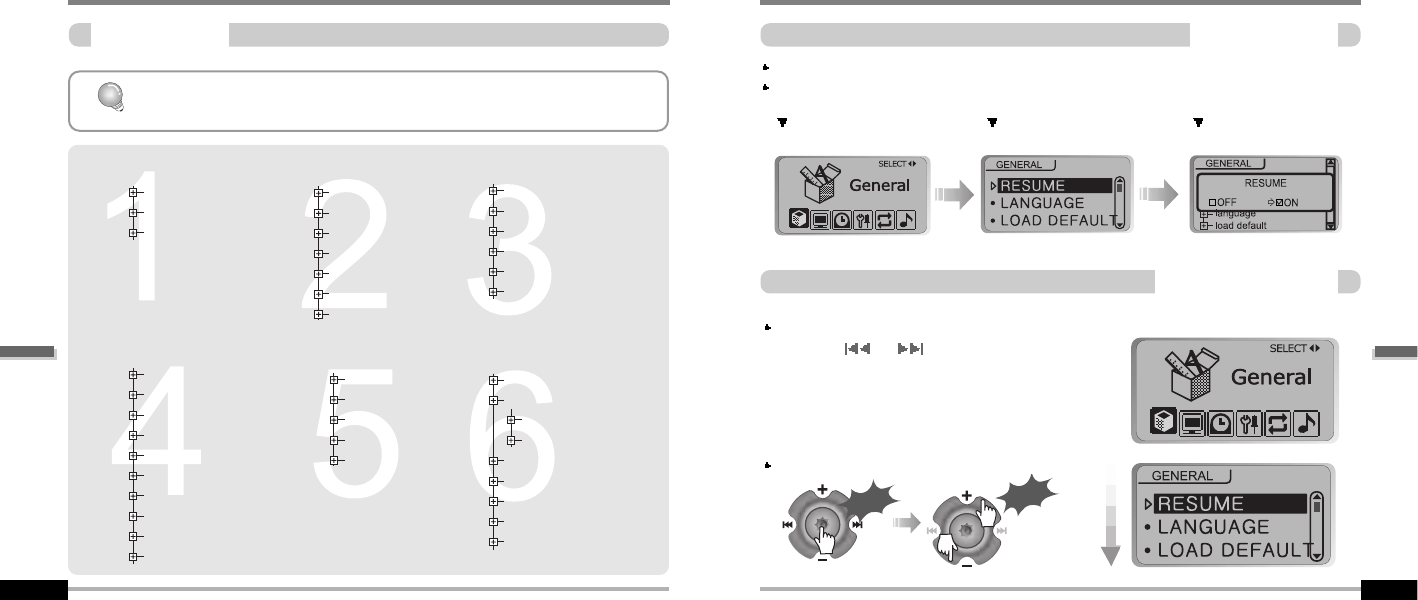
Configuration
5-9
Functions are subject to change with different firmware versions.
Users can configure their own settings.
resume
language
load default
back light
lcd contrast
visualization
scroll speed
tag information
time
battery select
sleep Power Off
stop Power Off
set Time
alarm/Record Select
set Alarm
tuner Rec. Reservation
fast skip
scan speed
voice recording mode
voice auto detection
tuner recording mode
line-in recording mode
line-in recording volume
line-in auto-sync
line-in/ext. mic
download activity
repeat
shuffle
intro
study
name
Xtreme EQ
Xtreme 3D
DBE setting
3D EQ setting
sound balance
eq limit
eq select
beep volume
fade in
GENERAL DISPLAY TIMER
SOUND
CONTROL MODE
5-10
MENU-BasicOperation
BasicOperation
MAIN MENU SUB MENU Window for SUB
MENU SETTING
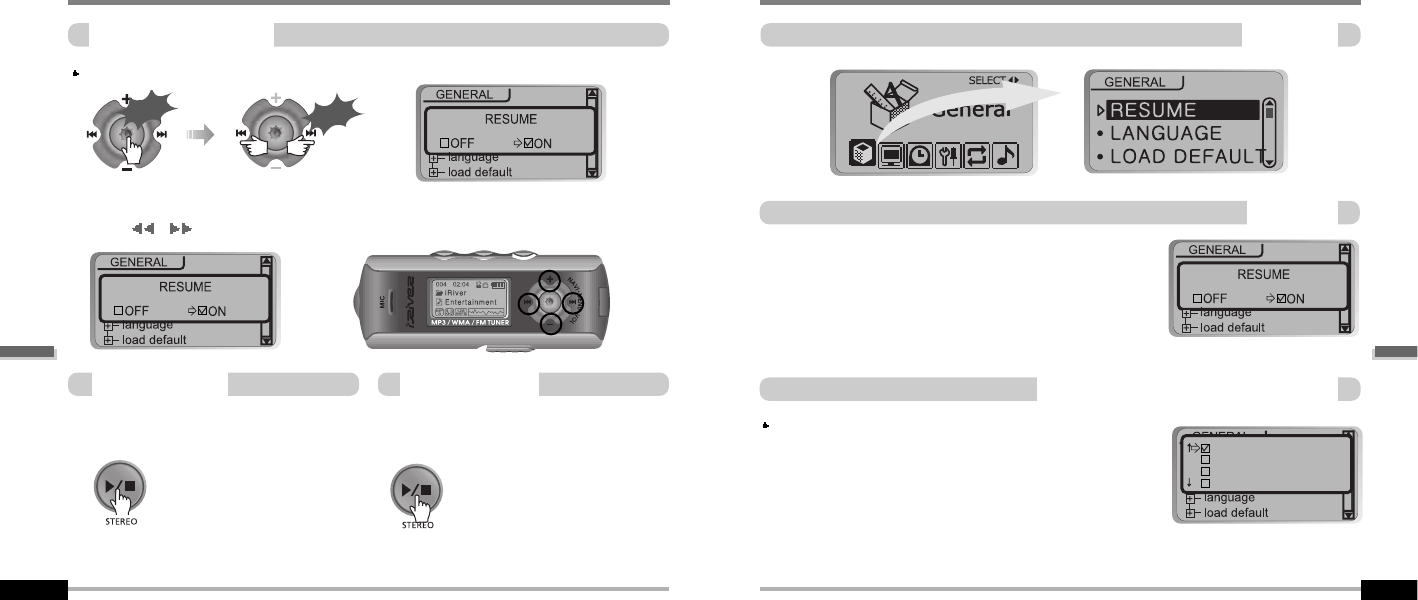
Press and hold the NAVI/MENU button to display the MENU system.
The MENU system is composed of 6 main menus with sub-menus.
ToselectMainMenu
From Main Menu to Sub Menu
Shift between Menus
Push the or switch to move
between main menu and sub menu.
Click
Push
ConvenientFunctions
ConvenientFunctions
MENU-BasicOperation
ToselectSubMenu
5-12
5-11
You can set, cancel or change Sub Menu by pressing the NAVI/MENU switch
toward
I
,
I
or VOL +, VOL -.
Click the PLAY/STOP button to exit
Main Menu.
Click the PLAY/STOP button to return
Main MENU at the sub-menu setting.
ExitSubMenu ExitMainMenu
Enter Sub Menu
Click
Push
MENU-General
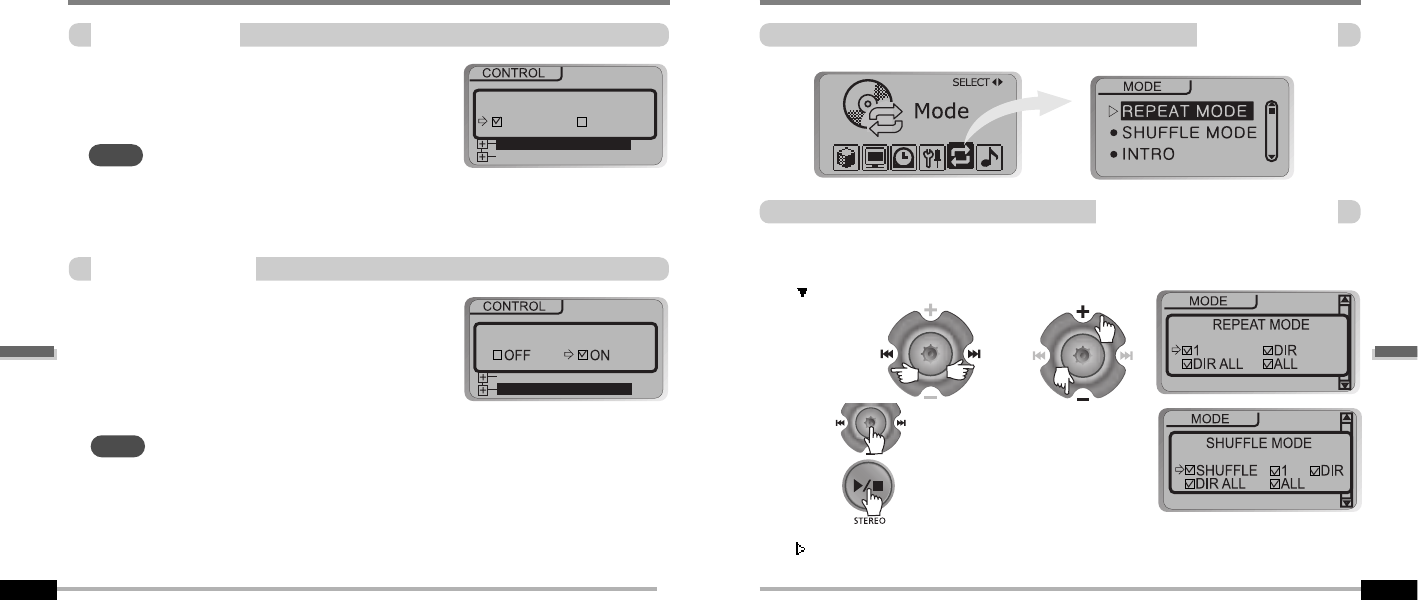
GENERAL
ON : Playback resumes from the previous location
in a song when the player is stopped or powered
off.
OFF : Playback begins from the first track after the
player is stopped or powered off.
Resume
Supports 40 languages
Song title and ID3 tag information for the MP3 files is
dependent on the version of the PC operating system
that was used to create it. (For example, if an MP3
file is created in a English version of Windows, the
language setting should be English for the proper title
display)
LANGUAGE(Supports40languages)
English
Estonian
Faeroese
Finnish
ConvenientFunctions
ConvenientFunctions
MENU-General
5-14
5-13
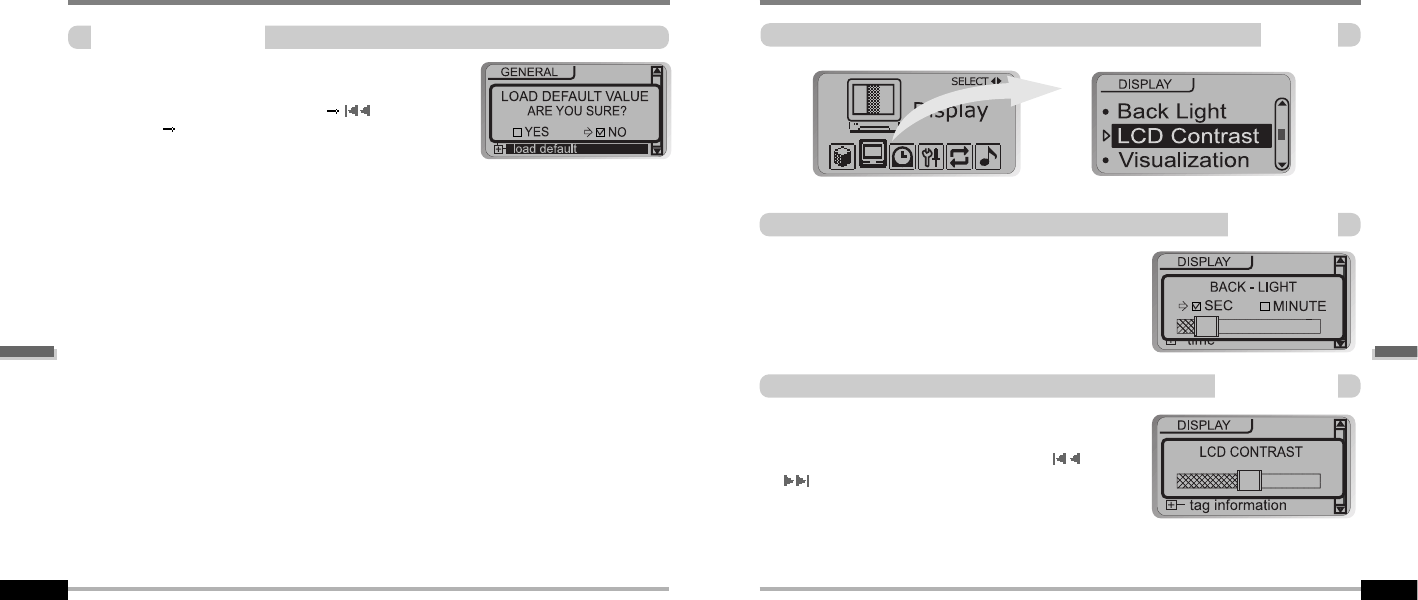
Initialize Menus to the original factory settings.
Button operation order is as below.
Click NAVI/MENU (select default menu) or VOL +
(select YES) Click NAVI/MENU (select YES : Initialization)
LoadDefaultValue
MENU-Display
Display
You can adjust the time that the Backlight stays on.
SEC : Backlight stays on from 0 to 30 seconds.
MINUTE : Backlight stays on from 0 to 30 minutes.
Press the NAVI/MENU button to set SEC/MINUTE.
Back-Light
Adjust the LCD screen contrast.
Contrast can be adjusted by using the or
(VOL + or VOL -) buttons.
LCDContrast
ConvenientFunctions
ConvenientFunctions
MENU-Display
ScrollSpeed
5-16
5-15
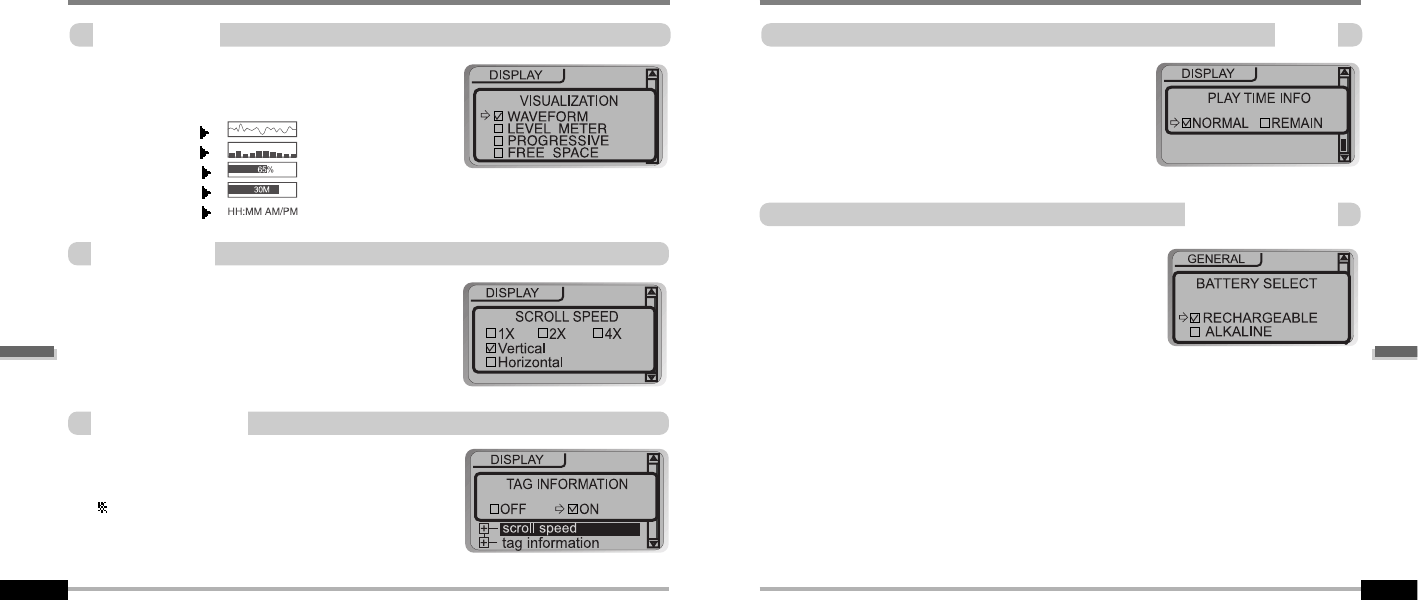
During playback, you can display visisualtions,
theelapsedtimeofthetrack,orthefreememory
on your player.
ON : Display track with ID3 tag information
OFF : Display track with file name
File name will be displayed by default for songs
with no ID3 information.
Adjust scroll speed by 1x/2x/4x/Vertical/Horizontal.
Vertical : The scroll goes up and down
Horizontal : The scroll goes from the left to
the right.
Visualization
TagInformation
BATTERYSELECT
WAVEFORM
LEVEL METER
PROGRESSIVE
FREE SPACE
CLOCK
MENU-Display
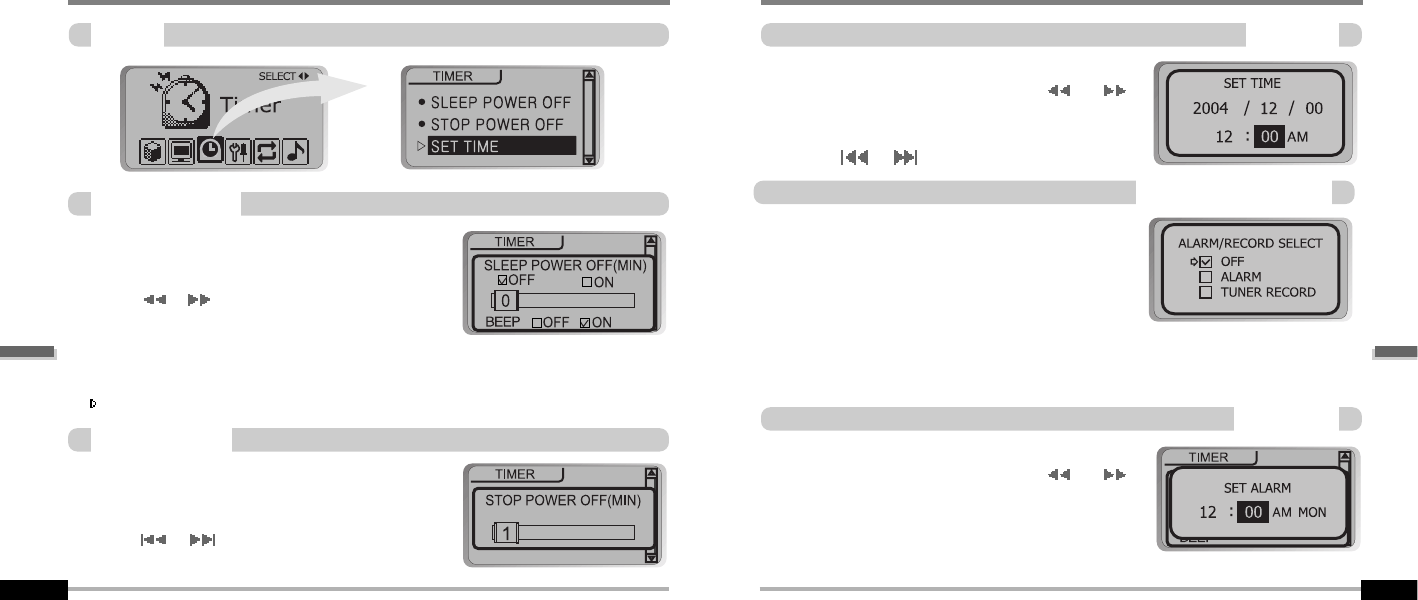
NORMAL : display elapsed time.
REMAIN : display remaining time.
Note : Time display may not be accurate for files
encoded in Variable Bit Rate formats.
Time
Select the current battery.
The player will manage the battery indicator icon
to better match the usage level.
ConvenientFunctions
ConvenientFunctions
MENU-Timer
Timer
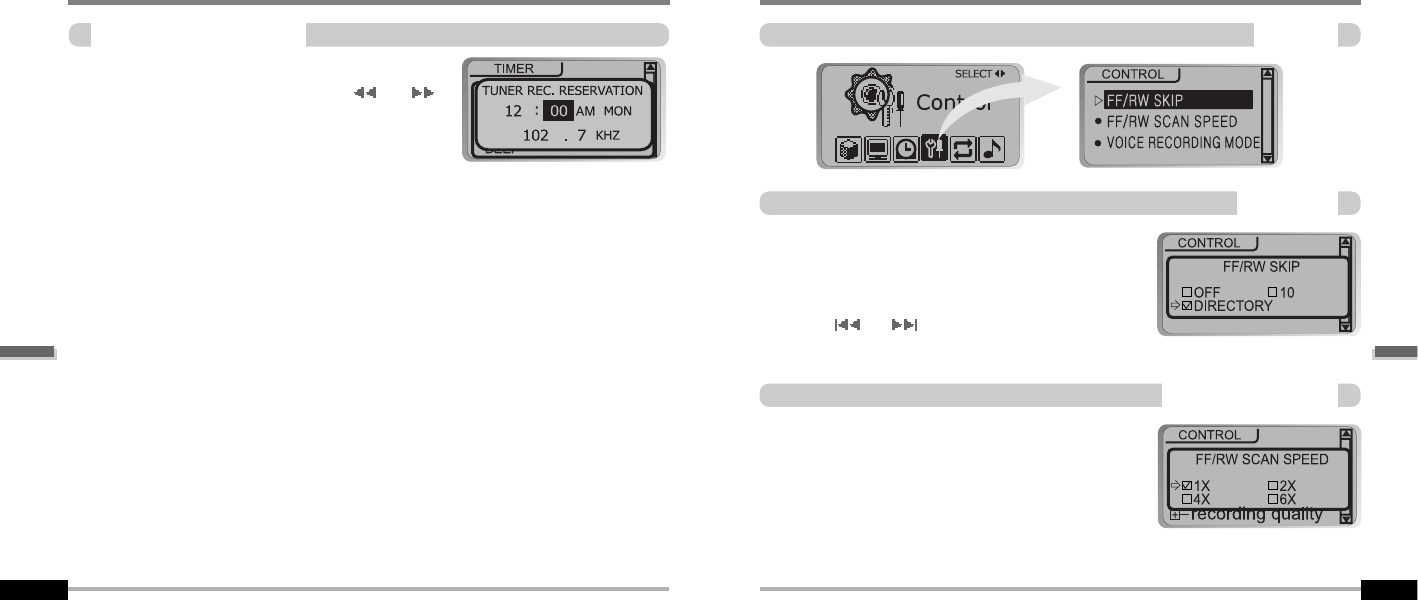
Automatically turns power off at stop mode.
(Time range can be set from 1 to 60 minutes by one
minute increments.)
Use the or (VOL + or VOL -) button to adjust time.
Automatically turns power off after a fixed
time. (Time range can be set from 1 to
180 minutes by one minute increments.)
Use the
I
or
I
(VOL + or VOL -) button to adjust time.
Set BEEP ON/ OFF by pressing the NAVI/MENU button.
Beep
ON : A beep sound will play one minute before the player shuts off.
OFF : No beep sound is played.
Once powered off, the sleep timer will reset to 0.
SleepPowerOff
StopPowerOff
5-17
MENU-Timer
SetTime
Alarm/RecordSelect
SetAlarm
Set the current time.
Push the NAVI/MENU switch toward
I
or
I
to select the item and toward VOL + or VOL - to
set the clock.
Use the or switch to adjust time.
OFF : The Alarm and Tuner Record functions are
disabled and the player will not power on at either
indicated time.
ALARM : At the time indicated in the "Set Alarm"
setting (see below) the player will power on and
begin music playback.
TUNER RECORD : At the time indicated in the "Tuner Rec. Reservation"
setting(seepage5-19)theplayerwillpoweronandbeginrecordingfromthe
selected radio station.
Set the working time of alarm.
Push the NAVI/MENU switch toward
I
or
I
to select the item and toward VOL + or VOL - to
set the alarm.
SUN~SAT:Alarmringsinthesametimeofthe
set day repeatedly.
ALL : Alarm rings in the set time every day.
5-18
ConvenientFunctions
ConvenientFunctions
5-20
MENU-Control
Control
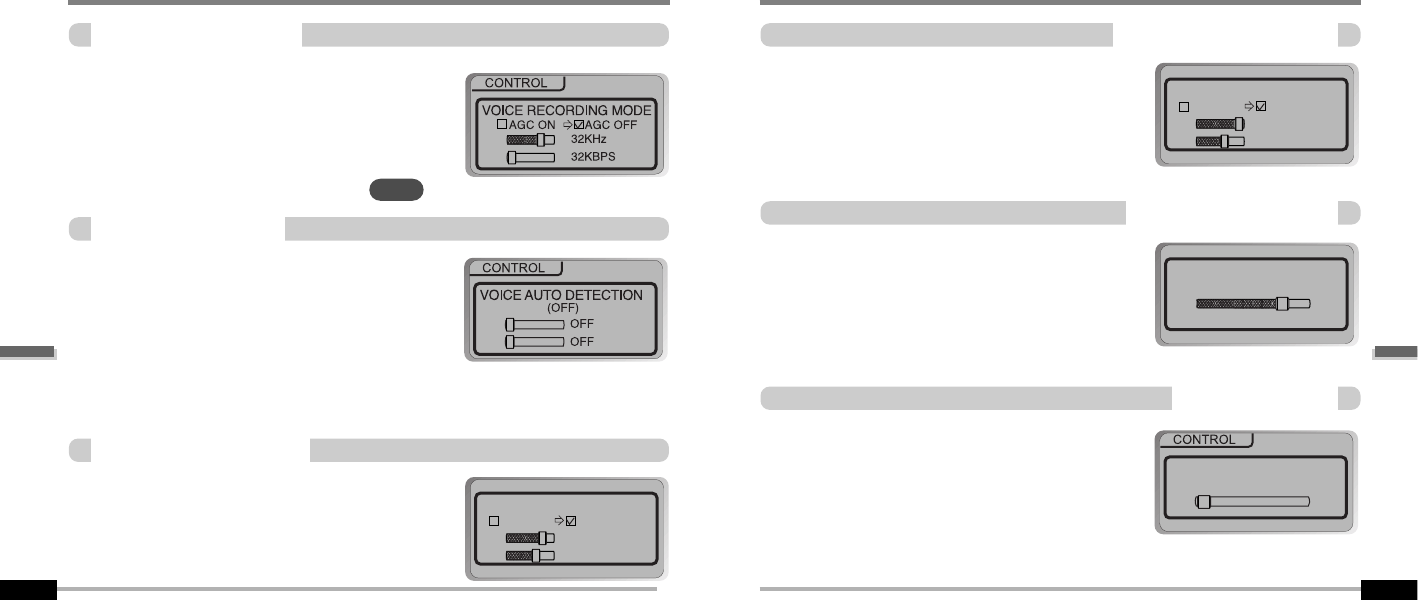
The fast scan speed can range from 1x/ 2x/ 4x/ 6x.
OFF : Skip doesn’t activate.
10 : Skip 10 tracks at time.
DIRECTORY : Skip to previous or next folder.
This defines the operating method of short or long
click of or lever.
FastSkip
FF/RWScanSpeed
5-19
MENU-Timer
TunerRec.Reservation
Set the time and station to be recorded.
Push the NAVI/MENU switch toward
I
or
I
to select the item and toward VOL + or VOL - to
set the recording time.
SUN ~ SAT : Tuner recording is started at the same time of the set day
repeatedly.
ALL : Tuner recording is started at the set time every day.
ConvenientFunctions
ConvenientFunctions
5-22
5-21
MENU-CONTROL
VoiceRecordingMode
The voice recording mode will automatically pause
during silence. This is useful for recording over a long
period of time to save memory.
AGC ON : When recording voice, the recording level is
automatically controlled and the sound from a long distance
is normally recorded.
AGC OFF: AGC Control not activated.
OFF : Voice Auto Detection is disabled.
Voice Auto Detection (first slider) : Set the relative level
of sound needed to activate the recorder. (Level 1-10).
Record pause time (second slider) : Set the number of seconds of silence to record before
pausing. (1-10 Sec)
VoiceAutoDetection
You can adjust recording quality when recording
from the FM Tuner.
Bit Rate : 8Kbps~320Kbps
Sampling Frequency : 11.025KHz ~44.1KHz
TUNERRECORDINGMODE
TUNER RECORDING MODE
MONO STEREO
32KHz
128KBPS
MENU-CONTROL
LINE-INRECORDINGMODE
You can adjust recording quality when recording
from external equipment.
Bit Rate : 8Kbps~320Kbps
Sampling Frequency : 11.025KHz ~44.1KHz
You can adjust recording level when recording
from External equipment.
(You can set from 0 to 64.)
LINE-INRECORDVOLUME
LINEIN RECORDING MODE
MONO STEREO
44.1KHz
128KBPS
LINEIN RECORD VOLUME
45
Line-In, a new file will be created for each track on
the CD automatically.
- OFF : Audio signal detection is disabled.
- Audio signal detection time (1-5 seconds) : The
amount of silence the player will use to determine
when a track has ended and to start a new file.
LINE-INAUTO-SYNC
LINEIN AUTO-SYNC
(off)
0
You can adjust recording quality when recording Voice.
Bit Rate : 8Kbps~160Kbps
Sampling Frequency : 11.025KHz ~44.1KHz
AGC :Automatic Gain Control
NOTE
ConvenientFunctions
ConvenientFunctions
5-23
MENU-Control
Line-in/Ext.Mic
You can select external microphone or
line-in when recording.
Line-In : To record through Line-In
Ext. Mic : To record through an external microphone
Use this setting to playback audio files while the
player is attached to your PC.
OFF : The player will playback audio files while
connected to the PC (to save battery life).
ON : The player to show “Connected to USB” on the
screen and you can transfer files to the player.
DownloadActivity
Line-in/Ext. Mic
Line-in
line-in/ext. mic
download activity
Ext. Mic
DOWNLOAD ACTIVITY
ext mic
download activity
- To record from an external microphone,
chose the LINE-IN recording mode (see page 5-14,
5-15).
- The recording quality level will be set to the values
chosen for LINE-IN recording (see page 5-22).
NOTE
This must be set to “ON” in order to transfer files to the player.
NOTE
MENU-PlaybackMode
PlaybackMode
RepeatMode/ShuffleMode
A number of Repeat and Shuffle modes are available. Select the one you
want by pressing MODE button (Multi selecting available)
(refer to page 5-3, 5-4)
After push
How to select
And button for selection.
Only the selected PLAYBACK MODE will be available when you press the
MODE/REC button (For details, please refer to page 5-3, 5-4)
And buttontoexit.
or
5-24
ConvenientFunctions
ConvenientFunctions
5-26
5-25
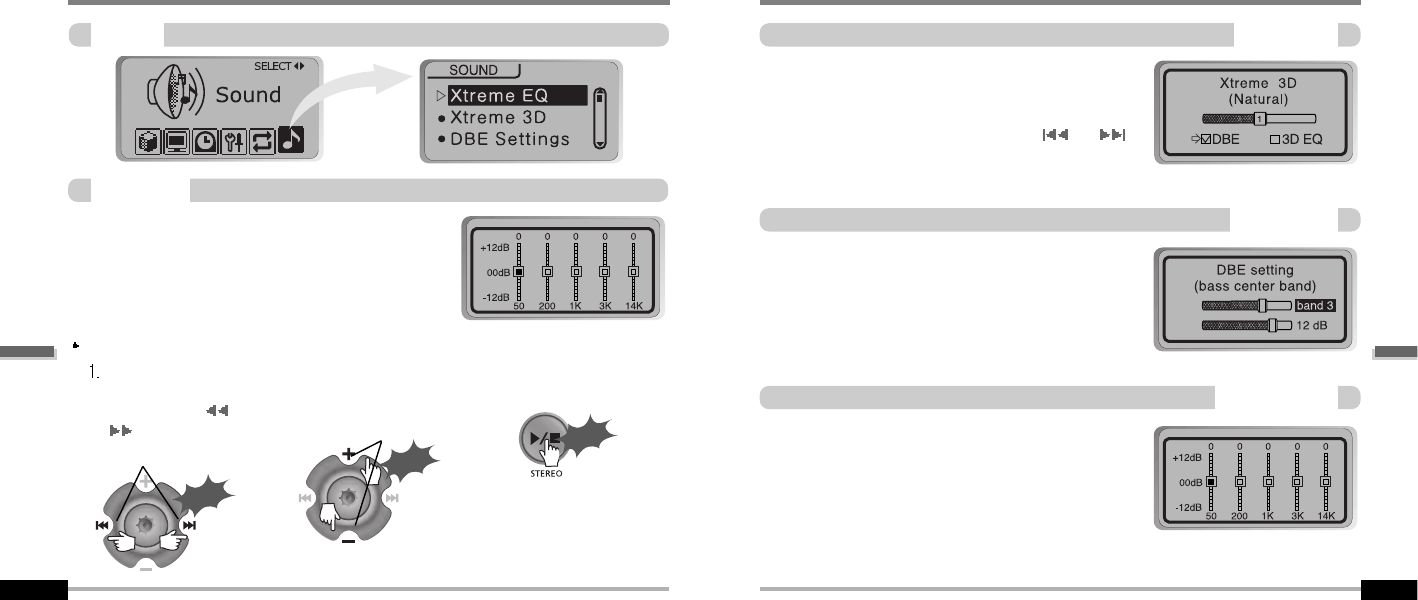
MENU-Mode
IntroMode
Intro: Plays the beginning 10 seconds of each
track.
Intro Highlight : Plays 10 seconds from 1 minute
into each track in sequential order.
While playing, short slide of the
I
,
I
(or
VOL +, VOL -) lever will skip the current track
set time ahead.
OFF : Study Mode is disabled.
The range is 1~60 seconds.
STUDY MODE
You can input your name or custom text. The saved text
is displayed when playback stops.
Select the character by using and
switch and press Navi/Menu button to input the
character.
To delete the character, press MODE button.
To scroll between English and your preferred
language, use MEMORY/EQ button.
To move the cursor in the name window, use +
and - on Volume switch.
Save and Exit
Name
Stopped playback
Button Operation
MENU-Name
NOTE
Chinese and Chinese characters are not supported in the Name feature.
ConvenientFunctions
ConvenientFunctions
5-27 5-28
MENU-Sound
Push
Push
Click
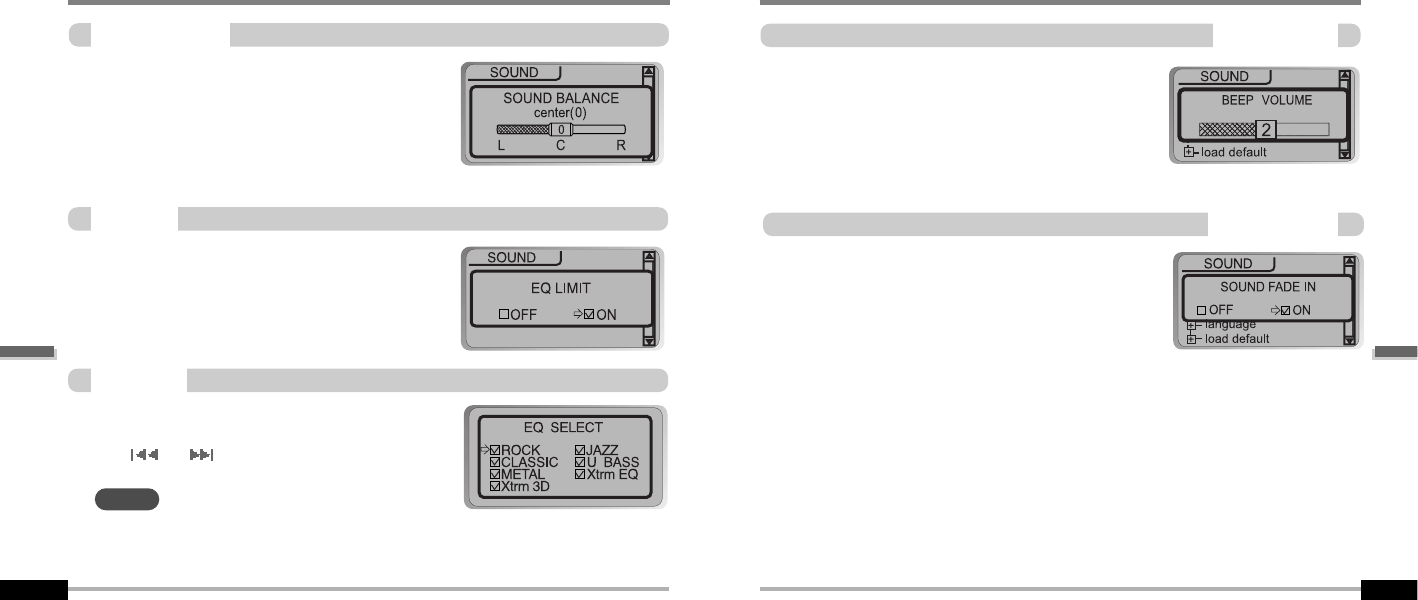
Sound
You can adjust the sound to your preference.
There are 5 band frequency steps, set from
-12dB to +12dB by 3dB step.
Select the
Frequency step to
set using the
I
,
I
switch.
2. Adjust the level using
the VOL + or VOL -
switch.
3. To exit Xtreme EQ
setting
Select the Frequency
Adjust the level
XtremeEQ
How to set Xtreme EQ
MENU-Sound
Xtreme3D
You can adjust the level of 3D sound(minimum,
Natural, and Maximum). You can extend 3D sound
by selecting Bass Boost or 3D EQ. You can also
adjust the level of 3D sound with the or (or
VOL +, VOL -) lever. Select DBE or 3D EQ with the
Navi/Menu button.
You can select the Bass Center Band level from
Band 1 to 4. You can also set the Bass Boost gain
from 0 dB to 15dB by 3dB step.
DBE (Dynamic Bass Enhancement) enhances
Low & Middle frequencies and only operates when
using Xtreme 3D.
SetEQtoUserEQtouse3DEQ.
You can adjust the sound to your preference.
There are 5 band frequency steps, set from -12dB
to +12dB by 3dB step.
DBESetting
3DEQSetting
ConvenientFunctions
ConvenientFunctions
5-29 5-30
MENU-Sound
SoundBalance
Balance your sound to the right or left or keep it in
the center according to your preference. When
Sound Balance bar is moved to L (Left, 20),the
sound outputs at the left earphone. When the lever
is moved to R (Right, 20) the sound outputs at the
right earphone. The default value is 0 and the sound
outputs the same level at both earphones.
ON : Limit the control of equalizer frequency
to prevent distortion of sound.
OFF : You can enjoy the original sound
though distortion of sound may occur.
You can select various EQ modes.
Press NAVI/MENU button after selecting EQ by
using or (or VOL +, VOL -) switch.
You can not select NORMAL EQ.
If you do not select Xtrm EQ or Xtrm 3D, Xtrm EQ or Xtrm 3D modes will not be available during playback.
EQLimit
EQSelect
NOTE
Set beep volume ON/OFF or level.
Set to "0" for OFF.
BeepVolume
SoundFadein
When activated, volume increases gradually at
playback mode to prevent sudden loudness.
MENU-Sound
ConvenientFunctions
ConvenientFunctions
AdditionalInformation
AdditionalInformation
Contents
6
TROUBLE SHOOTING
PRECAUTIONS
ACCESSORIES
SPECIFICATIONS
6-1
6-2
6-3
6-4
Road Safety
Do not use headphones/earphones while driving, cycling, or operating any motorized vehicle. It
may create a traffic hazard and is illegal in some areas. It can also be potentially dangerous to play
your headsets at high volume while walking, especially at pedestrian crossings. You should
exercise extreme caution or discontinue use in potentially hazardous situations.
Preventing hearing damage
Avoid using headphones/earphones at high volume. Hearing experts advise against continuously
loud and extended play. If you experience a ringing in your ears, reduce volume or discontinue use.
Consideration for others
Keep the volume at a moderate level. This will allow you to hear outside sound and to be
considerate of the people around you.
OnHeadphonesandEarphones
Safety
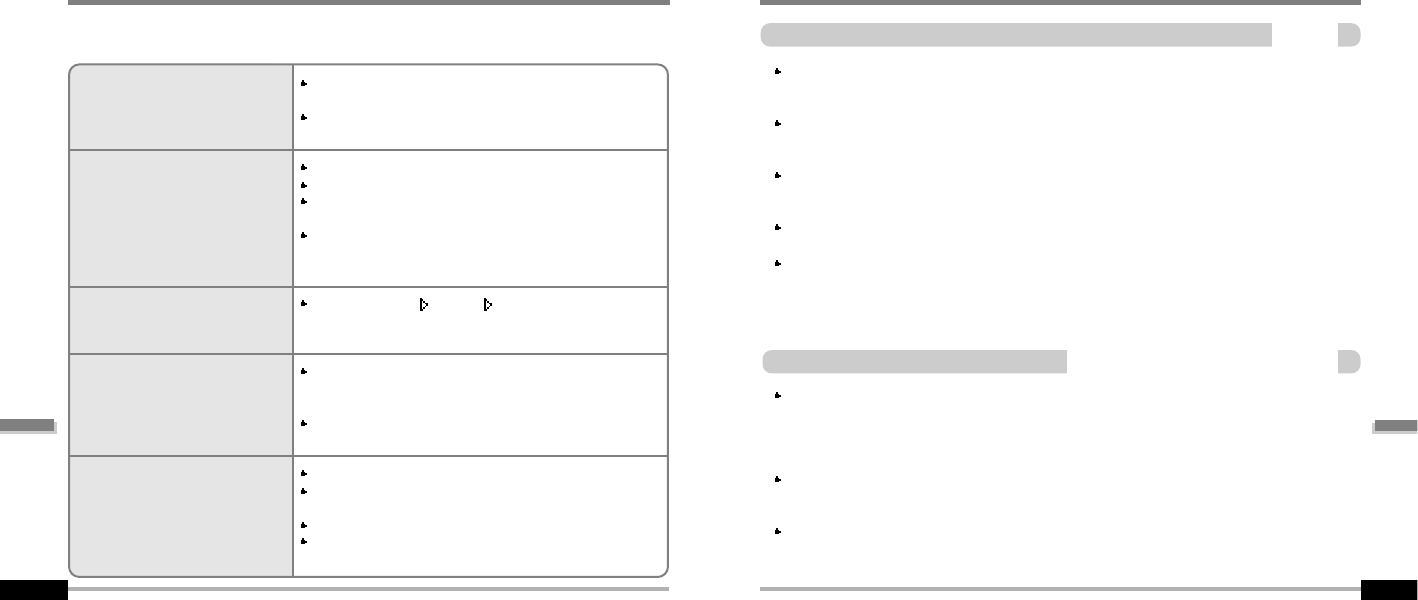
Should any problem persist after you have checked these symptoms,
consult your iRiver dealer or contact support at www.iRiver.com.
AdditionalInformation
Precautions
6-2
TroubleShooting
AdditionalInformation
6-1
No Power
No sound or distortion
during playback.
Characters in LCD are
corrupted.
Poor FM Reception.
Failed download of MP3 file
Check whether the HOLD switch on the player is ON
(Switch to OFF position)
Check the condition of the battery.
Insert a fresh battery.
Check whether VOLUME is set to "0".
Connect the earphones plug firmly.
Check whether the plug is dirty. Clean the plug with a dry
and soft cloth.
Corrupted MP3 or WMA files may make a static noise and
the sound may cut off. Listen to your files on the PC to
see if they are corrupted.
Check out Menu General Language and confirm
whether the right language has been selected.(Refer to
page 5-12)
Adjust the position of the player and earphones.
Turn off the power of other electric devices near the
player.
The Earphone cord functions as the antenna, they must
be plugged in for best reception.
Check the condition of the battery.
Check the connection between your computer and the
player to ensure that the cable is secure.
Check the Manager program to make sure it is operating.
Check whether the player’s memory is full.
Avoid dropping or impacting the player.
The player is designed to operate while walking or running, but dropping or excessively impacting
the player maybe cause damage.
Avoid contacting the player with water.
Damage to the internal parts of the player may occur if the player comes into contact with water. If
your player gets wet, dry the outside with a soft cloth as soon as possible.
Do not leave the player in a location near heat sources, or in a place subject to direct
sunlight, excessive dust or sand, moisture, rain, Mechanical shock, unleveled surface, or in
a car with its windows closed.
Remove the battery if player is unused for long periods of time.
Battery left in the player for a long time can corrode and damage the device.
All data stored on this device may be erased by a excessive impact, a thunder or an
electricity failure, etc. on the device.
The Manufacturer does not warrant and will not be held responsible in any way for damages or loss
of data, including loss of data stored on this device, resulting from a excessive impact, a thunder or
an electricity failure. You will be responsible for safe-guarding all data stored on this device.
1
12
23
3
4
45
56
6
7
78
89
9
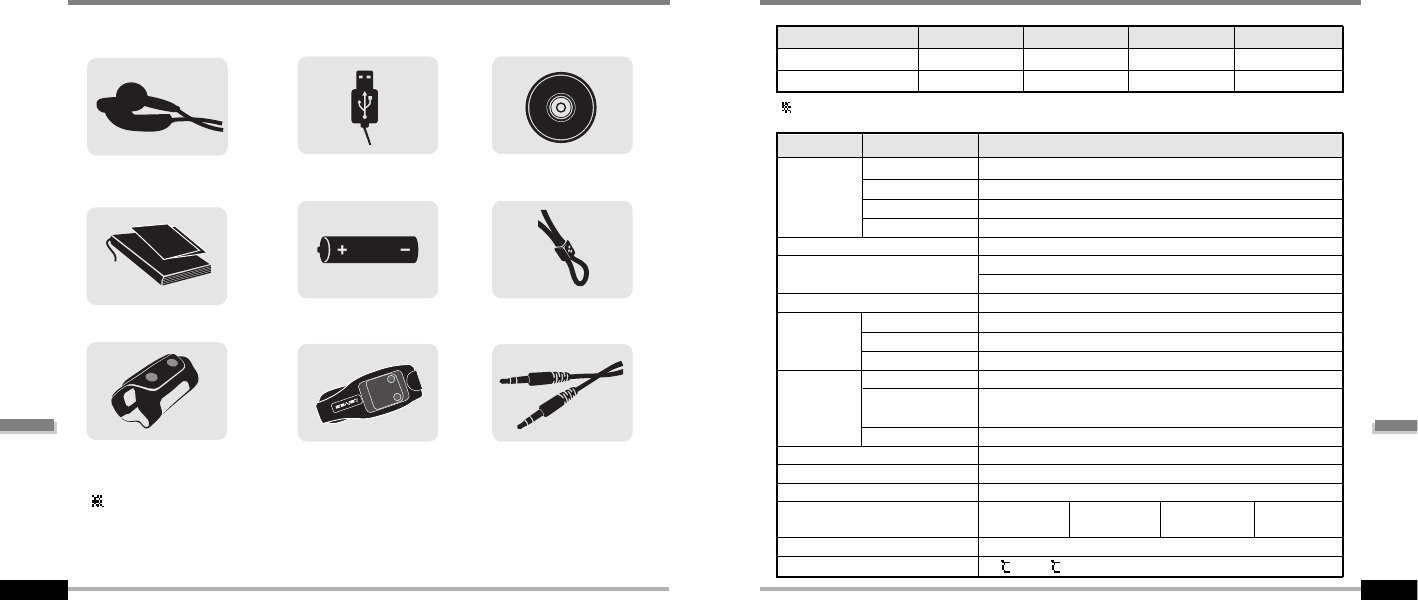
USB cable
Carrying Case
Installation CD
Neck strap for carrying
Audio Cable (Line-In)
Accessories subject to change without notice and may vary from image shown.
Dimension
Weight
Battery
FM TUNER
Audio
FILE
SUPPORT
87.5 MHz ~ 108 MHz
(L)12 mW + (R)12 mW (32 Ohm) max. Volume
50 dB
Headphone/Earphone-Cord Antenna
88.5(W)x36.2(D)x27.3(H)mm
40g(w/oBattery)
60 g (Battery included)
1AATypeAlkalinebattery
20 Hz ~ 20 KHz
(L)12 mW + (R)12 mW (32 Ohm) max. Volume
90 dB(MP3)
MPEG 1/2/2.5 Layer 3, WMA, OGG, ASF
8 Kbps ~ 320 Kbps
(OGG : 44.1 KHz, 96.1kbps~256kbps)
ID3VI,ID3V22.0,ID3V23.0,ID3V24.0
MPEG 1/2/2.5 Layer3
Full Graphic 4 Line with Backlight
40 Languages
Approx. 45 hours (128 kbps, MP3, Volume : 20, EQ Normal)
-5 ~40
Category ITEM Specifications
MP3 Encoding
LCD
Language
Voice Recording
Max. Playtime
Operational Temperature
Memory
Model No
USB version
128MB
iFP-780
1.1
256MB
iFP-790
2.0
FM Frequency range
Headphone Output
S/N ratio
Antenna
Frequency range
Headphone Output
S/N ratio
File Type
Bit Rate
Tag Info
Approx. 36:00 hrs
(8kbps, 128 MB) Approx. 72:00 hrs
(8kbps, 256 MB)
512MB
iFP-795
2.0
Approx. 144:00 hrs
(8kbps, 512 MB)
Memory is not expandable.
Specifications
6-4
Accessories
6-3
1GB
iFP-799
2.0
Arm Band
User Manual/Warranty card
Quick Start Guide
Earphone/ Earphone cover
Battery(AA type 1EA)
Approx. 288.00 hrs
(8kbps, 1 GB)
AdditionalInformation
AdditionalInformation

6-5 6-6
NoteNote