Ikea Kitchen Installation Step By Poster Assembly Instruction Step3_NA
2014-07-06
: Ikea Ikea-Kitchen-Installation-Step-By-Step-Poster-Assembly-Instruction ikea-kitchen-installation-step-by-step-poster-assembly-instruction ikea pdf
Open the PDF directly: View PDF ![]() .
.
Page Count: 4
© Inter IKEA Systems B.V. 2005.
3
Design and Quality
IKEA of Sweden
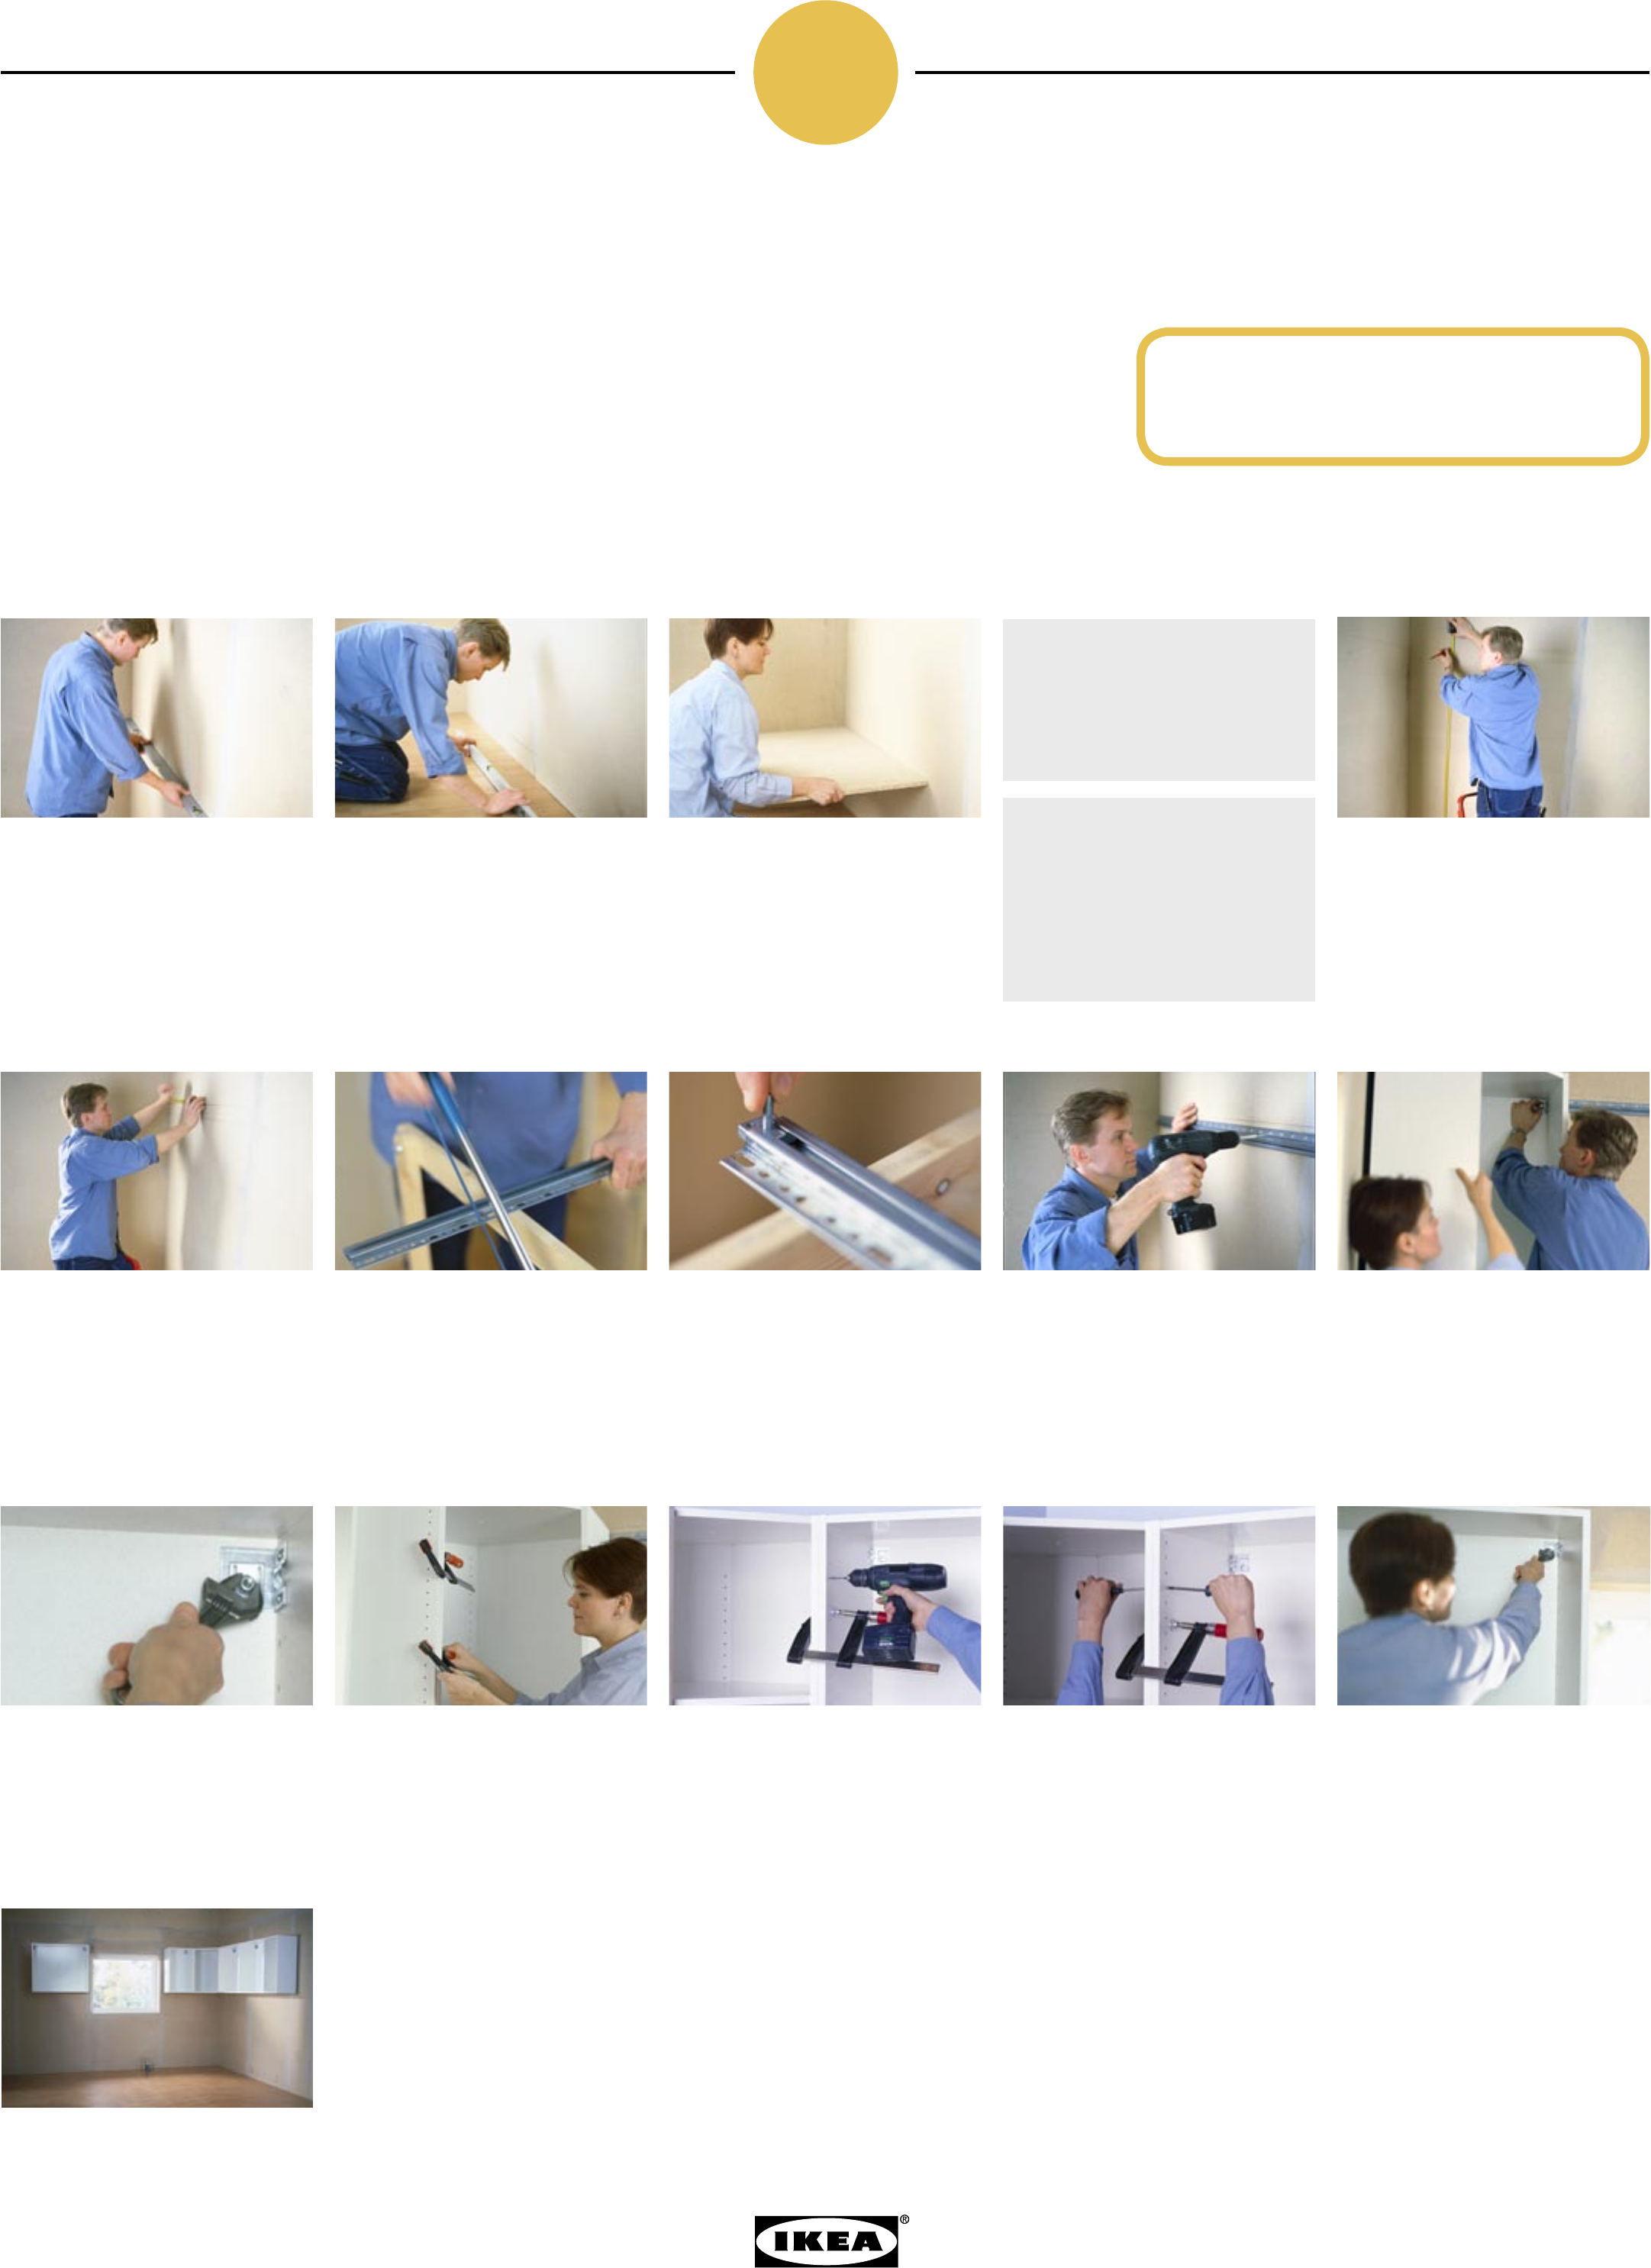
Hang the wall cabinets
AKURUM wall cabinets are mounted using a sturdy
steel suspension rail. This ensures a strong installation,
and makes it easier to hang and level the cabinets. In
most kitchens, it’s easiest to install the wall cabinets
first. This way there won’t be any base cabinets to work
around and you can more easily use a stepladder. If you
don’t have wall cabinets to install, go straight to Step 4.
If you haven’t already done so in Step 1, measure and
draw the position of the cabinets on the wall to be sure
everything will fit. It’s also important to mark any
uneven spots on the wall and smooth them out with
putty or shims.
Hang this poster on the wall
so you’ll have your hands free!
Important before you begin installing Begin installing the wall cabinets
1. Fill in irregularities
Start by checking the walls visually
and running a 4 foot level along the
surface. Mark any uneven spots such as
bows and high spots. If major problems
need to be fixed, it’s best to hire a
professional. It may also be necessary
to use shims when mounting wall
cabinets. Shims are often used to fill
in gaps and correct the angle: Use a
piece of wood, fibre-board or plywood
– depending on the size of the gap.
2. Check the floor for uneven spots
Find out if the floor is uneven. This is
important to consider if you want to
be sure there will be room for legs or
toekicks under all cabinets. Use a spirit
level to check the areas where you’ll be
installing base or high cabinets. Find
the floor’s highest and lowest points
and use a pen to mark them on the
wall.
3. Right-angled corners
Fit a combination square or right
angled wood panel into each corner,
and see if there are any gaps between
it and the wall. If the gap is more
than 1/4”, call your IKEA expert for
assistance. In a “U” shaped kitchen,
measure between opposite walls at
a number of spots to see if they are
parallel.
Good to know: If you will be
installing a high cabinet, don’t make
final adjustments or fully tighten
the screws until after the cabinet
is installed. It’s easier to see if
everything is level and fits correctly
when the cabinet is standing.
Good to know: Before installing the
fan cabinet saw a hole for the fan and
fan duct. Instructions are enclosed
with the fan. If you’re installing a fan
over a gas hob, you must follow spe-
cial regulations. These may be differ
from country to country. Before you
start, find out what regulations apply
in your country.v
4. Mark the level lines for the wall
cabinets and suspension rail
Using the high point on the floor
that you marked in Step 1, measure
up the wall 83-7/8” for the top of 30”
wall cabinets or 92-5/8” for 39” wall
cabinets. Next, locate the bottom of the
suspension rail by measuring down
2-1/2” from the first mark. Using your
4 foot level, draw level lines at both
points on the wall.
5. Finding the studs in drywall
At the marked suspension rail line, tap
the wall from the corner out (or use a
stud-finder) to check for the first stud.
Mark its position. While subsequent
studs are usually at 16” intervals, they
may be at 12” or 24” intervals in some
kitchens. Mark the location of each
stud along the line. This will show you
where to attach the suspension rail to
the wall.
6. Cut the suspension rail
Measure the length of the wall cabinets
to be installed along one wall. Include
the length of wall behind a high cabi-
net only if the high cabinet is 12” deep.
Subtract 1/4” from the overall measure-
ment. (This will leave 1/8” of space at
either end of the rail.) Use your hack
saw to cut the suspension rail to this
length.
7. Insert suspension rail hardware
Slide the suspension rail hardware into
the suspension rail before putting it up.
You’ll need two pieces per wall cabinet.
(Be sure to position one piece on each
side of the corner cabinet if your plan
calls for one.) You may find it helpful to
tape the hardware into place until the
rail goes up.
8. Secure the suspension rail
Secure the suspension rail to the studs,
aligning the bottom edge of the rail
with the level line marked on the wall.
If you found a bow in the wall of more
than 1/4” in Step 1, shim the suspen-
sion rail until it is straight. Should
the end of the rail fall between studs,
secure it to the wall with a heavy duty
anchor.
9. Hang the corner cabinet
Starting with the corner cabinet, align
one piece of the suspension rail hard-
ware with the predrilled hole at the top
of the cabinet. Position the second hole
and its hardware. Note: If you don’t
have a corner cabinet, install a cabinet
that fits against both the back and side
walls, allowing the filler space shown
on your plan.
10. Level and secure the cabinet
Fit the small metal plate over the bolt,
thread the nut loosely in place. Level
the cabinet, using shims at the bottom
edge if necessary. With your wrench,
loosely secure the cabinet hardware. Do
not tighten; this will allow you to make
adjustments once all of the cabinets are
installed.
11. Hang the remaining wall cabinets
Hang the rest of the cabinets in the
same way, aligning each with the
previous one. Use your C-clamps to
temporarily hold adjacent cabinets into
position. To avoid marring the surface
of your cabinets, use a small scrap
of wood between the clamp and the
cabinet.
12. Drill through cabinet walls
You’ll find predrilled holes on the
inside of each cabinet. For all doors
except ULRIKSDAL use a 3/16" drill bit
to drill through the fourth holes from
the top and bottom edges. (The second
and third holes are for the door hing-
es.) For ULRIKSDAL door, drill through
the second holes from the top and bot-
tom edges. (The hinges for ULRIKSDAL
fit into the third and fourth holes from
the top/bottom.)
13. Fasten cabinets together
Place the connection screws enclosed
with the cabinet frames into the holes
and tighten. Remove the C-clamps.
Continue fastening the remaining cabi-
nets together in the same way.
14. Tighten the mounting screws
When all wall cabinets have been
mounted, aligned and connected, and
final adjustments have been made,
tighten all of the mounting hardware.
Slide the plastic covers in place over
the metal corner bracket.
You’ve completed Step 3!
And the wall cabinets are in place.
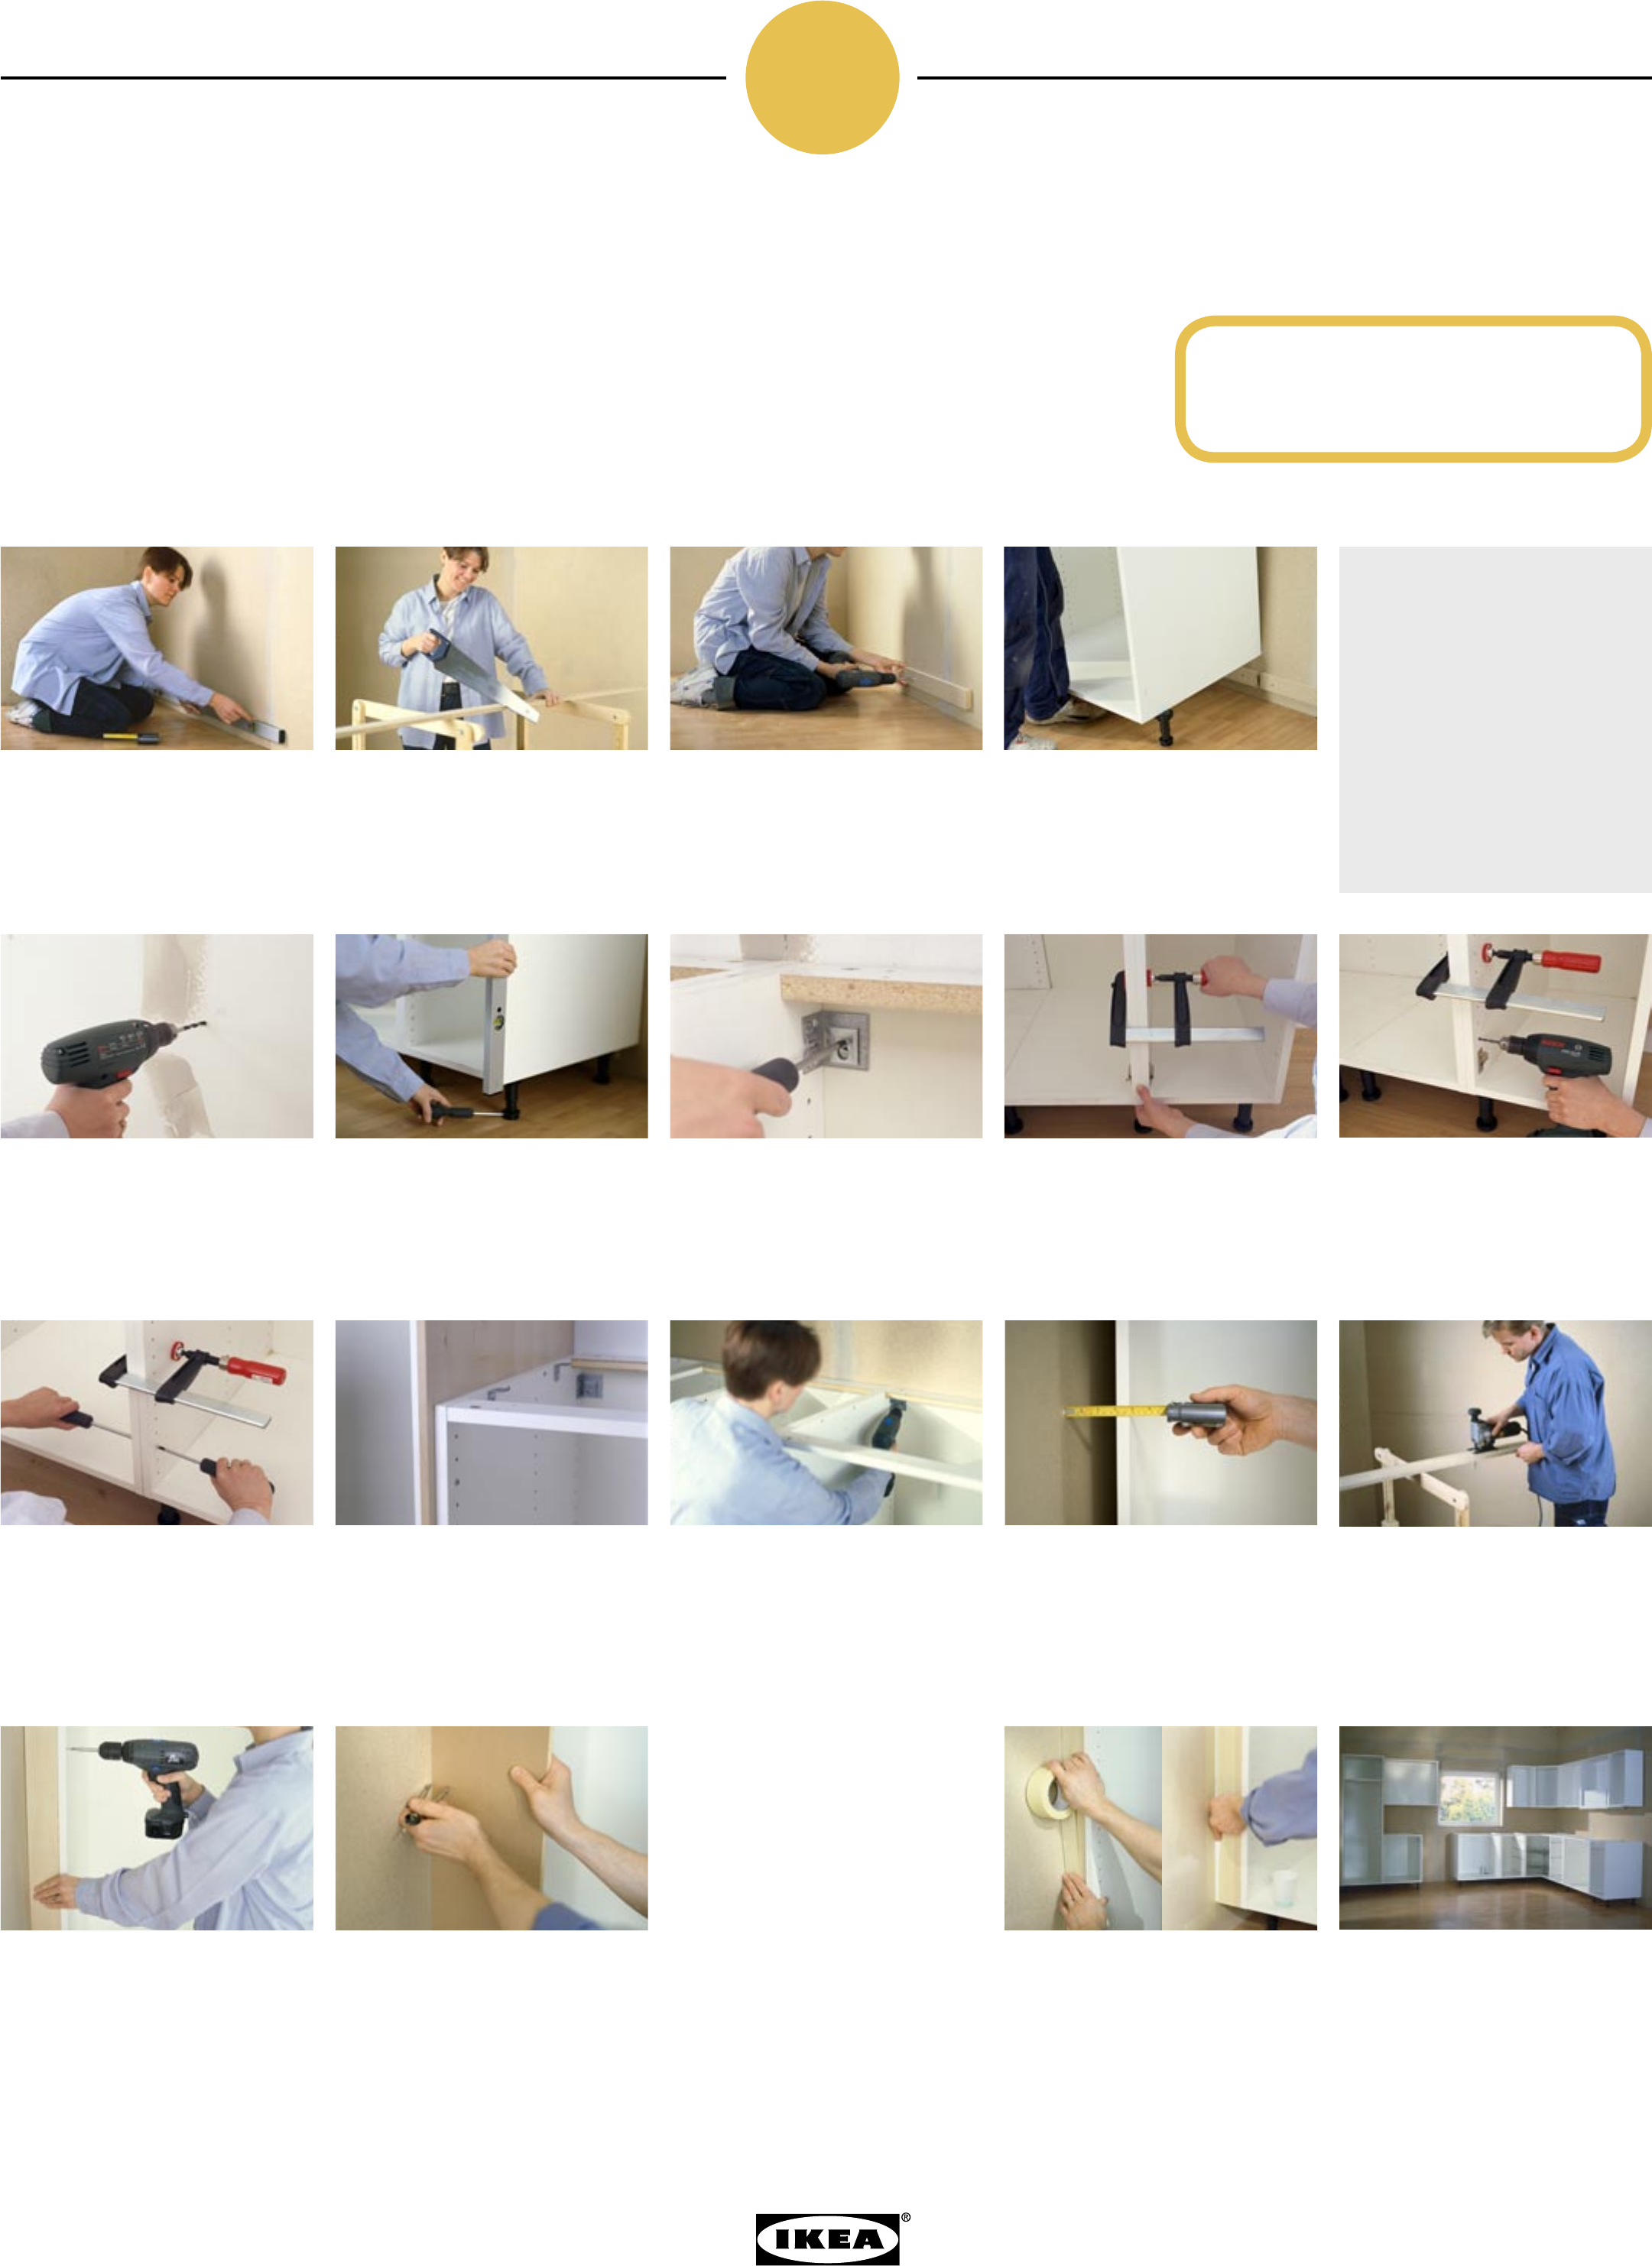
Install base and high cabinets
Hang this poster on the wall
so you’ll have your hands free!
4
9. Drill through the cabinet walls
For all doors except ULRIKSDAL use a
3/16” drill bit to drill through the fourth
holes from the top and bottom edges.
For ULRIKSDAL door, drill through
the second holes from the top/bottom.
When installing a drawer cabinet, drill
through the fifth hole from the top.
8. Install the next base cabinet
Mark, drill, and insert the screws for the
next cabinet. Lift the cabinet into place,
carefully aligning it with the previous
cabinet. Use a G-clamp to fasten the
cabinets together temporarily.
7. Secure the cabinet to the wall
Tighten the screws, but not completely.
Be sure the cabinet is level, front-to-
back and side-to-side. Hint: If you plan
to install a lazy susan – do it now. It’s
much easier before the countertops are
in place.
6. Install the corner cabinet
Lift the corner cabinet back into place
and adjust the height of the legs so that
it stands level. Use a spirit level to be
sure.
5. Use the right screws and fittings
Drill holes at the spots you’ve marked.
Be sure to use drill bits, screws and fit-
tings that are appropriate for your wall
material. If you have a plaster wall and
there’s no wall stud where you’ve drilled,
insert a mooring screw before the screw
and tighten halfway.
Now it’s time for the base and high cabinets. Before
you begin, locate all plumbing, power sources and
other utilities. Mark around these and using a key-
hole saw, cut the appropriate openings before you
install the cabinets.
In the following steps, you’ll install the legs at the
front of the cabinets and secure a cabinet wall strip
to the wall. The wall strip is made of particleboard
and comes packed together with the toekicks. If you
prefer, instead of the wall strip for support, you can
put legs on the back of the cabinets.
10. Fasten cabinets together
Place the connection screws enclosed
with the cabinet frames into the pre-
drilled holes and tighten. Remove the
G-clamp. Continue in this fashion with
the remaining cabinets.
11. Install the high cabinet
The high cabinet should be installed the
same way you installed the base cabi-
nets. If you’re using cover panels on the
sides , follow the enclosed assem-bly in-
struction to mount them before install-
ing the cabinet.
12. Tighten all the screws
When all base cabinets have been
mounted and aligned, tighten all screws
into the wall. Now the high cabinet is in
place, make the final adjustments to the
wall cabinets and tighten all the screws.
13. Measure filler pieces
Check the wall with your level to see if
it is even and flat. If the wall is uneven,
skip to picture 16. If the wall is even,
measure the distance from the wall to
the cabinet and mark this distance at
the top and bottom of the filler piece.
14. Cut filler pieces
With a handsaw: draw a line connect-
ing the top and bottom marks on the
front side of the filler, and cut it with the
face side up. With a keyhole-saw: mark
both sides of the filler. Put masking tape
over the line on the front side to ensure
an even edge, without chipping. Cut it
with the back side up.
© Inter IKEA Systems B.V. 2005.
Design and Quality
IKEA of Sweden
Good to know: Legs can be shared by
two cabinets. See the assembly instruc-
tions. Place the corner cabinet against
the wall so that its back edge is resting
on the wall strip. Through the holes at
the top back corners of the cabinet, mark
where to drill for the fixing screw. Set
the cabinet aside.
Good to know: If there’s no corner
cabinet, install the cabinet that will fit
against the back and side walls. Make
sure there’s enough room between the
cabinet and the side wall for the filler
piece.
3. Secure the wall strip
Align the top edge of the wall strip with
the level line you marked at 4-5/6" in
point 1, Step 4 . Secure it to the wall
studs. Should the end of the wall strip
fall between studs, secure it to the wall
with a mooring screw or expansion bolt.
4. Start with the corner cabinet
Attach legs to the front edges of the
cabinets according to the assembly in-
structions. If you are not using the wall
strip as support, attach back legs as well.
Always use a back leg at the end of the
run – it makes attaching the side toekick
easier. For more, see Good to know.
2. Cut base cabinet wall strips
Measure the length of the base and high
cabinets to be installed. Do not include
the wall space behind appliances. Cut
the wall strips into corresponding
lengths. Cut the strip 1–1/2” shorter
where a side toekick is planned.
15. Install filler pieces
Put the filler piece in place with the cut
edge against the wall. Attach by drill-
ing a screw through the predrilled holes
from the inside of the cabinet. To be sure
the filler piece stays in place, first fasten
a strip to the wall. Install other filler
pieces in the same way. When all filler
pieces are in place, go to 17.
17. The finishing touch
To produce an airtight seal between the
wall and the cabinet, you’ll need to caulk
around the filler pieces. Choose a well-
made latex/silicon brand (it doesn’t need
to be waterproof.) Tape alongside the
area to be caulked. Apply a bead of caulk
into the crevice. Dab your finger into
a 3-in-1 oil to prevent the caulk from
sticking, then run your finger along the
caulk, forcing it into the crevice. Re-
move the tape for an airtight seal and a
straight edge.
You’ve completed Step 4!
And the cabinet frames are in place.
16. Uneven walls
If the wall is not level and flat, the filler
must be cut to conform to the wall’s
shape. To do this, you’ll need to make
a template for tracing the wall’s shape
onto the filler. A piece of thin plywood
or heavy cardboard makes a suitable
template. You’ll also need a measur-
ing tape, pencil and compass. Cut the
template material so that it’s the same
height as the cabinet. Hold it in place
where the filler will be installed. Open
the compass a couple of inches and place
the point against the wall. Holding the
compass horizontal and level, follow the
line of the wall so that the pencil traces
a clear line on the template. To cut the
template to the correct width, measure
the distance from the farthest point on
the wall to the cabinet. Find the same
point on the template and mark it. Draw
a straight line from this point to the top
and bottom of the template to form the
flat edge that will fit against the cabinet.
Cut the template and check that it fits,
then trace the shape onto the filler and
follow the cutting directions in
picture 14.
1. Marking the level lines
Using the high point of the floor that you
marked earlier, measure up 4-5/16”. Use
a 4 foot level to draw a line on the wall
at this height. Now measure 34-1/2”
from the same point on the floor and
draw another level line. This will help
you level the top of the base cabinets.
Install the countertop
Now it’s time to install the countertops and sink.
When measuring and sawing the solid wood tops
throughout this step, we suggest placing them on
sawhorses for easiest handling. Once you’ve finished
Step 5, it’s a good idea to hire professionals to con-
nect the water, gas or electricity, and to install the
cooktop, dishwasher and lighting.
Hang the poster on the wall
so you’ll get your hands free!
5
© Inter IKEA Systems B.V. 2005.
Design and Quality
IKEA of Sweden
1. Space between cabinets and walls
Lay the countertop on top of the base
cabinets, allowing ⅛” at the back walls,
and a smaller space against the side
wall or high cabinets. If you’re install-
ing tops in an “L” shape, the two sec-
tions must meet in a butt join. (Do not
make angle or mitrecut joins.) These
steps allow the counter to undergo nor-
mal expansion and contraction.
2. Exact measurement on
the countertop
Measure the countertop from the end
of the base cabinet row out, allowing
for the cover panel plus a ½” overhang.
Mark with a pencil on the finished side
if you’ll be using a handsaw and on the
underside if using a power saw.
3. Saw the countertop
If you’re sawing by hand, we recom-
mend using a fine-toothed handsaw
for control. To avoid splintering the
countertop, tape over the area to be
cut. If you’re using a circular saw, turn
the countertop face down and clamp a
straight-edge in place to guide the saw
along the cut line. Finish the cut edge
with your file. Treat the cut edge.
Good to know: If you have a kitchen
where two laminate countertops meet,
cover the join with a cover strip before
you screw the countertops into place.
Because of moisture and steam, it’s
important to have a moisture barrier
under the countertop where you have
the dishwasher. Use VARIABEL diffu-
sion barrier for extra protection.
Good to know: Sand and oil your
countertop regularly for long-term
beauty and protection. Stains and
minor damage can be removed us-
ing fine sandpaper. Wipe the sanded
surface clean and re-oil the affected
area.
4. Mark a spot for the sink
With the countertop in place, trace
the inside of the base cabinet on the
underside of the countertop. This helps
assure that the sink cutout will be
aligned correctly. Then, place the sink
upside down on the underside of the
countertop, positioning it correctly side
to side and front to back. Trace around
the edge of the sink with a pencil. Use a
pencil and a straight edge, draw a “cut”
line inside this line. Read more in the
assembly instruction that came with
your sink.
5. Saw the sink hole
Place the countertop on the sawhorses.
Drill a ½” hole for the keyhole-saw
blade at all four corners of the cut line.
Following this same cut line, saw the
hole for the sink unit.
6. Seal the sink cutout
To prevent moisture from penetrating
the countertop, apply a polyurethane
silicone along the cut edges with a
paintbrush.
7. Room for the sink?
Fit the countertop back into place on
the base cabinet. Check that the sink
hole is not obstructed by the top frame
rails of the base cabinet. If it is, you’ll
need to trim the rails so that the sink
will fit properly.
You’ve completed Step 5!
And all the countertops and the sink
are in place.
10. Sand and oil the countertop
Your solid wood countertop was pre-
treated at the factory to condition and
protect it until installation. To prepare
it for use, sand the surface with a fine
sandpaper and finish it with an ap-
proved wood treatment oil, for example
BEHANDLA.
9. Secure the countertop
Your countertop should be secured as
shown using the hardware provided.
The slotted brackets allow the counter-
top to expand and contract normally.
Set countertops in place, allowing the
same gaps as when you measured.
Locate attachment points at regular
intervals and drill pilot holes before
securing the top.
8. Install the sink
Lift off the countertop and turn it up-
side down, placing it back on your saw-
horses. Install the sink according to the
assembly instruction enclosed with it.
You only have you only have a few more things left
to do! But they’re important, so be sure to take your
time. Remember to install child-safe catches on the
doors and drawers, hob guards and any other devises
you’ve chosen to make the kitchen safer for your
children. Your new kitchen will then be a place for
the whole family to enjoy!
© Inter IKEA Systems B.V. 2005.
Design and Quality
IKEA of Sweden
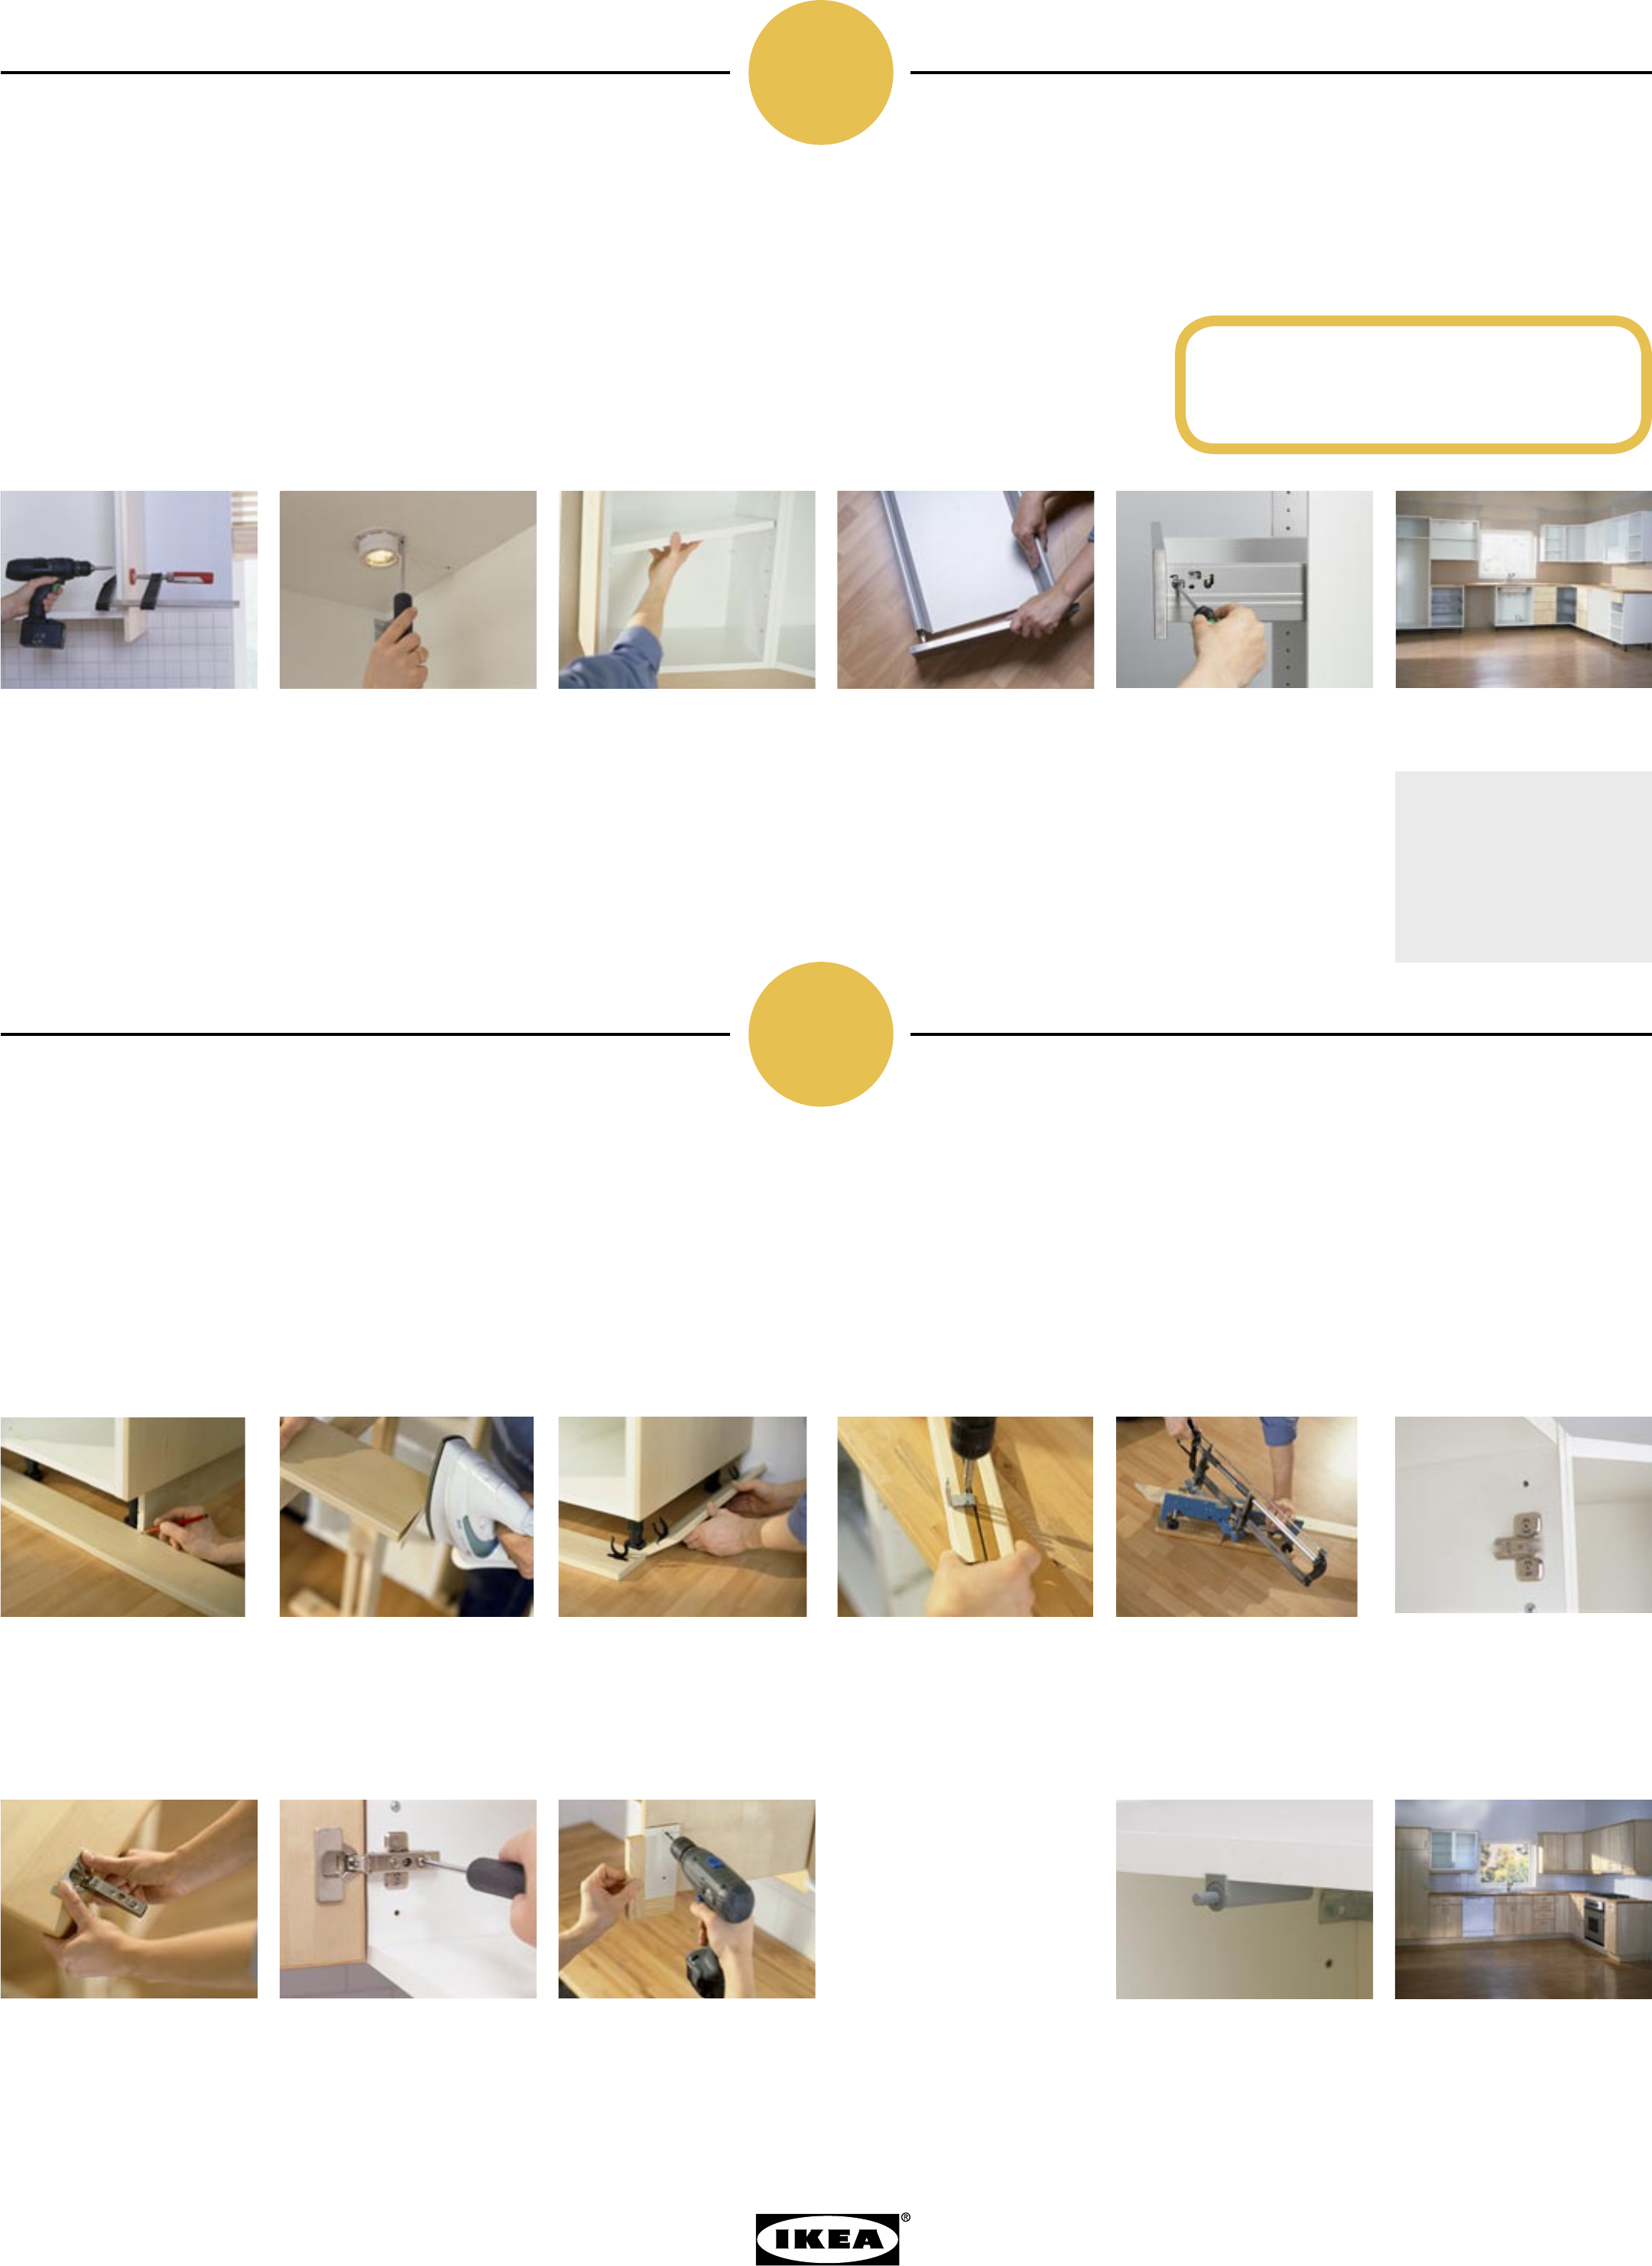
Install drawers, shelves & lighting
The cabinets have predrilled holes for quick and easy
installation of shelving, drawers and interior fittings.
This also makes it simple to make adjustments or
add interior fittings later on.
If you need to attach cover panels to the cabinet
frames, put them on before you install interior
fittings, since they’re screwed on from the inside. Hang the poster on the wall
so you’ll get your hands free!
6
7
The finishing touches makes all the difference
1. Install cover panels
Temporarily secure the cover
panel into place using a G-clamp.
Drill pilot holes through the
cabinet frame from the inside of
the cabinets, being careful not
to drill through the cover panel.
Screw the cover panel into place.
Remember that the cover panels
must be shortened 2½” if you are
not going to install decor strips
underneath the wall cabinets
- saw the top edge so that the
sawn surface is not visible from
below.
2. Install lighting
Now it is time to install lighting
in your glass-door cabinets. Use
a qualified electrician for profes-
sional results.
3. Put the shelves in place
Insert four supports per shelf
into the predrilled holes in-
side each cabinet, then rest the
shelves on top of them. Think
about what you need to store,
and place the shelves to make
best use of the space. You can
move the supports and the
shelves anytime you wish.
4. Attach drawer fronts
Using the hardware provided,
mount each drawer front to the
drawer box through the
predrilled,prealigned holes.
5. Adjust drawer fronts
Use a screwdriver to adjust the
drawer fronts and assure they’re
perfectly aligned. Attach knobs
or handles to the drawer fronts
after you’ve installed the draw-
ers in the cabinet frames. This
makes it easier to be sure they
are all even, and at the same
level.
You’ve completed Step 6!
And shelves, lighting and draw-
ers are in place.
Good to know: The drawers
glide smoothly on sturdy self-
closing runners for years of
service. To set the drawer in the
open position, slide it out until
it stops, then tilt slightly up so
it clears the stop point on the
runner. To close the drawer tilt
it up again and roll it shut.
1. Saw toekicks
Carefully measure and mark
toekicks so that they cover the
open area below your base cabi-
nets. Cut the toekicks to the cor-
rect length using a fine-toothed
handsaw.
2. Finish the edges
Cover the cut edge of the toe-
kicks with the enclosed edging
strip. Press it on with a warm
iron, then cut it to the right
length.
3. Clip toekick into place
Follow the assembly instruction
for attaching the toekick clips.
At corners set one clip facing up
and the other down – this allows
them both to fit on the same leg.
Snap the toekick into place.
4. Attach decor strips
Measure, cut and fit the decor
strips beneath the wall cabinets.
Instructions for installation and
placement are included with the
decor strips. Remember to attach
the sealing strips.
5. Install mouldings/cornices
Follow the assembly instruction
included with the moulding/cor-
nice. Measure carefully so that
cornices will be the right length.
For best results, use a mitre box
saw to cut the corners of each
moulding/cornice at a 45° angle.
6. Attach the hinge plate
Screw the door hinge base plate
into the second and third pre-
drilled holes at the top/bottom.
For ULRIKSDAL door, you must
screw the hinge base plate into
the third and fourth predrilled
holes.)
9. Attach door handles
A template makes it easy to place
handles in the same position on
all doors. Be sure to check on
which side the door opens before
you mark and drill the holes.
Hold a block of wood behind the
You’ve completed Step 7!
And your entire kitchen is in
place and ready to use. Consider
complementing with wall acces-
sories that save space on the
worktop.
door at the place you are drill-
ing so that the surface doesn’t
splinter when the drill bit goes
through.
7. Snap the hinge to the door
Insert the hinge body into the
predrilled hole in the door and
press as shown. No screws are
needed.
7. Snap the hinge to the door
Insert the hinge body into the
predrilled hole in the door and
press as shown. No screws are
needed.
10. Attach door bumpers
Door bumpers allow you to close
the door quitely and softly. Screw
the bumpers on the upper inside
of the cabinet, on the opposite
side of the hinge. Follow the
assembly instruction. Or use the
smaller bumpers included with
the hinges.
