Infinet Malta XM5X High Performance Broadband Wireless System User Manual InfiLINK XG
Infinet Malta Limited High Performance Broadband Wireless System InfiLINK XG
Contents
- 1. User Manual - CLI commands
- 2. User Manual
User Manual

InfiLINK XG
Software Version: v1.5.36
Last updated: 4/11/2016
Technical User Manual

Important Notice
Technical User Manual
InfiLINK XG ii
Legal Rights
© Copyright 2015 InfiNet Wireless. All rights reserved.
The information contained in this document is originated by, proprietary,
confidential and owned by InfiNet Wireless. No part of this document should be
disclosed, reproduced or distributed without the express written permission of
InfiNet Wireless Ltd.
InfiNet Wireless Ltd. reserves the right to change the information contained in this
document without prior notice. No part of this document may be considered as a
part of any contract or warranty.
Statement of Conditions
InfiNet Wireless Ltd. shall not be liable for errors contained herein or for incidental
or consequential damages in connection with the furnishing, performance or use of
this manual or equipment supplied with it.
Statement on the safe use
This InfiLINK XG equipment complies with RF exposure limits set forth for an
uncontrolled environment, when installed as directed. This equipment should be
installed and operated with fix-mounted antenna that are installed with a minimum
of 0.5 meters of separation distance between the antenna and all persons’ body
during normal operation.
FCC and IC Statement
Federal Communication Commission Interference Statement
(English)
This equipment has been tested and found to comply with the limits for a
Class B digital device, pursuant to Part 15 of the FCC Rules.
These limits are designed to provide reasonable protection against harmful
interference in a residential installation.
This equipment generates, uses and can radiate radio frequency energy
and, if not installed and used in accordance with the instructions, may
cause harmful interference to radio communications.
However, there is no guarantee that interference will not occur in a
particular installation. If this equipment does cause harmful interference to
radio or television reception, which can be determined by turning the
equipment off and on, the user is encouraged to try to correct the
interference by one of the following measures:

Important Notice
Technical User Manual
InfiLINK XG iii
• Reorient or relocate the receiving antenna.
• Increase the separation between the equipment and receiver.
• Connect the equipment into an outlet on a circuit different from that to
which the receiver is connected.
• Consult the dealer or an experienced radio/TV technician for help.
FCC Caution: Any changes or modifications not expressly approved by the
party responsible for compliance could void the user's authority to operate
this equipment.
This device complies with Part 15 of the FCC Rules.
Operation is subject to the following two conditions:
1. This device may not cause harmful interference, and
2. This device must accept any interference received, including interference
that may cause undesired operation
FCC et IC Déclaration
Federal Communication Commission Interference Statement
(Français)
Cet équipement a été testé et jugé conforme aux limites d'un dispositif
numérique de classe B, conformément à la partie 15 des règles de la FCC.
Ces limites sont conçues pour fournir une protection raisonnable contre les
interférences nuisibles dans une installation résidentielle.
Cet équipement génère, utilise et peut émettre de l'énergie radiofréquence
et, si non installé et utilisé conformément aux instructions, peut provoquer
des interférences dans les communications radio.
Cependant, il n'y a aucune garantie que des interférences ne se produiront
pas dans une installation particulière. Si cet équipement provoque des
interférences nuisibles à la réception radio ou de télévision, ce qui peut être
déterminé en allumant et éteignant l'équipement, l'utilisateur est encouragé
à essayer de corriger les interférences par une des mesures suivantes:
• Réorienter ou déplacer l'antenne de réception.
• Augmenter la séparation entre l'équipement et le récepteur.
• Branchez l'appareil dans une prise sur un circuit différent de celui sur
lequel est branché le récepteur.
• Consulter le revendeur ou un technicien radio / TV expérimenté.
Avertissement de la FCC: Les changements ou modifications non
expressément approuvés par la partie responsable de la conformité
pourraient annuler l'autorité de l'utilisateur à utiliser cet équipement.
Cet appareil est conforme à la partie 15 des règles de la FCC.
Son fonctionnement est soumis aux deux conditions suivantes:

Important Notice
Technical User Manual
InfiLINK XG iv
1. Ce dispositif ne peut causer des interférences nuisibles, et
2. Cet appareil doit accepter toute interférence reçue, y compris les
interférences qui peuvent provoquer un fonctionnement indésirable.
Disclaimer
The software is sold on an "AS IS" basis. InfiNet Wireless, its affiliates or its
licensors make no warranties, whatsoever, whether express or implied, with
respect to the software and the accompanying documentation. InfiNet Wireless
specifically disclaims all implied warranties of merchantability and fitness for a
particular purpose and non-infringement with respect to the software. Units of
product (including all the software) delivered to purchaser hereunder are not fault_
tolerant and are not designed, manufactured or intended for use or resale in
applications where the failure, malfunction or inaccuracy of products carries a risk
of death or bodily injury or severe physical or environmental damage (“high risk
activities”). High risk activities may include, but are not limited to, use as part of on-
line control systems in hazardous environments requiring fail-safe performance,
such as in the operation of nuclear facilities, aircraft navigation or communication
systems, air traffic control, life support machines, weapons systems or other
applications representing a similar degree of potential hazard. InfiNet Wireless
specifically disclaims any express or implied warranty of fitness for high risk
activities.
Indication of the countries
InfiNet Wireless equipment has no geographical limitations for selling and can be
supplied to any country of the world.
Limitation of Liability
InfiNet Wireless shall not be liable to the purchaser or to any third party, for any
loss of profits, loss of use, interruption of business or for any indirect, special,
incidental, punitive or consequential damages of any kind, whether arising under
breach of contract, tort (including negligence), strict liability or otherwise and
whether based on this agreement or otherwise, even if advised of the possibility of
such damages.
To the extent permitted by applicable law, in no event shall the liability for damages
hereunder of InfiNet Wireless or its employees or agents exceed the purchase
price paid for the product by purchaser, nor shall the aggregate liability for
damages to all parties regarding any product exceed the purchase price paid for
that product by that party (except in the case of a breach of a party’s confidentiality
obligations).

Important Notice
Technical User Manual
InfiLINK XG v

Technical User Manual
InfiLINK XG vi
About This Manual
About This Manual
This manual provides detailed technical information on the operation of the
InfiLINK XG, including system specifications, installation, commissioning,
maintenance and troubleshooting.
The document is intended to be used by qualified RF engineers/technicians and IT
professionals. Qualified personnel should have skills and experience in the
following areas:
Outdoor/indoor radio equipment installation
Outdoor wireless networks
TCP/IP networking protocols
Safety procedures and instructions for installing antenna equipment
Professional manage of electrical equipment and accessories
Safety procedures and instructions for working on towers and heights

Contents, Figures and Tables
Technical User Manual
InfiLINK XG vii
Table of Contents
FCC and IC Statement ........................................................................................................... ii
Getting started ............................................................................................................................ 1
1.1. Document structure ...................................................................................................... 2
1.2. Abbreviations ................................................................................................................ 2
1.3. Document marks ........................................................................................................... 3
System Description ..................................................................................................................... 4
2.1. Introducing InfiLINK XG ................................................................................................ 5
2.2. Hardware Description ................................................................................................... 5
2.2.1. Outdoor Units ........................................................................................................ 6
2.2.2. Power Supply Units (IDU) ...................................................................................... 8
2.2.3. Auxiliary Units ...................................................................................................... 10
2.3. InfiLINK XG Specifications .......................................................................................... 15
2.3.1. Performance ........................................................................................................ 15
2.3.2. Radio ................................................................................................................... 15
2.3.3. Data Communication ........................................................................................... 17
2.3.4. Configuration Management .................................................................................. 18
2.3.5. Electrical Characteristics ...................................................................................... 18
2.3.6. Physical Environmental........................................................................................ 18
2.3.7. Standards and Regulations .................................................................................. 19
Installation ................................................................................................................................ 20
3.1. Installation Requirements ........................................................................................... 21
3.1.1. Packing list .......................................................................................................... 21
3.1.2. Additional Items Required .................................................................................... 22
3.1.3. Optional Accessories ........................................................................................... 22
3.1.4. Precautionary Measures ...................................................................................... 22
3.2. Equipment Positioning Guidelines .............................................................................. 23
3.2.1. Antenna Placement ............................................................................................. 23
3.2.2. Mounting Types ................................................................................................... 24
3.3. Installing the Outdoor Units ......................................................................................... 26
3.3.1. Preparing the RJ-45 Connectors .......................................................................... 26
3.3.2. Preparing the SFP Connectors ............................................................................ 27
3.3.3. InfiLINK XG - Um ................................................................................................. 29
3.3.4. InfiLINK XG - Xm ................................................................................................. 31

Contents, Figures and Tables
Technical User Manual
InfiLINK XG viii
3.3.5. Grounding and Lightning Protection ..................................................................... 33
3.3.6. Grounding when Using AUX-ODU-INJ-G ............................................................. 34
3.3.7. Grounding when Using AUX-ODU-LPU-G ........................................................... 36
3.3.8. Antenna Alignment .............................................................................................. 39
3.4. Installing the Indoor Unit ............................................................................................. 39
Commissioning ......................................................................................................................... 40
4.1. Introduction ................................................................................................................. 41
4.2. Step by step procedure ............................................................................................... 41
Operation & Administration ....................................................................................................... 47
5.1. Introduction ................................................................................................................. 48
5.2. InfiLINK XG unit access .............................................................................................. 48
5.3. Status ......................................................................................................................... 49
5.3.1. Interface Statistics ...................................................................................................... 50
5.3.2. Wireless Link Statistics ............................................................................................... 51
5.4. Antenna alignment ...................................................................................................... 55
5.5. Maintenance ............................................................................................................... 57
5.5.1. Firmware..................................................................................................................... 58
5.5.2. Upload ........................................................................................................................ 60
5.5.3. Download.................................................................................................................... 60
5.5.4. Bottom section of the page ......................................................................................... 60
5.6. Settings ...................................................................................................................... 62
5.6.1. General ....................................................................................................................... 62
5.6.2. Network Access .......................................................................................................... 65
5.6.3. Radio .......................................................................................................................... 66
5.6.4. Switch ......................................................................................................................... 71
5.6.5. VLAN Switching .......................................................................................................... 75
5.6.6. SNMP ......................................................................................................................... 85
5.6.7. Apply and Try buttons for the configuration ................................................................. 88
5.6.8. Configuring QoS ......................................................................................................... 88
5.6.9. Configuring per-VLAN 802.1p priority assignment ...................................................... 92
Troubleshooting ........................................................................................................................ 94
6.1. Introduction ................................................................................................................. 95
6.2. The wireless link is down (it got lost) ........................................................................... 96
6.3. No access to the local unit .......................................................................................... 97
6.4. Expected capacity is not met ...................................................................................... 97
6.5. Errors on the wireless link, throughput fluctuations ..................................................... 99

Contents, Figures and Tables
Technical User Manual
InfiLINK XG ix
6.6. No data is being transferred ...................................................................................... 100
6.7. The management of the unit is lost ........................................................................... 100
6.7.1. ERConsole recovery procedure ................................................................................ 100
6.7.2. Restore to factory settings using ERConsole ............................................................ 102
Table of Figures
Figure 1 - IDU-BS-G Top View .................................................................................................... 8
Figure 2 - IDU-BS-G Front Panel Figure 3 - IDU-BS-G Rear Panel ..................................... 10
Figure 4 - AUX-ODU-INJ-G ....................................................................................................... 10
Figure 5 - AUX-ODU-LPU-G Front Panel .................................................................................. 12
Figure 6 - External High-gain Dual-polarization Parabolic Antenna ......... Ошибка! Закладка не
определена.
Figure 7 - Pole mounting ........................................................................................................... 25
Figure 8 - Ethernet Connector Components .............................................................................. 26
Figure 9 - RJ-45 Connection Step 1 .......................................................................................... 26
Figure 10 - RJ-45 Connection Step 2 ........................................................................................ 27
Figure 11 - SFP Connector Components .................................................................................. 27
Figure 12 - SFP Connection Step 1 .......................................................................................... 28
Figure 13 - SFP Connection Step 2 .......................................................................................... 28
Figure 14 - SFP Connection Step 3 .......................................................................................... 29
Figure 15 - InfiLINK XG - UM ODU Front Panel ........................................................................ 30
Figure 16 - InfiLINK XG - Um ODU Installation Procedure ........................................................ 30
Figure 17 - InfiLINK XG - Xm ODU Installation Procedure ........................................................ 32
Figure 18 - Grounding Connections Schematics when Using IDU-BS-G ................................... 34
Figure 19 - AUX-ODU-INJ-G Connecting and Sealing Procedure ............................................. 35
Figure 20 - AUX-ODU-INJ-G Mounting and Grounding Procedure ............................................ 35
Figure 21 - Grounding Connections Schematics when Using AUX-ODU-INJ-G ........................ 36
Figure 22 - AUX-ODU-INJ-G power connector .......................................................................... 36
Figure 23 - AUX-ODU-LPU-G Connecting and Sealing Procedure ........................................... 37
Figure 24 - AUX-ODU-LPU-G Mounting and Grounding Procedure .......................................... 37
Figure 25 - Grounding Connections Schematics when Using AUX-ODU-LPU-G ...................... 38
Figure 26 - Connection Scheme for IDU-BS-G .......................................................................... 39
Figure 27 - Connectivity to the unit ............................................................................................ 42
Figure 28 - Initial status of the link ............................................................................................. 43
Figure 29 - Link UP status ......................................................................................................... 45

Contents, Figures and Tables
Technical User Manual
InfiLINK XG x
Figure 30 - Web GUI login ........................................................................................................ 48
Figure 31 - Status page ............................................................................................................ 49
Figure 32 - Additional interface statistics ................................................................................... 51
Figure 33 - Antenna alignment tool ........................................................................................... 55
Figure 34 - Alignment test - graphical indicator ......................................................................... 56
Figure 35 - Firmware ................................................................................................................. 58
Figure 36 - New firmware warning message ............................................................................. 59
Figure 37 - Check latest release options ................................................................................... 60
Figure 38 - Unit reboot .............................................................................................................. 61
Figure 39 - How to create a diagnostic card .............................................................................. 61
Figure 40 - General page .......................................................................................................... 62
Figure 41 - Google Map ............................................................................................................ 65
Figure 42 - Network settings section ......................................................................................... 65
Figure 43 - Routing parameters ................................................................................................ 66
Figure 44 - Default frequency grids ........................................................................................... 69
Figure 45 - Custom frequency grids .......................................................................................... 70
Figure 46 - InfiLINK XG block diagram ...................................................................................... 71
Figure 47 - Switch Port Settings section .................................................................................... 72
Figure 48 - Switch Port Settings section .................................................................................... 72
Figure 49 - Port Interconnection Schema section ...................................................................... 74
Figure 50 - Connectivity matrix section ..................................................................................... 74
Figure 51 - Connectivity matrix section ..................................................................................... 74
Figure 52 - VLAN-based Switching section ............................................................................... 75
Figure 53- Adding a management IP address and associate it with VLAN 100 ......................... 76
Figure 54 - Default switching configuration ............................................................................... 77
Figure 55 - Adding and configuring a new VLAN ....................................................................... 77
Figure 56 - Configuring the operational mode of a port ............................................................. 78
Figure 57 - Configuring per-VLAN 802.1p priorities ................................................................... 79
Figure 58 – Different port state values ...................................................................................... 79
Figure 59 - Default native VLAN configuration .......................................................................... 79
Figure 60 - Native VLAN configuration example ........................................................................ 80
Figure 61 - Adding a management IP address and associate it with VLAN 100 ........................ 81
Figure 62 - VLAN-based switching configuration ....................................................................... 81
Figure 63 – Trunk and Acess VLAN example ............................................................................ 82
Figure 64 - Adding a management IP address and associate it with VLAN 100 ........................ 83
Figure 65 - VLAN-based switching configuration ....................................................................... 83

Contents, Figures and Tables
Technical User Manual
InfiLINK XG xi
Figure 66 - Adding a management IP address and associate it with VLAN 100 ........................ 84
Figure 67 - VLAN-based switching configuration ....................................................................... 84
Figure 68 - The options after clicking on the «Try» button ......................................................... 88
Figure 69 - Configuring per-port egress rate limiting ................................................................. 90
Figure 70 - Configuring the packet scheduling algorithm ........................................................... 91
Figure 71 - Configuring the QoS strategy .................................................................................. 92
Figure 72 - Adding and configuring a new VLAN ....................................................................... 92
Figure 73 - Configuring per-VLAN 802.1p priorities ................................................................... 93
Figure 74 - Basic faults classification ........................................................................................ 95
Figure 75 - Monitored wireless link ............................................................................................ 95
Figure 76 - ERConsole information ......................................................................................... 101
Figure 77 - Adding a new IP address ...................................................................................... 102
List of Tables
Table 1 - InfiLINK XG ODU Models with an Integrated Antenna.................................................. 6
Table 2 - InfiLINK XG ODU Models with a high-gain Integrated Antenna .................................... 7
Table 3 - InfiLINK XG ODU Connectorized Models ........... Ошибка! Закладка не определена.
Table 4 - IDU-BS-G Specifications .............................................................................................. 9
Table 5 - AUX-ODU-INJ-G Specifications ................................................................................. 11
Table 6 - AUX-ODU-LPU-G Specifications ............................................................................... 13
Table 7 - External High-gain Antennas Electrical Specification ................................................. 14
Table 8 - External High-gain Antennas Mechanical Specification .............................................. 14
Table 9 - External High-gain Antennas Environmental Specification ......................................... 15
Table 10 - Data Performance Specification ............................................................................... 15
Table 11 - Radio Technology Specification ............................................................................... 16
Table 12 - Air Protocol Specification ......................................................................................... 17
Table 13 - Wired Interfaces Specification .................................................................................. 17
Table 14 - Networking Specification .......................................................................................... 18
Table 15 - Management Specification ....................................................................................... 18
Table 16 - Electrical Specification ............................................................................................. 18
Table 17 - Physical and Environmental Specification ................................................................ 19
Table 18 - Compliance Specification ......................................................................................... 19
Table 19 - Package list ............................................................................................................. 21
Table 20 - The equipment necessary for initial configuration ..................................................... 42
Table 21 - Acceptable error rates for different applications ....................................................... 46

Contents, Figures and Tables
Technical User Manual
InfiLINK XG xii
Table 22 - Interface Statistics .................................................................................................... 50
Table 23 - General radio link parameters .................................................................................. 51
Table 24 - Wireless Links Statistics ........................................................................................... 53
Table 25- CINR value ranges .................................................................................................... 53
Table 26 - RSSI value ranges ................................................................................................... 53
Table 27 - InfiLINK XG throughput capabilities (laboratory figures) ........................................... 54
Table 28 - Acceptable error rates for different applications ....................................................... 54
Table 29 - Firmware parameters ............................................................................................... 58
Table 30 - Access credentials and Web GUI ............................................................................. 63
Table 31 - SNTP and Time Zone .............................................................................................. 64
Table 32 - GNSS and Location ................................................................................................. 64
Table 33 - Radio settings .......................................................................................................... 68
Table 34 - Port parameters ....................................................................................................... 73
Table 35 - SNMP Access .......................................................................................................... 87
Table 36 - SNMP Traps ............................................................................................................ 87
Table 37 - SNMP Trap Types ................................................................................................... 88
Table 38 - Priority queues mapping .......................................................................................... 89
Table 39 - The wireless link is down ......................................................................................... 97
Table 40 - No access to the local unit ....................................................................................... 97
Table 41 - Expected capacity is not met .................................................................................... 99
Table 42 - Errors on the wireless link, throughput fluctuations .................................................. 99
Table 43 - No data is being transffered ................................................................................... 100

Getting started
Chapter 1

Chapter 1 - Getting Started
Technical User Manual
InfiLINK XG 2
1.1. Document structure
This document consists of the following chapters:
“Getting started” - This chapter presents the information about this document’s
purpose and structure
“System Description” - This chapter describes the hardware, accessories and
technical specifications of the InfiLINK XG unit
“Installation” - This chapter describes the steps to be taken when installing the
equipment at the installation sites and installation site requirements
“Commissioning” - This chapter presents the actions and operations required
for the initial setup of an operational point-to-point link using InfiLINK XG units
“Operation & Administration” - This chapter presents the functionalities of the
web interface, a simple and efficient way to monitor the device status,
configure and maintain the equipment
“Troubleshooting” - This chapter presents the actions to be followed when
investigating an occured problem
1.2. Abbreviations
The following abbreviations are used in this document:
AC - Alternating Current
AMC - Automatic Modulation Control
BOM - Bill of Materials
BS - Base Station
CPE - Customer Premises Equipment
DC - Direct Current
DHCP – Dynamic Host Configuration Protocol
ETH - Ethernet
FDD - Frequency Division Duplexing
GUI – Graphical User Interface
HTTP - Hyper Text Transfer Protocol
IDU - Indoor Unit
IGMP - Internet Group Multicast Protocol
LAN - Local Area Network

Chapter 1 - Getting Started
Technical User Manual
InfiLINK XG 3
LED - Light Emitting Diode
LOS - Line of Sight
LPU - Lightning Protection Unit
MIB – Management Information Base
MIMO - Multiple Input Multiple Output
NLOS - Non-Line of Sight
ODU - Outdoor Unit
PoE - Power over Ethernet
PCP - Priority Code Point
PtMP - Point to Multi Point
PtP - Point to Point
QoS – Quality of Service
RF - Radio Frequency
SFP - Small Form-factor Pluggable
SNMP - Simple Network Management Protocol
STP - Shielded Twisted Pair
TDD - Time Division Duplexing
VLAN - Virtual Local Area Network
WRR - Weighted Round Robin
1.3. Document marks
CAUTION
All caution warnings are marked with a special warning sign. One should pay a great
deal of attention to what is written in the Caution section.
NOTE
All notes are marked with a special note sign. Notes usually contain useful comments or
hints to the described section of the document.

System Description
Chapter 2

Chapter 2 - System Description
Technical User Manual
InfiLINK XG 5
2.1. Introducing InfiLINK XG
InfiLINK XG is a proprietary system designed to meet the highest performance
standards at sub-7 GHz frequency bands (from 4.9 to 6.4 GHz). It is a high
capacity Point-to-Point solution, reaching a peak of 480 Mbps of net throughput in
40 MHz of spectrum and more than 100 Mbps in only 10 MHz. It has superior
spectral efficiency of up to 13 bps/Hz and it supports high order modulations, such
as QAM256 and QAM1024.
InfiLINK XG has full support for internal synchronization either via built-in
GLONASS/GPS receiver or via IEEE1588 PTP, making it ideal for applications
with tight synchronization constraints like small cell backhauling. Additionaly, a
very low constant latency of 0.5 ms is supported for 1 ms air frame period and up
to 3 ms for longer air frame period.
NOTE
Product technical specifications can be obtained from our web site at:
http://infinetwireless.com/products/infilink-xg
Available with a wide range of integrated antennas, as well as a connectorized
version for use with 3rd party external antennas and coupled with improved transmit
power and sensitivity, the XG family fits perfectly into a large array of applications
such as backhaul in the telecom, ISP or enterprise markets, education, oil and gas,
smart cities, video surveillance and public safety.
2.2. Hardware Description
The InfiLINK XG device comprises an Outdoor Unit (ODU) and an Indoor Unit to
be used with:
a) an external antenna providing connected to two N-type ports using low-loss RF
cables, or
b) an integrated antenna (regular or high-gain integrated antenna options
available)
and an Indoor Unit (IDU) to build a high-capacity MIMO point-to-point wireless link
over long distances.
Implemented in a robust all-weather metal enclosure and being IP66/67 compliant,
InfiLINK XG equipment can be used to create point-to-point wireless links at
distances in excess of 100 Km (depending on country regulations, antenna types,
interference, terrain, climate zones, etc.).
Chapter 2 - System Description
Technical User Manual
InfiLINK XG 6
2.2.1. Outdoor Units
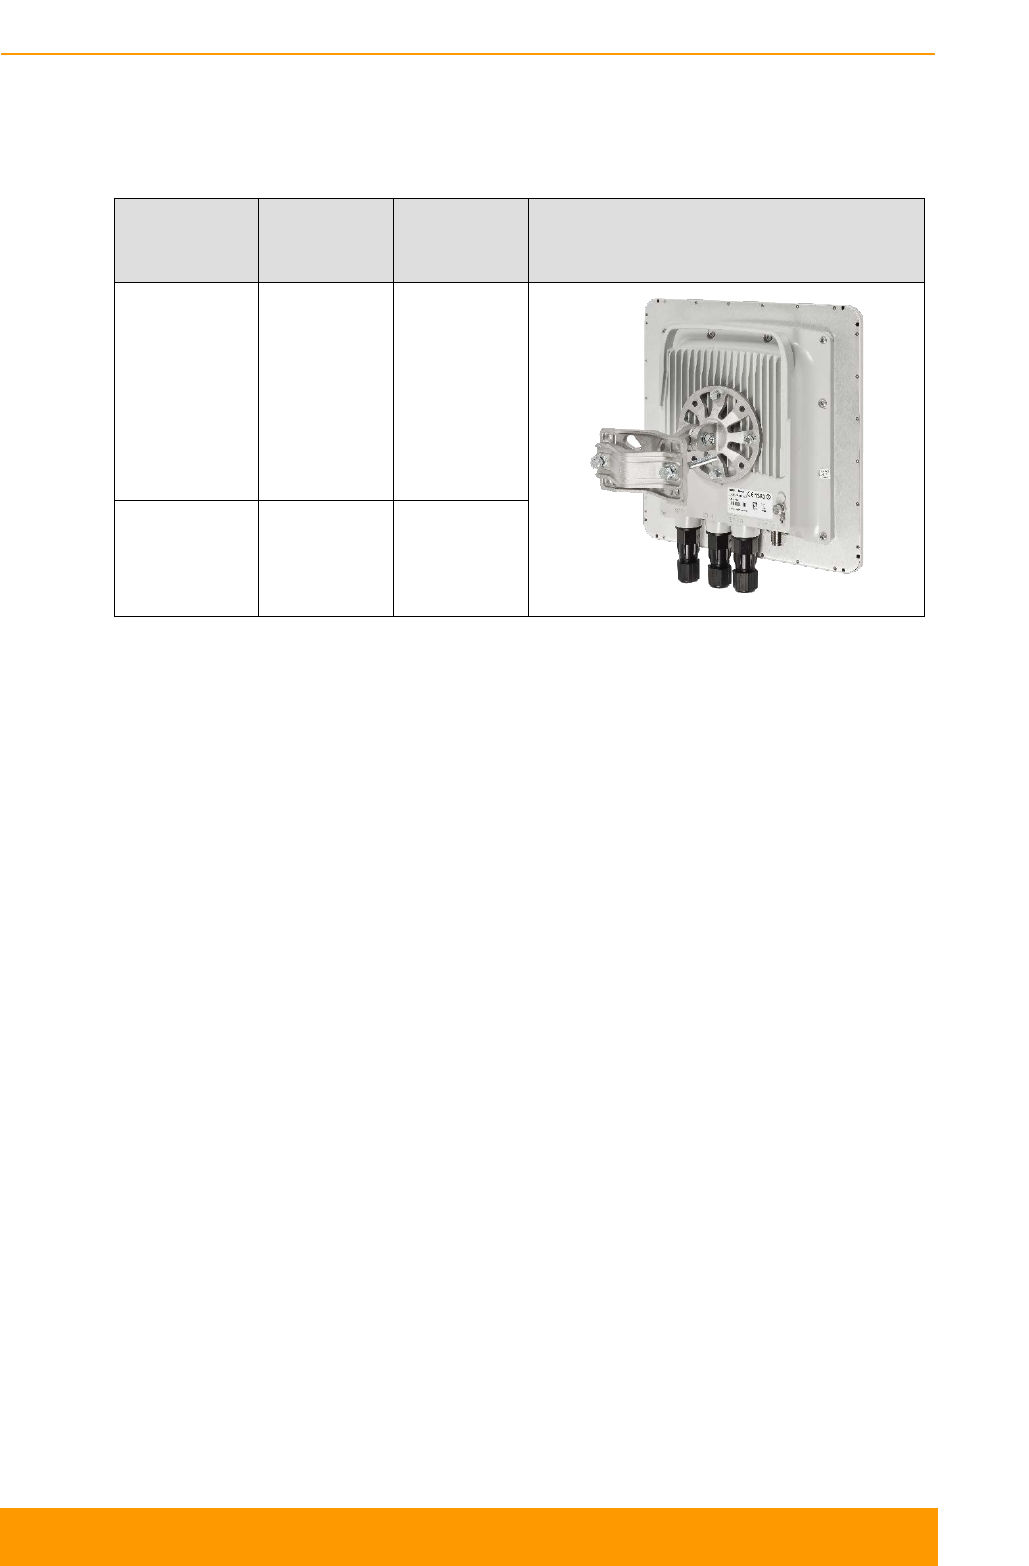
2.2.1.1. Integrated Antenna ODU Models
Part
Number Frequency
Band Integrated
Antenna Mechanics
Xm/5X.500.
2x500.2x23 4900-6000
MHz
Flat-panel,
23 dBi,
10°x10°
Xm/6X.500.
2x500.2x24 6000-6425
MHz
Flat-panel,
24 dBi,
8.5°x8.5°
Table 1 - InfiLINK XG ODU Models with an Integrated Antenna
Chapter 2 - System Description
Technical User Manual
InfiLINK XG 7
Part
Number Frequency
Band Integrated
Antenna Mechanics
Xm/5X.500.
2x500.2x28 4900-6000
MHz
Flat-panel,
28 dBi,
5°x5°
Xm/6X.500.
2x500.2x27 6000-6425
MHz
Flat-panel,
27 dBi,
5°x5°
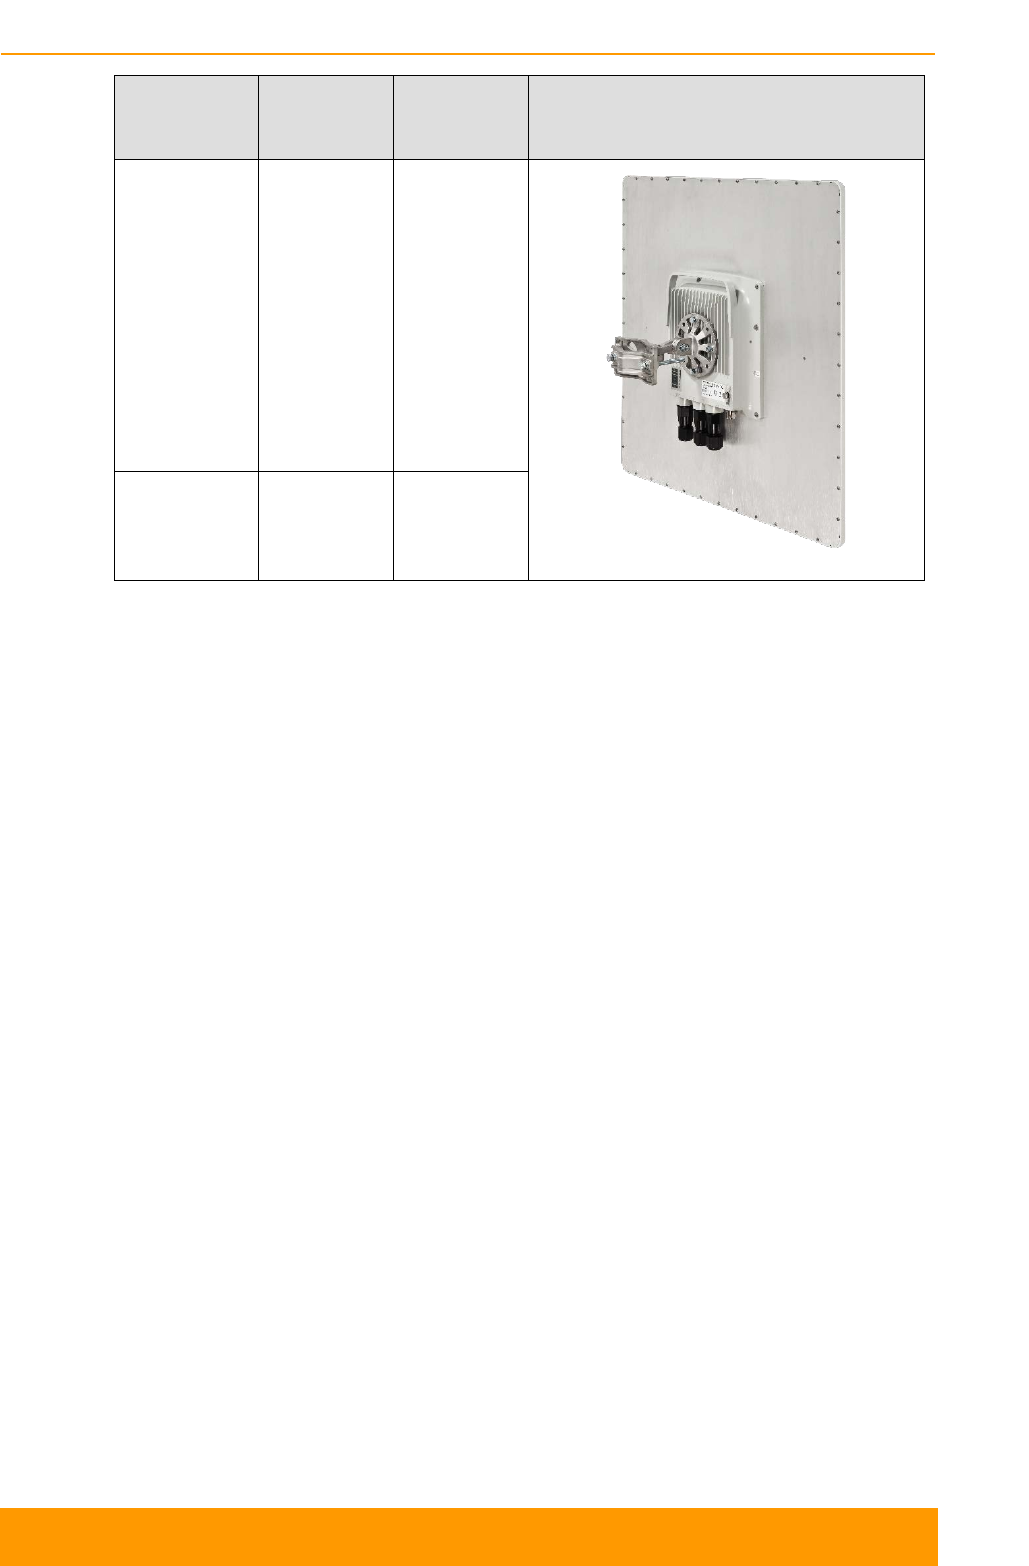
Table 2 - InfiLINK XG ODU Models with a high-gain Integrated Antenna
Chapter 2 - System Description
Technical User Manual
InfiLINK XG 8
2.2.2. Power Supply Units (IDU)
2.2.2.1. IDU-BS-G
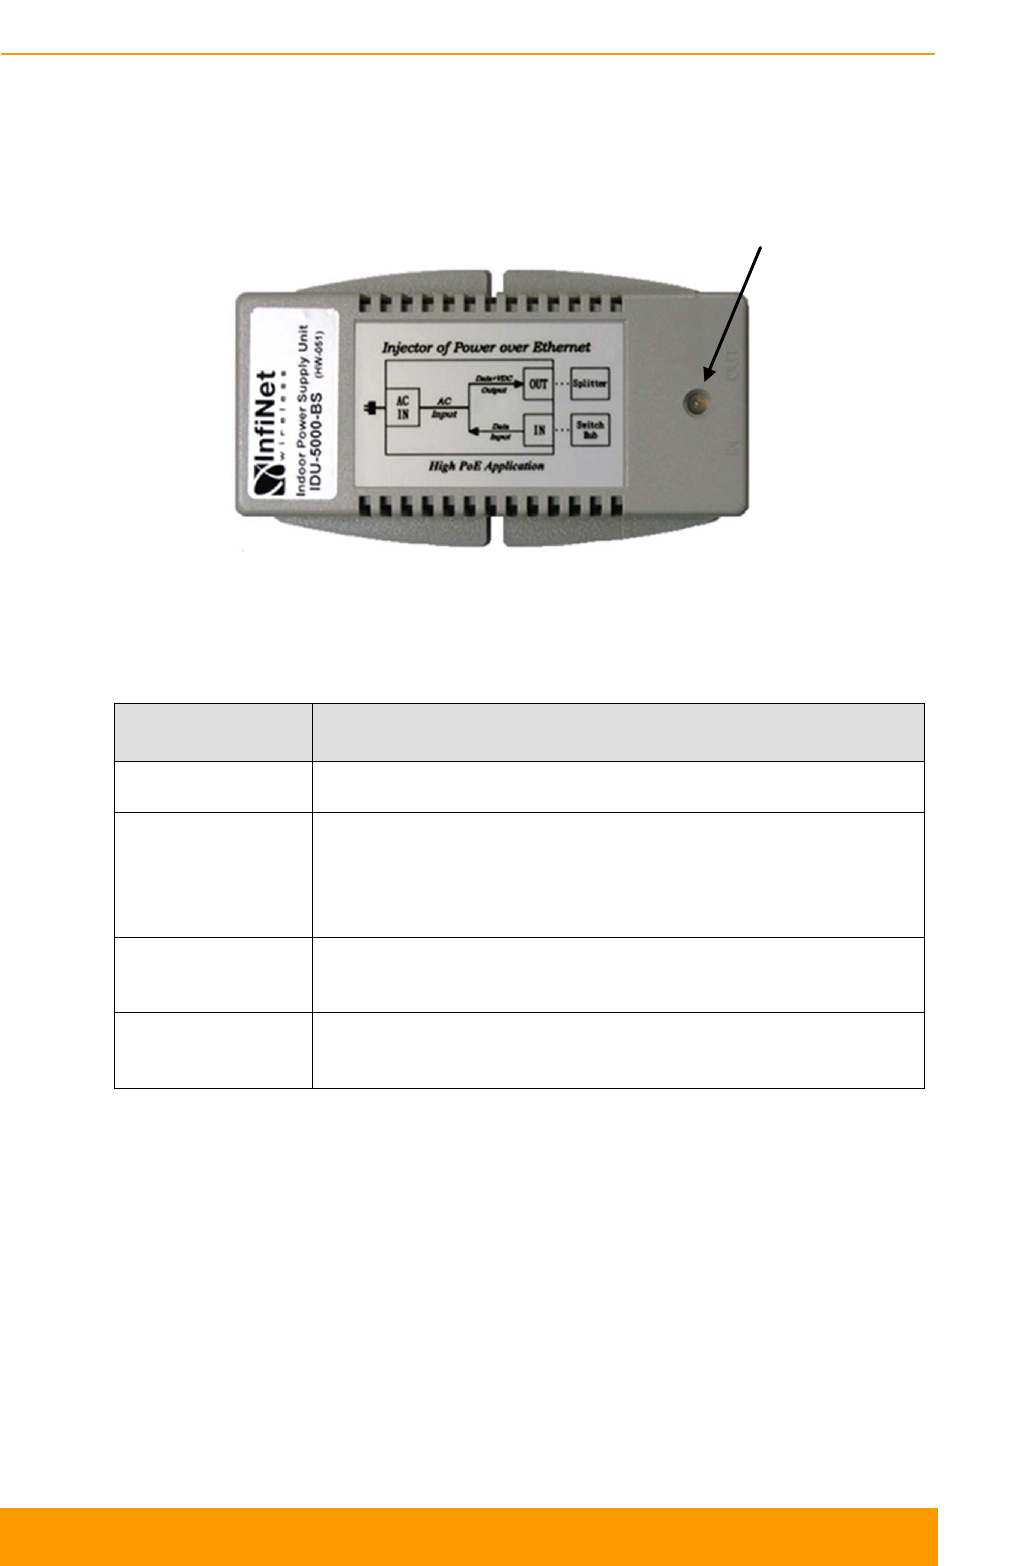
Power indicator
Figure 1 - IDU-BS-G Top View
Indoor Gigabit PoE Injector with lightning protection for InfiLINK XG, InfiLINK 2x2
and InfiMAN 2x2 series ODU.
Parameter Description
Size 125*72*38 mm (L*W*H)
Connectors and
Interfaces
ETH IN - Ethernet input (Data only)
ETH OUT - Ethernet output (Data+VDC), PASSIVE PoE
PWR - AC Input (100-240 V)
Supported
Ethernet Modes 10/100/1000Mbps (Gigabit Ethernet pass-through)
Output Voltage
& Current +56 V, 0.9 A (50.4W Max)

Chapter 2 - System Description
Technical User Manual
InfiLINK XG 9
Parameter Description
Ethernet
Connectors Pin-
out
ETH IN:
Pin
Description
1
Data pair A+
2
Data pair A-
3
Data pair B+
4
Data pair C+
5
Data pair C-
6
Data pair B-
7
Data pair D+
8
Data pair D-
ETH OUT:
Pin
Description
1
Data pair A+
2
Data pair A-
3
Data pair B+
4
+VDC + Data pair C+
5
+VDC + Data pair C-
6
Data pair B-
7
-VDC + Data pair D+
8
-VDC + Data pair D-
EMC
Meet:
- FCC Class B
- EN55022 Class B
Lightning
Protection
In compliance with:
- IEC 61000-4-2 (ESD) 15kV (air), 8kV (contact)
- IEC 61000-4-4 (EFT) 40A (tp = 5/50ns)
- IEC 61000-4-5 (Lightning) L5, 95A (tp = 8/20us)
Table 3 - IDU-BS-G Specifications
Chapter 2 - System Description
Technical User Manual
InfiLINK XG 10
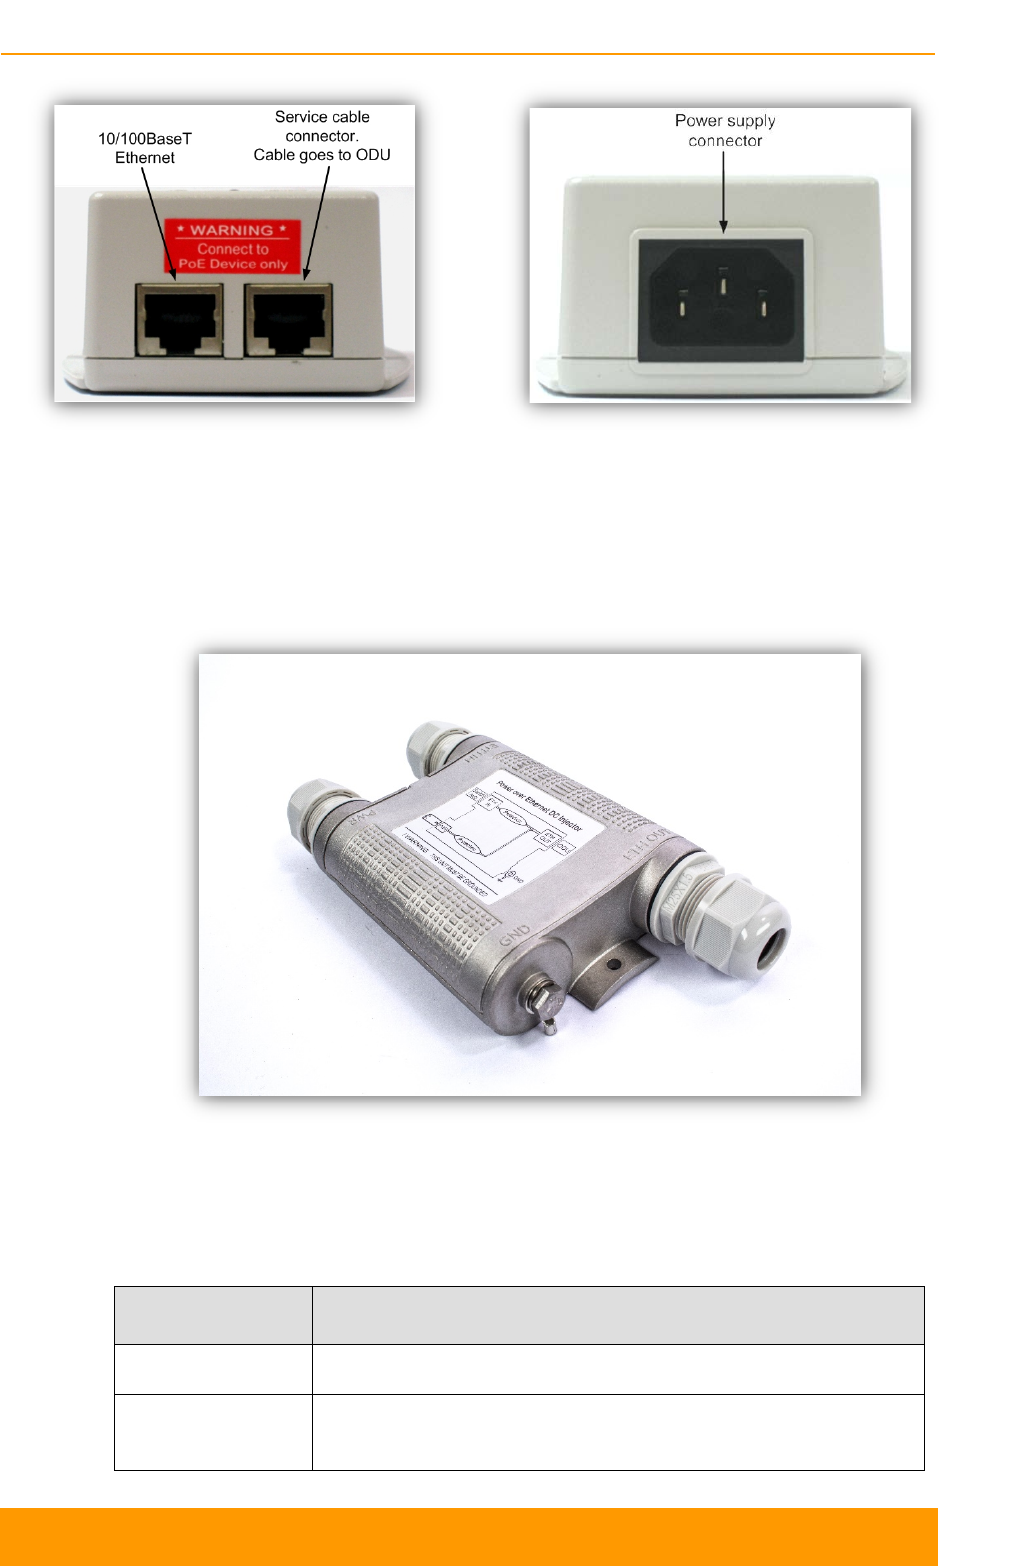
Figure 2 - IDU-BS-G Front Panel Figure 3 - IDU-BS-G Rear Panel
2.2.3. Auxiliary Units
2.2.3.1. DC Power Injector (AUX-ODU-INJ-G)
Figure 4 - AUX-ODU-INJ-G
Optional indoor/outdoor DC injector with built-in lightning protection. It greatly
reduces complexity of the deployment in the cases where DC source is available
on the rooftop eliminating the need of weather-sealed cabinets.
Parameter Description
Size and Weight 34x94x121 mm, 0.28 Kg
Connectors and
Interfaces ETH IN - Ethernet input

Chapter 2 - System Description
Technical User Manual
InfiLINK XG 11
Parameter Description
ETH OUT - Ethernet output (data+VDC, protected leg)
PWR - DC Input
GND - Ground clamp
Supported
Ethernet Modes 10/100/1000 Mbps (Gigabit Ethernet pass-through)
Water and Dust
Protection IP66 and IP67
DC Range ±43...±56 VDC
Ethernet
Connectors Pin-
out
ETH IN:
Pin
Description
1
Data pair A+
2
Data pair A-
3
Data pair B+
4
Data pair B-
5
Data pair C+
6
Data pair C-
7
Data pair D+
8
Data pair D-
ETH OUT:
Pin
Description
1
Data pair A+
2
Data pair A-
3
Data pair B+
4
+VDC + Data pair B-
5
+VDC + Data pair C+
6
Data pair C-
7
-VDC + Data pair D+
8
-VDC + Data pair D-
Lightning
Protection
In compliance with:
- GR-1089
- IEC 61000-4-2 (ESD) 15kV (air), 8kV (contact)
- IEC 61000-4-4 (EFT) 40A (tp = 5/50ns)
- IEC 61000-4-5 (Lightning) L5, 95A (tp = 8/20us)
- ETSI ETS 300 386
Table 4 - AUX-ODU-INJ-G Specifications
Chapter 2 - System Description
Technical User Manual
InfiLINK XG 12
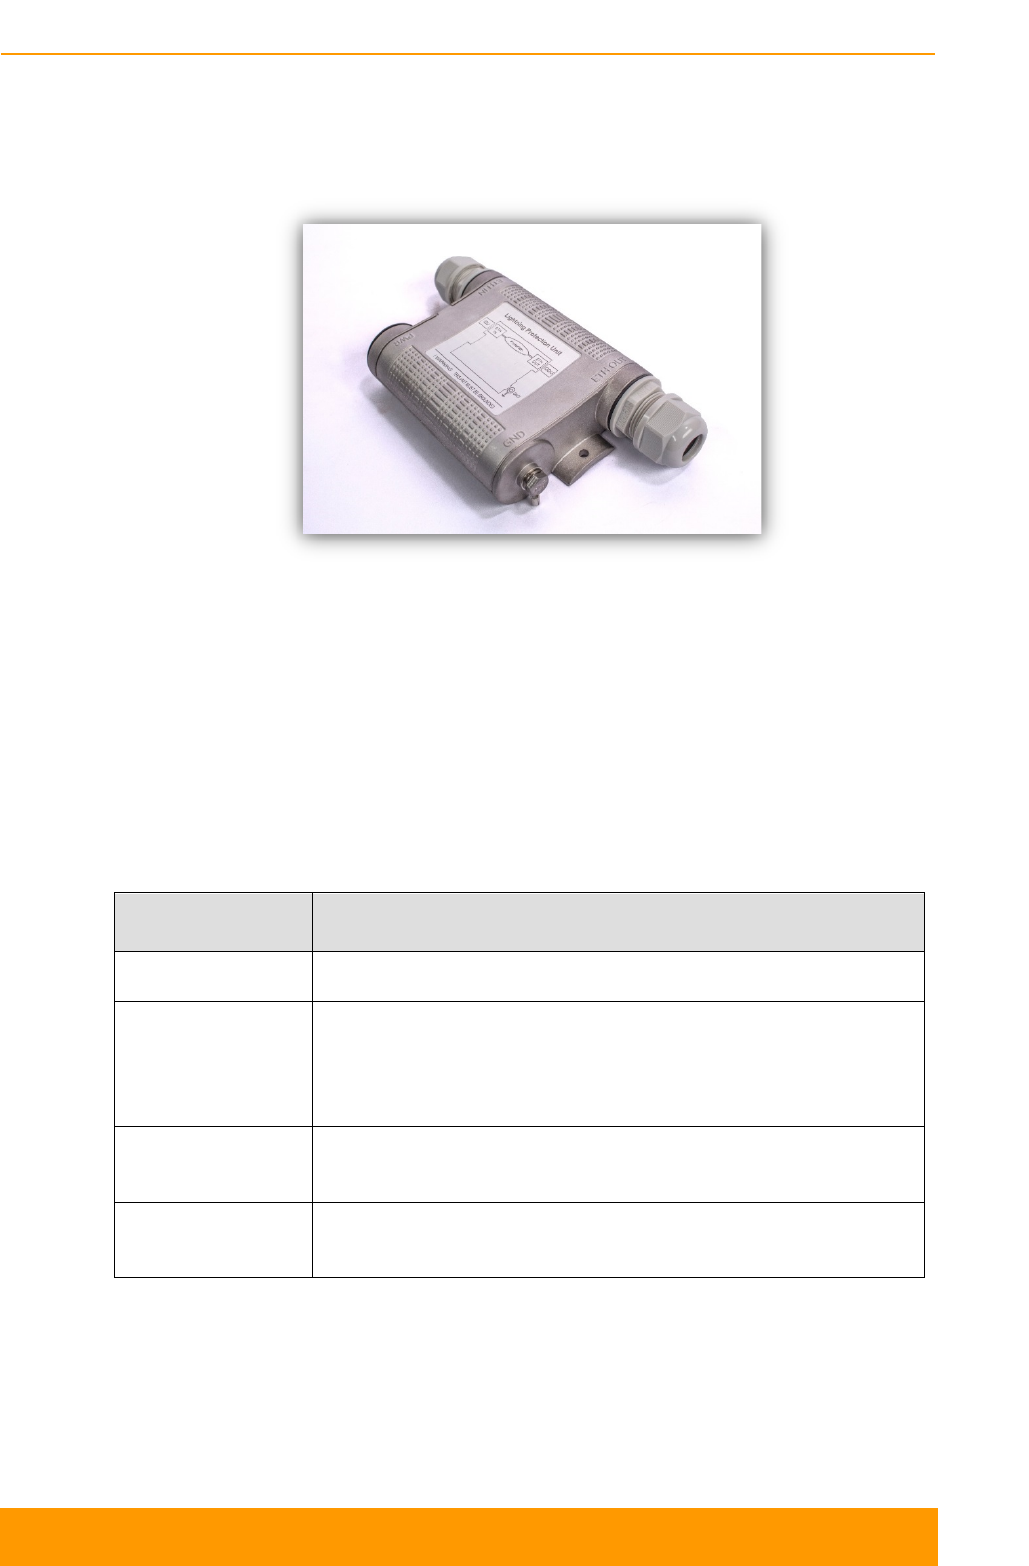
2.2.3.2. External Lightning Protection (AUX-ODU-LPU-
G)
Figure 5 - AUX-ODU-LPU-G Front Panel
Optional indoor/outdoor Lightning Protection Unit (LPU) for InfiNet Wireless
systems designed to withstand the toughest conditions and protect the outdoor or
the indoor unit from sudden power surges induced by lightning strikes. It provides
the same level of protection as AUX-ODU-INJ-G.
Despite the fact every InfiNet Wireless unit has a built-in lightning protection, AUX-
ODU-LPU-G, thanks to its superior GR-1089-grade protection, greatly reduces the
risk of replacing damaged devices operating in harsh environments or difficult-to-
reach locations.
Parameter Description
Size and Weight 34x94x121 mm, 0.28 Kg
Connectors and
Interfaces
ETH IN - Ethernet input
ETH OUT - Ethernet output (protected leg)
GND - ground clamp
Supported
Ethernet Modes 10/100/1000 Mbps (Gigabit Ethernet pass-through)
Water and Dust
Protection IP66 and IP67

Chapter 2 - System Description
Technical User Manual
InfiLINK XG 13
Ethernet
Connectors Pin-
out
ETH IN:
Pin
Description
1
Data pair A+
2
Data pair A-
3
Data pair B+
4
Data pair B-
5
Data pair C+
6
Data pair C-
7
Data pair D+
8
Data pair D-
ETH OUT:
Pin
Description
1
Data pair A+
2
Data pair A-
3
Data pair B+
4
Data pair B-
5
Data pair C+
6
Data pair C-
7
Data pair D+
8
Data pair D-
Lightning
Protection
In compliance with:
- GR-1089
- IEC 61000-4-2 (ESD) 15kV (air), 8kV (contact)
- IEC 61000-4-4 (EFT) 40A (tp = 5/50ns)
- IEC 61000-4-5 (Lightning) L5, 95A (tp = 8/20us)
- ETSI ETS 300 386
Table 5 - AUX-ODU-LPU-G Specifications
2.2.4.1. Electrical
Parameter Description
Frequency Range 4.9-5.15 GHz 5.15-5.9 GHz 5.9-6.1 GHz 5.7-6.5 GHz
Gain 32 dBi 34 dBi 34 dBi 35 dBi
VSWR, max. 2 : 1 1.7 : 1 2 : 1 1.7 : 1

Chapter 2 - System Description
Technical User Manual
InfiLINK XG 14
3 dB Beam-Width,
H-Plane 3° 3° 3° 2.5°
3 dB Beam-Width,
E-Plane 3° 3° 3° 2.5°
Polarization Dual Polarized, Vertical & Horizontal
Cross
Polarization, min. -20 dB -25 dB
Front to Back
Ratio, min. -40 dB
Input power, max 100 Watt
Input Impedance 50 Ohm
Port to Port
Isolation, min.
-36 dB @ 4.9-5.6 GHz
-20 dB @ 5.6-6.1 GHz -35 dB
Side Lobes, typ. -18 dB -17 dB
Table 6 - External High-gain Antennas Electrical Specification
2.2.4.2. Mechanical
Parameter Description
Weight 18 Kg
Connector 2 x N-Type, Female
Diameter (HxDia.) 1200 mm (4ft)
Table 7 - External High-gain Antennas Mechanical Specification

Chapter 2 - System Description
Technical User Manual
InfiLINK XG 15
2.2.4.3. Environmental
Parameter Description
Operating
Temperature
Range -40°C to +65°C
Vibration According to IEC 60721-3-4
Wind Load 200 Km/h (survival)
Flammability UL94
Dust and Water
Proofing IP-65
Humidity ETS 300 019-1-4, EN 302 085 (annex A.1.1)
Salt Fog According to IEC 68-2-11
Ice and Snow 25 mm radial (survival)
Table 8 - External High-gain Antennas Environmental Specification
2.3. InfiLINK XG Specifications
2.3.1. Performance
Parameter Description
Throughput Up to 480 Mbps, net aggregate
Packet
Performance More than 1 million packets per second (line rate)
Latency 0.5-3 ms one-way, typical (depending on air frame period)
Table 9 - Data Performance Specification
2.3.2. Radio
Parameter Description
Modulation Cyclic Single Carrier
Modulation
Schemes
QPSK 1/2
QPSK 3/4

Chapter 2 - System Description
Technical User Manual
InfiLINK XG 16
QAM16 1/2
QAM16 3/4
QAM64 4/6
QAM64 5/6
QAM256 6/8
QAM256 7/8
QAM256 30/32
QAM1024 8/10
Frequency
Bands
4.9-6.0GHz
6.0-6.425GHz
Channel Widths 10, 20 and 40 MHz
Spectral
Efficiency Up to 13 bps/Hz
Output Power
Up to 27
dBm (average, per Tx chain) @ QPSK to
QAM64
Up to 25 dBm @ QAM256, Up to 18 dBm @ QAM1024
Receiver
Sensitivity -94 dBm @ 10 MHz, QPSK
System Gain Up to 177 dB (based on a 28 dBi integrated antenna in 10
MHz channel width)
Duplex Scheme TDD, Hybrid-FDD
Antenna
Integrated: dual-polarization flat panel 23
, 24, 26, 27
and 28 dBi (selectable at time of ordering and model-
dependent)
Connectorized: 2 x N-
type (Female) connectors for
external dual-polarization antenna
Maximal Range In excess of 100 Km in clear line-of-sight conditions, with use
of high gain external antennas
Table 10 - Radio Technology Specification
Parameter Description
Airframe Configurable, 1 to 10 ms
Uplink/Downlin
k Ratio Configurable, from 50:50 to 90:10 in any direction
Chapter 2 - System Description
Technical User Manual
InfiLINK XG 17
Parameter Description
Automatic
Modulation
Control Supported
Automatic
Ranging Supported
TDD
Synchronizatio
n Via built-in GLONASS/GPS receiver or IEEE1588 PTP
Table 11 - Air Protocol Specification
2.3.3. Data Communication
Parameter Description
Ethernet
2x 10/100/1000-BaseT copper ports, RJ-45:
- GE0: Data+PoE input
- GE1: Data only
SFP port: various 3rd party single and multi-mode fiber
modules are supported
Either of the ports can be configured independently for
management, user data or for a hybrid mode
PoE 802.3at or InfiNet-proprietary “passive” PoE
Cable Length
Copper Ethernet cable length: up to 100
m between
outdoor unit and the primary network connection
Fiber cable length: up to 300 m or more depending on
the SFP module type
Table 12 - Wired Interfaces Specification
Parameter Description
QoS 4 queues
Prioritization Strict and WRR modes
Packet
Classification 802.1 p
Network
Protocols VLAN, STP, IGMP

Chapter 2 - System Description
Technical User Manual
InfiLINK XG 18
Timing
Transport IEEE 1588 v2, transparent clock
Table 13 - Networking Specification
2.3.4. Configuration Management
Parameter Description
LED Indication Power status, wireless and wired link status, RSSI indication,
TDD sync status
Management
Protocols HTTP, telnet, SNMP v1/2c/3 (MIB-II and proprietary MIBs)
Installation
Tools Antenna alignment tool
Table 14 - Management Specification
2.3.5. Electrical Characteristics
Parameter Description
Power Supply IDU-BS-G: 100-240 VAC, 50/60Hz, 0°C to +40°C, I24x72x38
mm, 0.3 Kg
Input DC range ±43 to ±56 VDC
Consumption Up to a maximum of 30 W
PoE type Passive PoE
Table 15 - Electrical Specification
2.3.6. Physical Environmental
Parameter Description
Weight and
Dimensions
Part Number
Weight
Size
Xm/5X.500.2x500.2x23
2.4 Kg 305x305x59 mm
Xm/6X.500.2x500.2x24
Xm/5X.500.2x500.2x26
3.1 Kg
371x371x83 mm
Xm/5X.500.2x500.2x28
6.2 Kg 600x600x75 mm
Xm/6X.500.2x500.2x27
Um/5X.500.2x500
2.1 Kg 253x240x85 mm
Um/6X.500.2x500

Chapter 2 - System Description
Technical User Manual
InfiLINK XG 19
Parameter Description
Operating
Temperature
Range -40°C to +60°C
Dust and Water
Protection IP66 and IP67
Wind load 160 Km/h (100mph), operational
200 Km/h (125mph), survival
Table 16 - Physical and Environmental Specification
2.3.7. Standards and Regulations
Parameter Description
Safety EN 60950-1:2006, UL 60950-1 2nd ed.
Radio
EN 301 893, v.1.8.1
EN 302 502, v.1.2.1
FCC part 15.247
EMC
ETSI EN 301 489-1
ETSI EN 301 489-17
FCC Part 15 Class B
RoHS Directive 2002/95/EC
Table 17 - Compliance Specification

Installation
Chapter 3
Chapter 3 - Installation
Technical User Manual
InfiLINK XG 21
3.1. Installation Requirements
This section describes all the supplies required to install the InfiLINK XG system
components and the items included in each installation package.
Before the installation, please make sure you have all necessary parts and
accessories.
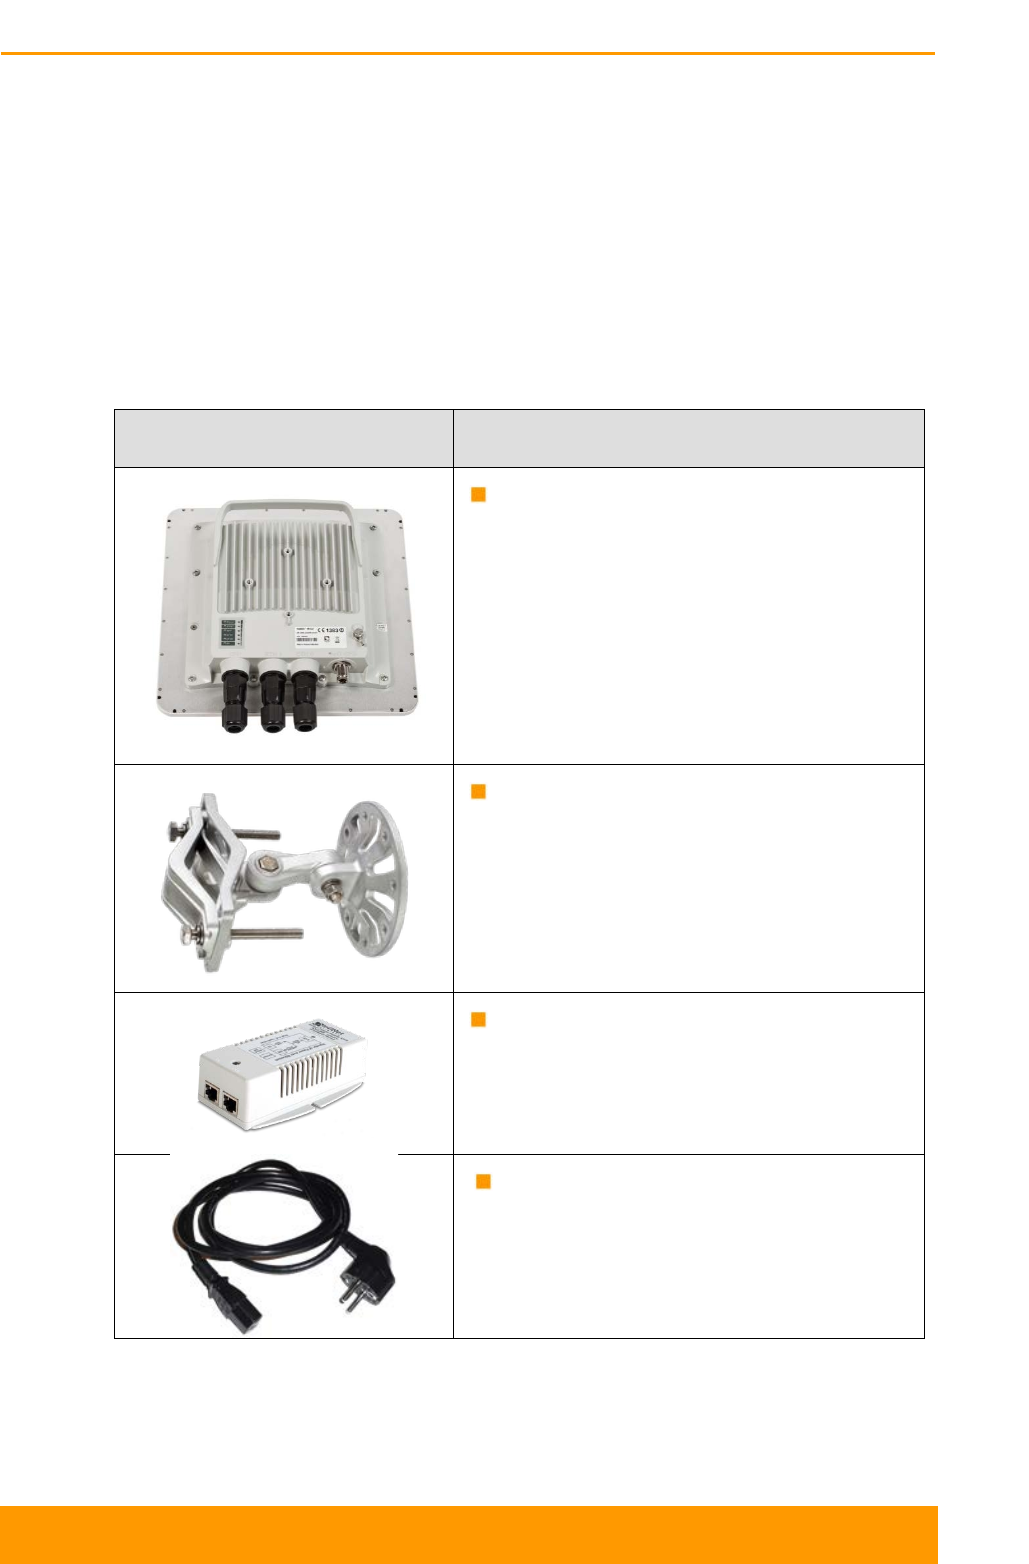
3.1.1. Packing list
Component Description
InfiLINK XG unit (ODU)
- Integrated antenna model or
connectorized model according to
the Purchase Order
Mounting kit
- Universal assembling kit for
mounting the ODU on standard
pole, wall or thick pipe
(vertical/horizontal)
Indoor power supply (IDU)
- The model depends on the ODU
model
Power supply cord
- The model depends on the region,
according to the Purchase Order
Table 18 - Package list

Chapter 3 - Installation
Technical User Manual
InfiLINK XG 22
3.1.2. Additional Items Required
3.1.2.1. Parts and Materials
External antenna (only for the connectorized ODU models)
Low-loss RF cables - CAB-RF-1M cable is recommended (only for the
connectorized ODU models)
Antenna pole (if necessary)
Required grounding circuit, including cables and rods (if these are not already
in place at the installation site)
3.1.2.2. Tools
Screwdrivers set
Pliers/Wrenches
Spanners set
Compass with bearing/azimuth reading
3.1.3. Optional Accessories
AUX-ODU-INJ-G DC injector with lightning protection
AUX-ODU-LPU-G line protection unit
NOTE
Accessories are available from InfiNet Wireless.
3.1.4. Precautionary Measures
CAUTION
Before you start the installation, please read this section very carefully.
Antennas are installed on the roof tops or on the building walls. This work must be
accomplished only by personnel having special skills and experience in this area.
Antennas and cables are electric conductors. Incidental electrostatic strikes may occur
during the system installation. This can lead to equipment damage or may hurt the
personnel. While installing or changing the elements of the antenna-feeder system, one
must make sure that open metal parts are temporarily grounded.
Do not install the antenna close to the electric power lines. Antenna and antenna pole
have to be installed in such a way that, during their assembling, disassembling and
repairing, they do not have any contact with power lines.
Basic precautionary measures that must be fulfilled during the installation are as follows:

Chapter 3 - Installation
Technical User Manual
InfiLINK XG 23
- Do not stay on the roof top in windy or rainy weather, during thunderstorms or when
the working zone is covered with snow or ice.
- Do not touch the antennas, antenna poles, cables and lighting arrestors during
thunderstorms
- Antenna cable must be grounded at all times.
In case of failure, any manipulation of the equipment is allowed to trained personnel only.
3.2. Equipment Positioning Guidelines
3.2.1. Antenna Placement
When selecting an antenna placement for PTP link, in order to obtain the
maximum link range and performance, LOS must be clear for the path between the
two antennas.
The radio beam is an invisible form of electromagnetic wave propagation and is not
as thin as, for example, a light (or laser) beam. The main energy in a radio beam is
concentrated along the straight line between the two antennas, inside an area the
shape of an ellipsoid (or a rugby ball). This area is called a 1st Fresnel zone and its
exact form and size depends upon the frequency and the signal propagation path
length.
If most of the 1st Fresnel zone is obstructed, a major part of the radio wave’s
electromagnetic energy is lost, which leads to a severe signal quality degradation
and, as a result, to decreased coverage range or performance.
Below is an incomplete list of possible obstructions on the signal propagation path:
Neighboring buildings
Trees
Bridges
Power lines
To obtain the best results, it is necessary to perform a precise analysis of the
signal propagation path and possible obstructions that may cover the 1st Fresnel
zone.
NOTE
For radio planning and path profile analysis, both the terrain model and clutter layer of
the area are required. These are typically provided by professional mapping vendors. For
details, please contact InfiNet Wireless.
Here are some general recommendations for antenna placement:

Chapter 3 - Installation
Technical User Manual
InfiLINK XG 24
Try to keep the LOS clear of obstructions. In case of installations over
vegetation and forest, make sure the direct LOS stays above the trees; in
urban environments - above the tallest buildings along the radio path;
The influence of trees can be variable, depending on seasons (ice, dew,
leaves). Keep in mind that, during spring and summer, leaves can absorb high
levels of radio energy. Therefore, when installing during the cold season, over
forests and trees without leaves, try to achieve a higher fade margin;
Proximity to other antennas should be avoided;
Reflecting surfaces should be considered (buildings with reflective windows,
water surfaces or wet grounds). These can be useful in NLOS situations,
where there is no direct clear path between the 2 antennas, so the radio signal
needs to be reflected off a surface. However, these can also decrease the
signal quality when encountered along a clear LOS link, because of fading
caused by multipath;
When installing antennas over water, tune the height bracket within 1-3 meters
range variation, because it can yield significant signal level variations due to
multipath fading;
If seasonal changes influence the signal quality, then the most probable
reasons would be either that the connectors are not protected well enough
from humidity, or that the cables, connectors or antennas are covered by
vegetation during summer or ice during winter.
3.2.2. Mounting Types
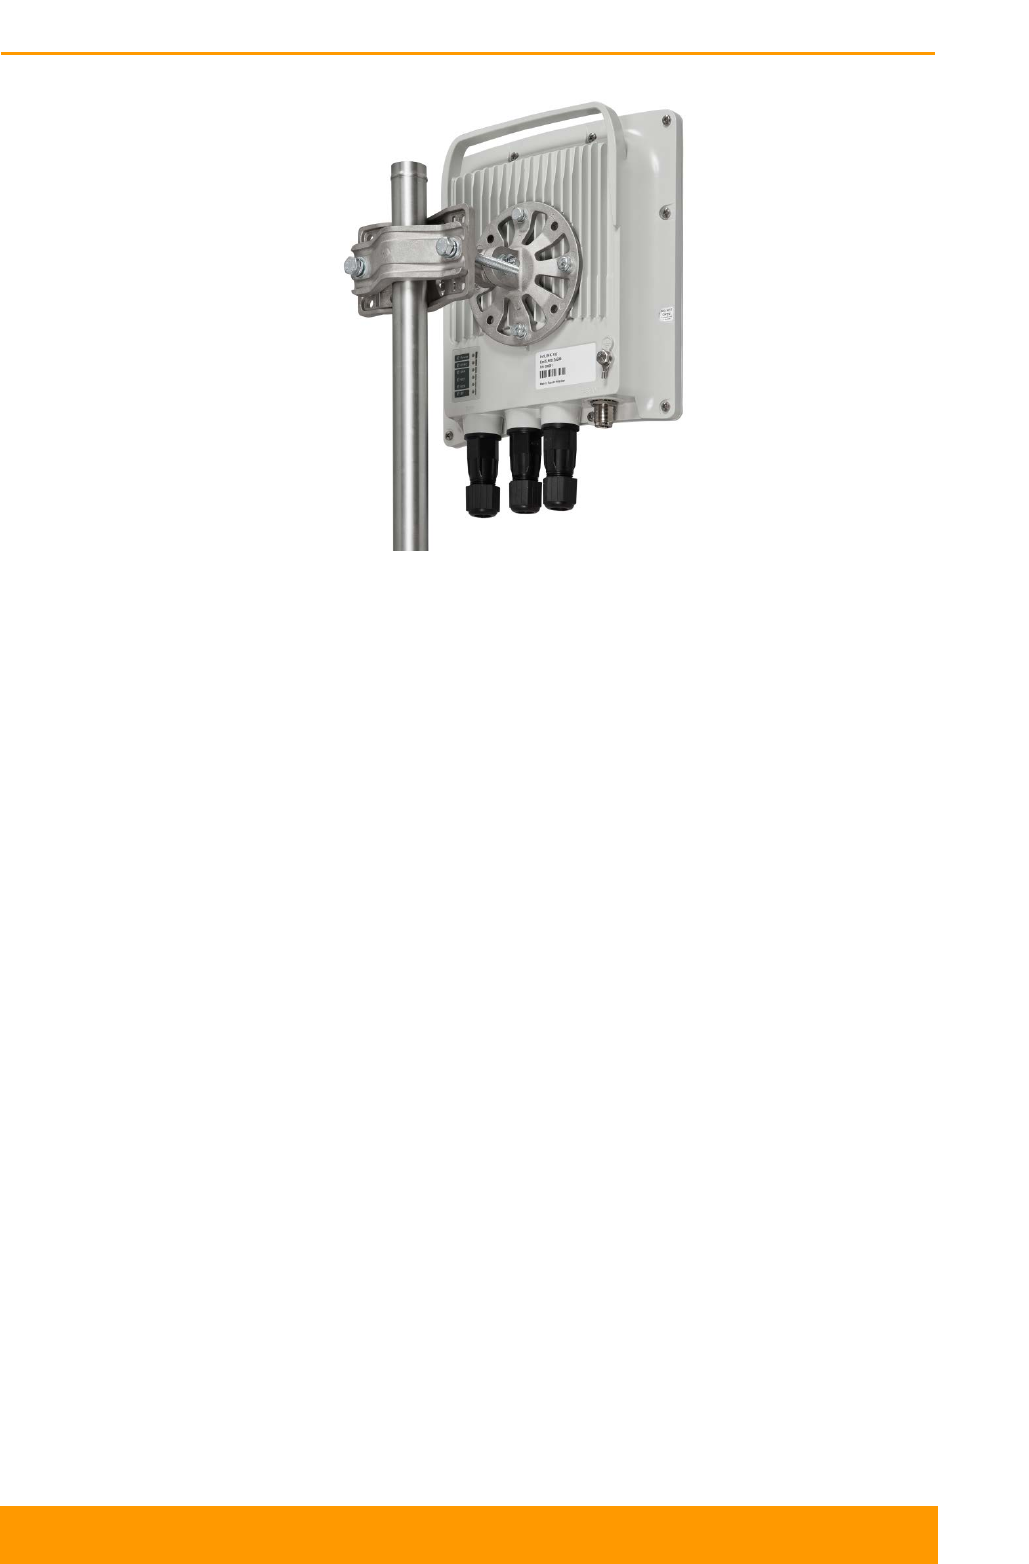
3.2.2.1. Pole Mounting
Antenna installation is performed on a special facility called antenna pole. The pole
is used for strong antenna tightening at the installation site. Poles might have
different modifications depending on the installation requirements.
Chapter 3 - Installation
Technical User Manual
InfiLINK XG 25
Figure 6 - Pole mounting
3.2.2.2. Poles with Stretching
Usually this kind of poles are used when installing antennas on a flat surface and
allow the installer to raise the antenna to a significant height for providing optimal
conditions for signal propagation.
3.2.2.3. Wall Mounting
This kind of mounting is used when there is no need to elevate the antenna above
the rooftop and there is the possibility of mounting it on a wall. This installation is
significantly simpler than the implementation with poles.
3.2.2.4. Pole Requirements
Easy access and sufficient mechanical durability of the pole should provide quick
and reliable fastening in conditions of high wind loads. Poles should have a round
profile for ease of azimuth adjustment. Typical pole diameter is 30 to 85 mm.
Chapter 3 - Installation
Technical User Manual
InfiLINK XG 26
3.3. Installing the Outdoor Units
3.3.1. Preparing the RJ-45 Connectors
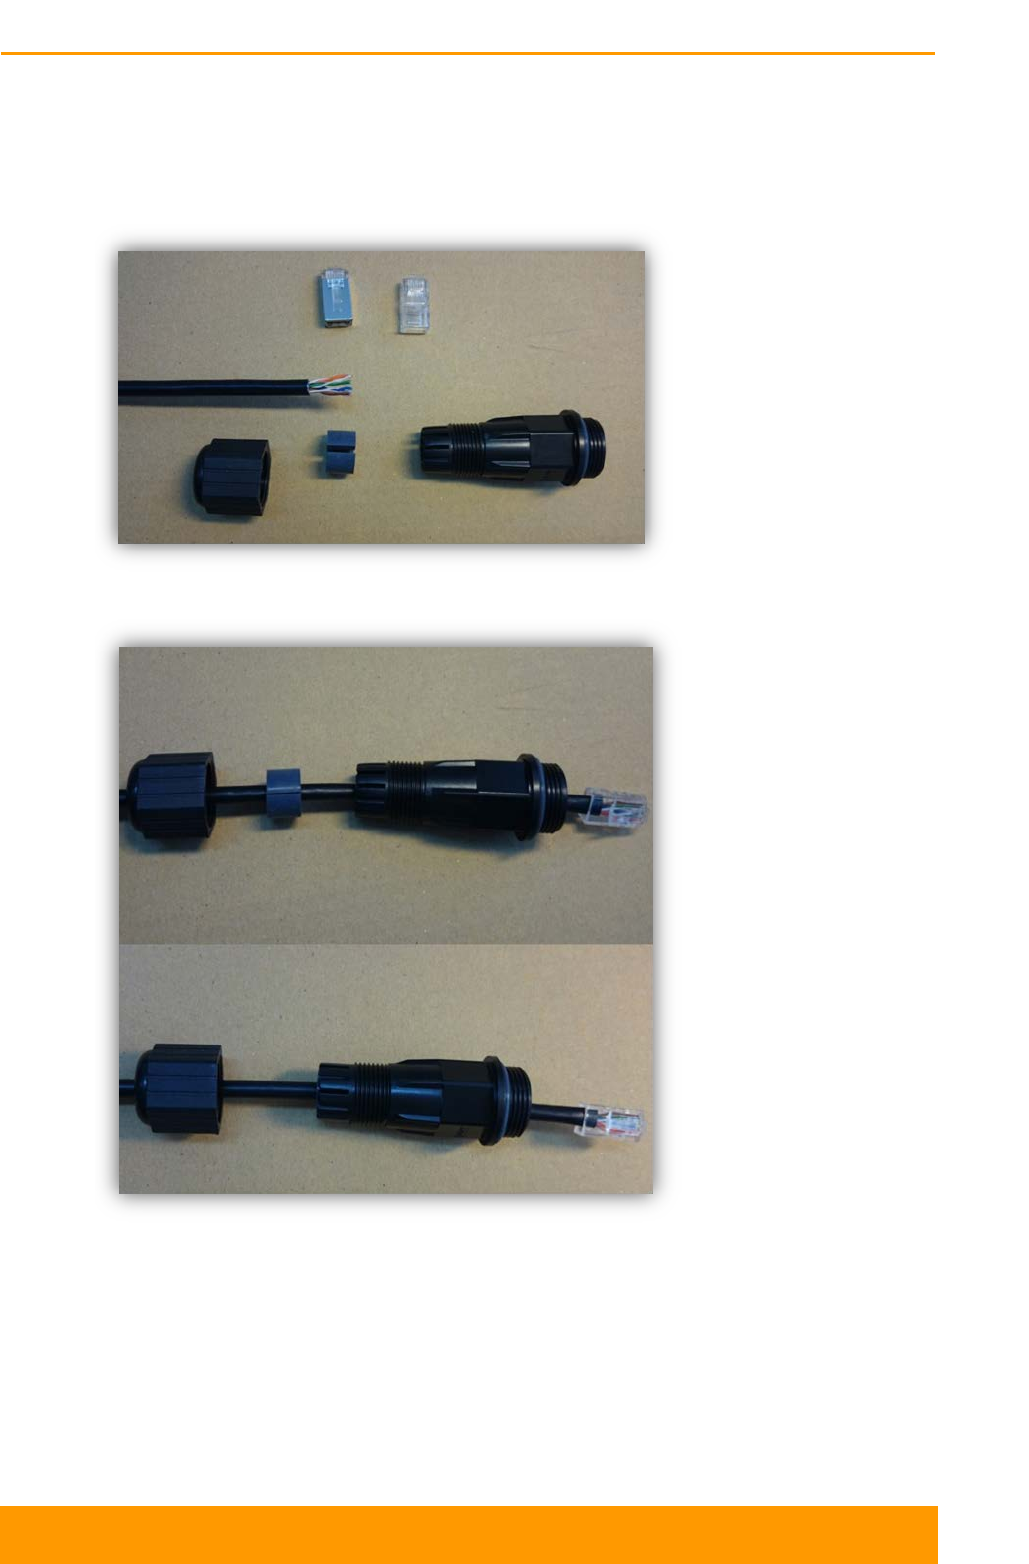
Figure 7 - Ethernet Connector Components
Required components:
1. Cable;
2. Shielded RJ-45
connector;
3. Standard RJ-45
connector;
4. Cable gland nut;
5.
Split sealing
grommet;
6. Cable gland threaded
coupling.
Pin-out scheme: T568B
wiring standards
Figure 8 - RJ-45 Connection Step 1
Crimp the regular RJ-45
connector (3) onto the
cable using the crimping
tool. Do not use the
shielded RJ-45 connector
(2) on this end of the
cable
as it should be
attached on the IDU end.
MAKE SURE THAT THE
RJ-
45 CONNECTOR IS
WELL-
CRIMPED. A
LOOSE CONNECTOR
CAN DAMAGE THE
DEVICE. PLEASE NOTE
THAT SUCH DAMAGE
IS NOT COVERED BY
THE WARRANTY.
Put the cable gland nut
(4), the split sealing
grommet (5) a
nd the
cable gland threaded
coupling (6) onto the pre-
terminated cable and
insert the split sealing
grommet (5) into the
cable gland threaded
coupling (6).
Chapter 3 - Installation
Technical User Manual
InfiLINK XG 27
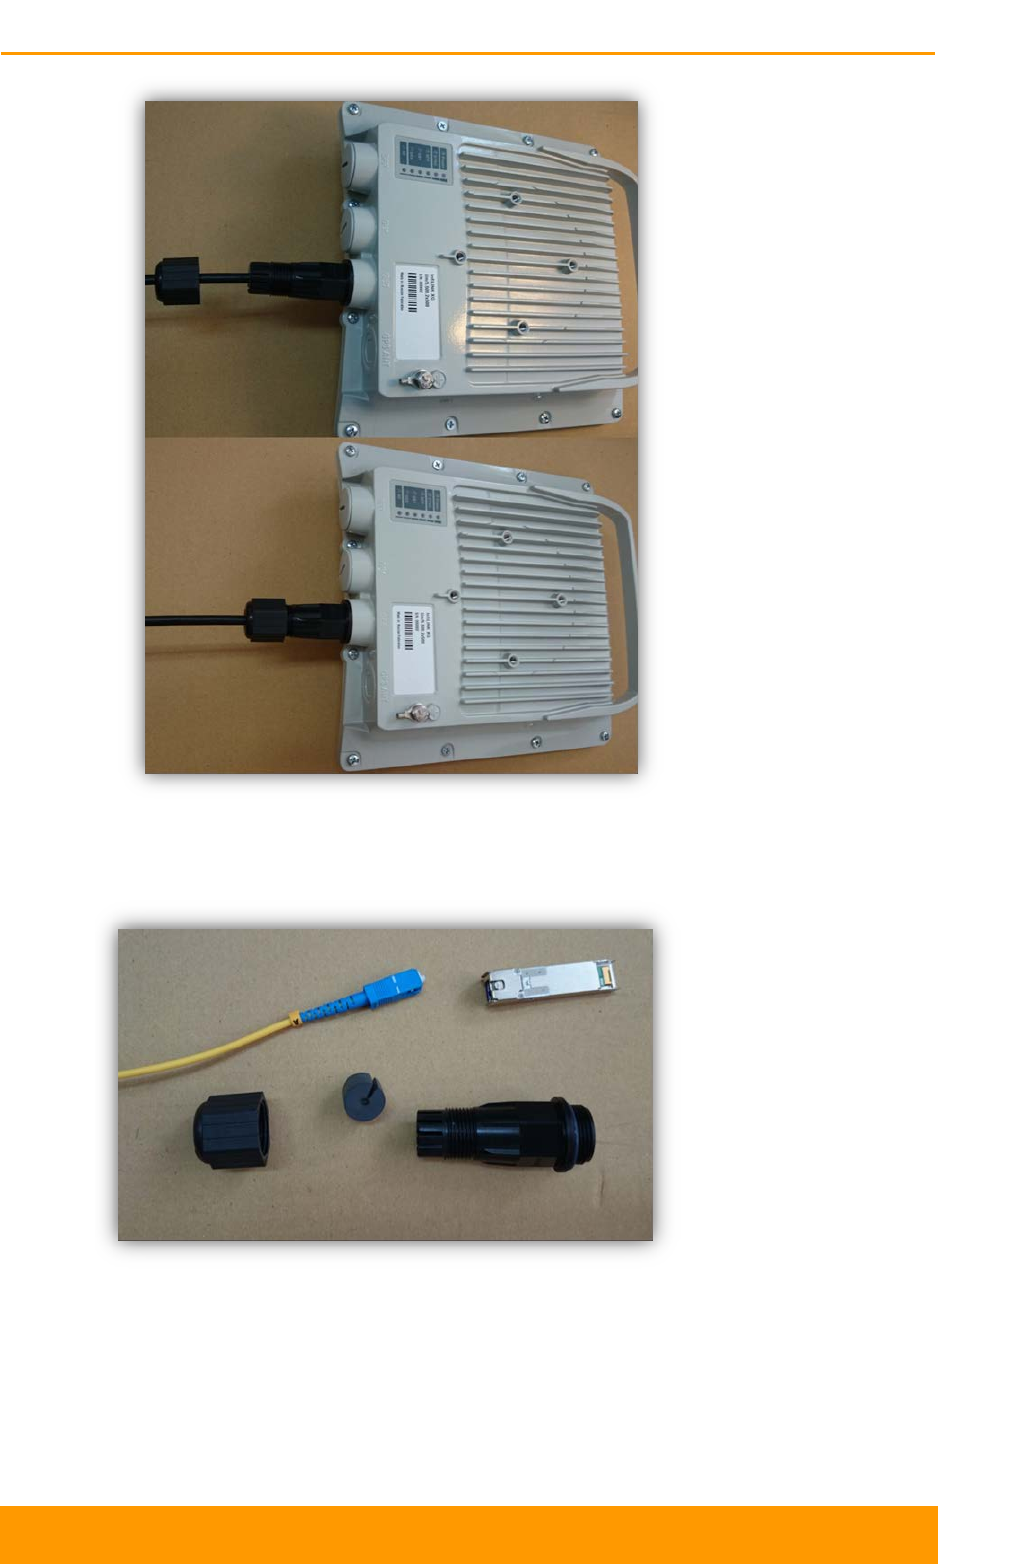
Figure 9 - RJ-45 Connection Step 2
-
Insert the connector
into the socket until
you hear a click;
-
Screw the cable
gland threaded
coupling (6) into the
port and tighten it;
-
Tighten the cable
gland nut (4);
-
Do not apply
excessive force.
3.3.2. Preparing the SFP Connectors
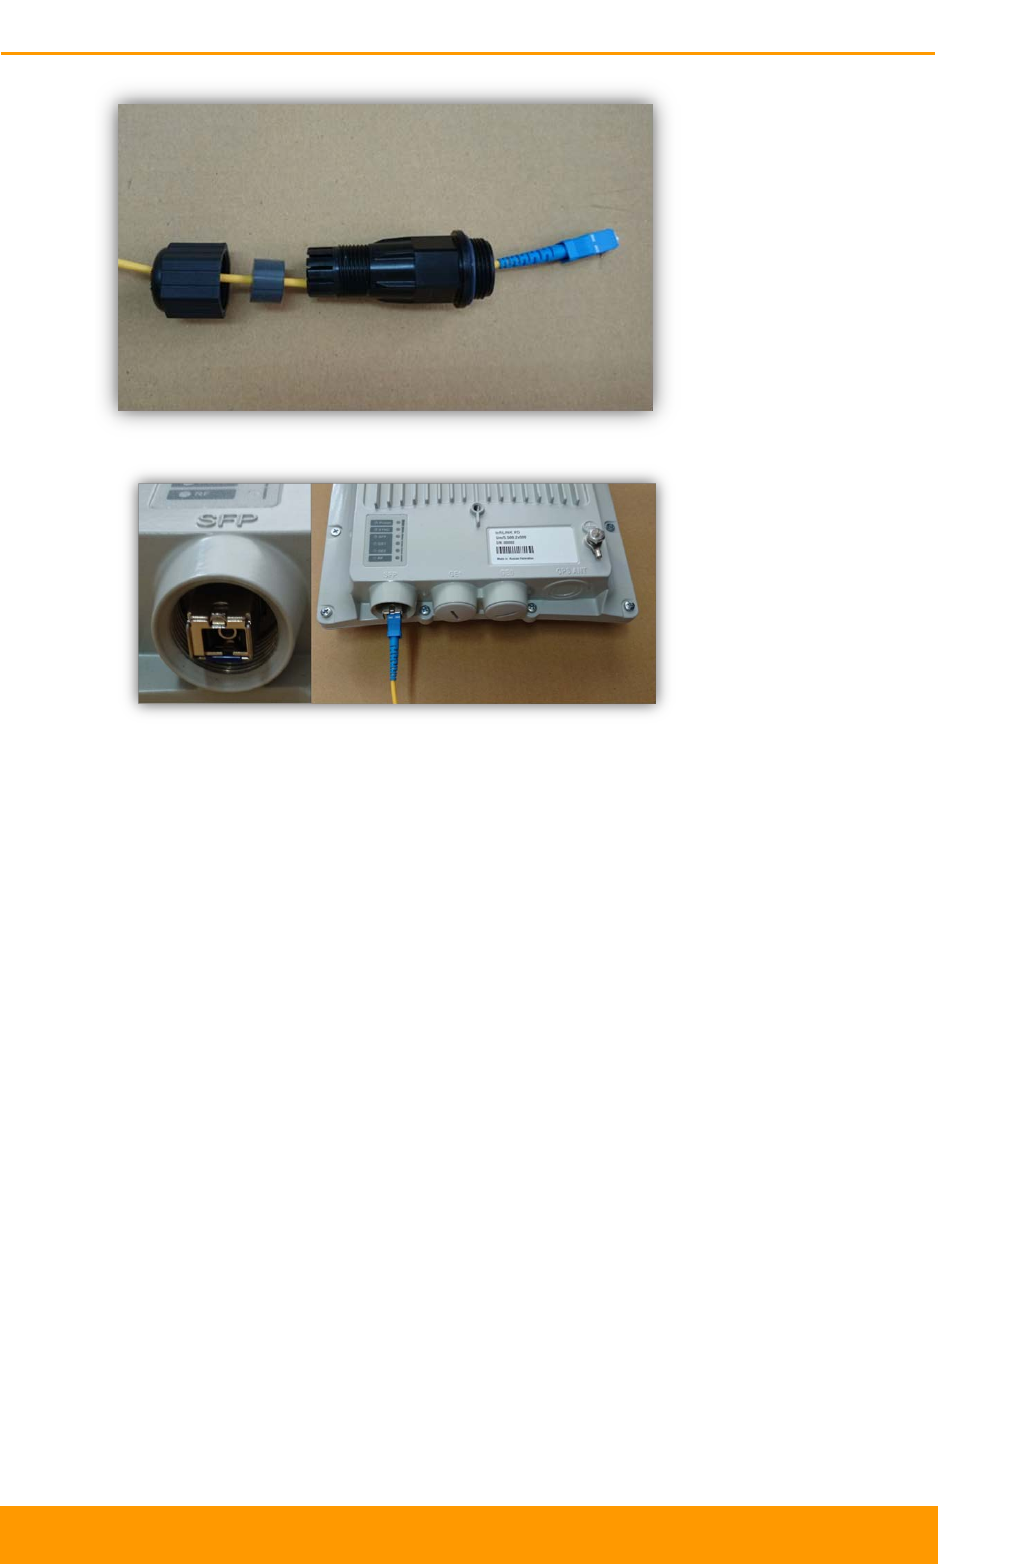
Figure 10 - SFP Connector Components
Required components:
1. Optical cable;
2. Optical connector;
3. SFP-module;
4. Cable gland nut;
5. Split sealing grommet
for optical cable;
6. Cable gland threaded
coupling.
Put the cable gland nut
(4), the
split sealing
grommet for optical cable
(5) and the cable gland
threaded coupling (6)
onto the pre-terminated
optical cable (1,2).
Chapter 3 - Installation
Technical User Manual
InfiLINK XG 28
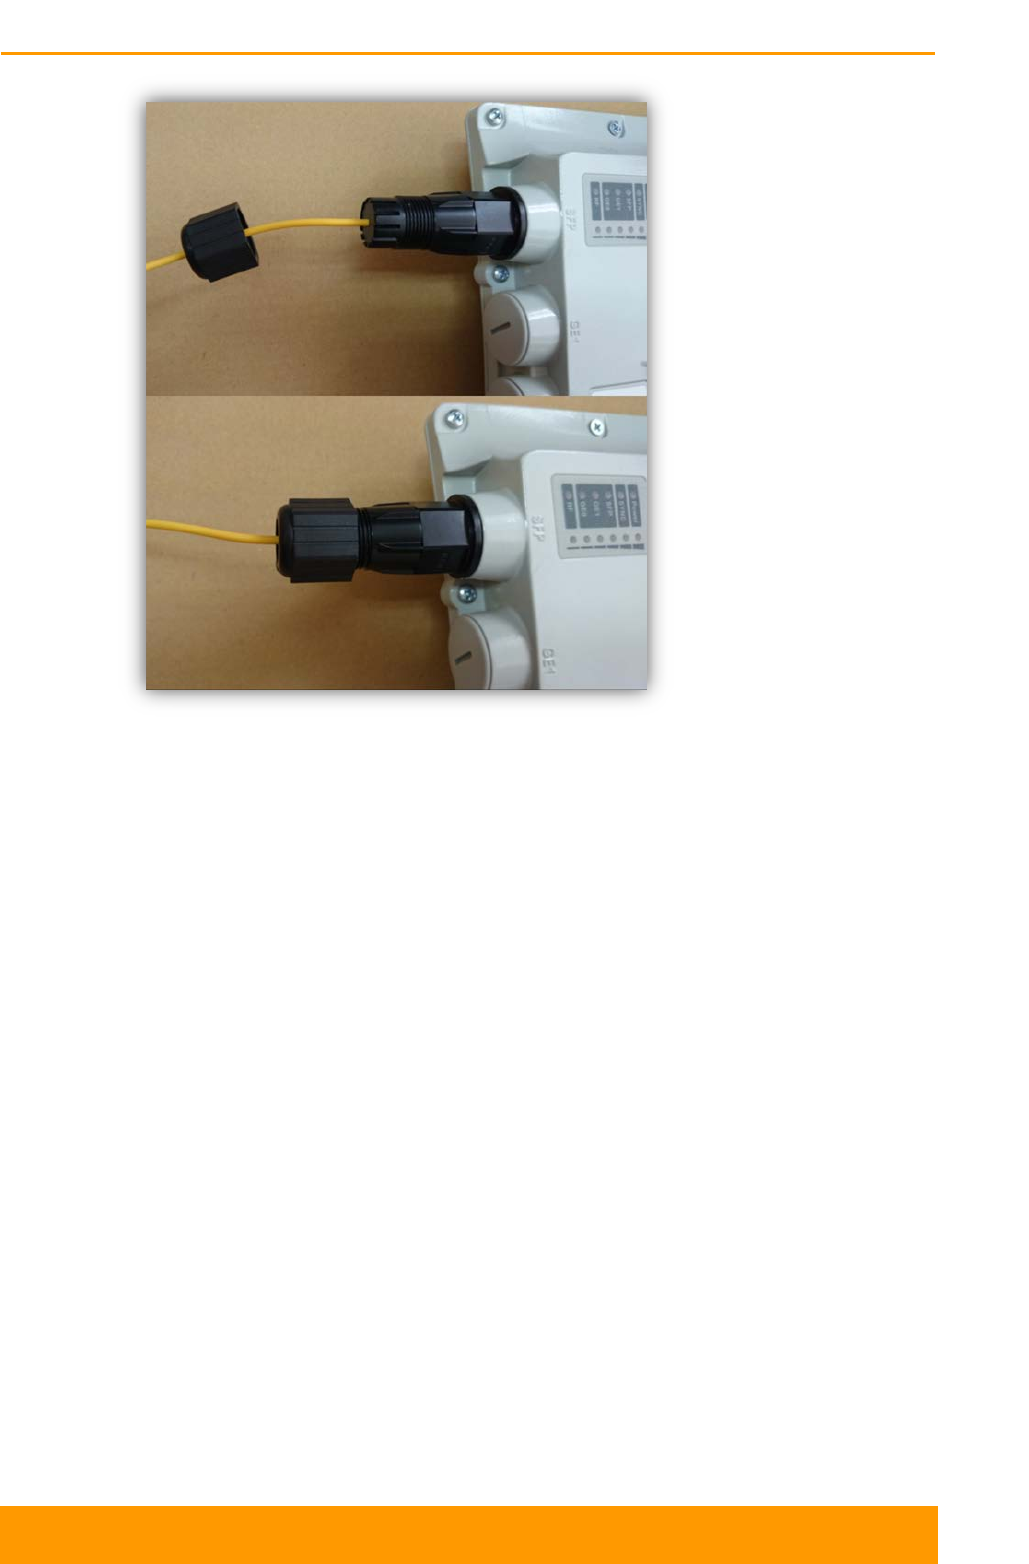
Figure 11 - SFP Connection Step 1
Figure 12 - SFP Connection Step 2
Set the SFP-
module (3)
into the socket until you
hear a click;
Insert the connector (2)
into the SFP-module (3).
Chapter 3 - Installation
Technical User Manual
InfiLINK XG 29
Figure 13 - SFP Connection Step 3
Insert the split sealing
grommet (5) into the
cable gland threaded
coupling (6);
Screw
the cable gland
threaded coupling (6) into
the port and tighten it;
Tighten th
e cable gland
nut (4);
Do not apply excessive
force.
In order to disassemble SFP, disconnect the optical cable, pull the clip of the
SFP module and withdraw the SFP module from the slot.
3.3.3. InfiLINK XG - Um
1. Unpack the equipment
2. Check items integrity
3. Initial configuration is required for link establishment
4. Prepare RF cables of the required length. For 5GHz devices, the
recommended maximum RF cable length is 1meter
5. Install and seal the connectors on the RF cables
6. Important: Horizontal and Vertical polarization should match each other on
both sides!
Chapter 3 - Installation
Technical User Manual
InfiLINK XG 30
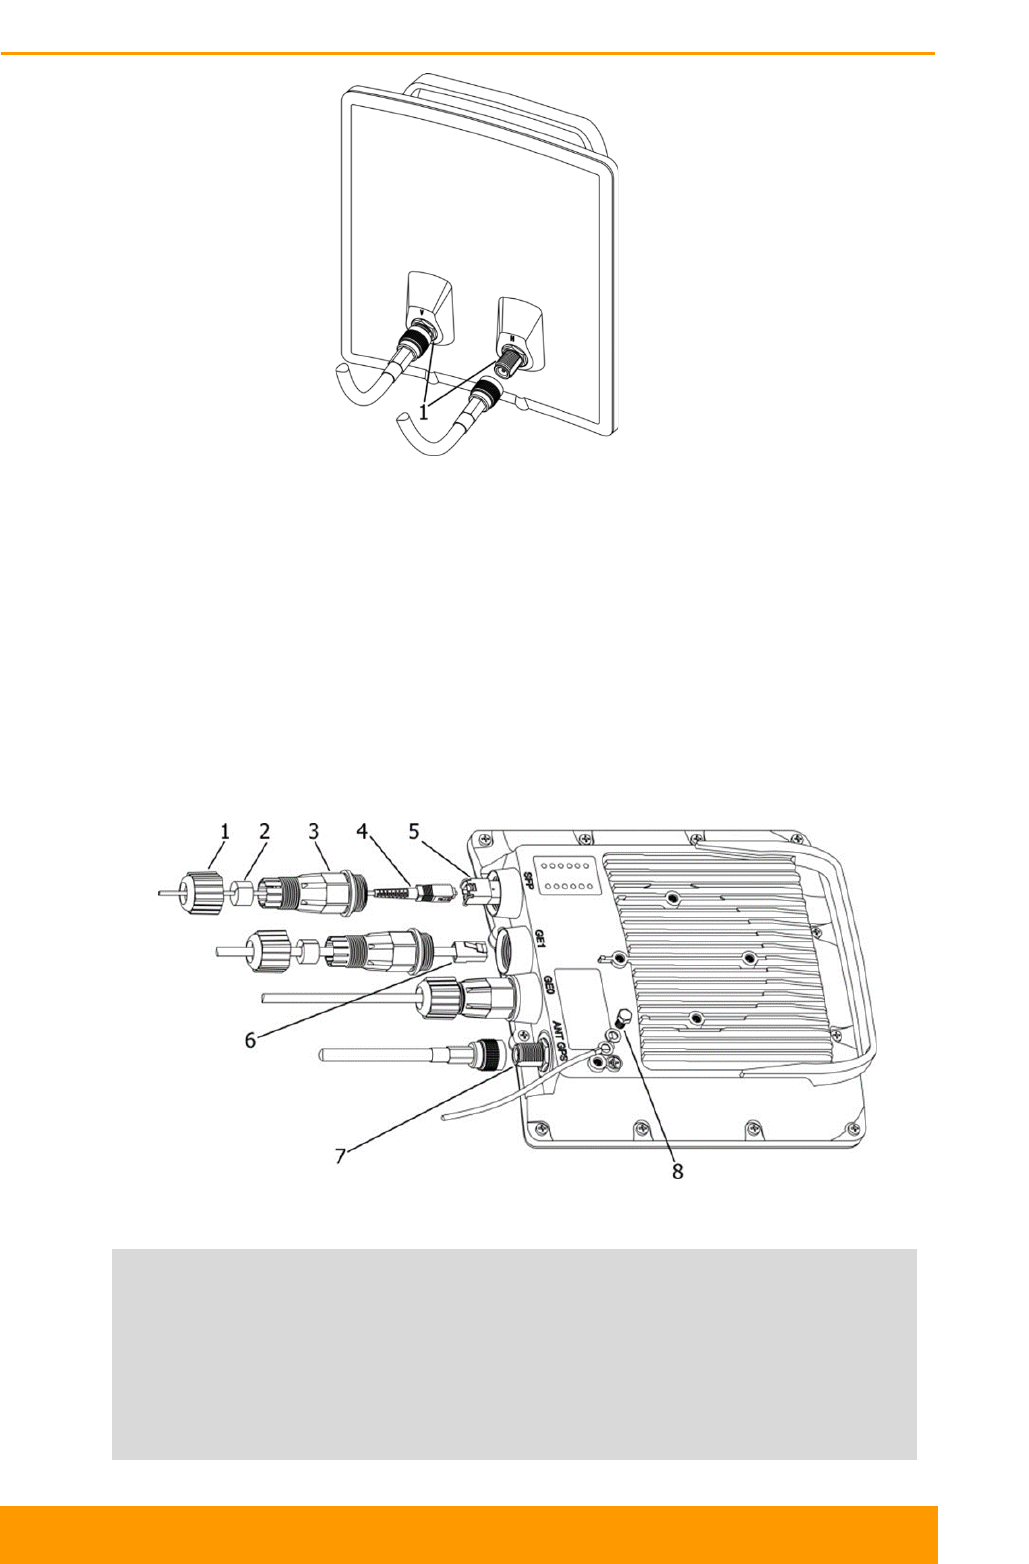
Figure 14 - InfiLINK XG - UM ODU Front Panel
1 - Antenna ports
7. Determine the STP cable length that is used to connect IDU and ODU. The
total cable length between LAN (behind IDU) and ODU should not be longer
than 100 meters. Service cable connecting IDU and ODU should be STP Cat
5E cable
8. If using SFP module, connect it to ODU, plug in the optical cable (the
maximum length and type depend on the SFP module type) and seal the
connector
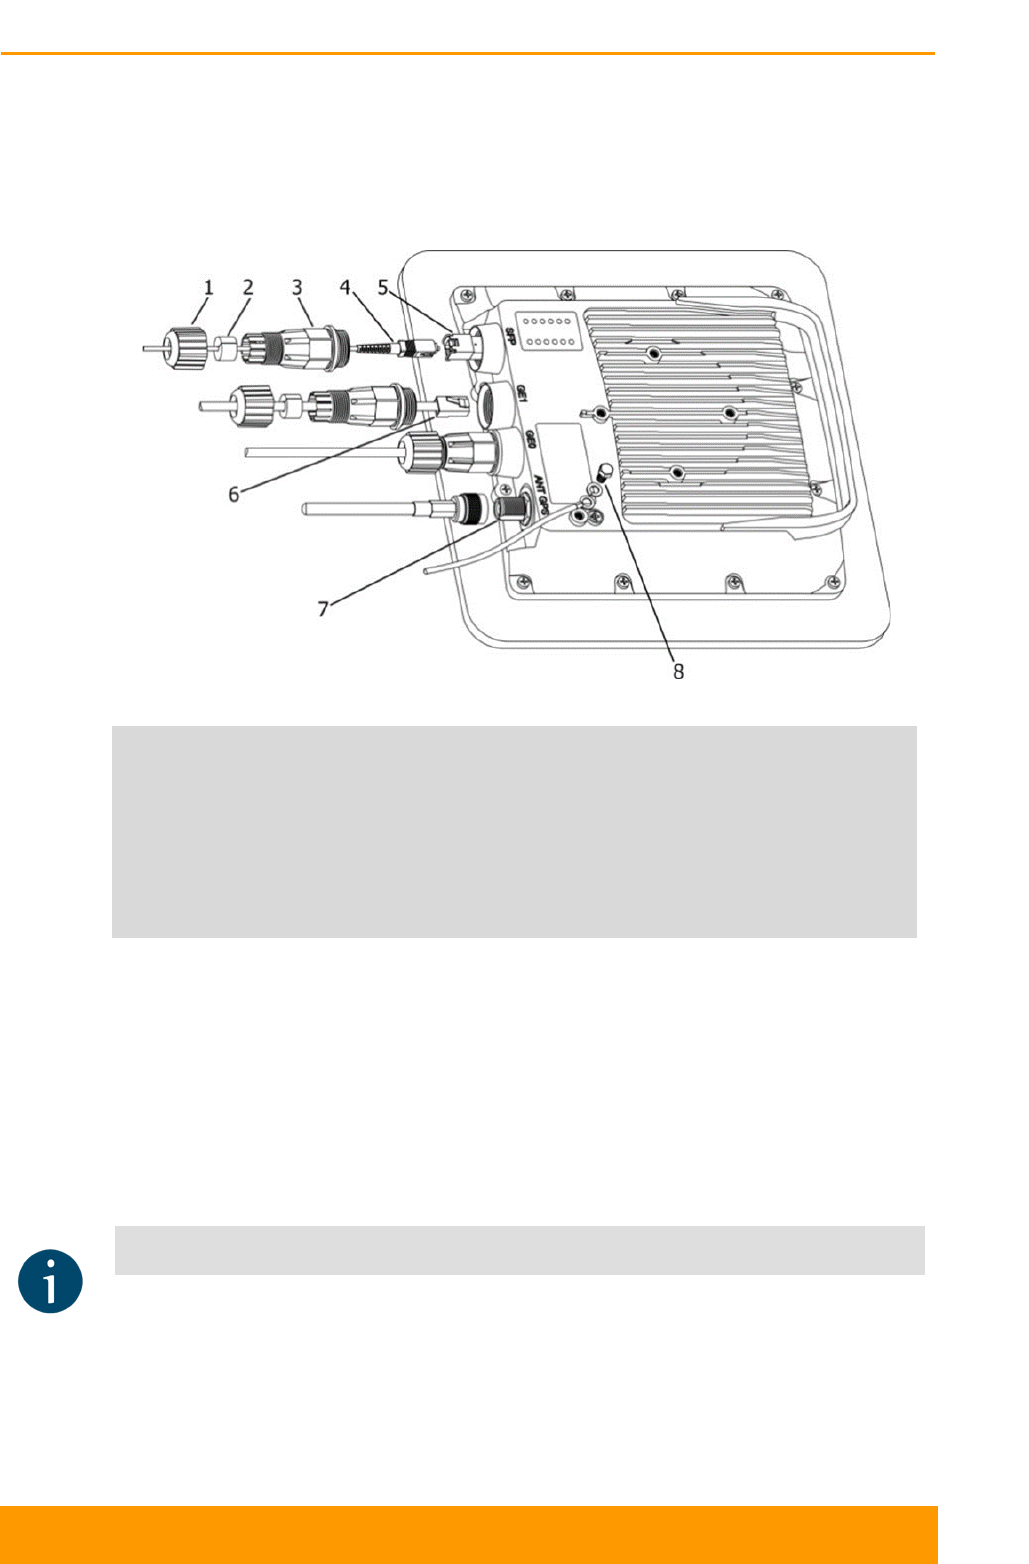
Figure 15 - InfiLINK XG - Um ODU Installation Procedure
1. Cable gland nut
2. Split sealing grommet
3. Cable gland threaded coupling
4. Optical cable (from 2mm to 3mm)
5. SFP-module (not included in the delivery package)
6. Standard RJ-45 connector
7. GPS antenna port (antenna and cable are not included in the delivery package)
8. Grounding bolt

Chapter 3 - Installation
Technical User Manual
InfiLINK XG 31
9. Install (crimp) regular RJ-45 connector for ODU on the STP cable and seal it.
Do not use the shielded RJ-45 connector on this end of the cable, as it should
be attached only on the IDU end
10. Lay the STP cable (and the optical cable, if used) “from top to bottom” – from
ODU to IDU
11. Install (crimp and solder) shielded RJ-45 connector for IDU on the STP cable
12. Install ODU on the mounting bracket, connectors facing down, and tighten it
NOTE
It is very important to mount the ODU connectors facing down.
13. Connect the ODU-IDU cable to the ODU
14. Seal the ODU Ethernet connectors
15. Once the antenna and antenna pole are installed they must be properly
grounded: connected to the building lightning protection circuit. Antenna’s
position must be lower than the highest antenna pole point at least by 1 meter.
If antenna is NOT DC-shorted (see antenna technical documentation),
additional lightning arrestors must be used which are placed between ODU
and antenna and are grounded to the antenna pole grounding circuit
16. Connect the RF cables to the antenna ports, minding the polarization marks.
Twist the connectors tightly
17. Connect the RF cables to the ODU ports, after previously having touched the
RF cables’ connector case with ODU connector case
18. Seal RF connectors from both sides (ODU and antenna)
19. Connect the STP cable to IDU, after previously having touched IDU connector
case with STP cable connector case
20. Provide grounding for IDU
21. Connect Ethernet cable to IDU
22. Connect the IDU to power
23. Connect to the Device using Telnet protocol
3.3.4. InfiLINK XG - Xm
1. Unpack the equipment
2. Check items integrity
3. Determine the STP cable length that is used to connect IDU and ODU. The
total cable length between LAN (behind IDU) and ODU should not be longer
Chapter 3 - Installation
Technical User Manual
InfiLINK XG 32
than 100 meters. Service cable connecting IDU and ODU should be STP Cat
5E cable
4. If using SFP module, connect it to ODU, plug in the optical cable (the
maximum length and type depend on the SFP module type) and seal the
connector
Figure 16 - InfiLINK XG - Xm ODU Installation Procedure
1. Cable gland nut
2. Split sealing grommet
3. Cable gland threaded coupling
4. Optical cable (from 2mm to 3 mm)
5. SFP-module (not included in the delivery package)
6. Standard RJ-45 connector
7. GPS antenna port (antenna and cable are not included in the delivery package)
8. Grounding bolt
5. Install (crimp) regular RJ-45 connector for ODU on the STP cable and seal it.
Do not use the shielded RJ-45 connector on this end of the cable, as it should
be attached only on the IDU end
6. Lay the STP cable (and the optical cable, if used) “from top to bottom” - from
ODU to IDU
7. Install (crimp and solder) shielded RJ-45 connector for IDU on the STP cable
8. Install ODU on the mounting bracket, connectors facing down, and tighten it
NOTE
It is very important to mount the ODU connectors facing down.
9. Connect the ODU-IDU cable to the ODU
10. Seal the ODU Ethernet connectors

Chapter 3 - Installation
Technical User Manual
InfiLINK XG 33
11. Once the ODU and pole are installed they must be properly grounded:
connected to the building lightning protection circuit. The ODU position must
be lower than the highest pole point at least by 2 ODU heights.
12. Connect the STP cable to IDU, after previously having touched IDU connector
case with STP cable connector case
13. Provide grounding for IDU
14. Connect Ethernet cable to IDU
15. Connect the IDU to power
16. Connect to the Device using Telnet protocol
3.3.5. Grounding and Lightning Protection
When installing on poles without lightning protection systems, the ODU or external
antenna should be placed on the pole at a height that is at least 1 meter below the
top of the pole. In this case, there is a significant probability that the lightning
strikes the pole and not the ODU or antenna. The pole should be properly
grounded: connected to the building lightning protection circuit according to your
local regulations. When lightning strikes the external antenna, the current goes
through the coaxial cable to the ODU case, which is connected through the ODU
clamp to the pole - the pole is grounded. The direct lightning strike to the STP
service cable (ODU-IDU) is partially terminated on the grounded IDU case. Partial
termination means that the direct lightning strike will probably destroy an STP
cable. The service cable pickups from the electromagnetic impulses are terminated
on the IDU case by the winding shield, and further - on the IDU grounding.
NOTE
The end of the STP service cable that is connected to IDU should be assembled with a
shielded RJ-45 connector. The other end of the STP service cable (connected to ODU)
should be assembled with unshielded (standard) RJ-45 connector.
IDU is grounded via a three-conductor power cord and a grounded socket. The
data & power wires pickups are terminated via IDU protection scheme (three-
conductor power cord and a grounded socket).
NOTE
Antenna pole, tower, ODU and lightning arrestor should be connected to the first
common grounding circuit. Grounding cables should be no less than 10AWG thick and
must use corrosion-resistant connectors. IDU and the customer LAN should be grounded
to the second common grounding circuit.
Special attention should be paid if the antenna used is not DC-shorted. In this
case, an additional lightning arrestor should be used between the antenna and
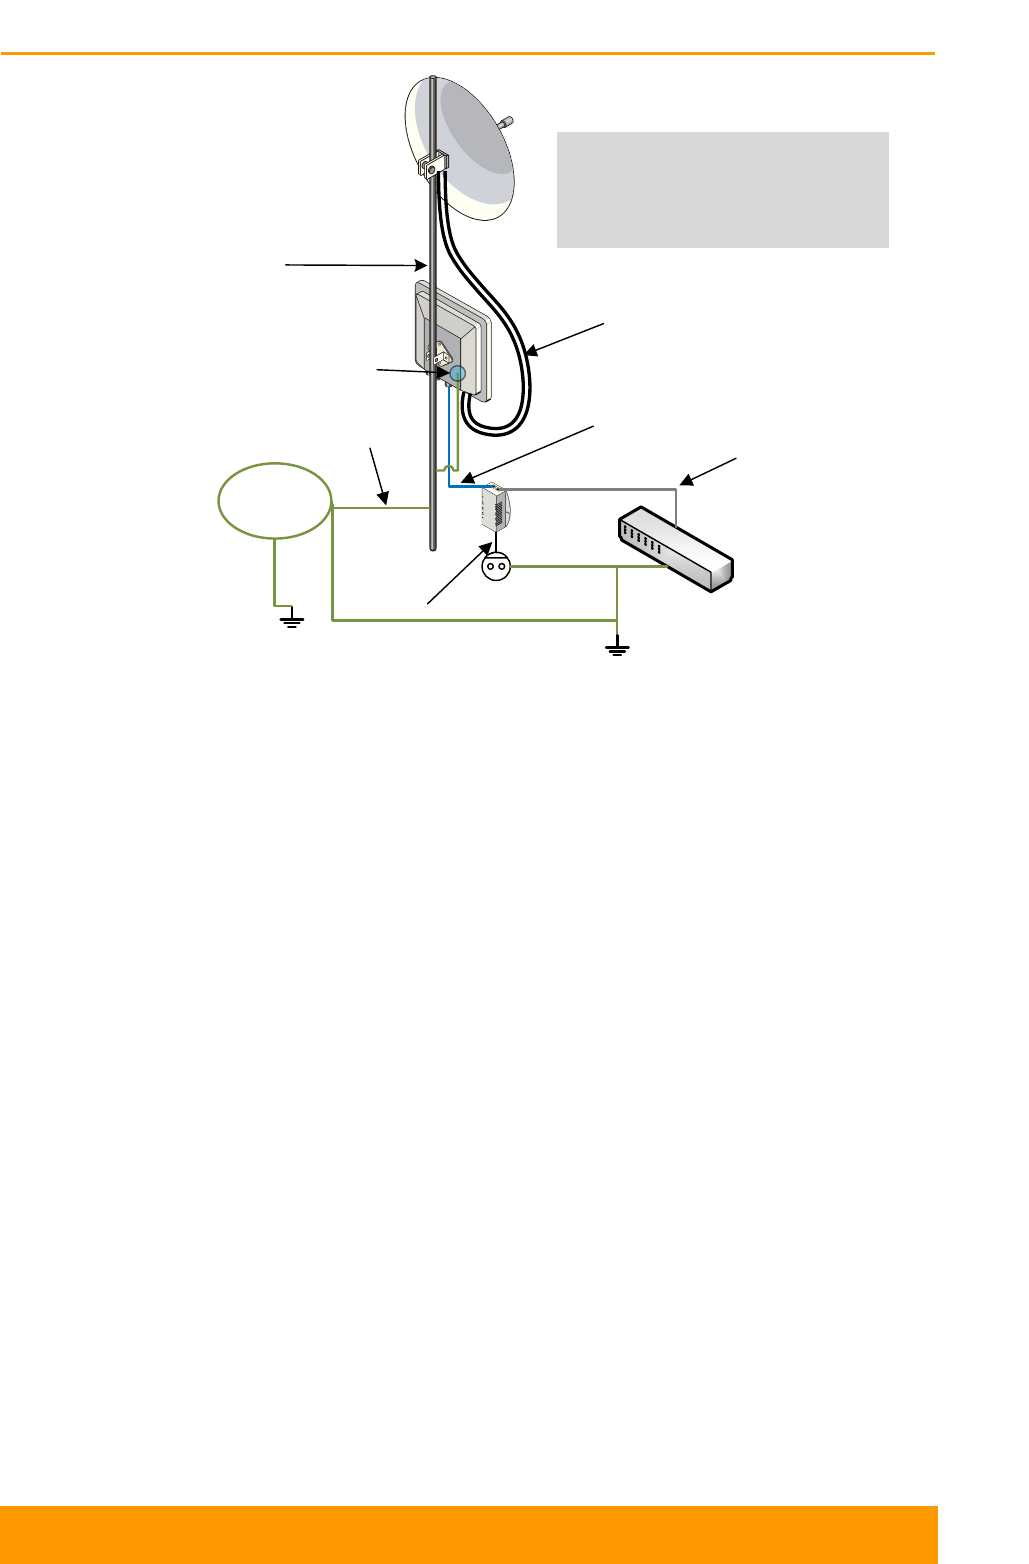
ODU. The suggested grounding diagram is shown in the picture below.
Chapter 3 - Installation
Technical User Manual
InfiLINK XG 34
Building
grounding
circuit LAN
switch
IDU
ODU
220V
Three-wire power
cable should be
used to ground
the IDU
Antenna pole
A separate grounded protection device
should be installed between the ODU
and the antenna, on each of the 2 RF
cables, in case the antenna has no DC-
short protection circuit.
STP Cat.5e
RF Cables
UTP/STP Cat.5e
Pole grounding
ODU Grounding clamp
Figure 17 - Grounding Connections Schematics when Using IDU-BS-G
3.3.6. Grounding when Using AUX-ODU-INJ-G
AUX-ODU-INJ-G is an optional accessory which may be used to connect third-
party DC power sources to the ODU (for example, to power the unit from solar
power or wind power sources).
AUX-ODU-INJ-G should be properly grounded.
Chapter 3 - Installation
Technical User Manual
InfiLINK XG 35
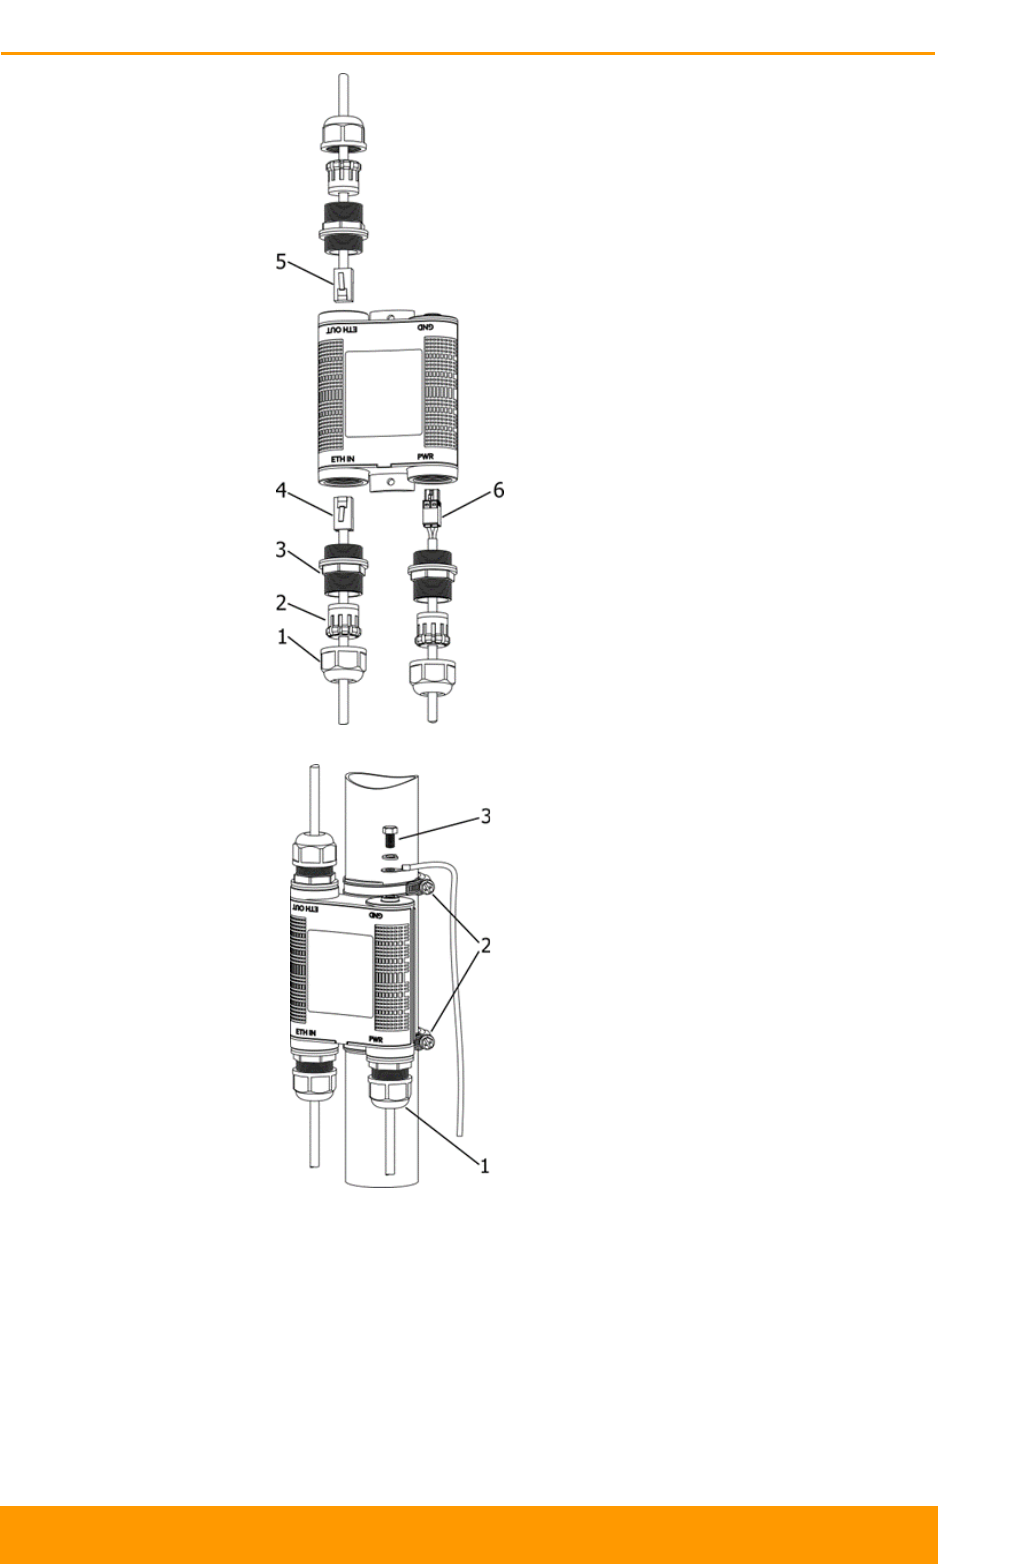
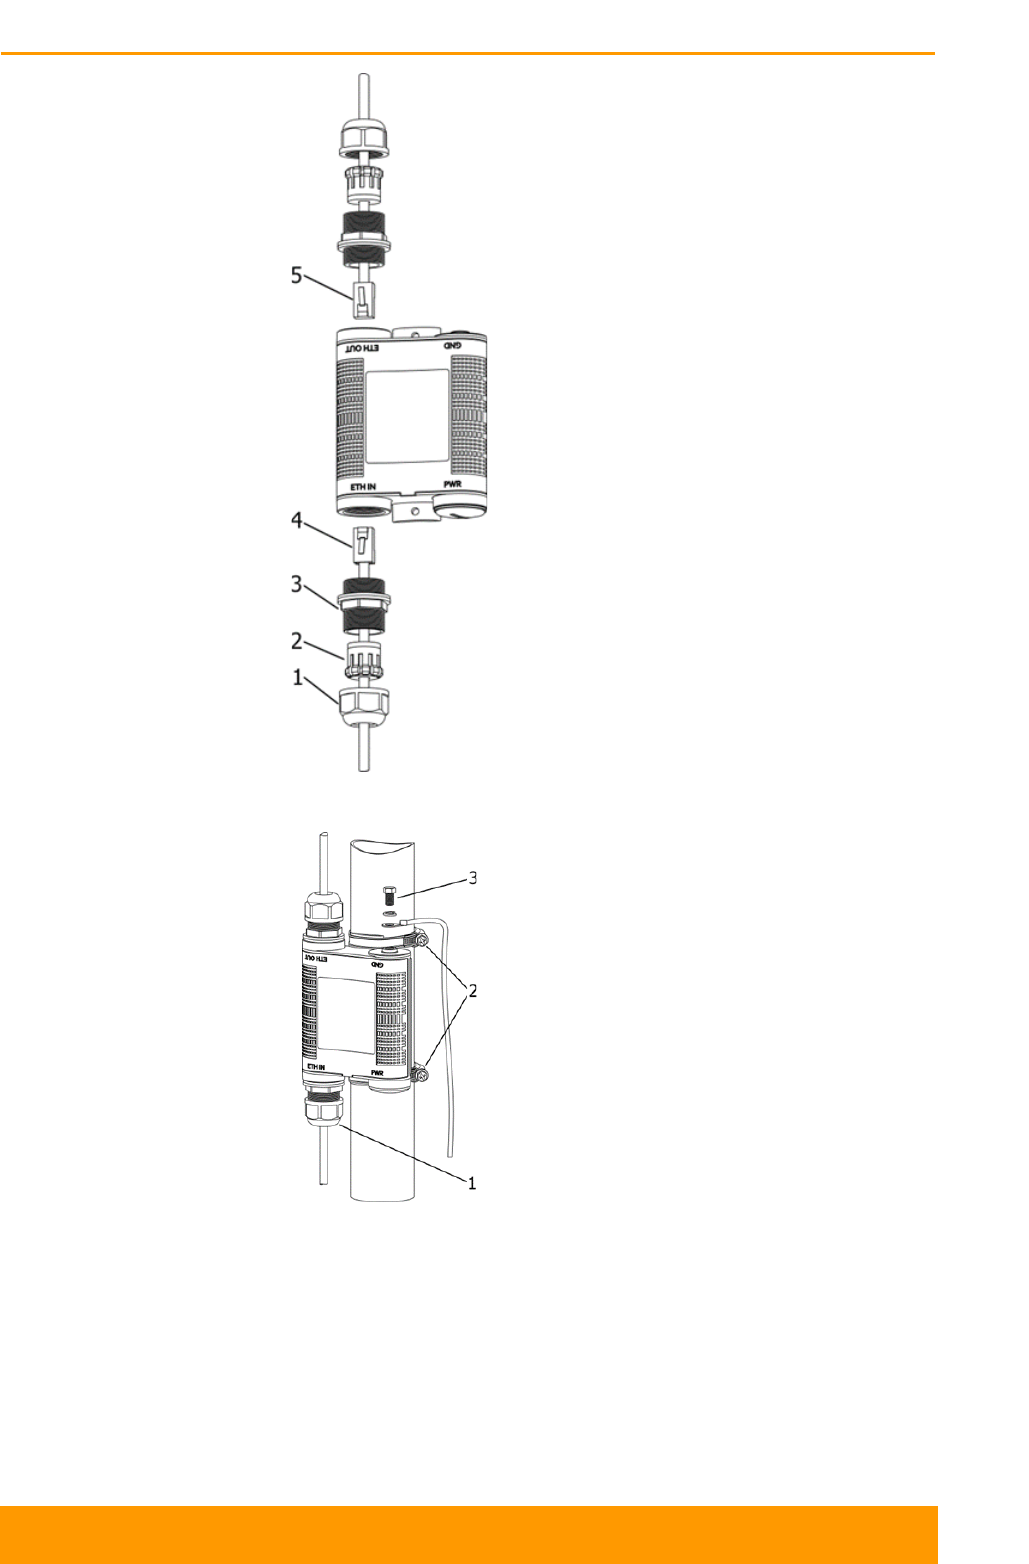
Figure 18 - AUX-ODU-INJ-G Connecting and Sealing Procedure
1 - Cable gland nut;
2 - Sealing grommet;
3 - Cable gland threaded
coupling;
4 - Standard RJ-45
connector;
5 - Shielded RJ-45
connector;
6 - Power connector.
Figure 19 - AUX-ODU-INJ-G Mounting and Grounding
Procedure
1 - Cable gland;
2 - Clamps;
3 - Grounding bolt.
The grounding and lightning protection initial procedures when using AUX-ODU-
INJ-G are similar to those when using regular IDU. First, please read the
instructions from previous section 3.3.5.
The current section outlines only the differences in grounding connections
schematics, when connecting AUX-ODU-INJ-G:
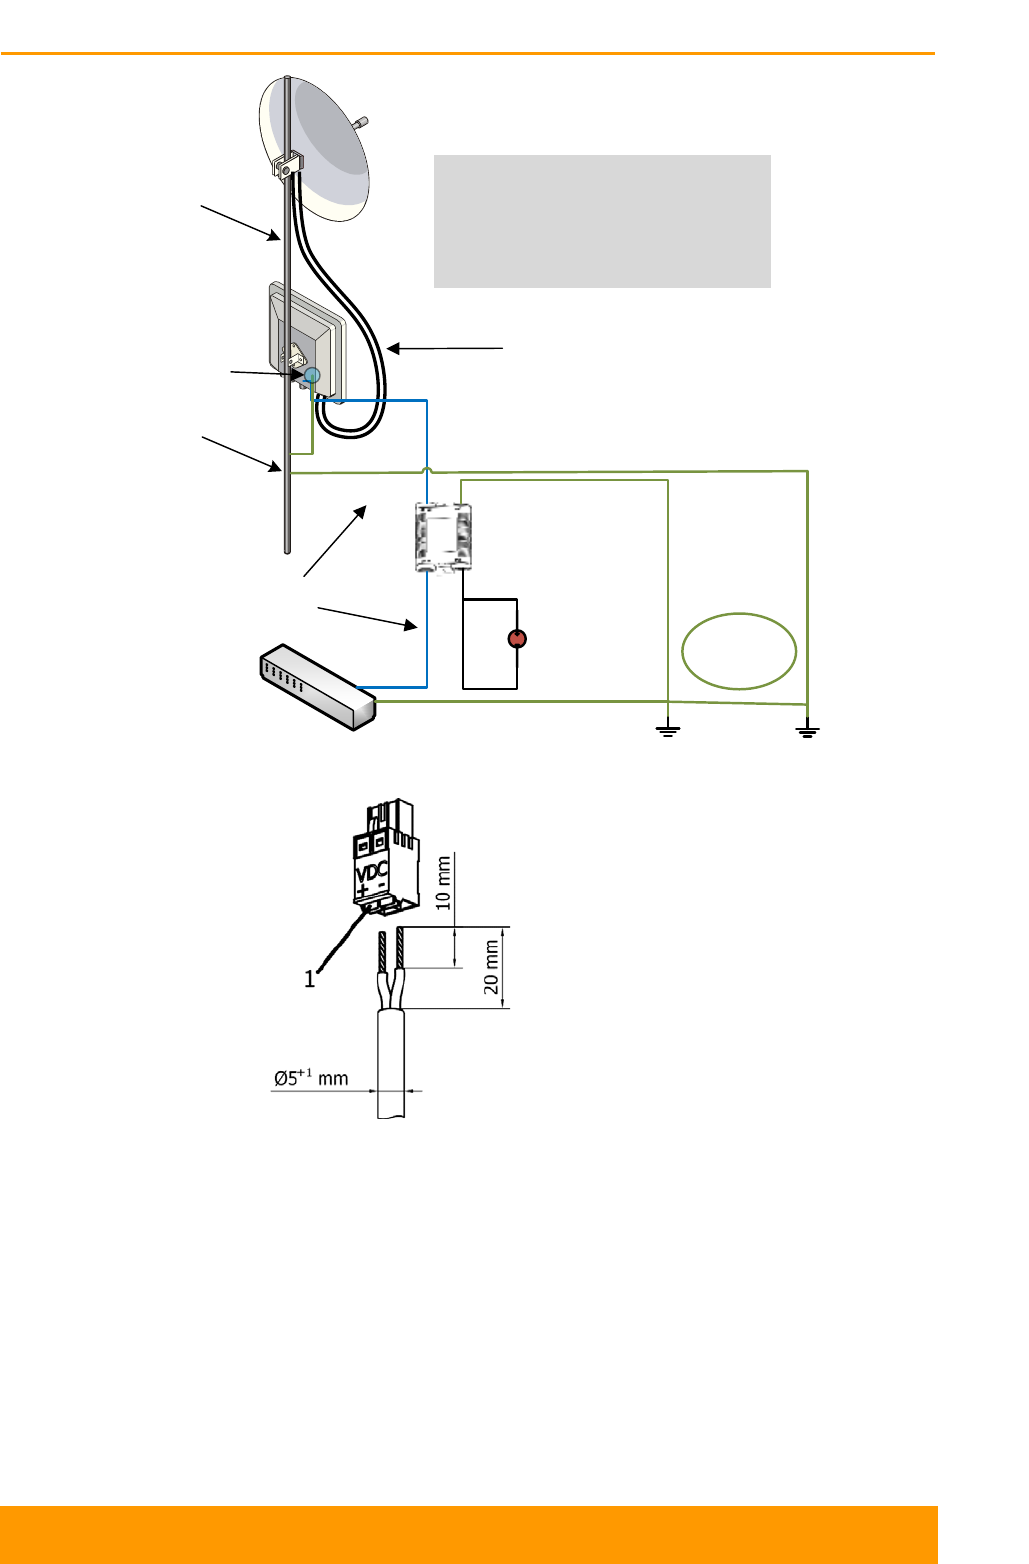
Chapter 3 - Installation
Technical User Manual
InfiLINK XG 36
Building
grounding
circuit
LAN switch
ODU
Antenna pole A separate grounded protection device
should be installed between the ODU
and the antenna, on each of the 2 RF
cables, in case the antenna has no DC-
short protection circuit.
STP
Cat.5e
43...56
V DC
AUX-ODU-
INJ-G
Pole grounding
RF cables
ODU Grounding clamp
Figure 20 - Grounding Connections Schematics when Using AUX-ODU-INJ-G
Figure 21 - AUX-ODU-INJ-G power connector
-
Press on these
catchers (1) when the
cable is terminated;
- Use the round cable
with diameter from
5mm to 6
mm with
conductor cross-
section from 0.5mm
to 2.5mm;
-
Cat 5e FTP cable
may be used.
3.3.7. Grounding when Using AUX-ODU-LPU-G
AUX-ODU-LPU-G is an optional accessory which may be used to serve as a line
protection unit for the ODU and for the indoor network equipment connected to the
Ethernet port of the IDU.
AUX-ODU-LPU-G should be properly grounded.
Chapter 3 - Installation
Technical User Manual
InfiLINK XG 37
Figure 22 - AUX-ODU-LPU-G Connecting and Sealing
Procedure
1 - Cable gland nut;
2 - Sealing grommet;
3 - Cable gland threaded
coupling;
4 - Standard RJ-45
connector;
5 - Shielded RJ-45
connector.
Figure 23 - AUX-ODU-LPU-G Mounting and Grounding
Procedure
1 - Cable gland;
2 - Clamps;
3 - Grounding bolt.
The grounding and lightning protection initial procedures when using AUX-ODU-
LPU-G are similar to those when using regular IDU. First, please read the
instructions from section 3.3.5.
The current section outlines only the differences in grounding connections
schematics, when connecting AUX-ODU-LPU-G:
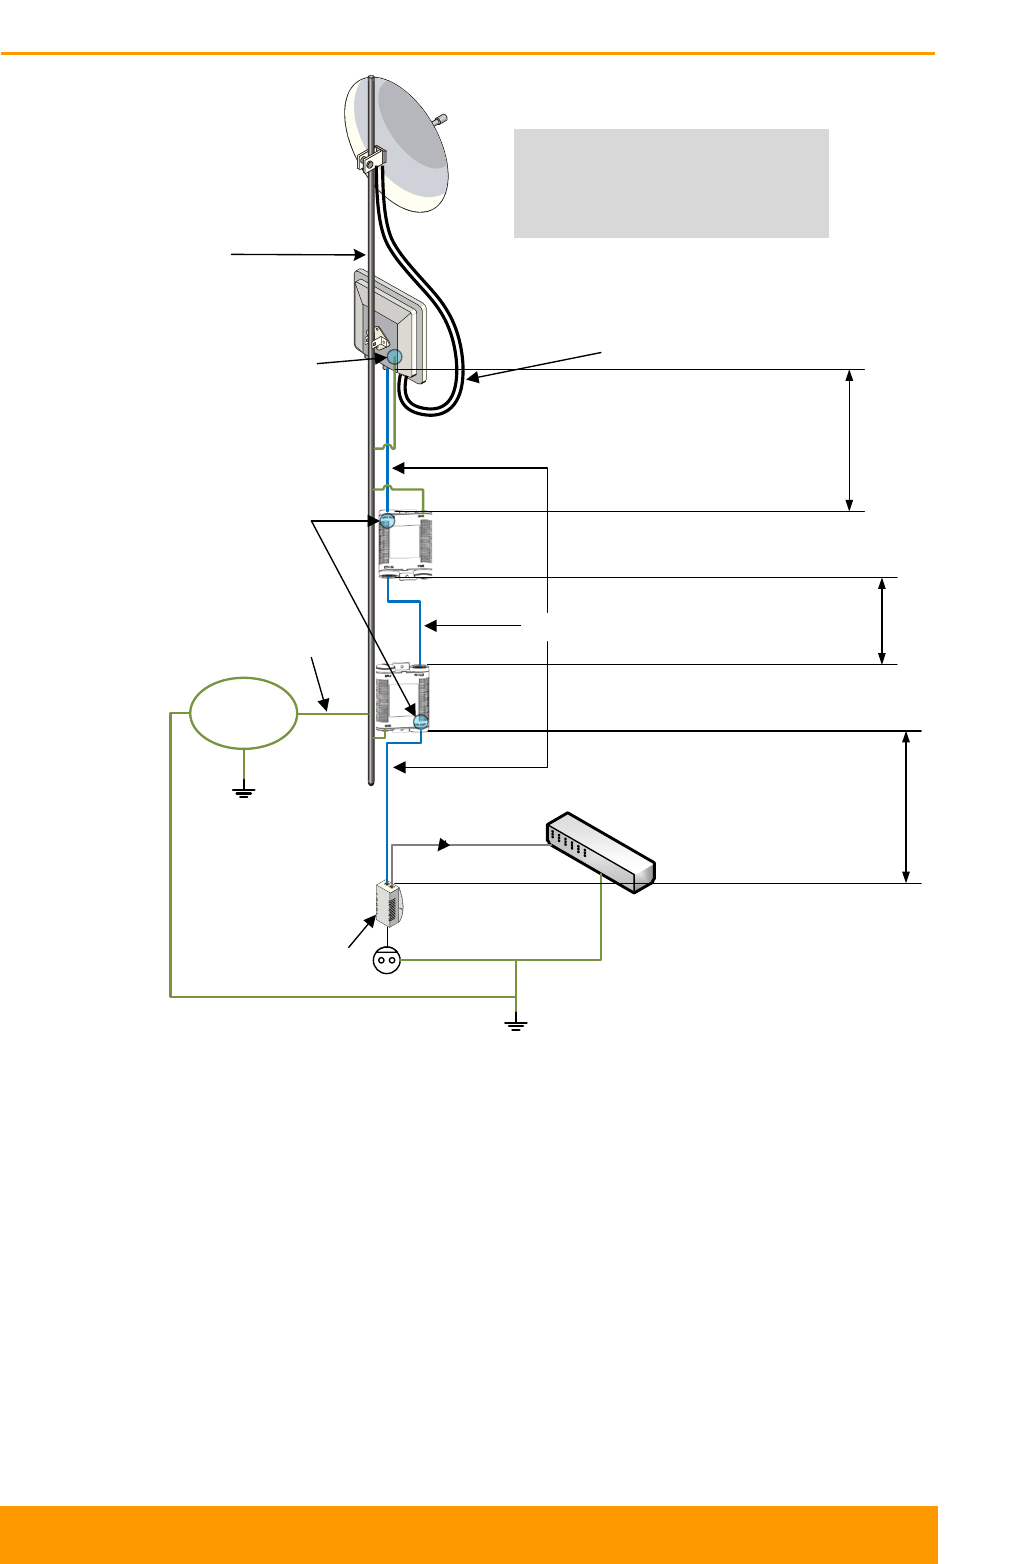
Chapter 3 - Installation
Technical User Manual
InfiLINK XG 38
Building
grounding
circuit
LAN
switch
IDU
ODU
220V
Three-wire power
cable should be
used to ground
the IDU
Antenna pole
A separate grounded protection device
should be installed between the ODU
and the antenna, on each of the 2 RF
cables, in case the antenna has no DC-
short protection circuit.
STP Cat.5e
AUX-ODU-
LPU-G
AUX-ODU-
LPU-G
Short distance (mount
upper AUX-ODU-LPU-G
close to ODU)
Long distance (the majority
of IDU-ODU cable run
should be between the 2
AUX-ODU-LPU-G)
Short distance (mount
lower AUX-ODU-LPU-
G close to IDU)
Pole grounding
RF cables
ODU Grounding clamp
ETH OUT
UTP/STP
Cat.5e
Figure 24 - Grounding Connections Schematics when Using AUX-ODU-LPU-G
For maximum protection of the ODU, IDU and customer LAN devices, use 2 AUX-
ODU-LPU-G connected as shown in the diagram. The purpose of the LPU at the
top is to protect the ODU from a surge of lightning strike which can hit the long
STP cable run along the height of the pole or on the roof of the building. The
purpose of the LPU at the bottom is to protect the IDU and customer equipment.
Make sure to install the 2 LPU devices in the correct polarity, as shown in the
diagram: top LPU with ETH OUT facing the ODU and bottom LPU with ETH OUT
facing the IDU, and the 2 LPU units connected to each other via ETH IN.
Install each LPU as close as possible to the device it protects. The cable length
between the top LPU and ODU should be minimum, as well as the cable length
Chapter 3 - Installation
Technical User Manual
InfiLINK XG 39
between bottom LPU and IDU. Keep most of the IDU-ODU STP cable length
between the two LPU devices.
3.3.8. Antenna Alignment
Prior to the antenna alliagnment activity, perform the radio planning activity using
either InfiNet Wireless Link Planner tool (http://linkplanner.infinetwireless.com),
your own RF planning tool or ordering InfiNet Wireless Professional Services.
To obtain maximum system performance, antennas must be precisely aligned
towards one another according to LOS requirements. General recommendations
for antenna alignment are as follows:
Align antennas using optical equipment (binoculars, spyglass) accompanied
by mobile phone actions coordination;
Use GPS receiver, compass and area map;
Use build-in InfiNet Wireless Device features. These features allow for the
evaluation of the current channel and signal quality and are a powerful aid in
performing precise antenna alignment.
Antenna polarization must be taken into account while installing. Please check the
corresponding labeling on the antenna and refer to the antenna technical
documentation.
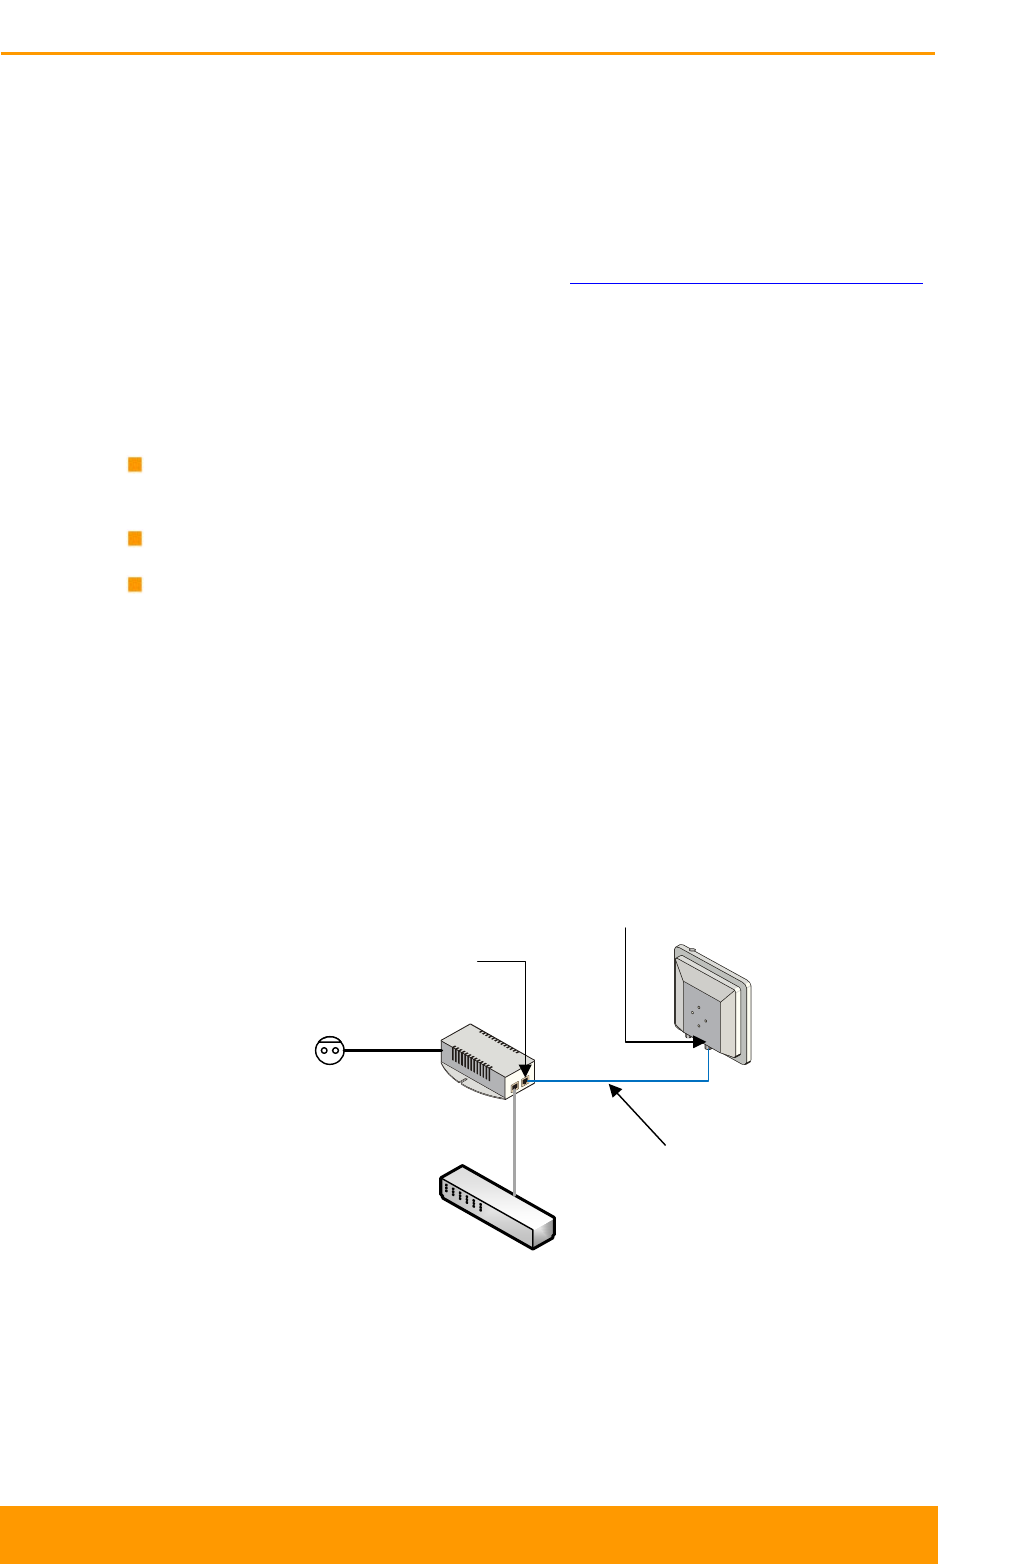
3.4. Installing the Indoor Unit
Shielded RJ45
connector
Unshielded
RJ45 connector
AC
LAN
STP Cat5e cable
Figure 25 - Connection Scheme for IDU-BS-G

Commissioning
Chapter 4
Chapter 4 - Commissioning
Technical User Manual
InfiLINK XG 41
4.1. Introduction
In order to initially setup an operational point-to-point link using InfiLINK XG units,
you must run the procedure described below.
4.2. Step by step procedure
Step 1 - Perform site survey
- Determine line of sight conditions and obstacles along the path
- Perform spectrum analysis and figure out spectrum occupation and
available channels
- Use InfiNet Wireless Link Planner tool
(http://linkplanner.infinetwireless.com) to estimate link performance and
required configuration in terms of antennas, channel width, Tx power, etc.
Step 2 - Pre-configure the units in the lab
The equipment list required for lab configuration and on site installation is:
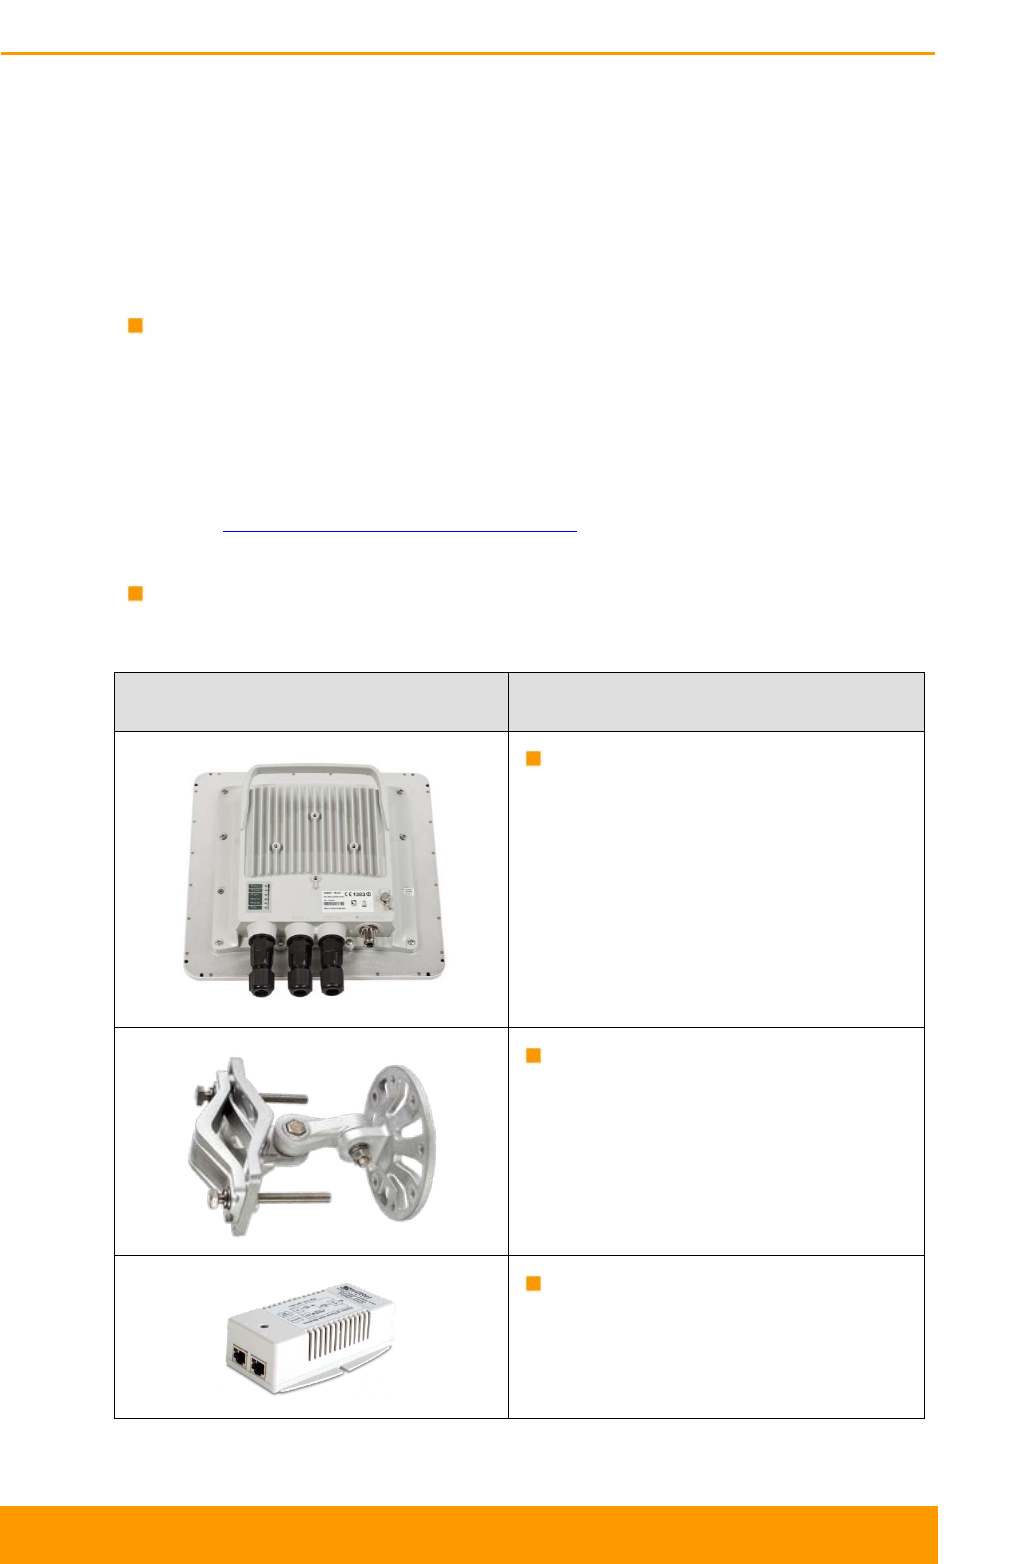
Component Description
2 x InfiLINK XG unit (ODU)
- Available in InfiLINK XG BOM
2 x mounting kit
- Available in InfiLINK XG BOM
2 x indoor power supply (IDU)
- Available in InfiLINK XG BOM
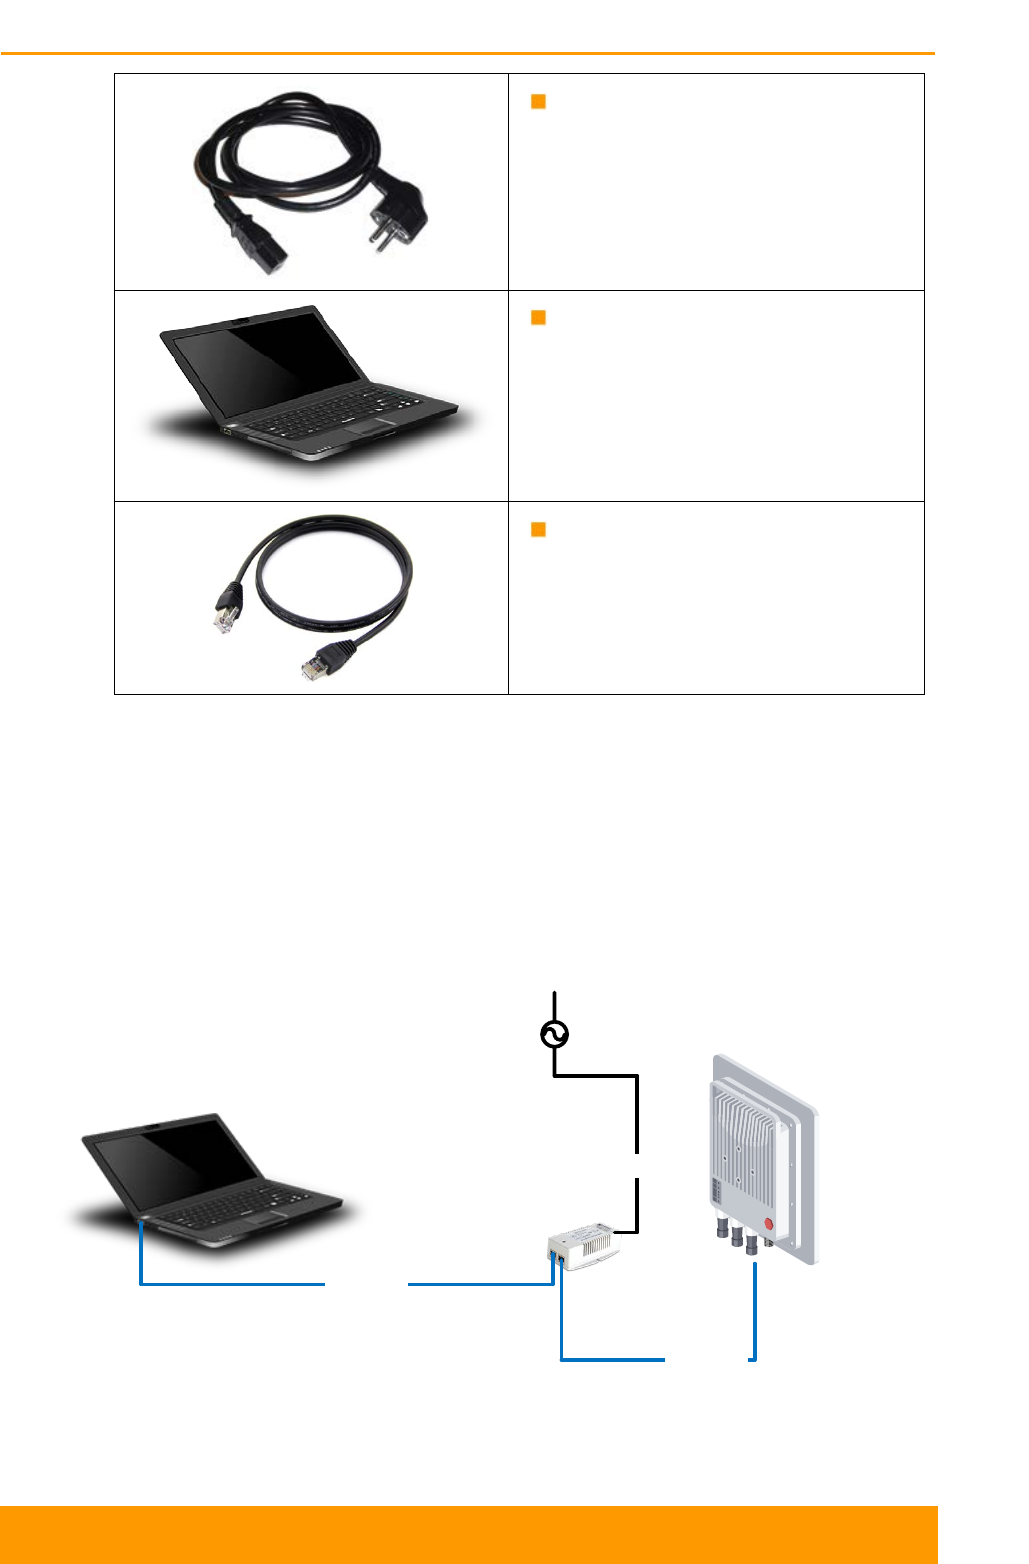
Chapter 4 - Commissioning
Technical User Manual
InfiLINK XG 42
2 x power supply cord
- Available in InfiLINK XG BOM
1 x laptop
- Not available in InfiLINK XG
BOM
3 x Ethernet patch cords
- Not available in InfiLINK XG
BOM
Table 19 - The equipment necessary for initial configuration
In the lab and later on site perform the connections as indicated below:
- Connect the power cord between the GE0 port of the XG unit and the
splitter port of the PoE injector
- Connect the Ethernet patch cord between the Laptop and the switch port
of the PoE injector
- Connect the PoE injector to an AC power supply using the power cord
ETH patch
ETH patch
Power cord
PoE
injector
InfiLINK XG
AC
Figure 26 - Connectivity to the unit
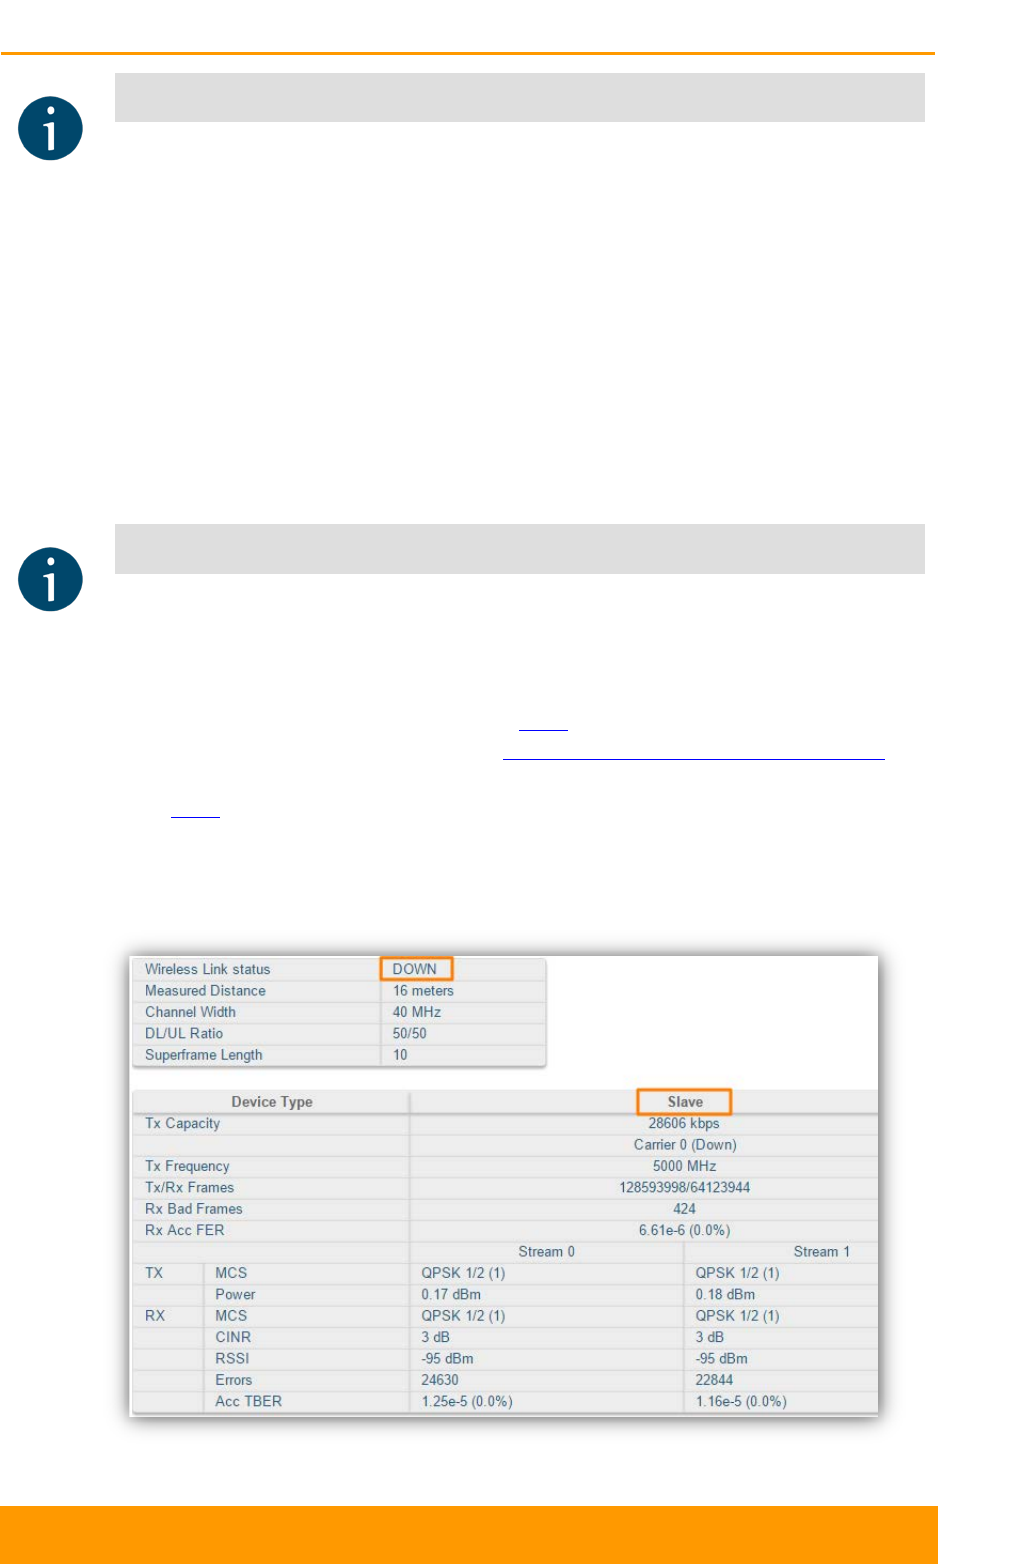
Chapter 4 - Commissioning
Technical User Manual
InfiLINK XG 43
NOTE
The PoE port of the IDU must be only connected to the GE0 port of the InfiLINK XG unit
Spectrum analyzer tool would be added to future firmware versions
After the physical connections are completed, access each unit to the default
IP address 10.10.10.1 with mask 255.255.255.0 via web browser. Make sure
that the Ethernet port of the Laptop has an IP address assigned from the
same network class as the one for the InfiLINK XG unit (for example, set
10.10.10.50 with mask 255.255.255.0).
Use any letters or numbers for initial authentication, for example:
- User name: login
- Password: password
NOTE
After the initial login to the units, it is recommended to change the user and password to
more secure permanent values
Upgrade the units to the newest firmware available in order to benefit of the
latest features implemented. You can directly upgrade to the latest firmware
available as described in section 5.5.1. Another option is to download the
firmware from the ftp address ftp://ftp.infinet.ru/pub/Firmware/XG/H12 and
then the upgrade can be performed via Web interface as described in section
5.5.2.
The last step is to connect to each unit separately and configure the radio link
parameters according to the planning previously performed. Initially the status
of the radio link is down like below.
Figure 27 - Initial status of the link
Chapter 4 - Commissioning
Technical User Manual
InfiLINK XG 44
In the Web interface, go to the Radio page and perform the following
configuration:
- Set one unit as Master and another one as Slave
- Set the uplink and downlink frequencies which should match on both units
- Set the same channel width on both units from the range: 10, 20 or 40
MHz
- Set the air frame period to match on both units (1, 2, 5 or 10 ms); shorter
air frame translates into lower latency and longer air frame means higher
throughput
- Set the link ID between 0 and 15 to match at both ends of the links
- Set the maximum distance in meters (initial setting is recommended to
exceed more the actual distance for 300…400 meters)
- Set the Tx power for each unit between 0 and 27 dBm
NOTE
The detailed description for each radio setting in the Radio page can be found in section
5.6.3 of this document
CAUTION
Please note that the following parameters must have the same values at each of the two
units in the PtP link; otherwise the wireless link between them won’t be established:
Downlink/uplink frequency channels
Channel width
Air frame period
Downlink/uplink ratio
Max distance
Link Id
Save the configuration, reboot both units and check if they link up after reboot.
The link status should be “UP” and the radio statistics should indicate the
capabilities and quality of the link.
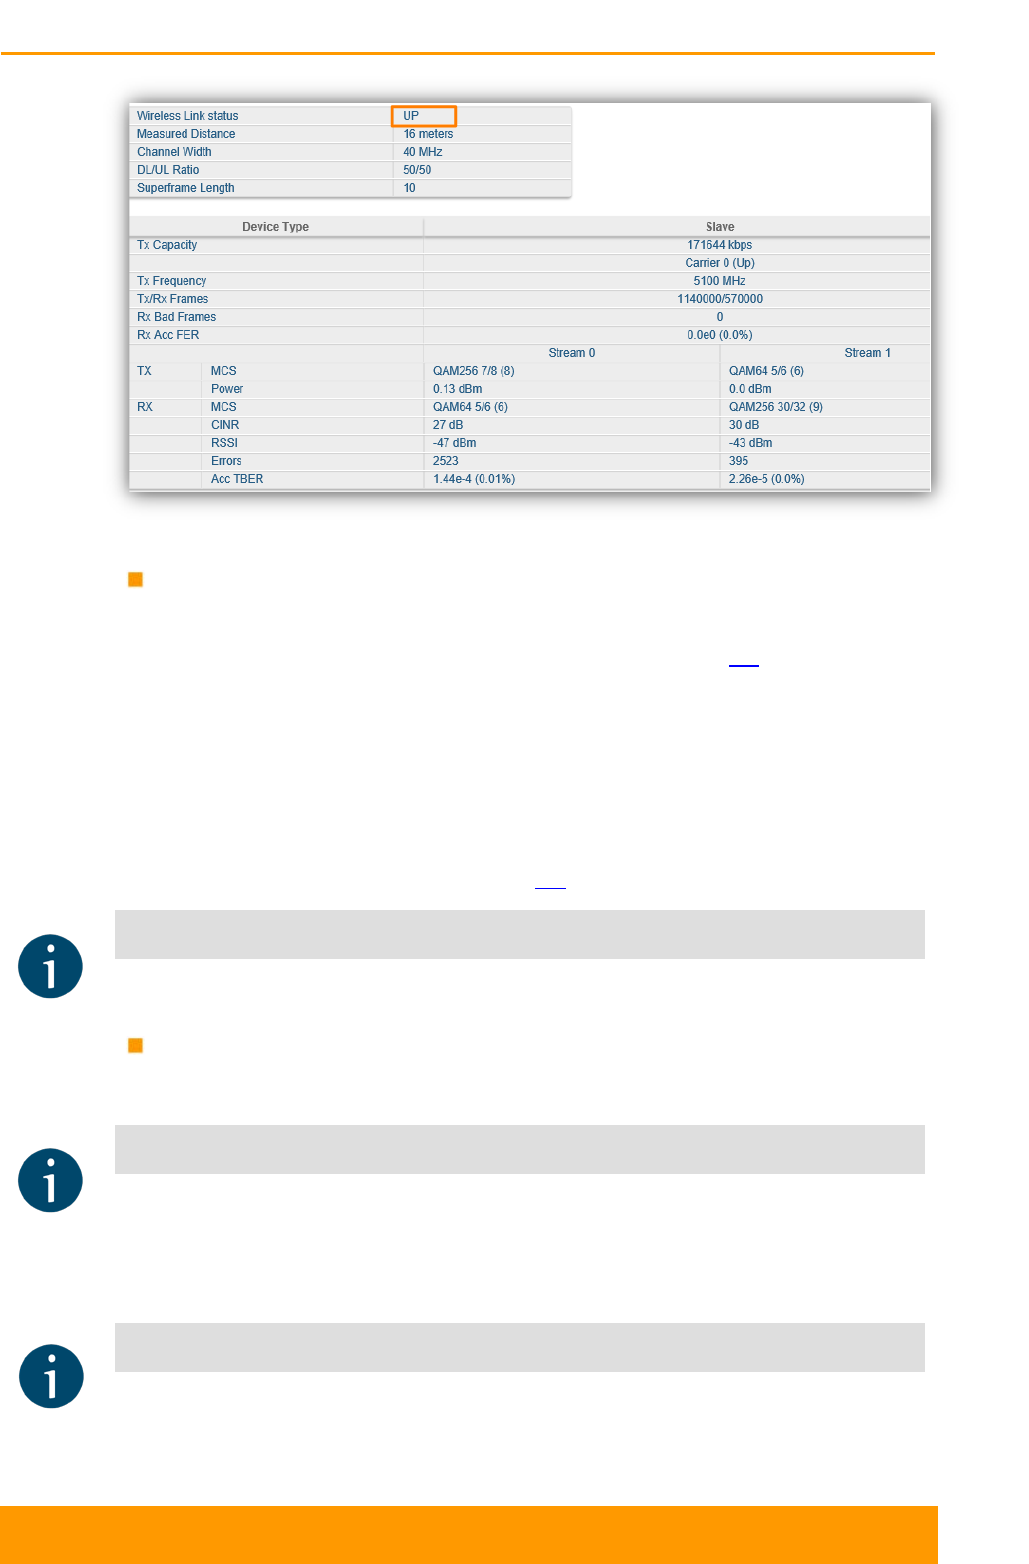
Chapter 4 - Commissioning
Technical User Manual
InfiLINK XG 45
Figure 28 - Link UP status
Step 3 - Perform initial alignment on site
- Install both units on the masts and roughly direct them at each other (the
detailed installation steps can be checked at section 3.3 of this document)
- Turn them on and check that the wireless link will be established using
RF link led indicator
- Perform coarse alignment using built-in signal strength indicators
- Perform fine alignment using the Alignment tool available in the Web
interface. Try to maximize CINR and RSSI readings. Please follow the
detailed indications from section 5.4 for a proper antenna alignment
NOTE
If “Absolute RSSI” value goes above -40 dBm, decrease Tx power at the opposite side
in order to keep it within -40...-50 dBm for the best performance.
Step 4 - Optimize the link performance
- Adjust Maximal link distance parameter based on the measured distance.
NOTE
Check measured link distance from the Status page and adjust the Max distance setting
by adding 200-300 m to the measured value.
- Monitor air block error rate by checking the Acc TBER parameter in the
Status page and adjust the AMC strategy if necessary.
NOTE
Acceptable error rate depends on the application. See some examples in the table
below.
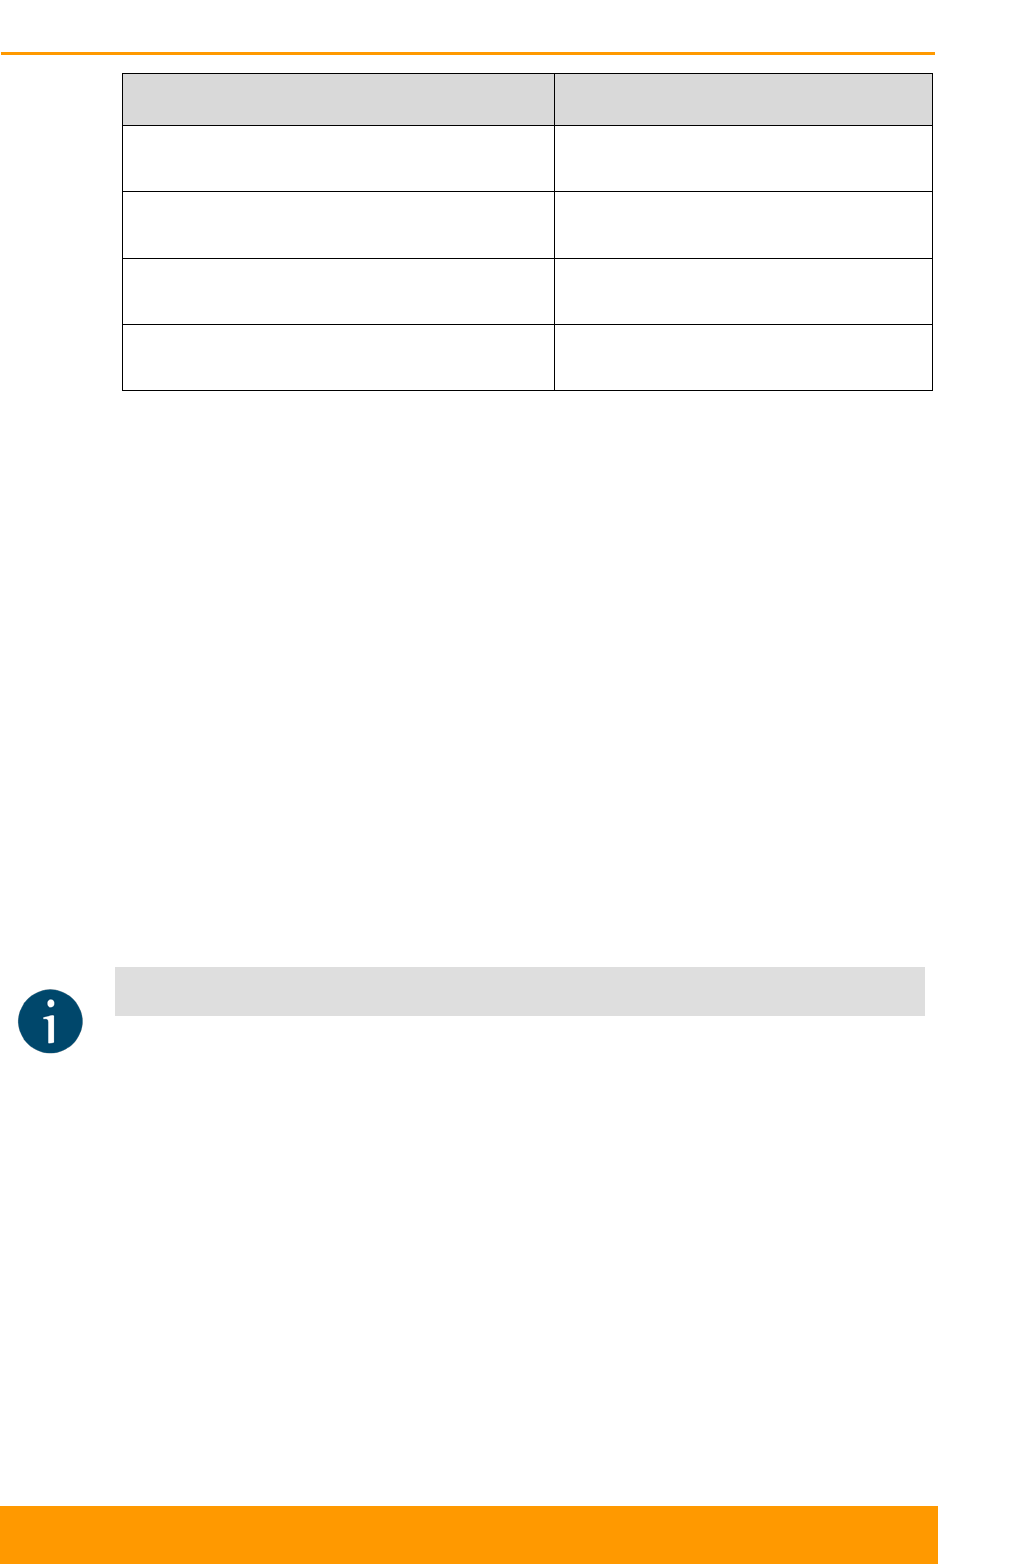
Chapter 4 - Commissioning
Technical User Manual
InfiLINK XG 46
Application Acceptable error rate
TCP-based applications (web, FTP, etc.) 10-4
Voice-over-IP 10-5
UDP video (CCTV, IPTV, etc) 10-6
TDM-over-IP 10-7..10-9
Table 20 - Acceptable error rates for different applications
Automatic Modulation Control (AMC) can be adjusted due to customers
requirements.
“Normal” AMC strategy is enabled by default.
“Aggressive” AMC strategy has been designed to maximize the throughput
by utilizing higher-order modulation schemes and reducing SNR margins.
“Conservative” AMC strategy increases SNR margins, so that lower order
MCSs are used in order to keep error rates to the minimum.
It is recommended to use “Normal” strategy initially and adjust it based on
target and actual TBER values.
- Fine tune the Tx power in order to optimize the CINR and RSSI values;
these parameters can be monitored in real time from the Status page and
the recommendation is to keep the RSSI between -40…-60 dBm and the
CINR higher than 30 dB
- Select the most appropriate air frame period
NOTE
The system supports a number of different frame periods between 1 and 10 ms.
1 ms frame period gives the lowest latency (from 500 µs one-way), while 10 ms
frame period has lowest overheads and thus maximum throughput will be by
approximately 12% better for the same MCS. Due to overheads, 1 ms frame period
has significantly higher distance penalty compared to 10 ms: at 100 Km maximum
throughput decreases by 7% at 10 ms and by 75% at 1 ms. So air frames higher
than 2 ms allow using the link at higher distances.

Operation & Administration
Chapter 5
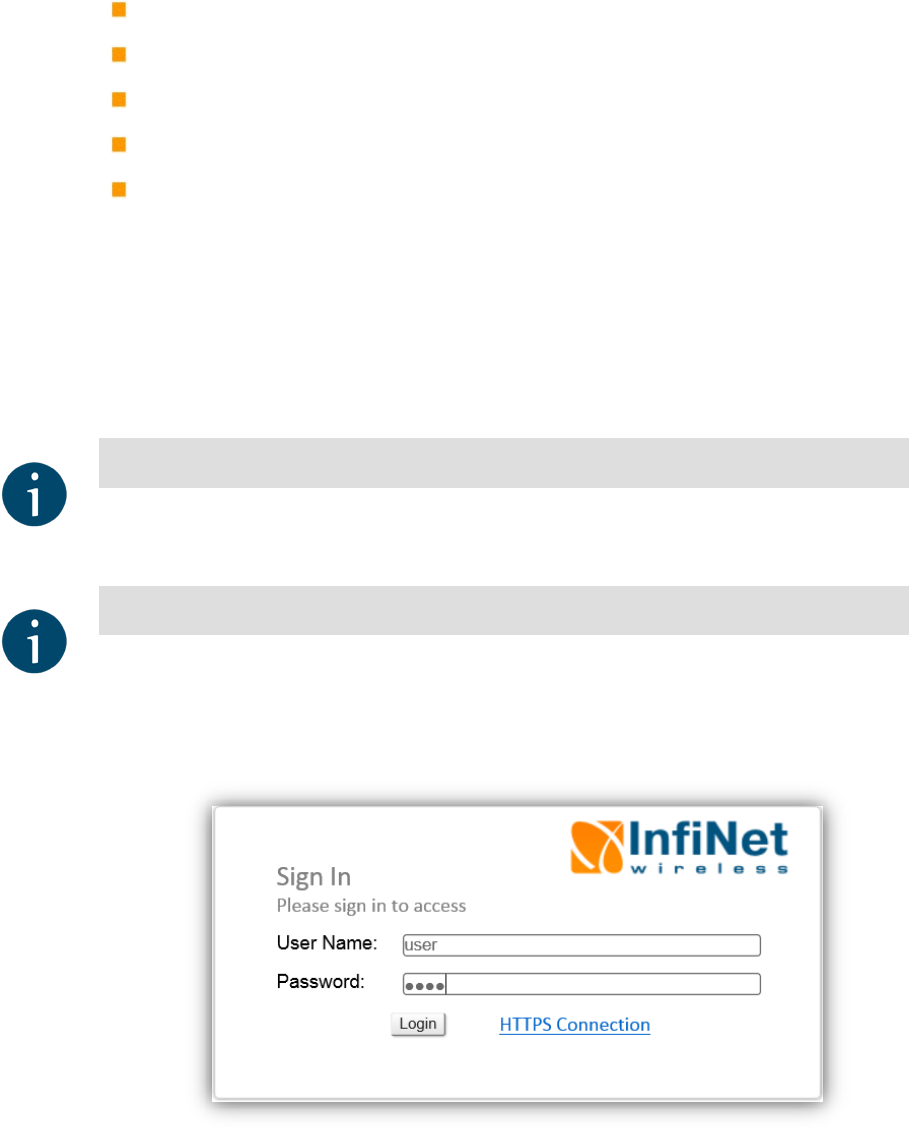
5.1. Introduction
Web interface is a friendly management tool of the InfiLINK XG unit. Using Web
interface, you can easily:
Monitor device interfaces statistics
Monitor radio link statistics
View and change device configuration
Perform device maintenance
Perform antenna alignment
5.2. InfiLINK XG unit access
Web management is enabled by default so, in order to access the unit via Web
browser (start the graphical user interface), type in the address bar:
http://<unit IP address>.
NOTE
The default management IP address is 10.10.10.1/24 and it can be used for initial login.
Make sure you have network connectivity to the unit.
NOTE
The system allows concurrent login sessions via Web interface.
On the login page, you can type any username and any password and click Login.
For example, “User name: user” and “Password: pass” like below.
Figure 29 - Web GUI login
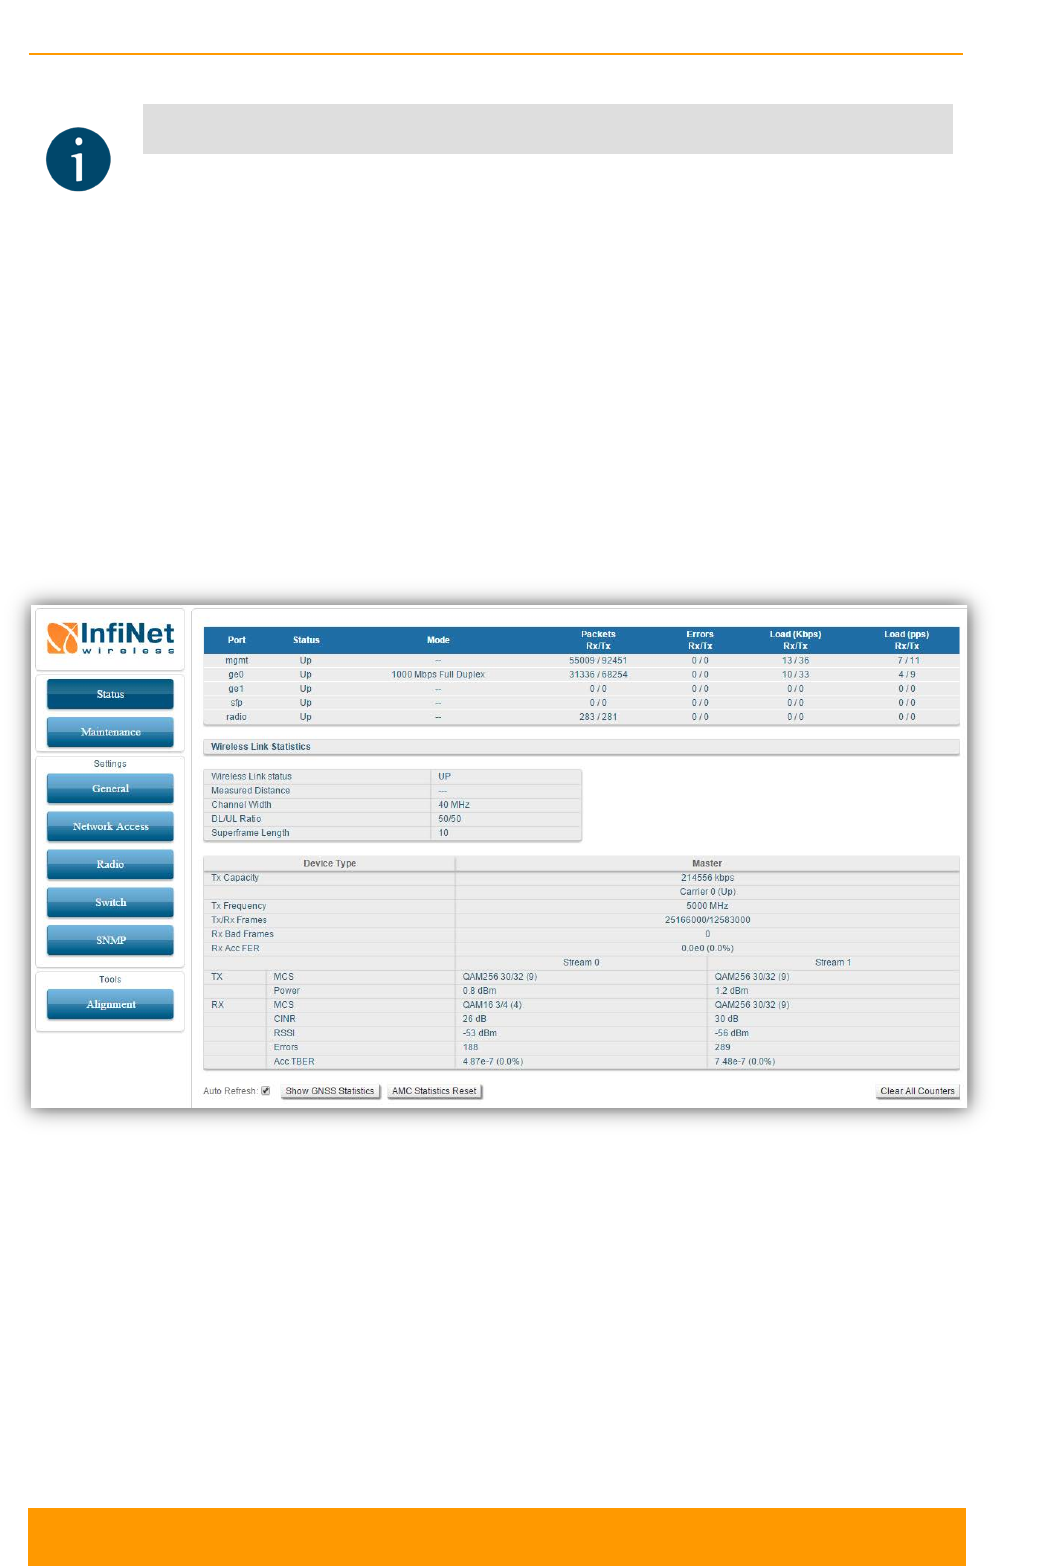
Chapter 3 - Configuration
Technical User Manual
InfiLINK XG 49
NOTE
Please change the credentials you have just inserted with a permanent username and
password for it after the first log in.
The default language is English. After the authentication step, the language can be
changed into Russian, French, Italian or Chinese.
You can access the unit via HTTPS (HTTP with SSL only) using InfiNet Wireless
self-signed certificate (from the Maintenance menu of Web interface). The «HTTPS
Connection» link is available in the right side of the «Login» button like in the
picture above.
5.3. Status
The Status page is displayed by default after the authentication step. It displays the
main parameters of the unit in real-time.
Figure 30 - Status page
You can set the "Auto Refresh" option to refresh the statistics automatically. The
“Auto refresh” is available in the bottom-left side of the Status page, along with the
«Show GNSS Statistics» button. If GNSS is in use and GNSS monitoring is
enabled, its statistics can be queried by clicking on «Show GNSS Statistics».
On the bottom-right side of the Status page the «Clear All Counters» button is
present with the scope of resetting the counter values to 0 when clicked on.
Chapter 3 - Configuration
Technical User Manual
InfiLINK XG 50
CAUTION
Clearing these counters by clicking on the «Clear All Counters» button means losing the
history data about the functionality of your unit. Avoid this operation unless you are
completely sure you don’t need this data in the future.
The Status page has the following sections:
Interface Statistics - displays the main parameters of all configured interfaces
(physical and logical)
Wireless Link Statistics - displays the main parameters of the radio link
5.3.1. Interface Statistics
Parameter Description
Port Displays all physical and logical set interfaces
Status Displays for each interface whether it is “up and running” or
not
Mode Displays the operation mode for the GE ports:
- 10,100 or 1000 Mbps and half or full duplex
Packets
Rx/Tx
Displays the number of received and transmitted packets for
each interface since the unit is operational
or since the
counters were last reset
Errors
Rx/Tx
Displays the number of received and transmitted error
packets for each interface since the unit is operational or
since the counters were last reset
Load
(Kbps)
Rx/Tx
Displays the packet flow through each interface in real-time
(for the system and the data traffic) expressed in Kbps
Load (pps)
Rx/Tx
Displays the packet flow through each interface in real-time
(for the system and the data traffic) expressed in packets
per second (pps)
Table 21 - Interface Statistics
Additional statistics about the network packet types and error types for
reception/transmission are displayed by clicking on any of the interfaces:
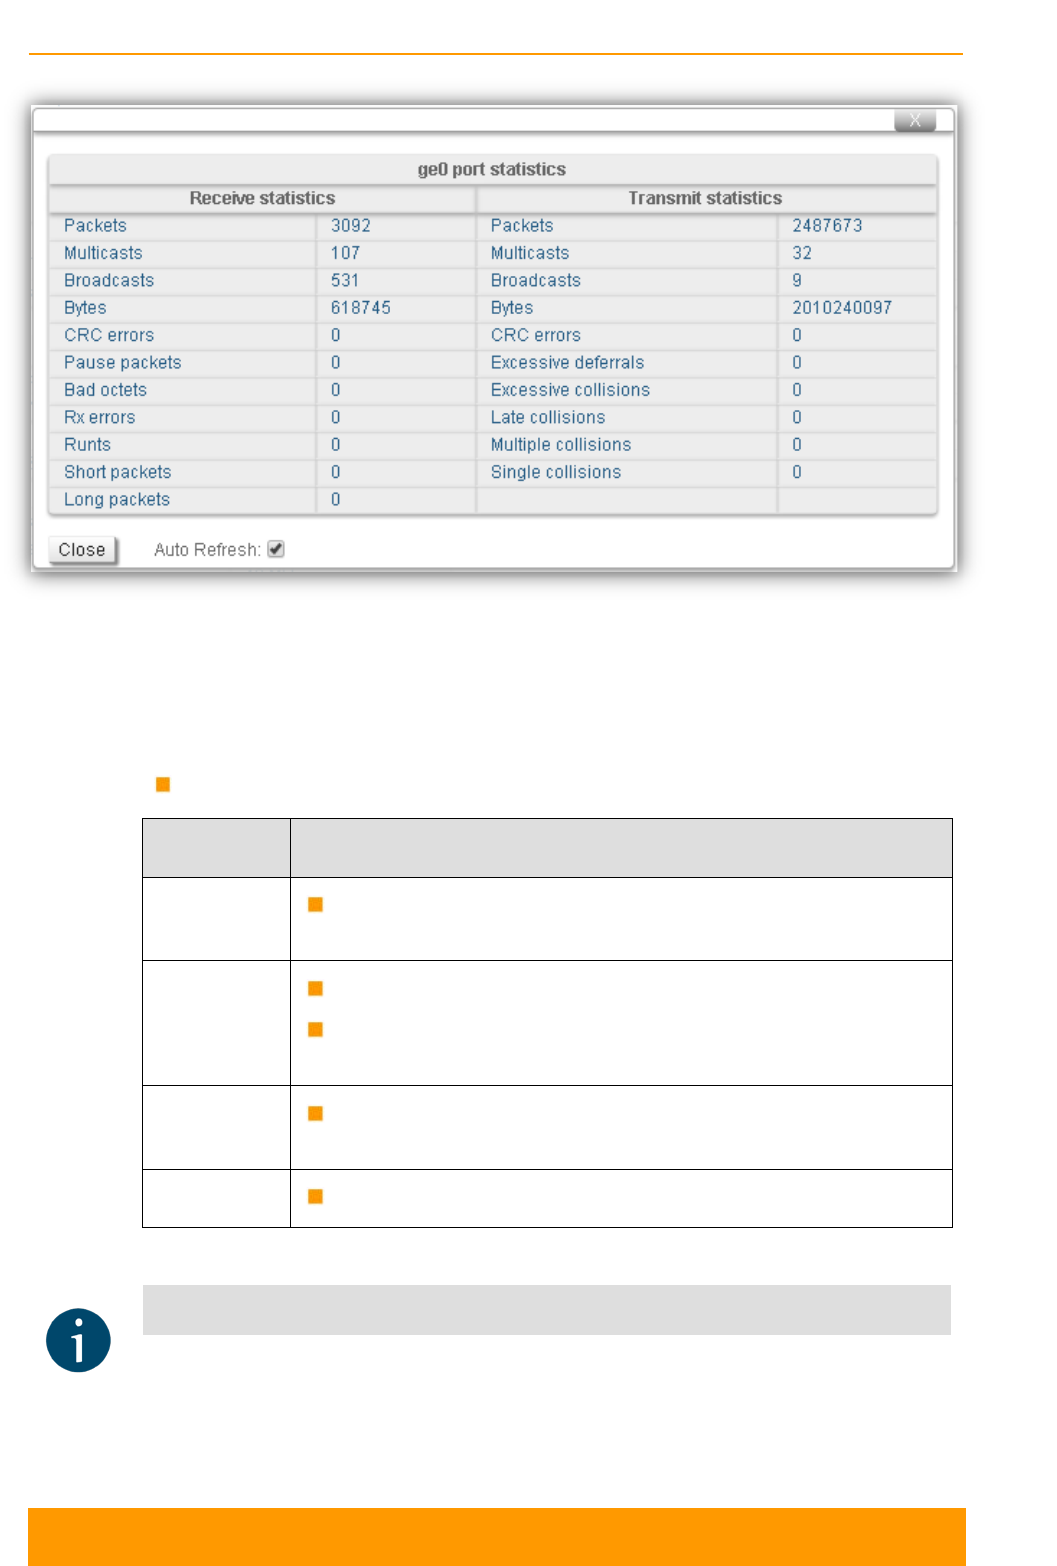
Chapter 3 - Configuration
Technical User Manual
InfiLINK XG 51
Figure 31 - Additional interface statistics
5.3.2. Wireless Link Statistics
This section is divided in the following two areas:
General radio link parameters - displays the following information:
Parameter Description
Wireless
Link Status
Displays the status of the radio link which can be “Up” or
“Down”
Measured
Distance Displays the measured distance of the radio link in meters
If the remote end stats is disabled, the measured distance is
only shown at the slave unit
Channel
Width Displays the channel bandwidth that is in use
DL/UL Ratio Displays actual downlink/uplin ratio
Table 22 - General radio link parameters
NOTE
The actual DL/UL ratio might different to the specified in the configuration because of air
protocol limitations. The system automatically chooses the closest possible value to the
requested one
Chapter 3 - Configuration
Technical User Manual
InfiLINK XG 52
Real time radio link status - displays the following parameters of the radio link
in real time for both the local and remote unit:
Parameter Description
Tx capacity Displays the maximum transmission capacity expressed
in Kbps for the current modulation and coding scheme; if
the MCS changes, the Tx capacity will also change
accordingly
Tx Frequency Displays the center Tx frequency expressed in MHz
Tx/Rx Frames
Displays the number of transmitted and received air
frames
Rx Bad frames Displays the number of air frames received with errors
for which the Control Block cannot be correctly decoded
Rx Acc FER Displays the Frame Error Ratio, meaning the percentage
of frame loss (air frames that cannot be decoded divided
by the total number of air frames received)
Tx parameters
MCS Displays the modulation and coding scheme that is in
use at Tx
side. There are 10 MCS schemes available
and if the AMC is set to auto, the MCS will dynamically
change its value based on the link quality (at both units -
local and remote)
For example, for QAM256 7/8 (8), “QAM256” is the
modulation in use, “7/8” is the coding scheme in use (for
every 7 data bits encoder produces 8 bits to be sent
over the air) and “(8)” represents the index of the MCS
in use
Power
Displays the current power level of the Tx signal for
each radio chain in dBm
Rx parameters
MCS Displays the modulation and coding scheme that is in
use at Rx side. The representation is similar to that for
Tx part
CINR
Displays Carrier to Interference and Noise Ratio
measured in downlink and expressed in dB
CINR can be limited either due to too low signal level or
because of the interference from other radios
AMC algorithm makes its decisions based on the CINR
Chapter 3 - Configuration
Technical User Manual
InfiLINK XG 53
Parameter Description
value
Higher CINR is better
RSSI
Displays the Received Signal Strength Indicator
measured in downlink and expressed in dBm
Represents the power of the received signal as a whole
(useful signal plus noise and interferences) and if it goes
below the level of the sensitivity, the link will go down
Acc TBER Displays the Transport Block Error Ratio, showing the
percentage of errored transport blocks
Each application has an acceptable air block error rate
defined as a minimum requirement
The values are presented in the table below
Table 23 - Wireless Links Statistics
CINR and RSSI are very important in analyzing the link performance. Below there
are the guidelines for CINR and RSSI levels:
CINR (dB) Comment
5…12
Very low quality signal suitable for low-order modulations
only. It is highly recommended to improve signal quality by
selecting less congested channel or increasing signal level
13…19
Low signal quality, average modulations are available
20…27
Average signal quality
>=28
Very good quality signal suitable for highest-order
modulations
Table 24- CINR value ranges
RSSI (dBm) Comment
-90…-80
Close to the receiver sensitivity level, suitable only for the
lowest modulation levels; it is highly recommended to
improve signal level or switch to narrower available channel
width in order to avoid the loss of connectivity
-80…-60
Average input range
-60…-40
The recommended range for achieving best performance
>-40
Input signal level is too high, it is recommended to decrease
the Tx power in order to avoid possible damage of the radio
module of the remote unit
Table 25 - RSSI value ranges

Chapter 3 - Configuration
Technical User Manual
InfiLINK XG 54
The maximum Tx capacity varies based on the MCS in use. The table below
specifies the relation between the MCS and the maximum capacity:
Channel
width 10 MHz 20 MHz 40 MHz
Air frame
period 1 ms 10 ms 1 ms 10 ms 1 ms 10 ms
Modulation,
coding rate Throughput, Mbps
QAM256 30/32 98 119 200 241 435 477
QAM256 7/8 92 110 186 225 401 440
QAM256 3/4 78 94 159 192 343 377
QAM64 5/6 65 77 132 159 284 312
QAM64 2/3 51 61 105 126 226 249
QAM16 3/4 38 45 77 94 168 185
QAM16 1/2 24 29 51 61 110 121
QPSK 3/4 17 21 37 45 81 89
QPSK 1/2 11 12 24 29 52 57
Table 26 - InfiLINK XG throughput capabilities (laboratory figures)
The minimum TBER requirement for specific applications:
Application Acceptable error rate
TCP-based applications (web, FTP, etc.) 10-4
Voice-over-IP 10-5
UDP video (CCTV, IPTV, etc) 10-6
TDM-over-IP 10-7...10-9
Table 27 - Acceptable error rates for different applications
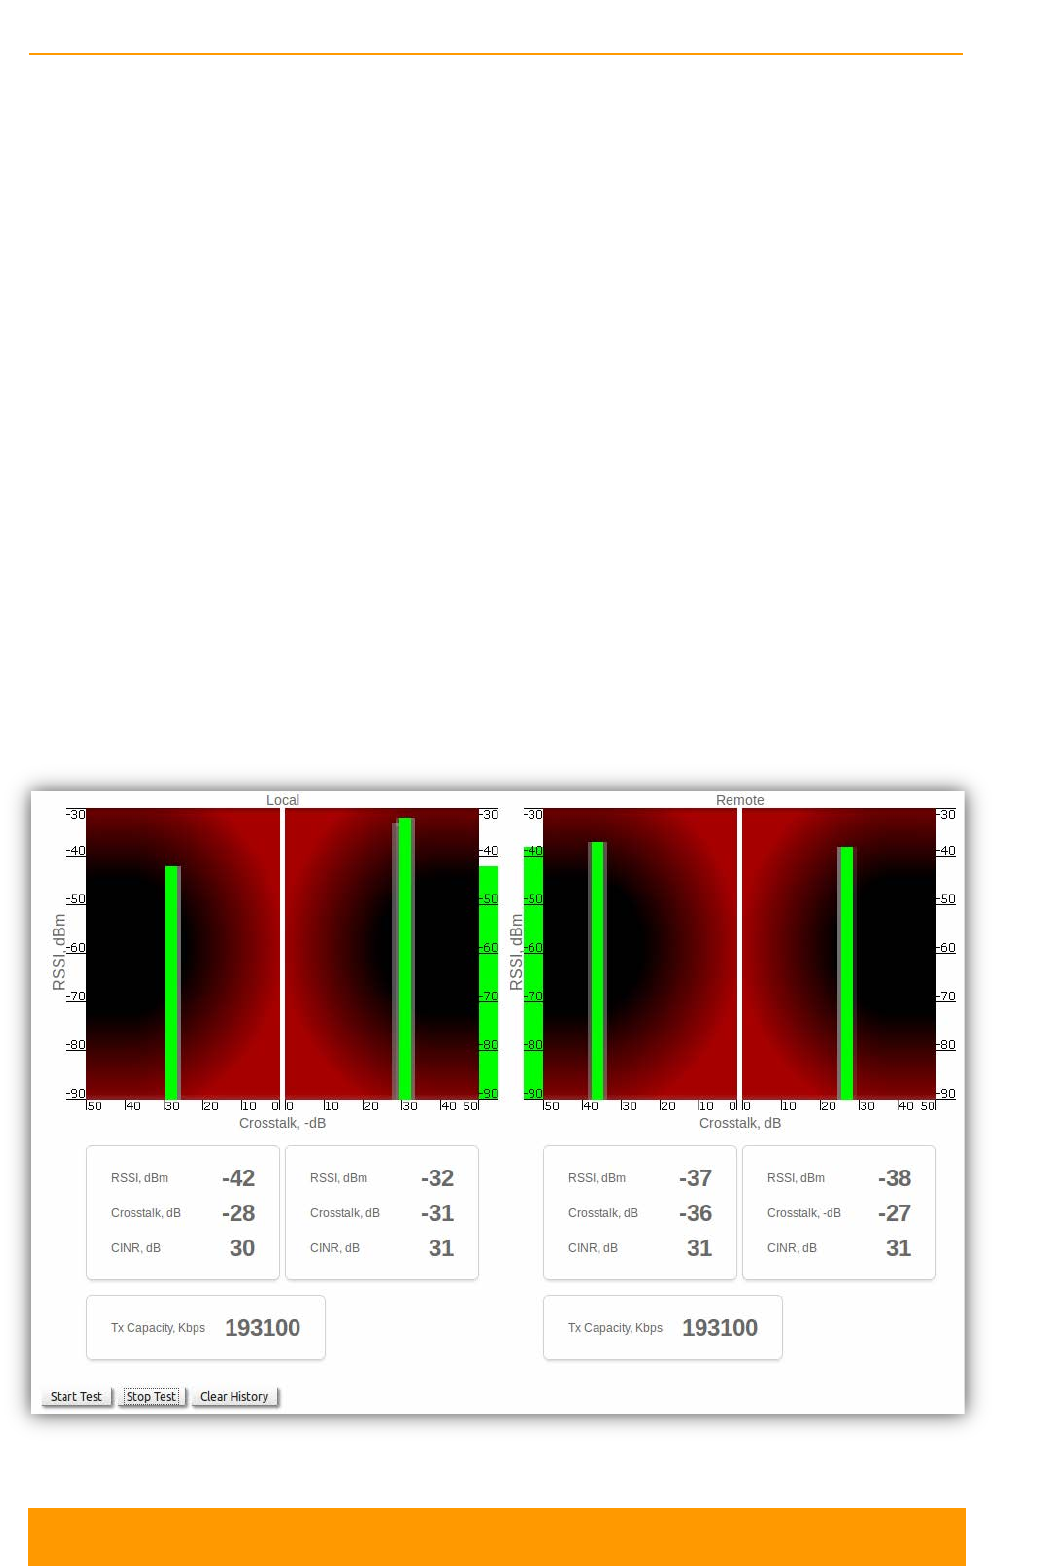
Chapter 3 - Configuration
Technical User Manual
InfiLINK XG 55
5.4. Antenna alignment
The graphical antenna alignment tool allows to visualize the signal characteristics
on both sides of the link in order to make the antenna alignment process more
accurate and easier.
The accuracy of the antenna alignment at the neighbor device is very important for
the link quality.
By clicking the «Start Test»/«Stop Test» buttons at the bottom of the page, you
can start/stop the alignment test.
By clicking the «Clear History» button, you delete all data stored from the moment
you clicked the «Start Test» button.
Once the test is started, the antenna alignment can be monitored using the graphic
and text indicators. The indicators for both local and remote devices are displayed
together in the same page which allows viewing the alignment process for both
sides of the link.
Each side of the link (local and remote) has two similar test indicator sets,
corresponding to each antenna polarization (one for Vertical polarization and
another for Horizontal). This allows controlling the alignment process for each
antenna polarization for the local and for the remote device simultaneously.
Figure 32 - Antenna alignment tool
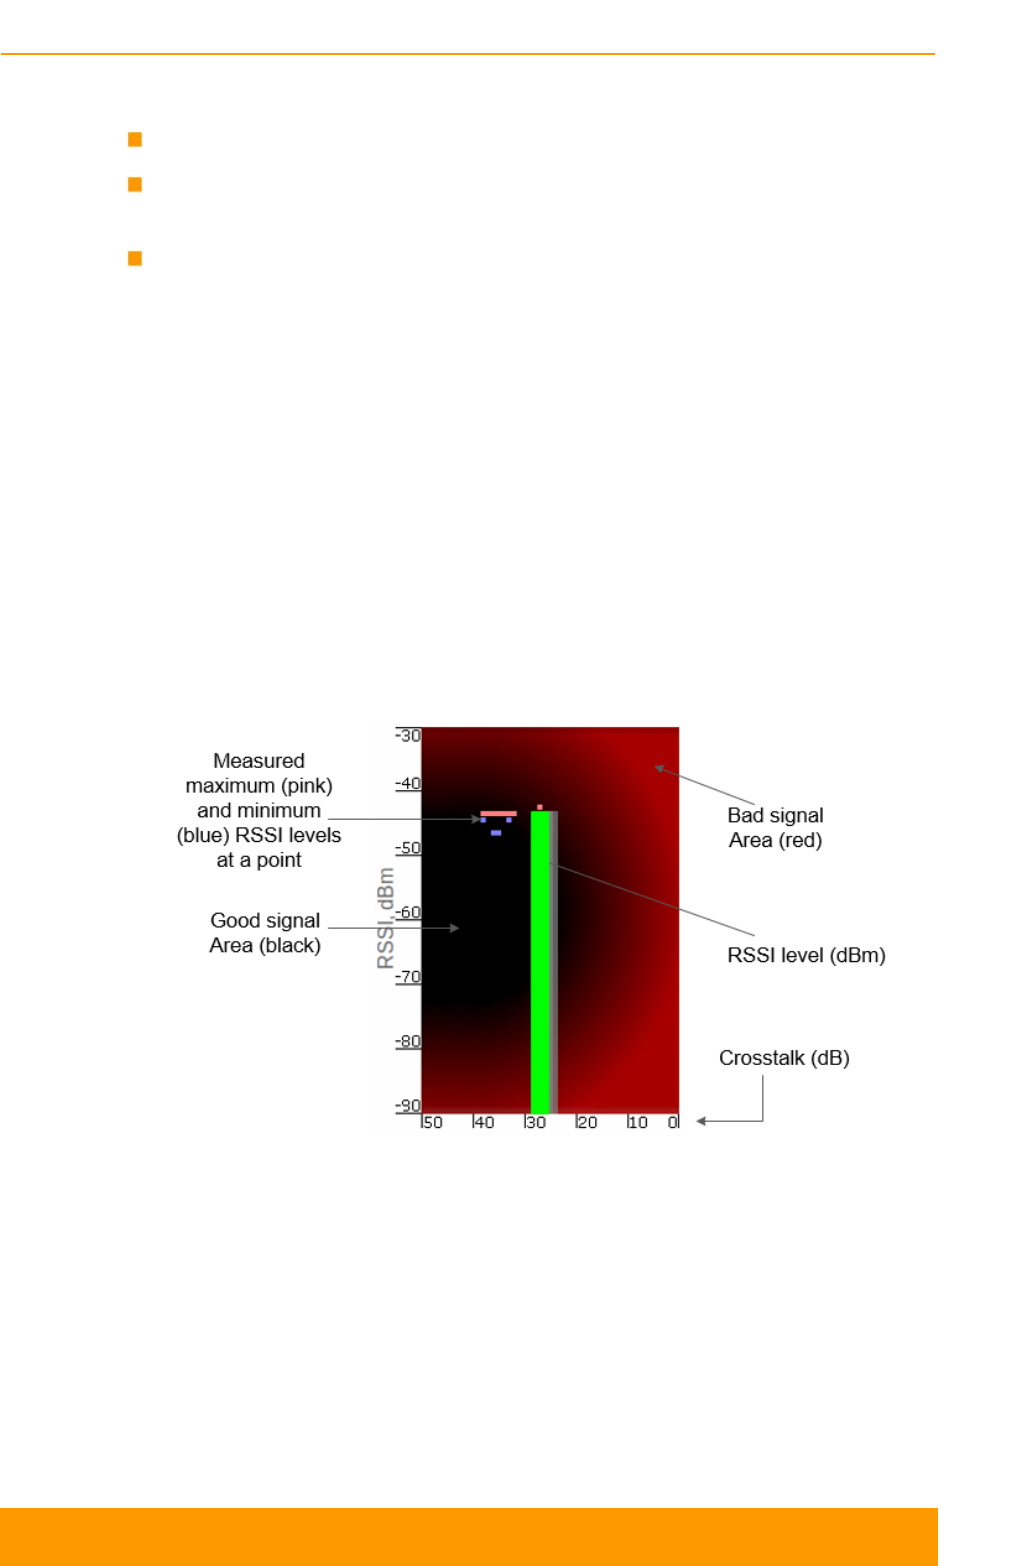
Chapter 3 - Configuration
Technical User Manual
InfiLINK XG 56
The text indicators are:
RSSI - indicates absolute level of the received radio signal (measured in dBm)
Crosstalk - indicates how much the vertically and horizontally polarized signals
interfere each other (measured in dB)
CINR - indicates the signal quality (for example, how strong is the carrier
signal compared to the noise plus interference level, measured in dB)
Graphical indicator:
The main indicator is the Input Signal stripe.
The height of the Input Signal stripe is measured in dBm by the RSSI scale. The
higher the stripe is, the stronger the signal is.
The stripe may change its position along the Crosstalk scale, showing how much
influence the corresponding device antenna has (for example, how much vertically
and horizontally polarized signals influence each other). The higher the value of
the stripe according to the Crosstalk scale (the farther stripe is from the 0 dB
value), the less influence the antennas have on each other.
Figure 33 - Alignment test - graphical indicator
The top of the Input Signal stripe can be located in black (Good signal) or red (Bad
signal) background areas or somewhere in between them. This means the signal is
good, bad or average correspondingly. When aligning the antenna, it is
recommended to try achieving the stripe top to be located in the black area.
At the bottom of the Input Signal stripe may appear a special red sub-stripe. This
sub-stripe indicates the presence of the packet retries and the percentage of the
total number of transmitted packets.

Chapter 3 - Configuration
Technical User Manual
InfiLINK XG 57
During the alignment test, the Input Signal stripe may change its position along the
Cross Fading scale and increase or decrease in height, indicating the changes in
the received signal. When the top of the stripe changes its location, moving from
one point on the background area to another, it leaves pink and blue marks behind,
indicating the maximum and minimum measured levels of the signal at a particular
point. Thus, it makes possible to observe the “history” of the signal changes.
You can clear the marks by clicking the «Clear History» button at the bottom of the
page.
Main recommendations when using the “Antenna Alignment Tool”:
RSSI level should be between -40 dBm and -60 dBm
If RSSI level is more than -40 dBm, it is recommended to decrease Tx power
CINR should be maximized during alignment
Crosstalk should be as far as possible from 0 dB
The top of an Input Signal stripe should be located in the black area
Input signals of the two antennas of the device should have similar Cross
fading values (Input Signal stripes should be symmetrically to the value of 0
dB)
ALL described recommendations are applicable to both (Local and Remote)
sections.
5.5. Maintenance
The Maintenance menu allows you to perform service tasks for the device and to
check the hardware and software version, reason for the last reboot, system
uptime, current configuration, license, diagnostic card, etc.
Maintenance page has the following sections:
Firmware
Upload
Download
Bottom section of the page with the «Reboot», «Restore Factory Settings»,
«View Current License», «View Current Configuration» and «Create
Diagnostic Card» buttons available
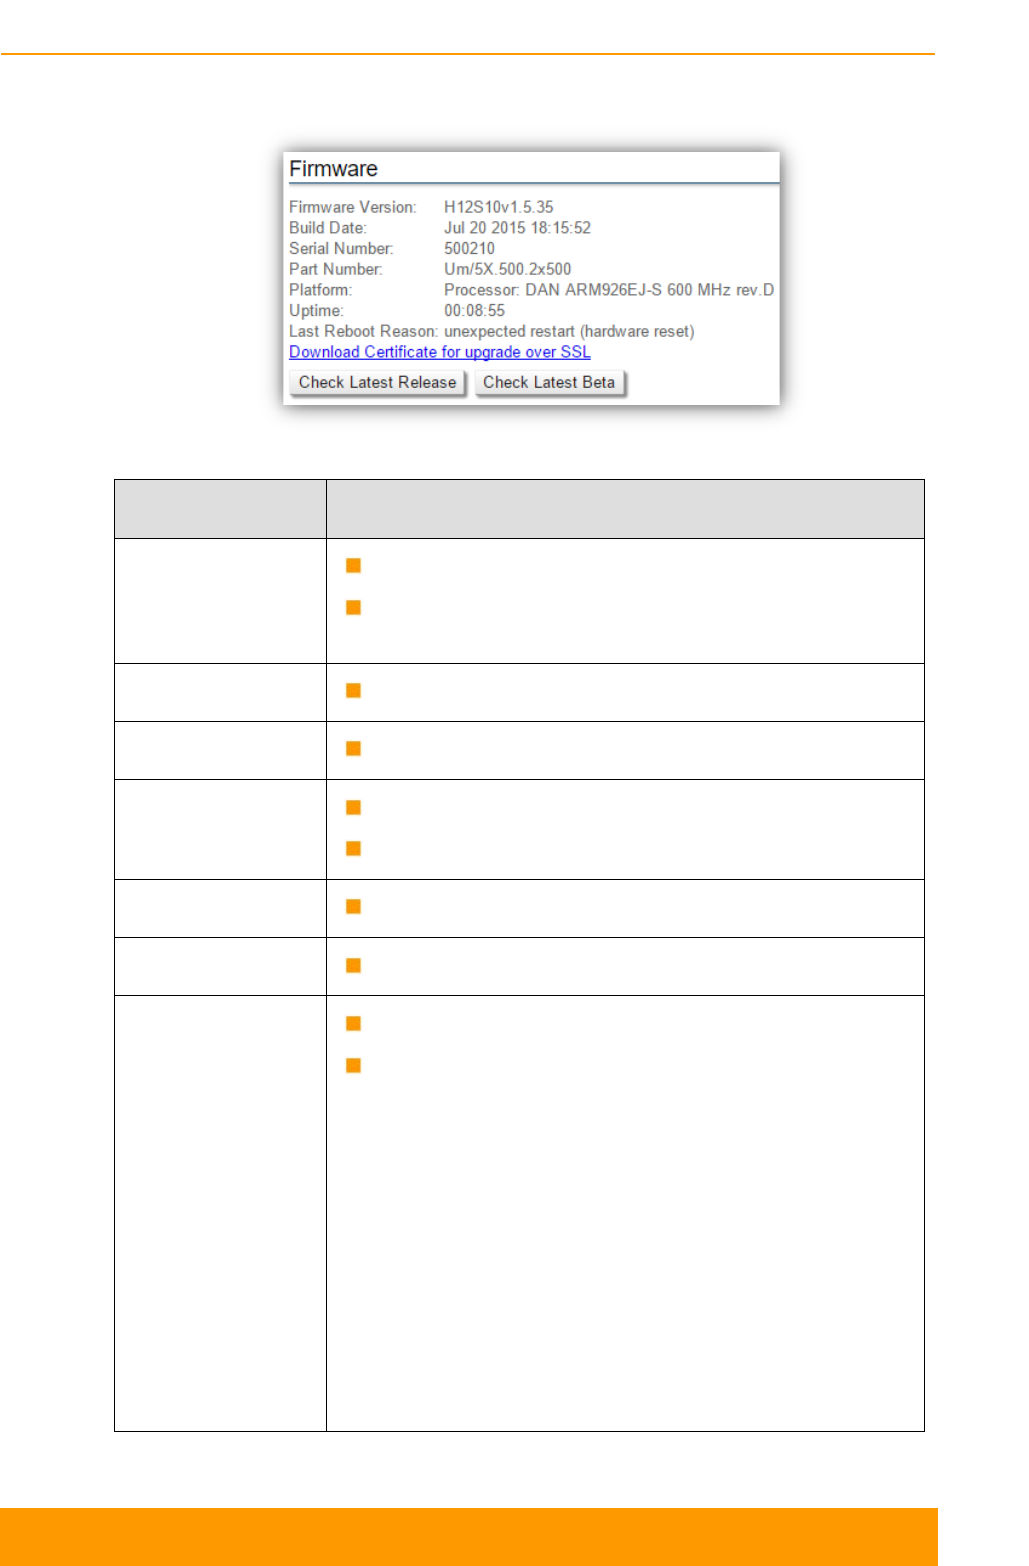
Chapter 3 - Configuration
Technical User Manual
InfiLINK XG 58
5.5.1. Firmware
Figure 34 - Firmware
Parameter Description
Firmware Version Displays the current firmware version
The firmware string contains also the hardware
platform type
Build Date Displays the firmware build date
Serial Number Displays the serial number of the unit
Part Number Displays the part number of the unit
It contains information about the unit type
Platform Displays the processor model
Uptime Displays the system up time since the last reboot
Last Reboot
Reason Displays the reason for the last reboot of the unit
The options are:
- Software fault
- Unexpected restart
- Manual restart
- Manual delayed restart
- Firmware upgrade
- SNMP managed restart
- Test firmware loaded
- Watchdog
- Panic (in case of critical errors in the software)
Table 28 - Firmware parameters
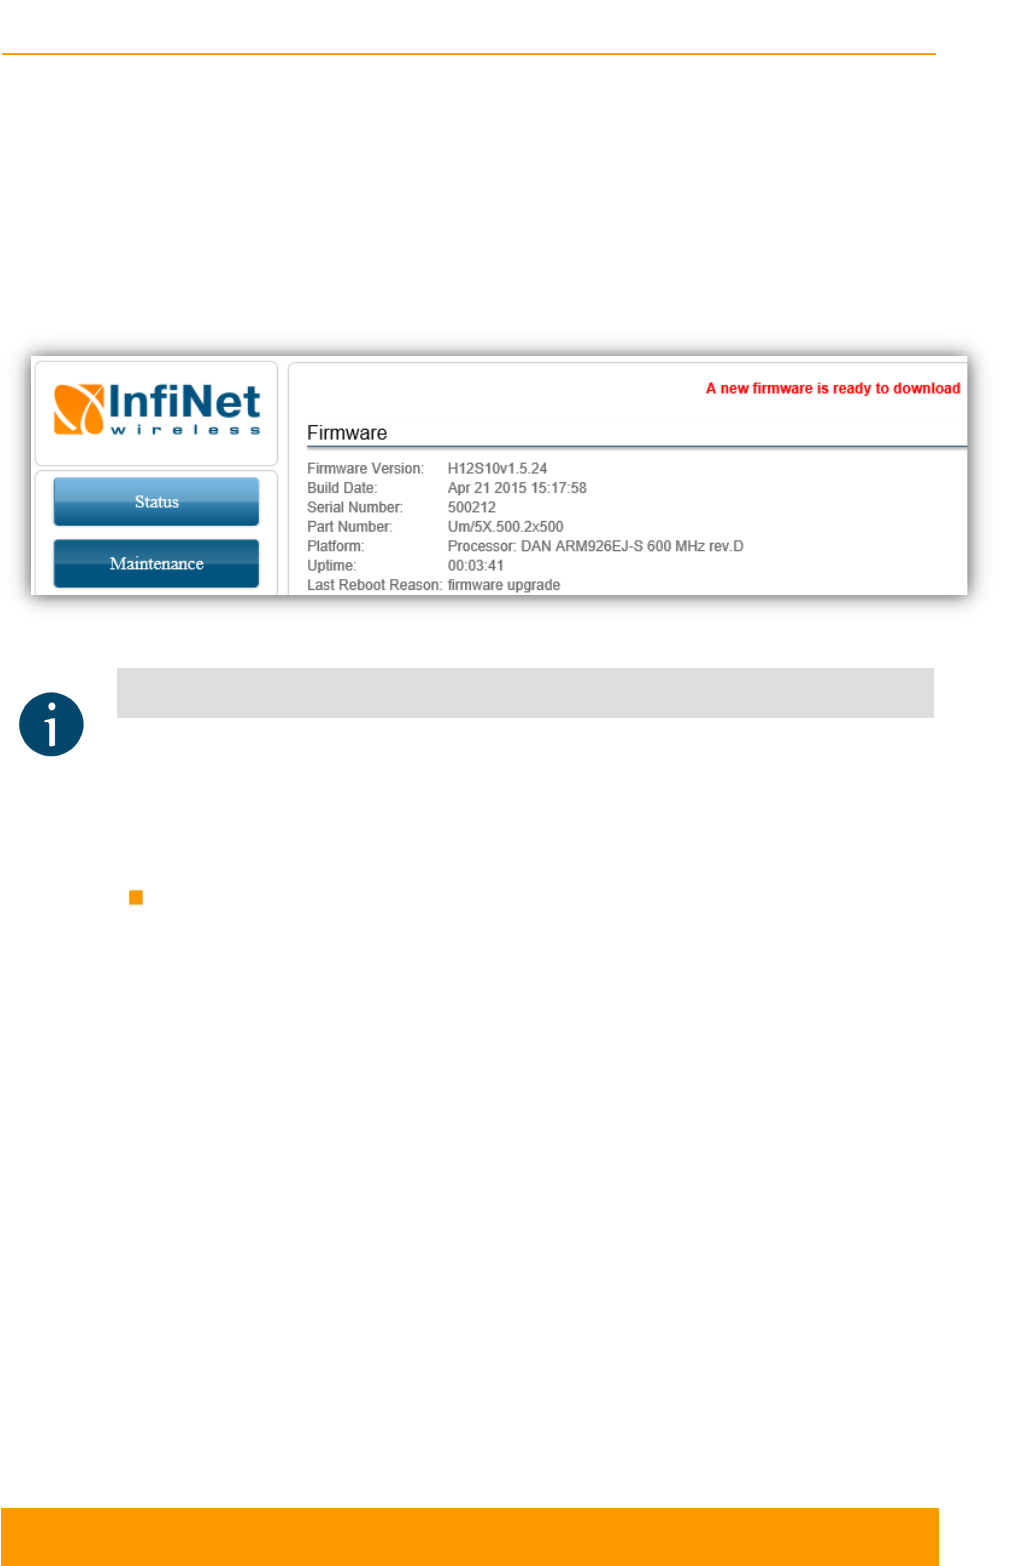
Chapter 3 - Configuration
Technical User Manual
InfiLINK XG 59
By clicking on the “Download Certificate for upgrade over SSL” link, you can
download InfiNet Wireless self-signed certificate. This allows you to upgrade the
unit software version when you are connected to the Web interface via HTTPS.
If Internet connectivity is available for the management PC, the InfiLINK XG unit
checks automatically for the firmware updates at the InfiNet Wireless repository
and displays a warning message for 10 s each time you go to the Maintenance
page if a new software version is available:
Figure 35 - New firmware warning message
NOTE
It is not mandatory that the unit to have access to the Internet for this feature to work.
However, the PC that is used to initialize the upgrade procedure must have access to
InfiNet Wireless website (both http and ftp).
Two action buttons are available in the Firmware section:
«Check Latest Release»: if you click this button, a text box will appear with
brief information about each firmware release, displaying the latest firmware
available. You can perform directly upgrade to the latest release available by
clicking the «Upgrade Firmware» button or you can save the newest firmware
by clicking the «Save New Firmware» button. In order to hide the information
just displayed, you can click the «Hide Update» button.

Chapter 3 - Configuration
Technical User Manual
InfiLINK XG 60
Figure 36 - Check latest release options
«Check Latest Beta»: if you click this button, the latest beta firmware version
available will be displayed. The options are the same like for the «Check
Latest Release» button, you can either upgrade or save the latest beta
firmware by clicking the corresponding button.
5.5.2. Upload
The Upload section allows you to upload different license, firmware and
configuration files to the unit.
For each of the three options, click on the «Browse» button, followed by the
«Upload» button after the file has been picked up.
After clicking on the «Upload» button, the system performs three operations:
uploading, saving and validating the new file uploaded and indicates if each of the
operation succeeded or failed. In case that the process succeeded, you have to
reboot the unit in order to apply the new changes.
5.5.3. Download
The Download section allows you to open or download locally, to the management
PC, the current license, firmware and configuration files, by clicking on the
corresponding buttons: «Download License», «Download Firmware» and
«Download Configuration».
5.5.4. Bottom section of the page
The following buttons are available:
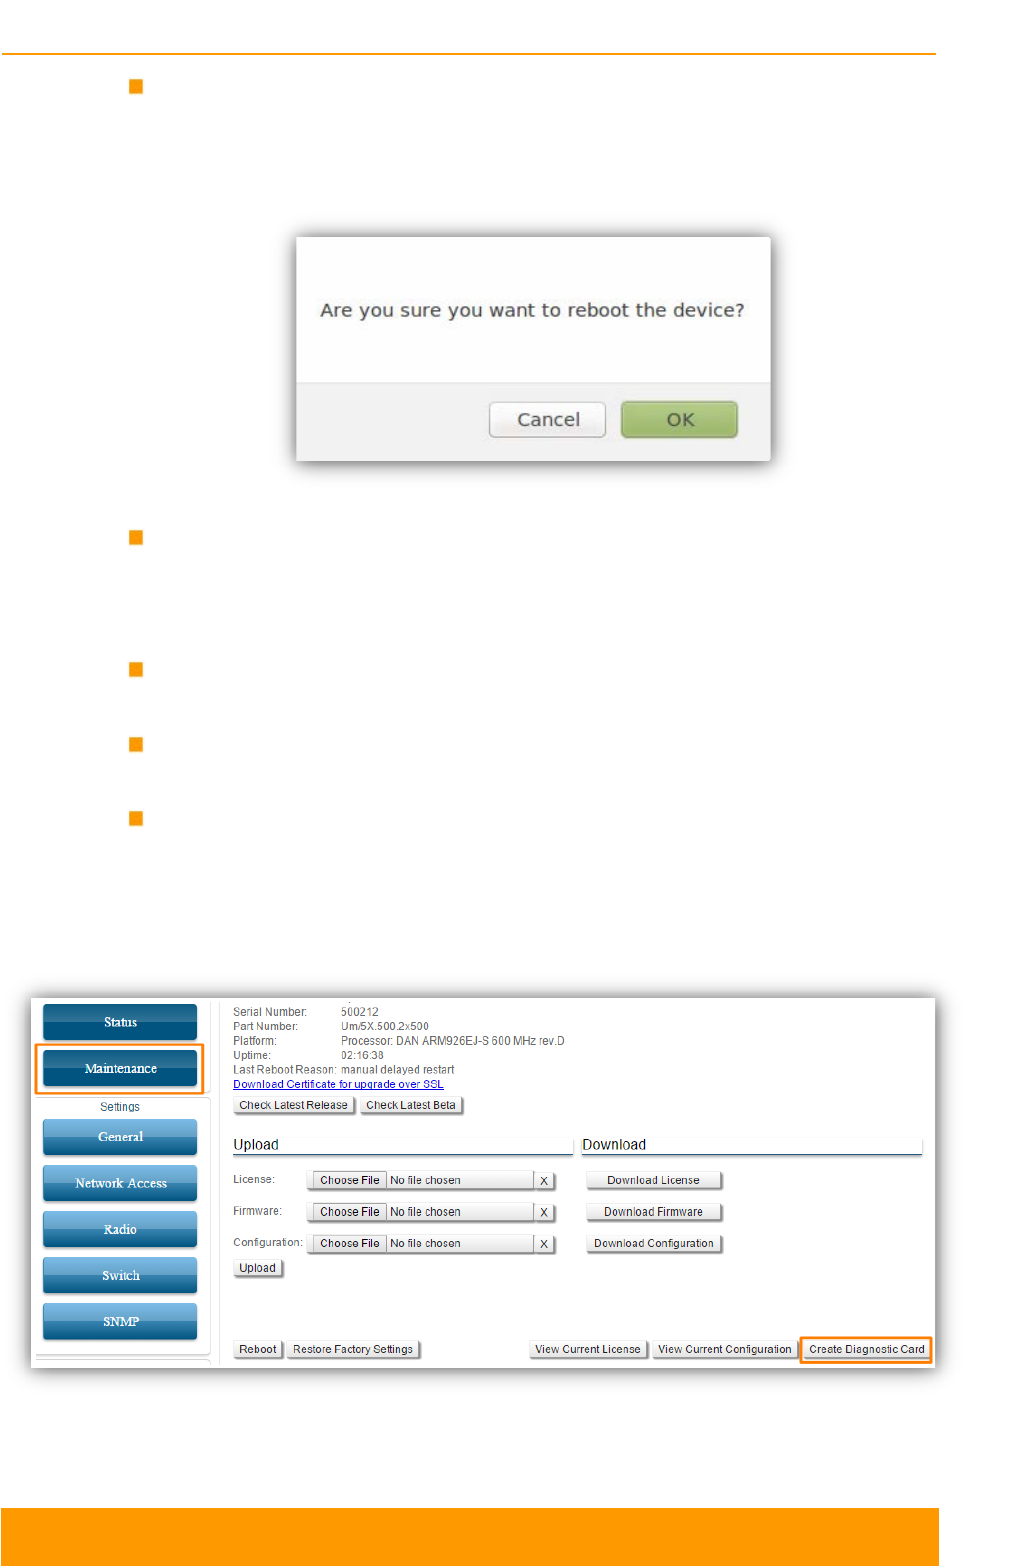
Chapter 3 - Configuration
Technical User Manual
InfiLINK XG 61
«Reboot» button - reboots the device. A warning message pops up asking for
confirmation before the operation can start. During the restart process, you are
redirected to the login page and the timeout period of 45 seconds counts down
before the new login:
Figure 37 - Unit reboot
«Restore Factory Settings» button - restores the factory default configuration.
A warning message pops up, asking for the permission before the operation to
start. During the reset to factory process, you are redirected to the login page
and the timeout period of 30 seconds counts down before the new login
«View Current License» button - shows the currents device license
parameters in a new window
«View Current Configuration» button - shows the currents device configuration
in text format in a new window
«Create Diagnostic Card» button - Tech Support Reports Generator. By
clicking on this button, the system downloads to the local PC a text file that
contains the complete information (for the technical support specialists) set
from the device such as: full device configuration listing, system log output,
license information, interfaces statistics, etc.
Figure 38 - How to create a diagnostic card
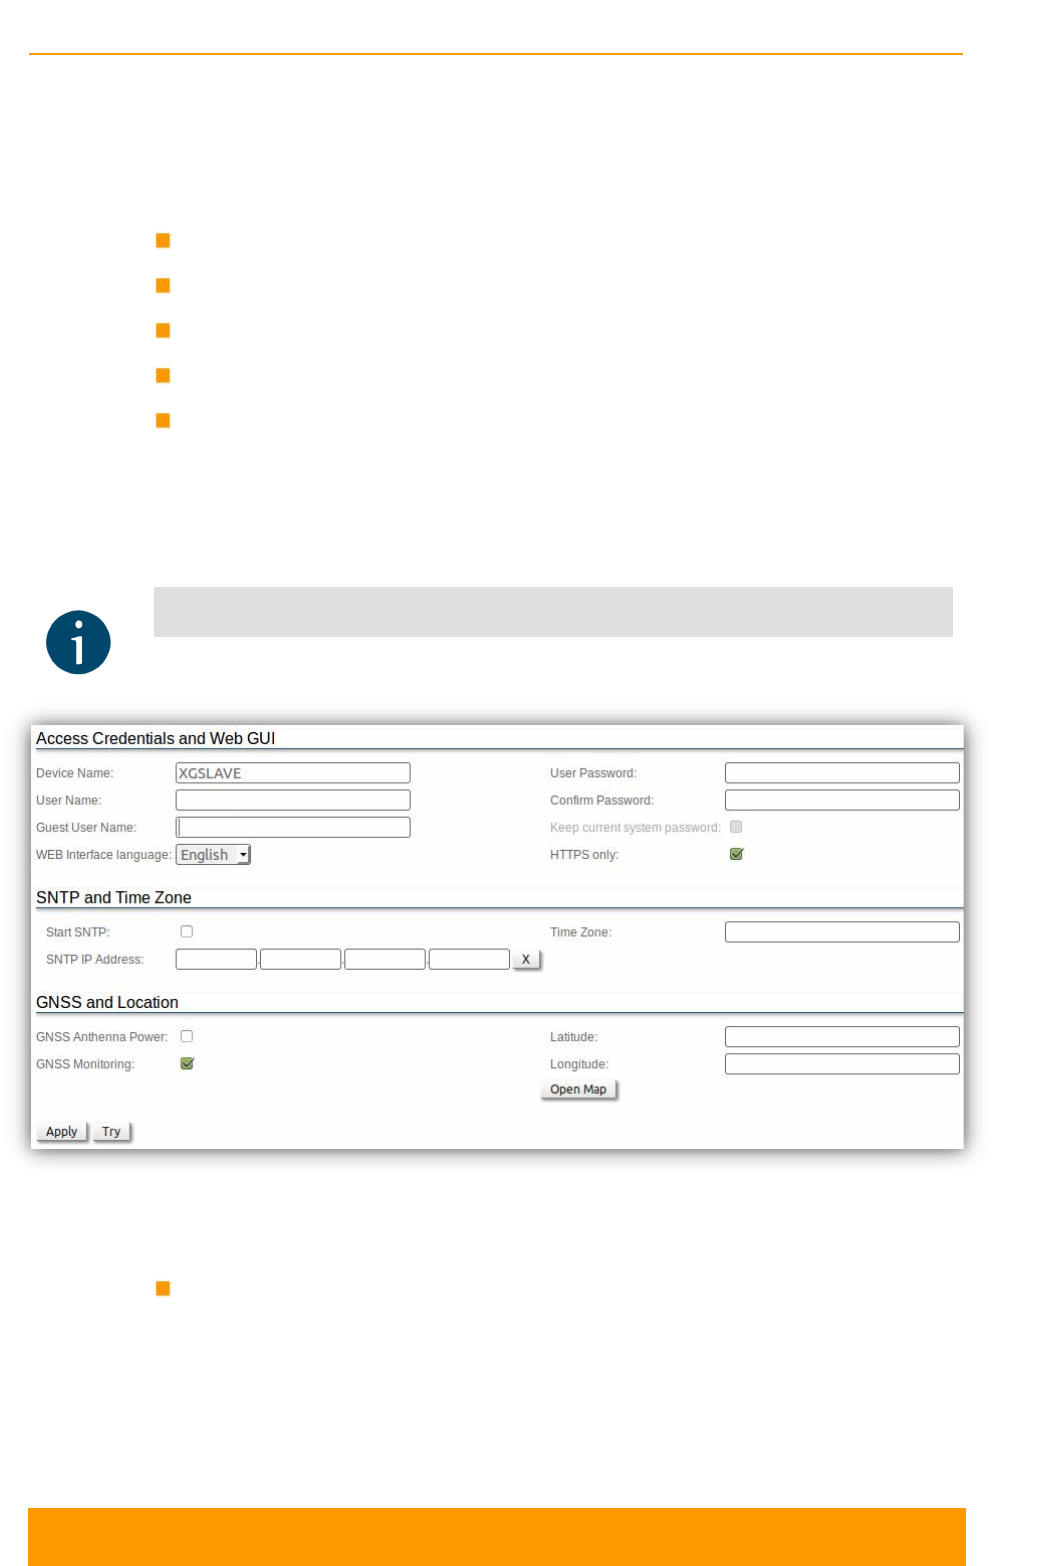
Chapter 3 - Configuration
Technical User Manual
InfiLINK XG 62
5.6. Settings
In the Settings section you can set and edit the parameters related to the
functionality of the unit. The following configuration pages are available:
General
Network Access
Radio
Switch
SNMP
5.6.1. General
In this page, you can view and edit the basic system settings.
NOTE
Read the information at the end of the Settings section in order to find out the output of
the «Apply», «Try» and buttons for the new configuration performed.
Figure 39 - General page
The general page is divided in the following sections:
Access Credentials and Web GUI
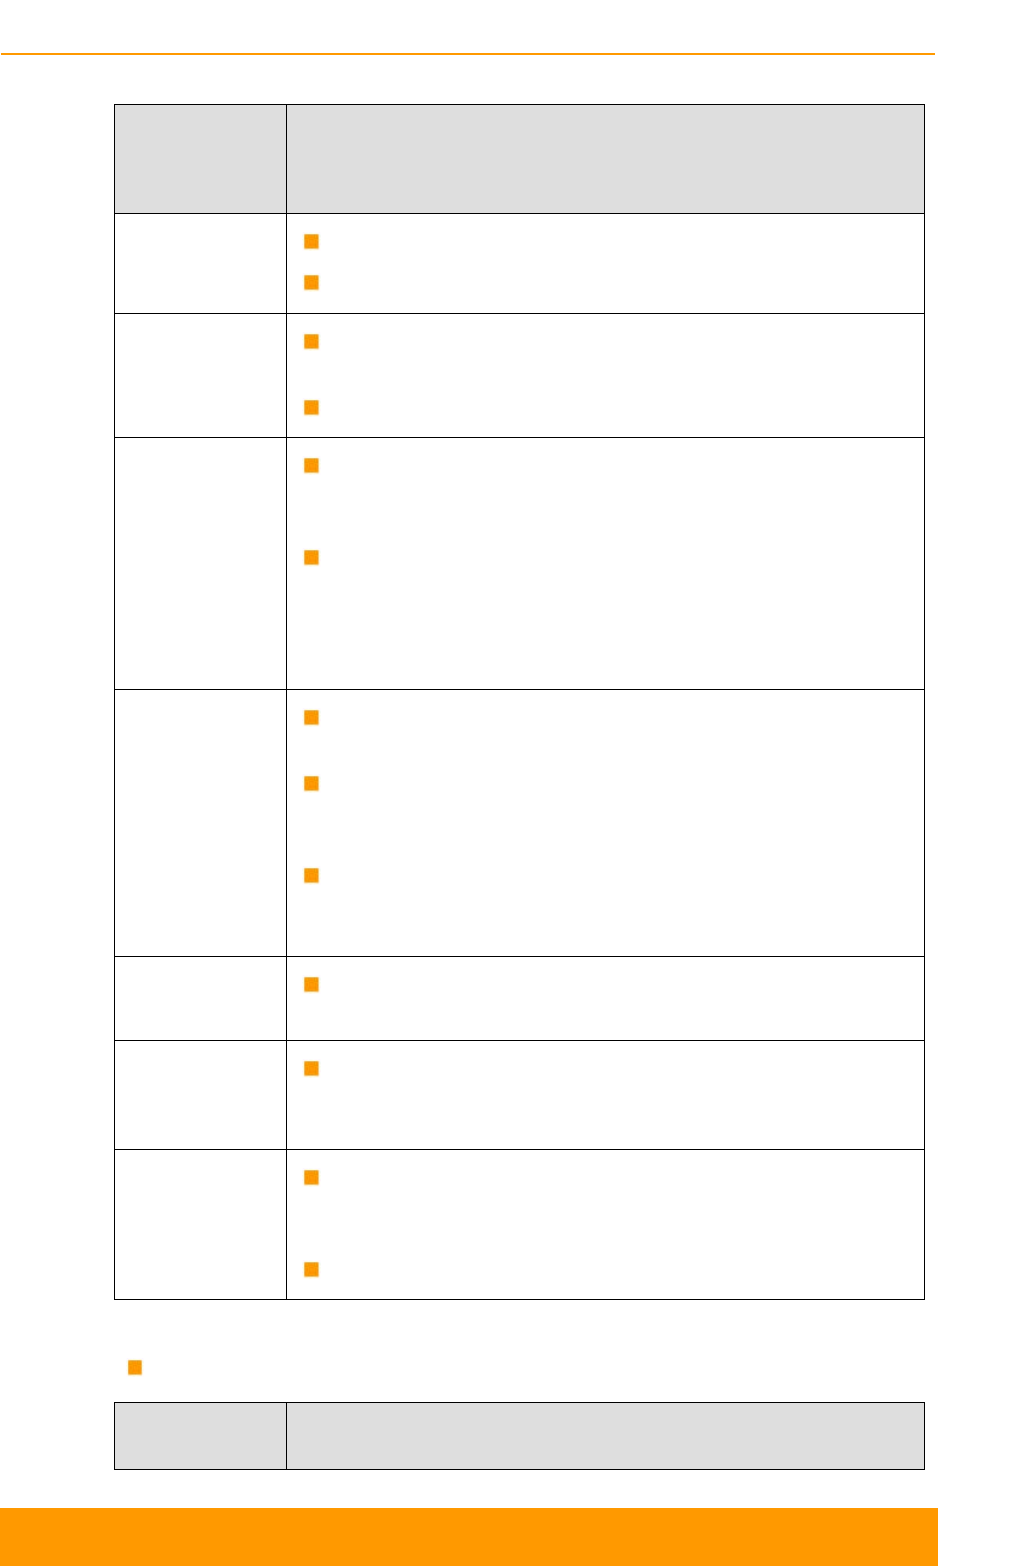
Chapter 3 - Configuration
Technical User Manual
InfiLINK XG 63
General
System
Parameter
Description
Device Name You can set the device name
This parameter is displayed in the web-page header
User Name
Displays the username (Login) used to access the unit
management interfaces
You can change the current username
User
Password and
Confirm
Password
You can change the password set in the previous
con
figuration only after unmarking the option “keep
current system password" in the corresponding checkbox
You can return to the default settings for Password and
User Name (any values with non-
zero length) by
unmarking the checkbox “Keep current system password”
and leaving the corresponding fields empty and save the
configuration at the bottom of the page
Guest User
Name You can set the guest user name for accessing the unit in
guest mode.
The user name and password in the previous fields for
normal l
ogin should be specified first. If they are not
specified, the guest user name will not take effect
The guest mode allows access to the unit in a restrictive
mode: only the device status can be seen and no
configuration modifications are available
WEB Interface
language You can change the default system language (English)
into Russian, French, Italian or Chinese language
Keep current
system
password
If this checkbox is unselected, you can set new
credentials for accessing the unit, if checked, this option
will keep the current login password in use
HTTPS only
You can set that all HTTP connections to the unit to
perform via HTTPS (HTTP with SSL only) by marking the
option “HTTPS only” in the corresponding checkbox
By default, this option is disabled
Table 29 - Access credentials and Web GUI
SNTP and Time Zone
General
System
Description
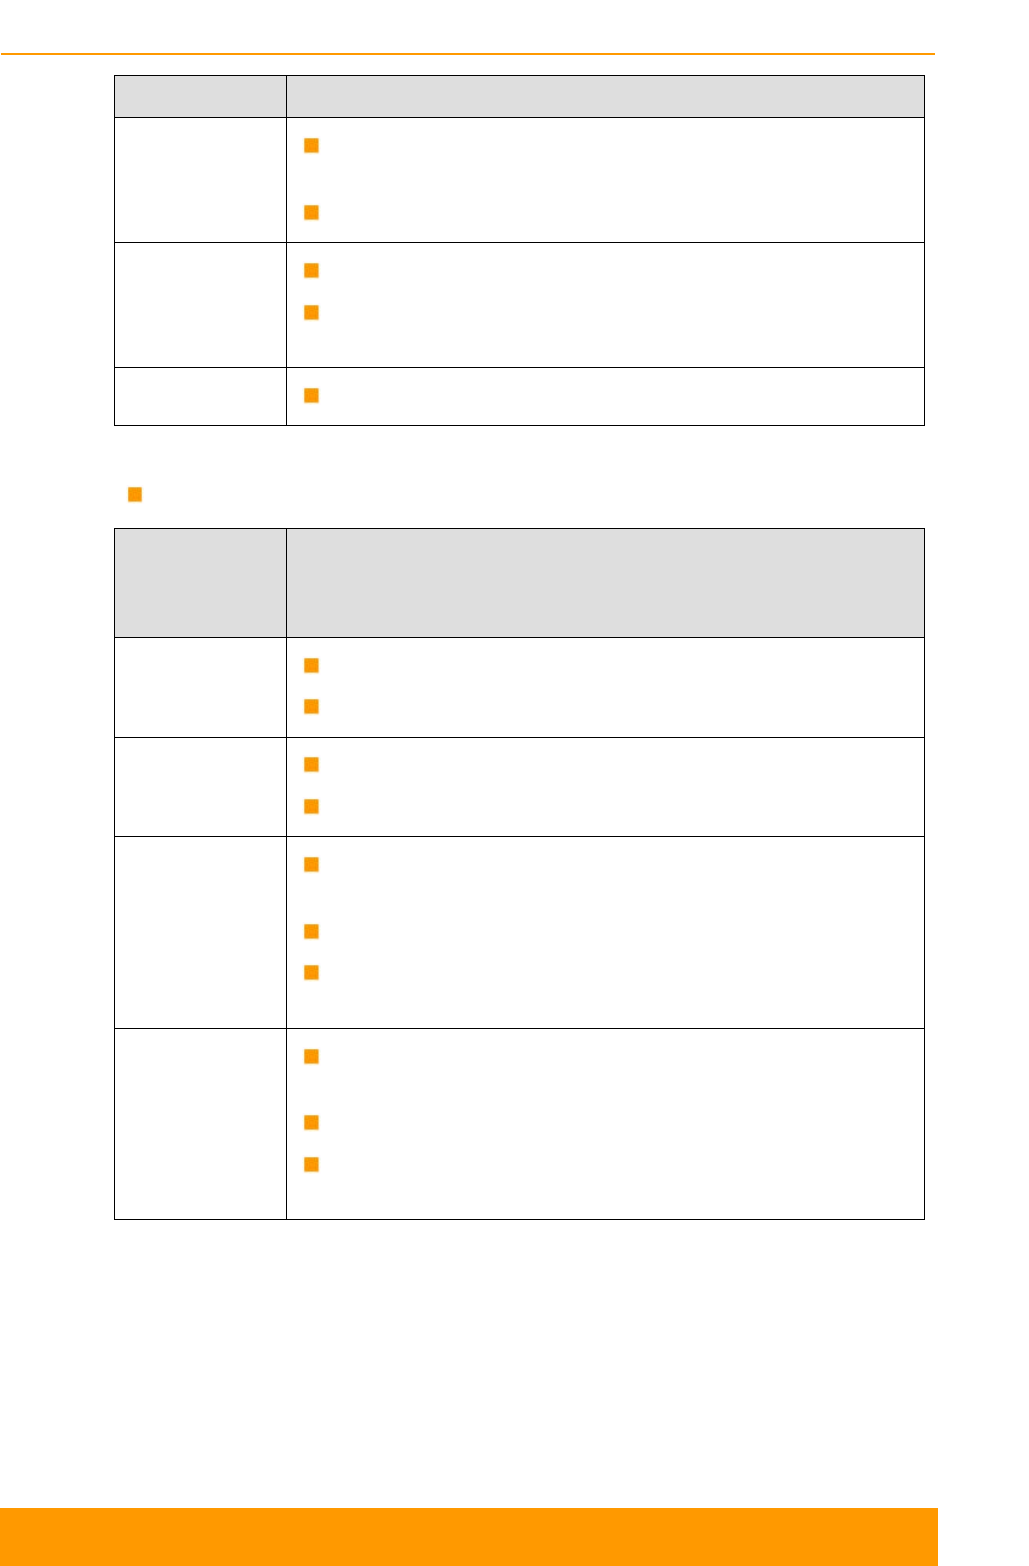
Chapter 3 - Configuration
Technical User Manual
InfiLINK XG 64
Parameter
Start SNTP You can start SNTP service by marking the option “Start
SNTP” in the corresponding checkbox
By default, this option is disabled
SNTP IP
Address You can set the IP address of a valid SNTP server
The unit must have an active connection with the SNTP
server in order to receive time services
Time Zone You can set the time zone. For example, GMT+4
Table 30 - SNTP and Time Zone
GNSS and Location
General
System
Parameter
Description
GNSS
Antenna
Power
Turn on the power of the antenna amplifier
By default, it is disabled
GNSS
Monitoring Start/stop the GPS service
By default, the GPS service is started
Latitude You can set the latitude of the geographical place where
the unit is installed
GPS latitude format is [N/S]YY.YYYYYY
Use the Google Map feature to automatically fill in this
field (follow the indications below)
Longitude
You can set the longitude of the geographical place
where the unit is installed
GPS longitude format is [E/W]XX.XXXXXX
Use the Google Map feature to automatically fill in this
field (follow the indications below)
Table 31 - GNSS and Location
Click on the «Open Map» button to open the Google map:
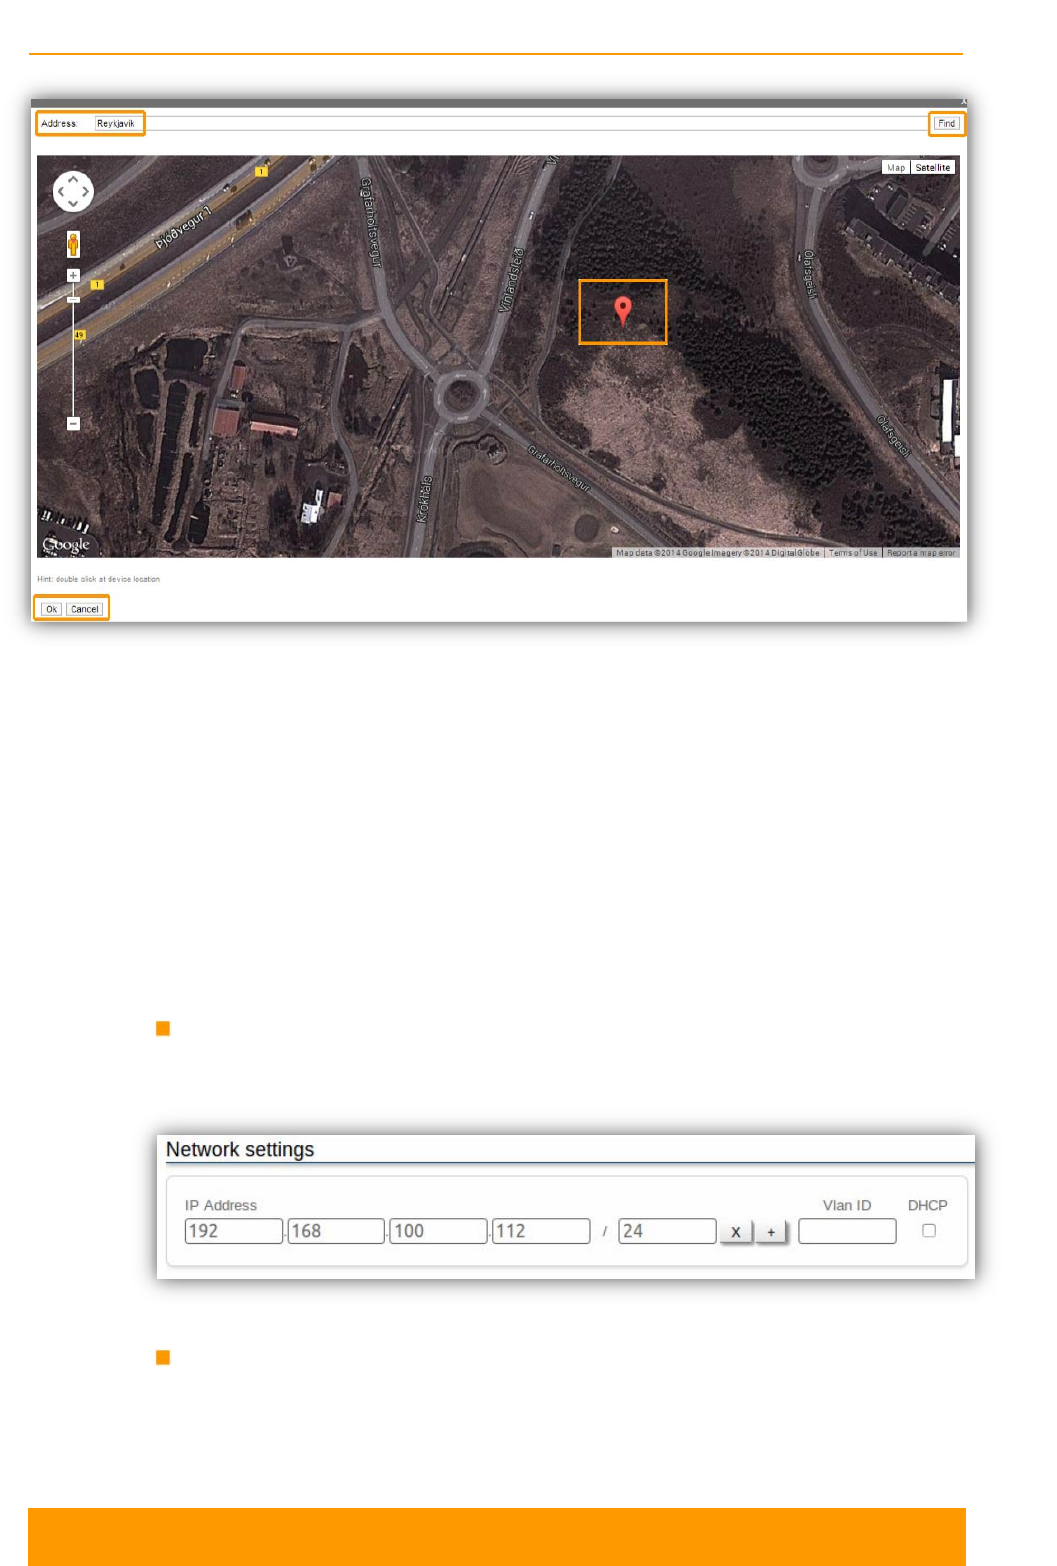
Chapter 3 - Configuration
Technical User Manual
InfiLINK XG 65
Figure 40 - Google Map
Type the location name in the Address bar, click on the «Find» button to search for
it and then move to the exact location where the unit is installed. Double click in
that position on the map and the Google pointer (see picture above) will be placed
there. After clicking on the «Ok» button, “Latitude” and “Longitude” fields are
automatically filled in with the GPS coordinates.
5.6.2. Network Access
The Network Access page allows you to perform general networking configuration
settings and it is divided in the following two sections:
Network settings - allows you to configure the IP address of the unit, to specify
a VLAN ID to pass and to enable or disable the DHCP for the IP address
allocation. Multiple IP addresses can be added
Figure 41 - Network settings section
Routing parameters - allows you to configure the routing information for the
unit. You can input the default gateway IP address and add a route to a
specific destination by specifying the destination network address, the network
mask and the gateway for reaching the destination
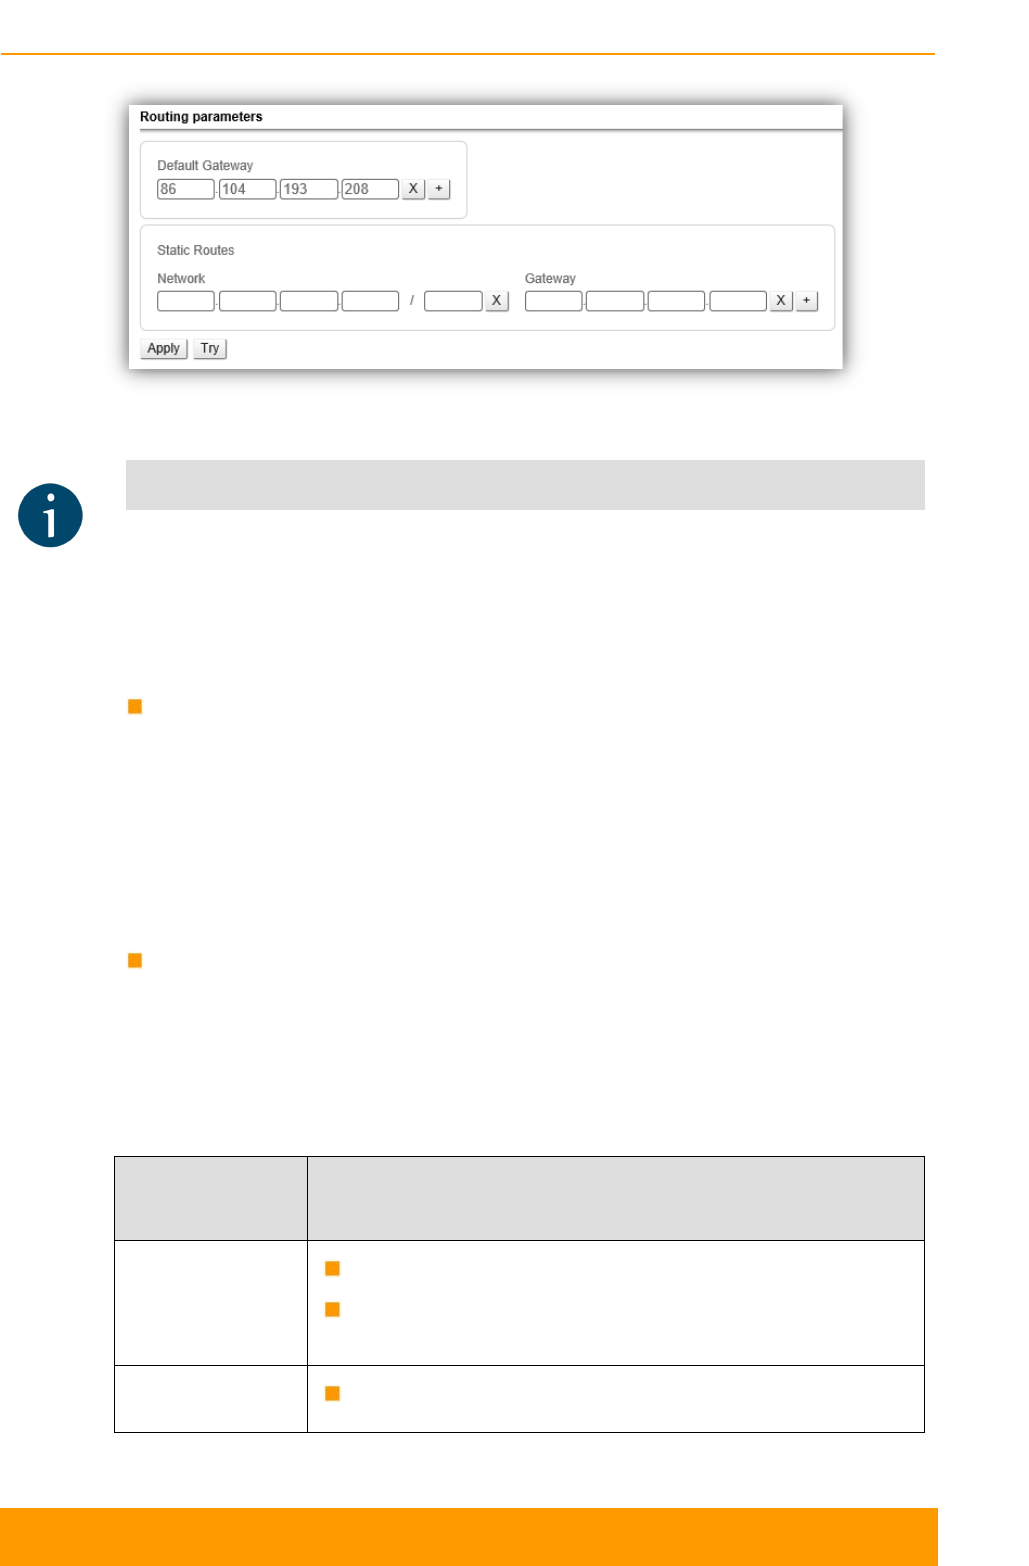
Chapter 3 - Configuration
Technical User Manual
InfiLINK XG 66
Figure 42 - Routing parameters
NOTE
Read the information at the end of the Settings section in order to find out the output of
the «Apply», «Try» and buttons for the new configuration performed.
5.6.3. Radio
The radio page is divided in two sections:
Radio settings - allows you to configure general radio parameters and
features:
- General parameters
- Radio Front End
- Modulation
- Radio frame
Frequency Grid and Limitations - specifies the default and custom frequency
domains for each bandwidth (10 MHz, 20 MHz, 40 MHz).
5.6.3.1. Radio settings
The following radio parameters can be configured under the Radio settings section:
Radio
parameter Description
Node Type Set the node type to Master or Slave
In the point-to-point link, one unit must be set to Master
and the other one to Slave
QoS Strategy
You can use this parameter to select the traffic
prioritization strategy. The following options are
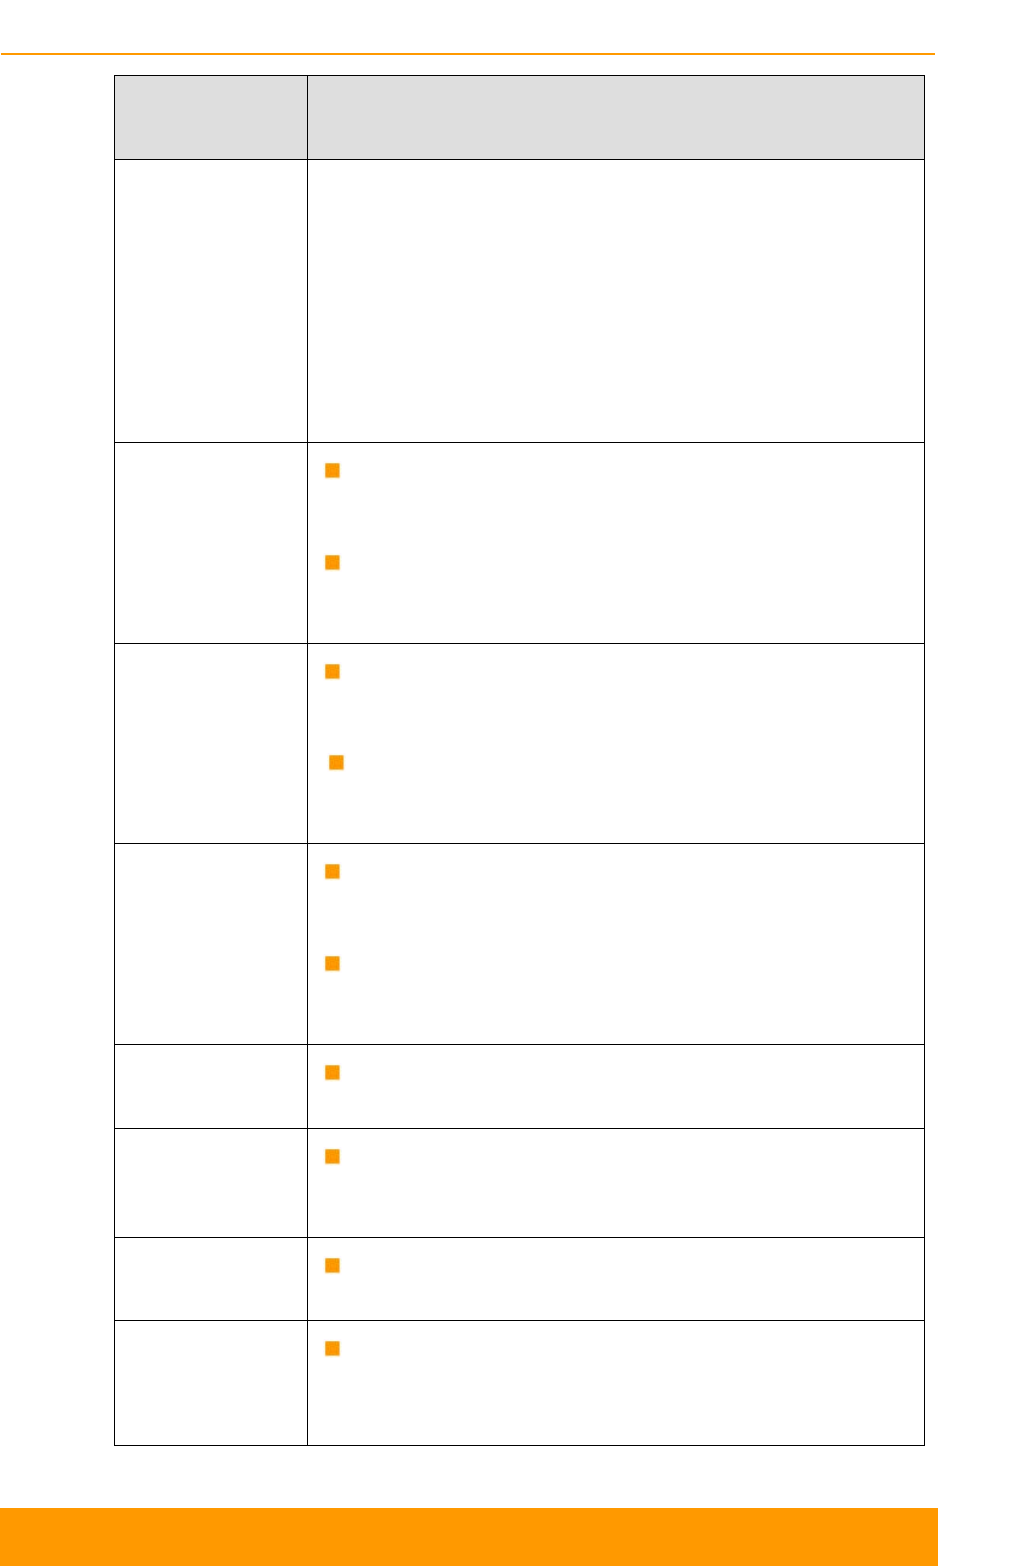
Chapter 3 - Configuration
Technical User Manual
InfiLINK XG 67
Radio
parameter Description
available:
- “normal” provides a balance between packet loss
and throughput. It is used by default.
- “aggressive” gives maximum throughput wit
h a
minor priority packet loss allowed
- “conservative” assures no priority packet loss, but
with small decline in the peak throughput
- “off” disables prioritization
Link ID
Use this parameter to avoid connecting a unit to a
wrong peer if there are several co-located units using
the same center frequency
Specify different ID values for different link. Both ends
of the same link must have the same ID
. The value
range is 0…15 in increments of 1
Downlink
Frequency Allows you to configure the downlink center frequency
in MHz (can be different from the UL frequency for the
models which support H-FDD)
Downlink Frequency refers to the set frequency for
communication in downlink direction - from the Master
unit to the Slave unit
Uplink
Frequency Allows you to configure the uplink center frequency in
MHz (can be different from the DL frequency for the
models which support H-FDD)
Uplink F
requency refers to the set frequency for
communication in uplink direction - from the Slave unit
to the Master unit
Channel Width Allows you to configure the channel width (in MHz).
The possible values are: 10, 20 or 40 MHz
Transmit Power Allows you to configure the transmit power level (in
dBm). The value range is 0…27 dBm in increments of
1 dBm
Maximal MCS Allows you to configure the maximum MCS that can be
used
AMC Strategy Allows you to select the AMC algorithm strategy:
- “conservative”
assumes using higher CINR
thresholds in order to minimize the error rate
Chapter 3 - Configuration
Technical User Manual
InfiLINK XG 68
Radio
parameter Description
- “aggressive” lowers the thresholds in order to use
higher mod
ulation levels and thus increase the
throughput
- “normal” represents a balance between the error
rate and throughput values
TDD
Synchronization
Allows you to configure the TDD synchronization
source:
- “freerun” unsynchronized frame start
- “gnss” synchronization from built-in
GPS/GLONASS receiver
Frame period
(ms) Allows you to set the air frame period duration (in ms).
The value range is 1, 2, 5 or 10 ms
- A shorter frame period gives lower latency, but
also has higher overheads
- Using longer frame periods cuts down overheads,
but increases the latency
- Also, air frames higher than 2 ms allow using the
link at higher distances
Requested
Downlink Quota
(%)
Allows you to set the desired downlink/uplink ratio
through specifying the downlink subframe period
relative to the whole frame. The value range of the
parameter is 10…90 in increments of 1
Actual downlink/uplink ratio might be different due to
internal system limitations. The system chooses the
closest available ratio automatically which can be
checked in the Status page or by checking the output
of the “xg capabilities” command
Max Distance
(meters)
Allows you to specify the maximum link distance (in
meters)
The specified value must not be lower than the actual
link distance, but it is recommended keep it as close as
possible to the actual distance to avoid unnecessary
overheads
The recommended strategy is to set this parameter
well above the actual distance and fine-tune it to actual
distance plus 200-
300 m after the units have been
deployed based on the measured distance value taken
from “xg stat” output
Table 32 - Radio settings
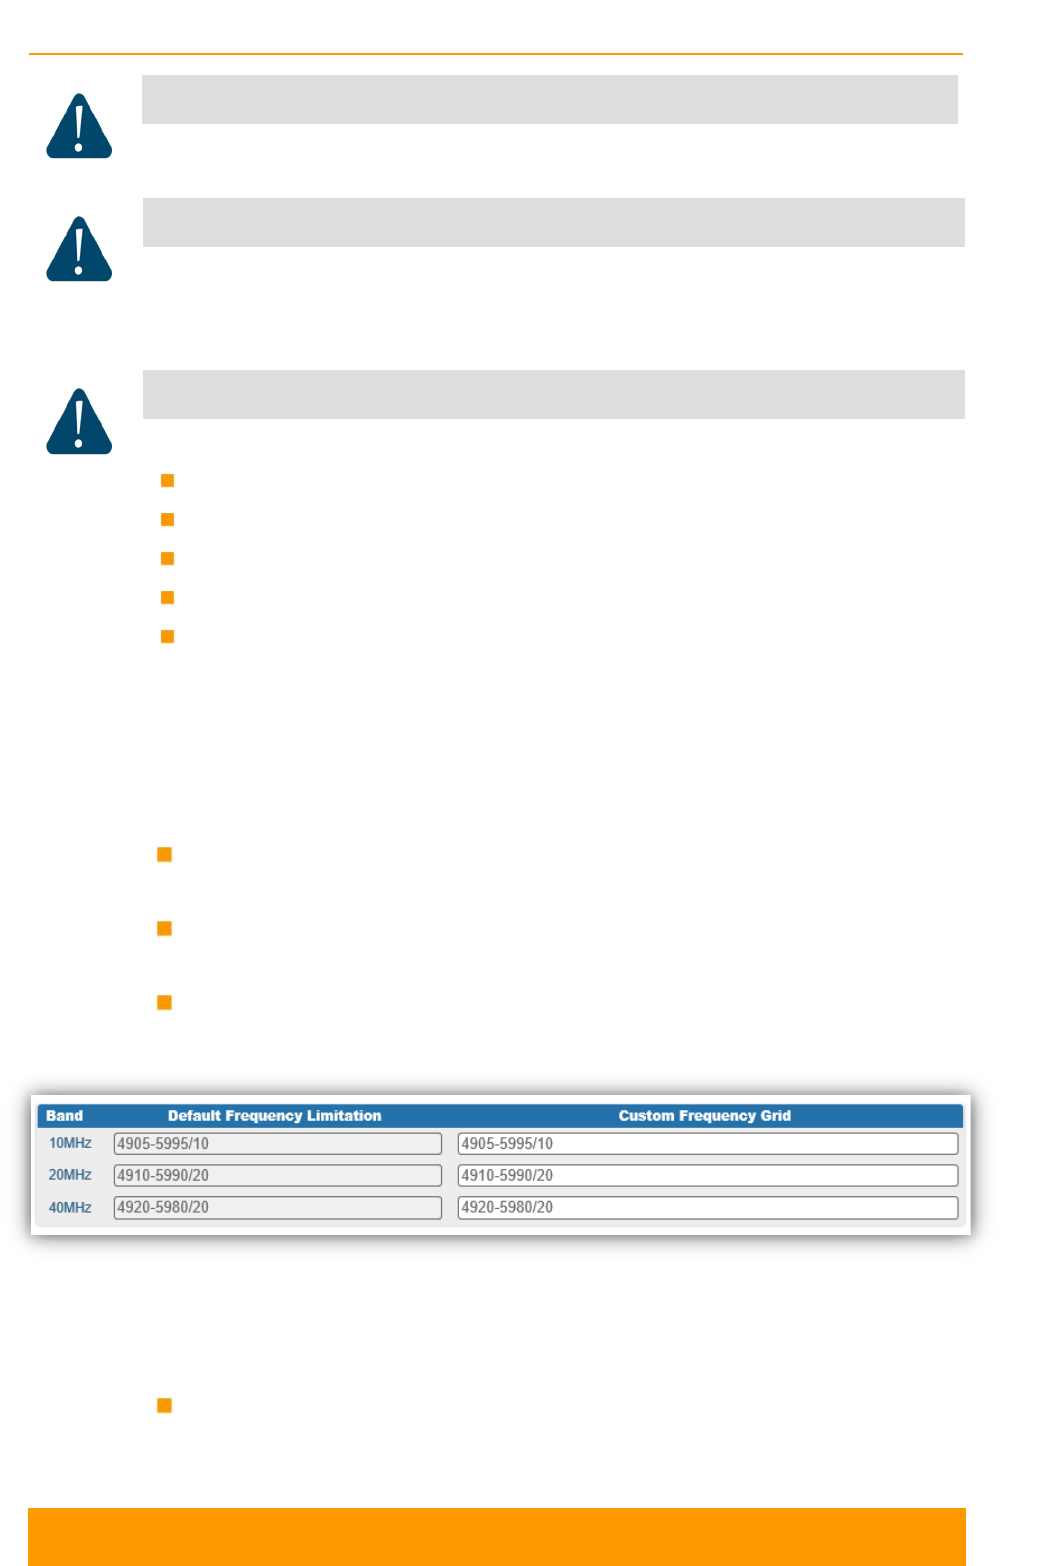
Chapter 3 - Configuration
Technical User Manual
InfiLINK XG 69
CAUTION
Setting the source of synchronization takes effect only for the Master unit
CAUTION
Make sure that the built-in GNSS receiver is set up before enabling the “gnss” option (use
“gps” command to check the status - it is recommended to use values of “HDOP”
parameter up to 1.5 for reliable global timing synchronization)
CAUTION
Please note that the following settings must be equal for the co-located units:
Channel width
Maximal distance
Air frame period
Downlink/uplink ratio
All co-located units must be Master units
5.6.3.2. Frequency Grid and Limitations
The licensed frequencies range per each bandwidth is displayed in the “Default
Frequency Limitation” fields:
For 10 MHz bandwidth: value range between 4905...5995 MHz in increments
of 10 MHz
For 20 MHz bandwidth: value range between 4910...5990 MHz in increments
of 20 MHz
For 40 MHz bandwidth: value range between 4920...5980 MHz in increments
of 20 MHz
Figure 43 - Default frequency grids
Changes to these default values can be performed in the “Custom Frequency Grid”
fields, whre you can:
Limit the licensed frequencies range per each bandwidth
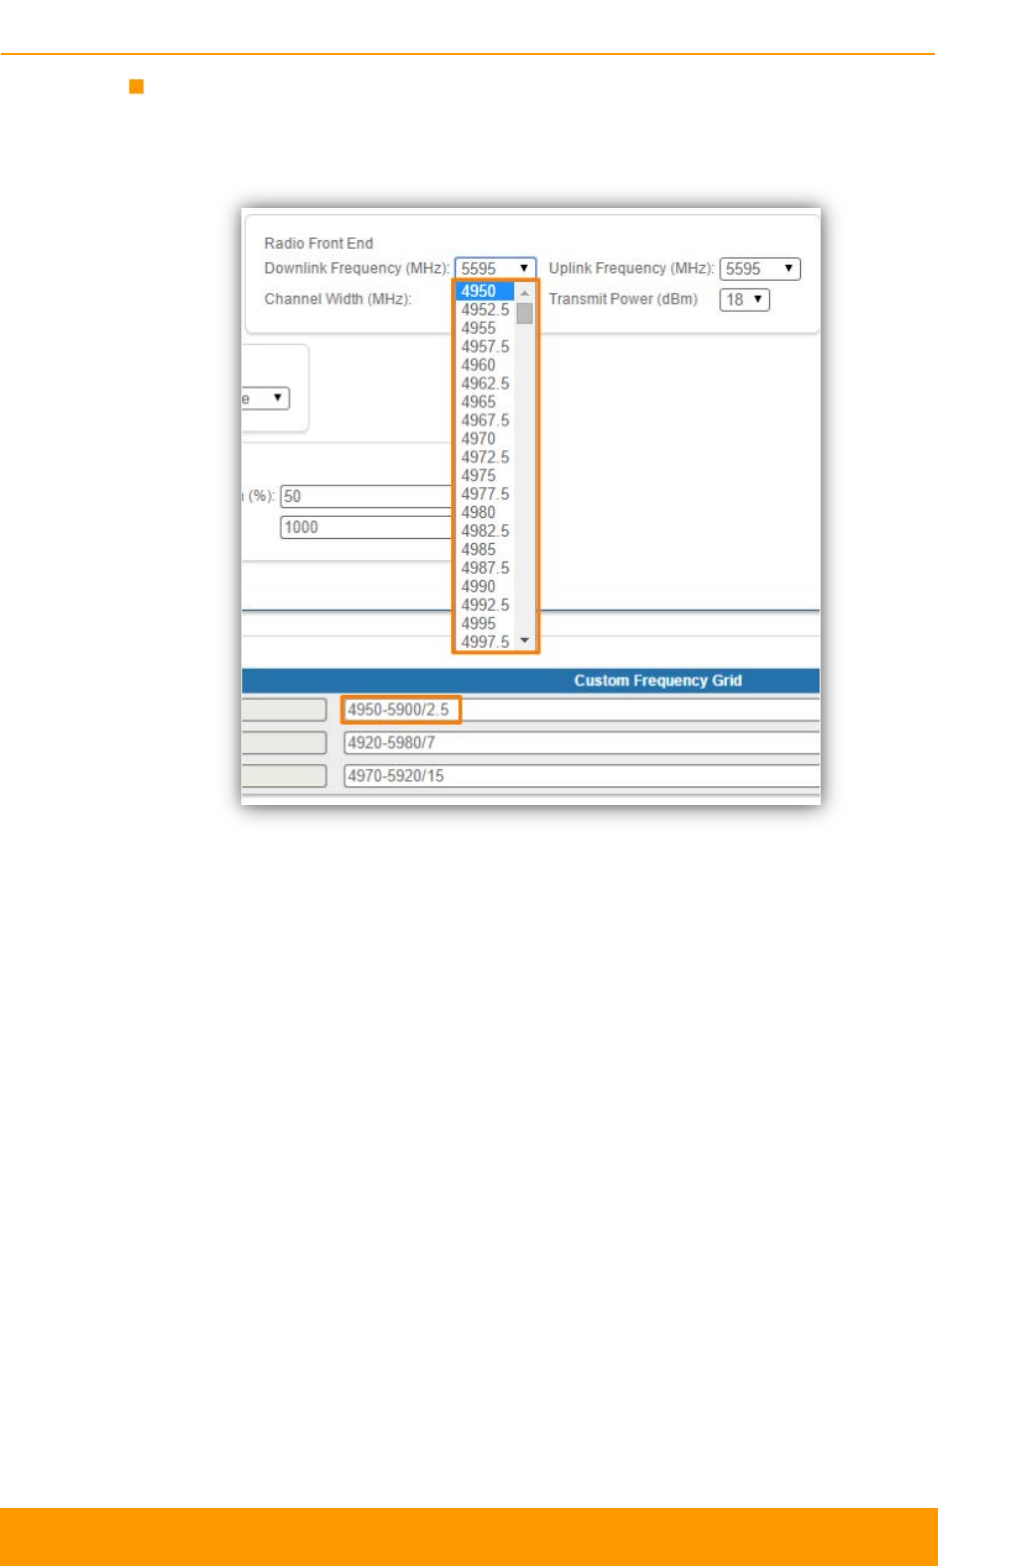
Chapter 3 - Configuration
Technical User Manual
InfiLINK XG 70
Change the center frequency step (for example, 4950-5900/2.5 means that the
step between the center frequencies from 4950 GHz and 5900 GHz is 2.5
MHz):
Figure 44 - Custom frequency grids
The step must be >= 1 MHz and the frequencies range (determined by the license)
cannot be exceeded.
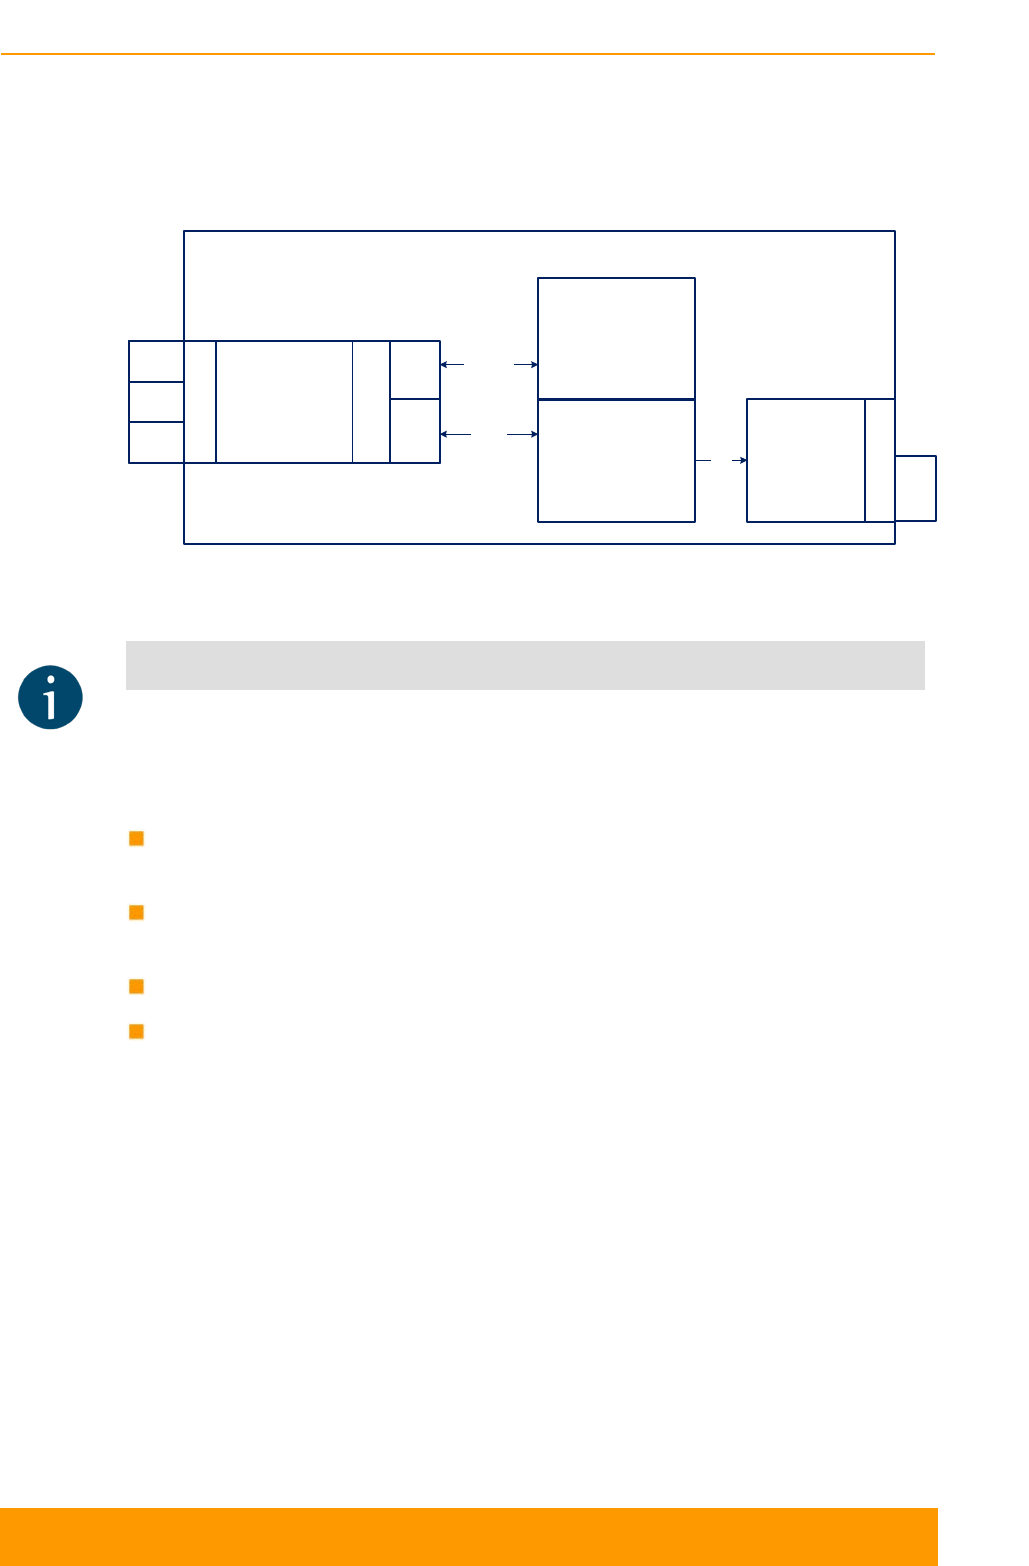
Chapter 3 - Configuration
Technical User Manual
InfiLINK XG 71
5.6.4. Switch
The switch page allows you to configure the ports of the unit and the switching
related features.
GE0
I/Q
GE1
External ports
Internal ports
MGMTRADIO
7 port managed
Ethernet switch
Application
processor
(OS WANFleX)
Modem
Control
path
Datal
path
Transceiver
External ports
RADIO
InfiLINK XG unit
SFP
Figure 45 - InfiLINK XG block diagram
NOTE
Please make the distinction between the internal RADIO port of the Ethernet switch
used for the data path separation and the external RADIO port of the unit.
The following 5 ports are available at InfiLINK XG:
GE0 and GE1 ports - external copper Gigabit Ethernet ports 1000BASE-T
(IEEE 802.1ab)
SFP port - external optical Gigabit port for plugging of the optical SFP
transceiver module
RADIO port - internal radio interface of the device
MGMT port - internal interface for the device management.
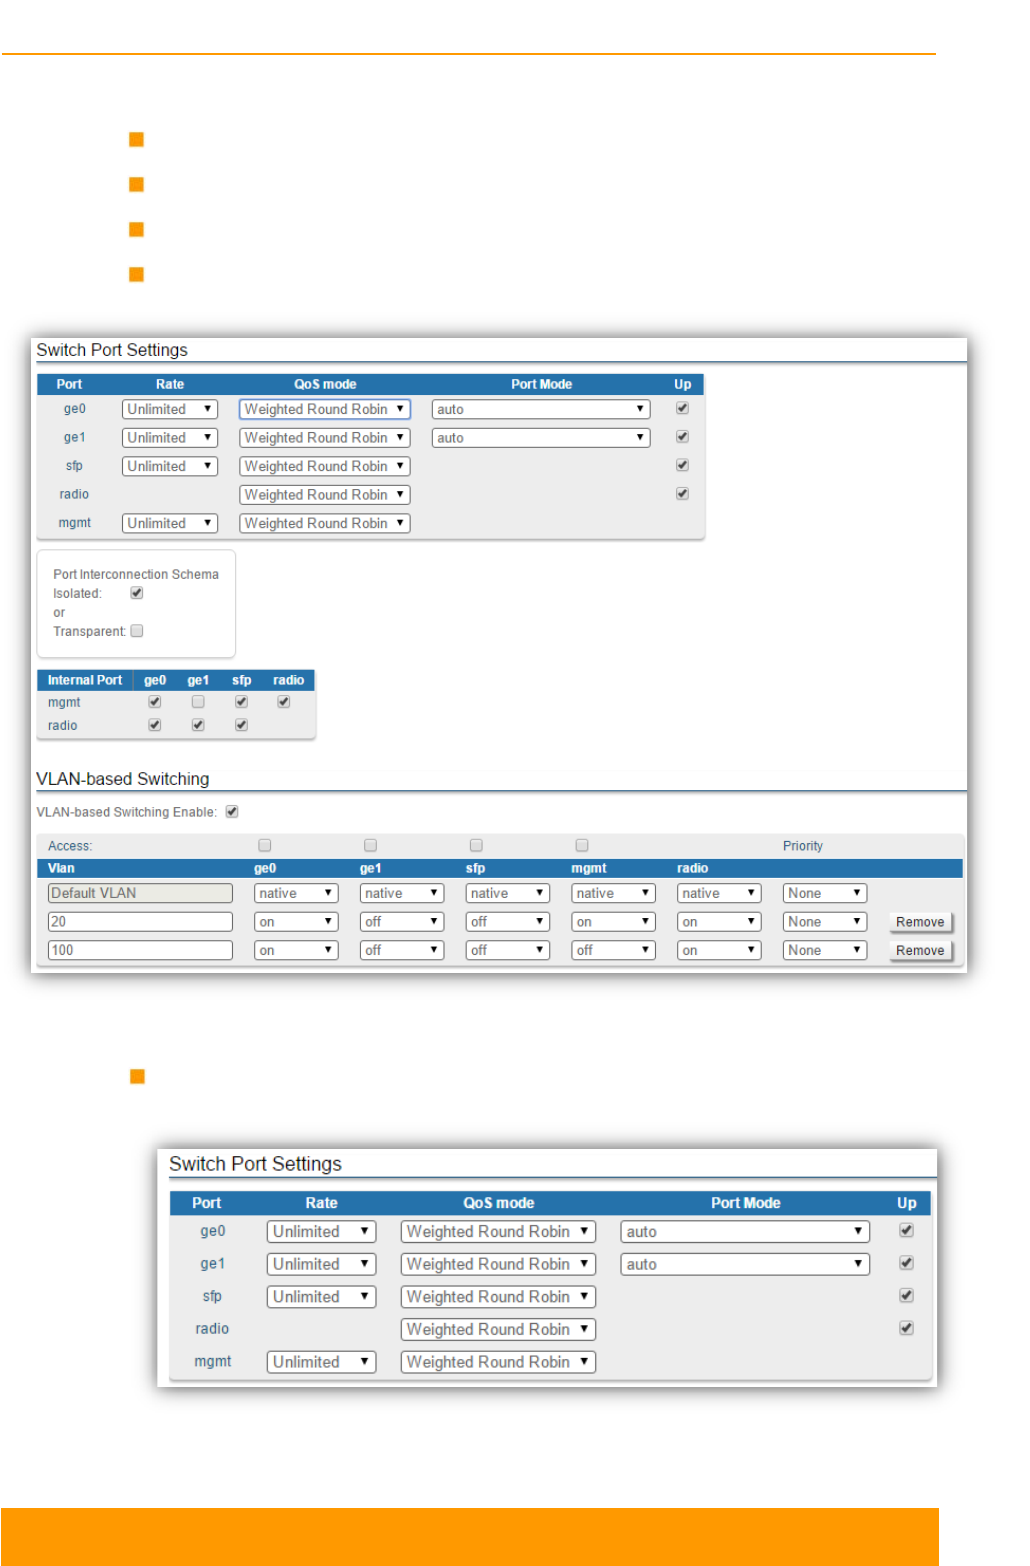
Chapter 3 - Configuration
Technical User Manual
InfiLINK XG 72
The switch page has four section:
Switch port Settings section
Port Interconnection Schema section
Connectivity matrix section
VLAN-based Switching section
Figure 46 - Switch Port Settings section
Switch Port Settings - allows you to perform general port configuration
Figure 47 - Switch Port Settings section
Chapter 3 - Configuration
Technical User Manual
InfiLINK XG 73
The following port parameters can be customized:
Parameter Description
Rate You can set the limit (traffic shaper) on the selected port,
for outgoing traffic, in Mbps, from 1 to 100 in increments
of 1, from 100 to 1000 in increments of 10, or to set it
unlimited
QoS mode You can select the traffic shaper policy for the port, WRR
is selected by default
- “weighted round robin” - weights are used for every
queue of an interface, which allows different queues
to have different service shares depending on the
weight value
- “strict” - packets within lower priority queue are not
processed if the higher priority queue is not empty
Port Mode You can select the physical port operational mode from:
- auto: the speed and operational mode of the port will
be negotiated between the 2 end points
- 10BaseT-halfduplex;10BaseT-halfduplexmanual;
10BaseT-fullduplex;10BaseT-fullduplex-manual
- 100BaseTX-halfduplex; 100BaseTX-halfduplex-
manual; 100BaseTX-fullduplex; 100BaseTX-
fullduplex-manual
- 1000BaseTX-fullduplex;1000BaseTX-fullduplex-
manual
Up You can enable or disable the port status
Table 33 - Port parameters
NOTE
Manual settings for the Port Mode will disable the negotiation and detection for speed
and duplex. Use them in case that the interconnected 3rd party switches have fixed
speed and duplex settings.
Port Interconnection Schema allows you to select the switch operation
mode:
- Isolate:All traffic switching is allowed ONLY between external (GE0,
GE1, SFP) and internal ports (Mgmt and internal radio). Thus, direct
switching between external ports is forbidden (for example, between GE0
and GE1)
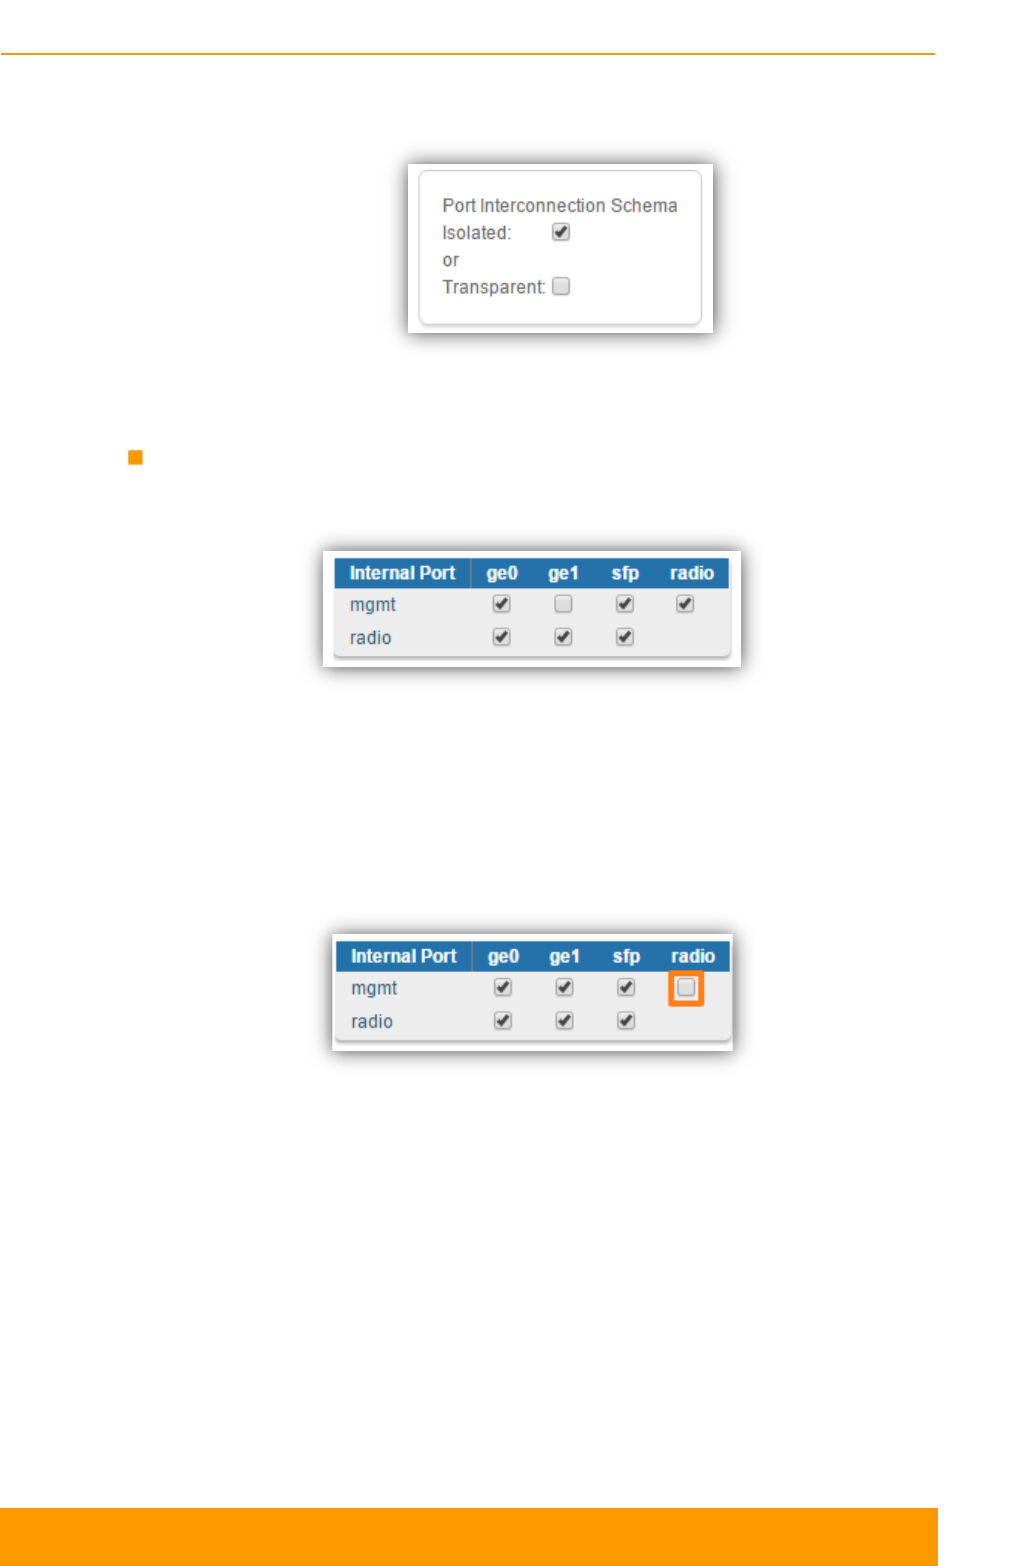
Chapter 3 - Configuration
Technical User Manual
InfiLINK XG 74
- Transparent: packet switching is allowed between external and internal
ports
Figure 48 - Port Interconnection Schema section
The connectivity matrix allows you to enable or disable switching between
internal and external ports of the switch.
Figure 49 - Connectivity matrix section
For example, it is quite easy to disable management of the unit via wireless link
just by disabling check box between “mgmt” and “radio” ports. Example shown
below
Figure 50 - Connectivity matrix section
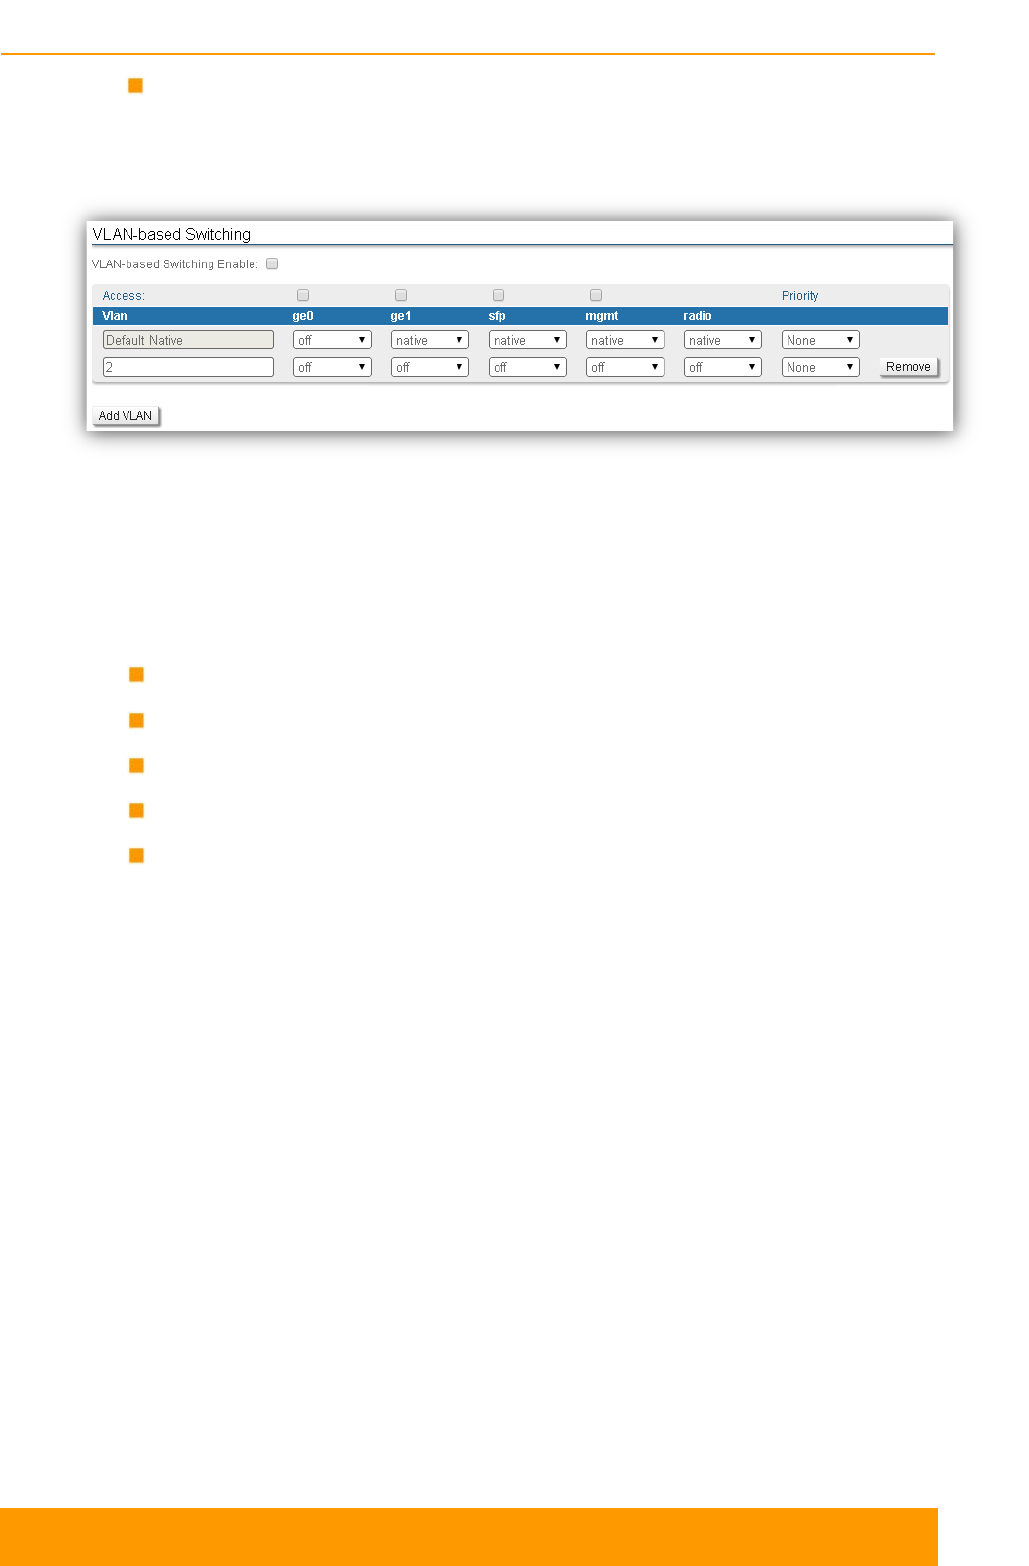
Chapter 3 - Configuration
Technical User Manual
InfiLINK XG 75
VLAN-based Switching allows to create list of allowed VLANs and their
handling on InfiLINK XG switch plane. Without such option active, wireless link
works as transparent Layer2 bridge. Thus, the link transport any frames with
any VLAN tags set.
Figure 51 - VLAN-based Switching section
5.6.5. VLAN Switching
The following configuration can be performed in order to customize the VLAN-
based switching operation of the InfiLINK XG unit:
Create management VLAN
Allow single VLAN and change of operational port mode
Configure a native VLAN
Allow multiple VLANs
Assign per-VLAN 802.1p priorities (also described in the QoS section above)
Switch default configuration works as transparent Layer2 bridge. Therefore, by
default any frames with any VLAN tags (and untagged frames too) will flow freely
through wireless link.
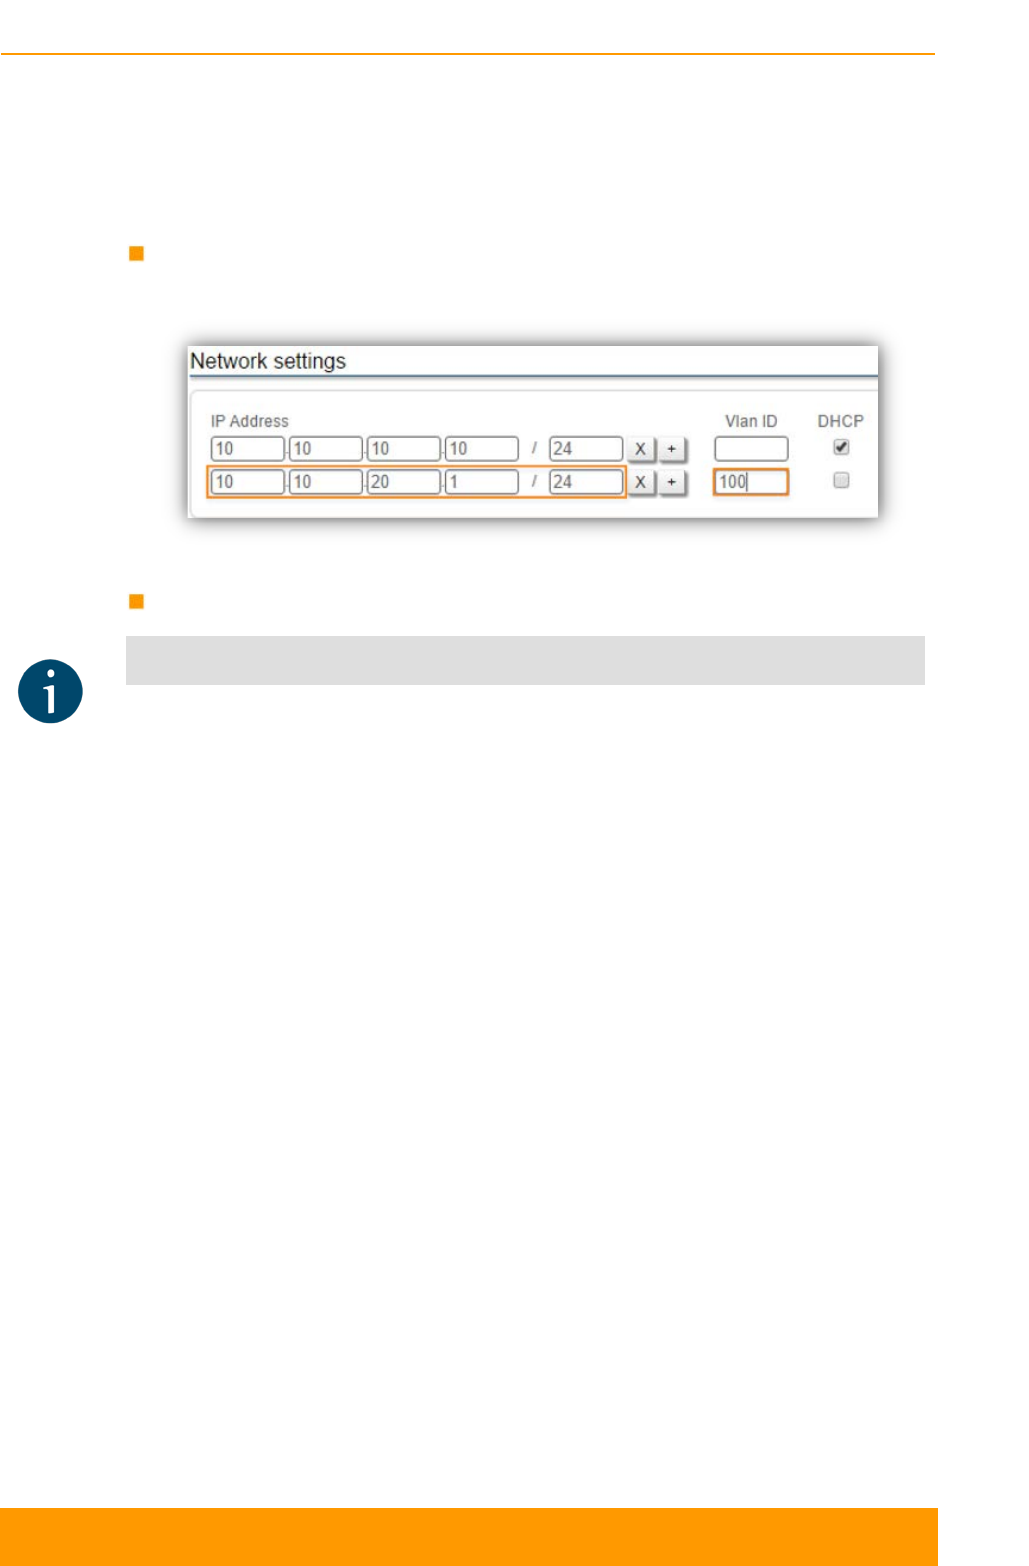
Chapter 3 - Configuration
Technical User Manual
InfiLINK XG 76
5.6.5.1. Management VLAN configuration
It is possible to add management VLAN configuration and to keep transparent
Layer2 bridging operational. It is the simpliest and sufficient configuration for vast
number of cases.
Go to the Network Access menu page in the Web interface. Add the
management IP address and associate it with VLAN 100 (example):
Figure 52- Adding a management IP address and associate it with VLAN 100
Click on the “Apply” button to save the changes
NOTE
Now, our InfiLINK XG has two management interfaces:
10.10.10.10 for untagged frame
10.10.20.1 for VLAN 100
All frames with any VLAN tags will be transparently switched through link
Security considerations imply to remove management interface for untagged
frames, leaving only management VLAN access operational.
Meanwhile, such simple, yet efficient configuration do not allow to restrict any other
VLAN transport except management VLAN.
In order to allow switching of selected VLANs only, please proceed to next
chapters.
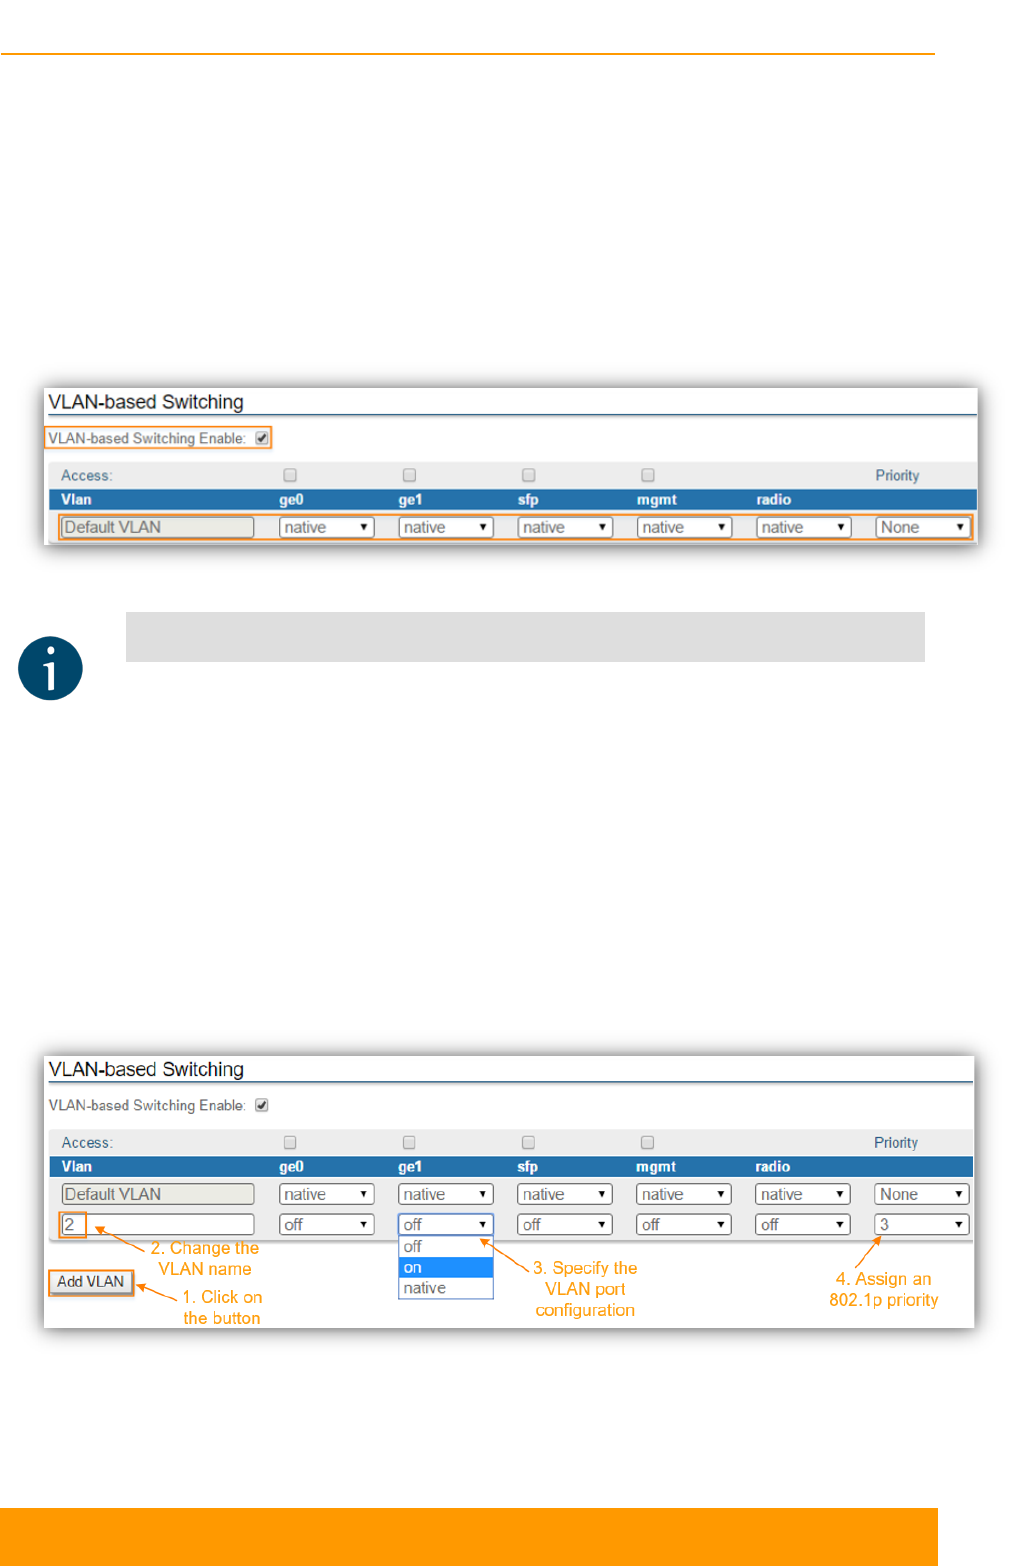
Chapter 3 - Configuration
Technical User Manual
InfiLINK XG 77
5.6.5.2. Allow single VLAN and change of operational
port mode
First: enable VLAN-based Switching.
Once the VLAN-based switching is enabled, the default switching configuration is
automatically displayed and it shows the Default VLAN as native VLAN for all
ports:
Figure 53 - Default switching configuration
NOTE
The Default VLAN (or VLAN 1) is the only defined VLAN and it cannot be deleted.
Multiple VLANs can be afterwards added and configured as desired for each port.
All ports are by default in trunk mode, but the native VLAN allows both tagged and
untagged traffic to pass. The operational mode of a port is described in the next section.
Now only traffic allowed in VLAN-based Switching matrix is allowed.
Second: you can allow transport of new VLAN by click to the «Add VLAN» button.
1. Click on the “Add VLAN” button
2. VLAN 2 is added by default. Modify the value for the VLAN tag according to
the actual requirements
Figure 54 - Adding and configuring a new VLAN
3. The VLAN just added is by default disabled (“off”) on all the ports. The
following options are available for the port configuration:
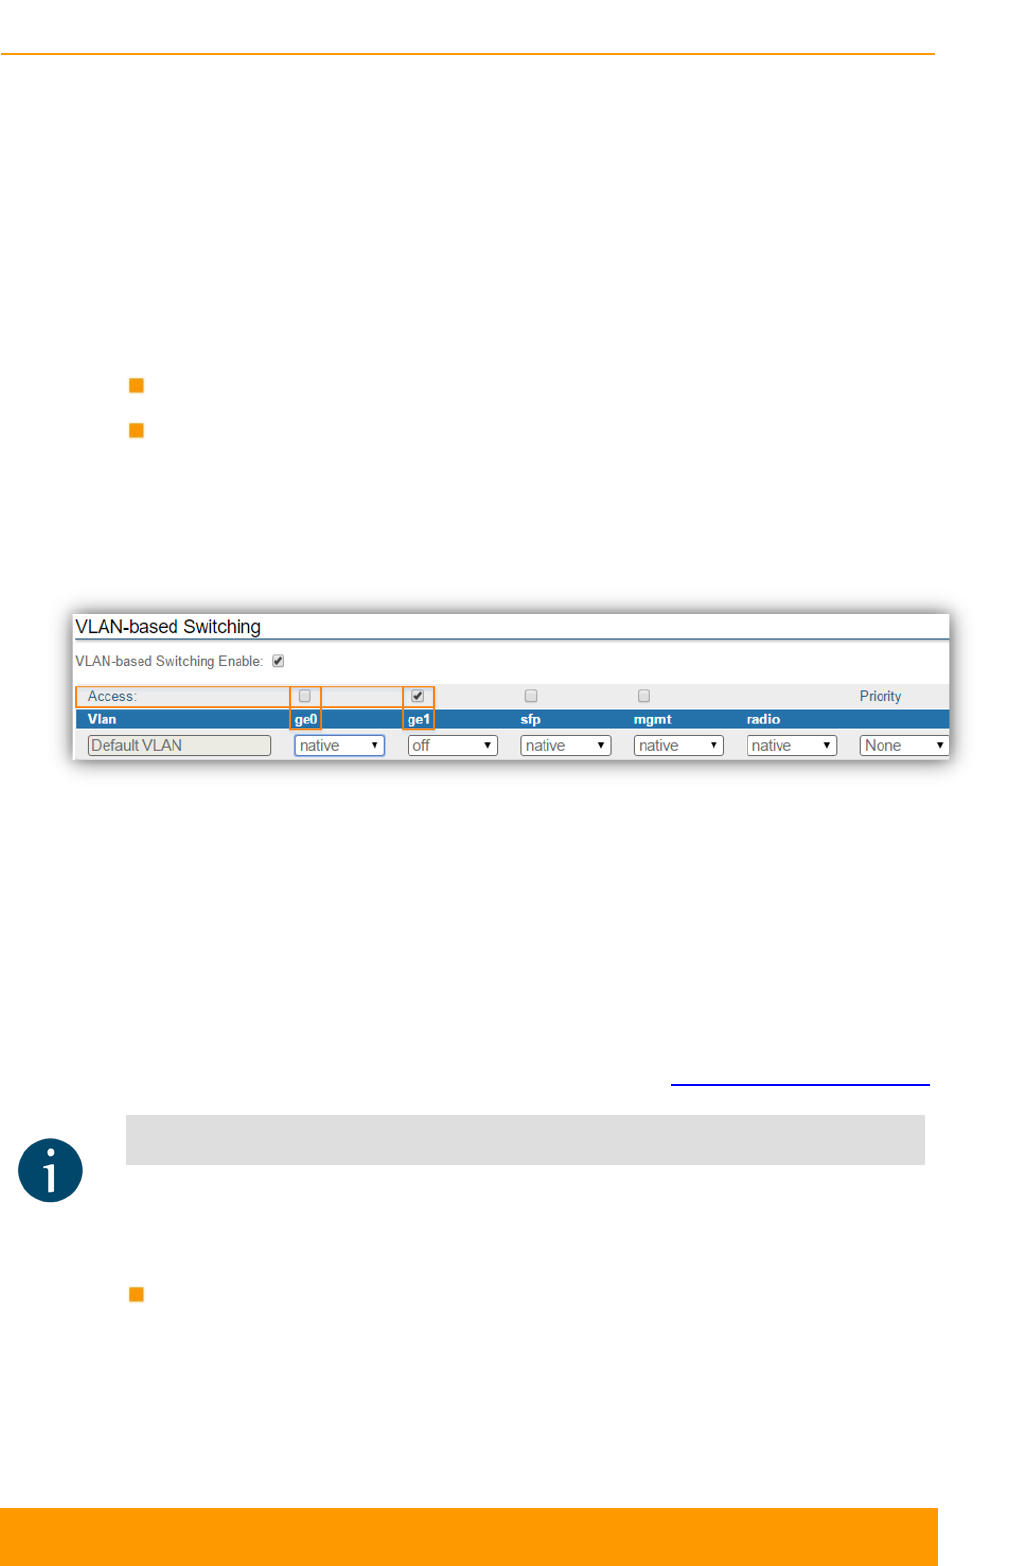
Chapter 3 - Configuration
Technical User Manual
InfiLINK XG 78
- “on”: allows the VLAN to pass through that port
- “off”: does not allow the VLAN to pass
- “native”: allows the VLAN to pass, but also allows the untagged traffic to
pass through that port
4. Assign an 802.1p priority. The packets received at the wired interfaces can be
marked with an 802.1p priority. “0” is the lowest priority and “7” the highest.
The following options are available for VLAN configuration:
Access mode (allows untagged traffic from certain VLAN only)
Trunk mode (allows tagged traffic only)
To configure the access mode or trunk mode, you need to enable or disable the
“Access” checkbox for each port. In the example below, the ge0 port is in trunk
mode and the ge1 port is in access mode.
Figure 55 - Configuring the operational mode of a port
To send and receive tagged and untagged traffic the native VLAN option should
be used. Native VLAN defines the VLAN tag number, which can receive all
incoming untagged traffic (for example, by default VLAN1 is configured as a Native
VLAN for all the ports).
In order to allow both tagged and untagged traffic to pass in trunk operational
mode, a native VLAN can be configured. The details about the native VLAN and
specific operation are described in the following section Configuring a native VLAN.
NOTE
Changing the operational mode of a port to the access mode will disable all VLANs on
that port automatically. More specifically, the VLANs that are set to “on” or “native” for
that port will be changed automatically to “off”. Please check section 7.2.4 for more
details about the on/off/native status of a VLAN.
Priority: use this option to set the priority to the certain VLAN in compliance
with 802.1p, from 0 to 7 in increments of 1
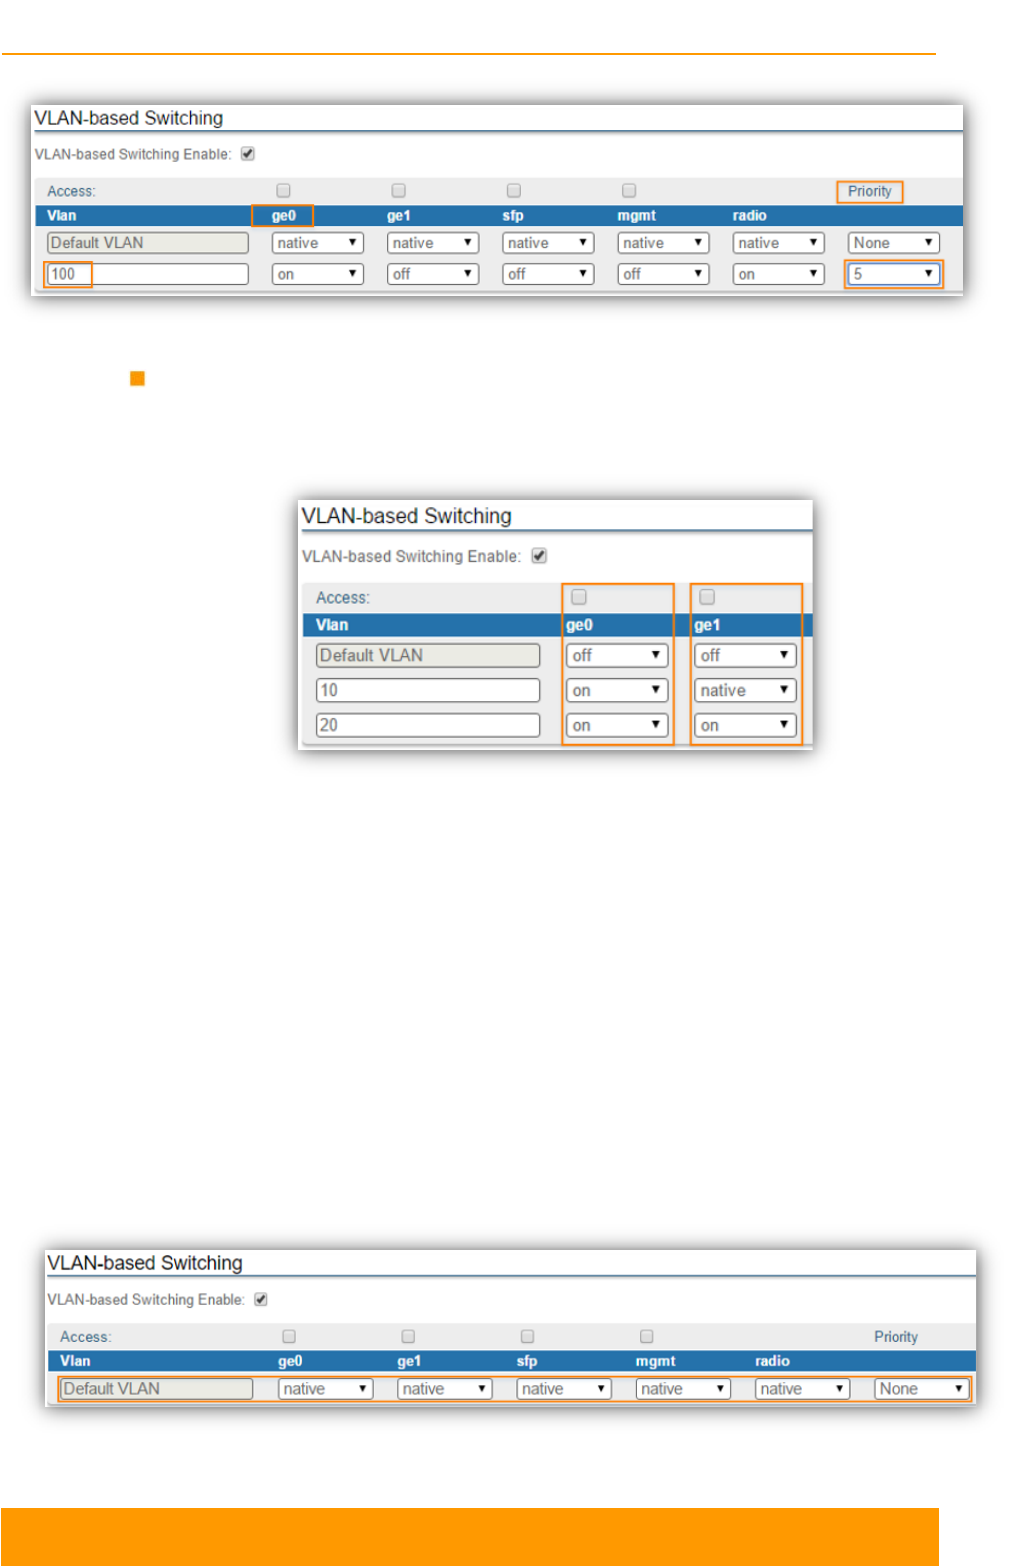
Chapter 3 - Configuration
Technical User Manual
InfiLINK XG 79
Figure 56 - Configuring per-VLAN 802.1p priorities
Port state: allows you to specify if a VLAN should be allowed to pass by the
port (“on” option), denied (“off”) or if the VLAN should be a native one for the
specific port (“native” option). Only one native VLAN per port.
Figure 57 – Different port state values
5.6.5.3. Configuring native VLAN
A port that is set to the trunk operational mode allows only tagged traffic to pass.
However, one of the VLANs allowed to pass through that port can be configured as
native VLAN and it will be the only VLAN that will allow to pass all the untagged
traffic at the reception. Therefore, the native VLAN will pass both tagged and
untagged traffic.
To be noted that there can be maximum one native VLAN for each port!
The Default VLAN or VLAN 1 is by default configured as native VLAN for all the
ports:
Figure 58 - Default native VLAN configuration
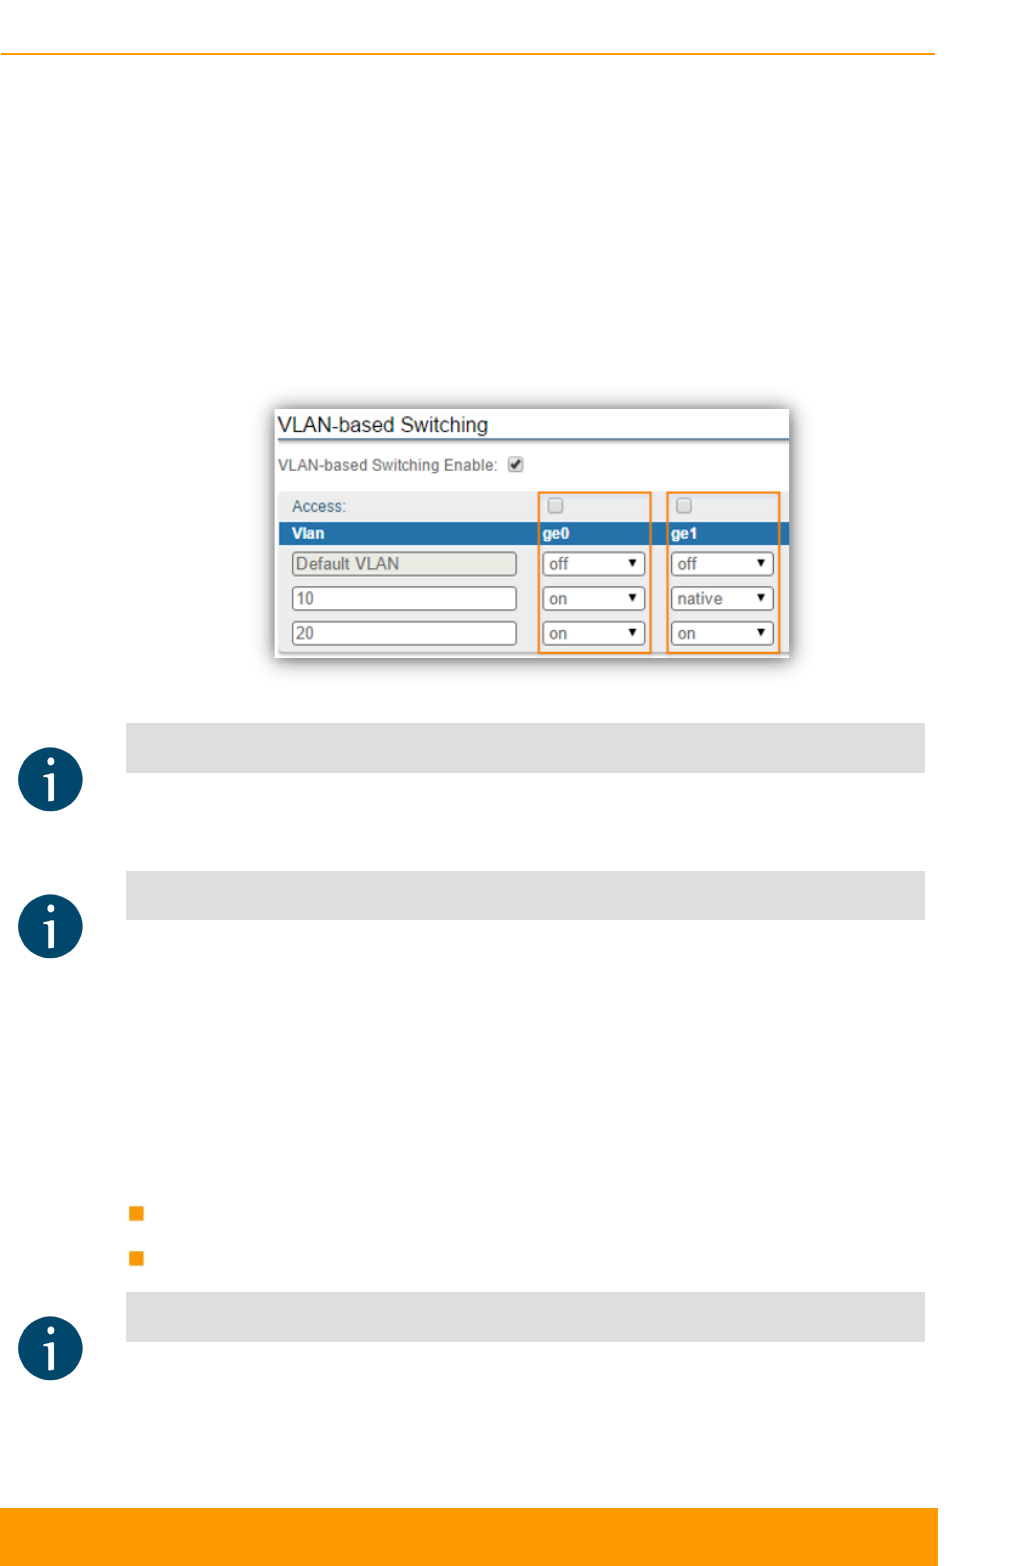
Chapter 3 - Configuration
Technical User Manual
InfiLINK XG 80
You can customize the native VLAN configuration according to the specific
requirements. For example, there can be ports that should allow only tagged traffic
to pass and ports that allow both tagged and untagged traffic.
Example - Port ge0 and ge1 should allow only VLANs 10 and 20 to pass.
Additionally, port ge1 should also allow the untagged traffic.
In this case, no native VLAN should be configured for the ge0 port and port ge1
should have VLAN 10 or 20 configured as native VLAN. The default VLAN should
be set to “off” on both ports, otherwise VLAN 1 will be allowed to pass!
Figure 59 - Native VLAN configuration example
NOTE
Changing the native VLAN, will automatically disable the Default VLAN, by setting it to
“off” on the specific port.
NOTE
When a different VLAN besides the Default VLAN is set as native, the “native” option
becomes unavailable for all other VLANs. In order to change the native VLAN in this
case you have to first remove the current native VLAN by changing the state to “on” or
“off”. After this, the “native” option is again available for all other VLANs.
5.6.5.4. Allow multiple VLANs
This section will describe step by step how to configure separate VLANs for
management and for the data traffic as follows:
VLAN 100 is used for the management of the unit
VLAN 200 is used for the data traffic
NOTE
In order to configure the VLAN based management access, it is necessary to associate
the IP address of the management interface with the management VLAN 100. If you
begin by enabling the VLAN-based switching and remove the native VLAN, you will lose
contact with the unit and ERConsole must be used for recovery.
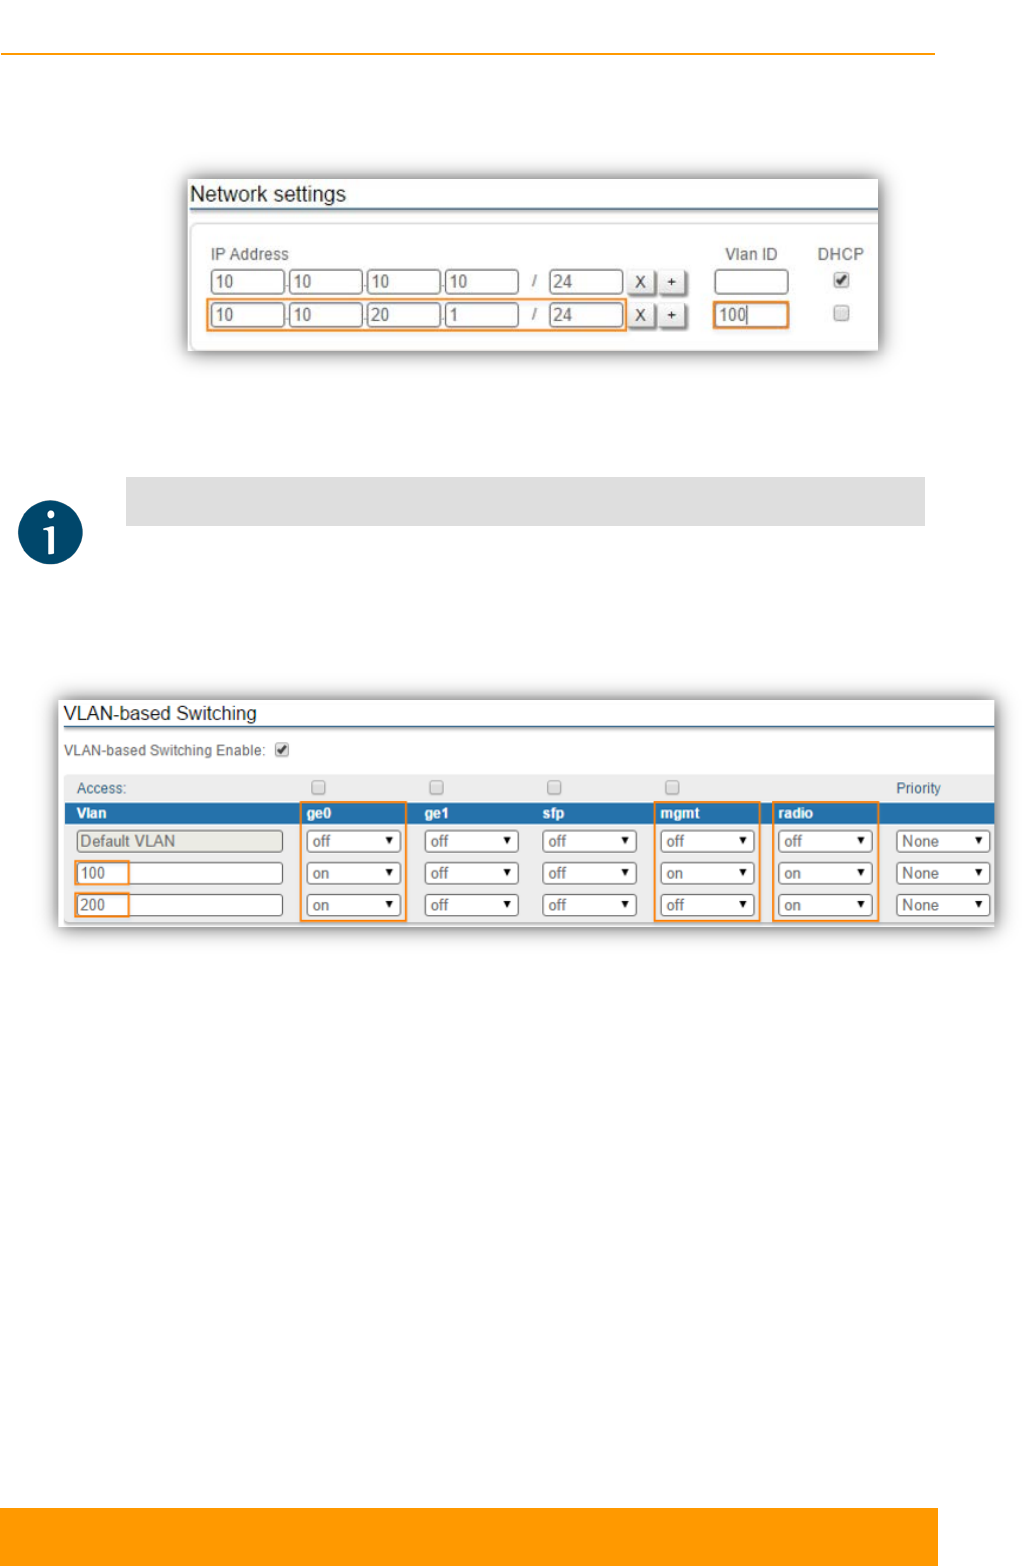
Chapter 3 - Configuration
Technical User Manual
InfiLINK XG 81
1. Go to the Network Access menu page in the Web interface. Add the
management IP address and associate it with VLAN 100
Figure 60 - Adding a management IP address and associate it with VLAN 100
2. Click on the “Apply” button to save the changes
NOTE
The IP address just configured cannot be used at this moment for the management of
the unit because VLAN 100 has not been added yet. The unit will be accessed for the
moment using the initial management IP address, in this case 10.10.10.10.
3. Go to the Switch menu page and enable VLAN-based switching
Figure 61 - VLAN-based switching configuration
4. Add VLAN 100 and allow it to pass through the ge0, mgmt and radio ports.
This way, the management will be enabled both locally and over the air using
VLAN 100
5. The default VLAN cannot be removed, so it is necessary to set it off on all the
ports in order to deny access using untagged traffic (“native”) or traffic tagged
with VLAN 1
6. Add VLAN 200 for the data traffic and allow it to pass through the ge0 and
radio ports. Since management is not allowed on VLAN 200, it should be set
to “off” at the mgmt port
7. Click on the “Apply” button to save the changes
At this point, the access to the unit is allowed using only VLAN 100 and the newly
assigned IP address. Traffic tagged with VLAN 200 will be switched only between
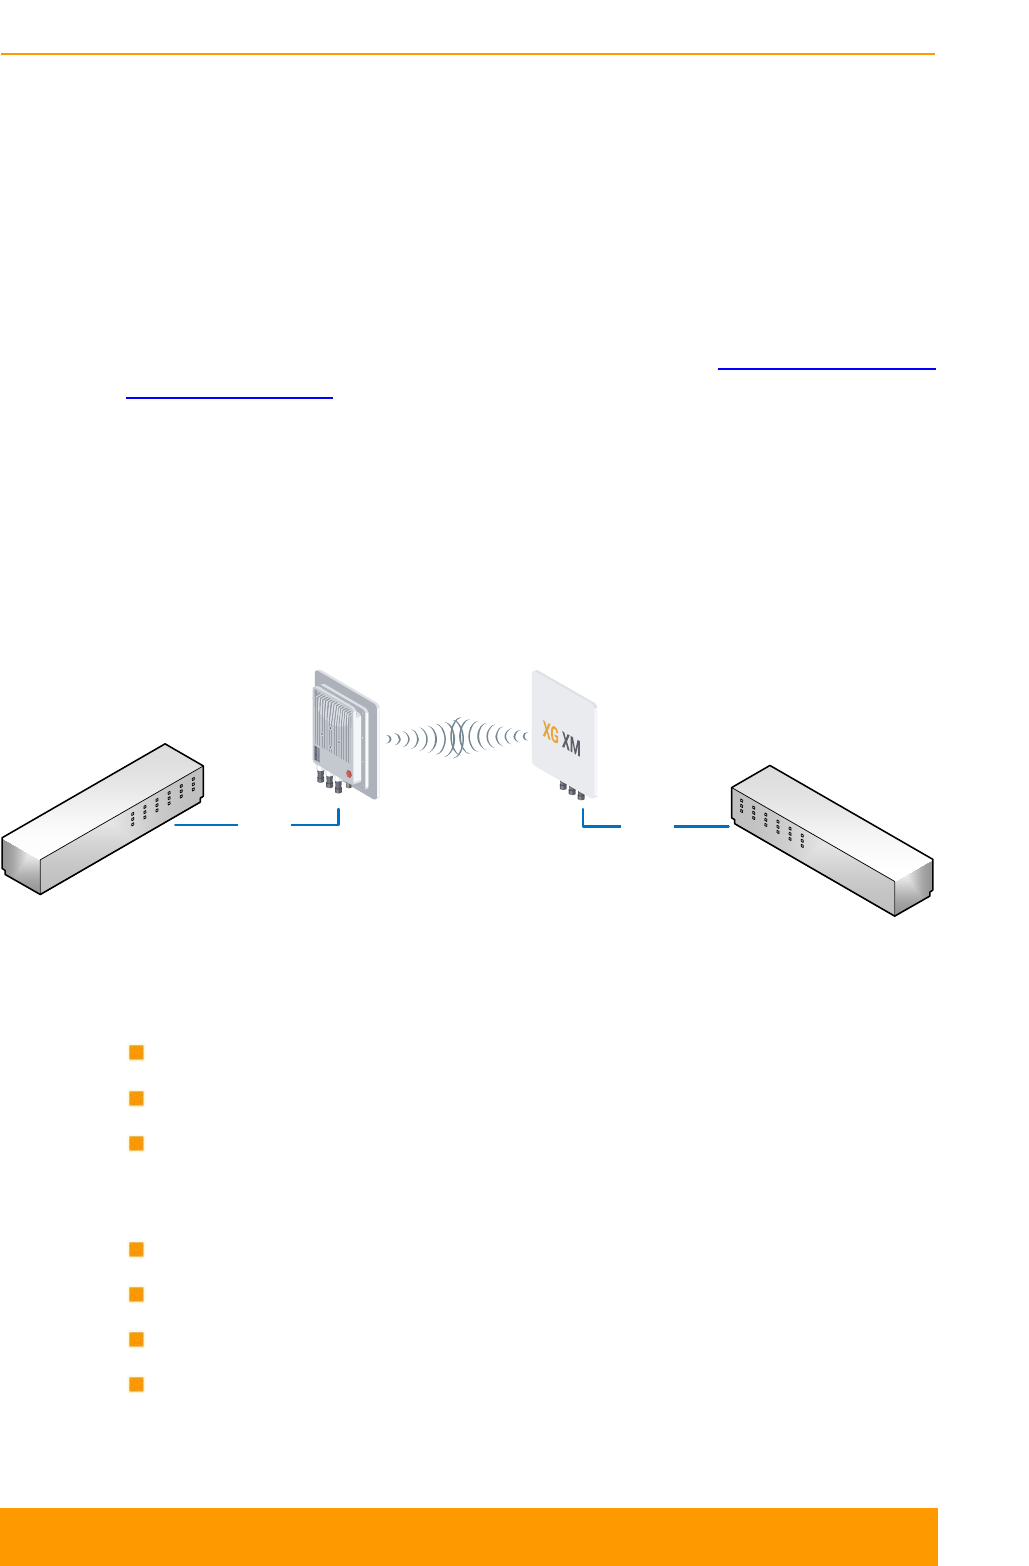
Chapter 3 - Configuration
Technical User Manual
InfiLINK XG 82
the ge0 and the rf ports. Untagged traffic or traffic tagged with other VLANs
besides 100 or 200 is not allowed!
5.6.5.5. Trunk and Trunk VLAN example
Installation which require VLAN tagged frames to flow in both directions through
InfiLINK XG wireless link do not require any specific configuration. Just due to
security reasons it is recommended to set up Management VLAN. All the rest
configurartion is not needed in most cases, except the issue to deny certain
VLANs. Please, use the configuration steps from chapter 5.6.5.1. Management
VLAN configuration
5.6.5.6. Access and Trunk VLAN example
Another example is very common for ISP installation. One InfiLINK XG receive
VLAN tagged frames from switch trunk port (port configured to carry frames with
different VLAN tags), another InfiLINK XG connects with end-customer LAN with
requirement to egress untagged frames from certain VLAN only. Please see
the diagram below.
Data cable Data cable
Trunk port Access port
XG1XG2
ISP LAN Customer’s
LAN
VLAN 100 management
VLAN 200 customer service
Untagged frames
VLAN 100 management
VLAN 200 customer service
Figure 62 – Trunk and Acess VLAN example
Brief actions to configure for XG1 :
Create management VLAN 100
Enable VLAN-based switching
Add VLAN 100, 200
Brief actions to configure for XG2 :
Create management VLAN 100
Enable VLAN-based switching
Add VLAN 100, 200
Set access port settings for VLAN 200
Configuration of XG1:
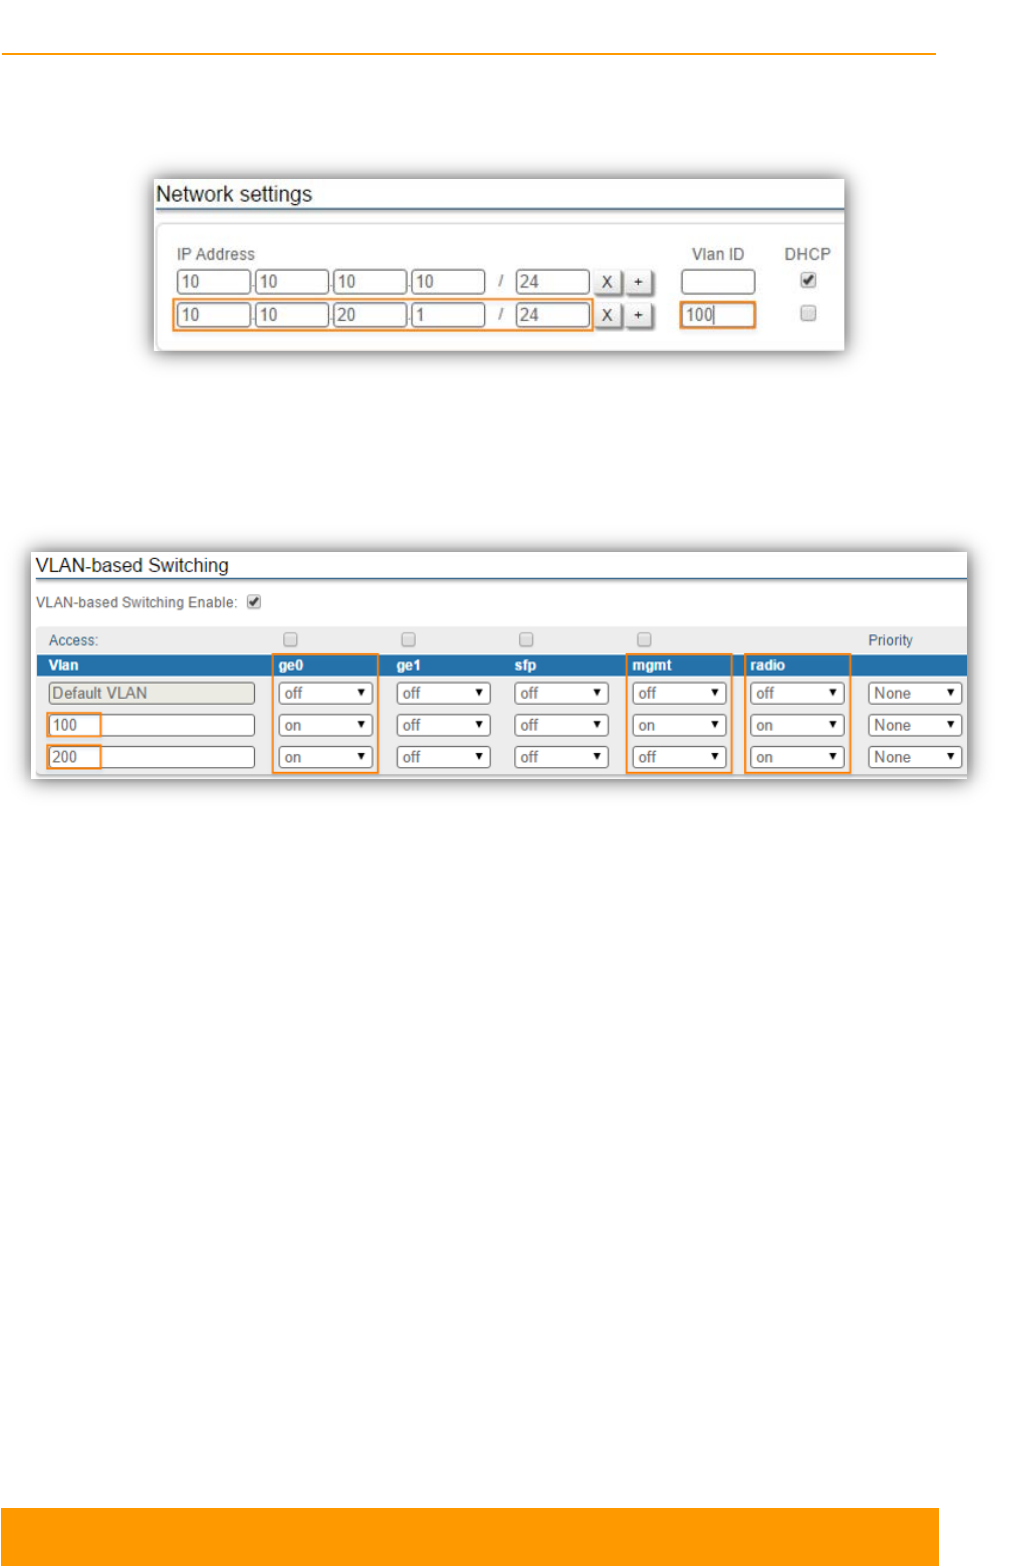
Chapter 3 - Configuration
Technical User Manual
InfiLINK XG 83
1. Go to the Network Access menu page in the Web interface. Add the
management IP address and associate it with VLAN 100
Figure 63 - Adding a management IP address and associate it with VLAN 100
2. Click on the “Apply” button to save the changes
3. Go to the Switch menu page and enable VLAN-based switching
Figure 64 - VLAN-based switching configuration
4. Add VLAN 100 and allow it to pass through the ge0, mgmt and radio ports.
This way, the management will be enabled both locally and over the air using
VLAN 100
5. The default VLAN cannot be removed, so it is necessary to set it off on all the
ports in order to deny access using untagged traffic (“native”) or traffic tagged
with VLAN 1
6. Add VLAN 200 for the data traffic and allow it to pass through the ge0 and
radio ports. Since management is not allowed on VLAN 200, it should be set
to “off” at the mgmt port
7. Click on the “Apply” button to save the changes.
At this point, the access to the unit is allowed using only VLAN 100 and the newly
assigned IP address. Traffic tagged with VLAN 200 will be switched only between
the ge0 and the rf ports.
Configuration of XG2:
1. Go to the Network Access menu page in the Web interface. Add the
management IP address and associate it with VLAN 100:
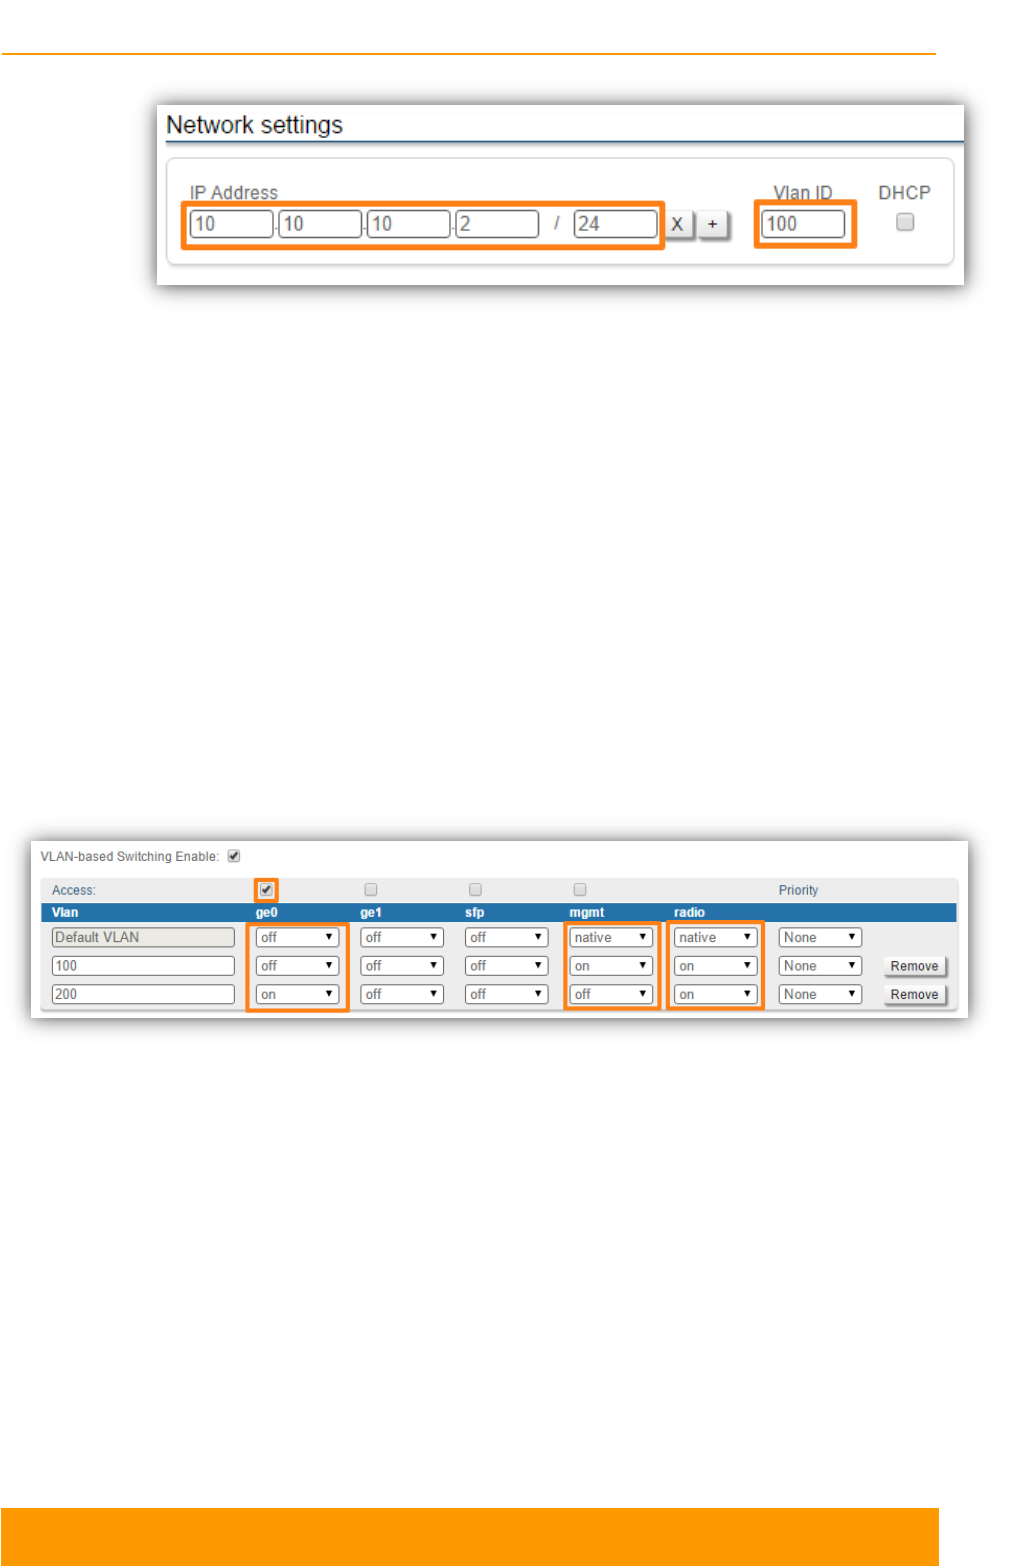
Chapter 3 - Configuration
Technical User Manual
InfiLINK XG 84
Figure 65 - Adding a management IP address and associate it with VLAN 100
2. Click on the “Apply” button to save the changes
3. Go to the Switch menu page and enable VLAN-based switching:
4. Add VLAN 100 and allow it to pass through the mgmt and radio ports. This
way, the management will be enabled over the air using VLAN 100
5. The default VLAN cannot be removed, so it is necessary to set it off on all the
ports in order to deny access using untagged traffic (“native”) or traffic tagged
with VLAN 1
6. Add VLAN 200 for the data traffic and allow it to pass through the ge0 and
radio ports. Since management is not allowed on VLAN 200, it should be set
to “off” at the mgmt port
7. Mark Access checkbox for ge0 in order to remove all tags for traffic to
customer’s LAN
Figure 66 - VLAN-based switching configuration
8. Click on the “Apply” button to save the changes
At this point, the access to the unit is allowed using only VLAN 100 and the newly
assigned IP address. Traffic tagged with VLAN 200 will be received by rf port and
switched untagged to customer’s LAN through ge0 port.

Chapter 3 - Configuration
Technical User Manual
InfiLINK XG 85
5.6.6. SNMP
The SNMP protocol support is an important feature of all communication devices
because it allows the system administrator to manage the operation of a network
as a whole, as well as of each component.
SNMP section contains a set of parameters to exchange data about network
activity of the device.
The SNMP Protocol has two sides, the agent and the management stations:
The agent sends data to the management station
The management station collects data from all the agents on the network. You
can set several destinations of traps with individual set of traps as well as
several users with individual access rights
The agent sends alerts called traps (see Traps zone) and answers requests
that were sent by the management station
The management station captures and decodes the traps. The management
station also requests specific information from the agent
The information is passed through requests and replies with the use of the MIB
The management station is responsible for decoding the SNMP packets and
providing an interface to the administrator. The interface can be a GUI or a
command line.
5.6.6.1. SNMP settings
In the SNMP settings section, you can view and edit the current SNMP access
settings; you can delete the current SNMP v.3 users by clicking the «Remove
SNMP User» button or create new ones by clicking the «Add SNMP v3 User»
button:
SNMP access
parameter Description
Start SNMP Enable/disable SNMP daemon in the device
Version 1
enable Enable/disable SNMP v.1 and v.2c support
The first version of the SNMP protocol lacks security in
the operation of the protocol itself, which hinders its use
for network management, so SNMP v.1 and v.2c works
only in read-only mode
By default, it is enabled
Community
Set the community name for read-only mode (SNMP v.1

Chapter 3 - Configuration
Technical User Manual
InfiLINK XG 86
and v.2c only)
The default SNMP v.1 and v.2c community name is
"public"
It is a security method for SNMP v.1 and v.2c, as Agents
can be set to reply only to queries received by accepted
community names
In SNMP v.1 and v.2c the community name passes
along with the data packet in clear text
Contact Set the contact information
Used as a reference information about the device owner
Location Set the geographical location where the unit is installed
Used as a reference information about physical device’s
location
User Name Set the authorization user name of SNMP v.3
Password Set the authorization password of SNMP v.3
Security Set the security level:
- the lowest level means no authentication or privacy
(No Authorization No Privacy), you have to set the
User Name only
-
the medium level means authorization and no
privacy (Authorization No Privacy), you have to set
User Name and Password
-
the highest level means authorization and privacy
(Authorization and Privacy), you have to set the
User Name, Password and Privacy Password
Read only Enable/disable the read-only permission
Read/Write is the default value
Admin Enable/disable the full access to the variables
For example, the ability to reboot the device
Limited access is the default value
Privacy
Password Set the privacy password
It is necessary when privacy is enabled for the required
security level
Privacy
Protocol
Set the encryption method for SNMP v.3: DES/AES128
Chapter 3 - Configuration
Technical User Manual
InfiLINK XG 87
Table 34 - SNMP Access
5.6.6.2. SNMP traps
SNMP protocol operation requires a network agent instance to send asynchronous
messages (traps) whenever a specific event occurs on the controlled device
(object). InfiNet Wireless units have a built-in SNMP Traps support module (which
acts as an agent) that performs a centralized information delivery from unit internal
subsystems to the SNMP server. This zone focuses on SNMP Traps agent
configuration.
In this section, you can view and edit the current SNMP traps settings. You can
clone, remove and clear target and traps by clicking the corresponding buttons:
SNMP traps
parameter Description
Enable SNMP
Traps
Enable/disable to send SNMP traps
Agent IP Set the IP address of the device which sends traps; it is
normally the IP address of the InfiNet Wireless unit
Destination Set the IP address of the server (InfiMonitor, for
example) and the UDP port (162 port is commonly used)
V2 Enable/disable SNMP v.2
Table 35 - SNMP Traps
The check boxes below specify traps or trap groups that are sent to the server:
SNMP trap types Description
radioGroup
Events which are related to
changes of radio link parameters
radioFreqChanged The Frequency has changed
radioBandChanged The Band has changed
others Other changes in network
linkEvent One
of the communication links
represented in the agent’s
configuration has come up or come
down
trapdColdStartEvent Cold Start event has occurred
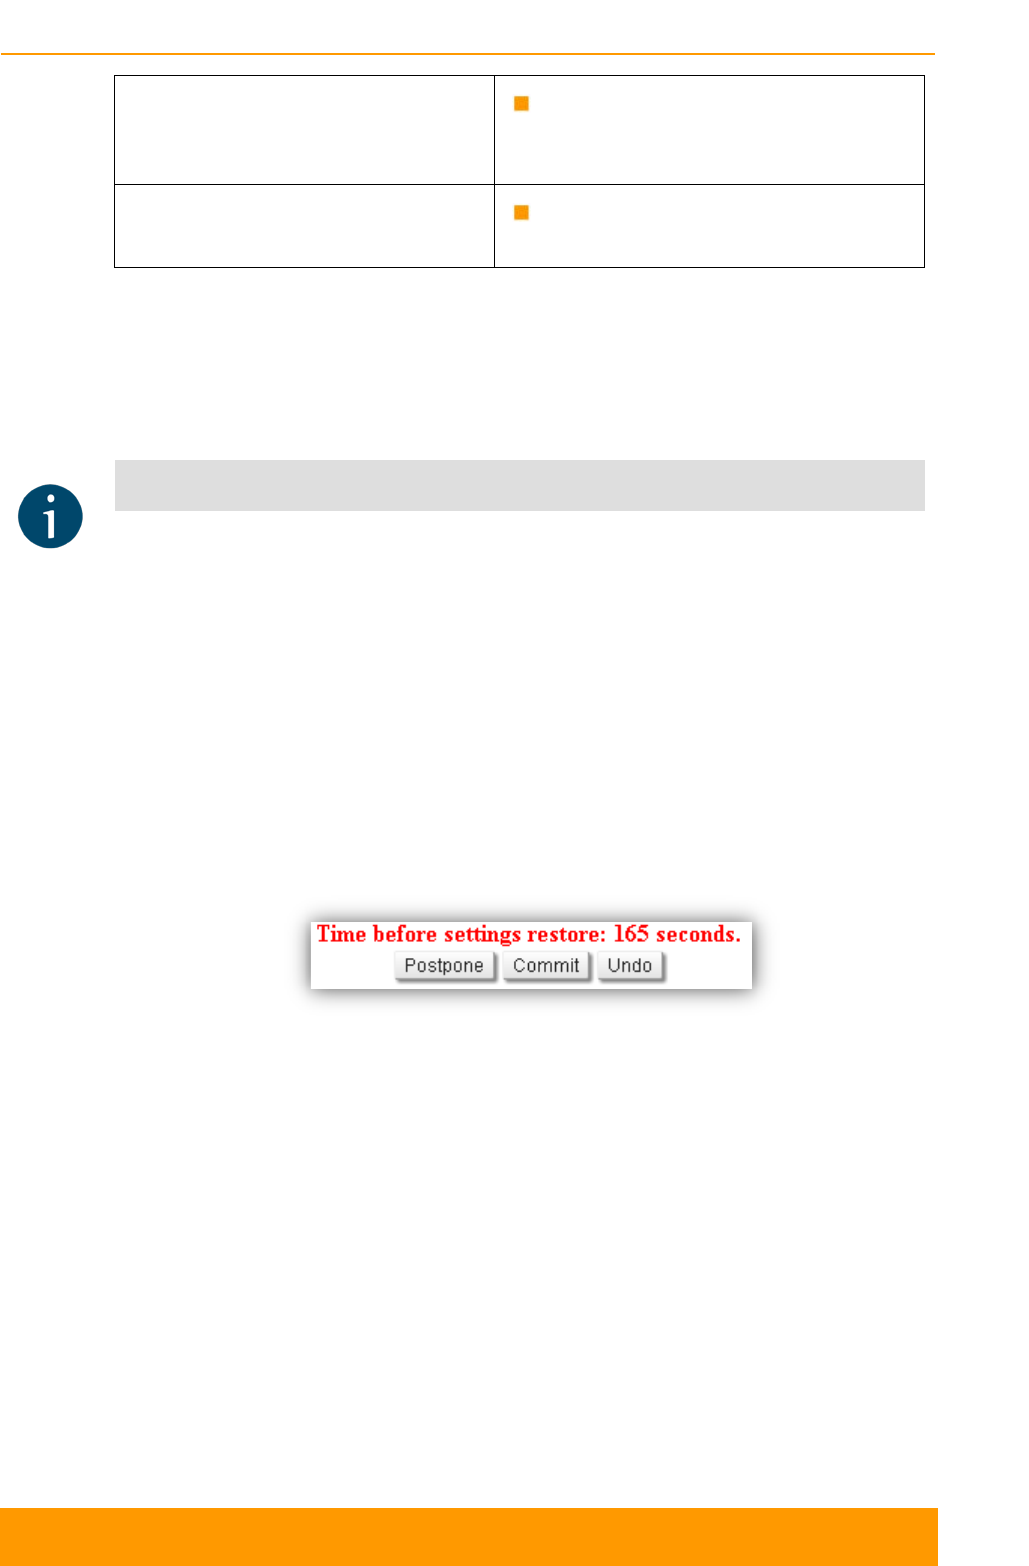
Chapter 3 - Configuration
Technical User Manual
InfiLINK XG 88
snmpdAuthenticationFailureEvent
Not properly authenticated SNMP
protocol message has been
received
syslog Events about messages recorded in
a system log
Table 36 - SNMP Trap Types
Clink the «Clone» button if you need to setup multiple SNMP servers. Each server
can have an individual set of traps directed toward it.
Click the «Clear» button in order to clear all check-boxes for the current server.
NOTE
Read the information at the end of the Settings section in order to find out the output of
the «Apply», «Try» and buttons for the new configuration performed.
5.6.7. Apply and Try buttons for the configuration
After performing the needed configuration in the Settings menu, you must save all
the new parameters by clicking on the «Apply» button. If you are not sure about
the effect of the new configuration performed, you can apply the new configuration
temporarily by clicking on the «Try» button. The previous configuration is
automatically restored after a grace period of 180 seconds (3 minutes). You have
the options to extend the grace period by choosing «Postpone», or immediately
accept/reject the changes by choosing «Commit» or «Undo».
Figure 67 - The options after clicking on the «Try» button
After clicking on the «Apply» button for saving the new configuration, the system
will redirect you to the login page. After a 5 seconds timer you can log in back to
the unit and check the new configuration.
5.6.8. Configuring QoS
Quality of Services (QoS) techniques aim to ensure a reliable transmission for all
type of services, especially for the most demanding ones, in terms of delay, jitter,
packet loss and availability. The QoS techniques are applied from inbound to
outbound and include: traffic selection and prioritization, queuing, packet
scheduling and traffic shaping.

Chapter 3 - Configuration
Technical User Manual
InfiLINK XG 89
QoS strategies were introduced for the InfiLINK XG units in order to be able to
customize the balance between the maximum achievable capacity and the allowed
packet loss for the priority packets. The QoS capabilities of the unit fall in two
categories:
QoS wired interface capabilities
QoS radio interface capabilities
5.6.8.1. QoS wired interface capabilities
The wired interface capabilities of InfiLINK XG unit are the following:
Traffic selection and prioritization based on 802.1p
The IEEE 802.1p standard provides the means to implement QoS techniques at
Layer 2 (MAC layer). QoS is implemented using a 3 bit field called Priority Code
Point (PCP) part of the Ethernet header when 802.1Q VLAN tagging is in use.
There are eight 802.1p priorities, “0” being the lowest and “7” - the highest. The
InfiLINK XG unit is capable to recognize and prioritize packets received on the
wired interfaces. Each packt will be further sent to a specific priority queue.
Four hardware priority queues on InfiLINK XG
Each received packet is sent to one of the 4 priority queues based on the PCP field
that contains the 802.1p priority.
When the actual traffic load reaches the egress rate, the switch will favor the
transmission of the highest priority packets in the detriment of the lower priority
ones.
The mapping between the 802.1p priorities and the 4 queues can be found below:
802.1p priority Traffic type InfiLINK XG priority queue
0
Background
1
1
Best Effort
2
Excellent Effort
2
3
Critical Applications
4
Video
3
5
Voice
6
Internetwork control
4
7
Network control
Table 37 - Priority queues mapping
Strict or weighted round robin packet scheduling algorithms
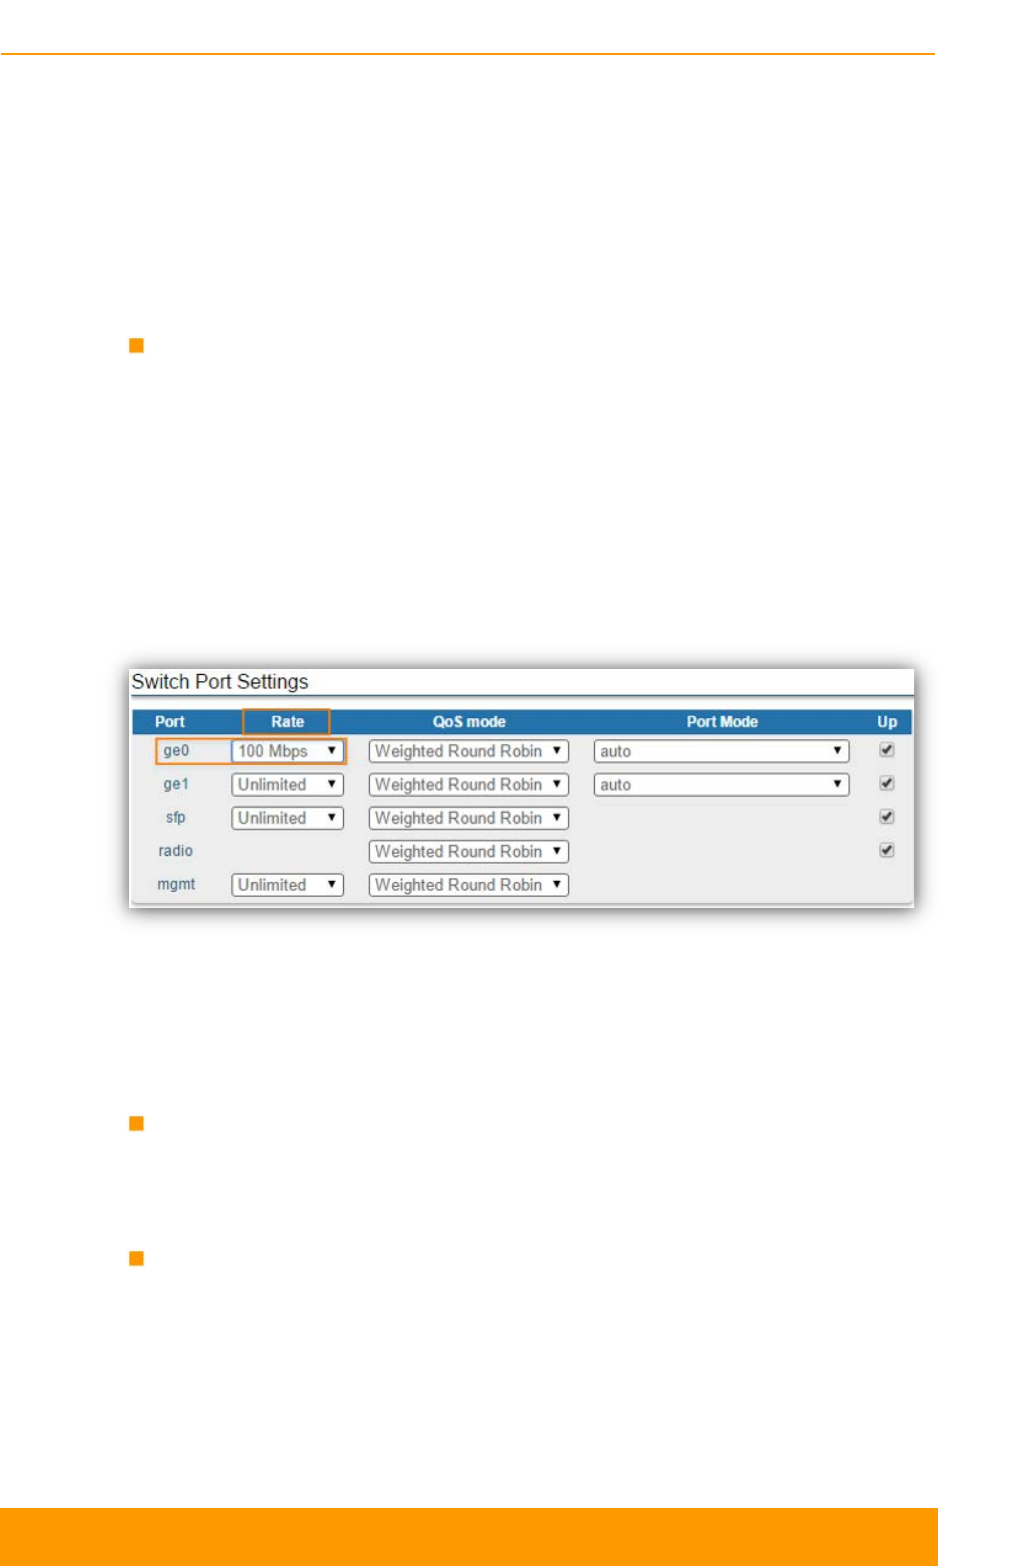
Chapter 3 - Configuration
Technical User Manual
InfiLINK XG 90
The packet scheduling algorithms available for determining how the packets shall
exit the priority queues are the following:
- Strict priority queuing: packets from lower priority queues are delayed
in case higher priority queues has traffic
- Weighted round robin: weights are used for every queue of an interface,
which allows different queues to have different service shares depending
on the weight value
Per-port egress rate limiting
Traffic shaping can be configured by limiting the egress rate on a selected wired
port.
In order to configure per-port egress rate limiting go to the “Switch” menu page in
the Web interface and set the “Rate” parameter for a specific wired interface. In
the example below, the traffic outgoing at the ge0 interface is limited to 100 Mbps.
It can be also noticed that the radio interface does not have available the option of
configuring a rate limit. Radio throughput depends only on current modulation:
Figure 68 - Configuring per-port egress rate limiting
5.6.8.2. QoS radio interface capabilities
The radio interface QoS capabilities of the InfiLINK XG unit are the following:
Traffic selection and prioritization based on 802.1p
The packets received at the radio interface that are marked with an 802.1p priority
will be recognized and sent to a specific priority queue.
Four priority queues
The same considerations mentioned for the wired interface capabilities are valid:
each received packet is sent to one of the 4 priority queues based on the PCP field
that contains the 802.1p priority.
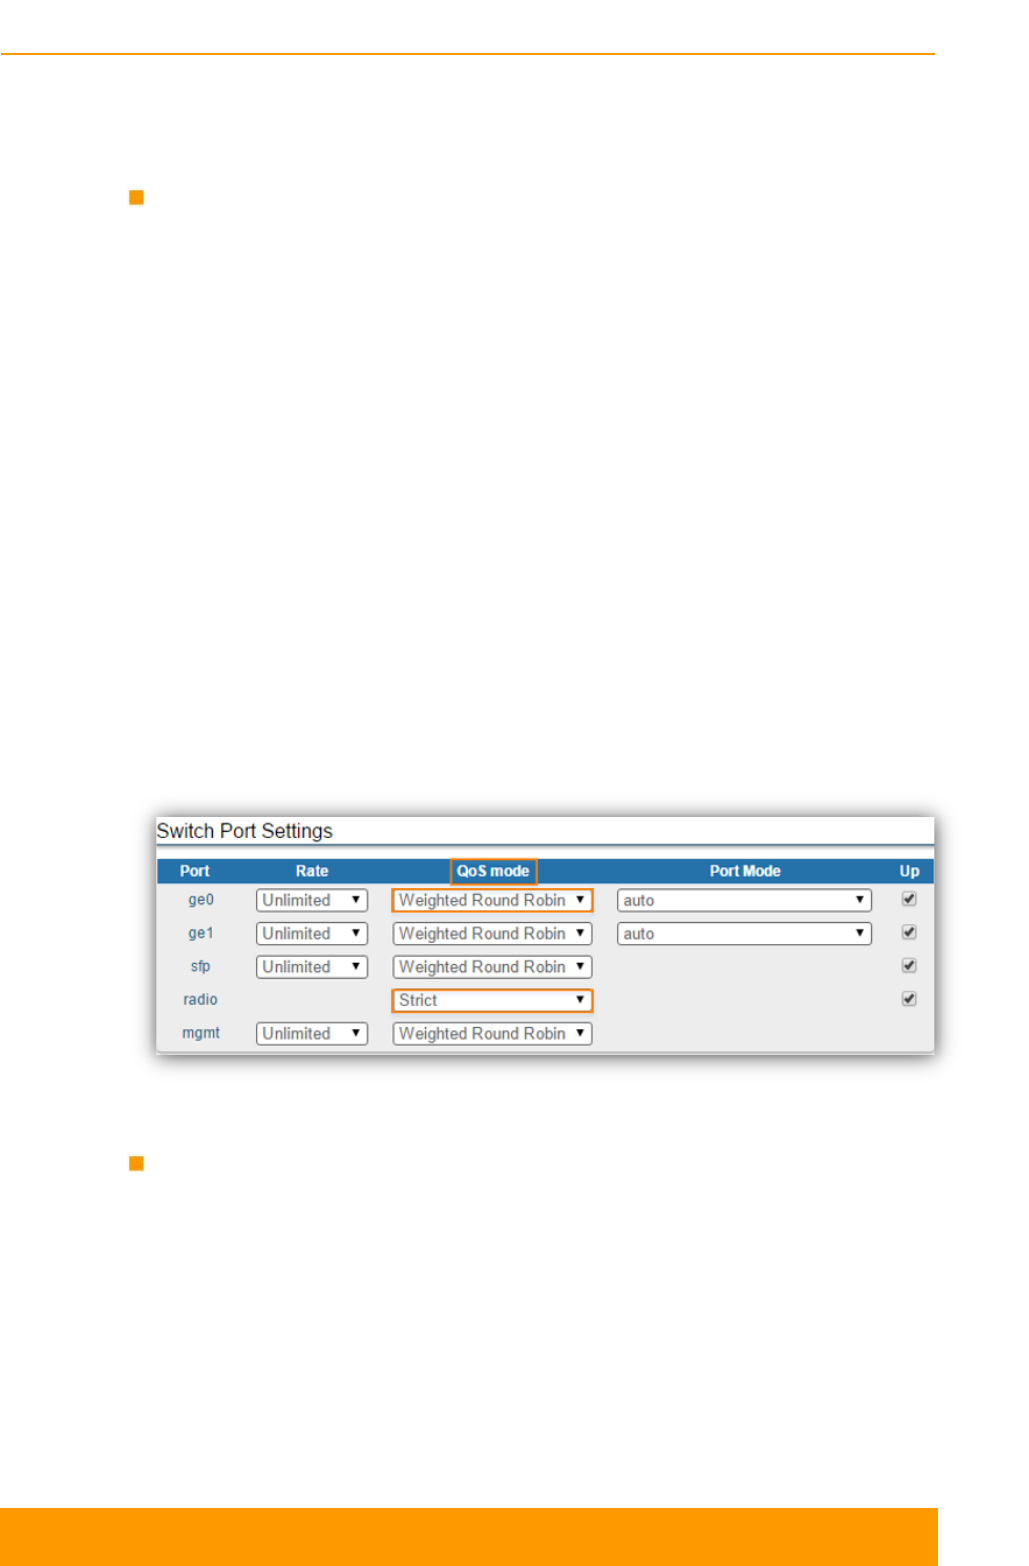
Chapter 3 - Configuration
Technical User Manual
InfiLINK XG 91
When the actual traffic load reached the egress rate, the switch will favor the
transmission of the highest priority packets in the detriment of the lower priority
ones.
Strict or weighted round robin packet scheduling algorithms
The strict priority queuing or weighted round robin scheduling alorithms can be
configured for the packets received at the radio interfaces and exiting the priority
queues:
- Strict priority queuing: packets from lower priority queues are delayed
in case higher priority queues has traffic
- Weighted round robin: weights are used for every queue of an interface,
which allows different queues to have different service shares depending
on the weight value.
No matter the interface on which the packets were received, one of the two packet
scheduling algorithms can be configured in order to determine the strategy for
emptying the priority queues.
Go to the “Switch” menu page in the Web interface and configure the “QoS mode”
parameter in the “Switch Port Settings” section. In the example below the
“Weighted Round Robin” is configured for the ge0 interface and the “Strict”
scheduling algorithm is configured for the radio interface:
Figure 69 - Configuring the packet scheduling algorithm
Three QoS strategies
Three QoS strategies are available for the radio interface transmission in order to
accommodate different packet loss requirements for the high priority packets:
- Aggressive: maximal throughput performance, but up to 10% priority
packet loss
- Conservative: no priority packet loss allowed, but up to 10% peak
throughput decrease compared to the aggressive strategy
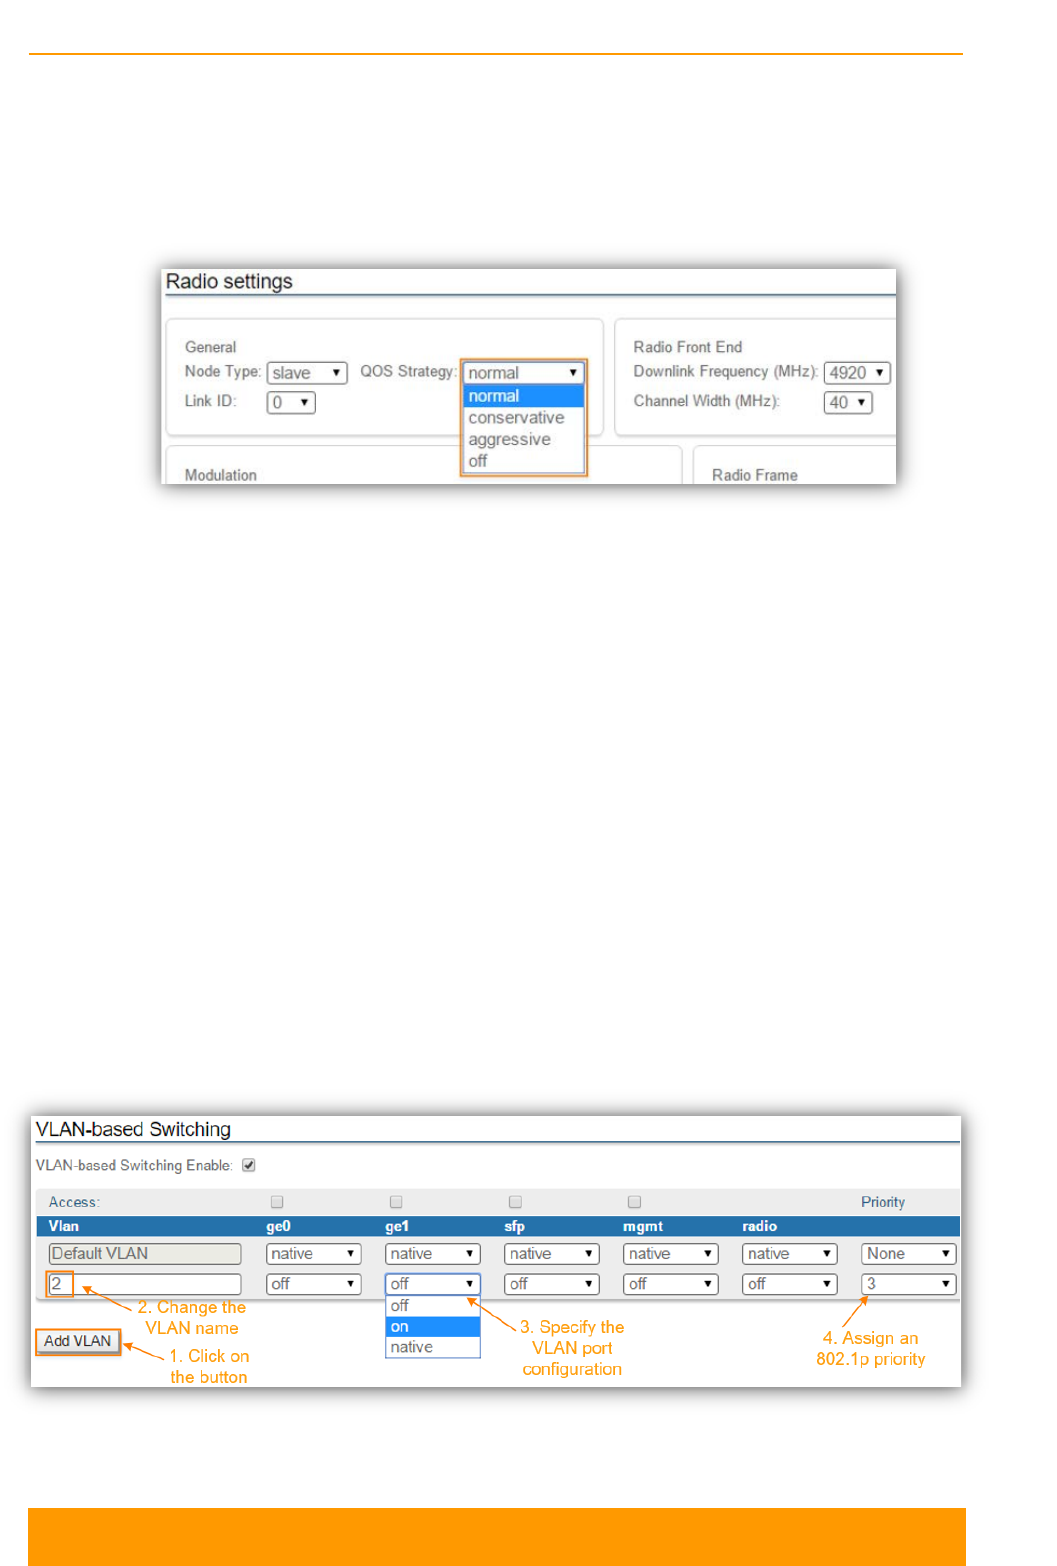
Chapter 3 - Configuration
Technical User Manual
InfiLINK XG 92
- Normal: minimal priority packet loss allowed, with less than 10% capacity
decrease
In order to configure the appropriate QoS strategy, go to the “Radio” menu page in
the Web interface and set the “QoS Strategy” parameter value:
Figure 70 - Configuring the QoS strategy
5.6.9. Configuring per-VLAN 802.1p priority
assignment
The packets received on the wired interface can be marked with a specific 802.1p
priority.
Example - configuring 802.1p priority 5 for the traffic received on VLAN 100 at ge0
The 802.1p priority assignment takes place only for the incoming packets with
802.1Q tags (VLAN tags) at the wired interfaces. In order to specify the 802.1p
priority associated to a VLAN, go to the “Switch” menu page in the Web interface
then proceed to add new VLAN:
Click on the “Add VLAN” button
1. VLAN 2 is added by default. Modify the value for the VLAN tag according to
the actual requirements:
Figure 71 - Adding and configuring a new VLAN
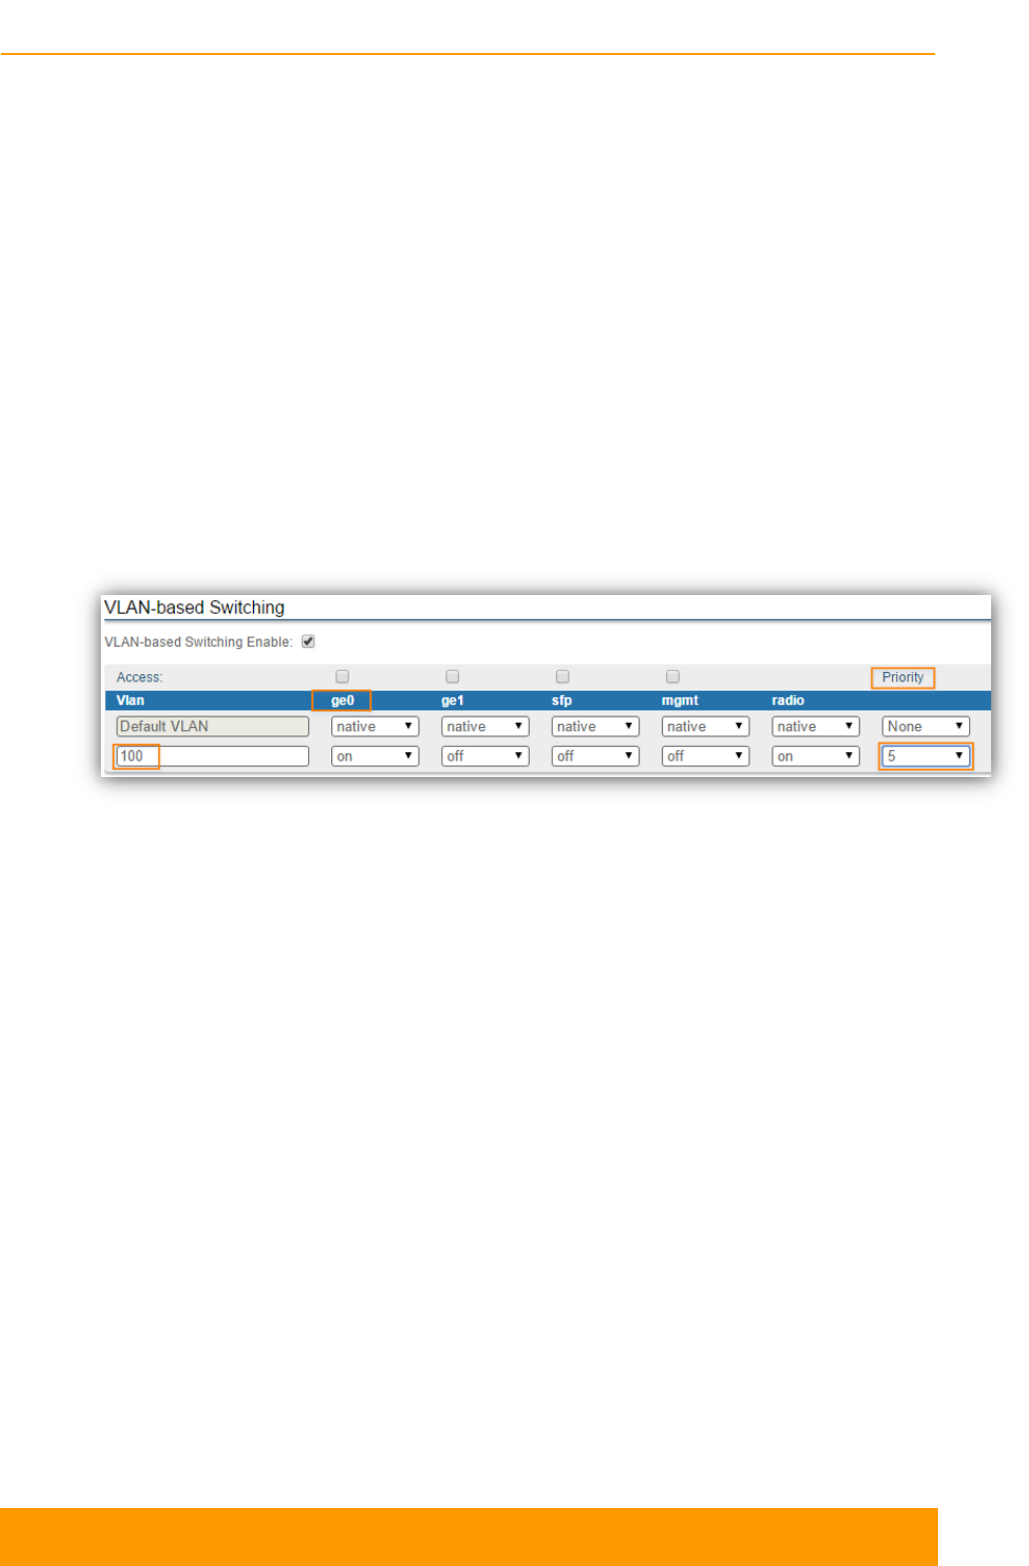
Chapter 3 - Configuration
Technical User Manual
InfiLINK XG 93
2. The VLAN just added is by default disabled (“off”) on all the ports. The
following options are available for the port configuration:
- “on”: allows the VLAN to pass through that port
- “off”: does not allow the VLAN to pass
- “native”: allows the VLAN to pass, but allows also the untagged traffic to
pass through that port.
3. Assign an 802.1p priority. The packets received at the wired interfaces can
be marked with an 802.1p priority. “0” is the lowest priority and “7” - the
highest.
Below, we can see how 802.1p priority 5 was assigned to the traffic received with
VLAN 100 at the ge0 interface. Priority 5 will not be assigned to the traffic incoming
at the radio interface even if VLAN 100 is allowed to pass through the radio
interface in the example below
Figure 72 - Configuring per-VLAN 802.1p priorities

Troubleshooting
Chapter 6
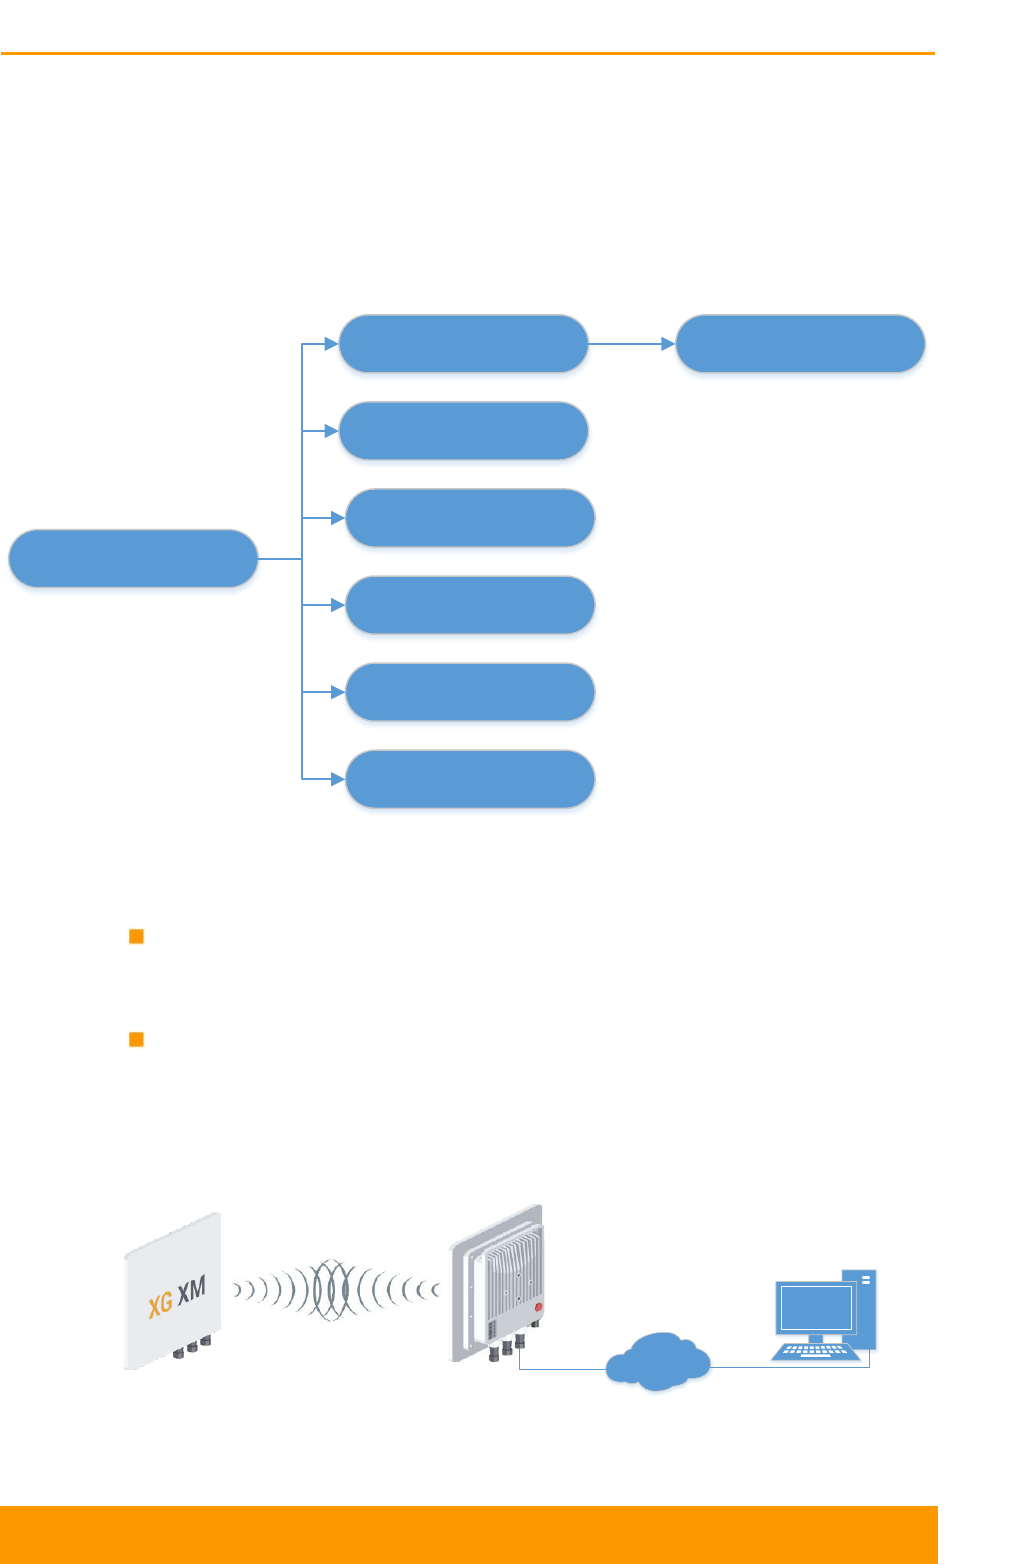
Chapter 6 - Troubleshooting
Technical User Manual
InfiLINK XG 95
6.1. Introduction
In this chapter are presented the basic troubleshooting actions to be taken in case
a problem occurs to the InfiLINK XG wireless link. The general fault classification
can be checked below and the detailed indications for fault handling are described
in the subsequent sections.
Possible issue
Wireless link is down No access to the
remote unit
No access to the local
unit
Expected capacity is
not met
Errors on the link,
throughput fluctuations
No data is transmitted
The local management
to the unit is lost
Figure 73 - Basic faults classification
Preliminary definitions:
For each radio link, the local unit will be considered the one closest to the
monitoring center and the remote unit will be its peer end like in the picture
below
If the radio link (between the local unit and the remote unit) or the Ethernet
connection (between the monitoring center and the local unit) become
unavailable, all units/equipment behind the failure point will be unreachable.
The debugging should begin in this case, at- the unit that is closest to the
failure point and has management access
Remote unit Local unit
Monitoring server
Figure 74 - Monitored wireless link

Chapter 6 - Troubleshooting
Technical User Manual
InfiLINK XG 96
6.2. The wireless link is down (it got lost)
Problem Debugging steps; possible cause & solution
The wireless
link is down
and there is
no access to
the remote
unit, but
there is
access to the
local unit
1. Check the values of the radio parameters in the Radio page
of the local unit to verify if they correspond to the settings
from the radio planning stage:
- max distance
- uplink/downlink frequenciy
- channel width
- transmit power
- maximal MCS
- frame period
- node type
- link ID
- custom frequency grid
If some of the parameters have different values, perform the
modifications and check the wireless link establishment after unit
reboot.
In case the wireless link is still down, go on site to the location of
the local unit and
check the integrity of the RF cables if an
external antenna is used. Tighten the connectors and check the
antennas, as well. Make sure that the Vertical and Horizontal RF
connections are properly performed.
2. In case the wireless link is still down even if the parameters
are according with the settings from the radio planning stage
and the RF connectivity verifications are completed for the
local unit (cables and connectors), go on site to the location
of the remote unit.
3. If the remote unit is powered on (else, check the AC power
supply, the IDU and the Ethernet cables), connect to it using
a laptop and check all radio parameters and RF connectivity
as described in step 1 and perform all corrections.
The values for the following radio parameters must be the same
on both units:
- uplink/downlink frequenciy
- channel width
- air frame period
- link ID
Check the license file in the Maintenance page to see if the
configured parameter values are supported by the license
(channel width, power level, frequencies, etc.)
Perform all needed modifications and check the wireless link
establishment after unit reboot.
4. In case the wireless link is still down, check the antennas
alliagnment with two teams working concurrently, one at the

Chapter 6 - Troubleshooting
Technical User Manual
InfiLINK XG 97
Problem Debugging steps; possible cause & solution
remote site and the other one to the local site.
Also, redo the radio planning: it can be that the coordinates from
the initial radio planning stage to be innapropriate for the current
situation (huge interferences on the working set of frequencies,
Fresnel zone obstruction as well as the wireless link cannot be
established, etc.).
5. Replace the unit if necessary or report the problem to InfiNet
Wireless support team with the Diagnostic card (according to
the information presented in Operation & Administration
chapter above, in Maintenace section).
http://support.infinetwireless.com
support@infinetwireless.com
+7 343 253-15-33
Table 38 - The wireless link is down
6.3. No access to the local unit
Problem Debugging steps; possible cause & solution
There is no
access to the
local unit
1. Check the network
connectivity between the monitoring
server and the local unit.
2. If there’s still no connectivity to the local unit, go on site to
the location of the local unit and check if:
- it is powered on (else, check the AC power supply, the
IDU, the Ethernet cables/fiber optic and connectors)
-
the local connection (for example, using a laptop)
works (else, follow the ERC console procedure
described below)
If local connection is allowed, after the authentication step in Web
GUI, check the administrative and oper
ational status of the
Ethernet/SFP port. Enable the port if found disabled.
3. If the problem is still not solved, g
o to the Switch page,
check the port interconnection and make sure that traffic is
enabled between the corresponding external and internal
ports. Check the VLAN configuration if VLANs are used.
Reboot the unit.
Table 39 - No access to the local unit
6.4. Expected capacity is not met
Problem Debugging steps; possible cause & solution

Chapter 6 - Troubleshooting
Technical User Manual
InfiLINK XG 98
Problem Debugging steps; possible cause & solution
The wireless
link is
operational
but the
expected
capacity is
not met
1.
Go to the Maintenance page and click the «Check Latest
Release» button. If a newer firmware version is available,
proceed with the firmware upgrade in order to benefit of the
latest radio features and improvements.
2. Go to
the Maintenance page, click the «View Current
License» button and check if the maximum transmit rate,
power levels or channel width are limited to lower values
compared to the expected configuration.
3. Go to the Switch page. Check the Rate limit and the Port
mode. In case of GE connection, if one unit has auto
negotiation enabled and the other has a manual setting, put
both units in auto negotiation. If the rate is lower than the
expected one, adjust accordingly or set to unlimited.
4. Go to the:
- Status page and check the radio link status (CINR,
RSSI, etc.)
- Radio page and check the the radio link configuration:
maximum modulation, air frame period, AMC and QoS
strategy (take as reference the throughput values
available in Operation & Administration chapter,
Wireless Link Statistics
section to compare the
configuration settings with the expected capacity)
- Alliagnment page and check the values from the the
antenna alliagnment tool
- The recorded statistics should be cleared for both units
(restart the unit or cli> xg stat -clear) and the wireless
link situation must be monitord again
Redo the radio planning activities if the values does’n correspond
to the values from the initial deployment.
5. Go on site and:
-
check the Ethernet or SFP connections, replace the
cables if necessary
-
check the RF connectors if an external antenna is
used. Tighten the connectors and check al
so the
integrity of the antenna
- perform proper antenna alignment on site. If after the
alignment the CINR level is still low, it indicates that
external interferences are present. Try to use another
frequency if available or perform a spectrum scanning.
6. Report the problem to InfiNet Wireless support team with
the Diagnostic card (according to the information presented
in Operation & Administration chapter above, in Maintenace
section).
http://support.infinetwireless.com

Chapter 6 - Troubleshooting
Technical User Manual
InfiLINK XG 99
Problem Debugging steps; possible cause & solution
support@infinetwireless.com
+7 343 253-15-33
Table 40 - Expected capacity is not met
6.5. Errors on the wireless link, throughput
fluctuations
Problem Debugging steps; possible cause & solution
The wireless
link is
operational
but there are
errors on the
wireless link,
throughput
fluctuations
1. Go to the Switch page. Check the Rate limit and the Port
mode. In case of GE connection, if one unit has auto
negotiation enabled and the other has a manual setting, put
both units in auto negotiation. If the rate is lower than the
expected one, adjust accordingly or set to unlimited.
2.
Go to the Status page and check the CINR and RSSI
levels. Try to adjust the Tx power on both ends in order to
improve the CINR and RSSI levels. If the CINR value is
low, it indicates the presence of external interferences. If
both CINR and RSSI are bad, the antenna alignment or
hardware faults could be the root cause.
3. Go on site and:
-
check the Ethernet or SFP connections, replace the
cables if necessary
-
check the RF connectors if an external antenna is
used. Tighten the connectors and check also the
integrity of the antenna
- perform proper antenna alignment on site. If after the
alignment the CINR level is still low, it indicates that
external interferences are present. Try to use another
frequency if available or perform a spectrum scanning.
4. Report the problem to InfiNet Wireless support team with
the Diagnostic card (according to the information presented
in Operation & Administration chapter above, in Maintenace
section).
http://support.infinetwireless.com
support@infinetwireless.com
+7 343 253-15-33
Table 41 - Errors on the wireless link, throughput fluctuations

Chapter 6 - Troubleshooting
Technical User Manual
InfiLINK XG 100
6.6. No data is being transferred
Problem Debugging steps; possible cause & solution
The wireless
link is
operational
but no data
is being
transffered
1. Go
to the Maintenance page and check the Maximum
transmit rate in the current license.
2. Go to the Switch page and make sure that the internal port
mapping is correct and the traffic flow is enabled between
the required ports.
3. Go to the Switch page and check the administrative state of
the GE or SFP port. Enable the port if it was disabled. If the
status is up but no packets are received, check the
configuration of the equipment which is directly connected.
4. Go on site and chec
k the Ethernet or SFP connections,
check and replace the cables if needed.
5. If VLANs are used, go to the Switch page and make sure
that the VLAN configuration is correct, allowing the specific
traffic VLAN ID to pass through the required ports.
6. Report the problem to InfiNet Wireless support team with
the Diagnostic card (according to the information presented
in Operation & Administration chapter above, in Maintenace
section).
http://support.infinetwireless.com
support@infinetwireless.com
+7 343 253-15-33
Table 42 - No data is being transffered
6.7. The management of the unit is lost
If the management of the unit is completely lost (of the local and/or the remote
one), the ERConsole recovery procedure should be used. ERConsole is a software
application created to recover or add a new IP address to the InfiNet Wireless
units. Additionally, the ERConsole can be used to reset the InfiNet Wireless units
to the factory default configuration.
6.7.1. ERConsole recovery procedure
Software requirements:
Java Runtime Environment should be installed. If you don’t have it already,
you can download it from http://www.java.com/en/download/
ERConsole software application - can be obtained from our ftp site:
ftp://ftp.infinet.ru/pub/Utils/EmergenceRepairConsole/ERConsole.zip
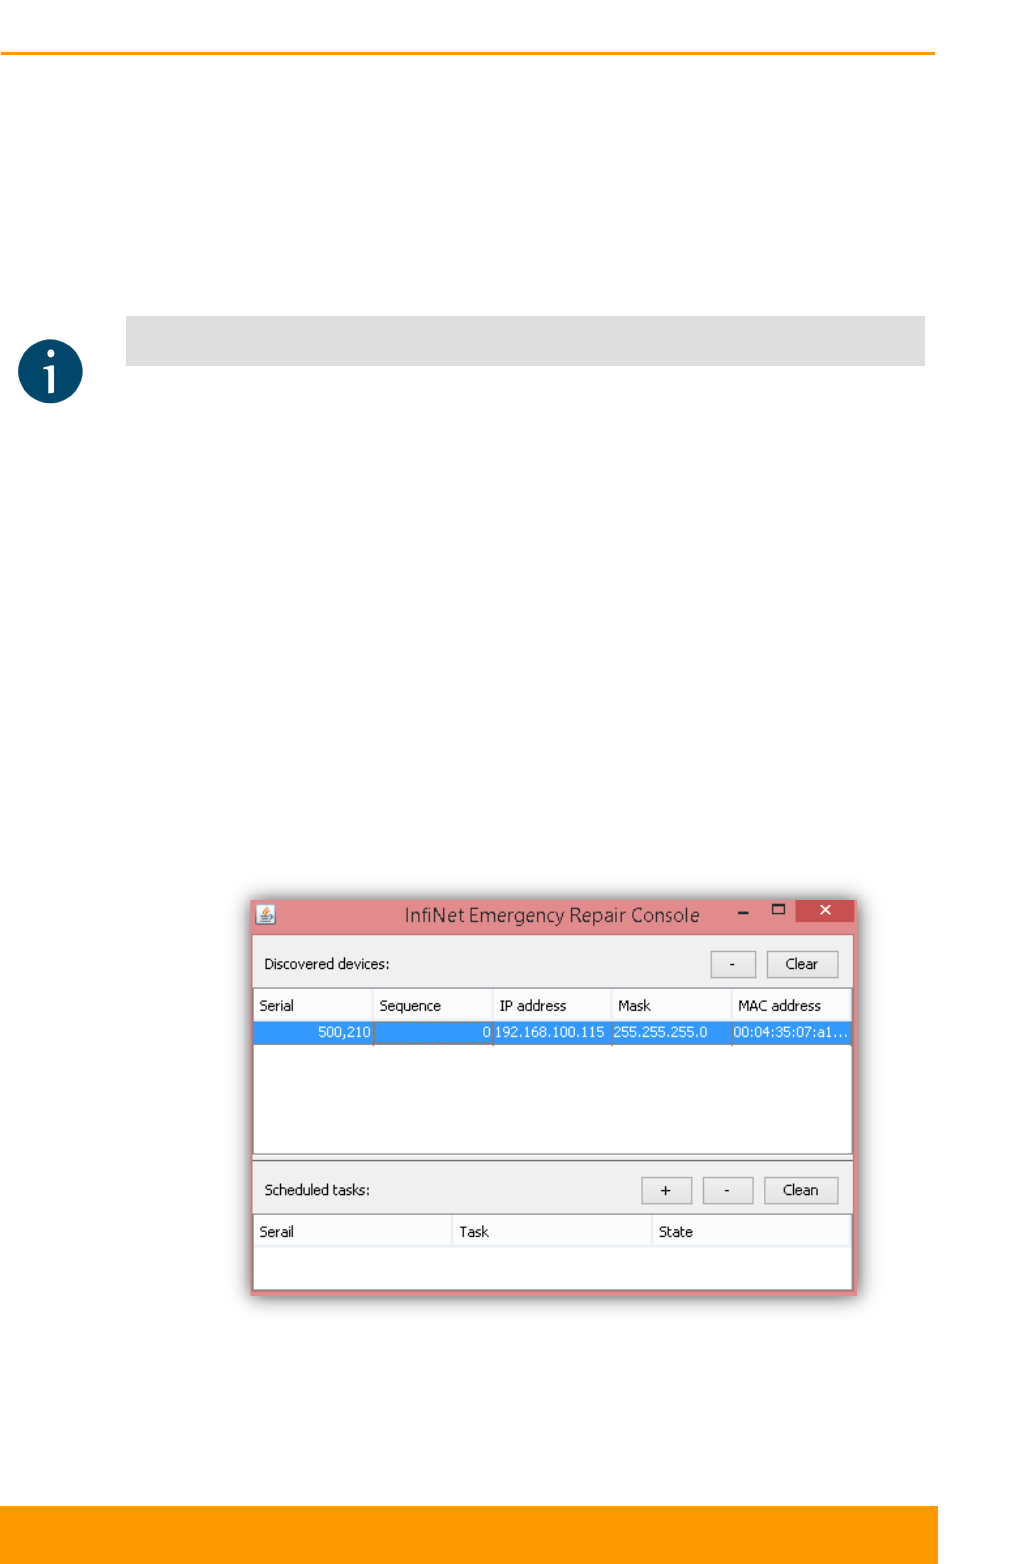
Chapter 6 - Troubleshooting
Technical User Manual
InfiLINK XG 101
It is recommended to turn off any anti-virus or firewall running on your computer.
We also recommend to use a simple unmanaged switch as intermediary device
between your PC and the InfiNet unit. It is essential to reboot the InfiNet unit each
time in order to activate the Emergency Repair Protocol on the unit, therefore the
switch would prevent your PC Ethernet interface from flapping up and down. Using
Cisco Catalyst switches for unit recoverty is not recommended due to a known
issue port mode negotiation delay.
NOTE
ERConsole and InfiNet Wireless units exchange information only during the bootup
process, therefore each time you need to read the units IP address, to add a new IP or
to restore to the default configuration, the InfiNet Wireless unit should be rebooted
If you lost management to your InfiNet Wireless unit, proceed with the following
steps:
1. Make sure you have set the correct IP address, network mask and VLAN if
used in order to access the unit. If these items are checked, proceed with the
next step for the ERConsole recovery
2. Connect a network Ethernet cable between the InfiNet Wireless unit and your
PC and then run the ETConsole.jar application downloaded from our ftp
3. Power off the InfiNet Wireless unit and then power it on in a few seconds
4. Wait about 30 seconds and the ERConsole screen should receive update from
the unit like below. The Serial number, IP address and network mask will be
displayed on the screen:
Figure 75 - ERConsole information
5. If an IP address is assigned to the unit, configure on your laptop an IP from
the same network class and connect to the unit in order to perform the
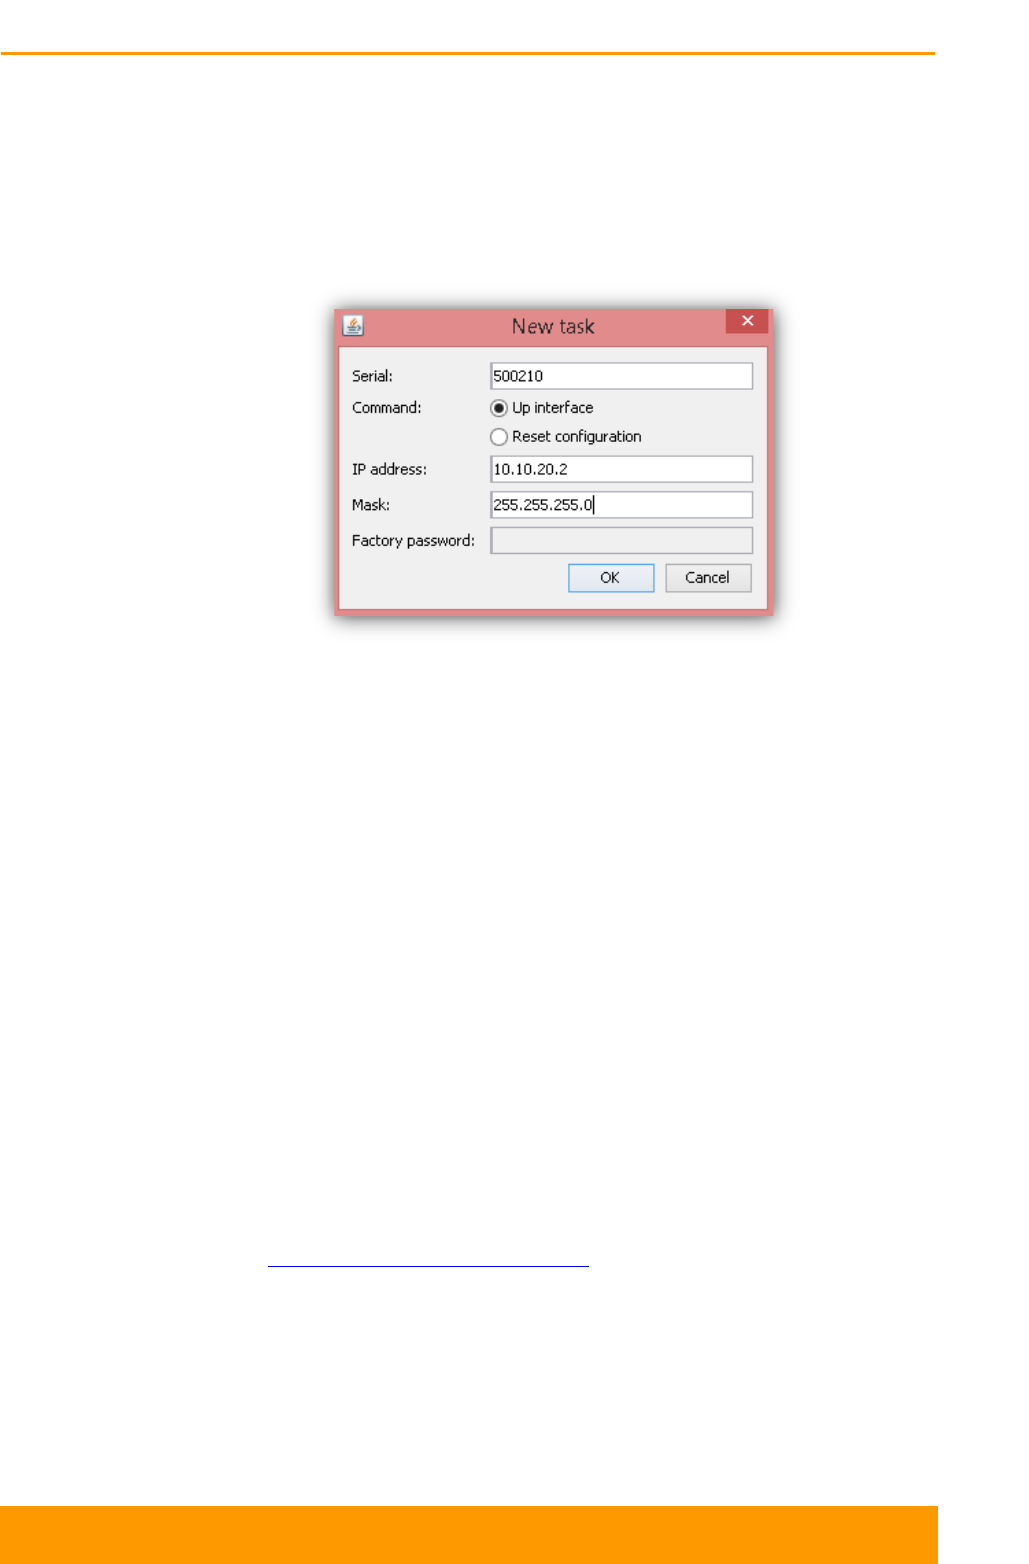
Chapter 6 - Troubleshooting
Technical User Manual
InfiLINK XG 102
modifications and checking required. If there is no IP displayed (0.0.0.0),
proceed with the next step
6. Click the «+» button in the ERConsole application and a new window will
appear
7. In the New task window, set the additional IP address and network mask, then
click «OK» like below:
Figure 76 - Adding a new IP address
8. Power off and on the InfiNet unit. Wait about 30 seconds until the IP is
assigned
9. Add an IP address from the same network subnet to your PC and access the
unit. ERC will not show newly assigned IP address
10. Login to the unit using the new IP. Do not reboot the unit now because the
additional IP address is temporar until the next restart or the new configuration
is saved
6.7.2. Restore to factory settings using ERConsole
If you need to restore your unit to the factory settings, follow the instructions below:
1. Obtain the IP address of the unit using the ERConsole as described in section
above
2. Click on the «+» button in the ERConsole application and a new window will
appear
3. Call InfiNet Wireless Technical support at +7 343 253 1533 or open a new
case at http://support.infinetwireless.com in order to obtain the Factory
Password for the unit. You will need the serial number of the unit for this step
4. Select “Reset configuration” option and input the Factory Password obtained
at the previous step in the Factory password field, then click «OK»
5. Power off and on the unit and then wait about 30 seconds

Chapter 6 - Troubleshooting
Technical User Manual
InfiLINK XG 103
6. The unit will start in special emergency mode with the IP address 10.10.10.1
and mask 255.255.255.0
7. Login to the unit and reset the configuration to the factory defaults from the
Maintenance page