Inkel LRC-122RF RF Remote Control User Manual LRC 122RF
Inkel Corporation RF Remote Control LRC 122RF
Inkel >
Contents
- 1. Users Manual I
- 2. Users Manual II
- 3. Users Manual III
Users Manual I
LRC-122RF� 2007.11.1 11:24 AM 페이지 1

2
Introduction
Information To The User
This equipment has been tested and found to comply with the limits for a Class B digital device, pursuant to Part 15 of the FCC
Rules. These limits are designed to provide reasonable protection against harmful interference in a residential installation. This
equipment generates, uses and can radiate radio frequency energy and, if not installed and used in accordance with the
instructions, may cause harmful interference to radio communications. However, there is no guarantee that interference will not
occur in a particular installation. If this equipment does cause harmful interference to radio or television reception, which can be
determined by turning the equipment off and on, the user is encouraged to try to correct the interference by one or more of the
following measures:
Reorient or relocate the receiving antenna.
Increase the separation between the equipment and receiver.
Connect the equipment into an outlet on a circuit different from that to which the receiver is connected.
Consult the dealer or an experienced radio/TV technician for help.
Caution : Any changes or modifications in construction of this device which are not expressly approved by the party responsible
for compliance could void the user’s authority to operate the equipment.
This Class B digital apparatus complies with Canadian ICES-003.
Cet appareil numérique de la Classe B est conforme à la norme NMB-003 du Canada.
CONTENTS
• Specifications . . . . . . . . . . . . . . . . . . . . . . . . . . . . . . . . . . . . . . . . . . . . . . . . . . . . . . . . . . . . . . . . . . . . . . . . . . . . . . . . . . 2
• RF Universal Remote Controls . . . . . . . . . . . . . . . . . . . . . . . . . . . . . . . . . . . . . . . . . . . . . . . . . . . . . . . . . . . . . . . . . . . . 3
OPERATING COMPONENTS WITH REMOTE CONTROL . . . . . . . . . . . . . . . . . . . . . . . . . . . . . . . . . . . . . . . . . . . 5
REMOTE CONTROL OPERATION RANGE . . . . . . . . . . . . . . . . . . . . . . . . . . . . . . . . . . . . . . . . . . . . . . . . . . . . . . . .5
LOADING BATTERIES . . . . . . . . . . . . . . . . . . . . . . . . . . . . . . . . . . . . . . . . . . . . . . . . . . . . . . . . . . . . . . . . . . . . . . . 5
USING FUNCTIONS OF REMOTE CONTROL . . . . . . . . . . . . . . . . . . . . . . . . . . . . . . . . . . . . . . . . . . . . . . . . . . . . . 6
• Setup Code Table . . . . . . . . . . . . . . . . . . . . . . . . . . . . . . . . . . . . . . . . . . . . . . . . . . . . . . . . . . . . . . . . . . . . . . . . . . . . . . 15
Specifications
• Operating frequency | 2.433 GHz 100 kHz
• RF range | 15 ~ 30 meters (50~100 feet), depending on the environment
• Sensitivity | Min. -90 dB
Note: Design and specifications are subject to change without notice for improvements.
ENGLISH
LRC-122RF� 2007.11.1 11:24 AM 페이지 2
3
RF Remote Control
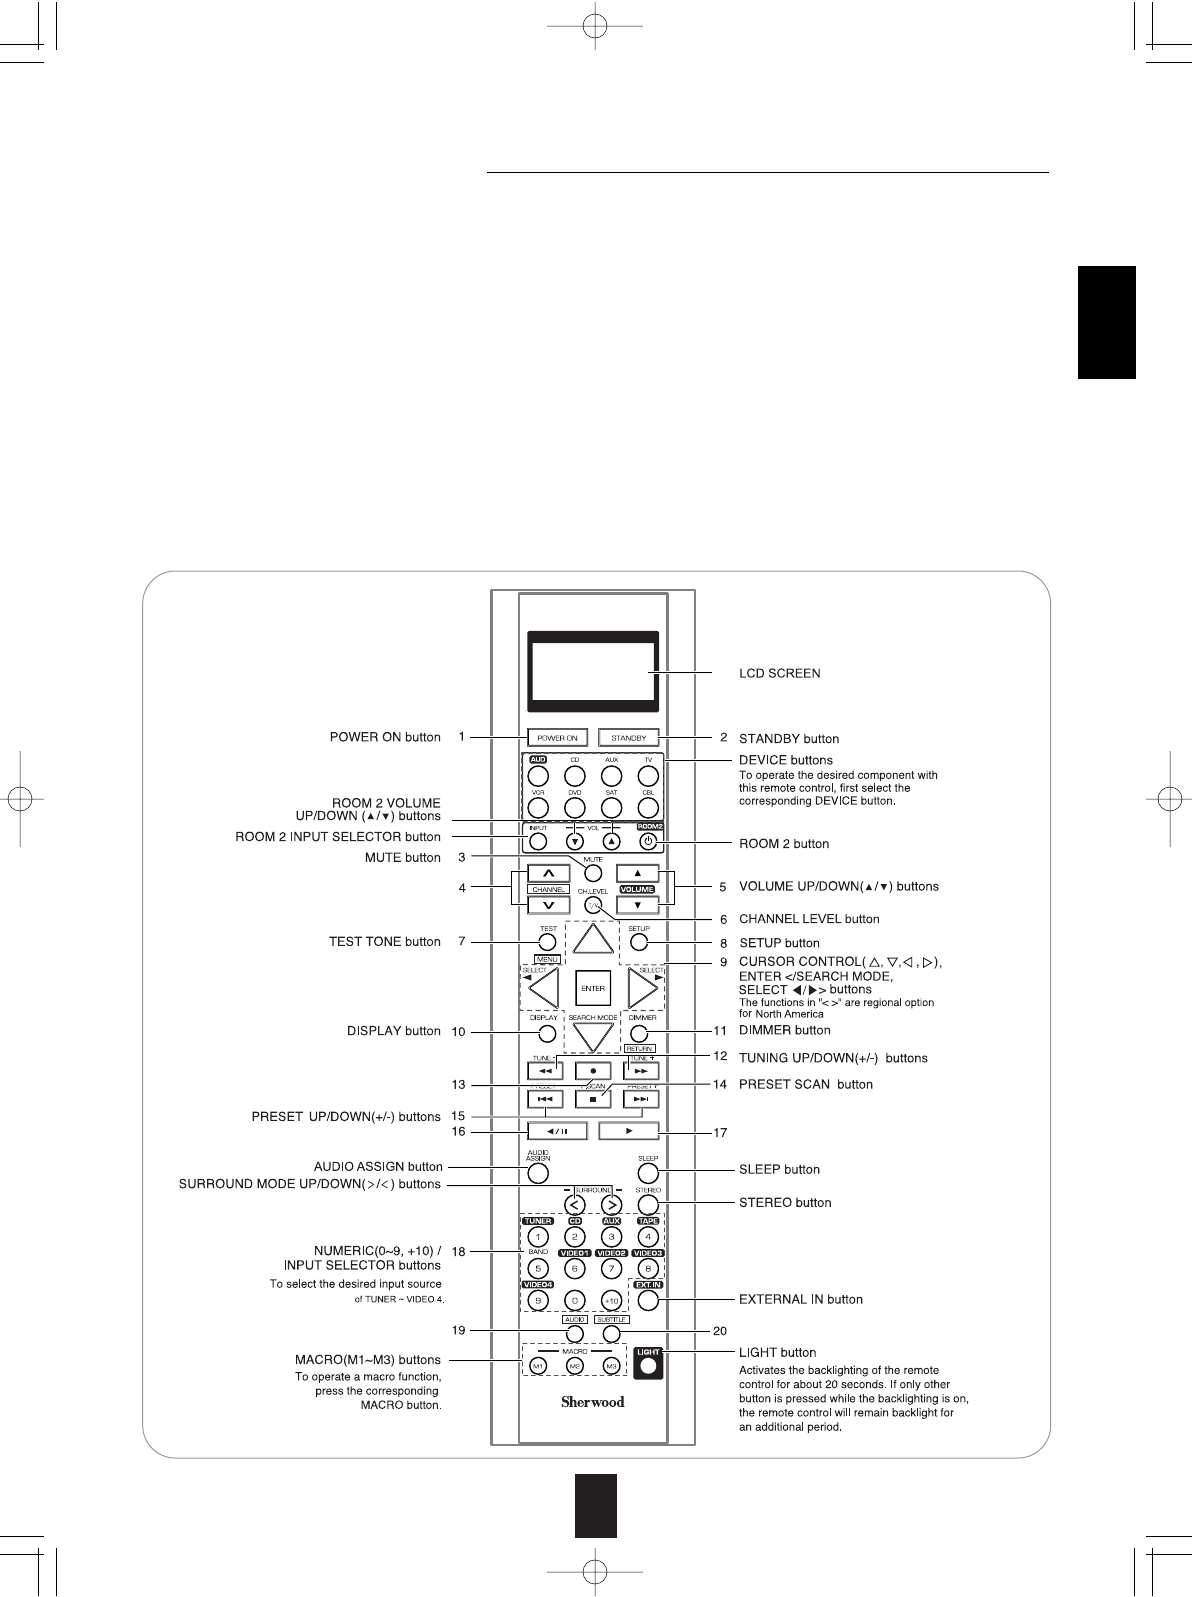
This universal remote control can operate not only this receiver but also most popular brands of audio and video components
such as CD players, tape decks, TVs, cable boxes, VCRs, DVD players, satellite receivers, etc.
• To operate 7 components other than this receiver , you should enter the setup code for each component.
(For details, refer to “USING FUNCTIONS OF REMOTE CONTROL” on page 6.)
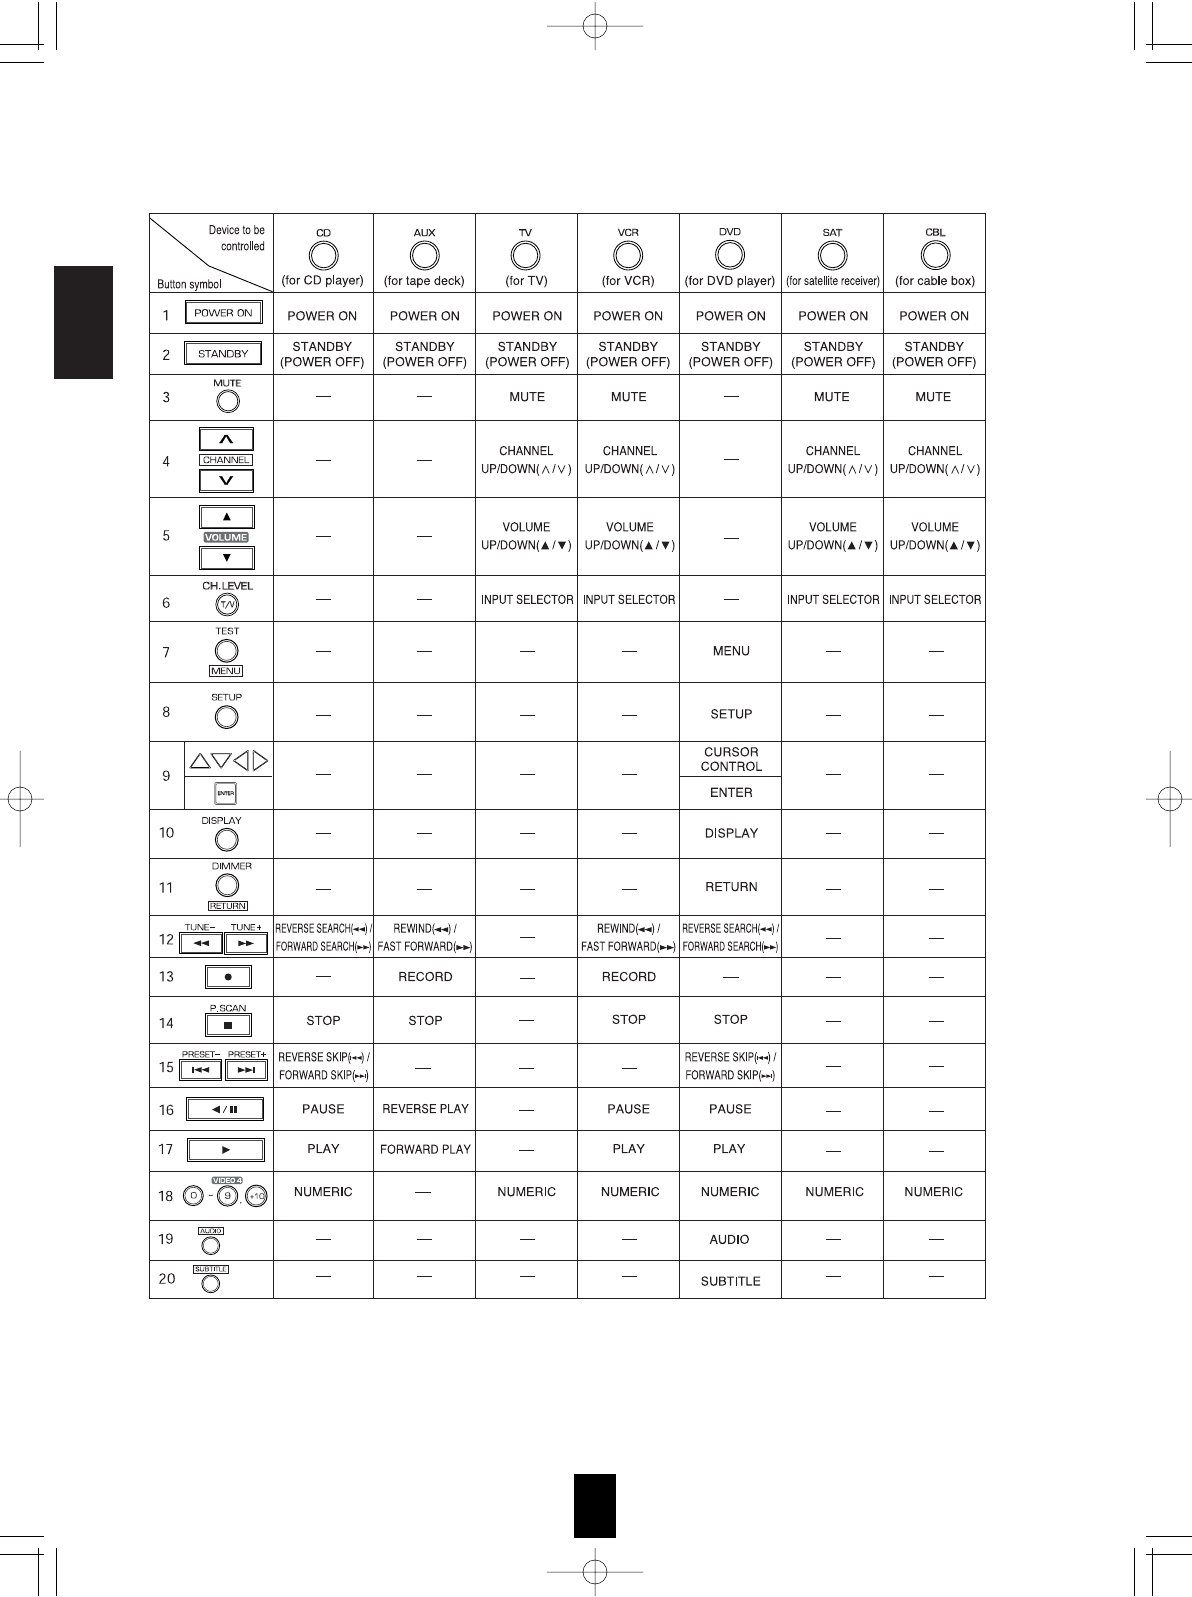
• The numbered buttons on the remote control have different functions in different device modes. For details, refer to
"FUNCTION TABLE of the NUMBERED BUTTONS" on the next page.
About the transmission signal
This remote control can emit not only the infrared beams which the conventional remote control(including the ROOM 2
remote control) uses but also the RF(Radio Frequency) beams which are stronger than those.
To operate this receiver and other components, this remote control should emit the infrared beams.
To operate this receiver only from longer distance even if there are obstacles such as walls, furniture, etc. in the way, this
remote control should emit the RF beams.
Therefore, depending on how to use this remote control, you should set the transmission signal mode to "IR"(default value)
or "RF". (For details, refer to "Changing the transmission signal" on page 14.)
Notes :
• To receive the RF beams, you should connect the RF remote antenna to this receiver. (For details, refer to "CONNECTING
RF REMOTE ANTENNA" in the operating instructions of your receiver.)
• If the transmission signal mode is set to "RF", this remote control cannot control other audio and video components.
However, if the IR emitter is connected to the IR OUT jack, you can control other component via it. (For details, refer to
"CONNECTING MULTI-ROOM SYSTEM KIT" in the operating instructions of your receiver.)
ENGLISH
LRC-122RF� 2007.11.1 11:24 AM 페이지 3
ENGLISH
4
FUNCTION TABLE of the NUMBERED BUTTONS.
Notes :
• Some functions for each component may not be available or may work differently.
• Depending on other kinds of components that are available for each DEVICE button, some functions may not be
available or may work differently, too.
• For details about functions, refer to the operating instructions of each component.
LRC-122RF� 2007.11.1 11:24 AM 페이지 4
ENGLISH
5
LOADING BATTERIES
OPERATING COMPONENTS WITH REMOTE CONTROL
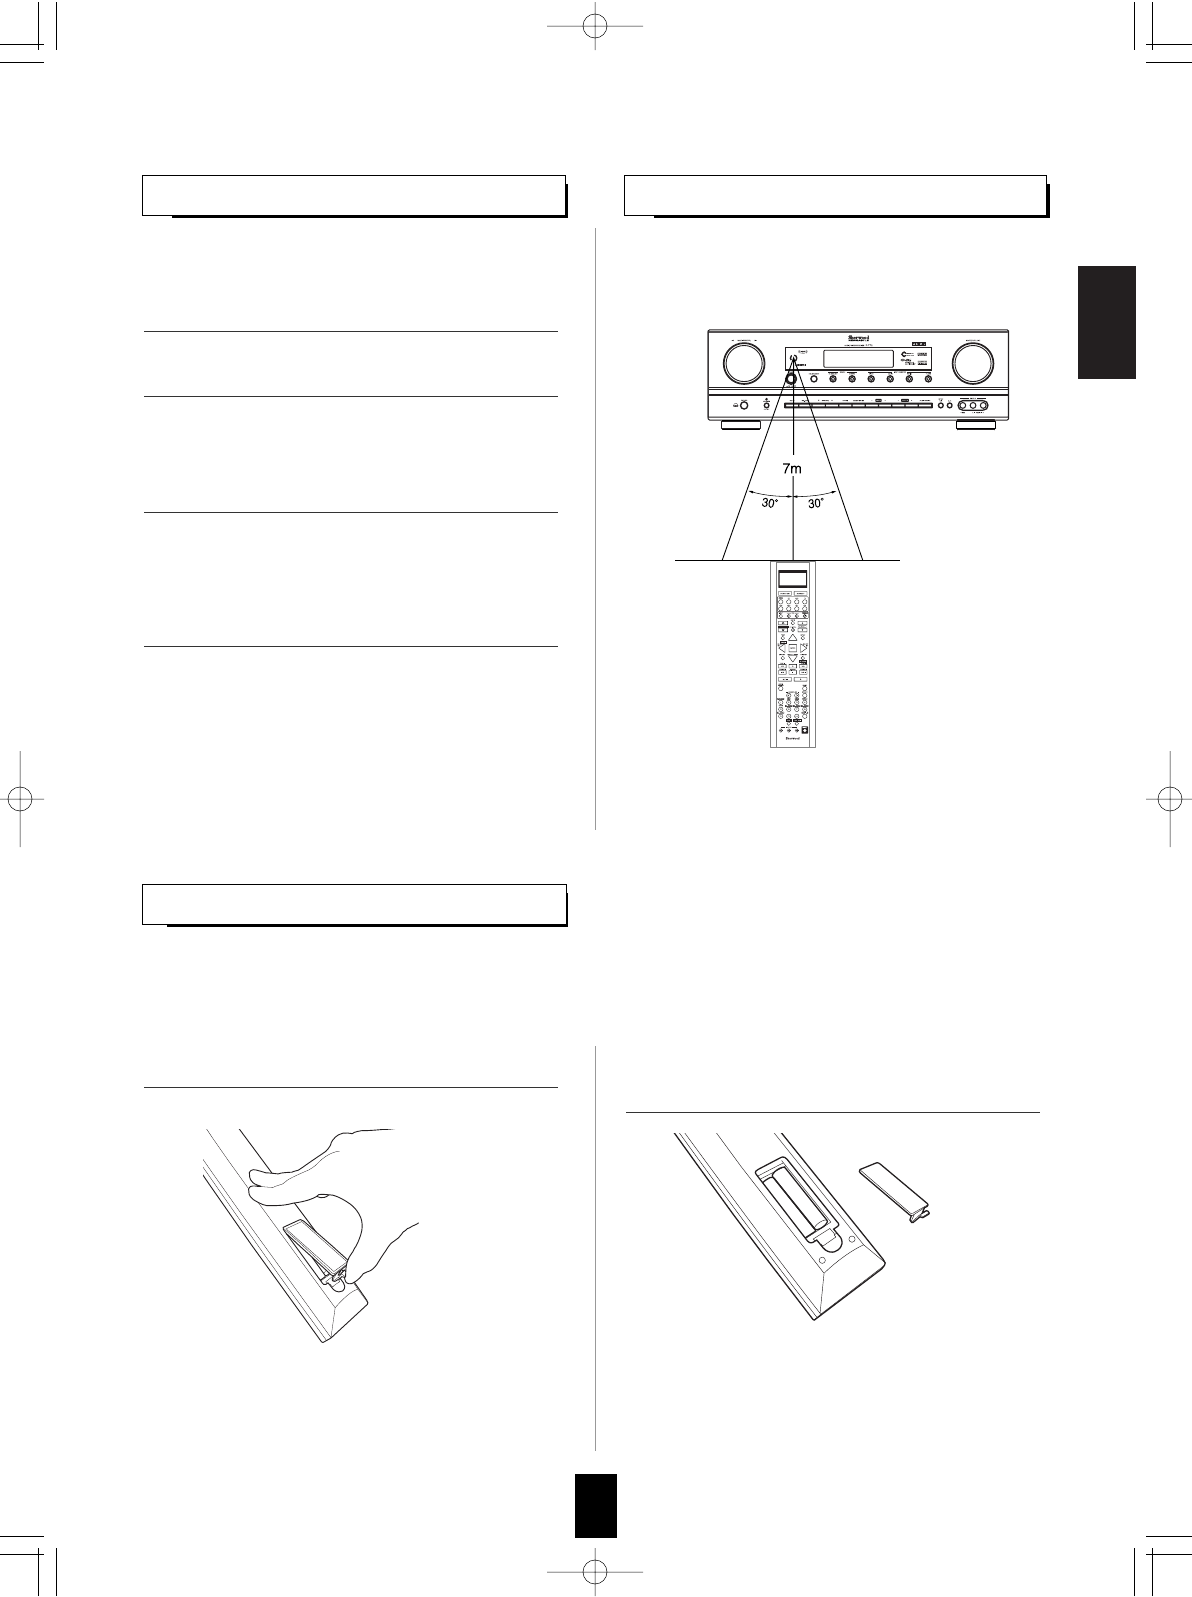
REMOTE CONTROL OPERATION RANGE
In case that this remote control emits the infrared beams
• Use the remote control within a range of about 7 meters
(23 feet) and angles of up to 30 degrees aiming at the
remote sensor.
In case that this remote control emits the RF beams
• Use the remote control within a distance of about 15
meters (50 feet) toward this receiver.
Notes :
• When you cannot operate any component, check if the
transmission signal mode is set to "RF". (For details,
refer to "Changing the transmission signal" on page 14.)
• In this case, to operate the component, connect the IR
emitter to the IR OUT jack and use the remote control
toward this receiver. (For details, refer to
"CONNECTING RF REMOTE ANTENNA" and
"CONNECTING MULTI-ROOM SYSTEM KIT" in the
operating instructions of your receiver.)
When the remote control does not operate, the old batteries should be replaced. In this case, load new batteries
within several minutes after removing old batteries.
If the batteries are removed or have been exhausted for a longer period of time, memorized contents will be
cleared. Should this happen, you should memorize them again.
+
+
+
• Remove the batteries when they are not used for a
long time.
• Do not use the rechargeable batteries (Ni-Cd type).
• Be sure to use alkaline batteries.
1. Enter the setup code for each component other
than this receiver. For details, refer to “Entering
a setup code” on page 6.
2. Turn on the component you want to operate.
1. Remove the cover. 2. Load four alkaline batteries ("AAA" size, 1.5V)
matching the polarity.
3. Press the DEVICE button on the remote control
corresponding to the component you wish to
operate.
4. Aim the remote control at the REMOTE
SENSOR of the component you wish to control
and press the button corresponding to the
operation you want.
LRC-122RF� 2007.11.1 11:24 AM 페이지 5
6
USING FUNCTIONS OF REMOTE CONTROL
ENGLISH
Entering a setup code
• This remote control can control up to 8 different components.
• Before operating audio and video components other than this receiver with using this remote control, the setup code for each
component should be entered.
• For system remote control operation, "000" was stored previously in the memory of the device button "CD" for Sherwood CD
player, "DVD" for Sherwood DVD player, "AUX" for Sherwood tape deck and "TV" for Sherwood TV respectively as its factory
setup code. So, you don’t need to enter its code for each Sherwood component except in such a case that its code does not work.
Note :
• If the transmission signal which this remote control emits is changed into "RF"(Radio Frequency), this remote control cannot
control other audio and video components. (For details, refer to "Changing the transmission signal" on page 14.)
• Then "LEARN" is displayed on the LCD screen for
several seconds.
Notes :
• The AUDIO button is unavailable for the audio
components other than this receiver.
• During setting operation, to exit from the setting mode,
press any of the DEVICE buttons.
• Setup code entry is the easiest way to program this
remote control for operating audio and video
components.
1. Turn on the component you want to operate.
2. Find the setup codes according to the type and
the brand name of your component, referring to
"Setup Code Table" on page 15.
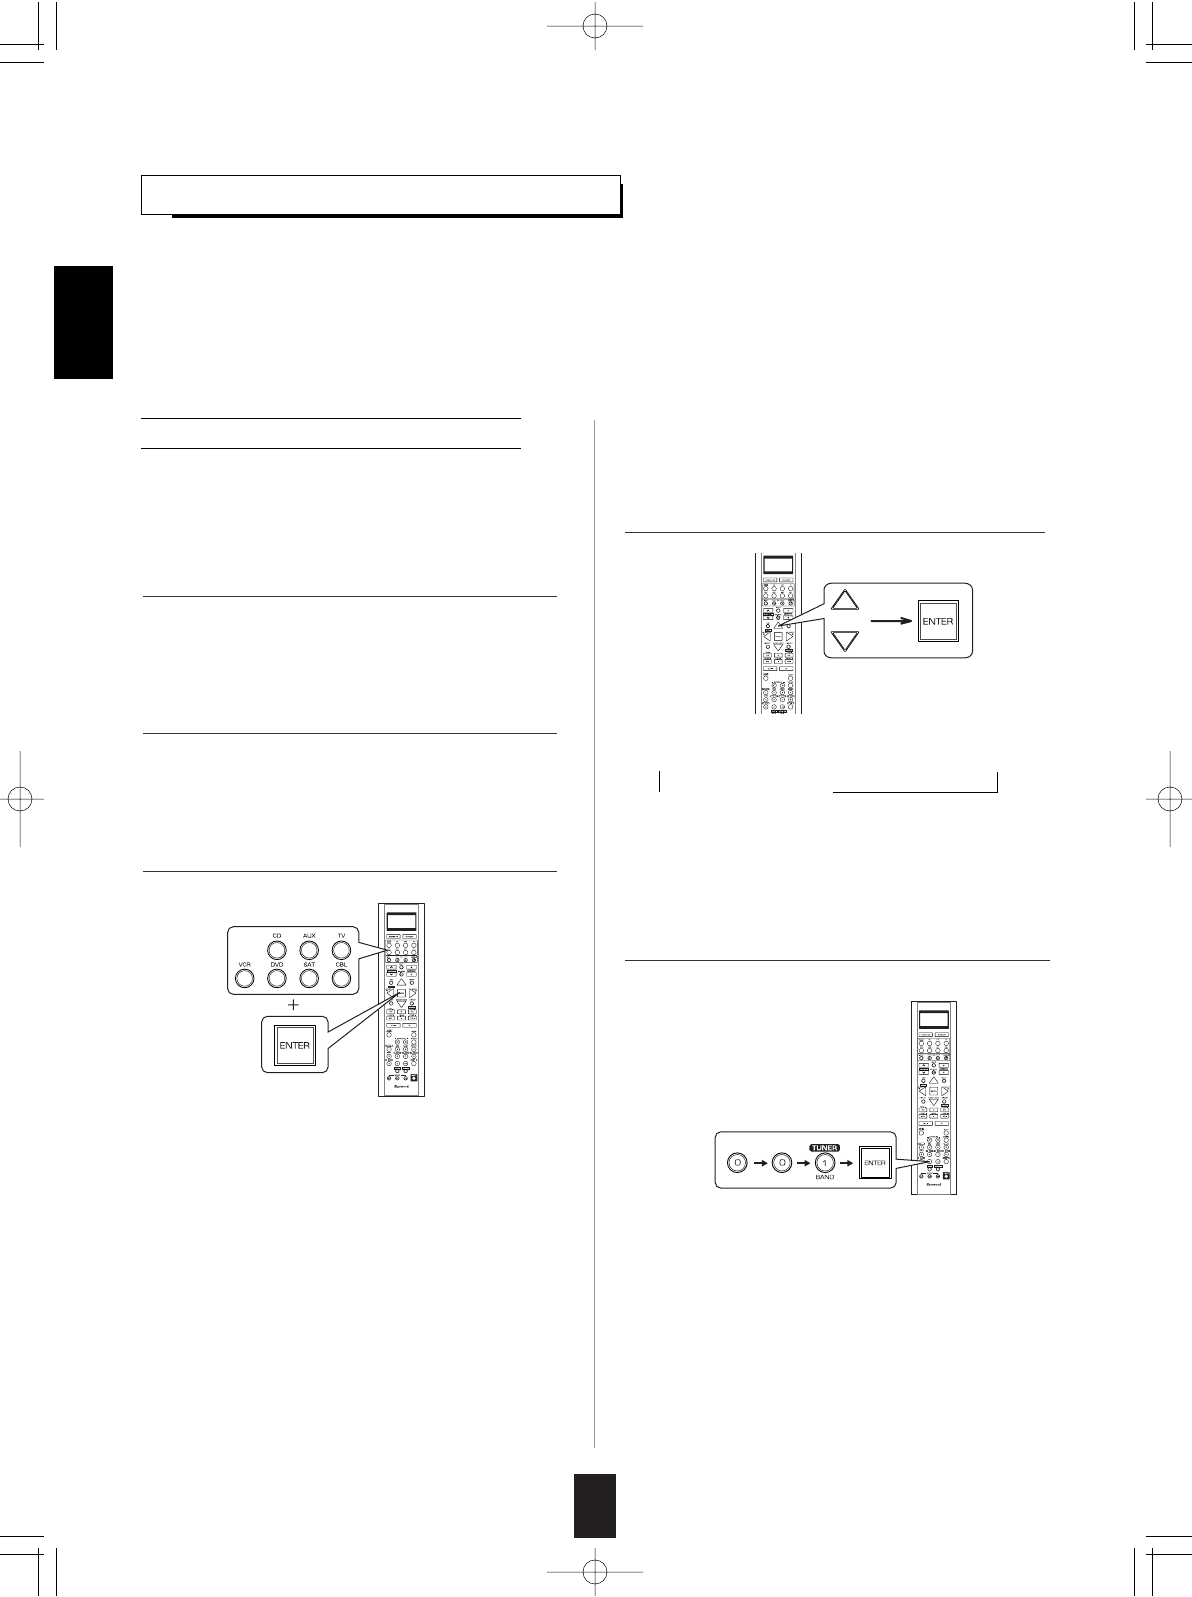
3. Press and hold down both the ENTER button
and the desired one of the DEVICE buttons for
more than 2 seconds.
4. While "LEARN" is displayed, press the CURSOR
UP()/DOWN() buttons to select the setup
code mode ("CODE"), then press the ENTER
button.
5. While "PRESET", etc. are displayed, enter a 3
digit code and press the ENTER button.
• Each time the CURSOR UP()/DOWN() buttons are
pressed, the mode changes as follows :
LEARN RF-IR DELETE MACRO
CODE PUNCH
• Then "PRESET" and 3 digit number are displayed.
• If "PRESET", etc. go off, start again from the above step 3.
Example: When entering "001".
• Then "OK" is displayed on the LCD screen.
• To be sure that the setup code is correct, press the
POWER ON (or STANDBY) button, aiming the remote
sensor on the component.
• If the setup code is correct, your component will be
turned off.
• When your component is not turned off, repeat the
above steps 2 to 5, trying entering each code for your
component until you find one that works.
• If "NG" is displayed, retry entering the correct setup
code while "PRESET" and 3 digit number are displayed.
LRC-122RF� 2007.11.1 11:24 AM 페이지 6
7
ENGLISH
• If any of buttons fails to operate as they should,
start from the step 1again to enter the correct setup
code.
Note :
• Manufacturers may use different setup codes for
the same product category. For that reason, it is
important that you check to see if the code you
have entered operates as many controls as
possible. If only a few functions operate, check to
see if another code will work with more buttons.
6. Operate the component using the corresponding
function buttons.
4. While "PRESET" is displayed, press the ENTER
button to store the setup code.
5. Operate the component using the corresponding
function buttons.
6. Repeat the above steps 1 to 5 for each of your
other components.
1. Turn on the component you want to operate.
2. Perform the steps 3 and 4 in "Entering a setup
code" procedure on page 6 to select the setup
code mode ("CODE").
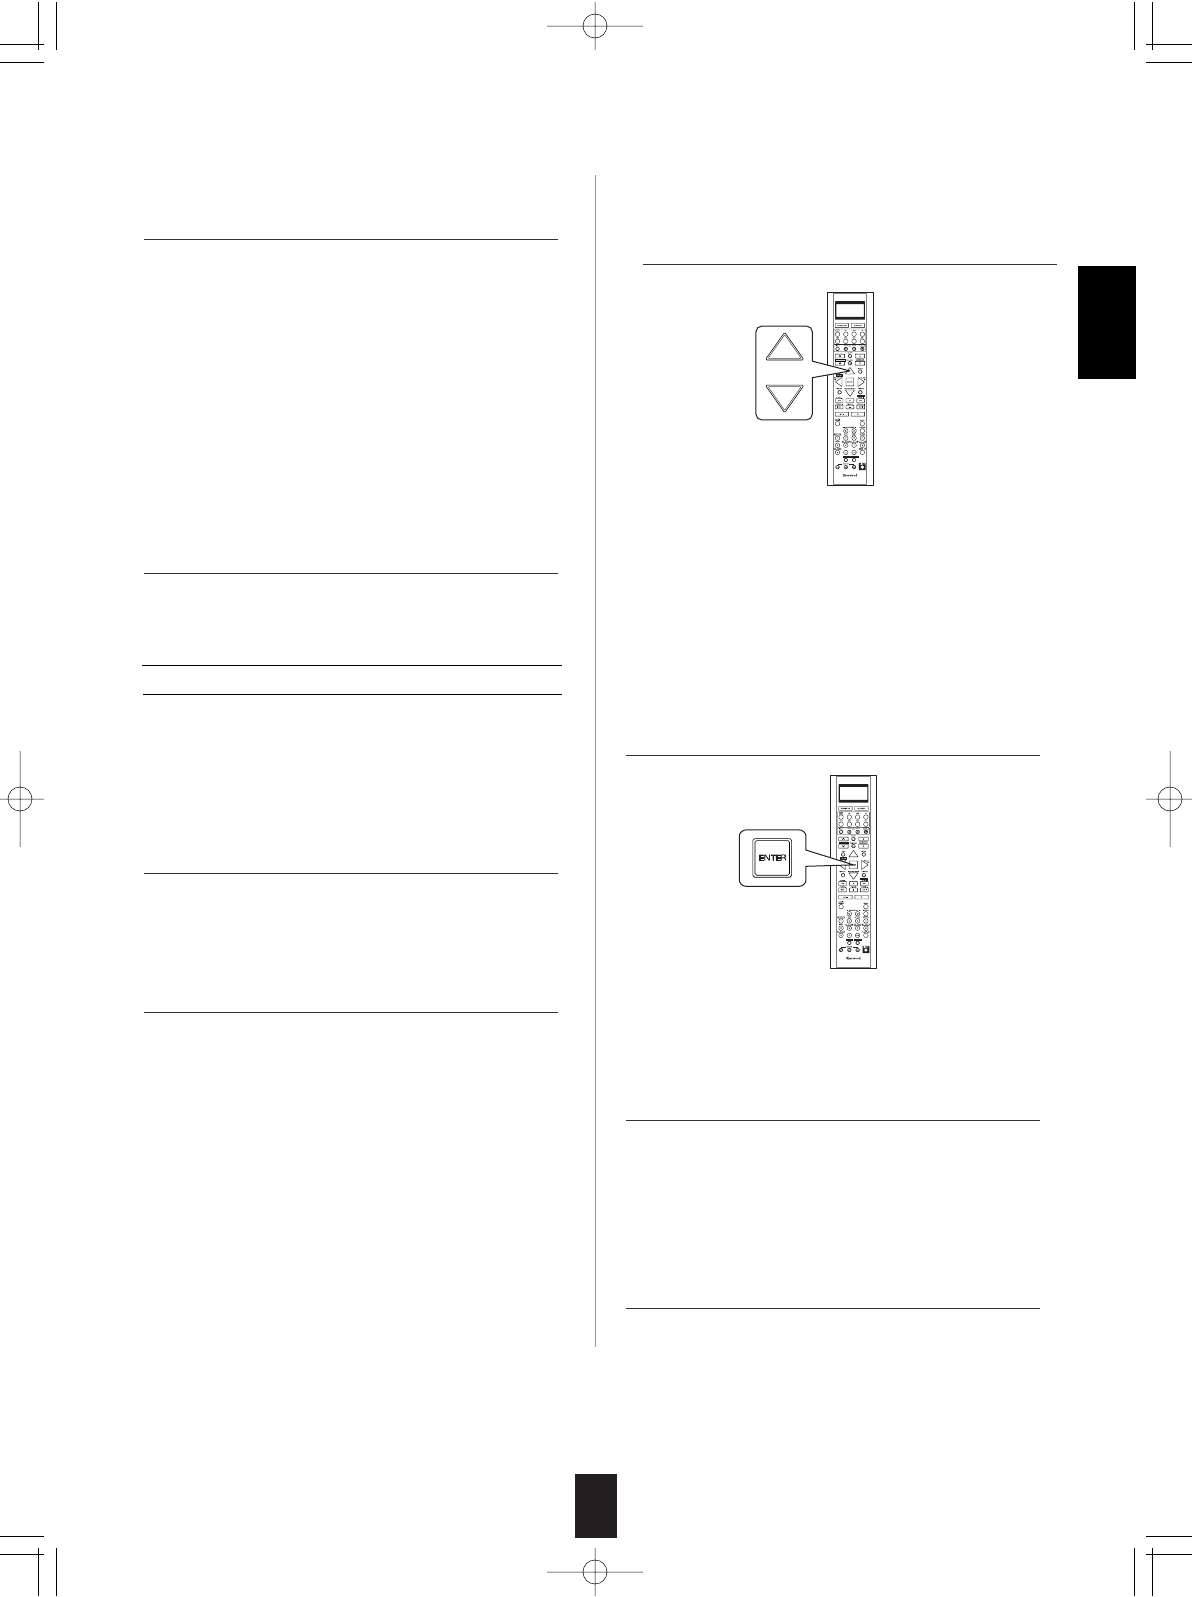
3. While "PRESET" is displayed, search a setup
code, aiming the remote control at the remote
sensor on the component.
7. Repeat the above steps 1 to 6 for each of your
other components.
Searching a setup code
• Each time the CURSOR UP()/DOWN()
buttons are pressed, the setup code is selected
one by one.
• If the selected code is correct, your component
will be turned off.
• When your component is not turned off, repeat
this step until you find one that works.
• In addition to enter a setup code using "Setup
Code Table" on page 15, it is also possible to
search through all the codes that are stored in the
library of this remote control.
• Then "OK" is displayed on the LCD screen.
• If any of buttons fails to operate as they should,
start from the step 1 again to find the correct
setup code.
LRC-122RF� 2007.11.1 11:24 AM 페이지 7
ENGLISH
8
• If the command has been learned successfully,
"OK" is displayed and then "SEL" is flickering.
• If "ERROR" is displayed and then "SEL" is
flickering, it means that for some reason the
command was not learned. In this case, repeat
the above steps 4 and 5.
Notes :
• If an incorrect signal has been sent or, in some
cases, the command from other remote control
simply cannot be learned.
• In some "ERROR" cases, the remote controls just
need to be moved closer together or farther
apart.
Programming the commands from other
remote controls (LEARNING mode)
• Then "SEL" is flickering.
• If "SEL" goes off, start again from the above
step 2.
• If the setup codes are not available for your
component or you want to program a missing or
special function into one button of a device, the
learning function enables this remote control to
learn the commands from other remote controls.
• Then "READY" is displayed.
Note:
• You cannot program a function into some buttons
such as DEVICE, MACRO and LIGHT buttons.
To exit from the setting mode, press any of the
DEVICE buttons.
• Then "LEARN" is displayed on the LCD screen
for several seconds
Note :
• During setting operation, to exit from the setting
mode, press any of the DEVICE buttons.
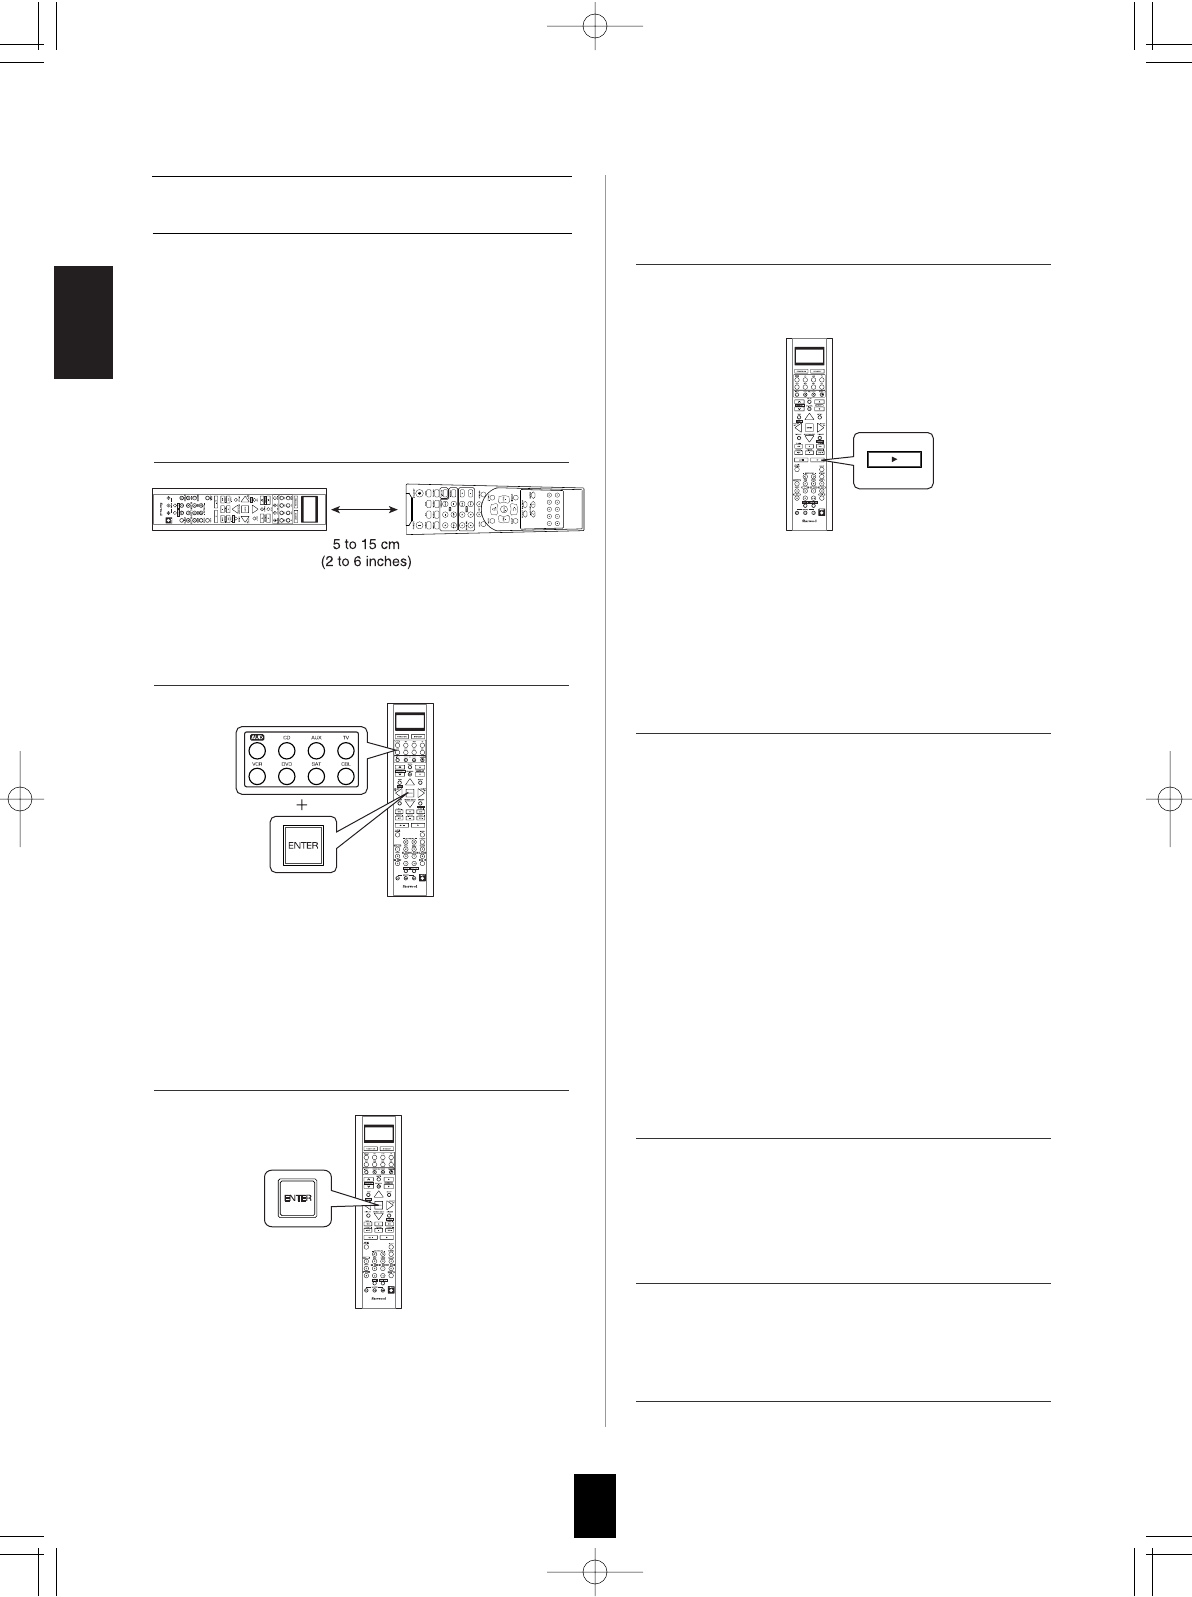
1. Place this remote control and other remote
control facing each other at a distance of 5 to 15
cm (2 to 6 inches ) apart.
2. Press and hold down the ENTER button and the
desired one of the DEVICE buttons for more
than 2 seconds.
3. While "LEARN" is displayed, press the ENTER
button.
4. While "SEL" is flickering, on this remote control,
press the button corresponding to the function to
be learned.
5. While "READY" is displayed, on the other
remote control, press the button of the function
to be learned.
8. Operate the newly programmed buttons to make
sure the learning function was performed
properly.
7. Repeat the above steps 1 to 6 to program the
commands from a different remote control.
6. While "SEL" is flickering, repeat the above steps
4 and 5 to program all the commands you want
to the buttons on this remote control under the
same device mode.
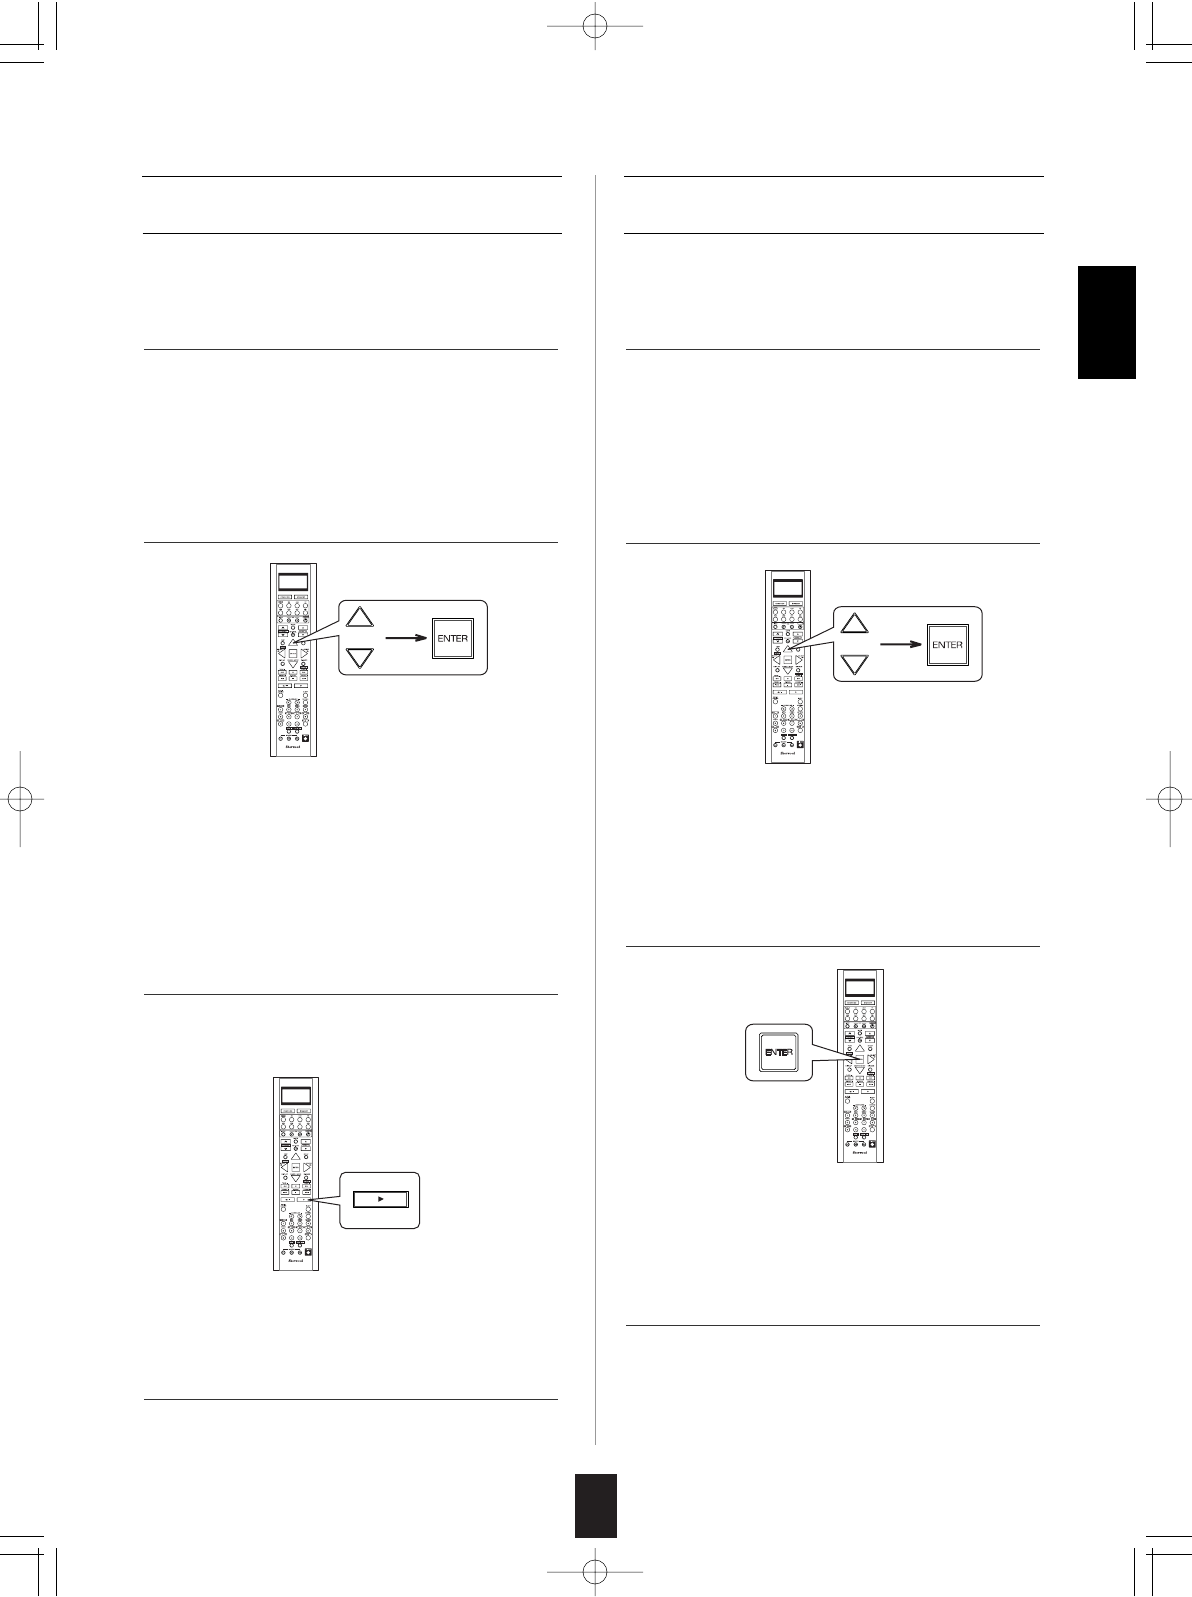
Example: If the function to be learned is playback,
press the PLAY() button.
LRC-122RF� 2007.11.1 11:24 AM 페이지 8
9
ENGLISH
Erasing the programmed command from
one button
• "OK" is displayed and then "SEL" is flickering.
• Then "BTTN" is displayed on the LCD screen for
several seconds.
Example: When the button for the command to be
erased is PLAY button.
• Each time the CURSOR UP()/DOWN()
buttons are pressed, "BTTN" or "LEARN"(all
command deleting mode) is selected.
• Then "SEL" is flickering.
• If "SEL" goes off, start again from the above
step 1.
1. Perform the steps 3 and 4 in "Entering a setup
code" procedure on page 20 to select the
deleting mode ("DELETE").
1. Perform the steps 3 and 4 in "Entering a setup
code" procedure on page 6 to select the deleting
mode ("DELETE").
2. While "BTTN" is displayed, press the CURSOR
UP()/DOWN() buttons to select the all
command deleting mode ("LEARN"), then press
the ENTER button.
3. While "SURE?" is displayed, press the ENTER
button.
4. To erase all the commands programmed under
other device mode, repeat the above steps 1 to
3.
2. While "BTTN" is displayed, press the CURSOR
UP()/DOWN() buttons to select the one
command deleting mode (BTTN), then press the
ENTER button.
3. While "SEL" is flickering, press the button for the
command you want to erase.
4. While "SEL" is flickering, repeat the above step
3 to erase other commands.
Erasing all the commands programmed
under a device mode
• Then all the commands programmed are erased.
• Then "BTTN" is displayed on the LCD screen for
several seconds.
• Then "SURE?" is displayed .
• If "SURE?" goes off, start again from the above
step 1
LRC-122RF� 2007.11.1 11:24 AM 페이지 9
ENGLISH
10
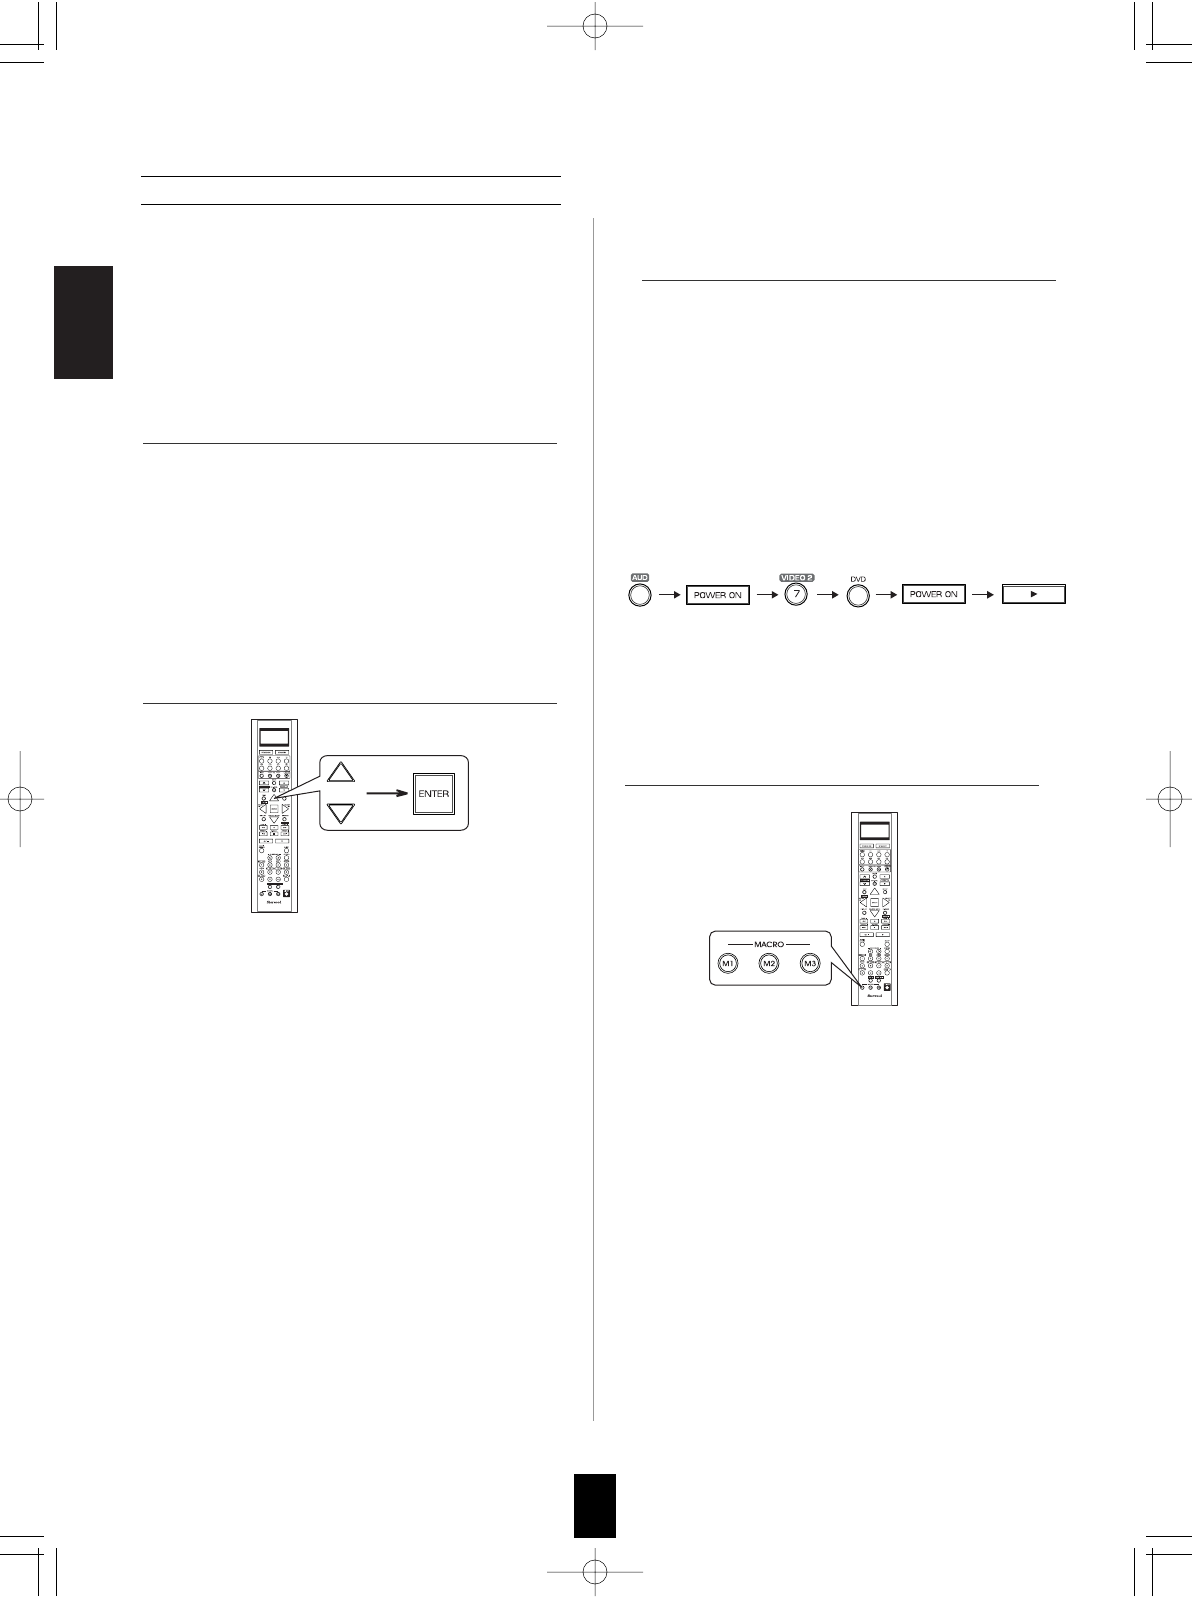
Programming a macro function
Example: When playing a DVD on the DVD player
connected to VIDEO 2 jacks of this
receiver.
. Press "AUDIO" button to control this receiver.
. Press "POWER ON" button to turn this
receiver on.
. Press "VIDEO 2(7)" button to select the
desired input source.
. Press "DVD" button to control the DVD player.
. Press "POWER ON" button to turn the DVD
player on.
. Press "PLAY ()" button to start playback.
• Each time the operation buttons are pressed, the
programmed order is displayed.
• The macro function enables you to program a
series of button operations(up to 15) on this
remote control into a single button.
• You can store up to three separate macro
command sequences into "M1", "M2" and "M3"
buttons.
• Then "M1" is displayed on the LCD screen for
several seconds.
• During macro setting operation, pressing any of
the DEVICE buttons cannot exit from the macro
mode.
• Each time the CURSOR UP()/DOWN()
buttons are pressed, "M1", "M2" or "M3" is
selected.
• Then "SEL" is flickering.
• If "SEL" goes off, start again from the above
step 1.
1. Perform the steps 3 and 4 in "Entering a setup
code" procedure on page 6 to select the macro
mode ("MACRO").
2. While "M1" is displayed, press the CURSOR
UP()/DOWN() buttons to select the MACRO
button to be programmed into, then press the
ENTER button.
3. While "SEL" is flickering, press the operation
buttons you want to program in order.
4. Press any of the MACRO buttons (M1~M3) to
complete the programming.
• Then "OK" is displayed.
To erase a macro program
• When erasing a macro program, perform the
above steps 1, 2 and 4, but ignore the step 3.
To change a macro program
• When a new macro program is stored into a
MACRO button with performing the above steps
1 to 4, the previous macro program is erased
from the memory of the MACRO button.
LRC-122RF� 2007.11.1 11:24 AM 페이지 10
ENGLISH
11
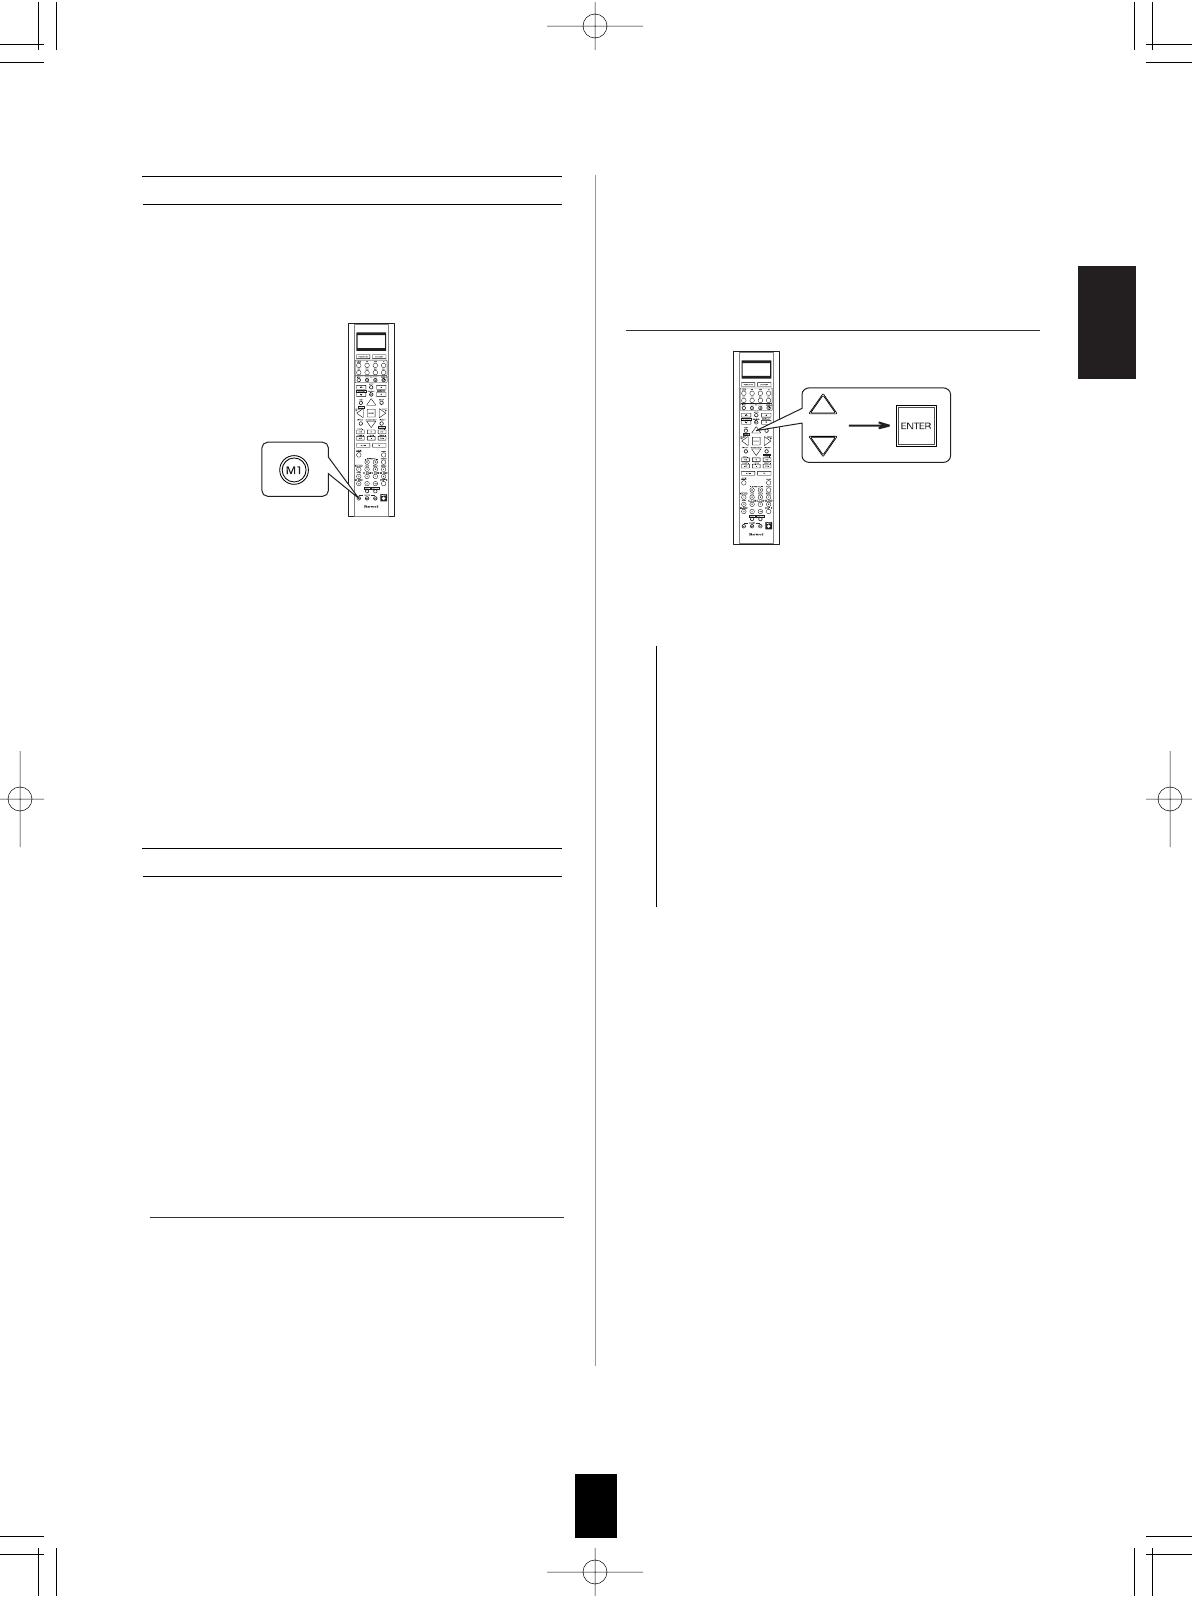
Operating a macro function
Notes:
• The codes programmed into a MACRO button will
be transmitted at an interval of 0.5 seconds.
However, some components may not be able to
complete one operation in 0.5 seconds and may
miss the next code.
In this case, the macro function cannot control the
corresponding components correctly.
• Be sure to use the remote control within the remote
control operation range of the components.
• Depending on the operation status of the
components, etc., the macro function cannot
control the corresponding components correctly.
• Aim the remote control at the REMOTE
SENSORs of the components to be controlled
and press the MACRO button you want.
Example : When pressing "M1" button.
1. Perform the steps 3 and 4 in "Entering a setup
code" procedure on page 6 to select a master
device and the punch-through mode ("PUNCH").
2. While "VOL" is displayed, press the CURSOR
UP()/DOWN() buttons to select the desired
punch-through mode, then press the ENTER
button.
Programming a punch-through function
• The punch-through function allows the volume
controls, channel controls or transport controls to
link to a different device while a device is
controlled with this remote control as a master
device.
• For example, since this receiver will likely be
used as the sound system while watching TV,
you may want to use volume controls to operate
this receiver although this remote control is set to
control the TV.
• Each time the CURSOR UP()/DOWN()
buttons are pressed, the mode changes as
follows:
VOL : The volume punch -through mode
allows the "VOLUME /" and
"MUTE" buttons to operate a different
device.
DELETE : All punch-through deleting mode.
PLAY : The transport punch-through mode
allows the "", "", "", "
", "",
"
", "
" and "" buttons to
operate a different device.
CH : The channel punch-through mode
allows the "CHANNEL /" and "CH.
LEVEL" buttons to operate a different
device.
• Then the device to which you can link the
selected punch-through mode is displayed.
• Then "VOL" is displayed on the LCD screen for
several seconds.
LRC-122RF� 2007.11.1 11:24 AM 페이지 11
ENGLISH
12
• Each time the CURSOR UP()/DOWN()
buttons are pressed, depending on the selected
punch-through mode, punch-through devices
and the one punch-through deleting mode
("DELETE") are selected as follows :
• In case of the volume punch-through,
AUDIO DELETE TV
• In case of the transport punch-through,
CD DELETE DVD VCR AUX
• In case of the channel punch-through,
TV DELETE SAT CABLE VCR
• Then "OK" is displayed and the current punch-
through mode is displayed.
3. While the device is displayed, press the
CURSOR UP()/DOWN() buttons to select
the desired punch-through device, then press
the ENTER button.
1. Perform the steps 3 and 4 in "Entering a setup
code" procedure on page 6 to select a master
device and the punch-through mode ("PUNCH").
2. While "VOL" is displayed, press the CURSOR
UP()/DOWN() buttons to select the punch-
through mode to be erased, then press the
ENTER button.
4. While the punch-through mode is displayed,
repeat the above steps 2 and 3 to program other
punch-through function under the same master
device mode.
5. To program punch-through functions under
other master device mode, repeat the above
steps 1 to 4.
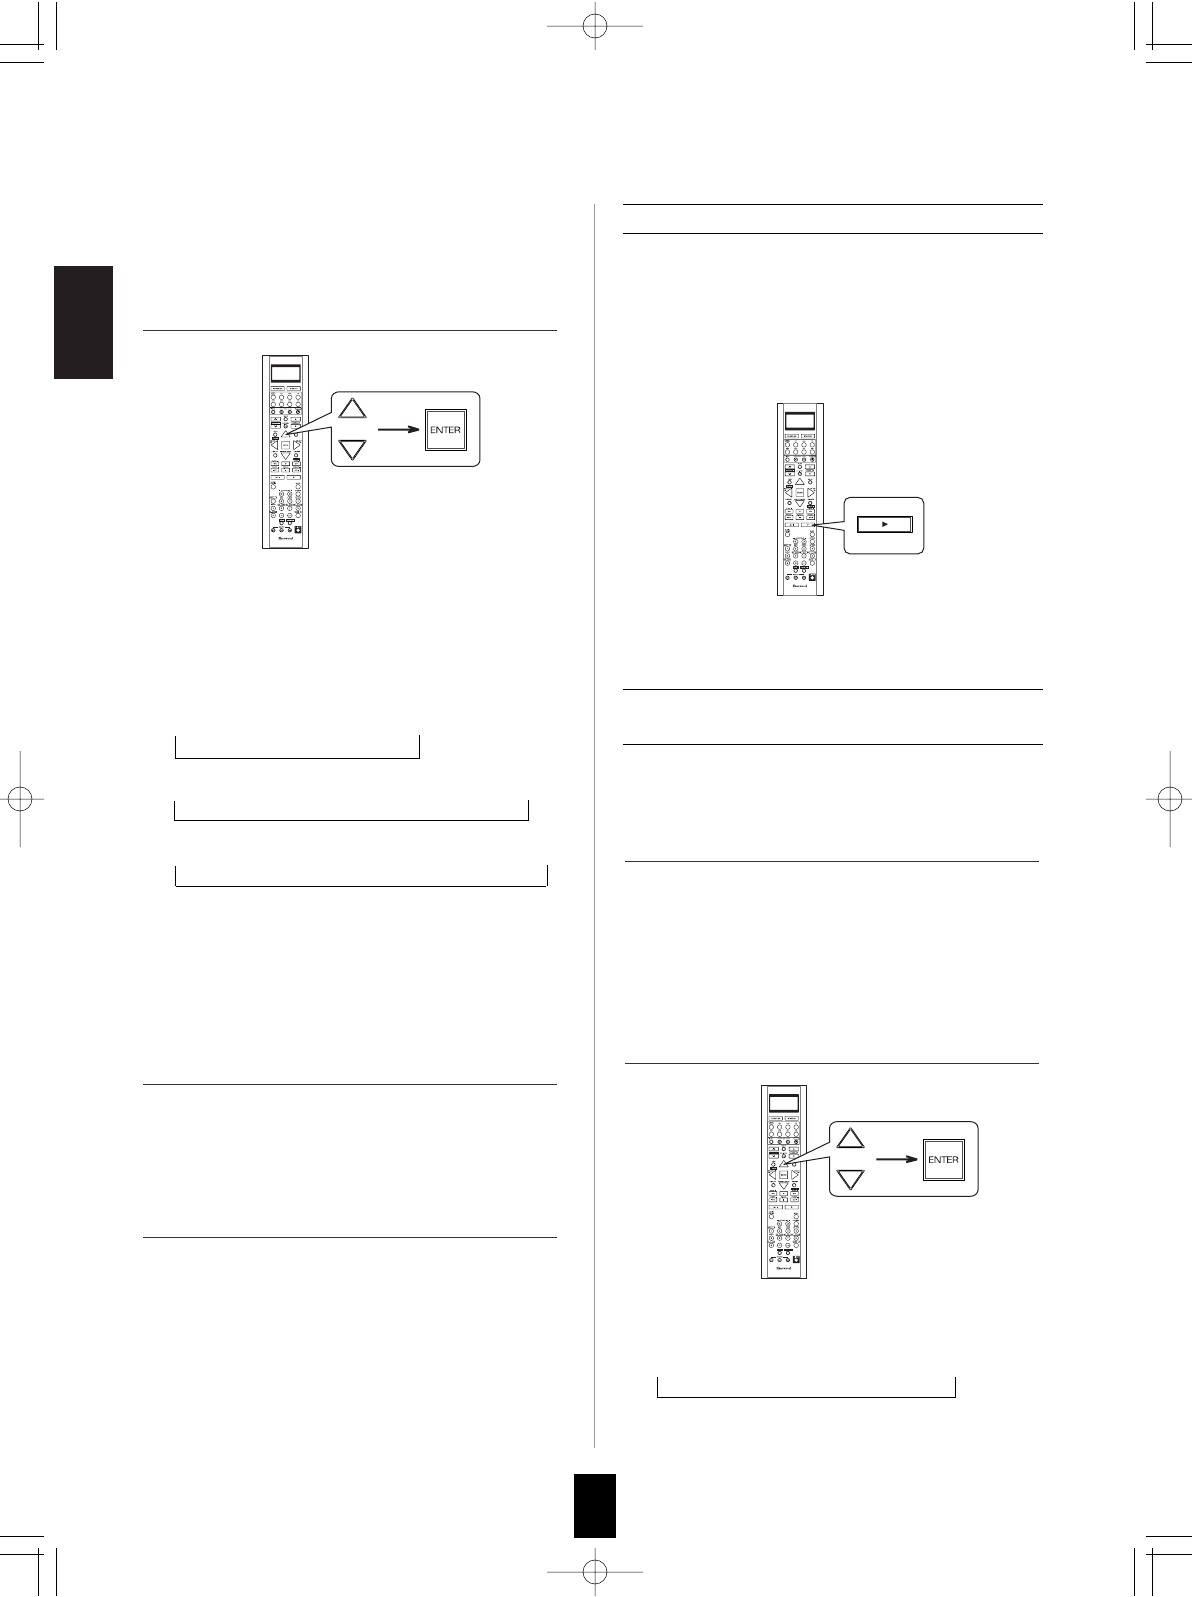
Operating a punch-through function
• While this remote control is set to control a
master device, aim the remote control at the
REMOTE SENSOR of the punch-through device
and press the desired button of the programmed
punch-through controls.
Example: When pressing "PLAY ()" button.
• Then the punch-through device is displayed on
the LCD screen.
Erasing the programmed punch-through
function
• Then "VOL" is displayed on the LCD screen for
several seconds.
• Each time the CURSOR UP()/DOWN()
buttons are pressed, the mode changes as
follows:
VOL DELETE PLAY CH
• Then the device is displayed .
Continued
LRC-122RF� 2007.11.1 11:24 AM 페이지 12
ENGLISH
13
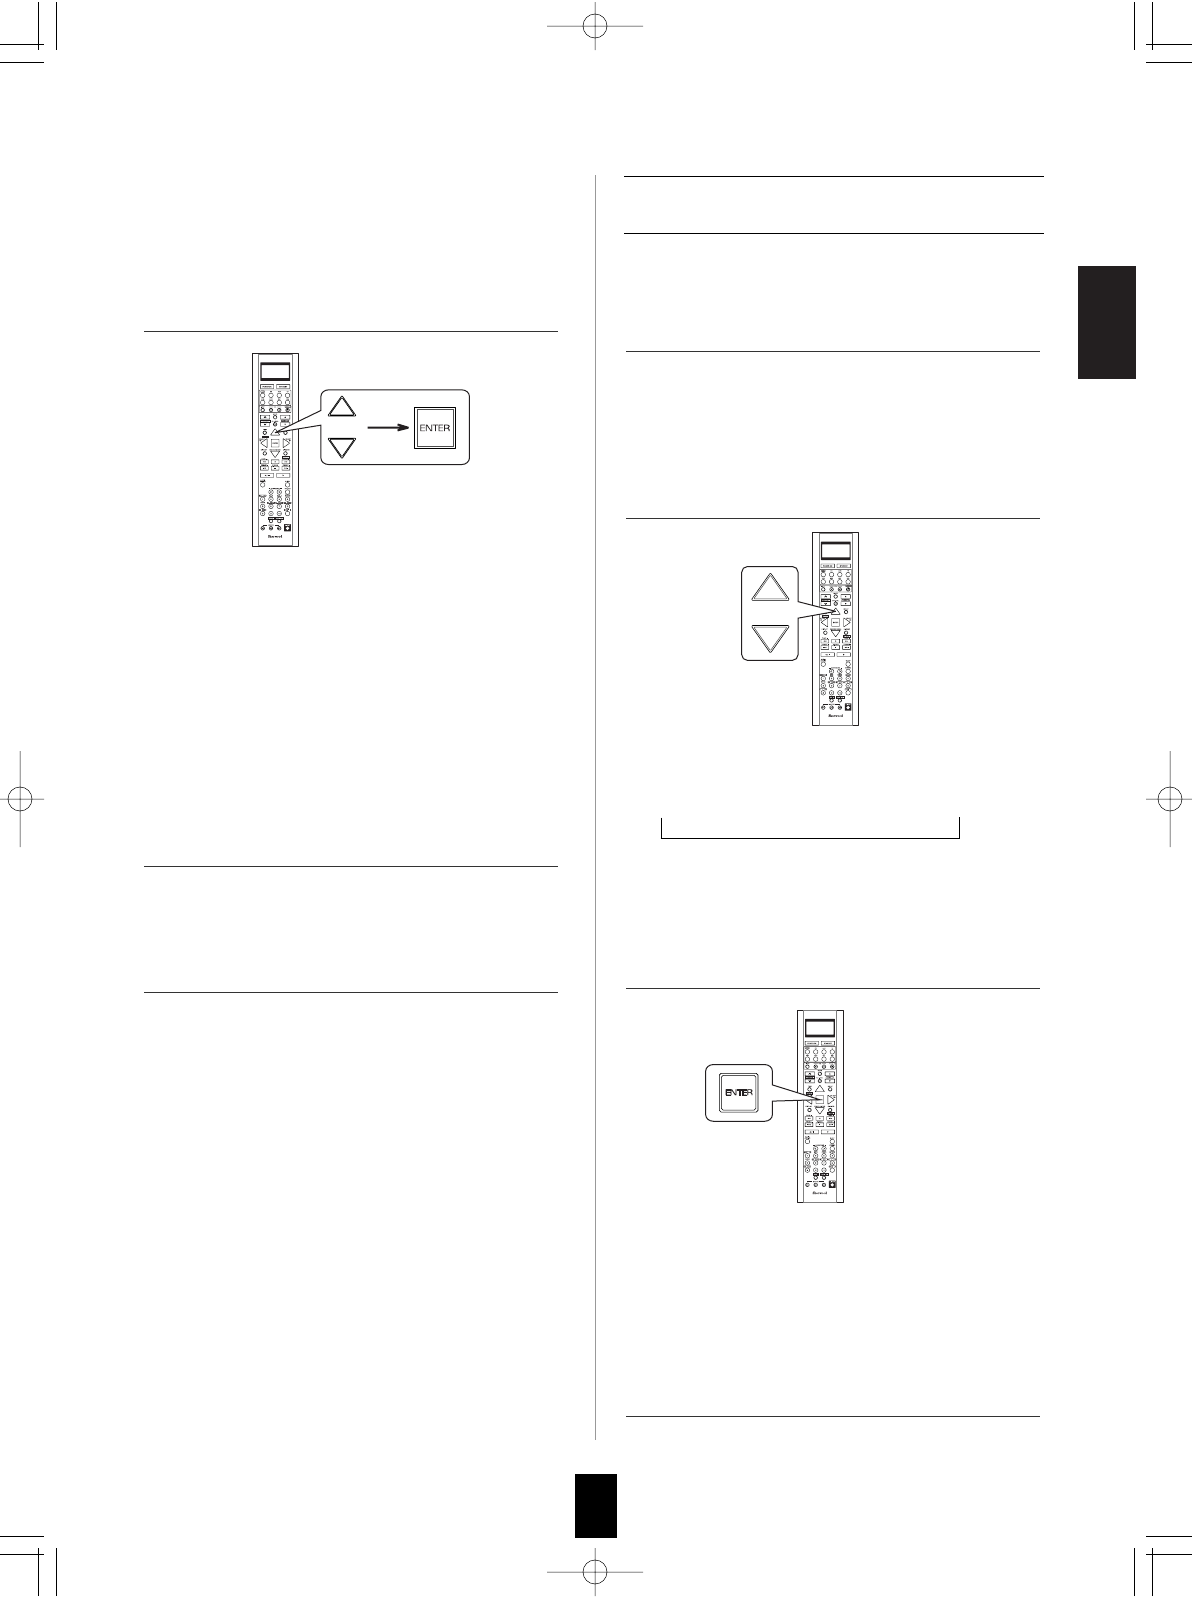
3. While the device is displayed, press the
CURSOR UP()/DOWN() buttons to select
the one punch-through deleting mode
("DELETE"), then press the ENTER button.
2. While "VOL" is displayed, press the CURSOR
UP()/DOWN() buttons to select the all
punch-through deleting mode ("DELETE").
3. While "DELETE" is displayed, to erase all the
punch-through functions programmed under the
master device mode, press ENTER button.
4. To erase all the punch-through functions
programmed under other master device mode,
repeat the above steps 1 to 3.
4. While the punch-through mode is displayed,
repeat the above steps 2 and 3 to erase other
punch-through function under the same master
device mode.
5. To erase punch-through functions under other
master device mode, repeat the above steps 1
to 4.
• Each time the CURSOR UP()/DOWN()
buttons are pressed, depending on the
selected punch-through mode, the punch-
through devices and the deleting mode
("DELETE") are selected.
• Then "OK" is displayed and the current punch-
through mode is displayed .
• Then "OK" is displayed and "DELETE" is
displayed.
• To exit from the deleting mode, press any of the
DEVICE buttons.
• Each time the CURSOR UP()/DOWN()
buttons are pressed, the mode changes as
follows:
VOL DELETE PLAY CH
• Then "DELETE" is displayed .
Continued
1. Perform the steps 3 and 4 in "Entering a setup
code" procedure on page 6 to select a master
device and the punch-through mode ("PUNCH").
Erasing all the punch-through functions
programmed under a master device mode
• Then "VOL" is displayed on the LCD screen for
several seconds.
LRC-122RF� 2007.11.1 11:24 AM 페이지 13
14
Changing the transmission signal
• This remote control can emit not only the infrared beams
which the conventional remote control uses but also the
RF(Radio Frequency) beams which are stronger than
those.
• When you want to control this receiver from longer
distance even if there are obstacles such as walls,
furniture, etc. in the way, change the transmission signal
into "RF"(Radio Frequency).
Notes:
• When the RF remote antenna is not connected, remote
operation will become unreliable. (For details, refer to
"CONNECTING RF REMOTE ANTENNA" in the
operating instructions of your receiver.)
• If the transmission signal mode is set to "RF" (Radio
Frequency), this remote control cannot control other
audio and video components.
• In this case, to control the component, connect the IR
emitter to the IR OUT jack. (For details, refer to
"CONNECTING MULTI-ROOM SYSTEM KIT" in the
operating instructions of your receiver.)
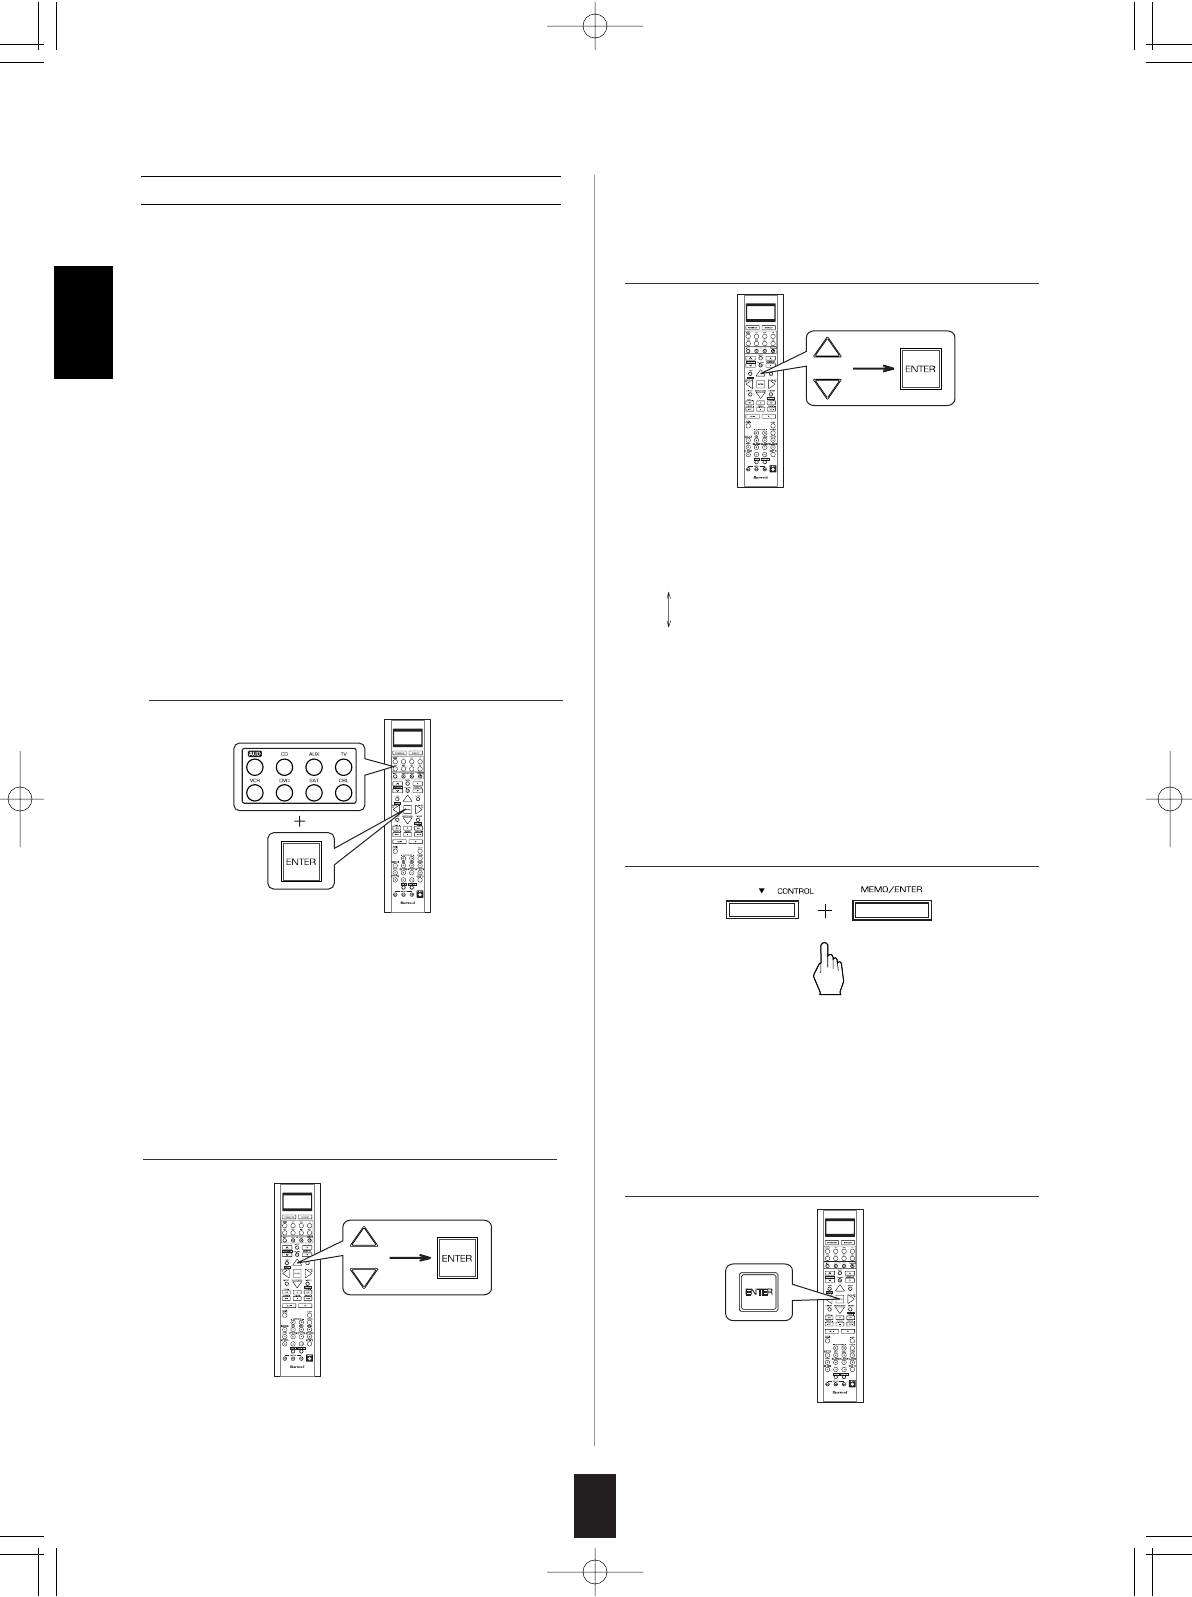
1. Press and hold down the ENTER button and
any of the DEVICE buttons for more than 2
seconds.
• Then "LEARN" is displayed on the LCD screen for
several seconds.
Note:
• During setting operation, to exit from the setting
mode, press any of the DEVICE buttons.
2. While "LEARN" is displayed, press the
CURSOR UP()/DOWN() buttons to select
the transmission signal mode("RF-IR"), then
press the ENTER button.
• Then "RF" (or "IR") is displayed.
• If "RF" (or "IR") goes off, start again from the
above step 1.
3. While "RF" (or "IR") is displayed, press the
CURSOR UP()/DOWN() buttons to select
the desired transmission signal, then press the
ENTER button.
4. To pair up this remote control and the receiver,
press the CONTROL DOWN() button and the
MEMORY/ENTER button simultaneously on the
receiver.
5. While "RF REMOCON PAIRING MODE" is
displayed, press the ENTER button, aiming at the
receiver.
• Each time the CURSOR UP()/DOWN()
buttons are pressed, the mode changes as
follows :
"RF" : This remote control emits the RF(Radio
Frequency) beams which stronger than the
infrared beams.
"IR" : This remote control emits the infrared
beams which the conventional remote
control uses.
• Then "OK" is displayed.
• "RF REMOCON PAIRING MODE" is displayed for
several seconds on the display of the receiver.
• If "RF REMOCON PAIRING MODE" goes off,
press these buttons again.
• Then "PAIRING SUCCESS" is displayed.
ENGLISH
When "RF" is set to.
LRC-122RF� 2007.11.1 11:24 AM 페이지 14
15
Setup Code Table
AOC 005 003
Admiral 041 031
Aiko 014
Akai 005
Alaron 026
Ambassador 024
America Action 027
Ampro 043
Anam 027 047 048 049
Audiovox 030 027 014 034
Baysonic 027
Belcor 003
Bell & Howell 019 001
Bradford 027
Brockwood 003
Broksonic 028 031
CXC 027
Candle 005 011
Carnivale 005
Carver 010
Celebrity 050
Cineral 030 014
Citizen 012 005 011 006 014
Concerto 011
Contec 027
Craig 027
Crosley 010
Crown 027 006
Curtis Mathes 007 010 019 008 030 041
012 005 016 011 001 006
022 032 038 040
Daewoo 030 003 006 014 034 035
Daytron 003
Denon 016
Dumont 002 003
Dwin 044 036
Electroband 050
Emerson 019 028 031 027 029 025
003 026 006 024 034 035
Envision 005
Fisher 019
Fujitsu 026
Funai 027 026 023
Futuretech 027
GE 007 008 030 041 029 025
004 015 038 040
Gibralter 002 005 003
TV
Goldstar 005 025 003 011
Gradiente 009 011
Grunpy 027 026
Hallmark 025
Harley Davidson 026
Harman/Kardon 010
Havard 027
Hitachi 016 011 018
Infinity 010
Inteq 002
JBL 010
JCB 050
JVC 009 046
KEC 027
KTV 027 005 006
Kenwood 005 003
LG 011
LXI 007 010 019 020 025
Logik 001
Luxman 011
MGA 017 005 025 003
MTC 012 005 003 011
Magnavox 010 005 026
Majestic 001
Marantz 010 005
Matsushita 042
Magatron 025 016
Memorex 019 042 031 017 025 011
001
Midland 007 002 008 006 015
Minutz 004
Mitsubishi 041 017 025 003
Motorola 041
Multitech 027
NAD 020 025 022
NEC 005 003 011
NTC 014
Nikko 005 025 014
Onwa 027
Optimus 019 042 022
Optonica 041 021
Orion 028 031 026
Panasonic 008 042
Penney 007 020 008 012 005 025
004 003 011 006 015 040
Pilco 010 031 005 016 003
Philips 010
ENGLISH
LRC-122RF� 2007.11.1 11:24 AM 페이지 15
ENGLISH
16
Admiral 027 021
Adventura 000
Aiko 025
Aiwa 005 000
Akai 026
America Action 025
America High 004
Asha 023
Audiovox 005
Beaumark 023
Bell & Howell 017
Brocksonic 021
Broksonic 020 018 021 001
CCE 015 025
Calix 005
Canon 004
Carver 016
Cineral 025
Citizen 005 025
Colt 015
Craig 005 012 023 015 024
Curtis Mathes 013 004 026 028
Cybernex 023
Daewoo 010 025
Denon 008
Dynatech 000
Electrohome 005
Electrophonic 005
Emerex 002
Emerson 005 020 000 018 009 021
001 025
Fisher 012 017
Fuji 004 003
Funai 000
GE 013 004 027 023
Garrard 000
GoldStar 005 006
Gradiente 000
HI-Q 012
Harley Davidson 000
Harman/Kardon 016 006
Harwood 015
VCR
Pilot 005 003 006
Pioneer 022
Portland 003 006 014
Prism 008
Proscan 007
Proton 025 032
Pulsar 002 003
Quasar 008 042 021
RCA 007 008 041 003 013 015
037 038 039 040
Radio Shack 007 019 021 027 005 025
003 011 006
Realistic 019 021 027 005 025 003
011 006
Runco 002 005 033
SSS 027 003
Sampo 005 006
Samsung 012 005 025 003 011 045
Samsux 006
Sansei 030
Sansui 031
Sanyo 019
Scimitsu 003
Scotch 025
Scott 028 027 025 003 026
Sears 007 010 019 020 025 026
011 023
Semivox 027
Semp 020
Sharp 041 021 006
Sherwood 000
Shogun 003
Signature 001
Sony 050
Soundesign 027 025 026
Squareview 023
Starlite 027
Supreme 050
Sylvania 010 005
Symphonic 023
TMK 025 011 024
Tandy 041
Technics 008 042
Technoi Ace 026
Techwood 008 011
Teknika 010 027 017 012 003 026
011 001 006 014
Telefunken 011
Toshiba 019 020 012
Totevision 006
Vector Research 005
Victor 009
Vidikron 010
Vidtech 025 003
Wards 010 021 005 025 004 003
026 011 001
White Westinghouse
031 034 035
Yamaha 005 003
Zenith 002 031 001 014
LRC-122RF� 2007.11.1 11:24 AM 페이지 16
ENGLISH
17
Headquarter 011
Hitachi 000 008 026
JVC 014 026
Jensen 026
KEC 005 025
KLH 015
Kenwood 014 026 006
Kodak 004 005
LXI 005
Lloyd’s 000
Logik 015
MEI 004
MGA 023 009
MGN Technology 023
MTC 023 000
Magnasonic 025
Magnavox 004 007 016 000 019
Magnin 023
Marantz 004 016
Marta 005
Matsushita 004 028 029
Memorex 004 005 027 007 012 023
000 017 021 011 031 032
Minolta 008
Mitsubishi 027 014 009
Motorola 004 016
Multitech 000 015
NEC 017 014 026 006
Nikko 005
Noblex 023
Olympus 004
Opimus 005 027 017 028 029 030
031 032
Orion 020 021 001
Panasonic 004 028 022 029 031
Penny 004 005 023 008 006
Pentax 008
Philco 004 021
Philips 004 016
Pilot 005
Pioneer 014
Profitronic 023
Proscan 013
Protec 015
Pulsar 007
Quarter 011
Quartz 011
Quasar 004 028 029 031
RCA 013 004 027 023 008 019
Radio Shack 000
Radix 005
Randex 005
Realistic 004 005 027 012 000 017
011
Runco 007
STS 008
Samsung 023 010 033
Sanky 027 007
Sansui 000 014 021 026 024
Sanyo 012 023 017 011
Scott 020 010 018 009
Sears 004 005 012 000 008 017
011
Semp 010
Sharp 027
Shintom 015
Shogun 023
Singer 015
Sony 004 002 000 003
Syvania 004 016 000 009
Symphonic 000
TMK 023
Tatung 026
Teac 000 026
Technics 004 028
Teknika 004 005 000
Thomas 000
Toshiba 010 009
Totevision 005 023
Unitech 023
Vector 010
Vector Research 006
Video Concepts 010
Videosonic 023
Wards 013 004 027 012 016 023
000 008 015 019
White WestingHouse
021 025
XR-100 004 000 015
Yamaha 006
Zenith 007 000 021 003
Ameira High 004 (TV use 008)
Brocksonic 001
Colt 015
Cutis Mathes 004 (TV use 008)
Daewoo 025
Emerson 001
Funai 000
GE 004 (TV use 008) 013 (TV use 007)
027 (TV use 041) 023
Hitachi 004 (TV use 008) 000
VCR - TV/VCR
LRC-122RF� 2007.11.1 11:24 AM 페이지 17
ENGLISH
18
HQ 000
Lloyds 000
MGA 023
Megavox 016 (TV use 010) 004 (TV use 008)
000
Magnin 023
Memorex 005 028 (TV use 042)
Mitsubishi 027 (TV use 041)
Orion 001
Panasonic 004 (TV use 008) 028 (TV use 042)
Penney 004 (TV use 008) 023
028 (TV use 042)
Quasar 004 (TV use 008) 028 (TV use 042)
RCA 013 (TV use 007) 004 (TV use 008)
027 (TV use 041)
Sansui 000
Sanyo 023
Sear 000 005
Sharp 027 (TV use 041)
Sony 002 (TV use 050)
Symphonic 000
Zenith 000
Apex 015
Harman/Kardon 009
JVC 008
Kenwood 005
Megavox 024
Mitsubishi 001
Onkyo 024
Panasonic 013
Philips 024 006
Pioneer 003 014 026
Proscan 002
RCA 002
Samsung 017
Sherwood 001 023 012 011 000 016
018 019 020 021 022
Sony 004
Technics 013
Theta Digital 014
Toshiba 024
Yamaha 013 007
Zenith 024 010
ABC 002 003 009 030 006 008
037 107 036 059 062 066
072
Adelphia 063 085
Allegro 018 021
Altrio 063
Americast 103
Archer 018 026 038 040 047
Armstrong 085
AT&T Broadband 085
Atlantic Broadband 063 085
Bell South 103
Bell&Howell 009
Blue Ridge 063 085
Bresnan 085
Bright House 063 114
Buckeye Comm 085
Cablevision 063 085 112
Centurion 096
Century 018 040
Charter 063 085
Citizen 018 021 040
Cogeco 085
Combano 089 090
Comcast 063 085 114
Comsat 085
Comtronics 014
Contec 011
Cox Digital 063 085
Digicable 105
Eagle 050 052 060
Eastern 001 076 081
Echostar 110
Electricord 054
Emerson 026
Everquest 010 014
Focus 022
Garrard 018
Gemini 010 041 073
General Electric 084
General Instrument
033 032 006 034 085 107
108
GNC 103
Golden Channel 052
GoldStar 017 014
Goodmind 026
Hamlin 012 020 004 013 068 069
074
DVD
CBL
LRC-122RF� 2007.11.1 11:24 AM 페이지 18
ENGLISH
19
Hitachi 006 107 074
Insight 085
Jasco 010 018 021
Jerrold 002 007 033 032 009 010
006 034 035 036 037 041
042 043 082 085 107
Magnavox 043 045 080 088 099 098
Massillon 085
Media One 111
Medicom 074
Memorex 000 071
Mitsubishi 106
Motorola 085 114 113 106
Movie Time 015 028 054
Moxi 106
Nctc 085
NSC 015 048 051 058 083
Oak 011 053 057 072
Optimus 031
Pace 063 085
Panasonic 000 016 031 064 067
Paragon 000 071
Philips 018 039 045 046 050 091
099
Pioneer 017 025 063 107 055 070
079 086 109
Popular Mechanics 022
Prucer 077
Pulsar 000 071
Quasar 000
RCA 031 067
Radio Shack 010 021 026 028
Recoton 022 102
Regal 012 020 068 069
Regency 001 076
Rembrandt 006
Rodgers 063
Runco 000
Samsung 017 014 052
Scientific Atlanta 003 023 030 027 063 044
036 061 062 065 066
Seren 063
Service Electric 085
Shaw 085
Sherwood 000
Sigecom 063
Signal 010 014
Signature 006
SL Marx 014
Sony 100 112
Sprucer 031 067 087
Starcom 002 010 035 037 041 042
Stargate 010 014 026 041 052 101
108
Starquest 010
Susquehanna 063 085
Teleview 014
Time Warner 063 085
Tocom 007 008 059 060 075
Toshiba 000 071
Tusa 010
TV86 015
Unika 018
United Cable 037 072
Universal 018 019 038 040 047 054
056
Videotron 063
Viewstar 015 045 048 049 092 093
094 095
Wide Open West 063 103
Zenith 000 024 071 078 097 104
Zentek 022
AlphaStar 008
Cablevision/voom 031
Chaparral 001
Directv 053
Echostar/dish 009 024 049 050
Expreevu 009
Expressvu 024
General Electric 033 021 032
General Instrument
016 015 018 031
Goi 024
Hitachi 011 028 029
HTS 009 024
Hughes 043 044 019 036 047 048
022 023
Hughes Net.Sys 007
JVC 009 024
Jerrold 016 015
LG 052
Magnavox 027
Megavox 006 005
Memorex 006
Mitsubishi 019 036
Motorola 031
Next Level 018 031
Panasonic 017 030 042
Pansat 027
Philips 006 005 034 035 038 019
036 027 022 023
SAT
LRC-122RF� 2007.11.1 11:24 AM 페이지 19
20
ENGLISH
Primestar 016 015
Proscan 033 021 032
Radio Shack 018 031
RCA 003 000 002 012
Realistic 014
RSA 033 021 032
Samsung 025 037 045 051 054
Sherwood 000
SKY 046
Sony 004 020
Star Choice 018 031
Toshiba 010 026 019 036 039 040
Uniden 006 005 014 027
Zenith 013 041
Denon 007
Mitsubishi 007
NAD 007
Pioneer 007
Sony 017 018
AUX-LD
Aiwa 004 034
Carver 004
Harman/Kardon 016 004
JVC 022 024
Kenwood 008
Megavox 004
Marantz 004
Onkyo 012 025
Opimus 002 020
Panasonic 038
Pioneer 002 019 011
Sansui 004
Sherwood 000
Sony 021 014 026
Technics 038
Victor 024
Wards 002
Yamaha 010 009
AUX-TAPE
Aiwa 030
Carver 023
Curtis Mathes 027
Denon 037
Harman/Kardon 040
Linn 023
Megavox 023
Marantz 023
Panasonic 039
Philips 023 040
Pioneer 003 027
Sony 019 033
Technics 039
Wards 003
Yamaha 028
AUX-CD AMP
Sherwood 035 (for Mini Disc)
AUX-MD
GE 043
Lutron 044
One For All 042
Radio Shack 043
Security System 042
Universal X10 042
X10 042
Aiwa 045 029
Fisher 005
Harman/Kardon 046
JBL 046
JVC 047
Jerrold 031
RCA 006
Scientific Artlanta 032
Sony 045
Starcom 031
AUX-DBS
Archer 013
GC Electronics 013
Jebsee 013
Rabbit 036
Radio Shack 013
Telecaption 015
AUX-VIDEO ACCESSORY
AUX-HOME AUTOMATION
LRC-122RF� 2007.11.1 11:24 AM 페이지 20
ENGLISH
21
Aiwa 010 030
Burmester 019
California Audio Lab
002
Carver 010 012 020
DKK 001
Denon 028 034
Emerson 035
Fisher 012 033
Garrard 019 018
Genexxa 004 035
Harman/Kardon 010 011
Hitachi 004
JVC 007
Kenwood 003 029 016 024 025
Krell 010
LXI 035
Linn 010
MCS 002
MTC 019
Megavox 010 035
Marantz 002 010 013
Mission 010
NSM 010
Nikko 033
Onkyo 008 026
Opimus 001 004 012 035 029
019 009 021 020
Panasonic 002 031
Parasound 019
Philips 010 023
Pioneer 004 035 021 017
Proton 010
QED 010
Quasar 002
RCA 012 035 006 036
Realistic 012 019 013
Rotel 010 019
SAE 010
Sansui 010 035
Sanyo 012
Scott 035
Sears 035
Sharp 029 013 037
Sherwood 013 027 038 039 040 041
000
Sony 001 014 022
Soundesign 009
CD Tascam 019
Teac 019 018 033 013
Technics 002 031
Victor 007
Wards 010 006
Yamaha 005 015
Yorx 032
LRC-122RF� 2007.11.1 11:24 AM 페이지 21
LRC-122RF� 2007.11.1 11:24 AM 페이지 22