Inkel R-807 Network AV Receiver (WiFi) User Manual R807 Manual A
Inkel Corporation Network AV Receiver (WiFi) R807 Manual A
UserManual.wiki
>
Inkel
>
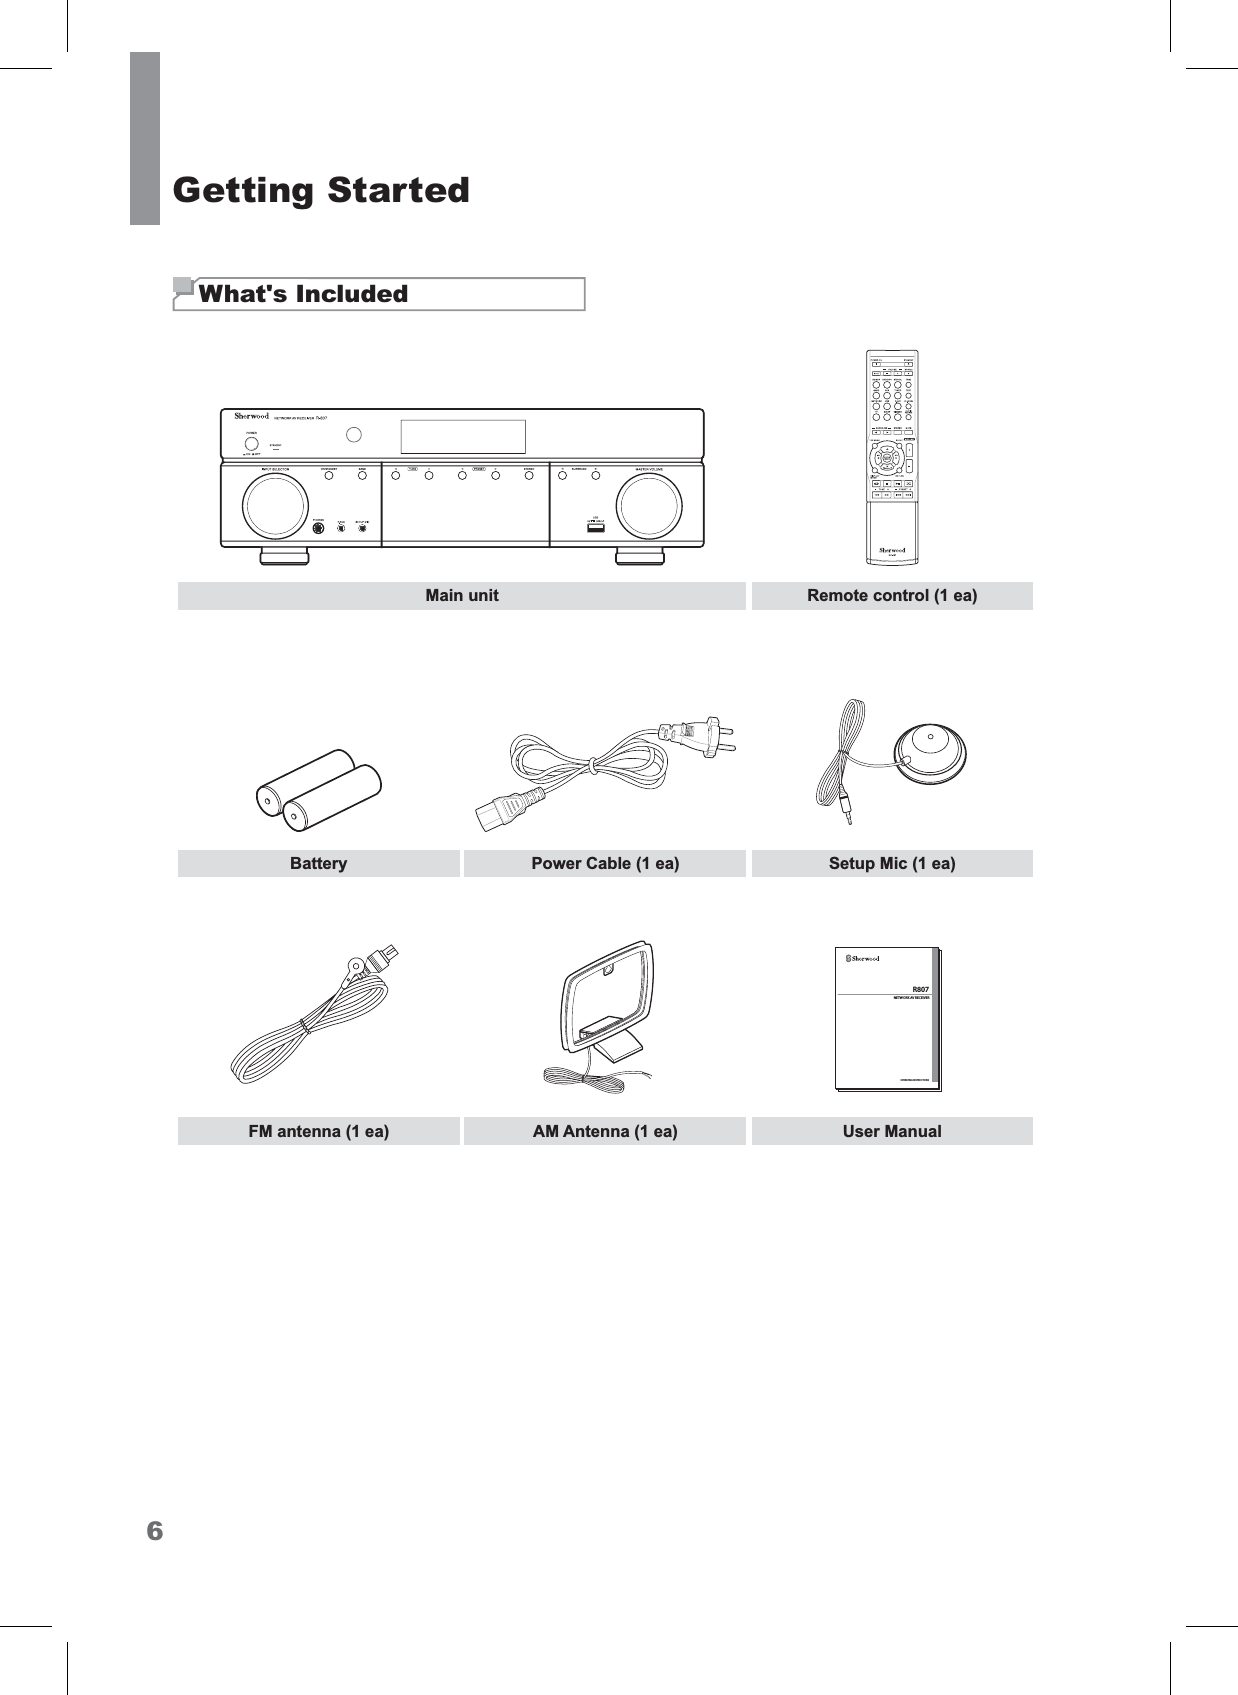
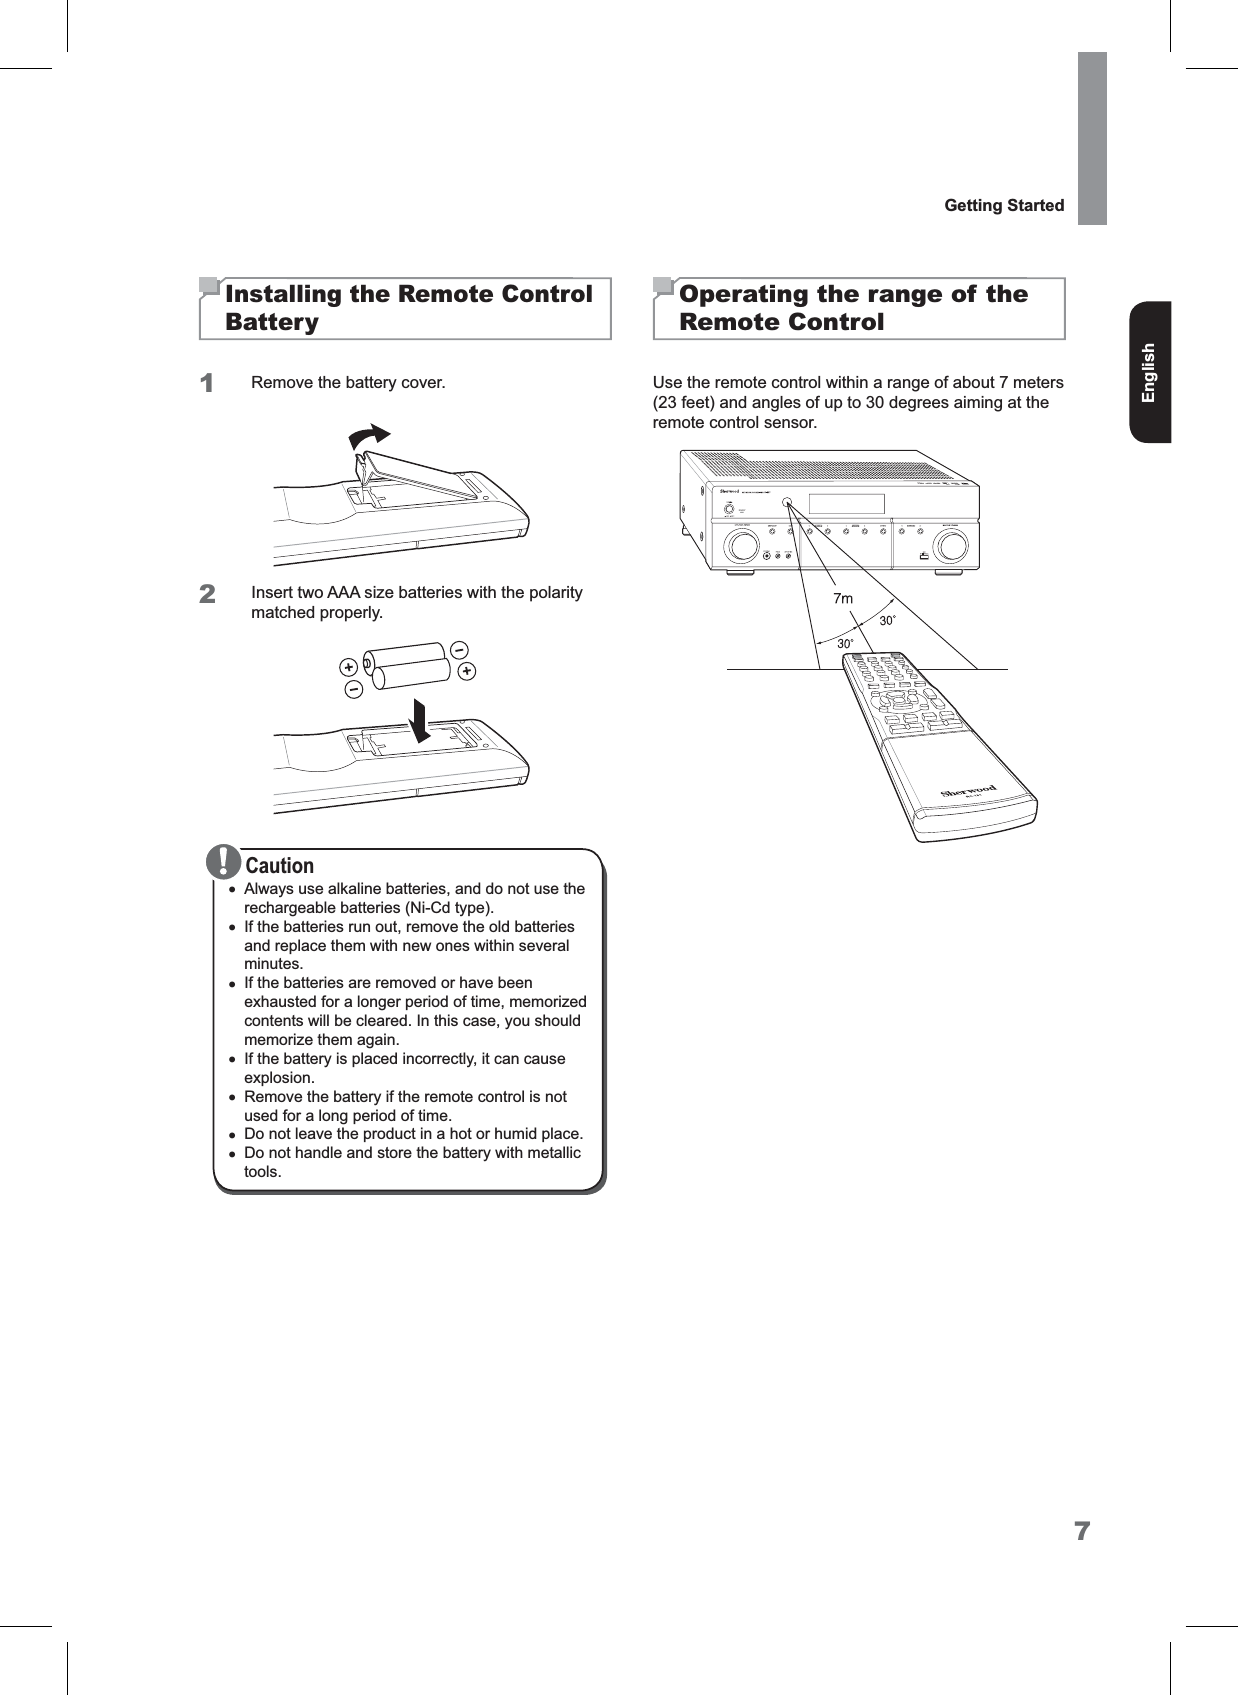
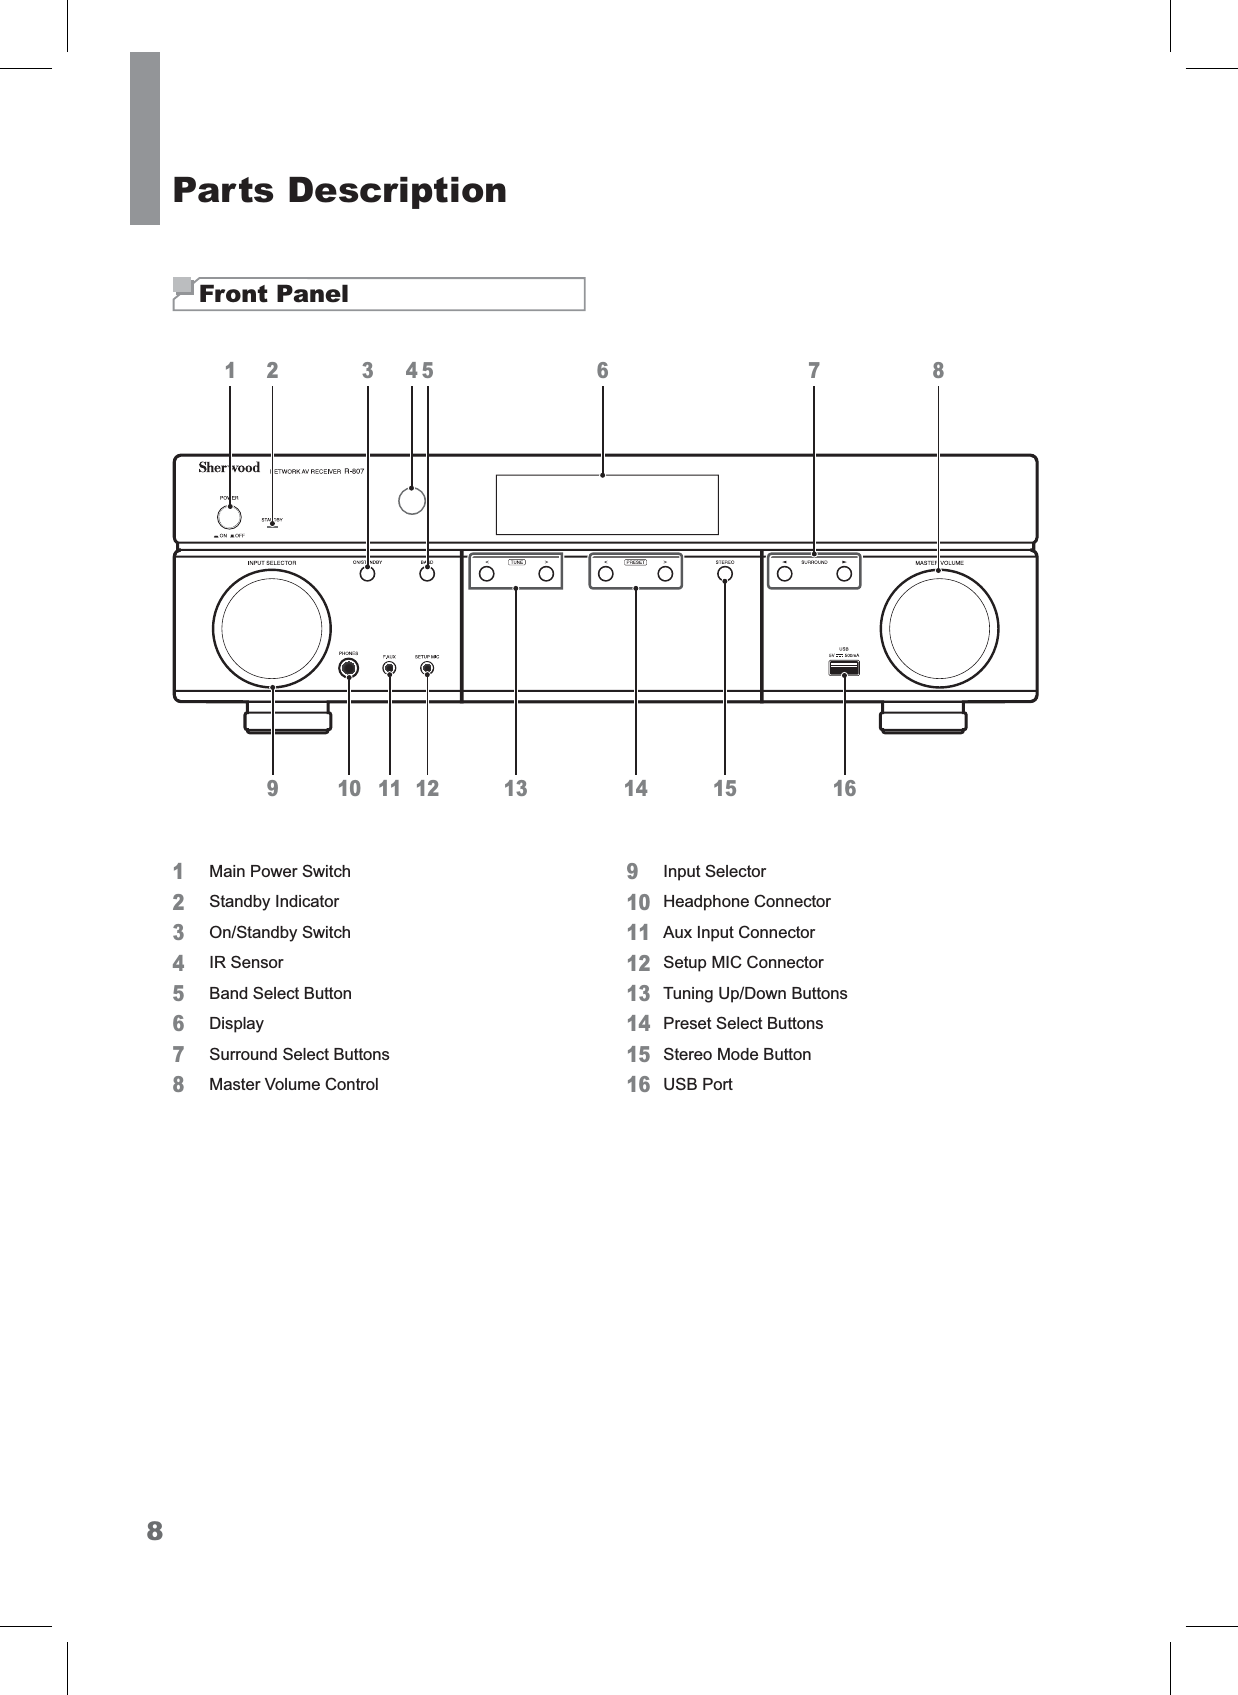
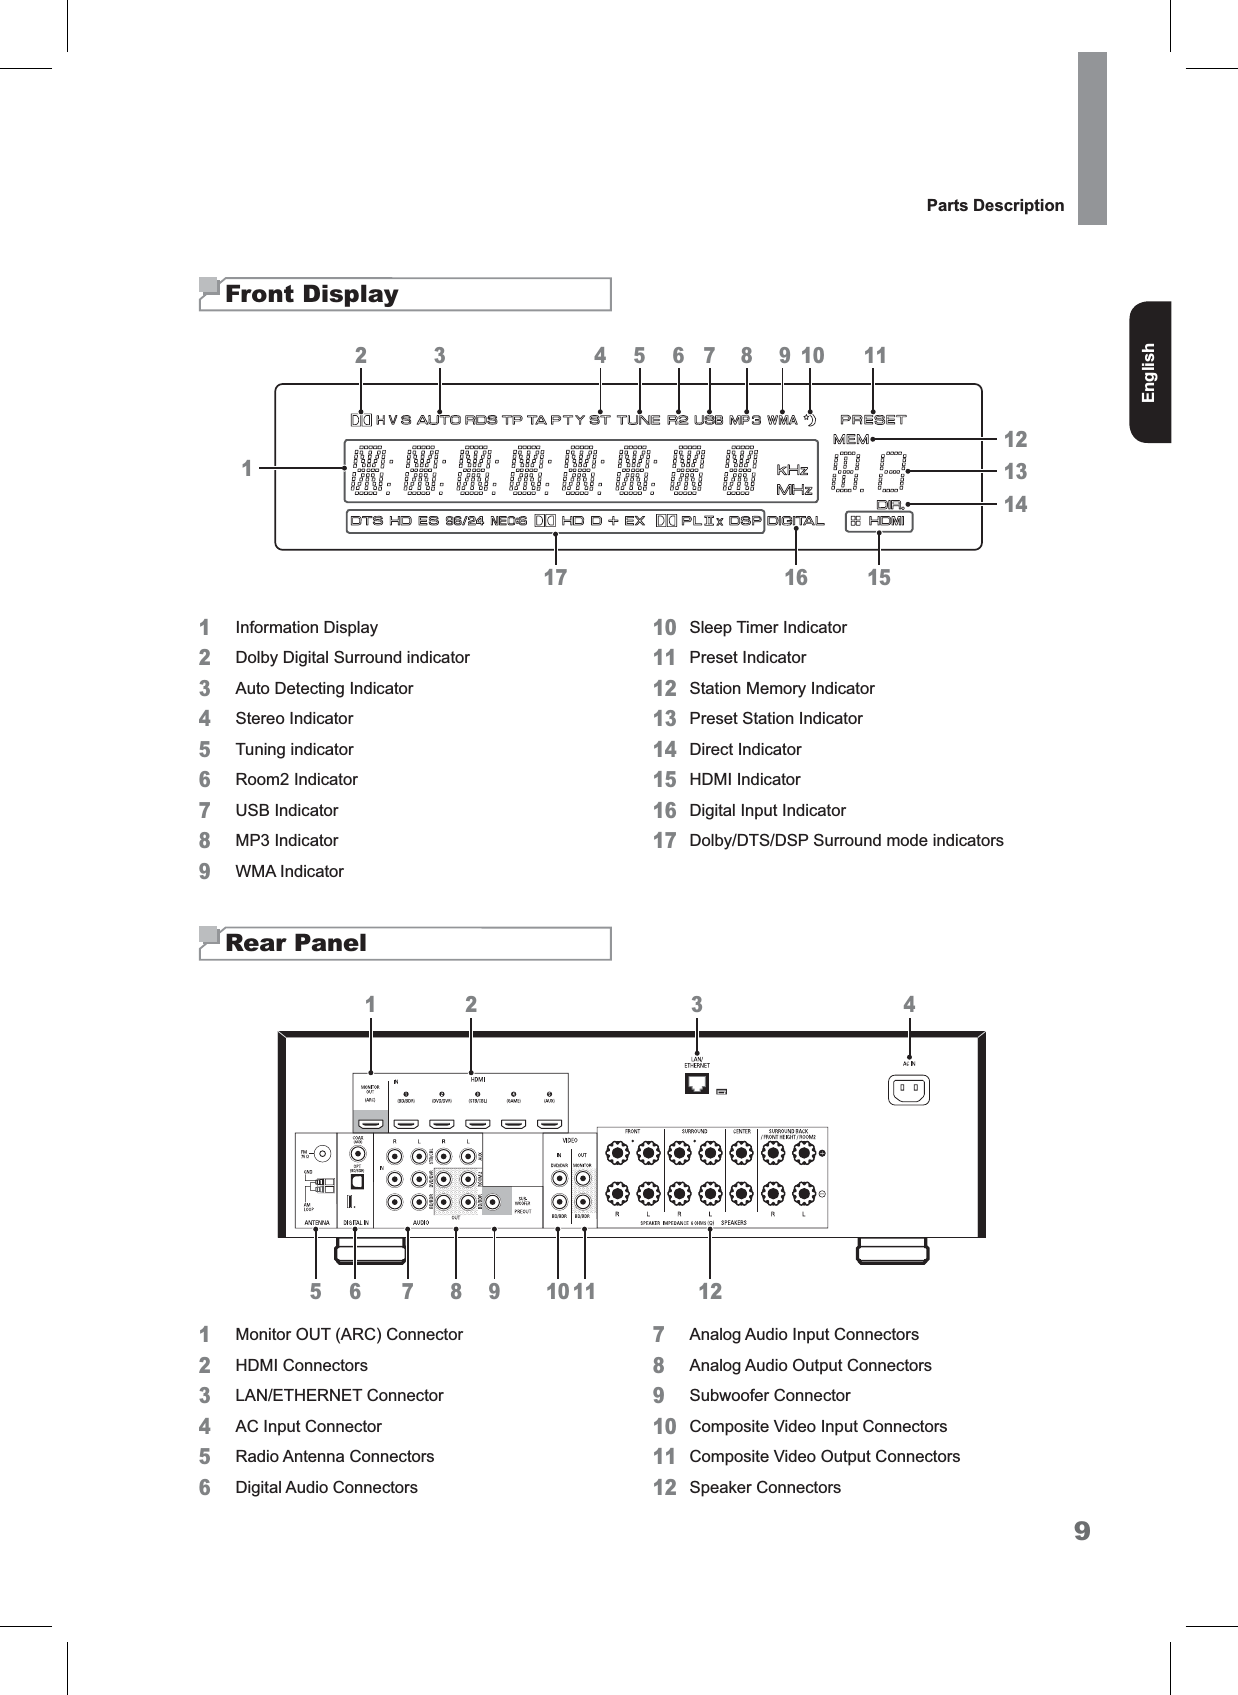
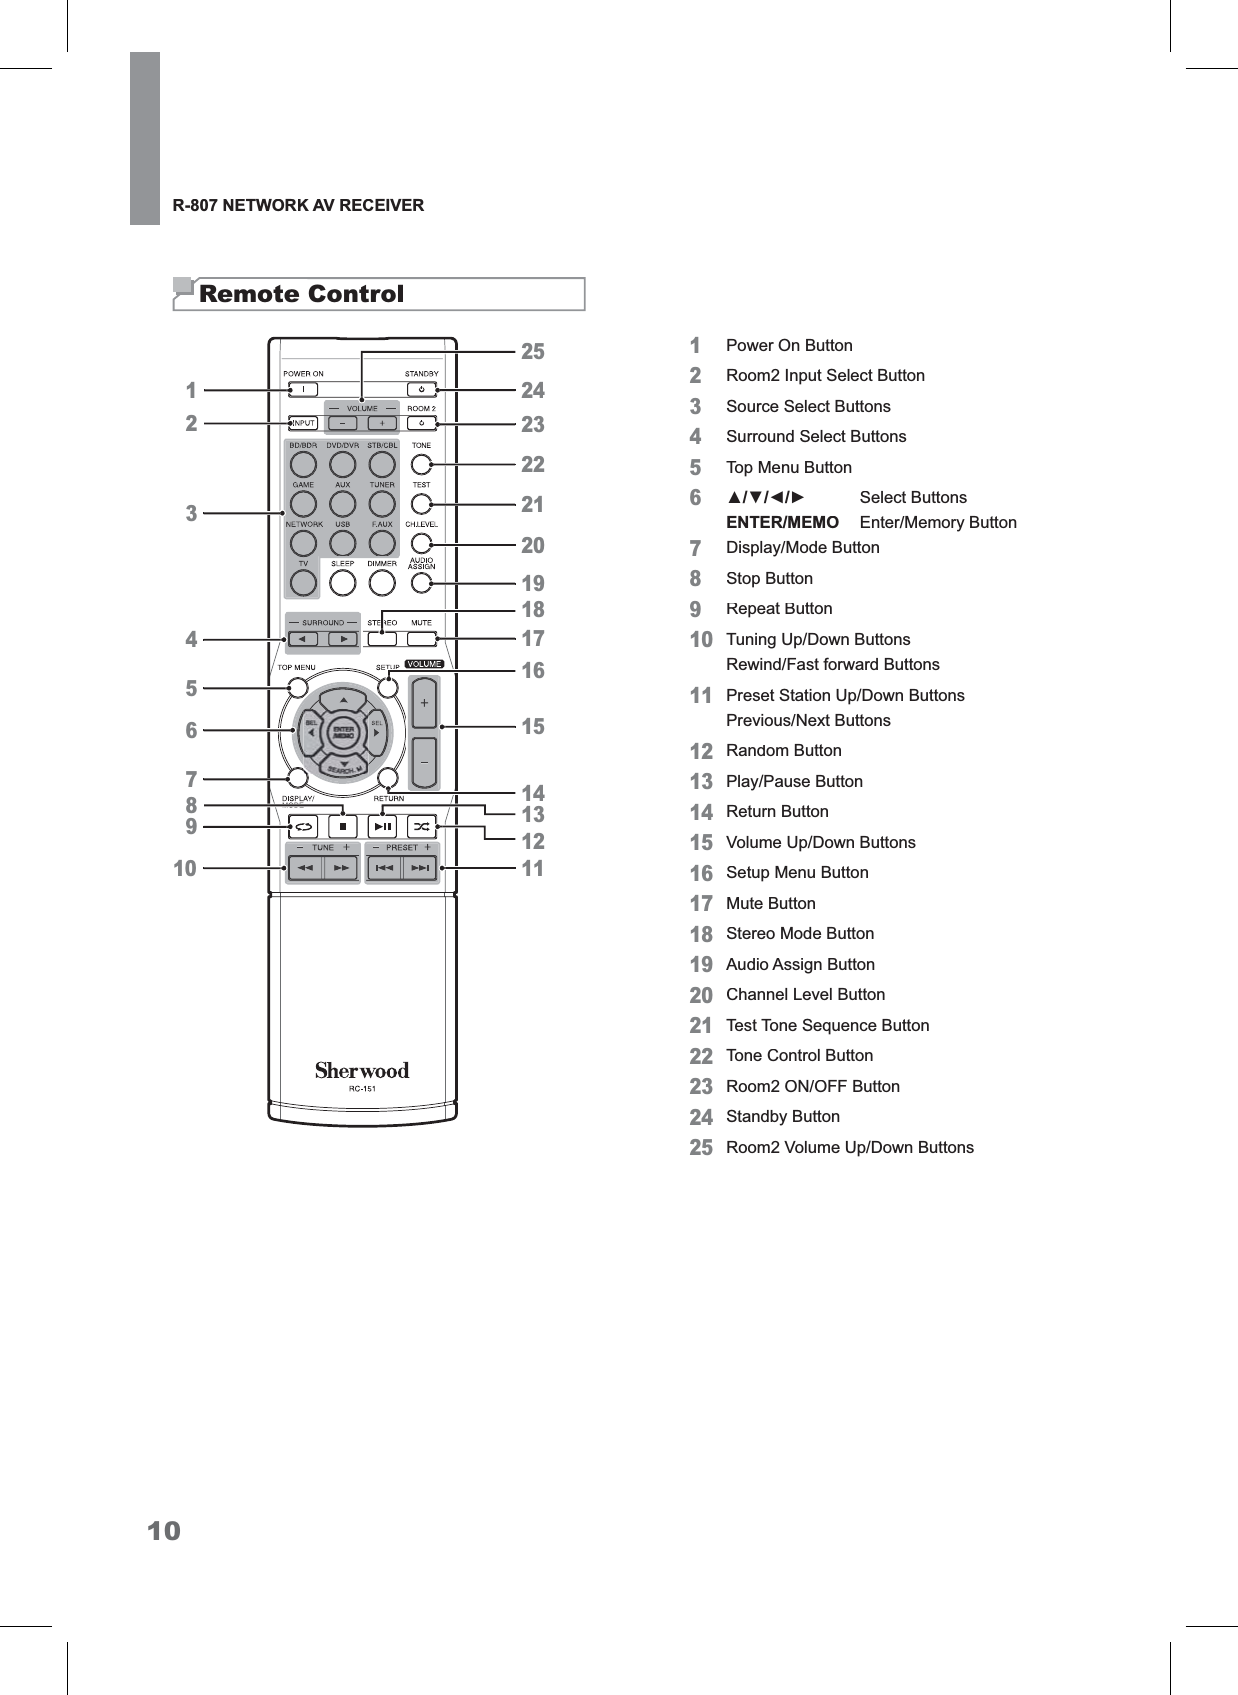
R 807 User Manual
User Manual
Navigation menu
Upload a User Manual
Namespaces
Wiki Guide
HTML
PDF
Info
Views
User Manual
Discussion / Help
Navigation

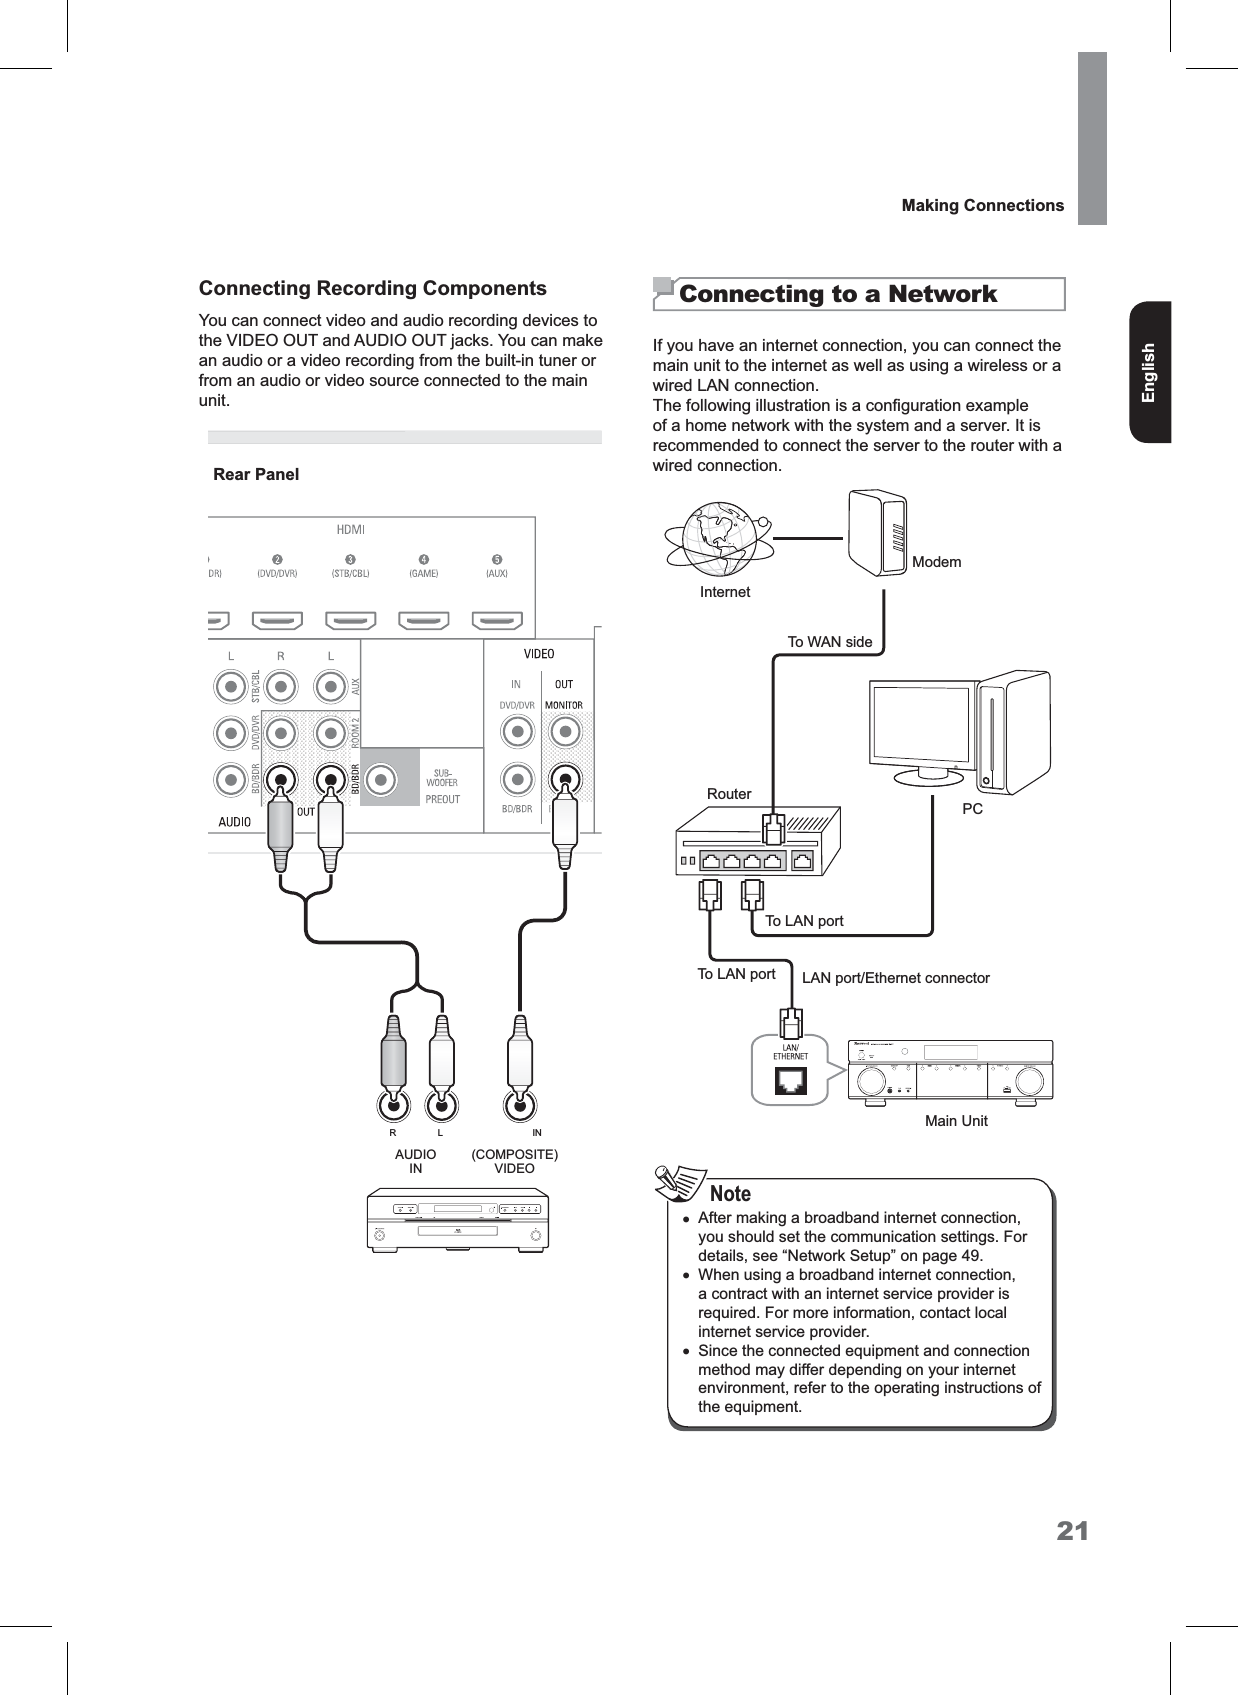
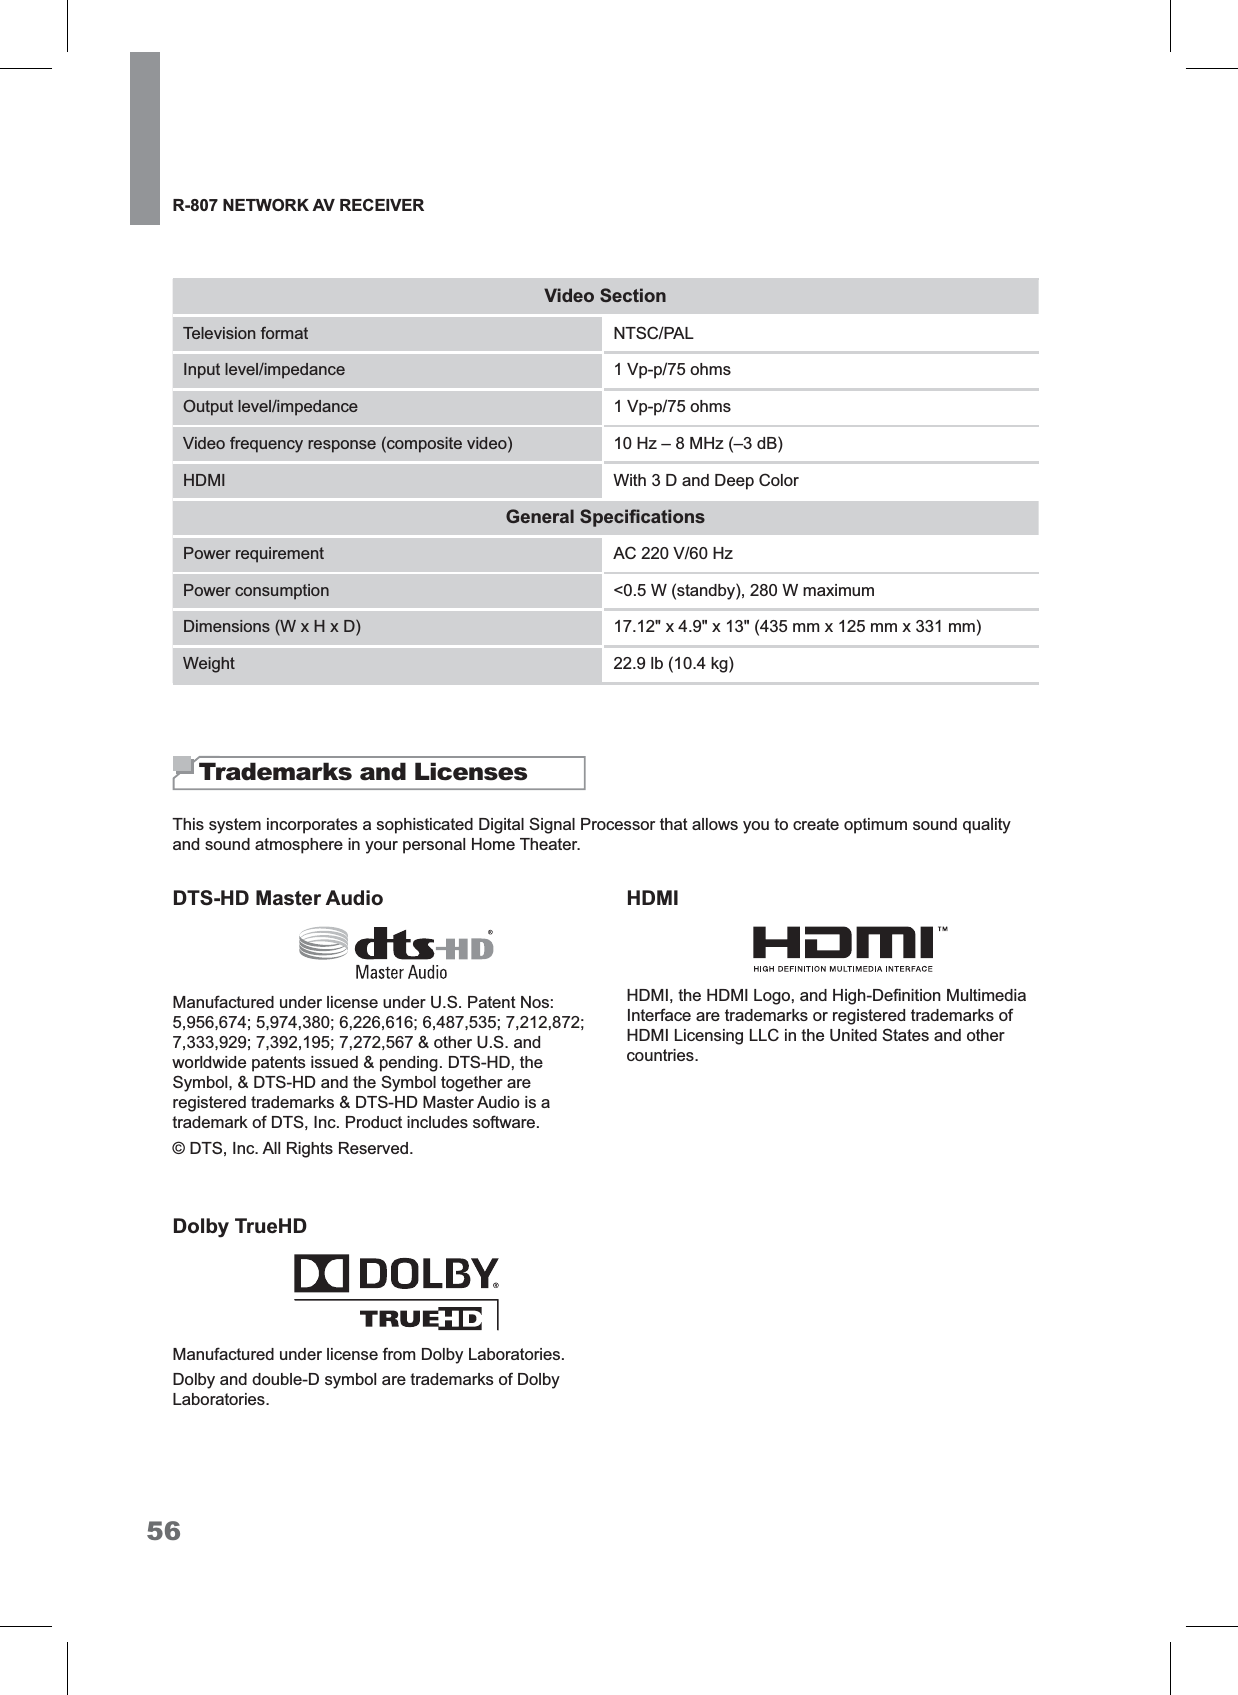
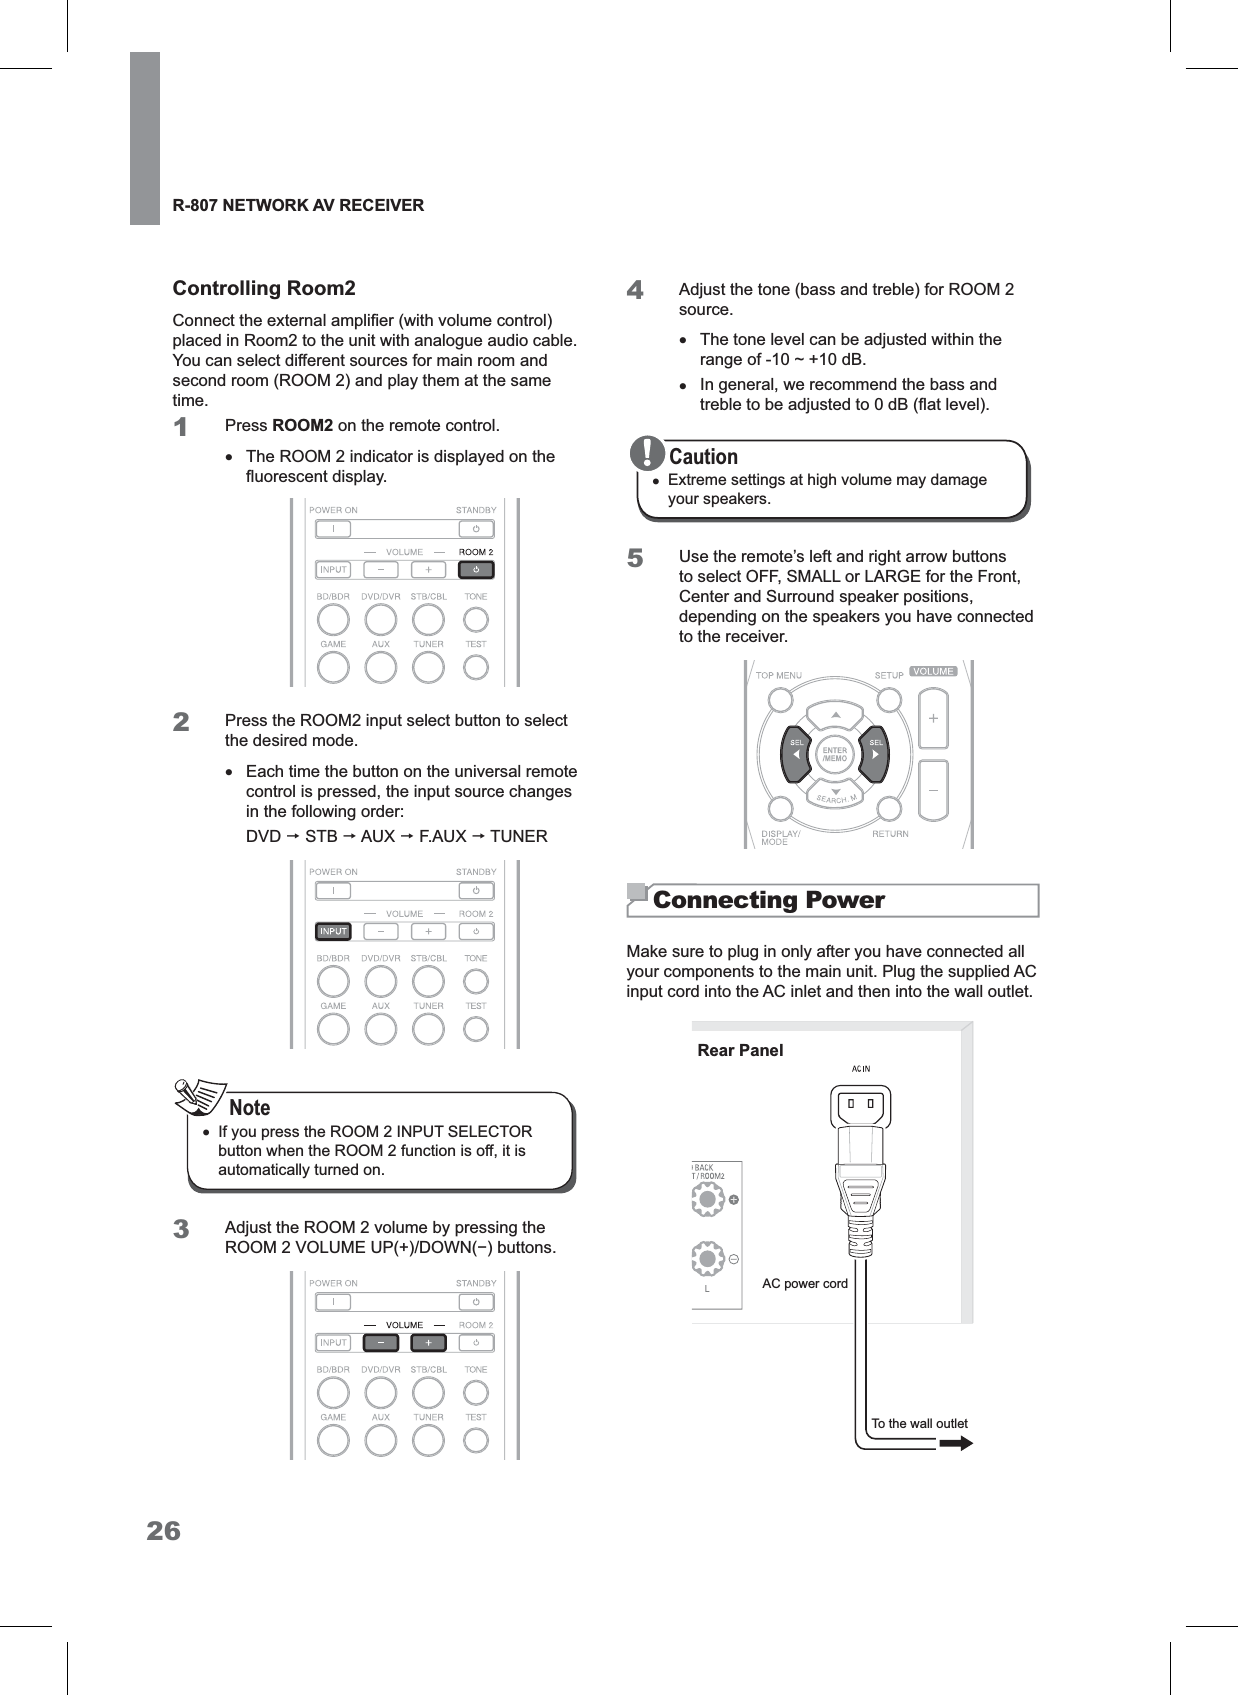
![24R-807 NETWORK AV RECEIVERConnecting to Muti-Room 7KHPXOWL]RQHIXQFWLRQDOORZV\RXWRSOD\EDFNGLIIHUHQWLQSXWVRXUFHVLQWKHURRPZKHUHWKHXQLWLVLQVWDOOHG0DLQRoom) and in another room (Room2).Main RoomYou can enjoy sounds from the equipment connected to the main unit in a room other than the main room. For example, you can watch the DVD in the main room and listen to a CD in the sub room. The main unit can power up to two independent systems in separate rooms after you have made the proper multi-room connections. Different sources can play in two rooms at the same time or, depending on your needs, the same source can also be used. The main and sub room have independent power (the main room power can be off while sub room is on) and the sub room can be controlled by the remote control. xWhen the Room2 output is enabled, the surround EDFNVSHDNHUVLQWKHPDLQURRPGRQRWSURGXFHsound.xRemove the unit’s power cable from the AC wall RXWOHWEHIRUHFRQQHFWLQJVSHDNHUVRUDQH[WHUQDODPSOL¿HUNoteSub Room (Room2)](https://usermanual.wiki/Inkel/R-807/User-Guide-1899672-Page-24.png)
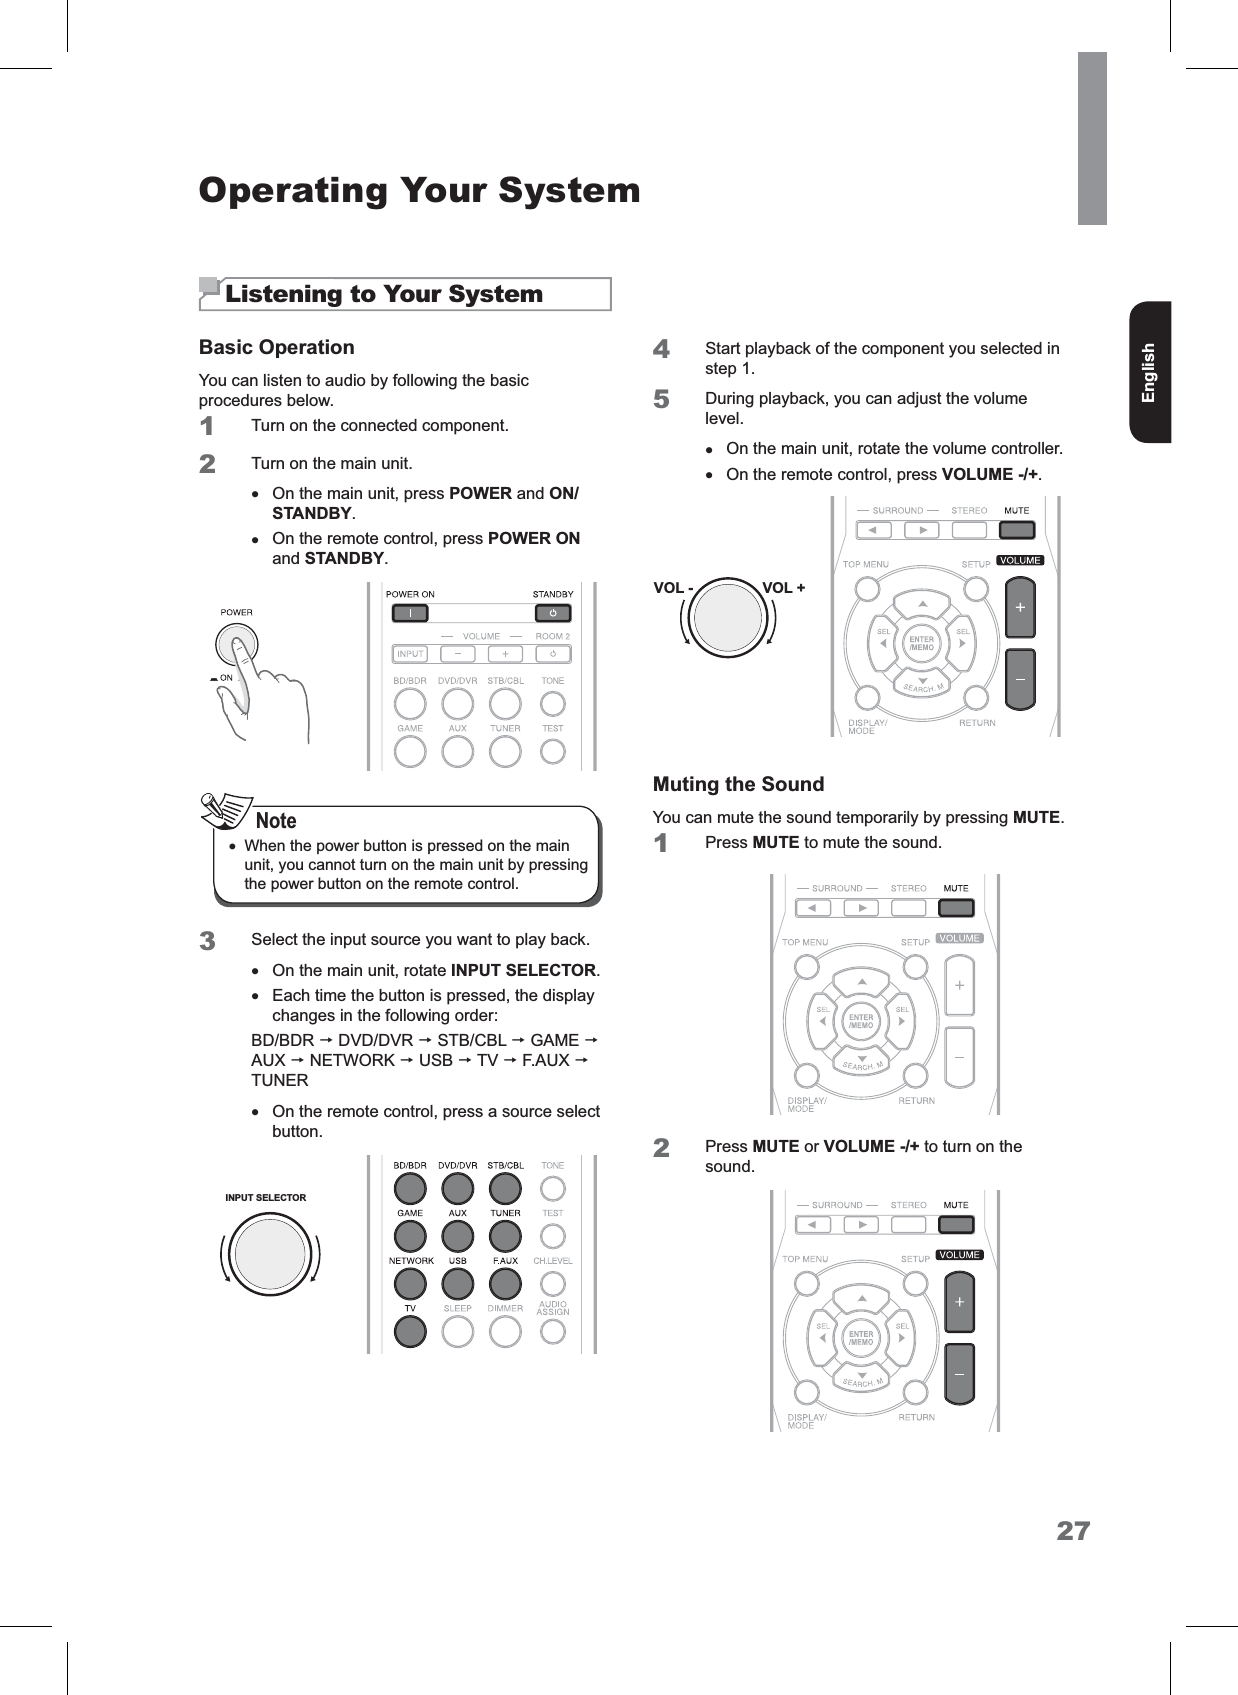
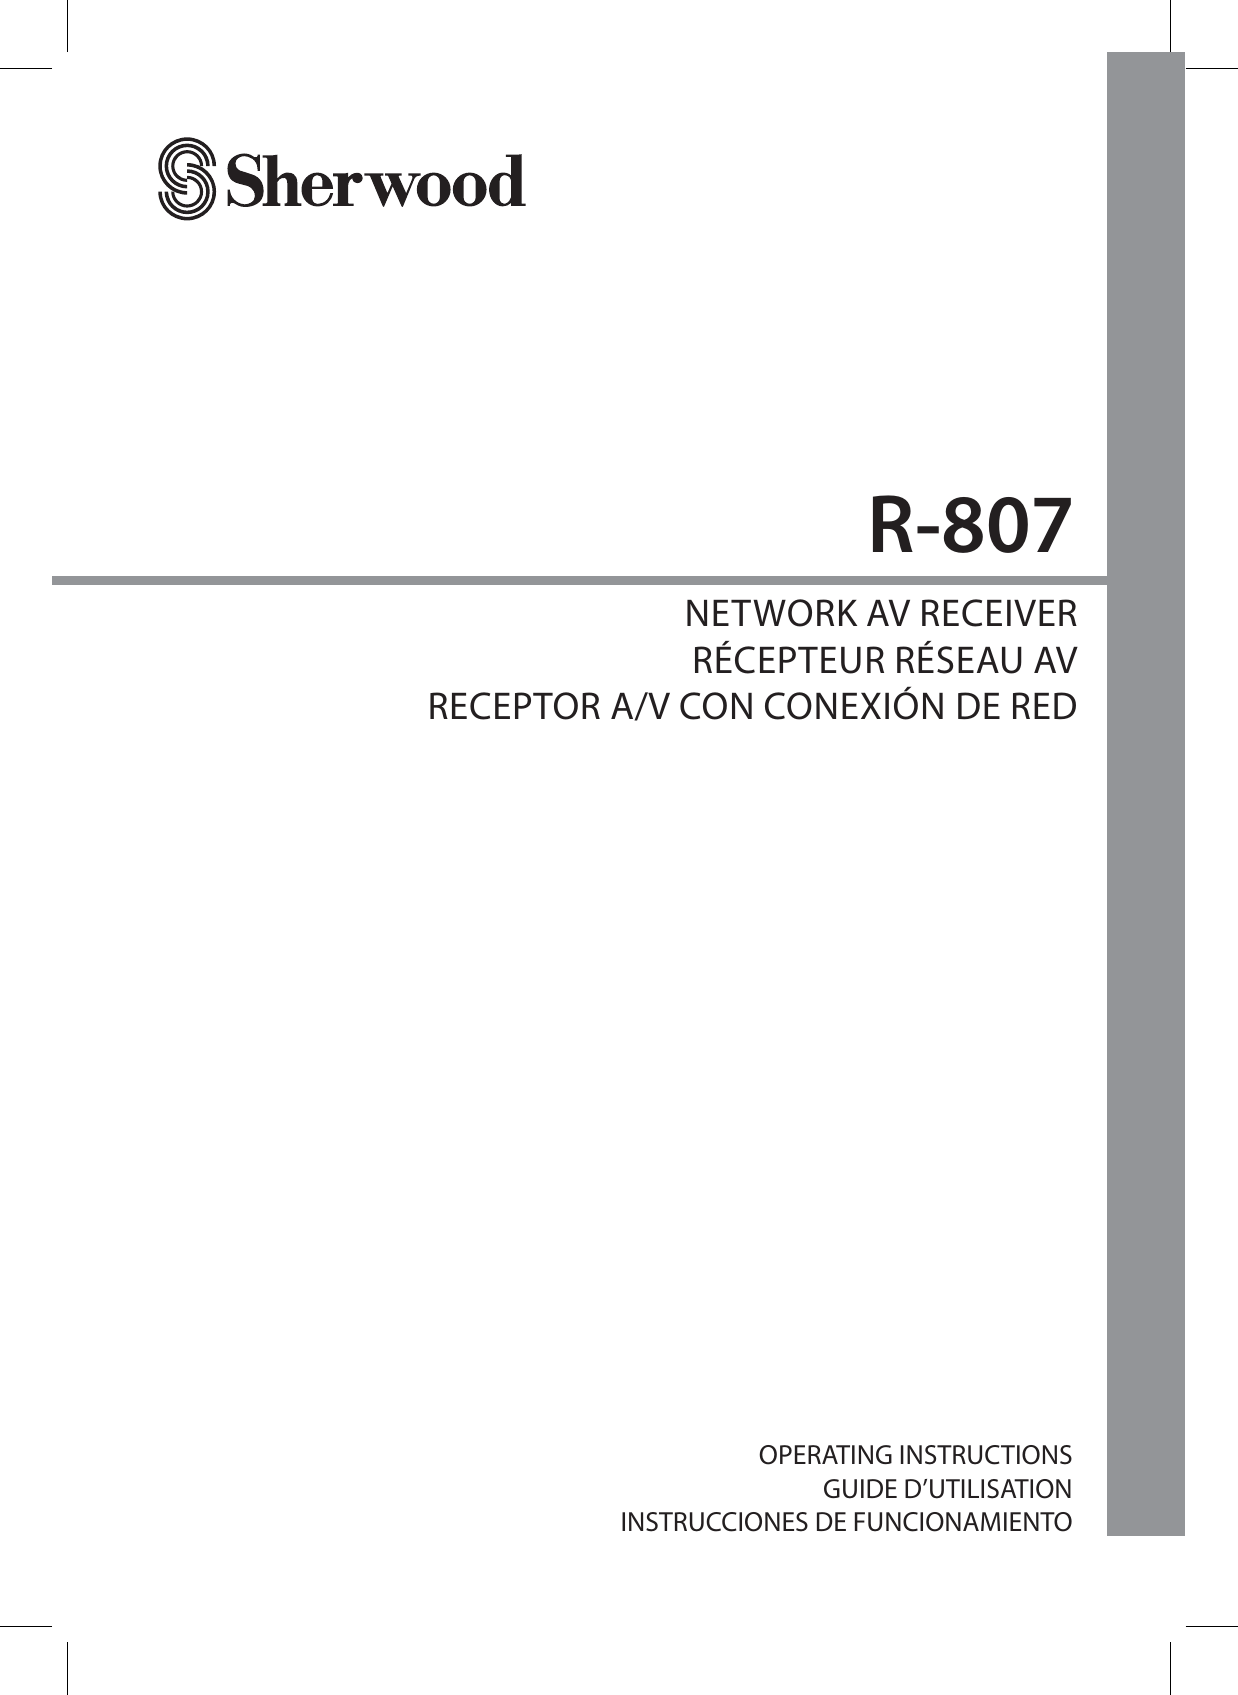
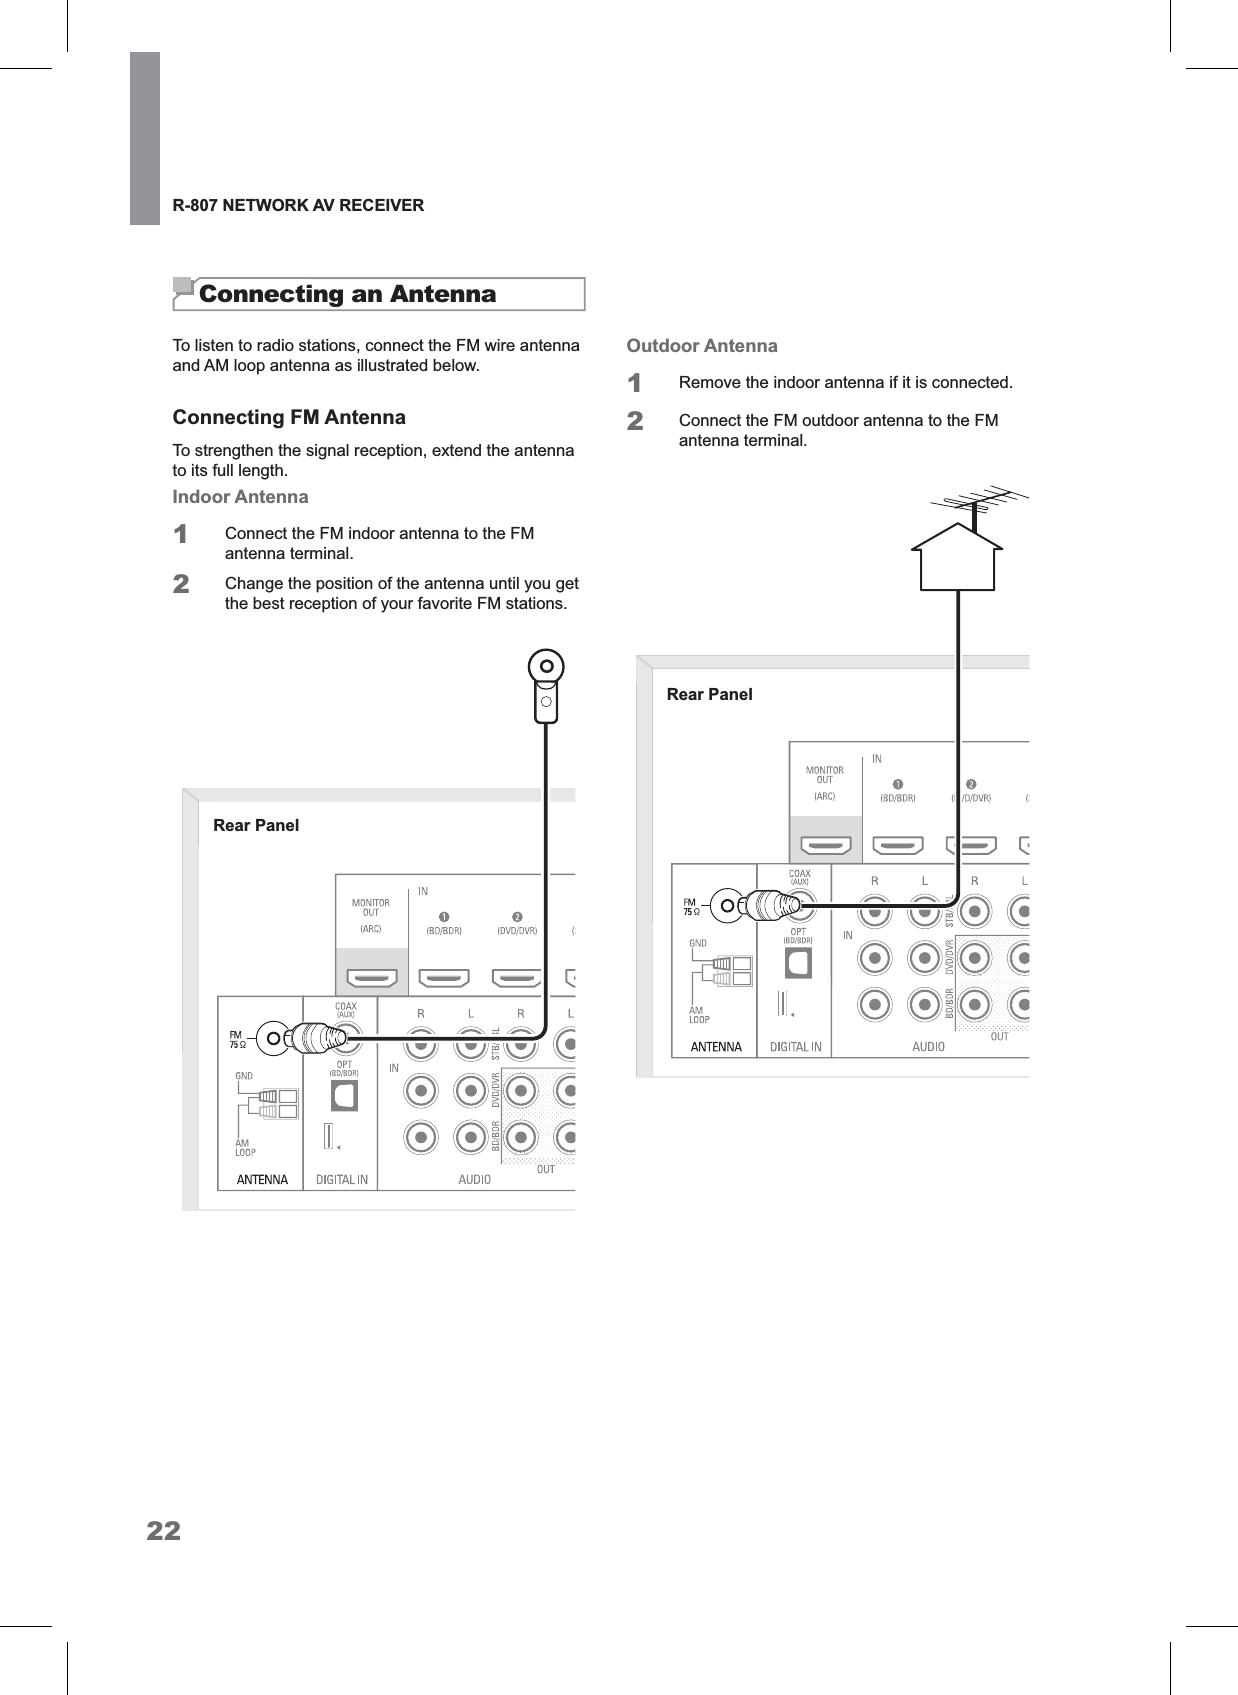
![R-807 NETWORK AV RECEIVER28Enjoying Surround EffectsThis main unit incorporates a sophisticated Digital Signal Processor that allows you to create optimum sound quality and sound atmosphere in your personal Home Theater.Setting the Surround Mode%HIRUHVXUURXQGSOD\EDFN¿UVWSHUIRUPWKHVSHDNHUVHWXSSURFHGXUHHWFRQWKH26'VHWWLQJVIRURSWLPXPSHUIRUPDQFH)RUGHWDLOVVHH³6HWWLQJWKH6SHDNHU6HWXS´RQSDJH1Select the desired surround mode by pressing the SURROUND buttons. xEach time the buttons are pressed, the surround mode changes depending on the input signal format as the table below:Signal format being input Selectable surround modeDolby Digital Plus sources DOLBY DIGITAL PLUSDolby TrueHD sources DOLBY TRUEHDDolby Digital EX 6.1 channel sourcesDolby Digital 5.1 channel sources<DOLBY DIGITAL EX, DOLBY D + PLIIx MUSIC>, (DOLBY D + PLIIx MOVIE), {DOLBY D + PLIIz}, DOLBY DIGITAL, DSP Surround modes*Dolby Digital 2 channel sources<DOLBY PLIIx MOVIE, DOLBY PLIIx MUSIC, DOLBY PLIIx GAME>, [DOLBY PLII MOVIE, DOLBY PLII MUSIC, DOLBY PLII GAME], {DOLBY PLIIz HEIGHT}, DTS NEO: 6 MUSIC, DTS NEO: 6 CINEMA, DSP Surround modes*DTS-HD High Resolution Audio sources DTS-HD HRADTS-HD Master Audio sources DTS-HD MSTR'76(6'LVFUHWH0DWUL[channel sources<Corresponding DTS ES mode, DTS + PLIIx MUSIC>, (DTS + PLIIx MOVIE), DTS, {DTS + PLIIz}, DSP Surround modes*DTS sources'76VRXUFHVCorresponding DTS mode, <DTS + NEO: 6, DTS + PLIIx MUSIC>, (DTS + PLIIx MOVIE), DTS, {DTS + PLIIz}, DSP Surround modes*PCM (multi-channel) sources **MULTI PCM, <MCH + PLIIx MOVIE, MCH + PLIIx MUSIC>, {MCH + PLIIz}, DSP Surround modes*PCM (2 channel) sourcesAnalog stereo sources0XVLF¿OHVIURP86%<DOLBY PLIIx MOVIE, DOLBY PLIIx MUSIC, DOLBY PLIIx GAME>, [DOLBY PLII MOVIE, DOLBY PLII MUSIC, DOLBY PLII GAME], DTS NEO: 6 MUSIC, DTS NEO: 6 CINEMA, {DOLBY PLIIz HEIGHT}, DSP Surround modes*Depending on surround back speaker setting, some surround modes can be selected or not as follows:< > : 3RVVLEOHRQO\ZKHQVXUURXQGEDFNVSHDNHULVQRWVHWWR³12´[ ] : 3RVVLEOHRQO\ZKHQVXUURXQGEDFNVSHDNHULVVHWWR³12´( ) : 3RVVLEOHRQO\ZKHQVXUURXQGEDFNVSHDNHULVVHWWR³FK´{ } : 3RVVLEOHRQO\ZKHQIURQWKHLJKWVSHDNHULVVHWWR³21´ * : Stand for THEATER, MOVIE, HALL, GAME, STADIUM, MCH STEREO, ALC. ** : on the signal format being input, the Dolby Pro Logic IIx modes may not be selected.](https://usermanual.wiki/Inkel/R-807/User-Guide-1899672-Page-28.png)
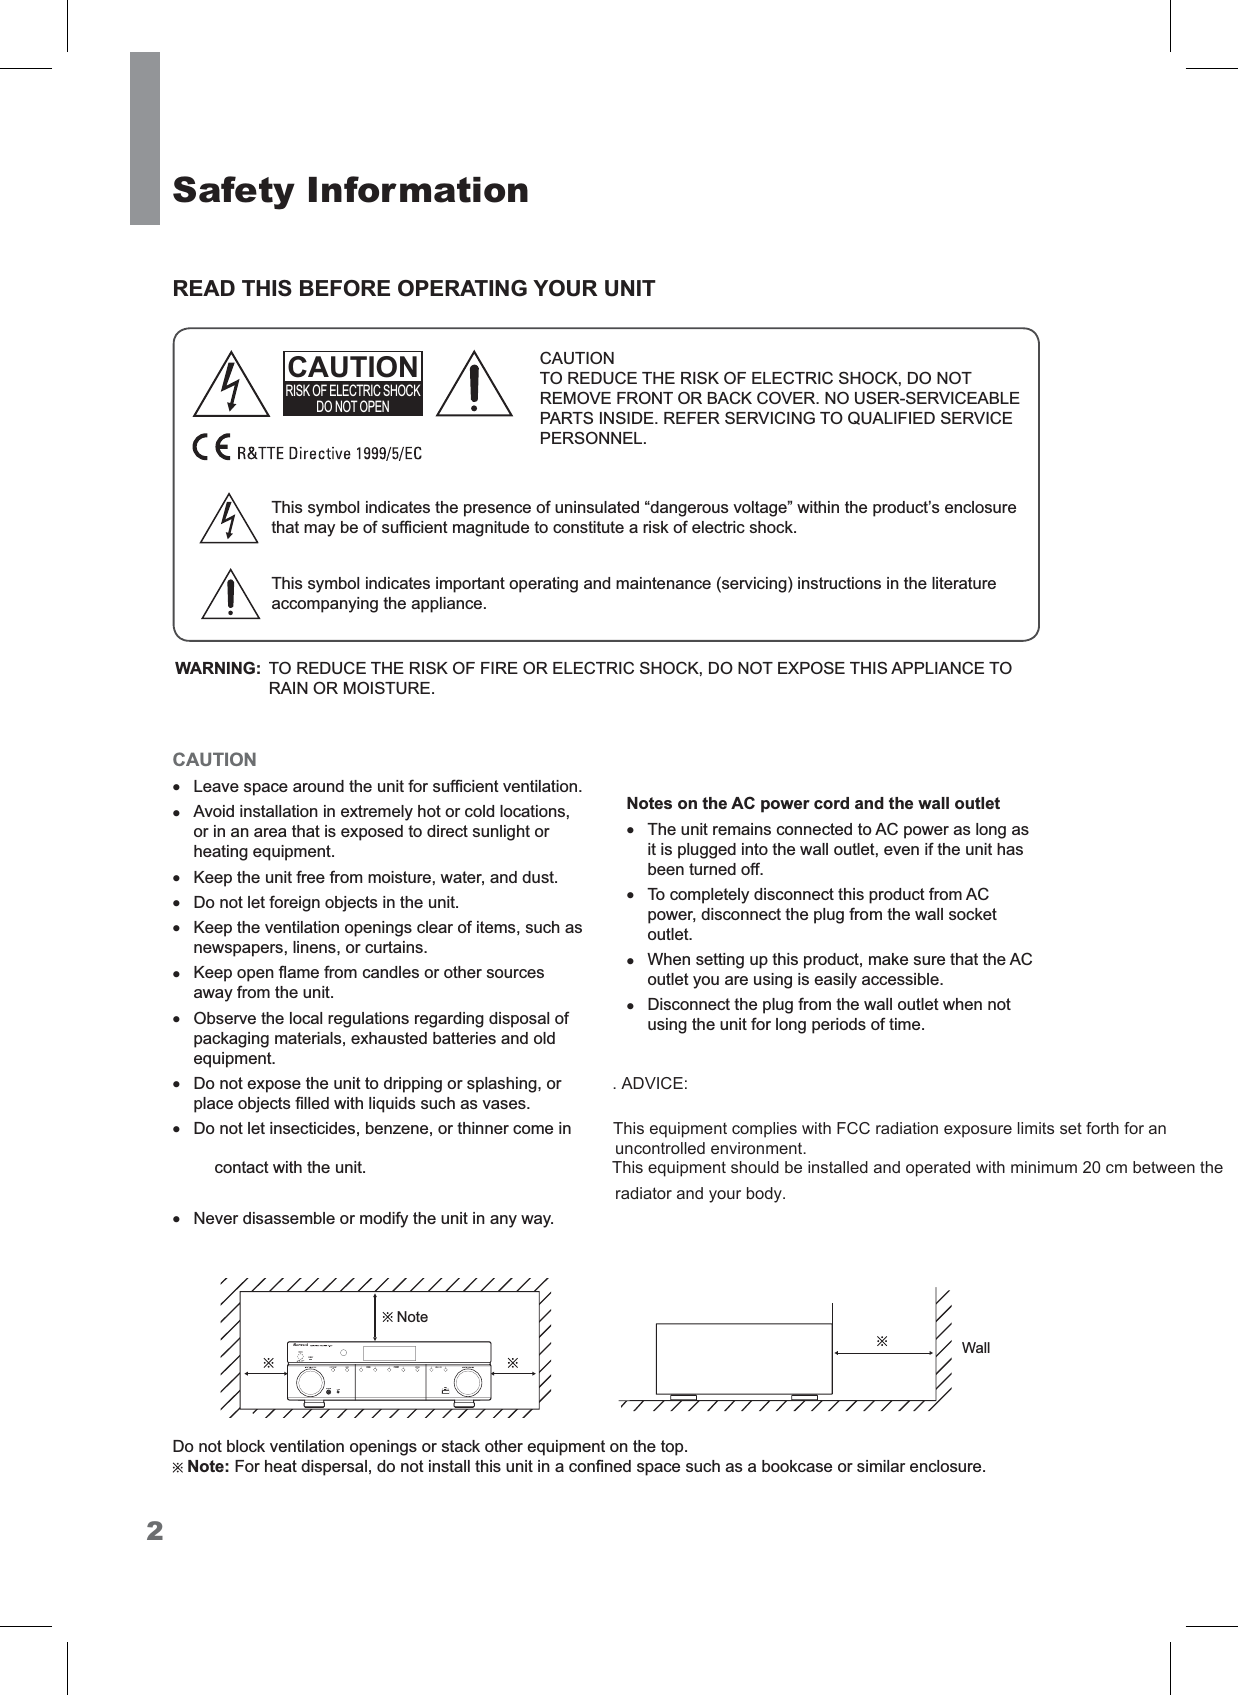
![29Operating Your SystemEnglishDTS Digital SurroundDTS Digital Surround (also called simply DTS) supports up to 5.1 discrete channels and uses less compression IRUKLJK¿GHOLW\UHSURGXFWLRQ8VHLWZLWK'9'VDQG&'Vbearing the DTS logo.DTS-ES™ Discrete 6.1This is a 6.1 channel discrete digital audio format ZKLFKDGGVDVXUURXQGEDFNFKDQQHOWRWKH'76digital surround sound. The seven totally separate audio channels provide better spatial imaging and 360 degrees sound localization, perfect for sounds that pan across the surround channels. Use it with DVDs bearing the DTS-ES logo, especially those with a DTS (6'LVFUHWHVRXQGWUDFNDTS - ES™ Matrix 6.1This is a 6.1 channel discrete digital audio format LQVHUWLQJDVXUURXQGEDFNFKDQQHOWRWKH'76GLJLWDOsurround sound through matrix encoding. Use it with DVDs bearing the DTSES logo.DTS Neo: 6™ SurroundDTS Neo: 6 is a matrix decoding technology for DFKLHYLQJFKDQQHOVXUURXQGSOD\EDFNZLWKFKDQQHOsources. It includes 'DTS Neo: 6 Cinema’ suited for playing movies' and 'DTS Neo: 6 Music’ suited for playing music'.'767KLVLVKLJKUHVROXWLRQ'76ZLWKDN+]VDPSOLQJUDWHDQGELWUHVROXWLRQSURYLGLQJVXSHULRU¿GHOLW\8VHLWwith DVDs bearing the DTS 96/24 logo.DTS-HD High Resolution AudioDeveloped for use with HDTV, including the new video disc formats Blu-ray and HD DVD, this is the latest multi-channel audio format from DTS. It supports up WRFKDQQHOVZLWKN+]ELWVDPSOLQJUDWHDQGsignal resolution.DTS-HD Master Audio'HVLJQHGWRWDNHIXOODGYDQWDJHRIWKHDGGLWLRQDOstorage space offered by the new Blu-ray and HD DVD disc formats, this new DTS format offers up to 7.1 discrete channels of uncompressed digital audio ZLWKN+]ELWVDPSOLQJUDWHDQGVLJQDOUHVROXWLRQManufactured under license under U.S. Patent Nos: 5,956,674; 5,974,380; 6,226,616; 6,487,535; 7,212,872; 7,333,929; 7,392,195; 7,272,567 & other U.S. and worldwide patents issued & pending. DTS-HD, the Symbol, & DTS-HD and the Symbol together are UHJLVWHUHGWUDGHPDUNV'76+'0DVWHU$XGLRLVDWUDGHPDUNRI'76,QF3URGXFWLQFOXGHVVRIWZDUH© DTS, Inc. All Rights Reserved.Dolby DigitalDolby Digital is the multi-channel digital signal format developed by Dolby Laboratories. Discs bearing the Dolby Digital logo include the recording of up to 5.1 channels of digital signals. This will put you right LQWKHPLGGOHRIWKHDFWLRQMXVWOLNHEHLQJLQDPRYLHtheater or concert hall.Dolby Digital EXThis mode expands 5.1-channel sources for FKDQQHOSOD\EDFN,WVHVSHFLDOO\VXLWHGWR'ROE\'LJLWDO(;VRXQGWUDFNVWKDWLQFOXGHDPDWUL[HQFRGHGVXUURXQGEDFNFKDQQHO7KHDGGLWLRQDOFKDQQHODGGVDQextra dimension and provides an enveloping surround VRXQGH[SHULHQFHSHUIHFWIRUURWDWLQJDQGÀ\E\VRXQGeffects.Dolby Digital PlusDeveloped for use with HDTV, including the new video disc formats Blu-ray and HD DVD, this is the latest multichannel audio format from Dolby. It supports up WRFKDQQHOVZLWKN+]ELWVDPSOLQJUDWHDQGsignal resolution.Dolby TrueHD'HVLJQHGWRWDNHIXOODGYDQWDJHRIWKHDGGLWLRQDOstorage space offered by the new Blu-ray and HD DVD disc formats, this new Dolby format offers up to 7.1 discrete channels of lossless audio performance ZLWKN+]ELWVDPSOLQJUDWHDQGVLJQDOUHVROXWLRQDolby Pro Logic IIzThis mode adds front height channels to surround VRXQGFUHDWLQJDFKDQQHOSDO\EDFNIRUPXVLFmovies and video games. Dolby Pro Logic IIz brings enhanced spatial effects, added depth, and an overall airiness to listening experience.Dolby Pro Logic IIxThis mode expands any 2-channel source for FKDQQHOSOD\EDFN,WSURYLGHVDYHU\QDWXUDOand seamless surround sound experience that fully envelopes the listener. As well as music and movies, YLGHRJDPHVFDQDOVREHQH¿WIURPWKHGUDPDWLFVSDWLDOeffects and vivid imaging. It includes ‘Dolby Pro Logic IIx Movie’ suited for playing movies, ‘Dolby Pro Logic IIx Music’ suited for playing music and ‘Dolby Pro Logic IIx Game’ suited for playing games.Dolby Pro Logic II,I\RXDUHQRWXVLQJDQ\VXUURXQGEDFNVSHDNHUV'ROE\Pro Logic II surround will be used instead of Dolby Pro Logic IIx surround. It includes Dolby Pro Logic II Movie, Dolby Pro Logic II Music and Dolby Pro Logic II Game OLNH'ROE\3UR/RJLF,,[VXUURXQGManufactured under license from Dolby Laboratories. Dolby, Pro Logic, and the double-D symbol are UHJLVWHUHGWUDGHPDUNVRI'ROE\/DERUDWRULHV](https://usermanual.wiki/Inkel/R-807/User-Guide-1899672-Page-29.png)
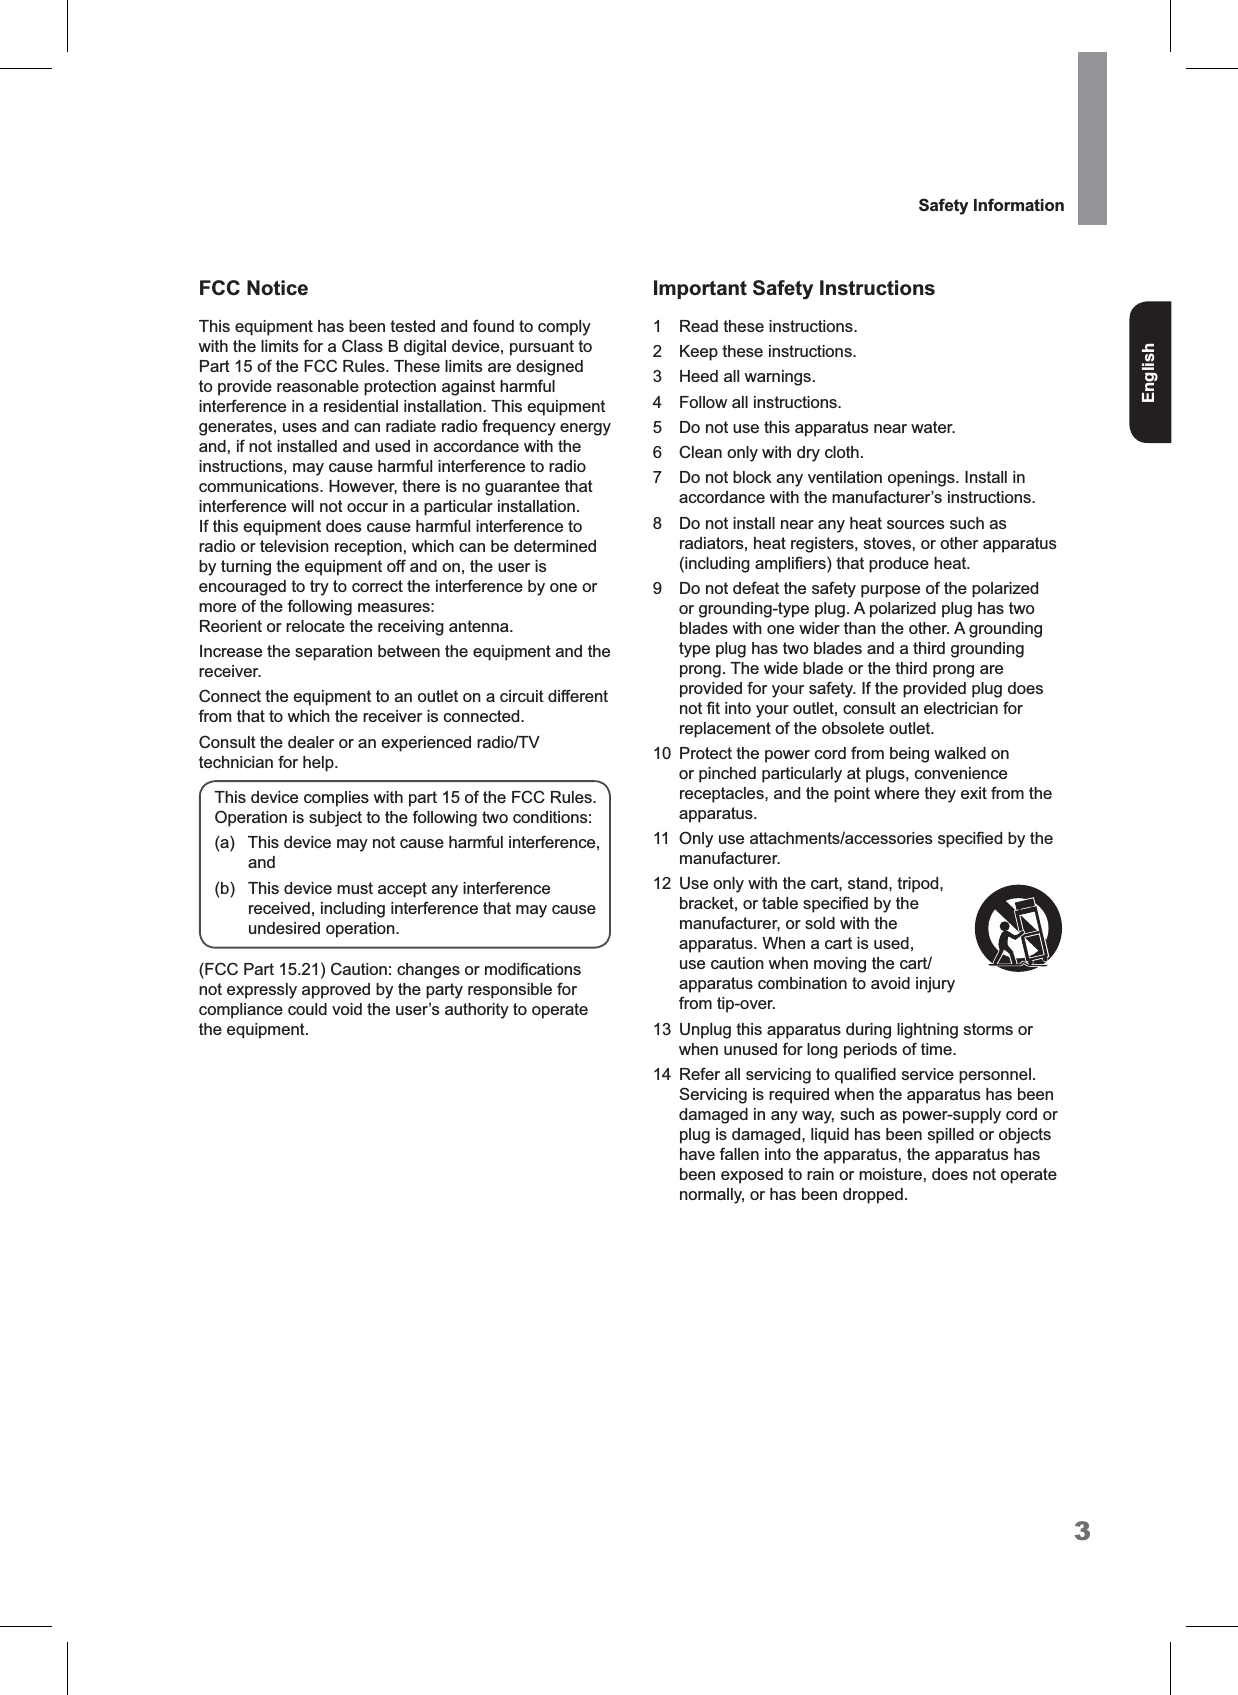
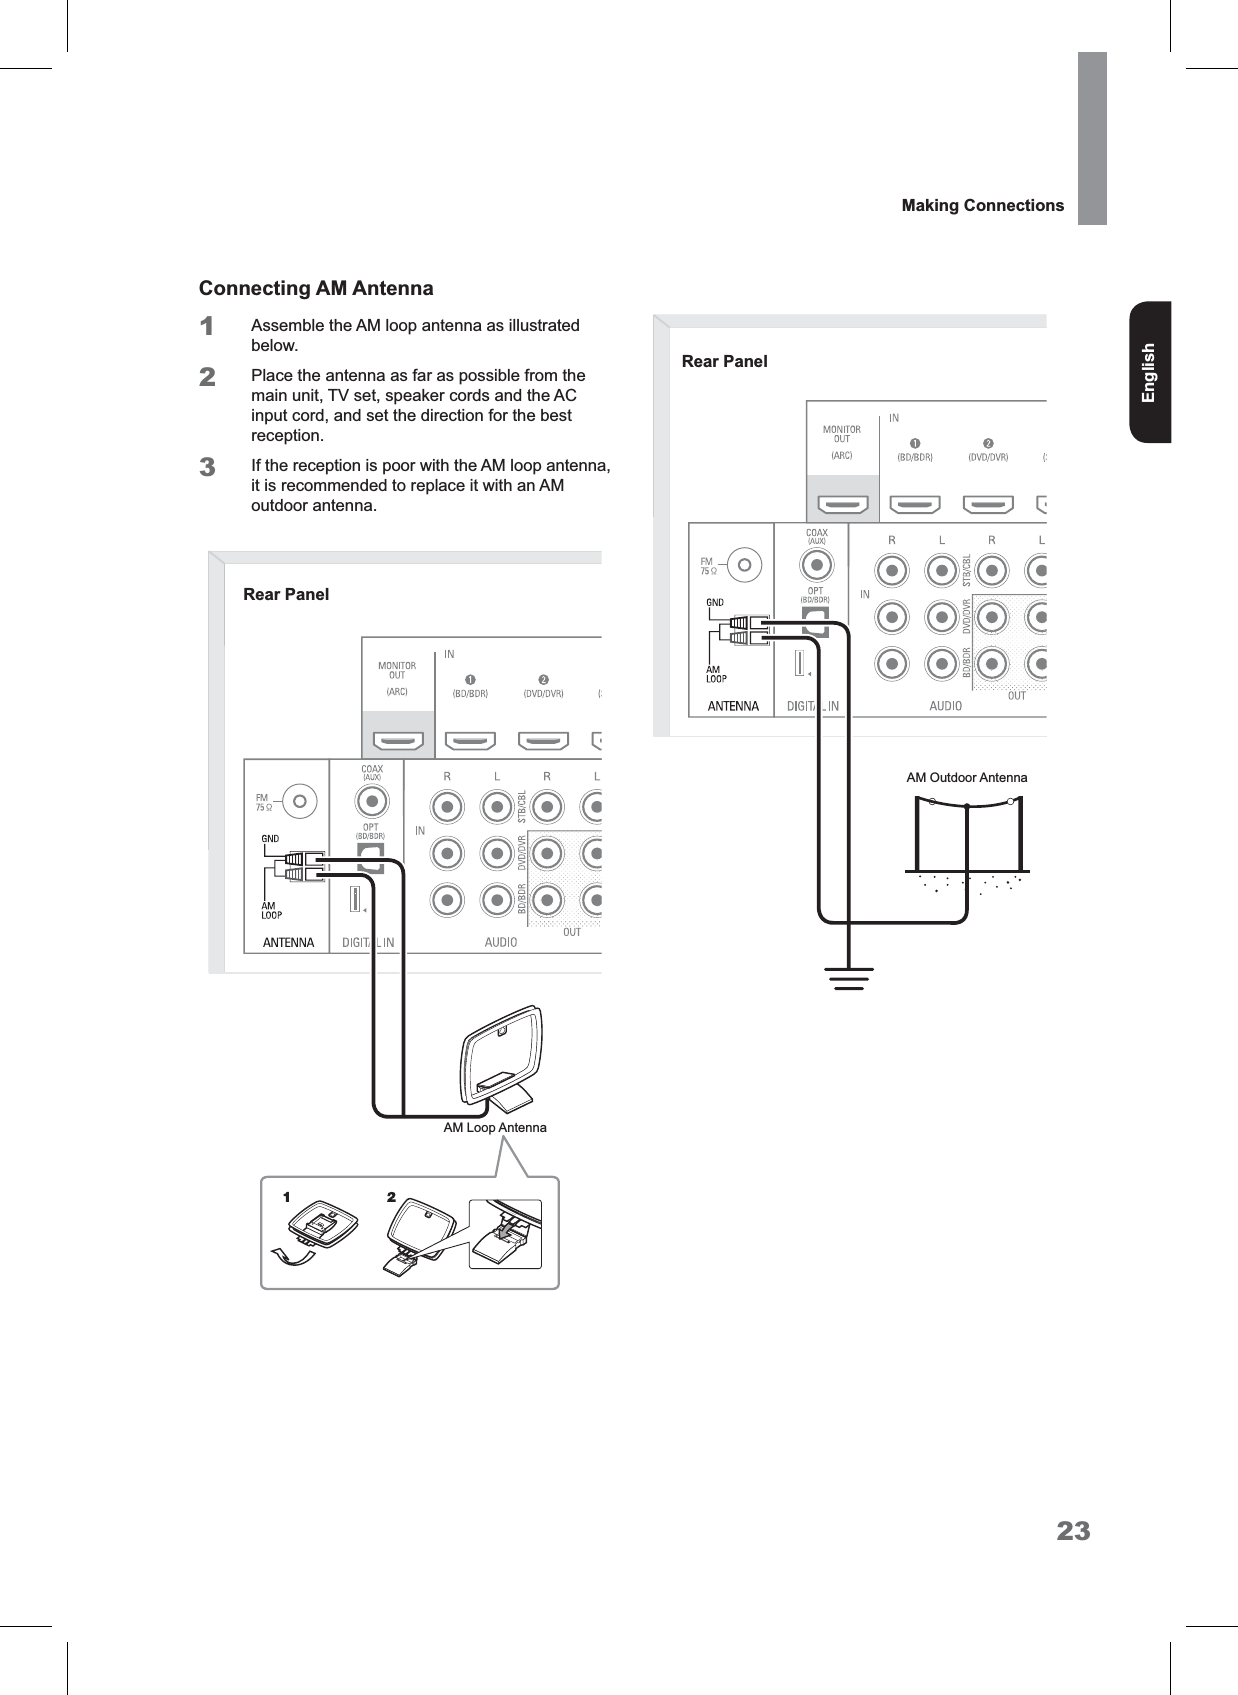
![30R-807 NETWORK AV RECEIVERTheaterThis mode provides the effect of being in a theater when watching a play.MovieThis mode provides the effect of being in a movie theater when watching a movie.HallThis mode provides the ambience of a concert hall for classical music sources such as orchestral, chamber music or an instrumental solo.GameThis mode is suitable for video games.Stadium7KLVPRGHSURYLGHVDQH[SDQVLYHVRXQG¿HOGLQRUGHUto achieve a true stadium effect when watching baseball or soccer games.Multi Channel Stereo7KLVPRGHLVGHVLJQHGIRUSOD\LQJEDFNJURXQGPXVLF7KHIURQWVXUURXQGDQGVXUURXQGEDFNFKDQQHOVFUHDWHa stereo image that encompasses the entire area.ALC (Auto Volume Level Control)7KLVPRGHDXWRPDWLFDOO\HTXDOL]HVSOD\EDFNVRXQGlevels if each sound level varies with the music source recorded in a portable audio player.xThe sound from each channel can be reproduced according to the surround modes as follows:ChannelsModes)5217/5 CENTER SURROUND/5SURROUND%$&.)5217+(,*+7/5SUBWOOFERDTS-HD HIGH RESOLUTION$8',20$67(5$8',2 O O O O/- O'76'76 OOO - O'76(6',6&5(7(0$75,; OOO O O'761(2&,1(0$086,& O O O O - (*)'2/%<',*,7$/3/86'2/%<TRUEHD O O O O/- ODOLBY DIGITAL OOO - ODOLBY DIGITAL EX OOO O ODOLBY PRO LOGIC IIz HEIGHT OOO O O'2/%<352/2*,&,,[029,(086,&*$0( OOO O O'2/%<352/2*,&,,029,(086,&*$0( OOO - O(MULTI) PCM O O O O/- OAUTO VOLUME LEVEL CONTROL O - - - - (*)Other Surrounds O O O O - (*)STEREO O - - - - (*)(*): Depending on the subwoofer setting, the sound from the subwoofer channel may be reproduced.x'HSHQGLQJRQWKHVSHDNHUVHWWLQJVDQGWKHQXPEHURIWKHHQFRGHGFKDQQHOVHWFWKHVRXQGIURPWKHFRUUHVSRQGLQJFKDQQHOVPD\QRWEHUHSURGXFHG)RUGHWDLOVVHH³6HWWLQJWKH6SHDNHU” on page 44.](https://usermanual.wiki/Inkel/R-807/User-Guide-1899672-Page-30.png)
![31Operating Your SystemEnglishCancelling the Surround Mode for Stereo Operation1Press STEREO.xDepending on the input signal format, either the stereo mode or the 2CH downmix mode is selected.2To cancel either the stereo mode or the 2CH downmix mode, press the SURROUND buttons to select the surround mode.x2 CH downmix mode allows the multi-channel signals encoded in DTS or Dolby Digital format, etc. to be mixed down into 2 front channels and WREHUHSURGXFHGWKURXJKRQO\WZRIURQWVSHDNHUVor through headphones.xIf headphones are plugged in to the main unit while playing the multi-channel digital signals from DTS or Dolby Digital sources, etc., it will enter the 2CH downmix mode automatically.NoteAdjusting the Current Channel LevelAfter adjusting each channel level with test tone, adjust the channel levels according to the program sources or to suit your tastes.1Press the CHANNEL LEVEL button.2Select the desired channel by pressing S or T.xEach time the buttons are pressed, the corresponding channel changes as follows: FL [p FHL] p C [p FHR] p FR pSR (p SBR p SBL) p SL p SW( ) : 3RVVLEOHZKHQWKHVXUURXQGEDFNFKDQQHOis set to “2ch” or “1ch”. [ ] : Possible only when the front height VSHDNHULVQRWVHWWR³12´x'HSHQGLQJRQWKHVSHDNHUVHWWLQJVVXFKDV³12´and surround mode, some channels cannot be selected.Note3Adjust the level of the selected channel as desired by pressing W or X.4Repeat the steps 2 and 3 to adjust each channel level.](https://usermanual.wiki/Inkel/R-807/User-Guide-1899672-Page-31.png)
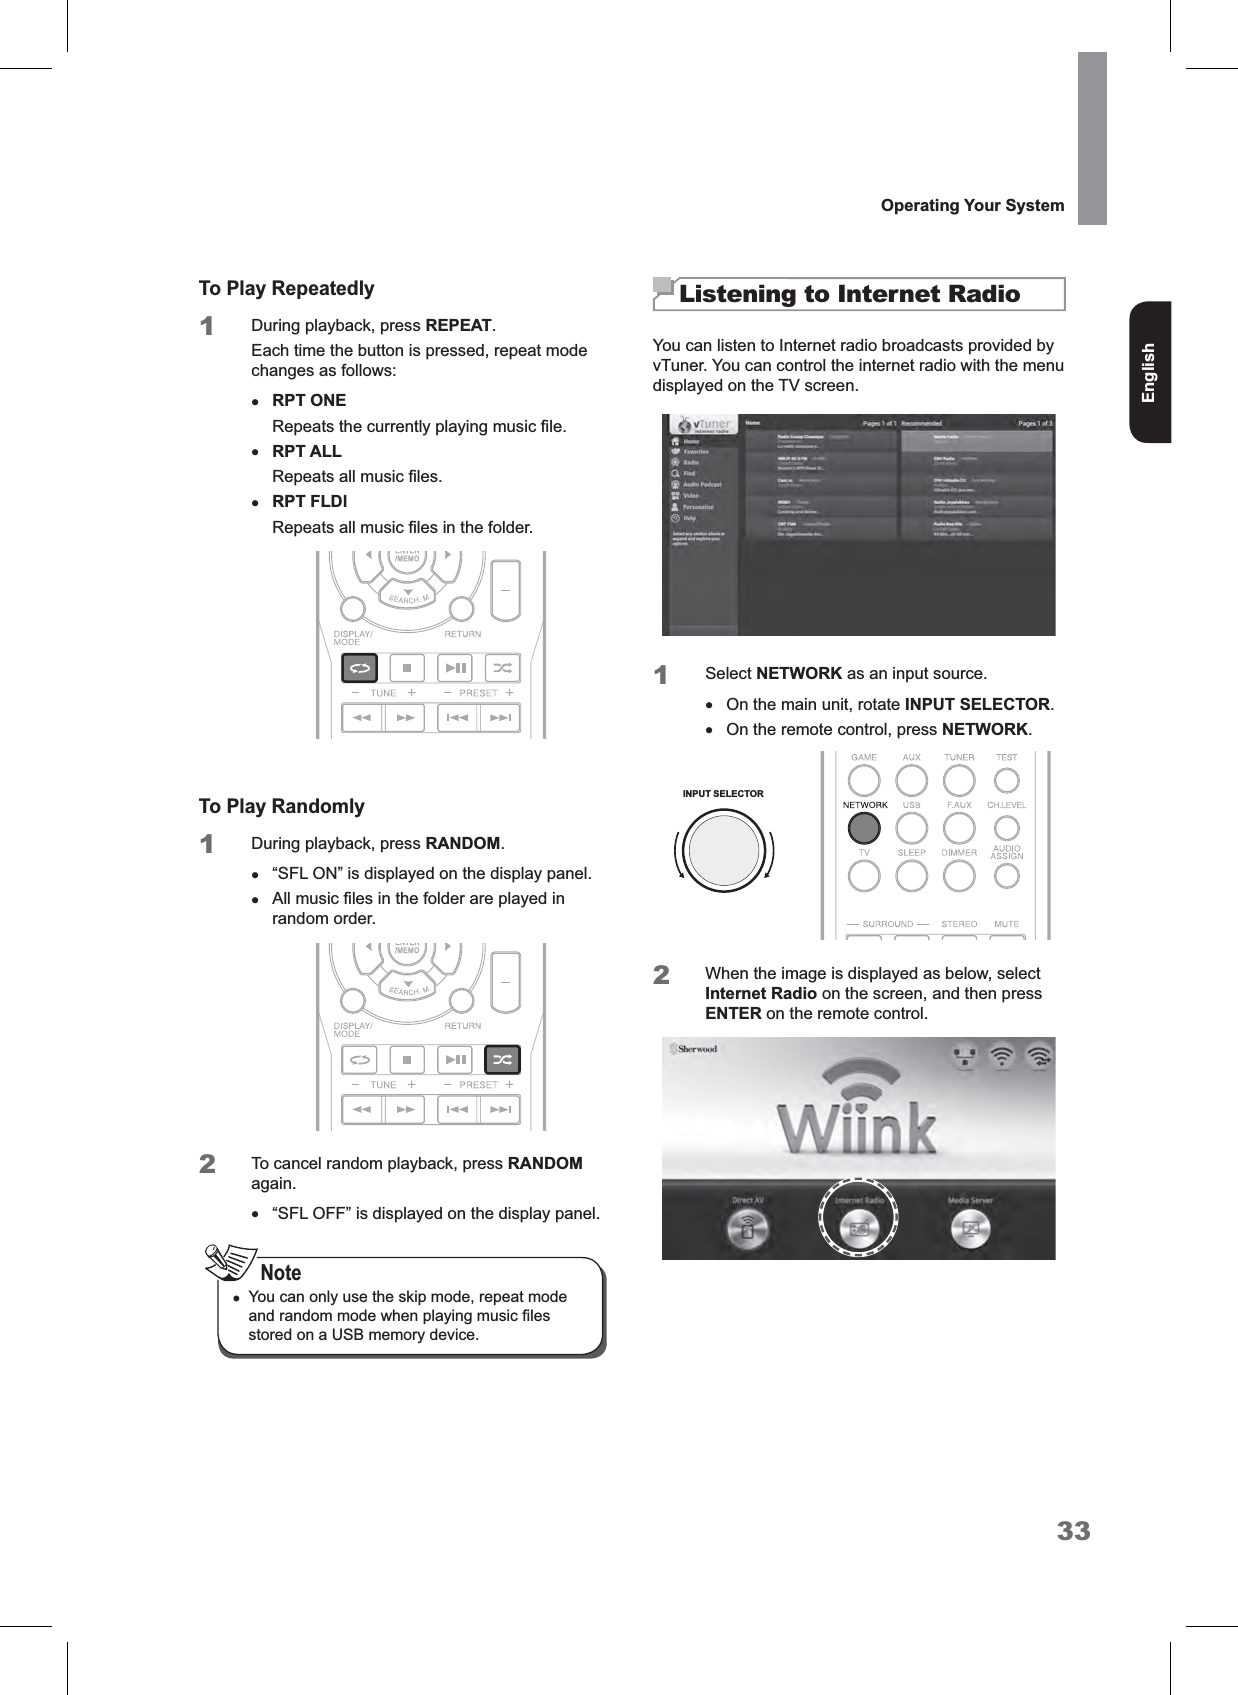
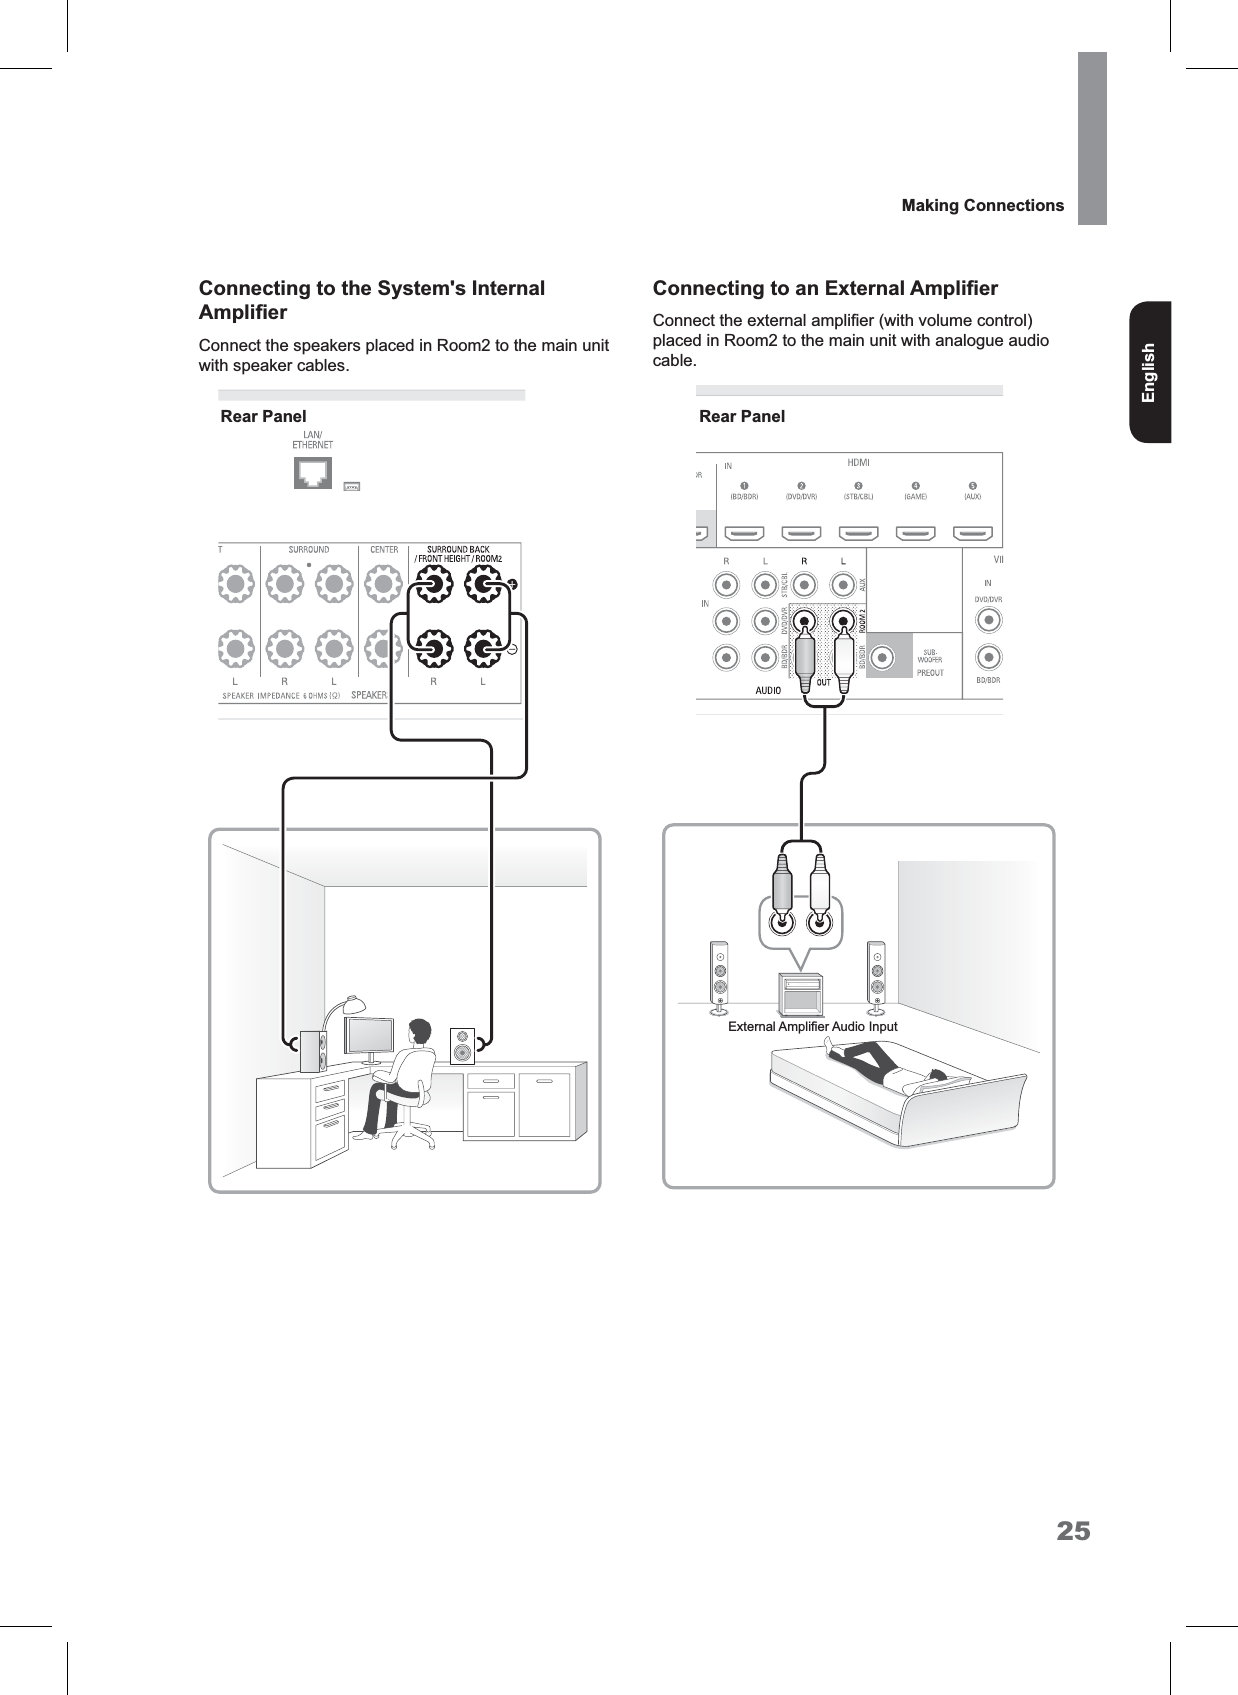
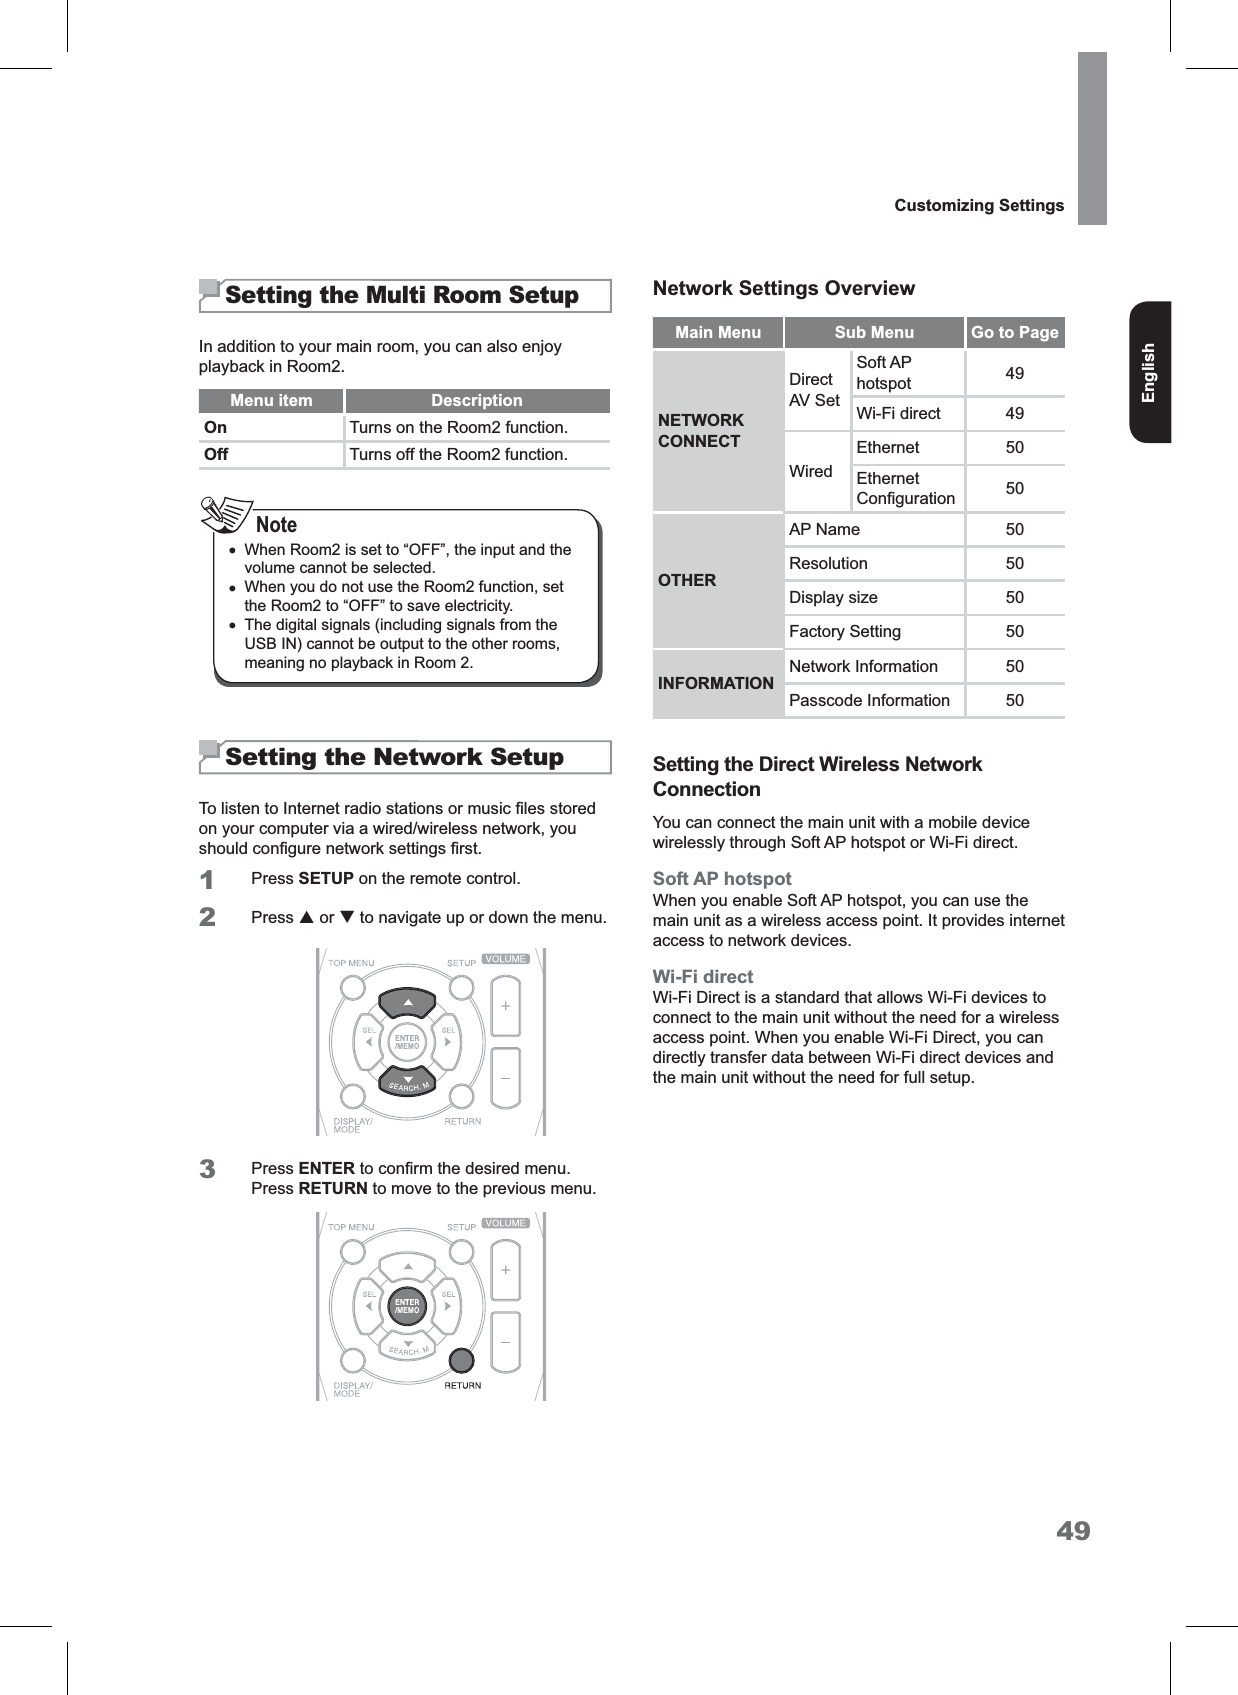
![43Customizing SettingsEnglishSetting Options Overview Main Menu Sub Menu Go to Page Description1. SYS SETAMP 44 $VVLJQVWKHSRZHUDPSOL¿HUA.P.C. 44 Automatic Power Control.N.S.C. 44 6HWVWKHVWDQGE\WLPHIRUWKHQHWZRUN2. SPK SET A. SETUP 44 $XWRPDWLFDOO\RSWLPL]HVWKHVSHDNHUVHWWLQJVSPK SET 46 6HWVWKHVSHDNHUV\VWHPX.OVER 46 Sets the crossover frequency. DISTANCE 46 6HWVWKHVSHDNHUGLVWDQFHCH.LEVEL 46 Sets the current channel levels.3. HDMI SETHDMI 47 Sets the connected HDMI input source. CEC 47 $OORZVLQSXWVHOHFWLRQRIWKHPDLQXQLWWREHLQWHUORFNHGwith the operation of the connected components.4. PARAMTRH.GAIN 47 Sets the front height channel level.PNRM 47 Sets to broaden the width of the front stereo image when using the Dolby Pro Logic IIx Music listening mode. C.WIDTH 47 Sets the center image so it may be heard only from the FHQWHUVSHDNHUDIEMN 47 6HWVWKHVRXQG¿HOGHLWKHUWRZDUGVWKHIURQWRUWRZDUGVthe rear.C.IMG 47 Sets the center image. DRC 48&RQWUROVWKHG\QDPLFUDQJHIRUPRYLHVRXQGWUDFNVoptimized for Dolby Digital, DTS, Dolby Digital Plus and Dolby TrueHD.TONE 48 Sets the tone (bass and treble) as desired.S.DLY 48 Adjust the time delay of audio signals to synchronize the sound with the picture.LFE 48 Sets the front height channel level.5. MLT. RM Z2 49 Sets to enable or disable the Room2 function.](https://usermanual.wiki/Inkel/R-807/User-Guide-1899672-Page-43.png)
![44R-807 NETWORK AV RECEIVERSetting the System Setup AMP Assign 7KHVXUURXQGEDFNFKDQQHOV¶SRZHUDPSOL¿HUFDQGULYHVXUURXQGEDFNVSHDNHUVIURQWKHLJKWVSHDNHUVDQGWKH5220VSHDNHUV'HSHQGLQJRQWKHSXUSRVHRIWKHVSHDNHUV\RXVKRXOGDVVLJQWKHSRZHUDPSOL¿HUDFFRUGLQJO\)RUGHWDLOVVHH³&RQQHFWLQJ6SHDNHUV´RQpage 14 and “Connecting Multi-Room” on page 24.Menu item DescriptionSurround Back'ULYHVWKHVXUURXQGEDFNVSHDNHUVwhen connecting the SURROUND BACK channels to them.Front Height 'ULYHVWKHIURQWKHLJKWVSHDNHUVIRU'ROE\3UR/RJLF,,]SOD\EDFNRoom2 'ULYHVWKH5220VSHDNHUVIRU5220SOD\EDFNAutomatic Power Control You can set the standby time for the system to be turned off. The default setting value is 4H. Network Standby Control You can set whether the main unit can be turned on IURPRWKHUQHWZRUNGHYLFHVMenu item DescriptionON (QDEOHVWKHQHWZRUNVWDQGE\function.OFF 'LVDEOHVWKHQHWZRUNVWDQGE\function.Setting the Speaker Setup After you have installed this receiver and connected DOOWKHFRPSRQHQWV\RXVKRXOGDGMXVWWKHVSHDNHUsettings for the optimum sound acoustics according to \RXUHQYLURQPHQWDQGVSHDNHUOD\RXW:KHQHYHU\RXFKDQJHVSHDNHUVVSHDNHUSRVLWLRQVRUWKHOD\RXWRIyour listening environment, you should also adjust the VSHDNHUVHWWLQJVWRRAuto Setup $XWR6HWXSOHWV\RXDYRLGWKHPRUHGLI¿FXOWOLVWHQLQJEDVHGVSHDNHUVHWXSDQGDFKLHYHJRRGVXUURXQGsound automatically. Auto Setup provides the optimum listening environment for the listening position in your room. When performing the Auto Setup procedure, \RXGRQRWQHHGWRSHUIRUPWKH6SHDNHU&RQ¿JXUDWLRQ6SHDNHU&URVVRYHU6SHDNHU'LVWDQFHDQG&KDQQHOLevel setup procedures.1&KHFNWKDWWKHVSHDNHUVDUH¿UPO\FRQQHFWHGWRthis receiver.xIf your subwoofer has a volume control and crossover frequency, set the volume halfway and set the crossover frequency to the PD[LPXPRUWKHORZSDVV¿OWHURII2Connect the supplied microphone to the SETUP 0,&MDFNRQWKHIURQWSDQHO](https://usermanual.wiki/Inkel/R-807/User-Guide-1899672-Page-44.png)
![45Customizing SettingsEnglishxSince the microphone for Auto Setup is designed exclusively for this receiver, do not use a microphone other than the one supplied with this receiver.Caution33ODFHWKHPLFURSKRQHRQDÀDWOHYHOVXUIDFHDWthe listening position.x,ISRVVLEOHXVHDWULSRGRUWR¿[WKHmicrophone at the same height as your ears would be when you are seated in your listening position.xEnsure there are no obstacles between the VSHDNHUVDQGWKHPLFURSKRQH4Press S or T to select the Auto Setup, and then press X button.5Press X to start the auto setup procedure.xLoud test tones are output played successively and when the auto setup procedure has been completed, “COMPLETED” will be displayed.xTo stop the auto setup procedure while performing it, press W.x,IWKHUHLVDSUREOHPZLWKVSHDNHURUmicrophone connection, an error message will be displayed. In this case, turn off the power, FKHFNWKHFRQQHFWLRQDQGWKHQUHWU\WKHDXWRsetup procedure. 6Press X to memorize the results.x7KHUHVXOWVDUHPHPRUL]HGDQGWKH6SHDNHUSetup menu is displayed.xWhen W is pressed to select “CANCEL”, the results are not memorized.x&KHFNWKHUHVXOWVRQHDFKVHWXSPHQX³6SHDNHU&RQ¿J´³6SHDNHU&URVVRYHU´³6SHDNHU'LVWDQFH´DQG³&KDQQHO/HYHO´menu on page 46).7Disconnect the microphone after you have completed the auto setup procedure.xBecause the test tones are loud, ensure there are no infants or young children in the room.CautionxFor best results, ensure the room is as quiet as possible during the auto setup procedure. If there is too much ambient noise, the results may not be satisfactory.xIf the results are not satisfactory, you can retry the auto setup procedure or personalize your VSHDNHUVHWXSDQGFKDQQHOOHYHOVHWXSE\choosing the settings manually. For details, see ³6SHDNHU&RQ¿J´³6SHDNHU&URVVRYHU´³6SHDNHUDistance” and “Channel Level” procedure on page 46.Note](https://usermanual.wiki/Inkel/R-807/User-Guide-1899672-Page-45.png)
![46R-807 NETWORK AV RECEIVERSpeaker Setup 7KHUHDUHVHYHUDOZD\V\RXFDQXVHWKHVSHDNHUchannels with the main unit. In addition to a normal home theater setup where they are used for the front KHLJKWVSHDNHUVWKH\FDQEHXVHGDVDQLQGHSHQGHQWVSHDNHUV\VWHPLQDQRWKHUURRPx6HOHFWWKHGHVLUHGVSHDNHUDQGWKHQSUHVVX to enter its setting menu.Menu item Description<HV1RSelects the desired item depending on whether the VSHDNHUVDUHFRQQHFWHGRUQRW&KDQQHO1 Channel (Left)Selects the desired item depending on the number of VSHDNHUVFRQQHFWHGWR6XUURXQG%DFN0XOWLFKDQQHOVx:KHQDVSHDNHULVQRWVHWWR³12´\RXQHHGto set their distances from listening position and crossover frequencies according to their frequency characteristics. For details, see ³6SHDNHU&URVVRYHU´RQSDJHDQG³6SHDNHUDistance” on page 46.xWhen the “SR” is set to “NO”, “SB” cannot be set to “2 Channel” or “1 Channel (Left)”.x:KHQWKHVXUURXQGEDFNFKDQQHOV¶SRZHUDPSOL¿HULVDVVLJQHGWR³5RRP´WKH³6%´cannot be selected. For details, see “AMP Assign” on page 44.NoteSpeaker CrossoverYou can set the crossover frequency according to the IUHTXHQF\FKDUDFWHULVWLFVRIWKHFRQQHFWHGVSHDNHUVFor details on the frequency characteristics, refer to the RSHUDWLQJLQVWUXFWLRQVRIWKHVSHDNHUVxYou can select the crossover frequency among Full Range, 40 Hz, 60 Hz, 80 Hz, 100 Hz, 120 Hz, 150 Hz, 200 Hz, and 250 Hz. The default setting is 100 Hz.x6HOHFW³)XOO5DQJH´ZKHQWKHVHOHFWHGVSHDNHUFDQfully reproduce frequencies below 40 Hz.x<RXFDQQRWVHOHFWWKHVXEZRRIHUDQGWKHVSHDNHUset to “NO”.x,IWKHIUHTXHQF\UDQJHRI\RXUVSHDNHULV+]aN+]WKHFURVVRYHUIUHTXHQF\VKRXOGbe set to 100 Hz or slightly higher. For details, UHIHUWRWKHRSHUDWLQJLQVWUXFWLRQVRIWKHVSHDNHUVto be connected.xFrequencies below the crossover frequency are RXWSXWIURPWKHVXEZRRIHURUWKHVSHDNHUVZKHQthey are set to “Full Range” (when not using a subwoofer).NoteSpeaker DistancexSelect the desired unit (Meter or Feet) before setting WKHVSHDNHUGLVWDQFH2QFHDXQLWLVVHOHFWHGWKHdistances are automatically converted to the selected unit.x<RXFDQVHWWKHGLVWDQFHZLWKLQWKHUDQJHRIaPHWHUVLQPHWHULQWHUYDOVRUaIHHWin 0.5 foot intervals).xAbout the speaker distance:KHQHQMR\LQJPXOWLFKDQQHOVXUURXQGSOD\EDFNZLWKsources such as Dolby Digital and DTS sources, etc., it is ideal that the center, surround, and surround EDFNVSHDNHUVVKRXOGEHWKHVDPHGLVWDQFHIURPWKHPDLQOLVWHQLQJSRVLWLRQDVWKHIURQWVSHDNHUVBy entering the distance between the listening SRVLWLRQDQGHDFKVSHDNHUWKHGHOD\WLPHVRIFHQWHUVXUURXQGDQGVXUURXQGEDFNVSHDNHUVHWFDUHautomatically adjusted to create an ideal listening environment virtually as if they were in their ideal locations.Speaker Channel LevelYou can adjust the current channel levels as desired. After adjusting each channel level with the test tone, adjust the channel levels either according to the program sources or to suit your tastes. For details, see “Adjusting each channel level with test tone” on page 31.](https://usermanual.wiki/Inkel/R-807/User-Guide-1899672-Page-46.png)

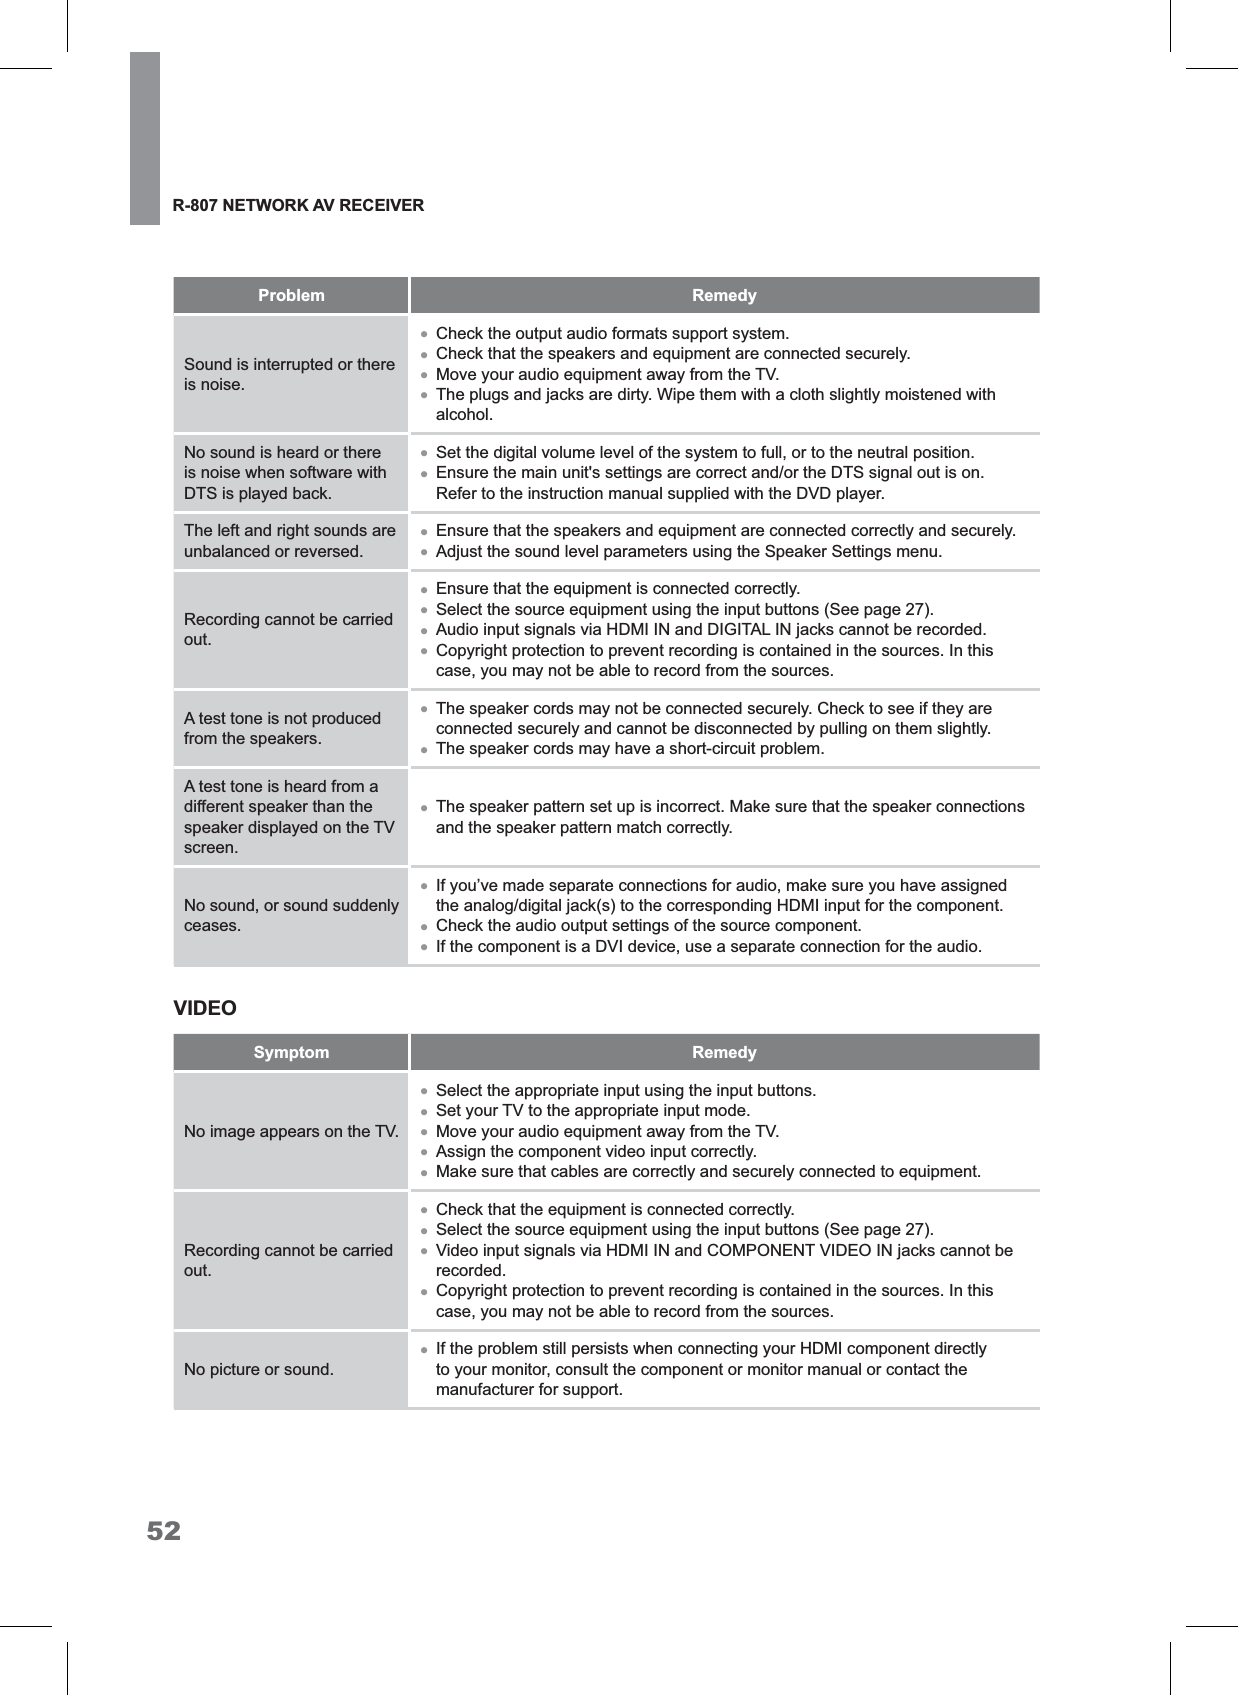
![51EnglishTroubleshooting,I\RXH[SHULHQFHDQ\RIWKHIROORZLQJGLI¿FXOWLHVZKLOHXVLQJWKHV\VWHPXVHWKLVWURXEOHVKRRWLQJJXLGHWRKHOSremedy the problem before requesting servicing. Should any problem persist, consult your nearest authorized dealer or authorized independent company.,IWKHXQLWGRHVQRWRSHUDWHQRUPDOO\GXHWRH[WHUQDOLQÀXHQFHVXFKDVVWDWLFHOHFWULFLW\GLVFRQQHFWWKHSRZHUSOXJfrom the outlet and insert again to return to normal operating conditions.GENERALProblem RemedyThe power does not turn on. xDisconnect the power plug from the outlet, and connect again.The system suddenly turns off.xAfter about a minute (you won’t be able to turn the main unit on during this time), WXUQWKHV\VWHPEDFNRQ,IWKHPHVVDJHSHUVLVWVFDOODQDXWKRUL]HGLQGHSHQGHQWservice company.No sound is heard after a function is selected.x0DNHVXUHWKHFRPSRQHQWLVFRQQHFWHGFRUUHFWO\(See “CONNECTIONS” on page 11.)xPress MUTE to restore the sound. Can’t operate the remote control.xReplace the batteries. (See page 7.)xOperate within 7 m, and 30° of the remote sensor.xRemove any obstacles, or operate from another position.xAvoid exposing the remote sensor on the front panel to direct light.7KHGLVSOD\LVGDUNRURII xPress DIMMER on the control repeatedly to return to the default setting.SOUNDProblem RemedyThere is no sound from the selected component. x&KHFNWKDWWKHFRPSRQHQWLVFRQQHFWHGFRUUHFWO\WRWKHDXGLRLQSXWMDFNVRIcomponents.x(QVXUHWKDWWKHFRUGVDUHIXOO\LQVHUWHGLQWRWKHMDFNVRQERWKWKHFRPSRQHQWand the main unit.xEnsure that the component is selected correctly. x(QVXUHWKDWWKHHTXLSPHQWLVFRQQHFWHGFRUUHFWO\WRWKH+'0,MDFNIRUWKDWequipment.x'HSHQGLQJRQWKHSOD\EDFNHTXLSPHQW\RXPD\QHHGWRDGMXVWWKH+'0,setting of the equipment. Refer to the operating instructions supplied with the equipment.xBe sure to use a High Speed HDMI cable when you view images or listen to sound, especially for the 1080p, Deep Color (Deep Colour) or 3D transmission. xAudio signals (format, sampling frequency, bit length, etc.) transmitted from an +'0,MDFNPD\EHVXSSUHVVHGE\WKHFRQQHFWHGHTXLSPHQW&KHFNWKHVHWXSRIthe connected equipment if the image is poor or the sound does not come out of the equipment connected via the HDMI cable. xWhen the connected equipment is not compatible with copyright protection WHFKQRORJ\+'&3WKHLPDJHDQGRUWKHVRXQGIURPWKH+'0,79287MDFNPD\EHGLVWRUWHGRUPD\QRWEHRXWSXW,IWKLVLVWKHFDVHFKHFNWKHVSHFL¿FDWLRQof the connected equipment.](https://usermanual.wiki/Inkel/R-807/User-Guide-1899672-Page-51.png)
![55EnglishAdditional Information6SHFLÀFDWLRQVAudio SectionMultichannel power75 W per channel, two channels driven @ 6 ohms, +]±N+]7+':SHUFKDQQHOWZRFKDQQHOVGULYHQ#RKPVN+]7+'Input sensitivity/impedance P9NRKPVSignal-to-noise ratio (IHF-A) 95 dBSurround system adjacent-channel separationDolby Pro Logic/PLII: 40 dBDolby Digital: 55 dBDTS: 55 dBFrequency response +]±N+]G%High instantaneous-current capability (HCC) DPSVFM Tuner SectionFrequency range 87.5 – 108.0 MHzUsable sensitivity IHF ȝ9G%ISignal-to-noise ratio (mono/stereo) 65 dB/62 dBDistortion (mono/stereo) Stereo separation G%#N+]Image rejection 80 dBIF rejection 80 dBAM Tuner SectionFrequency range ±N+]Signal-to-noise ratio 45 dBUsable sensitivity (loop) ȝ96HOHFWLYLW\N+] 30 dBIF rejection 80 dB](https://usermanual.wiki/Inkel/R-807/User-Guide-1899672-Page-55.png)