Inkel R-807 Network AV Receiver (WiFi) User Manual R807 Manual A
Inkel Corporation Network AV Receiver (WiFi) R807 Manual A
Inkel >
User Manual

R-807
NETWORK AV RECEIVER
RÉCEPTEUR RÉSEAU AV
RECEPTOR A/V CON CONEXIÓN DE RED
OPERATING INSTRUCTIONS
GUIDE D’UTILISATION
INSTRUCCIONES DE FUNCIONAMIENTO
2
Safety Information
READ THIS BEFORE OPERATING YOUR UNIT
CAUTION
TO REDUCE THE RISK OF ELECTRIC SHOCK, DO NOT
REMOVE FRONT OR BACK COVER. NO USER-SERVICEABLE
PARTS INSIDE. REFER SERVICING TO QUALIFIED SERVICE
PERSONNEL.
CAUTION
RISK OF ELECTRIC SHOCK
DO NOT OPEN
This symbol indicates the presence of uninsulated “dangerous voltage” within the product’s enclosure
WKDWPD\EHRIVXI¿FLHQWPDJQLWXGHWRFRQVWLWXWHDULVNRIHOHFWULFVKRFN
This symbol indicates important operating and maintenance (servicing) instructions in the literature
accompanying the appliance.
WARNING: TO REDUCE THE RISK OF FIRE OR ELECTRIC SHOCK, DO NOT EXPOSE THIS APPLIANCE TO
RAIN OR MOISTURE.
CAUTION
x/HDYHVSDFHDURXQGWKHXQLWIRUVXI¿FLHQWYHQWLODWLRQ
xAvoid installation in extremely hot or cold locations,
or in an area that is exposed to direct sunlight or
heating equipment.
xKeep the unit free from moisture, water, and dust.
xDo not let foreign objects in the unit.
xKeep the ventilation openings clear of items, such as
newspapers, linens, or curtains.
x.HHSRSHQÀDPHIURPFDQGOHVRURWKHUVRXUFHV
away from the unit.
xObserve the local regulations regarding disposal of
SDFNDJLQJPDWHULDOVH[KDXVWHGEDWWHULHVDQGROG
equipment.
xDo not expose the unit to dripping or splashing, or . ADVICE:
SODFHREMHFWV¿OOHGZLWKOLTXLGVVXFKDVYDVHV
xDo not let insecticides, benzene, or thinner come in This equipment complies with FCC radiation exposure limits set forth for an
uncontrolled environment.
contact with the unit. This equipment should be installed and operated with minimum 20 cm between the
radiator and your body.
xNever disassemble or modify the unit in any way.
Notes on the AC power cord and the wall outlet
xThe unit remains connected to AC power as long as
it is plugged into the wall outlet, even if the unit has
been turned off.
xTo completely disconnect this product from AC
SRZHUGLVFRQQHFWWKHSOXJIURPWKHZDOOVRFNHW
outlet.
x:KHQVHWWLQJXSWKLVSURGXFWPDNHVXUHWKDWWKH$&
outlet you are using is easily accessible.
xDisconnect the plug from the wall outlet when not
using the unit for long periods of time.
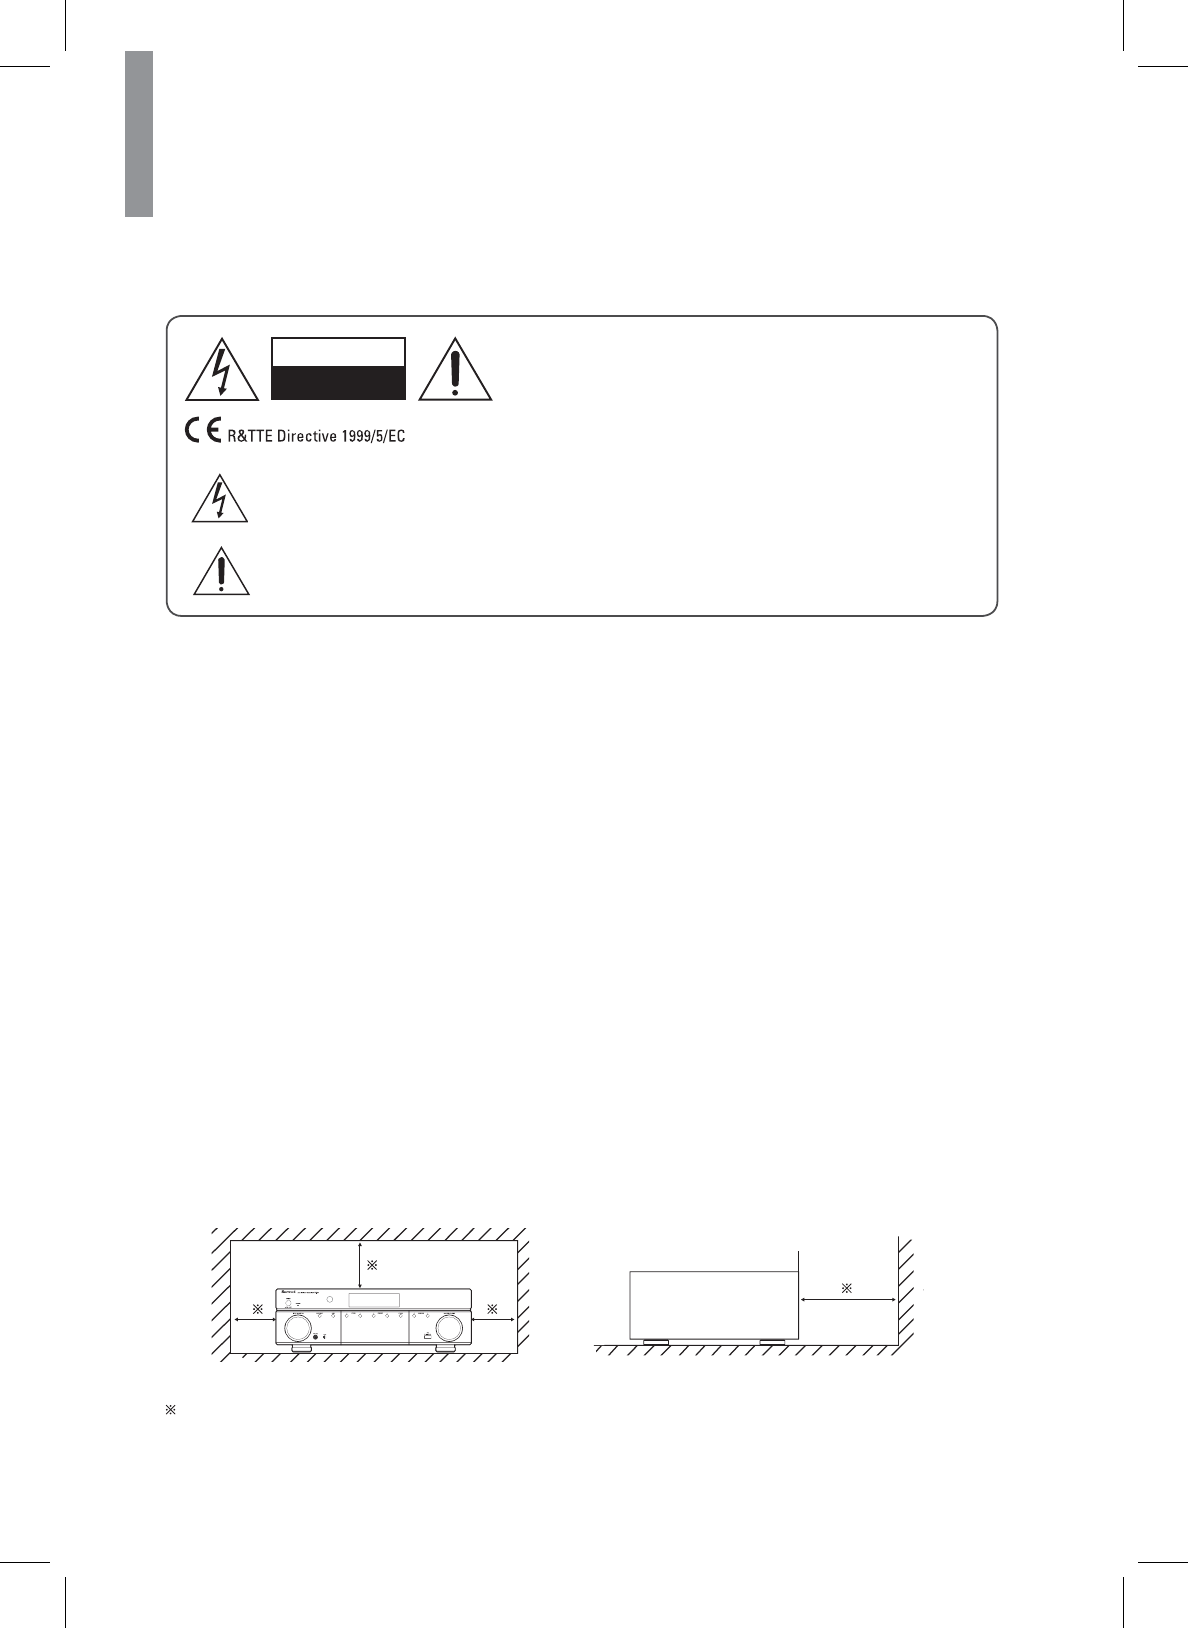
Caution regarding installation Note
Wall
'RQRWEORFNYHQWLODWLRQRSHQLQJVRUVWDFNRWKHUHTXLSPHQWRQWKHWRS
Note:)RUKHDWGLVSHUVDOGRQRWLQVWDOOWKLVXQLWLQDFRQ¿QHGVSDFHVXFKDVDERRNFDVHRUVLPLODUHQFORVXUH
3
Safety Information
English
FCC Notice
This equipment has been tested and found to comply
with the limits for a Class B digital device, pursuant to
Part 15 of the FCC Rules. These limits are designed
to provide reasonable protection against harmful
interference in a residential installation. This equipment
generates, uses and can radiate radio frequency energy
and, if not installed and used in accordance with the
instructions, may cause harmful interference to radio
communications. However, there is no guarantee that
interference will not occur in a particular installation.
If this equipment does cause harmful interference to
radio or television reception, which can be determined
by turning the equipment off and on, the user is
encouraged to try to correct the interference by one or
more of the following measures:
Reorient or relocate the receiving antenna.
Increase the separation between the equipment and the
receiver.
Connect the equipment to an outlet on a circuit different
from that to which the receiver is connected.
Consult the dealer or an experienced radio/TV
technician for help.
This device complies with part 15 of the FCC Rules.
Operation is subject to the following two conditions:
(a) This device may not cause harmful interference,
and
(b) This device must accept any interference
received, including interference that may cause
undesired operation.
)&&3DUW&DXWLRQFKDQJHVRUPRGL¿FDWLRQV
not expressly approved by the party responsible for
compliance could void the user’s authority to operate
the equipment.
Important Safety Instructions
1 Read these instructions.
2 Keep these instructions.
3 Heed all warnings.
4 Follow all instructions.
5 Do not use this apparatus near water.
6 Clean only with dry cloth.
7'RQRWEORFNDQ\YHQWLODWLRQRSHQLQJV,QVWDOOLQ
accordance with the manufacturer’s instructions.
8 Do not install near any heat sources such as
radiators, heat registers, stoves, or other apparatus
LQFOXGLQJDPSOL¿HUVWKDWSURGXFHKHDW
9 Do not defeat the safety purpose of the polarized
or grounding-type plug. A polarized plug has two
blades with one wider than the other. A grounding
type plug has two blades and a third grounding
prong. The wide blade or the third prong are
provided for your safety. If the provided plug does
QRW¿WLQWR\RXURXWOHWFRQVXOWDQHOHFWULFLDQIRU
replacement of the obsolete outlet.
10 3URWHFWWKHSRZHUFRUGIURPEHLQJZDONHGRQ
or pinched particularly at plugs, convenience
receptacles, and the point where they exit from the
apparatus.
11 2QO\XVHDWWDFKPHQWVDFFHVVRULHVVSHFL¿HGE\WKH
manufacturer.
12 Use only with the cart, stand, tripod,
EUDFNHWRUWDEOHVSHFL¿HGE\WKH
manufacturer, or sold with the
apparatus. When a cart is used,
use caution when moving the cart/
apparatus combination to avoid injury
from tip-over.
13 Unplug this apparatus during lightning storms or
when unused for long periods of time.
14 5HIHUDOOVHUYLFLQJWRTXDOL¿HGVHUYLFHSHUVRQQHO
Servicing is required when the apparatus has been
damaged in any way, such as power-supply cord or
plug is damaged, liquid has been spilled or objects
have fallen into the apparatus, the apparatus has
been exposed to rain or moisture, does not operate
normally, or has been dropped.

4
Table of Contents
2 SAFETY INFORMATION
6 GETTING STARTED
6 What's Included
7 Installing the Remote Control Battery
7 Operating the range of the Remote Control
8 PARTS DESCRIPTION
8 Front Panel
9 Front Display
9 Rear Panel
10 Remote Control
11 MAKING CONNECTIONS
11 Connection Overview
&RQQHFWLQJ6SHDNHUV
3ODFLQJ6SHDNHUV
&RQQHFWLQJ6SHDNHUV
6HWWLQJWKH6SHDNHU
16 Connecting a TV
16 Connecting with an HDMI TV
17 Connecting with a non-HDMI TV
&RQQHFWLQJ3OD\EDFN&RPSRQHQWV
18 Connecting HDMI Components
18 Connecting Video Components
19 Connecting Audio Components
21 Connecting Recording Components
&RQQHFWLQJWRD1HWZRUN
22 Connecting an Antenna
22 Connecting FM Antenna
23 Connecting AM Antenna
24 Connecting to Muti-Room
&RQQHFWLQJWRWKH6\VWHPV,QWHUQDO$PSOL¿HU
&RQQHFWLQJWRDQ([WHUQDO$PSOL¿HU
26 Controlling Room2
26 Connecting Power
27 OPERATING YOUR SYSTEM
27 Listening to Your System
27 Basic Operation
27 Muting the Sound
28 Enjoying Surround Effects
28 Setting the Surround Mode
31 Cancelling the Surround Mode for Stereo
Operation
31 Adjusting the Current Channel Level
32 Listening to Music on USB
7R6WRS3OD\EDFN
7R3DXVH3OD\EDFN
7R6NLS)RUZDUGRU%DFNZDUG
33 To Play Repeatedly
33 To Play Randomly
33 Listening to Internet Radio
34 Listening to Music from the Media Server
&RQ¿JXULQJWKH:LQGRZV0HGLD3OD\HU
35 Listening to Music from the Media Server
35 Using the Sherwood Remote Application
35 Preparing for the Application
36 Using the Application
40 Listening to FM Radio
40 Auto Tuning
40 Manual Tuning
40 Manual Presetting
41 Auto Presetting
41 Tuning in to Preset Stations
41 Recording

Table of Contents
5
English
42 CUSTOMIZING SETTINGS
42 Setting the System
43 Setting Options Overview
44 Setting the System Setup
44 AMP Assign
44 Automatic Power Control
1HWZRUN6WDQGE\&RQWURO
6HWWLQJWKH6SHDNHU6HWXS
44 Auto Setup
6SHDNHU6HWXS
6SHDNHU&URVVRYHU
6SHDNHU'LVWDQFH
6SHDNHU&KDQQHO/HYHO
47 Setting the HDMI Setup
47 HDMI
47 CEC Control
47 Setting the Surround Parameter Setup
47 Height Gain
47 PANORAMA
47 Center Width
47 Dimension
47 Center Image
48 DRC
48 Tone
48 Sound Delay
48 Low Frequency Effect
49 Setting the Multi Room Setup
6HWWLQJWKH1HWZRUN6HWXS
1HWZRUN6HWWLQJV2YHUYLHZ
6HWWLQJWKH'LUHFW:LUHOHVV1HWZRUN
Connection
6HWWLQJWKH:LUHG1HWZRUN&RQQHFWLRQ
6HWWLQJ2WKHU1HWZRUN2SWLRQV
9LHZLQJWKH1HWZRUN,QIRUPDWLRQ
51 TROUBLESHOOTING
51 GENERAL
51 SOUND
52 VIDEO
53 USB device
54 NETWORK CONNECTION
54 Important Information Regarding the HDMI
Connection
55 ADDITIONAL INFORMATION
6SHFL¿FDWLRQV
7UDGHPDUNVDQG/LFHQVHV
56 DTS-HD Master Audio
56 Dolby TrueHD
56 HDMI
6
Getting Started
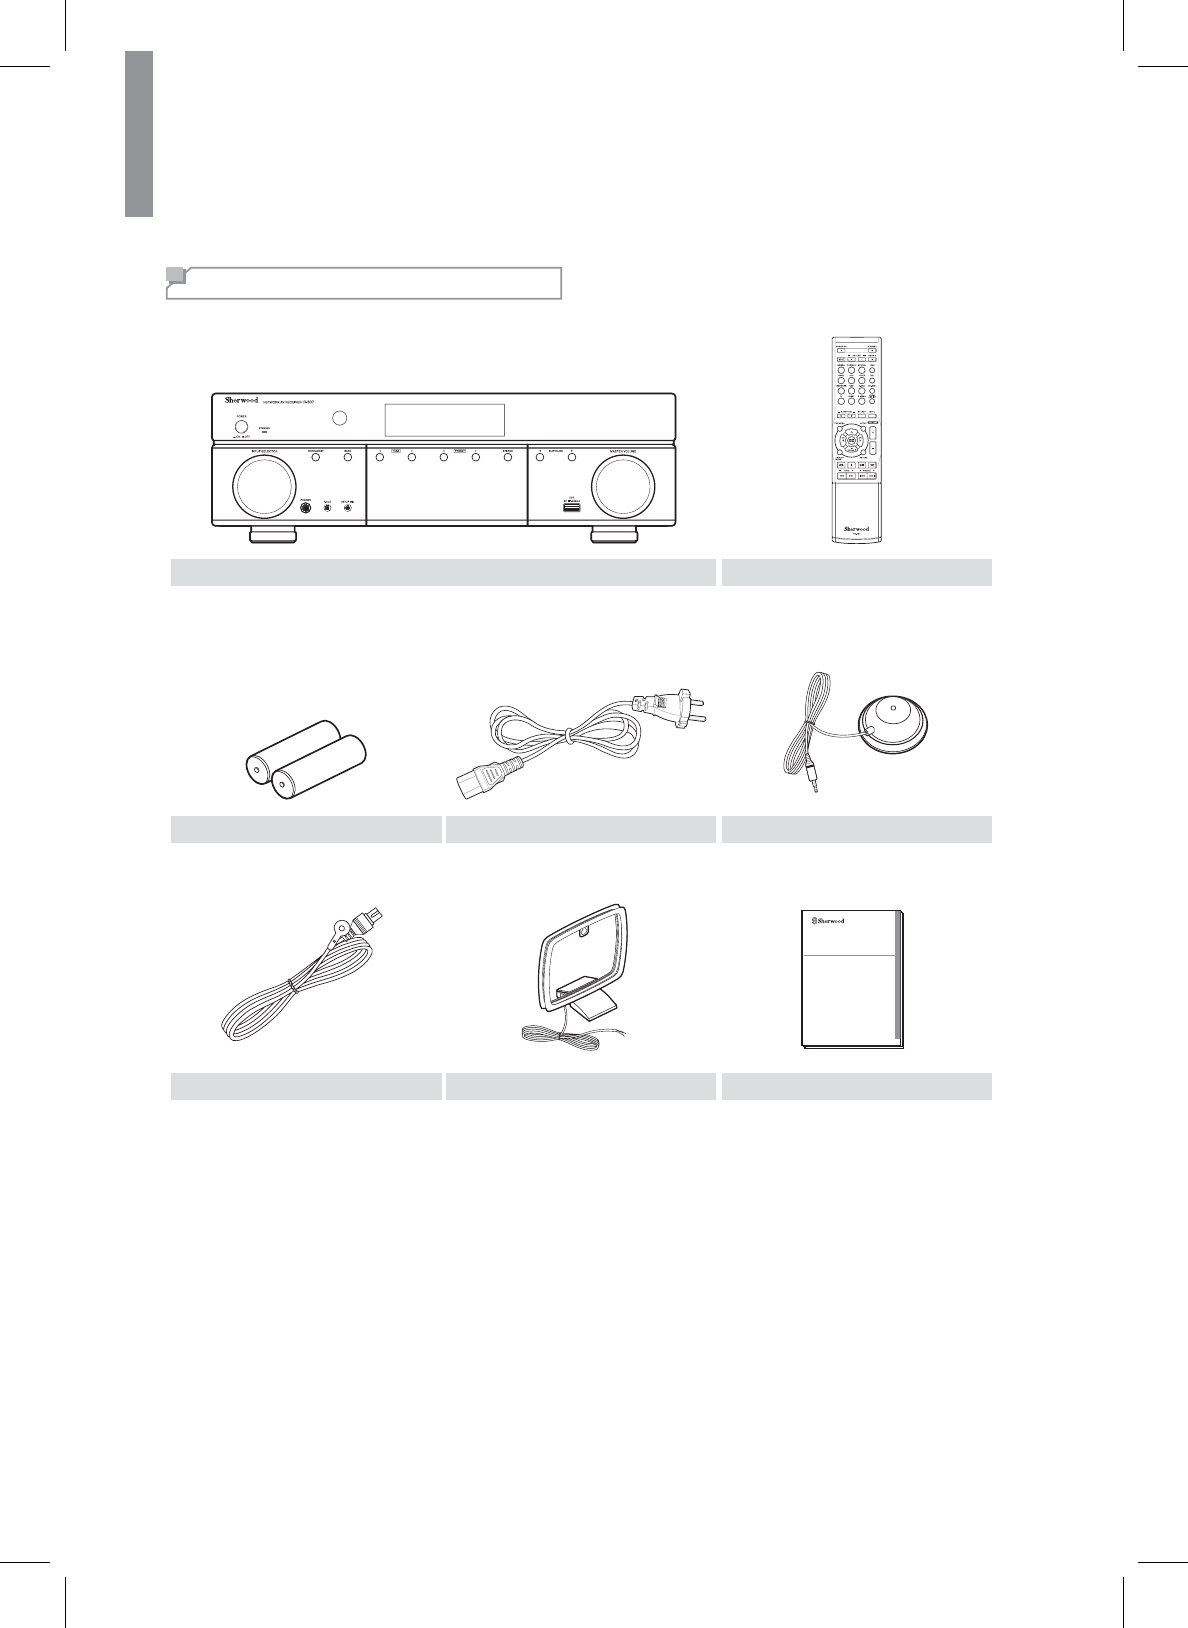
What's Included
Main unit Remote control (1 ea)
Battery Power Cable (1 ea) Setup Mic (1 ea)
R807
NETWORK AV RECEIVER
OPERATING INSTRUCTIONS
FM antenna (1 ea) AM Antenna (1 ea) User Manual

7
Getting Started
English
Installing the Remote Control
Battery
1Remove the battery cover.
2Insert two AAA size batteries with the polarity
matched properly.
x$OZD\VXVHDONDOLQHEDWWHULHVDQGGRQRWXVHWKH
rechargeable batteries (Ni-Cd type).
xIf the batteries run out, remove the old batteries
and replace them with new ones within several
minutes.
xIf the batteries are removed or have been
exhausted for a longer period of time, memorized
contents will be cleared. In this case, you should
memorize them again.
xIf the battery is placed incorrectly, it can cause
explosion.
xRemove the battery if the remote control is not
used for a long period of time.
xDo not leave the product in a hot or humid place.
xDo not handle and store the battery with metallic
tools.
Caution
Operating the range of the
Remote Control
Use the remote control within a range of about 7 meters
(23 feet) and angles of up to 30 degrees aiming at the
remote control sensor.
8
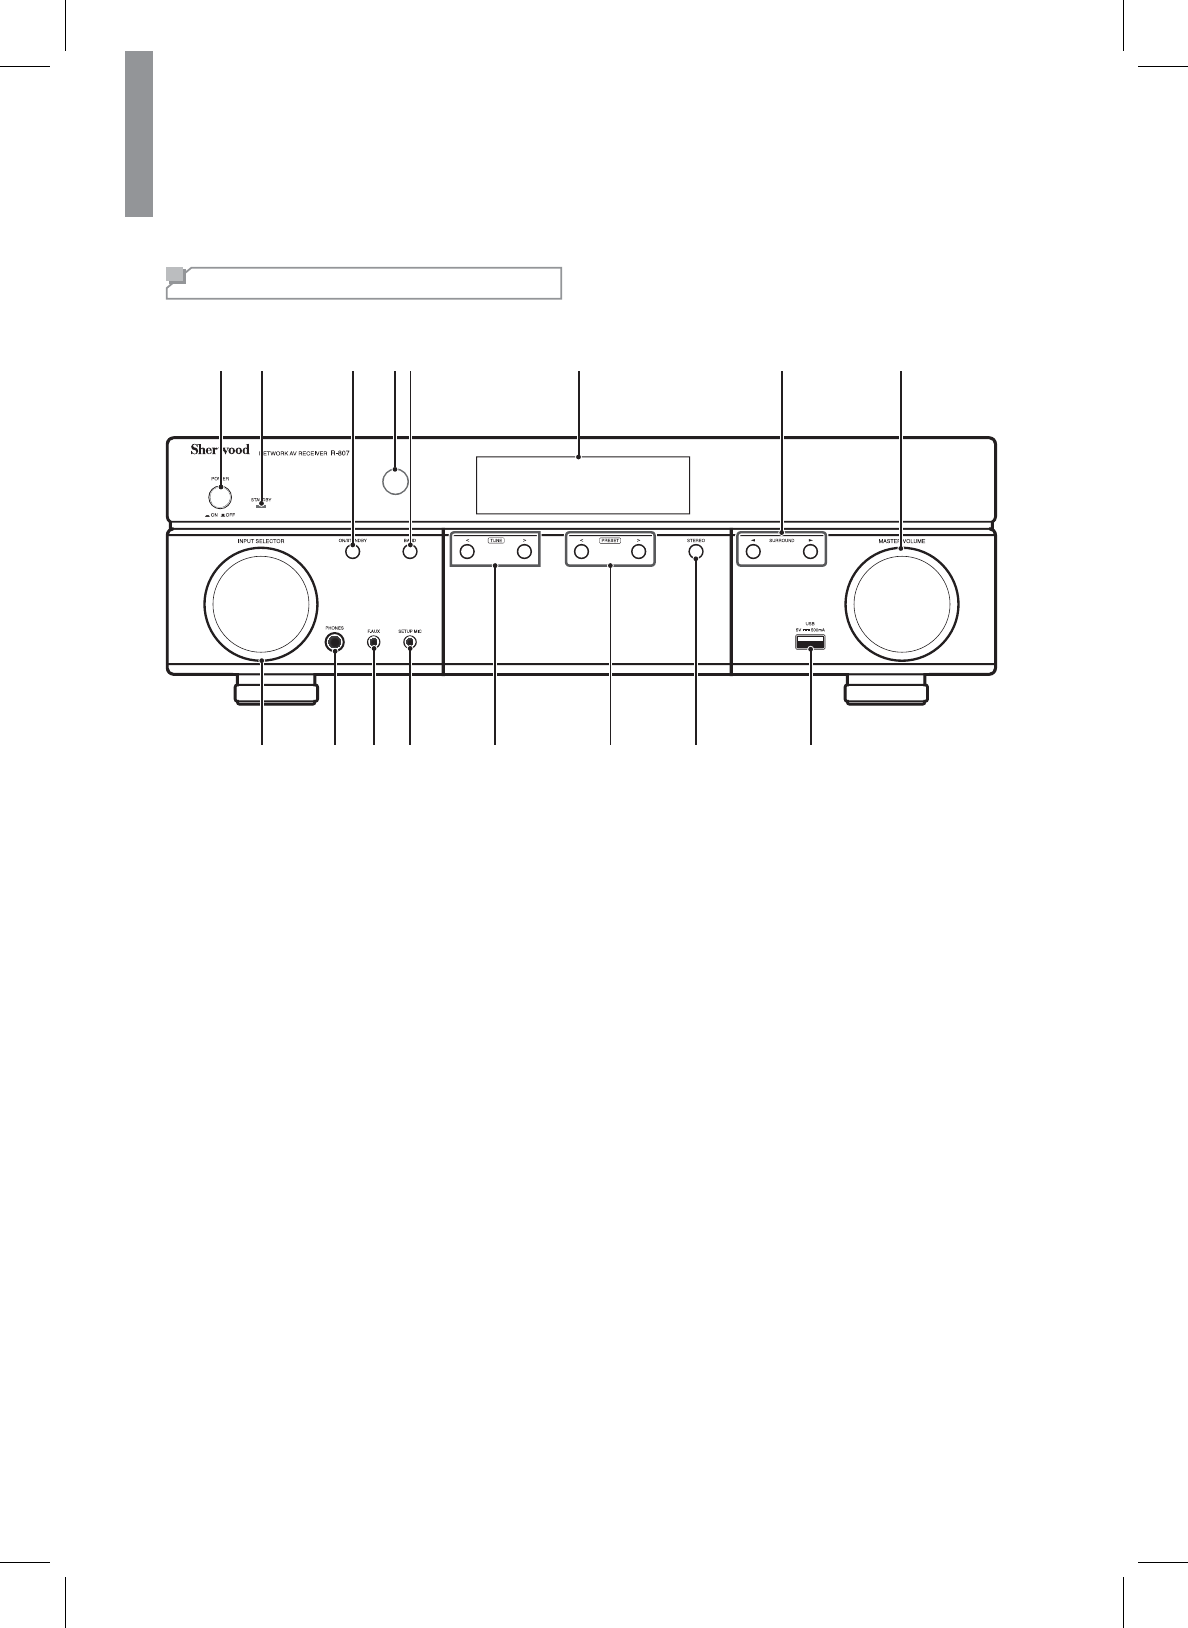
Parts Description
Front Panel
9101112 15 16
12 3 546 78
13 14
1
Main Power Switch
2
Standby Indicator
3
On/Standby Switch
4
IR Sensor
5
Band Select Button
6
Display
7
Surround Select Buttons
8
Master Volume Control
9
Input Selector
10
Headphone Connector
11
Aux Input Connector
12
Setup MIC Connector
13
Tuning Up/Down Buttons
14
Preset Select Buttons
15
Stereo Mode Button
16
USB Port
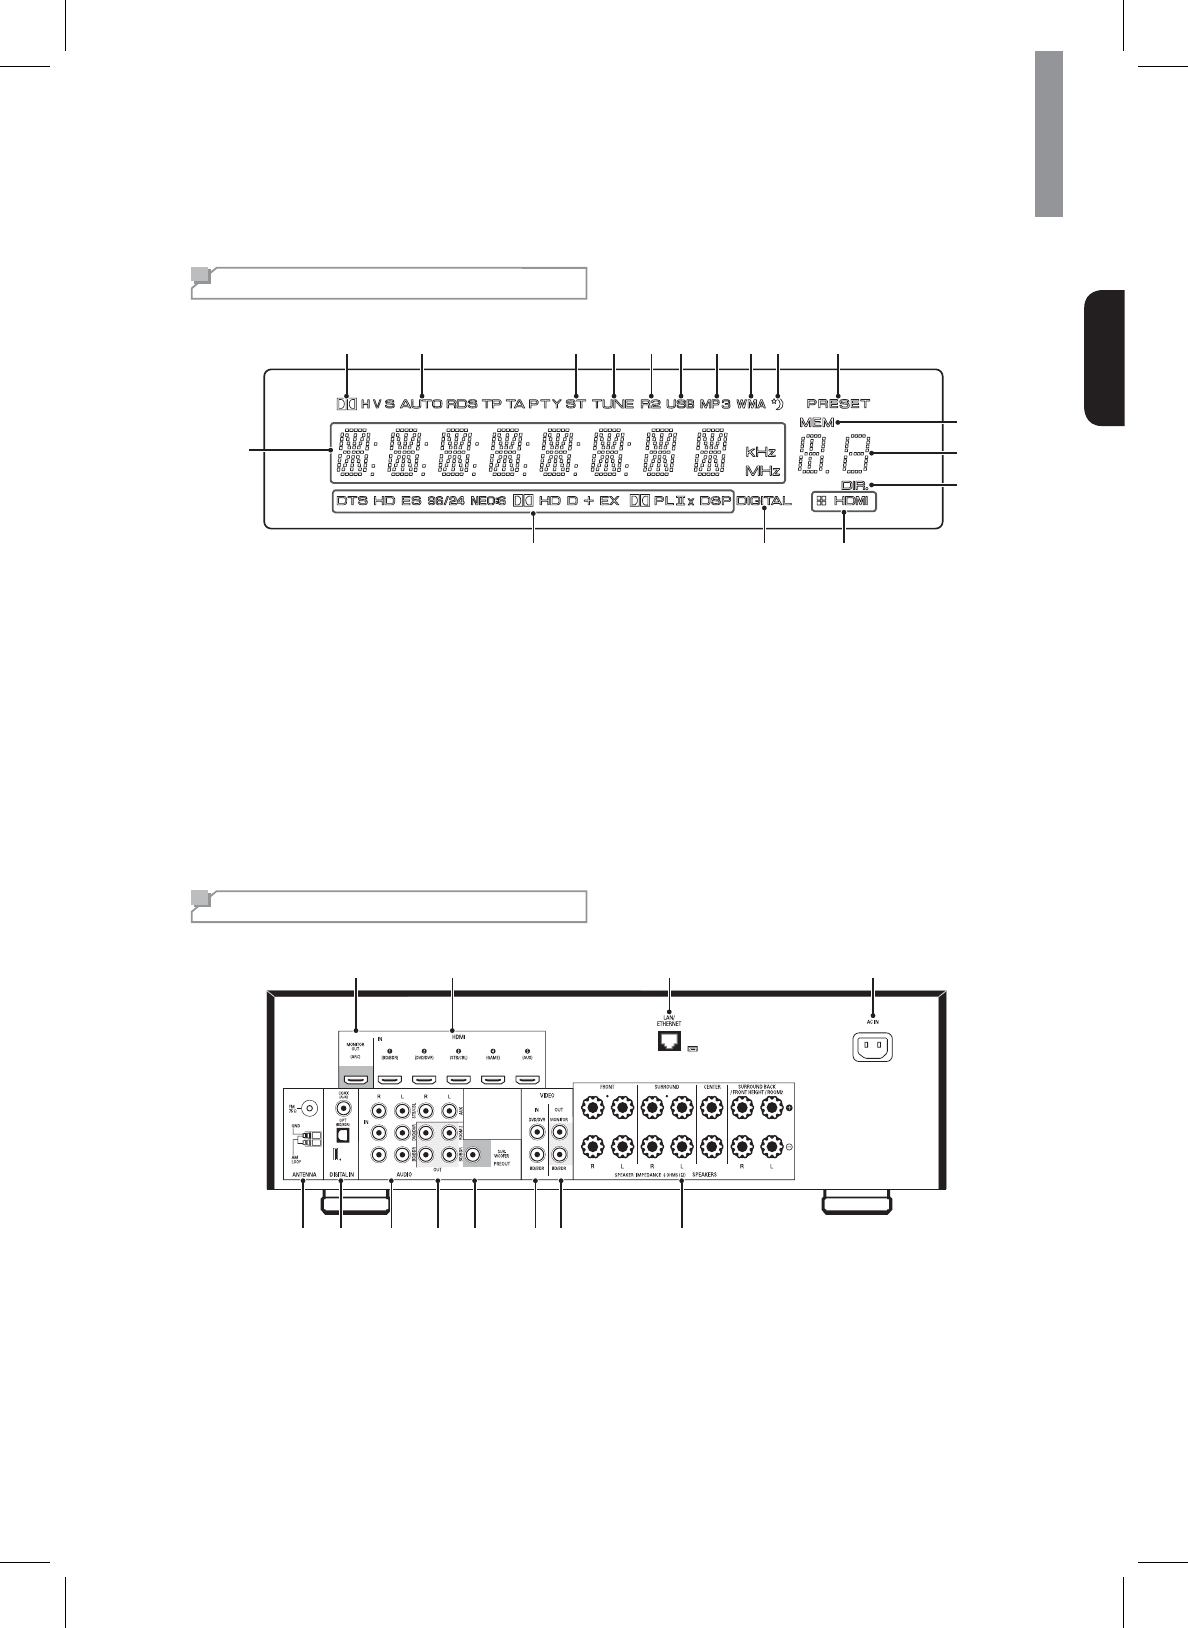
Parts Description
9
English
Front Display
1
14
13
12
17 1516
432 5 6 7 8 9 10 11
1
Information Display
2
Dolby Digital Surround indicator
3
Auto Detecting Indicator
4
Stereo Indicator
5
Tuning indicator
6
Room2 Indicator
7
USB Indicator
8
MP3 Indicator
9
WMA Indicator
10
Sleep Timer Indicator
11
Preset Indicator
12
Station Memory Indicator
13
Preset Station Indicator
14
Direct Indicator
15
HDMI Indicator
16
Digital Input Indicator
17
Dolby/DTS/DSP Surround mode indicators
Rear Panel
56 7 89 1011 12
12 3 4
1
Monitor OUT (ARC) Connector
2
HDMI Connectors
3
LAN/ETHERNET Connector
4
AC Input Connector
5
Radio Antenna Connectors
6
Digital Audio Connectors
7
Analog Audio Input Connectors
8
Analog Audio Output Connectors
9
Subwoofer Connector
10
Composite Video Input Connectors
11
Composite Video Output Connectors
12
6SHDNHU&RQQHFWRUV
R
-
80
7
N
E
TW
O
R
K
AV
R
EC
EIVER
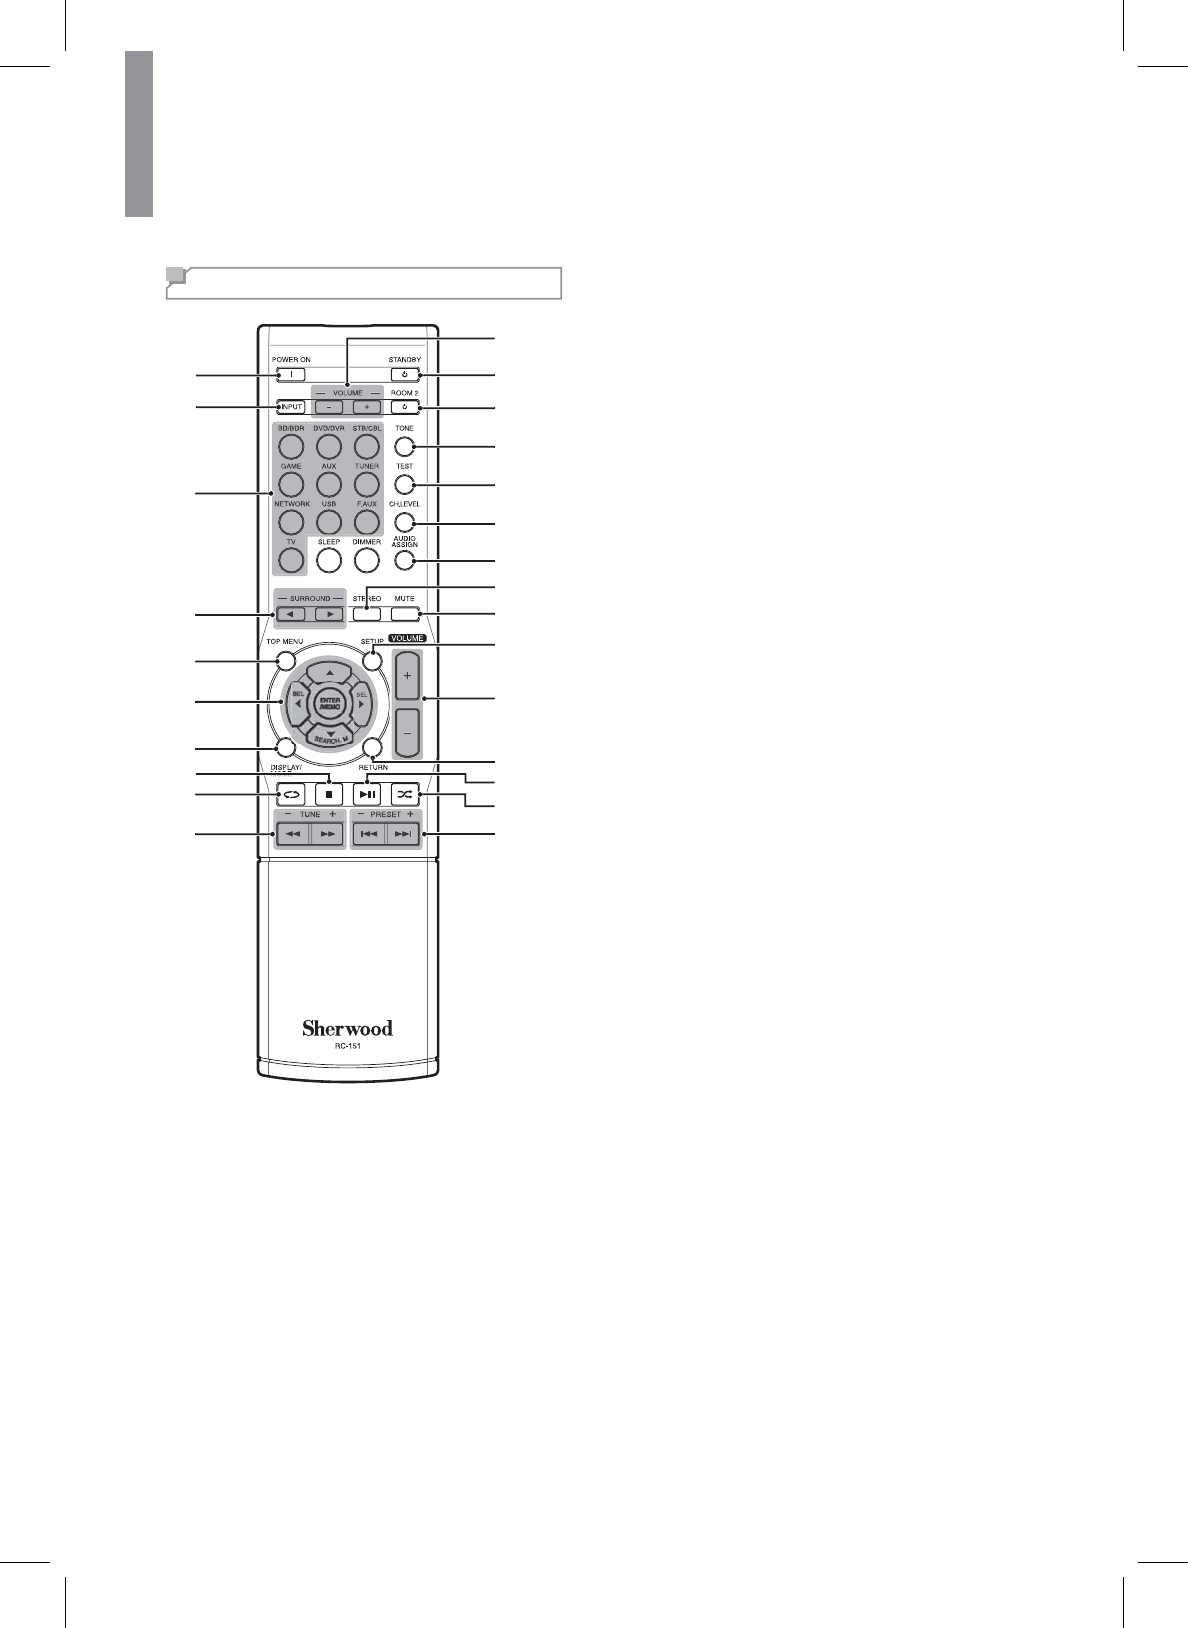
10
Remote
C
ontro
l
1
Power
O
n Button
2
Room2 In
p
ut Select Button
3
Source Select Button
s
4
S
urround
S
elect Buttons
5
T
op
M
enu
B
utton
6
ŸźŻ
Ź
S
elect Button
s
(17(50(0
2
Enter
/
Memor
y
Button
7
Display
/
Mode Button
8
S
top Button
9
R
epeat
B
utto
n
10
Tunin
g
Up/Down Buttons
Rewind
/
Fast forward Buttons
11
Preset Station U
p
/Down Button
s
Previous
/
Next Buttons
12
R
a
n
do
m B
u
tt
o
n
13
Pla
y
/Pause Butto
n
14
Return Button
15
Volume Up/Down Buttons
16
S
etup Menu Button
17
M
ute
B
utton
18
S
tereo Mode Button
19
A
u
di
o
A
ss
i
gn
B
utton
20
C
hannel Level Button
21
Test Tone Se
q
uence Button
22
Tone
C
ontrol Button
23
Room2
O
N
/O
FF Button
24
Standb
y
Butto
n
25
Room2 Volume U
p
/Down Buttons
1
2
5
7
6
9
10
8
3
4
18
16
24
25
23
17
12
22
21
20
19
15
11
14
13
11
English
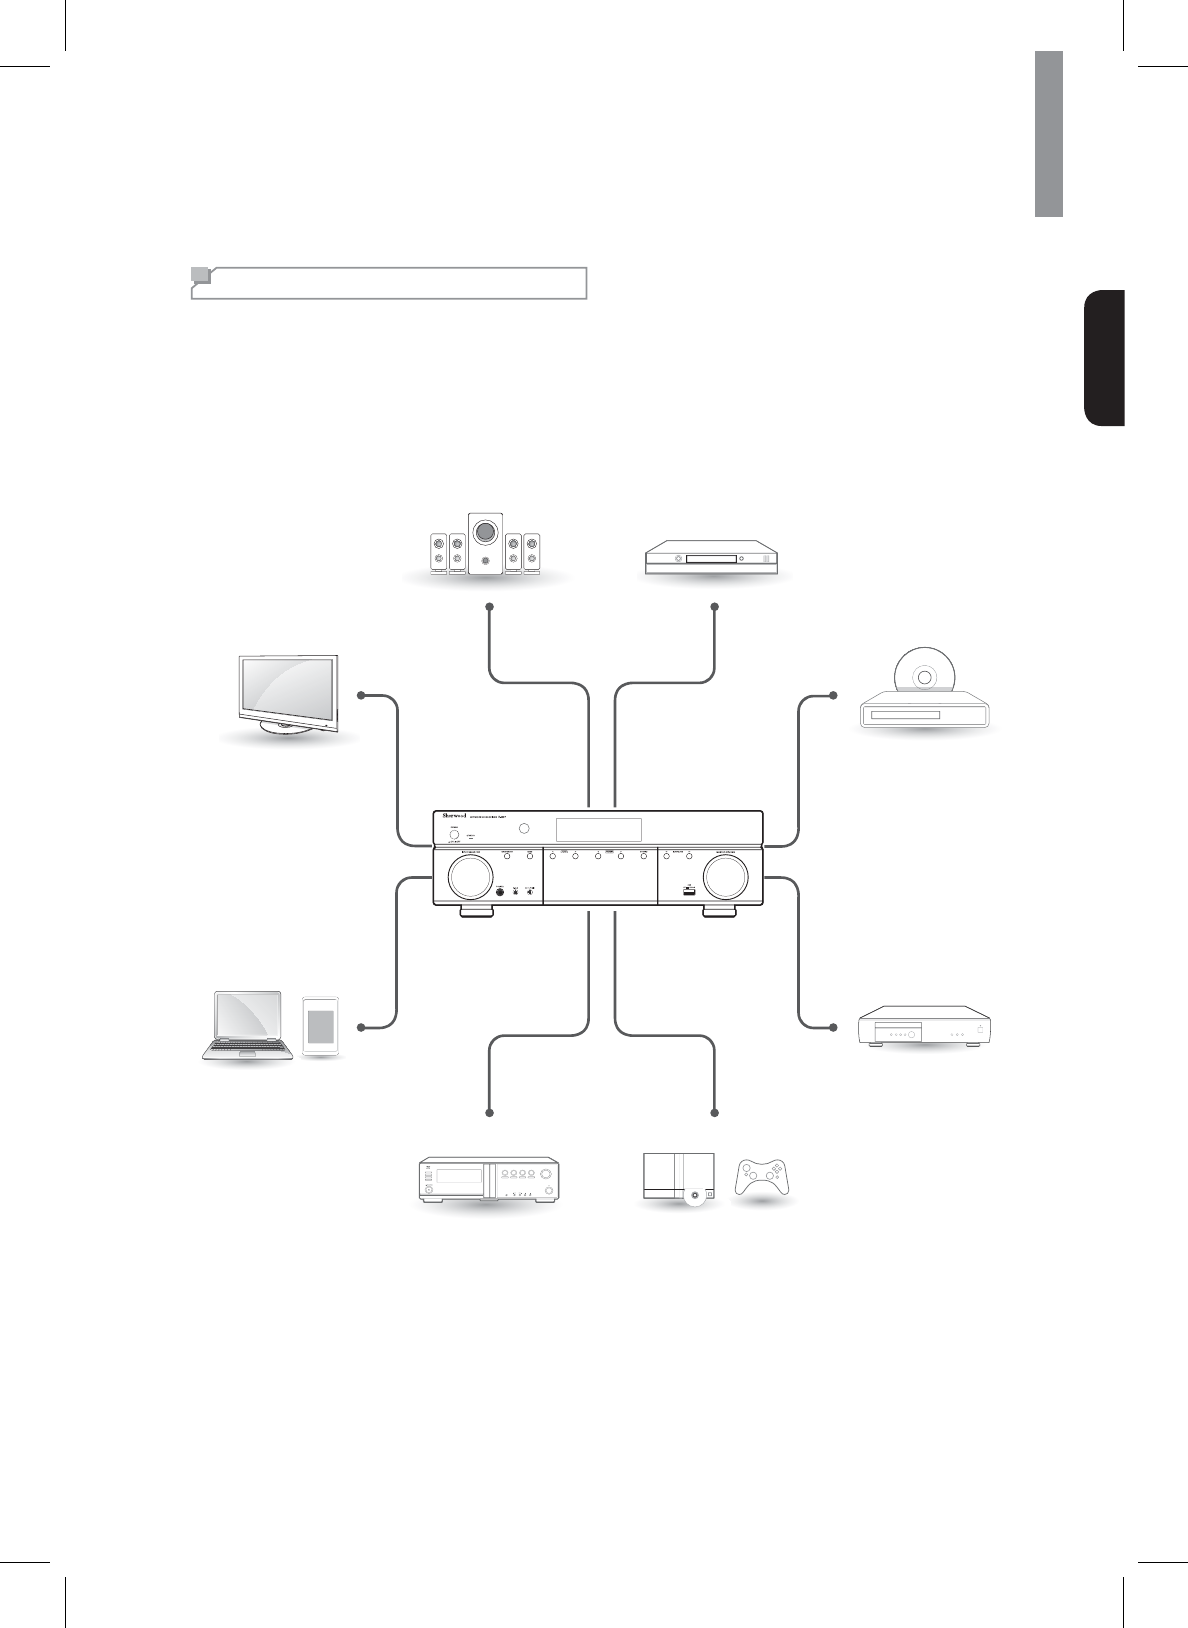
Making Connections
Connection Overview
Connect various external devices to the ports on the main unit.
1Find an external device you want to connect to the main unit as shown on the following illustration.
2&KHFNWKHFRQQHFWLRQW\SHRIWKHH[WHUQDOGHYLFH
3*RWRWKHDSSURSULDWHLOOXVWUDWLRQDQGFKHFNWKHFRQQHFWLRQGHWDLOV
HDMI IN - See page 16.
VIDEO OUT - See page 17.
DIGITAL IN - See page 19.
TV
%'%'5
Speaker System
'9''95
67%&%/
GAME
Audio External Devices
Portable Devices
HDMI IN - See page 16.
VIDEO IN/OUT - See page 18, 21.
DIGITAL IN - See page 19.
AUDIO IN/OUT - See page 20, 21.
See page 12.
HDMI IN - See page 16.
VIDEO IN - See page 18.
DIGITAL IN - See page 19.
AUDIO IN - See page 20.
HDMI IN - See page 16.
VIDEO IN - See page 18.
DIGITAL IN - See page 19.
AUDIO IN - See page 20.
HDMI IN - See page 16.
DIGITAL IN - See page 19.
AUDIO IN - See page 20.
AUDIO IN - See page 20.
F.AUX - See page 20.
12
R-807 NETWORK AV RECEIVER
Connecting Speakers
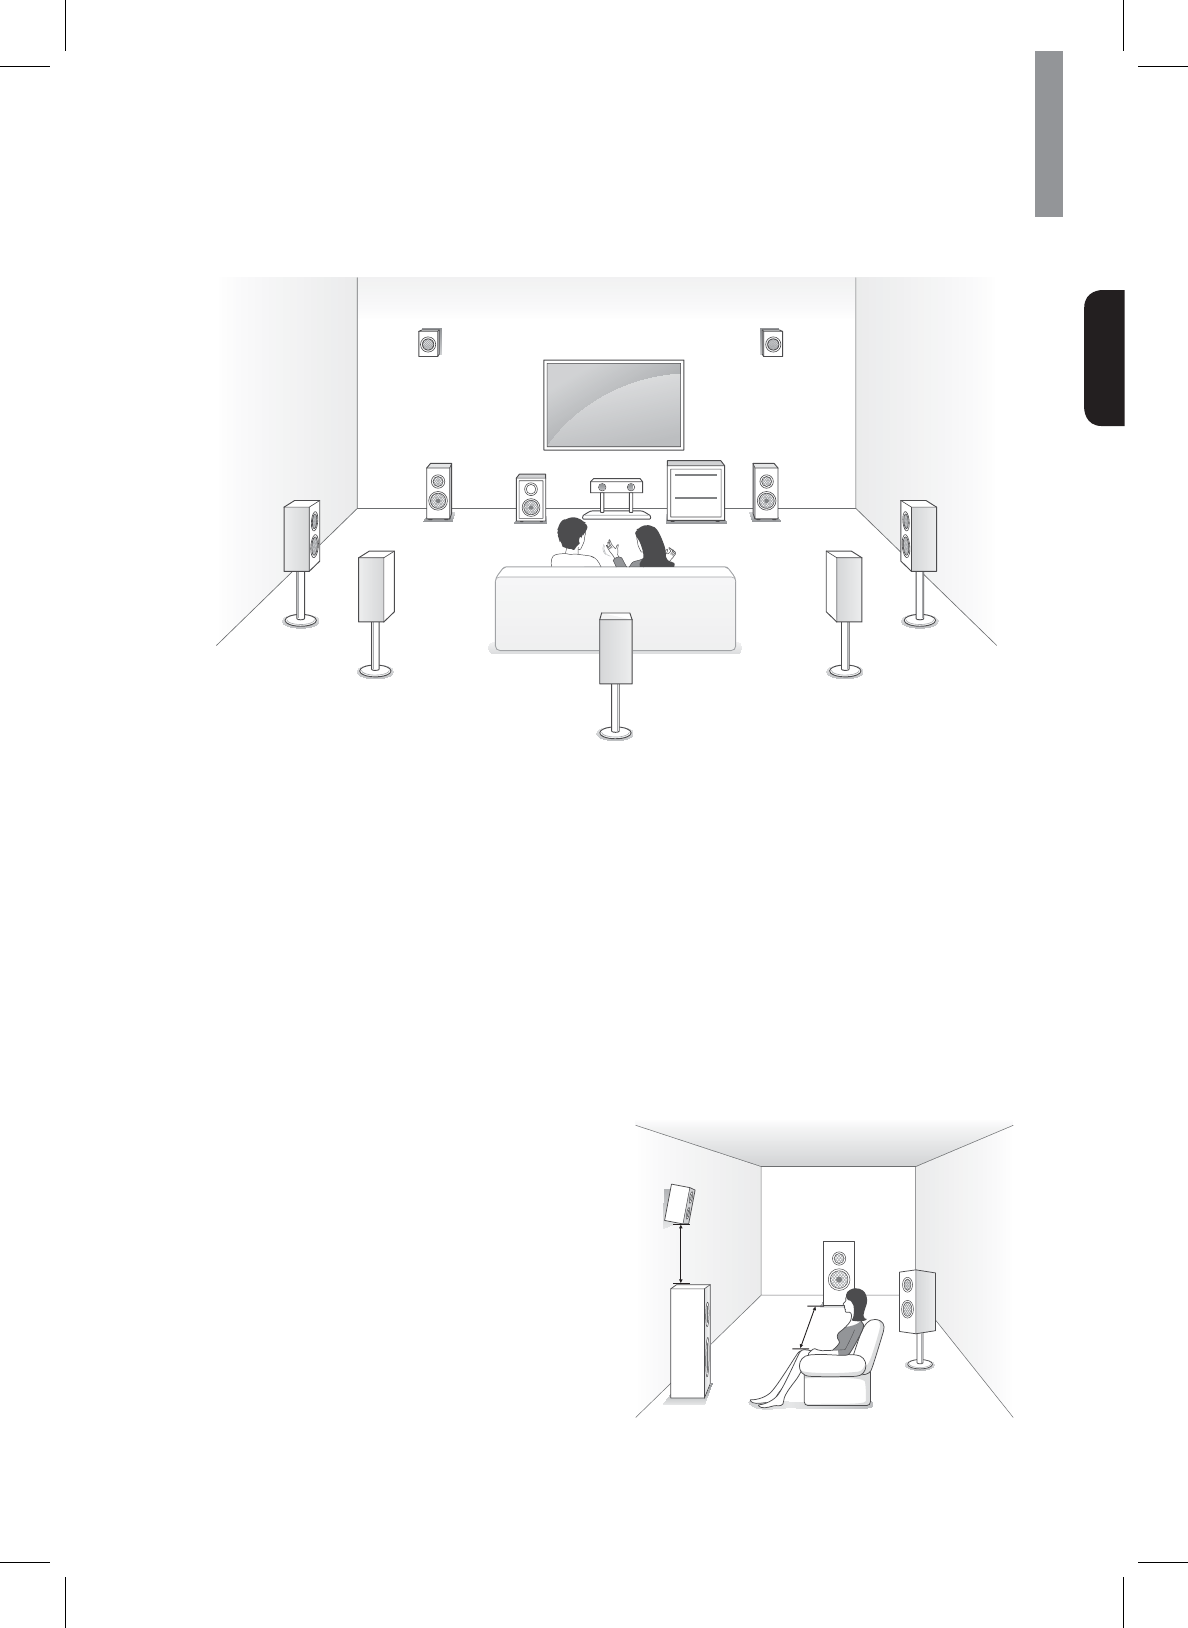
Placing Speakers
'HWHUPLQHWKHORFDWLRQVIRU\RXUVSHDNHUSODFHPHQWDFFRUGLQJWRWKHLUPDQXIDFWXUHU¶VGLUHFWLRQVDQGWKHOD\RXWRI
\RXUOLVWHQLQJURRP8VHWKHLOOXVWUDWLRQRQSDJHDVDJXLGHIRUVSHDNHUSODFHPHQW
7RFUHDWHWKHPRVWUHDOLVWLFVXUURXQGVRXQGHQYLURQPHQWSRVVLEOH\RXVKRXOGSODFH\RXUVSHDNHUVLQDFLUFOHDURXQG
WKHOLVWHQHU<RXVKRXOGDQJOHHDFKVSHDNHUVRLWGLUHFWO\IDFHVWKHOLVWHQLQJSRVLWLRQ8VHWKHGLDJUDPEHORZDVD
guide.
Speaker Type Abbr.
Speaker System
7.1 Channel
(for Dolby
Pro Logic IIz
playback)
7.1
Channel
6.1
Channel
5.1
Channel
4.1
Channel
3.1
Channel
2.1
Channel
Front Left FL ŏ ŏŏŏŏŏŏ
Front Right FR ŏ ŏŏŏŏŏŏ
Front Height Left FHL ŏ
Front Height Right FHR ŏ
Center Cŏ ŏŏŏ ŏ
Subwoofer SW ŏ ŏŏŏŏŏŏ
Surround Left SL ŏ ŏŏŏŏ
Surround Right SR ŏ ŏŏŏŏ
Surround Back Left SBL ŏ
Surround Back
Right SBR ŏ
Surround Back SB ŏ
x,I\RX¶UHXVLQJRQO\RQHVXUURXQGEDFNVSHDNHU
FRQQHFWLWWRWKHVXUURXQGEDFNOHIWVSHDNHU
terminals.
x)URQWKLJKDQGVXUURXQGEDFNVSHDNHUVFDQQRW
be used at the same time.
xTo avoid interference with the TV picture when
using a conventional TV, use only magnetically
VKLHOGHGIURQWOHIWULJKWDQGFHQWHUVSHDNHUV
xTo obtain the best surround effects, all the
VSHDNHUVH[FHSWWKHVXEZRRIHUVKRXOGEHIXOO
UDQJHVSHDNHUV
Note
Front left and right speakers and center speaker
x3ODFHWKHIURQWVSHDNHUVZLWKWKHLUIURQWVXUIDFHVDV
ÀXVKWRWKH79RUPRQLWRUVFUHHQDVSRVVLEOH
x3ODFHWKHFHQWHUVSHDNHUEHWZHHQWKHIURQWOHIWDQG
ULJKWVSHDNHUVDQGLWVGLVWDQFHVKRXOGQRWEHIXUWKHU
IURPWKHOLVWHQHUWKDQWKHIURQWVSHDNHUV
x3ODFHHDFKVSHDNHUVRWKDWVRXQGLVDLPHGDWZKHUH
listener's ears would be in the main listening position.
Surround left and right speakers
x3ODFHWKHVXUURXQGVSHDNHUVDSSUR[LPDWHO\a
FPaLQFKHVDERYHRQWKHGLUHFWOHIW
right side or slightly behind the ear level of a seated
listener.
13
Making Connections
English
TV
C
FHL
FL SW
SL
SBL SBR
SB
SR
FR
FHR
Surround back left and right speakers
x3ODFHWKHVXUURXQGEDFNVSHDNHUVDWWKHEDFNIDFLQJ
IRUZDUGWRJHWKHUDQGFORVHUWKDQIURQWVSHDNHUV
x:KHQXVLQJDVLQJOHVXUURXQGEDFNVSHDNHUSODFHLW
at the rear center facing forward at a slightly higher
SRVLWLRQWRFPWKDQWKHVXUURXQGVSHDNHUV
x:HUHFRPPHQGLQVWDOOLQJWKHVXUURXQGEDFN
VSHDNHUVIDFLQJVOLJKWO\7KLVHIIHFWLYHO\SUHYHQWV
WKHVXUURXQGEDFNFKDQQHOVLJQDOVIURPERXQFLQJ
off the TV or screen at the front center, resulting in
LQWHUIHUHQFHDQGPDNLQJWKHVHQVHRIPRYHPHQW
IURPWKHIURQWWRWKHEDFNOHVVVKDUS
Subwoofer
Because a room’s shape and volume can have a
dramatic effect on a subwoofer’s performance, you
VKRXOGH[SHULPHQWZLWKSODFHPHQWLQRUGHUWR¿QGWKH
location that produces the best results in your particular
listening room. With that in mind, these rules will help
you get started.
xPlacing the subwoofer next to a wall generally will
increase the amount of bass in the room.
xPlacing the subwoofer in a corner generally will
maximize the amount of bass in the room.
xIn many rooms, placing the subwoofer along the
VDPHSODQHDVWKHOHIWDQGULJKWVSHDNHUVFDQ
produce the best integration between the sound of
WKHVXEZRRIHUDQGWKDWRIWKHOHIWDQGULJKWVSHDNHUV
xIn some rooms, the best performance comes from
placing the subwoofer behind the listener. A good
way to determine the best location for the subwoofer
is by temporarily placing it in the listening position
and playing music with strong bass content. Move
around to various locations in the room while the
system is playing (putting your ears where the
VXEZRRIHUZRXOGEHSODFHGDQGOLVWHQXQWLO\RX¿QG
the location where the bass performance is best.
Place the subwoofer in that location.
Front height left and right speakers
(Recommended for Dolby Pro Logic IIz
playback)
x3ODFHWKHIURQWKHLJKWVSHDNHUVDWOHDVWPHWHU
LQFKHVDERYHWKHIURQWVSHDNHUV
Front height
VSHDNHU
Front
VSHDNHU
At least 1 m
Surround
VSHDNHU
6XUURXQGEDFN
VSHDNHU
aFP

14
R-807 NETWORK AV RECEIVER
Connecting Speakers
&DUHIXOO\FKHFNWKHOHIW/DQGULJKW5FKDQQHOVDQGWKHSRODULWLHVRQWKHVSHDNHUVEHLQJFRQQHFWHGWRWKLVUHFHLYHU
3Insert the bare part of the wire.
47LJKWHQWKHVSHDNHUWHUPLQDOE\WXUQLQJLW
FORFNZLVH
Sub
Woofer
Front
Right
Front
Left
CenterSurround
Right
Surround
Left
Surround Back
/Front Height
/Room2
Left
Surround Back
/Front Height
/Room2
Right
Rear Panel
Sub
Woofer
Font
Right
Font
Left
Surround
Right
Surround
Left
Center 6XUURXQG%DFN
Front Height/
Room2
Right
6XUURXQG%DFN
Front Height/
Room2
Left
Connecting Speaker Wires
1Strip away approx. 10 mm (3/8 inch) of wire
insulation, and then tightly twist the wire ends.
2/RRVHQWKHVSHDNHUWHUPLQDOE\WXUQLQJLW
FRXQWHUFORFNZLVH
15
Making Connections
English
x%HVXUHWRFRQQHFWVSHDNHUV¿UPO\DQGDFFXUDWHO\
according to the channel (left and right) and the
SRODULW\DQGí,IWKHFRQQHFWLRQVDUHLQFRUUHFWQR
VRXQGZLOOEHSURGXFHGE\WKHVSHDNHUVDQGLIWKH
SRODULW\RIWKHVSHDNHUFRQQHFWLRQLVLQFRUUHFWWKH
sound will be unnatural and tinny.
xWhen listening in Dolby Pro Logic IIz mode, connect
WKHIURQWKHLJKWVSHDNHUV
x7RLQVWDOOWKHVSHDNHUVVHH³3ODFLQJ6SHDNHUV´RQ
page 12.
x)RU5220SOD\EDFNFRQQHFWWKH5220
VSHDNHUV)RUGHWDLOVVHH³&RQQHFWLQJWR
Multi-Room” on page 24.
x$IWHULQVWDOOLQJWKHVSHDNHUV¿UVWDGMXVWWKHVSHDNHU
VHWWLQJVDFFRUGLQJWR\RXUHQYLURQPHQWDQGVSHDNHU
OD\RXW)RUGHWDLOVVHH³6HWWLQJWKH6SHDNHU´
x%HVXUHWRXVHWKHVSHDNHUVZLWKWKHLPSHGDQFH
of 6 ohms or above.
x'RQRWOHWEDUHVSHDNHUZLUHVWRXFKHDFKRWKHURU
any metal part of this receiver. This could damage
WKHPDLQXQLWDQGRUWKHVSHDNHUV
x1HYHUWRXFKWKHVSHDNHUWHUPLQDOVZKLOHWKH$&
input cord is connected to the wall AC outlet.
'RLQJVRFRXOGUHVXOWLQHOHFWULFVKRFN
Caution
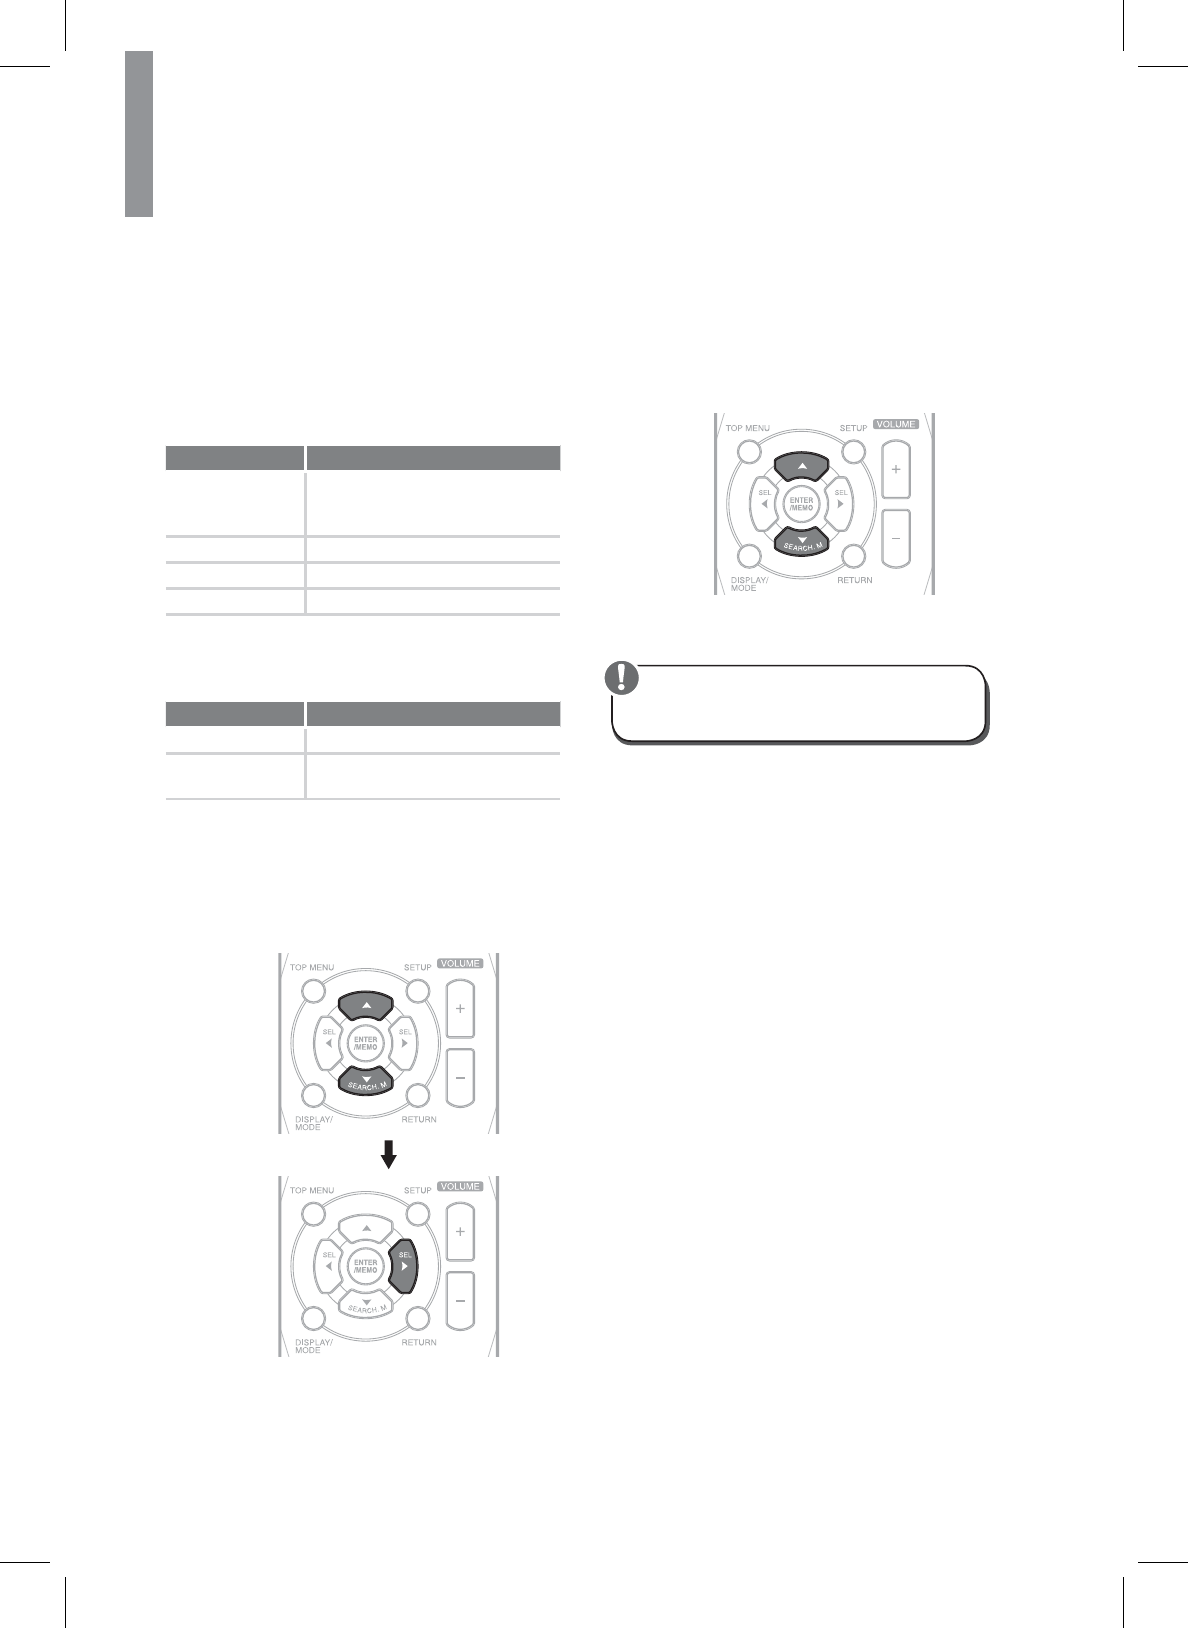
Setting the Speaker
You will be using the following remote control buttons
WRFRQ¿JXUHWKHPDLQXQLW)RUGHWDLOVRQWKHVSHDNHU
setup, see page 44.
1Turn on your TV and select the TV input.
x$OWKRXJK\RXFDQFRQ¿JXUHWKHPDLQXQLWXVLQJ
only its front-panel message display, it is much
easier to use the On-Screen Display (OSD) menu
system.
Note
2Press the remote control’s SETUP button. The
main unit’s OSD System Setup menu will appear
on the TV.
3Use the remote’s arrow and ENTER buttons
WRVHOHFW³6SHDNHU6HWXS´7KH6SHDNHU6HWXS
menu will appear.
46HOHFW³6SHDNHU6HWWLQJV´7KH6SHDNHU6HWWLQJV
menu will appear.
5Use the remote’s left and right arrow buttons
to select OFF, SMALL or LARGE for the Front,
&HQWHUDQG6XUURXQGVSHDNHUSRVLWLRQV
GHSHQGLQJRQWKHVSHDNHUV\RXKDYHFRQQHFWHG
to the receiver.
OFF: Select this setting if you have not
FRQQHFWHGDVSHDNHULQWKDWSRVLWLRQQRW
DYDLODEOHIRUWKHIURQWVSHDNHUV
SMALL:6HOHFWWKLVVHWWLQJLIWKHVSHDNHULVQRW
capable of producing clean, deep bass energy
at output levels that match those produced by
a powered subwoofer. All bass in that channel
LVUHPRYHGIURPWKDWVSHDNHUDQGLVVHQWWRWKH
VXEZRRIHURUWRWKHIURQWVSHDNHUVLIVXEZRRIHU
LVVHWWR120RVWVSHDNHUVXQOHVVWKH\DUH
large and powerful) should be considered
SMALL.
LARGE:6HOHFWWKLVVHWWLQJLIWKHVSHDNHULV
capable of producing clean, deep bass energy
at output levels that match those produced by a
powered subwoofer. All bass in that channel is
VHQWWRWKDWVSHDNHU
:KHQ\RX¶UH¿QLVKHGSUHVVWKHUHPRWHFRQWURO¶V
5(7851EXWWRQWRUHWXUQWRWKH6SHDNHU6HWWLQJ
menu.
xIf your system has a subwoofer and you set
WKHIURQWVSHDNHUVWR/$5*(WKHVXEZRRIHU
may only play Dolby Digital-audio signals and
DTS-encoded program material that contains
LFE channel information. If you set your
IURQWVSHDNHUVWR/$5*(DQG\RXZDQW\RXU
subwoofer to reproduce bass from all program
material, set the Subwoofer to PLUS (see below).
xFor subwoofer, select YES (if your system has
a subwoofer), NO (if your system does not have
a subwoofer), or PLUS (if your system has a
VXEZRRIHU\RXVHW\RXUIURQWVSHDNHUVWR/$5*(
and you want your subwoofer to reproduce bass
from all program material).
Note
16
R-807 NETWORK AV RECEIVER
6<RXFDQVNLSWKH³&URVVRYHU´VHWWLQJ
76HOHFW³6SHDNHU'LVWDQFH´7KH6SHDNHU
Distance menu will appear.
80HDVXUHWKHGLVWDQFHIURPHDFKVSHDNHULQ\RXU
system to the listener. Set the distances.
9Use the remote’s left and right arrow buttons to
FKDQJHWKHGLVWDQFHVHWWLQJIRUHDFKVSHDNHU
so that it matches the distance you wrote down
LQVWHS:KHQ\RX¶UH¿QLVKHGSUHVVWKH
remote control’s RETURN button to return to the
6SHDNHU6HWWLQJPHQX
10 Select “Channel Level”. The Channel Level
menu will appear. Use the remote’s left and
right arrow buttons to set Test Tone to “Manual”
and press the remote’s ENTER button. After the
on-screen countdown you will hear test noise
WKURXJKWKHIURQWOHIWVSHDNHU
11 Sit in the main listening position and adjust the
main unit’s volume control so the test sound
is moderately loud. Note the volume of the
WHVWVRXQGWKURXJKWKH¿UVWVSHDNHU3UHVVWKH
remote’s down arrow button to advance the
WHVWQRLVHWRHDFKRI\RXUV\VWHP¶VVSHDNHUV
and note the volume level of the noise in each
VSHDNHU
12 As you advance the test sound through the
VSHDNHUVXVHWKHUHPRWH¶VOHIWDQGULJKWDUURZ
buttons to adjust the volumes of the channels
until all of them play at the same volume.
:KHQ\RX¶UH¿QLVKHGSUHVVWKHUHPRWH¶V6(783
button to turn off the on-screen menus.
Connecting a TV
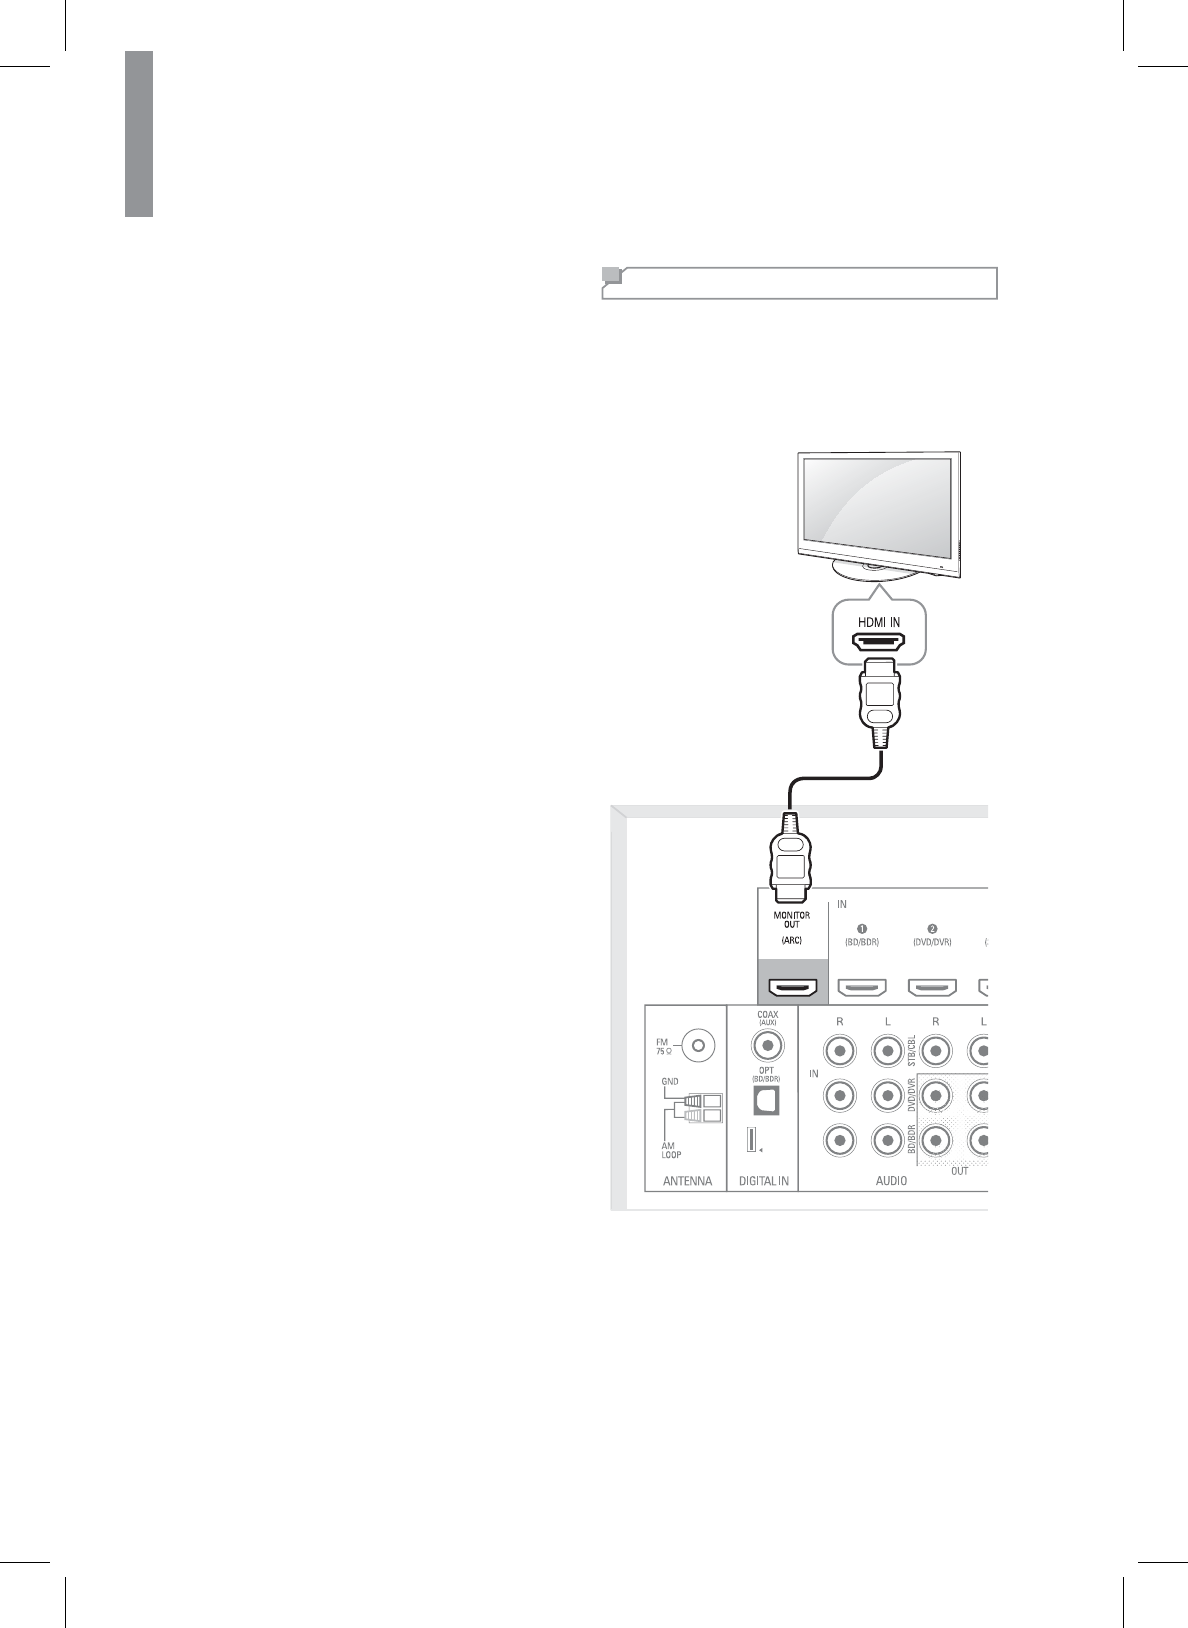
Connecting with an HDMI TV
With HDMI, you can easily enjoy high quality sounds
and images. The main unit plays audio from HDMI
compatible products while also passing on the video
signal to a HDMI-connected TV.
Rear Panel
About HDMI
+'0,+LJK'H¿QLWLRQ0XOWLPHGLD,QWHUIDFHVXSSRUWV
both audio and video on a single digital connection
for use with DVD players, DTV, set-top boxes, and
other AV devices. HDMI was developed to provide
the technologies of High Bandwidth Digital Content
Protection (HDCP) as well as Digital Visual Interface
'9,LQRQHVSHFL¿FDWLRQ+'&3LVXVHGWRSURWHFW
the digital content transmitted and received by
DVI-compliant displays.
17
Making Connections
English
HDMI has the capability to support standard,
HQKDQFHGRUKLJKGH¿QLWLRQYLGHRSOXVVWDQGDUGWR
multi-channel surround-sound audio. HDMI features
include uncompressed digital video, a bandwidth of up
to 2.2 gigabytes per second (with HDTV signals), one
connector (instead of several cables and connectors),
and communication between the AV source and AV
devices such as DTVs.
This main unit is also compatible with the DeepColor
DQG[Y&RORUIHDWXUH[Y&RORULVWUDGHPDUNVRI6RQ\
Corporation).
+'0,WKH+'0,ORJRDQG+LJK'H¿QLWLRQ0XOWLPHGLD
,QWHUIDFHDUHWUDGHPDUNVRUUHJLVWHUHGWUDGHPDUNVRI
+'0,/LFHQVLQJ//&
x&KHFNWKHVHWXSRIWKHFRQQHFWHGFRPSRQHQW
if an image is poor or there is no sound from a
component connected via the HDMI cable.
xAudio signals (sampling frequency, bit length,
HWFWUDQVPLWWHGIURPDQ+'0,MDFNPD\EH
suppressed by the connected component.
xWhen the connected component is not
compatible with copyright protection technology
(HDCP), the image and the sound from the HDMI
79287MDFNPD\EHGLVWRUWHGRUPD\EHQRW
RXWSXW,QWKLVFDVHFKHFNWKHVSHFL¿FDWLRQRIWKH
connected component.
xRegardless of which input is selected for the
V\VWHPWKHYLGHRVLJQDOIURPWKH+'0,LQSXWMDFN
(BD, DVD, SAT) that was last selected is output
IURPWKH+'0,79287MDFN
Note
&RQ¿UPLQJWKH+'0,FRQWUROIXQFWLRQV
To use the HDMI control functions properly, it is
UHFRPPHQGHGWRFRQ¿UPWKH+'0,FRQWUROIXQFWLRQV
usable with each connected component by performing
the following operations.
1Turn on all the components connected with HDMI
cables.
2Turn the TV off to standby mode.
x&RQ¿UPWKDWDOOWKHFRPSRQHQWVDUHWXUQHGRII
3:LWKDOOWKHFRPSRQHQWVRIIVWDUWSOD\EDFNRID
device (connected with HDMI cable).
4&RQ¿UPWKDWDOOWKHFRPSRQHQWVDUHWXUQHGRQDQG
the inputs of the main unit and TV are switched
automatically.
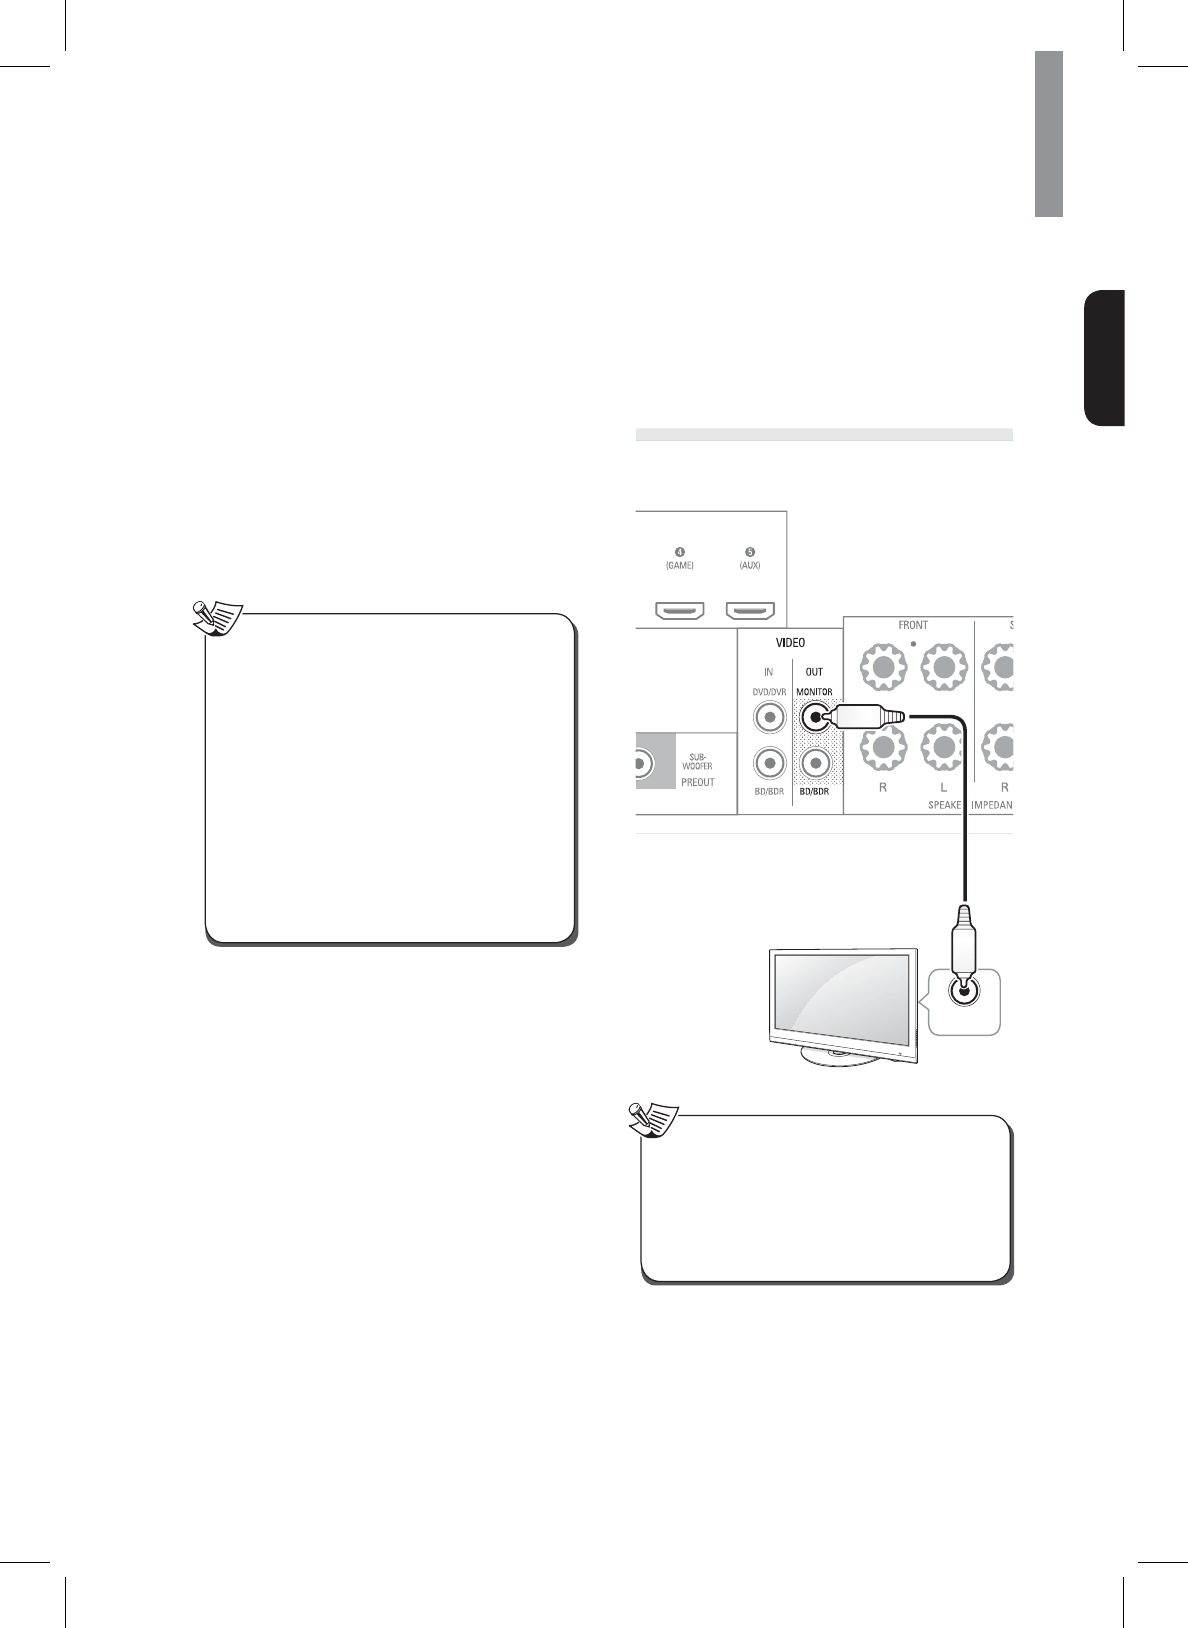
Connecting with a non-HDMI TV
If your TV does not have an HDMI connector, or if
your TV does have an HDMI connector but you are
connecting some source devices with only composite
video connectors, use a composite video cable (not
included) to connect the composite Monitor Out
connector to your TV’s composite video connector.
Composite
VIDEO IN
Composite Video Cable
(not supplied)
TV
Rear Panel
xThe on-screen display (OSD) only appears
through the Composite Monitor Out connector.
If you want to use the main unit's OSD menus
you will need to connect its Composite Monitor
Out connector to your TV even if you are not
connecting any composite video source devices
to the system.
Note
18
R-807 NETWORK AV RECEIVER
Connecting Playback
Components
6RXUFHGHYLFHVDUHFRPSRQHQWVIURPZKLFKDSOD\EDFN
signal originates, e.g., a Blu-ray Disc™ or DVD player;
a set-top box, or HDTV tuner, etc. The receiver has
several different types of input connectors for your
audio and video source devices: HDMI, composite
video, optical digital audio, coaxial digital audio and
analog audio.
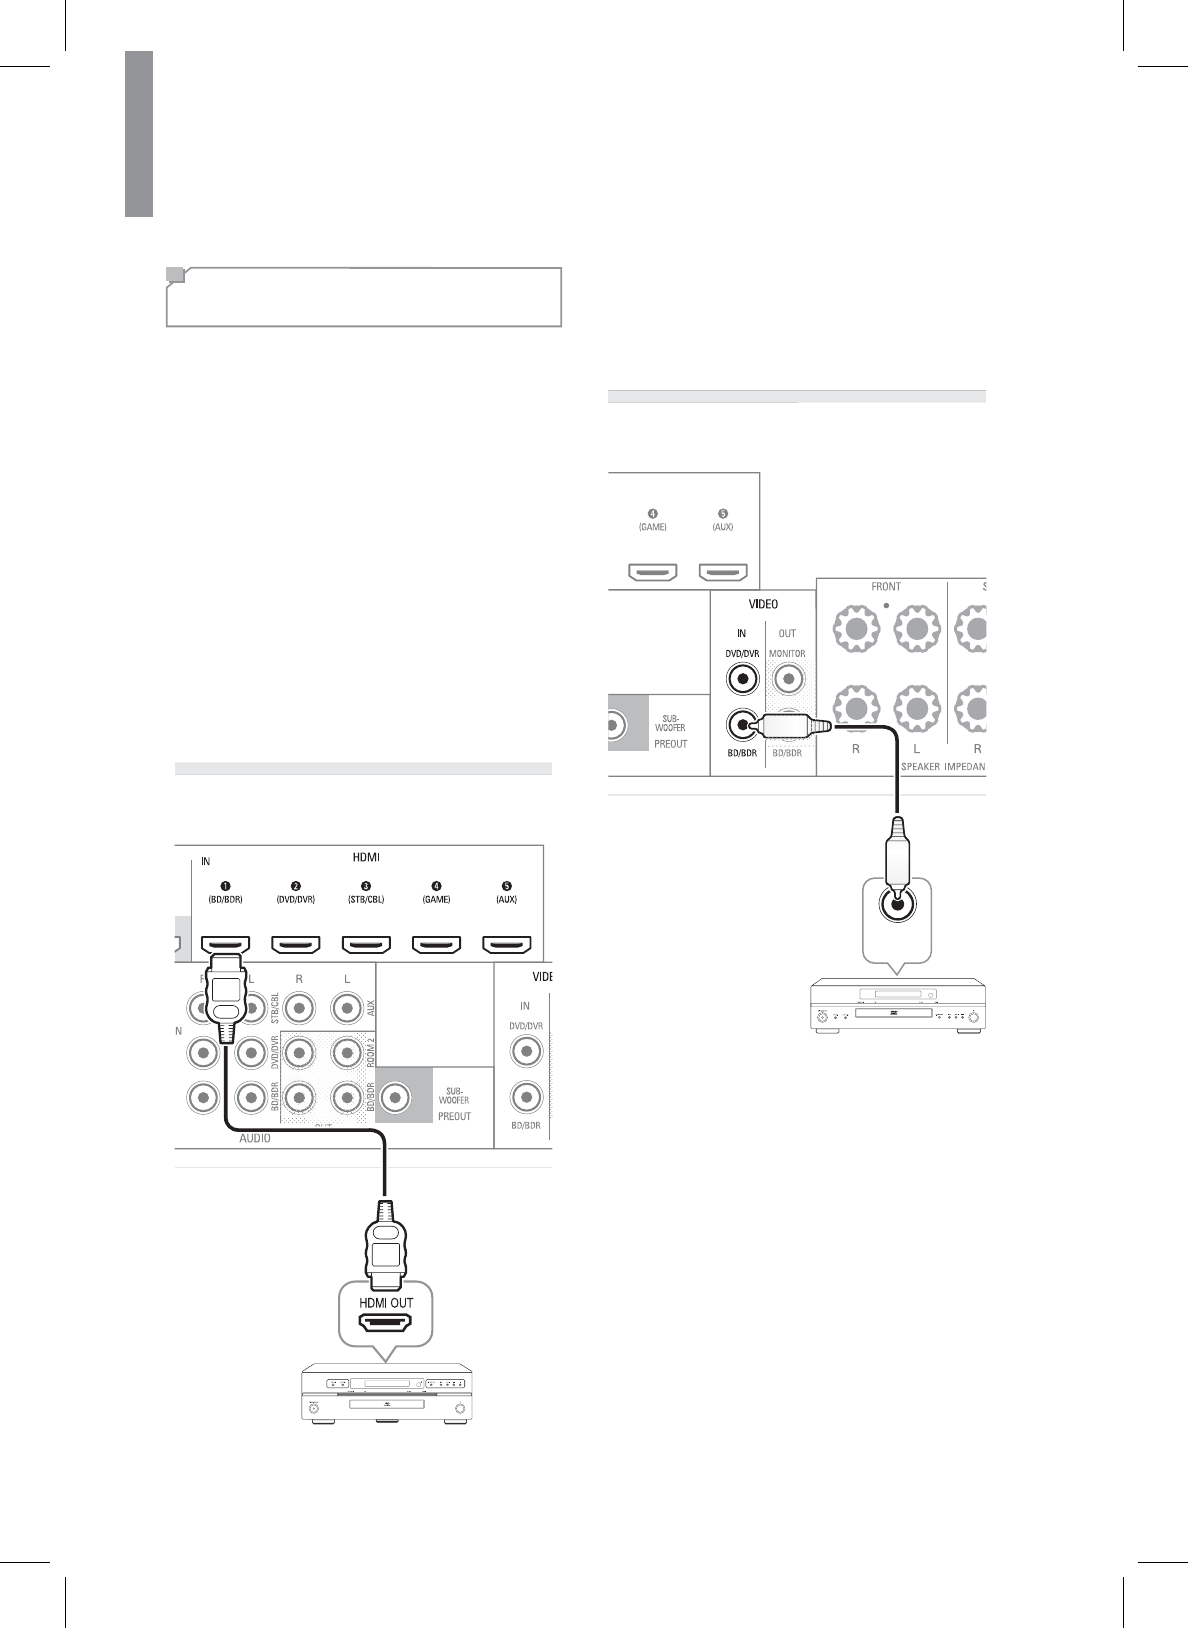
Connecting HDMI Components
If any of your source devices have HDMI connectors,
using those connectors will provide the best possible
video and audio performance quality. Since the HDMI
cable carries both digital video and digital audio
VLJQDOV\RXGRQRWKDYHWRPDNHDQ\DGGLWLRQDODXGLR
connections for devices you connect via HDMI cables.
If you have an HDMI or DVI (with HDCP) equipped
component (Blu-ray disc player, etc.), you can connect
it to this receiver using a commercially available HDMI
cable.
HDMI Cable
(not supplied)
HDMI-Equipped Source
Device
Rear Panel
Connecting Video Components
<RXZLOOQHHGWRPDNHFRPSRVLWHYLGHRFRQQHFWLRQV
from your source devices that do not have HDMI video
FRQQHFWLRQV<RXZLOODOVRQHHGWRPDNHDQDXGLR
connection from the device to the main unit.
Composite
VIDEO OUT
Composite Video Cable
(not supplied)
Composite Video-Equipped
Source Device
Rear Panel
19
Making Connections
English
Connecting Audio Components
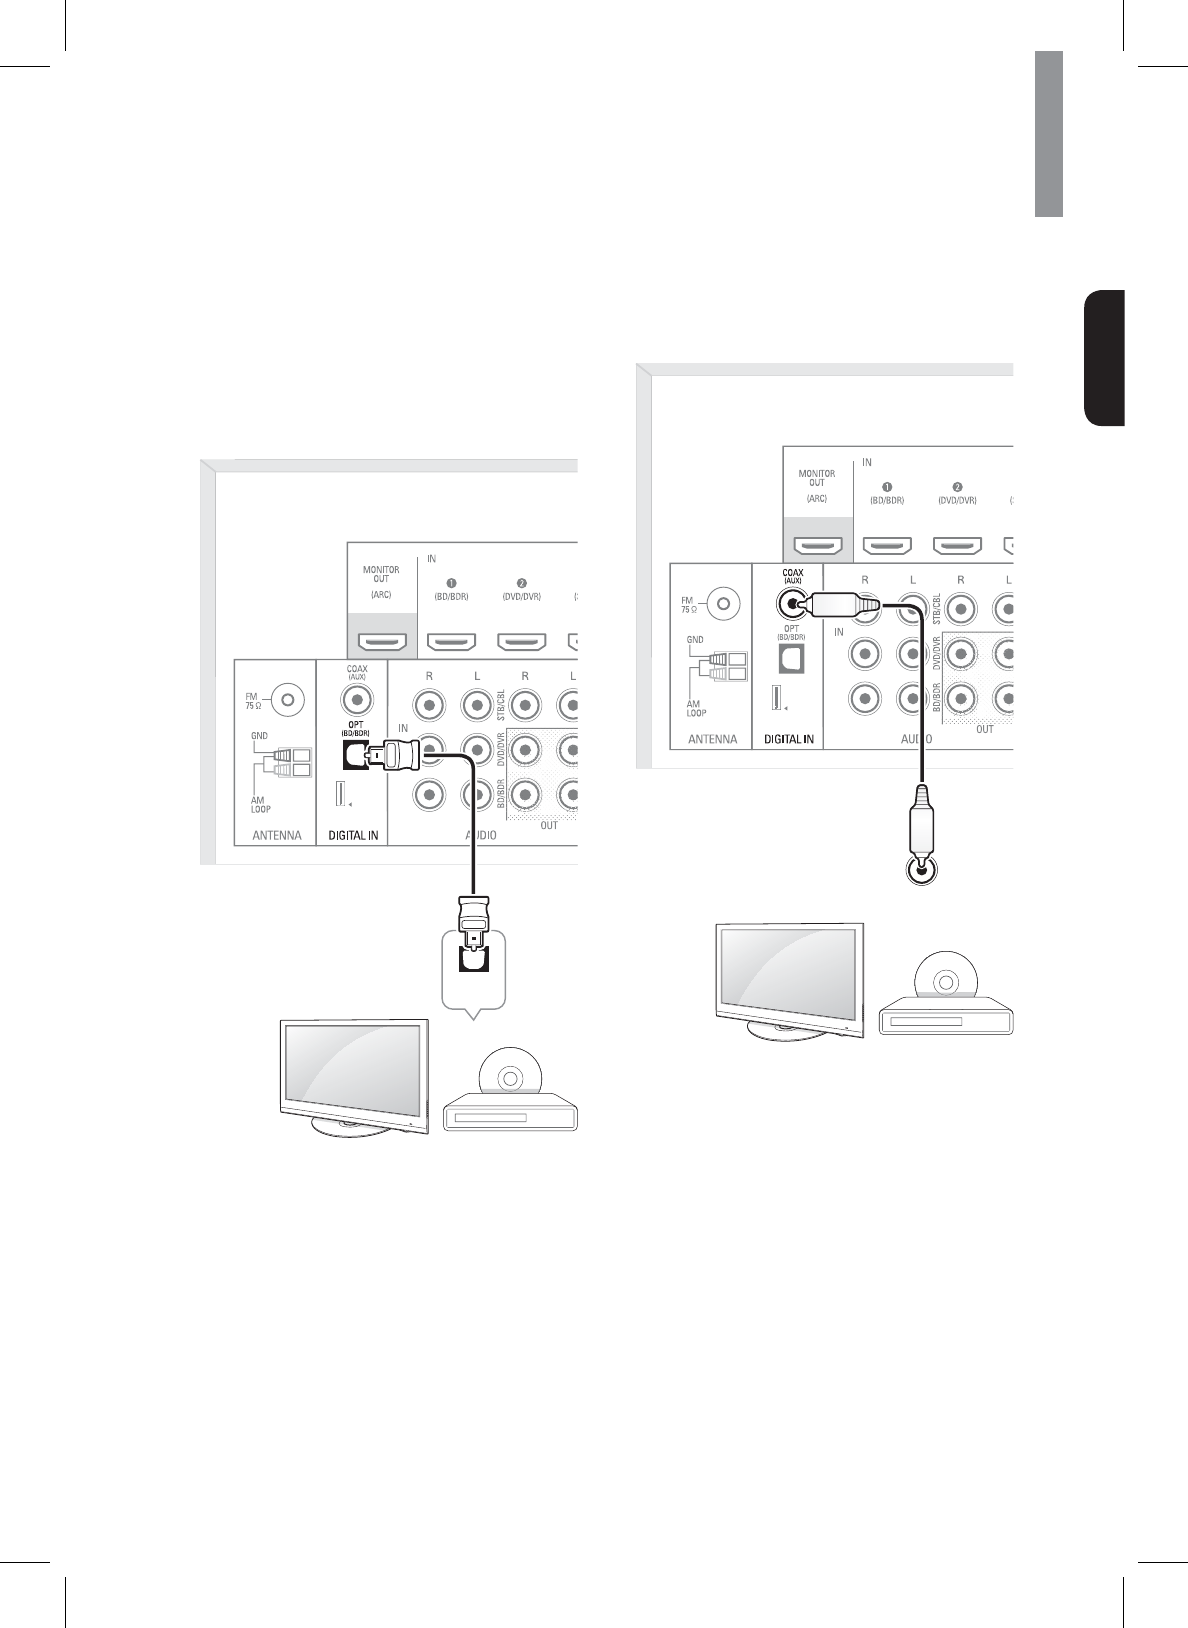
Optical Digital Audio Connection
You can connect components equipped with an optical
RXWSXWMDFN2QWKHPDLQXQLW\RXFDQHQMR\WKHIXOO
sound of components, such as DVD players, set-top
box, BD (Blu-ray Disc™) players or TVs.
³%OXUD\'LVF´LVDWUDGHPDUNRI%OXUD\'LVF
Association.
OPTICAL
OUT
TV, DVD Player, etc.
Rear Panel
Coaxial Digital Audio Connection
If your source devices have a coaxial digital output,
connect it to the main unit's coaxial digital audio
connector.
OUT
TV, DVD Player, etc.
Rear Panel
OUT
20
R-807 NETWORK AV RECEIVER
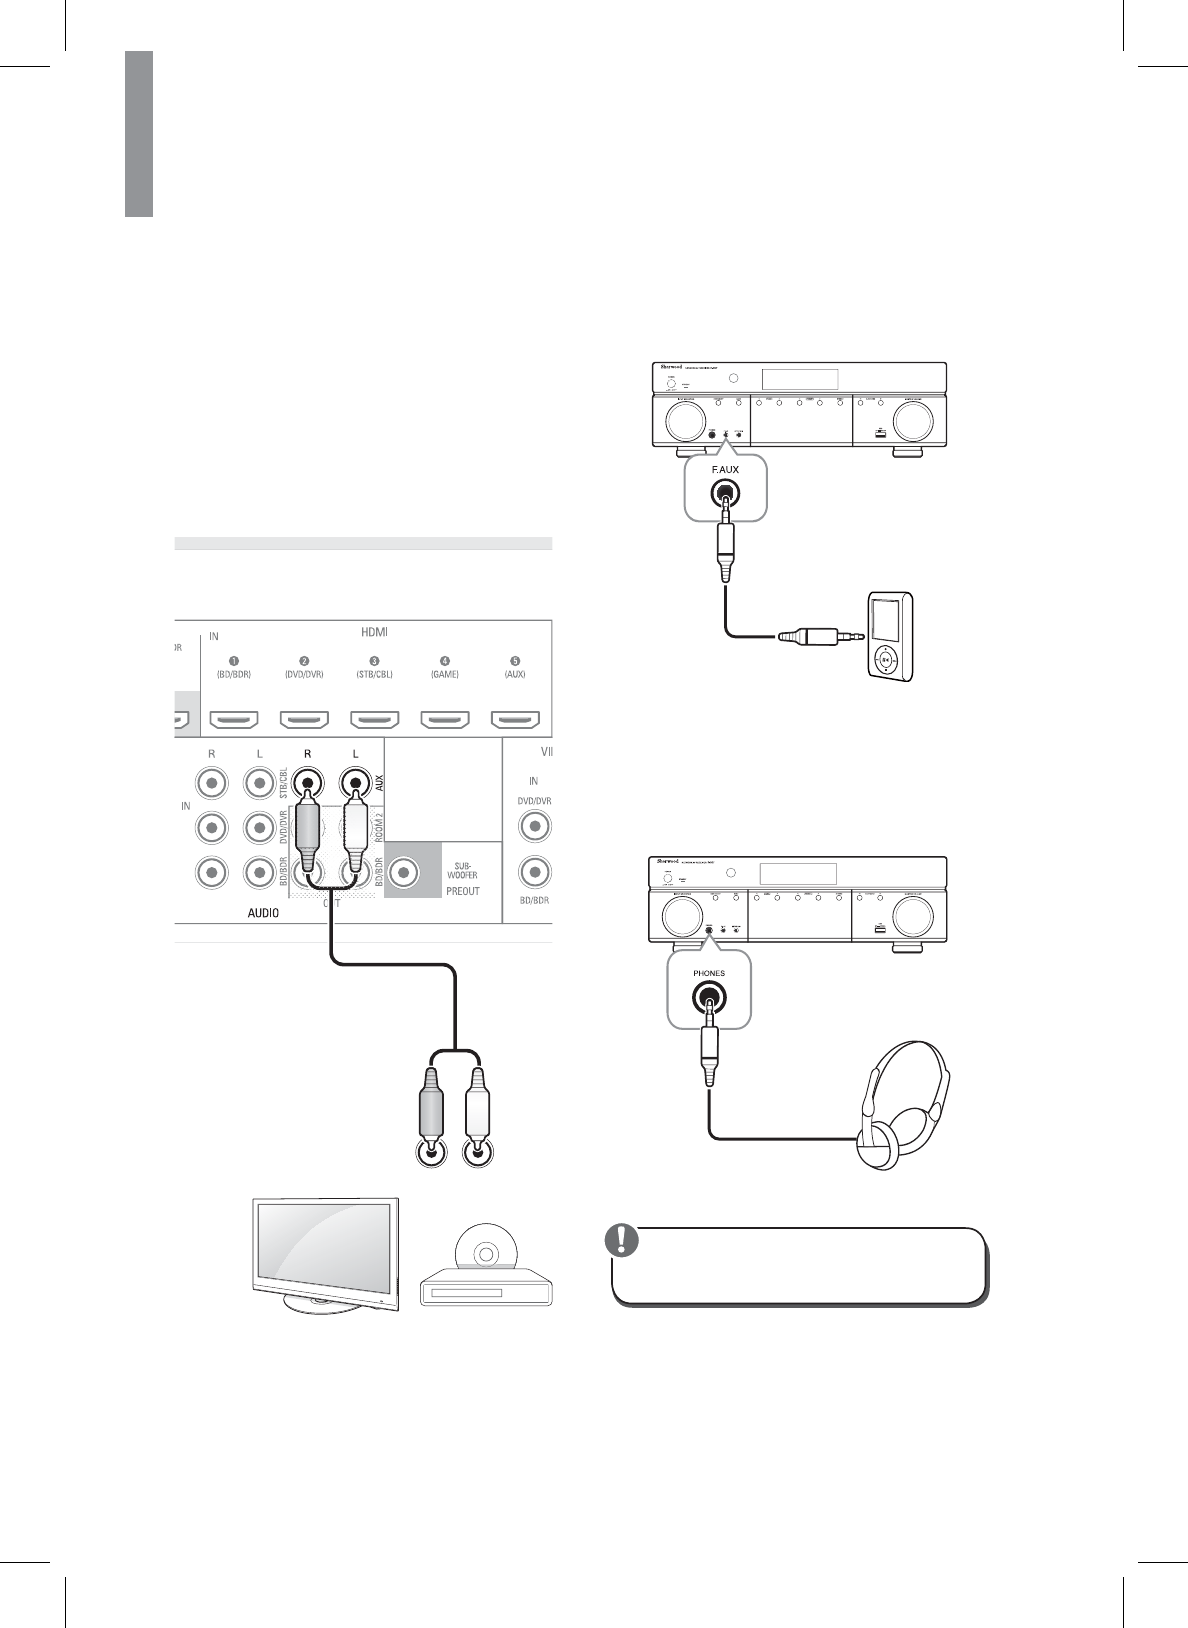
Analogue Audio Connection
0DNHDQDORJDXGLRFRQQHFWLRQVIURP\RXUVRXUFH
devices that do not have HDMI or digital audio
connections. If you’re connecting video sources to the
main unit, you must also connect the source device’s
composite video output to the corresponding composite
video connector.
xEnsure the left (L) and right (R) channels and the
inputs and outputs are correctly connected.
xTo listen to the sound of a connected audio device,
select AUX as the input source.
xTo listen to TV audio, select TV as the input source.
RL
TV, DVD Player, etc.
Rear Panel
F.AUX Connection
<RXFDQXVHWKH)$8;LQSXWMDFNWRFRQQHFWSRUWDEOH
audio components such as an MP3 player, etc.
MP3 player, etc.
Listening with Headphones
1&RQQHFWWKHKHDGSKRQHVWRWKH3+21(6MDFN
on the front panel.
xBe careful not to set the volume too high when
using headphones.
Caution
21
Making Connections
English
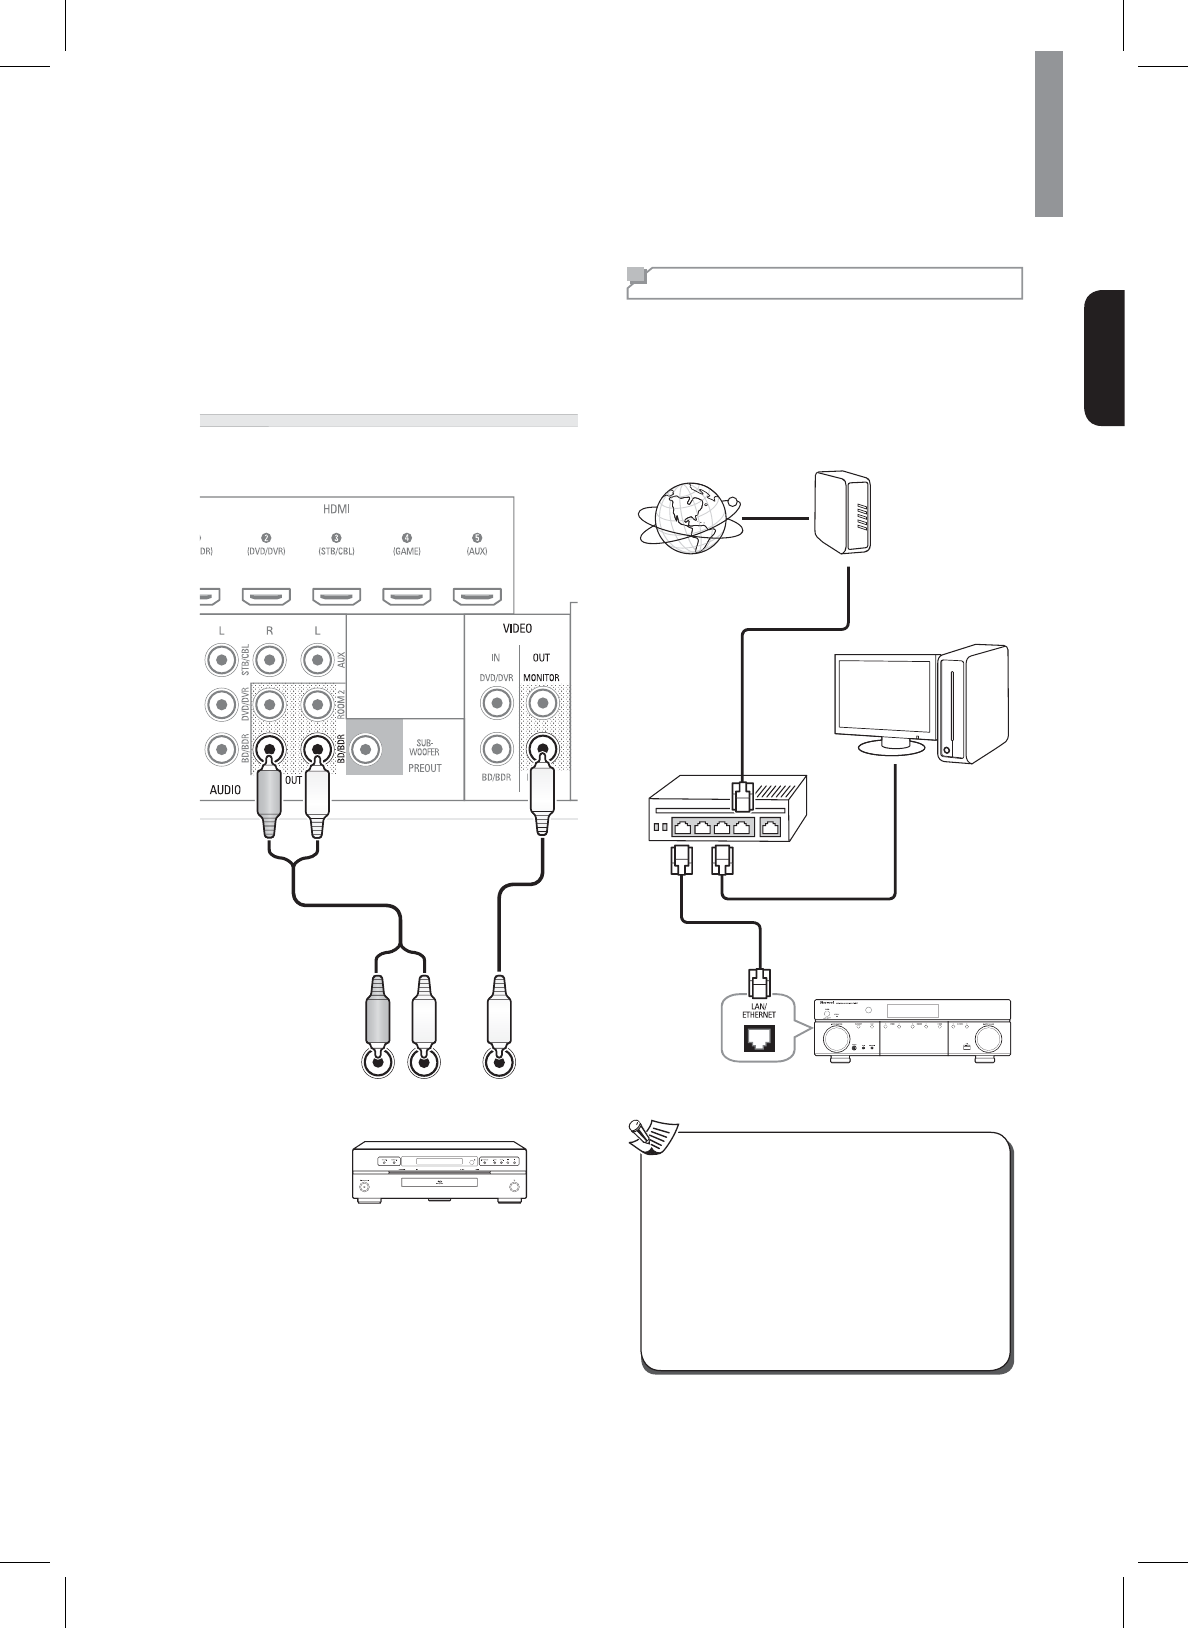
Connecting Recording Components
You can connect video and audio recording devices to
WKH9,'(2287DQG$8',2287MDFNV<RXFDQPDNH
an audio or a video recording from the built-in tuner or
from an audio or video source connected to the main
unit.
RL
AUDIO
IN
(COMPOSITE)
VIDEO
IN
Rear Panel
Connecting to a Network
If you have an internet connection, you can connect the
main unit to the internet as well as using a wireless or a
wired LAN connection.
7KHIROORZLQJLOOXVWUDWLRQLVDFRQ¿JXUDWLRQH[DPSOH
RIDKRPHQHWZRUNZLWKWKHV\VWHPDQGDVHUYHU,WLV
recommended to connect the server to the router with a
wired connection.
Internet
Modem
PC
Router
To WAN side
LAN port/Ethernet connector
To LAN port
Main Unit
To LAN port
x$IWHUPDNLQJDEURDGEDQGLQWHUQHWFRQQHFWLRQ
you should set the communication settings. For
GHWDLOVVHH³1HWZRUN6HWXS´RQSDJH
xWhen using a broadband internet connection,
a contract with an internet service provider is
required. For more information, contact local
internet service provider.
xSince the connected equipment and connection
method may differ depending on your internet
environment, refer to the operating instructions of
the equipment.
Note
22
R-807 NETWORK AV RECEIVER
Connecting an Antenna
To listen to radio stations, connect the FM wire antenna
and AM loop antenna as illustrated below.
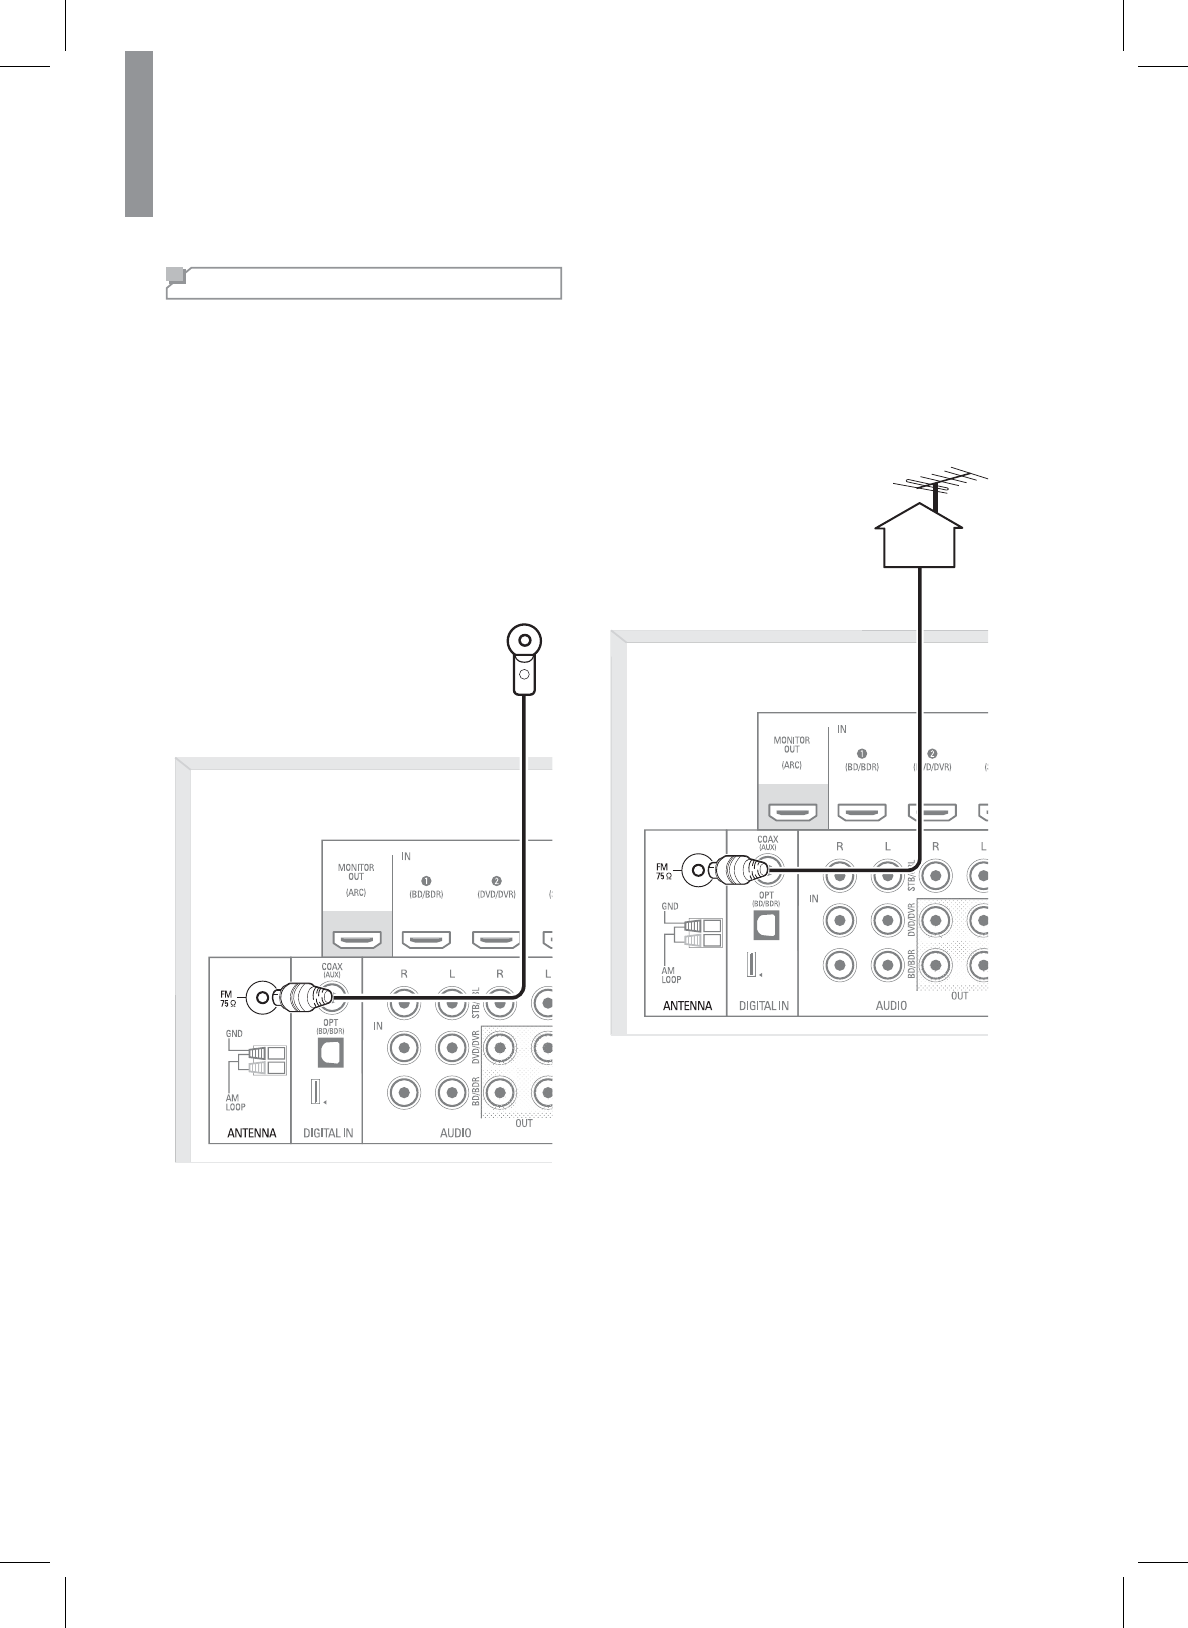
Connecting FM Antenna
To strengthen the signal reception, extend the antenna
to its full length.
Indoor Antenna
1Connect the FM indoor antenna to the FM
antenna terminal.
2Change the position of the antenna until you get
the best reception of your favorite FM stations.
Rear Panel
Outdoor Antenna
1Remove the indoor antenna if it is connected.
2Connect the FM outdoor antenna to the FM
antenna terminal.
Rear Panel
23
Making Connections
English
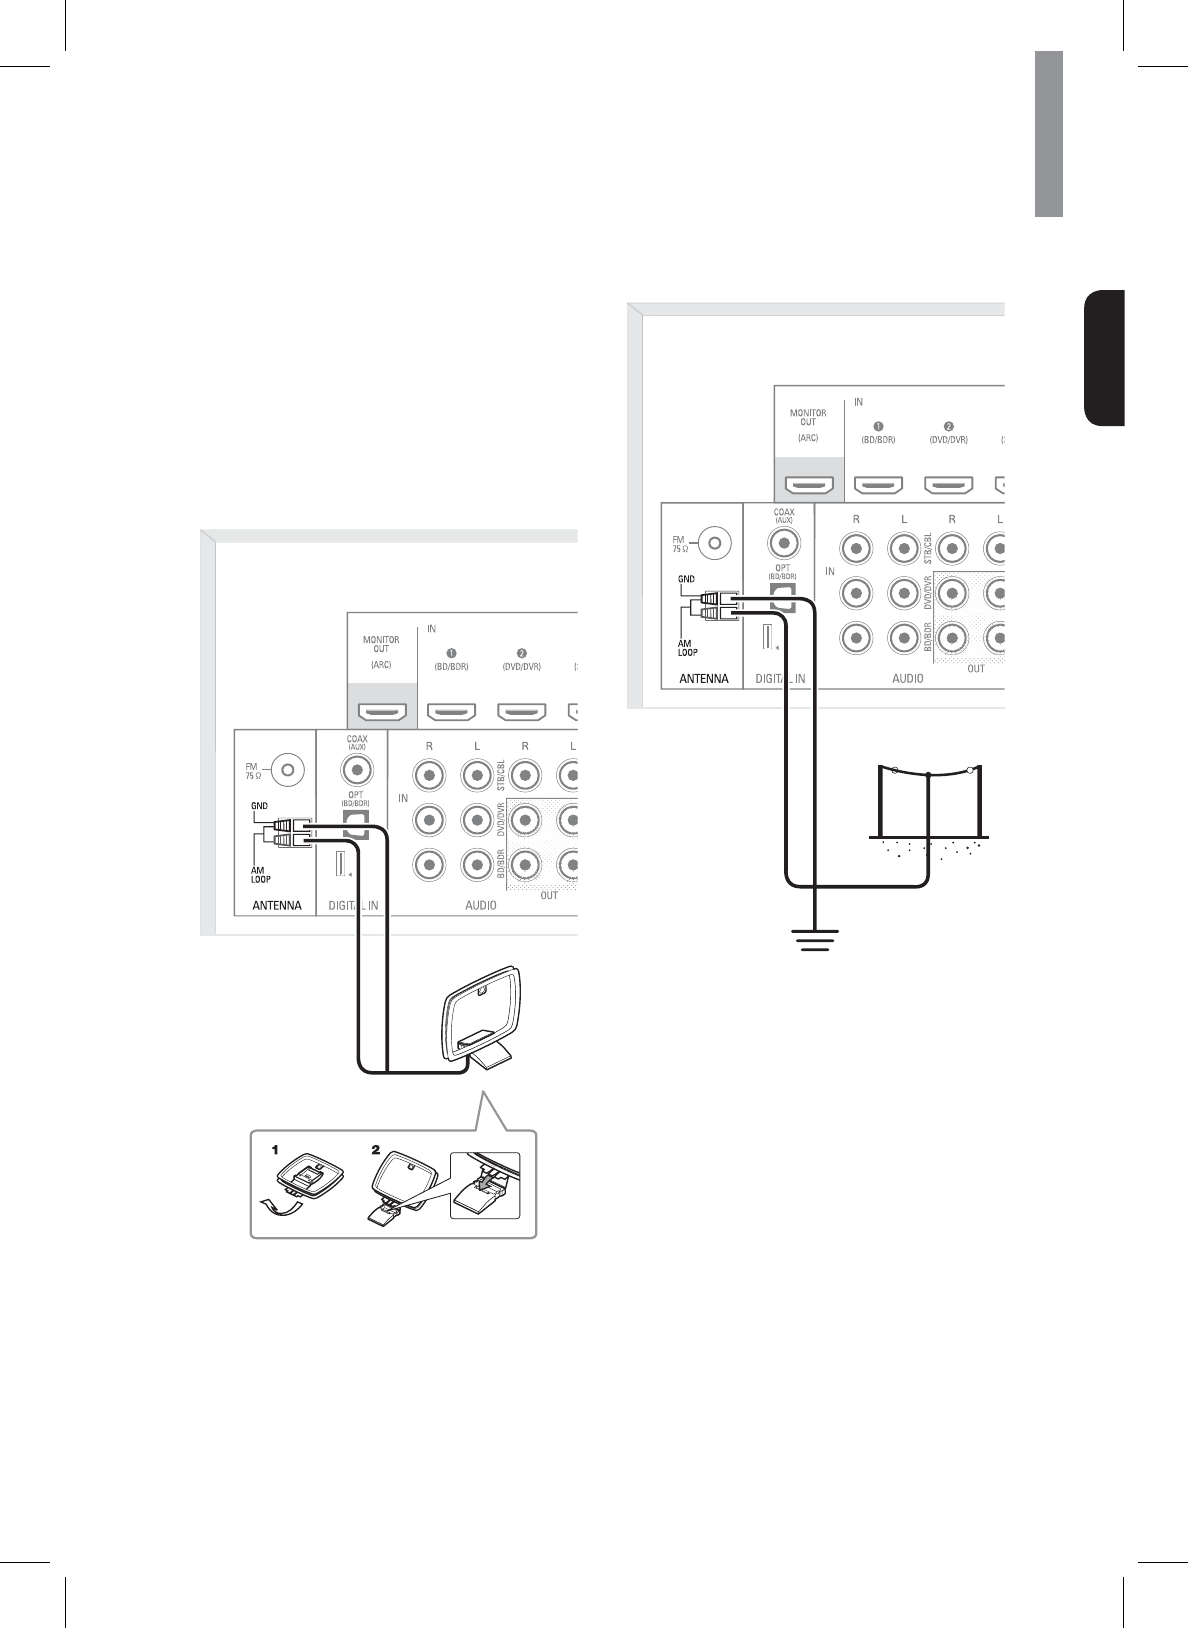
Connecting AM Antenna
1Assemble the AM loop antenna as illustrated
below.
2Place the antenna as far as possible from the
PDLQXQLW79VHWVSHDNHUFRUGVDQGWKH$&
input cord, and set the direction for the best
reception.
3If the reception is poor with the AM loop antenna,
it is recommended to replace it with an AM
outdoor antenna.
Rear Panel
AM Loop Antenna
Rear Panel
AM Outdoor Antenna
24
R-807 NETWORK AV RECEIVER
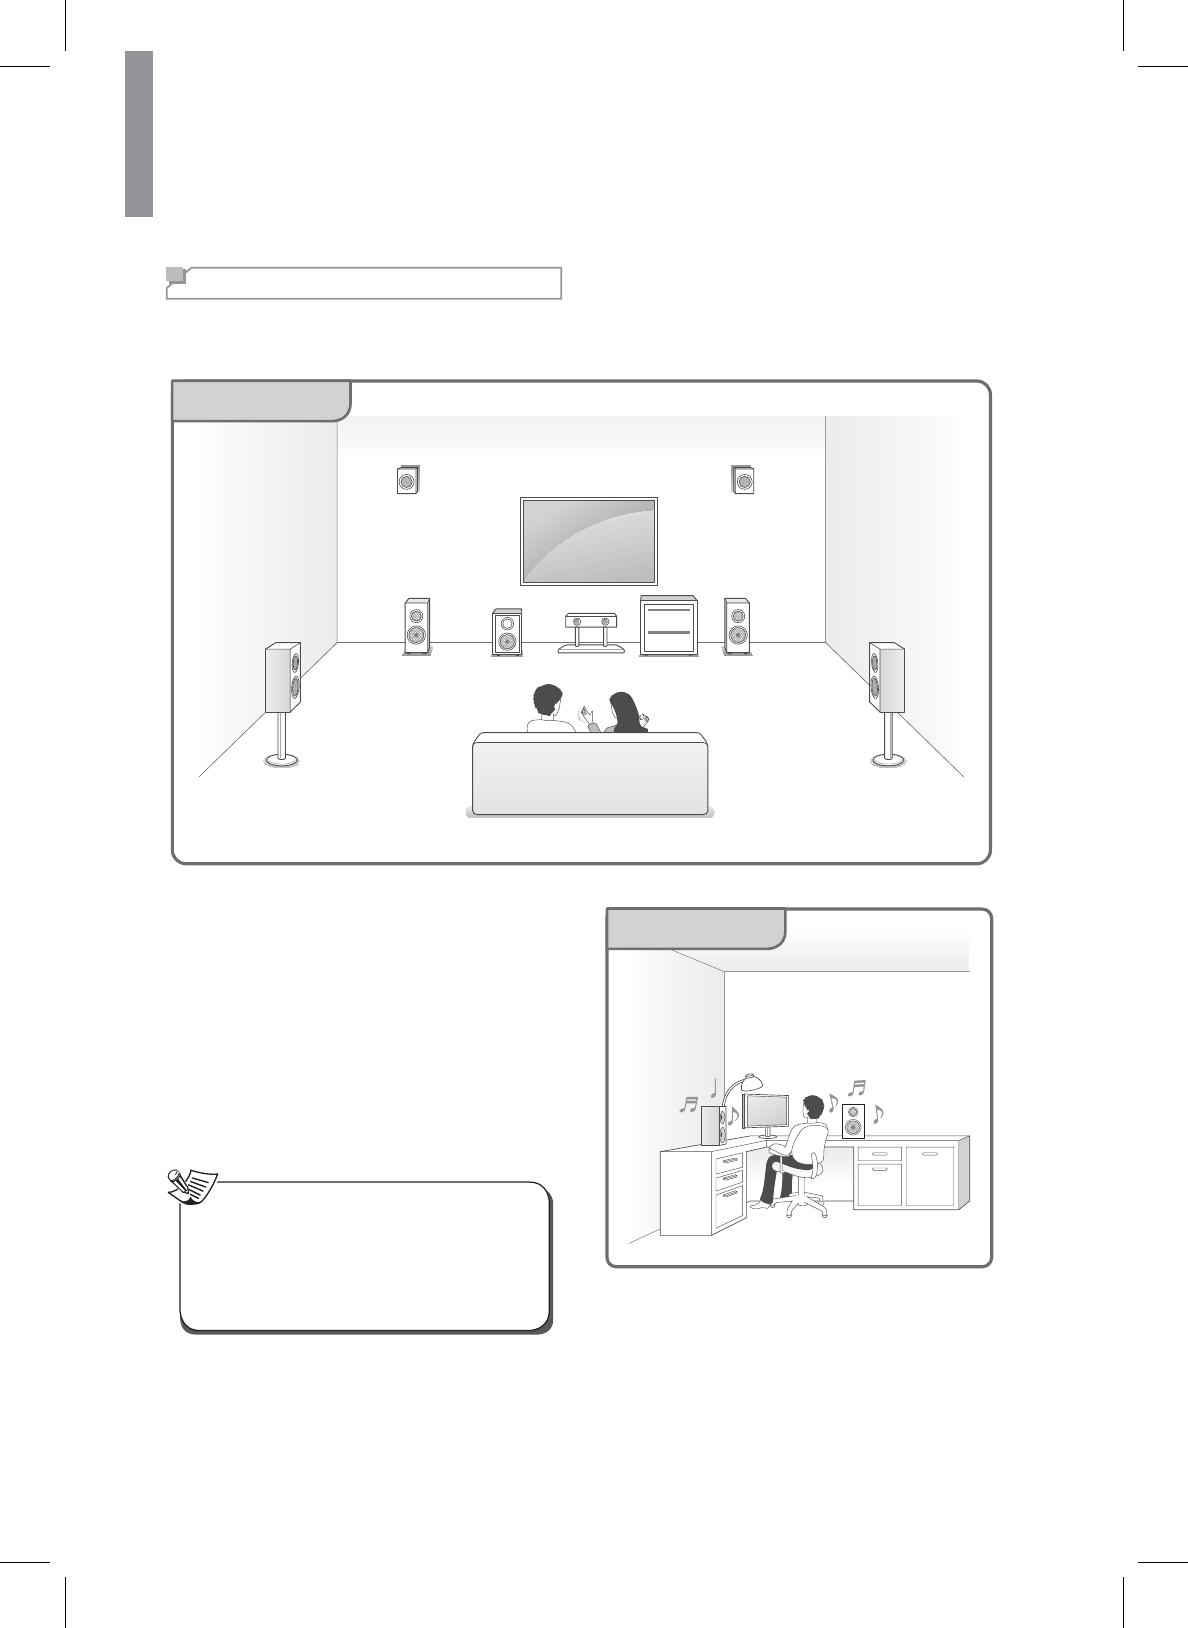
Connecting to Muti-Room
7KHPXOWL]RQHIXQFWLRQDOORZV\RXWRSOD\EDFNGLIIHUHQWLQSXWVRXUFHVLQWKHURRPZKHUHWKHXQLWLVLQVWDOOHG0DLQ
Room) and in another room (Room2).
Main Room
You can enjoy sounds from the equipment connected
to the main unit in a room other than the main room.
For example, you can watch the DVD in the main room
and listen to a CD in the sub room. The main unit can
power up to two independent systems in separate
rooms after you have made the proper multi-room
connections. Different sources can play in two rooms
at the same time or, depending on your needs, the
same source can also be used. The main and sub room
have independent power (the main room power can
be off while sub room is on) and the sub room can be
controlled by the remote control.
xWhen the Room2 output is enabled, the surround
EDFNVSHDNHUVLQWKHPDLQURRPGRQRWSURGXFH
sound.
xRemove the unit’s power cable from the AC wall
RXWOHWEHIRUHFRQQHFWLQJVSHDNHUVRUDQH[WHUQDO
DPSOL¿HU
Note
Sub Room (Room2)
25
Making Connections
English
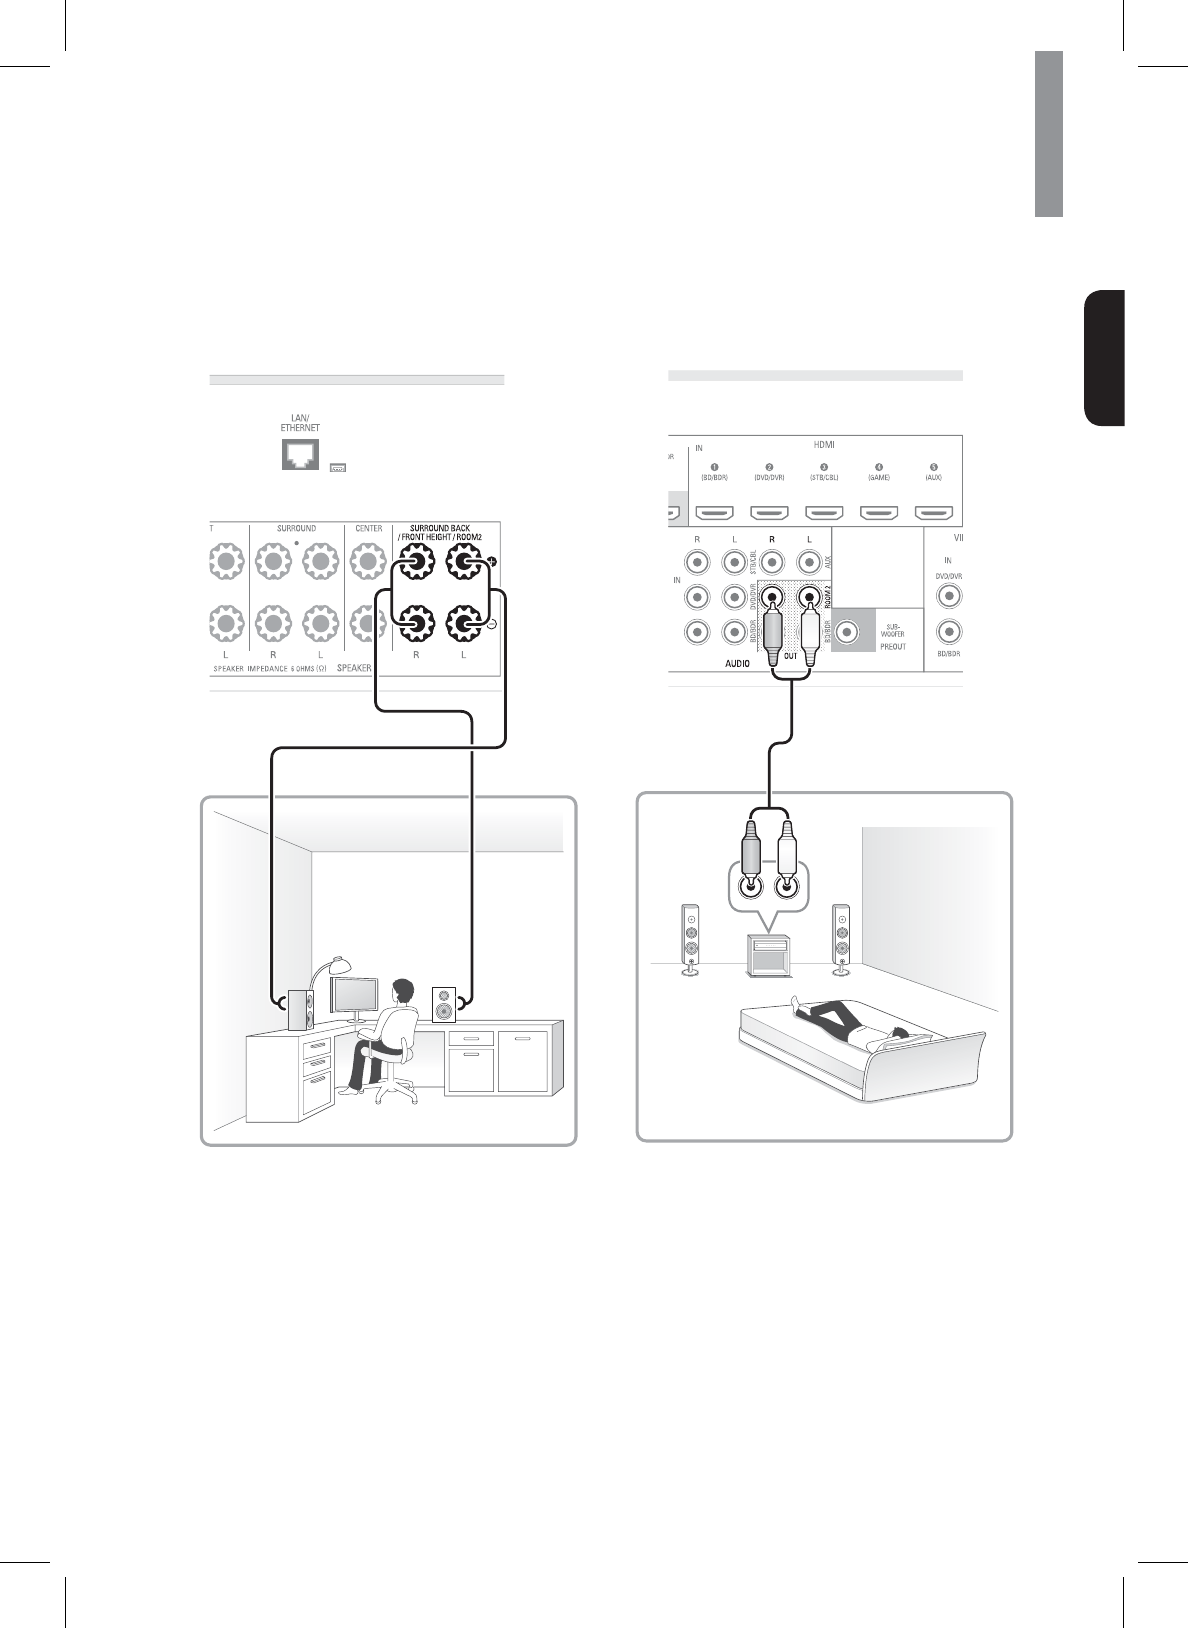
Connecting to the System's Internal
$PSOL¿HU
&RQQHFWWKHVSHDNHUVSODFHGLQ5RRPWRWKHPDLQXQLW
ZLWKVSHDNHUFDEOHV
Rear Panel
&RQQHFWLQJWRDQ([WHUQDO$PSOL¿HU
&RQQHFWWKHH[WHUQDODPSOL¿HUZLWKYROXPHFRQWURO
placed in Room2 to the main unit with analogue audio
cable.
([WHUQDO$PSOL¿HU$XGLR,QSXW
Rear Panel
26
R-807 NETWORK AV RECEIVER
Controlling Room2
&RQQHFWWKHH[WHUQDODPSOL¿HUZLWKYROXPHFRQWURO
placed in Room2 to the unit with analogue audio cable.
You can select different sources for main room and
second room (ROOM 2) and play them at the same
time.
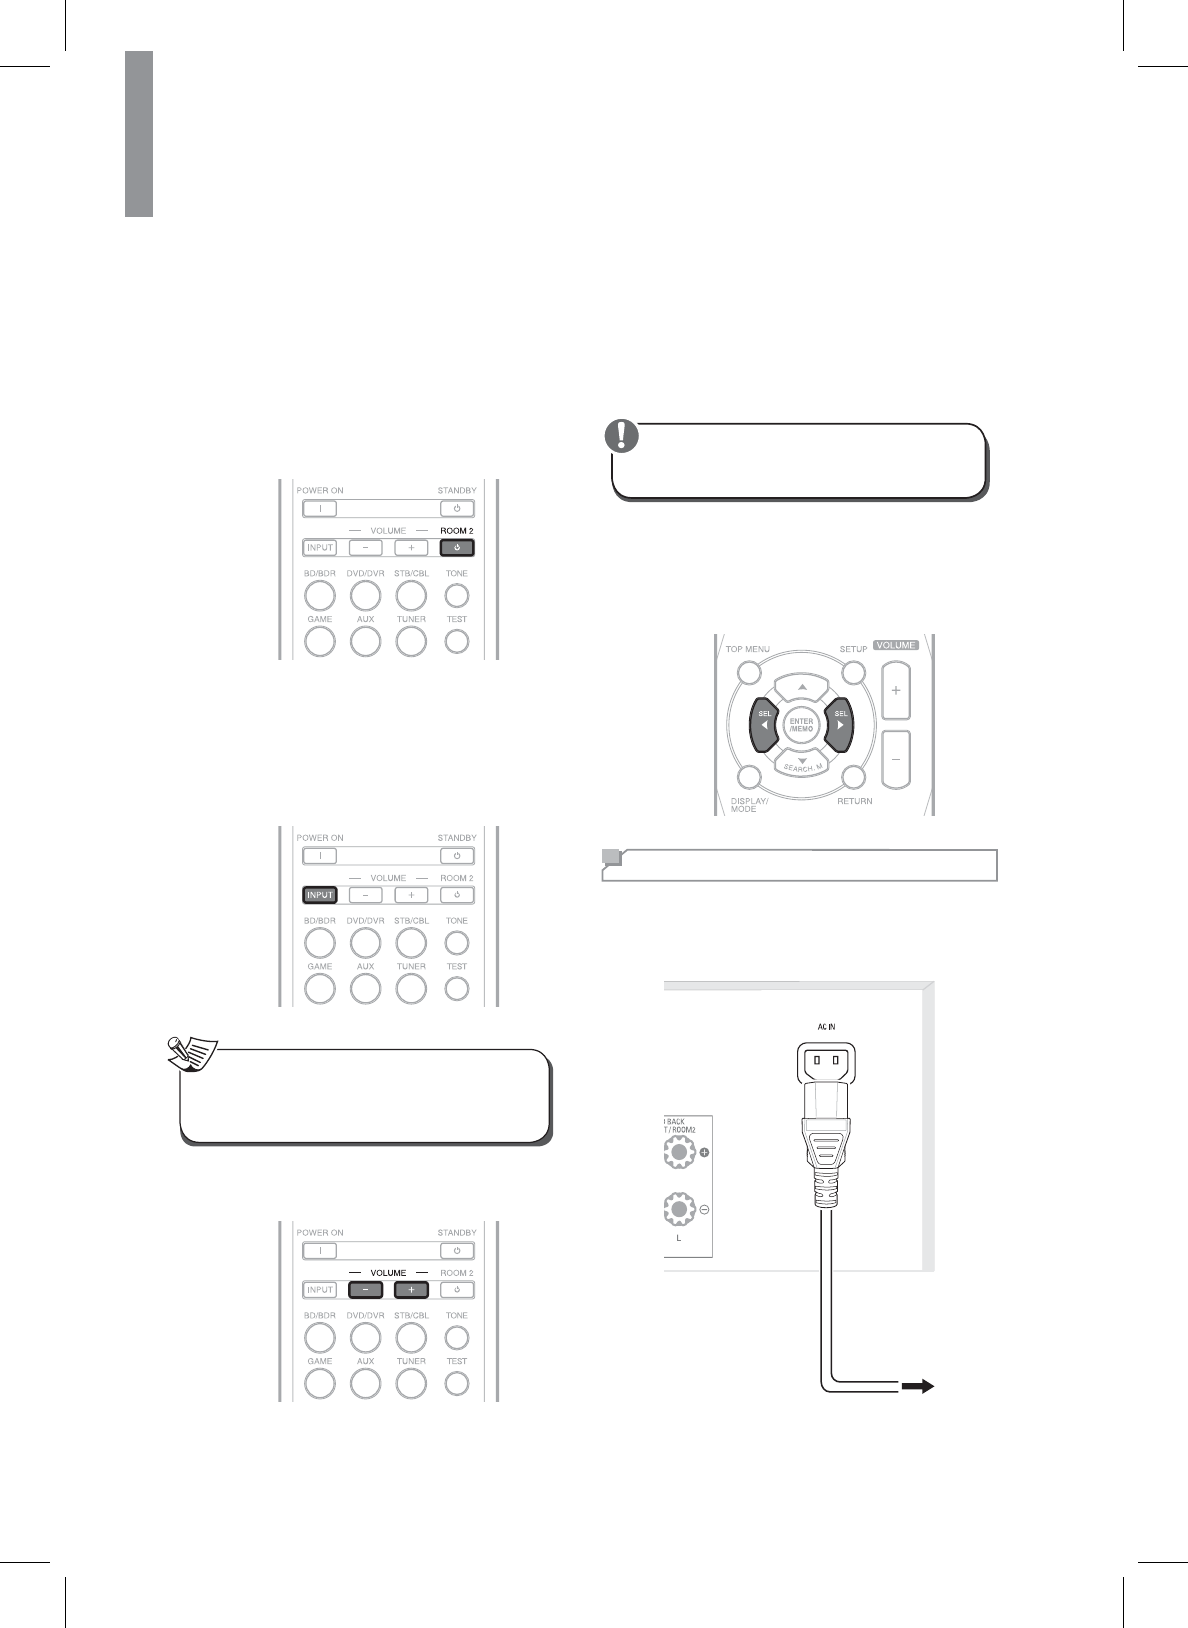
1Press ROOM2 on the remote control.
xThe ROOM 2 indicator is displayed on the
ÀXRUHVFHQWGLVSOD\
2Press the ROOM2 input select button to select
the desired mode.
xEach time the button on the universal remote
control is pressed, the input source changes
in the following order:
DVD p STB p AUX p F.AUX p TUNER
xIf you press the ROOM 2 INPUT SELECTOR
button when the ROOM 2 function is off, it is
automatically turned on.
Note
3Adjust the ROOM 2 volume by pressing the
522092/80(83'2:1íEXWWRQV
4Adjust the tone (bass and treble) for ROOM 2
source.
xThe tone level can be adjusted within the
UDQJHRIaG%
xIn general, we recommend the bass and
WUHEOHWREHDGMXVWHGWRG%ÀDWOHYHO
xExtreme settings at high volume may damage
\RXUVSHDNHUV
Caution
5Use the remote’s left and right arrow buttons
to select OFF, SMALL or LARGE for the Front,
&HQWHUDQG6XUURXQGVSHDNHUSRVLWLRQV
GHSHQGLQJRQWKHVSHDNHUV\RXKDYHFRQQHFWHG
to the receiver.
Connecting Power
0DNHVXUHWRSOXJLQRQO\DIWHU\RXKDYHFRQQHFWHGDOO
your components to the main unit. Plug the supplied AC
input cord into the AC inlet and then into the wall outlet.
AC power cord
To the wall outlet
Rear Panel
27
English
Operating Your System
Listening to Your System
Basic Operation
You can listen to audio by following the basic
procedures below.
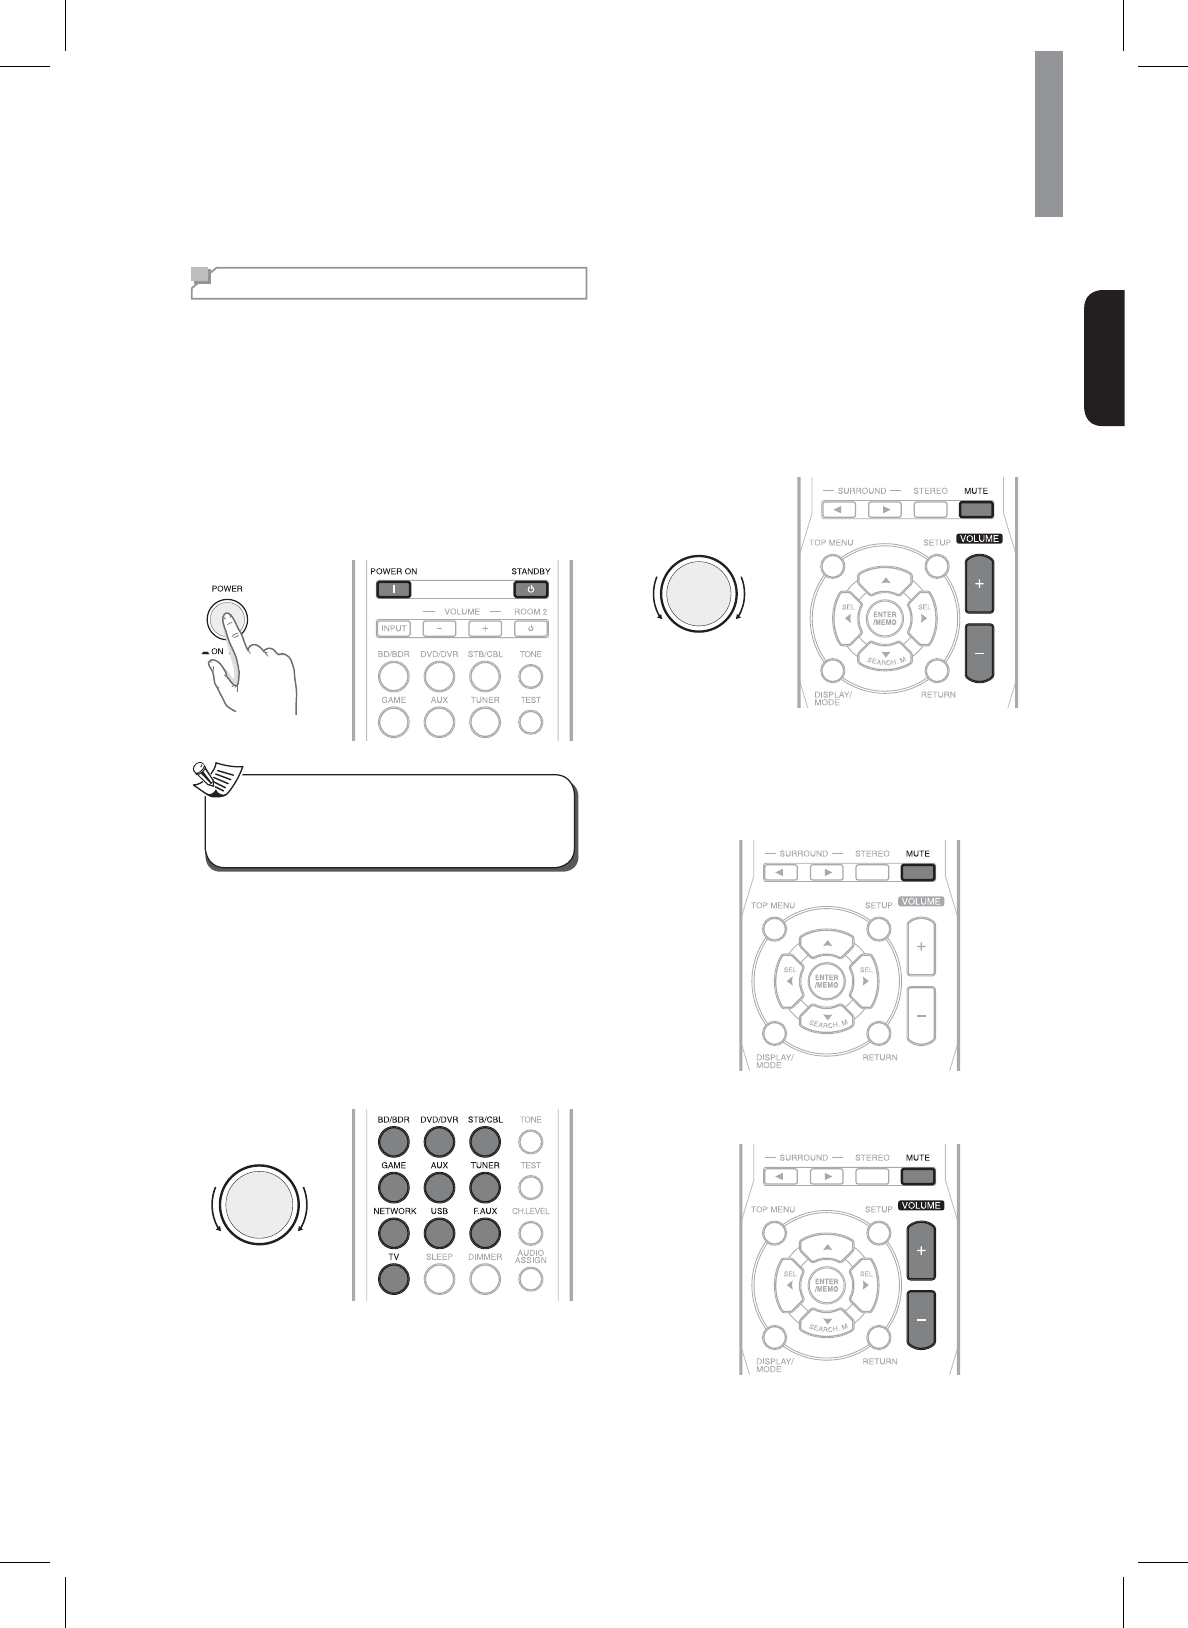
1Turn on the connected component.
2Turn on the main unit.
xOn the main unit, press POWER and 21
STANDBY.
xOn the remote control, press POWER ON
and STANDBY.
xWhen the power button is pressed on the main
unit, you cannot turn on the main unit by pressing
the power button on the remote control.
Note
36HOHFWWKHLQSXWVRXUFH\RXZDQWWRSOD\EDFN
xOn the main unit, rotate INPUT SELECTOR.
xEach time the button is pressed, the display
changes in the following order:
BD/BDR p DVD/DVR p STB/CBL p GAME p
AUX p NETWORK p USB p TV p F.AUX p
TUNER
xOn the remote control, press a source select
button.
INPUT SELECTOR
46WDUWSOD\EDFNRIWKHFRPSRQHQW\RXVHOHFWHGLQ
step 1.
5'XULQJSOD\EDFN\RXFDQDGMXVWWKHYROXPH
level.
xOn the main unit, rotate the volume controller.
xOn the remote control, press 92/80(.
VOL - 92/
Muting the Sound
You can mute the sound temporarily by pressing MUTE.
1Press MUTE to mute the sound.
2Press MUTE or 92/80(to turn on the
sound.
R-807 NETWORK AV RECEIVER
28
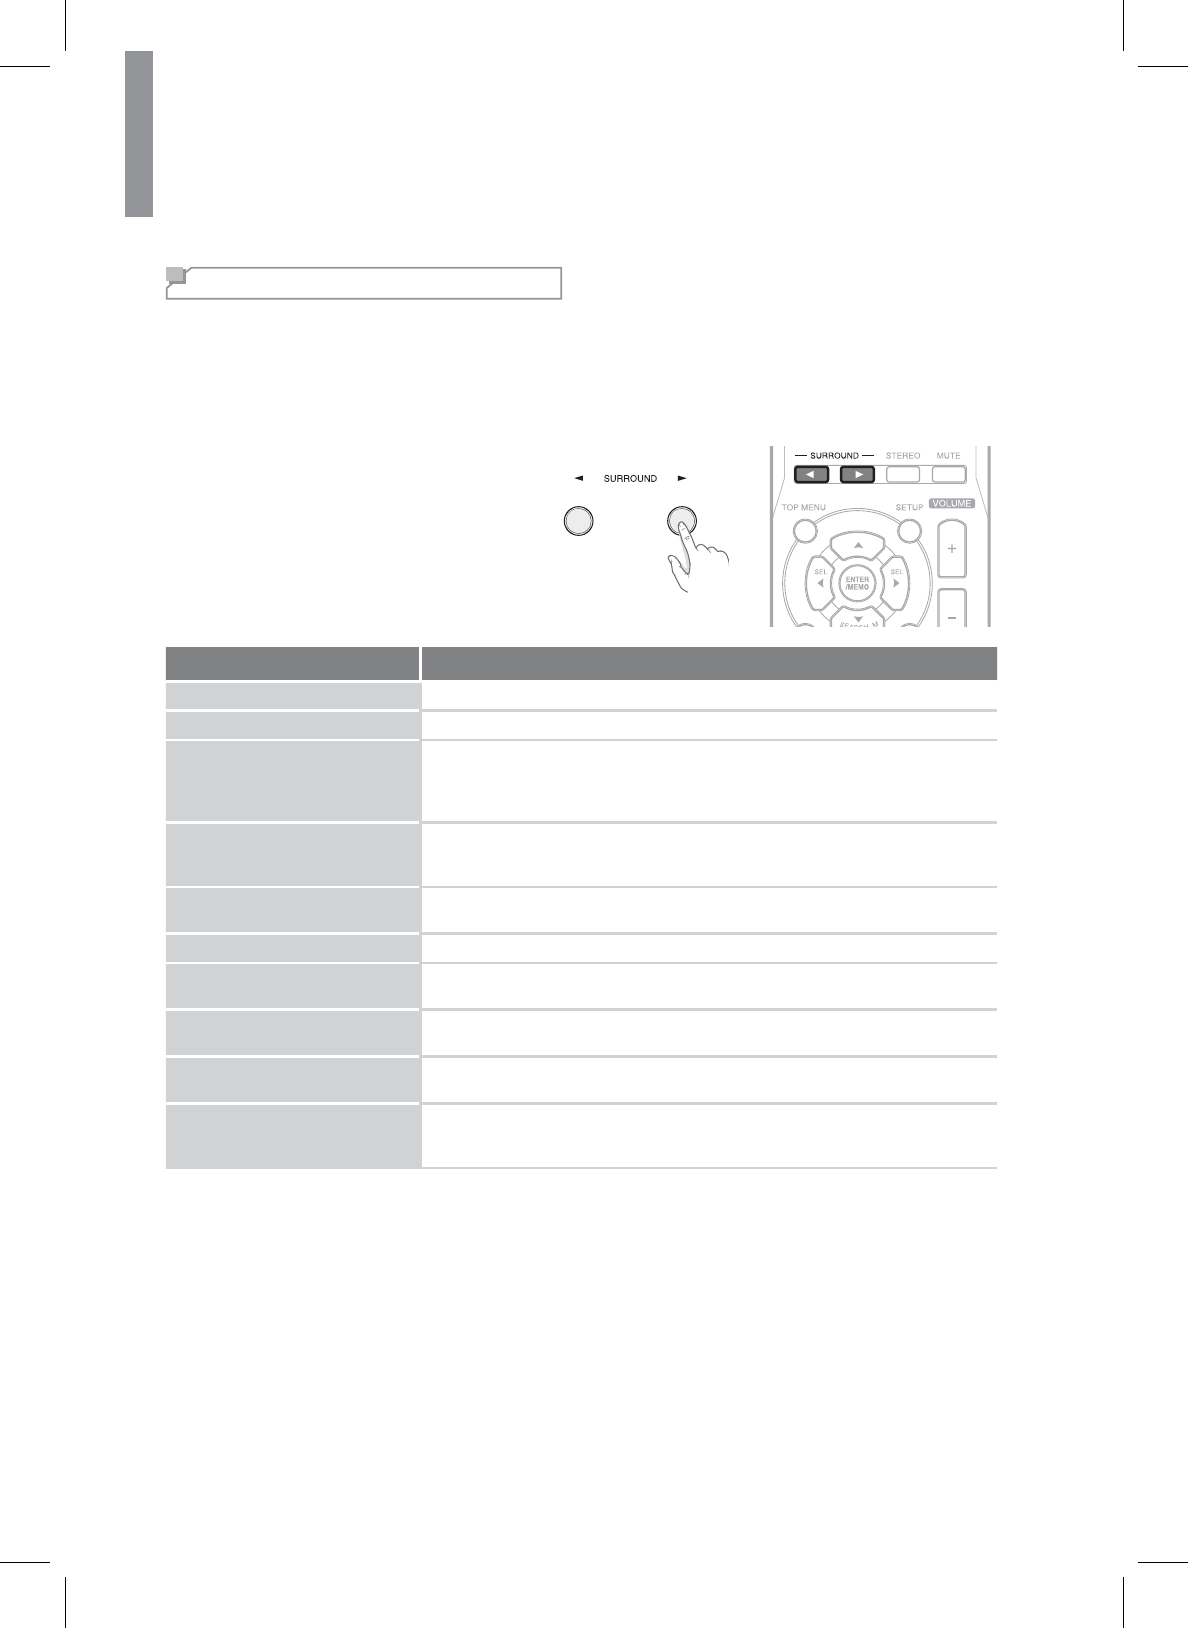
Enjoying Surround Effects
This main unit incorporates a sophisticated Digital Signal Processor that allows you to create optimum sound quality
and sound atmosphere in your personal Home Theater.
Setting the Surround Mode
%HIRUHVXUURXQGSOD\EDFN¿UVWSHUIRUPWKHVSHDNHUVHWXSSURFHGXUHHWFRQWKH26'VHWWLQJVIRURSWLPXP
SHUIRUPDQFH)RUGHWDLOVVHH³6HWWLQJWKH6SHDNHU6HWXS´RQSDJH
1Select the desired surround mode by pressing
the SURROUND buttons.
xEach time the buttons are pressed, the
surround mode changes depending on the
input signal format as the table below:
Signal format being input Selectable surround mode
Dolby Digital Plus sources DOLBY DIGITAL PLUS
Dolby TrueHD sources DOLBY TRUEHD
Dolby Digital EX 6.1 channel
sources
Dolby Digital 5.1 channel
sources
<DOLBY DIGITAL EX, DOLBY D + PLIIx MUSIC>, (DOLBY D + PLIIx MOVIE),
{DOLBY D + PLIIz}, DOLBY DIGITAL, DSP Surround modes*
Dolby Digital 2 channel
sources
<DOLBY PLIIx MOVIE, DOLBY PLIIx MUSIC, DOLBY PLIIx GAME>, [DOLBY
PLII MOVIE, DOLBY PLII MUSIC, DOLBY PLII GAME], {DOLBY PLIIz
HEIGHT}, DTS NEO: 6 MUSIC, DTS NEO: 6 CINEMA, DSP Surround modes*
DTS-HD High Resolution
Audio sources DTS-HD HRA
DTS-HD Master Audio sources DTS-HD MSTR
'76(6'LVFUHWH0DWUL[
channel sources
<Corresponding DTS ES mode, DTS + PLIIx MUSIC>, (DTS + PLIIx MOVIE),
DTS, {DTS + PLIIz}, DSP Surround modes*
DTS sources
'76VRXUFHV
Corresponding DTS mode, <DTS + NEO: 6, DTS + PLIIx MUSIC>, (DTS +
PLIIx MOVIE), DTS, {DTS + PLIIz}, DSP Surround modes*
PCM (multi-channel) sources
**
MULTI PCM, <MCH + PLIIx MOVIE, MCH + PLIIx MUSIC>, {MCH + PLIIz},
DSP Surround modes*
PCM (2 channel) sources
Analog stereo sources
0XVLF¿OHVIURP86%
<DOLBY PLIIx MOVIE, DOLBY PLIIx MUSIC, DOLBY PLIIx GAME>, [DOLBY
PLII MOVIE, DOLBY PLII MUSIC, DOLBY PLII GAME], DTS NEO: 6 MUSIC,
DTS NEO: 6 CINEMA, {DOLBY PLIIz HEIGHT}, DSP Surround modes*
Depending on surround back speaker setting, some surround modes can be selected or not as follows:
< > : 3RVVLEOHRQO\ZKHQVXUURXQGEDFNVSHDNHULVQRWVHWWR³12´
[ ] : 3RVVLEOHRQO\ZKHQVXUURXQGEDFNVSHDNHULVVHWWR³12´
( ) : 3RVVLEOHRQO\ZKHQVXUURXQGEDFNVSHDNHULVVHWWR³FK´
{ } : 3RVVLEOHRQO\ZKHQIURQWKHLJKWVSHDNHULVVHWWR³21´
* : Stand for THEATER, MOVIE, HALL, GAME, STADIUM, MCH STEREO, ALC.
** : on the signal format being input, the Dolby Pro Logic IIx modes may not be selected.

29
Operating Your System
English
DTS Digital Surround
DTS Digital Surround (also called simply DTS) supports
up to 5.1 discrete channels and uses less compression
IRUKLJK¿GHOLW\UHSURGXFWLRQ8VHLWZLWK'9'VDQG&'V
bearing the DTS logo.
DTS-ES™ Discrete 6.1
This is a 6.1 channel discrete digital audio format
ZKLFKDGGVDVXUURXQGEDFNFKDQQHOWRWKH'76
digital surround sound. The seven totally separate
audio channels provide better spatial imaging and
360 degrees sound localization, perfect for sounds that
pan across the surround channels. Use it with DVDs
bearing the DTS-ES logo, especially those with a DTS
(6'LVFUHWHVRXQGWUDFN
DTS - ES™ Matrix 6.1
This is a 6.1 channel discrete digital audio format
LQVHUWLQJDVXUURXQGEDFNFKDQQHOWRWKH'76GLJLWDO
surround sound through matrix encoding. Use it with
DVDs bearing the DTSES logo.
DTS Neo: 6™ Surround
DTS Neo: 6 is a matrix decoding technology for
DFKLHYLQJFKDQQHOVXUURXQGSOD\EDFNZLWKFKDQQHO
sources. It includes 'DTS Neo: 6 Cinema’ suited for
playing movies' and 'DTS Neo: 6 Music’ suited for
playing music'.
'76
7KLVLVKLJKUHVROXWLRQ'76ZLWKDN+]VDPSOLQJUDWH
DQGELWUHVROXWLRQSURYLGLQJVXSHULRU¿GHOLW\8VHLW
with DVDs bearing the DTS 96/24 logo.
DTS-HD High Resolution Audio
Developed for use with HDTV, including the new video
disc formats Blu-ray and HD DVD, this is the latest
multi-channel audio format from DTS. It supports up
WRFKDQQHOVZLWKN+]ELWVDPSOLQJUDWHDQG
signal resolution.
DTS-HD Master Audio
'HVLJQHGWRWDNHIXOODGYDQWDJHRIWKHDGGLWLRQDO
storage space offered by the new Blu-ray and HD
DVD disc formats, this new DTS format offers up to
7.1 discrete channels of uncompressed digital audio
ZLWKN+]ELWVDPSOLQJUDWHDQGVLJQDOUHVROXWLRQ
Manufactured under license under U.S. Patent Nos:
5,956,674; 5,974,380; 6,226,616; 6,487,535; 7,212,872;
7,333,929; 7,392,195; 7,272,567 & other U.S. and
worldwide patents issued & pending. DTS-HD, the
Symbol, & DTS-HD and the Symbol together are
UHJLVWHUHGWUDGHPDUNV'76+'0DVWHU$XGLRLVD
WUDGHPDUNRI'76,QF3URGXFWLQFOXGHVVRIWZDUH
© DTS, Inc. All Rights Reserved.
Dolby Digital
Dolby Digital is the multi-channel digital signal format
developed by Dolby Laboratories. Discs bearing
the Dolby Digital logo include the recording of up to
5.1 channels of digital signals. This will put you right
LQWKHPLGGOHRIWKHDFWLRQMXVWOLNHEHLQJLQDPRYLH
theater or concert hall.
Dolby Digital EX
This mode expands 5.1-channel sources for
FKDQQHOSOD\EDFN,WVHVSHFLDOO\VXLWHGWR'ROE\
'LJLWDO(;VRXQGWUDFNVWKDWLQFOXGHDPDWUL[HQFRGHG
VXUURXQGEDFNFKDQQHO7KHDGGLWLRQDOFKDQQHODGGVDQ
extra dimension and provides an enveloping surround
VRXQGH[SHULHQFHSHUIHFWIRUURWDWLQJDQGÀ\E\VRXQG
effects.
Dolby Digital Plus
Developed for use with HDTV, including the new video
disc formats Blu-ray and HD DVD, this is the latest
multichannel audio format from Dolby. It supports up
WRFKDQQHOVZLWKN+]ELWVDPSOLQJUDWHDQG
signal resolution.
Dolby TrueHD
'HVLJQHGWRWDNHIXOODGYDQWDJHRIWKHDGGLWLRQDO
storage space offered by the new Blu-ray and HD
DVD disc formats, this new Dolby format offers up to
7.1 discrete channels of lossless audio performance
ZLWKN+]ELWVDPSOLQJUDWHDQGVLJQDOUHVROXWLRQ
Dolby Pro Logic IIz
This mode adds front height channels to surround
VRXQGFUHDWLQJDFKDQQHOSDO\EDFNIRUPXVLF
movies and video games. Dolby Pro Logic IIz brings
enhanced spatial effects, added depth, and an overall
airiness to listening experience.
Dolby Pro Logic IIx
This mode expands any 2-channel source for
FKDQQHOSOD\EDFN,WSURYLGHVDYHU\QDWXUDO
and seamless surround sound experience that fully
envelopes the listener. As well as music and movies,
YLGHRJDPHVFDQDOVREHQH¿WIURPWKHGUDPDWLFVSDWLDO
effects and vivid imaging. It includes ‘Dolby Pro Logic
IIx Movie’ suited for playing movies, ‘Dolby Pro Logic IIx
Music’ suited for playing music and ‘Dolby Pro Logic IIx
Game’ suited for playing games.
Dolby Pro Logic II
,I\RXDUHQRWXVLQJDQ\VXUURXQGEDFNVSHDNHUV'ROE\
Pro Logic II surround will be used instead of Dolby Pro
Logic IIx surround. It includes Dolby Pro Logic II Movie,
Dolby Pro Logic II Music and Dolby Pro Logic II Game
OLNH'ROE\3UR/RJLF,,[VXUURXQG
Manufactured under license from Dolby Laboratories.
Dolby, Pro Logic, and the double-D symbol are
UHJLVWHUHGWUDGHPDUNVRI'ROE\/DERUDWRULHV

30
R-807 NETWORK AV RECEIVER
Theater
This mode provides the effect of being in a theater
when watching a play.
Movie
This mode provides the effect of being in a movie
theater when watching a movie.
Hall
This mode provides the ambience of a concert hall for
classical music sources such as orchestral, chamber
music or an instrumental solo.
Game
This mode is suitable for video games.
Stadium
7KLVPRGHSURYLGHVDQH[SDQVLYHVRXQG¿HOGLQRUGHU
to achieve a true stadium effect when watching baseball
or soccer games.
Multi Channel Stereo
7KLVPRGHLVGHVLJQHGIRUSOD\LQJEDFNJURXQGPXVLF
7KHIURQWVXUURXQGDQGVXUURXQGEDFNFKDQQHOVFUHDWH
a stereo image that encompasses the entire area.
ALC (Auto Volume Level Control)
7KLVPRGHDXWRPDWLFDOO\HTXDOL]HVSOD\EDFNVRXQG
levels if each sound level varies with the music source
recorded in a portable audio player.
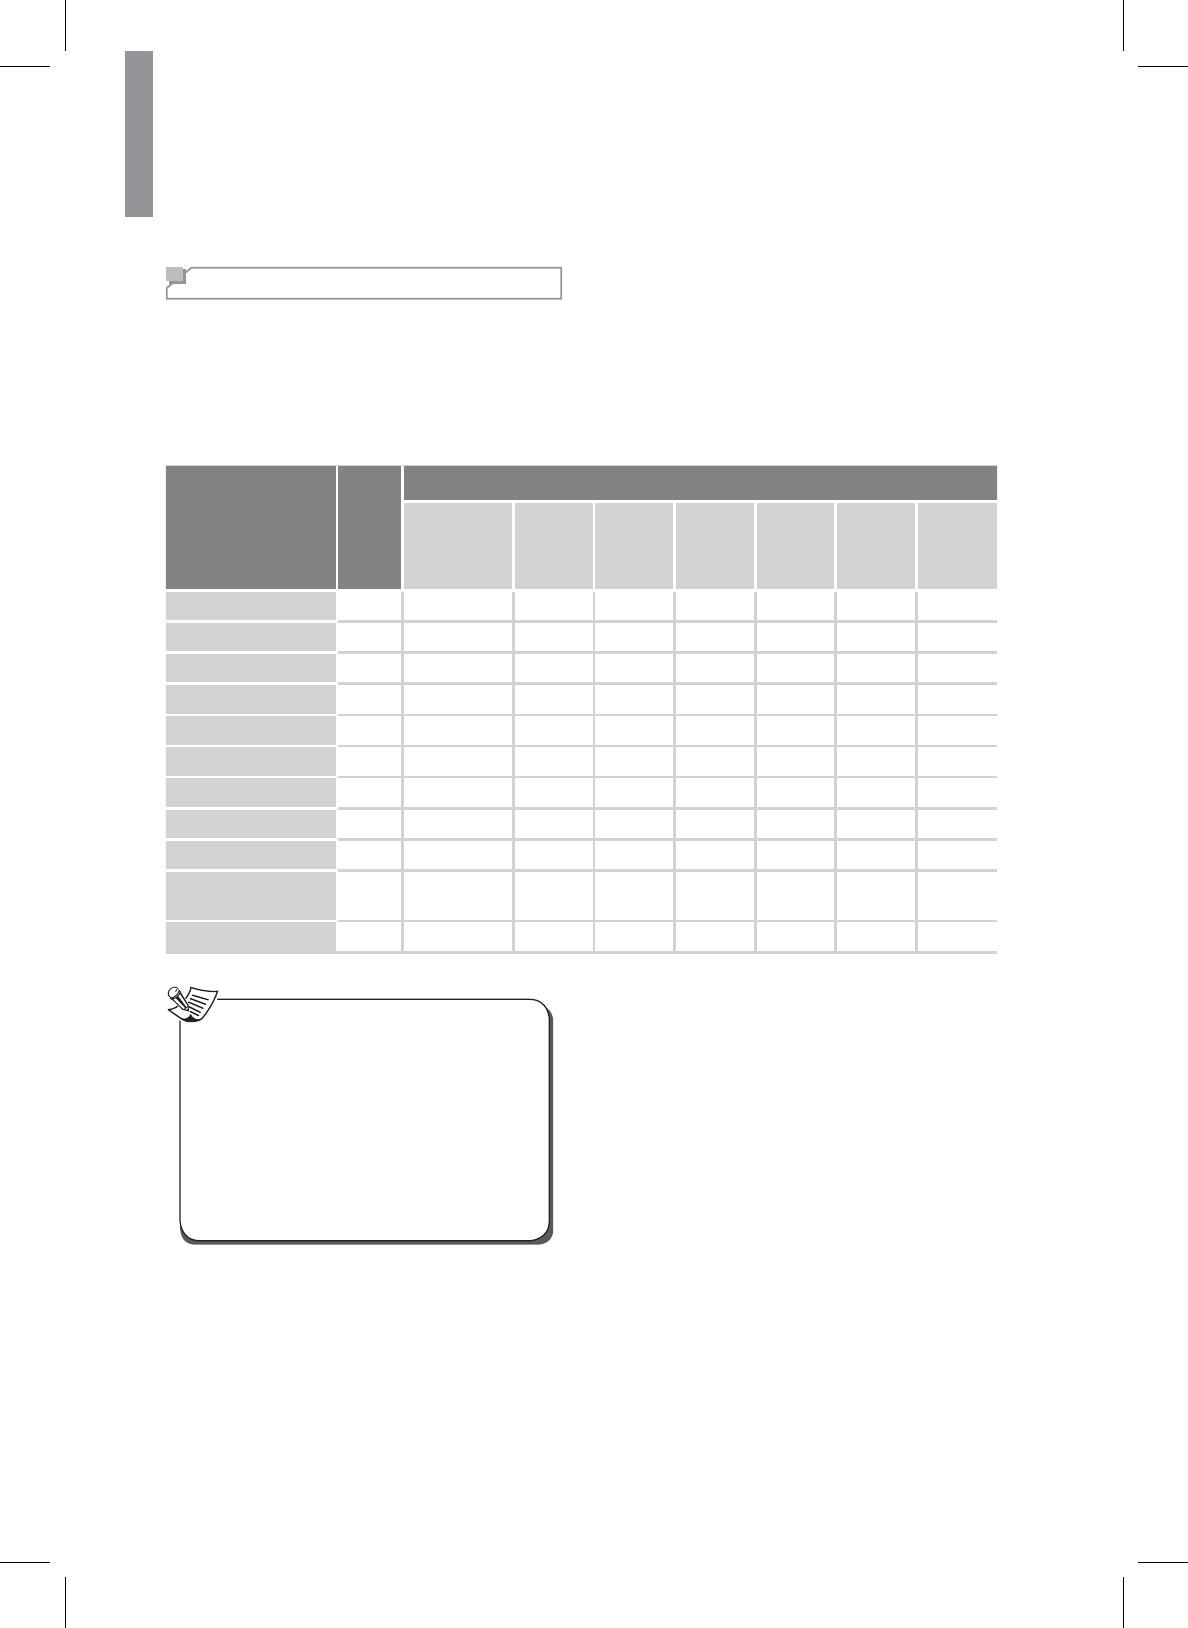
xThe sound from each channel can be reproduced according to the surround modes as follows:
Channels
Modes
)5217/5 CENTER SURROUND
/5
SURROUND
%$&.)5217
+(,*+7/5
SUBWOOFER
DTS-HD HIGH RESOLUTION
$8',20$67(5$8',2 O O O O/- O
'76'76 OOO - O
'76(6',6&5(7(0$75,; OOO O O
'761(2&,1(0$086,& O O O O - (*)
'2/%<',*,7$/3/86'2/%<
TRUEHD O O O O/- O
DOLBY DIGITAL OOO - O
DOLBY DIGITAL EX OOO O O
DOLBY PRO LOGIC IIz HEIGHT OOO O O
'2/%<352/2*,&,,[029,(
086,&*$0( OOO O O
'2/%<352/2*,&,,029,(
086,&*$0( OOO - O
(MULTI) PCM O O O O/- O
AUTO VOLUME LEVEL CONTROL O - - - - (*)
Other Surrounds O O O O - (*)
STEREO O - - - - (*)
(*): Depending on the subwoofer setting, the sound from the subwoofer channel may be reproduced.
x'HSHQGLQJRQWKHVSHDNHUVHWWLQJVDQGWKHQXPEHURIWKHHQFRGHGFKDQQHOVHWFWKHVRXQGIURPWKH
FRUUHVSRQGLQJFKDQQHOVPD\QRWEHUHSURGXFHG)RUGHWDLOVVHH³6HWWLQJWKH6SHDNHU” on page 44.
31
Operating Your System
English
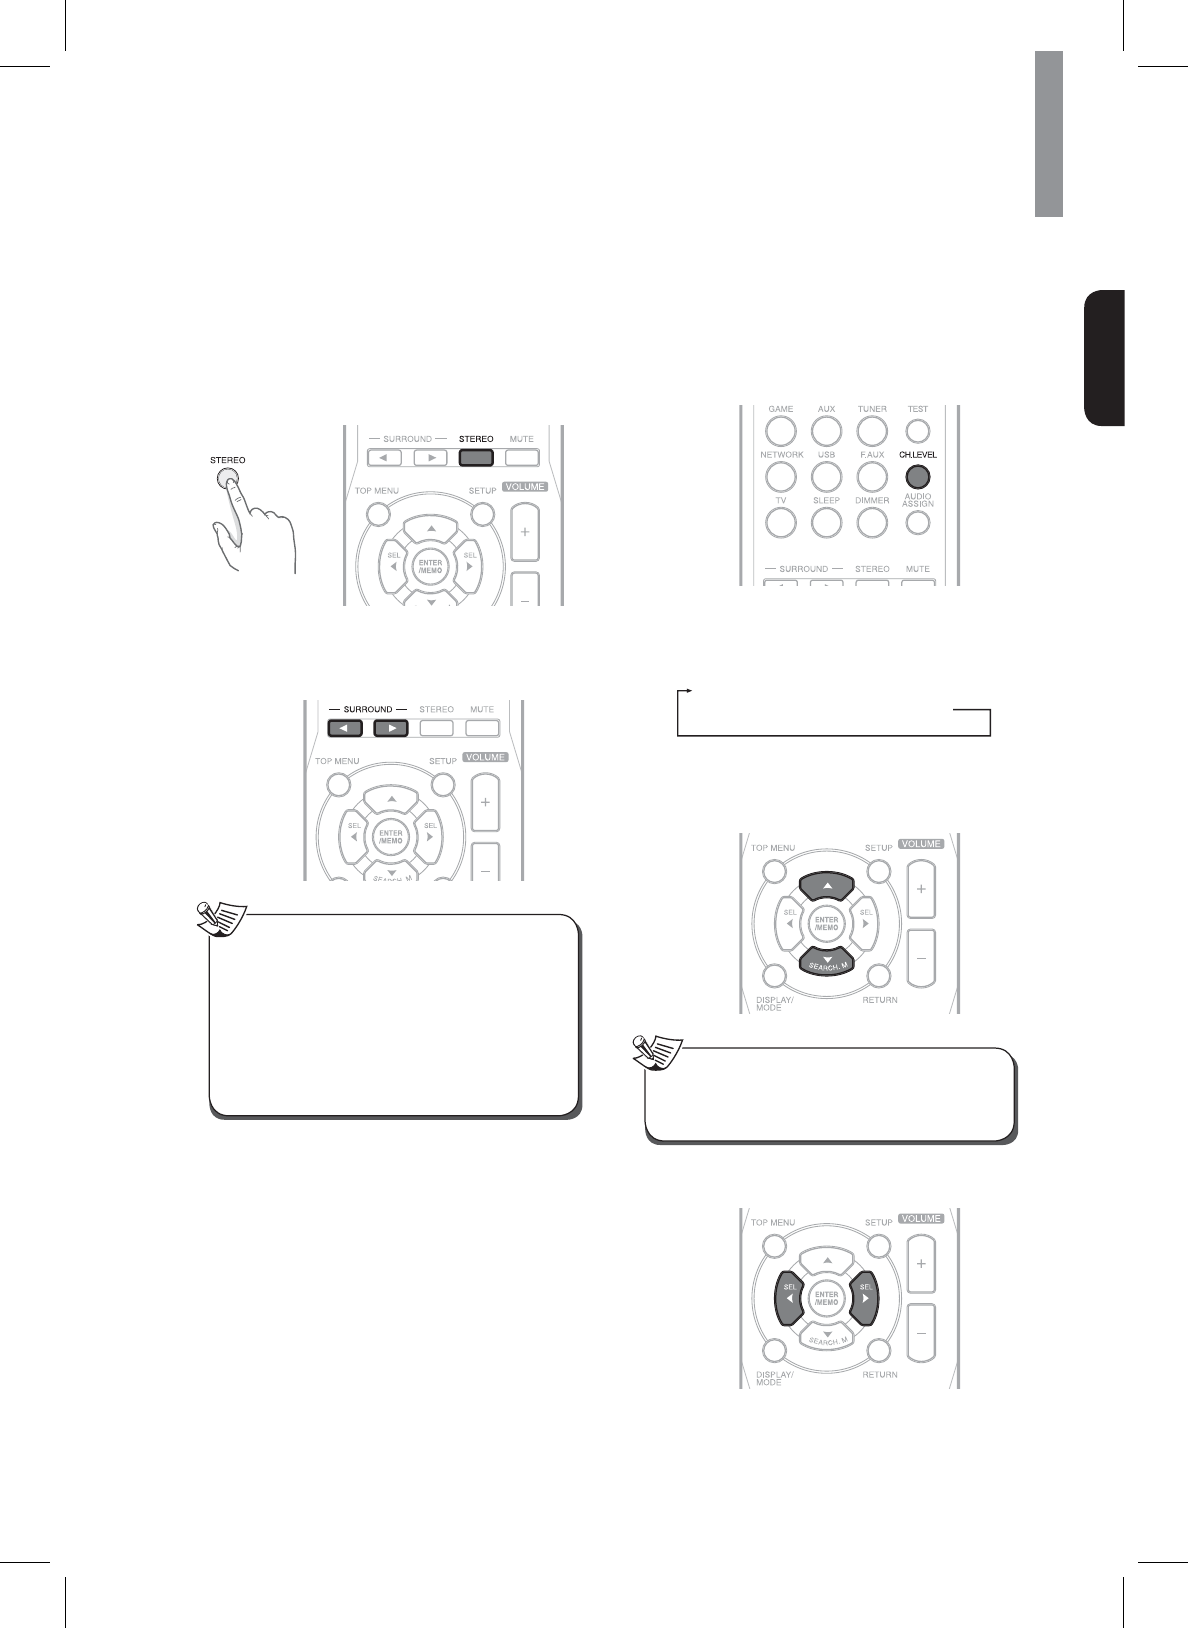
Cancelling the Surround Mode for Stereo
Operation
1Press STEREO.
xDepending on the input signal format, either
the stereo mode or the 2CH downmix mode is
selected.
2To cancel either the stereo mode or the 2CH
downmix mode, press the SURROUND buttons
to select the surround mode.
x2 CH downmix mode allows the multi-channel
signals encoded in DTS or Dolby Digital format,
etc. to be mixed down into 2 front channels and
WREHUHSURGXFHGWKURXJKRQO\WZRIURQWVSHDNHUV
or through headphones.
xIf headphones are plugged in to the main unit
while playing the multi-channel digital signals
from DTS or Dolby Digital sources, etc., it will
enter the 2CH downmix mode automatically.
Note
Adjusting the Current Channel Level
After adjusting each channel level with test tone, adjust
the channel levels according to the program sources or
to suit your tastes.
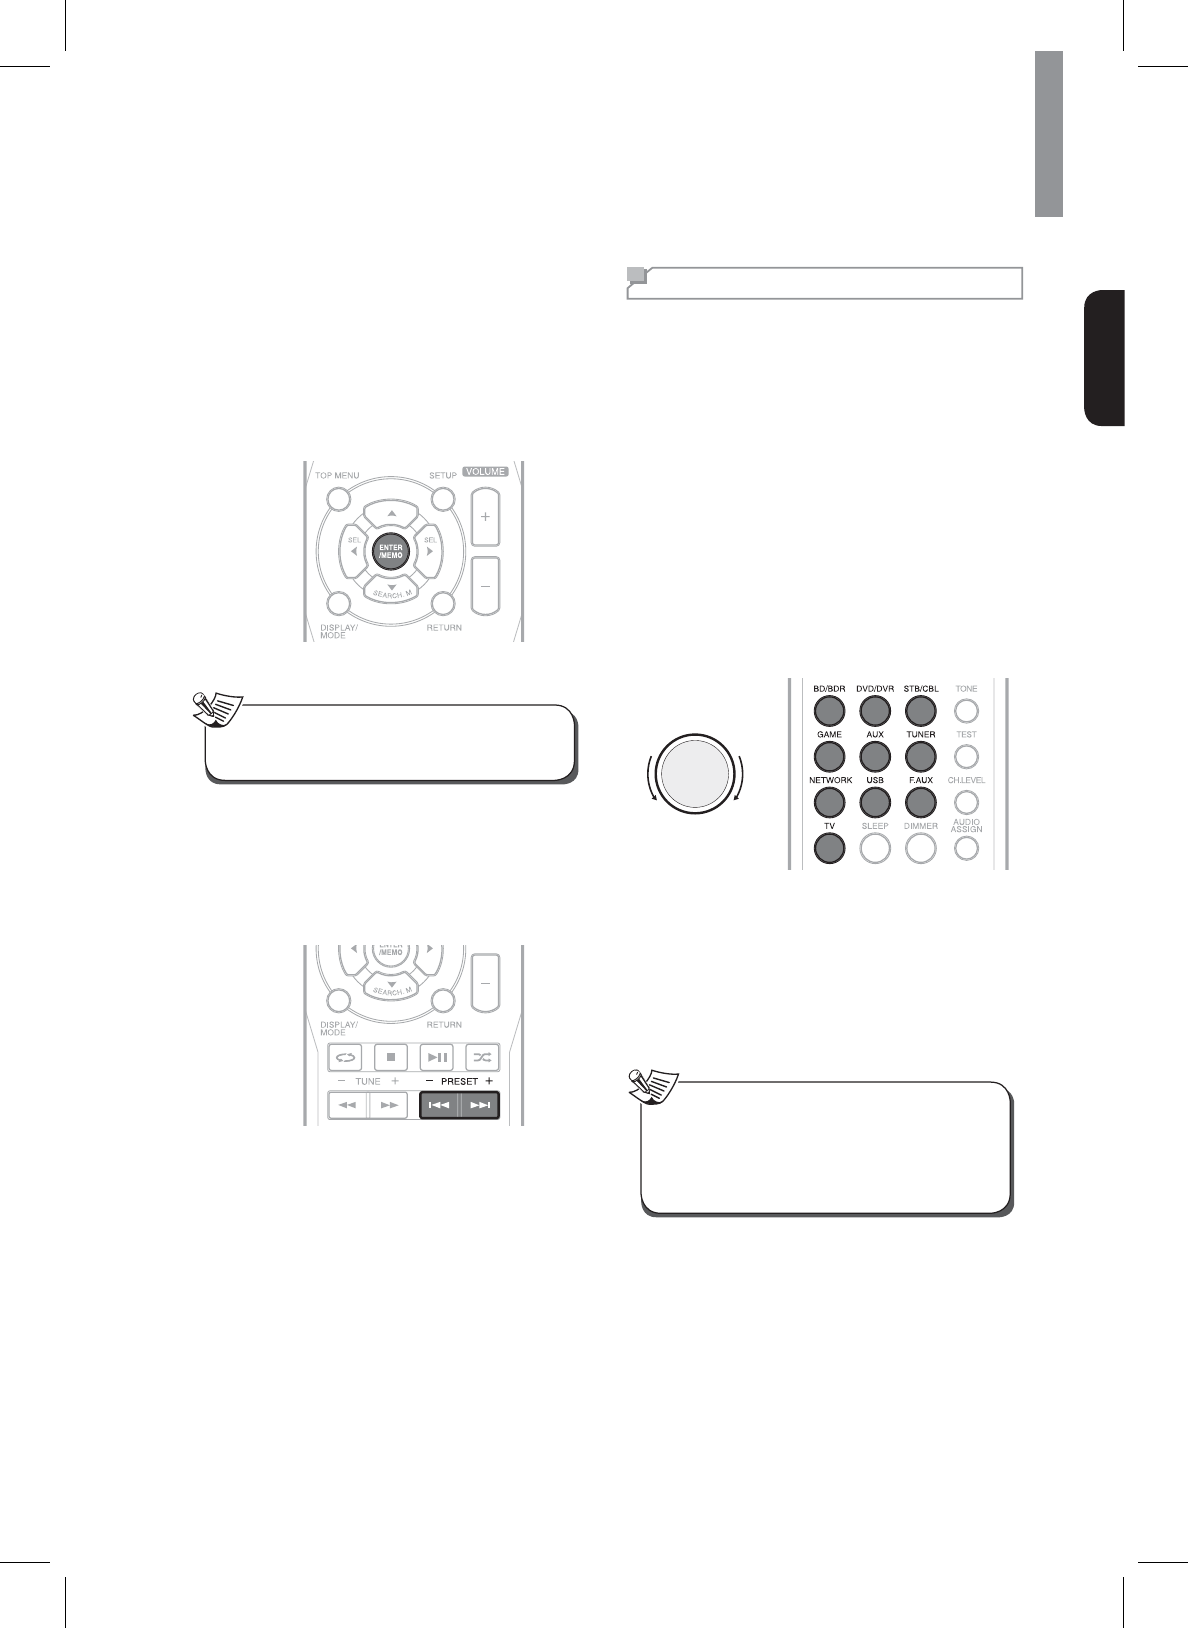
1Press the CHANNEL LEVEL button.
2Select the desired channel by pressing S or T.
xEach time the buttons are pressed, the
corresponding channel changes as follows:
FL [p FHL] p C [p FHR] p FR p
SR (p SBR p SBL) p SL p SW
( ) : 3RVVLEOHZKHQWKHVXUURXQGEDFNFKDQQHO
is set to “2ch” or “1ch”.
[ ] : Possible only when the front height
VSHDNHULVQRWVHWWR³12´
x'HSHQGLQJRQWKHVSHDNHUVHWWLQJVVXFKDV³12´
and surround mode, some channels cannot be
selected.
Note
3Adjust the level of the selected channel as
desired by pressing W or X.
4Repeat the steps 2 and 3 to adjust each channel
level.
32
R-807 NETWORK AV RECEIVER
Listening to Music on USB
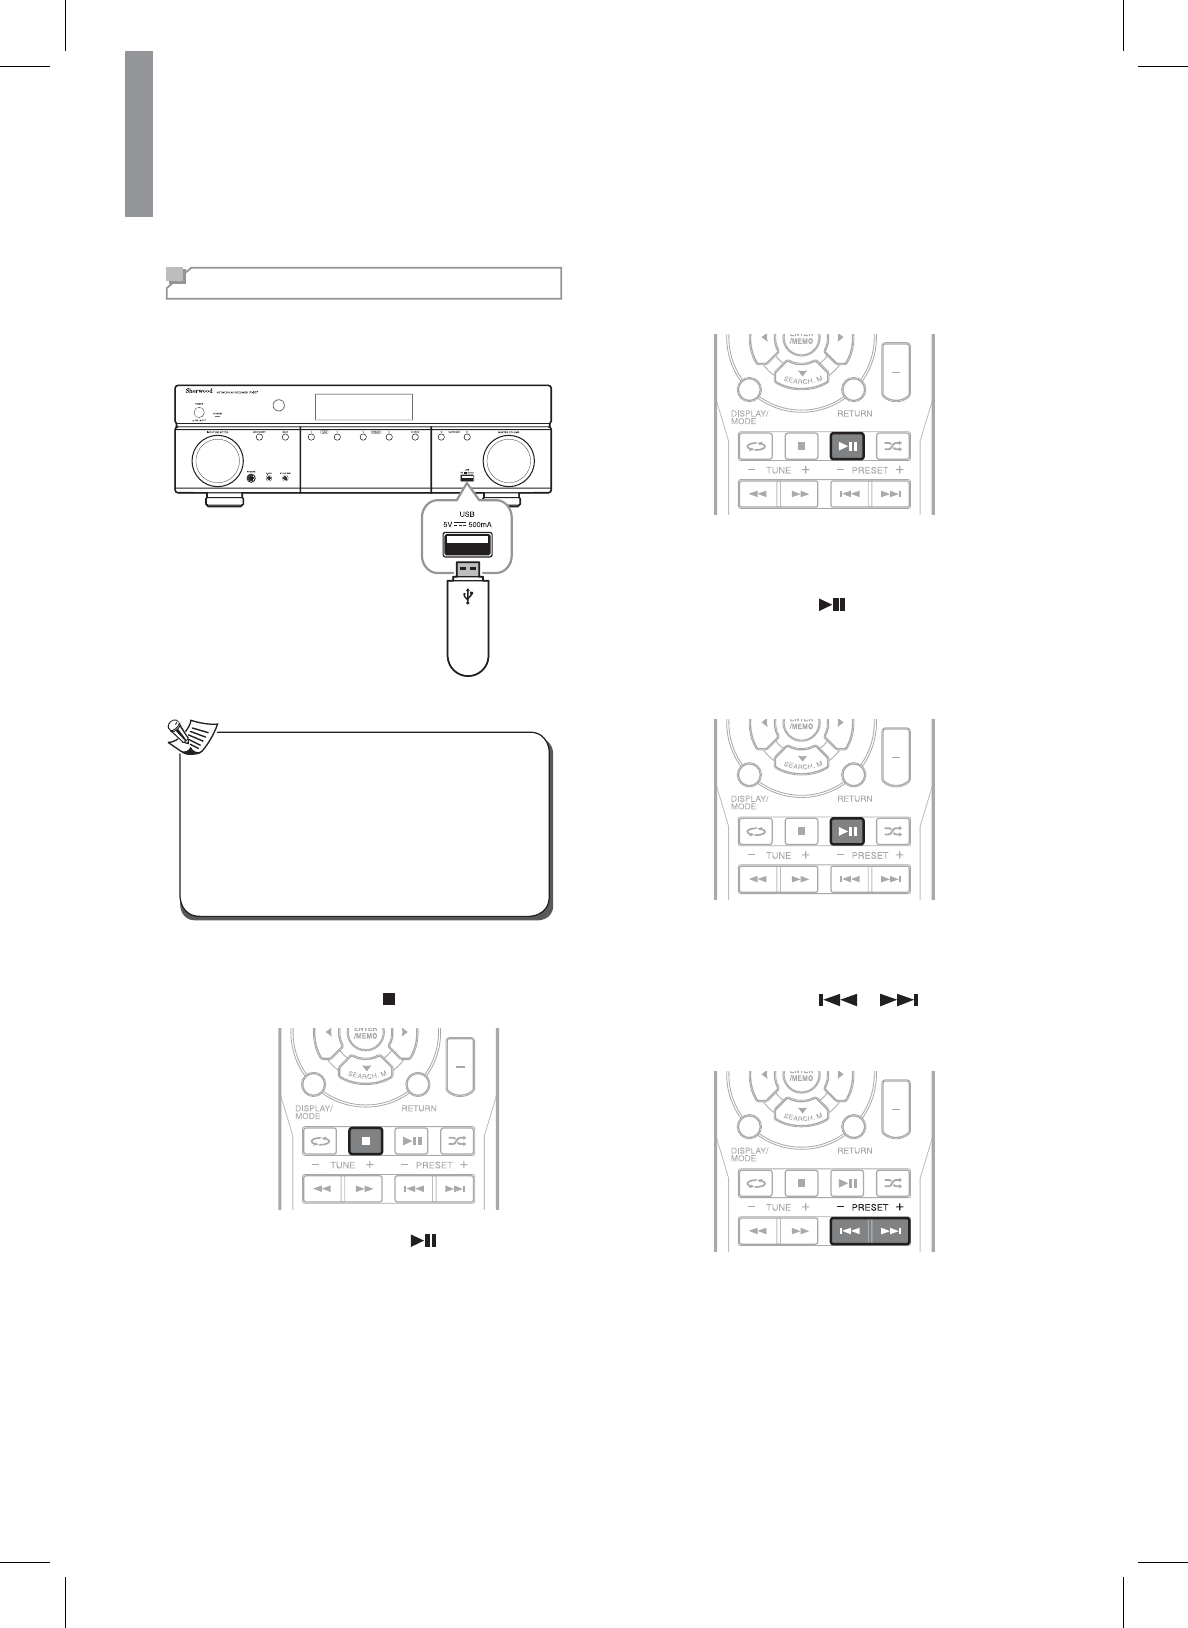
<RXFDQSOD\DXGLR¿OHVIURPD86%GHYLFH
+RZHYHUHGLWLQJRUFRS\LQJDGDWD¿OHLVQRWSRVVLEOH
USB storage device
x7KH86%MDFNGRHVQRWVXSSRUWWKHFRQQHFWLRQRI
RWKHU86%GHYLFHVH[FHSWIRUD86%ÀDVKGULYH
or a USB memory card reader.
x:KHQWKH86%GHYLFHGRHVQRW¿WLQWRWKH86%
MDFND86%H[WHQVLRQFDEOHLVUHTXLUHG
x<RXFDQSOD\EDFNRQO\WKHFRQWHQWIURPD
connected USB device.
xCopy-protected contents are not playable.
Note
To Stop Playback
1'XULQJSOD\EDFNSUHVV .
27RUHVXPHSOD\EDFNSUHVV .
To Pause Playback
1'XULQJSOD\EDFNSUHVV .
x3OD\EDFNZLOOVWRSDWWKHSRLQWZKHUHWKH
button is pressed.
x7RUHVXPHSOD\EDFNIURPWKLVSRLQWSUHVVWKH
button again.
To Skip Forward or Backward
1'XULQJSOD\EDFNSUHVV or .
x(DFKWLPHWKHEXWWRQLVSUHVVHGDWUDFNLV
VNLSSHGIRUZDUGRUEDFNZDUG
33
Operating Your System
English
To Play Repeatedly
1'XULQJSOD\EDFNSUHVVREPEAT.
Each time the button is pressed, repeat mode
changes as follows:
xRPT ONE
5HSHDWVWKHFXUUHQWO\SOD\LQJPXVLF¿OH
xRPT ALL
5HSHDWVDOOPXVLF¿OHV
xRPT FLDl
5HSHDWVDOOPXVLF¿OHVLQWKHIROGHU
To Play Randomly
1'XULQJSOD\EDFNSUHVVRANDOM.
x“SFL ON” is displayed on the display panel.
x$OOPXVLF¿OHVLQWKHIROGHUDUHSOD\HGLQ
random order.
27RFDQFHOUDQGRPSOD\EDFNSUHVVRANDOM
again.
x“SFL OFF” is displayed on the display panel.
x<RXFDQRQO\XVHWKHVNLSPRGHUHSHDWPRGH
DQGUDQGRPPRGHZKHQSOD\LQJPXVLF¿OHV
stored on a USB memory device.
Note
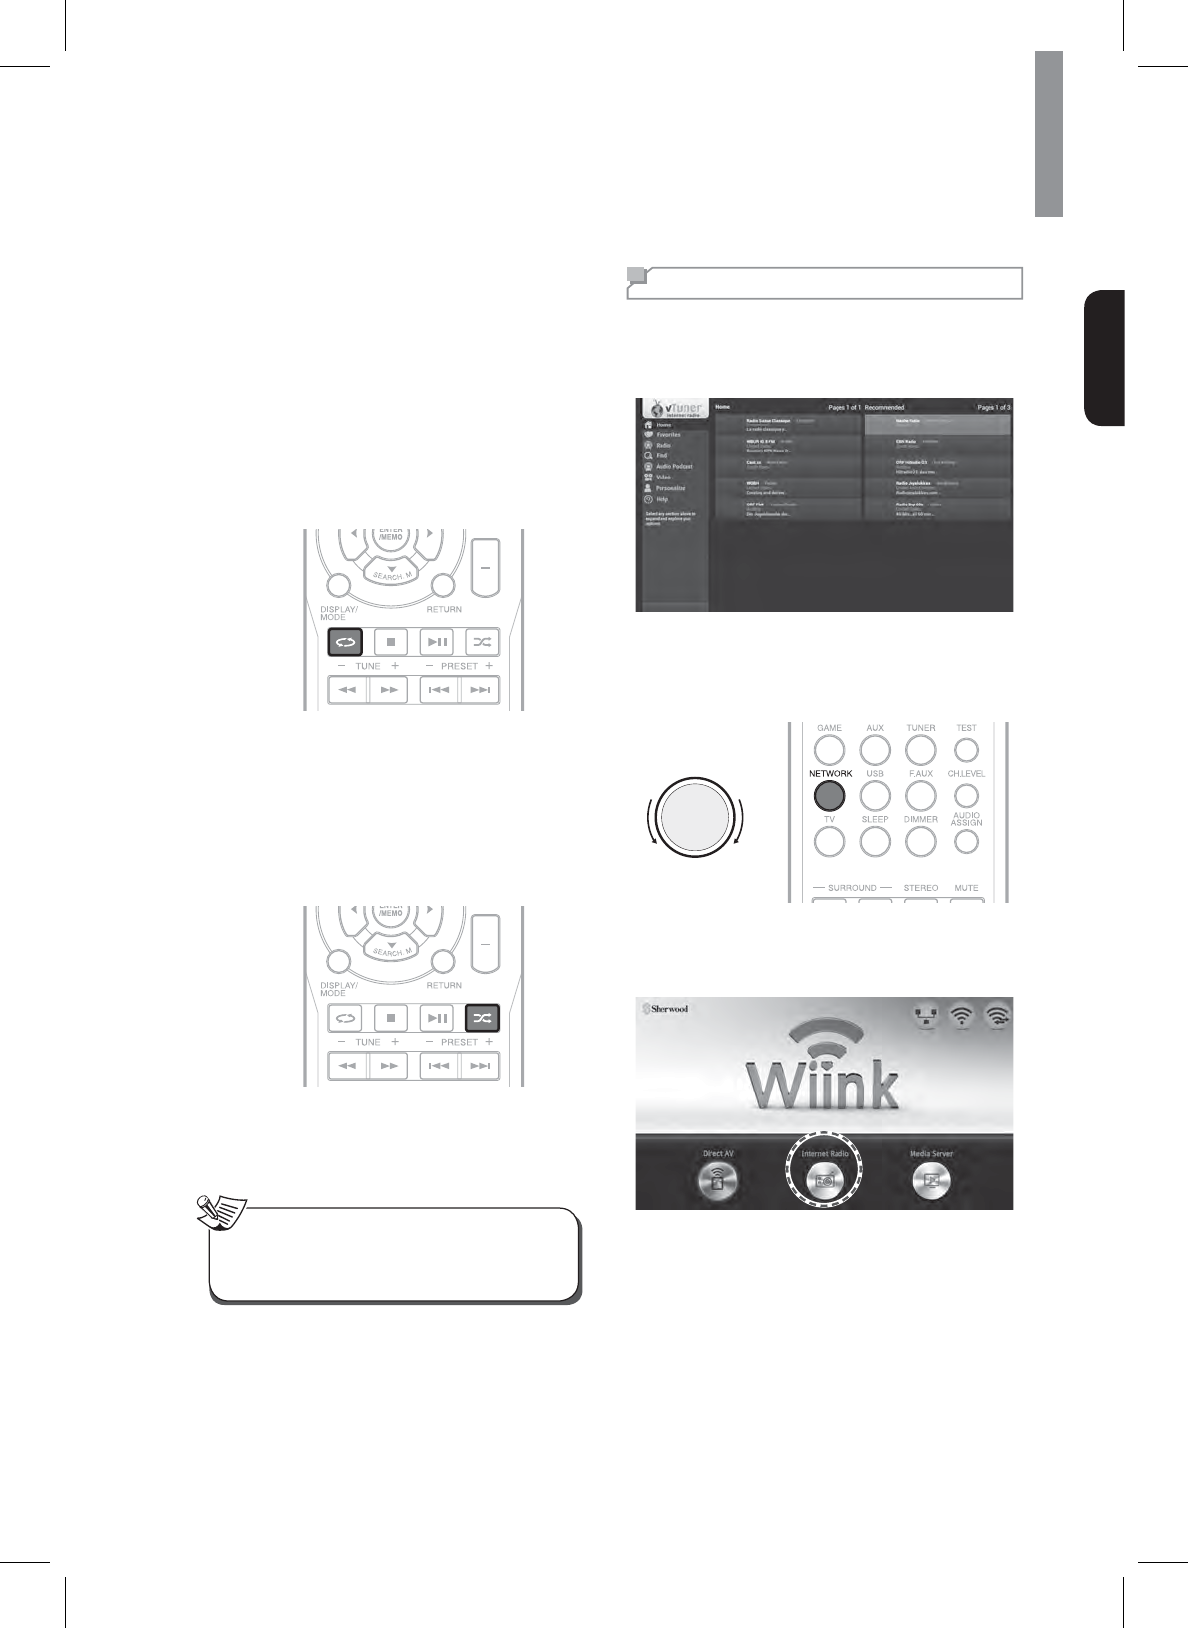
Listening to Internet Radio
You can listen to Internet radio broadcasts provided by
vTuner. You can control the internet radio with the menu
displayed on the TV screen.
1Select NETWORK as an input source.
xOn the main unit, rotate INPUT SELECTOR.
xOn the remote control, press NETWORK.
INPUT SELECTOR
2When the image is displayed as below, select
Internet Radio on the screen, and then press
ENTER on the remote control.
34
R-807 NETWORK AV RECEIVER
3Select the desired category by pressing S
and T, then press ENTER on the remote
control.
xTo use this function, the unit should be connected
WRWKHLQWHUQHW5HIHUWR³1HWZRUN6HWWLQJV´RQ
page 49 for details.
xThe service may be discontinued without notice.
xYou may not be able to receive some internet
radio stations.
Note
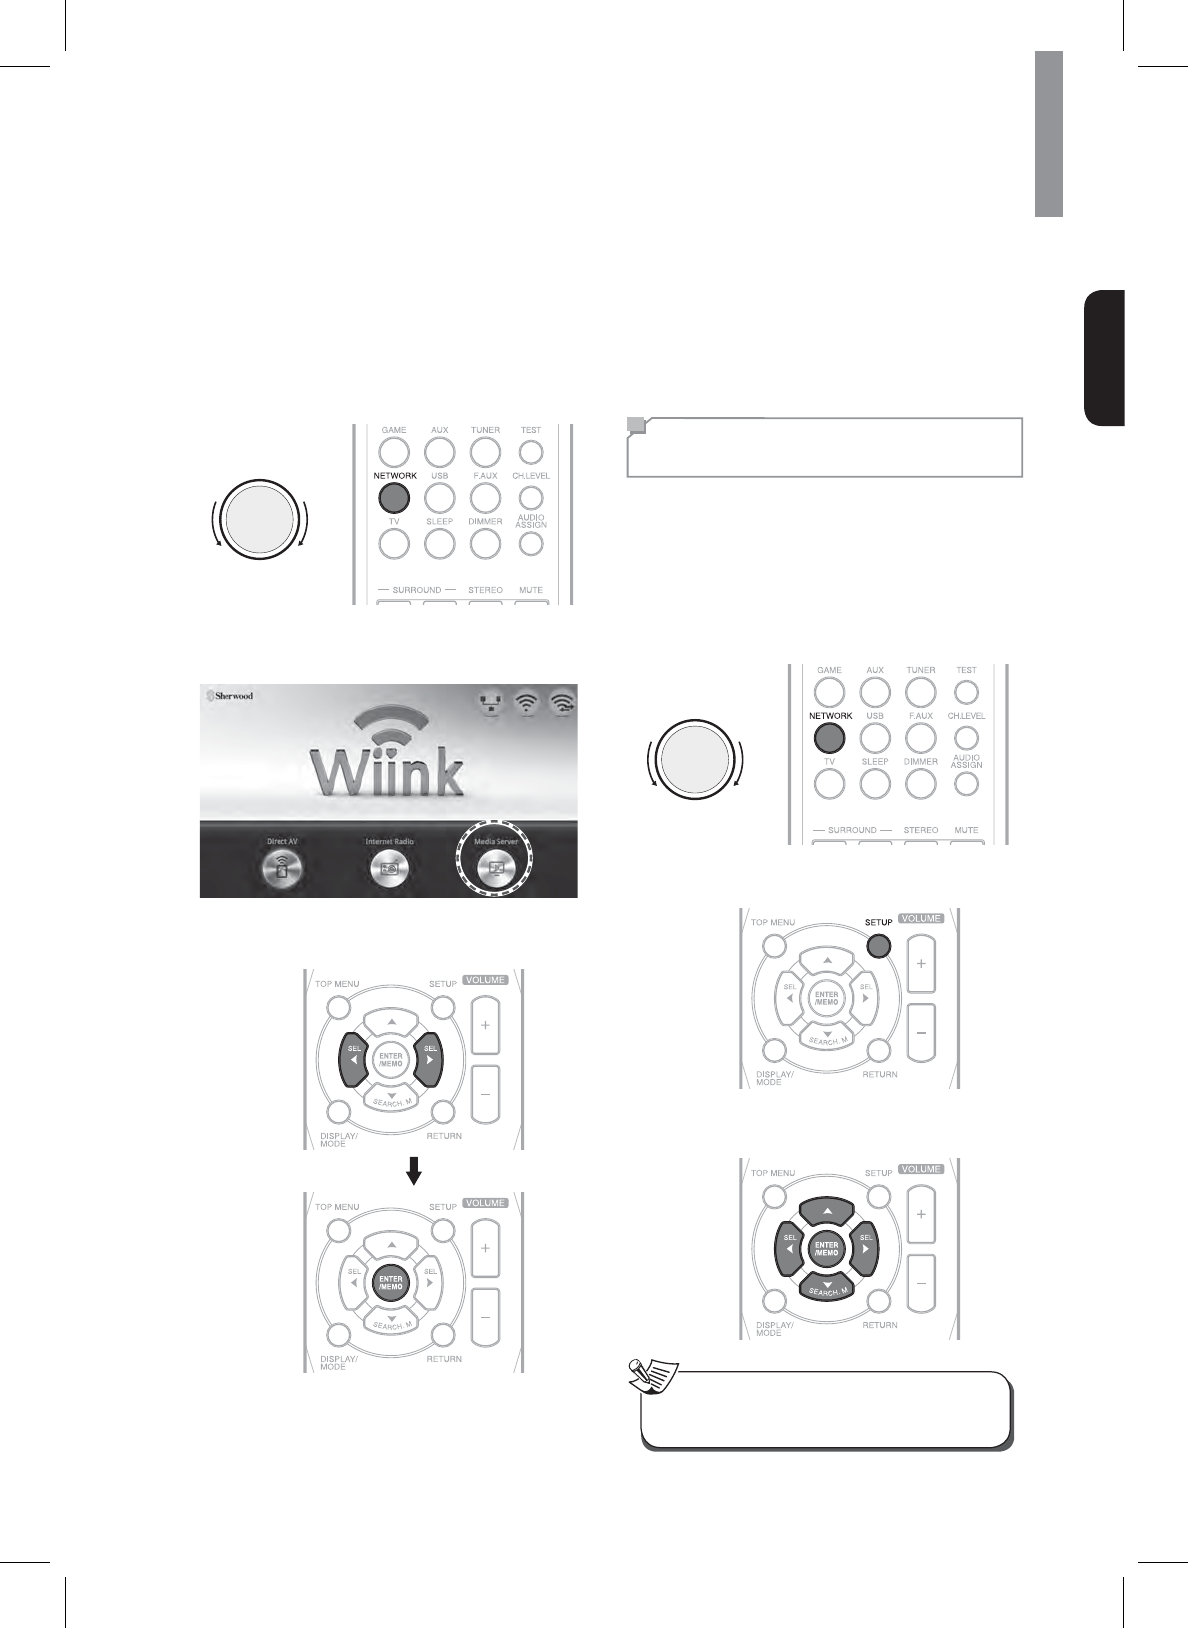
Listening to Music from the
Media Server
<RXFDQSOD\PXVLF¿OHVVWRUHGRQDFRPSXWHUPHGLD
server) connected to this receiver via a wired or wireless
QHWZRUN<RXFDQVKDUHWKHPXVLF¿OHVHDVLO\E\XVLQJ
Windows Media Player 11 or later versions.
&RQ¿JXULQJWKH:LQGRZV0HGLD3OD\HU
On Windows Media Player 11 version
1Run the Windows Media Player 11 version on
your computer.
2&OLFNWKH³/LEUDU\´WDELQWKHPHQXEDUDQGWKHQ
select “Media Sharing”.
3In the “Media Sharing” dialog box, select the
³6KDUHP\PHGLD´FKHFNER[DQGWKHQFOLFN
“OK”.
4Select this receiver in the list of devices, and
WKHQFOLFN³$OORZ´
5&OLFN³2.´WRFORVHWKHGLDORJER[
On Windows Media Player 12 version
1Run the Windows Media Player 12 version on
your computer.
2&OLFN³6WUHDP´DWWKHWRSRIWKHSOD\HU
3&OLFN³7XUQRQPHGLDVWUHDPLQJ´ZKHQLWDSSHDUV
in the next window.
46HOHFW³/RFDO1HWZRUN´QH[WWR6KRZGHYLFHVRQ
if it is not already selected.
5&OLFN³2.´WRFORVHWKHGLDORJER[
xWindows Media Player 11 and 12 versions can
be downloaded for free from the Microsoft web
site.
x,IWKH¿UHZDOOUHVWULFWVDFFHVV:LQGRZV0HGLD
3OD\HUDQGFDQQRWEHFRQ¿JXUHG
Note
35
Operating Your System
English
Listening to Music from the Media Server
1Start your computer.
2Select NETWORK as an input source.
xOn the main unit, rotate INPUT SELECTOR.
xOn the remote control, press NETWORK.
INPUT SELECTOR
3Select Media Server on the screen, and then
press ENTER on the remote control.
4Select the desired category by pressing W and X,
then press ENTER on the remote control.
55HSHDWVWHSDERYHXQWLOWKHGHVLUHGPXVLF¿OH
is selected.
7KHSOD\EDFNIXQFWLRQVDUHWKHVDPHDVWKRVH
IRU86%5HIHUWRIRUGHWDLOVRQSOD\EDFN
Using the Sherwood Remote
Application
Preparing for the Application
Setting the Network on the System
1Select NETWORK as an input source.
xOn the main unit, rotate INPUT SELECTOR.
xOn the remote control, press NETWORK.
INPUT SELECTOR
2Press SETUP on the remote control.
3Tap Hotspot & Wi-Fi Direct > Soft Wi-Fi
hotspot or Wi-Fi direct.
xWi-Fi hotspot is enabled as a default connection
setting.
Note
36
R-807 NETWORK AV RECEIVER
Installing the Application on Your Phone
1Visit Play Store on your Android Smartphone.
Or visit AppStore on your iPhone.
2Search for Sherwood Remote.
3Download and install the application on your
phone.
4Open the application.
5Tap Select Product and R-807.
Connecting Your Phone with the System
xOn a Android phone
1*RWR:LUHOHVVQHWZRUNVVHWWLQJVLQ\RXU
Android smartphone.
2Enable Wi-Fi direct or Portable Wi-Fi hotspot.
xWhen you connect your phone with the main
unit using a Wi-Fi hotspot, you should enter
the password (1234567890) for the system
connection.
3Go to Wi-Fi settings to select and tap R-807 and
Connect.
xWhen Ethernet is not connected to the main unit,
you cannot use Wi-Fi connection even though
Wi-Fi hotspot is enabled on your phone.
Note
xOn an iPhone
1Go to Wi-Fi hotspot settings to select and tap
R-807.
Using the Application
The Sherwood Remote application helps you to control
the main unit remotely by allowing you to select input
source, to set a surround mode, to control Room2, and
XVH:LLQN
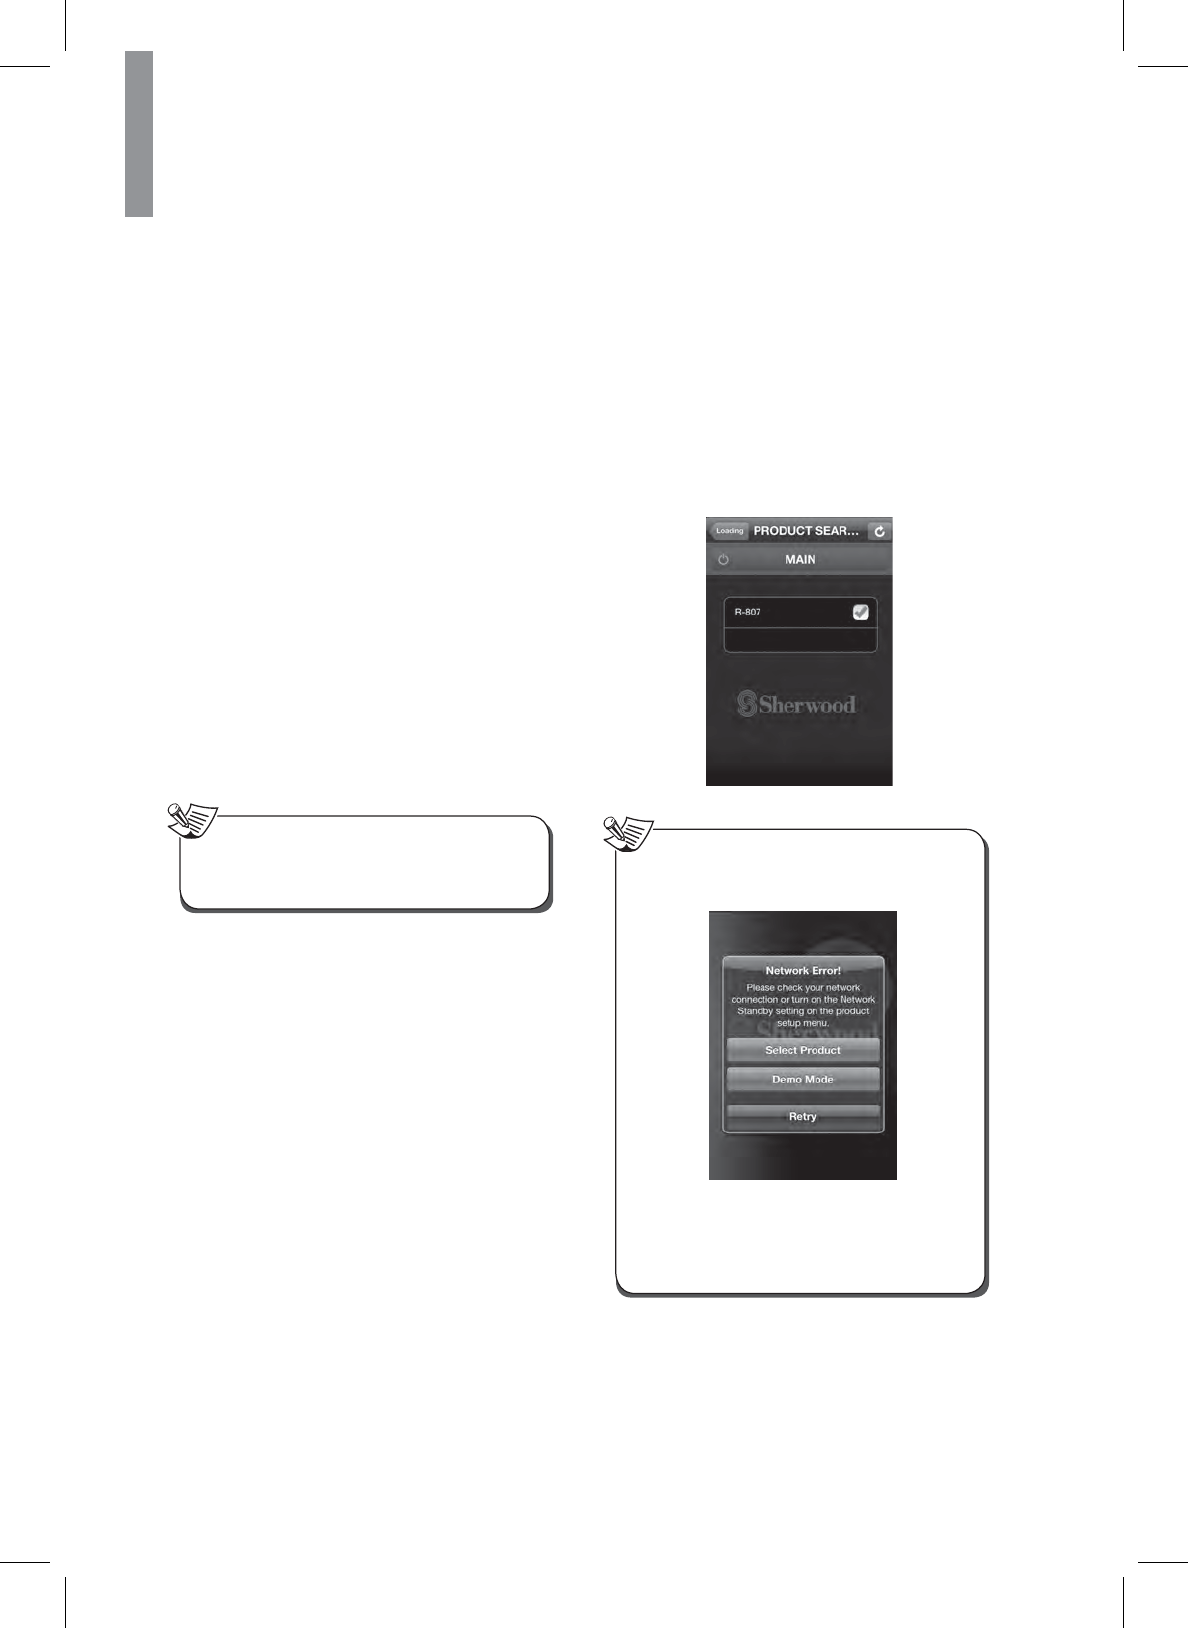
1Open the Sherwood Remote application.
2When the product search window is activated,
select and tap R-807. Then, you can use your
smartphone as a remote control for the main
unit.
:KHQDQHWZRUNHUURURFFXUVWKHIROORZLQJVFUHHQ
will pop up.
xSelect Product:&KHFN\RXUVPDUWSKRQHQHWZRUN
connection, and select R-807 again.
xDemo Mode: Uses the application in Demo
Mode.
xRetry: Tries to open the application again.
Note
37
Operating Your System
English
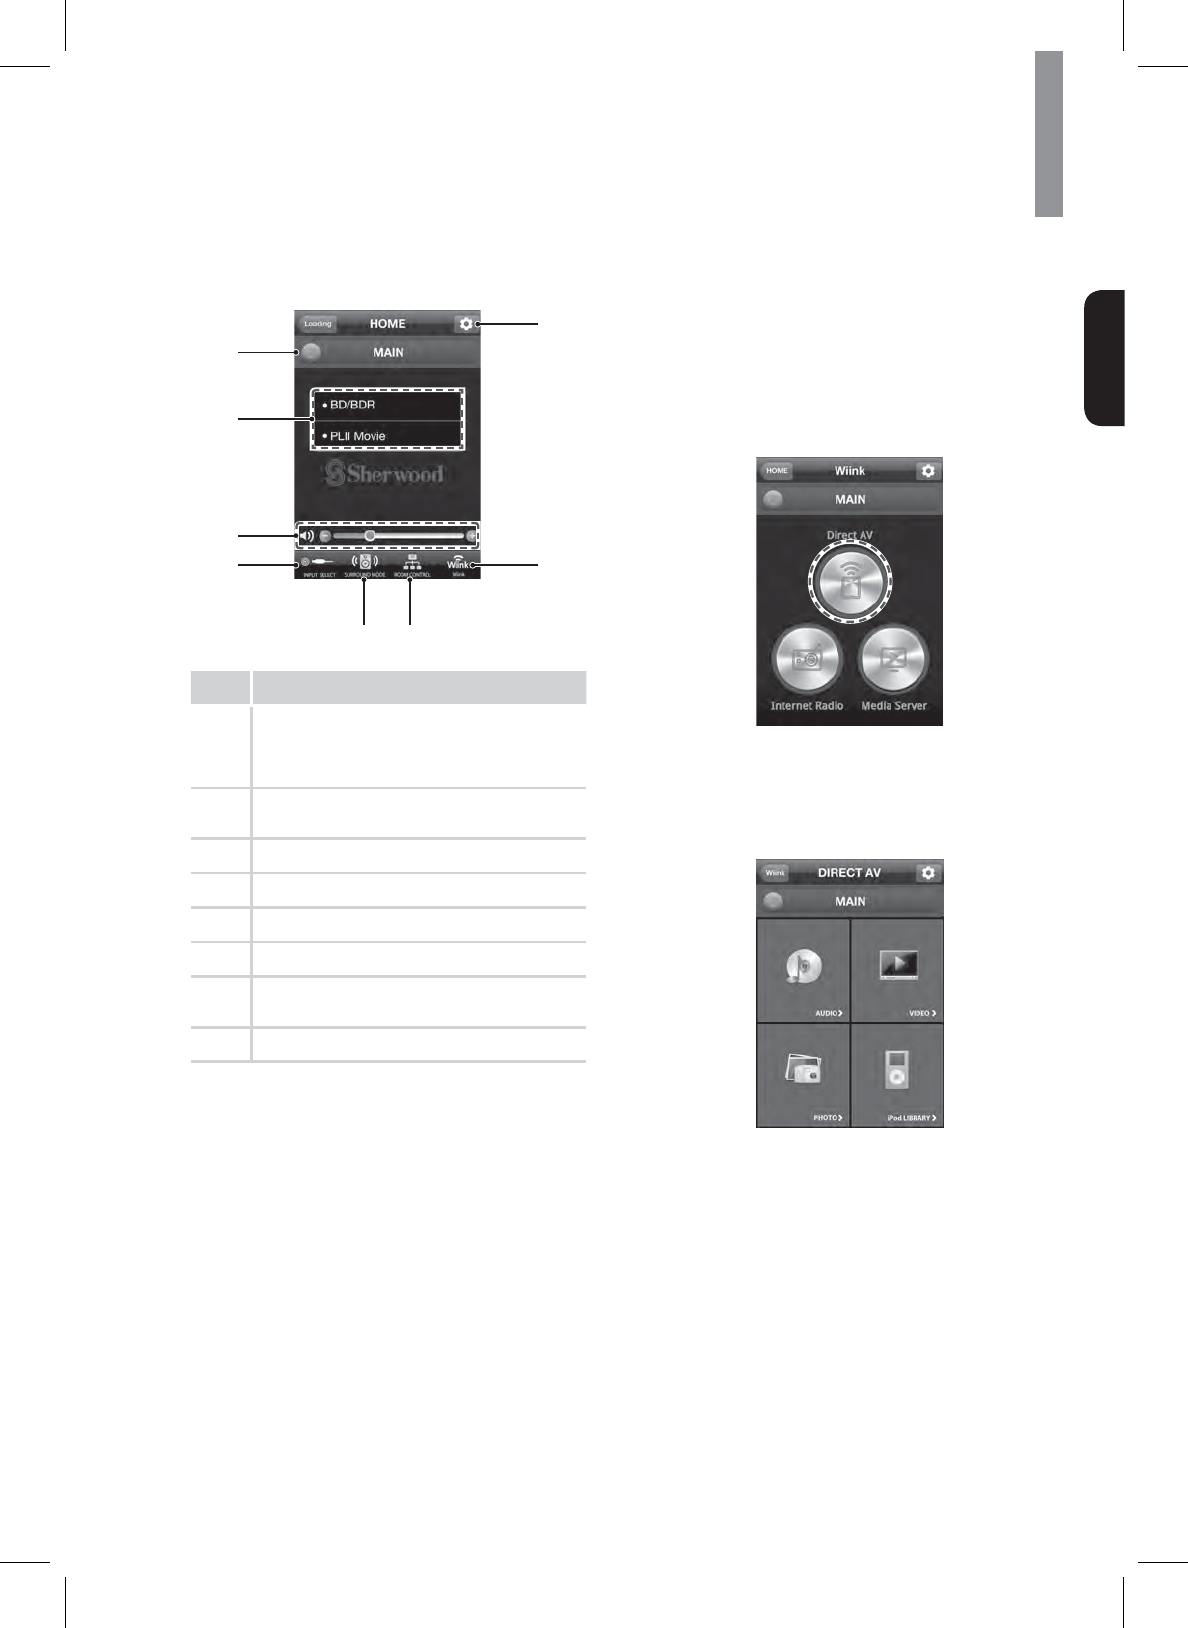
Overview of the Main Screen
1
2
3
4
8
7
56
No. Description
1
Turns on or off the main unit
xTo activates the function, you should set
N.S.C to ON. If you set the function on,
the power consumption may increase.
2
Selected input source
Surround mode
3
Volume control bar
4
Selects input source
5
Selects surround mode
6
Controls Room2
7
:LLQN
(Direct AV, Internet Radio, Media Server)
8
Settings
Using Direct AV
On Direct AV, you can listen to songs, watch videos,
and view photos stored on your Android phone or
iPhone.
1Tap Wiink at the bottom of the phone screen.
Or tap INPUT SELECT and select and tap
NETWORK.
2Tap Direct AV.
3Tap Audio to listen to the songs stored on your
phone.
Tap Video to watch video stored on your phone.
Tap Photo to view photos stored on your phone.
xiOS

38
R-807 NETWORK AV RECEIVER
xAndroid
Listening to Songs on Your Smartphone
You can select a song on the song list and play it over
the main unit.
1
4
2
3
8
5
6
7
No. Description
1
Moves to the previous menu
xThis menu is not displayed on Android
smartphone.
2
Plays or pauses a song
3
Plays a previous song
4
6HWVVKXIÀHIXQFWLRQ
5
Volume control bar
6
Sets the repeat function
(Repeat for all song or one song)
7
Plays the next song
8
Progress bar
Watching Videos on Your Smartphone
<RXFDQVHOHFWDYLGHRRQWKHYLGHR¿OHOLVWDQGHQMR\LW
on the main unit.
1
4
3
2
7
5
6
No. Description
1
Moves to the previous menu
xThis menu is not displayed on the Android
smartphone.
2
Plays or pauses a video
3
Moves to a previous video
4
Volume control bar
5
Moves to the next video
6
Controls display size
7
Progress bar
39
Operating Your System
English
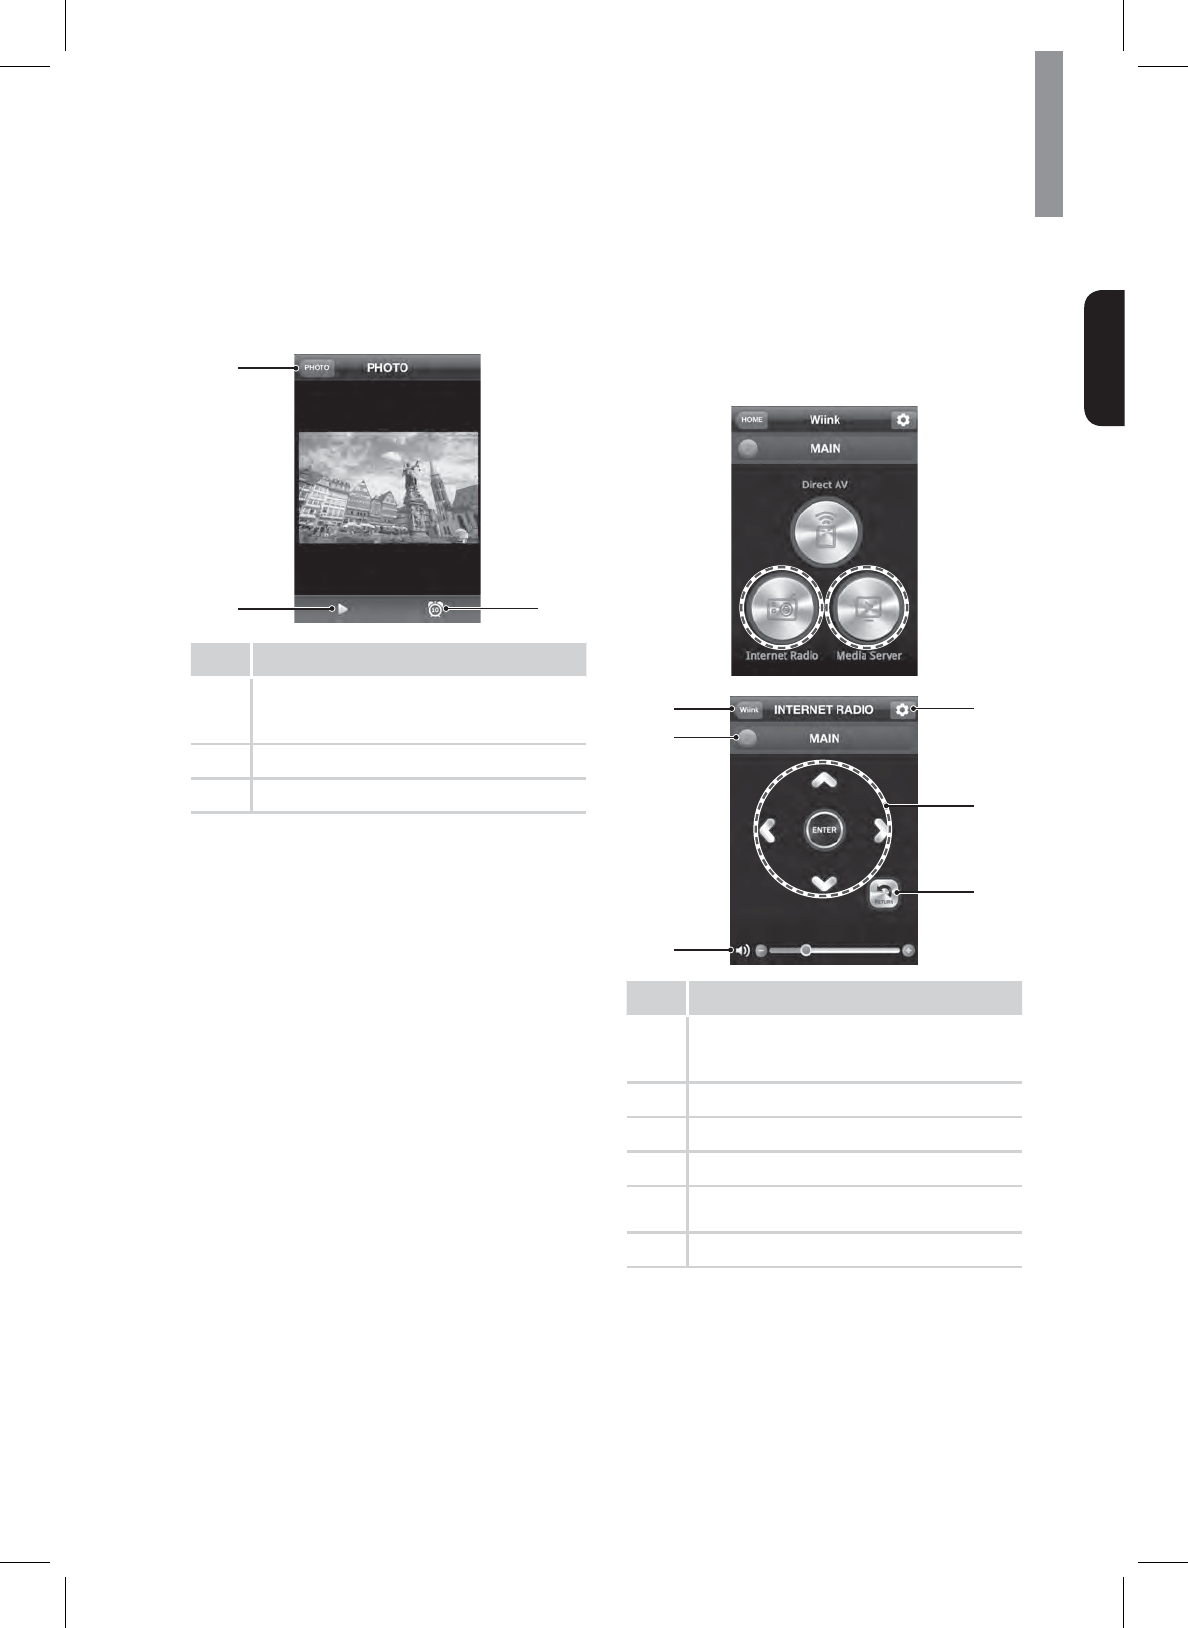
Viewing Photos on Your Smartphone
You can view photos as a slideshow and set the
slideshow transition time at 10, 20, or 30 seconds.
1
23
No. Description
1
Moves to the previous menu
xThis menu is not displayed on the Android
smartphone.
2
Starts the photo slideshow.
3
Sets the slideshow transition time.
Using Internet Radio and Media Server
You can use your smartphone as a remote controller for
Internet Radio and Media Server.
1Tap Wiink at the bottom of the phone screen.
2Tap Internet Radio or Media Server.
1
2
3
4
6
5
No. Description
1
Moves to the previous menu
xThis menu is not displayed on the Android
smartphone.
2
Turns off the main unit.
3
Volume control bar.
4
Returns to the previous menu.
5
6HOHFWVRUFRQ¿UPVDEURDGFDVWLQ,QWHUQHW
Radio and Media server.
6
Moves to the settings menu.
40
R-807 NETWORK AV RECEIVER
Listening to FM Radio
Auto Tuning
1Press 781( or TUNE - for more than
2 seconds.
x7KHWXQHUNHHSVVHDUFKLQJXQWLODVWDWLRQZLWK
strong signal strength is found. The display
shows the tuned frequency.
xIf the found station is not the desired one,
simply repeat this operation.
x6WDWLRQVZLWKZHDNVLJQDOVWUHQJWKDUH
VNLSSHGGXULQJDXWRWXQLQJ
Manual Tuning
1Press 781( or TUNE - repeatedly until the
desired station is found.
Manual Presetting
1Tune to the desired station with auto or manual
tuning.
2Press (17(50(02.
x$SUHVHWQXPEHUEOLQNV
36HOHFWDGHVLUHGSUHVHWQXPEHUaE\
pressing 781( or TUNE -.
xA station has now been stored in the memory.
xA stored station is erased from the memory
by storing another station in its place.
4Press (17(50(02DJDLQWRFRQ¿UP\RXU
selection.
xThe station has now been stored in the
memory.
xA stored station is erased from the memory
by storing another station in its place.
5Repeat the above steps 1 - 4 to store another
station.
41
Operating Your System
English
Auto Presetting
1Press and hold down (17(50(02 for more
than 2 seconds.
x³$8720(025<´EOLQNVDQGWKHPDLQXQLW
begins to preset stations with a strong signals.
xUp to 30 FM stations may be stored.
xTo stop auto presetting, press (17(50(02
again.
x)0VWDWLRQVZLWKZHDNVLJQDOVWUHQJWKFDQQRWEH
stored to memory.
Note
Tuning in to Preset Stations
1Select FM TUNER as the input source.
2Select a desired preset number by pressing
PRESET - or 35(6(7.
Recording
<RXFDQPDNHDQDXGLRRUDYLGHRUHFRUGLQJIURP
the built-in tuner, or from an audio or video source
connected to the receiver (such as a CD player or
79.HHSLQPLQG\RXFDQ¶WPDNHDGLJLWDOUHFRUGLQJ
IURPDQDQDORJVRXUFHRUYLFHYHUVDVRPDNHVXUH
WKHFRPSRQHQWV\RXDUHUHFRUGLQJWRIURPDUHKRRNHG
up in the same way. (For details on connection, see
³&RQQHFWLQJ3OD\EDFN&RPSRQHQWV´RQSDJH
xThe receiver’s volume, Audio parameters (the tone
controls, for example), and surround effects have no
effect on the recorded signal.
xSome digital sources are copy-protected, and can
only be recorded in analog.
xSome video sources are copy-protected. These
cannot be recorded.
1Select the desired recording source.
INPUT SELECTOR
2Start recording on the component.
3Start play on the desired input.
xThe audio and video signals from the desired
input will be dubbed on the recorder and you
can enjoy them on the TV set and from the
VSHDNHUV
xThe volume and tone (bass and treble) settings
have no effect on the recording signals.
xWhen recording the analog signals from CD,
AUX, F.AUX etc., be sure to select the analog
input.
Note
42
Customizing Settings
Setting the System
You can program additional sound settings.
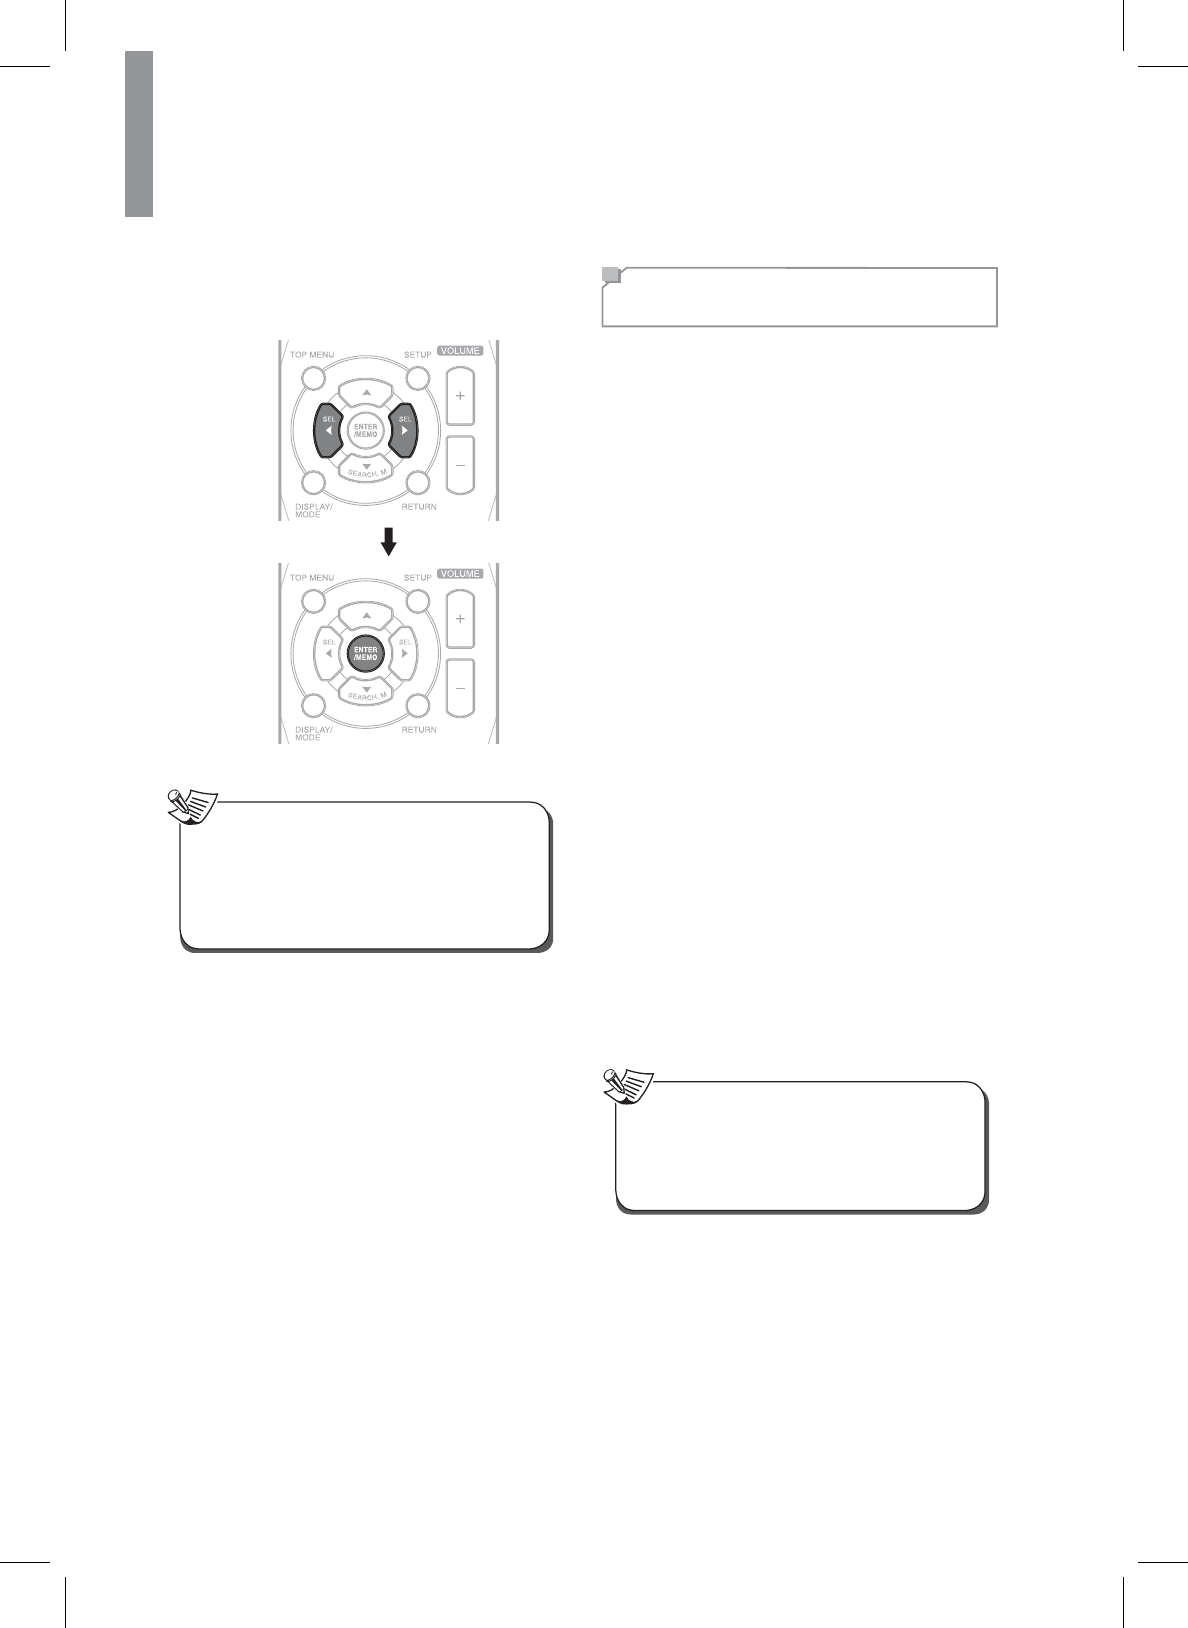
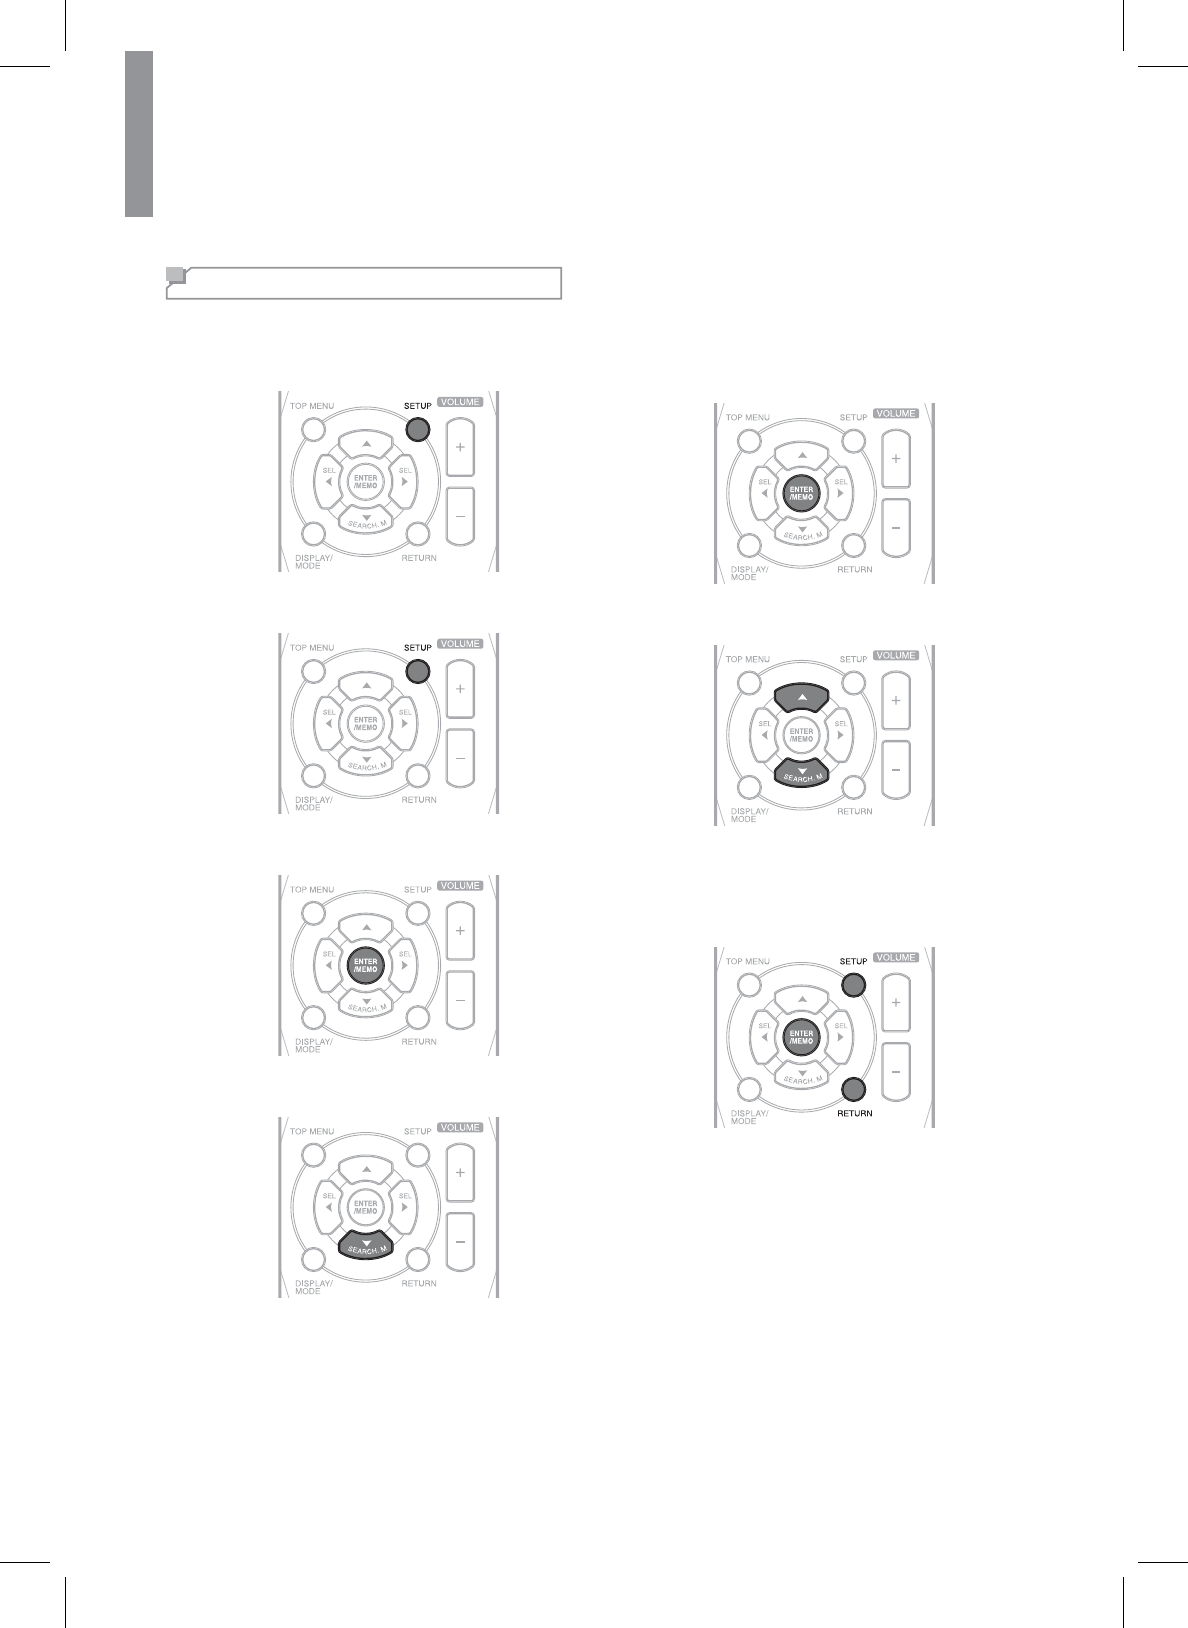
1Press SETUP.
2Press S or T to select a main menu.
3Press (17(50(02WRFRQ¿UP
4Press S or T to select an option.
5Press (17(50(02WRFRQ¿UPWKHVHOHFWHG
setting.
6Press S or T to set a value.
7Press (17(50(02WRFRQ¿UP
xTo return to the previous menu, press
RETURN.
xTo exit the menu, press SETUP again.

43
Customizing Settings
English
Setting Options Overview
Main Menu Sub Menu Go to Page Description
1. SYS SET
AMP 44 $VVLJQVWKHSRZHUDPSOL¿HU
A.P
.C. 44 Automatic Power Control.
N.S.C. 44 6HWVWKHVWDQGE\WLPHIRUWKHQHWZRUN
2. SPK SET
A. SETUP 44 $XWRPDWLFDOO\RSWLPL]HVWKHVSHDNHUVHWWLQJV
SPK SET 46 6HWVWKHVSHDNHUV\VWHP
X.OVER 46 Sets the crossover frequency.
DISTANCE 46 6HWVWKHVSHDNHUGLVWDQFH
CH.LEVEL 46 Sets the current channel levels.
3. HDMI SET
HDMI 47 Sets the connected HDMI input source.
CEC 47 $OORZVLQSXWVHOHFWLRQRIWKHPDLQXQLWWREHLQWHUORFNHG
with the operation of the connected components.
4. PARAMTR
H.GAIN 47 Sets the front height channel level.
PNRM 47 Sets to broaden the width of the front stereo image when
using the Dolby Pro Logic IIx Music listening mode.
C.WIDTH 47 Sets the center image so it may be heard only from the
FHQWHUVSHDNHU
DIEMN 47 6HWVWKHVRXQG¿HOGHLWKHUWRZDUGVWKHIURQWRUWRZDUGV
the rear.
C.IMG 47 Sets the center image.
DRC 48
&RQWUROVWKHG\QDPLFUDQJHIRUPRYLHVRXQGWUDFNV
optimized for Dolby Digital, DTS, Dolby Digital Plus and
Dolby TrueHD.
TONE 48 Sets the tone (bass and treble) as desired.
S.DLY 48 Adjust the time delay of audio signals to synchronize the
sound with the picture.
LFE 48 Sets the front height channel level.
5. MLT. RM Z2 49 Sets to enable or disable the Room2 function.
44
R-807 NETWORK AV RECEIVER
Setting the System Setup
AMP Assign
7KHVXUURXQGEDFNFKDQQHOV¶SRZHUDPSOL¿HUFDQGULYH
VXUURXQGEDFNVSHDNHUVIURQWKHLJKWVSHDNHUVDQG
WKH5220VSHDNHUV'HSHQGLQJRQWKHSXUSRVHRI
WKHVSHDNHUV\RXVKRXOGDVVLJQWKHSRZHUDPSOL¿HU
DFFRUGLQJO\)RUGHWDLOVVHH³&RQQHFWLQJ6SHDNHUV´RQ
page 14 and “Connecting Multi-Room” on page 24.
Menu item Description
Surround Back
'ULYHVWKHVXUURXQGEDFNVSHDNHUV
when connecting the SURROUND
BACK channels to them.
Front Height 'ULYHVWKHIURQWKHLJKWVSHDNHUV
IRU'ROE\3UR/RJLF,,]SOD\EDFN
Room2 'ULYHVWKH5220VSHDNHUVIRU
5220SOD\EDFN
Automatic Power Control
You can set the standby time for the system to be
turned off. The default setting value is 4H.
Network Standby Control
You can set whether the main unit can be turned on
IURPRWKHUQHWZRUNGHYLFHV
Menu item Description
ON (QDEOHVWKHQHWZRUNVWDQGE\
function.
OFF 'LVDEOHVWKHQHWZRUNVWDQGE\
function.
Setting the Speaker Setup
After you have installed this receiver and connected
DOOWKHFRPSRQHQWV\RXVKRXOGDGMXVWWKHVSHDNHU
settings for the optimum sound acoustics according to
\RXUHQYLURQPHQWDQGVSHDNHUOD\RXW:KHQHYHU\RX
FKDQJHVSHDNHUVVSHDNHUSRVLWLRQVRUWKHOD\RXWRI
your listening environment, you should also adjust the
VSHDNHUVHWWLQJVWRR
Auto Setup
$XWR6HWXSOHWV\RXDYRLGWKHPRUHGLI¿FXOWOLVWHQLQJ
EDVHGVSHDNHUVHWXSDQGDFKLHYHJRRGVXUURXQG
sound automatically. Auto Setup provides the optimum
listening environment for the listening position in your
room. When performing the Auto Setup procedure,
\RXGRQRWQHHGWRSHUIRUPWKH6SHDNHU&RQ¿JXUDWLRQ
6SHDNHU&URVVRYHU6SHDNHU'LVWDQFHDQG&KDQQHO
Level setup procedures.
1&KHFNWKDWWKHVSHDNHUVDUH¿UPO\FRQQHFWHGWR
this receiver.
xIf your subwoofer has a volume control and
crossover frequency, set the volume halfway
and set the crossover frequency to the
PD[LPXPRUWKHORZSDVV¿OWHURII
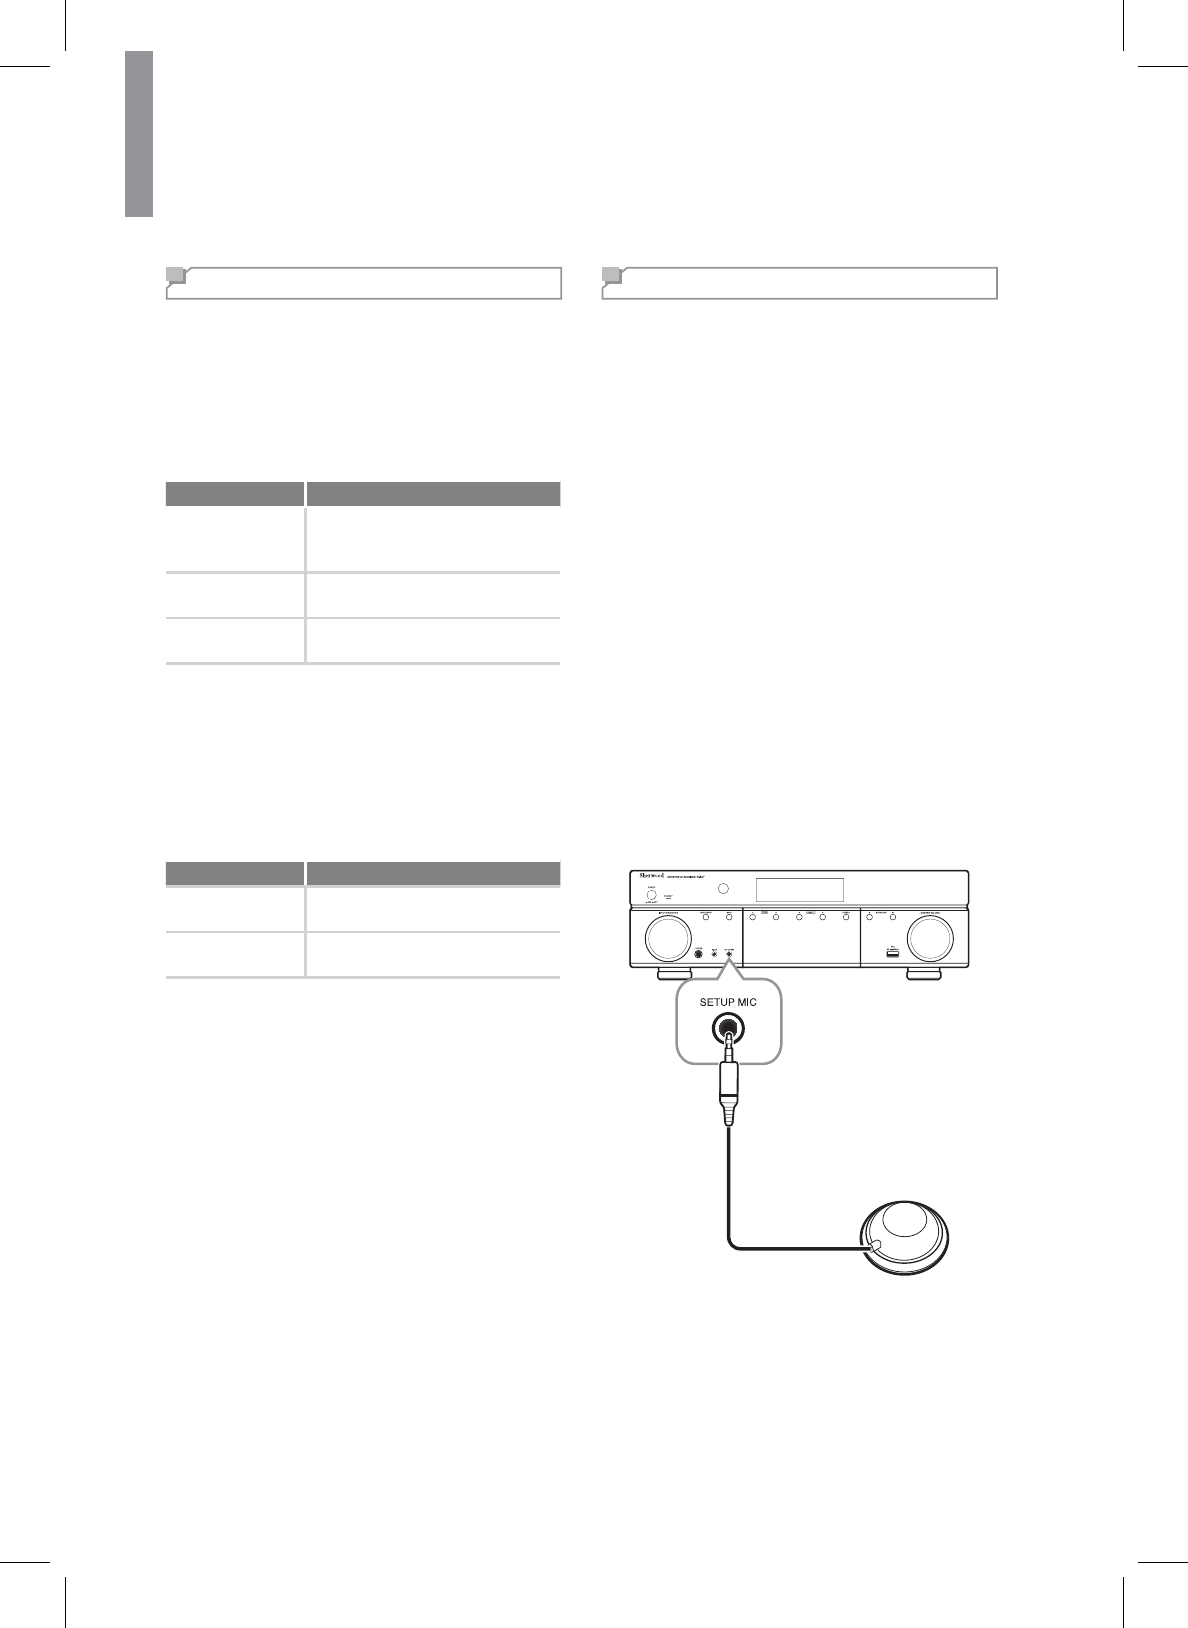
2Connect the supplied microphone to the SETUP
0,&MDFNRQWKHIURQWSDQHO

45
Customizing Settings
English
xSince the microphone for Auto Setup is designed
exclusively for this receiver, do not use a
microphone other than the one supplied with this
receiver.
Caution
33ODFHWKHPLFURSKRQHRQDÀDWOHYHOVXUIDFHDW
the listening position.
x,ISRVVLEOHXVHDWULSRGRUWR¿[WKH
microphone at the same height as your
ears would be when you are seated in your
listening position.
xEnsure there are no obstacles between the
VSHDNHUVDQGWKHPLFURSKRQH
4Press S or T to select the Auto Setup, and then
press X button.
5Press X to start the auto setup procedure.
xLoud test tones are output played
successively and when the auto
setup procedure has been completed,
“COMPLETED” will be displayed.
xTo stop the auto setup procedure while
performing it, press W.
x,IWKHUHLVDSUREOHPZLWKVSHDNHURU
microphone connection, an error message will
be displayed. In this case, turn off the power,
FKHFNWKHFRQQHFWLRQDQGWKHQUHWU\WKHDXWR
setup procedure.
6Press X to memorize the results.
x7KHUHVXOWVDUHPHPRUL]HGDQGWKH6SHDNHU
Setup menu is displayed.
xWhen W is pressed to select “CANCEL”, the
results are not memorized.
x&KHFNWKHUHVXOWVRQHDFKVHWXSPHQX
³6SHDNHU&RQ¿J´³6SHDNHU&URVVRYHU´
³6SHDNHU'LVWDQFH´DQG³&KDQQHO/HYHO´
menu on page 46).
7Disconnect the microphone after you have
completed the auto setup procedure.
xBecause the test tones are loud, ensure there are
no infants or young children in the room.
Caution
xFor best results, ensure the room is as quiet as
possible during the auto setup procedure. If there
is too much ambient noise, the results may not
be satisfactory.
xIf the results are not satisfactory, you can retry
the auto setup procedure or personalize your
VSHDNHUVHWXSDQGFKDQQHOOHYHOVHWXSE\
choosing the settings manually. For details, see
³6SHDNHU&RQ¿J´³6SHDNHU&URVVRYHU´³6SHDNHU
Distance” and “Channel Level” procedure on
page 46.
Note

46
R-807 NETWORK AV RECEIVER
Speaker Setup
7KHUHDUHVHYHUDOZD\V\RXFDQXVHWKHVSHDNHU
channels with the main unit. In addition to a normal
home theater setup where they are used for the front
KHLJKWVSHDNHUVWKH\FDQEHXVHGDVDQLQGHSHQGHQW
VSHDNHUV\VWHPLQDQRWKHUURRP
x6HOHFWWKHGHVLUHGVSHDNHUDQGWKHQSUHVVX to
enter its setting menu.
Menu item Description
<HV1R
Selects the desired item
depending on whether the
VSHDNHUVDUHFRQQHFWHGRUQRW
&KDQQHO
1 Channel (Left)
Selects the desired item
depending on the number of
VSHDNHUVFRQQHFWHGWR6XUURXQG
%DFN0XOWLFKDQQHOV
x:KHQDVSHDNHULVQRWVHWWR³12´\RXQHHG
to set their distances from listening position
and crossover frequencies according to their
frequency characteristics. For details, see
³6SHDNHU&URVVRYHU´RQSDJHDQG³6SHDNHU
Distance” on page 46.
xWhen the “SR” is set to “NO”, “SB” cannot be set
to “2 Channel” or “1 Channel (Left)”.
x:KHQWKHVXUURXQGEDFNFKDQQHOV¶SRZHU
DPSOL¿HULVDVVLJQHGWR³5RRP´WKH³6%´
cannot be selected. For details, see “AMP
Assign” on page 44.
Note
Speaker Crossover
You can set the crossover frequency according to the
IUHTXHQF\FKDUDFWHULVWLFVRIWKHFRQQHFWHGVSHDNHUV
For details on the frequency characteristics, refer to the
RSHUDWLQJLQVWUXFWLRQVRIWKHVSHDNHUV
xYou can select the crossover frequency among Full
Range, 40 Hz, 60 Hz, 80 Hz, 100 Hz, 120 Hz, 150 Hz,
200 Hz, and 250 Hz. The default setting is 100 Hz.
x6HOHFW³)XOO5DQJH´ZKHQWKHVHOHFWHGVSHDNHUFDQ
fully reproduce frequencies below 40 Hz.
x<RXFDQQRWVHOHFWWKHVXEZRRIHUDQGWKHVSHDNHU
set to “NO”.
x,IWKHIUHTXHQF\UDQJHRI\RXUVSHDNHULV
+]aN+]WKHFURVVRYHUIUHTXHQF\VKRXOG
be set to 100 Hz or slightly higher. For details,
UHIHUWRWKHRSHUDWLQJLQVWUXFWLRQVRIWKHVSHDNHUV
to be connected.
xFrequencies below the crossover frequency are
RXWSXWIURPWKHVXEZRRIHURUWKHVSHDNHUVZKHQ
they are set to “Full Range” (when not using a
subwoofer).
Note
Speaker Distance
xSelect the desired unit (Meter or Feet) before setting
WKHVSHDNHUGLVWDQFH2QFHDXQLWLVVHOHFWHGWKH
distances are automatically converted to the selected
unit.
x<RXFDQVHWWKHGLVWDQFHZLWKLQWKHUDQJHRIa
PHWHUVLQPHWHULQWHUYDOVRUaIHHW
in 0.5 foot intervals).
xAbout the speaker distance
:KHQHQMR\LQJPXOWLFKDQQHOVXUURXQGSOD\EDFNZLWK
sources such as Dolby Digital and DTS sources, etc.,
it is ideal that the center, surround, and surround
EDFNVSHDNHUVVKRXOGEHWKHVDPHGLVWDQFHIURP
WKHPDLQOLVWHQLQJSRVLWLRQDVWKHIURQWVSHDNHUV
By entering the distance between the listening
SRVLWLRQDQGHDFKVSHDNHUWKHGHOD\WLPHVRIFHQWHU
VXUURXQGDQGVXUURXQGEDFNVSHDNHUVHWFDUH
automatically adjusted to create an ideal listening
environment virtually as if they were in their ideal
locations.
Speaker Channel Level
You can adjust the current channel levels as desired.
After adjusting each channel level with the test tone,
adjust the channel levels either according to the program
sources or to suit your tastes. For details, see “Adjusting
each channel level with test tone” on page 31.
47
Customizing Settings
English
Setting the HDMI Setup
HDMI
<RXFDQVSHFL¿HVWKHURXWLQJRIWKH+'0,DXGLRVLJQDO
IURPWKHV\VWHPRUWKURXJKWRD79RUÀDWVFUHHQ79
The HDMI connection can carry uncompressed digital
video signals and digital audio signals. Depending on
whether the digital audio signals input into the HDMI
IN are output from the HDMI MONITOR OUT of the
main unit or not, you should set the HDMI Audio Output
correctly.
Menu item Description
AMP
Disables HDMI digital audio
signals output from the HDMI
MONITOR OUT of this main unit.
Then, these signals are heard
IURPWKHVSHDNHUVFRQQHFWHGWR
this receiver.
TV
Enables HDMI digital audio signals
output from the HDMI MONITOR
OUT of the main unit. Then,
these signals are heard from the
VSHDNHUVRI\RXU79
xIf the HDMI Audio Output is set to “TV”, no sound
ZLOOEHKHDUGIURPWKHVSHDNHUVFRQQHFWHGWRWKLV
UHFHLYHUH[FHSW5220VSHDNHUVHYHQLIDQ
input source is selected.
Note
CEC Control
The CEC Control function allows input selection of the
PDLQXQLWWREHLQWHUORFNHGZLWKWKHRSHUDWLRQRIWKH
connected components.
Menu item Description
On Enables the CEC Control function.
Off Disables the CEC Control function.
Setting the Surround
Parameter Setup
Height Gain
You can adjust the front height channel level as desired
(This setting is valid only when listening in Dolby Pro
Logic IIz mode).
Menu item Description
L : Low Decreases the front height
channel level.
M : Mid
Outputs the front height channel
sound with standard sound volume
level.
H : High Increases the front height channel
level.
PANORAMA
You can extend the front stereo image to include the
VXUURXQGVSHDNHUVIRUDQH[FLWLQJHIIHFWZLWKVLGHZDOO
imaging.
Menu item Description
On Enables the panorama effect.
Off Disables the panorama effect.
Center Width
This adjusts the center image so it may be heard only
IURPWKHFHQWHUVSHDNHURQO\IURPWKHOHIWRUULJKW
VSHDNHUVDVDSKDQWRPLPDJHRUIURPDOOWKUHHIURQW
VSHDNHUVWRYDU\LQJGHJUHHV7KHFRQWUROFDQEHVHWLQ
8 steps from 0 to 7.
Dimension
7KLVIXQFWLRQJUDGXDOO\DGMXVWVWKHVRXQG¿HOGHLWKHU
towards the front or towards the rear.
The control can be set in 7 steps from -3 to +3.
Center Image
When one of the Neo:6 is enabled, you can adjust
the level of the center image so it may be heard from
WKHFHQWHUVSHDNHUPRUH7KHOHYHOFDQEHDGMXVWHGLQ
11 steps from 1 to 10.
48
R-807 NETWORK AV RECEIVER
DRC
This function compresses the dynamic range of
SUHYLRXVO\VSHFL¿HGSDUWVRIWKH'ROE\'LJLWDO'ROE\
7UXH+'RU'76VRXQGWUDFNZLWKH[WUHPHO\KLJK
volume) to minimize the difference in volume between
WKHVSHFL¿HGDQGQRQVSHFL¿HGSDUWV7KLVPDNHV
LWHDVLHUWRKHDUWKHIXOOVRXQGWUDFNZKHQZDWFKLQJ
movies at night at low levels.
Menu item Description
Auto
Adjusts the dynamic range
compression automatically (Dolby
TrueHD only).
Off Turns off the DRC function.
Mid Sets to Mid compression.
Max Sets to Max compression.
Tone
You can adjust the tone (bass and treble) as desired.
Menu item Description
On Adjusts the tone for your taste.
Off Listens to a program source
without the tone effect.
Adjusting the tone (Bass and Treble)
You can adjust the tone if the Tone is set to “ON”.
1Select the desired tone by pressing S or T, and
then press X.
2Adjust the selected tone as desired by
pressing S or T.
xThe tone level can be adjusted within the
UDQJHRIaG%
xIt is recommended the bass and treble to be
DGMXVWHGWRG%ÀDWOHYHO
xExtreme settings at high volume may damage
\RXUVSHDNHUV
Caution
Sound Delay
Some monitors have a slight delay during video
SOD\EDFNVRWKHVRXQGWUDFNZLOOEHVOLJKWO\RXWRIV\QF
with the picture. By slightly increasing delay, you can
sync the sound to the video. The delay can be adjusted
ZLWKLQWKHUDQJHRIPVaPV
Low Frequency Effect
This channel reproduces low-frequency bass signals
and has a frequency range from 20 Hz to 120 Hz. This
channel is added to the channels for all bands with
Dolby Digital or DTS to enhance low frequency audio
effects. When the receiver is connected to a subwoofer,
you can produce LFE (low-frequency effect) channel
sounds and reinforce the bass parts of other channels.
The Low Frequency Effect can be disabled and set in
4 steps from -20 dB to 0 dB.
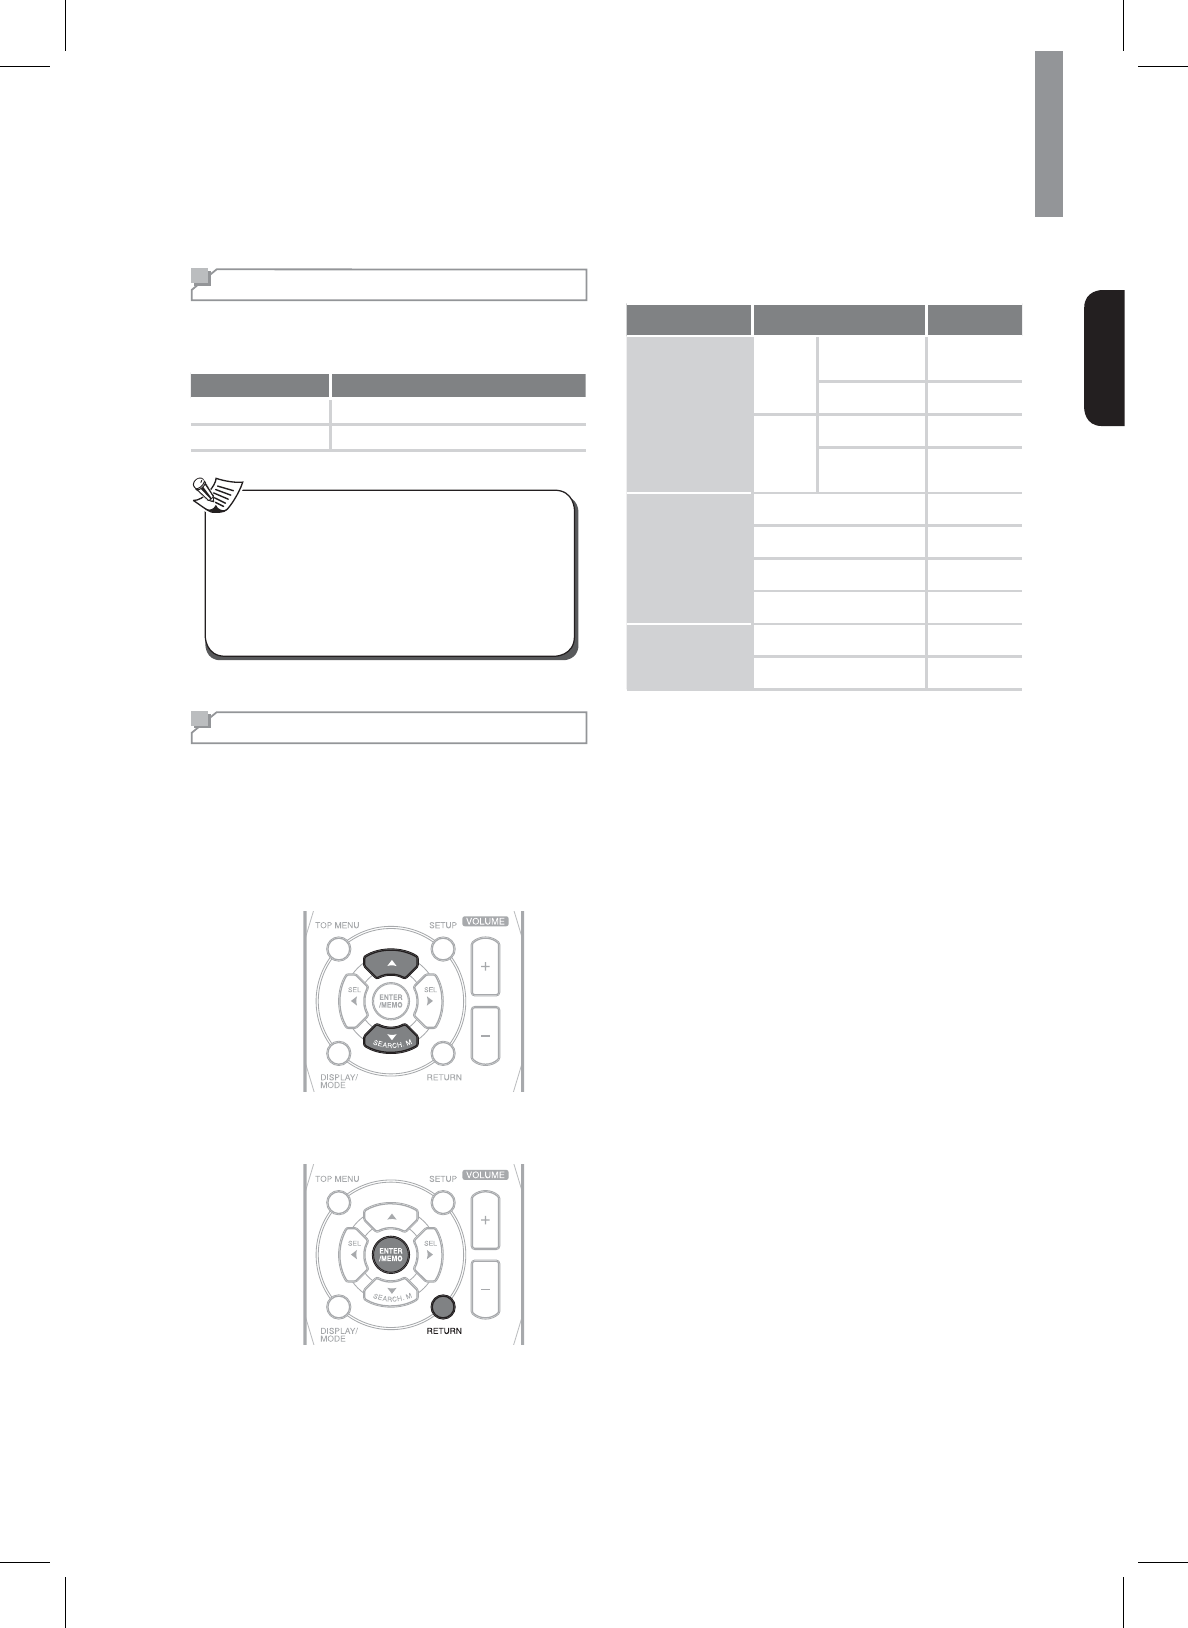
49
Customizing Settings
English
Setting the Multi Room Setup
In addition to your main room, you can also enjoy
SOD\EDFNLQ5RRP
Menu item Description
On Turns on the Room2 function.
Off Turns off the Room2 function.
xWhen Room2 is set to “OFF”, the input and the
volume cannot be selected.
xWhen you do not use the Room2 function, set
the Room2 to “OFF” to save electricity.
xThe digital signals (including signals from the
USB IN) cannot be output to the other rooms,
PHDQLQJQRSOD\EDFNLQ5RRP
Note
Setting the Network Setup
7ROLVWHQWR,QWHUQHWUDGLRVWDWLRQVRUPXVLF¿OHVVWRUHG
RQ\RXUFRPSXWHUYLDDZLUHGZLUHOHVVQHWZRUN\RX
VKRXOGFRQ¿JXUHQHWZRUNVHWWLQJV¿UVW
1Press SETUP on the remote control.
2Press S or T to navigate up or down the menu.
3Press ENTERWRFRQ¿UPWKHGHVLUHGPHQX
Press RETURN to move to the previous menu.
Network Settings Overview
Main Menu Sub Menu Go to Page
NETWORK
CONNECT
Direct
AV Set
Soft AP
hotspot 49
Wi-Fi direct 49
Wired
Ethernet 50
Ethernet
&RQ¿JXUDWLRQ 50
OTHER
AP Name 50
Resolution 50
Display size 50
Factory Setting 50
INFORMATION
1HWZRUN,QIRUPDWLRQ 50
Passcode Information 50
Setting the Direct Wireless Network
Connection
You can connect the main unit with a mobile device
wirelessly through Soft AP hotspot or Wi-Fi direct.
Soft AP hotspot
When you enable Soft AP hotspot, you can use the
main unit as a wireless access point. It provides internet
DFFHVVWRQHWZRUNGHYLFHV
Wi-Fi direct
Wi-Fi Direct is a standard that allows Wi-Fi devices to
connect to the main unit without the need for a wireless
access point. When you enable Wi-Fi Direct, you can
directly transfer data between Wi-Fi direct devices and
the main unit without the need for full setup.
50
R-807 NETWORK AV RECEIVER
Setting the Wired Network Connection
%HIRUH\RXVHWXSWKHFRQQHFWLRQFKHFNWKDWWKH/$1
cable is connected to the LAN/ETHERNET connector
properly and securely. For details, see “Connecting to
LAN cable” on page 21.
Ethernet
You can enable and set the Ethernet connection
automatically on the main unit.
(WKHUQHW&RQ¿JXUDWLRQ
You can set the Ethernet connection settings manually.
Menu item Description
Ethernet Device Inputs an Ethernet device name.
Connection Type Sets the connection type as DHCP
or Static IP
.
IP Address Inputs IP Address.
Netmask ,QSXWVVXEQHWPDVNZKHQWKH
DHCP function is disabled.
DNS address Inputs DNS address when the
DHCP function is disabled.
Default Router Inputs Default Router when the
DHCP function is disabled.
xWhen you set DHCP as a connection type, you
GRQRWQHHGWRVHWWKH,3$GGUHVV1HWPDVNRU
DNS address etc.
xWhen you set Static IP as a connection type, you
VKRXOGVHWWKHQHWZRUNFRQQHFWLRQPDQXDOO\E\
entering the IP Address, etc. In this case, some
NQRZOHGJHRIQHWZRUNVLVUHTXLUHG,I\RXGRQRW
understand internet connections, contact your
internet service provider.
Note
Setting Other Network Options
Menu item Description
AP Name Views and changes the name of
WKHXQLWGLVSOD\HGRQWKHQHWZRUN
Resolution Sets the resolution of the video
output.
Display size Adjusts the screen display size
manually.
Factory Setting Resets all the settings to the
factory default.
Viewing the Network Information
Network Information
You can view the detailed information of a connected
QHWZRUN
Passcode Information
You can view and change the passcode of the main
XQLW:KHQ\RXXVHWKHPDLQXQLWIRUWKH¿UVWWLPH\RX
should input this passcode when you enable Soft AP
hotspot and try to connect the mobile device to the main
unit.

51
English
Troubleshooting
,I\RXH[SHULHQFHDQ\RIWKHIROORZLQJGLI¿FXOWLHVZKLOHXVLQJWKHV\VWHPXVHWKLVWURXEOHVKRRWLQJJXLGHWRKHOS
remedy the problem before requesting servicing. Should any problem persist, consult your nearest authorized dealer
or authorized independent company.
,IWKHXQLWGRHVQRWRSHUDWHQRUPDOO\GXHWRH[WHUQDOLQÀXHQFHVXFKDVVWDWLFHOHFWULFLW\GLVFRQQHFWWKHSRZHUSOXJ
from the outlet and insert again to return to normal operating conditions.
GENERAL
Problem Remedy
The power does not turn on. xDisconnect the power plug from the outlet, and connect again.
The system suddenly turns
off.
xAfter about a minute (you won’t be able to turn the main unit on during this time),
WXUQWKHV\VWHPEDFNRQ,IWKHPHVVDJHSHUVLVWVFDOODQDXWKRUL]HGLQGHSHQGHQW
service company.
No sound is heard after a
function is selected.
x0DNHVXUHWKHFRPSRQHQWLVFRQQHFWHGFRUUHFWO\
(See “CONNECTIONS” on page 11.)
xPress MUTE to restore the sound.
Can’t operate the remote
control.
xReplace the batteries. (See page 7.)
xOperate within 7 m, and 30° of the remote sensor.
xRemove any obstacles, or operate from another position.
xAvoid exposing the remote sensor on the front panel to direct light.
7KHGLVSOD\LVGDUNRURII xPress DIMMER on the control repeatedly to return to the default setting.
SOUND
Problem Remedy
There is no sound from the
selected component.
x&KHFNWKDWWKHFRPSRQHQWLVFRQQHFWHGFRUUHFWO\WRWKHDXGLRLQSXWMDFNVRI
components.
x(QVXUHWKDWWKHFRUGVDUHIXOO\LQVHUWHGLQWRWKHMDFNVRQERWKWKHFRPSRQHQW
and the main unit.
xEnsure that the component is selected correctly.
x(QVXUHWKDWWKHHTXLSPHQWLVFRQQHFWHGFRUUHFWO\WRWKH+'0,MDFNIRUWKDW
equipment.
x'HSHQGLQJRQWKHSOD\EDFNHTXLSPHQW\RXPD\QHHGWRDGMXVWWKH+'0,
setting of the equipment. Refer to the operating instructions supplied with the
equipment.
xBe sure to use a High Speed HDMI cable when you view images or listen to
sound, especially for the 1080p, Deep Color (Deep Colour) or 3D transmission.
xAudio signals (format, sampling frequency, bit length, etc.) transmitted from an
+'0,MDFNPD\EHVXSSUHVVHGE\WKHFRQQHFWHGHTXLSPHQW&KHFNWKHVHWXSRI
the connected equipment if the image is poor or the sound does not come out of
the equipment connected via the HDMI cable.
xWhen the connected equipment is not compatible with copyright protection
WHFKQRORJ\+'&3WKHLPDJHDQGRUWKHVRXQGIURPWKH+'0,79287MDFN
PD\EHGLVWRUWHGRUPD\QRWEHRXWSXW,IWKLVLVWKHFDVHFKHFNWKHVSHFL¿FDWLRQ
of the connected equipment.

52
R-807 NETWORK AV RECEIVER
Problem Remedy
Sound is interrupted or there
is noise.
x&KHFNWKHRXWSXWDXGLRIRUPDWVVXSSRUWV\VWHP
x&KHFNWKDWWKHVSHDNHUVDQGHTXLSPHQWDUHFRQQHFWHGVHFXUHO\
xMove your audio equipment away from the TV.
x7KHSOXJVDQGMDFNVDUHGLUW\:LSHWKHPZLWKDFORWKVOLJKWO\PRLVWHQHGZLWK
alcohol.
No sound is heard or there
is noise when software with
'76LVSOD\HGEDFN
xSet the digital volume level of the system to full, or to the neutral position.
xEnsure the main unit's settings are correct and/or the DTS signal out is on.
Refer to the instruction manual supplied with the DVD player.
The left and right sounds are
unbalanced or reversed.
x(QVXUHWKDWWKHVSHDNHUVDQGHTXLSPHQWDUHFRQQHFWHGFRUUHFWO\DQGVHFXUHO\
x$GMXVWWKHVRXQGOHYHOSDUDPHWHUVXVLQJWKH6SHDNHU6HWWLQJVPHQX
Recording cannot be carried
out.
xEnsure that the equipment is connected correctly.
xSelect the source equipment using the input buttons (See page 27).
x$XGLRLQSXWVLJQDOVYLD+'0,,1DQG',*,7$/,1MDFNVFDQQRWEHUHFRUGHG
xCopyright protection to prevent recording is contained in the sources. In this
case, you may not be able to record from the sources.
A test tone is not produced
IURPWKHVSHDNHUV
x7KHVSHDNHUFRUGVPD\QRWEHFRQQHFWHGVHFXUHO\&KHFNWRVHHLIWKH\DUH
connected securely and cannot be disconnected by pulling on them slightly.
x7KHVSHDNHUFRUGVPD\KDYHDVKRUWFLUFXLWSUREOHP
A test tone is heard from a
GLIIHUHQWVSHDNHUWKDQWKH
VSHDNHUGLVSOD\HGRQWKH79
screen.
x7KHVSHDNHUSDWWHUQVHWXSLVLQFRUUHFW0DNHVXUHWKDWWKHVSHDNHUFRQQHFWLRQV
DQGWKHVSHDNHUSDWWHUQPDWFKFRUUHFWO\
No sound, or sound suddenly
ceases.
x,I\RX¶YHPDGHVHSDUDWHFRQQHFWLRQVIRUDXGLRPDNHVXUH\RXKDYHDVVLJQHG
WKHDQDORJGLJLWDOMDFNVWRWKHFRUUHVSRQGLQJ+'0,LQSXWIRUWKHFRPSRQHQW
x&KHFNWKHDXGLRRXWSXWVHWWLQJVRIWKHVRXUFHFRPSRQHQW
xIf the component is a DVI device, use a separate connection for the audio.
VIDEO
Symptom Remedy
No image appears on the TV.
xSelect the appropriate input using the input buttons.
xSet your TV to the appropriate input mode.
xMove your audio equipment away from the TV.
xAssign the component video input correctly.
x0DNHVXUHWKDWFDEOHVDUHFRUUHFWO\DQGVHFXUHO\FRQQHFWHGWRHTXLSPHQW
Recording cannot be carried
out.
x&KHFNWKDWWKHHTXLSPHQWLVFRQQHFWHGFRUUHFWO\
xSelect the source equipment using the input buttons (See page 27).
x9LGHRLQSXWVLJQDOVYLD+'0,,1DQG&20321(179,'(2,1MDFNVFDQQRWEH
recorded.
xCopyright protection to prevent recording is contained in the sources. In this
case, you may not be able to record from the sources.
No picture or sound.
xIf the problem still persists when connecting your HDMI component directly
to your monitor, consult the component or monitor manual or contact the
manufacturer for support.

53
Troubleshooting
English
Symptom Remedy
No picture.
xDepending on the output settings of the source component, the video format
may not be displayed. Change the output settings of the source, or connect your
VRXUFHFRPSRQHQWGLUHFWO\WR79XVLQJWKHFRPSRQHQWRUFRPSRVLWHYLGHRMDFNV
x7KLVV\VWHPLV+'&3FRPSDWLEOH&KHFNWKDWWKHFRPSRQHQWV\RXDUH
connecting are also HDCP-compatible. If they are not, please connect your
VRXUFHFRPSRQHQWGLUHFWO\WR79XVLQJWKHFRPSRQHQWRUFRPSRVLWHYLGHRMDFNV
x6RPHVRXUFHFRPSRQHQWVZLOOQRWZRUNZLWKWKHPDLQXQLWHYHQLILWLV
HDCP-compatible). In this case, connect your source component directly to TV
XVLQJWKHFRPSRQHQWRUFRPSRVLWHYLGHRMDFNV
x,IYLGHRLPDJHVGRQRWDSSHDURQ\RXU79RUÀDWVFUHHQ79WU\DGMXVWLQJWKH
resolution, DeepColor or other setting for your component.
xTo output signals in DeepColor, use an HDMI cable (High Speed HDMITM
Cable) to connect the main unit to a component or TV with the DeepColor
feature.
USB DEVICE
Symptom Remedy
7KHUHLVQRLVHVNLSSLQJRU
distorted sound.
xTurn off the receiver and reconnect the USB device, then turn on the main unit.
xThe music data itself contains noise, or the sound is distorted.
The USB device is not
recognized.
xTurn off the main unit, then disconnect the USB device. Turn on the main unit
again and reconnect the USB device.
xConnect the supported USB device (See page 32).
x7KH86%GHYLFHGRHVQRWZRUNSURSHUO\5HIHUWRWKH86%GHYLFHRSHUDWLQJ
instructions on how to deal with this problem.
3OD\EDFNGRHVQRWVWDUW xTurn off the main unit and reconnect the USB device, then turn on the main unit.
xConnect the supported USB device (See page 32).
The USB device cannot be
connected into the (USB)
port.
xThe USB device is being inserted upside down. Connect the USB device in the
correct orientation.

54
R-807 NETWORK AV RECEIVER
NETWORK CONNECTION
Symptom Remedy
The main unit cannot
connect to the WPS via a
wireless LAN connection.
x<RXFDQQRWFRQQHFWWRDQHWZRUNXVLQJ:36ZKHQ\RXUDFFHVVSRLQWLVVHWWR
:(36HWXS\RXUQHWZRUNDIWHUVHDUFKLQJWKHDFFHVVSRLQWXVLQJWKHDFFHVV
point scan.
The receiver cannot connect
WRWKHQHWZRUN
x&KHFNWKHQHWZRUNVWDWXV
x:KHQWKHV\VWHPLVFRQQHFWHGWKURXJKDZLUHOHVVQHWZRUNPRYHWKHPDLQXQLW
and the wireless LAN router/access point closer to each other and do the setup
again.
x&KHFNWKHVHWWLQJVRIWKHZLUHOHVV/$1URXWHUDFFHVVSRLQWDQGGRWKH
setup again. For details on the settings of the devices, refer to the operating
instructions of the devices.
x0DNHVXUHWKDW\RXXVHDZLUHOHVV/$1URXWHUDFFHVVSRLQW
x:LUHOHVVQHWZRUNVDUHLQÀXHQFHGE\HOHFWURPDJQHWLFUDGLDWLRQHPLWWHGE\
microwave ovens and other devices. Move the main unit away from these
devices
&DQQRWVHOHFWWKH1HWZRUN
Settings menu.
xWait for a few moments after you have turned on the main unit, and then select
WKH1HWZRUN6HWWLQJVPHQXDJDLQ
Important Information Regarding the HDMI Connection
Some HDMI signals cannot be routed through this system. (This depends on the HDMI-equipped component you are
FRQQHFWLQJ&KHFNZLWKWKHPDQXIDFWXUHUIRU+'0,FRPSDWLELOLW\LQIRUPDWLRQ
If you cannot receive HDMI signals properly through the main unit (from your component), please try the following
FRQ¿JXUDWLRQZKHQFRQQHFWLQJ

55
English
Additional Information
6SHFLÀFDWLRQV
Audio Section
Multichannel power
75 W per channel, two channels driven @ 6 ohms,
+]±N+]7+':SHUFKDQQHO
WZRFKDQQHOVGULYHQ#RKPVN+]7+'
Input sensitivity/impedance P9NRKPV
Signal-to-noise ratio (IHF-A) 95 dB
Surround system adjacent-channel separation
Dolby Pro Logic/PLII: 40 dB
Dolby Digital: 55 dB
DTS: 55 dB
Frequency response +]±N+]G%
High instantaneous-current capability (HCC) DPSV
FM Tuner Section
Frequency range 87.5 – 108.0 MHz
Usable sensitivity IHF ȝ9G%I
Signal-to-noise ratio (mono/stereo) 65 dB/62 dB
Distortion (mono/stereo)
Stereo separation G%#N+]
Image rejection 80 dB
IF rejection 80 dB
AM Tuner Section
Frequency range ±N+]
Signal-to-noise ratio 45 dB
Usable sensitivity (loop) ȝ9
6HOHFWLYLW\N+] 30 dB
IF rejection 80 dB

56
R-807 NETWORK AV RECEIVER
Video Section
Television format NTSC/PAL
Input level/impedance 1 Vp-p/75 ohms
Output level/impedance 1 Vp-p/75 ohms
Video frequency response (composite video) 10 Hz – 8 MHz (–3 dB)
HDMI With 3 D and Deep Color
*HQHUDO6SHFL¿FDWLRQV
Power requirement AC 220 V/60 Hz
Power consumption <0.5 W (standby), 280 W maximum
Dimensions (W x H x D) 17.12" x 4.9" x 13" (435 mm x 125 mm x 331 mm)
Weight OENJ
Trademarks and Licenses
This system incorporates a sophisticated Digital Signal Processor that allows you to create optimum sound quality
and sound atmosphere in your personal Home Theater.
DTS-HD Master Audio
Manufactured under license under U.S. Patent Nos:
5,956,674; 5,974,380; 6,226,616; 6,487,535; 7,212,872;
7,333,929; 7,392,195; 7,272,567 & other U.S. and
worldwide patents issued & pending. DTS-HD, the
Symbol, & DTS-HD and the Symbol together are
UHJLVWHUHGWUDGHPDUNV'76+'0DVWHU$XGLRLVD
WUDGHPDUNRI'76,QF3URGXFWLQFOXGHVVRIWZDUH
© DTS, Inc. All Rights Reserved.
Dolby TrueHD
Manufactured under license from Dolby Laboratories.
'ROE\DQGGRXEOH'V\PERODUHWUDGHPDUNVRI'ROE\
Laboratories.
HDMI
+'0,WKH+'0,/RJRDQG+LJK'H¿QLWLRQ0XOWLPHGLD
,QWHUIDFHDUHWUDGHPDUNVRUUHJLVWHUHGWUDGHPDUNVRI
HDMI Licensing LLC in the United States and other
countries.