Inmarsat Solutions GLOBEI250S3BDE Maritime Satelline Voice and Data Router User Manual
Inmarsat Solutions (US) Inc. Maritime Satelline Voice and Data Router
User Manual

i
i i i

SWG-125 Rev. G June 2013
Issued by Globe Wireless, LLC
1571 Robert J. Conlan Blvd. NE Palm Bay, FL 32905
© Copyright 2011 - 2013, Globe Wireless, LLC All rights reserved
This document contains information Confidential and Proprietary to Globe Wireless®. No part of this
publication may be reproduced or transmitted by any means; and disclosure or distribution of its contents for
any purpose without written consent from Globe Wireless® is strictly prohibited.
Every effort has been made to ensure that the information contained herein is complete and accurate.
However the information contained in this manual is subject to change without notice and Globe Wireless®
reserves the right to change specifications of hardware and software without prior notice. Globe Wireless®
assumes no responsibility or liability for any errors or inaccuracies that may appear in this document.
Companies, names and data used in examples herein are fictitious, unless otherwise noted.
Microsoft Windows, Word, and Excel are registered trademarks of Microsoft Corporation. Lotus and cc:Mail
are registered trademarks of IBM Corporation. Other software programs mentioned herein are the registered
trademarks of their respective owners.
The words Globe Wireless and Globe Wireless logo depicted herein are registered with the United States
Patent and Trademark Office. Globe Wireless, LLC reserves all trademark and service mark rights
worldwide to the terms Globe Wireless, Globe Communications Center, GlobeEmail, Global Maritime Data
Network, GlobeData, Globe Satellite, Globe Transfer, GlobeRelay and GPS Server mentioned or depicted
herein.
This document, as well as software described in it, are protected under the copyright laws of the United
States of American and similar laws in other countries of the world This document contains information
Confidential and Proprietary to Globe Wireless®. No part of this publication may be reproduced or
transmitted by any means and disclosure or distribution of its contents for any purpose without written
consent from Globe Wireless®is strictly prohibited.

SWG-125 Rev. G June 2013
Globe iFusion ®User Guide for i500, i250, iSRev. G iii
Table of Contents
Important Regulatory and Safety Information for i250-S3 .............................................................. xi
Important Regulatory and Safety Information for i500-S3 ............................................................. xv
CE Certification Globe iS .................................................................................................................. xix
FCC-Certification Globe iS ................................................................................................................ xx
Manual Organization ......................................................................................................................... xxi
Special Notations............................................................................................................................... xxi
Customer Comments ........................................................................................................................ xxi
1.0 Introduction.............................................................................................................................1-1
1.1 Key Features........................................................................................................................ 1-1
1.1.1 IP Router .......................................................................................................................1-1
1.1.2 GlobeVoice ................................................................................................................... 1-2
1.1.3 Email..............................................................................................................................1-2
1.1.4 Web Browsing ..............................................................................................................1-2
1.2 Shore Control ......................................................................................................................1-3
1.3 Globe iFusion® Overview Diagram ...................................................................................1-4
1.4 Package Contents ...............................................................................................................1-4
1.5 Installation of the Globe iFusion®.....................................................................................1-5
1.5.1 Installing the Globe iFusion ......................... 1-5
1.5.2 Installing the Globe iFusion® onto Wall, Shelf or Table..........................................1-6
2.0 Getting to Know the Globe iFusion®....................................................................................2-1
2.1 The Globe iFusion® Front Panel i250, i500, and iS ......................................................2-1
2.2 LED Operation .....................................................................................................................2-2

SWG-125 Rev. G June 2013
Globe iFusion ®User Guide for i500, i250, iSRev. G iv
2.2.1 POWER LED .................................................................................................................2-2
2.2.2 READY LED ..................................................................................................................2-3
2.2.3 BUSY LED .....................................................................................................................2-4
2.2.4 AC LED..........................................................................................................................2-4
2.2.5 TERMINAL LED ............................................................................................................2-4
2.2.6 ANTENNA LED ............................................................................................................. 2-4
2.2.7 NETWORK LED ............................................................................................................2-5
2.2.8 GPS LED .......................................................................................................................2-5
2.3 The Globe iFusion® Rear panel for i250, and i500 ..........................................................2-6
2.4 The Globe iFusion® Rear panel for iS ..............................................................................2-7
3.0 Fixed Multiple Lines ............................................................................................................... 3-1
3.1 Introduction .........................................................................................................................3-1
3.2 Features ...............................................................................................................................3-1
3.3 Features of the PolyCom Phone........................................................................................3-2
3.4 Navigate through Menus ....................................................................................................3-4
3.5 Configure Basic Settings ...................................................................................................3-4
3.5.1 Time and Date ..............................................................................................................3-4
3.5.2 Display Contrast ..........................................................................................................3-5
3.5.3 Ring Type......................................................................................................................3-6
3.5.4 Language Support .......................................................................................................3-6
3.5.5 Directory Search ..........................................................................................................3-7
3.6 Manage Contacts ................................................................................................................3-8
3.6.1 Adding Contacts ..........................................................................................................3-8
3.6.2 Deleting Contacts ........................................................................................................3-9

SWG-125 Rev. G June 2013
Globe iFusion ®User Guide for i500, i250, iSRev. G v
3.6.3 Placing a Call to a contact ........................................................................................3-10
3.7 Using Basic Features of your phone ..............................................................................3-10
3.7.1 Placing a Call..............................................................................................................3-11
3.7.2 Answering a Call ........................................................................................................3-11
3.7.2.1 Answer when NOT on another call ................................................................... 3-12
Using the Handset...............................................................................................................3-12
Hands-free Speakerphone..................................................................................................3-12
3.7.2.2 Answer when on another call............................................................................ 3-12
Phone configured for a Single Line Key..............................................................................3-12
Phone configured for Shared Lines ....................................................................................3-12
3.7.3 Ending a Call ..............................................................................................................3-13
3.7.4 Placing a Call on Hold ...............................................................................................3-13
3.7.5 Setting up Conference Calls.....................................................................................3-13
To Split a conference call:...................................................................................................3-14
Set up a Conference Call ....................................................................................................3-14
To End a Conference Call...................................................................................................3-15
3.7.6 Transferring Calls ......................................................................................................3-15
Consultative Transfer ..........................................................................................................3-15
Blind Transfer......................................................................................................................3-16
Attended Transfer ...............................................................................................................3-16
3.7.7 Do Not Disturb............................................................................................................3-16
3.8 Troubleshooting Your Phone...........................................................................................3-17
3.8.1 Securing the Handset on-hook.................................................................................3-17
3.8.2 Controls ......................................................................................................................3-19

SWG-125 Rev. G June 2013
Globe iFusion ®User Guide for i500, i250, iSRev. G vi
3.8.3 Access to Screens and Systems..............................................................................3-20
3.8.4 Calling .........................................................................................................................3-21
3.8.5 Displays ......................................................................................................................3-22
4.0 Using a Standard Phone ........................................................................................................4-1
4.1 Your Phone Number ...........................................................................................................4-1
4.1.1 Placing a Call from the Phone ....................................................................................4-1
4.1.2 Receiving a Call to the Phone ....................................................................................4-1
4.1.3 Making a Call to the Phone from Shore .....................................................................4-2
4.2 Captain Override .................................................................................................................4-2
5.0 Using the FBB Handset..........................................................................................................5-1
5.1 FleetBroadband Handset Use ............................................................................................5-1
5.1.1 Connect the handset to the Globe iFusion®............................................................. 5-2
5.1.2 Making a Call ................................................................................................................5-2
5.1.3 Receiving a Call ...........................................................................................................5-2
6.0 Using a Fax Machine .............................................................................................................. 6-1
6.1 Your Fax Number ................................................................................................................6-1
6.1.1 Sending a Fax from the Ship ......................................................................................6-1
6.1.2 Sending a Fax to the Ship ...........................................................................................6-2
6.1.3 Receiving a Fax on the Ship .......................................................................................6-2
7.0 Using a Mobile Phone ............................................................................................................7-1
7.1 GlobeMobile Services.........................................................................................................7-1
7.2 Getting Started ....................................................................................................................7-2
7.2.1 First Time User............................................................................................................. 7-2
7.2.1.1 Unlocked GSM Mobile Phone.............................................................................. 7-3

SWG-125 Rev. G June 2013
Globe iFusion ®User Guide for i500, i250, iSRev. G vii
7.2.1.2 No Mobile Phone................................................................................................... 7-6
7.2.2 Downloads....................................................................................................................7-9
7.2.3 Login ...........................................................................................................................7-10
7.2.3.1 Forgot Password ................................................................................................ 7-11
Receive password by an SMS message sent to your phone .............................................7-11
........................................................................7-12
7.2.3.2 Forgot User ID..................................................................................................... 7-14
7.2.4 Placing and Receiving Calls .....................................................................................7-16
7.2.5 SMS Text messaging .................................................................................................7-16
7.2.6 Operation Entering and Exiting Shipping Ports .....................................................7-16
8.0 Web-Based Software ..............................................................................................................8-1
8.1 Getting Connected ..............................................................................................................8-1
8.1.1 Configuring your IP Connection ................................................................................8-1
8.1.2 Supported Web Browsers ...........................................................................................8-2
8.1.3 The URL ........................................................................................................................8-2
8.2 Navigation ............................................................................................................................8-3
8.2.1 The Menu and Sub-Menu ............................................................................................8-3
8.2.2 Help ...............................................................................................................................8-3
8.2.3 Communication Status (Home Page).........................................................................8-4
8.2.4 Login .............................................................................................................................8-4
8.2.5 Logout ...........................................................................................................................8-6
8.3 Users ....................................................................................................................................8-6
9.0 Admin User..............................................................................................................................9-1
9.1 Satellite Tab ......................................................................................................................... 9-2

SWG-125 Rev. G June 2013
Globe iFusion ®User Guide for i500, i250, iSRev. G viii
9.1.1 Status Sub-tab..............................................................................................................9-3
9.1.2 Call History Sub-tab.....................................................................................................9-4
9.1.3 Data History Sub-tab ...................................................................................................9-5
9.1.4 Logs Sub-tab ................................................................................................................9-6
9.1.5 Information Sub-tab.....................................................................................................9-7
9.1.6 Safe Mode Sub-tab.......................................................................................................9-8
9.2 GlobeMobile Tab .................................................................................................................9-9
9.2.1 Status Sub-tab..............................................................................................................9-9
9.2.2 Admin Sub-tab ...........................................................................................................9-10
9.2.3 GlobeVoice Lines Sub-tab ........................................................................................9-11
9.3 Network Tab.......................................................................................................................9-12
9.3.1 Users Sub-tab.............................................................................................................9-13
9.3.2 Gateways ....................................................................................................................9-14
9.3.3 Proxy Server...............................................................................................................9-15
9.3.4 Firewall........................................................................................................................9-15
9.3.5 IP Configuration .........................................................................................................9-16
9.3.6 Diagnostics.................................................................................................................9-17
9.3.7 Routes .........................................................................................................................9-18
9.3.8 SNAP ...........................................................................................................................9-19
9.3.9 UPS..............................................................................................................................9-20
9.3.10 Reboot.........................................................................................................................9-20
9.4 VSAT Tab ...........................................................................................................................9-21
9.4.1 VSAT Status (default screen) ...................................................................................9-21
9.4.2 VSAT ACU...................................................................................................................9-22

SWG-125 Rev. G June 2013
Globe iFusion ®User Guide for i500, i250, iSRev. G ix
9.4.3 VSAT Log ....................................................................................................................9-22
9.5 Usage Tab ..........................................................................................................................9-22
9.5.1 Usage Details Sub-Tab ..............................................................................................9-23
9.6 Downloads Tab..................................................................................................................9-23
10.0 Prepaid Users ....................................................................................................................10-1
10.1 Home Tab .......................................................................................................................10-2
10.2 Email Tab (default) ........................................................................................................10-2
10.2.1 Compose a Message .................................................................................................10-3
10.2.2 Address Book.............................................................................................................10-4
10.2.2.1 Add a new Contact ............................................................................................. 10-4
10.2.2.2 Search for a contact ...........................................................................................10-5
10.2.2.3 Edit or Delete a Contact ..................................................................................... 10-6
10.2.3 Options .......................................................................................................................10-8
10.2.3.1 Personal Information.......................................................................................... 10-8
10.2.3.2 Display Preferences .........................................................................................10-10
10.2.3.3 Message Highlighting ......................................................................................10-11
10.2.3.4 Folder Preferences ...........................................................................................10-13
10.2.4 Search .......................................................................................................................10-15
10.2.5 Folders Pane ............................................................................................................10-17
10.2.5.1 Create a new folder ..........................................................................................10-18
10.2.5.2 Rename a Folder............................................................................................... 10-18
10.2.5.3 Delete a Folder ..................................................................................................10-19
10.2.5.4 Unsubscribe / Subscribe .................................................................................10-20
10.2.5.5 Inbox .................................................................................................................. 10-21

SWG-125 Rev. G June 2013
Globe iFusion ®User Guide for i500, i250, iSRev. G x
10.2.5.6 Deleted Items Folder ........................................................................................10-23
10.2.5.7 Drafts Folder .....................................................................................................10-23
10.2.5.8 Sent Items Folder..............................................................................................10-25
10.3 Preferences Tab...........................................................................................................10-26
10.4 Account Tab.................................................................................................................10-27
10.4.1 Account Details (default) Sub-Tab .........................................................................10-28
10.4.2 Change Password Sub-Tab ....................................................................................10-28
10.4.3 Add Alias Sub-Tab...................................................................................................10-29
10.4.4 Enter Credit Reload Sub-Tab..................................................................................10-29
10.5 Downloads Tab ............................................................................................................10-30
11.0 Web Browsing Users ........................................................................................................11-1
11.1 Start a Web Browsing Session ....................................................................................11-1
11.2 Stop or Extend a Web Browsing Session ...................................................................11-2
12.0 Troubleshooting................................................................................................................12-1
12.1 Basic User Issues and Solutions.................................................................................12-1
12.2 Frequently Asked Questions........................................................................................12-2
APPENDIX A: Updating the Globe iFusion® Software............................................................. A-1
APPENDIX B: Updating the Globe iFusion® Firmware............................................................ B-1
APPENDIX C: Restoring Factory Defaults for the Globe iFusion® Software ........................ C-1
APPENDIX D: Technical Specifications..................................................................................... D-1
Globe iFusion® Front Panel Dimensions and Description....................................................... D-2
Globe iFusion® Rear Panel.......................................................................................................... D-3
APPENDIX E: Contact Information ............................................................................................ E-1

SWG-125 Rev. G June 2013
Globe iFusion ®User Guide for i500, i250, iSRev. G xi
Important Regulatory and Safety Information
for i250-S3
Regulatory Information
Federal Communication Commission Notice
FCC Identifier: YC6GLOBEI250S3BDE
USE CONDITIONS:
This device complies with part 15 of the FCC Rules. Operation is subject to the
following two Conditions:
1. This device may not cause harmful interference, and
2. This device must accept any interference received, including interference that
may cause undesired operation.
NOTE:
This equipment has been tested and found to comply with the limits for a Class B
digital device, pursuant to Part 15 of the FCC Rules. These limits are designed to
provide reasonable protection against harmful interference in a residential
installation. This equipment generates uses and can radiate radio frequency energy
and, if not installed and used in accordance with the instructions, may cause harmful
interference to radio communications. However, there is no guarantee that
interference will not occur in a particular installation.
If this equipment does cause harmful interference to radio or television reception,
which can be determined by turning the equipment off and on, the user is
encouraged to try to correct the interference by one of the following measures:
Reorient or relocate the receiving antenna.
Increase the separation between the equipment and receiver.
Connect the equipment into an outlet on a circuit different from that to which the
receiver is connected.
Consult the dealer or an experienced radio/TV technician for help.
IMPORTANT NOTE: EXPOSURE TO RADIO FREQUENCY RADIATION

SWG-125 Rev. G June 2013
Globe iFusion ®User Guide for i500, i250, iSRev. G xii
This Device complies with FCC & IC radiation exposure limits set forth for an
uncontrolled environment. The Antenna used for this transmitter must be installed
to provide a separation distance of at least 100cm from all persons and must not be
co-located or operating in conjunction with any other antenna or transmitter
FCC CAUTION:
Any Changes or modifications not expressly approved by the manufacturer could
void the user's authority, which is granted by FCC, to operate this Maritime Satellite
Voice and Data Router
Eu Declaration of Conformity:
Globe wireless LLC, 1571 Robert J. Conlan Blvd. Palm Bay, FL 32905 declares under
our sole responsibility that the Product, brand name as Globe wireless and model:
Globe i250-S3 Maritime Satellite Voice and Data Router, to which this declaration
relates, is in conformity with the following standards and/or other normative
documents:
ETSI EN 301 444 V1.2.1:2012
ETSI EN 301 489-1 V1.9.2:2011
ETSI EN 301 489 -19 V1.2.1:2002
ETSI EN 301 489 -20 V1.2.1:2002
EN 60945:2002
EN 60950-1:2006+A11:2009+A1:2010+A12:2011
We hereby declare that all essential radio test suite have been carried out and that
the above named product is in conformity to all the essential requirements of
Directive 1999/5/EC.
The Conformity Assessment procedure referred to Article 10 and detailed in Annex
[III] or [IV] of Directive 1999/5/EC has been followed with involvement of the
following notified body(ies):
TIMCO ENGINEERING, INC., P.O BOX 370, NEW BERRY, FLORIDA 32669.
SWG-125 Rev. G June 2013
Globe iFusion ®User Guide for i500, i250, iSRev. G xiii
Identification mark: 1177 (Notified Body number)
The technical documentation relevant to the above equipment is held at:
Addvalue Communications Pte Ltd, 28 Tai Seng Street , #06-02, Singapore
534106
Signed by Mr. Mark Witsaman, Chief Technical Officer on 03 June 2013

SWG-125 Rev. G June 2013
Globe iFusion ®User Guide for i500, i250, iSRev. G xiv
This page intentionally left blank.

SWG-125 Rev. G June 2013
Globe iFusion ®User Guide for i500, i250, iSRev. G xv
Important Regulatory and Safety Information
for i500-S3
Regulatory Information
Federal Communication Commission Notice
FCC Identifier: YC6-GLOBEI500S3BDE
USE CONDITIONS:
This device complies with part 15 of the FCC Rules. Operation is subject to the
following two Conditions:
1. This device may not cause harmful interference, and
2. This device must accept any interference received, including interference that
may cause undesired operation.
NOTE:
This equipment has been tested and found to comply with the limits for a Class B
digital device, pursuant to Part 15 of the FCC Rules. These limits are designed to
provide reasonable protection against harmful interference in a residential
installation. This equipment generates, uses and can radiate radio frequency energy
and, if not installed and used in accordance with the instructions, may cause harmful
interference to radio communications. However, there is no guarantee that
interference will not occur in a particular installation.
If this equipment does cause harmful interference to radio or television reception,
which can be determined by turning the equipment off and on, the user is
encouraged to try to correct the interference by one of the following measures:
Reorient or relocate the receiving antenna.
Increase the separation between the equipment and receiver.
Connect the equipment into an outlet on a circuit different from that to which the
receiver is connected.
Consult the dealer or an experienced radio/TV technician for help.
IMPORTANT NOTE: EXPOSURE TO RADIO FREQUENCY RADIATION

SWG-125 Rev. G June 2013
Globe iFusion ®User Guide for i500, i250, iSRev. G xvi
This Device complies with FCC & IC radiation exposure limits set forth for an
uncontrolled environment. The Antenna used for this transmitter must be installed
to provide a separation distance of at least 100cm from all persons and must not be
co-located or operating in conjunction with any other antenna or transmitter
FCC CAUTION:
Any Changes or modifications not expressly approved by the manufacturer could
void the user's authority, which is granted by FCC, to operate this Maritime Satellite
Voice and Data Router
Eu Declaration of Conformity:
Globe wireless LLC, 1571 Robert J. Conlan Blvd. Palm Bay, FL 32905 declares under
our sole responsibility that the Product, brand name as Globe wireless and model:
Globe i250-S3 Maritime Satellite Voice and Data Router, to which this declaration
relates, is in conformity with the following standards and/or other normative
documents:
ETSI EN 301 444 V1.2.1:2012
ETSI EN 301 489-1 V1.9.2:2011
ETSI EN 301 489 -19 V1.2.1:2002
ETSI EN 301 489 -20 V1.2.1:2002
EN 60945:2002
EN 60950-1:2006+A11:2009+A1:2010+A12:2011
We hereby declare that all essential radio test suite have been carried out and that
the above named product is in conformity to all the essential requirements of
Directive 1999/5/EC.
The Conformity Assessment procedure referred to Article 10 and detailed in Annex
[III] or [IV] of Directive 1999/5/EC has been followed with involvement of the
following notified body(ies):
TIMCO ENGINEERING, INC., P.O BOX 370, NEW BERRY, FLORIDA 32669.

SWG-125 Rev. G June 2013
Globe iFusion ®User Guide for i500, i250, iSRev. G xvii
Identification mark: 1177 (Notified Body number)
The technical documentation relevant to the above equipment is held at:
Addvalue Communications Pte Ltd, 28 Tai Seng Street , #06-02, Singapore
534106
Signed by Mr. Mark Witsaman, Chief Technical Officer on 03 June 2013

SWG-125 Rev. G June 2013
Globe iFusion ®User Guide for i500, i250, iSRev. G xviii
This page intentionally left blank.
SWG-125 Rev. G June 2013
Globe iFusion ®User Guide for i500, i250, iSRev. G xix
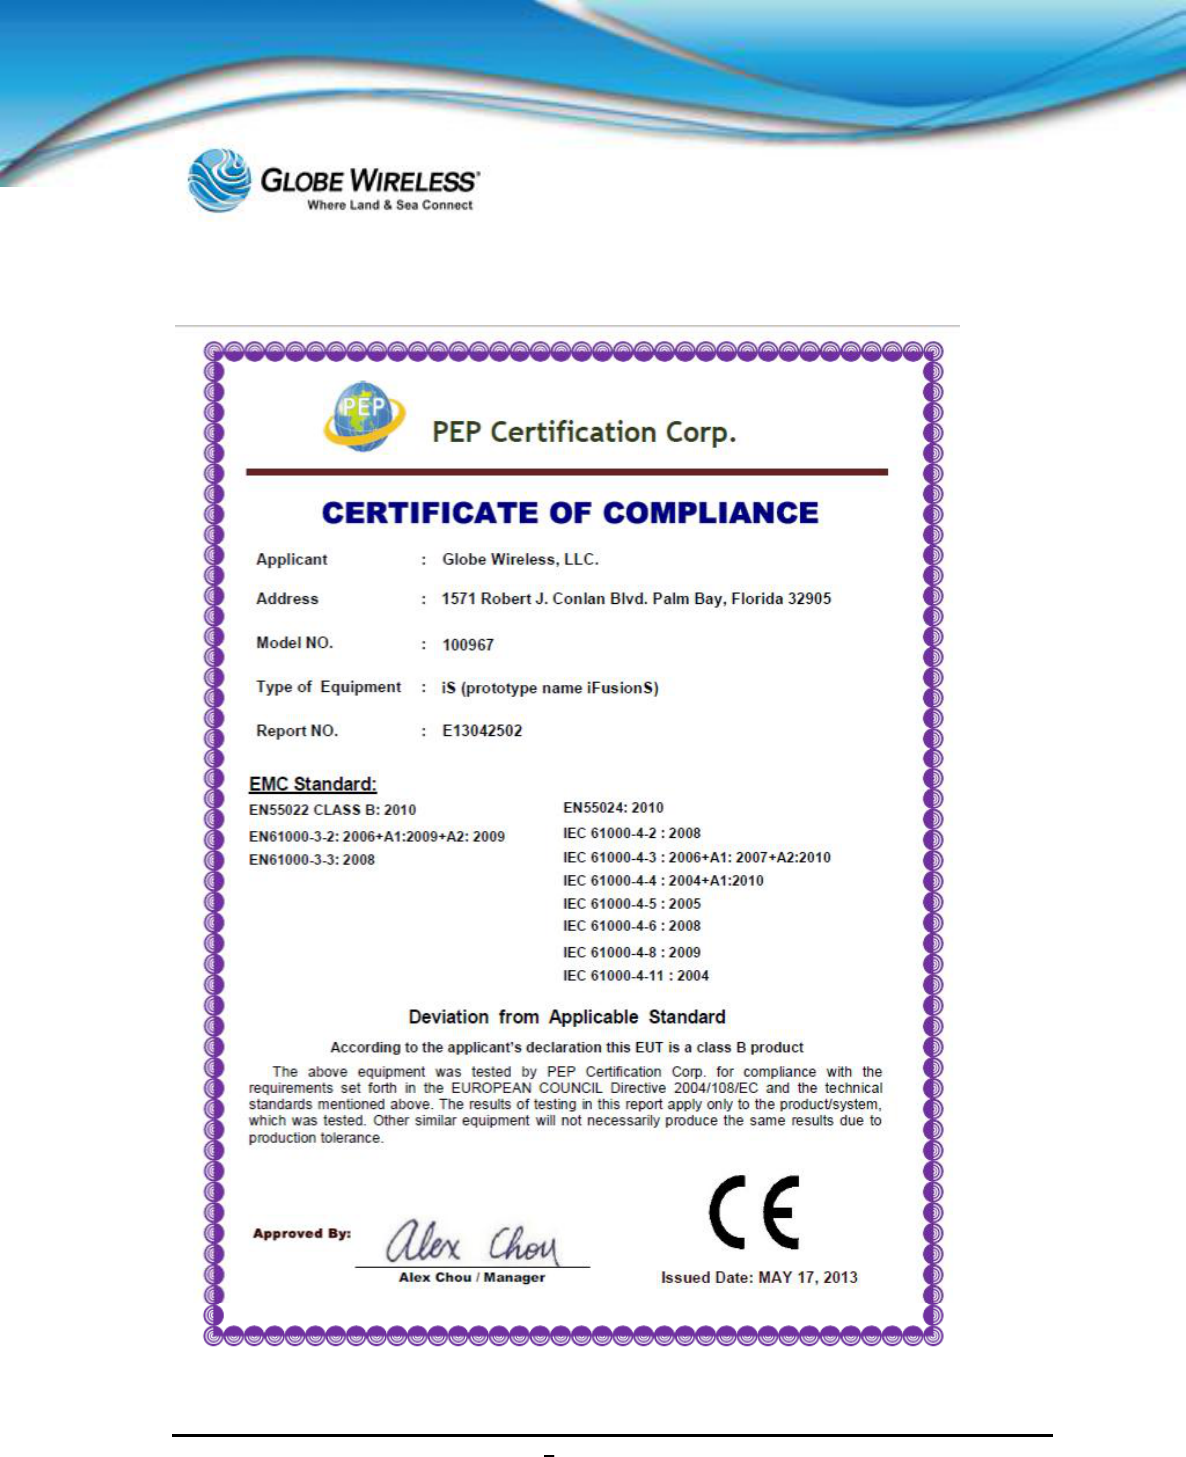
CE Certification Globe iS
SWG-125 Rev. G June 2013
Globe iFusion ®User Guide for i500, i250, iSRev. G xx
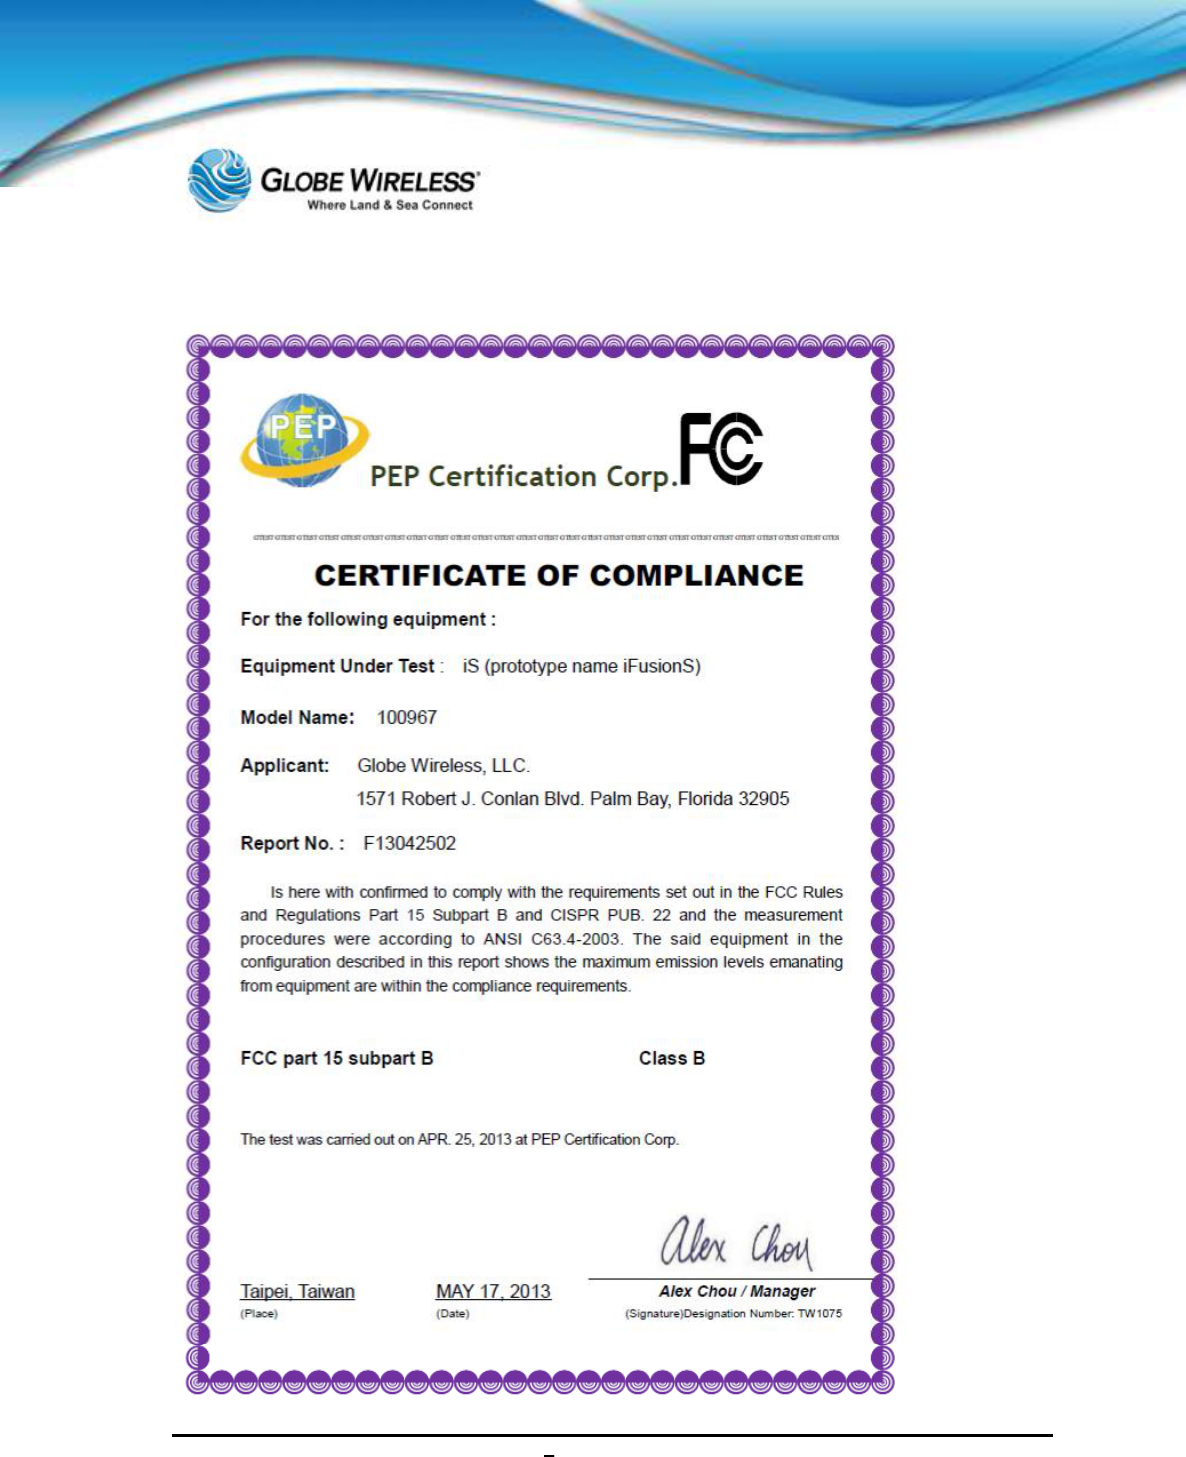
FCC-Certification Globe iS

SWG-125 Rev. G June 2013
Globe iFusion ®User Guide for i500, i250, iSRev. G xxi
Manual Organization
Instructions and graphics used in this manual may vary slightly depending upon each individual
computer and Operating System being used.
Special Notations
This manual uses the following levels of special notation to alert the user to important information or
useful tips for easier operation.
WARNING! AWARNING provides important information in the prevention of potential problems.
Note: Provides supplementary information to emphasize a point or procedure, or a tip for easier
operation.
Customer Comments
Globe Wireless is ISO Certified, and is committed to quality and total customer satisfaction. Customer
comments are important to us and help us to provide quality products and services. We invite emails
from satisfied customers as well as comments and recommendations for improvement.
Email comments and suggestions to: quality@globewireless.com
For further assistance, contact the Globe Wireless Customer Service Center at:
Within the United States or Canada: 1-(877)-535-0653
Overseas: 1-(321)-308-0112
customerservice@globewireless.com
www.globewireless.com

SWG-125 Rev. G June 2013
Globe iFusion ®User Guide for i500, i250, iSRev. G xxii
This page intentionally left blank.
SWG-125 Rev. G June 2013
Globe iFusion ®User Guide for i500, i250, iSRev. G 1-1
1.0 Introduction
The Globe iFusion® Maritime Satellite Voice and Data Router provides a connection for multiple
computers, network devices, fax machines, telephones and mobile phones to access both the
Internet and voice/text services through a built-in Inmarsat FleetBroadband 250 Satellite Terminal. It
also makes use of other broadband network access services your vessel may have by automatically
The
broadband access options include but are not limited to other FleetBroadband terminals, VSAT,
Iridium OpenPort, GSM, and Wired and Wireless connections available in port.
1.1 Key Features
The Globe iFusion®is an integration of several subsystems into a single, rack-mountable product.
These sub-systems are normally complete systems, but within the Globe iFusion®they are highly
integrated and function as a single system. These include an Inmarsat FleetBroadband 250 terminal,
a GSM mobile phone call router, an IP network router, firewall, proxy, and email system. Tying these
services together is a web application which provides users with email and web browsing.
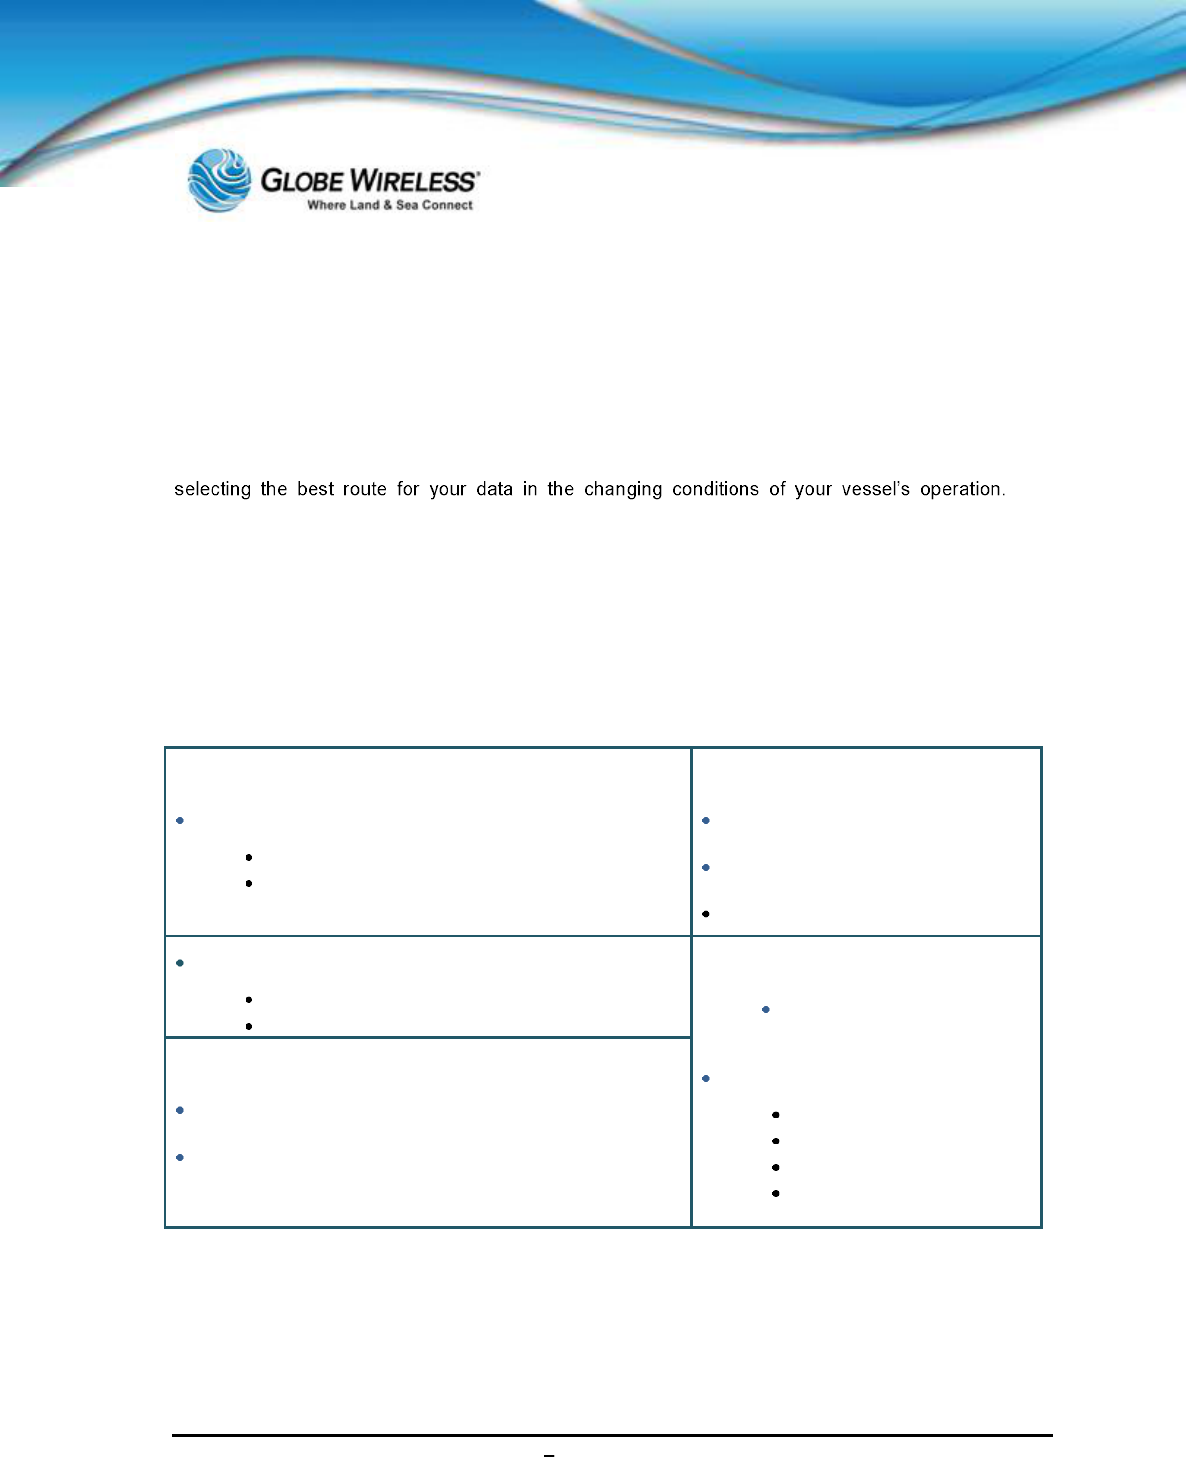
1.1.1 IP Router
Aside from the built-in FleetBroadband 250, the Globe iFusion®also has 3 WAN ports which allow
immediate expansion to accommodate other network gateways available on the vessel. With the use
IP Router
IP Satellite Gateway (External)
Built-In FleetBroadband 250
As many as 10 additional external IP satellite
systems
Prepaid Platform
GSM and SMS
Direct voice
Email
Shipboard Network (Internal)
Up to 4 PCs can connect directly
Additional PCs can connect using a switch
Web and IP Acceleration
Web proxy for browsing
control
Web acceleration
Image downsizing
Compression
Shipboard cache
Mobile Browser
Emulation
GlobeVoice Gateway
Prepaid and Postpaid in a single platform
GSM and telephone hard line access
Call routing over any satellite system

SWG-125 Rev. G June 2013
Globe iFusion ®User Guide for i500, i250, iSRev. G 1-2
of a network switch (not included) this can be increased to 10. Each gateway can serve as the
primary or an alternate means of connecting to the Internet.
The shipboard users can connect up to four PCs directly to the four LAN ports of the Globe
iFusion®. If more devices are needed this can be expanded as well with a network switch (not
included). Using the full-featured routing and firewall functions of the Globe iFusion®, these LAN
users can access any Internet service to which they have been given permission.
1.1.2 GlobeVoice
Voice and Fax calls can be made with standard telephones and fax machines by connecting these
devices to the designated ports on the back of the Globe iFusion®. There is also an optional
handset and handset port for those who wish to make calls directly from the Globe iFusion®.
Another voice communication service is the prepaid GSM mobile phone user. Included with every
Globe iFusion®is a Globe Mobile Antenna which provides cellular voice and text services to
mobile phones on the vessel even while at sea. These calls can be routed either over a standard
satellite terminal or via the Voice over IP (VOIP) service. A Globe Wireless SIM card and an unlocked
mobile phone are all you need to get started.
1.1.3 Email
Users of prepaid voice services also have access to individual, prepaid email accounts which deduct
from the same account. This email account can be used either from the Globe iFusion®web email
application or from a standard email client such as Microsoft Outlook. The Globe iFusion®supports
SMTP and IMAP4 client interfaces.
1.1.4 Web Browsing
The Globe iFusion®has a very advanced solution for web browsing in the maritime world. It
incorporates four different levels of web compression and cost reduction.
Text and large data are compressed using standard compression tools before sending them to the
vessel.
Images are down-sampled to reduce their size.
Web sites are cached locally to avoid retrieving them multiple times.
Mobile browser emulation provides an option for viewing the mobile versions of web pages even
when using Internet Explorer.
This last feature is unique and cuts through all of the normal advertising and extraneous images and
large files that most websites contain. Instead, the user, though he is using a full-fledged web
browser, arrives at the much reduced mobile web site if one exists. This saves both time in

SWG-125 Rev. G June 2013
Globe iFusion ®User Guide for i500, i250, iSRev. G 1-3
downloading and cost in bytes transferred. This is an excellent option for vessels with several people
browsing at the same time.
1.2 Shore Control
All of the main functions of the Globe iFusion®can be configured from shore using the Globe
iPortal web application. Changes made on the shore or the ship will be automatically shared and
synchronized. The system offers user based access control and shipboard users can be permitted or
restricted from accessing the email and the web. All user controls are fully configured from shore by
customer IT staff.
For further assistance, contact the Globe Wireless Customer Service Center at:
Within the United States or Canada: 1-(877)-535-0653
Overseas: 1-(321)-308-0112
SWG-125 Rev. G June 2013
Globe iFusion ®User Guide for i500, i250, iSRev. G 1-4
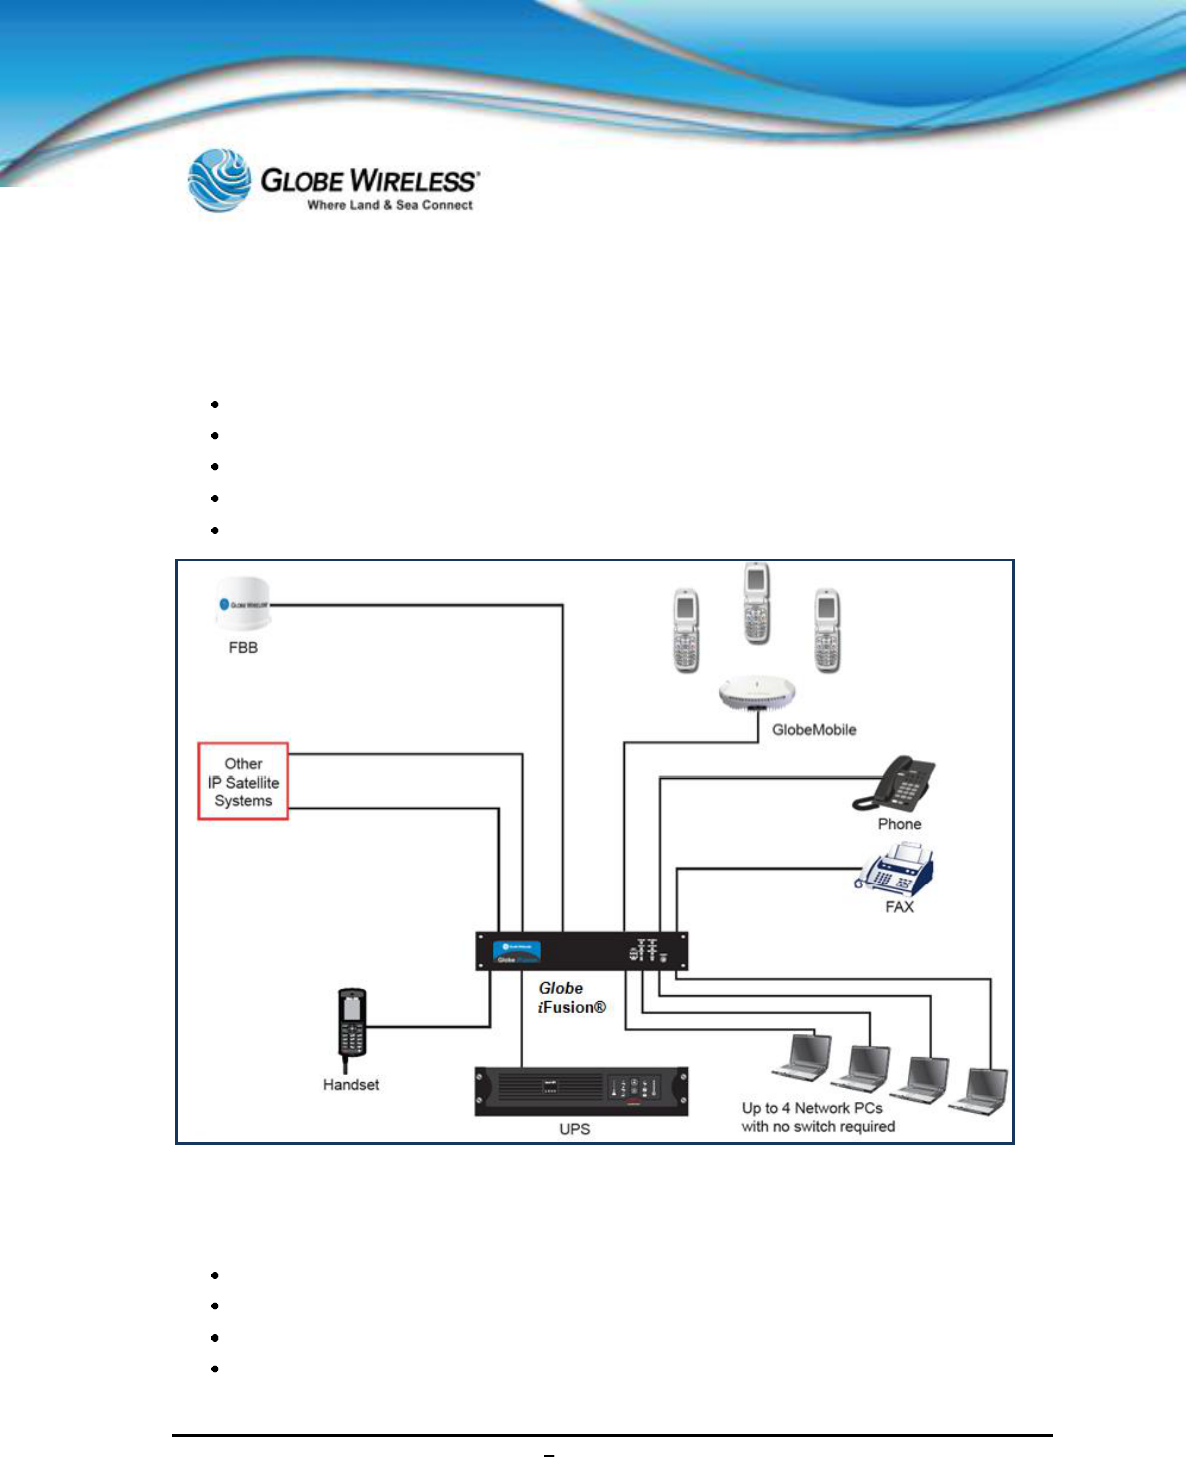
1.3 Globe iFusion® Overview Diagram
This unit supports the following:
Simultaneous voice and data over FleetBroadband
Full duplex, single or multi-user up to 284kbps
Support for streaming IP at 32, 64, 128 kbps
Standard Voice (AMBE+2, 4.0 kbps)
Fax/High Quality Voice (64kpbs, A-law PCM)
1.4 Package Contents
The following is a list of items in the Globe iFusion®package:
Globe iFusion®BDU
Antenna ADU
Base Transceiver Station
(30 meters) LMR-400 coaxial antenna cable with connectors

SWG-125 Rev. G June 2013
Globe iFusion ®User Guide for i500, i250, iSRev. G 1-5
LMR-400 N-type connector
Cable Gland
Grounding Strap
Antenna Mounting Clamps
(2x5 ft.) copper bus
Accessory kit
Goop kit with SS strap
(250 ft.) Spool of CAT5E Network Cable
(6) RJ-45 connectors
FBB250 Mast Mount
(3 ft.) jumper cable
Globe Wireless FBB SIM card
(20) GlobeMobile SIM cards
USB Thumb Drive
Rack Rails
Front and Rear bulkhead mounts
Bag of hardware
1.5 Installation of the Globe iFusion®
The Globe iFusion®is to be installed onboard ship in a control room into a Rack Cabinet or by
mounting on the wall, shelf, or table as described below.
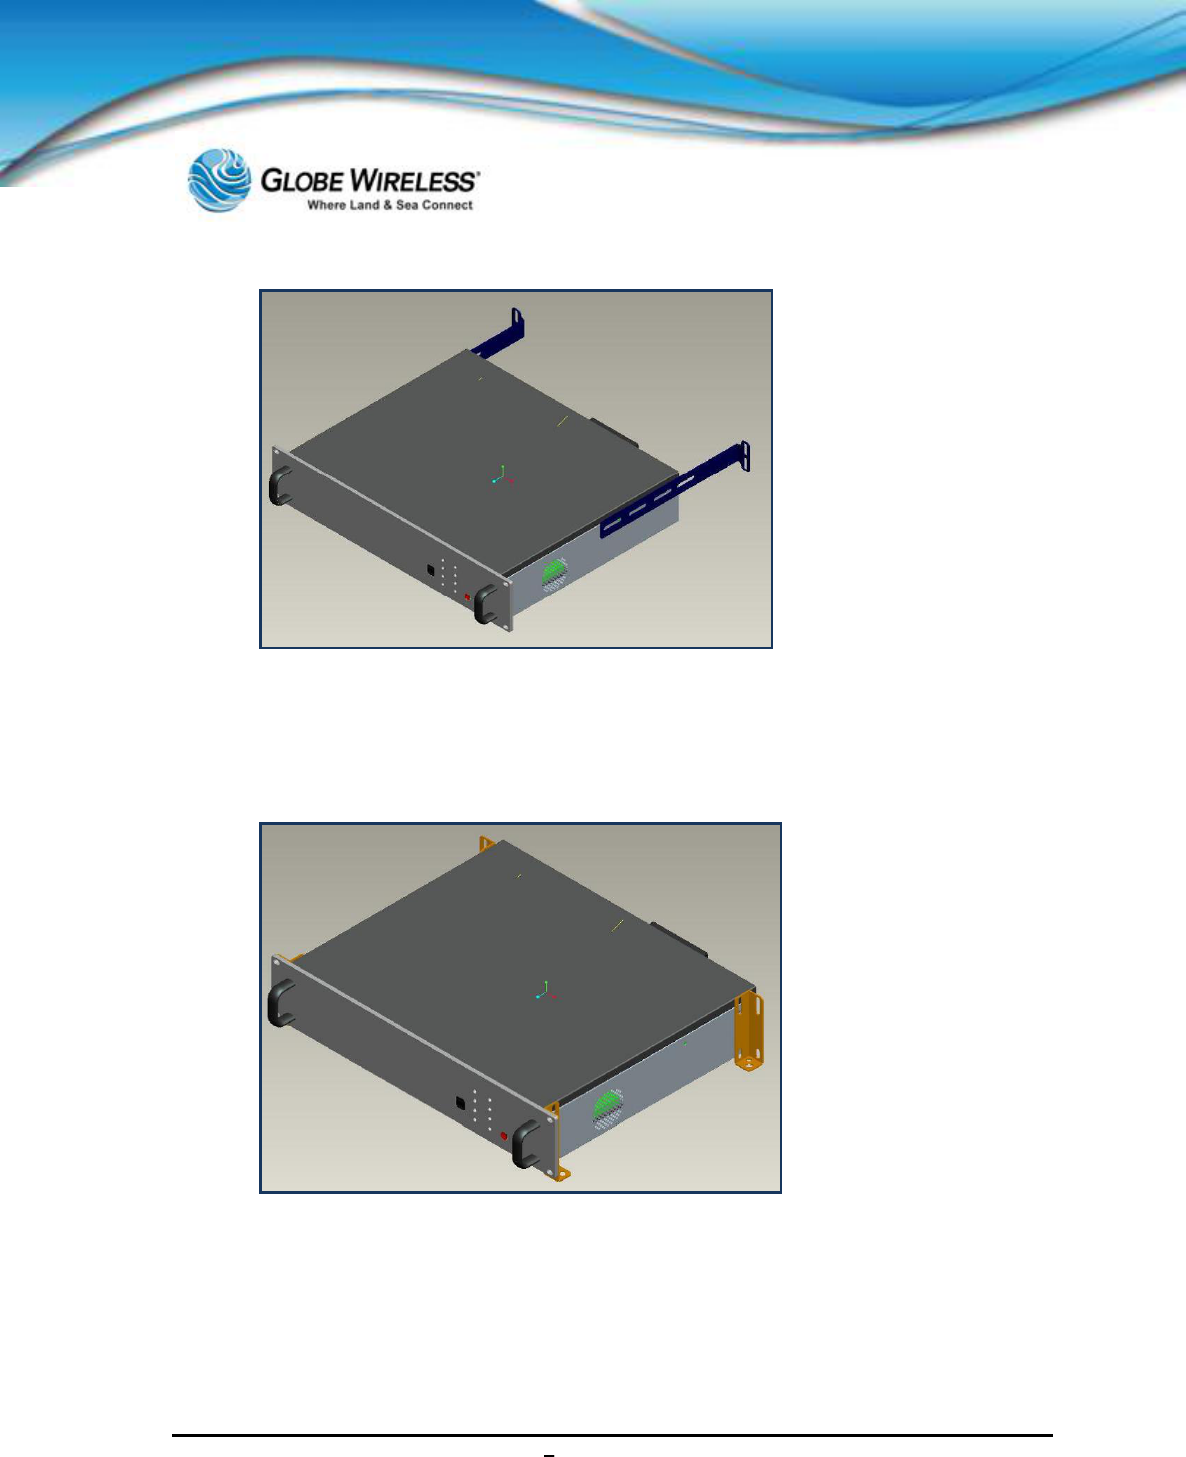
1.5.1 Installing the Globe iFusion®
The Globe iFusion®is designed to be ins
holes used to secure the enclosure case into the cabinet by means of two (2) M5x20mm screws for
the front of the cabinet and two (2) M5x12mm screws for the back of the cabinet. In addition, two
handles are included on the front panel allowing the case to be carried with ease.
Important! Ensure you use the 12mm screws on the back of the cabinet. Using the 20mm
screws on the back of the cabinet will damage the components inside.
Two long mounting brackets are mounted on each side of the enclosure case so that the end of each
bracket can be secured to the rear rails of the cabinet. Additional slots along the mounting bracket are
for different depth cabinets.
SWG-125 Rev. G June 2013
Globe iFusion ®User Guide for i500, i250, iSRev. G 1-6
1.5.2 Installing the Globe iFusion® onto Wall, Shelf or Table
Four small mounting adaptors are attached at each corner of the enclosure case allowing them to be
mounted onto a wall, shelf or table with four M5x12mm self-tapping screws.
ii i i
iFusion
This section describes all the components on the and panels of the iFusion .
Technical specifications of the isystem are located in Appendix D.
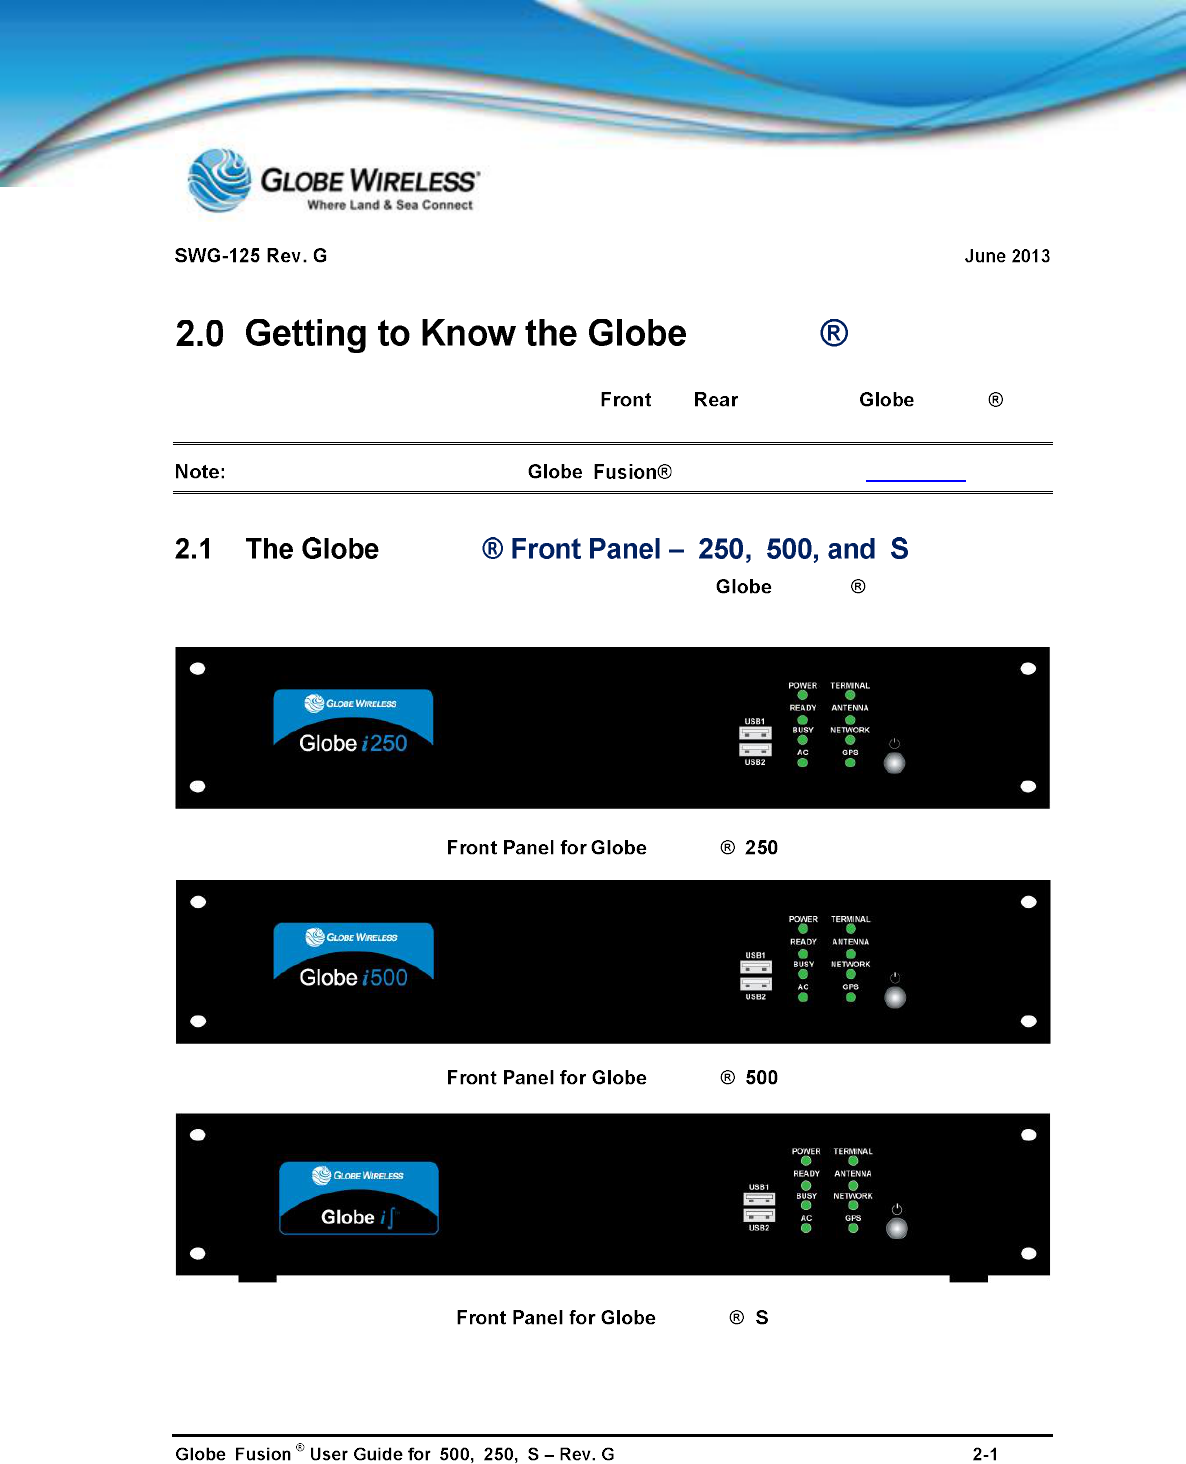
iFusion i i i
The following three graphics depict the front panel of the iFusion i250, i500, and iS,
respectively:
iFusion i
iFusion i
iFusion i
SWG-125 Rev. G June 2013
Globe iFusion ®User Guide for i500, i250, iSRev. G 2-2
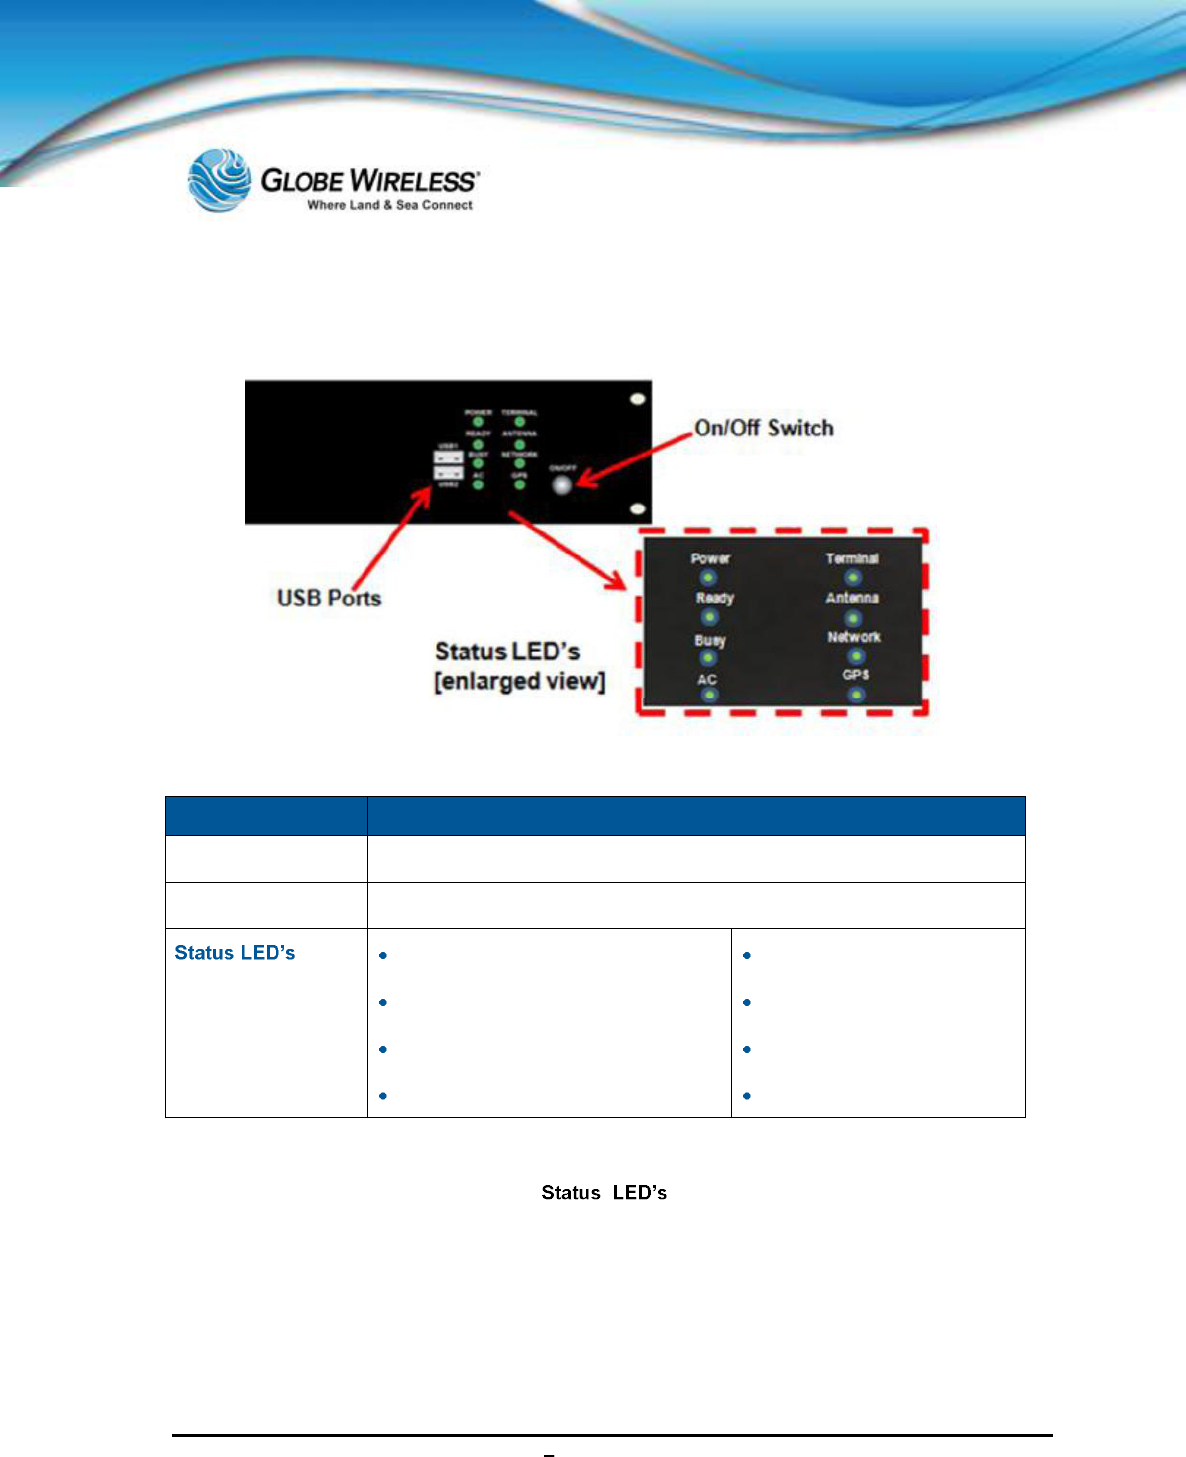
The following is an enlarged view of the components on the right front panel of the Globe iFusion®
i250, i500, and iS:
The front panel of the Globe iFusion®consists of the following components:
Name Description
On/Off Switch Powers the Globe iFusion® on / off.
2 USB Ports For use of USB flash drives which
install and update the system software.
Power
Ready
Busy
AC
Terminal
Antenna
Network
GPS
2.2 LED Operation
The following subsections describe the located on the front panel of the Globe
iFusion®.
2.2.1 POWER LED
The POWER lamp indicates that the components of the Globe iFusion® have power and are
operating.

SWG-125 Rev. G June 2013
Globe iFusion ®User Guide for i500, i250, iSRev. G 2-3
2.2.2 READY LED
The READY lamp is used primarily to indicate the ability of the Globe iFusion® to make data
connections to the Globe Wireless Network. The color and the blink state have different meanings.
Mode LED Description
Initial Boot Short AMBER
Long AMBER
When booting, the Ready LED
will display a series
of flashes to indicate this state. A short amber
colored flash followed by a long amber colored
flash indicates that the operating s
ystem has just
started to load.
Globe iFusion®
Services
Long AMBER
When the flashing changes to only a long amber
flash, the Globe iFusion ®
has successfully
booted its operating system and is now starting up
the processes which provide communication.
Normal Operation Long GREEN
followed by (for each
gateway):
Short GREEN
if connected
Short AMBER
if disconnected
Short RED
if in Safe Mode
During normal operating, the Ready LED
will give
one long green flash followed by one or more short
flashes fo
r each configured gateway. The color of
the short flash indicates where a data connection is
currently available on that gateway. Green means
the data connection is up and amber means that it
is down.
At the end of the sequence of short flashes the
Ready LED will flash red to indicate that the
Globe
iFusion ® is currently in Safe Mode.
Shutdown AMBER
RED
AMBER
The Ready LED
will begin alternating between
amber and red when the shutdown sequence has
begun. The shutdown sequence lasts about three
(3) minutes.
Disabled RED If for any reason the SIM card in the
Globe
iFusion® cannot be used, the Ready LED
will
flash red. This could indicate that the SIM is not
properly activated, or that it is seated incorrectly in
the SIM card reader.
SWG-125 Rev. G June 2013
Globe iFusion ®User Guide for i500, i250, iSRev. G 2-4
2.2.3 BUSY LED
The BUSY lamp will flash periodically when the main operating system of the Globe iFusion® is
reading or writing to its internal hard drive. The nominal state of this lamp is to flash. A non-flashing
lamp indicates there may be a problem.
2.2.4 AC LED
The AC lamp indicates that the Globe iFusion®has been plugged into a working power outlet.
Note: The AC lamp does not indicate that the Globe iFusion® is powered on. Refer to the
description of the POWER LED (Section 5.2.1).
2.2.5 TERMINAL LED
The TERMINAL lamp indicates the operational state of the FleetBroadband terminal and has the
following indications:
Mode LED Description
Power-Up AMBER
This indicates that the FleetBroadband terminal is
powering up.
Error RED A failure has occurred in the FleetBroadband terminal.
Shutdown Blinking AMBER The FleetBroadband terminal is being powered down.
Normal GREEN The FleetBroadband is fully operational.
2.2.6 ANTENNA LED
The ANTENNA lamp has the following indications:
Mode LED Description
Power Up AMBER This indicates that the antenna has rec
ently received
power or that it is currently calibrating itself.
Error RED
The antenna has failed to operate as intended and
should be inspected for damage to itself or the cable.
Searching Blinking AMBER The antenna is attempting to locate a satellite.

SWG-125 Rev. G June 2013
Globe iFusion ®User Guide for i500, i250, iSRev. G 2-5
Mode LED Description
Weak Signal Blinking GREEN A satellite has been found but the signal is weak.
Connected GREEN
The antenna has found and locked onto the selected
satellite.
2.2.7 NETWORK LED
The NETWORK lamp has the following indications:
Mode LED Description
Registering AMBER
The FleetBroadband terminal is attempting to register
on the Inmarsat network.
Error RED
There was an error attempting to register on the
Inmarsat network.
Voice Ready Blinking AMBER
The FleetBroadband terminal has registered on the
network and can ma
ke voice calls using the phone port
or corded handset.
Data Ready Blinking GREEN
The FleetBroadband terminal has been authenticated
for voice and data communication through Globe
Wireless.
Connected GREEN The primary Packet Data Protocol (PDP) context is
now
active and data connections are possible to Globe
Wireless and the Internet.
2.2.8 GPS LED
The GPS lamp is GREEN when a GPS fix has been achieved by the Antenna GPS unit.
Mode LED Description
Acquiring GPS AMBER The GPS is using a stored GPS position and
is actively
seeking a new fix.
Error RED
There was an error attempting to read data from the
GPS.
GPS Fix GREEN
The GPS has acquired its position and is transmitting
periodically updated location information.
SWG-125 Rev. G June 2013
Globe iFusion ®User Guide for i500, i250, iSRev. G 2-6
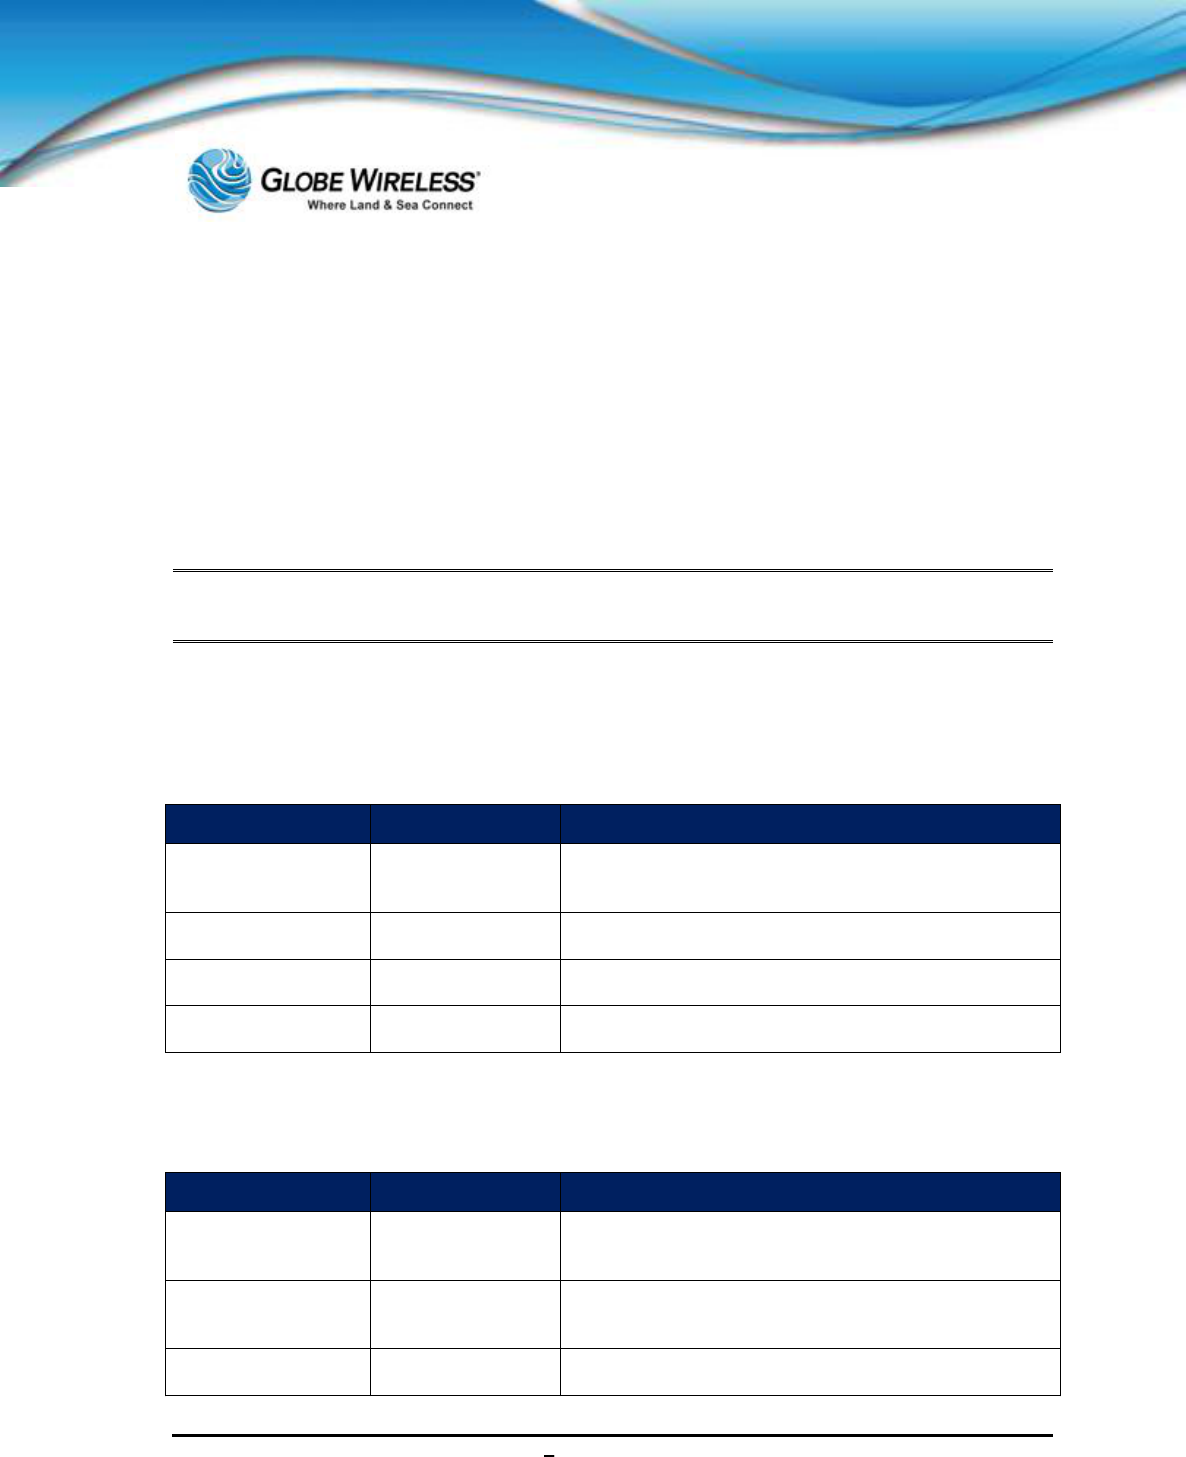
2.3 The Globe iFusion® Rear panel for i250, and i500
Name Description
(2) LAN Ports For Shipboard PCs, switches, routers, and servers.
RJ11 FXS Input Port
Allows prepaid users to make voice calls without using the GSM
subsystem.
(4) LAN Ports For Shipboard PCs, switches, routers, and servers.
(6) WAN Ports For connecting to other IP gateways and satellite terminals.
GSM Antenna Connects the GSM Antenna.
(3) RS-232 Serial Ports For adding additional devices requiring serial port connection.
4 USB Ports For adding additional devices requiring USB port connection.
FBB SIM Location where the FBB SIM card is inserted.
FAX Port Provides fax connection services for shipboard fax machines.
Phone Port Connects the system for use by a PBX or standard telephone.
Handset Port For installation of an FBB250 handset.
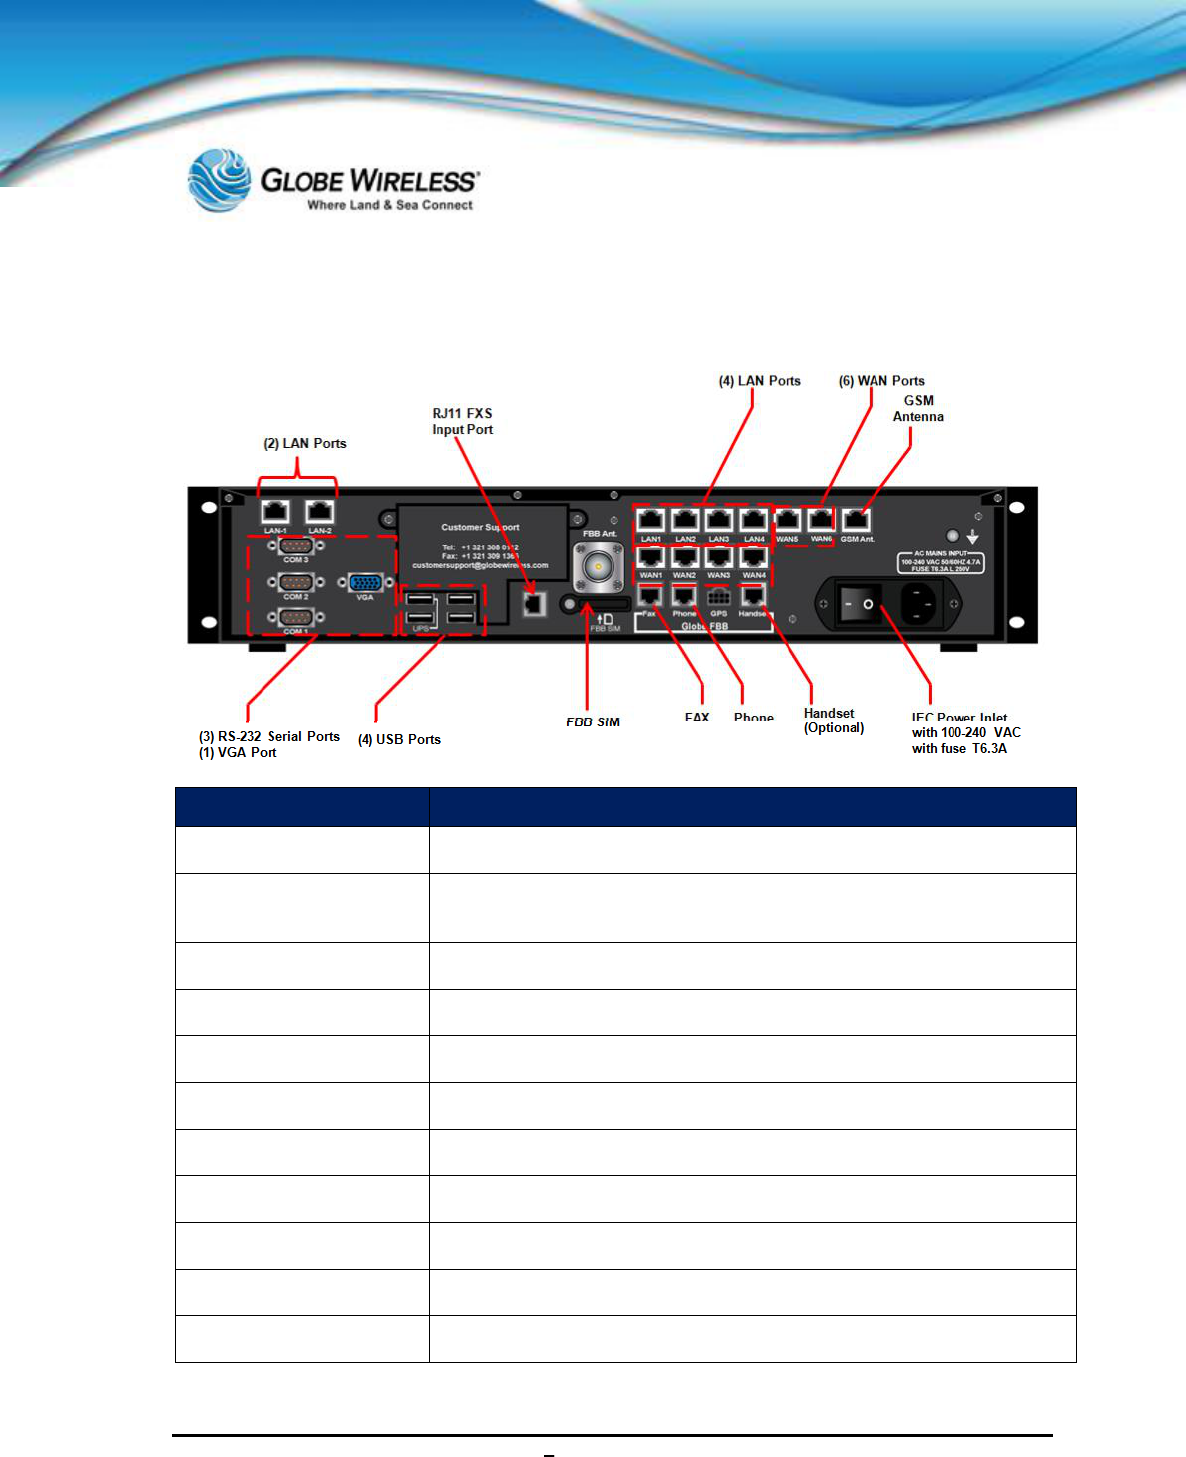
ii i i
i i
The following graphic depicts the rear panel of the Globe iFusion for i.
Allows prepaid users to make voice calls without using the GSM
subsystem.
For Shipboard PCs, switches, routers, and servers.
For connecting to other IP gateways and satellite terminals.
Connects the Antenna.
For adding additional devices requiring serial port connection.
For adding additional devices requiring USB port connection.

SWG-125 Rev. G June 2013
Globe iFusion ®User Guide for i500, i250, iSRev. G 2-8
This page intentionally left blank.

SWG-125 Rev. G June 2013
Globe iFusion ®User Guide for i500, i250, iSRev. G 3-1
3.0 Fixed Multiple Lines
3.1 Introduction
Your Globe iFusion® system can act as a PBX for voice calls using Polycom Voice over IP (VoIP)
phones. This service is called Fixed Multiple Lines and provides PIN entry control over the Globe
iFusion® shipboard phone system and adds many calling features beyond those of a standard
satellite terminal.
3.2 Features
The features of the Fixed Multiple Lines option are as follows:
Up to nine (9) VoIP phone extensions may be deployed throughout the ship
Each extension may be reached from shore using a phone number with the country code
prefix of choice
A white list determines the phone numbers your crew can dial without the use of a PIN
Prepaid users can enter their own PINs to pay for and make calls from VoIP phones
The VoIP phones support Call Transfer, Hold, and Conferencing features
Note: 4-digit PIN codes are required for calling from ship-to-shore.
All settings for a VoIP phone, such as name, extension, and phone number are controlled by the
customer using the Globe iPortal® Website. Features of the Fixed Multiple Lines service and
Polycom VoIP phones are discussed in the following sub-sections.
SWG-125 Rev. G June 2013
Globe iFusion ®User Guide for i500, i250, iSRev. G 3-2
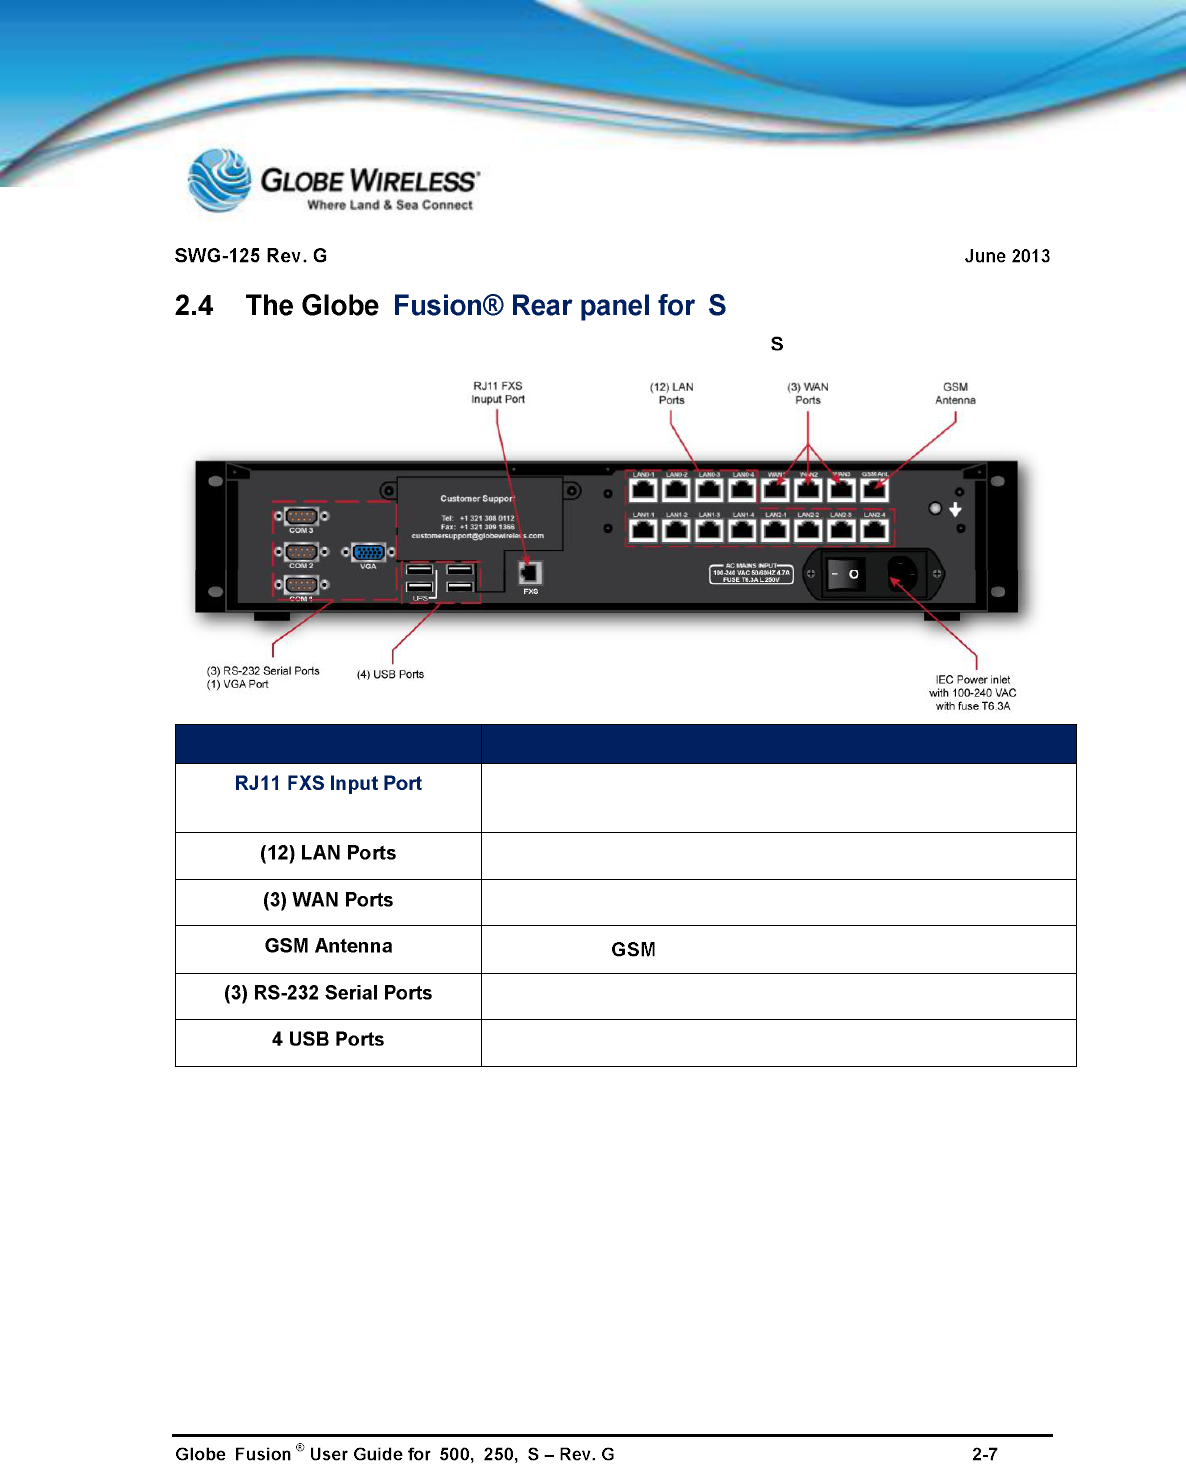
3.3 Features of the PolyCom Phone
features.
Note: At this time, one line only is supported; headsets are not supported; therefore, are not
supplied with the phone.
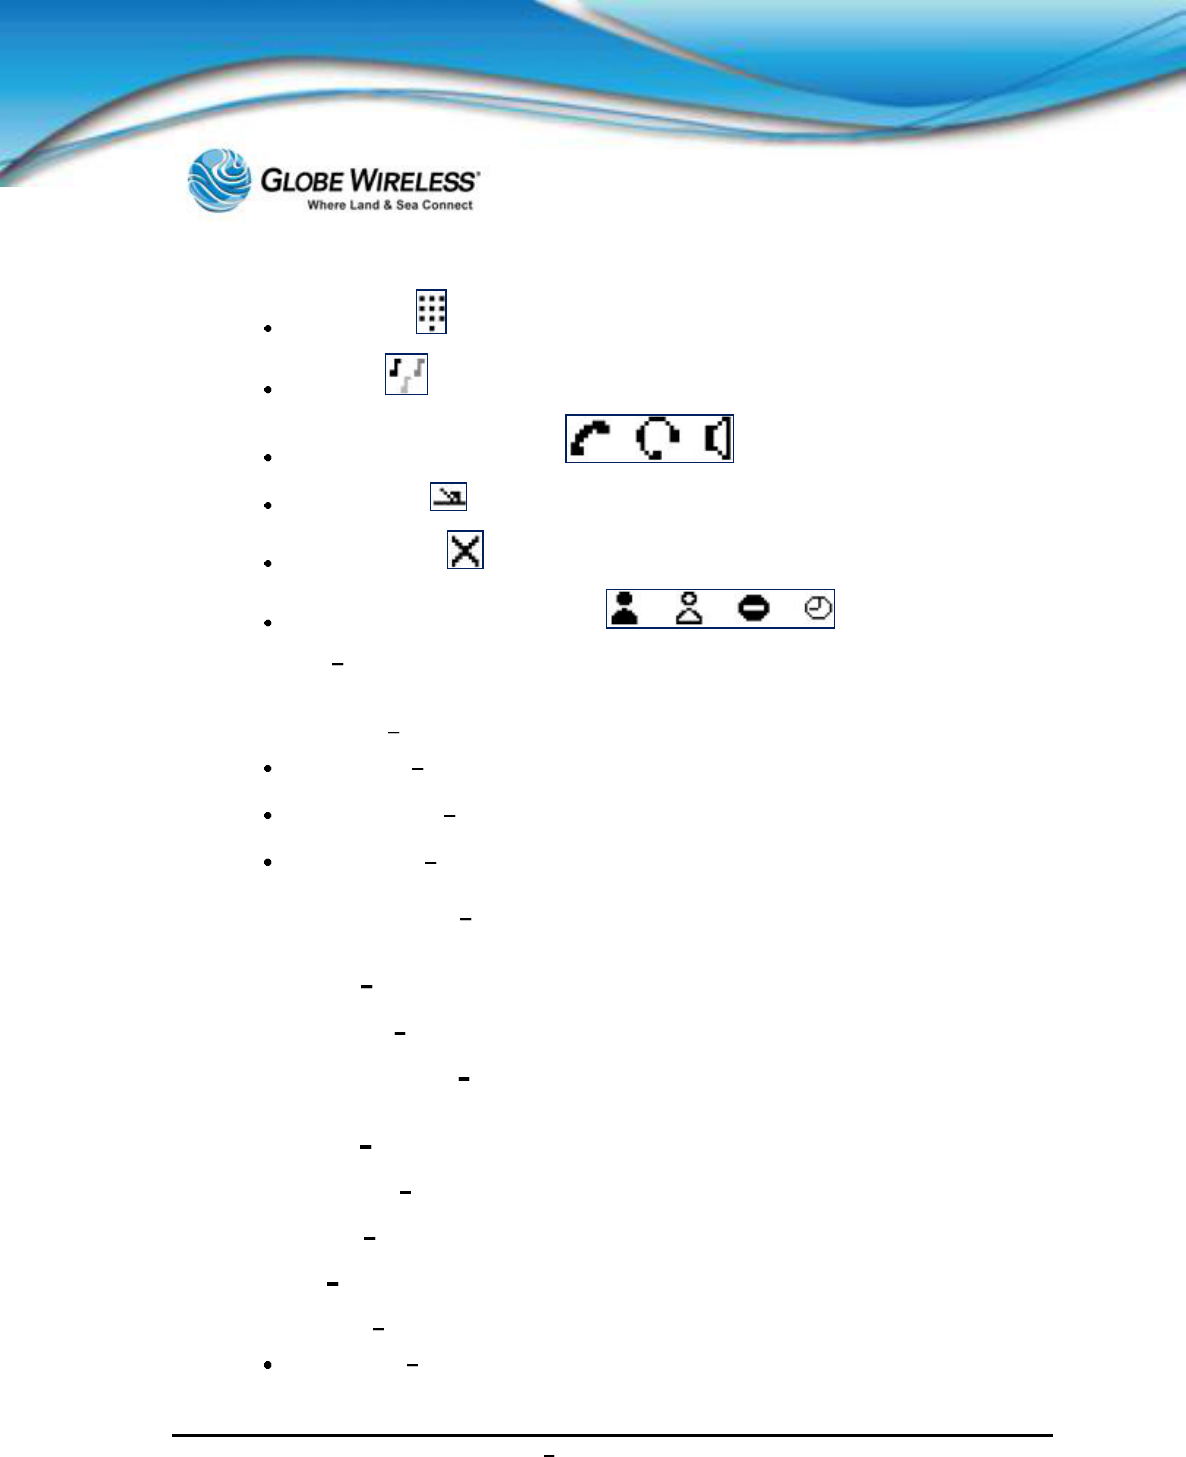
1. Message Waiting Indicator Light alerts you to incoming calls and new voicemail.
2. Line Icons Visual displays let you know the status of the lines.
* Registered line
*A registered line is a line that has been pre-configured by the System Administrator.
Registered shared line
Unregistered line
Voice Mail/Messages (Voice mail not supported at this time)
SWG-125 Rev. G June 2013
Globe iFusion ®User Guide for i500, i250, iSRev. G 3-3
Speed-Dial
Ringing
Call in progress/ Conference
Call Forward (not supported)
Do Not Disturb
Presence/BLF (Busy Lamp Field)
3. Softkeys Perform functions as shown on the LCD Screen. (Described in more detail within
this guide.)
4. Line Indicators Multicolor LEDs display the call state of Line 1 and Line 2:
Solid Green Active call
Flashing Green Incoming call
Flashing Red Call is on hold
5. Line 1 and Line 2 Keys Use to access the line on which you are receiving or making a call.
Only single line (line 1) is supported at this time.
6. Hold Button Push to put an active call on hold. Push again to take the call off of hold.
7. Headset Button Not supported.
8. Speakerphone Button Click to place,receive, or switch the current call to the speaker
phone.
9. Microphone Location of the microphone for the hands-free speakerphone.
10. Volume Buttons Press to adjust the volume of the handset, speaker, and ringer.
11. Mute Button Press to mute the audio during a call.
12. Dial Pad Use to dial a telephone number.
13. Feature Keys
Dial Button Press to dial the entered phone number or to access the Placed Calls list
SWG-125 Rev. G June 2013
Globe iFusion ®User Guide for i500, i250, iSRev. G 3-4
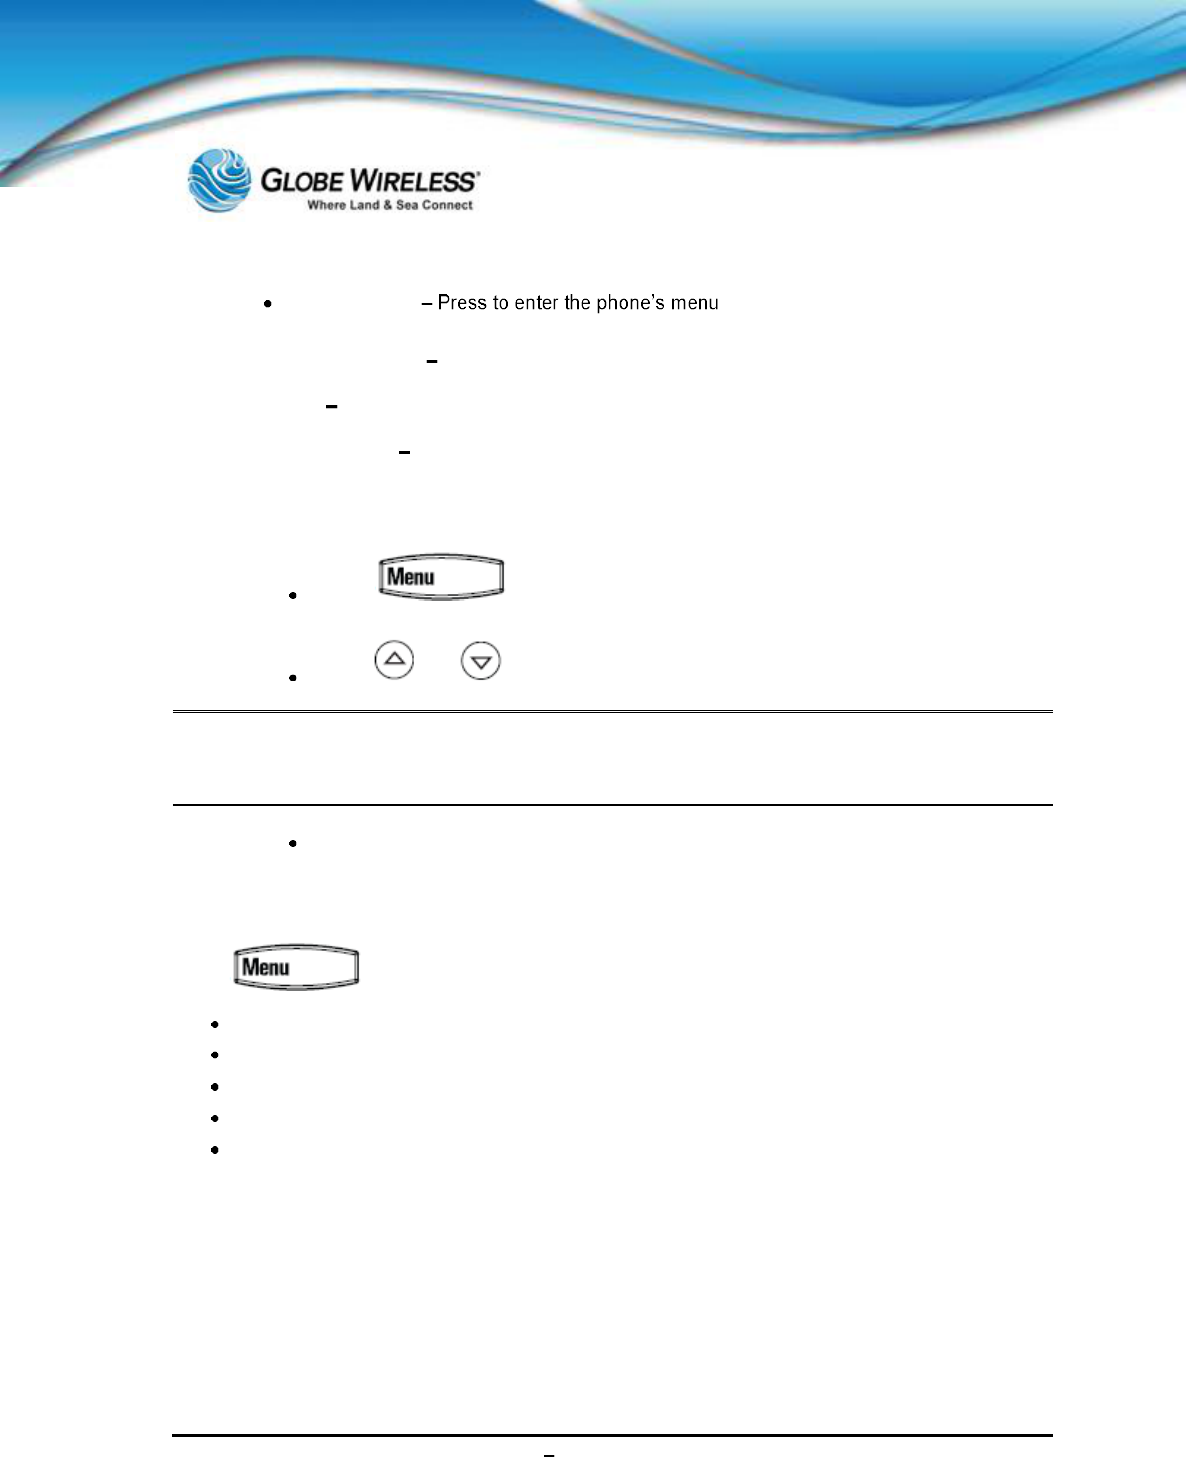
Menu Button
14. Control arrow keys Scroll through display menus. Use the checkmark to select.
15. Speaker For ringer and hands free speakerphone output.
16. Graphic Display Displays information regarding calls, messages, soft keys, time, date, etc.
3.4 Navigate through Menus
Press to enter the basic settings menu or to exit from any
menu.
Press and to scroll through the menu lists.
Note: Press *to page up and #to page down. These shortcuts do not work in the Contact
Directory. After 20 seconds of inactivity, the menu system will automatically exit to the idle
display unless an edit session is in progress.
Use the keypad to make selections in numbered menu lists
3.5 Configure Basic Settings
Press and then select Settings | Basic to configure the following basic settings:
Appearance of the time and date
Display contrast
Ring type
Language support
Directory search
3.5.1 Time and Date
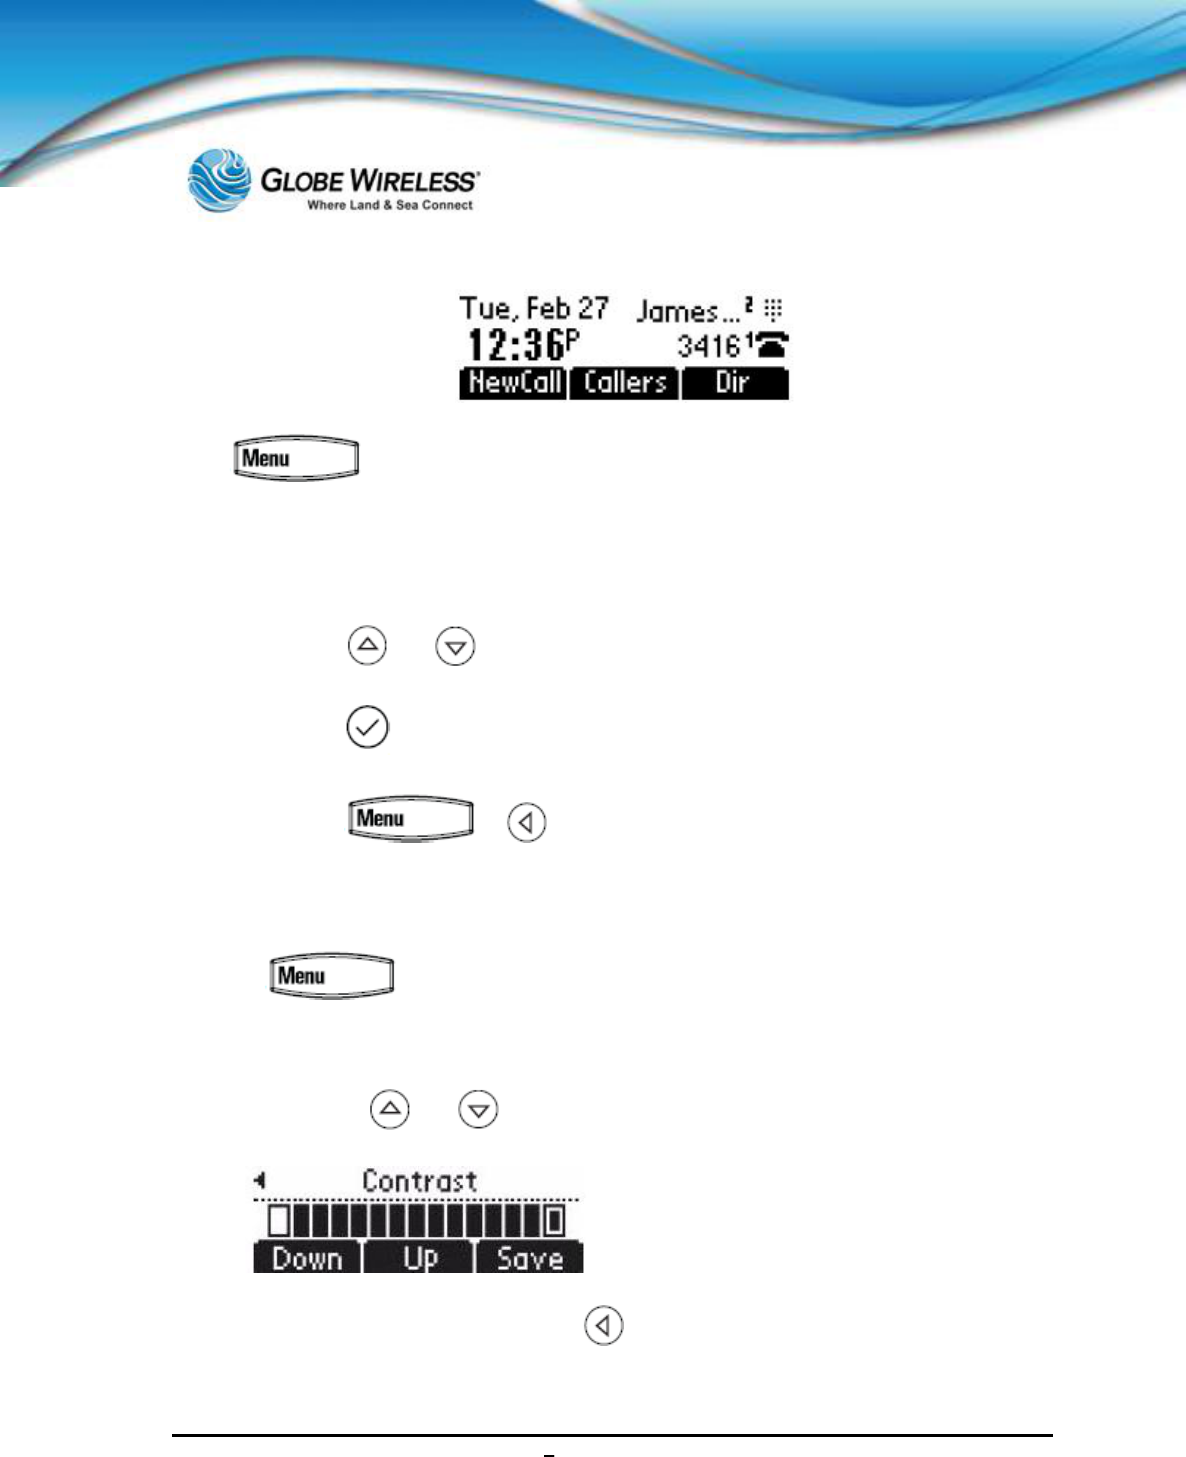
The time and date appears on the graphic display of the phone. You have control over the format of
the time and date display and can turn the display of time and date off. The default time and date
format appears in the following figure.
SWG-125 Rev. G June 2013
Globe iFusion ®User Guide for i500, i250, iSRev. G 3-5
Press
Step 1: Select Settings | Basic | Preferences | Time & Date.
Step 2: Select from Clock Date, Clock Time, Clock Order, or Enable/Disable.
Step 3: Press and to scroll through the options.
Step 4: Press to confirm your choice.
Step 5: Press or repeatedly to return to the idle display.
3.5.2 Display Contrast
Press
Step 1: Select Settings | Basic | Contrast.
Step 2: Press and to increase or decrease the display contrast.
Step 3: Press Save to accept changes or to cancel changes.
SWG-125 Rev. G June 2013
Globe iFusion ®User Guide for i500, i250, iSRev. G 3-6
Step 4: Press or repeatedly to return to the idle display.
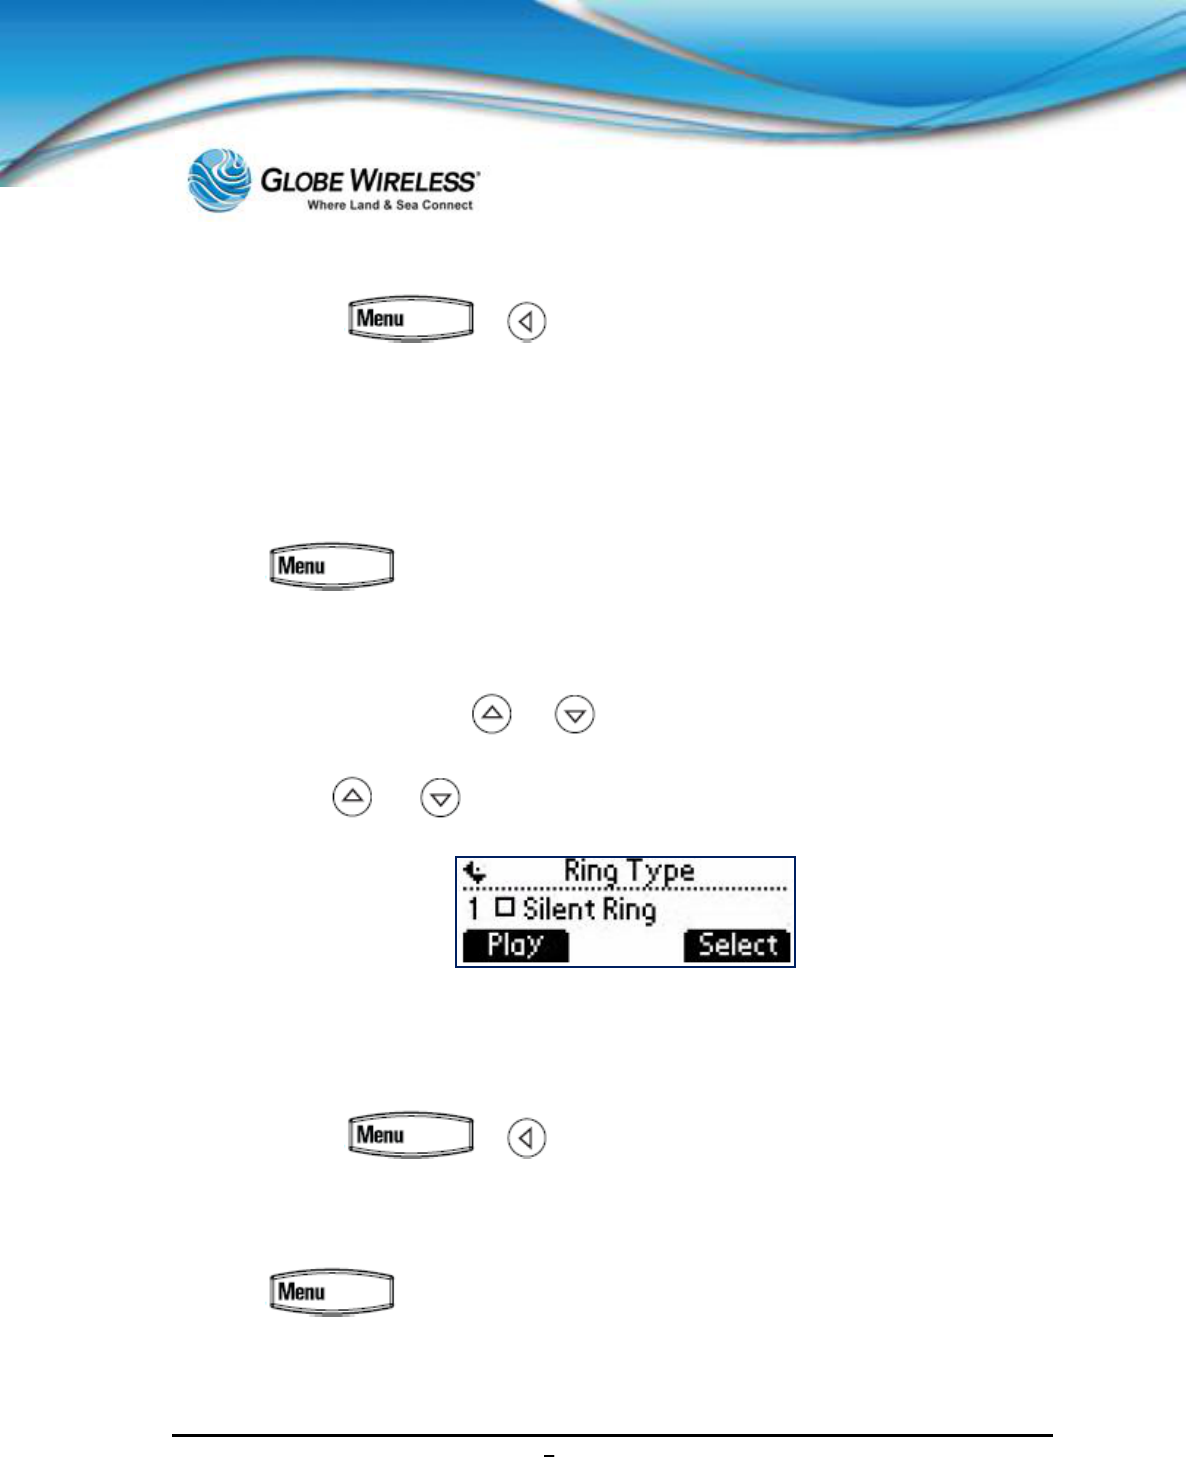
3.5.3 Ring Type
You can select from the different ring types to distinguish between lines or to have a different ring
from other phones near you. You can also set distinctive incoming ringing tones for contacts in your
local directory.
Press
Select Settings | Basic | Ring Type.
Step 1: (Optional) If multiple lines are configured on your phone, first select the line to change
from the list using and .
Step 2: Use and to select the desired ring type.
Step 3: Press Play to hear the selected ring type.
Step 4: Press Select to change to the selected ring type.
Step 5: Press or repeatedly to return to the idle display.
3.5.4 Language Support
Press
Step 1: Select Settings | Basic | Preferences | Language.

SWG-125 Rev. G June 2013
Globe iFusion ®User Guide for i500, i250, iSRev. G 3-7
Step 2: Scroll through the list of available languages.
Step 3: Press to confirm your choice. Text on the graphic display will change to the
language selected.
Step 4: Press or repeatedly to return to the idle display.
3.5.5 Directory Search
You can configure how the search of the local contact directory is performed. The local contact
directory can be searched by first or last name.
Press
Step 1: Select Settings | Basic | Preferences | Directory Search.
Step 2: Use and to select the directory search parameter.
Step 3: Press to confirm your choice.
Step 4: Press the Yes or Cancel key to accept or cancel changes.
SWG-125 Rev. G June 2013
Globe iFusion ®User Guide for i500, i250, iSRev. G 3-8
3.6 Manage Contacts
You can enter 99 contacts in your local contact directory.
3.6.1 Adding Contacts
New entries to the local contact directory are added to the top of the list.
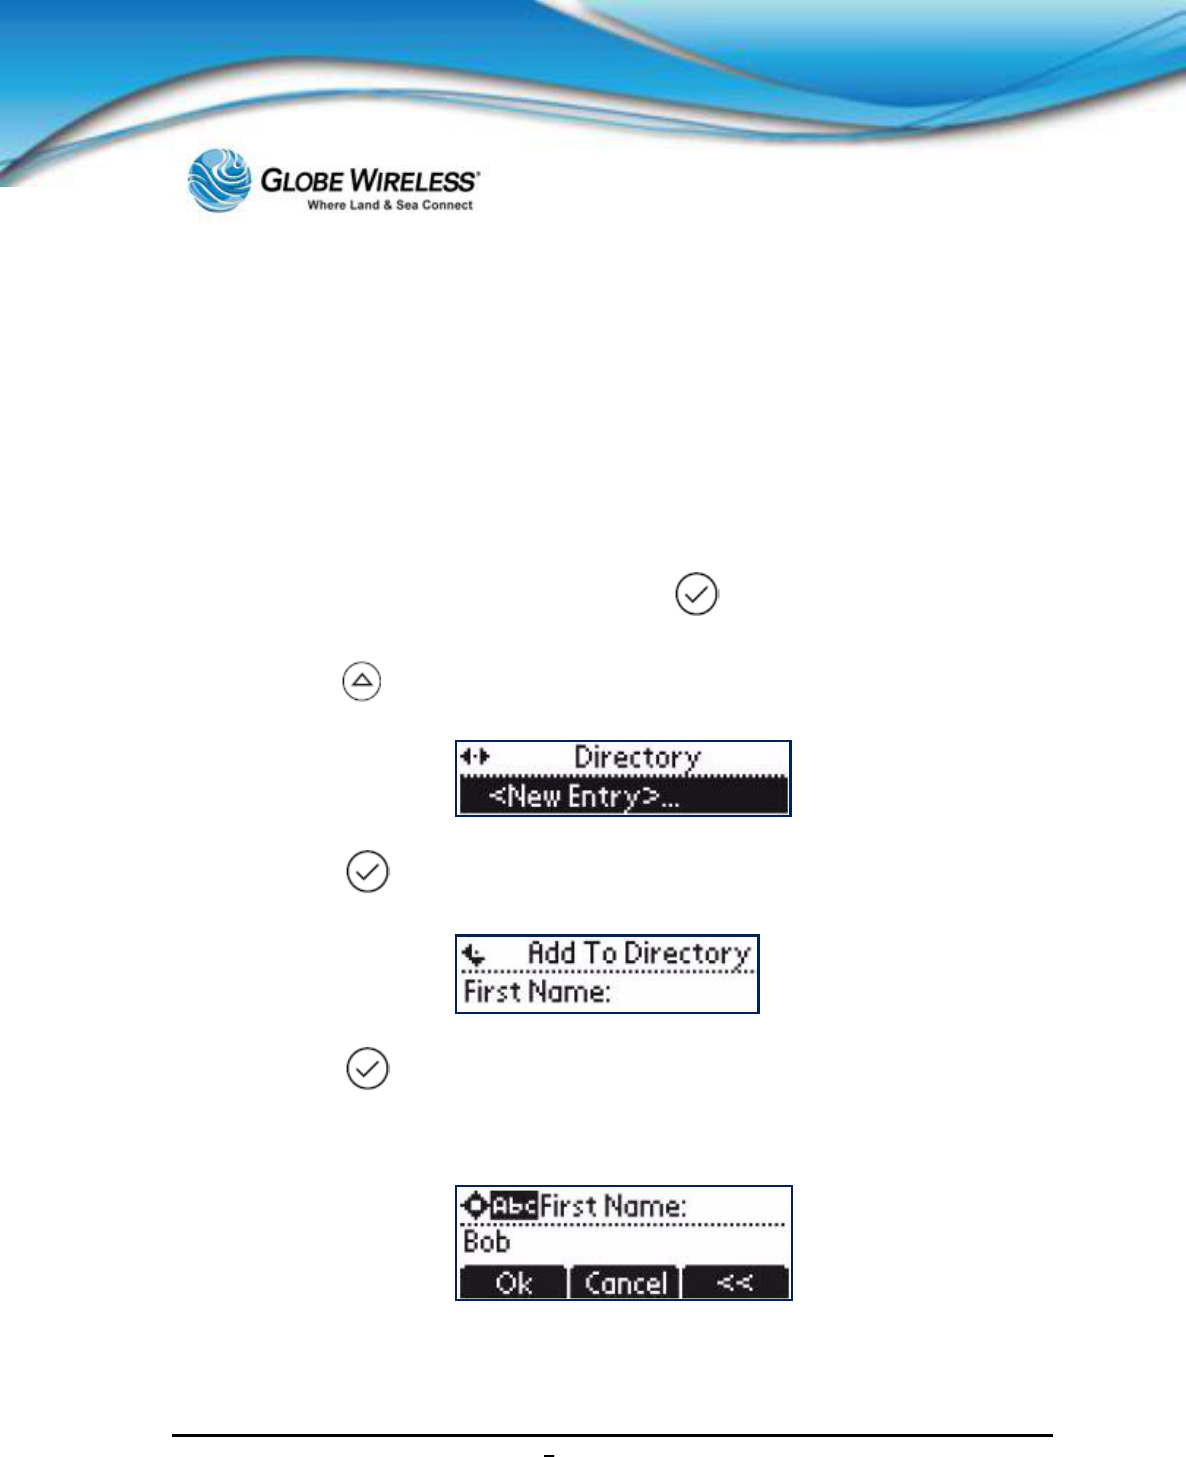
Step 1: Press the Dir soft key.
Step 2: Select the local contact directory by pressing if it does not appear automatically.
Step 3: Press . The Directory screen displays <New Entry> displays at the top of the list.
Step 4: Press to add a new entry.
Step 5: Press to enter a first name.
Step 6: Enter the first name of the contact from the dial pad.
Step 7: Press the OK or Cancel soft keys to accept or cancel.
SWG-125 Rev. G June 2013
Globe iFusion ®User Guide for i500, i250, iSRev. G 3-9
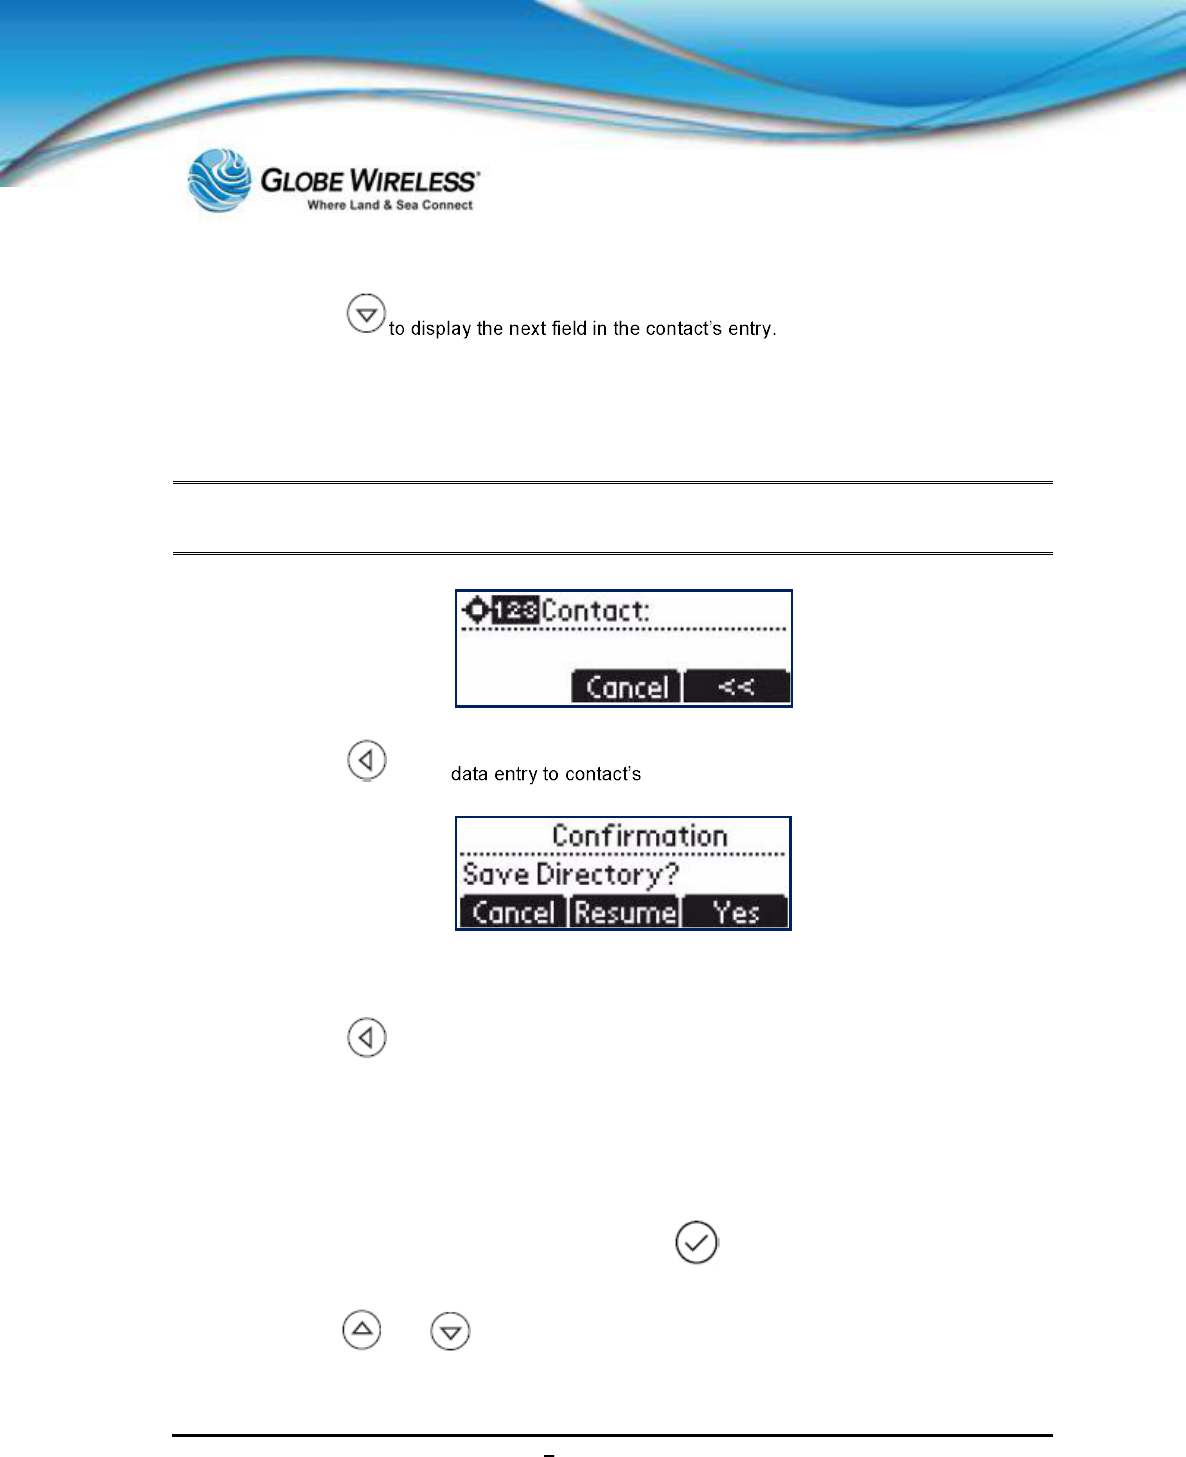
Step 8: Press
Step 9: Repeat the steps to enter the last name of the contact.
Step 10: Repeat the steps to enter a contact number.
Note: This is a required field and must be unique (not already in the directory). Entry to this field
is denoted by 1 2 3.
Step 11: Press to end .
Step 12: Press the Yes or Cancel soft keys to accept or cancel.
Step 13: Press repeatedly to return to the idle display.
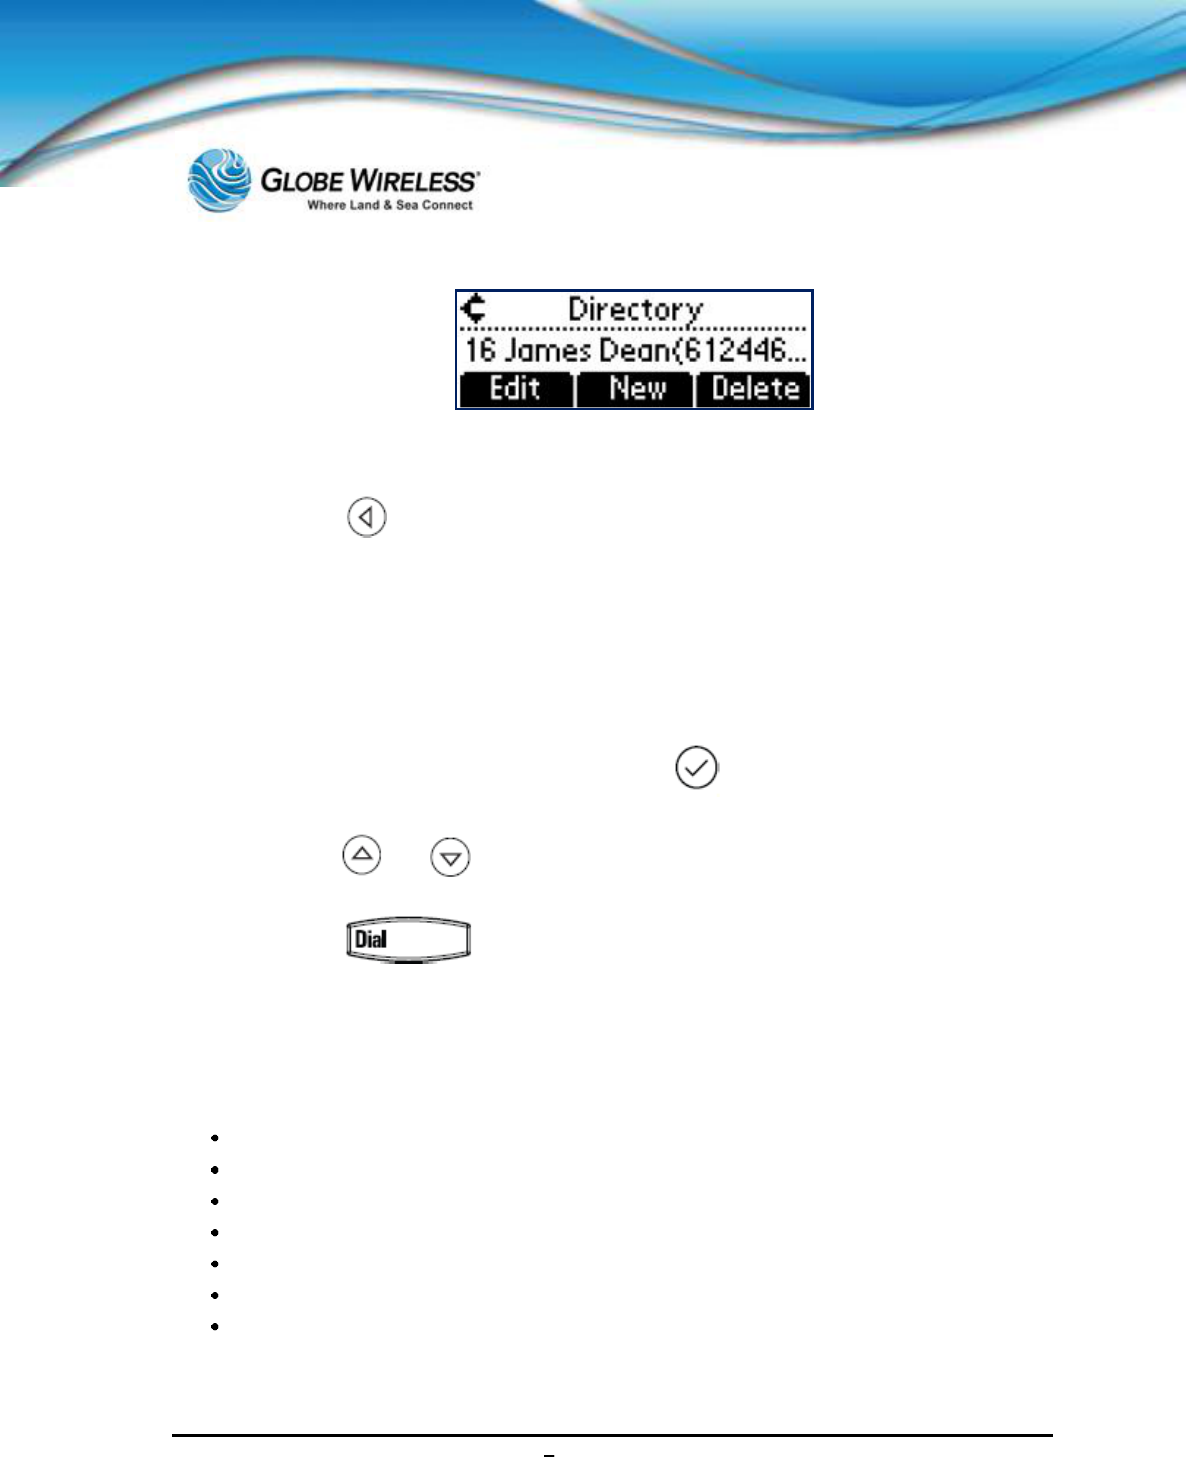
3.6.2 Deleting Contacts
Step 1: Press the Dir soft key.
Step 2: Select the local contact directory by pressing if it does not appear automatically.
Step 3: Press and to scroll through the list to locate the contact you wish to delete.
SWG-125 Rev. G June 2013
Globe iFusion ®User Guide for i500, i250, iSRev. G 3-10
Step 4: Press the Delete soft key to delete the displayed contact from the directory.
Step 5: Press repeatedly to return to the idle display.
3.6.3 Placing a Call to a contact
To place a call to a contact in the local contact directory, perform the following:
Step 1: Press the Dir soft key.
Step 2: Select the local contact directory by pressing if it does not appear automatically.
Step 3: Press and to scroll through the list to locate the contact you wish to call.
Step 4: Press or lift the handset.
3.7 Using Basic Features of your phone
Your phone is designed to be used like a regular phone on a public switched telephone network
(PSTN). This section will address the following features of the phone:
Placing a Call
Answering a Call
Ending a Call
Placing a Call on Hold
Setting Up Conference Calls
Transferring Calls
Do Not Disturb
SWG-125 Rev. G June 2013
Globe iFusion ®User Guide for i500, i250, iSRev. G 3-11
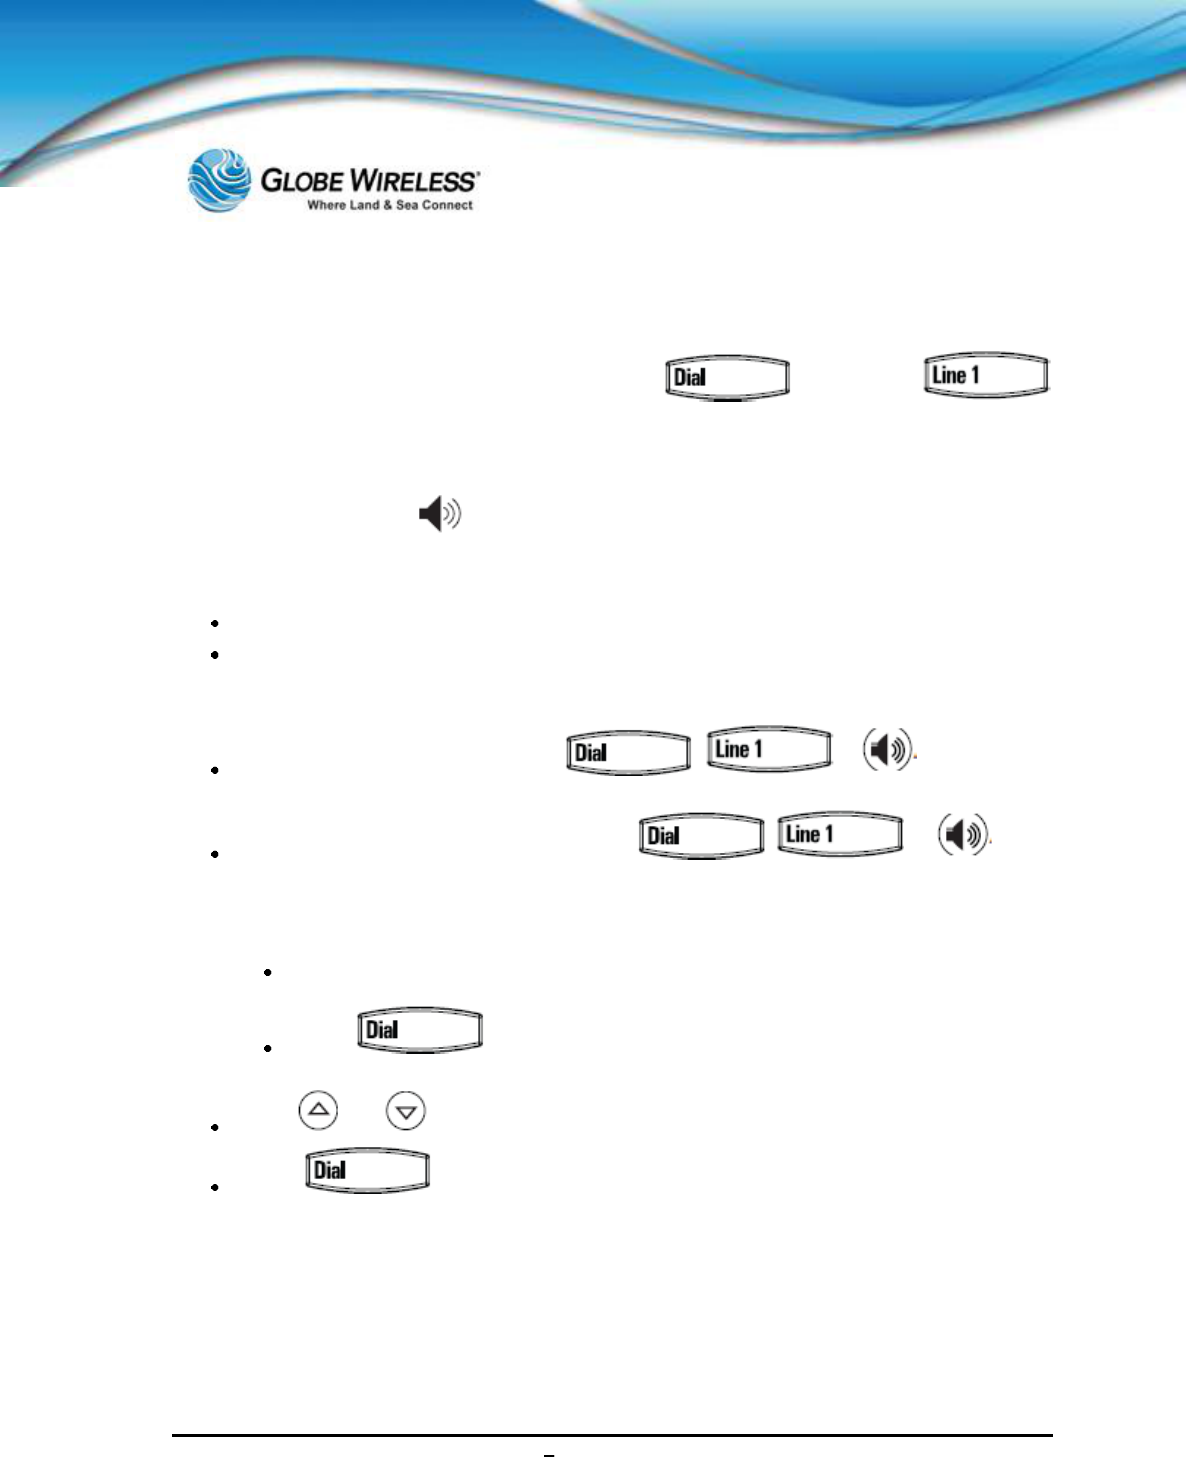
3.7.1 Placing a Call
You can place a call using the handset, speakerphone, button, or the
button. (Line 2 is not supported.) You can also dial the number first, and then choose the method you
will use to speak to the other party.
During a call, you can alternate between the Handset by using the handset, or Hands-Free
Speakerphone by pressing .
Place a call using the Handset
Pick up the handset.
Dial the number using the dial pad.
Place a Hands Free call
With the handset in the cradle, press , or to obtain a dial
tone.
Dial the number using the dial pad and press , , or
Place a call using the Dial Key
Do one of the following steps:
Press the Callers soft key to view the Receive Call list
Press to view the Placed Call list
Press and to scroll through the list to find the contact
Press to complete the call.
3.7.2 Answering a Call
Incoming calls may be ignored by pressing the Reject soft key (for private lines) or the Ignore soft
key (for private and shared lines).
SWG-125 Rev. G June 2013
Globe iFusion ®User Guide for i500, i250, iSRev. G 3-12
3.7.2.1 Answer when NOT on another call
Using the Handset
Answer the call by simply picking up the handset.
Hands-free Speakerphone
Answer using one of the following steps:
Press
With the handset on-hook, press where the line status indicator is flashing
green
Press the Answer soft key
3.7.2.2 Answer when on another call
Phone configured for a Single Line Key
The second call may cause a call waiting tone to be played and the display of the call waiting prompt
identifying the incoming callers for 10-seconds only. You can choose to ignore the call, answer the
call, or reject the call (if a private line).
After this (10-seconds) point, the user will need to scroll to the incoming call in order to answer as
follows:
Press to place the original call on hold.
Press to access the new call.
Note: Soft key labels are updated on the display showing Ignore,Answer, and Reject.
Phone configured for Shared Lines
The only difference between a shared line and private line is that there is no Reject soft key and that
another person on the shared line might answer the call.
SWG-125 Rev. G June 2013
Globe iFusion ®User Guide for i500, i250, iSRev. G 3-13
3.7.3 Ending a Call
Perform one of the following to end a call:
Press the End Call soft key
Replace the handset
Press if in Hands-free Speakerphone Mode
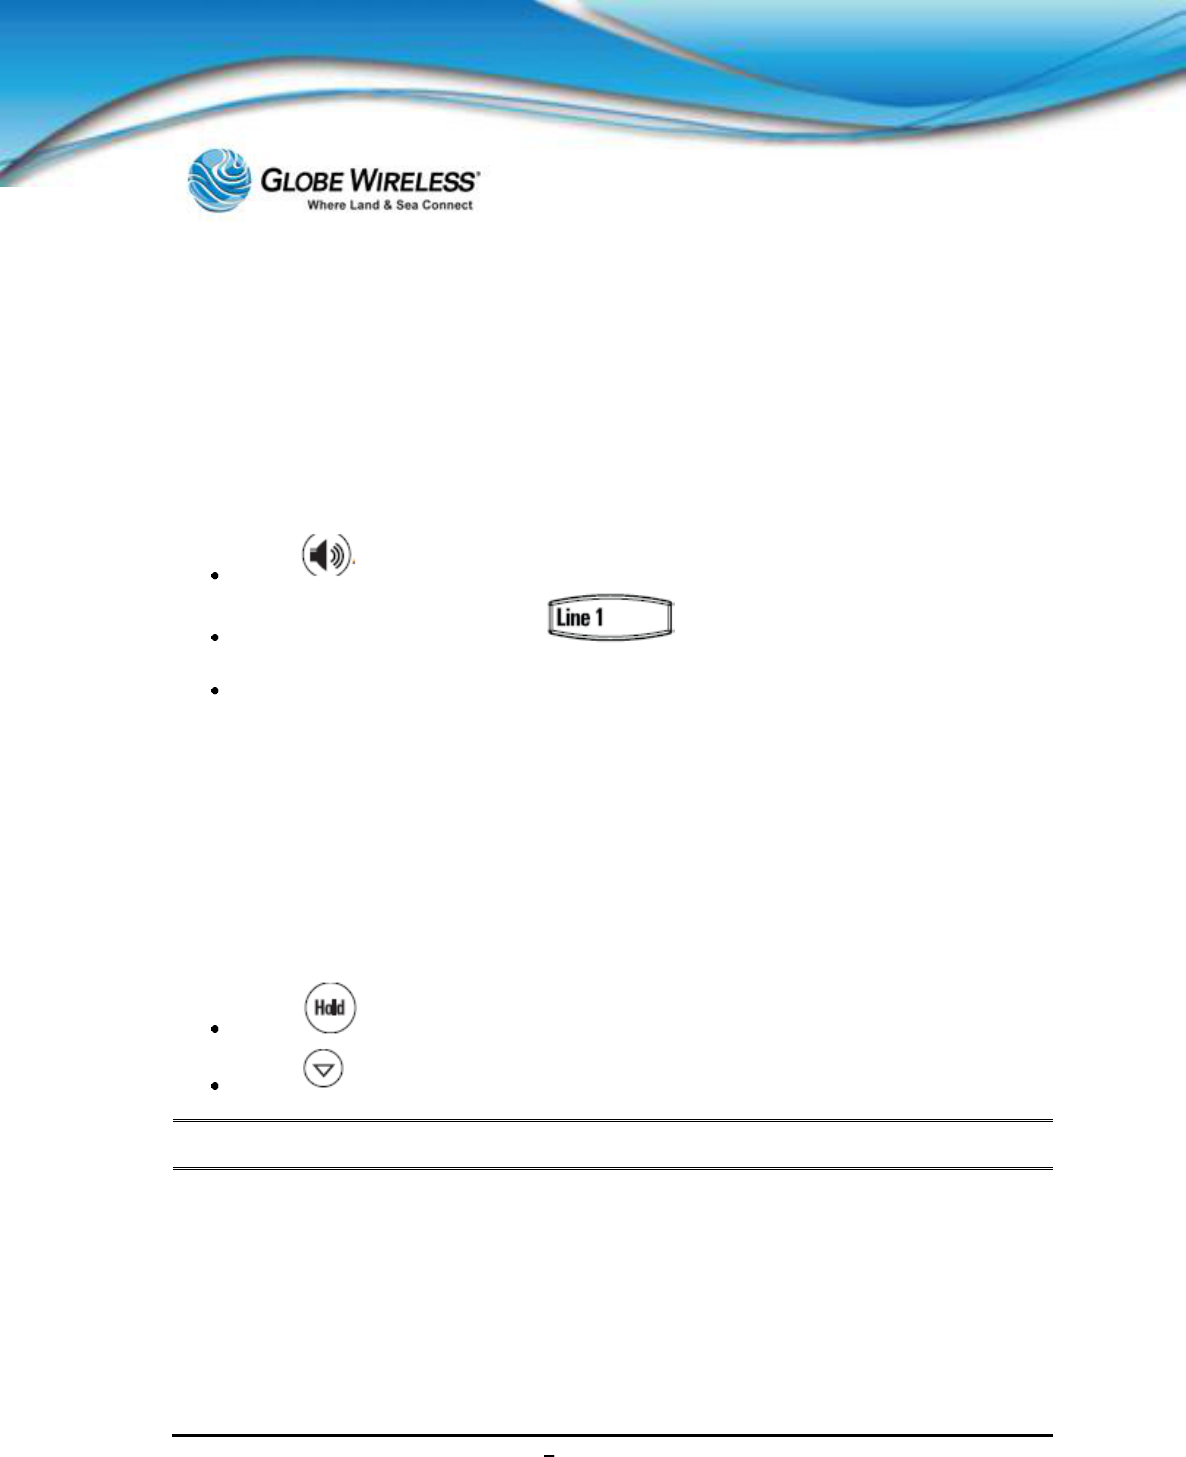
3.7.4 Placing a Call on Hold
During the call, press which will be indicated on the graphic display by the hold icon
To resume the call, press the Resume soft key or the hold button again
Note: Since using the Hold feature typically generates music or beeps, avoid placing a
conference call on hold.
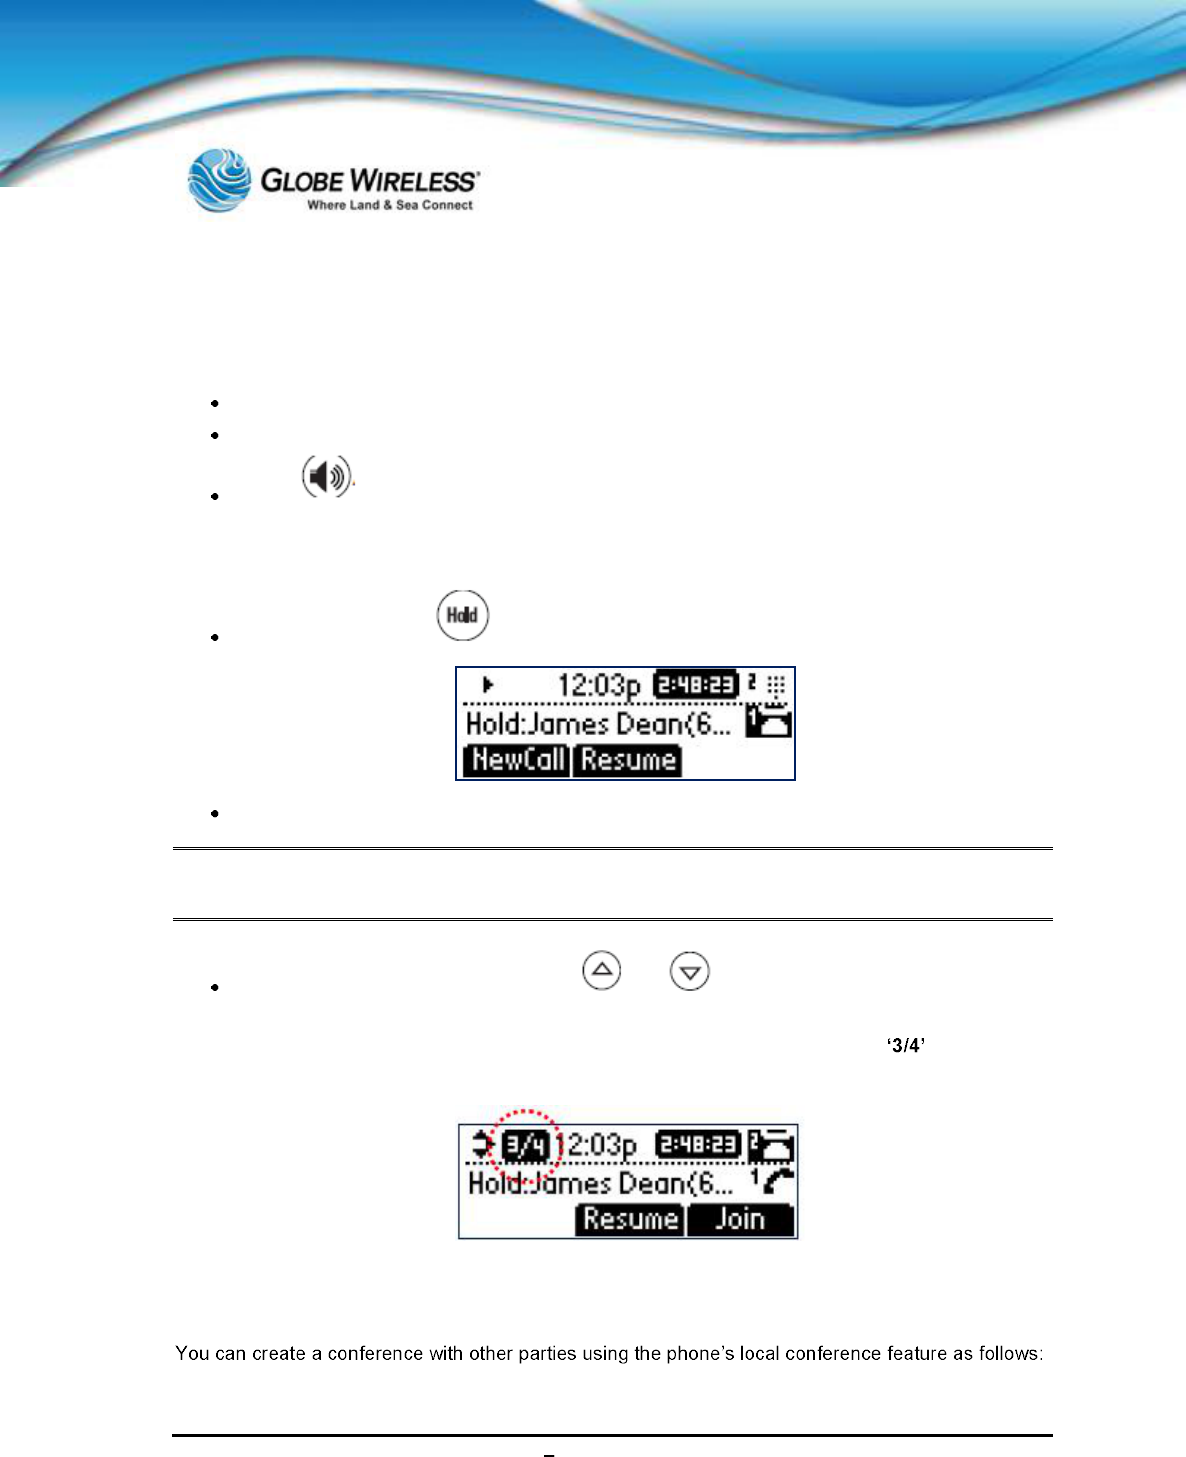
If you have multiple calls on hold, use and to switch between the calls, then press
the Resume soft key to retrieve the desired call
If two or more calls are on hold, an indication appears on the graphic display, e.g., , indicates that
this is the third call out of four calls.
3.7.5 Setting up Conference Calls
SWG-125 Rev. G June 2013
Globe iFusion ®User Guide for i500, i250, iSRev. G 3-14
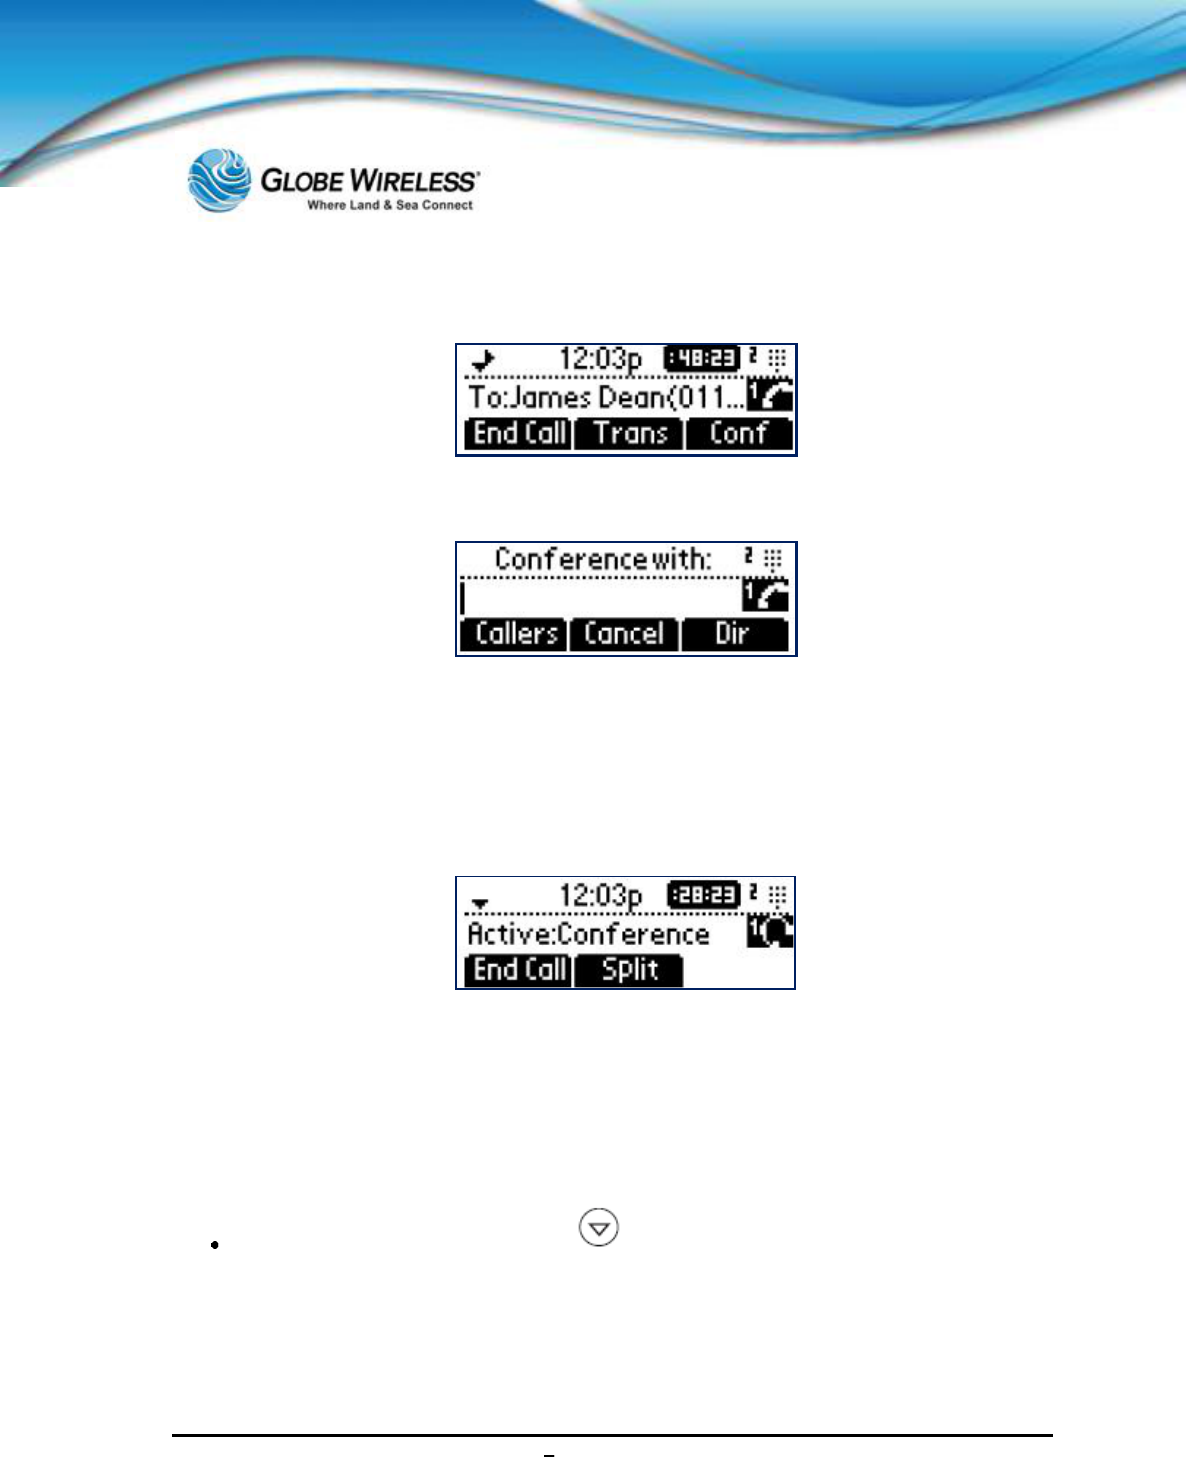
Step 1: Call the first party.
Step 2: Press the Conf soft key to create a new call. (The active call is placed on hold.)
Step 3: Call the second party.
Step 4: When the second party answers, press the Conf soft key again to join all parties in the
conference.
To Split a conference call:
Press the Split soft key. This places both parties on hold.
Set up a Conference Call
When you are in an active call, perform the following to add members:
One call on hold:
If you have one call on hold, press to return to the call on hold, and then press the
Join soft key.
(1) This creates a conference call with the active call, the call on hold, and yourself.
Multiple calls on hold:
SWG-125 Rev. G June 2013
Globe iFusion ®User Guide for i500, i250, iSRev. G 3-15
If you have multiple calls on hold, use and to switch to the desired call on hold
and press the Join soft key.
(2) This creates a conference call with the active call, the call on hold, and yourself.
To End a Conference Call
Press the End Call soft key, or simply hang up. The other parties will continue to be connected.
3.7.6 Transferring Calls
There are three ways to transfer a call:
Consultative Transfer The party to whom you wish to transfer the call answers their phone
before you transfer the call or hang up. You can consult with them before completing the
transfer.
Blind Transfer The call is automatically transferred after you dial the number of the party to
whom you wish to transfer the call.
Attended Transfer The parties are automatically connected to each other after you exit the
conference.
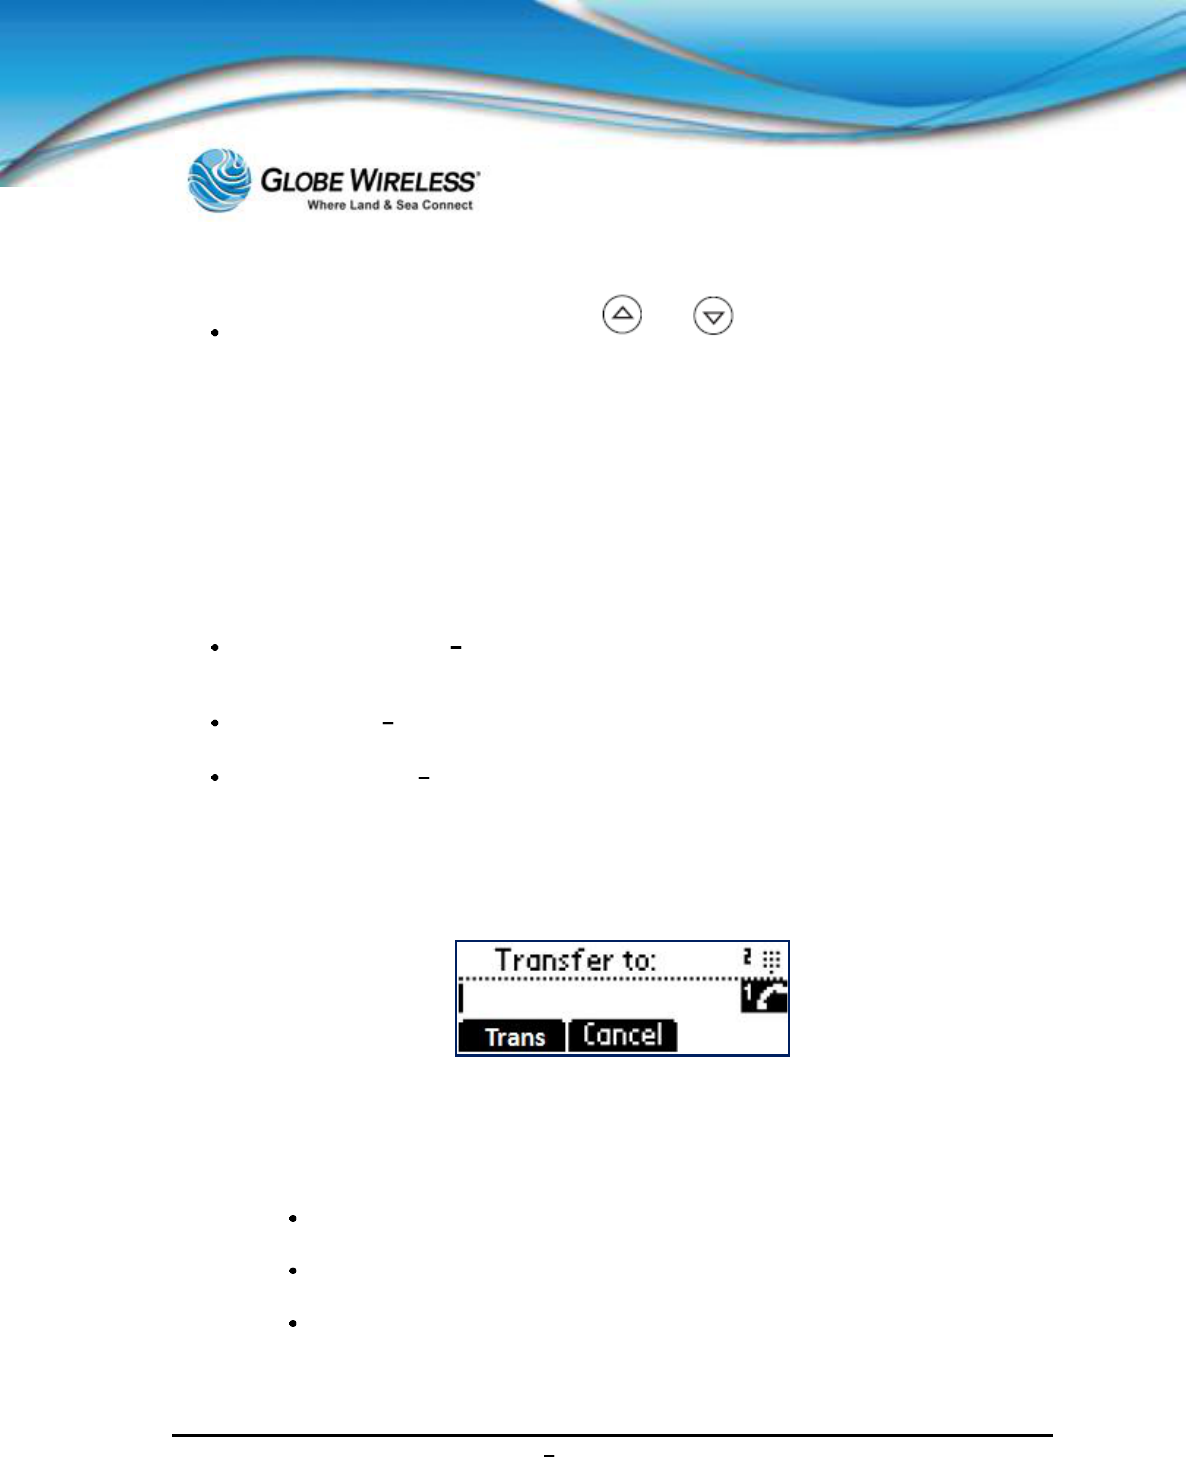
Consultative Transfer
Step 1: During a call, press the Trans soft key. The active call is placed on hold.
Step 2: Enter the number to which you want to transfer the call.
Step 3: As soon as the ring-back sound is heard, or after the party answers, press the Trans
soft key to complete the transfer.
You can talk privately to the party to which you are transferring the call before
the transfer is completed, if desired.
If you are using a handset, the transfer can be completed by putting the
handset on the cradle.
You can cancel the transfer before the call connects by pressing the Cancel
soft key.
SWG-125 Rev. G June 2013
Globe iFusion ®User Guide for i500, i250, iSRev. G 3-16
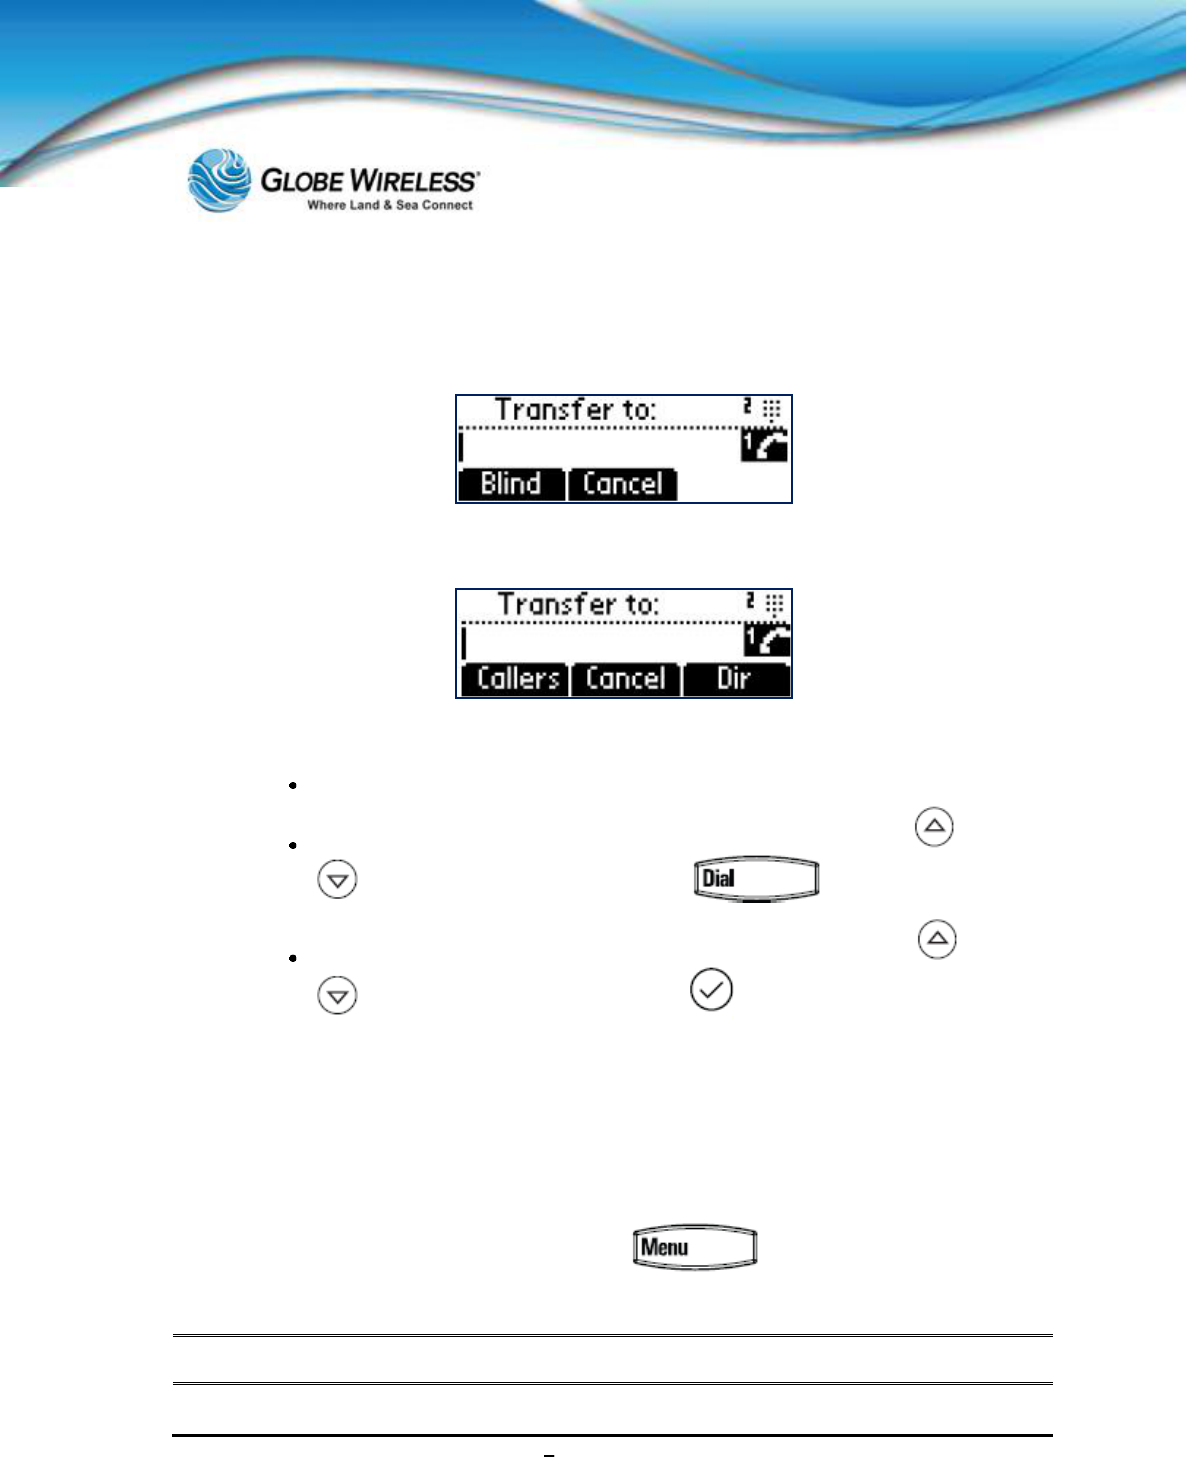
Blind Transfer
Step 1: During a call, press the Trans soft key.
Step 2: Press the Blind soft key.
Step 3: Do ONE of the following steps:
Enter the number to which you want to transfer the call
Press the Dir soft key to access the local contact directory. Use and
to access the contacts, and then press .
Press the Callers soft key to access the Received Call List and use and
to access the contact, and then press
Attended Transfer
The parties are automatically connected to each other once you hang up.
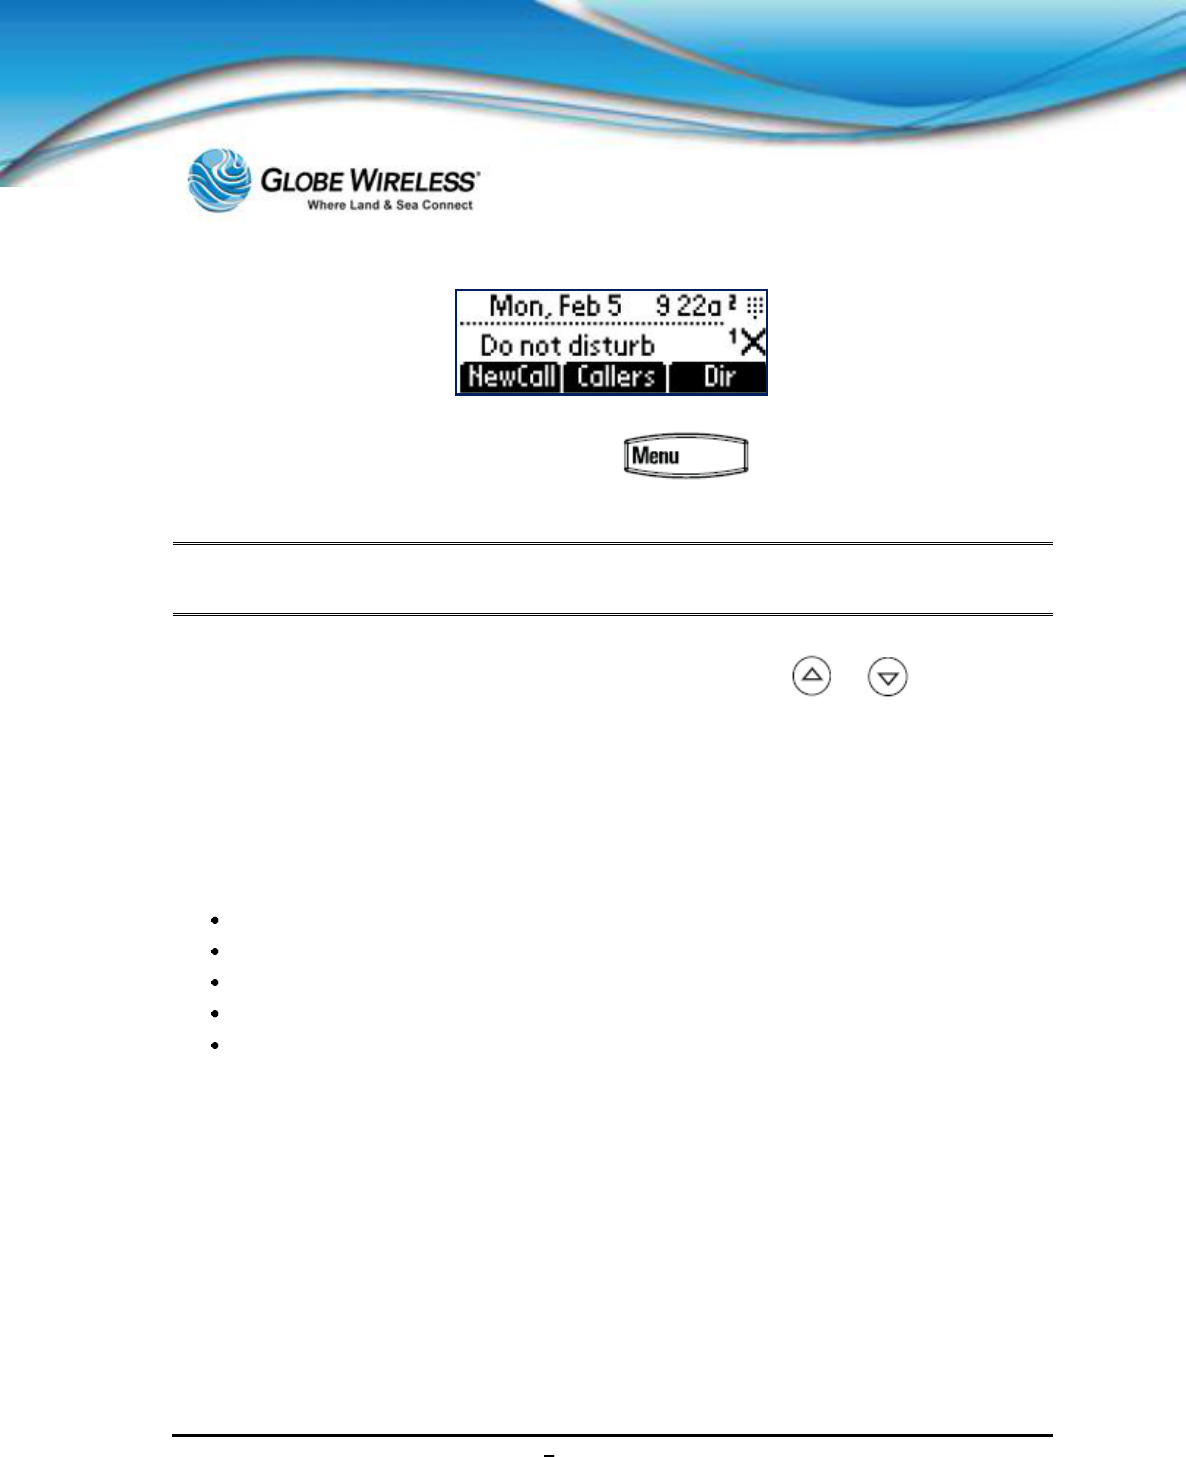
3.7.7 Do Not Disturb
Step 1: To Enable Do Not Disturb, press and select Features | Do Not
Disturb to prevent the phone from ringing on incoming calls.
A flashing icon and text on the graphic display indicates that Do Not Disturb is turned on.
SWG-125 Rev. G June 2013
Globe iFusion ®User Guide for i500, i250, iSRev. G 3-17
Step 2: To Disable Do Not Disturb, press and select Features | Do Not
Disturb.
Note: Do not disturb is local to the phone itself, and may be overridden by call server settings.
Contact your System Administrator for more information.
Step 3: To configure multiple lines for Do Not Disturb, use and to set Do Not
Disturb on a line-by-line basis using the same instructions as above.
3.8 Troubleshooting Your Phone
This section contains general troubleshooting information to help you solve any problems you might
encounter with your phone. The tables subsection list possible trouble symptoms, the likely causes of
these problems, and the recommended corrective actions to take.
Securing the Handset
Controls
Access to Screens and Systems
Calling
Displays
To obtain more detailed troubleshooting information, you can access certain menus on your phone
that test your phone hardware.
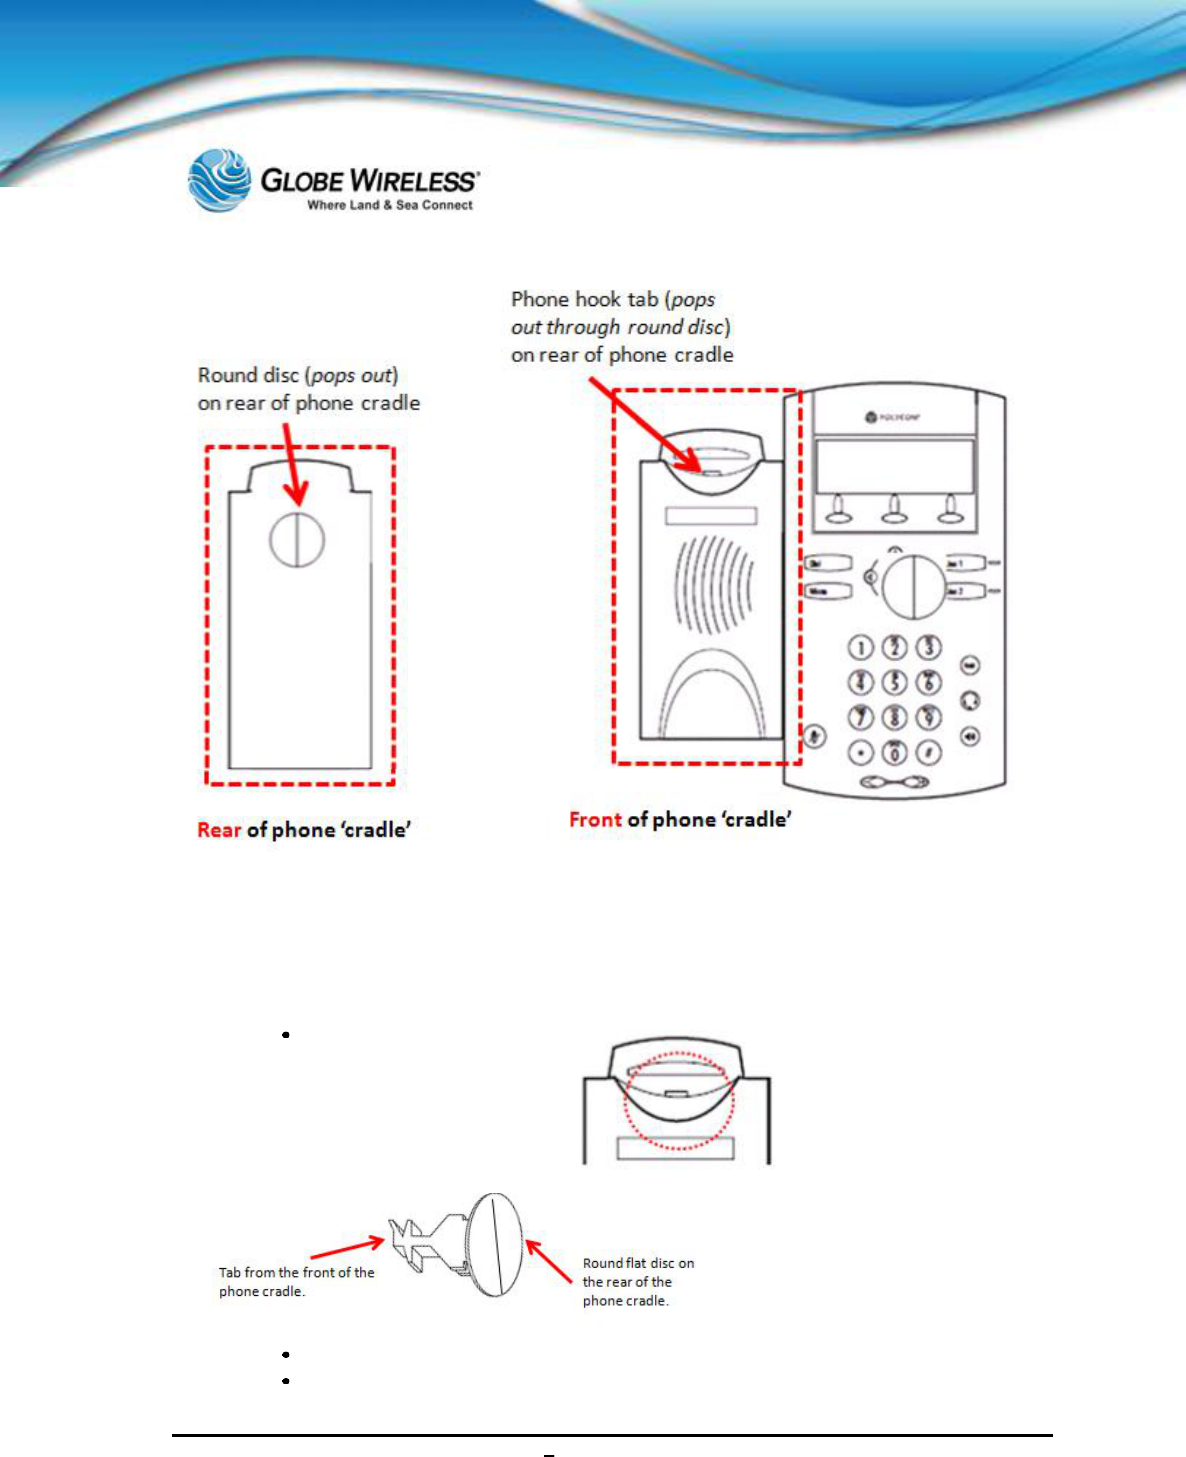
3.8.1 Securing the Handset on-hook
Due to ship vibration, etc., the handset can become dislodged from the phone.
To prevent this from happening, perform the following steps to change the phone hook tab to the
secured position.
SWG-125 Rev. G June 2013
Globe iFusion ®User Guide for i500, i250, iSRev. G 3-18
When you remove the handset from the cradle of the phone, notice a tab. If the tab is flush (flat)
against the cradle, you must change it; however if it protrudes from the opening, you need do nothing,
as it is already set-up to hold the handset securely in place when resting in the cradle of the phone.
Changing the Phone Hook Tab
From the front of the
phone,
use a pointed
object such as a ball point
pen or small screwdriver to
push the tab out
from the
front through the rear of
the phone.
The unit pops out all as one piece as shown above.
Manipulating the piece just removed, re-insert it back through t
he

SWG-125 Rev. G June 2013
Globe iFusion ®User Guide for i500, i250, iSRev. G 3-19
hole on the rear of the cradle so that when the tab comes through
the front, the tab is protruding and not flush or flat against the phone
cradle.
When positioned correctly, push on the round disc from the rear of
the phone to snap it into place.
The
phone is now secured to the cradle and should not slip off due to ship
vibration.
For further assistance, contact the Globe Wireless Customer Support Center at:
Within the United States or Canada: 1-(877)-535-0653
Overseas: 1-(321)-308-0112
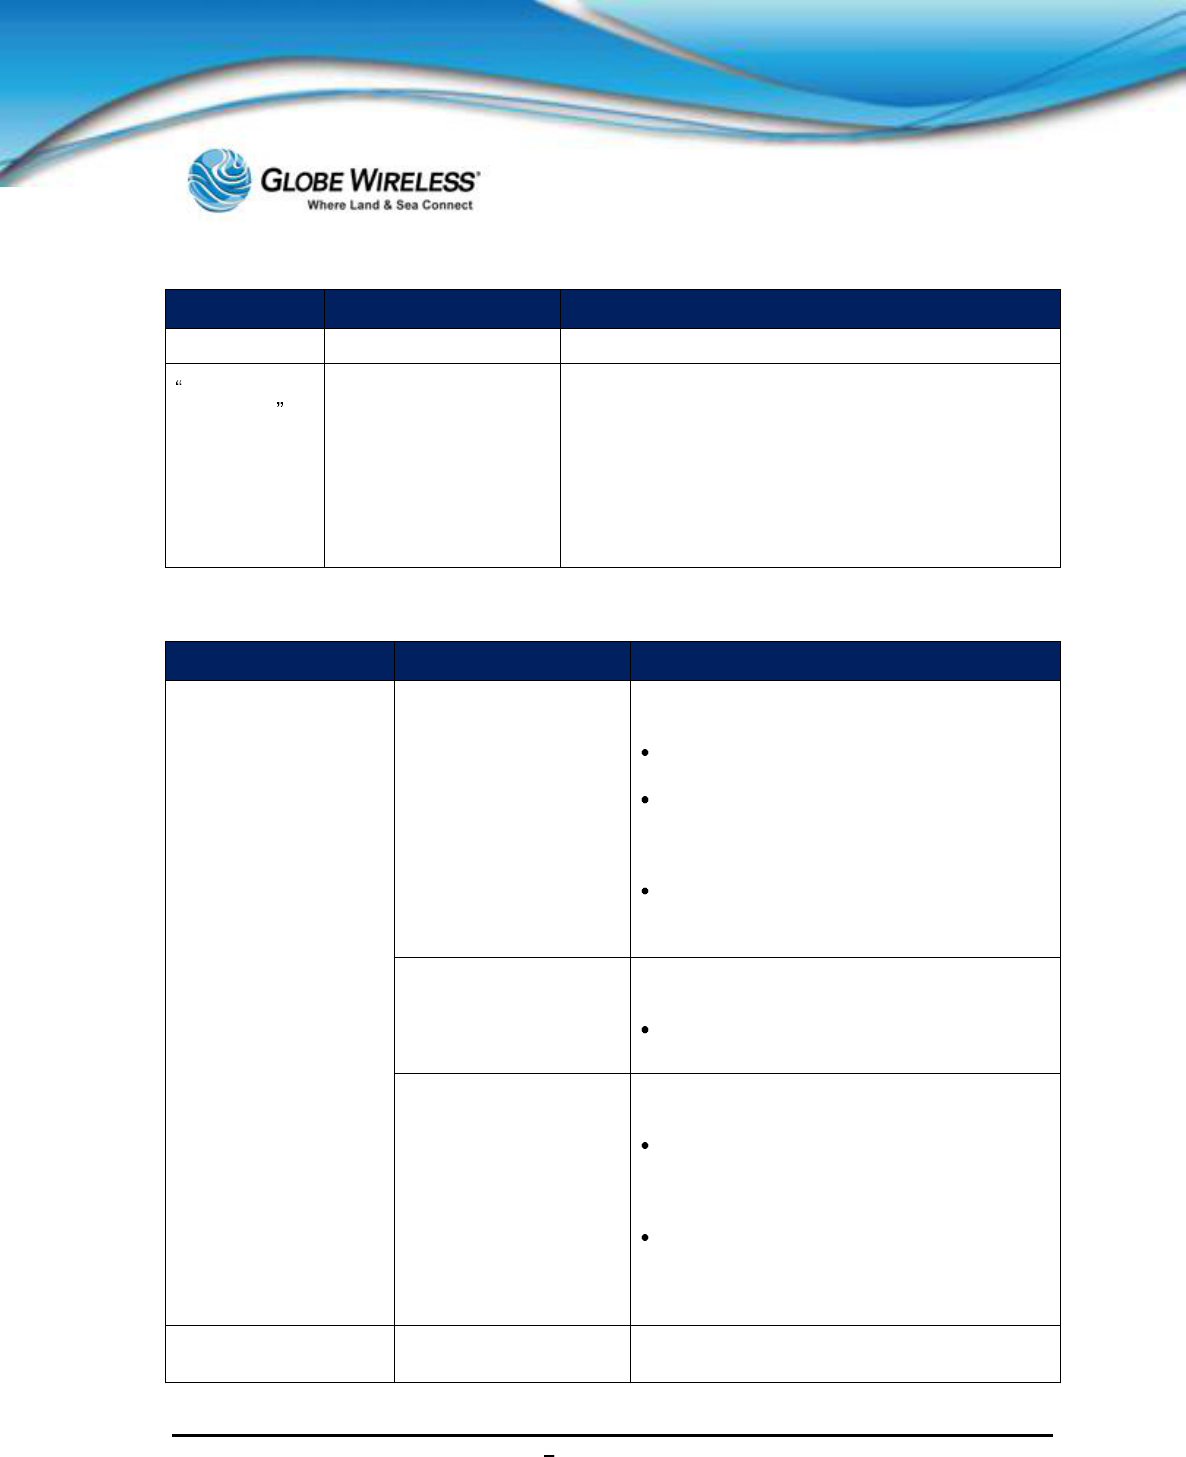
3.8.2 Controls
Symptom Problem Corrective Action
The
dial pad does not
work. The dial pad on the phone
does not respond. Do one of the following:
Check for a response from other feature
keys or from the dial pad.
Place a call to the phone from a known
working telephone. C
heck for display
updates.
Check if the LAN port is active or
inactive. Press the Menu key, and select
Status | Network | Ethernet. From the
Ethernet page, scroll to the LAN port field
and verify it is active.
Check the termination at the switch or
hub end
of the network LAN cable.
Ensure the switch/hub port connected to
the telephone is operational. (If not,
contact your system administrator.)
Before restarting the
phone, contact your
system administrator who may want to
troubleshoot your phone in more deta
il
before restarting the phone and losing
current status information.

SWG-125 Rev. G June 2013
Globe iFusion ®User Guide for i500, i250, iSRev. G 3-20
3.8.3 Access to Screens and Systems
Symptom Problem Corrective Action
There is no response
when you press a feature
key.
The phone is not in an
active
state. Do one of the following:
Press the keys more slowly.
Check with your system
administrator to see if the key has
been mapped to a different function
or is disabled.
Place a call to the phone to check
that inbound call display and ringing
is normal. If successful, try to press
feature key
s within the call to access
the Main Menu, for example.
To confirm that the line is active,
press the Menu
key and then select
Status | Lines | Line Information.
From the Line Information page,
verify your phone line is registered.
The screen shows
Network Link is Down .The LAN cable is not
properly connected. Do one of the following:
Check termination at the switch or
hub (furthest end of the cable from
the phone).
Check that the switch or hub is
operational (flashing link/status
lights) or contact your system
administrator.
Check if the LAN port is active or
inactive. Press the Menu key and
select Status | Network | Ethernet.
From the Ethernet page, scroll to
the LAN port field and verify it is
active.
To attempt re-
registration to the call
server, reboot your phone. Contact
your system administrator.

SWG-125 Rev. G June 2013
Globe iFusion ®User Guide for i500, i250, iSRev. G 3-21
3.8.4 Calling
Symptom Problem Corrective Action
There is no dial
tone. Power is not correctly
applied to the phone. Do one of the following:
Check that the screen is illuminated.
Ensure the LAN cable is inserted properly at the
back of the phone by unplugging and re-inserting.
If using
PoE, have your system administrator check
that the switch is supplying power to the phone.
Dial tone is not present
on one of the audio
modes.
Do one of the following:
Switch between Handset and hands free
speakerphone to see if the dial tone is present for
one of the audio modes.
If the dial tone exists on another audio mode,
connect a different handset to isolate the problem.
The phone
does not ring. Ring setting or volum
e is
low. Do one of the following:
Adjust the ringing level from the front panel using
the volume up/down keys.
Check status of the handset and hands free
speaker phone.
Outbound or inbound
calling is unsuccessful. Do one of the following:
Place a call to the phone under investigation.
Check that the screen indicates incoming call
information.
Lift the handset. Ensure the dial tone is present and
place a call to another extension or number. Check
that the screen changes in response.
You turned off the
ringer.
Do one of the following:
During an incoming call, lift the handset and press
the Speaker phone key to obtain a dial tone.
Press the ringing Line Key or the Answer soft key
SWG-125 Rev. G June 2013
Globe iFusion ®User Guide for i500, i250, iSRev. G 3-22
Symptom Problem Corrective Action
to answer the call.
Service
Unavailable
appears on the
screen.
The use
r pressed the
New Call
soft key,
dialed a number with the
handset on-
hook, or
attempted to make a call
from the contact
directory before
the
phone was registered.
Check with your system administrator to see when your
phone will be registered.
3.8.5 Displays
Symptom Problem Corrective Action
There is no display.
The display is incorrect.
The display has bad
contrast.
Power is not correctly
applied to the phone. Do one of the following:
Check that the screen is illuminated.
Ensure the LAN cable is inserted pro
perly
at the back of the phone by unplugging and
re-inserting the cable.
If using Power over Ethernet (PoE), have
your system administrator check that the
switch is supplying power to the phone.
The contrast needs
adjustment. Do one of the following:
Res
tart the phone to obtain a default level
of contrast.
Outbound or inbound
calling is unsuccessful. Do one of the following:
Place a call to the phone under
investigation. Check that the screen
indicates incoming call information.
Lift the handset. Ensure
the dial tone is
present and place a call to another
extension or number. Check that the
screen changes in response.
The display flickers. A certain type of older
fluorescent lighting Do one of the following:
SWG-125 Rev. G June 2013
Globe iFusion ®User Guide for i500, i250, iSRev. G 3-23
Symptom Problem Corrective Action
causes the display to
appear to flicker. Move the phone away from the lights.
Replace the lights.
For further assistance, contact the Globe Wireless Customer Support Center at:
Within the United States or Canada: 1-(877)-535-0653
Overseas: 1-(321)-308-0112

SWG-125 Rev. G June 2013
Globe iFusion ®User Guide for i500, i250, iSRev. G 3-24
This page intentionally left blank.
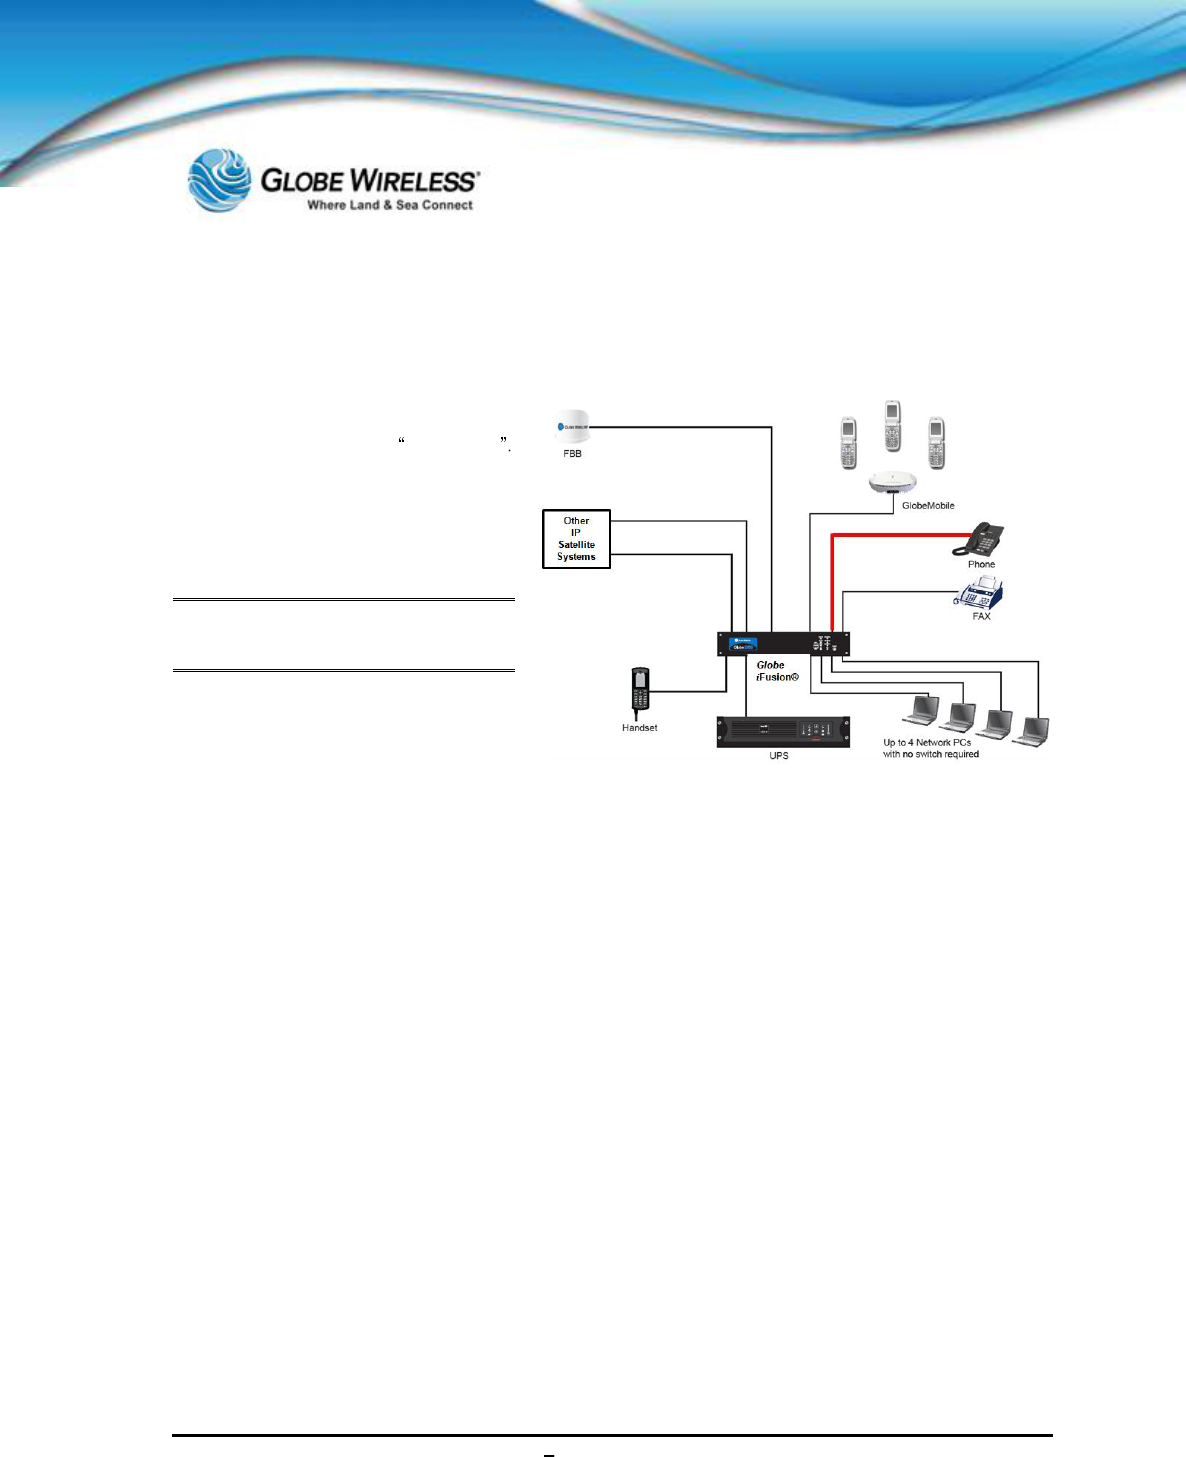
SWG-125 Rev. G June 2013
Globe iFusion ®User Guide for i500, i250, iSRev. G 4-1
4.0 Using a Standard Phone
Desk phones, PBX systems, and other
touch-
tone voice devices can be used
via the Globe iFusion®phone port
These devices are connected to the
Globe iFusion®
phone port using a
standard RJ-11, 4-
conductor phone
cord
. Calls can be placed and received
in the typical fashion.
Note:
In some cases, a PIN access
code may be required.
4.1 Your Phone Number
Your phone port phone number, which is also known as the MSISDN (Mobile Station International
Subscriber Directory Number) is determined by the Globe Wireless SIM card inserted into the SIM
port on the back of the Globe iFusion®. With each Globe iFusion®, Globe Wireless includes a
Product Registration Information Sheet containing all of the Globe iFusion®identifying numbers as
well as the phone and fax numbers. Please consult this sheet to determine your phone number.
4.1.1 Placing a Call from the Phone
The first step is to connect your phone to the Phone interface on the rear of the Globe iFusion®. To
make a call, dial:
00 <country code> <phone number> followed by #.
Example: To call Globe Wireless in the U.S.A. (+1 3213080112) from an analog
phone, dial the following: 00 1 3213080112 #
4.1.2 Receiving a Call to the Phone
To receive a phone call on a desk phone or other device, connect the device to the phone interface
located on the rear of the Globe iFusion®. The device will ring when the terminal receives a voice
call.

SWG-125 Rev. G June 2013
Globe iFusion ®User Guide for i500, i250, iSRev. G 4-2
4.1.3 Making a Call to the Phone from Shore
To make a call to the phone connected to the Globe iFusion®, dial:
+ <voice msisdn>
+ is a prefix used in front of the country code for international calls
Voice MSISDN. The first part of the voice msisdn is always 870
for all BGAN systems
4.2 Captain Override
Since the Globe iFusion®allows calls to be placed from several locations, there may be times when
a ship has a higher priority call to place but the Globe iFusion®voice line is currently in use by a low
priority call (typically a GSM call). In such a case, the lower priority call can be interrupted and the
higher priority call can then be placed.
When the phone is taken off the hook while there is another call in progress, you will hear a busy
tone. To terminate the call which is causing this busy signal, perform the following:
Press the hook button on your phone two times in rapid succession which will terminate the
current call
You will hear a standard dial tone from your phone indicating that you may now proceed with
your call
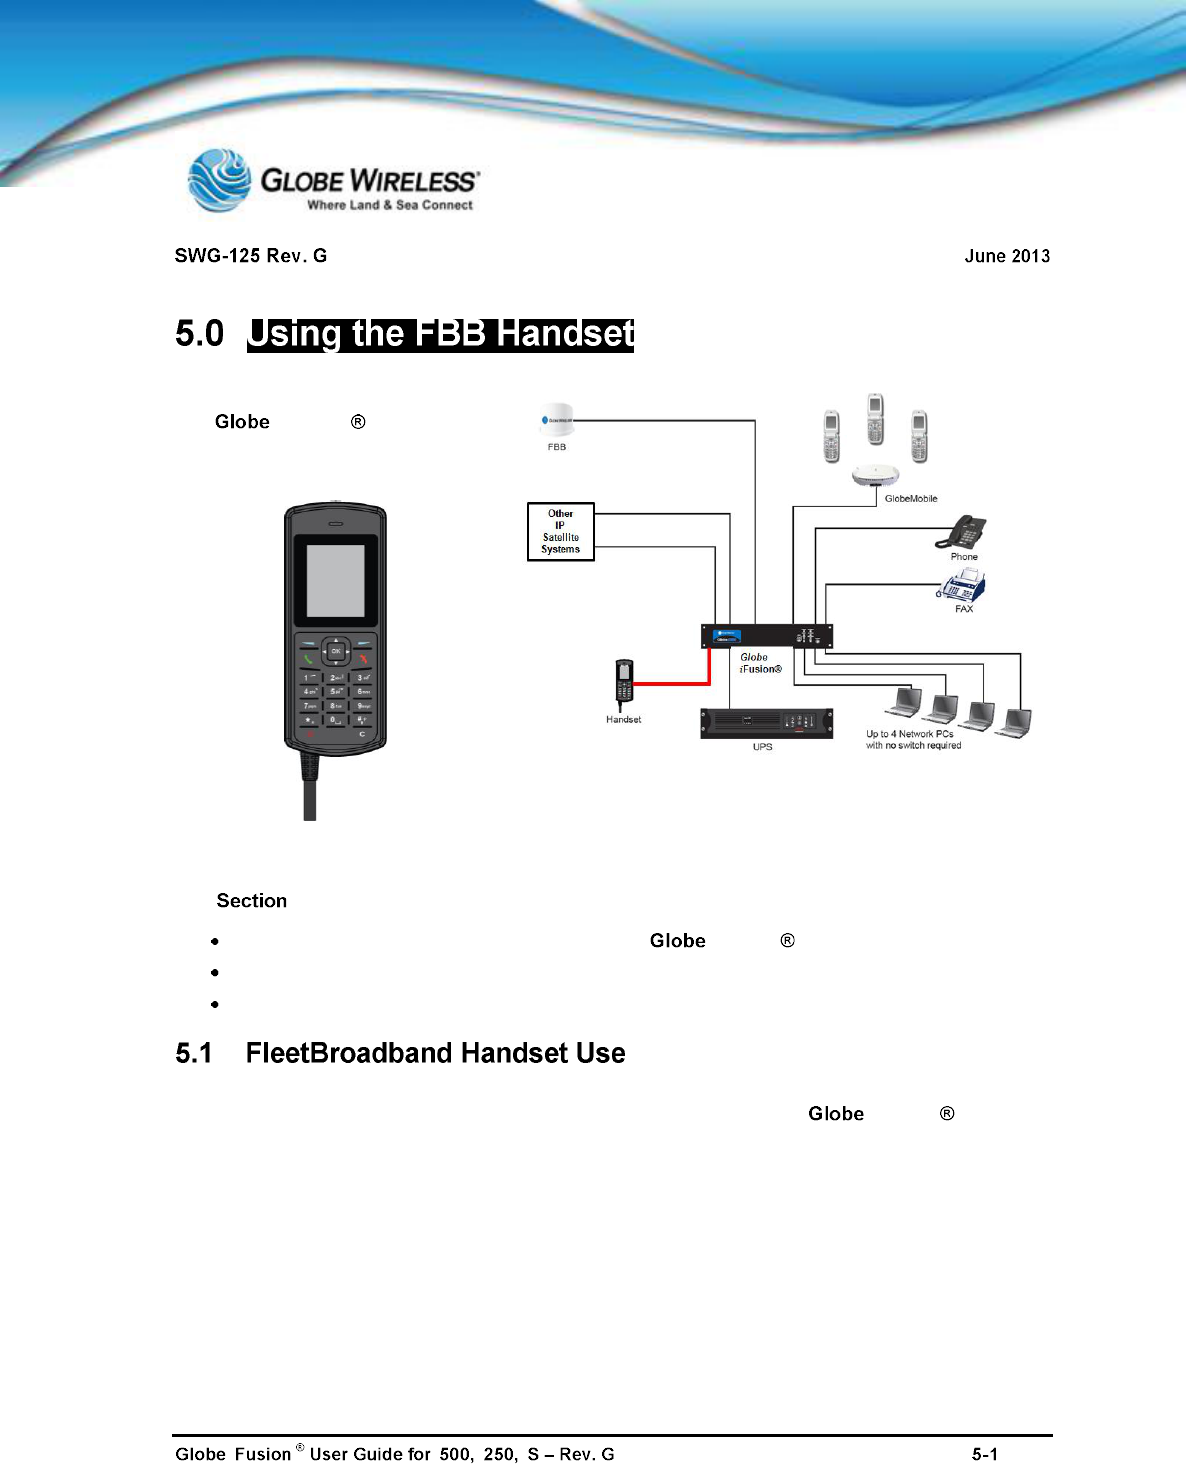
ii i i
The FBB handset can be used via
the iFusion RJ-11
phone
port using a standard RJ-
11 phone
cable.
This provides the basic instructions for the following:
Connecting the FBB250 corded handset to the iFusion
Procedures for making a call
Procedures for receiving a call
The handset allows access to the majority of the FleetBroadband functions. It provides a logical and
easy to read display. The procedures for connecting the handset to the iFusion as well as
making and receiving calls are detailed in the following subsections.
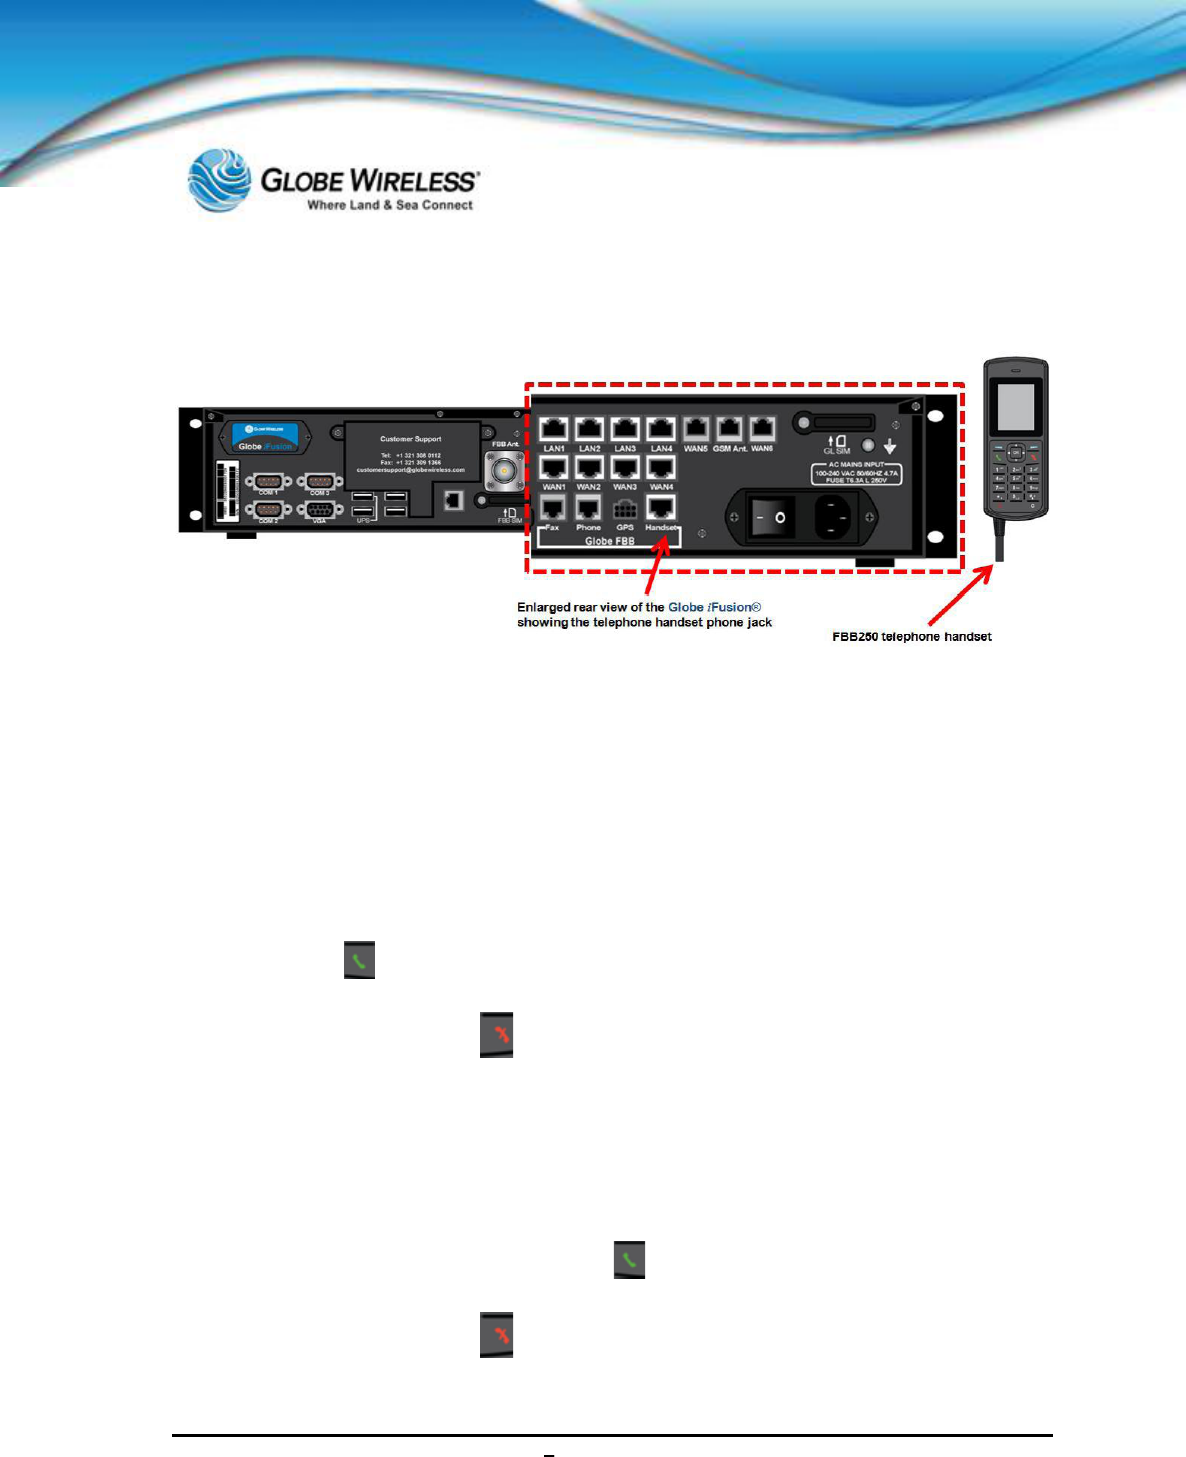
SWG-125 Rev. G June 2013
Globe iFusion ®User Guide for i500, i250, iSRev. G 5-2
5.1.1 Connect the handset to the Globe iFusion®
Connect the RJ-11 phone cable from the FBB250 handset to the Handset Port located on the rear of
the Globe iFusion®.
5.1.2 Making a Call
Step 1: Using the alpha-numeric keypad on the handset, dial the number in the following
format:
00 + [country code] [area code] [number]
Step 2: Press
Step 3: To end the call, press
5.1.3 Receiving a Call
Step 1: The phone will ring when a call is coming in, and the call number will be displayed on
the handset screen.
Step 2: Answer the incoming call by pressing
Step 3: To end the call, press
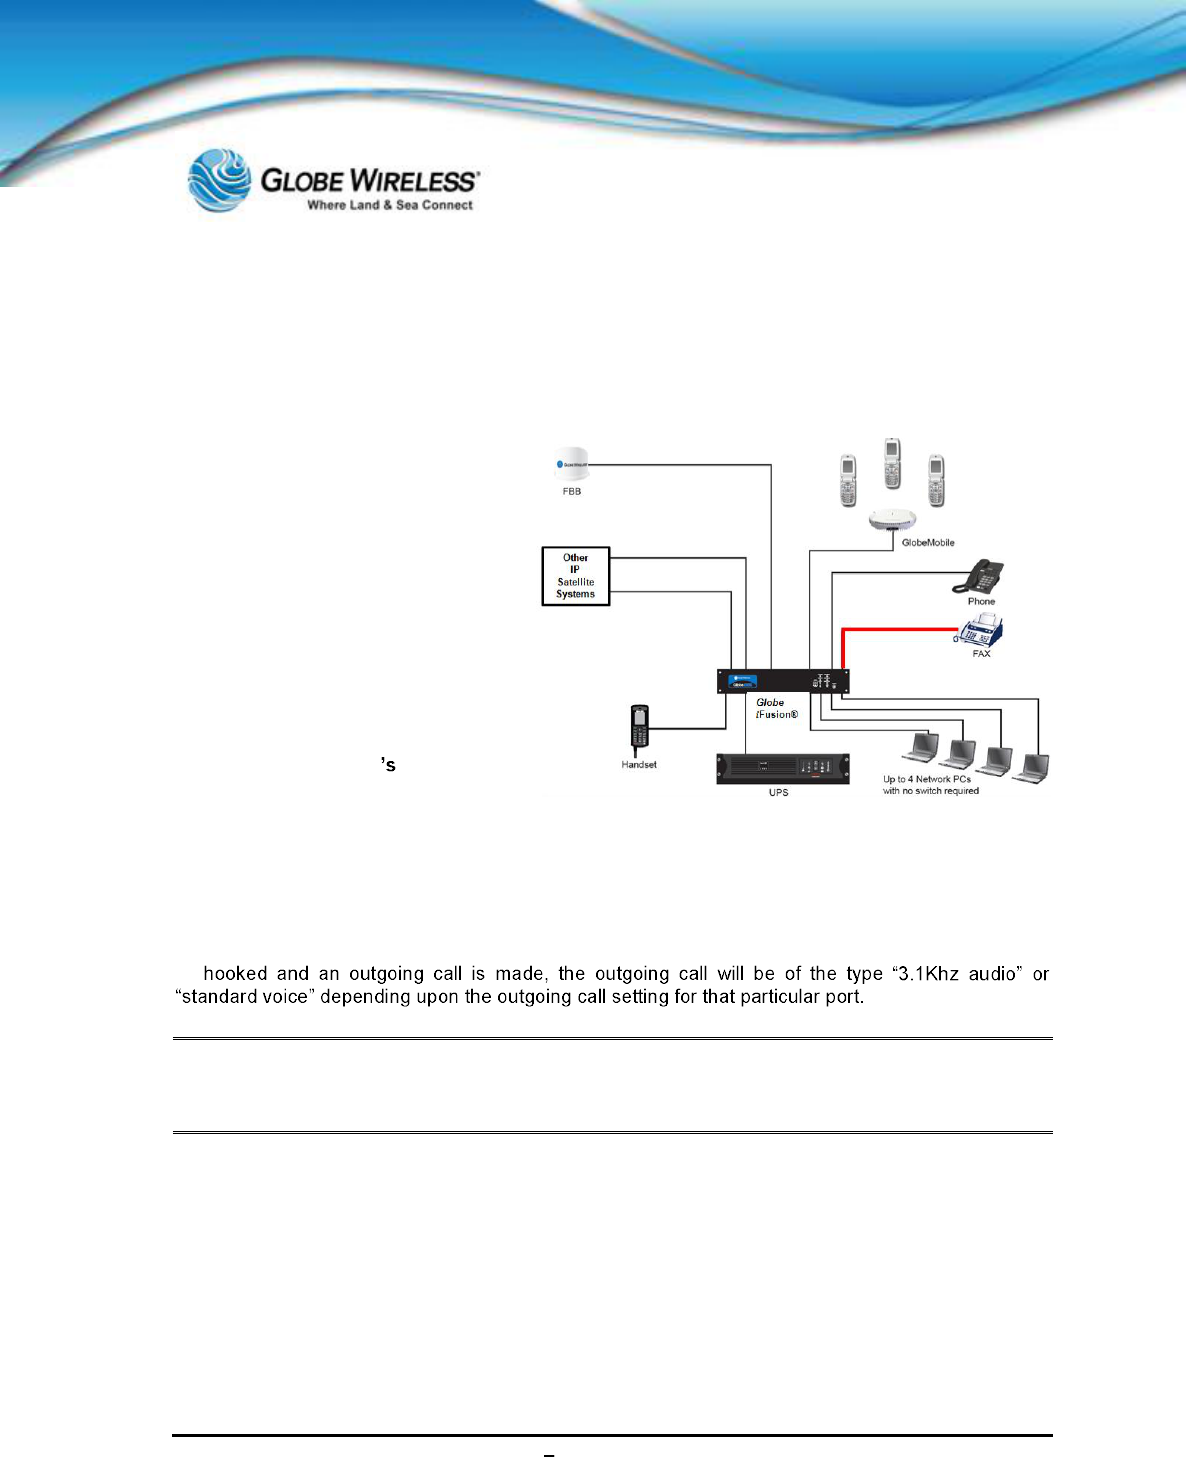
SWG-125 Rev. G June 2013
Globe iFusion ®User Guide for i500, i250, iSRev. G 6-1
6.0 Using a Fax Machine
6.1 Your Fax Number
All FleetBroadband SIM cards are
provisioned with two (2) numbers
(MSISDNs), one each meant for
3.1Khz/fax calls and standard voice
calls (aMBe+2).
Your fa
x port phone number, which is
also known as a MSISDN number is
determined by the Globe Wireless SIM
card inserted in the SIM port on the
back of the Globe iFusion®
. With
each Globe iFusion®
, Globe Wireless
includes a
Product Registration
Information Sheet
which contains all of
the Globe iFusion
identifying
numbers as well as the phone and fax
numbers. Please consult this sheet to
determine your fax number.
6.1.1 Sending a Fax from the Ship
When audio equipment (analog phone, Fax, or primary handset) connected to their respective ports is
off-
Note: 3.1 Khz audio call is meant for fax transmission and is not recommended for normal voice
conversation as the airtime charge for 3.1 Khz audio is expected to be significantly higher
than the standard voice call.
Fax in the Globe iFusion®works in the same way as it does through a telephone line. To send a fax
to a fax machine connected to the Globe iFusion®, perform the following:
1. Connect the Fax Machine to the FAX port with a standard 4-conductor RJ-11 cable.
2. Place the documents to be sent, on the fax machine (as per fax machine instructions).
3. Dial the number on your fax machine, using the following format:
SWG-125 Rev. G June 2013
Globe iFusion ®User Guide for i500, i250, iSRev. G 6-2
<+country code><destination fax number> # (for example, +6512345678#)
Note: #
4. Wait until the fax is sent.
6.1.2 Sending a Fax to the Ship
To send a fax to a fax machine connected to the Globe iFusion®, dial the following:
+ <fax MSISDN>
+is a prefix used in front of the country code for international calls
Fax MSISDN is the dedicated fax number for the SIM card in your Globe iFusion®
Note: The first part of the fax MSISDN is always 870 all BGAN
systems.
6.1.3 Receiving a Fax on the Ship
To receive a fax transmission, connect the fax machine to the Fax interface of the Globe iFusion®.
The device will ring when the terminal receives a fax call.
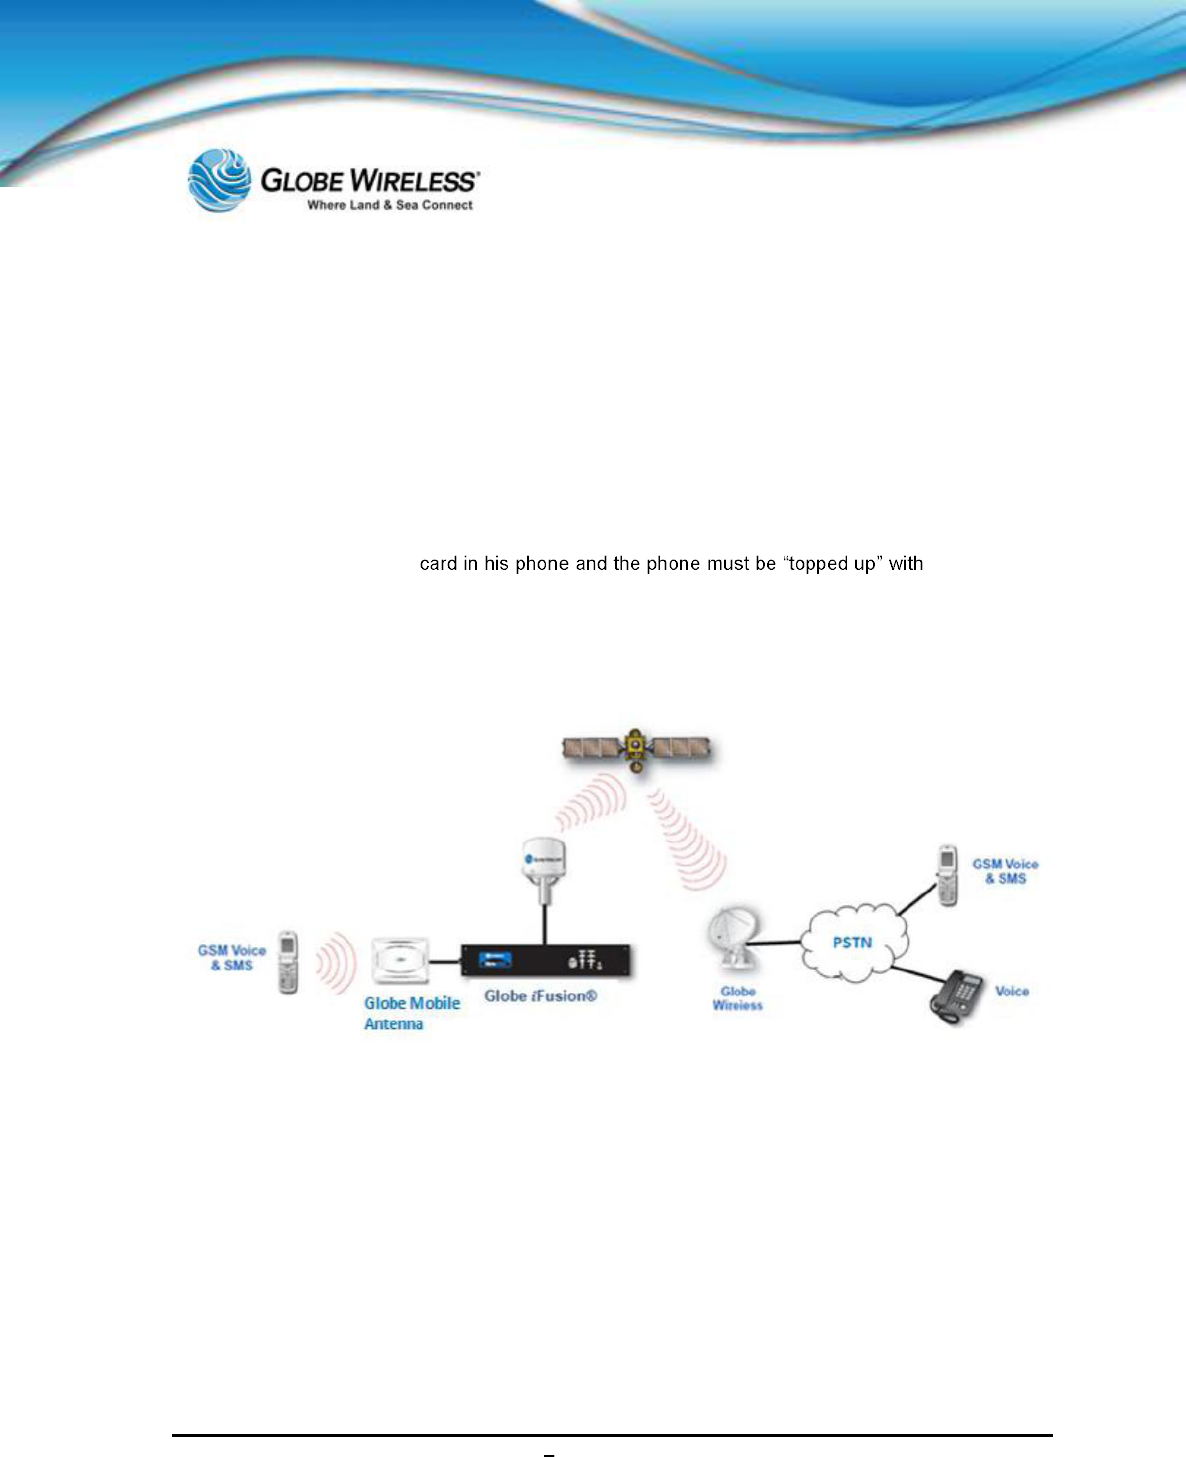
SWG-125 Rev. G June 2013
Globe iFusion ®User Guide for i500, i250, iSRev. G 7-1
7.0 Using a Mobile Phone
7.1 GlobeMobile Services
GlobeMobile is the Globe Wireless shipboard mobile phone service. The Globe iFusion®is
equipped with a full GlobeMobile gateway and antenna which provide two-way cellular calling and
text messaging routed over the satellite connection.
The GlobeMobile services are all based on the GSM prepaid model. This means that each user must
have a Globe Wireless SIM -a refresh card
which gives the user the credit necessary to talk or text.
To provide the shipboard GSM network, the Globe iFusion®has a GSM (Globe Mobile antenna)
installed in a central location onboard your vessel. It is usually located in a stairway or hallway in
order to achieve the best possible coverage.
Phone calls placed onboard ship are received by the GlobeMobile antenna, routed through the Globe
iFusion®, sent over the satellite and then connected to their final destination using terrestrial phone
and GSM networks. Charges for the calls are deducted automatically from the prepaid account as the
call is in progress.
Contact your captain for SIM or refresh cards, and information about phone and text message rates.
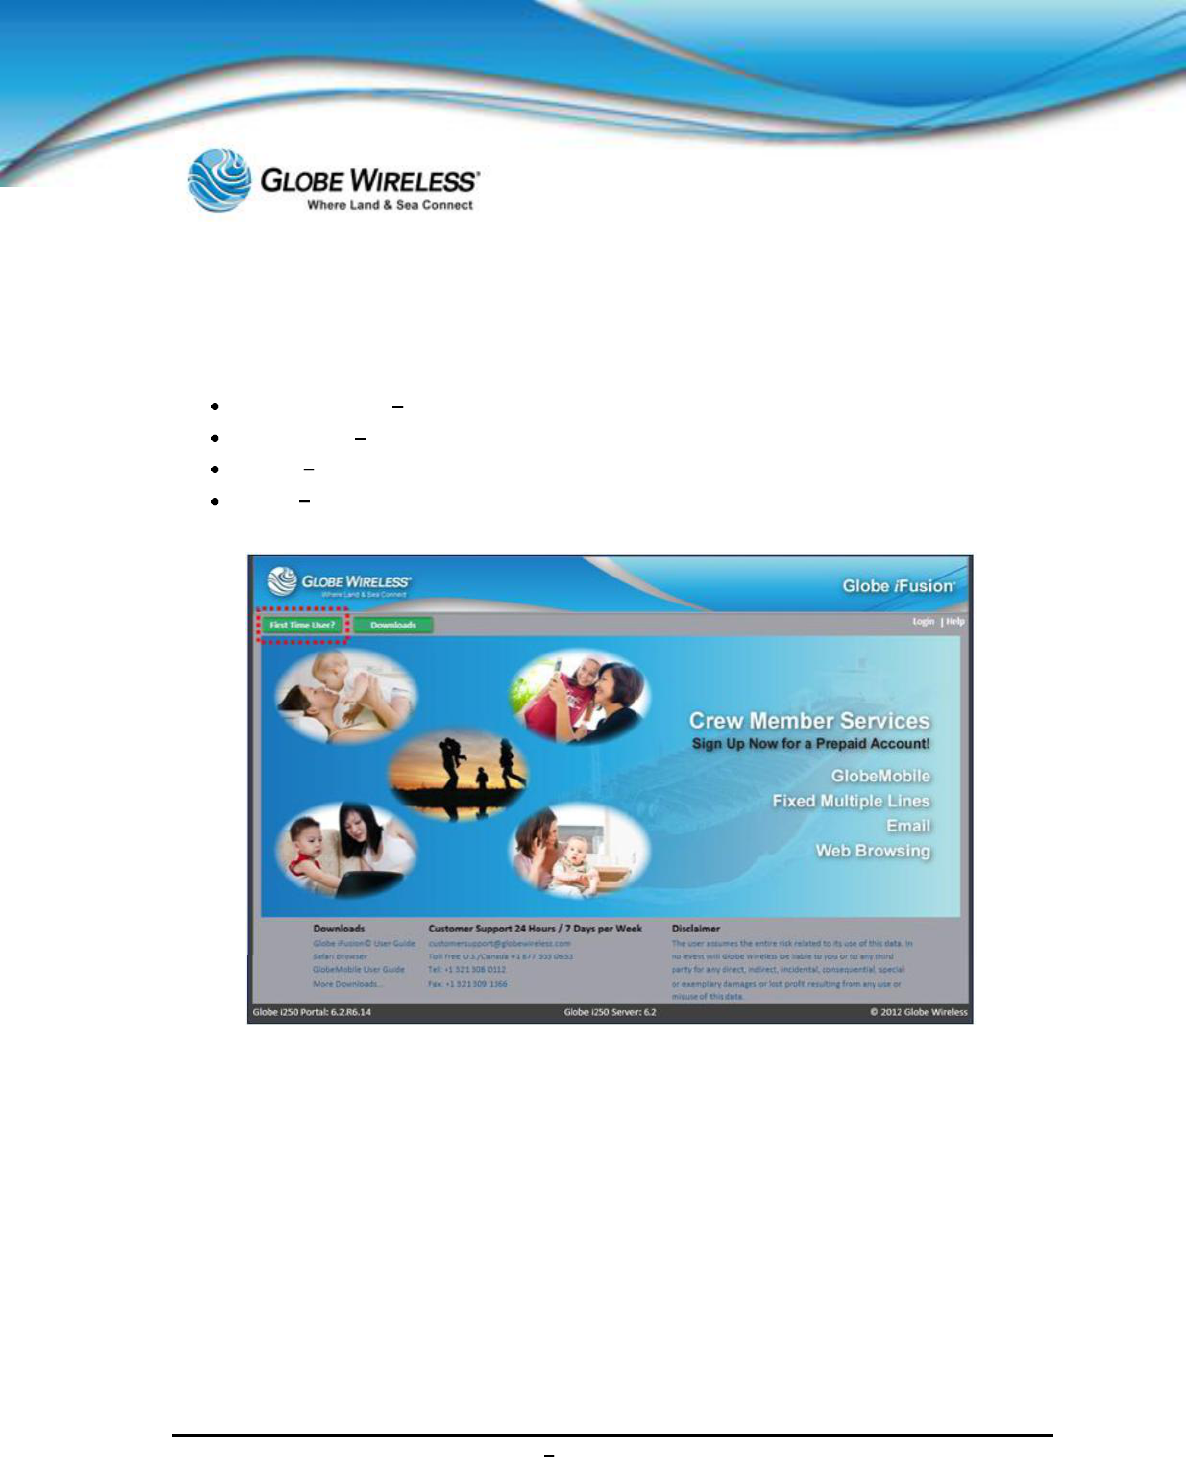
SWG-125 Rev. G June 2013
Globe iFusion ®User Guide for i500, i250, iSRev. G 7-2
7.2 Getting Started
Once you type in the URL, the Globe iFusion® is displayed as shown below. Depending on what you
wish to do, perform one of the following:
First Time User Click if you need to set up an account
Downloads Click to display the page of available downloads. Follow directions from there
Login If you have your Userid and Password, click this link to display the login screen
Help At any time, from any page, you can click on Help to display the online help
application
7.2.1 First Time User
Click the First Time User? link located on the login page to display the instructions for signing up for
an account to be used with your mobile phone.
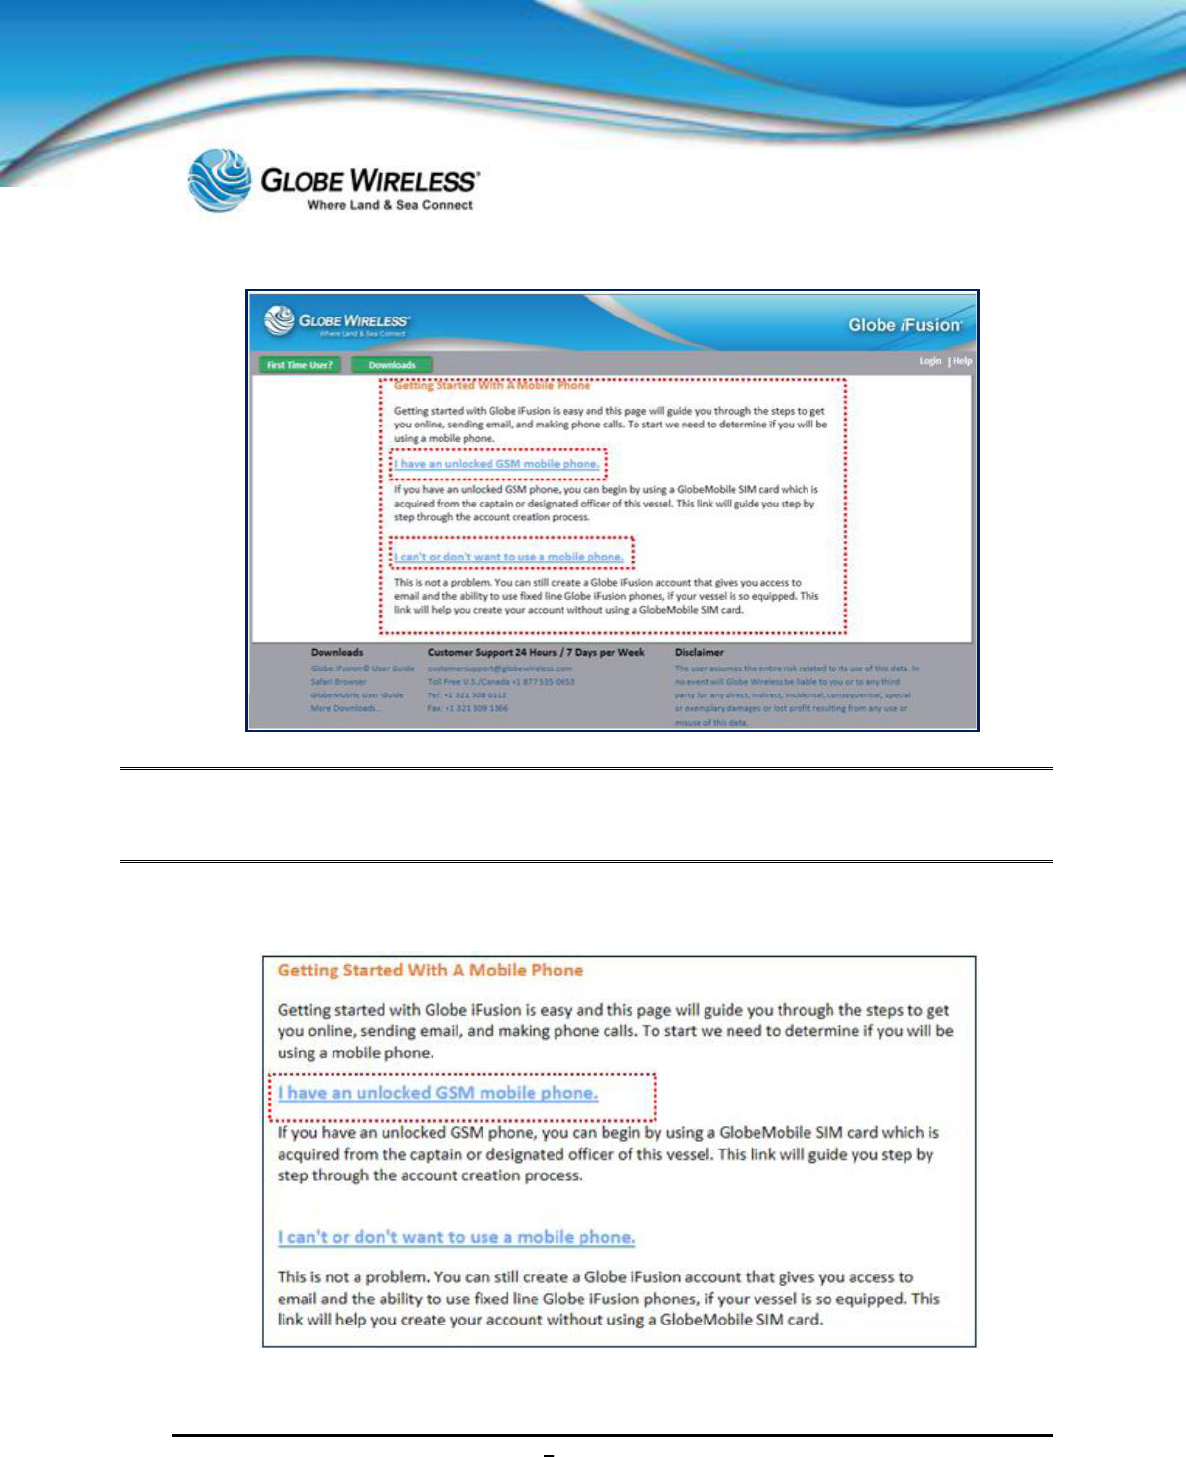
SWG-125 Rev. G June 2013
Globe iFusion ®User Guide for i500, i250, iSRev. G 7-3
Note: GlobeMobile SIM cards will only work in unlocked mobile phones. Some mobile devices are
locked to a particular carrier. If this is the case you will not be able to use the Globe Wireless SIM
card in your current device.
7.2.1.1 Unlocked GSM Mobile Phone
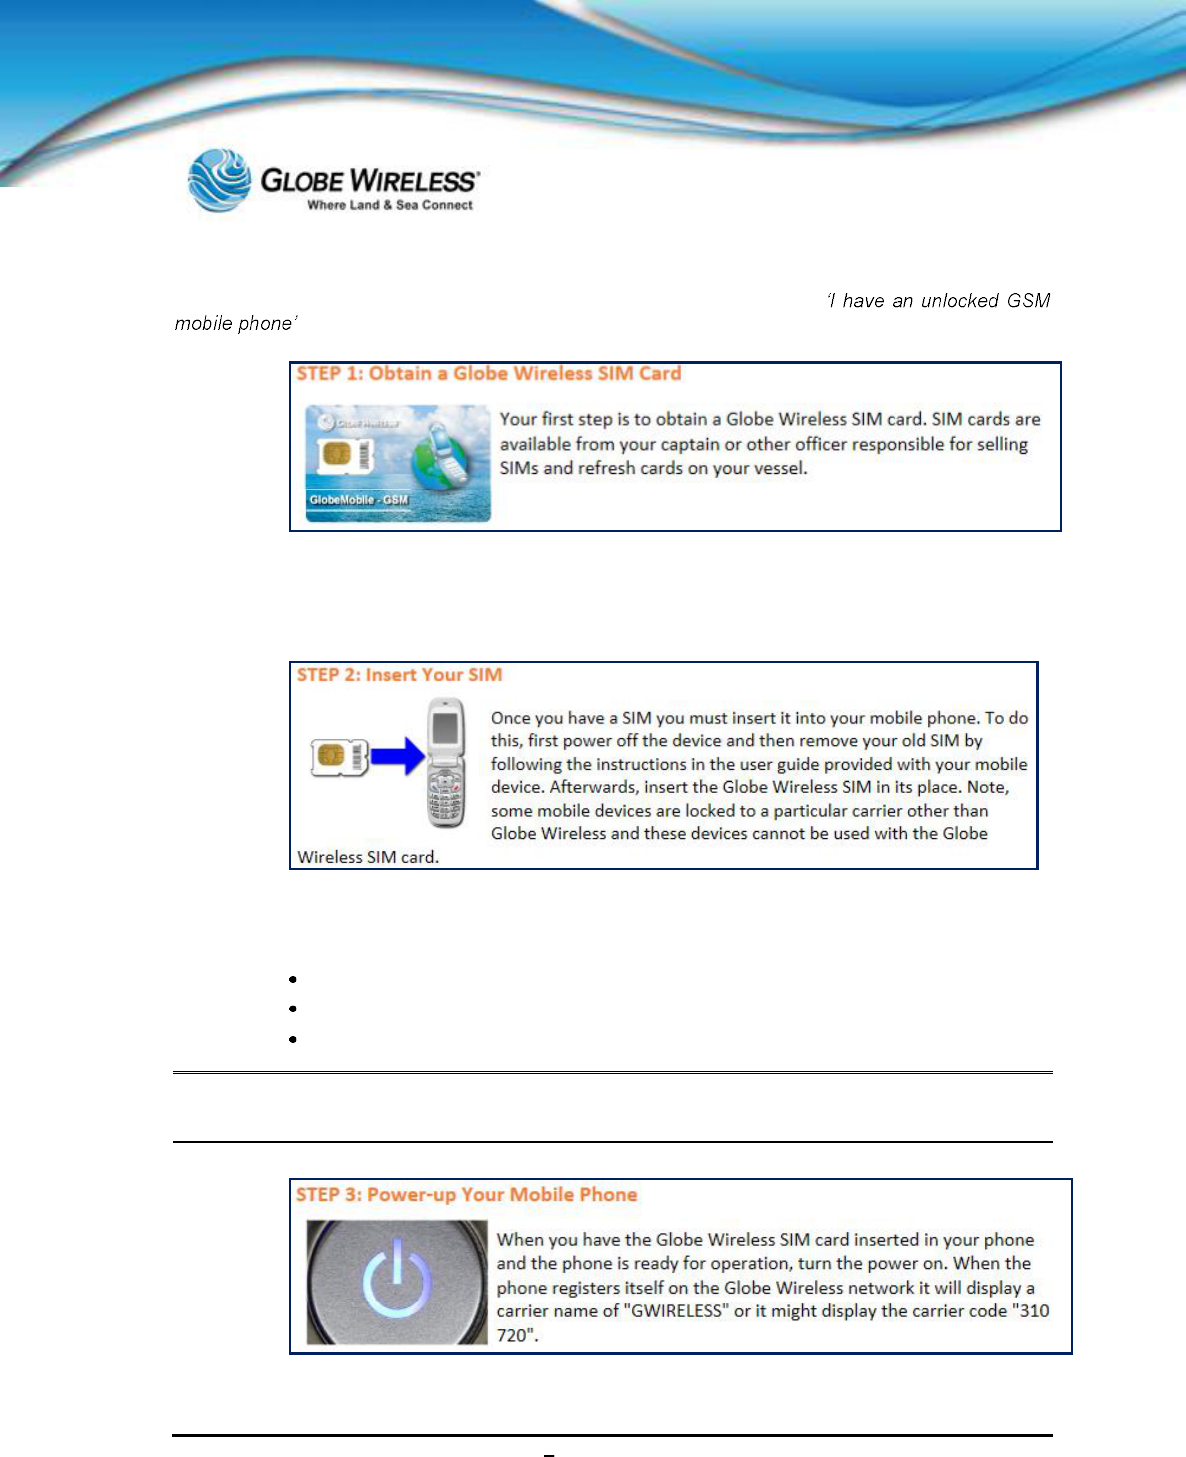
SWG-125 Rev. G June 2013
Globe iFusion ®User Guide for i500, i250, iSRev. G 7-4
If you have an unlocked GSM Mobile phone, click the corresponding link
and walk through the following steps:
Step 1: Referring to the graphic above, obtain a Globe Wireless SIM card, available from your
Captain or other designated officer responsible for selling SIM cards and refresh cards
on the vessel.
Step 2: Referring to the graphic above, insert the SIM into your mobile phone by performing the
following:
Power off the mobile phone
Remove the old SIM card following the instructions of the mobile device
Insert the Globe Wireless SIM in the slot from which the old SIM was removed
Note: Remember, some mobile devices are locked to a particular carrier. If this is the case you
will not be able to use the Globe Wireless SIM card in your current device.
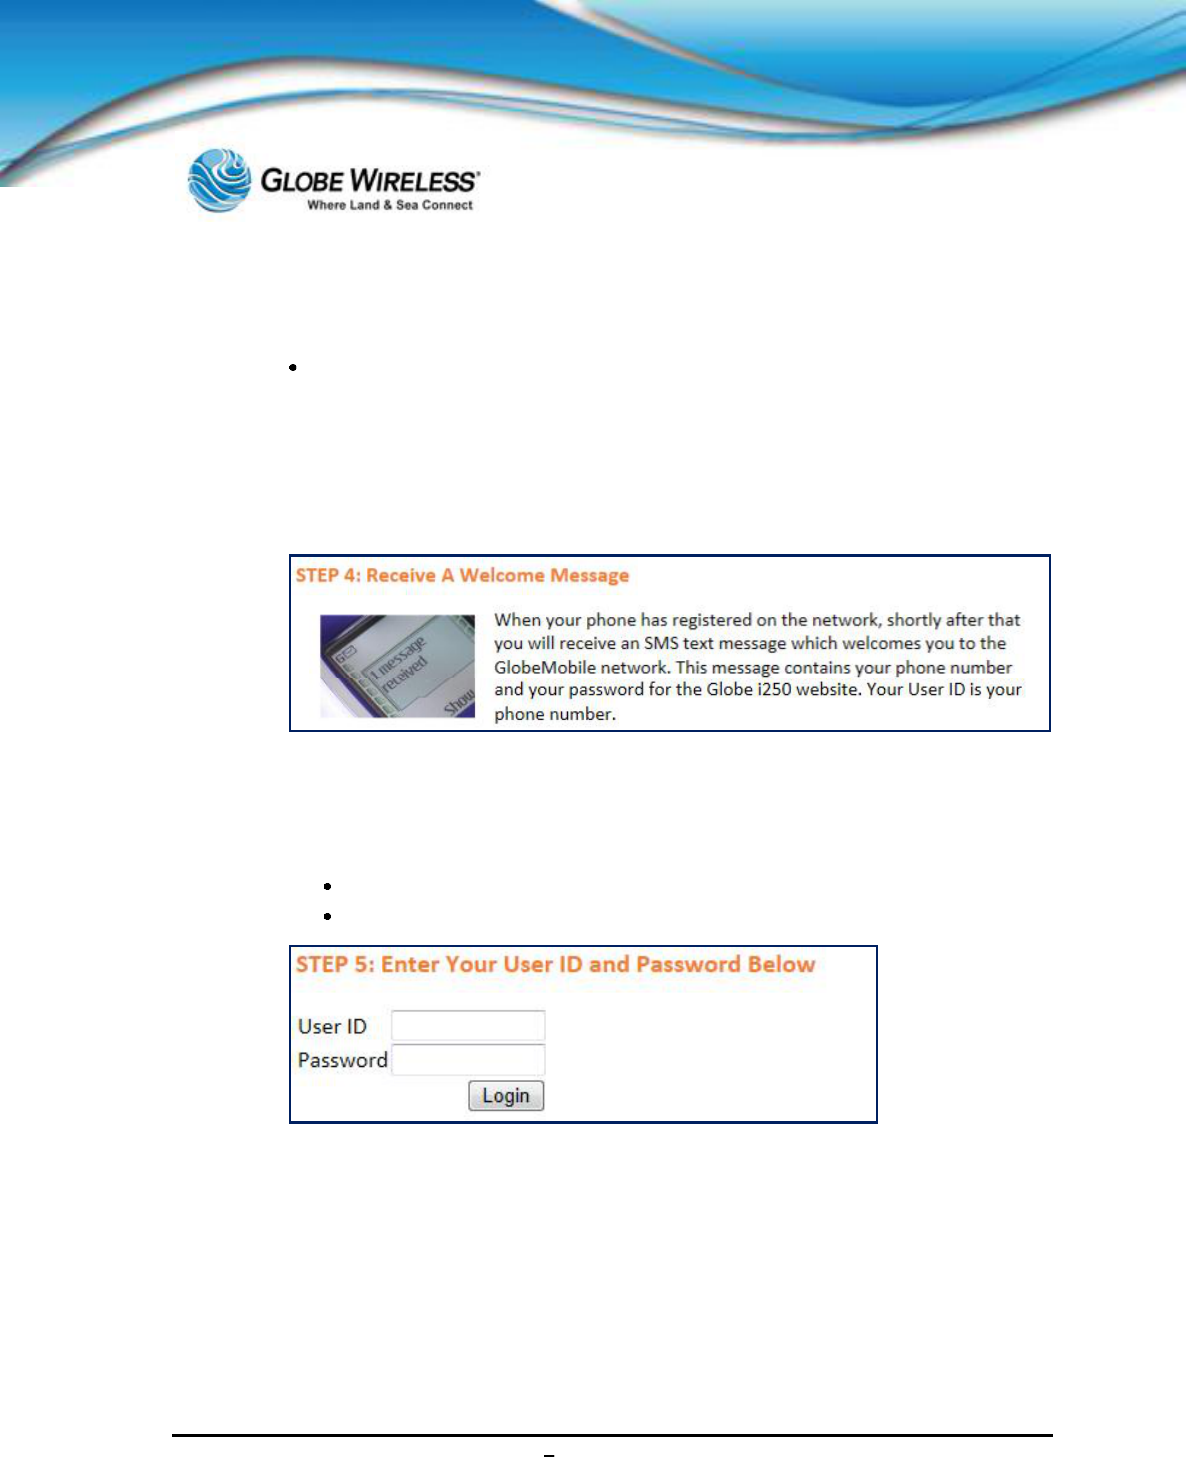
SWG-125 Rev. G June 2013
Globe iFusion ®User Guide for i500, i250, iSRev. G 7-5
Step 3: Referring to the graphic above, once the Globe Wireless SIM is inserted into your phone
and the phone is ready for operation, turn the power to ON.
Once the phone has registered itself on the Globe Wireless Network, one of the
following messages will be displayed:
Carrier Name: GWIRELESS
or
Carrier Code: 310 720
Step 4: Referring to the above graphic, wait to receive an SMS text message welcoming you to
the GlobeMobile network once your phone has been registered (on the Network).
This message will contain the following information:
Your phone number (Your phone number is also your userid)
Your password for the Globe iFusion® website
Step 5: Once you are set up and have received your phone number (userid) and password, log
in by typing your Userid and Password, and then clicking the Login button.
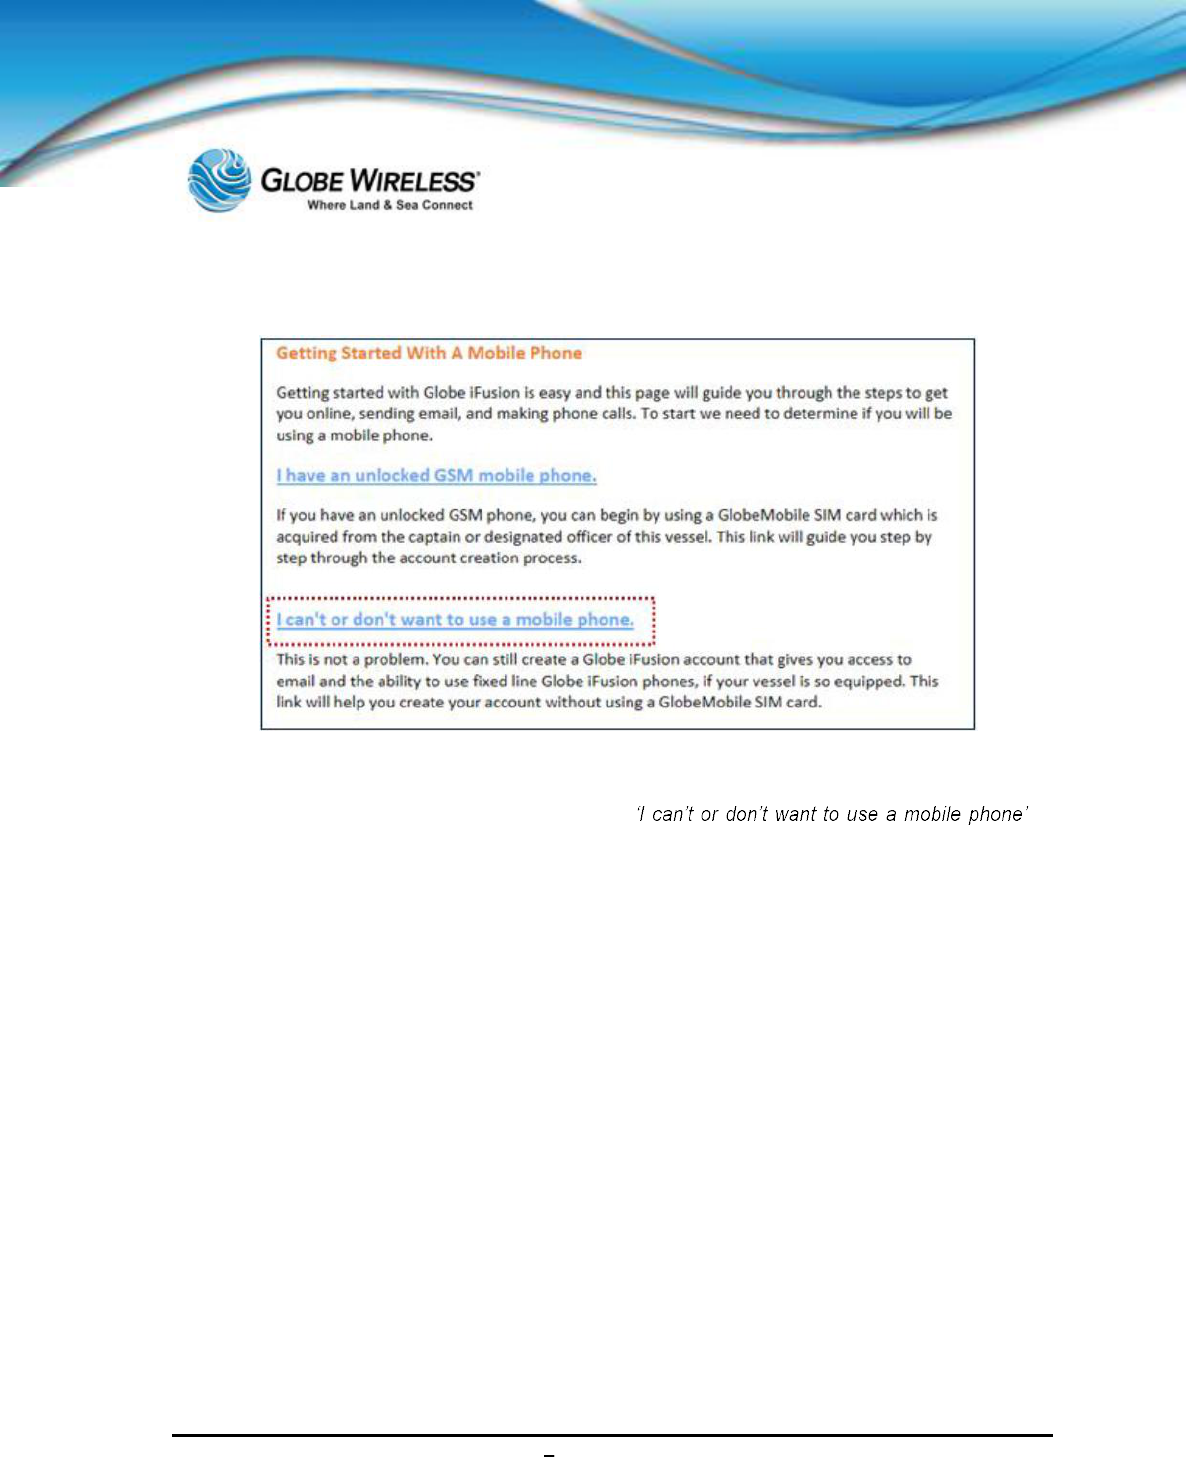
SWG-125 Rev. G June 2013
Globe iFusion ®User Guide for i500, i250, iSRev. G 7-6
7.2.1.2 No Mobile Phone
If for whatever reason you do not click on first option; whether you do not have an unlocked mobile
phone, or do not wish to use a mobile phone, you can still create an account without using a
GlobeMobile SIM card. Click the corresponding link to
display the Create a new Globe iFusion® Account screen.
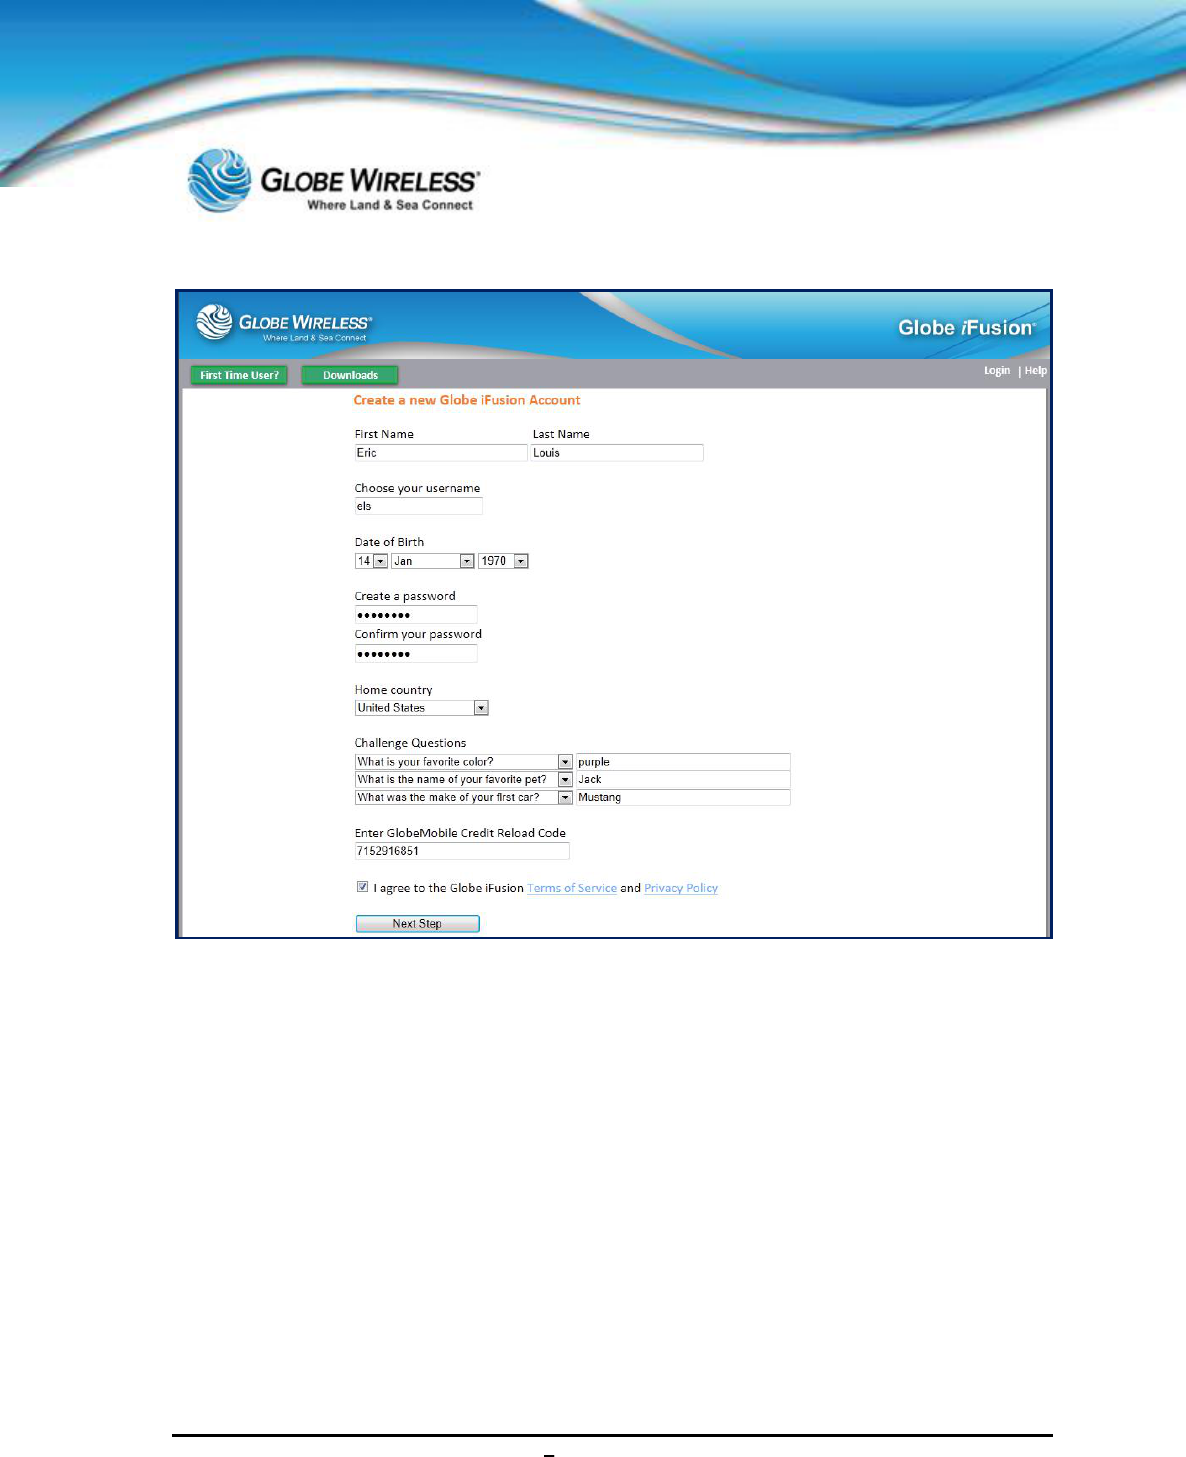
SWG-125 Rev. G June 2013
Globe iFusion ®User Guide for i500, i250, iSRev. G 7-7
Step 1: Populate the fields in the screen with your name, username, Date of Birth, password,
and home country.
Step 2: Answer the three Challenge Questions. (You can click on the drop-down arrow to
select a different challenge question, if desired.) If for some reason you forget your
logon or password, these questions will be asked to verify your identification before
authorizing log on.
Step 3: Enter the GlobeMobile Credit Reload Code which you should have received from the
captain or authorized personnel.
Step 4: Click the links to read the Terms of Service and the Privacy Policy. Once read and
understood, click to place a checkmark in the I Agree checkbox and click the Next Step
button. A pop-up confirmation will be displayed.
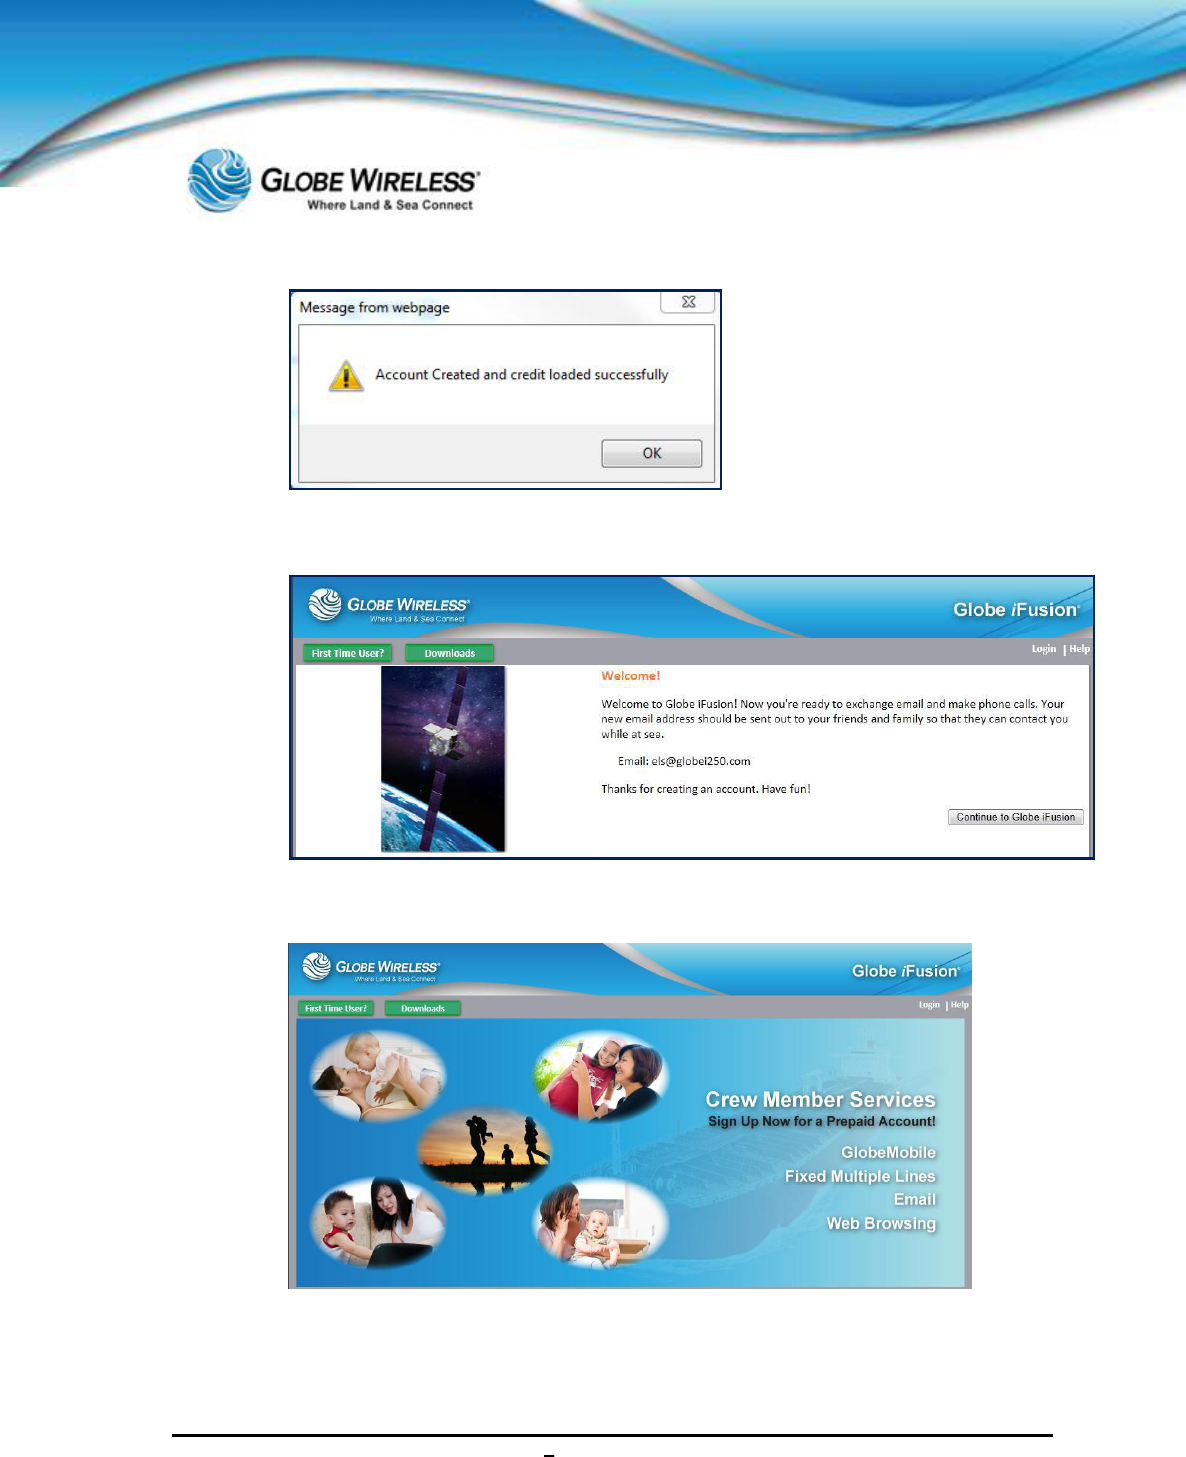
SWG-125 Rev. G June 2013
Globe iFusion ®User Guide for i500, i250, iSRev. G 7-8
Step 5: Click OK to display a Welcome! Screen which displays your email address.
Step 6: Click the Continue to Globe iFusion button which will re-display the opening page..
Step 7: Click the Login button to display the Login popup.
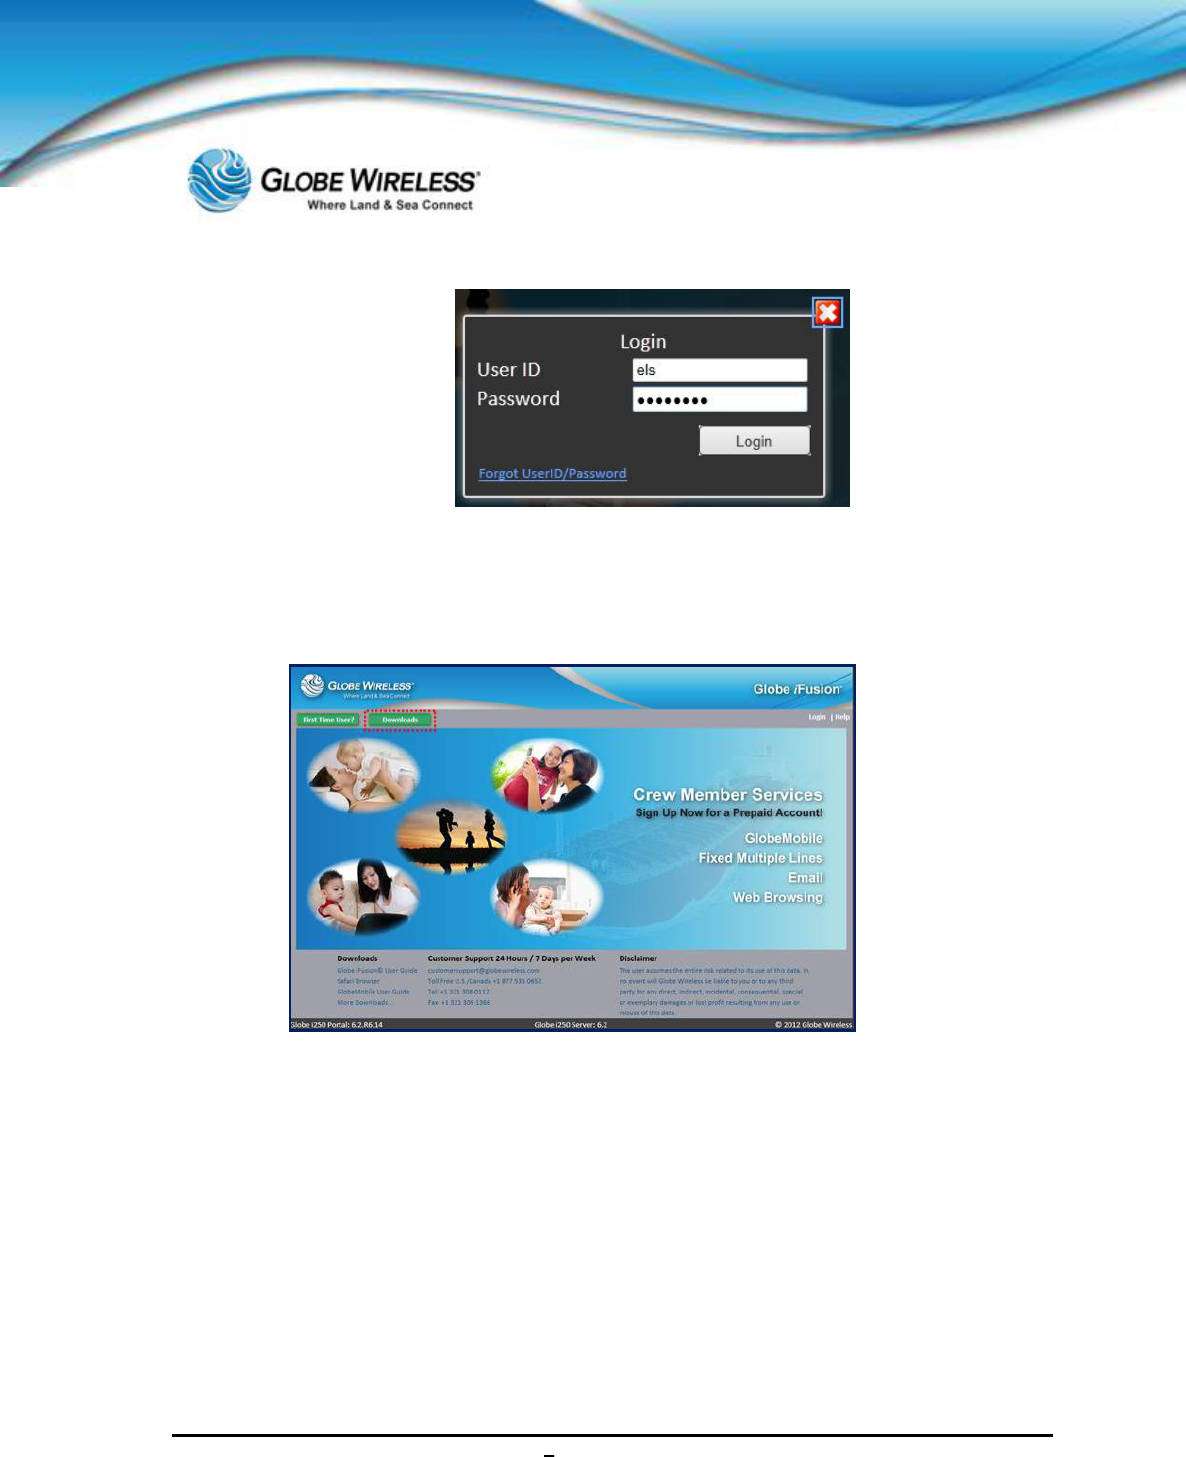
SWG-125 Rev. G June 2013
Globe iFusion ®User Guide for i500, i250, iSRev. G 7-9
Step 8: Enter your User ID and Password and click the Login button.
7.2.2 Downloads
Step 1: Click the Downloads link located on the login page to display a list of free downloads.
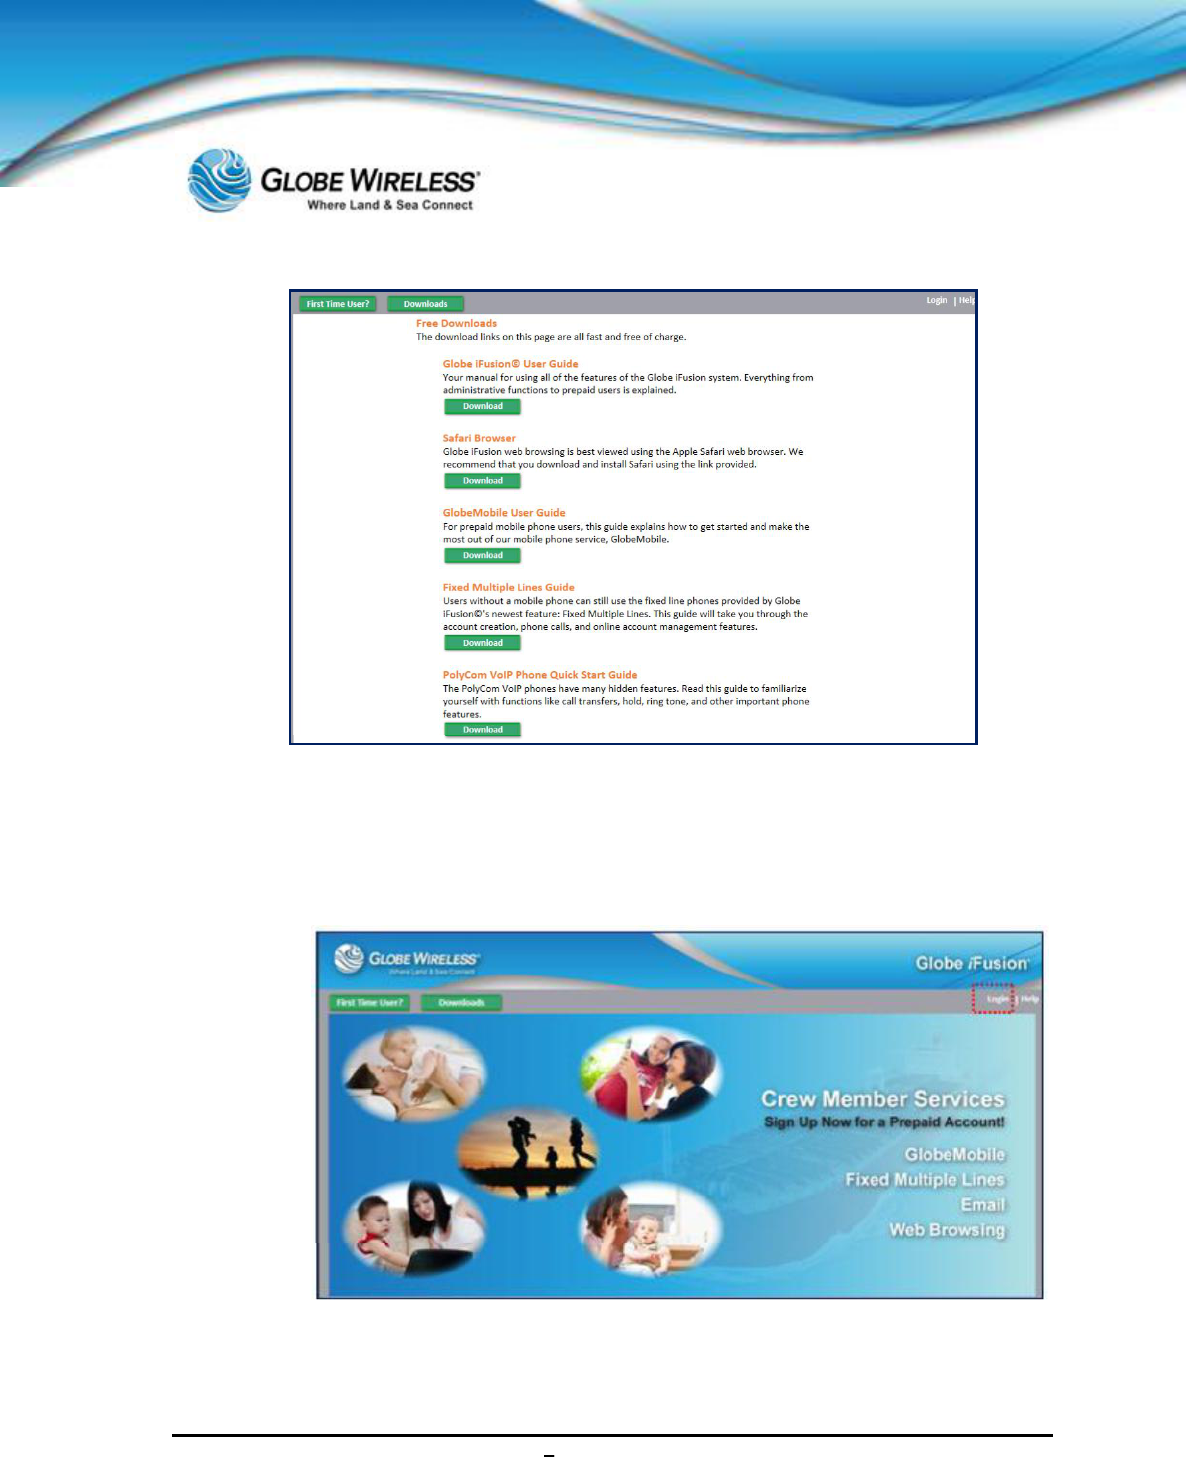
SWG-125 Rev. G June 2013
Globe iFusion ®User Guide for i500, i250, iSRev. G 7-10
Step 2: Click the Download button below the item to be downloaded and follow the download
instructions.
7.2.3 Login
Step 1: If you know your login and password, click the Login link to display he login pop-up.
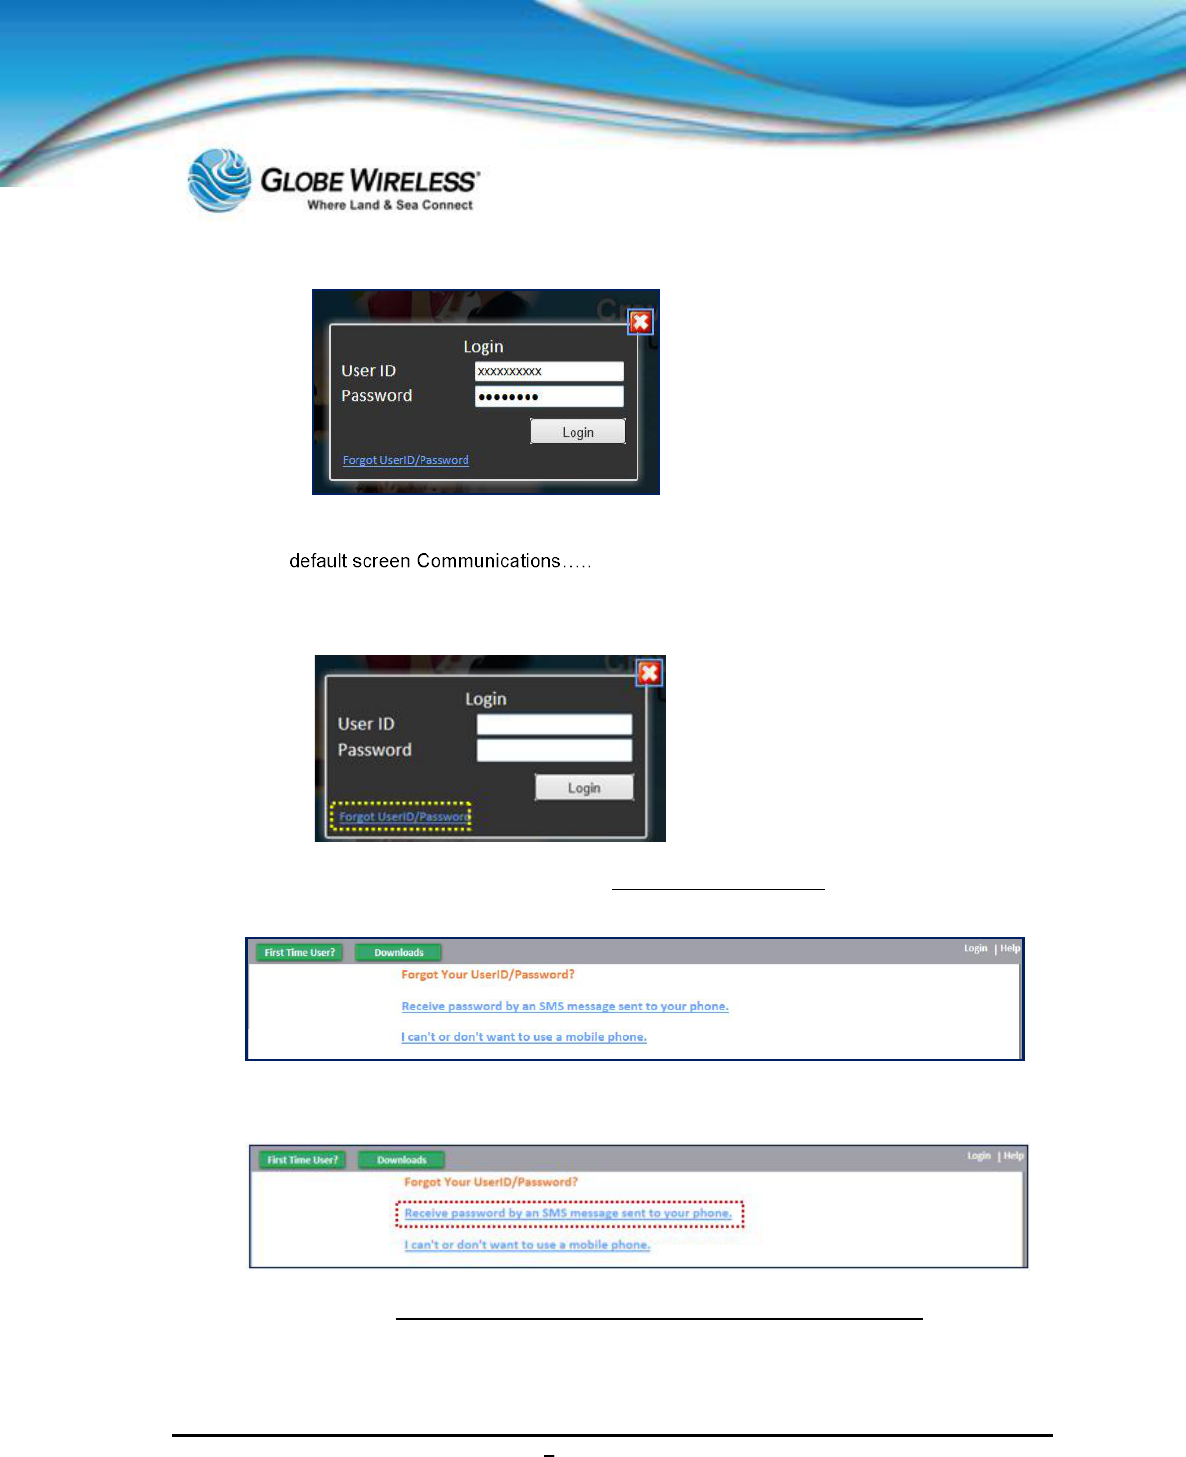
SWG-125 Rev. G June 2013
Globe iFusion ®User Guide for i500, i250, iSRev. G 7-11
Step 2: Type your User ID and Password in the fields and click the Login button to display the
7.2.3.1 Forgot Password
If you have forgotten your Password, click on the Forgot UserID/Password link on the Login pop-up.
The Forgot Your UserID/Password? screen is displayed.
Receive password by an SMS message sent to your phone
Step 1: Click the Receive password by an SMS message sent to your phone link to display
the Forgot your Password? screen.
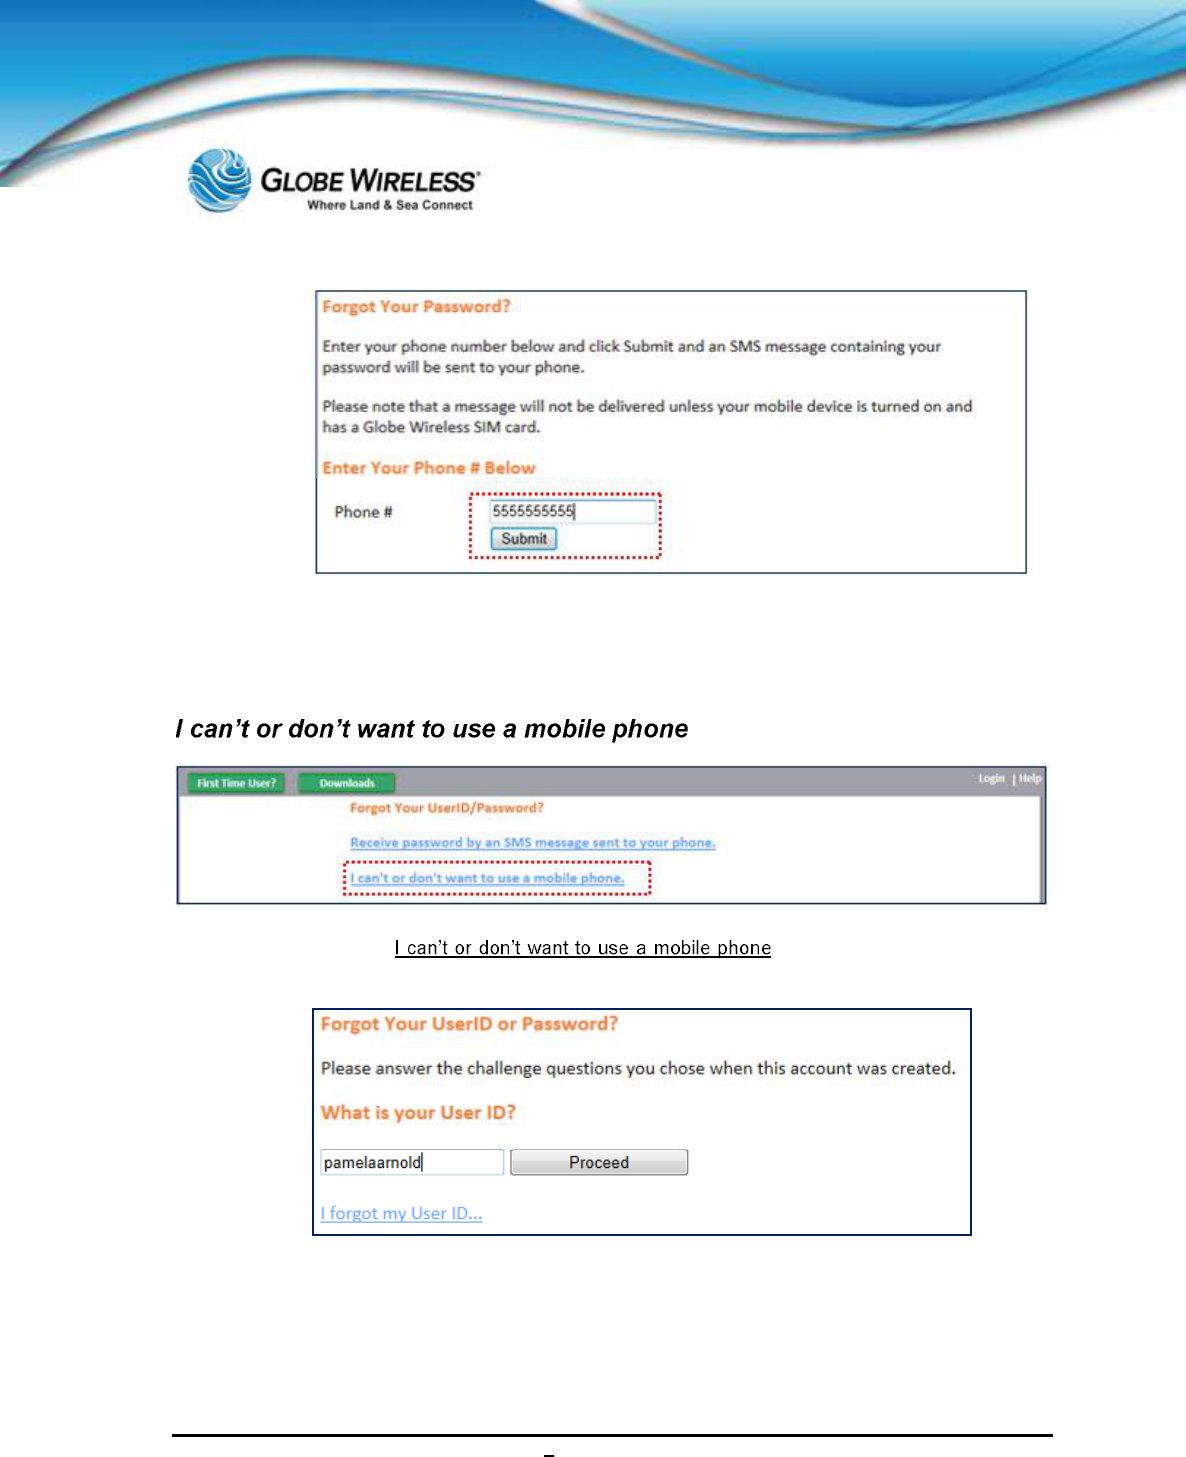
SWG-125 Rev. G June 2013
Globe iFusion ®User Guide for i500, i250, iSRev. G 7-12
Step 2: Type your phone number in the Phone # field and click the Submit button.
Your password will be sent to your phone via SMS message.
Step 1: Click the link to display the Forgot your
Password? screen.
Step 2: Type your User ID in the field (as shown above) and click the Proceed button.
A screen will be displayed requesting you supply a new password, your date of birth, and the answers
to the three challenge questions.
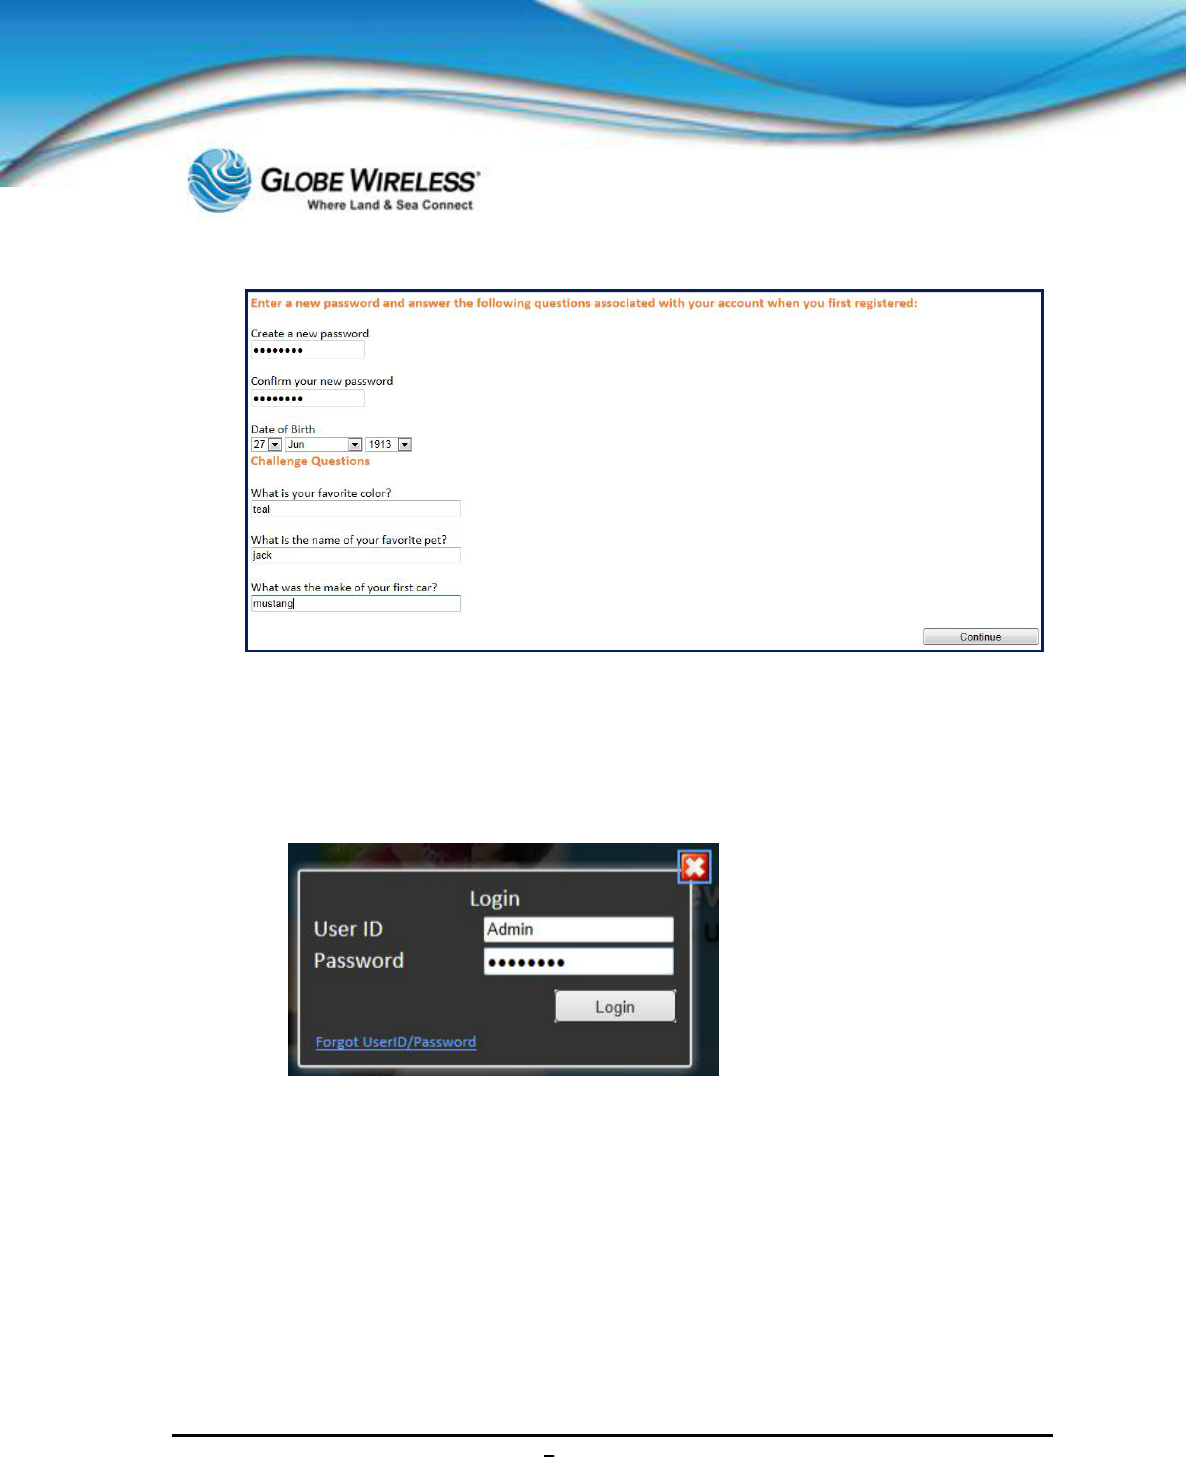
SWG-125 Rev. G June 2013
Globe iFusion ®User Guide for i500, i250, iSRev. G 7-13
Step 3: Populate the required fields and click the Continue button.
Step 4: The opening screen is once again displayed.
Step 5: Click on Login at the top right corner of the screen to display the Login pop-up.
Step 6: Enter your User ID and the password you just created and click the Login button. The
default Communication Status screen will be displayed.
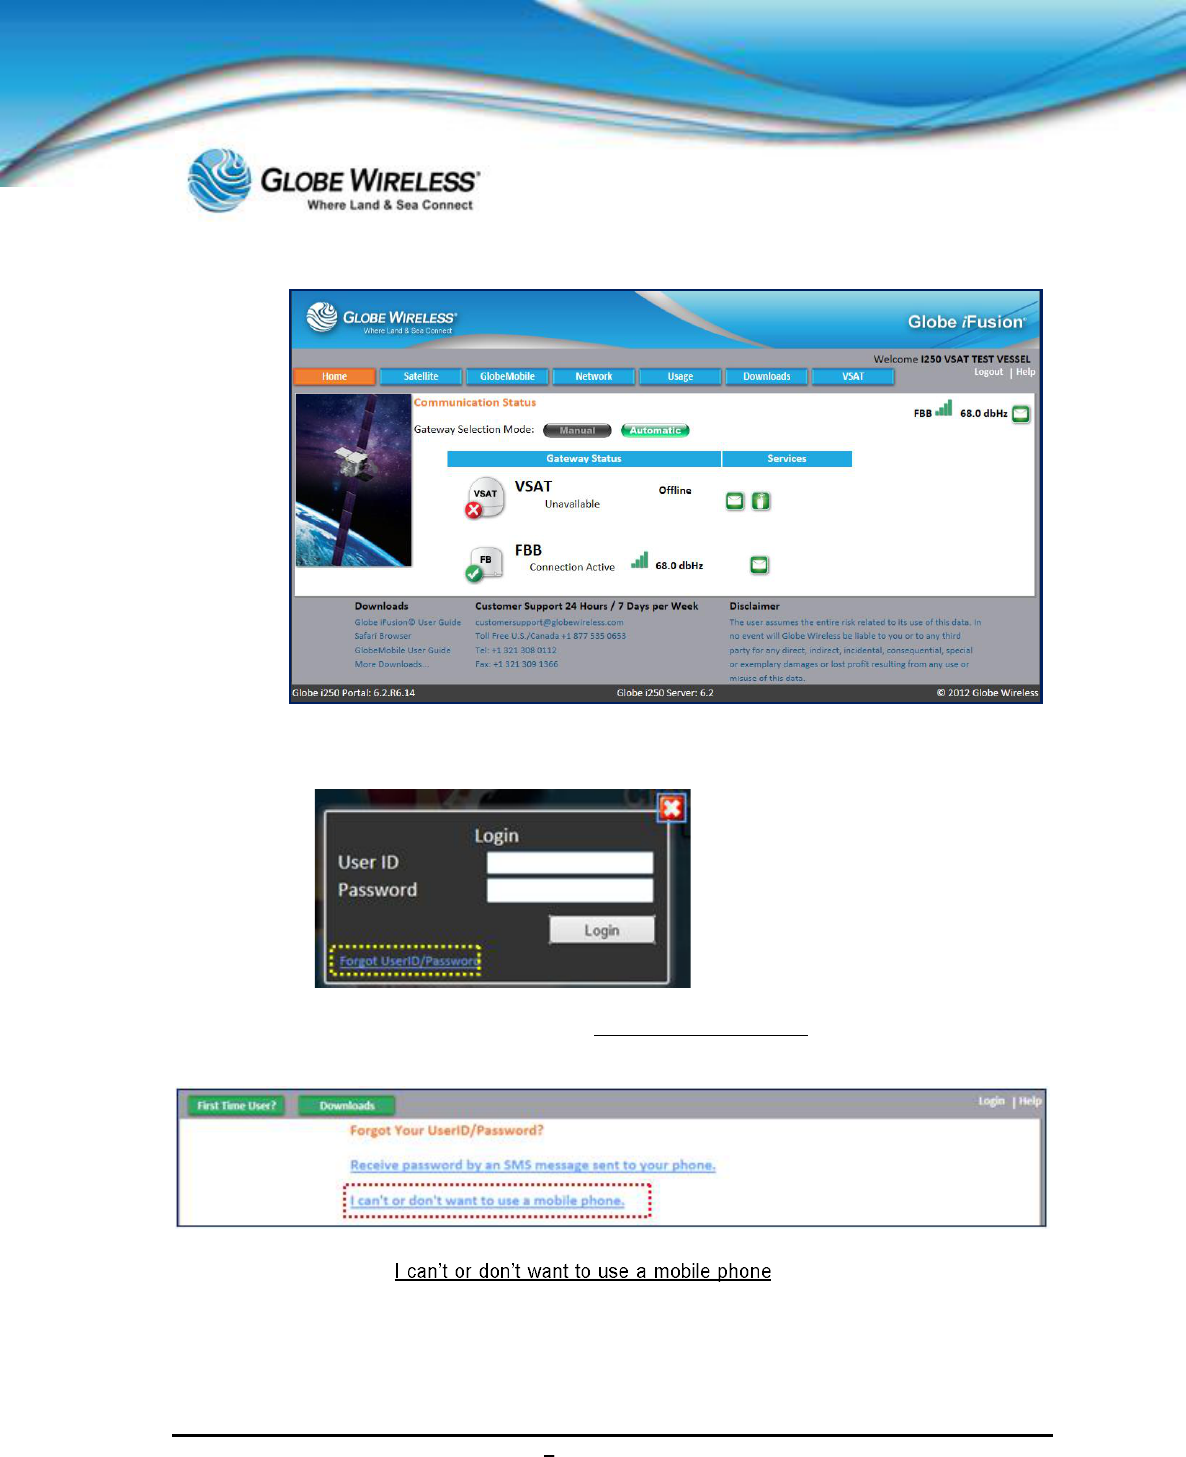
SWG-125 Rev. G June 2013
Globe iFusion ®User Guide for i500, i250, iSRev. G 7-14
7.2.3.2 Forgot User ID
If you have forgotten your User ID, click on the Forgot UserID/Password link on the Login pop-up to
display the Forgot Your UserID/Password? screen.
Step 1: Click the link to display the Forgot your
UserID or Password? screen.
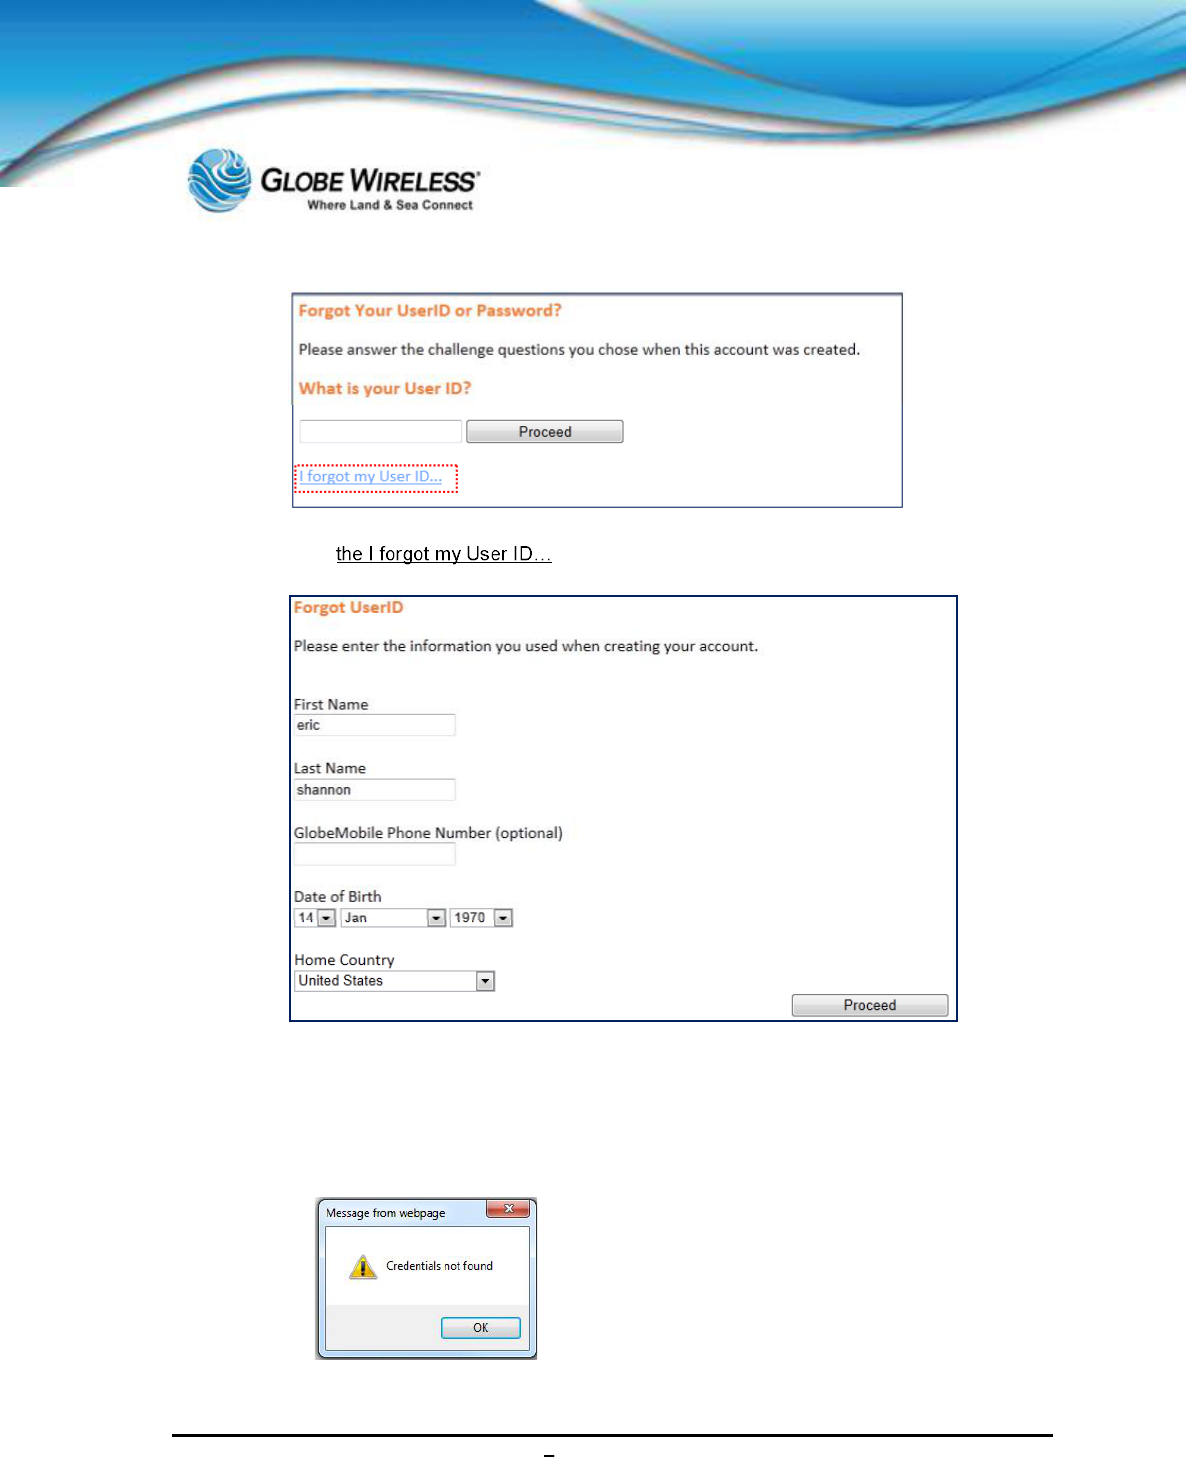
SWG-125 Rev. G June 2013
Globe iFusion ®User Guide for i500, i250, iSRev. G 7-15
Step 2: Click link to display the Forgot UserID screen.
Step 3: Populate the First name,Last name,Date of Birth, and Home Country fields; then click
the Proceed button. Your User ID will be displayed.
If you entered erroneous information on the Forgot User ID page, you will receive the following error
message. Click OK and follow the steps.
SWG-125 Rev. G June 2013
Globe iFusion ®User Guide for i500, i250, iSRev. G 7-16
7.2.4 Placing and Receiving Calls
Step 1: Dial + [country code] [area code] [number]. You may hear a dial tone or ringing tone
depending on destination and time delay.
Step 2: Once you have finished the call, hang-up.
Note: Once disconnected, you will receive a free text message with the cost of the call and your
remaining balance.
7.2.5 SMS Text messaging
Step 1: Enter your SMS message (refer to your phone user manual for instructions). An SMS
message can be up to 160 characters in length.
Step 2: or email address (refer to your phone
user manual for instructions).
Step 3: Send the message.
Note: Multimedia (MMS) messages are not currently supported.
7.2.6 Operation Entering and Exiting Shipping Ports
Although you can use the GlobeMobile SIM to roam on standard GSM shore networks, these calls
are at much higher rates. Globe Wireless recommends that you use a local SIM while on shore
whenever possible. Also note that as the vessel enters and leaves a distance of two miles from the
shoreline, the Globe iFusion®may disable and enable the GSM Antenna unit(s).
Important! It is especially important for mobile phone users to take note of which carrier is
displayed on their device once the vessel nears the shoreline. The Globe Wireless
carrier symbol is GWIRELESS.
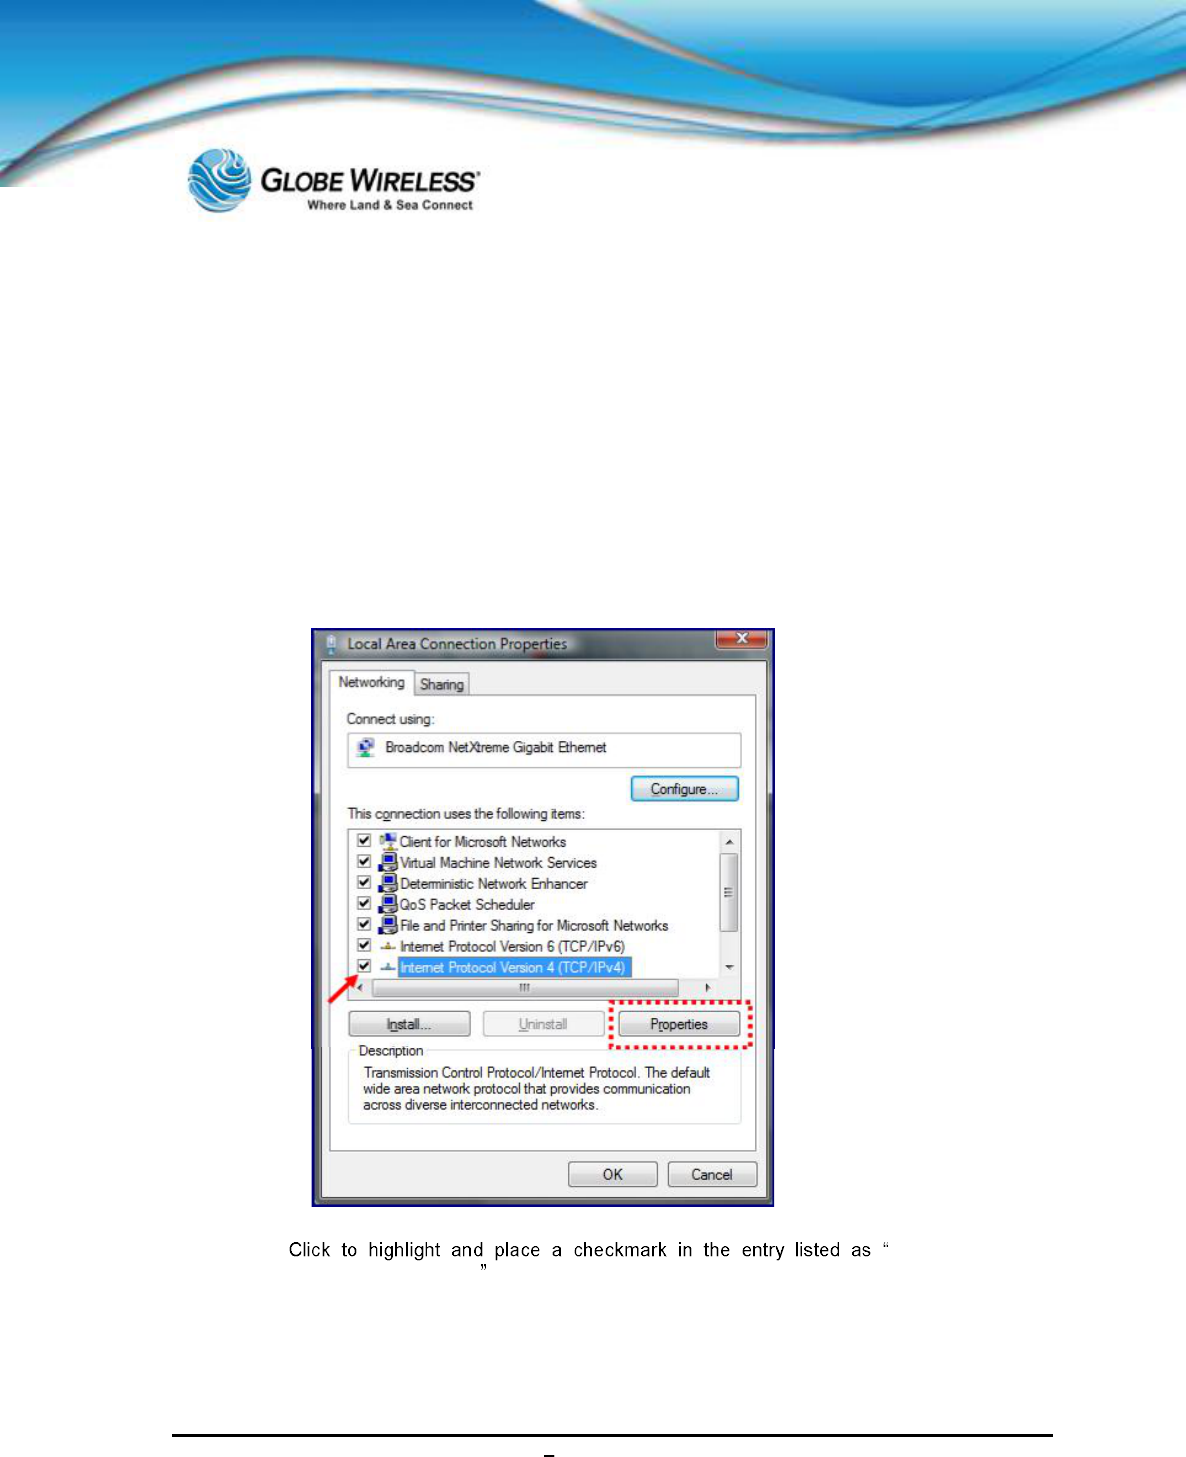
SWG-125 Rev. G June 2013
Globe iFusion ®User Guide for i500, i250, iSRev. G 8-1
8.0 Web-Based Software
8.1 Getting Connected
8.1.1 Configuring your IP Connection
The Globe iFusion® supports the network protocol DHCP to automatically configure your PC with
the correct network settings. To ensure your PC is configured to this setting, go to Control Panel |
Network Settings | Local Area Connection (Click View Status). Click the Properties button to
display the Local Area Connection Properties screen.
Step 1: Internet Protocol
Version 4 (TCP/IPv4) .
Step 2: Click the properties button to display the Internet Protocol Version 4 Properties screen.
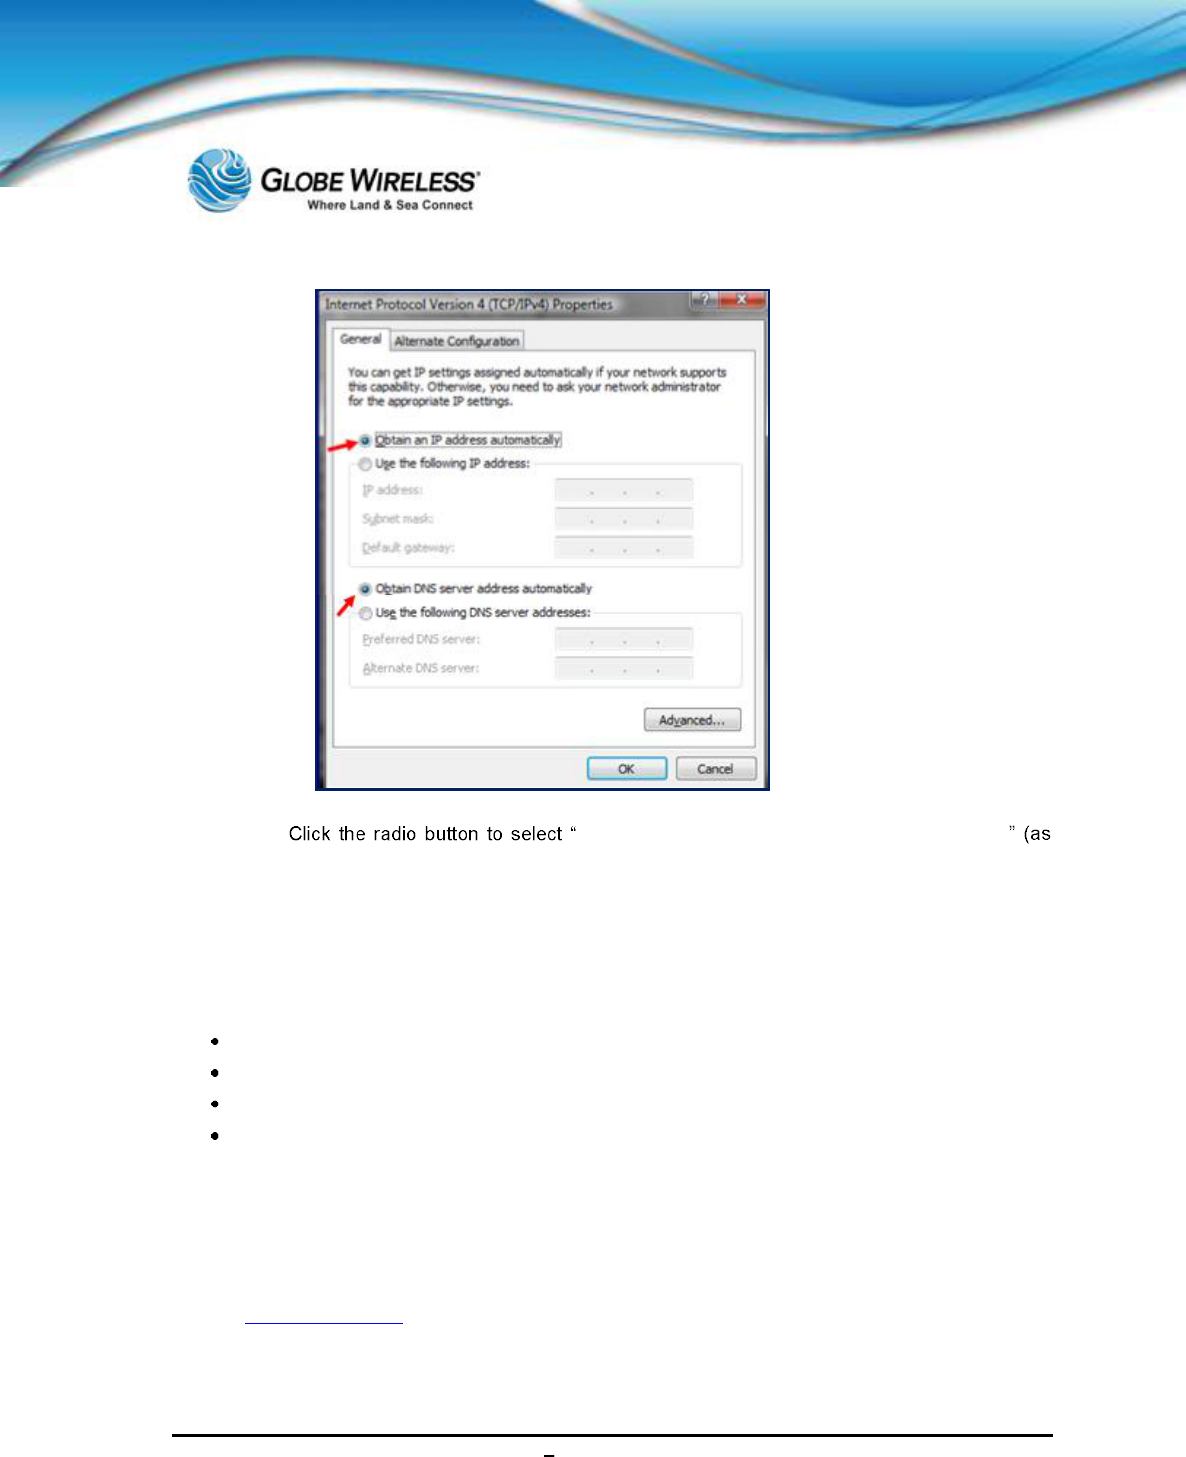
SWG-125 Rev. G June 2013
Globe iFusion ®User Guide for i500, i250, iSRev. G 8-2
Step 3: Obtain IP and DNS server address automatically
shown in the above example) to ensure that web browsing works properly.
8.1.2 Supported Web Browsers
Globe iFusion® web application supports the most recent versions of all major web browsers to
include:
Microsoft Internet Explorer version 8
Apple Safari version 5 (recommended)
Google Chrome version 3
Mozilla Firefox version 3
8.1.3 The URL
The Globe iFusion®web application can be accessed by its name. To access this web application,
open your web browser and type (for example):
http://globe.ifusion
Alternatively, the Globe iFusion® web application can be accessed by its IP address.
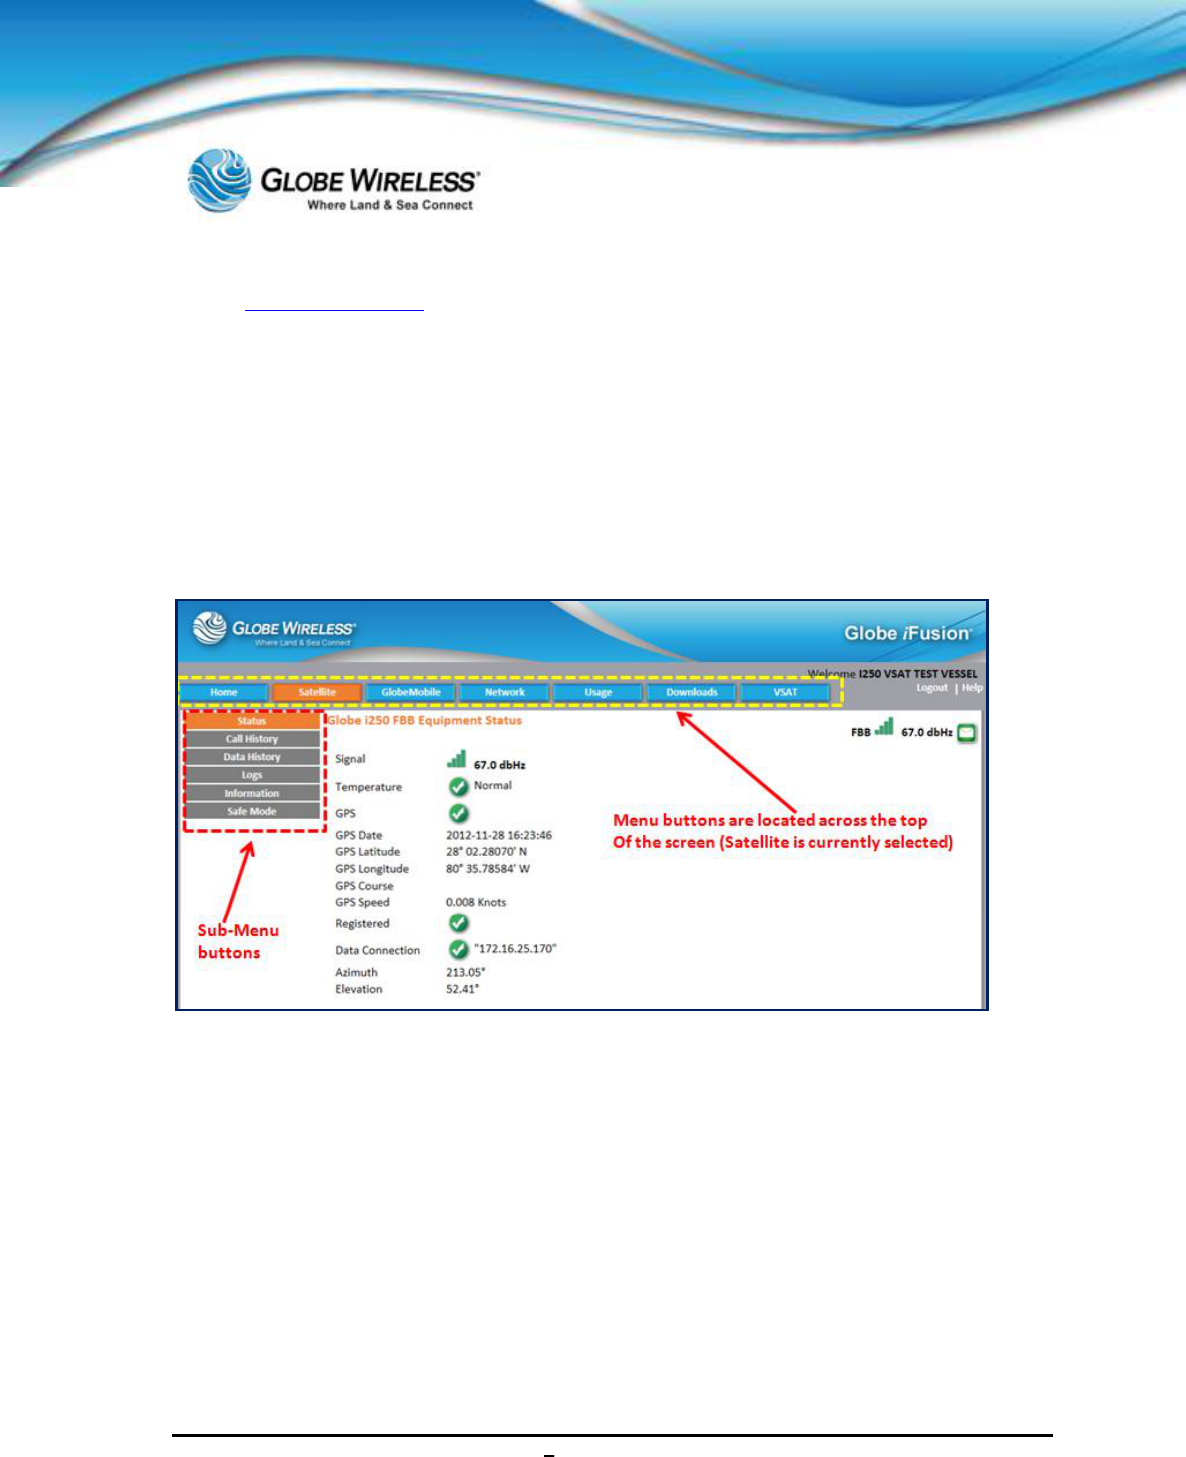
SWG-125 Rev. G June 2013
Globe iFusion ®User Guide for i500, i250, iSRev. G 8-3
http://192.168.1.210
(Substitute the example of 192.168.1.210 with the IP Address of your Globe iFusion®.)
8.2 Navigation
8.2.1 The Menu and Sub-Menu
Once you have entered the URL and logged into the Globe iFusion®, depending on where you
navigate to, determines the menu / sub-menu items displayed. The following is an example of the
(Satellite) menu as well as the associated sub-menu:
In the above example, the Menu button selected is Satellite. The sub-menu buttons associated with
Satellite are displayed on the left side of the screen. If the user presses the Network Menu button, a
different set of sub-menu buttons will be displayed on the left side of the screen.
The menus and sub-menus are described within this document.
8.2.2 Help
Click on Help at anytime from any screen to access the Online Help application.
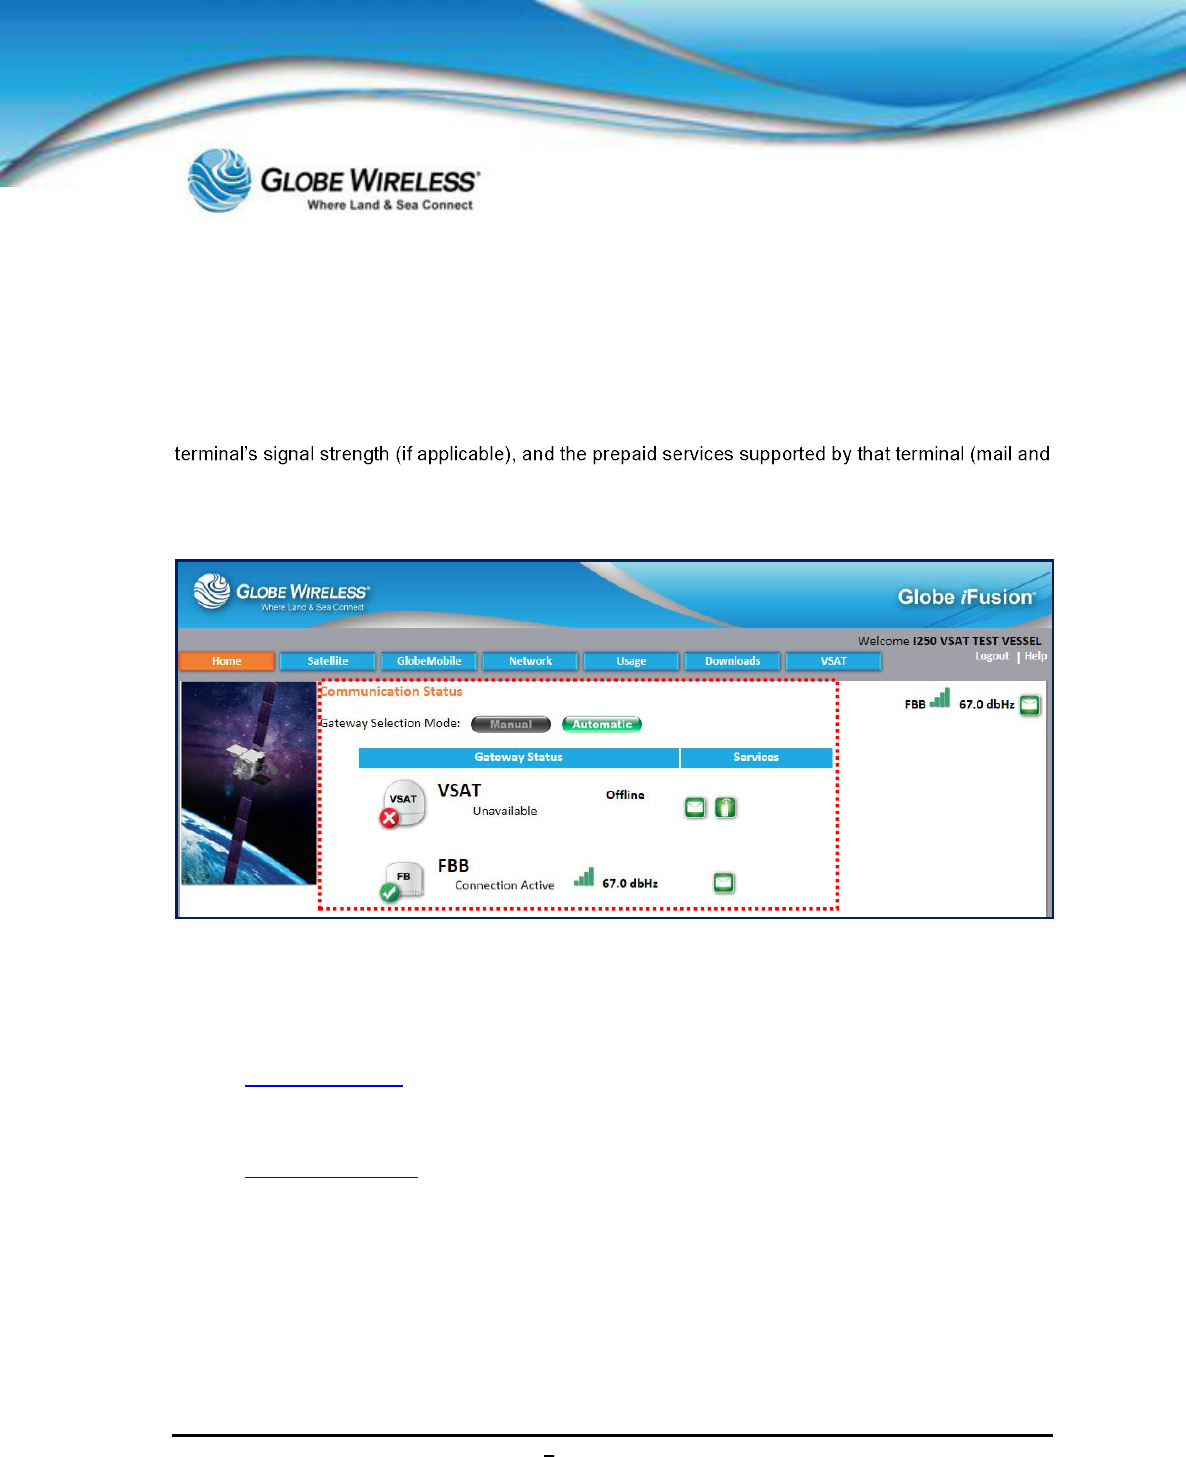
SWG-125 Rev. G June 2013
Globe iFusion ®User Guide for i500, i250, iSRev. G 8-4
8.2.3 Communication Status (Home Page)
Click on the Home menu button at any time to navigate to the Home Page which contains the
Communication Status information on services currently in use.
This page gives a quick view of which satellite terminal the Globe iFusion® currently prefers, that
phone).
It also displays the Gateway Selection Mode: Manual or Automatic.
8.2.4 Login
To access the web application, open your web browser and type the following URL:
http://globe.ifusion
Alternatively you can type the IP address of the Globe iFusion®. For example:
http://192.168.1.210
The opening screen is displayed. If you already have an account, you can log in. If you are a first time
user, you can set up a new account from this screen.
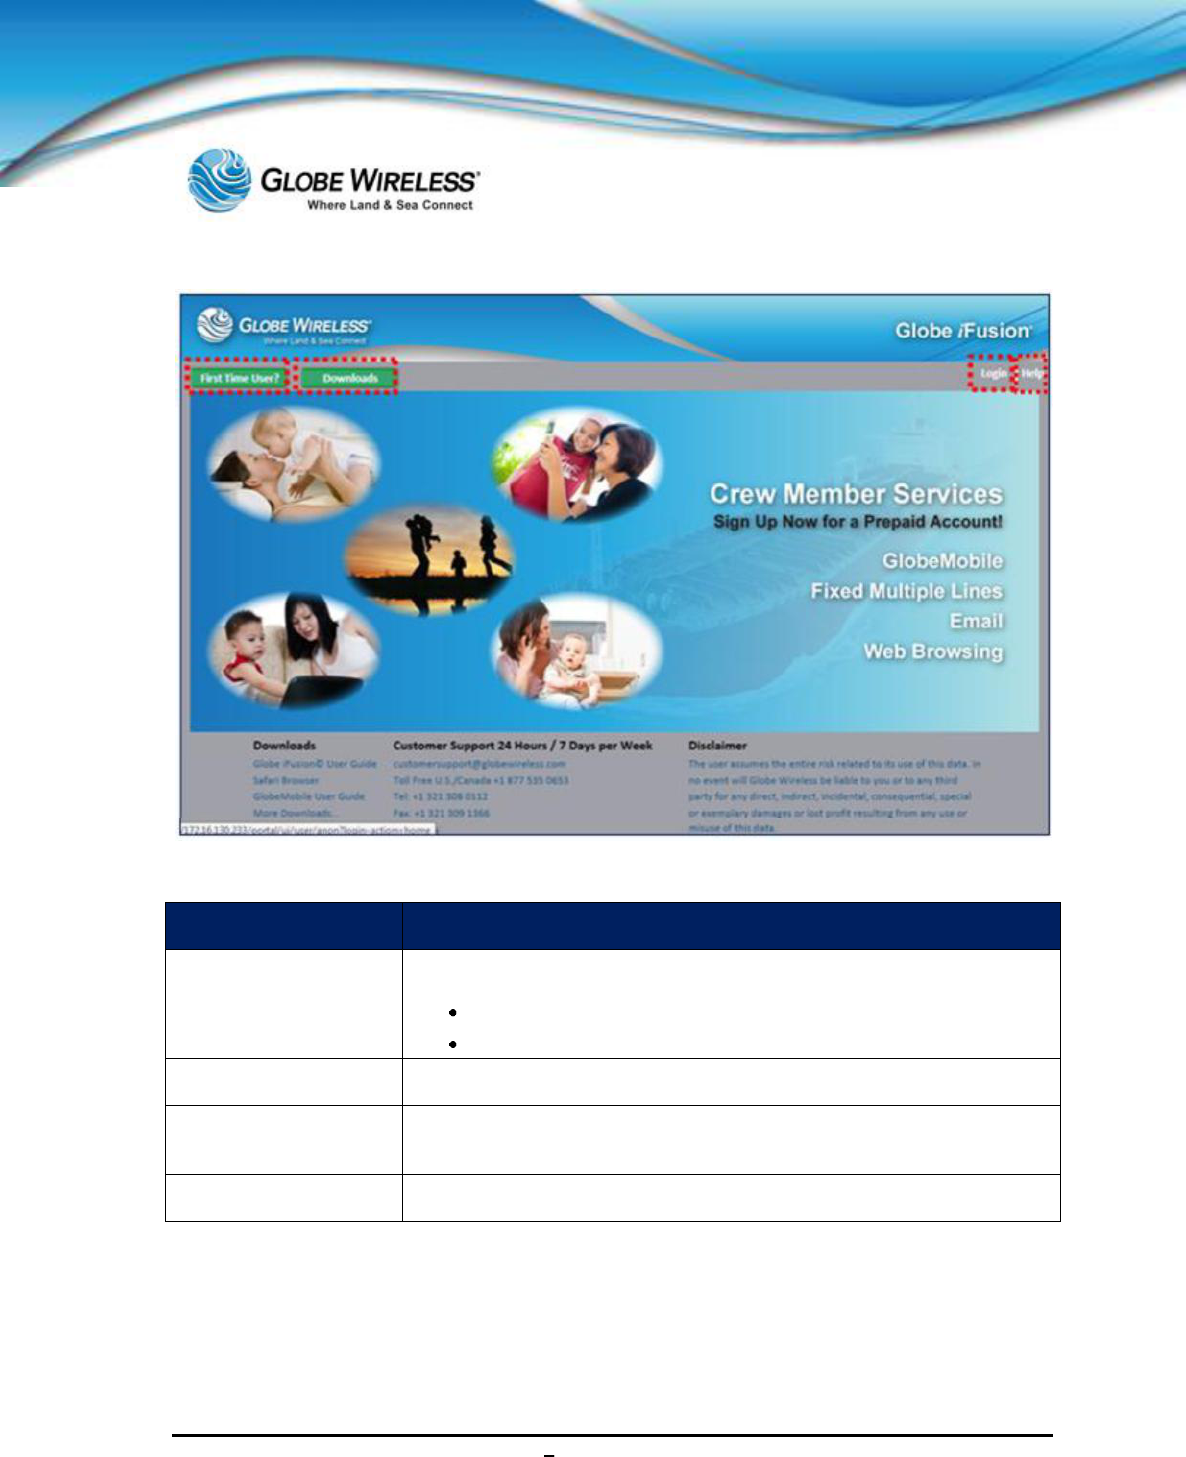
SWG-125 Rev. G June 2013
Globe iFusion ®User Guide for i500, i250, iSRev. G 8-5
Refer to the following table for a description of the fields located on the main Globe iFusion® screen:
Component Description
First Time User?
Button
Click to set up a new account
Using your own mobile phone
Sign up for prepaid email service only
Downloads Click to display a list of available downloads.
Login Click to display the pop-up Login screen where you will enter your
User
ID and Password.
Help Click at any time from any screen to access the Online Help
application.

SWG-125 Rev. G June 2013
Globe iFusion ®User Guide for i500, i250, iSRev. G 8-6
8.2.5 Logout
Click the Logout button at any time to log off the system.
When you logout, you will be returned to the Globe iFusion® beginning screen.
8.3 Users
There are three types of users for the Globe iFusion®:
Admin
Prepaid_user
Web Browser
Each user type is discussed in the following sections. You may also click on a user type from the
(above) list to link to the specific section.
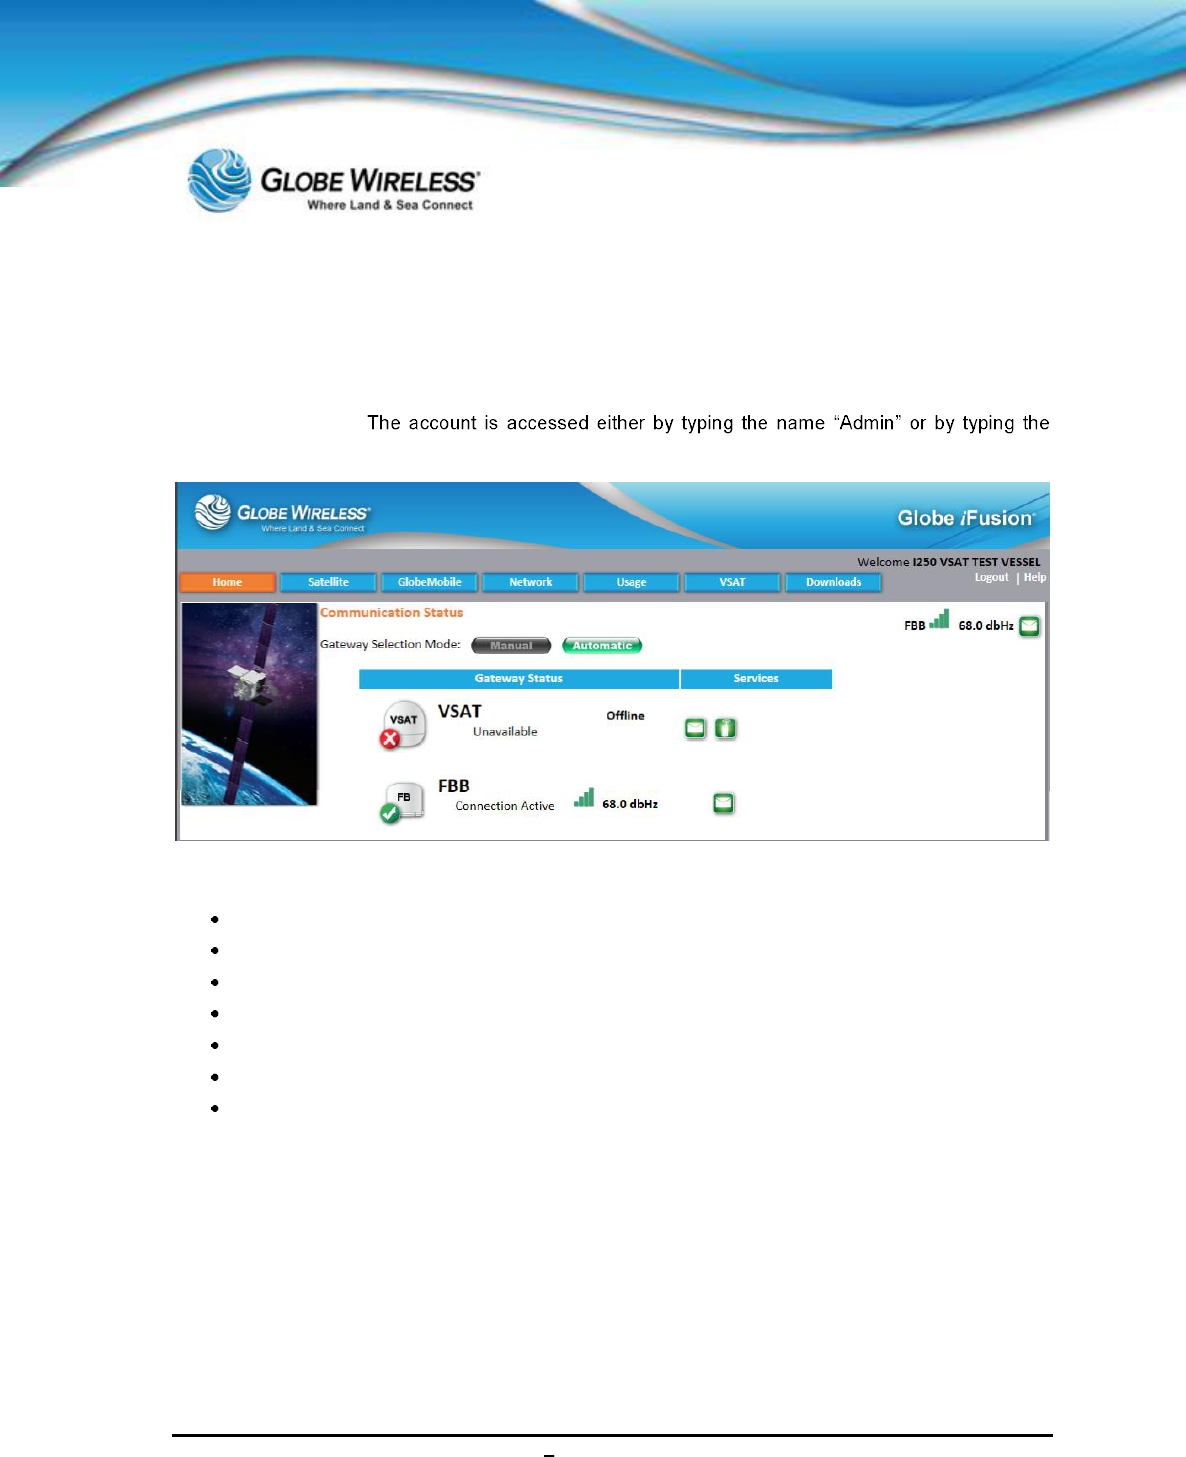
SWG-125 Rev. G June 2013
Globe iFusion ®User Guide for i500, i250, iSRev. G 9-1
9.0 Admin User
The Admin user is used to view the current settings of the Globe iFusion®. The user has no email or
web browsing ability.
Globe iFusion® ID number and then the password.
The Admin User Globe iFusion® screen contains the following tabs:
Home(default)
Satellite
GlobeMobile
Network
Usage
VSAT
Downloads
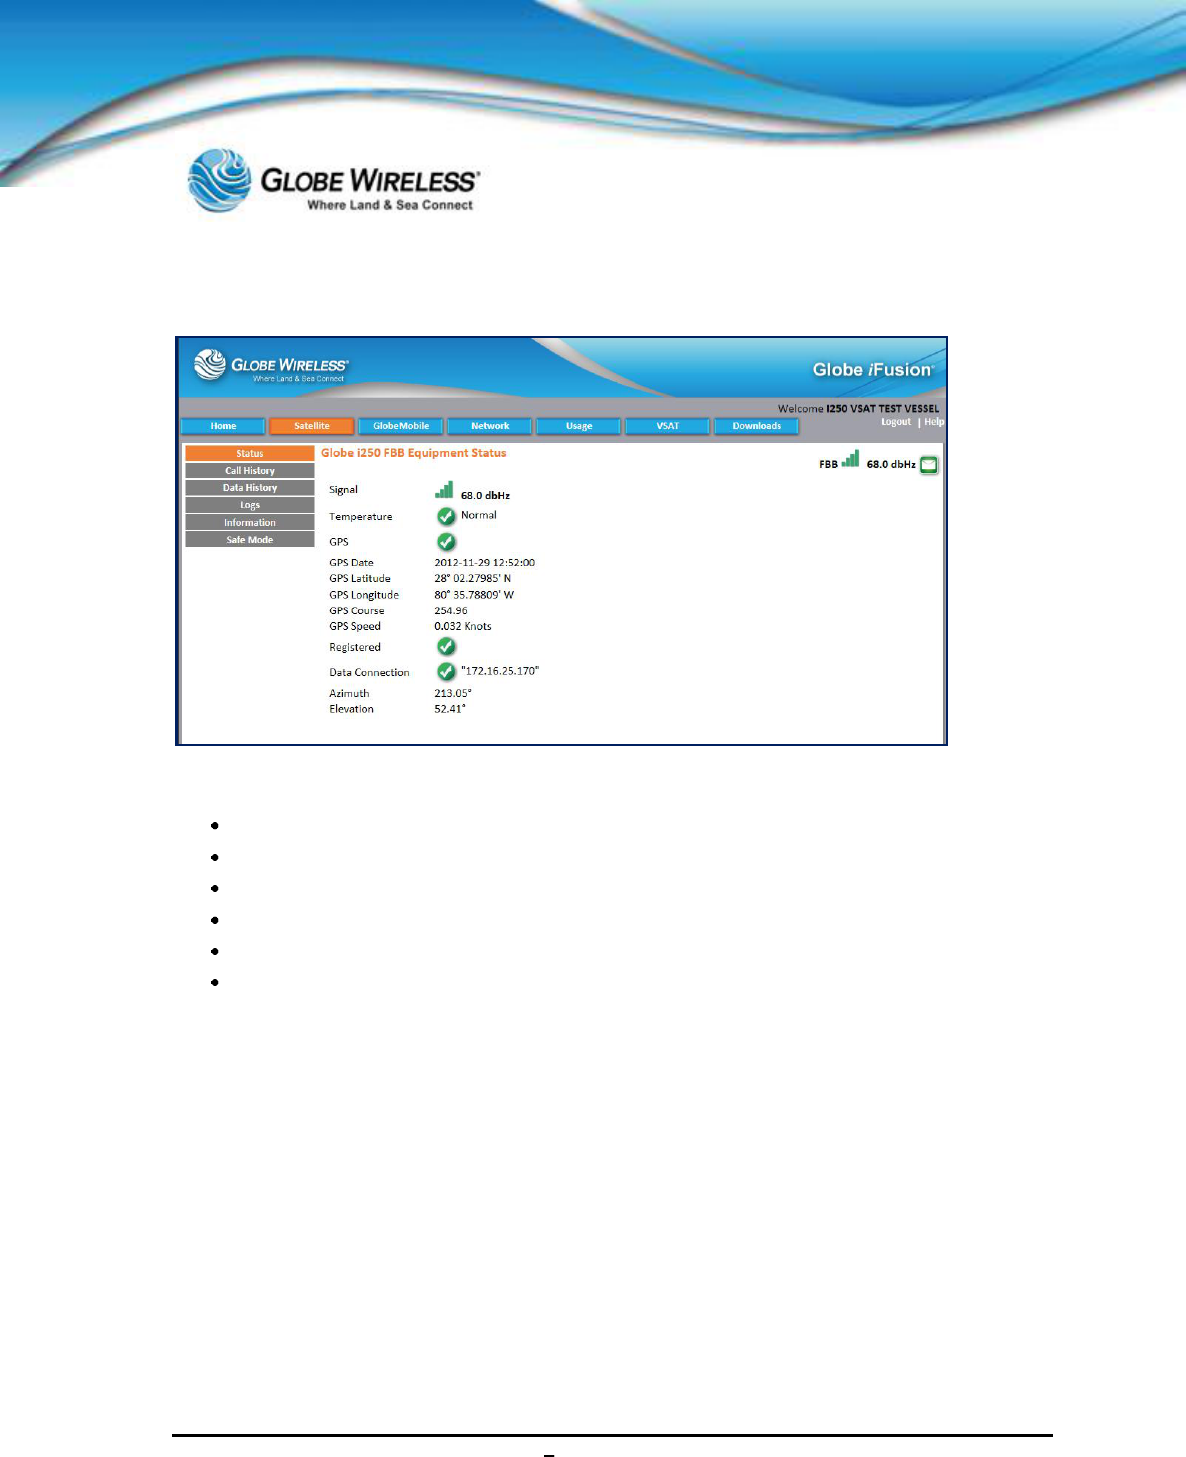
SWG-125 Rev. G June 2013
Globe iFusion ®User Guide for i500, i250, iSRev. G 9-2
9.1 Satellite Tab
Click on the Satellite Tab to display the following sub-tabs:
Status
Call History
Data History
Logs
Information
Safe Mode
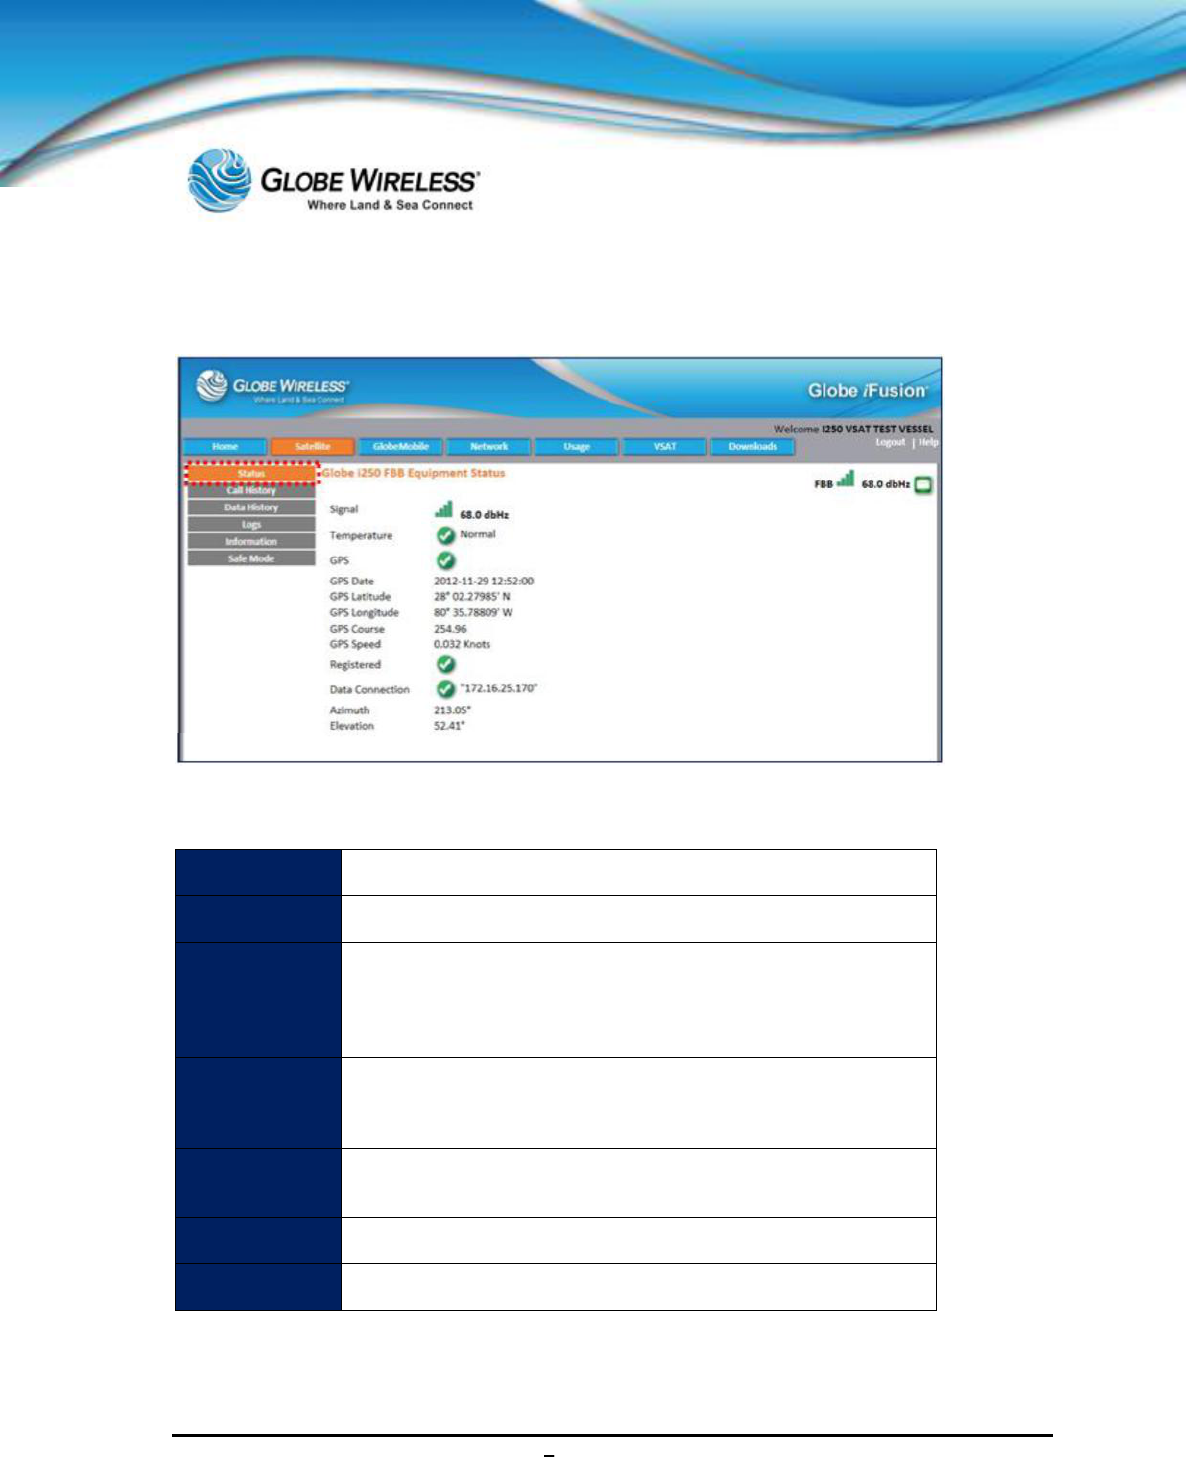
SWG-125 Rev. G June 2013
Globe iFusion ®User Guide for i500, i250, iSRev. G 9-3
9.1.1 Status Sub-tab
Status is the default sub-tab within the Satellite tab. The Status sub-tab displays the Globe
iFusion®FBB Equipment Status.
Signal
Green bars indicate signal strength of the equipment
Temperature
Indicates if the equipment temperature is within the normal range
GPS Displays the GPS coordinates:
GPS Date, GPS Latitude, GPS Longitude, GPS Course
, and
GPS Speed
Registered
A green checkmark indicates that the Globe iFusion®
has
connected to the satellite and has registered with the Inmarsat
shore system.
Data
Connection
Displays the connection address
Azimuth
Displays current Azimuth.
Elevation
Displays current Elevation.

SWG-125 Rev. G June 2013
Globe iFusion ®User Guide for i500, i250, iSRev. G 9-4
9.1.2 Call History Sub-tab
The Call History sub-tab shows only calls made using the Globe iFusion®internal
FleetBroadband 250 voice line. Depending on your configuration, the GlobeMobile service may be
using this line. If so, all calls made from mobile phones will be logged in this list as well.
Click on the Call History sub-tab to display the Globe iFusion® Daily Call Log which displays the
time of the call, the dialed phone number, and the duration of the call.
The user has the following options:
Display the log for a specific day by clicking the Prev Day or Next Day button
Viewing account code information
Editing account code information less than 24 hours old
Saving the changes to the account codes for the calls
Account codes can be used by your company for billing calls to a third party. The codes will be
reflected on the company invoice for the calls made. The admin user has a 24 hour window in which
to edit these account codes. After that time the codes will have been transmitted to shore and are no
longer editable. If your configuration uses the voice line of the internal FleetBroadband, those calls
will be shown with an account code of 299. This code is never editable.
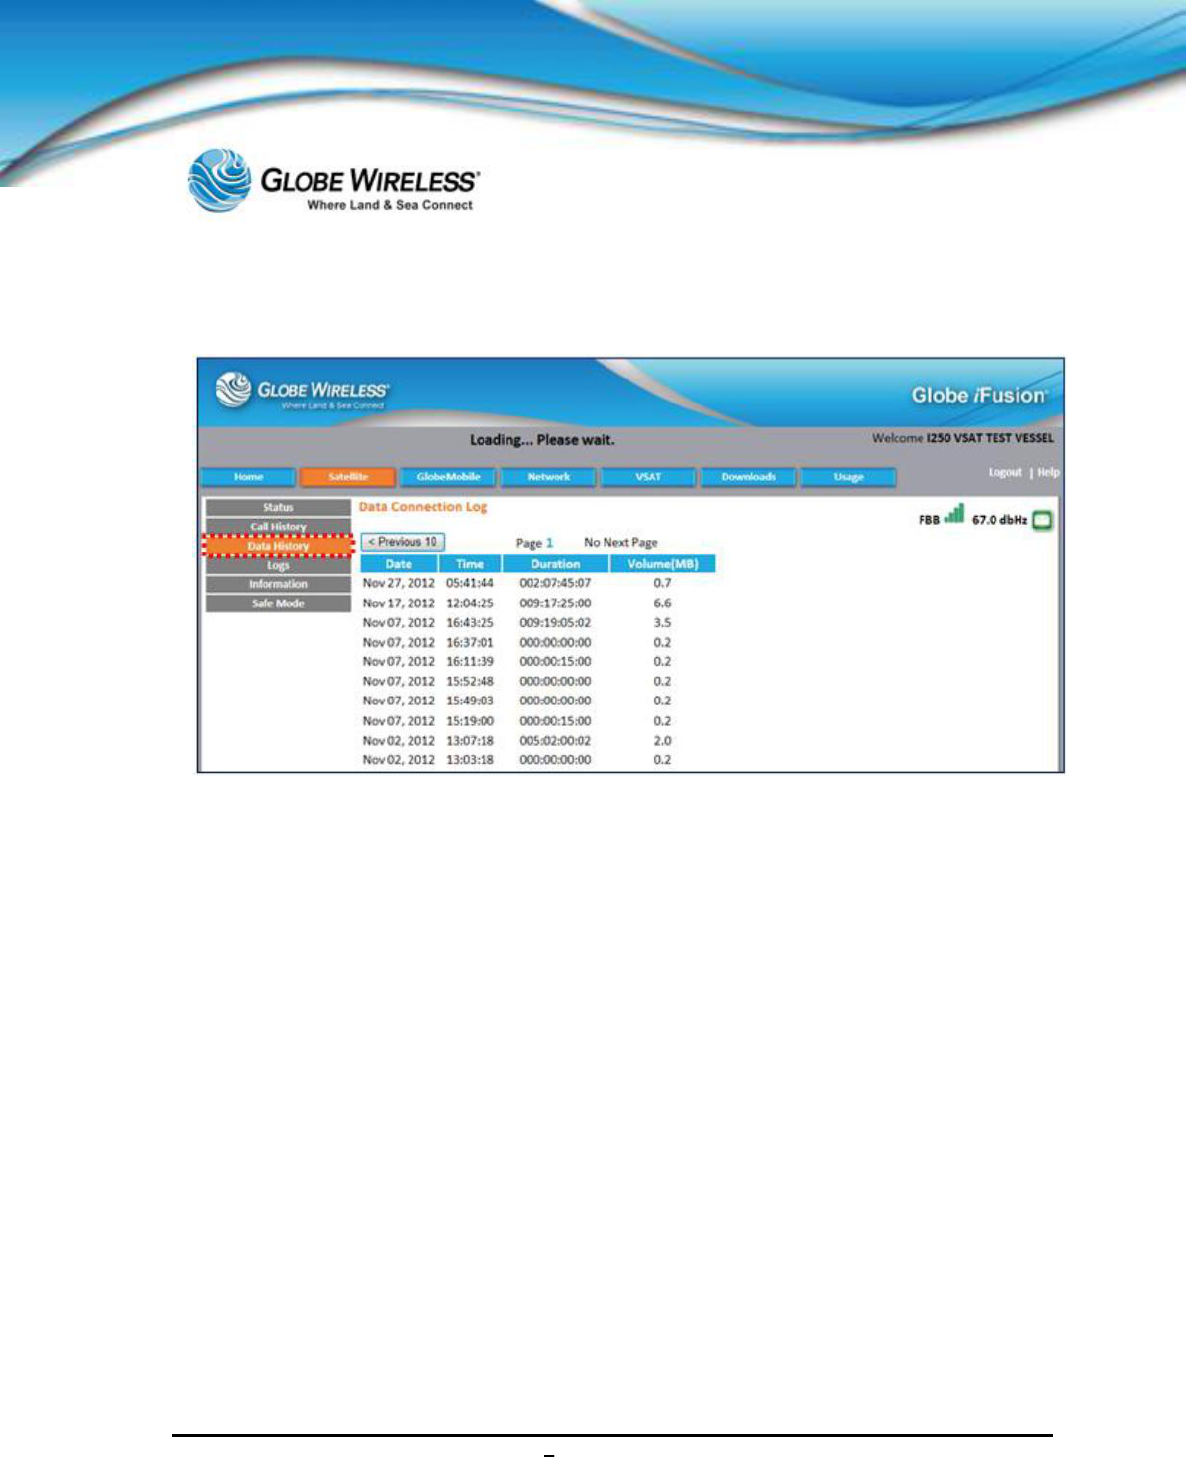
SWG-125 Rev. G June 2013
Globe iFusion ®User Guide for i500, i250, iSRev. G 9-5
9.1.3 Data History Sub-tab
Click on the Data History sub-tab to display the Globe iFusion® Data Connection Log which
displays the Date,Time, Duration (of time in minutes/seconds), and Volume transferred in
megabytes.
You can display the log for a specific day by clicking the Prev Day or Next Day button.
As with Call History; the Data History sub-tab screen shows only data connections made by the
internal FleetBroadband. The list includes both streaming and background data connections.
GlobeMobile Digital Quality Voice (DQV) connections are also listed here.
The connection history is updated approximately once per minute and shows approximate values for
the connection duration and volume.
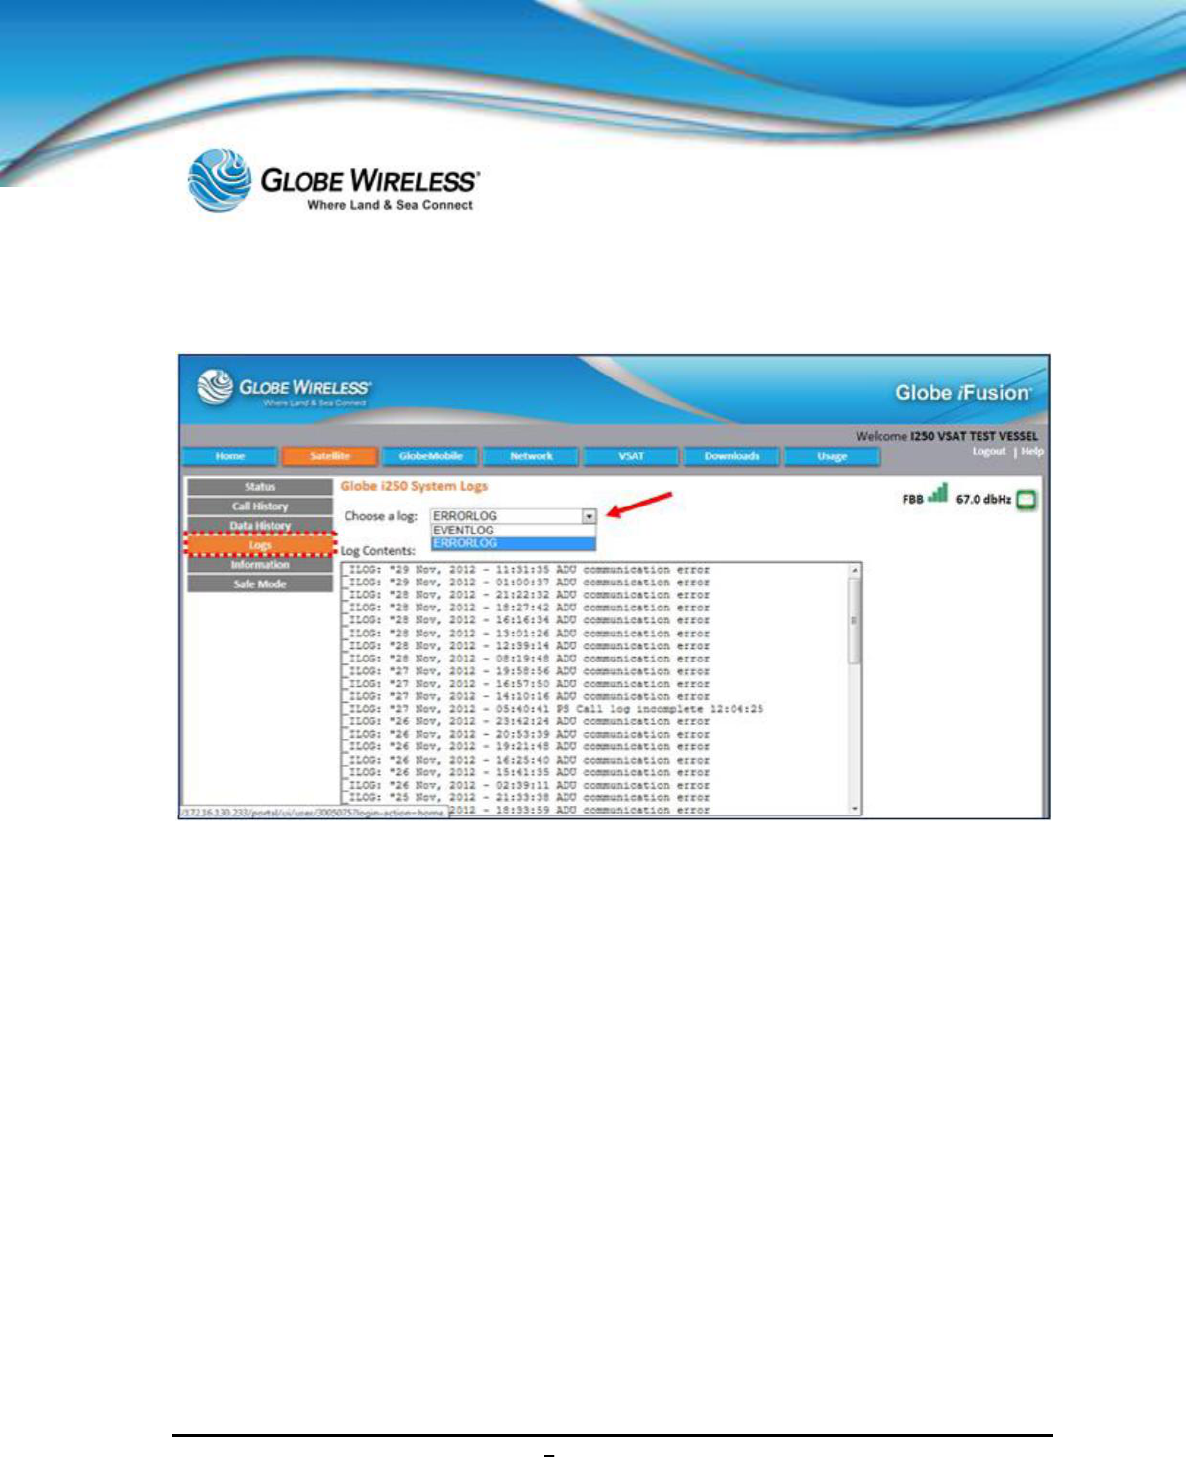
SWG-125 Rev. G June 2013
Globe iFusion ®User Guide for i500, i250, iSRev. G 9-6
9.1.4 Logs Sub-tab
Click on the Logs sub-tab to display the Globe iFusion® System Logs.
Click the dropdown arrow in the Choose a log: field and select the Error Log or the Event Log
which displays the Date,Time, Duration (of time in minutes/seconds), and the event or error that
occurred.
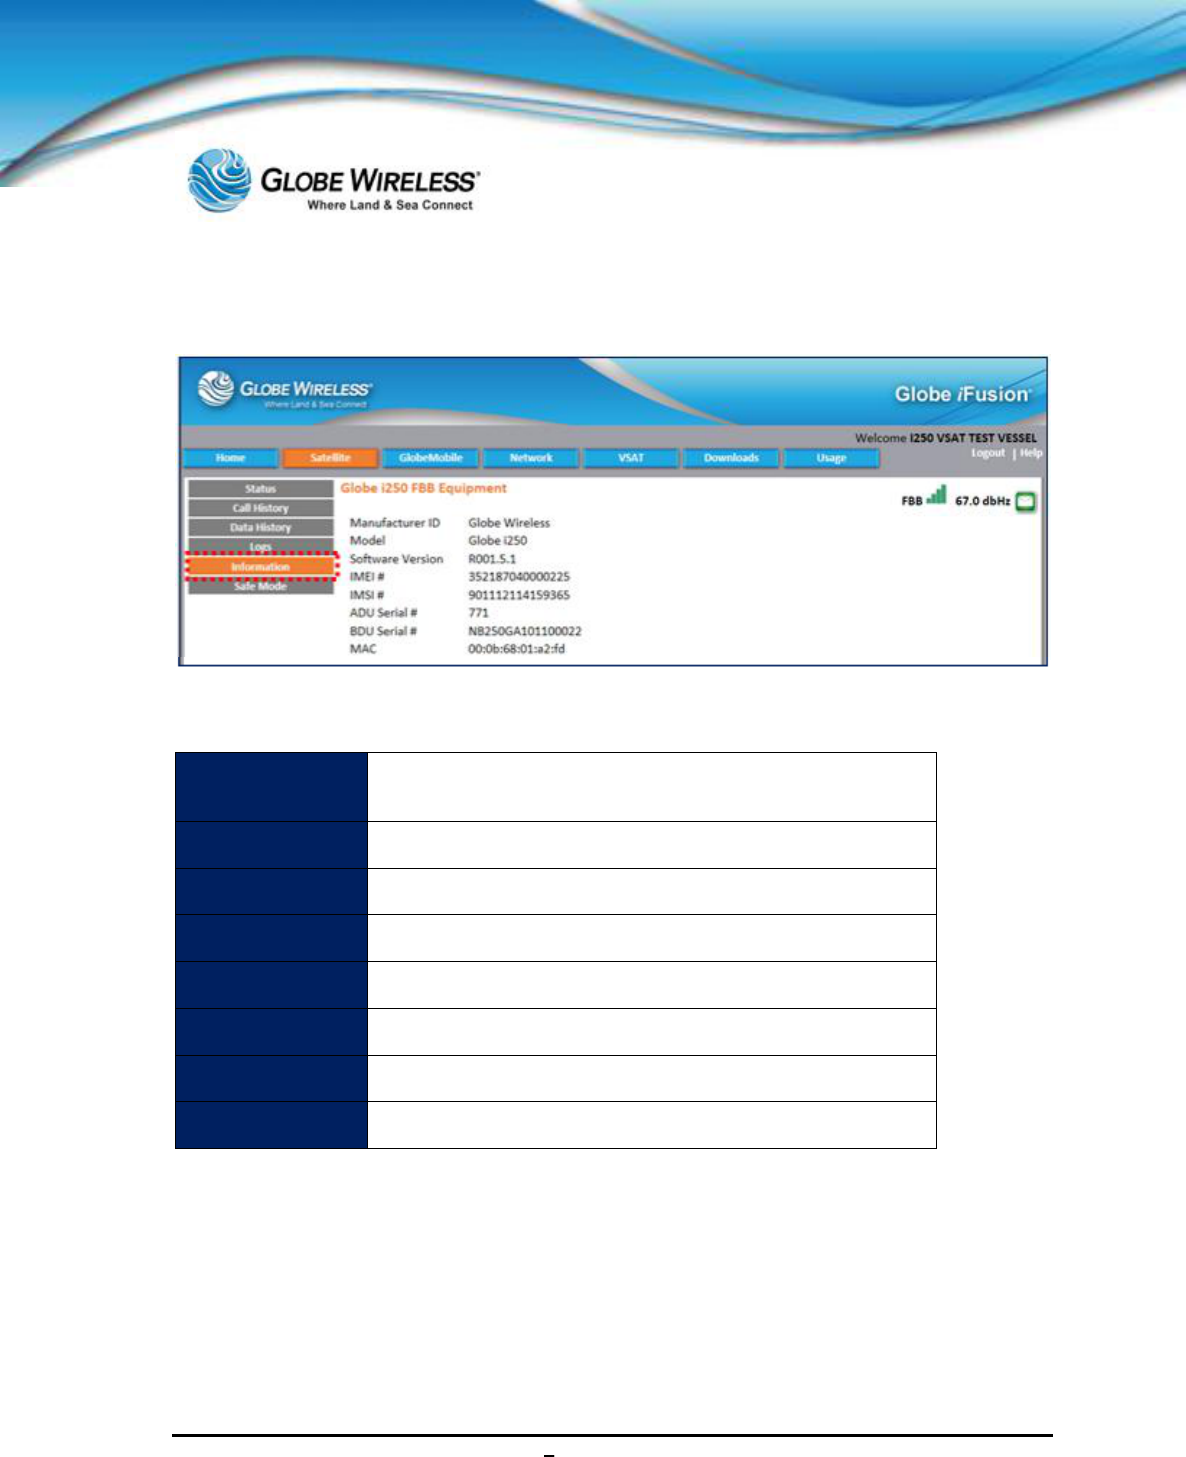
SWG-125 Rev. G June 2013
Globe iFusion ®User Guide for i500, i250, iSRev. G 9-7
9.1.5 Information Sub-tab
Click on the Information sub-tab to display specific equipment information about the Globe
iFusion® (Manufacturer ID, Model, SW Version, Subscriber #, etc.).
Manufacturer ID
Lists the Manufacturer name; i.e., Globe Wireless, Addvalue,
etc.
Model
Lists the Model; i.e., Globe iFusion®
Software Version
Displays the current version of the software being used
IMEI #
Displays the International Mobile Equipment Identity number
IMSI #
Displays the International Mobile Subscriber Identity number
ADU Serial #
Displays the serial number of the Above Deck Unit (ADU)
BDU Serial #
Displays the serial number of the Below Deck Unit (BDU)
MAC Displays the Media Access Control (MAC) Address
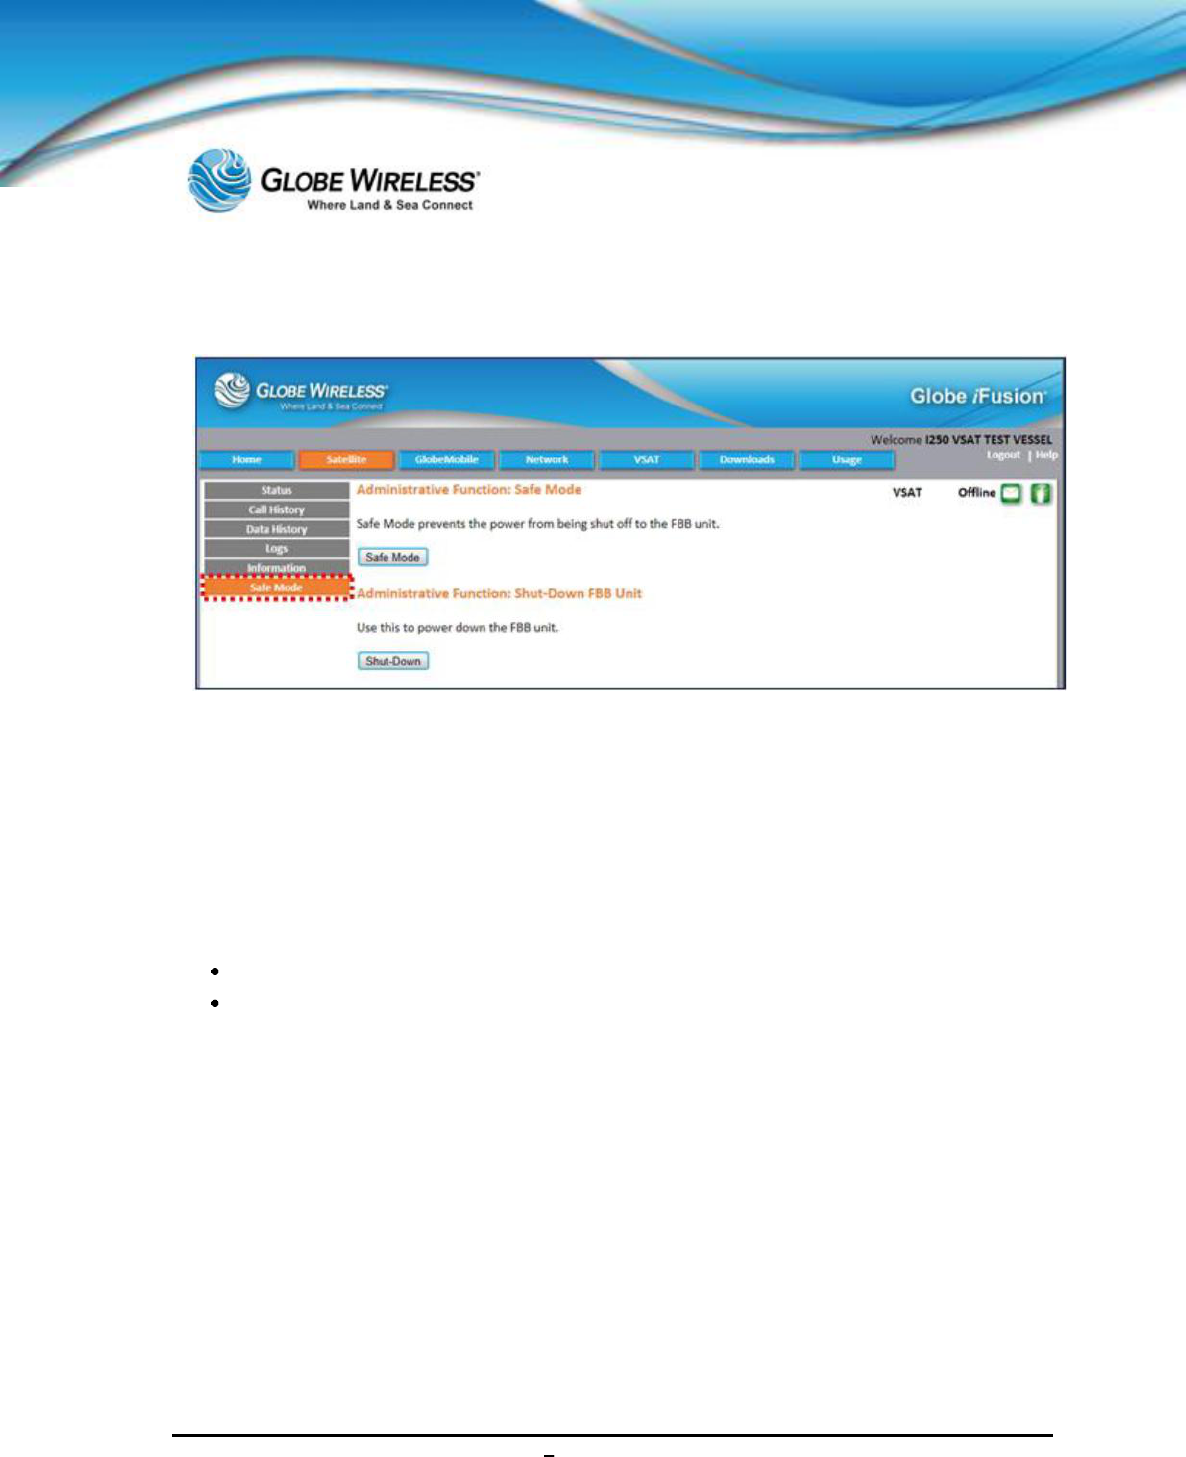
SWG-125 Rev. G June 2013
Globe iFusion ®User Guide for i500, i250, iSRev. G 9-8
9.1.6 Safe Mode Sub-tab
The Globe iFusion® automatically controls the data connections made by the internal
FleetBroadband. In the unlikely event that the FleetBroadband stops responding to commands, the
Globe iFusion® will reboot it automatically. This is designed to give greater uptime and recovery in
the case of hardware malfunction. However, this also poses some risks when upgrading the firmware
of the FleetBroadband.
Safe Mode is an administrative function used to prevent the automatic reboot of the internal
FleetBroadband by the Globe iFusion®. The main purpose of Safe Mode is to upgrade the
firmware of the FleetBroadband. (Refer to Appendix C for steps to update the Globe iFusion®
Firmware.)
Clicking the Safe Mode button prevents the power from being shut off to the FBB unit
Click the Shut Down button to power down the FBB unit
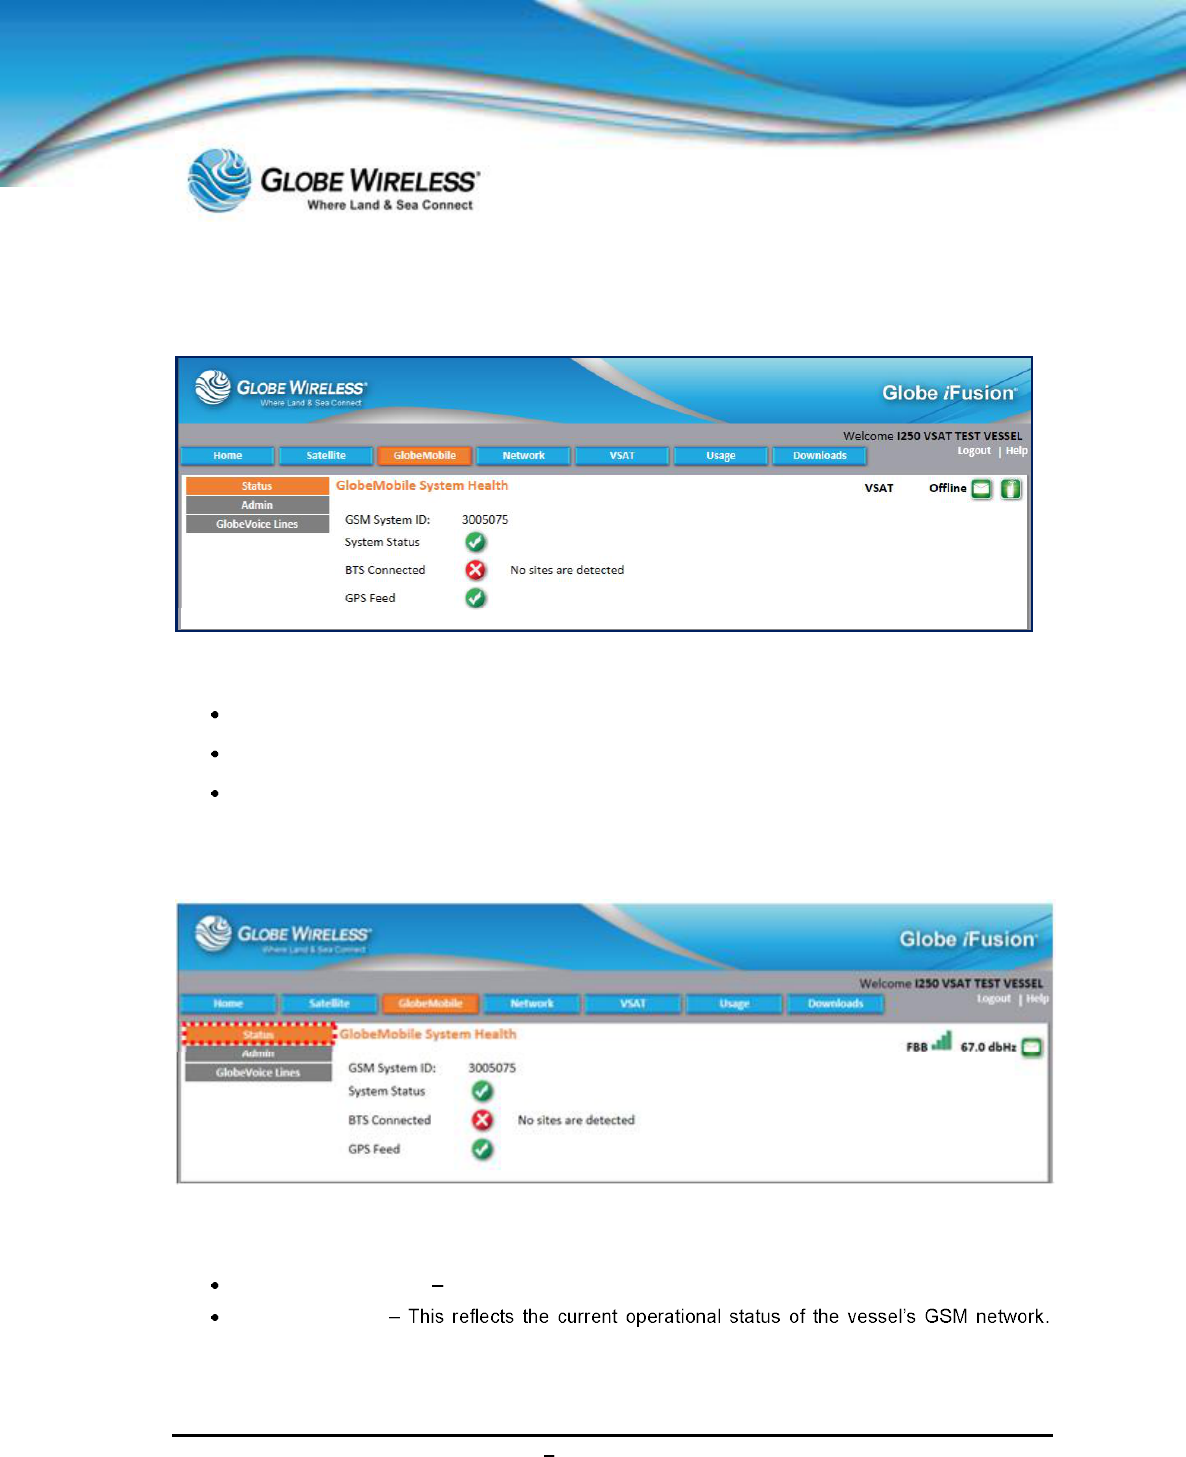
SWG-125 Rev. G June 2013
Globe iFusion ®User Guide for i500, i250, iSRev. G 9-9
9.2 GlobeMobile Tab
Click on the GlobeMobile Tab to display the following sub-tabs:
Status (default)
Admin
GlobeVoice Lines
9.2.1 Status Sub-tab
The default sub-tab (Status) displays the GlobeMobile System Health screen with the following
information:
The GSM System ID This is used to uniquely identify your GSM network on the vessel.
System Status
When it displays a green checkmark, the mobile devices on the vessel can place GSM phone
calls. When it displays a red X, no GSM phone calls can be made.
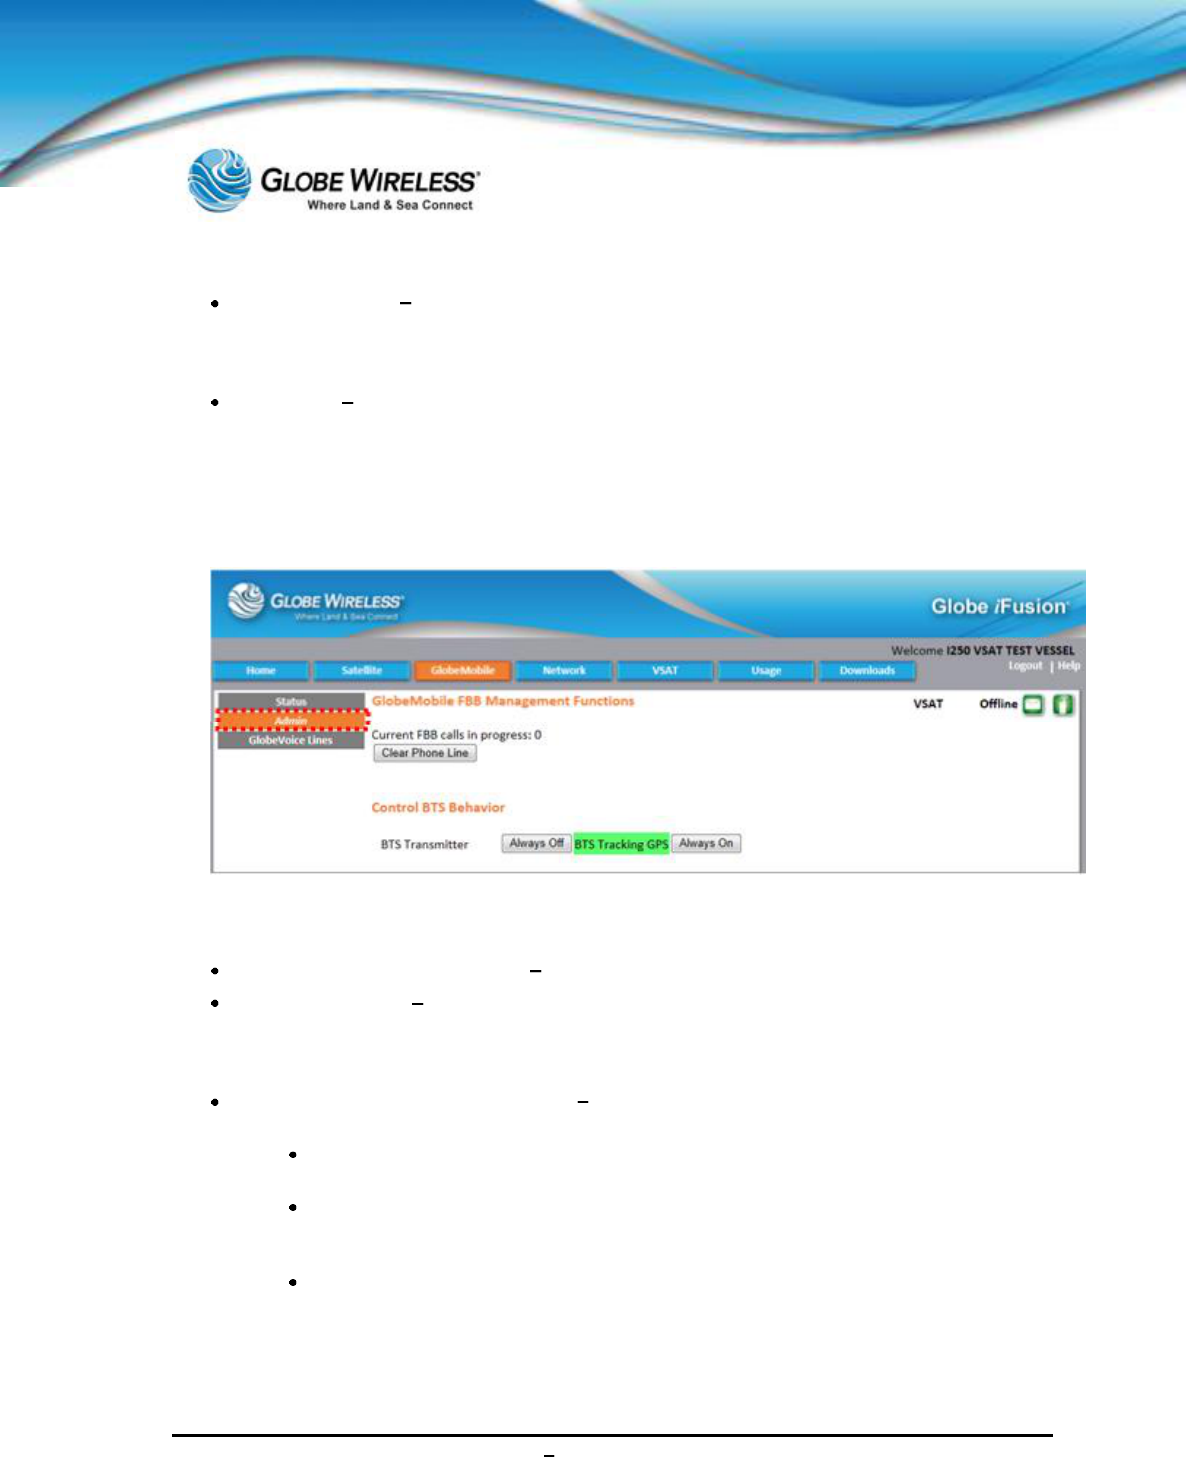
SWG-125 Rev. G June 2013
Globe iFusion ®User Guide for i500, i250, iSRev. G 9-10
BTS Connected In order to make GSM phone calls and send SMS text messages, the
BTS (GlobeMobile antenna) must be connected to the Globe iFusion® and it must be fully
operational. When this is the case, a green checkmark will be displayed and when it is not the
case a red X will be displayed.
GPS Feed In order to determine the proximity to the coastline so that the GSM network can
be disabled, GlobeMobile relies on a GPS feed from the internal FleetBroadband 250 unit. If
this is present, a green checkmark will be displayed and if it is not present a red X will be
displayed.
9.2.2 Admin Sub-tab
The Admin sub-tab allows the Administrator to view and/or perform certain GlobeMobile FBB
Management Functions:
Current FBB Calls in Progress Displays the number of FBB calls currently in progress.
Clear Phone Line The Administrator can end all of the current calls with the Clear Phone
Line button. This is an important feature when using the FleetBroadband Voice line rather
than Digital Quality Voice (DQV). In that configuration users will tie up the voice line of the
terminal and this could be at an inopportune time for the captain or officers of the vessel.
Control BTS (antenna) Behavior The Administrator can choose the mode which
determines the power to the BTS (GlobeMobile Antenna).
Always Off will disable the BTS (GlobeMobile Antenna) entirely and no calls
will be possible until the state is changed.
BTS Tracking GPS will use the GPS to determine the proximity of the vessel
to the shoreline and disable the BTS (GlobeMobile Antenna) when the vessel
approaches it.
Always On will permanently enable the BTS (GlobeMobile Antenna) without
regard for geographical location.
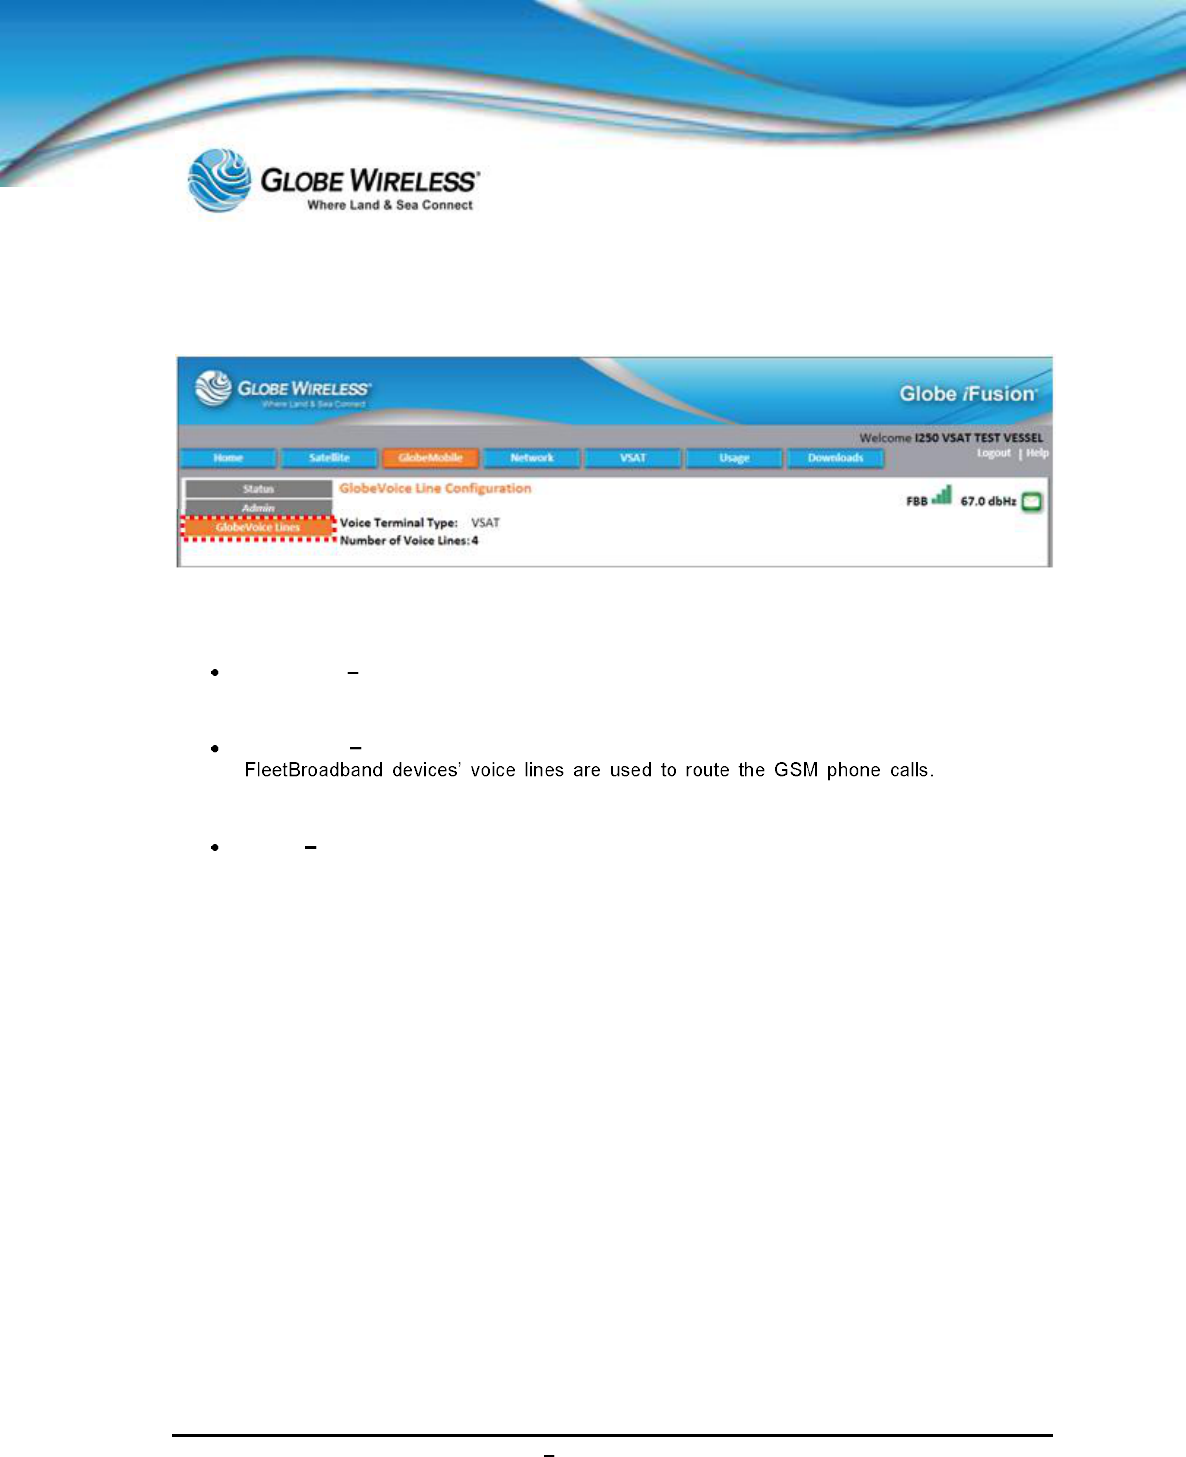
SWG-125 Rev. G June 2013
Globe iFusion ®User Guide for i500, i250, iSRev. G 9-11
9.2.3 GlobeVoice Lines Sub-tab
The GlobeVoice Lines sub-tab displays the configuration of the system GlobeMobile uses to make
GSM phone calls. The options are as follows:
FBB VOIP This is a Digital Quality Voice (DQV) setting. GSM calls will be routed over
FleetBroadband using an 8Kbps Streaming connection. This setting includes the number of
lines available for GlobeMobile using this technique.
FBB Voice In this setting the Internal FleetBroadband voice line and/or any other external
For external
devices, the OUT 1,OUT 2, and OUT 3 ports on the rear of the Globe iFusion® are used to
connect the Globe iFusion® to them.
VSAT This is a Digital Quality Voice (DQV) setting. GSM calls will be routed over the
VSAT device using the Committed Information rate (CIR). This setting includes the number of
lines available for GlobeMobile.
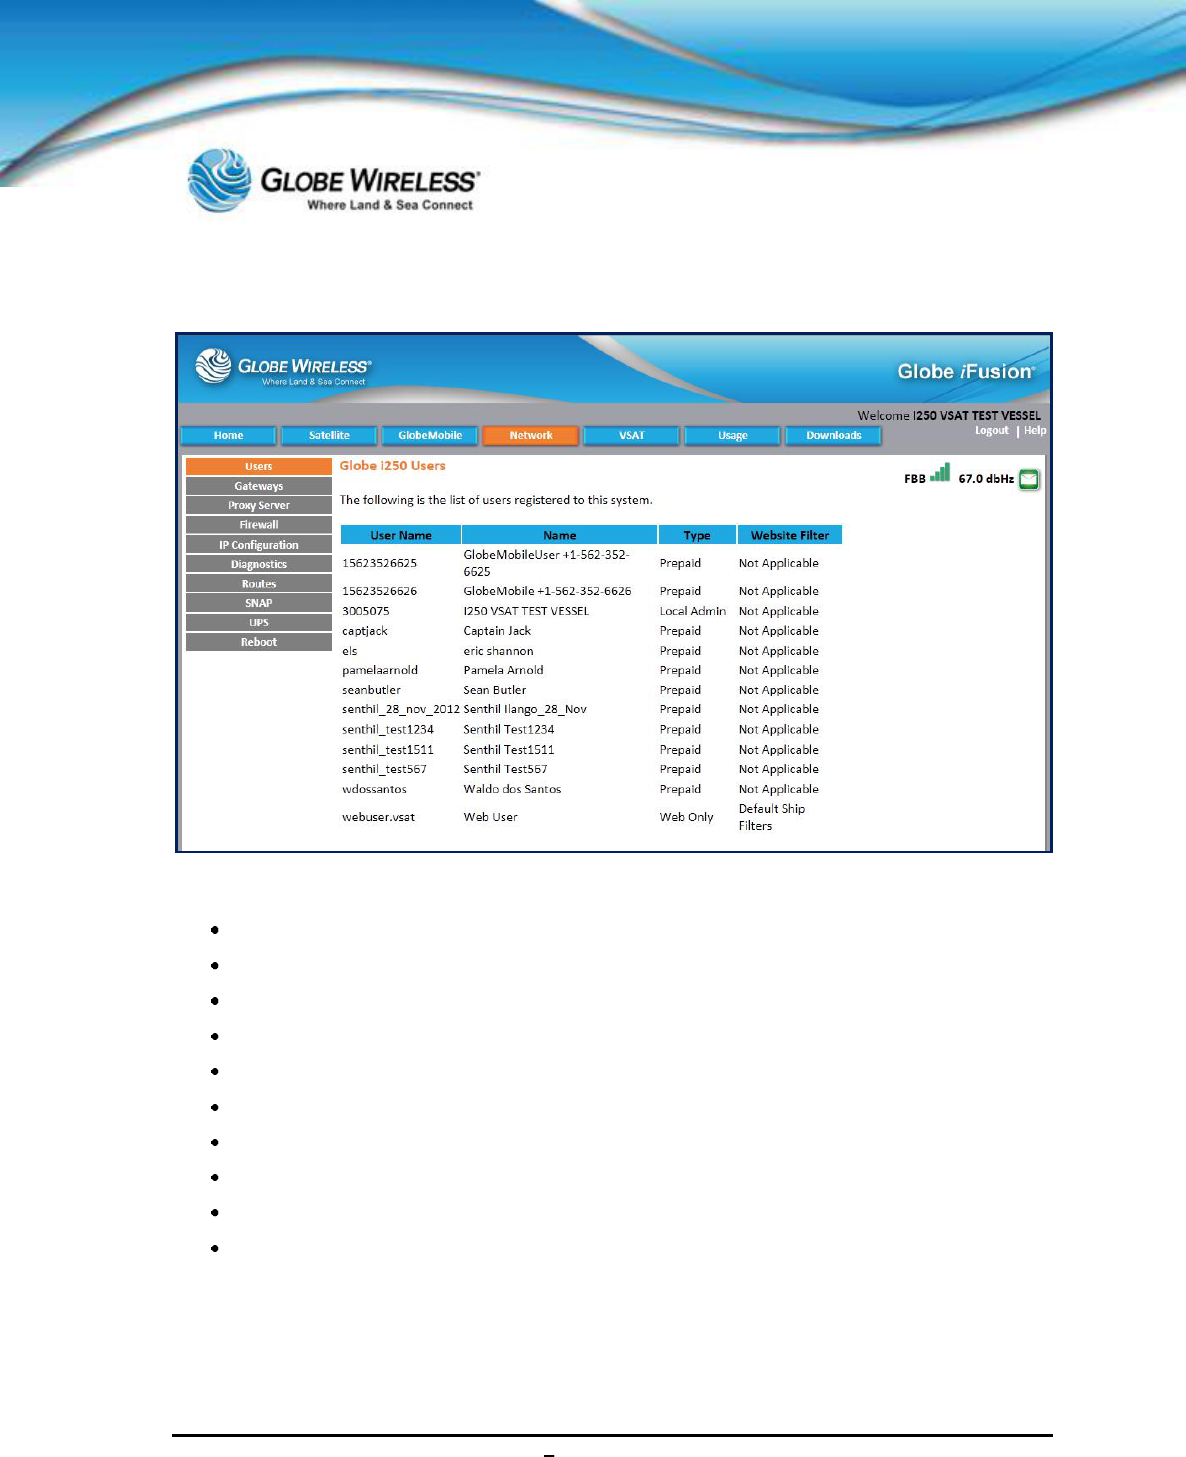
SWG-125 Rev. G June 2013
Globe iFusion ®User Guide for i500, i250, iSRev. G 9-12
9.3 Network Tab
Click on the Network Tab to display the following sub-tabs: (The Users sub-tab is the default.)
Users (default)
Gateways
Proxy Server
Firewall
IP Configuration
Diagnostics
Routes
SNAP
UPS
Reboot
The Network tab is used to display the configuration of the Globe iFusion® network communication
settings. This includes interconnections with other satellite terminals, LAN settings, and others.
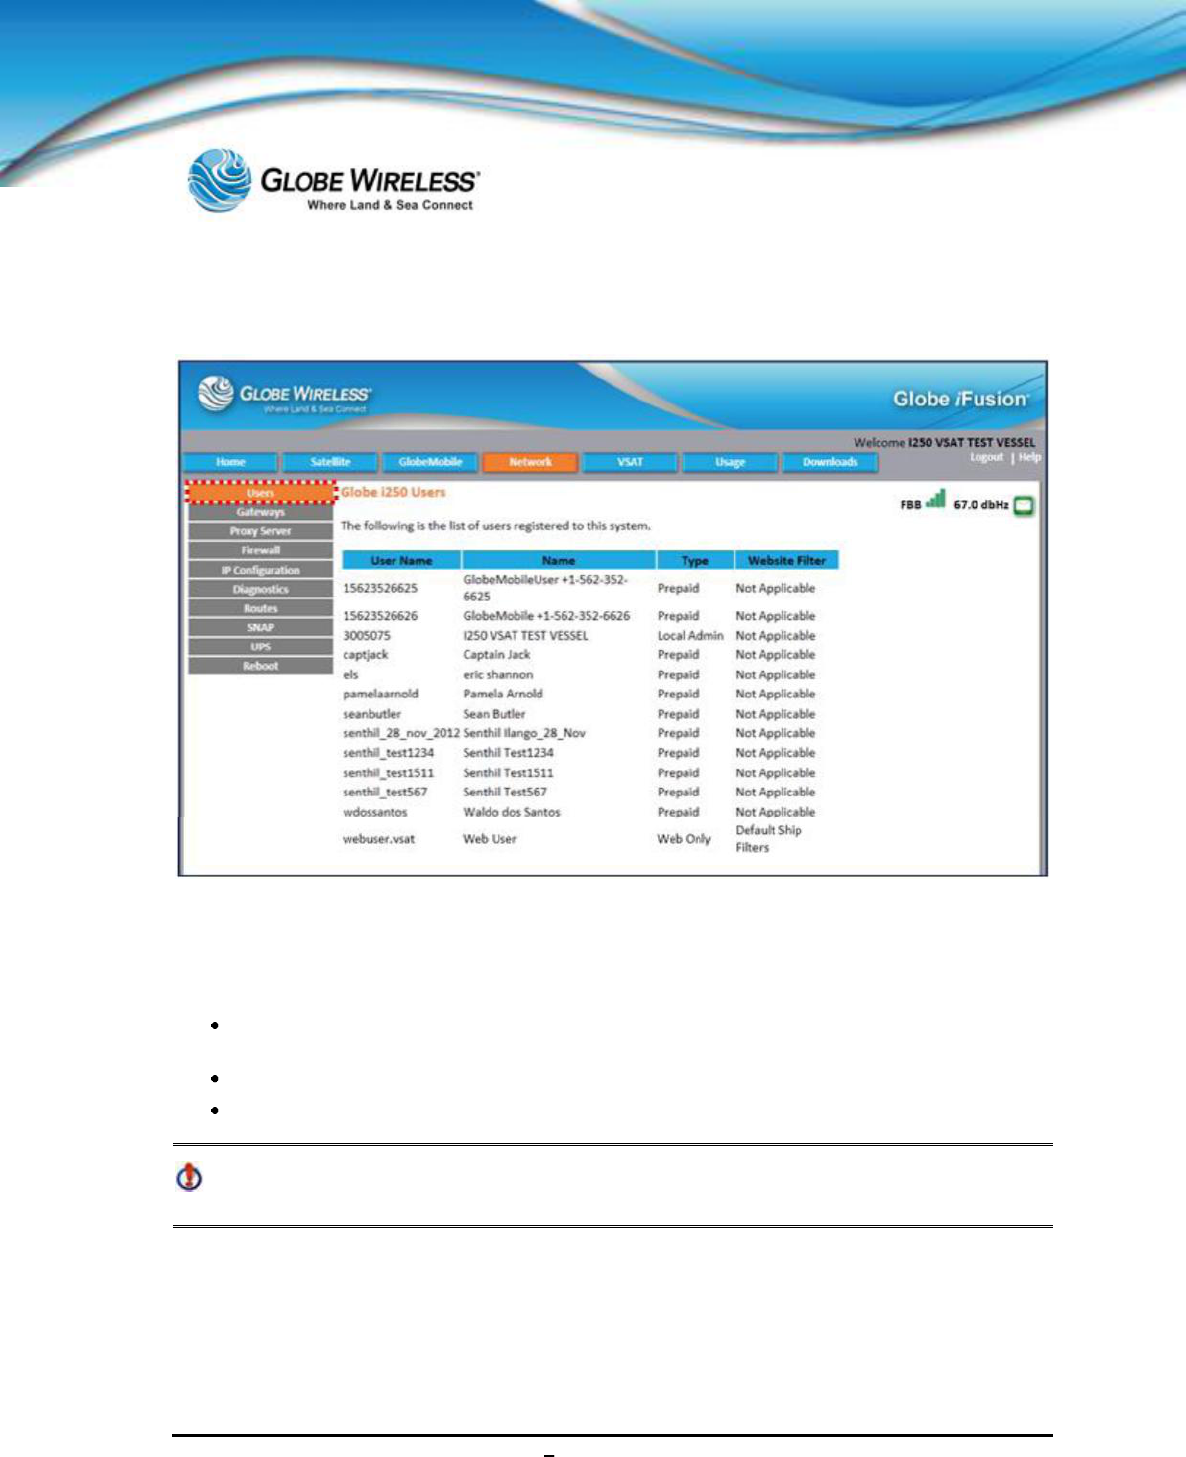
SWG-125 Rev. G June 2013
Globe iFusion ®User Guide for i500, i250, iSRev. G 9-13
9.3.1 Users Sub-tab
The Users sub-tab displays the User Name (logon ID), GlobeMobile phone number, and the Type
of user; i.e., Prepaid (email), Administrator, or Web only.
The list reflects the users currently registered on the vessel and what type of user they are.
Prepaid users who use their phone number as their username, are listed only when they
have activated a GSM phone with a Globe Wireless SIM card inside it while on the vessel
The Admin account will always be listed
Web Only accounts are permanent to the vessel but are created using the Globe iPortal®
It can take up to 20 minutes for a Prepaid account to appear on the user list after mobile
phone activation.
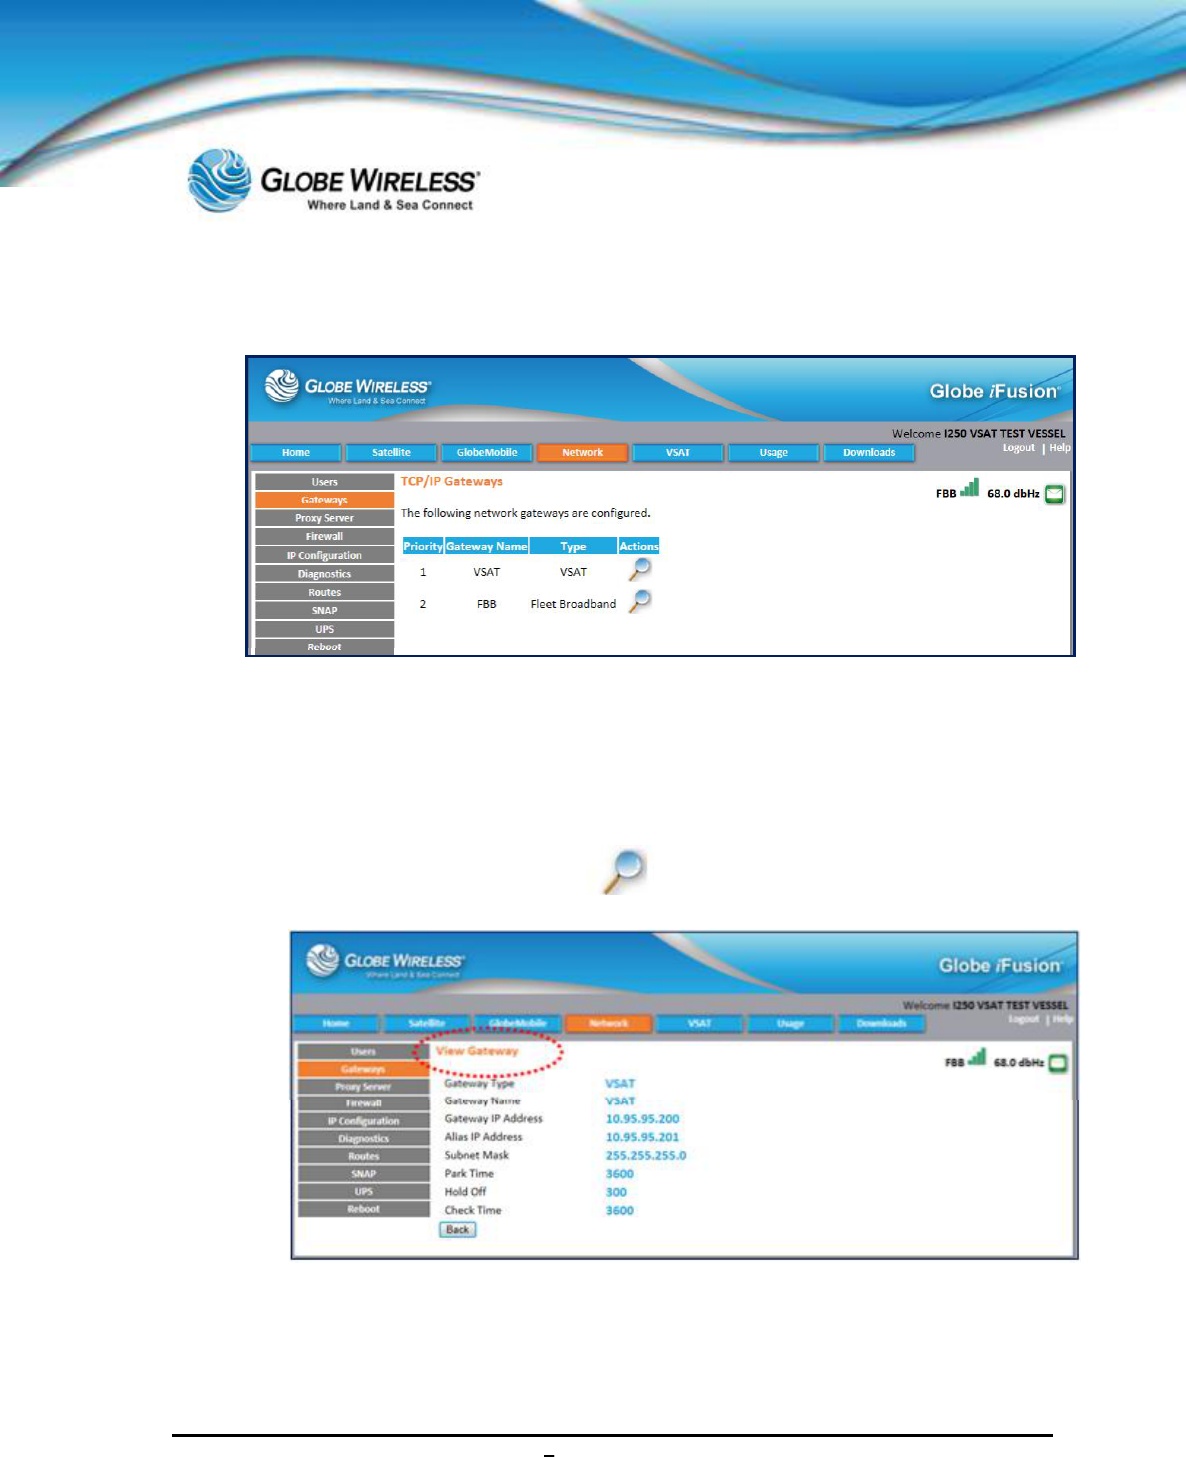
SWG-125 Rev. G June 2013
Globe iFusion ®User Guide for i500, i250, iSRev. G 9-14
9.3.2 Gateways
Click on the Gateways tab to display the TCP/IP Gateways screen. This screen displays the network
gateways that are configured to include their Priority,Gateway Name,Type, and Actions.
Gateways are the connections to the Globe Wireless Network via communications devices such as
satellite terminals, UMTS devices, 803.11 wireless connections, and any other TCP/IP device. These
devices are managed via the Globe iPortal®and are read-only in the Globe iFusion® web interface.
Step 1: In the Actions column, click on to display the View Gateway screen.
The View Gateway screen displays the Gateway Type,Name,IP Address,Alias IP Address,Subnet
Mask,Park Time,Hold Off, and Check Time fields.
Step 2: Click the Back button to return to the main TCP/IP Gateways screen.
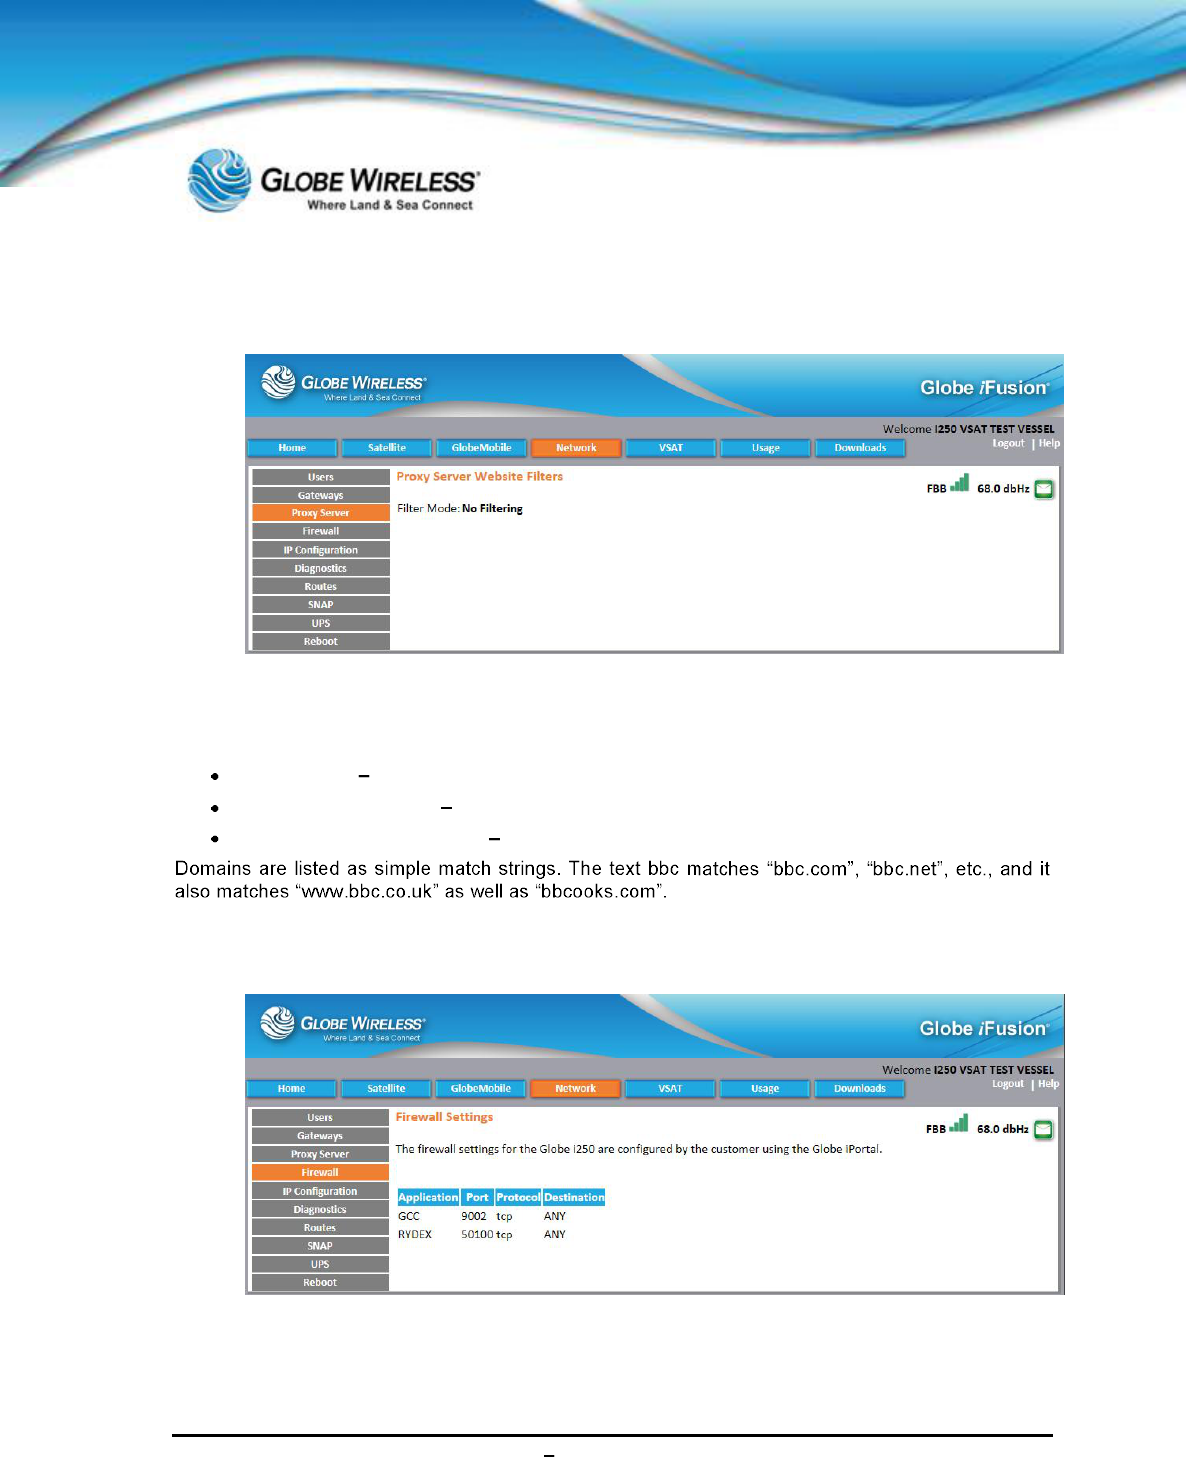
SWG-125 Rev. G June 2013
Globe iFusion ®User Guide for i500, i250, iSRev. G 9-15
9.3.3 Proxy Server
Click on the Proxy Server tab to display the Proxy Server Website Filters screen. There are three
different modes used by the proxy server; the selected mode is displayed in the Filter Mode: field.
These modes are:
No Filtering all websites are accessible
Block Selected Sites Domains listed are blocked and cannot be accessed
Allow Only Selected Sites Only the Domains listed can be accessed
9.3.4 Firewall
Click on the Firewall tab to display the Firewall Settings screen.
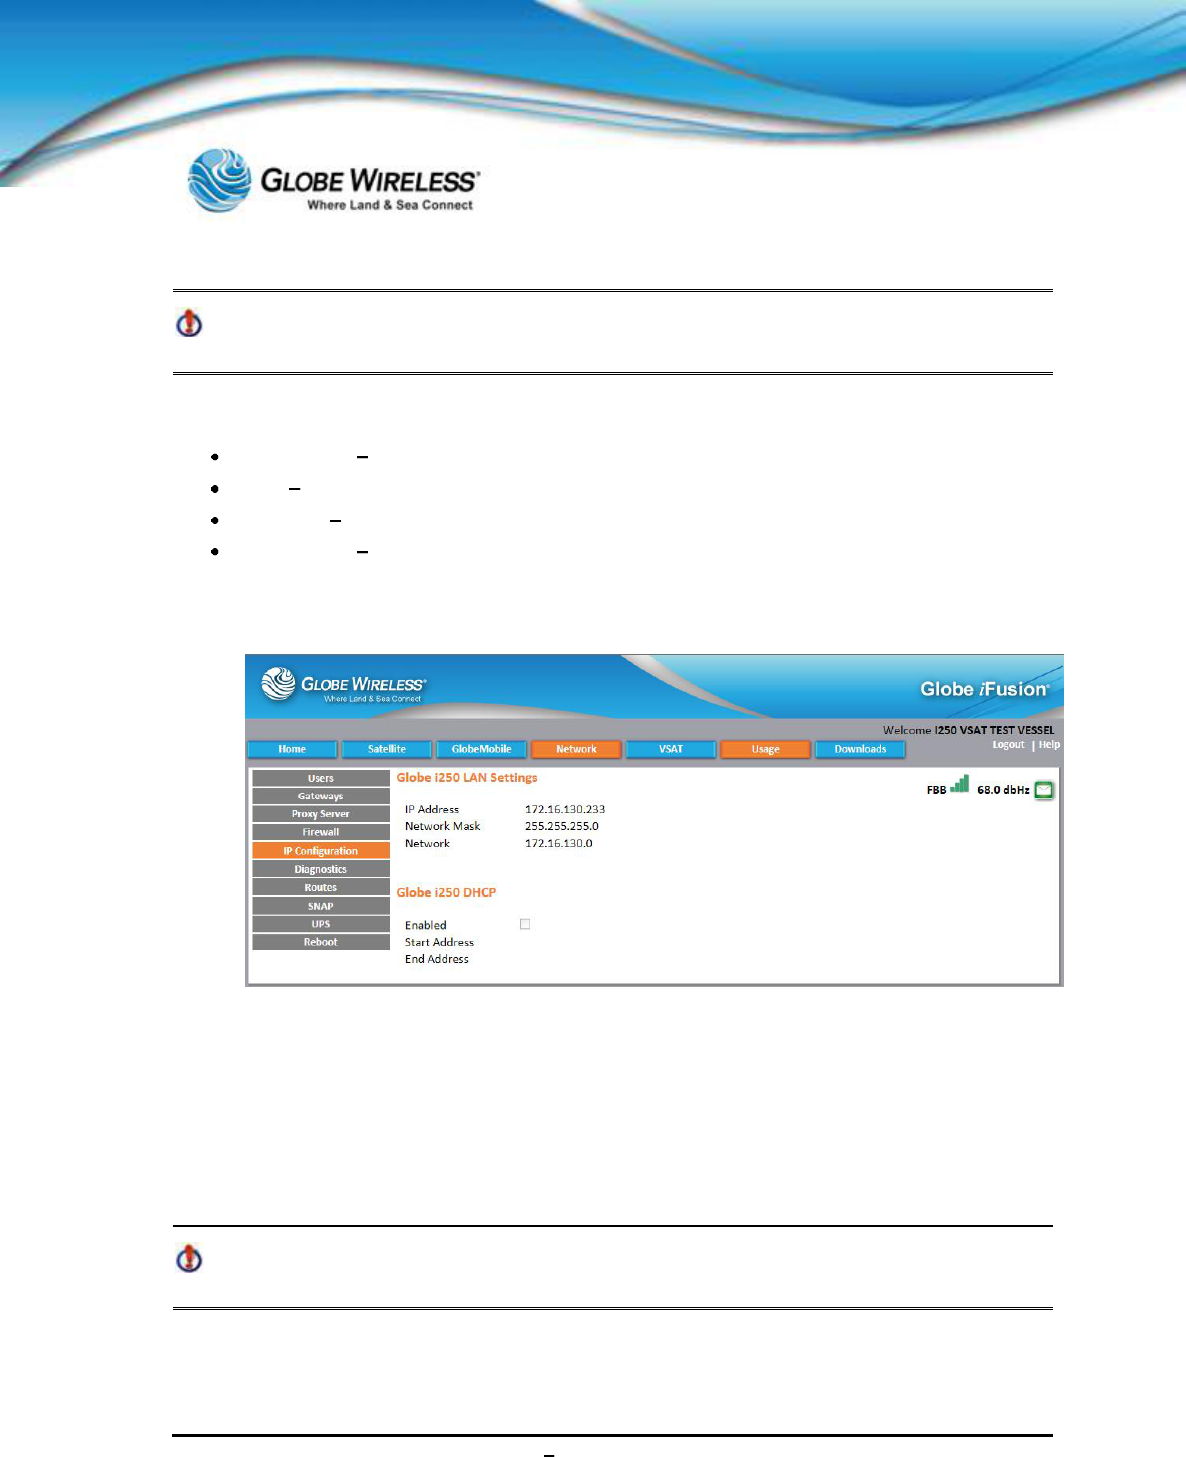
SWG-125 Rev. G June 2013
Globe iFusion ®User Guide for i500, i250, iSRev. G 9-16
The Firewall Settings for the Globe iFusion® are configured by the customer using the
Globe iPortal.
This screen displays a read-only listing of the following:
Application The program or type of service which uses the port
Port The Internet Protocol port opened
Protocol This is either TCP or UDP
Destination If any destination hosts were specified, they will be listed here
9.3.5 IP Configuration
Click on the IP Configuration tab to display the Globe iFusion® LAN Settings and Globe iFusion®
DHCP Settings screen which displays the current settings. These settings are read only and reflect
the settings used by the Globe iFusion® on the rear physical ports labeled LAN 1 through LAN 4.
Dynamic Host Configuration Protocol (DHCP) is used to automatically configure the IP address,
subnet mask, and default gateway of computers and other networking devices that request
configuration. The Start and End addresses show the range of IP addresses which will be given to
these devices.
You cannot manually assign IP addresses to computers or devices in this range when
DHCP is enabled.
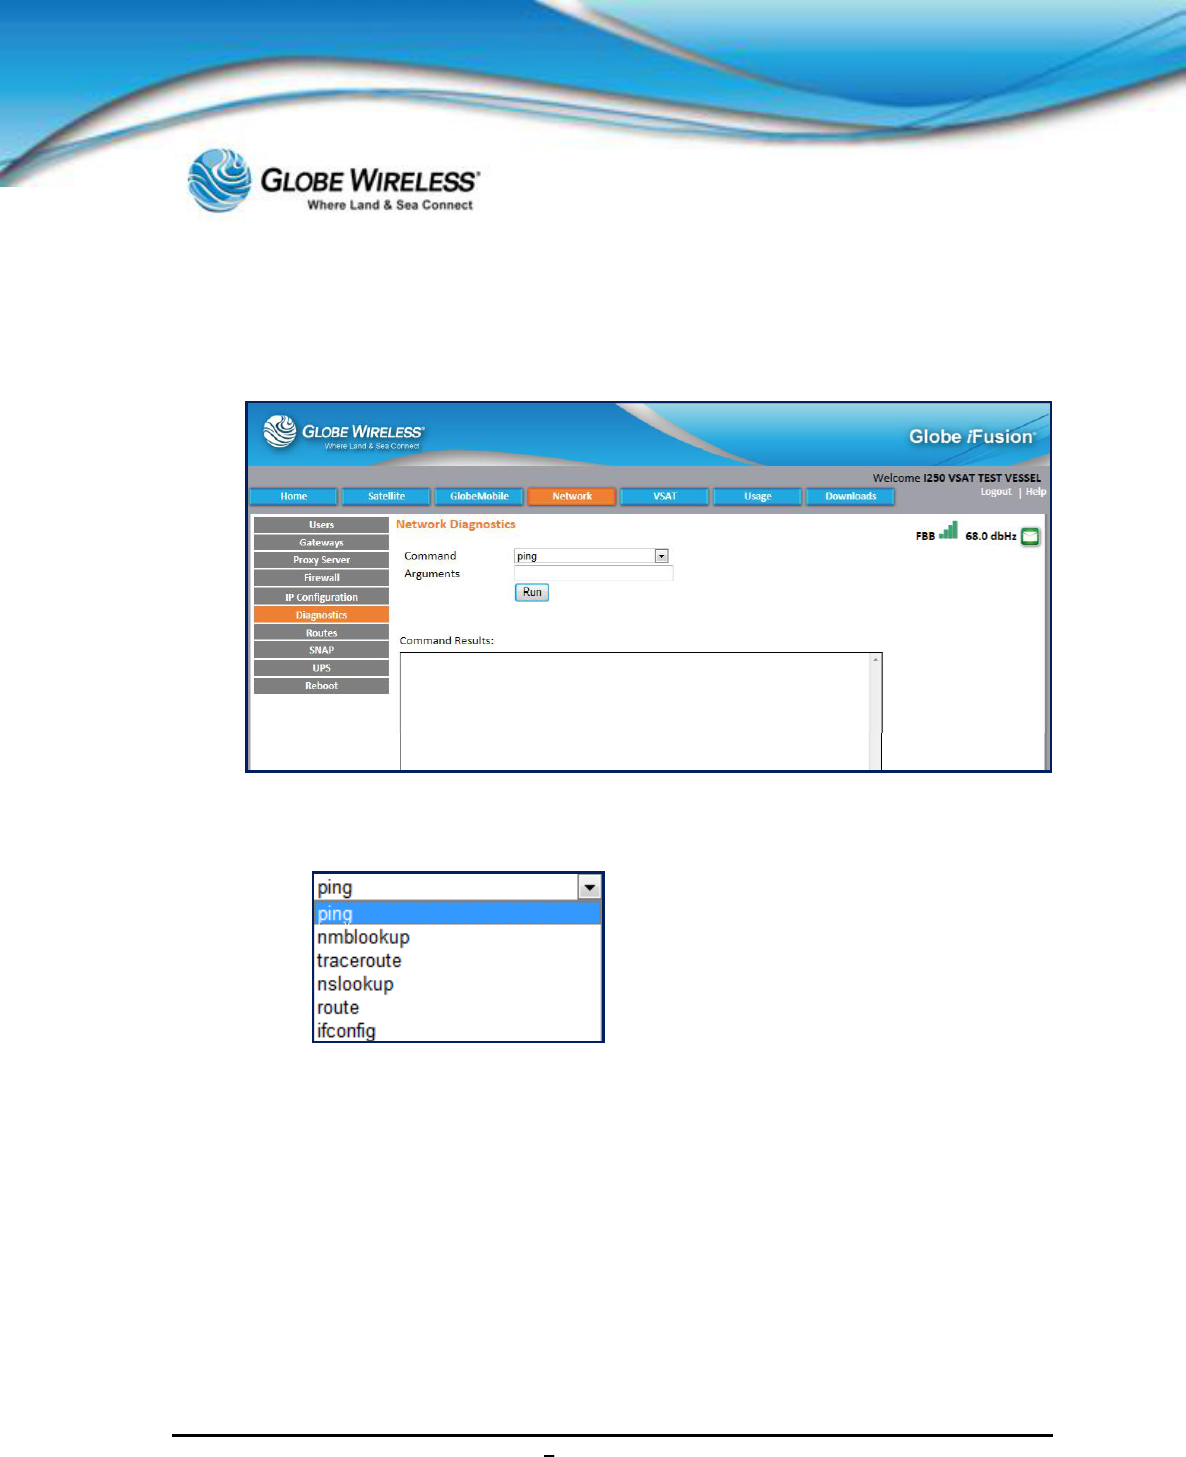
SWG-125 Rev. G June 2013
Globe iFusion ®User Guide for i500, i250, iSRev. G 9-17
9.3.6 Diagnostics
Click on the Diagnostics tab to display the Network Diagnostics screen.
The Administrator can perform the following actions on this screen:
Step 1: Click the Command drop-down arrow and make a selection from the drop-down list.
Step 2: Type an Argument in the field if applicable, and click the Run button. The results will be
displayed in the Command Results area of the screen.
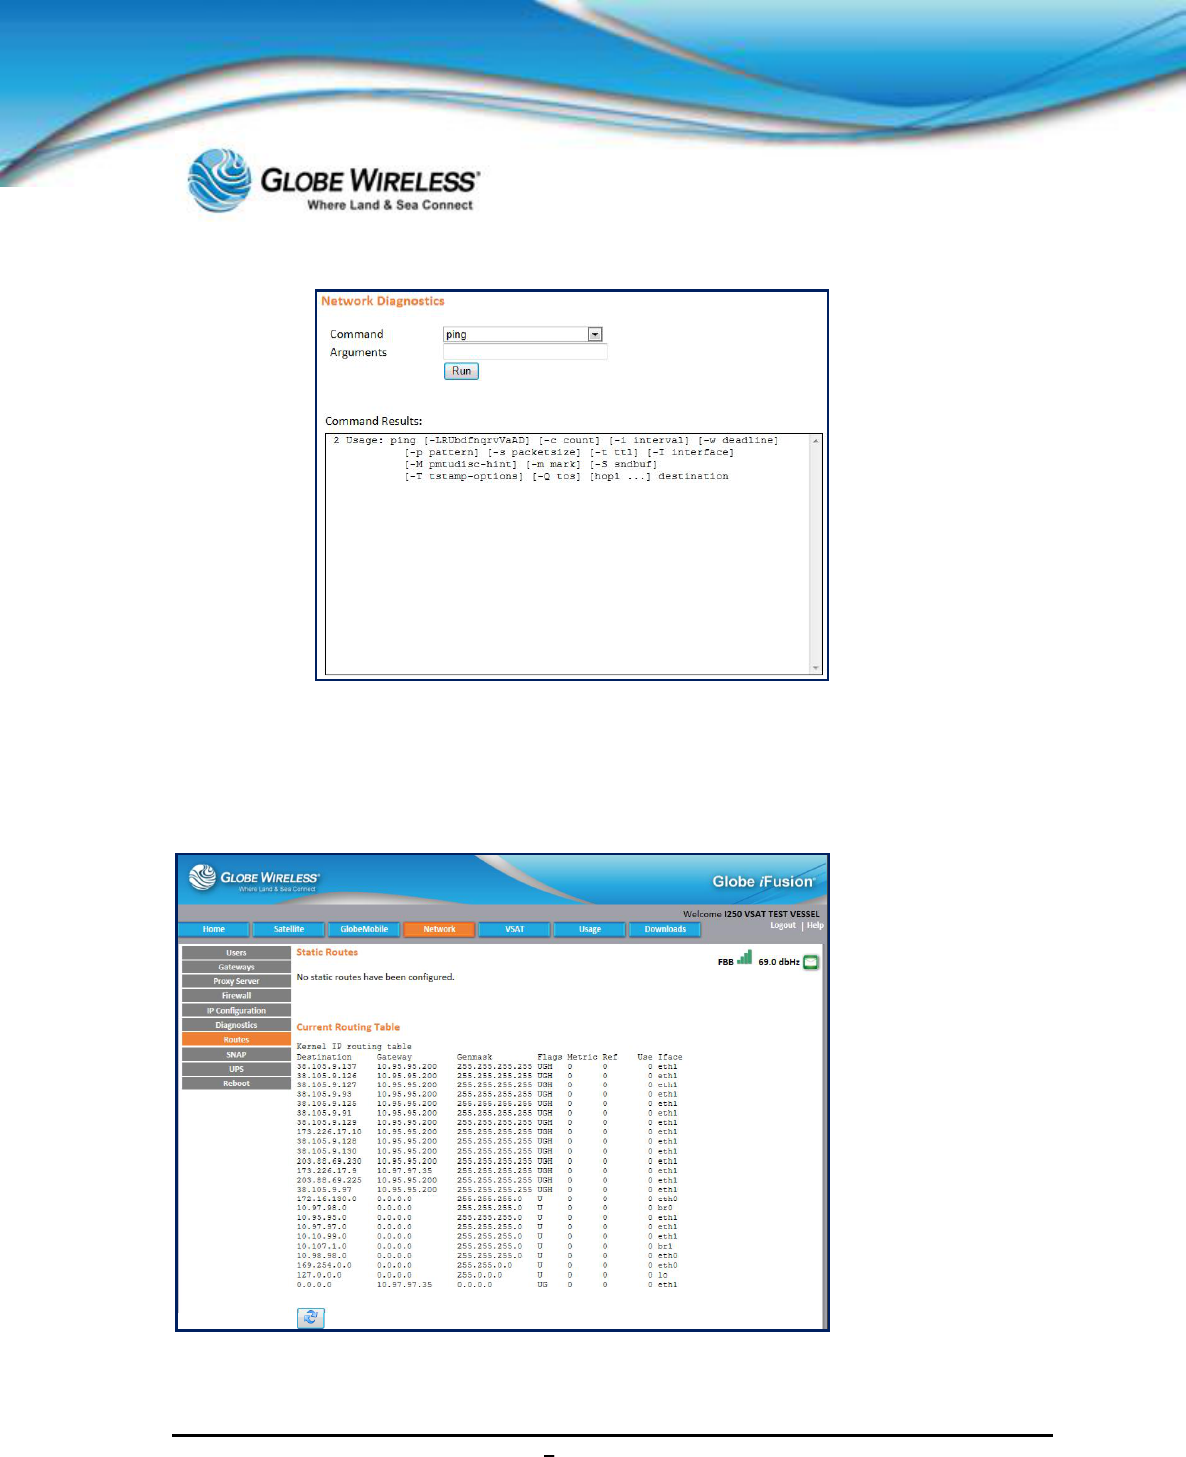
SWG-125 Rev. G June 2013
Globe iFusion ®User Guide for i500, i250, iSRev. G 9-18
9.3.7 Routes
Click on the Routes tab to display the Static Routes screen which displays the currently configured
Static Routes and Current Routing Table.
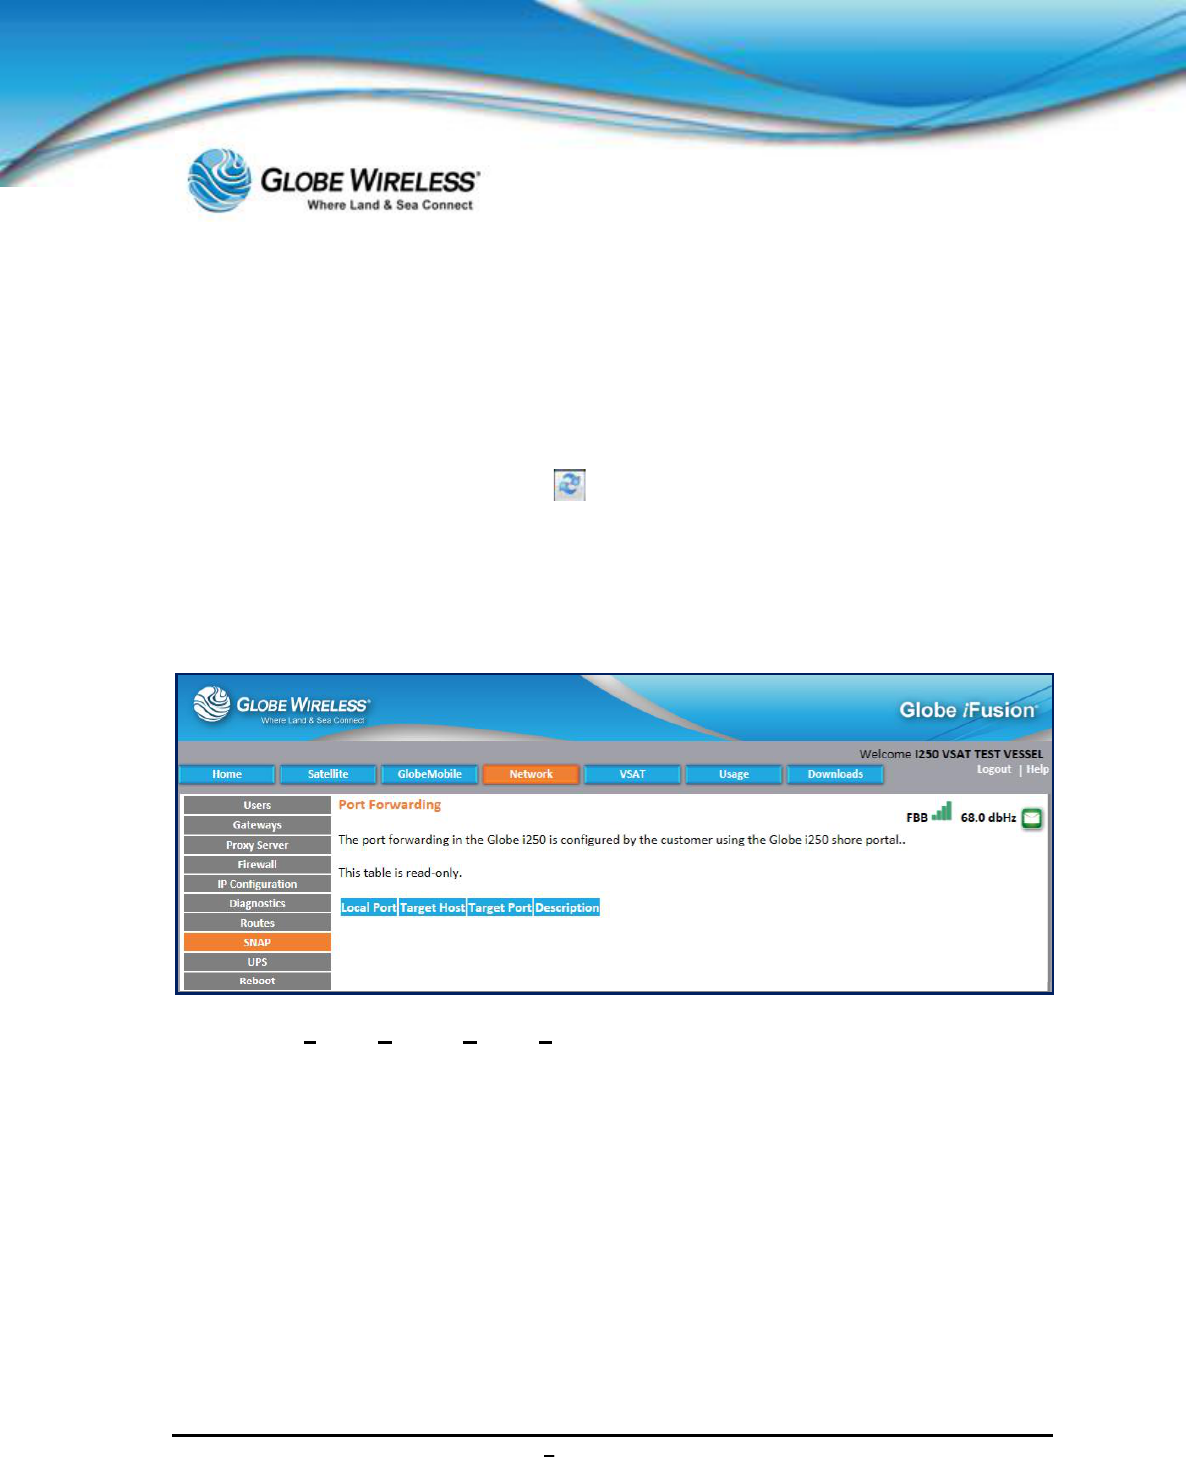
SWG-125 Rev. G June 2013
Globe iFusion ®User Guide for i500, i250, iSRev. G 9-19
Static routes configured in the Globe iFusion® are for the local area network only; they cannot be
added for one of the WAN interfaces. Routes are configured from shore using the Globe iPortal and
are most common in any configuration where the Globe iFusion® is connected to the shipboard LAN
via a router or smart switch.
The current routing table of the Globe iFusion® is displayed below the statically configured routes so
that if there are any irregularities in routing, a network administrator can deduce the cause.
Refresh the current routing table by clicking
9.3.8 SNAP
Click on the SNAP tab to display the Port Forwarding screen which displays the read only Ports
table. The Local Port,Target Host,Target Port, and Description of each are displayed.
GlobeSNAP (Secure Network Access Protocol) is a secure method for gaining access over
shipboard computers from the shore. Each computer which must be controlled by a shore
GlobeSNAP user must have a port forwarding rule configured.
The Port Forwarding rules begin with the port 6500 and go up to 6599. It is important ensure that the
IP Addresses and port numbers of the Target Host and Target Port are correct for the remote
control connection being used. The Description should help the shipboard user identify the computer
by its use or name.
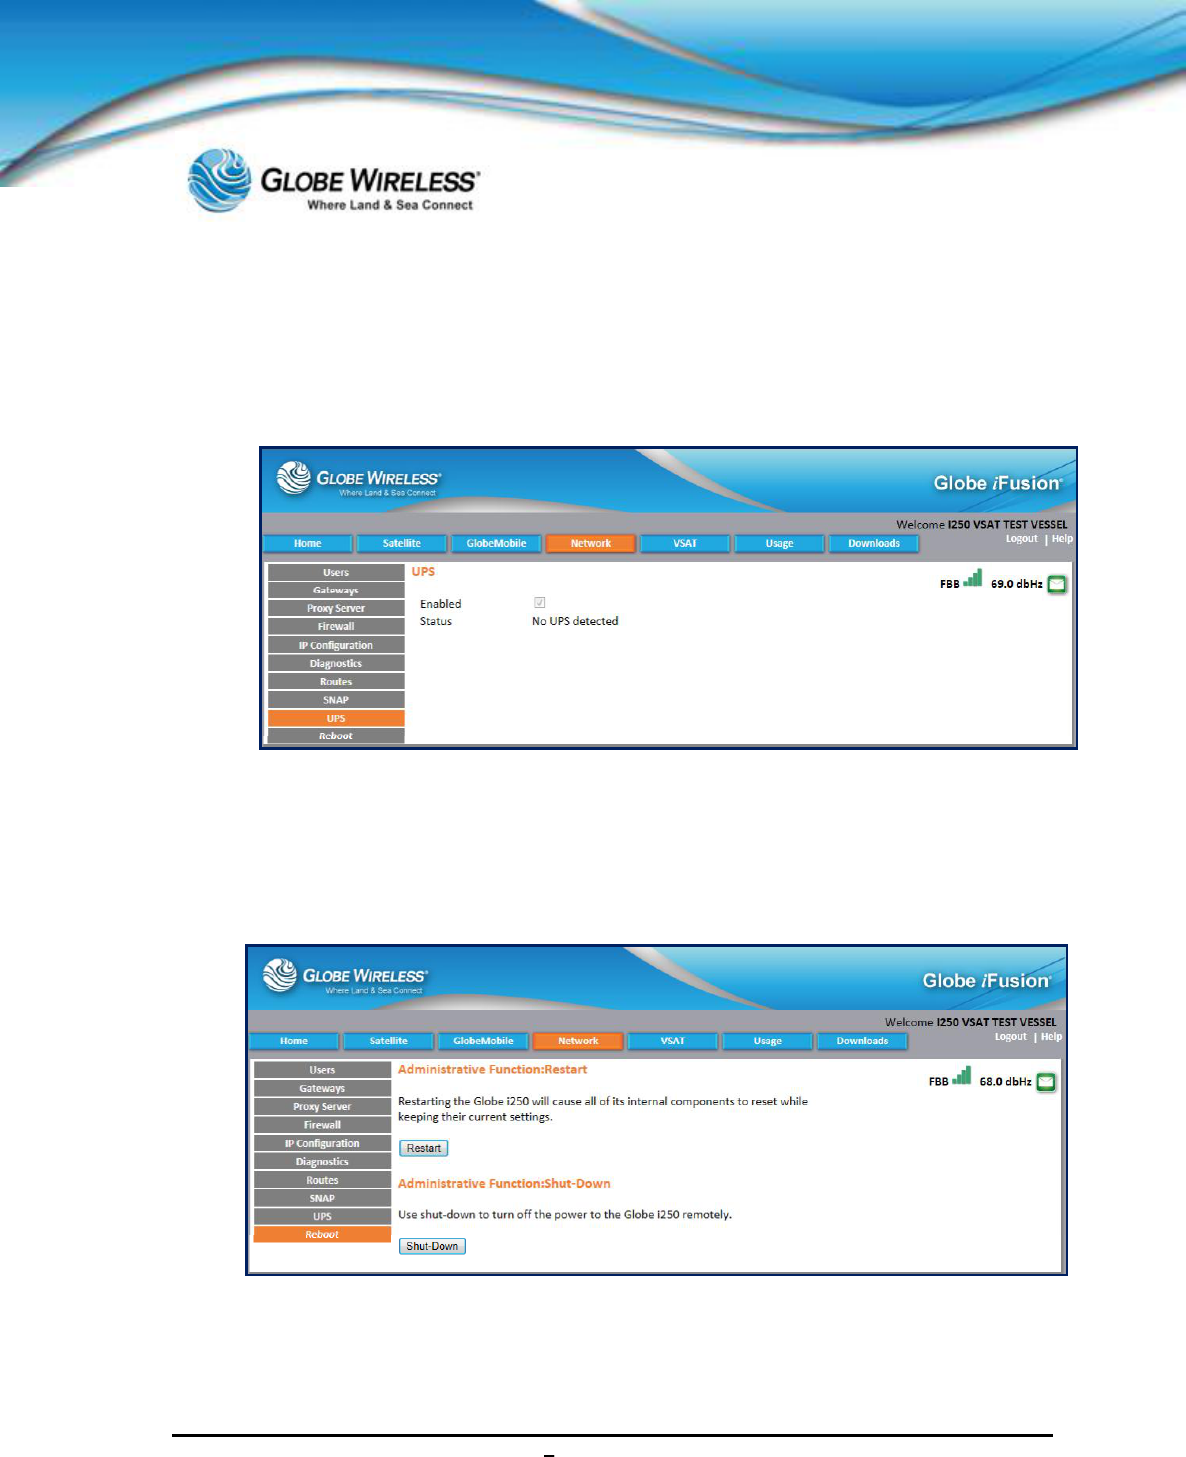
SWG-125 Rev. G June 2013
Globe iFusion ®User Guide for i500, i250, iSRev. G 9-20
9.3.9 UPS
Click on the UPS tab to display the screen showing the status of any detected UPS. If Enabled, a
checkmark will be visible in the checkbox.
9.3.10 Reboot
Click on the Reboot tab to display the Administrative Function: Restart / Shut-Down screen. From
here, the Administrator can click on the Restart button to Reboot or the Shut Down button to turn off
power to the Globe iFusion® remotely.
Rebooting the Globe iFusion® using this web interface can become necessary if the Globe
iFusion® is locked in a closet or other storage area where accessing it is difficult or impossible.
SWG-125 Rev. G June 2013
Globe iFusion ®User Guide for i500, i250, iSRev. G 9-21
Normally, the Globe iFusion® should not need to be rebooted, and should only be done so
on the advice of Globe Wireless Customer Support.
9.4 VSAT Tab
Click on the VSAT tab to display the VSAT screen.
In process
The VSAT screen contains the following sub-tabs:
Status (default)
VSAT ACU
VSAT Log
9.4.1 VSAT Status (default screen)
The Status tab is the default tab when VSAT is selected.
In process
Click on the Status link to display the Globe iFusion®VSAT Status and Control.
Signal
Green bars indicate signal strength of the equipment
Temperature
Indicates if the equipment temperature is within the normal range
GPS Displays the GPS coordinates:
GPS Date
GPS Latitude
GPS Longitude
GPS Course
GPS Speed
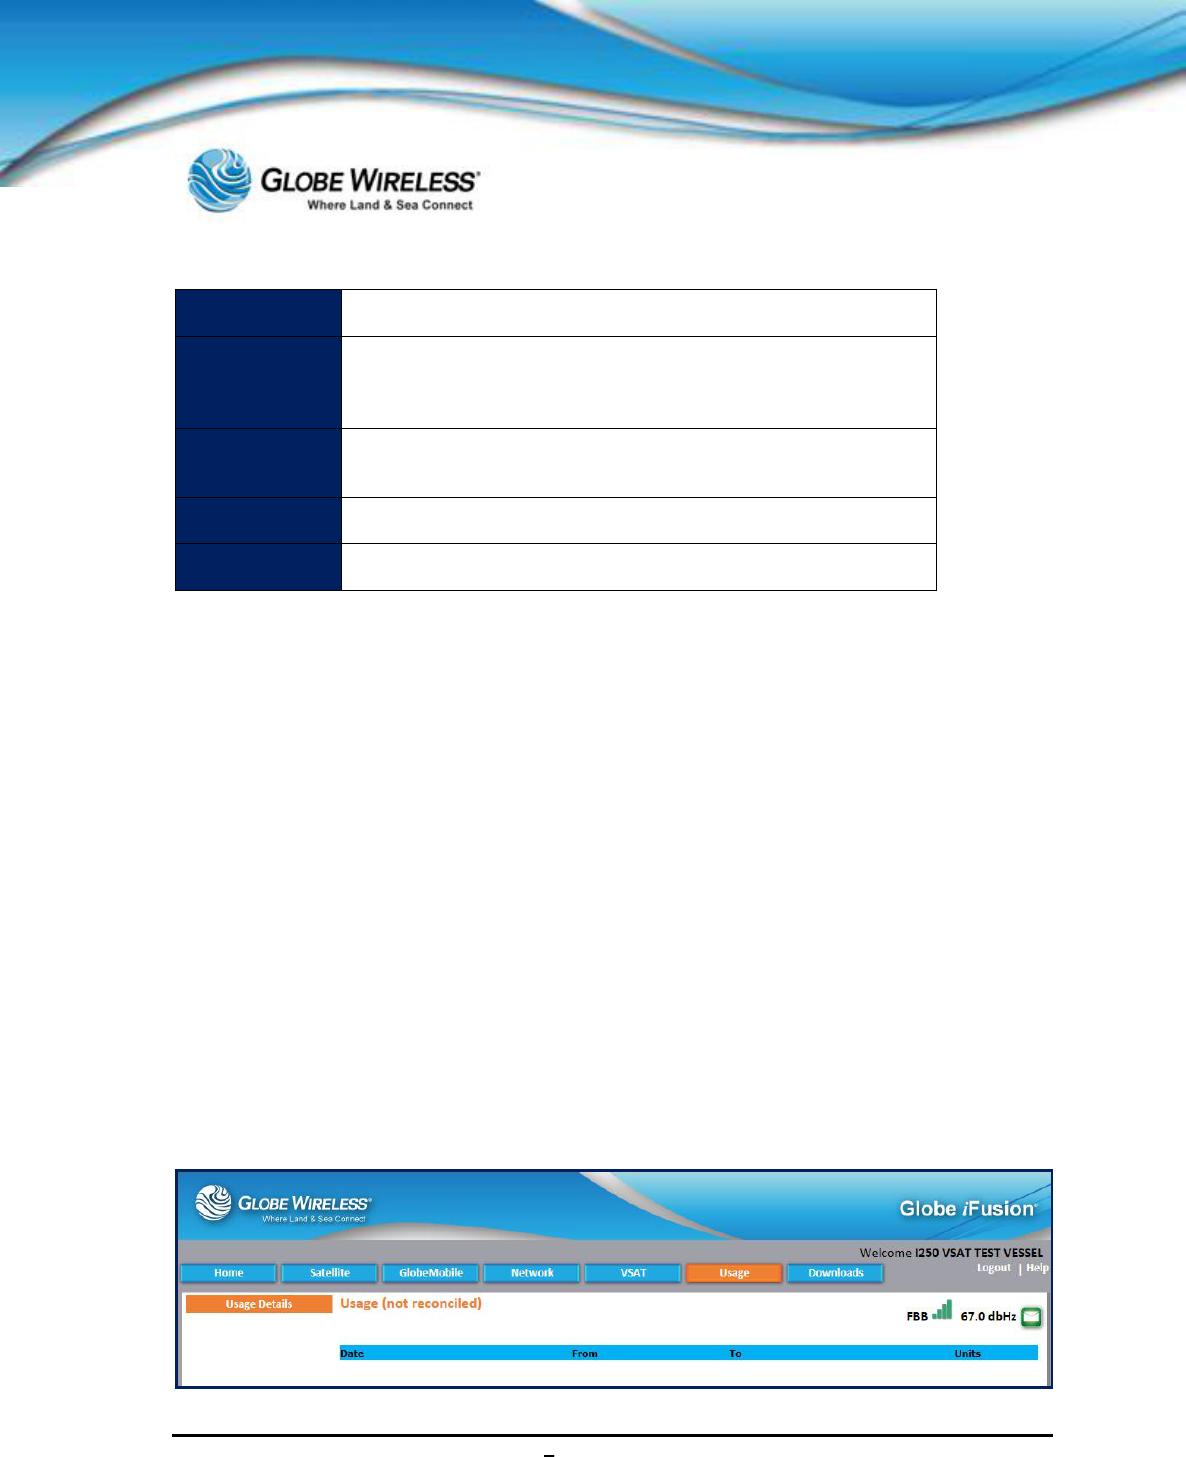
SWG-125 Rev. G June 2013
Globe iFusion ®User Guide for i500, i250, iSRev. G 9-22
Registered
A green checkmark indicates that the Globe iFusion®
has
connected t
o the satellite and has registered with the Inmarsat
shore system.
Data
Connection
Displays the connection address
Azimuth
Displays current Azimuth.
Elevation
Displays current Elevation.
9.4.2 VSAT ACU
In process
9.4.3 VSAT Log
In process
9.5 Usage Tab
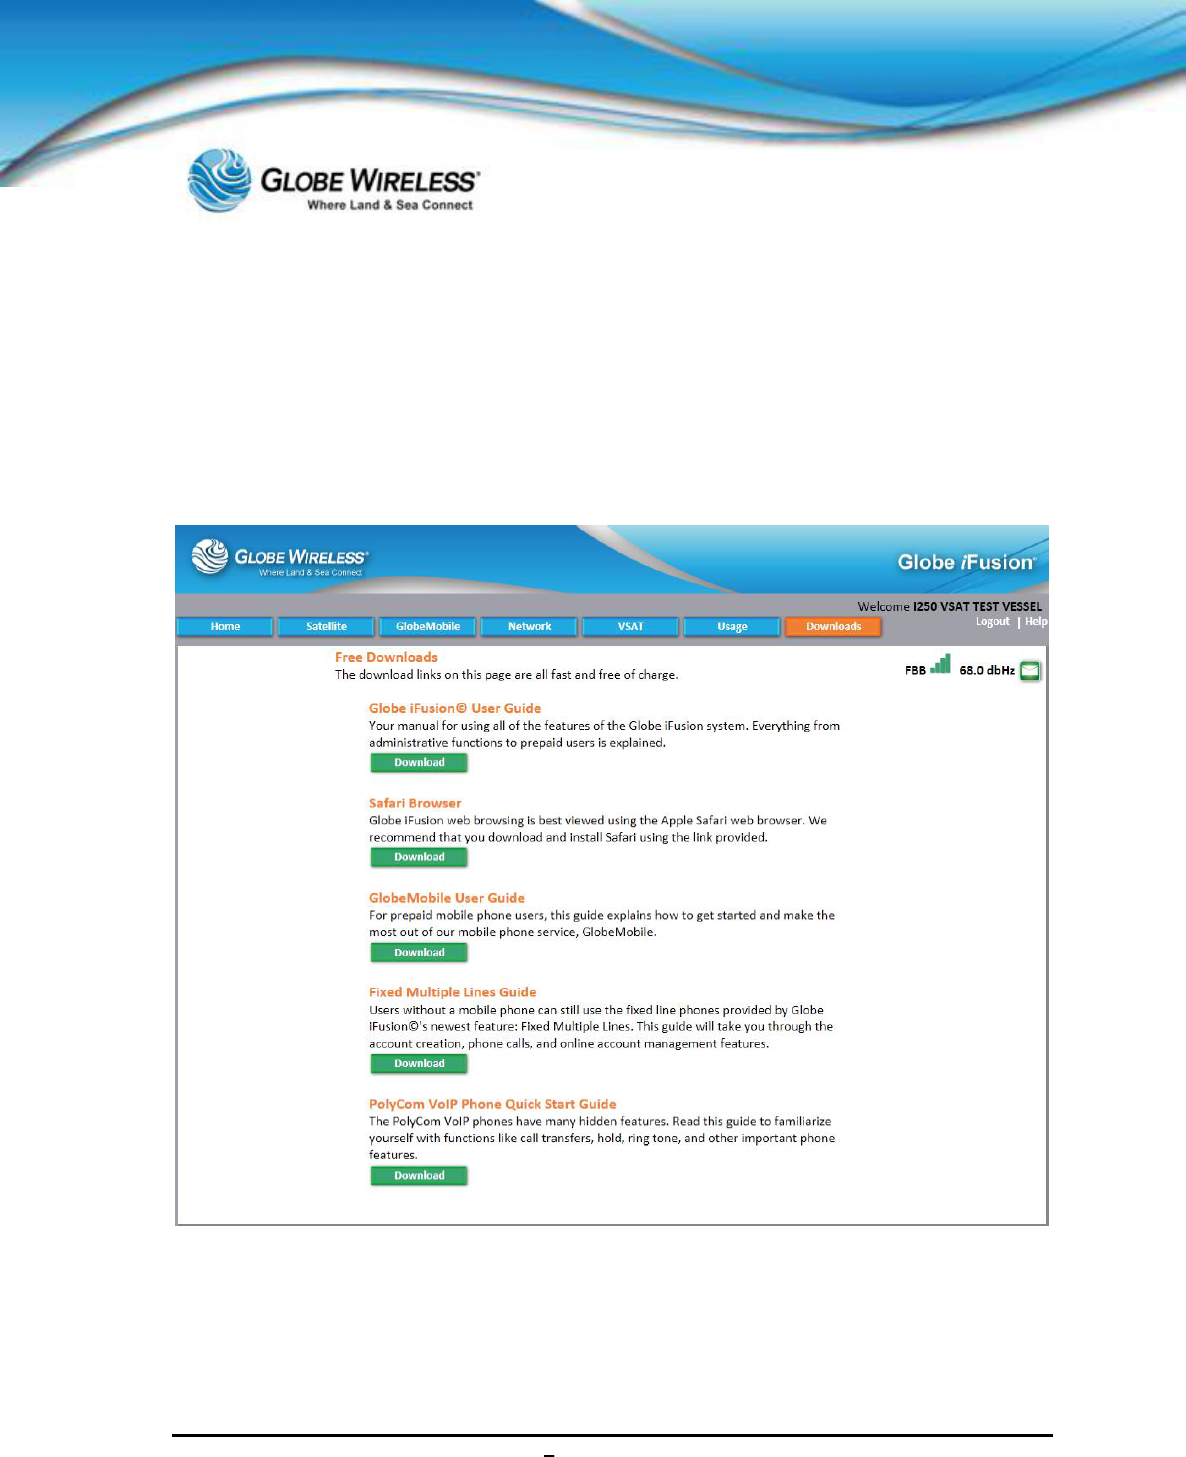
SWG-125 Rev. G June 2013
Globe iFusion ®User Guide for i500, i250, iSRev. G 9-23
9.5.1 Usage Details Sub-Tab
In process
9.6 Downloads Tab
Step 1: Click on the Downloads tab to display all downloadable data.
Step 2: Select a download you wish to perform and press the download button.
Step 3: Follow the steps displayed to complete the download.

SWG-125 Rev. G June 2013
Globe iFusion ®User Guide for i500, i250, iSRev. G 9-24
Step 4: If there are additional downloads you wish to perform, repeat the above steps.
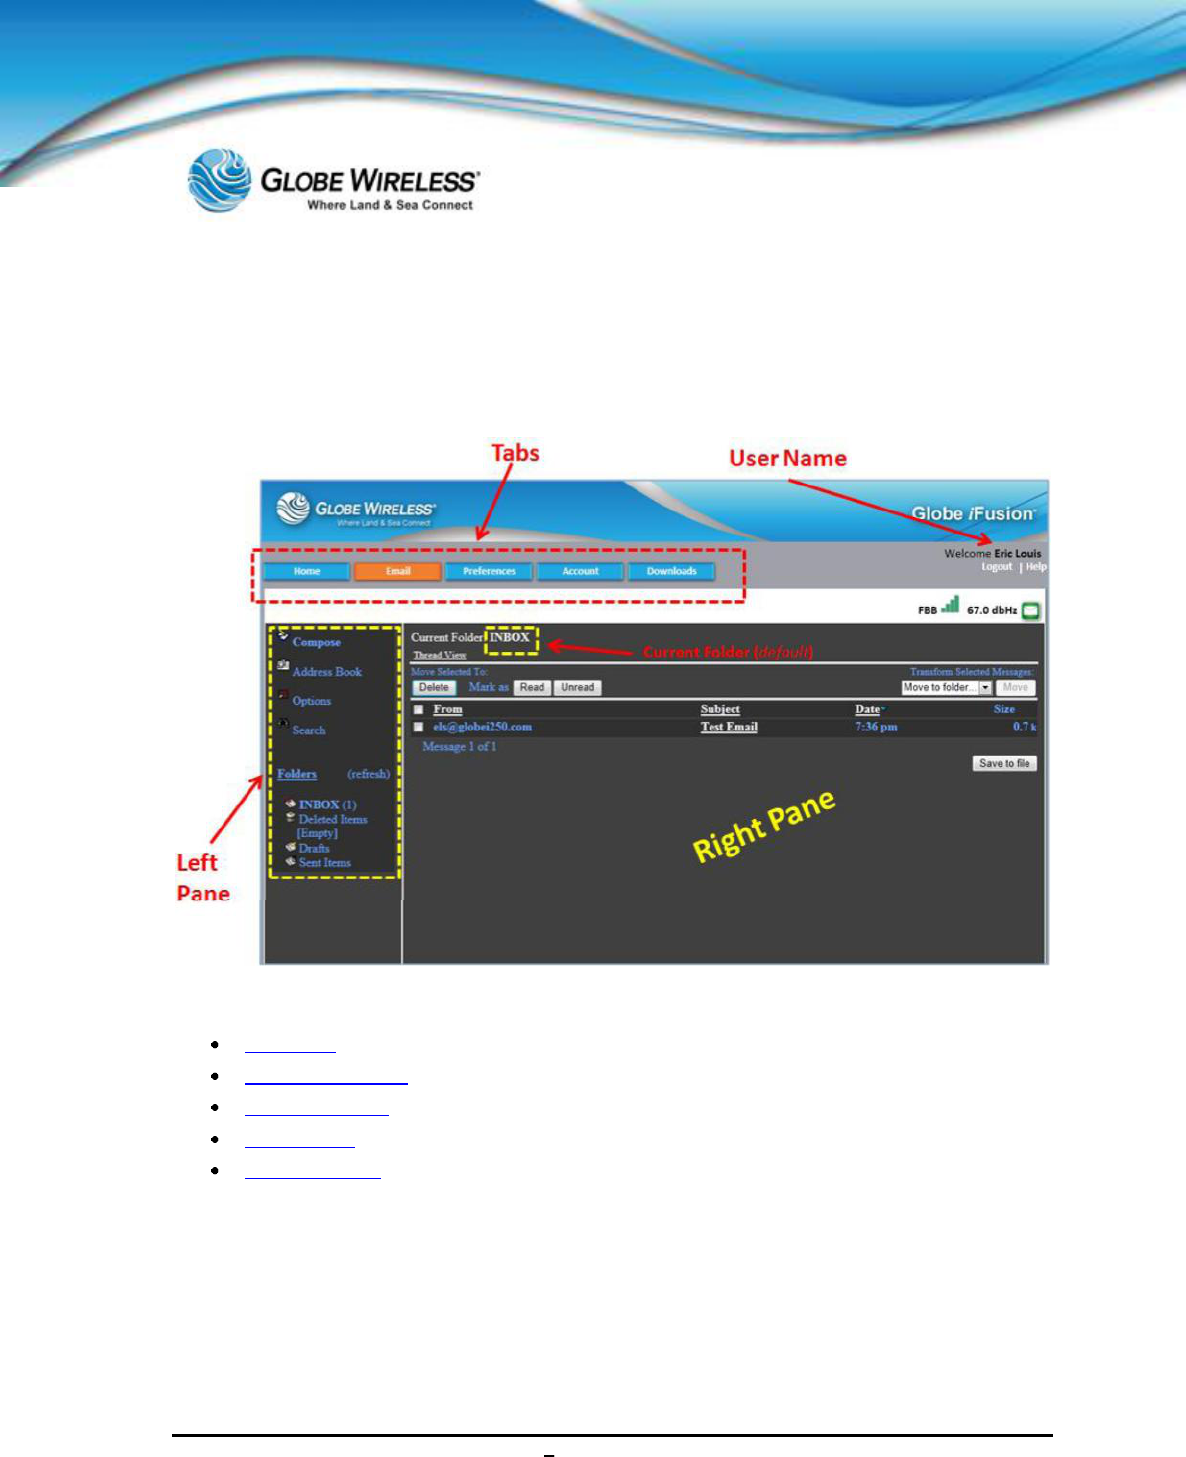
SWG-125 Rev. G June 2013
Globe iFusion ®User Guide for i500, i250, iSRev. G 10-1
10.0Prepaid Users
When the Prepaid User logs in to the Globe iFusion®, the default Email Inbox screen is displayed.
The Prepaid User screen contains the following tabs:
Home Tab
Email (default] Tab
Preferences Tab
Account Tab
Downloads Tab
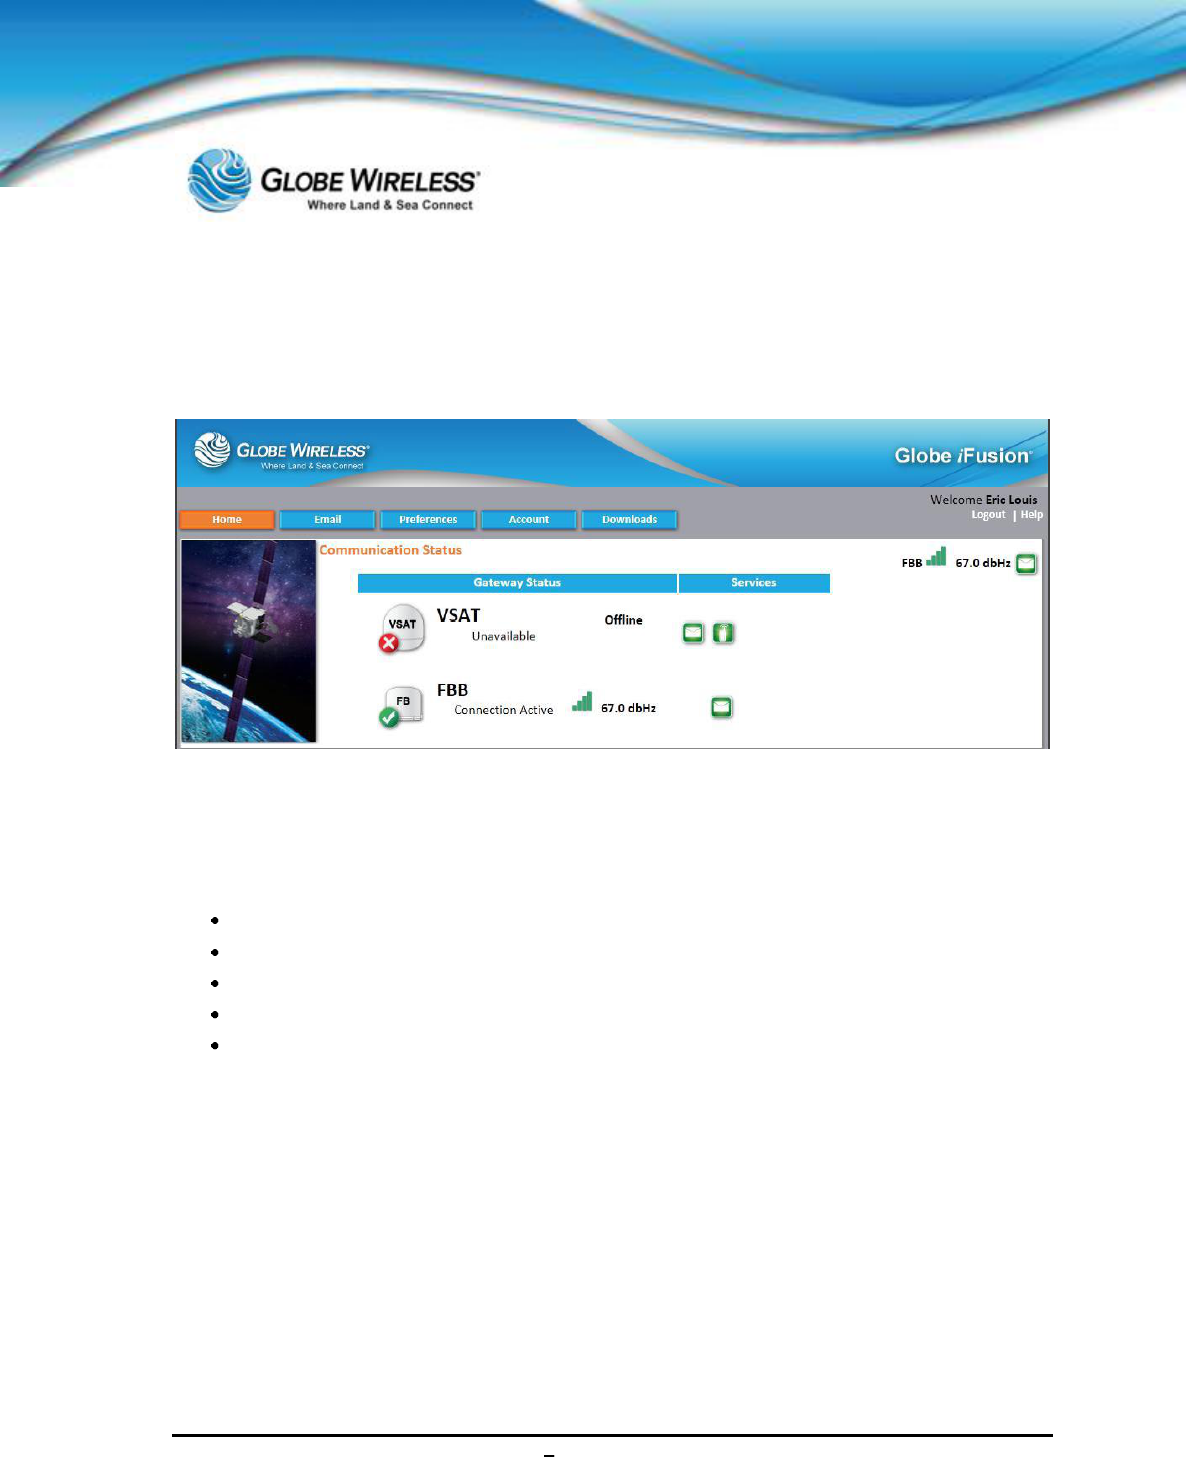
SWG-125 Rev. G June 2013
Globe iFusion ®User Guide for i500, i250, iSRev. G 10-2
10.1 Home Tab
Click the Home Tab to display the Communication Status screen showing the Gateway Status and
Services (e.g., prepaid email and prepaid GSM).
10.2 Email Tab (default)
Click the Email tab to display the prepaid user email (inbox is the default).
The left pane of the Inbox is where the user will perform such tasks as:
Compose new email messages
Manage the address book
Set options
Perform searches
Monitor the folders such as inbox,deleted items,drafts, and sent mail
The following sub-sections describe each function in the left frame of the Email tab:
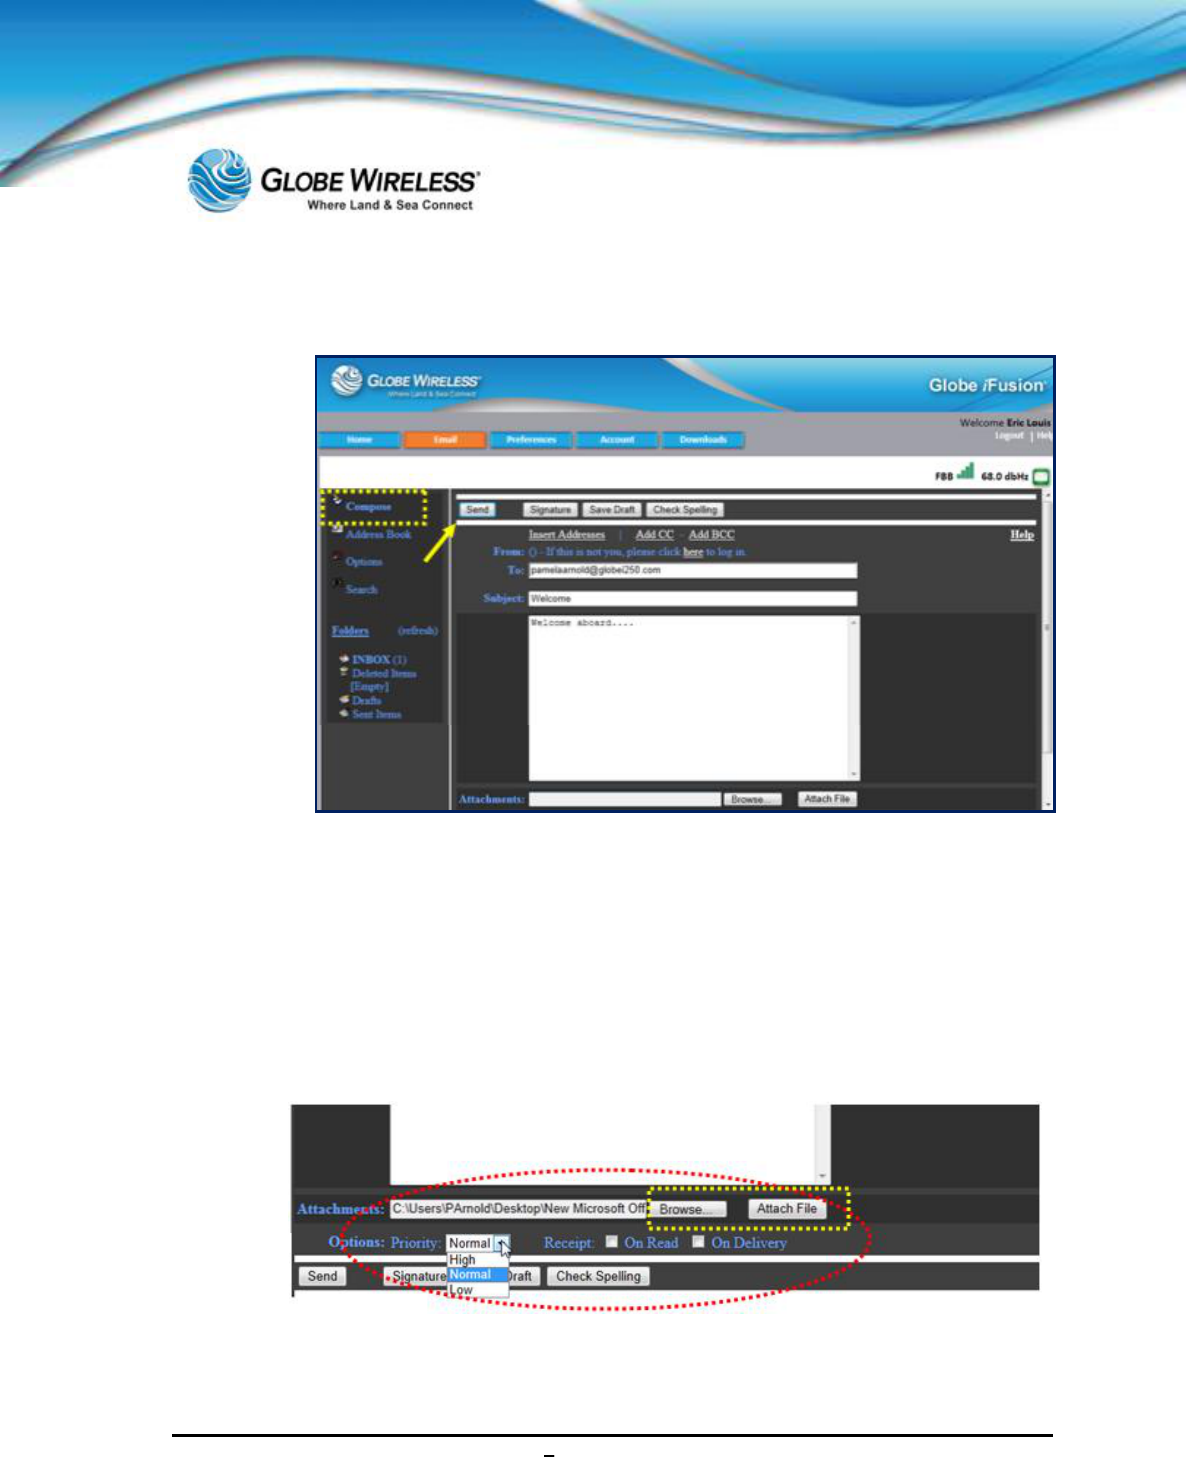
SWG-125 Rev. G June 2013
Globe iFusion ®User Guide for i500, i250, iSRev. G 10-3
10.2.1 Compose a Message
Step 1: Click Compose to open the compose email screen.
Step 2: Populate the To: and Subject: fields; then type your message in the message body
area.
Step 3: Click Send.
Step 4: If you wish to attach a file to the message, click on the Browse button and locate the file
you wish to attach.
Step 5: Once the file has been located, it is displayed in the Attachments: area at the bottom of
the screen.
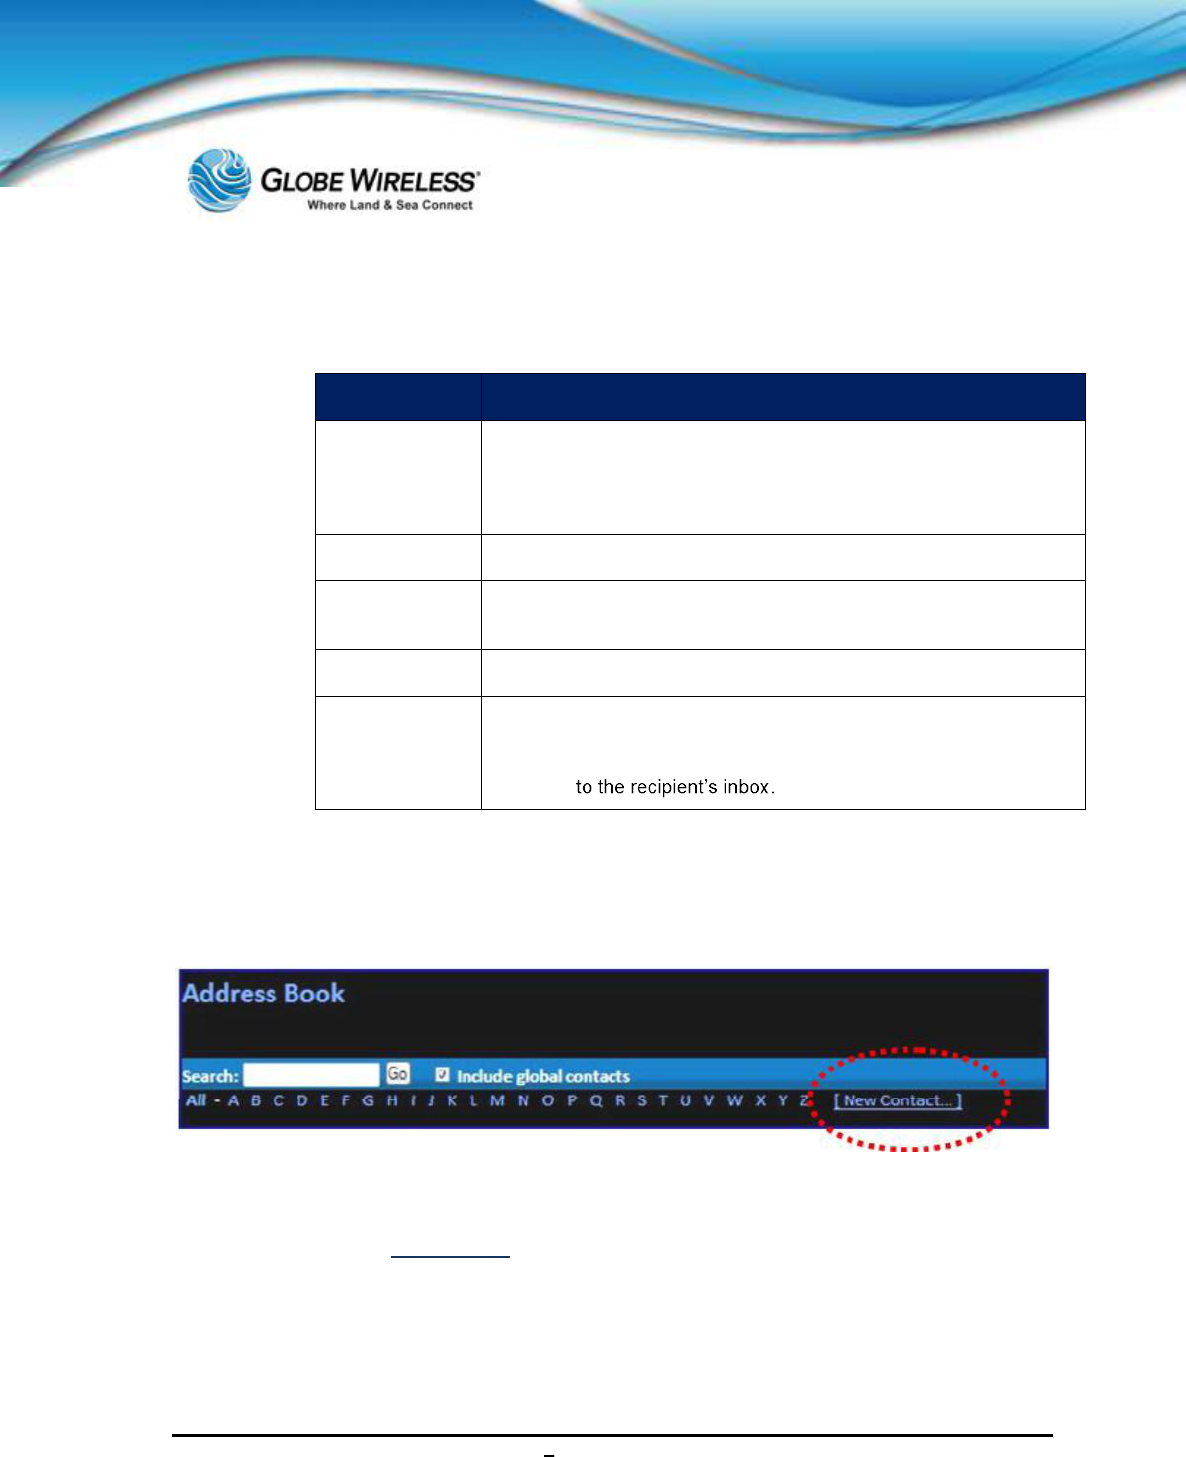
SWG-125 Rev. G June 2013
Globe iFusion ®User Guide for i500, i250, iSRev. G 10-4
Step 6: Click the Priority: drop-down arrow and select High,Normal, or Low priority.
Refer to the following table for options that can be selected by the sender:
Option Purpose
Signature
Click to add a signature to your email message. A signature is a
way to sign a message and usually includes at the very least, the
user's name. A professional signature might also includ
e title,
company, and contact information.
Save Draft Click to place a copy of the message into your Draft folder.
Check Spelling
Click to run the spell check application in the message prior to
sending.
Priority High, Normal, Low (self explanatory)
Receipt
options:
If you (the sender) would like confirmation the email has been
received, click to place a checkmark in a checkbox depending if
you wish to know when it has been read, or when it has
been
delivered
10.2.2 Address Book
The Address Book contains all the email contacts in alphabetical order. Click on a letter to view the
email contacts starting with that particular letter or click All to view all contacts in the address book.
10.2.2.1 Add a new Contact
Step 1: Click the New Contact link to display the Add Contact screen.
Step 2: Populate the applicable fields (i.e., Name, email, etc.)
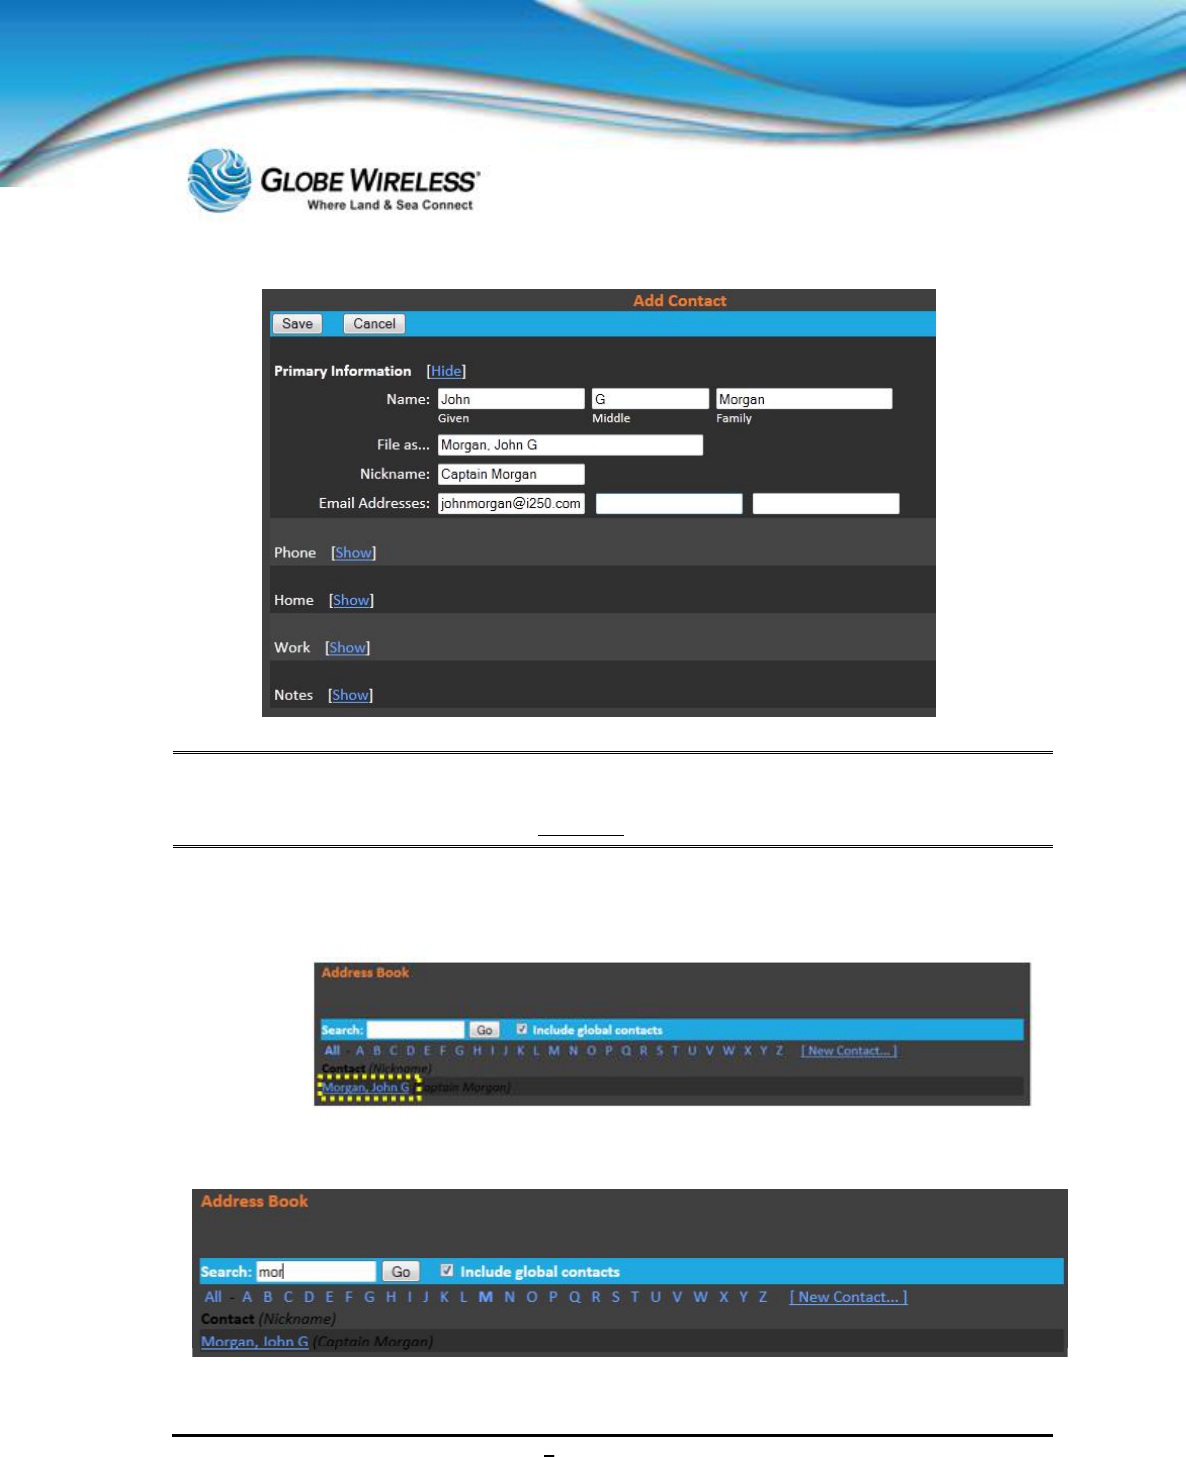
SWG-125 Rev. G June 2013
Globe iFusion ®User Guide for i500, i250, iSRev. G 10-5
Note: You also have the option of adding additional information such as phone numbers,
home/work information, and notes. Click on Show to display the populated field(s) and
Hide to hide the fields, thus not displaying any information.
Step 3: Click the Save button. The address was added successfully is displayed at the bottom of
the screen.
10.2.2.2 Search for a contact
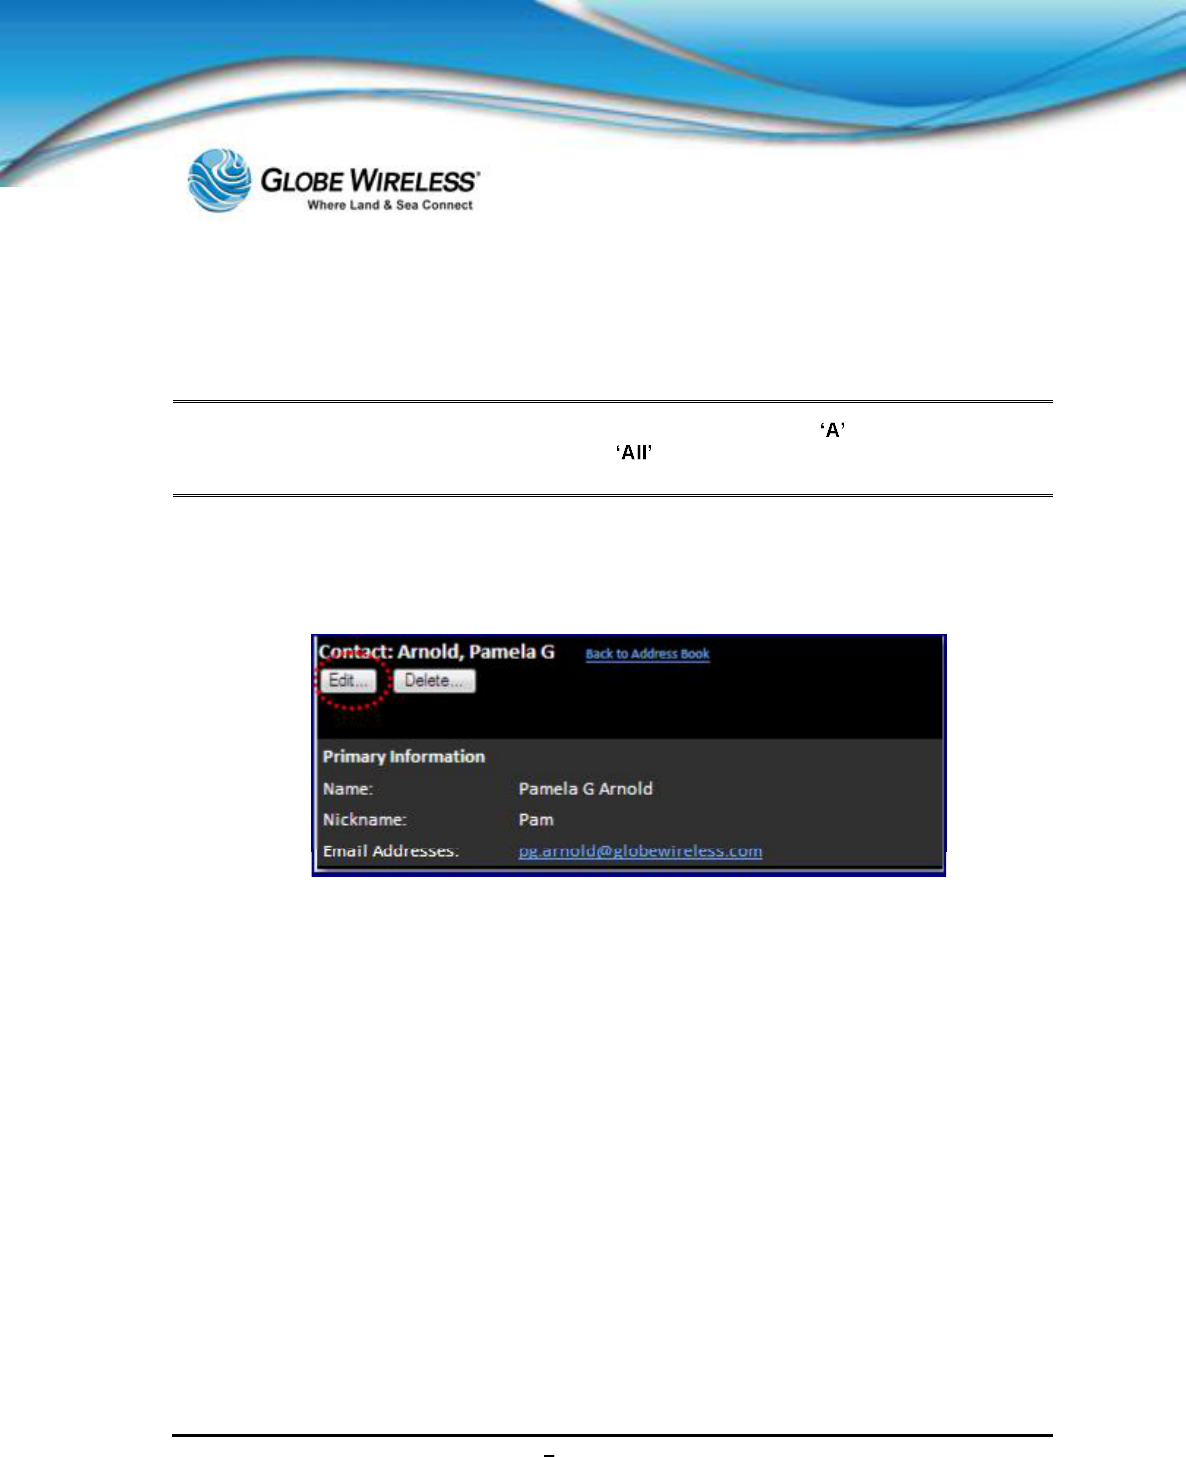
SWG-125 Rev. G June 2013
Globe iFusion ®User Guide for i500, i250, iSRev. G 10-6
Step 1: Type part of the contact name in the Search: field.
Step 2: Click the Go button to display all contacts beginning with the search criteria entered.
Note: You may also search for a contact by clicking on a letter (i.e., ) to display all contacts
beginning with the letter pressed. Press to display a list of all contacts in the address
book.
10.2.2.3 Edit or Delete a Contact
Step 1: Locate the contact you wish to edit or delete.
Step 2: Click the Delete button to delete the record.
Step 3: Click the Edit button to display the contact information screen.
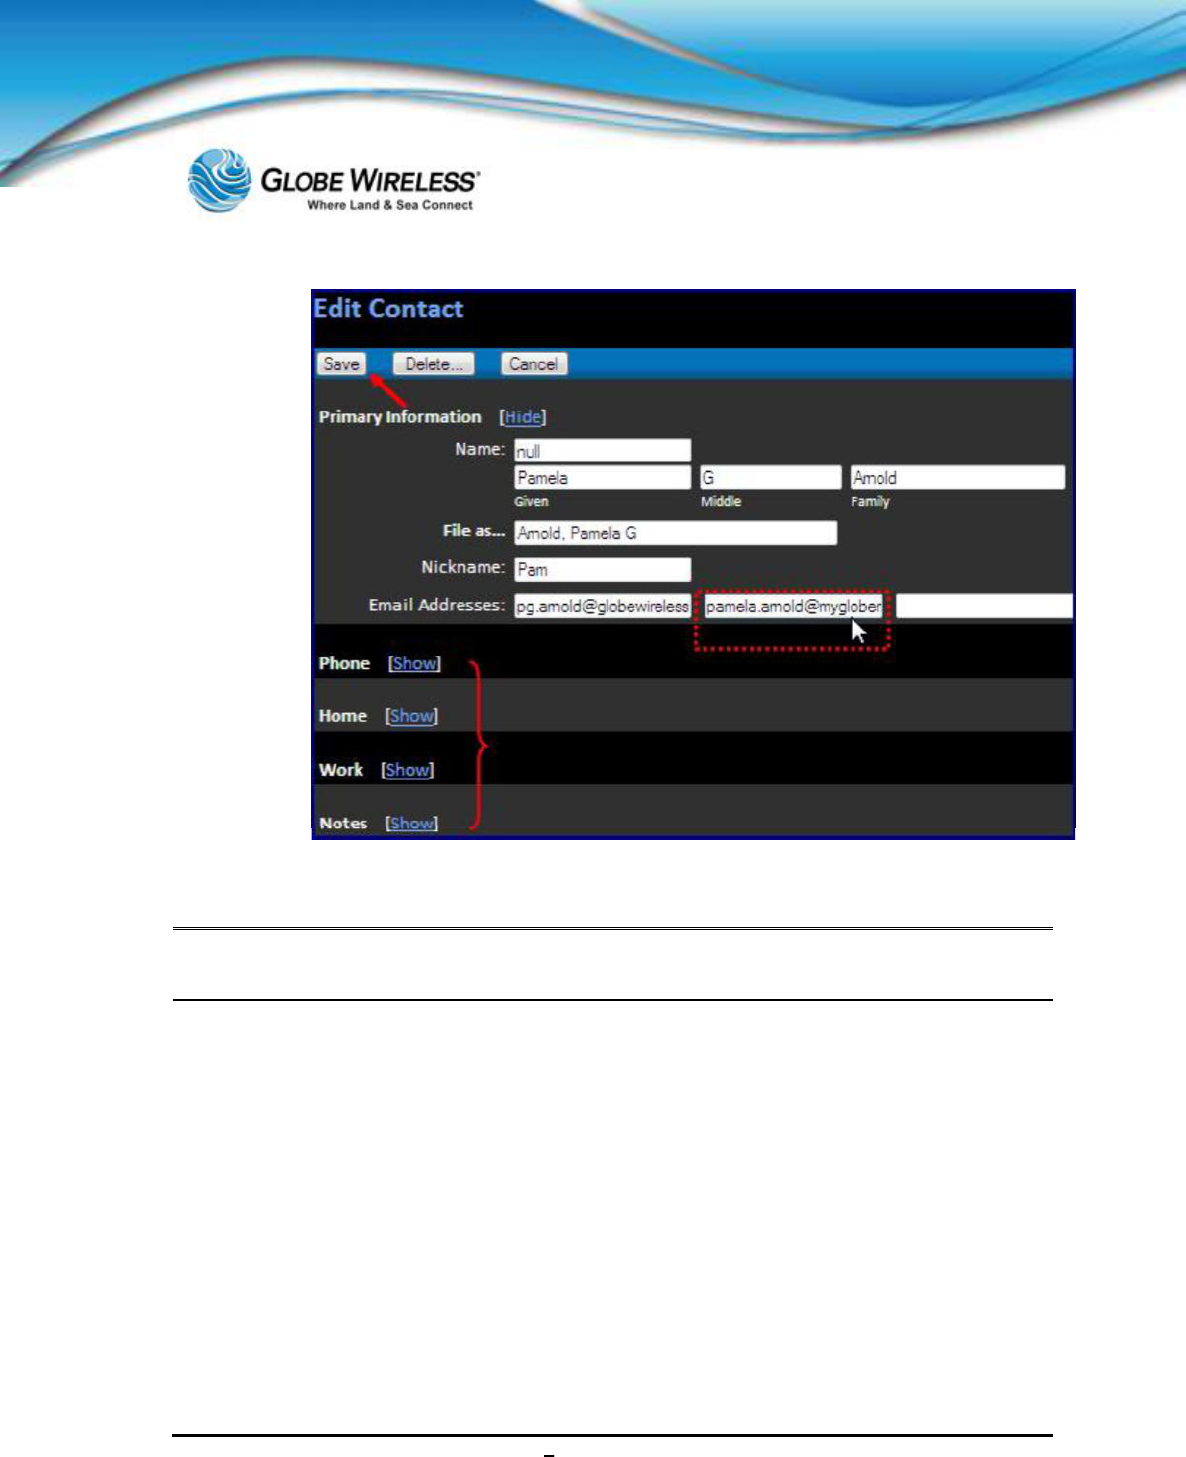
SWG-125 Rev. G June 2013
Globe iFusion ®User Guide for i500, i250, iSRev. G 10-7
Step 4: Make desired changes and click the Save button.
Note: You can also edit additional information such as phone numbers, home/work address, and
notes as well. Click on Show to display the fields and Hide to hide the fields.
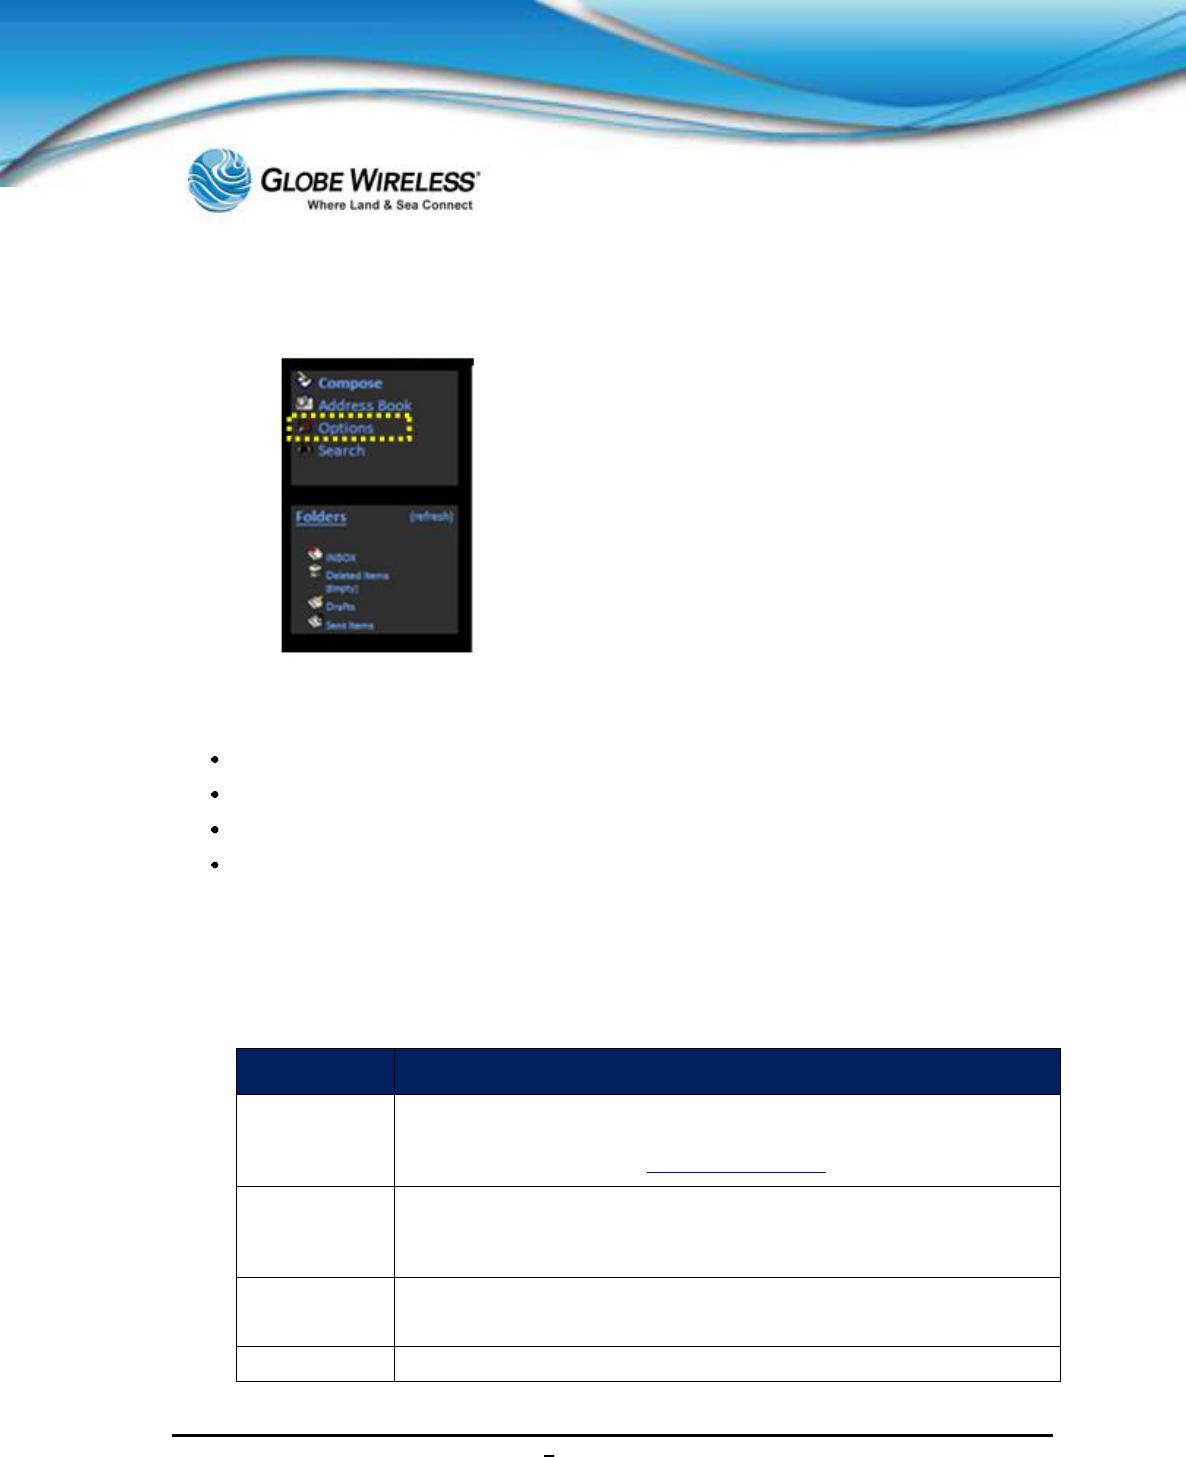
SWG-125 Rev. G June 2013
Globe iFusion ®User Guide for i500, i250, iSRev. G 10-8
10.2.3 Options
Click the Options link from the left pane of the screen. The user has the option of setting the
following:
Personal Information
Display Preferences
Message Highlighting
Folder Preferences
10.2.3.1 Personal Information
Personal Information contains information about the user such as name, email address, signature if
desired, etc.
The following fields are addressed on the Personal Information screen:
Field Description
Full Name:
The entire name of the user, for example, "John Doe". This is displayed to
the recipients of a message. When this is not populated, the recipi
ent will
only see the email address, jdoe@mydomain.org.
Signature:
A signature is a way to sign a message and usually includes at the very
least, the user's name. A professional signature might also include title,
company, and contact information.
Time zone
Options:
Same as Server is the default. Click the drop-
down arrow and select the
time zone of the user.
Reply Citation
No Citation is the default. To change, click the drop-
down arrow and
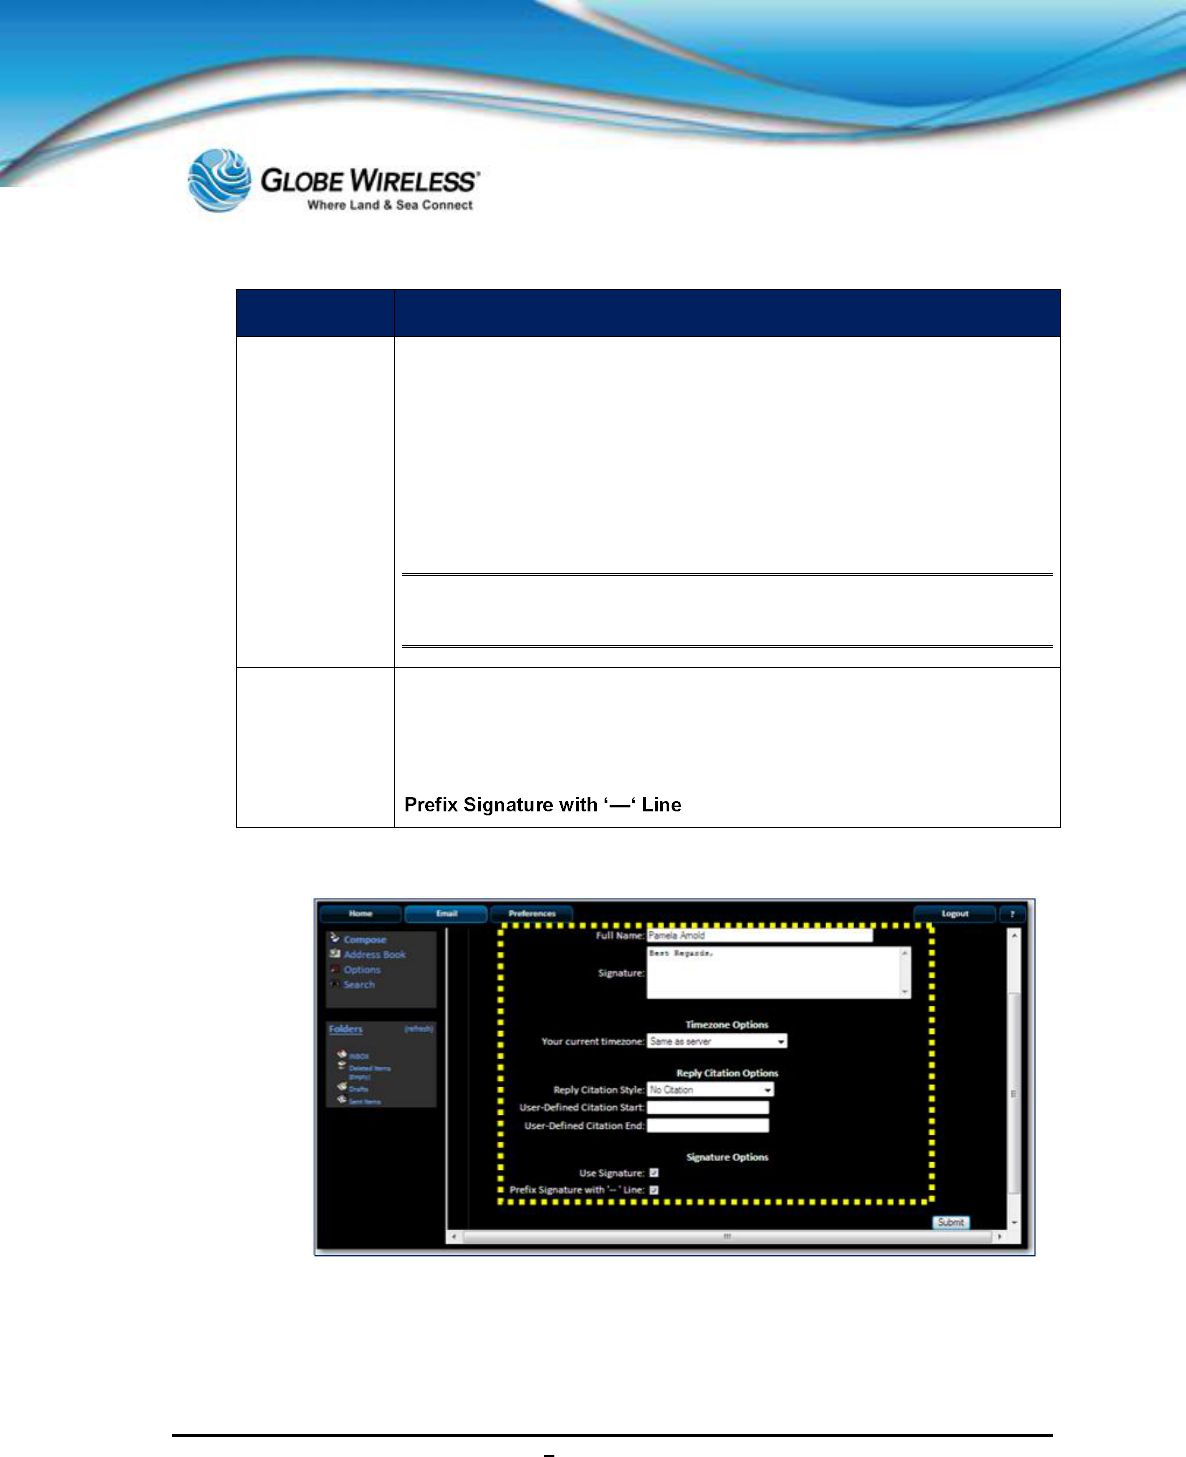
SWG-125 Rev. G June 2013
Globe iFusion ®User Guide for i500, i250, iSRev. G 10-9
Field Description
Options select the desired option:
AUTHOR Wrote
On DATE AUTHOR Wrote
Quote Who XML
User-Defined
Note: For User-Defined Citation, enter the Citation Start: and
Citation
End: in the applicable fields.
Signature
Options:
Click to place a checkmark in the checkbox for one or bo
th options if
desired. (A blank checkbox provides no signature or prefix.)
Use Signature
Step 1: Referring to the table, populate the fields on the personal Information screen.
Step 2: Click the Submit button when complete.

SWG-125 Rev. G June 2013
Globe iFusion ®User Guide for i500, i250, iSRev. G 10-10
10.2.3.2 Display Preferences
Use Display Preferences to change the way the Webmail looks and displays information to the user.
The following fields are addressed on the Display Preferences screen:
Field Description
Number of Messages
per Page
Click the drop-down arrow and
select the number of messages to
display on a page within a folder. If there are more messages than the
desired number to be shown in a folder, Previous and Next
will appear
above and below the listing, linking to the previous group or subsequent
group of messages.
Always Show Full
Date:
By default
, messages less than a week old show the day and time a
message was delivered. After a week, the message will show the full
date. To always view the full date, change the default setting from No
to
Yes.
Wrap Incoming Text
At:
Number of characters to allow before wrapping the text. This prevents
messages from scrolling way off the screen. 86 is a common value, but
it can be changed as desired by the user.
Show HTML Version
by Default:
If a message received is in
both text and HTML format, the user can
choose to view the HTML version. Click to place a checkmark in the
checkbox for Yes or leave the field unpopulated for No.
Enable Forward as
Attachment:
Click to place a checkmark in the checkbox for Yes or leave th
e field
unpopulated for No.
Include me in CC when
I Reply All:
Reply All
sends a reply to all recipients of the original message,
including the sender. Leave the senders e-
mail address out by setting
this value to No.
Note: Since it is a local deliv
ery, the users are not charged by Globe
Wireless when they cc: themselves (or other recipients on the
same vessel).
Cursor Position when
Replying
This setting allows placement of the cursor automatically in the TO
field
or message BODY area when replying to a message. By default
, the
user is taken to the TO field. Click the drop-
down arrow and select the
area you wish the cursor to reside:
To: field
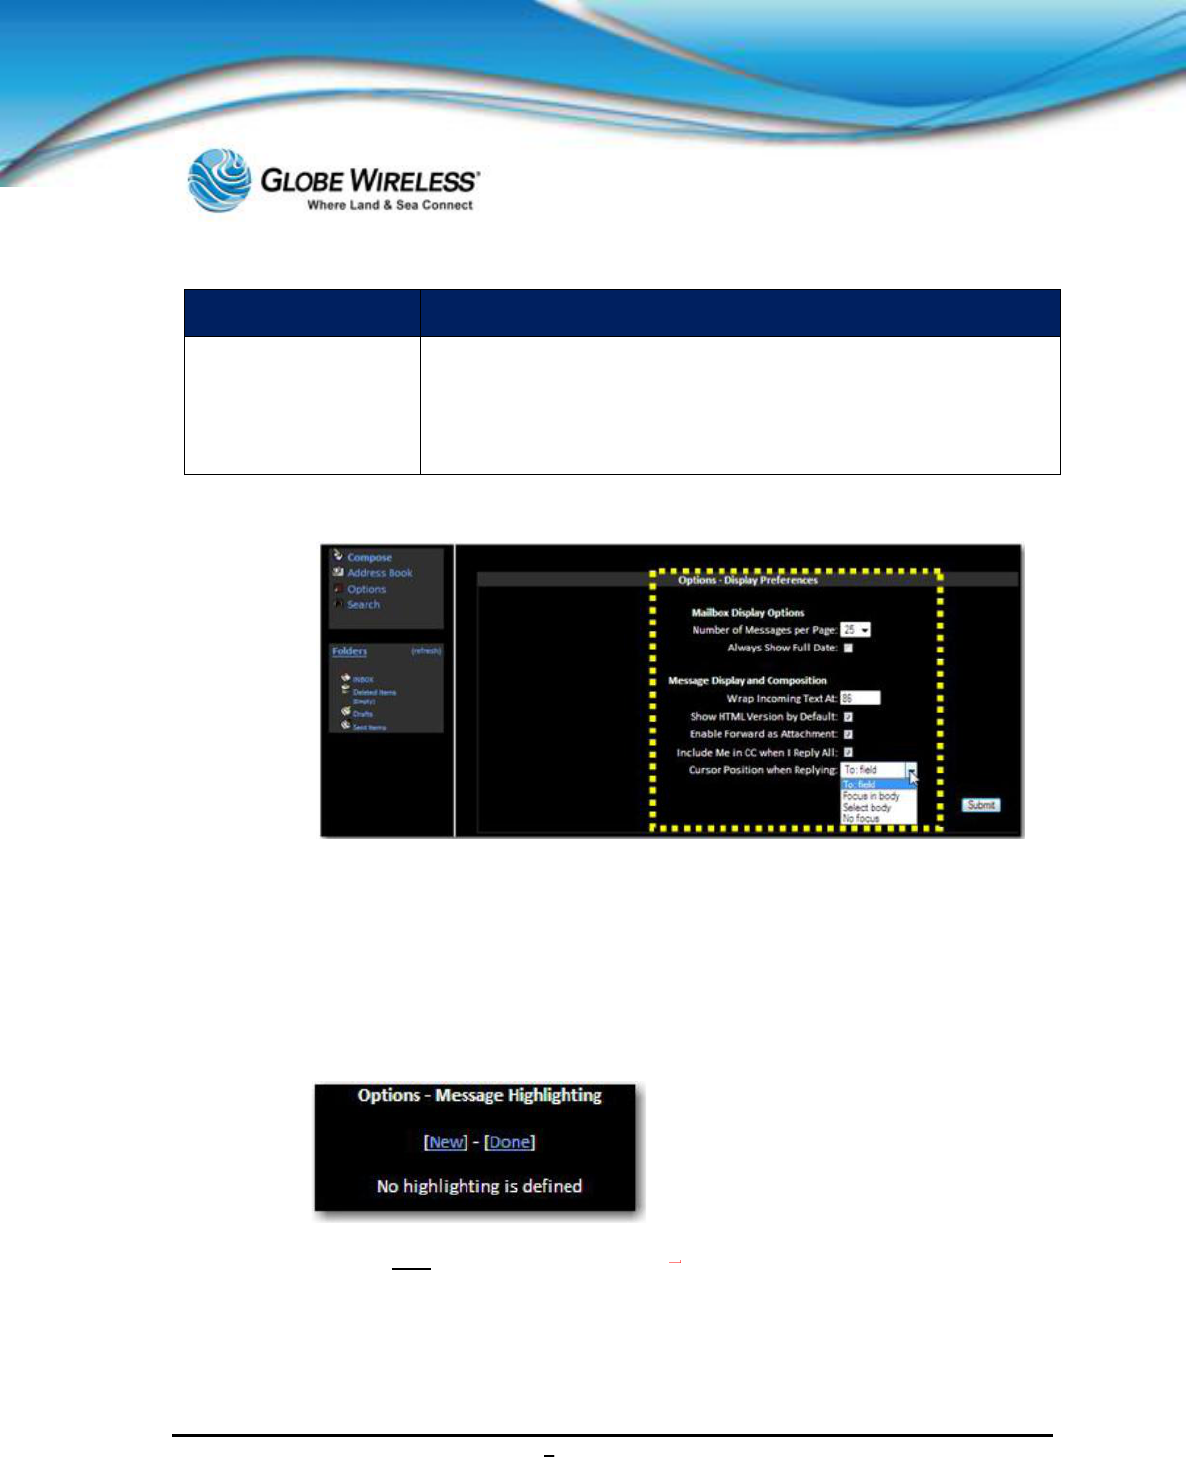
SWG-125 Rev. G June 2013
Globe iFusion ®User Guide for i500, i250, iSRev. G 10-11
Field Description
Focus in body
Select body
No focus
Step 1: Referring to the table, populate the fields on the Display Preferences screen.
Step 2: Click the Submit button when complete.
10.2.3.3 Message Highlighting
If the user is subscribed to many mailing lists, it can be difficult to distinguish which messages came
from where while reading through the list of messages. With Message Highlighting, the user can set
up criteria such as a different background color depending on the sender of the message, priority, or
mailing list, etc.
Step 1: Click the New link to display the Options Message Highlighting screen.
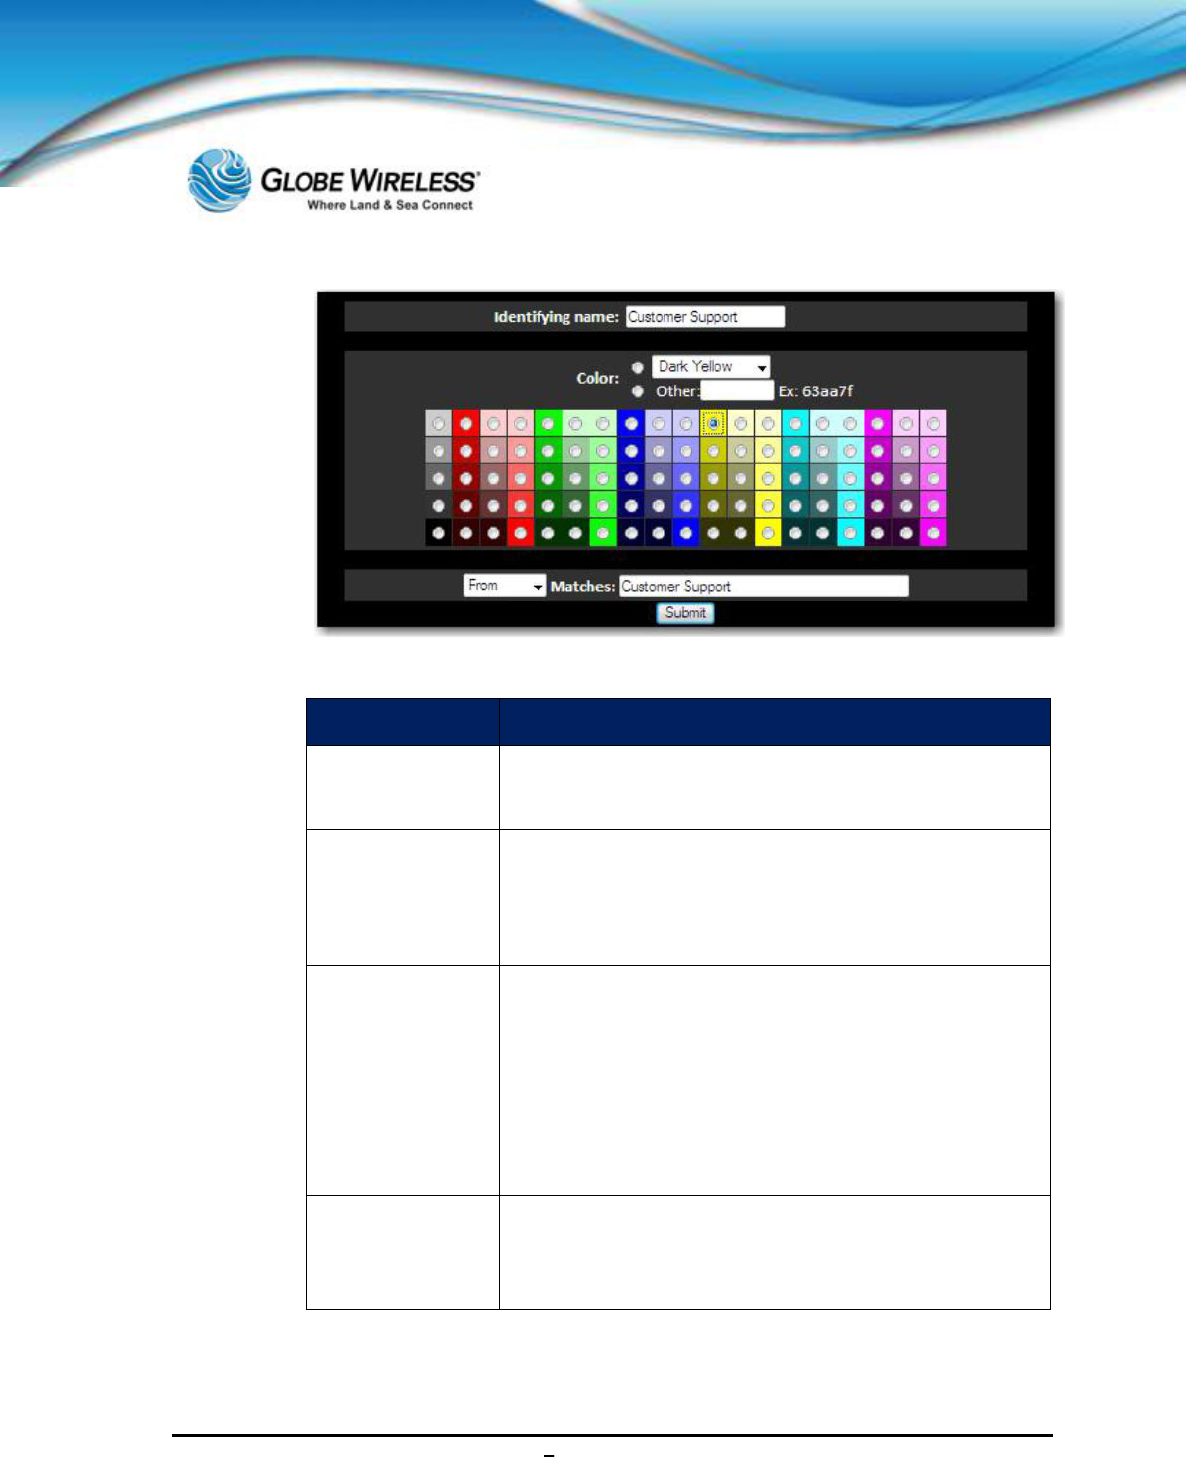
SWG-125 Rev. G June 2013
Globe iFusion ®User Guide for i500, i250, iSRev. G 10-12
The following fields are addressed on the Display Preferences screen:
Field Description
Identifying name:
The name you see which describes what it is. For example, if you
are highlighting messages from the customer support department,
you might set this to "Customer Support".
Color The actu
al color of the background. You can choose between
pre-
defined colors or you can enter the HEX code for the
color that you desire (i.e. a6b492). If you choose to enter
your own color, you must also click to select the radio button
in front of the selection.
Select from Drop-
down:
From
To
Cc
To or Cc
Subject
Matches: The user can choose the matching phrase. From the drop
-
down box, select
which header field to match against (to,
from, subject...) and in the text box, you can enter the phrase
to match (mom@yahoo.com).
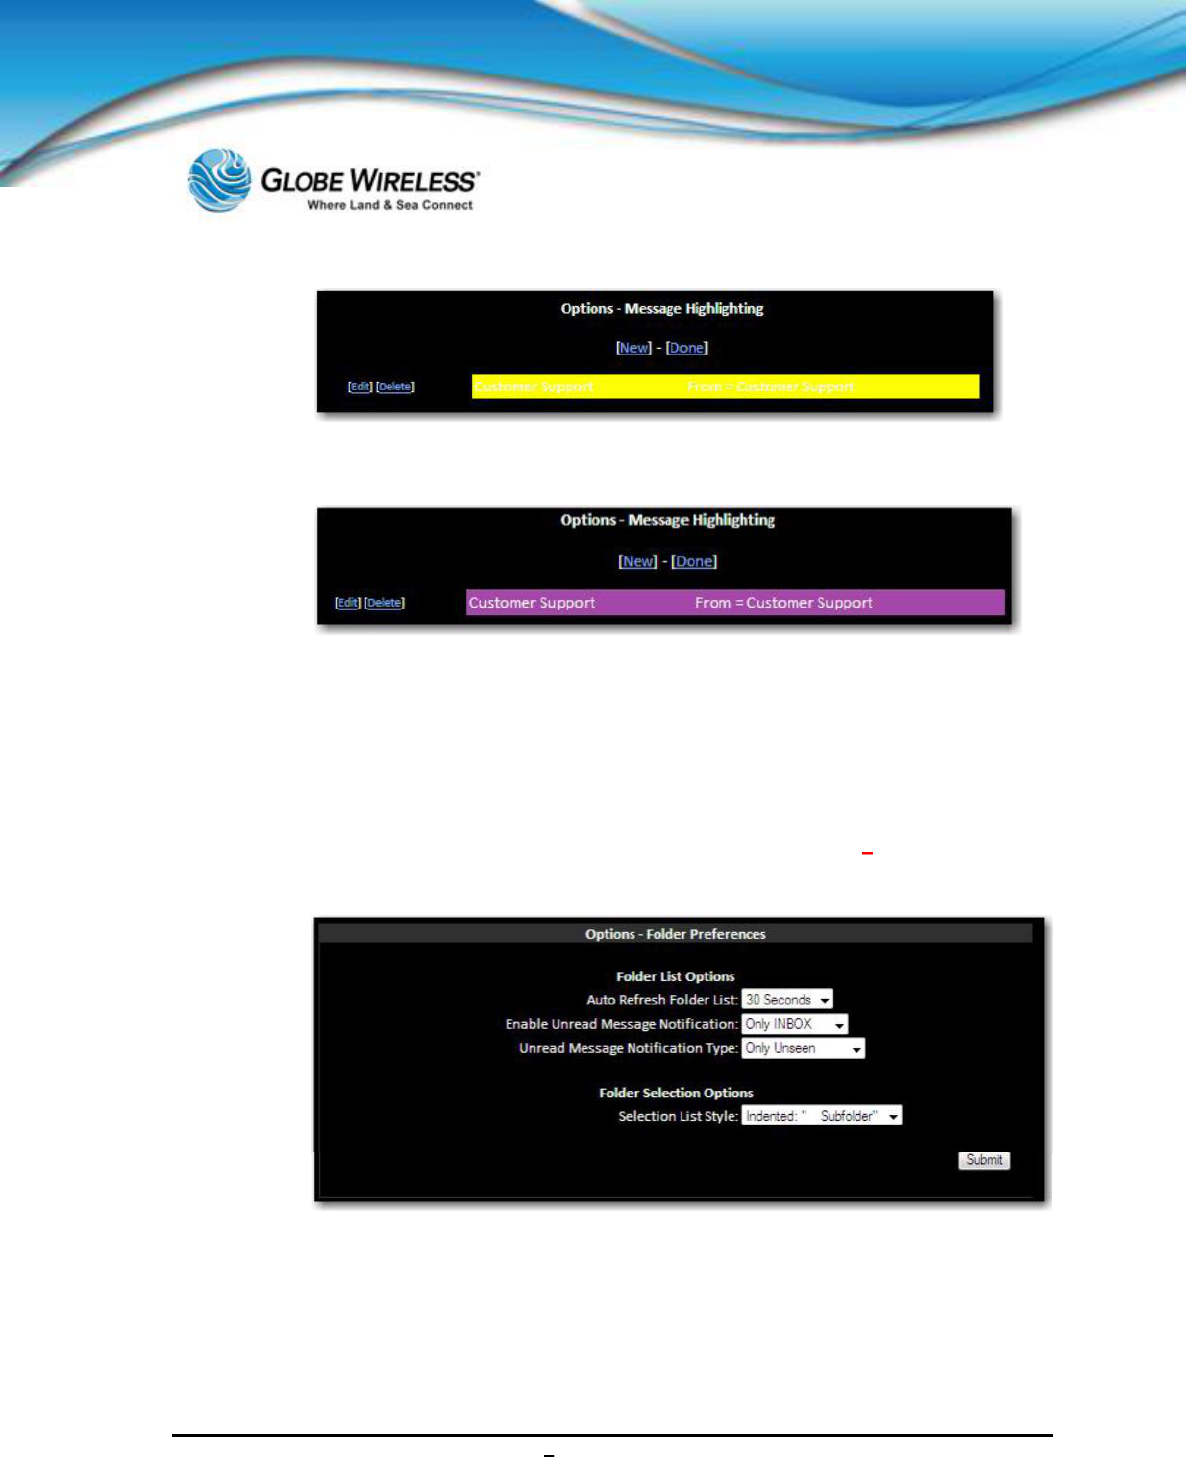
SWG-125 Rev. G June 2013
Globe iFusion ®User Guide for i500, i250, iSRev. G 10-13
Step 2: Click on edit if you wish to change the background color and select the new color.
Step 3: When complete, click the Submit button.
10.2.3.4 Folder Preferences
In Folder Preferences, the user can change the settings as to how folders are displayed and
manipulated.
Step 1: Click on the Folder Preferences link to display the Options Folder Preferences
screen.

SWG-125 Rev. G June 2013
Globe iFusion ®User Guide for i500, i250, iSRev. G 10-14
The following fields are addressed in Folder Preferences:
Field Description
Folder LIST Options
Auto Refresh
Folder List:
WebMail has the functiona
lity to automatically refresh the folder
listing on the left side of the browser window. This will also update the
number of unseen messages that are in each folder. This is a good
way to check for unseen messages in the INBOX
without having to
click on it every time. Click the drop-
down arrow and select frequency
of desired folder refreshing:
Never
Every 30 seconds
Every 1, 2, 3, or 5 Minutes
Every 10 Minutes
Every 20 Minutes
Enable Unread
Message Notification
Specifies how to display unseen messages in the folder listing. When set to
No
Notification, the user will not be notified of unseen messages. Set it to INBOX
, and
whenever a user has new messages, the INBOX
will become bold, and the number of
messages will display to the right of the inbox. When set to All Folders
, the number of
messages will be displayed to the right of all folders. Click the drop-
down arrow and
select:
No Notification
Only INBOX
All Folders
Unread Message
Notification Type:
When new messages are in a folder, this option tells e
ither to only display the number
of new messages or also display the total number of messages in that folder. Click the
drop-down arrow and select:
Only Unseen
Unseen and Total
Folder SELECTION Options
Selection List Style: Click the drop-down arrow and select:
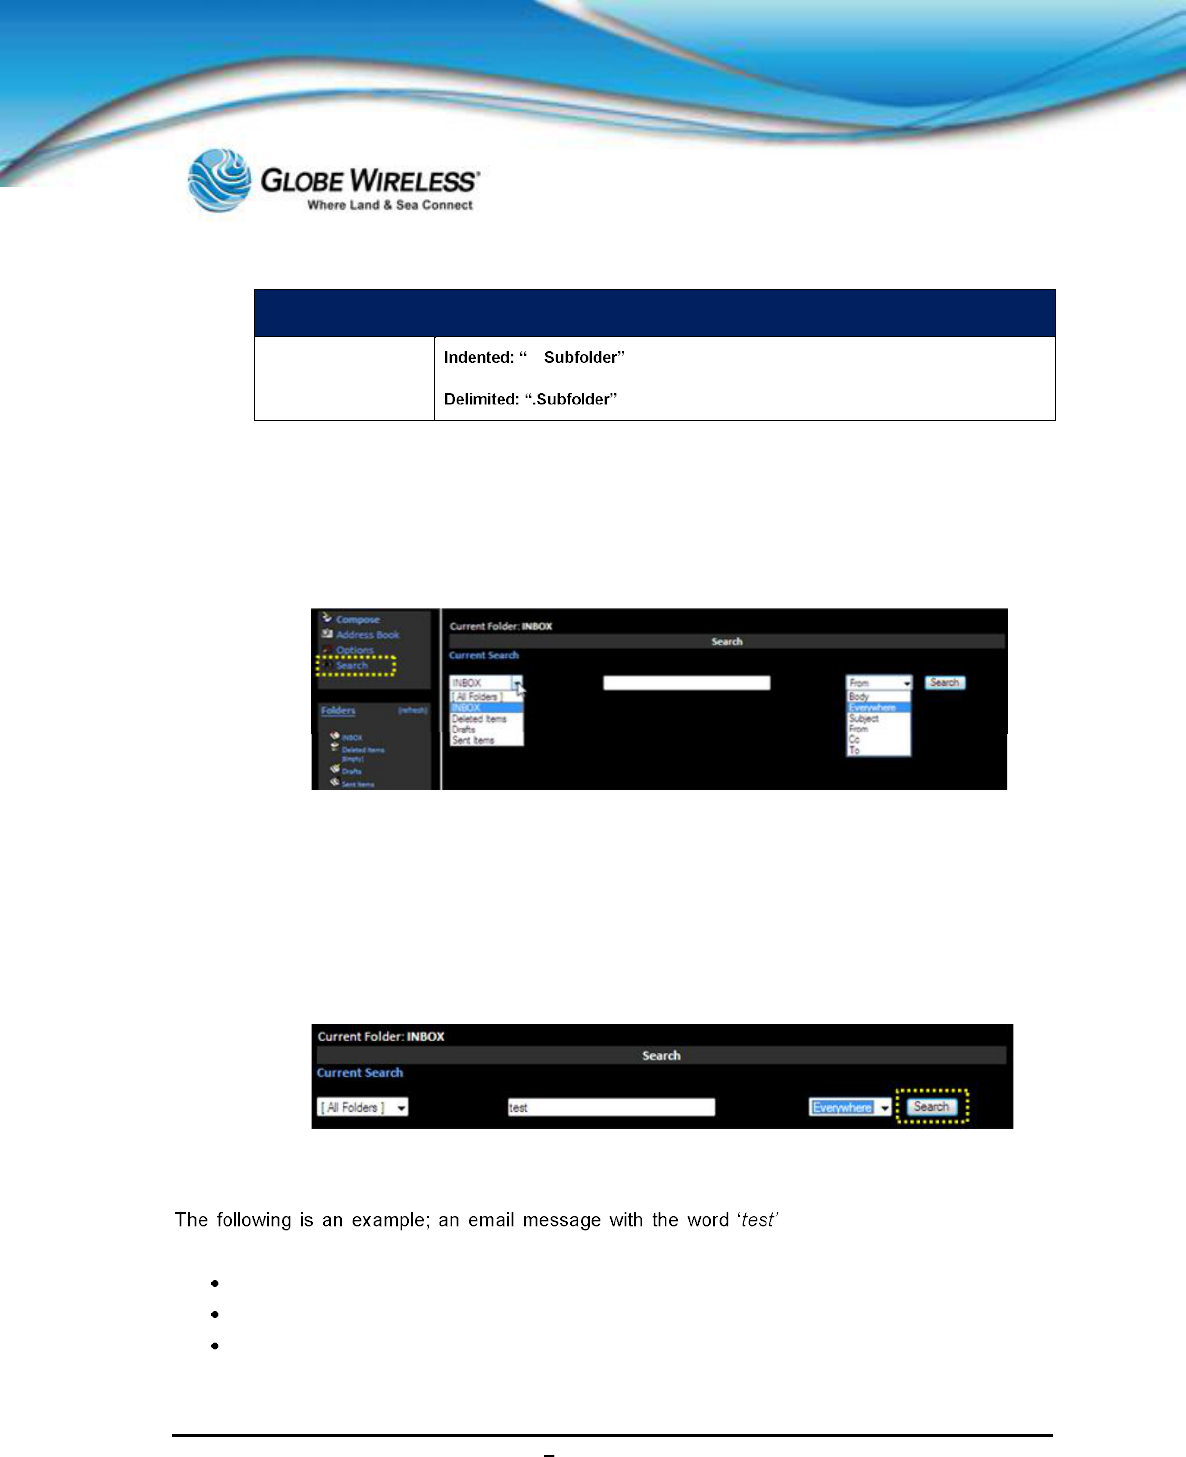
SWG-125 Rev. G June 2013
Globe iFusion ®User Guide for i500, i250, iSRev. G 10-15
Field Description
Step 2: Once you have defined the fields, click the Submit button.
10.2.4 Search
Click Search to set parameters to perform a search.
Step 1: Click the drop-down arrow in the Current Search field and select the folder from
which to perform the search.
Step 2: Type search criteria in the Search field.
Step 3: Click the drop-down arrow and select the area to be searched (i.e., only the body of the
email or everywhere, etc.)
Step 4: Click the Search button to begin the search.
in it needs to be located. The
following search criteria are set up to perform the search:
All Folders are to be searched
The word searched for is test
Everywhere is selected so that the word test is searched for in all areas of the email
messages
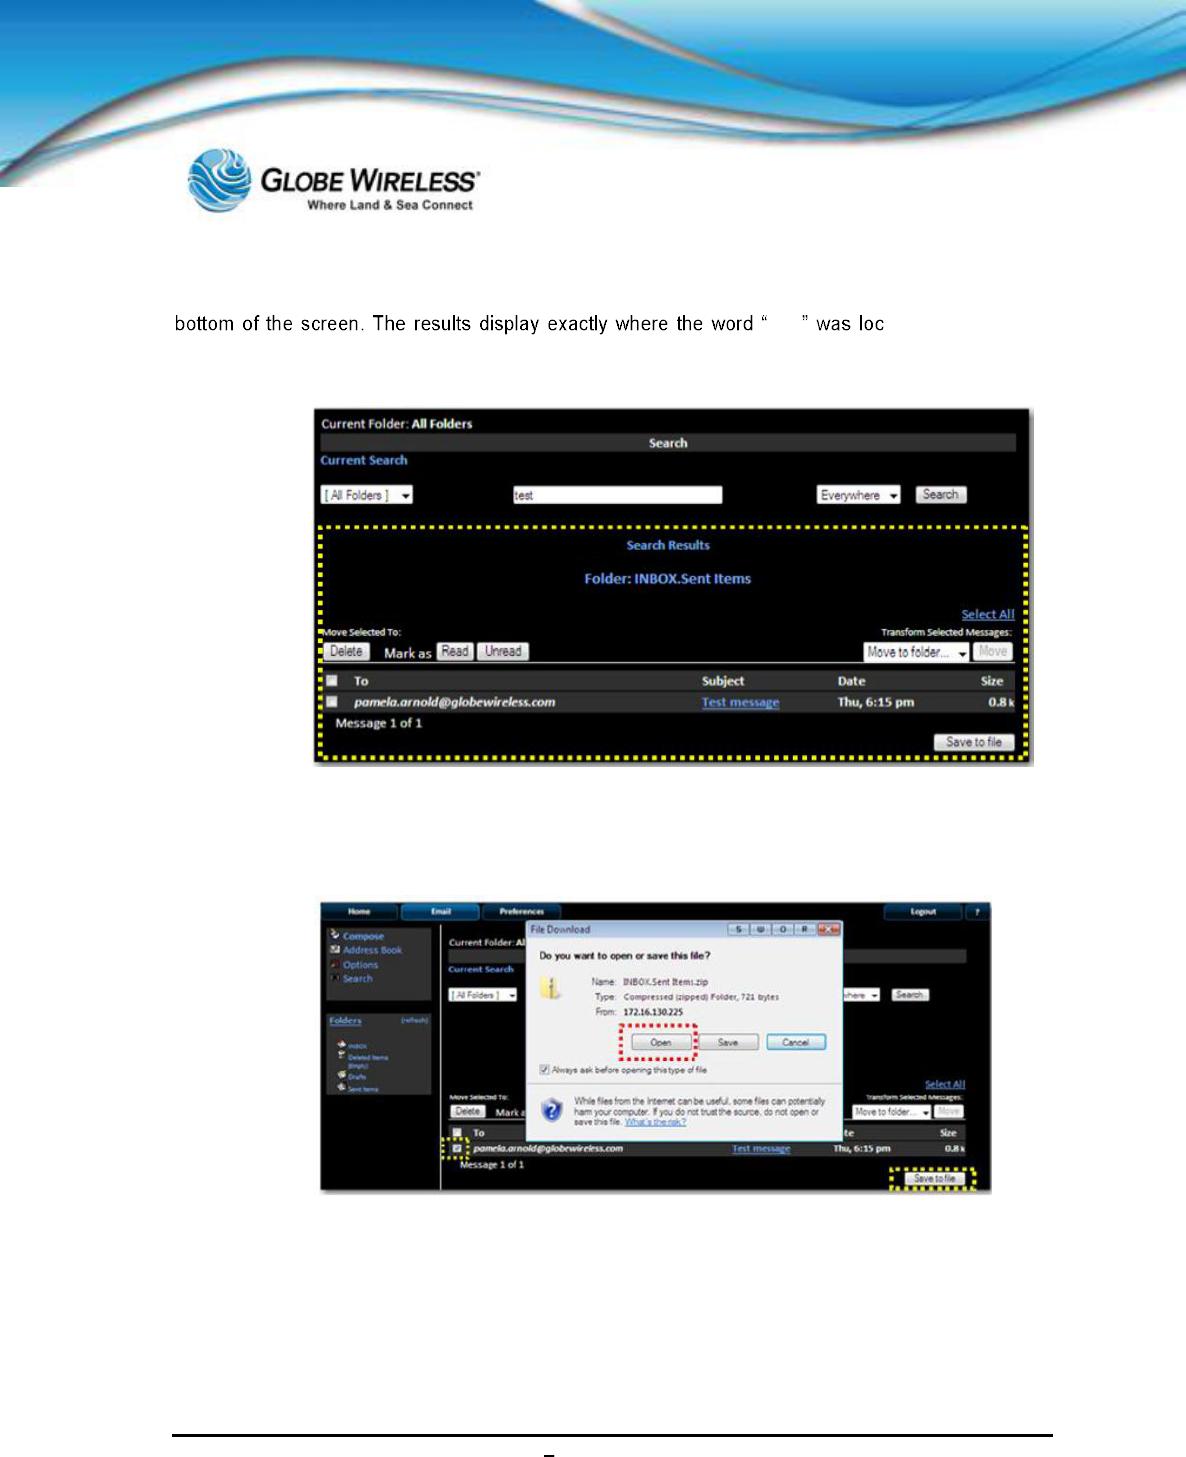
SWG-125 Rev. G June 2013
Globe iFusion ®User Guide for i500, i250, iSRev. G 10-16
Once the Search button is pressed, the search begins and results of the search are displayed at the
test ated. (Inbox folder;
Sent items folder, etc.). In the example, the email message entitled, Test message was located in
the search.
Step 5: To save the message, click to place a checkmark in the checkbox next to the message
you wish to save and click the Save to File button to display the File Download pop-up
screen.
Step 6: Click the Open button to open and view the message or click the Save button to display
the Save As screen.
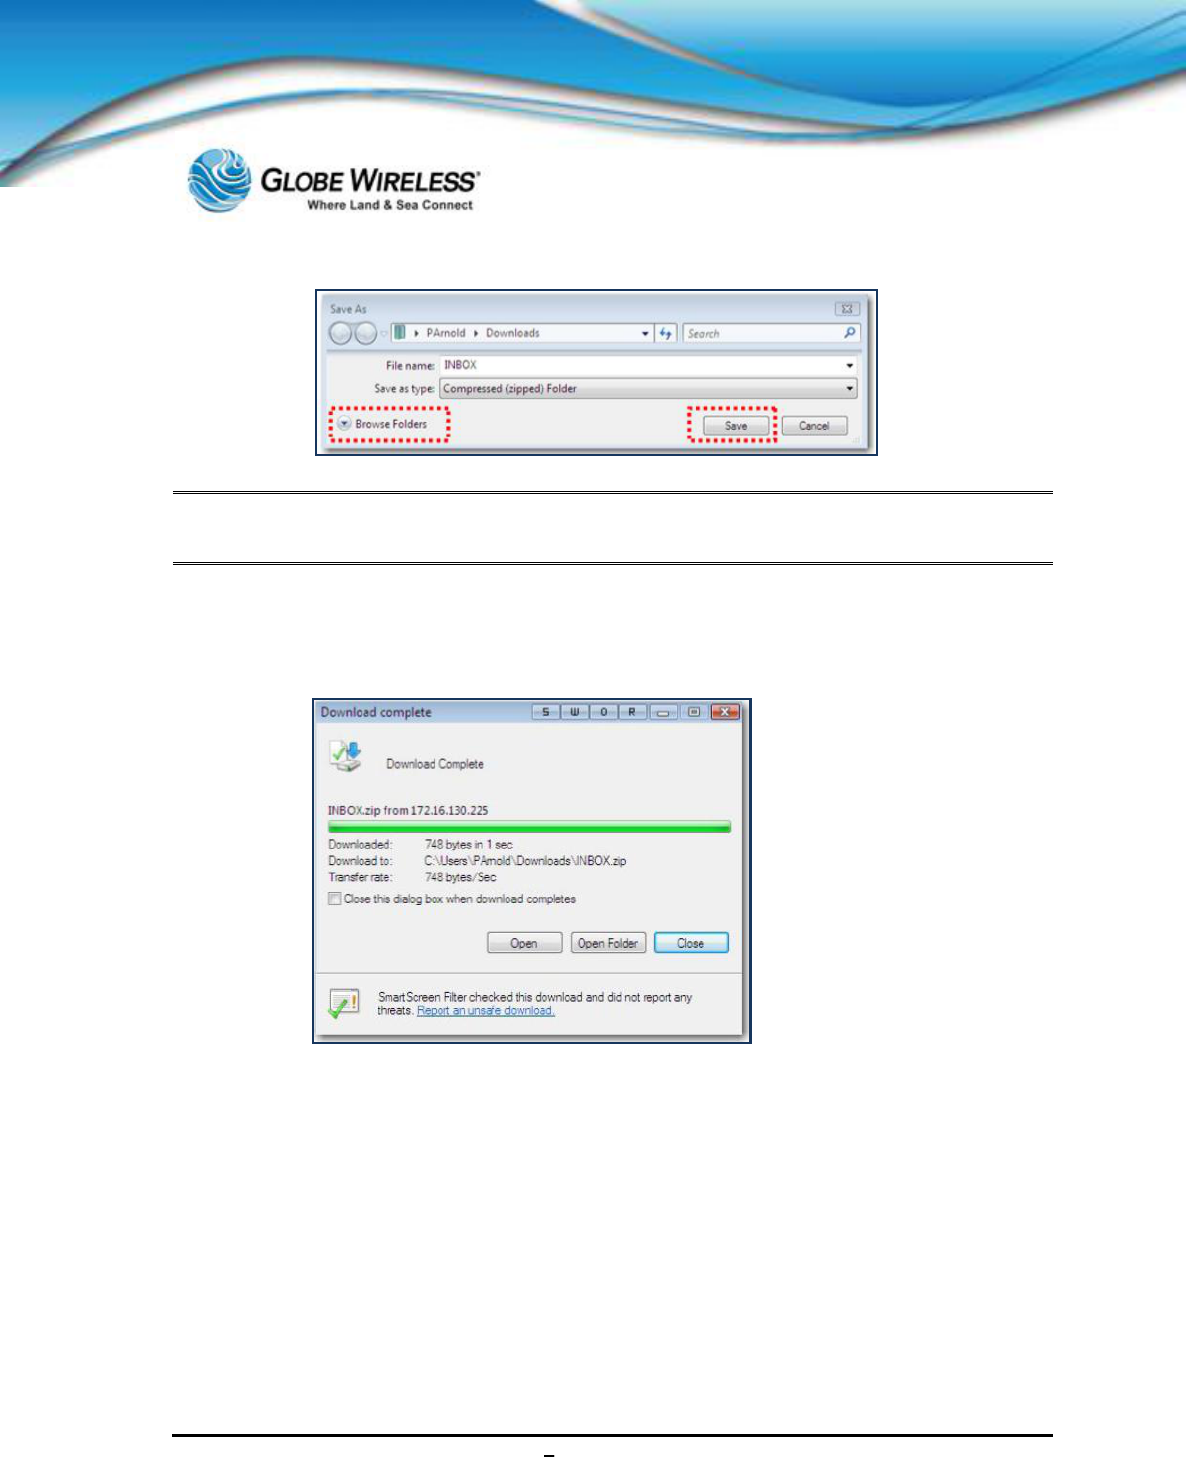
SWG-125 Rev. G June 2013
Globe iFusion ®User Guide for i500, i250, iSRev. G 10-17
Note: The pop-up screen displays where the message will be saved,filename of the saved
message, and type (compressed (zipped) folder) of file.
Step 7: Click the Save button to save the message or if you wish to save it into a different area
or folder, click the Browse Folders button to navigate to a folder to which you wish to
save the message.
Step 8: The Download Complete screen is displayed. At this point you can click either Open to
view the saved message or Close.
10.2.5 Folders Pane
The Folders pane contains default folders such as:
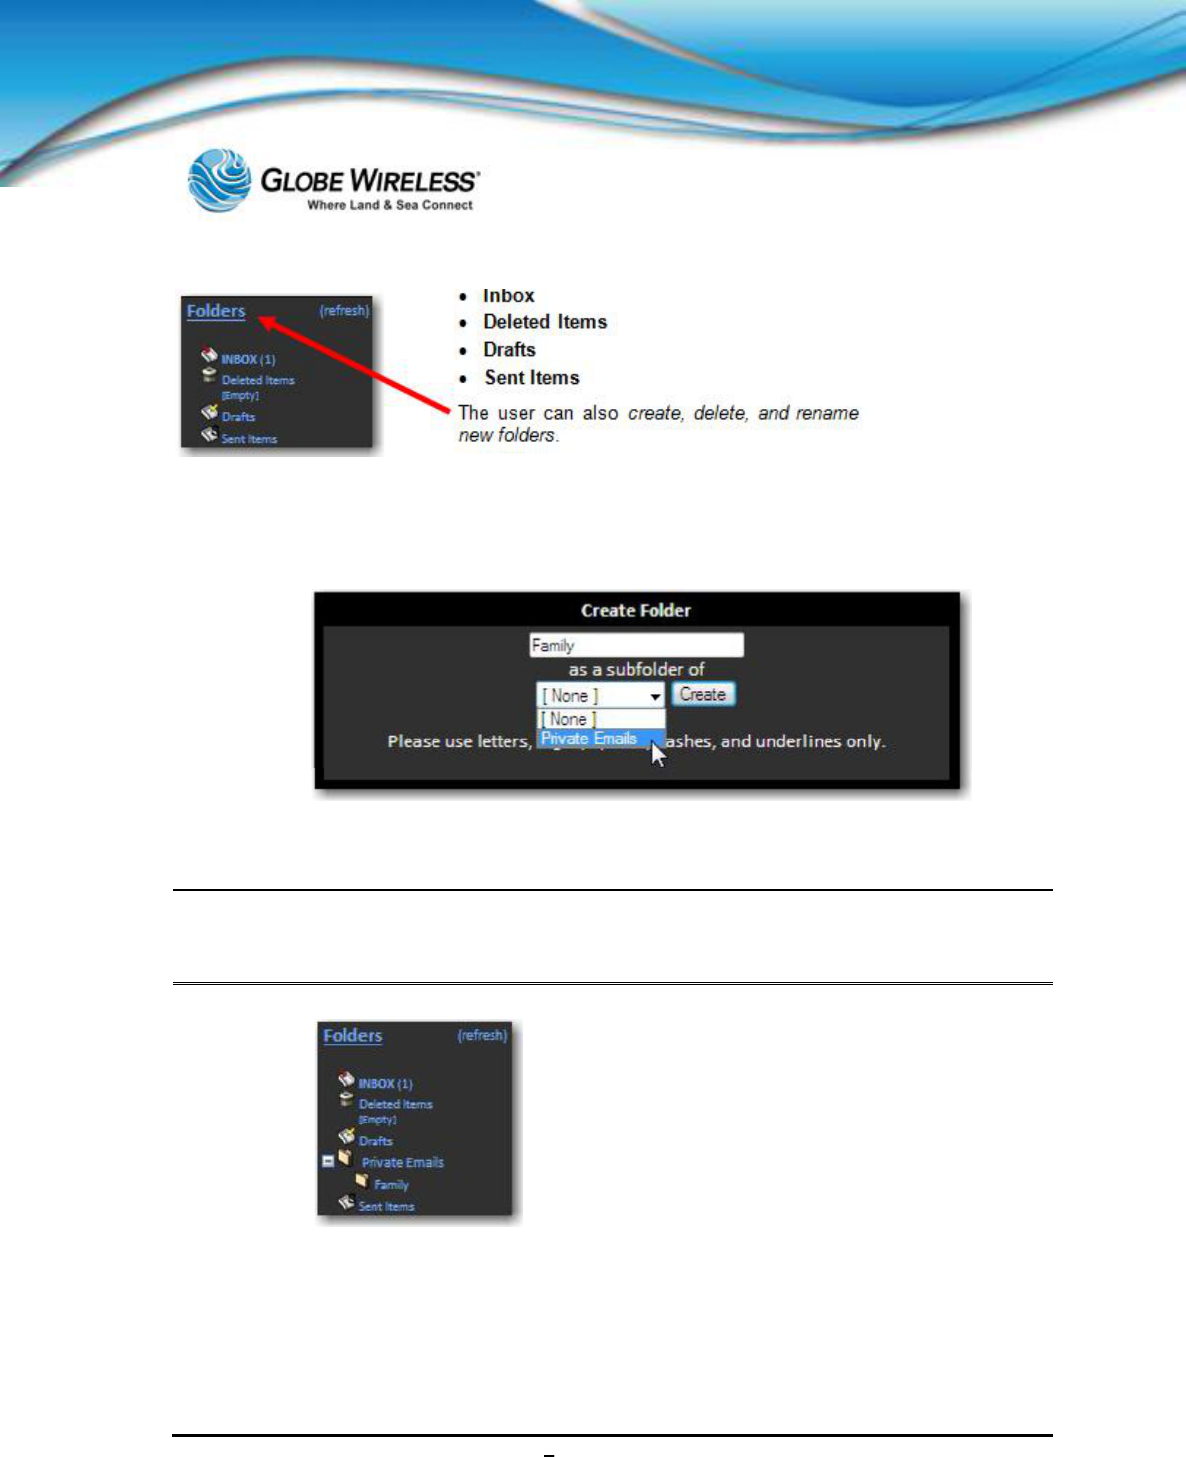
SWG-125 Rev. G June 2013
Globe iFusion ®User Guide for i500, i250, iSRev. G 10-18
10.2.5.1 Create a new folder
Step 1: Click on the Folders link to display the Create Folder screen.
Step 2: Type the name of the folder to create in the field. Click Create.
Note: In the above example, a folder named Private Emails was previously created; the folder,
Family becomes a child folder of the previously created parent folder and is now shown in
the Folders Pane.
10.2.5.2 Rename a Folder
Step 1: Click the drop-down arrow in the Rename a Folder field and select a folder to
rename from the drop-down list (e.g., Private Emails).
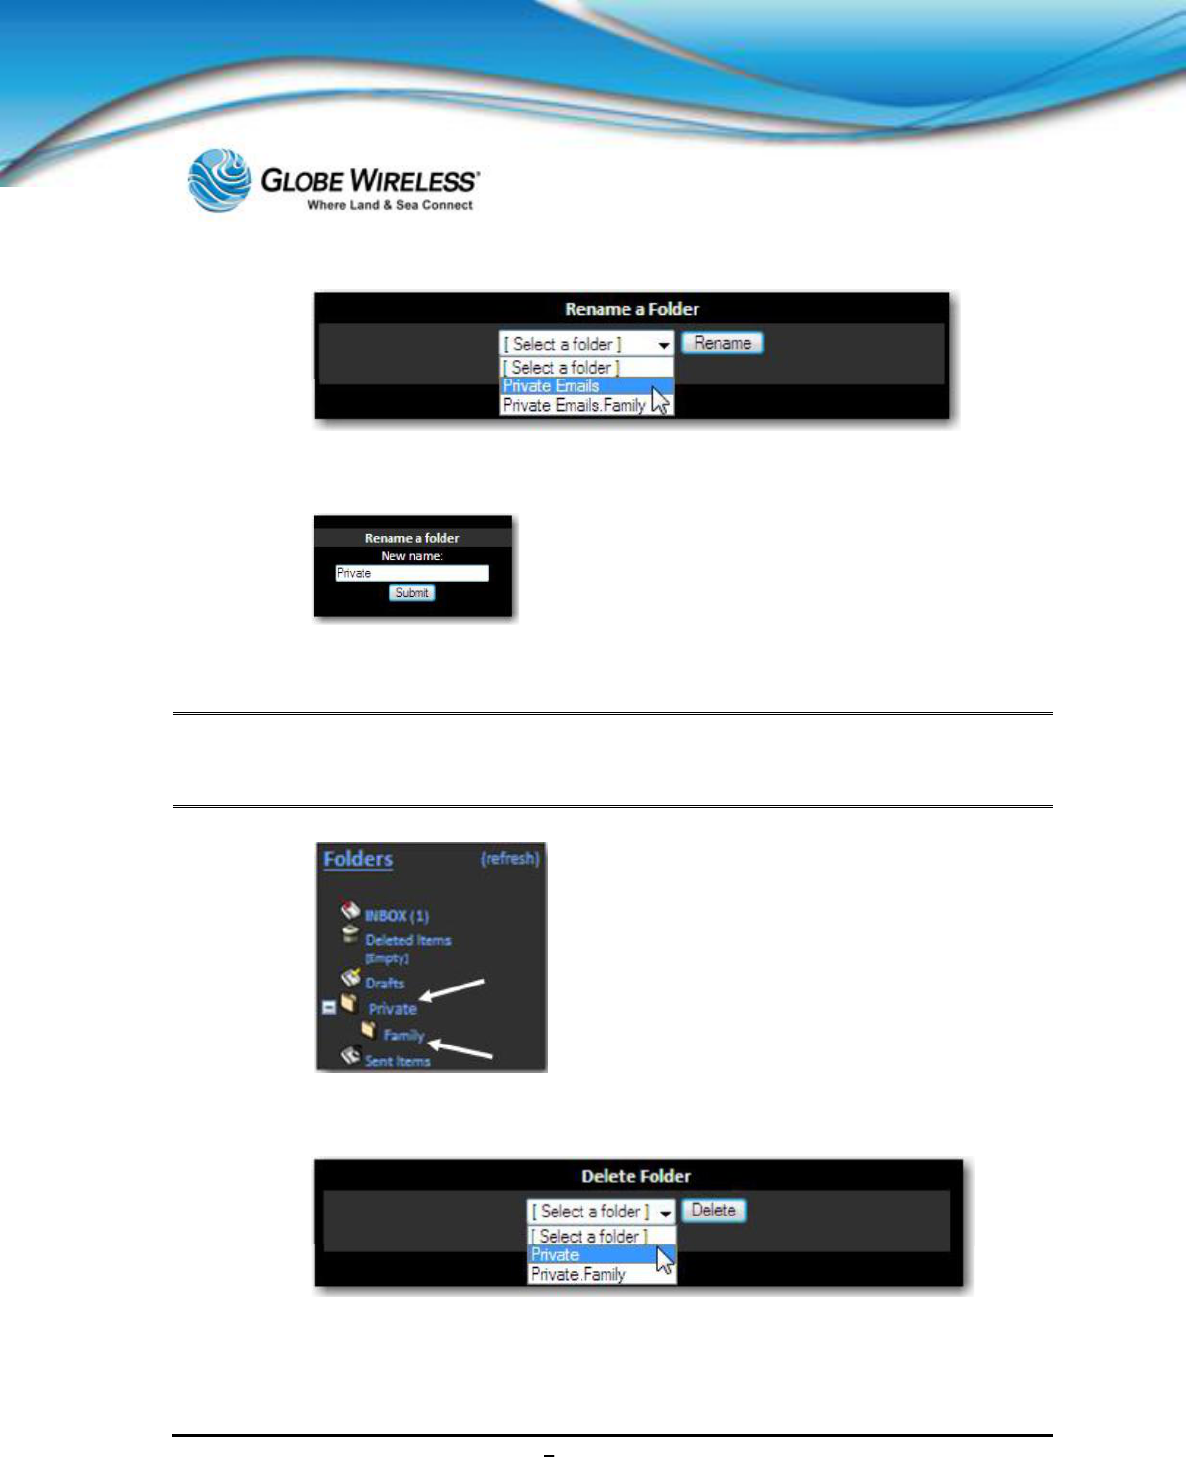
SWG-125 Rev. G June 2013
Globe iFusion ®User Guide for i500, i250, iSRev. G 10-19
Step 2: Click the Rename button.
Step 3: Type the new name of the folder (e.g., Private) and click the Submit button.
Note: As shown in the following graphic, the parent folder has been renamed from Private
Emails to Private. The child folder (Family) is displayed beneath the renamed parent
folder.
10.2.5.3 Delete a Folder
Step 1: Click the drop-down arrow in the Delete Folder field and select a folder to delete (in
this example, we will delete the Parent folder, Private.)
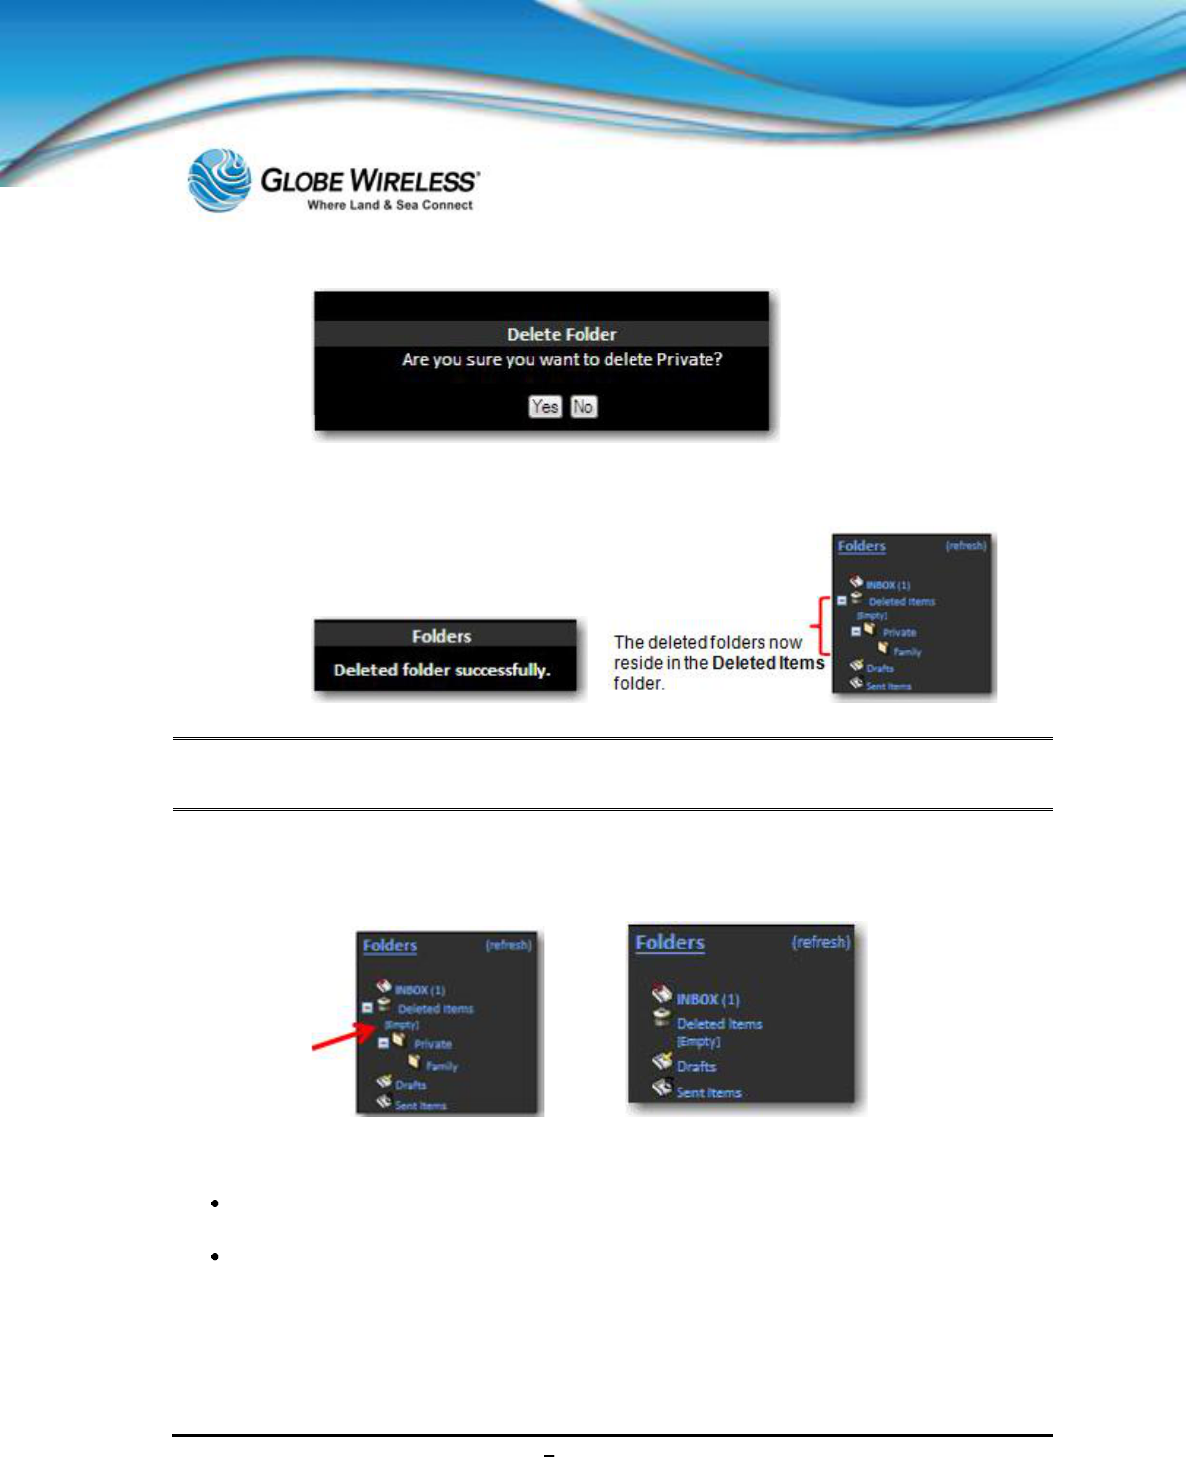
SWG-125 Rev. G June 2013
Globe iFusion ®User Guide for i500, i250, iSRev. G 10-20
Step 2: Click the Yes button. A Deleted folder successfully pop-up screen is displayed.
Note: Whenever a Parent folder is deleted, all subsequent child folders are automatically deleted
as well. Both deleted folders now reside in the Deleted Items Folder (above graphic).
Step 3: To delete the folders from the Deleted Items folder, click on the [Empty] link. The
deleted Parent and subsequent Child folders are removed.
10.2.5.4 Unsubscribe / Subscribe
Unsubscribing to a folder is the same as hiding it from the folders pane so that it cannot be
seen. Performing this action can improve system performance
Subscribing to a folder allows you to view it in the folders pane, thus being notified when
new mail arrives to the folder
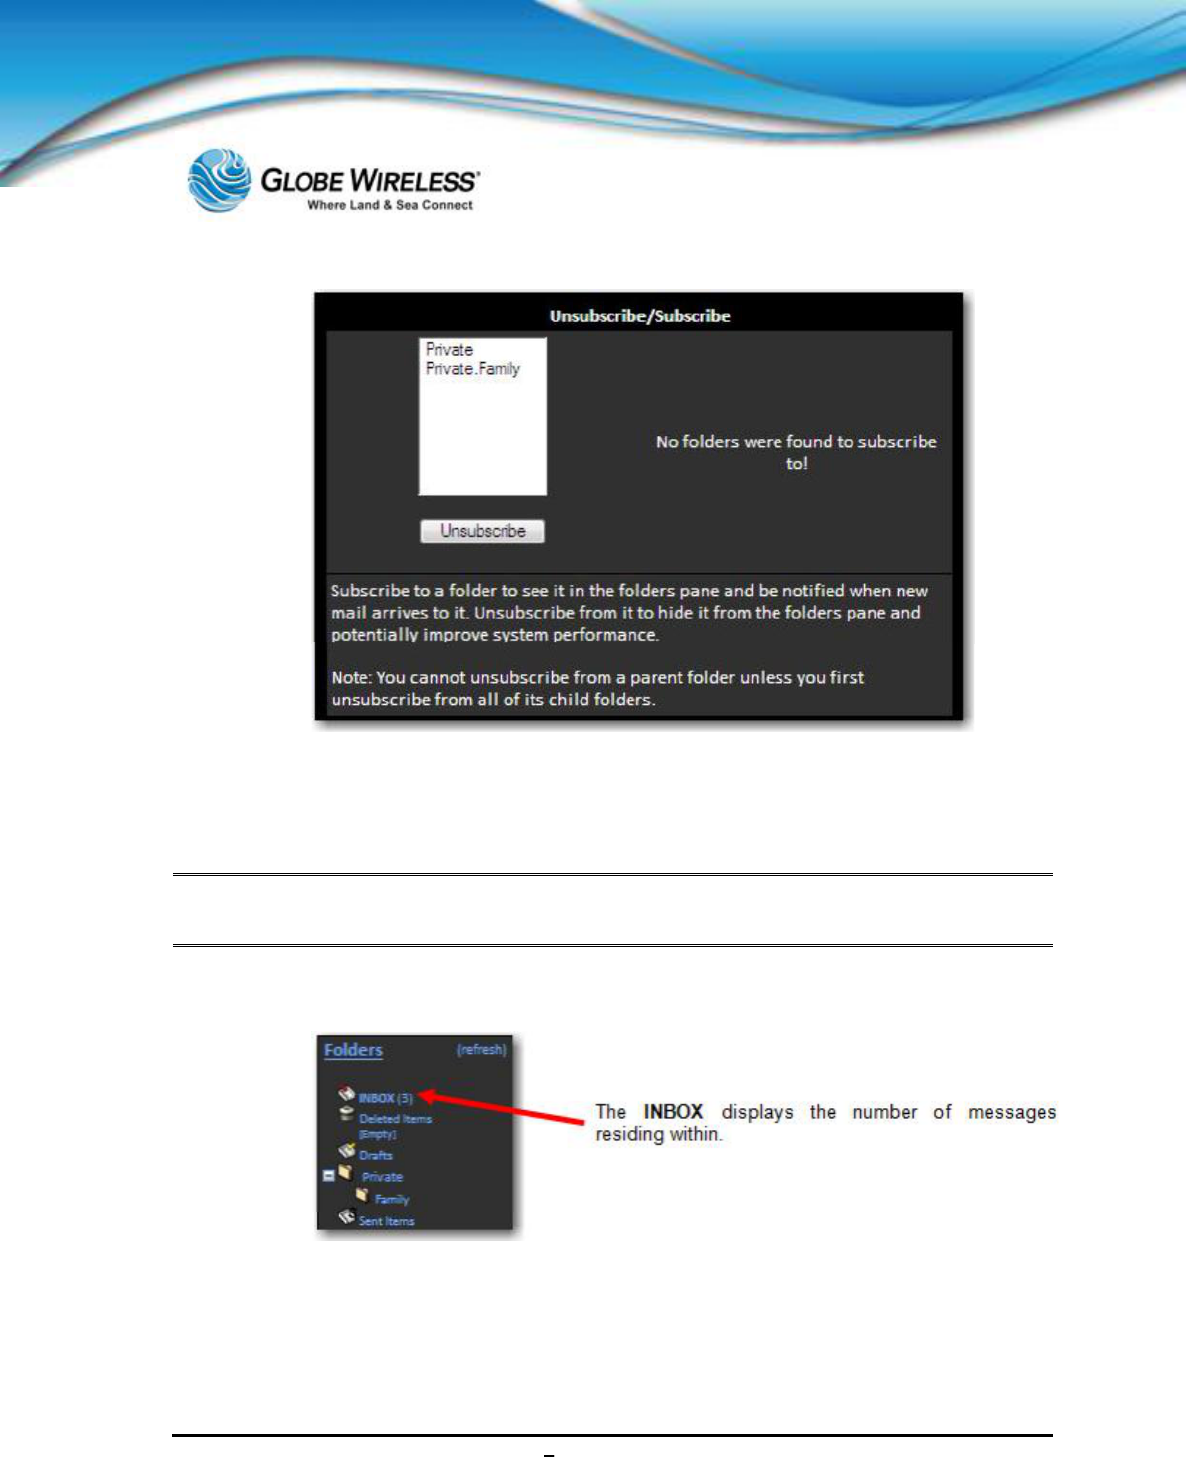
SWG-125 Rev. G June 2013
Globe iFusion ®User Guide for i500, i250, iSRev. G 10-21
Step 1: To subscribe/unsubscribe to/from a folder, click to select the folder from the list.
Step 2: Click the Unsubscribe or Subscribe button.
Note: Prior to unsubscribing from a parent folder, you must first unsubscribe from all of the child
folders.
10.2.5.5 Inbox
Step 1: Click on INBOX to display the contents of the inbox.
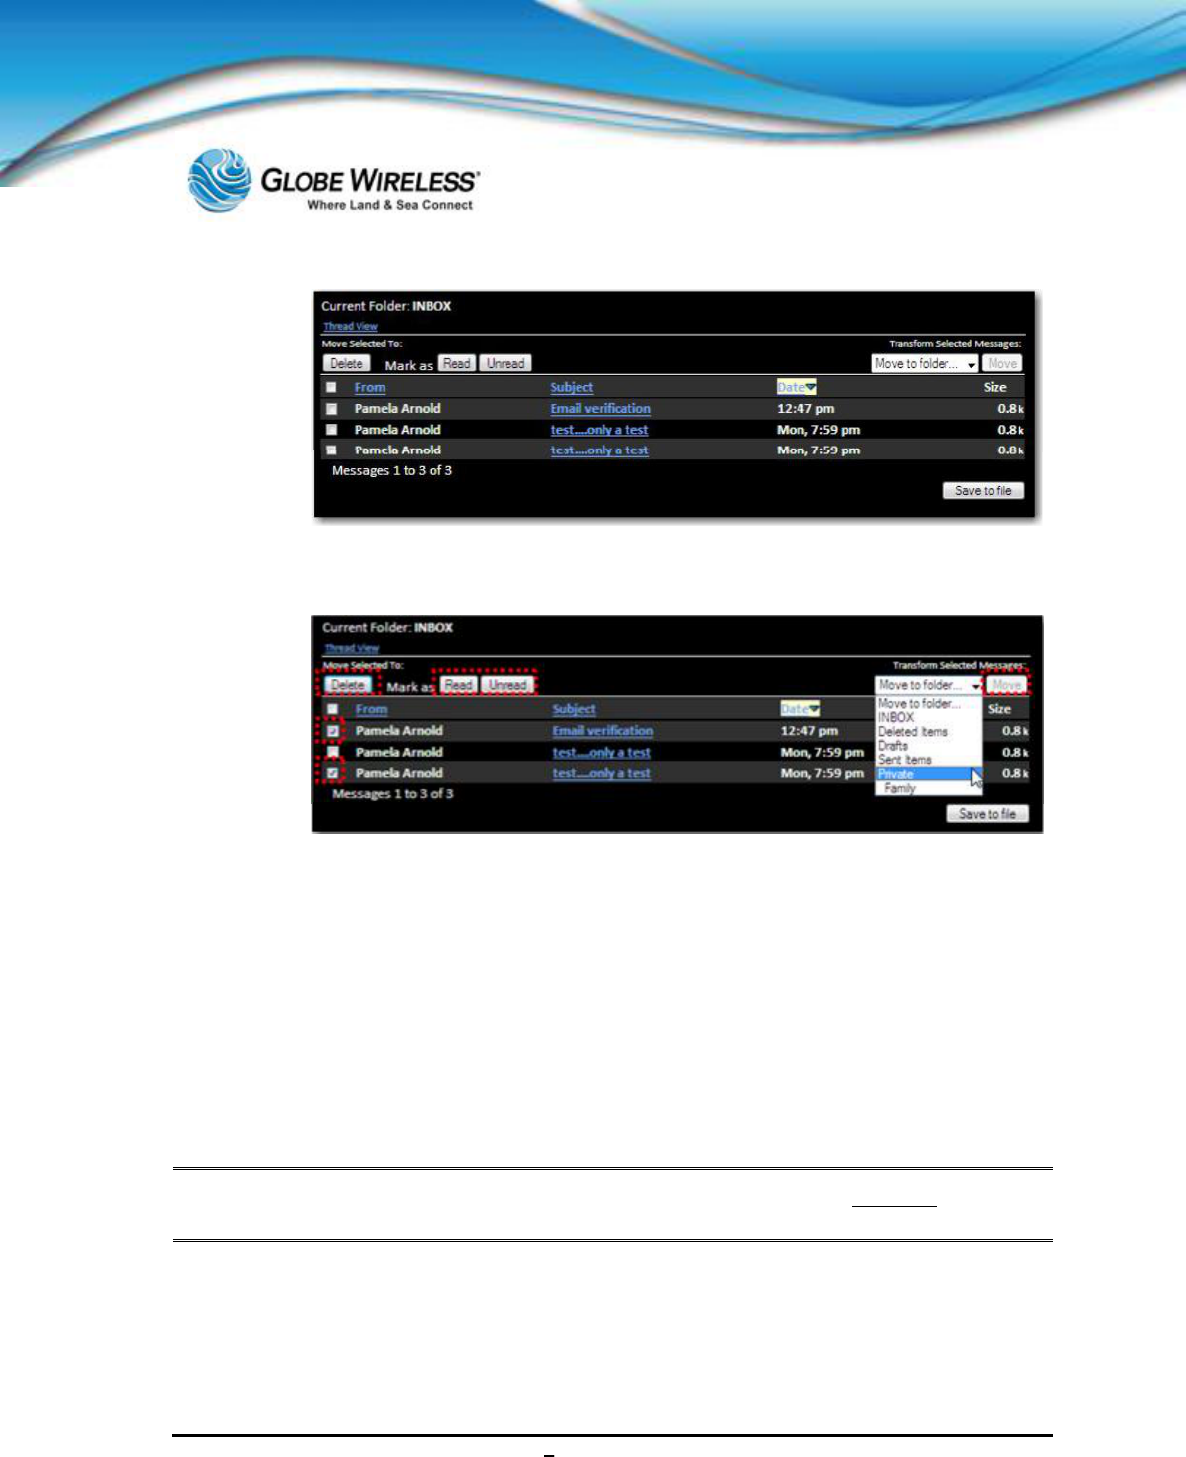
SWG-125 Rev. G June 2013
Globe iFusion ®User Guide for i500, i250, iSRev. G 10-22
From within the Inbox, you have the option to delete a message, mark as read / unread, or move one
or more messages to another folder.
Step 2: Click to place a checkmark into the checkbox next to the message to which you wish to
take some action.
Step 3: To delete a message, click the Delete button to place the message into the Deleted
Items folder.
Step 4: To mark a read message as unread or an unread message as read, click the
appropriate button.
Step 5: To move one or more messages to another folder, click the drop-down arrow in the
Move field and select the folder to move the message to from the drop-down list.
Note: To Save a message to file, click the Save to file button and refer to Step 5: in the Folder
Preferences section of this document.
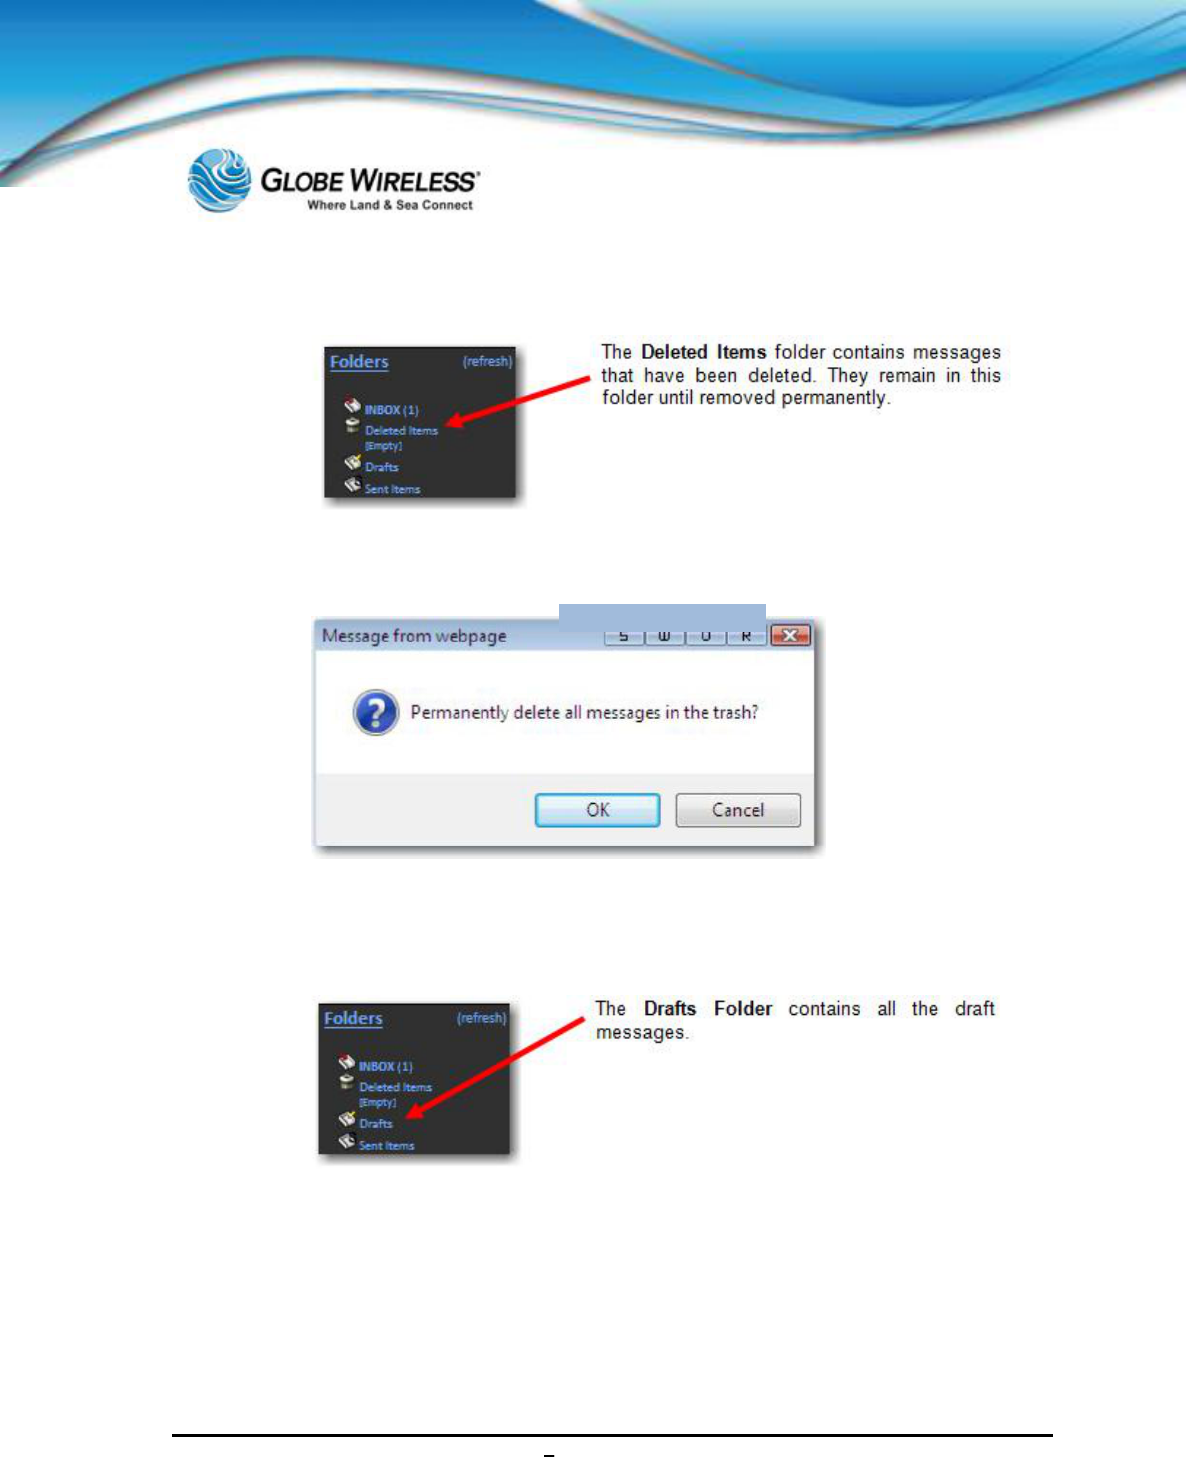
SWG-125 Rev. G June 2013
Globe iFusion ®User Guide for i500, i250, iSRev. G 10-23
10.2.5.6 Deleted Items Folder
Step 1: To delete items from the Deleted Items folder click on [empty] to display the
following message:
Step 2: Click the OK button to complete the action.
10.2.5.7 Drafts Folder
Step 1: Click on Drafts to display the contents of the folder.
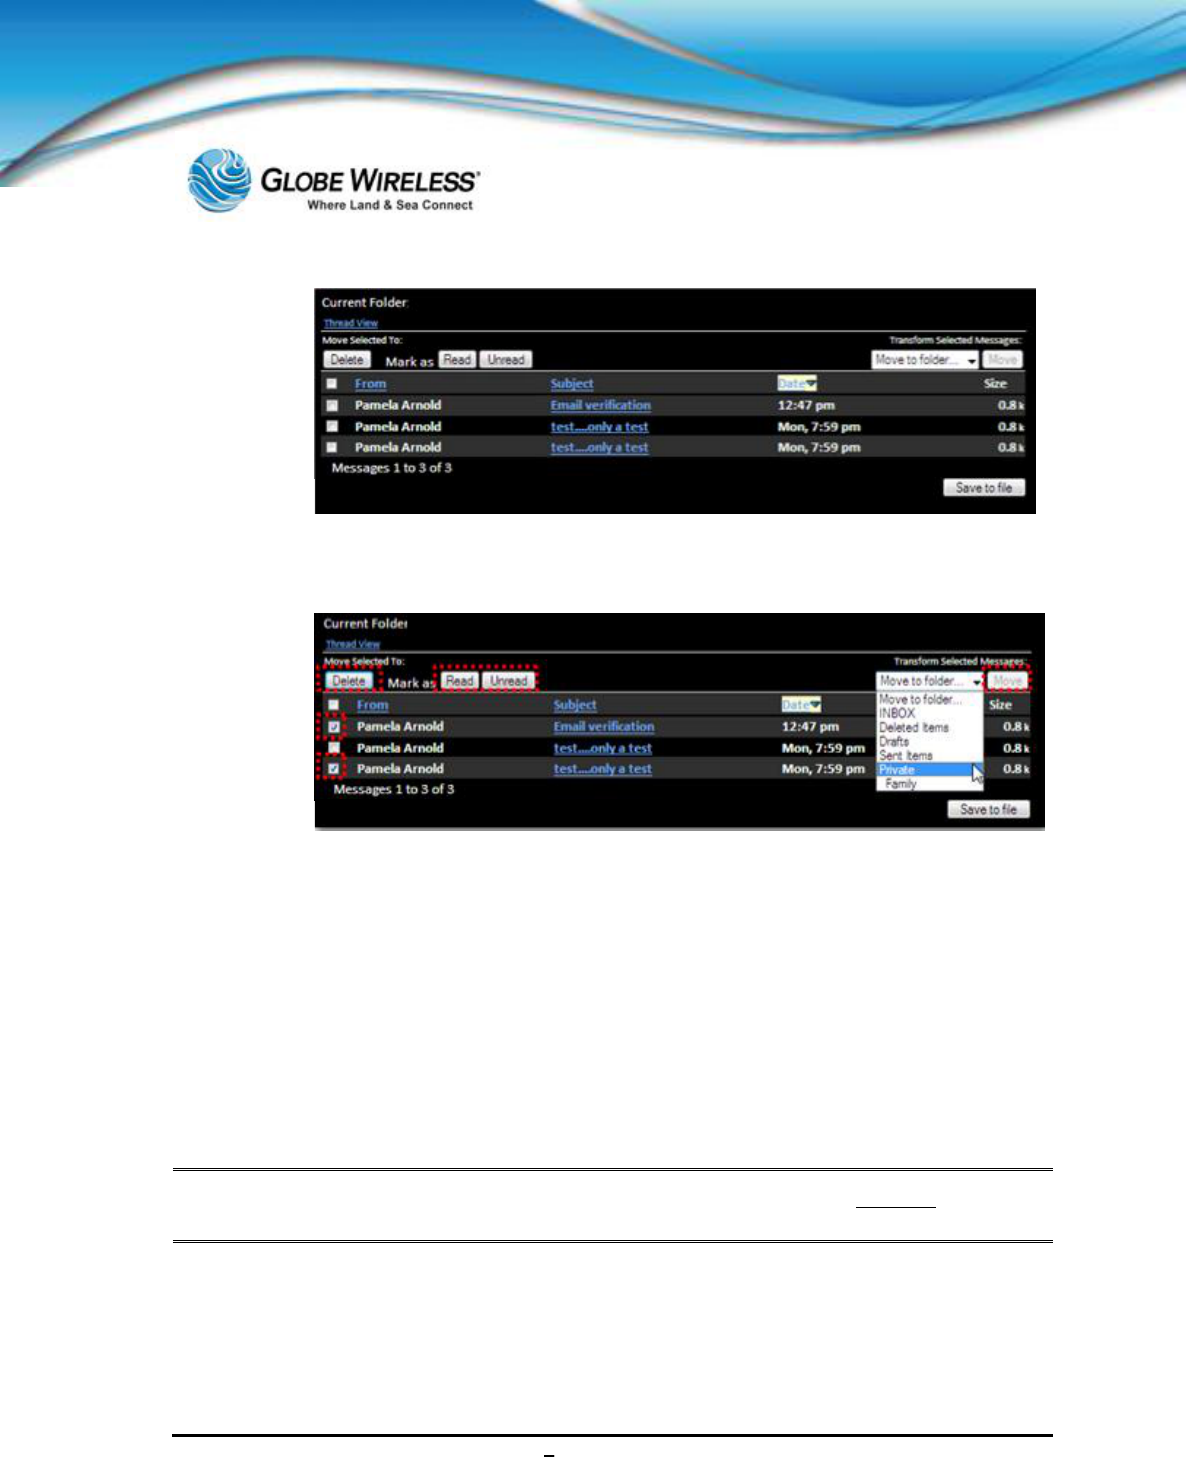
SWG-125 Rev. G June 2013
Globe iFusion ®User Guide for i500, i250, iSRev. G 10-24
From within Drafts, you have the option to delete a draft message, mark as read / unread, or move
one or more draft messages to another folder.
Step 2: Click to place a checkmark into the checkbox next to the draft message to which you
wish to take some action.
Step 3: To delete a draft message, click the Delete button to place the message into the
Deleted Items folder.
Step 4: To mark a read message as unread or an unread message as read, click the
appropriate button.
Step 5: To move one or more draft messages to another folder, click the drop-down arrow in the
Move field and select the folder to move the draft message to from the drop-down list.
Note: To Save a message to file, click the Save to file button and refer to Step 5: in the Folder
Preferences section of this document.
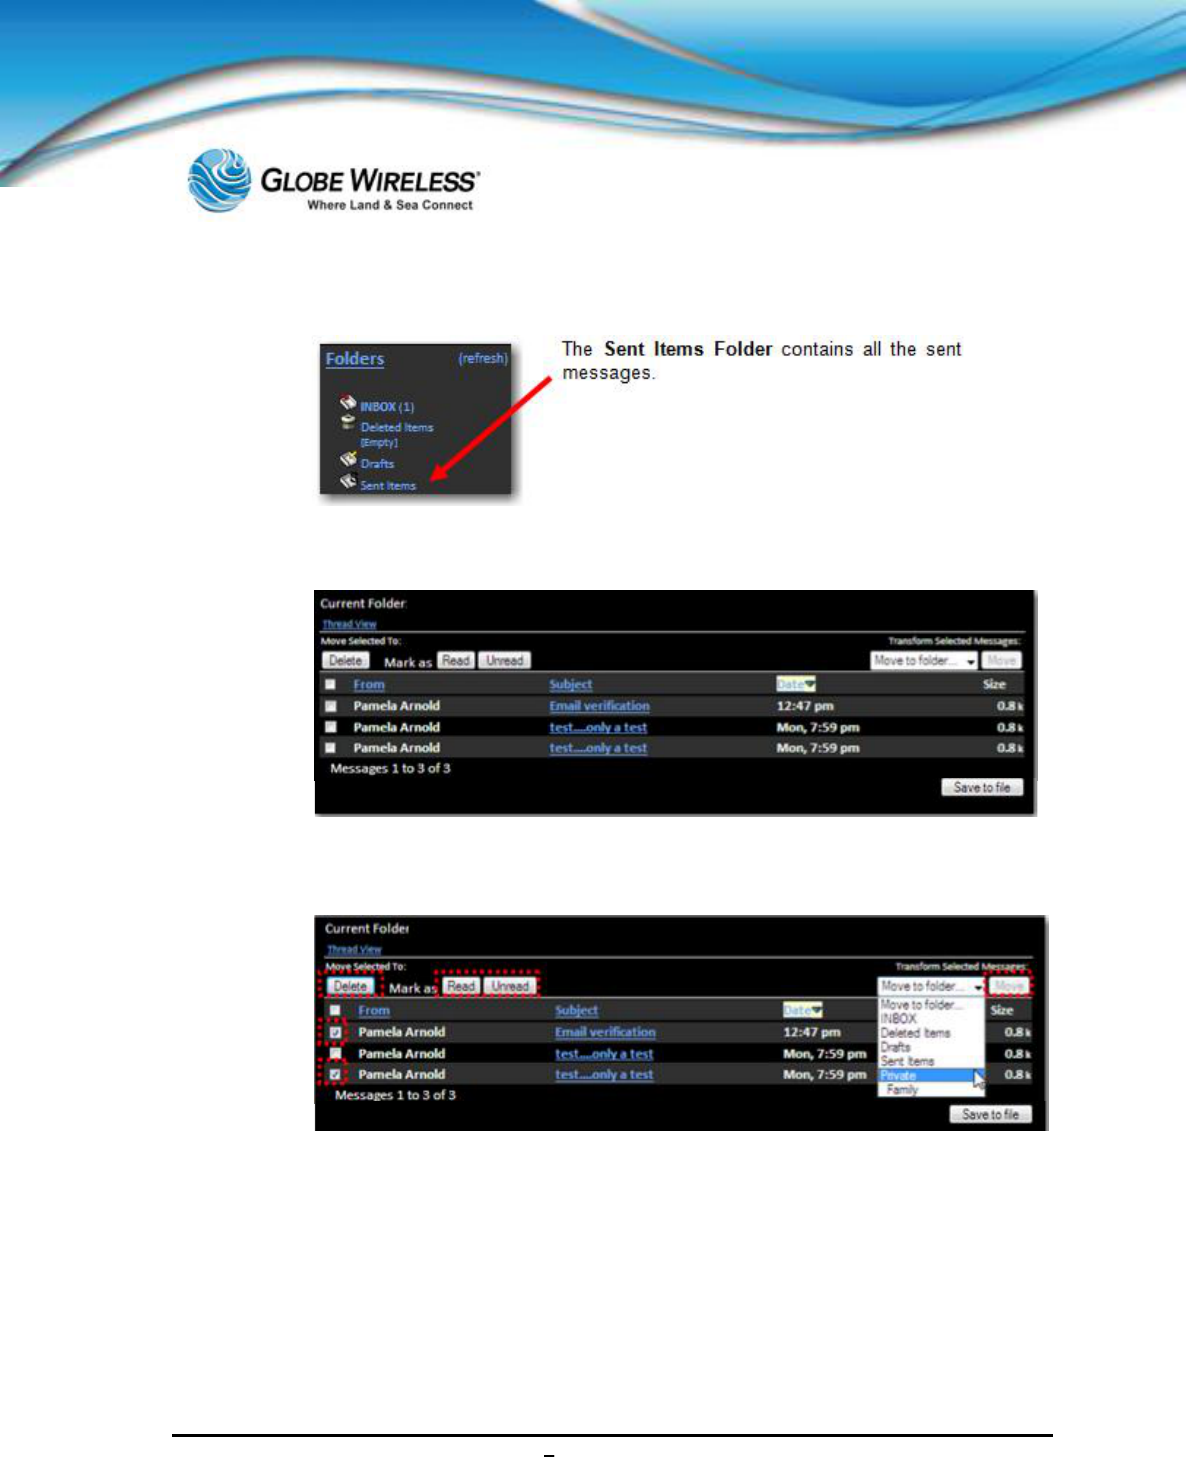
SWG-125 Rev. G June 2013
Globe iFusion ®User Guide for i500, i250, iSRev. G 10-25
10.2.5.8 Sent Items Folder
Step 1: Click on Sent Items to display the contents of the folder.
From within Sent Items, you have the option to delete a sent message, mark as read / unread, or
move one or more sent items to another folder.
Step 2: Click to place a checkmark into the checkbox next to the sent message to which you
wish to take some action.
Step 3: To delete a sent message, click the Delete button to place the message into the
Deleted Items folder.
Step 4: To mark a read message as unread or an unread message as read, click the
appropriate button.
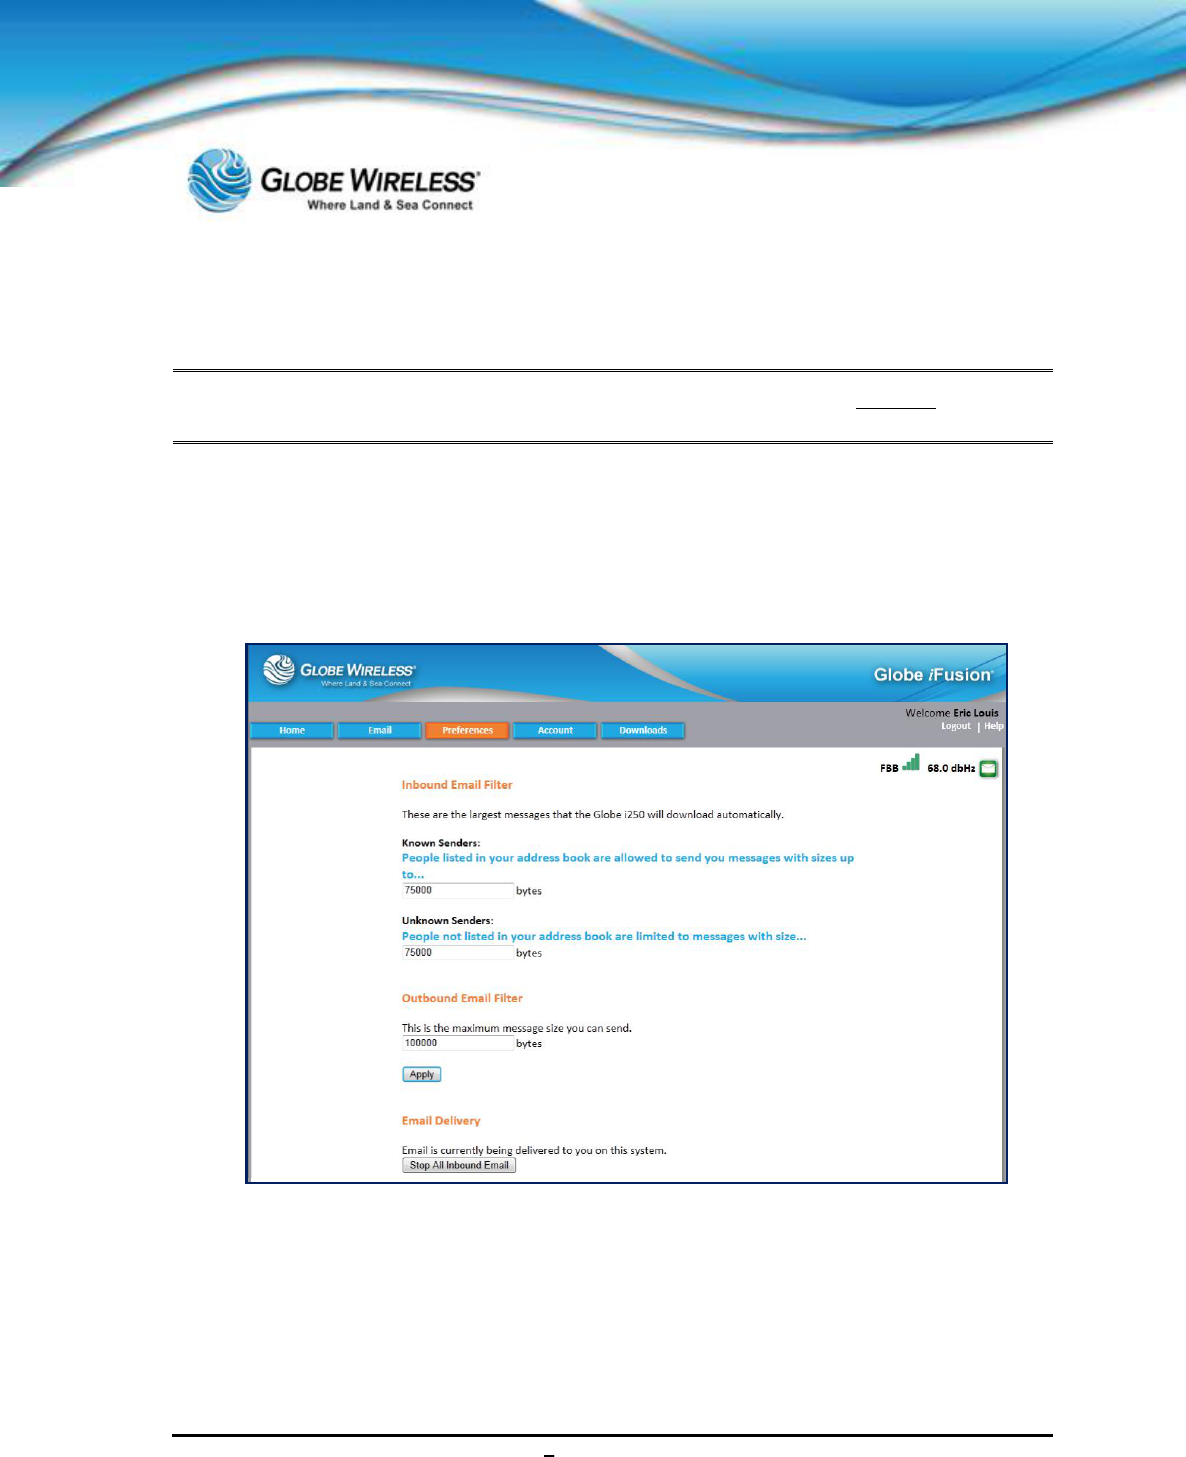
SWG-125 Rev. G June 2013
Globe iFusion ®User Guide for i500, i250, iSRev. G 10-26
Step 5: To move one or more sent messages to another folder, click the drop-down arrow in the
Move field and select the folder to move the sent message to from the drop-down list.
Note: To Save a message to file, click the Save to file button and refer to Step 5: in the Folder
Preferences section of this document.
10.3 Preferences Tab
The Preferences Tab contains prepaid user email delivery settings for the currently logged in user.
Each user may configure their individual preferences.
Click the Preferences Tab to display the following screen.
To keep mail costs down, the Inbound Email Filters can use your address book to prevent senders
from sending you large messages.
The Globe iFusion® distinguishes two kinds of senders: Known and Unknown. The Globe
iFusion® provides you the ability to specify the maximum size message for both Known and
Unknown Senders. With these two values you can control the size of a message you are willing to
receive. Messages larger than the size specified are not transmitted to the Globe iFusion® and you
pay no delivery costs for them.

SWG-125 Rev. G June 2013
Globe iFusion ®User Guide for i500, i250, iSRev. G 10-27
Known Senders are people whose email addresses are in your address book. Typically a
user might accept larger messages from people he knows.
Unknown Senders are people not in your address book. A user might limit unknown people
to a much smaller maximum message size. Setting one of the values to 0 bytes will block all
email from that class of senders. For example, setting the Unknown Senders value to 0 will
block all email from people not in your address book.
The Outbound Email Filter is also provided to help you protect yourself from accidentally sending an
overly large message. This filter works the same way as the other filters. The byte value you enter
here is the largest message that you wish the Globe iFusion® to send.
To stop all email deliveries, click the Stop All Inbound Email button at the bottom of the screen.
10.4 Account Tab
The Account screen contains the following sub-tabs:
Account Details (default)
Change Password
Add Alias
Enter Credit Reload
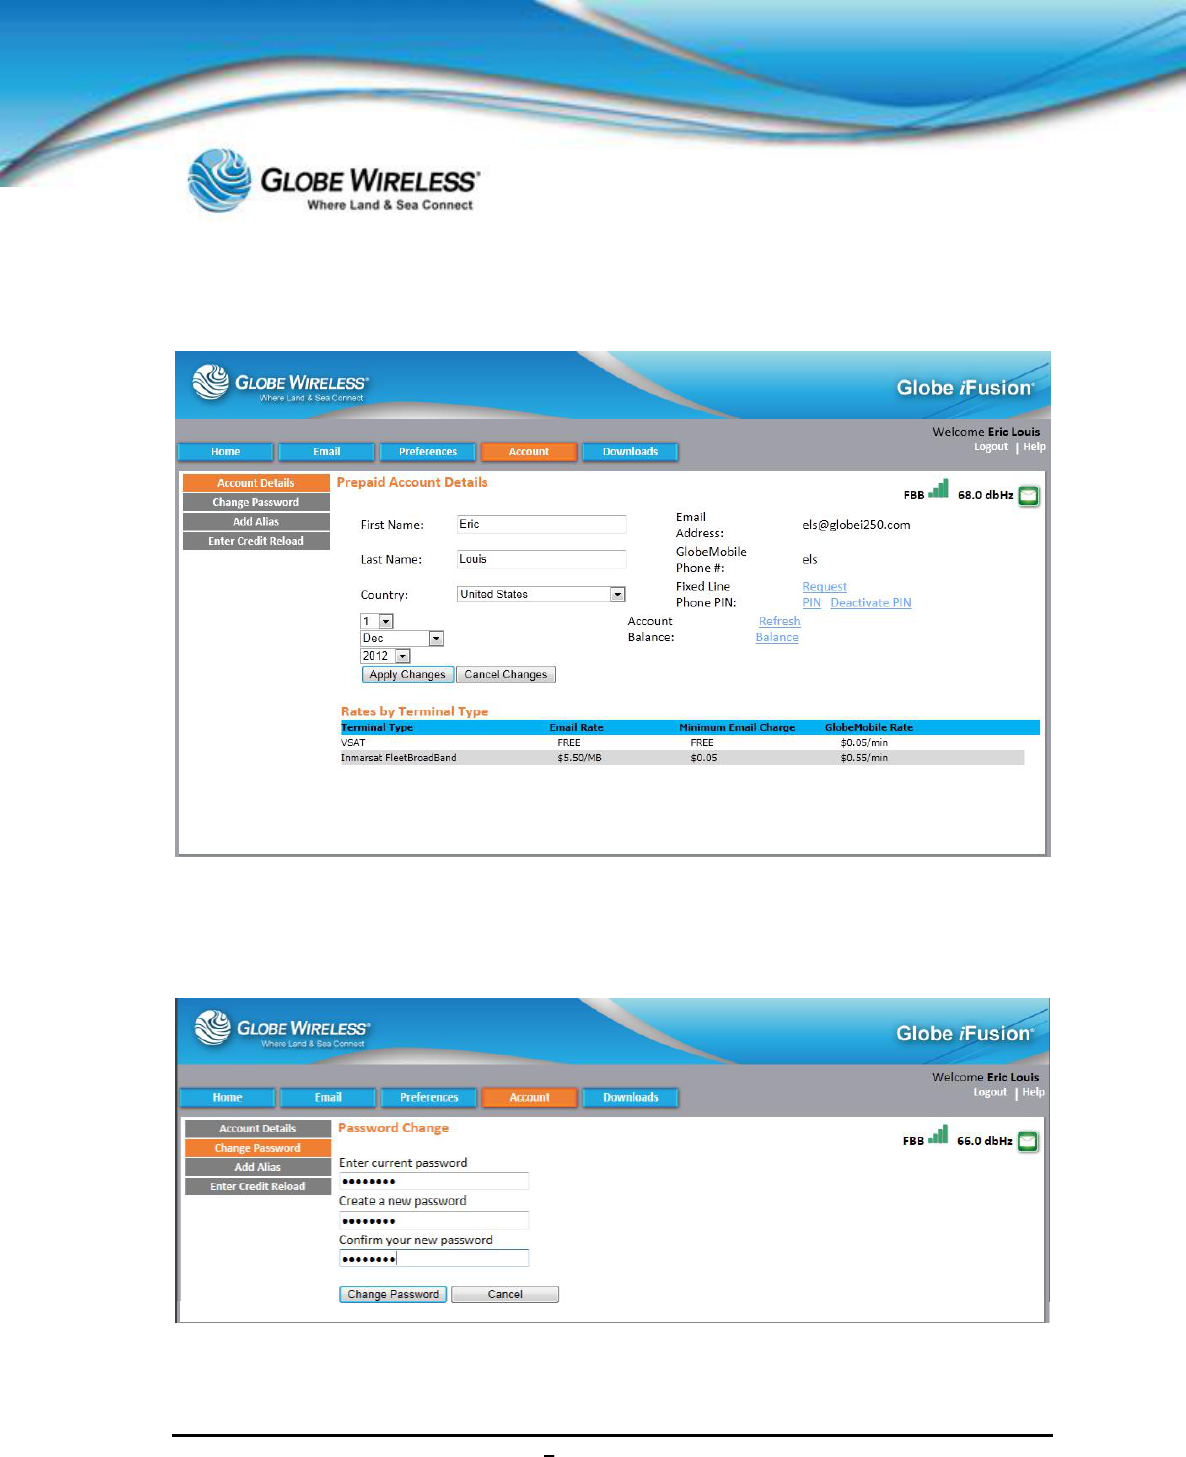
SWG-125 Rev. G June 2013
Globe iFusion ®User Guide for i500, i250, iSRev. G 10-28
10.4.1 Account Details (default) Sub-Tab
10.4.2 Change Password Sub-Tab
Click the Change Password Sub-tab to display the Password Change screen.
Step 1: Type your existing password into the Enter current password field.
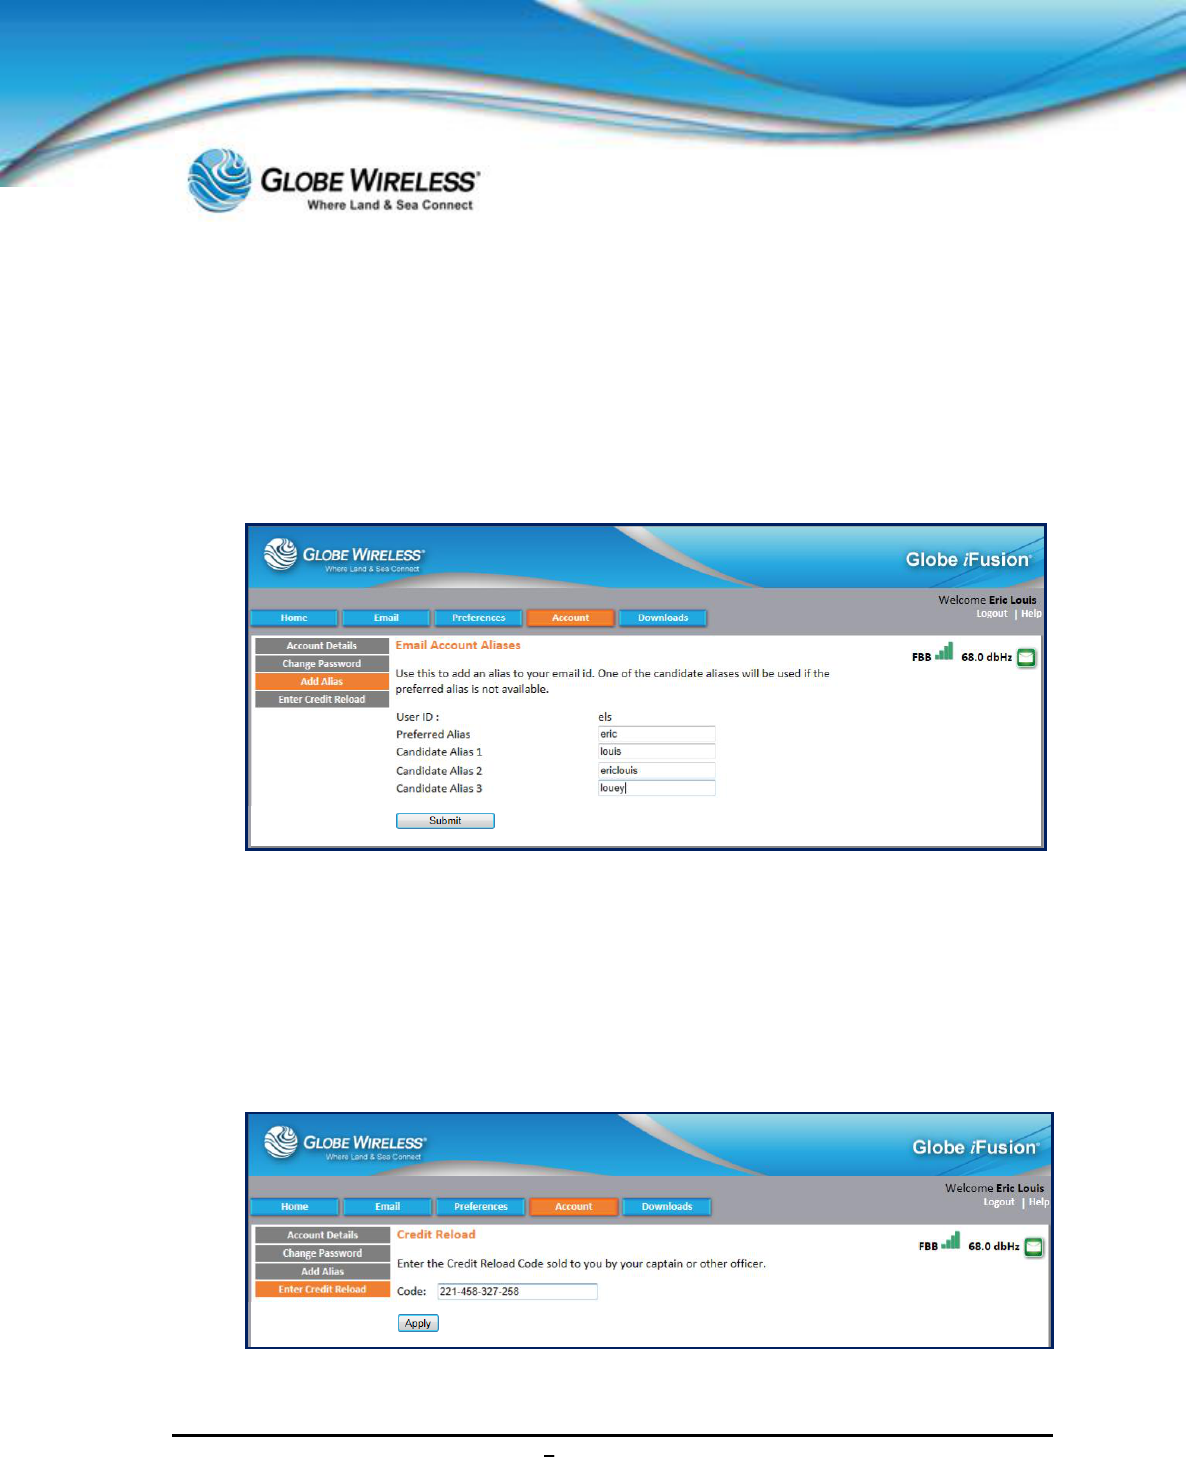
SWG-125 Rev. G June 2013
Globe iFusion ®User Guide for i500, i250, iSRev. G 10-29
Step 2: Type the new password into the next two fields (Create new and Confirm).
Step 3: Click on the Change Password button.
10.4.3 Add Alias Sub-Tab
Step 1: Click the Add Alias Sub-Tab to display the Email Account Aliases screen.
Step 2: Type your Preferred and candidate Alias in the fields. All Alias fields must be populated.
Step 3: Click on the Submit button.
10.4.4 Enter Credit Reload Sub-Tab
Step 1: Click on the Enter Credit Reload Sub-Tab to display the Credit Reload screen.

SWG-125 Rev. G June 2013
Globe iFusion ®User Guide for i500, i250, iSRev. G 10-30
Step 2: Enter the reload number you purchased from the captain or designated officer into the
Code: field.
Step 3: Click the Apply button.
10.5 Downloads Tab
Click on the Downloads Tab to display the Free Downloads screen.
Step 1: Select a download you wish to perform from the Free Downloads list and press the
corresponding Download button.
Step 2: Follow the steps displayed to complete the download.
Step 3: If there are additional downloads you wish to perform, repeat the above steps.
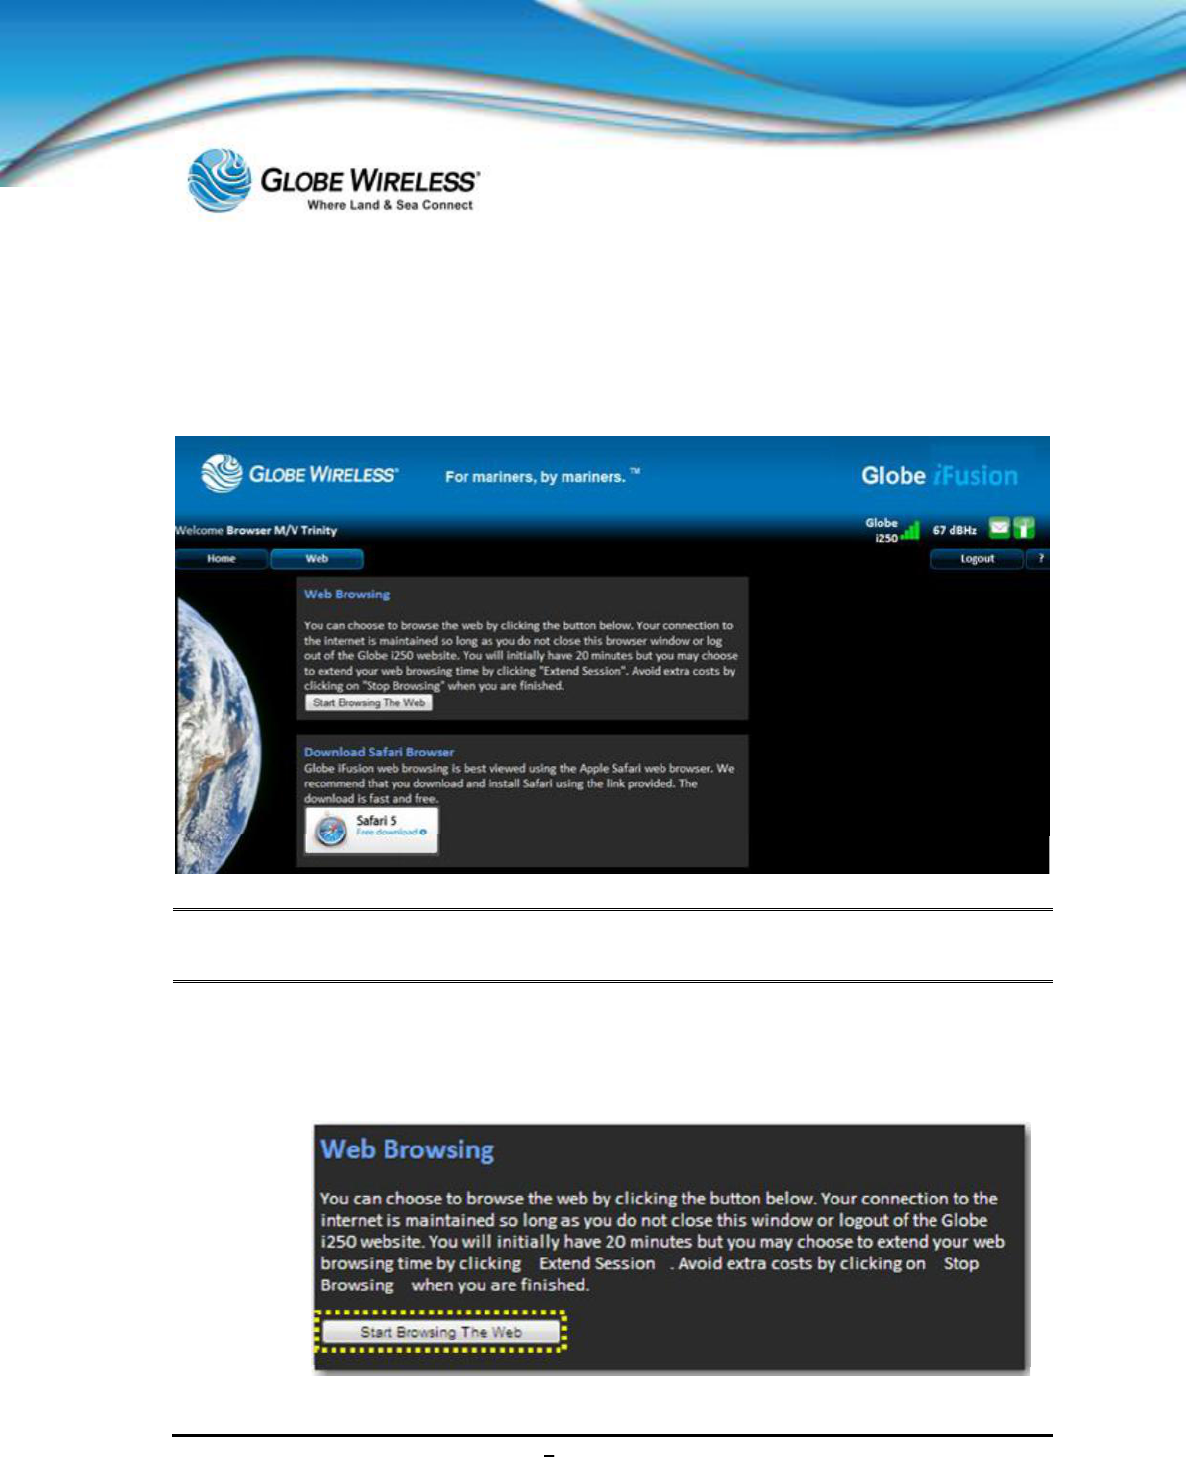
SWG-125 Rev. G June 2013
Globe iFusion ®User Guide for i500, i250, iSRev. G 11-1
11.0 Web Browsing Users
When the Web Browsing user logs in, the following screen is displayed.
Note: As noted on the screen, it is recommended that the user download the (free) Safari
Browser by clicking the link on the Web Browsing screen.
11.1 Start a Web Browsing Session
Step 1: Click the Web Tab to display the Web Browsing screen.
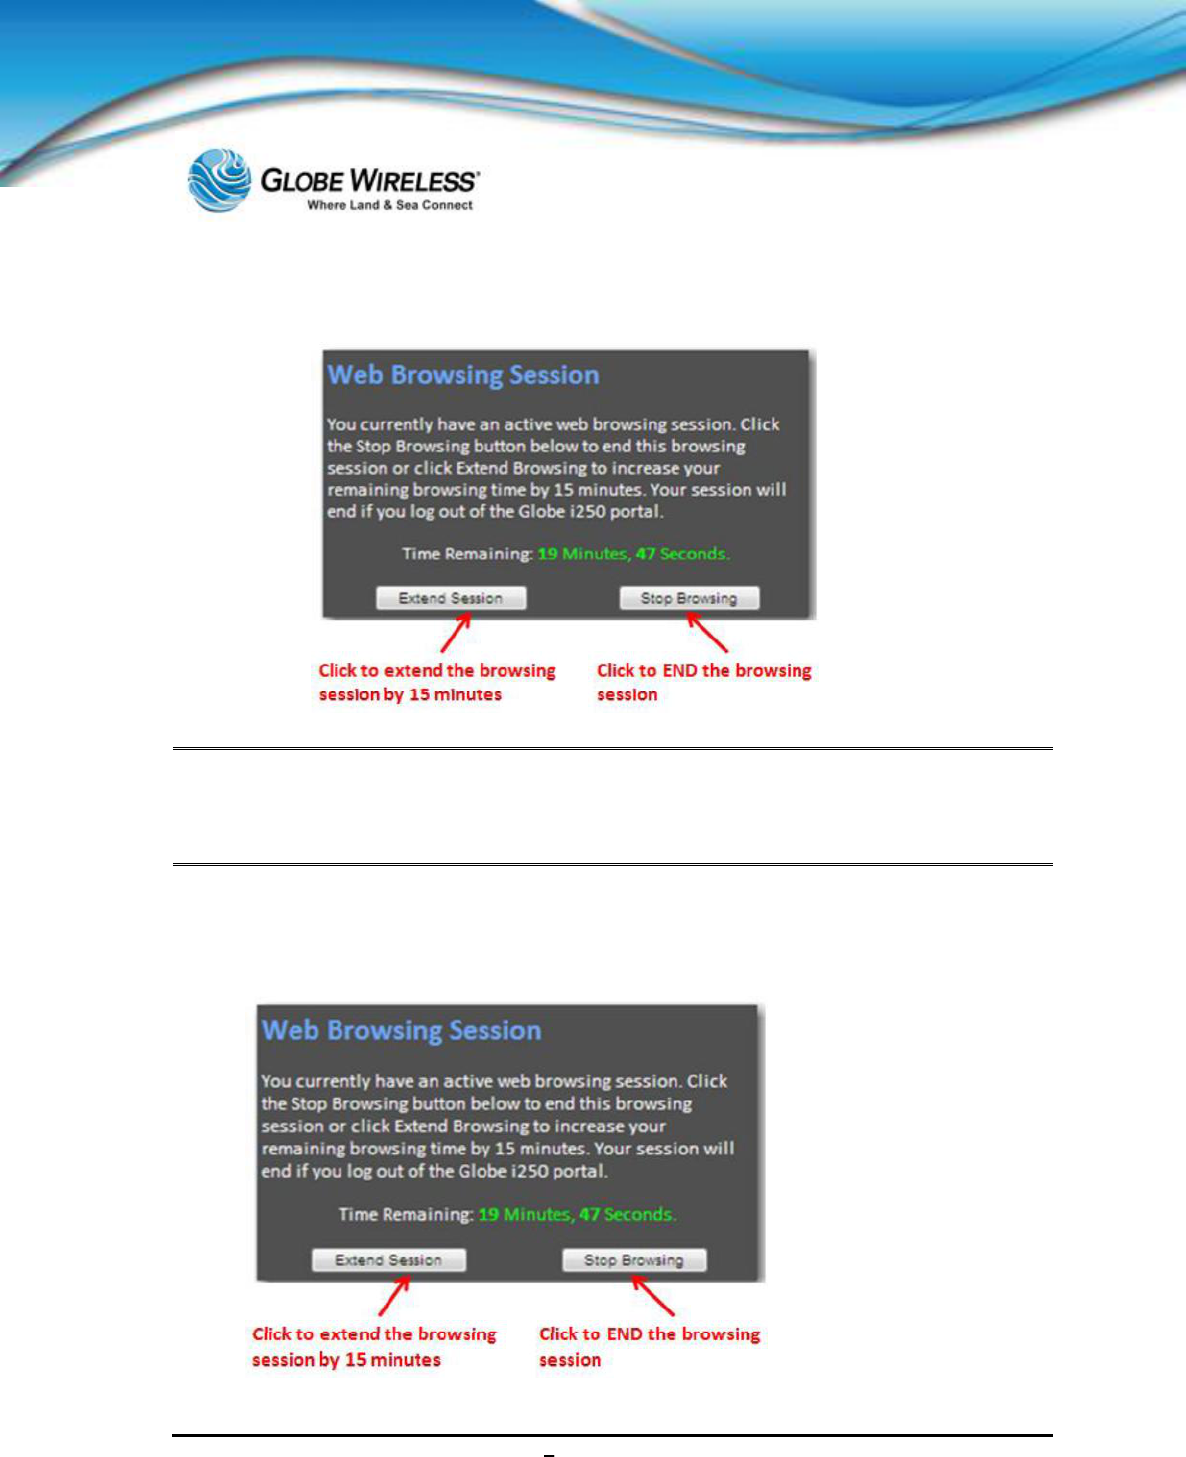
SWG-125 Rev. G June 2013
Globe iFusion ®User Guide for i500, i250, iSRev. G 11-2
Step 2: Click on the Start Browsing the Web button to start a Web Browsing session.
The web browsing session will remain active so long as there is time left and the web browsing page
is left open. If you leave the web browsing page on this browser window, the session will be dropped.
For that reason it is recommended that you open another browser window or tab and use that to
access the internet for web browsing.
11.2 Stop or Extend a Web Browsing Session
Click the Stop Browsing button to end the session and return to the beginning screen.

SWG-125 Rev. G June 2013
Globe iFusion ®User Guide for i500, i250, iSRev. G 11-3
Click the Extend Session button to extend the browsing session.
Note: Each time the Extend Session button is pressed, the browsing time is increased in 15-
minute increments.

SWG-125 Rev. G June 2013
Globe iFusion ®User Guide for i500, i250, iSRev. G 11-4
This page intentionally left blank.
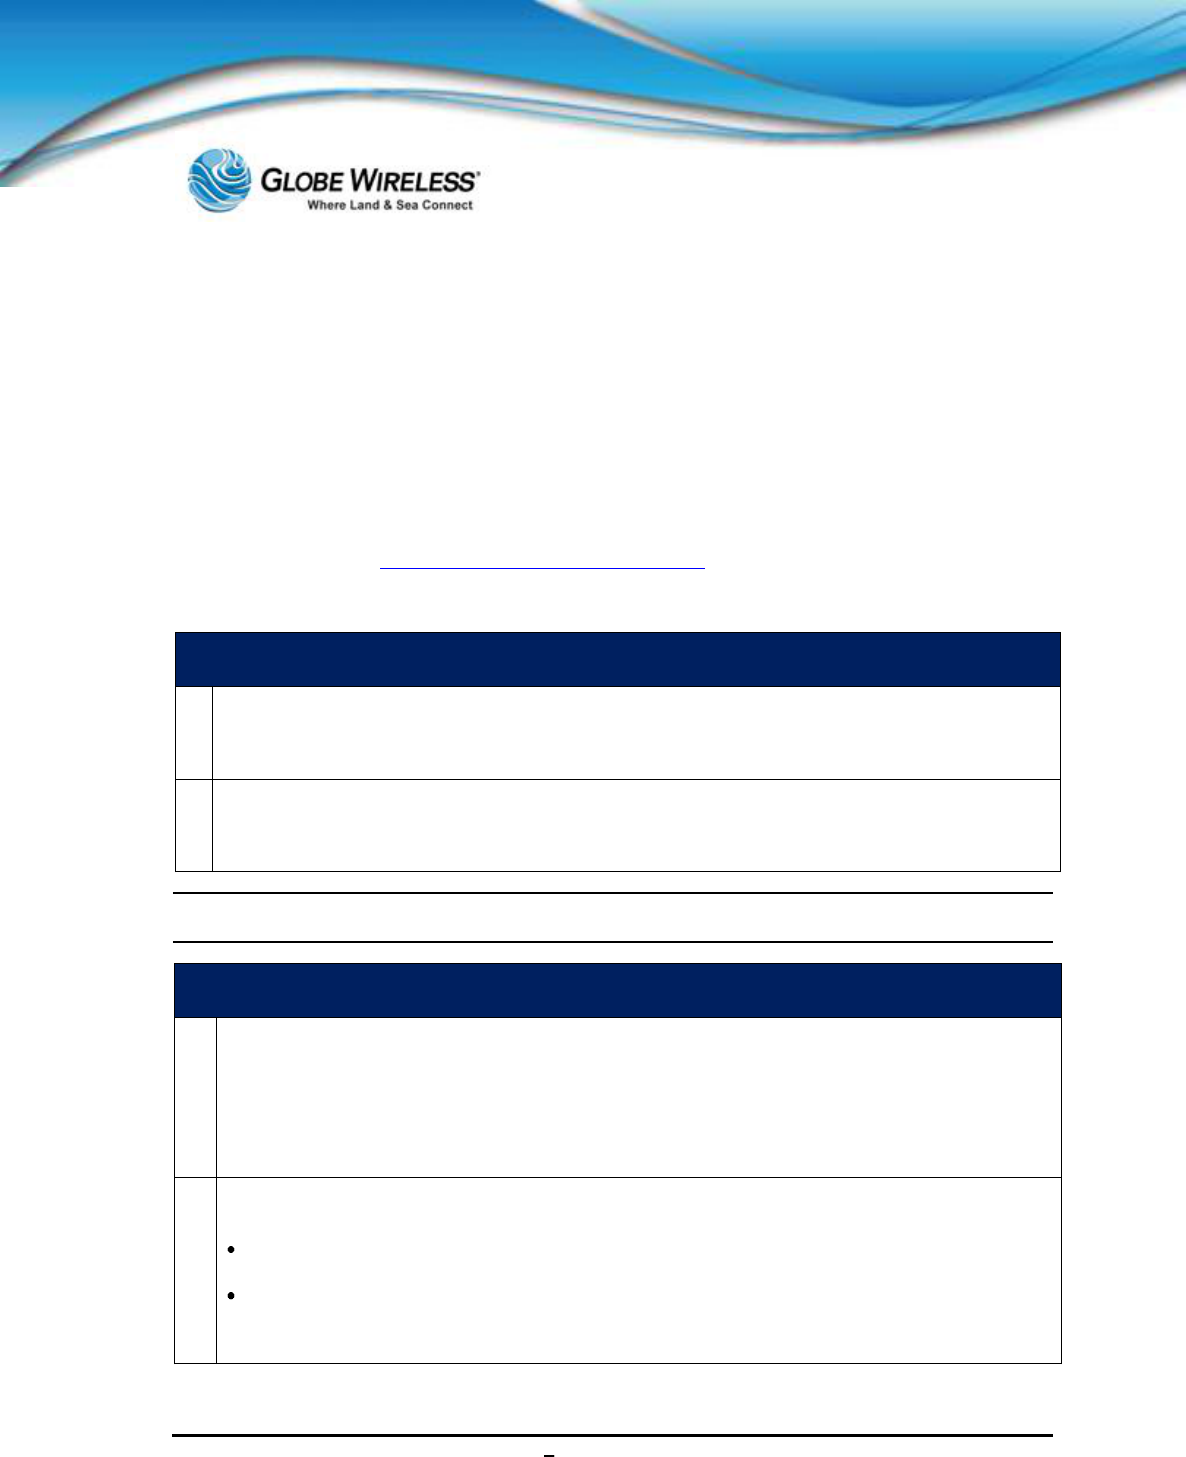
SWG-125 Rev. G June 2013
Globe iFusion ®User Guide for i500, i250, iSRev. G 12-1
12.0 Troubleshooting
This section is a guide on how to resolve basic user issues. If these basic steps fail, please contact
Globe Wireless Customer Support:
Within the United States or Canada: 1-(877)-535-0653
Overseas: 1-(321)-308-0112
Email: customersupport@globewireless.com
12.1 Basic User Issues and Solutions
Cannot Make Voice or Fax Calls (FleetBroadband & GlobeMobile)
1.
Check the FleetBroadband handset to determine if the terminal has sufficient signal strength
Change ocean region if necessary
2.
Does the telephone LED on the FleetBroadband terminal display as ORANGE?
A call is in progress. Wait until the telephone LED displays GREEN.
Note: A maximum of two simultaneous calls can be handled by the Globe iFusion® system.
GCC Cannot Make Data IP Calls / GlobeMobile SMS Messages Not Transferring
1.
Is the globe icon on the terminal showing RED? It is likel
y that the data connection has stopped
on the FleetBroadband terminals.
The terminals are configured to automatically connect to data services. Occasionally, it may be
necessary to make a data connection on the FleetBroadband terminal. Please note that it
does
not need to be deactivated after usage.
2.
Does the telephone LED on the FleetBroadband terminal display as ORANGE?
A call is in progress. Wait until the telephone LED displays GREEN.
From handset press MENU > DATA > STATUS > ACTIVATE PRIMARY
The globe LED on the terminal should now display as GREEN.
SWG-125 Rev. G June 2013
Globe iFusion ®User Guide for i500, i250, iSRev. G 12-2
GCC
Terminal Unresponsive Cannot Make Voice, Fax or Data Calls
1.
The FleetBroadband terminal may have locked up.
Power cycle the terminal in order to reboot it. Wait approximately 10 minutes befo
re attempting to
GREEN.
12.2 Frequently Asked Questions
Can I use my GlobeMobile SIM on other GlobeMobile vessels?
Yes. Rates may differ from vessel to vessel depending upon the satellite solution and plans
aboard.
How do I connect to GlobeMobile?
The GlobeMobile SIM is designed to automatically recognize and select the GWireless
network. Phones will display GWireless, or one of the following network codes: 310-720 or
310 72 once the mobile phone is registered in the Globe iFusion®. Select this and connect.
If connection cannot be made, see your mobile phone User Guide for information to perform
the necessary steps manually.
How do I receive calls or SMS messages?
You will have a standard U.S. cell (mobile) phone number that can send and receive SMS
messages. Note that you will be charged for all inbound calls as well as all SMS messages
sent and received to cover satellite & system costs.
Note: At this time you will not be able to receive incoming mobile phone calls. Only outbound calling is
available.
Can I have a local phone number?
At this time Globe Wireless can only offer U.S. phone numbers.
How much will it cost people to send SMS messages to me?
ates for SMS messaging to U.S. cell
(mobile) phone destinations. You will also be charged a fee to cover satellite airtime costs.
Can I call other users onboard the vessel via GlobeMobile and how much will it cost?
You can call other users onboard the same vessel and these calls are free of charge.

SWG-125 Rev. G June 2013
Globe iFusion ®User Guide for i500, i250, iSRev. G 12-3
Can all cell (mobile) phones be used with GlobeMobile?
GlobeMobile uses an 1800MHz frequency range and the cell (mobile) phone must be able to
use this range. This is the same frequency used in most European countries.
Note: GlobeMobile SIM cards will only work in unlocked mobile phones. Some mobile devices are
locked to a particular carrier. If this is the case you will not be able to use the Globe Wireless SIM
card in your current device.

SWG-125 Rev. G June 2013
Globe iFusion ®User Guide for i500, i250, iSRev. G 12-4
This page intentionally left blank.

SWG-125 Rev. G June 2013
Globe iFusion ®User Guide for i500, i250, iSRev. G A-1
APPENDIX A: Updating the Globe
iFusion® Software
Step 1: Obtain a Globe iFusion®USB Thumb Drive with the latest released software and
place it into one of the front USB slots.
Step 2: Power on the Globe iFusion®from the front panel.
Step 3: The system will reboot using the front panel Globe iFusion®USB drive and start an
install update automatically.
Step 4: Once the software installation is complete and the Globe iFusion®automatically
powers off, remove the USB Thumb Drive and power on the Globe iFusion®from the
front panel again.
Step 5: The Globe iFusion®may automatically reboot two more times before it is ready for use.

SWG-125 Rev. G June 2013
Globe iFusion ®User Guide for i500, i250, iSRev. G A-2
This page intentionally left blank.
SWG-125 Rev. G June 2013
Globe iFusion ®User Guide for i500, i250, iSRev. G B-1
APPENDIX B: Updating the Globe
iFusion® Firmware
Step 1: Using the Globe iFusion®console, login as root and use ce1177 as the password.
Warning: The following step prevents the Globe iFusion® Core from being power cycled. It is
extremely important that this step be followed to prevent damaging the FBB Core.
Step 2: At the prompt, enter the following command: bgan_safe_mode. The monitor displays
Step 3: Monitor the front of the Globe iFusion®, and when the READY light alternates between
red and green, it is safe to continue with the procedure.
Step 4: pe
http://10.97.97.35:9980 in the address field. The Globe iFusion®FBB Web Interface
login screen will appear.
Step 5: Enter the following into the username and password fields:
Username: service_rep
Password: eb0lg
Step 6: Click the Settings icon near the top of the page.
Step 7: Click on the Admin tab, beneath the icons.
Step 8: Click on the Firmware Upgrade tab on the left side of the screen.
Step 9: Click on the Firmware Upgrade button.
Step 10: Monitor the front of the Globe iFusion®and watch for the terminal to reboot into safe
mode. All four (4) of the FBB Core LEDs should begin and continue flashing amber.
Step 11: After waiting 2 minutes, the PC will have reestablished its network connection. Refresh
the PC screen and log back into the FBB Web Interface page using the same username
and password as in Step 5 (Username - service_rep; Password - eb0lg). Click the Login
button.

SWG-125 Rev. G June 2013
Globe iFusion ®User Guide for i500, i250, iSRev. G B-2
Step 12: The FBB Web Interface will again open and the Globe iFusion® CONTROL PANEL
will appear displaying Safe Mode. Click the Browse button. Browse and open the
latest released firmware package to be uploaded.
Note: The typical Firmware convention will appear as: GW_i250-FB250-r00X.X.X.fb
Step 13: Click the Upload button. The Firmware will begin transferring files.
Step 14: Monitor the FBB Web Interface page and wait for the download to complete.
Step 15: While still monitoring the FBB Web Interface, click the Reboot Terminal link to exit
safe mode, and monitor the unit through the complete rebooting sequences.
Step 16: Using the Globe iFusion console, again type the command bgan_safe_mode. The
Step 17: Using the Globe iFusion®console, type reboot, and press Enter. Monitor the unit
through the complete rebooting sequence. The unit will power off; then restart. When the
reboot sequence is complete the READY light will flash steady green.
Step 18: Return to the FBB Web Interface and click on the Settings icon.
Step 19: Click on the Terminal Info button and verify the Software Version listed is the same as
the version that was just downloaded.
Step 20: Power off the Globe iFusion®from the front panel.
Step 21: Remove the RF cable connector from the Globe iFusion®.

SWG-125 Rev. G June 2013
Globe iFusion ®User Guide for i500, i250, iSRev. G C-1
APPENDIX C: Restoring Factory Defaults
for the Globe iFusion®
Software
Perform the following steps to restore the factory defaults and update the Globe iFusion®software:
Step 1: Obtain a Globe iFusion®USB Thumb Drive with the latest released software and
place it into one of the front USB slots on the Globe iFusion®unit.
Step 2: Power on the Globe iFusion®from the front panel.
Step 3: Watch for the Globe iFusion®USB Installer to appear.
Step 4: Immediately arrow down to the Extras Menu and press Enter.
Step 5: Watch for the Force Globe iFusion® Rebuild **Warning** to appear and press Enter.
Step 6: Watch for the p Are you sure you wish to proceed ythen press
Enter.
Note: The system will reboot from the Globe iFusion®USB drive and start an install update
automatically. The install process takes approximately ten minutes to complete.
Step 7: Once the software installation is complete and the system automatically powers off,
remove the USB Thumb Drive and power on the Globe iFusion®from the front panel
again.
Note: The Globe iFusion®may automatically reboot up to two more times before it is ready for
use.

SWG-125 Rev. G June 2013
Globe iFusion ®User Guide for i500, i250, iSRev. G C-2
This page intentionally left blank.
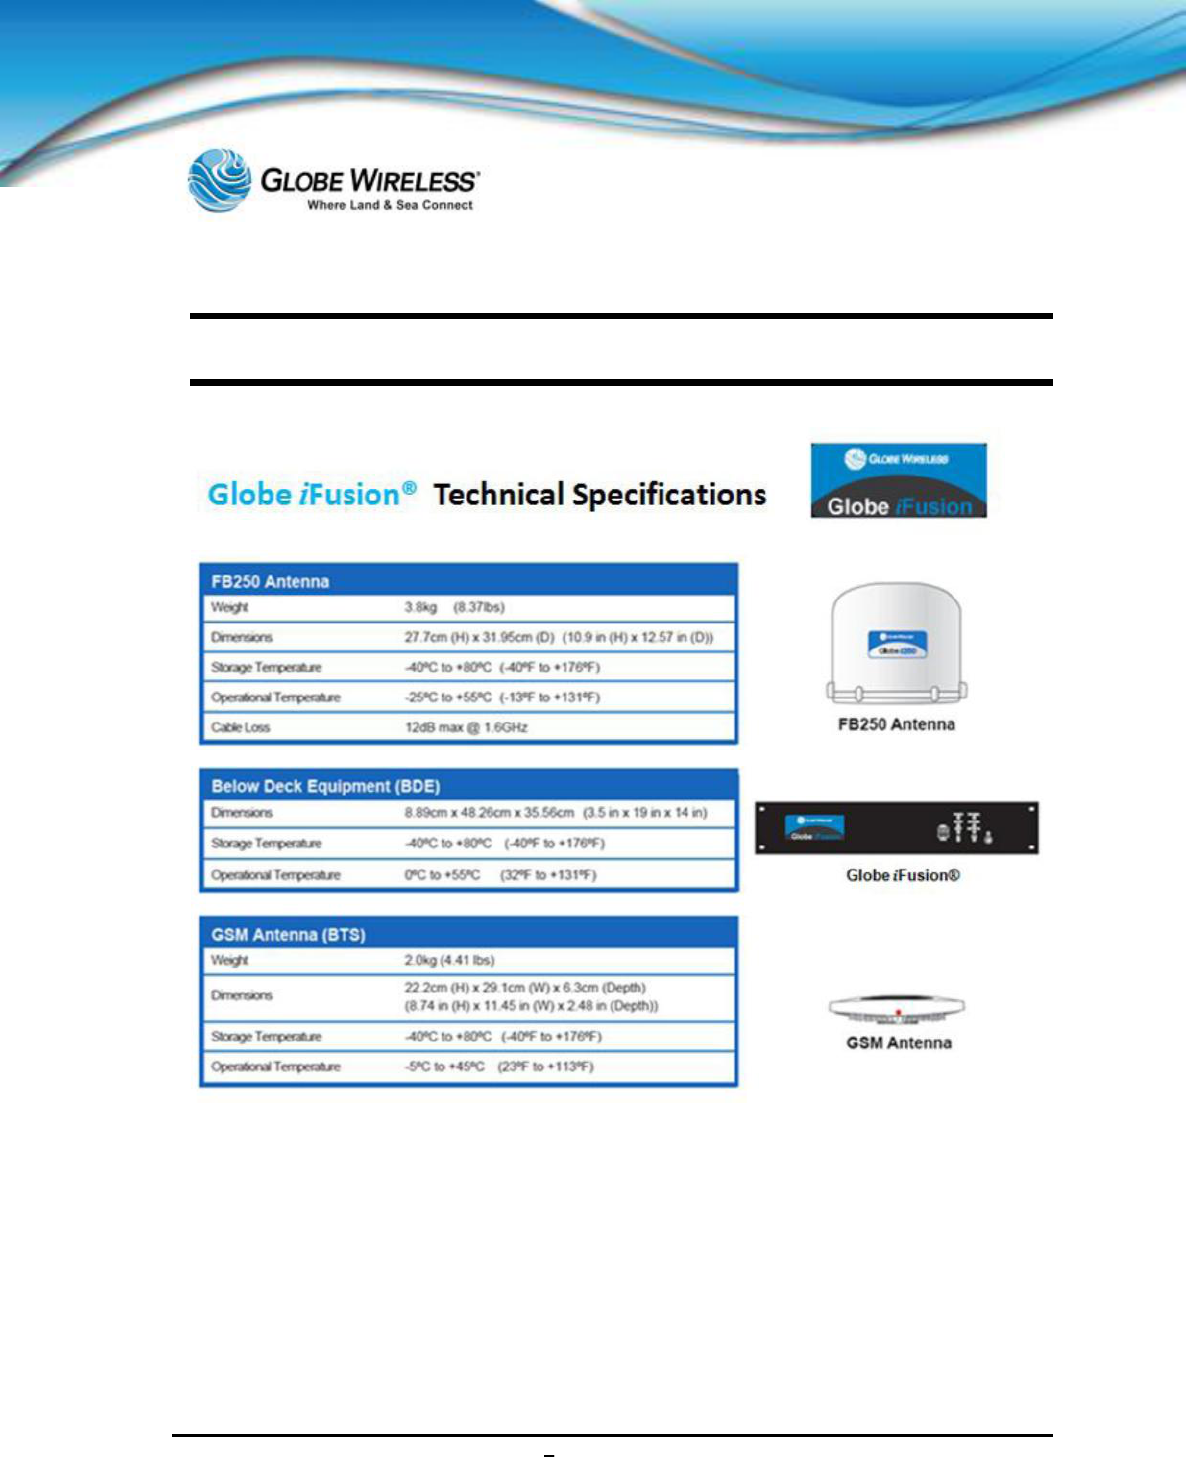
SWG-125 Rev. G June 2013
Globe iFusion ®User Guide for i500, i250, iSRev. G D-1
APPENDIX D: Technical Specifications
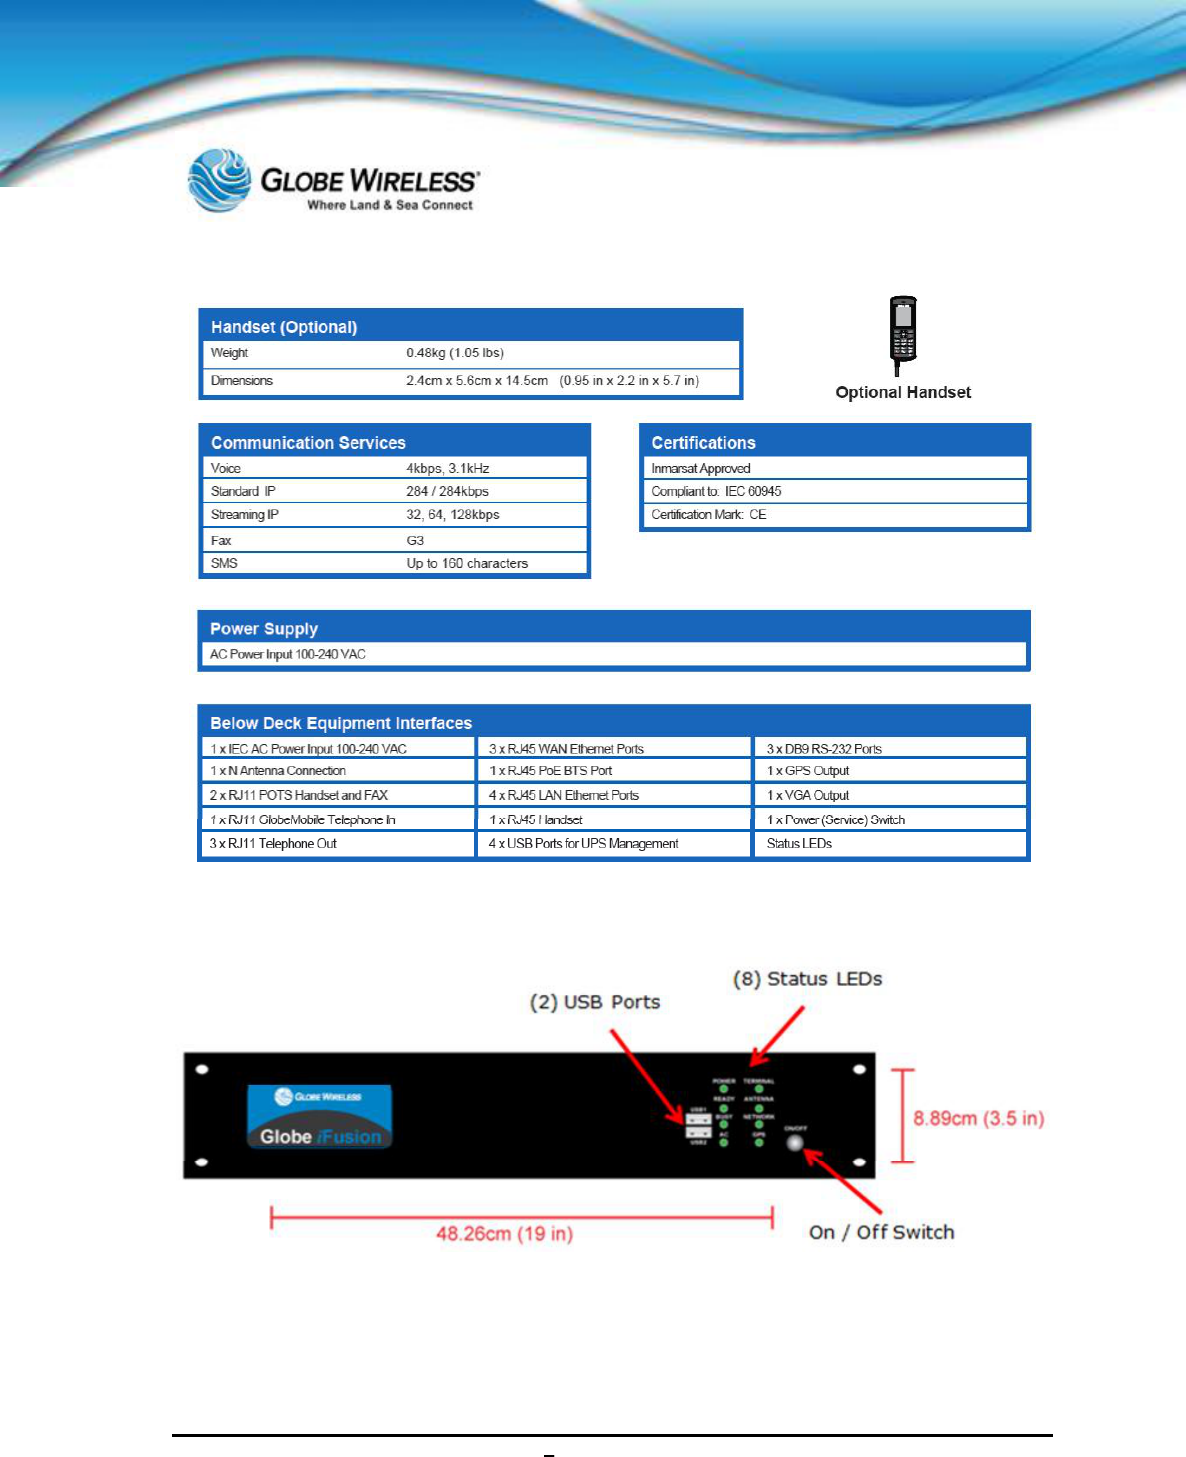
SWG-125 Rev. G June 2013
Globe iFusion ®User Guide for i500, i250, iSRev. G D-2
Globe iFusion® Front Panel Dimensions and Description
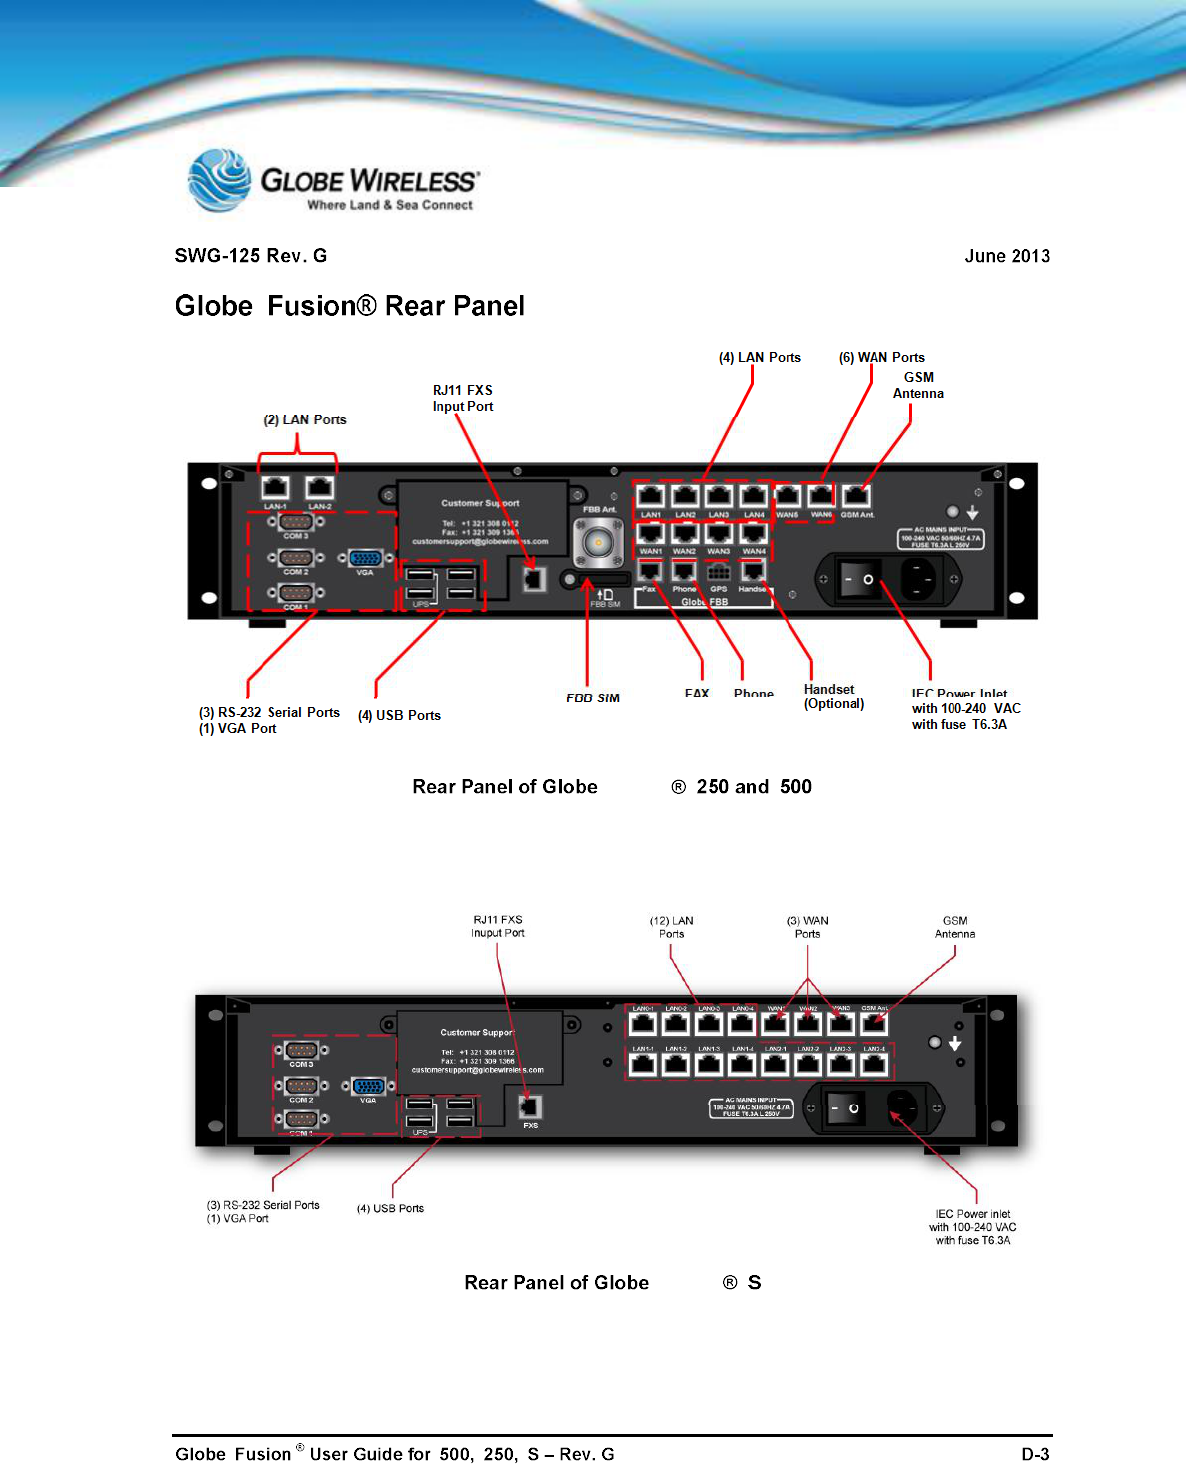
ii i i
i
iFusion i i
iFusion i

SWG-125 Rev. G June 2013
Globe iFusion ®User Guide for i500, i250, iSRev. G D-4
This page intentionally left blank.

SWG-125 Rev. G June 2013
Globe iFusion ®User Guide for i500, i250, iSRev. G E-1
APPENDIX E: Contact Information
For further assistance, contact the Globe Wireless Customer Service Center at:
Within the United States or Canada: 1-(877)-535-0653
Overseas: 1-(321)-308-0112
Email: customersupport@globewireless.com
Globe Wireless also encourages emails to our quality department with comments and
suggestions.
Please email comments and suggestions to: quality@globewireless.com

SWG-125 Rev. G June 2013
Globe iFusion ®User Guide for i500, i250, iSRev. G E-2
This page intentionally left blank.