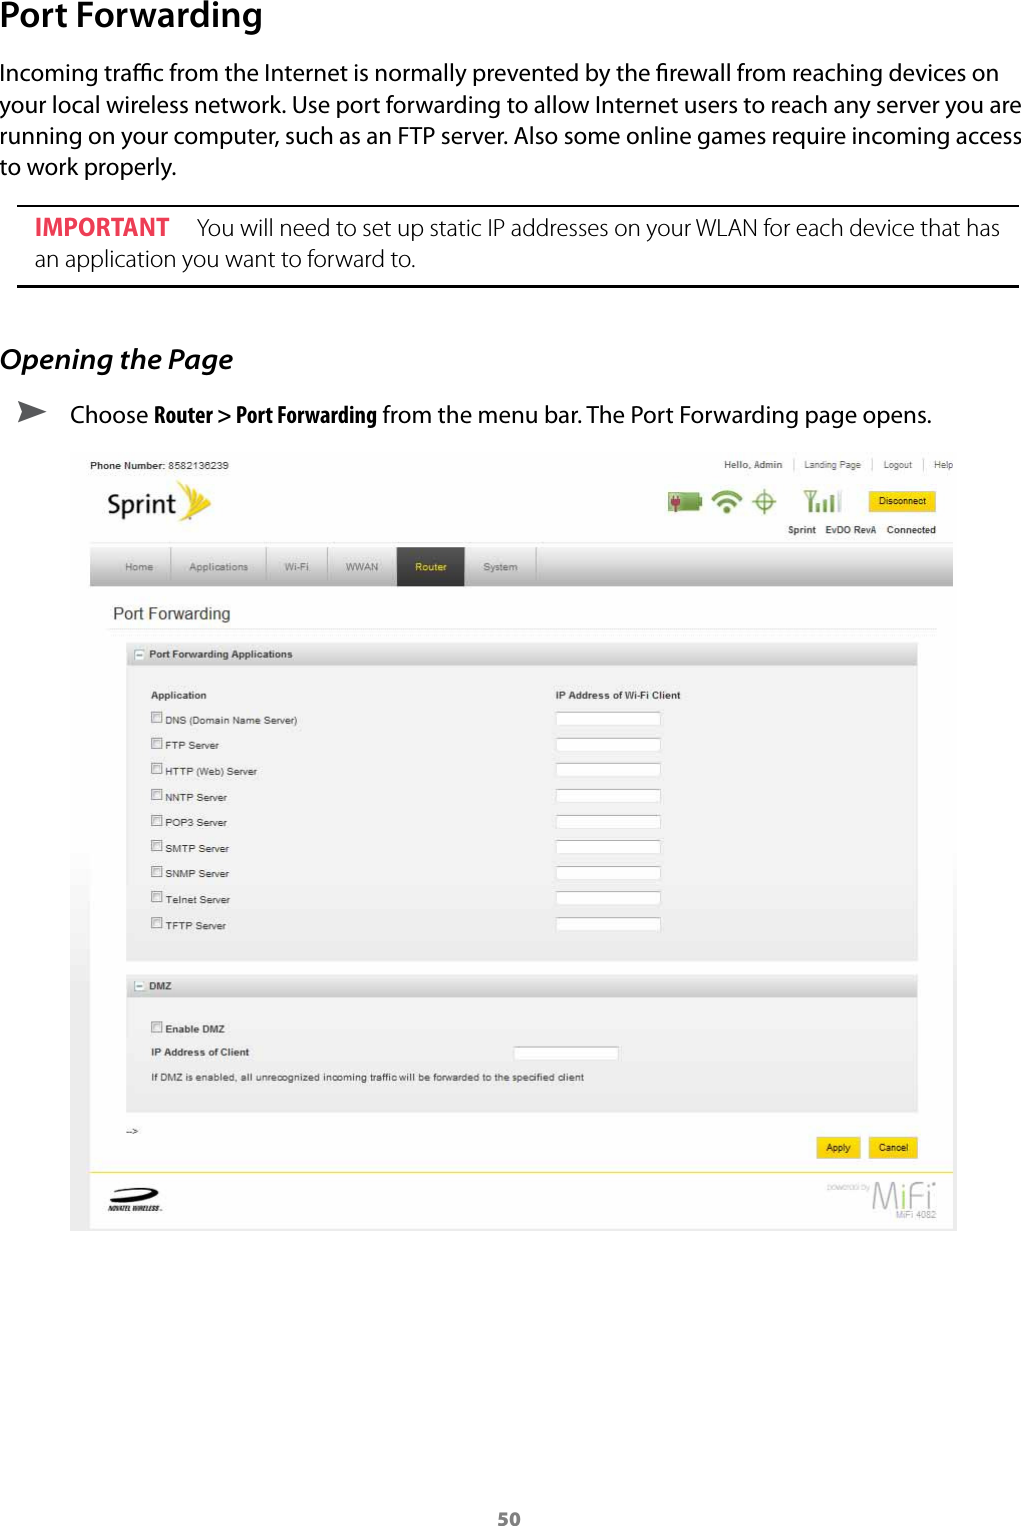
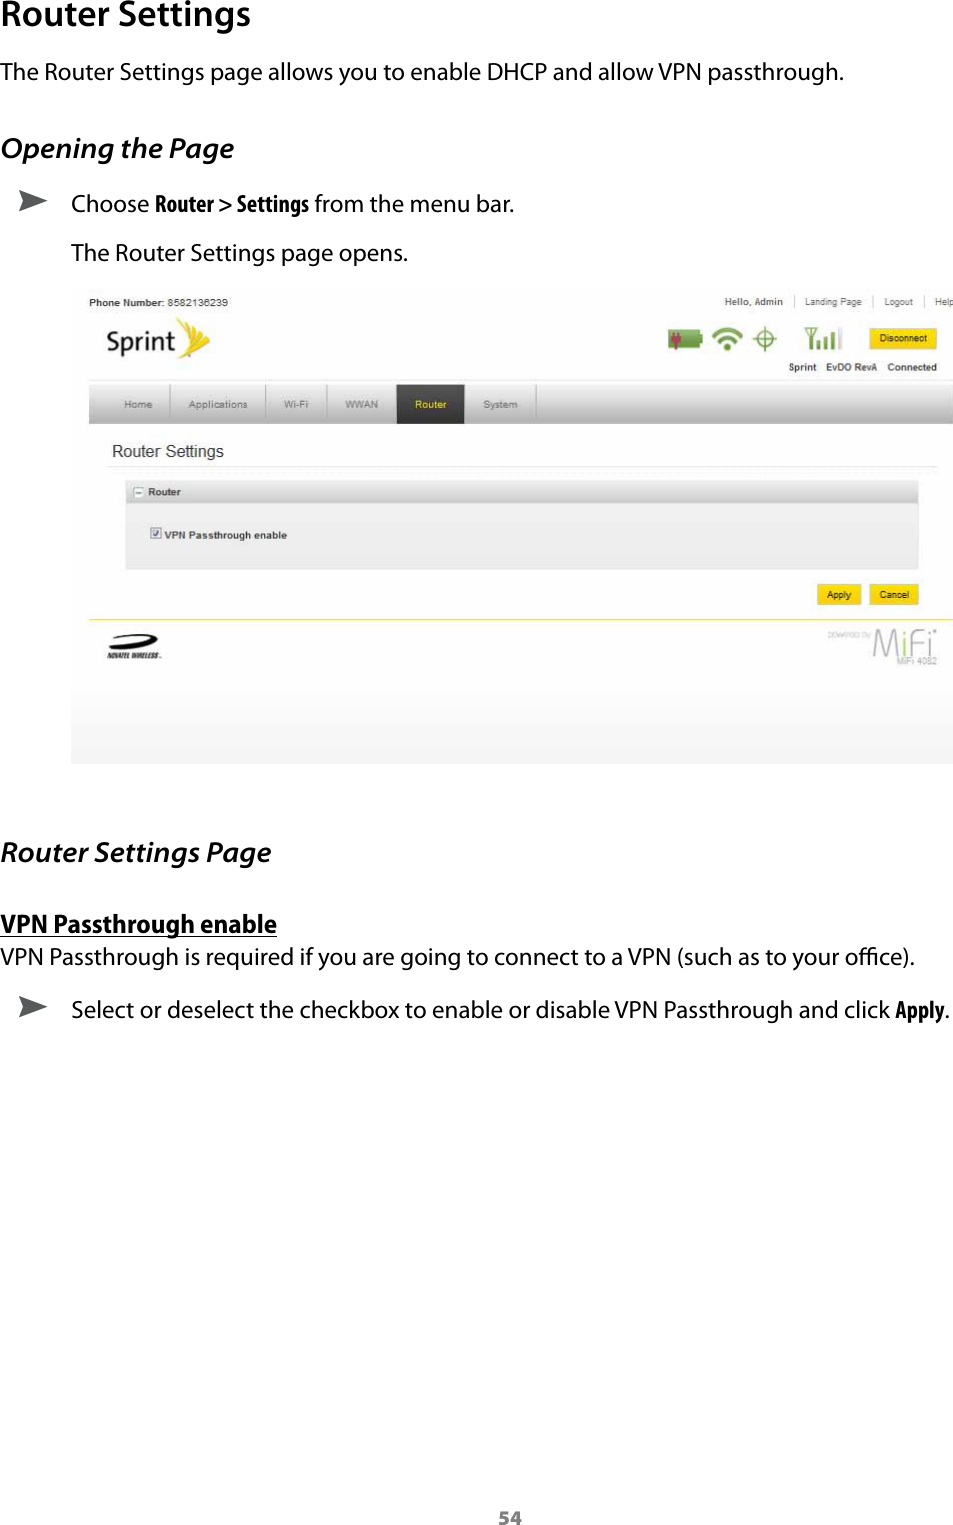
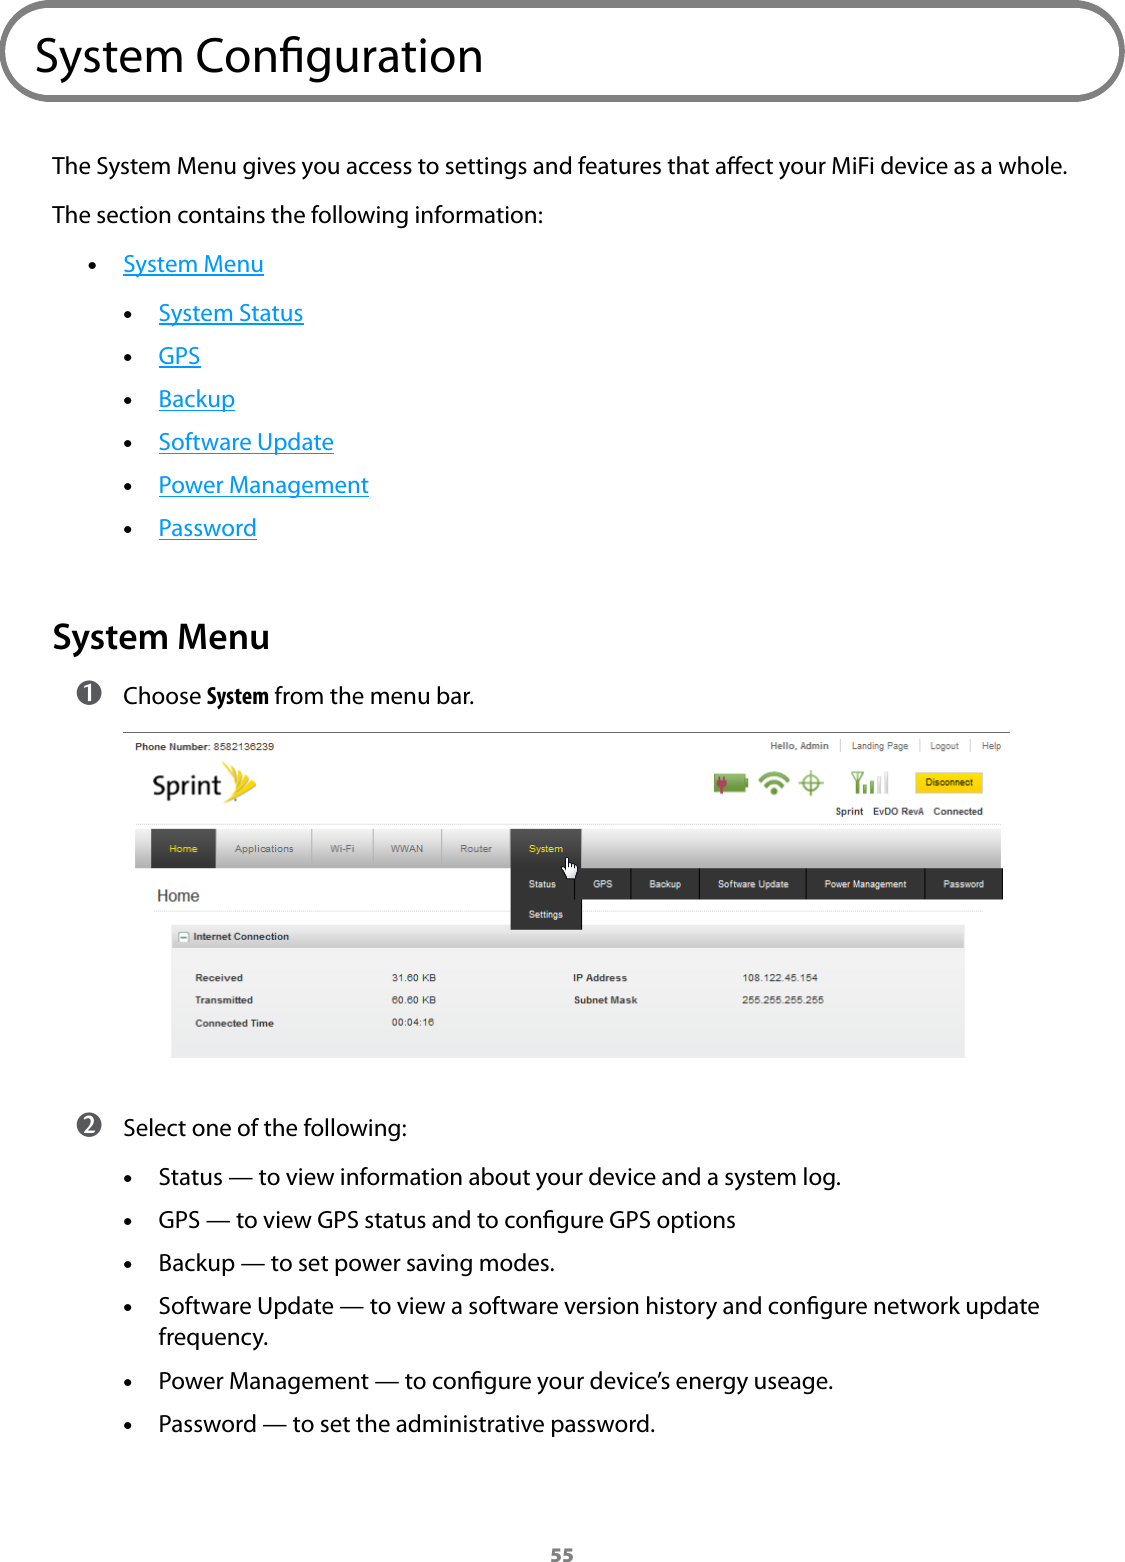
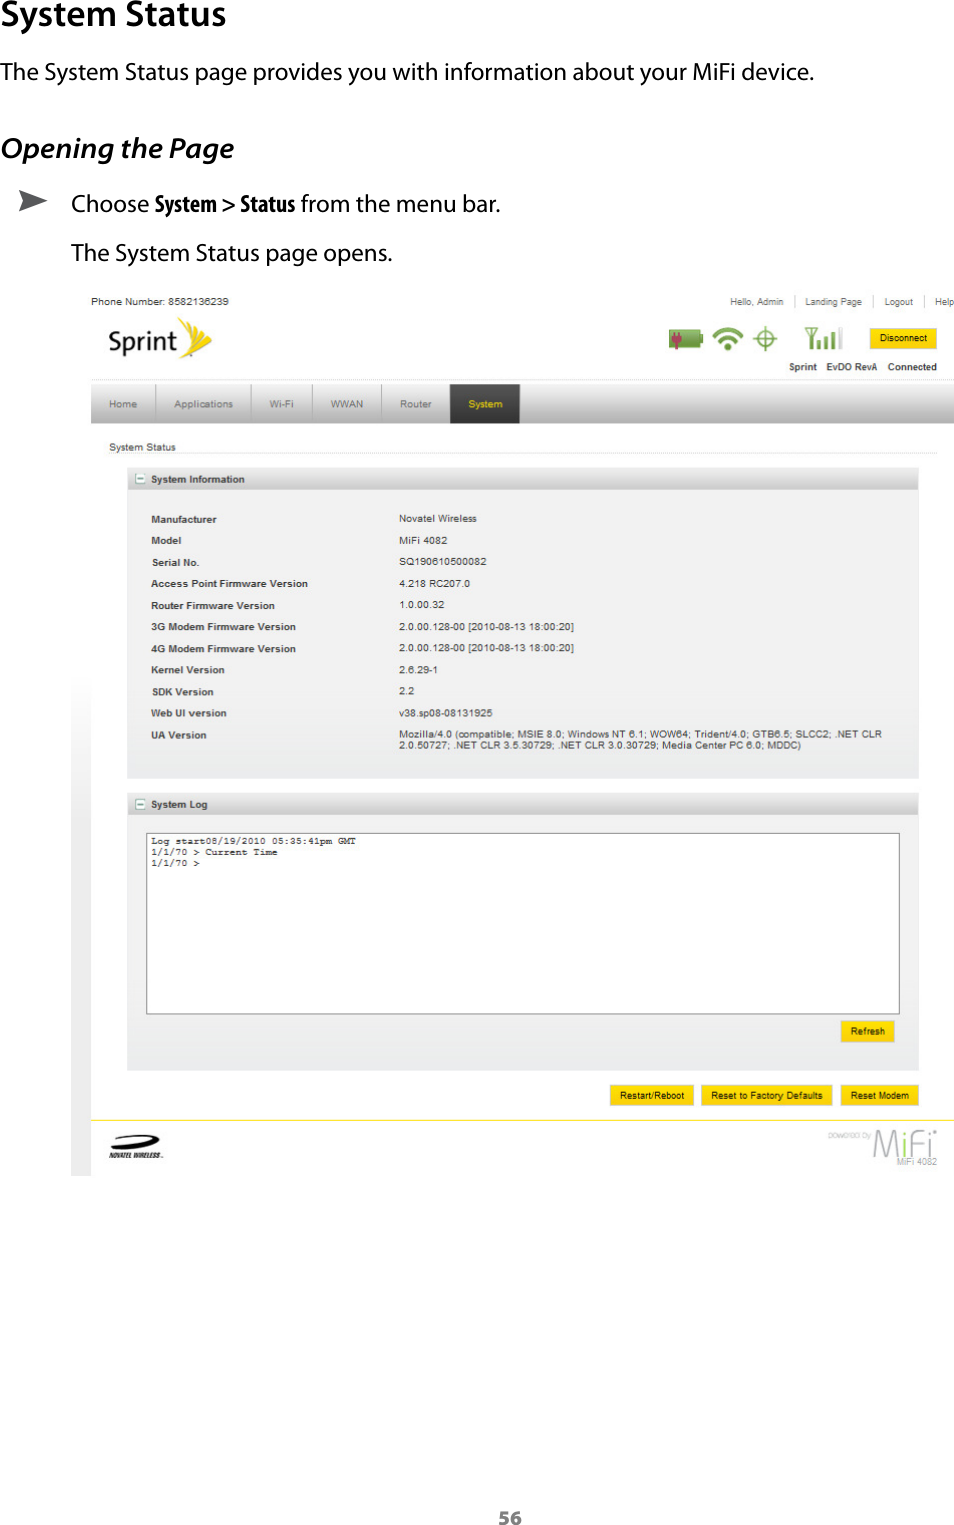
Inseego NVWMIFI4082 Cellular/ PCS CDMA Wireless Router with WiMAX and WLAN User Manual
Novatel Wireless Inc Cellular/ PCS CDMA Wireless Router with WiMAX and WLAN Users Manual
UserManual.wiki
>
Inseego
>
NVWMIFI4082 User Manual
Users Manual
Navigation menu
Upload a User Manual
Namespaces
Wiki Guide
HTML
PDF
Info
Views
User Manual
Discussion / Help
Navigation
![2MiFi 4082 Device OverviewThe Novatel Wireless MiFi Intelligent Mobile Hotspot device (model 4082) is your access point to the Internet anywhere you are. It acts as a Mobile Hotspot for up to ve Wi-Fi-enabled devices, where you can surf the web, download les and music, share and swap photos with the built-in microSDHC™ reader, manage email and more at speeds of up to 10 Mbps download via the highest speed mobile 3G and 4G broadband networks.You can connect any 802.11 b/g/n wireless device to your MiFi device, and the MiFi Landing Page (MLP) provides a quick and easy resource for information. You can establish a secure prole so that others cannot use your MiFi device unless you allow them. [See Wi-Fi Setup on page 16.] You can also establish temporary settings to allow up to ve devices to connect with your MiFi device without having to give them your security settings.System Requirements •Windows® 2000, XP, Vista and 7; Mac OS® X (10.4.7+); Linux® (2.4, 2.6)* •100 MB Hard Drive Space •128 MB of RAM •For Wi-Fi connection: Device supporting Wi-Fi 802.11 b/g/n and an Internet browser •For USB connection: USB 2.0 portPackage ContentsThe Novatel Wireless MiFi 4082 device package includes: •MiFi Intelligent Mobile Hotspot device •Rechargeable lithium ion battery •A/C charger •Storage pouch •Quick Start GuideProduct User Guide (on device)](https://usermanual.wiki/Inseego/NVWMIFI4082/User-Guide-1386896-Page-5.png)
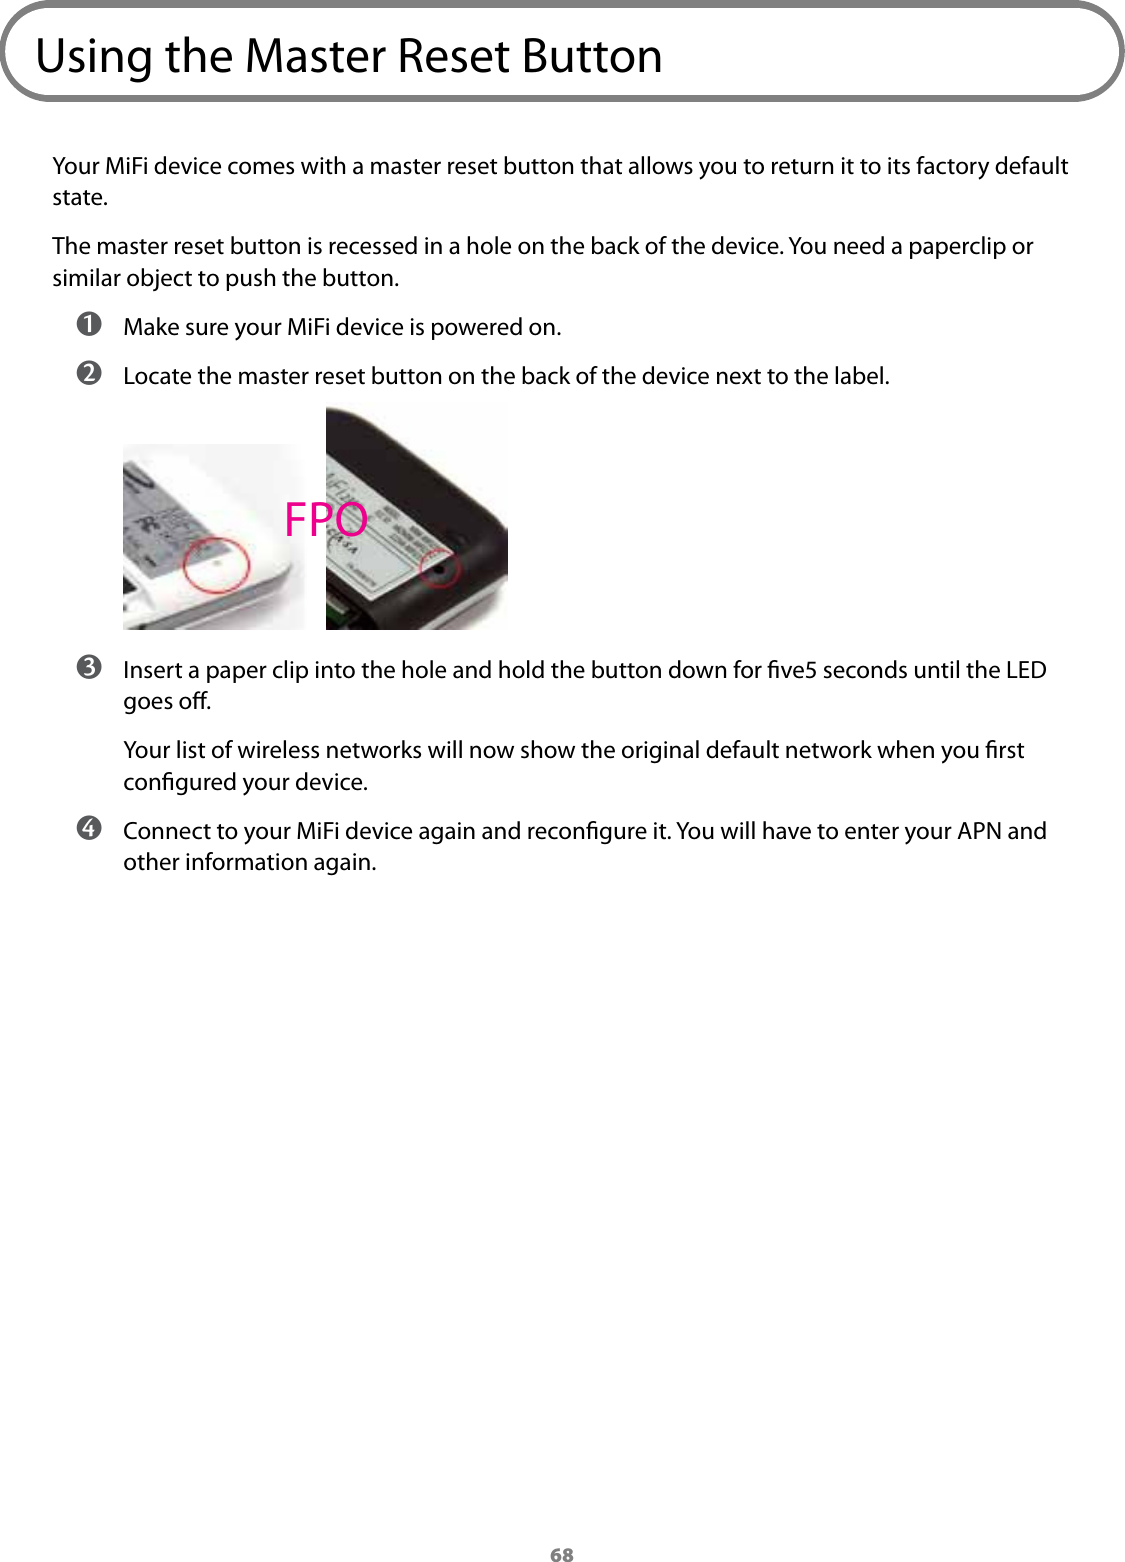
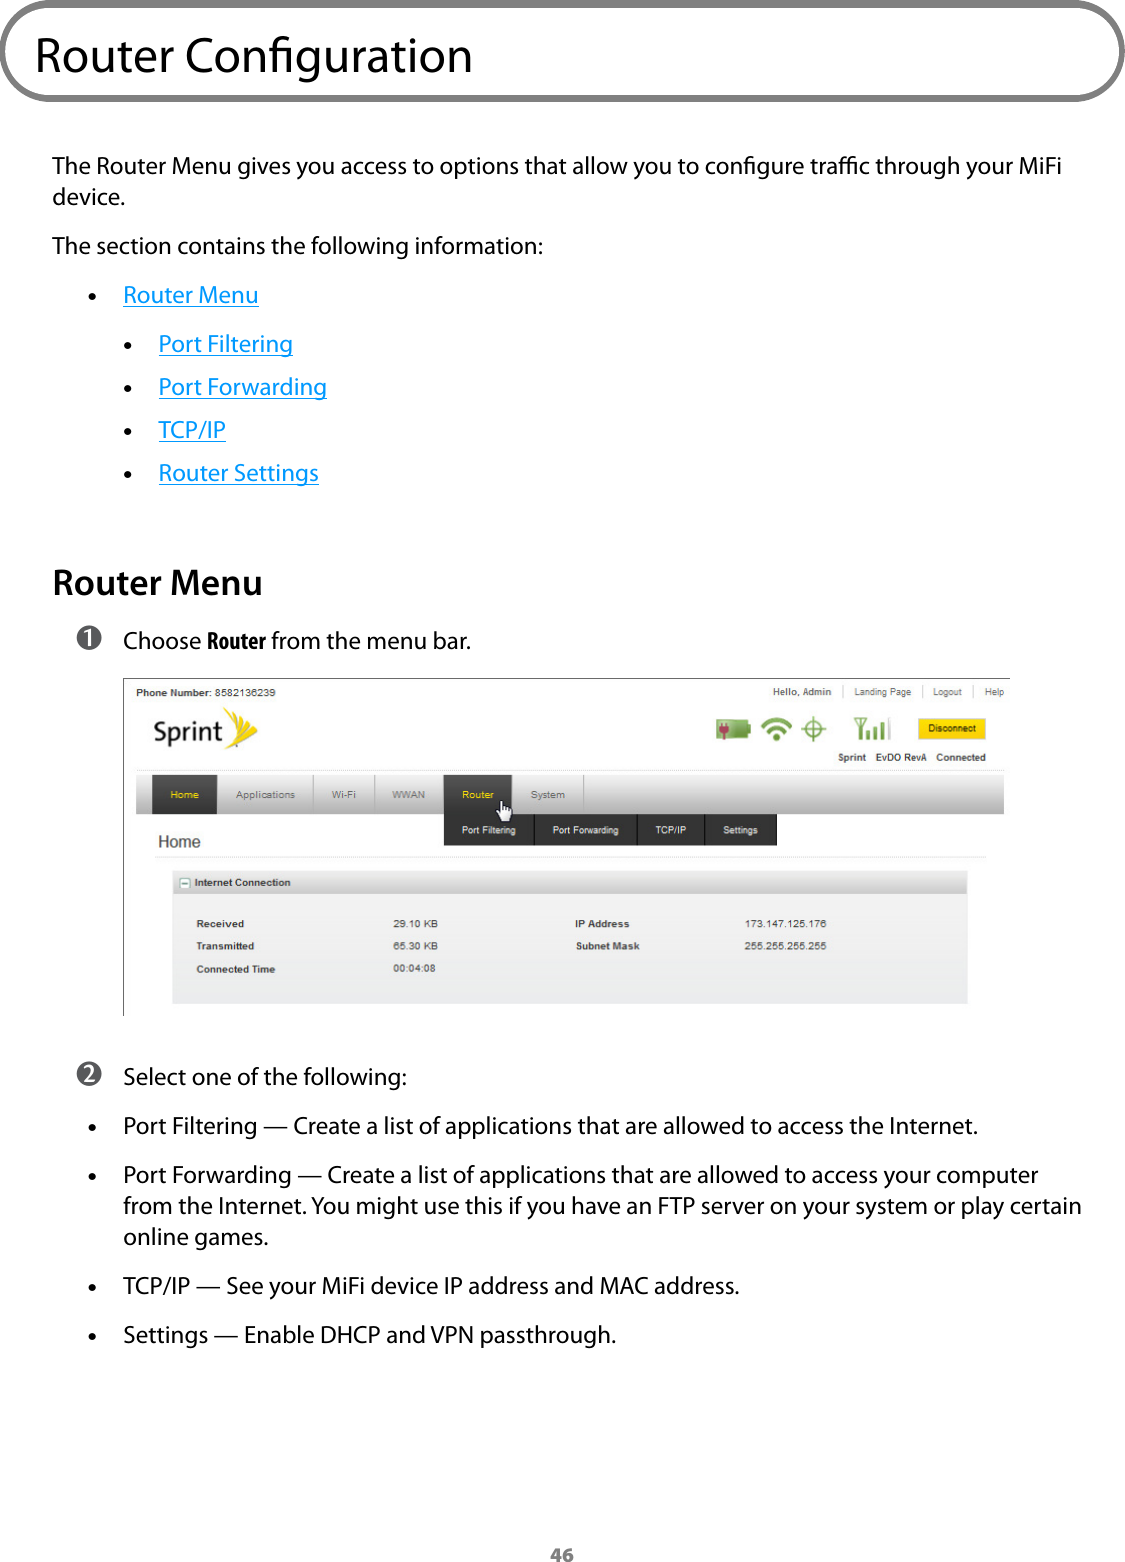
![3Your MiFi 4082 Intelligent Mobile Hotspot DeviceYour MiFi 4082 device has the following parts:4082 PHOTO DEVICE FRONTFPO4082 PHOTODEVICE BACKFPO ➊ microUSB Port — The AC charger, USB cable and optional car charger connect here. ➋ microSDHC Slot — Removable memory storage slot supports microSDHC cards (microSDHC card not included). ➌ Power / Connection LED — Displays network connection and status. [See LED States on page 4.] for a detailed list of the colors and their dened states. ➍ eInk Display — Displays network signal strength, battery charge, GPS, and number of users connected to the MiFi 4082 device.4082 PHOTODEVICE BACK BATT FPO4082 PHOTODEVICE BACK SSID LABELFPO ➎ Battery Compartment — The battery is placed here. ➏ Master Reset Button — Resets device to factory default settings. {See Using the Master Reset Button on page 68.] ➐ SSID Label — If your network is precongured, the SSID and Wi-Fi Key are located on the inside of the battery door.](https://usermanual.wiki/Inseego/NVWMIFI4082/User-Guide-1386896-Page-6.png)
![4LED StatesThe MiFi device LEDs provide valuable information about the state of the device and connection.Power/Connection LEDLED Color Status DescriptionNo Light No power — Device is powered o.Amber Connected to powerFlashing:Solid:Battery chargingBattery fully chargedGreen 3G Flashing:Solid:3G service is availableConnected to a network using 3GBlue 4G Flashing:Solid:4G service is availableConnected to a network using 4GeInk DisplayThe eInk Display is located on the right side of the front of the MiFi device. When the device is powered on, the icons display current device status information.Mobile Broadband network signal strength[Need correct icon]Battery life; this icon indicates the amount of battery life remaining, and also indicates when the device is connected to power.GPS status; this icon indicates whether the device has a GPS x or not, and also indicates when the device is searching for a GPS x.Need icon Connection status; displays a dot for each device connected to the MiFi 4082 device.Caring for Your DeviceAs with any electronic device, the MiFi 4082 device must be handled with care to ensure reliable operation. Novatel Wireless recommends the following handling guidelines: •Do not apply adhesive labels to the MiFi 4082 device; they may cause the device to potentially overheat and they may alter the performance of the antenna system. •The USB connector should plug easily into your computer’s Type A USB port. Forcing the device into a port may damage the connector. •Protect the MiFi 4082 device from liquids, dust, and excessive heat. •Store the MiFi 4082 device in a safe place, when not in use.](https://usermanual.wiki/Inseego/NVWMIFI4082/User-Guide-1386896-Page-7.png)
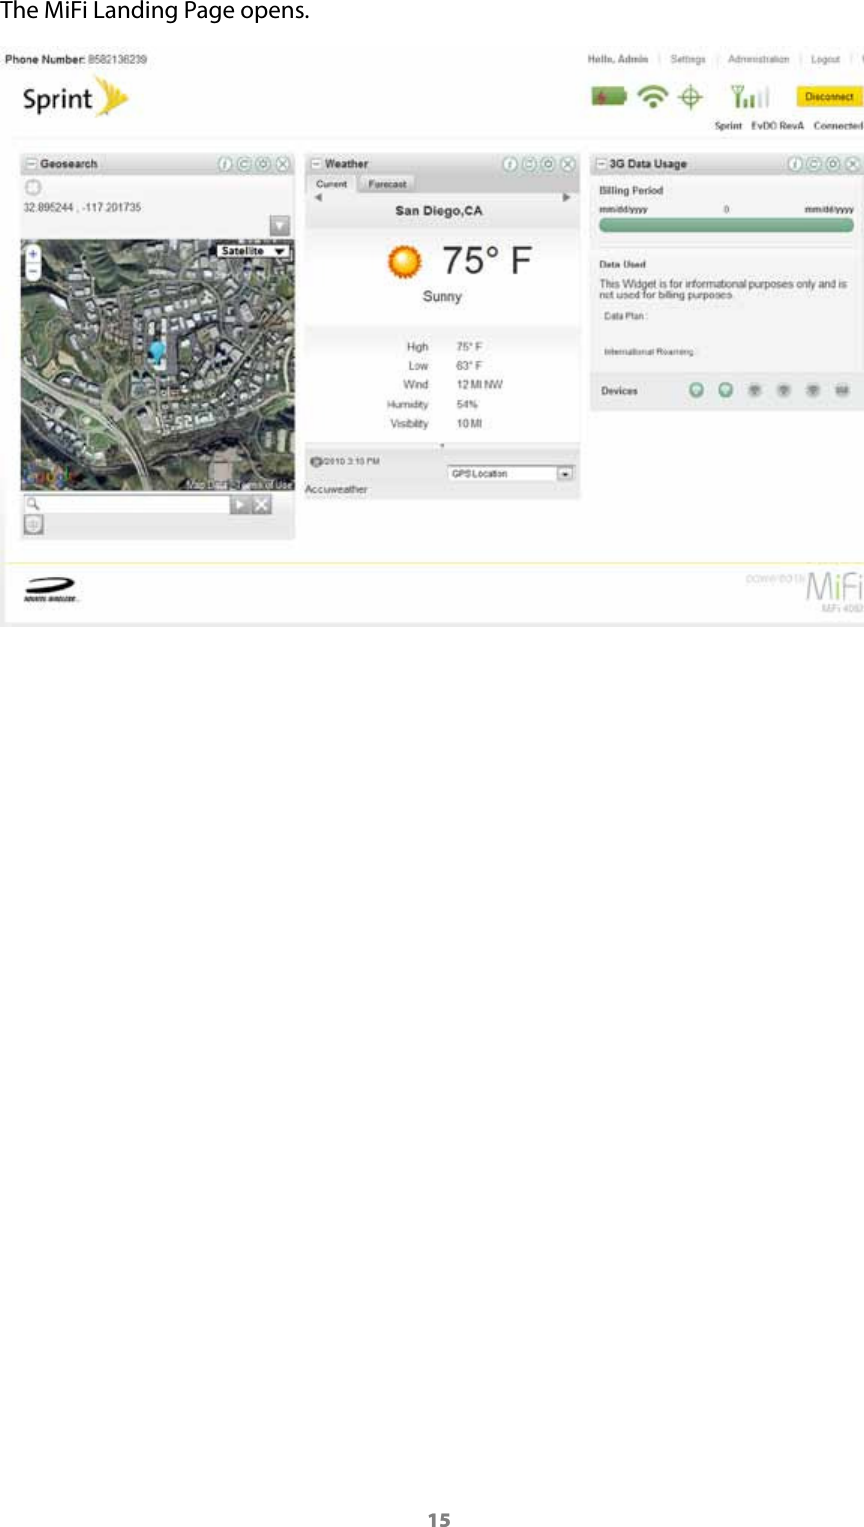
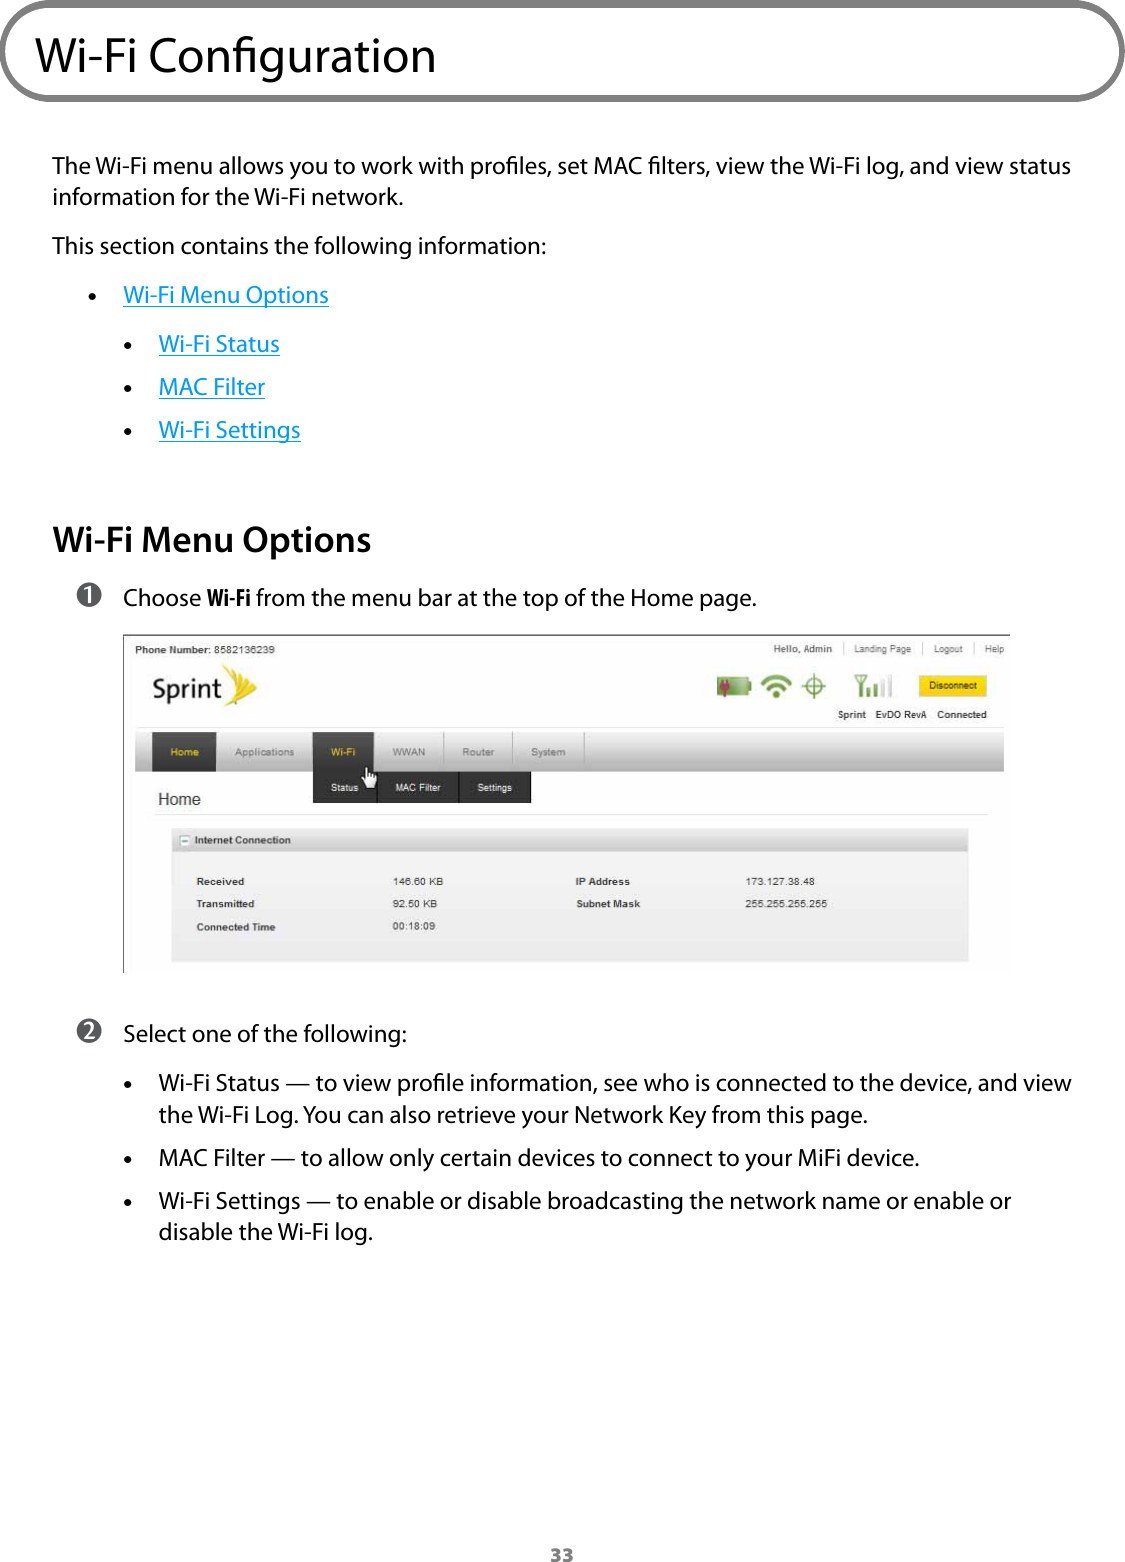
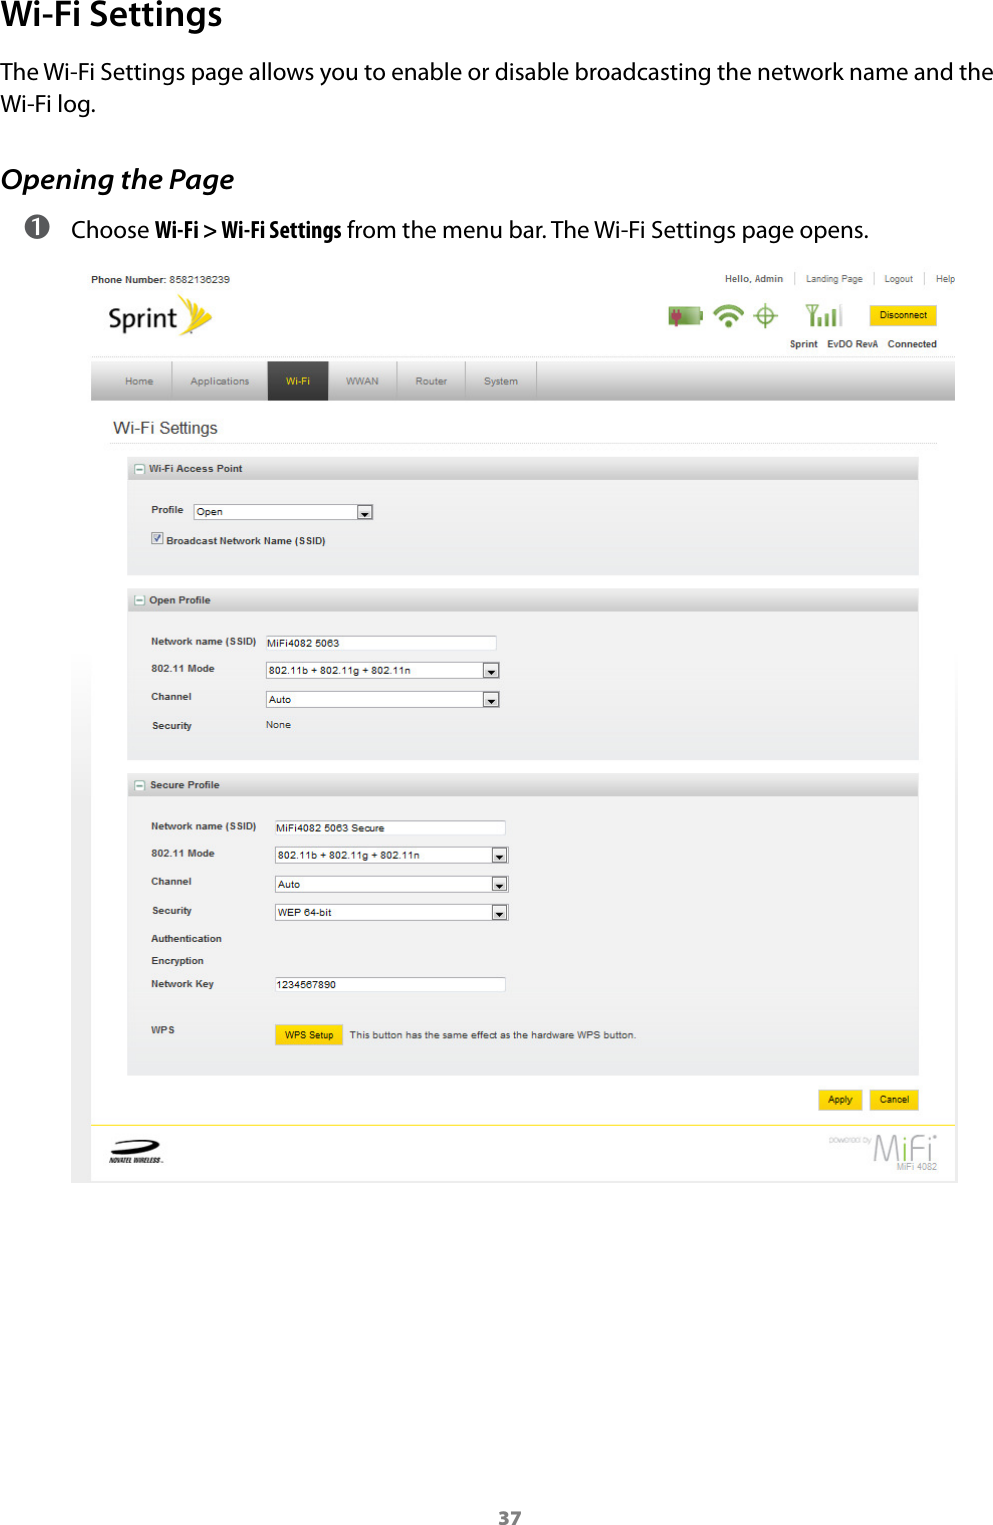
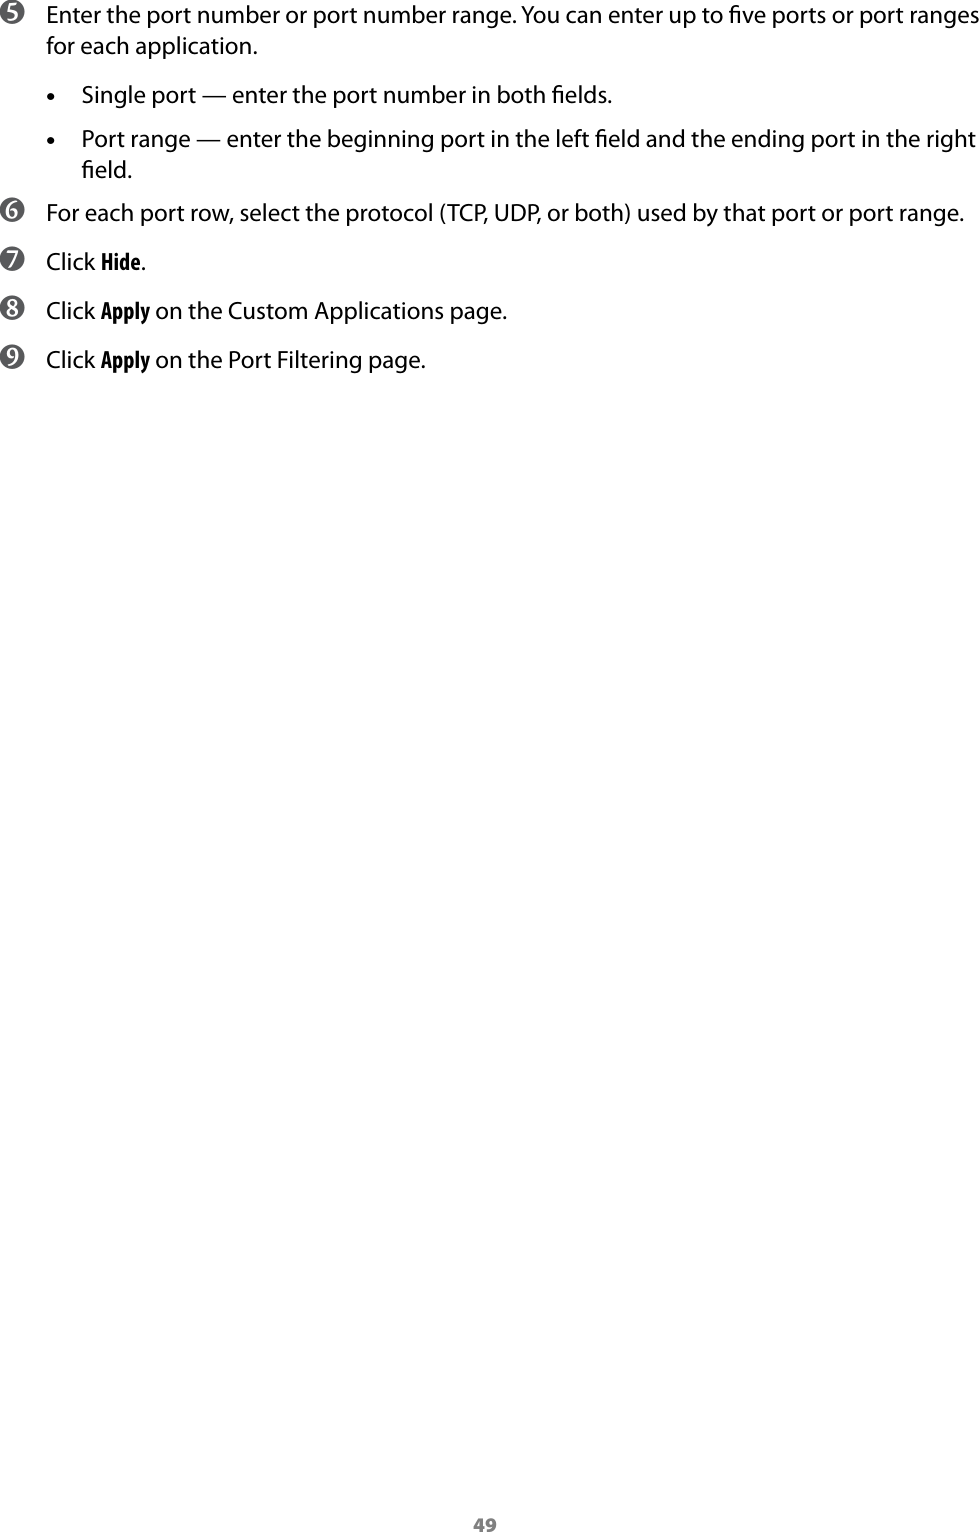
![11Initial Connection and Setup — OverviewIMPORTANT Your MiFi device is pre-configured with your network operator settings. If your MiFi device is unable to pre-configure your settings, you need the Service Programming Code (SPC) or Master Subsidy Lock (MSL) name from your service provider plus any username, password, or other information they may have given you. If you do not have this information, contact your service provider before attempting to set up your MiFi device.Your MiFi device is your access point to the Internet anywhere you are. It is also a temporary hotspot for up to ve devices, and the MiFi Landing Page is your quick and easy resource for information.You can connect any 802.11 b/g/n wireless device to your MiFi device. You can establish a secure prole so that others cannot use your MiFi device unless you allow them. You can also establish temporary settings to allow up to ve devices to connect with your MiFi device without you having to give them your security settings. [See Wi-Fi Conguration on page 34.]MiFi Landing PageThe MiFi Landing Page comes on your MiFi device. It’s an on-device web page that contains customizable widgets with frequently-used information. Your widgets may vary; the examples in this guide describe generally how widgets work.Continue through the following steps if you are setting up your MiFi device for the rst time. For more detailed information about the MiFi Landing Page features, see MiFi Landing Page on page 26.](https://usermanual.wiki/Inseego/NVWMIFI4082/User-Guide-1386896-Page-14.png)
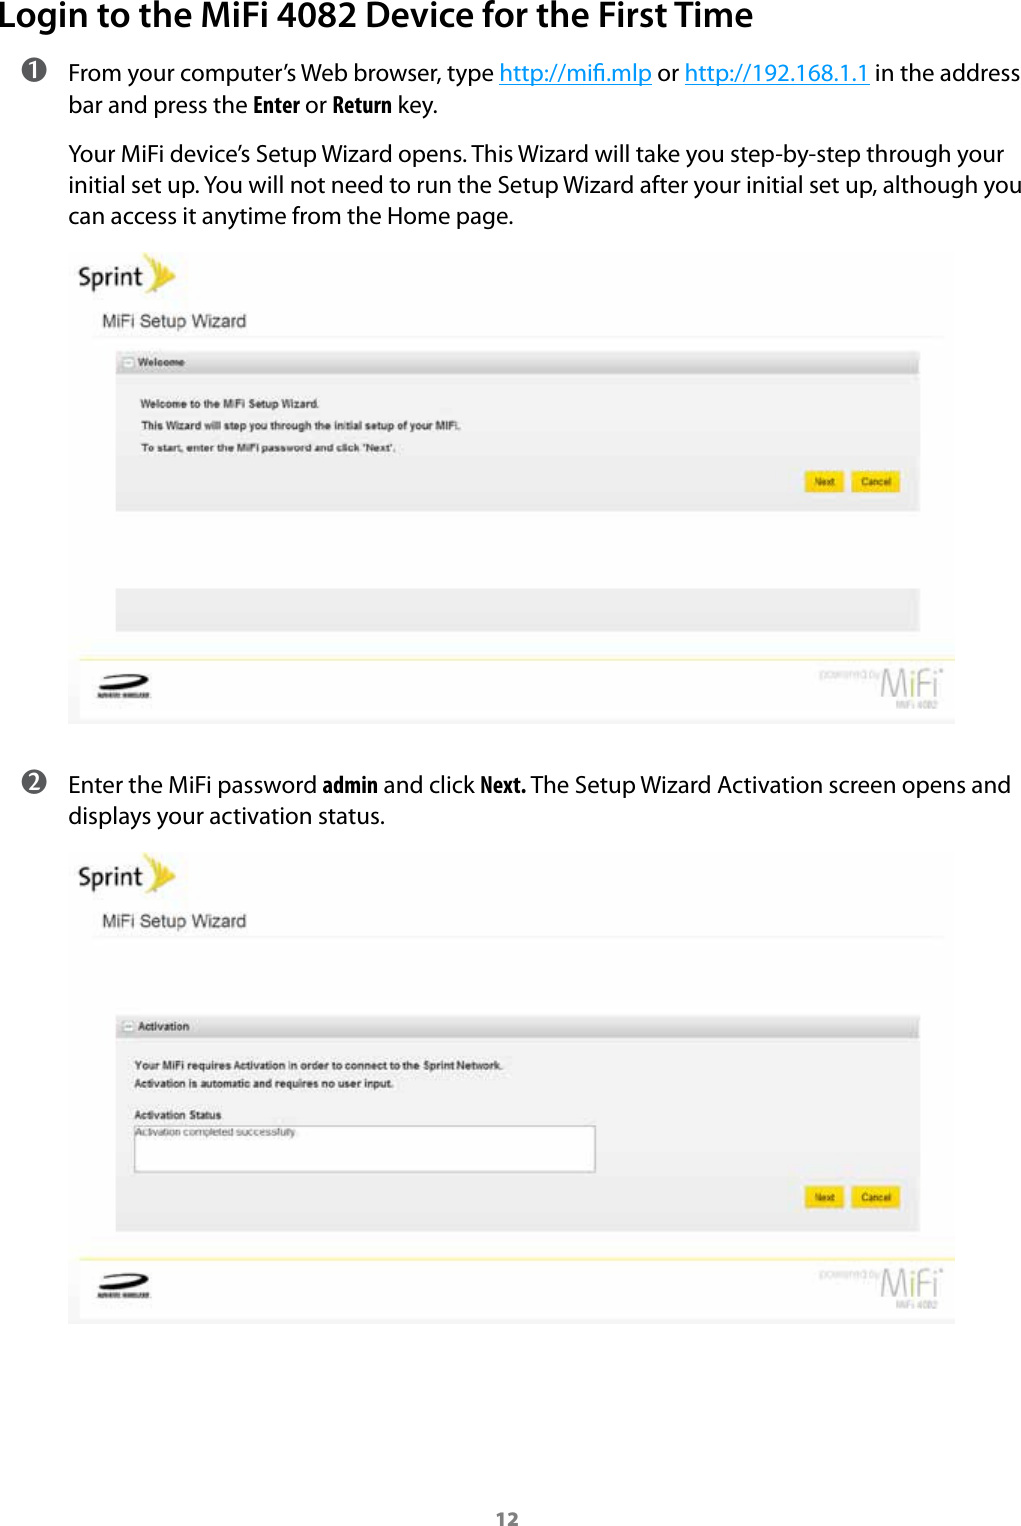
![16Wi-Fi SetupTo properly set up your device, you need to do both of the following tasks: •Set Up a Wi-Fi Connection •Set Up Wireless SecurityIMPORTANT Your MiFi device might be pre-configured with Wi-Fi encryption (WEP 128 bits) to prevent unauthorized access to your mobile broadband service. The unique SSID (network name) and WEP key are printed on the inside of the battery door. You need this information to continue.Set Up a Wi-Fi ConnectionIn most cases, your MiFi device should be pre-congured for your network operator right out of the box and you can connect normally. [See Connect to your MiFi device: (page 16).]If it is not pre-congured, setting up the Wi-Fi connection requires two steps: •Connect to your MiFi device •Congure your MiFi device for your service provider (Not required for most users.) NOTE The battery should be fully charged before using MiFi the first time. To connect in Wi-Fi Mode, your MiFi device must be powered with a charged battery, with an AC mains, or car charger. When your MiFi device is connected to your computer with the USB cable, Wi-Fi is disabled.Connect to your MiFi device: ➊ Press the power button.Your MiFi device powers on and starts up. When the power LED is ashing and the Wi-Fi LED is solid blue, the device is ready for you to connect another device (such as your computer) to it. ➋ Use the normal Wi-Fi manager on your computer to locate the MiFi network name (SSID) and select it. NOTE If your device was pre-configured, the network name was printed on the inside of the battery door. If your device was not pre-configured, select the network name that has MiFi_4082 in the name. Tip! Windows only: The steps to connect to a Wi-Fi network vary depending on your operating system version and whether you use the native application or third-party software.](https://usermanual.wiki/Inseego/NVWMIFI4082/User-Guide-1386896-Page-19.png)
![17 ➌ Windows: Click Connect.Mac OS X: Click the MiFi network name.If your unit was not pre-congured, the Wi-Fi LED ashes to show the connected status. Continue to Congure your MiFi device for your service provider on page 17.If your unit was pre-congured, continue to the next step. ➍ Enter the Network Key when requested.The Wi-Fi LED ashes to show connected status. Configure your MiFi device for your network operator:IMPORTANT If your network was not pre-configured, follow these steps to configure your MiFi device for you network operator. Your network service provider should have given you instructions with your APN (and user name and password, if required). Be sure you have and follow those instructions. ➊ Log in and then click Settings. [See Login to the MiFi 4082 Device for the First Time on page 12.] ➋ Select WiFi > Settings.The Wi-Fi Settings page opens. If your device does not come precongured with security, you will be prompted to change to the secure option.](https://usermanual.wiki/Inseego/NVWMIFI4082/User-Guide-1386896-Page-20.png)
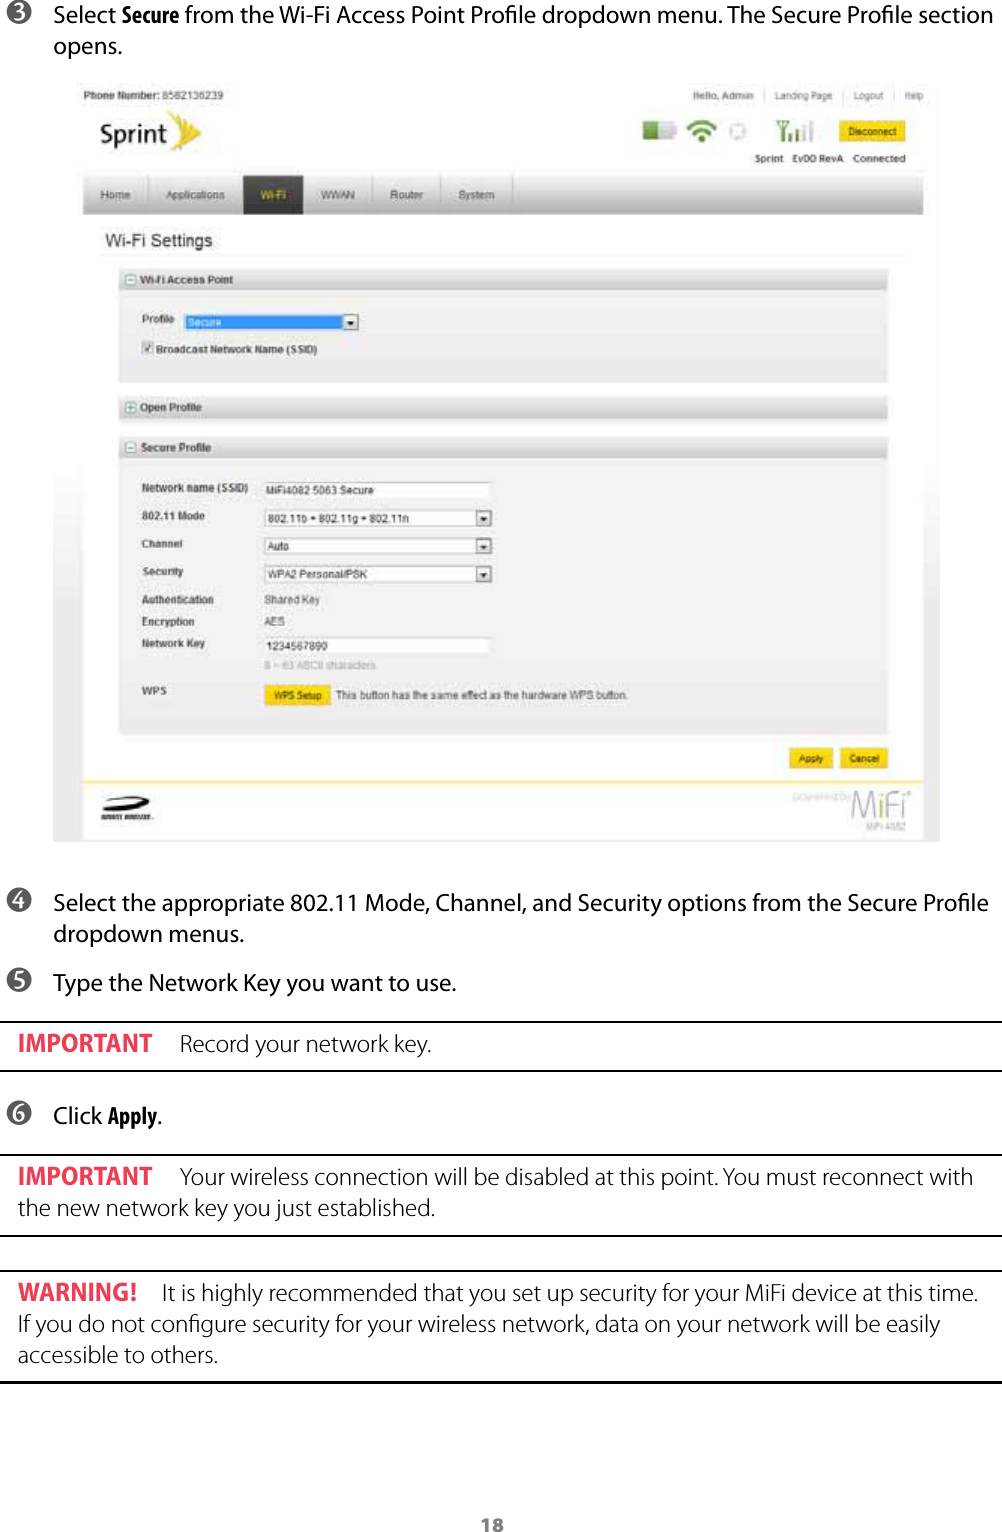
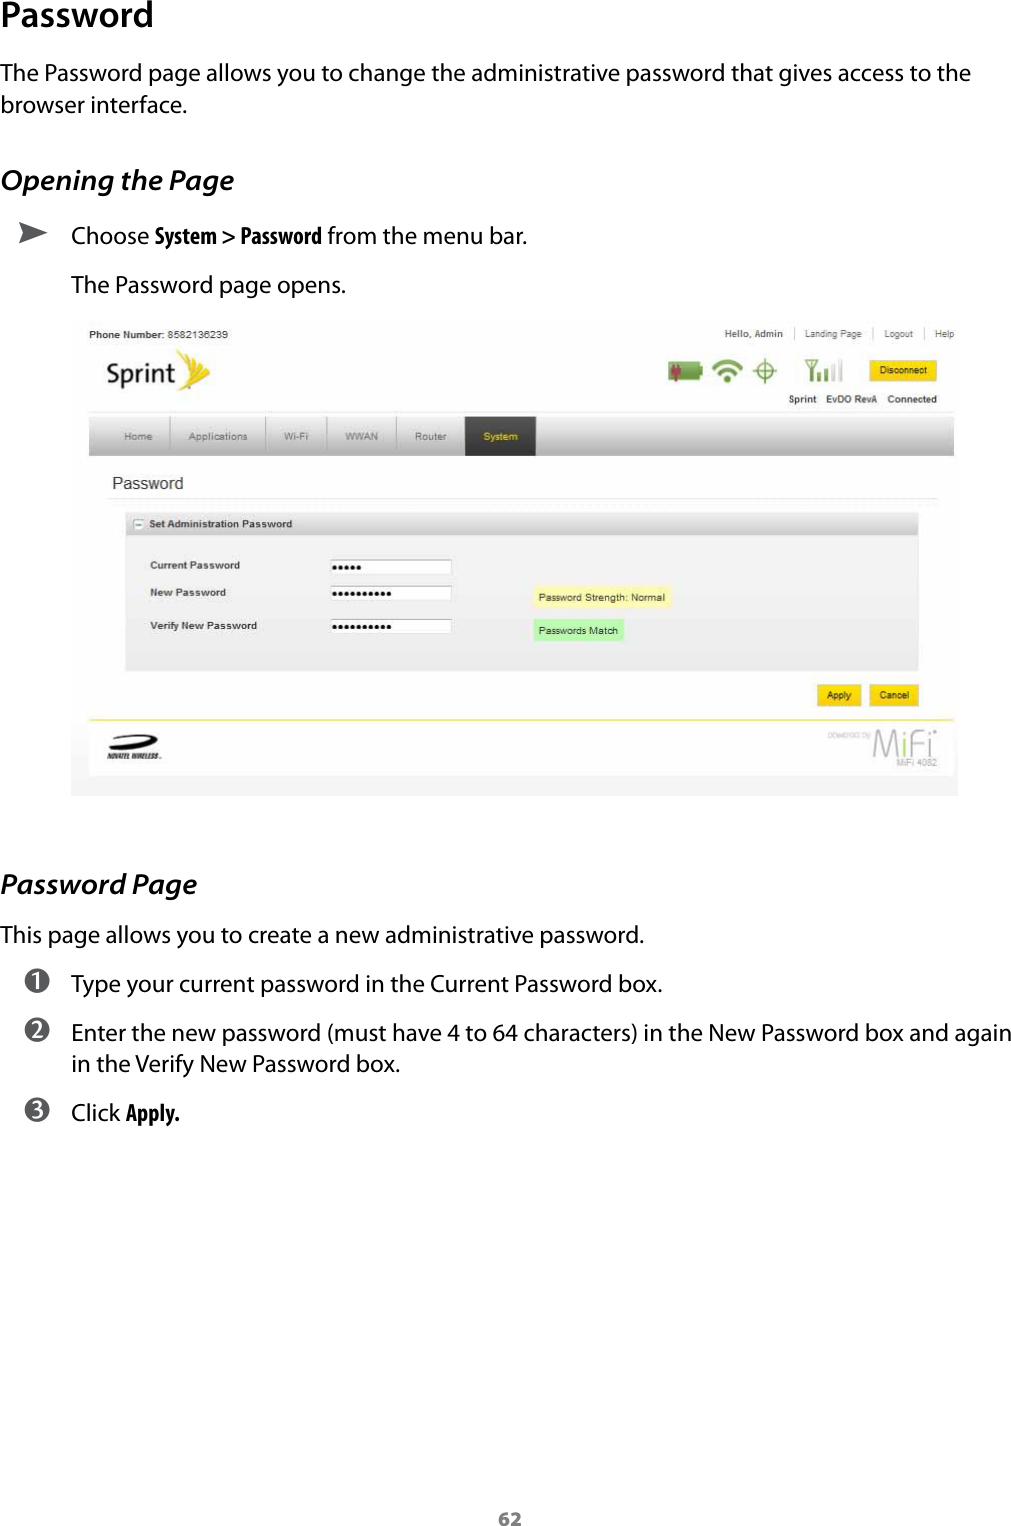
![19Set Up Wireless SecurityUsing security with your wireless network is very important. If your network was not pre-congured, Novatel Wireless recommends that you set up security immediately by following these steps: •Change the Administrative Password: •Establish a Secure Prole:Change the Administrative Password: ➊ Log in and then click Settings. [See Login to the MiFi 4082 Device for the First Time (page 12).] ➋ Choose System > Password from the menu bar. ➌ Type admin into the Current Password eld. ➍ Select a new administrative password and enter it into both New Password elds. ➎ Click Apply.This is the new administrative password that you use when you log in to the browser interface. NOTE Be sure to record the new password. You will have to reset the device using the Master Reset button if you lose the administrative password. [See Using the Master Reset Button (page 63).]Establish a Secure Profile:You can use WEP (64- or 128-bit), WPA-PSK, WPA2-PSK, or WPA/WPA2 mixed mode security. If you did not establish a secure prole when you congured your device for your network operator, you can do so now. [See Congure your MiFi device for your network operator on page 17.]You can customize your MiFi Landing Page by continuing to Accessing MiFi Features on page 26.](https://usermanual.wiki/Inseego/NVWMIFI4082/User-Guide-1386896-Page-22.png)
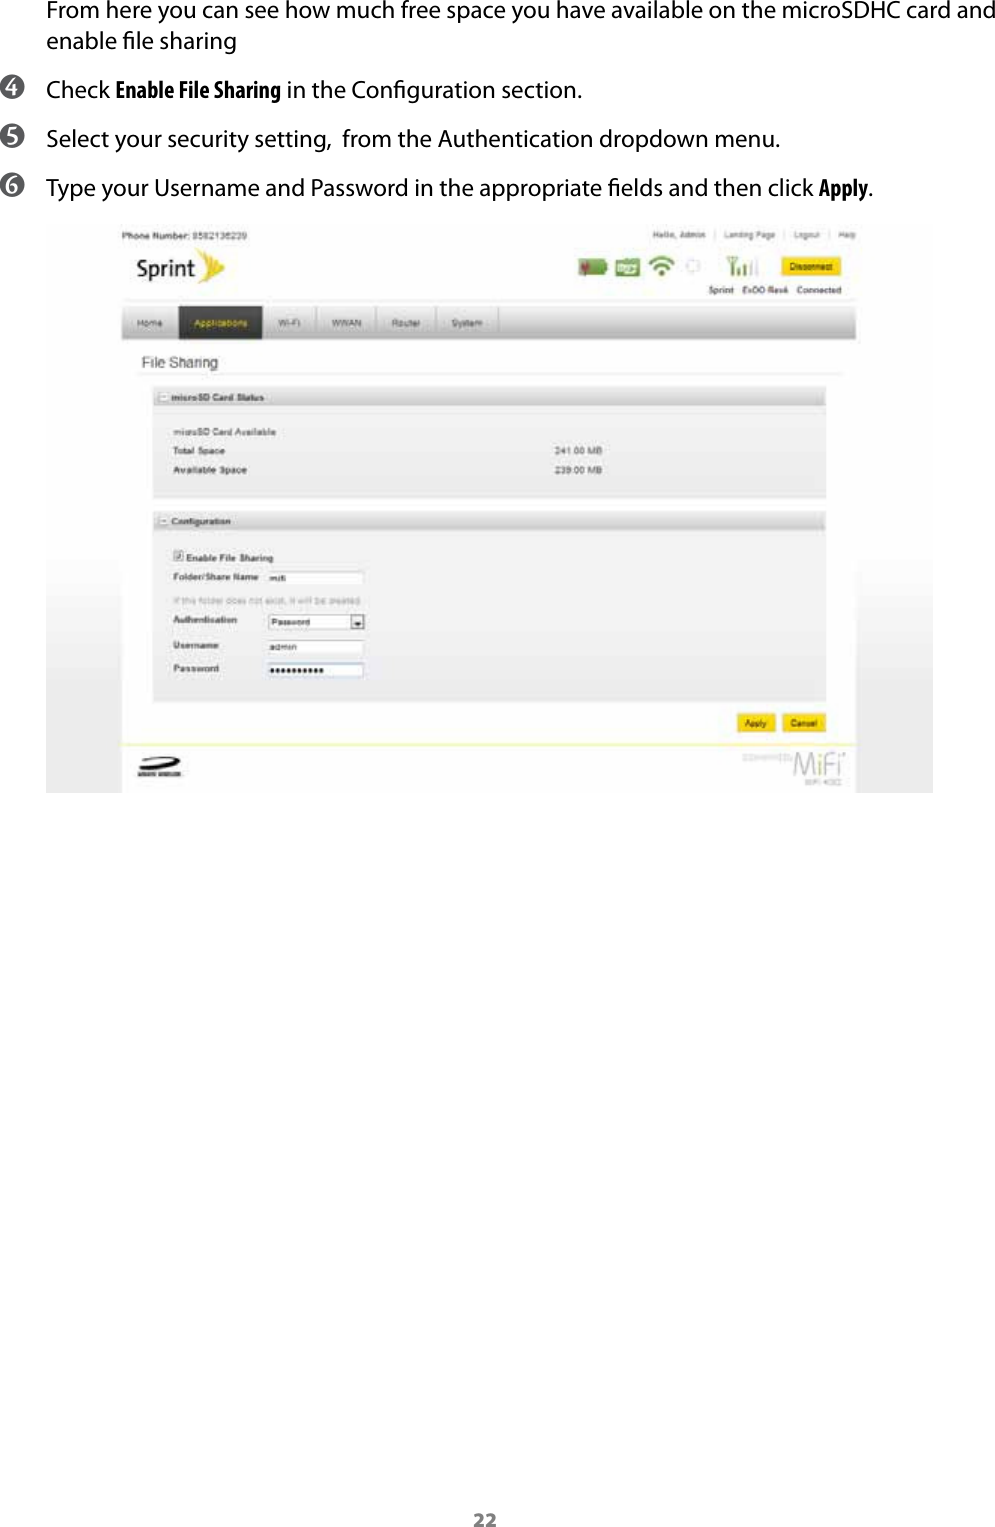
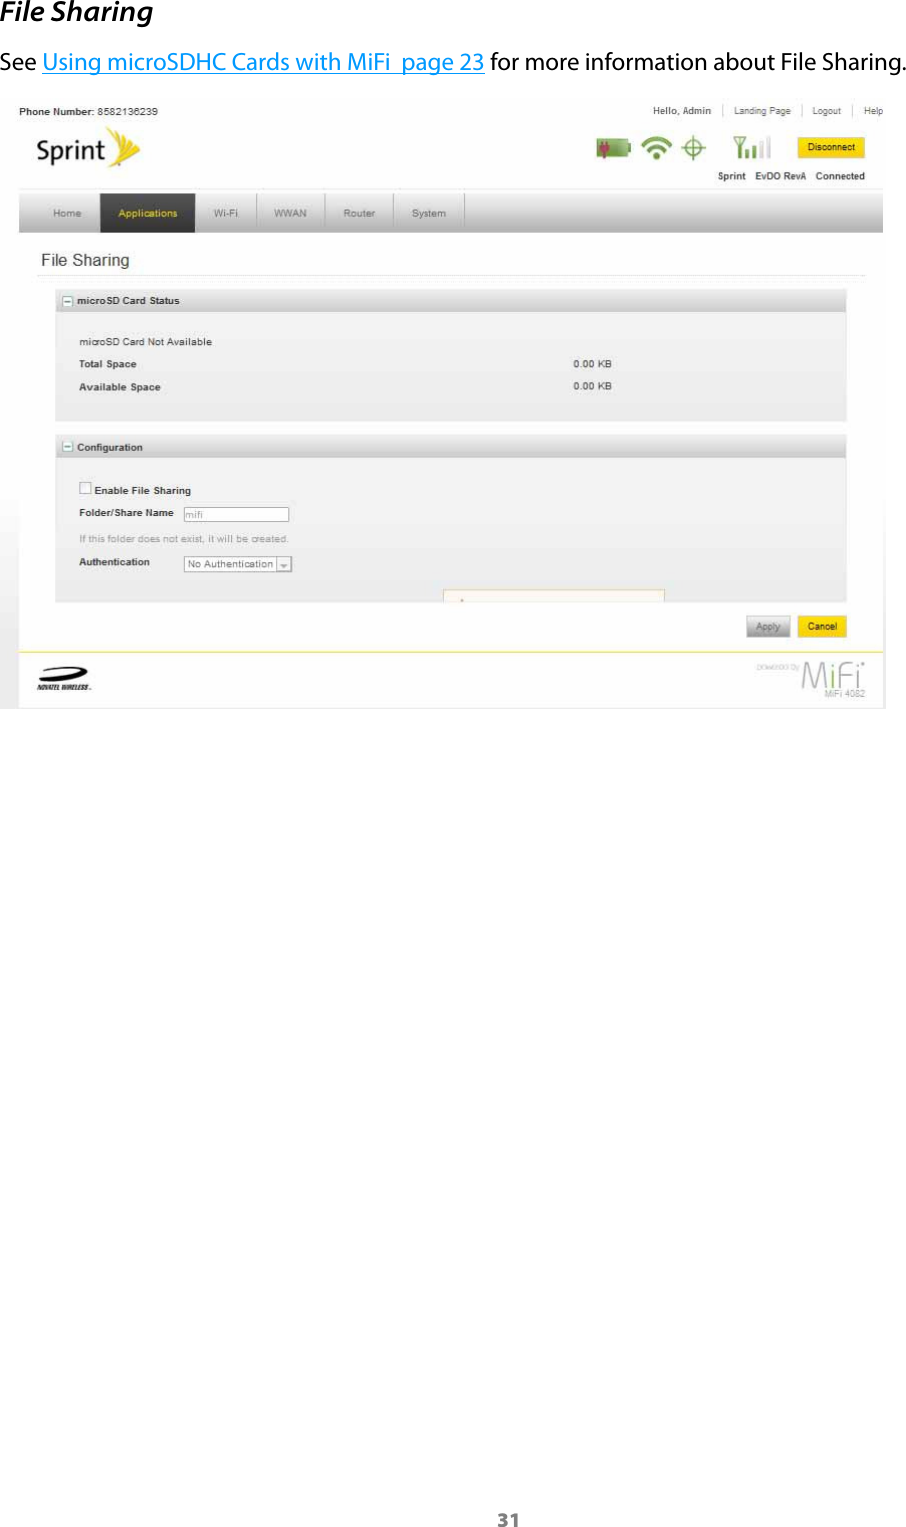
![21Using microSDHC Cards with MiFi — File SharingYour MiFi device comes with a microSDHC card slot that allows you to move les with you without having to carry an additional ash drive. You can use microSDHC cards with up to 16GB capacity.Insert the microSDHC Card ➤ Insert the microSDHC card into the microSDHC slot. NOTE – Be careful not to touch the contacts.– Do not force the card into the slot. Check the orientation if you have difficulties.Enable File Sharing on Your MiFi DeviceIf you establish le sharing on your MiFi device, others connected to your MiFi device can access the les on your microSDHC card. ➊ Log in and then click Settings. [See Log In to the Home Page (page <?>).] ➋ Insert a microSDHC card. ➌ Choose Applications > File Sharing from the menu bar. The File Sharing page opens.FPO](https://usermanual.wiki/Inseego/NVWMIFI4082/User-Guide-1386896-Page-24.png)
![23Access Shared Files on Your MiFi DeviceOnce you enable le sharing (see “Enable File Sharing on Your MiFi Device” on page 21), you can access the shared les on your computer.Windows ➊ Connect to your MiFi device using WiFi ➋ Open My Network Places. This might vary depending on your version of Windows. ➌ In the Address bar, type the MiFi IP address and the MiFi Share name (for example: \\192.168.1.1\mi, if your share name is the default name).You can set the MiFi Share name and authentication (username and password) on the File Sharing screen. [See Enable File Sharing on Your MiFi Device (page 21).] ➍ If authentication is enabled, you will be prompted for a username and password. Use the username and password set on the File Sharing screen.You can now browse the folders and les on the microSD card inserted in your MiFi device.Mac OS X (v10.4 and later) ➊ Connect to your MiFi device using WiFi. ➋ Select Go > Connect to Server. ➌ In the Address eld, type smb:// and the MiFi address (for example: smb://192.168.1.1/mi, if your share name is the default name).You can set the MiFi Share name and authentication (username and password) on the File Sharing screen. [See Enable File Sharing on Your MiFi Device (page 21).] ➍ Click Connect. ➎ Mac OS X v10.4 only: An authentication window opens. If you set authentication (password) on the File Sharing screen, type the username and password in the window. If you did not set authentication, click OK to access the MiFi Share. NOTE If no password is set, but you are prompted for a name, use the name guest.Mac OS X v10.5 and later: If you set authentication (username and password) on the File Sharing screen, type the username and password when prompted. If you did not set authentication, a Finder window opens.You can now browse the folders and les on the microSD card inserted in your MiFi device.](https://usermanual.wiki/Inseego/NVWMIFI4082/User-Guide-1386896-Page-26.png)
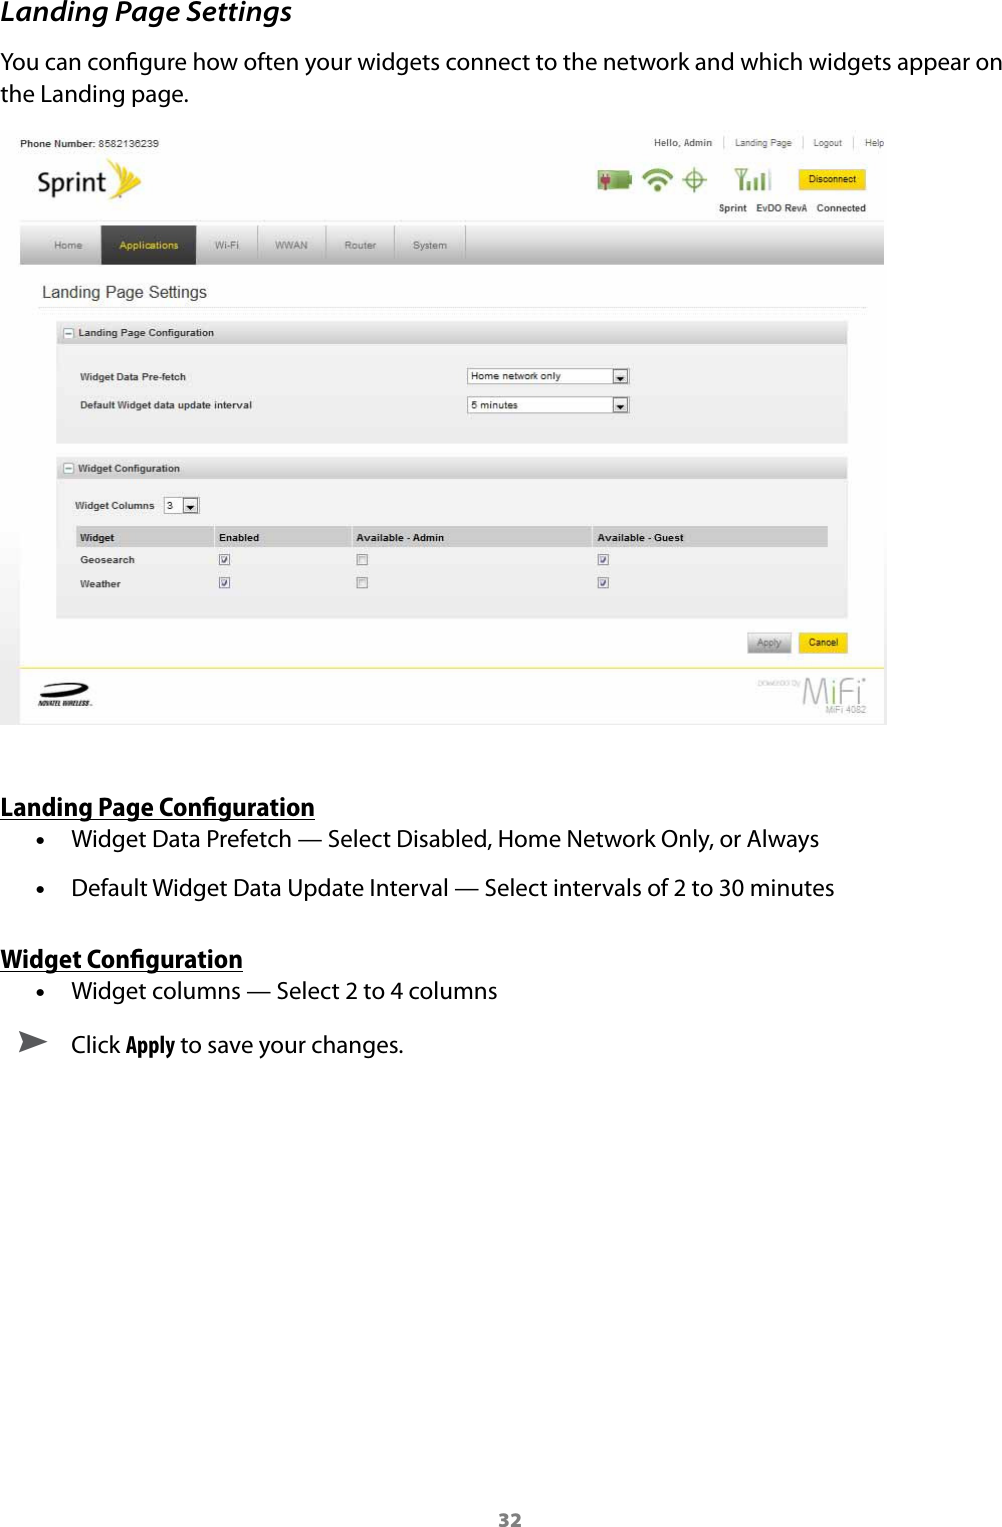
![25MiFi Landing PageOpen the MIFi Landing Page Interface[See Login to the MiFi 4082 Device for the First Time page 12]The Navigation BarAt the top of the MiFi Landing Page in the browser interface is the navigation bar. These buttons are dynamic according to the page you visit. The following images are some examples of the navigation bar: •The navigation prior to logging in. •The navigation after you log in, but before you go to the Settings section of the site. •The navigation in the Settings section of the site.](https://usermanual.wiki/Inseego/NVWMIFI4082/User-Guide-1386896-Page-28.png)
![27The Landing PageThe Landing page is the page you see when you rst connect to your MiFi device with your browser. It is the main point of entry for all your work with your MiFi device. This is the page where you rst nd the Connect button with which you can connect to the Mobile Broadband network. You can also set your MiFi device to auto-connect to the network.The Landing page is where guests can see and interact with widgets. They can drag and drop widgets around the screen and arrange them as they like; each guest’s browser stores the widget locations. Generally the widget settings are limited or not available to guests. Guests also cannot initiate a connection to the network. You can change this setting. [See Internet Settings (page 40).]](https://usermanual.wiki/Inseego/NVWMIFI4082/User-Guide-1386896-Page-30.png)
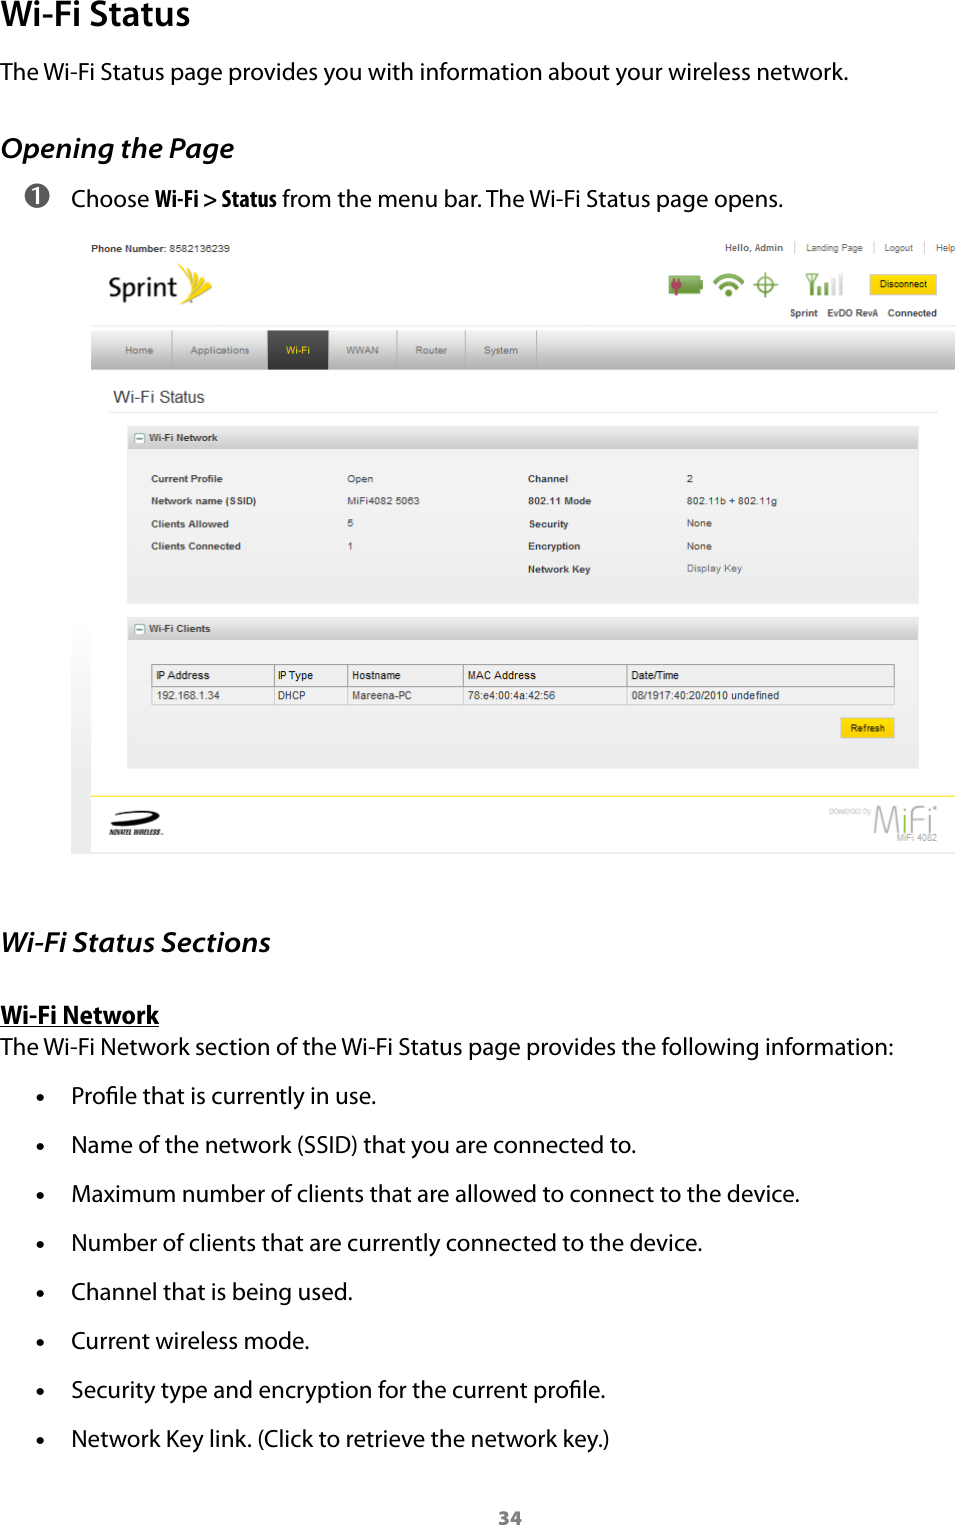
![35Wi-Fi ClientsThe Wi-Fi Clients section of the Wi-Fi Status page shows the clients that are currently connected to your MiFi device. This is another way you can nd the MAC address for a particular device when you are setting up MAC ltering. ➤ Click Refresh to update the information about the clients that are currently connected to your MiFi device.MAC FilterMAC Filtering allows you to restrict access to your MiFi device to only those devices with a specic MAC address. The MAC address is a unique code specic to a particular piece of hardware such as a network adapter. [See Finding the MAC Address (page 36).]Opening the Page ➤ Choose Wi-Fi > MAC Filter from the menu bar. The MAC Filter page opens](https://usermanual.wiki/Inseego/NVWMIFI4082/User-Guide-1386896-Page-38.png)
![36Finding the MAC AddressThe MAC Address is also known as a hardware or physical address for a device, usually a network adapter. It consists of 6 pairs of numbers and letters. The pairs of numbers may be separated by “-” or “:” (for example, 00-21-9B-1C-64-34 or 00:21:9B:1C:64:34).You can view the MAC address of any device currently connected to your MiFi device in the Wi-Fi Clients section of the Wi-Fi Status page. [See Wi-Fi Clients (page 35).] •On a Windows PC, you can nd the MAC address by running ipcong /all from a command prompt window (cmd). The MAC address is referred to as the Physical Address. •On a Mac, open System Preferences > Network. In the Show list, click AirPort, then click Advanced. The MAC address is the Airport ID.IMPORTANT Make sure you get the MAC address for the wireless network adapter and not the Ethernet adapter.Using MAC FilterThe MAC Filter page allows you to enable or disable MAC ltering and to add or delete MAC addresses from the trusted client list.IMPORTANT Do not enable MAC filtering unless you have added your own MAC address to the trusted client list. Otherwise you will be unable to access your MiFi device until you use the Master Reset button. [See Using the Master Reset Button (page 63).] ➊ Choose Wi-Fi > MAC Filter from the menu bar. ➋ Type the MAC address for your computer into the Add Trusted Client MAC Address box and click Add. Tip! You can copy and paste your computer’s MAC address from the Wi-Fi Clients section of the Wi-Fi Status page. [See Wi-Fi Clients (page 35).] ➌ If desired, type the MAC address for other computers into the Add Trusted Client MAC Address box and click Add. ➍ Select the Enable MAC Filter check box and click Apply.](https://usermanual.wiki/Inseego/NVWMIFI4082/User-Guide-1386896-Page-39.png)


![65Common Problems and SolutionsBefore you read on, all of the steps mentioned here are given in more detailed form elsewhere in the user guide. When a reference is given, click the link to go to the more detailed information.The following are some common problems and solutions.No service is available. - OR - I get a “Limited or No Connectivity” message. ➤ You are outside of the coverage area of your network operator. ➤ Check with your network operator. There may be a problem with your account. ➤ Reorient your MiFi device. ➤ If you are inside a building or near a structure that may be blocking the signal, change the position or location of the device. For example, try moving your MiFi device close to a window.The device has no power.The LED indicator is o and does not come on when the Power button is pressed. ➤ Ensure the battery is properly seated in the device. ➤ Ensure the battery is fully charged. Plug in the AC mains charger for at least 4 hours.I forgot my password. ➤ You can reset the device to factory defaults using the master reset button. [See Using the Master Reset Button (page 68).]I cannot connect to my MiFi device. ➊ Make sure the WiFi LED is on .If the LEDs are not on, check your battery. ➋ Make sure your Windows PC / Mac AirPort is turned on. (Check your computer help if you need assistance.) ➌ Open your wireless network connection list. •Windows: Right-click icon and select View Available Networks. •Mac: Pull down list from AirPort icon. ➍ Select the MiFi network name (in Windows, click Connect).When the your MiFi device is connected to the network, the WiFi LED begins to blink.](https://usermanual.wiki/Inseego/NVWMIFI4082/User-Guide-1386896-Page-68.png)
![66My network does not appear in the wireless network list. ➤ Verify that the MiFi LEDs are on and are not showing an error condition. Refer to your Quick Start Guide for a table of LED states. ➤ Refresh your network list. •Windows: Click Refresh Network List on the left side of the Wireless Network Connection screen. If that does not work you can try the following:1. Open Network Connections.2. Right-click Wireless Network Connection and select Properties.3. Click the Wireless Networks tab.4. Delete any unused wireless connections from the Preferred Networks list and click OK.5. Restart your computer. •Mac: Click the AirPort icon and select Turn AirPort O. Then click it again and select Turn AirPort On..I see the network name but cannot connect to my MiFi device. ➤ Check the user name, password, and Service Programming Code (SPC) or Master Subsidy Lock (MSL) in your connection prole. If any of these are wrong, you will not be able to connect to the network.How do I disconnect from the network? ➤ Login to your MiFi device and click Disconnect.1. Open the MiFi Home page. 2. Then type your administrative password into the login window and click Login. 3. Click the Disconnect button.How can I find out how many users are connected to my MiFi device? ➤ Open the MiFi Home page. The number of clients (users) currently connected to your MiFi device is in the WiFi section at the bottom of the screen. You can also see the number of clients currently connected on the Status Panel display on the front of your WiFi device. Where can I find information about Internet connectivity and my WiFi setup? ➤ Open the MiFi Login Home page.How do I check the model number and firmware versions of my MiFi device? ➤ Login to your MiFi device and choose System > Status. [See System Status (page 78).]](https://usermanual.wiki/Inseego/NVWMIFI4082/User-Guide-1386896-Page-69.png)
![67How can I check the battery level of my MiFi device? ➤ Open the MiFi Login Home page. The battery status icon is displayed in the menu bar. For more detailed information, login and choose Internet > Diagnostics. Then click Modem Status. You canHow do I check the available space on the microSDHC card? ➤ Open the MiFi Login Home page. Click Settings > Applications > File Sharing to open the File Sharing page and see the microSD Card status information.How do I turn off my MiFi device? ➤ Press and hold the Power button for 5 seconds until the LEDs turn o.What is the default administrative/login password? ➤ adminHow do I access information on the WiFi network and WiFi clients? ➤ Login to your MiFi device and choose Settings > WiFi >Status to open the WiFi Status page and see the current Wi-Fi Network and Wi-Fi Clients information. [See WiFi Status (page 58).]I am having trouble connecting to my office VPN. ➤ Login to your MiFi device and choose Router > Settings. Select the VPN Passthrough enable checkbox and click Apply.](https://usermanual.wiki/Inseego/NVWMIFI4082/User-Guide-1386896-Page-70.png)