Inseego NVWMIFI6620 4G LTE, 3G WCDMA/CDMA, GSM and Wi-Fi Mobile Hotspot User Manual
Novatel Wireless Inc 4G LTE, 3G WCDMA/CDMA, GSM and Wi-Fi Mobile Hotspot
Inseego >
User Manual

User Guide
MiFi® 6620L
90026966 - R1

©2014 Novatel Wireless, Inc. All rights reserved. The information contained in this document is subject to change
without notice and should not be construed as a commitment by Novatel Wireless, Inc.
Patents and Licenses
For a complete list of all Novatel Wireless patents, visit www.novatelwireless.com/about/contact-us.
Software License
Proprietary Rights Provisions:
The software drivers provided with this product are copyrighted by Novatel Wireless and/or Novatel Wireless’ suppliers.
Although copyrighted, the software drivers are unpublished and embody valuable trade secrets proprietary to Novatel
Wireless and/or Novatel Wireless’ suppliers. The disassembly, decompilation, and/or Reverse Engineering of the software
drivers for any purpose is strictly prohibited by international law. The copying of the software drivers, except for a reasonable
number of back-up copies is strictly prohibited by international law. It is forbidden by international law to provide access
to the software drivers to any person for any purpose other than processing the internal data for the intended use of the
software drivers.
U.S. Government Restricted Rights Clause:
The software drivers are classied as “Commercial Computing device Software” and the U.S. Government is acquiring only
“Restricted Rights” in the software drivers and their Documentation.
U.S. Government Export Administration Act Compliance Clause:
It is forbidden by US law to export, license or otherwise transfer the software drivers or Derivative Works to any country where
such transfer is prohibited by the United States Export Administration Act, or any successor legislation, or in violation of the
laws of any other country.
Trademarks and Service Marks
Novatel Wireless is a trademark of Novatel Wireless, Inc., and the other trademarks, logos, and service marks (collectively the
“Trademarks”) used in this user manual are the property of Novatel Wireless or their respective owners. Nothing contained in
this user manual should be construed as granting by implication, estoppel, or otherwise, a license or right of use of Novatel
Wireless or any other Trademark displayed in this user manual without the written permission of Novatel Wireless or its
respective owners.
• Novatel Wireless, and the Novatel Wireless logo are all trademarks of Novatel Wireless, Inc.
• MiFi® and the MiFi logo are registered trademarks of Novatel Wireless, Inc.
• Microsoft and Windows are either registered trademarks or trademarks of Microsoft Corporation in the United States and/or
other countries.
• Apple®, Mac®, and Mac OS® are trademarks of Apple, Inc., registered in the U.S. and other countries.
• Linux® is the registered trademark of Linus Torvalds in the U.S. and other countries.
The names of actual companies and products mentioned in this user manual may be the trademarks of their respective
owners.
Novatel Wireless Revision History
Part Number Revision Description Date
90026966 R1 Initial release 24 Jun 2014
FCC ID: PKRNVWMIFI6620
PN: 90026966_R1_DRAFTA_UG_MiFi6620L_VZW_24 Jun 2014
Please visit www.novatelwireless.com for the latest information about your device.
Contents
Getting Started . . . . . . . . . . . . . . . . . . . . . . . . . . . . . . . . . . . . . . . . . . . . . . . . . . . . . . . . . 1
Overview. . . . . . . . . . . . . . . . . . . . . . . . . . . . . . . . . . . . . . . . . . . . . . . . . . . . . . . . . . . . . . . . . . . . . . . . . . . . . . . . . . . . 2
Features ................................................................................. 2
Package Contents ....................................................................... 2
System Requirements. . . . . . . . . . . . . . . . . . . . . . . . . . . . . . . . . . . . . . . . . . . . . . . . . . . . . . . . . . . . . . . . . . . . 3
Components ............................................................................ 4
Status Indicators ......................................................................... 5
Power Management ......................................................................... 7
Caring for Your Jetpack ...................................................................... 8
Using Your Jetpack . . . . . . . . . . . . . . . . . . . . . . . . . . . . . . . . . . . . . . . . . . . . . . . . . . . . . . 9
Accessing the Network .....................................................................10
4G LTE. . . . . . . . . . . . . . . . . . . . . . . . . . . . . . . . . . . . . . . . . . . . . . . . . . . . . . . . . . . . . . . . . . . . . . . . . . . . . . . . . . 10
Using Your Jetpack for the First Time ........................................................11
Charging the Battery ....................................................................12
Replacing the Battery . . . . . . . . . . . . . . . . . . . . . . . . . . . . . . . . . . . . . . . . . . . . . . . . . . . . . . . . . . . . . . . . . . . 12
Replacing the 4G LTE SIM Card ..........................................................14
Universal Charging .....................................................................15
Battery Tips. . . . . . . . . . . . . . . . . . . . . . . . . . . . . . . . . . . . . . . . . . . . . . . . . . . . . . . . . . . . . . . . . . . . . . . . . . . . . 16
Power the Jetpack On and O. . . . . . . . . . . . . . . . . . . . . . . . . . . . . . . . . . . . . . . . . . . . . . . . . . . . . . . . . . . 17
Power On. . . . . . . . . . . . . . . . . . . . . . . . . . . . . . . . . . . . . . . . . . . . . . . . . . . . . . . . . . . . . . . . . . . . . . . . . . . 17
Power O ..........................................................................17
Connecting to Your Jetpack . . . . . . . . . . . . . . . . . . . . . . . . . . . . . . . . . . . . . . . . . . . . . . . . . . . . . . . . . . . . . . . . . 18
Using Your Jetpack After Setup is Complete .................................................20
Using the Jetpack User Interface ........................................................23
Jetpack Settings ....................................................... 25
Managing Your Jetpack .....................................................................26
On the Jetpack Display. . . . . . . . . . . . . . . . . . . . . . . . . . . . . . . . . . . . . . . . . . . . . . . . . . . . . . . . . . . . . . . . . . 26
On the Jetpack Web User Interface ......................................................27
Sign In .................................................................................28
Sign In to the Web User Interface ....................................................28
Menu Panel. . . . . . . . . . . . . . . . . . . . . . . . . . . . . . . . . . . . . . . . . . . . . . . . . . . . . . . . . . . . . . . . . . . . . . . . . 29
My Jetpack Home ..........................................................................30
On the Jetpack Display. . . . . . . . . . . . . . . . . . . . . . . . . . . . . . . . . . . . . . . . . . . . . . . . . . . . . . . . . . . . . . . . . . 30
On the Jetpack Web User Interface ......................................................31
Manage My Jetpack. . . . . . . . . . . . . . . . . . . . . . . . . . . . . . . . . . . . . . . . . . . . . . . . . . . . . . . . . . . . . . . . . 32
My Account & Tools . . . . . . . . . . . . . . . . . . . . . . . . . . . . . . . . . . . . . . . . . . . . . . . . . . . . . . . . . . . . . . . . . 35
Help & Support . . . . . . . . . . . . . . . . . . . . . . . . . . . . . . . . . . . . . . . . . . . . . . . . . . . . . . . . . . . . . . . . . . . . . 36
iii
Data Usage. . . . . . . . . . . . . . . . . . . . . . . . . . . . . . . . . . . . . . . . . . . . . . . . . . . . . . . . . . . . . . . . . . . . . . . . . . . . . . . . . 38
On the Jetpack Display. . . . . . . . . . . . . . . . . . . . . . . . . . . . . . . . . . . . . . . . . . . . . . . . . . . . . . . . . . . . . . . . . . 38
On the Jetpack Web User Interface ......................................................39
Connected Devices . . . . . . . . . . . . . . . . . . . . . . . . . . . . . . . . . . . . . . . . . . . . . . . . . . . . . . . . . . . . . . . . . . . . . . . . . 42
On the Jetpack Display. . . . . . . . . . . . . . . . . . . . . . . . . . . . . . . . . . . . . . . . . . . . . . . . . . . . . . . . . . . . . . . . . . 42
On the Jetpack Web User Interface ......................................................43
Connected Devices .................................................................43
Blocked Devices ....................................................................46
Jetpack Settings ............................................................................48
On the Jetpack Display. . . . . . . . . . . . . . . . . . . . . . . . . . . . . . . . . . . . . . . . . . . . . . . . . . . . . . . . . . . . . . . . . . 48
Screen Timeout. . . . . . . . . . . . . . . . . . . . . . . . . . . . . . . . . . . . . . . . . . . . . . . . . . . . . . . . . . . . . . . . . . . . . 48
Audio On/O . . . . . . . . . . . . . . . . . . . . . . . . . . . . . . . . . . . . . . . . . . . . . . . . . . . . . . . . . . . . . . . . . . . . . . . 48
Audio Alerts ........................................................................49
Network Technology ................................................................ 49
On the Jetpack Web User Interface ......................................................51
Jetpack. . . . . . . . . . . . . . . . . . . . . . . . . . . . . . . . . . . . . . . . . . . . . . . . . . . . . . . . . . . . . . . . . . . . . . . . . . . . . 56
Advanced ..........................................................................62
Messages ..................................................................................75
On the Jetpack Display. . . . . . . . . . . . . . . . . . . . . . . . . . . . . . . . . . . . . . . . . . . . . . . . . . . . . . . . . . . . . . . . . . 75
On the Jetpack Web User Interface. . . . . . . . . . . . . . . . . . . . . . . . . . . . . . . . . . . . . . . . . . . . . . . . . . . . . . 75
Parental Controls ...........................................................................76
Screen Sharing .............................................................................77
About Jetpack . . . . . . . . . . . . . . . . . . . . . . . . . . . . . . . . . . . . . . . . . . . . . . . . . . . . . . . . . . . . . . . . . . . . . . . . . . . . . . 78
On the Jetpack Display. . . . . . . . . . . . . . . . . . . . . . . . . . . . . . . . . . . . . . . . . . . . . . . . . . . . . . . . . . . . . . . . . . 78
On the Jetpack Web User Interface ......................................................79
Internet Status. . . . . . . . . . . . . . . . . . . . . . . . . . . . . . . . . . . . . . . . . . . . . . . . . . . . . . . . . . . . . . . . . . . . . . 79
Jetpack Info ........................................................................81
Diagnostics. . . . . . . . . . . . . . . . . . . . . . . . . . . . . . . . . . . . . . . . . . . . . . . . . . . . . . . . . . . . . . . . . . . . . . . . . 82
Logs ................................................................................86
Support ............................................................................88
Help .......................................................................................90
On the Jetpack Display. . . . . . . . . . . . . . . . . . . . . . . . . . . . . . . . . . . . . . . . . . . . . . . . . . . . . . . . . . . . . . . . . . 90
Troubleshooting . . . . . . . . . . . . . . . . . . . . . . . . . . . . . . . . . . . . . . . . . . . . . . . . . . . . . . . 92
Overview. . . . . . . . . . . . . . . . . . . . . . . . . . . . . . . . . . . . . . . . . . . . . . . . . . . . . . . . . . . . . . . . . . . . . . . . . . . . . . . . . . . 93
Common Problems and Solutions . . . . . . . . . . . . . . . . . . . . . . . . . . . . . . . . . . . . . . . . . . . . . . . . . . . . . . . . . . . 94
Technical Support ..........................................................................97
Technical Support ......................................................................97
Product Specications and Regulatory Information ...................... 98
Product Specications ......................................................................99
General ................................................................................99
Technology/Bands. . . . . . . . . . . . . . . . . . . . . . . . . . . . . . . . . . . . . . . . . . . . . . . . . . . . . . . . . . . . . . . . . . . . . . 99
Environmental. . . . . . . . . . . . . . . . . . . . . . . . . . . . . . . . . . . . . . . . . . . . . . . . . . . . . . . . . . . . . . . . . . . . . . . . . 100
iv
Regulatory Statements ....................................................................101
Wireless Communications. . . . . . . . . . . . . . . . . . . . . . . . . . . . . . . . . . . . . . . . . . . . . . . . . . . . . . . . . . . . . . . . . . 103
Limited Warranty and Liability .............................................................103
Safety Hazards. . . . . . . . . . . . . . . . . . . . . . . . . . . . . . . . . . . . . . . . . . . . . . . . . . . . . . . . . . . . . . . . . . . . . . . . . . . . . 104
Proper Battery Use and Disposal ...........................................................106
Glossary. . . . . . . . . . . . . . . . . . . . . . . . . . . . . . . . . . . . . . . . . . . . . . . . . . . . . . . . . . . . . . 107

2
Overview
Congratulations on your purchase of the Verizon Mobile Hotspot - MiFi® 6620L for 4GLTE™
and Wi-Fi!
With the Jetpack you can access 4G LTE networks for faster apps, uploads and downloads. Connect
up to 16 Wi-Fi enabled devices to the Internet at once - laptops, tablets, e-readers, gaming consoles
and more* - and experience download speeds of up to 100 Mbps*.
The Jetpack is backwards compatible to 3G networks, ensuring reliable connectivity when you need
it most.
Features
•Connect to High-Speed Wireless Data (4G LTE, 3G CDMA and GSM)
•Wi-Fi Connectivity with Parental Control
•Manage Wireless Network Activity
•MiFi Settings is an easy-to-use web-based interface that allows you to manage, monitor,
and customize your Wi-Fi and 4G LTE connection.
•Guest Network Capability with Screen Sharing
•Advanced Embedded Antenna Design
•VPN Capability
•Auto Connectivity Options
•Universal Charging
Package Contents
The Verizon Wireless MiFi6620L package includes:
•MiFi 6620L
•4000mAh Standard Lithium Ion Battery
•4G LTE SIM Card
•Wall Charger
•Protective Pouch
•Verizon Wireless Brochures
* Speeds shown are those published by Verizon Wireless, Inc. Actual throughput speed and coverage may vary.

3
System Requirements
•Compatible with all major operating systems
•Works with the latest versions of browsers, including Android™, Google Chrome®, Firefox®, Internet
Explorer®, Safari™ and Mobile Safari™.
To use Wi-Fi mode, your computer or other device needs Wi-Fi capability and Internet browser
software. If your computer does not have Wi-Fi capability you can use Ethernet over USB tethering.
Your Jetpack must have proper data service to function. (See Using Your Jetpack for the First Time
on page 11.)
4
Components
➊ ➋ ➌ ➌ ➍
➒
➎
➏
➐
➓
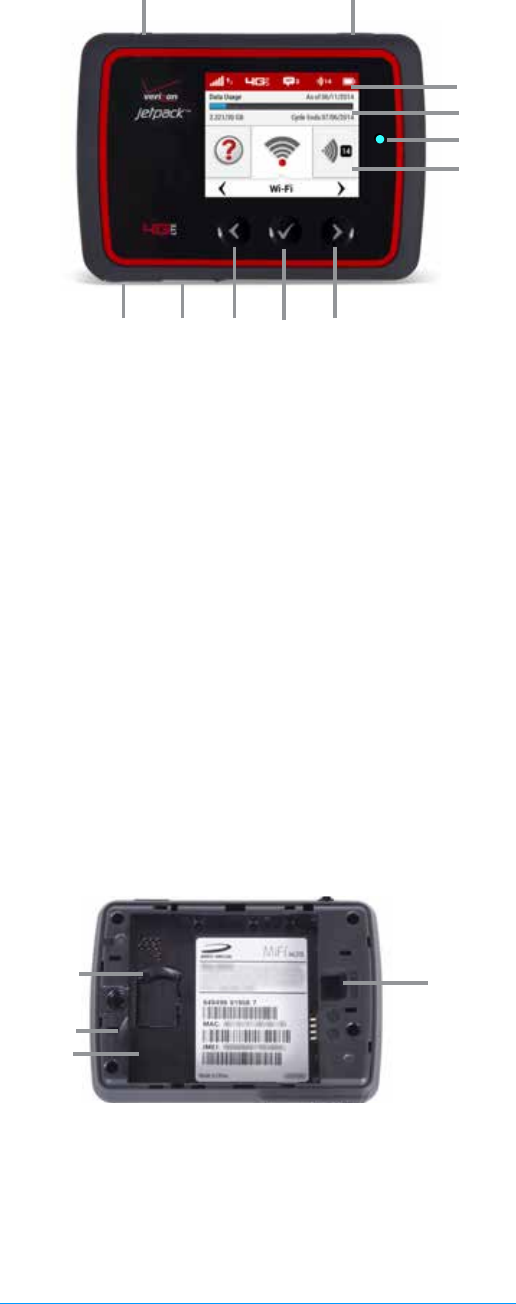
➊ Universal Charging Port — Use to charge one additional wireless device.
➋ Jetpack Charging Port — The wall charger connects here.
➌ Navigation Buttons — Scrolls left/up or right/down through available menu options.
➍ Select Button — Use to select a menu option.
➎ Home Screen — Displays the status bar, data usage meter, and menu options.
➏ LED Indicator — When the display is o (sleep mode) and the Jetpack is turned on, the LED
indicator blinks.
➐ Real-time Data Usage Meter — Displays data usage in GB, usage date, and cycle end date.
➑ Status Bar — Provides connection and battery status, network signal strength, roaming
status, and the number of users connected with Wi-Fi.
➒ Power Button — Powers the Jetpack on and o.
➓ Test port — Use for testing and diagnostics.
➊ SIM Card Slot — The SIM card is installed here.
➋ Battery Removal Divot — Insert a ngernail here and lift to remove the battery.
➌ Battery Compartment — The battery contacts connect here.
➍ Master Reset Button — Insert a paperclip in the small hole to reset the Jetpack to factory
settings. (See How do I reset the Jetpack back to factory settings? on page 108.)
➍
➊
➌
➑
➋
5
Status Indicators
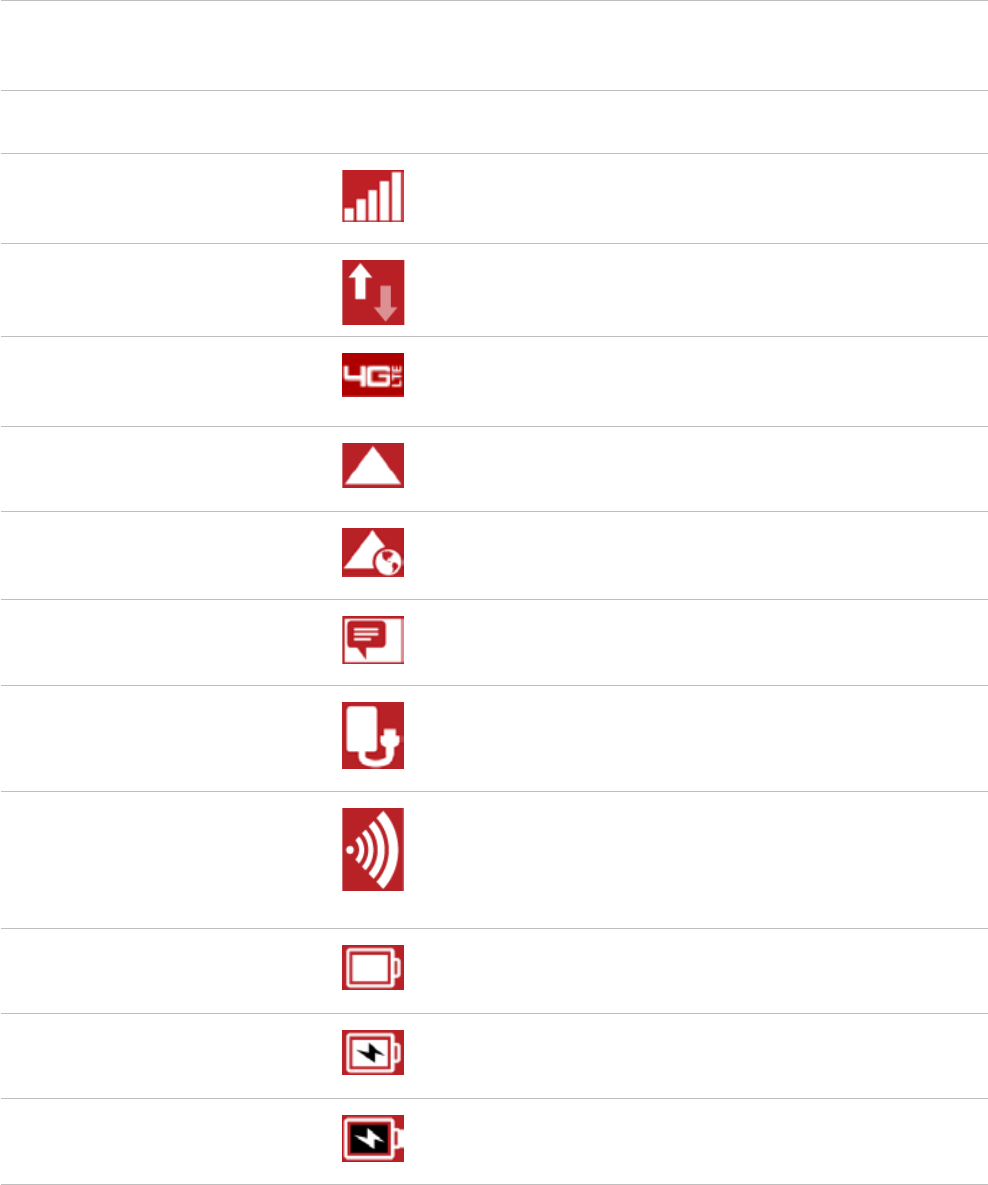
DISPLAY ICON DESCRIPTION
No icons The Jetpack is powered o or not receiving power,
or the screen is in power-saving mode.
Status Bar
Network Signal Strength More bars indicate more signal strength.
Activity Indicator If this icon is displayed, data is being transferred
between your Jetpack and connected device(s).
Network Indicator Displays the type of network to which your Jetpack
is connected.
Roaming If this icon is displayed, your Jetpack is connected to
a network outside the home network area.
International Roaming
Messages If this icon is displayed, you have unread SMS
messages.
Universal Charging Indicator If this icon is displayed, your Jetpack is xxxxxxxx.
Connected Devices
If this icon is displayed, it shows the number of
devices connected to your Jetpack.
Battery Charge Indicator Displays remaining battery power
Battery AC Charging Indicator Displays when the Jetpack is connected to the AC
charger.
Battery USB Charging Indicator Displays when another device is connected to the
Jetpack and charging via a USB cable.
6
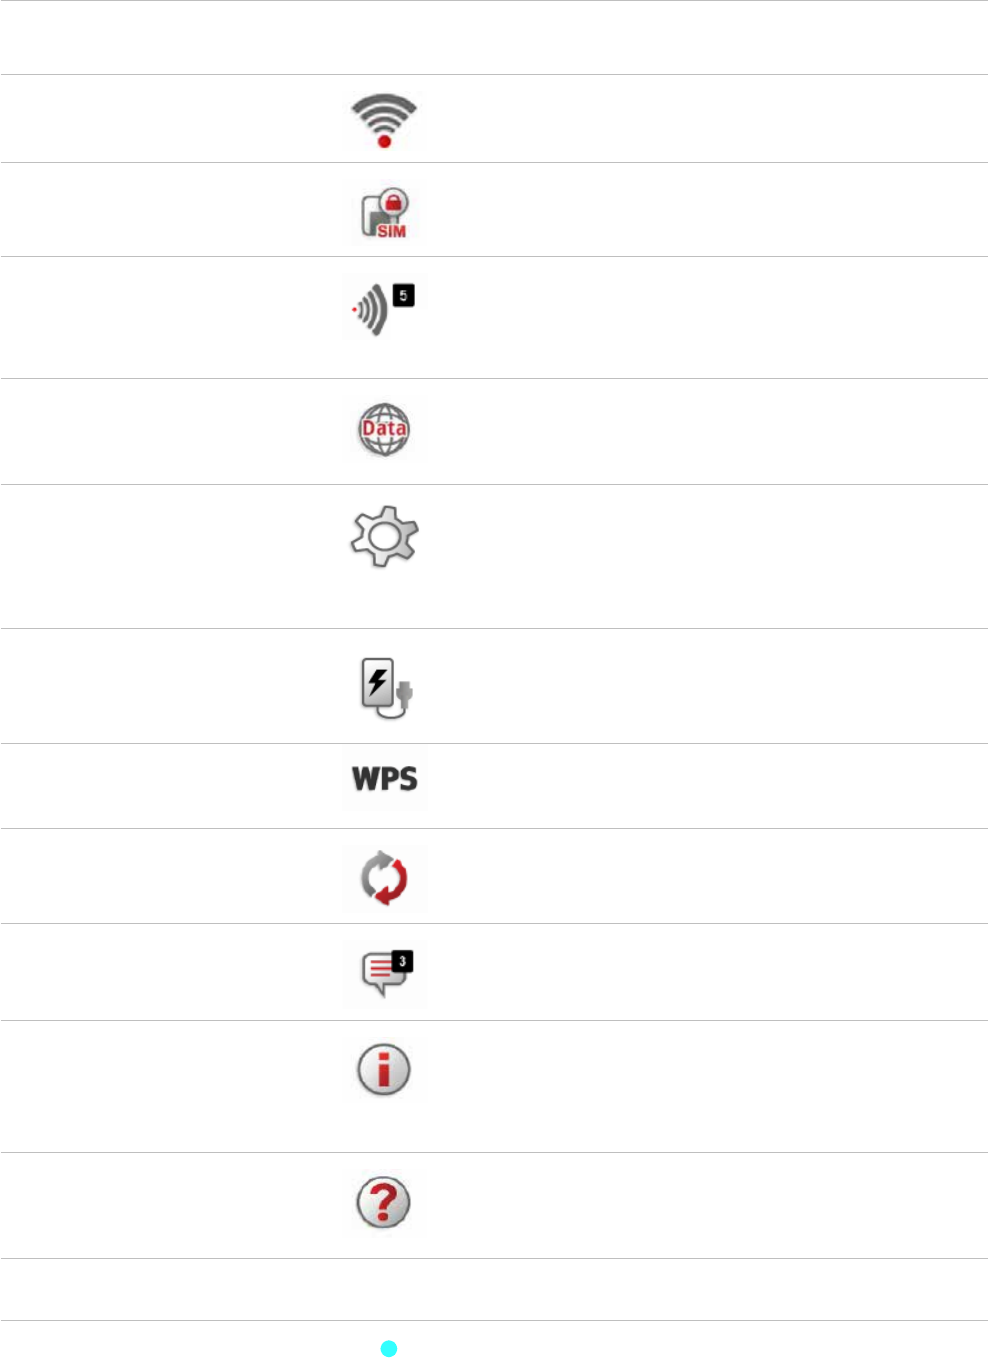
Carousel
Wi-Fi Scroll and select the icon to display the Wi-Fi name,
password and URL.
SIM If this icon is displayed, your SIM is locked. Real-time
data usage meter will not display.
Connected Devices Scroll and select the icon to display the number and
IP address of connected and blocked devices . Guest
network connections will not display if the Guest
Wi-Fi network is disabled.
Data Usage Scroll and select the icon to view the usage cycle
and the amount of data used as of the current date.
Settings Scroll and select the icon to display settings
options, including screen brightness, screen
timeout, audio on/o, audio alerts, and network
technology.
Universal Charging Scroll and select icon to display Universal Charging
status. Options include Available, Charging, or Not
available.
WPS Scroll and select icon to set WPS.
Software Update Scroll and select the icon to display the current SW
version, and to download and install an update.
Message Center Scroll and select the icon to display unread
messages, and to save or delete read messages.
About Jetpack Scroll and select the icon to display Internet
connection status and Jetpack information,
including SW version, wireless number, IMEI, and
batery level.
Help Scroll and select the icon to display Help Tips,
Web-based management, OS and Android Apps,
and Advanced features.
Front Panel
Power Indicator When the display is o (sleep mode) and the
Jetpack is turned on, the Power indicator blinks.

7
Power Management
Your Jetpack will work from its charged battery alone, or when the device with the installed battery
is plugged into a power source.
•Battery — Charge the battery by plugging in the wall charger. While the battery is charging
the battery icon bars blink. When the battery is fully charged, the battery icon is solid.
•USB wall charger — You can use the Jetpack when the battery is installed and the charger is
plugged into a wall socket. Please ensure the wall socket is located near the equipment and
is easily accessible. The MiFi battery charges while it is plugged into the charger.
•Universal charging — You can use the Jetpack to charge external devices such as
smartphones and tablets, to help keep you powered and connected longer.
Before using the Jetpack, read the battery safety information in the "Safety Hazards" section of this
guide. (See Proper Battery Use and Disposal on page 120.)

8
Caring for Your Jetpack
Like any electronic device, the Jetpack must be handled with care to ensure reliable operation.
Novatel Wireless recommends the following guidelines:
•Protect the Jetpack from liquids, dust, and excessive temperatures.
•Do not apply adhesive labels to the Jetpack; they might cause the Jetpack to potentially
overheat and they might alter the performance of the antenna.
•Store the Jetpack in a safe place when not in use.

Accessing the Network
Using Your Jetpack for the First Time
Connecting to Your Jetpack
Using Your Jetpack After Setup is Complete
Using Your Jetpack
2

10
Accessing the Network
4G LTE
With LTE bandwidth you can get the broadband speed you require to work eciently outside the
home or oce. You can connect to the Internet, access your corporate intranet, check your email
and download attachments at speeds that are up to 10 times faster than 3G*.
4G Mobile Broadband with LTE*
•Download: typical download speeds of 5-12 Mbps.
•Upload: typical upload speeds of 2-5 Mbps.
3G Mobile Broadband with EVDO Rev. A
•Download: typical download speeds of 600 kbps–1.4 Mbps with bursts up to 3.1 Mbps.
•Upload: typical upload speeds of 500-800 kbps with bursts up to 1.8 Mbps.
Wi-Fi 802.11b/g/n
•802.11b uses the 2.4 GHz frequency with a bandwidth of 11 Mbps.
•802.11g uses the 2.4 GHz frequency with a bandwidth of 54 Mbps.
•802.11n uses the 2.4 GHz frequency with a bandwidth of 150 Mbps.
* Actual throughput speed and coverage may vary. Speed claims not applicable when roaming.

11
Using Your Jetpack for the First Time
Your SIM Card and battery are pre-installed. To get started:
➊ Conrm your computer meets the minimum system requirements. (See System
Requirements on page 3).
➋ Fully charge the battery. (See Charging the Battery on page 12).
➌ Power on the Jetpack. (See Power the Jetpack On and O on page 17).
➍ Connect the Jetpack to your computer using Wi-Fi. (See Connecting to Your Jetpack on
page17.)
12
Charging the Battery
IMPORTANT Before you use your Jetpack, be sure to charge the battery for at least two hours
to ensure a full initial charge. When fully charged, the battery has up to 20 hours of life.
To charge the battery:
➊ Connect the micro USB end of the charger into the charging port of the Jetpack.
➋ Plug the other end of the wall charger into the appropriate electrical outlet.
CAUTION! Use only batteries and chargers with your Jetpack that have been approved by
Novatel Wireless. The failure to use approved batteries and chargers may increase the risk that
your Jetpack will overheat, catch fire, or explode, resulting in serious bodily injury, death, or
property damage.
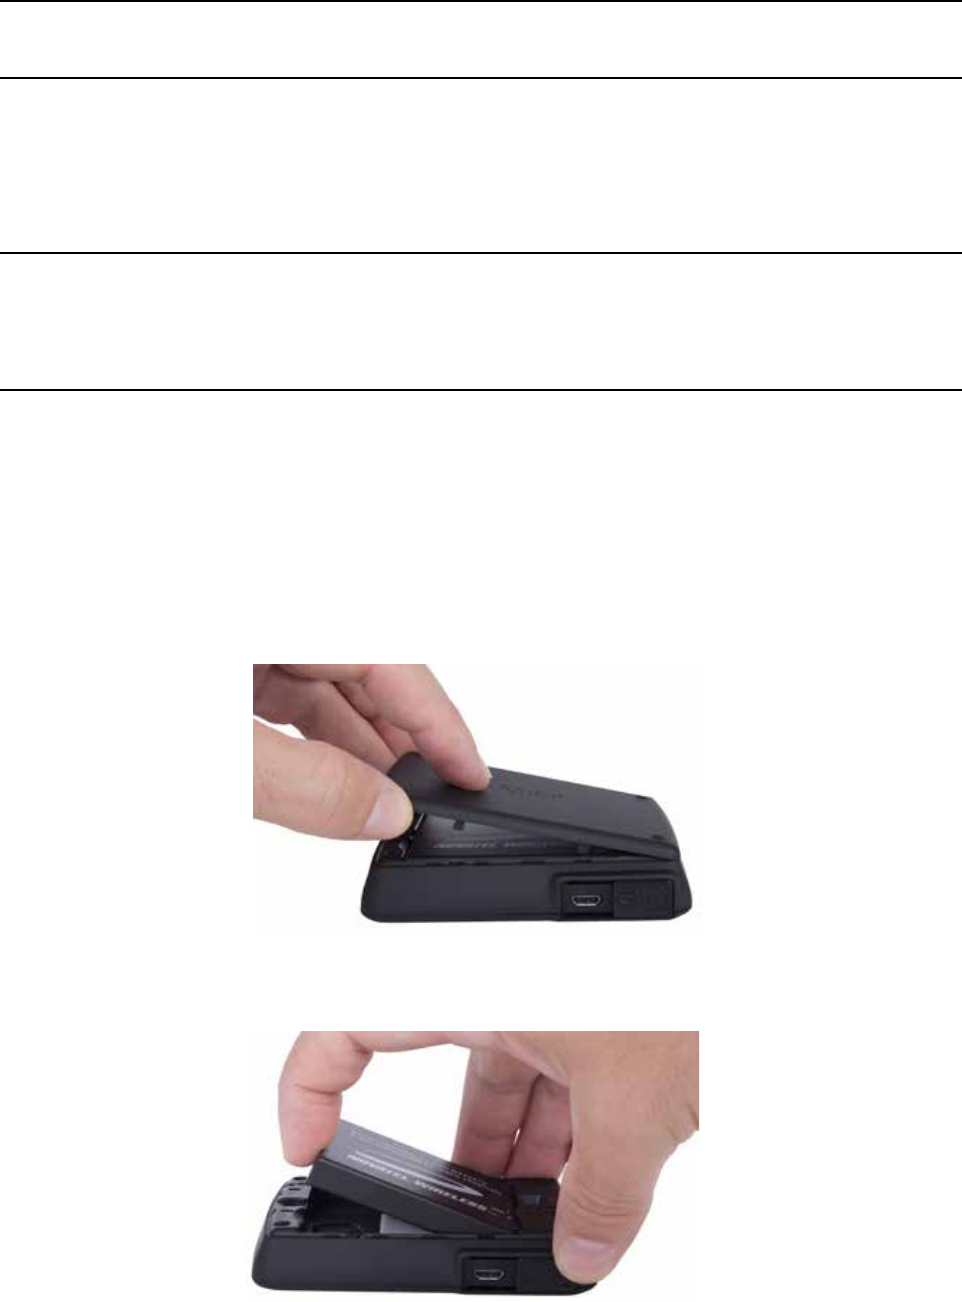
Replacing the Battery
To remove and replace the battery:
➊ Press your nger against the battery door removal tab, then lift and remove the battery
cover. Set the cover aside.
➋ Insert your nger into the battery removal divot and lift the battery out of the battery
compartment.
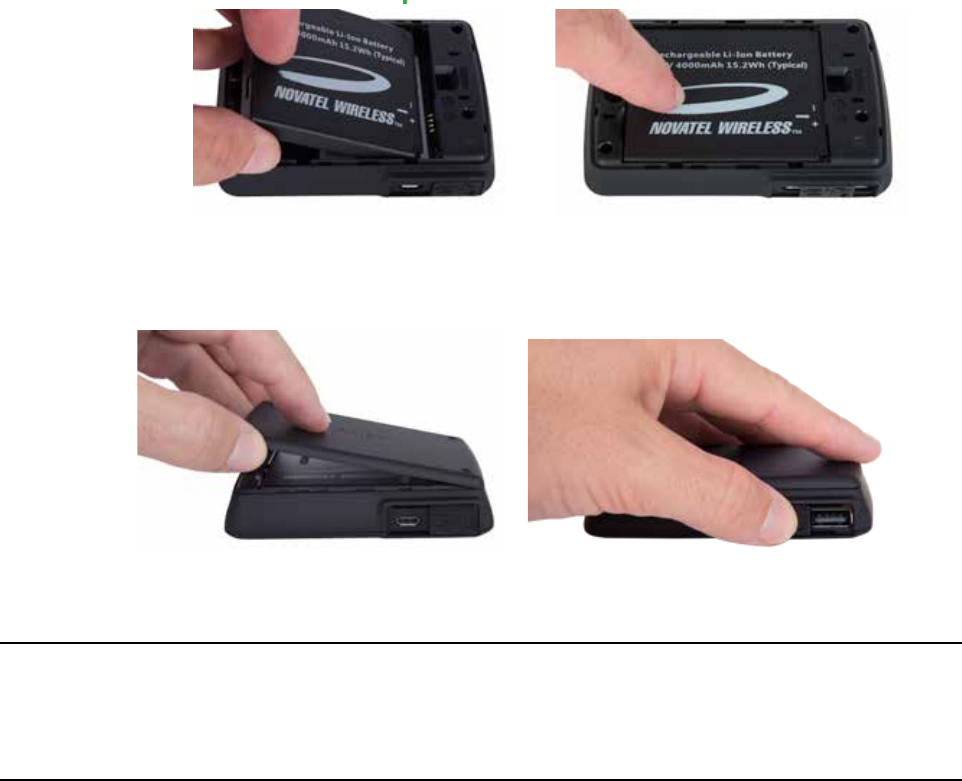
13
➌ Align the gold-colored contacts on the new battery with the gold-colored contacts on the
MiFi6620L and gently slide the battery into place.
➍ Replace the cover by setting it on the Jetpack where the notches align, then press on the
cover until it clicks into place and is at across the entire bottom surface.
CAUTION! Use only batteries and chargers with your Jetpack that have been approved by
Novatel Wireless. The failure to use approved batteries and chargers may increase the risk that
your Jetpack will overheat, catch fire, or explode, resulting in serious bodily injury, death, or
property damage.
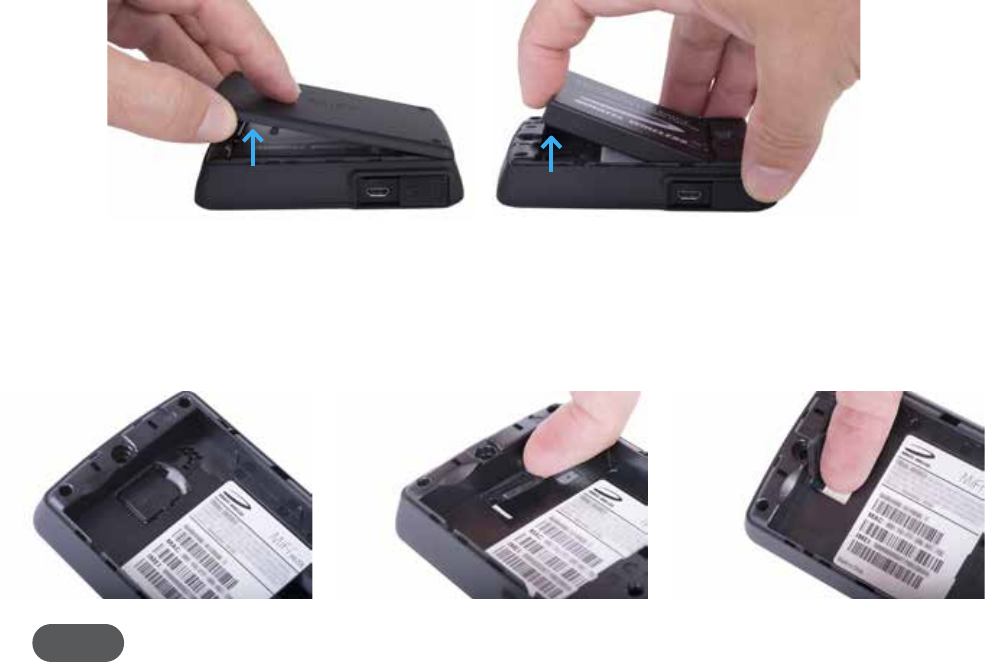
14
Replacing the 4G LTE SIM Card
Your SIM (Subscriber Identity Module) card is a small rectangular plastic card that stores your phone
number and important information about your wireless service. Your Jetpack comes with the SIM
card and battery already installed.
To remove the 4G LTE SIM card:
➊ Remove the battery cover located on the underside of the Jetpack.
➋ Remove the battery from the back of the Jetpack by inserting your ngernail into the battery
removal divot and lifting the battery out of the battery compartment.
➌ Locate the SIM Card protector and lift to open.
➍ Push the SIM Card forward to release, then carefully slide the card backwards to remove.
NOTE Should your 4G SIM card be lost or damaged, contact your network operator.
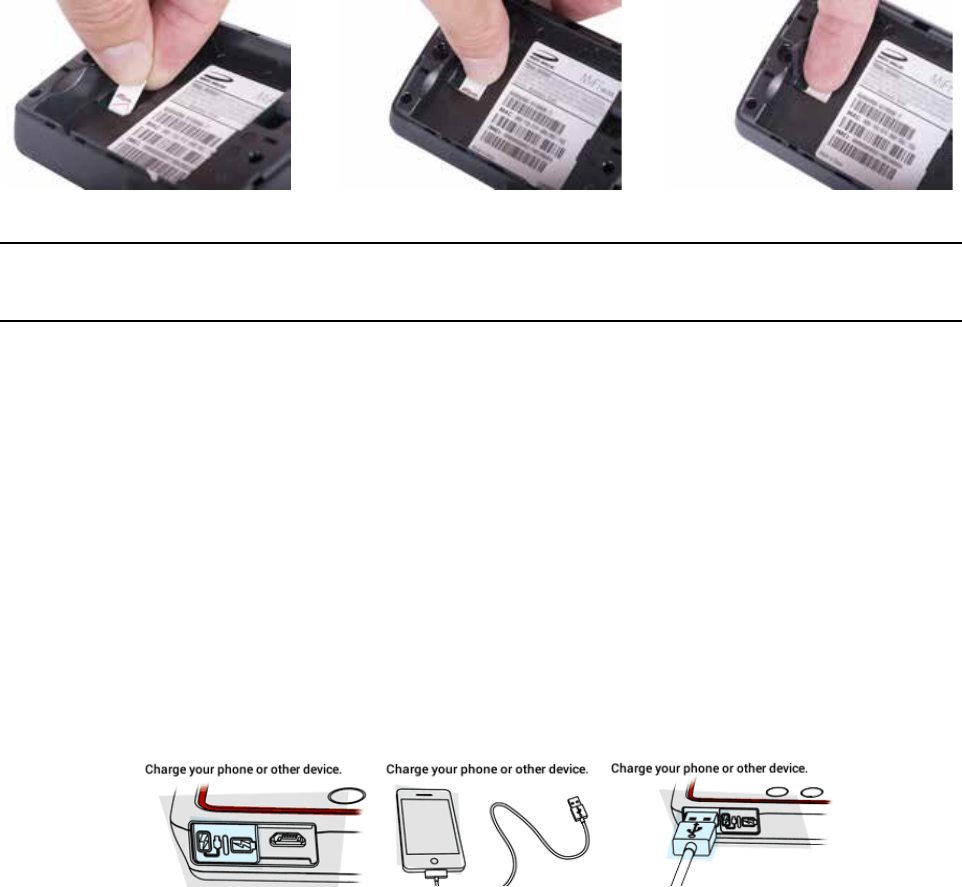
15
To install a new 4G LTE SIM card:
➊ Remove the battery cover located on the underside of the Jetpack.
➋ If necessary, remove the SIM card from the outer card, being careful not to touch the gold-
colored contacts.
➌ Hold the card with the gold-colored contact points facing down.
➍ Insert the SIM card into the slot. The SIM card MUST remain in the SIM card slot when in use.
CAUTION! Do not bend or scratch your SIM card. Avoid exposing your SIM card to static
electricity, water, or dirt.
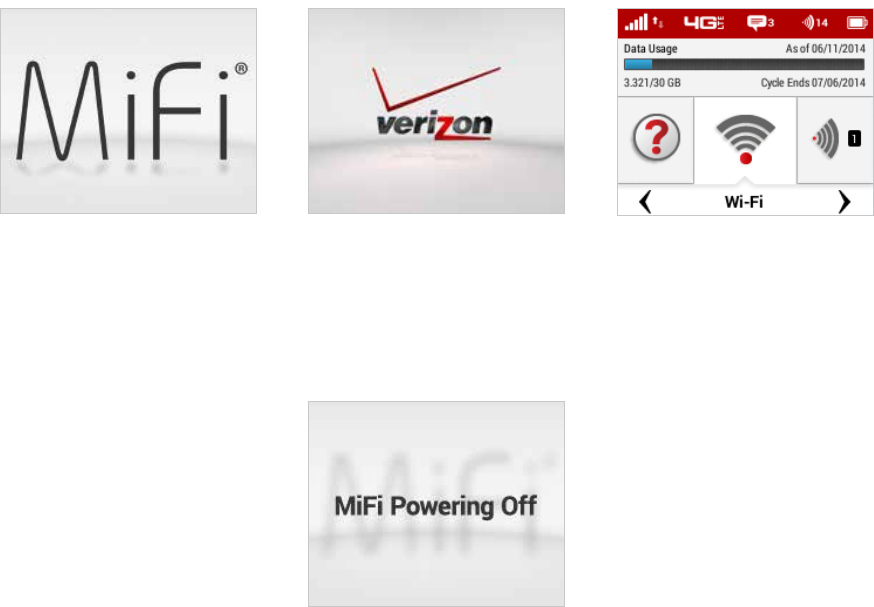
Universal Charging
The universal charging port allows you to charge an additional device using your Jetpack.
To charge an additional device:
➊ Slide the port shield to expose the USB universal charging port.
➋ Connect the USB cable to the device to be charged.
➌ Connect the other end of the USB cable to the Universal Charging port on the Jetpack.

16
Battery Tips
WARNING ! Always use only approved batteries and chargers with your Jetpack. The warranty
does not cover damage caused by non-approved batteries and/or chargers.
•It normally takes at least two hours to fully charge the battery with the wall charger.
•Do not use sharp objects or use excessive force to remove the battery or to access the battery
well, this may damage the Jetpack and the battery.
•The battery discharges more rapidly as additional devices access your Jetpack.
•Battery life depends on the network, signal strength, temperature, features, and accessories
you use.
•New batteries or batteries stored for a long time may take more time to charge.
•When charging your battery, keep it near room temperature.
•When storing your battery, keep it uncharged in a cool, dark, dry place.
•Never expose batteries to temperatures below -20°C (4°F) or above 60°C (140°F).
•Never leave the Jetpack in an unattended vehicle due to uncontrollable temperatures that
may be outside the desired temperature for this Jetpack.
•Some batteries perform best after several full charge/discharge cycles.
•It is normal for batteries to gradually wear down and require longer charging times. If you
notice a change in your battery life, it is probably time to purchase a new battery.
IMPORTANT Whenever you remove or insert either the battery or the SIM card, ensure your
Jetpack is not connected to any device or power source. Never use tools, knives, keys, pens or
any type of object to force the door open or to remove the battery. Using any of these types of
objects could result in puncturing the battery.
WARNING ! The failure to use approved batteries and chargers may increase the risk that your
Jetpack will overheat, catch fire, or explode, resulting in serious bodily injury, death, or property
damage. To avoid risk of explosion, never dispose of batteries in a fire.
17
Power the Jetpack On and O
Power On
•Press the Power Button until the Jetpack display lights up. After the initial startup screens
display, the Home screen and menu options are available.
Power Off
•Press and hold the Power Button until the display shows MiFi. The Jetpack will continue its
shutdown process for several seconds and then automatically turn o the display.
18
Connecting to Your Jetpack
Now you can connect your Wi-Fi enabled device to your Jetpack using Wi-Fi. Your computer,
tablet, or other Wi-Fi enabled devices need Wi-Fi capability and Internet browser software. Your
Jetpack is compatible with all major operating systems, and works with the latest version of
browsers, including Android™, Chrome™, Firefox®, Internet Explorer®, Safari™ and Mobile Safari™.
QuickStart
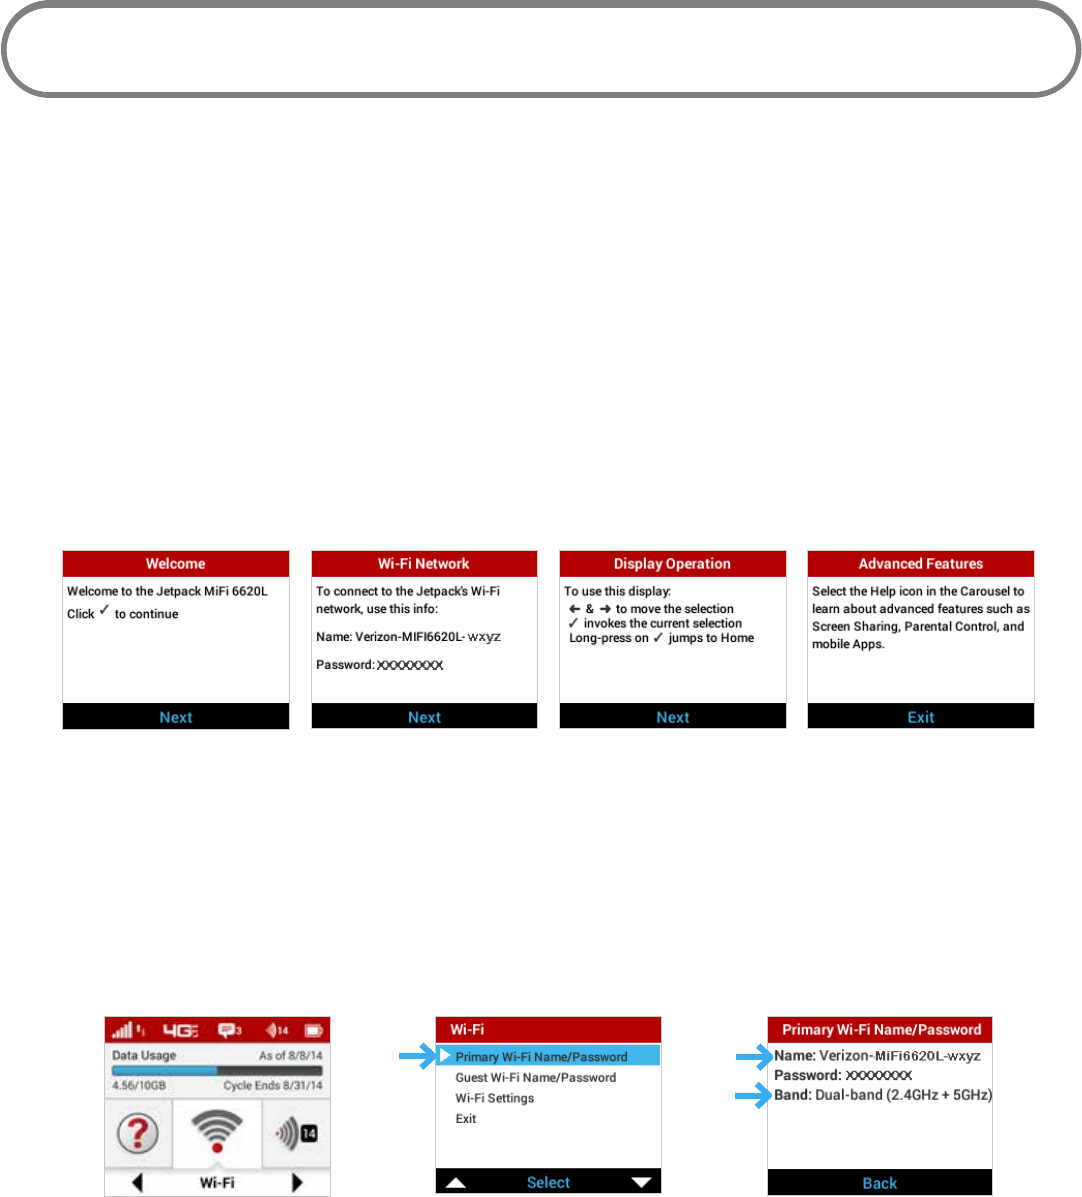
Your Wi-Fi Name (SSID) and Wi-Fi Password can be found on the Jetpack display upon initial power
up.
➊ Power on your Jetpack for the rst time to display the QuickStart Welcome screen.
➋ Press the select button to display the Wi-Fi Network screen with your Wi-Fi Name and
Password.
Welcome screen Wi-Fi Name and Password Display operation Access advanced features
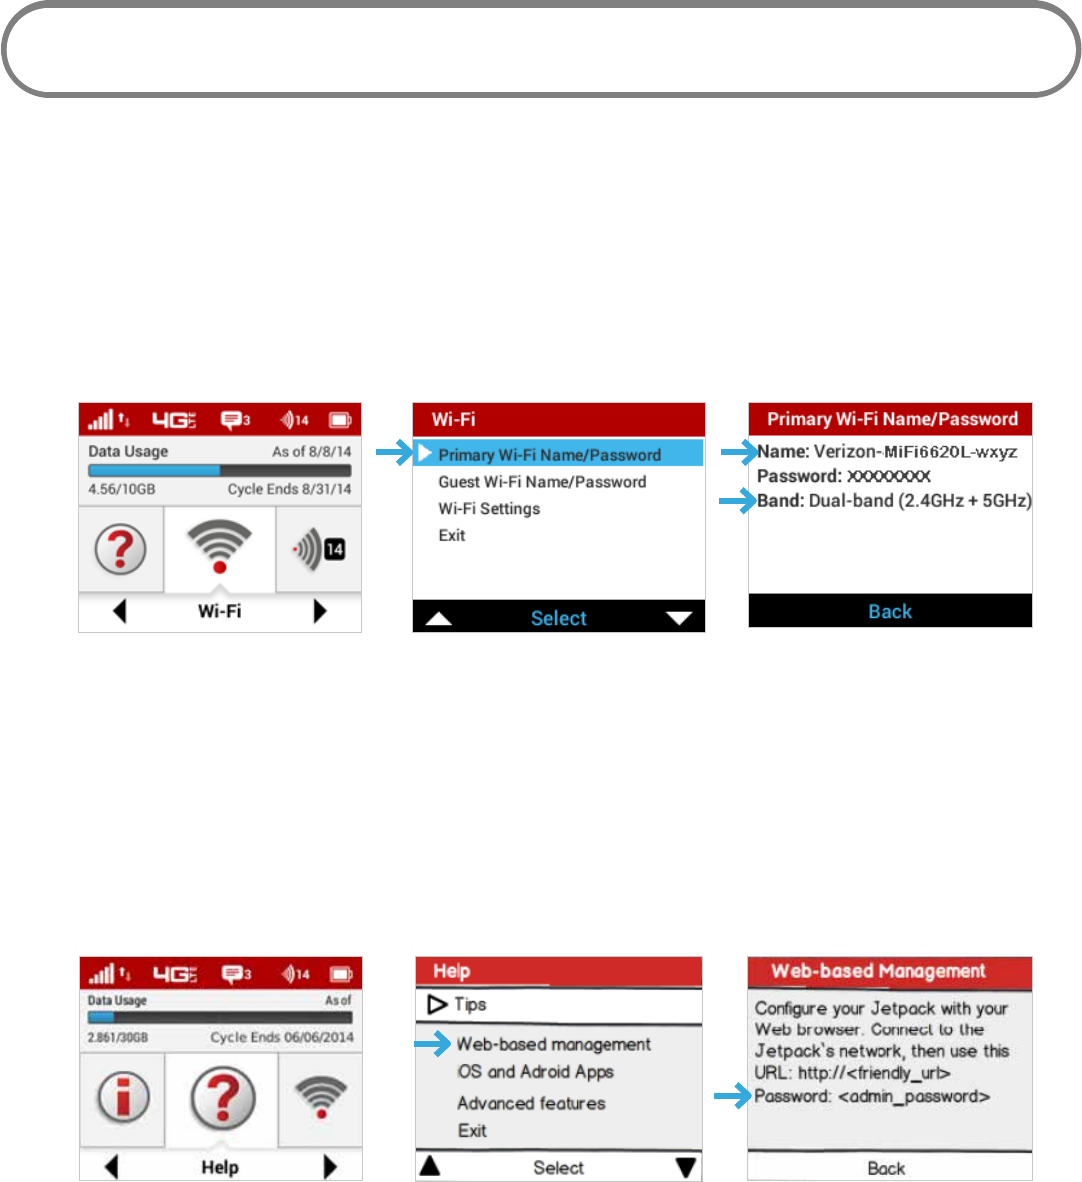
To access your Wi-Fi Name (SSID) and Wi-Fi Password after the initial power up or a device reset:
➊ Power on your Jetpack.
➋ Select Wi-Fi to display the Wi-Fi Select page.
➌ Select Primary Network to display the Primary Network SSID, security type, and password.
Press the select button to return to the Home screen and menu options.
Wi-Fi option Select Primary Network Primary Network SSID & Password
To connect to your Jetpack:
➊ Turn on your Wi-Fi enabled device and turn on your Jetpack using the power button. The
Jetpack display will light up. The Jetpack broadcasts its own wireless network and name.
➋ Open the Wi-Fi application or controls on the computer or Wi-Fi enabled device that you
want to connect to your Jetpack and nd the Wi-Fi name (SSID).

19
Tip! The steps to connect to a Wi-Fi network vary depending on your operating system and whether
you use the native application or third-party software. Generally, you click an icon in the Windows
notification area where you can select View Available Wireless Networks, or click the Airport
icon in the menu bar on a Mac. If you are unfamiliar with wireless networking on your computer,
consult the computer help system.
➌ When prompted, enter your Wi-Fi Primary Network password. The Jetpack Home screen
should now show an additional connected device. Your Wi-Fi enabled device is now
connected to the Internet.
➍ You can view or change Jetpack settings by connecting to the Jetpack web user interface at
http://my.jetpack or http://192.168.1.1.
IMPORTANT Charge the battery completely before you connect your computer to your
Jetpack. (See Charging the Battery on page 12).
20
Using Your Jetpack After Setup is Complete
You can use the Jetpack as a wireless mobile hotspot to connect your computer and up to a total
of 16 (on 4G LTE) Wi-Fi enabled devices to the mobile broadband network. The Jetpack is powered
on as soon as you press and hold the power button and the display turns on.
To nd the name of the Wi-Fi Primary Network (SSID) and Wi-Fi Password on the Jetpack display:
➊ Select Wi-Fi to display the Wi-Fi Select page.
➋ Select Primary Network to display the Primary Network SSID, security type, and password.
Wi-Fi option Select Primary Network Primary Network SSID & Password
The Jetpack comes from the factory with security enabled. You can change the security settings
using the Jetpack Web User Interface. To change your Jetpack security settings:
➊ Open the web browser of a device connected to the Jetpack and enter http://my.jetpack or
http://192.168.1.1.
➋ Login with the Jetpack Admin Password which can be found on the Jetpack display by
selecting Help > Web-based management. The default Admin Password is admin. Press the
select button to return to the Home screen.
Help option Select Web-based management Admin Password
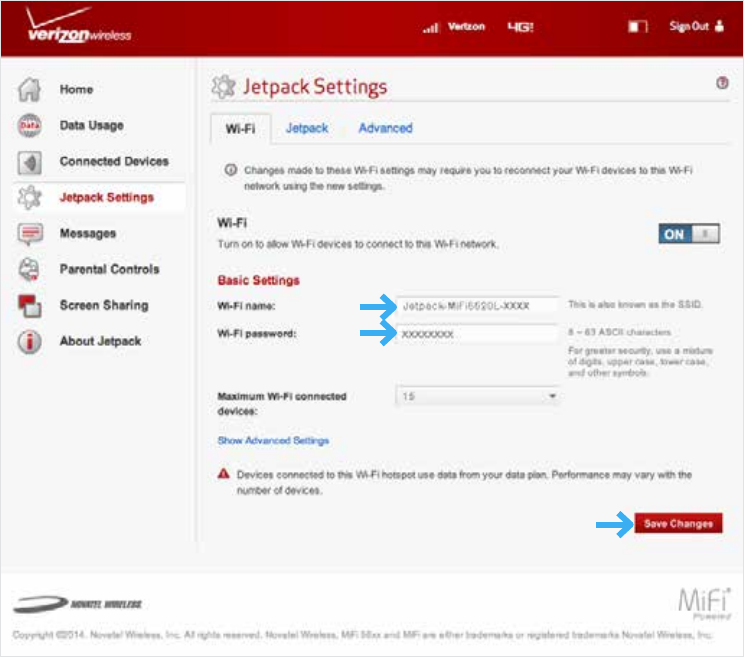
➌ To change your Wi-Fi Name/Password, from MiFi Home select Manage My MiFi > Customize
my Wi-Fi Settings.
➍ Enter the new Wi-Fi Name in the Wi-Fi name eld and the new Wi-Fi Password in the Wi-Fi
Password eld.
21
➎ Click Save Changes.
Change Wi-Fi name/Password
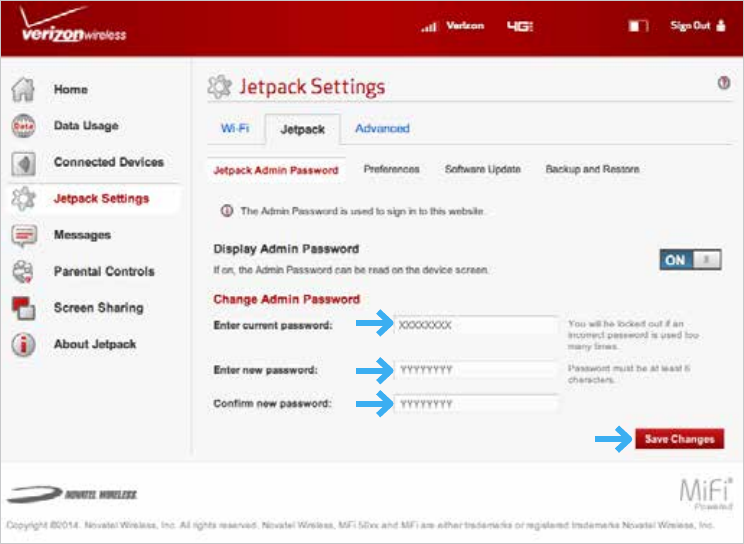
➏ To change your Admin Password from MiFi Home, select Manage My MiFi > Change Admin
Password.
➐ Enter your current Admin Password in the Enter current password eld.
➑ Enter your new password in the Enter new password eld, and re-enter to conrm in the
Conrm new password eld.
22
➒ Click Save Changes.
Change Jetpack Admin Password
23
Using the Jetpack User Interface
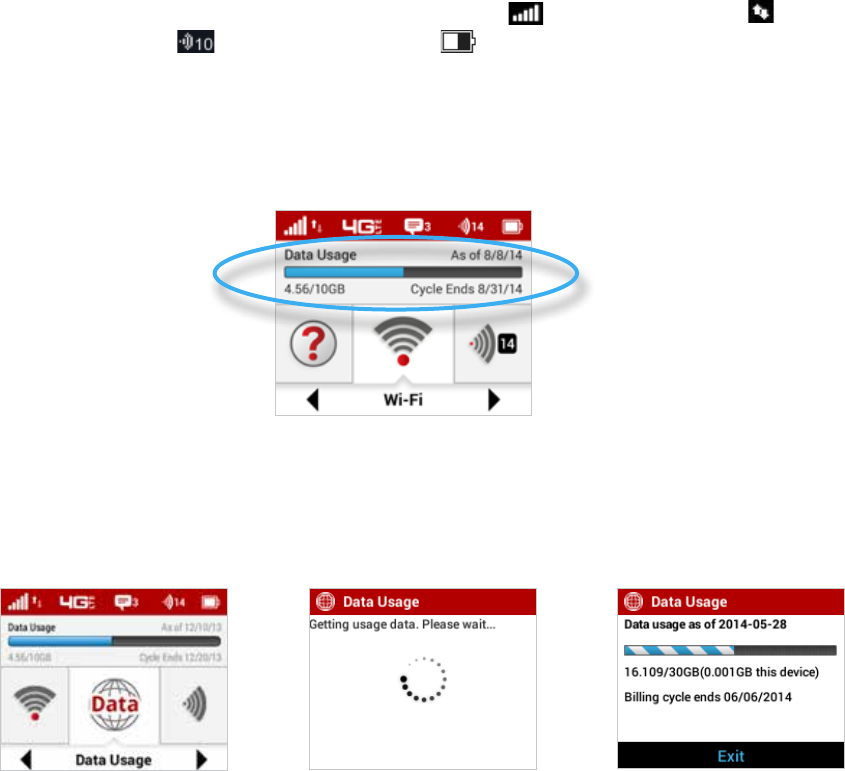
From the Jetpack display you can check your Jetpack status, view your current data usage, and
access an icon-based menu by using the Navigation and Select buttons. (See on page 3).
To view the current status of your Jetpack:
➊ Press the power button to turn on the Jetpack and display the Home screen. The status bar is
at the top of the screen.
➋ Check the status indicators for network signal strength , data trac activity , number
of connected devices , and battery strength .
To view your current data usage:
➊ Use the real-time data usage meter on the Home screen to check your data usage and billing
cycle schedule.
Jetpack display Home
➋ If SIM Lock is turned on, or if another device is connected to the Universal Charging port
and being charged, the Data Usage meter will not display. Scroll to the Data Usage icon and
press the select button to view your current data usage details.
24
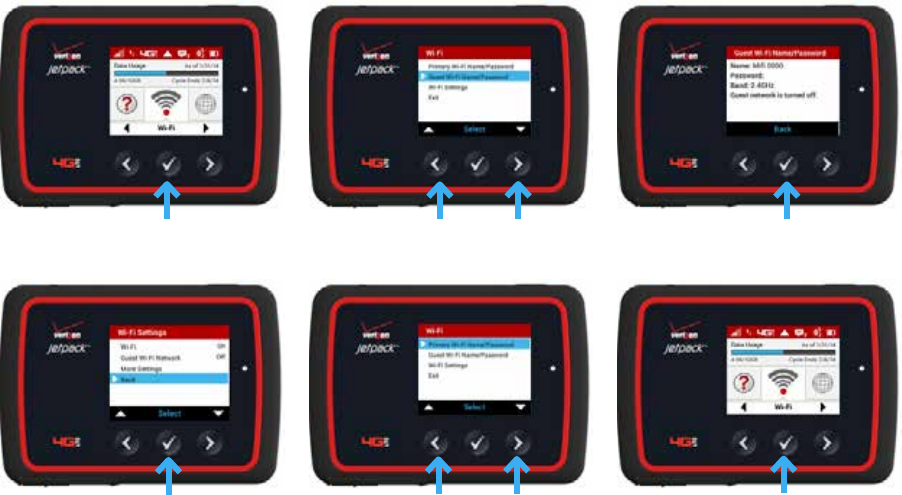
To access the icon-based menu options:
•From the Home screen, use the navigation buttons to move left or right to highlight the
desired Menu option, then press the select button to open the highlighted option. Continue
to press the select button to move through any additional screens.
Press select to open option menu Scroll up/down to desired option Press select to view desired option
Press select to go back to option menu Scroll down to the Exit option Press select to return Home
26
Managing Your Jetpack
Manage, monitor, and customize your Jetpack settings directly on the Jetpack, or by using the
Jetpack Web User Interface.
On the Jetpack Display
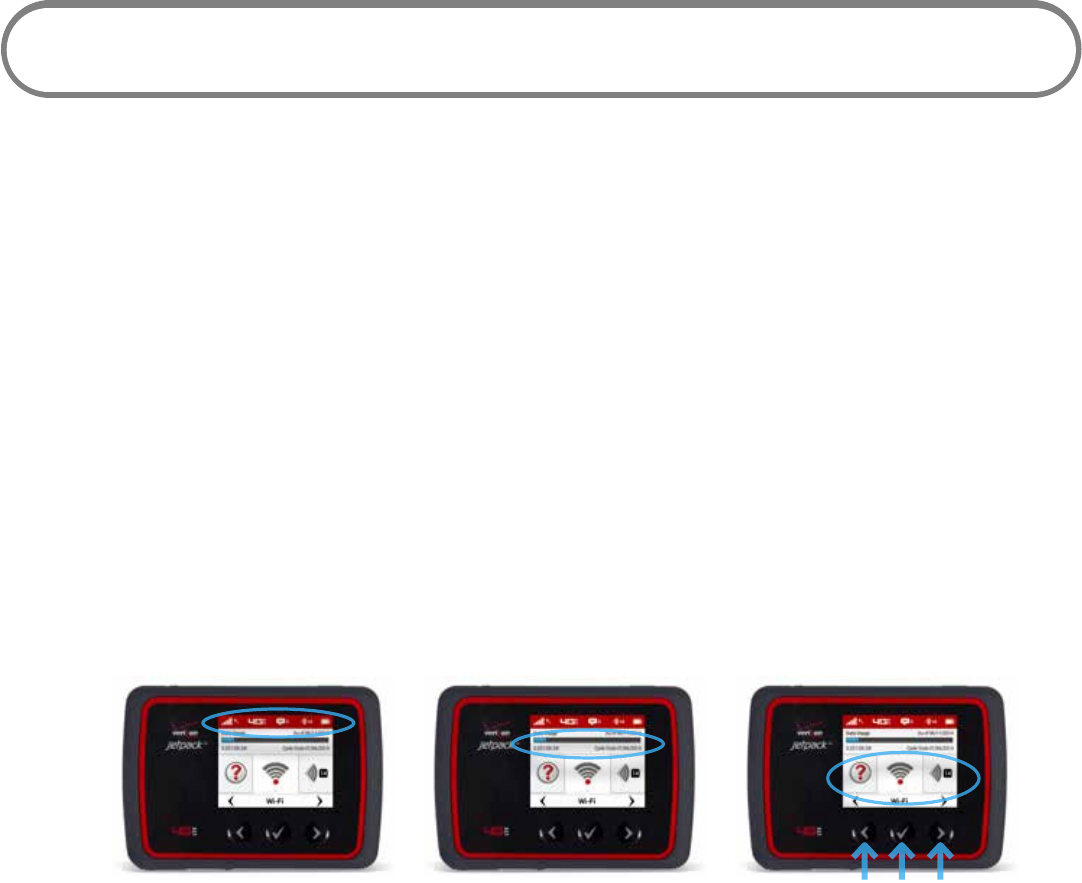
➊ Power on your Jetpack by pressing and holding the power button until the display lights
and the Home screen displays.
➋ Use the status bar to monitor network signal strength, data activity, roaming, messages,
connected devices, universal charging, and battery life .
➌ Use the Real-time Data Usage meter to monitor current data usage and billing cycle
schedule.
➍ Use the navigation buttons to scroll to the desired Menu option.
➎ Press the select button to open the selected Menu screen.
Jetpack status Real-time data usage Scroll & select
27
On the Jetpack Web User Interface
To connect to the Jetpack Web User Interface and customize your Jetpack settings:
➊ Connect your computer or Wi-Fi enabled device to your Jetpack to access the Internet.
(See Connecting to Your Jetpack on page 17.)
➋ Open your connected device’s web browser and type http://my.jetpack/ or http://192.168.1.1
into the address bar. Press Enter. The Home page opens. (See Sign In on page 28.)
Jetpack Home
➌ Click Sign In in the upper right corner of the window and type your Jetpack Admin password
in the Admin password eld and click Sign In to display the Jetpack Home page. (See MiFi
Home on page 28.)
You are now able to customize your Jetpack settings conguration.
28
Sign In
The Sign In page is the rst page you see after connecting and prior to signing in. You can access
more information after you sign in.
Jetpack Sign In
Sign In to the Web User Interface
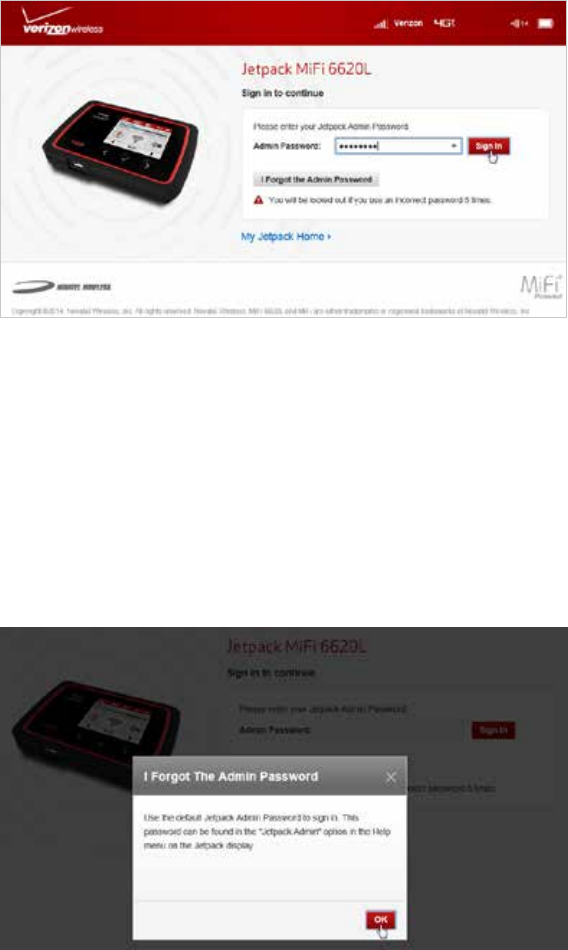
Type the Jetpack Admin Password (the default password is found on the Jetpack by selecting Help >
Web-based management) in the Sign In eld at the top right corner of the window. Click Sign In.
If you forget your Admin Password, click I Forgot the Admin Password and a reminder will appear
telling you where to nd your password. Click OK.
Jetpack Admin Password reminder
29
Menu Panel
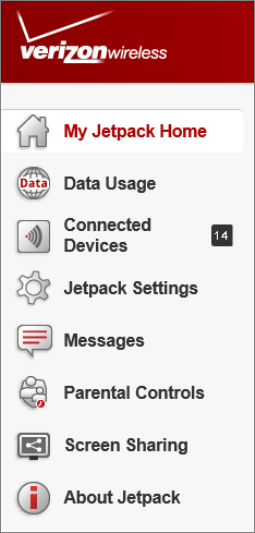
The Menu Panel is the primary navigation for MiFi Settings. You can access each feature under the
appropriate menu.
My Jetpack Home - Menu Panel
30
My Jetpack Home
MiFi Home is your gateway to conguring and managing your Jetpack.
On the Jetpack Display
➊ Power on your Jetpack by pressing and holding the power button until the display lights
and the Home screen displays.
➋ Use the navigation buttons to scroll to the desired Menu option.
➌ Press the select button to open the selected Menu screen.
➍ To return to the Home screen, press the select button to exit the selected Menu screen.
Home screen displays Scroll to desired Menu option Press select button to exit
31
On the Jetpack Web User Interface
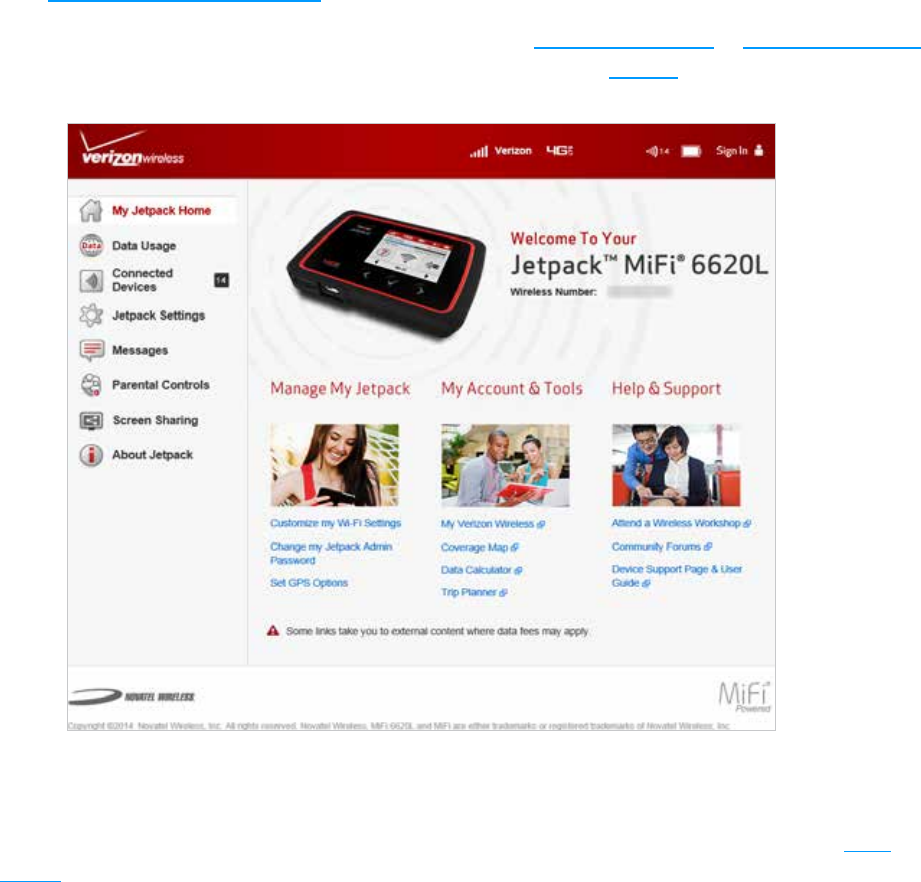
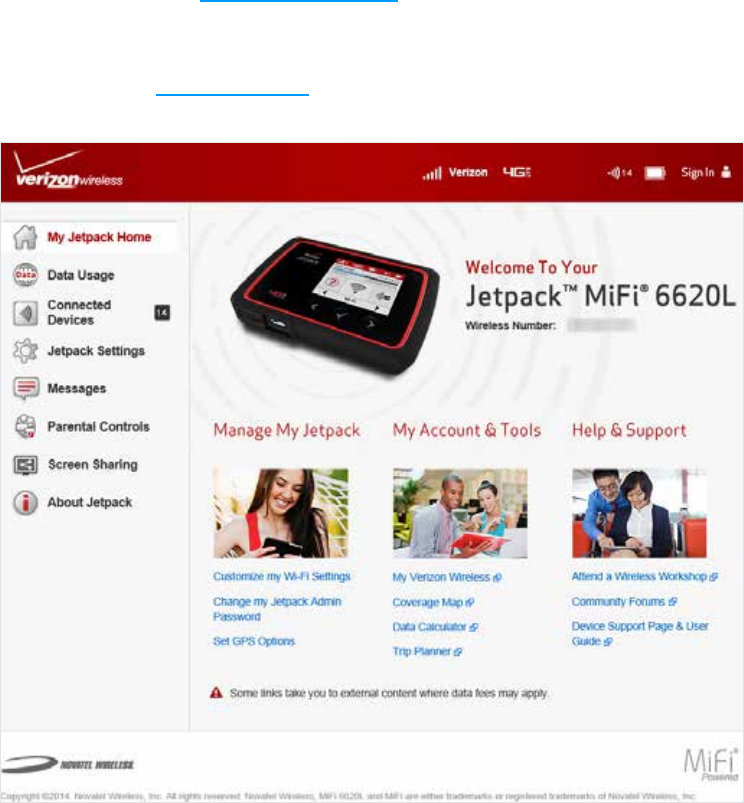
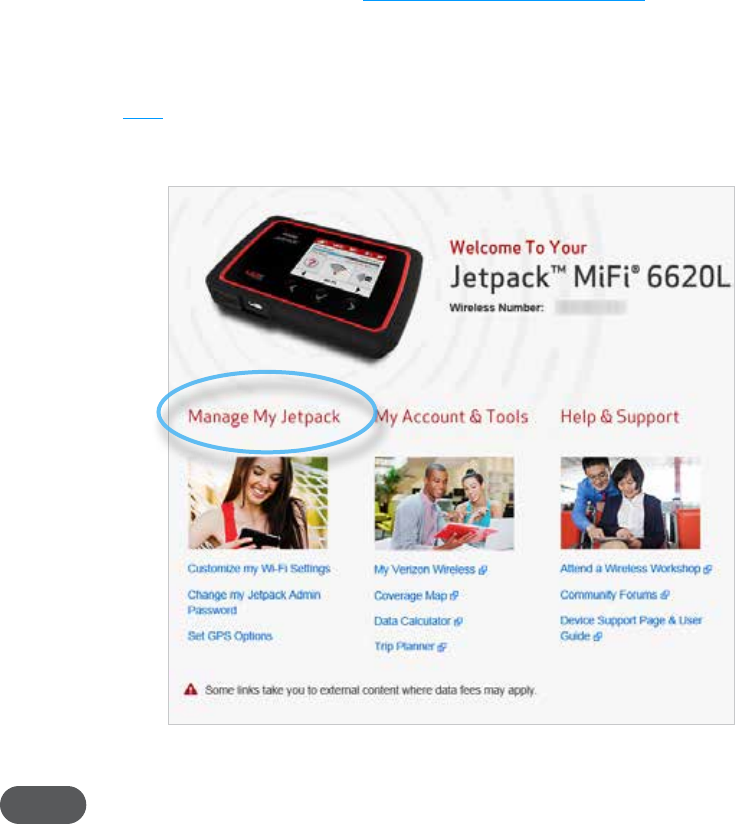
MiFi Home allows you to quickly access commonly used links and all available menu options for
your Jetpack. MiFi Home contains the following quick link menu options:
•Manage My Jetpack (See Manage My Jetpack on page 32.)
•My Account & Tools (See on page 37.)
•Help & Support (See Help & Support on page 46.)
Jetpack Home
32
Manage My Jetpack
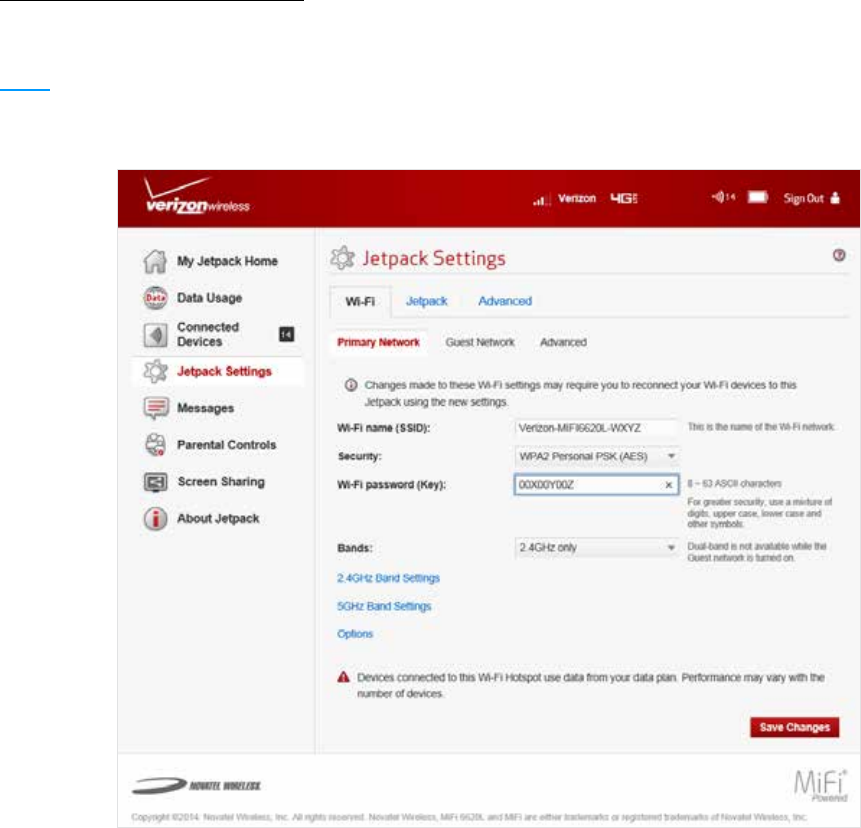
The Manage My Jetpack menu contains the following options:
•Customize my Wi-Fi Settings (See Customize my Wi-Fi Settings on page 33.)
•Change my Jetpack Admin Password (See Change my Jetpack Admin Password on page
34.)
•GPS (See GPS on page 32.)
Jetpack Home - Manage My Jetpack
NOTE The next time you sign in to Jetpack Settings, you will need to use the new password.
33
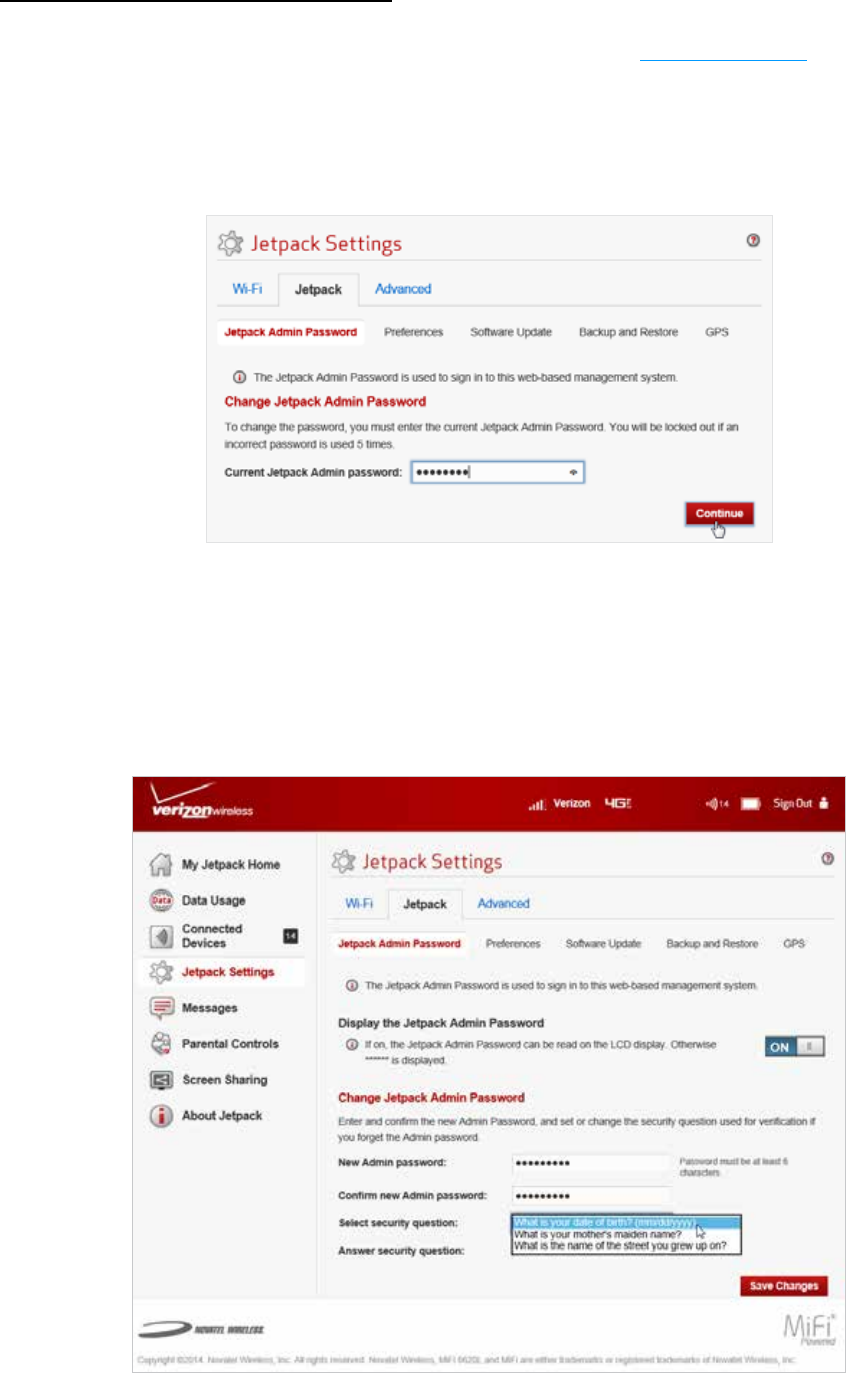
Customize my Wi-Fi Settings
Clicking on Customize my Wi-Fi Settings takes you to the Jetpack Settings page Wi-Fi menu where
you can customize Wi-Fi proles and view details about the devices connected to your Jetpack. (See
Wi-Fi on page 58.)
Jetpack Settings - Wi-Fi Primary Network Settings
34
Change my Jetpack Admin Password
Clicking on Change Admin Password takes you to the Jetpack Admin Password section of the
Settings page, where you can change the Admin Password. (See Admin Password on page46.)
The default Admin password is admin. This is the password you use to Sign In to Settings.
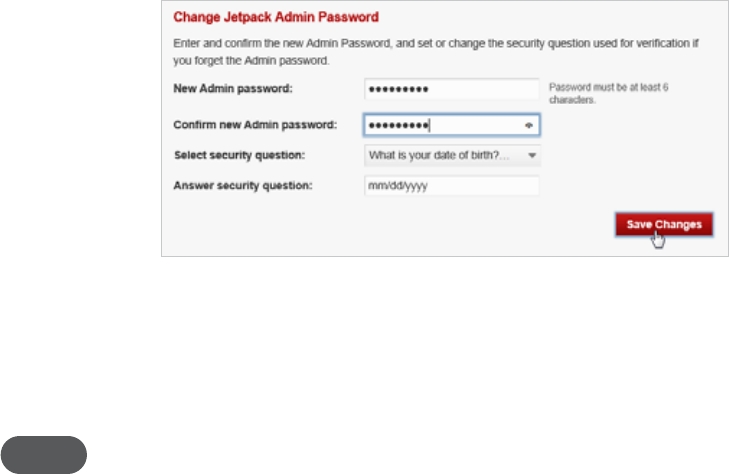
To change the Admin Password used to Sign In to your Jetpack:
➊ Enter your current Admin password in the Enter current password box, then click Continue.
Jetpack Settings - Change Jetpack Admin Password
➋ Enter your new password in the Enter new password box.
➌ Re-enter your new password in the Confirm new password box.
➍ Select a security question from the drop down menu.
Jetpacl Settings - Select Jetpack Security Question
35
➎ Enter the answer to the selected security question in the Answer Security Question eld.
Jetpack Settings - Answer Security Question
➏ Click Save Changes.
➐ A message displays conrming that your password has been changed.
NOTE The next time you sign in to Jetpack Settings, you will need to use the new password.
36
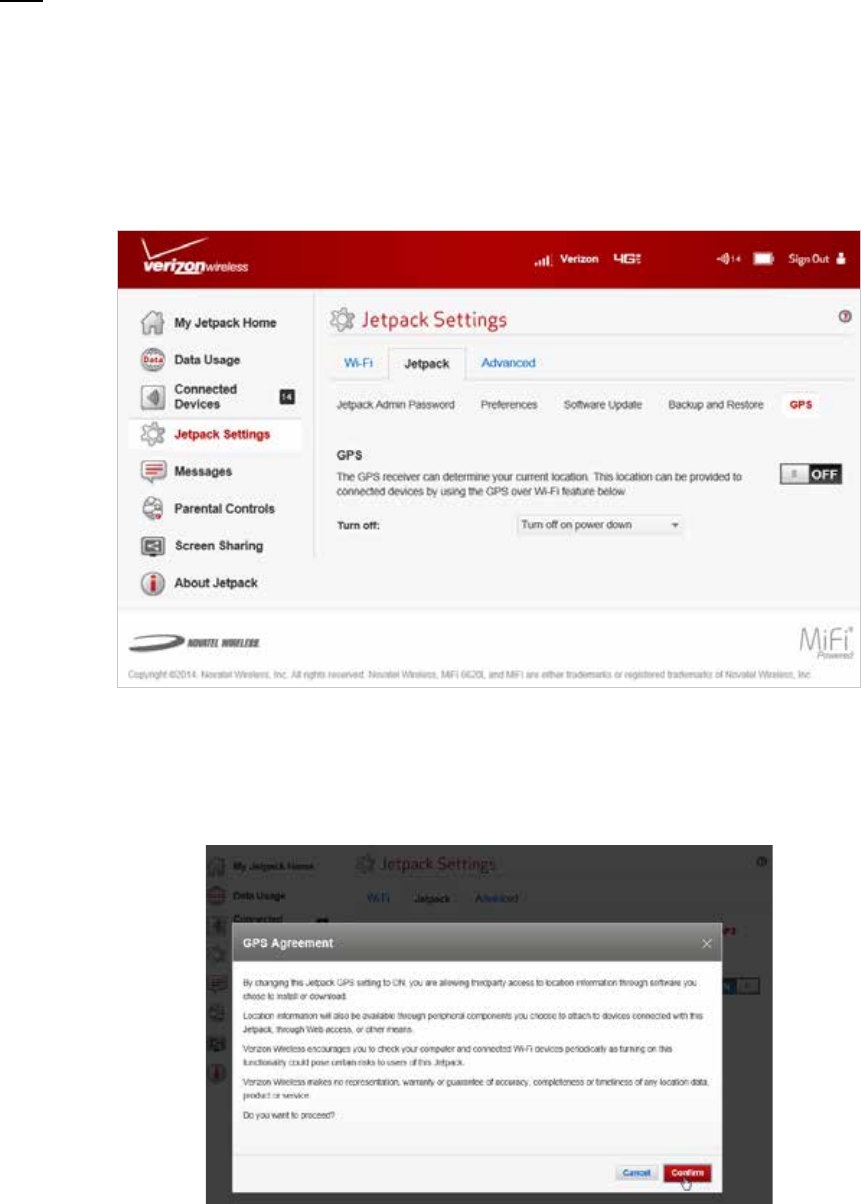
GPS
Clicking on GPS will take you to the Jetpack Settings page Advanced > GPS menu where you can
congure the GPS settings for your Jetpack.
To congure your Jetpack GPS settings:
➊ Slide the ON/OFF button to ON to activate the Jetpack location services and display the GPS
Agreement.
Jetpack Settings - GPS
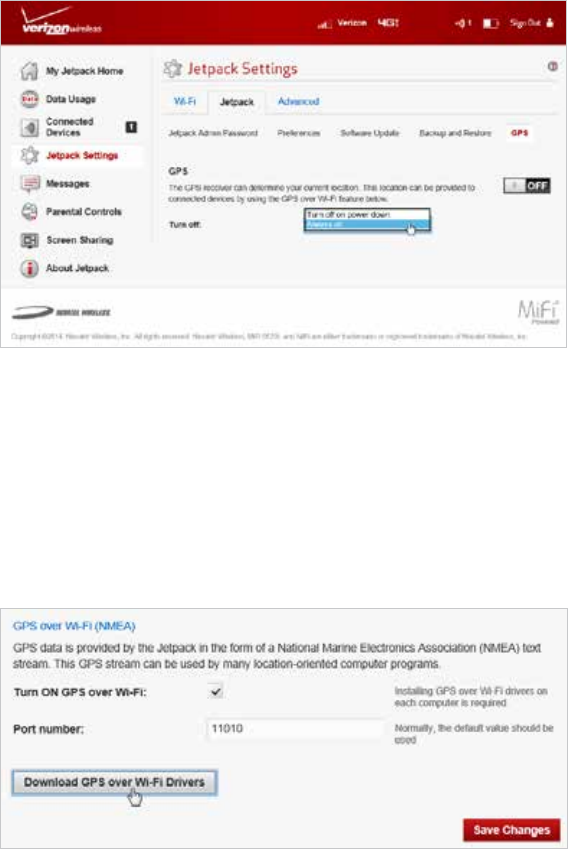
➋ To proceed, click Confirmed after reading and agreeing to the GPS Agreement.
Jetpack Settings - GPS Agreement
37
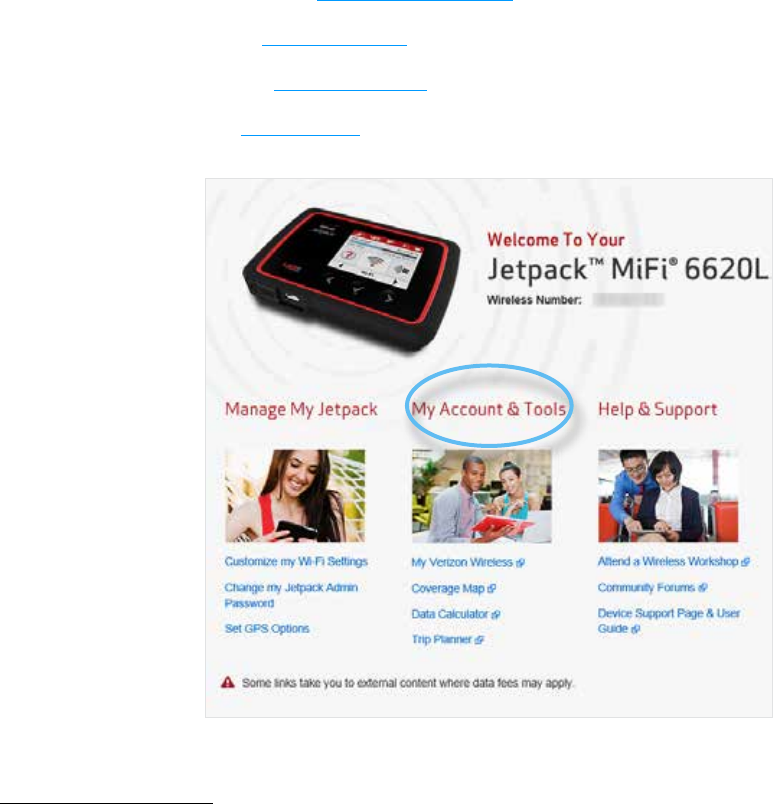
➌ Select the desired option from the Turn off drop down menu. The choices are Always on or
Turn off on power down.
GPS - Turn o menu
➍ NMEA is a standard method of providing a GPS data stream in Windows and other
computing platforms. If this check box is selected, when connected via a USB cable, a NMEA
(serial) port is available to applications that can use a NMEA stream. To use GPS over Wi-Fi
(NMEA), click Download GPS Over Wi-Fi Drivers at the bottom of page to download and
install the drivers.
GPS - Download GPS Over Wi-Fi Drivers
➎ Click Save Changes.
38
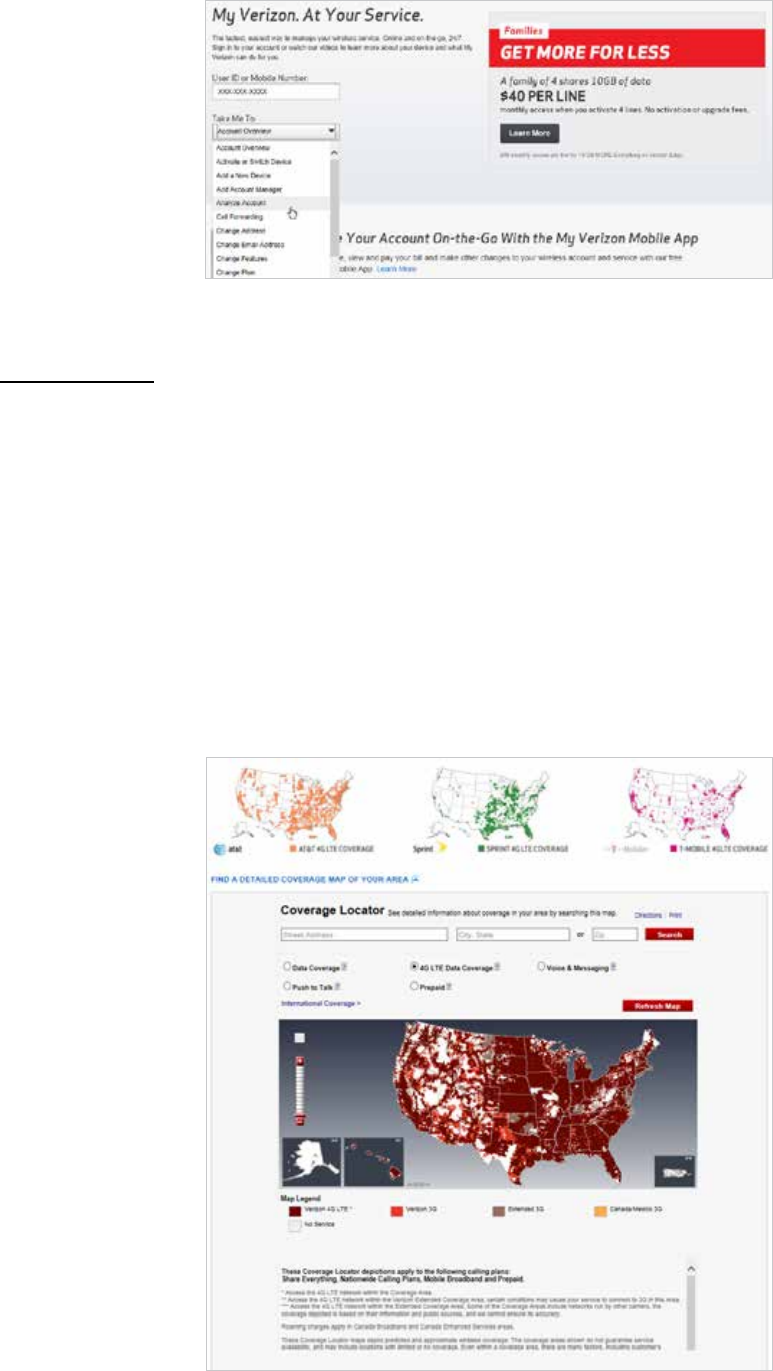
My Account & Tools
The My Account & Tools menu contains the following options:
•My Verizon Wireless (See My Verison Wireless on page 38.)
•Coverage Map (See Coverage Map on page 39.)
•Data Calculator (See Data Calculator on page 41.)
•Trip Planner (See Trip Planner on page 42.)
Jetpack Home - My Account & Tools
My Verison Wireless
Clicking on My Verizon Wireless takes you to the My Verizon page on the Verizon Wireless website
where you can manage your wireless service. Sign in to your account or watch videos to learn more
about your Jetpack and what My Verizon can do for you.
To sign in to your My Verizon account and access your account options:
➊ Type your User ID or Mobile Number in the User ID or Mobile Number eld.
➋ Select the desired option from the Take Me To drop down menu.
39
My Verizon Wireless
Coverage Map
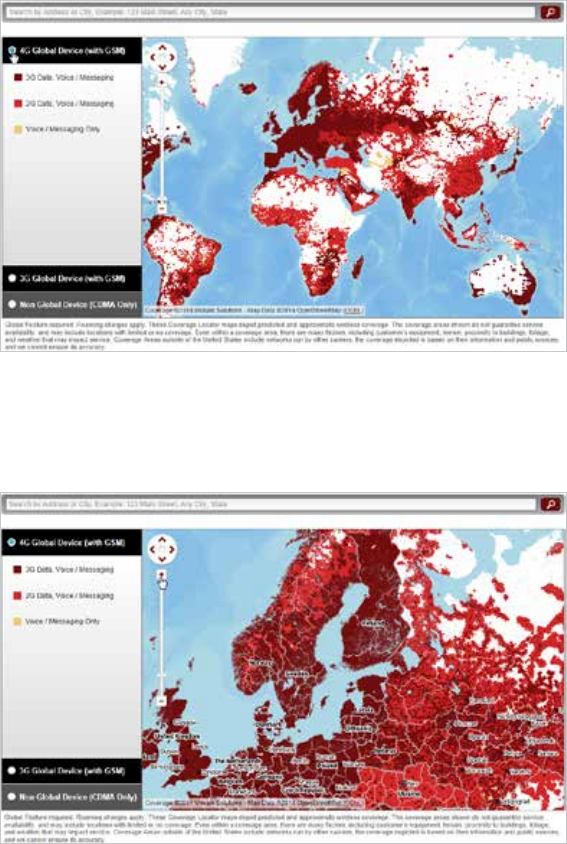
Clicking on Coverage Map takes you to the Coverage Locator on the Verizon Wireless website where
you can view a detailed coverage map, including Data, Push to Talk, 4G LTE Data, Prepaid, and Voice
& Messaging.
To display detailed information about Verizon Wireless coverage in your area (U.S.):
➊ Type your Street Address, City and State, or Zip code in the appropriate eld, then click
Search.
➋ To limit the coverage areas by service type, click the button by each service type desired,
then click Refresh Map.
➌ Use the map navigation tools to adjust the size and location of the area displayed.
Verizon Coverage Locator
40
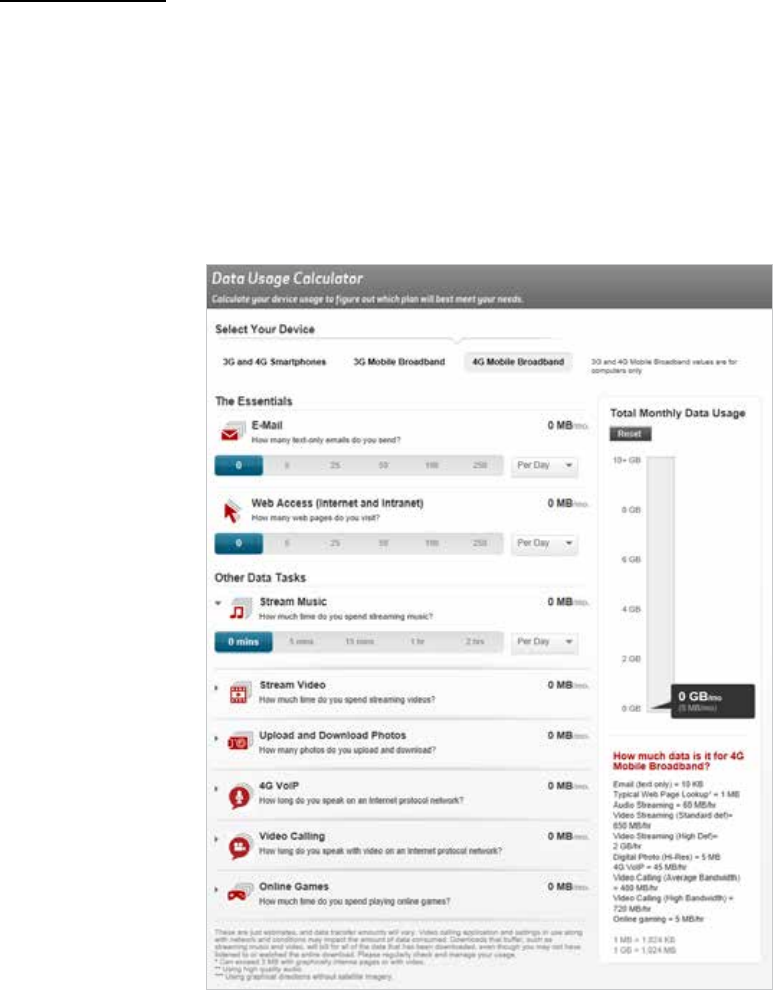
To display detailed information about Verizon Wireless international coverage:
➊ Type your Street Address, City and State, or Zip code in the appropriate eld, then click the
magnifying glass icon.
➋ To limit the coverage areas by service type, click the button by the service type desired.
Verizon International Coverage Map
➌ Use the map navigation tools to adjust the size and location of the area displayed.
Verizon International Coverage Map - Adjust Size
41
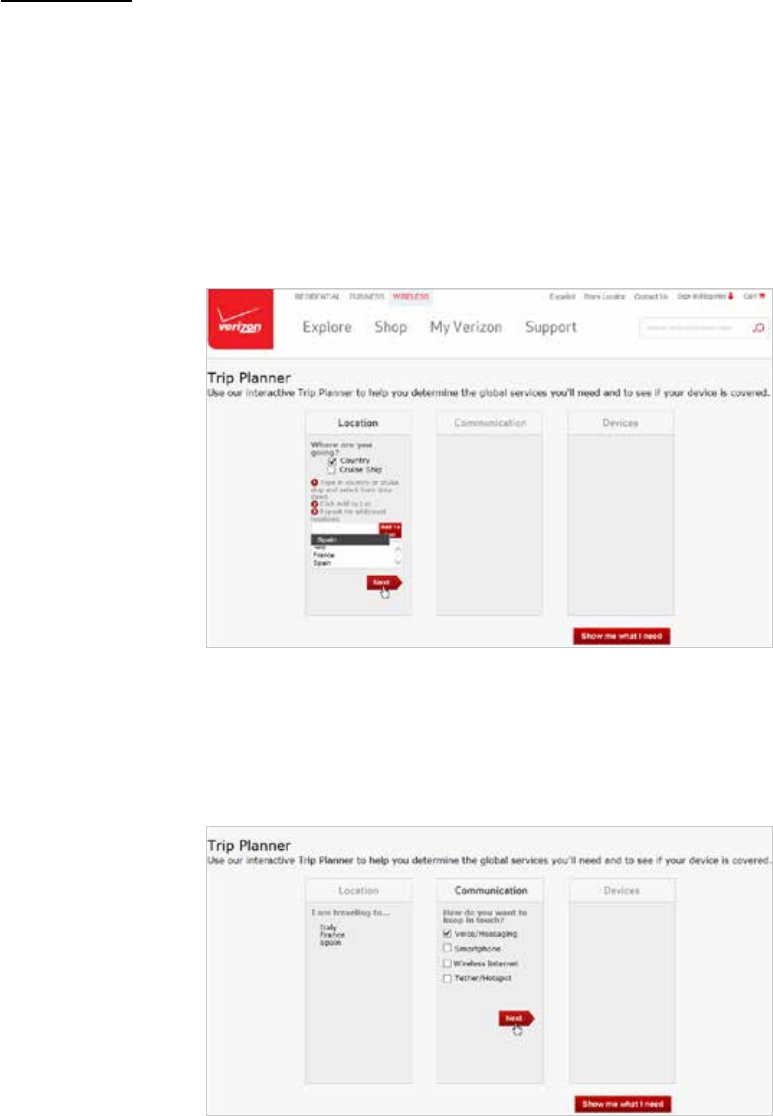
Data Calculator
Clicking on Data Calculator takes you to the Data Usage Calculator on the Verizon Wireless website
where you can calculate your Jetpack usage to determine which plan will best meet your needs.
To use the Data Calculator to select the best Verizon plan to meet your needs:
➊ TBD
➋ TBD
Verizon Data Calculator
42
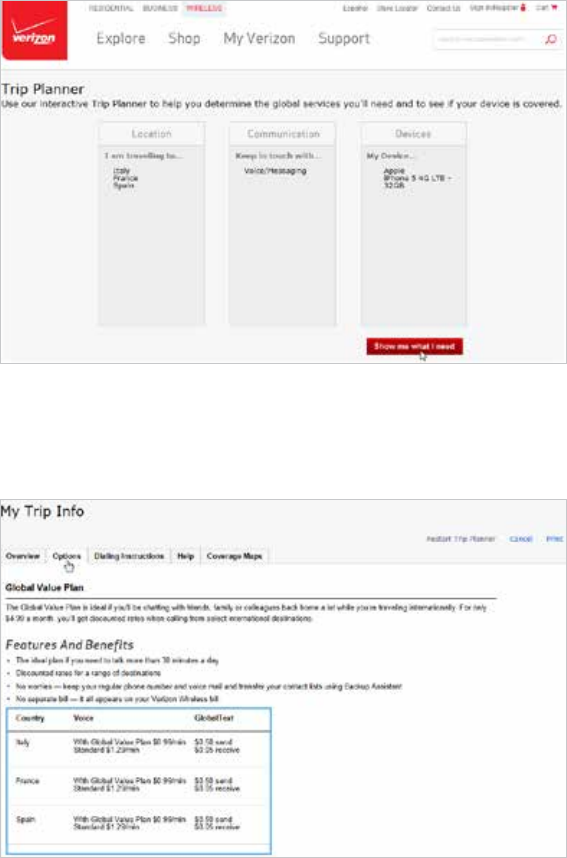
Trip Planner
Clicking on Trip Planner takes you to the interactive Trip Planner on the Verizon Wireless website
where you can determine the global services you need when you travel and see if your device is
covered.
To use the interactive Trip Planner:
➊ TBD
➋ TBD
Verizon Trip Planner - Enter Location
➌ TBD
➍ TBD
Verizon Trip Planner - Enter Communication Type
43
➎ TBD
➏ TBD
Verizon Trip Planner - Show me what I need
➐ TBD
Verizon Trip Planner - Options
➑ TBD
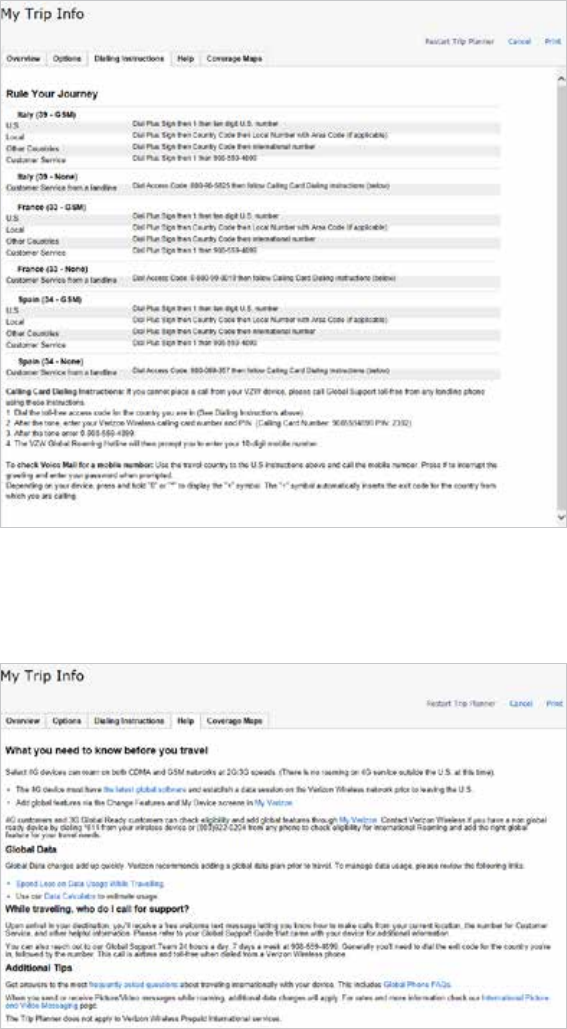
44
Verizon Trip Planner - Dialing Instructions
➒ TBD
Verizon Trip Planner - Help
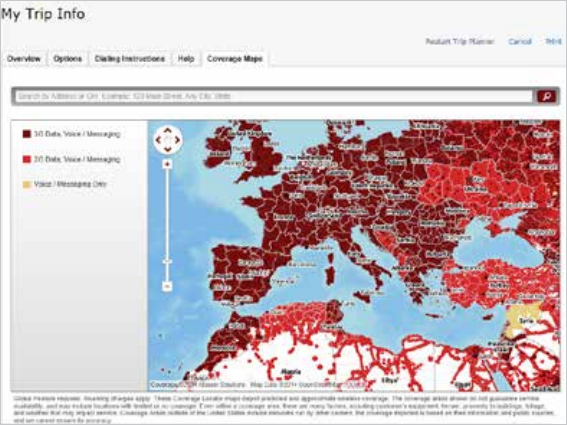
45
➓ TBD
Verizon Trip Planner - Coverage Maps
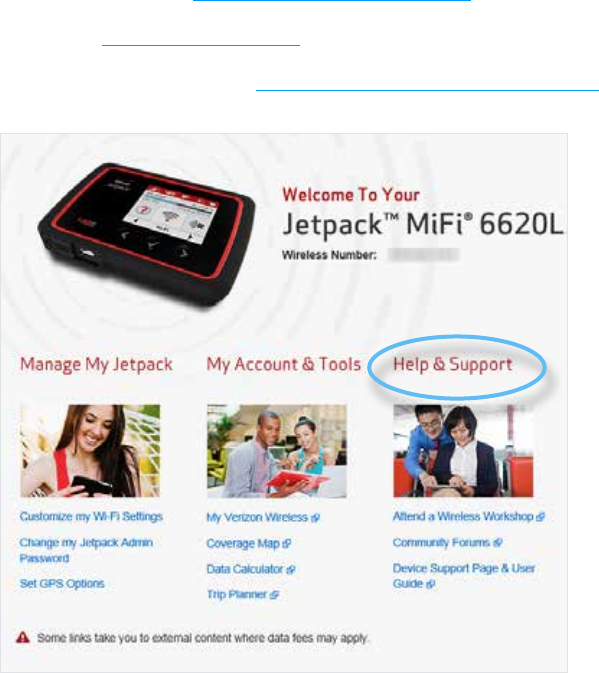
46
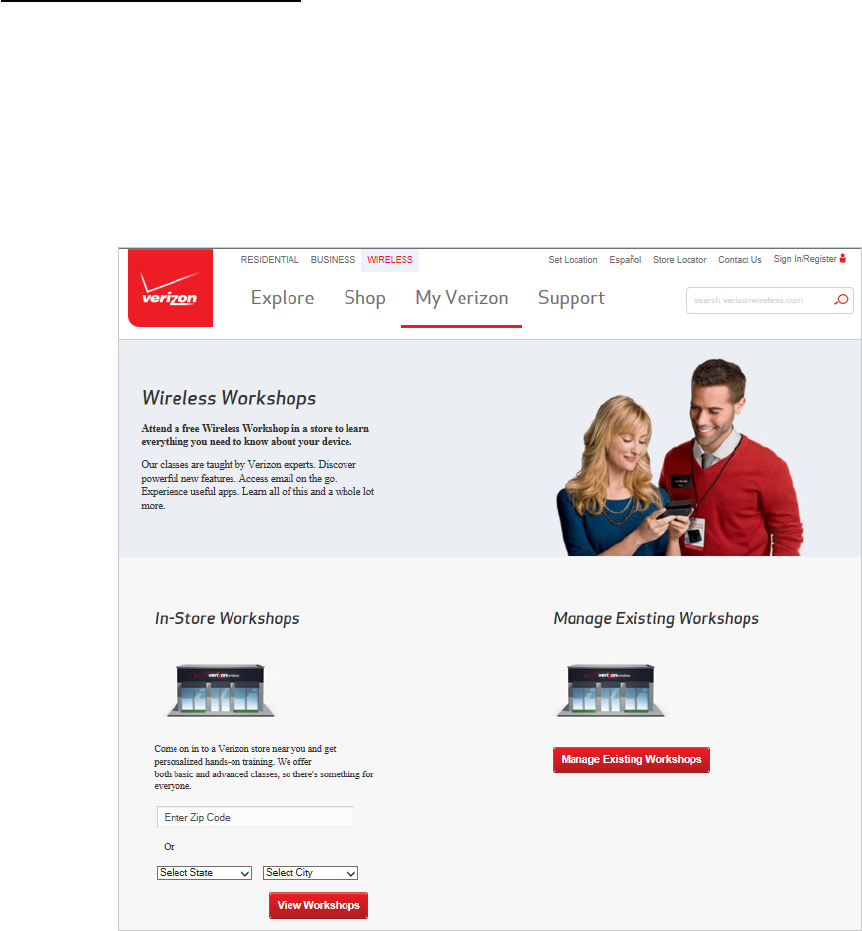
Help & Support
The Help & Support menu contains the following options:
•Attend a Wireless Workshop (See Attend a Wireless Workshop on page 47.)
•Community Forum (See Community Forums on page 48.)
•Device Support Page & User Guide (See Device Support Page & User Guide on page 49.)
Jetpack Home - Help & Support
47
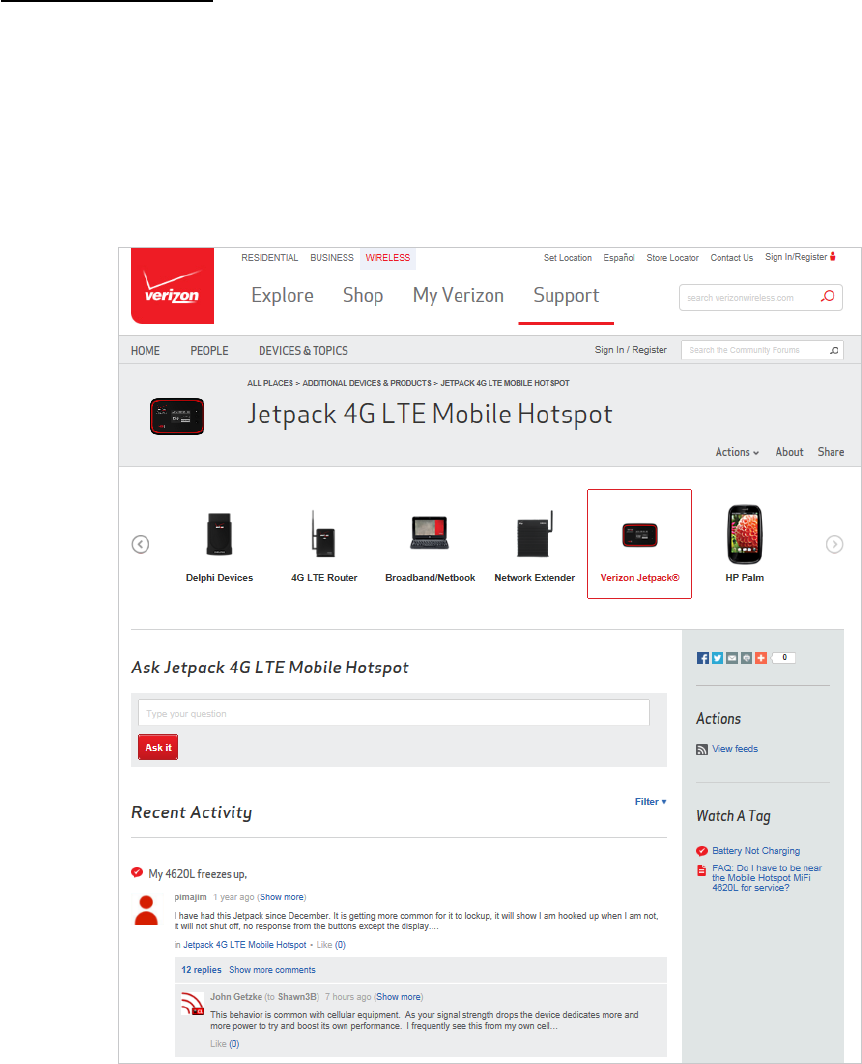
Attend a Wireless Workshop
Clicking on Attend a Wireless Workshop takes you to Attend a Wireless Workshop on the Verizon
Wireless website where you can xxxxxxxxxxxxxxxxx.
To attend a Wireless Workshop:
➊ TBD
➋ TBD
Verizon Wireless Workshops
48
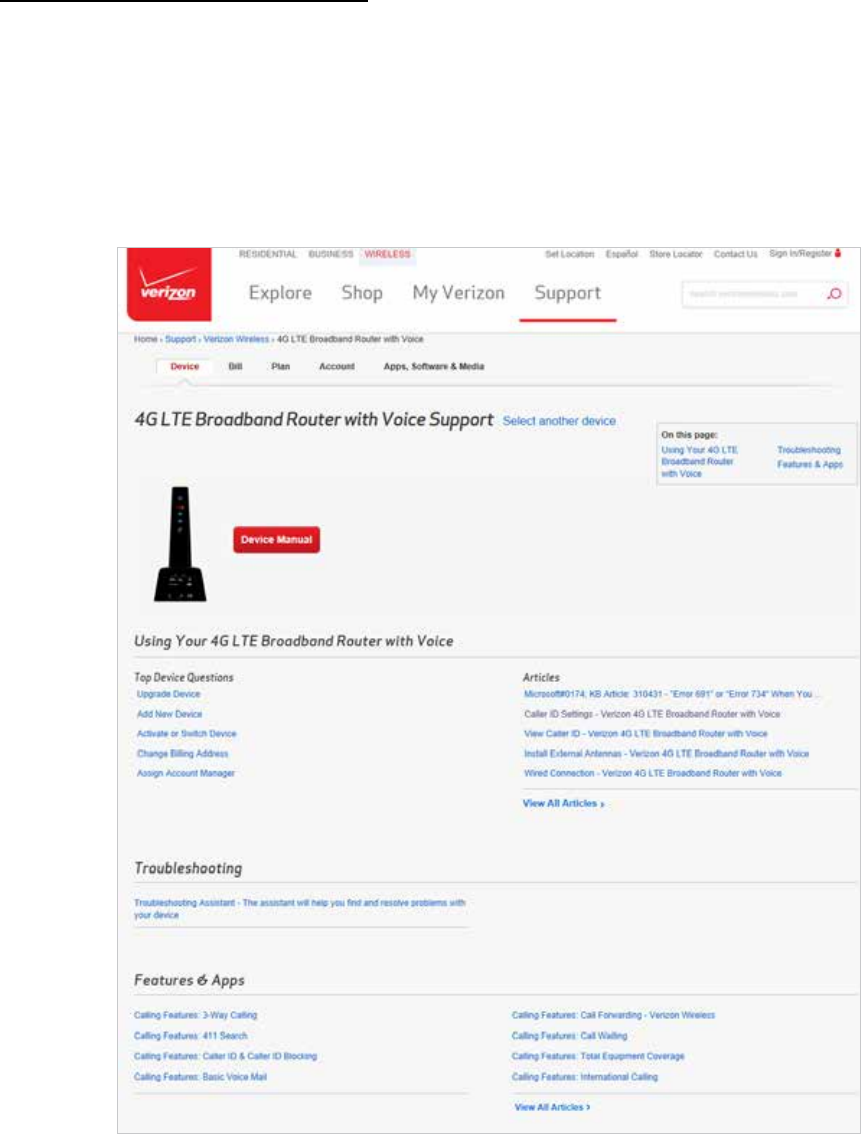
Community Forums
Clicking on Community Forums takes you to Community Forums on the Verizon Wireless website
where you can xxxxxxxxxxxxxxxxx.
To xxxxxxxxxxxxxxxxxxxxxxxxxx:
➊ TBD
➋ TBD
Verizon Support - Community Forums
49
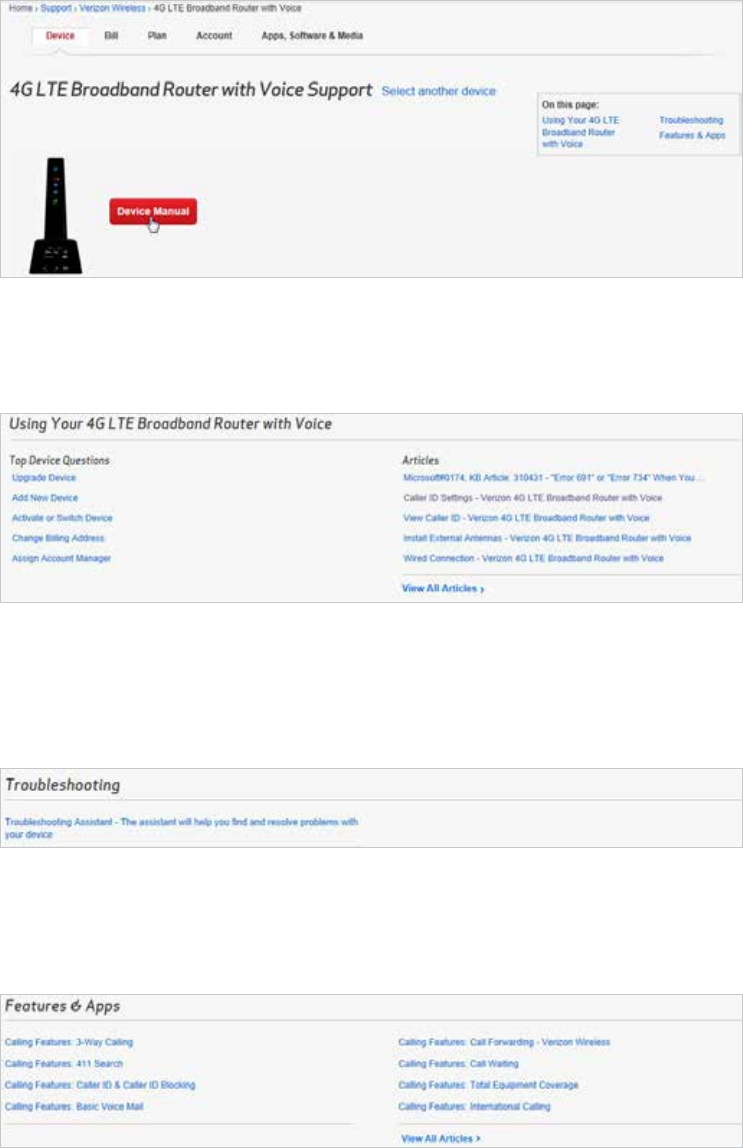
Device Support Page & User Guide
Clicking on Device Support Page & User Guide takes you to xxxxxxxxxxxxxx on the Verizon Wireless
website where you can xxxxxxxxxxxxxxxxx.
To xxxxxxxxxxxxxxx:
➊ TBD.
➋ TBD
Verizon Support - Device Support & User Guide
50
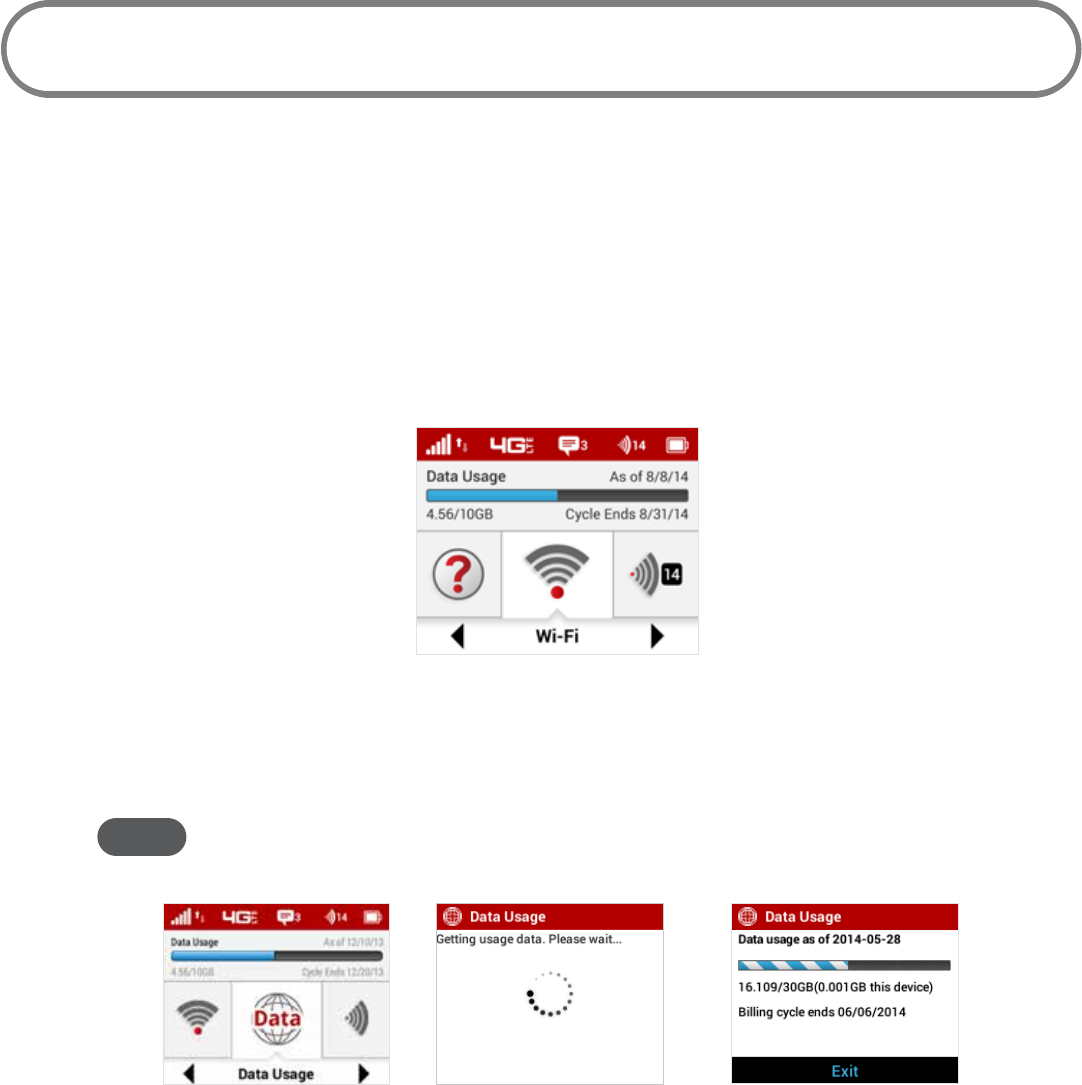
➌ Click Device Manual to view a downloadable PDF version of the User Guide:
Download Device Manual
➍ Click Using Your Jetpack to review the top device questions and device-related articles.
Using Your Jetpack
➎ Click Troubleshooting to access the Troubleshooting Assistant to help you nd and resolve
problems with your device.
Troubleshooting
➏ Click Features & Apps to review device features and applications.
Features & Apps
51
Data Usage
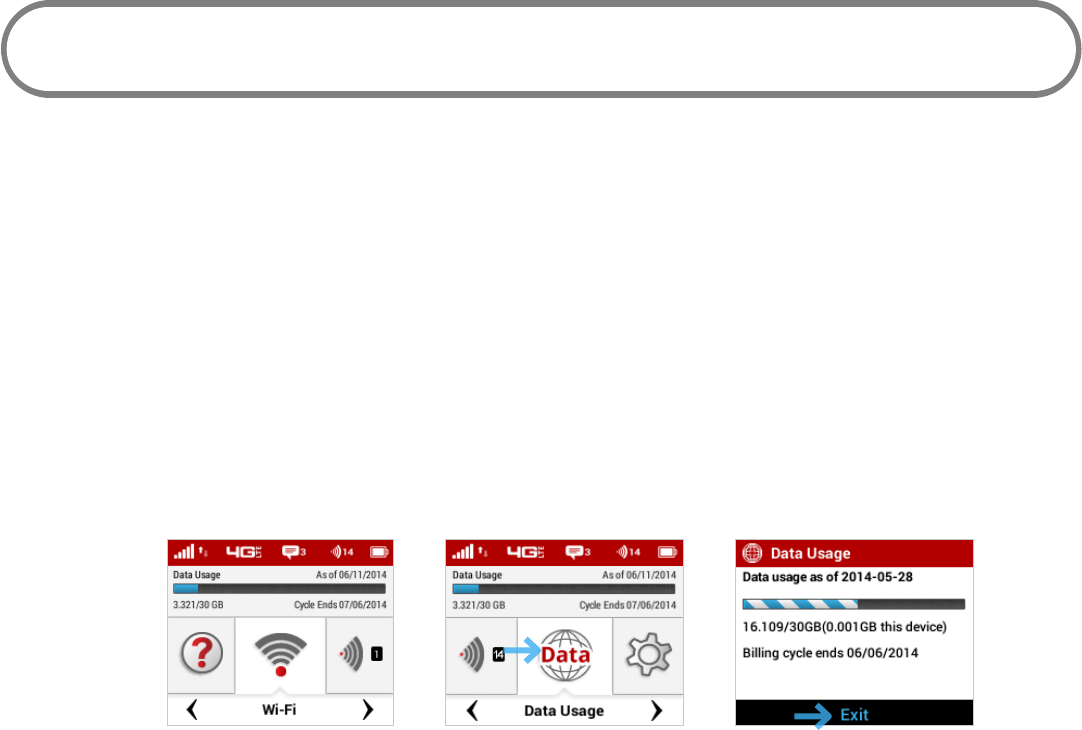
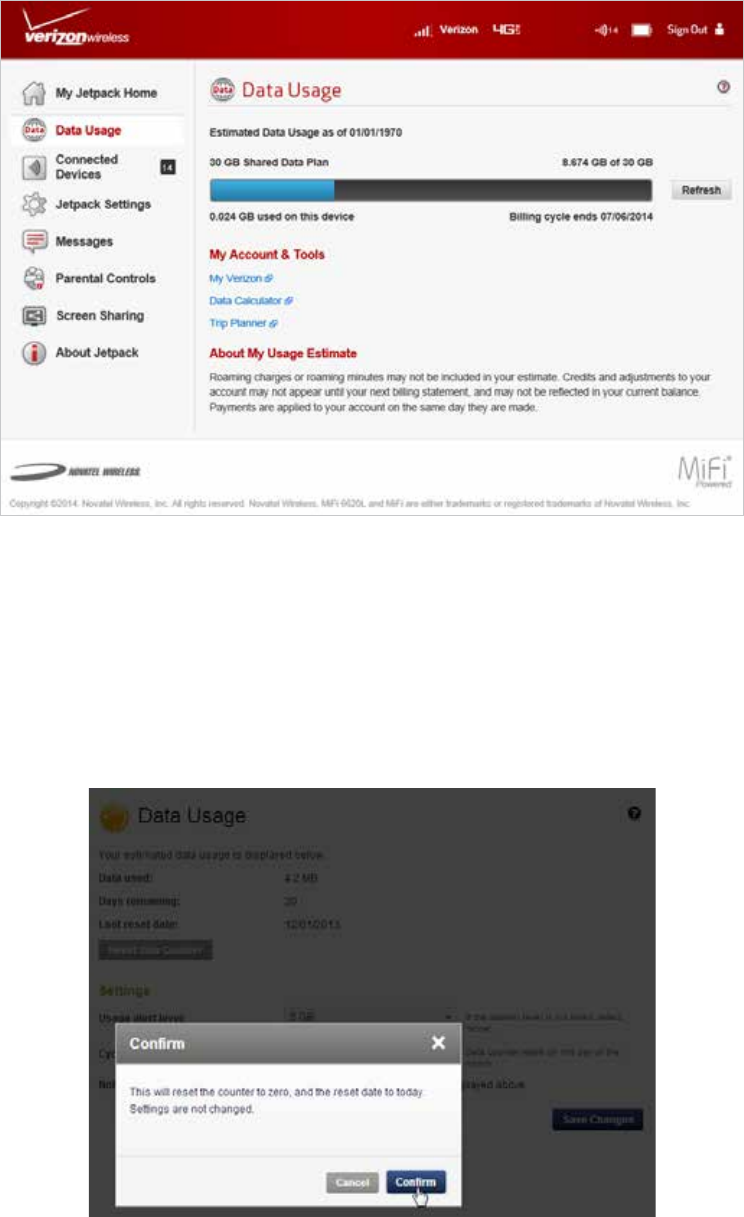
You can quickly check your data usage and billing cycle directly on the Jetpack display, or on the
Jetpack Web User Interface.
On the Jetpack Display
➊ Use the real-time data usage meter on the Home screen to check your data usage and billing
cycle schedule.
Real-time data usage
➋ For an expanded view of your data usage information, use the navigate button to scroll to
the Data Usage icon and press the select button to display both usage cycle and data usage
meters. Press the select button to exit and return to the Home screen.
NOTE The real-time data usage meter will not display when SIM lock is enabled or when another device is
connected to the Jetpack via the Universal Charging port.
Data usage option Getting usage data Data usage & billing cycle
52
On the Jetpack Web User Interface
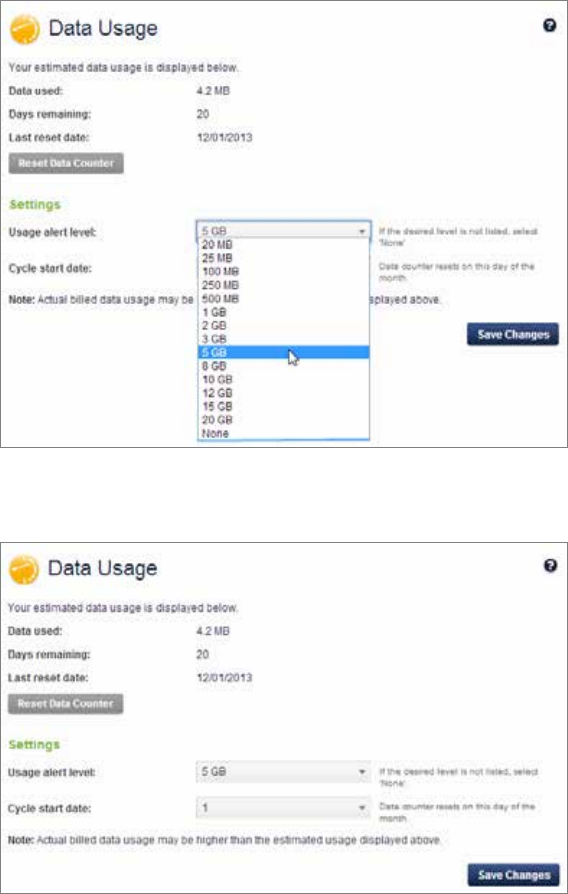
The Data Usage page allows you to obtain your estimated data usage, and to reset the data counter,
usage alert level and cycle start date. Click Data Usage on the Menu panel to display the Data Usage
page and access information specic to your particular plan.
Jetpack Data Usage
To reset the Data Counter:
➊ Click Reset Data Counter. A message displays to conrm that the counter will reset to zero and
the date will reset to the current date.
➋ Click Conrm to accept the changes, or Cancel to retain existing settings.
53
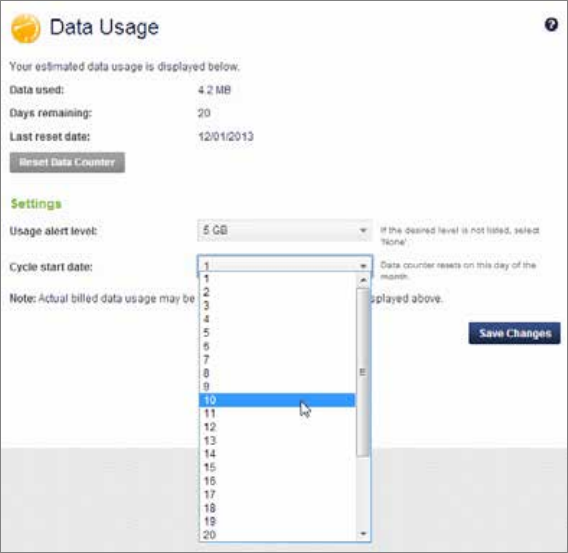
To set the usage alert level:
➊ Select the desired alert level from the Usage alert level dropdown menu.
➋ Click Save Changes to conrm and save the new alert level.
54
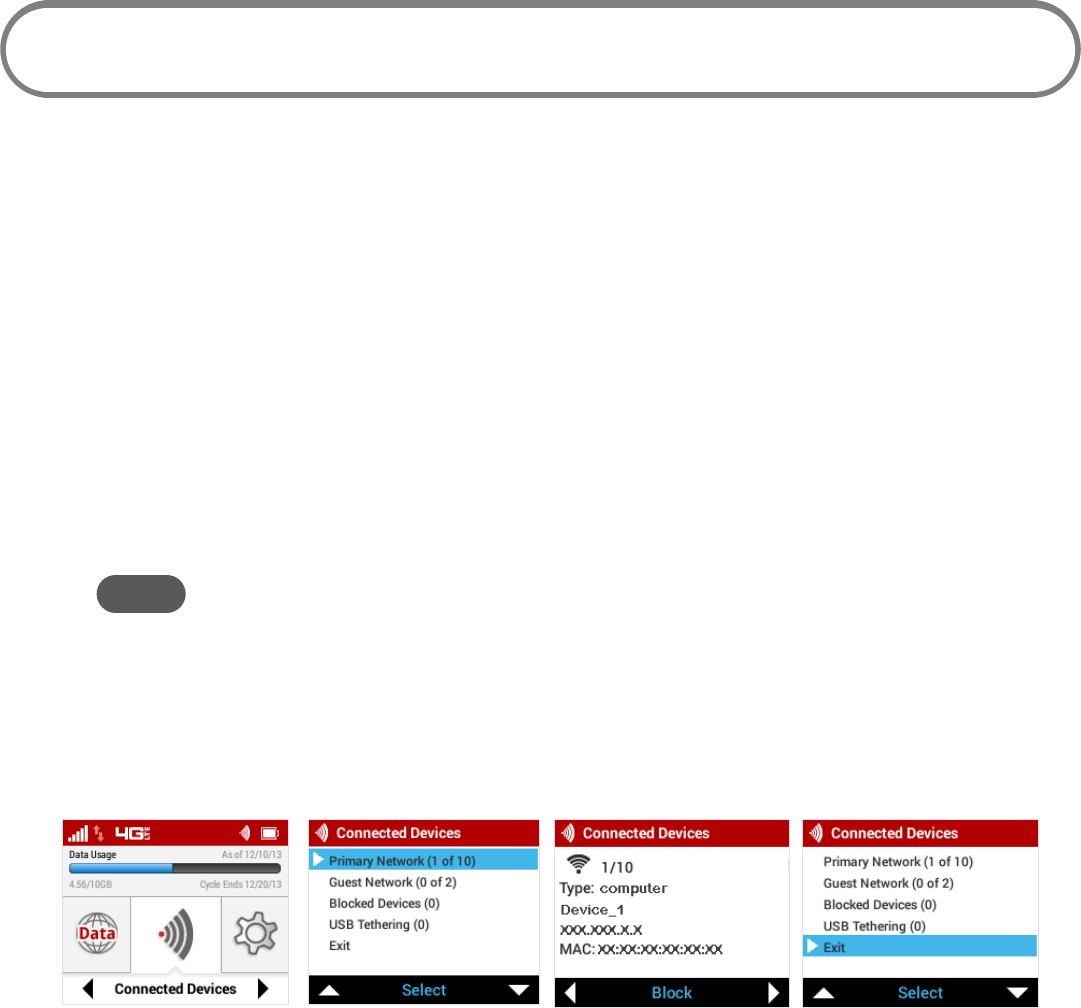
To set the cycle start date:
➊ Select the desired cycle start date from the Cycle start date dropdown menu.
➋ Click Save Changes to conrm and save the new start date.
55
Connected Devices
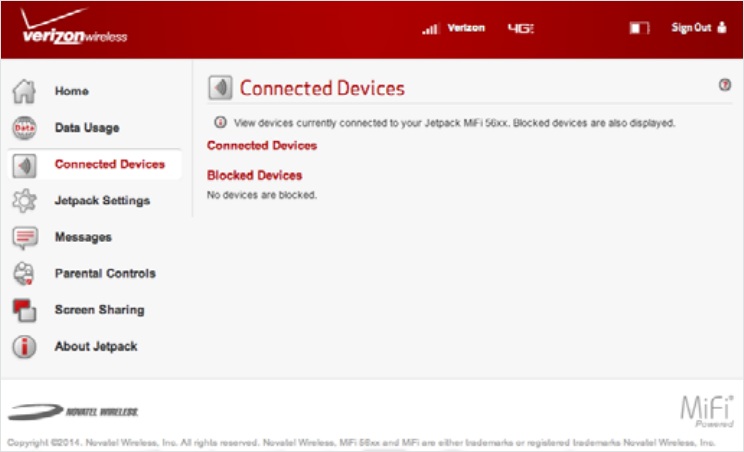
You can view and edit Wi-Fi enabled devices currently connected to your Jetpack Primary and Guest
Networks, as well as any devices currently blocked.
On the Jetpack Display
➊ To display Wi-Fi enabled devices currently connected to or blocked from your Jetpack, use
the navigation button to scroll to the Devices icon and press the select button.
➋ Select the Primary Network option to display the type, name, DNS and MAC details for each
device connected to the Primary Network, and to block or unblock each device.
➌ Select the Guest Network option to display the type, name, DNS and MAC details for each
device connected to the Guest Network, and to block or unblock each device.
NOTE The Guest Network option only displays when the option is enabled.
➍ Select the Blocked Devices option to display the type, name, DNS and MAC details for each
device blocked from the Primary and Guest Networks, and to unblock any of the blocked
devices.
➎ Press the select button to close the Connected Devices screen and return to the Home
screen.
Devices option Select Primary Network Connected device detail Exit Connected Devices
FPO FPO FPO FPO
56
On the Jetpack Web User Interface
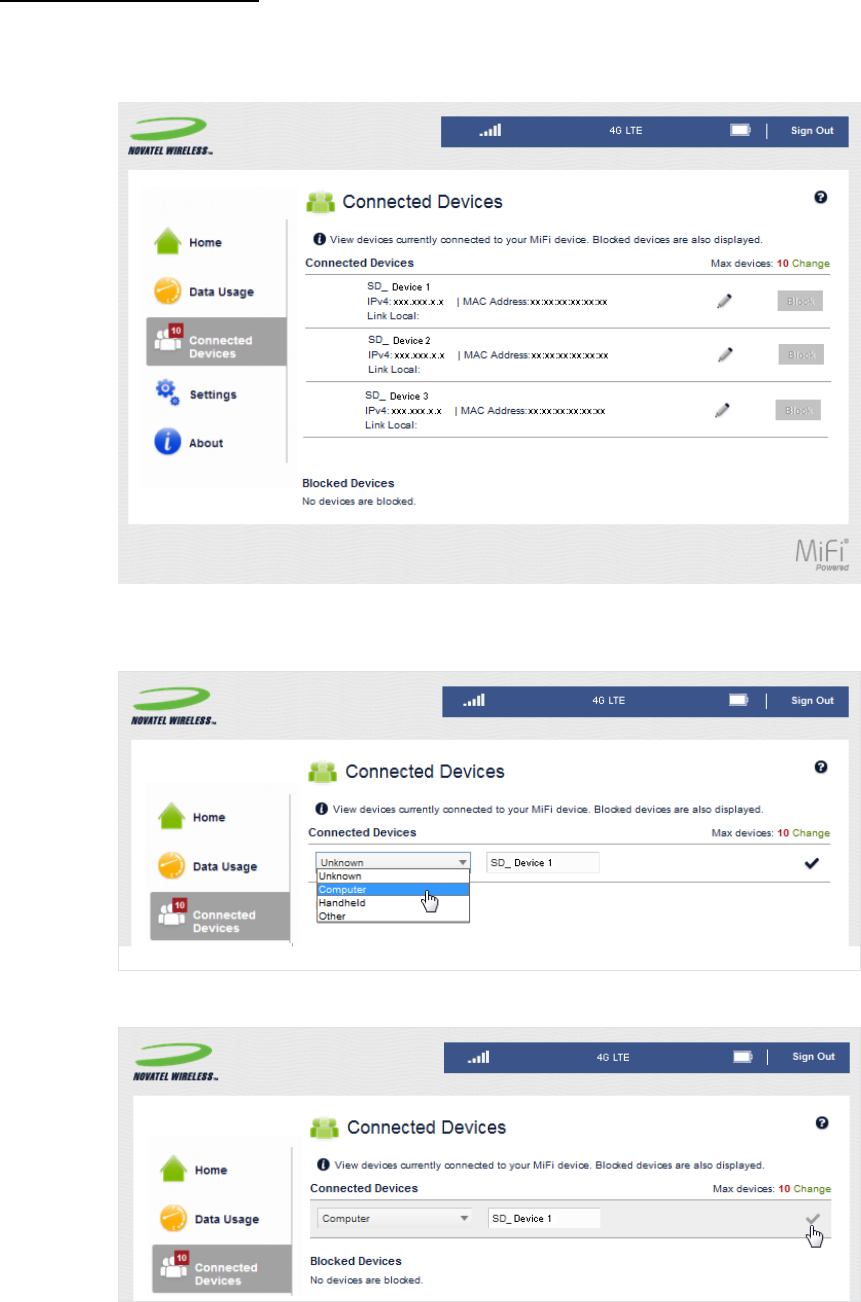
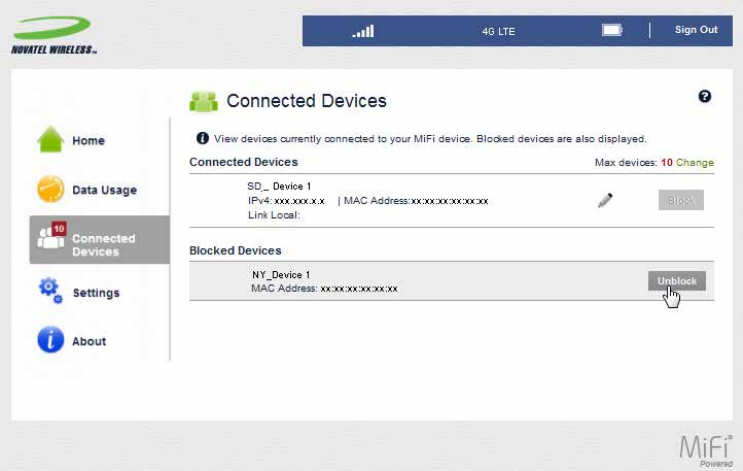
The Connected Devices page allows you to view and edit devices that are currently connected to
your Jetpack. You can also view and unblock any blocked devices. The Connected Devices page
contains the following:
•Connected Devices — Displays the IP Address, MAC Address and Link Local of up to ten
connected devices.
•Blocked Devices — Displays any blocked devices.
Jetpack Connected Devices
Connected Devices
The Connected Devices menu contains the following options:
•Name — Normally, this is the hostname of the connected device, as set on the connected
device. If you have used this interface to assign a name to a connected device, the assigned
name displays in place of the hostname. In rare cases, the hostname may be unavailable. You
can use the Edit option to change the name of any connected device.
•Type — The rst column indicates the type of connected device. You can use the Edit option
to set or change the type. If the type has not been set, no icon is displayed. Once you set the
device type, an appropriate icon is displayed.
•IP Address — The IP address of the connected device.
•MAC Address — The MAC Address is a unique network identier for this connected device.
•Link-Local — If the connected device supports IPv6, the Link-Local IPv6 address is displayed.
•Edit — Allows you to edit a connected device type or name.
•Block — Allows you to prevent a specic device from connecting to the Jetpack.
FPO
FPO
57
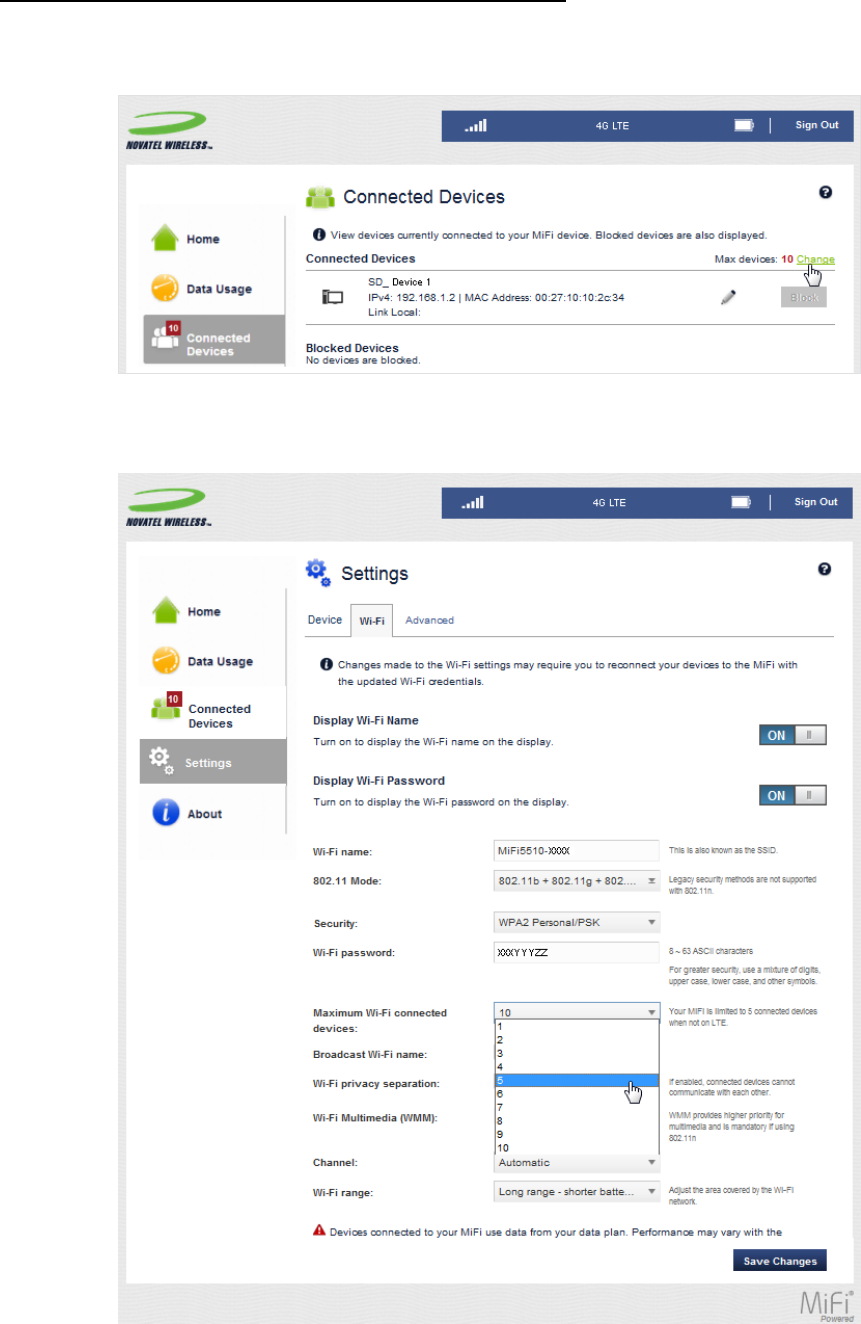
Edit a Connected Device
To edit a connected device:
➊ Click the pencil tool. A page opens allowing you to edit a connected device.
➋ Select the appropriate change from the Connected Devices dropdown menu.
➌ Click the checkmark to nish editing the device.
FPO
FPO
FPO
58
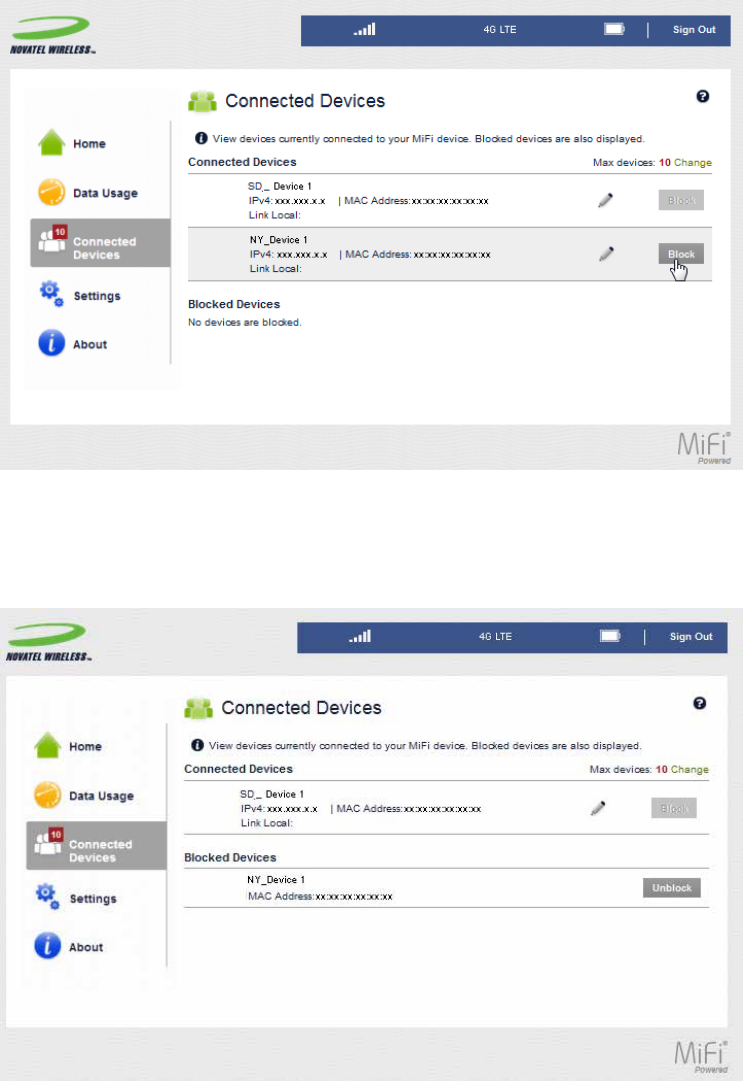
Change the Maximum Number of Connected Devices
To change the maximum number of connected devices:
➊ Click Change on the Connected Devices page.
➋ The Jetpack Settings Wi-Fi page opens. Select the number of devices from the Maximum Wi-
Fi connected devices dropdown menu.
➌ Click Save Changes.
FPO
FPO
59
Blocked Devices
The Blocked Devices menu contains the following menu options:
•Block Button — Click Block to disconnect a connected device and prevent it from
reconnecting. The blocked device then appears in the Blocked List. This option is available for
use with each connected device, except for your own device, and any device connected via
USB.
•Blocked List — This lists any devices you have blocked. Note that since these devices are
not currently connected, and are blocked from connecting, they do not have an IP address.
Instead, they are identied by their name and MAC address.
FPO
FPO
60
•Unblock Button — Click Unblock to unblock a previously blocked device, freeing it to
connect again. The unblocked device is deleted from the Blocked List, and will reappear in
the Connected Devices list when it connects.
FPO
61
Jetpack Settings
Settings allow you to make device changes such as screen brightness and audio on/o, and to
select mobile network options for your Jetpack.
On the Jetpack Display
Screen Timeout
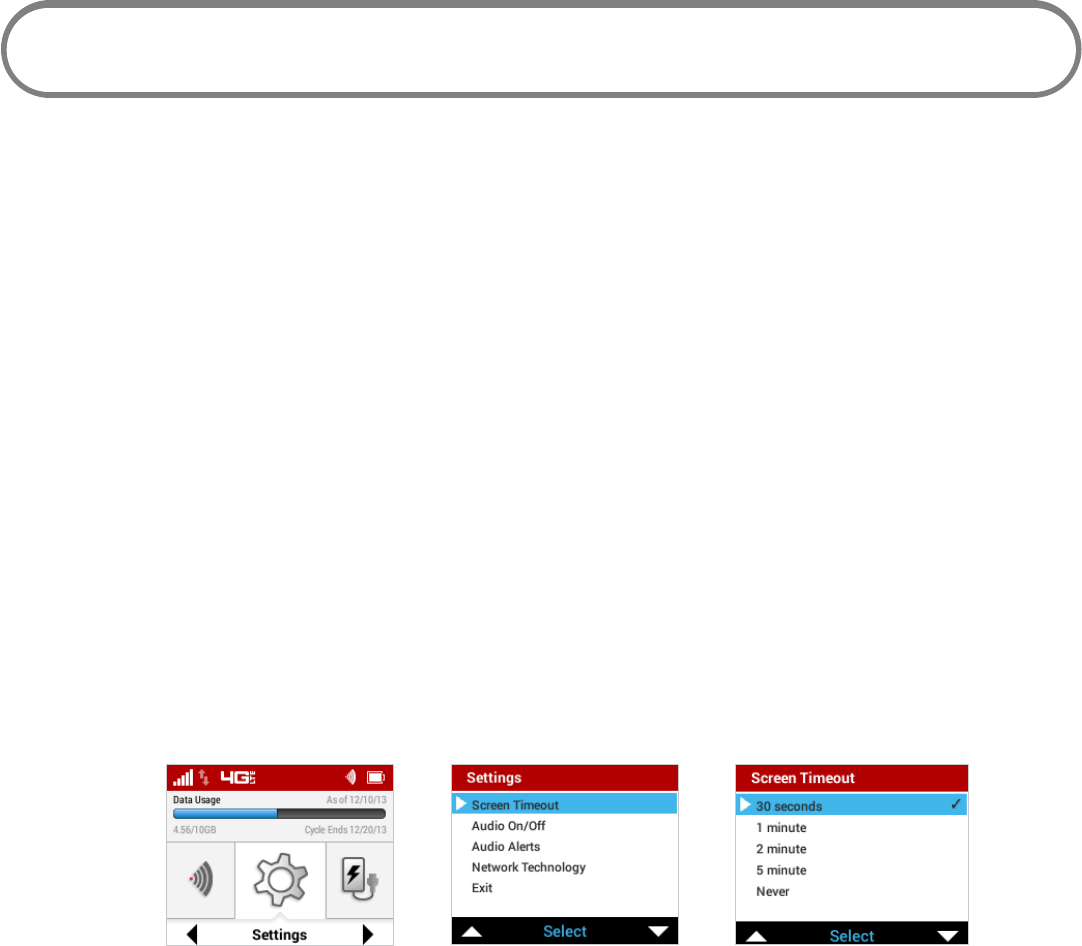
➊ On the Home screen, navigate to the Settings icon and press the select button to open the
Settings Select screen and display Settings options.
➋ Navigate to the Screen Timeout option and press the select button to display the Screen
Timeout settings options. The settings options include: after 30 seconds, after 1 minute,
after 2 minutes, after 5 minutes, and never. The current setting will be selected when the
screen is displayed.
➌ Select the desired Screen Timeout setting, and press select to save the setting and return to
the Settings Select screen.
➍ Navigate to the Exit option and press the select button to return to the Home screen.
Settings option Select Screen Timeout option Set Screen Timeout detail
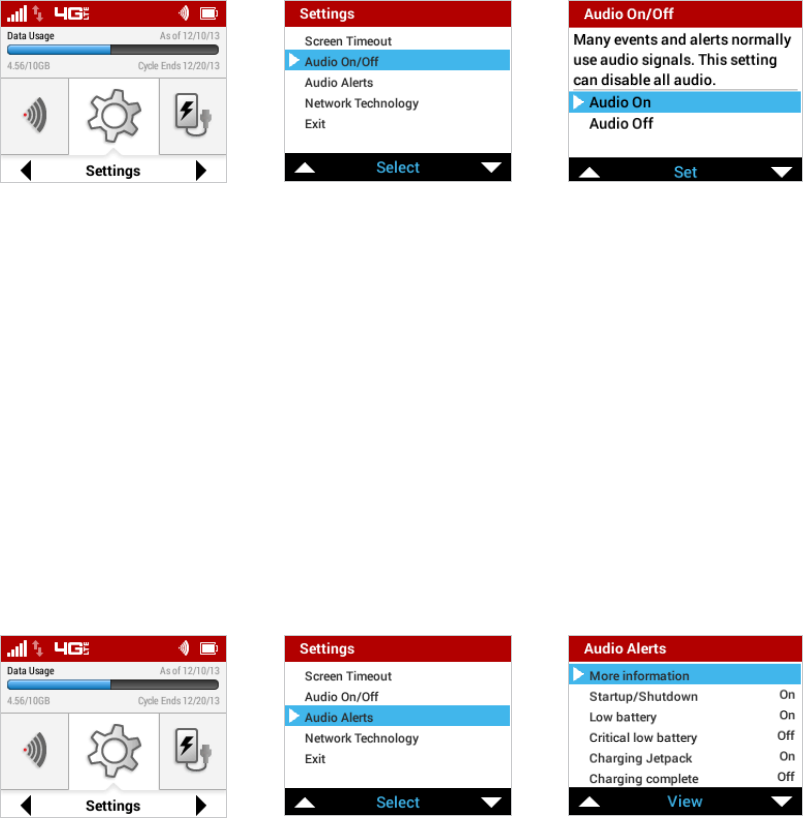
Audio On/Off
➊ On the Home screen, navigate to the Settings icon and press the select button to open the
Settings Select screen and display Settings options.
➋ Navigate to the Audio On/O option and press the select button to display the Audio On/
O settings options. The settings options are Audio On and Audio O. Setting Audio O will
disable all audio on the Jetpack.
➌ Select the desiredAudio On/O setting, and press select to save the setting and return to the
Settings Select screen.
FPO FPO FPO
62
➍ Navigate to the Exit option and press the select button to return to the Home screen.
Settings option Select Audio On/O option Set Audio On/O detail
Audio Alerts
➊ On the Home screen, navigate to the Settings icon and press the select button to open the
Settings Select screen and display Settings options.
➋ Navigate to the Audio Alerts option and press the select button to display the Audio Alerts
settings options. Alert settings include Startup/Shutdown, Low battery, Critical low battery,
Charging complete, and External charging. The current settings are displayed for each alert
➌ Select the desired setting for each alert, and press select to save the setting and return to the
Settings Select screen.
➍ Navigate to the Exit option and press the select button to return to the Home screen.
Settings option Select Audio Alerts option Set Audio Alerts detail
Network Technology
➊ On the Home screen, navigate to the Settings icon and press the select button to open the
Settings Select screen and display Settings options.
➋ Navigate to the Network Technology option and press the select button to display the
Network Technology screen with the available technology options.
➌ Navigate to the desired technology option and press the select button.
FPO FPO FPO
FPO FPO FPO

63
➍ Navigate to the Exit option and press the select button to return to the Home screen.
Settings option Select Network Technology option Set Network Technology detail
FPO FPO FPO
64
On the Jetpack Web User Interface
The Settings page allows you to make administration password and preference changes; obtain
software update information; and backup and restore les to your Jetpack. The Settings page
contains the following menu options:
•Wi-Fi (See Wi-Fi on page 58.)
•Jetpack (See Jetpack on page 69.)
•Advanced (See Advanced on page 75.)
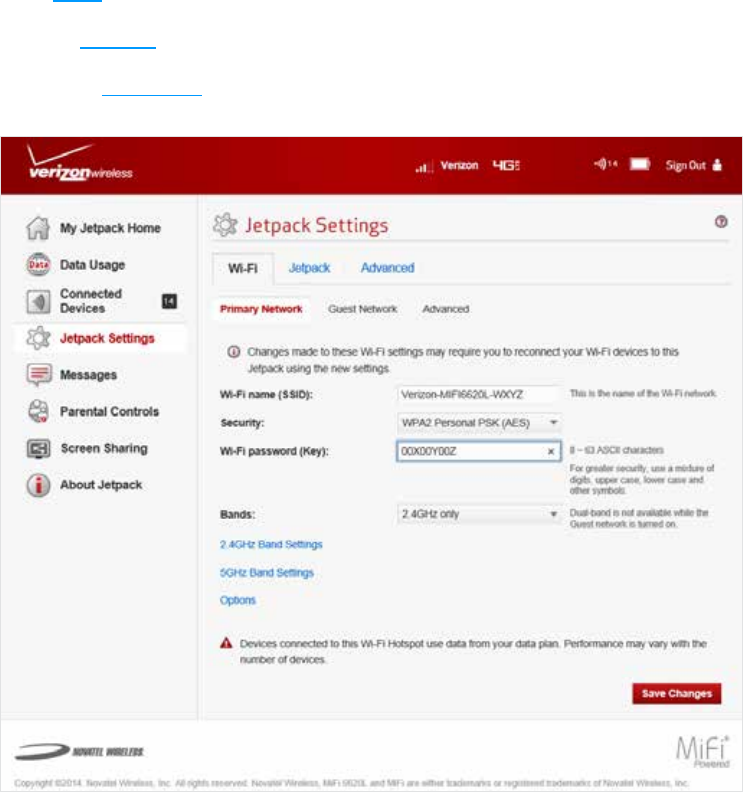
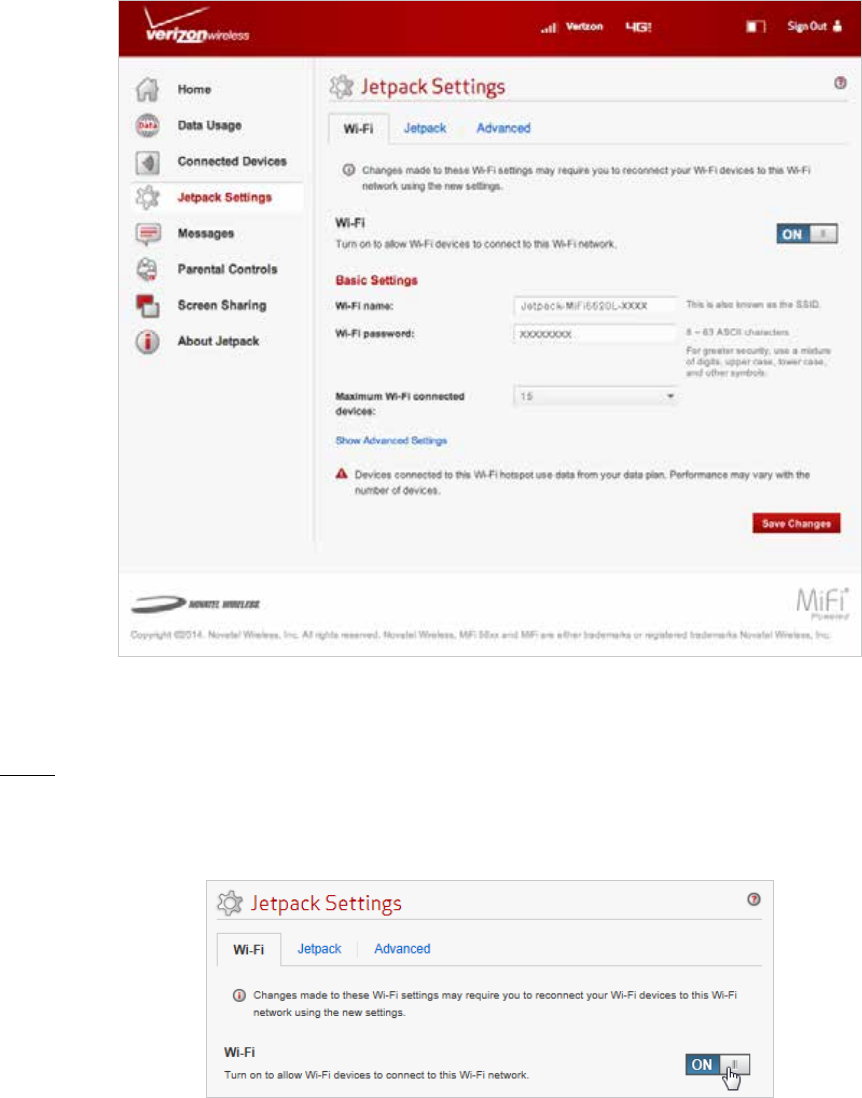
Jetpack Wi-Fi Settings
65
Wi-Fi
The Wi-Fi menu allows you to enable Wi-Fi devices to connect to the Jetpack Wi-Fi network, and to
change the Basic Settings and access the Advanced Wi-Fi Settings.
•Wi-Fi
•Basic Settings
•Show Advanced Settings
Change Wi-Fi Name and Password
Wi-Fi
•To allow Wi-Fi devices to connect to your Jetpack Wi-Fi network, slide the ON/OFF button to
ON.
Turn Wi-Fi ON
FPO

66
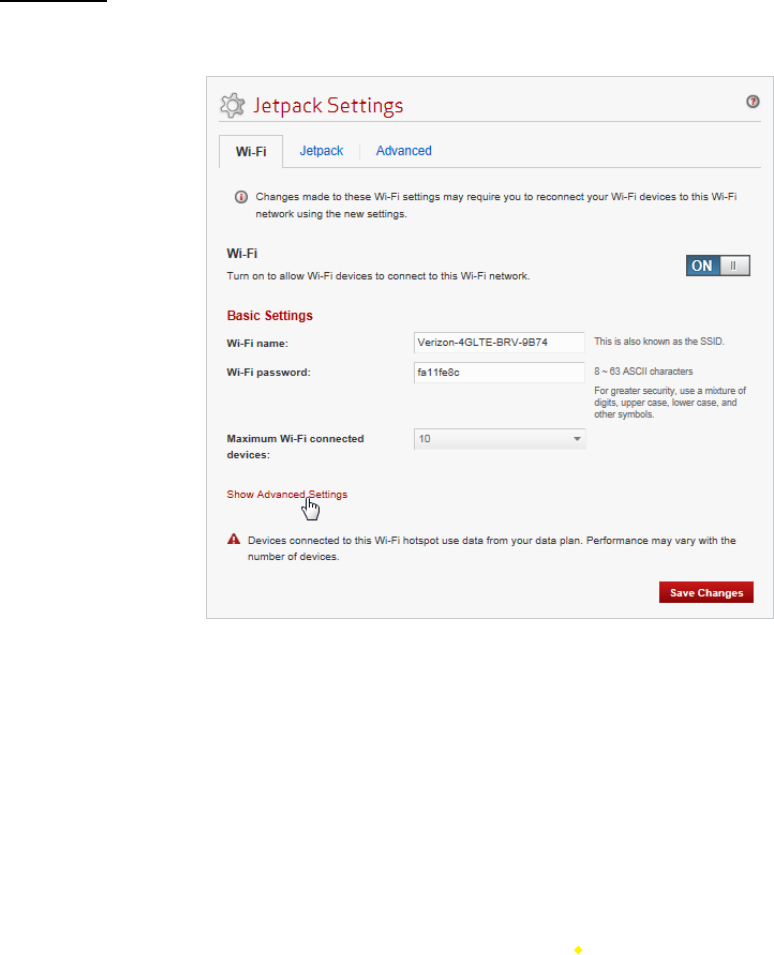
Basic Settings
Use the Basic Settings options to change your Wi-Fi name, password, or the maximum number of
Wi-Fi connected devices:
➊ To change the current Wi-Fi name (SSID), type the new name in the Wi-Fi name eld.
➋ To change the current Wi-Fi password, type the new password in the Wi-Fi password eld.
NOTE The password must be a minimum of 8 ASCII characters. For the greatest security, use a mixture of
digits, upper case, lower case, and other symbols.
➌ Select the desired maximum number of Wi-Fi connected devices from the dropdown menu.
➍ Click Save Changes to accept and nalize the new Basic Settings.
67
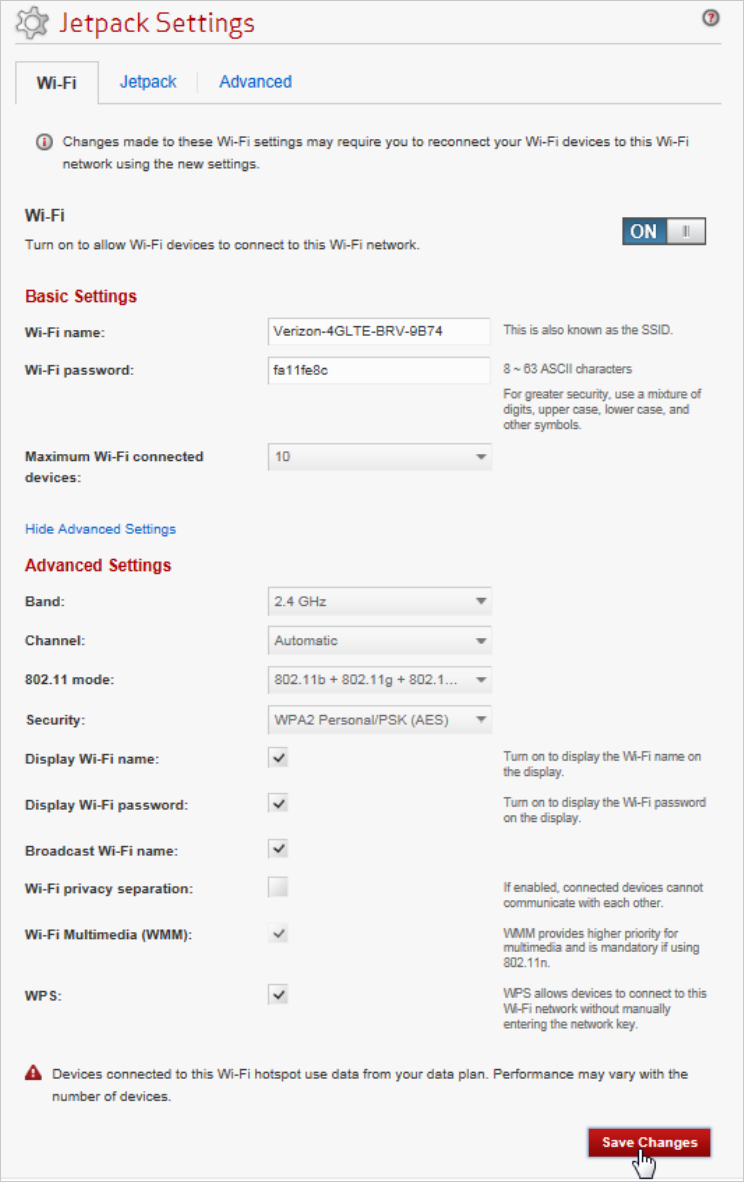
Advanced
To display and access the Wi-Fi Advanced Settings options, click Show Advanced Settings.
Show Advanced Jetpack Settings
Use the Advanced Settings options to change the following:
•Band — Select the desired Band from the dropdown menu. Band options are either 5 GHz or
2.4 GHz.
•Bandwidth — Select the desired Bandwidth from the dropdown menu. Bandwidth options
are either 20/40 MHz or 20 MHz.
•Channel — Select the desired Channel from the dropdown menu. Channel options are
automatic, 36, 40, 44, 48, 149, 153, 157, 161 or 165.
•802.11 mode — 802.11 mode is 802.11a + 802.11n.
•Security — Select the desired Security type from the dropdown menu. Security type options
are either WPA2 Personal/PSK (AES) or None.
•Display Wi-Fi name — Click the checkbox to display the Wi-Fi name on the Jetpack display.
•Display Wi-Fi password — Click the checkbox to display the Wi-Fi password on the Jetpack
display.
•Broadcast Wi-Fi name — Click the checkbox to display your Jetpack Wi-Fi network in the list
of available Wi-Fi networks on your connected devices. .
•Wi-Fi privacy separation — Click the checkbox to prevent connected devices from
communicating with each other.
•Wi-Fi Multimedia (WMM) — Click the checkbox to provide a higher priority for multimedia.
This setting must be turned on if you are using 802.11n.
•WPS— Click the checkbox to allow devices to connect to your Jetpack Wi-Fi network without
manually entering the Wi-Fi password.
➊ To change the Band, Bandwidth, Channel, 802.11mode, or Security, select the desired option
FPO
68
from the dropdown menu.
➋ To turn on the Wi-Fi name and password display, Wi-Fi privacy separation, Wi-Fi Multimedia,
or WPS, click the appropriate checkbox.
➌ Click Save Changes to accept and nalize the new Advanced Settings.
Change Jetpack Wi-Fi Advanced Settings
FPO
69
Jetpack
The Jetpack menu contains the following menu options:
•Jetpack Admin Password (See Jetpack Admin Password on page 46.)
•Preferences (See Preferences on page 71.)
•Software Update (See Software Update on page 44.)
•Backup and Restore (See Backup and Restore on page 73.)
Jetpack Admin Password
FPO
70
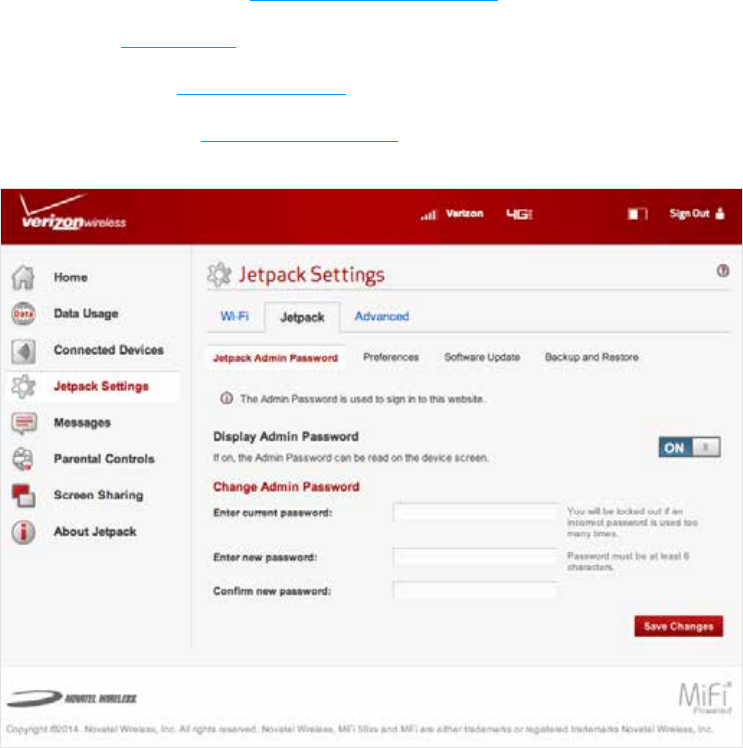
Jetpack Admin Password
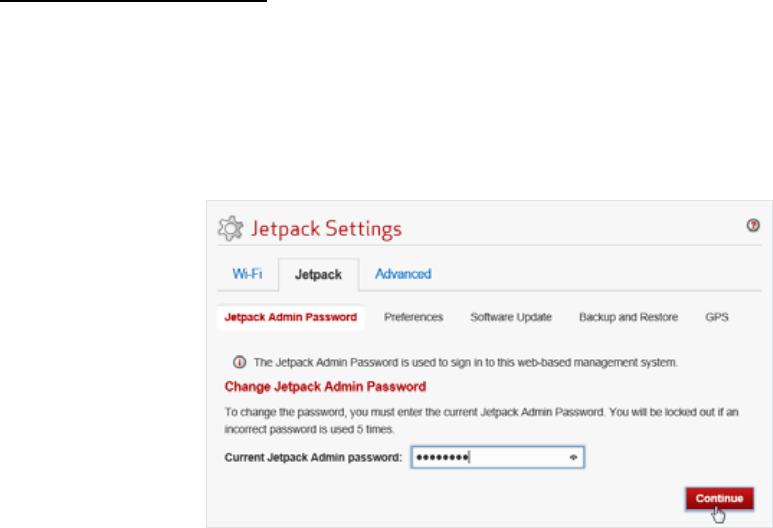
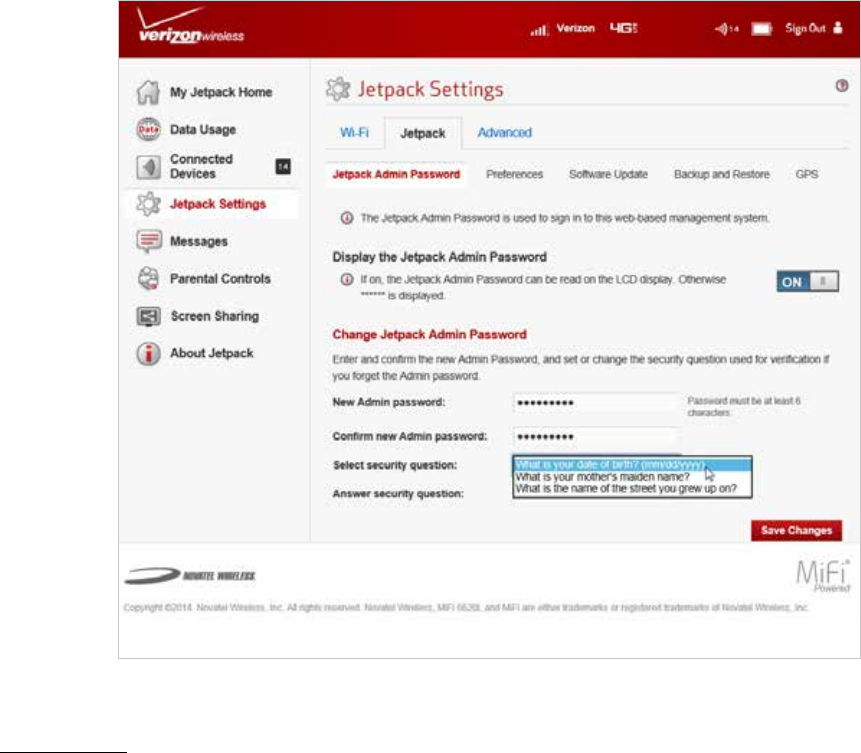
The Jetpack Admin Password page allows you to display, hide and/or change the Admin Password.
Display or Hide the Admin Password
Slide the ON/OFF button to ON to display the Jetpack Admin Password on the device or to OFF to
hide the Jetpack Admin Password on the device.
Change Jetpack Admin Password
Change the Admin Password
To change your Admin Password:
➊ Type your current password in the Current Admin Password eld. Select Continue to display
the Change Jetpack Admin Password screen.
➋ Type your new password in the New Admin Password eld.
➌ Type your new password a second time in the Confirm new Admin Password eld.
➍ Select a security question from the dropdown menu options.
➎ Type the answer to the selected security question in the Answer security question eld.
71
➏ Click Save Changes to save any changes made to your password.
Save Changes to Jetpack Admin Password
Preferences
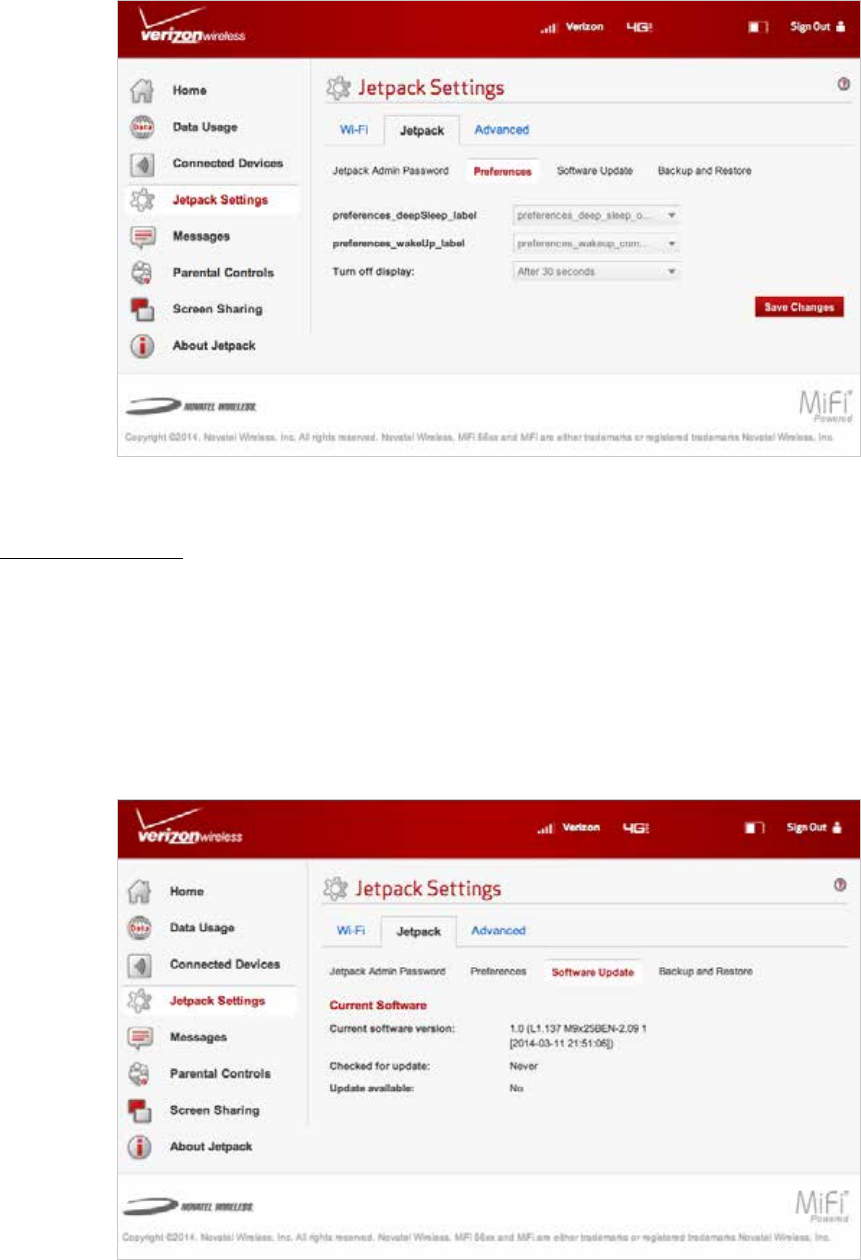
The Preferences page contains the following:
•Turn off display — The Turn off display menu changes the amount of time (After 30 seconds,
After 1 minute, After 5 minutes or Never) that expires before the display turns o.
•Sleep
•Shutdown — The Automatic shutdown menu changes the amount of time (After 5 minutes,
After 10 minutes, After 30 minutes or Never) that expires before the Jetpack automatically
shuts down.
•Save Changes — Click Save Changes to accept and nalize the new Preferences Settings.
72
Jetpack Settings - Preferences
Software Update
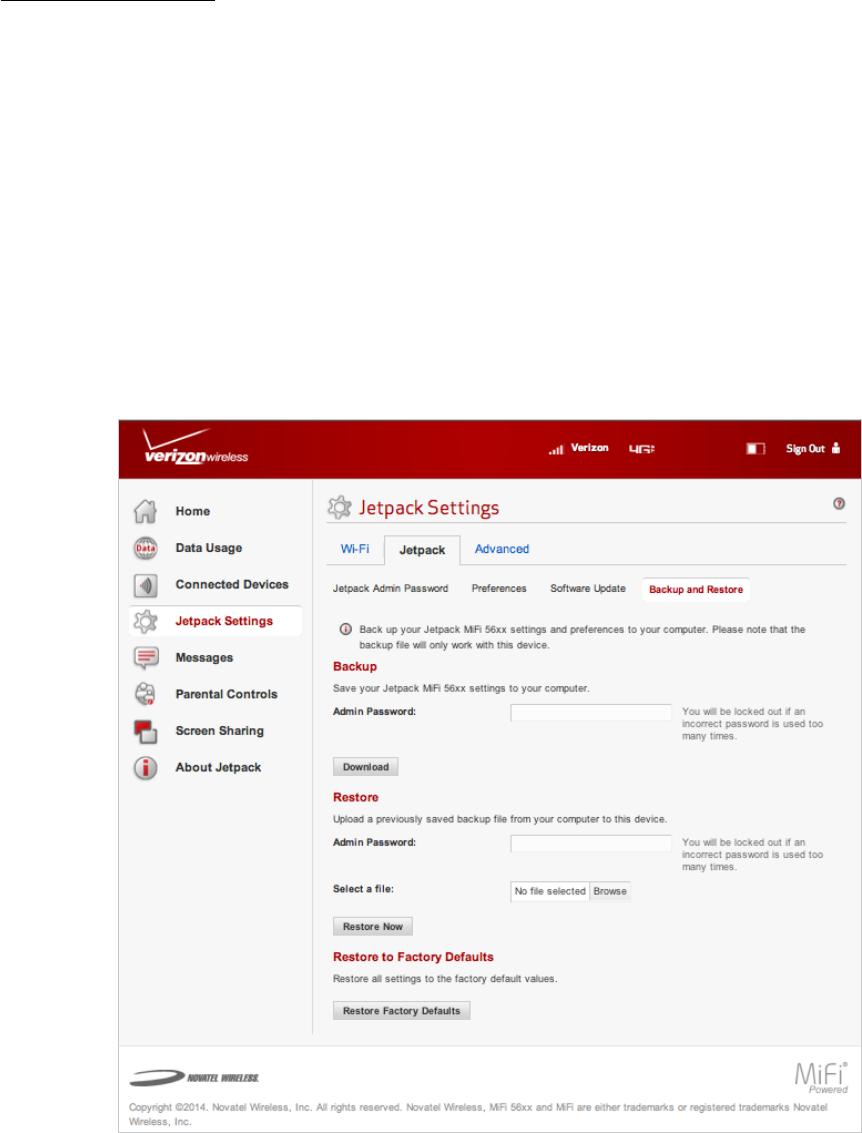
The Software Update page contains the following sections:
•Current software version— Displays information for the current software version, date of last
check for updates and the number of updates currently available.
•Checked for update — Displays the date of the last software update.
•Update available — Displays the software update history.
Jetpack Settings - Software Update
FPO
FPO
73
Backup and Restore
The Backup and Restore page contains the following sections:
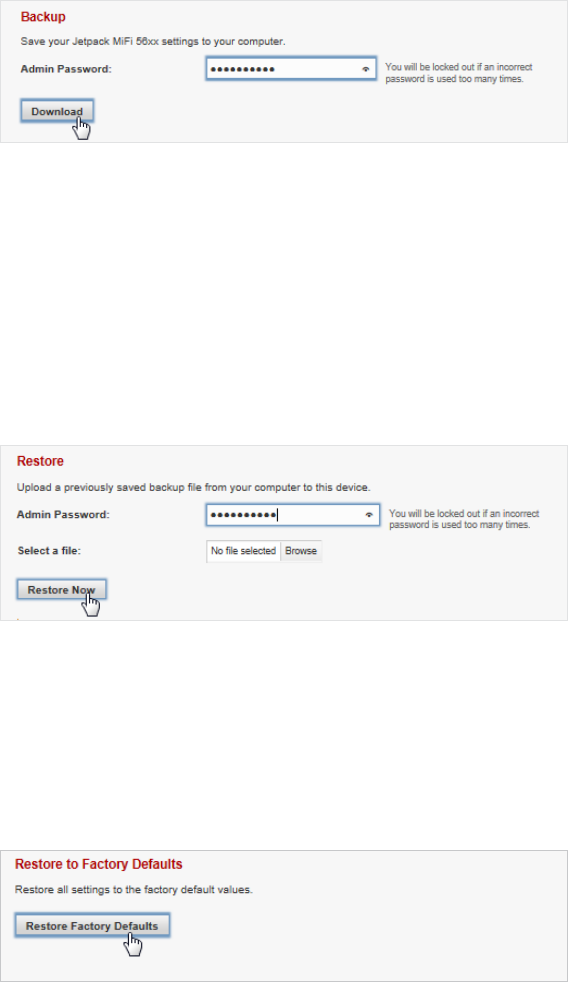
•Backup — Allows you to save your Jetpack settings to your computer. You must enter your
Admin Password in the Admin Password eld and click Download to save settings to your
computer.
•Restore — Allows you to upload a previously saved backup le from your computer to your
Jetpack. Click Browse and select a le, then enter the Admin Password in eect when the
backup le was saved in the Admin Password eld and click Restore Now.
•Restore to Factory Defaults — Allows you to restore all settings on your Jetpack to the
factory default values. Click Restore Factory Defaults to restore all such settings. If prompted
for a password, use the default Admin Password which is admin.
Jetpack Settings - Backup and Restore
FPO
74
To save your Jetpack settings to your computer:
➊ Enter your Admin Password in the Admin Password eld.
➋ Click Download to save your current Jetpack settings to a designated location on your
computer.
Download Current Jetpack Settings
To restore a previous version of your Jetpack settings to your Jetpack device:
➊ Click Browse to navigate to the desired settings backup le saved on your computer.
➋ Enter the Admin Password in eect when the backup le was saved in the Admin Password
eld.
➌ Click Restore Now.
Restore Previous Jetpack Settings
To restore all settings on your Jetpack to factory default settings:
➊ Click Restore Factory Defaults.
➋ If prompted for a password, enter the default Admin Password admin.
Restore Factory Defaults
75
Advanced
The Advanced page allows you to change the Jetpack advanced settings. The Advanced page
provides network, manual DNS, SIM, rewall and LAN settings, as well as options for conguring
port ltering applications.
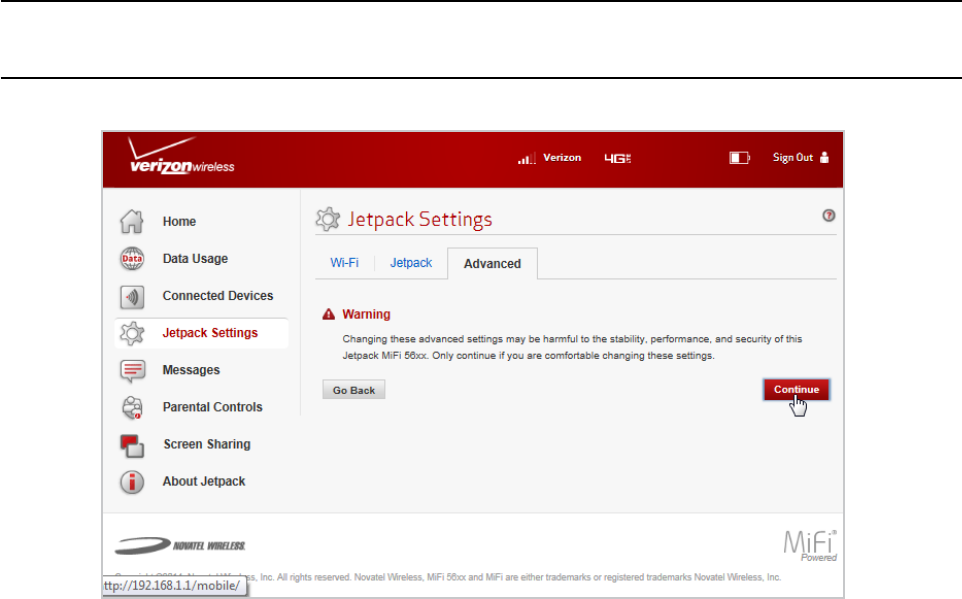
IMPORTANT! Changing the Jetpack's Advanced settings can adversely aect stability,
performance and security of the Jetpack.
Jetpack Advanced Settings Warning
Click Continue on the Advanced page to access Advanced page options.
FPO
76
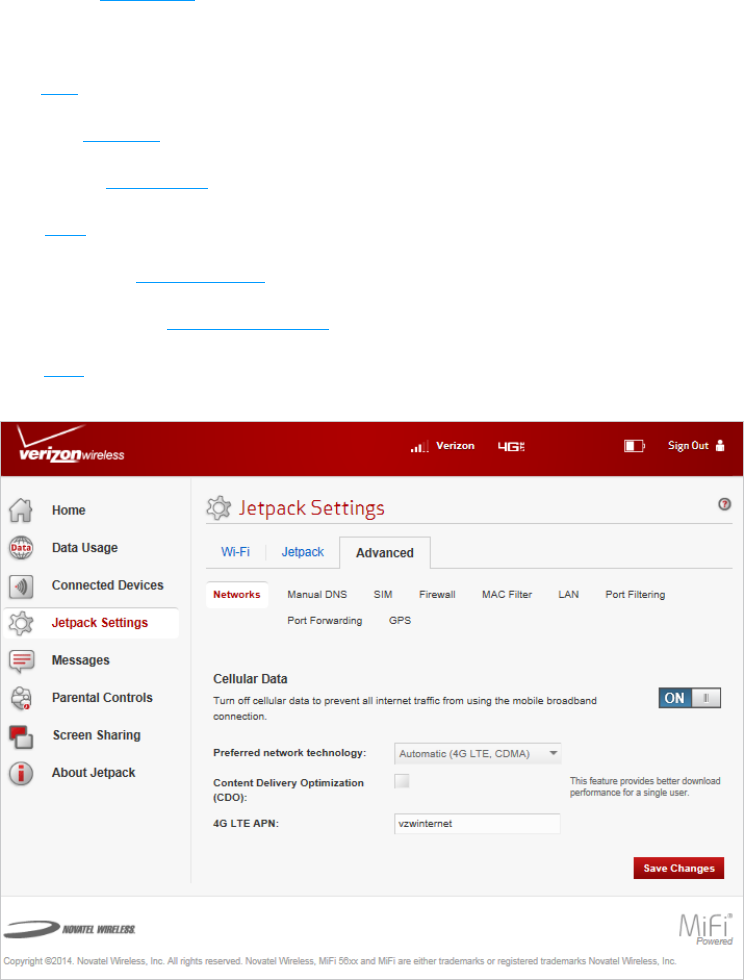
The Advanced page contains the following menu options:
•Networks (See Networks on page 77.)
•Manual DNS (See on page 77.)
•SIM (See SIM on page 80.)
•Firewall (See Firewall on page 81.)
•MAC Filter (See MAC Filter on page 70.)
•LAN (See LAN on page 70.)
•Port Filtering (See Port Filtering on page <?>.)
•Port Forwarding (See Port Forwarding on page <?>.)
•GPS (See GPS on page 58.)
Jetpack Advanced Settings - Networks
FPO
77
Networks
The Networks menu contains the following sections:
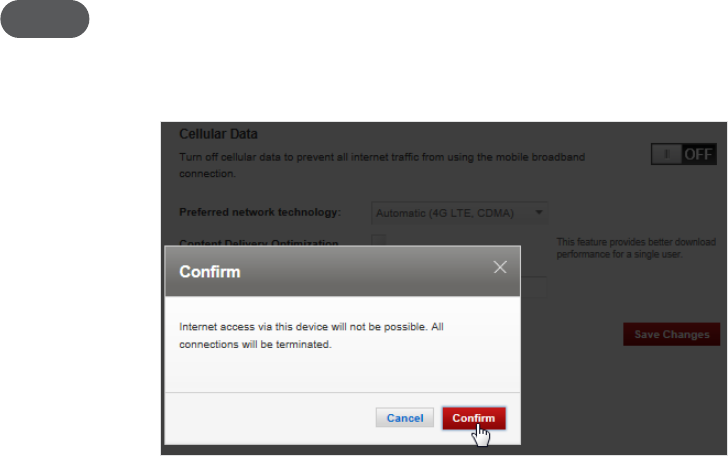
•Cellular Data — Allows you to turn o cellular data to prevent all internet trac from using
the Jetpack mobile broadband connection.
•Preferred network technology — The Preferred network technology default value is
Automatic. The Jetpack will select the best available technology. If desired, you can
change this to limit the network technologies which will be used.
•Content Delivery Optimization (CDO) — Provides better download performance for a
single user.
•4G LTE APN — Displays the network carrier APN.
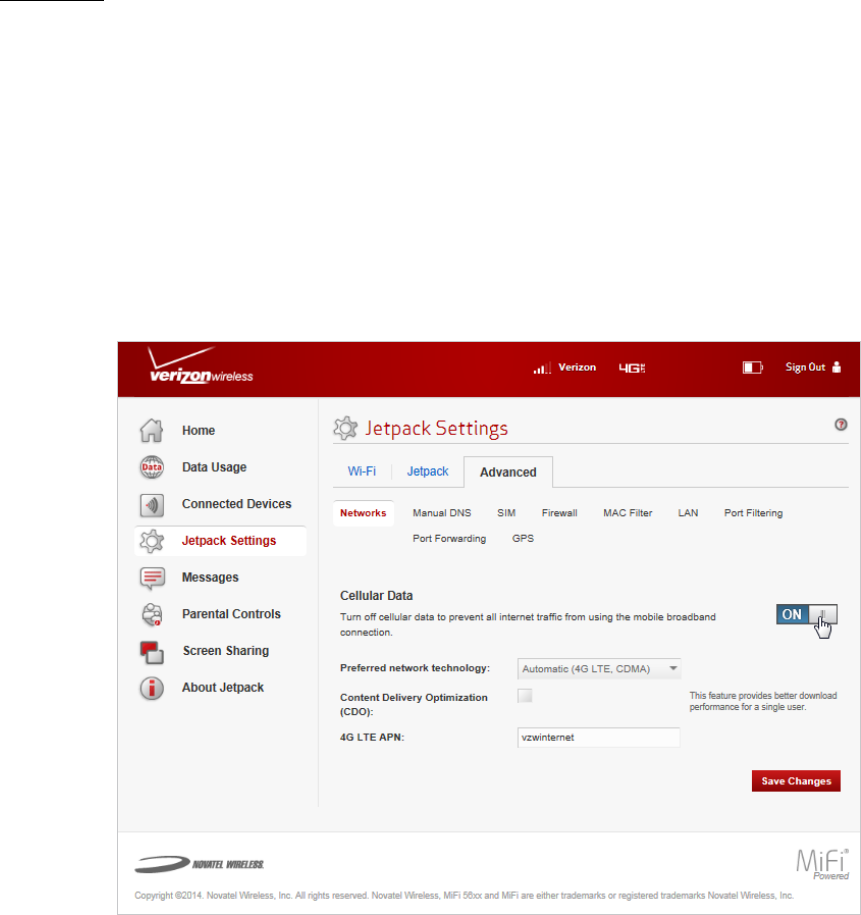
Jetpack Advanced Settings - Cellular Data ON
FPO
78
To turn o cellular data and prevent all internet trac from using the Jetpack mobile broadband
connection:
➊ Slide the Cellular Data ON/OFF button to OFF.
➋ Click Confirm on the Conrm warning pop-up window.
NOTE All internet connections will be immediately terminated when you click Confirm.
➌ Click Save Changes to accept and nalize the new Advanced Networks setting.
Turn Cellular Data OFF Conrmation
To change your preferred network technology:
➊ Select the desired network technology from the dropdown menu. Choose from Automatic,
4G LTE only, CDMA Auto, EVDO only, or 1xRTT only.
➋ Click Save Changes to accept and nalize the revised preferred network setting.
To turn on Content Delivery Optimization for better download performance for a single user:
➊ Click the Content Delivery Optimization checkbox.
➋ Click Save Changes to accept and nalize the revised CDO setting.
FPO
79
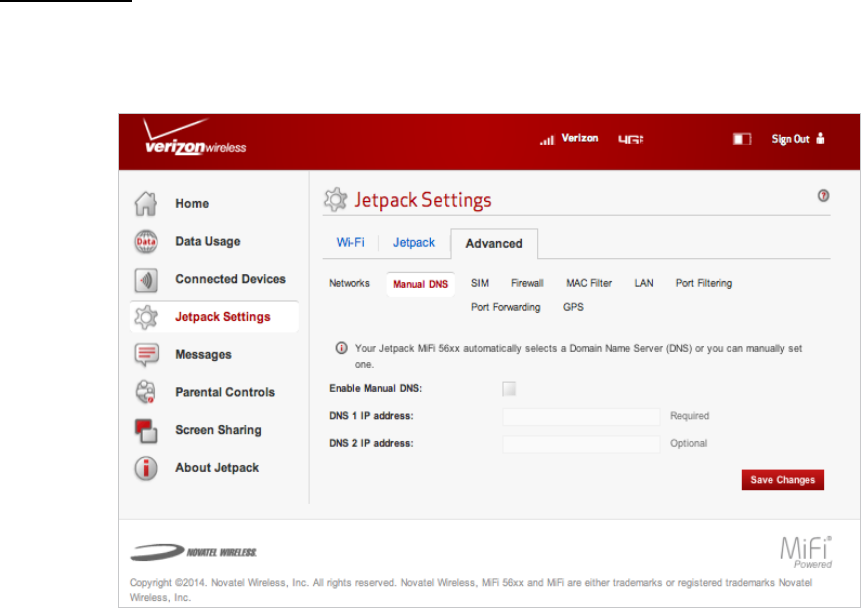
Manual DNS
The Jetpack automatically selects a Domain Name Server (DNS). The Manual DNS menu allows you
to manually select up to two DNS IP addresses.
Jetpack Advanced Settings - Manual DNS
To manually select a Domain Name Server:
➊ Click the box next to Enable manual DNS.
➋ Enter the IP address for the rst DNS in the DNS 1 IP address eld.
➌ Enter the IP address for the second DNS in the DNS 2 IP address eld, if applicable.
➍ Click Save Changes.
FPO
80
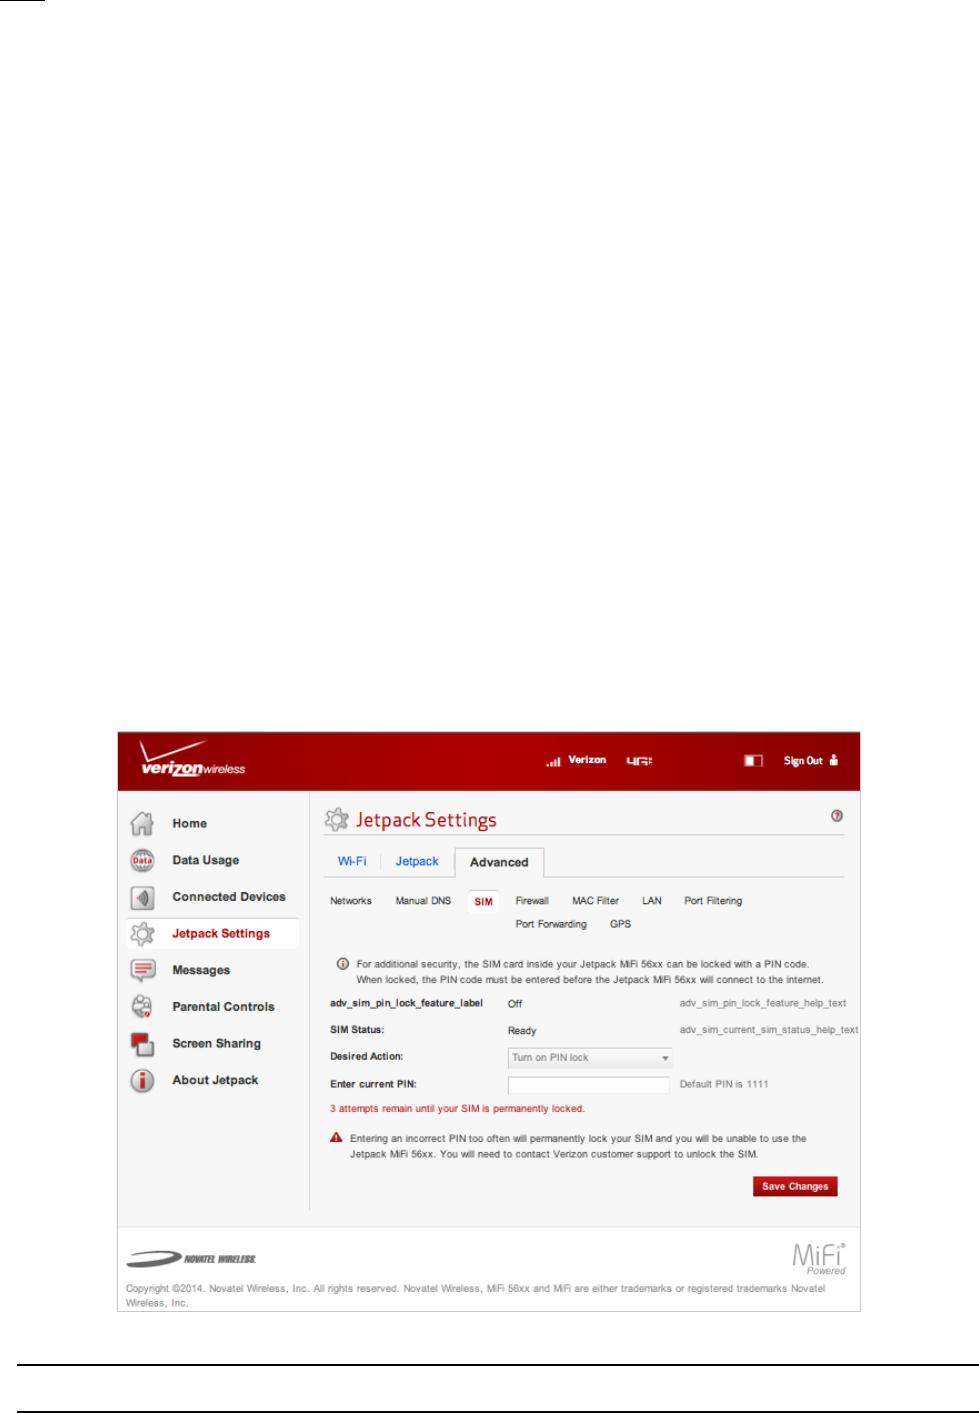
SIM
The SIM menu gives you settings and information about the Jetpack's Subscriber Identity Module
(SIM) card. The SIM card inside your Jetpack can be locked with a PIN code for additional security. If
locked, the PIN code must be entered before the Jetpack can connect to the Internet. The SIM menu
takes you to the SIM page. The SIM menu has the following options:
•SIM PIN Lock feature —
•SIM status — Indicates the current status of the SIM card. Possible values include:
•Ready — This is the normal state. The SIM PIN is not used.
•PIN Locked — The SIM PIN must be entered before you can use the mobile network.
•PUK Locked — The PUK for the SIM must be entered in order to continue. The PUK can be
obtained from your service provider.
•Unlocked — The SIM PIN is needed, but has already been entered.
•No SIM — No SIM was detected. If you do have a SIM, check that it is inserted correctly.
•Invalid SIM — A SIM was detected, but it is not usable in this device.
•SIM Error — A SIM was detected, but it did not respond as expected, and cannot be used.
•Desired action —
•Enter current PIN —
•Save Changes —
Jetpack Advanced Settings - SIM
IMPORTANT! Entering an incorrect PIN will lock the SIM. The default PIN is 1111.
FPO
81
Firewall
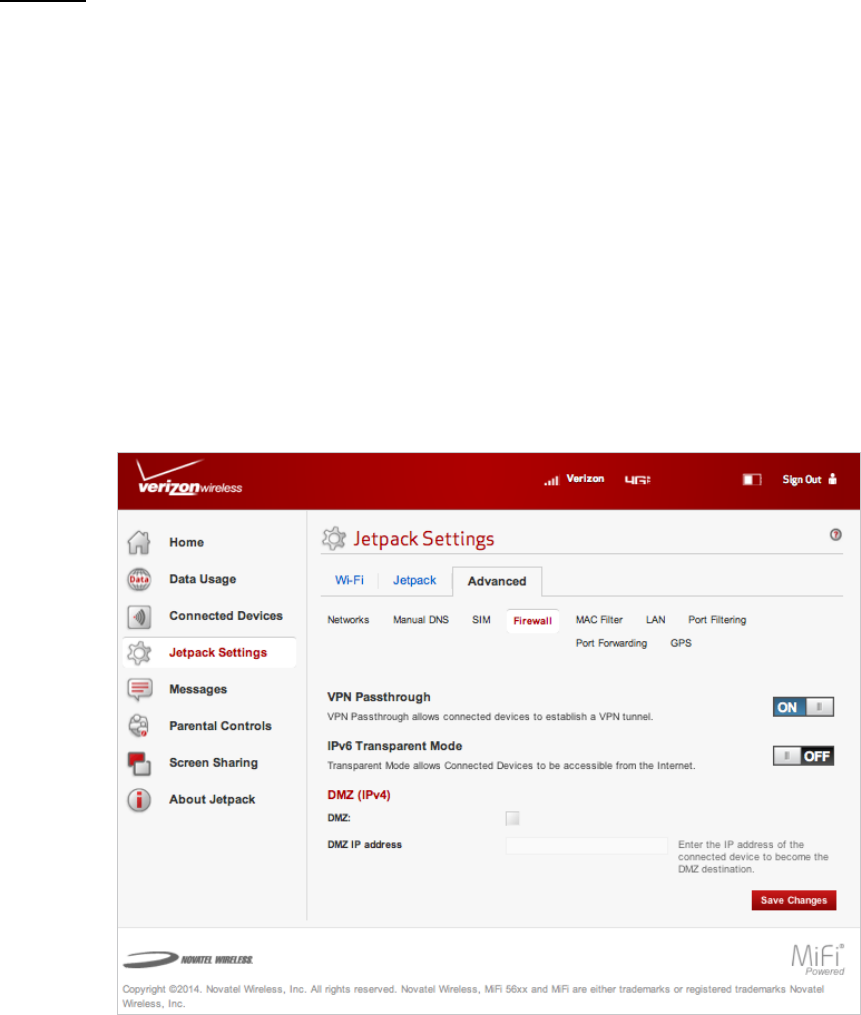
The Jetpack rewall determines which Internet trac is allowed. The Firewall menu contains the
following sections:
•VPN Passthrough — Enables or disables the VPN feature and allows or disallows connected
devices to establish a VPN tunnel.
•If this is ON (enabled), this feature allows VPN clients to connect through the Jetpack to
remote VPN Servers. Normally, this option should be enabled.
•If this is OFF (disabled), VPN clients are not allowed to connect.
•IPv6 Transparent Mode — Allows connected devices to be accessible from the Internet.
•DMZ —
•Save Changes —
Jetpack Advanced Settings - Firewall
FPO
82
MAC Filter
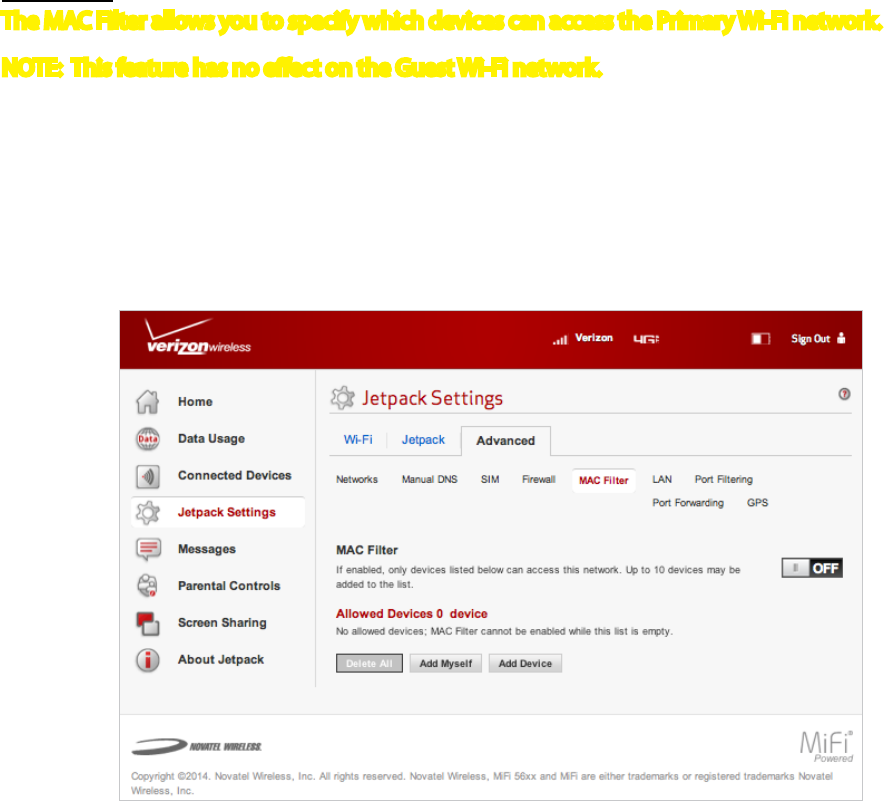
The MAC Filter allows you to specify which devices can access the Primary Wi-Fi network.
NOTE: This feature has no eect on the Guest Wi-Fi network.
•ON/OFF
•Refresh
•Manage Devices
•Save Changes
Jetpack Advanced Settings - MAC Filter
FPO
83
LAN
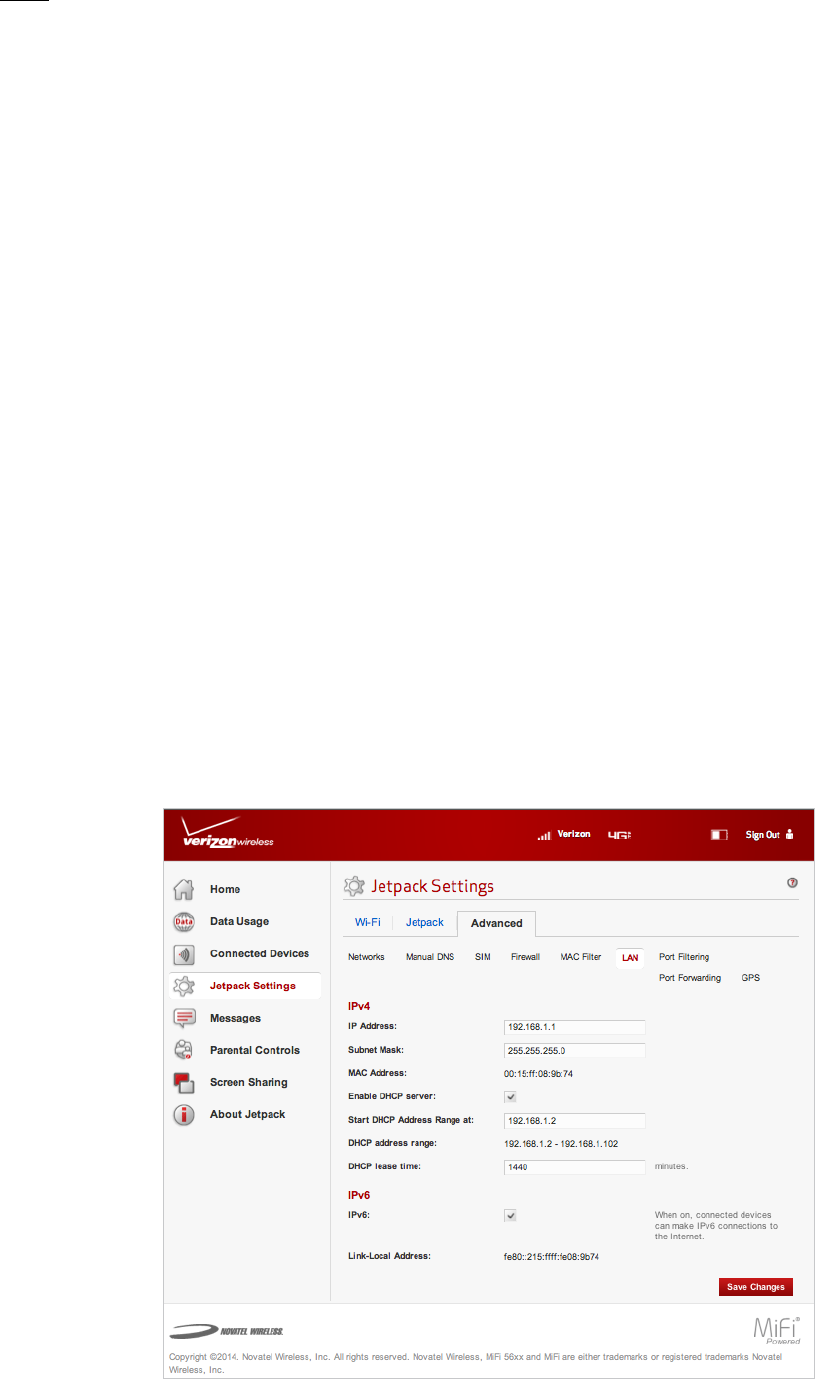
The LAN page gives you settings and information about the Jetpack's network. The LAN menu
contains the following sections:
•IPv4
•IP address — The IP address for the Jetpack.
•Subnet mask — The subnet mask network setting for the Jetpack. The default value
255.255.255.0 is standard for small (class "C") networks. If you change the LAN IP Address,
ensure you use the correct Subnet Mask for the IP address range containing the LAN IP
address.
•MAC address — The Media Access Controller (MAC) or physical address for the Jetpack.
•Enable DHCP server — The Enable DHCP Server checkbox enables or disables the DHCP
Server feature.
•Start DHCP address range at — The start range of IP addresses reserved for use by the
Jetpack's DHCP server table.
•DHCP address range — The current range of IP addresses reserved for use by Jetpack's
DHCP server table. If a device with a static IP address wants to connect to MiFi6620L's
network, the static IP should be outside of the DHCP address range. Most devices do not
have a static IP.
•IPv6
•Enable IPv6 — The Enable IPv6 checkbox enables or disables the IPv6 feature.
•Link-Local address — Displays the local address when IPv6 is enabled.
•Save Changes
FPO
84
Port Filtering
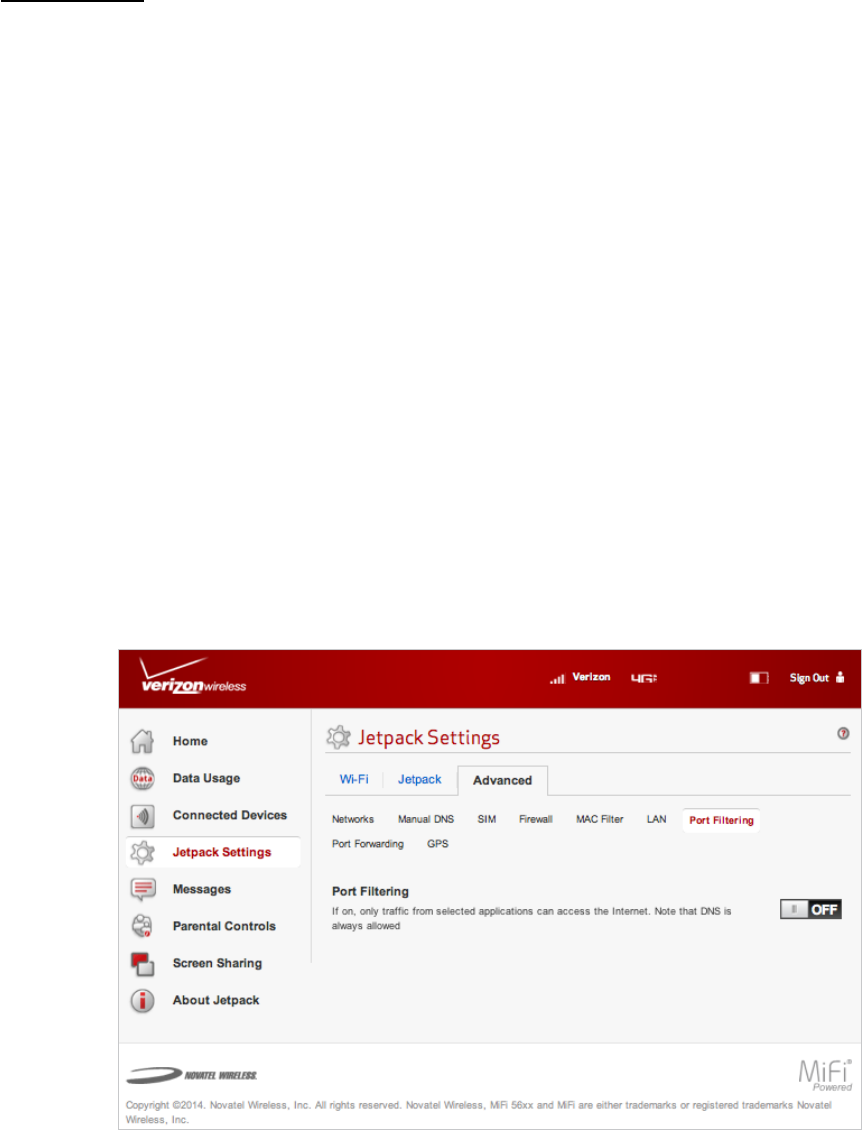
Port Filtering allows you to block outgoing Internet connections and permit only allowed
applications to access the Internet. You can also customize a list of allowed applications which
permits only certain programs to connect to the Internet.
Click ON to enable Port Filtering. When the feature is enabled, you must select a port ltering
application in the Applications list to allow that application to connect to the Internet. For example,
if you select VPN in the Applications list but do not select HTTP, you can connect to a VPN server but
you cannot connect to a web page using your Internet browser.
Click OFF to disable Port Filtering. When the feature is disabled, any application can connect to the
Internet.
The Port Filtering menu contains the following sections:
•Applications — Enable each port ltering application that needs to be able to access
the Internet by checking the box next to one or more applications. When port ltering is
enabled, all other applications are blocked.
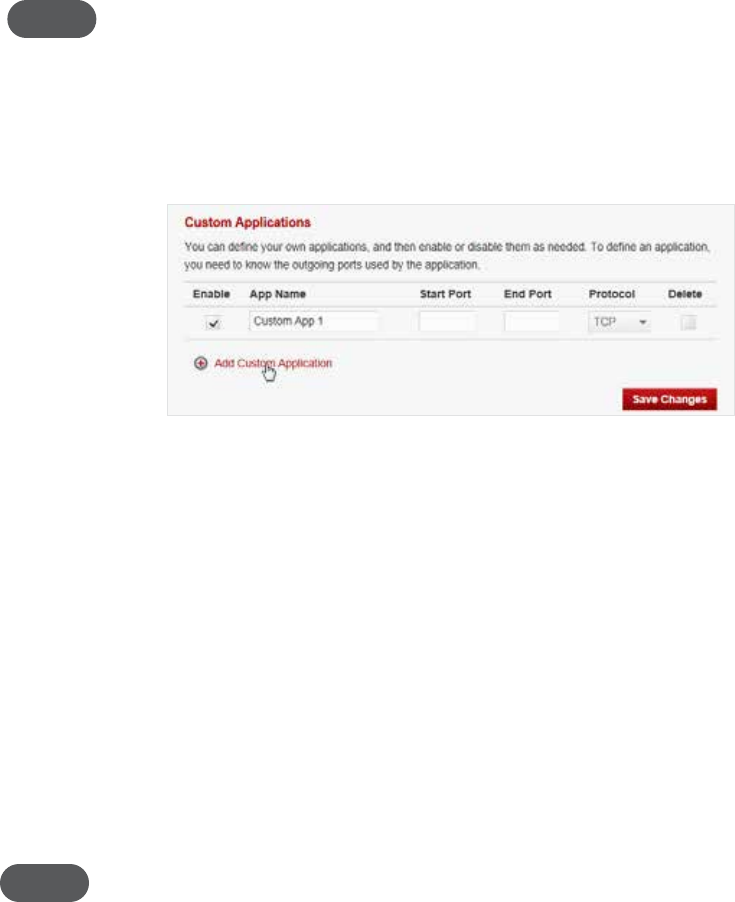
•Custom Applications — You can dene your own applications, and then enable or disable
them as needed. To dene an application, you need to know the outgoing ports used by the
application.
•Save Changes
Jetpack Advanced Settings - Port Filtering
FPO
85
Add a Custom Application
To add a custom application:
➊ Click Add Custom Application to add a new custom application to the list of allowed
applications. You can dene and enable custom Port Filtering applications. You need to
know details of the trac used and generated by the applications you wish to dene.
NOTE The Add Custom Application option is only available when the port filtering Enable checkbox is
selected. You can add up to ten custom applications.
The Custom Port Filtering page uses check boxes to enable port ltering for custom
applications. Similar to the Applications list, you must enable custom applications so they
can connect to the Internet.
Add Custom Application
➋ Enter the beginning of the range of port numbers used by outgoing trac for the custom
application being added in the Start Port eld.
➌ Enter the end of the range of port numbers in the End Port eld. If the port is a single port
instead of a range, type the same value for both the Start Port and the End Port.
➍ Select the protocol (TCP, UDP, or both) used by each port range from the Protocol dropdown
menu.
➎ Click Save Changes to save any changes made to the custom applications.
➏ Select the Delete checkbox next to any custom application you wish to delete and click Save
Changes.
NOTE Click on the Port Filtering menu tab again to remove deleted custom spplications from view on the screen.
86
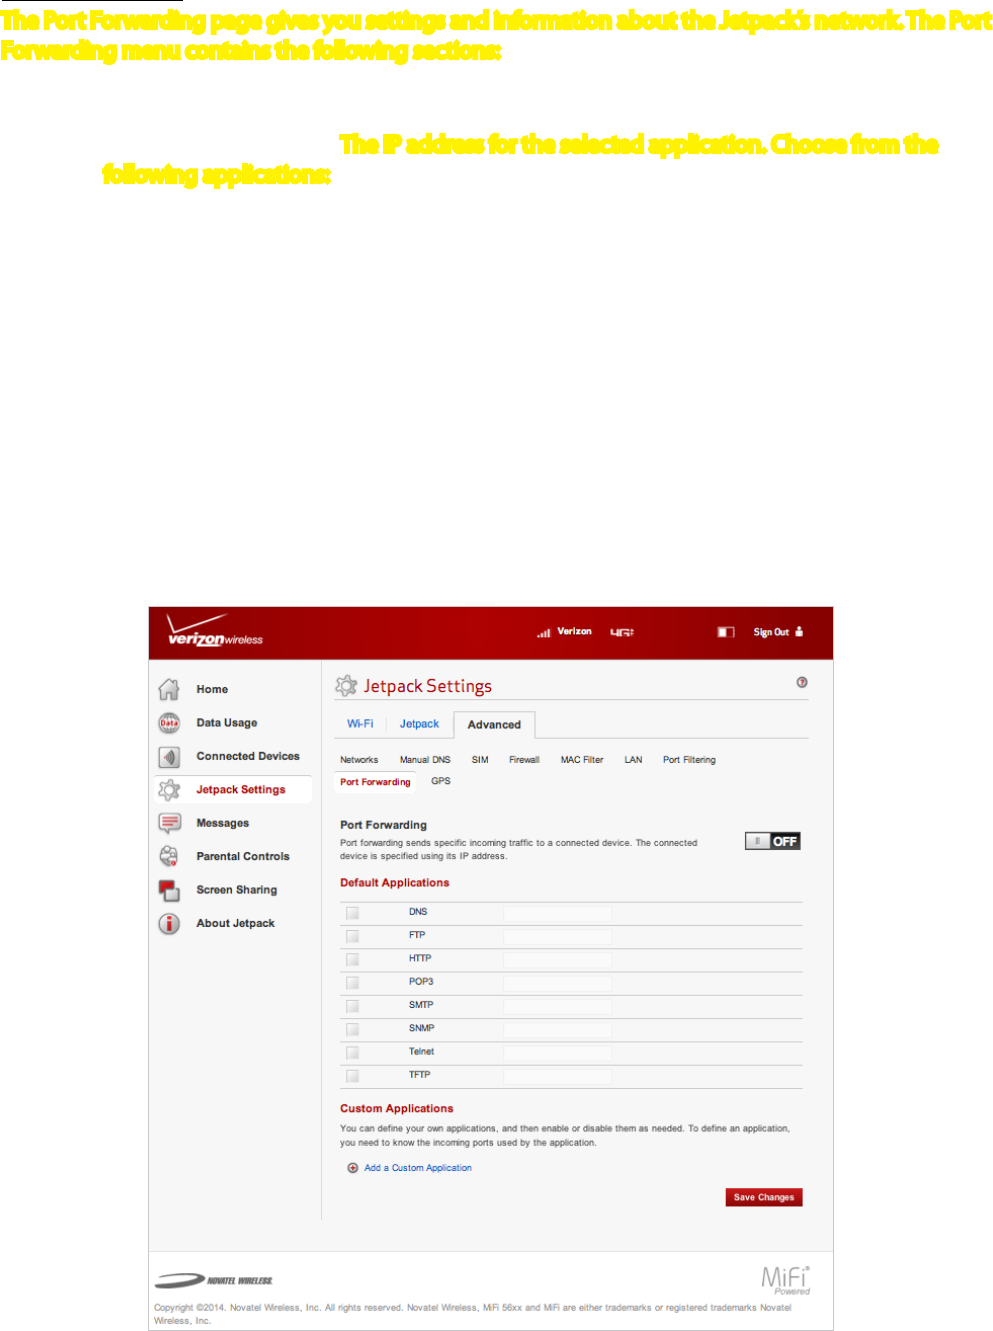
Port Forwarding
The Port Forwarding page gives you settings and information about the Jetpack’s network. The Port
Forwarding menu contains the following sections:
•ON/OFF
•Default Applications — The IP address for the selected application. Choose from the
following applications:
» DNS
» FTP
» HTTP
» POP3
» SMTP
» SNMP
» Telnet
» TFTP
•Custom Applications
•Add Custom Application
•Save Changes
Jetpack Advanced Settings - Port Forwarding
FPO
87
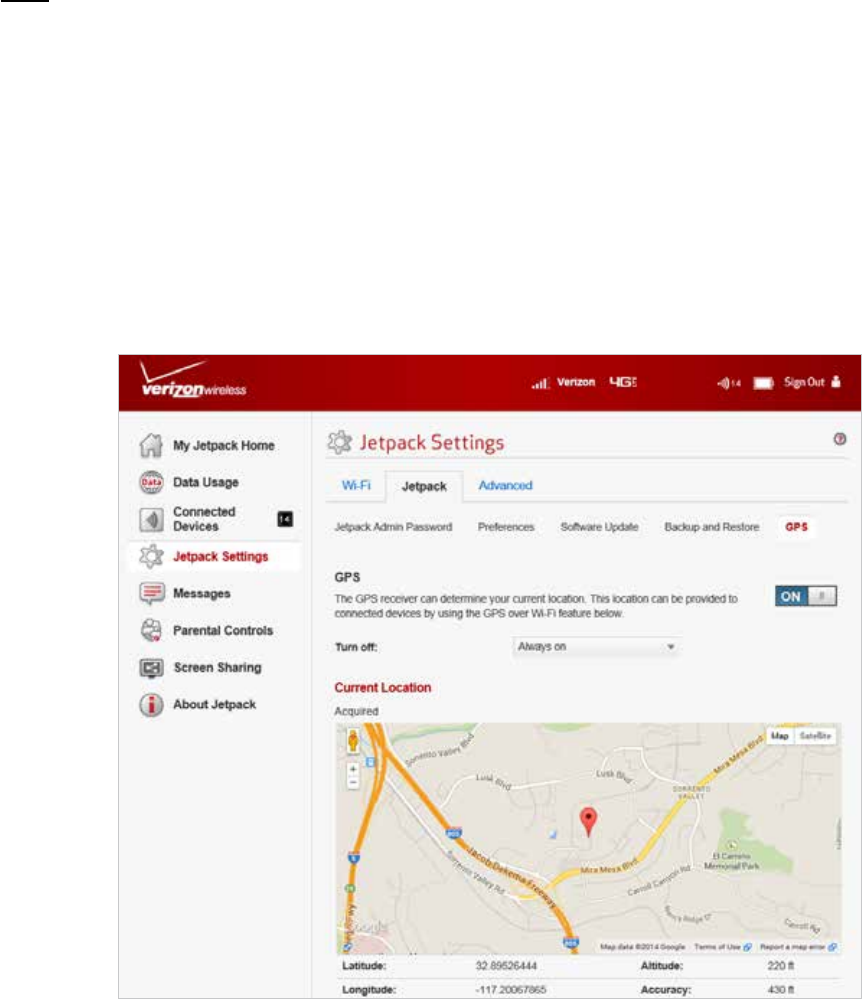
GPS
The GPS page allows you to enable GPS and to enable GPS over Wi-Fi (NMEA). The GPS receiver on
the Jetpack can determine your current location, often even indoors. The GPS menu contains the
following sections:
•ON/OFF —
•Turn o —
•Current Location —
•GPS Over Wi-Fi (NMEA) —
•Download GPS over Wi-Fi Drivers —
Jetpack Advanced Settings - GPS
88
Messages
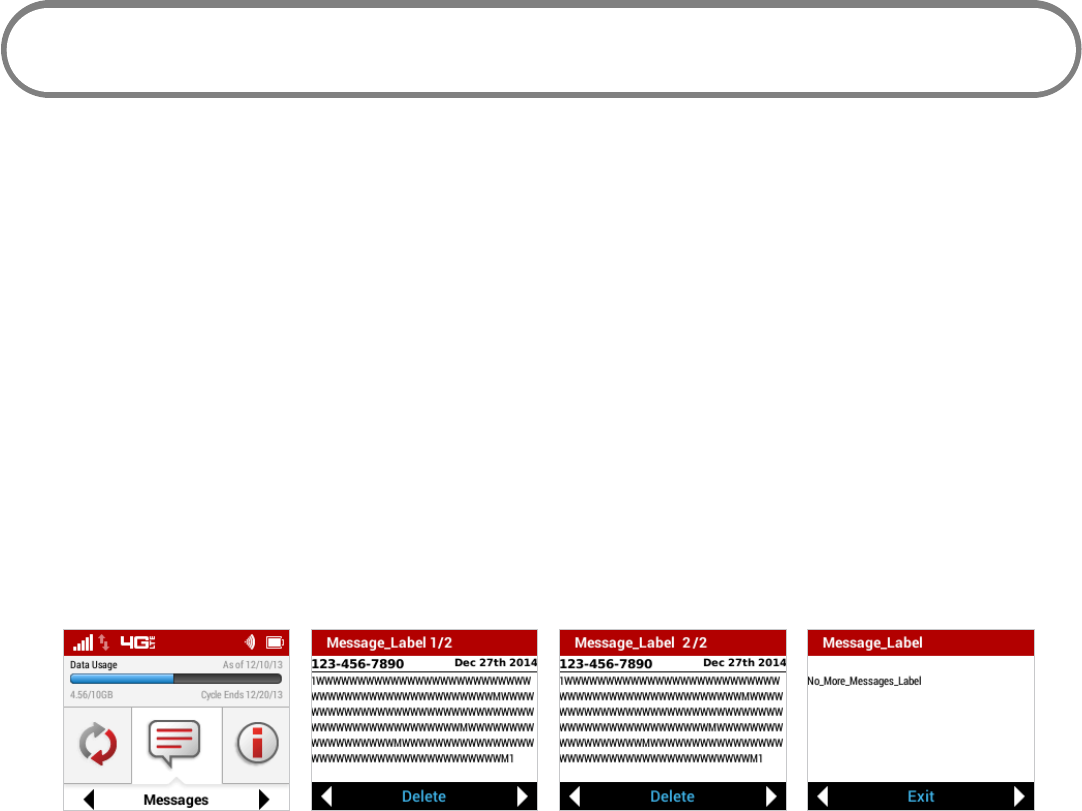
Messages displays the number of unopened SMS messages sent to your Jetpack, and allows you to
read and retain or delete each message.
On the Jetpack Display
To display unread SMS messages:
➊ On the Home screen, scroll to the Messages icon and press the select button to open the
rst unread message.
➋ To delete the message, press the select button. To retain the message, use the right scroll
button to move to the next unread message.
➌ When No More Messages displays, press the select button to exit and return to the Home
screen.
Select Messages Scroll right to next message Press select to delete Press select button to exit
On the Jetpack Web User Interface
FPO FPO FPO FPO

89
Parental Controls
TBD

90
Screen Sharing
TBD
91
About Jetpack
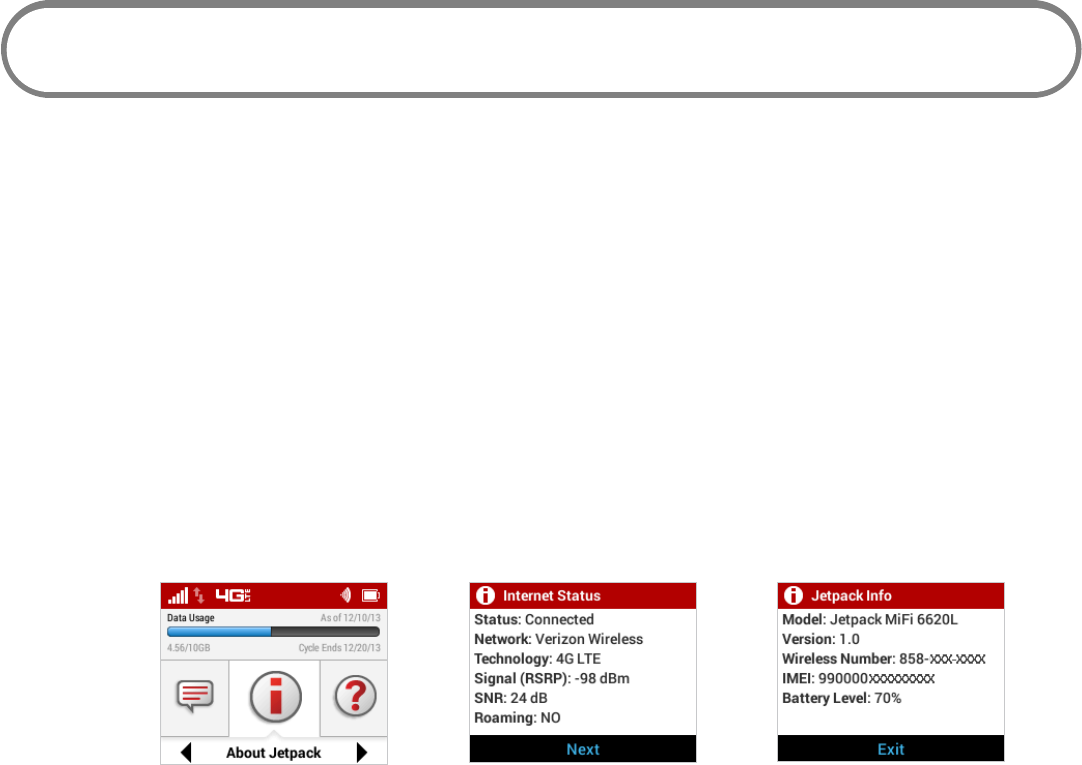
About Jetpack displays information about your Jetpack, including Internet and roaming status,
model and version, wireless and IMEI number, and battery charge level.
On the Jetpack Display
➊ On the Home screen, navigate to the About Jetpack icon and press the select button to open
the Internet Status screen and display status information, including connection, network,
technology, signal SNR and roaming.
➋ Press the select button to navigate to the Jetpack Info screen and display model number,
version, wireless number, IMEI, and battery level.
➌ Press the select button to exit the Jetpack Info screen and return to the Home screen.
About Jetpack option Internet connection status Jetpack details
FPO FPO FPO
92
On the Jetpack Web User Interface
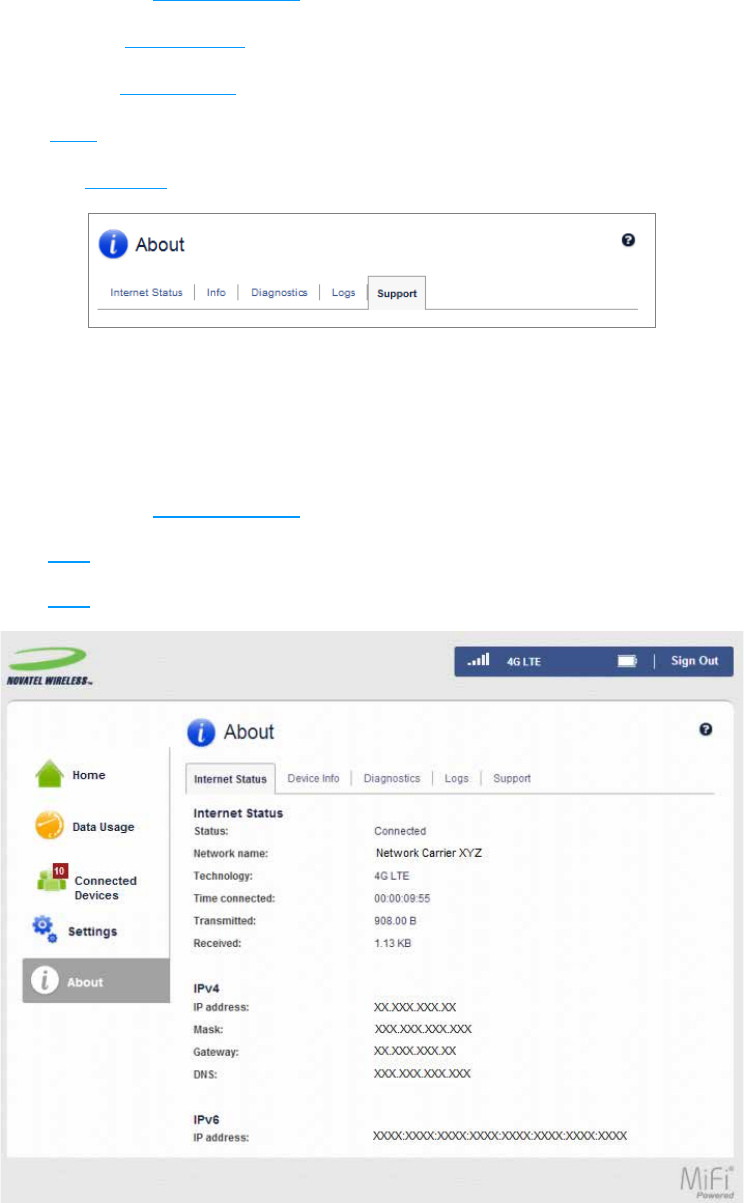
The About page allows you to view detailed information about Jetpack internet status, device
specic information, diagnostics, troubleshooting and support. The About page contains the
following menu options:
•Internet Status (See Internet Status on page 92.)
•Jetpack Info (See Jetpack Info on page 94.)
•Diagnostics (See Diagnostics on page 95.)
•Logs (See Logs on page 99.)
•Support (See Support on page 102.)
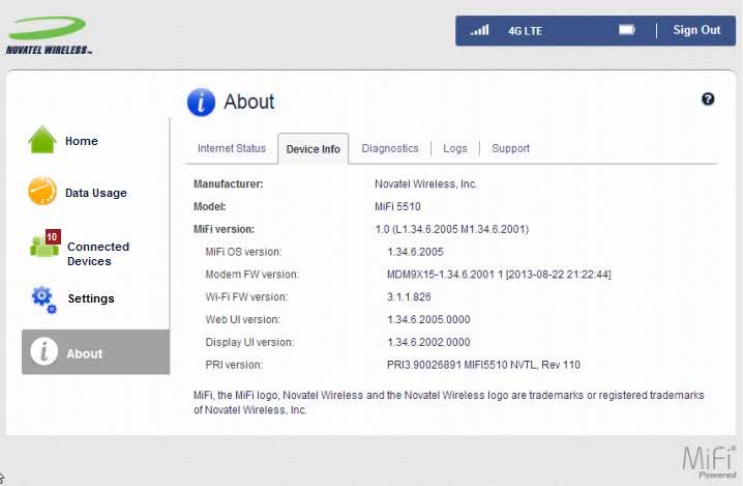
Internet Status
The Internet Status page shows Jetpack settings and status and contains the following sections:
•Internet Status (See Internet Status on page 93.)
•IPv4 (See IPv4 on page 93.)
•IPv6 (See IPv6 on page 93.)
FPO

93
Internet Status
The Internet Status section has the following options:
•Status — The status of the Internet connection, usually Connected or Disconnected.
•Network name — The name of the network to which this Jetpack is currently connected.
•Technology — The type of technology used to connect to the Internet.
•Time connected — How long the Jetpack has been connected to the network.
•Transmitted — The amount of data sent to the network.
•Received — The amount of data received from the network.
IPv4
The IPv4 section has the following options:
•IP Address — The IP address for the Jetpack.
•Mask — The subnet mask network setting for the Jetpack. The default value 255.255.255.0 is
standard for small (class "C") networks. If you change the LAN IP Address, ensure you use the
correct Subnet Mask for the IP address range containing the LAN IP address.
•Gateway — The address of the server used to access the Internet.
•DNS — The address of the Domain Name Server (DNS).
IPv6
The IPv6 section has the following option:
•IP address — The IP address for the Jetpack.
94
Jetpack Info
The Jetpack Info page contains detailed information about the Jetpack. The Jetpack Info page
contains the following sections:
•Manufacturer — The manufacturer of the Jetpack.
•Model — The model number or name of the Jetpack.
•My Jetpack version — The current Jetpack version.
•MiFi OS version — The Jetpack operating system (OS), including its components, version.
•Modem FW version — The current modem rmware version.
•Wi-Fi FW version — The current Wi-Fi rmware version.
•Web UI version — The web user interface version.
•Display UI version — The current user interface version.
•PRI version — The conguration version currently applied to the Jetpack.
FPO
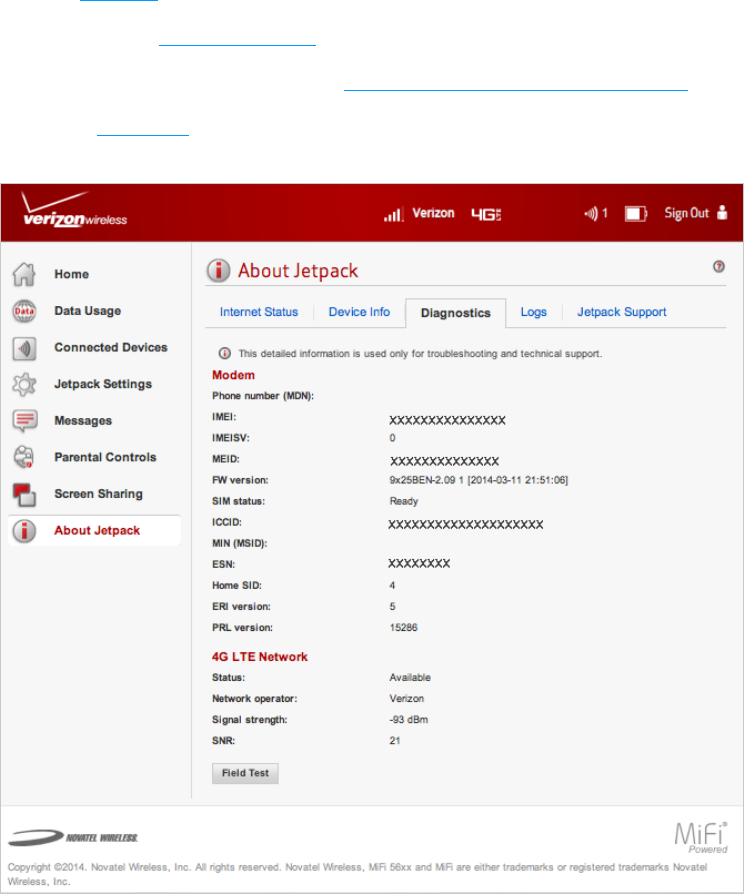
95
Diagnostics
The Diagnostics page shows information about the Jetpack rmware and other system-level
information. You can also view the system log. This page is used mostly for troubleshooting and is
not required for normal operation. The Diagnostics page contains the following sections:
•Modem (See Modem on page 96.)
•4G LTE Network (See 4G LTE Network on page 97.)
•3G Network (eHRPD/EVDO/1xRTT) (See 3G Network (eHRPD/EVDO/1xRTT) on page 97.)
•Field Test (See Field Test on page 98.)
FPO

96
Modem
The Modem section has the following options:
•Phone number (MDN) — The Phone Number or Mobile Directory Number (MDN) is used by
the mobile data network to identify this particular data service.
•MEID — The Mobile Equipment Identier (MEID) is used by the mobile data network to
identify this particular modem.
•IMEI — The International Mobile Equipment Identity (IMEI) number for the Jetpack.
•IMEISV — The International Mobile Equipment Identity (IMEI) combined with an approval
number for the Jetpack.
•FW version — The modem rmware version.
•SIM status — Status of the SIM card. If the SIM card is missing, or this eld indicates some
form of SIM error, the Jetpack will not be able to connect to the mobile network.
•ICCID — The ID number assigned to the SIM Card.
•MIN (MSID) — The Mobile Identication Number (MIN) or Mobile Station ID (MSID) is the
number associated with the home service provider and the wireless phone number.
•ESN — The Electronic Serial Number, which is either blank or a pseudo-ESN which is not
guaranteed to be unique for devices that use an MEID.
•Home SID — System identier for the home network.
•ERI version — The Enhanced Roaming Indicator version that is currently installed.
•PRL version — The version of the Preferred Roaming List (PRL), which tells the modem which
non-home carrier towers should provide roaming coverage.
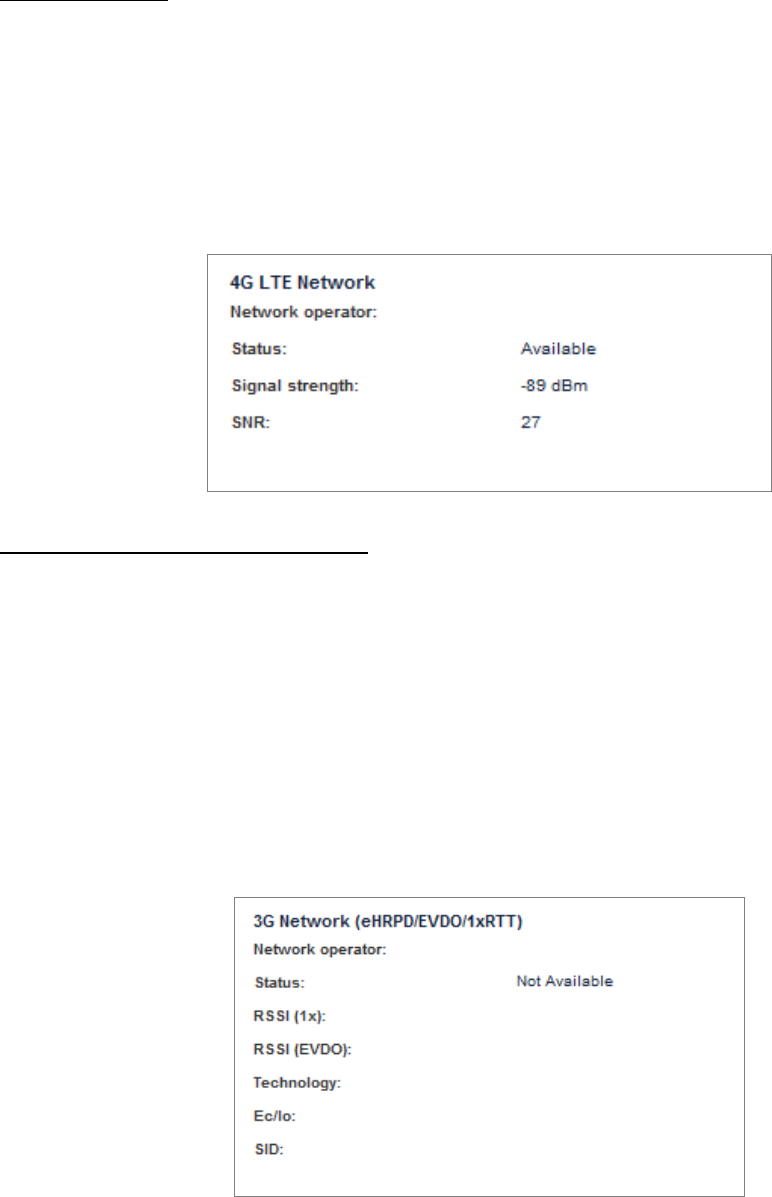
97
4G LTE Network
The 4G LTE Network section has the following options:
•Status — Status of the network (Disabled, Not available, or Available).
•Network operator — The vendor that currently provides wireless access.
•Signal strength — Indicates the signal strength for LTE.
•SNR — A measure of signal quality; the higher the number the better the signal.
3G Network (eHRPD/EVDO/1xRTT)
The 3G Network (eHRPD/EVDO/1xRTT) section has the following options:
•Status — Status of the network (Disabled, Not available, or Available).
•Network operator — The vendor that currently provides wireless access.
•RSSI (1x) — Indicates the RSSI for the 1xRTT signal.
•RSSI (EVDO) — Indicates the signal strength for the EVDO/eHRPD signal.
•Technology — The type of technology used to connect to the Internet.
•Ec/Io — A measure of how clean the signal is, and is a type of signal-to-noise ratio.
•SID — System identier for the network.
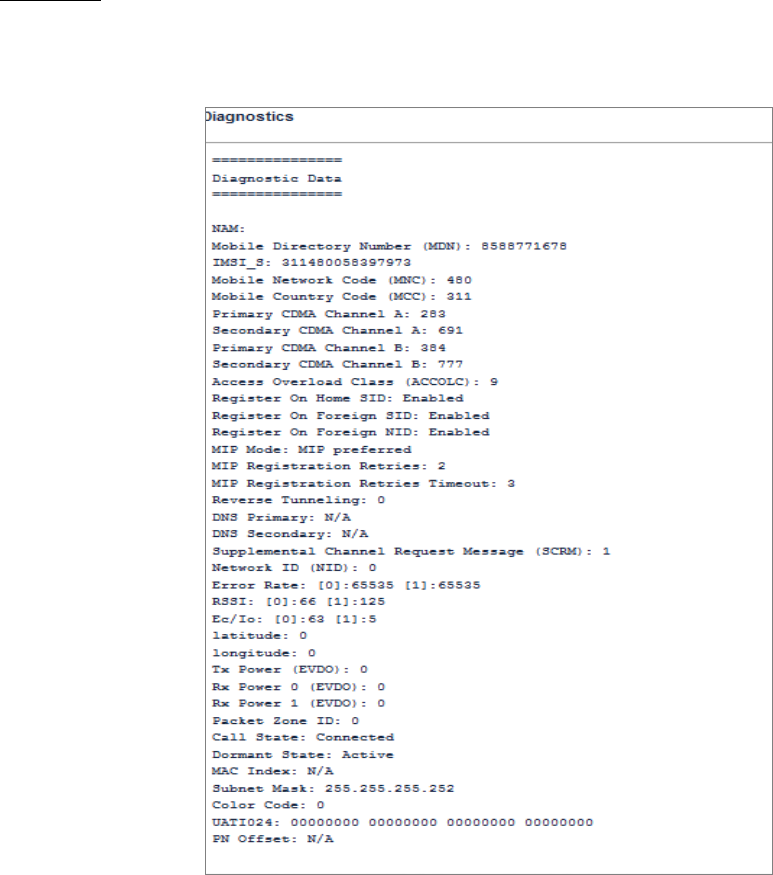
98
Field Test
Click on Field Test to provide a list of low-level network parameters which can be helpful for
technical support sta when they troubleshoot network connectivity issues.
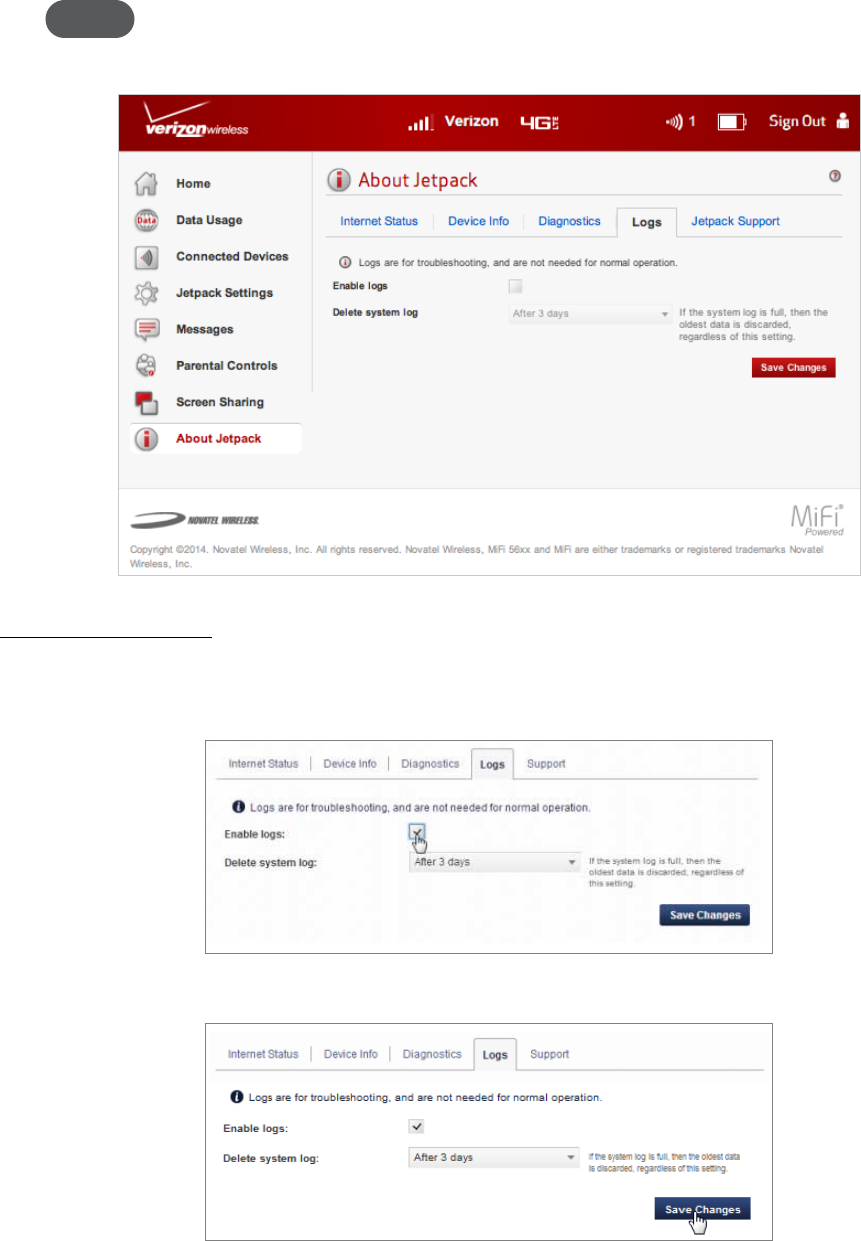
99
Logs
The Logs page allows you to enable or disable logs and to delete system logs.
NOTE Logs record various operations and are used for troubleshooting and are not needed for normal
Jetpack operation.
Enable System Logs
To enable system logs:
➊ Select the checkbox next to Enable logs.
➋ Click Save Changes.
FPO
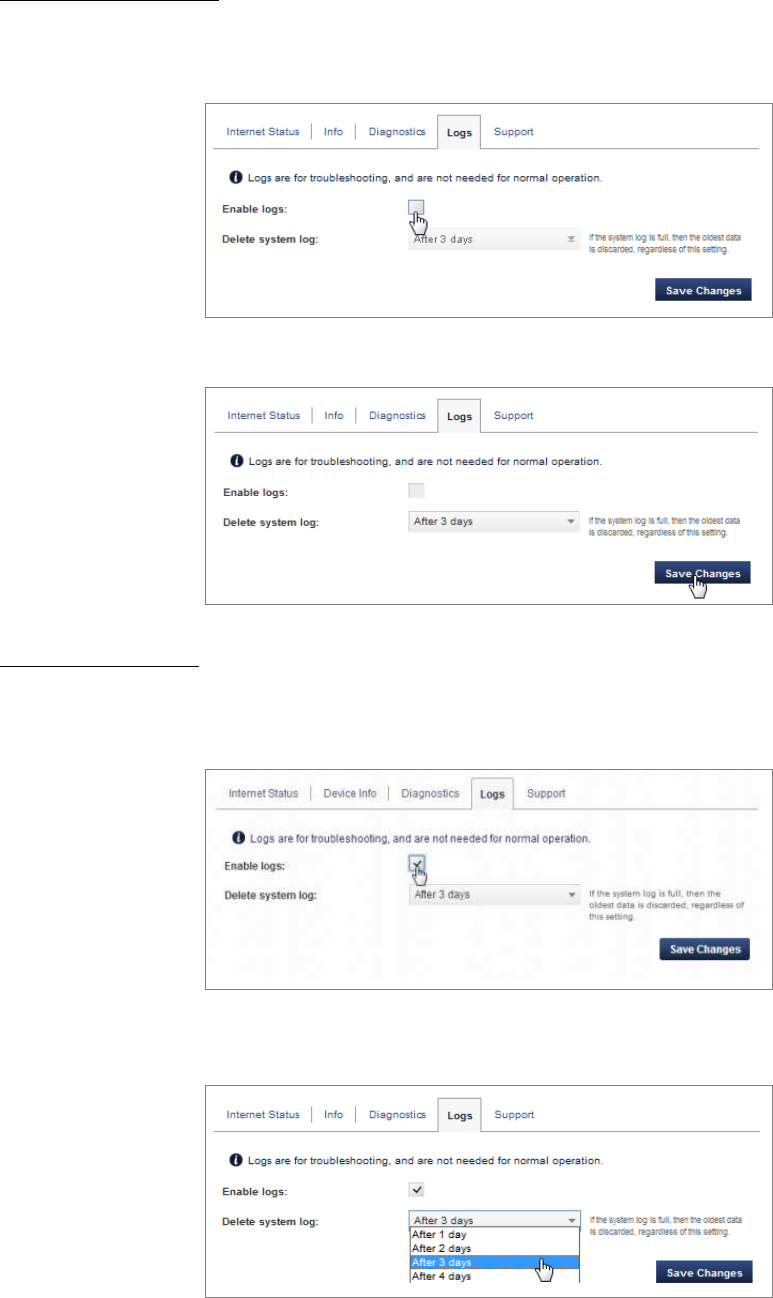
100
Disable System Logs
To disable system logs:
➊ Deselect the checkbox next to Enable logs.
➋ Click Save Changes.
Delete System Log
To delete a system log:
➊ Select the checkbox next to Enable logs.
➋ Select the appropriate time period for the deletion of system logs from the dropdown menu
next to Delete system log.
➌ Click Save Changes.
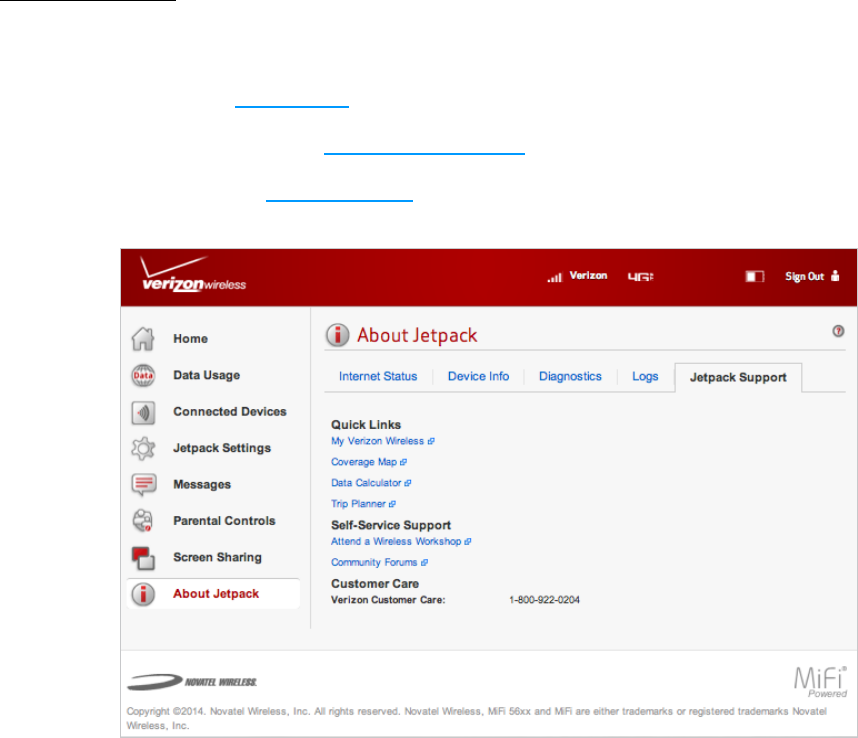
101
Jetpack Support
Click on Jetpack Support to link directly to the Quick Links, Self Support, and Customer Care
sections of the web interface. The Jetpack Support page contains the following sections:
•Quick Links (See Quick Links on page 102.)
•Self-Service Support (See Self Service Support on page 102.)
•Customer Care (See Customer Care on page 103.)
FPO
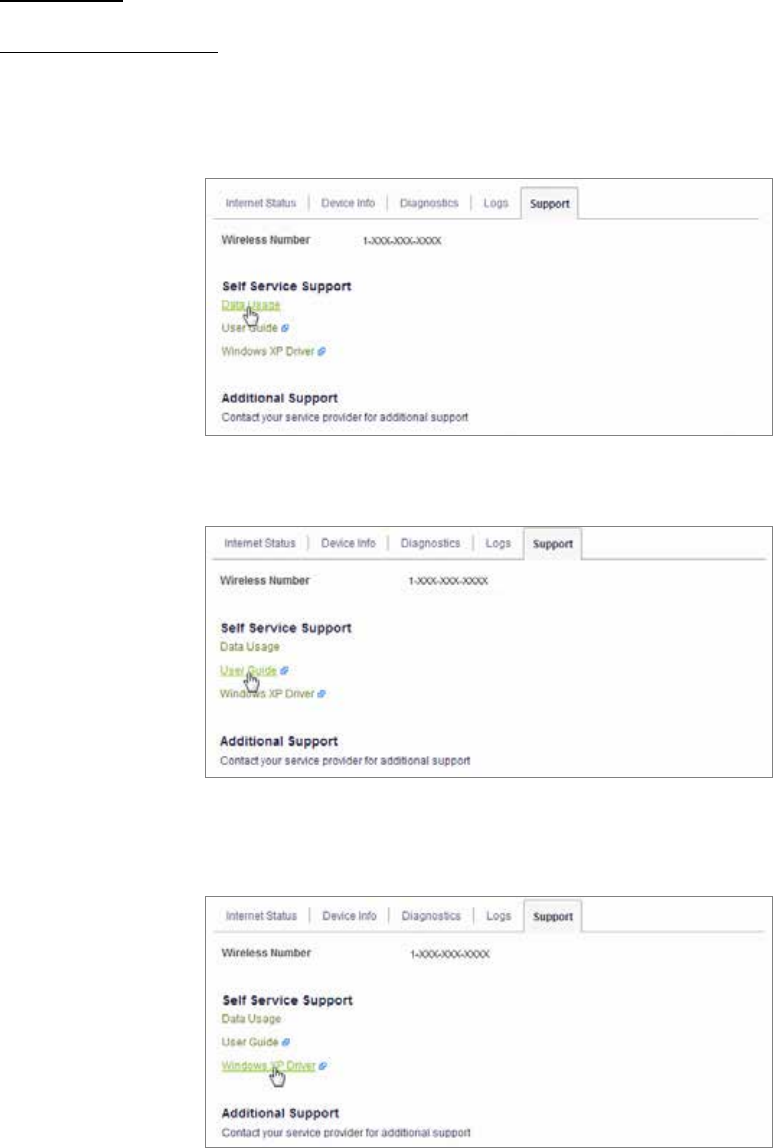
102
Quick Links
Self Service Support
Self Service Support provides access to the following support options:
•Data Usage — Takes you to the Data Usage page where you can see your estimated data
usage and reset the data counter.
•User Guide — Takes you to an online version of the User Guide.
•Windows XP Driver — Allows you to access and download the Windows XP Drivers to your
computer.

103
Customer Care
TBD
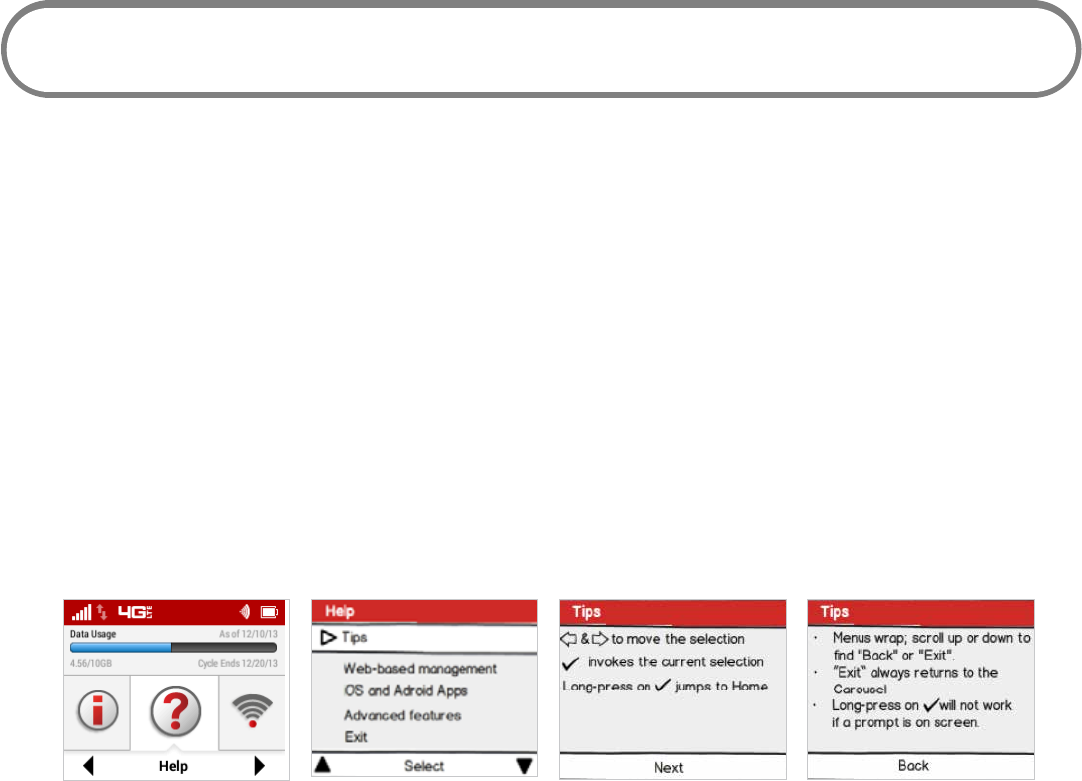
104
Help
Help displays helpful Tips, Web-based management details, OS and Android Apps information, and
Advanced features.
On the Jetpack Display
To display Help options:
➊ On the Home screen, navigate to the Help icon and press the select button to open the Help
screen and display Tips.
➋ Press the select button to display information for scrolling, selecting, and jumping to the
Home screen. Press the select button to display additional tips.
➌ Press the select button to return to the Help options.
➍ Use the right/down scroll button to highlight the Web-based management option, and
display the Jetpack’s network address and Admin Password.
➎ Press the select button to return to the Help options.
➏ Use the right/down scroll button to highlight the OS and Android Apps option to display
details for checking your Jetpack’s status using your smartphone.
➐ Press the select button to return to the Help options.
➑ Use the right/down scroll button to highlight the Advanced Features option and select from
Screen Sharing, GPS, and Parental Controls options. Press the select button to open the
desired option.
➒ Press the select button to return to the Advanced Features options. Use the right/down
scroll button to highlight Back and press the select button to return to the Help options.
➓ Use the right/down scroll button to highlight Exit and return to the Home screen.
FPO FPO FPO
FPO

105
FPO FPO FPO FPO

107
Overview
When properly installed, the Jetpack is a highly reliable product. Most problems are caused by one
of these issues:
•System resources required by the Jetpack are being used by other devices.
•Network coverage is unavailable due to coverage area, an account problem, or a network
problem.
The following tips can help solve many common problems encountered while using the Jetpack.
First Steps
•Make sure you are using the Jetpack in the correct geographic region.
•Ensure that your wireless coverage extends to your current location.
•Ensure you have an active subscription plan.
•Restarting your computer and your Jetpack can resolve many issues.
IMPORTANT Before contacting support, be sure to restart both your computer and your
MiFi 6620L, and ensure that your SIM card is inserted correctly.
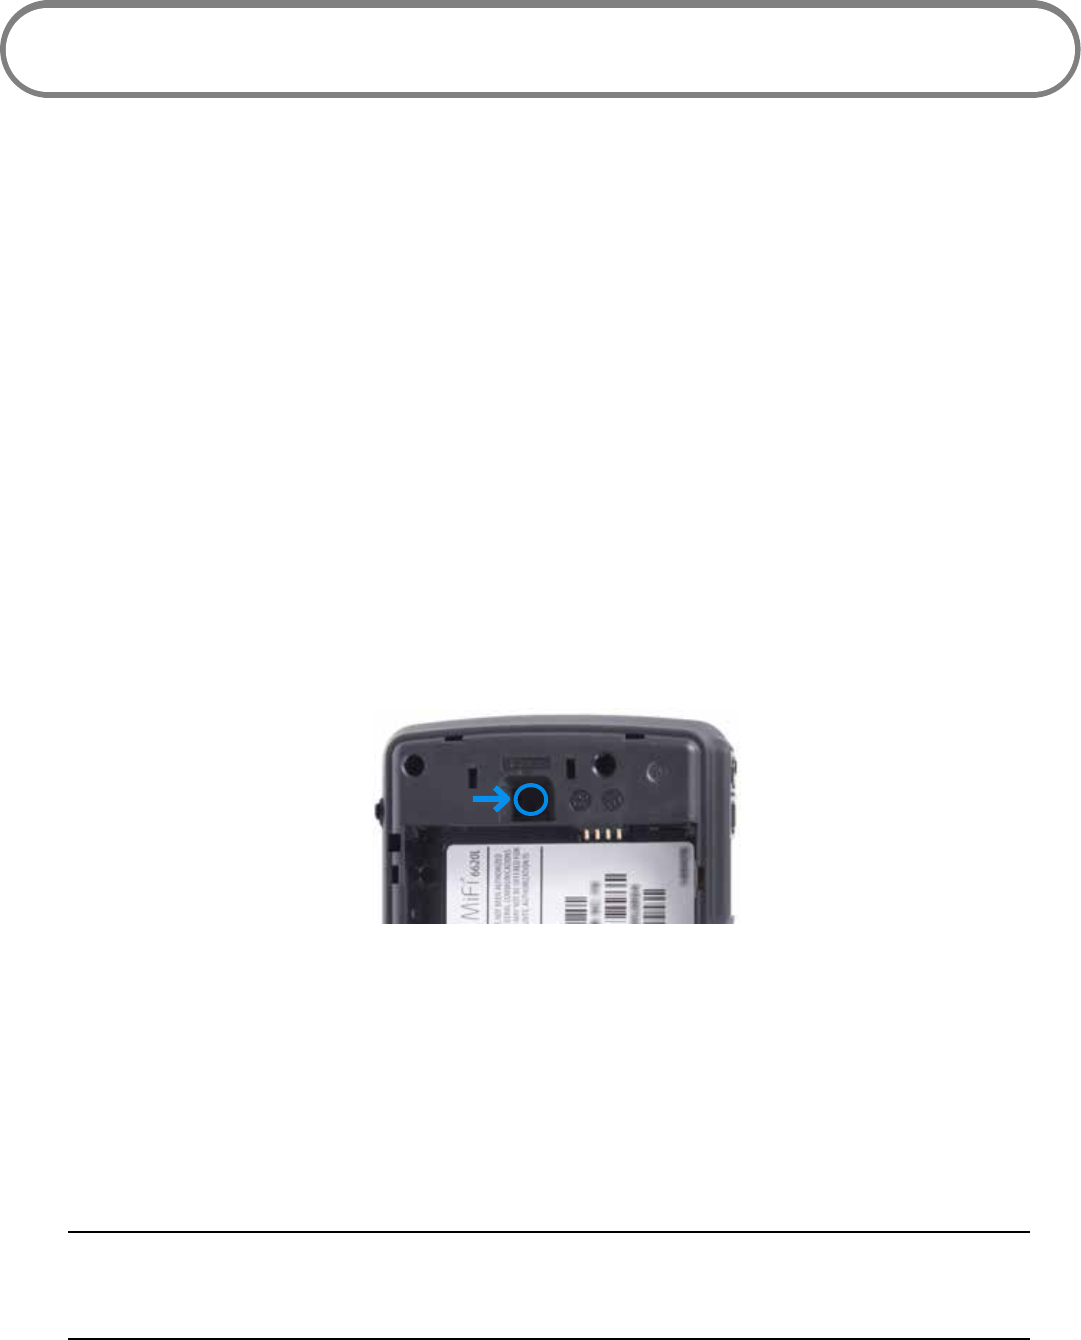
108
Common Problems and Solutions
The following are some common problems and solutions.
My Jetpack just powered off without my pressing the power button. Why?
This may occur under any of the following circumstances.
•Pressing the Master Reset button
•Jetpack automatically restarting after conguration changes
•Switching proles
•Restoring the conguration settings
•Battery depletion
To restore battery power, follow these steps.
➊ Manually press and hold the power button to turn it back on.
➋ If the battery is depleted, charge the Jetpack with the wall charger.
How do I reset the Jetpack back to factory settings?
The master reset button is in a small hole located on the bottom of the Jetpack, underneath the
battery cover. This button returns the Jetpack to factory settings, including re-setting the Wi-Fi
Name (SSID) and Wi-Fi Password. To reset the Jetpack, follow these steps.
➊ Place one end of an unfolded paper clip into the master reset button hole.
➋ Press the paper clip on the button until the display shows "MiFi Powering O" (about ve to
six seconds), then your Jetpack will restart.
WARNING! The "Reset to Factory Defaults" operation overwrites ALL existing settings. If
the Wi-Fi settings change, you will lose this connection, and need to reconnect using the new
settings.

109
How do I reset the Access Point and Router settings back to factory settings?
To reset the access point and router settings, follow these steps.
➊ Connect to Jetpack Settings by connecting your computer to the MiFi wireless network and
going to http://my.jetpack/ or http://192.168.1.1 in your browser.
➋ Connect to the Jetpack Backup and Restore page. (See on page 71.)The Backup and
Restore page has a Restore to Factory Defaults button. This button resets all Access Point
and Router settings to their factory default values. All existing settings are lost.
No service is available.
•Reorient your device. If you are inside a building or near a structure that may be blocking the
signal, change the position or location of the device. For example, try moving your device
close to a window.
•You are outside your coverage area, or there may be a problem with your account. Check
with your network operator.
The Jetpack has no power or the device screen does not display when the
power button is pressed.
•Make sure the battery is properly seated in the device.
•Make sure the battery is fully charged. Plug in the AC charger for at least 3.5 hours.
I forgot my Wi-Fi password.
•Select Menu > Wi-Fi > More to display the Wi-Fi screen with your device name and Wi-Fi
password.
I forgot my Web Interface password.
•Select Menu > Wi-Fi > More > More > More to display the Web Interface screen with the Web
Interface URL and password.
I cannot connect to my Jetpack.
•Make sure the Network Signal Strength indicator displays at least one bar and that the type
of network is displayed on the device Home page.
•Make sure your Windows Wi-Fi adapter/Mac AirPort is turned on. (Refer to your computer’s
Help if you need assistance.)
➊ Open your wireless network connection list:
Windows: Right-click icon and select View Available Networks.
Mac: Pull down list from AirPort icon.
➋ Windows: Click Connect.
Mac: Select the network name.

110
When your device is connected to the network, the Connected Devices icon in the status bar
will show a connected device.
I see the network name but cannot connect to my Jetpack.
•Go to Menu > Wi-Fi > More to check that you are using the correct Wi-Fi password.
How do I disconnect from the network?
➊ Go to http://my.jetpack to open the Jetpack Home page.
➋ Sign In using your Web Interface password.
➌ Click Sign Out.
How can I find out how many users are connected to my Jetpack?
•Check the Connected Devices icon in the status panel on the Home page of your Jetpack.
The number of connected devices is displayed to the right of the icon.
How can I get detailed information about the devices that are connected to my
Jetpack?
➊ Select Menu > Connected Devices > More to display the name and IP address of each
connected device.
➋ To display more detailed information for connected devices, go to http://my.jetpack to open
the Home page, then Sign In using your Web Interface password. Select Connected Devices
from the Navigation panel to display additional details for all currently connected and
blocked devices.
How do I check the firmware version installed on my Jetpack?
•Select Menu > Software Update > More to display the current version installed. To check for
new update, select Check Now.
How do I check the battery level of my Jetpack?
•Check the battery icon on the status panel on the Home page of the Jetpack device.
How do I turn off my Jetpack?
•Press and hold the Power button until the display shows MiFi.
How can I tell that my Jetpack is still on after the device screen goes off?
•Tap the power button quickly. If the screen displays the device is still active.

111
Technical Support
IMPORTANT Before contacting support, be sure to re-start both your computer and the
MiFi 6620L.
Technical Support
Contact your service provider for assistance. When calling, you may be asked for the wireless
number of your Jetpack. To nd your Jetpack’s wireless number, go to About Jetpack > Open on
your device, or http://my.jetpack > Home on the Web User Interface.

113
Product Specications
General
Name: Jetpack Mobile Hotspot by Novatel
Wireless
Model: Jetpack
Approvals: FCC (North America)
Weight: 94 g / 4.6 oz
Dimensions: 95 mm x 67 mm x 19.35 mm,
3.94 in x 2.44 in x 0.65 in
Wireless Network – Tri Mode: LTE, CDMA
Wireless Network –
Wi-Fi Mode
802.11 b/g/n
Default SSID MiFi6620L-XXXX
Battery
•Size
•Time required for full charge
•Life
4000 mAh
2 hours (when not in use)
20 hours
Chip Set: QUALCOMM® MDM9625
Interface Type: Type B USB Port for Micro USB, used by
the wall charger
Memory: RAM = 128MB, LPDDR
FLASH = 256MB, NAND
Technology/Bands
Technology: LTE, CDMA 1X/EV-DO Rev 0/A
Band Designation: LTE Category 3
CDMA 1x/EV-DO RA; 800/1900 MHz
Bands: Domestic – B13 (700MHz), B4 (1700MHz), B2 (1900MHz
Global – B3 (1700MHz) & B7 (2500MHz)
Quad band HSPA+, Quad band GPRS/EDGE
LTE: B13 (700MHz)
LTE: B4 (1700MHz)
LTE: Roaming band
GSM/EDGE: B5/B8/B3/B2 (850/900/1800/1900MHz)
UMTS/HSPA/HSPA+: B5/B8/B2/B1
(850/900/1900/2100MHz)

114
Environmental
Operating Temperature: -10 ° C to +45° C (14°F to 113° F)
Storage Temperature: -20° C to 55° C (-4° F to 131° F)
Drop: 1 meter (3.28 feet) drop, no damage – fully operational
Vibration Stability: 5 Hz to 500 Hz, 0.1 octave/second

115
Regulatory Statements
Federal Communications Commission Notice (FCC – United States)
Electronic devices, including computers and wireless modems, generate RF energy incidental to their
intended function and are therefore subject to FCC rules and regulations.
This equipment has been tested to, and found to be within the acceptable limits for a Class B digital device,
pursuant to part 15 of the FCC Rules. These limits are designed to provide reasonable protection against
harmful interference when the equipment is operated in a residential environment.
This equipment generates radio frequency energy and is designed for use in accordance with the
manufacturer’s user manual. However, there is no guarantee that interference will not occur in any particular
installation. If this equipment causes harmful interference to radio or television reception, which can be
determined by turning the equipment o and on, you are encouraged to try to correct the interference by
one or more of the following measures.
• Reorient or relocate the receiving antenna.
• Increase the separation between the equipment and the receiver.
• Connect the equipment into an outlet on a circuit dierent from that to which the receiver is connected.
• Consult the dealer or an experienced radio/television technician for help.
This device complies with Part 15 of the Federal Communications Commission (FCC) Rules. Operation is
subject to the following two conditions.
• This device may not cause harmful interference.
• This device must accept any interference received, including interference that may cause undesired
operation.
WARNING: DO NOT ATTEMPT TO SERVICE THE WIRELESS COMMUNICATION DEVICE YOURSELF. SUCH ACTION
MAY VOID THE WARRANTY. THE Jetpack MODEM IS FACTORY TUNED. NO CUSTOMER CALIBRATION OR TUNING
IS REQUIRED. CONTACT NOVATEL WIRELESS TECHNICAL SUPPORT FOR INFORMATION ABOUT SERVICING YOUR
WIRELESS COMMUNICATION DEVICE.
FCC CAUTION: Any changes or modication not expressly approved by the party responsible for compliance
could void the user's authority to operate this equipment.
MODIFICATIONS: The FCC requires that you be notied that any changes or modications made to this
device that are not expressly approved by Novatel Wireless, Inc. may void your authority to operate the
equipment.
NOTE: The Radio Frequency (RF) emitter installed in your modem must not be located or operated in
conjunction with any other antenna or transmitter, unless specically authorized by Novatel Wireless
Technologies.
116
RF Exposure Content
FCC Equipment Authorization ID: PKRNVWMIFI6620
This device is authorized for use in mobile and portable applications.
This product has been evaluated for SAR and meets the FCC Guidelines for exposure to radio waves.
For better signal reception, coverage range and data throughput, do not place the router near
any physical obstruction, including in a pocket or in close proximity of any object. For RF Safety, a
mandatory minimum of 10 mm (1 cm) should be maintained between the device and any part of
a human body when using the device. Increasing the separation between the device and the body
will result in better reception and reduced exposure to radio energy.
117
Wireless Communications
IMPORTANT Due to the transmission and reception properties of wireless communications,
data occasionally can be lost or delayed.
This can be due to the variation in radio signal strength that results from changes in the
characteristics of the radio transmission path. Although data loss is rare, the environment where you
operate the modem might adversely aect communications.
Variations in radio signal strength are referred to as fading. Fading is caused by several dierent
factors including signal reection, the ionosphere, and interference from other radio channels.
Novatel Wireless or its partners will not be held responsible for damages of any kind resulting
from the delays or errors in data transmitted or received with the Jetpack device, or failure of the
MiFi6620L device to transmit or receive such data.
Limited Warranty and Liability
Novatel Wireless, Inc. warrants for the 12-month period immediately following receipt of the
Product by Purchaser that the Product will be free from defects in material and workmanship under
normal use. THESE WARRANTIES ARE EXPRESSLY IN LIEU OF ALL OTHER WARRANTIES, EXPRESS OR
IMPLIED, INCLUDING, WITHOUT LIMITATION, ALL IMPLIED WARRANTIES OF MERCHANTABILITY AND
FITNESS FOR A PARTICULAR PURPOSE.
The exclusive remedy for a claim under this warranty shall be limited to the repair or replacement,
at Novatel Wireless’ option, of defective or non-conforming materials, parts or components. The
foregoing warranties do not extend to (I) non conformities, defects or errors in the Products due
to accident, abuse, misuse or negligent use of the Products or use in other than a normal and
customary manner, environmental conditions not conforming to Novatel Wireless’ specication, of
failure to follow prescribed installation, operating and maintenance procedures, (II) defects, errors or
nonconformities in the Product due to modications, alterations, additions or changes not made in
accordance with Novatel Wireless’ specications or authorized by Novatel Wireless, (III) normal wear
and tear, (IV) damage caused by force of nature or act of any third person, (V) shipping damage,
(VI) service or repair of Product by the purchaser without prior written consent from Novatel
Wireless, (VII) products designated by Novatel Wireless as beta site test samples, experimental,
developmental, reproduction, sample, incomplete or out of specication Products, or (VIII) returned
products if the original identication marks have been removed or altered.

118
Safety Hazards
Do not operate the Jetpack in an environment that might be susceptible to radio interference
resulting in danger, specically:
Areas where prohibited by the law
Follow any special rules and regulations and obey all signs and notices. Always turn o the host
device when instructed to do so, or when you suspect that it might cause interference or danger.
Where explosive atmospheres might be present
Do not operate your device in any area where a potentially explosive atmosphere might exist.
Sparks in such areas could cause an explosion or re resulting in bodily injury or even death. Be
aware and comply with all signs and instructions.
Users are advised not to operate the device while at a refueling point or service station. Users are
reminded to observe restrictions on the use of radio equipment in fuel depots (fuel storage and
distribution areas), chemical plants or where blasting operations are in progress.
Areas with a potentially explosive atmosphere are often but not always clearly marked. Potential
locations can include gas stations, below deck on boats, chemical transfer or storage facilities,
vehicles using liqueed petroleum gas (such as propane or butane), areas where the air contains
chemicals or particles, such as grain, dust or metal powders, and any other area where you would
normally be advised to turn o your vehicle engine.
Near medical and life support equipment
Do not operate your device in any area where medical equipment, life support equipment, or near
any equipment that might be susceptible to any form of radio interference. In such areas, the host
communications device must be turned o. The device can transmit signals that could interfere
with this equipment.
On an aircraft, either on the ground or airborne
In addition to FAA requirements, many airline regulations state that you must suspend wireless
operations before boarding an airplane. Please ensure that the modem is turned o prior to
boarding aircraft in order to comply with these regulations. The modem can transmit signals that
could interfere with various onboard systems and controls.
While operating a vehicle
The driver or operator of any vehicle should not operate a wireless data device while in control of a
vehicle. Doing so will detract from the driver or operator’s control and operation of that vehicle. In
some countries, operating such communications devices while in control of a vehicle is an oense.
119
Electrostatic discharge (ESD)
Electrical and electronic devices are sensitive to electrostatic discharge (ESD). Macintosh native
connection software might attempt to reinitialize the device should a substantial electrostatic
discharge reset the device. If the software is not operational after an ESD occurrence, then restart
your computer.

120
Proper Battery Use and Disposal
IMPORTANT In event of a battery leak:
• Do not allow the liquid to come in contact with the skin or the eyes. If contact has been
made, wash the affected area with large amounts of water and seek medical advice.
• Seek medical advice immediately if a battery has been swallowed.
• Communicate the appropriate steps to be taken if a hazard occurs. Due to the transmission
and reception properties of wireless communications, data occasionally can be lost or
delayed.
Please review the following guidelines for safe and responsible battery use.
•Do not disassemble or open, crush, bend or deform, puncture, or shred.
•Do not modify or remanufacture, attempt to insert a foreign object into the battery, immerse
or expose to water or other liquids, or expose to re, explosion, or other hazard.
•Only use the battery for the system for which it was specied.
•Only use the battery with a charging system that has been qualied with the system per
this standard. Use of an unqualied battery or charger may present a risk of re, explosion,
leakage, or other hazard.
•Do not short circuit a battery or allow a metallic or conductive object to contact the battery
terminals.
•Replace the battery only with another battery that has been qualied with the system per
this standard. Use of an unqualied battery may present a risk of re, explosion, leakage, or
other hazard.
•Promptly dispose of used batteries in accordance with local regulations.
•Battery usage by children should be supervised.
•Avoid dropping the Jetpack or battery. If the Jetpack or the battery is dropped, especially on
a hard surface, and the user suspects damage, take it to a service center for inspection.
•Improper battery use may result in a re, explosion, or other hazard.

Glossary
6

122
Glossary
● 1X — The core CDMA2000 wireless air interface standard. The designation “1X”, meaning 1 times Radio
Transmissio Technology, indicates the same radio frequency (RF) bandwidth as IS-95: a duplex pair of
1.25 MHz channels. The 1X standard supports packet data speeds of up to 153 kbits/s with real world
data transmission averaging 80-100 kbit/s in most commercial applications.
● 3G — Third Generation. 3G refers to the third generation of mobile telephony technology. 3G
telecommunication networks support services that provide an information transfer rate of at least 200
kbit/s. However, many services advertised as 3G provide higher speed than the minimum technical
requirements for a 3G service. 3G finds application in wireless voice telephony, mobile Internet access,
fixed wireless Internet access, video calls and mobile TV.
● 4G LTE — Fourth Generation Long Term Evolution. LTE is a standard for wireless data communications
technology and an evolution of the GSM/UMTS standards. The goal of LTE is to increase the capacity
and speed of wireless data networks using new DSP (digital signal processing) techniques and
modulations that were developed around the turn of the millenium. A further goal is the redesign and
simplification of the network architecture to an IP-based system with significantly reduced transfer
latency compared to the 3G architecture. The LTE wireless interface is incompatible with 2G and 3G
networks, so that it must be operated on a separate wireless spectrum.
● 802.11 (b, g, n) — A set of WLAN communication standards in the 2.4, 3.6 and 5 GHz frequency bands.
● bps — Bits per second. The rate of data flow.
● Broadband — High-capacity high-speed transmission channel with a wider bandwidth than
conventional modem lines. Broadband channels can carry video, voice, and data simultaneously.
● CDMA — Code Division Multiple Access. It is the underlying channel access method used by some
mobile phone standards.
● DHCP — Dynamic Host Configuration Protocol. Software found in servers and routers that
automatically assigns temporary IP addresses to clients logging into an IP network.
● DHCP Server — A server or service with a server that assigns IP addresses.
● DNS — Domain Name System. A system for converting host names and domain names into IP
addresses on the Internet or on local networks that use the TCP/IP protocol.
● EV-DO Rev 0 — CDMA EV-DO Rev. 0 is a leading-edge wireless technology with higher data rates and
higher system capacity. It is a fully backward compatible standard and remains interoperable with
deployed EV-DO networks and devices around the world. Rev 0 provides access to mobile devices
with forward link speeds of up to 2.4 Mbit/s, and reverse link speeds up to 152 kbit/s. For more
information, visit www.cdg.org.
● EV-DO Rev A — CDMA EV-DO Rev. A is a leading-edge wireless technology with higher data rates and
higher system capacity. It is a fully backward compatible standard and remains interoperable with
deployed EV-DO networks and devices around the world. Rev A provides access to mobile devices
with forward link speed of up to 3.1 Mbit/s, and reverse link speeds up to 1.8 Mbit/s. The increased
data rates on Rev. A’s physical layer enable richer applications and services. For more information, visit
www.cdg.org.
123
● Firmware — A computer program embedded in an electronic device. Firmware usually contains
operating code for the device.
● GB — Gigabyte. A multiple of the unit byte for digital information storage. Usage depends on context.
When referring to disk capacities it usually means 109 bytes. It also applies to data transmission
quantities over telecommunication circuits.
● Hotspot — A Wi-Fi (802.11) access point or the area covered by an access point. Used for connecting
to the Internet.
● HTTP — Hypertext Transfer Protocol. An application-level protocol for accessing the World Wide Web
over the Internet.
● IEEE — Institute of Electrical and Electronics Engineers. An international technical/professional society
that promotes standardization in technical disciplines.
● IMEI — International Mobile Equipment Identity. Used in LTE networks to identify the device. It is
usually printed on the device and can often be retrieved using a USSD code.
● IP — Internet Protocol. The mechanism by which packets are routed between computers on a
network.
● IP Type — The type of service provided over a network.
● IP address — Internet Protocol address. The address of a device attached to an IP network (TCP/IP
network).
● ISP — Internet Service Provider. Also referred to as the service carrier, an ISP provides Internet
connection service. (See Network Operator)
● Kbps — Kilobits per second. The rate of data flow.
● LAN — Local Area Network. A type of network that lets a group of computers, all in close proximity
(such as inside an office building), communicate with one another. It does not use common carrier
circuits though it can have gateways or bridges to other public or private networks.
● MAC Address — Media Access Control. A number that uniquely identifies each network hardware
device. MAC addresses are 12-digit hexadecimal numbers. This is also known as the physical or
hardware address.
● Mbps — Megabits per second. The rate of data flow.
● MSID — Mobile Station IDentifier. A number for a mobile phone that identifies that phone to the
network. These numbers are carrier specific.
● Network Operator — The vendor who provides your wireless access. Known by different names in
different regions, some examples are: wireless provider, network provider, and service provider.
● Network Technology — The technology on which a particular network provider’s system is built; such
as CDMA or EVDO.
● Port — A virtual data connection used by programs to exchange data. It is the endpoint in a logical
connection. The port is specified by the port number.
● Port Forwarding — A process that allows remote devices to connect to a specific computer within a
private LAN.
124
● Port Number — A 16-bit number used by the TCP and UDP protocols to direct traffic on a TCP/IP
host. Certain port numbers are standard for common applications.
● PRL — Preferred Roaming List. A list that your wireless phone or device uses to determine which
networks to connect with when you are roaming. (Network operator specific).
● Protocol — A standard that enables connection, communication, and data transfer between
computing endpoints.
● Proxy — A firewall mechanism that replaces the IP address of a host on the internal (protected)
network with its own IP address for all traffic passing through it.
● Router — A device that directs traffic from one network to another.
● SIM — Subscriber Identification Module. Found in LTE and GSM network technology, the SIM is a card
containing identification information for the subscriber and their account. The SIM card can be moved
to different devices.
● SSID — Service Set IDentifier. The name assigned to a Wi-Fi network.
● TCP/IP — Transmission Control Protocol/Internet Protocol. The set of communications protocols used
for the Internet and other similar networks.
● USB — Universal Serial Bus. A connection type for computing device peripherals such as a printer,
mobile modem, etc. USB connectors may be used for data transfer or charging.
● USB Port Types — The USB ports on computers and hubs have a rectangular Type A socket, and
peripheral devices have a cable with a Type A plug. Peripherals that do not have an attached cable
have a square Type B socket on the device and a separate cable with a Type A and Type B plug. Ports
and connectors are available in different sizes (for example, standard, mini, and micro).
● VPN — Virtual Private Network. A secure private network that runs over the public Internet.
Commonly used to connect to an office network from elsewhere.
● WCDMA — Wideband Code Division Multiple Access. An air interface standard found in 3G mobile
telecommunications networks. The most-commonly used member of the UMTS family.
● WWAN — Wireless Wide Area Network. A public network that extends beyond architectural,
geographical, or political boundaries (unlike a LAN, which is usually a private network located within a
room, building, or other limited area).
● Wi-Fi — Wireless Fidelity. Any system that uses the 802.11 standard developed and released in 1997 by
the IEEE.
● Wi-Fi Client — A wireless device that connects to the Internet via Wi-Fi.
● WPA/WPA2 — Wi-Fi Protected Access. A security protocol for wireless 802.11 networks from the Wi-Fi
Alliance.


