Contents
- 1. User Manual
- 2. User manual
- 3. Users manual
Users manual
Contacts and Important Information
o
Name
Address
Telephone and Fax
Email Address
Name
Address
Telephone and Fax
Email Address
Name
Address
Telephone Number(s)
Policy Number
Name
Address
Telephone and Fax
Email Address
mylife OmniPod System Start Date: ______________________
PDM Model: ENT500 Serial Number: _____________________
Distributor:
Customer Care:
Doctor
Nurse/Educator
Health Insurance
Pharmacy
XXXXXXXXXXXXXXXXXXXXXXXXXXXXXXXXXXXXXXXXXXXX
XXXXXXXXXXXXXXXXXXXXXXXXXXXXXXXXXXXXXXXXXXXX
XXXXXXXXXXXXXXXXXXXXXXXXXXXXXXXXXXXXXXXXXXXX
XXXXXXXXXXXXXXXXXXXXXXXXXXXXXXXXXXXXXXXXXXXX
Use the spaces below to record important health and product information.
© 2012–2013 Insulet Corporation. All rights reserved.
mylife OmniPod is a registered trademark of Insulet Corporation.
U.S. Patent No. 6,740,059.
OneTouch® Verio™ is a registered trademark of Johnson & Johnson.
Third-party trademarks used herein are the trademarks of their respective owners.
15858-AW Rev A

iii
Contents
Introduction. . . . . . . . . . . . . . . . . . . . . . . . . . . . . . . . . . . . . . . . . . . . . . . . viii
About This User Guide . . . . . . . . . . . . . . . . . . . . . . . . . . . . . . . . . . . . . . . . . viii
Symbols . . . . . . . . . . . . . . . . . . . . . . . . . . . . . . . . . . . . . . . . . . . . . . . . . . . . viii
Conventions and Terms . . . . . . . . . . . . . . . . . . . . . . . . . . . . . . . . . . . . . . ix
Important Information . . . . . . . . . . . . . . . . . . . . . . . . . . . . . . . . . . . . . . . ix
Indication . . . . . . . . . . . . . . . . . . . . . . . . . . . . . . . . . . . . . . . . . . . . . . . . . . . . .ix
Contraindications . . . . . . . . . . . . . . . . . . . . . . . . . . . . . . . . . . . . . . . . . . . . . x
Your Role: Safely Using the mylife OmniPod System. . . . . . . . . . . . . xi
1 Your New mylife OmniPod Insulin Management System. . . . 1
Insulin Delivery with the mylife OmniPod System. . . . . . . . . . . . . . . 1
How Does the mylife OmniPod System Work? . . . . . . . . . . . . . . . . . . 2
No tubing . . . . . . . . . . . . . . . . . . . . . . . . . . . . . . . . . . . . . . . . . . . . . . . . . . . . 2
Suggested bolus calculation . . . . . . . . . . . . . . . . . . . . . . . . . . . . . . . . . 2
Carb presets. . . . . . . . . . . . . . . . . . . . . . . . . . . . . . . . . . . . . . . . . . . . . . . . . . 2
Automated cannula insertion . . . . . . . . . . . . . . . . . . . . . . . . . . . . . . . . 2
A fully integrated design with blood glucose monitoring . . . . 3
Record keeping . . . . . . . . . . . . . . . . . . . . . . . . . . . . . . . . . . . . . . . . . . . . . . 3
Personalizing your System . . . . . . . . . . . . . . . . . . . . . . . . . . . . . . . . . . . 3
The Pod . . . . . . . . . . . . . . . . . . . . . . . . . . . . . . . . . . . . . . . . . . . . . . . . . . . . . . . . . 4
The Personal Diabetes Manager. . . . . . . . . . . . . . . . . . . . . . . . . . . . . . . . . 4
Buttons that program and control the mylife OmniPod
System . . . . . . . . . . . . . . . . . . . . . . . . . . . . . . . . . . . . . . . . . . . . . . . . . . . . 5
Primary screens . . . . . . . . . . . . . . . . . . . . . . . . . . . . . . . . . . . . . . . . . . . . . . 6
Safety Features. . . . . . . . . . . . . . . . . . . . . . . . . . . . . . . . . . . . . . . . . . . . . . . . . . 8
Automatic priming, safety checks, and insertion . . . . . . . . . . . . . 8
Occlusion detection . . . . . . . . . . . . . . . . . . . . . . . . . . . . . . . . . . . . . . . . . . 8
Table 1:. . . . . . . . . . . . . . . . . . . . . . . . . . . . . . . . . . . . . . . . . . . . . . . . . . 8
Alerts and alarms. . . . . . . . . . . . . . . . . . . . . . . . . . . . . . . . . . . . . . . . . . . . . 8
2 Getting Started . . . . . . . . . . . . . . . . . . . . . . . . . . . . . . . . . . . . . . . . . . . . 9
Set Up the Personal Diabetes Manager (PDM). . . . . . . . . . . . . . . . . . . 9
Turn on the PDM . . . . . . . . . . . . . . . . . . . . . . . . . . . . . . . . . . . . . . . . . . . . . 9
The mylife OmniPod Setup Wizard . . . . . . . . . . . . . . . . . . . . . . . . . . . . . 10
Enter your PDM ID. . . . . . . . . . . . . . . . . . . . . . . . . . . . . . . . . . . . . . . . . . . 10
Select the ID screen color. . . . . . . . . . . . . . . . . . . . . . . . . . . . . . . . . . . . 10
Set date and time . . . . . . . . . . . . . . . . . . . . . . . . . . . . . . . . . . . . . . . . . . . 11
Enter basal settings. . . . . . . . . . . . . . . . . . . . . . . . . . . . . . . . . . . . . . . . . . 11
Enter blood glucose sound setting and BG goal. . . . . . . . . . . . . 11
Enter minimum BG allowed for use in bolus calculation. . . . . 12
Enter insulin-to-carbohydrate ratio. . . . . . . . . . . . . . . . . . . . . . . . . . 13
Enter correction factor . . . . . . . . . . . . . . . . . . . . . . . . . . . . . . . . . . . . . . 13
Set reverse correction . . . . . . . . . . . . . . . . . . . . . . . . . . . . . . . . . . . . . . . 13
Set low reservoir advisory . . . . . . . . . . . . . . . . . . . . . . . . . . . . . . . . . . . 14
Set Pod expiration notification . . . . . . . . . . . . . . . . . . . . . . . . . . . . . . 14

Contents
iv
3 Understanding and Adjusting Basal Rates . . . . . . . . . . . . . . . . 16
What Is a Basal Rate?. . . . . . . . . . . . . . . . . . . . . . . . . . . . . . . . . . . . . . . . . . . . 16
Personalized Basal Programs . . . . . . . . . . . . . . . . . . . . . . . . . . . . . . . . . . . 16
Create a basal program . . . . . . . . . . . . . . . . . . . . . . . . . . . . . . . . . . . . . . 17
Enable an existing basal program . . . . . . . . . . . . . . . . . . . . . . . . . . . 19
Temporary Basal Rates and Presets . . . . . . . . . . . . . . . . . . . . . . . . . . . . . 22
What is a temporary basal rate?. . . . . . . . . . . . . . . . . . . . . . . . . . . . . . 22
Enable a one-time temporary basal rate. . . . . . . . . . . . . . . . . . . . . 23
Cancel a one-time temporary basal rate . . . . . . . . . . . . . . . . . . . . . 24
Create a temporary basal preset . . . . . . . . . . . . . . . . . . . . . . . . . . . . . 24
Enable an existing temporary basal preset . . . . . . . . . . . . . . . . . . 25
Cancel an active temporary basal preset . . . . . . . . . . . . . . . . . . . . 26
Change, rename, or delete a temporary basal preset . . . . . . . . 26
Maximum Basal Rate . . . . . . . . . . . . . . . . . . . . . . . . . . . . . . . . . . . . . . . . . . . 27
What is the maximum basal rate?. . . . . . . . . . . . . . . . . . . . . . . . . . . . 27
Change the maximum basal rate . . . . . . . . . . . . . . . . . . . . . . . . . . . . 27
4 Understanding and Delivering Bolus Doses. . . . . . . . . . . . . . . 28
What Is a Bolus? . . . . . . . . . . . . . . . . . . . . . . . . . . . . . . . . . . . . . . . . . . . . . . . . 28
Bolus Dose Options . . . . . . . . . . . . . . . . . . . . . . . . . . . . . . . . . . . . . . . . . . . . 29
Suggested Bolus Calculator . . . . . . . . . . . . . . . . . . . . . . . . . . . . . . . . . . . . 29
How a suggested bolus is calculated . . . . . . . . . . . . . . . . . . . . . . . . 30
Deliver a Normal Bolus . . . . . . . . . . . . . . . . . . . . . . . . . . . . . . . . . . . . . . . . . 31
Deliver a bolus when suggested bolus calculator is On. . . . . . 31
Deliver a bolus manually (suggested bolus calc is Off). . . . . . . 33
Deliver an Extended Bolus. . . . . . . . . . . . . . . . . . . . . . . . . . . . . . . . . . . . . . 34
Deliver an extended bolus instead of a normal bolus. . . . . . . . 34
Cancel Active Boluses . . . . . . . . . . . . . . . . . . . . . . . . . . . . . . . . . . . . . . . . . . 36
Replace an Extended Bolus. . . . . . . . . . . . . . . . . . . . . . . . . . . . . . . . . . . . . 36
Bolus Presets . . . . . . . . . . . . . . . . . . . . . . . . . . . . . . . . . . . . . . . . . . . . . . . . . . . 37
Enable an existing bolus preset. . . . . . . . . . . . . . . . . . . . . . . . . . . . . . 38
Change, rename, or delete a bolus preset . . . . . . . . . . . . . . . . . . . 39
Cancel an active bolus preset. . . . . . . . . . . . . . . . . . . . . . . . . . . . . . . . 39
Carb Presets . . . . . . . . . . . . . . . . . . . . . . . . . . . . . . . . . . . . . . . . . . . . . . . . . . . . 40
Create a carb preset . . . . . . . . . . . . . . . . . . . . . . . . . . . . . . . . . . . . . . . . . 40
Change or edit a carb preset. . . . . . . . . . . . . . . . . . . . . . . . . . . . . . . . . 41
Delete a carb preset . . . . . . . . . . . . . . . . . . . . . . . . . . . . . . . . . . . . . . . . . 42
5 Using the Pod. . . . . . . . . . . . . . . . . . . . . . . . . . . . . . . . . . . . . . . . . . . . 43
The Pod Change Process . . . . . . . . . . . . . . . . . . . . . . . . . . . . . . . . . . . . . . . 43
Gather equipment and supplies . . . . . . . . . . . . . . . . . . . . . . . . . . . . . 44
Fill a new Pod. . . . . . . . . . . . . . . . . . . . . . . . . . . . . . . . . . . . . . . . . . . . . . . . 46
Select the infusion site. . . . . . . . . . . . . . . . . . . . . . . . . . . . . . . . . . . . . . . 49
Prepare the infusion site . . . . . . . . . . . . . . . . . . . . . . . . . . . . . . . . . . . . . 50
Apply the new Pod . . . . . . . . . . . . . . . . . . . . . . . . . . . . . . . . . . . . . . . . . . 51
Insert cannula and begin insulin delivery . . . . . . . . . . . . . . . . . . . 53
Check Pod Status . . . . . . . . . . . . . . . . . . . . . . . . . . . . . . . . . . . . . . . . . . . . . . . 55
Suspend Insulin Delivery . . . . . . . . . . . . . . . . . . . . . . . . . . . . . . . . . . . . . . . 56
Resume Insulin Delivery . . . . . . . . . . . . . . . . . . . . . . . . . . . . . . . . . . . . . . . . 57
Avoid Infusion Site Infections. . . . . . . . . . . . . . . . . . . . . . . . . . . . . . . . . . . 58
Get the Most From Your Pod. . . . . . . . . . . . . . . . . . . . . . . . . . . . . . . . . . . . 58
Avoid extreme temperatures . . . . . . . . . . . . . . . . . . . . . . . . . . . . . . . . 58
Water and your Pod. . . . . . . . . . . . . . . . . . . . . . . . . . . . . . . . . . . . . . . . . . 58
Safe storage . . . . . . . . . . . . . . . . . . . . . . . . . . . . . . . . . . . . . . . . . . . . . . . . . 59
6 Using the Personal Diabetes Manager . . . . . . . . . . . . . . . . . . . . 60
The ID Screen. . . . . . . . . . . . . . . . . . . . . . . . . . . . . . . . . . . . . . . . . . . . . . . . . . . 60

Contents
v
The Status Screen . . . . . . . . . . . . . . . . . . . . . . . . . . . . . . . . . . . . . . . . . . . . . . 60
The System Setup Menu . . . . . . . . . . . . . . . . . . . . . . . . . . . . . . . . . . . . . . . 62
Reset the Date or Time . . . . . . . . . . . . . . . . . . . . . . . . . . . . . . . . . . . . . . . . . 63
Reset the time. . . . . . . . . . . . . . . . . . . . . . . . . . . . . . . . . . . . . . . . . . . . . . . 63
Reset the date . . . . . . . . . . . . . . . . . . . . . . . . . . . . . . . . . . . . . . . . . . . . . . . 64
Change Bolus and Basal Settings. . . . . . . . . . . . . . . . . . . . . . . . . . . . . . . 64
Bolus calcs. . . . . . . . . . . . . . . . . . . . . . . . . . . . . . . . . . . . . . . . . . . . . . . . . . . 64
Ratios/factors/targets . . . . . . . . . . . . . . . . . . . . . . . . . . . . . . . . . . . . . . . 66
Temp basal . . . . . . . . . . . . . . . . . . . . . . . . . . . . . . . . . . . . . . . . . . . . . . . . . . 67
Extended. . . . . . . . . . . . . . . . . . . . . . . . . . . . . . . . . . . . . . . . . . . . . . . . . . . . 67
Bolus increment. . . . . . . . . . . . . . . . . . . . . . . . . . . . . . . . . . . . . . . . . . . . . 67
Max bolus . . . . . . . . . . . . . . . . . . . . . . . . . . . . . . . . . . . . . . . . . . . . . . . . . . . 67
Max basal rate. . . . . . . . . . . . . . . . . . . . . . . . . . . . . . . . . . . . . . . . . . . . . . . 67
Alerts and Reminders . . . . . . . . . . . . . . . . . . . . . . . . . . . . . . . . . . . . . . . . . . 68
Set alerts and reminders . . . . . . . . . . . . . . . . . . . . . . . . . . . . . . . . . . . . 69
Change Blood Glucose Meter Settings . . . . . . . . . . . . . . . . . . . . . . . . . 71
Change BG goal limits. . . . . . . . . . . . . . . . . . . . . . . . . . . . . . . . . . . . . . . 72
Manage the blood glucose tags list . . . . . . . . . . . . . . . . . . . . . . . . . 72
Change BG sound . . . . . . . . . . . . . . . . . . . . . . . . . . . . . . . . . . . . . . . . . . . 72
Customize the Personal Diabetes Manager . . . . . . . . . . . . . . . . . . . . 73
Set PDM options . . . . . . . . . . . . . . . . . . . . . . . . . . . . . . . . . . . . . . . . . . . . 73
Set ID screen . . . . . . . . . . . . . . . . . . . . . . . . . . . . . . . . . . . . . . . . . . . . . . . . 73
Set PDM lock . . . . . . . . . . . . . . . . . . . . . . . . . . . . . . . . . . . . . . . . . . . . . . . . 74
Set the Screen time-out . . . . . . . . . . . . . . . . . . . . . . . . . . . . . . . . . . . . . 74
Set Diagnostic Functions . . . . . . . . . . . . . . . . . . . . . . . . . . . . . . . . . . . . . . . 75
Diagnostic options . . . . . . . . . . . . . . . . . . . . . . . . . . . . . . . . . . . . . . . . . . 75
Set a Reminder to Vibrate . . . . . . . . . . . . . . . . . . . . . . . . . . . . . . . . . . . . . . 76
Get the Most from Your PDM . . . . . . . . . . . . . . . . . . . . . . . . . . . . . . . . . . . 77
Keep it handy . . . . . . . . . . . . . . . . . . . . . . . . . . . . . . . . . . . . . . . . . . . . . . . 77
Communicating with the Pod . . . . . . . . . . . . . . . . . . . . . . . . . . . . . . . 77
Water and your PDM . . . . . . . . . . . . . . . . . . . . . . . . . . . . . . . . . . . . . . . . 77
Avoid extreme temperatures. . . . . . . . . . . . . . . . . . . . . . . . . . . . . . . . 77
Electrical interference . . . . . . . . . . . . . . . . . . . . . . . . . . . . . . . . . . . . . . . 78
7 Checking Your Blood Glucose . . . . . . . . . . . . . . . . . . . . . . . . . . . . 79
The Built-in OneTouch® Verio™ Blood Glucose Meter . . . . . . . . . . . 79
The OneTouch® Verio™ Blood Glucose Test Strips. . . . . . . . . . . . . . . 80
Important test strip information. . . . . . . . . . . . . . . . . . . . . . . . . . . . . 80
The OneTouch® Verio™ Control Solution. . . . . . . . . . . . . . . . . . . . . . . . 81
When to perform a control solution test. . . . . . . . . . . . . . . . . . . . . 81
Check that the meter and test strips are working. . . . . . . . . . . . 81
Control solution expiration date. . . . . . . . . . . . . . . . . . . . . . . . . . . . . 81
Ensure accurate control solution results . . . . . . . . . . . . . . . . . . . . . 82
Performing a Control Solution Test . . . . . . . . . . . . . . . . . . . . . . . . . . . . . 82
Performing a Blood Glucose Reading . . . . . . . . . . . . . . . . . . . . . . . . . . 85
Prepare the lancing device . . . . . . . . . . . . . . . . . . . . . . . . . . . . . . . . . . 86
Insert the blood glucose test strip . . . . . . . . . . . . . . . . . . . . . . . . . . . 87
Fill the blood glucose test strip with blood . . . . . . . . . . . . . . . . . . 88
Remove the lancet . . . . . . . . . . . . . . . . . . . . . . . . . . . . . . . . . . . . . . . . . . 90
Blood Glucose Results and the Suggested Bolus
Calculator . . . . . . . . . . . . . . . . . . . . . . . . . . . . . . . . . . . . . . . . . . . . . . . . . . . 91
Entering Blood Glucose Readings Manually. . . . . . . . . . . . . . . . . . . . 92
Editing Tags . . . . . . . . . . . . . . . . . . . . . . . . . . . . . . . . . . . . . . . . . . . . . . . . . . . . 93
Low and High Blood Glucose Readings . . . . . . . . . . . . . . . . . . . . . . . . 94
Low readings. . . . . . . . . . . . . . . . . . . . . . . . . . . . . . . . . . . . . . . . . . . . . . . . 94

Contents
vi
High readings . . . . . . . . . . . . . . . . . . . . . . . . . . . . . . . . . . . . . . . . . . . . . . . 94
Important Health-Related Information . . . . . . . . . . . . . . . . . . . . . . . . . 95
8 Understanding Your Records . . . . . . . . . . . . . . . . . . . . . . . . . . . . . 96
Record Keeping . . . . . . . . . . . . . . . . . . . . . . . . . . . . . . . . . . . . . . . . . . . . . . . . 96
Insulin Delivery Records . . . . . . . . . . . . . . . . . . . . . . . . . . . . . . . . . . . . . . . . 97
View insulin delivery records . . . . . . . . . . . . . . . . . . . . . . . . . . . . . . . . 97
Blood Glucose Records . . . . . . . . . . . . . . . . . . . . . . . . . . . . . . . . . . . . . . . . . 99
View single-day trends . . . . . . . . . . . . . . . . . . . . . . . . . . . . . . . . . . . . . . 99
View multiple-day trends. . . . . . . . . . . . . . . . . . . . . . . . . . . . . . . . . . . 100
Alarm Records. . . . . . . . . . . . . . . . . . . . . . . . . . . . . . . . . . . . . . . . . . . . . . . . . 101
Carbohydrate Records. . . . . . . . . . . . . . . . . . . . . . . . . . . . . . . . . . . . . . . . . 101
All Records . . . . . . . . . . . . . . . . . . . . . . . . . . . . . . . . . . . . . . . . . . . . . . . . . . . . 102
User Information/Support. . . . . . . . . . . . . . . . . . . . . . . . . . . . . . . . . . . . . 102
9 Living with Diabetes . . . . . . . . . . . . . . . . . . . . . . . . . . . . . . . . . . . . 104
Your Role: Safely Using the mylife OmniPod System . . . . . . . . . . . 104
Daily Diabetes Management Activities . . . . . . . . . . . . . . . . . . . . . . . . 105
Check your blood glucose frequently. . . . . . . . . . . . . . . . . . . . . . . 105
Inspect the infusion site daily. . . . . . . . . . . . . . . . . . . . . . . . . . . . . . . 105
Prepare for Emergencies . . . . . . . . . . . . . . . . . . . . . . . . . . . . . . . . . . . . . . 106
Water and Your Pod . . . . . . . . . . . . . . . . . . . . . . . . . . . . . . . . . . . . . . . . . . . 106
Traveling and Vacationing . . . . . . . . . . . . . . . . . . . . . . . . . . . . . . . . . . . . . 107
Plan for changing time zones. . . . . . . . . . . . . . . . . . . . . . . . . . . . . . . 107
Take enough supplies . . . . . . . . . . . . . . . . . . . . . . . . . . . . . . . . . . . . . . 107
Keep supplies accessible . . . . . . . . . . . . . . . . . . . . . . . . . . . . . . . . . . . 109
Avoid lows, highs, and DKA. . . . . . . . . . . . . . . . . . . . . . . . . . . . . . . . . . . . 109
General precautions . . . . . . . . . . . . . . . . . . . . . . . . . . . . . . . . . . . . . . . . 109
Hypoglycemia (Low Blood Glucose) . . . . . . . . . . . . . . . . . . . . . . . . 109
Symptoms of hypoglycemia. . . . . . . . . . . . . . . . . . . . . . . . . . . . . . . . 110
To avoid hypoglycemia (low blood glucose) . . . . . . . . . . . . . . . . 110
To treat hypoglycemia (low blood glucose). . . . . . . . . . . . . . . . . 111
How much is 15 grams of carbohydrate? . . . . . . . . . . . . . . . . . . . 112
Hyperglycemia (high blood glucose) . . . . . . . . . . . . . . . . . . . . . . . 114
Diabetic ketoacidosis (DKA) . . . . . . . . . . . . . . . . . . . . . . . . . . . . . . . . 118
Handling Special Situations . . . . . . . . . . . . . . . . . . . . . . . . . . . . . . . . . . . 119
Sick days. . . . . . . . . . . . . . . . . . . . . . . . . . . . . . . . . . . . . . . . . . . . . . . . . . . . 119
Exercising, playing sports, or working hard . . . . . . . . . . . . . . . . . 120
X-rays, MRIs, and CT scans . . . . . . . . . . . . . . . . . . . . . . . . . . . . . . . . . . 120
Surgery or hospitalization . . . . . . . . . . . . . . . . . . . . . . . . . . . . . . . . . . 121
10 Alerts and Alarms . . . . . . . . . . . . . . . . . . . . . . . . . . . . . . . . . . . . . 122
Safety Checks . . . . . . . . . . . . . . . . . . . . . . . . . . . . . . . . . . . . . . . . . . . . . . . . . 122
Blood Glucose Meter Alerts. . . . . . . . . . . . . . . . . . . . . . . . . . . . . . . . . . . . 122
Alarms. . . . . . . . . . . . . . . . . . . . . . . . . . . . . . . . . . . . . . . . . . . . . . . . . . . . . . . . . 126
Advisory Alarms . . . . . . . . . . . . . . . . . . . . . . . . . . . . . . . . . . . . . . . . . . . . 126
Hazard Alarms . . . . . . . . . . . . . . . . . . . . . . . . . . . . . . . . . . . . . . . . . . . . . . 126
Manual Shut-off of a Hazard Alarm . . . . . . . . . . . . . . . . . . . . . . . . . . . . 134
11 Communication Failures . . . . . . . . . . . . . . . . . . . . . . . . . . . . . . . 136
The Communication Process . . . . . . . . . . . . . . . . . . . . . . . . . . . . . . . . . . 136
Failure During Pod Activation or Operation . . . . . . . . . . . . . . . . . . . 136
Failure During Pod Deactivation. . . . . . . . . . . . . . . . . . . . . . . . . . . . . . . 138
Failure During Request for Status. . . . . . . . . . . . . . . . . . . . . . . . . . . . . . 139
Failure During Bolus Cancellation . . . . . . . . . . . . . . . . . . . . . . . . . . . . . 140
Appendix . . . . . . . . . . . . . . . . . . . . . . . . . . . . . . . . . . . . . . . . . . . . . . . . . .142
Pod Care and Maintenance. . . . . . . . . . . . . . . . . . . . . . . . . . . . . . . . . . . . 142
Storage . . . . . . . . . . . . . . . . . . . . . . . . . . . . . . . . . . . . . . . . . . . . . . . . . . . . . 142

Contents
vii
Cleaning . . . . . . . . . . . . . . . . . . . . . . . . . . . . . . . . . . . . . . . . . . . . . . . . . . . 142
Personal Diabetes Manager Care and Maintenance . . . . . . . . . . . 142
Storage. . . . . . . . . . . . . . . . . . . . . . . . . . . . . . . . . . . . . . . . . . . . . . . . . . . . . 142
Cleaning and disinfecting . . . . . . . . . . . . . . . . . . . . . . . . . . . . . . . . . . 143
Replacing batteries. . . . . . . . . . . . . . . . . . . . . . . . . . . . . . . . . . . . . . . . . 144
If the PDM becomes submerged in water. . . . . . . . . . . . . . 145
If you drop the PDM. . . . . . . . . . . . . . . . . . . . . . . . . . . . . . . . . . . . . . . . 146
Storage and Supplies . . . . . . . . . . . . . . . . . . . . . . . . . . . . . . . . . . . . . . . . . 146
Suggested Bolus Calculator Examples and Guidelines . . . . . . . . 147
Meal bolus calculation . . . . . . . . . . . . . . . . . . . . . . . . . . . . . . . . . . . . . 147
Insulin-on-board (IOB) calculation. . . . . . . . . . . . . . . . . . . . . . . . . . 147
Examples of suggested bolus calculations . . . . . . . . . . . . . . . . . 148
Calculator guidelines. . . . . . . . . . . . . . . . . . . . . . . . . . . . . . . . . . . . . . . 149
mylife OmniPod System Options and Settings . . . . . . . . . . . . . . . . 151
Pod Specifications. . . . . . . . . . . . . . . . . . . . . . . . . . . . . . . . . . . . . . . . . . . . . 152
Accuracy Test Results. . . . . . . . . . . . . . . . . . . . . . . . . . . . . . . . . . . . . . . . . . 153
Flow rate error. . . . . . . . . . . . . . . . . . . . . . . . . . . . . . . . . . . . . . . . . . . . . . 153
Personal Diabetes Manager Specifications . . . . . . . . . . . . . . . . . . . . 154
Blood Glucose Meter Specifications . . . . . . . . . . . . . . . . . . . . . . . . . . . 154
mylife OmniPod System Label Symbols . . . . . . . . . . . . . . . . . . . . . . . 155
Personal Diabetes Manager Icons . . . . . . . . . . . . . . . . . . . . . . . . . . . . . 156
Medical Device Directive . . . . . . . . . . . . . . . . . . . . . . . . . . . . . . . . . . . . . . 157
mylife OmniPod System Notice Concerning Interference . . . . . 157
Electromagnetic Compatibility. . . . . . . . . . . . . . . . . . . . . . . . . . . . . . . . 157
Glossary . . . . . . . . . . . . . . . . . . . . . . . . . . . . . . . . . . . . . . . . . . . . . . . . . . 162
Index . . . . . . . . . . . . . . . . . . . . . . . . . . . . . . . . . . . . . . . . . . . . . . . . . . . . . 168
viii
n About This User Guide
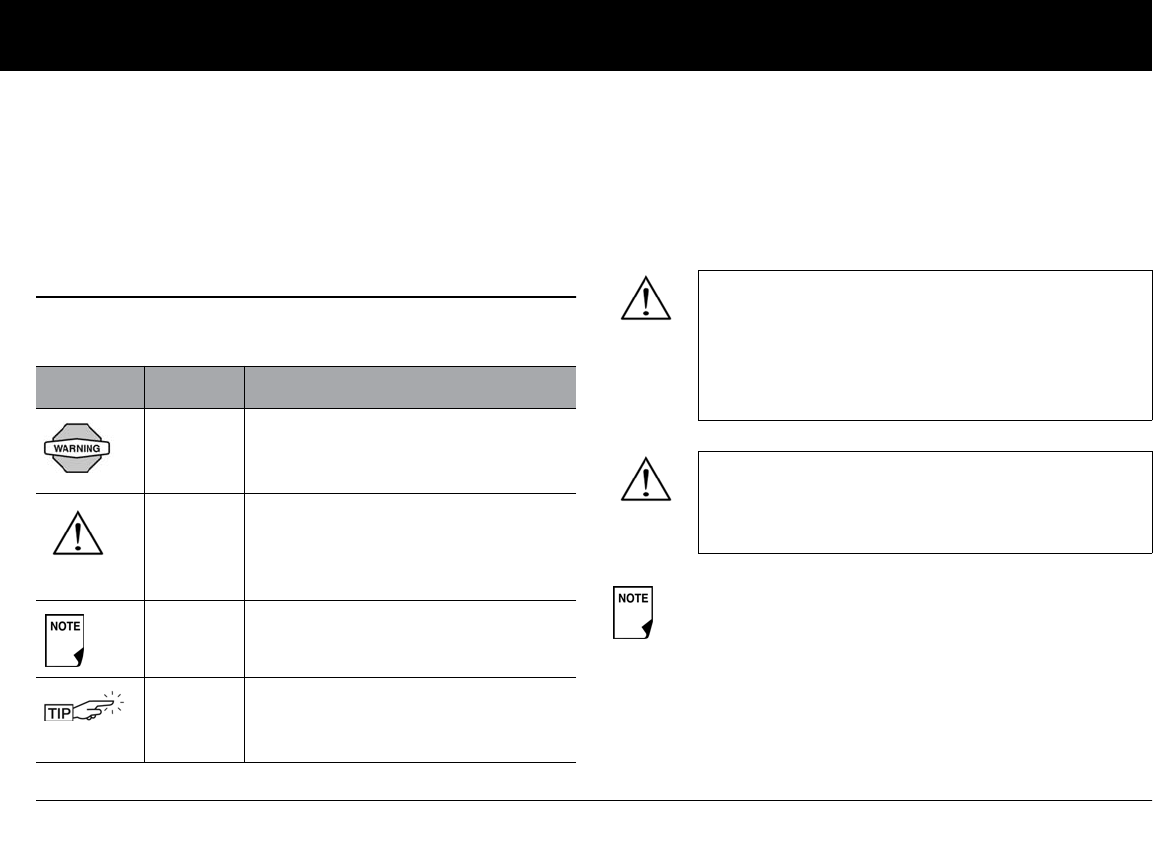
Symbols
Symbol Term Meaning
Warning Describes potential serious adverse
reactions, or indicates conditions that
could cause death or serious injury.
Caution Caution: Consult accompany in docu-
ments. Indicates conditions that could
cause minor or moderate injury to
you or damage to the device.
Note Provides helpful information.
Tip Offers a suggestion for successful use
of the mylife OmniPod® Insulin Man-
agement System.
This User Guide is intended for use only with PDM
model ENT500. To learn which version of the PDM
you have, turn it over. On the back of the PDM, look
for “ENT500.” If you see it, this is the correct User
Guide. If you do not see “ENT500” on the back of the
PDM, please call Customer Care.
This User Guide is periodically updated. Visit the Cus-
tomer Care section of mylife-omniPod.com to see
the most recent version and to find other helpful
information.
Screen displays shown in this User Guide are for illustra-
tive purposes only and should not be considered
suggestions for user settings. Consult with your health-
care provider to determine the appropriate settings for
you.
Introduction
Introduction
ix
Conventions and Terms
Important Information
Indication
The mylife OmniPod® Insulin Management System is intended
for subcutaneous (below the skin) delivery of insulin at set and
variable rates for the management of diabetes mellitus in persons
requiring insulin and for the quantitative measurement of glu-
cose in fresh whole capillary blood (in vitro).
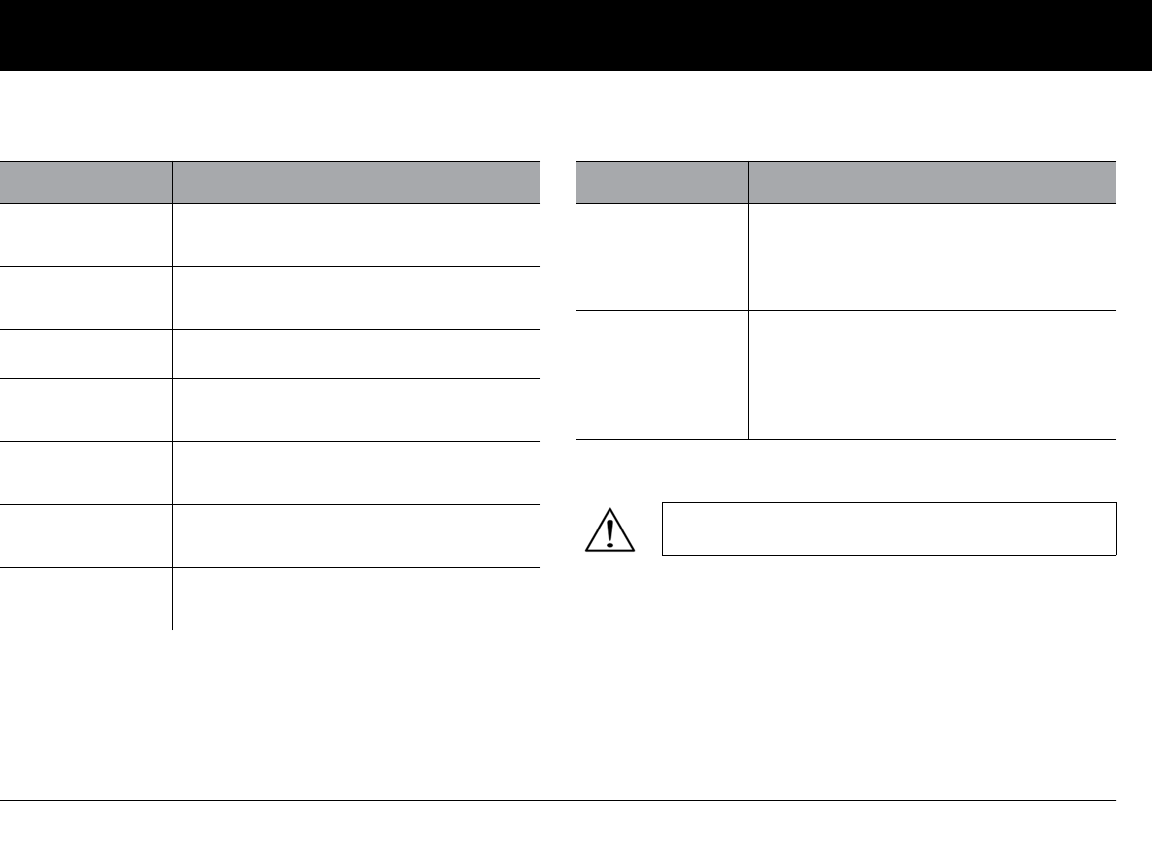
Convention/Term Meaning
Bold Names of buttons, soft keys, menus, and
screens are in bold.
Italics Words in italics are defined in the
Glossary at the end of this User Guide.
Press Press and release a button or soft key.
Hold Keep pressing a button until its function is
complete.
Menu A list of options on the PDM. Options allow
you to perform tasks.
Screen Displays programming, operating, and
alarm/alert information.
Button A physical button on the PDM, such as the
Home/Power button.
Convention/Term Meaning
Icon An image on the PDM screen that indi-
cates a menu option or item of informa-
tion. A table of screen icons appears in the
Appendices.
Soft keys A row of three unlabeled buttons on the
PDM whose label or function appears on
the screen directly above the button. The
label changes depending on the task you
are performing.
This device is for prescription use only.
Introduction
x
OneTouch® Verio™ test strips are used with the built-in One-
Touch® Verio™ meter for the quantitative measurement of blood
glucose in fresh whole capillary blood from the finger, upper arm
and palm. OneTouch® Verio™ Control Solutions are used to verify
that the meter and test strips are working together properly and
that the test is performed correctly.
Contraindications
Insulin pump therapy is NOT recommended for people who are
either:
• Unable to perform at least four (4) blood glucose tests per day
• Unable to maintain contact with their healthcare provider
• Unable to use the System according to instructions
Do not use the integrated OneTouch® Verio™ Blood Glucose
Monitoring System for:
• Testing on newborns
• Testing arterial blood
• Diagnosing of or screening for diabetes mellitus
The mylife OmniPod System is designed to use
rapid-acting U-100 insulin. The following U-100
rapid-acting insulin analogs have been tested and
found to be safe for use in the Pod: NovoRapid®,
Humalog®, or Apidra®. NovoRapid® is compatible
with the mylife OmniPod System for use up to 72
hours (3 days). Before using different insulins with
the mylife OmniPod System, check the insulin drug
label to make sure it can be used with a pump. Refer
to the insulin labeling and follow your healthcare
provider’s directions for how often to replace the Pod.
Not recommended for individuals with hearing
loss. Always verify ability to hear Pod/PDM alerts
and alarms.
The Pod and PDM may be affected by strong radi-
ation or magnetic fields. Before having an X-ray, MRI,
or CT scan (or any similar test or procedure), remove
your Pod and put it and the PDM outside the treat-
ment area. Check with your healthcare provider for
Pod removal guidelines.
Introduction
xi
n Your Role: Safely Using the mylife OmniPod
System
Work with your healthcare provider to establish diabetes man-
agement guidelines and settings that best fit your needs. These
may include:
Insulin-to-Carbohydrate (IC) Ratio: Number of grams of carbo-
hydrate covered by one unit of insulin. For example, if your
insulin-to-carbohydrate ratio is 1:15, then you need to deliver one
unit of insulin to cover every fifteen grams of carbohydrate you
eat.
Correction Factor: How much one unit of insulin will lower
blood glucose. For example, if your correction factor is 50, one
unit of insulin will lower your blood glucose by 50 mg/dL.
Target Blood Glucose Value: The blood glucose level you want
to achieve. For example, you may want to keep your blood glu-
cose close to 100 mg/dL.
Duration of Insulin Action: The length of time that insulin
remains active and available in your body after a correction or
meal bolus.
The glucose meter and lancing device are for single-
patient use. Do not share the device with anyone
including other family members. Do not use on mul-
tiple patients.
Parts of the device are considered biohazardous and
can potentially transmit infectious diseases, even
after you have performed cleaning and disinfection.
If you are unable to use the System according to
instructions, you may be putting your health and
safety at risk. Talk with your healthcare provider if
you have questions or concerns about using the
System properly.
Please read all the instructions provided in this User
Guide and practice the blood glucose testing proce-
dures before using the System. Monitor your blood
glucose with the guidance of your healthcare pro-
vider. Undetected hyperglycemia or hypoglycemia
can result without proper monitoring.
This device is intended for self-testing by the user.
If you are having symptoms that are not consistent
with your blood glucose test and you have followed
all instructions described in this User Guide, call your
healthcare professional.
Introduction
xii
Your individual needs influence the initial settings you and your
healthcare provider will enter into the Personal Diabetes Man-
ager (PDM) during setup (see Chapter 2, Getting Started).
Your healthcare provider must help you enter these initial set-
tings. Soon you will enter and change your own settings with
confidence and ease. The mylife OmniPod System is more user-
friendly than most electronic devices you use every day. In fact,
technology is what makes the mylife OmniPod System so easy to
use.
Your healthcare provider is a valuable resource. You will rely on
him or her for a lot of critical information about your mylife
OmniPod System, especially during the first few weeks and
months. When you have questions about diabetes management
after starting on the mylife OmniPod System, do not hesitate to
talk with your healthcare provider. For nonmedical emergencies
or for technical questions about your mylife OmniPod System
setup or operation, you can call Customer Care 24 hours a day, 7
days a week.
Customer Care:
Your healthcare provider will give you all the tools and training
you need to be successful with the mylife OmniPod Insulin Man-
agement System. However, in the end, your success depends on
YOU. You must become actively involved in your own diabetes
management to enjoy the outstanding control, freedom, and
flexibility that is possible with the mylife OmniPod System.
Being actively involved means:
• Frequently monitoring blood glucose levels
• Learning how to operate your mylife OmniPod System and
practicing proper techniques
• Visiting your healthcare provider
XXXXXXXXXXXXXXXXXXXXXXXXXXXXXXXXXXXXXXXXXXXX
Do NOT attempt to use the mylife OmniPod® Insulin
Management System before you receive training
from your healthcare provider. Inadequate training
could put your health and safety at risk.

1
CHAPTER 1
Your New mylife OmniPod Insulin Management System
n Insulin Delivery with the mylife OmniPod
System
The mylife OmniPod® Insulin Management System is an innova-
tive continuous insulin delivery system that provides all the
proven benefits of continuous subcutaneous insulin infusion (CSII)
therapy. The System’s innovative design and features allows you
to live your life—and manage your diabetes—with unprece-
dented freedom, comfort, convenience, and ease.
The long-term health benefits of better blood glucose control
are well known. Maintaining near-normal blood glucose levels
can help you live a longer, healthier life with fewer diabetes-
related complications. The mylife OmniPod System also has
many practical, everyday benefits, including convenience, free-
dom, flexibility, and ease of use.
Continuous insulin delivery most closely mimics the insulin
release of a healthy pancreas. Since the landmark 10-year
Diabetes Control and Complications Trial (DCCT), the long-
term health benefits of maintaining near-normal blood
glucose levels have been widely recognized.
Continuous insulin delivery at preset rates eliminates the need
for injections and the interruptions that come with them. In addi-
tion, with the mylife OmniPod System, insulin delivery can be
changed with the press of a button to adapt to snacks or unex-
pected changes in daily routine.
The mylife OmniPod System works much like the pancreas of a
person without diabetes by delivering insulin in two ways:
• A small, constant, background supply of insulin (called a basal
rate) is delivered automatically at a programmed rate, all day
and night.
• An extra dose of insulin (called a bolus) can be delivered
when you need it to match the carbohydrates in a meal or
snack or to correct a high blood glucose.

Your New mylife OmniPod Insulin Management System
2
1
n How Does the mylife OmniPod System Work?
The Pod is a small, lightweight, self-adhesive device that you fill
with insulin and wear directly on your body. The Pod delivers
precise, personalized doses of insulin into your body through a
small flexible tube (called a cannula), based on instructions that
you program into its wireless companion, the Personal Diabetes
Manager. The cannula is inserted only once with each Pod.
The Personal Diabetes Manager (PDM) is a wireless, handheld
device that:
• Programs the Pod with your personalized insulin-delivery
instructions
• Wirelessly monitors the Pod’s operation
• Includes a OneTouch® Verio™ blood glucose meter
With just two parts, you’ll enjoy all the functionality and benefits
of continuous insulin delivery and blood glucose monitoring.
Plus you’ll enjoy the safety, convenience, and freedom of:
No tubing
There is no tubing connecting the Pod to the PDM. You wear the
Pod comfortably and discreetly under your clothes. You can carry
the PDM separately in a backpack, briefcase, or purse. With the
mylife OmniPod Insulin Management System, you don’t have to
worry about snagging, tangling, or feeling tethered by tubing.
Suggested bolus calculation
Calculating bolus doses has never been easier. After you check
your blood glucose, enter the carbs for your snack or meal. Based
on your individual settings, the System displays a suggested
bolus dose. You can accept the suggestion, change it, or cancel it.
Carb presets
To make carbohydrate counting easier, the mylife OmniPod Sys-
tem includes “carb presets.” You can enter your favorite foods,
snacks, or entire meals as “carb presets.” Presets contain the
grams of carbohydrate in the food item or meal. Next time you
eat this same food, you don’t have to count the carbs; just select
your carb preset and the System does the calculating for you.
The System stores up to 36 carb presets.
Automated cannula insertion
With the mylife OmniPod System, you don’t have to insert the
infusion set manually or carry around a separate inserter. You sim-
ply press a button on the PDM and the Pod’s automated
insertion system safely and consistently inserts the cannula
beneath the skin, virtually pain free. It then begins delivering
insulin according to your programmed basal rate.

Your New mylife OmniPod Insulin Management System
3
1
A fully integrated design with blood glucose monitoring
With a fully integrated two-part design, there’s no need to carry
separate infusion sets, reservoirs, or inserters. It’s all integrated
into the Pod. With the PDM, you can check your blood glucose
level using OneTouch® Verio™ blood glucose test strips, but with-
out the hassle of carrying a separate blood glucose meter.
If you prefer to use another blood glucose meter, you can enter
the readings manually into the PDM.
Record keeping
Another convenient part of the mylife OmniPod System is record
keeping. Paper charts are useful, but sometimes they can be
inconvenient to carry or use. The data storage system in the
Personal Diabetes Manager (PDM) displays up to 90 days’ worth
of information. This includes blood glucose readings, basal rates
and bolus doses, carbohydrates, and alarms.
Personalizing your System
You can personalize your mylife OmniPod System in other ways,
too:
• Enter and name basal programs
• Name and save temporary basal presets
• Add your own customized reminders
• Enter your name, phone number, doctor’s name and
number, and other emergency information
Your New mylife OmniPod Insulin Management System
4
1
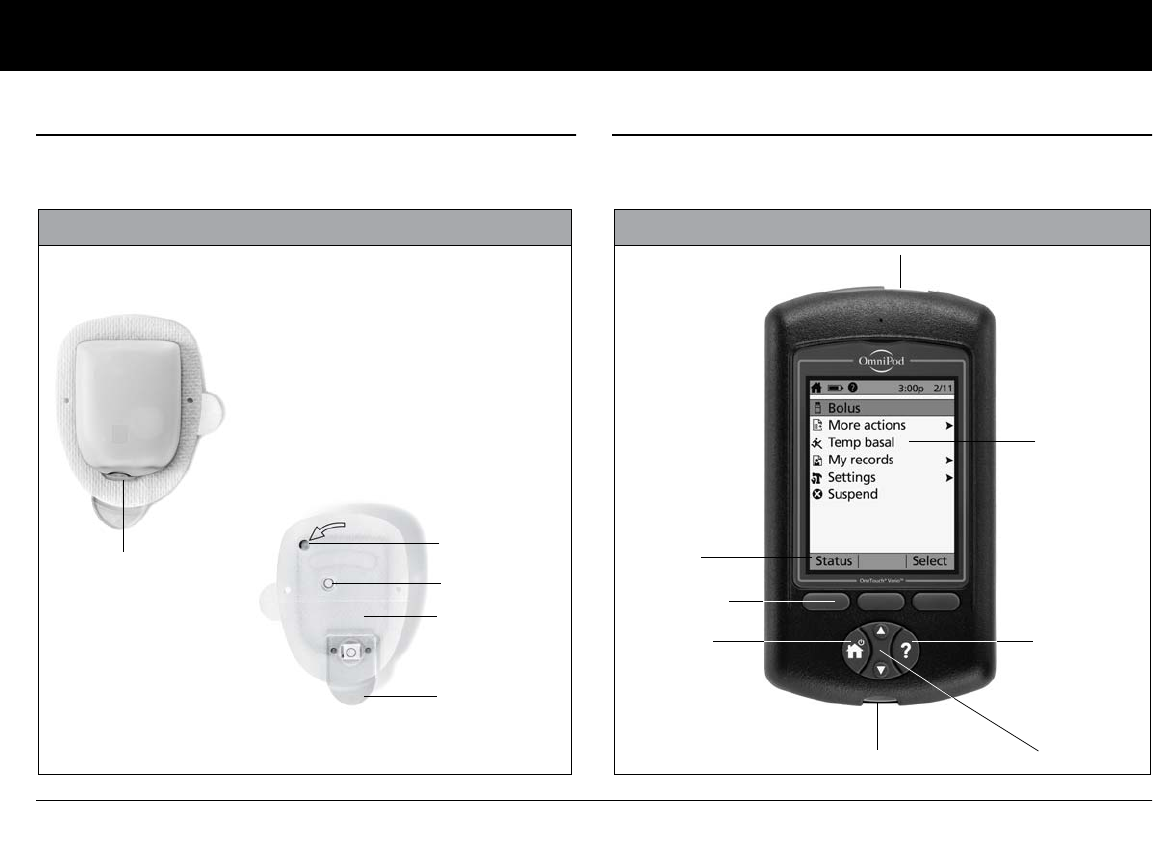
n The Pod
The Pod (Figure 1-1) is applied to your skin with an adhesive
backing, similar to an adhesive bandage.
n The Personal Diabetes Manager
All Pod operations are programmed and controlled through the
palm-sized Personal Diabetes Manager (PDM; Figure 1-2).
Top
Bottom
Needle Cap
Viewing Window
Fill Port
Figure 1-1
Adhesive
Backing
Housing Vent
Figure 1-2
Up/Down
Controller
User Info/
Support
Soft Key
Label
Soft Keys
Home/
Power
USB Port
Test Strip Port
LCD Screen
Your New mylife OmniPod Insulin Management System
5
1
Buttons that program and control the mylife OmniPod
System
Button Action
Home/
Power Pressing and holding turns the PDM on and off.
When the PDM is on, pressing this button
(quickly/briefly) displays the Home screen, from
which you can choose a menu item or view the
Status screens (shown later in this chapter).
Up/Down
Controller Pressing and releasing scrolls through a list of
available menu options or numbers, so you can
pick the one you want. Holding the button
scrolls faster.
Soft Keys Soft key labels and functions depend on the
menu or screen you are viewing. The label
appears on the screen directly above the physi-
cal button you press. Select, Save, and Back are
just three examples of the soft key labels on your
PDM.
Button Action
User Info/
Support Pressing opens a User Info/Support screen that
displays additional information about the cur-
rent screen you are viewing. The User Info/Sup-
port icon appears when additional information
can be viewed. It may be displayed at the top of
the screen, to the right of an event detail (such as
a suggested bolus), or to the right of a record
item (such as a BG history record). (See “Personal
Diabetes Manager Icons” in the Appendix).
In addition, pressing and holding this button for
2 seconds enables a “bright mode” on the PDM
screen.
Your New mylife OmniPod Insulin Management System
6
1
Primary screens
Messages on the screen either:
• Let you identify your PDM
• Tell you how the System is operating
• List menu choices
• Explain how to perform certain tasks
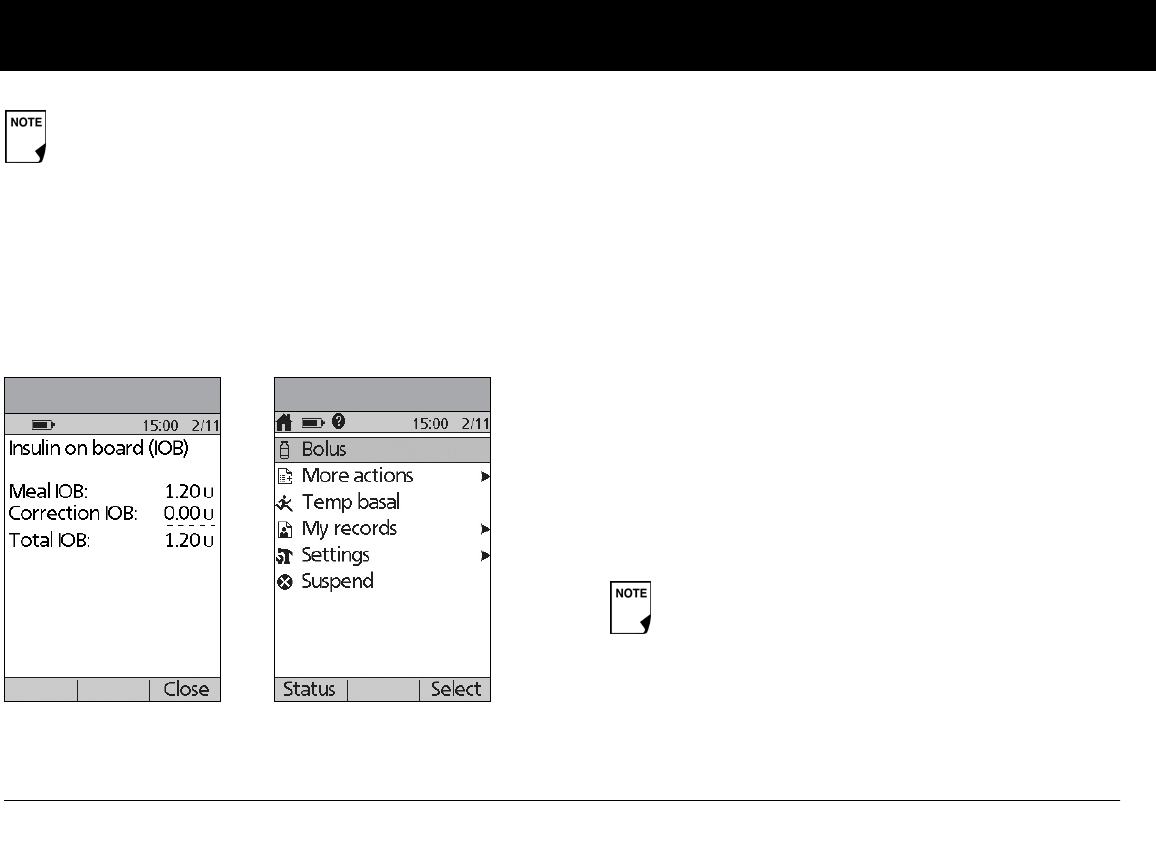
The System’s primary screens are the ID screen (Figure 1-3), the
Status screen (Figure 1-4), and the Home screen (Figure 1-6 on
the next page).
ID screen
The System displays an ID screen to make the PDM easy to iden-
tify when you first turn it on. You can personalize the ID screen by
adding your name and choosing its color. (See “The mylife Omni-
Pod Setup Wizard” on page 10, for details on customizing your
PDM.) You must acknowledge the ID screen before you can use
the PDM. It is important that you always identify the PDM as
yours before you use it.
Status screen
Lists the System’s current operating status (Figure 1-4).
From top to bottom, the Status screen displays:
• Time, date, and result of last blood glucose checked or
entered manually
• Time, date, and total amount of last bolus delivered
• Amount of Insulin on Board (IOB) will be displayed on Status
screen (if calculator in use)
• Name and rate of active basal program or temp basal
program
• “Ext bolus,” the amount of insulin, and the delivery time
remaining if an extended bolus is being delivered
• “INSULIN SUSPENDED” if insulin delivery has been
suspended
• Time and date of when the Pod will expire
Figure 1-3 Figure 1-4
Your New mylife OmniPod Insulin Management System
7
1
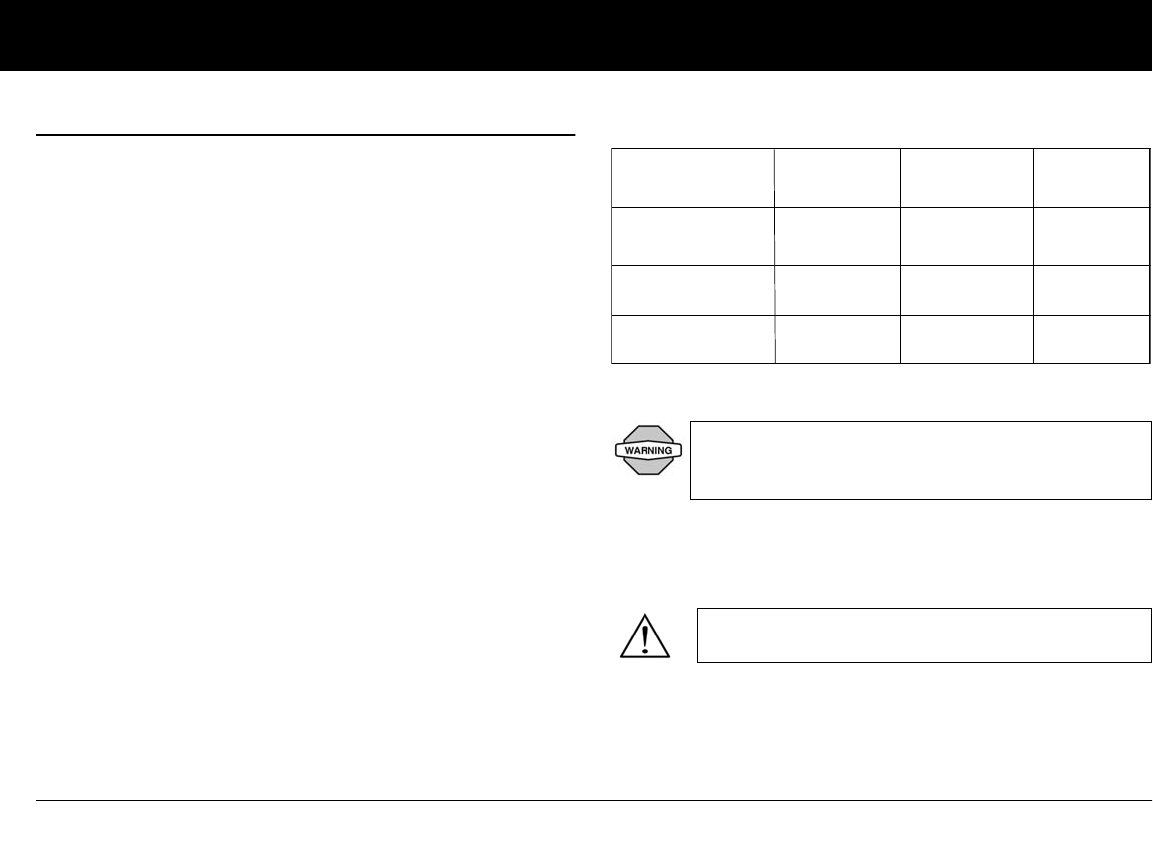
Status support screen
From the Status screen, press the User Info/Support button to
see details about the current insulin on board (IOB) in your
body (Figure 1-5). See page 30 for additional information
describing insulin on board (IOB).
Home screen
Lists all the major menus (Figure 1-6).
•Bolus menu to deliver bolus doses
•More actions menu to change the Pod, manually enter
blood glucose readings, and assign and edit tags for BG
readings that are less than 2 hours old
•Temp basal menu to deliver temporary basal rates (This
submenu does not appear if temp basal is turned Off in
Settings.)
•My records menu to review insulin delivery, blood glucose
history, alarm history, carb history, and personal user informa-
tion
•Settings menu to edit, enter, and name basal programs,
temp basal, carbohydrate and bolus presets, and to custom-
ize System settings
•Suspend menu to suspend, cancel, or resume insulin
delivery programs
If a Pod has not yet been activated (during Pod changes),
the screen displays “No active Pod. Would you like to acti-
vate a Pod now?” (See Chapter 5, Using the Pod, for details
on activating a Pod.)
Figure 1-5 Figure 1-6
You can go to the Status screen at any time by
pressing Status from the Home screen.
Your New mylife OmniPod Insulin Management System
8
1
n Safety Features
The mylife OmniPod System’s state-of-the-art design includes
the latest safety technology. Its built-in safety features include:
Automatic priming, safety checks, and insertion
Every time you activate a new Pod, the System automatically
primes and performs a safety check on the Pod, then inserts
and primes the cannula (see Chapter 5, Using the Pod). Micro-
processor technology makes it possible to complete thousands
of safety checks in only a few seconds.
The mylife OmniPod System also performs safety checks on the
PDM. If it detects any problems in the PDM or the Pod—or in
communication between them—it informs you with beeps and
on-screen messages.
Occlusion detection
An occlusion is a blockage or interruption in insulin delivery. If
the mylife OmniPod System detects an occlusion, it sounds a
hazard alarm and prompts you to deactivate and change your
Pod (see Chapter 5, Using the Pod).
A hazard alarm sounds when an average of 3 to 5 units of missed
insulin occurs. This table depicts occlusion detection for 3 differ-
ent situations when using U100 insulin (Table 1). If an occlusion is
cleared, a volume of insulin could be released. That volume
would not exceed 3.9 U.
If an occlusion is detected during an immediate bolus, the Pod
will alarm at the conclusion of the bolus.
Table 1:
Alerts and alarms
For your safety, the mylife OmniPod System provides a range of
alerts and alarms to tell you that your attention is needed, or to
warn you of hazardous situations.
See Chapter 6, Using the Personal Diabetes Manager, for a
description of notifications and how to set them. See Chapter 10,
Alerts and Alarms, for a list of safety alarms built into the mylife
OmniPod System and how to respond to them.
At very low flow rates checking your blood glucose
frequently may give you an early indication of an
occlusion (refer to Chapter 9, page 107).
Confirm on ID screen - alerts/alarms do not show on
PDM until after ID screen is confirmed.
5.00 U Bolus
1.00 U/hr basal
0.05 U/hr basal
200 seconds
2.4 hr
48 hr
Minimum
time
202 seconds
3.7 hr
74 hr
Typical
time
300 seconds
5.0 hr
80 hr
Maximum
time
(Pod expiration)
9
CHAPTER 2
Getting Started
n Set Up the Personal Diabetes Manager (PDM)
If you are a first-time mylife OmniPod System user, you need to
meet with your healthcare provider for training and System
setup before using it. To get a head start on learning about your
new mylife OmniPod System, review this User Guide. If you have
a basic understanding of the System in advance, you will get
more out of your training sessions.
Chapter 6 describes the PDM options in detail. The instructions
in this chapter are simplified to help you get started.
Turn on the PDM
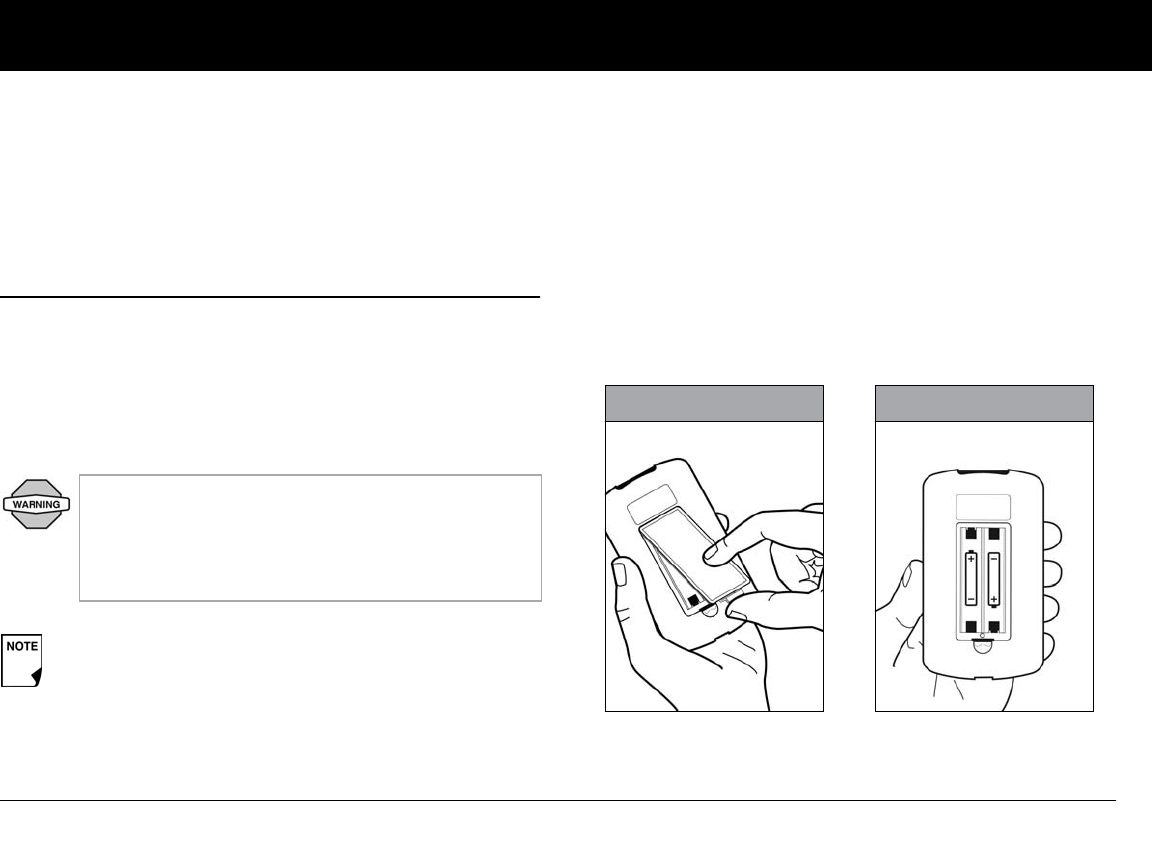
1. Open the battery compartment on the back of the PDM
by pushing the compartment latch and lifting upward
(Figure 2-1). No special tools are necessary.
2. Insert two (2) new AAA alkaline batteries into the compart-
ment.
Do NOT use the mylife OmniPod
®
Insulin Management
System until you have been trained by your health-
care provider. He or she will initialize the System based
on your individual needs. Inadequate training or
improper setup could put your health and safety at risk.
Prepare and keep an emergency kit with you at all times
to quickly respond to any diabetes emergency. For
details, see Chapter 9, Living with Diabetes.
Figure 2-1 Figure 2-2
B
Getting Started
10
2
3. Replace the battery door.
4. Turn the PDM face up. The PDM has begun to power on auto-
matically.
n The mylife OmniPod Setup Wizard
The first time you turn on the Personal Diabetes Manager, the
Setup Wizard comes on automatically. Although setup is easy
with the Wizard, if you are a first-time user, your healthcare pro-
vider must guide you through the process. Setup takes only a
few minutes and is easy to do:
• Use the Up/Down Controller buttons to increase or
decrease a number, or to move up or down a list.
• Press the Soft Key labeled Next, Select, Done, or Save to con-
tinue to the next screen.
• Press Back to return to the previous screen.
To get started, press Next on the Wizard's Welcome Screen to
begin setting up your PDM.
Enter your PDM ID
1. Use the Up/Down Controller buttons to scroll through the
list of characters. An up-and-down-arrow symbol on the
screen indicates the character that can be changed.
2. Press the middle Soft Key (labeled with the right arrow) to
move the underscore to the next character.
3. Enter each character one at a time. For example, if you want
to enter your name, you might enter J, a, n, e, [space], S, m, i, t,
h. (A blank character or space is the first and last option in the
scrolling menu.)
4. Press Next.
Select the ID screen color
1. Use the Up/Down Controller buttons to choose a color, then
press Next.
The diagram inside the compartment shows you which
direction to insert the batteries (Figure 2-2 on the previous
page).
Do not use any other type of batteries than AAA
alkaline batteries to power the PDM. Never use old
or used batteries; the PDM may not work properly.
Initial settings are “---” [blank] for target blood glucose
value, insulin-to-carbohydrate ratio, correction factor,
and duration of insulin action.
Getting Started
11
2
Set date and time
1. Use the Up/Down Controller buttons to increase or
decrease the time. (Press 12/24hr if you prefer a different
time format.) Then press Next.
2. Enter the current year, then press Next.
3. Choose the current month, then press Next.
4. Enter the current day of the month, then press Next.
5. Choose the date format you prefer, then press Next.
Enter basal settings
1. Choose a maximum basal rate, then press Next. (The default
maximum basal rate is 3 U/hr.)
2. Choose the initial basal rate to use, then press Next.
The initial basal program created with the Setup Wizard is
named basal 1. You can change the name in the Settings >
Basal Programs menu (see Chapter 3, Understanding and
Adjusting Basal Rates).
3. Press Done to confirm the basal program shown on the
screen. To add more basal segments to the program, or to
change the rate shown, see Chapter 3, Understanding and
Adjusting Basal Rates.
4. To see the basal program as a list, press List. To return to the
graphic view, press Graph.
5. Press Save to accept the basal program you have set.
6. Choose a temporary basal feature, then press Next. Choose
% to show temporary basal rates as a percent increase or
decrease of your current basal rate. Choose U/hr to show
temporary basal rates in units per hour. Or choose Off to turn
off the temporary basal feature. For details about setting tem-
porary basals, see Chapter 3, Understanding and Adjusting
Basal Rates.
Enter blood glucose sound setting and BG goal
1. To set the sound for the blood glucose meter, choose On or
Off, then press Next.
2. Use the Up/Down Controller buttons to enter the lower
limit for your blood glucose (BG) goal, then press Next.
3. Enter the upper limit for your BG goal, then press Next.
Your ID and the chosen color will be displayed on an
identification (ID) screen that you must acknowledge
every time you turn on the PDM. Always be sure you
properly identify your PDM before using it.
You can add up to 7 basal programs and set 24
segments per program.
The lower and upper BG limits are only used when
viewing BG History (see Chapter 8, Understanding
Your Records).
Getting Started
12
2
4. Press Save to accept the BG goal.
Set the suggested bolus calculator
1. To set the suggested bolus calculator feature, choose On or
Off, then press Next.
Enter target blood glucose value
1. Use the Up/Down Controller button to enter a target blood
glucose (BG) value, then press Next.
2. Use the Up/Down Controller buttons to enter the “correct
above” value or correction threshold (the BG value above
which you want the PDM to suggest a correction bolus), then
press Next.
3. To save the target BG value, press Done. To change these set-
tings, select the segment you wish to change and press Edit.
You can define up to 8 target BG time segments. To enter
additional segments, choose [add new], then:
a. Press New.
b. Enter a start time for the target BG segment, then press
Enter.
c. Enter an end time for the target BG segment, then press
Next.
d. Enter a target blood glucose value, then press Next.
Use the Up/Down Controller buttons to enter the “cor-
rect above” value or “correction threshold” (the BG value
above which you want the PDM to suggest a correction
bolus), then press Next.
e. When you have finished entering segments, press Done.
4. To see the segments as a list, press List. To return to the
graphic view, press Graph.
5. Press Save to accept the target BG profile you have set.
Enter minimum BG allowed for use in bolus calculation
1. Use the Up/Down Controller buttons to enter a minimum
blood glucose value, below which the System will not calcu-
late a suggested bolus. The values are in 0.1 mmol/L incre-
ments and range from 2.8 to 3.9 mmol/L.
2. Press Next.
Check with your healthcare provider before adjust-
ing these settings.
If the suggested bolus calculator is set to On, perform
the following steps. If set to Off, you will be prompted
to “Select bolus increment” and “Enter maximum
bolus.”
If the suggested bolus calculator is On, a correction
bolus will be suggested only when your BG is above
the value shown in brackets on the screen.
Getting Started
13
2
Enter insulin-to-carbohydrate ratio
1. Use the Up/Down Controller buttons to enter your insulin-
to-carbohydrate ratio, then press Next. (Insulin-to-carbohy-
drate ratio is the number of carbs in grams covered by 1 unit
of insulin.)
2. To save the ratio, press Done. To change the ratio, select the
segment you wish to change and press Edit.
You can define up to 8 insulin-to-carbohydrate time seg-
ments. To enter additional ratios, choose [add new], then:
a. Press New.
b. Enter a start time for the segment, then press Next.
c. Enter an end time for the segment, then press Next.
d. Enter the insulin-to-carb ratio for the new time segment,
then press Next.
e. To save the new ratio, press Done.
3. To see the ratios as a list, press List. To return to the graphic
view, press Graph.
4. Press Save to accept the ratios you have set.
Enter correction factor
1. Use the Up/Down Controller buttons to enter how much
one unit of insulin decreases your blood glucose, then press
Next.
2. To save the correction factor, press Done. To change the
factor, select the segment you wish to change and press Edit.
You can define correction factors for up to 8 time segments.
To enter additional correction factors, choose [add new],
then:
a. Press New.
b. Enter a start time for the segment, then press Next.
c. Enter an end time for the segment, then press Next.
d. Enter the correction factor, then press Next.
e. To save the new correction factor segment, press Done.
3. To see the factors as a list, press List. To return to the graphic
view, press Graph.
4. Press Save to accept the correction factors you have set.
Set reverse correction
1. To set reverse correction, use the Up/Down Controller
buttons to choose On or Off, then press Next.
If you enter carbs and reverse corrections are On, the
System will subtract insulin from the suggested meal
bolus to compensate for a low blood glucose (below
the BG target you set). With reverse corrections Off,
the System will not subtract insulin from the sug-
gested meal bolus dose due to a low BG. Follow your
healthcare provider’s recommendation to set
reverse correction On or Off.
Getting Started
14
2
Enter the duration of insulin action
1. Use the Up/Down Controller buttons to enter the duration
of insulin action (how long insulin lasts in your body), then
press Next.
Select bolus increment and enter maximum bolus
1. Choose a bolus increment (how much each press of the
Up/Down Controller buttons will increase or decrease a
bolus amount)—either 0.05, 0.10, 0.50, or 1.00 unit of insu-
lin—then press Next.
2. Choose the maximum bolus you can give at one time, then
press Next.
Set extended bolus doses
1. To set the units for an extended bolus dose, choose % for per-
cent of the total bolus, or choose Units for units of insulin. To
turn off the extended bolus feature, choose Off. Then press
Next.
Set low reservoir advisory
1. Choose the level of insulin in the reservoir at which the
PDM should give you an alarm. Choose from 10 to 50 units
in 5-unit increments, then press Next.
Set Pod expiration notification
1. Choose the number of hours before a Pod expires when the
PDM should give you a notification, then press Next. The
values are in 1-hour increments and range from 1 to 24 hours.
(The default is 4 hours.)
The PDM asks whether you want to activate a Pod.
• Press Yes if you are ready to activate a new Pod. See Chapter
5, Using the Pod, to learn how to activate a new Pod.
• Press No if you do not want to activate a Pod at this time. The
PDM displays the Home screen.
The duration-of-insulin-action setting is used to
calculate the amount of insulin on board (IOB) from a
previous correction bolus or meal bolus when you
use the suggested bolus calculator.
The maximum bolus default is 10 units. Check with
your healthcare provider before adjusting these set-
tings.
You can press and hold the Power button to turn off the
PDM at any time during setup. Otherwise, it turns off
automatically after 5 minutes. If you do not complete the
entire setup within 60 minutes, when you turn on the
PDM again you will return to the beginning of the Setup
Wizard.

Getting Started
15
2
Your healthcare provider will help you fill and apply your first
Pod. The process is easy because on-screen messages walk you
through every step. Please refer to Chapter 5, Using the Pod, for
detailed instructions.
You may want to adjust the PDM screen time-out
and backlight time-out. For more information on
how to do this, see Chapter 6, Using the Personal
Diabetes Manager.
Use the form at the end of this User Guide to write
down all your settings from the Setup Wizard. If you
ever need to reset or replace your PDM, having
these settings handy will make setup very easy.
16
CHAPTER 3
Understanding and Adjusting Basal Rates
n What Is a Basal Rate?
A basal rate is a small base or background amount of insulin that
is delivered, at a preset rate, continuously for a specified period of
time.
Even without eating, our bodies need a small, constant supply
of insulin for normal daily living. In people without diabetes, the
pancreas continuously delivers this basal insulin. For people
using the mylife OmniPod® Insulin Management System, the
Pod mimics a healthy pancreas by delivering insulin at the rate
that you’ve programmed into the Personal Diabetes Manager
(PDM).
n Personalized Basal Programs
Insulin needs vary throughout the day. Therefore, most people
set their basal rates to deliver slightly more or less insulin at
certain times. For example, one person may need to deliver a
higher rate of insulin during the early morning and a lower rate
during the late evening. A basal program describes the amount
of insulin to be delivered during an entire 24-hour period.
A basal program contains at least one basal rate for the 24-hour
period, but for most people it will be broken into several time
segments, or basal segments, each delivering a different rate of
insulin. A sample basal program with three basal segments
might be:
Approximately 50% of a person’s total daily insulin dose
typically comes from basal insulin delivery; the remain-
ing 50% typically comes from bolus doses (see Chapter 4,
Understanding and Delivering Bolus Doses).
00:00–08:00 0.60 U/hr Between 00:00 (midnight) and
08:00, the Pod delivers 0.60
units of insulin per hour.
08:00–15:00 0.80 U/hr Between 08:00 and 15:00, the
Pod delivers 0.80 units of insulin
per hour.
15:00–24:00 0.70 U/hr Between 15:00 and 24:00
(midnight), the Pod delivers
0.70 units of insulin per hour.
Understanding and Adjusting Basal Rates
17
3
In addition to normal daily changes, insulin needs can vary with
different routines or days of the week. For example, regular
school or workday routines may differ from weekend routines,
and insulin needs may differ, too. With your healthcare provider,
you will decide on the basal rates that best match your lifestyle
and insulin needs. You will enter at least one basal program (your
Basal 1 Program) into your PDM during the setup process (see
Chapter 2, Getting Started). You can add other programs later as
you fine-tune your System settings or when your needs change.
You can also create temporary basal presets to use on occasions
when you need to adjust your basal rate for a short period of
time. See “Temporary Basal Rates and Presets” later in this
chapter.
Create a basal program
The Personal Diabetes Manager can store up to 7 different basal
programs. Each program can contain 24 rates, programmed in
half-hour increments. Once you enter a basal program into the
PDM, you only need to press a few buttons to pick the program
you want. The Pod continues to deliver insulin at those rates until
you change that program or switch to another one.
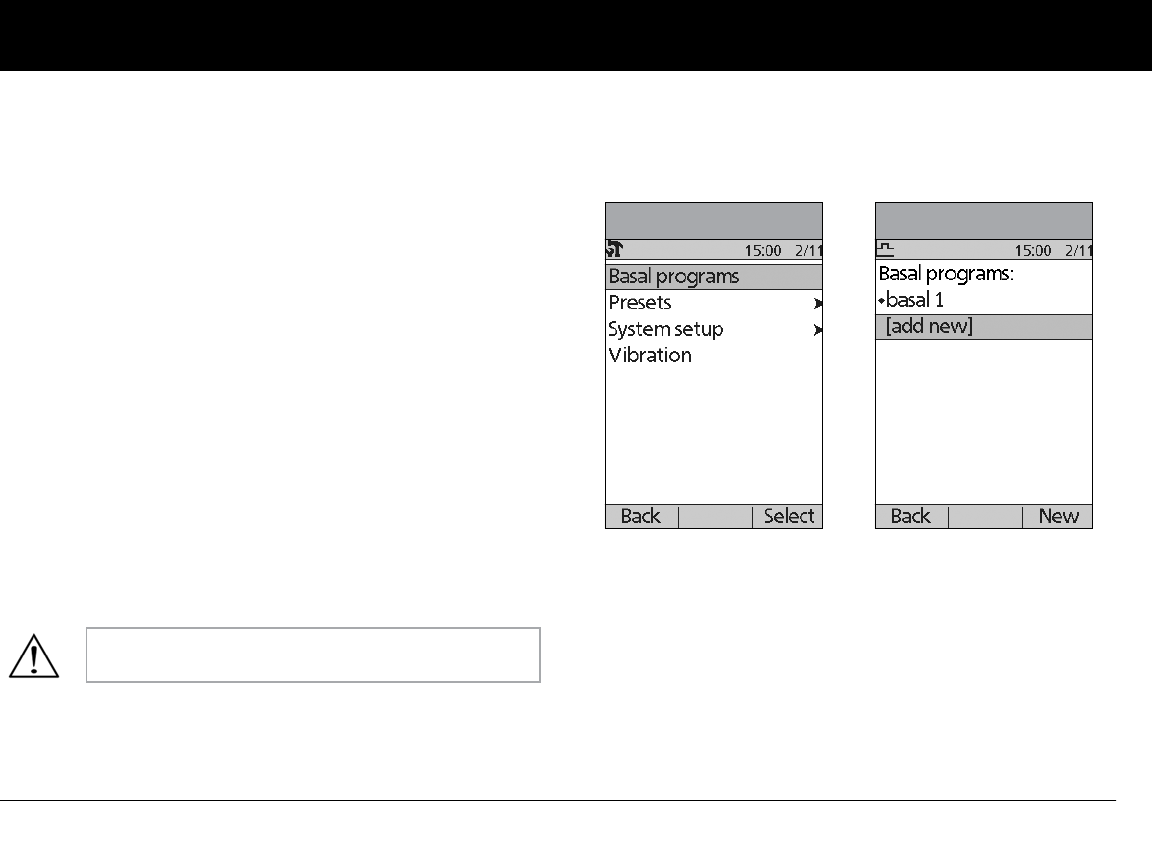
1. On the Home screen, use the Up/Down Controller buttons
to choose Settings; then press Select.
2. Choose Basal programs (Figure 3-1), then press Select.
3. Choose [add new] (Figure 3-2), then press New.
4. To use the default naming system, simply press Next. The
default naming system automatically assigns program
names in numerical order, such as basal 1, basal 2, basal 3.
If you want to give a different name to the program:
a. Press the Up/Down Controller buttons to scroll through
the list of characters. An up-and-down arrow symbol on
the screen indicates the character that can be changed.
Check with your healthcare provider before adjust-
ing these settings.
Figure 3-1 Figure 3-2
Understanding and Adjusting Basal Rates
18
3
b. Press the middle Soft Key (labeled with the right arrow) to
move the underscore to the next character.
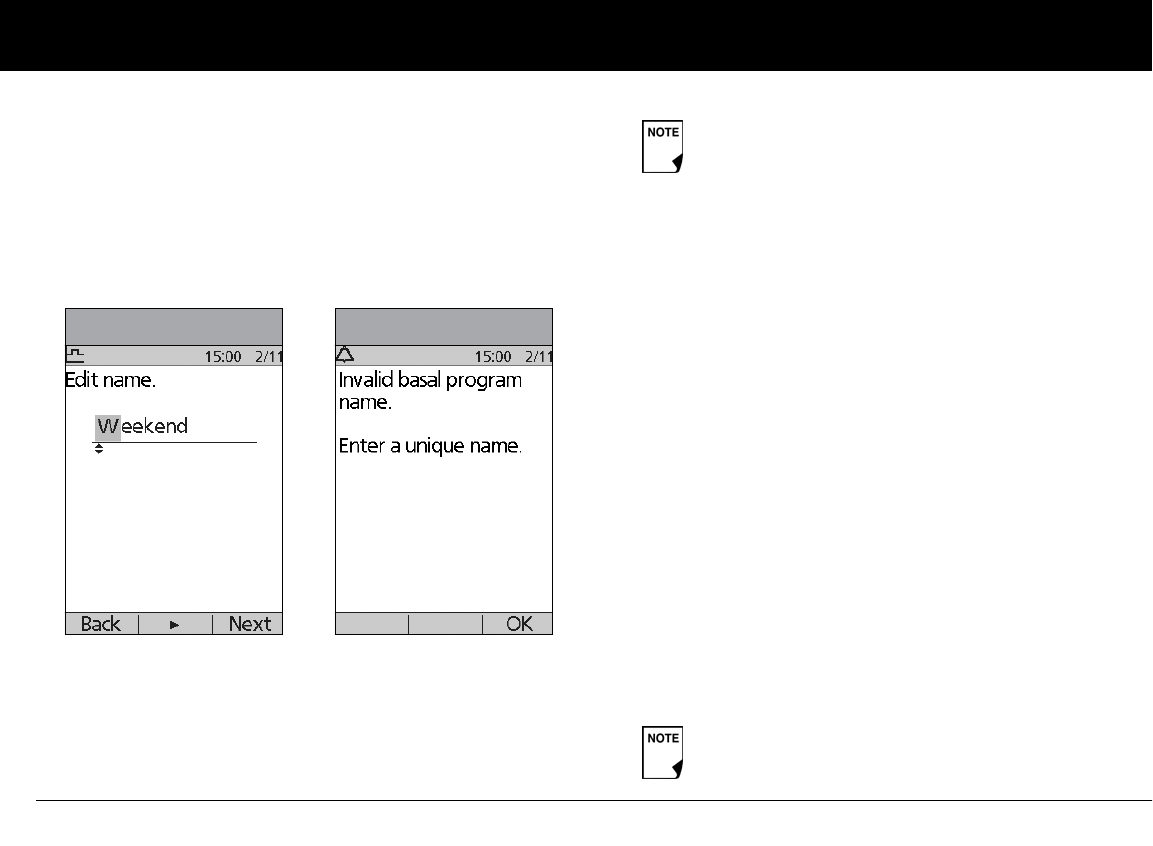
c. Enter each character one at a time. For example, if your
weekend schedule is different from your weekday sched-
ule, you might enter W, e, e, k, e, n, d (Figure 3-3). (A blank
character or space is the first and last option in the scroll-
ing menu.)
d. Press Next.
5. Enter the rate, in U/hr, for the first basal segment (from 0.05 to
the maximum you entered during setup), then press Next.
6. Review the list showing your new basal program.
To use the same basal rate for the entire 24-hour program,
press Done and continue with step 7.
Or, to add basal segments and rates (for example, a higher
basal rate between 08:00 and 15:00):
a. Choose an existing basal segment, then press Edit.
Or, choose [add new], then press New.
b. Enter the start time (for example, 08:00), then press Next.
Basal segments are in 30-minute increments.
c. Enter the end time (for example, 15:00), then press Next.
d. Enter the rate for the new basal segment (for example,
0.80 U/hr), then press Next.
Figure 3-3 Figure 3-4
As a safety feature, the words “Invalid basal program
name” (Figure 3-4) appear if the name you entered
does not have at least one character or if the name is
being used for another basal program. Capitals and
lowercase letters are considered the same. Press OK
to return to the previous screen and enter a different
name.
Basal rates outside the changed segment do not
change.
Understanding and Adjusting Basal Rates
19
3
e. Repeat steps a-d for each new segment and rate you
want, then press Done.
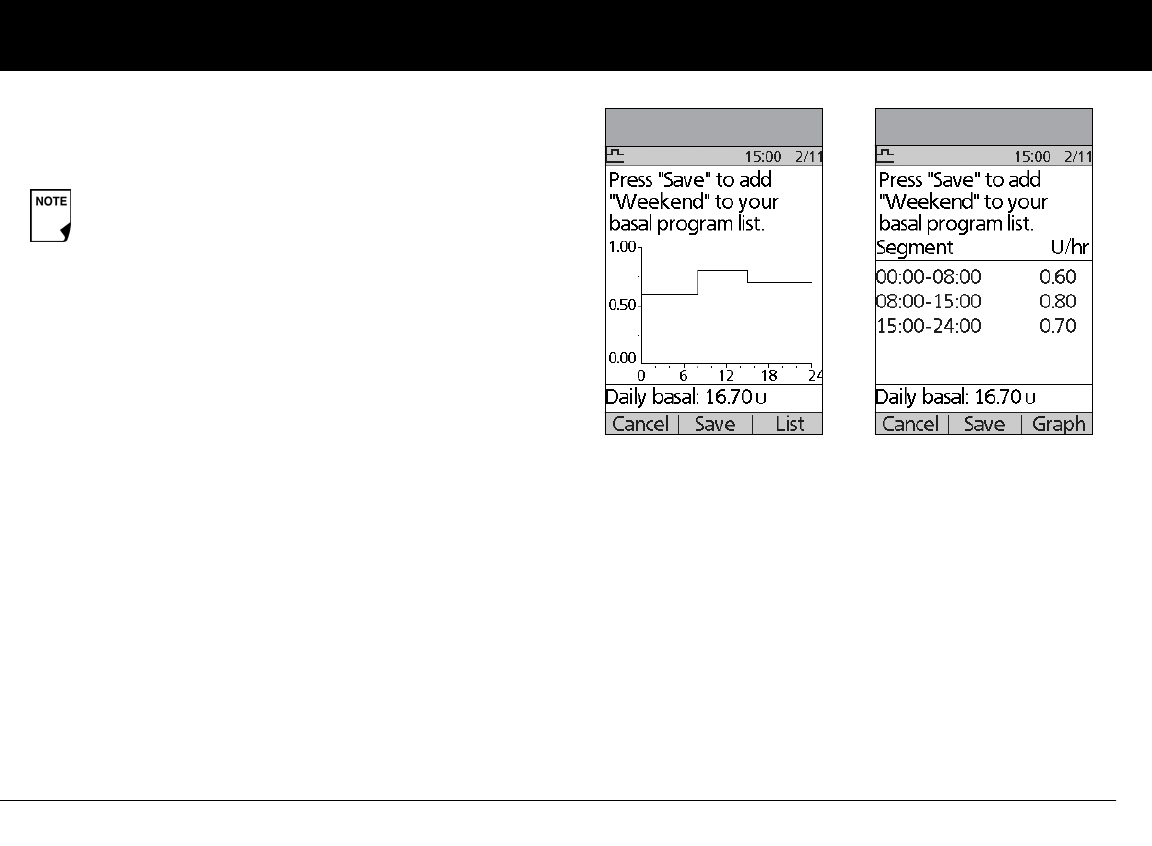
7. Review the graph of the new basal program (Figure 3-5).
8. To see the program as a list, press List (Figure 3-6). To see the
graph again, press Graph.
The total daily basal that will be delivered is shown at the
bottom of each “Basal programs” graph and list.
9. To add the program to the PDM’s memory, press Save.
Repeat steps 1 through 9 (above) for each basal program (up to 7
programs) you want to create.
Enable an existing basal program
1. On the Home screen, use the Up/Down Controller buttons
to choose Settings; then press Select.
2. Choose Basal programs, then press Select.
Press and hold the Power button to turn the screen
back on. In some cases, if it has been less than 5
minutes since the screen timed out, pressing the
Power button returns you to the same screen you
were using. If it has been longer than 5 minutes, the
PDM brings you to the Status screen.
Figure 3-5 Figure 3-6
Understanding and Adjusting Basal Rates
20
3
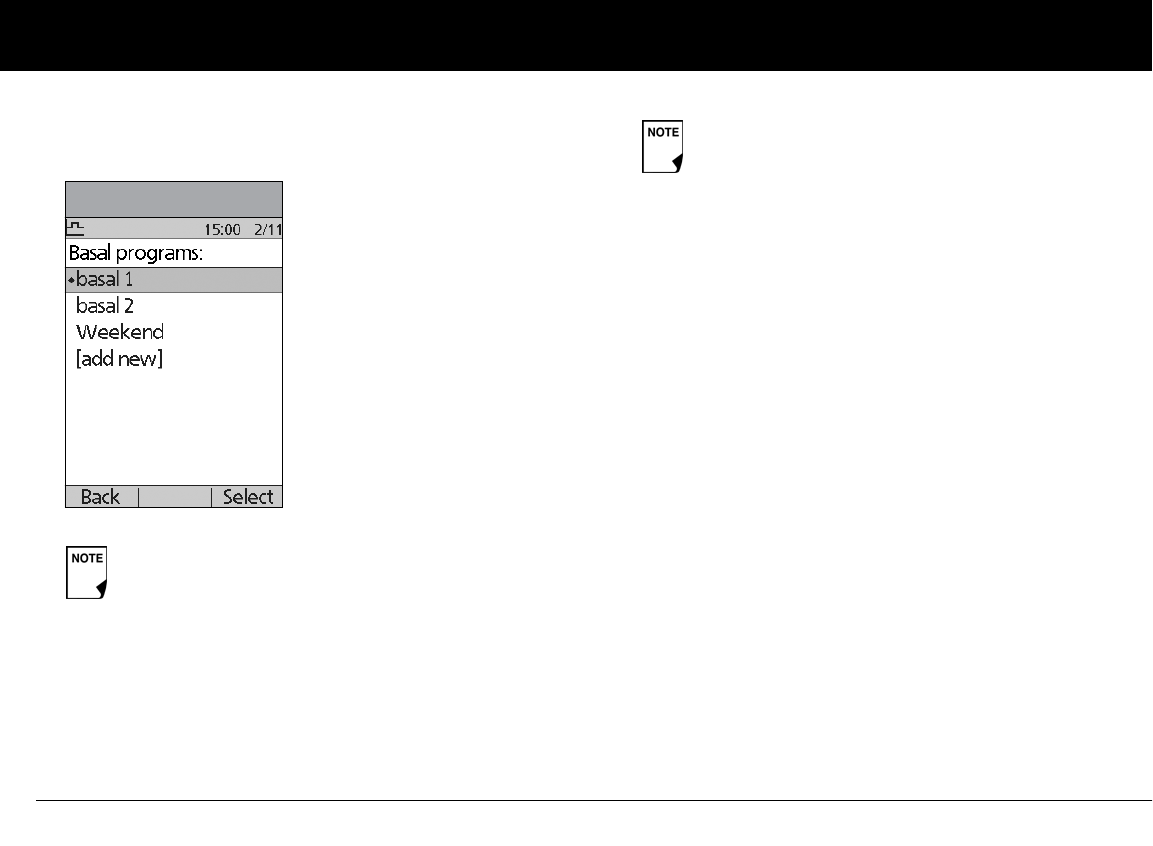
3. Choose the program you want from the list (Figure 3-7), then
press Enable.
4. Press Enable again to start the selected basal program. If a
Pod is active, the PDM beeps to indicate that the chosen
basal program is running.
Change, rename, copy, or delete a basal program
1. On the Home screen, use the Up/Down Controller buttons
to choose Settings; then press Select.
2. Choose Basal programs, then press Select.
3. Choose a program from the list, then press Select.
A diamond icon (u) appears next to the program that
is active. You cannot select the active program to
enable it, because it is already running.
Figure 3-7
As a safety feature, you cannot enable a new basal
program while a temporary basal program is in pro-
cess (see “Temporary Basal Rates and Presets” later in
this chapter); you must first cancel the active tempo-
rary basal program.
Understanding and Adjusting Basal Rates
21
3
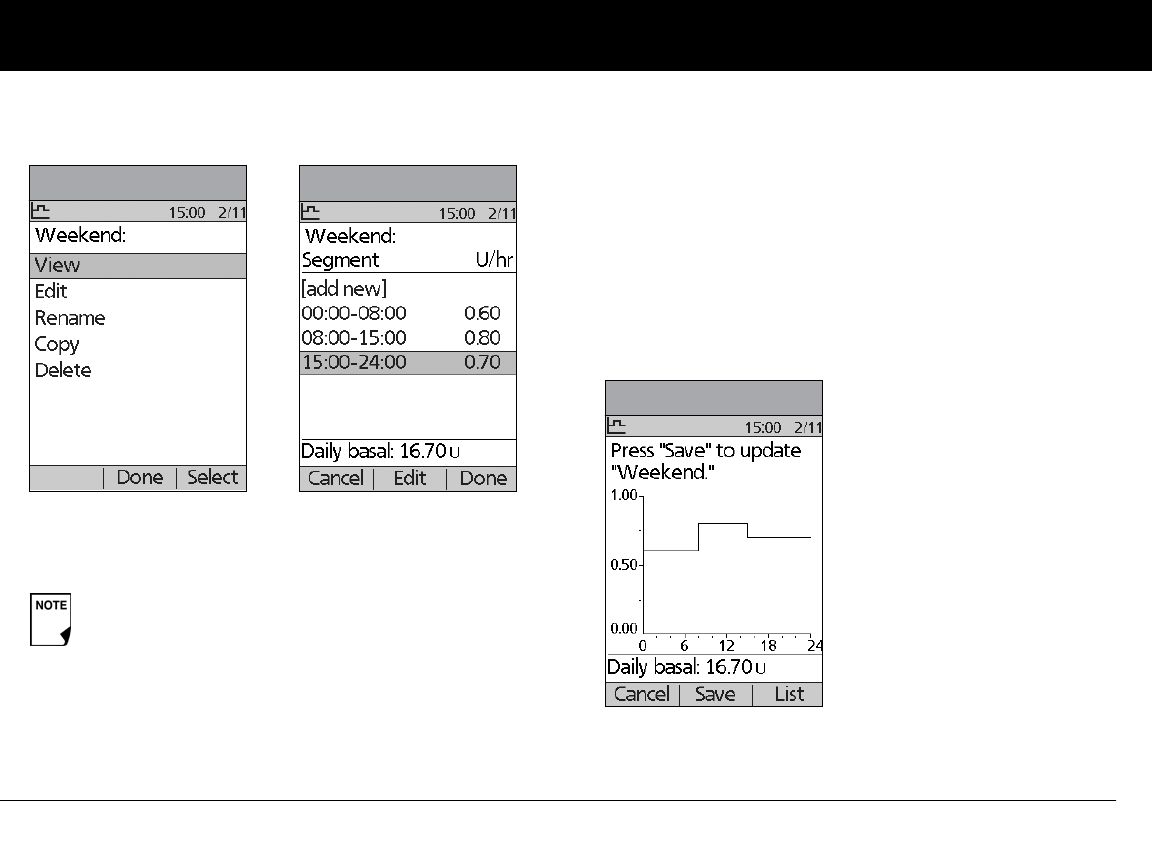
To view the segments of the basal program
1. Choose View, then press Select (Figure 3-8).
To edit or add a segment or rate in the basal program
1. Choose Edit, then press Select.
2. Choose the segment to change, then press Edit (Figure 3-9).
Or, choose [add new], then press New.
3. Enter a start time for the segment you want to change, then
press Next.
4. Enter an end time for this segment, then press Next.
5. Enter a basal rate for the new segment, then press Enter.
6. To save the newly entered segment into the basal program,
press Save (Figure 3-10). If you want to make additional edits,
repeat steps 2–5.
7. To see the program as a list, press List. To see the graph again,
press Graph.
As a safety feature, you must suspend insulin delivery
before editing an active basal program (see Chapter
5, Using the Pod). Remember to resume delivery after
the edits are made.
Figure 3-8 Figure 3-9
Figure 3-10
Understanding and Adjusting Basal Rates
22
3
To rename a basal program
1. After choosing a program from the list, choose Rename, then
press Select.
2. Press the Up/Down Controller buttons to enter the charac-
ters that spell out the new name you want. Press the middle
soft key (labeled with the right arrow) to move the under-
score to the next character, then press Save.
To copy a basal program
1. After choosing a program from the list, press Copy to accept
this change, then press Select.
2. Press the Up/Down Controller buttons to enter the charac-
ters that spell out the name you want for the copied file. Press
the middle soft key (labeled with the right arrow) to move the
underscore to the next character, then press Next.
3. To use the same basal program for the entire 24-hour period,
press Save.
To edit or add segments to the newly copied basal program, fol-
low the steps under “To edit or add a segment or rate in the basal
program” earlier in this chapter.
To delete a basal program
After choosing a program from the list, press Delete to accept
this change and then press Select.
4. Press Delete to permanently delete the program.
n Temporary Basal Rates and Presets
What is a temporary basal rate?
A temporary basal rate lets you adjust your basal rate for a pre-
determined period of time.
On occasion, you may need to change the active basal rate for
only a short time. For example, if you are going cross-country
skiing for several hours, you may want to lower the basal rate
during and after you exercise. This is called a “one-time tempo-
rary basal rate.”
Some temporary changes are easy to predict and plan for. They
happen routinely and you may know from experience how they
affect your insulin needs. For example, you might take the same
exercise class twice a week for a few weeks or months, or join a
summer soccer league. For women, a monthly hormonal change
that affects blood glucose is an example of predictable
Instead of suspending, changing, and then resuming
the active basal program, try this: Copy the active
program, rename it, make the changes, save it, then
enable it.
As a safety feature, you cannot delete the active basal
program.
Understanding and Adjusting Basal Rates
23
3
change. To easily handle predictable, short-term changes, you
can “preset” a temporary basal rate, so it is ready whenever you
need it. The PDM can remember up to 7 temporary basal presets.
You can set a temporary basal rate for a duration of 30 minutes to
12 hours. Once the time limit is reached, the System automati-
cally returns to the active basal program.
When using units per hour, the mylife OmniPod System allows
you to set temporary basal rates from 0.0 U/hr, up to your max
basal rate. When using percent rate, you can set temporary basal
rates from “Off” to +95% of your active rate, as long as the tem-
porary rate is less than or equal to your max basal rate. Another
limit on the temp basal rate when configured in % is that the rate
cannot be decreased such that the resultant flow rate will be less
than 0.05 U/hr. Example – if flow rate is 0.10 U/hr, you can’t create
a temp basal of -60%.
See the sections below on creating, enabling, cancelling, and
changing temporary basal presets.
Enable a one-time temporary basal rate
1. On the Home screen, use the Up/Down Controller buttons
to choose Temp basal, then press Select.
2. If you have created temp basal presets, choose [enter manu-
ally] from the list, then press Select.
If you have not created any temp basal presets, the PDM skips
this step.
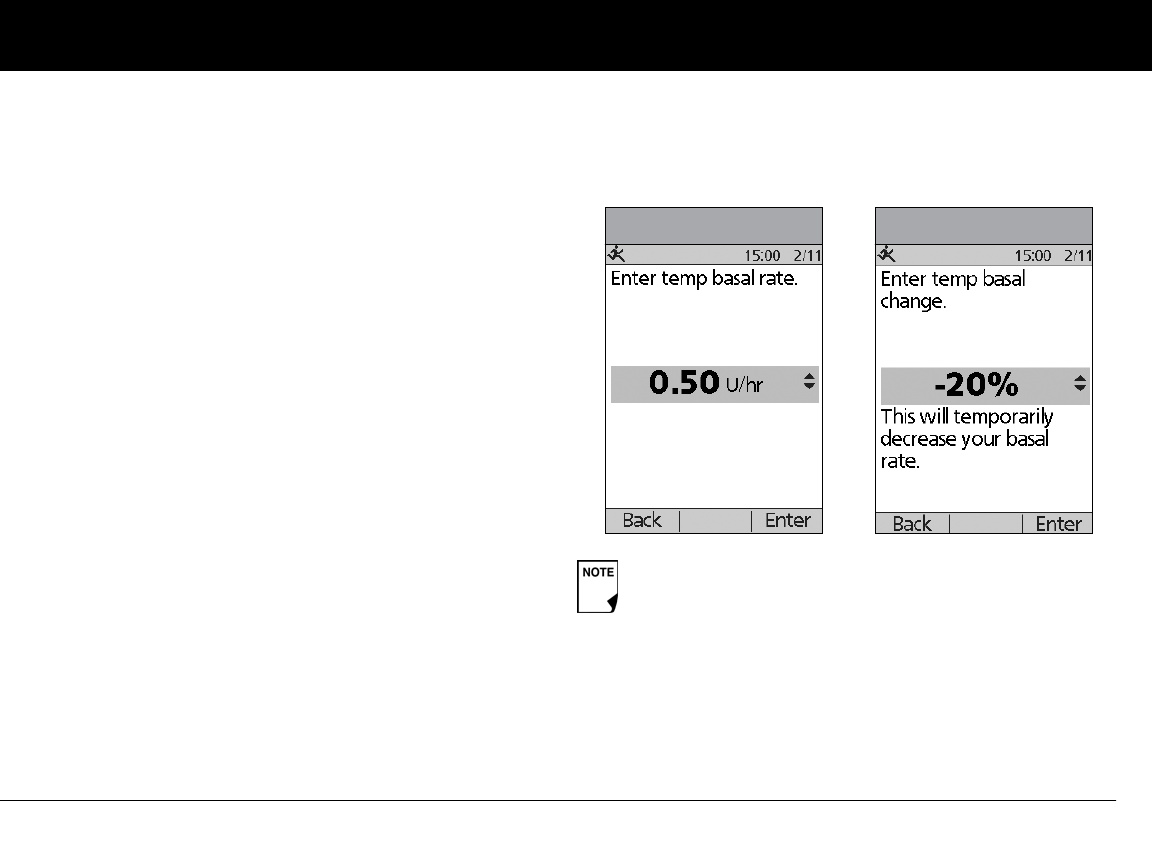
3. Enter the temporary basal rate in either units per hour (Figure
3-11) or percent change (Figure 3-12), depending on how
you choose to show the rates, then press Enter.
4. Enter the duration for the temporary rate, then press Enter.
5. Press Confirm to start the temporary basal rate shown on the
screen. The Pod beeps to indicate that the temporary basal
rate is running.
During initial setup, you and your healthcare provider
either turned Off temporary basal rates, or chose to
show the rates as % or U/hr. To change this setting, see
Chapter 6, Using the Personal Diabetes Manager.
Figure 3-11 Figure 3-12
Understanding and Adjusting Basal Rates
24
3
Cancel a one-time temporary basal rate
1. On the Home screen, use the Up/Down Controller buttons
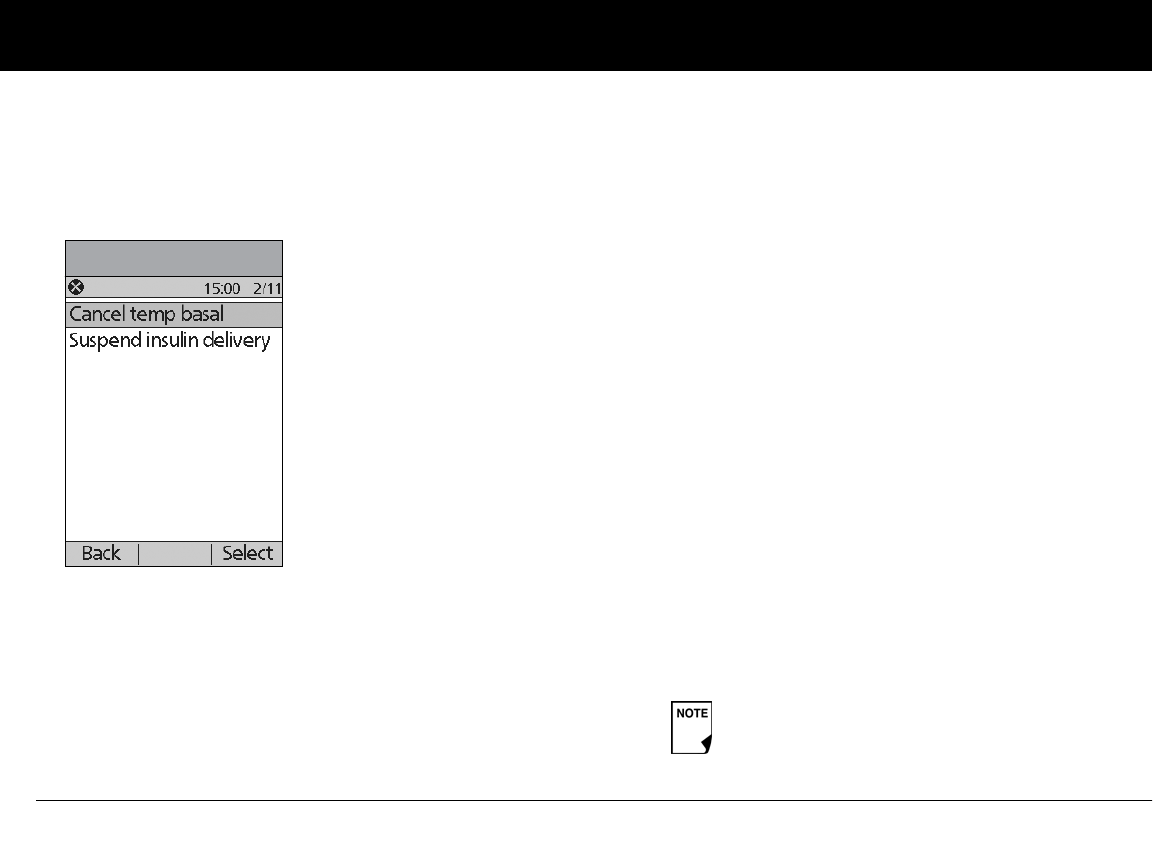
to choose Suspend/cancel, then press Select.
2. Choose Cancel temp basal (Figure 3-13), then press Select.
3. Press Confirm to cancel the temporary basal shown on the
screen.
Create a temporary basal preset
1. On the Home screen, use the Up/Down Controller buttons
to choose Settings, then press Select.
2. Choose Presets, then press Select.
3. Choose Temp basal presets, then press Select.
4. Choose [add new], then press New.
5. To use the mylife OmniPod System’s default naming system,
simply press Next. The default naming system automatically
assigns program names in numerical order, such as temp
basal 1, temp basal 2, temp basal 3.
Or, to give a different name to the program:
a. Press the Up/Down Controller buttons to scroll through
the list of characters. An up-and-down arrow symbol on
the screen indicates which character can be changed.
b. Press the middle Soft Key to move the underscore to the
next character.
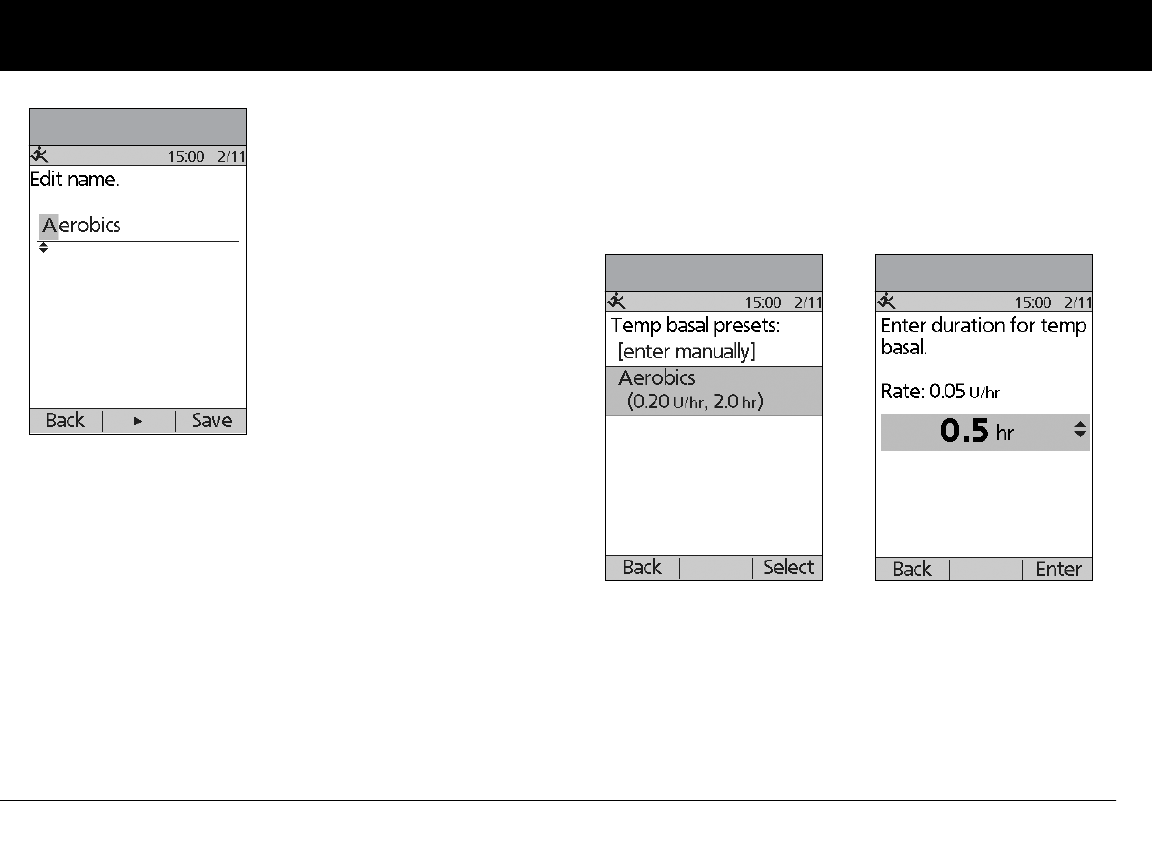
c. Enter each character one at a time. For example, if you
take an aerobics class two nights a week, you might enter
A, e, r, o, b, i, c, s (Figure 3-14 on the next page). (A blank
character or space is the first and last option in the scroll-
ing menu.)
Figure 3-13
Capitals and lowercase letters are considered the
same.
Understanding and Adjusting Basal Rates
25
3
d. Press Next.
6. Enter the new temporary basal rate (or percent change), then
press Next.
7. Enter the duration of the temporary basal rate, from 0.5 hours
to 12 hours, then press Next.
8. Review the temporary basal name, rate, and duration, then
press Save to accept it.
Enable an existing temporary basal preset
1. On the Home screen, use the Up/Down Controller buttons
to choose Temp basal, then press Select.
2. Choose the temporary basal preset you want to use from the
list (Figure 3-15), then press Select.
3. If you want, change the duration for the temporary rate, in
half-hour increments, then press Enter (Figure 3-16).
4. Press Confirm to begin the temporary basal rate shown on
the screen. The Pod beeps to indicate that the chosen tempo-
rary basal preset is running.
Figure 3-14
Figure 3-15 Figure 3-16
Understanding and Adjusting Basal Rates
26
3
Cancel an active temporary basal preset
1. On the Home screen, use the Up/Down Controller buttons
to choose Suspend/cancel;, then press Select.
2. Choose Cancel temp basal, then press Select.
3. Press Confirm to cancel the actively running temporary basal
preset.
Change, rename, or delete a temporary basal preset
1. On the Home screen, use the Up/Down Controller buttons
to choose Settings, then press Select.
2. Choose Presets, then press Select.
3. Choose Temp basal presets, then press Select.
4. Choose a temporary preset from the list, then press Edit.
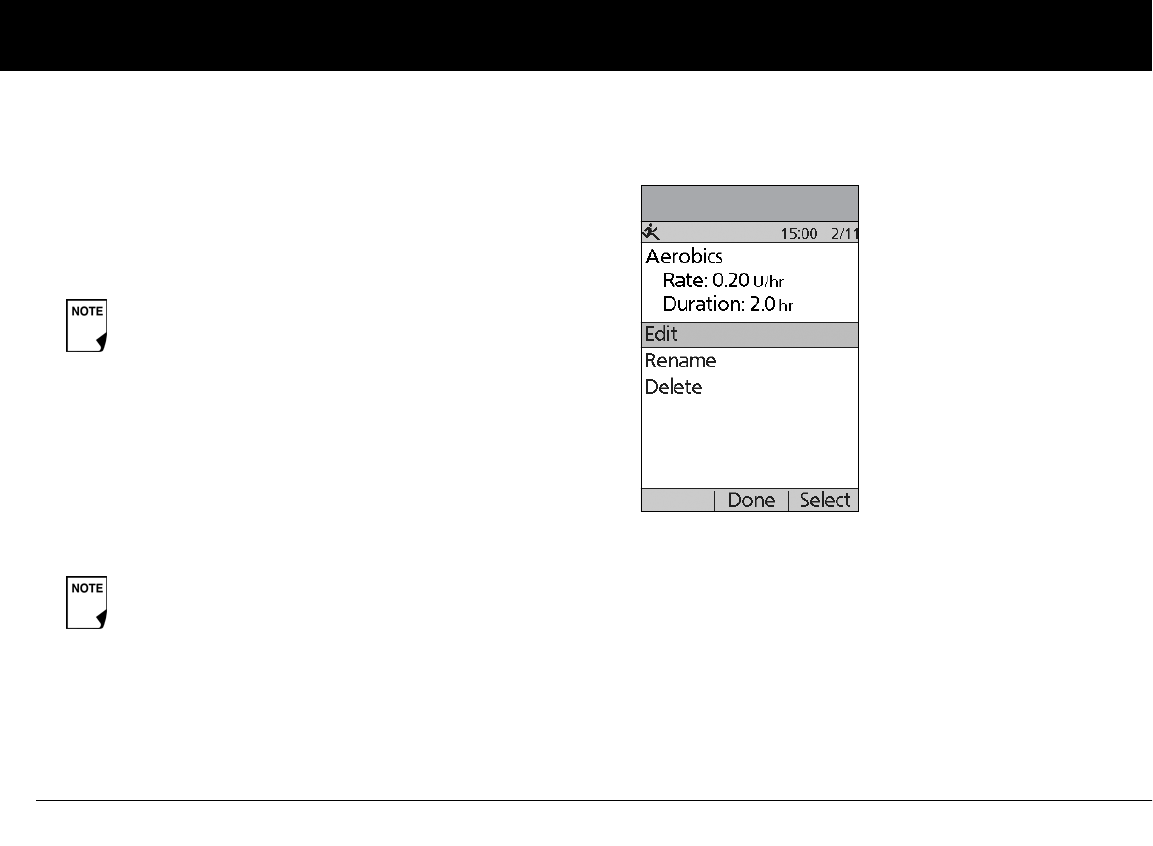
To change a temporary basal preset
1. Choose Edit, then press Select (Figure 3-17).
2. Enter a new rate (or new percent change), for the preset, then
press Next.
3. Enter a new duration for the preset, then press Save.
4. Press Done.
If you suspend insulin delivery while a temp basal is
running, the temp basal will be cancelled when you
suspend.
You cannot edit, change, or delete a temporary basal
preset that is actively running.
Figure 3-17

Understanding and Adjusting Basal Rates
27
3
To rename a temporary basal preset
1. Choose Rename, then press Select.
2. Press the Up/Down Controller buttons to enter the charac-
ters that spell out the name you want, then press Save.
3. Press Done.
To delete a temporary basal preset
1. Choose Delete, then press Select.
2. Press Delete to permanently delete the preset.
n Maximum Basal Rate
What is the maximum basal rate?
The maximum basal rate is a safety feature that limits the basal
rate (U/hr) that the Pod can deliver. Once you enter it into the
PDM memory, the maximum applies to both regular basal pro-
grams and temporary basal rates.
You and your healthcare provider will enter an initial maximum
basal rate into your PDM during the setup process (see Chapter
2, Getting Started). You can change it later as you fine-tune your
System settings or when your needs change.
Change the maximum basal rate
1. On the Home screen, use the Up/Down Controller buttons
to choose Settings, then press Select.
2. Choose System setup, then press Select.
3. Choose Bolus/basal/calcs, then press Select.
4. Choose Max basal, then press Select.
5. Enter a new maximum basal rate, then press Enter.
28
CHAPTER 4
Understanding and Delivering Bolus Doses
n What Is a Bolus?
A bolus is an extra dose of insulin, delivered when needed to:
• Match the carbohydrates (sugar content) in a meal or snack—
also known as a meal bolus
• Lower blood glucose when it gets too high—also known as a
correction bolus
This extra dose is in addition to the basal rate delivered through-
out the day and night (see Chapter 3, Understanding and
Adjusting Basal Rates).
The size of a bolus dose depends on the current factors at the
time you deliver the bolus:
• Your blood glucose level
• Your insulin-to-carbohydrate ratio
• Your correction factor
• Your target blood glucose and correct above threshold
• The amount of insulin on board (IOB) (active insulin) from pre-
vious meal and correction boluses
• Your correction threshold, the BG level above which you
would like to take insulin to reduce an elevated blood
glucose
• Your activity level
• The type and amount of food you eat
With the mylife OmniPod System, it is easy to adapt to any situa-
tion. With just a few button presses, you can adjust to
unexpected or changing insulin needs.
During setup, you entered bolus dose settings in the PDM (see
Chapter 2, Getting Started). You can adjust these settings as you
fine-tune your System or when your needs change (see Chapter
6, Using the Personal Diabetes Manager).
Check with your healthcare provider before adjust-
ing these settings.
Understanding and Delivering Bolus Doses
29
4
n Bolus Dose Options
So that you can fully enjoy freedom and flexibility in your life, the
mylife OmniPod System offers the following bolus dose options:
Suggested bolus calculator: When you want the System to
calculate your suggested bolus, based on your personal settings,
your current blood glucose, the amount of insulin still active in
your body from previous boluses, and the grams of carbohy-
drate (“carbs” for short) you are about to eat.
Normal bolus: When you need a dose of insulin right away to
cover a meal or snack you are about to eat or to reduce a high
blood glucose level.
Extended bolus: When you are eating high-fat or high-protein
foods (which take longer to digest and are slower to affect blood
glucose).
n Suggested Bolus Calculator
The suggested bolus calculator lets the mylife OmniPod System
recommend your bolus based on your personal settings. To
review or adjust these settings—including turning the sug-
gested bolus calculator On or Off—see Chapter 6, Using the
Personal Diabetes Manager.
If the suggested bolus calculator is turned On, the System
automatically calculates a bolus dose. If the suggested bolus
calculator is turned Off, you must enter a bolus amount
manually.
When using the extended bolus function the user
should check their blood glucose levels more fre-
quently to avoid hypoglycemia or hyperglycemia.
The bolus features in the mylife OmniPod System are
designed for flexibility and convenience. You can easily
transition from a normal to an extended bolus with just a
few button presses.
The suggested bolus calculator will display a sug-
gested bolus dose based on the settings you have
programmed into the PDM. Check with your health-
care provider before using this feature or adjusting
these settings.
If a suggested bolus exceeds the max bolus you
have set, the suggested bolus screen displays
“Exceeds max bolus.” (Figure 4-1 on next page.) If you
select Extend or Enter, the following confirmation is
displayed “WARNING: Exceeds max bolus of nn.nn U.
Accept this bolus and temporarily override your
limit?” (Figure 4-2 on next page). Consult your
healthcare provider before changing the setting.
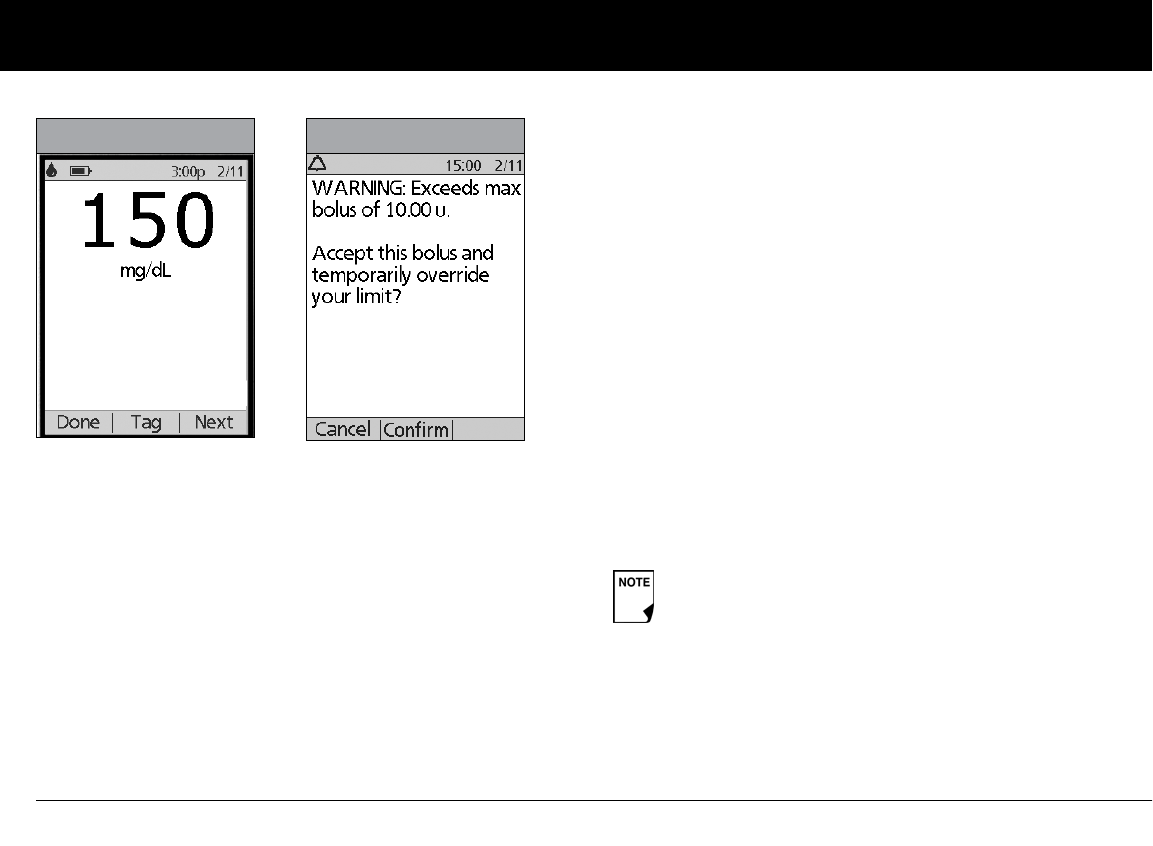
Understanding and Delivering Bolus Doses
30
4
How a suggested bolus is calculated
The suggested bolus calculator estimates the suggested amount
for each bolus portion based on your personal settings and
inputs.
The settings used to calculate a suggested bolus are:
• Target BG
• Insulin-to-carbohydrate (IC) ratio
• Correction factor (CF)
• Duration of insulin action
The inputs used to calculate a suggested bolus are:
• current BG
• carbs entered
• insulin on board (IOB)
A suggested bolus can have a correction bolus only, a meal bolus
only, or both.
Correction bolus: The correction bolus, as the name suggests,
“corrects” for a blood glucose (BG) level above your target BG
level.
Meal bolus: The meal bolus provides insulin for the carbohy-
drates you enter into the System.
Insulin on board (IOB): Insulin on Board (IOB) the amount of
insulin still working in your body from previous meal and correc-
tion boluses. The amount of time the insulin remains “on board”
or “active” depends on what you set for your duration of insulin
action.
For formulas for each element of the suggested bolus calcula-
tion, detailed examples, and additional guidelines of how the
suggested bolus calculator works, see the Appendix.
Figure 4-1 Figure 4-2
The mylife OmniPod System can only subtract insulin on
board (IOB) from a suggested bolus when the current BG
is known.
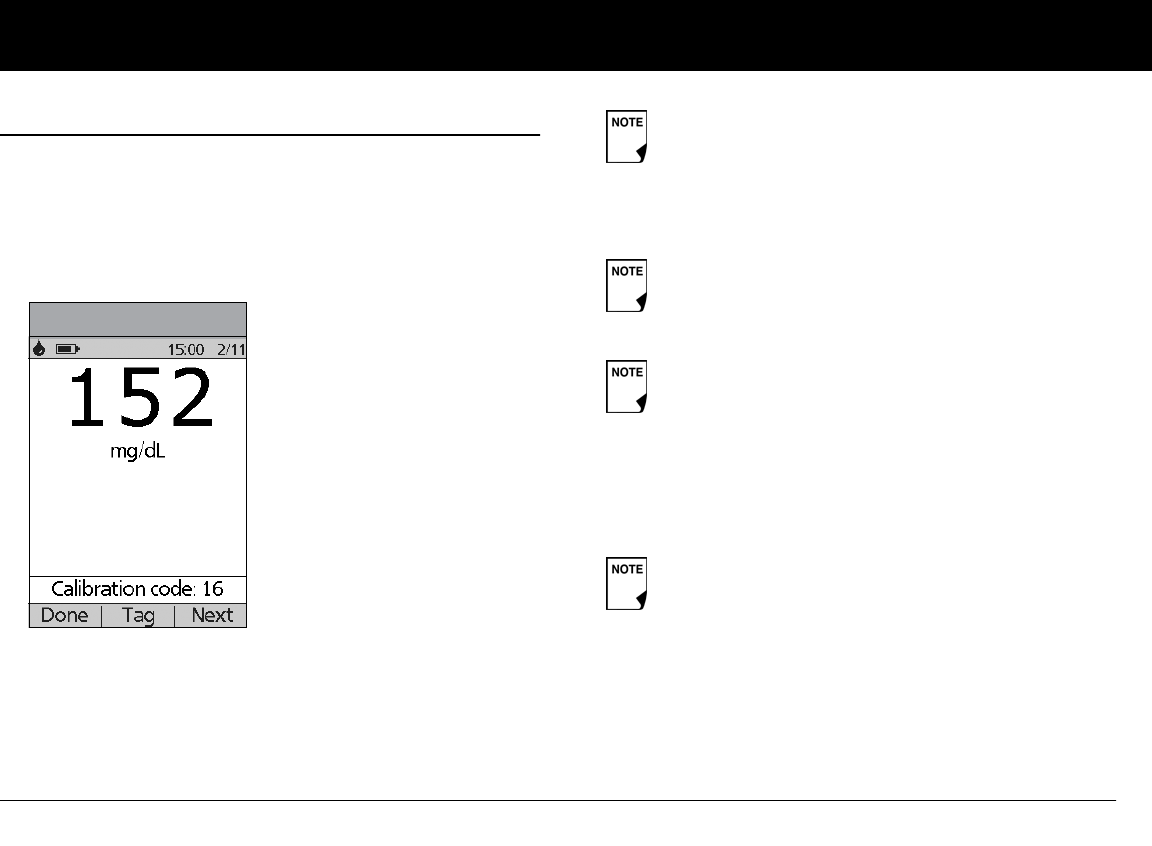
Understanding and Delivering Bolus Doses
31
4
n Deliver a Normal Bolus
Deliver a bolus when suggested bolus calculator is On
1. After you check your blood glucose, the PDM displays the
results (Figure 4-3; see the end of Chapter 7, Checking Your
Blood Glucose). Press Next.
Figure 4-3
A blood glucose value is current for up to 10 minutes
after it is tested. So you can wait up to 10 minutes,
restart the bolus process, and not have to retest your
blood glucose in order to include it in the suggested
bolus calculator.
When your blood glucose result reads “HIGH” or
“LOW,” the suggested bolus calculator will be
disabled.
If you use a separate blood glucose meter—not the
Personal Diabetes Manager (PDM)—you will need to
enter your blood glucose manually. On the Home
screen, choose Bolus, then press Select. Use the Up/
Down Controller buttons to enter your current BG
value, then press Yes if you want this value to be used
by the suggested bolus calculator.
You can also enter a BG manually by choosing the
More actions menu, then choosing Add BG Read-
ing. See the end of Chapter 7, Checking Your Blood
Glucose.
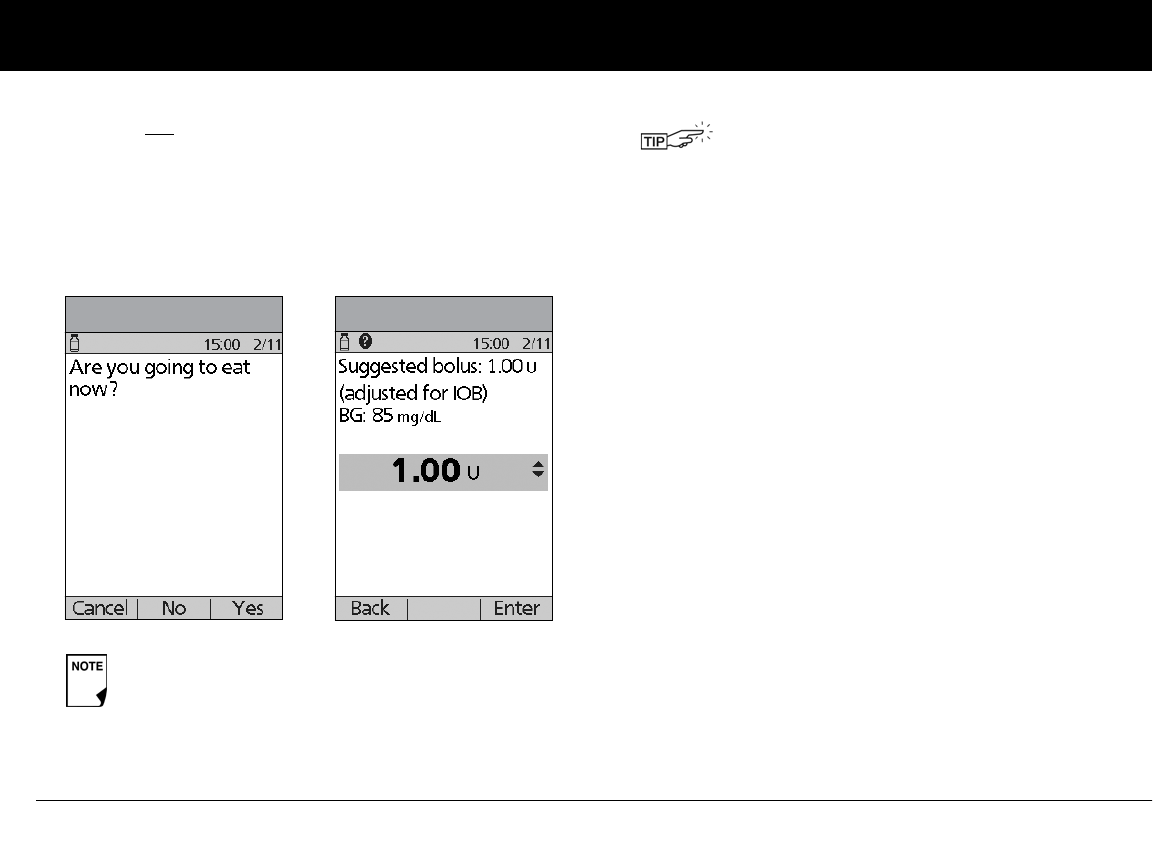
Understanding and Delivering Bolus Doses
32
4
2. If you are not going to eat now, press No (Figure 4-4). The
Suggested Bolus screen appears (Figure 4-5). Press Enter to
accept the suggested bolus.
Or, if you wish, press the Up/Down Controller buttons to
increase or decrease the suggested bolus. Then press Enter
to accept the bolus.
3. If you are going to eat now:
a. Press Yes (Figure 4-4), enter the number of carbohydrates
you are about to eat, then press Enter.
If you’ve previously entered a carb preset, then either:
• Use the Up/Down Controller buttons to choose
[enter manually], then press Select. Enter the num-
ber of carbohydrates that you are going to eat, then
press Enter.
• Use the Up/Down Controller buttons to choose
favorites, snacks, or meals. From there, select a carb
preset you have previously entered (see “Carb Presets”
later in this chapter), then press Select.
b. Press Enter to accept the suggested bolus (Figure 4-6 on
the following page).
Or press the User Info/Support (?) button to view calcula-
tion information used for this suggested bolus. Press
Close to return to the Suggested Bolus screen, then
press Enter.
In the Suggested Bolus screen (Figure 4-5), “adjusted
for IOB” appears only when Insulin on Board (IOB) is a
factor in the calculation.
Figure 4-4 Figure 4-5
To view detailed information about the calcula-
tions used for this suggested bolus, press the User
Info/Support button and scroll through the infor-
mation screens. Press Close to return to the
Suggested Bolus screen.
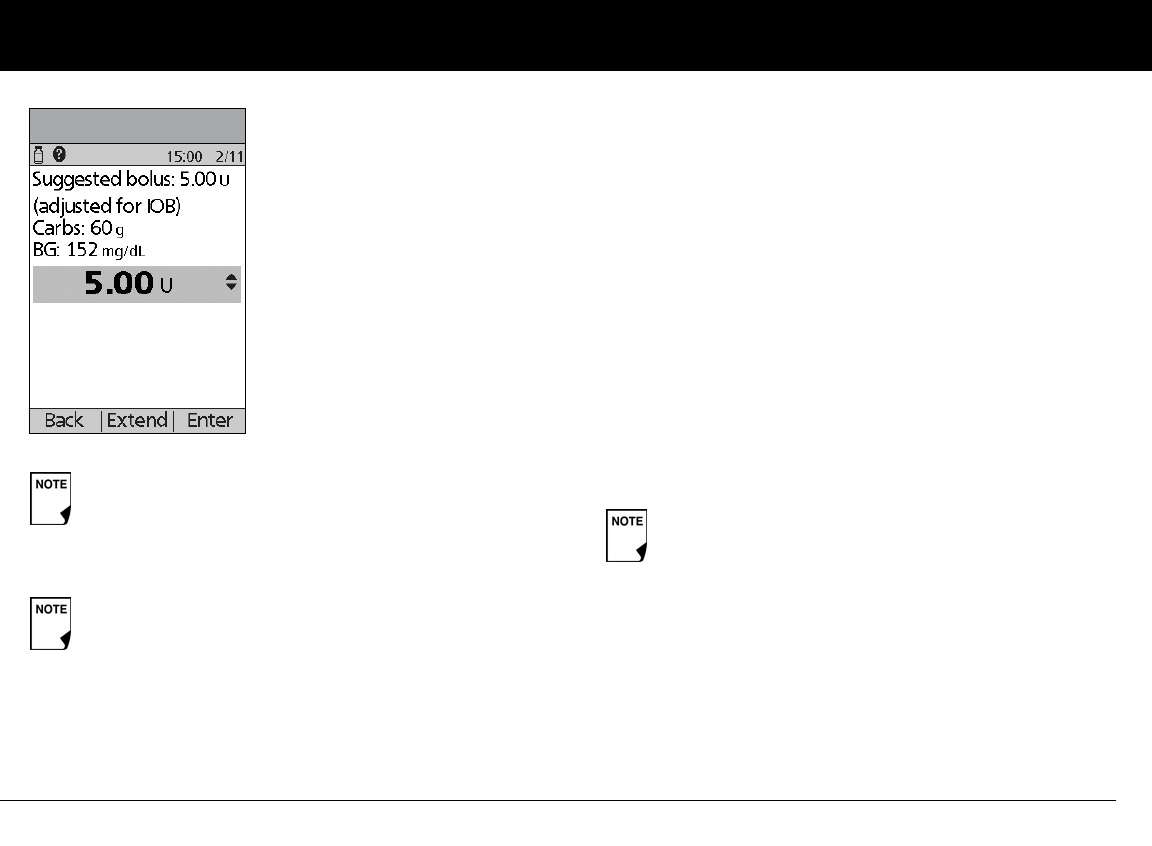
Understanding and Delivering Bolus Doses
33
4
4. If you have set the blood glucose reminder option to On and
you want to add a reminder:
a. Press Yes.
b. Enter the time for the reminder, then press OK.
5. Press Confirm to begin the bolus delivery.
Deliver a bolus manually (suggested bolus calc is Off)
1. On the Home screen, use the Up/Down Controller buttons
to choose Bolus, then press Select.
2. Enter the number of units you want to deliver, then press
Enter.
3. If the blood glucose reminders feature is turned On, you can
now set a blood glucose reminder.
4. Press Confirm to begin the bolus delivery.
If the reverse correction feature is turned On and if
your blood glucose level is below your target, the
System subtracts a correction amount from the meal
portion of the bolus.
If the reverse correction setting is turned Off, the
System does not subtract anything for a blood glu-
cose level below your target.
Figure 4-6
As a safety feature, the mylife OmniPod System only
allows you to give a bolus at or below the maximum
bolus dose you have set. See Chapter 6, Using the
Personal Diabetes Manager, for information on reset-
ting your maximum bolus dose. If suggested bolus
calc is On, you can enter a temporary manual over-
ride to make an adjustment above your max bolus
limit (Figure 4-1 and Figure 4-2). Consult your health-
care provider before changing this setting.
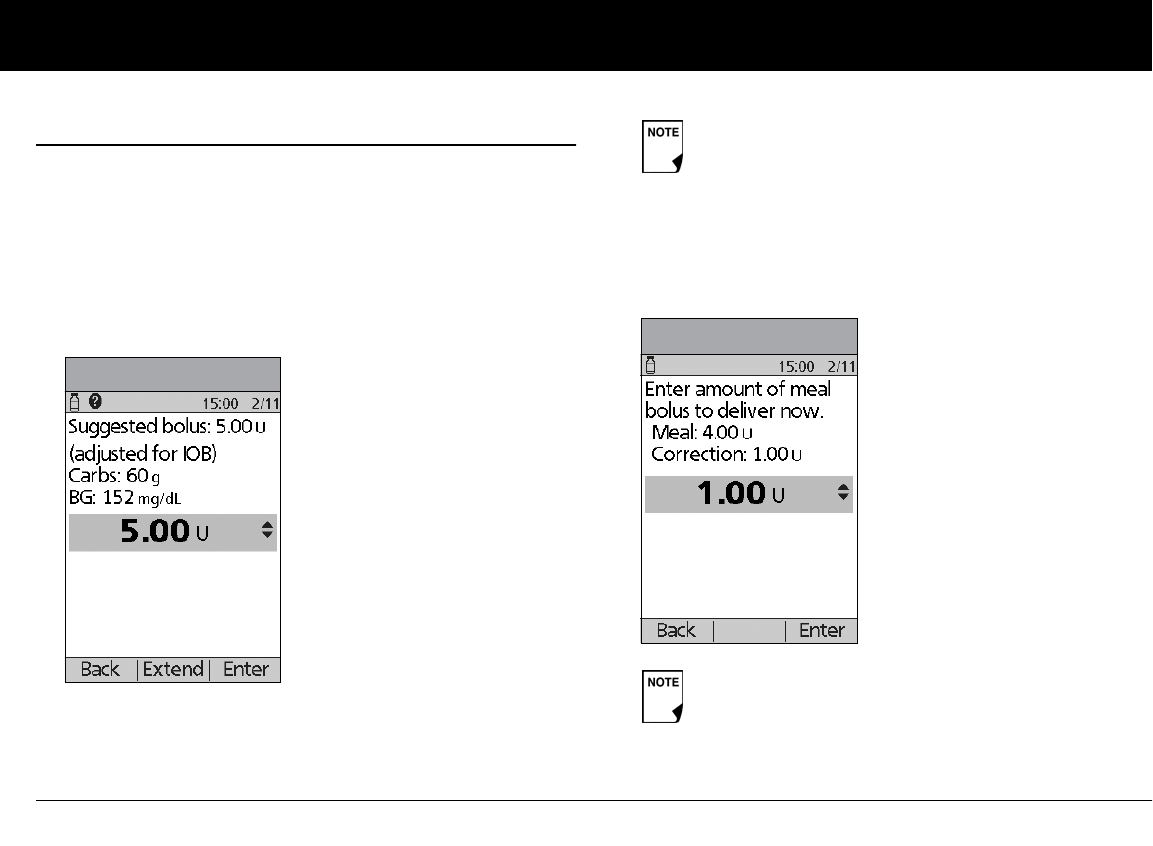
Understanding and Delivering Bolus Doses
34
4
n Deliver an Extended Bolus
The extended bolus feature lets the mylife OmniPod System
deliver some (or no) insulin now and the remainder over a period
of time you choose.
Deliver an extended bolus instead of a normal bolus
1. After you get your suggested bolus, press Extend instead of
Enter (see Figure 4-7).
2. Enter the units of insulin or percentage of the bolus that you
want to take immediately (Figure 4-8), then press Enter.
Figure 4-7
If you have set the Extended bolus option to Off,
the PDM will not display the Extend Soft Key. For
information on turning this feature On and Off see
Chapter 6, Using the Personal Diabetes Manager.
To learn how to set extended boluses in percentages
or units, see Chapter 6, Using the Personal Diabetes
Manager.
Figure 4-8
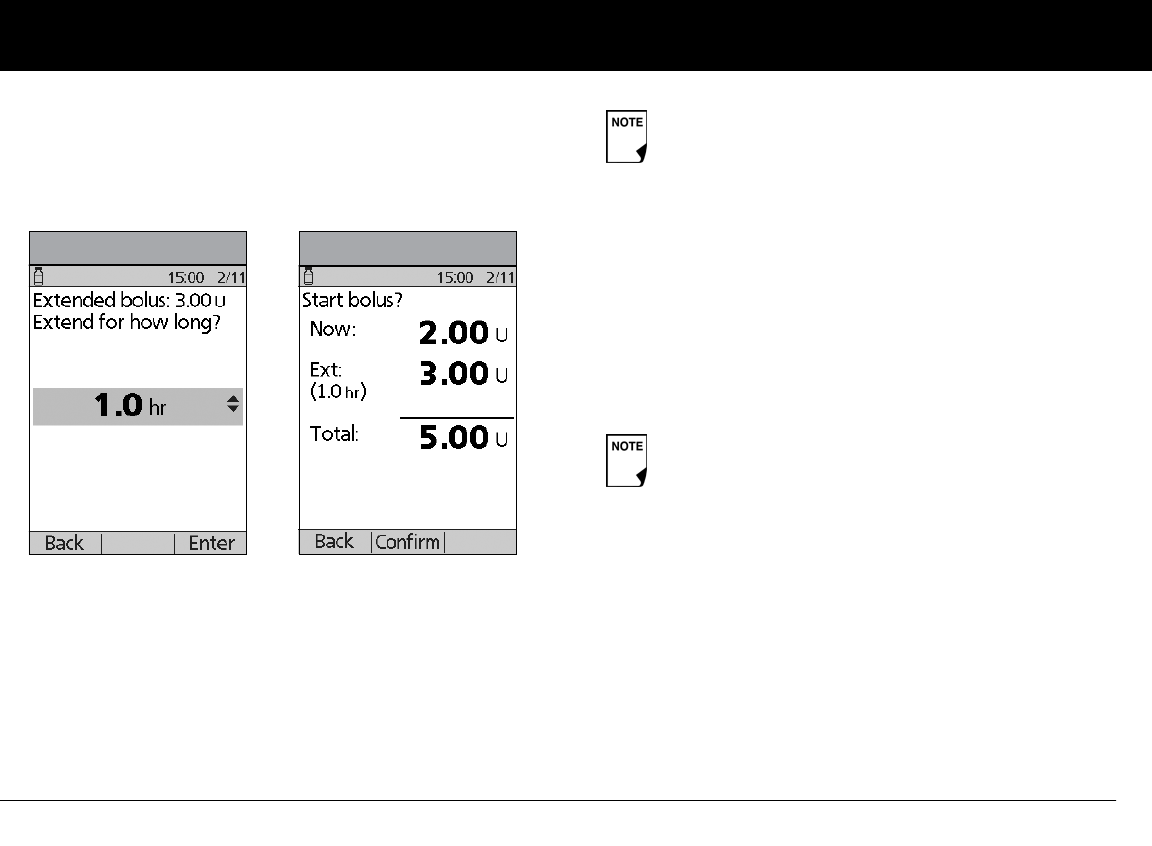
Understanding and Delivering Bolus Doses
35
4
3. Enter the time (up to 8 hours, in 30-minute increments) over
which to deliver the remainder of the bolus, then press Enter
(Figure 4-9). In Figure 4-10 you can see a detailed view of the
extended bolus.
4. If the blood glucose reminders feature is turned On, you
can now set a blood glucose reminder.
5. Press Confirm to begin the bolus delivery.
Figure 4-9 Figure 4-10
As a safety feature, the correction bolus is always
delivered first and cannot be extended. Only the
meal bolus can be extended. For example:
Total bolus = 5 units
correction bolus 1 unit
meal bolus 4 units
Deliver now = 2 units
correction bolus 1 unit
meal bolus 1 unit
Extend = 3 units
meal portion 3 units
As a safety feature, you cannot deliver two extended
boluses at the same time. You can, however, cancel
the first extended bolus and replace it with another
(see “Replace an Extended Bolus” on page 36). You
can deliver a normal bolus while an extended bolus is
being delivered.
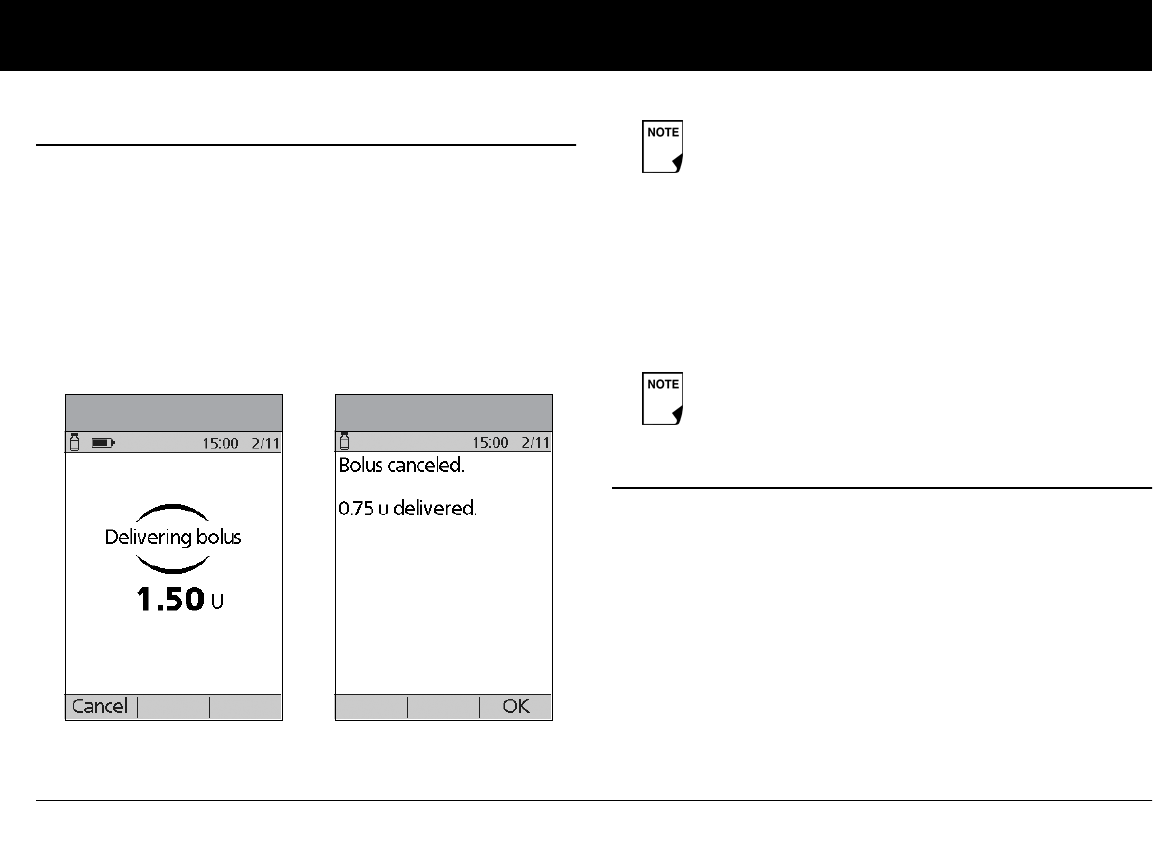
Understanding and Delivering Bolus Doses
36
4
n Cancel Active Boluses
The mylife OmniPod System is extremely flexible, so you can use
it to respond to your changing insulin needs. It is easy to cancel
an active bolus (one that is currently being delivered), even after
insulin delivery has started.
1. To check the Pod status, refer to Page 54 for detailed instruc-
tions. The ID screen must be confirmed before you can check
Pod status. An on-screen message appears for as long as a
normal bolus is being delivered (Figure 4-11).
2. Press Cancel.
The Pod beeps to confirm the bolus is cancelled. An on-screen
message tells you how much insulin was delivered before
you cancelled the bolus (Figure 4-12).
3. Press OK to return to the Status screen.
n Replace an Extended Bolus
You can replace one extended bolus with another. The System
tells you how much of the first bolus has not yet been delivered.
1. After you see your suggested bolus, press Extend instead of
Enter (see Figure 4-7 on Page 34).
Figure 4-11 Figure 4-12
If the bolus has already been completely delivered,
the “Delivering bolus” message and Cancel do not
appear, but the Status screen does appear.
If your suggested bolus contains both a correction
bolus and a meal bolus, the correction bolus is always
delivered first.
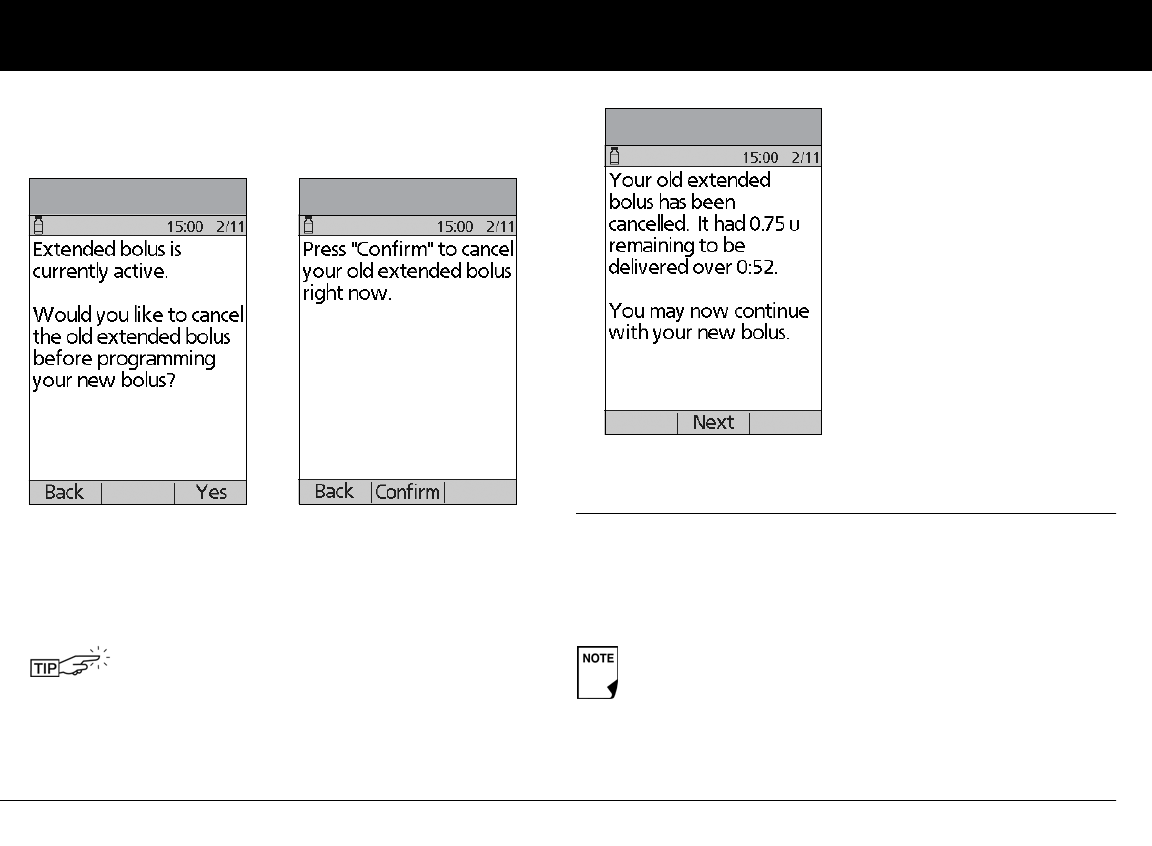
Understanding and Delivering Bolus Doses
37
4
2. Press Yes to cancel the active extended bolus (Figure 4-13).
Or press Back to return to the Suggested Meal Bolus screen.
3. Press Confirm (Figure 4-14).
4. The screen displays the amount of the old extended bolus
that has yet to be delivered (Figure 4-15). Press Next to return
to the Suggested Meal Bolus screen.
n Bolus Presets
Bolus presets are bolus amounts that you program for frequent
use. For example, if you often take the same bolus at lunchtime,
you can create a bolus preset for that amount and name it
“Lunch.”
You can add what remained of the old extended
bolus to the new one.
Figure 4-13 Figure 4-14
Bolus presets are available only when the suggested
bolus calculator feature is turned Off. (If the suggested
bolus calculator is turned On, you can still use carb pre-
sets. See “Carb Presets” on Page 39.)
Figure 4-15
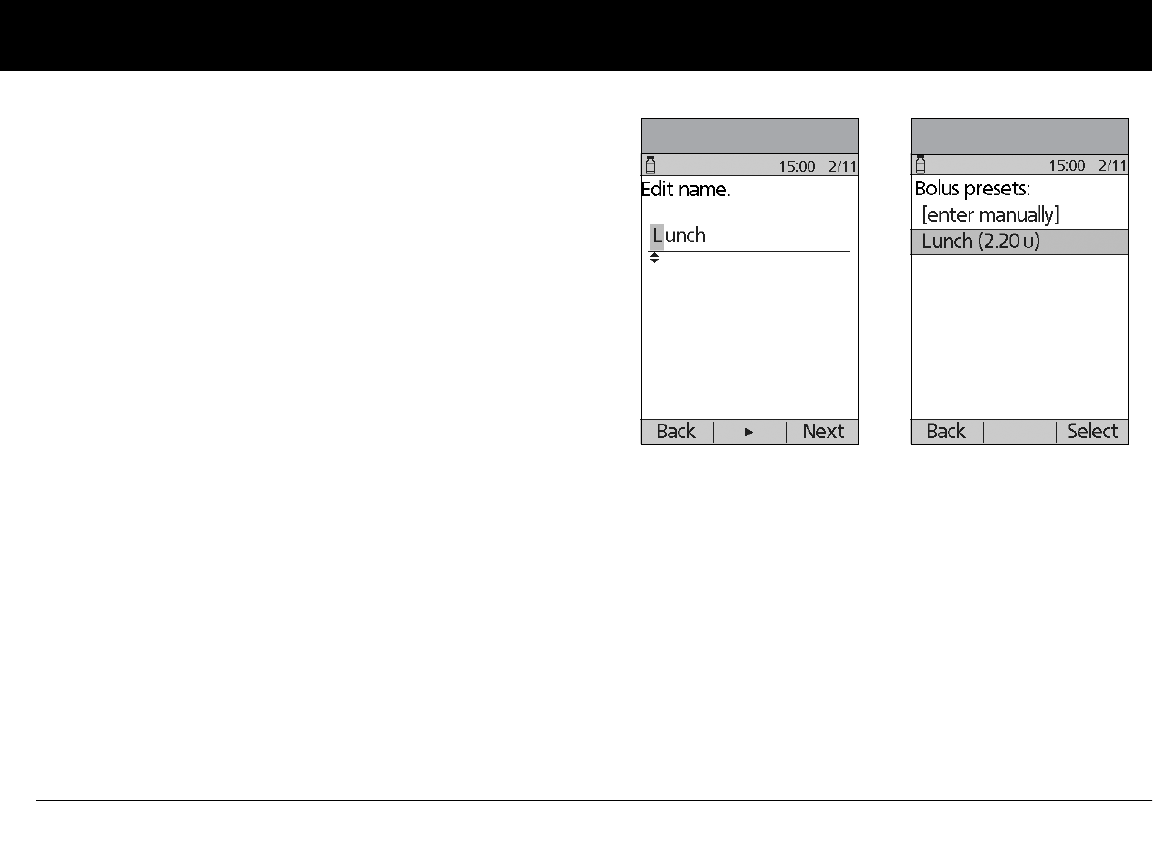
Understanding and Delivering Bolus Doses
38
4
Create a bolus preset
1. On the Home screen use the Up/Down Controller buttons
to choose Settings; then press Select.
2. Choose Presets, then press Select.
3. Choose Bolus presets, then press Select.
4. Choose [add new], then press New.
5. To use the mylife OmniPod System’s default naming system,
simply press Next. The default naming system automatically
assigns program names in numerical order, such as bolus 1,
bolus 2, bolus 3.
Or, to give a different name to the program:
a. Press the Up/Down Controller buttons to enter the char-
acters that spell the name you want. The up and down
arrow symbol on the screen indicates which character can
be changed.
b. Press the middle Soft Key (labeled with the right arrow) to
move the underscore to the next character.
c. Enter each character one at a time. For example, if you
frequently take the same bolus at lunchtime, you might
enter L, u, n, c, h (Figure 4-16).
d. Press Next.
6. Enter the new bolus preset amount, up to the maximum
bolus you entered during setup; then press Next.
7. Review the bolus preset name and amount, then press Save
to accept it.
Enable an existing bolus preset
1. On the Home screen, use the Up/Down Controller buttons
to choose Bolus; then press Select.
2. Choose the bolus preset you want to use from the list (Figure
4-17), then press Select.
3. Press Enter to confirm the bolus preset amount, or, if neces-
sary, use the Up/Down Controller buttons to adjust the
bolus amount.
Figure 4-16 Figure 4-17

Understanding and Delivering Bolus Doses
39
4
4. Press Confirm to deliver the bolus shown on the screen.
Change, rename, or delete a bolus preset
1. On the Home screen, use the Up/Down Controller buttons
to choose Settings, then press Select.
2. Choose Presets, then press Select.
3. Choose Bolus presets, then press Select.
4. Choose a preset from the list, then press Edit.
Change a bolus preset
1. Choose Edit, then press Select.
2. Enter a new insulin amount for the bolus, then press Save.
Rename a bolus preset
1. Choose Rename, then press Select.
2. Press the Up/Down Controller buttons to enter the charac-
ters that spell out the name you want, then press Next.
Delete a bolus preset
1. Choose Delete, and then press Select.
2. Press Delete to permanently delete the preset.
Cancel an active bolus preset
1. Press and hold the Power button to turn on the PDM (To
check the Pod status, refer to Page 54 for detailed instruc-
tions. The ID screen must be confirmed before you can check
Pod status.), if it is not already on. An on-screen message
appears as long as a bolus is being delivered.
2. Press Cancel.
The Pod beeps to confirm the bolus is cancelled. An on-screen
message tells you how much insulin was delivered before
you cancelled the bolus.
3. Press OK to return to the Status screen.
For more details, see “Cancel Active Boluses” earlier in this
chapter.
Understanding and Delivering Bolus Doses
40
4
n Carb Presets
Carb presets are favorite food items, snacks, or meals that you eat
frequently. After you enter these items, you can quickly select
one when entering carb amounts during the suggested bolus
calculator process.
Create a carb preset
1. On the Home screen, use the Up/Down Controller buttons
to choose Settings, then press Select.
2. Choose Presets, then press Select.
3. Choose Carb presets, then press Select.
4. Choose the category for this carb preset: (Favorites, Snacks,
or Meals), then press Select.
5. Choose [add new], then press New.
6. To use the mylife OmniPod System’s default naming system,
simply press Next. The default naming system automatically
assigns program names in numerical order, such as carb pre-
set 1, carb preset 2, carb preset 3.
Or, to give a different name to the program:
a. Press the Up/Down Controller buttons to enter the char-
acters that spell the name you want. An up and down
arrow symbol on the screen indicates the character that
can be changed.
b. Press the middle Soft Key (the right arrow) to move the
underscore to the next character.
c. Enter each character one at a time. For example, if you
frequently eat a breakfast consisting of plain low-fat
yogurt with blueberries, sweetener, and cinnamon, you
might enter B, l, u, e, [space], Y, o, g, u, r, t (Figure 4-18 on
the next page).
d. Press Next.
7. Enter the grams of carbohydrate in the meal, then press Next.
8. For American food label enter the fiber. For European food
label do not enter the fiber, because it is already counted off
the carbohydrate. Press Next.
9. If you want, enter the grams of fat and protein in the meal,
and the total calories. Press Next after each entry.
These additional units are not required. If you prefer not
to enter them, simply press Next repeatedly to skip
through the screens.
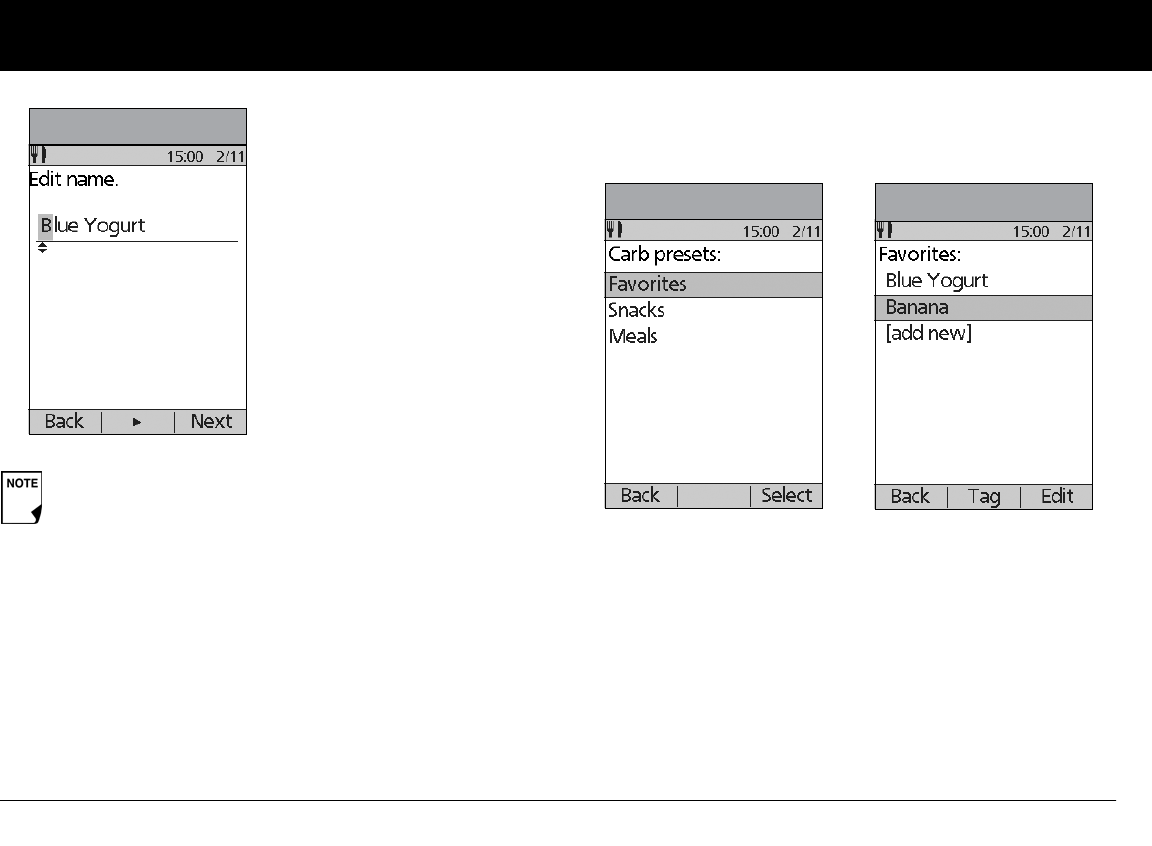
Understanding and Delivering Bolus Doses
41
4
10. Press Save to add the preset to the category.
Change or edit a carb preset
1. On the Home screen, use the Up/Down Controller buttons
to choose Settings, then press Select.
2. Choose Presets, then press Select.
3. Choose Carb presets, then press Select.
4. Choose the category of the preset you want to change, then
press Select (Figure 4-19).
To change the category for a carb preset
1. Choose the carb preset you want to move to another cate-
gory, then press Tag (Figure 4-20).
2. Choose a new category, then press Select.
If you do include grams of fiber in step 8 to the left, the
suggested bolus calculator uses carbs minus fiber. Alter-
natively, in step 7, you can enter the total grams of carbs
minus the fiber yourself. Your healthcare provider can
best advise you on how to make this entry.
Figure 4-18
Figure 4-19 Figure 4-20
Understanding and Delivering Bolus Doses
42
4
To edit a carb preset
1. Choose the carb preset you want to change, then press Edit.
2. Press Edit again on the next screen.
3. To rename the carb preset, press the Up/Down Controller
buttons to enter the characters that spell out the name you
want, then press Next.
To “erase” characters, press either Up or Down until you reach
the end of the characters, which gives you the option to
choose a blank space.
4. Enter the grams of carbohydrate in the meal, then press Next.
5. For American food label enter the fiber. For European food
label do not enter the fiber, because it is already counted off
the carbohydrate. Press Next.
6. If you want, enter the grams of fat and protein in the meal,
and the total calories. Press Next after each entry.
7. Press Save to update the preset.
Delete a carb preset
1. On the Home screen, use the Up/Down Controller buttons
to choose Settings, then press Select.
2. Choose Presets, then press Select.
3. Choose Carb presets, then press Select.
4. Choose the category of the preset you want to change, then
press Select.
5. Choose the carb preset you want to delete, then press Edit.
6. Press Delete.
7. Press Delete again to permanently delete the preset.
These additional units are not required. If you prefer
not to enter them, simply press Next repeatedly to
skip through the screens.
43
CHAPTER 5
Using the Pod
n The Pod Change Process
Replace the Pod at least once every 72 hours or up to 200
units of insulin (3 days). Refer to the insulin labeling and follow
your healthcare provider’s directions for how often to replace
your Pod. If you like, you can set the Personal Diabetes Manager
(PDM) to notify you when it is time to replace the Pod (see Chap-
ter 6, Using the Personal Diabetes Manager).
WARNINGS!
• Do NOT apply or use a Pod if the sterile packaging is open or
damaged, or if the Pod has been dropped after removal from
the package as this may increase the risk of infection. Pods
are sterile unless packaging has been opened or damaged.
• Do NOT apply or use a Pod if it is damaged in any way. A dam-
aged Pod may not work properly.
• To minimize the possibility of site infection, do NOT apply a
Pod without first using aseptic technique. This means to:
• wash your hands
• clean the insulin vial with an alcohol prep swab
• clean the infusion site with soap and water
• keep sterile materials away from any possible germs
• Do NOT use a Pod if you are sensitive to or have allergies to
acrylic adhesives, or have fragile or easily damaged skin.
• Check often to make sure the Pod and soft cannula are
securely attached and in place. A loose or dislodged cannula
may interrupt insulin delivery. Verify there is no wetness or
scent of insulin, which may indicate the cannula has dis-
lodged.
• Do NOT apply a new Pod until you have deactivated and
removed the old Pod. A Pod that has not been deactivated
properly may continue to deliver insulin as programmed, put-
ting you at risk of over infusion and possible hypoglycemia.
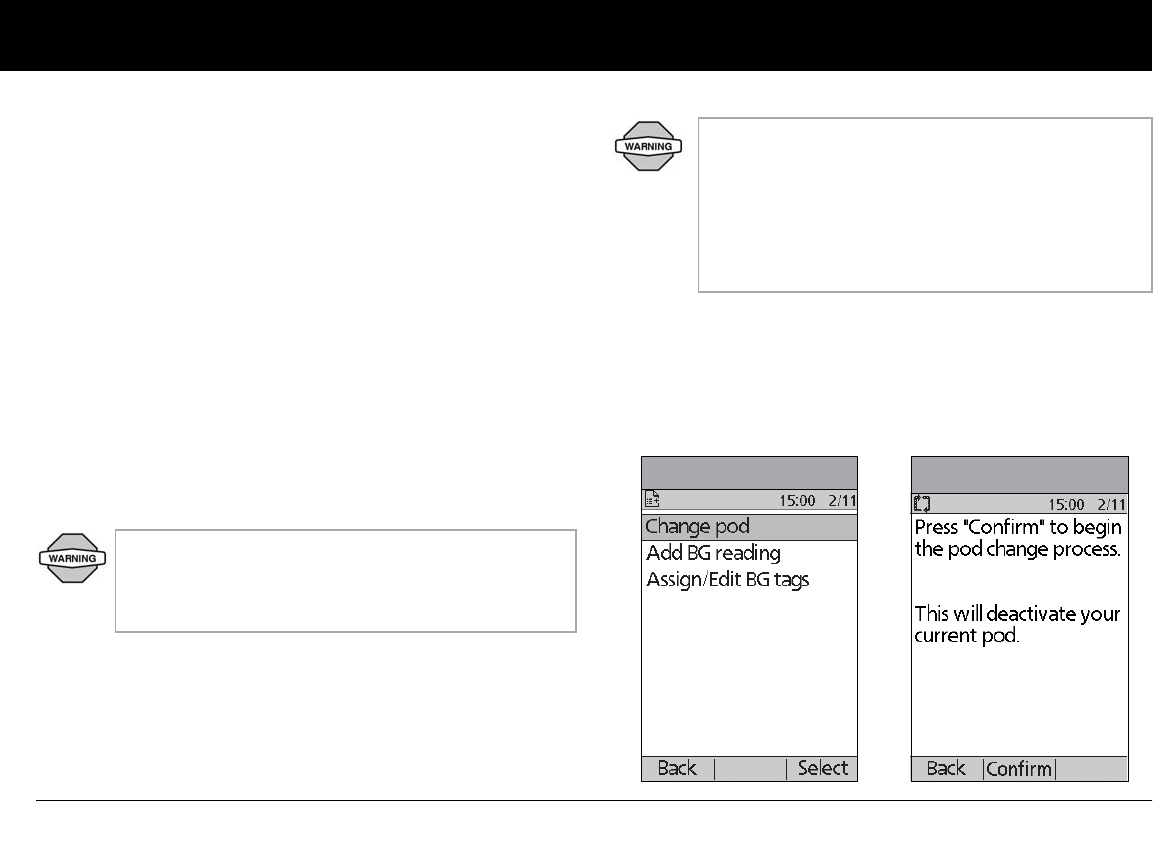
Using the Pod
44
5
• Because insulin Pods use only rapid-acting insulin, users are
at increased risk for developing hyperglycemia (high blood
glucose) if insulin delivery is interrupted. If it is untreated,
severe hyperglycemia can quickly lead to diabetic ketoacido-
sis (DKA). DKA can cause symptoms such as breathing difficul-
ties, shock, coma, or death. If insulin delivery is interrupted for
any reason, you may need to replace the missing insulin usu-
ally with an injection of rapid-acting insulin. Ask your health-
care provider for instructions on handling interrupted insulin
delivery.
Gather equipment and supplies
Gather the following before you begin:
• A vial of rapid-acting U-100 insulin (See the warning on
page 8 of the Introduction for a list of insulins approved for
use in the mylife OmniPod System.)
• An unopened Pod
• An alcohol prep swab
Deactivate the current Pod
1. On the Home screen, use the Up/Down Controller buttons
to choose More actions, then press Select.
2. Choose Change Pod (Figure 5-1), then press Select.
3. Press Confirm (Figure 5-2) to deactivate the current Pod.
NEVER use insulin that is cloudy; it may be old or inac-
tive. Failure to use rapid-acting U-100 insulin, or using
insulin that is expired or inactive, may lead to hyper-
glycemia or diabetic ketoacidosis (DKA).
If you are a first-time mylife OmniPod System user,
your healthcare provider will guide you through the
steps for initializing and applying your first Pod. Do
NOT attempt to apply or use a Pod until you have
been trained by your healthcare provider. Use of the
System with inadequate training or improper setup
could put your health and safety at risk.
Figure 5-1 Figure 5-2
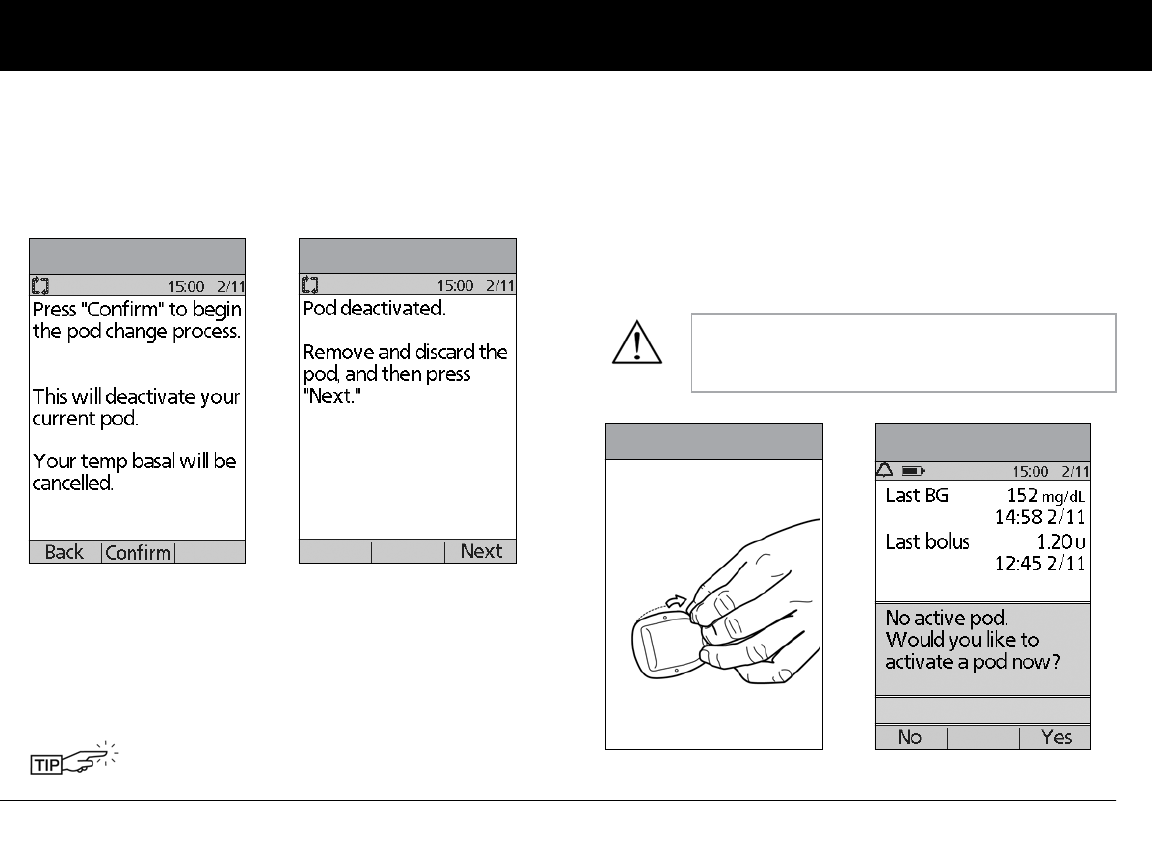
Using the Pod
45
5
4. If an extended bolus or temporary basal or both are actively
running, you will see a message similar to that shown in Fig-
ure 5-3. Press Confirm to accept the cancellation.
Or press Back to return to the More actions menu.
5. After you press Confirm, you will see the message in
Figure 5-4.
To remove the old Pod:
a. Gently lift the edges of the adhesive tape from your skin
and remove the entire Pod (Figure 5-5).
b. Use soap and water to remove any adhesive that remains
on the skin or, if necessary, use an adhesive remover.
c. Discard the used Pod according to local waste disposal
regulations or contact Customer Care for more informa-
tion about how to dispose of your used Pod.
6. After removing the old Pod, press Next.
7. Press Yes to fill and activate a new Pod (Figure 5-6).
.
Removing the Pod slowly will help to avoid
possible skin irritation.
Figure 5-3 Figure 5-4
Check the infusion site for signs of infection.
See “Avoid Infusion Site Infections” later in this
chapter.
Figure 5-5 Figure 5-6
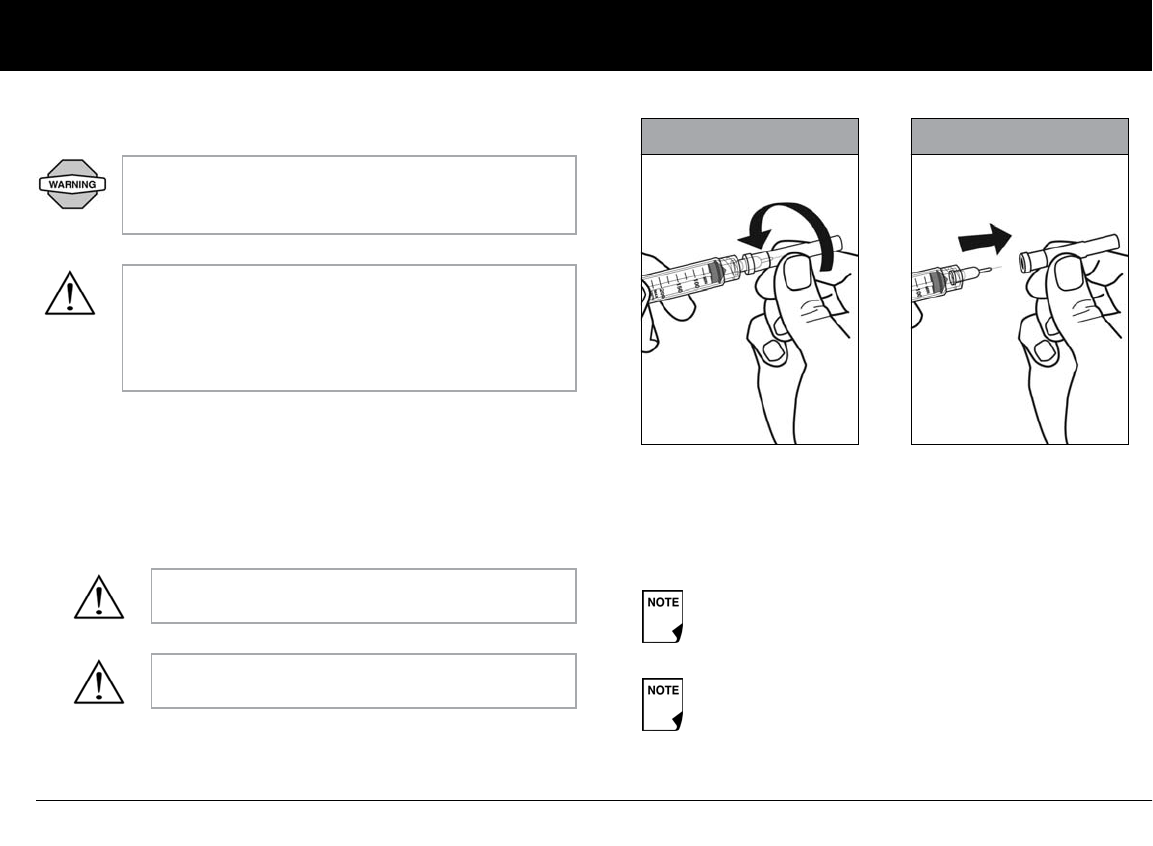
Using the Pod
46
5
Fill a new Pod
1. Use an alcohol prep swab to clean the top of the insulin vial,
then discard the prep swab.
2. Securely twist the fill needle onto the syringe (Figure 5-7).
3. Pull outward to remove the protective cap from the needle
(Figure 5-8). Save the cap; you will need it later.
4. Determine the amount of insulin you need to insert into the
Pod. For example, if you will use this Pod for 72 hours, you
need enough insulin to last you 72 hours. Your healthcare
provider will help you determine the correct amount.
Before filling a Pod, ensure that no other Pods are
being activated within 61 cm (24 inches) of your
PDM.
Before filling a Pod with insulin, ensure that the Pod
is above 10° Celsius. If the Pod has been exposed to
temperatures below 10° C, then allow the Pod to be
brought back to room temperature before filling it
with insulin.
Use care after removing the needle cap and
exposing the fill needle.
Only use room temperature insulin when filling
the Pod.
The Pod requires a minimum of 85 units of insulin to
begin operation.
The Pod can deliver up to 200 units of insulin.
Figure 5-7 Figure 5-8
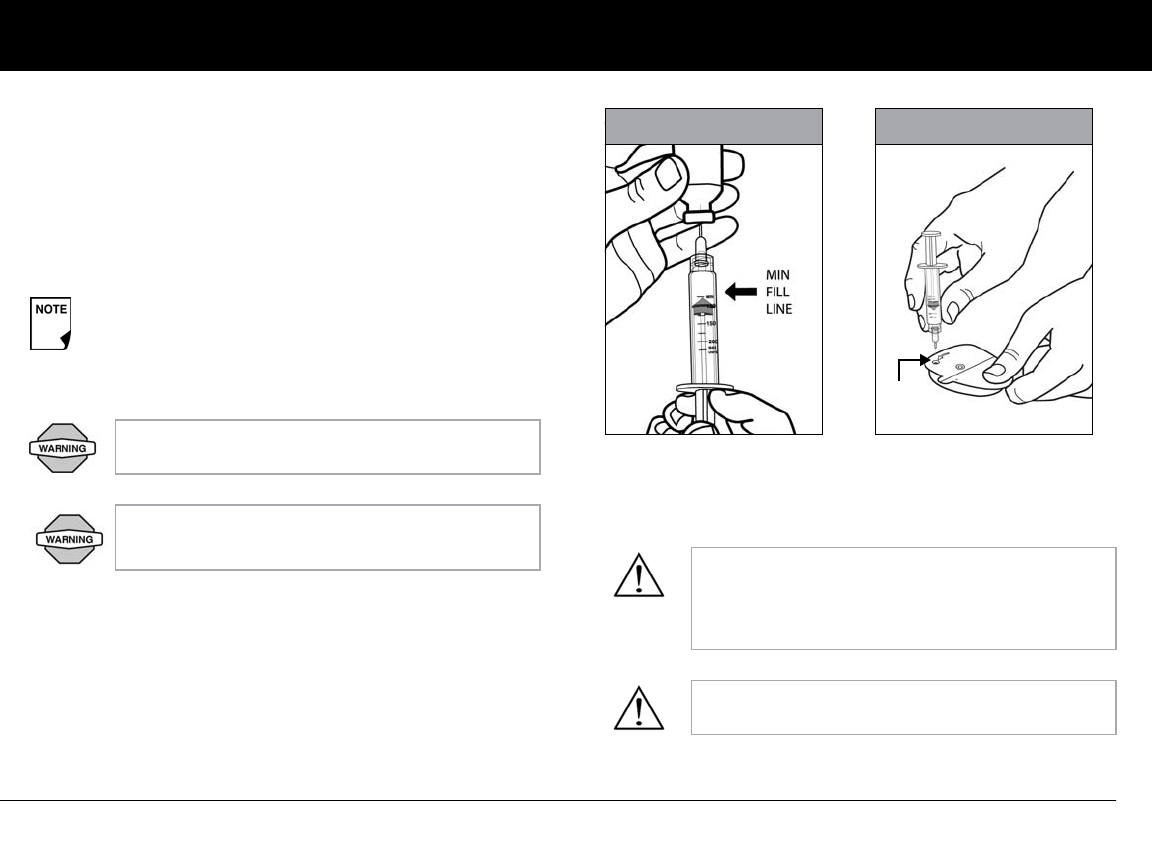
Using the Pod
47
5
5. Draw air into the syringe up to the amount of insulin you
want.
6. Insert the needle into the insulin vial and inject the air. This
makes it easier to withdraw insulin from the vial.
7. Turn the vial and syringe upside down. Withdraw insulin from
the vial into the syringe, expelling any and all air or air bub-
bles. Fill at least to the MIN (minimum) fill line (Figure 5-9).
8. Remove the needle from the vial and insert it straight down
into the insulin fill port on the underside of the Pod
(Figure 5-10).
Any air bubbles present in the fill syringe could be
transferred into the reservoir during the fill process.
The pod does not purge air that is introduced into the
reservoir by way of customer fill.
Failure to expel air bubbles from the fill syringe
may result in interrupted insulin delivery.
Make sure there is no air in the syringe before
attempting to fill a Pod with insulin. Be sure to only insert the fill syringe into the fill
port. Attempting to inject insulin into any other
location on the Pod may result in damage to the
Pod or loss of insulin.
To ensure proper fill, do not insert the fill syringe
at an angle into the fill port.
Figure 5-9 Figure 5-10
Fill
port
Using the Pod
48
5
9. Depress the syringe plunger to completely empty the insulin
into the Pod. The Pod will beep, indicating that the System is
ready to proceed to the next step.
10. Remove the needle from the insulin fill port. The port is self-
sealing; insulin will not leak after the needle is removed.
11. Place the protective cap back on the needle and remove the
needle from the syringe.
12. After you fill the Pod, it will beep twice. After hearing the
beeps, PDM and pod should be adjacent and touching,
either in or out of tray to ensure proper communication
during priming (Figure 5-11on the next page). Press Next.
13. The Pod will only beep if you have filled it with at least 85 units
of insulin. If you have filled the Pod with more than 85 units
and still do not hear the 2 beeps, please call Customer Care.
14. The System performs a series of safety checks and automati-
cally primes the Pod (Figure 5-12 on next page). Once com-
plete, the PDM beeps, letting you know that the priming and
safety checks were successful.
Do not use any other type of needle or filling
device besides the syringe provided with each
Pod.
NEVER use a Pod if you hear a crackling noise or
feel resistance when you depress the plunger.
These conditions can result in interrupted deliv-
ery of insulin.
Do not insert the fill syringe into the fill port more
than once.
NEVER inject air into the fill port. Doing so may
result in unintended or interrupted insulin deliv-
ery.
The fill syringe is intended for single use only and
should be used only with the mylife OmniPod
System.
As a safety feature, the communication distance be-
tween the Pod and PDM is reduced during activation.
Once a Pod is primed and communicates with the
PDM, the full communication range is restored and
the Pod can receive commands only from that PDM.
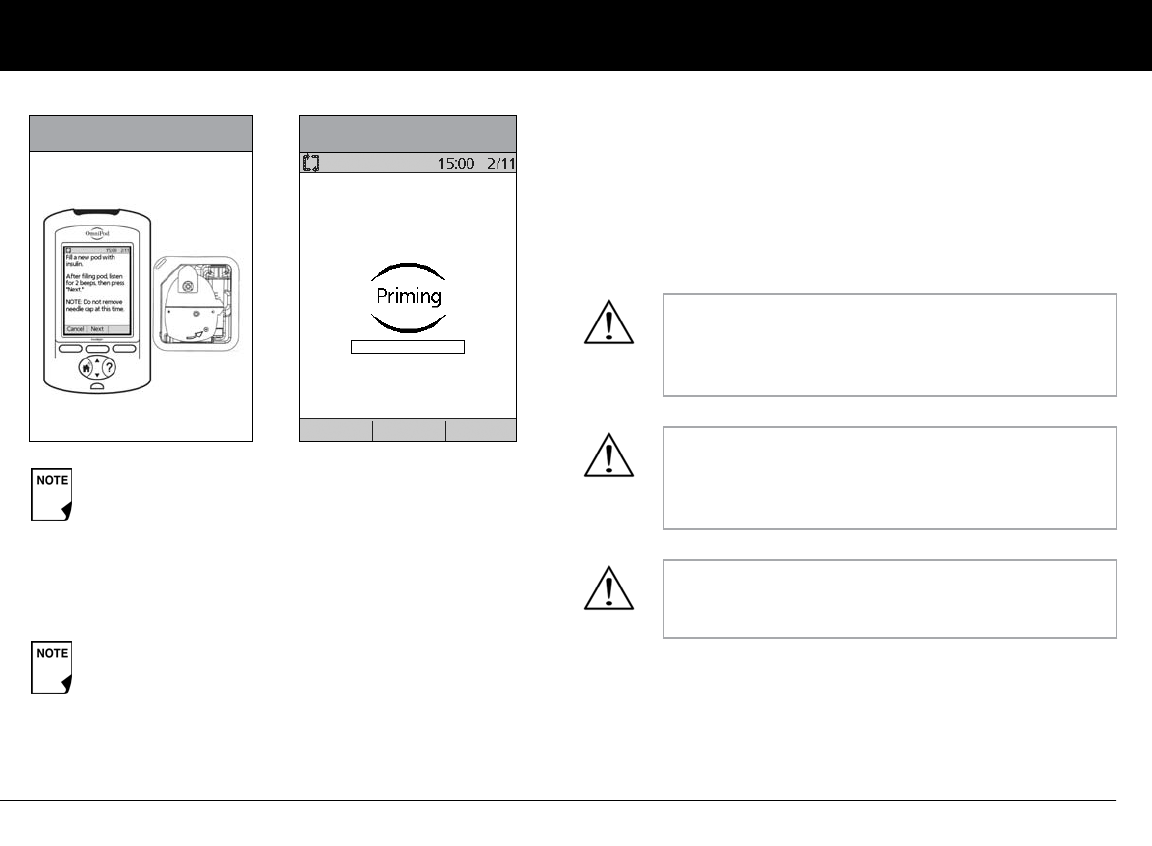
Using the Pod
49
5
Select the infusion site
Before applying a new Pod, you must first select an appropriate
infusion site. Due to ease of access and viewing, the abdomen is
often used. Your healthcare provider may suggest other poten-
tial sites that, like the abdomen, typically have a layer of fatty
tissue, such as the hip, back of upper arm, upper thigh, or lower
back (Figure 5-13 on the next page).
After filling the Pod with insulin, you should complete
the Pod change process within 60 minutes. As a
reminder that the Pod has been filled, it will beep
every 5 minutes to indicate that time is passing. If you
do not set up the Pod within 60 minutes, you must
deactivate and discard it.
Once a Pod is activated and communicates with the
PDM, it can only receive commands from that PDM,
not from any other.
Figure 5-11 Figure 5-12
Avoid sites where belts, waistbands, or tight clothing
may rub against, disturb, or dislodge the Pod. Also
avoid sites where the Pod will be affected by folds of
skin.
Change the site each time you apply a new Pod. A
new infusion site should be at least 2.5 cm (1 inch)
away from the last site. (Using the same location
repeatedly may reduce insulin absorption.)
Do NOT apply the Pod within 5 cm (2 inches) of your
navel or over a mole, a tattoo, or scar, where insulin
absorption may be reduced.
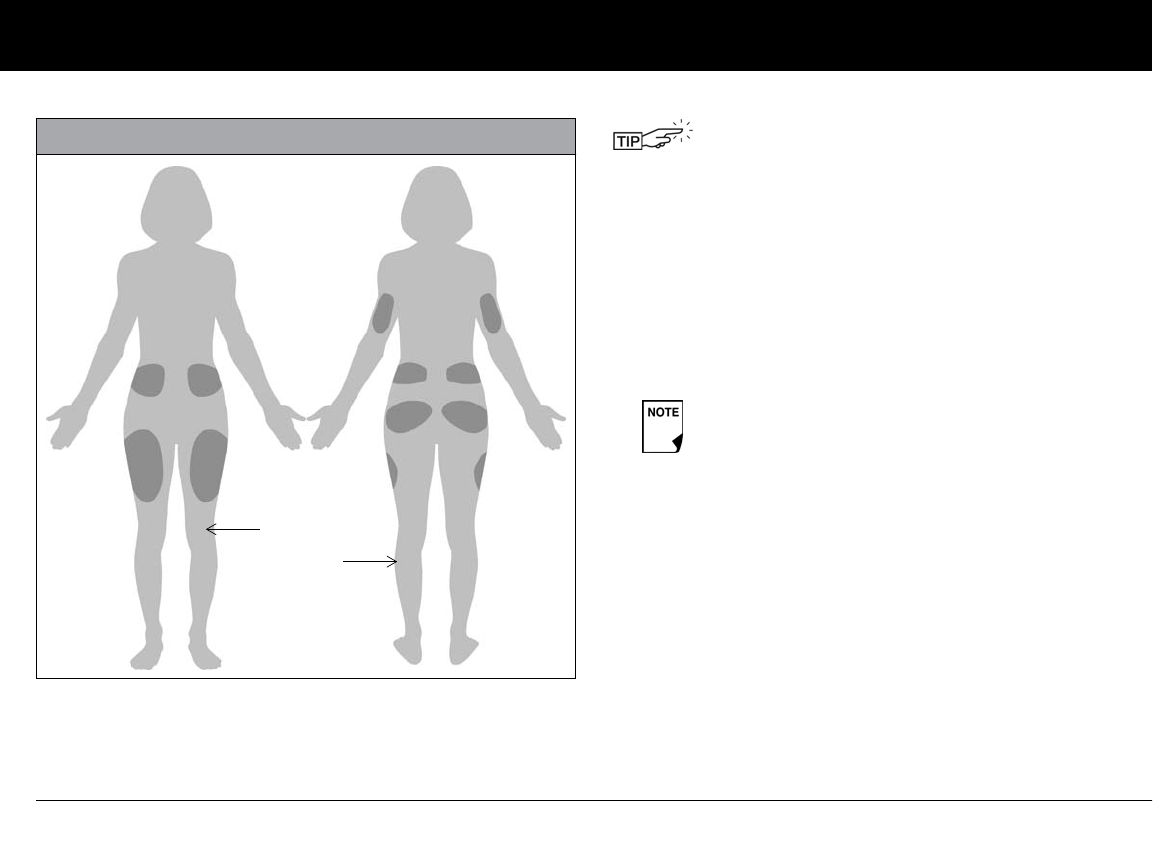
Using the Pod
50
5
Prepare the infusion site
You can reduce the risk of infection at the infusion site by follow-
ing aseptic technique and disinfecting the infusion site. Before
applying a new Pod, always:
1. Wash hands with soap and water.
2. Use soap to wash the infusion site.
3. Dry the site with a clean towel.
4. Use an alcohol prep swab to disinfect the infusion site. Start at
the center of the site and gently rub outward in a circular
motion.
5. Let the site air-dry thoroughly. Do not blow on the site to dry
it.
Figure 5-13: Pod placement options
Front
Back
To help avoid condensation from occurring in the
viewing window, make sure both your Pod and your
insulin are at room temperature.
Antibacterial soap may irritate skin, especially at the
infusion site. Ask your healthcare provider how to
treat any skin irritation.
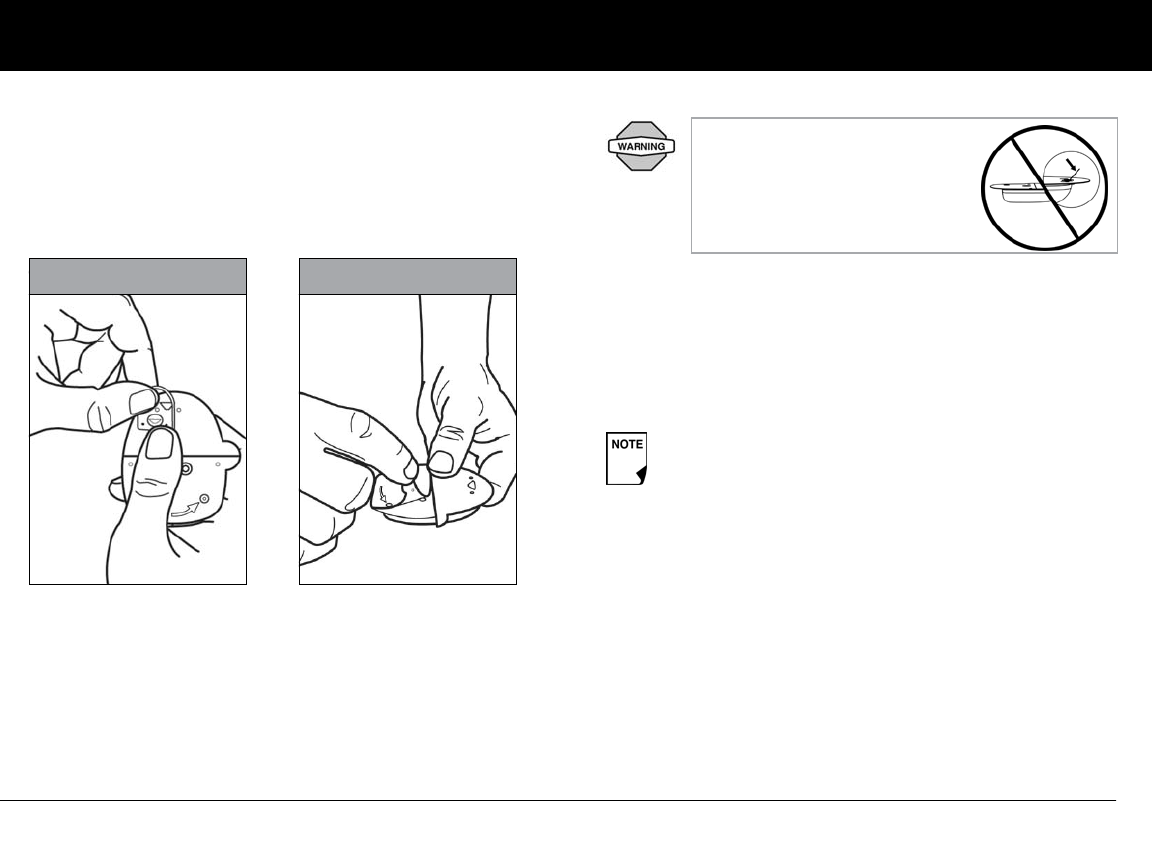
Using the Pod
51
5
Apply the new Pod
Prepare the Pod for applying to your infusion site:
1. To remove the needle cap on the underside of the Pod, place
your thumb on the bottom (flat edge) of the needle cap and
pull it upwards (Figure 5-14). The needle cap will snap off.
2. Verify that the Pod is ready to be applied:
• Pod is clean and dry.
• Adhesive pad is intact and undamaged.
• Pod is intact and in its original condition
• If Pod is accidentally dropped, discard it; sterility may be
compromised.
If you are unsure the Pod is ready to be applied to the site,
press “Discard” and do not use it (Figure 5-17 on the next
page). Select a new Pod.
3. Using the pull tabs, remove and discard the white paper
backing from the adhesive tape (Figure 5-14).
4. Apply the Pod to the prepared infusion site. Press firmly to
secure it to your skin.
Figure 5-14 Figure 5-15
Verify cannula does not extend
beyond adhesive backing once
needle cap is removed.
Do not remove the needle cap until you are
instructed to do so by the PDM. When you remove
the needle cap, a drop of insulin may be visible at the
end of the cannula or in the well.
FF
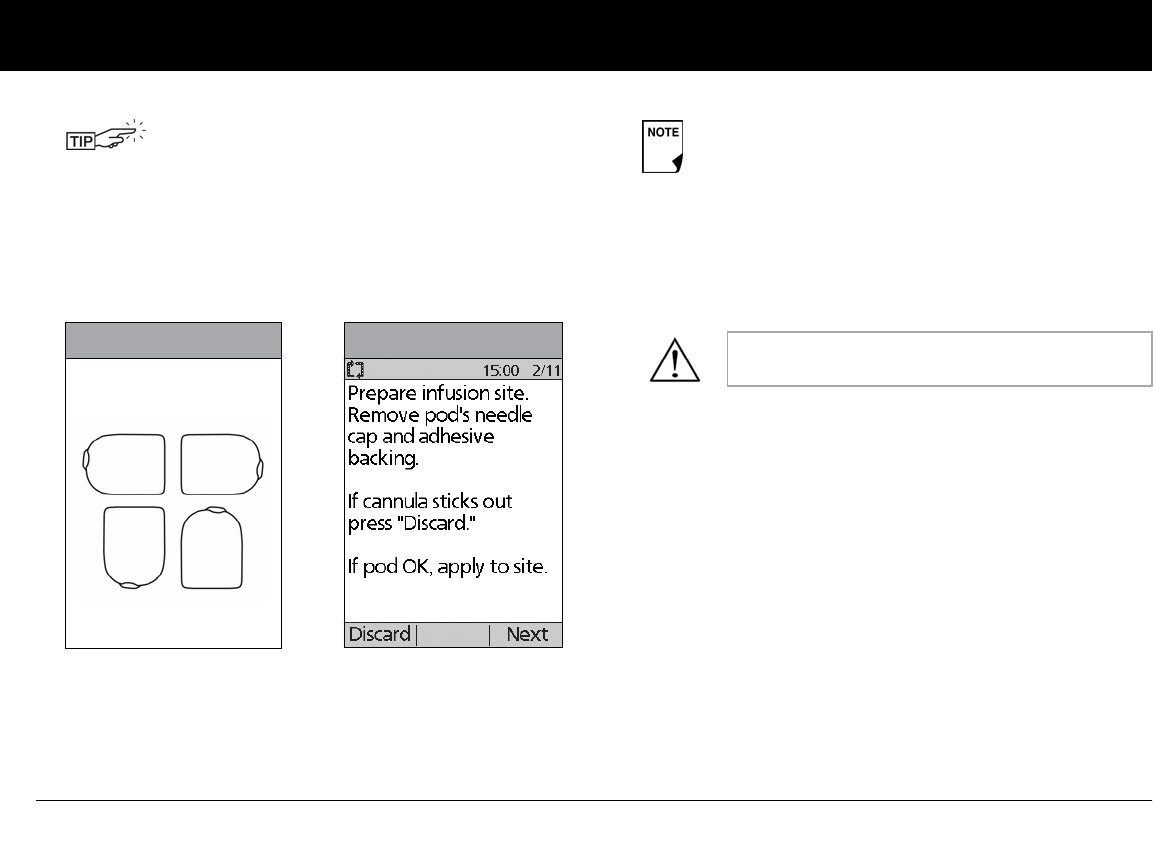
Using the Pod
52
5
5. Once you securely apply the Pod, press Next (Figure 5-17).
For the Pod to work best, apply it:
a. Crosswise or at a slight angle on your abdo-
men, hip, or buttocks (in Figure 5-16)
b. Up and down or at a slight angle on your
upper arm or thigh (in Figure 5-16)
c. At least 2.5 cm (1 inch) away from the last site
Figure 5-13
a.
b.
Figure 5-16 Figure 5-17
The Pod’s adhesive keeps it securely in place for up to
3 days. However, if necessary, several products are
available to enhance adhesion. Ask your healthcare
provider about these products. Avoid getting body
lotion, creams, or oils near the infusion site; these
products may loosen the adhesive.
The adhesive is designed for one-time use. Once
removed, a Pod cannot be reapplied.
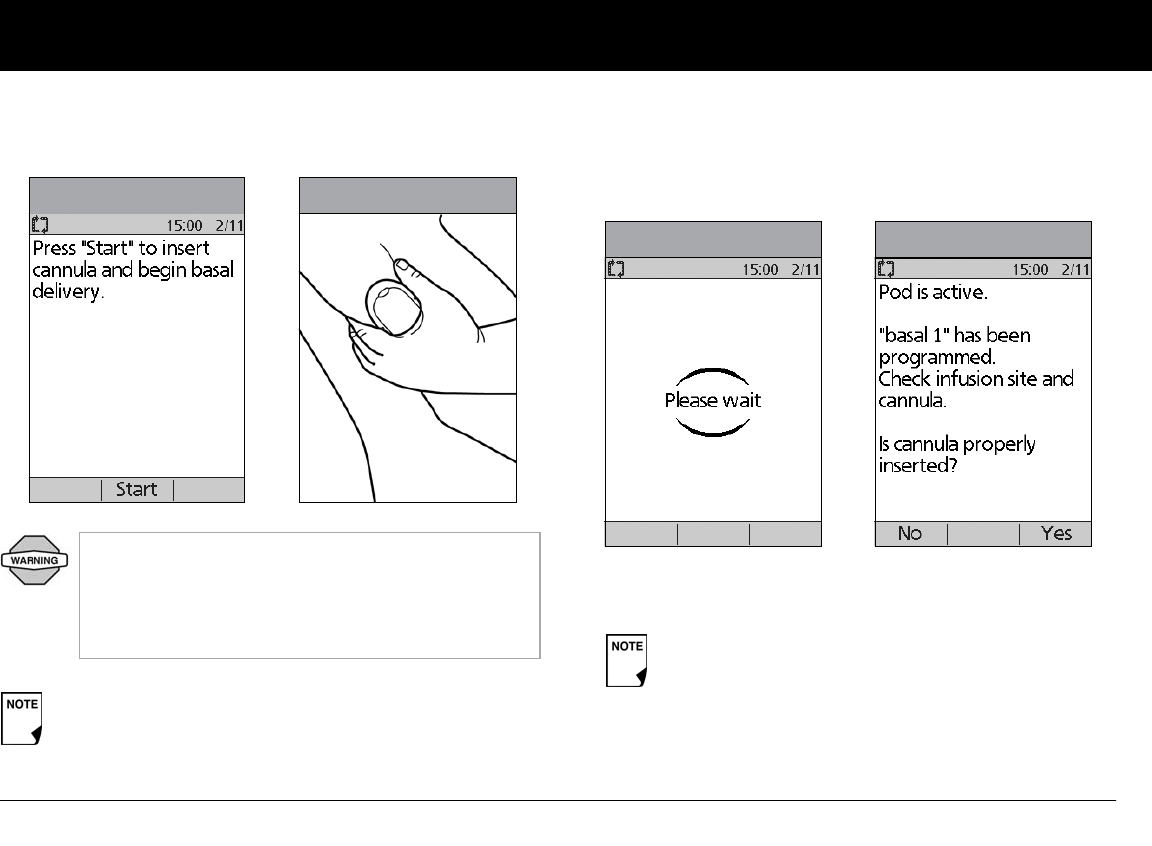
Using the Pod
53
5
Insert cannula and begin insulin delivery
1. To insert the soft cannula, press Start (Figure 5-18).
The Pod automatically inserts the soft cannula below your
skin. It takes a few seconds to complete this process. Once the
cannula is inserted, the Pod delivers a prime bolus to fill the
cannula with insulin (Figure 5- 20).
Once the soft cannula is inserted, the PDM indicates that the Pod
is active (Figure 5-21).
If you are applying a Pod in a place that does not have
a lot of fatty tissue or is very lean, pinch the skin
around the Pod (Figure 5-19) after you press Start
and hold it until the cannula inserts. Occlusions may
result in lean areas if you do not use this technique.
The soft cannula is tinted light blue.
Figure 5-18 Figure 5-19
You will hear a click when the cannula inserts.
Figure 5- 20 Figure 5-21
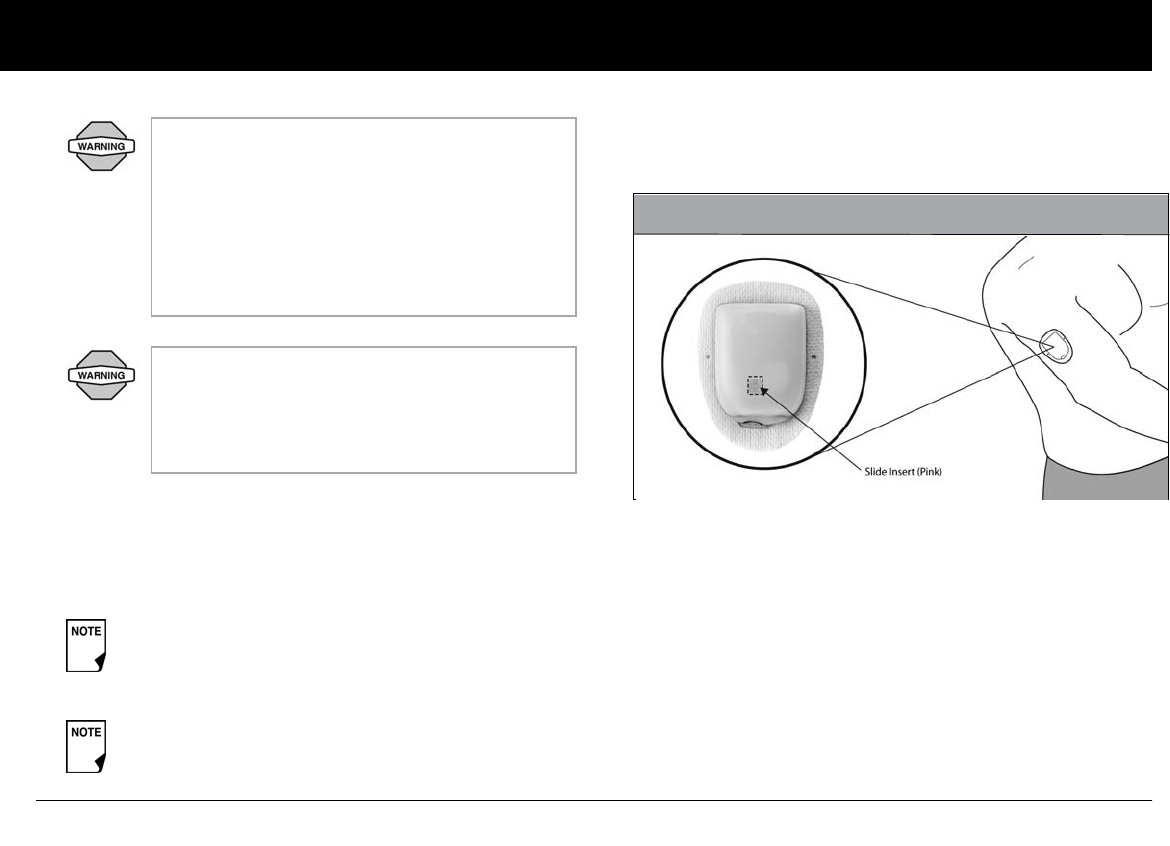
Using the Pod
54
5
Figure 5-21 on the previous page also displays a reminder to
check the infusion site and cannula. Make sure the Pod is
securely attached to your skin. You can see the cannula
through the small viewing window on the Pod.
When you see the pink slide insert in this position, it means
that the cannula is inserted (Figure 5-22).
2. Press Yes if you can see that the cannula is properly inserted.
The PDM returns to the Status screen.
Press No if you see a problem with the cannula. The PDM
instructs you to deactivate the new Pod (Figure 5-23 on
the next page). Press Discard to restart the process with
a new Pod.
Check the infusion site after insertion to ensure
that the cannula was properly inserted. You
should check your blood glucose 1.5 to 2 hours
after each Pod change and check the infusion site
periodically. If the cannula is not properly
inserted, hyperglycemia may result. Verify there is
no wetness or scent of insulin, which may indi-
cate the cannula has dislodged.
If you observe blood in the cannula, check your
blood glucose more frequently to ensure insulin
delivery has not been affected. If you experience
unexpected elevated blood glucose levels,
change your Pod.
To help avoid condensation from occurring in the
viewing window, make sure both your Pod and your
insulin are at room temperature.
Condensation may occur in the viewing window, due
to perspiration.
Figure 5-22
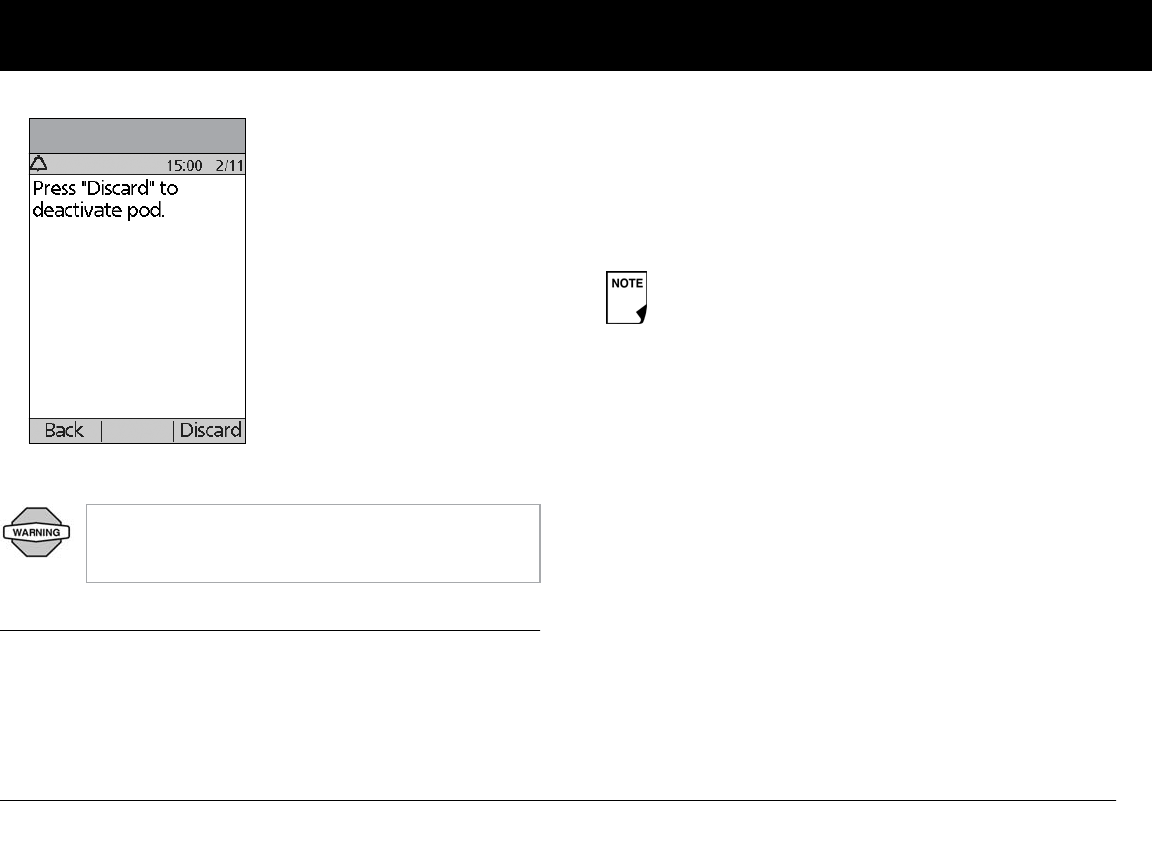
Using the Pod
55
5
Or press Back to return to the previous screen.
n Check Pod Status
To check Pod status, if the PDM is turned Off, press and hold the
Power button to display the ID screen, then press Confirm to
display the Status screen. If the PDM is On, press Back until you
reach the Status screen. (If you press and hold the Power but-
ton, you will turn off the PDM instead.) Or, from the Home
screen, press Status.
The PDM automatically checks the status of the Pod. The PDM
then displays the current insulin reservoir volume, PDM battery
level, last blood glucose value, last bolus dose, active basal pro-
gram, and any alarm conditions. See Chapter 6, Using the
Personal Diabetes Manager, for details of what you see on the
Status screen.
If the Pod goes into hazard alarm condition and the PDM is
unable to communicate with it to turn off the alarm, you can turn
it off manually on the Pod. See the end of Chapter 10, Alerts and
Alarms, for instructions.
NEVER inject insulin (or anything else) into the
fill port while the Pod is on your body. Doing so may
result in unintended or interrupted insulin delivery.
Figure 5-19
Figure 5-23
Once a Pod is activated and communicates with the
PDM, it can only receive commands from that PDM,
not from any other.
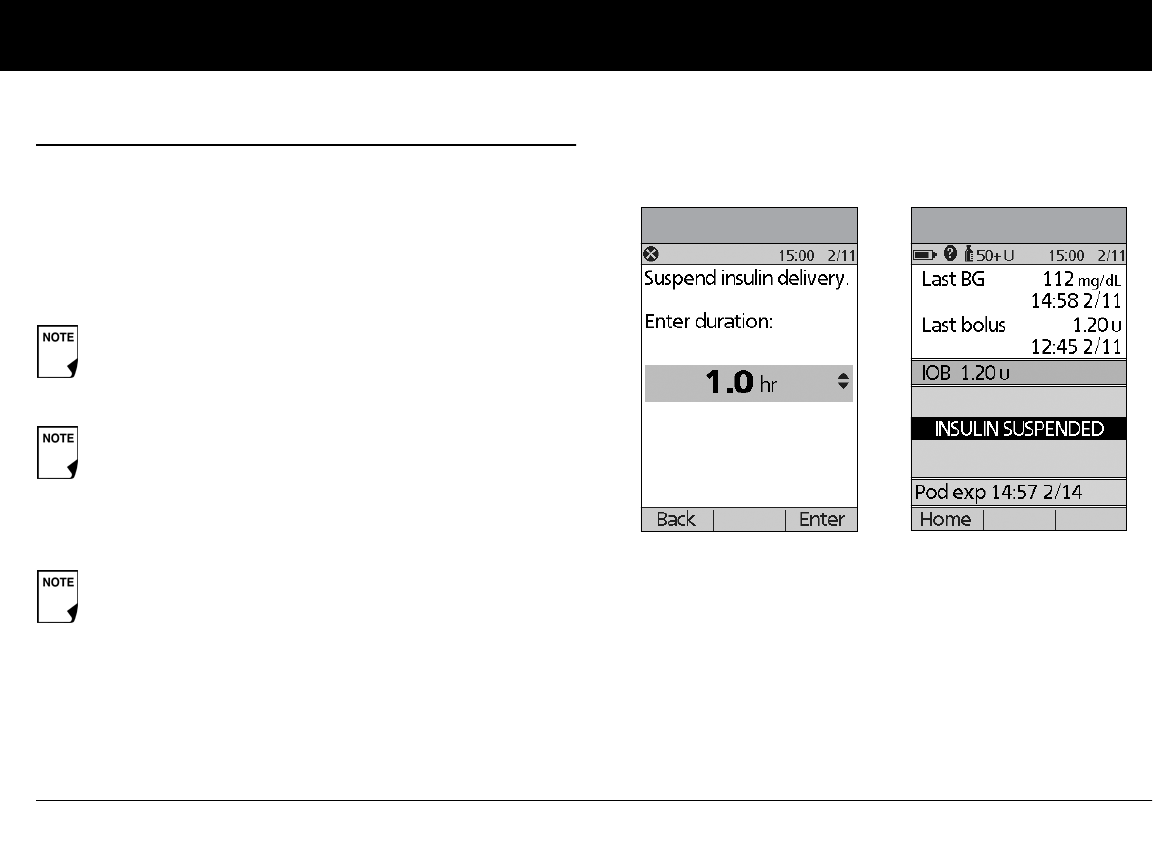
Using the Pod
56
5
n Suspend Insulin Delivery
Sometimes you may need to briefly stop insulin delivery (for
example, when editing an active basal program or changing the
time or date). The mylife OmniPod System lets you suspend all
insulin delivery for up to 2 hours. While in suspension, the Pod
beeps once every 15 minutes, reminding you that insulin deliv-
ery is suspended.
1. On the Home screen, use the Up/Down Controller buttons
to choose Suspend; then press Select.
2. Enter how long you want to stop all insulin delivery, from 30
minutes to 2 hours, in 30-minute increments (Figure 5-24),
then press Enter.
3. Press Confirm to confirm that you want to halt all insulin
delivery (basal and bolus). The PDM beeps and an on-screen
message lets you know that insulin delivery is now sus-
pended (Figure 5-25).
The Pod beeps every 15 minutes until the end of the suspen-
sion period. The Status screen shows INSULIN SUSPENDED
until you resume insulin delivery (see “Resume Insulin Deliv-
ery” on the next page).
At any time during a suspension period, press Resume
to resume the basal program that was running when you
suspended insulin delivery.
Extended boluses and temporary basal rates will be can-
celled when you suspend insulin delivery.
If a temporary basal or extended bolus is in process, the
menu item will read Suspend/cancel instead, and
options for cancelling these programs also appear in the
menu. If these options appear, choose Suspend insulin
delivery.
Figure 5-20
Figure 5-24 Figure 5-25
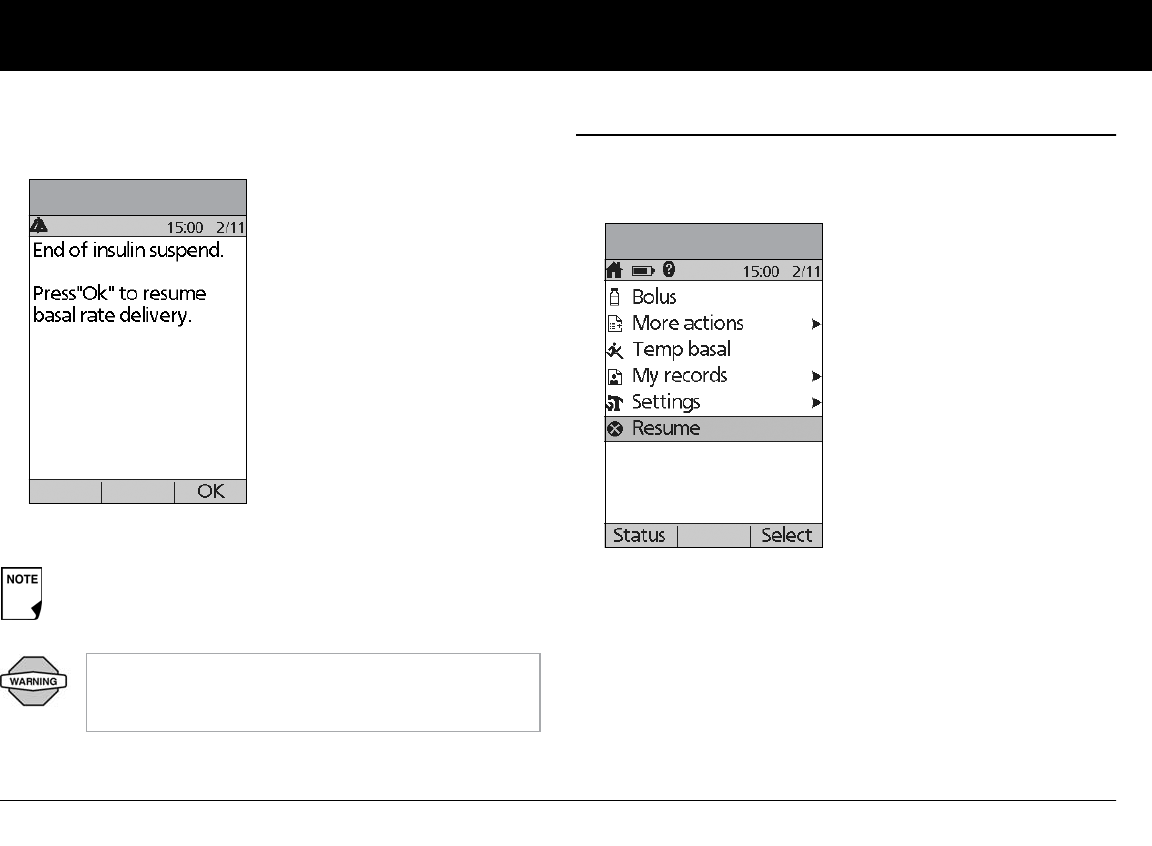
Using the Pod
57
5
4. At the end of the suspend time, a Pod Advisory alarm occurs
(Figure 5-26).
5. To resume your programmed basal rate, press OK.
n Resume Insulin Delivery
1. On the Home screen, use the Up/Down Controller buttons
to choose Resume (Figure 5-27), then press Select.
2. Press Confirm to restart the basal program for that time seg-
ment.
The Advisory alarm repeats every 15 minutes until you
press OK.
Insulin delivery will not resume until you press OK. If
you do not press OK to resume insulin delivery, you
could develop hyperglycemia (high blood glucose).
Figure 5-22
Figure 5-26
Figure 5-23
Figure 5-27
Using the Pod
58
5
n Avoid Infusion Site Infections
• Always wash your hands and use the aseptic technique to pre-
pare the infusion site before applying a Pod.
• Do not apply a Pod to any area of the skin with an active
infection. If you are unsure whether to use a specific site, ask
your healthcare provider.
• At least once a day, use the Pod’s viewing window to check
the site for signs of infection and to confirm that the soft can-
nula is securely in place.
• Be aware of the signs of infection, including pain, swelling,
redness, discharge, or heat at the site. If you suspect an infec-
tion, immediately remove the Pod and apply a new one in a
different location. Then call your healthcare provider.
• Change the Pod as instructed by your healthcare provider.
n Get the Most From Your Pod
Avoid extreme temperatures
The Pod’s operating temperature is between 4.4°C and 40°C
(between 40°F and 104°F). Under normal circumstances, your
body temperature will keep the Pod well within this range.
Water and your Pod
The Pod is waterproof up to a depth of 7.6 meters (25 feet) for up
to 60 minutes (IPX8). After exposure to water, rinse off the Pod
with clean water and gently dry it with a towel.
Do NOT expose a Pod to direct sunlight for long peri-
ods of time. It is recommended that you remove your
Pod prior to using hot tubs, whirlpools, or saunas.
These conditions could expose the Pod to extreme
temperatures and may also affect the insulin inside
the Pod.
Remember to check your blood glucose levels frequently
before and after removing the Pod. Check with your
healthcare provider for guidelines on removing the Pod
for extended periods.
Insulin degrades at high temperatures and will
freeze near 0°C (32°F). Follow the insulin manufac-
turer’s instructions for use.
Using the Pod
59
5
Safe storage
Store unopened Pods in a cool, dry place. Extreme heat or cold
can damage Pods and cause them to malfunction. If Pods are
exposed to extreme temperatures, allow them to return to room
temperature before use.
Do not expose your Pod to water at depths greater
than 7.6 meters or for more than 60 minutes. Check
often to make sure the Pod and soft cannula are
securely attached and in place. If the cannula is not
properly inserted, hyperglycemia may result. Verify
there is no wetness or scent of insulin, which may
indicate the cannula has dislodged.
The PDM is NOT waterproof. Do not place it in or
near water.
Pods are sterile unless their packaging is opened or
damaged. Do NOT apply or use a Pod if its sterile
packaging is opened or damaged, or if the Pod has
been dropped after removal from the package as
this may increase the risk of infection or serious
injury.
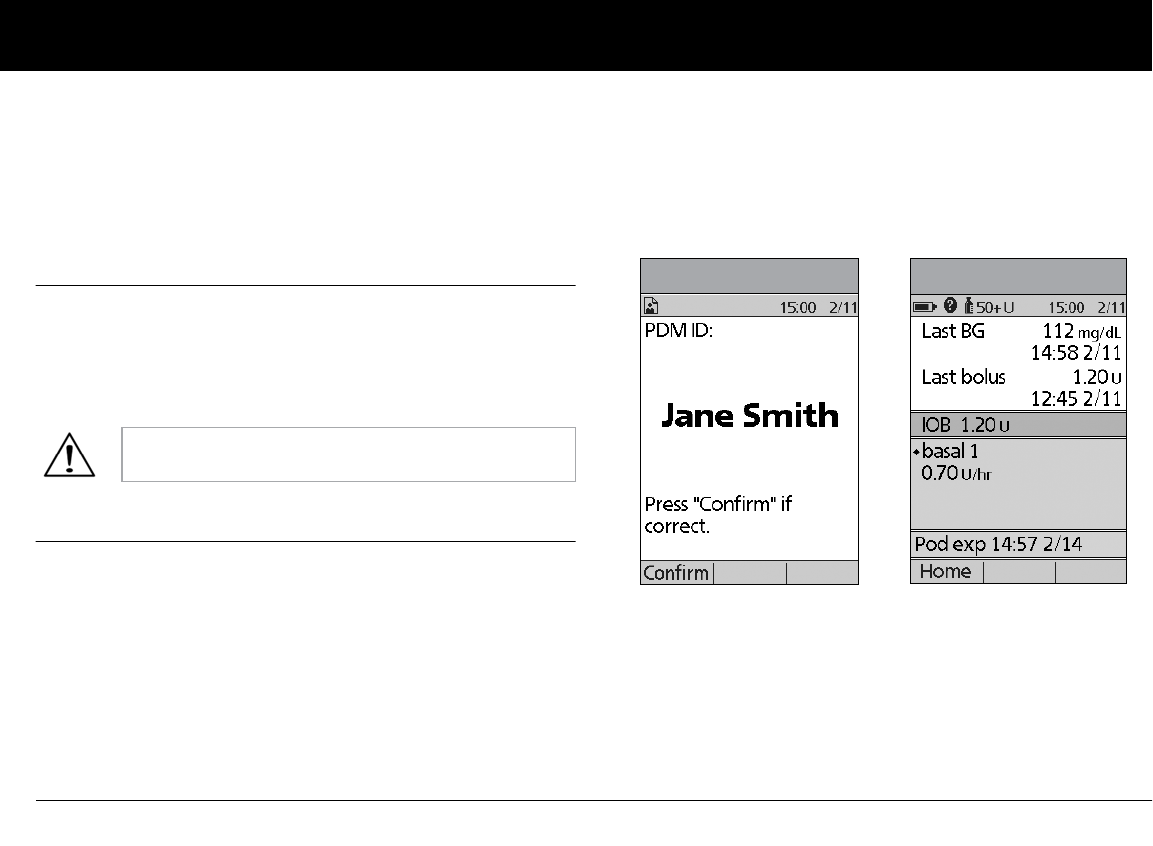
60
CHAPTER 6
Using the Personal Diabetes Manager
n The ID Screen
When you first turn on the PDM, it displays the identification (ID)
screen (Figure 6-1), which allows you to identify that the PDM is
yours. You can personalize the ID screen by adding your name
and choosing its color. You must acknowledge the ID screen
before you can use the PDM.
n The Status Screen
When a Pod is active and the PDM is turned on, the PDM estab-
lishes communication with the Pod to obtain a status check.
During the status check, the PDM collects information from the
Pod about bolus deliveries, active basal programs, and Pod expi-
ration. The information obtained is then displayed in the status
screen, which shows the System’s current operating status.
The Status screen (Figure 6-2) displays:
• Time, date, and result of last blood glucose checked or
entered manually
• Time, date, and total amount of last bolus delivered
It is important that you always identify the PDM as
yours before you use it.
Figure 6-1 Figure 6-2
Using the Personal Diabetes Manager
61
6
• Amount of insulin on board (IOB), if suggested bolus calcula-
tor is in use
• Name and rate of active basal program or temp basal
program
• “Ext bolus,” the amount of insulin and the delivery time
remaining if an extended bolus is being delivered
• “INSULIN SUSPENDED” if insulin delivery has been
suspended
• Time and date when the Pod will expire
Insulin gauge and display
One of the important icons on the Status screen is the insulin
gauge at the top of the screen. It indicates how much insulin is
left in the Pod’s reservoir. As the reservoir empties, the icon
changes to indicate the amount of insulin remaining.
Next to the insulin gauge, the PDM displays the number of units
remaining in the Pod. As long as more than 50 units remain, the
gauge displays “50+ U.” Once the reservoir volume drops to 50
units, the gauge counts down unit by unit. When the volume
falls below 5 units, the display changes to “LOW.”
PDM settings
You can adjust the PDM settings to meet your individual needs.
1. From the Status screen, press Home.
2. Use the Up/Down Controller buttons to choose Settings,
then press Select.
3. Choose System setup, then press Select.
4. Choose an option from the System setup list, then press
Select (Figure 6-3 on the next page). Check with your health-
care provider before making any changes.
If a Pod has not yet been activated (as in during Pod
changes), the screen displays “No active Pod. Would you
like to activate a Pod now?” (See Chapter 5, Using the Pod,
for details on activating a Pod.)
Regularly checking the insulin gauge enables you
to plan Pod changes easily. For example, if you
know you will need approximately 20 units during
your work day and the insulin gauge shows only 17
units remaining, you can either take a new Pod with
you or change it before you leave for the day.
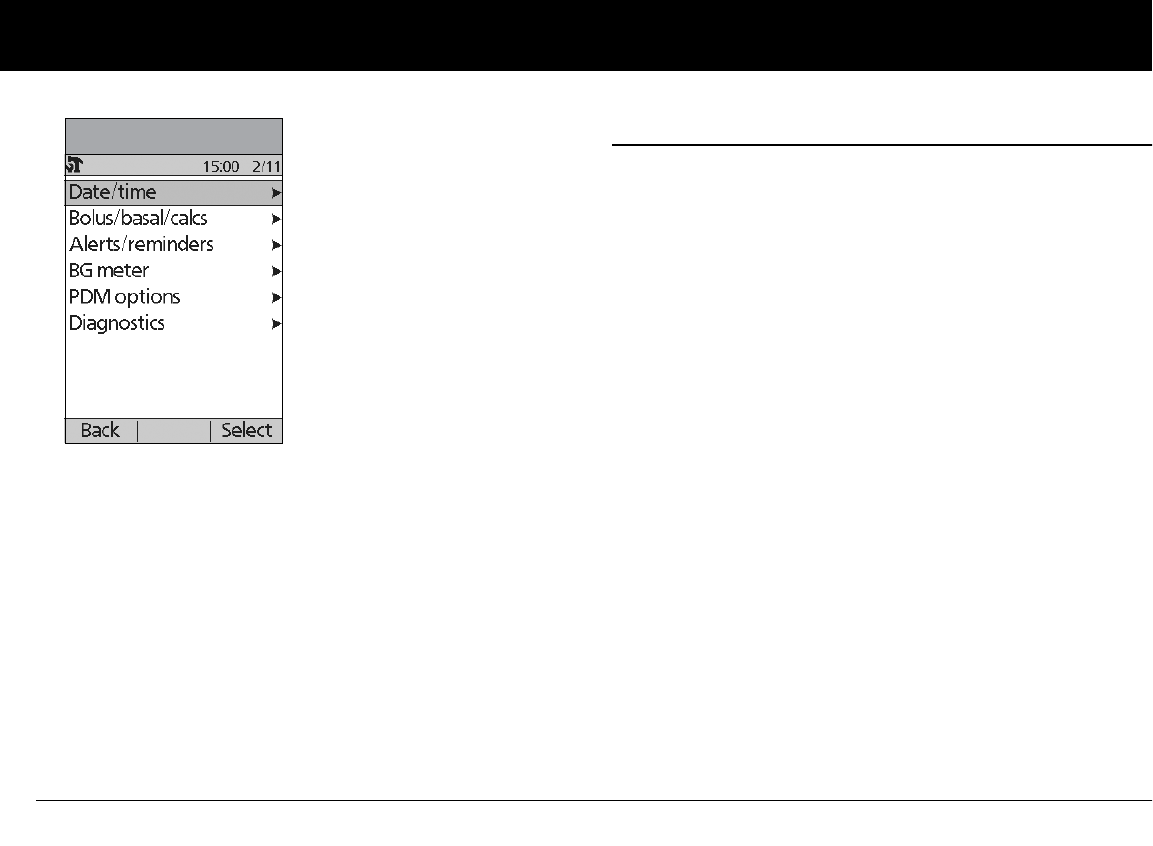
Using the Personal Diabetes Manager
62
6
n The System Setup Menu
The System setup menu lets you personalize the settings that
control the mylife OmniPod System. These include:
• Date and time
•Bolus doses, basal rates, and bolus calculator settings
• Alerts and reminders
• Blood glucose meter settings and tags
• PDM options
• Diagnostics
You and your healthcare provider entered initial System settings
using the Setup Wizard (see Chapter 2, Getting Started). After
setup, you can use the System setup menu to customize or
change those settings, as described in this chapter.
Figure 6-3
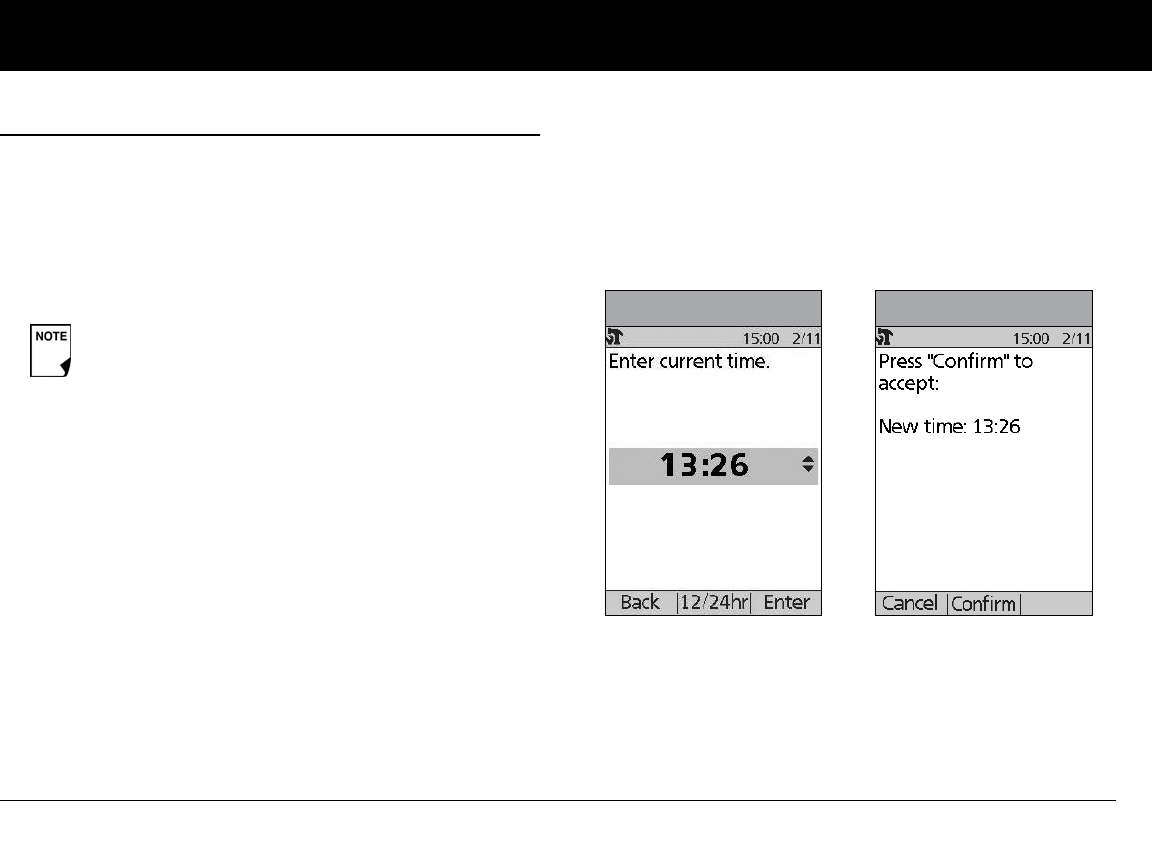
Using the Personal Diabetes Manager
63
6
n Reset the Date or Time
Occasionally, you need to change date and time settings (for
example, to adjust for daylight savings time or after resetting the
PDM). As a safety feature, you can change date and time settings
only when the Pod is deactivated or when insulin delivery is sus-
pended (see Chapter 5, Using the Pod).
1. Suspend insulin delivery.
2. On the Home screen, use the Up/Down Controller buttons
to choose Settings; then press Select.
3. Choose System setup, then press Select.
4. Choose Date/time, then press Select.
5. Choose either Date or Time, then press Edit.
Reset the time
1. To enter the current time, press the Up/Down Controller
buttons. Press and hold the button to increase or decrease
the time faster.
2. Press 12/24 hr to choose either a 12-hour or 24-hour clock,
then press Enter (Figure 6-4).
3. Press Confirm to accept the new time (Figure 6-5).
If you are changing the Pod, you can reset the date or
time without suspending by changing the date or
time before activating the new Pod.
Figure 6-4 Figure 6-5
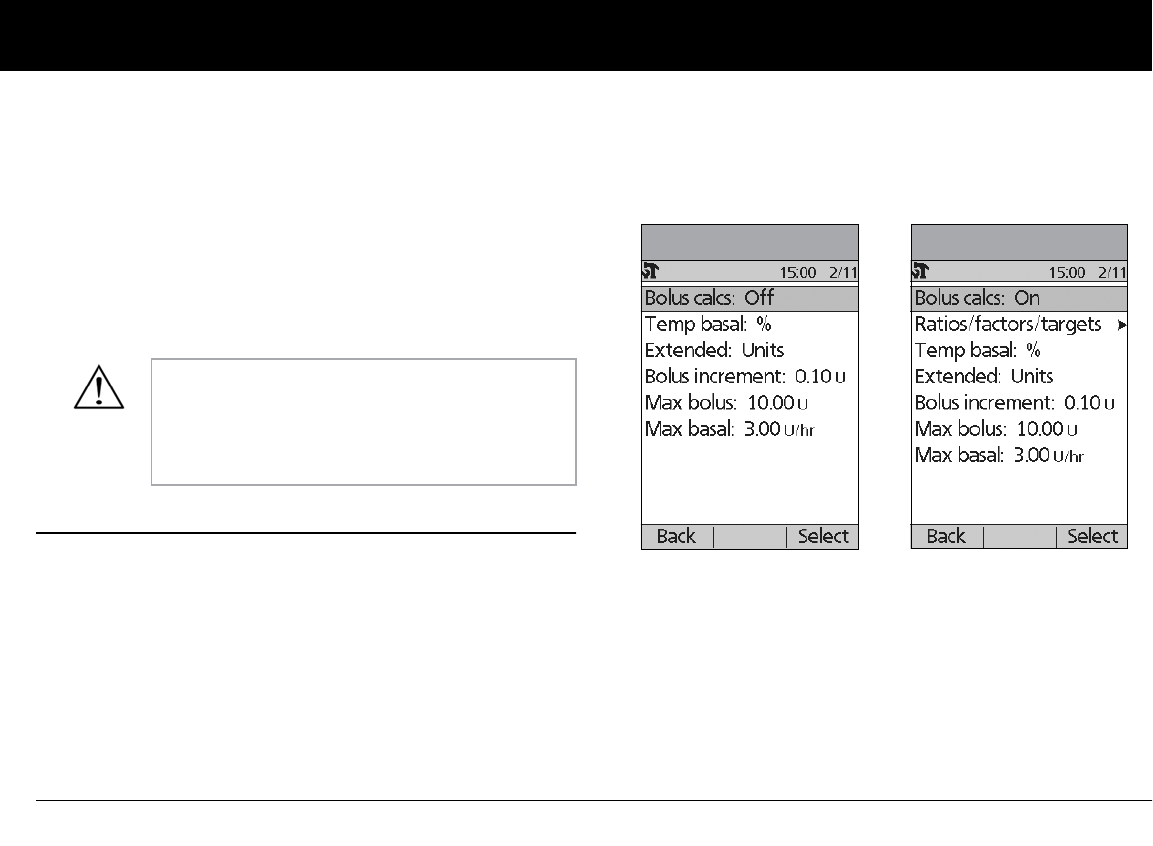
Using the Personal Diabetes Manager
64
6
Reset the date
1. Press the Up/Down Controller buttons to choose the cur-
rent year, then press Next.
2. Choose the current month, then press Next.
3. Choose the current day, then press Next.
4. Choose the date format to be displayed by the PDM, then
press Select.
5. Press Confirm to accept the new date and format.
n Change Bolus and Basal Settings
You and your healthcare provider entered initial bolus and basal
System settings using the Setup Wizard. Using the System setup
menu, you can edit all the mylife OmniPod System bolus and
basal settings as your needs change. Check with your healthcare
provider before making any changes.
1. On the Home screen, use the Up/Down Controller buttons
to choose Settings, then press Select.
2. Choose System setup, then press Select.
3. Choose Bolus/basal/calcs, then press Select.
4. Choose one of the options (Figure 6-6a and Figure 6-6b), then
press Select. Each option is described below.
Bolus calcs
When the suggested bolus calculator is turned Off and you want
to turn it On, press On and follow these steps:
1. Target BG and correct-above value—You can edit existing
time segments and add segments, up to a total of 8.
If you suspended insulin delivery to change the
time or date, remember to resume insulin deliv-
ery. If you changed the time or date during the
Pod change process, remember to activate a new
Pod.
Figure 6-6a Figure 6-6b
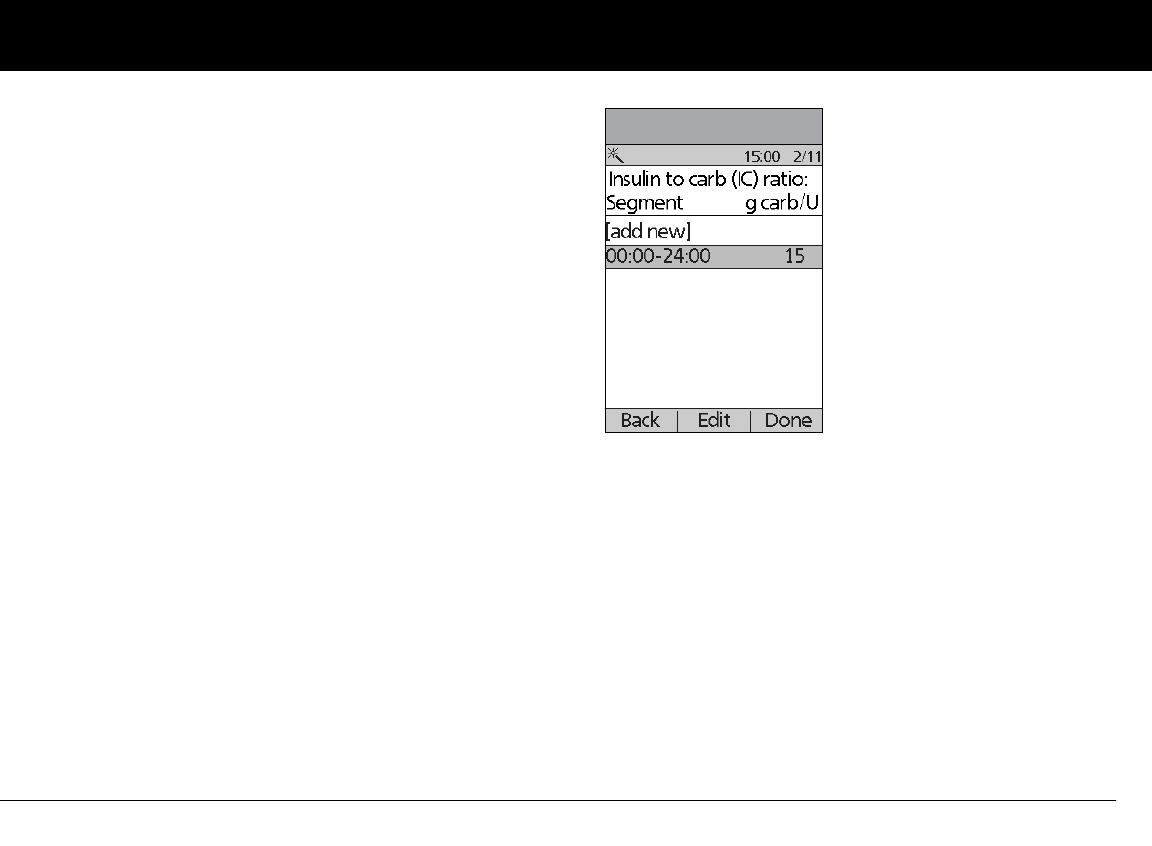
Using the Personal Diabetes Manager
65
6
a. To edit an existing target BG time segment, choose the
segment, then press Edit. Use the Up/Down Controller
buttons to choose a new start time, end time, target BG
value, and correct-above value (correction threshold). Press
Next after each entry.
b. To add a segment, choose [add new], then press New.
Use the Up/Down Controller buttons to choose a start
time, end time, target BG value, and correct-above value
(correction threshold). Press Next after each entry.
c. When you have completed all the time segments you
want, press Done, then Save.
2. Min BG for calcs (smallest blood glucose value allowed for
calculating boluses)—Use the Up/Down Controller buttons
to enter a new minimum BG, then press Next.
3. Insulin-to-carb (IC) ratio—You can edit existing time seg-
ments and add segments, up to a total of 8.
a. To edit an existing IC ratio time segment, choose the seg-
ment, then press Edit (Figure 6-7 on next page). Use the
Up/Down Controller buttons to choose a new start time,
end time, and IC ratio. Press Next after each entry.
b. To add a segment, choose [add new], then press New.
Use the Up/Down Controller buttons to choose a start
time, end time, and IC ratio. Press Next after each entry.
c. When you have completed all time segments, press
Done, then Save.
4. Correction factor—You can edit existing time segments and
add segments, up to a total of 8.
a. To edit an existing correction factor time segment, choose
the segment, then press Edit. Use the Up/Down Control-
ler buttons to choose a new start time, end time, and cor-
rection factor. Press Next after each entry.
b. To add a segment, choose [add new], then press New.
Use the Up/Down Controller buttons to choose a start
time, end time, and correction factor. Press Next after
each entry.
c. When you have completed all time segments, press
Done, then Save.
Figure 6-7
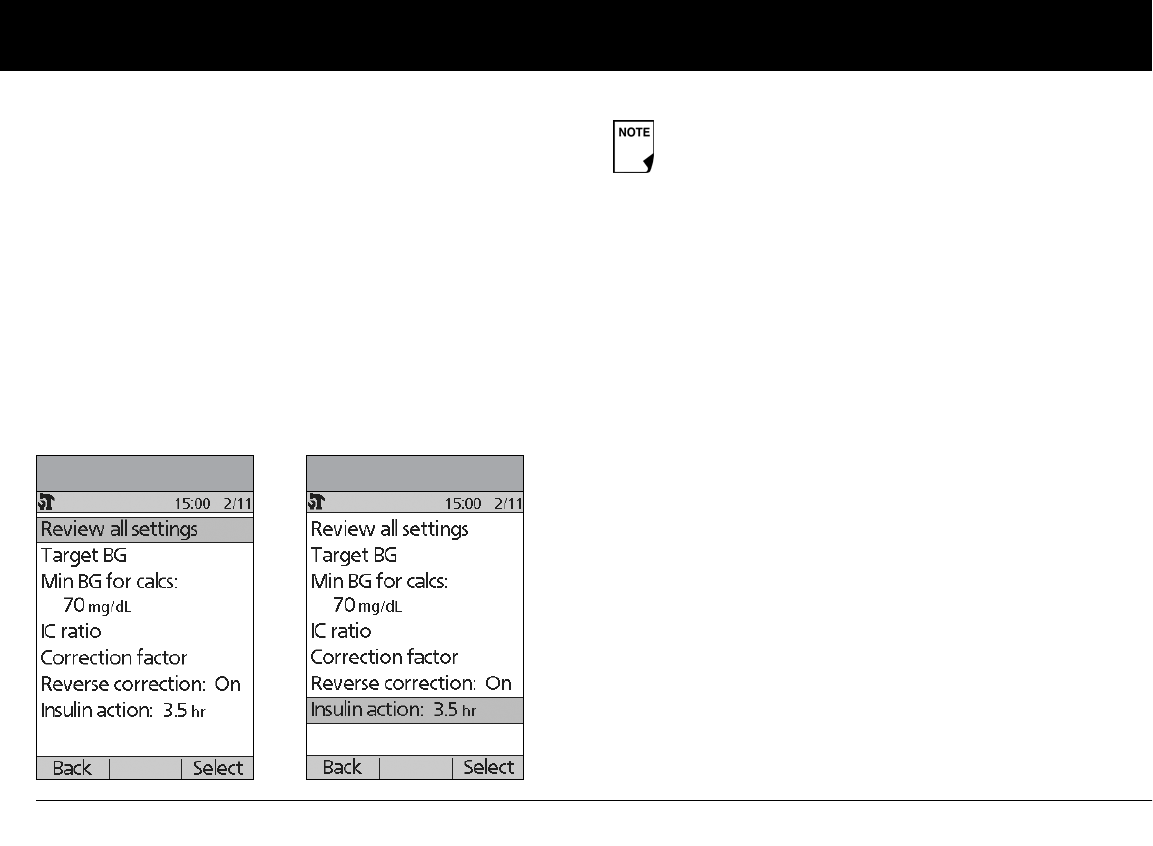
Using the Personal Diabetes Manager
66
6
5. Reverse correction—Choose On or Off, then press Next.
6. Insulin action (duration)—Use the Up/Down Controller
buttons to choose a duration of insulin action, then press
Done.
7. Press OK.
Ratios/factors/targets
When the suggested bolus calculator is turned On, you can view
and change all the settings using the Ratios/factors/targets
menu option. Choose Review all settings, then press Select
(Figure 6-8a) or choose one setting from the menu, then press
Select (Figure 6-8b). The steps are the same whether you choose
all settings or individual ones.
1. Target BG and correct-above value—You can edit existing
segments and add segments, up to a total of 8.
a. To edit an existing target BG time segment, choose the
segment, then press Edit. Use the Up/Down Controller
buttons to choose a new start time, end time, target BG
value, and correct-above value (correction threshold).
Press Next after each entry.
b. To add a segment, choose [add new], then press New.
Use the Up/Down Controller buttons to choose a start
time, end time, target BG value, and correct-above value
(correction threshold). Press Next after each entry.
c. When you have completed all the time segments you
want, press Done, then Save.
2. Min BG for calcs (smallest blood glucose value allowed for
calculating boluses)—Use the Up/Down Controller buttons
to enter a new minimum BG, then press Enter.
3. Insulin-to-carb (IC) ratio—Number of grams of carbohy-
drate covered by one unit of insulin. You can edit existing
time segments and add segments, up to a total of 8.
a. To edit an existing IC ratio time segment, choose the
segment, then press Edit. Use the Up/Down Controller
Figure 6-8a Figure 6-8b
When the suggested bolus calculator is turned Off, the
Ratios/factors/targets option does not appear in the
Bolus/basal/calcs menu.

Using the Personal Diabetes Manager
67
6
buttons to choose a new start time, end time, and IC ratio.
Press Next after each entry.
b. To add a segment, choose [add new], then press New.
Use the Up/Down Controller buttons to choose a start
time, end time, and IC ratio. Press Next after each entry.
c. When you have completed all time segments, press
Done, then Save.
4. Correction factor—You can edit existing time segments and
add segments, up to a total of 8.
a. To edit an existing correction factor time segment, choose
the segment, then press Edit. Use the Up/Down Control-
ler buttons to choose a new start time, end time, and cor-
rection factor. Press Next after each entry.
b. To add a segment, choose [add new], then press New.
Use the Up/Down Controller buttons to choose a start
time, end time, and correction factor. Press Next after
each entry.
c. When you have completed all time segments, press
Done, then Save.
5. Reverse correction—Choose On or Off, then press Select.
6. Insulin action (duration) or Insulin on Board (IOB)—Use
the Up/Down Controller buttons to choose a duration of
insulin action, then press Enter.
Temp basal
Choose %, U/hr, or Off to set the mode for temporary basal rates
and presets, then press Select.
Extended
Choose %, Units, or Off to set the mode for extended boluses,
then press Select.
Bolus increment
Choose 0.05, 0.10, 0.50, or 1.00 units for bolus increments, then
press Select.
Max bolus
Use the Up/Down Controller buttons to enter the maximum
bolus dose you can take, then press Enter.
Max basal rate
Use the Up/Down Controller buttons to enter the maximum
basal rate you can choose, then press Enter.
Some settings have preset defaults, but all settings
are changeable. See the Appendix for a list of Sys-
tem specifications, including preset default settings.
For additional details on bolus and basal settings,
see Chapter 3, Understanding and Adjusting Basal
Rates, and Chapter 4, Understanding and Deliver-
ing Bolus Doses.
Using the Personal Diabetes Manager
68
6
n Alerts and Reminders
In addition to automatic safety alarms (see Chapter 10, Alerts and
Alarms), the mylife OmniPod System offers a number of personal
settings to help you manage your diabetes. These features are
optional. You can turn them on or off at any time, except for the
alerts. Those you can set at levels that you find convenient to
remind you to change your Pod.
Notifications you can use are:
BG (blood glucose) reminder: Reminds you to check your blood
glucose. Choose from On or Off. The default setting is Off. When
the reminder is on, the PDM asks you each time you enter a bolus
dose whether you want to set a BG reminder, and you can then
choose a time interval, in 30-minute increments.
Pod expiration: Reminds you when the Pod is nearing the 72-
hour expiration time. Choose a period from 1 to 24 hours before
expiration, in 1-hour increments. The default setting is 4 hours.
You will hear 2 sets of beeps every minute for 3 minutes. The
notification will repeat every 15 minutes until you press OK to
acknowledge it.
Low reservoir: Alerts you when insulin in the Pod reaches a cer-
tain level, so you can plan ahead to change the Pod. Choose a
level from 10 to 50 units, in 5-unit increments. The default setting
is 10 units.
Auto-off: Alerts you if the PDM does not receive a Pod status
within a predefined period of time. Obtain Pod status by press-
ing and holding the PDM’s Power button. Choose a time period
from 1 to 24 hours, in 1-hour increments, or choose Off. The
default setting is Off. Refer to page 55 to check Pod status and to
Confirm ID.
This alert can be especially beneficial if you are prone to hypogly-
cemia unawareness. Ask your healthcare provider about using
this alert and where to set it.
The Low reservoir alert will escalate to an Empty res-
ervoir hazard alarm when insulin is depleted. Be sure
to respond to the alert when it occurs.
The Auto-off alert will escalate to a hazard alarm if
ignored and will result in the deactivation of your
active Pod. Be sure to respond to the alert when it
occurs.
Turning the PDM on by inserting a blood glucose
test strip does not send a Pod status to the PDM.
If you use the Auto-off feature, always turn on the
PDM with the Power button before using the system.
This allows the PDM to obtain a Pod status. Refer to
page 54 to check Pod status and to Confirm ID.
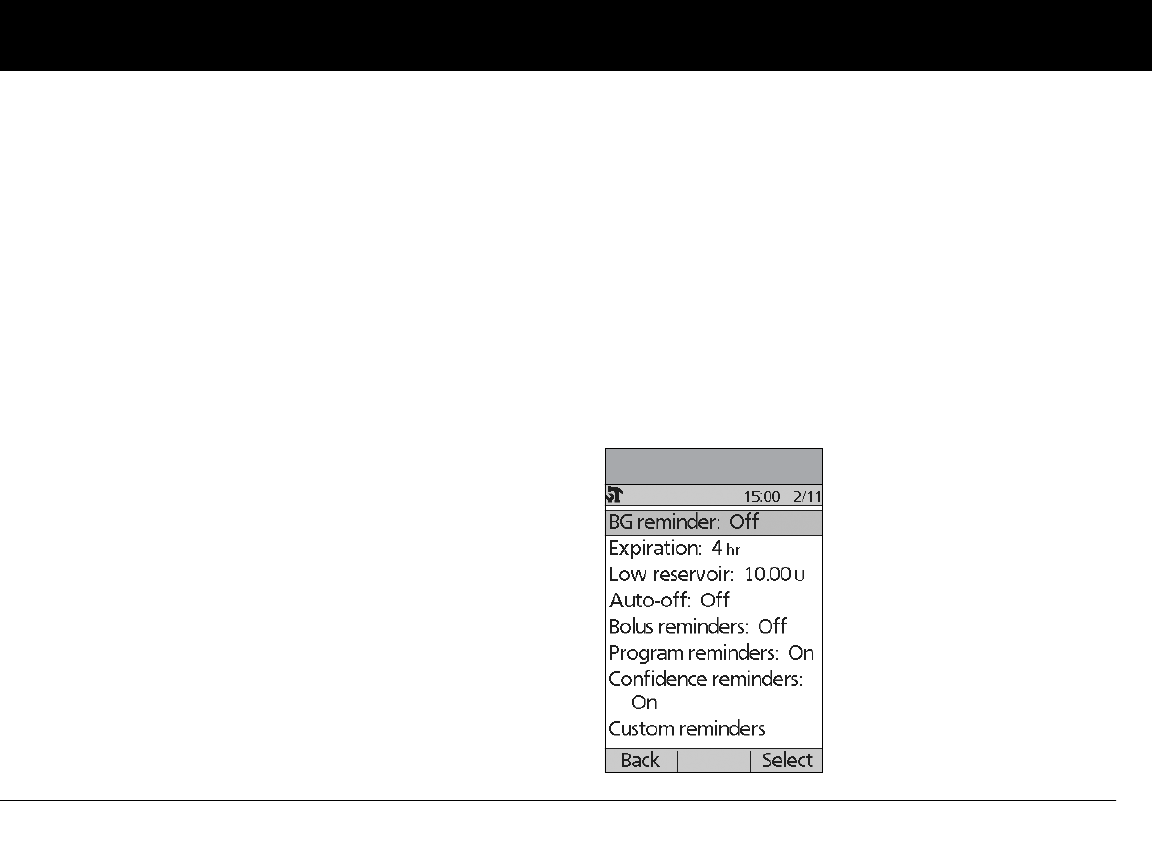
Using the Personal Diabetes Manager
69
6
Bolus reminders: Notifies you if you have not delivered a meal
bolus, manually or using the suggested bolus calculator,
between the times you specify. Choose On or Off and choose up
to 6 time segments.
Program reminders: Pod beeps when a program is in process
(see Chapter 3, Understanding and Adjusting Basal Rates; and
Chapter 4, Understanding and Delivering Bolus Doses, for
details). These include:
• Temporary basal in process
• Extended bolus in process
Choose On or Off. The default setting is On.
Confidence reminders: The Pod or PDM beeps in response to
your instructions, so you become familiar with the operation of
the mylife OmniPod System and feel confident that you are get-
ting the insulin you need. These notifications include:
• Bolus delivery started
• Bolus delivery completed
• Extended bolus started
• Extended bolus completed
• Temporary basal rate started
• Temporary basal completed
Choose On or Off. The default setting is On.
Custom reminders: Displays text reminders that you enter, at
times that you select. You can choose to receive a notification
Daily, One time only, or Off. You can change or delete these
notifications at any time.
Set alerts and reminders
1. On the Home screen, use the Up/Down Controller buttons
to choose Settings, then press Select.
2. Choose System setup, then press Select.
3. Choose Alerts/reminders, then press Select.
4. Choose the option you want to set (Figure 6-9), then press
Select.
Figure 6-9

Using the Personal Diabetes Manager
70
6
5. For all except Bolus reminders and Custom reminders,
choose the desired option or set the desired value, then press
Select or Enter.
6. For Bolus reminders
• Use the Up/Down Controller buttons to choose On or
Off, then press Select.
• If you chose On, you are taken to a new screen where you
can add, edit or delete reminders:
To add a Bolus reminder
a. Use the Up/Down Controller buttons to choose [add
new], then press New.
b. Choose a start time, then press Next.
c. Choose an end time, then press Save.
To edit a Bolus reminder
a. Choose the bolus reminder you wish to edit, then
press Edit.
b. Choose Edit, then press Select.
c. Enter a new start time, then press Next.
d. Enter a new end time, then press Save.
To delete a Bolus reminder
a. Choose the bolus reminder you wish to delete, then
press Edit.
b. Choose Delete then press Select.
c. Press Delete to remove the bolus reminder.
7. For Custom reminders
• Use the Up/Down Controller buttons to choose [add
new], then press New.
• To use the mylife OmniPod System’s default naming sys-
tem, simply press Next. The default naming system
automatically assigns names in numerical order, such as
alert 1, alert 2, alert 3.
If you want to give a different name to the reminder:
a. Use the Up/Down Controller buttons to scroll
through the list of characters. An up-and-down arrow
symbol on the screen indicates the character that can
be changed.
b. Press the middle Soft Key (the right arrow) to move the
underscore to the next character.
c. Enter each character one at a time. For example, for a
reminder to pick up a prescription, you might enter
R, x (Figure 6-10 on the next page). (A blank character
or space is the first and last option in the scrolling
menu.)
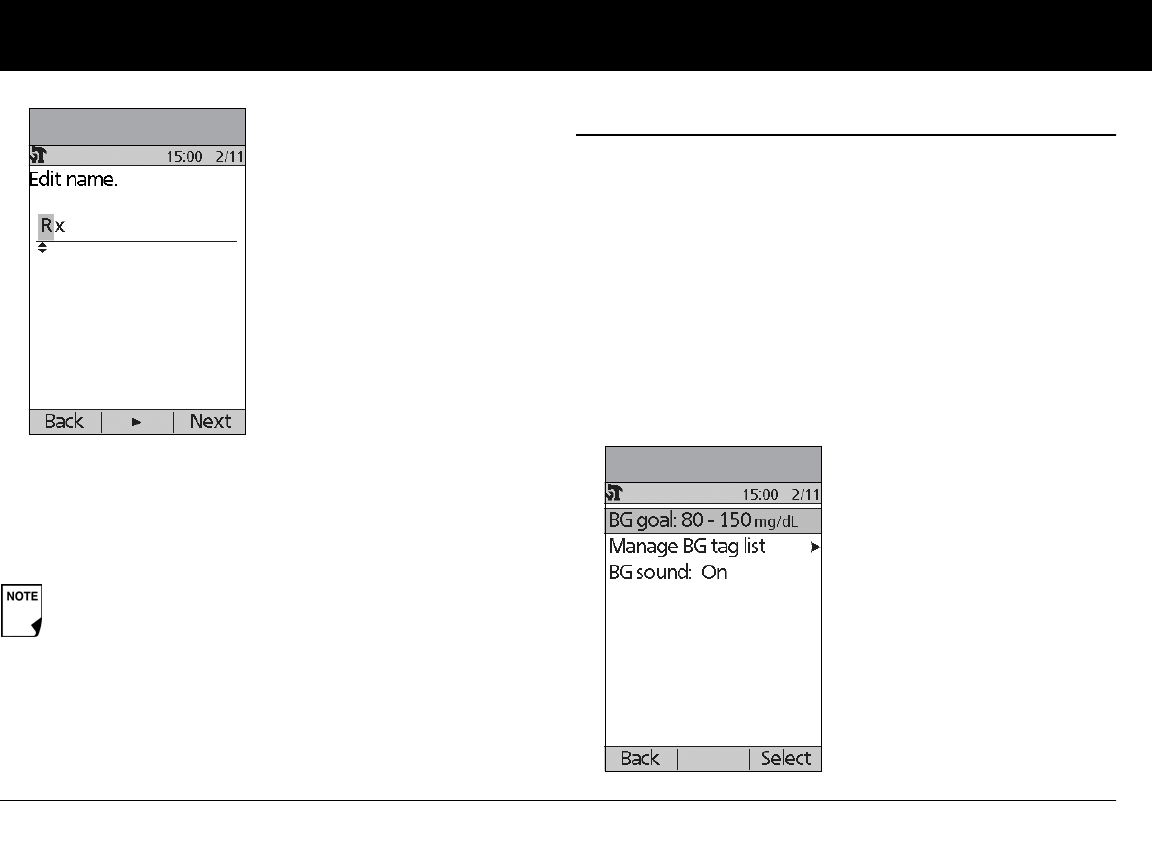
Using the Personal Diabetes Manager
71
6
d. Press Next.
• Enter the time of day for the reminder, in 30-minute incre-
ments, then press Next.
• Choose Daily, One time only, or Off, then press Select.
n Change Blood Glucose Meter Settings
You can adjust blood glucose (BG) meter settings:
• BG goal lower and upper limits (for BG history)
• Manage BG tags list
• BG sound—On or Off
1. On the Home screen, use the Up/Down Controller buttons
to choose Settings, then press Select.
2. Choose System setup, then press Select.
3. Choose BG meter, then press Select.
4. Choose the setting you want to change (Figure 6-11), then
press Select.
Custom reminders will repeat every 15 minutes until
acknowledged.
Figure 6-10
Figure 6-11
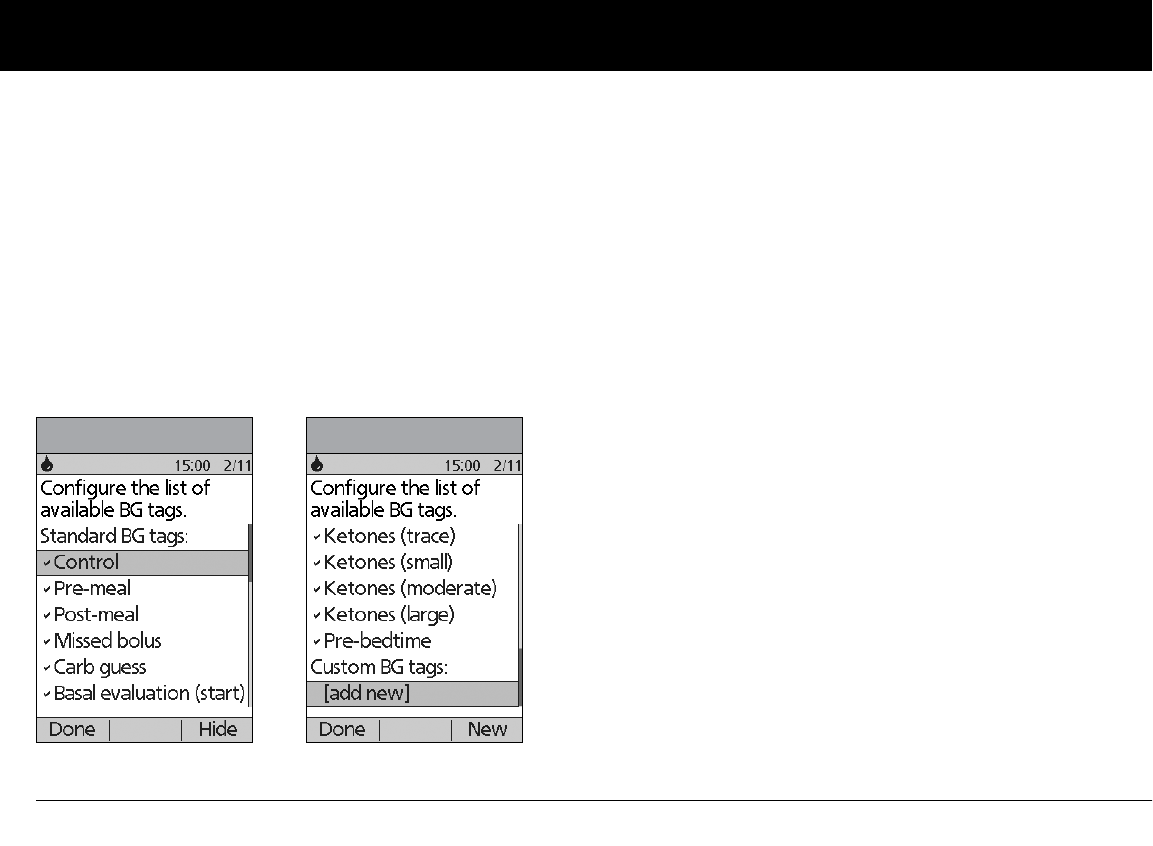
Using the Personal Diabetes Manager
72
6
Change BG goal limits
To change the BG goal limits, press Edit, change either or both
values, then press Save.
Manage the blood glucose tags list
You can create up to 15 custom blood glucose tags and hide any
of the standard tags you do not plan to use. Standard BG tags are
shown first on the screen (Figure 6-12a), followed by custom
tags, and then [add new] (Figure 6-12b). For more information
about tagging BG readings, see Chapter 7, Checking Your Blood
Glucose.
1. To hide or show a standard BG tag, choose the tag, and press
Show (if it is marked as hidden) or Hide.
Tags you choose to show will be check marked; hidden ones
will not be.
2. To add a custom tag, choose [add new] at the end of the list
of custom tags, then press New.
In the Edit name screen, either:
a. Press Save to save the new tag with the default name,
custom tag1, custom tag2, and so on; or
b. Use the Up/Down Controller buttons to choose letters
and numbers for a name, followed by the middle Soft Key
(the right arrow) to move forward one space. Then press
Save.
3. To delete a custom tag, choose the tag, press Delete, then
press Delete again. Or press Cancel to leave the tag
unchanged.
Change BG sound
To change BG sound, choose On or Off, then press Select.
Figure 6-12a Figure 6-12b
Using the Personal Diabetes Manager
73
6
n Customize the Personal Diabetes Manager
Additional options let you customize how the PDM operates:
ID screen: Make your PDM unique by adding your name and
choosing a color. The options you set will be shown on the ID
screen every time you turn on the PDM.
PDM lock: “Locks” the buttons on the PDM. The default setting is
Off. This safety feature can help avoid accidentally changing
basal rates or giving boluses.
Screen time-out: The screen turns off after a time interval that
you set, which occurs if you have not pressed any buttons on the
PDM. This setting preserves battery power by turning off the
screen when you are not using it. Set it at the lowest setting to
maximize battery life. The ID screen must be confirmed before
you can check Pod status.
Backlight time-out: The backlight is on by default while you are
using the PDM. The time-out setting dims the backlight and
causes the screen to dim when you have not used it within the
time interval that you set. Set at the lowest setting to maximize
battery life.
Set PDM options
1. On the Home screen, use the Up/Down Controller buttons
to choose Settings, then press Select.
2. Choose System setup, then press Select.
3. Choose PDM options (Figure 6-13), then press Select.
4. Choose one of the options (Figure 6-14), then press Select.
Set ID screen
To change the ID:
1. Choose ID, then press Select.
2. Press the Up/Down Controller buttons to scroll through the
list of characters. An up-and-down arrow symbol on the
screen indicates the character that can be changed.
Press and hold the Power button to turn the screen back
on. In some cases, if it has been less than 5 minutes since
the screen timed out, pressing the Power button returns
you to the same screen you were using. If it has been lon-
ger than 5 minutes, the PDM brings you to the Status
screen. To check the Pod status, refer to page 55 for
detailed instructions.
For extra brightness on the PDM screen, press and
hold the User Info/Support button (?) for 2 seconds.
This enables a “bright mode.” The screen will remain
in this mode until the PDM times out or you turn it off.
To preserve battery life, use this feature only when
necessary.
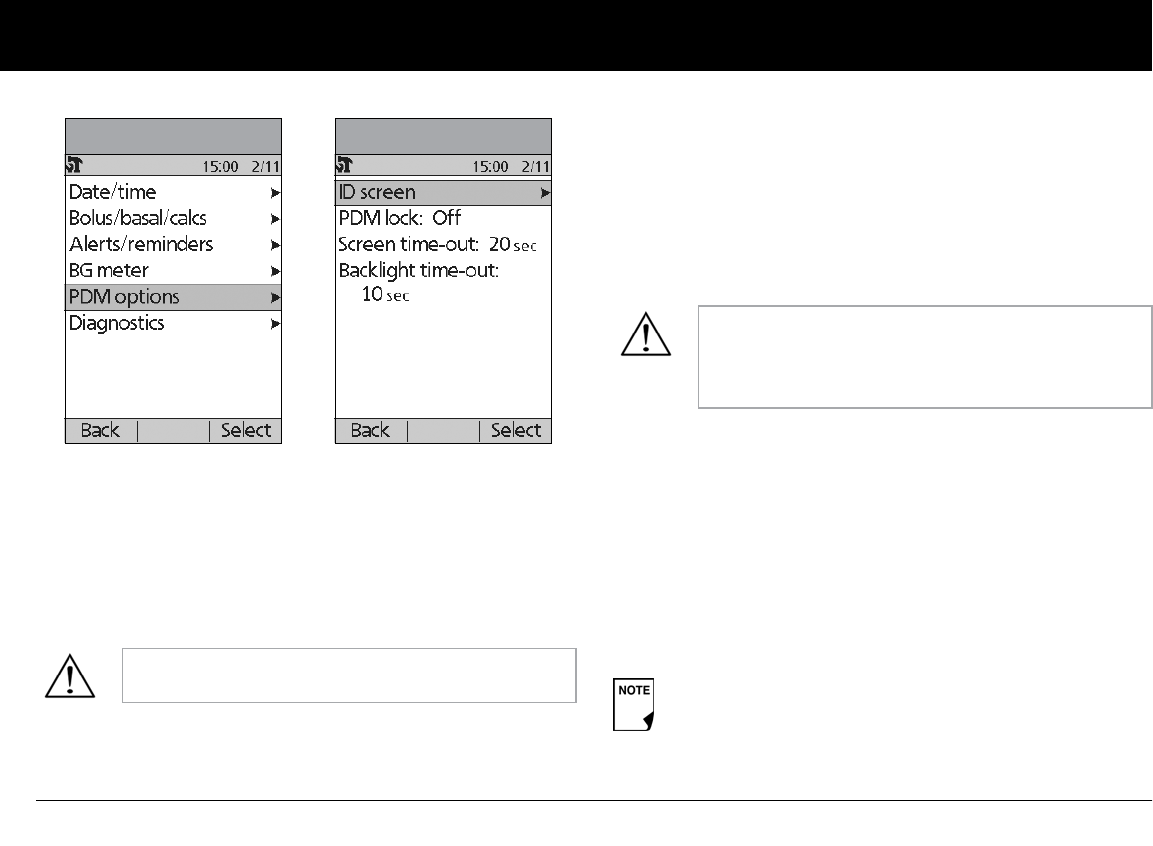
Using the Personal Diabetes Manager
74
6
3. Press the middle Soft Key (labeled with the right arrow) to
move the underscore to the next character.
4. Enter each character one at a time. For example, if you want
to enter your name, you might enter J, a, n, e, [space], S, m, i, t,
h. (A blank character or space is the first and last option in the
scrolling menu.)
5. Press Save.
To change the ID screen color:
1. Choose Screen color, then press Select.
2. Use the Up/Down Controller buttons to choose a color, then
press Select.
Set PDM lock
Choose On or Off, then press Select.
Set the Screen time-out
Choose a time interval, then press Select.
When the screen times out and goes black, turn it on again by
pressing the Home/Power button.
Set the Backlight time-out
Choose a time interval, then press Select.
When the screen dims, turn it on again by pressing any button.
The PDM will ignore the usual command and re-light the screen.
As a safety feature, an ID must be entered to enable
the PDM to be identified.
Figure 6-13 Figure 6-14
If you choose On, other PDM options and most
other soft keys are locked and will not respond to
button presses. To use them, you must first set PDM
lock to Off.
The lowest setting will drain the battery the least.
Using the Personal Diabetes Manager
75
6
n Set Diagnostic Functions
The Diagnostics screen allows you to instantly confirm how the
System is working or to completely update settings entered
during setup (see Chapter 2, Getting Started). Options include:
Check alarms: Confirms that all alarms work properly when
needed. When you select this function, the PDM beeps and
vibrates, then the Pod beeps. This function cannot be executed
unless insulin delivery is suspended.
Reset PDM (soft reset): Restores all settings in the PDM to the
factory defaults.
Diagnostic options
1. On the Home screen, use the Up/Down Controller buttons
to choose Settings, then press Select.
2. Choose System setup, then press Select.
3. Choose Diagnostics, then press Select.
To check alarms
1. Choose Check alarms, then press Select.
2. Press OK. TThe PDM beeps three times and vibrates three
times. If the Pod is active, it beeps three times, then sounds
the alarm tone for 5 seconds.
To reset the PDM
1. Choose Reset PDM, then press Select.
2. If the Pod is deactivated, the PDM asks for confirmation and
reminds you that you will lose all user settings (Figure 6-15).
Press Confirm to reset the PDM.
If the Pod is still active, you will be unable to reset the PDM
(Figure 6-16). Press OK to return to the Diagnostics menu.
If the PDM fails to beep, immediately call Customer
Care. If a Pod is active and fails to beep, change the
Pod immediately (see Chapter 5, Using the Pod).
Continuing to use the System in these situations
may put your health and safety at risk.
Resetting the PDM deletes all basal programs, temp
basal presets, carb presets, bolus presets, and all sug-
gested bolus settings. Before you use this feature, be
sure you have a written record of the information
you need. History records will not be deleted.
As a safety feature, you cannot reset the PDM when a
Pod is active. You must first deactivate the Pod.
Be sure to check the alarm function at every Pod
change.
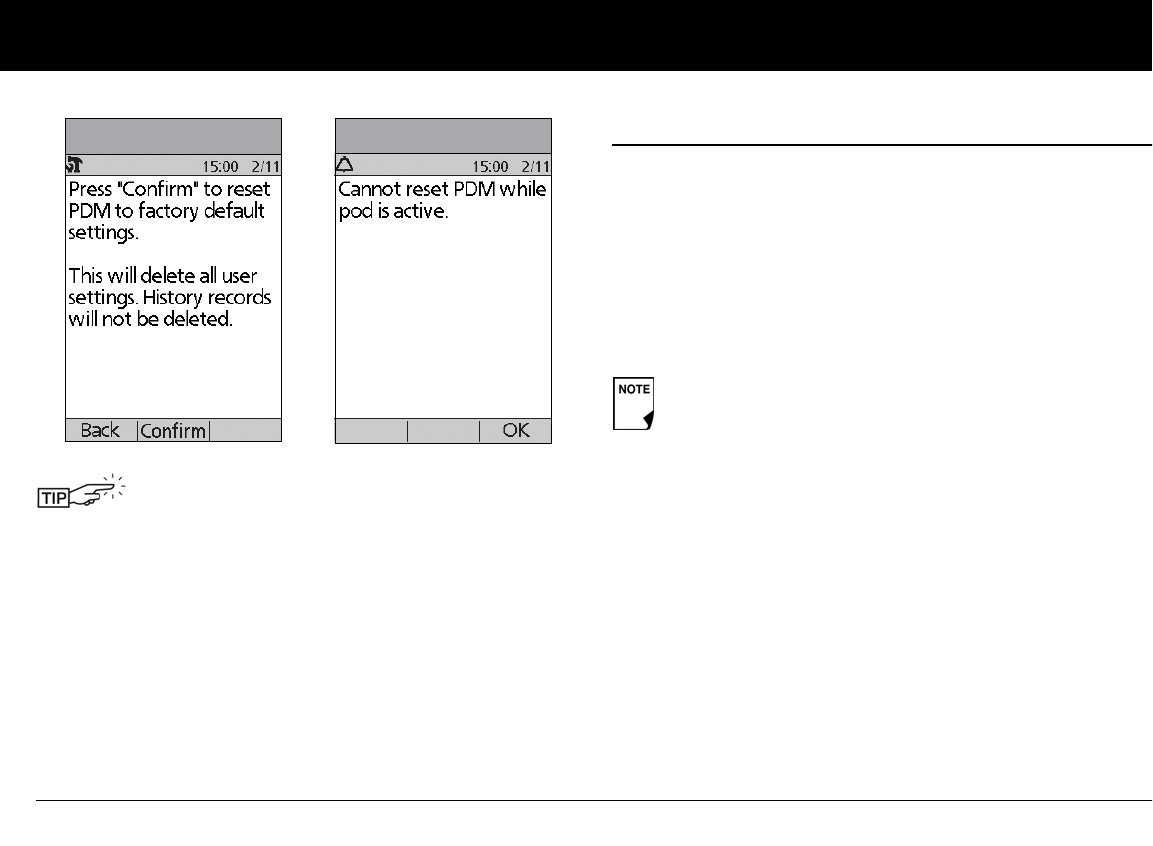
Using the Personal Diabetes Manager
76
6
n Set a Reminder to Vibrate
For certain reminders, you can choose vibration instead of beeps
or vibration followed by beeps, instead of only beeps. If you acti-
vate it, the PDM will vibrate for:
• Blood Glucose reminders
• Missed Bolus reminders
• Custom reminders
• “No active Pod” reminders
To change the type of notification
1. Use the Up/Down Controller buttons to choose Settings,
then press Select.
2. Choose Vibration, then press Select.
3. Choose Vibrate, Vibrate then beep, or Off (beep only), then
press Select. (Vibrate then beep means the PDM will repeat
the reminder twice using vibration. After that, it uses beeps.)
Or press Back to return to the Settings menu.
Use the form at the end of this User Guide to write
down all your settings from the Setup Wizard. If you
ever need to reset your PDM, having these settings
handy will make setup very easy.
Figure 6-15 Figure 6-16
The PDM cannot be set to vibrate for hazard or advisory
alarms.
Using the Personal Diabetes Manager
77
6
n Get the Most from Your PDM
Keep it handy
Wireless communication technology means you don’t have to
keep the PDM right next to the Pod for the Pod to work. Once
you set your basal program, the Pod continues to deliver your
basal program 24 hours a day, regardless of the location of the
PDM. However, you still need the PDM to deliver a bolus, change
the basal rate, and so on. You can store the PDM conveniently
inside an article of clothing (like a shirt pocket) or put it discreetly
into a drawer, briefcase, or purse.
Communicating with the Pod
When you use the PDM to communicate with the Pod, hold the
PDM within 152 cm (60'') of the Pod.
Water and your PDM
Avoid extreme temperatures
Extreme operating temperatures can damage PDM batteries
and interfere with System operation. Avoid using the PDM in
temperatures below 4.4°C (40°F) or above 40°C (104°F).
Do NOT use IV Prep wipes, alcohol swabs, soap,
detergent, or solvents to clean the screen or any
other part of the PDM. The PDM is NOT waterproof.
Do NOT immerse it or place it in or near water.
Do not store or leave the PDM where it may be
exposed to extreme temperatures, such as inside a
car. Extreme heat or cold can cause the device to
malfunction.
Never attempt to test your blood glucose while your
PDM is connected via USB cable to a computer.
Doing so could result in electrical shock.
Using the Personal Diabetes Manager
78
6
Electrical interference
The PDM is designed to withstand normal radio interference and
electromagnetic fields. However, as with all wireless communica-
tion technology, certain operating conditions can interrupt
communication. For example, electric appliances such as micro-
wave ovens and electric machinery located in manufacturing
environments may cause interference. In most cases, interrup-
tions are easy to resolve (see Chapter 11, Communication
Failures).
Only connect a USB cable to your PDM when down-
loading data to a computer. Other PDM functions are
disabled while a USB cable is connected, and the
PDM cannot communicate with the Pod.
When you connect a USB cable to the PDM, only use
a cable that is less than or equal to 2.7 meters (9 feet)
in length.
79
CHAPTER 7
Checking Your Blood Glucose
n The Built-in OneTouch® Verio™ Blood Glucose
Meter
With the OneTouch® Verio™ blood glucose meter, checking your
blood glucose requires a very small sample size, 0.4 μL (microli-
ter) of blood. Refer to your OneTouch® Verio™ Test Strip Insert for
important test strip information.You may want to test for low
blood glucose:
• When you feel symptoms such as weakness, sweating,
nervousness, headache, or confusion
• When you have delayed a meal after taking insulin
• When your healthcare provider advises you to do so
Keep the system and the OneTouch® Verio™ accesso-
ries away from young children, as they contain small
parts that may be dangerous if swallowed.
Only use OneTouch® Verio™ test strips and One-
Touch® Verio™ control solution with the System.
Using other brands of test strips and control solutions
with the System can produce inaccurate results.
Never attempt to test your blood glucose while your
PDM is connected via USB cable to a computer.
Doing so could result in electrical shock.
This Device is intended for self-testing by the user.
Please read all the instructions provided in this User
Guide and practice the testing procedures before
using the system and OneTouch® Verio™ accessories.
Follow the guidance of a healthcare professional for
proper blood glucose monitoring.
Checking Your Blood Glucose
80
7
n The OneTouch® Verio™ Blood Glucose Test Strips
Important test strip information
• Store the test strip vial in a cool dry place between 41° and
86° F (5° and 30° C). Keep away from direct sunlight and heat.
Exposure to temperatures and/or humidity outside the stor-
age limits may cause inaccurate readings.
• The expiration date is printed on the vial.
• The discard date is 6 months after you first open a test strip
vial. When you open a new vial, write the discard date on the
label.
•Do Not use after the expiration or discard date, whichever
comes first.
• Store your test strips in the vial only. To avoid damage or
contamination, Do Not put test strips in any other container.
• Open the vial only when taking out a test strip for use.
• Close the vial lid tightly right away after removing a test strip.
Use each test strip as soon as you take it out of the vial.
•Do Not use test strips from a vial that is damaged or left open
to air.
•Do Not get dirt, food, or liquids on the test strip. You may
touch the test strip anywhere on its surface with clean, dry
hands.
•Do Not bend, cut, or alter test strips in any way.
• Test strips are for single use only.
•Never reuse a test strip that already has blood or control
solution on it.
• Operating temperature of the meter and strip is 6°- 44°C.
• Apply only OneTouch® Verio™ Control Solution or a blood
sample to the test strip.
•Do Not put the used test strip back in the vial after taking a
test.
• Used test strips may be considered biohazardous waste in
your area. Be sure to follow your health care professional’s
advice or local laws when throwing them away.
Complete information on the OneTouch® Verio™ test
strips (such as interferences and performance) can be
found in the test strip insert. Please read all instruc-
tions provided on the test strip insert before using the
OmniPod System and OneTouch® Verio™ accessories.
Keep the test strip vial away from children. Test strips
are a choking hazard. Do Not swallow test strips. The
test strip vial may contain drying agents that are
harmful if inhaled or swallowed and may cause skin
or eye irritation. Do Not ingest or swallow any items.
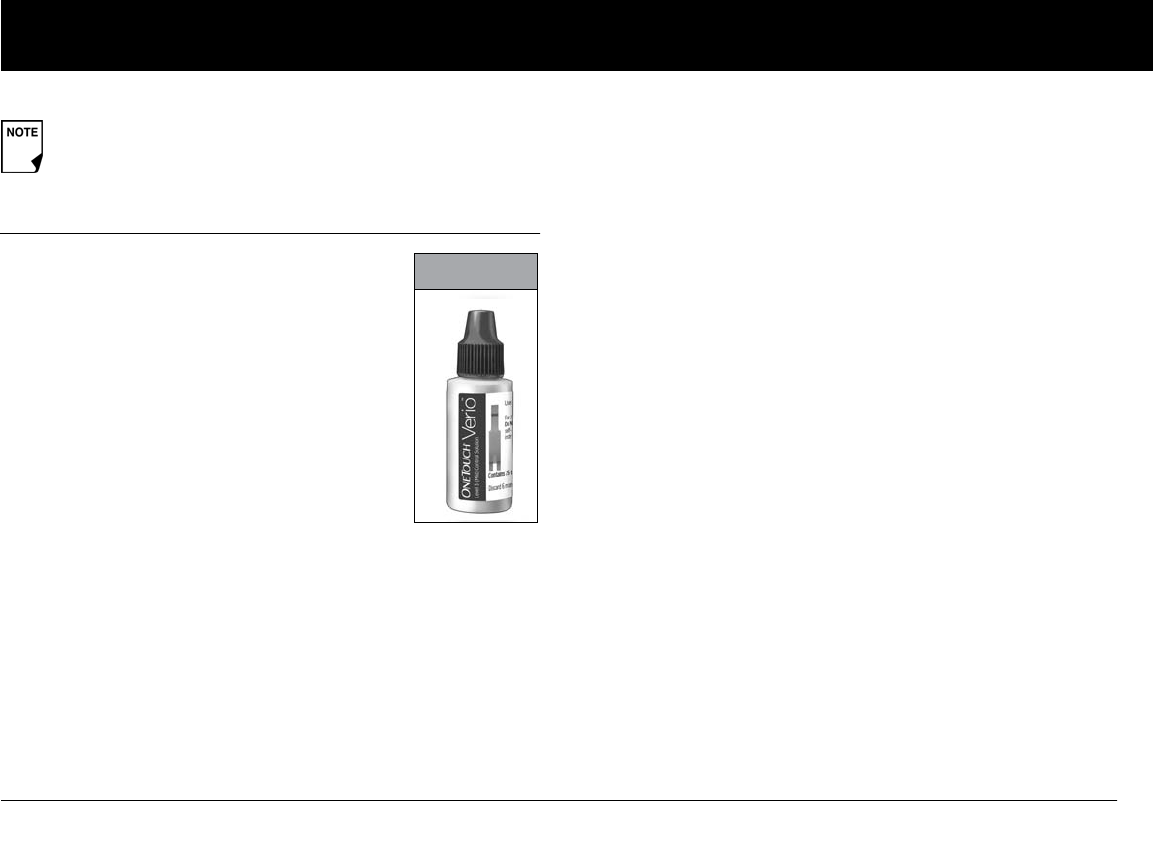
Checking Your Blood Glucose
81
7
n The OneTouch® Verio™ Control Solution
The OneTouch® Verio™ control solution (Fig-
ure 7-1) is a liquid that consists of a viscosity-
adjusting agent, a preservative, a dye, a buffer
and glucose in water and has two important
uses:
• To check that the meter and test strips are
working together properly and that the
test is performed correctly
• To practice testing without having to use
your own blood
Two levels of control solution are available:
Mid (Blue Cap: 102-138 mg/dL) and High (Red
Cap: 298-403 mg/dL). For information on how to obtain control
solution, call Insulet’s Customer Care (24 hours/7 days): 800-591-
3455. When calling from outside the United States: 781-457-
5098.
When to perform a control solution test
• Whenever you open a new vial of test strips
• If you suspect that the meter or test strips are not working
properly
• If you have had repeated unexpected blood glucose results
• If you drop or damage the meter
Check that the meter and test strips are working
A control solution test follows the same procedure as a blood
glucose reading, except that you use a sample of control solution
instead of a drop of blood. (See “Performing a Blood Glucose
Reading” later in this chapter.)
When you perform a control solution test, if the reading is within
the control solution acceptable range, the meter is working
properly.
Control solution expiration date
OneTouch® Verio™ control solution is good for 6 months after
opening the bottle, or until the expiration date printed on the
label, whichever comes first. Count forward 6 months from the
date you open a new bottle of control solution. This is your dis-
card date. Write this date on the side of the control solution
bottle. For example, if you open the control solution on January
15, count forward 6 months to July 15. This is the discard date to
record on the bottle, as well as the date to discard it and begin
using a new bottle.
For detailed storage and usage information, refer to the
test strip insert.
Figure 7-1
Checking Your Blood Glucose
82
7
Ensure accurate control solution results
• Replace the cap on the control solution bottle immediately
after using it.
• Do not add water or any liquid to control solution.
• Control solution tests are specified to be accurate only when
performed between 43° and 111°F(6° and 44°C).
• The control solution test results should fall within the range
printed on the test strip vial label.
If control solution results are out of this range, REPEAT THE TEST.
Out-of-range control solution results
Out-of-range test results may be caused by:
• Expired or bad control solution
• Expired or bad test strip
• Error in performing test
• Malfunction of the System
• Control solution test must be performed between 43° and
111°F (6° and 44°C).
If your control solution test results continue to fall outside the
range printed on the test strip vial:
1. The System may not be working properly.
2. Do not use the System to test your blood glucose.
3. Call Insulet’s Customer Care (24 hours/7 days): 800-591-3455.
When calling from outside the United States: 781-457-5098.
n Performing a Control Solution Test
1. Grasp the bottom of the test strip with the gold side facing up
(Figure 7-2).
Use only OneTouch® Verio™ control solution with
the System. Other brands of control solution may
produce inaccurate results with this System.
Do not use control solution past the expiration
date or you may get inaccurate results.
Results from OneTouch® Verio™ control solution
tests do not reflect your blood glucose level.
The control solution range is a target range for control
solution only. It is not a target range for your blood
glucose.
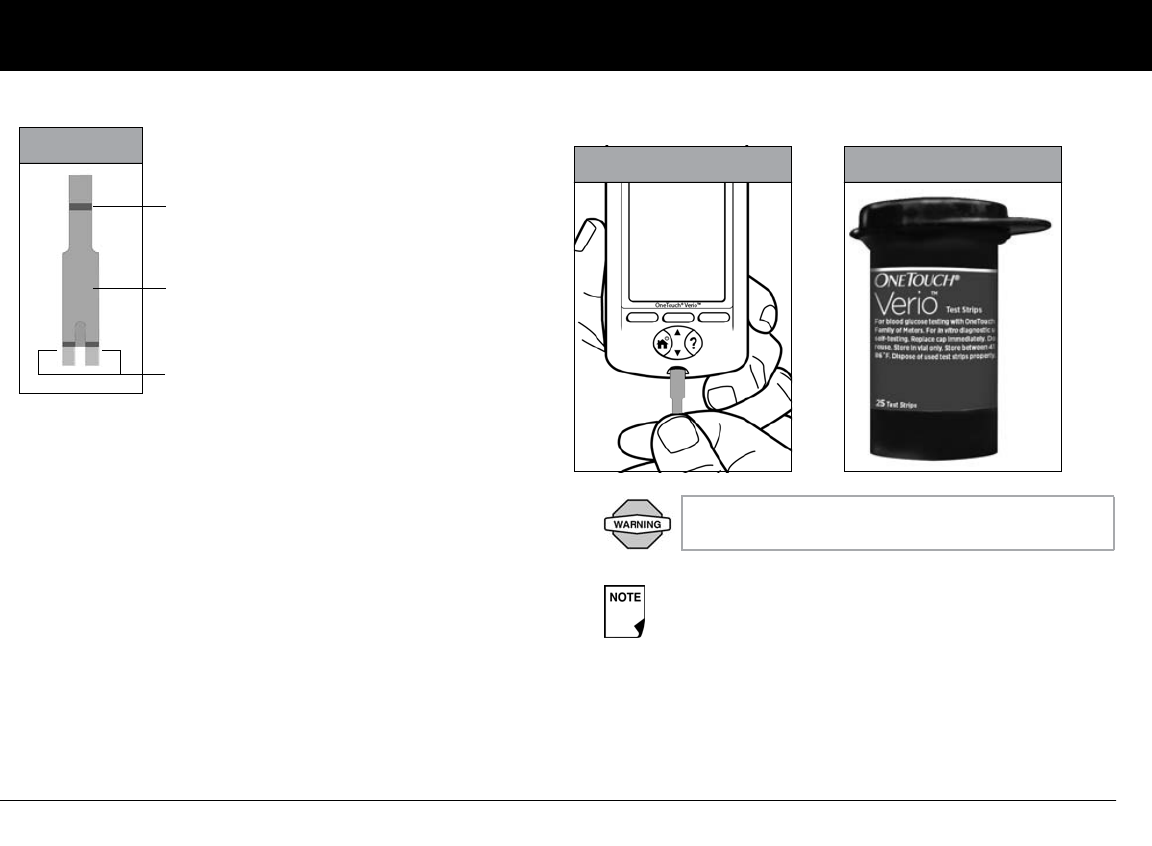
Checking Your Blood Glucose
83
7
2. Insert a test strip into the test strip port with the gold
side of the test strip and silver prongs facing you. (Figure
7-3) until it stops. This turns on the PDM on the screen. Refer
to page 57 to check Pod status and to Confirm ID.
Figure 7-2
Channel to apply sample
OneTouch® Verio™ test strip
Silver prongs, insert into test strip port
Always verify that you are using OneTouch®
Verio™ test strips with your PDM (Figure 7-4).
From some PDM screens, you cannot access the One-
Touch® Verio™ blood glucose meter. For example, you
cannot use the meter while you are activating a Pod
or when an alert, alarm or communication error
screen is displayed. In these cases, if you insert a test
strip, the PDM beeps to alert you.
Figure 7-3 Figure 7-4
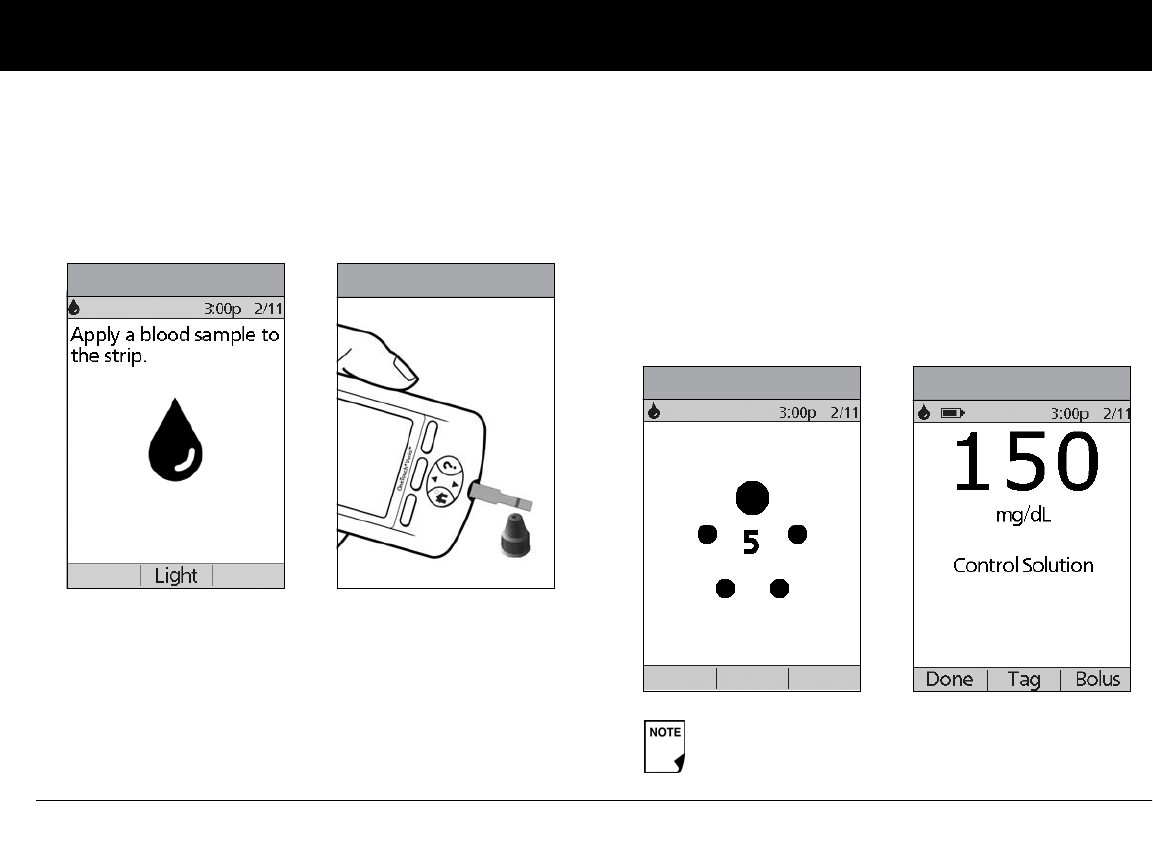
Checking Your Blood Glucose
84
7
3. To help you see the test strip port in reduced lighting, when
you insert a test strip into the PDM, you can turn on the port
light. Press the middle Soft Key labeled Light. To turn the light
off, press Light again.
4. Wait for the PDM to display “Apply a blood sample to the
strip” on the screen (Figure 7-5).
5. Remove the vial cap and place it on a flat surface with
the top of the cap pointing up. Squeeze the vial to dis-
card the first drop. Then, wipe both the tip of the control
solution vial and the top of the cap with a clean, damp
tissue or cloth. Next, squeeze a drop into the small well
on the top of the cap or onto another clean, non-absor-
bent surface.
6. Gently touch only ONE SIDE of the test strip to the control
solution drop. Specifically, apply the control solution to the
test strip side next to the gold metallic channel (Figure 7-6 on
the previous page). If BG sound is set to On, the PDM beeps
when the test strip is full.
If you do not apply the sample within 10 seconds, the strip
port light turns off. To turn it on again, press Light.
The Countdown Screen appears while the sample is process-
ing (Figure 7-7). The strip port light turns off when the sample
is accepted.
Figure 7-5 Figure 7-6
Do not apply control solution to both sides of the test
strip.
Figure 7-7 Figure 7-8
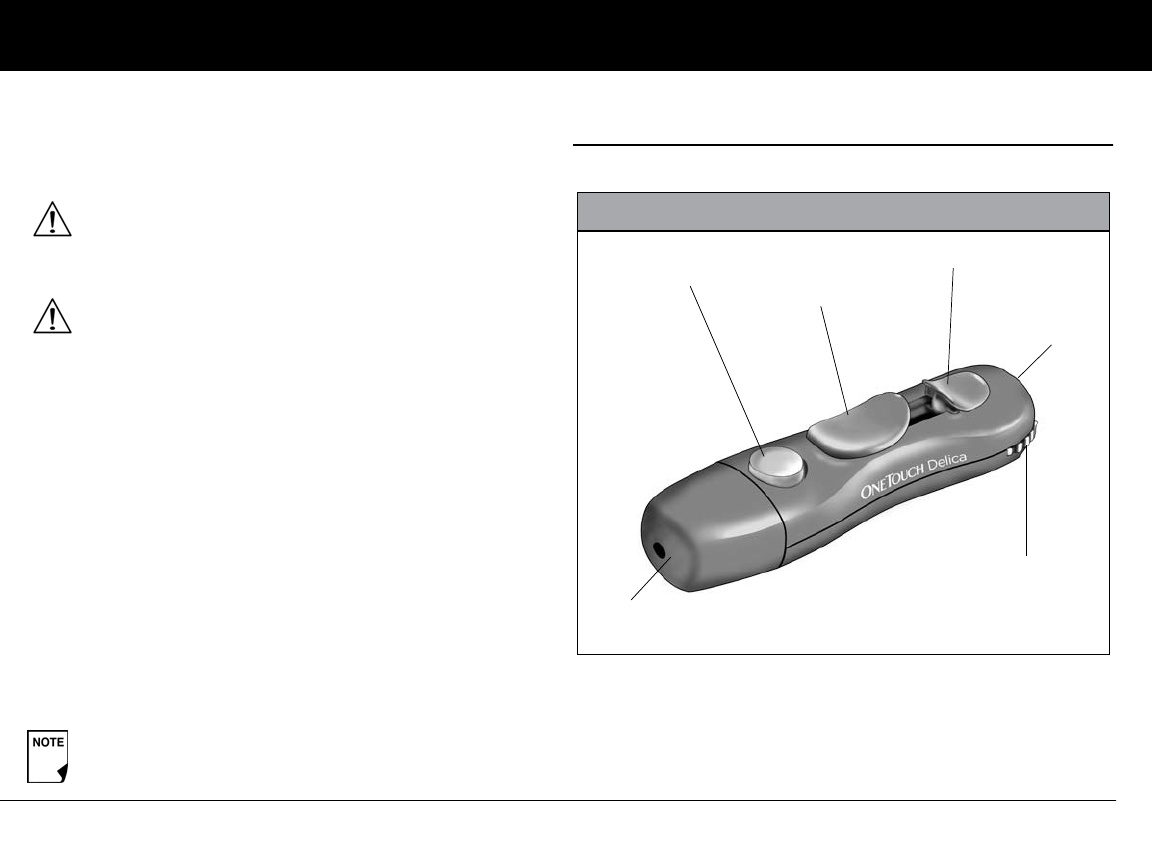
Checking Your Blood Glucose
85
7
If BG sound is set to On, the PDM beeps twice. The PDM
automatically marks the result as a control solution test (Fig-
ure 7-8 on the previous page).
7. Compare the control solution test result to the range printed
on the Test strip vial label. If the result does not fall within the
range, repeat the test. If the result still does not fall within
the range, call Insulet’s Customer Care (24 hours/7 days):
800-591-3455. When calling from outside the United States:
781-457-5098.
8. Remove the test strip. If the strip port light was turned on, it
now turns off.
If you remove the test strip before this step, you will still see
the available soft keys.
n Performing a Blood Glucose Reading
Figure 7-9 shows the parts of the lancing device.
If the words Control solution do not show on
the screen, you MUST tag this result as a control
solution test.
If you do not mark this result as a control solution
result it will be included in your BG averages and
your averages may change, too. Repeat the test
with a new test strip. If the problem persists, con-
tact Insulet's Customer Care (24 hours/7days):
800-591-3455. When calling from outside the
United States: 781-457-5098.
Be sure to discard used test strips. (You can only use
test strips once.) Used test strips are considered bio-
hazardous material.
Release Button
Depth Wheel
Cocking Control
Figure 7-9
Lancing Device Cap
Depth Indicator
Ejection Control
Lancing device depicted in Figure 7-9 is representative only. Please follow
the instructions included with your specific lancing device.
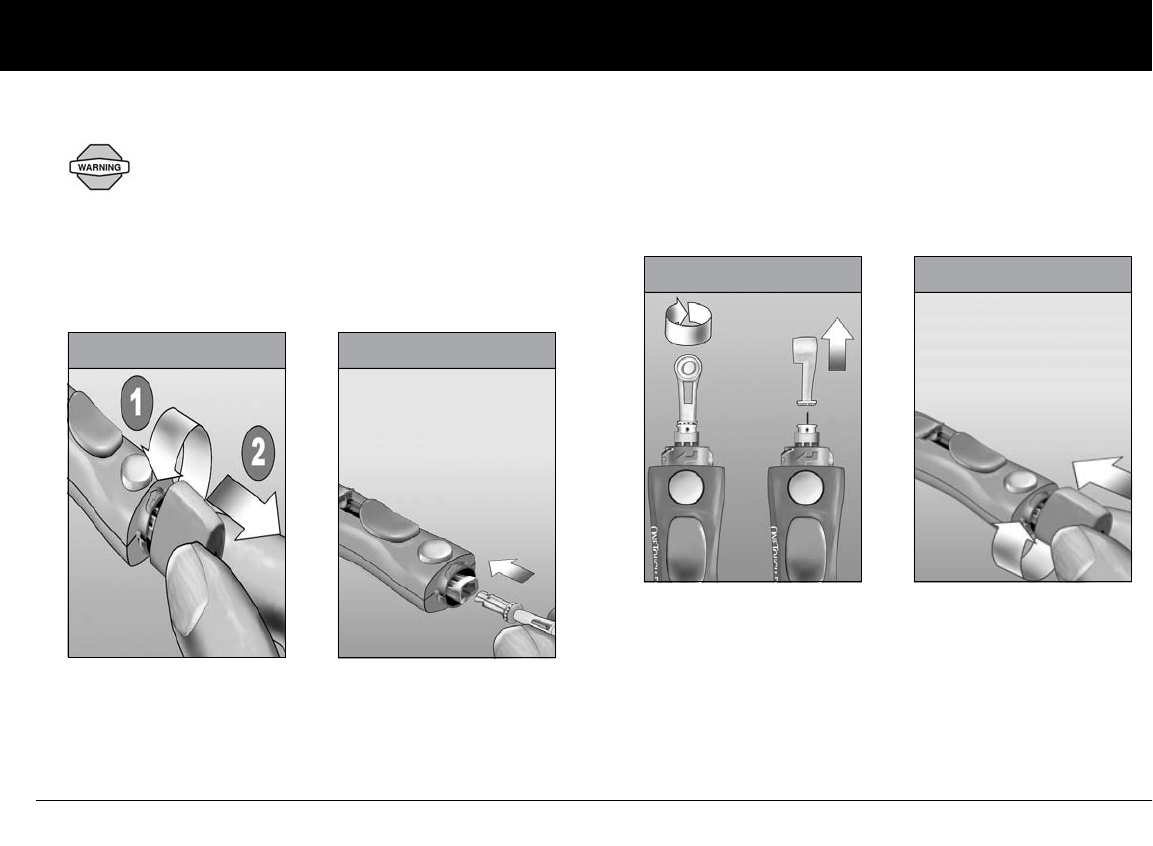
Checking Your Blood Glucose
86
7
Prepare the lancing device
1. Remove the cap by turning it counterclockwise and
then pulling it straight off of the device. (Figure 7-10).
2. Insert a new lancet firmly into the white lancet holder cup
(Figure 7-11). Pushing the device into the cup may cock the
device, which is fine.
3. Hold the lancet firmly in place with one hand. With your other
hand, twist off the rounded top (Figure 7-12).
4. Place the cap back onto the device; turn clockwise to
secure the cap (Figure 7-13). Be careful not to touch the
exposed needle on the lancet.
5. The lancing device has seven puncture depth settings, num-
bered 1 through 7. Smaller numbers are for a shallower punc-
ture and the larger numbers are for a deeper puncture.
(Figure 7-14 on the next page).
To ensure accurate results, wash your hands with
soap and water. Do not leave any cream or lotion on
your hands or fingers. Thoroughly dry your hands.
Figure 7-10 Figure 7-11
Figure 7-12 Figure 7-13
Lancing device depicted in Figures 7-10, 7-11, 7-12 and 7-13 is representative
only. Please follow the instructions included with your specific lancing
device.
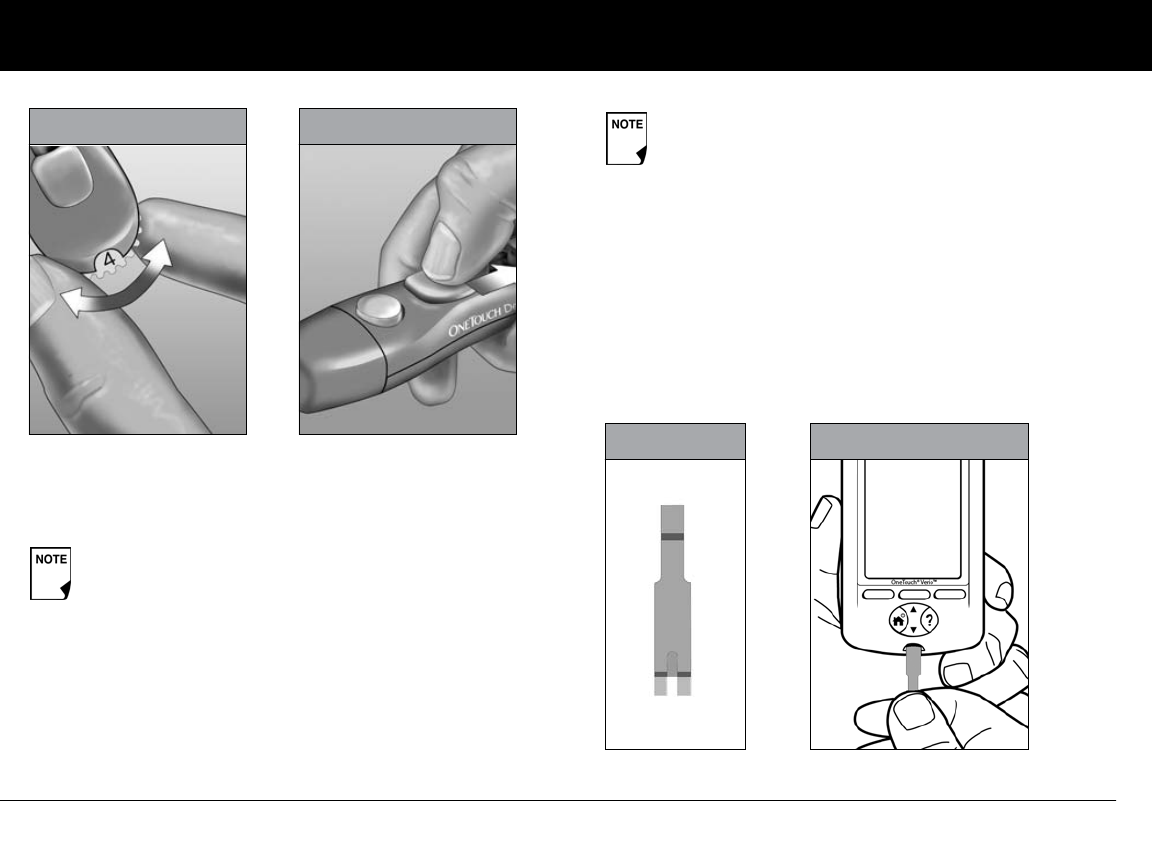
Checking Your Blood Glucose
87
7
6. Pull out the cocking handle until it clicks (Figure 7-15). (You
may have already cocked the handle in step 2. This is okay.)
You are now ready to perform a blood glucose test.
Insert the blood glucose test strip
1. Insert a new blood glucose test strip into the test strip port
until it stops. The test strip port is at the bottom of the PDM.
2. To help you see the test strip port in reduced lighting, press
the middle soft key labeled Light. To turn the light off, press
Light again.
3. Insert only the bottom end of the strip into the test strip port
(Figure 7-16 and Figure 7-17).
Consult your lancing device instructions to ensure
proper usage.
Figure 7-14 Figure 7-15 From some PDM screens, you cannot access the One-
Touch® Verio™ blood glucose meter. For example, you
cannot use the meter while you are activating a Pod
or when an alert, alarm or communication error
screen is displayed. In these cases, if you insert a test
strip, the PDM beeps to alert you.
Figure 7-16
Bottom
Top
Figure 7-17
Lancing device depicted in Figures 7-14 and 7-15 is representative only. Please follow the instructions included with your specific lancing device.
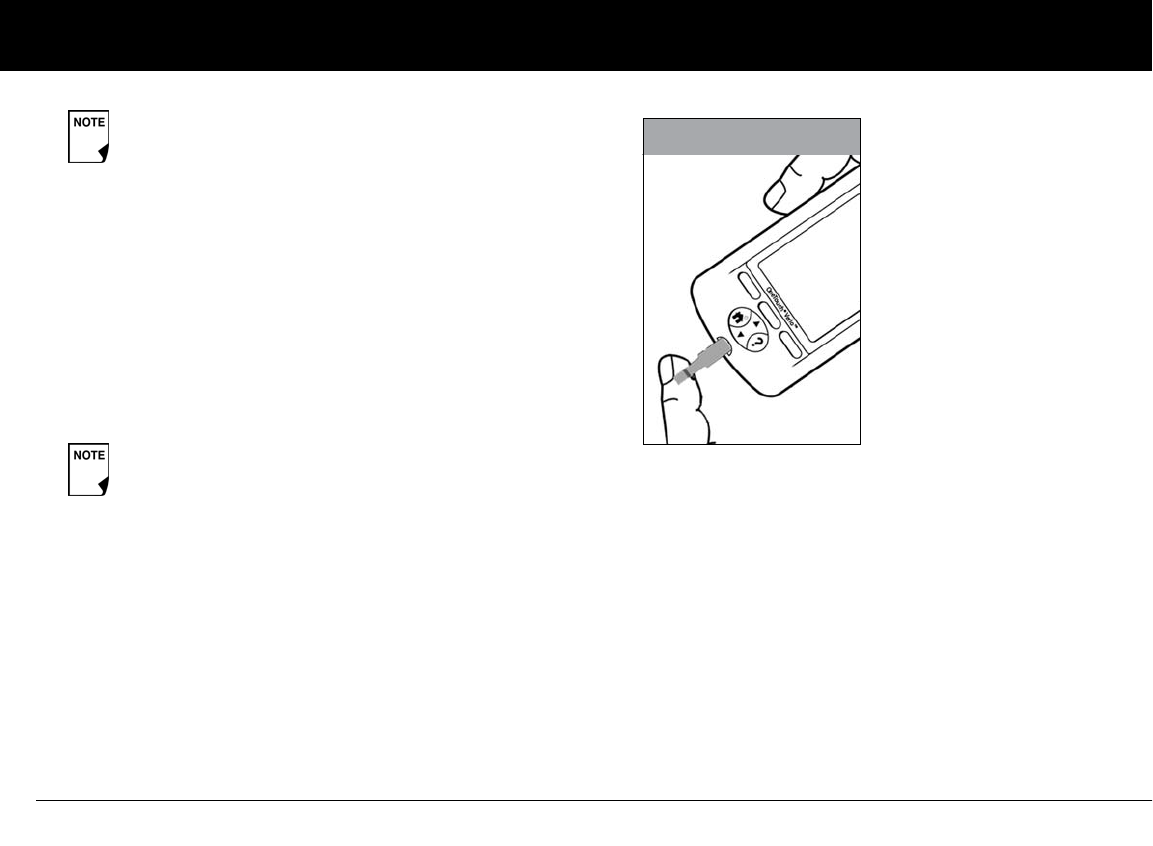
Checking Your Blood Glucose
88
7
Fill the blood glucose test strip with blood
1. Make sure that the strip is in the PDM and the PDM is pow-
ered on. Refer to page 55 to check Pod status and to Confirm
ID.
2. Hold the lancing device firmly against the side of your
finger. Press the release button. Remove the lancing
device from your finger.
3. Gently squeeze and/or massage your fingertip until a round
drop of blood forms on your fingertip.
4. Bring the strip to the blood sample at a slight angle
(Figure 7-18).
If you do not apply the sample within 10 seconds, the strip
port light turns off. To turn it on again, press Light.
Use only one edge of the blood glucose test strip per test. Do
not apply blood to both sides (Figure 7-19 on the next page).
Only use strips once. Discard used strips.
If you do not start the test within 2 minutes, the PDM
powers off. Refer to page 55 to check Pod status and to
Confirm ID.
If the blood smears or runs, DO NOT use that
sample. Dry the area and gently squeeze another
drop of blood, or puncture a new site.
Figure 7-18
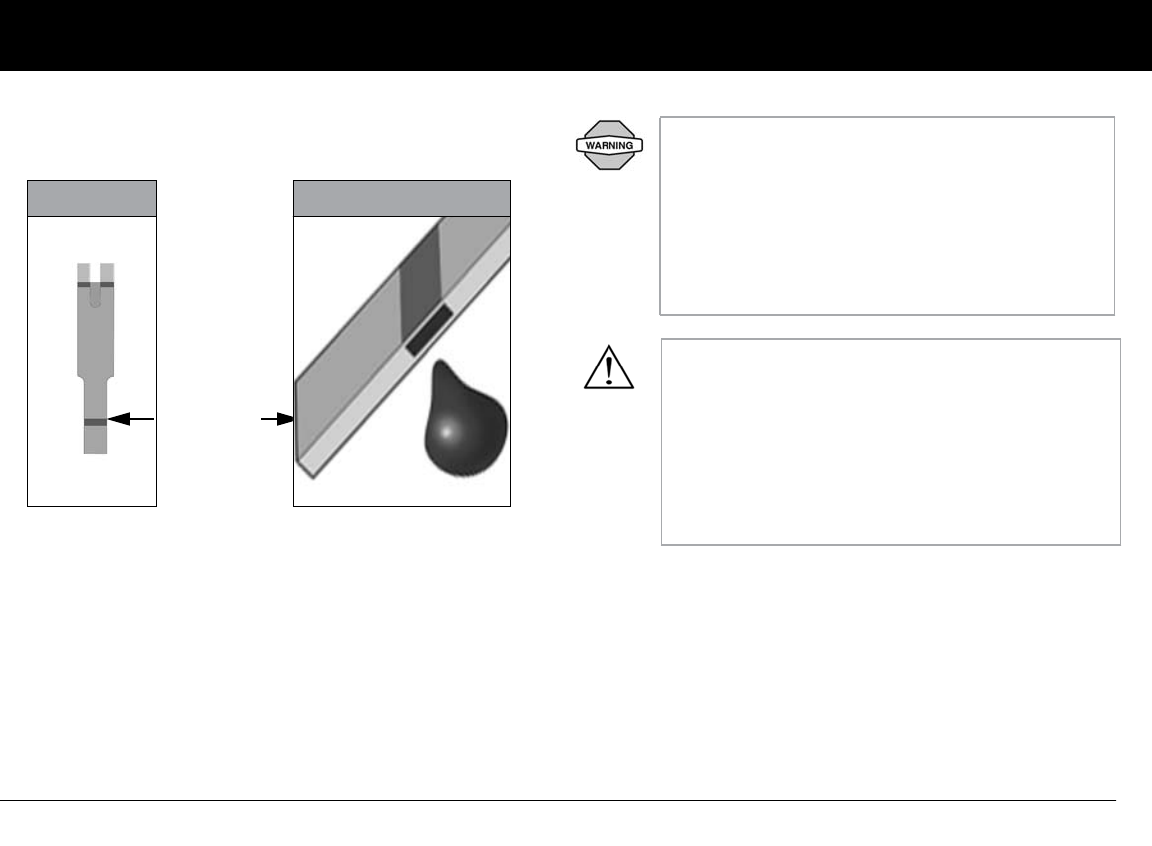
Checking Your Blood Glucose
89
7
The test strip pulls the blood into the strip through the sides
(Figure 7-20).
1. Do not pull the test strip away from the sample until you hear
1 beep or see the countdown screen on the screen (Figure 7-
21 on the next page). This means you applied enough blood
and the meter is reading your glucose.
Figure 7-19
Side of test
strip, apply
blood here
Figure 7-20
The lancing device is intended for individual use and
should not be shared. If the device is being operated
by a second person who is providing testing assis-
tance to the user, the meter and lancing device
should be decontaminated prior to use by the sec-
ond person (see page 137 for PDM disinfection or
refer to lancing device instructions for use for
lancing device decontamination instructions).
Do not:
• Press the strip against the test site
• Share a lancing device with anyone.
• Scrape the blood onto the strip
• Apply blood to the flat side of the strip
• Apply blood to the strip when it is out of the meter
• Put blood or foreign objects into the test strip port
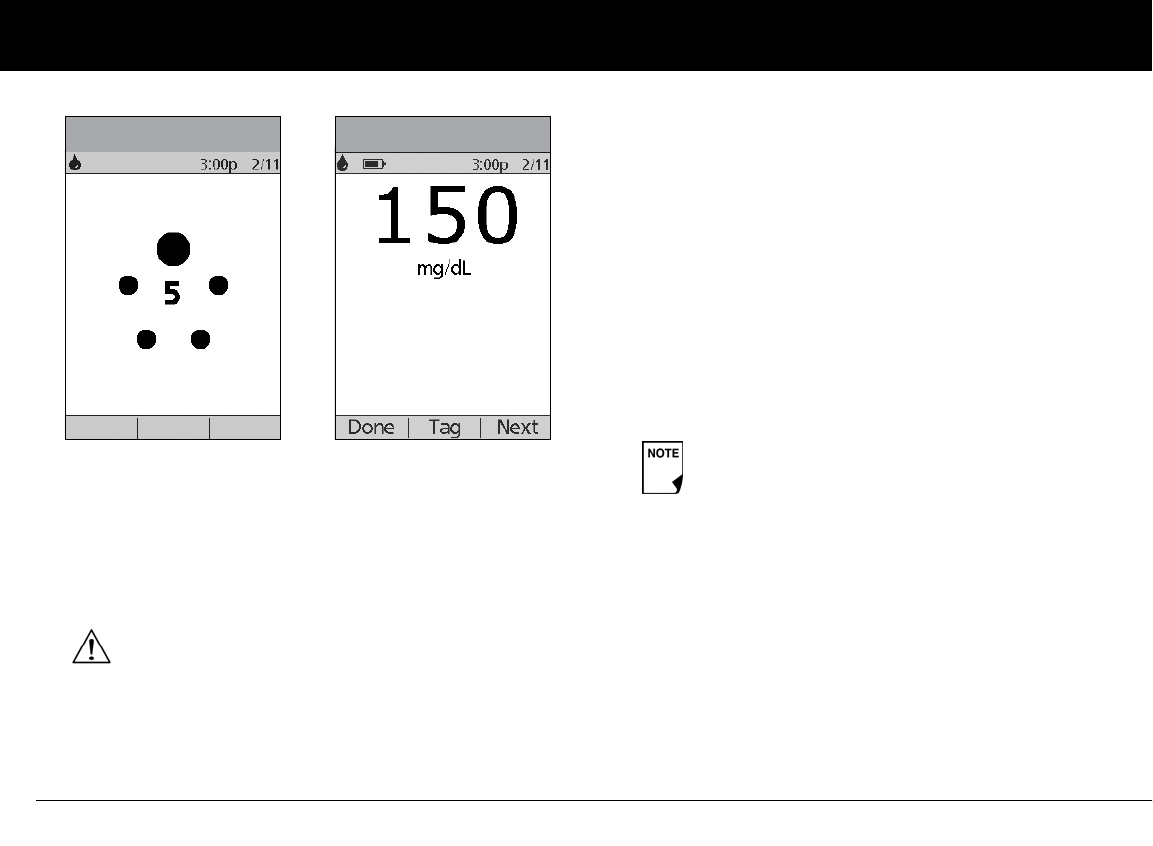
Checking Your Blood Glucose
90
7
2. If after 5 seconds the PDM does not display the countdown
screen, the sample may be too small.
The strip port light turns off when the blood sample is
accepted. The reading is complete when you hear 2 beeps (if
BG sound is turned On) and the PDM shows your reading on
the screen (Figure 7-22).
3. To mark the result as a pre- or post-meal test, to indicate a
level of exercise or to indicate other situations connected to
this blood glucose reading, press Tag. Then:
a. Use the Up/Down Controller buttons to select a tag,
then press Select. You can select a second tag for the
reading in the same way.
To learn how to manage your list of tags and to add
custom tags, see “Manage the blood glucose tags list” in
Chapter 6, Using the Personal Diabetes Manager.
b. Press OK to return to the reading screen (Figure 7-24),
then press Next.
4. If you do not want to mark the test, press Next instead of Tag.
5. Remove the test strip. If the strip-port light was turned on, it
now turns off.
Remove the lancet
6. When you have finished testing, place the lancet protec-
tive cover on a hard surface, then push the rounded top
into the cupped side of the cover. Then, remove the lan-
cet from the lancing device (Figure 7-23 on the next page).
Discard the used lancet properly in a puncture-resistant con-
tainer. Then wash your hands with soap and water.
If the words Control solution show on the
screen, repeat the test with a new test strip. If the
problem persists, contact Insulet's Customer
Care (24 hours/7days): 800-591-3455. When
calling from outside the United States: 781-457-
5098.
Figure 7-21 Figure 7-22
If the suggested bolus calculator feature is turned Off,
the Bolus soft key appears instead of Next.
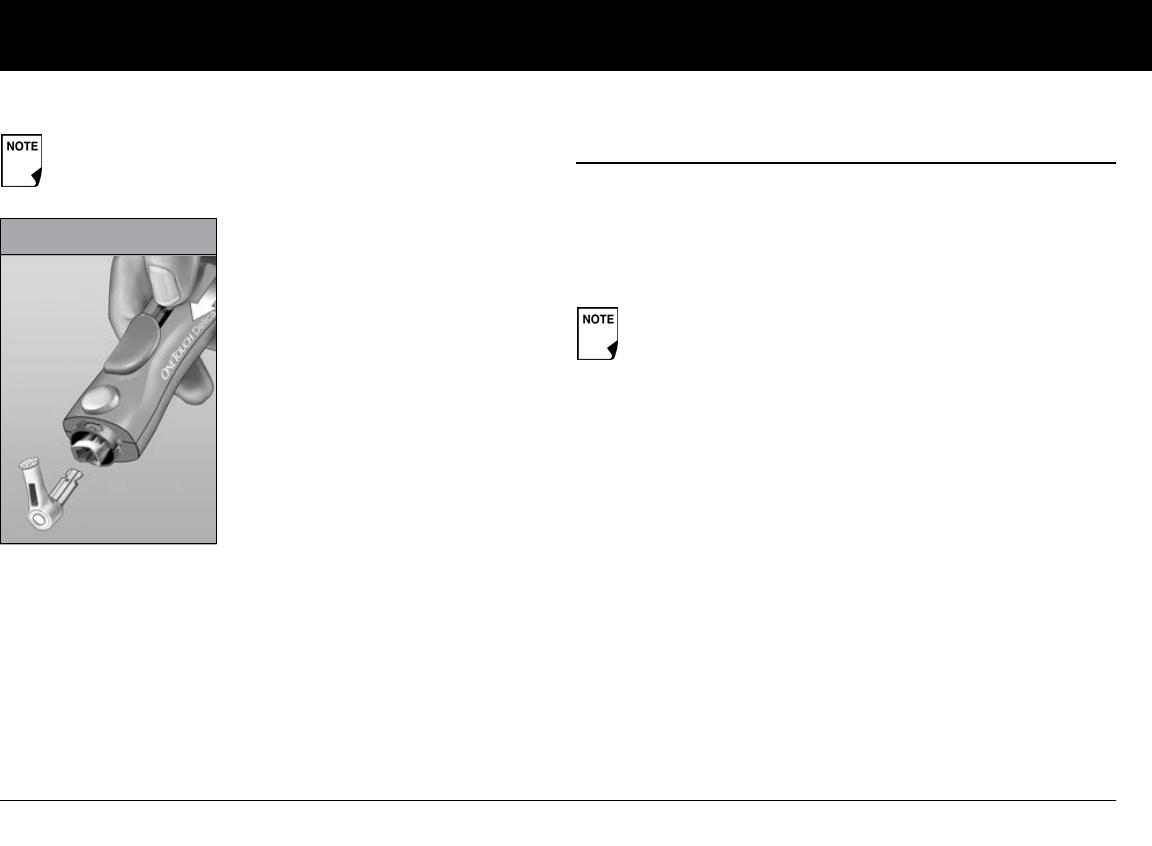
Checking Your Blood Glucose
91
7
.n Blood Glucose Results and the Suggested Bolus
Calculator
If the suggested bolus calculator feature is turned On when you
check your blood glucose, the PDM will display the result. From
here, press Next to enter carbs (if eating) and have the System
calculate a suggested bolus. (See “Suggested Bolus Calculator” in
Chapter 4, Understanding and Delivering Bolus Doses.)
If the suggested bolus calculator feature is turned Off, the Next
soft key does not appear. Instead:
Press Bolus to open a screen where you can enter a bolus
manually.
Or press Done to return to the Status screen to see the most
recent BG result.
The BG result, either from the PDM or from manual entry, is
stored in the System’s history, whether suggested bolus calcula-
tor is turned On or Off. (See “Blood Glucose Records” in Chapter
8, Understanding Your Records.)
See “Cleaning and disinfecting” in the Appendix for
instructions on how to clean or disinfect your PDM.
Figure 7-23
If you use the suggested bolus calculator within 10
minutes after taking a blood glucose reading, or if you
store a BG reading (for example, one you enter manually)
within the same 10 minutes, that BG value will be used
automatically in the suggested bolus calculator process
(Figure 7-24 on the next page).
Lancing device depicted in Figure 7-23 is representative only.
Please follow the instructions included with your specific lancing device.
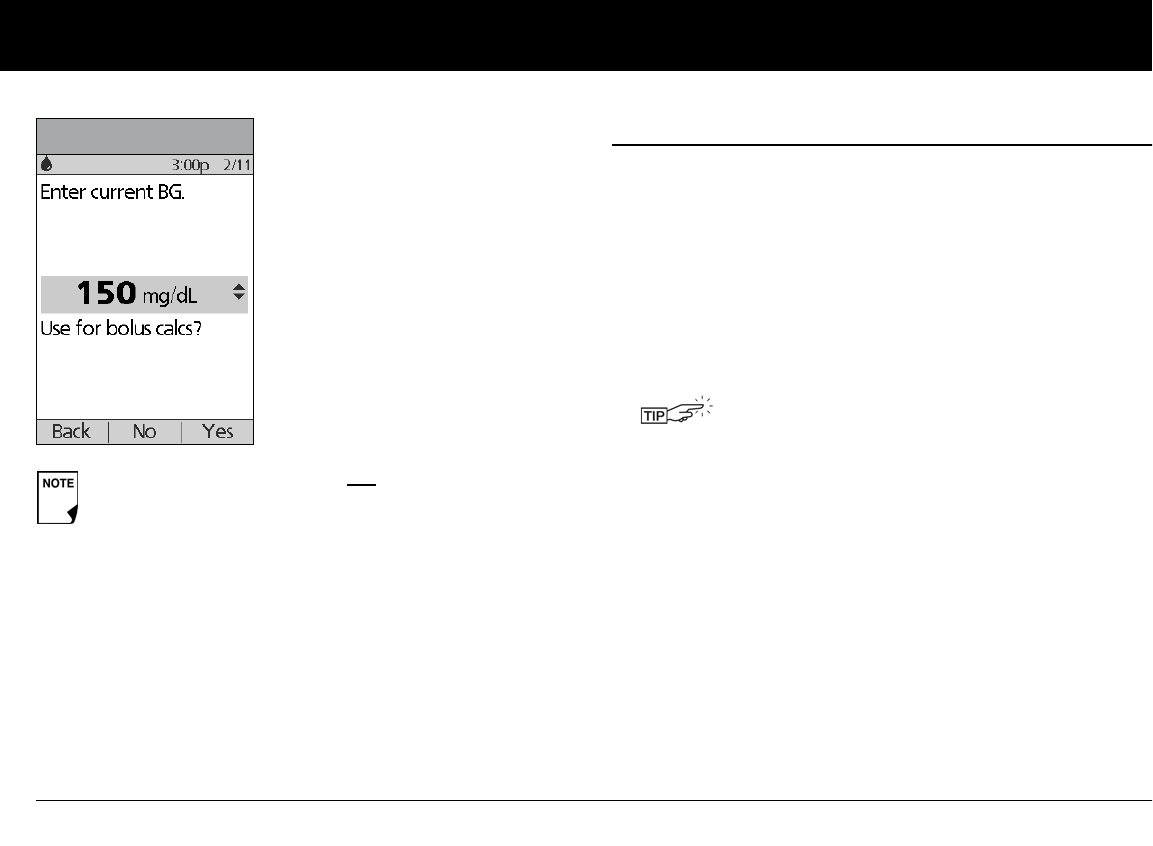
Checking Your Blood Glucose
92
7
n Entering Blood Glucose Readings Manually
You can enter blood glucose readings manually into the PDM.
This is particularly helpful if you use a separate blood glucose
meter.
1. On the Home screen, use the Up/Down Controller buttons
to choose More actions, then press Select.
2. Choose Add BG reading, then press Select.
3. Use the Up/Down Controller buttons to enter the BG read-
ing from your separate meter.
4. Press Tag to assign a tag to the reading. Press OK when fin-
ished. (For an explanation of entering tags, see page 90.)
5. Press Save to save the reading.
Or press Cancel to return to the More actions menu without
saving the reading.
The Bolus Entry screen does not open if:
• A regular bolus is currently in process
• The meter temperature is out of range
• The BG reading has been tagged as a Control
• The BG reading is less than your “Min BG for calcs”
• Insulin is suspended
Figure 7-24
To enter a “LOW” reading, press the Up/Down
Controller buttons down until you reach the mini-
mum value (20); then press down one more time.
To enter a “HIGH” reading, press up until you reach
the maximum value (600); then press up one more
time.
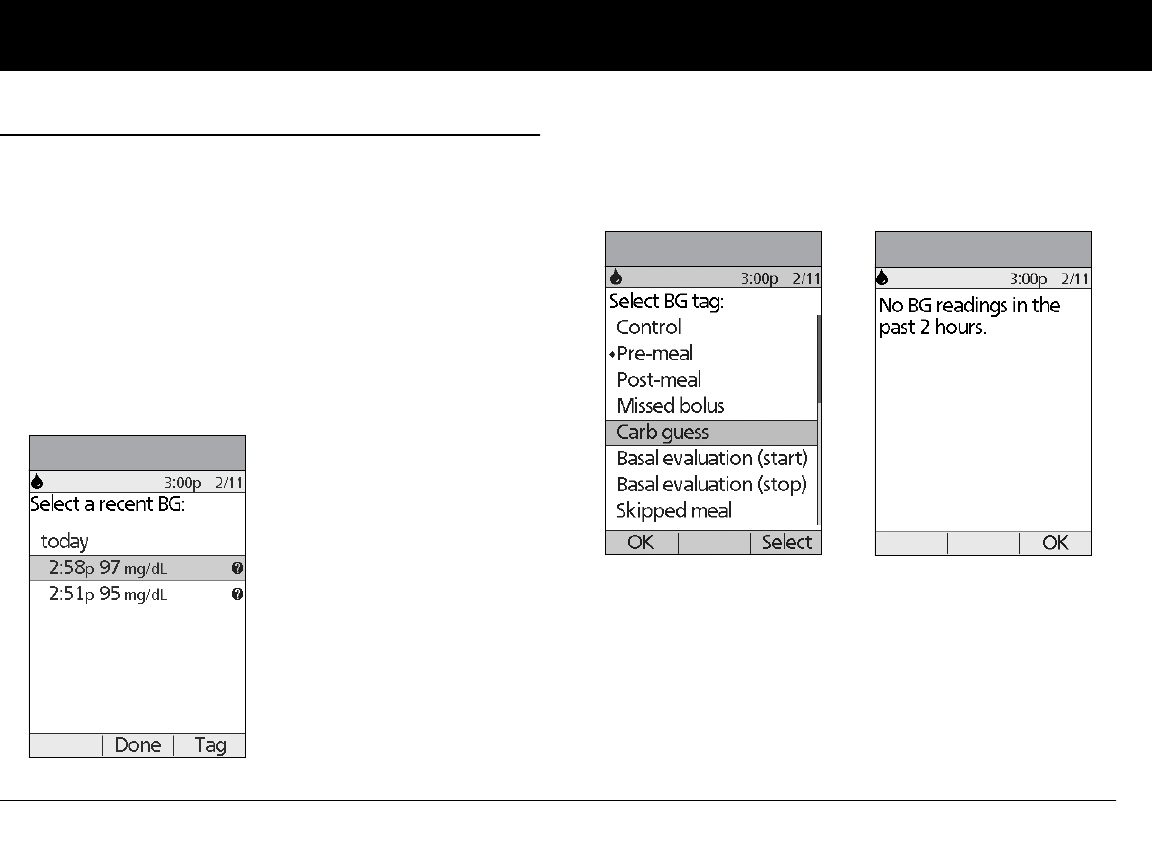
Checking Your Blood Glucose
93
7
n Editing Tags
Within 2 hours of a blood glucose reading, you can remove or
change a tag or add one. However, you cannot alter a Control tag.
1. On the Home screen, use the Up/Down Controller buttons
to choose More actions, then press Select.
2. Choose Assign/Edit BG tags, then press Select.
3. Use the Up/Down Controller buttons to choose a reading,
then press Tag (Figure 7-25). A User Info/Support icon (?) is
shown to the right of any reading to which you have already
assigned one or two tags.
Or press Done to return to the More actions menu.
4. Use the Up/Down Controller buttons to choose the first tag
you want, then press Select (Figure 7-26 on the next page). A
diamond icon appears next to selected tags, as in “Pre-meal” in
the figure. You can select up to two tags for each BG reading.
5. To remove a selected tag, highlight it and press Clear. (The
soft key changes from Select to Clear when you highlight
the tag.)
6. Press OK to return to the list of readings.
7. If no BG readings have been entered into the PDM within the
past 2 hours, you will see the screen in Figure 7-27. Press OK
to return to the More actions menu.
Figure 7-25
Figure 7-26 Figure 7-27
Checking Your Blood Glucose
94
7
To learn how to manage your list of tags and to add custom tags,
see “Manage the blood glucose tags list” in Chapter 6, Using the
Personal Diabetes Manager.
n Low and High Blood Glucose Readings
WARNINGS!
“LOW” or “HIGH” blood glucose readings can indicate a poten-
tially serious condition requiring immediate medical attention.
If left untreated, this situation can quickly lead to diabetic keto-
acidosis (DKA), shock, coma, or death.
Low readings
If your reading is below 20 mg/dL, the PDM displays: “LOW Treat
your low BG!” This indicates severe hypoglycemia (low blood
glucose).
Low reading with symptoms
If you get a “LOW Treat your low BG!” reading and feel symptoms
such as weakness, sweating, nervousness, headache, or confu-
sion, follow your healthcare provider’s recommendation to treat
hypoglycemia.
Low reading without symptoms
If you get a “LOW Treat your low BG!” reading, but have no symp-
toms of low blood glucose, then retest with a new test strip on
your fingers. If you still get a “LOW Treat your low BG!” reading,
perform a control solution test to ensure your system is working
properly. If the system is working properly, follow your health-
care provider's recommendation to treat hypoglycemia.
High readings
If your reading is above 600 mg/dL, the PDM displays “HIGH
Check for ketones!” This indicates severe hyperglycemia (high
blood glucose).
High reading with symptoms
If you get a “HIGH Check for ketones!” reading and feel symp-
toms such as fatigue, thirst, excess urination, or blurry vision,
follow your healthcare provider’s recommendation to treat
hyperglycemia.
High reading without symptoms
If you get a “HIGH Check for ketones!” reading, but have no
symptoms of high blood glucose, then retest with a new test
strip on your fingers. If you still get a “HIGH Check for ketones!”
reading, perform a control solution test to ensure your system is
working properly. If the system is working properly, follow your
healthcare provider's recommendation to treat hyperglycemia.
You can add and edit tags for LOW and HIGH BG readings
just as you would to any other reading. To add tags, see
page 90; to edit tags, see page 93.

Checking Your Blood Glucose
95
7
n Important Health-Related Information
For additional information, consult your test strip product infor-
mation sheet.
WARNINGS!
• Severe dehydration and excessive water loss may cause false
low results. If you believe you are suffering from severe dehy-
dration, consult your healthcare provider immediately.
• Test results below 70 mg/dL mean low blood glucose (hypo-
glycemia).
• Test results greater than 250 mg/dL mean high blood glu-
cose (hyperglycemia).
• If you get results below 70 mg/dL or above 250 mg/dL, but
do not have symptoms of hypoglycemia or hyperglycemia
(see Chapter 9, Living with Diabetes), repeat the test. If you
have symptoms or continue to get results that fall below 70
mg/dL or above 250 mg/dL, follow the treatment advice of
your healthcare provider.
• If you are experiencing symptoms that are not consistent
with your blood glucose reading and you have followed all
instructions described in this User Guide, call your healthcare
provider immediately.
• Do not use during xylose absorption testing.
• The lancing device is for individual use only and must not be
shared. Always use a new, sterile lancet; lancets are for single
use only.
• Objects that may be soiled with blood may then transmit
pathogens. See “Cleaning and disinfecting” in the Appendix
for instructions on how to clean or disinfect your PDM.
• “FDA Public Health Notification: Use of Fingerstick Devices on
More than One Person Poses Risk for Transmitting Blood-
borne Pathogens: Initial Communication” (2010) http://
www.fda.gov/MedicalDevices/Safety/AlertsandNotices/
ucm224025.htm.
• “CDC Clinical Reminder: Use of Fingerstick Devices on More
than One Person Poses Risk for Transmitting Bloodborne
Pathogens” (2010) http://www.cdc.gov/injectionsafety/
Fingerstick-DevicesBGM.html.
96
CHAPTER 8
Understanding Your Records
n Record Keeping
Record keeping is an important part of successful diabetes man-
agement. The Personal Diabetes Manager (PDM) helps simplify
this task. It automatically stores records of insulin delivery history,
blood glucose readings, alarms and carbohydrates. The PDM can
store over 5,000 records or approximately 90 days’ worth of infor-
mation. Once the memory is full, new information begins to
replace the oldest information.
Special symbols in record screens
In the record screens, you may encounter several special symbols:
If the PDM batteries run out, date and time are at risk.
Do NOT remove the old batteries until you have new
ones on hand. The PDM protects data in the mem-
ory for up to 2 hours after the batteries run out or are
removed.
Records with a question-mark symbol next to them have
additional information available. To see this information, use
the Up/Down Controller buttons to highlight the record,
then press the User Info/Support button to view details
about that record.
The record for this item has been “lost.”
If the PDM can no longer communicate with an
active Pod, then you must activate a new Pod. The
PDM may not be able to communicate with the
active Pod because of signal interference or because
you have discarded the Pod. If you change the Pod
without getting a Status update, any “unconfirmed”
records will be “lost.” If this occurs, the PDM will not
display insulin totals for any day containing “lost”
records.
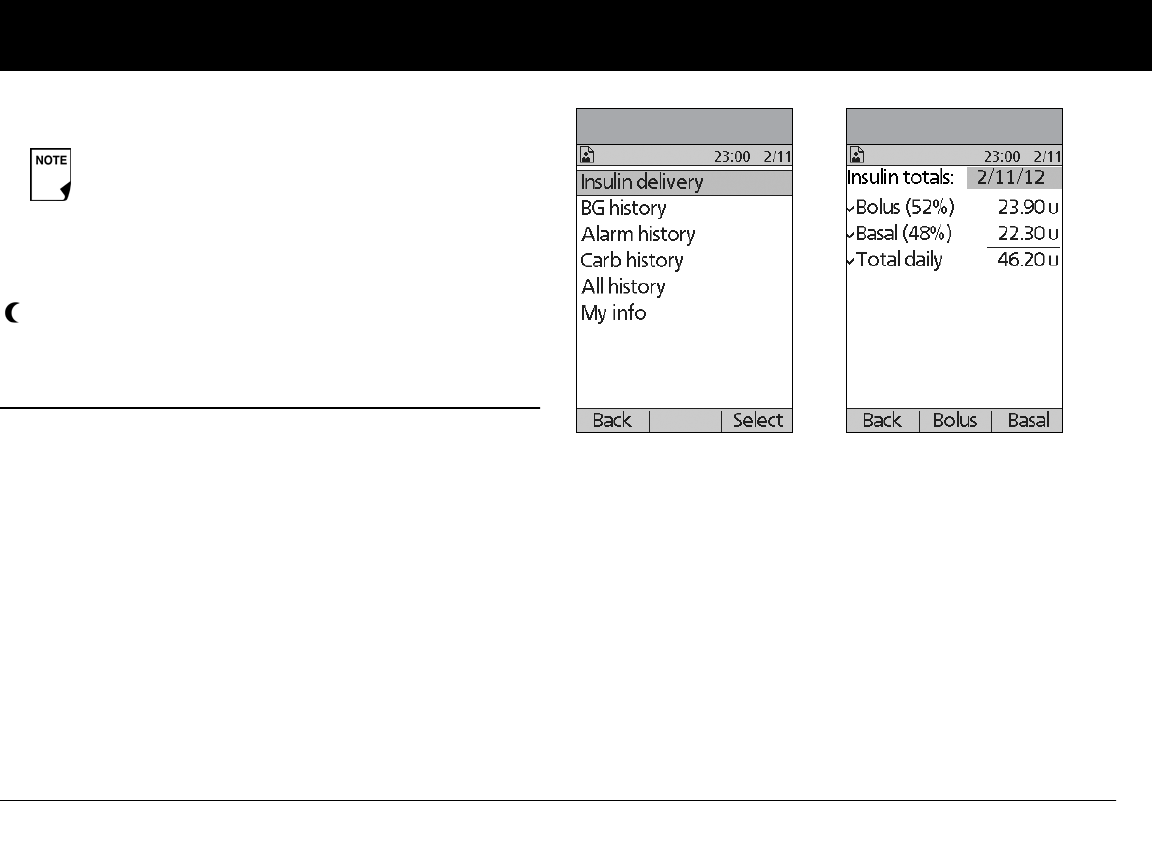
Understanding Your Records
97
8
n Insulin Delivery Records
The PDM stores:
•Basal rates (including any rate changes and temporary basals)
•Bolus doses (both normal and extended)
• Dates, times and how long insulin delivery was suspended,
and dates and times when it was resumed
• Total daily doses (basal plus boluses) by date
View insulin delivery records
1. On the Home screen, use the Up/Down Controller buttons
to choose My records, then press Select.
2. Choose Insulin delivery, then press Select (Figure 8-1).
The PDM displays a summary of today’s information,
including total boluses delivered, total basal amount deliv-
ered and total daily dose delivered (Figure 8-2). Press the
Up/Down Controller buttons to view the summary for
previous days.
Wherever you see the ? symbol, press the User Info/Support
button to see additional information.
3. To review your basal history by day, press Basal.
The display shows the basal deliveries that have occurred for
the current day, most recent first (Figure 8-3 on the next
page). The active basal rate or program is indicated by a dia-
mond icon (u).
4The record for this item is “unconfirmed.”
When you power on the PDM, it will request a status
update from the active Pod and then update the
insulin history. If the PDM does not receive a status
update from the Pod, the PDM will update history
with “unconfirmed” records. The next time the PDM
receives a status update, it will update these records.
This insulin delivery item spans midnight. The date given
is the start date.
Figure 8-1 Figure 8-2
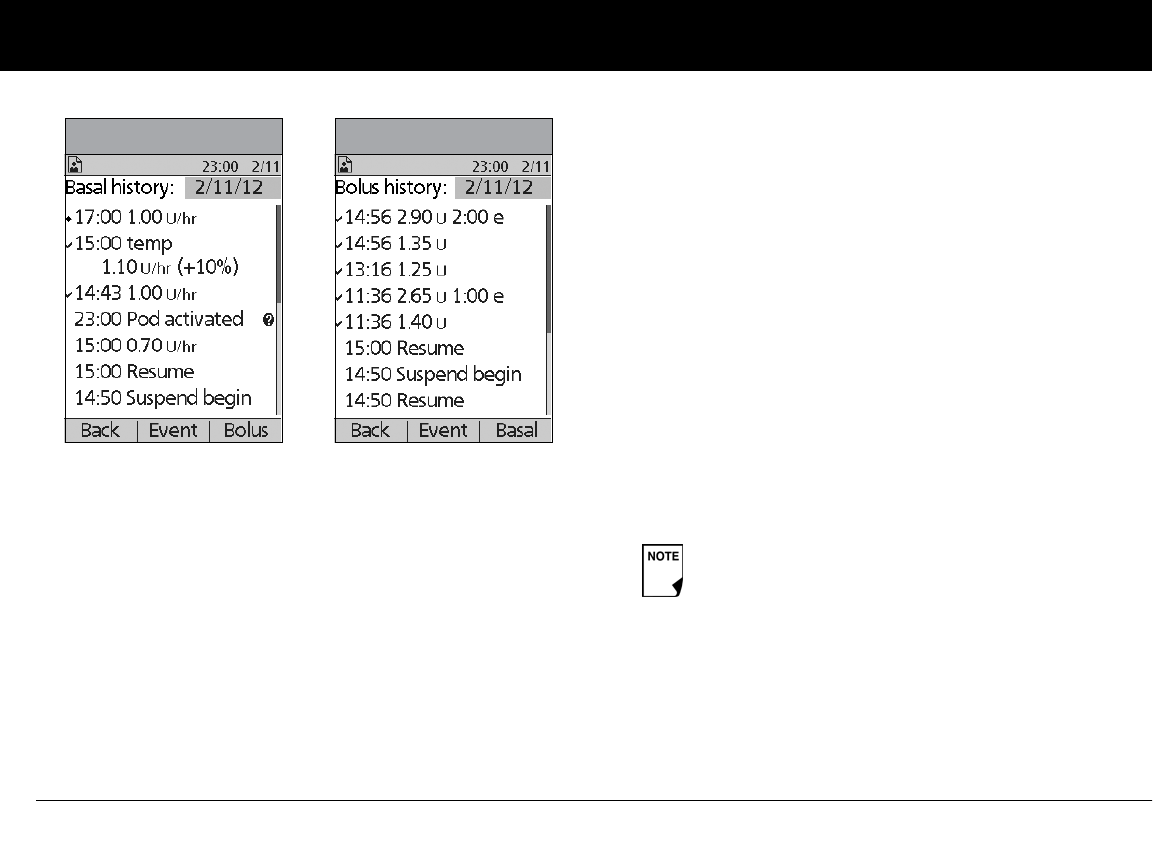
Understanding Your Records
98
8
For a temporary basal program, the display shows the %
adjustment that have been made to the default basal rate
(active or current). So, in Figure 8-3, “1.10 temp U/hr (+10%)”
means that you delivered a temporary basal of 1.10 units per
hour, which was 10% more than the default basal. (Notice
that two hours later, the basal rate returns to the default.)
Also, the “Pod activated” entry shows what time you applied
a new Pod.
Press the Up/Down Controller buttons for earlier or later
dates.
Press Event to use the Up/Down Controller buttons to scroll
through the list of information on the screen. Choose a
record, then press the User Info/Support button to view
details about that record. Record details may include insulin
delivery that was interrupted due to a Pod alarm, Pod deacti-
vation, or user cancellation. The screen shows the amount of
the bolus or basal that remained undelivered.
4. Press Day to return to dates.
5. To review your bolus history by day, press Bolus.
The display indicates whether the bolus was normal or
extended (marked “e” in Figure 8-4). Normal and extended
boluses are displayed separately even if they were pro-
grammed at the same time. Extended boluses are shown
with time and duration. If an extended bolus is active, a dia-
mond icon (u) appears next to it. If a bolus was cancelled,
only the amount delivered before cancellation is shown.
Press the Up/Down Controller buttons for different dates.
Press Event to use the Up/Down Controller buttons to scroll
through the list of information on the screen. Press Day to
return to dates.
Figure 8-3 Figure 8-4
The amount shown after cancellation may be in 0.05
unit increments, even though you may have pro-
grammed the bolus increment to be in 0.10 units.
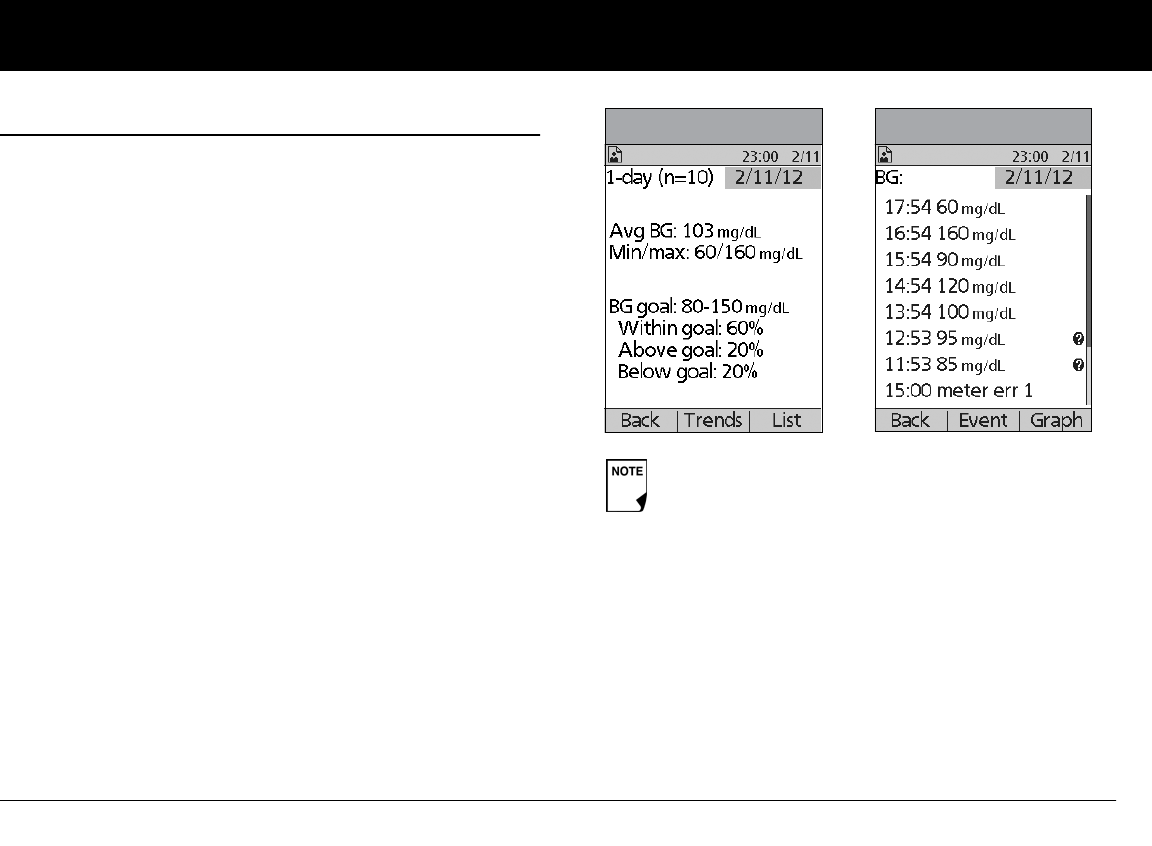
Understanding Your Records
99
8
n Blood Glucose Records
The PDM stores blood glucose records for the past 90 days. You
can choose to view individual readings, single-day trends with
individual readings, or trends for the previous 7, 14, 30, 60 or 90
days.
View single-day trends
1. On the Home screen, use the Up/Down Controller buttons
to choose My records, then press Select.
2. Choose BG history, then press Select.
The PDM displays the current-day trends first (Figure 8-5),
including:
• Number of days and number of blood glucose
readings (n)
• Average blood glucose (Avg BG)
• Lowest and highest blood glucose (Min/max)
• The BG goal you have set
• Percentage of readings within the BG goal
• Percentage of readings above the BG goal
• Percentage of readings below the BG goal.
3. Press List to see a list of the current day’s readings
(Figure 8-6).
LOW and HIGH readings are included in the number
of BG readings (n), but not in calculations or averages.
Figure 8-5 Figure 8-6
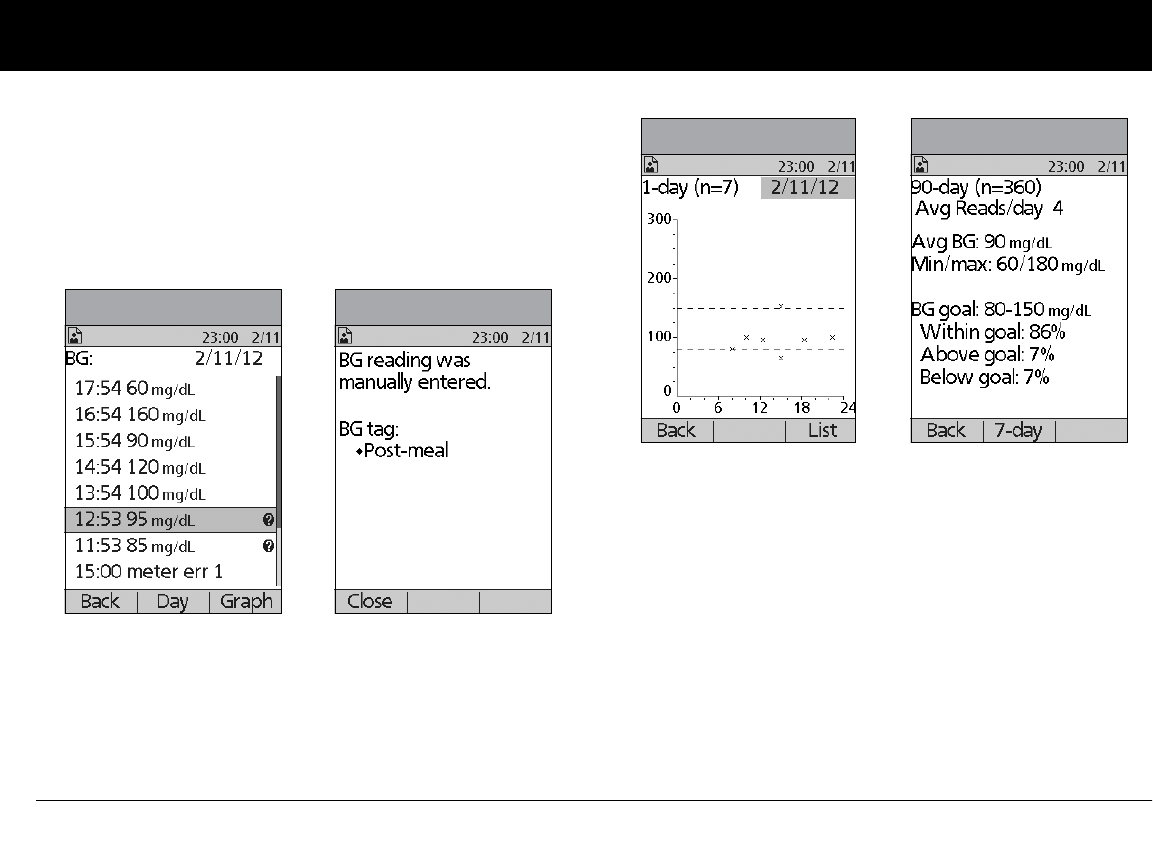
Understanding Your Records
100
8
In the List view, press Event to select individual readings.
Readings with a question mark icon (?) next to them have
additional information available (Figure 8-7). To see this infor-
mation, use the Up/Down Controller buttons to choose the
reading. Then press the User Info/Support button to view
details about that reading (Figure 8-8).
4. Press Close to return to the List view.
5. Press Graph to see a graph of the data (Figure 8-9).
View multiple-day trends
1. On the Home screen, use the Up/Down Controller buttons
to choose My records, then press Select.
2. Choose BG history, then press Select.
3. Press Trends to display blood glucose data for the past 7
days.
4. Continue pressing the middle soft key to view trends for the
previous 14, 30, 60 and 90 days.
5. The PDM displays the same details for multiple days as for
single days, plus the average number of BG measurements
taken per day (Figure 8-10).
Figure 8-7 Figure 8-8
Figure 8-9 Figure 8-10
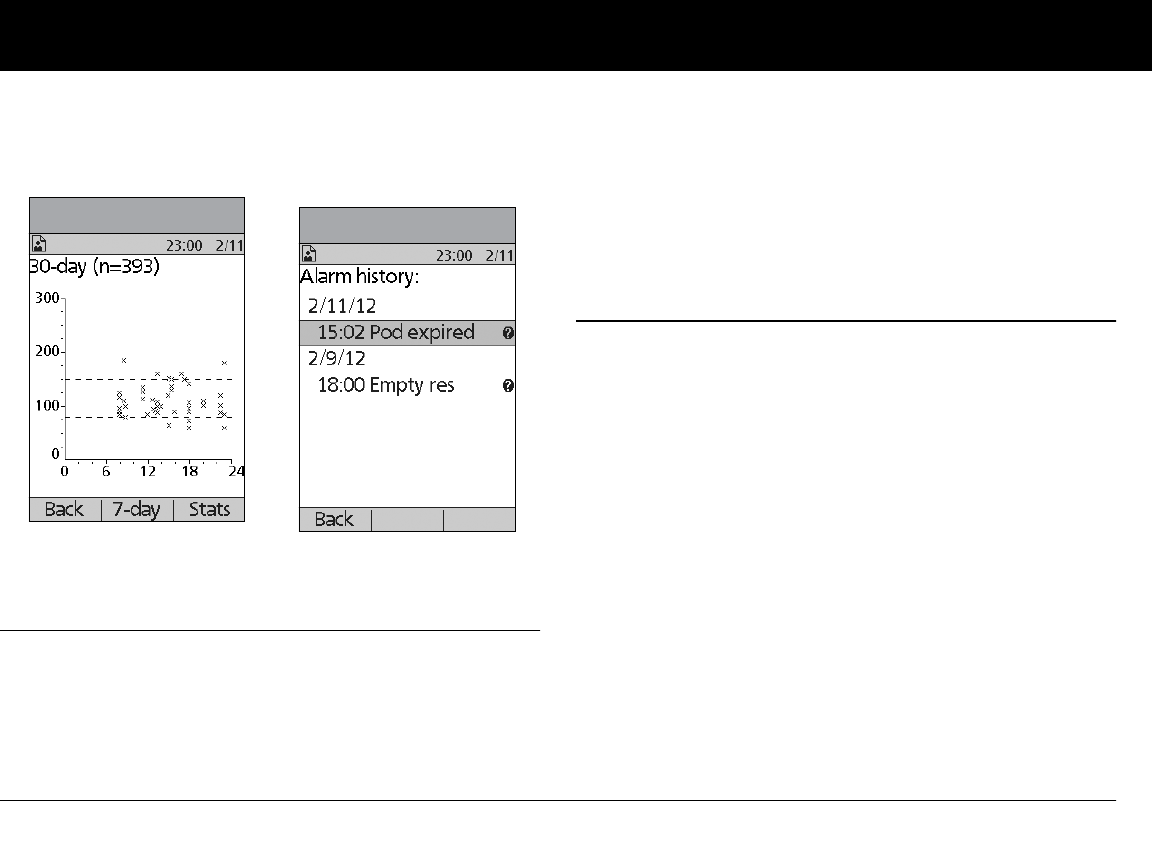
Understanding Your Records
101
8
For the 7-, 14- and 30-day trends, press Graph to see a graph
of the trends (Figure 8-11). Graphs are not available for 60- or
90-day trends. Press Stats to return to the detail view.
6. Press Back to return to the single-day trends.
n Alarm Records
The PDM lists the entire alarm history for the mylife OmniPod
System. The PDM can store over 90 days’ worth of alarm records.
1. On the Home screen, use the Up/Down Controller buttons
to choose My records, then press Select.
2. Choose Alarm history, then press Select.
The PDM displays the date, time, and type of each alarm
(Figure 8-12).
3. Press the Up/Down Controller buttons to see additional
screens.
4. Choose an alarm record, then press User Info/Support to
see more information.
n Carbohydrate Records
The PDM displays the records of carbohydrates you have
entered.
1. On the Home screen, use the Up/Down Controller buttons
to choose My records, then press Select.
2. Choose Carb history, then press Select.
The PDM displays the date, time and grams of carbohydrate
you have entered (Figure 8-13 on the following page).
3. Press the Up/Down Controller buttons to see additional
days.
Press Event to use the Up/Down Controller buttons to scroll
through the list of information on the screen. Press Day to
use the Up/Down Controller buttons for dates.
Figure 8-11 Figure 8-12
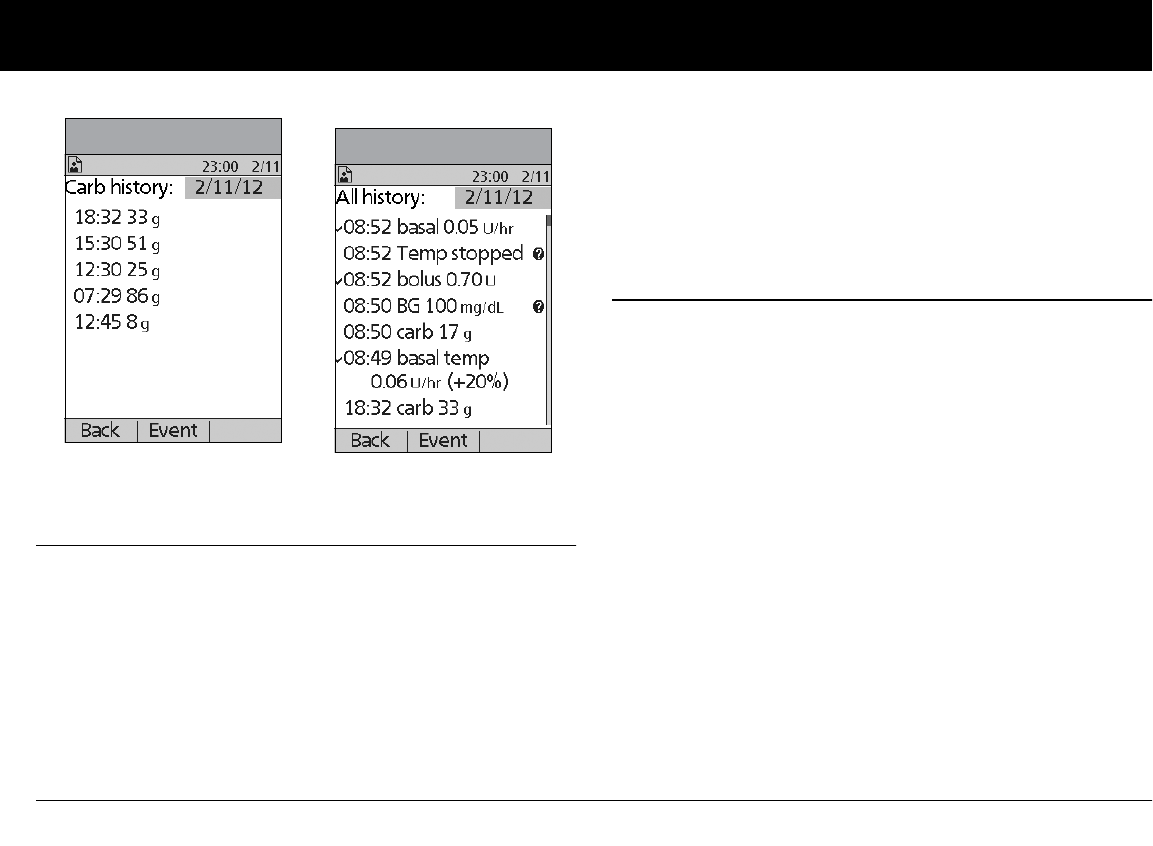
Understanding Your Records
102
8
n All Records
The PDM displays the combined insulin delivery, blood glucose,
alarm and carbohydrate records.
1. On the Home screen, use the Up/Down Controller buttons
to choose My records, then press Select.
2. Choose All history, then press Select.
The PDM displays all history for the most recent date (Figure
8-14).
3. Press the Up/Down Controller buttons to see additional
days.
Press Event to use the Up/Down Controller buttons to scroll
through the list of information on the screen. Press Day to
use the Up/Down Controller for dates.
n User Information/Support
You or your healthcare provider may have entered personal
contact information during your start-up visit. To view this infor-
mation, press the User Info/Support button (to the right of the
Power button) while on the Home screen. Or follow the steps
below to view the information. You can add or change the user
information at any time.
You may want to include your name, address, phone, email
address, emergency contact and phone, doctor’s or healthcare
provider’s name and phone, prescription numbers or other
information.
The user information screen also displays product information
for your mylife OmniPod System (make, model, serial number).
You cannot change this information.
Figure 8-13 Figure 8-14
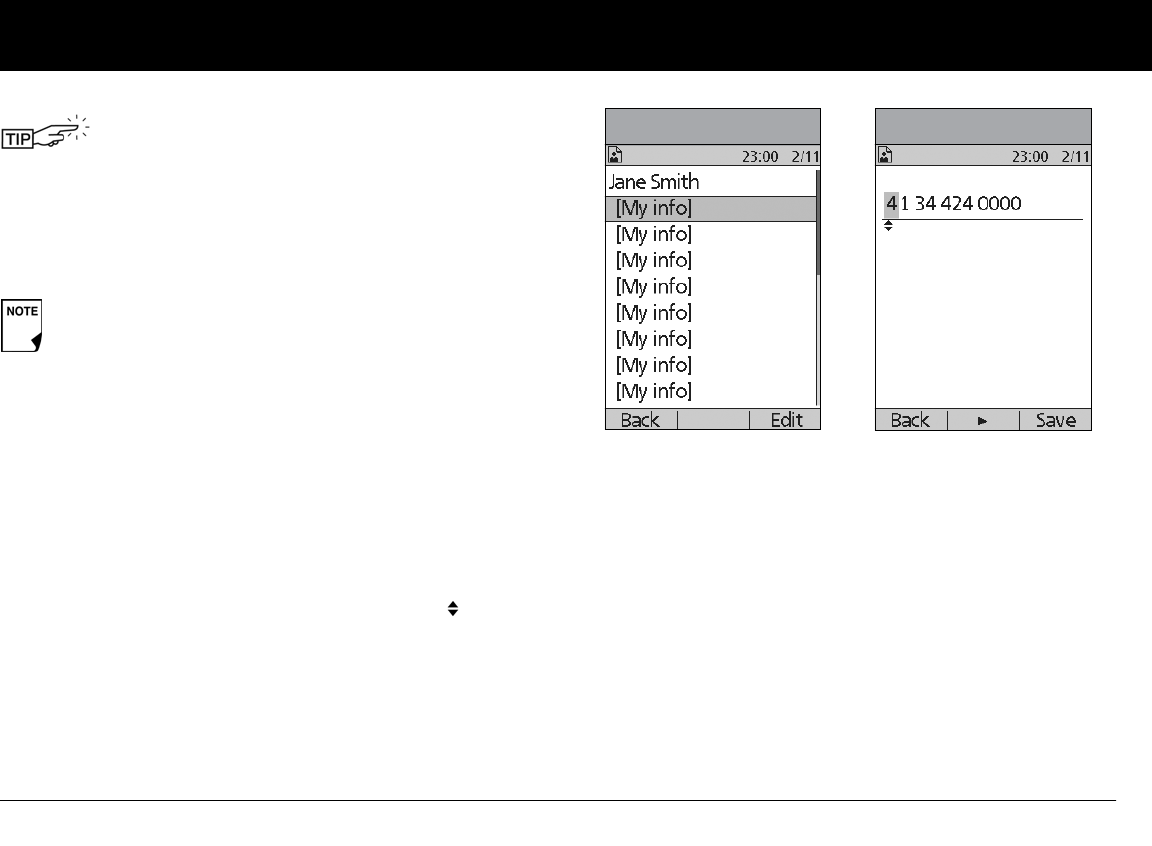
Understanding Your Records
103
8
Add or change user information
1. On the Home screen, use the Up/Down Controller buttons
to choose My records, then press Select.
2. Choose My info, then press Select.
3. Choose an existing line or [My info] (Figure 8-15), then press
Edit.
4. Press the Up/Down Controller buttons to scroll through the
list of characters. An up-and-down arrow symbol ( ) on the
screen indicates the character that can be changed.
5. Press the middle soft key to move the underscore to the next
character.
6. Enter each character one at a time. For example, if you want
to enter your address, you might enter 5, 6, 5, [space], M, a, i, n,
[space], S, t, [period]. (A blank character or space is the first
and last option in the scrolling menu.)
For your healthcare provider and local phone number, you
might enter J, a, n, e, [space], S, m, i, t, h, [comma], [space], 5, 5,
5, [hyphen], 1, 2, 3, 4 (Figure 8-16).
7. Press Save.
8. Repeat steps 3–7 for each line of personal information you
want to enter or change. Twenty lines are available.
The User Info/Support icon is also displayed on
the suggested bolus screen. For information about
the support information displayed on these
screens, see Chapter 4, Understanding and Deliver-
ing Bolus Doses.
The first line of My Info displays the information that was
entered for the ID screen during your PDM setup. For
information on editing this line, see Chapter 6, Using the
Personal Diabetes Manager, “Customize the Personal
Diabetes Manager.”
Figure 8-15 Figure 8-16
104
CHAPTER 9
Living with Diabetes
n Your Role: Safely Using the mylife OmniPod
System
Before deciding on the mylife OmniPod® Insulin Management
System, you and your healthcare provider discussed the advan-
tages and benefits of the mylife OmniPod System, as well as the
responsibilities that come with insulin pump therapy. Remem-
ber: safe use begins and ends with you. If you have questions or
doubts about being able to safely use the mylife OmniPod Sys-
tem at any time, consult your healthcare provider immediately.
Most problems are easily avoided by:
• Learning all you can about successful diabetes management.
• Being actively involved in your treatment.
• Checking your blood glucose levels frequently.
• Washing your hands and disinfecting infusion sites to reduce
the possibility of infection.
• Being aware of the signs of hypoglycemia (low blood glu-
cose), hyperglycemia (high blood glucose), and diabetic keto-
acidosis (DKA). (See “Avoid Lows, Highs and DKA” later in this
chapter.)
• Keeping a diabetes emergency kit with you at all times. (See
“Prepare for Emergencies” later in this chapter.)
• Knowing how to contact your healthcare provider in case of
an emergency.
If you are unable to use the mylife OmniPod Insulin
Management System according to instructions, you
may be putting your health and safety at risk. Talk
with your healthcare provider if you have questions or
concerns about using the mylife OmniPod System.
Living with Diabetes
105
9
n Daily Diabetes Management Activities
To ensure proper mylife OmniPod System operation and your
continued good health:
• Check your blood glucose frequently
• Inspect the infusion site daily
Check your blood glucose frequently
When you routinely check your blood glucose level, you can iden-
tify and treat high or low blood glucose before it becomes a
problem (see “Avoid lows, highs, and DKA” later in this chapter).
Check your blood glucose (BG):
• At least 4 to 6 times a day: when you wake up, before every
meal, and before going to bed
• Whenever you feel nauseated or sick
• Before driving a car
• Whenever your blood glucose has been running unusually
high or low
• If you suspect that your blood glucose is high or low
• Before, during, and after exercise
• As directed by your healthcare provider
Inspect the infusion site daily
At least once a day, use the Pod’s viewing window to inspect the
infusion site. Check the site for signs of infection, such as pain,
swelling, redness, discharge or heat.
If an infusion site shows signs of infection:
1. Immediately remove the Pod and apply a new
one at a different site (see Chapter 5, Using the Pod).
2. Contact your healthcare provider.
Treat the infection according to instructions from
your healthcare provider. (Refer to Chapter 5, Using
the Pod, for how to prepare and care for infusion
sites.)
Consider making infusion site checks a part of your
regular daily routine (like showering or brushing your
teeth). That way, it’s easy to remember. Verify there is
no wetness or scent of insulin, which may indicate
the cannula has dislodged.
If you observe blood in the cannula, check your blood
glucose more frequently to ensure insulin delivery
has not been affected. If you experience unexpected
elevated blood glucose levels, change your Pod.
Living with Diabetes
106
9
n Prepare for Emergencies
n Water and Your Pod
The Pod is waterproof to a depth of 7.6 meters (25 feet) for up to
60 minutes (IPX8). After the Pod gets wet, rinse it off with clean
water and dry it with a towel.
Keep an emergency kit with you at all times to
quickly respond to any diabetes emergency. The kit
should include:
• Several new, sealed Pods
• Extra new PDM batteries (at least two AAA alka-
line). Do not use rechargeable batteries.
• A vial of rapid-acting U-100 insulin (See the warn-
ing on page 8 of the Introduction for insulins
approved for use in the mylife OmniPod System.)
• Syringes for injecting insulin
• Instructions from your healthcare provider about
how much insulin to inject if delivery from the
Pod is interrupted
• Blood glucose test strips
• Ketone test strips
• Lancing device and lancets
• Glucose tablets or another fast-acting source of
carbohydrate
• Alcohol prep swabs
• A copy of the letter from your healthcare pro-
vider for airline security (see “Minimize airport
security delays” later in this chapter)
• Phone numbers for your healthcare provider
and/or doctor in case of an emergency
• Glucagon kit and written instructions for giving
an injection if you are unconscious (see “Avoid
Lows, Highs and DKA” later in this chapter)
Ask your healthcare provider to help you develop
plans for handling emergency situations, including
what to do if you cannot reach your healthcare
provider.
Do NOT expose your Pod to water at depths greater
than 7.6 meters (25 feet) or for longer than 60 min-
utes. Check the infusion site often to make sure the
Pod and soft cannula are securely applied and in
place. If the cannula is not properly inserted, hyper-
glycemia may result.
Living with Diabetes
107
9
n Traveling and Vacationing
Plan for changing time zones
If you’re planning a vacation or business trip to a different time
zone, you may need to adjust your basal rate programs. For
changes of just a few hours, basal rate adjustments are minor
and easy to calculate. For long-distance travel, however, figuring
out the correct program can be more challenging. Your health-
care provider can help with these adjustments.
Take enough supplies
Keeping your emergency kit with you during trips or vacations
is especially important (see “Prepare for Emergencies” on
page 106). It may be difficult or impossible to get insulin or
supplies in an unfamiliar place. If traveling by air, be sure to pack
your supplies in your carry-on luggage. When packing for travel,
take more supplies than you think you’ll need. Be sure to include:
• Diabetes emergency kit packed in your carry-on luggage
• Enough Pods for your trip, plus a backup supply
• Extra new PDM batteries. Do not use rechargeable batteries.
• Additional blood glucose meter
• Insulin syringes or pens in case you need injections
• Several vials of insulin or insulin cartridges if you use a pen
• Glucagon kit (Make sure any person you are traveling with
knows how to give the injection.)
The Personal Diabetes Manager (PDM) is not water-
proof. Do NOT place it near water and never immerse
it.
Living with Diabetes
108
9
• Alcohol prep swabs
• Written prescriptions for all medications and supplies.
(Generic medications may be easier to find than brand
names outside the country.)
Minimize airport security delays
With changing airport security checks and screening procedures,
you may have questions on how this impacts traveling with
your diabetes supplies. Below you will find more information on
prepping for travel and what you can expect when going
through security checkpoints.
Travel Preparation
• Review the airport websites for travel updates
• Pack extra supplies and hypoglycemia treatments
• Carry contact information for your physician
• Arrive at the airport 2-3 hours prior to your flight
To ensure airport security checks run smoothly, be sure you have
the following items easily accessible:
• All diabetes supplies in your carry-on luggage
• A signed letter from your healthcare provider explaining
you need to carry insulin supplies and mylife OmniPod
equipment
• Prescriptions for all medications and supplies with origi-
nal prescription labels
Screening Procedures
The airport may offer the option of requesting a visual inspection
of your medical supplies rather than putting them through the
X-ray. This must be requested before the screening process
begins. Your medical supplies should be ready in a separate bag
when you approach the Security Officer.
In order to prevent contamination or damage to your supplies,
you should be asked at the security checkpoint to display, han-
dle, and repack your own supplies during the visual inspection
process. Any medication and/or associated supplies that cannot
be cleared visually must be submitted for X-ray screening.
If you're concerned or uncomfortable about going through the
walk-through metal detector, you should notify the Security Offi-
cer that you're wearing a pump and would like a full-body pat-
down and a visual inspection of your pump instead. You should
also advise the Security Officer that the insulin pump cannot be
When you travel outside the country or for long peri-
ods of time, be sure to take extra Pod supplies. Call
Customer Care to order additional supplies for your
trip.
Living with Diabetes
109
9
removed because it is inserted with a catheter (needle) under
the skin.
Visit the airport websites if you have any further questions or
concerns.
If the security detector goes off, tell the security screener that you
have diabetes and wear an insulin Pod (pump).
Keep supplies accessible
On airplanes and trains, keep these items with you, rather than
checking them:
• Personal Diabetes Manager (PDM)
• An emergency kit
• Vials of insulin (cargo area temperatures may affect insulin)
• A copy of your healthcare provider’s letter (see “Minimize air-
port security delays”)
• Prescriptions for insulin and supplies
• Snacks, in case food is not available
• Bottled water (especially on planes) to prevent dehydration
The name and phone number of a physician at your final
destination, in case of emergency.
n Avoid lows, highs, and DKA
You can avoid most risks related to using the mylife OmniPod
System by practicing proper techniques and by acting promptly
at the first sign of trouble. You can avoid potential problems by
knowing the signs of hypoglycemia (low blood glucose), hyper-
glycemia (high blood glucose), and diabetic ketoacidosis (DKA).
The easiest and most reliable way to avoid these conditions is to
check your blood glucose often.
General precautions
• Keep careful records and discuss changes and adjustments
with your healthcare provider.
• Tell your healthcare provider if you have extreme highs or
lows, or if highs or lows are occurring more often than usual.
• If you have technical problems with your mylife OmniPod
System and cannot resolve them, do not hesitate to call Cus-
tomer Care.
Hypoglycemia (Low Blood Glucose)
Hypoglycemia can occur even when a Pod is working properly.
Never ignore the signs of low blood glucose (no matter how
mild). If left untreated, severe hypoglycemia can cause seizures
or lead to unconsciousness. If you suspect that your blood glu-
cose level is low, check it.
Pods and PDMs can safely pass through airport
X-ray machines (see the “mylife OmniPod System Notice
Concerning Interference” in the Appendix).
Living with Diabetes
110
9
Symptoms of hypoglycemia
Never ignore these symptoms:
• Shakiness
• Fatigue
• Unexplained sweating
• Cold, clammy skin
• Weakness
• Blurred vision or a headache
• Sudden hunger
• Rapid heart rate
• Confusion
• Tingling in the lips or tongue
• Anxiety
To avoid hypoglycemia (low blood glucose)
• Work with your healthcare provider to establish individual-
ized blood glucose targets and guidelines.
• Keep a fast-acting carbohydrate with you at all times to
respond quickly to low blood glucose. Examples of fast-
acting carbs are glucose tablets, hard candies or juice.
• Teach your friends, family members and colleagues to
recognize the signs of hypoglycemia, so they can help if you
develop hypoglycemia unawareness or a severe adverse
reaction.
• Keep a glucagon injection kit with your emergency supplies.
Teach friends and family members how to give a glucagon
injection in case you have severe hypoglycemia and become
unconscious.
Hypoglycemia unawareness is a condition in which
you do not realize when your blood glucose level is
low. If you are prone to hypoglycemia unawareness,
you may want to use the mylife OmniPod System’s
blood glucose reminder and check your blood glu-
cose more frequently. See “Alerts and Reminders” in
Chapter 6, Using the Personal Diabetes Manager, for
how to set the reminder.
Make sure your blood glucose is at least 100 mg/dL
before driving or working with dangerous machinery
or equipment. Hypoglycemia may cause you to lose
control of a car or dangerous equipment. Also, when
you focus intently on a task, you may miss the symp-
toms of hypoglycemia.
Periodically check the expiration date of your glucagon
kit to make sure it has not expired.
Living with Diabetes
111
9
Again, frequent blood glucose checks are the key to avoiding
potential problems. Detecting low blood glucose early lets you
treat it before it becomes a problem.
Check with your healthcare provider for guidance in any and all
areas listed above.
To treat hypoglycemia (low blood glucose)
Any time your blood glucose is low, treat immediately. Check it
every 15 minutes while you are treating, to make sure you don’t
overtreat the condition and cause blood glucose levels to rise
too high.
1. If blood glucose is below 70 mg/dL, eat or drink 15 grams of
fast-acting carbohydrate, such as glucose tablets, juice, or
hard candy (see “How much is 15 grams of carbohydrate?”).
2. Check blood glucose again after 15 minutes.
3. If blood glucose remains low, eat another 15 grams of
carbohydrate. Contact your healthcare provider as needed
for guidance.
4. Repeat steps 2 and 3 until blood glucose is within the BG goal.
5. Investigate possible cause for hypoglycemia to avoid similar
problems in the future (see “Possible causes of hypoglycemia
(low blood glucose)” on page 115).
Always carry medical identification (emergency
wallet card) and wear an emergency medical neck-
lace or bracelet such as the Medic Alert tag. (See the
end of the Appendix for address, telephone and
website information for obtaining these items.)
Even if you cannot check your blood glucose, do NOT
wait to treat symptoms of hypoglycemia, especially
if you are alone. Waiting to treat symptoms could
lead to severe hypoglycemia, which can quickly lead
to shock, coma or death.
Do NOT use chocolate or candy bars to treat low
blood glucose. Their fat content slows down glucose
absorption.
Living with Diabetes
112
9
How much is 15 grams of carbohydrate?
Examples of fast-acting foods:
Three 5-gram glucose tablets, or four 4-gram tablets
118 milliliters of apple or orange juice
6 pieces of hard candy
1/2 can of regular (non-diet) soda
30 milliliters of table sugar or honey
Teach people you trust (like family members and
close friends) how to give a glucagon injection. You
will need to rely on them to give it to you if you have
severe hypoglycemia and become unconscious.
Include a copy of the glucagon instructions in your
emergency kit and periodically review the proce-
dure with family and friends.
Living with Diabetes
113
9
Possible causes of hypoglycemia (low blood glucose)
Possible cause of low
blood glucose
Suggested action
Incorrect basal
program
Confirm that correct basal program
is active.
Confirm that PDM time is set cor-
rectly.
Consult your healthcare provider
about adjusting your basal pro-
grams or using a temporary (temp)
basal rate.
Incorrect bolus
timing
Take bolus with food.
Check blood glucose before giving
meal bolus; if necessary, adjust
bolus.
Check bolus size and timing.
Do NOT overcorrect for post-meal
glucose levels.
Check carb intake.
Consult healthcare provider for
guidance.
Bolus too large
Possible cause of low
blood glucose
Suggested action
Incorrect target
blood glucose levels
Consult healthcare provider about
refining these settings as needed.
Incorrect correction
factor
Incorrect insulin-to-
carb ratio (IC)
Prone to severe hypo-
glycemia
Consult healthcare provider about
hypoglycemia unawareness and
about raising target blood glucose
levels.
Hypoglycemia
unawareness
Unplanned physical
activity
If blood glucose is below
100 mg/dL
,
eat a snack before activity.
Consult your healthcare provider
about using a temporary (temp)
basal rate.
Living with Diabetes
114
9
Hyperglycemia (high blood glucose)
Insulin Pods use rapid-acting insulin, so you have no long-acting
insulin in your body. If an occlusion (interruption of insulin deliv-
ery from the Pod) occurs, your blood glucose can rise rapidly.
Symptoms of hyperglycemia (high blood glucose)
• Fatigue
• Frequent urination, especially during the night
• Unusual thirst or hunger
• Unexplained weight loss
• Blurred vision
• Slow healing of cuts or sores
Possible cause of low
blood glucose
Suggested action
Prolonged or intense
exercise
Adjust insulin delivery as instructed
by your healthcare provider.
Check blood glucose before, during
and after activity and treat as
necessary.
Consult your healthcare provider
about adjusting your basal pro-
grams or using a temporary (temp)
basal rate.
Low carbohydrate
intake prior to
activity
Consume carbohydrate before
activity, especially if you have not
decreased insulin beforehand.
Alcohol consumption Check blood glucose before going
to bed.
Consult healthcare provider for
guidance.
Effects of exercise can last
several hours—even a full
day—after activity ends.
An occlusion may result from a blockage, Pod mal-
function or from using old or inactive insulin. If
insulin delivery is interrupted by an occlusion, check
your blood glucose level and follow the treatment
guidelines established by your healthcare provider.
Hyperglycemia could result if appropriate actions
are not taken.
Hyperglycemia symptoms can be confusing.
Always check your blood glucose before you
treat for hyperglycemia.
Living with Diabetes
115
9
To avoid hyperglycemia (high blood glucose)
Check your blood glucose at least 4–6 times a day (when you
wake up, before each meal, and before going to bed). In addi-
tion, always check it:
• If you feel nauseated or sick
• Before driving a car
• Whenever your blood glucose has been running unusually
high or low
• If you suspect that your blood glucose is high or low
• Before, during and after strenuous physical activities
• As directed by your healthcare provider
To treat hyperglycemia (high blood glucose)
Always check your blood glucose levels frequently while treating
hyperglycemia. You don’t want to over-treat the condition and
cause your BG level to drop too far.
1. Check your blood glucose level. The result will help you to
find out how much insulin is needed to return your blood
glucose to the BG goal.
2. If your blood glucose is 250 mg/dL or above, check for
ketones. If ketones are present, follow your healthcare
provider’s guidelines.
3. If ketones are not present, take a correction bolus as pre-
scribed by your healthcare provider.
4. Check blood glucose again after 2 hours.
5. If blood glucose levels have not decreased, take a second
bolus by injection, using a sterile syringe. Ask your healthcare
provider whether to inject the same amount of insulin as in
step 3.
6. If you feel nauseated at any point, check for ketones and call
your healthcare provider immediately (see “Diabetic ketoaci-
dosis (DKA)” later in this chapter).
7. If blood glucose remains high after another 2 hours (a total of
4 hours), replace the Pod. Use a new vial of insulin to fill the
new Pod. Then:
• Contact your healthcare provider for guidance.
• Drink eight ounces of water every 30 minutes until blood
glucose is within BG goal.
8. Investigate possible cause for hyperglycemia to avoid similar
problems in the future [see “Possible causes of hyperglyce-
mia (high blood glucose)“].
If you need emergency attention, ask a friend or
family member to take you to the emergency
room or call an ambulance. Do NOT drive yourself.
Living with Diabetes
116
9
Possible causes of hyperglycemia (high blood glucose)
Possible cause of high
blood glucose
Suggested action
Expired insulin Deactivate and remove used Pod.
Apply a new Pod filled from a new
vial of insulin.
Insulin exposed
to extreme
temperatures
Infusion site in or
near a scar or mole
Deactivate and remove used Pod.
Apply a new Pod in a different
location.
Infected infusion site Deactivate and remove used Pod.
Apply a new Pod in a different loca-
tion and consult your healthcare
provider.
Dislodged cannula Deactivate and remove used Pod.
Apply a new Pod in a different
location.
Possible cause of high
blood glucose
Suggested action
Avoid sites near a waistband,
belt, or other areas where fric-
tion may dislodge the cannula.
Living with Diabetes
117
9
Possible cause of high
blood glucose
Suggested action
Empty Pod Deactivate and remove used Pod.
Apply a new Pod in a different
location.
Incorrect basal
program
Confirm that correct basal program
is active.
Confirm that PDM time is set
correctly.
Consult your healthcare provider
about adjusting your basal pro-
grams or using a temporary (temp)
basal rate.
Incorrect bolus
timing
Check carb intake.
Take bolus with food.
Check blood glucose before giving
meal bolus; if necessary, adjust
bolus.
Consult healthcare provider for
guidance.
Bolus too small
High-protein or
high-fat meal
Calculate protein/fat intake and
account for it in your bolus timing
and bolus type.
Consult healthcare provider about
using the extended bolus option.
Less activity than
normal
Consult your healthcare provider
about adjusting your basal pro-
grams or using a temporary (temp)
basal rate.
Blood glucose value
greater than
250 mg/dL (with
ketones present)
before strenuous
activity
Do NOT exercise when ketones are
present. (Blood glucose increases
with exercise when ketones are
present.)
Consult healthcare provider for
guidance.
Infection or illness See “Sick days” later in this chapter.
Consult your healthcare provider
about sick day guidelines and
about medication changes.
Medication change
Possible cause of high
blood glucose
Suggested action
Living with Diabetes
118
9
Diabetic ketoacidosis (DKA)
Insulin Pods use rapid-acting insulin, so you have no long-acting
insulin in your body. If insulin delivery from the Pod is interrupted
(an occlusion), your blood glucose can rise rapidly and lead to
diabetic ketoacidosis (DKA). DKA is a serious—but totally pre-
ventable—emergency that can occur if you ignore high blood
glucose levels.
Symptoms of DKA
• Nausea and vomiting
• Abdominal pain
• Dehydration
• Fruity-smelling breath
• Dry skin or tongue
• Drowsiness
• Rapid pulse
• Labored breathing
The symptoms of DKA are much like those of the flu. Before
assuming you have the flu, check your blood glucose and check
for ketones to rule out DKA.
Weight loss or gain Consult your healthcare provider
for guidance.
Menstrual cycle
Pregnancy
Check with your healthcare provider for guidance on any
of the causes or suggested actions above.
Possible cause of high
blood glucose
Suggested action
If left untreated, DKA can cause breathing difficulties,
shock, coma, and eventually death.
Living with Diabetes
119
9
To avoid DKA
The easiest and most reliable way to avoid DKA is by checking
your blood glucose at least 4–6 times a day. Routine checks
allow you to identify and treat high blood glucose before DKA
develops.
To treat DKA
• Once you have begun treatment for high blood glucose,
check for ketones. Check for ketones any time your blood
glucose is 250 mg/dL or above.
• If ketones are negative or trace, continue treating for high
blood glucose.
• If ketones are present, and you are feeling nauseated or ill,
immediately call your healthcare provider for guidance.
• If ketones are positive, but you are not feeling nauseated or ill,
replace the Pod, using a new vial of insulin.
• Check blood glucose again after 2 hours. If blood glucose
level has not declined, immediately call your healthcare
provider for guidance.
n Handling Special Situations
Sick days
Any physical stress can cause your blood glucose to rise, and ill-
ness is a physical stress. Your healthcare provider can help you
make a plan for sick days. The following are only general
guidelines.
When you are ill, check your blood glucose more often (at least
once every 2 hours) to avoid DKA. The symptoms of DKA are
much like those of the flu. Before assuming you have the flu,
check your blood glucose to rule out DKA (see “Diabetic ketoaci-
dosis (DKA)” earlier in this chapter).
To handle sick days
• Treat the underlying illness to promote faster recovery.
• Eat as normally as you can.
• Adjust bolus doses, if necessary, to match changes in meals
and snacks.
• Always continue your basal insulin, even if you are unable to
eat. Contact your healthcare provider for suggested basal
rate adjustments during sick days.
• Check your blood glucose every 2 hours and keep careful
records of results.
• Check for ketones when blood glucose is 250 mg/dL or
higher.
If you need emergency attention, ask a friend or
family member to take you to the emergency
room or call an ambulance. Do NOT drive yourself.
Living with Diabetes
120
9
• Follow your healthcare provider’s guidelines for taking addi-
tional insulin on sick days.
• Drink plenty of noncaffeinated fluids to prevent dehydration.
• Call your healthcare provider immediately if you have:
• Persistent nausea
• Vomiting for more than 2 hours
• High blood glucose or ketones that stay high even
though you take extra insulin
• Low blood glucose with nausea and vomiting
Exercising, playing sports, or working hard
Check your blood glucose levels before, during and after exercis-
ing, playing sports, or doing unusually hard physical labor.
The Pod’s adhesive keeps it securely in place for up to 3 days.
However, if necessary, several products are available to enhance
adhesion. Ask your healthcare provider about these products.
Avoid getting body lotion, creams, or oils near the infusion site;
these products may loosen the adhesive.
For some contact sports, you may want to remove the Pod.
Be sure to check your blood glucose levels before removing the
Pod and after applying a new one. Pods are designed for one-
time use. Do not attempt to reapply a used Pod.
If you will need to remove the Pod for more than 1 hour, ask your
healthcare provider to recommend appropriate guidelines.
X-rays, MRIs, and CT scans
If you are well enough to eat, drink sugar-free bever-
ages. However, if you are too sick to eat solid foods,
alternate between sugar-free beverages and those
containing sugar.
If possible, avoid wasting Pods by planning removal
times that coincide with a scheduled Pod replace-
ment.
The Pod and PDM may be affected by strong radia-
tion or magnetic fields. Before having an X-ray, MRI, or
CT scan (or any similar test or procedure), remove
your Pod and put it and the PDM outside the treat-
ment area. Check with your healthcare provider on
Pod removal guidelines.
The Pod and PDM can tolerate common electromag-
netic and electrostatic fields, including airport security
and cellular phones.

Living with Diabetes
121
9
Surgery or hospitalization
For scheduled surgeries or hospitalization, you should tell the
doctor/surgeon or hospital staff about your insulin Pod. It may
be necessary to remove it for certain procedures or treatments.
Remember to replace the basal insulin that was missed while the
Pod was removed. Your healthcare provider can help you pre-
pare for these situations.
Always carry medical identification and wear an
emergency medical necklace or bracelet such as
the Medic Alert tag.
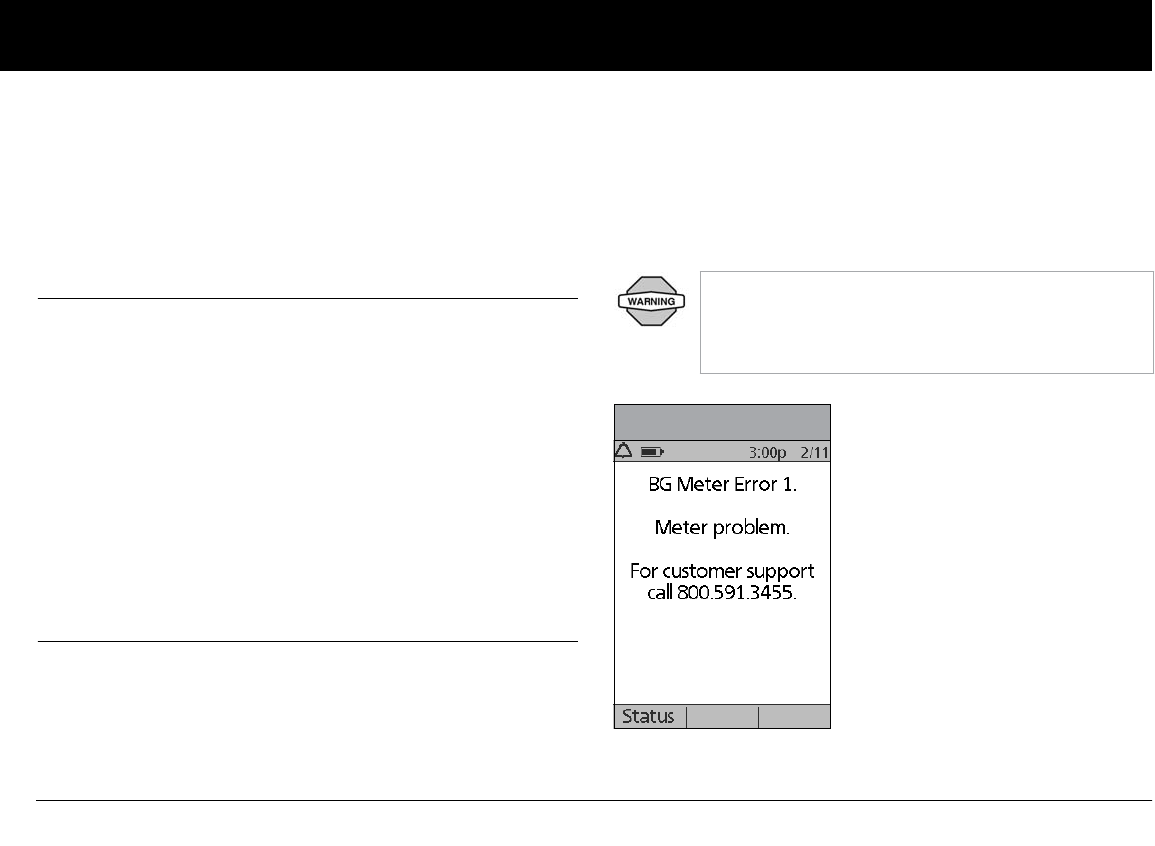
122
CHAPTER 10
Alerts and Alarms
n Safety Checks
The mylife OmniPod System has a very important safety feature:
It can check its own functions automatically and alert you when
something needs attention. When you turn on the Personal Dia-
betes Manager (PDM), the System automatically performs
a series of safety checks. (Refer to Page 54 for detailed instruc-
tions. The ID screen must be confirmed before you can check
Pod status.) To make you aware of a serious or potentially serious
condition, the System sounds an alarm and displays an on-
screen message. The message has instructions for taking care of
the alarm condition. Alarm conditions are easy to handle. They
are not a problem if you attend to them promptly.
n Blood Glucose Meter Alerts
These alerts let you know about an error in the blood glucose
meter, test strip, sample, or results. The PDM beeps and displays
an error message number, as in Figure 10-1.
If you are having symptoms that are not consistent
with your blood glucose test and you have followed
all instructions described in this User Guide, call your
healthcare professional.
Figure 10-1

Alerts and Alarms
123
10
The following table explains what the message could mean and what you should do.
Alert error message Possible causes Action
BG Meter Error 1.
Meter problem.
For customer support
call 800.591.3455.
• There is a problem with the
meter.
1. DO NOT use the meter. Contact Customer Care.
BG Meter Error 2.
Meter or strip
problem.
Retest with a new
strip.
• Error message could be
caused either by a used
test strip or a problem
with the meter.
1. Repeat the test with a new test strip.
2. If the error persists, call Customer Care or repeat the blood test.
BG Meter Error 3.
Meter was not
ready.
Retest with a new
strip.
• The sample was applied
before the meter was
ready.
1. Be sure you see the Blood Drop and Test Strip symbols on the display
screen before you apply blood or control solution.
2. Conduct a control solution test using a new test strip. If the results of
the control solution test are within the range printed on the side of
the test strip vial, retest using blood and a new test strip.
3. If the control solution test does not work or the error persists, call
Customer Care or perform another blood test.
Alerts and Alarms
124
10
BG Meter Error 4.
Strip fill problem.
Retest with a new
strip.
• Not enough blood or
control solution was
applied or more was
added after the meter
began to count down.
• The test strip may have
been damaged or moved
during testing.
• The sample was improp-
erly applied.
• There is a problem with the
meter.
1. Retest using a new test strip. Do not press any buttons or Soft Keys
while applying blood or control solution to the test strip.
2. If the error persists, call Customer Care or perform another blood test.
BG Meter Error 5.
Strip problem.
Retest with a new
strip.
• The meter has detected a
problem with the test
strip, possible cause is
test strip damage.
1. Retest using a new test strip. Do not press any buttons or Soft Keys
while applying blood or control solution to the test strip.
2. If the error persists, call Customer Care.
Alert error message Possible causes Action
Alerts and Alarms
125
10
Temperature too
high. Out of operating
range.
For customer support
call 800.591.3455.
• Meter is too hot (above
111°F) to work correctly.
1. Move the meter and test strips to a cooler area. Insert a new test strip
when the meter and test strips are within the operating range (43–
111°F). If you do not get another Temperature too high message, you
can proceed with testing.
Temperature too low.
Out of operating
range.
For customer support
call 800.591.3455.
• Meter is too cold (below
43°F)to work correctly.
1. Move the meter and test strips to a warmer area. Insert a new test
strip when the meter and test strips are within the operating range
(43–111°F). If you do not get another Temperature too low message,
you can proceed with testing.
Alert error message Possible causes Action
Alerts and Alarms
126
10
n Alarms
The mylife OmniPod System provides alarms to make you aware
of serious or potentially serious conditions. When a condition
occurs that requires your attention an Advisory Alarm or a
Hazard Alarm will sound. Advisory alarms beep intermittently
and inform you about a condition that requires your attention.
Hazard alarms are continuous tones and occur when either the
Pod or PDM is in a serious condition. During an alarm the PDM
will display an on-screen message with instructions for taking
care of the alarm condition. Be sure to respond to all alarms
when they occur.
Details on how to handle an Advisory or a Hazard Alarm are
below:
Advisory Alarms
Advisory alarms tell you about a condition that requires your
attention. Each advisory alarm beeps intermittently. When you
hear an advisory alarm, first turn on the PDM to display the
Status screen. The PDM communicates with the Pod, if
necessary, and the screen displays a message describing the
alarm and how to resolve it. All advisory alarms are time sensitive
and require a response. Some advisory alarms escalate to hazard
alarms if you do not respond within a certain time period (as
noted in the following table).
Some advisory alarms are controlled by levels you set in the
Settings screen. One example is the level at which the Low
reservoir volume alarm sounds.
Hazard Alarms
Hazard alarms occur either when the Pod is in a very serious con-
dition or something is wrong with the PDM. Hazard alarms are
continuous tones and each has an on-screen message. Follow
the instructions in the message to fix the alarm situation. For
details, see the table on page 129.
Many alarms (such as Auto-off) will escalate and
result in deactivation of the active Pod if ignored. Be
sure to respond to all alarms when they occur.
Hazard alarms are continuous tones. If the alarm is NOT
acknowledged immediately, the Pod periodically gener-
ates an intermittent alarm tone and then returns to the
continuous tone.
Alerts and Alarms
127
10
When a hazard alarm occurs in the Pod, all insulin
delivery stops. Failing to address the situation could
result in hyperglycemia. If you had a temp basal or
extended bolus running when the hazard occurred,
the PDM will remind you of this.
Due to the serious nature of hazard alarms, you must
act promptly to resolve them.
1. Acknowledge the alarm condition by pressing
OK, which silences the alarm.
2. Deactivate and remove the active Pod (see Chap-
ter 5, Using the Pod).
3. Activate and apply a new Pod (see Chapter 5,
Using the Pod).
If you ever need to return the PDM for repair or
replacement, contact your healthcare provider
for instructions on going back to treatment by
injections.
Alerts and Alarms
128
10
Use the form at the end of this User Guide to write
down all your settings from the Setup Wizard. If you
ever need to reset your PDM, having these settings
handy will make setup very easy.
Alarm Type Source Beep Pattern Action
End of insulin suspend.
Press OK to resume basal
rate delivery.
Advisory
Alarm
Pod
and
PDM
2 sets of beeps every minute for 3
minutes.
Repeats every 15 minutes until
insulin delivery is resumed.
Press OK to resume insulin delivery at
programmed basal rate.
Auto-off alert Advisory
Alarm
Pod
and
PDM
2 sets of beeps every minute for 15
minutes.
Escalates to Auto-off hazard alarm
if not acknowledged within 15
minutes.
Press OK to acknowledge.
Insulin delivery will not resume
until you press OK. If you do not
press OK to resume insulin deli-
very, you could develop hyper-
glycemia (high blood glucose).
The Auto-off alert will escalate to
a hazard alarm if ignored and
will result in the deactivation of
your active Pod. Be sure to
respond to the alert when it
occurs.
Alerts and Alarms
129
10
Auto-off.
Remove Pod now.
Hazard
Alarm
Pod
and
PDM
Continuous tone. Pod has been deactivated. Insulin deliv-
ery has stopped. Press OK to acknowl-
edge.
Change Pod.
Check blood glucose.
Low reservoir.
Replace Pod soon.
(This is based on the vol-
ume level you selected.)
Advisory
Alarm
Pod
and
PDM
2 sets of beeps every minute for 3
minutes.
Repeats every 60 minutes until
acknowledged.
Escalates to Empty reservoir
hazard alarm when empty.
Press OK to acknowledge.
Empty reservoir.
Insulin delivery stopped.
Change Pod now.
Hazard
Alarm
Pod
and
PDM
Continuous tone. This alarm occurs when the Pod's
reservoir is out of insulin. Press OK to
acknowledge.
Change Pod.
Check blood glucose.
Alarm Type Source Beep Pattern Action
The Low reservoir alert will
escalate to an Empty reservoir
hazard alarm when insulin is
depleted. Be sure to respond to
the alert when it first occurs.

Alerts and Alarms
130
10
Pod expiration advisory.
Change Pod now.
Advisory
Alarm
Pod
and
PDM
2 sets of beeps repeat periodically.
Repeats every 15 minutes during
the last hour of the Pod’s life and is
independent of the Expiration noti-
fication that you can set. (See Using
the Personal Diabetes Manager in
Chapter 6.)
Escalates to Pod expired hazard
alarm.
Press OK to acknowledge.
Change Pod. (See Chapter 5, Using the
Pod.)
Pod expired.
Insulin delivery stopped.
Change Pod now.
Hazard
Alarm
Pod
and
PDM
Continuous tone. This alarm occurs when the Pod has
reached the end of its operating life.
Press OK to acknowledge.
Change Pod.
Check blood glucose.
Stuck key detected.
Check Home button to
resolve.
For technical support refer
to your User Guide.
Advisory
Alarm
PDM 2 sets of beeps every 5 minutes. Check the key described on the screen.
(In this example, the stuck key is the
Home button.) Press the key to unstick
it.
If this does not work, notify Customer
Care.
Alarm Type Source Beep Pattern Action

Alerts and Alarms
131
10
Occlusion detected.
Insulin delivery stopped.
Change Pod now.
Hazard
Alarm
Pod
and
PDM
Continuous tone. Press OK to acknowledge.
Change Pod.
Check blood glucose.
Pod Error.
Insulin delivery stopped.
Change pod now.
Hazard
Alarm
Pod
or
PDM
Continuous tone. This alarm occurs when the Pod detects
an unexpected error. Press OK to
acknowledge.
Change Pod.
Check blood glucose.
PDM Error.
Remove Pod now.
For customer support,
refer to your User Guide.
Hazard
Alarm
PDM Continuous tone. This alarm occurs if an unexpected error
is detected in the PDM. Press OK to
acknowledge.
Remove Pod.
Notify Customer Care immediately.
Check blood glucose.
Alarm Type Source Beep Pattern Action

Alerts and Alarms
132
10
PDM Error.
Memory corruption.
Press OK to reset PDM and
delete all user settings.
History records will not be
deleted.
Hazard
Alarm
PDM Continuous tone. This alarm occurs after the PDM is reset
and a memory corruption error occurs.
Press OK to acknowledge.
Change Pod.
Check blood glucose.
System Error.
Remove pod now.
For customer support,
refer to your User Guide.
Hazard
Alarm
Pod
or
PDM
Continuous tone. This alarm occurs if an unexpected error
is detected in the Pod or PDM. Press OK
to acknowledge.
Remove Pod.
Notify Customer Care immediately.
Check blood glucose.
PDM Error.
Press OK to reset clock.
Hazard
Alarm
PDM Continuous tone. This alarm occurs after the PDM is reset,
indicating that the time and date must
be reset. Press OK to acknowledge.
Reset clock.
Check blood glucose.
Alarm Type Source Beep Pattern Action
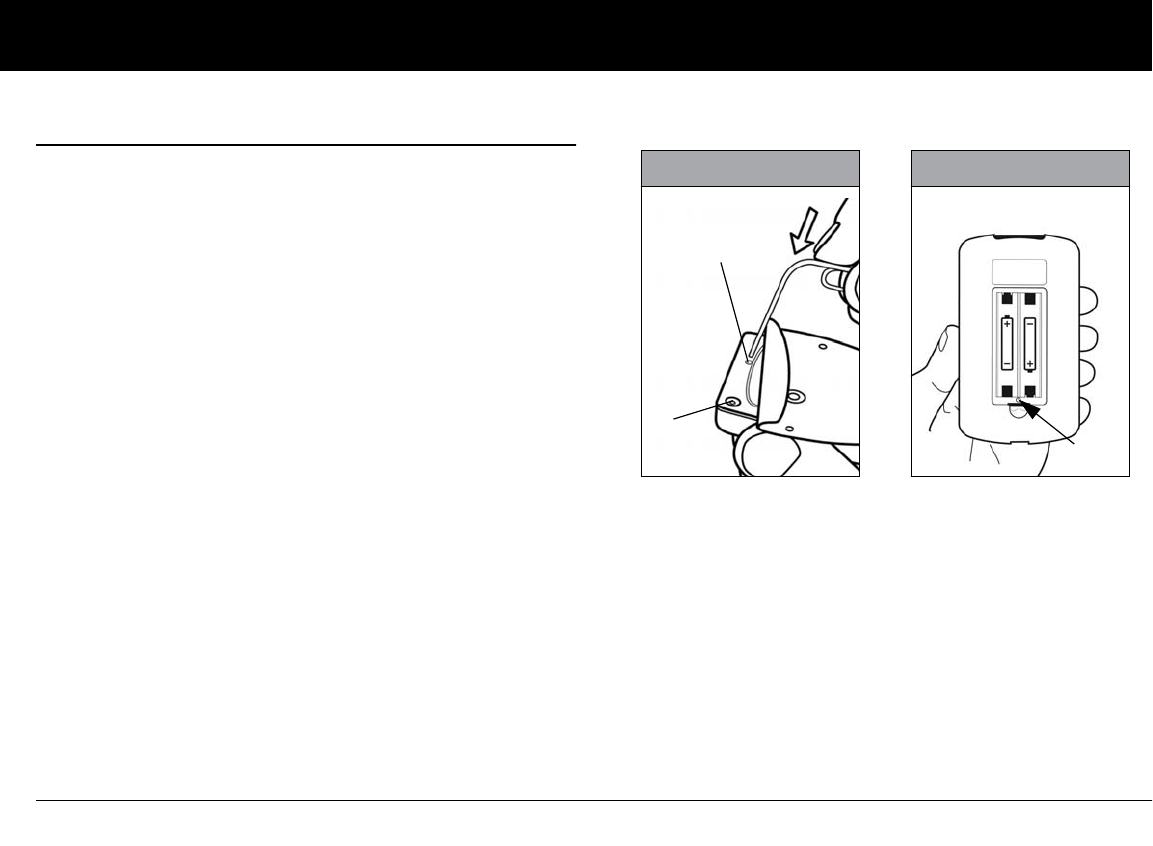
Alerts and Alarms
134
10
n Manual Shut-off of a Hazard Alarm
If you respond to a hazard alarm but the PDM cannot communi-
cate with the Pod to acknowledge or shut off the alarm, you can
shut off the alarm manually.
1. Remove the Pod from your body if you have not already
done so.
2. Press the end of a paper clip or similar item straight down into
the manual alarm shut-off port (Figure 10-2) on the bottom
of the Pod. The port can be found by peeling back the adhe-
sive pad from the bottom of the Pod at the square end. The
alarm shut-off port is to the right of the fill port.
3. Press the paper clip straight down into the manual alarm shut
off port until the alarm stops and can no longer be heard.
Then discard the Pod according to local waste disposal regu-
lations.
4. The Reset Button is located in the PDM’s battery compart-
ment (Figure 10-3). The Reset Button allows the user to reset
the PDM (i.e. if the screen locks up and goes into an alarm).
The users PDM settings are not lost.
Figure 10-2
Manual
alarm shut-
off port
Fill
port
Figure 10-3
Reset
Button
136
CHAPTER 11
Communication Failures
n The Communication Process
When you turn on or use the Personal Diabetes Manager (PDM),
it establishes communication with the active Pod. Usually, com-
munication occurs quickly. Occasionally, communication takes
longer and the PDM displays the communication icon during
that time in the upper left-hand corner of the current screen.
However, if communication does not work, the PDM will walk
you through the necessary steps to re-establish communication.
Communication can fail if the PDM is:
• Too far from the Pod—The PDM and Pod should be side by
side while priming during activation.
• Interrupted by outside interference—See the “mylife Omni-
Pod System Notice Concerning Interference” in the Appen-
dix.
n Failure During Pod Activation or Operation
When you send an instruction from the PDM—such as Start to
begin bolus delivery or Enable to begin using a different basal
program—the Pod usually responds quickly. However, if the
PDM cannot send your instruction within a few seconds, it dis-
plays the “Communication error” screen (Figure 11-1 on the next
page).
1. Move the PDM closer to the Pod. The PDM will try to commu-
nicate with the Pod again. If communication still fails, you will
see the message in Figure 11-2 on the next page.
As a safety feature, the communication distance
between the Pod and PDM is reduced during activation.
Once a Pod is primed and communicates with the PDM,
the full communication range is restored and the Pod
can receive commands only from that PDM.
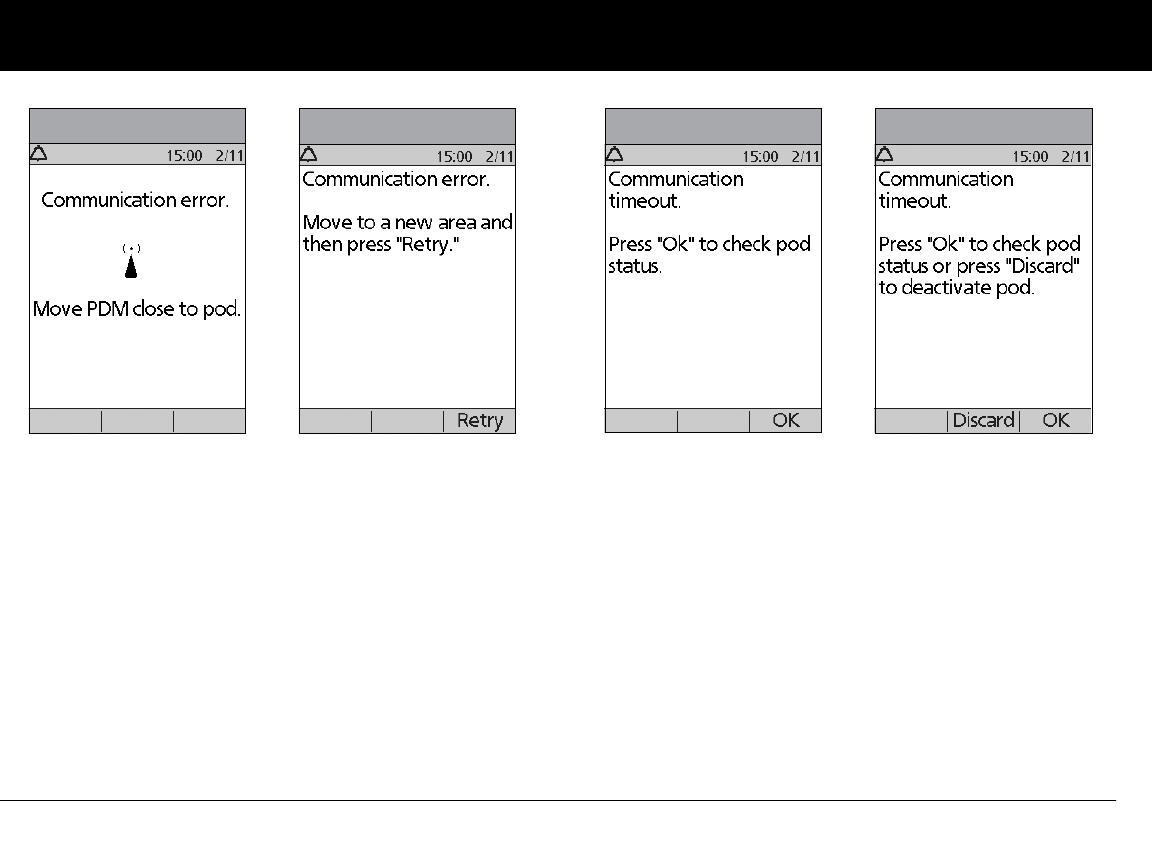
Communication Failures
137
11
2. Move across the room or to a different room. Then press
Retry.
a. If you press Retry within 2 minutes, the PDM tries to
communicate with the Pod again. If it cannot communi-
cate, it displays the same screen as in Figure 11-2,
then finally the “Communication time-out” screen
(Figure 11-3). Press OK to check the Pod status.
b. If the status check fails, you will see the screen in Figure
11-4. Press OK to try checking Pod status again or press
Discard to begin the deactivation process.
Figure 11-1 Figure 11-2 Figure 11-3 Figure 11-4
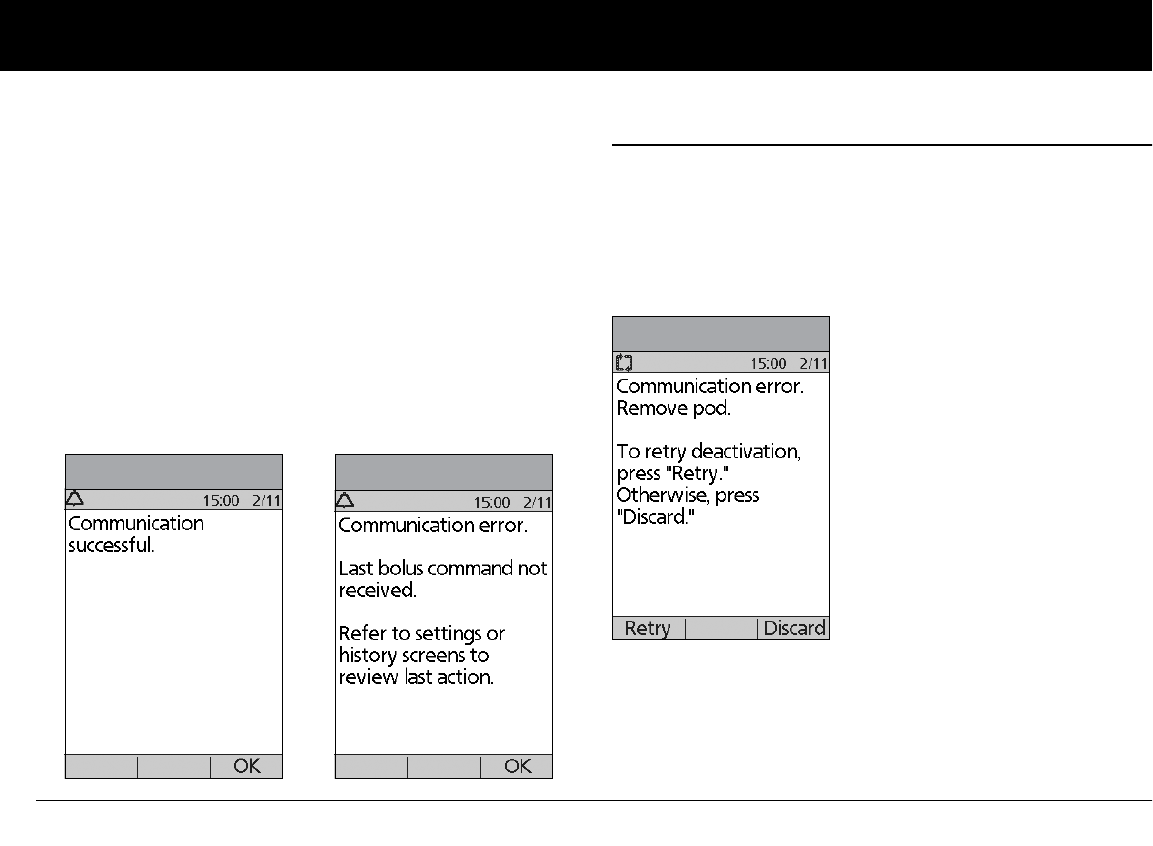
Communication Failures
138
11
3. If at any point in this process the PDM can communicate
again with the Pod, you will see either:
a. Figure 11-5, indicating that your original instruction or
command was successfully sent to the Pod. When you
press OK, or within 5 seconds, the System displays the next
screen in the command sequence you were entering.
b. Figure 11-6, indicating that your last command was not
sent to the Pod. Press OK.
If you were activating a Pod, the System returns to the pre-
vious screen where you can continue activation. If you
were issuing any other command, the System returns to
the Status screen, where you can reissue the command.
n Failure During Pod Deactivation
To review the deactivation process, see “Deactivate the current
Pod” in Chapter 5, Using the Pod.
If you press Confirm to deactivate the active Pod and the PDM
cannot send your instruction to the Pod, you will see the screen
in Figure 11-7.
Either:
1. Press Retry to try deactivating the Pod again. If the PDM still
cannot send the instruction, you will see Figure 11-7 again.
Follow step 2.
Figure 11-5 Figure 11-6
Figure 11-7
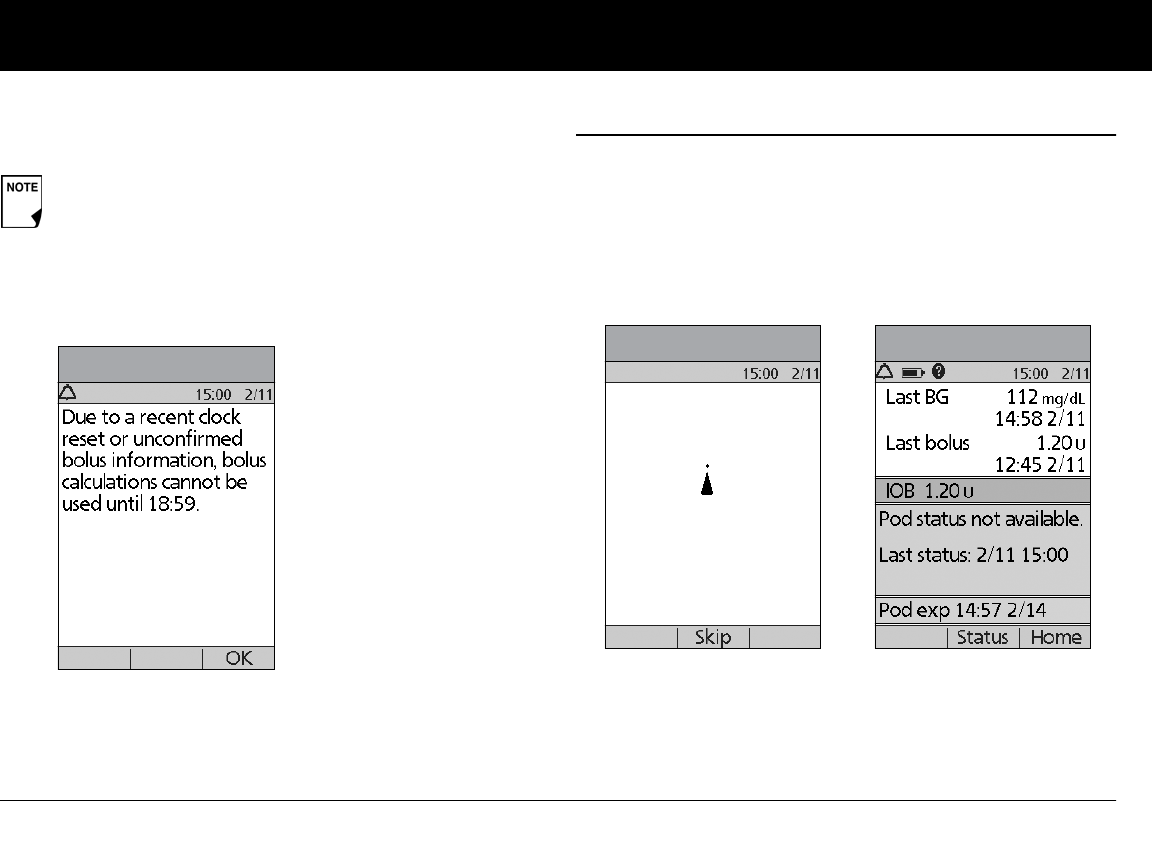
Communication Failures
139
11
2. Press Discard. The PDM will consider the Pod lost and ask
whether you want to activate a new Pod.
n Failure During Request for Status
If you turn on the PDM or press Status and the PDM cannot
communicate with the Pod, it displays a communication icon
(Figure 11-9). Below the icon is a soft key labeled Skip.
Either:
1. Wait until you see the “Pod status not available” screen
(Figure 11-10).
Or:
2. Press Skip to skip the communication process and immedi-
ately bring up Figure 11-10.
If you have an unconfirmed correction bolus when you
discard a Pod, then the bolus calculator will be temporar-
ily disabled. In this situation, the bolus calculator is dis-
abled until the duration-of-insulin-action period passes
(Figure 11-8). If you have any questions, call Customer
Care.
Figure 11-8
Figure 11-9 Figure 11-10
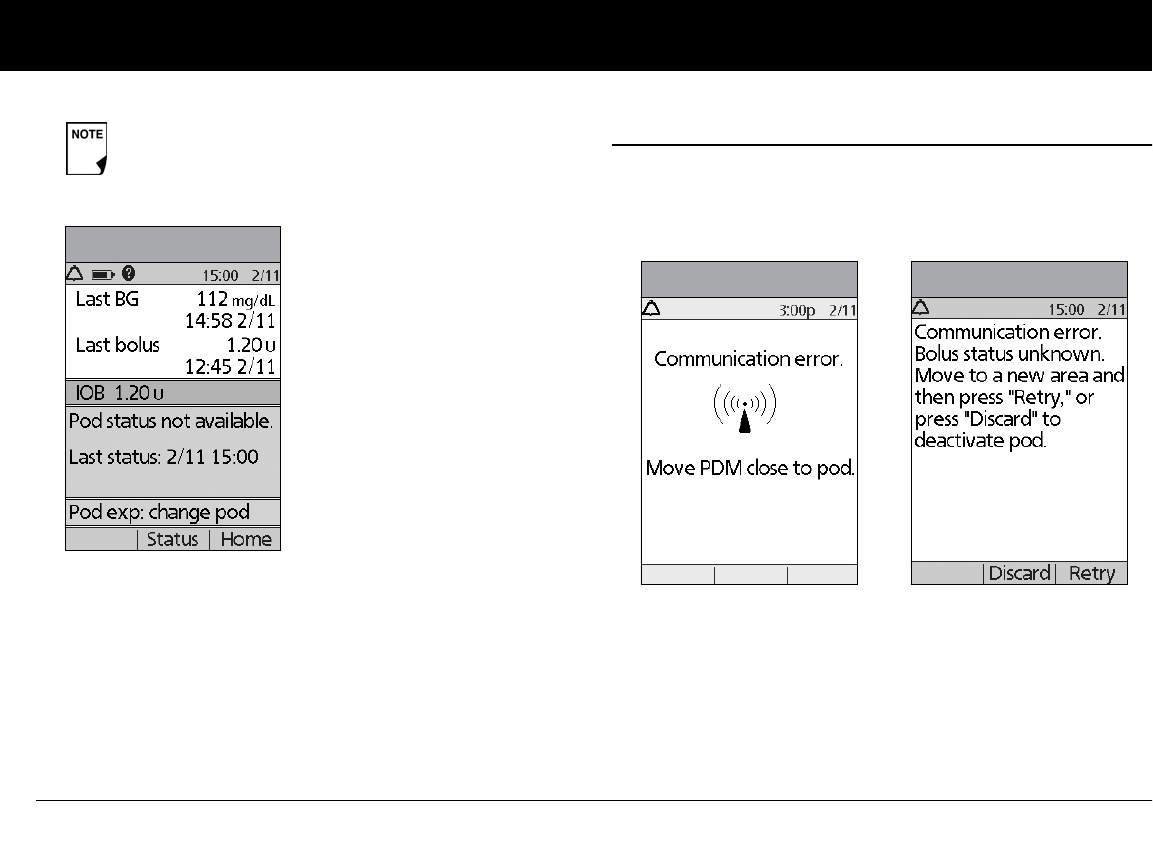
Communication Failures
140
11
At either “Pod status not available” screen, press Home to return
to the Home screen or press Status to send another status
request.
n Failure During Bolus Cancellation
When you instruct the PDM to cancel a bolus, if the PDM cannot
send your instruction to the Pod within a few seconds, it displays
the “Communication error” screen (Figure 11-12).
1. Move the PDM close to the Pod. The PDM tries to communi-
cate with the Pod again.
2. If the PDM still cannot communicate with the Pod, you will
see the “Bolus status unknown” message (Figure 11-13).
If the Pod has expired, you will see the screen in
“” on page 140 instead.
Figure 11-11
Figure 11-12 Figure 11-13
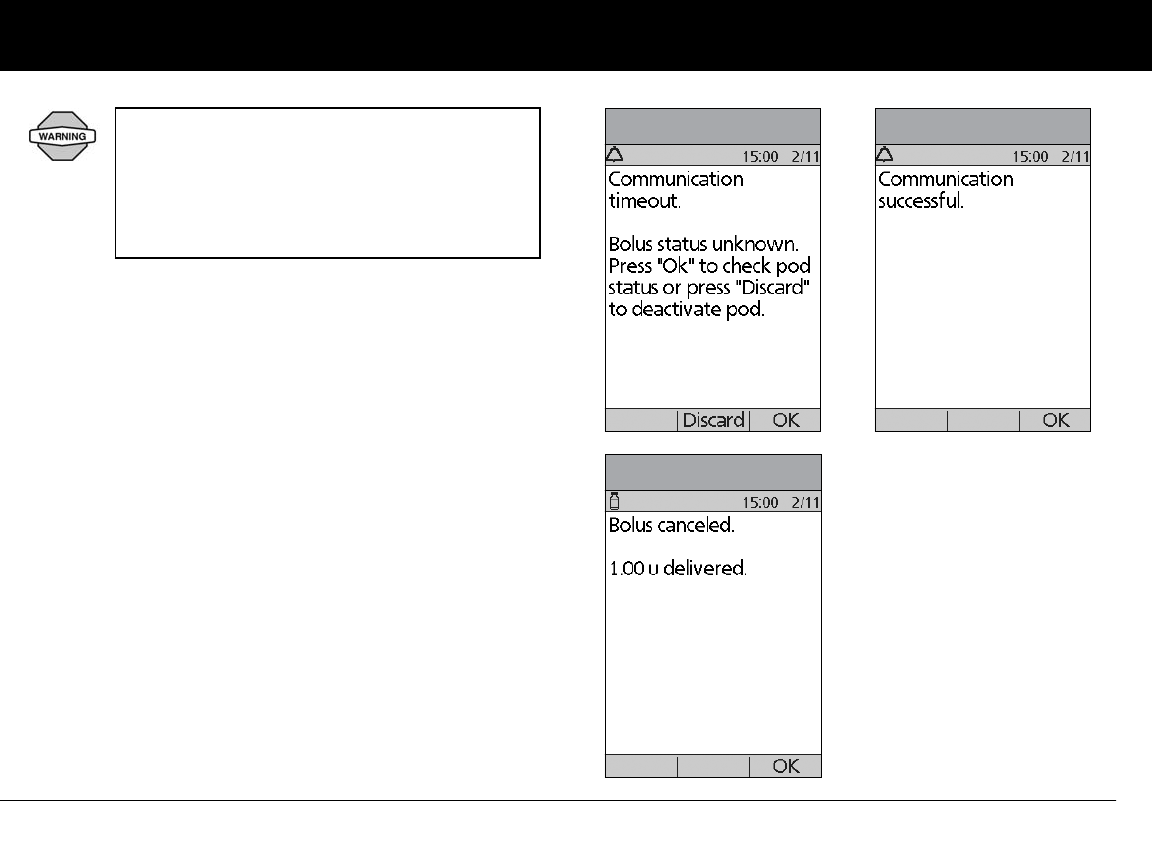
Communication Failures
141
11
3. Move across the room or to a different room. Then either:
a. Press Discard to begin the deactivation process.
b. Press Retry to repeat the attempts to communicate with
the Pod. The PDM tries to communicate with the Pod
again. If it cannot communicate, it displays the same
screen as in Figure 11-13, then finally a second “Bolus
status unknown” screen (Figure 11-14). Press OK to check
the Pod status or press Discard to begin the deactivation
process.
4. If at any point in this process the PDM can communicate
again with the Pod, you will see Figure 11-15. The message
indicates that your original instruction to cancel the bolus
was successful.
a. Press OK. The PDM displays the screen in Figure 11-16,
showing how much insulin was delivered before the
bolus was canceled.
b. Press OK again to return to the Status screen.
If your PDM is damaged or not working as
expected, call Customer Care for assistance. Be
sure to check your blood glucose frequently.
Remove your Pod and contact your healthcare
provider for treatment guidelines to follow after
you remove it.
Figure 11-14 Figure 11-15
Figure 11-16
142
Appendix
The mylife OmniPod® Insulin Management System has no user-serviceable parts. If you require assistance operating or main-
taining the System, please call Customer Care.
n Pod Care and Maintenance
Storage
Store unopened Pods in a cool, dry place. Extreme heat or cold
can damage Pods and cause them to malfunction. If Pods are
exposed to extreme temperatures, inspect them carefully before
use. Pods are sterile unless packaging is opened or damaged. Do
not apply or use a Pod if its sterile packaging is opened or
damaged.
Cleaning
Pods are waterproof. If you need to clean a Pod, you can gently
wash it with a clean, damp cloth. Or you can use mild soap and
water. However, do not use strong detergents or solvents. They
can damage the Pod’s casing or irritate the infusion site.
n Personal Diabetes Manager Care and Maintenance
Storage
When you are not actively using the Personal Diabetes Manager
(PDM) to enter or change programs, you can store it in a conve-
nient, nearby location. The storage location should be cool and
dry.
If the PDM is not safe from children or others who may press the
buttons by accident, consider using the optional PDM lock
safety feature to prevent accidental program changes (see
Chapter 6, Using the Personal Diabetes Manager).
Hold the Pod securely and take care while cleaning
it, so the cannula doesn’t kink and the Pod doesn’t
become detached from your skin.
Do not store or leave the PDM where it may be
exposed to extreme temperatures, such as inside a
car. Extreme heat or cold can cause the device to
malfunction.
Appendix
143
Cleaning and disinfecting
Cleaning is to keep free from dirt, stains, or impurities; unsoiled.
Disinfecting is the process of destroying pathogenic organisms
or rendering them inert.
Keep your PDM test strip port and USB port free of debris and
liquids. Dirt, dust, blood, and control solution can impair the
functionality of your PDM or damage it.
If the battery compartment becomes soiled, gently shake out
the debris or use a dry, lint-free cloth to remove it.
You should clean and disinfect your PDM at least once a week.
You should also clean your PDM whenever it is visibly soiled. For
both cleaning and disinfecting the same process should be fol-
lowed. Therefore, if you are intending to complete weekly
cleaning and disinfection you should complete the process out-
lined to the right.
Use the guidelines below to clean or disinfect your PDM:
The PDM can be cleaned and disinfected up to twice a week over
the course of the life of the device (4 years).
1. Be sure to turn off your PDM before cleaning or disinfecting.
2. To clean and disinfect the outside surfaces of the PDM hous-
ing, use Dispatch® Hospital Cleaner Disinfectant Towels with
Bleach or its formula equivalent (available online through
major retailers).
3. Following the instructions on the label of the Dispatch® Hos-
pital Cleaner Disinfectant Towels with Bleach , wipe the out-
side surfaces of your PDM. Treated surfaces must remain wet
for a full two (2) minutes.
4. Let your PDM air dry completely before checking your BG
next. We recommend you perform a control solution test to
ensure the System functions properly. See ”Performing a
Control Solution Test” in Chapter 7, Checking Your Blood Glu-
cose.
5. If you see any signs of deterioration of the PDM (i.e. cracking,
separation, discolorations), please contact Customer Care.
Do NOT use IV Prep™ wipes, alcohol wipes, soap,
detergent, or solvents. Never put any liquid into the
battery compartment. The PDM is NOT waterproof.
Do NOT immerse it or place it in or near water.
It is recommended that the user pre-clean the device
prior to each disinfection cycle.
While cleaning, do NOT allow debris or liquid to get
into the test strip port, USB port, battery compart-
ment, or buttons (see Figure A-1 on the next page).
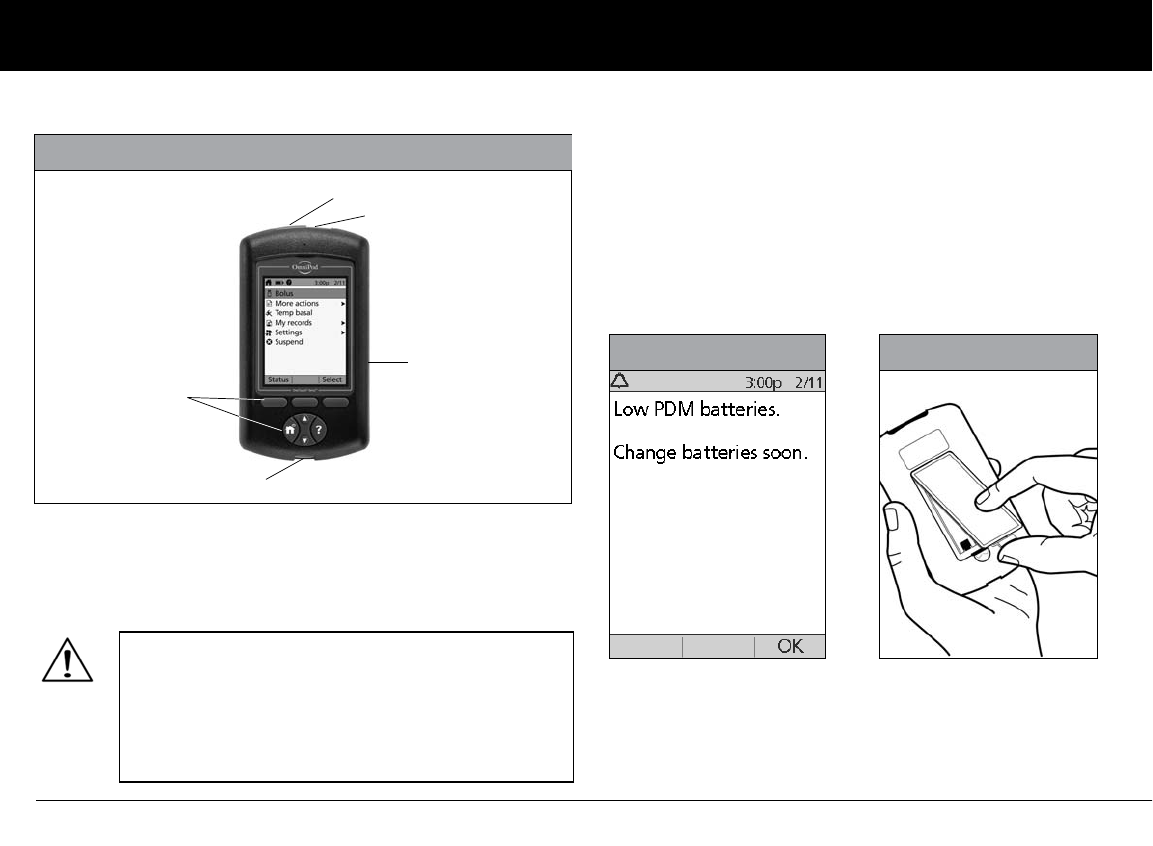
Appendix
144
.
Replacing batteries
The PDM uses two (2) AAA alkaline batteries. You can purchase
them at any grocery, hardware or convenience store.
On average, a pair of batteries powers the PDM for 3 weeks. The
battery life indicator on the PDM shows the battery power level.
See “Personal Diabetes Manager Icons” later in this Appendix for
the various battery power levels and their respective icons.
The PDM automatically alerts you when its battery power gets
low (see Figure A-2). When you see the “Low PDM battery” alert,
press OK to turn off the alert. Replace the batteries as soon as
you can.
AAA alkaline batteries are the required battery to
power the PDM. Do not use any other type of batter-
ies. Never use old or used batteries; the PDM may
not work properly. Using any kind of batteries other
than alkaline may reduce battery life and cause dam-
age to the PDM. Do no use rechargeable batteries.
Figure A-1
Test Strip Port (BG)
IR Port
USB Port
Battery
Compartment
(Reverse Side)
Buttons
Figure A-2 Figure A-3
Appendix
145
To replace batteries
1. Open the battery compartment on the back of the PDM by
pushing the compartment latch inward and then upward
(Figure A-2). No special tools are necessary.
2. Insert 2 new AAA alkaline batteries into the compartment.
3. Replace the battery door.
4. Turn the PDM face up. The PDM powers on automatically.
The PDM is now ready to use. Dispose of the old batteries in
accordance with local waste disposal regulations.
If the PDM becomes submerged in water
The PDM is not waterproof. Do not place it in water or leave it
near water where it can accidentally fall in. If it becomes sub-
merged in water:
1. Dry the outside of the PDM with a clean, lint-free cloth.
2. Open the battery compartment; remove the batteries and
discard them.
3. Use a clean, lint-free cloth to gently absorb any water in the
battery compartment.
4. Leave the battery compartment door open until the PDM is
thoroughly dry.
5. Do not put in fresh batteries or attempt to use the PDM until
it has thoroughly air-dried.
When your PDM alerts you that battery power is getting
low, the PDM will maximize remaining battery life by:
• Turning off your vibration alert (if set)
• Disabling bright mode
• Disabling the test strip port light
Once the batteries are replaced, these functions resume.
If the batteries run out, date and time are at risk. DO
NOT remove the old batteries until you have new
ones at hand. The PDM protects data in the memory
for up to 2 hours after the batteries run out or are
removed.
The diagram inside the compartment shows you
which direction to insert the batteries.
Never use a blow dryer or hot air to dry the Pod or
PDM. Extreme heat can damage the electronics.
Appendix
146
If you drop the PDM
The PDM is built to withstand reasonable amounts of abuse, but
shock or a severe impact can damage it. If you drop the PDM or if
it is otherwise subjected to severe impact:
1. Inspect the outside of the PDM for visible signs of damage.
2. Press and hold the Power button to see whether the PDM
turns on and whether the LCD screen is damaged.
3. Inspect the inside of the battery compartment for visible
signs of damage.
4. Do NOT use the PDM if it appears damaged or is not working
as it should.
If you are unable to use your PDM to check your BG, have a back
up meter on hand to check your BG.
n Storage and Supplies
To order all mylife OmniPod System products and supplies, call
Customer Care.
If your PDM is damaged or not working as it
should, please call Customer Care for assistance.
Be sure to check your blood glucose frequently.
Remove your Pod and contact your healthcare
provider for treatment guidelines to follow after
you remove it.
If you require assistance, please call Customer Care.
Store all mylife OmniPod System products and sup-
plies (including unopened Pods) in a cool, dry place.
Products or supplies that have been exposed to
extreme temperatures may not function properly.
It is especially important to store your insulin in a well-
controlled environment. Inspect insulin before using
it; never use insulin that looks cloudy or discolored.
Insulin that is cloudy or discolored may be old, conta-
minated or inactive. Check the insulin manufacturer’s
instructions for use and expiration date.
Appendix
147
n Suggested Bolus Calculator Examples and
Guidelines
A suggested bolus is equal to the sum of a correction bolus and
meal bolus, then adjusted for insulin on board, if applicable.
Examples of each of these elements are shown below.
Example of correction bolus
Target BG: 100 mg/dL
Current BG: 200 mg/dL
Correction factor (CF): 50
200 mg/dL (current) – 100 mg/dL (target) = 100 mg/dL
100 mg/dL ÷ 50 (CF) = 2 units correction bolus
If the reverse correction feature is turned On and if your current
BG is below your target BG, the suggested bolus calculator sub-
tracts a correction amount from the meal bolus.
Example of reverse correction bolus:
Target BG: 100 mg/dL
Current BG: 75 mg/dL
Correction factor (CF): 50
75 mg/dL (current) – 100 mg/dL (target) = –25 mg/dL
–25 mg/dL ÷ 50 CF = –0.5 units reverse correction bolus
(reduces meal bolus)
Meal bolus calculation
Carbs entered ÷ insulin-to-carb (IC) ratio
Example of meal bolus
Carbs entered: 45 grams of carb
Insulin-to-carb ratio: 15
45 carbs ÷ 15 IC ratio = 3 units meal bolus
Insulin-on-board (IOB) calculation
(Duration of insulin action – time since your previous bolus) ÷
(duration of insulin action) (previous bolus)
IOB from a previous correction bolus is called “correction IOB,”
and IOB from a previous meal bolus is called “meal IOB.”
Example of correction insulin-on-board (IOB)
Duration of insulin action: 3 hours
Time since previous correction bolus: 1 hour
Previous correction bolus: 3 units
3 hours – 1 hour = 2 hours
2 hours ÷ 3 hours = 2/3
2/3 3 units = 2 units correction IOB
In other words, one hour after your previous correction bolus,
you have received only 1 unit of insulin from it; 2 units of insulin
are still working to correct your BG. This feature prevents deliver-
ing too much insulin when correcting a high BG.
Appendix
148
Example of meal insulin-on-board IOB
Duration of insulin action: 3 hours
Time since previous meal bolus: 2 hours
Previous meal bolus: 4.5 units
3 hours – 2 hours = 1 hour
1 hours ÷ 3 hours = 1/3
1/3 4.5 units = 1.5 units meal insulin on board (IOB)
In other words, two hours after your previous meal bolus, you
have received 3 units of insulin from it; 1.5 units of insulin are still
working to cover your meal.
Examples of suggested bolus calculations
The examples below use these settings:
• Target BG: 100 mg/dL
• IC ratio: 1:15
• Correction factor (CF): 50
• Duration of insulin action: 3 hrs
Example 1
Current BG level: 150 mg/dL
Carb intake: 0 grams of carbohydrate (carbs)
Meal IOB: 1 unit
Correction IOB: 1 unit
Correction bolus: 150 mg/dL (current) – 100 mg/dL (target) = 50
50 ÷ 50 (CF) = 1 unit
Meal bolus: 0 (carbs) ÷ 15 (IC ratio) = 0 units
Suggested bolus dose = 1 (correction) + 0 (meal) – 2 (meal +
correction IOB) = 0 U
Example 2
Current BG level: 150 mg/dL
Carb intake: 45 carbs
Meal IOB: 0 units
Correction IOB: 0 units
Correction bolus: 150 mg/dL (current) – 100 mg/dL (target) = 50
50 ÷ 50 (CF) = 1 unit
Meal bolus: 45 (carbs) ÷ 15 (IC ratio) = 3 units
Suggested bolus dose = 1 (correction) + 3 (meal) – 0 (IOB) = 4 U
Meal IOB is used only to reduce a correction bolus,
and the correction bolus is only reduced until it
becomes 0 units.

Appendix
149
Example 3
Current BG level: 100 mg/dL
Carb intake: 45 carbs
Meal IOB: 1 unit
Correction insulin on board (IOB): 0 units
Correction bolus: 100 mg/dL (current) – 100 mg/dL (target) = 0
0 ÷ 50 (CF) = 0 units
Meal bolus: 45 (carbs) ÷ 15 (IC ratio) = 3 units
Suggested bolus dose = 0 (correction) + 3 (meal) – 0 (IOB) = 3 U
Example 4
Current BG level: 150 mg/dL
Carb intake: 60 carbs
Meal IOB: 0 units
Correction IOB: 1 unit
Correction bolus: 150 mg/dL (current) – 100 mg/dL (target) = 50
50÷ 50 (CF) = 1 unit
Meal bolus: 60 (carbs) ÷ 15 (IC ratio) = 4 units
Suggested bolus dose = 1 (correction) + 4 (meal) – 1 (IOB) = 4 U
Calculator guidelines
When the suggested bolus calculator is turned On, the mylife
OmniPod System applies these guidelines to the suggested
bolus doses:
• Suggested bolus doses are rounded down to the nearest
0.05 U.
• If the total of the suggested bolus calculation (correction
bolus plus meal bolus) is less than zero, the suggested bolus
dose is 0.00 U.
• The System will not suggest a bolus dose if your current
blood glucose (BG) reading is below the minimum BG you
have set for bolus calculation (see Chapter 2, Getting Started,
and Chapter 6, Using the Personal Diabetes Manager).
• The System suggests a correction bolus only when your BG
reading is above the correction threshold or correct-above
value you have set (see Chapter 2, Getting Started, and
Chapter 6, Using the Personal Diabetes Manager).
• Meal IOB, which is insulin on board from a previous meal
bolus, is subtracted first from the current correction bolus, if
any, until it is zero. However, any remaining meal IOB is never
subtracted from the current meal bolus.
Meal IOB is never subtracted from another meal
bolus – only from a correction bolus.

Appendix
150
• Correction IOB, which is insulin on board (active insulin) from
a previous correction bolus, is then subtracted from the cur-
rent correction bolus, if any remains, until it is zero. At that
point, any remaining correction IOB is subtracted from the
current meal bolus.
• The calculated insulin on board is rounded up to the nearest
0.05 U.
• A reverse correction only occurs if the meal bolus is greater
than 0.00 U.
• If your blood glucose value is below the target blood glucose
value and you have set reverse correction to On, the sug-
gested correction bolus is subtracted from the suggested
meal bolus. If you have set reverse correction to Off, the
System will not subtract insulin from the suggested meal
bolus dose.
If you manually increase or decrease the suggested bolus, the
following rules apply:
• If you increase a suggested bolus, the increase is applied to
the meal bolus unless there is no meal bolus, in which case it
is applied to the correction bolus.
• If you decrease a suggested bolus, the decrease is applied to
the meal bolus until it reaches zero; then it is applied to the
correction bolus. If there is no meal bolus, the decrease is
applied to the correction bolus.
Appendix
151
n mylife OmniPod System Options and Settings
Time 12-hour or 24-hour clock
Date MM/DD/YY
DD/MM/YY
MM.DD.YY
DD.MM.YY
YY.MM.DD
YY-MM-DD
Maximum basal rate 30 U/hr
Default is 3.00 U/hr
Basal programs 7
Basal rate segments 24 per program
Basal rate increment 0.05 units
Temp basal presets 7
Temp basal %, Units, or Off
30 minutes to 12 hours in
30-minute increments
Default is Off
Blood glucose (BG) goal for
BG history
Upper and lower limits; 70 to 200
mg/dL in 1 mg/dL increments
Blood glucose reminder On or Off; maximum of 4 active at
any one time. Created at time of
bolus entry; reminder can be set
for 30 minutes to 4 hours after
bolus is started, in 30-minute
increments. Default is Off.
Blood glucose meter sound On or Off
Default is On
Suggested bolus calculator On or Off
Default is On
Target BG value and
correction threshold
8 time segments; 70 to 200 mg/dL
in 1 mg/dL increments
Minimum BG allowed for
use by the suggested bolus
calculator
50 to 70 mg/dL in 1 mg/dL incre-
ments
Default is 70 mg/dL
Insulin-to-carb (IC) ratio 8 time segments; 1 to 150 g
carb/U in 1g carb/U increments
Correction factor 8 time segments; 1 to 300 mg/dL
in 1 mg/dL increments
Reverse correction On or Off
Default is On
Duration of insulin action 2 to 6 hours in 30-minute
increments
Bolus increment 0.05, 0.1, 0.5, or 1.0 units
Default is 0.1 units
Maximum bolus size 30 units
Default is 10 units
Extended bolus %, Units, or Off
30 minutes to 8 hours in
30-minute increments
Default is Off
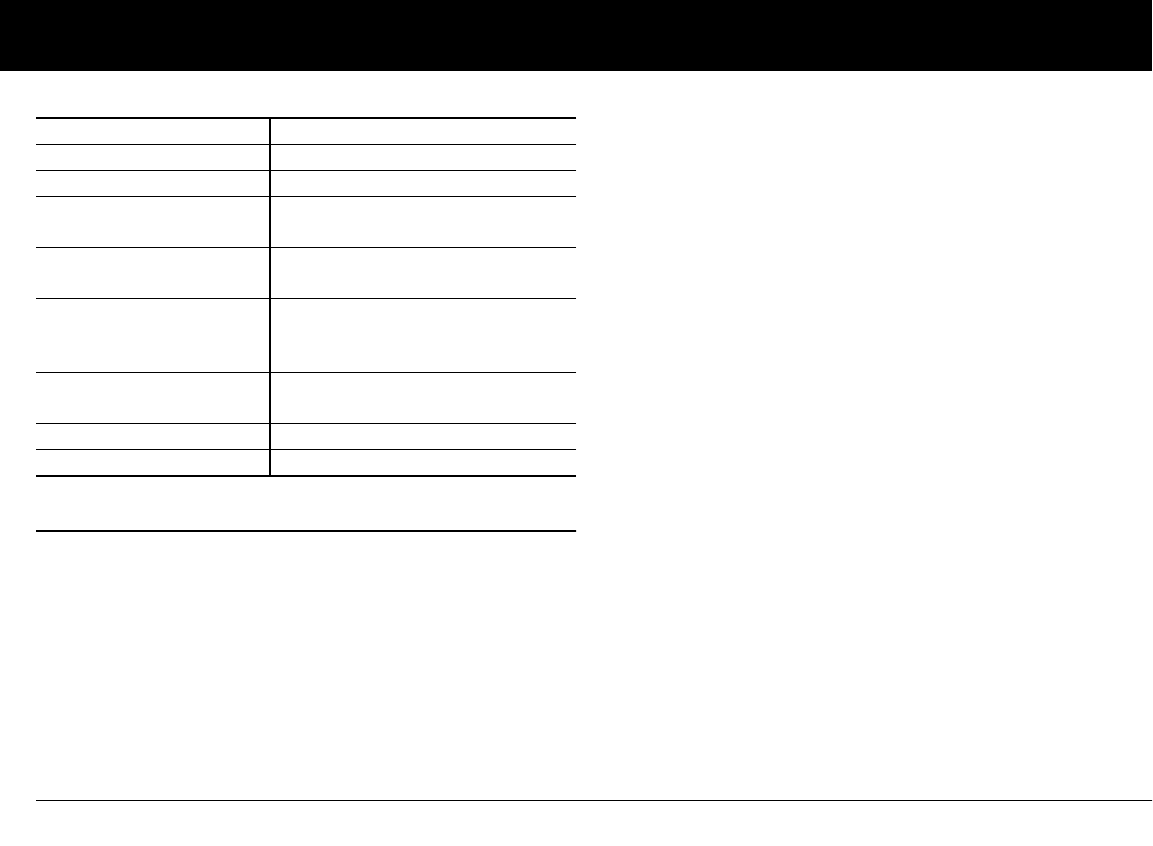
Appendix
152
n Pod Specifications
Size: 3.9 cm x 5.2 cm x 1.45 cm
Weight (without insulin): 25 grams
Operating temperature range: 4.4°C to 40°C
Under normal circumstances, your body temperature will keep
the Pod well within this range.
Startup temperature: above 10°C
Storage temperature range: 0°C to 30°C
Reservoir volume (deliverable): 200 units
Cannula insertion depth: 6.5 mm
Waterproof rating: IPX8 (7.6 meters for up to 60 minutes)
Insulin concentration: U-100
Alarm type: Audible
Operating relative humidity range: 20–85%, non-condensing
Storage relative humidity range: 20–85%, non-condensing
Operating atmospheric pressure: 696 hPA to 1060 hPA
Storage atmospheric pressure: 696 hPA to 1060 hPA
Non-pyrogenic: Fluid pathway only
Type BF Medical Device: Protection from electrical shock
Flow Capability:
Basal: Programmable by the user in 0.05 U pulses
up to 30.0 U per hour
Bolus:
Rate: 1.5 units per minute
Range: 0.05 to 30.0 units
Delivery accuracy (tested per IEC 60601-2-24):
Basal: +/- 5% at rates > 0.05 U/hr
Bolus: +/- 5% for all set values > 0.05 units
Bolus presets 7
Carbohydrate presets 36
Suspend 30 minutes to 2 hours
Low reservoir volume
indicator
10 to 50 units in 5-unit increments
Default is 10.0 units
Pod expiration alert 1 to 24 hours in 1-hour increments
Default is 4 hours
Auto-off alert 1 to 24 hours or Off, in 1-hour
increments
Default is Off
PDM lock On or Off
Default is Off
History storage 5400 records/90 days
Language English
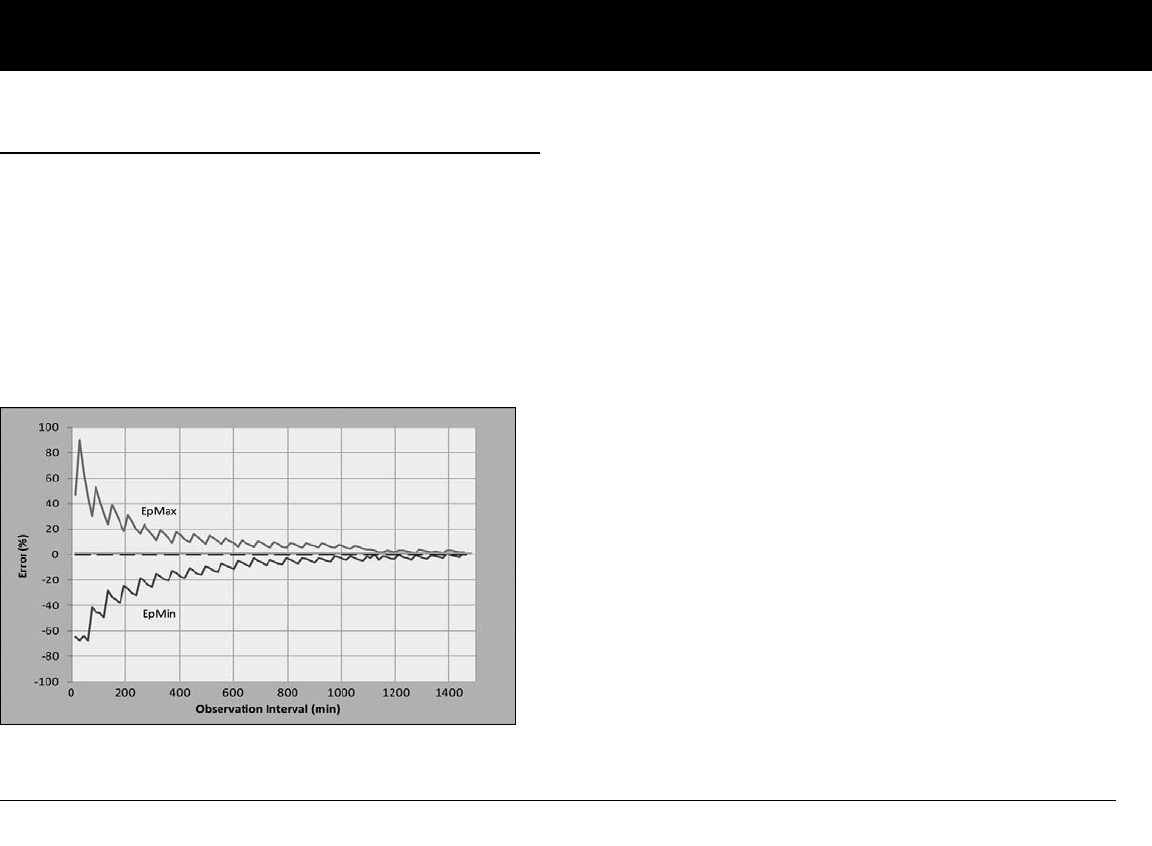
Appendix
153
n Accuracy Test Results
The following graph is designed to show flow accuracy of the
Pod against given time periods.
Flow rate error
The following trumpet curve shows the accuracy of the delivery
rate in relation to the observation period. The measurements
were made using a Pod with a basal rate of 0.05 U/h at high oper-
ating temperature. The overall mean percentage flow error was
1.40%.

Appendix
154
n Personal Diabetes Manager Specifications
Size: 6.21cm x 11.25cm x 2.5cm
Weight (with batteries): 125 grams
Screen: 3.6cm wide x 4.8cm long; 6.1cm diagonal screen LCD
Battery: Powered by (2) AAA alkaline batteries
Battery life: Approximately 3 weeks
Operating temperature range: 4.4°C to 40°C
Storage temperature range: -29°C to 60°C
Operating relative humidity range: 10% to 90% non-
condensing
Storage relative humidity range: 10% to 90% non-condensing
Operating atmospheric pressure: 696 hPA to 1062 hPA
Storage atmospheric pressure: 703 hPA to 1062 hPA
Communication distance: At start up the PDM and Pod should
be adjacent and touching, either in or out of tray to ensure proper
communication during priming. At least 152.40 cm during
normal operation.
Alarm type: Audible
Alert type: Audible and vibratory
Warranty: 4 Year Limited (PDM)
n Blood Glucose Meter Specifications
Assay method: Coulometric electrochemical sensor
Calibration: Plasma equivalent
Hematocrit: 15% to 65%
Measurement units: mg/dL
Result range: 20 to 500 mg/dL
Sample: Whole blood, capillary
Sample size: 300 nanoliters (0.3 microliters)
Test time: Results in as fast as 7 seconds
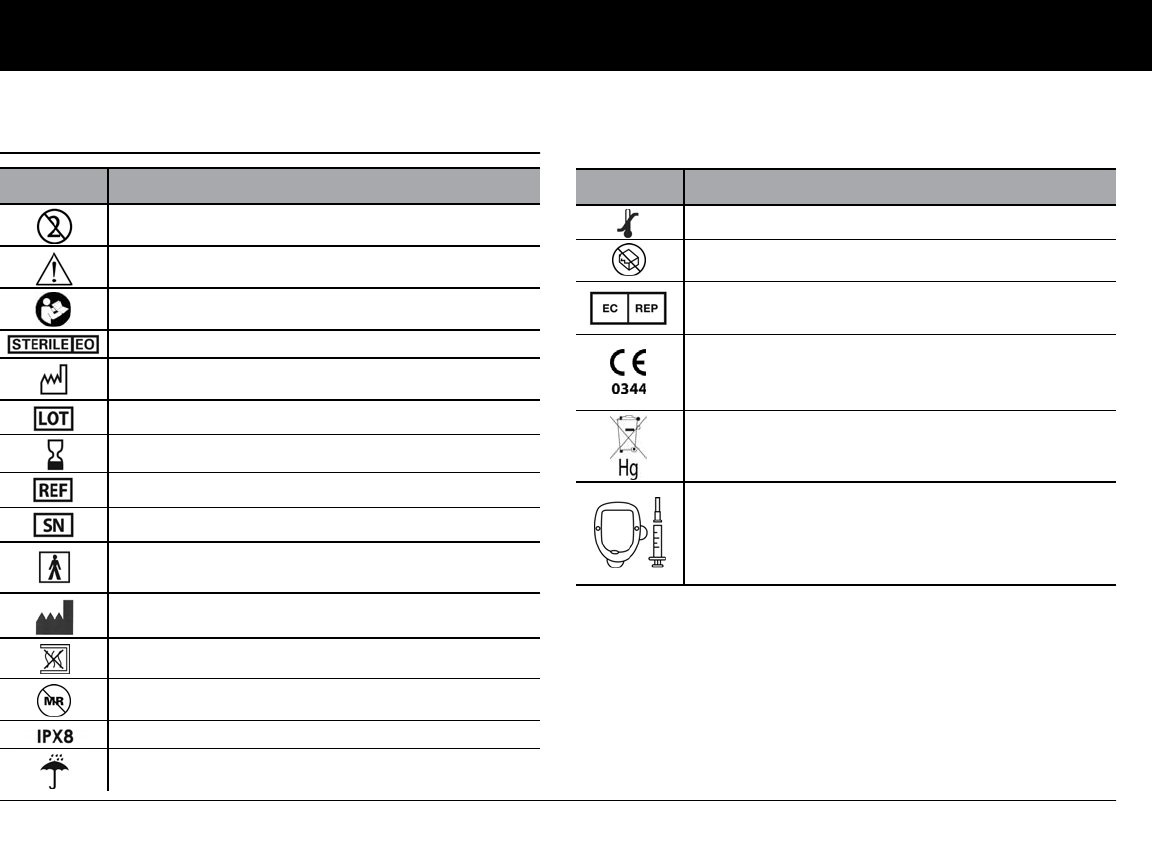
Appendix
155
n mylife OmniPod System Label Symbols
Symbol Meaning
Do not reuse this device; single-use only
Caution: Consult accompanying documents
Refer to Instruction Manual
Sterilized by ethylene oxide
Manufacture date: (year–month)
Lot number
Expiration date (use-by date): (year–month)
Reference/reorder number
Device serial number
Type BF medical device
(protection from electrical shock)
Manufacturer
Non-pyrogenic; fluid pathway only
Not MRI-safe
Waterproof to 7.6 meters for up to 60 minutes
Keep dry
Symbol Meaning
Storage temperature
Do not use if package is damaged
Authorized Representative in the European
Community
Product is designed and manufactured in accor-
dance with applicable standards/guidelines and
may be sold in the EU (European Union)
Do not throw away; contains mercury
Quantity of Pod(s), Needle(s) and Syringe(s) that
are packaged individually or as 10 packs.
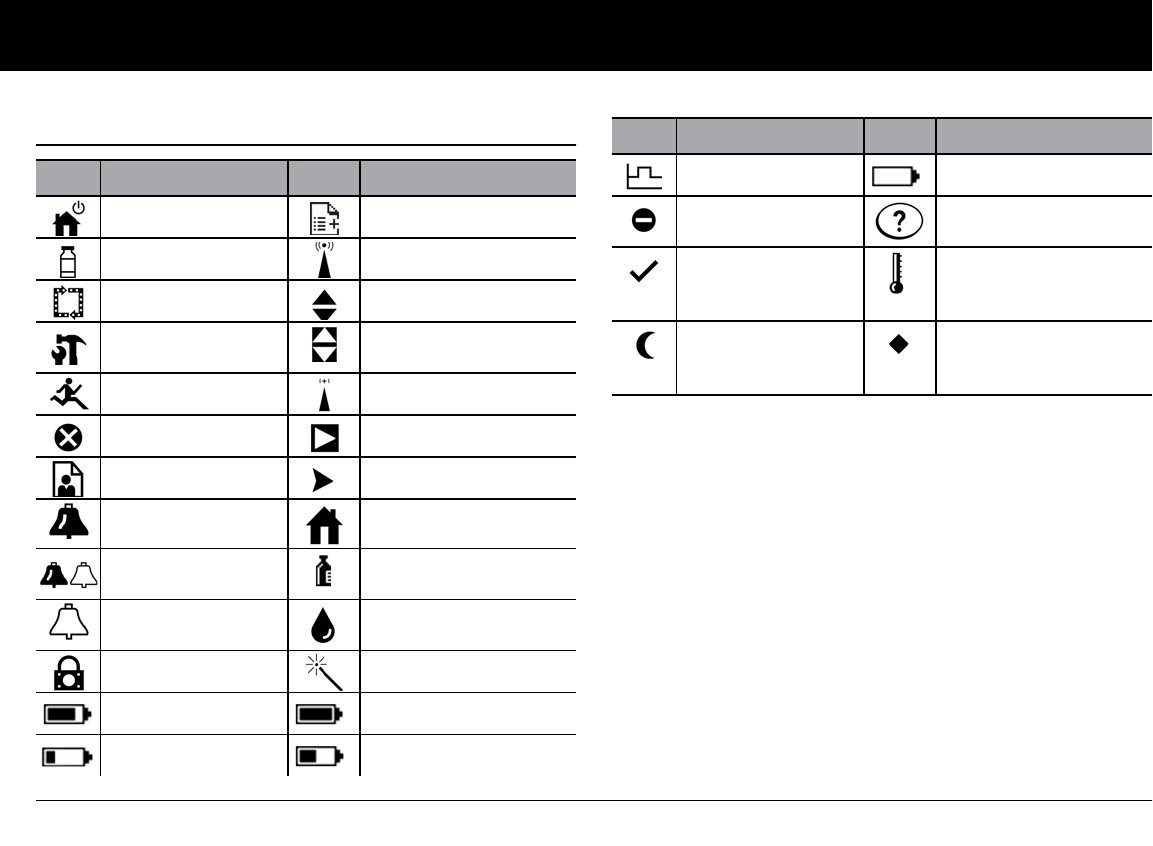
Appendix
156
n Personal Diabetes Manager Icons
Icon Meaning Icon Meaning
Power More actions
Bolus Communication
Pod change Up/Down
Diagnostics/
settings Up/Down (on color)
Temp basal Status
Suspend/cancel Text entry right
My Records Submenu
Advisory alarm Home screen
(Alternating)
Hazard alarm Insulin gauge
Alert Apply blood sample/
Blood glucose records
PDM lock Setup Wizard
Battery 3/4 full Battery full
Battery 1/4 full Battery half full
Basal program Battery empty
“Lost” history
record
User Information/
Support
“Unconfirmed”
history record
Blood Glucose Meter -
Temperature out of
range
“Delivery Spans
Midnight”
history record
Active/default
program or selected
BG tag
Icon Meaning Icon Meaning
Appendix
157
n Medical Device Directive
This device complies with Medical Device Directive 93/42/EEC.
Contact Person: The Complaints Officer
Address: HealthLink Europe BV, Centaurusweg 123
NL-5015 TC TILBURG, The Netherlands
TEL: +31.13.5479300
FAX: +31.13.5479302
E-mail: complaints@HealthlinkEurope.com
Insulet Corporation complies with EU Directive, HIPAA, and rele-
vant provisions of PIPEDA.
n mylife OmniPod System Notice
Concerning Interference
The mylife OmniPod Insulin Management System (both the Pod
and the Personal Diabetes Manager or PDM) complies with Part
15 of the FCC Rules. Operation is subject to the following two
conditions:
1. These devices may not cause harmful interference.
2. These devices must accept any interference received, includ-
ing interference that may cause undesirable operation.
Changes or modifications not expressly approved by Insulet
could void the user’s authority to operate the equipment.
Both the Pod and the PDM generate, use, and can radiate radio
frequency energy, and may cause harmful interference to radio
communications. There are no guarantees that interference will
not occur in a particular installation. If the mylife OmniPod Sys-
tem does cause harmful interference to radio and television
reception, the interference may be corrected by one of the fol-
lowing measures:
• Move or reposition the mylife OmniPod System.
• Increase the distance between the System and the other
device that is emitting or receiving interference.
Insulet Corporation declares that the mylife OmniPod System is
in compliance with the essential requirements and other rele-
vant provisions of Directive 1999/5/EC. This ISM device complies
with Canadian ICES-003 and IC-RSS-210.
n Electromagnetic Compatibility
The information contained in this section (such as separation
distances) is, in general, specifically written with regard to the
mylife OmniPod System. The numbers provided will not guaran-
tee faultless operation but should provide reasonable assurance
of such. This information may not be applicable to other medical
electrical equipment; older equipment may be particularly sus-
ceptible to interference.
Appendix
158
General Notes
Medical electrical equipment requires special precautions
regarding electromagnetic compatibility (EMC) and needs to be
installed and put into service according to the EMC information
provided in this document and the instructions for use.
Portable and mobile RF communications equipment can affect
the function of medical electrical equipment.
Insulet Corporation declares that the mylife OmniPod Insulin
Management System is in compliance with the essential require-
ments and other relevant provisions of Directive 1999/5/EC.
Cables and accessories not specified within the instructions for
use are not authorized. Using other cables and/or accessories
may adversely impact safety, performance, and electromagnetic
compatibility (increased emission and decreased immunity).
Care should be taken if the System is used adjacent to other elec-
trical equipment; if adjacent use is inevitable, such as in work
environments, the System should be observed to verify normal
operation in this setting.
The System communicates by low level RF energy. As with all RF
receivers, the potential for disturbance exists, even with equip-
ment that complies with FCC and CISPR emissions requirements.
The mylife OmniPod System communicates with the following
characteristics:
Frequency: 433 MHz, FSK modulation, with an effective radi-
ated power of 13mW
The mylife OmniPod System greatly exceeds the immunity
requirements of the general standard for electromagnetic com-
patibility, IEC 60601-1-2.
Electromagnetic Emissions
This equipment is intended for use in the electromagnetic environment specified below. The user of this equipment should assure
that is used in such an environment.
Emissions Compliance according to Electromagnetic environment
RF Emissions (CISPR 11) Group 2 The Pod and the PDM emit low level electromagnetic energy (RF) in
order to communicate. Although unlikely, nearby electronic equip-
ment may be affected.
CISPR B
Emissions Classification
Class B The System is suitable for use in all establishments including domestic
establishments.
Appendix
159
Electromagnetic Immunity
The System is intended for use in the electromagnetic environment specified below. You should observe these requirements in the
use of the System.
Immunity against
IEC 60601-1-2
test level
Compliance level
(of this device) Electromagnetic environment
ElectroStatic Discharge,
ESD (IEC 61000-4-2)
contact discharge:
± 6 kV
air discharge: ± 8 kV
± 8 kV
± 15 kV
If floors are covered with synthetic material, try to avoid electro-
static discharges.
Power Frequency mag-
netic fields 50/60 Hz
(IEC 61000-4-8)
3 A/m 400 A/m Suitable for most environments. Magnetic field strengths in
excess of 400 A/m would be unlikely except in close proximity
to industrial magnetic devices.
Appendix
160
Radiated RF
(IEC 61000-4-3)
80 MHz–2.5 GHz 10 V/m Portable and mobile RF communications equipment should
be used no closer to any part of the System than the recom-
mended separation distance calculated from the equation
applicable to the frequency of the transmitter as below.
Recommended separation distance:
d=1.17 P 150 KHz to 80 MHz
d=0.35 P 80 MHz to 800 MHz
d=0.7 P 800 MHz to 2.5 GHz
where P is the maximum output power rating of the transmit-
ter in watts (W) according to the transmitter manufacturer and
d is the recommended separation distance in meters (m).
Field strengths from fixed RF transmitters, as determined by an
electromagnetic site survey,a should be less than the compli-
ance level in each frequency range.
Interference may occur in the vicinity of equipment marked
with the following symbol:
Note 1: At 80 MHz and 800 MHz, the higher frequency range applies.
Note 2: These guidelines may not apply in all situations. Electromagnetic propagation is affected by absorption and reflections from struc-
tures, objects, and people.
a Field strengths from fixed transmitters, such as base stations for radio (cellular/cordless) telephones and land mobile radios, amateur radio,
AM and FM radio broadcast, and TV broadcast, cannot be predicted theoretically with accuracy. To assess the electromagnetic environment
due to fixed RF transmitters, an electromagnetic site survey should be considered. If the measured field strength in the location in which the
equipment is used exceeds the applicable RF compliance level above, the equipment should be observed to verify normal operation. If
abnormal performance is observed, additional measures may be necessary, such as reorienting or relocating the equipment.
Electromagnetic Immunity (Continued)
Appendix
161
Recommended Separation Distances Between Portable and
Mobile RF Communications Equipment and the System
You can help prevent electromagnetic interference by maintaining a minimum distance between portable and mobile RF communi-
cations equipment (transmitters) and the System, as recommended below, according to the maximum output power of the com-
munications equipment.
Rated maximum output power
of transmitter, in watts
Separation distance according to frequency of transmitter, in meters
150 kHz to 80 MHz, d = 1.17 P 80 MHz to 800 MHz, d = 0.35 P 800 MHz to 2.5 GHz, d = 0.7 P
0.01 0.12 0.035 0.070
0.1 0.37 0.11 0.22
1 1.17 0.35 0.7
10 3.70 1.11 2.21
100 11.7 3.5 7.0
For transmitters rated at a maximum output power not listed above, the recommended separation distances in meters (m) can be estimated
using the equation applicable to the frequency of the transmitter, where P is the maximum output power rating of the transmitter in watts
(W) according to the transmitter manufacturer.
NOTE 1: At 80 MHz and 800 MHz, the separation distance for the higher frequency range applies.
NOTE 2: These guidelines may not apply in all situations. Electromagnetic propagation is affected by absorption and reflection from struc-
tures, objects, and people.

162
Glossary
A1c (see Hemoglobin A1c)
Advisory alarm
Notification by the PDM that a serious condition exists.
Aseptic technique
A method for maintaining sterilization and preventing
contamination.
Basal program
One or more basal rates that together cover a 24-hour period
from midnight to midnight.
Basal rate
A small base or background amount of insulin that is delivered, at
a preset rate, continuously for a specified period of time. Basal
rates are measured in units per hour (U/hr).
Basal segment (time segment)
The time period during which a specific basal rate is delivered.
BG goal
A range of blood glucose levels that you are trying to achieve
during a certain period of the day. For example, you may want
one BG goal before meals, a different BG goal two hours after
meals, and yet another BG goal for bedtime.
Blood glucose (see glucose)
Blood glucose level
The amount of glucose, or sugar, in the blood.
Blood glucose meter
A device used to check blood glucose content.
Bolus dose
A dose of insulin taken to correct an elevated blood glucose level
or to cover carbohydrates in a meal or snack.
Bolus preset
A bolus dose of insulin, in units, that can be assigned a custom
name and preprogrammed into the PDM.

Glossary
163
Calorie
A unit of measurement used to express the energy value of food.
Calories come from carbohydrate, protein, fat, and alcohol.
Cannula
A small, thin tube inserted below the skin, which serves to intro-
duce a liquid medication into the body.
Carbohydrate (carb)
One of the three main nutrients found in food. (The other two
are protein and fat.) Foods that contain carbohydrates include
starches, sugars, vegetables, fruits, and dairy products.
Carbohydrate counting
A method of meal planning based on counting the number of
grams of carbohydrate in a given food.
Carb preset
A favorite food item, snack, or entire meal that can be assigned a
custom name and preprogrammed into the PDM. You set the
carbohydrate value (and, optionally, the fat, protein, fiber, and
total calories) for each carb preset.
Complications (of diabetes)
Harmful effects of diabetes such as damage to the eyes, kidney,
heart, blood vessels, nervous system, teeth and gums, feet, and
skin.
Correction bolus
An amount of insulin taken to compensate for high blood glucose
levels. The mylife OmniPod System calculates the correction
bolus by taking the difference between your current blood glu-
cose level and your target blood glucose level, then dividing the
result by your correction factor.
Correction factor
A value that indicates how much one unit of insulin will lower
your blood glucose. For example, if your correction factor is 50,
one unit of insulin will lower your blood glucose by 50 mg/dL.
Correction threshold
The blood glucose level above which you would like to take
insulin to reduce an elevated blood glucose.
CSII (continuous subcutaneous insulin infusion)
Delivering insulin continuously under the skin (“subcutaneously”)
on a programmed schedule.
Dawn phenomenon
An early morning rise in blood glucose level caused by the normal
release of hormones that block insulin’s effect.

Glossary
164
Diabetes Control and Complications Trial (DCCT)
A study by the National Institute of Diabetes and Digestive and
Kidney Diseases (NIDDK), conducted from 1983 to 1993 in
people with type 1 diabetes, which showed that good blood
glucose control significantly helped prevent or delay diabetes
complications.
Diabetes, diabetes mellitus
A condition characterized by hyperglycemia (high blood glucose)
resulting from the body’s inability to use blood glucose for energy.
In type 1 diabetes, the pancreas no longer makes insulin and
therefore blood glucose cannot enter the cells to be used for
energy. In type 2 diabetes, either the pancreas does not make
enough insulin or the body is unable to use insulin correctly.
Diabetic ketoacidosis (see Ketoacidosis)
Duration of insulin action
The length of time that certain types of insulin remain active and
available in your body after a bolus. This duration can vary greatly
depending on the type of insulin you take. Only use rapid-acting
insulin with the mylife OmniPod® Insulin Management System.
Extended bolus
A feature of the mylife OmniPod System that allows a meal bolus
dose to be given over an extended period of time.
Fat
One of the three main energy sources in food. (The other two are
carbohydrate and protein.) Fat is a concentrated source of energy,
providing 9 calories per gram. Foods high in fat include oils, mar-
garine, salad dressings, red meat, and whole-milk dairy foods.
Fiber
The indigestible part of plant foods. Foods that are high in fiber
include broccoli, beans, raspberries, squash, whole-grain bread,
and bran cereal or granola. Fiber is a type of carbohydrate but
does not raise blood glucose levels as other carbohydrates do.
Glucose
A simple sugar (also known as dextrose) used by the body for
energy. Without insulin, the body cannot use glucose for energy.
Hazard alarm
Notification by the PDM that a dangerous condition exists.
Healthcare provider
A professional who practices medicine or teaches people how to
manage their health. All healthcare providers are a resource for
valuable diabetes management information.

Glossary
165
Hemoglobin A1c (HbA1c)
A test that measures a person’s average blood glucose level over
the past 2 to 3 months. Also called glycosylated hemoglobin, the
test shows the amount of glucose that sticks to the red blood cell,
which is proportional to the amount of glucose in the blood.
Hyperglycemia (high blood glucose)
A higher-than-normal level of glucose in the blood; generally 180
mg/dL or higher.
Hypoglycemia (low blood glucose)
A lower-than-normal level of glucose in the blood; generally 70
mg/dL
or lower.
Hypoglycemia unawareness
A condition in which a person does not feel or recognize the
symptoms of hypoglycemia.
Infusing
Introducing a liquid substance under the skin into the body.
Infusion site
A place on the body where an infusion set or Pod is placed and
cannula is inserted.
Insulin
A hormone that helps the body use glucose for energy. The beta
cells of a healthy pancreas make insulin.
Insulin on board (IOB) (active insulin)
The amount of insulin that is still “active” in the body from a previ-
ous bolus dose. In the mylife OmniPod System, insulin on board
(IOB) is considered in two parts: the Insulin on Board (IOB) from a
previous correction bolus and the IOB from a previous meal bolus.
The amount of time insulin remains “on board” or “active”
depends on each individual’s duration of insulin action. Talk with
your healthcare provider to determine your duration of insulin
action.
The mylife OmniPod System continually calculates the Insulin on
Board (IOB) to help prevent “stacking” of bolus doses, which is a
major cause of hypoglycemia.
Insulin reaction (see hypoglycemia)
Insulin-to-carbohydrate ratio (IC ratio)
Number of grams of carbohydrate covered by one unit of insulin.
For example, if your insulin-to-carbohydrate ratio is 1:15, then
you need to deliver one unit of insulin to cover every fifteen
grams of carbohydrate you eat.
Glossary
166
In vitro
Literally, “in glass.” Refers to a biological function taking place in a
laboratory dish rather than in a living organism.
Ketoacidosis (diabetic ketoacidosis or DKA)
A very serious condition in which extremely high blood glucose
levels and a severe lack of insulin cause the body to break down
fat for energy. The breakdown of fat releases ketones into the
blood and urine. DKA can take hours or days to develop, with
symptoms that include stomach pain, nausea, vomiting, fruity
breath odor, and rapid breathing.
Ketones
Acidic by-products that result from the breakdown of fat for
energy. The presence of ketones indicates that the body is using
stored fat and muscle (instead of glucose) for energy.
Meal bolus (also known as carbohydrate bolus)
An amount of insulin administered before a meal or snack to
ensure that blood glucose levels stay within the desired BG goal
after a meal. The mylife OmniPod System calculates a meal bolus
by dividing the grams of carbohydrates you are about to eat by
your insulin-to-carbohydrate ratio.
Multiple daily injections (MDIs)
Introducing insulin into the body with a syringe several times a
day.
Occlusion
A blockage or interruption in insulin delivery.
Prime bolus
An amount of insulin used to fill the cannula, preparing it to
begin delivering insulin under your skin.
Protein
One of the three main energy sources in food (the other two are
carbohydrate and fat). Protein is necessary for the growth, main-
tenance, and repair of body cells and tissues. Protein contains 4
calories per gram. Foods high in protein include meat, poultry,
fish, legumes and dairy products.
Reverse correction (negative correction)
Using an individual’s correction factor, the reverse correction is a
calculation that reduces a portion of a meal bolus dose when the
patient’s blood glucose level is below their blood glucose target.
This feature is an option in the mylife OmniPod® Insulin Manage-
ment System, which should be turned on or off according to the
advice of a healthcare provider.
It is important to rule out ketoacidosis when you
experience symptoms that might otherwise indicate
the flu.

Glossary
167
Sharps
Any medical item that may cause punctures or cuts to those
handling them. Sharps include needles, syringes, scalpel blades,
disposable razors, and broken medical glassware. Dispose of
used sharps according to local waste disposal regulations.
Sharps container
A puncture-proof container used for storage and disposal of
used sharps.
Soft Key
A button on the PDM whose label or function appears on the
screen directly above the button. The label changes depending
on the task you are performing.
Subcutaneous
Under the skin.
Suggested bolus calculator
A feature that calculates bolus doses with user-specific settings
and inputs. The settings used to calculate a suggested bolus are
target BG, insulin-to-carbohydrate (IC) ratio, correction factor (CF)
and duration of insulin action. The inputs used to calculate a sug-
gested bolus are current BG, carbs entered, and insulin on board.
The bolus calculator can be turned Off or On in the PDM.
Target blood glucose (BG) level
The ideal number at which you would like your blood glucose
level to be. The mylife OmniPod System uses this number in cal-
culating bolus doses.
Temp basal
A basal rate that is used to cover predictable, short-term changes
in basal insulin need. Temporary rates are often used during exer-
cise and for sick-day insulin adjustments.
Temporary basal preset
An adjustment in a basal rate, in either % or U/hr, that can be
assigned a custom name and preprogrammed into the PDM.
Time segment (see basal segment)

Index
168
Index
A
activate a new Pod. . . . . . . . . . . . . . . 43–45
active insulin . . . . . . .See insulin on board
add
basal segment or rate . . . . . . . . . 17–21
bolus reminder. . . . . . . . . . . . . . . . . . . .70
custom reminders. . . . . . . . . . . . . . . . .70
user information . . . . . . . . . . . . . . . . 103
adhesive. . . . . . . . . . . . . . . . . . . . . . . . . . 4, 51
remover. . . . . . . . . . . . . . . . . . . . . . . . . . .45
advisory alarms . . . . . . . . . . 126–130, 162
airport security . . . . . . . . . . . . . . . . . . . . 108
alarms . . . . . . . . . . . . . . . . . . . . . . 8, 126–134
acknowledge . . . . . . . . . . . . . . . . . . . 127
advisory. . . . . . . . . . . . . . . . . . . . 126–130
hazard . . . . . . . . . . . . . . . . . . . . . 126–134
history records . . . . . . . . . . . . . . . . . . 101
alert escalation . . . . . . . . . . . . . . . . . . . . 126
alerts and reminders. . . . . . . . . . . . . 68–71
auto-off alert . . . . . . . . . . . . . . . . . . . . . .68
BG reminder . . . . . . . . . . . . . . . . . . . . . .68
bolus reminders. . . . . . . . . . . . . . . . . . .69
confidence reminders. . . . . . . . . . . . . 69
custom reminders . . . . . . . . . . . . . . . . 69
low reservoir alert . . . . . . . . . . . . . 14, 68
missed bolus . . . . . . . . . . . . . . . . . . . . . . 69
Pod expiration reminder . . . . . . . . . . 68
program reminders . . . . . . . . . . . . . . . 69
aseptic technique . . . . . . . . . . . . . . 58, 162
automated cannula insertion. . . . . 2, 53
auto-off alert . . . . . . . . . . . . . . . . . . . . . . . .68
B
backlight time-out. . . . . . . . . . . . . . . . . . .73
set . . . . . . . . . . . . . . . . . . . . . . . . . . . . . . . .74
basal history . . . . . . . . . . . . . . . . . . . . . . . . .97
basal program . . . . . . . . . . 11, 16–22, 162
add segment or rate . . . . . . . . . . . . . .21
copy . . . . . . . . . . . . . . . . . . . . . . . . . . . . . .22
create . . . . . . . . . . . . . . . . . . . . . . . . . . . . . 17
delete . . . . . . . . . . . . . . . . . . . . . . . . . . . . .22
edit segment or rate . . . . . . . . . . . . . .21
enable . . . . . . . . . . . . . . . . . . . . . . . . . . . . 19
rename . . . . . . . . . . . . . . . . . . . . . . . . . . .22
basal rate . . . . . . . . . . . . . 1, 11, 16–27, 162
maximum. . . . . . . . . . . . . . . . . . . . . . . . . 27
temporary . . . . . . . . . . . . . . . . . . . . . . . . 22
basal segment. . . . . . . . . . . . . . 11, 16, 162
basal settings . . . . . . . . . . . . . . . . . . . . . . . . 11
batteries . . . . . . . . . . . . . . . . . . . . . .9, 96, 144
blood glucose
BG goal . . . . . . . . . . . . . . . . . . 11, 72, 162
BG reminder . . . . . . . . . . . . . . . . . . . . . . 68
checking . . . . . . . . . . . . . . . . . . . .9, 79–95
goal limit. . . . . . . . . . . . . . . . . . . . . . . . . . 72
history . . . . . . . . . . . . . . . . . . . . . . . . . . . . 99
level. . . . . . . . . . . . . . . . . . . . . . . . . . 28, 162
monitoring. . . . . . . . . . . . . . . . . . . . . . . 9, 3
sound . . . . . . . . . . . . . . . . . . . . . . . . . 11, 72
test strip . . . . . . . . . . . . . . . . . . . . . . . . . . 87
blood glucose meter . . . . .3, 79–95, 162
error messages. . . . . . . . . . . . . 122–124
readings . . . . . . . . . . . . . . . . . . . . . . . .3, 89
settings . . . . . . . . . . . . . . . . . . . . . . . . . . . 71
specifications . . . . . . . . . . . . . . . . . . . .154
blood glucose readings
enter manually. . . . . . . . . . . . . . . . . . . . 92
low and high. . . . . . . . . . . . . . . . . . . . . . 94
bolus . . . . . . . . . . . . . . . . . . . . . . . 1, 3, 28–42

Index
169
cancel . . . . . . . . . . . . . . . . . . . . . . . . . . . . .36
dose. . . . . . . . . . . . . . . . . . . . . . . . . . 28, 162
extended. . . . . . . . . . . . . . . . . . . . . . 29, 34
history . . . . . . . . . . . . . . . . . . . . . . . . . . . .98
manual delivery . . . . . . . . . . . . . . . . . . .33
normal . . . . . . . . . . . . . . . . . . . . . . . . 29, 31
presets . . . . . . . . . . . . . . . . . . . 37–39, 162
ratios/factors/targets. . . . . . . . . . . . . .66
reminders . . . . . . . . . . . . . . . . . . . . . 69, 70
settings . . . . . . . . . . . . . . . . . . . . . . . 64–67
suggested bolus calculator. . . 29–34,
147–150
bolus presets . . . . . . . . . . . . . . . 37–39, 162
cancel . . . . . . . . . . . . . . . . . . . . . . . . . . . . .39
change. . . . . . . . . . . . . . . . . . . . . . . . . . . .39
create . . . . . . . . . . . . . . . . . . . . . . . . . . . . .38
delete . . . . . . . . . . . . . . . . . . . . . . . . . . . . .39
enable . . . . . . . . . . . . . . . . . . . . . . . . . . . .38
rename. . . . . . . . . . . . . . . . . . . . . . . . . . . .39
bolus reminder
add. . . . . . . . . . . . . . . . . . . . . . . . . . . . . . . .70
bolus reminders . . . . . . . . . . . . . . . . . . . . .69
Bolus/basal/calcs menu. . . . . . . . . . . . . .64
bright mode . . . . . . . . . . . . . . . . . . . . . . 5, 73
buttons
Home/Power. . . . . . . . . . . . . . . . . . . . . . . 5
Up/Down Controller . . . . . . . . . . . . . . . 5
User Info/Support . . . . . . . . . . . . . . . . . . 5
C
calorie . . . . . . . . . . . . . . . . . . . . . . . . . . . . . 163
cancel
bolus. . . . . . . . . . . . . . . . . . . . . . . . . . . . . .36
bolus preset. . . . . . . . . . . . . . . . . . . . . . .39
one-time temporary basal rate. . . .24
temporary basal presets . . . . . . . . . .26
cannula . . . . . . . . . . . . . . . . . . . . . . . . . . 2, 163
automated insertion . . . . . . . . . . . 8, 53
carb presets . . . . . . . . . . . . . .2, 40–42, 163
change. . . . . . . . . . . . . . . . . . . . . . . . . . . .41
change category . . . . . . . . . . . . . . . . . .41
create . . . . . . . . . . . . . . . . . . . . . . . . . . . . .40
delete . . . . . . . . . . . . . . . . . . . . . . . . . . . . .42
edit . . . . . . . . . . . . . . . . . . . . . . . . . . . 41, 42
rename . . . . . . . . . . . . . . . . . . . . . . . . . . .42
carbohydrate . . . . . . . . . . . . . . . . . . . . 1, 163
counting . . . . . . . . . . . . . . . . . . . . . . . . 163
history . . . . . . . . . . . . . . . . . . . . . . . . . . 101
carbohydrate bolus . . . . . See meal bolus
care and maintenance . . . . . . . . . . . . . 142
cellular phones . . . . . . . . . . . . . . . . . . . . 120
change
basal programs . . . . . . . . . . . . . . . . . . . 20
basal settings . . . . . . . . . . . . . . . . . . . . .64
bolus presets. . . . . . . . . . . . . . . . . . . . . .39
bolus settings . . . . . . . . . . . . . . . . . . . . . 64
carb presets . . . . . . . . . . . . . . . . . . . . . . .41
temporary basal presets . . . . . . . . . . 26
user information . . . . . . . . . . . . . . . . 103
check alarms. . . . . . . . . . . . . . . . . . . . . . . . . 75
check blood glucose. . . . . . . . . . . . . 79–95
cleaning . . . . . . . . . . . . . . . . . . . . . . .142, 143
clock
12-hour or 24-hour. . . . . . . . . . . . . . . .63
communication
distance to Pod . . . . . . . . . . . . . . 77, 154
interruption. . . . . . . . . . . . . . . . . . 78, 136
communication failure . . . . . . . 136–141
bolus cancellation. . . . . . . . . . . . . . . 140
Pod activation. . . . . . . . . . . . . . . . . . . 136
Pod deactivation . . . . . . . . . . . . . . . . 138
Pod operation. . . . . . . . . . . . . . . . . . . 136

Index
170
request for status . . . . . . . . . . . . . . . 139
complications, diabetes-related . .
1, 163
confidence reminders . . . . . . . . . . . . . . .69
contact information . . . . . . . . . . . . . . . 102
continuous subcutaneous insulin
infusion . . . . . . . . . . . . . . . . . . . . . . . . . 163
control solution
expiration . . . . . . . . . . . . . . . . . . . . . . . . .81
results. . . . . . . . . . . . . . . . . . . . . . . . . 82, 85
test. . . . . . . . . . . . . . . . . . . . . . . . . . . . 82–85
copy basal program . . . . . . . . . . . . . . . . .22
correct-above value . . . . .See correction
threshold
correction bolus . . . . . . . . . . . 30, 147, 163
correction factor . . . . . 13, 28, 65, 67, 163
correction IOB . . . . . . . . . . . . . . . . . . . . . 147
correction threshold . . . . .28, 65, 66, 163
create
basal program . . . . . . . . . . . . . . . . . . . .17
bolus preset. . . . . . . . . . . . . . . . . . . . . . .38
carb presets . . . . . . . . . . . . . . . . . . . . . . .40
temporary basal presets . . . . . . . . . .24
CSII . . . . . See continuous subcutaneous
insulin infusion
CT scans . . . . . . . . . . . . . . . . . . . . . . . . . . . 120
custom reminders . . . . . . . . . . . . . . . 69, 70
customize PDM. . . . . . . . . . . . . . . . . . . . . .73
D
date and time. . . . . . . . . . . . . . . . . . . . 11, 63
dawn phenomenon . . . . . . . . . . . . . . . 163
deactivation . . . . . .See Pod deactivating
delete
basal program . . . . . . . . . . . . . . . . . . . .22
bolus presets. . . . . . . . . . . . . . . . . . . . . .39
bolus reminder. . . . . . . . . . . . . . . . . . . .70
carb presets . . . . . . . . . . . . . . . . . . . . . . .42
temporary basal presets . . . . . . . . . . 27
diabetes . . . . . . . . . . . . . . . . . . . . . . . . . . . 164
Diabetes Control and Complications Tri-
al (DCCT). . . . . . . . . . . . . . . . . . . . . . . . 164
diabetes emergency kit. . . . . . . . . . . . 106
diabetes mellitus . . . . . . . . . . . . . . . . . . . . . 7
diabetic ketoacidosis . . . . . . . . . . . See DKA
diagnostic functions . . . . . . . . . . . . . . . . . 75
check alarms . . . . . . . . . . . . . . . . . . . . . . 75
reset PDM. . . . . . . . . . . . . . . . . . . . . . . . . 75
disinfecting wipes . . . . . . . . . . . . . . . . . 143
DKA . . . . . . . . . . . . . . . . . . . . . . . . . . . . . . . .166
avoiding . . . . . . . . . . . . . . . . . . . . . . . . .119
symptoms . . . . . . . . . . . . . . . . . . . . . . .118
treating . . . . . . . . . . . . . . . . . . . . . . . . . .119
duration of insulin action . . . . . 9, 14, 30,
147–148, 164
E
edit
basal segment or rate . . . . . . . . . . . . .21
bolus reminder . . . . . . . . . . . . . . . . . . .70
carb presets. . . . . . . . . . . . . . . . . . . . . . . 42
electrical interference . . . . . . . . . . . . . . . 78
electrical safety . . . . . . . . . . . . . . . 157–161
electromagnetic compatibility 157–161
electromagnetic fields. . . . . . . . . . . . . . . 78
emergency kit . . . . . . . . . . . .104, 106, 107
empty reservoir hazard alarm . . . . . .129
enable
basal program . . . . . . . . . . . . . . . . . . . . 19
bolus preset. . . . . . . . . . . . . . . . . . . . . . . 38
one-time temporary basal rate. . . . 23
temporary basal presets . . . . . . . . . . 25

Index
171
enter
ID screen color . . . . . . . . . . . . . . . . . . . .10
tags . . . . . . . . . . . . . . . . . . . . . . . . . . . 72, 90
error messages, BG meter. . . . . 122–124
exercise . . . . . . . . . . . . . . . . . . . . . . . 114, 120
expiration
control solution . . . . . . . . . . . . . . . . . . .81
Pod. . . . . . . . . . . . . . . . . . . . . . . . . . . . . . . .68
extended bolus . . . . . .14, 29, 34–35, 164
Extended option. . . . . . . . . . . . . . . . . . . . .67
extreme temperatures. . . . . . . . . . . . . . .77
F
failure . . . . . . . See communication failure
fat . . . . . . . . . . . . . . . . . . . . . . . . . . . . . . . . . 164
fiber . . . . . . . . . . . . . . . . . . . . . . . . . . . .41, 164
fill syringe. . . . . . . . . . . . . . . . . . . . . . . . 46–48
Flow accuracy
Pod. . . . . . . . . . . . . . . . . . . . . . . . . . . . . . 153
Flow rate error . . . . . . . . . . . . . . . . . . . . . 153
G
glucagon . . . . . . . . . . . . . . . . . . . . . . . . . . 107
glucose . . . . . . . . . . . . . . . . . . . . . . . . . . 7, 164
H
hard work. . . . . . . . . . . . . . . . . . . . . . . . . . 120
hazard alarm, manual shut-off . . . . . 134
hazard alarms. . . . . . . . . . . . 126–134, 164
healthcare provider. . . . . . . . . . . . . . 9, 164
hemoglobin A1c (HbA1c). . . . . . . . . . 165
history
alarms. . . . . . . . . . . . . . . . . . . . . . . . . . . 101
all . . . . . . . . . . . . . . . . . . . . . . . . . . . . . . . 102
basal . . . . . . . . . . . . . . . . . . . . . . . . . . . . . .97
blood glucose. . . . . . . . . . . . . . . . . . . . .99
bolus. . . . . . . . . . . . . . . . . . . . . . . . . . . . . .98
carbohydrates. . . . . . . . . . . . . . . . . . . 101
insulin delivery . . . . . . . . . . . . . . . . 96, 97
Home screen . . . . . . . . . . . . . . . . . . . . . . 6–7
Home/Power button . . . . . . . . . . . . . . . . . 5
hospitalization. . . . . . . . . . . . . . . . . . . . . 121
hyperglycemia. . . . . . 104, 114–118, 165
avoiding . . . . . . . . . . . . . . . . . . . . . . . . 115
causes. . . . . . . . . . . . . . . . . . . . . . . . . . . 116
symptoms . . . . . . . . . . . . . . . . . . . . . . 114
treating . . . . . . . . . . . . . . . . . . . . . . . . . 115
hypoglycemia . . . . . . 104, 109–114, 165
avoiding . . . . . . . . . . . . . . . . . . . . . . . . 110
causes. . . . . . . . . . . . . . . . . . . . . . . . . . . 113
symptoms . . . . . . . . . . . . . . . . . . . 79, 109
treating . . . . . . . . . . . . . . . . . . . . . . . . . 111
hypoglycemia unawareness . . .110, 165
I
icons. . . . . . . . . . . . . . . . . . . . . . . . . . . . . . . 156
insulin gauge . . . . . . . . . . . . . . . . . . . . .61
ID screen . . . . . . . . . . . . . . . . . . . . . . . . . . . .60
color . . . . . . . . . . . . . . . . . . . . . . . . . . . . . . 10
set . . . . . . . . . . . . . . . . . . . . . . . . . . . . . . . .73
illness. . . . . . . . . . . . . . . . . . . . . . . . . . . . . . 119
infection . . . . . . . . . . . . . . . . . . . . . . . . 58, 105
infusion set, automated insertion. . . . . 2
infusion site. . . . . . . . . . . . 49, 58, 105, 165
infusion site, inspection. . . . . . . . . . . . 105
insulin . .16, 28, 43, 46, 48, 106, 146, 165
insulin action . . . See duration of insulin
action
insulin delivery
resume. . . . . . . . . . . . . . . . . . . . . . . . . . . . 57
suspend. . . . . . . . . . . . . . . . . . . . . . . . . . . 56
insulin delivery records . . . . . . . . . . 96–98
insulin delivery, continuous. . . . . . . . . . . 1

Index
172
insulin gauge icon . . . . . . . . . . . . . . . . . . .61
insulin on board (IOB). .28, 30, 147–150,
165
insulin reservoir. . . . . . . . . . . . . . . . . . . . . .61
insulin, rapid-acting vs. long-acting
. 118
insulin-to-carb (IC) ratio9, 13, 28, 65, 66,
165
interruption in communication. . . . . .78
IV Prep wipes . . . . . . . . . . . . . . . . . . . 77, 143
K
ketoacidosis . . . . . . . . . . . . . . . . . . . . . . See DKA
ketones . . . . . . . . . . . . . . . . . . . . 94, 118, 166
L
lancing device . . . . . . . . . . . . . . . . . . . 85–87
long-acting insulin. . . . . . . . . . . . . . . . . 118
low battery alert . . . . . . . . . . . . . . . . . . . 144
low blood glucose . . See hypoglycemia
low reservoir advisory . . . . . . . . . . . . . 129
low reservoir alert . . . . . . . . . . . . . . . 14, 68
lows, highs, and DKA, avoid. . . . . . . . 109
M
manual shut-off of hazard alarm. . . 134
maximum basal rate. . . . . . . . . . . . . 27, 67
maximum bolus . . . . . . . . . . . . . . . . . 14, 67
meal bolus. . . . . . . . . . . . 30, 147–150, 166
meal IOB. . . . . . . . . . . . . . . . . . . . . . . . . . . 148
Medic Alert tag . . . . . . . . . . . . . . . . . . . . 121
medical electrical equipment. 157–161
menu
Bolus/basal/calcs. . . . . . . . . . . . . . . . . . 64
More actions . . . . . . . . . . . . . . . . . . . 7, 31
My records . . . . . . . . . . . . . . . . . . . . . . . . . 7
Settings . . . . . . . . . . . . . . . . . . . . . . . . . . . . 7
Suspend/resume. . . . . . . . . . . . . . . . . . . 7
System setup . . . . . . . . . . . . . . . . . . . . .62
Temp basal. . . . . . . . . . . . . . . . . . . . . . . . . 7
microwave ovens . . . . . . . . . . . . . . . . . . . .78
Min BG for calcs. . . . . . . . . . . . . . .12, 65, 66
missed bolus reminder . . . . . . . . . . 69–70
More actions menu . . . . . . . . . . . . . . . . . .31
MRIs . . . . . . . . . . . . . . . . . . . . . . . . . . . . . . . 120
multiple daily injections (MDIs) . . . . 166
multiple-day trends, BG history. . . . 100
N
normal bolus . . . . . . . . . . . . . . . . . . . . 29, 31
O
occlusion . . . . . . . . . . . . . . . . .114, 118, 166
occlusion detected hazard alarm . . .131
OmniPod label symbols . . . . . . . . . . . .155
OmniPod System . . . . . . . . . . . . . . . . . . . . . 2
one-time temporary basal rate . . . . . . 23
cancel. . . . . . . . . . . . . . . . . . . . . . . . . . . . . 24
enable . . . . . . . . . . . . . . . . . . . . . . . . . . . . 23
operating temperatures . . . 77, 152, 154
options
Bolus calcs . . . . . . . . . . . . . . . . . . . . . . . . 64
Extended . . . . . . . . . . . . . . . . . . . . . . . . . 67
Max basal rate . . . . . . . . . . . . . . . . . . . .67
Max bolus. . . . . . . . . . . . . . . . . . . . . . . . . 67
Ratios/factors/targets . . . . . . . . . . . . . 66
Temp basal. . . . . . . . . . . . . . . . . . . . . . . . 67
Options and settings . . . . . . . . . . . . . . .151
P
PDM . . . . . . . . . . . . . . . . . . . . . . . . . . .4, 60–78
backlight time-out . . . . . . . . . . . . . . . . 73
batteries . . . . . . . . . . . . . . . . . . . . . . 9, 144
BG goal . . . . . . . . . . . . . . . . . . . . . . . . . . . 72
blood glucose sound . . . . . . . . . . . . . 72

Index
173
cleaning. . . . . . . . . . . . . . . . . . . . . . . . . 143
communication with Pod . . 136–141
customize . . . . . . . . . . . . . . . . . . . . . 73–74
disinfecting wipes. . . . . . . . . . . . . . . 143
dropped . . . . . . . . . . . . . . . . . . . . . . . . 146
icons . . . . . . . . . . . . . . . . . . . . . . . . . . . . 156
ID screen . . . . . . . . . . . . . . . . . . . . . . . . . .60
PDM lock. . . . . . . . . . . . . . . . . . . . . . 73–74
repair or replacement . . . . . . . . . . . 127
screen time-out . . . . . . . . . . . . . . . . . . .73
settings . . . . . . . . . . . . . . . . . . . . . . . . . . .61
specifications . . . . . . . . . . . . . . . . . . . 154
Status screen. . . . . . . . . . . . . . . . . .60–61
storage. . . . . . . . . . . . . . . . . . . . . . . . . . 142
submerged in water. . . . . . . . . . . . . . .77
version . . . . . . . . . . . . . . . . . . . . . . . . . . . . . 6
PDM error hazard alarm . . . . . . . . . . . 132
PDM lock . . . . . . . . . . . . . . . . . . . . . . .73, 142
set. . . . . . . . . . . . . . . . . . . . . . . . . . . . . . . . .74
PDM options, System setup. . . . . . . . . .73
personal contact information. . . . . . 102
Personal Diabetes Manager . . .See PDM
physical exertion. . . . . . . . . . . . . . . . . . . 120
playing sports . . . . . . . . . . . . . . . . . . . . . 120
Pod . . . . . . . . . . . . . . . . . . . . . . . . . . . .4, 43–45
applying . . . . . . . . . . . . . . . . . . . . . . . . . .51
change process . . . . . . . . . . . . . . . . . . .43
check status. . . . . . . . . . . . . . . . . . . . . . .55
cleaning. . . . . . . . . . . . . . . . . . . . . . . . . 142
deactivating . . . . . . . . . . . . . . . . . . . . . .44
expiration reminder. . . . . . . . . . . . . . .68
filling. . . . . . . . . . . . . . . . . . . . . . . . . . . . . .46
flow accuracy . . . . . . . . . . . . . . . . . . . 153
flow rate error . . . . . . . . . . . . . . . . . . . 153
inserting cannula . . . . . . . . . . . . . . . . .53
priming . . . . . . . . . . . . . . . . . . . . . . . . . . .48
removal . . . . . . . . . . . . . . . . . . 44–45, 120
safety checks. . . . . . . . . . . . . . . . . . . . . .48
specifications . . . . . . . . . . . . . . . . . . . 152
storage. . . . . . . . . . . . . . . . . . . . . . . . . . 142
Pod error hazard alarm . . . . . . . . . . . . 131
Pod expiration advisory. . . . . . . . . . . . 130
Pod expired hazard alarm. . . . . . . . . . 130
Pod occlusion hazard alarm . . . . . . . 131
prescriptions. . . . . . . . . . . . . . . . . . . . . . . 109
for travel . . . . . . . . . . . . . . . . . . . . . . . . 108
prime bolus. . . . . . . . . . . . . . . . . . . . . 53, 166
priming, automatic . . . . . . . . . . . . . . . . . . . 8
program reminders. . . . . . . . . . . . . . . . . . 69
protein . . . . . . . . . . . . . . . . . . . . . . . . . . . . 166
R
radio interference . . . . . . . . . . . . . . . . . . .78
rapid-acting insulin . . . . . . . . . . . . . . . . 118
Ratios/factors/targets option . . . . 66–67
record keeping . . . . . . . . . . . . . . 3, 96–103
record screens . . . . . . . . . . . . . . . . . .96–103
alarms. . . . . . . . . . . . . . . . . . . . . . . . . . . 101
all . . . . . . . . . . . . . . . . . . . . . . . . . . . . . . . 102
blood glucose. . . . . . . . . . . . . . . . . . . . . 99
carbohydrates . . . . . . . . . . . . . . . . . . 101
combined records . . . . . . . . . . . . . . 102
insulin delivery. . . . . . . . . . . . . . . . . . . .97
personal contact information . . . 102
special symbols . . . . . . . . . . . . . . 96, 100
User Info/Support. . . . . . . . . . . . . . . 102
remove a Pod. . . . . . . . . . . . . . . 44–45, 120
rename
basal program . . . . . . . . . . . . . . . . . . . .22
bolus presets. . . . . . . . . . . . . . . . . . . . . .39
custom reminders . . . . . . . . . . . . . . . . 70
temporary basal presets . . . . . . . . . . 27

Index
174
replace batteries . . . . . . . . . . . . . . . . . . . 145
reset
date . . . . . . . . . . . . . . . . . . . . . . . . . . . . . . .64
PDM . . . . . . . . . . . . . . . . . . . . . . . . . . . . . .75
time. . . . . . . . . . . . . . . . . . . . . . . . . . . . . . .63
resume insulin delivery . . . . . . . . . . . . . .57
reverse correction . . . . . . . 13, 33, 66, 67,
147, 166
S
safety . . . . . . . . . . . . . . . . . . . . . . . . . . . . 8, 104
alerts and alarms. . . . . . . . . . . . . . . . . . . 8
automatic priming . . . . . . . . . . . . . . . . . 8
automatic safety checks. . . . . . . . . . . . 8
electrical . . . . . . . . . . . . . . . . . . . 157–161
safety checks . . . . . . . . . . . . . . . . . . . . . . 122
screen time-out. . . . . . . . . . . . . . . . . . . . . .73
set. . . . . . . . . . . . . . . . . . . . . . . . . . . . . . . . .74
set
backlight time-out . . . . . . . . . . . . . . . .74
ID screen . . . . . . . . . . . . . . . . . . . . . . . . . .73
PDM lock. . . . . . . . . . . . . . . . . . . . . . . . . .74
screen time-out . . . . . . . . . . . . . . . . . . .74
settings, BG meter . . . . . . . . . . . . . . . . . . .71
Setup Wizard . . . . . . . . . . . . . . . . . . . . . . . .10
sharps . . . . . . . . . . . . . . . . . . . . . . . . . . . . . 167
sharps container. . . . . . . . . . . . . . . . . . . 167
shock . . . . . . . . . . . . . . . . . . . . . . . . . . . . . . . .44
shut-off, manual . . . . . . . . . . . . . . . . . . . 134
sick days . . . . . . . . . . . . . . . . . . . . . . . . . . . 119
soap, solvent. . . . . . . . . . . . . . . 77, 142, 143
soft keys . . . . . . . . . . . . . . . . . . . . . . . 7, 5, 167
soft reset . . . . . . . . . . . . . . . . . . . See reset PDM
special symbols in record screens. . . .96
specifications
BG meter. . . . . . . . . . . . . . . . . . . . . . . . 154
PDM . . . . . . . . . . . . . . . . . . . . . . . . . . . . 154
Pod . . . . . . . . . . . . . . . . . . . . . . . . . . . . . 152
sports. . . . . . . . . . . . . . . . . . . . . . . . . . . . . . 120
Status screen . . . . . . . . . . . . . . . 6–7, 60–61
storage . . . . . . . . . . . . . . . . . . . . . . . . . . . . . .59
storage temperatures. . . . . . . . . .152, 154
stuck key advisory . . . . . . . . . . . . . . . . . 130
suggested bolus calculator . . . . . . . 2, 12,
29–33, 91, 167
examples . . . . . . . . . . . . . . . . . . 147–149
guidelines. . . . . . . . . . . . . . . . . . . . . . . 149
supplies
packing for travel . . . . . . . . . . . . . . . .107
surgery . . . . . . . . . . . . . . . . . . . . . . . . . . . . .121
suspend insulin delivery . . . . . . . . . . . . . 56
symbols
in history records. . . . . . . . . . . . . . . . . . 96
on screen . . . . . . . . . . . . . . . . . . . . . . . .156
System labels . . . . . . . . . . . . . . . . . . . .155
symptoms
DKA . . . . . . . . . . . . . . . . . . . . . . . . . . . . . .118
hyperglycemia . . . . . . . . . . . . . . . . . . .114
hypoglycemia. . . . . . . . . . . . . . . . 79, 109
System options and settings. . . . . . . .151
System setup menu . . . . . . . . . . . . . . . . . 62
T
tags
enter . . . . . . . . . . . . . . . . . . . . . . . . . . 72, 90
target BG . . . . . . . . . . . . . . . . . . . 28, 64, 167
target blood glucose value . . . . . . . . . . 12
temperatures
extreme. . . . . . . . . . . . . . . . . . . . . . . . . . . 77
operating . . . . . . . . . . . . . . . 77, 152, 154
storage. . . . . . . . . . . . . . . . . . . . . .152, 154
temporary basal . . . . . . . . . . . . . . . . . 11, 67

Index
175
temporary basal presets . . . . 24–27, 167
cancel . . . . . . . . . . . . . . . . . . . . . . . . . . . . .26
change. . . . . . . . . . . . . . . . . . . . . . . . . . . .26
create . . . . . . . . . . . . . . . . . . . . . . . . . . . . .24
delete . . . . . . . . . . . . . . . . . . . . . . . . . . . . .27
enable . . . . . . . . . . . . . . . . . . . . . . . . . . . .25
rename. . . . . . . . . . . . . . . . . . . . . . . . . . . .27
temporary basal rate. . . . . . . . 22–27, 167
temporary basal rate, one-time . . . . . .23
test strips . . . . . . . . . . . . . . .3, 79, 80, 82, 87
text, entering and changing . . . . .17, 22,
24, 27, 38, 39, 40
time . . . . . . . . . . . . . . . . . . . . . . . . . . . . . 11, 63
time segment . . . . . . . See basal segment
time zones. . . . . . . . . . . . . . . . . . . . . . . . . 107
travel concerns . . . . . . . . . . . . . . . . . . . . 107
U
Up/Down Controller buttons . . . . . . . . . 5
User Guide symbols. . . . . . . . . . . . . . . . . . . . 6
User Info/Support
button . . . . . . . . . . . . . . . . . . . . . . . . 5, 102
icon . . . . . . . . . . . . . . . . . . . . . . . . . . . . . . . . 5
screen. . . . . . . . . . . . . . . . . . . . . . . . . . . 103
V
vacation . . . . . . . . . . . . . . . . . . . . . . . . . . . 107
W
water . . . . . . . . . . . . . . . . . . 58, 77, 106, 145
wireless communication technology . .
78
X
X-rays. . . . . . . . . . . . . . . . . . . . . . . . . .109, 120
My PDM Settings
Use this form to keep track of your important PDM settings. Remember to update your information as you change or add settings.
Basal Program 1
Name _________________________________
00:00 to ________
________ to ________
________ to ________
________ to ________
________ to ________
________ to ________
________ to ________
Rate
____________ U/hr
____________ U/hr
____________ U/hr
____________ U/hr
____________ U/hr
____________ U/hr
____________ U/hr
Target BG
Target BG (“correct to” values) for
each time segment defined, starting
at midnight. These values are used
by the suggested bolus calculator.
00:00 to ________
________ to ________
________ to ________
________ to ________
________ to ________
________ to ________
________ to ________
________ to ________
Target BG
_________
_________
_________
_________
_________
_________
_________
_________
Suggest correction
when BG is above
__________ mg/dL
__________ mg/dL
__________ mg/dL
__________ mg/dL
__________ mg/dL
__________ mg/dL
__________ mg/dL
__________ mg/dL
Basal Program 2
Name _________________________________
00:00 to ________
________ to ________
________ to ________
________ to ________
________ to ________
________ to ________
________ to ________
Rate
____________ U/hr
____________ U/hr
____________ U/hr
____________ U/hr
____________ U/hr
____________ U/hr
____________ U/hr
Insulin-to-Carbohydrate Ratio
Insulin-to-carbohydrate ratio for each time
segment defined, starting at midnight.
00:00 to ________
________ to ________
________ to ________
________ to ________
________ to ________
________ to ________
________ to ________
________ to ________
1 unit of insulin
covers
__________ g carb
__________ g carb
__________ g carb
__________ g carb
__________ g carb
__________ g carb
__________ g carb
__________ g carb
My PDM Settings
Duration of Insulin Action
Time that insulin will remain “active” in the body
from a previous bolus. _____________ hrs
Correction Factor
Correction factor for each time segment defined,
starting at midnight.
00:00 to ________
________ to ________
________ to ________
________ to ________
________ to ________
________ to ________
________ to ________
________ to ________
1 unit of insulin
decreases BG by
__________ mg/dL
__________ mg/dL
__________ mg/dL
__________ mg/dL
__________ mg/dL
__________ mg/dL
__________ mg/dL
__________ mg/dL
Bolus Presets
Name
________________________________________
________________________________________
________________________________________
________________________________________
________________________________________
________________________________________
________________________________________
Units
______________ U
______________ U
______________ U
______________ U
______________ U
______________ U
______________ U
Temp Basal Presets
Name
________________________________________
________________________________________
________________________________________
________________________________________
________________________________________
________________________________________
________________________________________
Rate (circle
measurement)
________ U/hr or %
________ U/hr or %
________ U/hr or %
________ U/hr or %
________ U/hr or %
________ U/hr or %
________ U/hr or %
Carb Presets
Name
________________________________________
________________________________________
________________________________________
________________________________________
________________________________________
________________________________________
________________________________________
________________________________________
________________________________________
________________________________________
Grams of
carbohydrate
__________ g carb
__________ g carb
__________ g carb
__________ g carb
__________ g carb
__________ g carb
__________ g carb
__________ g carb
__________ g carb
__________ g carb

My Notes
_____________________________________________________________________________________________________________
_____________________________________________________________________________________________________________
_____________________________________________________________________________________________________________
_____________________________________________________________________________________________________________
_____________________________________________________________________________________________________________
_____________________________________________________________________________________________________________
_____________________________________________________________________________________________________________
_____________________________________________________________________________________________________________
_____________________________________________________________________________________________________________
_____________________________________________________________________________________________________________
_____________________________________________________________________________________________________________
_____________________________________________________________________________________________________________
_____________________________________________________________________________________________________________
