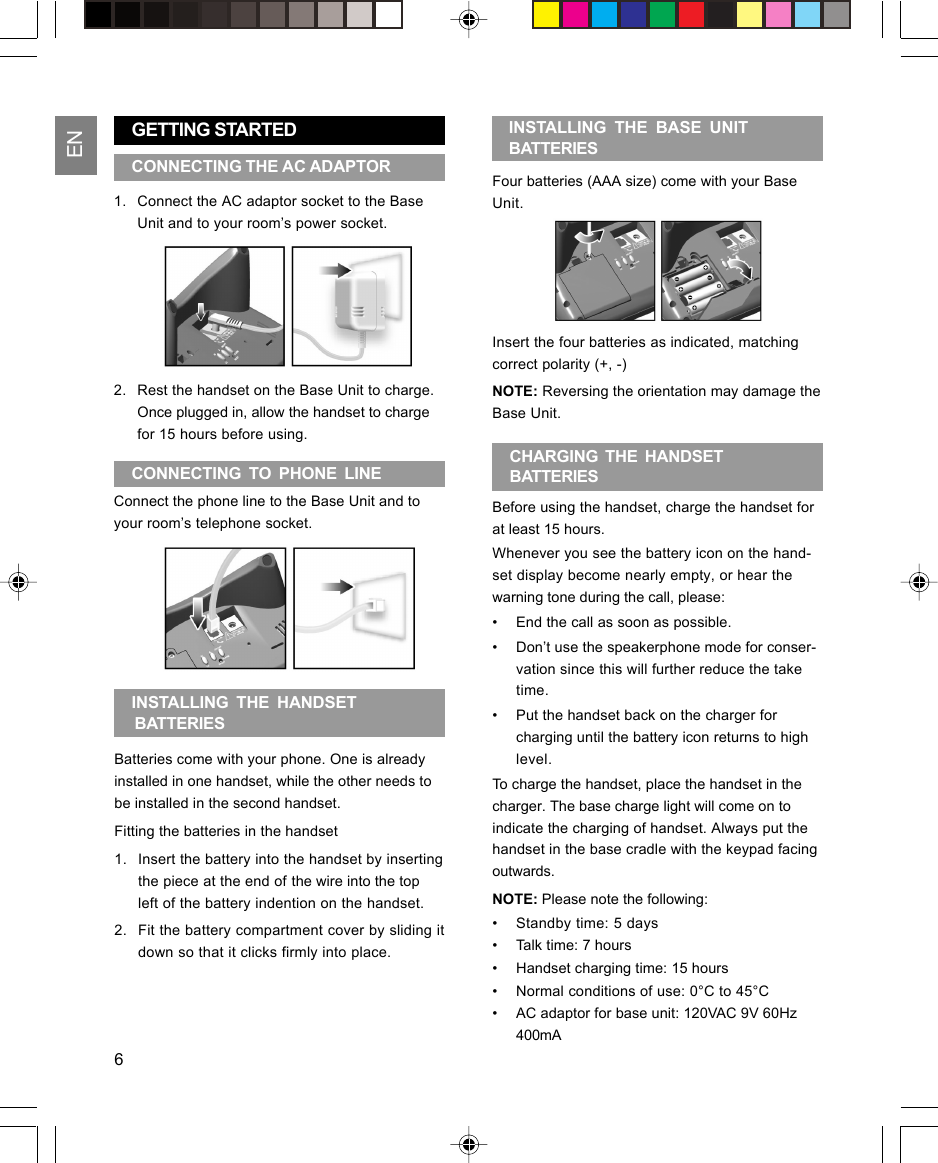
Integrated Display Technology WW338 2.4GHz FHSS Cordless Phone w/ CID User Manual manual E1 p65

Integrated Display Technology Ltd 2.4GHz FHSS Cordless Phone w/ CID manual E1 p65

Contents

User Manual

ENModel: WW338User ManualManual del UsuarioManual do UsuárioManuel de L’utilisateur
EN
ENImportant Safety Instruction ...................... 1Safety Tips ................................................... 2Introduction ................................................. 3Key Features ............................................... 3Handset and Base Unit – Front View ...... 4Base Unit – Bottom View ........................ 4Handset – Front View .............................. 4Charger – Front View ............................... 5Getting Started ............................................ 6Connecting the AC Adaptor .................... 6Connecting to Phone Line ...................... 6Installing the Handset Batteries .............. 6Installing the Base Unit Batteries ........... 6Charging the Handset Batteries .............. 6Final Safety Tips ..................................... 7Electrical Safety ...................................... 7Basic Functions .......................................... 7Making a Call ........................................... 7Answering a Call ...................................... 7Ending a Call ........................................... 7Call waiting .............................................. 8Message Waiting ..................................... 8Adjusting the Speaker Volume ............... 8TABLE OF CONTENTSRedialing a Call ...................................... 8Redial from the Last 10 Numbers ........... 8Fast Redial ............................................... 8Deleting a Redial Number ...................... 8Saving Dialed Numbers into Memory .... 8Phonebook .................................................. 8Storing Numbers in Phonebook .............. 8Keys to Use ............................................... 9Deleting Numbers from Phonebook ....... 9Editing Numbers in the Phonebook ....... 9Calling Numbers from Phonebook ........ 10Quick Browsing of Phonebook .............. 10Caller ID Display ....................................... 10Viewing Caller ID Records .................... 10Saving Caller ID Records in Phonebook .. 10Formatting Caller ID Numbers .............. 10Deleting Caller ID Records .................... 10No Caller ID ............................................ 11Missed Calls ........................................... 11During a Call .............................................. 11Using the Mute Function ....................... 11Using Speakerphone During a Call ...... 11Handset Settings ...................................... 11Setting the Ring Tone ........................... 11Setting the Ring Tone Volume ............. 11Setting the Display language ............... 11Setting the Dial Mode ........................... 12Setting the Time / Date Format ........... 12Setting the Area Code .......................... 12MODEL: WW338USER MANUAL2.4GHz Digital ExpandableCordless Phone with Integrated Weather Station
ENConference Call ........................................ 12Weather Forcasting .................................. 12Weather Forecasting on the Handset ... 12Temperature on the Handset ................ 13Changing from Celsius to Fahrenheit... 13Operating the Remote Sensor ................. 13Installing Batteries ................................. 13Low Battery Warning ............................. 14Setting a Channel in Remote Sensor .. 14Table Stand or Wall Mount ................... 14The Reset Button ................................... 14Operating the Base Unit ........................... 14Paging the Handsets ............................. 15Settings the Base Unit Time ................. 15Setting the Time Format....................... 15Setting the Date Format ........................ 15Setting the Date .................................... 15Selecting Celsius or Fahrenheit ........... 15Setting the Base Unit Alarm ................. 16Turning the Alarm Off ........................... 16Installing the Sensor .............................. 16Using Multiple Handsets .......................... 16Intercom Calling Between Handsets .... 17Answering Intercom Calls ...................... 17Call Waiting ........................................... 17Call Transfer Between Handsets ........... 17Registering Handsets to Base Unit ........ 17Registration Procedure .......................... 17De-Registration of Handsets .................. 17Playing the Game (Snake) ....................... 18Playing the Game ................................. 18Resetting Your System ............................. 18Setting Your Default Settings ............... 18Your Default Settings ............................. 18Keypad Symbols .................................... 19Safety & Care ............................................ 19Safety Precautions................................. 19Caring for the Product ........................... 19Caution ................................................... 19Troubleshooting ......................................... 20Potential Issues ...................................... 20Problems with Multi-Handset Use ......... 21Other Important Items ............................ 21Specifications ........................................... 21About Oregon Scientific ........................... 22FCC Statement .......................................... 22Declaration of Conformity ........................ 22Copyright .................................................... 23
ENSome of the following information may not applyto your particular product; however, when usingconference phone equipment, basic safetyprecautions should always be followed to reducethe risk of fire, electric shock and injury topersons, including the following:1. Read and understand all instructions.2. Follow all warnings and instructions marked onthe product.3. Unplug this product from the wall outlet beforecleaning. Do not use liquid cleaners or aerosolcleaners. Use a damp cloth for cleaning.4. This product should not be used while you arein a bathtub, shower or pool. Immersion  of theproduct in water could cause an electricalshock.5. Slots and openings in the cabinet back or bot-tom are provided for ventilation, to protect itfrom overheating. These openings must not beblocked or covered. The  openings shouldnever be blocked by placing the product onthe bed, sofa, rug, or other similar surface.This product should not be placed in a built-ininstallation unless proper ventilation isprovided.6. This product should be operated only from thetype of power source indicated on the markinglabel. If you are not sure of the type of powersupply to your home, consult your dealer orlocal power company.7. Do not allow anything to rest on the powercord. Do not locate this product where the cordwill be abused by persons walking on it.8. Do not overload wall outlets and extensioncords as this can result in the risk of fire orelectric shock.9. Never push objects of any kind into this pro-duct through cabinet slots as they may touchdangerous voltage points or short out partsthat could result in a risk of fire or electricshock. Never spill liquid of any kind on theproduct.10.To reduce the risk of electric shock, do notdisassemble this product, but take it to aqualified serviceman when service or repairwork is required. Opening or removing coversmay expose you to dangerous voltages orother risks. Incorrect reassembly can causeelectric shock when the telephone equipmentis subsequently used.11. Do not expose the product to extreme tem-peratures such as areas near a hot radiator orstove or in a hot car.12. Do not place lighted candles, cigarettes, cigars,etc., on the telephone.13. Never touch uninsulated telephone wires orterminals unless the telephone line has beendisconnected at the network interface.14. Never install or modify telephone wiring duringa lightning storm.15. Never install telephone jacks in wet locationsunless the jack is specifically designedfor wet locations.16. Use caution when installing or modifying tele-phone lines to prevent electrical shock and/orfire.17. Unplug this product from the wall outlet andrefer servicing to qualified service personnelunder the following conditions:A. When the power supply cord or plug isdamaged or frayed.B. If the product has been exposed to rain orwater.C. If the product does not operate normally byfollowing the operating instructions.D. If the product’s cabinet has been damaged.1IMPORTANT   SAFETYINSTRUCTIONS
ENE. If the product exhibits a distinct change inperformance.18. Avoid using a telephone (other than a cordlesstype) during an electrical storm. There may bea remote risk of electric shock from lightning.19. Do not use the telephone to report a gas leakin the vicinity of the leak.20. Do not place this product on an unstable cart,stand or table.The product may fall, causing serious damageto the product.21. Plug the adaptor to the socket-outlet whichnear the equipment and shall be easilyaccessible.22.   Risk of explosion if battery is replaceby an incorrect type, use only SANIK, 3SN-AAA75H-S-JIF. Dispose of used batteriesaccording to the instructions.23. For servicing or replacement, you can pur-chase a suitable headset through servicecenter or retailer shop.(see in www. oregonscientic.com)This product is designed to give you years ofservice if handled properly. Observe the followingguidelines:• Clean the unit with a damp cloth and milddetergent. Avoid dropping the unit or placing itin a high-traffic location.• Never immerse the unit in water. This cancause electrical shock and damage the unit.• Do not subject the Base Unit to extremeforce, shock, or fluctuations in humidity.• Do not tamper with the internal components.• Do not mix new and old batteries or batteriesof different types.• Remove the batteries if storing this productfor a long period of time.You must use a Class 2 powersource that supplies 9V DC anddelivers at least 400mA. Its plugmust fit the phone’s DC IN 9V jack.The supplied adapter meets these specifica-tions. Using an adapter that does not meetthese specifications could damage the phoneor the adapter.Always connect the AC adapter to the phonebefore you connect it to AC power. When youfinish, disconnect the adapter from AC powerbefore you disconnect from the phone.CAUTIONCAUTIONTo reduce the risk of fire, use onlyNo. 26 AWG or largertelecommunication line cord.2SAFETY  TIPS• Do not scratch the LCD display.• Do not make any changes or modifications tothis product. Unauthorized changes may voidyour right to use this product.• The technical specifications for this productand the contents of the user guide are subjectto change without notice.lSAVE  THESE  INSTRUCTIONS
ENThank you for selecting the Oregon Scientific™WW338 2.4GHz Digital Expandable CordlessPhone with Integrated Weather Station as yourproduct of choice. The Base Unit of the WW338has a built-in thermometer and clock station thatis capable of keeping track of minimum andmaximum temperatures in different locations viatransmissions from the remote sensor.This powerful device bundles animated weatherforecasting, indoor / outdoor wireless temperatureand humidity readings, time / date keeping, anddual alarm features into a single tool that you canuse from the convenience of your home.The following items should be included in thispackage:WW338• 1 handset• 1 base unit• AC / DC adaptor for the Base Unit• Telephone line for the Base Unit• Remote thermo-hygro sensor• Handset battery pack• Sensor wall-mount bracket• Belt clip• Sensor batteries• User manualKEY   FEATURESWW338H:• 2 handsets• 1 base unit• 1 charger• AC / DC adaptor for the Base Unit• Telephone line for the Base Unit• Remote thermo-hygro sensor• Handset batteries• Sensor wall-mount bracket• Belt clip• Sensor batteries• User manualThe WW338  Digital  Phone Features:• Handset speakerphone• Intercom/Call Transfer/Conference callcapability• Weather forecasting• Dual-crescendo alarms• High/low temperature/hygrometer alarm• Dual alarm with snooze function• Up to 3 remote thermo-hygro sensors• Full-dot graphic handset display• 40-Caller ID memory• User-selectable Celsius or Fahrenheit• Built-in game on handset• 10 ringer melodies and 4 standard ring tones• Mute/Flash/Redial functionality• Multiple language display – English, French,Spanish and Portuguese• Caller ID display• Headset jack & belt clip• Sensor wall-mount bracket• Phonebook review during conversation• Redial feature for last 10 numbersNOTE: Keep this manual handy as you use yournew product. It contains practical step-by-stepinstructions, as well as technical specificationsand warnings you should know.INTRODUCTION3
EN12435698711102145687391011131215161432187654HANDSET  AND  BASE UNIT– FRONT  VIEW1. Handset2. LED Charge Indicator3. UNANSWERED CALL /IN USE Indicator4. PAGE Button5. SNOOZE / LIGHTbutton6. Base Unit LCD1. Power jack2. Telephone line jack3. Battery box4. Speaker outlet7. CHANNELbutton8. ALARM button9. SET button10. DOWN button11. UP buttonBASE  UNIT  -  BOTTOM  VIEW5. ON / OFF ALARMbutton6. RESET hole7. UP button8. HI/LO buttonHANDSET  -  FRONT  VIEW1. Receiver2. Belt Clip3. LCD Display4. Headphone jack5. Keypad• Keypad 0-9, A-Z buttons.• Press the number to dial the call or use fortext input i.e. editing the phonebook orcaller identification.6. MUTE / FORMAT button• Press this to mute the microphone during acall.• Press to select the format you want to usefor a phone number i.e. no area code, witharea code, with area and international code.7. REDIAL / DELETE button• Press to browse redial list.• Press to redial a phone number.• Press to delete digits when dialing a phonenumber.8. PHONEBOOK (PHBK) button• Press to view the phonebook.4
EN9. TALK / CALLBACK button• Press to begin and end a phone call.• Press to callback a number.10. MENU / FLASH button• Press to access main menu.• Press to confirm a selected option.• Press to move from a current call, to callwaiting.11. ARROW  KEYS• Press to move up and down menu options.• Press to increase or decrease the speakervolume.• Press to browse Caller ID records,phonebook and redial list.12. EXIT / * button• Press to exit an operation and return tostandby mode.• Press to use * in text.13. CONF / # button• Press to make a conference call.• Press to use # in text.14. SPEAKERPHONE (SPK) button• Press to turn the speakerphone on or off.15. INTERCOM (INT) button• Press to make an intercom call.• Press to make a conference call.• Press to transfer a call.16. MicrophoneCHARGER  -   FRONT  VIEW1. Handset2. AC / DC power3. Charge LED5
ENGETTING  STARTED1. Connect the AC adaptor socket to the BaseUnit and to your room’s power socket.2. Rest the handset on the Base Unit to charge.Once plugged in, allow the handset to chargefor 15 hours before using.Connect the phone line to the Base Unit and toyour room’s telephone socket.CONNECTING THE AC ADAPTORCONNECTING  TO  PHONE  LINEBatteries come with your phone. One is alreadyinstalled in one handset, while the other needs tobe installed in the second handset.Fitting the batteries in the handset1. Insert the battery into the handset by insertingthe piece at the end of the wire into the topleft of the battery indention on the handset.2. Fit the battery compartment cover by sliding itdown so that it clicks firmly into place.INSTALLING  THE  HANDSET BATTERIESINSTALLING  THE  BASE  UNITBATTERIES6Four batteries (AAA size) come with your BaseUnit.Insert the four batteries as indicated, matchingcorrect polarity (+, -)NOTE: Reversing the orientation may damage theBase Unit.Before using the handset, charge the handset forat least 15 hours.Whenever you see the battery icon on the hand-set display become nearly empty, or hear thewarning tone during the call, please:• End the call as soon as possible.• Don’t use the speakerphone mode for conser-vation since this will further reduce the taketime.• Put the handset back on the charger forcharging until the battery icon returns to highlevel.To charge the handset, place the handset in thecharger. The base charge light will come on toindicate the charging of handset. Always put thehandset in the base cradle with the keypad facingoutwards.NOTE: Please note the following:• Standby time: 5 days• Talk time: 7 hours• Handset charging time: 15 hours• Normal conditions of use: 0°C to 45°C• AC adaptor for base unit: 120VAC 9V 60Hz400mACHARGING  THE  HANDSETBATTERIES
ENWhen the battery is fully charged, the handsetbattery icon will show the battery full in the topright on the LCD display.Due to radio interference in the environment,occasional loss of synchronization between thehandset and base may occur for a very shortduration. The base will very quickly change toanother channel automatically to overcome theinterference and restore synchronization.•Do not install the base unit near a sink, bathor shower, or anywhere else where it could getwet. Electrical equipment can cause seriousinjury if used while you are wet or standing inwater.• If the base unit ever falls into water, do notretrieve it until you have unplugged the powerlead from the mains and the telephone lineplug from the telephone socket; then pull it outby the unplugged cables.•Never use your weather phone in the open airduring a thunderstorm - unplug the Base Unitfrom the telephone line and the main socketwhen there are storms in your area. Damagecaused to your phone by lightning is notcovered by the guarantee.Usually, a loss of reception means you are toofar from the Base Unit, or there is interferencebetween the two units. Make sure to:• Stay within a range of 300 meters from theBase Unit while using the handset.FINAL  SAFETY  TIPSELECTRICAL  SAFETY• Avoid interference such as TV or otherelectrical appliances.NOTE: In this user manual, all BOLDED,capitalized letters are buttons that appear in yournew weather phone.Using the TALK button:1. Press TALK to get the dial tone, and dial thenumber. If you make a mistake, press TALKagain to cancel the whole number.OR2. Dial the number then press TALK.NOTE: You can use the TALK button to togglebetween Talk Mode and Standby Mode.Using the Speakerphone (SPK) button:1. Press SPK to get the dial tone, and dial thenumber.OR2. Dial the number then press SPK.NOTE: If you are in Speakerphone Mode and youwant to use the handset, press TALK to switch offthe speakerphone first.The handset will ring when there is an external call.• Press TALK OR press SPK. (This will enablethe speakerphone function).NOTE: If the handset is placed in the rechargecradle of the Base Unit when it is in Talk Mode, itwill automatically enter the Standby Mode.• Press TALK.BASIC   FUNCTIONSMAKING  A  CALL7ANSWERING  A  CALLENDING A CALL
ENSTORING  NUMBERS  IN  THEPHONEBOOKYou will hear a call waiting tone:• Press FLASH to switch from an existing call tocall waiting.•“Message Waiting” will appear on the screen.Follow the voice message commands to enteryour phone network operator’s messageservice.To adjust the speaker volume:• Press TALK, then press the ARROW KEYS toadjust the speaker volume accordingly.• Press TALK, then press REDIAL.1. Press REDIAL to see your last call record.2. Use the ARROW KEYS to select a number.3. Press TALK to dial the number.If you want to edit the phone number beforeredialing:1. Press REDIAL, then press MENU.2. Use ARROW KEYS to select “Edit for Call”,then press MENU.3. Use the 0-9 buttons to edit the number.4. Press TALK to dial the number.When you make a call and hear the busy tone,press REDIAL. The phone will quickly redial thenumber within 3 seconds.MESSAGE WAITINGADJUSTING THE SPEAKER VOLUMEREDIALING A CALLREDIAL FROM THE LAST 10 NUMBERS1. Press REDIAL to see your last call record.2. Use the ARROW KEYS to select a number,then press MENU.3. Select “Delete Record”.4. Press MENU.5. Select “Yes” and then press MENU to confirm.The handset will automatically save the last 10numbers you dialed. To save dialed numbers intoyour Phonebook:1. Press REDIAL. (The last number is listed).2. Use the ARROW KEYS to select a phonenumber, then press MENU.3. Select ‘Save Phonebook” to save number,then press MENU. “SAVED” will appear on thescreen to confirm the action.• The phone can store 50 phone numbers in thephonebook of up to 24 digits.• The name of the phone number can be storedwith a maximum of 15 characters.1. Press PHBK.2. Press MENU.3. Use the ARROW KEYS to select “AddRecord”, then press MENU.4. The handset display shows “<Enter Name>”and “<Enter Number>”.5. Enter the name (see key guide below) andthen press MENU.6. Enter the number and then press MENU toconfirm.FAST REDIALDELETING  A REDIAL NUMBERSAVING  DIALED  NUMBERS  INTOMEMORY8PHONEBOOKCALL WAITING
EN7. The handset will beep twice indicating that therecord has been stored.NOTE: If only a phone number and no name isinput, then the record can still be saved.When entering a name, “B” will be entered bypressing the “2” button once, followed by pressing“2” again within 1 second. If pressed beyond 1second, “A” is entered and the second press of “2”will give the entry of “AA”.KEYS  TO  USEThe list of characters is shown below:Capital Letter Small  Letter1 SPACE 1 _ - + = ^ SPACE 1 _ - + = ^~ . , ; : ? ! ~ . , ; : ? !2 ABC2ÄÆÅÀÁÂÃÇ abc2äæåàáâãç3 DEF3ÈÉÊËÐ def3èéêëð4 GHI4ÌÍÎÏ ghi4ìíîï5 JKL5 jkl56 MNO6ÖØÒÓÔÕÑ mno6öøòóôõñ7 PQRS7 pqrs78 TUV8ÙÚÛÜ tuv8ùúûü9 WXYZ9ÝÞ wxyz9ýþ0 0 * # $ & % / \ | ( ) 0 * # $ & % / \ | ( )[ ] < >  [ ] < >DELETING  NUMBERS  FROMPHONEBOOK9NOTE: Use the # key to change from uppercaseto lowercase.To delete 1 record:1. Press PHBK.2. Use the ARROW KEYS to select the numberyou want to remove, then press MENU.3. Select “Delete Record” and then pressMENU.4. When asked to confirm the deletion, select“Yes”.5. Press MENU to remove the number.6. The handset will beep twice indicating that therecord has been deleted.To delete all records:1. Follow steps 1-3 above and select “Deleteall?”2. Now follow steps 4-6 above.1. Press PHBK.2. Use the ARROW KEYS to select the numberyou want to edit, then press MENU.3. Select “Edit Record” and then press MENU.4. Edit the name if needed, then press MENU.5. Edit the phone number if needed, then pressMENU.6. You will hear the double beep from the handsetindicating that the task is complete.* Press when editing Press when editinga name to return to a number to get “*”Standby Mode# Press to change Press to changebetween capital and between capital andsmall letter small letterEDITING  NUMBERS IN THEPHONEBOOK
ENDELETING  CALLER  ID  RECORDS1. Press PHBK whilst on an active call.2. Use the ARROW KEYS to select a number,then press MENU to dial the number.1. Press PHBK.2. Use the ARROW KEYS to select a phonebookentry, OR press the key with the 1st letter ofthe person’s name you are looking for. E.g.Press key 7, 4 times to get quick access to aname beginning with ‘S’3. Press TALK to dial.NOTE: You can use the Phonebook function whilston an active call.If you have subscribed to this service from yourphone network operator, the caller’s phone numberwill be shown on the handset display when there isan incoming call. The phone can store the callerID’s of up to 40 different call numbers.NOTE: If the caller’s phone number was stored inthe phonebook, the associated name will bedisplayed with the phone number.Each entry in the caller list has:• Caller number (up to 24 digits).• The caller name (up to 15 characters) if this isstored in the phonebook or supplied from thephone network.• The date and time of the call.• The number of calls made to this number (upto 40).1. When the phone is in Standby Mode use theARROW KEYS to browse through Caller IDrecords.CALLLING  NUMBERS  FROMPHONEBOOKQUICK  BROWSING  OF  PHONEBOOK2. If you need to edit the phone number beforemaking the call press MENU, then use theARROW KEYS to select “Edit for Call.”3. Use the 0-9 buttons to edit the number.4. Press TALK to dial the number.NOTE: If “NO CALLS”, appears on the screenthen no records are stored in the Caller IDmemory.When you have a Caller ID record on yourscreen:1. Press MENU, then use the ARROW KEYS toselect “Save Phonebook”.2. Press MENU. “SAVED” will appear on thescreen to confirm the action.NOTE: When the Caller ID memory is full, it willautomatically delete your 1st Caller ID record.1. Use the ARROW KEYS to select a phonenumber in the Caller ID memory, then pressthe FORMAT key.2. The number you selected can now be format-ted by pressing FORMAT to get the formatyou prefer.3. When the format is selected, press TALK todial the number.To delete 1 record:1. Press the ARROW KEYS whilst in StandbyMode and select the number you want todelete. Then, press MENU.2. Select “Delete Record”, then press MENU.3. Select “Yes” and then press MENU to confirm.To delete all records:1. Press the ARROW KEYS whilst in StandbyMode. Then, press MENU.VIEWING  CALLER  ID  RECORDSSAVING  CALLER  ID  RECORD  INPHONEBOOKFORMATTING  CALLER  ID  NUMBERS10CALLER  ID  DISPLAY
EN2. Select “Delete All”, then press MENU.3. Select “Yes” and then press MENU to confirm.If a caller has withheld their Caller ID name and /or number, one of the following messages willappear on your screen:•BLOCKED NUMBER•UNKNOWN NUMBER•BLOCKED NAME•UNKNOWN CALLER•BLOCKED CALL•UNKNOWN NAMEIf you miss a call, the handset will display thissymbol    When you view the Caller ID of yourmissed calls the following notifications will appearon the screen:•“NEW” – This is the first missed call from thisparticular Caller ID.•“REPT” – This is not the first missed call fromthis particular Caller ID.To mute the handset:• Press MUTE.• Press MUTE again to un-mute the handset andreturn to the normal mode.NOTE: If the phone is muted, you cannot dial anydigits until the mute button is released.During a conversation:• Press SPK to turn the speakerphone on.• Press TALK again to turn the speakerphoneoff.NO CALLER IDMISSED  CALLSIMPORTANT:• If you press the TALK button you will enterTalk Mode.• If you press the MENU button you will enterMenu Mode.• You cannot enter the Menu Mode when thephone is in Talk Mode. To exit the Talk Modepress TALK.You have a choice of 10 melodies and 4 tones forincoming calls. To select a ring tone:1. Press MENU, then use the ARROW KEYS toselect “Handset Setting”.2. Press MENU.3. Select “Ringtone”, then press MENU.4. Select the melody or tone you prefer, thenpress MENU to confirm.NOTE: If the ring volume is turned off, you willnot hear the ring melody while adjusting the ringtone and LCD will display “   “ icon.1. Press MENU, then use the ARROW KEYS toselect “Ringer Volume”.2. Press MENU.3. Use the ARROW KEYS to increase ordecrease the volume.4. Press MENU to confirm.To change language:1. Press MENU, use the ARROW KEYS to select“Handset Setting”, then press MENU.2. Select “Language”, the press MENU.3. Select the language you want, then pressMENU to confirm.DURING  A  CALLUSING  THE  MUTE  FUNCTIONUSING  SPEAKERPHONE  DURING  ACALLSETTING THE RING TONE11SETTING THE RING TONE VOLUMESETTING THE DISPLAY LANGUAGEHANDSET   SETTINGS
ENWEATHER   FORECASTING   ON   THEHANDSETNOTE: The default language for the handsetdisplay is English. You can also change thelanguage to French, Spanish and Portuguese.In order to provide compatibility with other phonesystems, your phone can be set to either Pulsedialing (same as rotary dial phones), or Tonedialing (DTMF).To set the Dial Mode:1. Press MENU, then use the ARROW KEYS toselect “Handset Setting”.2. Press MENU.3. Select “Dialing”, then press MENU.4. Select either “Tone” or “Pulse” mode, thenpress MENU to confirm.1. Press MENU, then use ARROW KEYS toselect “Handset setting”.2. Press MENU.3. Select “Time & Date”, then press MENU.4. Select either “Time Format” or “DateFormat”, then press MENU.5. Then select your chosen format and pressMENU.1. Press MENU, then use the ARROW KEYS toselect “Handset Setting”.2. Press MENU.3. Select “Area Code”, then press MENU.4. Enter your 3-digit area code, then press MENUto confirm.SETTING  THE  DIAL  MODESETTING  THE  TIME  / DATE  FORMATYou can have a conference conversation with anexternal call party and 2 internal calling parties.1. First establish the call with the external partyby either making an external call or answeringan incoming call.2. Press INT to make an intercom call to anotherhandset. The external party will be on hold.3. The internal party answers your intercom callby pressing TALK.4. Then you press CONF and hold for about 2seconds (you will hear a confirmation keytone).5. Then the external party, the other internalparty and you can talk together.ORA second internal party can join in on a callbetween an internal and external party by simplypressing TALK.NOTE: You cannot have an intercom conversationbetween a handset and the Base Unit.The weather forecast display is the first LCDdisplay on the Base Unit. The outdoor temperatureis shown on the second line of the LCD display. Ithas an icon on the left to represent the tempera-ture recorded by the external sensor on channel 1,as well as the humidity shown on the right of theicon.To display the weather forecasting symbols on thehandset:1. Press MENU.2. Use the arrow keys to select “Weather”, thenpress MENU.SETTING  THE  AREA  CODECONFERENCE    CALL12WEATHER   FORECASTING
EN133. Use the ARROW KEYS to select “Forecast”,then press MENU.4. After the double beeps confirming selection,press the EXIT key.You should now be in stand-by mode showing oneof the five forecasting symbols. These include:IMPORTANT:• The accuracy of weather forecasting whenusing pressure trend alone is about 70 to 75percent and, therefore, the manufacturers andsuppliers cannot be held responsible for anyinconvenience caused by an inaccurateweather forecast.• The weather forecast symbols may not reflectcurrent weather condition. The symbols areforecasting the future.• A “sunny” forecast covering the nighttimereflects fine, clear weather.To remove the weather forecasting symbols onthe handset:1. Press MENU.2. Use the ARROW KEYS to select “Weather”,then press MENU.3. Use the ARROW KEYS to select “Off”, thenpress MENU.4. After the double beeps confirming selection,press the EXIT key.The handset can display the temperature Informa-tion for both the built-in and external sensors. Toview the temperature readings on the handsetdisplay:1. Press MENU.2. Use the ARROW KEYS to select “Weather”,then press MENU.3. Use the ARROW KEYS to select“Temperature”, then press MENU.4. After the double beeps confirming selection,press the EXIT key.The display will toggle between the date, time andinternal/external temperature with relativehumidity.NOTE:  If multiple sensors are installed to gathertemperature and humidity readings from otherareas, the phone will cycle through these readingsas well.1. Press the MENU button, then use the ARROWKEYS to select “Handset setting”.2. Press the MENU button.3. Select “Temp Format”, then press MENU.4. Select either “Fahrenheit” or “Celsius”, thenpress MENU to confirm.To begin using the remote sensor:1. You must first install two triple “A” (AAA)batteries by taking a Philips screwdriver andremoving the four screws in the back bracket.2. Insert batteries into the back.TEMPERATURE  ON  THE  HANDSETCHANGING  FROM  CELSIUS  TOFAHRENHEITOPERATING  THE  REMOTE  SENSORINSTALLING  BATTERIESPartially cloudy Cloudy RainySnowing Sunny
ENOPERATING   THE  BASE UNIT3. Before screwing the back bracket on to theremote sensor, you need to reset the sensorby pressing the reset hole with a blunt stylus,such as an “unfolded” paper clip.NOTE: Beside the RESET button on the back ofthe remote sensor, there is a switch to select thechannel of the remote sensor.4. Take the four bolts and screw them back in toreplace the back bracket.NOTE: Make sure the thin black rubber liningaround the circumference of the batteries lines upwith the crease in the back bracket so water doesnot seep in to the sensor if wet.When it is time to replace the batteries, the low-battery indicator will show up when the respectivechannel is selected. The battery level of the mainunit will be shown on the indoor temperaturedisplay when it is running low.The individual channel temperatures will bedisplayed on the 2nd line and the indoor tempera-ture on the 3rd line. The Base Unit will automati-cally update its readings at about 30-secondintervals.1. Take a Philips screwdriver and remove thefour screws in the back bracket.2. Move the black switch to 1, 2 or 3.3. Take the four bolts and screw them back in toreplace the back bracket.LOW  BATTERY  WARNINGIf no signals are received, blanks “__ • __ °C__%“ willbe displayed and the kinetic wave icon will show.NOTE: Once a channel is assigned to a remoteunit, you can only change it by replacing thebatteries or resetting the unit.The remote sensor has a retractable table stand,which when flipped open can support the unit on aflat surface. Or you can flip close the stand andmount the unit on a wall using the recessed screwhole.This button is only used when the unit is operatingin an unfavorable way or malfunctioning. Insert apointed object such as an unfolded paper clip intothe reset hole, then press and hold. All settingswill return to their default values.The Weather Base Unit displays the weather fore-cast as well as the outdoor and indoor tem-perature and relative humidity. You may also setthe alarm to activate, indicating when a certaintemperature or humidity has been reached.NOTE: On the top line in the Base Unit, the radiosignal should show the signal emitting a radio fre-quency to the remote sensor.SETTING  A  CHANNEL  IN  REMOTESENSOR14TABLE  STAND  OR  WALL  MOUNTTHE  RESET  BUTTON
ENThis feature is very useful if you can’t rememberwhere you put your handset. Make the lost hand-set ring for a fixed time of 2 minutes by pressingPAGE in the cradle on the Base Unit.NOTE: You cannot have an intercom conversationbetween a handset and the Base Unit.• To look for all handsets, press the PAGEbutton in the cradle of the Base Unit.• To stop the paging, select any key on thehandset or press the PAGE button again.1. Press the ALARM button 2 or 3 times to set itat the month-and-day screen.2. Press and hold down the SET button for 2 ormore seconds. You should now see “24hr/12hr”flashing on the bottom left of the screen.3. Press the SET button again to change theflashing image to the time.4. Use the ARROW KEYS to change the time5. Once the time is set, press the SET buttonfive more times to escape the set-up mode.NOTE: Updating the date and time on the BaseUnit will synchronize all other handsets.1. Press the ALARM button 2 or 3 times to set itat the month-and-day screen.2. Press and hold down the SET button for 2 ormore seconds. You should now see “24hr/12hr”flashing on the bottom left of the screen.3. Use the ARROW KEYS to change the timeformat.NOTE: By entering this mode, you can alsochange time display, M/D vs. D/M, date andmonth and Fahrenheit and Celsius (see below formore instruction).PAGING  THE  HANDSETSSETTING  THE  BASE  UNIT TIME4. When set, then press the SET to escape set-up mode.NOTE: By pressing and holding down the UP orDOWN buttons, you can increase or decrease thesettings at a much faster rate.1. Press the ALARM button 2 or 3 times to set itat the month-and-day screen.2. Press and hold down the SET button for 2 ormore seconds. You should now see “24hr/12hr”flashing on the bottom left of the screen.3. Press the SET button twice more to changethe flashing image to the date in the lower rightof the screen.4. Use the ARROW KEYS to change the dateformat.5. Once the time is set, then press the SETto escape set-up mode.1. Press the ALARM button 2 or 3 times to set itat the month-and-day screen.2. Press and hold down the SET button for 2 ormore seconds. You should now see “24hr/12hr”flashing on the bottom left of the screen.3. Press the SET button 3 more times to changethe flashing image to the date in the lower rightof the screen.4. Use the ARROW KEYS to change the date,then press the SET to escape set-up mode.NOTE: The latest setting on any handset willsupercede the previous setting on other handsetsand Base Unit.1. Press the ALARM button 2 or 3 times to set itat the month-and-day screen.2. Press and hold down the SET button for 2 orSETTING  THE  DATE  FORMATSETTING  THE  DATESETTING  THE TIME FORMAT15SELECTING CESIUS OR FAHRENHEIT
ENUSING  MULTIPLE  HANDSETSINTERCOM  CALLING  BETWEENHANDSETSmore seconds. You should now see “24hr/12hr”flashing on the bottom left of the screen.3. Press the SET button 4 more times to changethe flashing image to a “C” in the lower right ofthe screen.4. Use the ARROW KEYS to select either Celsius orFahrenheit, then press the SET button.There are two channels for the dual alarmfunction. To choose one of the alarms:1. Press the ALARM button on the Base Unit toselect alarm ((1)).2. Press the ALARM button again to change it toalarm ((2)), or press ALARM again to selectalarm ((1)).3. Use the ARROW KEYS to set the time of thealarm.4. When time is set, press the SET key to setthe alarm.NOTE: Your Base Unit has 2 daily crescendoalarms. If both set, the alarms will sound daily atthe set time.Once an alarm sounds, you have two options:Option 1:1. Press any key except the SNOOZE button toturn the alarm off completely.Option 2:1. Press the SNOOZE button. (The alarm willreturn on after 8 minutes).This sensor works as a radio-frequency clocktransmitter for the Base Unit. This remote sensoris used to transmit radio frequency signals for theradio-controlled clock, and to measure thetemperature and humidity.TURNING  THE  ALARM  OFFMount the remote sensor on a flat surface usingthe recess holes in the back of the unit. (Youneed to slip on the white wall-mount bracket to geta recess hole).Additional sensors can be purchased to allowreporting from up to 3 locations.Place the remote sensor somewhere dry outsideso that you can read the temperature and humi-dity, as well as forecast the weather.For best results:• Do not place the sensor in direct sunlight ormoisture.• Position the sensor so that it faces the indoorBase Unit.• Minimize obstructions, such as doors, wallsand furniture.• To maximize radio frequency reception for theclock, place the remote unit in a location with aclear view to the sky. You may need toexperiment with various locations to find thebest reception.NOTE: Please note that the remote sensor mustbe placed within 300 meters of the Base Unit tobe fully functional.Your base unit can synchronize with up to 2handsets. If you have multiple handsetsregistered with the base, 2 handsets can makeintercom calls.1. Press INT on your handset.2. Type in the number of the handset (1-4) thatyou want to reach.3. The paged handset will ring. The display of theSETTING  THE  BASE  UNIT  ALARMINSTALLING  THE  SENSOR16
ENpaged handset will show “INT CALL”.NOTE: To cancel the intercom call, press TALK.1. Press TALK to answer an intercom call.2. Press TALK to end the intercom call.If an external call comes in during an intercomconversation, you will hear a call waiting tone.1. To end an intercom call, press TALK.2. The external line will ring. Press TALK again toanswer the external call.You can transfer an external call from onehandset to another.1. During an external phone conversation, pressINT. Your caller will be put on hold.2. Type in the handset number (1-4) to which youwant the call transferred.3. The paged handset will ring and “INT CALL”will appear on the display.4. To answer the call on the paged handset, pressTALK.5. Press TALK on the paging handset to completethe operation.NOTE: If the other handset does not answer,press INT to end the intercom call and get back tothe external line. Pressing TALK will end both theintercom call and the external call.The handset and Base Unit shall be factory pre-registered among each other with the identificationdigital security codes, which are stored into thenon-volatile memory. Therefore, the unit shouldANSWERING  INTERCOM  CALLSCALL  WAITINGCALL TRANSFER  BETWEEN  HAND-SETSbe in full working order out of the box.When you purchase an additional handset, youhave to register it to the Base Unit in order tomake and answer calls.You can register up to 3 more handsets to makeand answer calls via the same Base Unit.Handsets are numbered 1 to 4.To register a new handset:1. On the handset, press MENU.2. Use the ARROW KEYS to select “HandsetSetting”, then press MENU.3. Select “Registration”, then press MENU.4. Select “Yes” then press MENU. (You will seethe message: “Registering”).5. Press and hold the PAGE button on the cradleof the base unit.NOTE: The Base Unit will then send a signal to thehandset registering the handset to the Base Unit.Once the registration function has beencompleted, the handset will return to StandbyMode.To de-register handsets to the base unit:1. On the handset, press MENU.2. Use the ARROW KEYS to select “HandsetSetting,” then press MENU.3. Select “Remove HS”, then press MENU.4. Use the ARROW KEYS to select the handsetnumber, then press MENU.5. Select “Yes,” then press MENU to confirm thede-registration.17REGISTRATION  PROCEDUREDE-REGISTRATION  OF  HANDSETSREGISTERING  HANDSETS  TOBASE  UNIT
ENThe weather phone handset contains one game:The Snake Game.The objective of snake is to let it eat as manygemstones as possible without ever hitting thewalls or itself.To play:1. Press MENU.2. Use the ARROW KEYS to select “Game”,then press MENU.3. Select  “Snake” and then press the MENUbutton.4. Use the ARROW KEYS to choose the level ofthe game, with level 5 being the most difficult,then press MENU.NOTE: The game will commence as soon as youpress MENU.When the game starts, you will see a snakemoving along the screen. To win the game, youwill have to direct the snake to the eggs withouthitting the wall or letting the snake hit itself.Using the keypad, press as follows to direct thesnake:BUTTON ACTION5Up9 Right8 Down7 LeftEXIT End gameNOTE: When the snake is moving, you only needto turn the snake to the left or right. There is noneed to move the snake forward. If you move thesnake backwards, it will hit itself and the game willbe over.PLAYING  THE  GAME  (SNAKE)PLAYING THE GAMEIf you need to reset your system, you will loseany information that you have stored and allsettings will return to their default settings.To reset your system to the default settings:1. Press MENU.2. Use the ARROW KEYS to select “HandsetSetting” , then press MENU.3. Use the ARROW KEYS to select “SetDefault”, then press MENU.4. When prompted, select “Yes”. You will thenhear the double beep to indicate the defaultsettings have been restored.Your default settings are:Language: EnglishINT melody: Melody 1Ring volume: 3Dial mode: ToneEar volume: Vol. 1Phonebook: EmptyCLID list: EmptyRedial list: EmptyWeather: OFFArea Code: —-Time format: 12HrDate format: MM / DDTemperature format: FahrenheitTime: 12:00 AMRESETTING  YOUR  SYSTEMSETTING  YOUR  DEFAULT  SETTINGSYOUR   DEFAULT   SETTINGS18
ENKEYPAD  SYMBOLSPlease observe the following safety precautionswhen setting up and using this product.• LCD panel – The LCD panel is made of glass,and may break if the unit is dropped.• Heat sources – Keep the product away fromheat sources, such as radiators, stoves,heaters, and other heat-generating products.• Water and moisture – Do not use the productin or near water or in high moisture areas, suchas a bathroom.To ensure you receive the maximum benefit fromusing this product, please observe the followingguidelines.Capital Letter Small  Letter1 SPACE 1 _ - + = ^ SPACE 1 _ - + = ^ ~~ . , ; : ? ! . , ; : ? !2 ABC2ÄÆÅÀÁÂÃÇ abc2äæåàáâãç3 DEF3ÈÉÊËÐ def3èéêëð4 GHI4ÌÍÎÏ ghi4ìíîï5 JKL5 jkl56 MNO6ÖØÒÓÔÕÑ mno6öøòóôõñ7 PQRS7 pqrs78 TUV8ÙÚÛÜ tuv8ùúûü9 WXYZ9ÝÞ wxyz9ýþ0 0 * # $ & % / \ | ( ) 0 * # $ & % / \ | ( )[ ] < >  [ ] < >* Press when editing Press when editinga name to return to a number to get “*”Standby Mode# Press to change Press to changebetween capital and between capital andsmall letter small letter• Do not clean any part of your weather phonewith benzene, thinner or other solvent chemi-cals - this may cause permanent damage thatis not covered by the guarantee. When neces-sary, clean it with a damp cloth.• Keep your weather phone away from hot,humid conditions or strong sunlight.• Every effort has been made to ensure thehighest standards of reliability for yourweather phone. However, if something doesgo wrong, please do not try to repair ityourself-consult your supplier.• Do not use your weather phone outdoors in therain, or handle it with wet hands – water candamage electrical equipment.• To avoid risk of fire or injury, do not attemptto charge non-rechargeable batteries.• Replace only batteries with the same orequivalent type recommended by themanufacturer.• Please dispose of old, defective batteries inan environmentally friendly manner inaccordance with the relevant legislation.• No naked flames, such as lighted candles,should be placed near the apparatus.19SAFTEY  AND  CARESAFETY  PRECAUTIONSCARING  FOR  THIS  PRODUCTCAUTION
ENIf your weather phone is not working correctly,check the points here before returning it for repair.Whatever your problem, you should first checkthat:• You have installed the Base Unit correctly,and it is plugged into the telephone line and themain power socket.• Main power is switched on at the socket.• You have installed the batteries into the hand-set.NEVER attempt any repairs or adjustmentsyourself - you could make the problem worse andinvalidate your guarantee.Problems with making and answering calls:“I cannot make or answer calls.”• Try moving the handset closer to the BaseUnit.• If this doesn’t work, try a different position forthe Base Unit - perhaps higher up if possible.• The battery charge level may be low - placethe handset in the charging cradle of the BaseUnit to recharge the battery.• Switch off the power at the main socket, waita few seconds and then switch the power backon, this may solve the problem.“When I press the TALK button, I cannot makea call.”• Please check if the line is already in use byother handsets registered to the same BaseUnit. The EXT symbol on your handset wouldindicate this.“When I press keys on my handset, digitsappear on the display but I cannot make anoutside call.”• Try moving the handset closer to the BaseUnit.• If this doesn’t work, try a different position forthe Base Unit. Make sure it is not near anyelectrical equipment, such as another phone,TV, radio, washing machine, fridge, etc. Ifpossible, position the Base Unit higher up.• If any other handsets are registered to thesame Base Unit, make sure they are notalready on a call — you would see the EXTsymbol on your own handset.• You may need to change the dial type settingto Pulse dialing if your local telephone ex-change does not support Tone dialing.“My call was cut off when I went out of rangeof the Base Unit. Now I cannot use myhandset.”• Please move the handset closer to the BaseUnit.“I hear a tone while I am using my handset,and the battery symbol on the display is“empty”.• The battery needs to be recharged. Put thehandset into the charger; it will take up to 15hours to be fully charged.“I’ve tried recharging the batteries, but I stillget a warning that it is not charged.”• The batteries probably need to be replaced.“The handset does not ring when a call comesin.”• Check that you have not set the ringingvolumes to “off” (see section Setting theRing Tone Volume).“The Caller Display function is not working”• Please check if you have subscribed to theCaller Display service with your network pro-vider.“The Caller Display function is working butthe Caller’s Name from the phonebook is notdisplayed even if the same telephone numbercalls in”• You need to store the full telephone numberincluding the STD code into your phonebookmemory.20POTENTIAL ISSUESTROUBLESHOOTING
EN“I have tried several times to press the TALKbutton but I cannot make a call and the greenLED on the base is not on”• Unplug the power adapter at the bottom of theBase Unit, then reconnect the power adapter.Press and hold PAGE on the Base Unit until INUSE (green LED) is flashing.• Repeat steps as outlined in the “RegisteringHandsets to Base Unit” section.“I cannot make a call.”• Only one outside call and one intercom callcan take place at once. Make sure no otherhandset user is already on a call.• Please check if another handset has engagedthe line already.Weight DimensionCharger: 5.64 ounces (including adaptor)Charger: 0.19 x 0.35 x 0.35 inches (withoutadaptor)Handset: 3.7 ounces (without battery)Handset: 0.53 x 0.22 x 0.15 inches (H x W x D)WARNING• The contents of this manual and technicalspecification are subject to change.• Due to printing limitation, picture and displayshowed in this manual may be slightlydifferent from real one.• The contents of this manual may not bereproduced without the permission of themanufacturer.• In case a Ni-Cadmium rechargeable battery isused, the draining of its contents should be ddone in accordance to the law re: specialwaste material.Your phone operates on a 2.4GHz ISM digitalWorldwide Digital Cordless Telecommunication(WDCT) platform technology. This product uses75 regular channels plus 14 channels forsubstitution when the environment is interfered.Here are the specifications for your weatherphone:21PROBLEMS  WITH  MULTI-HANDSETUSETYPE DESCRIPTIONStandard Worldwide DigitalCordless Telecommuni-cation  (WDCT)Frequency range 2.4GHz ISMChannel bandwidth 0.824MHzModulation GFSKSpeech coding Adaptive DifferentialPulse Code Modulation(ADPCM)Communication range Up to 300 meters inopen spaceBase power supply Input 120V / 60HzHandset charger Input 120V / 60Hzpower supplyHandset power supply 1 pack rechargeablebatteries, NiMH750mAhHandset battery 15 hourscharging timeOperating time Standby: approxi-mately 5 daysTalk: approximately7 hoursOperating temperature 0°C to 45°CStorage temperature -20°C to 60°C(outdoor)Storage temperature -5°C to 50°C(indoor)Humidity range 25% to 90%OTHER  IMPORTANT  ITEMSSPECIFICATIONS
EN22Visit our website (www.oregonscientific.com) tolearn more about Oregon Scientific products suchas digital cameras; MP3 players; children'selectronic learning products and games; projectionclocks; health and fitness gear; weather stations;and digital and conference phones. The websitealso includes contact information for our customercare department in case you need to reach us, aswell as frequently asked questions and customerdownloads.We hope you will find all the information you needon our website, however if you'd like to contactthe Oregon Scientific Customer Care departmentdirectly, please visit www2.oregonscientific.com/service/support or call 949-608-2848 in the US.For international enquiries, please visit www2.oregonscientific.com/about/international/default.asp.This device complies with Part 15 of the FCCRules. Operation is subject to the following twoconditions: (1) This device may not cause harmfulinterference, and (2) This device must accept anyinterference received, including interference thatmay cause undesired operation.WARNING: Changes or modifications to this unitnot expressly approved by the party responsiblefor compliance could void the user’s authority tooperate the equipment.NOTE: This equipment has been tested and foundto comply with the limits for a Class B digitaldevice, pursuant to Part 15 of the FCC Rules.These limits are designed to provide reasonableprotection against harmful interference in aresidential installation.This equipment generates, uses and canradiate radio frequency energy and, if notinstalled and used in accordance with theinstructions, may cause harmful interferenceto radio communications.However, there is no guarantee that interferencewill not occur in a particular installation. If thisequipment does cause harmful interference toradio or television reception, which can bedetermined by turning the equipment off and on,the user is encouraged to try to correct theinterference by one or more of the followingmeasures:• Reorient or relocate the receiving antenna.• Increase the separation between the equip-ment and receiver.• Connect the equipment into an outlet on acircuit different from that to which the receiveris connected.• Consult the dealer or an experienced radio / TVtechnician for help.The following information is not to be used ascontact for support or sales. Please call ourcustomer service number (listed on our website atwww.oregonscientific.com, or on the warranty cardfor this product) for all inquiries instead.Name: Oregon Scientific, Inc.Address: 19861 SW 95th Place,Tualatin, Oregon 97062USATel No.: 1-800-853-8883Fax No.: 1-503-684-8883Declares that the product:Product No. : WW338- 1 handset- 1 base unit- 1 sensorProduct No. : WW338-H- 2 handsetsABOUT OREGON SCIENTIFICFCC   STATEMENT DECLARATION  OF  CONFORMITY
EN23- 1 base unit- 1 charger- 1 sensorProduct Name : 2.4GHz DigitalExpandable CordlessPhone with IntegratedWeather StationManufacturer : IDT Technology LimitedAddress : Block C, 9/F, KaiserEstate, Phase 1,41 Man Yue St.Hung Hom, KowloonHong KongThe WW338HSC - one HS and charger onlyis in conformity with Part 15 of the FCC Rules.Operation is subject to the following twoconditions: 1) this device may not cause harmfulinterference. 2) This device must accept anyinterference received, including interference thatmay cause undesired operation.© 2004 Oregon Scientific. All rights reserved.COPYRIGHT
Consumer Information:This equipment complies with Part 68 of the FCC rules and the requirements adopted by the ACTA. On thebottom of this equipment is a label that contains, among other information, a product identifier in the format US:KT5W400BWW338. If requested, this number must be provided to the telephone company.An applicable certification jacks Universal Service Order Codes (USOC) for the equipment is provided (i.e.,RJ11C) in the packaging with each piece of approved terminal equipment.A plug and jack used to connect this equipment to the premises wiring and telephone network must complywith the applicable FCC Part 68 rules and requirements adopted by the ACTA. A compliant telephone cord andmodular plug is provided with this product. It is designed to be connected to a compatible modular jack that isalso compliant. See installation instructions for details.The REN is used to determine the number of devices that may be connected to a telephone line. ExcessiveRENs on a telephone line may result in the devices not ringing in response to an incoming call. In most but notall areas, the sum of RENs should not exceed five (5.0). To be certain of the number of devices that may beconnected to a line, as determined by the total RENs, contact the local telephone company. [For productsapproved after July 23, 2001, the REN for this product is part of the product identifier that has the format US:KT5W400BWW338. The digits represented by 0.0B are the REN without a decimal point (e.g., 03 is a REN of0.3). For earlier products, the REN is separately shown on the label.]If this equipment WW338 causes harm to the telephone network, the telephone company will notify you inadvance that temporary discontinuance of service may be required. But if advance notice isn’t practical, thetelephone company will notify the customer as soon as possible. Also, you will be advised of your right to file acomplaint with the FCC if you believe it is necessary.The telephone company may make changes in its facilities, equipment, operations or procedures that couldaffect the operation of the equipment. If this happens the telephone company will provide advance notice inorder for you to make necessary modifications to maintain uninterrupted service.Please follow instructions for repairing if any (e.g. battery replacement section); otherwise do not alternate orrepair any parts of device except specified.Connection to party line service is subject to state tariffs. Contact the state public utility commission, publicservice commission or corporation commission for information.NOTICE: If your home has specially wired alarm equipment connected to the telephone line, ensure theinstallation of this [equipment ID] does not disable your alarm equipment. If you have questions about what willdisable alarm equipment, consult your telephone company or a qualified installer.This equipment is hearing aid compatible.NOTICE: According to telephone company reports, AC electrical surges, typically resulting from lightningstrikes, are very destructive to telephone equipment connected to AC power sources. To minimize damagefrom these types of surges, a surge arrestor is recommended.CAUTION: To maintain compliance with the FCC's RF exposure guidelines place the base unit at least 20cmfrom nearby persons.

Navigation menu