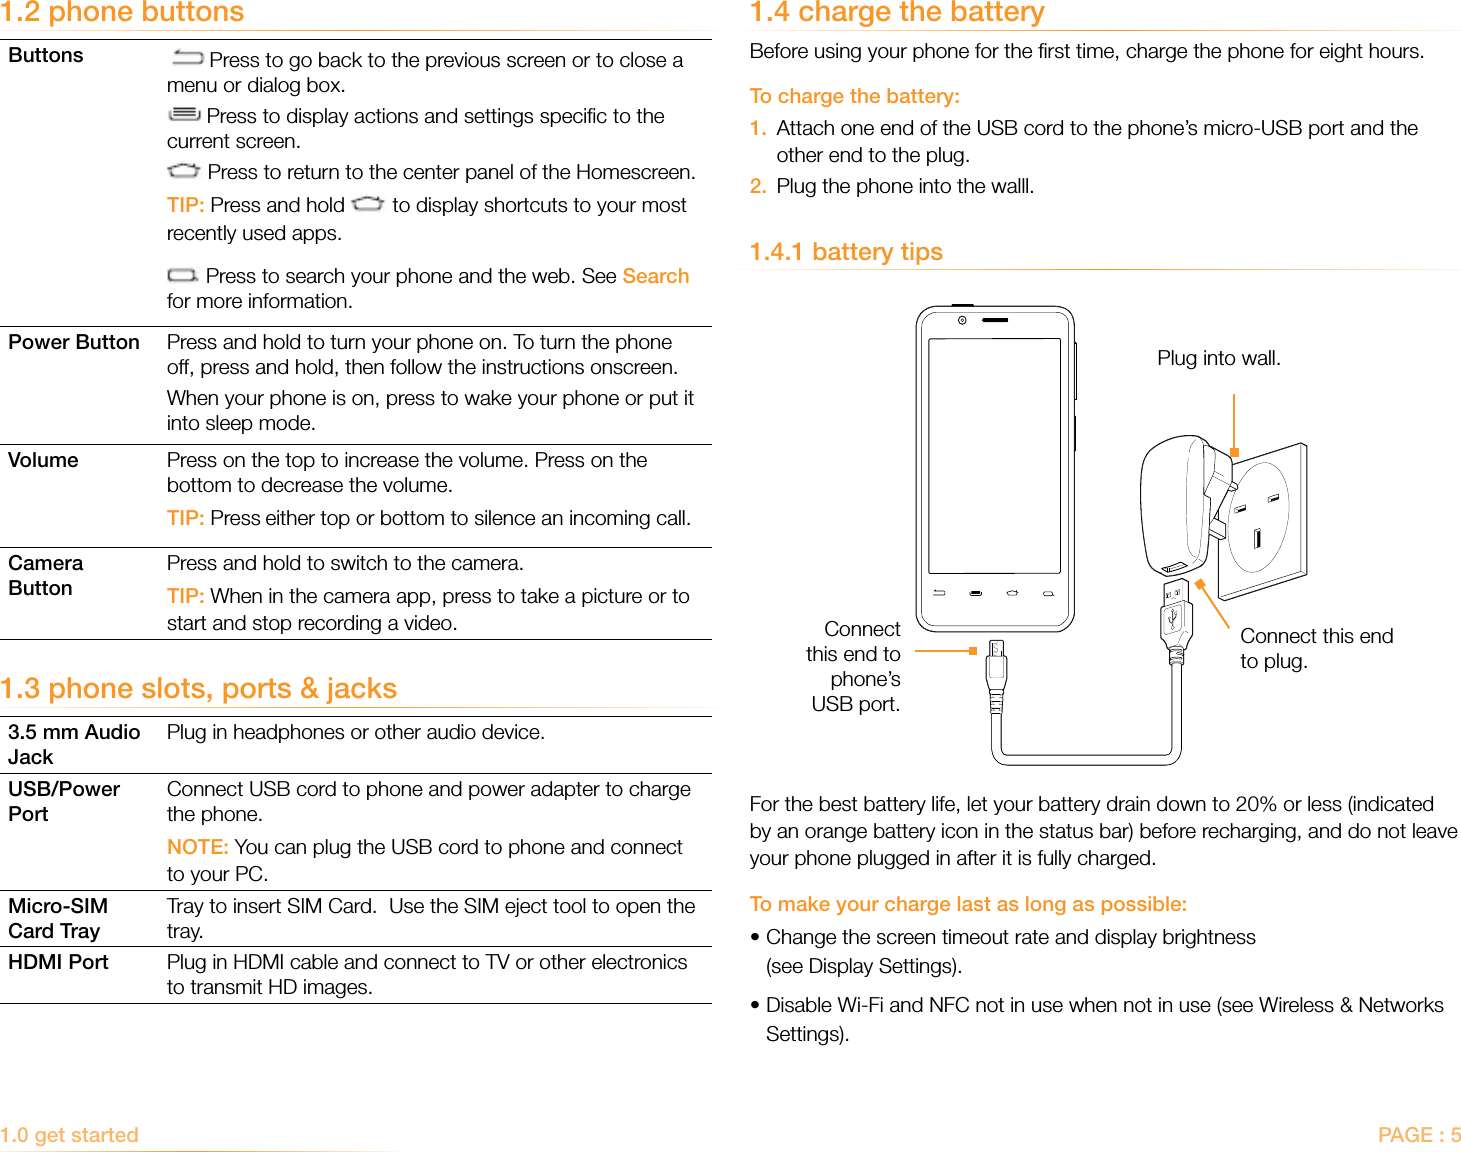
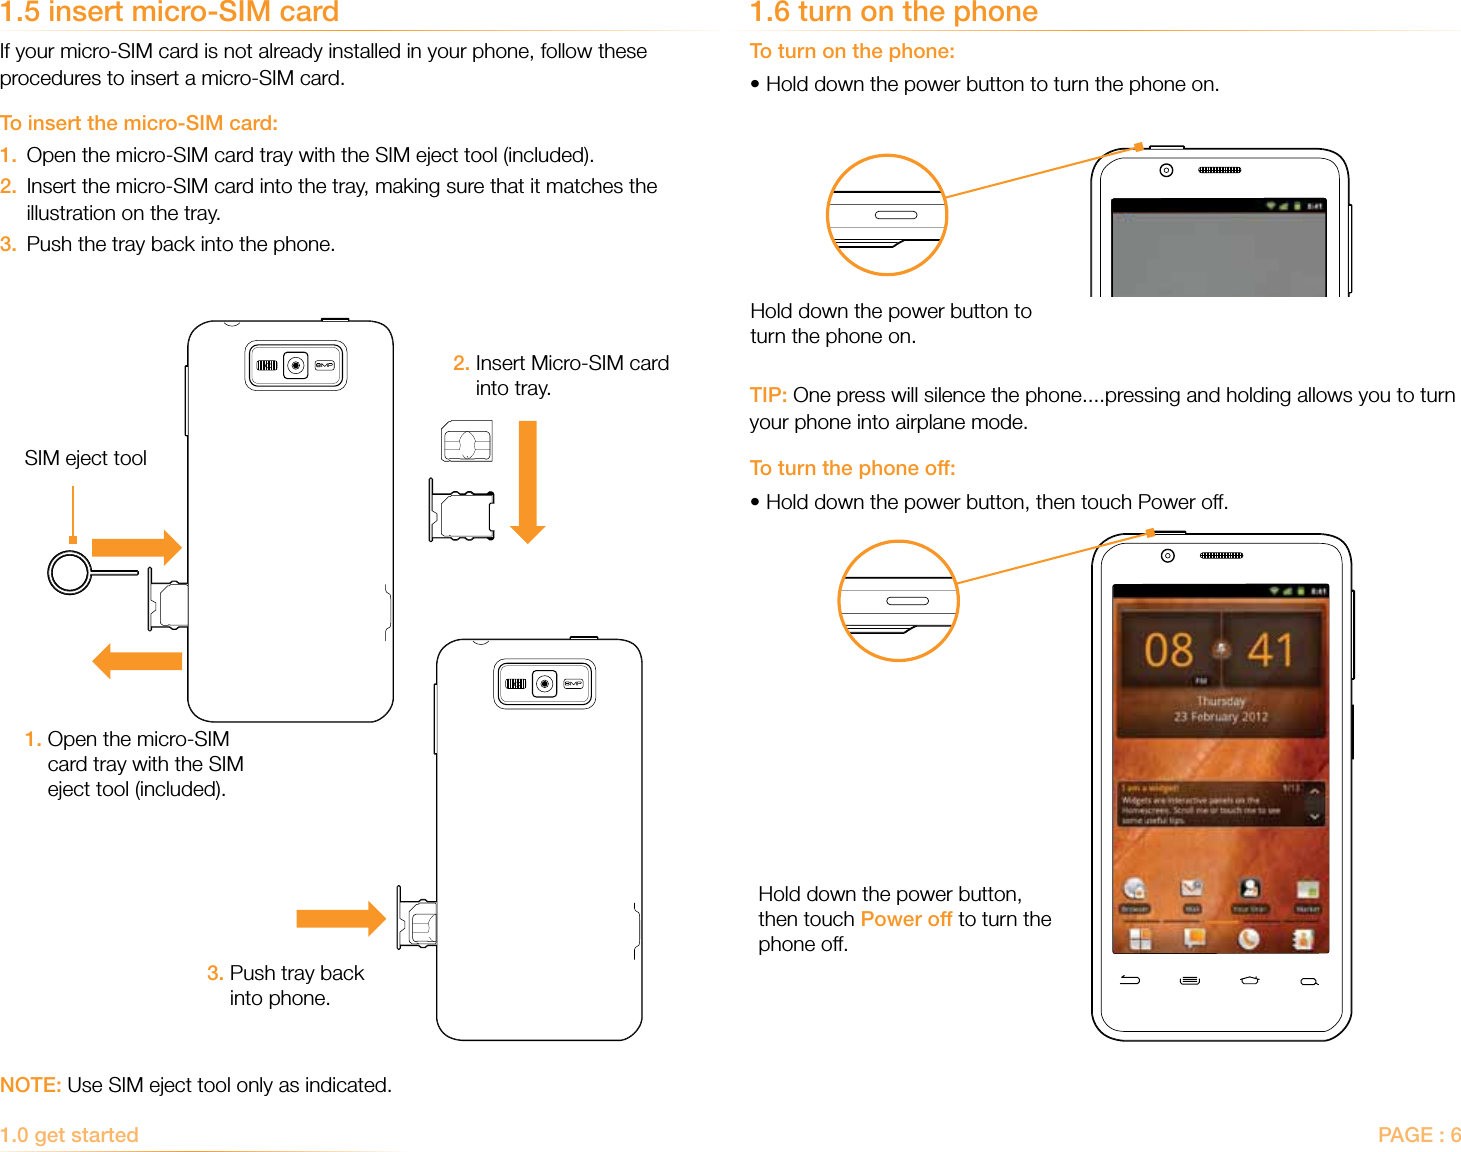
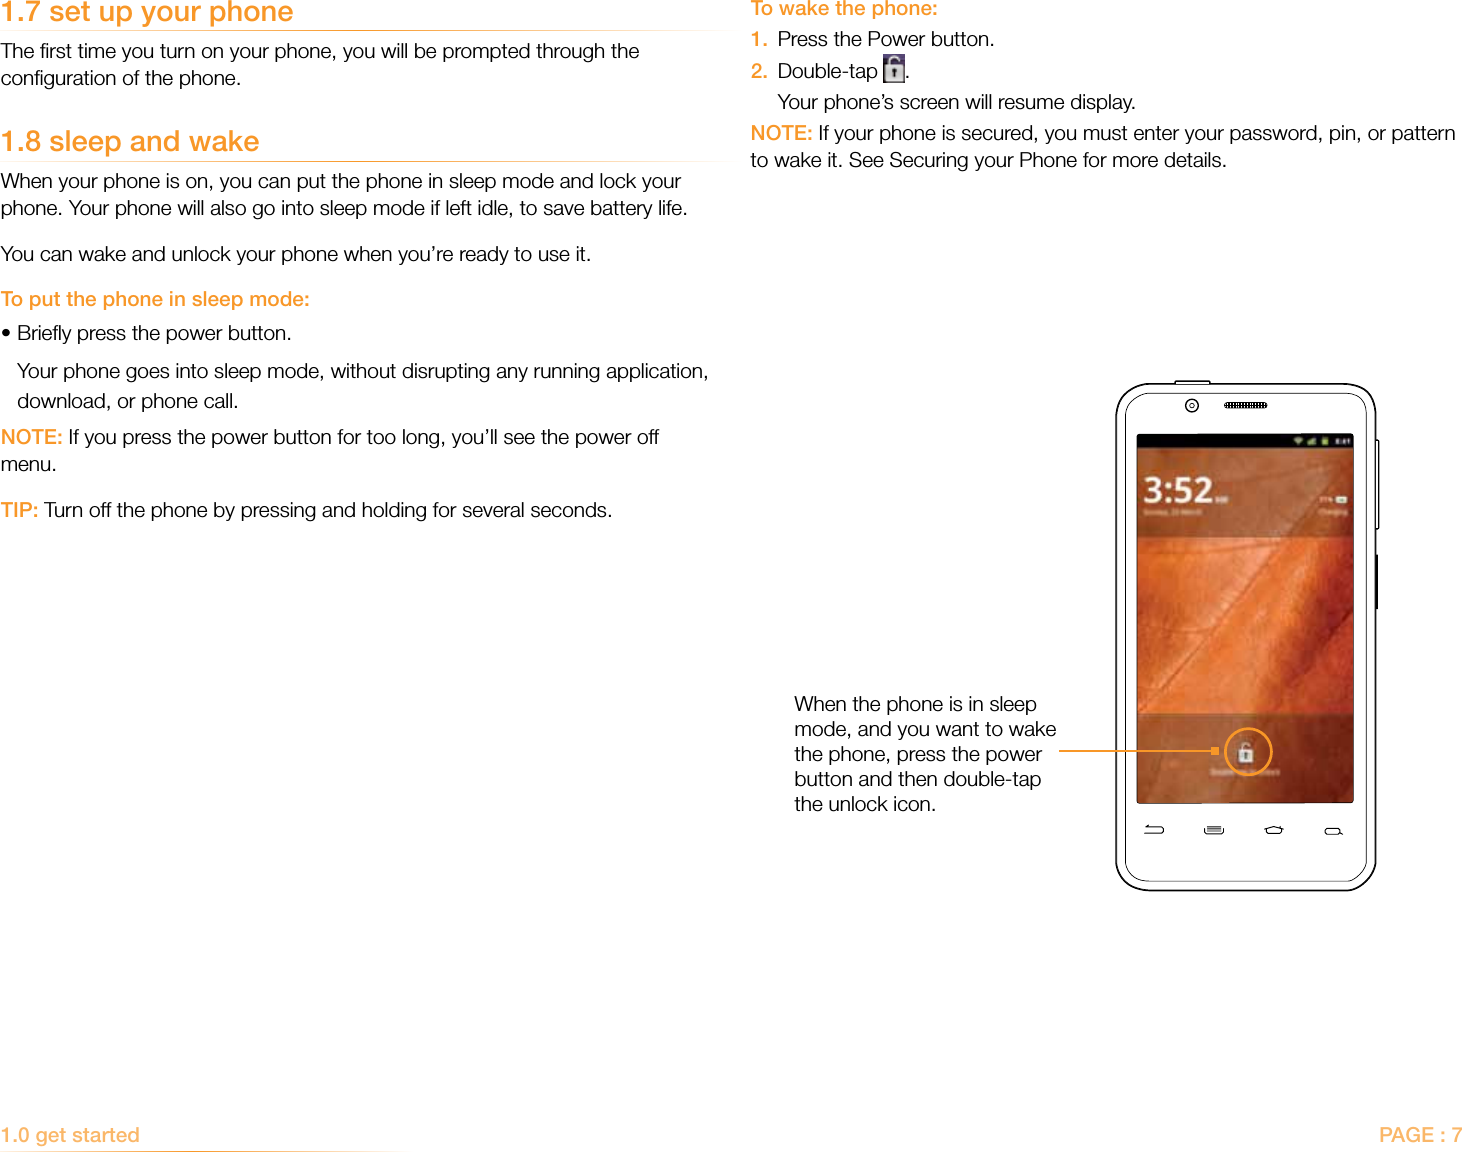
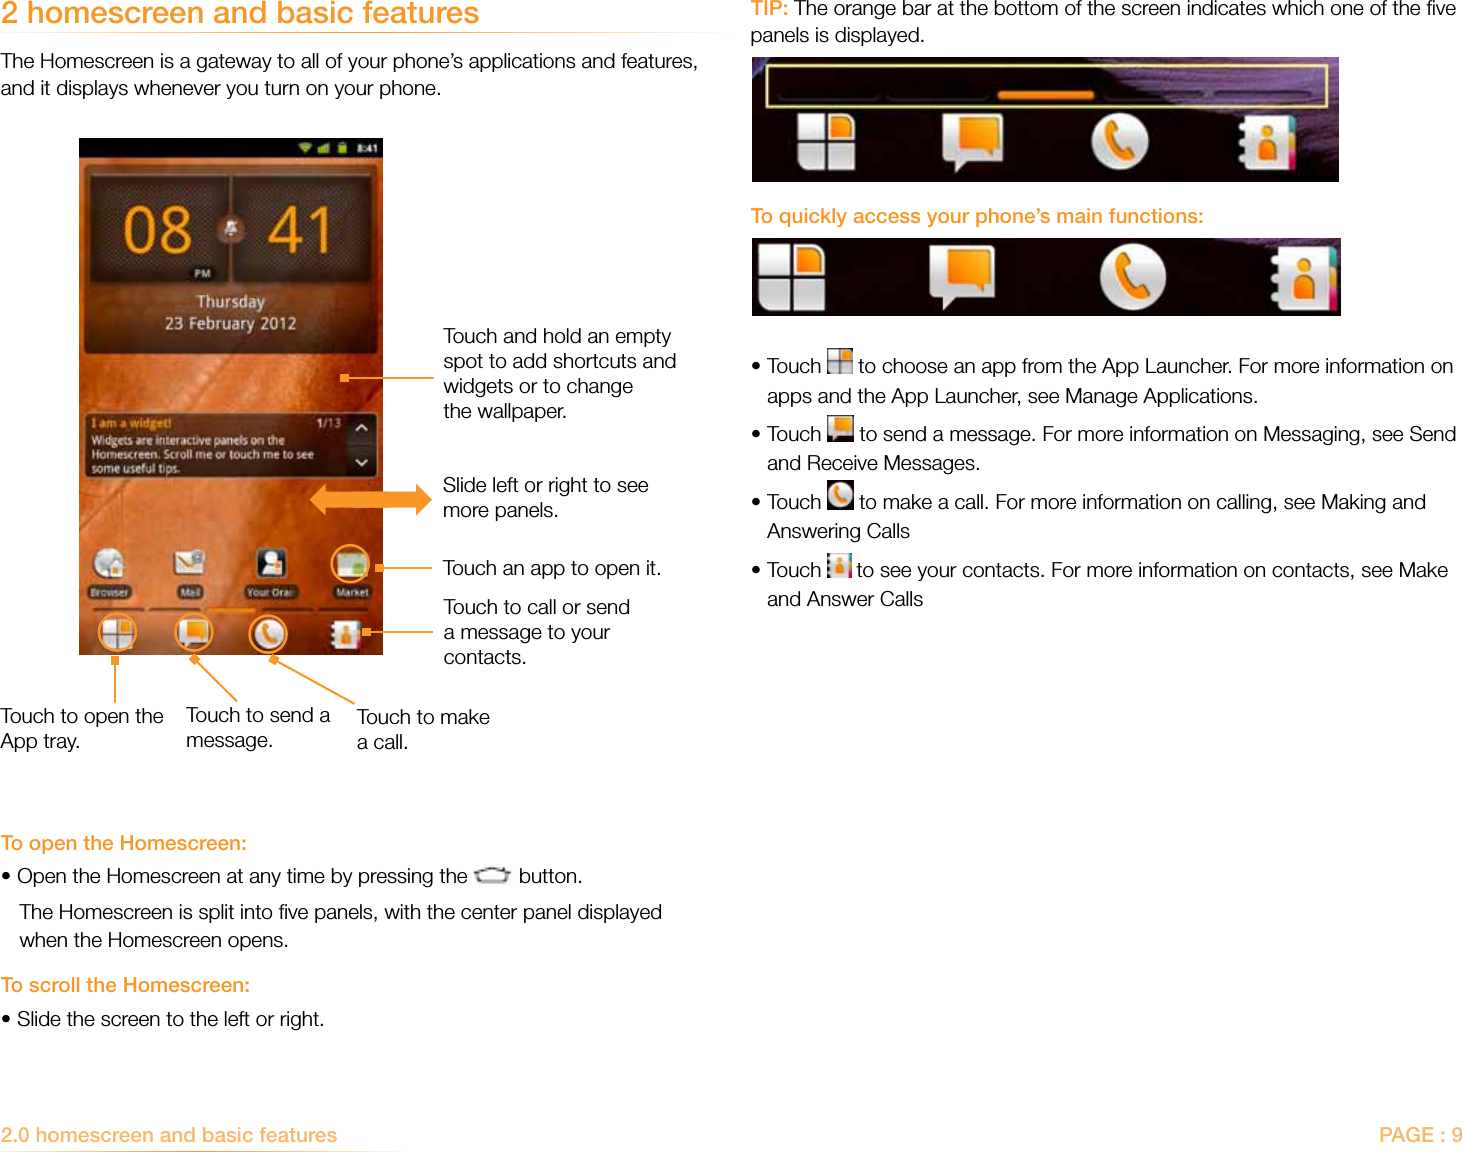
Intel AZ210 SMARTPHONE User Manual
Intel Corporation SMARTPHONE
UserManual.wiki
>
Intel
>
AZ210 User Manual
User Manual
Navigation menu
Upload a User Manual
Namespaces
Wiki Guide
HTML
PDF
Info
Views
User Manual
Discussion / Help
Navigation
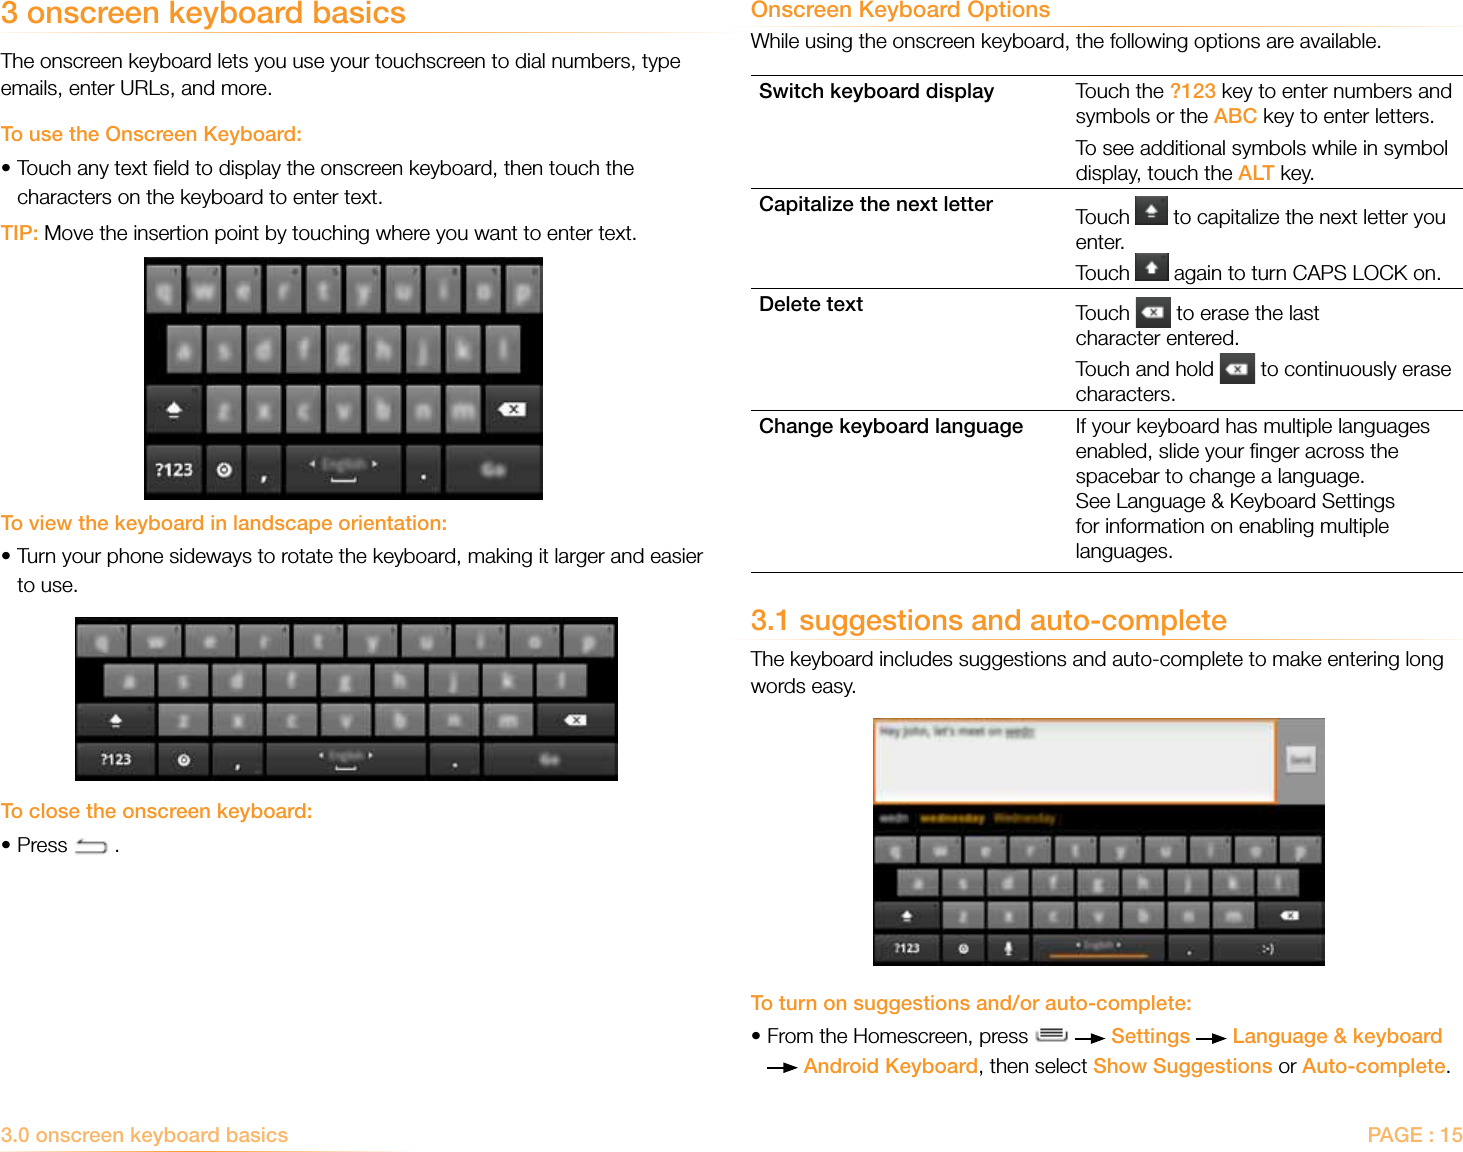
![Congratulations on your new phone purchase!This guide will help you to quickly setup and understand the important features on your new San Diego from Orange.welcomeNote: Screen images and icons are simulated for the purpose of this guide. Actual displays may vary. Instructions in this guide may change depending on the software version on your device.a fast processorFeaturing the 1.6 GHz Intel® Atom™ processor that delivers great performance for speedy application and web page loading, advanced multi-tasking, and smooth video playback.intelligent cameraAn advanced 8MP HD camera that lets you capture images quickly - up to 10 photos a second so you’ll never miss the best shot, even in challenging environments. Featuring advanced image processing for quality, color accuracy and low-light capture. These smart features mean that no matter how you capture your images, they come out exactly how you want them.great entertainmentEasily create and share superb [or true] HD-quality video, and with super-smooth playback, your phone becomes a personal theatre you can take with you anywhere. To maximize your entertainment experience you can easily project your smartphone screen to your HDTV through an HDMI cable.](https://usermanual.wiki/Intel/AZ210/User-Guide-1784837-Page-1.png)


![PAGE : 296.0 take photos and videos To change advanced settingsThe following advanced settings are available:•Touch to select the exposure time in seconds. This setting only takes effect when AE Mode is in either Manual or Aperture Priority.•Touch [AE mode icon] to select an Auto Exposure mode:• Auto – set ISO and shutter speed automatically, ignoring any manual settings.• Manual – use the current ISO and shutter speed settings.• Shutter Priority – use the manual shutter speed to automatically calculate the best ISO value for a normally exposed image.• Aperture priority – use the manual ISO setting to calculate the best shutter speed to get a normally exposed image.• AE Metering Mode – specify whether metering is done automatically, or to optimize a small spot in the center of the focus area, or the entire center of the focused area.•Touch to override the camera’s automatic setting and select indoor or outdoor settings.•Touch to enable or disable the following settings. eXtreme Noise Reduction (XNR), Advanced Noise Reduction (ANR), Red Eye Correction, and Geometric Distortion Correction. NOTE that XNR, ANR and GDC are normally selected automatically by the camera.•Touch to addresses the artifacts produced from incandescent lights that naturally flicker at 50 Hz or 60 Hz. Be default, the camera automatically attempts to detect the presence of these banding artifacts and compensate for them.To change focus settings Touch to control how the camera focuses.The following settings are available:• Automatically focuses the camera for the best focus setting for subjects in the range of 50 cm to infinity.• Infinity sets the focus lens to focus on subjects far away.• Macro changes the focus range to close ranges of 10 to 50 cm.• Touch allows you to touch the area of the screen on which you want to focus.To change the white balance Touch (fourth from the right) to either automatically or manually choose the correct ambient light setting (such as Daylight or Incandescent lighting).NOTE: The preview window shows the effects of the different white balance modes.To change exposure Touch to use either longer (+1, +2) or shorter exposure (-1, -2).To change flash settings Touch , and select a flash setting: Auto, Off, On, or Torch for a constant light.NOTE: When capturing a video, the available Flash settings are Off and On.To change the zoom Touch and select a zoom.To change the color effect Touch and specify color enhancements, such as making the photo black and white or adding a sepia filter.To change the ISO value Touch to manually set an ISO value. The default value is recommended for most users, but advanced users can decrease the value for well lit conditions or increase it for darker conditions.NOTE: The setting only takes effect when AE Mode is in either Manual or Aperture Priority.](https://usermanual.wiki/Intel/AZ210/User-Guide-1784837-Page-29.png)
![PAGE : 306.0 take photos and videos 6.2 view your pictures and videoPictures and videos you take with the camera app are stored in the Gallery app, and can be previewed within the main camera screen.The Gallery app displays the pictures and videos you’ve taken on your phone, downloaded from the web, or uploaded to a synchronized Picasa account (Google’s web-based photo storage). Gallery stores all of your photographs and videos in albums. Photographs and videos captured with the Camera app are stored in the “Camera” album, while downloaded media is stored in the “Downloads” album.To preview your captures:• Touch an image within the camera app to display your recently captured pictures and videos.To open the Gallery app:•From the App Launcher, touch .To open an album and view the pictures and videos inside:• From within the Gallery app, touch the thumbnail for the album you want to open. Thumbnails for all pictures and videos inside the album will display.TIP: You can slide left or right to see more albums.To open a picture or video:• Within an album, touch the thumbnail for the picture or video you want to open.More pictures and videos inside the album can be seen by sliding left or right. While viewing an album, you can drag the slider at the top of the screen to to display each pictures and video inside the album as one tile, or to to group them into smaller albums within the main album. The latter setting is useful for albums with many pictures and videos. At the top of the screen press the button with the (Camera) icon to open the Camera app. •Attempt to save the GPS coordinates with each picture.•Enable to correct the lighting in photos where the subject is standing in front of a window or other brightly lit background.•Touch to enable an experimental feature that writes the sensor raw image data to USB storage. This option is not meant for end-user operation.•Touch [rotation mode icon] to record image rotation information in the image header or in the image itself. Including the information in the header may not display the image in the correct rotation in some viewing applications. Including the information in the image will make it always display correctly, but may increase processing time.•(Video only) Enable to compensate for shake produced by holding the camera in your hand. •(Video only) Enable to turn on noise reduction, reduce “noise” in the video frames.To reset capture settingsTouch Reset to return all the camera settings to their default values. The settings are saved between camera sessions even if you return to the Android homescreen and restart the camera application.](https://usermanual.wiki/Intel/AZ210/User-Guide-1784837-Page-30.png)