IntelliDOT IDOT-001 802.11b radio User Manual
IntelliDOT 802.11b radio
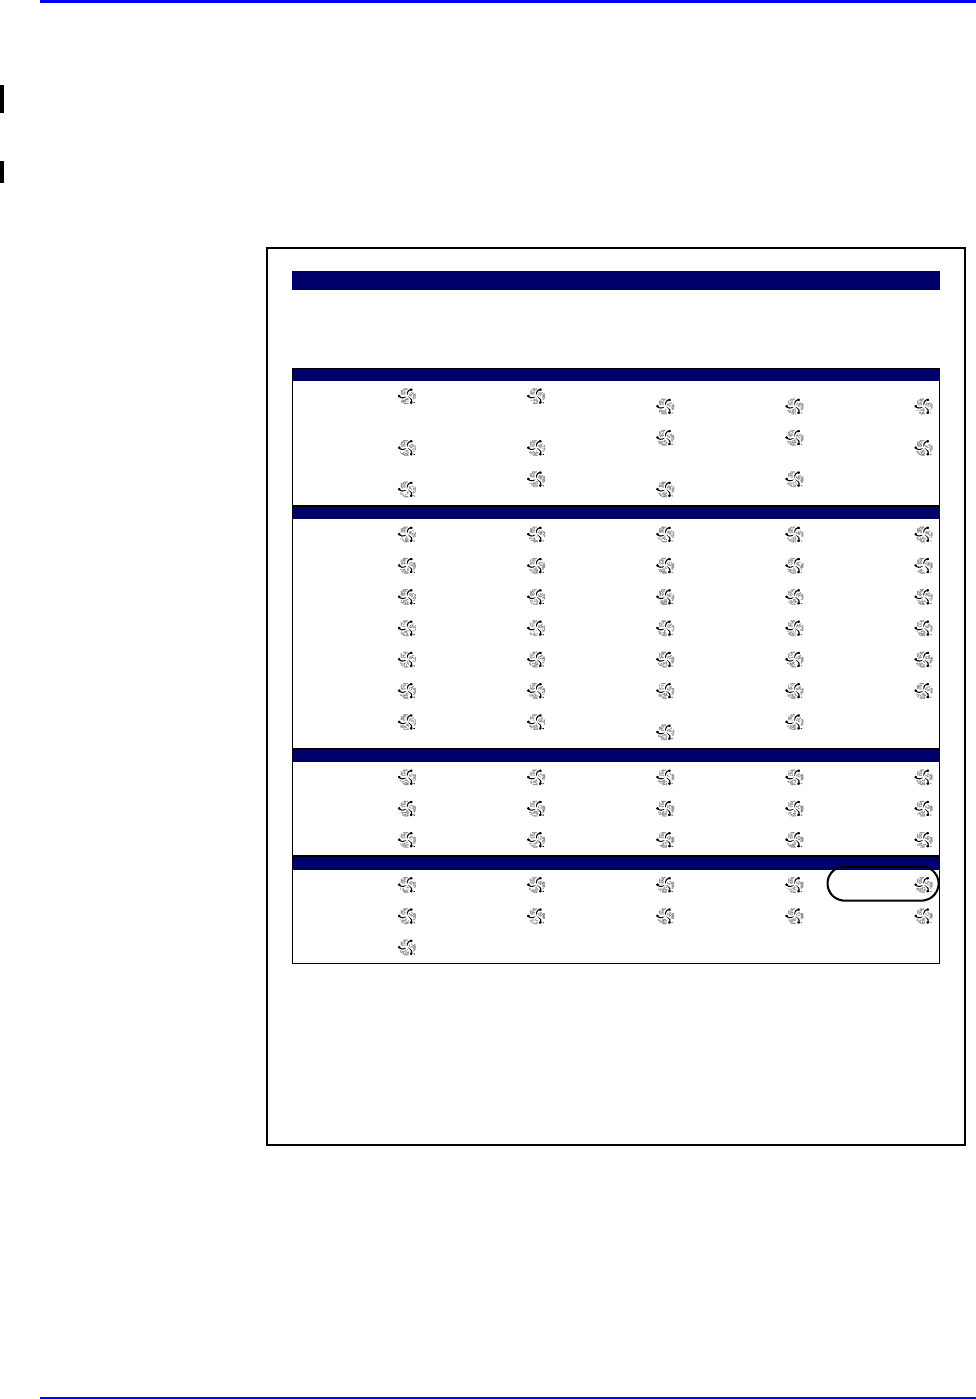
Contents
- 1. Users manual part 1 of 4
- 2. Users manual part 2 of 4
- 3. Users manual part 3 of 4
- 4. Users manual part 4 of 4
Users manual part 4 of 4
P/N TP0001-01 Rev. B Advance Prepared Items
intelliDOT iConnect System User Guide Confidential 2-31
Case 3 - Prepared Item with multiple medications that is
printed on the Prospective MAR
This case describes the handling of a prepared item that is printed on the
Prospective MAR. An iDOT will appear on the MAR to the left of the item. To
prepare this dose:
1. Scan iDOT next to the medication order to be prepared on the Prospective
MAR. In this example, the order is comprised of two medications <med name
one> and <med name two>.
The following screen will appear showing how many components are
expected for scanning.
2. Scan the med bar codes for each of the ordered meds being prepared.
3. Verify that the correct medication is displayed, then press OK. If the
medication does not require entry of the dose amount, proceed to step 6. If
entry of the dose amount is required, the following screen will appear:
4. Enter the dose amount for this ingredient using the numbered iDOTs on the
Medication Administration DOT sheet. The screen will display your entry
5. If you entered the incorrect dose, scan the Back iDOT on the Medication
Administration DOT sheet to back up one space. Scan the # iDOT clear the
previous entry and reenter the correct amount.
6. Press the OK button to accept the entry. The following screen will appear:
Med Preparation
<0 of 2 Meds Scanned>
Scan Med
ED
iConnect Handheld screen
Multi -Dose Vial
<?>
Enter Dose
ED
iConnect Handheld screen
Multi -Dose Vial
10 ML
Accept OK or Enter Dose
ED
iConnect Handheld screen
Advance Prepared Items P/N TP0001-01 Rev. B
2-32 Confidential intelliDOT iConnect System User Guide
7. Scan the New Order Prep iDOT on the Medication Administration DOT
sheet.
8. Repeat steps 2 - 6 for each medication ingredient.
9. When the process is completed for all ingredient medications, scan the New
Order Prep iDOT on the Medication Administration DOT sheet to complete
the preparation. The following screen will appear which the iConnect
Handheld sends information to the database.
10. When the following screen appears, the preparation process is complete.
11. Your preparation is complete. The medication may be taken to the patient for
administration.
Med Preparation
<1 of 2 Meds Scanned>
Scan Med or New Order Prep DOT
ED
iConnect Handheld screen
Sending Data
Please Wait
ED
iConnect Handheld screen
7/09/04 16:36
User: Joe Smith
Scan Patient or Command Dot
ED
iConnect Handheld screen
P/N TP0001-01 Rev. B Advance Prepared Items
intelliDOT iConnect System User Guide Confidential 2-33
Case 4 - Administering Medications for Cases 1-3
1. Scan the patient wristband.
2. Scan the appropriate order iDOT on the Prospective MAR. The following
screen will appear:
3. If a clinical prompt appears (i.e., Check Blood Sugar Level), scan the
appropriate Number iDOTs.
4. Press OK to confirm. The following screen will appear:
5. To complete the transaction, scan your badge.
Med Preparation
<0 of 1 Med Scanned>
Scan Med
ED
iConnect Handheld screen
Check Blood Sugar Level
Last: <none>
Scan # DOTs
ED
iConnect Handheld screen
Admin Complete Dose: 1 Unit
Human insulin-R U100 Units/100Units
(Insulin Human Regular) 1 Unit
Confirm OKED
iConnect Handheld screen
Work Recorded
1 Med Given
Push OK
ED
iConnect Handheld screen

Advance Prepared Items P/N TP0001-01 Rev. B
2-34 Confidential intelliDOT iConnect System User Guide
6. When the following screen appears, the administration process is complete.
7/09/04 16:36
User: Joe Smith
Scan Patient or Command Dot
ED
iConnect Handheld screen
P/N TP0001-01 Rev. B Advance Prepared Items
intelliDOT iConnect System User Guide Confidential 2-35
Case 5 - Prepared Item that is NOT yet printed on the
Prospective MAR
This procedure describes the process of preparing a medication in advance, away
from the bedside for medication orders, which are not yet computer entered by the
pharmacy (e.g., new or stat medication orders). To prepare this dose:
1. Scan the New Order Prep iDOT on the Medication Administration DOT
sheet.
The following screen will appear:
Sites
L. UPPER ARM R. LOWER ABD. L. ANTERIOLATERAL
THIGH L. DELTIOD MUSCLE L. VENTRO-GLUTEAL
MUSCLE
L. GLUTEAL-MEDIAL
MUSCLE R. ANTERIOLATERAL
THIGH R. UPPER ARM L. LOWER ABD. R. DELTOID MUSCLE
R. VENTRO-GLUTEAL
MUSCLE L. UPPER ABD. R. GLUTEAL-MEDIAL
MUSCLE INTRAVENOUS
Override Reasons
Patient Preference Pt. Declined Pt. Sleeping Pt. Off Unit Pt. Transferred
Pt. Discharged IV Discontinued IV Infiltrated IV Patency C/O Pain
Increased Pain C/O Nausea Increased Nausea Within Normal Limits VS Warranted
Med. Missing Tx. In Progress Hold Medication NPO Per Protocol
New Order New Schedule New Route Standing Order Stat Order
RX Change Discontinued Abnormal Limits Contraindicated Incompatability
Dialysis In Progress Pending Lab Specimen Collection
Needed S/W Bug
keypad
1 2 3 4 5
6 7 8 9 /
0 # Cancel decimal back
Extra Dots
Cancel All Continue Omit Logout New Order Prep
Cover Patients Previous Next Enter Later Extra Dose
Delay Dose
Medication Administration Dot Sheet
New Order Prep
<No Patient DOT Scanned>
Scan Patient DOT screen
iConnect Handheld screen
ED
Advance Prepared Items P/N TP0001-01 Rev. B
2-36 Confidential intelliDOT iConnect System User Guide
2. Scan the patient iDOT on the Prospective MAR.
The following screen will appear:
000857:
ATORVASTATIN 20 MG TAB (40MG)
(LIPITOR)
Start
07/12
15:00
Stop
DOSE: 40 MG PO DAILY AT BEDTIME
10:35 SB1 OMITTED
Reason Omitted : Pt. Sleeping 21:00
000863:
IRBESARTAN 150 MG TAB (300MG)
(AVAPRO)
Start
07/12
15:00
Stop
DOSE: 300 MG PO EVERY MORNING
09:00
000864:
DILTIAZEM HCL 180 MG CAPCR (180)
(CARDIZEM CD)
IN: DILTIAZEM HCL 120 MG CAPCR
(120)
(CARDIZEM CD)
Start
07/12
15:00
Stop
DOSE: 300 PO EVERY MORNING
10:35 SB1 OMITTED
Reason Omitted : Pt. Sleeping
000865:
METFORMIN HCL 500 MG TAB (1000MG)
(GLUCOPHAGE)
Start
07/12
15:00
Stop
DOSE: 1000 MG PO WITH BREAKFAST
10:35 SB1 OMITTED
Reason Omitted : Pt. Sleeping
000866:
METFORMIN HCL 500 MG TAB (500MG)
(GLUCOPHAGE)
Start
07/12
15:00
Stop
DOSE: 500 MG PO 12,17
12:00 17:00
000868:
MAGNESIUM OXIDE 400 MG TAB
(400MG)
(MAG-OX 400)
Start
07/12
15:00
Stop
DOSE: 400 MG PO EVERY MORNING
10:35 SB1 OMITTED
Reason Omitted : Pt. Sleeping
000869:
CLOPIDOGREL BISULFATE 75 MG TAB
(75MG)
(PLAVIX)
Start
07/12
15:00
Stop
DOSE: 75 MG PO EVERY MORNING
10:36 SB1 OMITTED
Reason Omitted : Pt. Sleeping
000870:
METOPROLOL SUCCINATE 50 MG
TABCR (100MG)
(TOPROL XL)
Start
07/12
15:00
Stop
DOSE: 100 MG PO EVERY MORNING
10:36 SB1 OMITTED
Reason Omitted : Pt. Sleeping
900862:
CEFTRIAXONE SOD 1 GM INJ (1)
(ROCEPHIN)
IN: SODIUM CL 50 ML BAG (50)
(SODIUM CHLORIDE)
Start
07/20
14:00
Stop
DOSE: 0 IV GIVE EVERY 12 HOURS
02:00 10:36 SB1 OMITTED
Reason Omitted : Pt. Sleeping
14:00
Prospective MAR (by User)
7/23/04 NAME: QA, 006
TIME PRINTED: 07/23/2004 15:39 Admit: 7/12/04
DIAGNOSIS:
NOTES:
ALLERGIES: NKA
23:00-07:00 07:00-15:00 15:00-23:00
Nurse Signatures
Signature 23:00-07:00 Initial
_
_
_
Signature 07:00-15:00 Initial
SB1 = BROADBENT1,SARAH
_
_
Signature 15:00-23:00 Initial
_
_
_
QA, 006
Gender: M
DOB: 8/21/20 MRN: M90000006
Visit: V000006
Acct: DR: JENKINS, WOODY G.
Room: 312 1
Stillwater Medical Center
1323 West 6th Box 2408
Stillwater, OK 74074
Printed By: User, Admin Page 1 of 3 Printed At: 07/23/2004 15:39
Patient iDOT
New Order Prep
John Smith
Scan Patient DOT or OK
ED
iConnect Handheld screen
P/N TP0001-01 Rev. B Advance Prepared Items
intelliDOT iConnect System User Guide Confidential 2-37
3. Verify that the correct patient name is displayed. If it is not the intended
patient, scan the correct patient's iDOT on the Prospective MAR. When the
correct patient's name is displayed, press OK. The following screen will
appear:
4. Scan the medication bar code. If the medication does not require entry of the
dose amount, proceed to step 8. If entry of the dose amount is required, the
following screen will appear:
5. Press the OK button to confirm. The following screen will appear.:
6. Enter the dose amount for the medication using the numbered iDOTs on the
Medication Administration DOT sheet. The screen will display your entry.
7. Verify that you have entered the correct dose amount. If necessary, use the
Backspace iDOT to remove your entry and reenter the dose amount.
Med Preparation
<0 Meds Scanned>
Scan Med
ED
iConnect Handheld screen
Med Preparation
Normal Saline 100 ML
(100 ML Vial)
Scan Med or OK
ED
iConnect Handheld screen
Multi -Dose Vial
<?> ML
Enter Dose
ED
iConnect Handheld screen
Multi-Dose Vial
10 ML
Accept OK or Enter Dose
ED
iConnect Handheld screen
Advance Prepared Items P/N TP0001-01 Rev. B
2-38 Confidential intelliDOT iConnect System User Guide
8. Press OK button to accept the entry. The following screen will appear:
9. Scan the New Order Prep iDOT on the Medication Administration DOT sheet
to indicate that the last ingredient has been scanned.
Med Preparation
<1 Med Scanned>
Scan Med or New Order Prep DOT
ED
iConnect Handheld screen
Sites
L. UPPER ARM R. LOWER ABD. L. ANTERIOLATERAL
THIGH L. DELTIOD MUSCLE L. VENTRO-GLUTEAL
MUSCLE
L. GLUTEAL-MEDIAL
MUSCLE R. ANTERIOLATERAL
THIGH R. UPPER ARM L. LOWER ABD. R. DELTOID MUSCLE
R. VENTRO-GLUTEAL
MUSCLE L. UPPER ABD. R. GLUTEAL-MEDIAL
MUSCLE INTRAVENOUS
Override Reasons
Patient Preference Pt. Declined Pt. Sleeping Pt. Off Unit Pt. Transferred
Pt. Discharged IV Discontinued IV Infiltrated IV Patency C/O Pain
Increased Pain C/O Nausea Increased Nausea Within Normal Limits VS Warranted
Med. Missing Tx. In Progress Hold Medication NPO Per Protocol
New Order New Schedule New Route Standing Order Stat Order
RX Change Discontinued Abnormal Limits Contraindicated Incompatability
Dialysis In Progress Pending Lab Specimen Collection
Needed S/W Bug
keypad
1 2 3 4 5
6 7 8 9 /
0 # Cancel decimal back
Extra Dots
Cancel All Continue Omit Logout New Order Prep
Cover Patients Previous Next Enter Later Extra Dose
Delay Dose
Medication Administration Dot Sheet
Printed By: User, Admin Page 1 of 1 Printed At: 04/08/2004 13:42
P/N TP0001-01 Rev. B Advance Prepared Items
intelliDOT iConnect System User Guide Confidential 2-39
The following screen appears:
10. Press OK to save the prepared medication transaction data. The following
screen will appear while the information is stored:
11. When the following screen appears, the preparation process is complete:
12. When you later scan the patient, the iConnect will display the prepared
medication for administration.
Prep Complete
<1 Med Scanned>
OK
ED
iConnect Handheld screen
Sending Data
Please Wait
ED
iConnect Handheld screen
7/09/04 16:36
User: Joe Smith
Scan Patient or Command Dot
ED
iConnect Handheld screen
Advance Prepared Items P/N TP0001-01 Rev. B
2-40 Confidential intelliDOT iConnect System User Guide
Case 6 - Prepared Item with multiple medications that is
NOT yet printed on the Prospective MAR
This case describes the handling of a prepared item that now appears in printed
form on the Prospective MAR. To prepare this dose:
1. Scan the New Order Prep iDOT on the Medication Administration DOT
Sheet
Sites
L. UPPER ARM R. LOWER ABD. L. ANTERIOLATERAL
THIGH L. DELTIOD MUSCLE L. VENTRO-GLUTEAL
MUSCLE
L. GLUTEAL-MEDIAL
MUSCLE R. ANTERIOLATERAL
THIGH R. UPPER ARM L. LOWER ABD. R. DELTOID MUSCLE
R. VENTRO-GLUTEAL
MUSCLE L. UPPER ABD. R. GLUTEAL-MEDIAL
MUSCLE INTRAVENOUS
Override Reasons
Patient Preference Pt. Declined Pt. Sleeping Pt. Off Unit Pt. Transferred
Pt. Discharged IV Discontinued IV Infiltrated IV Patency C/O Pain
Increased Pain C/O Nausea Increased Nausea Within Normal Limits VS Warranted
Med. Missing Tx. In Progress Hold Medication NPO Per Protocol
New Order New Schedule New Route Standing Order Stat Order
RX Change Discontinued Abnormal Limits Contraindicated Incompatability
Dialysis In Progress Pending Lab Specimen Collection
Needed S/W Bug
keypad
1 2 3 4 5
6 7 8 9 /
0 # Cancel decimal back
Extra Dots
Cancel All Continue Omit Logout New Order Prep
Cover Patients Previous Next Enter Later Extra Dose
Delay Dose
Medication Administration Dot Sheet
Printed By: User, Admin Page 1 of 1 Printed At: 04/08/2004 13:42
P/N TP0001-01 Rev. B Advance Prepared Items
intelliDOT iConnect System User Guide Confidential 2-41
The following screen will appear:
2. Scan the patient iDOT on the Prospective MAR.
New Order Prep
<No Patient DOT Scanned>
Scan Patient DOT screen
iConnect Handheld screen
ED
000857:
ATORVASTATIN 20 MG TAB (40MG)
(LIPITOR)
Start
07/12
15:00
Stop
DOSE: 40 MG PO DAILY AT BEDTIME
10:35 SB1 OMITTED
Reason Omitted : Pt. Sleeping 21:00
000863:
IRBESARTAN 150 MG TAB (300MG)
(AVAPRO)
Start
07/12
15:00
Stop
DOSE: 300 MG PO EVERY MORNING
09:00
000864:
DILTIAZEM HCL 180 MG CAPCR (180)
(CARDIZEM CD)
IN: DILTIAZEM HCL 120 MG CAPCR
(120)
(CARDIZEM CD)
Start
07/12
15:00
Stop
DOSE: 300 PO EVERY MORNING
10:35 SB1 OMITTED
Reason Omitted : Pt. Sleeping
000865:
METFORMIN HCL 500 MG TAB (1000MG)
(GLUCOPHAGE)
Start
07/12
15:00
Stop
DOSE: 1000 MG PO WITH BREAKFAST
10:35 SB1 OMITTED
Reason Omitted : Pt. Sleeping
000866:
METFORMIN HCL 500 MG TAB (500MG)
(GLUCOPHAGE)
Start
07/12
15:00
Stop
DOSE: 500 MG PO 12,17
12:00 17:00
000868:
MAGNESIUM OXIDE 400 MG TAB
(400MG)
(MAG-OX 400)
Start
07/12
15:00
Stop
DOSE: 400 MG PO EVERY MORNING
10:35 SB1 OMITTED
Reason Omitted : Pt. Sleeping
000869:
CLOPIDOGREL BISULFATE 75 MG TAB
(75MG)
(PLAVIX)
Start
07/12
15:00
Stop
DOSE: 75 MG PO EVERY MORNING
10:36 SB1 OMITTED
Reason Omitted : Pt. Sleeping
000870:
METOPROLOL SUCCINATE 50 MG
TABCR (100MG)
(TOPROL XL)
Start
07/12
15:00
Stop
DOSE: 100 MG PO EVERY MORNING
10:36 SB1 OMITTED
Reason Omitted : Pt. Sleeping
900862:
CEFTRIAXONE SOD 1 GM INJ (1)
(ROCEPHIN)
IN: SODIUM CL 50 ML BAG (50)
(SODIUM CHLORIDE)
Start
07/20
14:00
Stop
DOSE: 0 IV GIVE EVERY 12 HOURS
02:00 10:36 SB1 OMITTED
Reason Omitted : Pt. Sleeping
14:00
Prospective MAR (by User)
7/23/04 NAME: QA, 006
TIME PRINTED: 07/23/2004 15:39 Admit: 7/12/04
DIAGNOSIS:
NOTES:
ALLERGIES: NKA
23:00-07:00 07:00-15:00 15:00-23:00
Nurse Signatures
Signature 23:00-07:00 Initial
_
_
_
Signature 07:00-15:00 Initial
SB1 = BROADBENT1,SARAH
_
_
Signature 15:00-23:00 Initial
_
_
_
QA, 006
Gender: M
DOB: 8/21/20 MRN: M90000006
Visit: V000006
Acct: DR: JENKINS, WOODY G.
Room: 312 1
Stillwater Medical Center
1323 West 6th Box 2408
Stillwater, OK 74074
Printed By: User, Admin Page 1 of 3 Printed At: 07/23/2004 15:39
Patient iDOT
Advance Prepared Items P/N TP0001-01 Rev. B
2-42 Confidential intelliDOT iConnect System User Guide
The following screen will appear:
3. Verify that the correct patient name is displayed. If it is not the intended
patient, scan the correct patient's iDOT on the Prospective MAR. When the
correct patient's name is displayed, press OK.
4. Scan the medication bar code. If the medication does not require entry of the
dose amount, proceed to step 6. If entry of the dose amount is required, the
following screen will appear:
5. Press the OK button to accept the entry. The following screen appears:
6. If there is more than one ingredient medication, repeat steps 4 - 7 for each
medication. Otherwise, go on to step 9.
7. Scan the New Order Prep iDOT on the medication Medication Administration
DOT sheet.to indicate that the last ingredient has been scanned.
New Order Prep
John Smith
Scan Patient DOT or OK
ED
iConnect Handheld screen
Med Preparation
<0 Meds Scanned>
Scan Med
ED
iConnect Handheld screen
Med Preparation
Viaflex Bag
Scan Med or OK
ED
iConnect Handheld screen
Med Preparation
<1 Med Scanned>
Scan Med or New Order Prep DOT
ED
iConnect Handheld screen
P/N TP0001-01 Rev. B Advance Prepared Items
intelliDOT iConnect System User Guide Confidential 2-43
8. Press the OK button to confirm. The following screen will appear:
9. Press OK to save the prepared medication transaction data. The following
screen will appear while the information is stored:
10. When the following screen appears, the preparation process is complete:
11. When you later scan the patient, iConnect will display the prepared
medication for administration.
Prep Complete
<1 Meds Scanned>
OK
ED
iConnect Handheld screen
Sending Data
Please Wait
ED
iConnect Handheld screen
7/09/04 16:36
User: Joe Smith
Scan Patient or Command Dot
ED
iConnect Handheld screen
Advance Prepared Items P/N TP0001-01 Rev. B
2-44 Confidential intelliDOT iConnect System User Guide
Case 7 - Administering Medications for Cases 4-5
1. Scan the patient wristband.
2. Scan the New Order Prep iDOT on the Medication Administration DOT
sheet.
The following screen will appear:
Sites
L. UPPER ARM R. LOWER ABD. L. ANTERIOLATERAL
THIGH L. DELTIOD MUSCLE L. VENTRO-GLUTEAL
MUSCLE
L. GLUTEAL-MEDIAL
MUSCLE R. ANTERIOLATERAL
THIGH R. UPPER ARM L. LOWER ABD. R. DELTOID MUSCLE
R. VENTRO-GLUTEAL
MUSCLE L. UPPER ABD. R. GLUTEAL-MEDIAL
MUSCLE INTRAVENOUS
Override Reasons
Patient Preference Pt. Declined Pt. Sleeping Pt. Off Unit Pt. Transferred
Pt. Discharged IV Discontinued IV Infiltrated IV Patency C/O Pain
Increased Pain C/O Nausea Increased Nausea Within Normal Limits VS Warranted
Med. Missing Tx. In Progress Hold Medication NPO Per Protocol
New Order New Schedule New Route Standing Order Stat Order
RX Change Discontinued Abnormal Limits Contraindicated Incompatability
Dialysis In Progress Pending Lab Specimen Collection
Needed S/W Bug
keypad
1 2 3 4 5
6 7 8 9 /
0 # Cancel decimal back
Extra Dots
Cancel All Continue Omit Logout New Order Prep
Cover Patients Previous Next Enter Later Extra Dose
Delay Dose
Medication Administration Dot Sheet
Printed By: User, Admin Page 1 of 1 Printed At: 04/08/2004 13:42
New Order Prep
John Smith
Scan Patient DOT or OK
ED
iConnect Handheld screen
P/N TP0001-01 Rev. B Advance Prepared Items
intelliDOT iConnect System User Guide Confidential 2-45
3. Press OK to confirm. The following screen will appear:
4. To complete the transaction, scan your badge. The following screen will
appear:
Admin Complete
Viaflex Bag/Tobramycin
Confirm OK
ED
iConnect Handheld screen
7/09/04 16:36
User: Elaine Dawson
Scan Patient or Command Dot
ED
iConnect Handheld screen
Multi-Component Items Dispensed by Pharmacy P/N TP0001-01 Rev. B
2-46 Confidential intelliDOT iConnect System User Guide
Multi-Component Items Dispensed by
Pharmacy
Occasionally, pharmacy may dispense more than one item to satisfy a single order.
For example, an order for Warfarin 7.5 mg, may require that a 5 mg tablet and a
2.5 mg tablet be dispensed. The scanning process for these multi-component
orders is a follows:
1. Scan the patient wristband. The following screen will appear:
2. Scan the first medication bar code. The following screen will appear:
3. Press the OK button to confirm. The following screen will appear:
4. Scan the next component medication bar code:
1 Med Due
John Smith, Rm: 333 1
Review Meds OK or Scan Med/Badge
ED
iConnect Handheld screen
Multi-component
Coumadin 5 MG (Warfarin SOD) 5 MG
Scan Med or OK
ED
iConnect Handheld screen
Multi-component
<1 of 2 scanned>
Scan Med
ED
iConnect Handheld screen
Multi-component
Coumadin 2.5 MG (Warfarin SOD) 2.5 MG
Scan Med or OK
ED
iConnect Handheld screen
P/N TP0001-01 Rev. B Correcting or Canceling During Medication Transactions
intelliDOT iConnect System User Guide Confidential 2-47
5. If one or more clinical prompts appear, enter responses by scanning the
appropriate iDOTs. Otherwise, proceed to the next step.
6. Press OK button to confirm. The following screen will appear:
7. To complete your transaction, scan your badge. The following screen will
appear:
Correcting or Canceling During Medication
Transactions
To correct an entry or cancel a medication transaction, the following options are
available:
•Back iDOT - To backup a space and remove the last character entered
•Clear iDOT - To clear the entire data entry field
•Cancel iDOT - To Cancel the last in-progress medication transaction for
the current patient
•Cancel All iDOT- To Cancel All in-progress medication transactions for
the current patient
Transaction may also be edited from the iConnect System Manager,.
Admin Complete Dose: 7
000360: 2 components
Confirm OK
ED
iConnect Handheld screen
No More Meds Due
John Smith, Rm: 333 1
Review Meds OK or Scan Med/Badge
ED
iConnect Handheld screen

Communicating Directly with Pharmacy using the iConnect Handheld P/N TP0001-01 Rev. B
2-48 Confidential intelliDOT iConnect System User Guide
Communicating Directly with Pharmacy using
the iConnect Handheld
The iConnect System allows the nurse to quickly and easily communicate with the
pharmacy. Specific messages are defined by the hospital's iConnect system
administrator. An example of a useful application of this feature is to request a
change in administration times for a specific medication order. (Having the
pharmacy change the dosing times for an order in the Pharmacy Information
System is the only way to adjust the iConnect dosing schedule for a medication
order.)
To allow a message from the nurse to pharmacy to request a time change, an
iDOT for the message "Change Med Time" must be created by the system
manager. Message iDOTs can appear on Prospectiv MARs. Messages are received
on an iConnect printer located in the pharmacy department.
The following outlines the steps for sending a Change Med Time request to
pharmacy:
1. Scan the Change Med Time iDOT on the Prospective MAR.
2. Enter new scheduled time(s) using the numeric iDOTs on the Medication
Administration DOT sheet.
3. Press OK when new time(s) is entered and complete.
4. Scan the Order iDOT on the Prospective MAR for the order time to be
changed.
5. Press OK.
P/N TP0001-01 Rev. B Pharmacy Inventory Verification Using the iConnect Handheld
intelliDOT iConnect System User Guide Confidential 2-49
Pharmacy Inventory Verification Using the
iConnect Handheld
Once the iConnect medication formulary is complete with one or more valid bar
codes for each item in place, Pharmacy needs a method for quickly verifying that
a product manufacturer bar code is present in the formulary. This is important to
avoid stocking and dispensing of items that are unknown to intelliDOT and
therefore cannot be scanned at the time of administration. The iConnect
Handheld makes this verification extremely fast and easy for Pharmacy.
To determine whether a manufacturer's bar-coded item exists in the iConnect
formulary and is ready for use:
1. Print the DOT Keyboard report. Refer to DOT Keyboard on page 4-71.
2. Scan the Verify iDOT on the DOT Keyboard report. The following screen will
appear.
If you press OK, you will return to the home screen.
3. Scan the medication's manufacturer bar code. If an item, such as the
Hydrochlorothiazide 50 mg Tablet used in this example, has already been
entered into the iConnect formulary database, the following screen will
appear:
Verify Item
<no item scanned>
Scan Item or OK
ED
iConnect Handheld screen
Item Verified
Hydrachlorothizide 50 MG
Scan Item or OK
ED
iConnect Handheld screen

Pharmacy Inventory Verification Using the iConnect Handheld P/N TP0001-01 Rev. B
2-50 Confidential intelliDOT iConnect System User Guide
4. If the item has NOT yet been entered into the iConnect formulary database,
the Unknown Barcode screen will appear and the bar code content will be
displayed:
5. Pharmacy must add this item to the iConnect formulary before dispensing it.
Verify Item
Unknown Barcode: 1234567
Scan Item or OK
ED
iConnect Handheld screen

intelliDOT iConnect System User Guide Confidential 3-1
Using the iConnect System Manager P/N TP0001-01 Rev. B
Chapter 3
Using the iConnect System
Manager
The iConnect System Manager consists of a client server application. The
application is accessed via any PC in the hospital where the client application has
been installed. The iConnect System Manager is primarily used by nursing to look
up and edit medication data or assign patients to nurses and print reports.
Pharmacy has access to the iConnect System Manager for formulary, database and
system maintenance and reports. This section provides information on using
IntelliDOTs iConnect System Manager including the following information:
•Logging into the iConnect System
Manager •iConnect System Manager
MAR
•Configuration Setup •Assigning Patients
•Formulary Setup •Configuring iConnect
Handhelds
•Nursing Unit Setup •Site of Administration Setup
(Adding and Editing)
•Sig Code Setup •Override Reasons Setup
(Adding and Editing)
•Role Setup •Script Setup
•User Setup (Adding and Editing) •Reports
•Patient Setup (Adding and
Editing) •DOT Organization Setup
Logging into the iConnect System Manager P/N TP0001-01 Rev. B
3-2 Confidential intelliDOT iConnect System User Guide
Logging into the iConnect System Manager
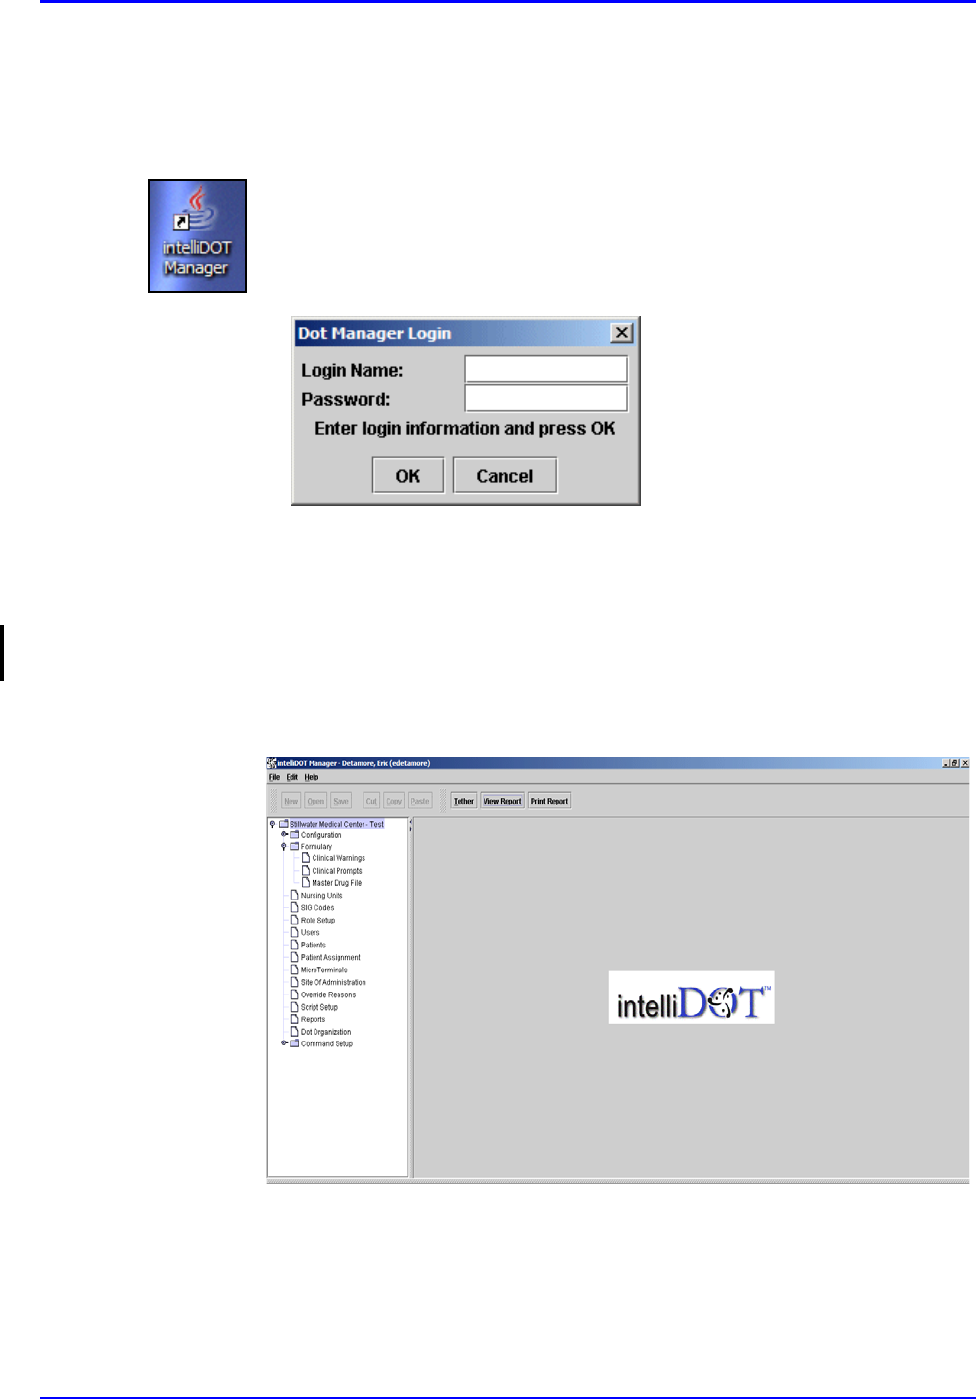
The IntelliDOT DOT Manager shortcut location has been placed on your desktop
for all IntelliDOT DOT Managers.
Login
To login, perform the following:
1. Click on the iConnect System Manager Icon
The IntelliDOT DOT Manager Login screen will appear.
2. Enter your Login Name.
Your login name must be at least 6 characters
3. Enter your Password.
Your password must be between 4 and 10 numeric numbers.
4. Click OK.
The IntelliDOT DOT Manager screen will appear.
P/N TP0001-01 Rev. B Configuration Setup
intelliDOT iConnect System User Guide Confidential 3-3
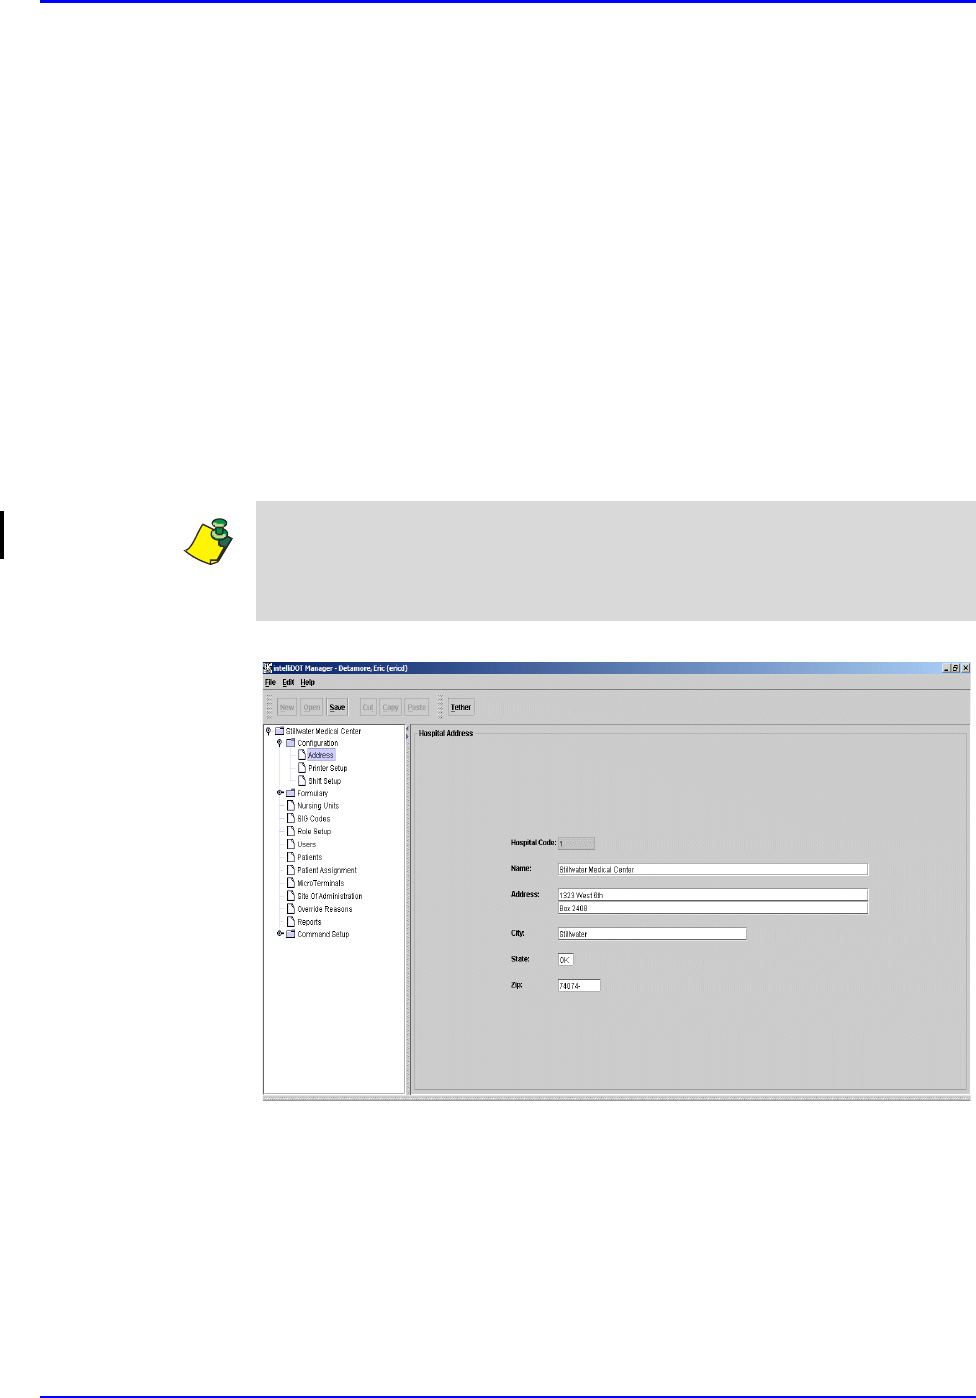
Configuration Setup
The Hospital configuration consists of:
• Hospital Address
•Printer Setup
•Shift Setup
Hospital Address Setup
The Hospital Address is setup by your IntelliDOT Application Specialist.
To setup the Hospital Address, perform the following:
1. Click Configuration on your IntelliDOT DOT Manager.
2. Click on Address.
The Hospital Address screen will appear.
Note: The information you enter in these fields will be displayed on your MARs.
This Hospital Code can ONLY be entered by an IntelliDOT representative
(Application Specialist) or hospital staff working with IntelliDOT. The code will
be greyed out once it has been entered. You will not be able to change it.
Configuration Setup P/N TP0001-01 Rev. B
3-4 Confidential intelliDOT iConnect System User Guide
Printer Setup
The IntelliDOT system allows all printers on your hospital network to work with
IntelliDOT.
Adding, Editing, and Deleting Printers
To add the Printers, perform the following:
1. Click Configuration on your IntelliDOT DOT Manager.
The Configuration (Hospital Address screen will appear).
2. Click Printer Setup.
The Printer Setup window appears.
3. To add a printer, click New and enter the Friendly Name and Device Name.
4. To search for a specific printer, select the drop down box (Friendly Name or
Device Name).
5. Enter the printer name and click Search.
The specified printer appears and is highlighted.
6. Click Save to save all your information.
Note: The Friendly Name is what you will call the printer. The Device Name is
the name of the Device the network administrator has assigned to the device.
Note: To edit the Printers, select the printer and edit the fields. To delete the
Printers, select the printer, click delete and click OK. You will be prompted to
save your information.
P/N TP0001-01 Rev. B Configuration Setup
intelliDOT iConnect System User Guide Confidential 3-5
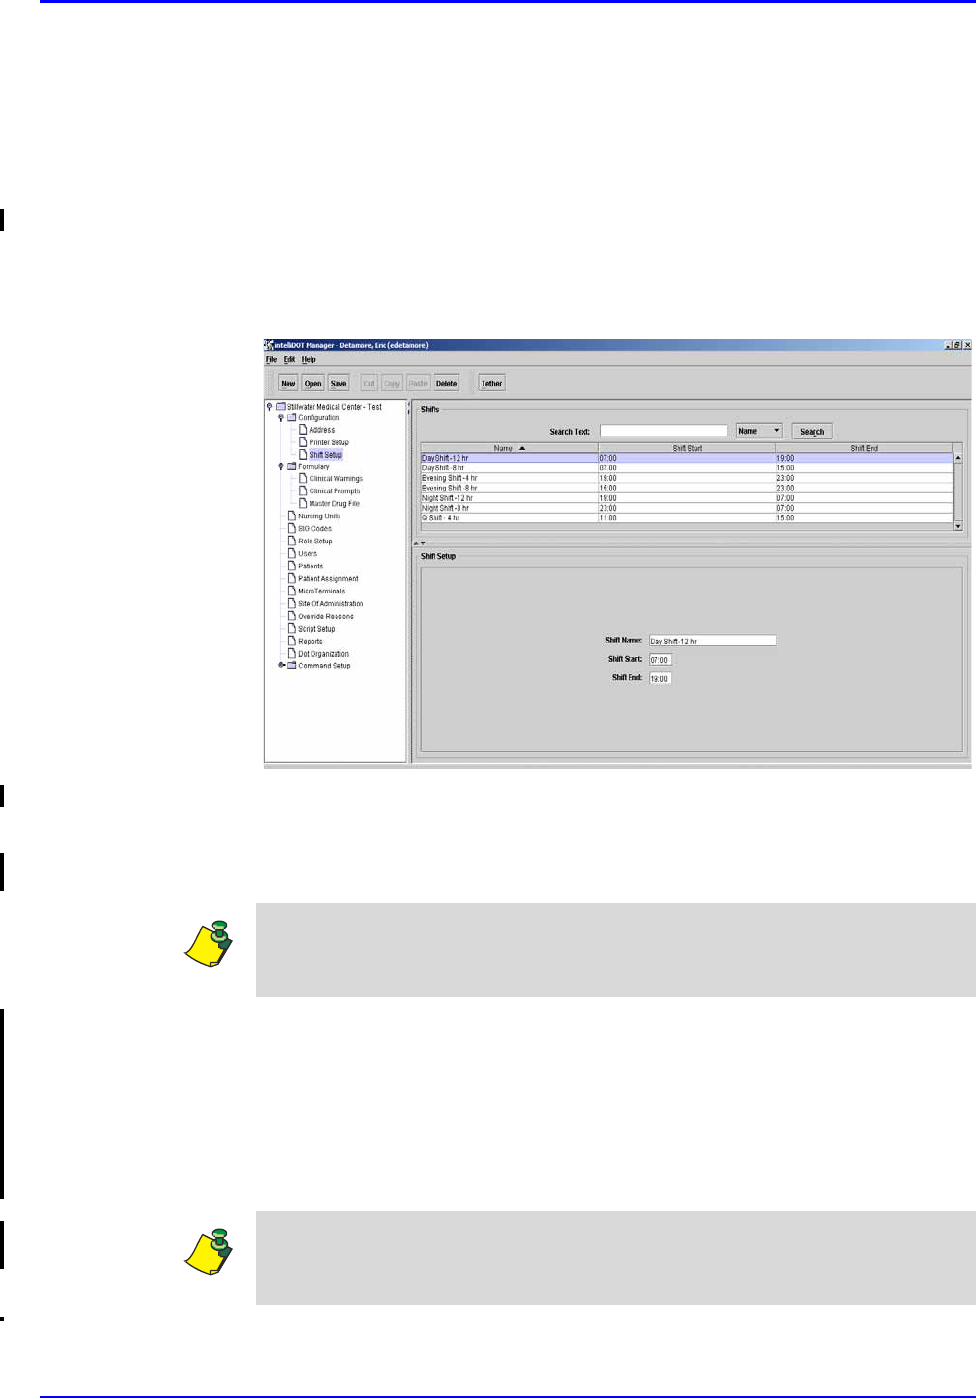
Shift Setup
Shift Setup is used to enter and store all nurse shift start and end times used in all
areas of the hospital. Typically, your system administrator enters all of this
information. All shifts schedules worked on all units should be entered. This is not
nursing unit specific.
To add the Nursing Shifts, perform the following:
1. Click Configuration on your IntelliDOT DOT Manager.
2. Click Shift Setup.
The Shift Setup window appears.
3. To add a shift, click New.
4. Enter the Shift Name.
5. Enter the Shift Start and Shift End.
6. To search for a specific shift, select the drop down box (Shift Name, Shift
Start, or Shift End).
7. Enter the desired information and click Search.
The specified shift will appear and is highlighted.
8. Click Save to save all your information.
Note: The Schedule for the nurses is based on start times of schedules. If your
schedule is 12 hours, the shift would start at 7:00am and end at 7:00pm. The new
shifts will appear in the top of the window as you have entered them.
Note: To edit the Shift, select the shift and edit the fields. To delete the shift,
select the printer, click delete and click OK. You will be prompted to save your
information.
Formulary Setup P/N TP0001-01 Rev. B
3-6 Confidential intelliDOT iConnect System User Guide
Formulary Setup
As part of the iConnect System, the hospital pharmacy electronically transmits the
Hospital Formulary to the iConnect server database. The iConnect System
maintains a copy of the pharmacy formulary and stores bar code data for all
pharmacy formulary line items.
Each new item received by pharmacy must be checked to assure it is in the
iConnect database. This process is done using the iConnect Handheld in “verify”
mode. Refer to Pharmacy Inventory Verification Using the iConnect Handheld on
page 2-49. Items which are not found in the iConnect database must be entered,
and bar code information scanned and stored. Items received without bar codes
printed on them must be packaged or labeled with a bar code.
Each formulary line item must be configured for a variety of clinical settings,
parameters and warnings. The following configuration settings are explained.
The clinical settings and warning parameters are set for each formulary drug item.
• Clinical Warnings - Setup by Pharmacy
• Clinical Prompts - Setup by System Administrator
• Master Drug File - Setup by Pharmacy and System Administrator (Clinical
Prompts)
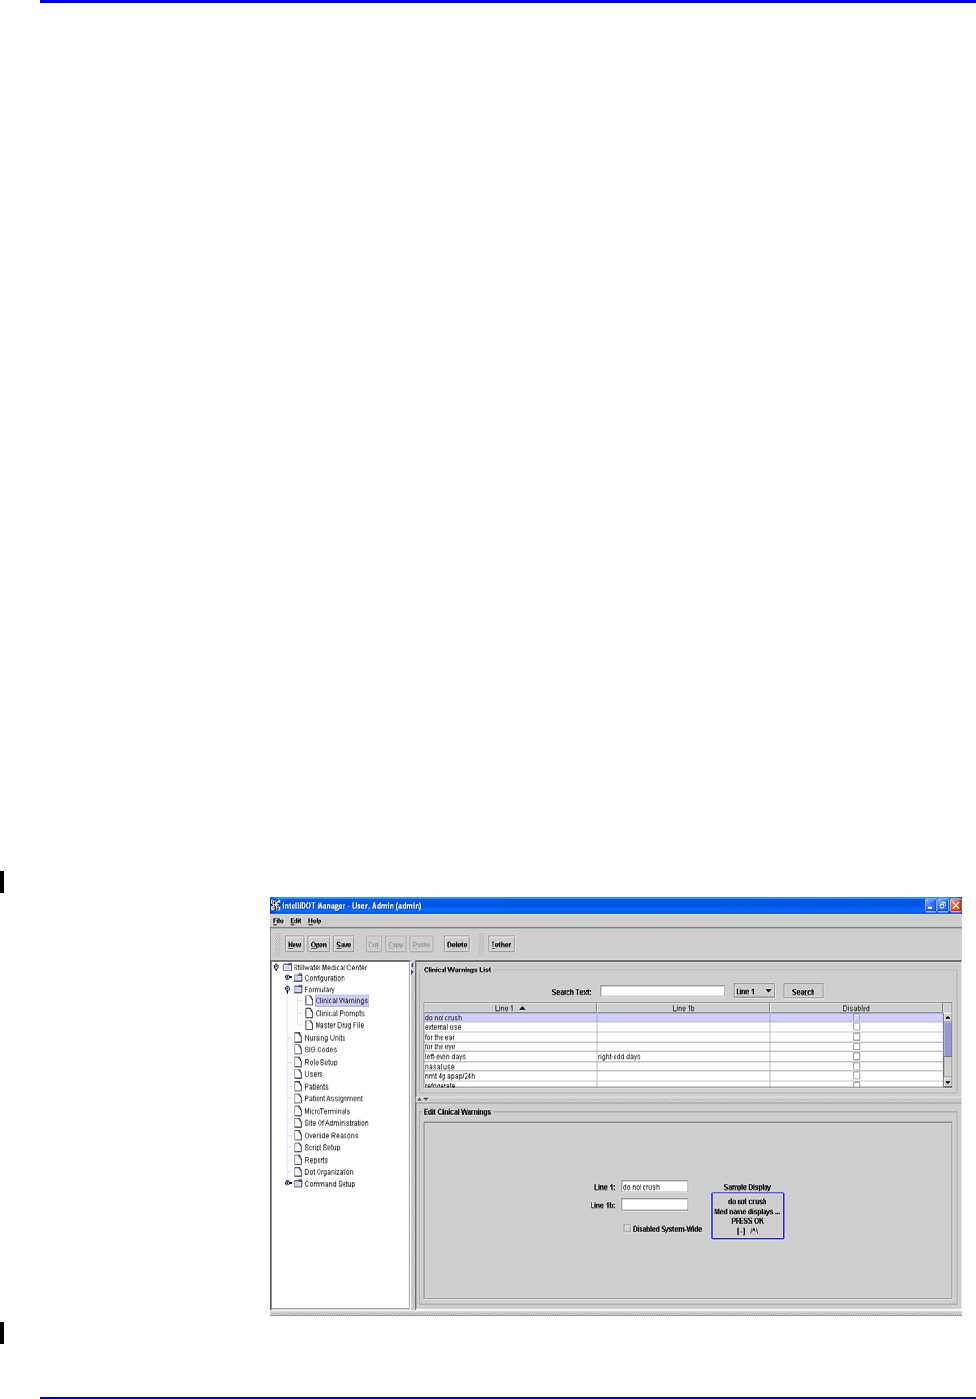
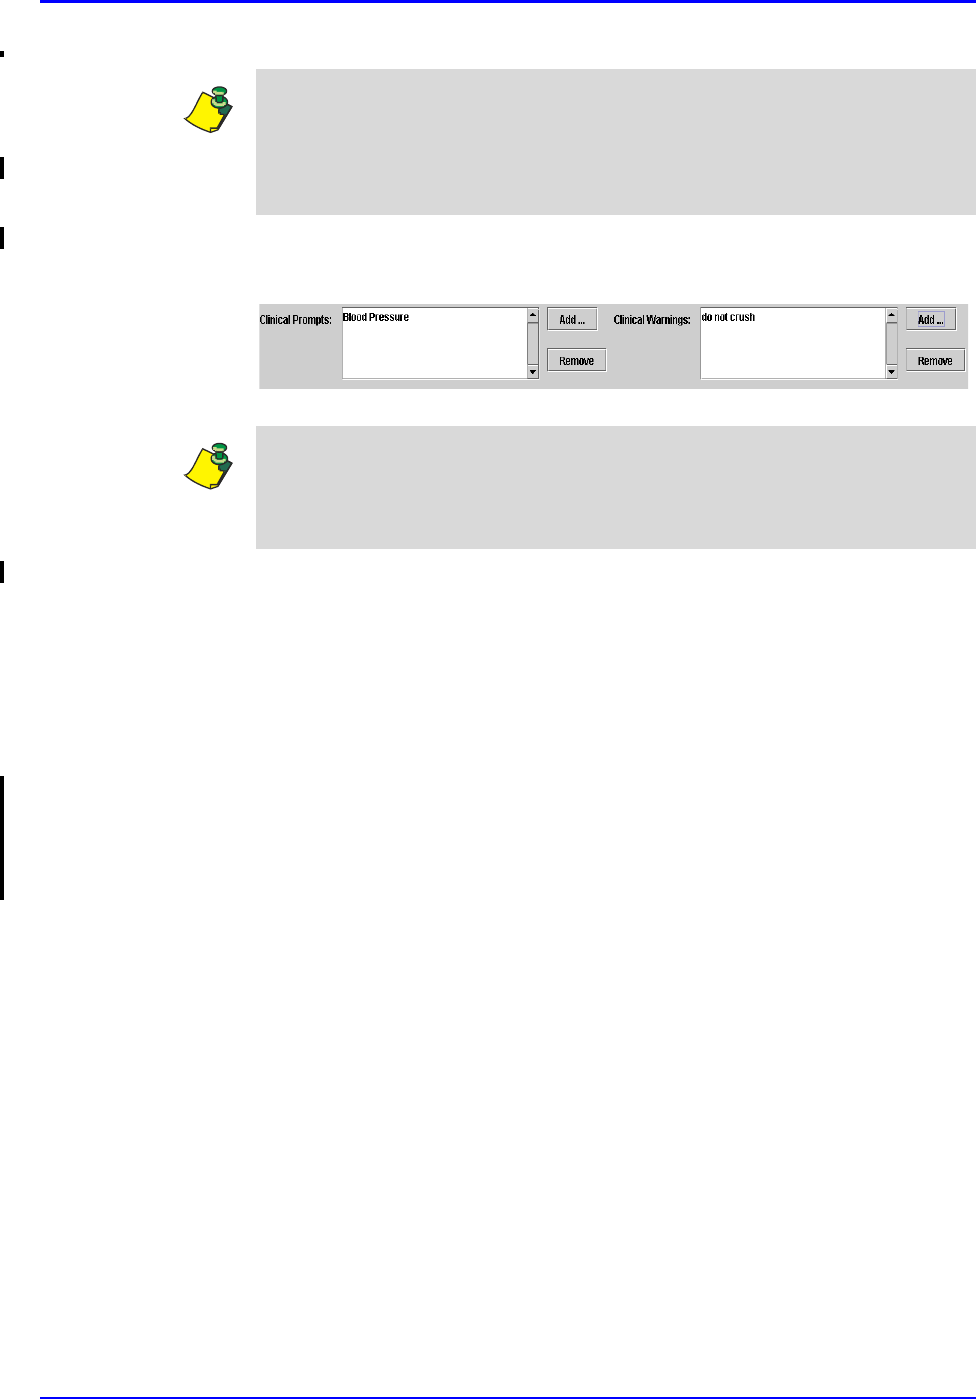
Clinical Warnings
Clinical warnings displayed during medication administration are entered here.
The pharmacy must set up the clinical warnings prior to assigning them to the
formulary items. Warnings must first be entered here. Then they are available to
be linked to individual formulary line items.
Adding, Editing and Deleting Clinical Warnings
1. To add Clinical Warnings, click New.
The Edit Clinical Warnings screen with empty fields will appear.

P/N TP0001-01 Rev. B Formulary Setup
intelliDOT iConnect System User Guide Confidential 3-7
2. Enter the clinical warning in line 1 and line 1b.
3. Check Disabled System Wide if you do not want this warning to appear on
any iConnect Handheld.
The flag enables the hospital to turn warnings on or off without needing to
edit every formulary item that those warnings are associated with. When this
feature is checked, the warnings will not appear for the displayed medication
on the iConnect Handheld.
4. To search for a specific clinical warning, select the drop down box (Line 1,
Line B, or Disabled), enter the desired name and click Search.
The specified warning will appear and is highlighted.
5. Click Save.
The Clinical Warning appears in the Clinical Warning List.
Note: You can enter up to 16 characters each in the line 1 and line 1b (No more
than 32 for both). The Clinical Warning will display in the display box to the
right of the fields as it will appear on the iConnect Handheld screen. When line 1
reaches 16 characters, additional text is added in line 1b which then appears. Line
1 will alternately flash with line 1b when displayed during med administration.
Note: To edit the Clinical warning, select the warning and edit the fields. To
delete the Clinical warning, select the warning, click delete and click OK. You
will be prompted to save your information.

Formulary Setup P/N TP0001-01 Rev. B
3-8 Confidential intelliDOT iConnect System User Guide
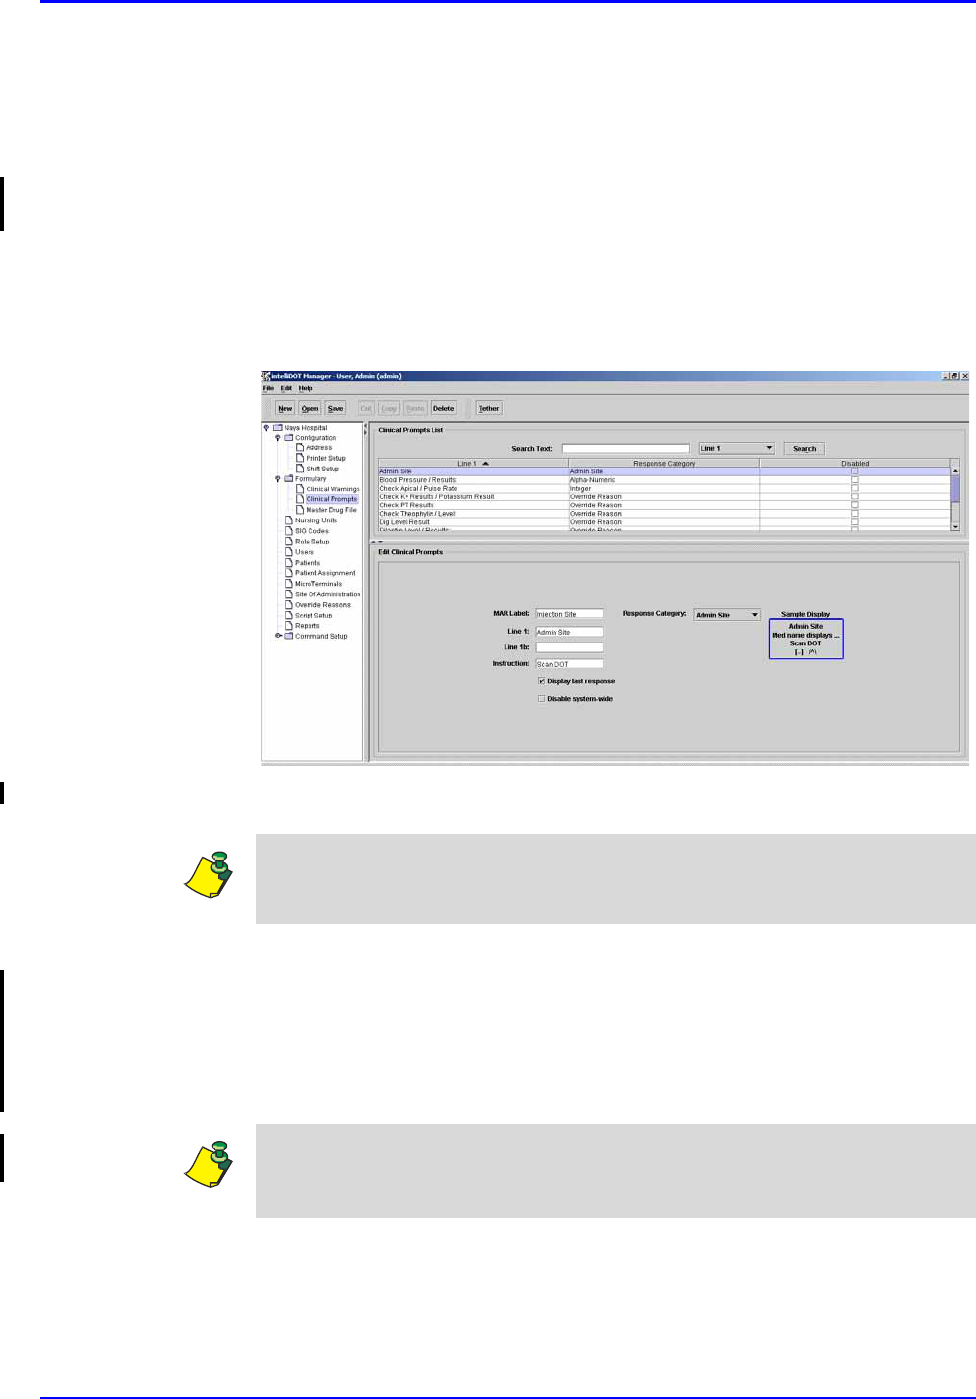
Clinical Prompts
Clinical information requests or “prompts” to be displayed at the time of
medication administration must first be entered here. The prompts are then
available to be linked to individual formulary line items.
Adding, Editing, and Deleting Clinical Prompts
1. To add Clinical Prompts, click New.
The Edit Clinical Prompts with empty fields will appear.
2. Enter the MAR label for the clinical prompt. The MAR label, is the actual
medication description text that appears on your MAR.
For Example: Type “Injection Site”. Injection site will display as it will
appear on the MAR.
3. Enter the clinical prompts in line 1 and line 1b as you would like it to display
on the top line of the iConnect Handheld.
4. Enter the Instruction or “prompt” you would like it to display on the bottom
line of the iConnect Handheld.
5. Check the Display Last Response box if you want the last response entry to
appear on the iConnect Handheld display.
For example, The nurse may need to know the last administered injection site
(Lower Upper Arm). The next area may need to be in a different site.
Note: You can enter up to 16 characters each on line 1 and line 1b (No more than
32 for both). The Clinical Prompt information will display in the Sample Display
box to the right of the fields. Line 1 and line1b alternately flash to provide the
nurse with the clinical prompt information during med administration.
P/N TP0001-01 Rev. B Formulary Setup
intelliDOT iConnect System User Guide Confidential 3-9
6. Check the Disable System Wide box if you do not want this warning to
appear on any iConnect Handheld.
When this feature is checked, this warning will not appear on the iConnect
Handheld for any medication system-wide. It is only checked if nursing does
not want it displayed on the iConnect Handheld every time the medication is
administered.
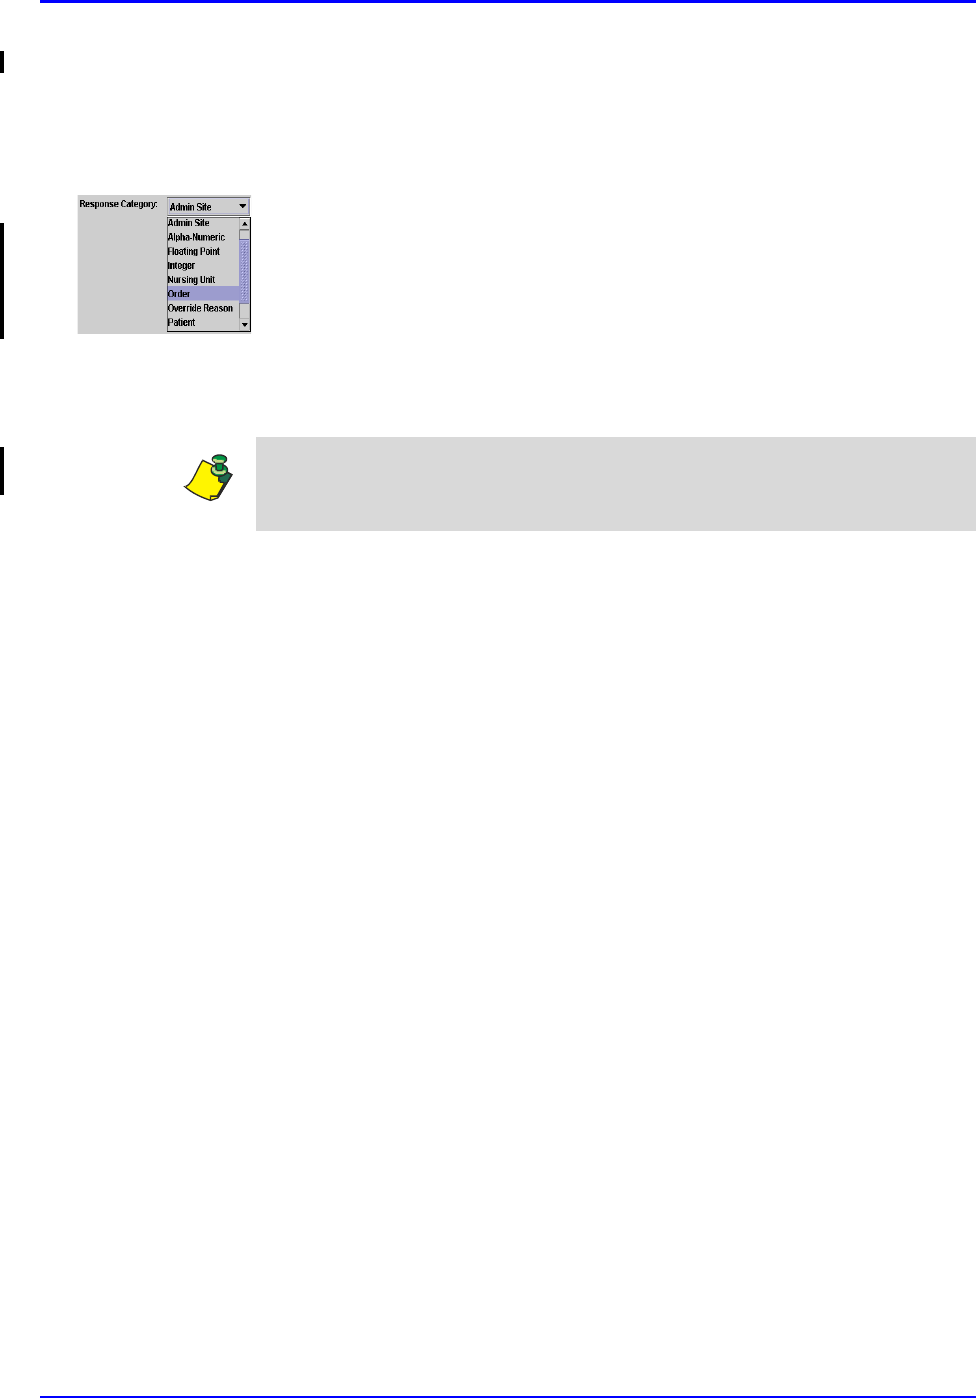
7. From the drop-down menu, select the applicable Response Category.
8. To search for a Clinical Prompt, select the drop down box (Line 1, Response
Category, or Disabled), enter the desired name and click Search.
The specified prompt will appear and is highlighted.
9. Click Save.
The Clinical Warning appears in the Clinical Warning List.
Note: To edit the Clinical Prompt, select the prompt and edit the fields. To delete
the Clinical Prompt, select the warning, click delete and click OK. You will be
prompted to save your information.

Formulary Setup P/N TP0001-01 Rev. B
3-10 Confidential intelliDOT iConnect System User Guide
Master Drug File
Formulary Download
The iConnect Handheld receives master drug file download (delimited ASCII
format) from the pharmacy information system. The following fields are typically
downloaded (* indicates field is required):
Formulary Configuration
Once the formulary download is complete, configuration is completed as follows:
1. Click on Formulary on your iConnect System Manager.
Clinical Warnings, Clinical Prompts, and Master Drug File will appear.
2. Click on Master Drug File.
The Formulary screen will appear.
3. From the Formulary Listing, select a med.
4. From the Brand Info section of the Edit Formulary screen, click the Add
button.
Med Identifier* (MedID or Hospital ID) Volume (numeric)
Billing code (*if different form MedID) Volume Unit (*if volume provided)
Generic Name* Dosage Form* (short version
preferred (e.g. TAB preferred over
TABLET)
Reference or Key Brand Name (one) Dispense Size* (numeric)
Strength (numeric) Dispense Size Unit*
Strength Unit (* if strength provided) Drug Class*
Note: The hospital pharmacy must always be checking the formulary to make
sure the bar code for each medication is correct. Meds without bar codes cannot
be administered at the bedside and the pharmacist will need to maintain this
information. The iConnect system requires all medications to be barcoded.
P/N TP0001-01 Rev. B Formulary Setup
intelliDOT iConnect System User Guide Confidential 3-11
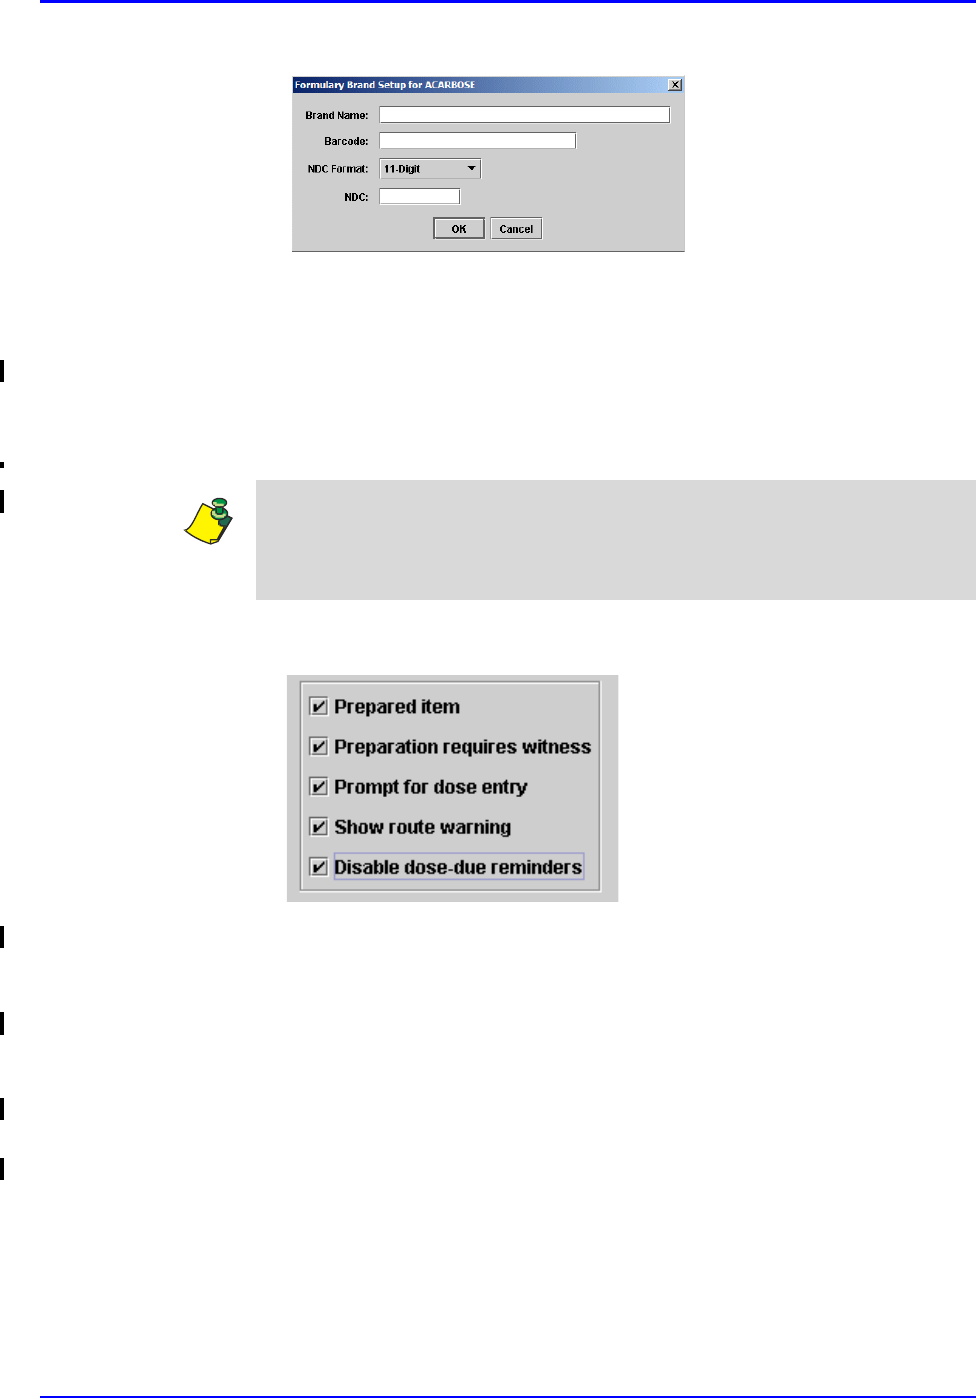
The Formulary Brand Setup for the medication window appears.
5. Tether the iConnect Handheld. Refer to Tethering the iConnect Handheld on
page 6-2.
6. Scan your medication bar code.
The bar code information will display in the bar code field.
7. If the Brand Name is not present, enter the Brand Name.
8. Enter the NDC number.
9. Click the OK button to save this information.
The following screen references steps 8 through 16.
10. Check the Prepared Item box if this medication requires advance preparation
by the nurse prior to administration away from the bedside. Refer to Advance
Prepared Items on page 2-25.
11. Check the Preparation Requires Witness box if the medication requires a
witness. Refer to Case 2 - Prepared Item that is printed on the Prospective
MAR and requiring a witness on page 2-28.
12. Check the Prompt for dose entry box if the dosage form allows the nurse to
administer less than the entire contents.
13. Check the Show route warning box if a route warning needs to appear on the
iConnect Handheld. Some meds may be given both IM and IV.
Note: The NDC number is not always the same as the bar code number. You may
have packaged this medication via your medication packaging system. If so,
select Hospital Packed from the drop down menu instead of NDC. If you did
hospital package the medication, typically this number is a non-NDC number.
Formulary Setup P/N TP0001-01 Rev. B
3-12 Confidential intelliDOT iConnect System User Guide
14. Check the Disable Dose Due Reminders box if you do not want the nurse to
be reminded when this medication is due.
15. Configure for Clinical Prompts by selecting from entered choices.
16. Click the Add button to add a clinical prompt or clinical warning.
A list of prompts appear.
17. Select the prompts and the press the OK button.
The clinical warning or clinical prompt appear if for example: a med has a
clinical warning of “Do Not Crush or a clinical prompt of “Check Blood
Pressure”. This checked box provides a way for the prompt to appear on the
iConnect Handheld during medication administration.
18. To remove the prompts, select the prompt and click the Remove button.
The prompts will be removed from the Clinical Warning and Prompt windows.
19. Click Save to save all information.
If you do not click the save button, you will be prompted to do so after exiting
the Master Drug File screen.
Note: Route warning should be used for medications where more than one route
of administration is possible. For example, an injectable med may be given IM,
SQ or IV. The route warning will display the ordered route at medication
administration. If a med has a route warning of “Give IV” the checked box
provides a way the prompt to appear on the iConnect Handheld.
Note: Clinical Prompts must be added before using this screen. Refer to Clinical
Prompts on page 3-8.
Clinical Warnings must be added before using this screen. Refer to Clinical
Warnings on page 3-6.
P/N TP0001-01 Rev. B Nursing Unit Setup
intelliDOT iConnect System User Guide Confidential 3-13
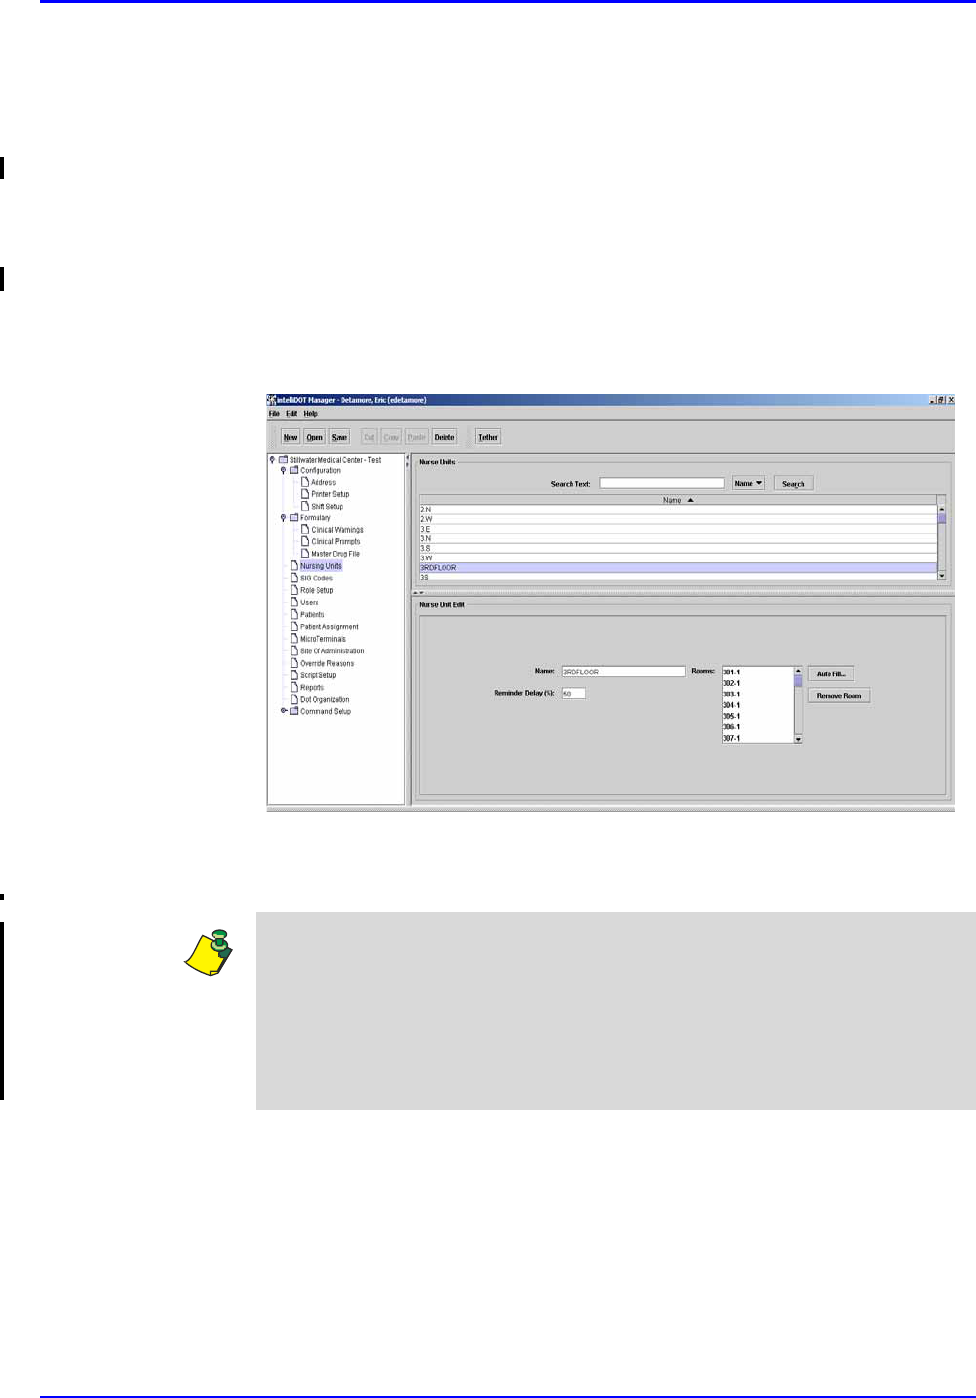
Nursing Unit Setup
Each nursing unit using the iConnect System must be entered here, along with all
room numbers located on the unit. Each nursing unit must be separately entered
and configured. The Auto Fill section of the nursing unit is a time saving feature
that allows you to automatically enter room numbers within a certain range for
that area and add and remove applicable rooms.
Adding, Editing, and Deleting Nursing Units
To add a new nursing unit, perform the following:
1. Select Nursing Unit.
The Nursing Unit screen will appear.
2. Click New and enter a Name for the Nursing Unit.
3. Enter the Reminder Delay %.
Note: The delay is the % of the lag time before a med due reminder is shown to
the nurse. For instance, if the lag time is 1 hour and the reminder delay % is
50%, then at 30 minutes after the due time the nurse will receive a med due
reminder. If the setting is 25%, then at 15 minutes past the due time, the nurse
will receive a reminder. If set to 100%, the nurse will never see a Med Due
reminder, but will just receive a Med Late reminder after the complete lag time
has past. Select the Shift Schedule from your hospital shifts.
Nursing Unit Setup P/N TP0001-01 Rev. B
3-14 Confidential intelliDOT iConnect System User Guide
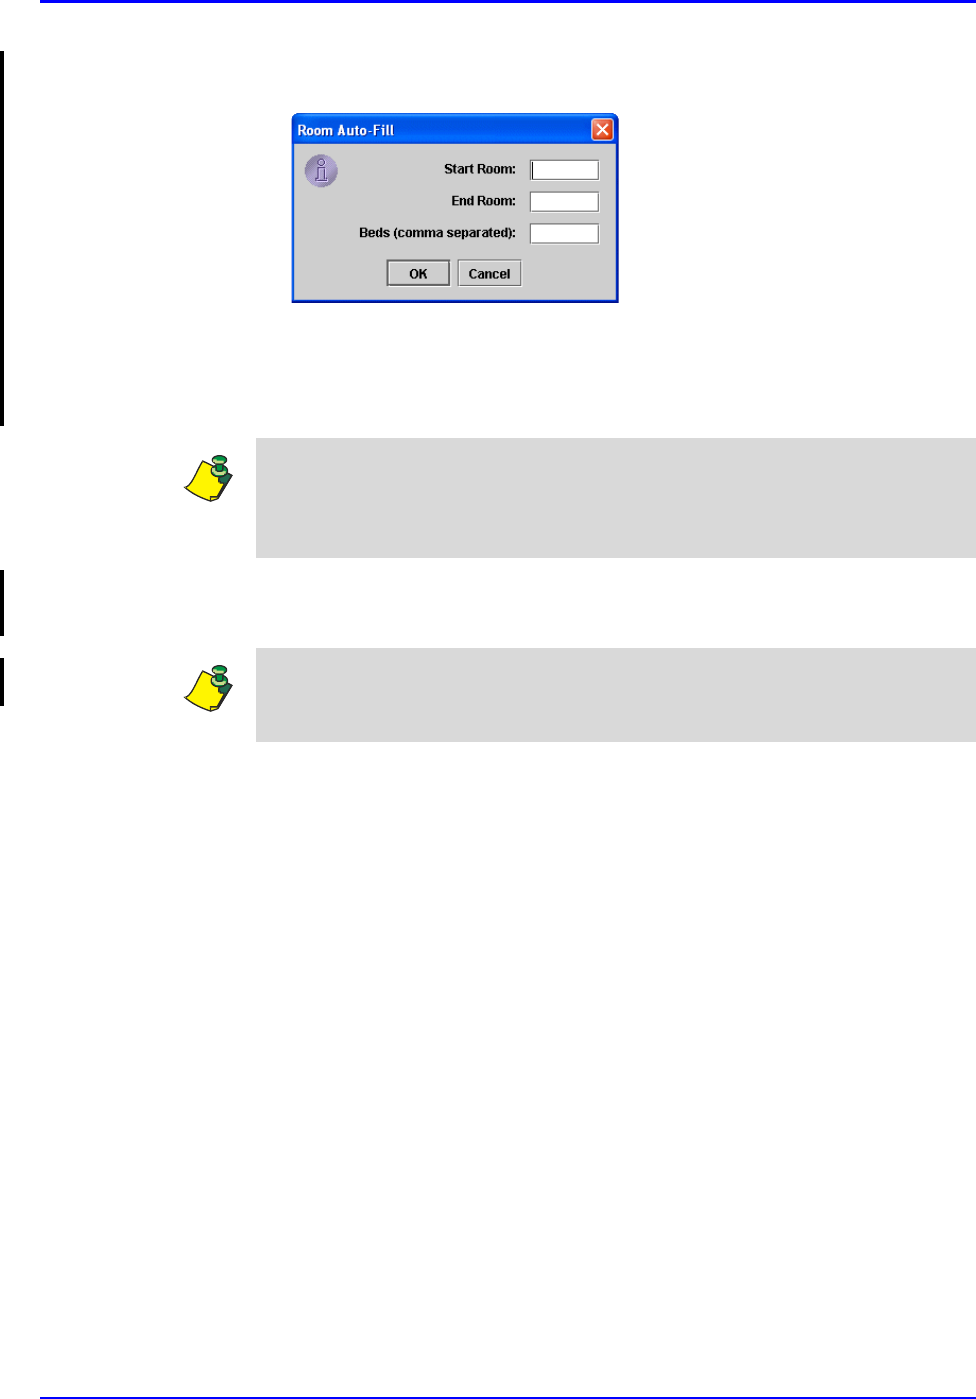
4. To enter Enter the bed or room numbers, click the Auto Fill button.
The Room Auto Fill window will appear.
5. Enter the Start Room, End Room and Beds (comma separated) and click
OK.
Autofill will fill in sequential room numbers entered. If room numbers are not
sequential, manual entry must be used.
6. Click Save to save all information. If you do not click the save button, you
will be prompted to do so after exiting the iConnect System Manager screen.
Note: Route warning should be used for medications where more than one route
of administration is possible. For example, an injectable med may be given IM,
SQ or IV. The route warning will display the ordered route at medication
administration.
Note: To edit the Nursing Unit, select the Nursing Unit and edit the fields. To
delete the Nursing Unit, select the Nursing Unit, click delete and click OK. You
will be prompted to save your information.
P/N TP0001-01 Rev. B Sig Code Setup
intelliDOT iConnect System User Guide Confidential 3-15
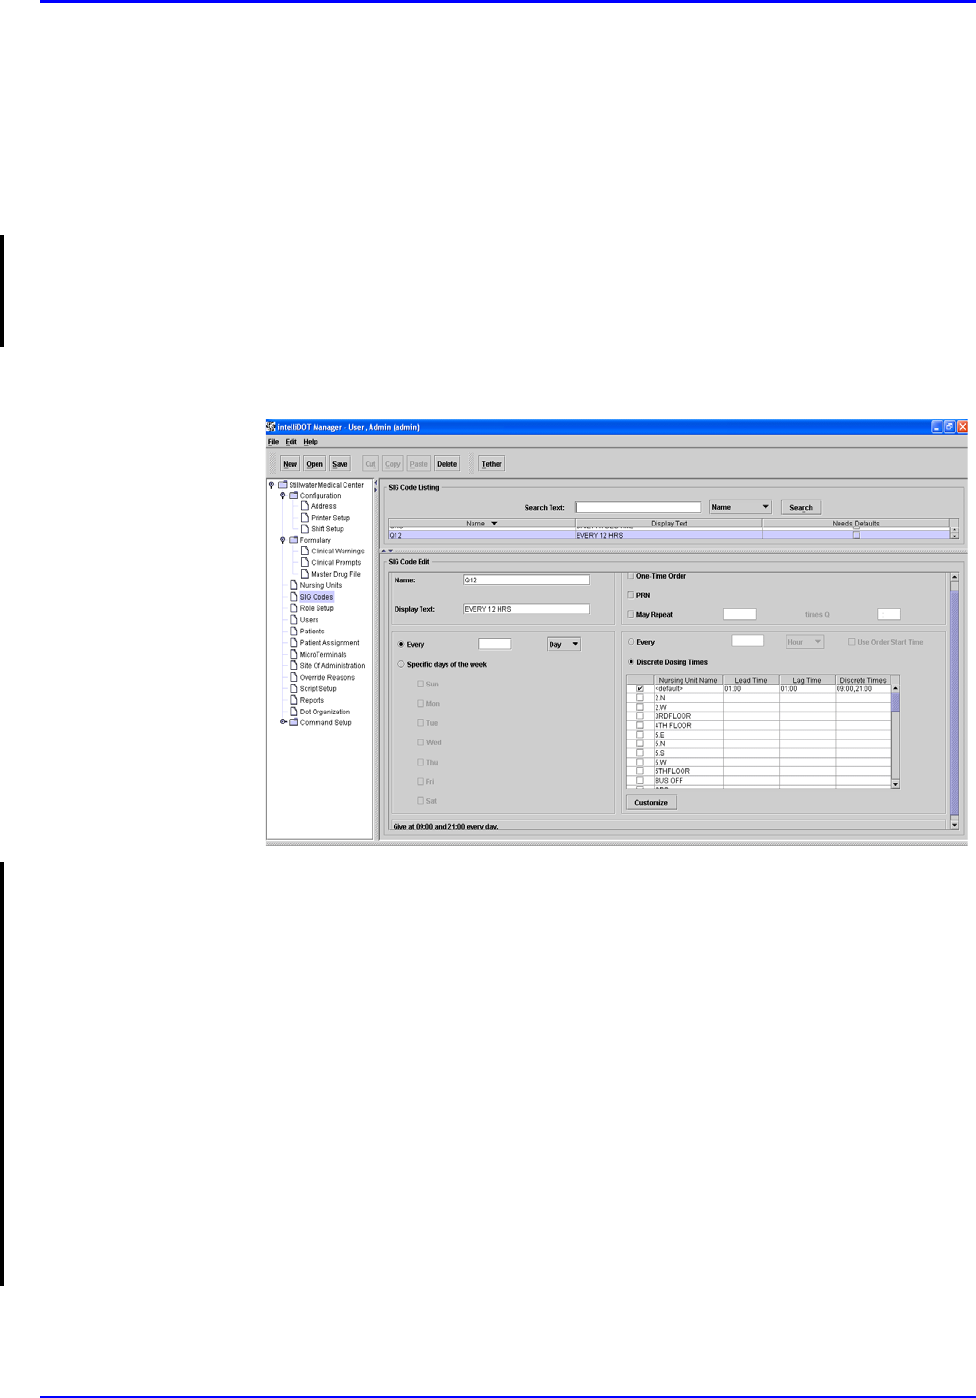
Sig Code Setup
A "sig" is the physician's directions for when and how often an ordered med is to
be given. Examples of sigs are BID (twice a day), Q4H (every four hours), and
PRN (as needed). The "Sig Code" listings must be stored in the iConnect system
to be recognized when they are received from the pharmacy system. Each sig code
that is used for order entry purposes in the pharmacy information system must be
defined in IntelliDOT.
Adding, Editing, and Deleting Sig Codes
To add sig codes, perform the following:
1. Select Sig Codes.
The Sig Codes screen will appear.
2. Click New and enter the name of the sig code.
The cursor will appear in the name field.
3. Click in the Display Text field and enter the Display Text information.
4. Check the May Repeat box to set the sig code to repeat the administration.
May repeat defines the number of actions that a medication can be
administed. After the total number of actions has been met, the order is ended.
5. Check the Every button, enter the desired number (1-7), and select the Day/
Week/Month to set the sig code up for specific Days, Weeks, or Months.
6. Check the Specific days of the week button and check the specific days
(Sun-Sat) to set the sig code up for specific days.
7. Check the Every button, enter the desired number (1-24), and select hour/
minute/second to set the sig code up for specific hours.
8. Check the Use Order Start Time if you want to use the order start time for
the medication.
Sig Code Setup P/N TP0001-01 Rev. B
3-16 Confidential intelliDOT iConnect System User Guide
9. Select the Discrete Dosing Times button.
10. Double-click on the applicable Nursing Unit Name.
The Custom Time for Nursing Unit window will appear.
11. Enter the Lead, Lag and Base times for the sig code and click OK.
After all your sig code information is entered, the bottom left side of the
screen displays what this sig intended (example: Give every hour every day).
Note: Discrete dosing times are the standard administration times set by the
hospital or nursing for a particular sig code. (example: 1 hour lead, 1 hour lag,
and base time of 00:00.
Note: You can also select the “Customize” button located underneath the
Discrete Dosing Times window. This will open the Custom Timing for Nursing
Unit window. Once the information has been entered, the Nursing Unit Name
check box will have a check mark appear.
Note: To edit Sig Codes, select the sig code and edit the fields. To delete the Sig
Codes, select the sig code, click delete and click OK. You will be prompted to
save your information.
P/N TP0001-01 Rev. B Sig Code Setup
intelliDOT iConnect System User Guide Confidential 3-17
Adding, Editing, and Deleting a One Time Order
A one time order is an order which is only to be administered once. The
medication time for a one time order may be specifically assigned (i.e. administer
at 08:00), or it may be ordered as a "now" order. "Now" one time orders are
expected to be given at the time the order is signed off and therefore may be noted
at any time. In addition, a one time order may be written as a pre-op order, in
which case, the time will depend on a surgery or procedure schedule. One time
orders result in a single event or action and after the one time dose is administered
the order is ended.
To add a one time order sig code, perform the following:
1. Select Sig Codes.
The Sig Codes screen will appear.
2. Click New and enter the name of the sig code.
The cursor will appear in the name field.
3. Click in the Display Text field and enter the Display Text information.
4. Check the One Time Order box if an order is only to be administered
once.
5. Select the Discrete Dosing Times button.
Note: Discrete dosing times are the standard administration times set by the
hospital or nursing for a particular sig code. (example: 1 hour lead, 1 hour lag,
and base time of 00:00.
Sig Code Setup P/N TP0001-01 Rev. B
3-18 Confidential intelliDOT iConnect System User Guide
6. Double-click on the applicable Nursing Unit Name.
The Custom Time for Nursing Unit window will appear.
7. Enter the Lead, Lag and Base times for the sig code and click OK.
After all your sig code information is entered, the bottom left side of the
screen displays what this sig intended (example: Give every hour every day).
Note: You can also select the “Customize” button located underneath the
Discrete Dosing Times window. This will open the Custom Timing for Nursing
Unit window. Once the information has been entered, the Nursing Unit Name
check box will have a check mark appear.
Note: To edit Sig Codes, select the sig code and edit the fields. To delete the Sig
Codes, select the sig code, click delete and click OK. You will be prompted to
save your information.
P/N TP0001-01 Rev. B Sig Code Setup
intelliDOT iConnect System User Guide Confidential 3-19
Adding, Editing, and Deleting a PRN
A PRN order is an order which can be administered on an "as needed" or recurring
basis. A PRN order may have timeframes such as "give every 3-4 hours PRN"
which indicates that the patient is not to exceed a dosing schedule of 3 hour
intervals. A PRN order might have a end date/time established, which restricts the
nurse in administering any doses beyond the end date of the order.
A "one time PRN" order enables the nurse to give the medication one time, but
not at any specifically timed schedule. After the dose is administerd, the order is
ended.
To add a PRN sig code, perform the following:
1. Select Sig Codes.
The Sig Codes screen will appear.
2. Click New and enter the name of the PRN sig code.
The cursor will appear in the name field.
3. Click in the Display Text field and enter the Display Text information.
4. Check the PRN box to administer a medication on an "as needed" or recurring
basisis.
5. Check the May Repeat box to set the sig code to repeat the administration.
May repeat defines the number of actions that a medication can be
administed. After the total number of actions has been met, the order is ended.
6. Check the Every button, enter the desired number (1-7), and select the Day/
Week/Month to set the PRN sig code up for specific Days, Weeks, or
Months.
7. Check the Specific days of the week button and check the specific days
(Sun-Sat) to set the PRN sig code up for specific days.
8. Check the Every button, enter the desired number (1-24), and select hour/
minute/second to set the PRN sig code up for specific hours.

Sig Code Setup P/N TP0001-01 Rev. B
3-20 Confidential intelliDOT iConnect System User Guide
9. Check the Use Order Start Time if you want to use the order start time for
the medication.
After all your sig code information is entered, the bottom left side of the
screen displays what this sig intended (example: Give every hour every day).
Note: To edit Sig Codes, select the sig code and edit the fields. To delete the Sig
Codes, select the sig code, click delete and click OK. You will be prompted to
save your information.
P/N TP0001-01 Rev. B Role Setup
intelliDOT iConnect System User Guide Confidential 3-21
Role Setup
Role Setup allows the system administrator to identify classes of user and
privileges of users in the iConnect system. Roles are created for specific
pharmacy and nursing functions. Each role can have different privilege depending
on your hospital security levels. The IntelliDOT system gives you the ability to
have as many roles as you desire.
1. Select Role Setup.
The Role Setup screen will appear.
2. Enter a role name.
3. Enter a set of privileges for each role.
Each privilege for a role is different. Depending on your system privileges
within the hospital, you may only see certain functions in your iConnect
System Manager Tree (left side of screen). Example: the pharmacist will have
all privileges, the staff nurse will have viewing privileges.
The new privileges that you can use to tailor your users' access to the system are
listed below. These are the items that can be assigned to roles:
Role Setup P/N TP0001-01 Rev. B
3-22 Confidential intelliDOT iConnect System User Guide
Complete List of User Roles and Privileges
Role Description
View Formulary View Formulary, no Editing Allowed
Manage Formulary View and Edit Formulary
Manage Clinical Data View and Edit Clinical Warnings and Prompts
Manage Users View and Edit User information (*note: user will only
be able to assign roles that the current user is assigned
to)
View Patient Information View Patient Information, no editing allowed
Manage Patient
Information View and Edit Patient Information
Manage Nursing Units View and Edit Nursing Unit Information
Manage Hospital
Configuration View and Edit Hospital configuration (address, shifts,
printers)
Manage User Roles View and Edit User Roles
Manage SIG Codes View and Edit SIG Codes
View SIG Codes View SIG Codes, no editing allowed.
Manage Terminals View and Reset Micro Terminal devices
Tether Terminals View and Tether Micro Terminal devices (no reset or
remove allowed)
View Administration Sites View Administration Sites, no editing allowed
Manage Administration
Sites View and Edit Administration Sites
View Override Reasons View Override Reasons, no editing allowed
Manage Override Reasons View and Edit Override Reasons
Manage Commands View and Edit Commands
Manage Patient
Assignment View and Perform patient assignment on the iConnect
System Manager. Users with Micro Terminals can still
perform patient assignment using the patient
assignment report.
Document/Edit Patient
MAR Enables user to Document/Edit the on-line MAR.
Without this privilege, the user can only view the
information. User must also have at least ‘View
Patient Information’ for this to have any affect.
P/N TP0001-01 Rev. B Role Setup
intelliDOT iConnect System User Guide Confidential 3-23
Suggested Privileges for “Director/Nurse Manager” Roles
Role Description
View Formulary View Formulary, no Editing Allowed
Manage Clinical Data View and Edit Clinical Warnings and Prompts
Manage Users View and Edit User information (*note: user will
only be able to assign roles that the current user is
assigned to)
View Patient Information View patient information, no editing allowed
Manage Nursing Units View and Edit Nursing Unit Information
Manage Hospital Configuration View and Edit Hospital configuration (address,
shifts, printers)
Manage User Roles View and Edit User Roles
View SIG Codes View SIG Codes, no editing allowed.
Manage Terminals View and Reset Micro Terminal devices
Tether Terminals View and Tether Micro Terminal devices (no reset
or remove allowed)
Manage Administration Sites View and Edit Administration Sites
Manage Override Reasons View and Edit Override Reasons
Manage Commands View and Edit Commands
Manage Patient Assignment View and Perform patient assignment on the
iConnect System Manager. Users with Micro
Terminals can still perform patient assignment
using the patient assignment report.
Document/Edit Patient MAR Enables user to Document/Edit the on-line MAR.
Without this privilege, the user can only view the
information. User must also have at least ‘View
Patient Information’ for this to have any affect.

Role Setup P/N TP0001-01 Rev. B
3-24 Confidential intelliDOT iConnect System User Guide
Suggested Privileges for “Charge Nurses” Roles
Role Description
View Formulary View Formulary, no Editing Allowed
Manage Clinical Data View and Edit Clinical Warnings and Prompts
Manage Users View and Edit User information (*note: user will
only be able to assign roles that the current user is
assigned to)
View Patient Information View patient information, no editing allowed
Manage Nursing Units View and Edit Nursing Unit Information
Manage Hospital Configuration View and Edit Hospital configuration (address,
shifts, printers)
Manage User Roles View and Edit User Roles
View SIG Codes View SIG Codes, no editing allowed.
Manage Terminals View and Reset Micro Terminal devices
Tether Terminals View and Tether Micro Terminal devices (no reset
or remove allowed)
View Administration Sites View Administration Sites, no editing allowed
View Override Reasons View Override Reasons, no editing allowed
Manage Commands View and Edit Commands
Manage Patient Assignment View and Perform patient assignment on the
iConnect System Manager. Users with Micro
Terminals can still perform patient assignment
using the patient assignment report.
Document/Edit Patient MAR Enables user to Document/Edit the on-line MAR.
Without this privilege, the user can only view the
information. User must also have at least ‘View
Patient Information’ for this to have any affect.
P/N TP0001-01 Rev. B Role Setup
intelliDOT iConnect System User Guide Confidential 3-25
Suggested Privileges for “Staff Nurses” Roles
Suggested Privileges for “Ward Clerks/Unit Secretaries” Roles
Role Description
View Formulary View Formulary, no Editing Allowed
View Patient Information View patient information, no editing allowed
Manage Hospital Configuration View and Edit Hospital configuration (address,
shifts, printers)
View SIG Codes View SIG Codes, no editing allowed.
Manage Terminals View and Reset Micro Terminal devices
View Administration Sites View Administration Sites, no editing allowed
View Override Reasons View Override Reasons, no editing allowed
Manage Patient Assignment View and Perform patient assignment on the
iConnect System Manager. Users with Micro
Terminals can still perform patient assignment
using the patient assignment report.
Document/Edit Patient MAR Enables user to Document/Edit the on-line MAR.
Without this privilege, the user can only view the
information. User must also have at least ‘View
Patient Information’ for this to have any affect.
Role Description
View Formulary View Formulary, no Editing Allowed
View Patient Information View patient information, No editing allowed
Manage Hospital Configuration View and Edit Hospital configuration (address,
shifts, printers)
View SIG Codes View SIG Codes, no editing allowed.
View Administration Sites View Administration Sites, no editing allowed
View Override Reasons View Override Reasons, no editing allowed
Role Setup P/N TP0001-01 Rev. B
3-26 Confidential intelliDOT iConnect System User Guide
Suggested Privileges for “Pharmacists” Roles
Role Description
View Formulary View Formulary, No Editing Allowed
Manage Formulary View and Edit Formulary
Manage Clinical Data View and Edit Clinical Warnings and Prompts
Manage Users View and Edit User information (*note: user will
only be able to assign roles that the current user is
assigned to)
View Patient Information View Patient Information, No editing allowed
Manage Patient Information View and Edit Patient Information
Manage Nursing Units View and Edit Nursing Unit Information
Manage Hospital Configuration View and Edit Hospital configuration (address,
shifts, printers)
Manage User Roles View and Edit User Roles
Manage SIG Codes View and Edit SIG Codes
View SIG Codes View SIG Codes, No editing allowed.
Manage Terminals View and Reset Micro Terminal devices
Tether Terminals View and Tether Micro Terminal devices (no reset
or remove allowed)
View Administration Sites View Administration Sites, No editing allowed
Manage Administration Sites View and Edit Administration Sites
View Override Reasons View Override Reasons, No editing allowed
Manage Override Reasons View and Edit Override Reasons
Manage Commands View and Edit Commands
Manage Patient Assignment View and Perform patient assignment on the
iConnect System Manager. Users with Micro
Terminals can still perform patient assignment
using the patient assignment report.
Document/Edit Patient MAR Enables user to Document/Edit the on-line MAR.
Without this privilege, the user can only view the
information. User must also have at least ‘View
Patient Information’ for this to have any affect.
P/N TP0001-01 Rev. B Role Setup
intelliDOT iConnect System User Guide Confidential 3-27
Suggested Privileges for “Pharmacy Technicians” Roles
Role Description
View Formulary View Formulary, No Editing Allowed
View Patient Information View Patient Information, No editing allowed
Manage Hospital Configuration View and Edit Hospital configuration (address,
shifts, printers)
View SIG Codes View SIG Codes, No editing allowed.
Manage Terminals View and Reset Micro Terminal devices
Tether Terminals View and Tether Micro Terminal devices (no reset
or remove allowed)
View Administration Sites View Administration Sites, No editing allowed
View Override Reasons View Override Reasons, No editing allowed
Manage Commands View and Edit Commands
User Setup (Adding and Editing) P/N TP0001-01 Rev. B
3-28 Confidential intelliDOT iConnect System User Guide
User Setup (Adding and Editing)
1. Select Users.
The Users screen will appear.
2. Click New.
The User/View Edit screen fields appear.
3. Enter the user name information, roles, and nursing units where the user is to
have privileges. Select a default printer if desired.
4. Click the Save button.
The Users information will display information in the Users area the only
after you click the Save button.
Note: Roles must be defined before adding users. Refer to Role Setup on
page 3-21.
P/N TP0001-01 Rev. B Patient Setup (Adding and Editing)
intelliDOT iConnect System User Guide Confidential 3-29
Patient Setup (Adding and Editing)
The iConnect System Manager patient screen is used primarily for viewing
patients. The patient screen is populated by an interface between the hospital ADT
system and the iConnect system. If patient information is missing or incorrect,
contact your system administrator. You should not have to change any patient
information on the screen. The orders are received via an interface with the
pharmacy’s software system and should not need to be changed.
Reviewing Medications on the iConnect System Manager
1. After logging into the iConnect System Manager, select Patients.
The Patient screen will appear.
2. Click the View MAR button.
The MAR screen will appear providing detailed medication administration.
3. Click the Show My Patients button to view your patients you are caring for
iConnect System Manager MAR P/N TP0001-01 Rev. B
3-30 Confidential intelliDOT iConnect System User Guide
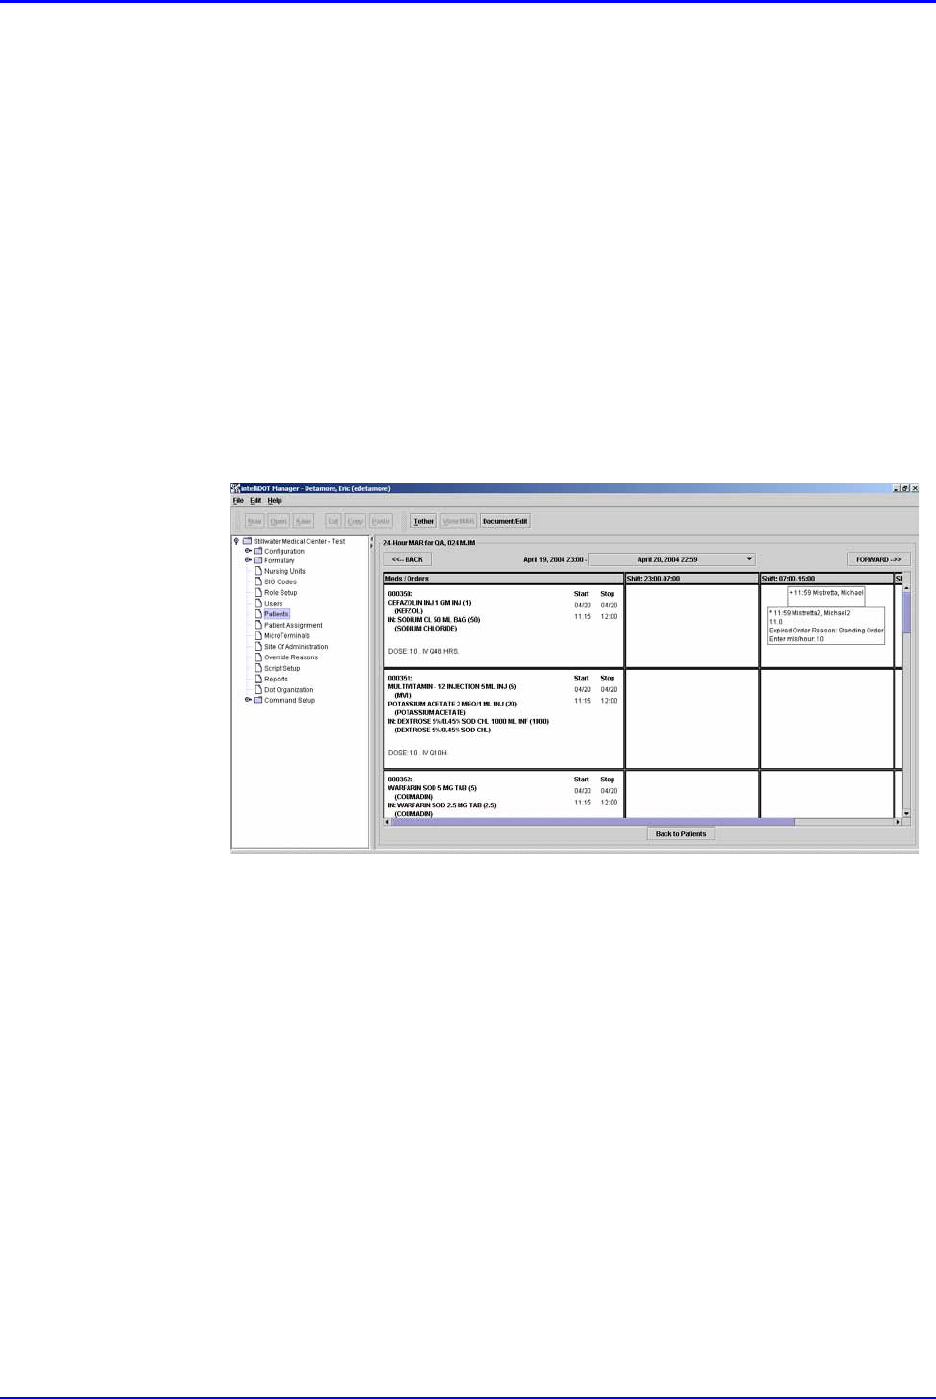
iConnect System Manager MAR
The On-Line MAR is created as nurses administer medications using the iConnect
Handheld. By selecting MAR, users may review and edit before, during or after
administrations. Users may also add to patient’s med orders or particular
administrations.
How to View the MAR
1. After logging into the iConnect System Manager, select Patients.
The Patient screen will appear.
2. Select a patient from the patient list.
3. Select the View MAR button.
The MAR screen will appear providing detailed medication administration.