Intermagic IMP400 MP3 Player User Manual
Intermagic Corp. MP3 Player
User Manual

Thank you for choosing NeckPhone.
Specifications and design may be changed without prior notice.
Before using this product, please read this manual carefully to ensure you know
how to operate it safely and correctly.
Please reserve this manual within your reach for proper use.
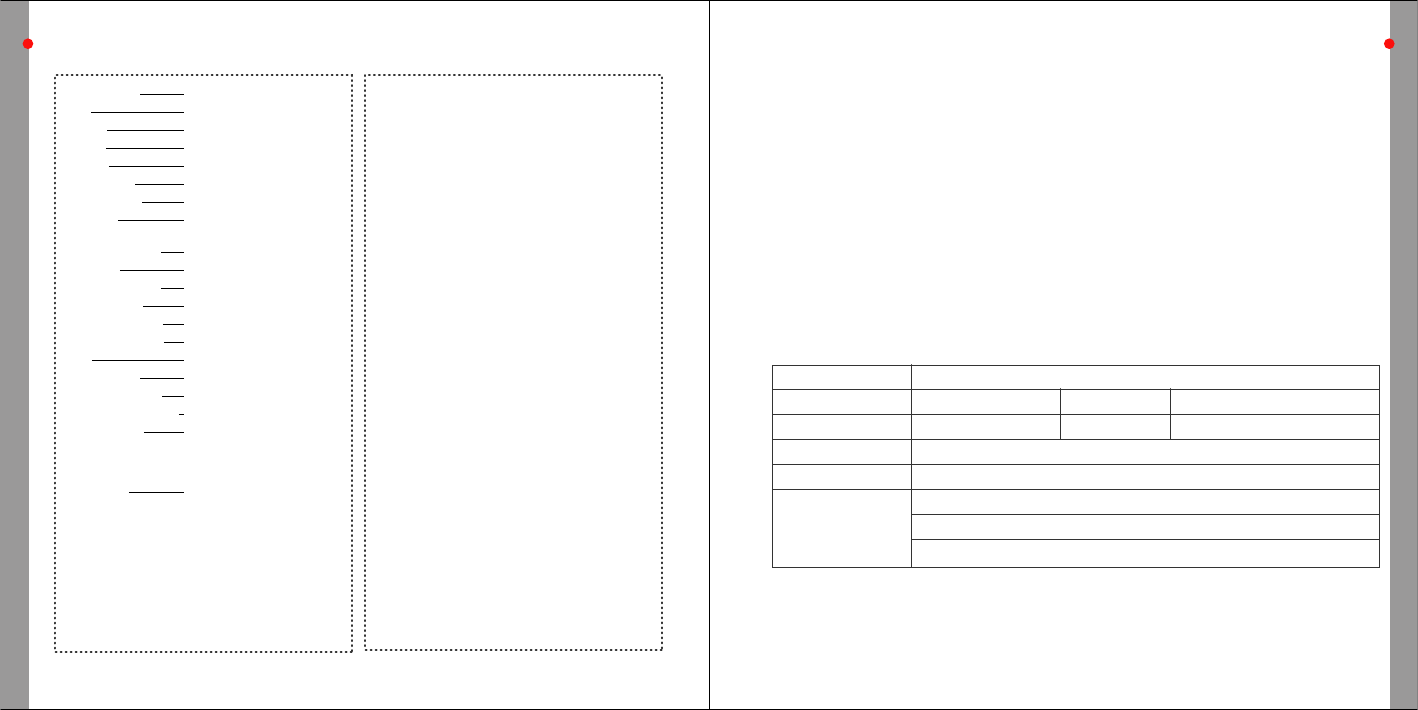
CONTENT
Class B This product is designed to provide reasonable protection against harmful
interference to radio frequency in a residential installation.
Notice
* Intermagic Corporation has reserved the
right of this manual and NeckPhone software.
Without prior approval, it is banned copy of
parts or whole documents and distribute.
* Any type of files (MP2, MP3, MP3 Pro and
WMA file) made from NeckPhone cannot be
used for commercial purpose or any service
except personal use. It will be in contravention
of the law & Intellectual property if you do
not follow this notice.
Before You Use
General Notice
Accessories
System Requirements
Location of Controls & Connections
Functions of Buttons per mode & LED Display
Power On/Off/Delete
Mode Selection/Volume Control
Operation in Music Mode
Operation in FM Mode
Operation in Encoding Mode
Operation of the NeckPhone on PC
NeckPhone Manager Program Installation
Connecting NeckPhone with PC
Device Driver Installation
NeckPhone Manager Menu & Function
How to Use NeckPhone Manager
Appendix Specifications
Troubleshooting
BEFORE YOU USE
BEFORE YOU USE
General Notice
* Do not leave this product in hot or humid locations such as inside of a closed place under direct sunlight
or beach in the summer and heater.
* Avoid from strong shock or drop
* Do not attempt to modify the device.
* Do not place the device on the top of or near electronic appliances such as TVs or refrigerators, etc.
* Do not disconnect USB cable during data uploading.
* Do not push band with heavy power.
02 03
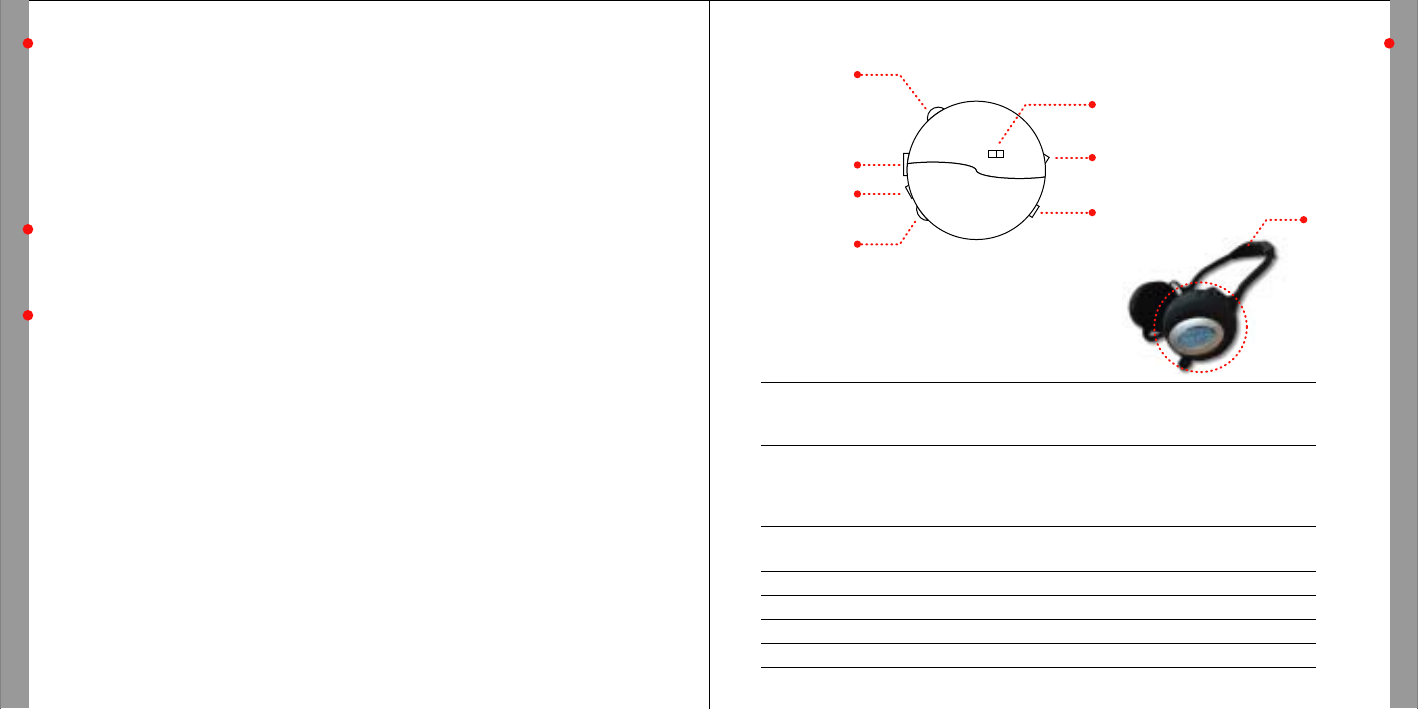
Location of Controls and Connections
Jog Shuttle Ɯ/ȯPlay / Stop, FM Radio ON/OFF, Recording Stop
ȯȯ Move to next file/Fast Forward/Increase frequency
ȭȭ Move to previous file/Fast Rewind/Decrease Frequency
Mode Key MUSIC Play Music file
FM FM Radio Selection & Recording
ENCODING Recording from external device audio source
and using as headphone
Volume Key Volume + Increase
Volume - Decrease
REC/DEL Key REC/DEL Recording / Delete
USB Port USB Connecting with PC
External Port LINE IN Connecting with external device
LED GREEN & RED Display operating status
Accessories
Neckphone / USB Cable / User's Manual / CD-ROM (Install Program) /
Stereo Jack (for external device)
System Requirements
Computer : Pentium 133MHz or higher IBM Compatible PC supporting USB port
Memory :128MB/256MB
HDD : 500MB free space
CD-ROM Drive : 4X speed or higher
Sound Card : Sound Blaster Compatible
Operating System : Windowsˇ98SE/ME/2000/XP
ӀWe can not guarantee 100% compatibility to any PC system and it may cause some influence
to depending on PC system.
R
LED
NeckBand
VOLUME
LINE-IN
USB PORT
JOG SHUTTLE
REC/DEL
MODE
BEFORE YOU USE
BEFORE YOU USE
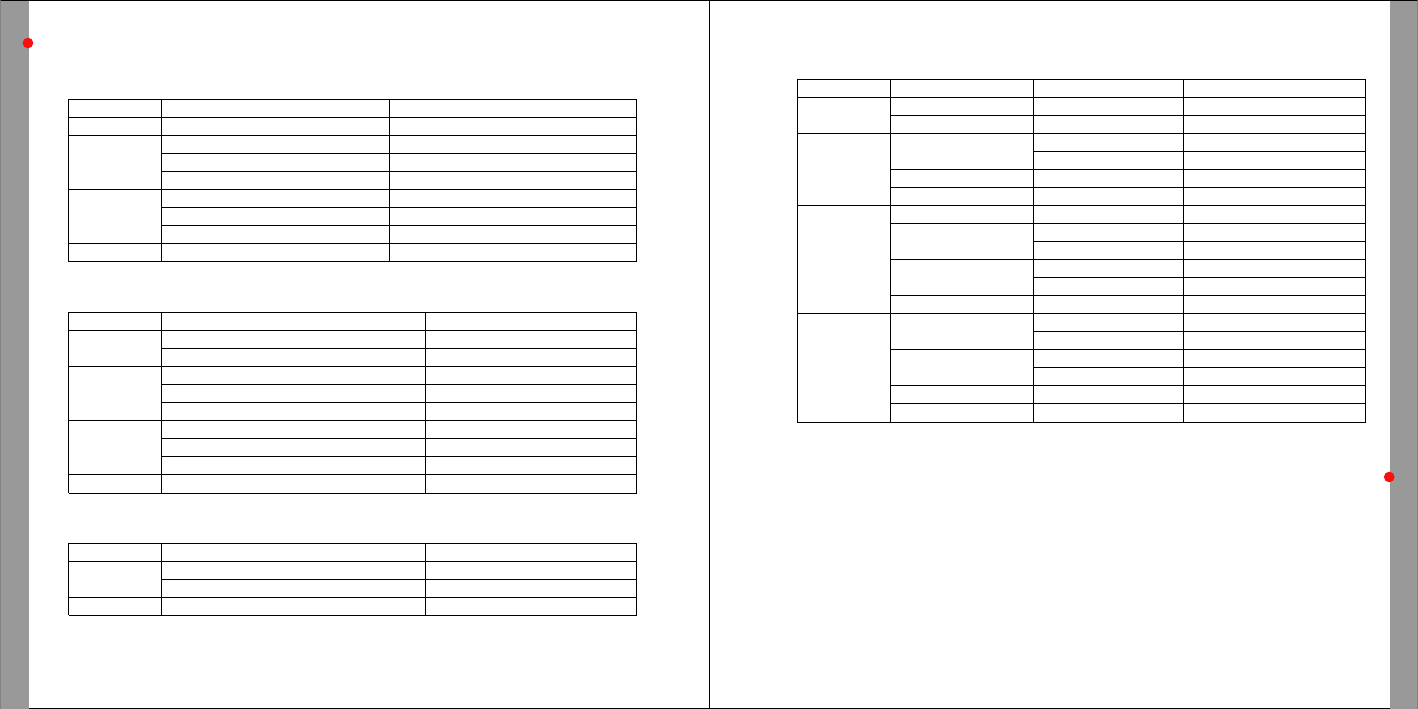
Functions of Buttons per mode & led display
[ BUTTON FUNCTIONS PER MODE ]
ƗMUSIC Mode
ƗFM Mode
Key
ȯ/Ɯ
ȯȯ
ȭȭ
REC/DEL
Function
Play / Pause / Stop
Move to next file
Move to after 10 song
Fast Forward within file
Move to previous file
Fast Backward before 10 song
Fast Back ward within file
Delete current playing file
Control
Push one time shortly
Push one time shortly
Push two times shortly
As much as pushed
Push one time shortly
Push two times shortly
As much as pushed
Push one time shortly
04 05
Battery Installation
[ LED DISPLAY ]
Mode
Power
MUSIC
FM
ENCODING
LED
GREEN & RED
GREEN & RED
GREEN
RED
GREEN & RED
GREEN & RED
GREEN
RED
GREEN
RED
GREEN & RED
GREEN & RED
GREEN
RED
GREEN
RED
GREEN & RED
GREEN & RED
LED Display
Off after blinking 2~3 sec.
Off
Off
Off
Off
Off
Blink
Off
Off
Blink
Off
Off
Off
Blink
Blink
Off
Off
Off
Status
ON
OFF
PLAY
PAUSE
Wait
FM Listening
FM Recording
FM Recording
Waiting
Recording
Headphone Function
Headphone OFF
Waiting
Key
ȯ/Ɯ
ȯȯ
ȭȭ
REC/DEL
Function
FM Radio ON / OFF
Stop FM recording
Increase FM frequency(0.05MHz)
Move to next Preset
Auto Searching next FM frequency
Decrease FM frequency(0.05MHz)
Move to previous Preset
Auto Searching previous FM frequency
FM Radio Recording / Pause
Control
Push one time shortly
Push one time shortly
Push one time shortly
Push two times shortly
Push longer than 1.5 sec.
Push one time shortly
Push two times shortly
Push longer than 1.5 sec.
Push one time shortly
ƗENCODING Mode
Key
ȯ/Ɯ
REC/DEL
Function
Encoding Stop
Converting to earphone / return
Recording / Pause
Control
Push one time shortly
Push one time shortly
Push one time shortly
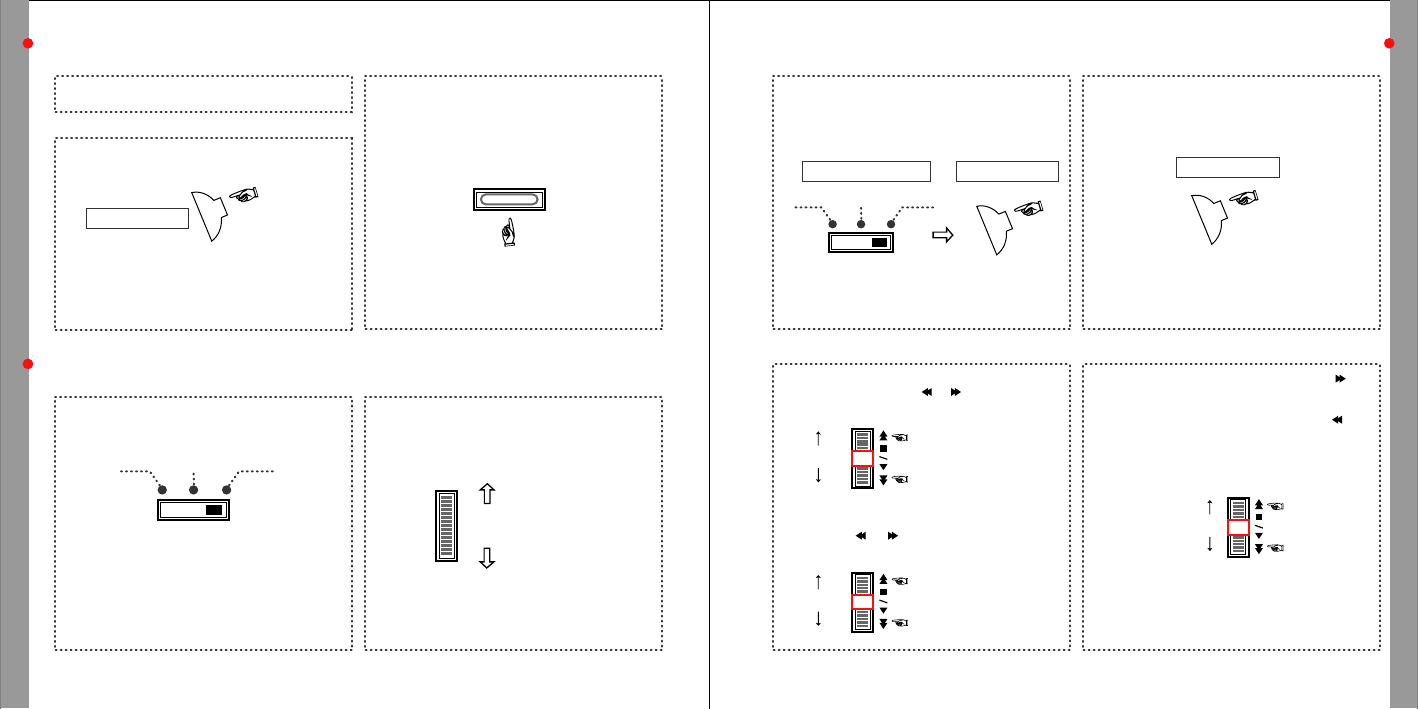
1. Open battery Cover.
2. Insert 'AAA' Battery, after checking +, - and then cover up.
ƗBattery Change Indication
If you hear beep sound continually between track and track, please change battery.
OPERATION IN MUSIC MODE
BEFORE YOU USE
Power On/Off
ƗPower On
Power on if push Jog Shuttle Button
06 07
Music Mode
ƗDelete
1) During play,push REC/DEL button shortly to
delete current file.
You could hear voice guide for confirmation.
2) Push REC/DEL button again within 3 seconds
to delete current file.
If fail to push REC/DEL within 3 seconds after
confirmation message or push other key, delete is
cancelled.
Press longer
than 1.5 sec.
ƗPower Off
Power off if Press Jog Shuttle Button longer
than 1.5 sec.
*Auto Power off in any mode (MUSIC Mode,
FM Mode, ENCODING Mode) without any
operation longer than 60 sec.
*Remove battery if you do not use long time.
Jog shuttle Button
Mode Selection / Volume Control
ƗMode Selection
Select among MUSIC / FM / ENCODING by
mode switch
*MUSIC Mode - Play MP2, MP3, MP3 Pro,
WMA file
*FM Mode - Listening FM Radio & Recording
*ENCODING Mode - Recording any sound through
external device by using LINE-IN and using
as headphone
ƗVolume Control
Decrease volume by turning volume switch
upward and increase volume by turning volume
switch downward.
*Battery Life is be variable according to Volume.
ENCODING
VOLUME
MUSIC FM
REC/DEL
(-) Decrease
Push shortly
Move to previous file
Move to next file
(+) Increase
Jog shuttle Button
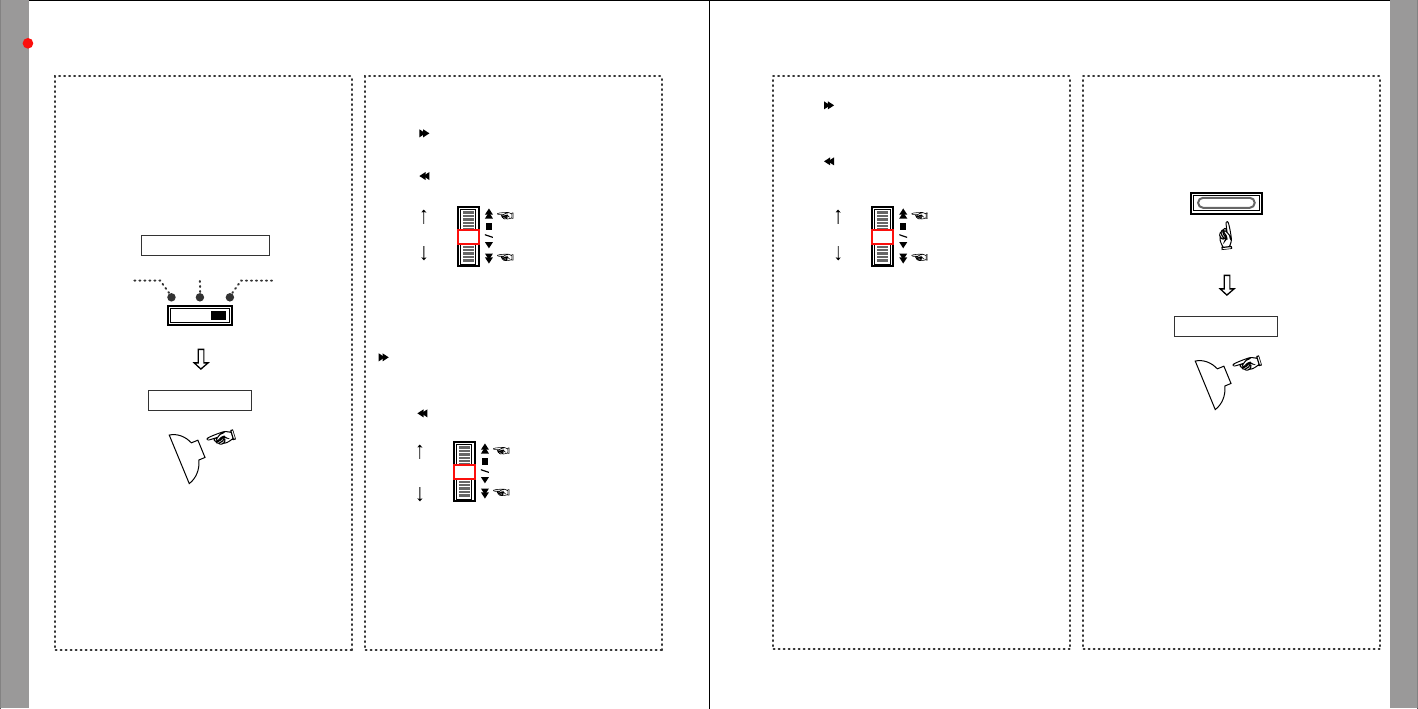
ƗPlay
1) Select Music mode.
2) Push Jog Shuttle button downward(Ɯ/ȯ) shortly
until hearing beep sound.
Music file will be played.
*Maximum 999 files can be stored in memory.
*NeckPhone plays MP2, MP3, MP3 Pro, WMA.
But, you can use it as a storage device for all type
of files.
ƗStop
To stop play, push Jog Shuttle button(Ɯ/ȯ)
during play. Push Jog Shuttle button(Ɯ/ȯ)
Again to replay from last stop.
*If there is no operation longer than 60 seconds in a
stop mode, it will be power off automatically.
Mode Selection Switch Jog shuttle Button
ƗMove
< Move to next or previous file >
During play or stop, push or key to move to
next or previous file.
< Jump up play by 10 files >
Double Click or during stop or play mode
jumpupby10files.
ƗFast Move with Current Track
During play, push Jog Shuttle button toward to
rewind as much as you want within current track.
During play, push Jog Shuttle button toward to
forward as much as you want within current track.
If file ends up, it will play next or previous song.
*This function is useful for language study or Search.
FM
MUSIC ENCODING
Push as long
as you want
Double Click
Jump up backward by 10 files
Jump up forward by 10 files
OPERATION IN FM MODE
OPERATION IN FM MODE
FM Mode
ƗFM Radio On / Off
FM Radio On
Switch to FM Mode and then turn on the
FM Radio.
FM Radio Off
Push Jog Shuttle button (Ɯ/ȯ) shortly FM
Radio off and push again shortly return to FM
Radio on.
08 09
ƗChange & Searching Frequency
<Change Frequency>
During Radio on, push Jog Shuttle button shortly
toward to increase frequency by 0.05MHz
During Radio on, push Jog Shuttle button shortly
toward to decrease frequency by 0.05MHz
<Radio Station Search>
During Radio on, push Jog Shuttle button toward
longer than 0.5 sec. to search Radio Station
automatically.
During Radio on, push Jog Shuttle button shortly
toward to decrease frequency by 0.05MHz
ƗMove to Preset
During Radio on, double click Jog Shuttle button
toward to move to Preset automatically with
frequency increase.
During Radio on, double click Jog Shuttle button
toward to move to Preset automatically with
frequency decrease.
*Preset can be set up by PC manager.
*If preset is not selected, it will move to frequency
previously selected more than 1 min.
ƗFM Radio Recording
During Radio on, push REC/DEL button one time
shortly to start recording.
Push Jog Shuttle button (Ɯ/ȯ) downward to stop
recording.
*It record as MP3 format which can be played in
MUSIC mode.
*Recorded file is named as ENC001, ENC002 by
number increasing and name can be changed by
PC manager.
Jog shuttle Button
Mode Selection Switch
Jog shuttle Button
FMMUSIC ENCODING
Push shortly
Increase frequency
by 0.05 MHz
Increase frequency
by 0.05 MHz
Double Click
Move to Preset with
frequency increase
Start Recording
Stop Recording
Move to Preset with
frequency decrease
Push longer
than 0.5 sec.
Auto Search Radio Station
by frequency increase
Auto Search Radio Station
by frequency decrease
REC/DEL
OPERATION OF THE NeckPhone ON PC
OPERATION IN ENCORDING MODE
Encoding Mode
ƗUsing as headphone of External audio device
< Connecting with External device >
Play after connecting Line-In of NeckPhone using
stereo jack to Cassette player, CD player, etc.
< Using as headphone of External device >
Select ENCODING mode.
Push Jog Shuttle button (Ɯ/ȯ) downward one time
shortly to hear sound by NeckPhone as headphone
through external device.
10 11
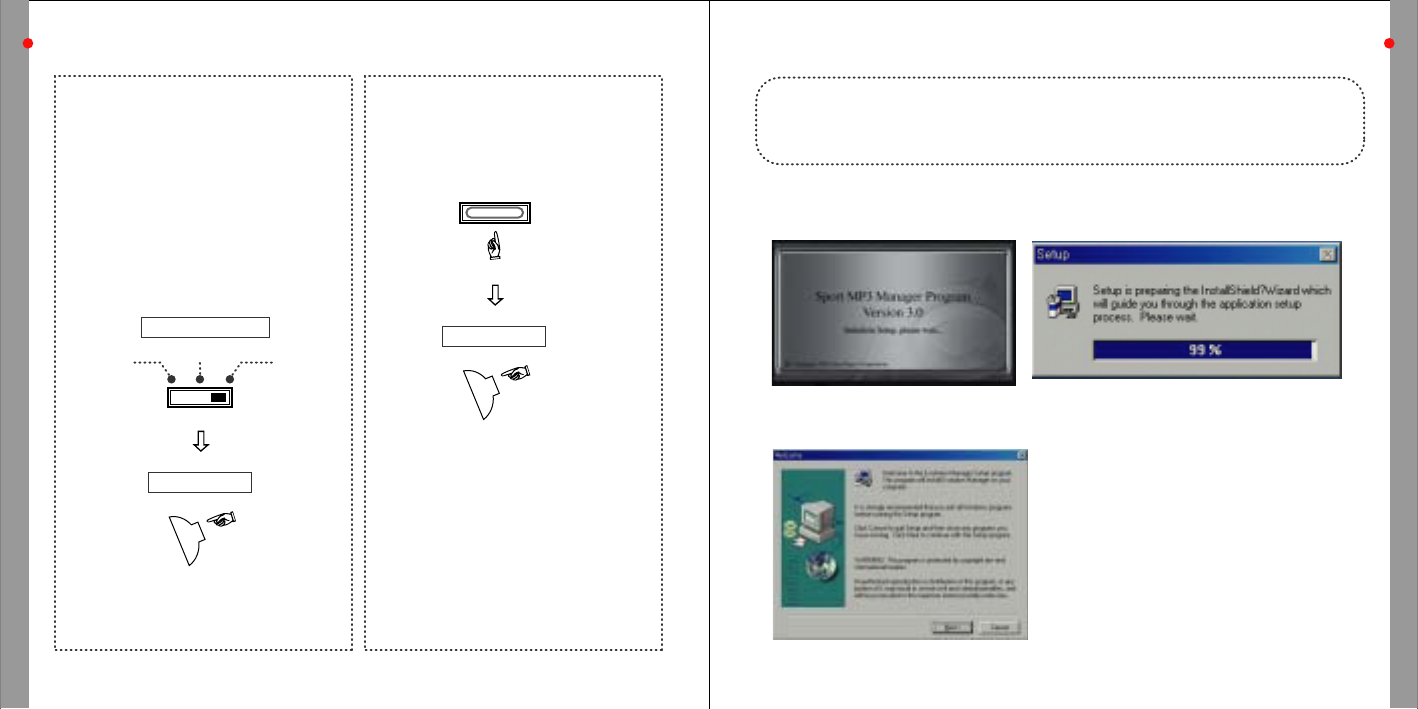
NeckPhone Manager Program Installation
ƗRecording through external audio device
Push REC/DEL key one time shortly to record sound
from external device which is connected through
Line-In. Push REC/DEL button again to pause.
To stop recording, push Jog Shuttle button (Ɯ/ȯ)
downward one time.
*It record as MP3 format which can be played in
MUSIC mode.
*Recorded file is named as ENC001, ENC002 by
number increasing and name can be changed by
PC manager.
If you connect NeckPhone to PC before software installation, you must setup by manual.
So, please connect it after software installation as mentioned in manual.
1. Load Install CD. Then, setup starts automatically.
(In case setup does not run automatically, please click setup.exe.)
2. Click Next button after showing "Welcome" Dialogue.
Jog shuttle Button
Mode Selection Switch
FMMUSIC ENCODING Jog shuttle Button
Recording & Pause
Stop
REC/DEL
OPERATION OF THE NeckPhone ON PC
OPERATION OF THE NeckPhone ON PC
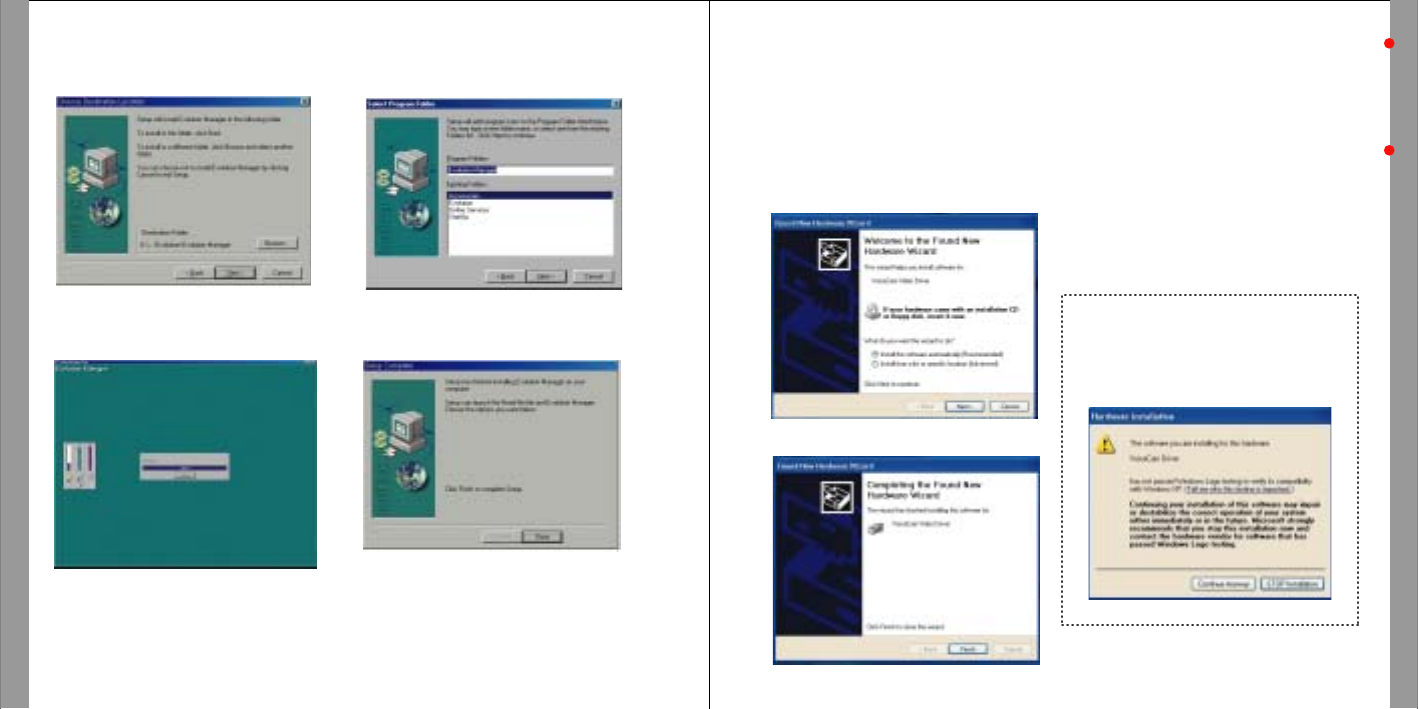
3. Click "Next" button after selecting
destination folder. 4. Click "Next" button after selecting
program folder.
5. Installation Processing 6. Click "Finish" button to finish Installation.
12 13
Connecting NeckPhone with PC
Notice: WindowsR XP Driver
Click "Next" button to progress setup when
following message appears in WindowsⓇ XP
environment.
1. After opening cover of USB port, plug USB cable to Couple-it II.
2. After power on of Neckphone, connect opposite side of USB Cable to PC.
3. Hardware Driver Setup will start automatically with the message of "recognized new hardware".
Device Driver Installation
1. Check the connection between Neckphone and PC.
2. Select "Auto Installation(Recommended)", and then, press "Next" button.
3. Press "Finish" button.
OPERATION OF THE NeckPhone ON PC
OPERATION OF THE NeckPhone ON PC
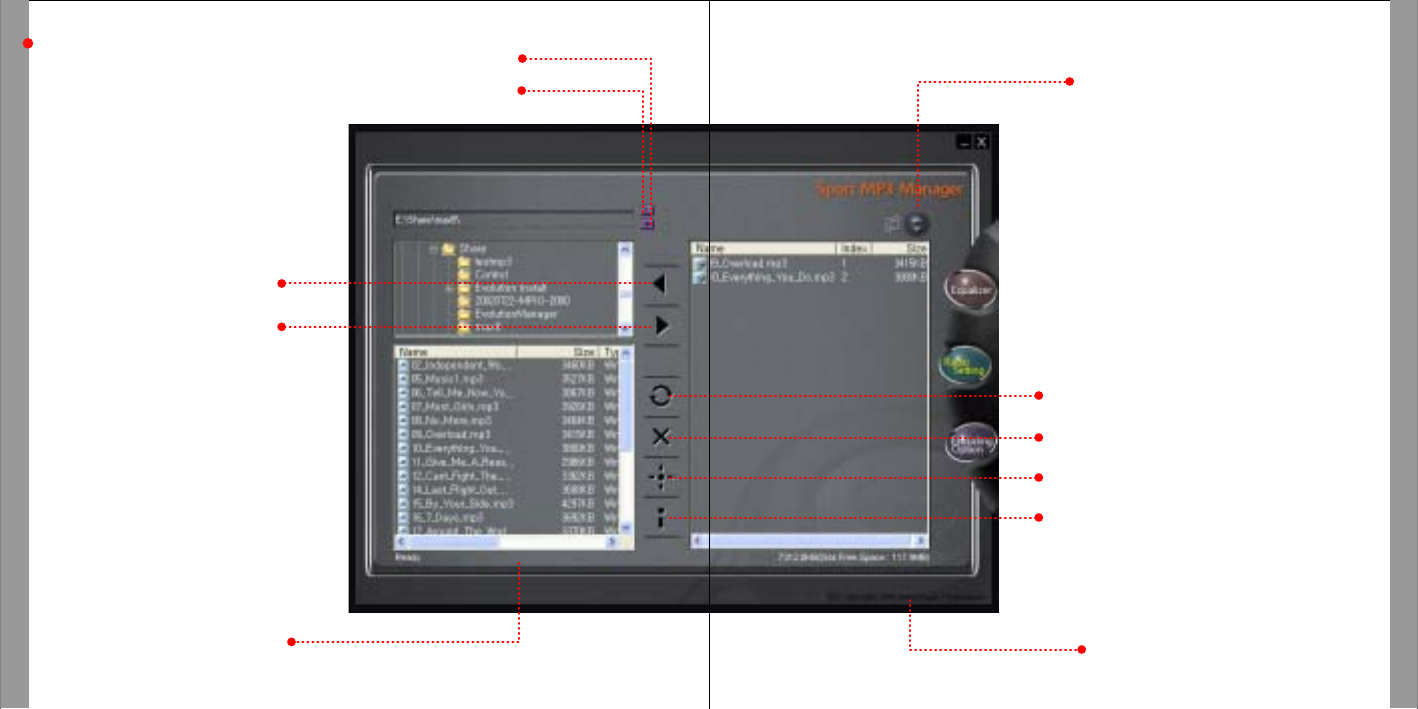
NeckPhone Manager Menu & Function
14 15
Delete
: Remove file
Memory Format
Initialize
Equalizer Mode Setting
Select sound mode
Refresh
: Renew content of memory
Upload :
Send file to PC
Show per file format
Download :
Send file to Player
Change playsequence
Show memory size on player
Show file name on PC
Show PC Directory
OPERATION OF THE NeckPhone ON PC
OPERATION OF THE NeckPhone ON PC
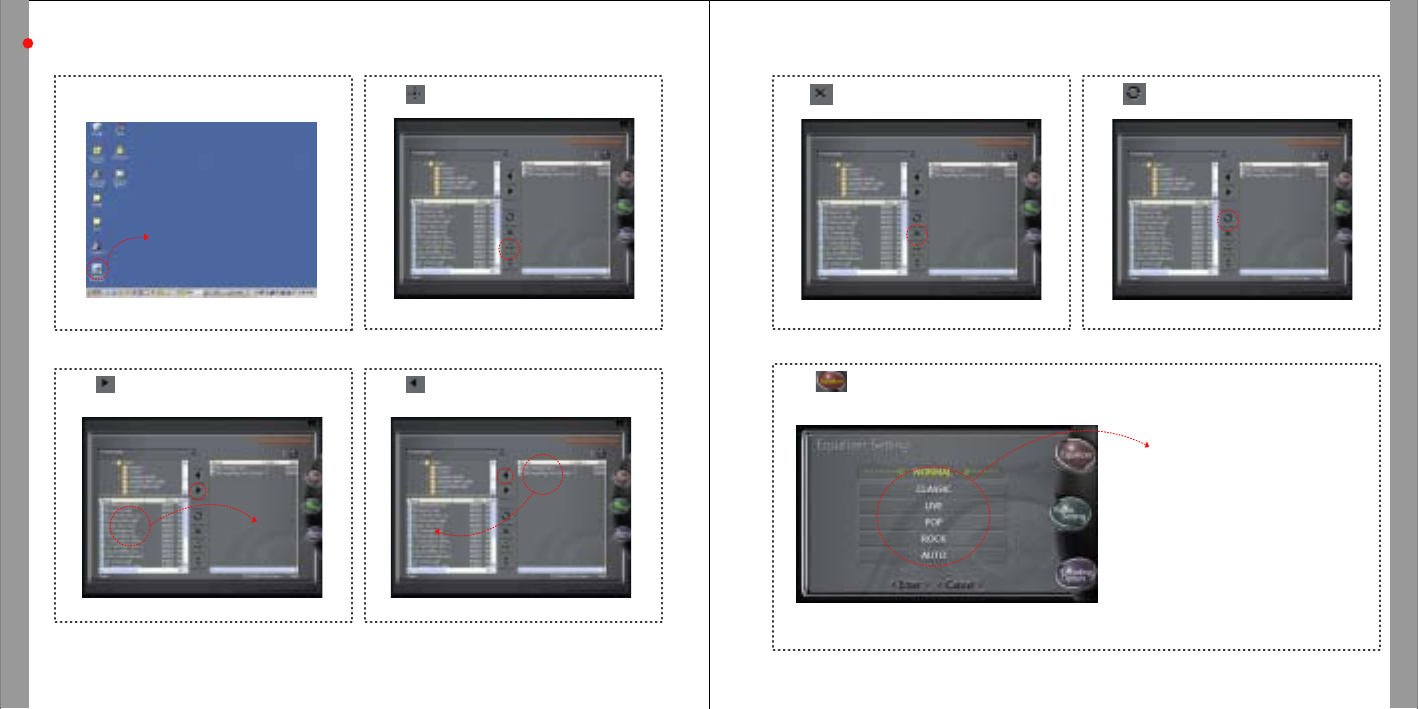
How to Use NeckPhone Manager
ƗStart PC Manager
Double Click icon of PC Manager on background.
16 17
ƗFormat flash memory
Press icon to format flash memory
ƗSave file on NeckPhone
*Do not plug out USB cable during file download. If it is not working properly, remove battery and
then insert again.
Press icon or drag & drop to window on right
side after selecting file
ƗSave file on PC
Press icon or drag & drop to window on left
side after selecting file
ƗDelete file on NeckPhone
Press icon or "Delete" Key after selecting file.
ƗRefresh
Press icon to renew information of memory.
ƗEqualizer Mode
Select icon, then pop up Equalizer window.
NORMAL : Normal Sound
CLASSIC : Using for classical mode
LIVE : Using for vivid sound
POP : Using for pop music
ROCK : Using for rock music
AUTO : Auto selectable according to song
Select sound mode.
Double Click

OPERATION OF THE NeckPhone ON PC
OPERATION OF THE NeckPhone ON PC
ƗRecording Quality
Press icon. Then, pop up new window.
Press icon. Then, pop up new window.
18 19
ƗSync Setup
ƗFM preset
Press icon. Then, pop up new window.
Select quality of recording sound
HIGH -128kbps
LOW - 32kbps
Up to 10 preset selectable
Press "Radio Set" button to memorize
preset to NeckPhone.
There is 3 mode as follows.
*Sync Off - Press "REC/DEL" button to start recording.
Press "REC/DEL" button again to stop recording.
*Sync On - Start recording if there is input through
Line-in and pause recording if there is no input after
press "REC/DEL" button.
*CD Sync - Start recording if there is input through
Line-in and pause recording if there is no input after
press "REC/DEL" button.
If there is new input, start recording as new file.
Thank you very much for your purchase of our product.
You can be serviced on free charge of repair for one year since you purchased our product.
Please fill in the date you bought certainly and have a good quality service.
Warranty Contents
1. We will repair this product on free charge in case abnormal operation happens if everything is normal
for one year since the Date you purchased it.
2. When following abnormalities happen, you have to charge the money of technology and machine stuff.
Therefore please read user manual carefully before you use it.
! When abnormality happened because customers did wrong operation or repaired or modified it carelessly.
! When abnormality happened when you have it repaired the person who doesn Øt belong to an agent
or service center of this product.
! When abnormality happened because used power used power supply is not proper.
! When abnormality happened because connections are not stable.
! When abnormality happened by natural disasters such as fire, earthquakes, floods, thunderbolts and so on.
* Please fill in the blanks on your purchase.
* Please contact us for the repair of this product.
Product Name
Model Name Serial No.
Date of Purchase Purchaser Tel.
Purchaser Add.
Warranty Period You can be serviced repair on free charge for one year.
Address
Customer Name
Tel.
APPENDIX
APPENDIX
Appendix
Model Name
SIZE
Weight
Battery
Storage
PC Interface
Audio Format
Equalizer
Encoding Quality
FM Radio
Download Speed
Audio Output
Frequency Range
S/N Ratio of DAC
THD
Battery Time
Frequency Range
Power Consumption
Function Keys
File System
EV-256 NFX
160(D)x170(W)x70(H)mm
App.80g (without battery)
1EA of 1.5V AAA size battery
128 / 256 MB
USB 1.1, Over 4Mbps
MP2, MP3, MP3Pro, WMA
Normal, Classic, Live,
Pop, Rock, Auto
High(128kbps) / Low(32kbps)
87.5MHz ~ 108.1MHz
12Mbps
10mAx2,32ѻx2
20Hz ~ 20kHz
96dB
88dB
Over 7 Hours
FO ~ 4.5KHz
80mA(MP3 mode)
Volume Up / Down,
Play/Pause/Stop/FF/REW
( Jog Shutter Control ),
Power On/Off,Rec/Del
FAT 12/16 Compatible
- Unable to work
1) Check battery life.
2) Check +, - pole of battery.
3) Remove battery. Then, insert again.
- Not working by pressing button
Check POWER ON/OFF button.
- Unable to download file
Check the connection between PC and
Neckphone
- Unable to recognize Neckphone
1) Check whether Neckphone Manager is
working correctly.
2) Check USB cable.
3) Check power of Neckphone.
- Poor Sound Quality
CheckbiterateofMP3,WMAfile.
- Unable to play
Check memory of Neckphone whether including
MP3, WMA file.
20 21
ƗSpecification ƗTroubleshooting Warranty Card

This device complies with Part 15 of the FCC Rules. Operation is subject to the following two conditions :
(1) this device may not cause harmful interference, and (2) this device must accept any interference
received, including interference that may cause undesired operation.
The users manual or instruction manual for an intentional or unintentional radiator shall caution the user
that changes or modifications not expressly approved by the party responsible for compliance could void
the user's authority to operate the equipment.
This equipment has been tested and found to comply with the limits for a Class B digital device, pursuant to
Part 15 of the FCC Rules. These limits are designed to provide reasonable protection against harmful
interference in a residential installation.
This equipment generates, uses and can radiate radio frequency and, if not installed and used in accordance
with the instructions, may cause harmful interference to radio communications.
However, there is no guarantee that interference will occur in a particular installation.
If this equipment does cause harmful interference to radio or television reception which can be determined
by turning. The equipment off and on, the user is encouraged to try to correct the interference by one or
more of the following measures:
- Reorient or relocate the receiving antenna.
- Increase the separation between the equipment and receiver.
- Connect the equipment into an outlet on a circuit different from that to which the receiver is connected.
- Consult the dealer or an experienced radio, TV technical for help.
- Only shielded interface cable should be used.
Finally, any changes or modifications to the equipment by the user not expressly approved by the grantee
or manufacturer could void the users authority to operate such equipment.
APPENDIX
FCC RF INTERFERENCE STATEMENT
22