Intermec Technologies 07CN3 CN3 User Manual CN3UserManual
Intermec Technologies Corporation CN3 CN3UserManual
Contents
- 1. Compliance Insert
- 2. User Manual part 1 of 6
- 3. User Manual part 2 of 6
- 4. User Manual part 3 of 6
- 5. User Manual part 4 of 6
- 6. User Manual part 5 of 6
- 7. User Manual part 6 of 6
- 8. User Manual 1 of 6
- 9. User Manual 2 of 6
- 10. User Manual 3 of 6
- 11. User Manual 4 of 6
- 12. User Manual 5 of 6
- 13. User Manual 6 of 6
- 14. Manual
- 15. Radio Info
- 16. User Manual part 1
- 17. User Manual part 2
- 18. User Manual part 3
- 19. User Manual part 4
- 20. User Manual 1
User Manual part 3 of 6

CN3 Mobile Computer User’s Manual 29
2Windows Mobile
This chapter introduces Microsoft Windows Mobile 5.0 for Pocket PC.
While using the CN3 Mobile Computer, keep these key points in mind:
•Tap Start on the navigation bar, located at the top of the screen, to
quickly move to programs, files, and settings. Use the command bar at
the bottom of the screen to perform tasks in programs. The command
bar includes menus, icons, and the onscreen keyboard.
• Tap and hold an item to see a pop-up menu containing a list of actions
you can perform. Pop-up menus give you quick and easy access to the
most common actions.
Below is a list of Windows Mobile components described in this chapter.
Tap Start > Help, then select a topic on your CN3 to find additional
information on Windows Mobile components.
Windows Mobile 5.0 Components
Microsoft ActiveSync (page 44)
Microsoft Outlook Mobile (page 45)
Word Mobile (page 66)
Excel Mobile (page 69)
PowerPoint Mobile (page 70)
Windows Media Player for Windows Mobile (page 71)
Using Internet Explorer Mobile (page 74)

Chapter 2 — Windows Mobile
30 CN3 Mobile Computer User’s Manual
Software Builds
See “Learning Software Build Versions” on page 4 to determine which
Intermec build of Windows Mobile 5.0 is on your CN3.
Where to Find Information
This chapter describes your CN3 hardware, provides an overview of the
programs on your CN3, and explains how to connect your CN3 to a
desktop, a network, or the Internet. For instructions on setting up your
CN3 and installing ActiveSync, see the Quick Start Guide. The following is
a guide to more information to assist you use your CN3.
Use these URLs for additional information about Microsoft Windows
Mobile (Pocket PC):
•msdn2.microsoft.com/en-us/support/default.aspx
•support.microsoft.com/
•http://msdn.microsoft.com/newsgroups/ (a free support option)
And, most importantly, the Intermec front-line support personnel can help
assist you work with many of the Windows Mobile and technologies that
you find on the CN3. See “Global Services and Support” on page xi for
more information.
Basic Usage
Learning to use your CN3 is easy. This section describes the basic concepts
of using and customizing your CN3.
Today Screen
When you turn on your CN3 for the first time each day (or after four hours
of inactivity), you see the To d a y screen. You can also display it by tapping
the Start flag at the top left of your display and then To d a y. On the Today
screen, you can see important information for the day.
For information on: See this source:
Programs on your mobile computer. This chapter and mobile computer Help. To view Help, tap
Start > Help, then select a topic.
Additional programs that can be installed on the
mobile computer.
The Windows Mobile Companion CD.
Connecting to and synchronizing with a desktop. The Quick Start Guide or ActiveSync Help on your desktop. To
view Help, click Help > Microsoft ActiveSync Help.
Last-minute updates and detailed technical
information.
The Read Me files, located in the Microsoft ActiveSync folder
on the desktop and on the Windows Mobile Companion CD.
Up-to-date information on your Windows Mobile. www.microsoft.com/windowsmobile/resources/communi-
ties/default.mspx
Chapter 2 — Windows Mobile
CN3 Mobile Computer User’s Manual 31
To customize what is displayed on the Today screen including the background
Programs
You can switch from one program to another by selecting it from the Start
menu. (You can customize which programs you see on this menu. For
information, see “Adjusting Settings” on page 41.) To access some
programs, tap Start > Programs, and then the program name.
You can also switch to some programs by pressing a program icon. Your
CN3 has one or more program icons located on the front or side of the
computer. The icons identify the programs to which they switch.
The following is a partial list of programs that are on your CN3, in the
order they appear in the Start menu. Look on the Windows Mobile
Companion CD for additional programs that you can install onto the CN3.
1Tap Start > Settings > the Personal tab > the To da y icon.
2Status icons display information such as low batteries or when the CN3
is connected to a desktop or to the Internet. You can tap an icon to open
the associated setting or program.
Note: Some programs have abbreviated labels for check boxes and drop-
down menus. To see the full spelling of an abbreviated label, tap and hold
the stylus on the label. Drag the stylus off the label so that the command is
not carried out.
Keep track of your appointments and create meeting requests.
Keep track of your friends and colleagues.
Browse web sites, and download new programs, files from the Internet.
Send and receive e-mail messages.
Keep track of your tasks.
Tap to start a program Tap and hold to change time format
Tap to change date and time
Tap to change owner information
Tap to review your email
Your day at a glance. Tap to open an associated
program
Chapter 2 — Windows Mobile
32 CN3 Mobile Computer User’s Manual
Navigation Bar and Command Bar
The navigation bar is located at the top of the screen. It displays the active
program and current time, switch to programs, and close screens.
Use the command bar at the bottom of the screen to perform tasks in
programs. The command bar includes menu names, functions, and the
Input Panel icon, when needed. To create a new item in the current
program, tap New. To see the name of a icon, tap and hold the stylus on the
icon. Drag the stylus off the icon so the command is not carried out.
Pop-up Menus
Use pop-up menus to quickly perform an action on an item. For example,
you can use a pop-up menu to delete or make a copy of an item. To access a
pop-up menu, tap and hold the item on which you want to perform the
action. When the menu appears, tap the action you want to perform, or tap
anywhere outside the menu to close the menu without doing the action.
Notifications
When you have something to do, your CN3 notifies you in a variety of
ways. For example, if you have set up an appointment in Calendar, an e-
mail message arrives, or a friend sends you an instant message, you are
notified in any of the following ways: a message box appears on the screen,
a sound (which you can specify) is played, a light flashes on your CN3, or
the CN3 vibrates. You can choose the notification types.
Play digital audio and video files that are stored on your CN3 or on a
network.
Tap to switch to a program
Tap to see more programs
Tap to change device settings
Tap to see a Help topic for the current screen
Select from up to six recent accessed programs
Tap and hold to display the pop-up menu
Lift the stylus and tap the action you want
Tap outside to close without performing an action
Chapter 2 — Windows Mobile
CN3 Mobile Computer User’s Manual 33
Entering Information
You can enter information on your CN3 in several ways, depending on the
type you have and the program you are using:
Use the input panel to enter information in any program on your CN3.
You can either type using the onscreen keyboard or write using Block
Recognizer, Letter Recognizer, or Transcriber. In either case, the
characters appear as typed text on the screen.
To show or hide the input panel, tap the Input Panel icon. Tap the arrow
next to the Input Panel icon to see your choices.
When you use the input panel, your CN3 anticipates the word you are
typing or writing and displays it above the input panel. When you tap the
displayed word, it is inserted into your text at the insertion point. The more
you use your CN3, the more it learns to anticipate.
Synchronizing Using Microsoft ActiveSync, synchronize or copy information between your desktop and CN3. For
more information on ActiveSync, see ActiveSync Help on your desktop.
Typing Using the input panel, enter typed text into the CN3. Do this by tapping keys on the onscreen
keyboard or by using handwriting recognition software.
Writing Using the stylus, write directly on the screen.
Drawing Using the stylus, draw directly on the screen.
Recording Create a stand-alone recording or embed a recording into a document or note.
Select an input method
Tap to see your choices
Input Panel icon
Tap a text box to display the input panel
Tap to insert anticipated word
Tap characters on the onscreen keyboard to enter them
Chapter 2 — Windows Mobile
34 CN3 Mobile Computer User’s Manual
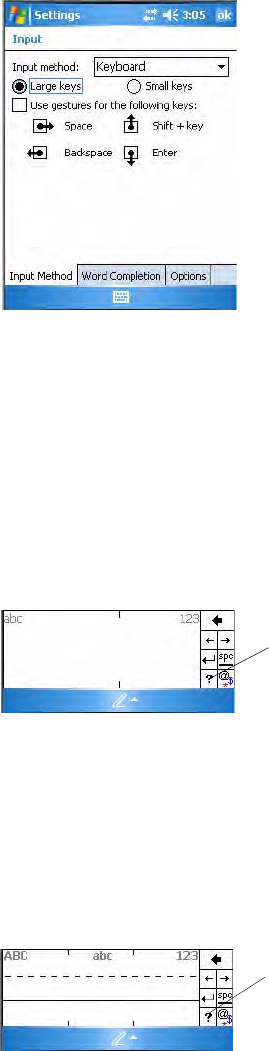
Typing With the Onscreen Keyboard
Tap the input panel arrow, then tap Keyboard. On the soft keyboard that is
displayed, tap the keys with your stylus.
• To type a single uppercase letter or symbol, tap the Shift key. To tap
multiple uppercase letters or symbols, tap the CAP key.
• To convert to uppercase, hold the stylus on the letter and drag up.
• To add a space, drag the stylus to the right across at least two keys.
• To backspace a character, drag the stylus to the left across multiple keys.
• To insert a carriage return, tap and hold the stylus anywhere on the
keyboard and drag down.
To use larger keys, tap the input panel arrow, tap Options, select
“Keyboard” from the Input method drop-down list, then select Large
To change word suggestion options, such as the number of words suggested
at one time, tap Start > Settings > the Personal tab > Input > the Word
Completion tab.
Chapter 2 — Windows Mobile
CN3 Mobile Computer User’s Manual 35
keys.
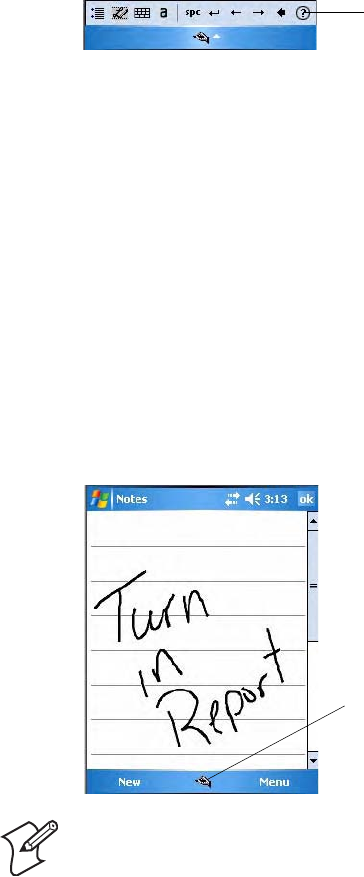
Using Block Recognizer
Character recognition software gives you a fast and easy method for
entering information in any program on your CN3. Letters, numbers, and
punctuation you write are translated into typed text.
Tap the input panel arrow, then tap Block Recognizer. Write a letter in the
box. When you write a letter, it is converted to typed text that appears on
the screen.
For specific instructions on using Block Recognizer, with Block Recognizer
open, tap the question mark next to the writing area.
Using Letter Recognizer
With Letter Recognizer, you can write letters using the stylus just as you
would on paper.
Tap the input panel arrow, then tap Letter Recognizer. Write a letter in the
box. When you write a letter, it is converted to typed text that appears on
the screen. For specific instructions on using Letter Recognizer, with Letter
Recognizer open, tap the question mark next to the writing area.
Using Transcriber
With Transcriber, you can write anywhere on the screen using the stylus
just as you would on paper. Unlike Letter Recognizer and Block
Recognizer, you can write a sentence or more of information. Then, pause
and let Transcriber change the written characters to typed characters.
Tap for assistance
Tap for assistance
Chapter 2 — Windows Mobile
36 CN3 Mobile Computer User’s Manual
Tap the input panel arrow, then tap Transcriber. Tap ok, then write
anywhere on the screen.
For specific instructions on using Transcriber, with Transcriber open, tap
the question mark in the lower, right-hand corner of the screen.
Selecting Typed Text
If you want to edit or format typed text, you must select it first. Drag the
stylus across the text you want to select.
You can cut, copy, and paste text by tapping and holding the selected words
and then tapping an editing command on the pop-up menu, or by tapping
the command under Menu.
Writing on the Screen
In any program that accepts writing, such as the Notes program, and in the
Notes tab in Calendar, Contacts, and Tasks, you can use your stylus to
write directly on the screen. Write the way you do on paper. You can edit
and format what you have written and convert the information to text at a
later time. Tap the Pen icon to switch to writing mode. This action displays
lines on the screen to help you write.
Selecting the Writing
If you want to edit or format writing, you must select it first.
1Tap and hold the stylus next to the text you want to select until the
insertion point appears.
2Without lifting, drag the stylus across the text you want to select.
If you accidentally write on the screen, tap Menu > Undo and try again.
You can also select text by tapping the Pen icon to deselect it and then
dragging the stylus across the screen.
Note: Some programs that accept writing may not have the Pen icon. See
documentation for that program to see how to switch to writing mode.
Tap for assistance
Tap to use your stylus like a pen
Chapter 2 — Windows Mobile
CN3 Mobile Computer User’s Manual 37
You can cut, copy, and paste written text in the same way you work with
typed text: tap and hold the selected words and then tap an editing
command on the pop-up menu, or tap the command under Menu.
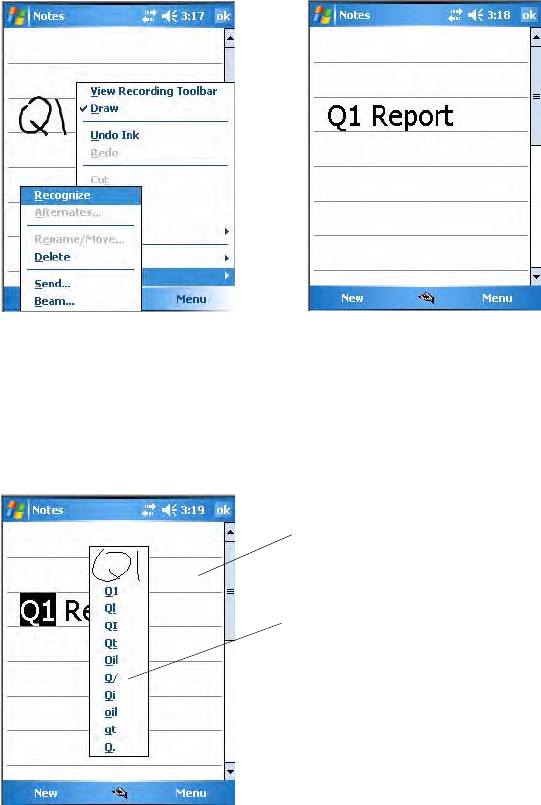
Converting Writing to Text
You can convert words you write in print or cursive to text by tapping
Menu > Tools > Recognize. If a word is not recognized, it stays in its
original form.
If you want to convert only certain words, tap Pen to disable the writing
function, tap twice over the word or phrase to highlight, then tap Menu >
Tools > Recognize.
If the conversion is incorrect, you can choose different words from a list of
alternates or return to the original writing. To do so, tap and hold the
incorrect word (tap one word at a time). On the pop-up menu, tap
Alternates. Tap the word use from the menu with a list of alternate words,
or tap the writing at the top of the menu to return to the original writing.
Tips for getting good recognition:
• Write neatly.
• Write on the lines and draw descenders below the line. Write the cross of
the “t” and apostrophes below the top line so they are not confused with
the word above. Write periods and commas above the baseline.
Before Recognition After Recognition
Tap to return to the original writing
Or tap the word you want to use
Chapter 2 — Windows Mobile
38 CN3 Mobile Computer User’s Manual
• For better recognition, try increasing the zoom level to 300% by
selecting Menu > Zoom. Recognition is not good under a 150% zoom.
• Write the letters of a word closely and leave big gaps between words so
that the CN3 can easily tell where words begin and end.
• Hyphenated words, foreign words that use special characters such as
accents, and some punctuation cannot be converted.
• If you add writing to a word to change it (such as changing a “3” to an
“8”) after you attempt to recognize the word, the writing you add is not
included if you attempt to recognize the writing again.
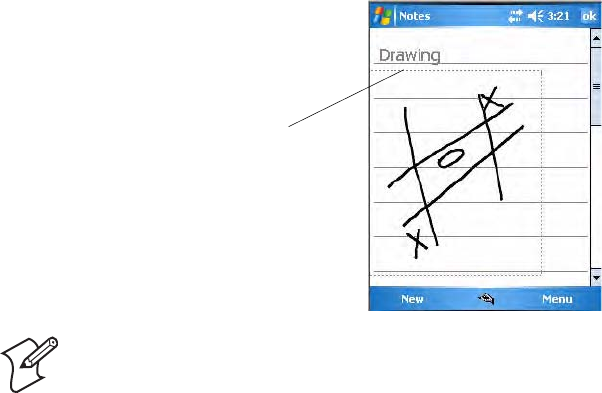
Drawing on the Screen
You can draw on the screen in the same way that you write on the screen.
The difference between writing and drawing on the screen is how you select
items and how they are edited. For example, you can resize selected
drawings, while you cannot resize writing.
Creating a Drawing
Select Menu > Draw, then draw a line to initiate a drawing box.
Subsequent strokes in or touching the box become part of the drawing.
Selecting a Drawing
If you want to edit or format a drawing, you must select it first. Tap and
hold the stylus on the drawing until the selection handle appears. To select
multiple drawings, deselect the Pen icon and then drag to select the
drawings you want.
You can cut, copy, and paste selected drawings by tapping and holding the
selected drawing and then tapping an editing command on the pop-up
menu, or by tapping the command under Menu. To resize a drawing, make
sure the Pen icon is not selected, and drag a selection handle.
Note: You may want to change the zoom level so that you can easily work
on or view your drawing. Tap Menu > Zoom, then select a zoom level.
The drawing box indicates
the boundaries of the drawing
Chapter 2 — Windows Mobile
CN3 Mobile Computer User’s Manual 39
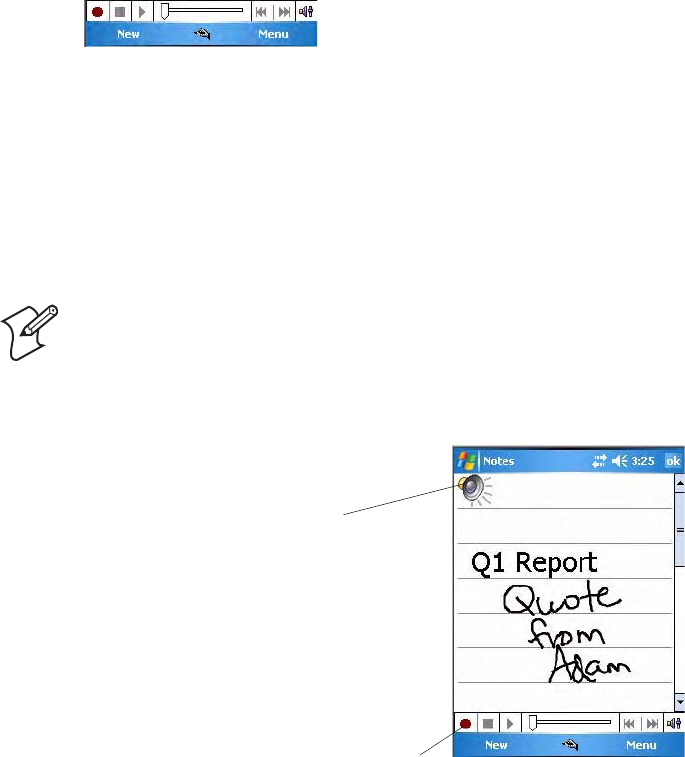
Recording a Message
In a program where you can write or draw onscreen, you can also quickly
capture thoughts, reminders, and phone numbers by recording a message.
In the Messaging program, you can add a recording to an e-mail message.
In Calendar, Tasks, and Contacts, you can include a recording in the Notes
tab. In the Notes program, you can create a stand-alone recording or add a
recording to an open note.
To add a recording
1Tap Menu > View Recording Toolbar to add the recording toolbar to
the bottom of the screen.
2Hold the CN3’s microphone near your mouth or source of sound.
3Tap the red circle to start your recording.
4Tap the black box when finished. If you are recording in an open note,
an icon appears in the note, like in the following sample. If you are
creating a stand-alone recording, it appears in the note list.
5To play a recording, tap the recording icon in the open note or tap the
recording in the note list.
6To play a recording, tap it in the list or tap its icon in the note.
Note: To quickly create a recording, hold down the Record hardware
button. When you hear the beep, begin your recording. Release the
button when you are finished. The new recording is stored in the open
note or as a stand-alone recording if no note is open.
Tap to begin recording
Indicates an embedded recording
Chapter 2 — Windows Mobile
40 CN3 Mobile Computer User’s Manual
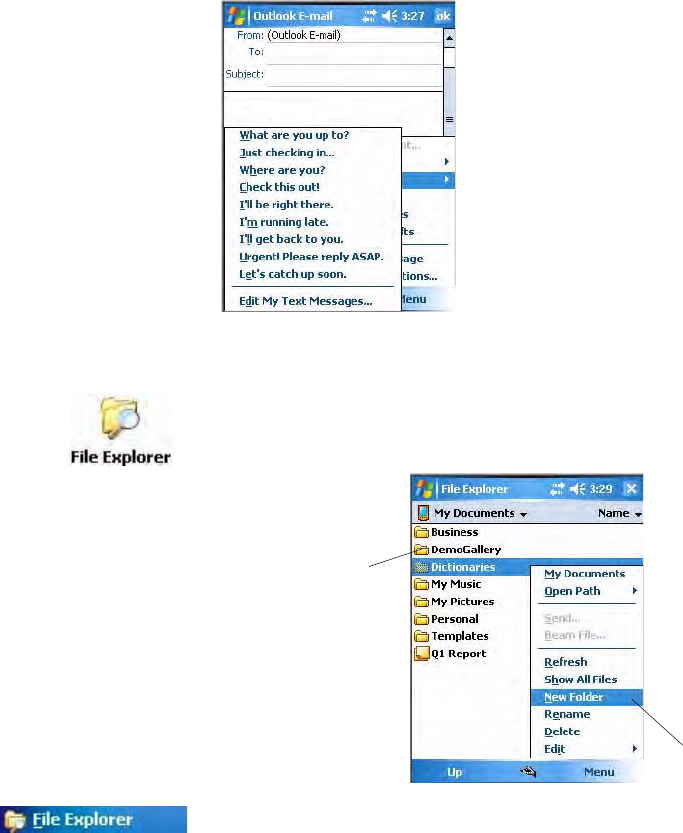
Using My Text
When using Messaging, use My Text to quickly insert preset or frequently
used messages into the text entry area. To insert a message, tap Menu > My
Tex t , then select a message.
• To quickly add common messages, tap Menu > My Text and tap a
desired message.
• To edit a My Text message, tap Menu > My Text > Edit My Text
Messages. Tap the message you want to edit and enter new text at the
bottom of the screen.
Finding and Organizing Information
You can use the File Explorer to find files on the CN3, and organize these
files into folders, and move files using the cut or copy-and-paste methods.
Tap Start > Programs > the File Explorer icon.
For future use, this is added to your Start menu in the Recent Programs area,
via Start > File Explorer.
Tap New Folder to
Tap a folder to open it
create a new folder
Chapter 2 — Windows Mobile
CN3 Mobile Computer User’s Manual 41
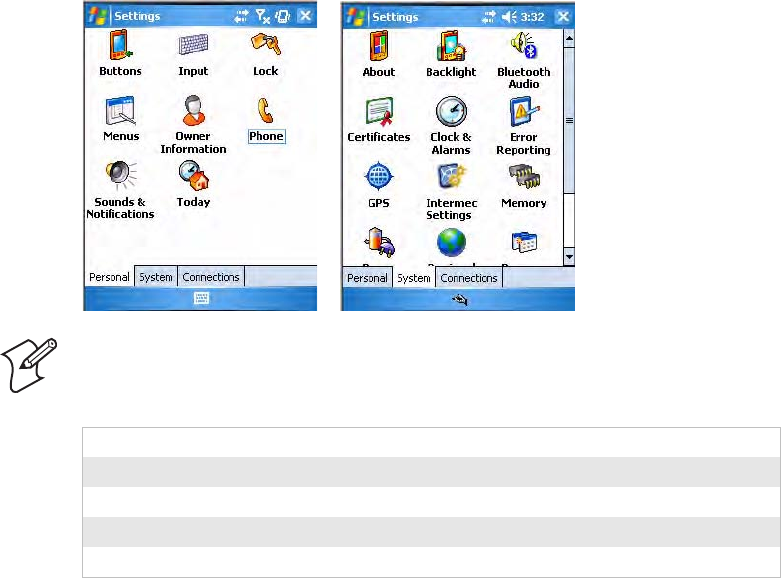
Customizing Your Computer
You can customize by adjusting settings and installing additional software.
Adjusting Settings
To adjust settings to fit the way you work, tap Start > Settings > either the
Personal tab or the System tab located at the bottom of the screen.
Adding or Removing Programs
Programs added to your CN3 at the factory are stored in ROM (Read Only
Memory). You cannot remove this software, and you cannot accidentally
lose ROM contents. Applications added to your CN3 go into the Object
Store, which is located in Flash ROM. See “Packaging Applications for the
Computer” on page 76 for more information about the Object Store.
You can install any program created for the CN3, as long as there is enough
memory. A popular place to find software for your CN3 is on the Windows
Mobile web site (www.microsoft.com/windowsmobile/resources/
communities/default.mspx).
Menus To customize what appears on the Start menu.
Owner Information To enter your contact information.
Today To customize the look and information seen on the Today screen.
Clock & Alarms To change the time or to set alarms.
Power To maximize battery life.
Note: The Phone applet in the Personal tab is available only on CN3s
with built-in phones.
Chapter 2 — Windows Mobile
42 CN3 Mobile Computer User’s Manual
Adding Programs Using ActiveSync
Install the appropriate software for your CN3 on your desktop before
installing it on your CN3.
2Download the program to your desktop (or insert the CD or disk that
contains the program into your desktop). You may see a single .xip, .exe,
or .zip file, a SETUP.EXE file, or several versions of files for different
CN3 types and processors. Be sure to select the program designed for the
Windows Mobile and your CN3 processor type.
3Read any installation instructions, Read Me files, or documentation that
comes with the program. Many programs provide special installation
instructions.
4Connect your CN3 and desktop.
5Double-click the .exe file.
• If the file is an installer, the installation wizard begins. Follow the
directions on the screen. Once the software is installed, the installer
automatically transfers the software to your CN3.
• If the file is not an installer, an error message stating that the program
is valid but it is designed for a different type of computer is displayed.
Move this file to your CN3. If you cannot find any installation
instructions for the program in the Read Me file or documentation,
use ActiveSync Explore to copy the program file to the Program Files
folder on your CN3. For more information on copying files using
ActiveSync, see ActiveSync Help.
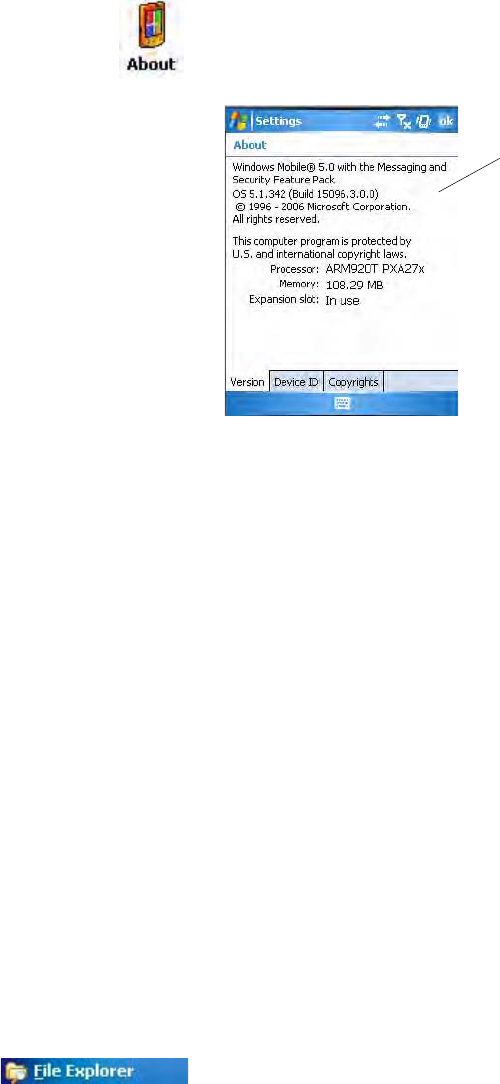
1Determine your CN3 and processor type so that you know which
version of the software to install. Tap Start > Settings > the System tab >
the About icon > the Version tab, then make a note of the information
in Processor.
Once installation is complete, tap Start > Programs, and then the program
icon to switch to it. For future use, this is added to your Start menu in the
Recent Programs area, via Start > File Explorer.
Note this information
Chapter 2 — Windows Mobile
CN3 Mobile Computer User’s Manual 43
Adding a Program Directly from the Internet
2Download the program to your CN3 straight from the Internet using
Pocket Internet Explorer. You may see a single .xip, .exe, or .zip file, a
setup.exe file, or several versions of files for different CN3 types and
processors. Be sure to select the program designed for the Windows
Mobile and CN3 processor type.
3Read program installation instructions, Read Me files, or other
documentation. Many programs provide installation instructions.
4Tap the file, such as a .xip or .exe file to start the installation wizard.
Follow the directions on the screen.
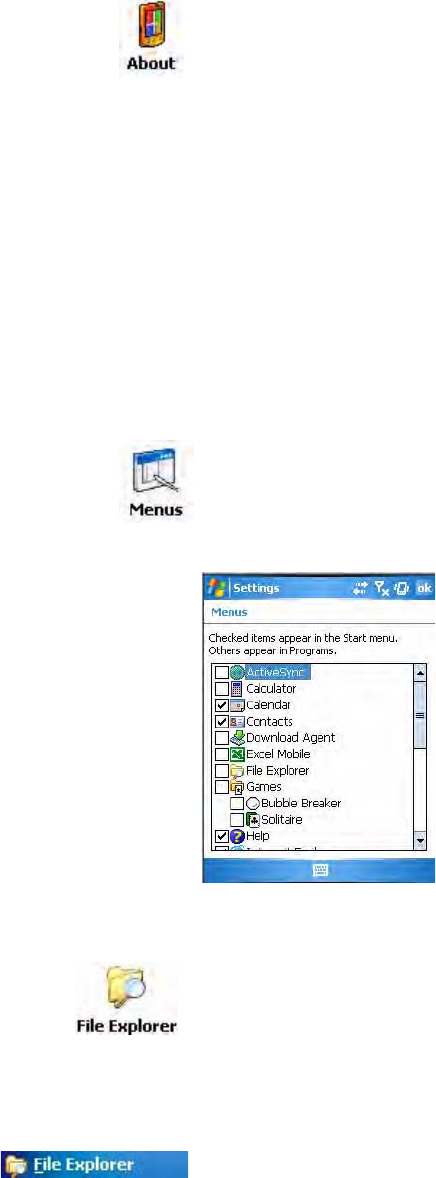
Adding a Program to the Start Menu
Using File Explorer on the Computer
1Determine your CN3 and processor type so that you know which
version of the software to install. Tap Start > Settings > the System tab >
the About icon > the Version tab, then make a note of the information
in Processor.
Tap Start > Settings > the Personal tab > the Menus icon, then the check
box for the program. If you do not see the program listed, you can either
use File Explorer on the CN3 to move the program to the Start Menu
folder, or use ActiveSync on the desktop to create a shortcut to the program
and place the shortcut in the Start Menu folder.
Tap Start > Programs > the File Explorer icon, locate the program (tap the
folder list, labeled My Documents by default, then My Device to see a list
of all folders on the CN3). Tap and hold the program and tap Cut on the
pop-up menu. Open the Start Menu folder located in the Windows folder,
tap and hold a blank area of the window, and tap Paste on the pop-up
menu for the program to appear on the Start menu. For information on
using File Explorer, see “Finding and Organizing Information” on page 40.
For future use, this is added to your Start menu in the Recent Programs area,
via Start > File Explorer.

Chapter 2 — Windows Mobile
44 CN3 Mobile Computer User’s Manual
Using ActiveSync on the desktop
Removing Programs
Microsoft ActiveSync
Visit the following Microsoft web site for the latest in updates, technical
information, and samples:
www.microsoft.com/windowsmobile/resources/communities/
default.mspx
Using Microsoft ActiveSync, you can synchronize the information on your
desktop with the information on your CN3. Synchronization compares the
data on your CN3 with your desktop and updates both computers with the
most recent information. For example:
• Keep Pocket Outlook data up-to-date by synchronizing your CN3 with
Microsoft Outlook data on your desktop.
• Synchronize Microsoft Word and Microsoft Excel files between your
CN3 and desktop. Your files are converted to the correct format.
With ActiveSync, you can also:
• Back up and restore your CN3 data.
• Copy (rather than synchronize) files between your CN3 and desktop.
• Control when synchronization occurs by selecting a synchronization
mode. For example, you can synchronize continually while connected to
your desktop or only when you choose the synchronize command.
• Select which information types are synchronized and control how much
data is synchronized. For example, you can choose how many weeks of
past appointments you want synchronized.
Use the Explorer in ActiveSync to explore your CN3 files and locate the
program. Right-click the program, and then click Create Shortcut. Move
the shortcut to the Start Menu folder in the Windows folder. The shortcut
now appears on the Start menu. For information, see ActiveSync Help.
Tap Start > Settings > the System tab > the Remove Programs icon. If
the program does not appear in the list of installed programs, use File
Explorer on your CN3 to locate the program, tap and hold the program,
and then tap Delete on the pop-up menu.
Note: You must have Microsoft ActiveSync 4.2 or greater on your desktop
before you can synchronize information with your CN3.
Note: By default, ActiveSync does not automatically synchronize all types
of information. Use ActiveSync options to turn synchronization on or off
for specific information types.
Chapter 2 — Windows Mobile
CN3 Mobile Computer User’s Manual 45
Before synchronization, install ActiveSync on your PC from the Windows
Mobile Companion CD. ActiveSync is already installed on the CN3.
After installation is complete, the ActiveSync Setup Wizard helps you
connect your CN3 to your desktop, set up a partnership so you can
synchronize information between your CN3 and your desktop, and
customize your synchronization settings. Your first synchronization process
automatically begins when finished using the wizard.
After your first synchronization, look at Calendar, Contacts, and Tasks on
your CN3. Notice that information you have stored in Microsoft Outlook
on your desktop was copied to your CN3, and you did not have to type a
word. Disconnect the CN3 from your computer and you are ready to go!
For information about using ActiveSync on your desktop, start ActiveSync
on your desktop, and then see ActiveSync Help.
For more information about ActiveSync on your CN3, switch to
ActiveSync, tap Start > Help, then select a topic.
Microsoft Outlook Mobile
Microsoft Outlook Mobile includes Calendar, Contacts, Tasks, Messaging,
and Notes. You can use these programs individually or together. For
example, you can use e-mail addresses stored in Contacts to address e-mail
messages in Messaging.
Using ActiveSync, you can synchronize information in Microsoft Outlook
or Microsoft Exchange on your desktop with your CN3. You can also
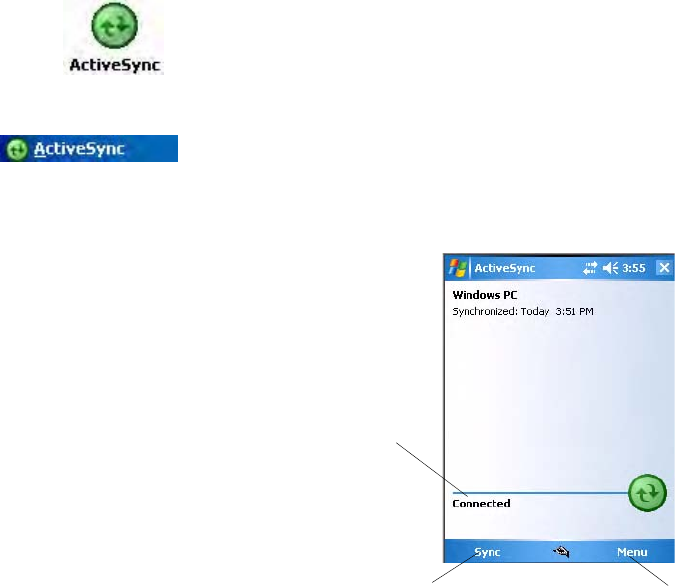
Once you have set up ActiveSync and completed the first synchronization
process, you can initiate synchronization from your CN3. To switch to
ActiveSync on your CN3, tap Start > Programs > the ActiveSync icon.
Note that if you have a wireless LAN card, you can synchronize remotely
from your CN3.
For future use, this is added to your Start menu in the Recent Programs area,
via Start > ActiveSync.
View the connection status
Tap to connect and synchronize Tap to synchronize via IR
or change synchronization
Chapter 2 — Windows Mobile
46 CN3 Mobile Computer User’s Manual
synchronize this information directly with a Microsoft Exchange server.
Each time you synchronize, ActiveSync compares the changes you made on
your CN3 and desktop or server and updates both computers with the
latest information. For information on using ActiveSync, see ActiveSync
Help on the desktop.
You can switch to any program by tapping it on the Start menu.
Calendar: Scheduling Appointments and Meetings
Use Calendar to schedule appointments, including meetings and other
events. You can check your appointments in one of several views (Day,
Week, Month, Year, and Agenda) and set Calendar to remind you of
appointments with a sound or other method.
Appointments for the day can display on the Today screen.
If you use Outlook on your desktop, you can synchronize appointments
between your CN3 and desktop.
Synchronizing Calendar
Calendar items stored on your CN3 can be synchronized with calendar
items on your desktop or Microsoft Exchange Server. (Note that you can
only synchronize information directly with an Exchange Server if your
company is running Microsoft Mobile Information Server 2002 or later.)
Calendar synchronization is automatically selected in ActiveSync.
Calendar items entered on one computer are copied to the other during
synchronization. Handwritten notes and drawings are saved as metafiles
(pictures).
For information on synchronization, see ActiveSync Help on the desktop.
Why Use Categories in the Calendar?
Use categories to group related tasks, contacts, and appointments. Then,
use these groupings to quickly display only the information you want. For
example, you can easily share your CN3 with another by assigning your
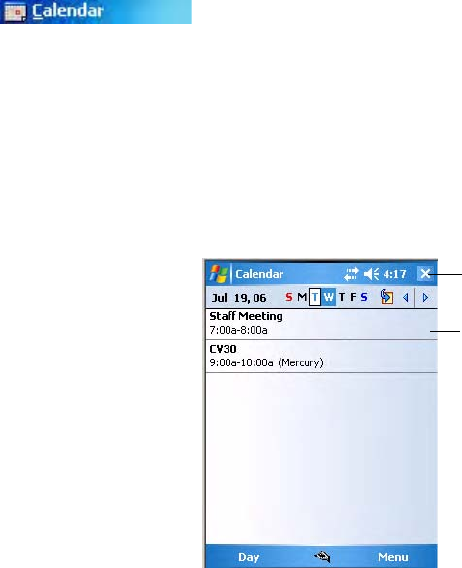
To switch to Calendar on the CN3, tap Start > Calendar.
Tap to go to Today
Tap to display and edit appointment details
Chapter 2 — Windows Mobile
CN3 Mobile Computer User’s Manual 47
appointments to a category with a special project’s name. You can then use
this category to filter and only display project appointments.
What Is an All Day Event?
An appointment can either be a normal appointment or an all day event,
which lasts the full day or spans many days. Examples include a trade show,
a vacation, or a seminar. You can also use all day events to schedule an
annual event, such as a birthday or anniversary. In this case, change the
Status box to Free (you may need to scroll to see it) so that it does not show
time as busy in your calendar. All day events do not occupy blocks of time
in Calendar; they appear in banners at the top of the calendar.
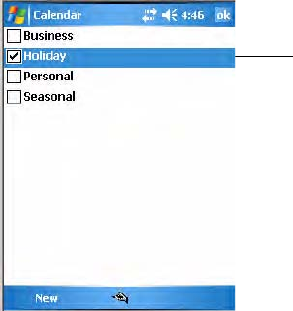
Note: In Month View, the day of an appointment assigned to the Holiday
category appears in red.
Note: You cannot modify or create all-day events with attendees on the
CN3. If you create all day events with attendees on your desktop, use
ActiveSync to copy such events to the CN3, then view them in Calendar.
For more information on copying files, see ActiveSync Help. To use the CN3
to schedule an appointment with attendees lasting all day, set type to
“Normal,” then adjust the date and time.
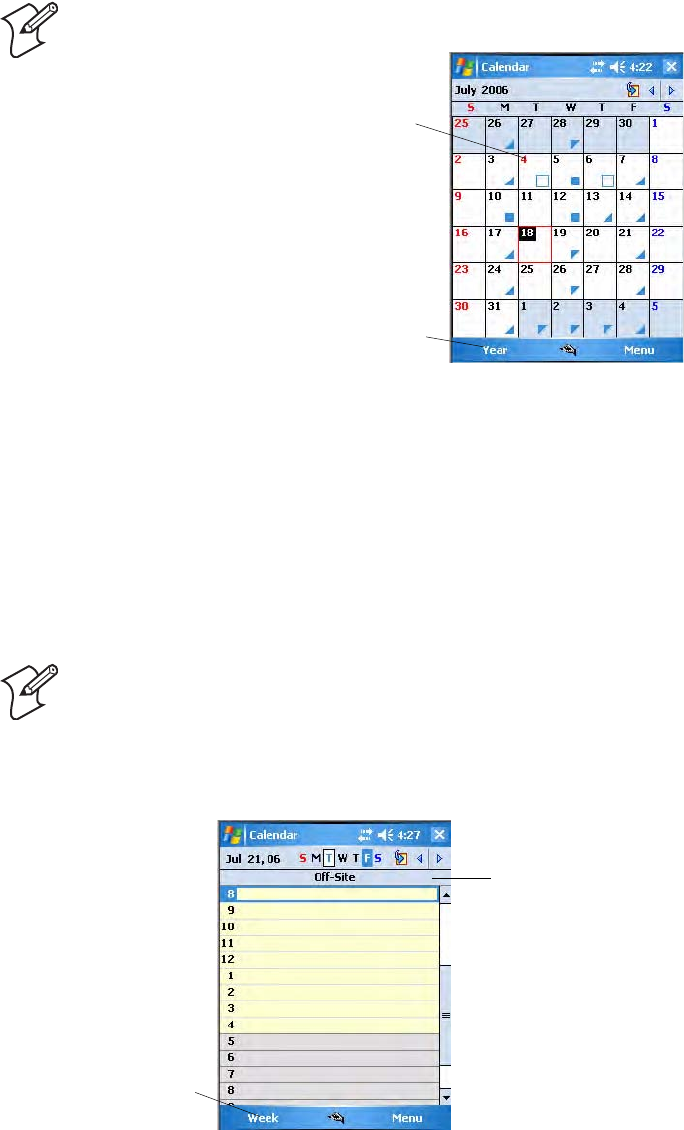
This day was assigned the Holiday category
Tap to access the Year view
This describes the all-day event
Tap to access
the Week view
Chapter 2 — Windows Mobile
48 CN3 Mobile Computer User’s Manual
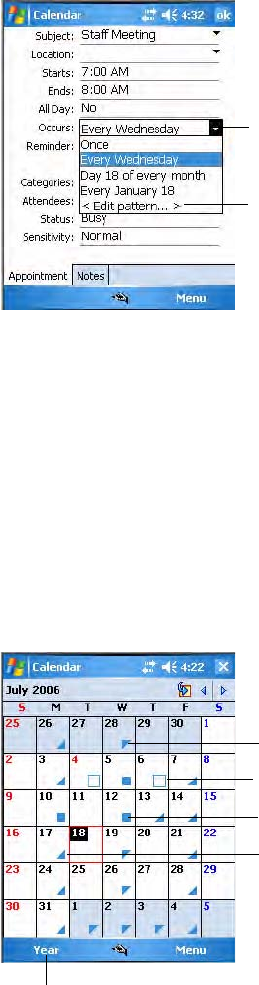
What Is a Recurrence Pattern?
If you have an appointment or task that you do on a regular basis, such as a
weekly team meeting or a monthly status report, enter the item once and
set a recurrence pattern for it. If the default patterns in the list are not what
you need, you can create your own pattern using the wizard.
Viewing Appointments
You can view appointments in one of several views (Agenda, Day, Week,
Month, and Year). In Agenda view, upcoming appointments are displayed
in bold. To see detailed appointment information in any view, tap the
appointment. To see a list of available actions for an appointment, tap and
hold the appointment. Tap Start > To d a y to see appointments for the day.
Month view displays symbols to indicate the types of appointments you
have on a given day. An upward triangle indicates a morning appointment;
a downward triangle indicates an afternoon appointment. If you have
appointments in the morning and afternoon, a solid square is displayed. If
you have an all day event not marked Free, a hollow square is displayed.
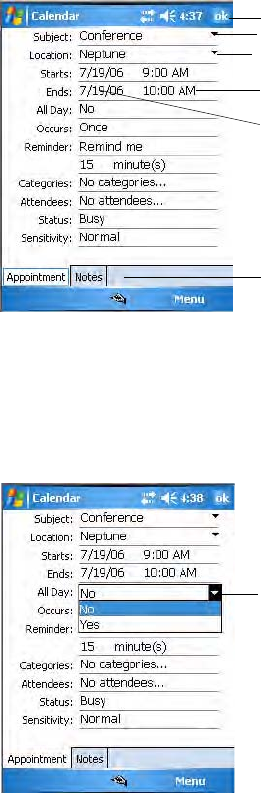
Creating or Changing an Appointment
To create an appointment, tap Menu > New Appointment. To select a new
date from a pop-up calendar, tap the display date. To enter or select a new
time, tap the display time. Enter the appointment details, and when
finished, tap ok to return to the calendar.
Select your recurrence pattern from this list
Select <edit pattern> to access the wizard with which
to customize your recurrence.
Tap this to access the Year view
This displays a morning appointment
This displays an afternoon appointment
This displays appointments in morning and afternoon
This displays an all-day event not marked “Free”
Chapter 2 — Windows Mobile
CN3 Mobile Computer User’s Manual 49
If you are working in Day view, tap and hold the time slot for the new
appointment, then select New Appointment to have the time
automatically entered for you.
To change an appointment, tap it in the calendar, and then tap Edit.
Change any appointment detail by tapping it and entering the new
information. Tap the arrows to the right of the description and location
boxes to choose from previous entries.
When entering a time, you can type military and abbreviated time forms,
such as 2300 (becomes 11:00 PM), 913pm (becomes 9:13 PM), 911
(becomes 9:11 AM), and 9p (becomes 9:00 PM).
Creating an All-Day Event
Tap Menu > New Appointment, tap All Day, then select Yes to create an
event. To change an all-day event, switch to Day or Agenda, tap the event
listed at the top of the calendar, then tap Edit. Change any appointment
detail by tapping it and entering the new information.
You cannot modify or create all day events with attendees on the CN3. If
you create all-day events with attendees on your desktop, use ActiveSync to
copy such events to the CN3. Then, view them in Calendar. For more
information on copying files, see ActiveSync Help. To use the CN3 to
schedule an appointment with attendees lasting all day, set type to Normal,
then adjust date and time accordingly.
Tap to return to calendar, saved automatically
Tap to choose from predefined text
Tap to choose from previous defined locations
Tap to select a time
Tap to select a date
Notes is a good place for maps and directions
Tap to select “Yes” or “No” for the all-day event
Chapter 2 — Windows Mobile
50 CN3 Mobile Computer User’s Manual
Setting a Reminder for an Appointment
1Tap the appointment, then tap Edit to change the appointment.
2Tap Reminder and select Remind me.
3To change how many minutes before the appointment you are reminded,
tap the minutes displayed, then select the new minutes from a drop-
down or enter the new minutes. Tap minutes to change hours, days, or
weeks.
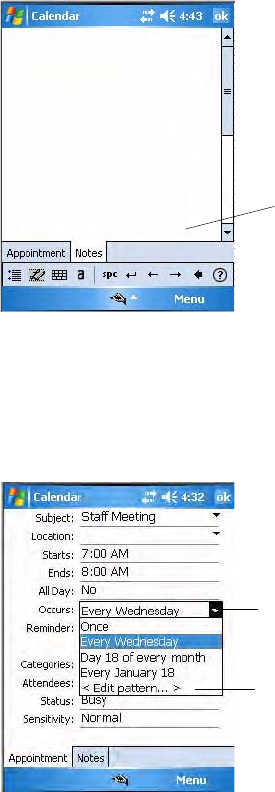
You can add written or typed notes and even recordings (if your CN3
supports recordings) to an appointment. This is a good place for maps,
drawings, and other detailed information. To edit an existing note, tap the
appointment in the calendar, tap Edit, then tap the Notes tab.
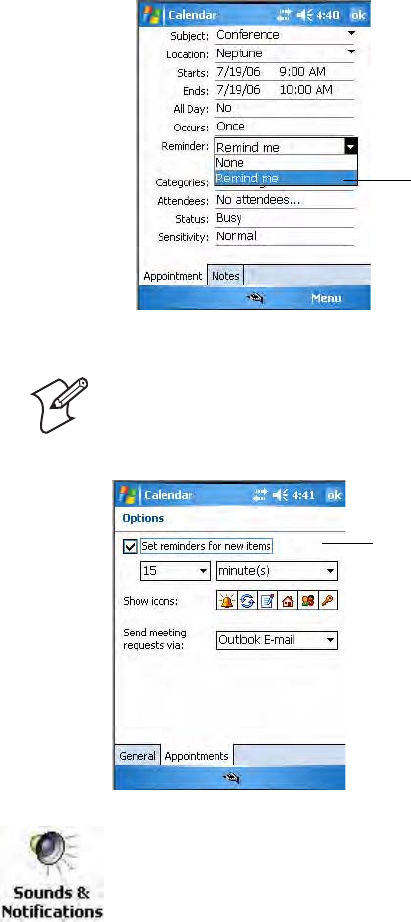
Note: To automatically set a reminder for all new appointments, in the
calendar, tap Menu > Options > the Appointments tab, check Set
reminders for new items, then tap the number and timeframe options to
change the information given.
To choose how you are reminded, for example by a sound, tap Start >
Settings > the Personal tab > the Sounds & Notifications icon.
Adding a Note to an Appointment
Tap this to enable the reminder feature
Tap this to set reminders for new appointments
Chapter 2 — Windows Mobile
CN3 Mobile Computer User’s Manual 51
1In the calendar, tap the appointment, then tap Edit.
2Tap the Notes tab to enter notes. For specific instructions, tap Start >
Help, then select a topic.
Making an Appointment Recurring
1In the calendar, tap the appointment, then tap Edit.
2Tap Occurs and select a pattern from the list. Or, to create a new
pattern, tap <Edit pattern...>, and follow the steps in the wizard.
Assigning an Appointment to a Category
To find an appointment assigned to a category, tap Menu > Filter, then
select the type of appointment to display. To show all appointments, tap
Menu > Filter > All Appointments to clear all categories.
1In the calendar, tap the appointment, tap Edit, then tap Categories.
2Check the categories to which you want to assign the appointment.
3To create a new category, tap New, enter the category name, then tap
Done. The new category is automatically checked in the list.
Use your stylus to write or draw information here
Select your recurrence from the drop-down list
Select <edit pattern> to customize your recurrence
Chapter 2 — Windows Mobile
52 CN3 Mobile Computer User’s Manual
4Tap ok to return to the appointment.
Sending a Meeting Request
Use Calendar to schedule meetings with people who use Outlook or
Outlook Mobile. When attendees receive a meeting request, they can
accept or decline the meeting. If they accept the request, the meeting is
automatically added to their schedule, their response is sent back to you,
and your calendar is updated.
Before you can send a meeting request, you must enter e-mail addresses in
Contacts Help and set up Messaging to send and receive messages. For
more information on sending and receiving meeting requests, open either
the Calendar application or the Messaging application, tap Start > Help,
then select a topic.
If you are sending the meeting request through a connection to an ISP or
the network, rather than through synchronization with your desktop, tap
Menu > Options > the Appointments tab. From the Send meeting
request via drop-down list, tap the service to use to send the request.
1Tap and hold to select a timeslot in the calendar, then tap New
Appointment.
2Enter the meeting information, hide the onscreen keyboard, if needed,
then tap Attendees. Only those contacts with e-mail addresses are
displayed. Select the contacts to invite, then tap Add to return to the list.
3Repeat this procedure until you have everyone you want to invite to the
meeting, then tap ok.
4Messaging automatically creates a meeting request and sends it to the
attendees the next time you synchronize with your desktop. Textual
A check mark indicates a selected category
Chapter 2 — Windows Mobile
CN3 Mobile Computer User’s Manual 53
notes entered in the Notes tab (excluding writing) are also sent.
Finding an Appointment
• To find an appointment assigned to a category, tap Menu > Filter, select
the type of appointment to display. To show all appointments again, tap
Menu > Filter > All Appointments to clear all categories.
Deleting an Appointment
1In the calendar, tap and hold the appointment.
2On the pop-up menu, tap Delete Appointment. The next time you
synchronize, the appointment is also deleted from the desktop.
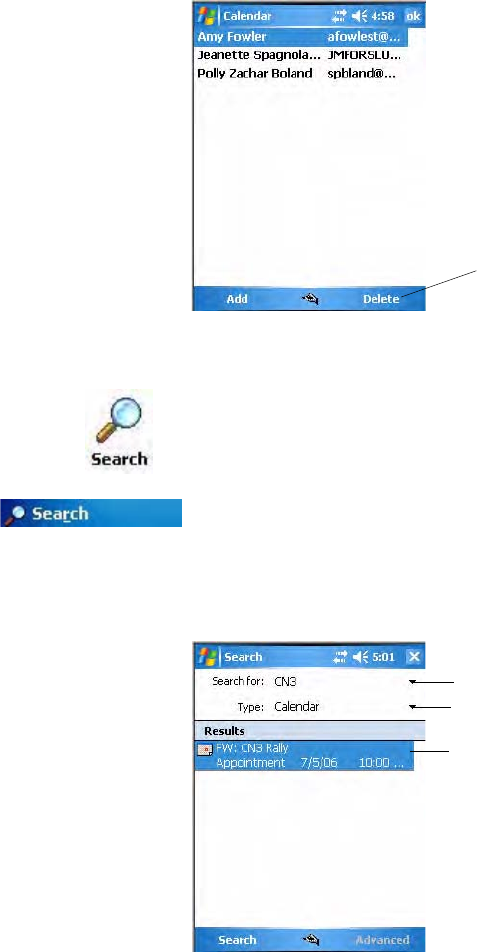
•Tap Start > Programs > the Search icon, enter the appointment name,
tap the Type arrow and select “Calendar” from the drop-down list, and
then tap Search. You can tap the Search for drop-down arrow to select
from a list of previously searched items or phrases.
Note for future access, this is added to your Start menu in the Recent
Programs area, via Start > Search.
To remove a person, highlight that person,
then tap Delete
Tap to select or enter a phrase
Tap to select where to search for this phrase
Tap to see details
Chapter 2 — Windows Mobile
54 CN3 Mobile Computer User’s Manual
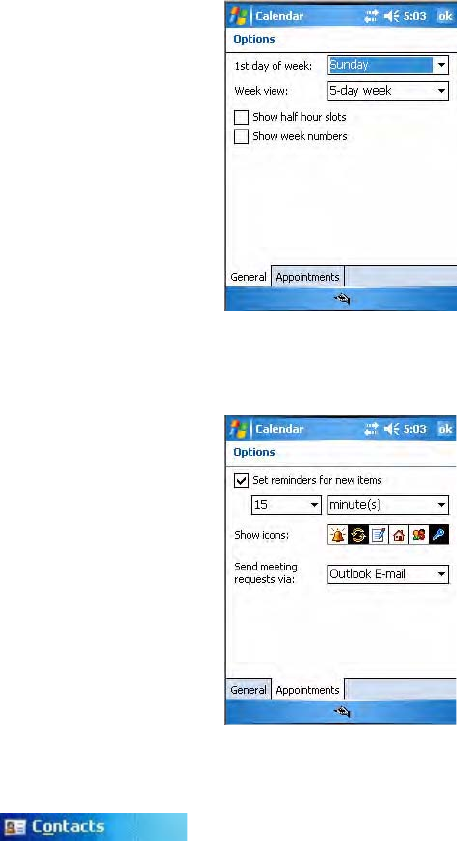
Changing Calendar Options
In the calendar, tap Menu > Options, tap either tap, make your changes,
then tap ok to return to the calendar.
•Tap the General tab to change the calendar view.
•Tap the Appointments tab to select what Show icons appointment
indicators should appear when you view appointment contents. Tap and
hold an icon to see its name. Selected icons are in black.
Contacts: Tracking Friends and Colleagues
Contacts maintains a list of your friends and colleagues so that you can
easily find the information you are looking for, whether you are at home or
on the road. You can enter both personal and business information.
If you use Microsoft Outlook on your desktop, you can synchronize
contacts between your CN3 and your desktop.
To switch to Contacts on the CN3, tap Start > Contacts.
Chapter 2 — Windows Mobile
CN3 Mobile Computer User’s Manual 55
Creating a Contact
1Tap New, then use the input panel to enter a name and other contact
information. Scroll down to see all available fields.
2To assign the contact to a category, scroll to and tap Categories, then
select a category from the list. In the contact list, you can display contacts
by category.
3To add notes, tap the Notes tab. You can enter text or draw. For
information on creating notes, see “Notes: Capturing Thoughts and
Ideas” on page 61.
4When finished, tap ok to return to the contact list.
Synchronizing Contacts
Contacts stored on your CN3 can be synchronized with Outlook contacts
stored on your desktop or with Mobile Information Server 2002 or later.
New items entered in one location are copied to the other during
synchronization. Handwritten notes and drawings are saved as pictures
when synchronizing with your desktop, but are removed when
synchronizing with a server. For information, see ActiveSync Help on the
desktop.
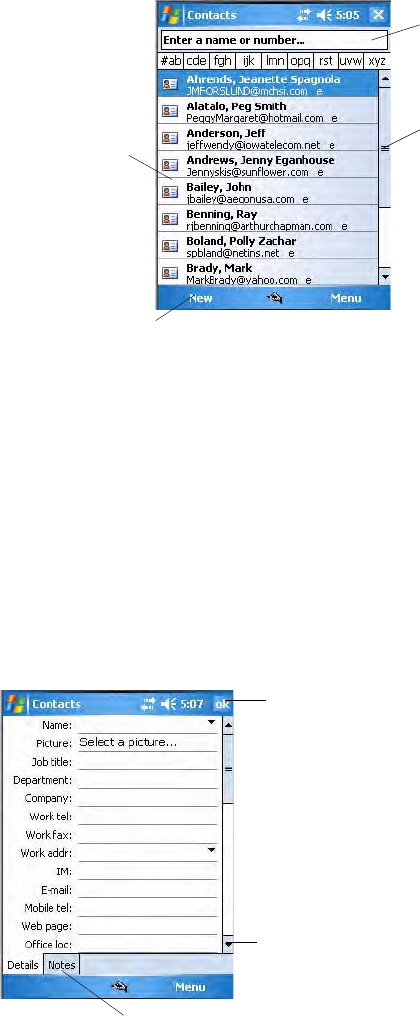
Tap and enter part of a
Tap to see additional phone
Tap to display and numbers and e-mail addresses
name to find it in the list
Tap to create a new contact
edit contact details
Tap to return to the list, entry saved automatically
Scroll to see more fields
Use Notes to include maps and directions
Chapter 2 — Windows Mobile
56 CN3 Mobile Computer User’s Manual
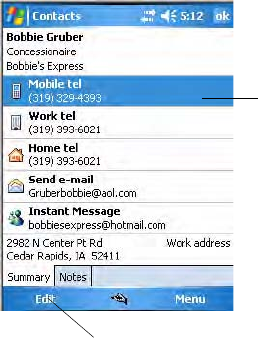
Viewing Contacts
The contact list displays the contact name and the first primary phone
number or e-mail address specified for that contact. Contacts are ordered
by name of contact or company. You can change the appearance of the
Contacts list by tapping Menu > Options.
• Tap the default letter (home, work, mobile, or e-mail) to the right of the
contact to see additional phone numbers and e-mail addresses.
• Use the up/down controls on your keypad to highlight a contact, then
press the left/right controls on your keypad to change the default
number, displayed as a letter to the right of the contact name. The
default number is highlighted in the contact’s summary, like the sample
on the next page.
• To see more contact information, tap the contact.
• To see a list of available actions for a contact via a pop-up menu, tap and
hold the contact.
• To see a list of contacts employed by a specific company, tap Menu >
View By > Company. Then, tap the desired company name.
Indicates the default number
Tap to edit the default number
Chapter 2 — Windows Mobile
CN3 Mobile Computer User’s Manual 57
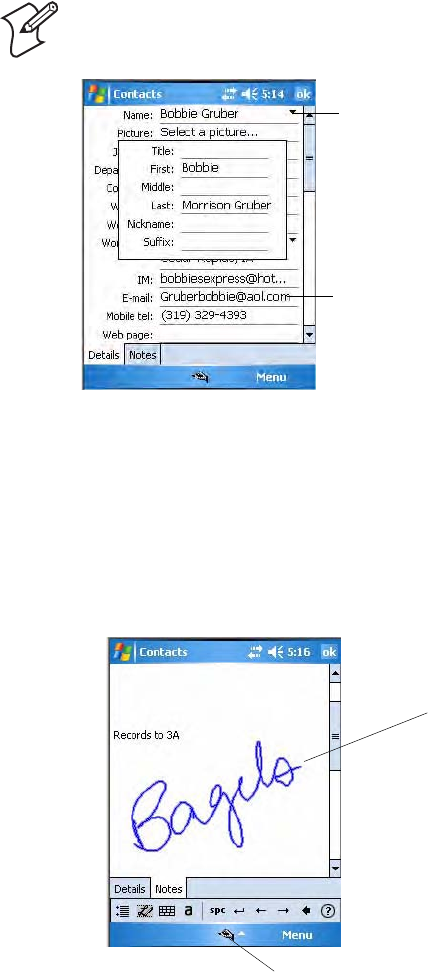
Changing a Contact
• In the contact list, tap the contact, and then tap Menu > Edit. To cancel
edits, tap Menu > Undo. When you are finished making changes, tap ok
to return to the contact list.
Adding a Note to a Contact
You can add written or typed notes and even recordings (if your CN3
supports recordings) to a contact. Notes are handy for maps and drawings.
To edit an existing note, tap the contact, tap Menu > Edit, then tap the
Notes tab.
1In the contact list, tap the contact.
2Tap t h e Notes tab. For instructions, tap Start > Help, then select a topic.
Assigning a Contact to a Category
1In the contact list, tap the contact, and then tap Menu > Edit.
2Scroll to, tap Categories, then check categories to assign to the contact.
Note: If you enter a name with more than two words, the middle word is
recorded as a middle name. If your contact has a double first or last name,
tap the Name arrow and enter the names in the proper box.
Tap to access the Name fields
Tap outside the box to close and return to details
Use your stylus to write or draw your information
Tap to activate the input panel
Chapter 2 — Windows Mobile
58 CN3 Mobile Computer User’s Manual
3To create a new category, tap New, enter the category name, then tap
Done. The new category is automatically checked in the list.
4Tap ok to return to the contacts.
Copying a Contact
Press and hold a contact for a pop-up menu, then select Copy Contact; or
if a contact is already highlighted, tap Menu > Copy Contact.
Sending a Message to a Contact
Press and hold a contact for a pop-up menu, then select Send E-mail or
Send SMS depending on the type of message being sent. To send an e-mail
message, you must have an e-mail address configured for the contact. To
send an SMS (Short Messaging Service) message, you must have an SMS
number for the contact, which is usually the mobile phone number.
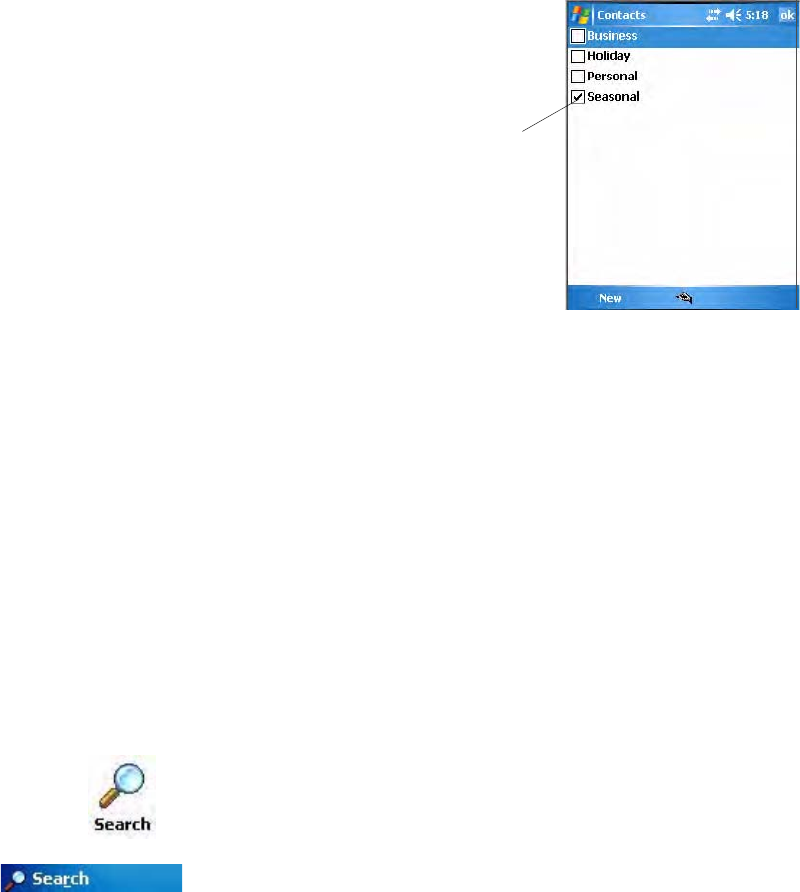
Finding a Contact
Use any of the following methods to find a contact. To quickly move
through a long list of contacts, tap one of the sets of letters displayed at the
top to view contact names beginning with those letters.
• From Contacts, start typing a contact name until you see it displayed on
the screen. To show all contacts again, tap the text box at the top of the
screen and clear the text, or tap the arrow to the right of the text box.
• To find a contact assigned to a category, tap Menu > Filter, then select
the type of contact to display. To show all contacts again, tap Menu >
Filter > All Contacts to clear all categories.
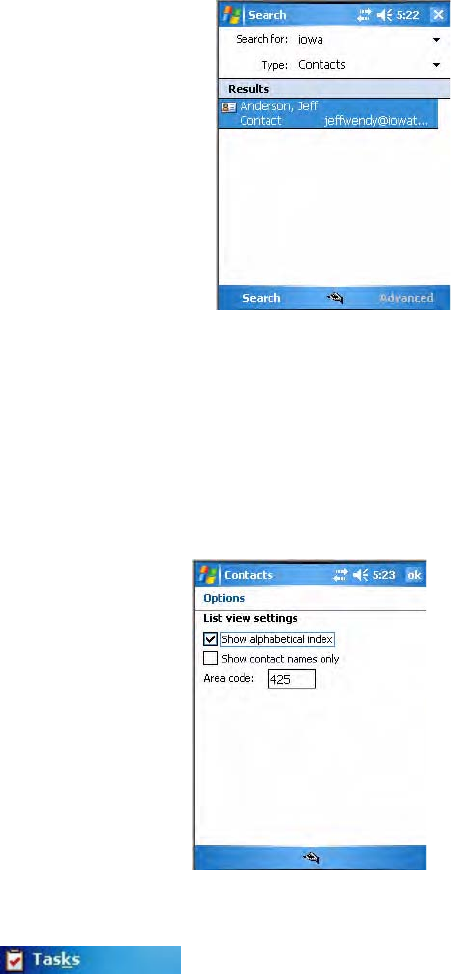
•Tap Start > Programs > the Search icon, enter the contact name, tap the
Type arrow and select “Contacts” from the drop-down list, and then tap
Search. You can tap the Search for drop-down arrow to select from a list
of previously searched items or phrases.
Note for future access, this is added to your Start menu in the Recent
Programs area, via Start > Search.
A check mark indicates a selected category
Chapter 2 — Windows Mobile
CN3 Mobile Computer User’s Manual 59
• To view the names of companies for which your contacts work, in the
contact list, tap Menu > View By > Company. The number of contacts
that work for that company is displayed to the right of the company.
Deleting a Contact
Press and hold a contact for a pop-up menu, select Delete Contact, then
select Yes; or if a contact is already highlighted, tap Menu > Delete
Contact, then select Yes.
Changing Contacts Options
In the contact list, tap Menu > Options, make your changes, then click ok
to return to the Contacts list.
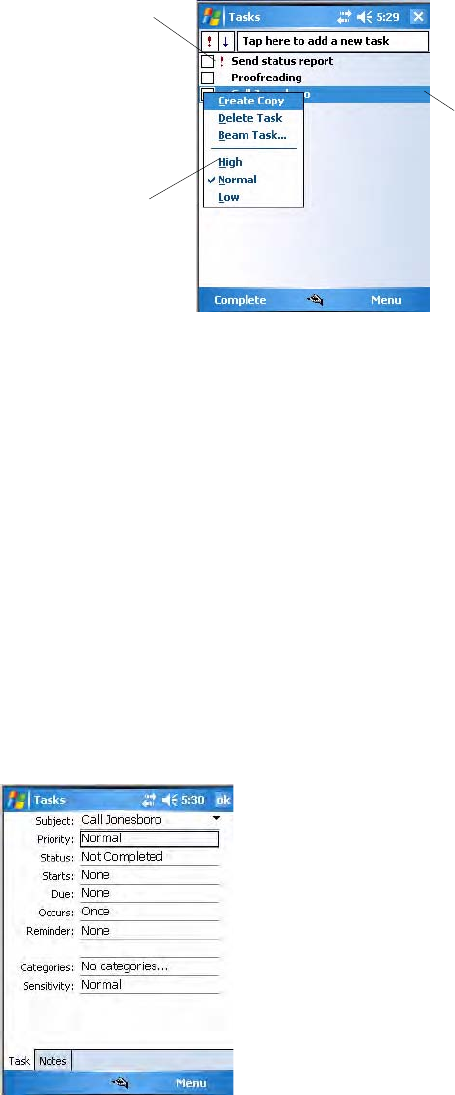
Tasks: Keeping a To Do List
Use Tasks to keep track of what you have to do. A variety of task
information can display on the Today screen. If you use Microsoft Outlook
on your desktop, you can synchronize tasks between your CN3 and
To switch to Tasks on your CN3, tap Start > Ta sk s.
Chapter 2 — Windows Mobile
60 CN3 Mobile Computer User’s Manual
desktop. To change the way information is displayed, tap Menu > Options.
Creating a Task
To create a task with only a subject, tap Tap here to add a new task.
• To quickly create a task, enter text in the Tap here to add a new task box
at the top of the screen. If you do not see this box, tap Menu > Options,
then check Show Tasks entry bar.
• To create a task with detailed information, such as start and due dates,
tap New. To enter notes, tap the Notes tab. Enter a start date and due
date or enter other information by first tapping the field. If the input
panel is open, hide it to see all available fields. For information on
creating notes, see “Notes: Capturing Thoughts and Ideas” on page 61.
• To change a task, tap it in the task list, and then tap Edit. Using the
onscreen keyboard, enter a description. To assign the task to a category,
tap Categories and check categories from the list. In the task list, you
can filter tasks by category. When finished, tap ok to return to the task
list.
Synchronizing Tasks
Tasks stored on the CN3 can synchronize with Microsoft Outlook on your
desktop. Task synchronization is automatic in ActiveSync.
Indicates a high priority
Tap to display or edit details
Tap and hold to
display a pop-up menu
Chapter 2 — Windows Mobile
CN3 Mobile Computer User’s Manual 61
New items entered on one computer are copied to the other during
synchronization. Handwritten notes and drawings are saved as metafiles
(pictures). For information, see ActiveSync Help on the desktop.
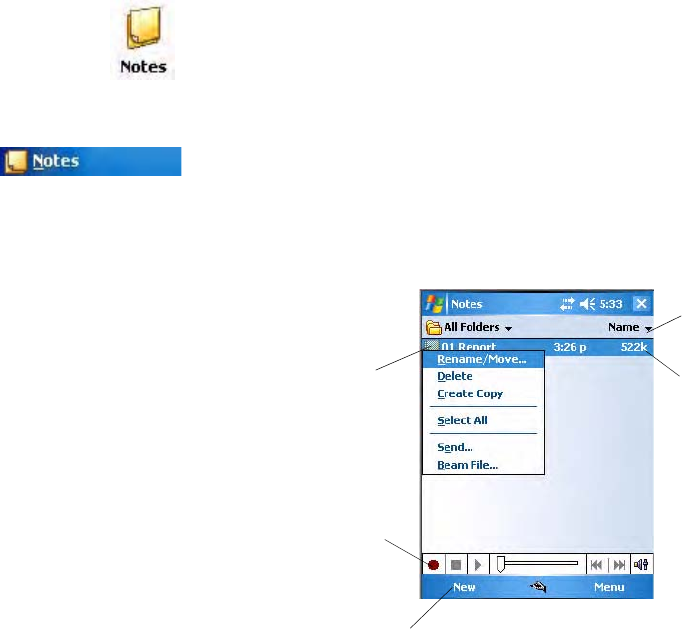
Notes: Capturing Thoughts and Ideas
To create documents with advanced formatting or templates, such as
bulleted lists and tabs, use word processing software developed for your
CN3, such as Word Mobile.
Creating a Note
To create your note, tap New, then write, draw, type, or record your
information. For information about using the input panel, writing and
drawing, and creating recordings, see “Recording a Message” on page 39.
•Writing
Using the stylus, write directly on the screen.
•Drawing
Using the stylus, draw directly on the screen.
•Typing
Using the input panel, enter typed text into the CN3 by tapping keys on
the onscreen keyboard or by using handwriting recognition software.
•Recording
Create a stand-alone recording or embed a recording into a note.
To switch to Notes on your CN3, tap Start > Programs > the Notes icon.
Notes helps you quickly capture your ideas, notes, and thoughts. You can
create a note using written and typed text, drawings, and recordings. You
can also share your notes with others through e-mail, infrared, and
synchronization with your desktop.
Note for future access, this is added to your Start menu in the Recent
Programs area, via Start > Notes.
Tap to change the
Tap to open a note
Tap and hold to display
Tap to record
Tap to create a new note
a pop-up menu
sort order of the list
or play a recording
Chapter 2 — Windows Mobile
62 CN3 Mobile Computer User’s Manual
Synchronizing Notes
Notes can synchronize between your desktop and CN3 either through
notes synchronization or file synchronization. Notes synchronization
synchronizes the notes on your CN3 with Outlook Notes on your desktop.
File synchronization ties all notes on the CN3 with the CN3’s “\My
Documents” folder on your desktop.
To synchronize your notes through notes synchronization, first select the
Notes information type for synchronization in ActiveSync. The next time
you synchronize, all notes in My Documents and its subfolder on your
CN3 appear in Outlook Notes on your desktop. Notes that contain only
text appear as regular notes in Outlook on your desktop, while notes
containing written text or drawings appear in the device format. In
addition, all notes in the Notes group in Outlook on the desktop appear in
Notes on the CN3.
To synchronize your notes as files, in ActiveSync, select the Files
information type for synchronization and clear the Notes information type.
When you select Files, the My Documents folder for the CN3 is created on
your desktop. All .PWI files placed in the “\My Documents” folder on your
CN3 and all .doc files placed in the CN3’s “\My Documents” folder on
your desktop are synchronized. Password-protected files cannot be
synchronized.
ActiveSync converts documents during synchronization. For information
on synchronization or file conversion, see ActiveSync Help on the desktop.
Messaging: Sending and Receiving E-mail Messages
You can receive Internet e-mail messages and SMS messages in Messaging.
Internet e-mail messages are sent by using an address you receive from your
Internet service provider (ISP) or your employer. SMS messages are sent
and received through your wireless phone service provider by using a phone
number as the message address.
You can send and receive e-mail by synchronizing with your desktop, or by
connecting to a Post Office Protocol 3 (POP3) or Internet Message Access
Protocol 4 (IMAP4) mail server. You need to set up an e-mail account for
each method that you use except for Microsoft ActiveSync, which is set up
by default. The ActiveSync folder on your CN3 stores messages that you
send and receive through synchronization with a desktop. Account names
Note: When you delete or change an item on either your desktop or the
CN3, the item is changed or deleted in the other location the next time you
synchronize.
Note: If you synchronize your notes using file synchronization and then
later decide to use notes synchronization, all of your notes are synchronized
with Outlook on your desktop and no longer stored in the My Documents
folder for the CN3.
To switch to Messaging on your CN3, tap Start > Messaging.
Chapter 2 — Windows Mobile
CN3 Mobile Computer User’s Manual 63
appear as folders in the folder list (located on the left, under the navigation
bar) in the Messaging message list.
With synchronization, messages are synchronized between the CN3 Inbox
and the PC Inbox by using ActiveSync and Microsoft Exchange or
Microsoft Outlook.
When connecting to a POP3 or IMAP4 server, you use a modem to
connect to your Internet service provider (ISP) or a modem card to connect
to the local area network to which your e-mail server is connected. You can
also use your phone to connect by using a cellular line connection. For
more information, see the next page.
Synchronizing E-mail Messages
After selecting Messaging for synchronization in ActiveSync, e-mail
messages are synchronized as part of the general synchronization process.
During synchronization:
• Messages are copied from the Inbox folder on your desktop or the
Microsoft Exchange server to the Inbox folder on your CN3. (Note that
you can only synchronize information directly with an Exchange Server
if your company is running Microsoft Mobile Information Server 2002
or later.) By default, you receive messages from the last three days only,
the first 100 lines of each new message, and file attachments of less than
100 KB in size.
• Messages in the Outbox folder on your CN3 are transferred to Exchange
or Outlook and then sent from those programs.
• The messages on the two computers are linked. When you delete a
message on your CN3, it is deleted from your desktop the next time you
synchronize.
• Messages in subfolders in other e-mail folders in Outlook are
synchronized only if they were selected for synchronization in
ActiveSync.
For information on initiating Messaging synchronization or changing
synchronization settings, see ActiveSync Help on your desktop or tap Start >
Help, then select a topic.
Managing E-mail Messages and Folders
Each e-mail account and SMS account has its own folder hierarchy with
five default folders: “Inbox,” “Outbox,” “Deleted Items,” “Drafts,” and
“Sent Items.” The messages you receive and send through the mail account
are stored in these folders. You can also create additional folders within each
hierarchy. The “\Deleted Items” folder contains messages that were deleted
on the CN3. The behavior of the “\Deleted Items” and “\Sent Items”
folders depends on the Inbox options you have chosen.
The behavior of the folders you create depends on whether you are using
ActiveSync, SMS, POP3, or IMAP4.
Chapter 2 — Windows Mobile
64 CN3 Mobile Computer User’s Manual
• If you use ActiveSync, e-mail messages in the “\Inbox” folder in Outlook
automatically synchronize with your CN3. You can select to synchronize
additional folders by designating them for ActiveSync. The folders you
create and the messages you move are then mirrored on the server. For
example, if you move two messages from the “\Inbox” folder to a folder
named “\Family,” and you have designated “\Family” for
synchronization, the server creates a copy of the Family folder and copies
the messages into that folder. You can then read messages while away
from your desktop.
• If you use SMS, messages are stored in the Inbox folder.
• If you use POP3 and you move e-mail messages to a folder you created,
the link is broken between the messages on the CN3 and their copies on
the mail server. The next time you connect, the mail server sees that the
messages are missing from the CN3 Inbox and deletes them from the
server. This does prevent duplicate copies of a message, but it also means
that you no longer have access to messages that you move to folders
created from anywhere except the CN3.
• If you use IMAP4, the folders you create and the e-mail messages you
move are mirrored on the server. Therefore, messages are available to you
anytime you connect to your mail server, whether it is from your CN3 or
desktop. This folder synchronization occurs when you connect to your
mail server, create new folders, or rename/delete folders when connected.
For all accounts except ActiveSync, you can access folder options by tapping
Menu > Tools > Manage Folders.
Connecting to a Mail Server
In addition to synchronizing e-mail messages with your desktop, you can
send and receive e-mail messages by connecting to an e-mail server using a
modem or network card connected to your CN3. You need to set up a
remote connection to a network or an ISP, and a connection to your e-mail
server. For information, see “Remote Access (Modems)” on page 139.
When connected to the e-mail server, new messages are downloaded to the
CN3 “\Inbox” folder, messages in the CN3 “\Outbox” folder are sent, and
deleted messages in the e-mail server are removed from the CN3 “\Inbox”
folder.
Messages that you receive directly from an e-mail server are linked to your
e-mail server rather than your desktop. When you delete a message on your
CN3, it is also deleted from the e-mail server the next time you connect
based on the settings selected in ActiveSync.
You can work online or offline. When working online, you read and
respond to messages while connected to the e-mail server. Messages are sent
as soon as you tap Send, which saves space on your CN3.
When working offline, once you have downloaded new message headers or
partial messages, you can disconnect from the e-mail server and then decide
which messages to download completely. The next time you connect, Inbox

Chapter 2 — Windows Mobile
CN3 Mobile Computer User’s Manual 65
downloads the complete messages you have marked for retrieval and sends
the messages you have composed.
Setting Up or Changing an Account
To set up a a POP3 or IMAP4 e-mail account, tap Menu > Tools >
Options > New Account. Follow instructions in the New Account Wizard.
To set up an SMS account, tap Menu > Switch Accounts, and then tap
SMS. Follow the instructions on the screen.
To change options for an account, tap Menu > Tools > Options > the
name of the account, and follow the instructions on the screen.
To delete an account, tap Menu > Tools > Options, tap and hold the name
of the account, and then tap Delete.
Downloading Messages from the Server
Note that receiving entire messages consumes storage memory. The size
column in the message list displays the local size and server size of a
message. Even when a message has downloaded fully, these numbers may
differ because the size of a message can vary between the server and the
CN3.
1Tap Menu > Switch Accounts and ensure that the account you want to
use is selected (marked by a bullet.)
2The messages on your CN3 and e-mail server are synchronized. Tap a
message in the message list to open it.
3If you read a message and decide that you need the full copy, tap Menu >
Download Message while in the message window. If you are in the
message list, tap and hold the message, and then tap Download
Message. This also downloads message attachments if you selected those
options when you set up the e-mail account. You can also choose to
download full copies of messages by default.
4When finished, close Messaging.
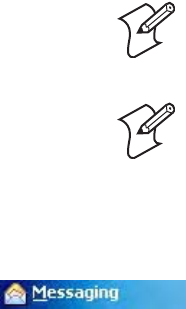
Composing and Sending Messages
If you are sending an SMS message and want to know if it was received,
before sending the message, tap Menu > Message Options > Request SMS
text message delivery notification.
Depending on the e-mail address options that you select, you can use a
directory service in addition to your contact list to verify names.
To compose a message
1In the message list, tap New.
2To select an account, tap the From list and select “ActiveSync,” “SMS,”
or the desired e-mail account.
Note: You can set up several e-mail accounts including your ActiveSync
account, but you can set up only one SMS account, which you cannot
delete once it is set up.
Chapter 2 — Windows Mobile
66 CN3 Mobile Computer User’s Manual
3Enter the e-mail address or SMS address of one or more recipients,
separating them with semicolons. To access addresses and phone
numbers from Contacts, tap To.
4Enter your message. To quickly add common messages, tap Menu > My
Tex t , select a desired message.
5To check spelling, tap Edit > Spell Check.
6Tap Send. If you are working offline, the message is moved to the
“\Outbox” folder and is sent the next time you connect.
Companion Programs
Companion programs include Word Mobile, Excel Mobile, and
PowerPoint Mobile, and Windows Media Player. To switch to a companion
program on your CN3, tap Start > Programs > the program name.
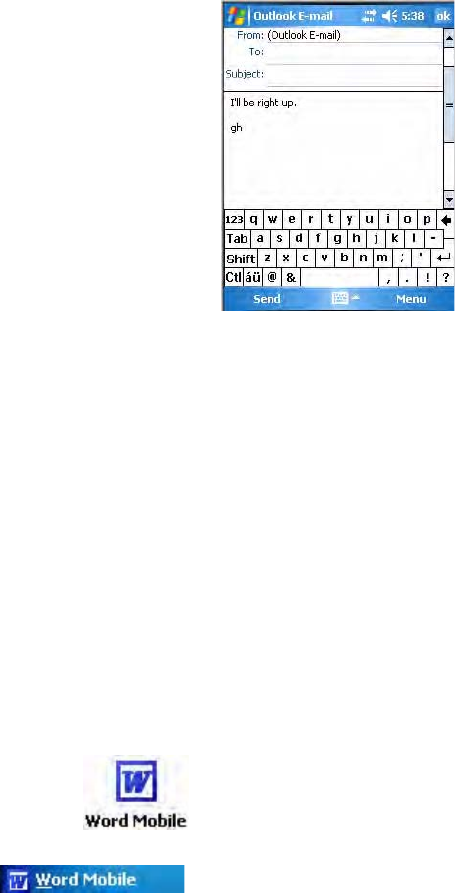
Word Mobile
Word Mobile works with Microsoft Word on your desktop to give you
access to copies of your documents. You can create new documents on your
CN3, or you can copy documents from your desktop to your CN3.
Synchronize documents between your desktop and your CN3 to have up-
to-date content in both locations.
Creating a Document
You can open only one document at a time; when you open a second
document, you have to save the first. You can save a document you create or
edit in formats such as Word (.doc), Pocket Word (.psw), Rich Text Format
(.rtf), and Plain Text (.txt).
Use Word Mobile to create documents, such as letters or meeting minutes.
To create a new file, tap Start > Programs > the Word Mobile icon > New.
You get either a blank document or a template, depending on what you
have selected under Menu > Tools > Options.
For future use, this is added to your Start menu in the Recent Programs
area, via Start > Word Mobile.
Chapter 2 — Windows Mobile
CN3 Mobile Computer User’s Manual 67
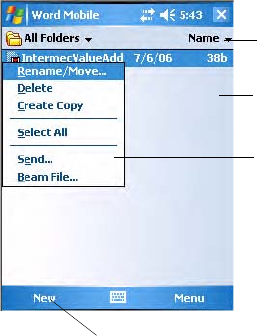
Word Mobile contains a list of files stored on your CN3. Tap a file in the
list to open it. To delete, make copies of, and send files, tap and hold a file
in the list, then, select the action on the pop-up menu.
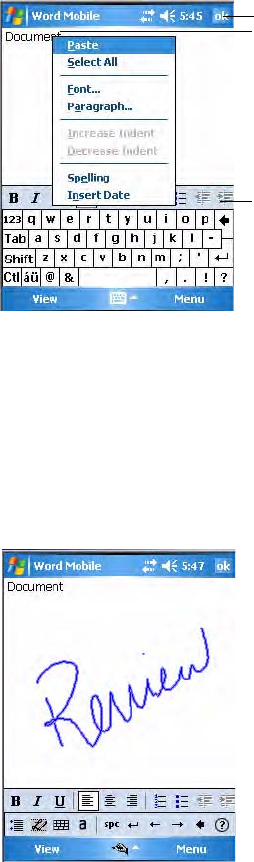
You can enter information in Word Mobile in by typing or writing. Each
mode has its own toolbar, which you can show and hide by tapping the
Input Panel icon in the center of the command bar.
You can change the zoom magnification by tapping View > Zoom, then
select the percentage you want. Select a higher percentage to enter text and
a lower one to see more of your document.
If you are opening a Word document created on a desktop, you may select
View > Wrap to Window so that you can see the entire document. To
check spelling, select text, then tap Menu > To o ls > Spelling. To use new
documents as templates, move the documents to the Templates folder.
You can insert the data in a document. Tap and hold anywhere on the
document, then tap Insert Date from the pop-up menu.
Typing Mode
Using the input panel, enter typed text into the document. For more
information on entering typed text, see “Basic Usage” on page 30.
To format existing text and to edit text, first select the text. You can select
text as you do in a Word document, using your stylus instead of the mouse
to drag through the text you want to select. You can search a document to
Tap to change the sort order of the list
Tap to open a document
Tap and hold an item to see a pop-up menu
Tap to create a new document
Chapter 2 — Windows Mobile
68 CN3 Mobile Computer User’s Manual
find text by tapping Menu > Edit > Find/Replace.
Writing Mode
In writing mode, use your stylus to write directly on the screen. Ruled lines
are displayed as a guide, and the zoom magnification is greater than in
typing mode to allow you to write more easily. For more information on
writing and selecting writing, see “Basic Usage” on page 30.
Written words are converted to graphics (metafiles) when a Pocket Word
document is converted to a Word document on your desktop.
Synchronizing Word Mobile Documents
Word Mobile documents can be synchronized with Word documents on
your desktop. To synchronize files, first select the Files information type for
synchronization in ActiveSync. When you select Files, the My Documents
folder for the CN3 is created on your desktop. Place all files you want to
synchronize with the CN3 in this folder. Password-protected files cannot be
synchronized.
All Word Mobile files stored in My Documents and its subfolders are
synchronized with the desktop. ActiveSync converts documents during
synchronization.
For more information on synchronization or file conversion, see ActiveSync
Help on the desktop. When you delete a file on either your desktop or your
CN3, the file is deleted in the other location the next time you synchronize.
Tap and hold to see a pop-up menu
Tap to return to the document list
Tap to format text
Chapter 2 — Windows Mobile
CN3 Mobile Computer User’s Manual 69
Excel Mobile
You can create and edit workbooks and templates in Excel Mobile as you do
in Microsoft Excel on your desktop. Excel Mobile workbooks are usually
saved as .PXL files, but you can also save them in .XLS format.
When you close a workbook, it is automatically named and placed in the
Excel Mobile workbook list.
Creating a Workbook
You can open only one workbook at a time. Save the first workbook before
you open the second workbook. You can save a workbook in formats such
as Pocket Excel (.PXL) and Excel (.XLS). You can also save a workbook as a
template by moving the workbook to the “\Templates” folder.
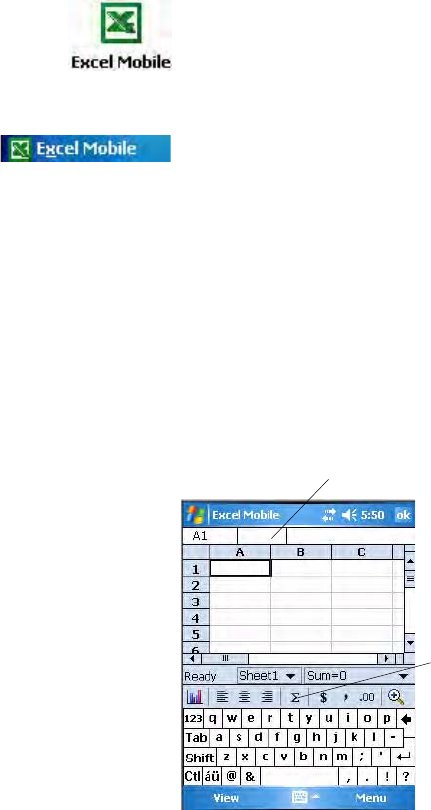
Excel Mobile contains a list of the files stored on your CN3. Tap a file in
the list to open it. To delete, make copies of, send files, tap and hold a file in
the list, then select the appropriate action from the menu.
Excel Mobile provides fundamental spreadsheet tools, such as formulas,
functions, sorting, and filtering. Tap View > Toolbar to see the toolbar.
Tips for Working in Excel Mobile
Note the following when working in large worksheets in Excel Mobile:
• View in full-screen mode to see as much of the worksheet as possible.
Tap View > Full Screen. Tap View > Full Screen to exit the full screen.
•Tap View > Zoom and select a percentage so that you can easily read the
worksheet.
Use Excel Mobile to create workbooks, such as expense reports and mileage
logs. To create a new file, tap Start > Programs > the Excel Mobile icon >
New to access a blank workbook. Or, if you have selected a template for
new workbooks under the Menu > Tools > Options, that template appears
with appropriate text and formatting already provided.
For future use, this is added to your Start menu in the Recent Programs
area, via Start > Excel Mobile.
Cell contents appear here as you enter them
Autosum icon
Chapter 2 — Windows Mobile
70 CN3 Mobile Computer User’s Manual
• Show and hide window elements. Tap View > Show, then tap the
elements you want to show or hide.
• Freeze panes on a worksheet. First select the cell where to freeze panes.
Tap View > Freeze Panes. You might want to freeze the top and leftmost
panes in a worksheet to keep row and column labels visible as you scroll
through a sheet. Tap View > Unfreeze Panes to undo this process.
• Split panes to view different areas of a large worksheet. Tap View > Split.
Then drag the split bar to where you want it. To remove the split, tap
View > Remove Split.
For more information on using Excel Mobile, tap Start > Help.
PowerPoint Mobile
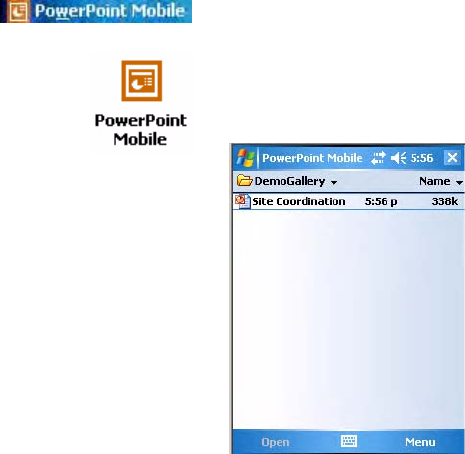
With PowerPoint Mobile on your CN3, you can open and view slide show
presentations created on your PC. Whether the presentation is opened from
an e-mail message, downloaded from a file share or the Internet, copied to
the CN3 via a storage card, or obtained by synchronizing with your PC,
slide shows created in .PPT and .PPS format with PowerPoint 97 and later
can be viewed on your CN3.
Many presentation elements built into the slide shows such as slide
transitions and animations will play back on the device. If the presentation
is set up as a timed slide show, one slide will advance to the next
automatically. Links to URLs are also supported.
For more information on PowerPoint Mobile while you are in this
application, tap Start > Help, then select a topic.
To Start a Slide Show Presentation
3Tap the current slide to advance to the next slide. If the presentation is
set up as a timed slide show, slides will advance automatically.
For future use, this is added to your Start menu in the Recent Programs
area, via Start > PowerPoint Mobile.
1To start a slide show presentation, tap Start > Programs > the
PowerPoint Mobile icon.
2In the presentation list, tap the slide show you want to view.
Chapter 2 — Windows Mobile
CN3 Mobile Computer User’s Manual 71
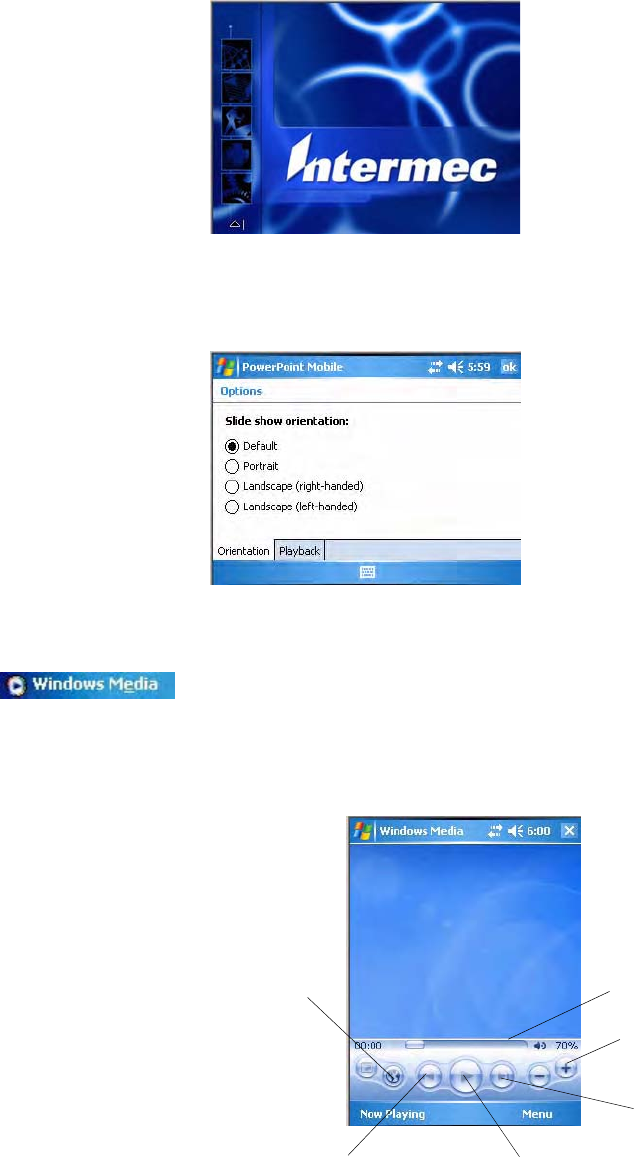
4To view a PowerPoint Mobile presentation in portrait, or right-handed
or left-handed landscape orientations, tap the slide icon (in the bottom,
left corner of the following illustration) for a pop-up menu.
5Tap Show Options > the Orientation tab, then select an orientation.
6Tap Default to view the presentation in the orientation that best fits the
size and shape of the screen.
Windows Media Player for Windows Mobile
Use Microsoft Windows Media Player on your desktop to copy digital
audio and video files to your CN3. You can play Windows Media and MP3
files on your Windows Mobile.
Tap Start > Windows Media. For more information about using Windows
Media, tap Start > Help, then select a topic.
Indicates the current track progress
Tap to adjust the volume
Tap to skip to the next song
Tap to play the previous song Tap to play or pause
Tap to download
from the internet

Chapter 2 — Windows Mobile
72 CN3 Mobile Computer User’s Manual
Internet Explorer Mobile
Use Internet Explorer Mobile to view web pages in these ways:
• During synchronization with your desktop, download your favorite links
and mobile favorites that are stored in the Mobile Favorites subfolder in
Internet Explorer on the desktop.
• Connect to an ISP or network and browse the web. To do this, create the
connection first, as described in “Remote Access (Modems)” on
page 139.
When connected to an ISP or network, you can also download files and
programs from the Internet or intranet.
Favorite Links
During synchronization, the list of favorite links in the Mobile Favorites
folder on your desktop is synchronized with Internet Explorer Mobile on
your CN3. Both computers are updated with changes made to either list
each time you synchronize. Unless you mark the favorite link as a mobile
favorite, only the link is downloaded to your CN3. Connect to your ISP or
network to view the content.
1In ActiveSync on your desktop, click Tools > Options, and select
“Favorites” from the Windows PC list. For more information on using
ActiveSync, see ActiveSync Help on the desktop.
2In Internet Explorer on your desktop, save or move favorite links to the
Mobile Favorites subfolder in the Favorites list via Favorites > Organize
Favorites. For more information on using Internet Explorer, see Internet
Explorer Help on the desktop.
3Connect your CN3 to your desktop. If synchronization does not start
automatically, in ActiveSync on your desktop, click Sync.
Mobile Favorites
Only items stored in the Mobile Favorites subfolder in the Favorites folder
in Internet Explorer on your desktop are synchronized with your CN3.
This folder was created automatically when you installed ActiveSync.
If you are using Microsoft Internet Explorer 5.0 or later on your desktop,
you can download mobile favorites to your CN3. Synchronizing mobile
favorites downloads web content to your CN3 so that you can view pages
while you are disconnected from your ISP and desktop.
Use the Internet Explorer plug-in installed with ActiveSync to create mobile
favorites quickly.
To switch to Internet Explorer Mobile on your CN3, tap Start > Internet
Explorer.
Chapter 2 — Windows Mobile
CN3 Mobile Computer User’s Manual 73
To create a mobile favorite
1In ActiveSync on your desktop, click Tools > Options, and select
“Favorites” from the Windows PC list. For more information on using
ActiveSync, see ActiveSync Help on the desktop.
2In Internet Explorer 5.0 or greater on your desktop, browse to the page
you want to view offline, then click To o l s > Create Mobile Favorite.
3To change the link name, enter a new name in the Name box.
4In the Update box, select a desired update schedule to keep the page in
the Mobile Favorites folder up to date. You can also update content by
clicking To o l s > Synchronize in Internet Explorer.
5To save the link in a subfolder of Mobile Favorites, click Create In and
select the desired subfolder.
6Click OK. Internet Explorer downloads the latest version of the page to
your desktop.
7To download the pages that are linked to the mobile favorite you just
created, in Internet Explorer on the desktop, right-click the mobile
favorite, then click Properties. On the Download tab, specify the
number of links deep you want to download. To conserve CN3 memory,
go only one level deep.
8Connect your CN3 to your desktop. If synchronization between your
CN3 and desktop does not start, in ActiveSync on your desktop, click
Sync.
Mobile favorites take up storage memory on your CN3. To minimize the
amount of memory used:
• In the settings for the Favorites information, type in ActiveSync options,
turn off pictures and sounds, or stop downloading some mobile favorites
to the CN3. For more information, see ActiveSync Help.
• Limit the number of downloaded linked pages. In Internet Explorer on
the desktop, right-click the mobile favorite you want to change and then
Properties. In the Download tab, specify “0” or “1” for the number of
linked pages you want to download.

Chapter 2 — Windows Mobile
74 CN3 Mobile Computer User’s Manual
Using Internet Explorer Mobile
You can use Internet Explorer Mobile to browse mobile favorites and
channels that were downloaded to your CN3 without connecting to the
Internet. You can also connect to the Internet through an ISP or a network
connection and browse the web.
Viewing Mobile Favorites and Channels
1Tap Favorites, or Menu > Favorites to display your list of favorites.
2Tap the page you want to view.
3The page that was downloaded the last time you synchronized with your
desktop opens. If the page is not on your CN3, the favorite is dimmed.
Synchronize with your desktop again to download the page to your
CN3, or connect to the Internet to view the page.
Browsing the Internet
Set up a connection to your ISP or corporate network using Connections,
as described in “Remote Access (Modems)” on page 139. Tap Favorites, or
Menu > Favorites, and then tap the favorite to view, in the address bar that
appears at the top of the screen; enter the web address you want to visit,
then tap Enter, and tap the arrow to choose from previously entered
addresses; or while using the CN3, go to the page you want to add, tap and
hold on the page, and tap Add to Favorites to add favorites.
Tap the favorite you want to view
Tap to add or remove a folder or link

CN3 Mobile Computer User’s Manual 75
3Configuring the Computer
There are multiple ways to get an application to your CN3 Mobile
Computer like there are multiple ways to package the application for
delivery.
Note: Desktop icons and settings icons are shown to the left. Any place that
Start is mentioned, tap the following Windows icon in the top, left corner
of your CN3 desktop.

Chapter 3 — Configuring the Computer
76 CN3 Mobile Computer User’s Manual
Developing Applications for the Computer
CN3s run applications programmed in Microsoft Visual Studios 2005. Use
this chapter to understand what you need to develop a new application for
the CN3.
To develop applications for your CN3, use the Resource Kits in the
Intermec Developer Library (IDL). Download the IDL from the Intermec
web site at www.intermec.com/idl. Contact your Intermec representative
for more information.
You need the following hardware and software components to use the
resource kits:
• Pentium desktop, 400 MHz or higher
• Windows 2000 (Service Pack 2 or later) or Windows XP (Home,
Professional, or Server)
• For native and managed development, Microsoft Visual Studio 2005
• 128 MB RAM (196 MB recommended)
• 360 MB hard drive space for minimum installation (720 MB for
complete)
• CD-ROM drive compatible with multimedia desktop specification
• VGA or higher-resolution monitor (Super VGA recommended)
• Microsoft Mouse or compatible pointing device
Packaging Applications for the Computer
Use any of these methods to package applications for installation:
• Package an application as a cabinet (CAB) file. (Recommended)
• For simple applications, the application itself may be the file to deliver.
• It could be a directory structure that contains the application, supporting
files like ActiveX controls, DLLs, images, sound files, and data files.
Consider any of these when choosing a storage location for applications:
• In the basic CN3, there are two built-in storage options: the Object Store
and the Flash File Store. The Object Store, or User Store, is a Disk on
Chip (DOC) Flash that looks like a disk. The Flash File Store is an area
of storage which is embedded in a section of the system’s FLASH
memory. This storage area is not erased during a clean-boot.
• If the optional Secure Digital storage card is in the system, then consider
this card the primary location for placing an applications install files.
This storage card creates the “\Storage Card” folder.
Note: Microsoft eMbedded Visual C++ 4.0 may be used, but some features
are not available.
Chapter 3 — Configuring the Computer
CN3 Mobile Computer User’s Manual 77
• Use the small nonvolatile Flash File Store region to hold CAB files that
rebuild the system at clean-boot or install applications from a CAB file
into the Flash File Store so they are “ready-to-run” when a clean-boot is
performed. Since the FLASH in the system has a limited number of
write cycles, do not use the Flash File Store for excessive writing
purposes; however, reading is okay.
Installing Applications on the Computer
Any of these options can move items to locations on your CN3:
• Microsoft ActiveSync
• FTP Server
• Secure Digital storage cards
• SmartSystems™ Console
• Wavelink Avalanche
• InstallSelect
This section describes each option.
Using Microsoft ActiveSync
You can use Microsoft ActiveSync to establish a connection between your
desktop and the CN3. Microsoft ActiveSync transfers files, synchronizes
files, remote debugging, and other device management activities.
See Chapter 2, “Windows Mobile” for information about the Microsoft
ActiveSync application as provided by Microsoft Corporation.
This can be a USB Microsoft ActiveSync connection. Files can be copied
using Windows Explorer on a desktop or a laptop computer. This is usually
good when updating few CN3s.
These instructions assume that Microsoft ActiveSync was installed onto
your desktop and is up and running. If not, go to Chapter 2, “Windows
Mobile” for an URL from which to download the latest application.
To connect your CN3 to your desktop
1Connect your CN3 to your desktop using a USB cable. You may have to
detach, then reattach the cable to “wake” the connection.
2Wait for a “Connected” message to appear in ActiveSync to signal a
connection to the CN3. If necessary, select File > Get Connected to
initiate a connection or detach, then reattach the USB cable.
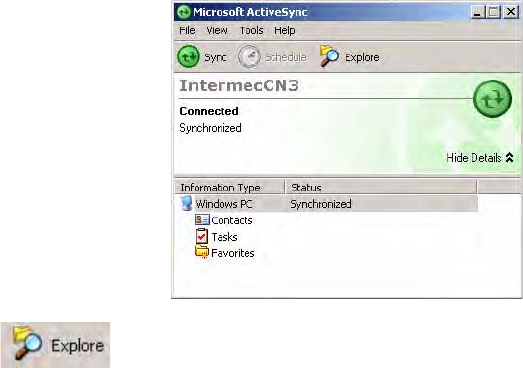
Chapter 3 — Configuring the Computer
78 CN3 Mobile Computer User’s Manual
4From your desktop, select Start > Windows Explorer, then browse the
“C:\Intermec\CN3 Mgmt Tools\CabFiles” path for any CAB files
needed for your CN3. Select the appropriate file, right-click the file for a
pop-up menu, then select Copy.
5Within the “\My Windows Mobile-Based Device” directory, go to the
directory where you want the files located on the CN3, do a right-click
for a pop-up menu, then select Paste.
6When all the files are pasted, perform a clean-boot on the CN3. When
the computer reboots, wait for the LED on the top-left of the keypad to
stop blinking. Tap Start > Programs > Windows Explorer to locate the
new, copied executable files, then tap these files to activate their utilities.
Using the FTP Server
The CN3 has a built-in FTP Server that connects to a network via
Ethernet, 802.11b, or WAN (Wireless Access Network). This allows
connections to the CN3 to perform file transfers or computer management
functions. Another benefit is you can create FTP scripts to automate the
process of copying files to the CN3. This option is good for when a large
number of CN3 computers need updating.
To enable or disable the FTP server, you need to use iConnect. For more
information, see “iConnect” on page 147.
Using a Storage Card
If you have a miniSD storage card for your CN3, this is the best place for
you to installation applications.
To install applications using a storage card
1If you are using a Secure Digital card reader, suspend the CN3, remove
its miniSD storage card, insert it in a miniSD adapter card, then place it
in the reader. For help, see “Using the Storage Card” on page 24.
3Click Explore to access the “\Mobile Device” folder on your CN3.

Chapter 3 — Configuring the Computer
CN3 Mobile Computer User’s Manual 79
2Copy your application file to the miniSD card. If you are using
Microsoft ActiveSync to copy the files to the miniSD card, place the
application in the “\Storage Card” folder on the CN3.
3If using a Secure Digital card reader, insert the miniSD card back into
the CN3.
4Navigate to the “\Storage Card” folder and run your application. After
your application is installed, you can run it from the Programs menu.
Using the SmartSystems Console
To use SmartSystems Console to install an application file
1Download the file from the Intermec web site, unzip it on your desktop.
2From the SmartSystems Console, drag-and-drop the application onto
each CN3 discovered in your network.
To download SmartSystems Foundation, go to www.intermec.com/idl and
open the Device Management page. For information on using the
SmartSystems Console, see its online help.
Using Wavelink Avalanche
You can use the Wavelink Avalanche device management system to install
applications on all of your wireless CN3s. Contact your Intermec
representative or visit the Wavelink web site at www.wavelink.com for
more information on using Wavelink Avalanche.
When the Avalanche Enabler is activated, the CN3 attempts to connect to
the Avalanche Agent. When the CN3 connects to the agent, the agent
determines whether an update is available and immediately starts the
software upgrade, file transfer, or configuration update.
To use Avalanche to remotely manage the CN3
1Use the Avalanche Management Console to install software packages and
updates for the CN3. See the Console online help for information.
2Schedule the CN3 updates or manually initiate an update using the
Avalanche Management Console.
You can use the SmartSystems Console to drag-and-drop Intermec
applications onto your CN3s. The CN3 ships with the SmartSystems client
loaded on it. The console is part of SmartSystems Foundation and is
available from the Intermec web site.
Note: If you manually activate the Avalanche Enabler on the CN3, you
may be prompted for a password when you exit the Avalanche Enabler. The
default password is leave.

Chapter 3 — Configuring the Computer
80 CN3 Mobile Computer User’s Manual
Using InstallSelect
InstallSelect manages the installation of value-added software features of the
CN3. Removal of software features may result in loss of device
functionality, or the ability to manage device settings. See “Understanding
Software Feature Descriptions” on page 81 or contact your Intermec
representative for information about each software feature before making
changes.
You can use the InstallSelect application to reduce the amount of virtual
memory used by portions of the SmartSystems Platform Bundle (SSPB).
See “SmartSystems Platform Bundles (SSPB)” on page 21 for more
information about SSPB.
Freeing up virtual memory provides you with more space to load and run
custom applications. In technical terms, virtual memory allows software to
run in a memory address space whose size and addressing are not necessarily
tied to the physical memory of the CN3.
InstallSelect is not intended to be run with any other application.
After the clean boot is performed, the applications cleared (unchecked)
from the list shown in InstallSelect are not installed. You can reinstall any of
these SSPB components using InstallSelect. Be sure to back up any related
files that you wish to retain before you proceed. See “Clean Boot Process”
on page 5 for more information about performing the clean boot.
Using the InstallSelect Application
The InstallSelect application is included in the SSPB, which is installed at
the factory.
To use the InstallSelect application
Note: This application should only be used by administrators, developers,
integrators, or Intermec representatives.
1Select Start > Programs > the File Explorer icon.
2Browse to the “\Windows” folder, then scroll down to and select the
InstallSelect application.

Chapter 3 — Configuring the Computer
CN3 Mobile Computer User’s Manual 81
3By default, components already installed on the CN3 are checked to be
installed again after you perform a clean boot on the CN3.
Check additional components you do want installed after a clean boot is
performed. Clear (uncheck) any components you do not want installed
after the clean boot.
4Click Apply to initiate the clean boot and install only the files that are
checked. Click Cancel to disregard any selections you made and close
the InstallSelect application.
5If you clicked Apply, then click Yes to continue with the clean boot.
After the CN3 has finished with its clean boot, you should find all of the
checked components installed.
Understanding Software Feature Descriptions
The following table shows the friendly name that you may see in
InstallSelect and its underlying filename. Note that the list of files varies by
product so you will see a different list on the CN3 versus the CV30 Fixed
Note: When a component is not checked, the components listed after
this component will appear as if they are not checked after the clean boot
is performed. However, if you had checked these components before the
clean boot, they will have been installed on the CN3 after the clean boot.

Chapter 3 — Configuring the Computer
82 CN3 Mobile Computer User’s Manual
Mount Computer. Also, the underlying filenames includes the product
name (such as “CV30”) that is represented by product in the table.
InstallSelect Software Features
Friendly Name Description Filename
Data Collection & Intermec Settings Data Collection and Intermec Settings
or Data Collection, Intermec Settings,
and on-unit SDK libraries.
ITCIVAproduct.cab
Funk Wireless Security Intermec Security Supplicant -
Provides a wireless security solution
with several features that are
unsupported by Microsoft (this
replaces MS zero config).
SuppRCMagneto.cab
Printer Support Provides Intermec printer driver
support.
PrinterSupport.cab
Avalanche Enabler Provides client enablement to
Wavelink's Device Management
solution.
WLEnablerproduct.cab
SmartSystems Client & Intermec Settings Provides client enablement to the
SmartSystems Server and enables the
use of Intermec Settings on the local
computer.
SSRefClient_WM50_ARMV41.cab
Screen Magnifier Application Magnifies or enlarges a selected
portion of the display.
magnifier.cab
TE2000 This is the terminal emulation
application that provides support for
VT/ANSI, 3270, 5250, and Native
emulations.
TE_product.cab
Intermec DHCP Client This is the Intermec DHCP client
application.
Intermec_DHCP.cab
Wavelink Emulator This is the Wavelink terminal
emulation client application.
WLTNproduct.cab
Bluetooth Connection Service Release This is a service release CAB file that
corrects a Bluetooth connection issue.
SR062700.cab
Notes:
SmartSystems Client & Intermec Settings:
If a user disables this CAB file, they cannot use SmartSystems and they also
cannot use Intermec Settings locally on the device.
Data Collection & Intermec Settings:
If a user disables this CAB file, they cannot scan or collect data on the
device and they cannot use Intermec Settings because the executable file is
not extracted from the CAB file.
We used the ampersand symbol (&) to keep the names shorter. The CN3
display in this application can show about 40 characters without scrolling.

Chapter 3 — Configuring the Computer
CN3 Mobile Computer User’s Manual 83
Launching Your Application Automatically
You can configure the various media used in the Windows Mobile system
with a folder name and can change the media in the registry of the system.
Many of the startup components rely on folder names to locate information
files, applications, or other related data.
The registry keys used by FolderCopy and other startup components to
retrieve the folder names are as follows:
Flash File Store
[HKLM\Drivers\BuiltIn\FlshDrv]
“FolderName”=“Flash File Store”
SD Card (Storage Card)
[HKLM\System\StorageManager\Profiles\SDMemory]
“Folder”=“Storage Card”
Disk On Chip
[HKLM\System\StorageManager\Profiles\TRUEFFS_DOC]
“Folder”=“DiskOnChip”
During normal Windows Mobile system startup, there are Intermec-
specific and non-Intermec components that require an orderly start to
properly function. These non-Intermec components may also need to start
themselves so the Windows Mobile device can function properly. Since
there are possible configurations that come from using one or more
optional built-in peripheral devices, the platform components starting on
the next page are required to manage startup.
RunAutoRun
System components are installed and configured during the power up
process from a single starting point. RunAutoRun (RunAutoRun.exe), built
into the operating system image and located in the “\Windows\Startup”
folder, checks for AutoExec (AutoExec.exe) in a “\SYSTEM” folder on a
mounted volume in this order: miniSD, Object Store (or User Store),
which may be non-volatile storage or RAM, Disk on Chip which may map
as Object Store, and Flash File Store which may map as Object Store
(default location for the AutoExec program in Intermec systems). Intermec
system applications start from this folder. However, the ordering of
mounted volumes does override this feature.
Folder names used for the mounted volumes above are retrieved from the
registry to maintain coherence with the naming of the mounted volumes on
the platform. These folder names are not hard-coded. If AutoExec is
Note: This describes the system component startup for Intermec provided
components only. It does not describe the bootstrap loader process. It only
describes the component installation process provided by Windows Mobile.
It is assumed that you understand the Microsoft Mobile startup procedures
and are familiar with how Microsoft components start up.
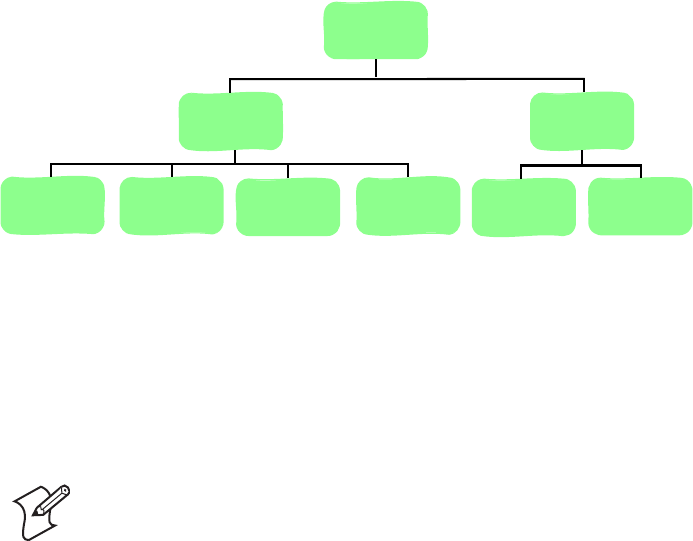
Chapter 3 — Configuring the Computer
84 CN3 Mobile Computer User’s Manual
present in the “\SYSTEM” folder on any of these media, it executes the
program only on the first media it is found on and no other.
AutoExec is reserved for Intermec use to configure Intermec-specific
applications. It launches the CAB installer, AutoCab (AutoCab.exe), to
install platform cab files to the system, such as Intermec Data Collection.
When the AutoExec is complete, RunAutorun then checks for the existence
of AutoRun (AutoRun.exe) and executes this program from the first media
it is found on. This order is the same as what is used by AutoExec.
AutoRun is reserved for customer use to configure application launch
sequences. It launches the AutoCab installer and any customer programs
added to the AutoUser.dat file. Shown is the hierarchy of these files:
AutoExec
AutoExec (AutoExec.exe) automates operations such as pausing, launching
processes, or signaling, and is configured through the AutoExec data file
(AutoExec.dat). This script file must be in the same directory as the
program itself.
Usage:
AutoExec [-%[W]] [-E=["X"]] [-F=["Y"]] [-LOG=] [-W=[Z]]
Note: Intermec considers the usage of the AutoExec data file as “Intermec
Private.” AutoExec installs Intermec applications such as Data Collection,
Security Supplicants, Intermec Management, and shortcuts from
components found in the Flash File System. Do not modify the AutoExec
data file. Instead, use the AutoRun program to add software components.
-% Passes an ID to use in a call to SignalStarted. This argument is useful only during
system startup that relies on a SignalStarted to call. W is an integer value.
-E Passes a signal event name to use when autoexec completes. X is a string value.
-F Overrides the data file to use. This must be a fully qualified name. Default is
“autoexec.dat” in the same location as the AutoExec.exe program. “Y” is a string
value.
-LOG Set to any value logs activity to AutoExec.txt (in the same location as the
AutoExec.exe program). Default is disabled.
runautorun
autorun
autoexec
autocopy autoreg foldercopy autocab customer autocab
applications

Chapter 3 — Configuring the Computer
CN3 Mobile Computer User’s Manual 85
Process return code uses standard error codes defined in WinError.h.
Keywords that AutoExec supports are:
Examples of keyword usage are as follows:
; Allow message pop up if an error occurs.
QUIET 0
; Log any debug output to a trace file.
LOGGING 1
; Perform a SetEvent on the event name "autoexec_started".
SIGNAL "autoexec_started"
; Include this child data file, childexec.dat.
CALL "\childexec.dat"
; Use autocopy to copy the audio control panel from flash file store to the
windows directory. Wait for up to 60 seconds for it to exit.
EXEC "\Flash File Store\SYSTEM\autocopy.exe" -S"\Flash File
Store\System\CPLAudio.cpl" -D"\Windows\CPLAudio.cpl"
; Change the default EXEC wait time to 90 seconds.
EXECWAIT 90
; Suspend processing any commands for 10 seconds.
WAIT 10
; Suspend processing any commands until event called MyEventName is signaled.
WAITFOR "MyEventName"
AutoRun
AutoRun (AutoRun.exe) automates operations such as launching other
processes and is configured through the AutoRun data file (AutoRun.dat).
This file must be in the same directory as the program itself.
-W Pauses the autoexec process by calling sleep for the number of seconds specified
by Z. Z is an integer value.
QUIET Enables user notification when an error occurs.
LOGGING Enables logging to a trace file.
SIGNAL Enables the specified named event and is immediately signaled. Useful for notifying other components of
the current status.
CALL Opens another .dat file to process. After the called file is completed, this file is resumed.
RUN Runs a program with a SW_SHOWNORMAL attribute. Autoexec does not wait for the child process to
exit.
LOAD Runs a program with a SW_HIDE attribute. Autoexec waits for 60 seconds for the child process to exit or
EXECWAIT seconds if set.
EXEC Runs the specified program. AutoExec waits 60 seconds for the child process to exit or EXECWAIT
seconds if set.
EXECWAIT Changes the default EXEC wait time from 60 seconds to the number of seconds specified. There is a
maximum 10-minute limit imposed.
WAIT Forces a sleep for the specified number of seconds to occur.
WAITFOR Forces a sleep until the named event is signaled.
Chapter 3 — Configuring the Computer
86 CN3 Mobile Computer User’s Manual
AutoRun supports the following script commands in AutoUser.dat and
AutoRun.dat.
AutoRun handles quoted file names for the first parameter to allow
specifying path names or file names that contain white space. Note only
one set of quotes per command is supported. AutoRun.dat entry examples:
AutoCopy
AutoCopy (AutoCopy.exe) copies/moves files between locations. It has no
user interface and is configured through command line arguments. It has
support for the following parameters, in no particular order:
Usage:
AutoCopy [-D["W"]] [-L["X"]] [-M[D]] [-Q[Y]] [-S["Z"]]
Process return code uses standard error codes defined in WinError.h.
Example:
; use AutoCopy to copy the control panel from flash file store to windows.
autocopy.exe -S"\Flash File Store\System\Audio.cpl" -D"\Windows\Audio.cpl"
; use AutoCopy to move the control panel from flash file store to windows.
autocopy.exe -M1 -S"\Flash File Store\System\Audio.cpl" -D"\Windows\Audio.cpl"
AutoReg
The AutoReg (AutoReg.exe) component adds registry information to the
Windows Mobile registry. It has no user interface and is configured through
command line arguments.
Note: If you need to add steps at boot time, add them to AutoUser.dat, not
to AutoRun.dat. AutoRun.dat is provided by Intermec and is subject to
change. AutoUser.dat is the designated place for the end user to add steps to
the boot time process.
EXEC Launches a specified program, waits for it to complete (up to 10 minutes).
CALL Processes a specified file of commands and returns.
CHAIN Processes a specified file of commands and does not return.
RUN Loads a specified program and executes it.
LOAD Loads a specified program and executes it.
RUN “Flash File Store\Apps\some.exe” arg1, arg2, arg3
CALL “Flash File Store\2577\usercmds.dat”
-D Indicates the destination file name and must be fully qualified. W is a string value.
-L Indicates a fully qualified file name for logging to enable. Default is disabled. X is a string value.
-M Moves file to a destination rather than copies the file. Default value is disabled. D is an integer value. D=1
indicates enabled, 0 is disabled.
-Q Indicates if a message box should appear when an error occurs. Default is disabled. Y is an integer value.
-S Indicates a source file name and must be fully qualified. Z is a string value.

Chapter 3 — Configuring the Computer
CN3 Mobile Computer User’s Manual 87
Usage:
AutoReg [-D] [-HKey] [-Q] “filename”
Process return code uses standard error codes defined in WinError.h.
Example:
; use AutoReg to install this registry information.
autoreg.exe "\Flash File Store\install.reg"
; use AutoReg to install this registry information. Delete the file afterwards.
autoreg.exe -D "\Flash File Store\install.reg"
; use AutoReg to extract registry information to a file.
autoreg.exe -HHKEY_LOCAL_MACHINE\Software\Intermec\Version "\version.reg"
The format of the input file, in this example, is the standard registry format
which should ease the creation of the input file since there are many
publicly available utilities to generate a registry file besides Notepad. One
example of a tool is the Microsoft Remote Registry Editor.
AutoCab
AutoCab (AutoCab.exe) extracts files, registry settings, and shortcuts from
Windows Mobile cabinet (.cab) files. The Windows Mobile startup
sequence invokes AutoCab as a part of AutoExec and AutoRun. During the
Windows Mobile startup sequence, AutoCab processes all cab files in the
“\CabFiles” directory relative to the current location of Autocab, unless the
location is overridden by command line arguments. AutoCab can run as a
stand-alone program to install a cab file or a directory of cab files.
AutoCab only installs the cab file if it was not installed before by AutoCab.
To track the installation of a cab file, AutoCab marks the cab file with the
System attribute. This attribute is ignored if the device is performing a
clean-boot on a non-persistent file system.
AutoCab preserves the cab file after installation if the ReadOnly attribute is
set. If not set, the cab file is deleted automatically after installation.
Command line switches are described as follows.
Usage:
AutoCab [-ChkRst=][-File=][-Force][-Log=][-Move=][-Quiet=][-Show=][-Signal=]
-D Deletes the registry file after successfully loading it. This allows for systems that have hives implemented.
-H Saves the registry path, and all child entries, to the specific .REG registry file.
-Q Indicates whether a message box should appear when a fatal error occurs.
filename Fully qualified file name to read from or write to, encased in double quotes to support spaces in paths or
file names. See examples below.
-ChkRst= Set to 1 to configure AutoCab to check for the Reset flag after all cab files are installed. This file is created
by cab files that want a clean reset after installation. Default is 0 (do not check for flag).
-File= Specifies the cab files to extract. Note that the specified files need not end with the .cab extension.
-Force Forces the specified cab files to extract regardless of whether it was previously extracted.
-Log= Set to 1 to create a log file in the same folder that AutoCab is running. Useful for debugging cab
installation. Default is 0 (disabled).

Chapter 3 — Configuring the Computer
88 CN3 Mobile Computer User’s Manual
If <PathName> references a single cab file, that file is processed. If
<PathName> references a directory, all the .cab files in that directory is
processed. If <PathName> is a wild card pattern, all files matching that
pattern is processed, If <PathName> is omitted, InstallCab processes all the
.cab files in directory “\CabFiles.”
Example:
; Install all cab files in the \Flash File Store\XYZ directory, regardless.
AutoCab -FILE="\Flash File Store\XYZ\.cab" -FORCE
; Install only one cab file, use Intermec cab installation display
AutoCab -FILE=”\myCab\app.cab” =show=2
Customizing How Applications Load on the Computer
If you have several processes that you need running in a specific order as the
CN3 turns on, you can use the AutoRun system to customize the way
applications load. For compatibility with other Intermec computers, you
can place a copy of AutoRun.exe in the same folder as your AutoRun.dat
file but it is not required.
To create and install the AutoRun.dat file on your Computer
1On the CN3, create a folder called “SYSTEM.”
2On your desktop, open the Notepad application.
3Write commands for AutoRun.dat using these supported script
commands:
4Save this Notepad file as AutoRun.dat.
-Move= Set to 1 to force source cab file deletion, even when read-only bit set on file. Default is 0 (disabled).
-Quiet= Set to 0 to allow AutoCab to display user message box on errors. Useful for debugging cab installation.
Default is 1 (keep quiet).
-Show= Set to 0 to prevent showing any installation progress interfaces. Also prevents user from canceling
installation. Set to 1 to show normal installation. Set to 2 to show Intermec installation progress interface
(user can see what is installing but cannot cancel it). Default is 1 (show normal).
-Signal= Set to string name of signal to use at the completion of cab installation before a reboot occurs (if enabled).
AutoCab uses WaitForSingleObject on this name. Default is disabled.
Script Command Description
EXEC Launches a specified program and waits up to 10 minutes for it to complete.
CALL Processes a specified file of commands, returns. When you use the CALL command, the
execution of the current file pauses while a new file that follows the same set of commands
executes. Once the new file completes executing, AutoRun.exe processes the current file.
CHAIN Processes a specified file of commands and does not return. This command calls another file that
follows the same set of commands and stops processing the current file.
RUN Loads a specified program and executes it. Specifies the show window attribute so that the user
interface is visible when the application launches.
LOAD Loads a specified program and executes it. Specifies the hide window attribute so the user
interface is hidden initially.

Chapter 3 — Configuring the Computer
CN3 Mobile Computer User’s Manual 89
5Copy the AutoRun.dat file to the “\SYSTEM” folder on your CN3.
During every boot, the system scans for AutoRun.dat in the “\SYSTEM”
folder.
Here is a sample AutoRun.dat file that runs a dialer application and
connects to a VPN:
EXEC “\Program Files\My Dialer\Dialer.exe” 348-2600
EXEC “\Program Files\My VPN\Connect.exe” MyDomain
Configuring Parameters
You can configure many parameters on the CN3, such as the bar code
symbologies it decodes or the network settings. These characteristics are
controlled by configuration parameters. The values you set for these
configuration parameters determine how the computer operates. Use
configuration commands to configure the CN3.
Configuring the Computer With Intermec Settings
Use Intermec Settings to configure the CN3 and view system information.
You can access Intermec Settings while running any application.
To access Intermec Settings
For detailed information on most of the commands available in Intermec
Settings, see the Intermec Computer Command Reference Manual (P/N
073529) via the Intermec web site. Go to “Before You Begin” for access
information.
Synchronizing the Computer System Time with a Time Server
It is important that the time on all of your CN3s be synchronized with a
network time server to ensure real-time communications and updates.
Network time servers acquire Coordinated Universal Time (UTC) from an
outside source such as the U.S. Naval Observatory (USNO). The CN3 uses
• From the CN3 desktop, select Start > Settings > the System tab > the
Intermec Settings icon.

Chapter 3 — Configuring the Computer
90 CN3 Mobile Computer User’s Manual
Simple Network Time Protocol (SNTP) to synchronize with a network
time server.
The default reference time server is the USNO (tock.usno.navy.mil). To
synchronize the time on your CN3 with this time server, you must have a
valid connection to the Internet. You can also synchronize the CN3 system
time with a corporate network server within your firewall that is SNTP-
capable. To use an internal corporate network server, you need to set the
command name in the registry.
Configuring the Computer through the Network
You can change the configuration parameters of the CN3 by sending
commands through a host computer or through the network. If you are
using a network, you can configure one or more CN3s at a time. You can
remotely configure the wireless CN3 by sending a command from an
application on the host computer.
Configuring the Computer in a TCP/IP Direct Connect Network
Use the host computer to configure a wireless CN3 in a TCP/IP network.
To send and receive configuration data, write a host application that can
communicate with the CN3 directly through an access point or through
the network. Use the TMF protocol to send and receive transactions
between the host application and the CN3.
To set up the host computer, verify communication with the CN3. To set
up the application, prepare and write a host application that can
communicate with the IAS and send transactions to and receive
transactions from the CN3 in this format:
where:
Note: You cannot set all parameters through the network. You can only set
those commands that have a syntax in the Intermec Computer Command
Reference Manual.
Note: You can continue running an application on the CN3 while
configuring it from the host computer.
TMF field commands
TMF field A 2-byte field containing one of these values:
CG Configuration Get request sent from the host application.
Cg Configuration Get response sent from the CN3 to the host
computer.
CS Configuration Set request sent from the host application.
Cs Configuration Set response sent from the CN3 to the host
computer.
commands The reader and configuration commands to set on the CN3 or the current
value to retrieve from the CN3. To save configuration changes in flash
memory, send the .+1 reader command as the last command. See the
Command Reference Manual for a list of commands.

Chapter 3 — Configuring the Computer
CN3 Mobile Computer User’s Manual 91
Example
In the host application, you want to get the current values of two
configuration commands from the CN3. Send the CG$+NABV transaction
from the host application
where:
The computer returns the CgS+BV4 transaction to the host application:
Configuring the Computer in a UDP Plus Network
Use the host computer to configure a CN3 in your wireless network. To
send and receive configuration data or files, write a host application that
can communicate with an Intermec Application Server (IAS), formerly
Gateway or DCS 30X.
For help, see the appropriate Gateway or DCS 30X User’s Manual. Use the
Terminal Message Format (TMF) protocol to send and receive transactions
between the host application and the CN3.
To set up the IAS, configure a peer-to-peer destination name for the host
application. Create a $NGCFGRSP transaction ID that routes to this
destination name. The IAS uses the transaction ID to route responses from
the CN3 back to the host application. $NGCFGRSP is a special
transaction ID that the server uses to forward configuration response data
from a CN3.
All configuration responses are routed with the $NGCFGRSP transaction
ID. The IAS cannot track multiple applications sending reader or
configuration commands. If you have two host applications sending reader
or configuration commands, they must both be configured to receive the
$NGCFGRSP transactions, and receive all CN3 responses.
To set up the host computer, verify host computer-to-IAS communication.
To set up the application, prepare and write a host application that can
communicate with the IAS and send transactions to and receive
transactions from the CN3 in this format.
where:
Note: The transaction header is not shown in this example. You do not
need a transaction header for a host application in a TCP/IP network, but
you do for a UDP Plus network.
CG is a TMF Configuration Get request.
$+ is the Change Configuration reader command.
BV is the Beeper Volume configuration command.
Cg is a TMF Configuration Get response.
$+ is the Change Configuration reader command.
BV4 means the Beeper Volume configuration command is set to a value of 4, which is
a very high beeper volume.
transaction header TMF field commands

Chapter 3 — Configuring the Computer
92 CN3 Mobile Computer User’s Manual
Reprogramming the CN3 Keypad
Information about remapping the CN3 keypads can be found online in the
Device Resources Kit in the Intermec Developer Library at
www.intermec.com/idl. Look for the “Key Remapper Functions” section in
this kit.
Information is also in the IDL Resource Kit Developer’s Guide
(P/N 934-006-001).
Configuring the Color Camera
Using the Pictures & Videos application, you can take, view, edit pictures,
and record and launch video clips stored on your CN3 or on a storage card.
You can also send pictures and video clips to others, or save an image as the
background on the Today screen. Pictures can be viewed individually, as
thumbnails, or as part of a slide show. You can edit your pictures by
cropping, rotating, and adjusting the brightness and contrast.
If the color camera is enabled, then tap Menu > Options to configure
camera options. While you are in the Pictures & Videos application, you
can select Start > Help for complete information on using the camera.
To set the pixel size and rotation
•Use the General tab to set the pixel size of the image and to rotate it in
either direction by 90 degrees before sending it through the e-mail. Note
transaction
header
A 96-byte field with message number, date, time, source application ID,
destinations application ID, transaction ID, and other. Set the system
message (SYS$MSG) flag to E in the transaction header.
TMF field A 2-byte field containing one of these values:
CG Configuration Get request sent from the host application.
Cg Configuration Get response sent from the CN3 to the host
computer.
CS Configuration Set request sent from the host application.
Cs Configuration Set response sent from the CN3 to host computer
commands The reader and configuration commands to set on the CN3 or the current
value to retrieve from the CN3. To save configuration changes in flash
memory, send the .+1 reader command as the last command. See the
Command Reference Manual for a list of supported commands.
To enable the camera
• Select Start > Programs > the Pictures & Videos icon to access the
options.
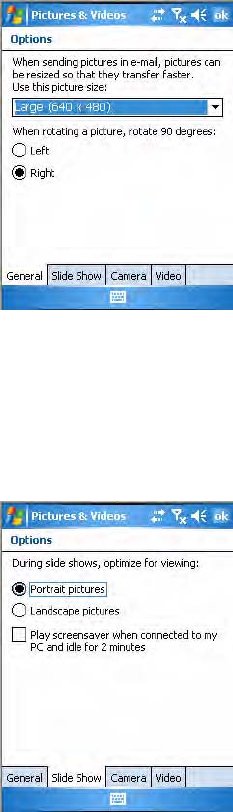
Chapter 3 — Configuring the Computer
CN3 Mobile Computer User’s Manual 93
that only the picture sent in the e-mail is resized.
To set images to portrait or landscape
• Using the Slide Show tab, you can set your images to portrait or
landscape for optimum viewing. When your CN3 is connected to your
desktop PC using an ActiveSync USB connection and ActiveSync is idle,
you can play a screensaver slide show using all the pictures in the “\My
Pictures” folder.
To save picture files
•Use the Camera tab, you can set the default location where pictures are
saved. If you select main memory, pictures are saved to permanent
storage on your CN3, which may mean you need to consider the storage
needs of other programs.

Chapter 3 — Configuring the Computer
94 CN3 Mobile Computer User’s Manual
You can also set the compression level of each image taken. Note that
selecting a high quality picture increases the size of each file significantly.
To add sound to images and set the timer
•With the Video tab, you can add sound to your images and set the time
for how long the camera is to stay on an image before pausing the
recording.
Configuring the SF51 Cordless Scanner
The following information pertains to configuring the SF51 Cordless
Scanner to work with your CN3. These instructions assume you have
EasySet version 5.4 or later installed on your desktop or laptop. EasySet is
available at no charge from the Intermec web site at www.intermec.com.
Setting the Imager
Depending on what is selected as the scanner model, image settings, decode
security, scanner settings, and virtual wedge are configured from Intermec
Settings. See the Intermec Computer Command Reference Manual, available
from the Intermec web site for more information about each enabled
option. Go to “Related Documents” on page xii for information how to
download this .chm file.
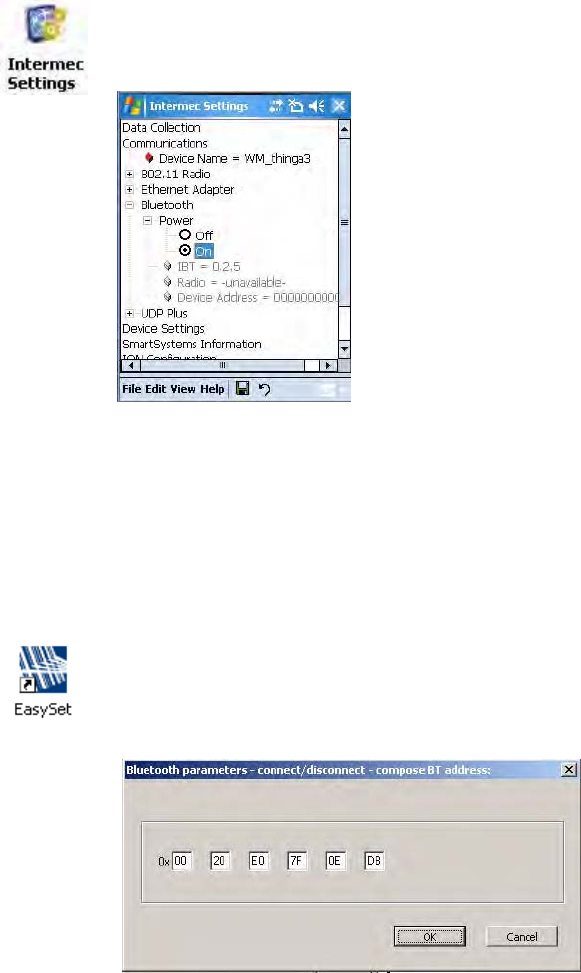
Chapter 3 — Configuring the Computer
CN3 Mobile Computer User’s Manual 95
Enabling Bluetooth
Bluetooth is required for the SF51. On the CN3, use Intermec Settings to
enable Bluetooth communications before you configure the SF51.
To enable Bluetooth
3Tap File > Save Settings, then File > Exit to close Intermec Settings.
Creating an SF51 Connection Label
To initiate a connection from the SF51
1Use EasySet to create an SF51 connection label with the CN3 Bluetooth
address. The device address is listed in Intermec Settings on your CN3,
like the illustration shown previously.
1Select Start > Settings > the System tab > the Intermec Settings icon.
2Tap (+) to expand Communications > Bluetooth > Power, then select
On to enable Bluetooth.
2On your desktop or laptop, double-click the EasySet icon if you have
not already done so.
3Enter the Bluetooth address assigned to your CN3 (shown in the
Bluetooth window), then click OK to close this dialog box.
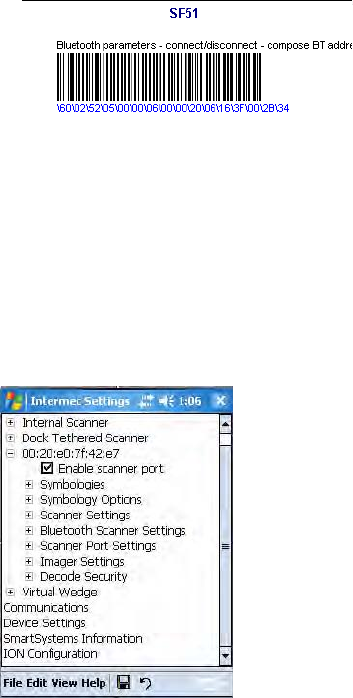
Chapter 3 — Configuring the Computer
96 CN3 Mobile Computer User’s Manual
4The connection label for the SF51 appears to the right in EasySet,
similar to the following. Scan the label once, then confirm the blue
Intermec Ready-to-Work™ indicator on the SF51 starts blinking, which
means it is trying to connect.
5Enter the passcode number when prompted. The default is “0000.”
6When connected, the blue Intermec Ready-to-Work indicator turns on
and stays on.
Viewing SF51 Scanner Information from Your Computer
Note that in the CN3, Intermec Settings can display up to seven separate
SF51 connections. The following illustration shows such connections
under the Data Collection option.
Tap Data Collection, then tap (+) to expand the SF51 Scanner
connections to view MAC addresses, firmware version numbers, and
whether each scanner is connected to the CN3. When you clear (uncheck)
Enable scanner port, the SF51 is disconnected from the CN3. Check
Enable scanner port again to reconnect.
If you want to rename these connections to descriptions more suitable for
your situation, press the stylus on each SF51 Scanner connection for a
pop-up menu, then select Rename. Enter the description, tap ok to save.
When the SF51 is connected, configuration changes take effect
immediately. When the SF51 is not connected, configuration changes take
effect once the SF51 is reconnected.
Chapter 3 — Configuring the Computer
CN3 Mobile Computer User’s Manual 97
Using Configuration Parameters
A configuration parameter changes the way the CN3 operates. Use either of
these methods to execute configuration parameters:
Scan EasySet bar code labels:
Use the EasySet application from Intermec Technologies Corporation to
print configuration labels. Scan labels to change imager configuration and
data transfer settings. See the EasySet online help for information.
Send Reader Commands through the Network or from an Application
See the Intermec Computer Command Reference Manual for information.
Chapter 3 — Configuring the Computer
98 CN3 Mobile Computer User’s Manual